

Page 1

37" LCD TV
Televisor con pantalla LCD de 37"
DX-LCD37-09
USER GUIDE • GUÍA DEL USUARIO
Page 2

2
Contents
Dynex DX-LCD37-09
37" LCD TV
Contents
Important safety instructions...........................................................4
TV components ................................................................................ 6
Front and side............................................................................ 6
Back........................................................................................... 6
Remote control .......................................................................... 7
Setting up your TV............................................................................ 8
Installing remote control batteries.............................................8
Connecting an antenna or basic cable........................................ 8
Connecting a cable or satellite box............................................. 8
Connecting an HDMI device ....................................................... 9
Connecting a DVI device ............................................................ 9
Connecting a component video device ......................................9
Connecting an S-Video device.................................................. 10
Connecting a camcorder, game, or VCR.................................... 10
Connecting a digital audio device............................................ 10
Connecting an analog audio device ......................................... 11
Connecting a computer............................................................ 11
Using your TV ................................................................................. 11
Turning your TV on or off ......................................................... 11
Setting up for the first time .....................................................11
Opening the on-screen menu.................................................. 12
Scanning for channels ............................................................. 12
Deleting channels from the channel list .................................. 13
Adding channels to the channel list......................................... 13
Selecting the on-screen menu language ................................. 13
Changing channels .................................................................. 14
Adjusting the volume ..............................................................14
Adjusting the picture............................................................... 14
Adjusting the sound ................................................................ 14
Selecting the video input source.............................................. 15
Selecting the audio mode........................................................ 15
Displaying program information.............................................. 15
Selecting the aspect ratio ........................................................ 15
Setting the sleep timer ............................................................ 16
Checking the antenna signal strength ..................................... 16
Freezing the picture................................................................. 17
Using digital closed captioning................................................ 17
Using analog closed captioning............................................... 17
Changing digital closed captioning styles................................ 18
Setting parental controls ......................................................... 19
Setting the MPAA Rating ......................................................... 20
Setting the TV Rating............................................................... 20
Changing the password...........................................................21
Adjusting the computer image ................................................21
Selecting the HDMI audio mode .............................................. 22
Maintaining.................................................................................... 22
Cleaning .................................................................................. 22
Servicing..................................................................................22
Checking the remote control signal..........................................22
Troubleshooting ............................................................................. 22
Specifications .................................................................................25
Legal notices...................................................................................25
One-year limited warranty.............................................................27
Español ...................................................... 29
Page 3
Contents
f
It makes a difference how and where you use
As you enjoy your new product, keep these
The issue
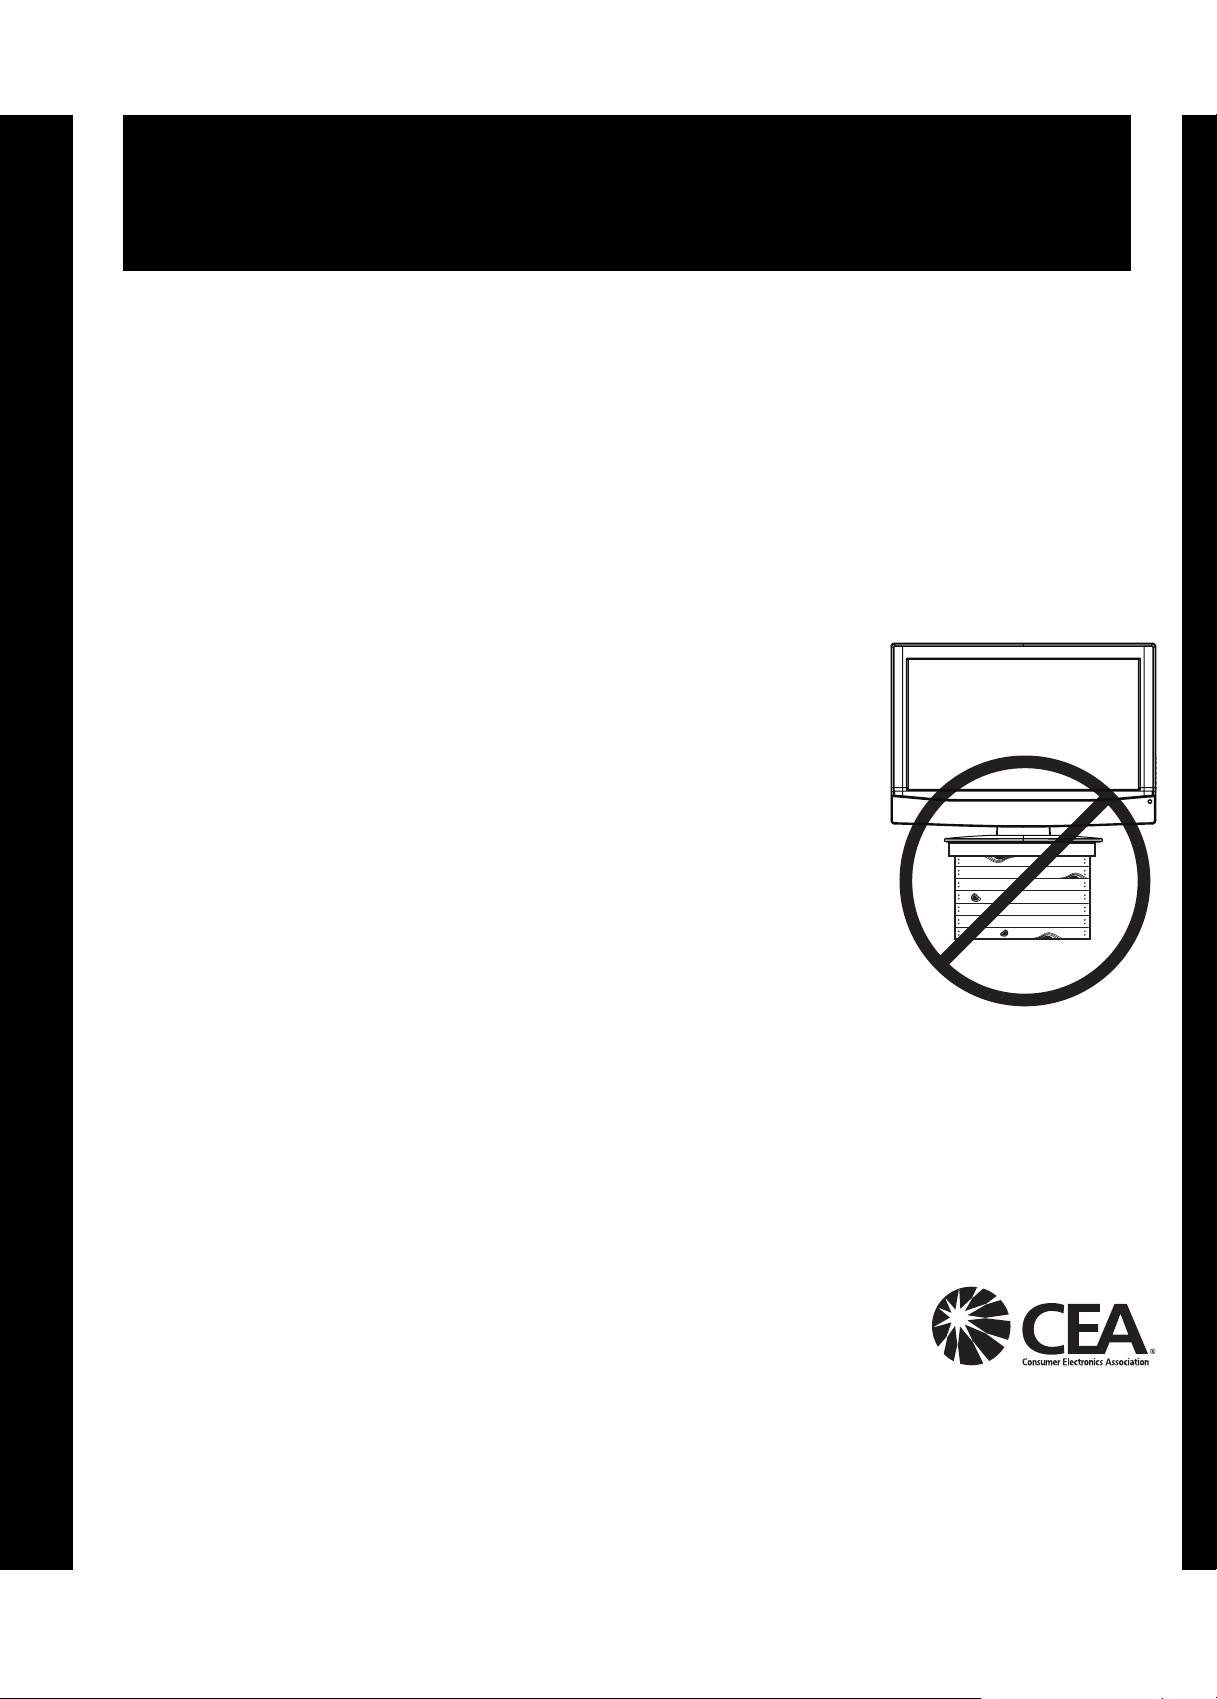
The home theater entertainment experience is a growing trend, and larger TVs are popular
purchases. However, TVs are not always supported on the proper stands or installed
according to the manufacturer’s recommendations. We and the consumer electronics
industry are committed to making home entertainment enjoyable and safe.
TVs that are inappropriately placed on dressers, bookcases, shelves, desks, speakers,
chests, or carts may fall over and cause injury.
Tune into safety
3
CHILD SAFETY
your flat panel display
safety tips in mind
• One size of TV stand does not fit all. Use only a TV stand
rated for the weight of your TV.
• Carefully read and understand all enclosed instructions for
proper use of this product.
• Don’t let children to climb on or play with entertainment
system furniture and TVs.
• Don’t place TVs on furniture that can easily be used as
steps, such as a chest of drawers.
• Remember that children can become excited while watching
a program, especially on a “larger-than-life” TV. Make sure
that you place or install the TV where it cannot be pushed,
pulled over, or knocked down.
• Make sure that you route all cords and cables so that they
cannot be pulled or grabbed by curious children.
Wall mounting
If you decide to wall mount your TV, always:
• One size of wall mount does not fit all. Use only a wall mount rated for the weight of your
TV and that has been recommended by this TV manufacturer, listed in this manual, or
otherwise listed by an independent laboratory (such as UL, CSA, or ETL) as suitable for
your TV.
• Follow all instructions supplied by the TV and wall mount manufacturers.
• If you have any doubts about your ability to safely wall mount your TV, get help from a
professional installer.
• Make sure that the wall where you are mounting the TV is
appropriate. Some wall mounts are not designed to be mounted
to walls backed with steel studs or cinder blocks. If you are
unsure, ask a professional installer.
• TVs can be heavy. At least two people are required for safe wall mount installation.
Page 4
4
Important safety instructions
RISK OF ELECTRIC SHOCK
CAUTION
DO NOT OPEN
War ning : To reduce the risk of electric shock, do not remove the cover or
back. No user serviceable parts inside. Refer servicing to qualified
service personnel.
War ning : To reduce t he risk of f ire or elect ric shock , do not ex pose your TV
to rain or moisture.
War ning : To prevent electric shock, match the wide blade on the power
cord plug to the wide slot on an electric outlet. If the plug does not fit,
consult a licensed electrician to replace the obsolete outlet. Do not
modify the power cord plug, or you will defeat this safety feature.
This symbol indicates that dangerous
voltage constituting a risk of electric shock is
present within your TV. This label is located
on the back of your TV.
This symbol indicates that there are
important operating and maintenance
instructions in the literature accompanying
your TV.
War ning : Your TV contains a fluorescent lamp containing a small amount
of mercury. Disposal of these materials may be regulated for
environmental reasons. For disposal or recycling information, contact
your local authorities or the Electronic Industries Alliance at
www.eia.org.
Important safety instructions
Read instructions
Read all of the safety and operating instructions before you use your TV.
Retain instructions
Retain safety and operating instructions for future reference.
Follow warnings and instructions
Follow all warnings on your TV and in the operating instruc tions. Follow
all operating and use instructions.
Water and moisture
Do not use your TV near water. For example, do not use it near a bath
tub, wash bowl, kitchen sink, or laundry tub, in a wet basement, or near
a swimming pool.
Cleaning
Unplug your TV before cleaning. Do not use liquid or aerosol cleaners.
Use only a damp cloth to clean the exterior of your TV.
Note: If your TV requires uninterrupted service for some specific reason,
such as the possibility of the loss of an authorization code for a CATV
converter, ignore the instruction to unplug your TV before cleaning.
Ventilation
Slots and openings in the cabinet and the back or bottom are provided
for ventilation, reliable operation, and protection from overheating.
These openings must not be blocked or covered. Do not block the
openings by placing your TV on a bed, sofa, rug, or other similar sur face.
Do not place your TV near or over a radiator or heat register. Do not
place your TV in a built-in installation, such as a bookcase or rack, unless
you provide correct ventilation or follow the manufacturer’s
instructions.
Heat
Make sure that your TV is located away from heat sources such as
radiators, heat registers, stoves, or other products (including amplifiers)
that produce heat.
Grounding or polarization
Do not defeat the safety purpose of the polarized or grounding-type
plug. A polarized plug has two blades with one wider than the other. A
grounding type plug has two blades and a grounding prong. The wide
blade or grounding prong are provided for your safety. If the plug does
not fit, contact an electrician to replace the obsolete outlet.
Power cord protection
Route power cords so that they are not likely to be walked on or pinched
by items placed on or against them. Pay particular attention to cords at
plugs, convenience receptacles, and the point where they exit from your
TV.
Attachments
Do not use attachments not recommended by Dynex because they may
cause hazards.
Stand
Do not place your TV on an unstable cart, stand, tripod,
bracket, or table. Your TV may fall, causing serious
personal injury and serious damage to your TV. Use
only with a cart, stand, tripod, bracket, or table
recommended by the manufacturer, or sold with your
TV. If you mount your TV to the wall, follow the manufacturer’s
instructions and use a mounting accessory recommended by the
manufacturer. Your TV and cart combination should be moved with
care. Quick stops, excessive force, and uneven surfaces may cause your
TV and cart combination to overturn.
Servicing
Do not attempt to service your TV yourself because opening or
removing covers may expose you to dangerous voltage or other
hazards. Refer all servicing to qualified service personnel.
Overloading
Do not overload power outlets and extension cords because this can
result in a risk of fire or electric shock.
Object and liquid entry
Never push objects of any kind into your TV through openings because
objects may touch dangerous voltage points or short out parts that
could result in a fire or electric shock. Never spill liquid of any kind on
your TV.
Damage requiring service
Unplug this TV from the power outlet and refer servicing to qualified
service personnel under the following conditions:
• When the power supply cord or plug is damaged or frayed.
• If liquid has been spilled or objects have fallen into your TV.
• If your TV has been exposed to rain or water.
• If your TV does not operate normally by following the operating
instructions. Adjust only those controls that are covered by the
operating instructions because incorrect adjustment of other
controls may result in damage and will often require extensive
work by a qualified technician to restore your TV to its normal
operation.
• If your TV has been dropped or damaged in any way.
• When your TV exhibits a distinct change in performance.
Replacement parts
When replacement parts are required, make sure that the service
technician uses replacement parts specified by the manufacturer that
have the same characteristics as the original part. Unauthorized
substitutions may result in fire, electric shock, personal injury, or other
hazards.
Page 5
Important safety instructions
5
Safety check
After completing any service or repair to this TV, ask the service
technician to perform routine safet y checks to determine that your TV is
in correct operating condition.
Power source
Operate your TV only from the type of power source indicated on the
marking label. If you are not sure of the type of power supplied to your
home, consult your TV dealer or local power company.
Lightning
For added protection for your TV’s receiver during a lightning storm, or
when it is left unattended and unused for long periods of time, unplug
it from the power outlet and disconnect the antenna or cable system.
This helps prevent damage to your TV from lightning and power line
surges.
Screen protection
Your TV’s screen is made of glass. Do not drop your TV or hit the glass
screen. If the screen breaks, be careful of broken glass.
Non-active pixels
The LCD panel contains almost 3 million thin film transistors, which
provide exceptionally sharp video quality. Occasionally, a few nonactive
pixels may appear on the screen as a fixed blue, green, or red point.
These non-active pixels do not adversely affect the performance of your
TV, and are not considered defects.
Power lines
An outside antenna system should not be located in the vicinity of
overhead power lines or other electric light of power circuits, or where it
can fall into such power lines or circuits.
When installing an outside antenna system, extreme care should be
taken to keep from touching such power lines or circuits as contact with
them might be fatal.
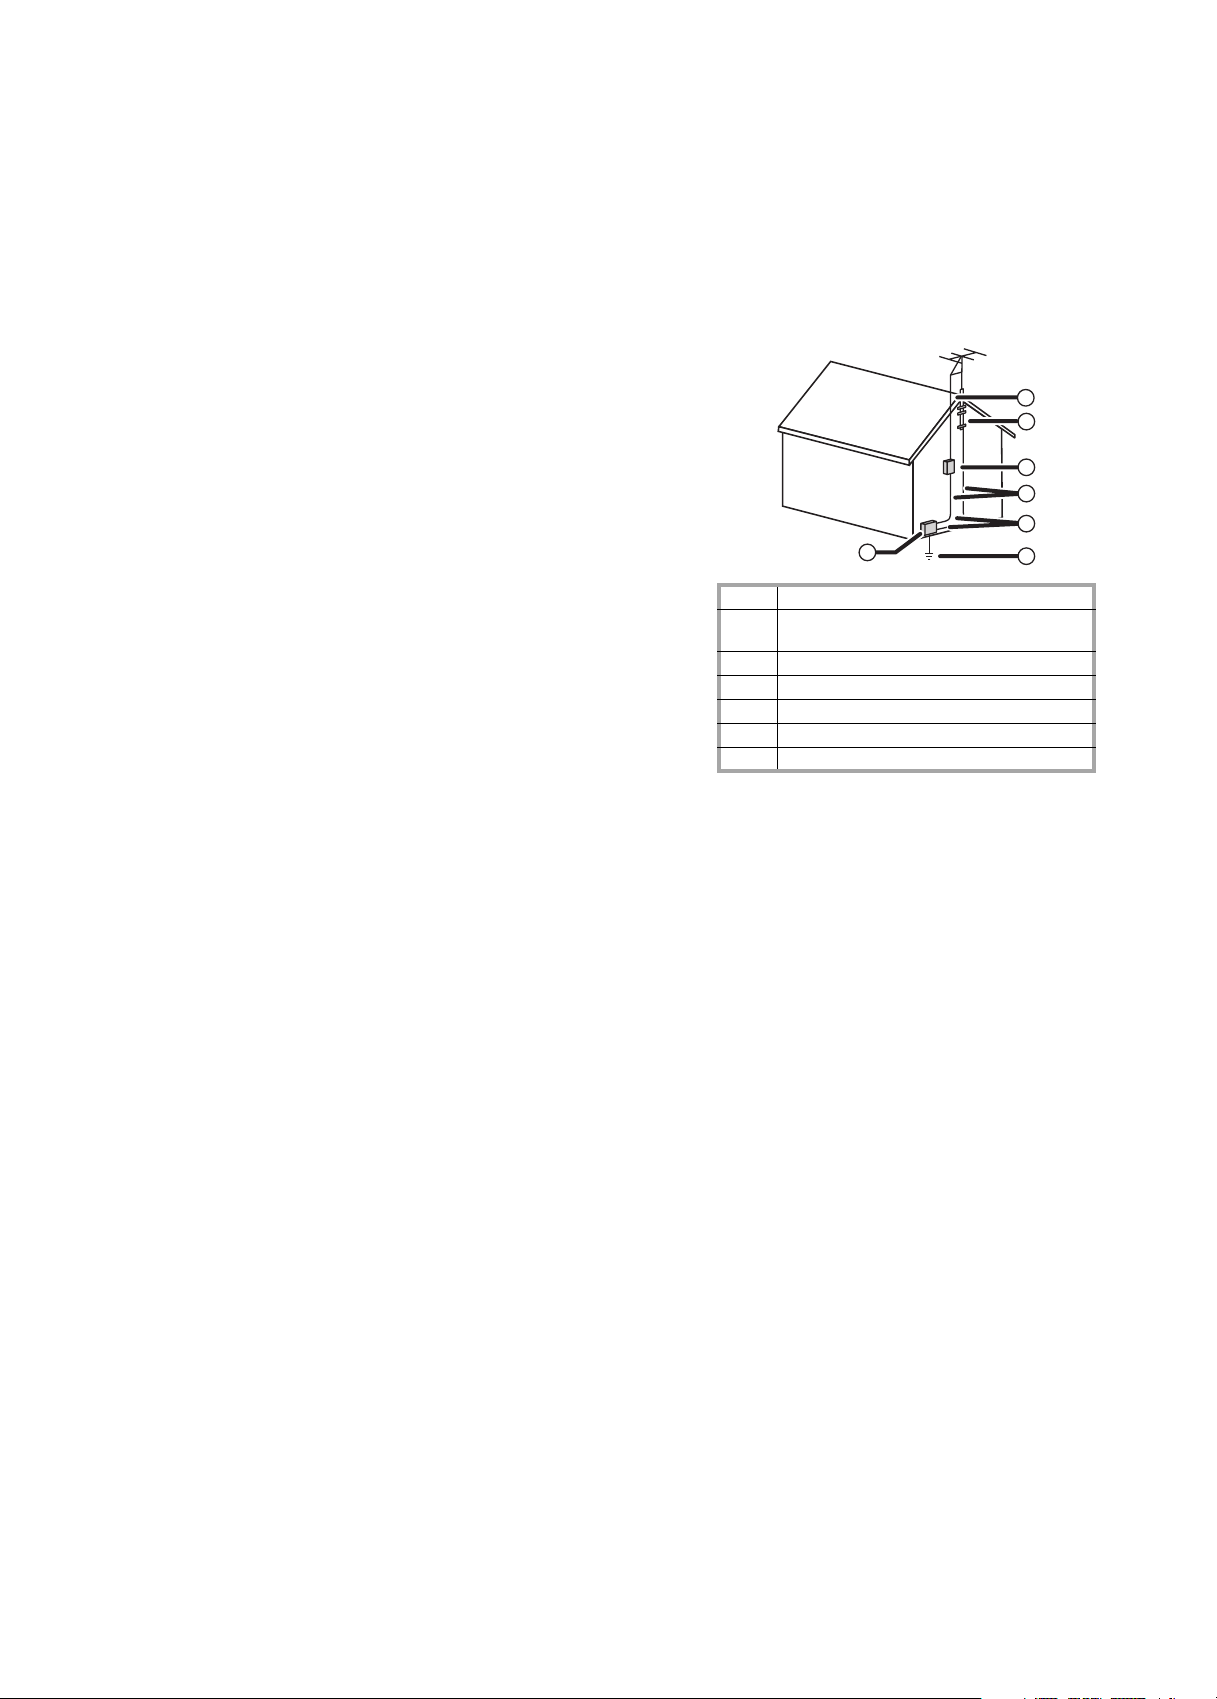
Outdoor antenna grounding
If an outside antenna or cable system is connected to your TV, make sure
that the antenna or cable system is grounded to provide some
protection against voltage surges and built-up static charges. Article
810 of the National Electrical Code, ANSI/NFPA No. 70, provides
information with respect to correct grounding of the mast and
supporting structure, grounding of the lead-in wire to an antenna
discharge unit, size of grounding conductors, location of the
antenna-discharge unit, connection to grounding electrodes, and
requirements for the grounding electrode.
7
6
5
4
3
1
1 Electric service equipment
2 Power service grounding electrode
system
3Ground clamps
4 Grounding conductors
5 Antenna discharge unit
6Grounding clamp
7 Antenna lead-in wire
2
Note to CATV system installer
This reminder is provided to call the CATV system installer’s attention to
Article 820-40 of the NEC that provides guidelines for correct grounding
and in particular, specifies that the cable ground must be connected to
the grounding system of the building as close to the point of cable entr y
as practical.
Page 6
6
TV components
TV components
Accessories
• Remote control
• AA batteries (2)
•User guide
Note: Cables are not supplied. You can purchase cables at most electronics
stores.
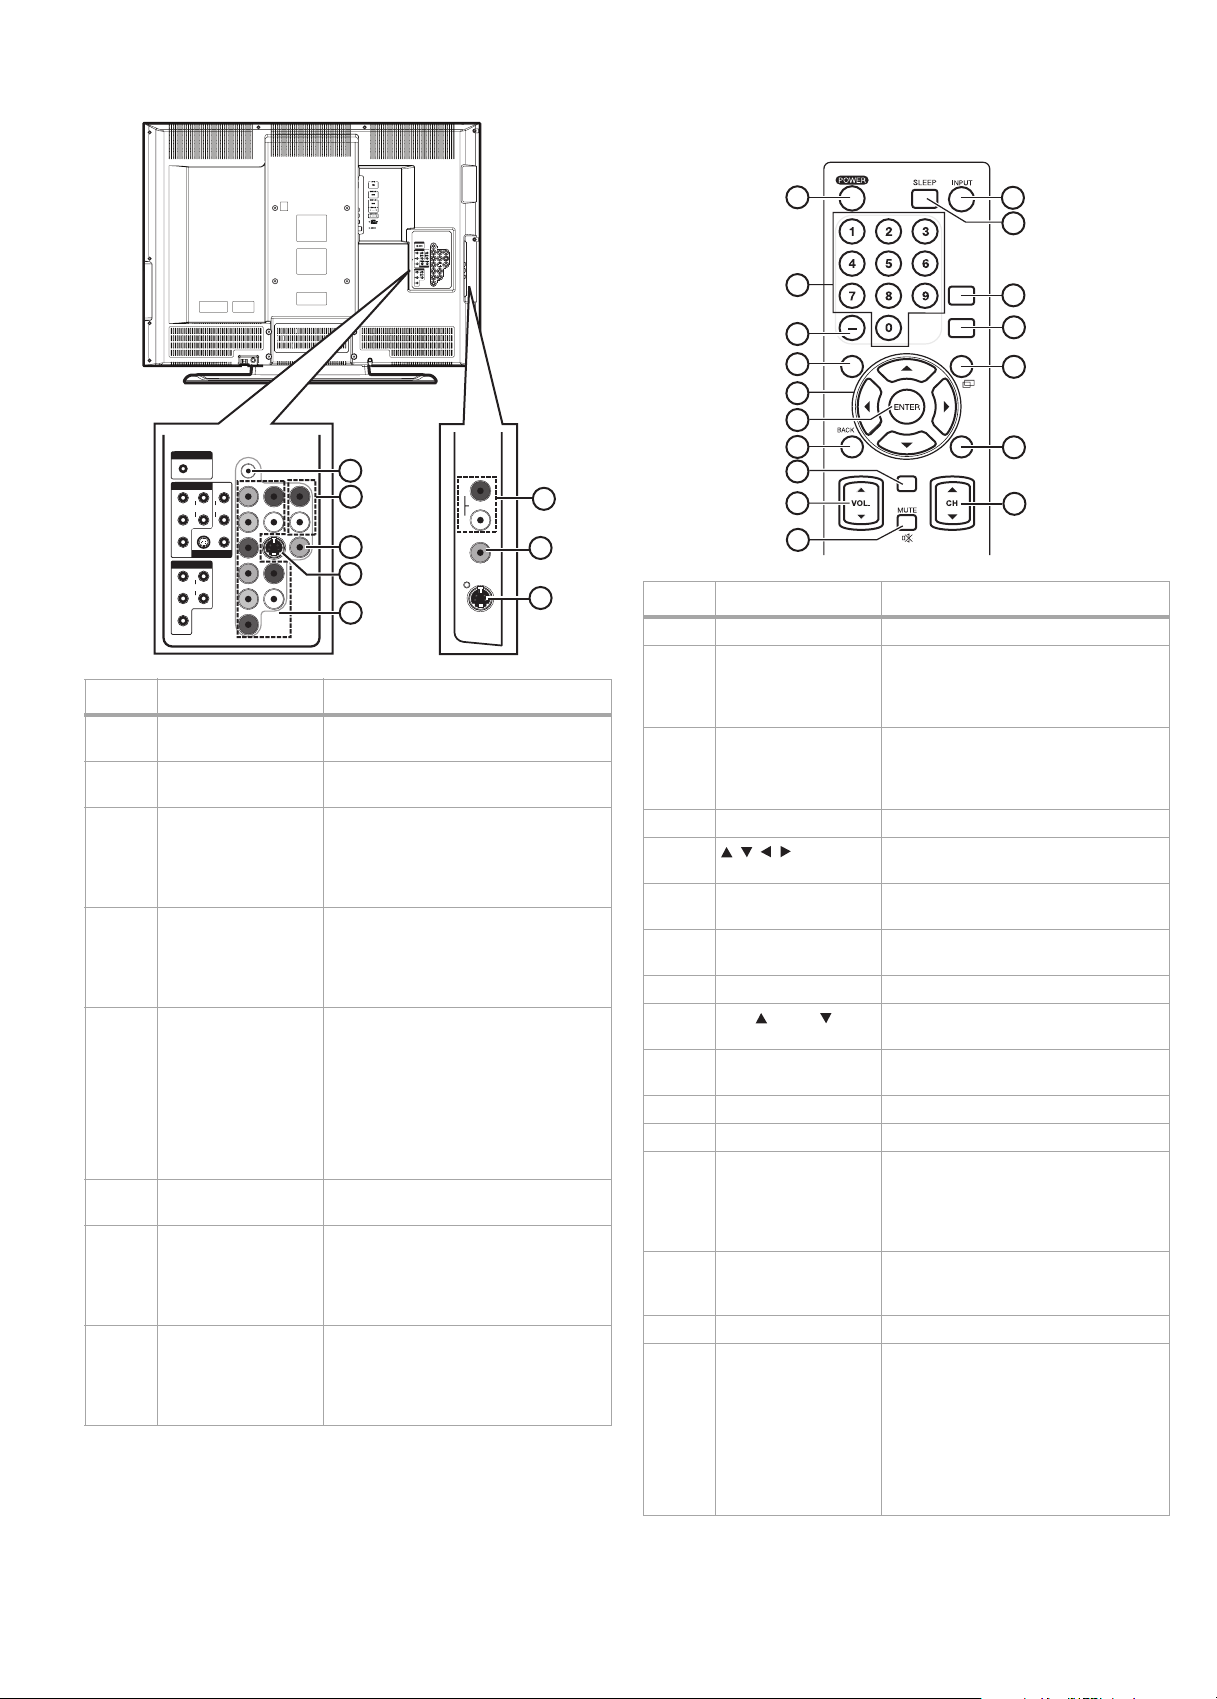
Front and side
1
2
3
4
5
6
7
8
# Component Description
1Remote control
2 POWER Press to turn your TV on or off.
3 INPUT Press to select the video input source.
4
5
6
7
8 MENU Press to open the on-screen menu.
sensor
CHANNEL
CHANNEL
VOLUME
VOLUME
Receives signals from the remote
control. Do not block.
When the on-screen menu is open,
press to confirm selections.
Press to tune to the next higher
channel in the channel list. For
information about creating the
channel list, see “Scanning for
channels” on page 12.
When the on-screen menu is open,
press to move up.
Press to tune to the next lower
channel in the channel list. For
information about creating the
channel list, see “Scanning for
channels” on page 12.
When the on-screen menu is open,
press to move down.
Press to increase the volume.
When the on-screen menu is open,
press to move right .
Press to decrease the volume.
When the on-screen menu is open,
press to move left.
POWER
INPUT
CHANNEL
VOLUME
MENU
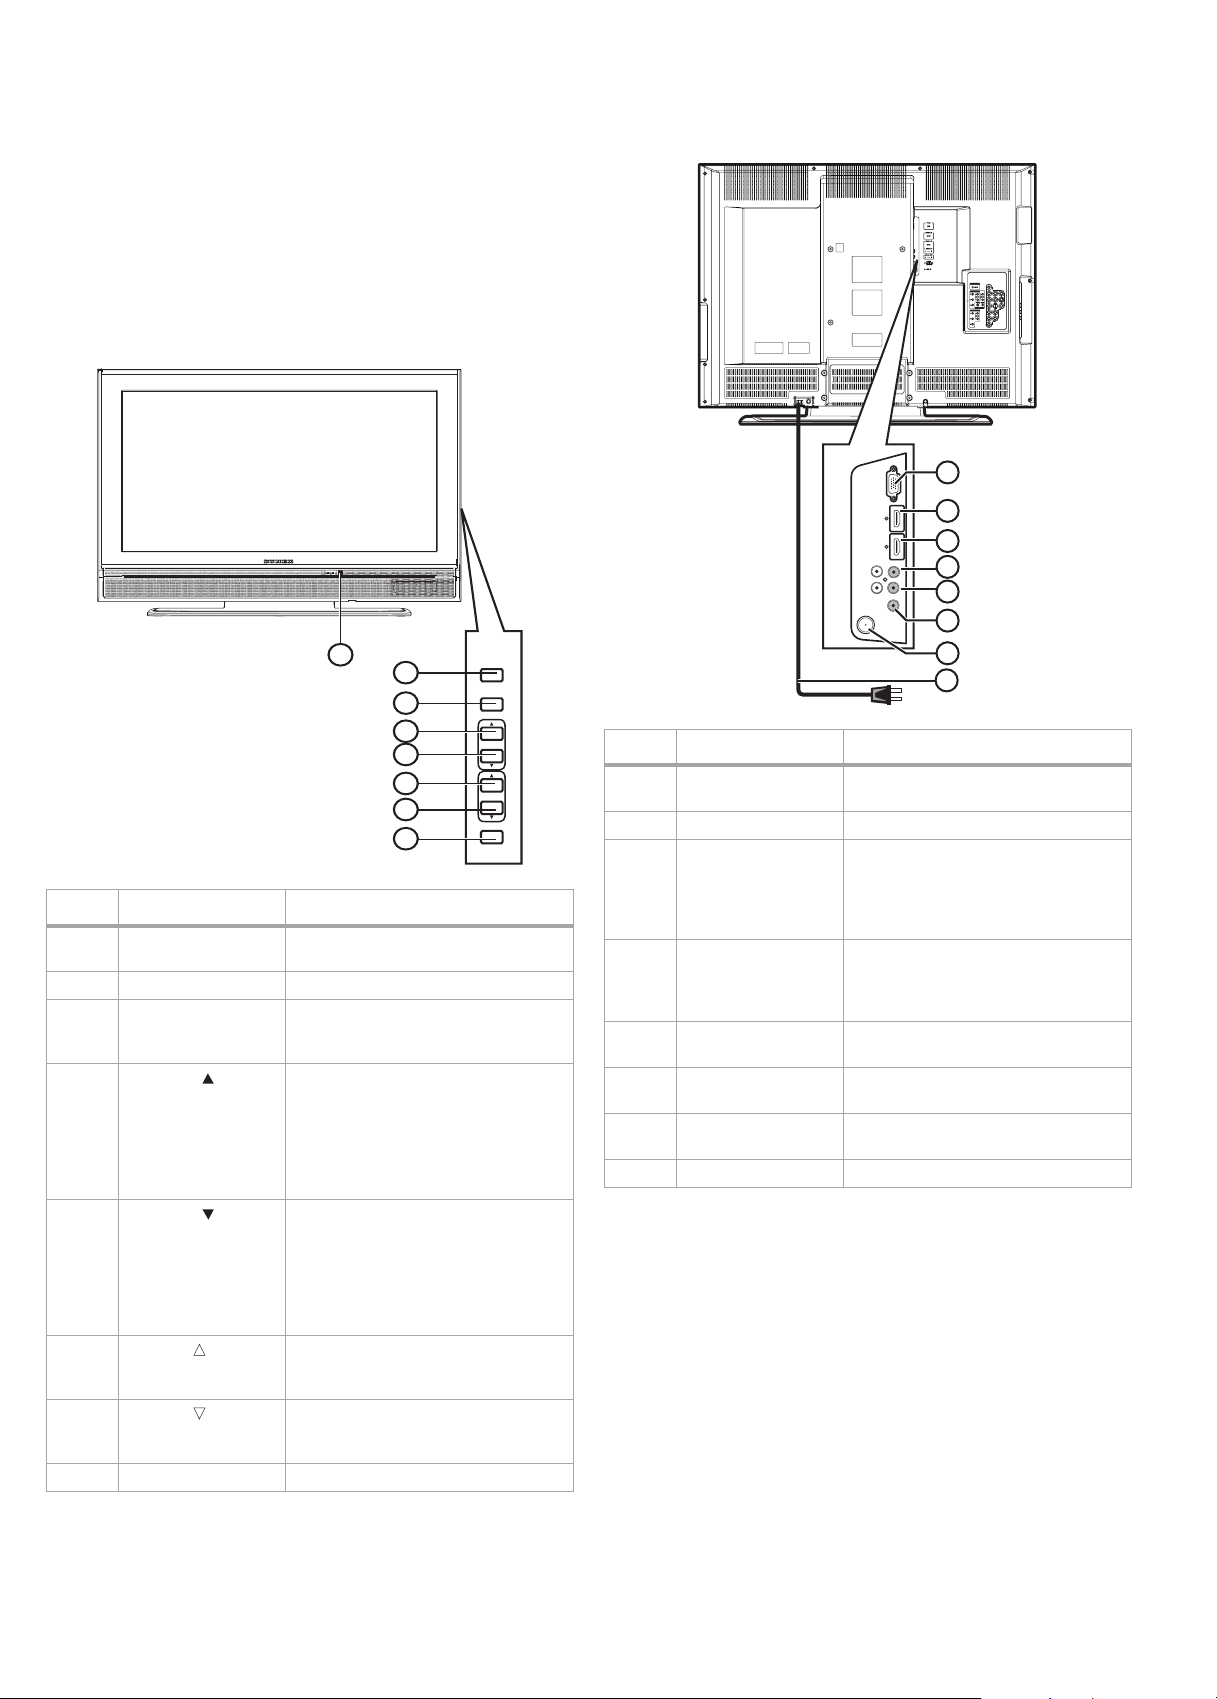
Back
1
2
3
4
5
6
7
8
#Jack Description
1 PC-IN Connect a computer with a VGA
2 HDMI 2 IN Connect an HDMI device to this jack.
3 HDMI 1 IN Connect an HDMI or DVI device to
4 AUDIO IN L/R If you connect a DVI device to the
5 AUDIO OUT L/R Connect an analog audio device to
6 DIGITAL AUDIO OUT
(COAXIAL)
7 ANT. IN Connect an antenna or cable TV to
8 Power cord Plug into a power outlet.
cable to this jack.
this jack. To connect an DVI device,
you need to connect an HDMI-DVI
cable, and connect an audio cable to
the AUDIO IN L/R jacks.
HDMI 1 IN jack, connect the DVI
device’s audio out jacks to these
jacks.
these jacks with an RCA cable.
Connect a digital audio device to this
jack.
this jack.
Page 7
TV components
7
Remote control
PC-IN
AUDIO
COMPONENT 1
YR
AUDIO
PbPrL
S VIDEO VIDEO
COMPONENT 2
YR
AUDIO
PbPrL
VIDEO 1
R
AUDIO
L
1
2
3
4
AUDIO
VIDEO
S-VIDEO
5
6
7
8
#Jack Description
1 PC-IN AUDIO Connect the computer audio jack to
this jack.
2 AUDIO (for VIDEO1) Connect the audio for an analog
device to these jacks.
3 VIDEO1 Connect an analog video device to
this jack. The analog video cable does
not carry audio. You need to connect
an audio cable to the AUD IO jacks
when using an analog video device.
4 S-VIDEO (VIDEO1) Connect an S-Video device to this
jack. The S-Video cable does not carry
audio. You need to connect an audio
cable to the AUDIO jacks when using
an S-Video device.
5 COMPONENT1/
COMPONENT2
Connect a component video device
to the COMPO NENT1 or
COMP ONENT2 jacks and the AUDIO
jacks. You can connect two
component devices. The component
video cable does not carry audio. You
need to connect an audio cable to
the AUDIO jacks when using a
component video device.
6 AUDIO (for VIDEO2) Connect the audio for an analog
device to these jacks.
7 VIDEO2 Connect an analog video device to
this jack. The analog video cable does
not carry audio. You need to connect
an audio cable to the AUD IO jacks
when using an analog video device.
8 S-VIDEO (VIDEO2) Connect an S-Video device to this
jack. The S-Video cable does not carry
audio. You need to connect an audio
cable to the AUDIO jacks when using
an S-Video device.
1
11
12
2
3
MENU
4
MTS/SAP
FREEZE
ZOOM
13
14
15
5
6
7
8
RECALL
9
DISPLAY
16
17
10
# Button Description
1 POWER Press to turn your TV on or off.
2 Numbers Press to enter a channel number. If
3
—
4 MENU Press to open the on-screen menu.
5 Press to navigate in the on-screen
6 ENTER Press to confirm option settings in
7 BACK Press to return to a previous menu in
8 RECALL Press to go to the previous channel.
9
VOL. / VOL.
10 MUTE Press to mute the sound. Press again
11 INPUT Press to select the video input source.
12 SLEEP Press to set the sleep timer.
13 MTS/SAP In digital TV mode, press to select the
14 FREEZE Press to still (freeze) the picture. Press
15 ZOOM Press to select the aspect ratio.
16 DISPLAY For digital or analog TV channels,
you want to select a digital
sub-channel, press — to select the
sub-channel.
Press the number buttons to select a
main digital channel, then press this
button to select a digital
sub-channel.
menu.
the on-screen menu.
the on-screen menu.
Press to increase or decrease the
volume.
to restore the sound.
audio language, if more than one
language is available.
In analog TV mode, press to select
the audio mode.
any button except POWER to return
to normal viewing.
press to display the channel
information, signal type, and TV
setting (such as the audio setting,
aspect ratio, program rating, and
closed caption setting) .
For an external device, press to
display the input mode, signal type,
and TV setting.
Page 8
8
Setting up your TV
#Button Description
17
CH / CH
Press to go to the next or previous
channel in the channel list, or to
select the external input mode. When
you press one of these buttons
repeatedly, you cycle between:
• Analog TV channels in the
channel list
• Digital TV channels in the channel
list
•Video1
•Video2
• Component1
• Component2
•HDMI1
•HDMI2
•PC
Setting up your TV
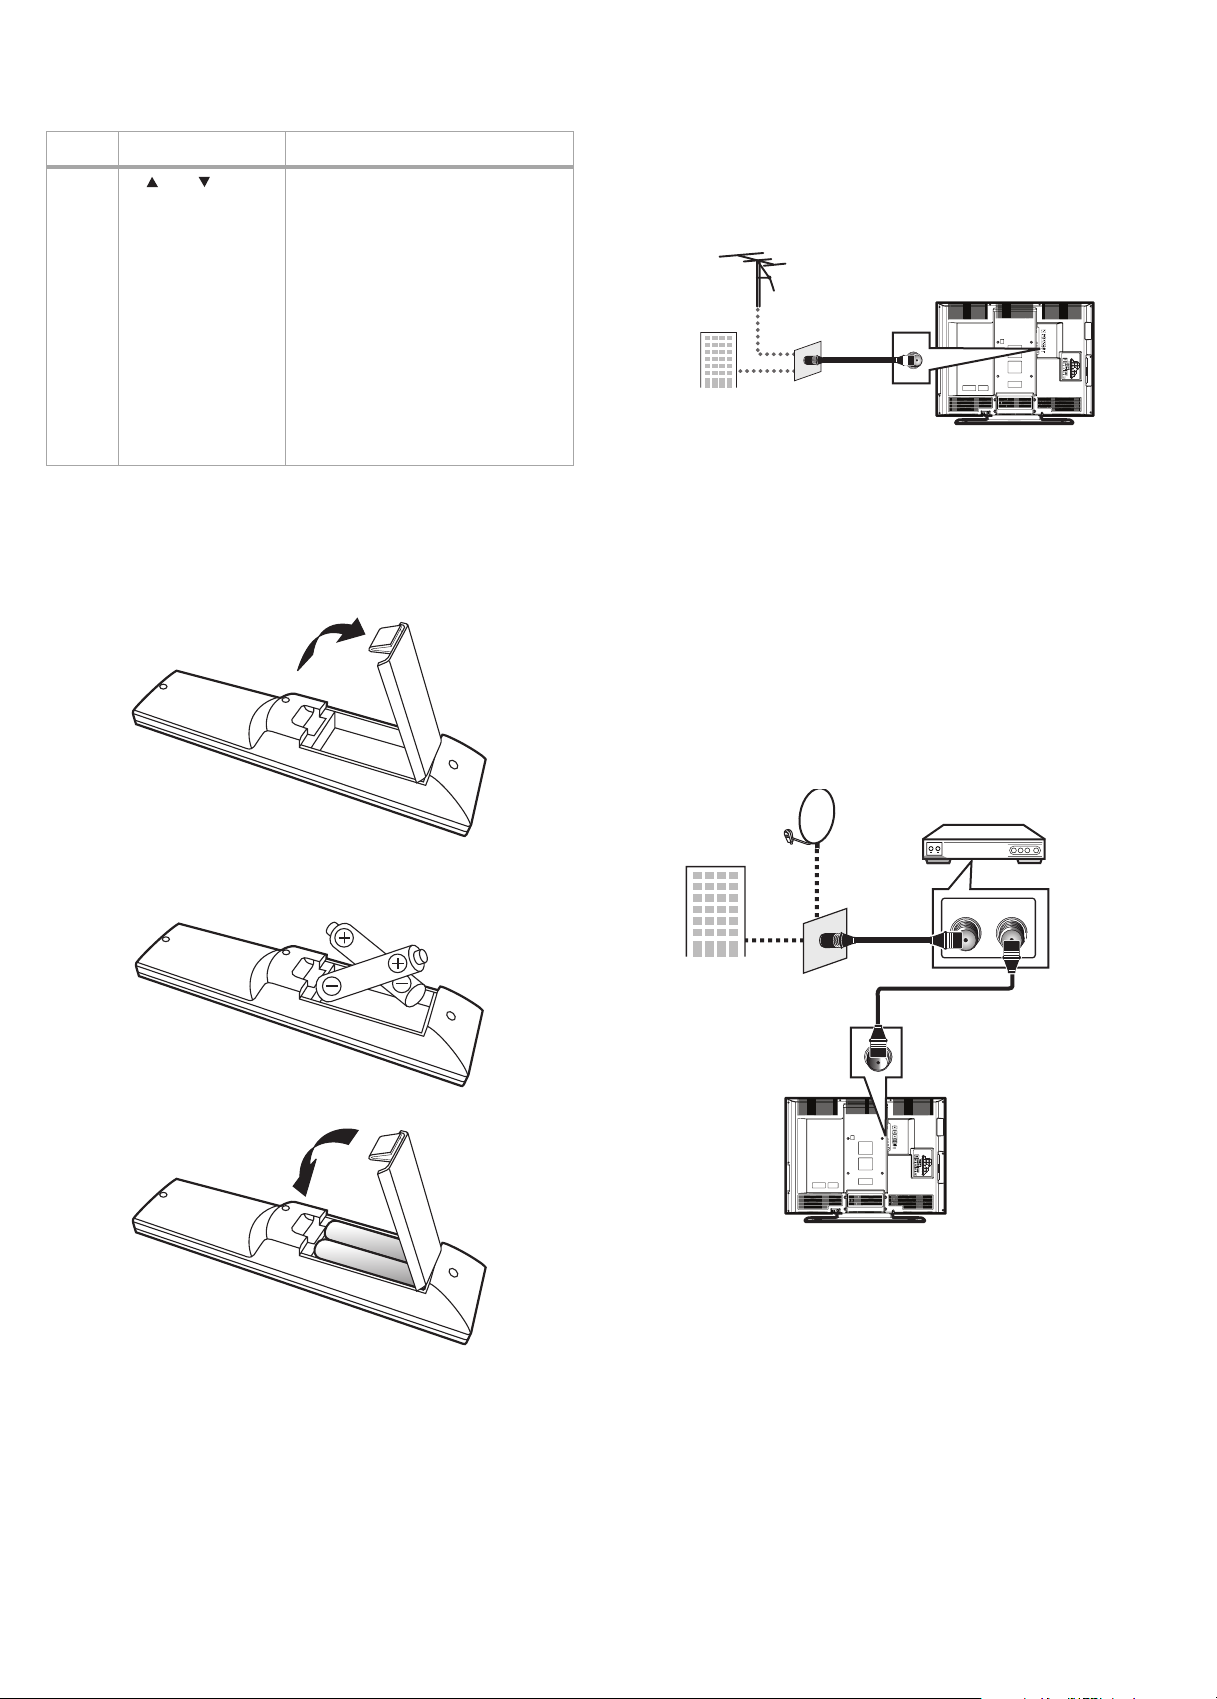
Installing remote control batteries
To install remote control batteries:
1 Open the battery compartment.
Connecting an antenna or basic cable
To connect an antenna or basic cable (no cable box):
• Connect one end of a 75 ohm coaxial cable to the antenna or
basic cable wall jack, then connect the other end of the cable to
the ANT. IN jack on the back of your TV.
Antenna
Coaxial cable
Cable
Notes:
Always unplug the coaxial cable when you move your TV.
If you use an antenna to receive analog TV, the antenna should also work
for digital TV (DTV).
If you want to switch between antenna and cable, install an antenna
selector.
If you need help connecting cable TV, contact you r cable TV provider.
Connecting a cable or satellite box
Note: Installation methods may vary depending on the type of cable or
satellite box. Contact your cable or satellite provider for more
information.
To connect a cable or satellite box:
1 Connect a 75 ohm cable to cable or satellite TV wall jack, then
connect the other end to the Antenna IN jack on the cable or
satellite TV box.
2 Insert two AA batteries into the battery compartment. Make sure
that the + and – symbols on the batteries match the + and –
symbols in the battery compartment.
3 Close the battery compartment.
Notes:
Make sure that you match the + and – symbols on the batteries with the
symbols in the battery compartment.
Do not mix different types of batteries or old and new batteries.
If you do not intend to use the remote control for a extended period of
time, remove the batteries to prevent leakage.
Do not try to recharge batteries non-rechargable batteries. They may
overheat and rupture.
Cable T V
Satellite
Coaxial cable
Cable or satellite box
RF OUTANT. IN
Coaxial ca ble
2 Connect a 75 ohm coaxial cable to the RF OUT jack on the cable
or satellite TV box, then connect the other end to the ANT. IN
jack on the back of your TV.
Page 9
Setting up your TV
9
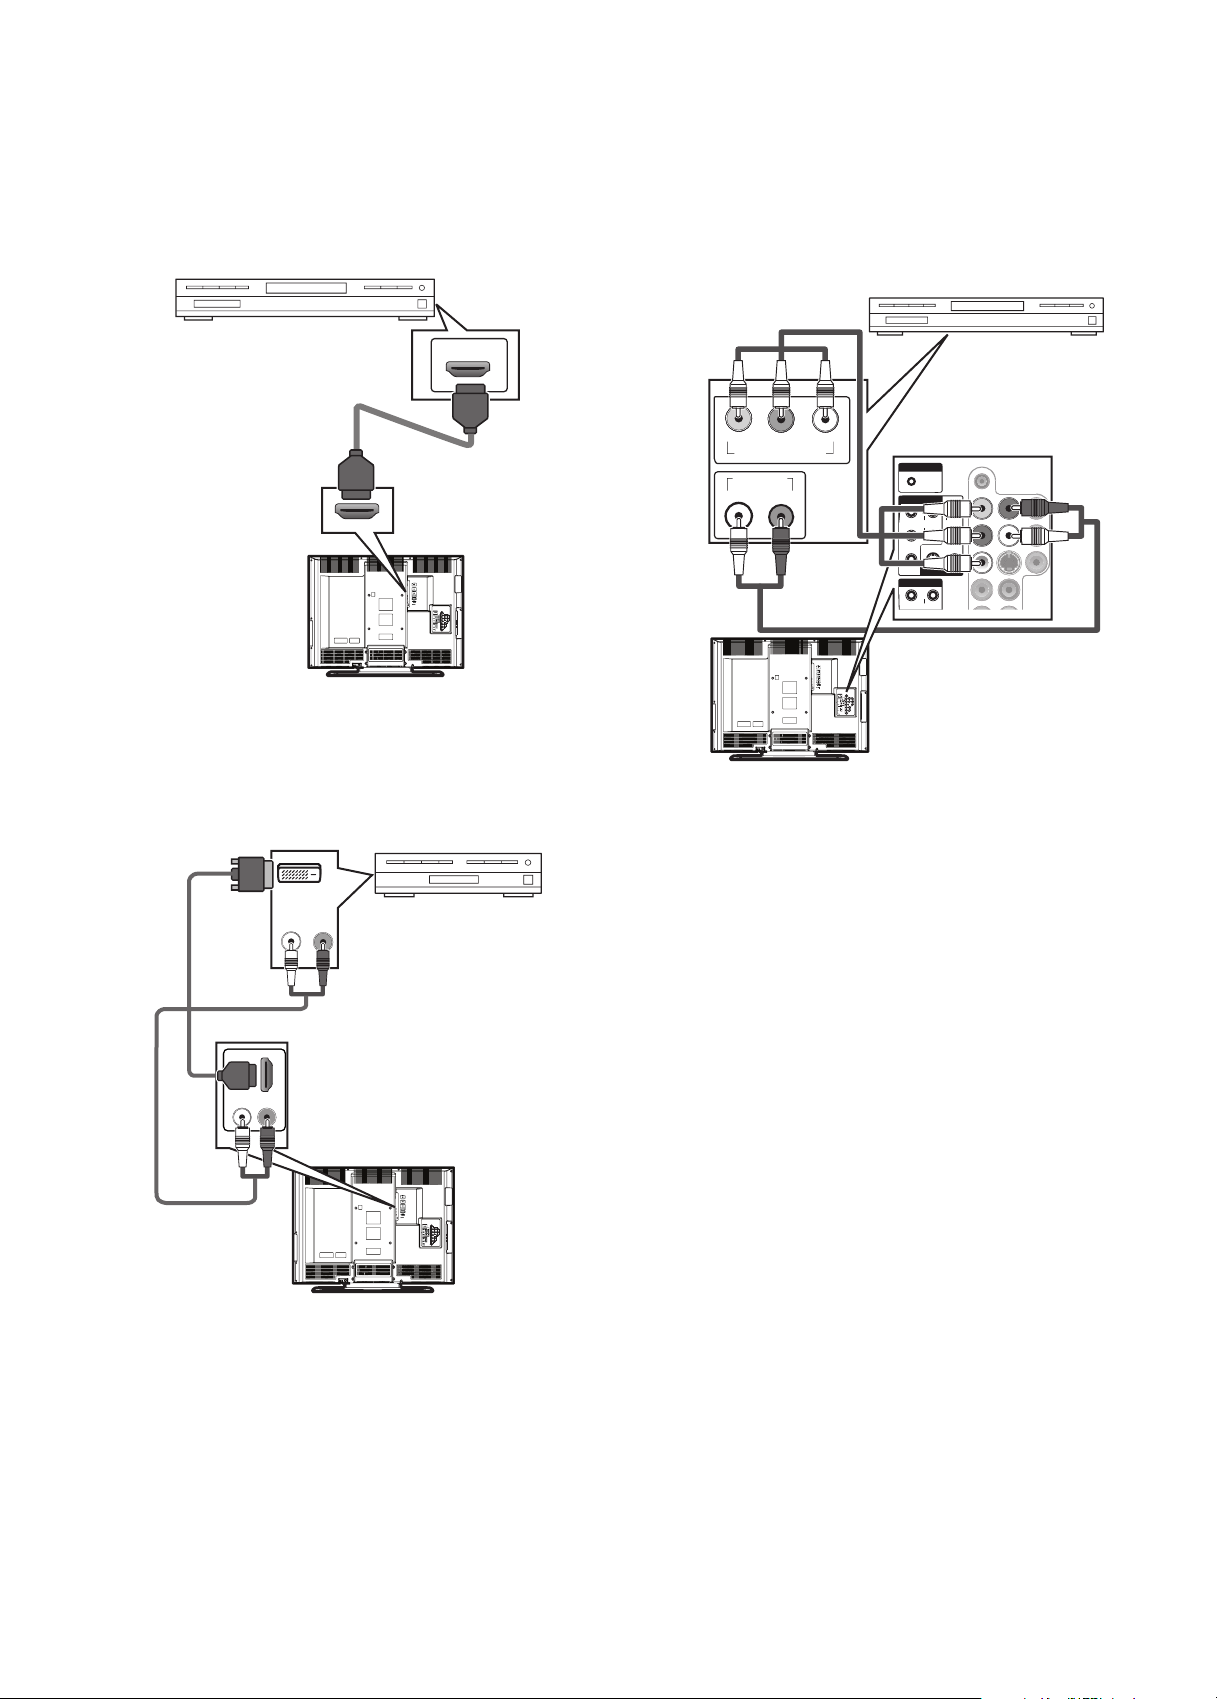
Connecting an HDMI device
You can connect two HDMI devices.
To connect an HDMI device:
• Connect one end of an HDMI cable to the HDMI OUT jack on the
HDMI device, then connect the other end of the cable to the
HDMI 1 INPUT or HDMI 2 INPUT jack on the back of your TV.
HDMI device
Connecting a DVI device
HDMI OUT
HDMI cable
Connecting a component video device
You can connect two component video devices.
To connect a component video device:
1 Connect a component video cable to the COMPONENT VIDEO
OUT (Y, Pb, and Pr) jacks on the component device, then connect
the other end of the cable to the COMPONENT 1 or
COMPONENT 2 jacks on the back of your TV.
Component video cable
Component video device
COMPONENT VIDEO OUT
AUDIO OUT
PrPbY
PC-IN
RL
AUDIO
COMPONENT 1
YR
AUDIO
PbPrL
S VIDEO VIDEO
VIDEO 1
COMPONENT 2
YR
AUDIO
Audio cable
R
AUDIO
L
To connect a DVI device, you need an HDMI-to-DVI conversion cable.
To connect a DVI device:
1 Connect the DVI end of the HDMI-to-DVD conversion cable to the
DVI OUT jack on the DVI device, then connect the HDMI end of
the cable to the HDMI 1 IN jack on the back of your TV.
DVI OUT
DVI device
HDMI-to-DVI cable
Audio cable
AUDIO OUT
RL
2 Connect an audio cable to the AUDIO OUT jacks on the DVI
device, then connect the other end of the cable to the AUDIO IN
jacks next to the HDMI 1 IN jack on the back of your TV.
Notes:
Your T V accepts 480i, 480p, 720p, and 1080i video signals. Your TV cannot
display 480i video that is not EIA/CEA-861/861B- compliant.
You must use the HDMI 1 IN jac k to connec t a DVI device be cause a DVI
device requires an audio connection. The AUD IO IN jacks only work for
the HDMI 1 IN jack.
2 Connect an RCA audio cable to the AUDIO L and R jacks on the
component video device, then connect the other end of the cable
to the AU DIO L and R jacks on the back of your TV. Make sure that
you connect the audio cable to the audio jacks associated with
the component jacks you connected the component video
cable to.
Note: Your TV accepts 480i, 480p, 720p, and 1080i video signals.
Page 10
10
Setting up your TV
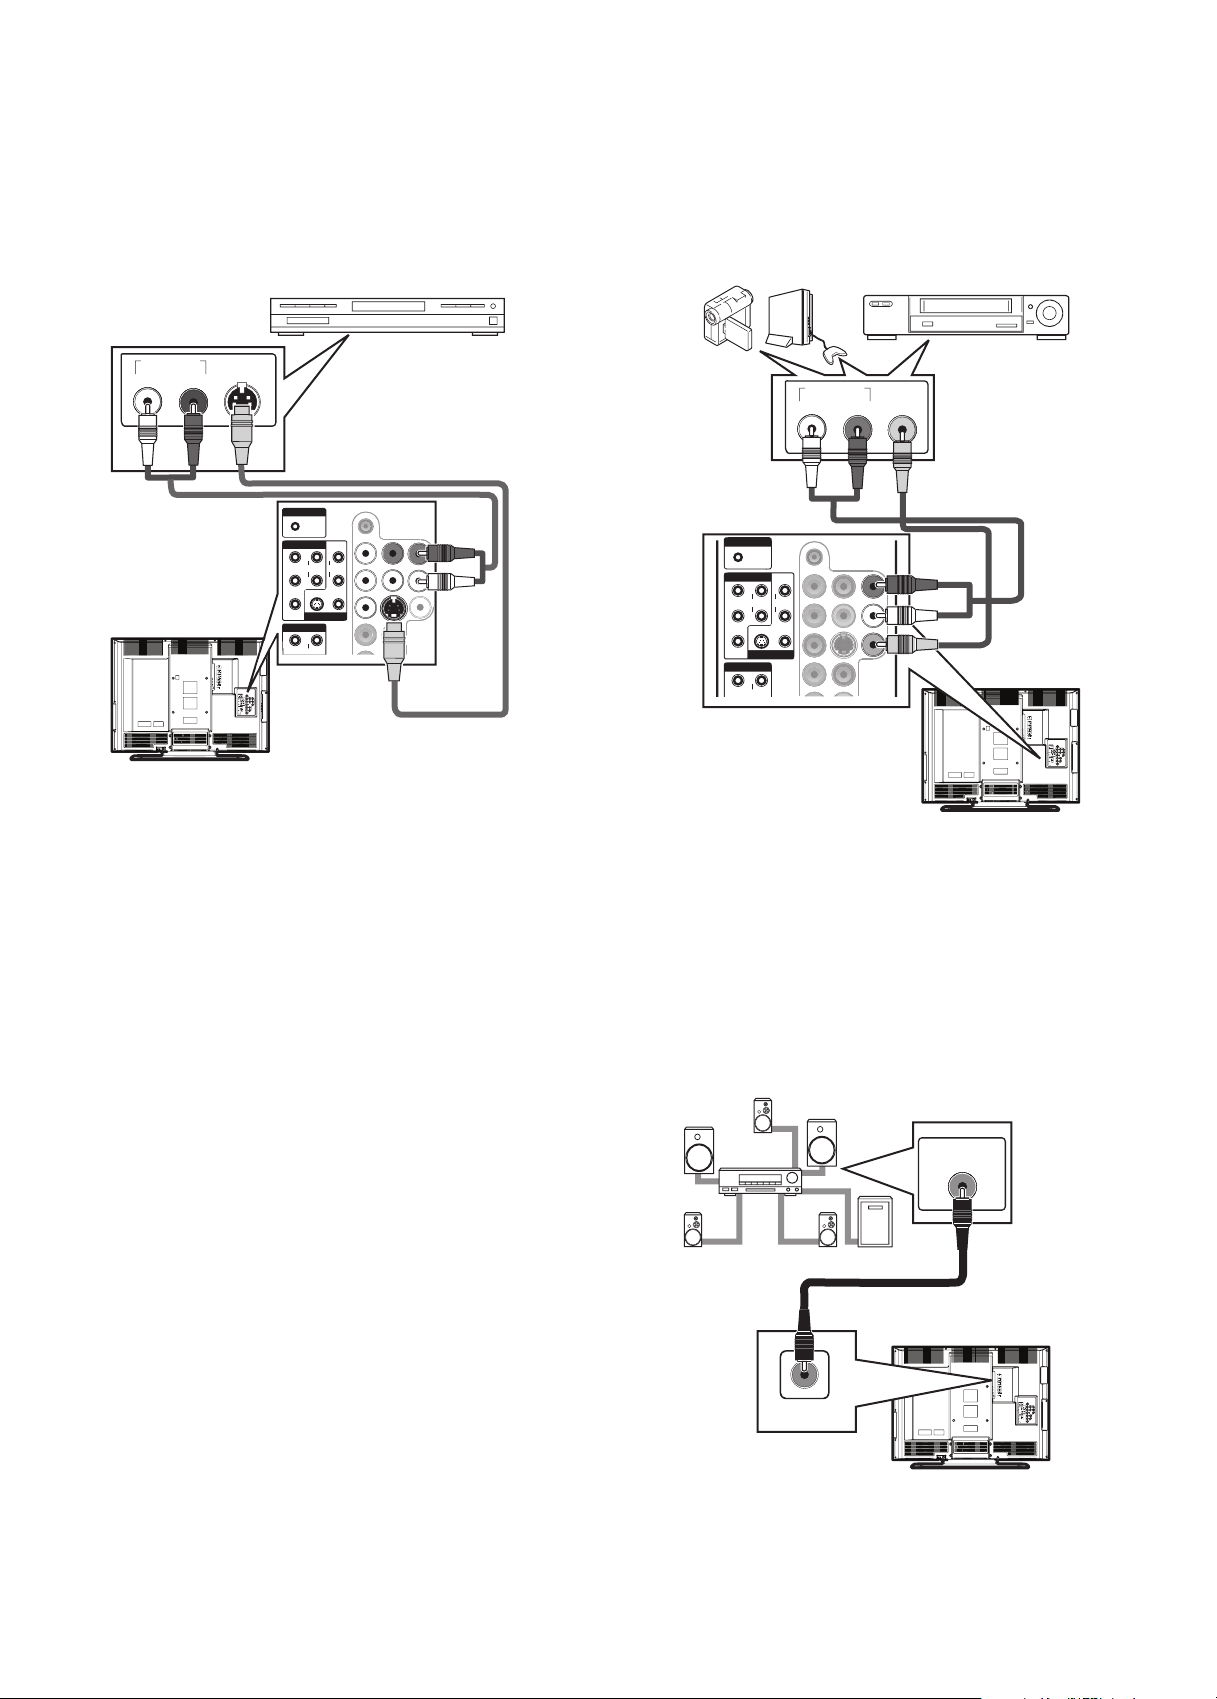
Connecting an S-Video device
You can connect two S-Video devices.
To connect an S-Video device:
1 Connect one end of an S-Video cable to the S-VIDEO OUT jack on
the S-Video device, then connect the other end of the cable to the
S-VIDEO (VIDEO 1) or S-VIDEO (VIDEO 2) jack on the back of
your T V.
S-Video cabl e
R
AUDIO
AUDIO
L
S VIDEO VIDEO
VIDEO 1
AUDIO
S-Video device
AUDIO OUT
Audio cable
S-VIDEO
OUT
RL
PC-IN
AUDIO
COMPONENT 1
YR
PbPrL
COMPONENT 2
YR
Connecting a camcorder, game, or VCR
To connect a camcorder, game, or VCR:
1 Connect one end of a video cable to the VIDEO OUT jack on the
camcorder, game, or VCR, then connect the other end to the
VIDEO1 or VIDEO2 jack on the back of your TV.
GameCamcorder VCR
AUDIO OUT
Audio cable Video cable
PC-IN
AUDIO
COMPONENT 1
YR
R
AUDIO
AUDIO
PbPrL
L
S VIDEO VIDEO
VIDEO 1
COMPONENT 2
R
Y
AUDIO
VIDEO
RL
OUT
2 Connect one end of an audio cable to the AUDIO OUT jacks on
the S-Video device, then connect the other end of the cable to the
AUDIO L and R jacks that are near the S-Video jack you
connected the S-Video cable to.
Note: If you connect an S -Video device to the S-VIDEO (VIDEO1) jack and
a video device to the VIDEO1 jack, the S-Video device has priority. If
you connect an S-Video device to the S-VIDEO (VIDEO2) jack and a
video device to the VIDEO2 jack, the S-Video device has priority.
2 Connect one end of an audio cable to the AUDIO OUT jacks on
the camcorder, camera, or VCR, then the other end of the cable to
AUDIO jacks on the back of your TV. Make sure that you connect
the audio cable to the audio jacks associated with the video jack
you connected the video cable to.
Connecting a digital audio device
To connect a digital audio device:
• Connect one end of a digital audio coaxial cable to the DIGITAL
AUDIO IN jack on the audio device, then connect the other end of
the cable to DIGITAL AUDIO OUT jack on the back of your TV.
Digital audio device
DIGITAL AUDIO
COAXIAL IN
DIGITAL AUDIO
OUT jack
Page 11

Using your TV
11
Connecting an analog audio device
To connect an analog audio device:
• Connect one end of an audio cable to the AUDIO IN L and R jacks
on the audio device, then connect the other end of the cable to
the AUDIO OUT jacks on the back of your TV.
AUDIO IN
RL
Analog audio device
AUDIO OUT jacks
Connecting a computer
Note: Make sure that the VGA cable has a ferrite core.
To connect a computer:
1 Connect one end of a VGA cable to the VGA jack on the computer,
then connect the other end of the cable to the PC-IN jack on the
back of your TV.
Compute r
Setting up for the first time
The first time you turn on your TV, a quick setup program starts that lets
you select a language for the on-screen menu, select the TV signal
source, and scan for available channels.
To set up your TV for the first time:
1 Make sure that your TV is connected to an antenna, cable TV, or
satellite TV.
2 Press POWER. You may have to wait a few seconds for your TV to
initialize. After your TV turns on, the Initial Setup screen opens.
Initial Setup
Initial Setup
Select the language for setup display.
Elija el idioma de ajuste.
Sélectionner langue écran config.
Select Enter Exit
ENTER
3 Press or to select English, Español, or Français, then
press ENTER. The following screen opens.
Initial Setup
Initial Setup
Make sure the antenna is connected to "ANT.IN" jack.
Select the destination of "ANT.IN" jack.
Air
Cable
Or
ANT.IN
English
Español
Français
MENU
Air
Cable
Mini audio cable
Ferrite core
VGA cable
PC-IN video jack
PC-IN AUDIO ja ck
2 Connect one end of a mini-plug audio cable to the
AUDIO LINE OU T jack on the computer, then connect the other
end of the cable to the PC-IN AUDIO jack on the back of your TV.
Using your TV
Turning your TV on or off
To turn your TV on or off:
•Press POWER.
War ning : When you press POWER to turn off your T V, your TV goes into
Standby mode. It is still receiving electrical power. To completely
disconnec t power, unplug the power cord.
Note: When your TV does not receive a signal and you do not press any
buttons for 15 minutes, your TV goes into Standby mode.
ENTER
BACK
Back
MENU
tixEretnEtceleS
4 Press or to select Air (antenna) or Cable (cable or satellite
TV), then press ENTER. The following screen opens, and your TV
starts scanning for channels. Your TV stores the channel
information in the channel list.
Initial Setup
Initial Setup
Now the system is scanning for channels,please wait.
5%
Analog channels 1ch
Digital channels 0ch
MENU
Exit
When the scan is complete, the lowest channel in the channel list
is displayed.
Notes:
The initial setup program only runs once for A ir or Cable. If you change the
TV signal source, you need to re-scan for channels. For more
information, see “Scanning for channels” on page 12.
If you press POWER or MENU while your TV is scanning for channels,
scanning will stop.
Page 12
12
Using your TV
Opening the on-screen menu
To open the on-screen menu:
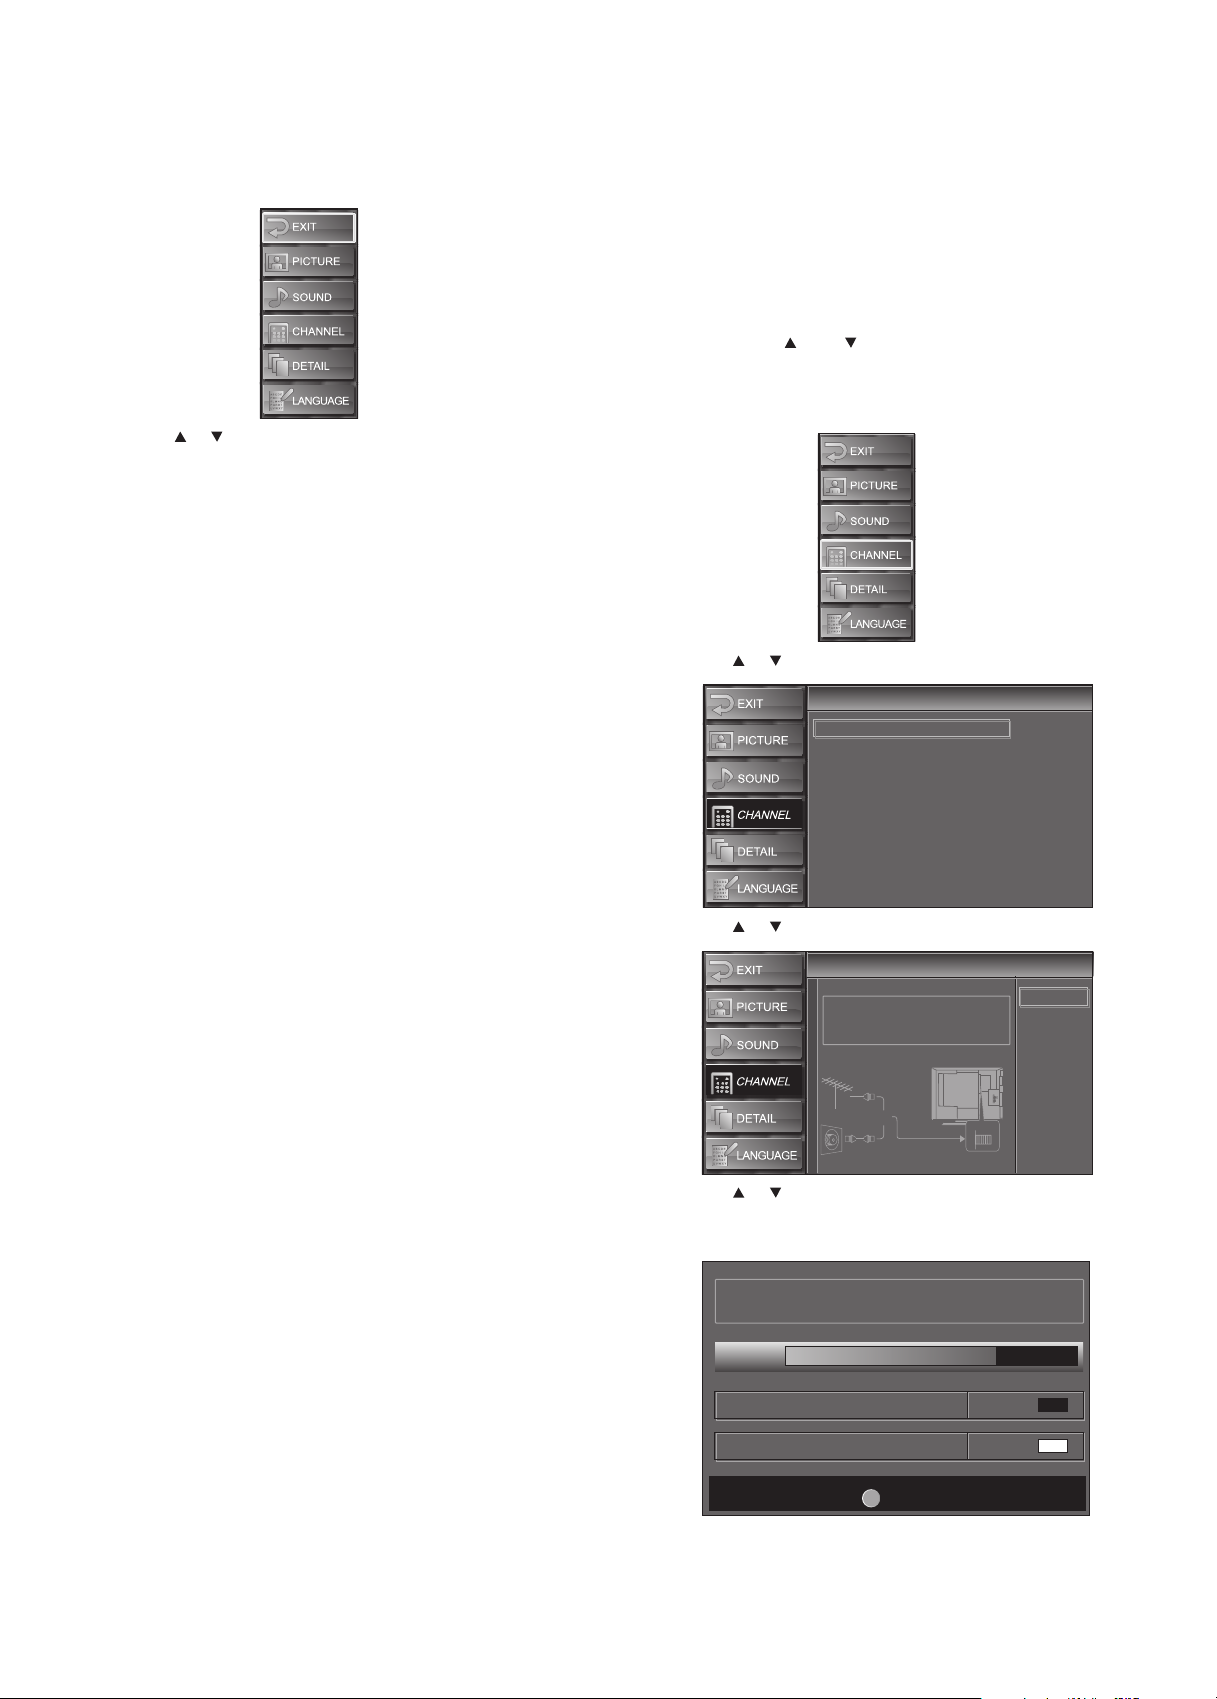
1 Press MENU. The on-screen menu opens.
2 Press or to select a menu, then press ENTER. You can select:
• EXIT—Closes the on-screen menu.
• PICTURE—Lets you adjust the picture quality. For more
information, see “Adjusting the picture” on page 14.
• SOUND—Lets you adjust the sound quality. For more
information, see “Adjusting the sound” on page 14.
• CHANNEL—Lets you scan for channels and remove unwanted
channels. For more information, see “Scanning for channels” on
page 12 and “Deleting channels from the channel list” on page
13.
• DETAIL—Lets you change closed captioning styles, set parental
controls, adjust the computer video image, and select the audio
input for connected HDMI devices. For more information, see:
• “Changing digital closed captioning styles” on page 18
• “Setting parental controls” on page 19
• “Adjusting the computer image” on page 21
• “Selecting the HDMI audio mode” on page 22
• LANGUAGE—Lets you change the language for the on-screen
menu. For more information, see “Selecting the on-screen menu
language” on page 13.
Scanning for channels
The first time you turned on your TV, your TV scanned for channels. You
only need to re-scan for channels if:
• You change the TV signal source. For example, you change from
Air to Cable.
• You move your TV to a different viewing area.
• Additional channels have become available since the initial scan.
• You want to restore DTV channels you have deleted.
Your TV stores the scanned channel information in the channel list.
When you press CH or CH , your TV tunes to the next or previous
channel in the channel list, and skips channels that do not have a signal.
To scan for channels:
1 Press MENU. The on-screen menu opens.
2 Press or to select CHANNEL, then press ENTER.
Channel
Channel
Autoscan
Channel List
Manual Register
Antenna
3 Press or to select Autoscan, then press ENTER.
Autoscan
Autoscan
Autoscan will rescan all channels.
This may take a while to complete.
Select the destination of "ANT.IN" jack.
Air
Or
Cable
Back
Air
Cable
ANT.IN
4 Press or to select Air (antenna) or Cable (cable or satellite
TV). Your TV scans for channels. When the scan is complete, the
lowest channel in the channel list is displayed.
Now the system is scanning for channels, please wait.
72%
Analog channels 10ch
Digital channels 6ch
MENU
Exit
Page 13
Using your TV
13
Notes:
If you connect cable T V without a cable box, you may need to contact your
cable TV provider for help.
If you press POWER or MENU during the scan, the scan will be canceled.
For digital channels, if you unplug the power cord without turning off your
TV first, the channel list information may be lost.
Deleting channels from the channel list
If the channel list includes channels you do not want, you can delete the
channels from the list. When you press CH or CH , your TV skips the
deleted channels. You can still tune to a deleted analog channel by
pressing the number buttons for the channel.
To delete channels from the channel list:
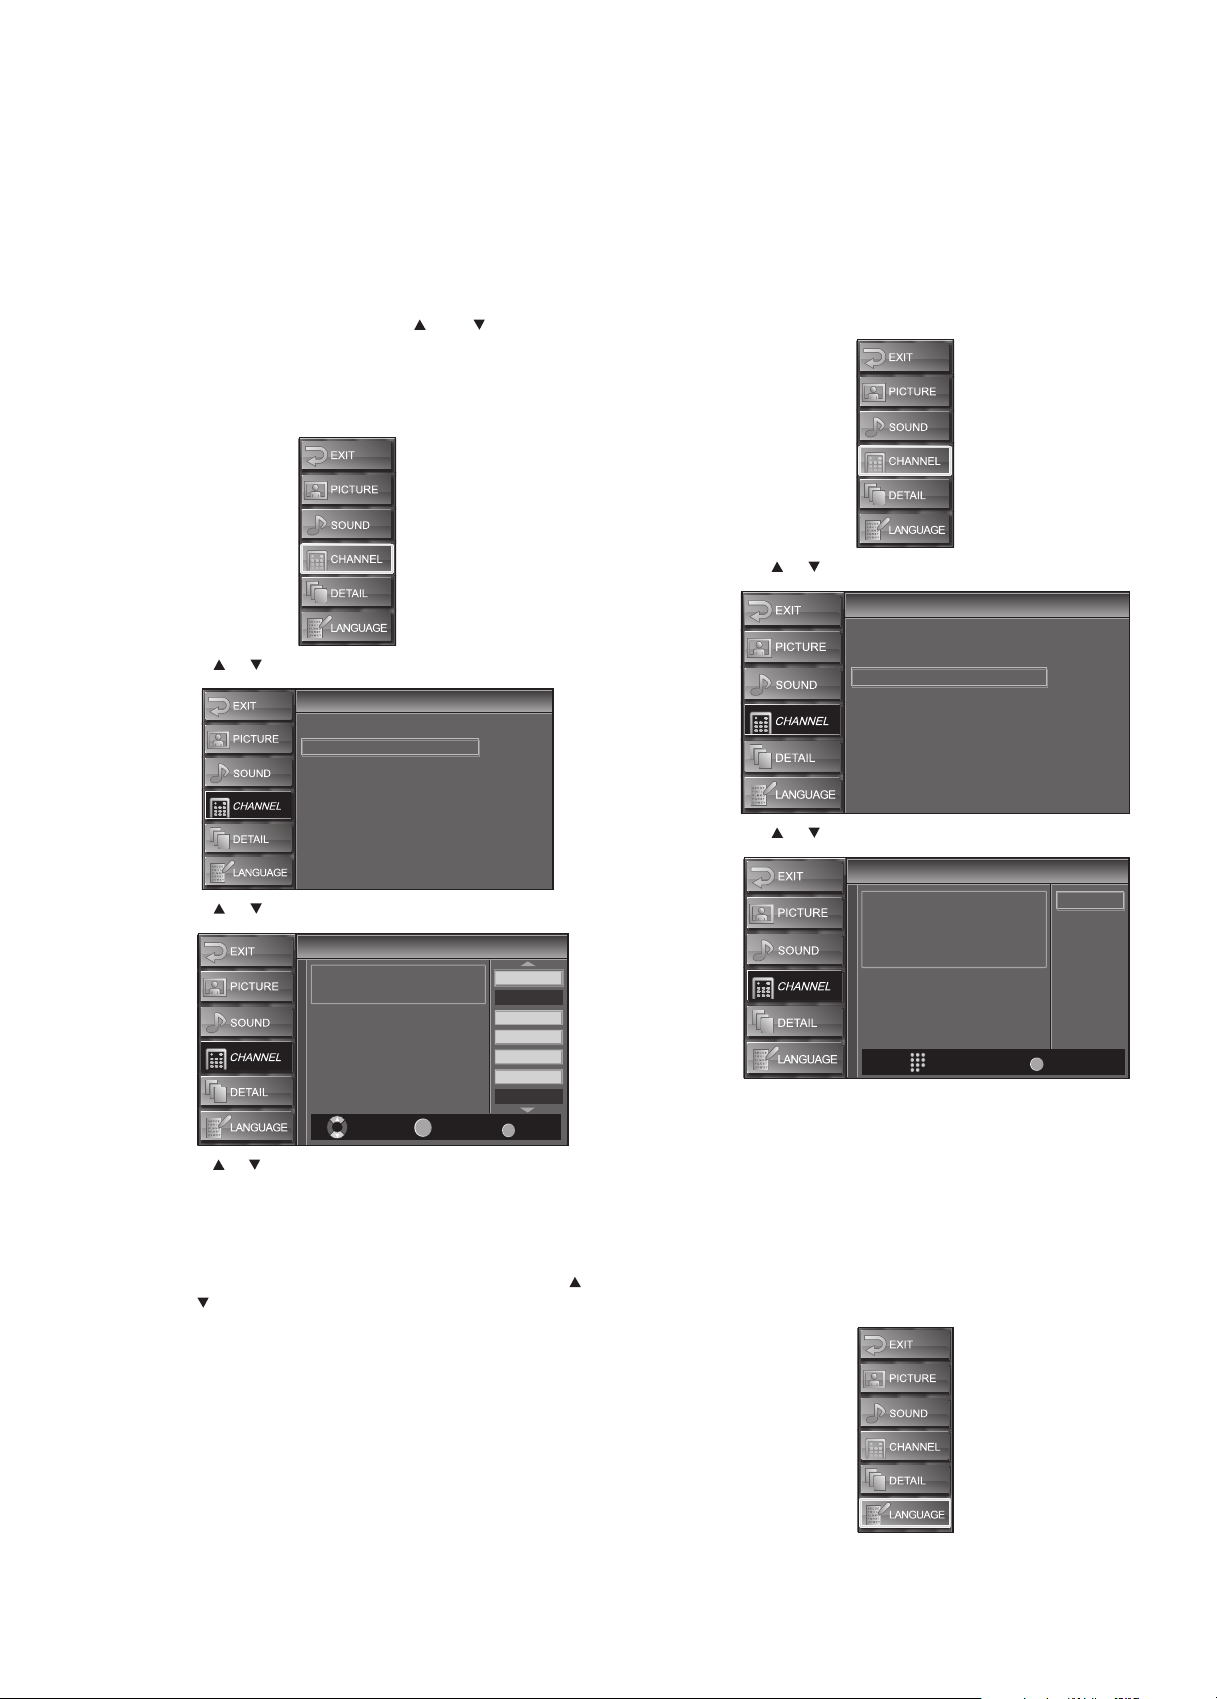
1 Press MENU. The on-screen menu opens.
2 Press or to select CHANNEL, then press ENTER.
Channel
Channel
Autoscan
Channel List
Manual Register
Antenna
Adding channels to the channel list
When your TV scans for channels, it looks for channels with good
signals. If a channel has a poor signal, your TV skips that channel. You
can add a skipped channel to the channel list.
Note: This feature only works for analog channels. You cannot add digital
channels to the channel list. To add digital channels, you must scan for
channels.
To add channels to the channel list:
1 Press MENU. The on-screen menu opens.
2 Press or to select CHANNEL, then press ENTER.
Channel
Channel
Autoscan
Channel List
Manual Register
Antenna
3 Press or to select CHANNEL LIST, then press ENTER.
Channel List
Channel List
Highlight channels for
Ch Up/Down key selection.
Ch Select Watch/Skip Back
ENTER
DTV 6
DTV 6
DTV 8
DTV 8
DTV 48
DTV 48
DTV 67
BACK
27
9
9
58
58
4 Press or to select the channel you want to delete, then press
ENTER. The channel number is grayed out and the channel is
deleted from the channel list.
5 Press MENU to close the menu.
Notes:
If you want to add a deleted channel back to the channel list, press or
to select the channel, then press ENTER.
When you delete a main digital channel, its sub-channels are also deleted.
Digital channels are indicated by DTV next to the channel number.
Unmarked channels are analog.
3 Press or to select Manual Register, then press ENTER.
Manual Register
Manual Register
BACK
Register
Back
For analog channels,
select a channel to register using
number keys.
For digital channels,
you must perform Autoscan function.
Ch Change
4 Press the number button for the channel you want to add, then
press ENTER. Registered to the Channel List is displayed.
5 Press MENU to close the menu.
Note: If external input (Video1, Video2, Component1, Component2,
HDMI1, HDMI2, or PC) is used, you cannot add the channel and
Unavailable appears.
Selecting the on-screen menu language
To select the on-screen menu language:
1 Press MENU. The on-screen menu opens.
Page 14
14
Using your TV
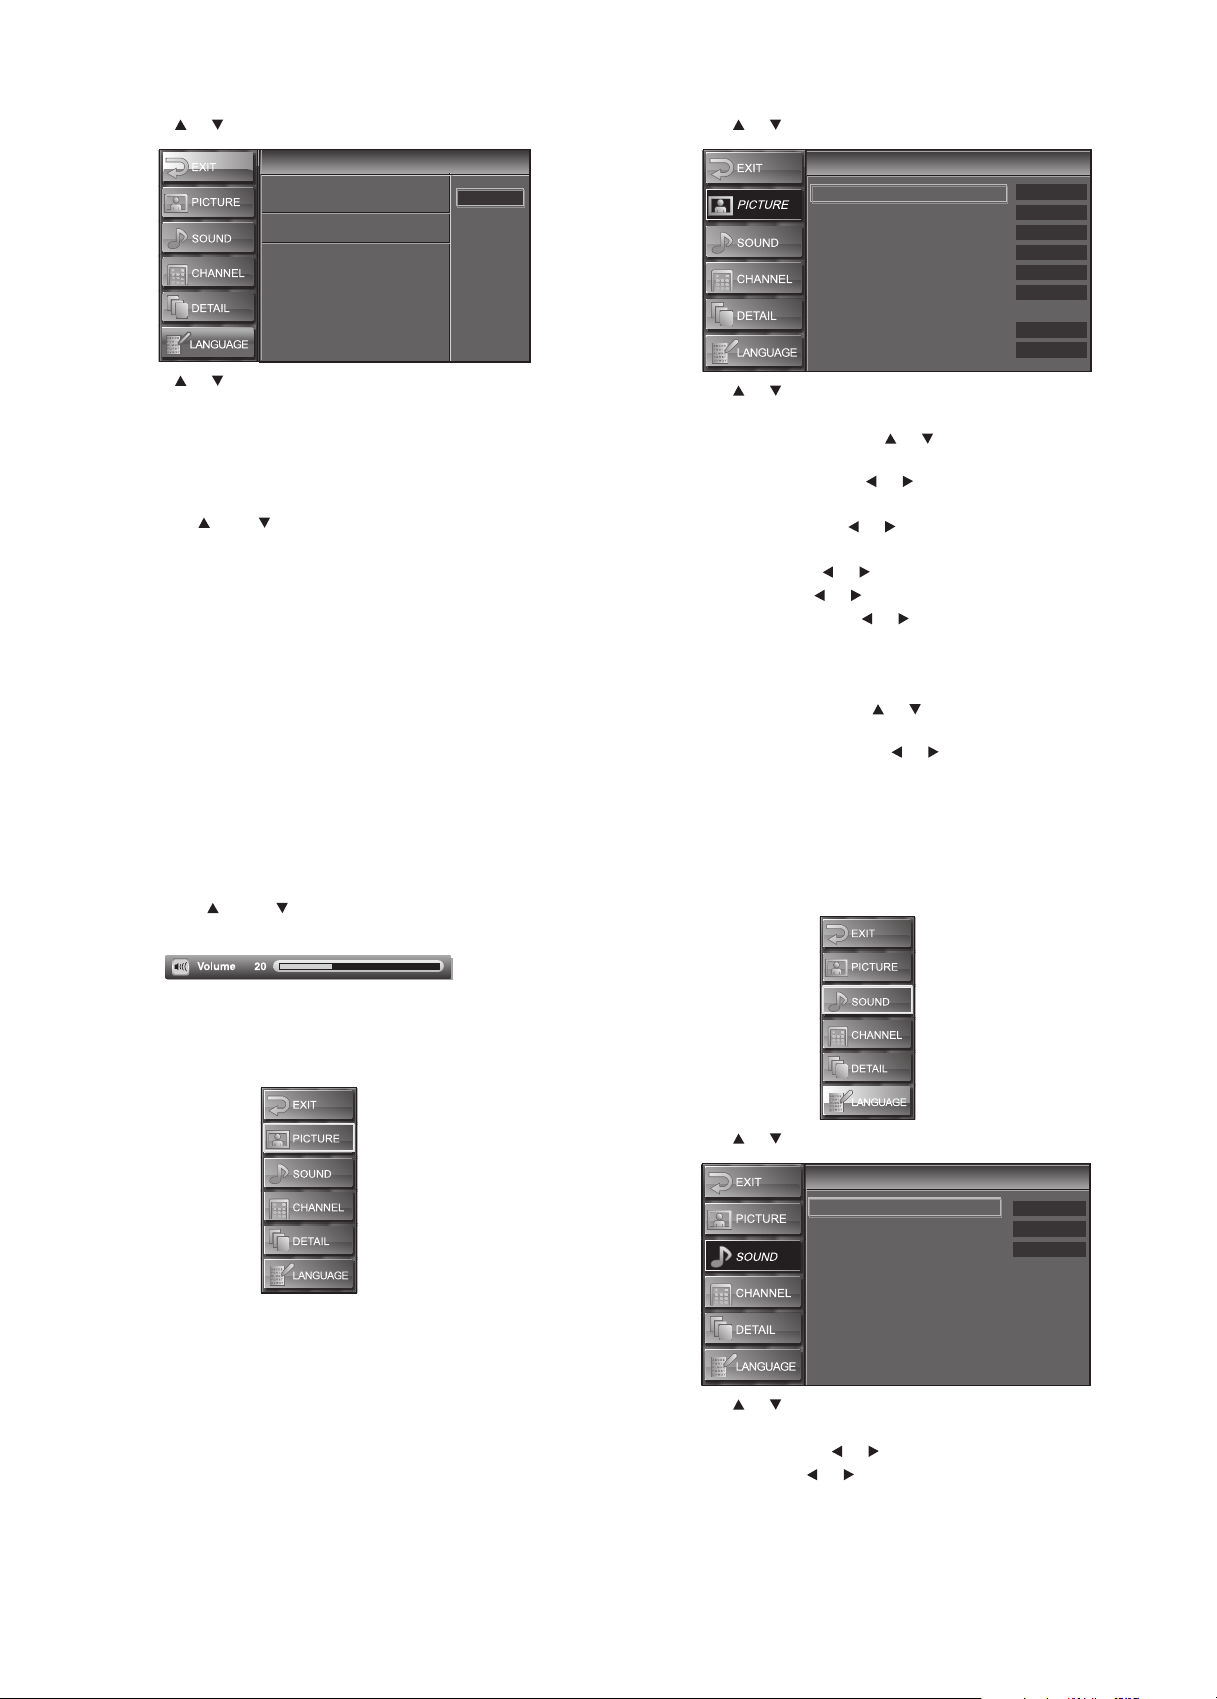
2 Press or to select LANGUAGE, then press ENTER.
Language
Language
Select the language for setup display.
Elija el idioma de ajuste.
Sélectionner langue écran config.
3 Press or to select English, Español, or Français, then
press ENTER.
4 Press MENU to close the menu.
Changing channels
To change channels:
•Press CH or CH to select a channel in the channel list.
• Press the number buttons for the channel you want, then press
ENTER or wait a few seconds.
•Press RECALL to go to the previous channel.
• To select a digital sub-channel, press the number button for the
main channel, press —, then press the number button for the
sub-channel.
Most digital TV channels have more than one channel. The main
channel carries the signal for the main TV program. The
sub-channels carry signals for additional or alternate
programming, such as a radio or news broadcasts.
For example, if the main channel number is 8, the sub-channel
number might be 8-1, 8-2, or 8-3.
Note: No Signal appears when the sub-channel program ends.
Adjusting the volume
To adj ust the volu me:
•Press VOL or VOL to increase or decrease the volume. The
Volu me bar appears at the bottom of the screen.
English
Español
Français
2 Press or to select PICTURE, then press ENTER.
Picture
Picture
Picture Mode
Brightness
Contrast
Color
Tint
Sharpness
Reset Settings
Color Temp.
Energy Saving
3 Press or to select the setting you want to adjust, then press
ENTER. You can select:
• Picture Mode—Press or to select Standard,
Dynamic, Movie, or News, then press ENTER.
• Brightness—Press or to decrease or increase the
brightness.
• Contrast—Press or to decrease or increase the
contrast.
• Color—Press or to adjust the color.
• Tint—Press or to adjust the tint.
• Sharpness—Press or to decrease or increase the
sharpness.
• Reset Settings—Press ENTER to reset the picture settings
to the factory default.
• Color Temp.—Press or to select Cool, Neutral, or
Warm, then press ENTER.
• Energy Saving—Press or to decrease or increase the
brightness of the backlight.
4 Press MENU to close the menu.
Adjusting the sound
To adjust the sound:
1 Press MENU. The on-screen menu opens.
Dynamic
30
60
36
0
0
Neutral
Off
Adjusting the picture
To adjust the picture:
1 Press MENU. The on-screen menu opens.
2 Press or to select SOUND, then press ENTER.
Sound
Sound
Treble
Bass
Surround
Reset Settings
0
0
Off
3 Press or to select the setting you want to adjust, then press
ENTER. You can select:
• Treb le—Press or to adjust the treble.
• Bass–Press or to adjust the bass.
Page 15
Using your TV
15
• Surround–Press or to select On or Off.
• Reset Settings–Press ENTER to reset the sound settings to
the factory default.
4 Press MENU to close the menu.
Selecting the video input source
To select the video input source:
•Press INPUT or CH repeatedly to select the video input source.
You can selec t:
• TV or DTV channel
• Video1—Selects the video or S-Video device connected to
the VIDEO1 jacks.
• Video2–Selects the video or S-Video device connected to
the VIDEO2 jacks.
• Component1—Selects the component device connected
to the COMPONENT1 jacks.
• Component2—Selects the component device connected
to the COMPONENT2 jacks.
• HDMI1—Selects the HDMI or DVI device connected to the
HDMI1 jack.
• HDMI2—Selects the HDMI device connected to the
HDMI2 jack.
• PC—Selects the computer connected to the PC-IN jack.
Selecting the audio mode
To select the digital audio mode:
•Press MTS/SAP repeatedly to select the audio language. The
languages you can select depend on the available languages for
the program you are watching.
To select the analog audio mode:
•Press MTS/SAP repeatedly to select the audio mode. Depending
on the modes available for the program you are watching, you
can select STEREO, MONO, or SAP (second audio program).
Note: Pressing MTS/SAP does not control the audio from an external
device.
Displaying program information
To display analog channel information:
•Press DISPLAY. The following information appears:
6
SAP / STEREO
480i
480i
TV-PG DLSV
SD
SD
4:3
4:3
CC
CC
This information includes the channel number, audio mode, type
of resolution, aspect ratio, CC (if closed captioning is turned on),
and program rating.
•Press DISPLAY or BACK to close the display.
To display external device information:
•Press DISPLAY. The following information appears:
Video1
480iSDSD
480i
TV-PG DLSV
CC
CC
This information includes the video input source, type of
resolution, program rating, and CC (if closed captioning is turned
on).
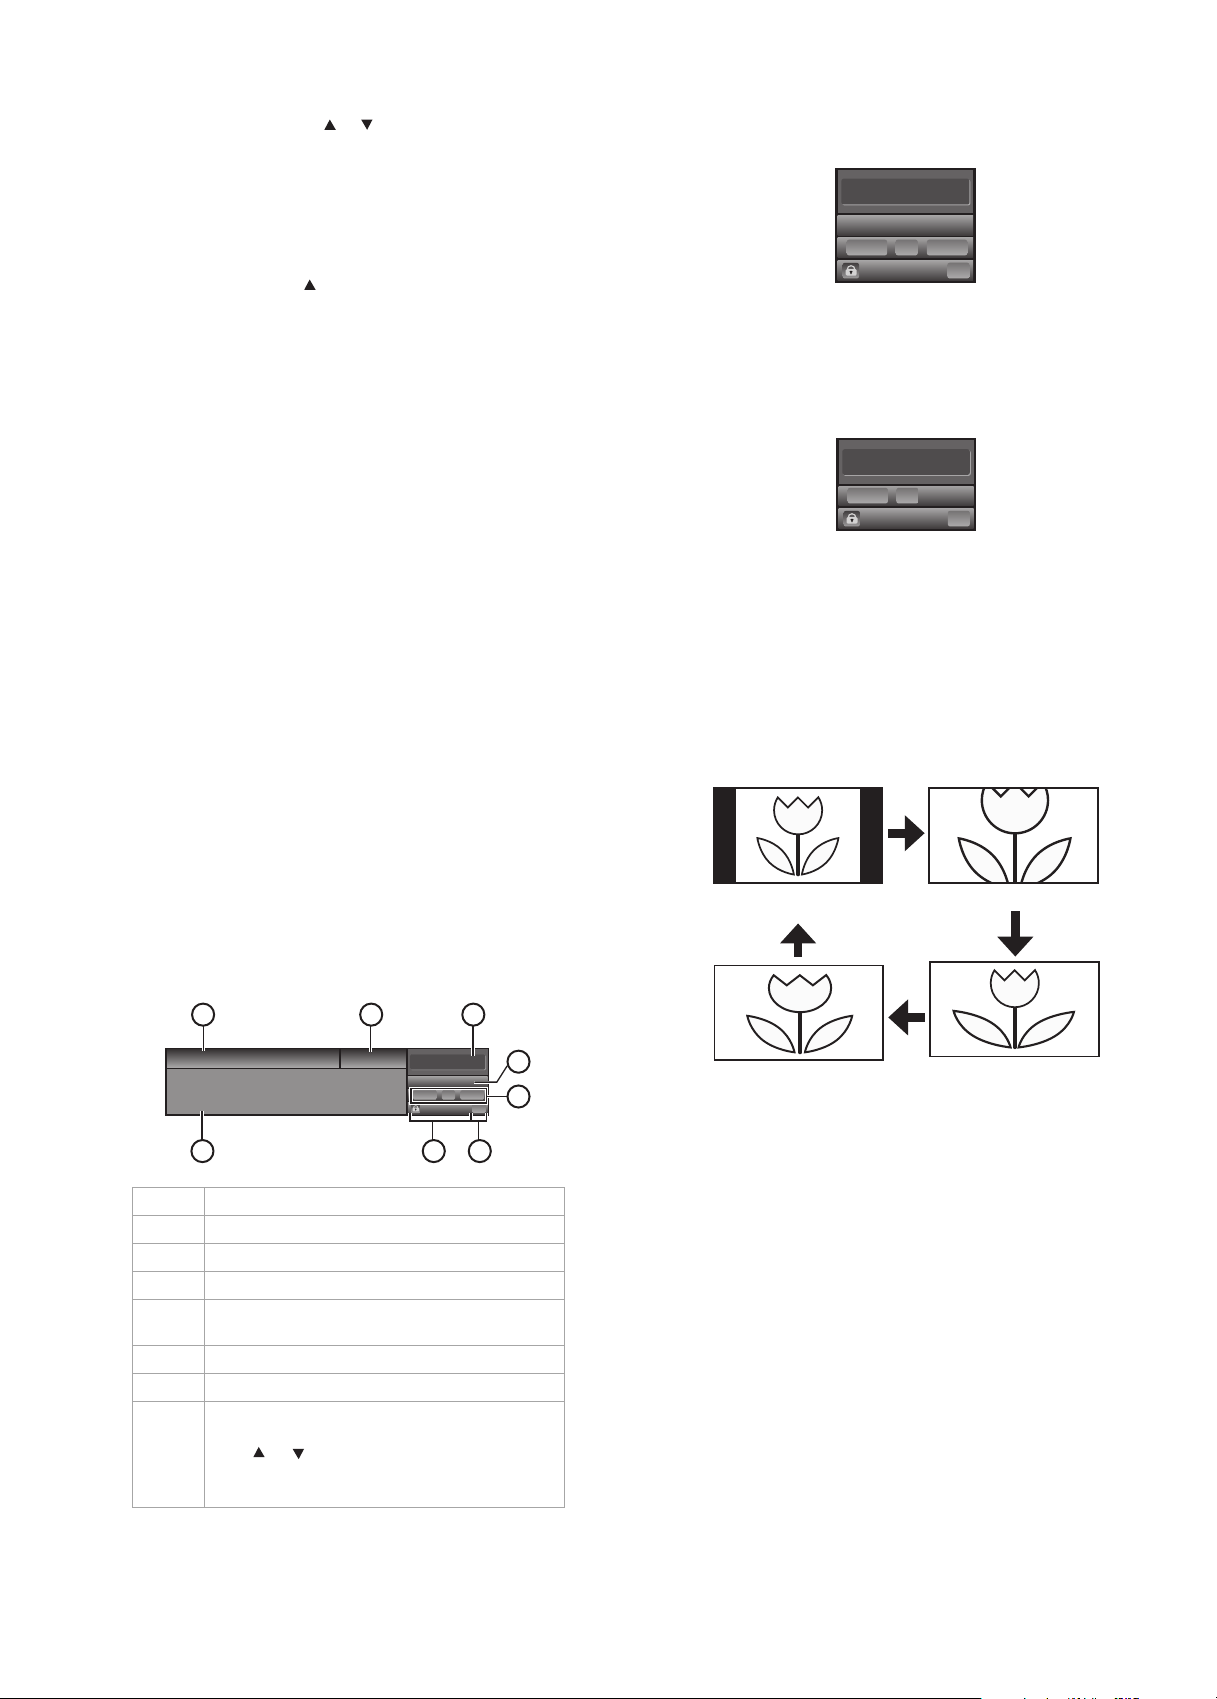
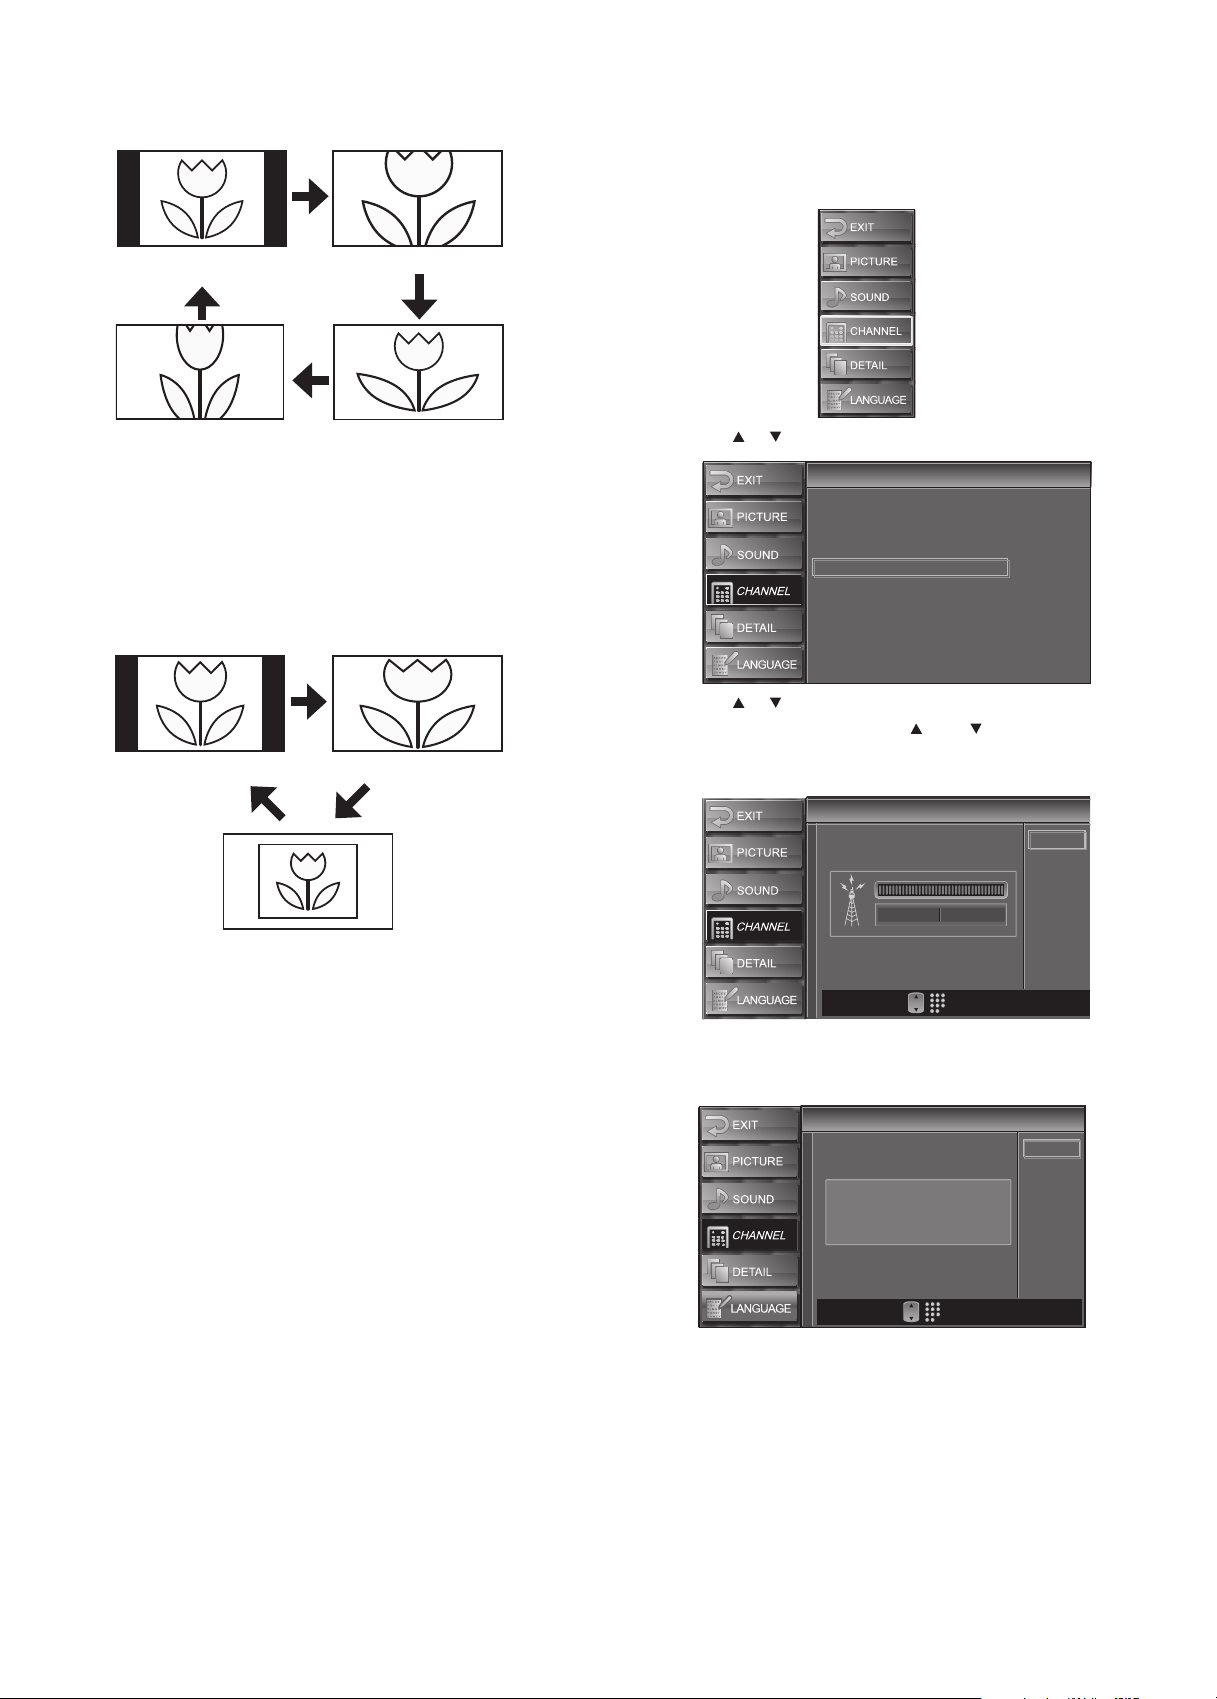
Selecting the aspect ratio
You can select from four aspect ratios for TV channels and three aspect
ratios for a computer.
To select the display mode:
•Press ZOOM repeatedly to select the aspect ratio you want.
For a 4:3 video signal
Normal Zoom
To display digital channel information:
•Press DISPLAY. The following information appears.
1
A Day of Memories
A Day of Memories
A quarter-century ago,which may now qualify as the
good old days of newspapering,run-of-paper sales
accounted for 80 percent of the industry's advertising
revenues.Department stores and supermarket were
8
1Program title.
2 Broadcast station.
3 Channel number.
4 Audio language.
5 Effective scanning lines and scan mode,
6 CC is closed captioning if turned on.
7 Program rating.
8 Program guide information (four-line limit). If
program format, and aspect ratio.
the guide information is longer than four lines,
press or to scroll the information.
If no program information is available,
description provided appears.
2
KABC
KABC
English 1/2
1080i
1080i
TV-PG DLSV
7
3
6-1
16:9HDHD
16:9
CC
CC
6
•Press DISPLAY or BACK to close the display.
No
4
5
• Normal—Displays the picture at its original size. Black bars
Cinema Wide
appears on the sides of the picture.
• Zoom—Enlarges the center of the picture. The top and bottom
of the picture are cropped.
• Wide—Stretches the picture horizontally to fill the screen.
• Cinema—Stretches the picture to fill the 16:9 screen
horizontally, then enlarges the picture until it fills the entire
screen without changing the aspect ratio. The outer part of the
picture is cropped.
Page 16
16
Using your TV
For a 16:9 video signal
Normal Zoom
Cinema Wide
• Normal–Squeezes the picture horizontally to be displayed at
4:3. Black bars appear on the sides of the picture.
• Zoom–Enlarges the center of the picture. The outer part of the
picture is cropped.
• Wide—Displays the picture at its original size.
• Cinema—Displays the picture at its maximum size without
changing its aspect ratio. The outer part of the picture is cropped.
For a computer image
Normal Wide
Checking the antenna signal strength
To check the antenna signal strength:
1 Press MENU. The on-screen menu opens.
2 Press or to select CHANNEL, then press ENTER.
Channel
Channel
Autoscan
Channel List
Manual Register
Antenna
3 Press or to select Antenna, then press ENTER.
4 Press the number buttons or CH or CH to select the channel
you want to check the signal strength for. A screen opens that
shows the signal strength.
Dot-by-Dot
• Normal—Stretches the image proportionally. Black bars
appears on the sides of the image. Availability of this option
depends on the aspect ratio of the input signal.
• Wide—Stretches the image to fill the screen.
• Dot-by-Dot—Displays the image in its original size.
Setting the sleep timer
To set the sleep timer:
•Press SLEEP repeatedly to select the amount of time you want
your TV to wait before it turns itself off. You can select 30min,
60min, 90min, or 120min.
• To turn off the timer before it expires, press SLEEP repeatedly
until Sleep Off appears.
Note: If you unplug the power cord or a power failure occurs, the sleep
timer is canceled.
Antenna
Antenna
Back
Now 0 0Peak
CH
Ch Change
If the video input source is not TV, the following screen opens.
You cannot check the signal strength when the video input
source is an external device.
Antenna
Antenna
Back
Indicator is available
for antenna signal only.
CH
Ch Change
5 Press MENU to close the menu.
Page 17
Using your TV
17
Freezing the picture
To freeze the picture:
•Press FREEZE. The picture freezes on the screen, but the sound
continues to play. Press any button except POWER to return to
normal viewing.
Notes:
If your TV does not detec t a signal or the signal is protected, the picture
freezes and the sound is muted.
After the picture is frozen fo r five minutes, your TV retu rns to normal
viewing to protect the screen.
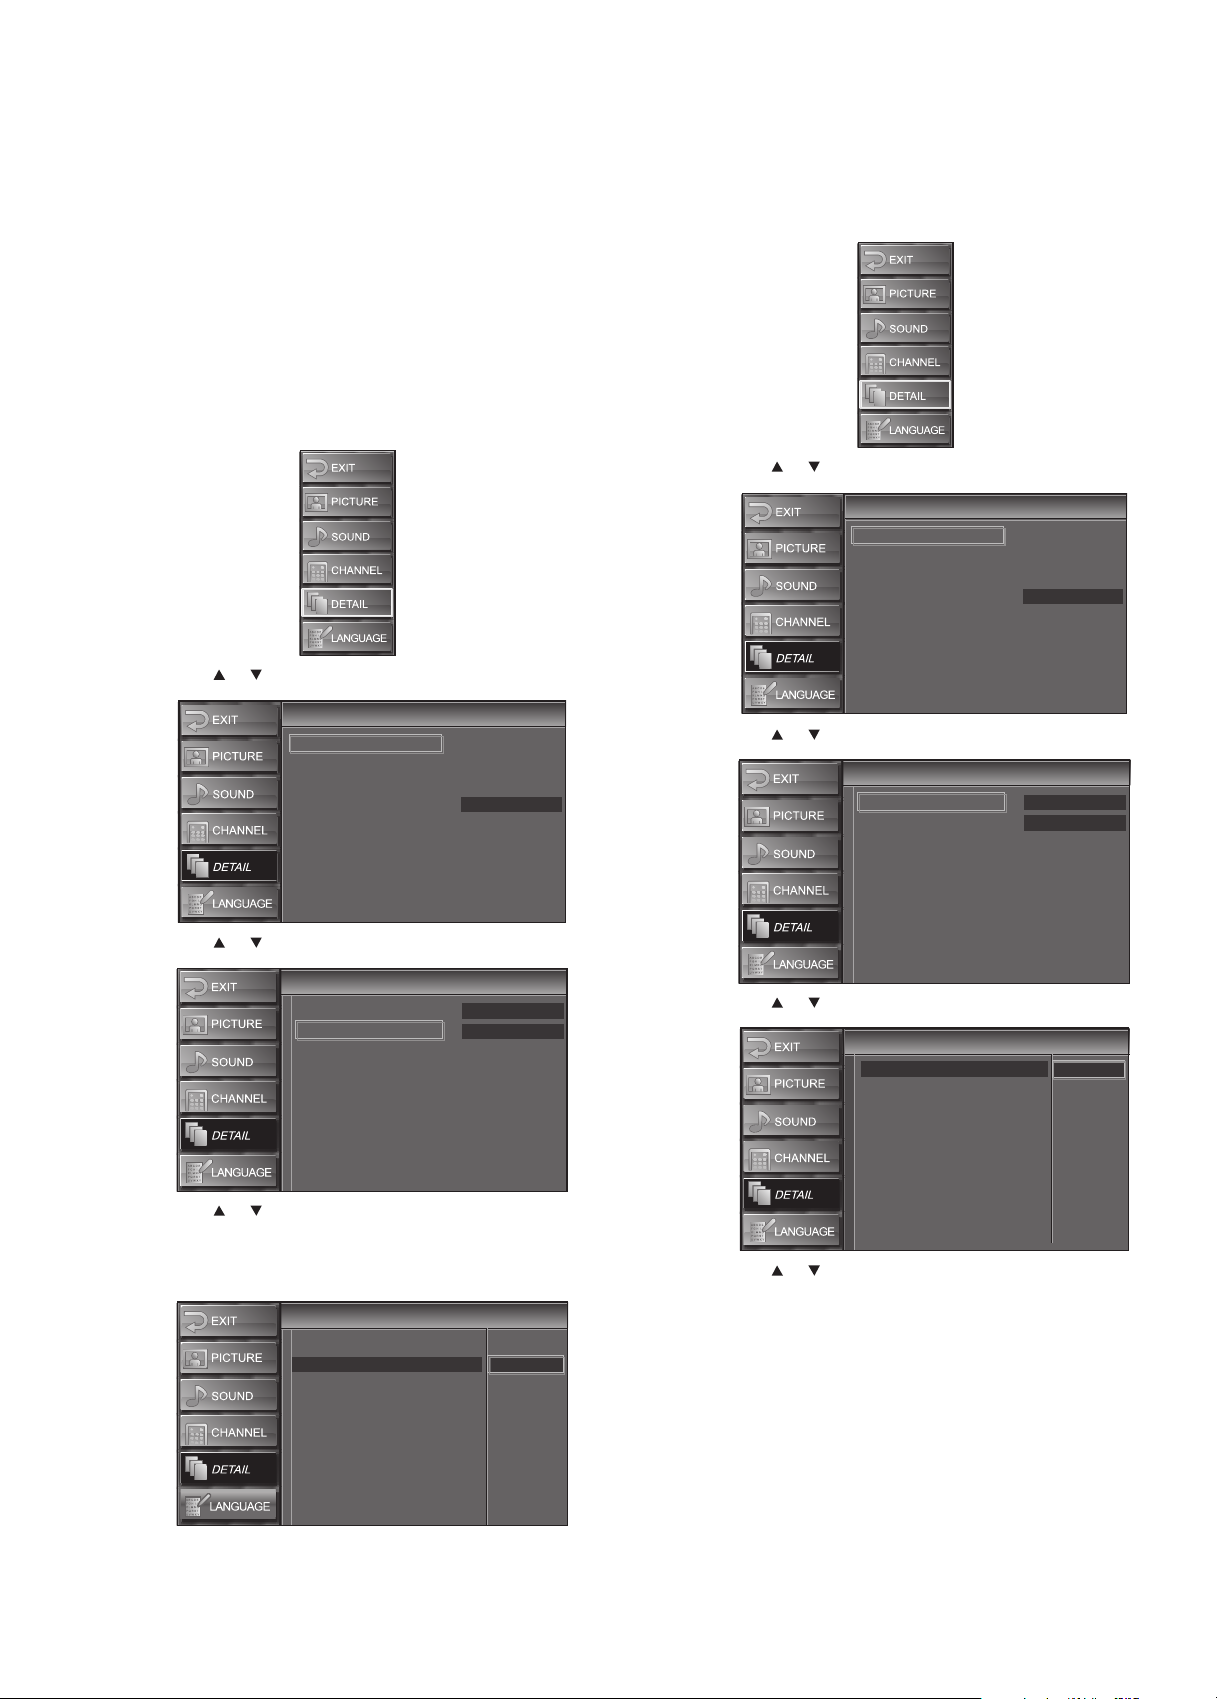
Using digital closed captioning
To use digital closed captioning:
1 Press MENU. The on-screen menu opens.
2 Press or to select DETAIL, then press ENTER.
5 Press MENU to close the menu.
Using analog closed captioning
To use analog closed captioning:
1 Press MENU. The on-screen menu opens.
2 Press or to select DETAIL, then press ENTER.
Detail
Detail
Closed Caption
V–chip
PC Settings
HDMI1 Audio
Auto
Detail
Detail
Closed Caption
V–chip
PC Settings
HDMI1 Audio
Auto
3 Press or to select DTV CC, then press ENTER.
Closed Caption
Closed Caption
Conventional CC
DTV CC
CC Style
Off
Off
4 Press or to select a closed captioning mode, then press
ENTER. You can select Off or Service 1 through Service 6. The
normal mode is Service 1. The available modes depend on the
modes broadcast with the program.
Closed Caption
Closed Caption
Conventional CC
DTV CC
CC Style
Off
Service1
Service2
Service3
Service4
Service5
Service6
3 Press or to select Closed Caption, then press ENTER.
Closed Caption
Closed Caption
Conventional CC
DTV CC
CC Style
Off
Off
4 Press or to select Conventional CC, then press ENTER.
Closed Caption
Closed Caption
Conventional CC Off
DTV CC
CC Style
CC1
CC2
CC3
CC4
Text 1
Text 2
Text 3
Text 4
5 Press or to select a closed captioning mode, then press
ENTER. You can select:
• Off—Turns off closed captioning.
• CC1 through CC4—Displays text in a small area so it does
not obstruct the picture. CC1 normally displays the text for
the audio in the same language as the audio. CC3 normally
displays the text for the audio in a second language. CC2 and
CC4 are rarely used and usually display information provided
by the broadcaster like news or weather reports.
Page 18
18
Using your TV
• Tex t1 through Te xt4 —Displays text in a large black box
that may obstruct the picture. Text1 normally displays the
text for the audio in the same language as the audio. Text3
normally displays the text for the audio in a second
language. Text2 and Text4 are rarely used and usually display
information provided by the broadcaster like news or
weather reports.
6 Press MENU to close the menu.
Notes:
To displa y closed capt ioning on yo ur TV, the broadca st signal must contain
the closed captioning data.
Not all TV programs and commercials have closed captioning or all types
of the closed captioning.
Captions and texts may not exactly match the TV voice.
Changing channels may delay closed captioning for a few s econds.
Adjusting the volume or muting the sound may delay closed captioning
for a few seconds.
Abbreviations, symbols, and other grammatical shortcuts may be used in
order to keep pace with the on-screen action. This is not a problem
with your TV.
The caption or text characters will not be displayed while the on-screen
menu is open.
If a black box appears on the TV screen, closed captioning is set to the Text
mode. To clear the box, select CC1, CC2 , CC3, CC4, or Off.
If your TV receives poor quality television signals, captioning may contain
errors, or there might be no captioning at all. Some possible causes of
poor quality signals are automobile ignition noise, electric motor
noise, weak signal reception, or multiplex signal reception (ghosts or
screen flutter).
Your TV retains the closed captioning setting if the power fails.
Closed captioning is not displayed when you are using an HDMI
connection.
When your TV receives a special effects playback signal (such as Search,
Slow, or Freeze) from a VCR’s video output channel (3 or 4), your TV
may not display the correct captioning or text.
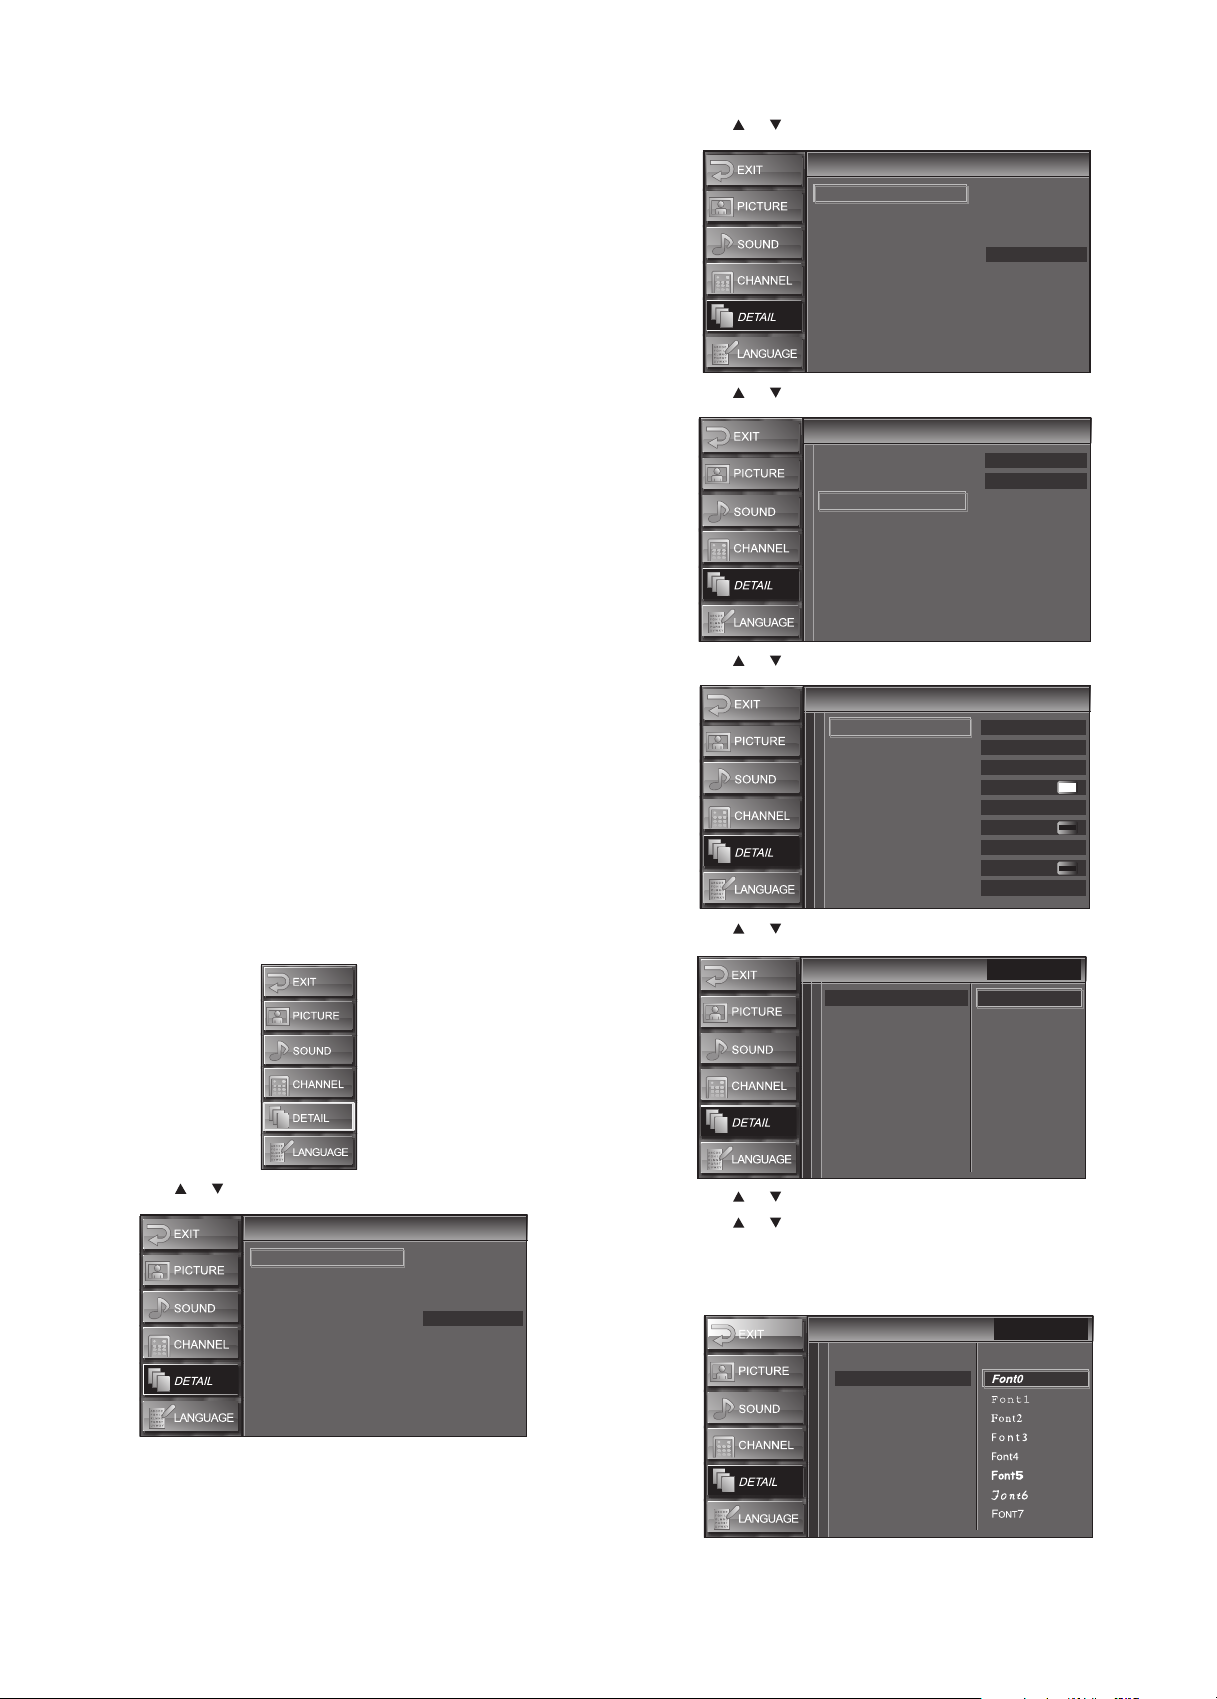
Changing digital closed captioning styles
To change digital closed captioning styles:
1 Press MENU. The on-screen menu opens.
2 Press or to select DETAIL, then press ENTER.
Detail
Detail
Closed Caption
V–chip
PC Settings
HDMI1 Audio
Auto
3 Press or to select Closed Caption, then press ENTER.
Detail
Detail
Closed Caption
V–chip
PC Settings
HDMI1 Audio
Auto
4 Press or to select CC Style, then press ENTER.
Closed Caption
Closed Caption
Conventional CC
DTV CC
CC Style
Off
Off
5 Press or to select User Setting, then press ENTER.
CC Style
CC Style
User Setting
Font Style
Font Size
Font Color
Font Opacity
Back Color
Back Opacity
Edge Color
Edge Type
Off
Font0
Middle
White
Solid
Black
Solid
Black
None
6 Press or to select On, then press ENTER.
CC Style
CC Style
User Setting
Font Style
Font Size
Font Color
Font Opacity
Back Color
Back Opacity
Edge Color
Edge Type
Closed Caption
On
Off
7 Press or to select a style, then press ENTER.
8 Press or to select change the style, then press ENTER. You
can change the following styles:
Font Style
CC Style
CC Style
User Setting
Font Style
Font Size
Font Color
Font Opacity
Back Color
Back Opacity
Edge Color
Edge Type
Closed Caption
Page 19

Using your TV
19
Font Size
Font Color
Font Opacity
CC Style
CC Style
User Setting
Font Style
Font Size
Font Color
Font Opacity
Back Color
Back Opacity
Edge Color
Edge Type
CC Style
CC Style
User Setting
Font Style
Font Size
Font Color
Font Opacity
Back Color
Back Opacity
Edge Color
Edge Type
CC Style
CC Style
User Setting
Font Style
Font Size
Font Color
Font Opacity
Back Color
Back Opacity
Edge Color
Edge Type
Closed Caption
Large
Middle
Small
Closed Caption
White
Black
Red
Green
Blue
Yel low
Magenta
Cyan
Closed Caption
Solid
Flash
Tra nslucent
Tra nsparent
Edge Color
CC Style
CC Style
User Setting
Font Style
Font Size
Font Color
Font Opacity
Back Color
Back Opacity
Edge Color
Edge Type
Edge Type
CC Style
CC Style
User Setting
Font Style
Font Size
Font Color
Font Opacity
Back Color
Back Opacity
Edge Color
Edge Type
9 Press MENU to close the menu.
Setting parental controls
To set parental controls:
1 Press MENU. The on-screen menu opens.
Closed Caption
White
Black
Red
Green
Blue
Yellow
Magenta
Cyan
Closed Caption
None
Raised
Depressed
Uniform
L.Shadow
R.Shadow
Back Color (background color)
CC Style
CC Style
User Setting
Font Style
Font Size
Font Color
Font Opacity
Back Color
Back Opacity
Edge Color
Edge Type
Back Opacity
CC Style
CC Style
User Setting
Font Style
Font Size
Font Color
Font Opacity
Back Color
Back Opacity
Edge Color
Edge Type
Closed Caption
White
Black
Red
Green
Blue
Yellow
Magenta
Cyan
Closed Caption
Solid
Flash
Translucent
Transparent
2 Press or to select DETAIL, then press ENTER.
Detail
Detail
Closed Caption
V–chip
PC Settings
HDMI1 Audio
Auto
3 Press or to select V-chip, then press ENTER.
V-c hi p
V-c hi p
Enter password.
PIN Code
BACK
Back
-
Page 20
20
Using your TV
4 Press the number buttons to enter the four-digit password. If you
have not set a password, enter 0000.
V-c hi p
V-c hi p
MPAA Rating
TV Rating
Downloadable Rating
Clear Downloadable Rating
New Password
5 Press or to select a parental control option, then press
ENTER. You can select:
• MPAA Rating—For more information, see “Setting the
MPAA Rating” on page 20.
• TV Rating—For more information, see “Setting the TV
Rating” on page 20.
• Downloadable Rating—Lets you use rating information
that is automatically downloaded for digital stations. This is
a new rating system, and not all digital channels use this
rating system.
• Clear Downloadable Rating—Lets you clear downloaded
rating information.
• New Password—For more information, see “Changing the
password” on page 21.
Setting the MPAA Rating
Many movies have ratings based set by the Motion Picture Association
of America (MPAA). You can block movies based on these ratings.
To set the movie rating:
1 Press or to select MPAA Rating, then press ENTER.
V-c hi p
V-c hi p
X
NC-17
R
PG-13
PG
G
NR
Select View/Block Back
ENTER
2 Press or to select the rating you want to block, then press
ENTER. To unblock the rating press ENTER. The rating you
selected and all higher ratings will be blocked. When a rating is
blocked, a lock icon appears next to the rating.
You can selec t:
• X—Mature audiences only.
• NC-17—No one under 17.
• R—Children under 17 should be supervised by a parent or
adult guardian.
• PG-13—Unsuitable for children under 13.
• PG—Parental guidance suggested.
• G—General audiences.
• NR—Not rated.
3 Press MENU to close the menu.
BACK
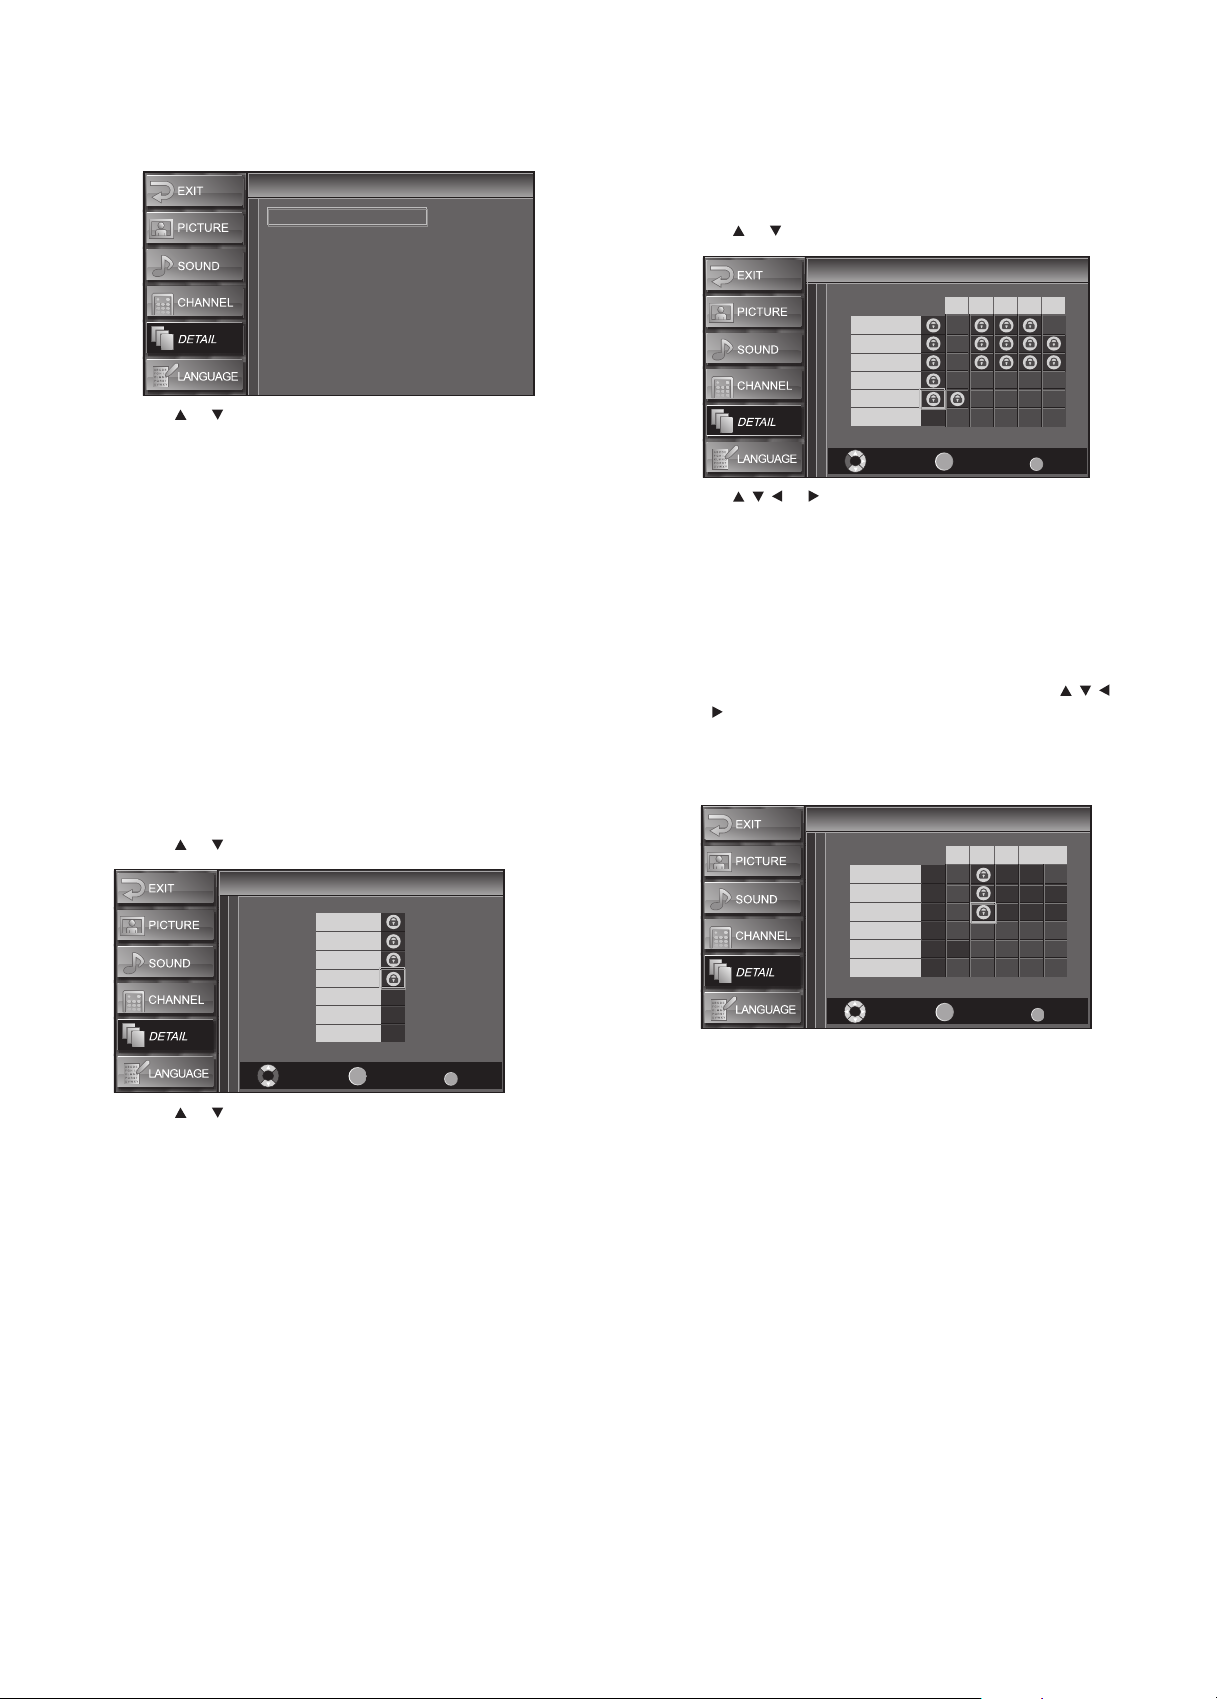
Setting the TV Rating
Many TV programs have ratings set by broadcasters. You can blick TV
programs based on these ratings.
To set the TV rating:
1 Press or to select TV Rating, then press ENTER.
V-chip
V-chip
FV
ENTER
FV
ENTER
V S L D
V S L D
TV-MA
TV-14
TV-PG
TV-G
TV-Y7
TV-Y
Select View/Block Back
2 Press or to select the rating you want to block, then
press ENTER. To unblock the rating, press ENTER. You can select:
• TV-MA—Mature audiences only.
• TV-14—Not suitable for children under 14.
• TV-PG—Parental guidance suggested.
• TV-G—General audiences.
• TV-Y7—Not suitable for children under 7.
• TV-Y—Suitable for all children.
3 If you selected TV-MA, TV-14, TV-PG, or TV-Y7, press
or to select the sub-rating you want to block, then press
ENTER. To unblock the rating press ENTER. The rating you
selected and all higher ratings will be blocked. When a rating is
blocked, a lock icon appears under to the rating.
V-c hi p
V-c hi p
TV-MA
TV-14
TV-PG
TV-G
TV-Y7
TV-Y
Select View/Block Back
You can se lec t:
• FV—Fantasy violence. For TV-Y7.
• V—Violence. For TV-PG, TV-14, and TV-MA.
• S—Sexual situations. For TV-PG, TV-14, and TV-MA.
• L—Coarse language. For TV-PG, TV-14, and TV-MA.
• D—Suggestive dialog. For TV-PG, and TV-14.
Note: You cannot block a sub-rating unless the main rating is blocked.
4 Press MENU to close the menu.
Notes:
When you block a rating, the higher ratings are blocked automatically. The
lower ratings are still available for viewing.
When you unblock the highest rating, all ratings are unblocked
automatically.
Different programs use different ratings. To block all inappropriate
programming, set parental controls for MPAA Rating, TV Rating,
and Downloadable Rating.
If power fails, your TV retains the V-chip setting except for the password.
The pass word is res et to 0000.
BACK
BACK
Page 21

Using your TV
21
Changing the password
To change the password:
1 Press MENU. The on-screen menu opens.
2 Press or to select DETAIL, then press ENTER.
Detail
Detail
Closed Caption
V–chip
PC Settings
HDMI1 Audio
3 Press or to select V-chip, then press ENTER.
Auto
5 Press or to select New Password, then press ENTER.
V-c hi p
V-c hi p
Enter password.
Confirm password.
PIN Code
6 Press the number buttons to enter the new password, then enter
the new password again to confirm.
7 Press MENU to close the menu.
Adjusting the computer image
To adjust the computer image:
1 Press MENU. The on-screen menu opens.
----
----
BACK
Back
V-c hi p
V-c hi p
Enter password.
PIN Code
BACK
Back
-
4 Press the number buttons to enter the four-digit password. If you
have not set a password, enter 0000. If you have forgotten the
password, close the menu, turn off your TV, and unplug the
power cord for 10 seconds. The default password (0000) is
restored.
V-c hi p
V-c hi p
MPAA Rating
TV Rating
Downloadable Rating
Clear Downloadable Rating
New Password
2 Press or to select DETAIL, then press ENTER.
Detail
Detail
Closed Caption
V–chip
PC Settings
HDMI1 Audio
Auto
3 Press or to select PC Settings, then press ENTER.
PC Settings
PC Settings
Auto Adjustment
Horizontal Position
Vertical Position
Clock
Phase
- -
- -
- -
- -
4 Press or to select the setting you want to adjust, then press
ENTER. You can select:
• Auto Adjustment—Press ENTER. Your TV automatically
adjusts horizontal position, vertical position, clock, and
phase. If you do not get the results you want, you may need
to manually adjust the other settings.
• Horizontal Position—Press or to move the image
left or right.
• Vertic al Pos ition —Press or to move the image d own
or up.
Page 22

22
Maintaining
• Clock—Press or to stabilize the image. For best
results, adjust the Phase setting before you adjust the Clock
setting.
• Phase—Press or to improve image clarity.
5 Press MENU to close the menu.
Selecting the HDMI audio mode
You can select the HDMI audio mode for the device connected to the
HDMI 1 IN jack only.
To select the HDMI audio mode:
1 Press MENU. The on-screen menu opens.
2 Press or to select DETAIL, then press ENTER.
Detail
Detail
Closed Caption
V–chip
PC Settings
HDMI1 Audio
Auto
Maintaining
Cleaning
• Before cleaning the screen, unplug your TV from the power
outlet.
• Wipe the front panel and other exterior surfaces of your TV with a
soft cloth immersed in lukewarm water, then wrung dry.
• Never use a solvent or alcohol. Do not spray insecticide liquid
near your TV. Such chemicals may cause damage and
discoloration to the exposed surfaces.
Servicing
Do not try to repair your TV yourself. There are no user serviceable parts
inside. Turn off your TV, unplug the power cord, then contact an
authorized service center.
Checking the remote control signal
If the remote control is not working correctly, you can use an AM radio
or digital camera (including a cellular phone with built-in camera) to
see if the remote control is sending an infrared signal.
To check the signal with an AM radio:
1 Tune the AM radio to a non-broadcasting frequency.
2 Point the remote control towards the radio, then push any button
and listen. If the sound from the radio flutters, the remote control
is working.
To check the signal with a digital camera:
1 Point a digital camera towards the remote control.
2 Push any button on the remote control and look at the camera's
LCD viewfinder. If the infrared light appears on the LCD, the
remote control is working.
3 Press or to select HDMI1 Audio, then press ENTER.
Detail
Detail
Closed Caption
V–chip
PC settings
HDMI1 Audio
Auto
Digital
Analog
4 Press or to select an HDMI1 audio mode, then press ENTER.
You can selec t:
• Auto—If you have connected a digital device to the
HDMI 1 IN jack and an analog device to the related
AUDIO IN jacks, gives the digital audio device priority.
• Digital—Selects the digital device connected to the
HDMI 1 IN jack.
• Analog—Selects the analog device connected to the
AUDIO IN jacks related the HDMI 1IN jack.
5 Press MENU to close the menu.
Troubleshooting
Problem Solution
No power. Make sure that the power cord is
plugged in.
If a power failure occurs, unplug the
power cord for 30 minutes to let your
TV reset itself.
No picture or sound. Make sure that your TV is turned on.
Make sure that the power outlet is
supplying power.
Make sure that the antenna or cable
TV is connected correctly and
securely.
If you are using an outside antenna,
check the condition of the wiring and
connections.
Try another channel. The problem
might be limited to the broadcasting
station.
Turn off your TV, wait for about one
minute, then turn it on again.
Page 23

Troubleshooting
23
Problem Solution
No color. Make sure that the antenna or cable
TV is connected correctly and
securely.
If you are using an outside antenna,
check the condition of the wiring and
connections.
Try another channel. The problem
might be limited to the broadcasting
station.
Adjust the Color option in the
on-screen menu. For more
information, see “Adjusting the
picture” on page 14.
Sound good, picture poor. Make sure that the antenna or cable
TV is connected correctly and
securely.
If you are using an outside antenna,
check the condition of the wiring and
connections.
Electrical interference from nearby
appliances may affect picture quality.
Turn off the appliances or move your
TV.
Adjust the Contrast and Brightness
options in the on-screen menu. For
more information, see “Adjusting the
picture” on page 14.
Try another channel. The problem
might be limited to the broadcasting
station.
Picture distorted. If you are using an outside antenna,
check the condition of the wiring and
connections.
Try another channel. The problem
might be limited to the broadcasting
station.
Weak picture. Make sure that the antenna or cable
TV is connected correctly and
securely.
If you are using an outside antenna,
check the condition of the wiring and
connections.
Adjust the Contrast and Brightness
options in the on-screen menu. For
more information, see “Adjusting the
picture” on page 14.
Try another channel. The problem
might be limited to the broadcasting
station.
Lines or streaks in picture. If you are using an outside antenna,
check the condition of the wiring and
connections.
Electrical interference from nearby
appliances may affect picture quality.
Turn off the appliances or move your
TV.
Try another channel. The problem
might be limited to the broadcasting
station.
Picture blurred. If you are using an outside antenna,
check the condition of the wiring and
connections.
Try another channel. The problem
might be limited to the broadcasting
station.
Problem Solution
Ghosts in picture. Make sure that the antenna or cable
Bars on TV screen. If you are using an outside antenna,
Picture rolls vertically. If you are using an outside antenna,
Different color marks on TV
screen.
Picture has a few bright or
dark dots
Poor reception on some
channels.
Picture good, sound poor. Try another channel. The problem
TV is connected correctly and
securely.
If you are using an outside antenna,
check the condition of the wiring and
connections.
Electrical interference from nearby
appliances may affect picture quality.
Turn off the appliances or move your
TV.
Try another channel. The problem
might be limited to the broadcasting
station.
check the condition of the wiring and
connections.
Electrical interference from nearby
appliances may affect picture quality.
Turn off the appliances or move your
TV.
check the condition of the wiring and
connections.
Electrical interference from nearby
appliances may affect picture quality.
Turn off the appliances or move your
TV.
Try another channel. The problem
might be limited to the broadcasting
station.
Move the unit away from nearby
electric appliances. Turn off the
power and wait 30 minutes before
turning it back on.
Try another channel. The problem
might be limited to the broadcasting
station.
A few bright or dark dots on an LCD
screen is normal. It does not affect
the operation of this TV.
Make sure that the antenna or cable
TV is connected correctly and
securely.
If you are using an outside antenna,
check the condition of the wiring and
connections.
Electrical interference from nearby
appliances may affect picture quality.
Turn off the appliances or move your
TV.
Try another channel. The problem
might be limited to the broadcasting
station.
might be limited to the broadcasting
station.
Page 24

24
Troubleshooting
Problem Solution
No reception of digital
signals.
The entered channel
number changes
automatically.
Make sure the auto channel scan has
been completed.
The auto channel scan must be
completed when you set up your TV
for the first time or move it to a
location where previously
unavailable channels are broadcast.
The selected channel may not be
broadcasting.
When the auto channel scan is
interrupted and not completed, some
channels will not be received. Make
sure the auto channel scan has been
completed.
Many digital channels have alternate
channel numbers. Your TV changes
the numbers automatically to the
ones signifying the broadcasting
station. These are the numbers used
for analog broadcasts.
Problem Solution
Remote control does not
work.
Misspelled captions are
displayed.
Captions are not entirely
displayed, or captions
appear after the dialog.
Captions are displayed as a
white box or no caption is
displayed in a closed
caption-supported
program.
No caption is displayed
when playing the
videotape containing
captions.
Black box is displayed in the
TV screen.
If you are using an outside antenna,
check the condition of the wiring and
connections.
Check the remote control batteries.
Make sure that there is no obstacle
between the remote control sensor
on your TV and the remote control.
Test the signal output. If the signal is
good, then there may be infrared
sensor trouble.
When there is an infrared-equipped
device such as a computer is near
your TV, the device may interrupt the
remote control signal. Move the
infrared-equipped device away from
your TV, change the angle of the
infrared sensor, or turn off the
infrared communication function.
Aim the remote control directly at the
remote control sensor on the front of
your TV.
Reduce the distance between the
remote control and your TV.
Make sure that the batteries are
inserted correctly. The + and –
symbols on the batteries must match
the + and – symbols inside the
battery compartment.
Closed captioning production
companies may broadcast programs
without correcting the misspelling in
a live broadcast.
Captions that are delayed a few
seconds behind the actual dialog are
common for live broadcasts. Most
captioning production companies
can display dialog at a maximum of
220 words per minute. If a dialog
exceeds that rate, selective editing is
used to ensure that the captions
remain up to date with the current
dialog.
Interference from buildings or
weather conditions may cause
captioning to be incomplete.
Broadcasting stations may shorten
the programs to insert commercials.
The closed caption decoder cannot
read the information of shortened
programs.
The videotape may be illegally
copied, or the caption signal might
not have been read during copying.
The text mode is selected for caption.
Select CC1, CC2, CC3 , CC4 , or Off.
Page 25

Specifications
25
Specifications
Specifications are subject to change without notice.
TV format
Closed caption
system
Channel coverage
(ATSC/NTSC)
Tuning system
Channel access
Sound output
Antenna input
S-Video input
Video input
Audio input
Component video
HDMI input
PC input
Coaxial digital audio
output
Analog audio output
Remote control
Operating
temperature
Power requirements
Power consum ption
(maximum)
Dimensions
H×W×D
Weight
ATSC / NTSC-M TV standard
§15.122/FCC (digital CC)
§15.119/FCC (analog CC)
Terrestrial VHF: 2~13
UHF: 14~69
CATV: 2~13, A~W, W+1~W+94 (analog
W+1~W+84), A-5~A-1, 5A
Channel frequency synthesized tuning system
Direct access keyboard, programmable scan,
and up/down
10W, 8Ω × 2
VHF/UHF/CATV
75Ω unbalanced (F-type)
Mini DIN 4-pin jack × 2
Y: 1Vp-p (75Ω )
C: 286mVp-p (75Ω )
RCA jack × 2
1Vp-p (75Ω)
RCA jack (L/R) × 10
500mV rms
RCA jack × 6
Y: 1Vp-p (75Ω )
input
Pb: 700mVp-p (75Ω )
Pr: 700mVp-p (75Ω )
HDMI 19-pin × 2
D-Sub 15-pin × 1 (RGB)
Mini jack ø3.5mm × 1 (audio)
RCA jack × 1
500mVp-p (75Ω )
RCA jack × 2
Digital encoded infrared light system
41°F to 104°F (5°C to 40°C)
120 V AC ± 10%, 60 Hz ± 0.5%
220 W
37 inches wide XGA panel
LCD
Without stand:
26.5 × 37.5 × 5.0 inches
(672.5 × 950 × 126.5 mm)
With stand:
28.1 × 37.5 × 11.5 inches
(713 × 950 × 290 mm)
45.5 lbs. (20.6 kg)
Legal notices
FCC Part 15
This device complies with Part 15 of the FCC Rules. Operation of this
product is subject to the following two conditions: (1) this device may
not cause harmful interference, and (2) this device must accept any
interference received, including interference that may cause undesired
operation.
This equipment has been tested and found to comply within the limits
for a class B digital device, pursuant to Part 15 of the FCC Rules. These
limits are designed to provide reasonable protection against harmful
interference in a residential installation. This equipment generates,
uses, and can radiate radio frequency energy and, if not installed and
used in accordance with the instructions, may cause harmful
interference to radio communications. However, there is no guarantee
that interference will not occur in a particular installation. If this
equipment does cause harmful interference to radio or television
reception, which can be determined by turning the equipment off and
on, the user is encouraged to try to correct the interference by one or
more of the following measures:
• Reorient or relocate the receiving antenna.
• Increase the separation between the equipment and receiver.
• Connect the equipment into an outlet on a circuit different from
that to which the receiver is connected.
• Consult the dealer or an experienced technician for help.
FCC warning
Changes or modifications not expressly approved by the party
responsible for compliance with the FCC Rules could void the user’s
authority to operate this equipment.
Copyrights
Dolby Laboratories
This product incorporates copyright protection technology that is protected by method
claims of certain US patents and other intellectual property rights owned by
Macrovision Corporation and other rights owners. Use of this copyright protection
technology must be authorized by Macrovision Corporation, and is intended for home
and other limited viewing uses only unless otherwise authorized by Macrovision
Corporation. Reverse engineering or disassembly is prohibited.
Manufactured under license from Dolby Laboratories. Dolby and the symbol are
registered trademarks of DOLBY LABOR ATORIES. All rights reserved.
HDMI™
Your TV incorporates HDMI™ technology. HDMI, the HDMI
Logo and High-Definition Multimedia Interface are
trademarks or registered trademarks of HDMI Licensing LLC.
Energy Star
Products that have earned ENERGY STAR® are designed to protect the
environment through superior energy efficiency. Your TV is Energy Star
compliant.
HDTV
The “HD TV” Logo is a trademark of EICTA.
Notices
Specifications and features are subject to change without notice or
obligation.
For service and support call (800) 305-2204.
HIGH-DEFINITION TELEVISION
Page 26

26
Legal notices
Page 27

One-year limited warranty
Dynex Products (“Dynex”) warrants to you, the original purchaser of this new
DX-LCD37-09 (“Product”), that the Product shall be free of defects in the original
manufacture of the material or workmanship for a period of one (1) year from the date
of your purchase of the Produc t (“Warranty Period”). This Product must be purchased
from an authorized dealer of Dynex brand Products and packaged with this warranty
statement. This warranty does not cover refurbished product. If you notify Dynex during
the Warranty Period of a defect covered by this warranty that requires service, terms of
this warranty apply.
How long does the coverage last?
The Warranty Period lasts for one year (365 days) from the date you purchased the
Product. The purchase date is printed on the receipt you received with the Product.
What does this warranty cover?
During the Warranty Period, if the original manufacture of the material or workmanship
of the Product is determined to be defective by an authorized Dynex repair center or
store personnel, Dynex will (at its sole option): (1) repair the Product with new or
rebuilt parts; or (2) replace the Product at no charge with new or rebuilt comparable
products or parts. Products and parts replaced under this warranty become the property
of Dynex and are not returned to you. If service of products and parts are required after
the Warranty Period expires, you must pay all labor and parts charges. This warranty
lasts as long as you own your Dynex Product during the Warranty Period. Warranty
coverage terminates if you sell or otherwise transfer the Product.
How to obtain warranty service?
If you purchased the Product at a retail store location, take your original receipt and the
Product to the store you purchased it from. Make sure that you place the Product in its
original packaging or packaging that provides the same amount of protection as the
original packaging. If you purchased the Product from an online web site, mail your
original receipt and the Product to the address listed on the web site. Make sure that
you put the Product in its original packaging or packaging that provides the same
amount of protection as the original packaging.
To obtain in-home warranty service for a televis ion with a screen 25 inches or larger, call
1-888-BESTBUY. Call agents will diagnose and correct the issue over the phone or will
have an Dynex-approved repair person dispatched to your home.
Where is the warranty valid?
This warranty is valid only to the original purchaser of the Product in the United States
and Canada.
What does the warranty not cover?
This warranty does not cover:
• Customer instruction
• Installation
•Set up adjustments
• Cosmetic damage
• Damage due to acts of God, such as lightning strikes
•Accident
•Misuse
•Abuse
•Negligence
•Commercial use
• Modification of any part of the Product
• Plasma display panel damaged by static (non-moving) images applied for
lengthy periods (burn-in).
This warranty also does not cover:
• Damage due to incorrect operation or maintenance
• Conn ection to an incorrec t voltage supply
• Attempted repair by anyone other than a facility auth orized by Dynex to ser vice
the Product
• Products sold as is or with all faults
• Consumables, such as fuses or batteries
• Products where the fac tory a pplied serial number h as been altered or removed
REPAIR REPLACEMENT AS PROVIDED UNDER THIS WARRANTY IS YOUR EXCLUSIVE
REMEDY. DYNEX SHALL NOT BE LIABLE FOR ANY INCIDENTAL OR CONSEQUENTIAL
DAMAGES FOR THE BREACH OF ANY EXPRESS OR IMPLIED WARRANTY ON THIS PRODUCT,
INCLUDING, BUT NOT LIMITED TO, LOST DATA, LOSS OF USE OF YOUR PRODUCT, LOST
BUSINESS OR LOST PROFITS. DYNEX PRODUCTS MAKES NO OTHER EXPRESS WARRANTIES
WITH RESPECT TO THE PRODUCT, ALL EXPRESS AND IMPLIED WARRANTIES FOR THE
PRODUCT, INCLUDING, BUT NOT LIMITED TO, ANY IMPLIED WARRANTIES OF AND
CONDITIONS OF MERCHANTABILITY AND FITNESS FOR A PARTICULAR PURPOSE, ARE
LIMITED IN DURATION TO THE WARRANTY PERIOD SET FORTH ABOVE AND NO
WARRANTIES, WHETHER EXPRESS OR IMPLIED, WILL APPLY AFTER THE WARRANTY
PERIOD. SOME STATES, PROVINCES AND JURISDICTIONS DO NOT ALLOW LIMITATIONS ON
HOW LONG AN IMPLIED WARRANTY LASTS, SO THE ABOVE LIMITATION MAY NOT APPLY
TO YOU. THIS WARRANTY GIVES YOU SPECIFIC LEGAL RIGHTS, AND YOU MAY ALSO HAVE
OTHER RIGHTS, WHICH VARY FROM STATE TO STATE OR PROVINCE TO PROVINCE.
Contact Dynex:
For customer service please call 1-800-305-2204
www.dynexproducts.com
Distributed by Best Buy Purchasing, LLC
7601 Penn Avenue South, Richfield, Minnesota, U.S.A. 55423-3645
© 2008 Best Buy Enterprise Services, Inc.
All rights reserved. DYNEX is a trademark of Best Buy Enterprise Services, Inc. Registered
in some countries. All other products and brand names are trademarks of their
respecti ve owners.
Page 28

28
Legal notices
Page 29

Contenido
29
Dynex DX-LCD37-09
Televisor con pantalla LCD de 37"
Contenido
Instrucciones importantes de seguridad.........................................31
Componentes del televisor .............................................................32
Vista frontal y lateral................................................................ 33
Vista posterior ......................................................................... 34
Control remoto ........................................................................ 35
Preparación de su televisor............................................................. 36
Instalación de las pilas del control remoto............................... 36
Conexión de una antena o servicio de cable básico.................. 36
Conexión de una caja de cable o satélite.................................. 36
Conexión de un equipo con HDMI............................................ 37
Conexión de un equipo con DVI................................................ 37
Conexión de un equipo con video de componentes ................. 38
Conexión de un equipo con S-Video......................................... 38
Conexión de una videocámara, una consola de videojuegos o un
VCR.......................................................................................... 39
Conexión de un equipo con audio digital................................. 39
Conexión de un equipo con audio analógico............................ 39
Conexión de una computadora................................................ 40
Uso de su televisor.......................................................................... 40
Encendido o apagado de su televisor.......................................40
Configuración inicial................................................................40
Abriendo el menú de pantalla ................................................. 41
Escaneo de canales .................................................................. 41
Borrado de canales de la lista de canales .................................42
Agregando canales a la lista de canales...................................42
Selección del idioma para el menú de pantalla........................43
Cambio de canales...................................................................43
Ajuste del volumen..................................................................43
Ajuste de la imagen ................................................................. 43
Ajuste del sonido.....................................................................44
Selección de la fuente de entrada de video.............................. 44
Selección del modo de audio ................................................... 44
Mostrando información de programa ...................................... 44
Selección de la relación de aspecto..........................................45
Ajuste del temporizador de apagado automático .................... 45
Verificación de la intensidad de la señal de la antena .............. 45
Congelamiento de la imagen................................................... 46
Uso de subtítulos optativos digitales ....................................... 46
Uso de subtítulos optativos analógicos .................................... 47
Cambio del estilo de subtítulos optativos digitales..................48
Configuración de los controles de los padres............................ 49
Configuración de la clasificación de MPAA ............................... 50
Configuración de las clasificaciones de TV................................ 50
Cambio de la contraseña.......................................................... 51
Ajuste de la imagen de computadora ...................................... 51
Selección del modo de audio de HDMI..................................... 52
Mantenimiento .............................................................................. 52
Limpieza.................................................................................. 52
Reparación............................................................................... 52
Verificación de la señal del control remoto............................... 52
Localización y corrección de fallas................................................... 53
Especificaciones.............................................................................. 55
Avisos legales ................................................................................. 55
Garantía limitada de un año...........................................................57
Page 30

30
F
F
SEGURIDAD PARA LOS NIÑOS
Cómo y dónde usa su televisor de pantalla plana
Al mismo tiempo que disfrute su nuevo producto,
recuerde estos consejos de seguridad
¿De qué se trata?
La experiencia de entretenimiento del cine en casa es una tendencia que se desarrolla cada
día más, y televisores de tamaños grandes se venden muy bien. Sin embargo, los
televisores no se colocan siempre sobre los soportes adecuados, o no se instalan de
acuerdo con las recomendaciones del fabricante. Nuestra compañía y la industria de los
productos electrónicos de consumo se han cometido en hacer del entretenimiento en casa
algo agradable y seguro.
Los televisores que se colocan en tocadores, bibliotecas, estantes, escritorios, altavoces,
baúles o carros inadecuados pueden voltearse causando lesiones.
Contenido
hace toda la diferencia
La seguridad primera
• Un tamaño de soporte para TV no puede acomodar todos los
modelos. Use solamente un soporte para TV recomendado para el
peso de su televisor.
• Lea cuidadosamente y entienda las instrucciones que se incluyen
para un uso adecuado de este producto.
• No deje los niños subir sobre el mueble del sistema de
entretenimiento ni jugar con él o el televisor.
• No coloque los televisores sobre muebles que se pueden usar como
escalón, tal como una cómoda.
• Recuerde que los niños pueden excitarse cuando visualizan un
programa, especialmente con un televisor de grande tamaño.
Asegúrese de colocar o instalar el televisor en un lugar donde no se
puede empujarlo, jalarlo o hacerlo caer.
• Asegúrese de encaminar todos los cables de manera que no se
puedan jalar o agarrar por niños curiosos.
Montaje en pared
En el caso de instalación del televisor en pared, recuerde:
• Un tamaño de soporte para TV no puede acomodar todos los modelos. Use solamente un
soporte de montaje en pared adaptado al peso de su televisor y que está recomendado por el
fabricante del televisor, este manual, o por un laboratorio independiente (UL, CSA, o ETL) como
siendo adecuado para su televisor.
• Sigue todas las instrucciones suministradas por los fabricantes del televisor y del soporte de
pared.
• En caso de duda sobre su habilidad a instalar su televisor en pared, llame a un instalador
profesional.
• Asegúrese de que la pared donde se instala el televisor está
adaptada. Ciertos soportes de montaje en pared no están diseñados
para el montaje en una pared adosada a vigas de acero o bloques de
hormigón ligero. Si no está seguro, llame a un instalador profesional.
• Los televisores pueden ser pesados. Se necesita por lo menos dos
personas para una instalación en pared segura.
Page 31

Instrucciones importantes de seguridad
31
RIESGO DE CHOQUE ELÉCTRICO
CUIDADO
NO ABRIR
Advert encia: Para reducir el riesgo de choqu e eléct rico, no retire la
cubierta o la parte posterior. No hay partes reparables por el usuario
en el interior. Refiera cualquier reparación a personal de servicio
calificado.
Advert encia: Para reducir el riesgo de incendio o choque eléctrico, no
exponga su televisor a la lluvia o la humedad.
Advert encia: Para evitar un choque eléctrico, introduzca la clavija ancha
del enchufe del cable de alimentación en la ranura ancha de un
tomacorriente. Si el enchufe no entra, solicite a un electricista
certificado que cambie el tomacorriente obsoleto. No modifique el
enchufe del cable de alimentación ya que se anulará esta característica
de seguridad.
Este símbolo indica que voltaje peligroso que
puede constituir un riesgo de choque
eléctrico se encuentra presente dentro de su
televisor. Esta etiqueta se encuentra ubicada
en la parte posterior de su televisor.
Este símbolo indica que hay instrucciones
importantes de operación y mantenimiento
en la literatura que acompaña a su televisor.
Advert encia: Su televisor cuenta con una lámpara fluorescente que
contiene una pequeña cantidad de mercurio. El desecho de estos
materiales p uede se r regulado po r razones ambien tales. Pa ra obtene r
información sobre el desecho o reciclaje, póngase en contacto con sus
autoridades locales o la Alianza de Industrias Electrónicas (EIA, por sus
siglas en inglés) en el sitio Web www.eia.org.
Instrucciones importantes de
seguridad
Lea las instrucciones
Lea todas las instrucciones de seguridad y operación antes de usar su
televisor.
Guarde las instrucciones
Conserve las instrucciones de seguridad y operación para referencia
futura.
Siga las advertencias y las instrucciones
Preste atención a todas las advertencias sobre su televisor y las
instrucciones de operación. Siga todas las instrucciones de operación y
uso.
Agua y humedad
No use su televisor cerca del agua. Por ejemplo, no lo use cerca de una
bañera, lavabo, fregadero de cocina o lavadero, en un sótano mojado o
cerca de una piscina.
Limpieza
Desconecte su televisor antes de limpiarlo. No use productos de
limpieza líquidos o en aerosol. Use solamente un paño húmedo para
limpiar el exterior de su televisor.
Nota: Si su televisor requiere estar en uso sin interrupción por alguna
razón específica, tal como la posibilidad de perder un código de
autorización para una caja convertidora de CATV, ignore la instrucción
del desenchufar su televisor antes de limpiarlo.
Ventilación
Las ranuras y aberturas en el gabinete y en la parte posterior o en la
base se proporcionan con fines de ventilación, operación confiable y
protección contra sobrecalentamiento. Estas aberturas no se deben
bloquear ni cubrir. No cubra las aberturas al colocar su televisor sobre
una cama, sofá, alfombra, o cualquier otra superficie parecida. No
coloque su televisor cerca o sobre un radiador o calefactor. No coloque
su televisor en una instalación integrada, tal cómo un librero o estante,
a menos que se provea una ventilación adecuada o siga las
instrucciones del fabricante.
Calor
Asegúrese de que su televisor se encuentre alejado de fuentes de calor
tal cómo radiadores, calefactores, estufas u otros productos (incluyendo
amplificadores) que produzcan calor.
Conexión a tierra o polarización
No anule el propósito de seguridad del enchufe con polarización o con
conexión a tierra. Un enchufe polarizado tiene dos clavijas planas, una
más ancha que la otra. Un enchufe de conexión a tierra tiene dos
clavijas y un conector de tierra. La clavija ancha o conector de tierra se
proporcionan para su seguridad. Si el enchufe no entra, solicite a un
electricista que cambie el tomacorriente obsoleto.
Protección del cable de alimentación
Los cables de alimentación deben colocarse de manera que no se pisen
ni se los aplaste con artículos colocados sobre ellos o contra ellos. Preste
atención especial a los cables en los enchufes, en los receptáculos
auxiliares y en el punto en el que salen de su televisor.
Accesorios
No use aditamentos no recomendados por Dynex ya que podrían
constituir un peligro.
Soporte
No coloque su televisor en un carro, base, trípode,
soporte o mesa inestable. Su televisor se podría caer y
sufrir daños importantes, además de causar serias
lesiones personales. Usar solamente con carros, bases,
trípodes, soportes, o mesas especificadas por el
fabricante o que se vendan con el televisor. Si monta su televisor en la
pared, siga las instrucciones del fabricante y use un accesorio de
montaje recomendado por el fabricante. La combinación del televisor y
un carro debe moverse con cuidado. Las paradas repentinas, la fuerza
excesiva y las superficies irregulares pueden causar que su televisor y el
carro se volteen de lado.
Reparación
No trate de reparar este televisor usted mismo, ya que abrir o quitar las
cubiertas puede exponerlo a voltajes peligrosos u otros peligros. Remita
todas las reparaciones a personal de servicio calificado.
Sobrecarga
No sobrecargue los tomacorrientes y los cables de extensión ya que esto
resultará en riesgo de incendio o choque eléctrico.
Ingreso de objetos y líquidos
Nunca inserte objetos de ningún tipo en su televisor a través de las
ranuras, ya que estos pueden tocar puntos de voltaje peligrosos o hacer
cortocircuito con otros componentes, lo cual puede causar un incendio o
choque eléctrico. Nunca derrame líquidos de ninguna clase sobre su
televisor.
Daños que requieren reparación
Desconecte este televisor del tomacorriente y encomiende su
reparación a personal calificado bajo las siguientes condiciones:
• Cuando el cable de alimentación o el enchufe esté dañado o
expuesto.
Page 32

32
Componentes del televisor
• Si se ha derramado líquido u objetos han caído dentro de su
televisor.
• Si el televisor ha sido expuesto a la lluvia o al agua.
• Si su televisor no funciona normalmente aún siguiendo las
instrucciones de operación. Ajuste únicamente los controles que
están cubiertos en las instrucciones de operación, ya que el ajuste
incorrecto de otros controles puede resultar en daño y
frecuentemente requerirá trabajo intensivo de un técnico
calificado para restaurar la operación normal del televisor.
• Si su televisor se ha caído o dañado de cualquier forma.
• Cuando su televisor exhiba un cambio significativo en el
rendi miento.
Piezas de repuesto
Cuando se necesiten repuestos, asegúrese de que el técnico de
reparación use repuestos especificados por el fabricante o que tengan
las mismas características que la pieza original. Las substituciones no
autorizadas pueden resultar en incendio, choque eléctrico, lesiones
personales u otros peligros.
Verificación de seguridad
Después de completar la revisión o reparación de este televisor, pídale al
técnico de servicio que realice verificaciones de seguridad para
determinar que el televisor se encuentra en perfecto estado de
funcionamiento.
Fuente de alimentación
Su televisor debe funcionar únicamente con el tipo de fuente de
alimentación indicada en la etiqueta de marca. Si no está seguro del
tipo de fuente de alimentación que hay en su casa, consulte con el
vendedor de su televisor o la compañía de energía local.
Rayos
Para protección adicional del receptor de TV durante una tormenta
eléctrica, o cuando se deje sin supervisión o sin usar por largos periodos
de tiempo, desconéctelo del tomacorriente y desconecte la antena o el
sistema de cable. Esto ayudará a evitar daños a su televisor debido a
relámpagos o sobretensiones en las líneas de alimentación.
Protección de la pantalla
La pantalla de su televisor está hecha de vidrio. No deje caer su televisor
ni golpee la pantalla de vidrio. Si la pantalla se quiebra, tenga cuidado
al recoger el vidrio quebrado.
Píxeles inactivos
El panel de LCD contiene casi 3 millones de transistores de película fina,
que proporcionan una calidad de video excepcionalmente nítida.
Ocasionalmente unos cuantos píxeles inactivos pueden aparecer en la
pantalla como un punto fijo de color azul, verde o rojo. Estos píxeles
inactivos no afectan adversamente el rendimiento de su televisor, y no
se consideran defectos.
Líneas de alto voltaje
Un sistema de antena externa no debe de ubicarse en las inmediaciones
de líneas de corriente u otros circuitos de luz eléctrica o de energía, o
donde pueda caer sobre dichos circuitos o líneas de corriente.
Al instalar un sistema de antena exterior, se debe tener cuidado
extremo para no tocar los circuitos o líneas de alimentación ya que el
contacto con ellos podría ser fatal.
Conexión a tierra de la antena exterior
Si una antena externa o un sistema de cable está conectado al televisor,
asegúrese de que la antena o el sistema de cable está conectado a
tierra, para proveer una protección contra sobre voltajes y la
acumulación de cargas estáticas. El artículo 810 del código nacional
eléctrico, ANSI/NFPA N.º 70-1984 proporciona información con respecto
a la correcta conexión a tierra del poste y de la estructura de soporte, la
conexión a tierra del alambre principal de una unidad de descarga de
antena, el tamaño de los conductores de la conexión a tierra, la
ubicación de la unidad de descarga de antena, la conexión a los
electrodos de conexión a tierra y los requisitos para el electrodo de
conexión a tierra.
7
6
5
4
3
1
1 Equipo de servicio eléctrico
2 Sistemas de electrodos de tierra para el
servicio de alimentación eléctrica
3 Abrazaderas de tierra
4 Conductores de conexión a tierra
5 Unidad de descarga de antena
6 Abrazadera de tierra
7 Cable conductor de entrada de antena
2
Nota para el instalador del sistema CATV
Este recordatorio se proporciona para que el instalador del sistema CATV
preste atención al artículo 820-40 del NEC, que proporciona pautas para
una correcta conexión a tierra y, en particular, especifica que la conexión
a tierra del cable debe conectarse al sistema de masa del edificio, tan
cerca al punto de entrada del cable como sea posible.
Componentes del televisor
Accesorios
• Control remoto
• Pilas AA (2)
• Guía del usuario
Nota: No se incluyen l os cables. Se puede comprar cables en la mayoría de
las tiendas de electrónicos.
Page 33

Componentes del televisor
33
Vista frontal y lateral
# Componentes Descripción
1 Sensor del control
remoto
Recibe las señales del control remoto.
No se debe obstruir.
2 ENCENDIDO Permite encender o apagar su
televisor.
3 SELECCIÓN DE
ENTRADA
Permite seleccionar la fuente de
entrada de video.
Cuando se muestra el menú de
pantalla, permite confirmar
selecciones.
4
CANAL
Permite ir al canal adyacente superior
en la lista de canales. Para obtener
más información sobre cómo crear la
lista de canales, refiérase a “Escaneo
1
2
3
4
5
6
7
POWER
INPUT
CHANNEL
VOLUME
MENU
5
CANAL
8
de canales” en la página 41.
Cuando el menú de pantalla está
abierto, permite moverse hacia
arriba.
Permite ir al número de canal
adyacente inferior en la lista de
canales. Para obtener más
información sobre cómo crear la lista
de canales, refiérase a “Escaneo de
canales” en la página 41.
Cuando el menú de pantalla está
abierto, permite moverse hacia abajo.
6
VOLUMEN
Permite subir el volumen.
Cuando el menú de pantalla está
abierto, permite moverse hacia la
derecha.
7
VOLUMEN
Permite bajar el volumen.
Cuando el menú de pantalla está
abierto, permite moverse hacia la
izquierda.
8 MENÚ Permite acceder al menú de pantalla.
Page 34

34
Vista posterior
1
2
3
4
5
6
7
8
# Toma Descripción
1 ENTRADA DE PC Conecte una computadora con un
2 ENTRADA DE HDMI 2 Conecte un equipo HDMI en esta
3 ENTRADA DE HDMI 1 Conecte un equipo HDMI o DVI en
4 ENTRADA DE AUDIO
IZQ./DER.
5 SALIDA DE AUDIO
IZQ./DER.
6 SALIDA DE AUDIO
DIGITAL (COAXIAL)
7 ANT. IN Conecte su antena o sistema de TV
8Cable de
alimentación
cable de VGA en esta toma.
toma.
esta toma. Para conectar un equipo
DVI necesita conectar un cable
HDMI-DVI, y conectar un cable de
audio a las tomas de entrada de
audio izq./der. (AUDIO IN L/R).
Si conecta un equipo con DVI a la
toma de entrada de HDMI 1 (HDMI 1
IN), conecte las tomas de salida de
audio del equipo DVI a estas tomas.
Conecte un equipo con audio
analógico a estas tomas con un cable
de RCA.
Conecte un equipo con audio digital
a esta toma.
por cable a esta toma.
Enchúfelo en un tomacorriente.
Componentes del televisor
PC-IN
AUDIO
COMPONENT 1
R
YR
AUDIO
AUDIO
L
PbPrL
S VIDEO VIDEO
VIDEO 1
COMPONENT 2
YR
AUDIO
PbPrL
# Toma Descripción
1 ENTRADA DE AUDIO
DE PC
2 AUDIO (para VIDEO1) Conecte el audio de un equipo
3 VIDEO1 Conecte un equipo con video
4 S-VIDEO (VIDEO1) Conecte un equipo con S-Video a
5 COMPONENTES 1/
COMPONENTES 2
6 AUDIO (para VIDEO2) Conecte el audio de un equipo
7 VIDEO2 Conecte un equipo con video
8 S-VIDEO (VIDEO2) Conecte un equipo con S-Video a
1
2
3
4
AUDIO
VIDEO
S-VIDEO
5
Conecte la toma de audio de la
computadora a esta toma.
analógico a estas tomas.
analógico a esta toma. El cable de
video analógico no incluye el audio.
Necesita conectar un cable de audio
a las tomas de AUDIO cuando utilice
algún equipo con video analógico.
esta toma. El cable de S-Video no
incluye el audi o. Necesita conectar u n
cable de audio a las tomas de AUDIO
cuando utilice algún equipo con
S-Video.
Conecte un equipo con video de
componentes a las tomas de
Componentes 1 (COMPONENT1) o
Componentes 2 (COMPONENT2 ) y a
las tomas de AUDIO. Puede conectar
dos equipos con video de
componentes. El cable de video de
componentes no incluye el audio.
Necesita conectar un cable de audio
a las tomas de AUDIO cuando utilice
algún equipo con video de
componentes.
analógico a estas tomas.
analógico a esta toma. El cable de
video analógico no incluye el audio.
Necesita conectar un cable de audio
a las tomas de AUDIO cuando utilice
algún equipo con video analógico.
esta toma. El cable de S-Video no
incluye el audi o. Necesita conectar u n
cable de audio a las tomas de AUDIO
cuando utilice algún equipo con
S-Video.
6
7
8
Page 35

Componentes del televisor
35
Control remoto
1
2
3
MENU
4
5
6
7
8
RECALL
9
10
# Botón Descripción
1 ENCENDIDO Permite encender o apagar su
2 Números Permite ingresar un número de canal.
3
—
4 MENÚ Permite acceder al menú de pantalla.
5 Permite navegar el menú de pantalla.
6 ENTRAR Permite confirmar los ajustes de
7 ATRÁS Permite regresar a un menú anterior
televisor.
Si desea seleccionar un subcanal
digital, presione — para seleccionar
el subcanal.
Presione los botones numéricos para
seleccionar un canal digital principal
y presione este botón para
seleccionar un subcanal digital.
opciones realizados en el menú de
pantalla.
en el menú de pantalla.
MTS/SAP
FREEZE
ZOOM
DISPLAY
11
12
13
14
15
16
17
# Botón Descripción
8 REGRESAR Permite regresar al canal anterior.
9
VOL / VOL.
Permiten subir o bajar el volumen.
10 SILENCIAR Permite silenciar el sonido. Presione
el botón de nuevo para restaurar el
sonido.
11 SELECCIÓN DE
ENTRADA
12 APAGADO
AUTOMÁTICO
Permite seleccionar la fuente de
entrada de video.
Permite configurar el temporizador
de apagado automático.
13 MTS/SAP En el modo de TV digital, permite
seleccionar el idioma de audio, si más
de un idioma está disponible.
En el modo de TV analógico, permite
seleccionar el modo de audio.
14 CONGELAR Permite congelar la imagen. Presione
cualquier botón excepto el de
encendido (POWER) para regresar a
la visualización normal.
15 ZOOM Permite seleccionar la relación de
aspecto.
16 VISUALIZACIÓN En el caso de canales de TV digitales
o analógicos, permite mostrar la
información del canal, el tipo de
señal, y la configuración del televisor
(tal como la configuración del audio,
la relación de aspecto, la clasificación
del programa y la configuración de
subtítulos optativos).
En el caso de un equipo externo,
permite mostrar el modo de entrada,
el tipo de señal y la configuración del
televisor.
17
CH /CH
Permite ir al siguiente canal o al
anterior en la lista de canales o
seleccionar el modo de entrada
externa. Cuando presione
repetidamente uno de estos botones,
alternará entre:
• Canales de TV analógicos en la
lista de canales
• Canales de TV digitales en la lista
de canales
•Video 1
•Video 2
• Componentes 1
• Componentes 2
•HDMI 1
•HDMI 2
•PC
Page 36
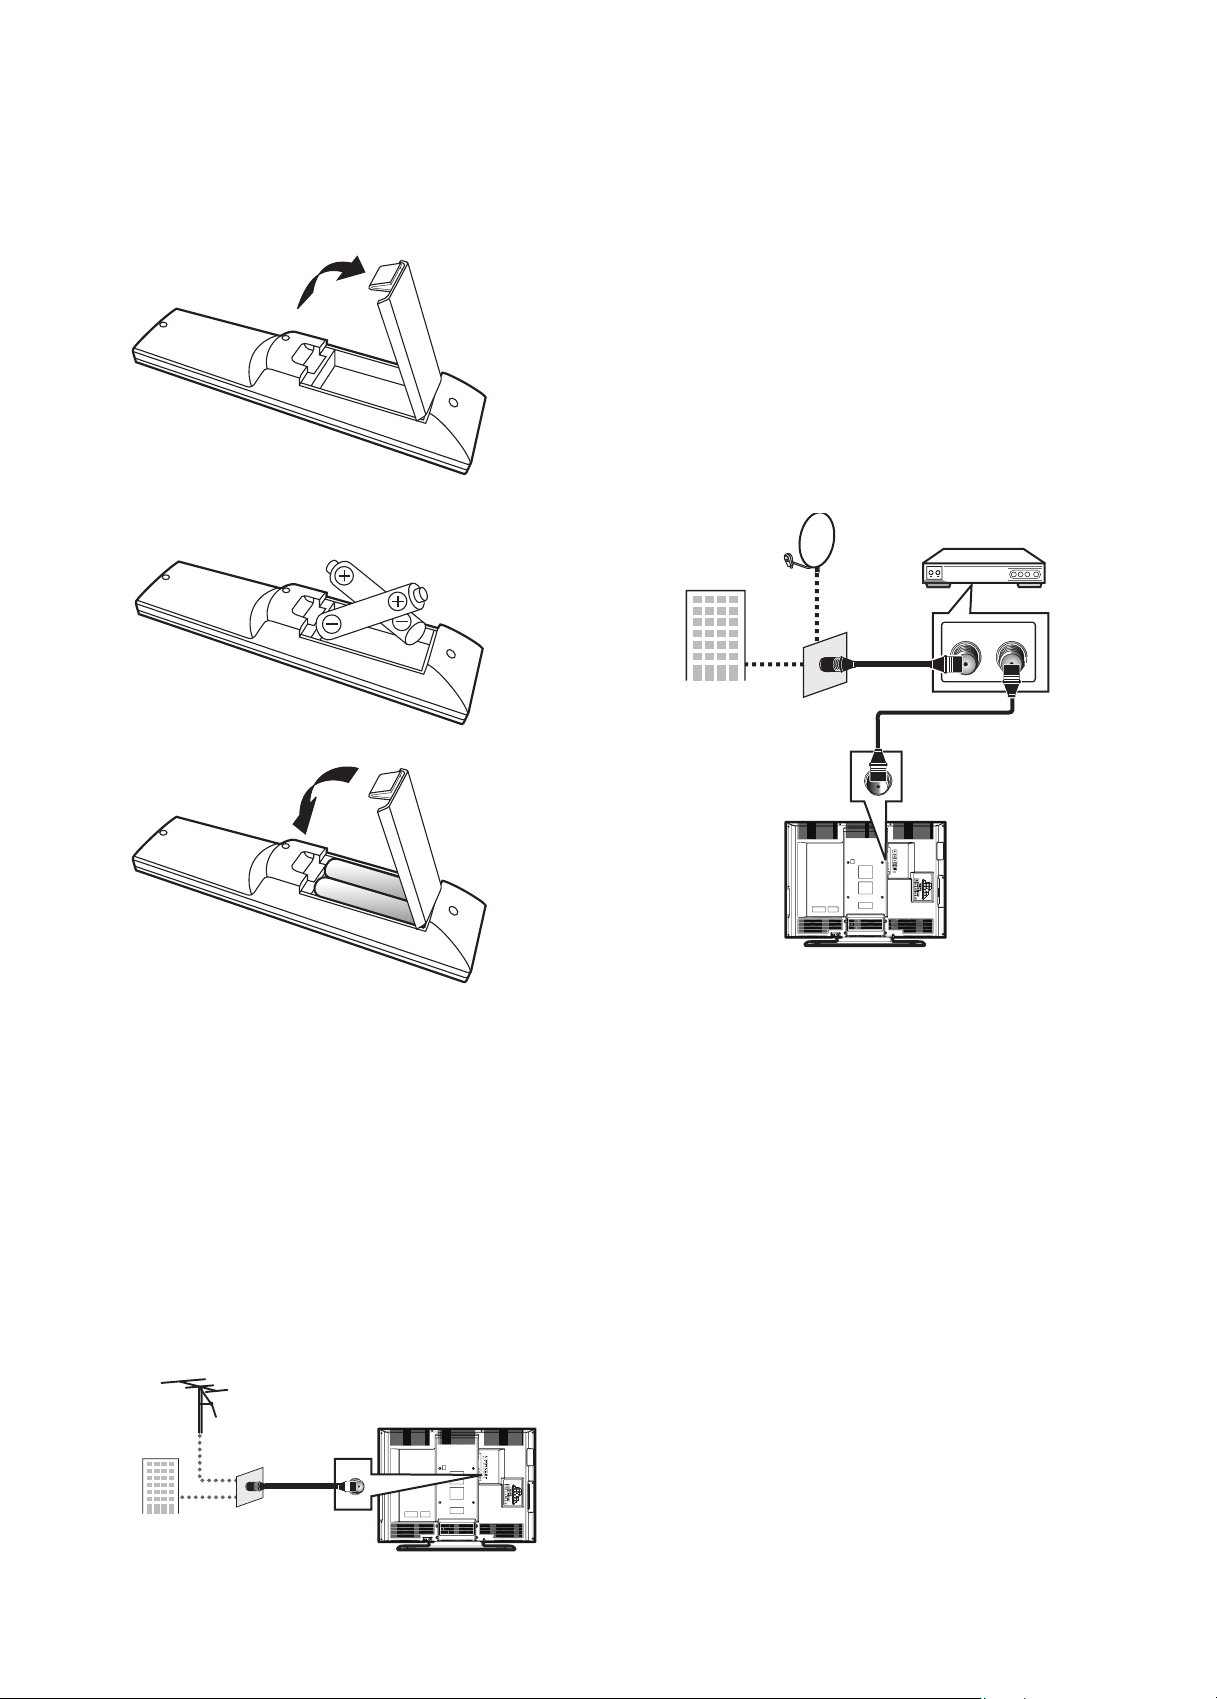
36
Preparación de su televisor
Preparación de su televisor
Instalación de las pilas del control remoto
Para instalar las pilas del control remoto:
1 Abra el compartimiento de las baterías.
2 Inserte dos pilas AA en el compartimiento de las pilas. Verifique
que los símbolos + y – en las pilas correspondan con los símbolos
+ y – en el compartimiento de las pilas.
3 Cierre el compartimiento de las pilas.
Notas:
Siempre desconecte el cable coaxial cuando mueva su televisor.
Si usa una antena para recibir TV analógica, la misma antena
generalmente funciona para TV digital (DTV).
Si desea alternar entre antena y T V por cable, instale un selector de
antena.
Si necesita ayuda al realizar la conexión de TV por cable, póngase en
contacto con su proveedor de servicio de cable.
Conexión de una caja de cable o satélite
Nota: Los métodos de instalación pueden variar dependiendo del tipo de
caja de cable o satélite. Consu lte con su proveedor de servicio de cable
para obtener más información.
Para conectar una caja de cable o satélite:
1 Conecte un cable de 75 ohmios a la toma de pared de TV por
cable o satélite y conecte el otro extremo a la toma de entrada de
antena ( Antenna IN) en la parte de posterior de la caja de cable
o satélite.
Satélite
Cable coaxial
TV por Cable
Caja de satélite o
TV por cable
Cable co axial
RF OUTANT. IN
Notas:
Verifique que los símbolos + y – en las pilas correspondan con los
símbolos + y – en el compartimiento de las pilas.
No se deben mezclar distintos tipos de pilas, ni mezclar pilas usadas con
nuevas.
Cuando no planee usar el control remoto durante un período largo de
tiempo, extraiga las pilas para prevenir fugas.
No in tente recargar pila s que no sea n recargables. Se pueden
sobrecalentar y rajarse.
Conexión de una antena o servicio de
cable básico
Para conectar una antena o servicio de cable básico (sin caja de cable):
• Conecte un extremo de un cable coaxial de 75 ohmios a la antena
o a la toma de pared del servicio de cable básico, y conecte el otro
extremo del cable a la toma de antena (ANT. IN) en la parte
posterior de su televisor.
Antena
Cable coaxial
Cable
2 Conecte un cable coaxial de 75 ohmios a la toma de salida de RF
(RF OUT) en la caja de cable o satélite y conecte el otro extremo a
la toma de entrada de antena ( ANT. IN) en la parte posterior de
su televisor.
Page 37
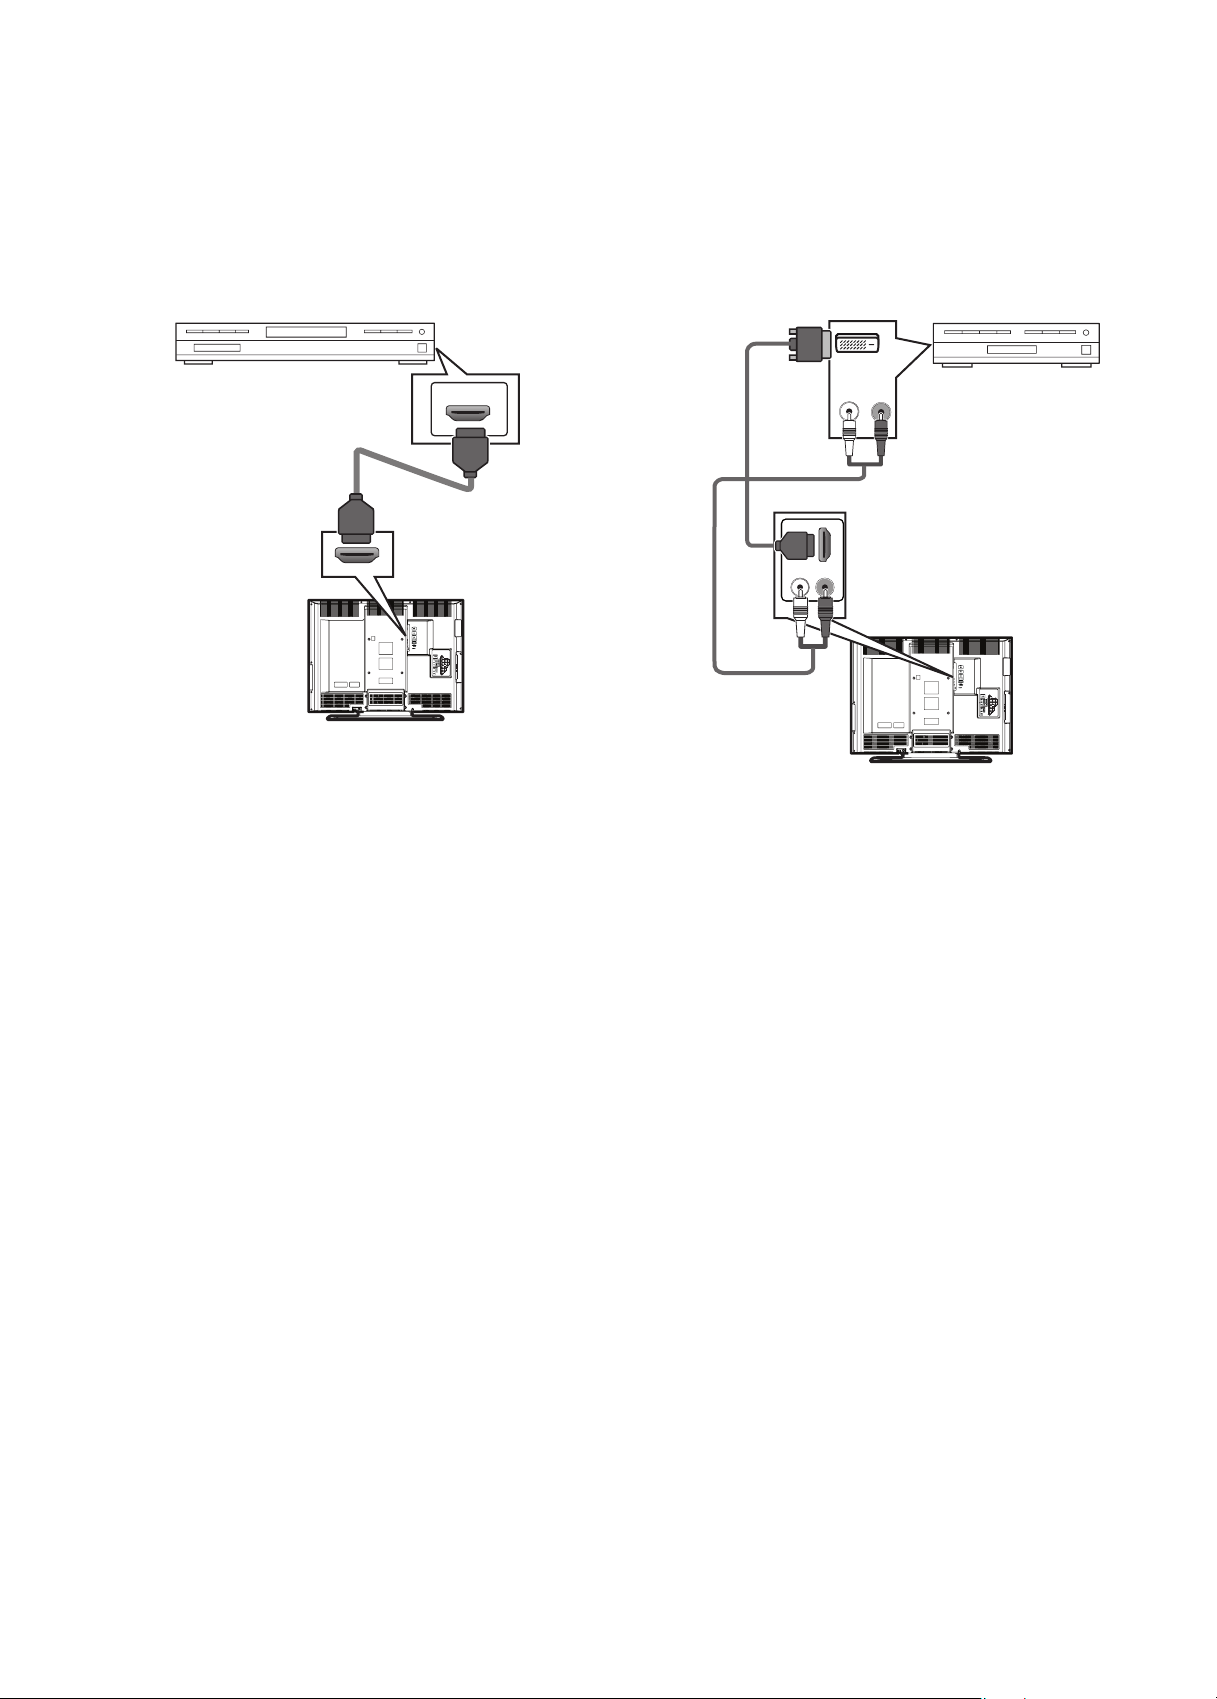
Preparación de su televisor
37
Conexión de un equipo con HDMI
Puede conectar dos equipos con HDMI.
Para conectar un equipo con HDMI:
• Conecte un extremo de un cable de HDMI a la toma de salida de
HDMI (HDMI OUT) en el equipo con HDMI, y conecte el otro
extremo del cable a la entrada de HDMI 1 (HDMI 1 INPUT) o a la
entrada de HDMI 2 (HDMI 2 INPUT) en la parte posterior de su
televisor.
Equipo con
HDMI
HDMI OUT
Cable de
HDMI
Conexión de un equipo con DVI
Para conectar un equipo con DVI, necesita un cable de conversión de
HDMI a DVI.
Para conectar un equipo con DVI:
1 Conecte el extremo de DVI del cable de conversión de HDMI a DVI
a la toma de salida de DVI (DVI OUT) en el equipo con DVI y
conecte el extremo de HDMI del cable a la toma de entrada de
HDMI 1 (HDMI 1 IN) en la parte posterior de su televisor.
DVI OUT
Equipo con
DVI
Cable de HDMI a DVI
Cable de audio
AUDIO OUT
RL
2 Conecte un cable de audio en las tomas de salida de audio
(AUDIO OUT) en el equipo con DVI y conecte el otro extremo del
cable a las tomas de entrada de audio (AUDIO IN) junto a
entrada de HDMI 1 (HDMI 1 IN) en la parte posterior de su
televisor.
Notas:
Su televisor acepta señales de video de 480i, 480p, 720p y 1080i. Su
televisor no puede mostrar video de 480i que no se adhiera a
EIA/CEA-861/861B.
Debe usar la toma de entrada de HDMI 1 (HDMI 1 IN) para conectar un
equipo con DVI ya que este dispositivo requiere una conexión de audio.
Las tomas de entrada de audio (AUDIO IN) sólo funcionan con la toma
de entrada de HDMI 1 (HDMI 1 IN).
Page 38
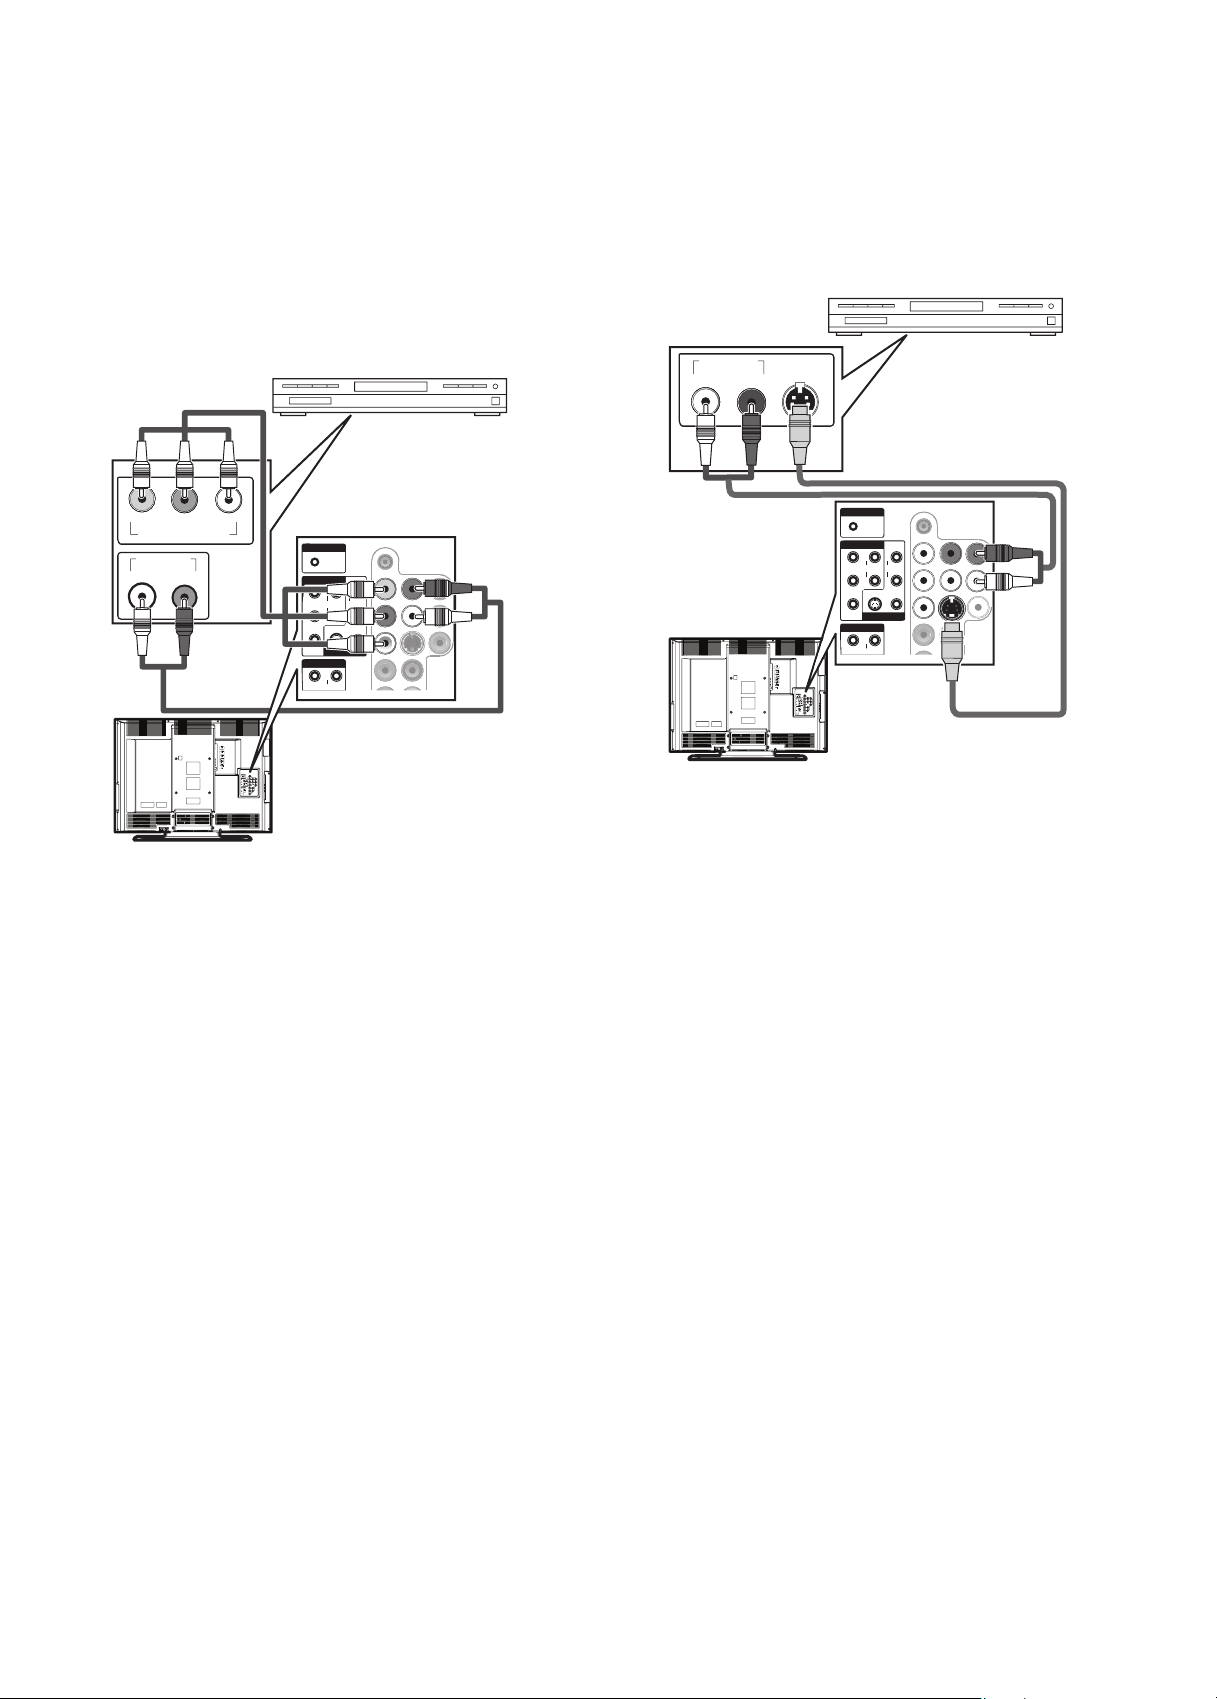
38
Preparación de su televisor
Conexión de un equipo con video de
componentes
Puede conectar dos equipos con video de componentes.
Para conectar un equipo con video de componentes:
1 Conecte un cable de video de componentes a la salida de video de
componentes [COMPONENT VIDEO OUT] (Y, Pb y Pr) en el
equipo con video de componentes y conecte el otro extremo del
cable a las tomas de componentes 1 (COMPONENT 1) o de
componentes 2 (COMPONENT 2) en la parte posterior de su
televisor.
Cable de video de
componentes
Equipo con vide o
de componentes
COMPONENT VIDEO OUT
AUDIO OUT
PrPbY
PC-IN
RL
AUDIO
COMPONENT 1
YR
AUDIO
PbPrL
S VIDEO VIDEO
COMPONENT 2
YR
AUDIO
VIDEO 1
R
AUDIO
L
Conexión de un equipo con S-Video
Se pueden conectar dos equipos con S-Video.
Para conectar un equipo con S-Video:
1 Conecte un extremo de un cable de S-Video a la toma de salida de
S-Video (S-VIDEO OUT) en el equipo con S-Video y conecte el
otro extremo del cable a la toma de S-VIDEO (VIDEO 1) o
S-VIDEO (VIDEO 2) en la parte posterior de su televisor.
Cable S -Video
R
AUDIO
AUDIO
L
S VIDEO VIDEO
VIDEO 1
AUDIO
Equipo con S -Video
AUDIO OUT
RL
Cable de audio
S-VIDEO
OUT
PC-IN
AUDIO
COMPONENT 1
YR
PbPrL
COMPONENT 2
YR
Cable de audio
2 Conecte un cable de audio RCA a las tomas de audio izquierdo
(AUDIO L) y derecho (R) en el equipo con video de componentes
y conecte el otro extremo del cable a las tomas de audio izquierdo
(AUDIO L) y derecho (R) en la parte posterior de su televisor.
Asegúrese de que conecte el cable de audio a las tomas de audio
asociadas con las tomas de componentes a las que conectó el
cable de video de componentes.
Nota: Su televisor acepta señales de video de 480i, 480p, 720p y 1080i.
2 Conecte un extremo de un cable de audio a las tomas de salida de
audio (AUDIO OUT) en el equipo con S-Video y conecte el otro
extremo del cable a las tomas de audio izquierdo (AUDIO L) y
derecho (R) que se encuentran cerca de la toma de S-Video a la
que conectó el cable de S-Video.
Nota: Si conecte un equipo co n S-Video a la toma d e S-VIDEO (VIDEO1) y
un equipo de video a la toma de VIDEO1, el equipo con S-Video tiene
prioridad. Si conecta un equipo con S-Video a la toma de S-VIDEO
(VIDEO2) y un equipo de video a la toma de VIDEO2, el equipo con
S-Video tiene prioridad.
Page 39

Preparación de su televisor
39
Conexión de una videocámara, una
consola de videojuegos o un VCR
Para conectar una videocámara, una consola de videojuegos o un VCR:
1 Conecte un extremo del cable de video a la toma de salida de
video (VIDEO OUT) en la videocámara, consola de videojuegos o
el VCR, y conecte el otro extremo a la toma de VIDEO1 o VIDEO2
en la parte posterior de su televisor.
PC-IN
AUDIO
COMPONENT 1
YR
AUDIO
PbPrL
S VIDEO VIDEO
COMPONENT 2
R
Y
AUDIO
Consola de
videojuegos
Cable de
audio
R
AUDIO
L
VIDEO 1
AUDIO OUT
VCR
VIDEO
RL
OUT
Cable de video
Una videocámara
Conexión de un equipo con audio digital
Para conectar un equipo con audio digital:
• Conecte un extremo de un cable coaxial de audio digital a la toma
de entrada de audio digital (DIGITAL AUDIO IN) en el equipo de
audio y conecte el otro extremo del cable a la toma de salida de
audio digital (DIGITAL AUDIO OUT) en la parte posterior de su
televisor.
Equipo con
audio digital
DIGITAL AUDIO
COAXIAL IN
Toma de SALIDA
DE AUDIO DIGITAL
Conexión de un equipo con audio
analógico
2 Conecte un extremo de un cable de audio a las tomas de salida de
audio (AUDIO OUT) en la videocámara, cámara o VCR y el otro
extremo del cable a las tomas de AUDIO en la parte posterior de
su televisor. Asegúrese de que conecte el cable de audio a las
tomas de audio asociadas con la toma de video a la que conectó
el cable de video.
Para conectar un equipo con audio analógico:
• Conecte un extremo de un cable de audio a las tomas de entrada
de audio izquierdo (AUDIO IN L) y derecho (R) en el equipo de
audio y conecte el otro extremo del cable a las tomas de salida de
audio (AUDIO OUT) en la parte posterior de su televisor.
AUDIO IN
Equipo con audio
analógico
Tomas de SALIDA
DE AUDIO
RL
Page 40

40
Uso de su televisor
Conexión de una computadora
Nota: Asegúrese de que el cable de VGA tiene un núcleo de ferrita.
Para conectar una computadora:
1 Conecte un extremo de un cable de VGA a la toma de VGA en una
computadora y conecte el otro extremo del cable a la toma de
entrada de PC (PC-IN) en la parte posterior de su televisor.
Computa dora
Núcleo de
Mini cable de audio
Tom a de en tra da
de video de PC
Toma de entrada
de audio de PC
ferrita
Cable d e VGA
2 Conecte un extremo de un cable de audio con mini conector a la
toma de salida de la línea de audio AUDIO LINE OUT) en la
computadora y conecte el otro extremo del cable a la toma de
entrada de audio de PC (PC-IN AUDIO) en la parte posterior de su
televisor.
Uso de su televisor
Encendido o apagado de su televisor
Para encender o apagar su televisor:
• Presione el botón de encendido (POWER).
Adver tencia: Cuando presione el botón de encendido (POWER) para
apagar su televisor, este entrará en modo de suspensión. Todavía está
alimentado. Para desconectar la corriente completamente, desenchufe
el cable de alimentación.
Nota: Cuando su televisor no recibe nunguna señaly que no se presione
ningun botón durante 15 minutos, su televisor entra en modo de
suspensión.
Configuración inicial
La primera vez que encienda su televisor, un programa de configuración
rápida arrancará y le permitirá seleccionar un idioma para el menú de
pantalla, seleccionar la fuente de señal de TV y escanear los canales
disponibles.
Para configurar su televisor por primera vez:
1 Asegúrese de que su televisor está conectado a una antena, TV
por cable o satélite.
2 Presione el botón de encendido (POWER). Puede ser que tenga
que esperar unos segundos para que su televisor se inicialice.
Después que su televisor se encienda, se abrirá la pantalla de
configuración inicial ( Initial Setup).
Initial Setup
Initial Setup
Select the language for setup display.
Elija el idioma de ajuste.
Sélectionner langue écran config.
Select Enter Exit
ENTER
3 Presione o para seleccionar inglés (English), Español, o
francés (Français) y luego presione el botón de entrar (ENTER).
Se abrirá la siguiente pantalla.
Initial Setup
Initial Setup
Make sure the antenna is connected to "ANT.IN" jack.
Select the destination of "ANT.IN" jack.
Air
ENTER
Or
BACK
ANT.IN
Back
Cable
4 Presione o para seleccionar aire [Air] (antena) o Cable (TV
por cable o satélite) y luego presione el botón de entrar (ENTER).
Se abrirá la siguiente pantalla y su televisor comenzará a
escanear los canales. Su televisor guarda la información de los
canales en la lista de canales.
Initial Setup
Initial Setup
Now the system is scanning for channels,please wait.
English
Español
Français
MENU
Air
Cable
MENU
tixEretnEtceleS
5%
Analog channels 1ch
Digital channels 0ch
MENU
Exit
Cuando se ha completado el escaneo, se mostrará el canal más
bajo en la lista de canales.
Page 41

Uso de su televisor
41
Notas:
El programa de configuración inicial solamente se ejecuta una vez cuando
se selecciona a aire (Air) o Cable. Si cambia la fuente de señal de TV,
necesitará volver a escanear l os canales. Para obten er más
información, refiérase a “Escaneo de canales” en la página 41.
Si presiona el botón de encendido (POWER) o de menú (MENU) mientras
su televisor está escalonando los canales, se dejará de escanear.
Abriendo el menú de pantalla
Para abrir el menú de pantalla:
1 Presione el botón de menú (MENU). Se abrirá el menú de
pantalla.
2 Presione o para seleccionar un menú y presione el botón de
entrar (ENTER). Se puede seleccionar:
• EXIT (Salir) — Cierra el menú de pantalla.
• PICTURE (Imagen) — Permite ajustar la calidad de la imagen.
Para obtener más información, refiérase a “Ajuste de la imagen”
en la página 43.
• SOUND (Sonido) – Permite ajustar la calidad del sonido. Para
obtener más información, refiérase a “Ajuste del sonido” en la
página 44.
• CHANNEL (Canal) — Le permite escanear los canales y remover
los canales no deseados. Para obtener más información, refiérase
a “Escaneo de canales” en la página 41 y “Borrado de canales de
la lista de canales” en la página 42.
• DETAIL (Detalle) — Le permite cambiar el estilo de los
subtítulos optativos, ajustar los controles de los padres, ajustar la
imagen de video de la computadora y seleccionar la entrada de
audio para los equipos con HDMI conectados. Para obtener más
información, refiérase a:
• “Cambio del estilo de subtítulos optativos digitales” en la
página 48
• “Configuración de los controles de los padres” en la página
49
• “Ajuste de la imagen de computadora” en la página 51
• “Selección del modo de audio de HDMI” en la página 52
• LANGUAGE (Idioma) — Le permite seleccionar el idioma para el
menú de pantalla. Para obtener más información, refiérase a
“Selección del idioma para el menú de pantalla” en la página 43.
Escaneo de canales
La primera vez que encendió su televisor, éste escaneó los canales.
Solamente necesitará volver a escanear los canales si:
• Cambia la fuente de la señal de TV. Por ejemplo, puede cambiar
de aire (Air) a Cable.
• Mueve su televisor a otra área de visualización.
• Canales adicionales se han vuelto disponibles desde que se
realizó al escaneo inicial.
• Desea restaurar los canales de DTV que ha borrado.
Su televisor almacena la información de canal escaneada en la lista de
canales. Cuando presione CH o CH , su televisor sintonizará el
siguiente canal o el anterior en la lista de canales y se saltará los canales
que no tengan señal.
Para escanear los canales:
1 Presione el botón de menú (MENU). Se abrirá el menú de
pantalla.
2 Presione o para seleccionar CHANNEL (Canal) y presione el
botón de entrar (ENTER).
Channel
Channel
Autoscan
Channel List
Manual Register
Antenna
3 Presione o para seleccionar Autoscan (Escaneo
automático) y presione el botón de entrar (ENTER).
Autoscan
Autoscan
Autoscan will rescan all channels.
This may take a while to complete.
Select the destination of "ANT.IN" jack.
Air
Or
Cable
ANT.IN
Back
Air
Cable
Page 42

42
Uso de su televisor
4 Presione o para seleccionar aire [Air] (antena) o Cable (TV
por cable o satélite). Su televisor escaneará los canales. Cuando
se ha completado el escaneo, se mostrará el canal más bajo en la
lista de canales.
Now the system is scanning for channels, please wait.
72%
Analog channels 10ch
Digital channels 6ch
MENU
Exit
Notas:
Si conec ta TV por cable sin una caja de cable, puede ser que necesite
ponerse en contacto con su proveedor de TV por cable para obtener
ayuda.
Si presiona el botón de encendido ( POWER) o de
menú (MENU) durante
el escaneo, la operación se cancelará.
En el caso de canales digitales si desenchufa el cable de alime ntación sin
primero apagar el televisor, se puede perder la información de la lista
de canal.
Borrado de canales de la lista de canales
Si la lista de canales incluye canales que no desea ver, los puede borrar
de la lista. Cuando se presiona CH o CH , su televisor se saltará los
canales borrados. Todavía puede sintonizar un canal borrado al
presionar los botones numéricos del canal.
Para borrar canales de la lista de canales:
1 Presione el botón de menú (MENU). Se abrirá el menú de
pantalla.
3 Presione o para seleccionar CHANNEL LIST (Lista de
canales) y presione el botón de entrar (ENTER).
Channel List
Channel List
Highlight channels for
Ch Up/Down key selection.
Ch Select Watch/Skip Back
ENTER
DTV 6
DTV 6
DTV 8
DTV 8
DTV 48
DTV 48
DTV 67
BACK
27
9
9
58
58
4 Presione o para seleccionar el canal que desea borrar y
presione el botón de entrar (ENTER). El número de canal se
mostrará color gris y el canal se borrará de la lista de canales.
5 Presione el botón de menú (MENU) para cerrar el menú.
Notas:
Si desea volver a agregar un canal borrado a la lista de canales, presione
o para seleccionar el canal y presione el botón de entrar
(ENTER).
Cuando se borra un canal digital principal, sus subcanales también se
borran.
Los canales digitales se indican con el símbolo DTV junto al número de
canal. Los canales y marca son analógicos.
Agregando canales a la lista de canales
Cuando su televisor escanea los canales, éste busca los canales con
buena señal. Si un canal tiene una señal deficiente, su televisor se
saltará ese canal. Se puede agregar un canal que se ha omitido a la lista
de canales.
Nota: Esta función solamente funciona con canales analógicos. No se
puede agregar o borrar canales digitales de la lista de canales Para
agregar canales digitales, se tiene que escanear los canales primero.
Para agregar canales a la lista de canales:
1 Presione el botón de menú (MENU). Se abrirá el menú de
pantalla.
2 Presione o para seleccionar CHANNEL (Canal) y presione el
botón de entrar (ENTER).
Channel
Channel
Autoscan
Channel List
Manual Register
Antenna
2 Presione o para seleccionar CHANNEL (Canal) y presione el
botón de entrar (ENTER).
Channel
Channel
Autoscan
Channel List
Manual Register
Antenna
Page 43

Uso de su televisor
43
3 Presione o para seleccionar Manual Register (Registro
manual) y presione el botón de entrar (ENTER).
Manual Register
Manual Register
BACK
Register
Back
For analog channels,
select a channel to register using
number keys.
For digital channels,
you must perform Autoscan function.
Ch Change
4 Presione el botón numérico del canal que desea agregar, y
presione el botón de entrar (ENTER). Se muestra el mensaje
“Registered to the Channel List” (Registrado en la lista de canales).
5 Presione el botón de menú (MENU) para cerrar el menú.
Nota: Si se utiliza una entrada externa (Video1, Video2, Component1,
Component2, HDMI1, HDMI2, o PC), no podrá agregar el canal y
aparecerá el mensaje “U navailable” (No disponible).
Selección del idioma para el menú de
pantalla
Para seleccionar el idioma del menú de pantalla:
1 Presione el botón de menú (MENU). Se abrirá el menú de
pantalla.
La mayoría de canales de TV digital tienen más de un canal. El
canal principal lleva la señal del programa de TV principal. Los
subcanales llevan las señales para programación adicional o
alternativa, tal como transmisiones de radio o noticias.
Por ejemplo, si el número de canal principal es 8, el número de
subcanal puede ser 8-1, 8-2 ó 8-3.
Nota:Aparece el mensaje No Signal (No hay señal) cuando se termina el
programa del subcanal.
Ajuste del volumen
Para ajustar el volumen:
• Presione VOL o VOL para subir o bajar el volumen. Aparece
la barra Volume (Volumen) en la parte inferior de la pantalla.
Ajuste de la imagen
Para ajustar la imagen:
1 Presione el botón de menú (MENU). Se abrirá el menú de
pantalla.
2 Presione o para seleccionar LANGUAGE (Idioma), luego
presione el botón de entrar (ENTER).
3 Presione o para seleccionar inglés (English), Español, o
francés (Français) y presione el botón de entrar (ENTER).
4 Presione el botón de menú (MENU) para cerrar el menú.
Cambio de canales
Para cambiar los canales:
• Presione CH o CH para seleccionar un canal de la lista de
canales.
• Presione los botones numéricos del canal que guste y presione el
botón de entrar (ENTER) o espere unos cuantos segundos.
• Presione el botón de regresar (RECALL) para ir al canal anterior.
• Para seleccionar un subcanal digital, presione los botones
numéricos del canal principal, presione — y presione el botón
numérico del subcanal.
Language
Language
Select the language for setup display.
Elija el idioma de ajuste.
Sélectionner langue écran config.
English
Español
Français
2 Presione o para seleccionar PICTURE (Imagen) y presione
el botón de entrar (ENTER).
Picture
Picture
Picture Mode
Brightness
Contrast
Color
Tint
Sharpness
Reset Settings
Color Temp.
Energy Saving
Dynamic
30
60
36
0
0
Neutral
Off
3 Presione o para seleccionar la opción que desea ajustar y
presione el botón de entrar (ENTER). Se puede seleccionar:
• Picture Mode (Modo de imagen) — Presione o para
seleccionar Standard (Estándar), Dynamic (Dinámico),
Movie (Película) o News (Noticias) y presione el botón de
entrar (ENTER).
• Brightness (Brillo) — Presione o para subir o bajar el
brillo.
• Contrast (Contraste) — Presione o para subir o bajar
el contraste.
• Color — Presione o para ajustar el color.
• Tint (Tono) — Presione o para ajustar el tono.
• Sharpness (Nitidez) — Presione o para subir o bajar
la nitidez.
• Reset Settings (Restaurar configuración) —Presione el
botón de entrar (ENTER) para restaurar la configuración de
imagen a los valores de fábrica.
Page 44

44
Uso de su televisor
• Color Temp. (Temperatura de color) — Presione o
para seleccionar Cool (Fresco), Neutral (Neutro) o Warm
(Cálido) y presione el botón de entrar (ENTER).
• Energy Saving (Ahorro de energía) — Presione o
para aumentar o reducir el brillo de la retroiluminación.
4 Presione el botón de menú (MENU) para cerrar el menú.
Ajuste del sonido
Para ajustar el sonido:
1 Presione el botón de menú (MENU). Se abrirá el menú de
pantalla.
2 Presione o para seleccionar SOUND (Sonido) y presione el
botón de entrar (ENTER).
Sound
Sound
Treble
Bass
Surround
Reset Settings
Off
• HDMI2 — Selecciona el componente con HDMI o DVI
conectado a la toma de HDMI2 .
• PC — Selecciona la computadora conectada a la toma de
entrada de PC (PC-IN).
Selección del modo de audio
Para seleccionar el modo de audio digital:
• Presione repetidamente el botón de MTS/SAP para selecciona r el
idioma de audio. Los idiomas que se pueden seleccionar
dependen de los idiomas disponibles en el programa que está
viendo.
Para seleccionar el modo de audio analógico:
• Presione repetidamente el botón de MTS/SAP para selecciona r el
modo de audio. Dependiendo de los modos disponibles en el
programa que está viendo, se puede seleccionar estéreo
(STEREO), monofónico (MONO) o SAP (programa de audio
secundario).
Nota: Presionar el botón de MTS/SAP no controla el audio desde un
equipo externo.
Mostrando información de programa
Para mostrar información sobre canal digital:
• Presione el botón de visualización (DISPLAY). La siguiente
información aparecerá:
0
0
1
A Day of Memories
A Day of Memories
A quarter-century ago,which may now qualify as the
good old days of newspapering,run-of-paper sales
accounted for 80 percent of the industry's advertising
revenues.Department stores and supermarket were
2
KABC
KABC
English 1/2
1080i
1080i
TV-PG DLSV
6-1
16:9HDHD
16:9
3
4
5
CC
CC
3 Presione o para seleccionar la opción que desea ajustar y
presione el botón de entrar (ENTER). Se puede seleccionar:
• Treb le (Agudos) — Presione o para ajustar los
agudos.
• Bass (Graves) — Presione o para ajustar los graves.
• Surround (Envolvente) – Presione o para activar (On)
o desactivar (Off).
• Reset Settings (Restaurar configuración) – Presione el
botón de entrar (ENTER) para restaurar la configuración de
sonido a los valores de fábrica.
4 Presione el botón de menú (MENU) para cerrar el menú.
Selección de la fuente de entrada de video
Para seleccionar la fuente de entrada de video:
• Presione repetidamente el botón de selección de entrada
(INPUT) o CH para seleccionar la fuente de entrada de video.
Se puede seleccionar:
• Un canal de TV o DTV
• Video1 — Selecciona el equipo con video o S-Video
conectado a las tomas de VIDEO1.
• Video2 — Selecciona el equipo con video o S-Video
conectado a las tomas de VIDEO2.
• Component1 (Componentes 1) — Selecciona el equipo con
video de componentes conectado a las tomas de
COMPONENT1.
• Component2 (Componentes 2) — Selecciona el equipo con
video de componentes conectado a las tomas de
COMPONENT2.
• HDMI1 — Selecciona el componente con HDMI o DVI
conectado a la toma de HDMI1.
6
8
1 Título del programa.
2 Estación transmisora.
3Número del canal.
4 Idioma del audio.
5 Líneas de barrido efectivas y modo de barrido,
formato del programa y relación de aspecto.
6 CC son los subtítulos optativos si están
activados.
7 Clasificación de programa.
8 Información de la guía de programación (límite
de cuatro líneas). Si la guía de información es
más larga que cuatro líneas, presione o
para desplazar la información.
Si no información de programación está
disponible, aparece el mensaje
provided (No se proveyó una descripción).
7
No description
• Presione el botón de visualización (DISPLAY) o de atrás (BACK)
para cerrar la pantalla.
Para mostrar información sobre el canal analógico:
• Presione el botón de visualización (DISPLAY). La siguiente
información aparecerá:
6
SAP / STEREO
480i
480i
TV-PG DLSV
Esta información incluye el número del canal, el modo de audio,
el tipo de resolución, la relación de aspecto, CC (si los subtítulos
optativos están activados) y la clasificación de programación.
SD
SD
4:3
4:3
CC
CC
Page 45

Uso de su televisor
45
• Presione el botón de visualización (DISPLAY) o de atrás (BACK)
para cerrar la pantalla.
Para mostrar información sobre un equipo externo:
• Presione el botón de visualización (DISPLAY). La siguiente
información aparecerá:
Video1
480iSDSD
480i
TV-PG DLSV
CC
CC
Esta información incluye la fuente de la entrada de dinero, el tipo
de resolución, la clasificación del programa y CC (si los subtítulos
optativos están activados).
Selección de la relación de aspecto
Se puede seleccionar entre cuatro relaciones de aspecto para los canales
de TV y tres relaciones de aspecto para la computadora.
Para seleccionar el modo de pantalla:
• Presione repetidamente el botón de ZOOM para seleccionar la
relación de aspecto que guste.
En el caso de una señal de video 4:3
Normal Zoom
• Zoom — Agranda el centro de la imagen. La parte externa de la
imagen esta cortada.
• Ancho – Muestra la imagen en su tamaño original.
• Cine – Muestra la imagen con su dimensión máxima sin cambiar
su relación de aspecto. La parte externa de la imagen esta
cortada.
En el caso de una imagen de computadora
Normal Wide
Punto por punto
(Ancho)
• Normal — Estira la imagen proporcionalmente. Barras negras
aparecen en ambos lados de la imagen. La disponibilidad de esta
opción depende de la relación de aspecto de la señal de entrada.
• Ancho — Estira la imagen para llenar la pantalla.
• Punto por punto — Muestra la imagen con su tamaño
original.
Cinema
(Cine)
Wide
(Ancho)
• Normal — Muestra la imagen en su tamaño original. Se corta
la parte superior e inferior de la imagen.
• Zoom — Agranda el centro de la imagen. Estira la imagen
horizontalmente para llenar la pantalla.
• Ancho — Estira la imagen para llenar la pantalla
horizontalmente.
• Cinema — Estira la imagen para llenar la pantalla de 16:9
horizontalmente, y luego agranda la imagen hasta que llene
completamente la pantalla sin cambiar la relación de aspecto. La
parte externa de la imagen esta cortada.
En el caso de una señal de video 16:9
Normal Zoom
Ajuste del temporizador de apagado
automático
Para configurar el temporizador de apagado automático:
• Presione repetidamente el botón de apagado automático
(SLEEP) para seleccionar la cantidad de tiempo que su televisor
esperará antes de apagarse por sí mismo. Se puede seleccionar
30 min, 60 min, 90 min o 120 min.
• Para desactivar el temporizador antes de que expire, presione el
botón de apagado automático (SLEEP) hasta que aparezca el
mensaje “Sleep Off” (Apagado automático desactivado).
Nota: Si desenchufa el cable de alimentación u ocurre una falla de
energía, se cancelará el temporizador de apagado automático.
Verificación de la intensidad de la señal de
la antena
Para verificar la intensidad de la señal de la antena:
1 Presione el botón de menú (MENU). Se abrirá el menú de
pantalla.
Cinema
(Cine)
Ancho
• Normal — Reduce la imagen horizontalmente al tamaño 4:3.
Barras negras aparecen en ambos lados de la imagen.
Page 46

46
Uso de su televisor
2 Presione o para seleccionar CHANNEL (Canal) y presione el
botón de entrar (ENTER).
Channel
Channel
Autoscan
Channel List
Manual Register
Antenna
3 Presione o para seleccionar Antenna (Antena) y presione el
botón de entrar (ENTER).
4 Presione los botones numéricos o CH o CH para seleccionar
el canal del cual desea verificar la intensidad de la señal. Se abre
una pantalla que muestra la intensidad de la señal.
Antenna
Antenna
Back
Now 0 0Peak
Uso de subtítulos optativos digitales
Para usar subtítulos optativos digitales:
1 Presione el botón de menú (MENU). Se abrirá el menú de
pantalla.
2 Presione o para seleccionar DETAIL (Detalle) y presione el
botón de entrar (ENTER).
Detail
Detail
Closed Caption
V–chip
PC Settings
HDMI1 Audio
Auto
CH
Si la fuente de entrada de video no es TV, se abre la siguiente
pantalla. No se puede verificar la intensidad de la señal cuando la
fuente de entrada de video es un equipo externo.
Antenna
Antenna
Indicator is available
for antenna signal only.
CH
Ch Change
5 Presione el botón de menú (MENU) para cerrar el menú.
Congelamiento de la imagen
Para congelar la imagen:
• Presione el botón de congelar (FREEZE). La imagen se congela en
la pantalla pero el sonido sigue reproduciéndose. Presione
cualquier botón excepto el de encendido (POWER) para regresar
a la visualización normal.
Notas:
Si su televisor no detecta una señal o la señal está protegida, la imagen se
congela y el sonido se silencia.
Después de que la imagen se ha congelado por c inco minutos, su televisor
regresar a a la visualización normal para proteger la pantalla.
Ch Change
Back
3 Presione o para seleccionar DTV CC y presione el botón de
entrar (ENTER).
Closed Caption
Closed Caption
Conventional CC
DTV CC
CC Style
Off
Off
4 Presione o para seleccionar un modo de subtítulos
optativos y presione el botón de entrar (ENTER). Se puede
seleccionar Off (Desactivado) o Service 1 (Servicio 1) a Service
6 (Servicio 6). El modo normal es Servicio 1 (Service 1). Los
modos disponibles dependen de los modos transmitidos con el
programa.
Closed Caption
Closed Caption
Conventional CC
DTV CC
CC Style
Off
Service1
Service2
Service3
Service4
Service5
Service6
5 Presione el botón de menú (MENU) para cerrar el menú.
Page 47

Uso de su televisor
47
Uso de subtítulos optativos analógicos
Para usar subtítulos optativos analógicos:
1 Presione el botón de menú (MENU). Se abrirá el menú de
pantalla.
2 Presione o para seleccionar DETAIL (Detalle) y presione el
botón de entrar (ENTER).
Detail
Detail
Closed Caption
V–chip
PC Settings
HDMI1 Audio
3 Presione o para seleccionar Closed Caption (Subtítulos
optativos) y presione el botón de entrar (ENTER).
Closed Caption
Closed Caption
Conventional CC
DTV CC
CC Style
4 Presione o para seleccionar Conventional CC (Subtítulos
optativos convencionales) y presione el botón de entrar (ENTER).
Closed Caption
Closed Caption
Conventional CC Off
DTV CC
CC Style
Auto
Off
Off
CC1
CC2
CC3
CC4
Text 1
Text 2
Text 3
Text 4
5 Presione o para seleccionar un modo de subtítulos
optativos y presione el botón de entrar (ENTER). Se puede
seleccionar:
• Off (Desactivado) — Desactiva los subtítulos optativos.
• CC1 a CC4 — Muestra texto en un área pequeña para que no
obstruya la imagen. CC1 normalmente muestra el texto del
audio en el mismo idioma que el audio. CC3 normalmente
muestra el texto del audio en un segundo idioma. CC2 y CC4
raramente se usan y normalmente muestran información
suministrada por la estación transmisora tal como noticias o
repor tes del clima.
• Tex t1 a Tex t4 — Muestra el texto en un cuadro negro
grande que puede obstruir la imagen. Text1 normalmente
muestra el texto del audio en el mismo idioma que el audio.
Text3 normalmente muestra el texto del audio en un
segundo idioma. Text2 y Text4 raramente se usan y
normalmente muestran información suministrada por la
estación transmisora tal como noticias o reportes del clima.
6 Presione el botón de menú (MENU) para cerrar el menú.
Notas:
Para mostrar los subtítulos optativos en su televisor, la señal transmitida
debe contener la información de los subtítulos.
No todos los programas de televisión y comerciales cuentan con subtítulos
optativos o con todos los tipos de subtítulos optativos.
Es posible que los subtítulos y texto no coincidan exactamente con la voz
en el televisor.
Cambiar canales puede retrasar los subtítulos optativos por unos
segundos.
Ajustar el volumen o silenciar el sonido puede retrasar los subtítulos
optativos por unos segundos.
Abreviaturas, símbolos y otros atajos gramaticales se pueden usar para
poder mantenerse sincronizado con la acción en la pantalla. Éste no es
un problema de su televisor.
Los subtítulos opcionales o los caracteres de texto no se mostrarán
mientras el menú de pantalla esté abierto.
Si aparece un cuadro negro en la pantalla de su televisor, los subtítulos
optativos están configurados en el modo de texto. Para remover el
cuadro, seleccione CC1, CC2, CC 3, CC4 o Off (Desactivado).
Si su televisor recibe señales de televisión de mala calidad, los subtítulos
optativos pueden contener errores o no pueden estar presentes.
Algunas posibles causas de señales de mala calidad son el ruido de la
ignición de un auto, ruido de un motor eléctrico, recepción de una
señal débil o la recepción de una señal multiplexada (fantasmas o
agitación de la pantalla).
Su televisor mantendrá la configuración de subtítulos optativos aún si
falla la energía.
Los subtítulos optativos no se muestran cuando se utiliza una conexión
HDMI.
Cuando su televisor recibe una señal de reproducción de efecto especial
(por ej., Bu scar, Cámara lenta o Detener) proveniente de un canal de
salida de video del VCR (3 ó 4), es posible que su televisor no muestre el
texto o subtítulos correctos.
Page 48

48
Uso de su televisor
Cambio del estilo de subtítulos optativos
digitales
Para cambiar el estilo de los subtítulos optativos digitales:
1 Presione el botón de menú (MENU). Se abrirá el menú de
pantalla.
2 Presione o para seleccionar DETAIL (Detalle) y presione el
botón de entrar (ENTER).
Detail
Detail
Closed Caption
V–chip
PC Settings
HDMI1 Audio
3 Presione o para seleccionar Closed Caption (Subtítulos
optativos) y presione el botón de entrar (ENTER).
Detail
Detail
Closed Caption
V–chip
PC Settings
HDMI1 Audio
4 Presione o para seleccionar CC Style (Estilo de subtítulos
optativos) y presione el botón de entrar (ENTER).
Auto
Auto
5 Presione o para seleccionar User Setting (Configuración
del usuario) y presione el botón de entrar (ENTER).
CC Style
CC Style
User Setting
Font Style
Font Size
Font Color
Font Opacity
Back Color
Back Opacity
Edge Color
Edge Type
Off
Font0
Middle
White
Solid
Black
Solid
Black
None
6 Presione o para seleccionar On (Activado) y presione el
botón de entrar (ENTER).
CC Style
CC Style
User Setting
Font Style
Font Size
Font Color
Font Opacity
Back Color
Back Opacity
Edge Color
Edge Type
Closed Caption
On
Off
7 Presione o para seleccionar un estilo y presione el botón de
entrar (ENTER).
8 Presione o para seleccionar un estilo y presione el botón de
entrar (ENTER). Puede cambiar los siguientes estilos:
Estilo de fuente
CC Style
CC Style
User Setting
Font Style
Font Size
Font Color
Font Opacity
Back Color
Back Opacity
Edge Color
Edge Type
Closed Caption
Tamaño de fuente
Closed Caption
Closed Caption
Conventional CC
DTV CC
CC Style
Off
Off
CC Style
CC Style
User Setting
Font Style
Font Size
Font Color
Font Opacity
Back Color
Back Opacity
Edge Color
Edge Type
Closed Caption
Large
Middle
Small
Page 49
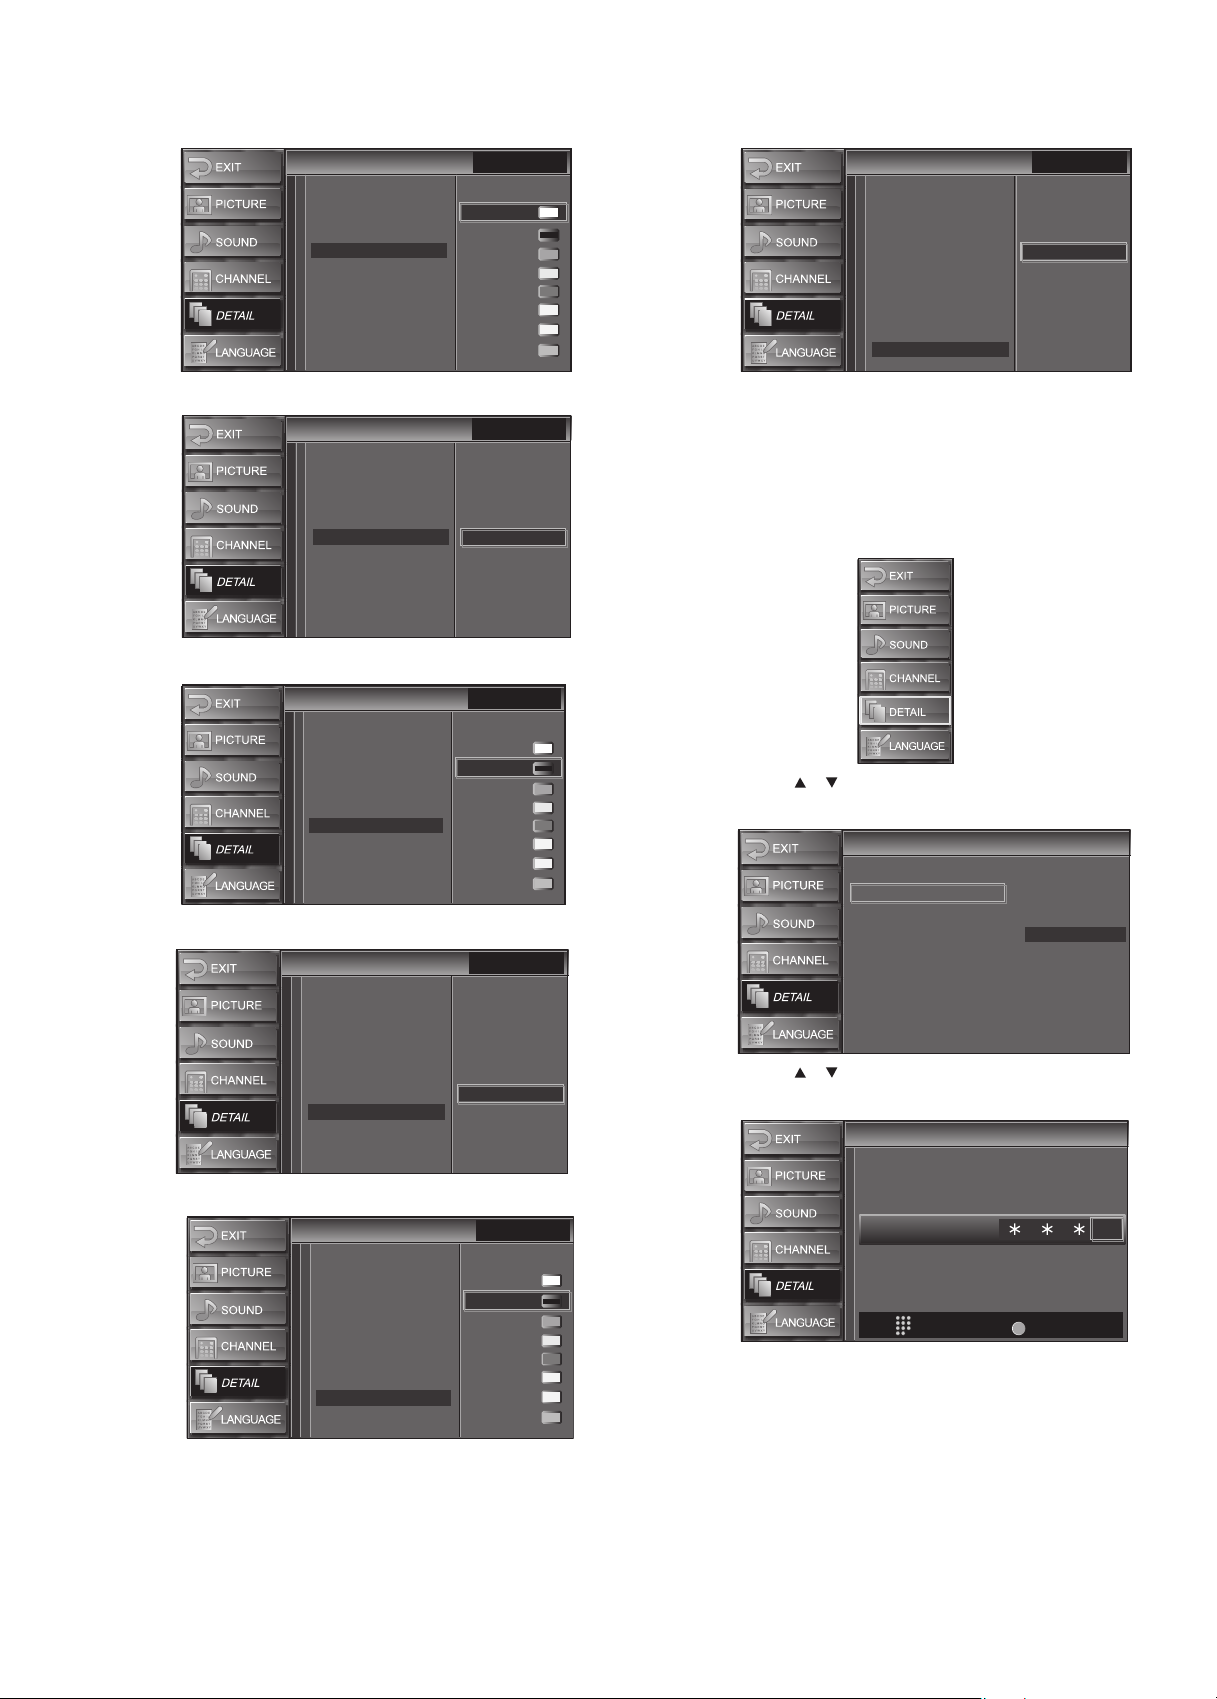
Uso de su televisor
49
Color de fuente
CC Style
CC Style
Opacidad de fuente
CC Style
CC Style
Color de fondo
CC Style
CC Style
Opacidad de fondo
CC Style
CC Style
User Setting
Font Style
Font Size
Font Color
Font Opacity
Back Color
Back Opacity
Edge Color
Edge Type
User Setting
Font Style
Font Size
Font Color
Font Opacity
Back Color
Back Opacity
Edge Color
Edge Type
User Setting
Font Style
Font Size
Font Color
Font Opacity
Back Color
Back Opacity
Edge Color
Edge Type
User Setting
Font Style
Font Size
Font Color
Font Opacity
Back Color
Back Opacity
Edge Color
Edge Type
Closed Caption
White
Black
Red
Green
Blue
Yel low
Magenta
Cyan
Closed Caption
Solid
Flash
Tra nslucent
Tra nsparent
Closed Caption
White
Black
Red
Green
Blue
Yellow
Magenta
Cyan
Closed Caption
Solid
Flash
Translucent
Transparent
Tipo de borde
CC Style
CC Style
User Setting
Font Style
Font Size
Font Color
Font Opacity
Back Color
Back Opacity
Edge Color
Edge Type
Closed Caption
None
Raised
Depressed
Uniform
L.Shadow
R.Shadow
9 Presione el botón de menú (MENU) para cerrar el menú.
Configuración de los controles de los
padres
Para configurar los controles de los padres:
1 Presione el botón de menú (MENU). Se abrirá el menú de
pantalla.
2 Presione o para seleccionar DETAIL (Detalle) y presione el
botón de entrar (ENTER).
Detail
Detail
Closed Caption
V–chip
PC Settings
HDMI1 Audio
3 Presione o para seleccionar V-chip y presione el botón de
entrar (ENTER).
V-c hi p
V-c hi p
Auto
Color de borde
CC Style
CC Style
User Setting
Font Style
Font Size
Font Color
Font Opacity
Back Color
Back Opacity
Edge Color
Edge Type
Closed Caption
White
Black
Red
Green
Blue
Yellow
Magenta
Cyan
Enter password.
PIN Code
BACK
-
Back
Page 50

50
Uso de su televisor
4 Presione los botones numéricos para ingresar una contraseña de
cuatro dígitos. Si no ha configurado una contraseña, ingrese
0000.
V-c hi p
V-c hi p
MPAA Rating
TV Rating
Downloadable Rating
Clear Downloadable Rating
New Password
5 Presione o para seleccionar una opción de control de los
padres y presione el botón de entrar (ENTER). Se puede
seleccionar:
• MPAA Rating (Clasificación de MPAA) — Para obtener más
información, refiérase a “Configuración de la clasificación de
MPAA” en la página 50.
• TV Rating (Clasificación de TV) — Para obtener más
información, refiérase a “Configuración de las clasificaciones
de TV” en la página 50.
• Downloadable Rating (Clasificación descargada) — Le
permite usar información de clasificación que se descarga
automáticamente para las estaciones digitales. Este es un
nuevo sistema de clasificación y no a todos los canales
digitales lo usan.
• Clear Downloadable Rating (Borrar clasificación
descargada) — Le permite borrar la información de
clasificación descargada.
• New Password (Contraseña nueva) — Para obtener más
información, refiérase a "Cambio de la contraseña" en la
página 51.
Configuración de la clasificación de MPAA
La mayoría de las películas tienen clasificaciones establecidas por la
MPAA (Motion Picture Association of America). Pueda bloquear estas
películas con referencia a estas clasificaciones.
Para configurar la clasificación de películas:
1 Presione o para seleccionar MPAA Rating (Clasificación de
MPAA) y presione el botón de entrar (ENTER).
V-c hi p
V-c hi p
X
NC-17
R
PG-13
PG
G
NR
Select View/Block Back
ENTER
2 Presione o para seleccionar la clasificación que desea
bloquear y presione el botón de entrar (ENTER). Para
desbloquear la clasificación, presione el botón de entrar
(ENTER). Se bloqueará la clasificación seleccionada y todas las
clasificaciones superiores. Cuando una clasificación está
bloqueada, aparece un icono de candado junto a la clasificación.
Se puede seleccionar:
• X — Audiencias adultas solamente.
• NC-17 — Prohibido para menores de 17 años.
• R — Niños menores de 17 años deben ser supervisados por
un padre o un custodio adulto.
BACK
• PG-13 — No se recomienda a niños menores de 13 años.
• PG — Se recomienda la guía de los padres.
• G — Para audiencia general.
• NR — Sin clasificación.
3 Presione el botón de menú (MENU) para cerrar el menú.
Configuración de las clasificaciones de TV
Muchos programas de televisión tienen clasificaciones establecidas por
las estaciones emisoras. Puede bloquear los programas de TV y las
películas basado en estas clasificaciones.
Para configurar la clasificación de TV:
1 Presione o para seleccionar TV Rating (Clasificación de TV)
y presione el botón de entrar (ENTER).
V-chip
V-chip
FV
ENTER
FV
ENTER
V S L D
BACK
V S L D
BACK
TV-MA
TV-14
TV-PG
TV-G
TV-Y7
TV-Y
Select View/Block Back
2 Presione o para seleccionar la clasificación que desea
bloquear y presione el botón de entrar (ENTER). Para
desbloquear la clasificación, presione el botón de entrar
(ENTER). Se puede seleccionar:
• TV-MA — Solo para audiencia madura.
• TV-14 — No adecuado para niños menores de 14 años.
• TV-PG — Se recomienda la guía de los padres.
• TV-G – Audiencia general.
• TV-Y7 — No adecuado para niños menores de 7 años.
• TV-Y — Adecuado para todos los niños
3 Si seleccionó TV-MA, TV-14, TV-PG, o TV-Y7, presione
o para seleccionar la subclasificación que desea bloquear y
presione el botón de entrar ( ENTER). Para desbloquear la
clasificación, presione el botón de entrar (ENTER). Se bloqueará
la clasificación seleccionada y todas las clasificaciones superiores.
Cuando una clasificación está bloqueada, aparece un icono de
candado debajo de la clasificación.
V-c hi p
V-c hi p
TV-MA
TV-14
TV-PG
TV-G
TV-Y7
TV-Y
Select View/Block Back
Se puede seleccionar:
• FV — Violencia de fantasía. En el caso de TV-Y7.
• V — Violencia. En el caso de TV-PG, TV-14 y TV-MA.
• S — Situaciones sexuales. En el caso de TV-PG, TV-14 y
TV-MA.
• L — Lenguaje vulgar. En el caso de TV-PG, TV-14 y TV-MA.
• D — Dialogo insinuante. En el caso de la TV-PG y TV-14.
Nota: No se puede bloquear una subcategoría a menos que la categoría
principal esté bloqueada.
Page 51
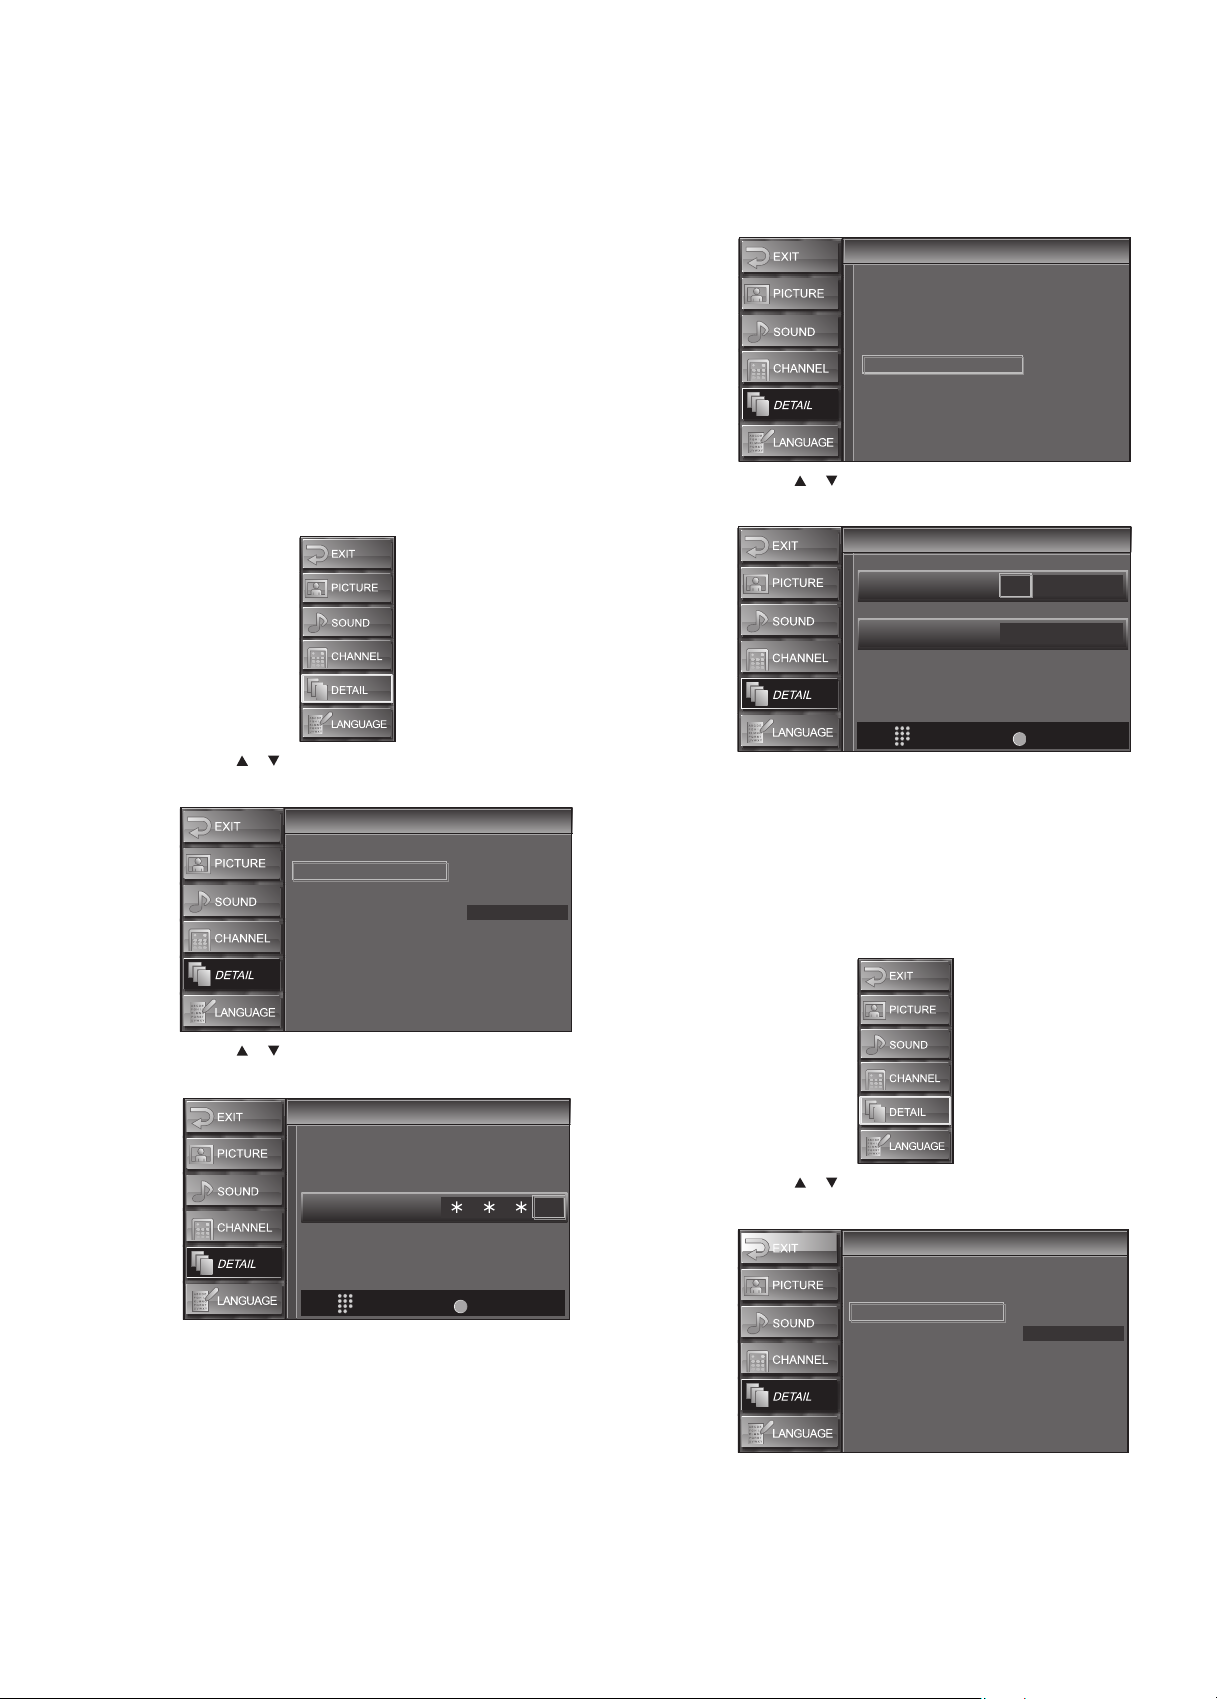
Uso de su televisor
51
4 Presione el botón de menú (MENU) para cerrar el menú.
Notas:
Cuando se bloquea una clasificación, las clasificaciones superiores se
bloquean automáticamente. Las clasificaciones inferiores se
mantendrán disponibles para verlas.
Cuando se bloquea la clasificación más alta, todas las clasificaciones se
bloquean automáticamente.
Diferente s programas u san dife rentes cl asifica ciones . Para bloq uear tod a
la programación que no es apropiada, ajuste los controles de los
padres para la clasificación de MPAA (MPAA Rating), la clasificación
de TV ( TV Rating) y la clasificación descargada (Downloadable
Ratin g).
Si la energía falla, su televisor mantendrá la configuración del V-chip con
excepción de la contraseña. La contraseña se restaurará a 0000.
Cambio de la contraseña
Para cambiar la contraseña:
1 Presione el botón de menú (MENU). Se abrirá el menú de
pantalla.
4 Presione los botones numéricos para ingresar una contraseña de
cuatro dígitos. Si no ha configurado una contraseña, ingrese
0000. Si olvidó la contraseña, cierre el menú, apague su televisor
y desenchufe el cable de alimentación por 10 segundos. Se
restaurará la contraseña predefinida (0000).
V-c hi p
V-c hi p
MPAA Rating
TV Rating
Downloadable Rating
Clear Downloadable Rating
New Password
5 Presione o para seleccionar New Password (Nueva
contraseña) y presione botón de entrar (ENTER).
V-c hi p
V-c hi p
Enter password.
Confirm password.
----
----
2 Presione o para seleccionar DETAIL (Detalle) y presione el
botón de entrar (ENTER).
Detail
Detail
Closed Caption
V–chip
PC Settings
HDMI1 Audio
Auto
3 Presione o para seleccionar V-chip y presione el botón de
entrar (ENTER).
V-c hi p
V-c hi p
Enter password.
PIN Code
BACK
Back
-
PIN Code
BACK
Back
6 Presione los botones numéricos para ingresar la contraseña
nueva y vuelva a ingresar la contraseña nueva para confirmar.
7 Presione el botón de menú (MENU) para cerrar el menú.
Ajuste de la imagen de computadora
Para ajustar la imagen de computadora:
1 Presione el botón de menú (MENU). Se abrirá el menú de
pantalla.
2 Presione o para seleccionar DETAIL (Detalle) y presione el
botón de entrar (ENTER).
Detail
Detail
Closed Caption
V–chip
PC Settings
HDMI1 Audio
Auto
Page 52

52
Mantenimiento
3 Presione o para seleccionar PC Settings (Configuración de
PC) y presione el botón de entrar (ENTER).
PC Settings
PC Settings
Auto Adjustment
Horizontal Position
Vertical Position
Clock
Phase
4 Presione o para seleccionar la opción que desea ajustar y
presione el botón de entrar (ENTER). Se puede seleccionar:
• Auto Adjustment (Ajuste automático) — Presione el
botón de entrar (ENTER) Su televisor ajustará
automáticamente la posición horizontal, la posición vertical,
el reloj y la fase. Si no obtiene los resultados que desea,
puede ser que necesite ajustar manualmente la
configuración.
• Horizontal Position (Posición horizontal) — Presione
o para mover la imagen hacia la izquierda o derecha.
• Vertical Position (Posición vertical) — Presione o
para mover la imagen hacia la arriba o abajo.
• Clock (Reloj) — Presione o para estabilizar la imagen.
Para obtener los mejores resultados, ajuste la fase (Phase)
antes de ajustar el reloj (Clock).
• Phase (Fase) — Presione o para mejorar la claridad de
la imagen.
5 Presione el botón de menú (MENU) para cerrar el menú.
Selección del modo de audio de HDMI
Sólo se puede seleccionar el modo de audio de HDMI para el equipo
conectado en la toma de entrada HDMI 1 (HDMI 1 IN).
Para seleccionar el modo de audio de HDMI:
1 Presione el botón de menú (MENU). Se abrirá el menú de
pantalla.
3 Presione o para seleccionar HDMI1 Audio (audio de HDMI
1) y presione botón de entrar (ENTER).
Detail
Detail
Closed Caption
V–chip
- -
- -
- -
- -
PC settings
HDMI1 Audio
Auto
Digital
Analog
4 Presione o para seleccionar un modo de audio de HDMI 1 y
presione botón de entrar (ENTER). Se puede seleccionar:
• Auto — Sí ha conectado un equipo digital a la toma de
entrada de HDMI 1 (HDMI 1 IN) y un equipo analógico a las
tomas de entrada de audio relacionadas (AUDIO IN), se le
dará la prioridad al equipo con audio digital.
• Digital — Selecciona el equipo digital conectado a la toma
de entrada de HDMI 1 (HDMI 1 IN).
• Analog (Analógico) — Selecciona el equipo analógico
conectado a las tomas de entrada de audio (AUDIO IN)
relacionadas con la toma de entrada de HDMI 1 (HDMI 1 IN).
5 Presione el botón de menú (MENU) para cerrar el menú.
Mantenimiento
Limpieza
• Antes de limpiar la pantalla, desenchufe su televisor del
tomacorriente.
• Limpie el panel frontal y otras superficies exteriores de su
televisor con un paño suave que se ha mojado en agua templada
y luego ha sido exprimido.
• Nunca use disolventes ni alcohol. No rocíe un líquido insecticida
cerca de su televisor. Esta clase de productos químicos podría
dañar y decolorar las superficies expuestas.
Reparación
2 Presione o para seleccionar DETAIL (Detalle) y presione el
botón de entrar (ENTER).
Detail
Detail
Closed Caption
V–chip
PC Settings
HDMI1 Audio
Auto
No intente reparar su televisor usted mismo. No existen partes
reparables por el usuario en el interior. Apague su televisor y desconecte
el cable de alimentación y póngase en contacto con un
centro de servicio autorizado.
Verificación de la señal del control remoto
Si el control remoto no está funcionando correctamente, puede usar un
radio de AM o una cámara digital (incluyendo un teléfono celular con
una cámara integrada) para ver si el control remoto está enviando una
señal infrarroja.
Para verificar la señal con un radio de AM:
1 Sintonice el radio de AM a una frecuencia sin transmisión.
2 Apunta el control remoto hacia el radio, presione cualquier botón
y escuche. Si se escucha un sonido agitado en el radio, el control
remoto está funcionando.
Para verificar la señal con una cámara digital:
1 Apunte la cámara digital hacia el control remoto.
2 Presione cualquier botón en el control remoto y vea la pantalla
LCD de la cámara. Si la luz infrarroja aparece en la pantalla LCD, el
control remoto está funcionando.
Page 53
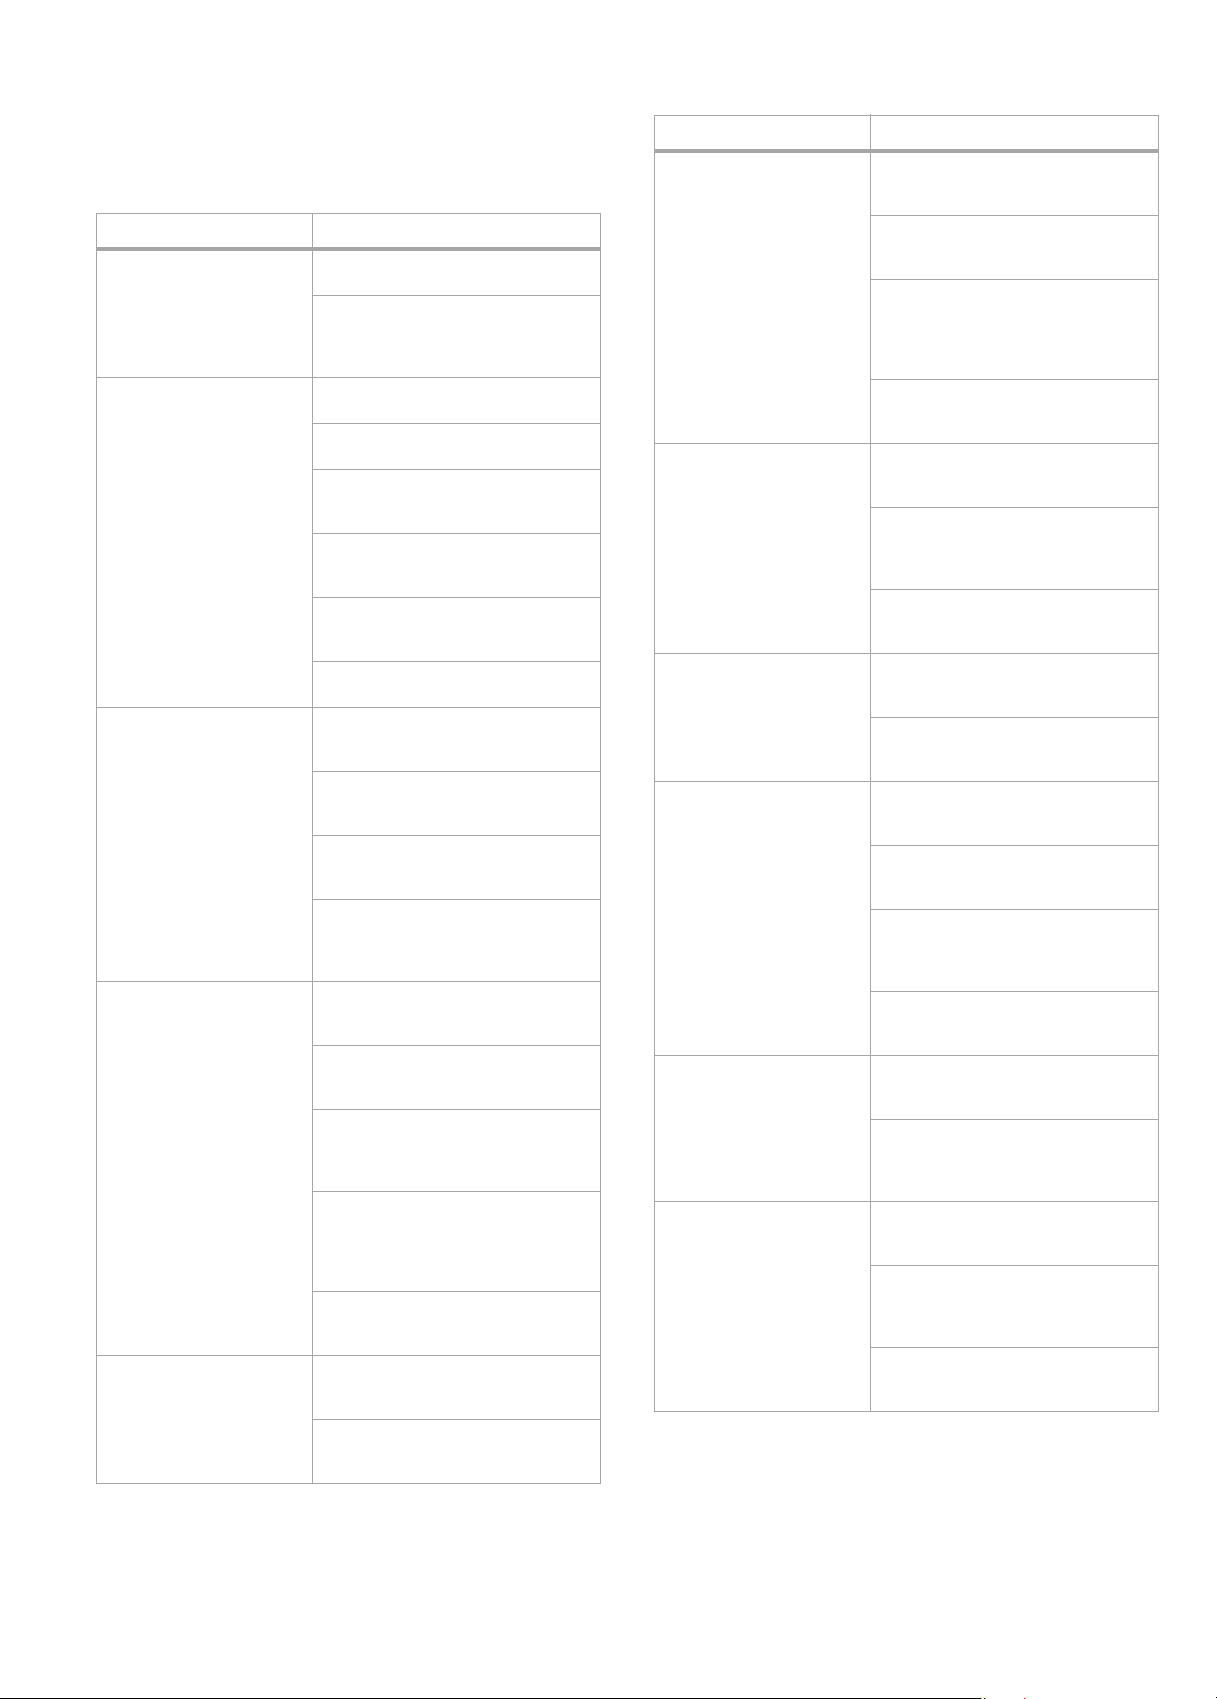
Localización y corrección de fallas
53
Localización y corrección de
fallas
Problema Solución
La unidad no enciende. Asegúrese de que el cable de
No hay imagen o sonido. Asegúrese de que su televisor esté
Sin color. Asegúrese de que la antena o la TV
El sonido está bien pero la
imagen es deficiente.
Imagen distorsionada. Si está usando una antena exterior,
alimentación esté enchufado.
Si ocurre una falla de energía,
desenchufe el cable de alimentación
por 30 minutos para dejar que su
televisor se reinicie solo.
encendido.
Asegúrese de que el tomacorriente
esté suministrando corriente.
Asegúrese de que la antena o la TV
por cable esté correctamente
conectada y asegurada.
Si está usando una antena exterior,
verifique la condición del cableado y
las conexiones.
Intente con otro canal. El problema
puede estar limitado a la estación
transmisora.
Apague su televisor, espere por un
minuto y vuelva a encenderlo.
por cable esté correctamente
conectada y asegurada.
Si está usando una antena exterior,
verifique la condición del cableado y
las conexiones.
Intente con otro canal. El problema
puede estar limitado a la estación
transmisora.
Ajuste la opción de Color en el menú
de pantalla. Para obtener más
información, refiérase a “Ajuste de la
imagen” en la página 43.
Asegúrese de que la antena o la TV
por cable esté correctamente
conectada y asegurada.
Si está usando una antena exterior,
verifique la condición del cableado y
las conexiones.
La interferencia eléctrica proveniente
de aparatos cercanos puede afectar
la calidad de la imagen. Apague los
aparatos o mueva su televisor.
Ajuste de las opciones de contraste
(Contrast) y brillo (Brightness) en el
menú de pantalla. Para obtener más
información, refiérase a “Ajuste de la
imagen” en la página 43.
Intente con otro canal. El problema
puede estar limitado a la estación
transmisora.
verifique la condición del cableado y
las conexiones.
Intente con otro canal. El problema
puede estar limitado a la estación
transmisora.
Problema Solución
Imagen débil. Asegúrese de que la antena o la TV
Líneas o bandas en la
imagen.
Imagen borrosa. Si está usando una antena exterior,
Fantasmas en la imagen. Asegúrese de que la antena o la TV
Barras en la pantalla. Si está usando una antena exterior,
La imagen se desplaza
verticalmente.
por cable esté correctamente
conectada y asegurada.
Si está usando una antena exterior,
verifique la condición del cableado y
las conexiones.
Ajuste de las opciones de contraste
(Contrast) y brillo (Brightness) en el
menú de pantalla. Para obtener más
información, refiérase a “Ajuste de la
imagen” en la página 43.
Intente con otro canal. El problema
puede estar limitado a la estación
transmisora.
Si está usando una antena exterior,
verifique la condición del cableado y
las conexiones.
La interferencia eléctrica proveniente
de aparatos cercanos puede afectar
la calidad de la imagen. Apague los
aparatos o mueva su televisor.
Intente con otro canal. El problema
puede estar limitado a la estación
transmisora.
verifique la condición del cableado y
las conexiones.
Intente con otro canal. El problema
puede estar limitado a la estación
transmisora.
por cable esté correctamente
conectada y asegurada.
Si está usando una antena exterior,
verifique la condición del cableado y
las conexiones.
La interferencia eléctrica proveniente
de aparatos cercanos puede afectar
la calidad de la imagen. Apague los
aparatos o mueva su televisor.
Intente con otro canal. El problema
puede estar limitado a la estación
transmisora.
verifique la condición del cableado y
las conexiones.
La interferencia eléctrica proveniente
de aparatos cercanos puede afectar
la calidad de la imagen. Apague los
aparatos o mueva su televisor.
Si está usando una antena exterior,
verifique la condición del cableado y
las conexiones.
La interferencia eléctrica proveniente
de aparatos cercanos puede afectar
la calidad de la imagen. Apague los
aparatos o mueva su televisor.
Intente con otro canal. El problema
puede estar limitado a la estación
transmisora.
Page 54

54
Localización y corrección de fallas
Problema Solución
Diferentes marcas de color
en la pantalla.
La imagen tiene unos
puntos brillantes u oscuros
Recepción deficiente en
algunos canales.
Imagen aceptable, sonido
deficiente.
No se pueden recibir
señales digitales.
El número de canal
ingresado cambia
automáticamente.
Aleje la unidad de aparatos eléctricos
cercanos. Apague la unidad y espere
30 minutos antes de volver a
encenderla.
Intente con otro canal. El problema
puede estar limitado a la estación
transmisora.
Unos puntos brillantes u oscuros en
un una pantalla LCD es normal. Esto
no afecta el funcionamiento de este
televisor
Asegúrese de que la antena o la TV
por cable esté correctamente
conectada y asegurada.
Si está usando una antena exterior,
verifique la condición del cableado y
las conexiones.
La interferencia eléctrica proveniente
de aparatos cercanos puede afectar
la calidad de la imagen. Apague los
aparatos o mueva su televisor.
Intente con otro canal. El problema
puede estar limitado a la estación
transmisora.
Intente con otro canal. El problema
puede estar limitado a la estación
transmisora.
Asegúrese de que el escaneo de
canales automático se ha
completado.
El escaneo de canales automático
debe ser completado cuando
configure su televisor por primera vez
o cuando lo mueva a un lugar donde
se transmiten canales que antes no
estaban disponibles.
Puede ser que no se transmita el
canal seleccionado.
Cuando el escaneo de canales
automático se interrumpe y no se
completa, no se podrán recibir
algunos canales. Asegúrese de que el
escaneo de canales automático se ha
completado.
Algunos canales digitales tienen
números de canal alternativos. Su
televisor cambia de números
automáticamente a los que
representan la estación transmisora.
Estos son los números usados para
las transmisiones analógicas.
Problema Solución
El control remoto no
funciona.
Los subtítulos se muestran
con errores ortográficos.
Los subtítulos optativos no
se muestran
completamente, o
aparecen después del
diálogo.
Los subtítulos optativos se
muestran en un cuadro
blanco o no se muestra
ningún subtítulo en un
programa que contiene
subtítulos optativos.
No se muestran subtítulos
optativos cuando se
reproduce una cinta de
video que contiene
subtítulos.
Se muestra un cuadro
negro en la pantalla del
televisor.
Si está usando una antena exterior,
verifique la condición del cableado y
las conexiones.
Revise las pilas del control remoto.
Verifique que no hay obstáculos
entre el sensor del control remoto en
su televisor y el control remoto.
Verifique la salida de señal. Si las
señales buena, entonces puede
haber un problema con el sensor
infrarrojo.
Cuando hay un dispositivo equipado
con infrarrojo tal como una
computadora cercana al televisor, en
dispositivo puede interrumpir la
señal del control remoto. Aleje de su
televisor el dispositivo equipado con
infrarrojo, cambie el ángulo del
sensor infrarrojo o desactive la
función de comunicación infrarroja.
Apunte el control remoto
directamente hacia el sensor de
control remoto al frente de su
televisor.
Acerque el control remoto a su
televisor.
Asegúrese de que las pilas están
insertadas correctamente. Los
símbolos + y – en las pilas deben
coincidir con los símbolos + y –
dentro del compartimiento de las
pilas.
Las compañías de producción de
subtítulos pueden transmitir los
programas sin corregir los errores
ortográficos en una transmisión en
vivo.
Es común que los subtítulos se
retrasen unos cuantos segundos en
programas de difusión en vivo. La
mayoría de compañías de
producción de subtítulos pueden
mostrar un diálogo a un máximo de
220 palabras por minuto. Si un
diálogo excede esa velocidad, la
edición selectiva se usa para asegurar
que los subtítulos se mantengan
sincronizados con el diálogo actual.
La interferencia de edificios o
condiciones de clima pueden hacer
que los subtítulos optativos no estén
completos.
Las estaciones de transmisión
pueden acortar los programas para
insertar comerciales. El decodificador
de subtítulos no puede leer la
información de programas acortados.
La cinta de video puede haber sido
copiada ilegalmente, o puede ser que
no se leyó la señal de subtítulos
durante el copiado.
Se seleccionó el modo de texto para
los subtítulos optativos. Seleccione
CC1, CC2, CC3, CC4 o Off
(Desactivado).
Page 55

Especificaciones
55
Especificaciones
Las especificaciones están sujetas a cambio sin aviso previo.
Formato de TV
Sistema de
subtítulos optativos
Rango de canales
(ATSC/NTSC)
Sistema de
sintonización
Acceso de canales
Salida de sonido
Entrada de antena
Entrada de S-Video
Entrada de video
Entrada de audio
Entrada de video de
componentes
Entrada de HDMI
Entrada de PC
Salida coaxial de
audio digital
Salida de audio
analógico
Control remoto
Temperatura de
operación
Requisitos de
alimentación
Consumo de energía
(máximo)
Dimensiones
Alto ×Ancho × Profu
ndidad
Estándar de TV ATSC/NTSC-M
§15.122/FCC (subtítulos optativos digitales)
§15.119/FCC (subtítulos optativos analógicos)
VHF terrestre: 2~13
UHF: 14~69
CATV: 2~13, A~W, W+1~W+94 (analógico
W+1~W+84), A-5~A-1, 5A
Sistema de sintonización sintetizado por
frecuencia de canal
Teclado con acceso directo, rastreo
programable y arriba/abajo
10 W, 8 Ω × 2
VHF/UHF/CATV
75Ω sin balance (Tipo F)
Conector Mini DIN de 4 terminales × 2
Y: 1 Vp-p (75 Ω )
C: 286 mVp-p (75 Ω¶)
Toma RCA × 2
1 Vp-p (75 Ω )
Toma RCA (Izq./Der.) × 10
500 mV rms
Toma RCA × 6
Y: 1 Vp-p (75 Ω )
Pb: 700 mVp-p (75 Ω )
Pr: 700 mVp-p (75 Ω)
HDMI de 19 terminales × 2
Conector D-Sub de 15 terminales × 1 (RGB)
Mini toma de ø3.5 mm × 1 (audio)
Toma RCA × 1
500 mVp-p (75 Ω )
Toma RCA × 2
Sistema de luz infrarroja digital codificada
41 °F a 104 °F (5 °C a 40 °C)
120 V CA ± 10 %, 60 Hz ± 0.5 %
220 W
Panel panorámico XGA de 37 pulgadas
LCD
Sin pedestal:
26.5 × 37.5 × 5 pulgadas
(672.5 × 950 × 126.5 mm)
Con pedestal:
28.1 × 37.5 × 11.5 pulgadas
(713 × 950 × 290 mm)
45.5 lb. (20.6 kg)
Peso
Avisos legales
FCC Parte 15
Este dispositivo satisface la parte 15 del reglamento FCC. La operación
de este producto está sujeta a las dos condiciones siguientes: (1) Este
dispositivo no puede causar interferencia dañina, y (2) este dispositivo
debe aceptar cualquier interferencia recibida incluyendo interferencias
que puedan causar una operación no deseada.
Este equipo ha sido sometido a prueba y se ha determinado que
satisface los límites establecidos para ser clasificado cómo dispositivo
digital de la Clase B de acuerdo con la Parte 15 del reglamento FCC.
Estos límites están diseñados para proporcionar una protección
razonable contra interferencias dañinas en un ambiente residencial.
Este equipo genera, usa y puede emitir energía de radiofrecuencia, y si
no se instala y usa de acuerdo con las instrucciones, puede causar
interferencias perjudiciales a las comunicaciones de radio. Sin embargo,
no se garantiza que no ocurrirá interferencia en una instalación
particular. Si este equipo causa interferencias perjudiciales en la
recepción de la señal de radio o televisión, lo cual puede comprobarse
encendiendo y apagando el reproductor alternativamente, se
recomienda al usuario corregir la interferencia mediante uno de los
siguientes procedimientos:
• Cambie la orientación o la ubicación de la antena receptora.
• Aumente la distancia entre el equipo y el receptor.
• Conecte el equipo a un tomacorriente de un circuito distinto de
aquel al que está conectado el receptor.
• Solicite consejo al distribuidor o a un técnico calificado para
obtener ayuda.
Advertencia de la FCC
Cualquier cambio o modificación que no esté aprobado expresamente
por la parte responsable por el cumplimiento con el reglamento de FCC
puede anular la autoridad del usuario para operar este equipo.
Derechos de reproducción
Dolby Laboratories
Este producto incorpora tecnología de protección de derechos de reproducción que está
protegida por demandas de método de ciertas patentes de los Estados Unidos y otros
derechos de propiedad intelectual poseídos por Macrovision Corporation y otros dueño s
de los derechos. El uso de esta tecnología con protección de derechos de autor debe ser
autorizada por Macrovision Corporation, y está destinada únicamente para visualización
en casa y otros usos limitados de visualización a menos que sea autorizada por
Macrovision Corporation. Se prohíbe la ingeniería inversa y el desmontaje.
Fabricado bajo licencia de Dolby Laboratories. Dolby y el símbolo son marcas
registradas de DOLBY LABORATORIES. Todos los derechos reservados.
HDMI™
Su televisor incorpora una tecnología HDMI™. HDMI, el logo de
HDMI y High-Definition Multimedia Interface (Interfaz de
Multimedia de Alta Definición) son marcas comerciales o marcas registradas de HDMI
Licensing LLC.
Energy Star
Los productos que han obtenido la homologación ENERGY STAR® están
diseñado para proteger el ambiente gracias a una eficiencia más alta de la
energía. Su televisor esta en conformidad con la norma Energy Star.
HDTV
El logo “HD TV” es una marca comercial de EICTA.
Avisos
Las especificaciones y características están sujetas a cambio sin aviso
previo u obligación.
Para reparación y soporte llamar al (800) 305-2204.
HIGH-DEFINITION TELEVISION
Page 56

56
Avisos legales
Page 57

Avisos legales
57
Garantía limitada de un año
Dynex Products (“Dynex”) le garantiza a usted, el comprador original de este nuevo
DX-LCD37-09 (“Producto”), que éste se encontrará libre de defectos de material o de
mano de obra en su fabricación original por un periodo de un (1) año a partir de la fecha
de compra del Producto (“Período de Garantía”). Este Producto debe ser comprado en
un distribuidor autorizado de productos Dynex y empacado con esta declaración de
garantía. Esta garantía no cubre productos reacondicionados. Si notifica a Dynex
durante el Período de Garantía sobre un defecto cubierto por esta garantía que requiere
reparación, los términos de esta garantía se aplican.
¿Cuánto dura la garantía?
El Período de Garantía dura por un año (365 días) a partir de la fecha en que compró el
Producto. La fecha de compra se encuentra impresa en el recibo que recibió con el
Producto.
¿Qué es lo que cubre esta garantía?
Durante el Período de G arantía, si un centro de reparación autorizado de Dynex concluye
que la fabricación original del material o la mano de obra del Producto se encuentran
defectuosos Dynex (cómo su opción exclusiva): (1) reparará el Producto con repuestos
nuevos o reacondicionados; o (2) reemplazará el Producto con uno nuevo o con uno
reacondicionado con repuestos equivalentes. Los Productos y repuestos reemplazados
bajo esta garantía se volverán propiedad de Dynex y no se le regresarán a usted. Si se
requiere la reparación de productos y partes después de que se vence el Período de
Garantía, usted deberá pagar todos los costos de mano de obra y de repuestos. Esta
estará vigente con tal que usted sea el dueño de su producto Dynex durante el Periodo
de Garantía. El alcance de la garantía se termina si usted vende o transfiere el producto.
¿Cómo se obtiene la reparación de garantía?
Si ha comprado el Producto en una tienda de ventas, lleve su recibo original y el
Producto a la tienda en donde lo compró. Asegúrese de que vuelva a colocar el Producto
en su empaque original o en un empaque que provea la misma protección que el
original. Si compró el Producto en un sitio Web, envíe por correo su recibo original y el
Producto a la dirección postal listada en el sitio Web. Asegúrese de colocar el Producto
en su empaque original o en un empaque que provea la misma protección que el
original.
Para obtener servicio de garantía a domicilio para un televisor con una pantalla de 25
pulgadas o más, llame al 1-888-BESTBUY. El soporte técnico diagnosticará y corregirá el
problema por teléfono o enviará un técnico certificado por Insignia a su casa.
¿En dónde es válida la garantía?
Esta garantía sólo es válida al comprador original del Producto en los Estados Unidos y
en Canadá.
¿Qué es lo que no cubre la garantía?
Esta garantía no cubre:
• Capacitación del cliente
•Instalación
• Ajuste de configuración
• Dañ os cosméticos
• Daños debido a actos de la naturaleza, tal como rayos
•Accidentes
•Mal uso
•Abuso
•Negligencia
•Uso comercial
• Modificación de alguna parte del Producto
• Un panel de pantalla de pl asma dañado por la persistencia de imágenes
estáticas (sin movimiento), mostradas por periodos de tiempo extendido
(efecto “burn-in”).
Esta garantía tampoco cubre:
• Daño debido al uso o mantenimiento incorrecto
• La conexión a una fuente de voltaje incorrecta
• El intento de reparación por alguien que no sea una compañía autorizada por
Dynex para reparar el Producto
• Productos vendidos tal cual (en el estado en que se encuentran) o con todas sus
fallas
• Productos consumibles, tal como fusibles o baterías
• Productos en los cuales el número de serie asignado en la fábrica ha sido
alterado o removido
EL REEMPLAZO DE REPARACIÓN SEGÚN PROVISTO BAJO ESTA GARANTÍA ES SU ÚNICO
RECURSO. DYNEX NO SERÁ RESPONSABLE POR DAÑOS INCIDENTALES O CONSECUENTES
DEBIDO AL INCUMPLIMIENTO DE CUALQUIER GARANTÍA EXPRESA O IMPLÍCITA
RELACIONADA CON ESTE P RODUCTO, INCLUYENDO P ERO SIN LIMITARSE A LA PÉRDIDA DE
INFORMACIÓN, LA PÉRDIDA DE NEGOCIOS O DE GANANCIAS. DYNEX PRODUCTS NO HACE
NINGUNA OTRA GARANTÍA EXPRESA E IMPLÍCITA RELACIONADA A ESTE PRODUCTO,
INCLUYENDO PERO SIN LIMITARSE A, CUALQUIER GARANTÍA IMPLICITA DE O
CONDICIONES DE COMERCIALIZACIÓN O IDONEIDAD PARA UN USO PARTICULAR, ESTÁN
LIMITADAS EN DURACIÓN AL PERÍODO DE GARANTÍA DECLARADO ANTERIORMENTE Y
NINGUNA GARANTÍA YA SEA EXPRESA O IMPLÍCITA SE APLICARÁ DESPUÉS DEL PERÍODO
DE GARANTÍA. ALGUNOS ESTADOS, PROVINCIAS Y JURISDICCIONES NO PERMITEN
RESTRICCIONES EN CUANTO A LA DURACIÓN DE UNA GARANTÍA IMPLÍCITA, ASÍ QUE LA
RESTRICCIÓN ANTERIOR PUEDE NO APLICARSE EN SU CASO. ESTA GARANTÍA LE DA
DERECHOS LEGALES ESPECÍFICOS, Y USTED PUEDE POSEER OTROS DERECHOS QUE
VARÍAN DE ESTADO A ESTADO, O DE PROVINCIA A PROVINCIA.
Póngase en contacto con Dynex:
Para servicio al cliente favor llamar al 1-800-305-2204
www.dynexproducts.com
Distribuido por Best Buy Purchasing, LLC
Dynex, 7601 Penn Avenue South, Richfield, Minnesota, E.U.A. 55423-3645
© 2008 Best Buy Enterprise Services, Inc.Todos los derechos reservados. DYNEX es una
marca comercial de Best Buy Enterprise Services, Inc. registrada en ciertos países. Todos
los otros productos y los nombres de marca son marcas comercial es de sus respectivos
dueños.
Page 58

58
Avisos legales
Page 59

Avisos legales
59
Page 60

60
Avisos legales
Page 61

Avisos legales
61
Page 62

62
Avisos legales
Page 63

Avisos legales
63
Page 64

08-1262
www.dynexproducts.com (800) 305-2204
Distributed by Best Buy Purchasing, LLC
7601 Penn Ave. South, Richfield, MN 55423 U.S.A.
DYNEX is a trademark of Best Buy Enterprise Services, Inc. Registered in some countries. All other
DYNEX es una marca de Best Buy Enterprise Services, Inc. Registrada en ciertos países. Todos los
demás productos y marcas son marcas comerciales de sus respectivos dueños.
© 2008 Best Buy Enterprise Services, Inc. All rights reserved.
products and brand names are trademarks of their respective owners.
Distribuido por Best Buy Purchasing, LLC
7601 Penn Ave. South, Richfield, MN 55423 U.S.A.
© 2008 Best Buy Enterprise Services, Inc. Todos los derechos reservados.
Printed in Mexico
1EMN23239
A71GDUE*****
 Loading...