

Page 1
INSTALLATION INSTRUCTIONS
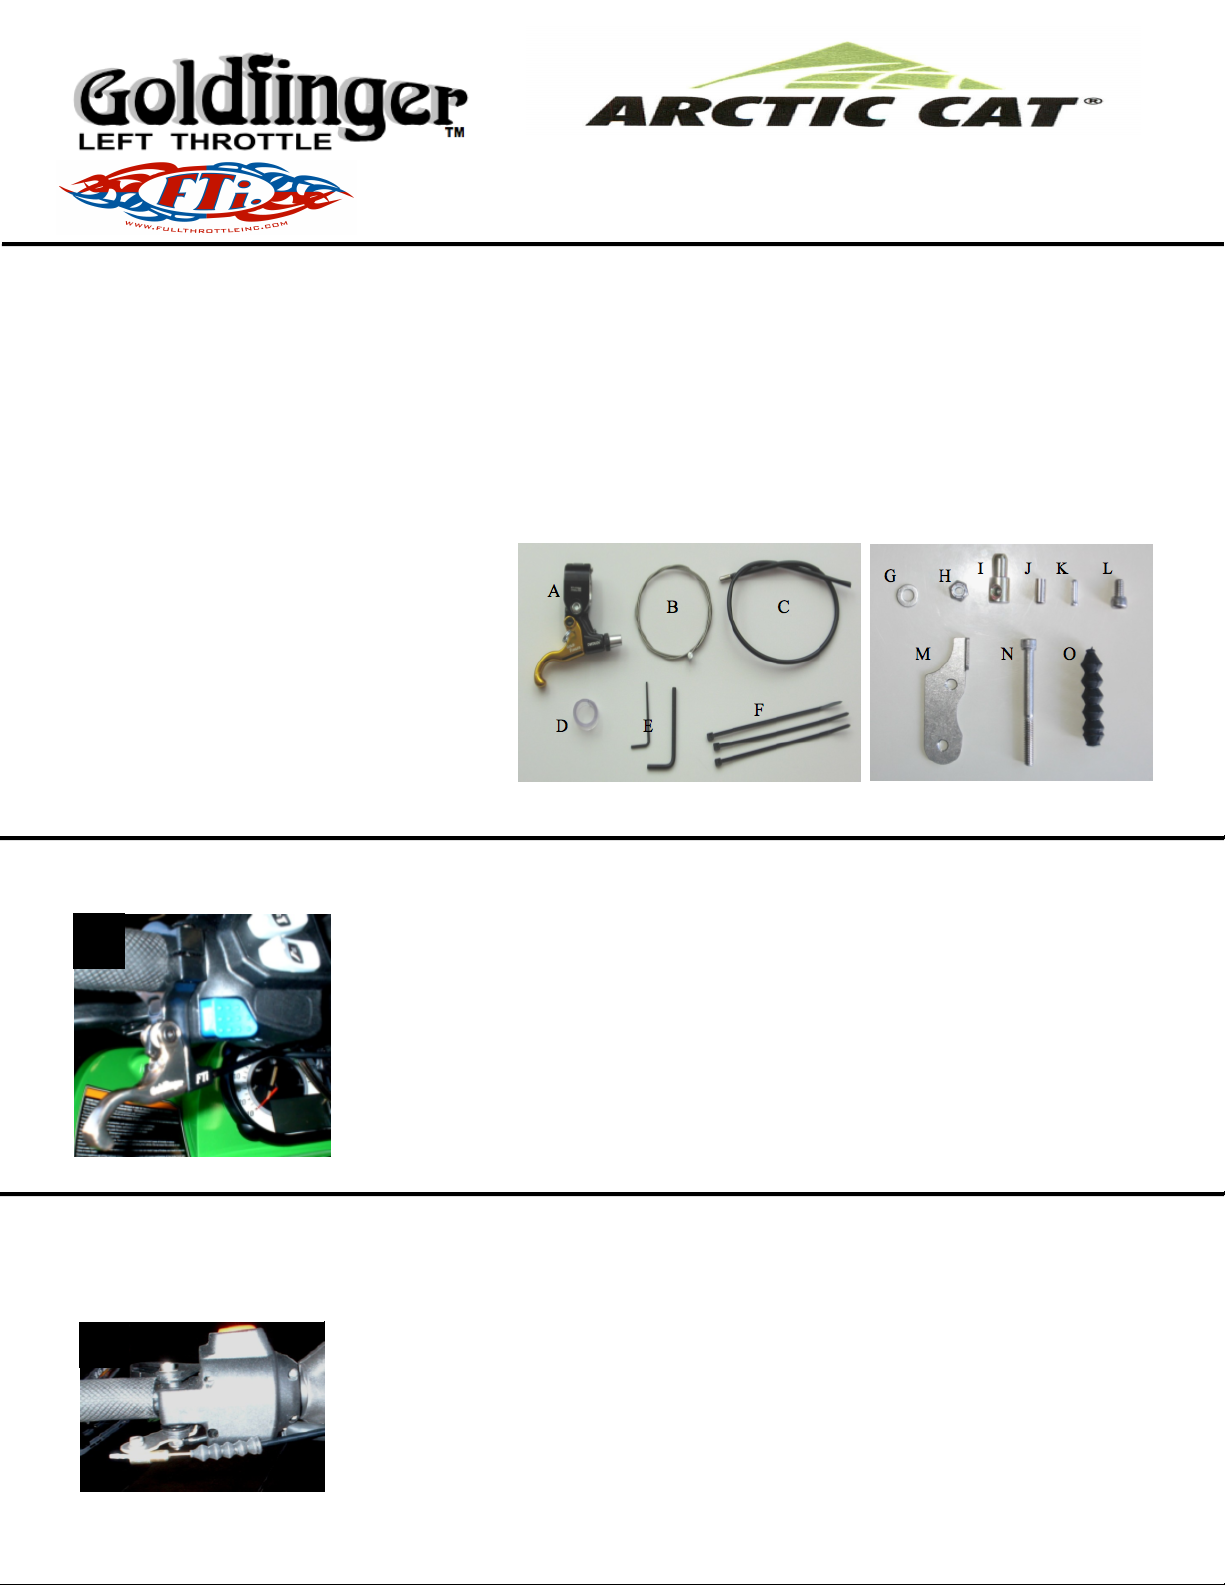
O. Rubber accordion boot (1)
A
B
Revised May 2013
CAUTION: INSTALLATION IS ALWAYS AT YOUR OWN RISK.
Improper assembly of this device may result in serious injury or even death, not to mention catastrophic damage to your machine. Before beginning, you
must carefully read ALL INSTRUCTIONS, as well as attached DISCLAIMER INFORMATION. If you have any questions, no matter how silly, consult an
professional mechanic or call to speak with one of our Technical Advisors at (509) 927-7533. While installation is quite simple, it should ONLY be
performed by those possessing solid mechanical abilities.
IF YOU ARE NOT MECHANICALLY INCLINED WE RECOMMEND YOU SEEK OUT EITHER A PROFESSIONAL MECHANIC
TOOLS NEEDED
Other than the tools supplied with kit, you should only need: a pair of diagonal cutters (dikes) to trim excess cable, a pair of slip-joint pliers, and 1 tube
Blue Loctite.
PARTS LIST
A. GOLDFINGER lever and perch with safety pin installed (1)
B. Stainless steel cable (1)
C. Black cable housing (1)
D. 1” clear nylon spacer (1)
E. Allen wrenches (2, small and large)
F. Plastic zip-ties (4)
G. Flat washers (5)
H. Nyloc nut (1)
I. Barrel bolt (1)
J. Ferrule end (2)
K. Aluminum cable crimp cap (1)
L. Short allen screw (1)
M. Stainless steel adapter plate (1)
N. Long allen screw (1)
OR YOUR DEALER TO INSTALL THE GOLDFINGER ON YOUR SNOWMOBILE!
A) Installation of Left-Side Throttle Lever Perch (See Photo A)
On most models the throttle lever perch will fit over the left side handlebar grip with no modifications to the grip.
The goal for this section will be to position the throttle lever perch assembly as closely as possible to the left side
of the brake reservoir/switch switch housing on the left side of handlebars, with the lever hanging straight down.
1) Using smallest (2.5mm) allen wrench supplied in kit, remove the 2 lever perch allen screws, then remove the
perch cap.
2) Position lever perch and cap over handlebar grip as closely as possible to the left side of the brake reservoir/
switch housing assembly on the left side of handlebars. The GOLDFINGER lever should hang in approximately
the 6:00 position, or 90 degrees separated from the brake lever. (Note: If you have wider aftermarket bars and
the lever perch will be installed directly over the handlebars instead of the grips, you can use the nylon spacer
provided in your kit.)
3) Thread allen screws back into perch housing, being careful not to cross-thread screws.
4) Once the lever perch fits snugly and the allen screws thread smoothly, tighten the screws to prevent the perch
from rotating loosely on the handlebar. CAUTION: In no case should your GOLDFINGER throttle lever be
parallel or close to your brake lever!
B) Installation of Right-Side Throttle Adapter Plate (See Photo B)
** If your snowmobile is a 2007 or later model please refer to the adapter kit found in a small sealed ziploc bag for this part of installation**
1) Using a screwdriver or needle-nose pliers, remove the OEM (original) throttle pivot pin snap-ring from the
ORIGINAL throttle on the right side.
2) Remove the pivot pin and washers and put them in your toolbox (you won’t need them anymore).
3) Starting from the top, insert the long allen screw first through a washer, then into the throttle flipper, then into
the pivot pin hole on the throttle block housing.
4) Then put two washers on the long allen screw, followed by the stainless steel adapter plate with the bent tab
end toward you. The adapter plate tab should be pointed UP so that it fits into the space between the throttle
flipper and the throttle block housing.
5) Next, place 1 more washer on the long allen screw and secure with the nyloc nut. (If there is still too much
unthreaded space on the long allen screw use the extra washers in the kit to make up the difference.)
Page 2
6) Tighten the nyloc nut a few turns. Your goal should be to tighten the nut just to the point where it keeps the adapter plate from slipping around, but
D
C
not so tight that the plate can’t float freely (i.e., independent of the movement of the throttle flipper). The clearance should be approximately the
thickness of a business card. Don’t worry, since it’s a locking nut it won’t vibrate off.
7) Now, hold the adapter plate with your left hand while engaging the right side throttle with your right hand. You should feel no friction whatsoever, yet
the plate should not wobble excessively on the bolt. Adjust the tightness of the nyloc nut until it feels as described in step 6.
C) Routing of Cable From Left Throttle to Right-Side Cable Attachment (See Photos C and D)
(CAUTION: Your kit contains a black vinyl cable housing. This cable housing MUST BE TRIMMED
binding, which may cause friction. (TIP: On our snowmobile we found it worked best to run the cable UNDERNEATH the brake line and wiring harness
on the LEFT SIDE of the handlebars, but OVER the wires and OEM throttle cables on the RIGHT SIDE of the handlebars.)
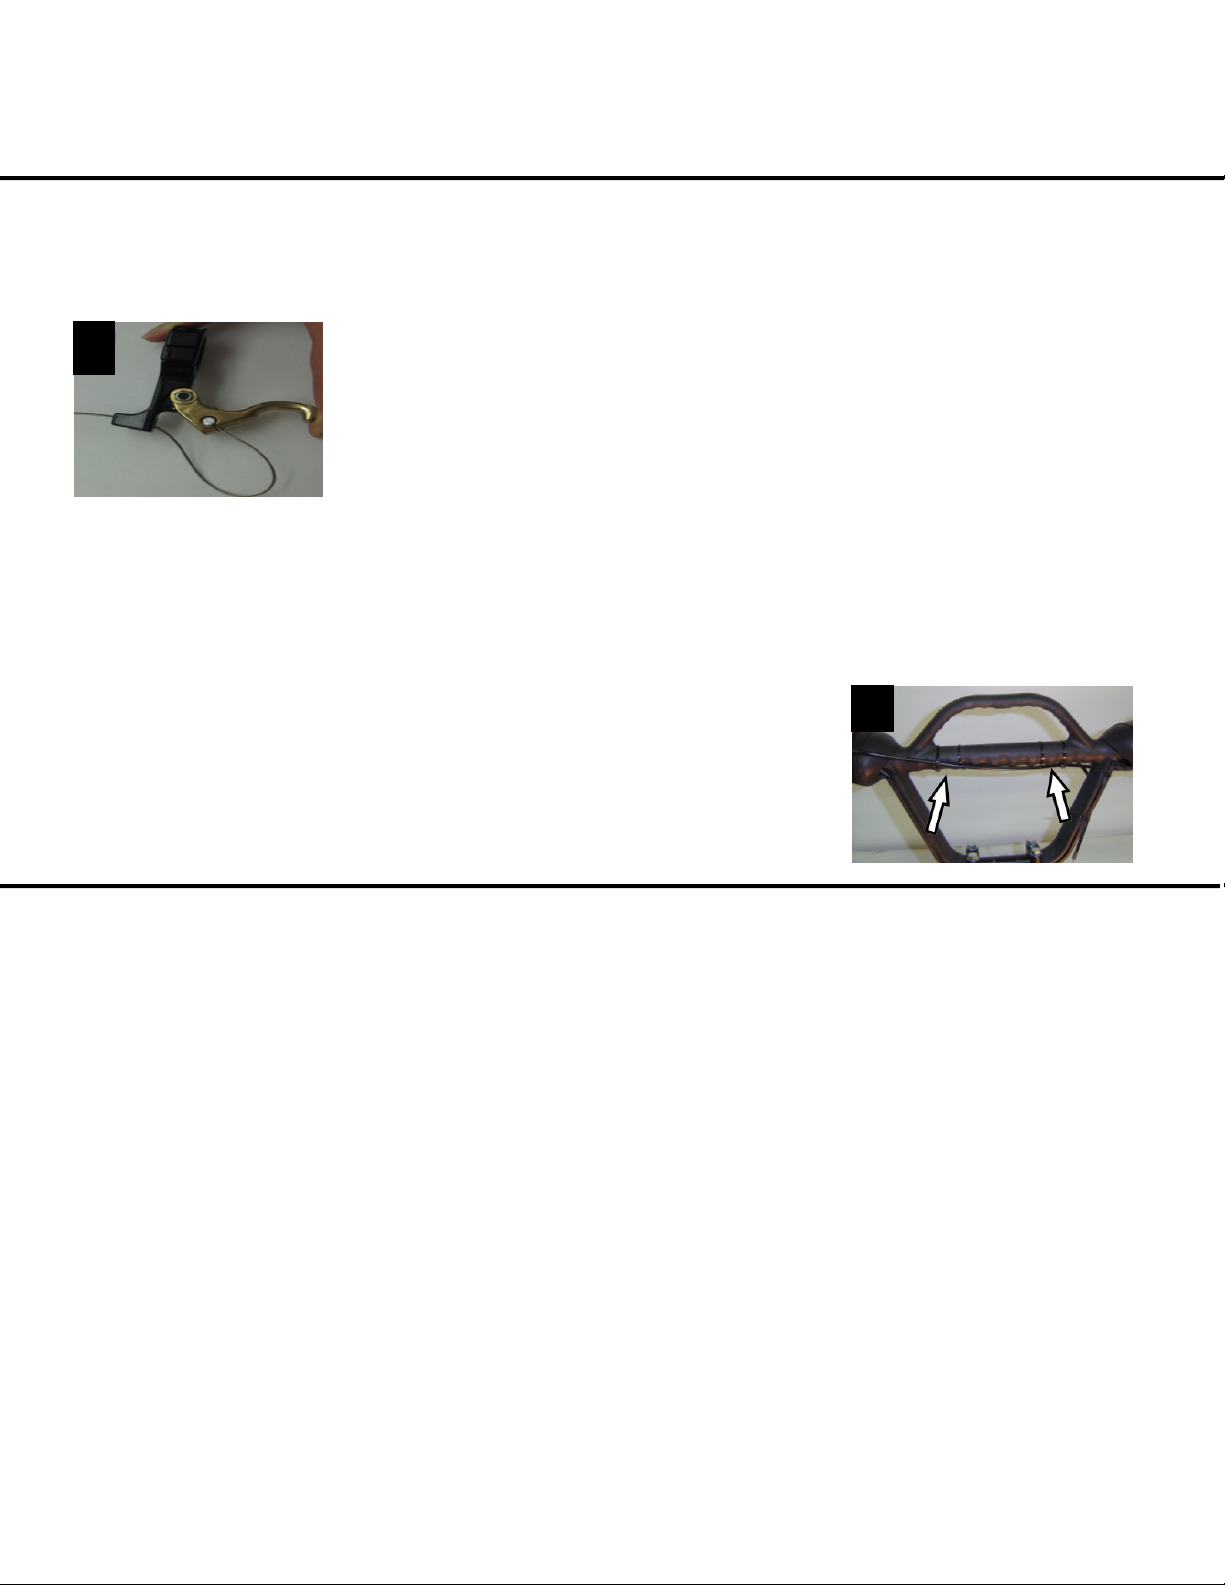
5) Secure the newly routed cable shroud with two zip ties on the left and two on the right side of the handlebars. (SEE ARROWS IN PHOTO D.) Pull
the zip ties snug, but not so tight as to kink the cable, then cut off the excess length from each zip tie.
6) With the GOLDFINGER left throttle in the fully-closed position, check to make sure chrome-capped cable housing end is pushed all the way into the
left throttle perch assembly. Next, measure 1 ¼” to the LEFT from the rounded end of the barrel bolt and make a mark on the black cable housing.
7) Before trimming cable housing, you MUST slide the stainless cable far enough into the housing so you don’t cut through the cable itself. Use a
sharp pair of diagonal cutters (dikes) to cut the cable housing. After trimming cable shroud, inspect end for any burrs or obstructions which might need
further trimming. (TIP: If there is a burr inside the cable housing you can usually clear it with a drill bit or
other sharp pointed tool which is slightly smaller than the internal diameter of the cable housing .)
8) Lightly crimp the shiny chrome cable end (included in your kit) on to the cut end of the cable housing
(slip-joint pliers work nicely), then push stainless cable back through the cable housing, making sure the
cable slides smoothly in and out of housing. If there is any friction, refer to burr removal tip found in step 7.
9) Next, run the bare end of the stainless cable through the large end of the rubber accordion boot, pulling
the boot up until it slides on to the chrome cable housing end.
10) Insert stainless cable through hole in the rounded end of barrel bolt. For now, leave excess cable
hanging out of the end of the barrel bolt, and do not tighten the barrel bolt short allen screw yet. You will do
this in step D.
11) Replace the handlebar padding and vinyl cover.
to the proper length during installation for safe and proper operation.)
1) In order to protect your cable from the many hazards of snowmobiling, we recommend that you route your leftthrottle-to-right-throttle cable shroud underneath the handlebar padding on models so equipped. To do this you
will first need to remove the center handlebar padding. Most snowmobile models have either zippers or a velcro
closure system which you will first need to open before removing the foam padding.
2) Push the “hammerhead” cable end of the stainless cable into the slot on the back of the GOLDFINGER left
throttle lever, then thread through the hole in the GOLDFINGER throttle perch housing as shown in photo C.
3) Insert the stainless cable bare end into the black cable housing (starting at the end with the chrome ferrule
end), then push all the way through until it comes out the other end.
4) Route the cable housing across the handlebars and through the hole in the rounded end of the
barrel bolt (you may need to loosen the short allen screw slightly to allow the cable to pass through the hole). It is
very important that the cable follow as straight a line as possible to the right side in order to reduce kinks or
D) Left Throttle Adjustment
THE FOLLOWING IS THE MOST CRITICAL PART OF THE INSTALLATION PROCESS!
1) With the right throttle in the FULLY CLOSED position and while holding the throttle plate from moving, pull the bare cable end tightly to the right to
eliminate slack in the cable (slip-joint pliers or vice grips help to grip the cable).
2) Using the 4mm allen wrench, tighten the short allen screw into the barrel bolt to secure the cable. DO NOT TIGHTEN COMPLETELY until you are
satisfied with the adjustment of the cable (this will flatten the cable inside the barrel bolt, making it more difficult to adjust).
3) Slowly engage the left throttle (with the engine off, of course--we had to put that in for obvious legal reasons) while watching the movement
of the right-side adapter plate. If adjusted properly, the right throttle should open fully, and then CLOSE COMPLETELY when left throttle is released.
If it does not close completely, continue adjusting position of cable inside barrel bolt until throttle opens and closes fully. When satisfied with
adjustment, tighten short allen screw into barrel bolt. (NOTE: There should be one washer between the short allen screw head and the top side of
the adapter plate, and another washer between the plate and the barrel bolt. When the short allen screw is tightened completely into the barrel bolt it
will secure the cable, but there should still be a tiny bit of clearance so the barrel bolt can rotate freely without binding.) Use your best judgment so
you don’t strip the threads in the barrel bolt (we’ve never done it yet, but we’re sure someone out there might be stronger than us….)
4) One more test: Engage the right throttle flipper fully with your right hand while watching the left throttle. Does the left throttle move any more
than 1/8” to 1/4”? If so you will need to remove the friction by either adding or removing stainless washers from between the right-side throttle flipper
and the throttle block housing.
5) Final step: Now you’re ready to trim the excess stainless steel cable. It’s best to use a sharp pair of diagonal cutting pliers or other sharp wire
cutters. You should leave about 1/2”” of cable sticking out of the blunt (right) end of the barrel bolt. Push the bare wire into the aluminum crimp cap
included with your kit, and crimp lightly with pliers to secure it on to the cable.
7) Before starting snowmobile, confirm that OEM throttle is in the fully closed (idle) position.
CONGRATULATIONS -- You are finished with the installation of your
GOLDFINGER left-side throttle!
Page 3

PLEASE READ FOLLOWING WARNINGS AND
DISCLAIMER FOR SAFE OPERATION!
BEFORE EACH RIDE
✦
Always inspect both ends of the cable, the left throttle lever, and the right-side adapter before each ride. Look for ice buildup from the cold
ride on the trailer, loose fasteners and/or kinks in the cable.
✦
Make sure before starting snowmobile that both throttles are in the FULLY CLOSED position. If anything looks amiss, either remedy the
problem or remove the adapter plate to disable left throttle.
✦
After starting engine, check to make sure that GOLDFINGER left throttle engages right side properly, and that engine immediately returns
to idle when lever is released.
CAUTIONS WHEN RIDING
✦
Getting accustomed to your newly-installed GOLDFINGER left throttle will probably take a day or two of riding. We recommend that you
carry at least the tools that you used to install your kit (allen wrenches and pliers) so that any necessary adjustments can be made while
out on the trail.
✦
We recommend that you ONLY use your GOLDFINGER when side-hilling or hill-climbing. For this reason, we have included a safety
lockout pin with your kit. This pin should ALWAYS be in place when trailriding, loading and unloading (we’ve heard horror stories of people
who have accidentally grabbed wide-open throttle when slowing for a corner, and others of people who have launched themselves
through the steel fronts of their enclosed trailers.)
✦
NEVER, NEVER, NEVER allow anyone unfamiliar with your sled to operate your machine without your first inserting the safety locking
pin!
✦
CHILDREN UNDER THE AGE OF 16 SHOULD NEVER BE ALLOWED TO OPERATE A SNOWMOBILE WITHOUT THE SAFETY
LOCKING PIN IN PLACE. (TIP: Secure your pin to the plastic clip at the end of the curly black ignition cutoff cord and you won’t lose it.)
✦
If you lose your lockout pin, please call us at (509) 927-7533 for a FREE REPLACEMENT pin.
CAUTIONS AFTER ROLLOVER OR CRASH
✦
Any time you roll your sled or crash into something (or worse, someone) it makes sense to thoroughly check out all of your controls before
riding further. After any such incidents, we strongly recommend that you remove the handlebar cover and padding to make sure your
cable is still routed properly with no kinks which might cause your throttle to malfunction. Also, turn the handlebars from left to right to
ensure that such movement does not activate either throttle.
✦
If you are unable to restore proper operation of GOLDFINGER throttle on the trail, DISCONNECT left throttle entirely by removing
stainless cable from barrel bolt until you can work on the throttle system with the proper tools back at home. It may not be enough to
merely insert the lockout pin, as it is possible for a kinked GOLDFINGER cable to cause unwanted operation of the OEM throttle!
IF YOU HAVE EVEN THE SILLIEST QUESTION, PLEASE CALL US AT:
(509) 927-7533
OR VISIT US ONLINE AT:
Page 4

DISCLAIMER INFORMATION
General Information
While all of the information presented here is believed to be accurate, Full Throttle, Inc acknowledges that some errors may occur
when interpreting installation instructions. Full Throttle, Inc presents these instructions for informational purposes only, and is not
responsible for any damages that you may incur based on any incorrect information found here. Instructions intended for general
reference purposes, and are not written to accommodate every snowmobile or ATV ever manufactured. All product specifications are
copyright Full Throttle, Inc, and are believed to be accurate; we assume no responsibility for incorrect information presented on our
website product specification pages or within these instructions. Rights © 2009 Full Throttle, Inc. Products include GOLDFINGER left
throttle, ESCALATOR cargo rack, HOT POT and HOTPOT JR food warming devices.
General terms and conditions
Terms, conditions and policies subject to change without notice. Full Throttle, Inc is not responsible for late or delayed shipments or
system failures. Full Throttle, Inc retains title to items purchased until said items are paid for by the purchaser and at that time the title
passes to purchaser. If you purchase items for the purpose of export, you must obtain from the federal government certain export
documentation, and that responsibility is solely yours. The terms of our agreements with some vendors represented in our online and
print advertisements forbid us from exporting their products. Likewise, some products are not available for sale to dealers and or
exporters. All trademarks and registered trademarks are used to benefit and without intent to infringe on the holder of the mark. The
Full Throttle, Inc logo and all other distinctive logos, marks and graphic elements are trademarks of Full Throttle, Inc and are subject
to applicable trademark protections.
Governing law
Transactions between you and Full Throttle, Inc shall be governed by and construed in accordance with the laws of the State of
Washington, without regard to the laws regarding conflicts of law. If any provision of this agreement shall be unlawful, void, or for any
reason unenforceable, then that provision shall be deemed severable from this agreement and shall not affect the validity and
enforceability of any remaining provisions. This agreement, the policies printed in the applicable Full Throttle, Inc catalog or online
material, and the policies, terms and conditions stated on the applicable Full Throttle, Inc invoice or packing slip constitute the entire
agreement between the parties relating to the subject matter herein and cannot be modified except in a written agreement signed by
both parties.
Jurisdiction
Unless otherwise specified, the Full Throttle, Inc website is presented solely for the purpose of promoting products available in the
United States, its territories, possessions, and protectorates. The website is controlled and operated by Full Throttle, Inc from its
offices within the State of Washington, United States of America. Those who choose to access this site from other locations do so on
their own initiative and are responsible for compliance with laws governing export of software and other applicable laws, including local
laws, if and to the extent local laws are applicable. Any litigation regarding this agreement or any transaction between customer and
Full Throttle, Inc shall be brought in the state or federal courts located in Spokane County, Washington and customer hereby agrees
and submits to such jurisdiction and venue as proper.
Warranty disclaimer and limitation of liability
Full Throttle, Inc expressly disclaims all warranties, either express or implied, including any implied warranty of merchantability or of
fitness for a particular purpose. Full Throttle, Inc shall have no liability to anyone for incidental or consequential damages or any other
liability, loss or damage arising out of or related to the merchandise, even if Full Throttle, Inc or an authorized representative of Full
Throttle, Inc has been advised of the possibility of such damages.
All merchandise is sold "as is". Full Throttle, Inc makes no warranty as to the performance of any merchandise sold. We are not
responsible for system downtime, etc. This disclaimer by Full Throttle, Inc in no way affects the terms of a manufacturer's warranty, if
any. Full Throttle, Inc does not warrant that the functions contained in any product sold will be uninterrupted or error-free, that defects
will be corrected, or that the website or the server that makes it available is free of viruses or other harmful components. Full Throttle,
Inc does not warrant or make any representations regarding the use or the results of the use of any product purchased in terms of its
compatibility, correctness, accuracy, reliability or otherwise.
You (and not Full Throttle, Inc) assume the entire cost of all necessary servicing, repair or correction. Applicable law may not allow the
exclusion of implied warranties, so the above exclusion may not apply to you. In no event shall Full Throttle, Inc total liability to you for
any and all damages, losses and causes of action (whether in contract, tort (including, but not limited to, negligence) or otherwise)
exceed the retail price of the product paid by you, if any, to Full Throttle, Inc or to any dealer, wholesaler, for the specific merchandise
at issue.
 Loading...