

Page 1

Page 2

1
PT 118 Mobile GSM/GPRS Dig it al Phone
Contents
1The Basic............................................................................................................................................ 3
1.1 Introduction ................................................................................................................................... 3
1.2 Safety Notice .................................................................................................................................. 4
1.3 For Your Safety.............................................................................................................................. 4
1.3.1General matters........................................................................................................................... 4
1.3.2 Phone Safety ............................................................................................................................... 5
1.3.3 Battery Safety ............................................................................................................................. 6
1.3.4 Charger Safety............................................................................................................................ 7
1.3.5 Cleaning and Maintenance........................................................................................................ 8
2 Befo re U se ......................................................................................................................................... 9
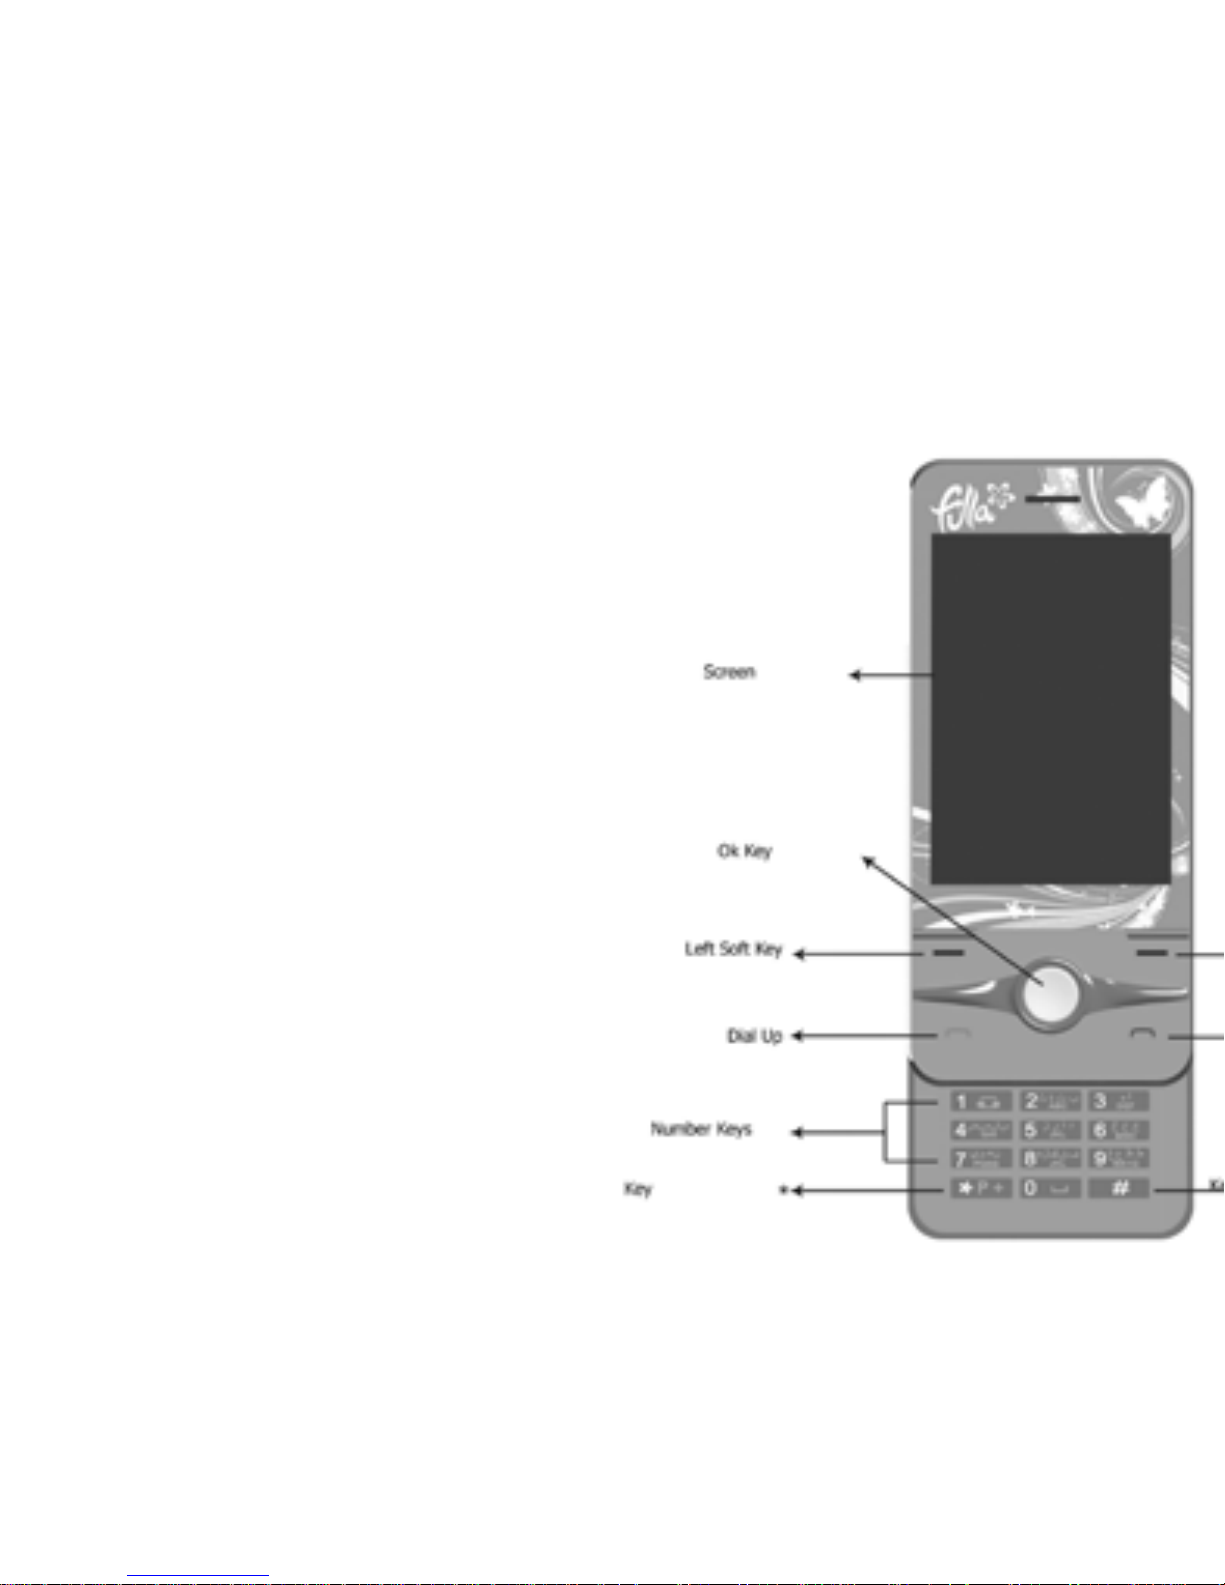
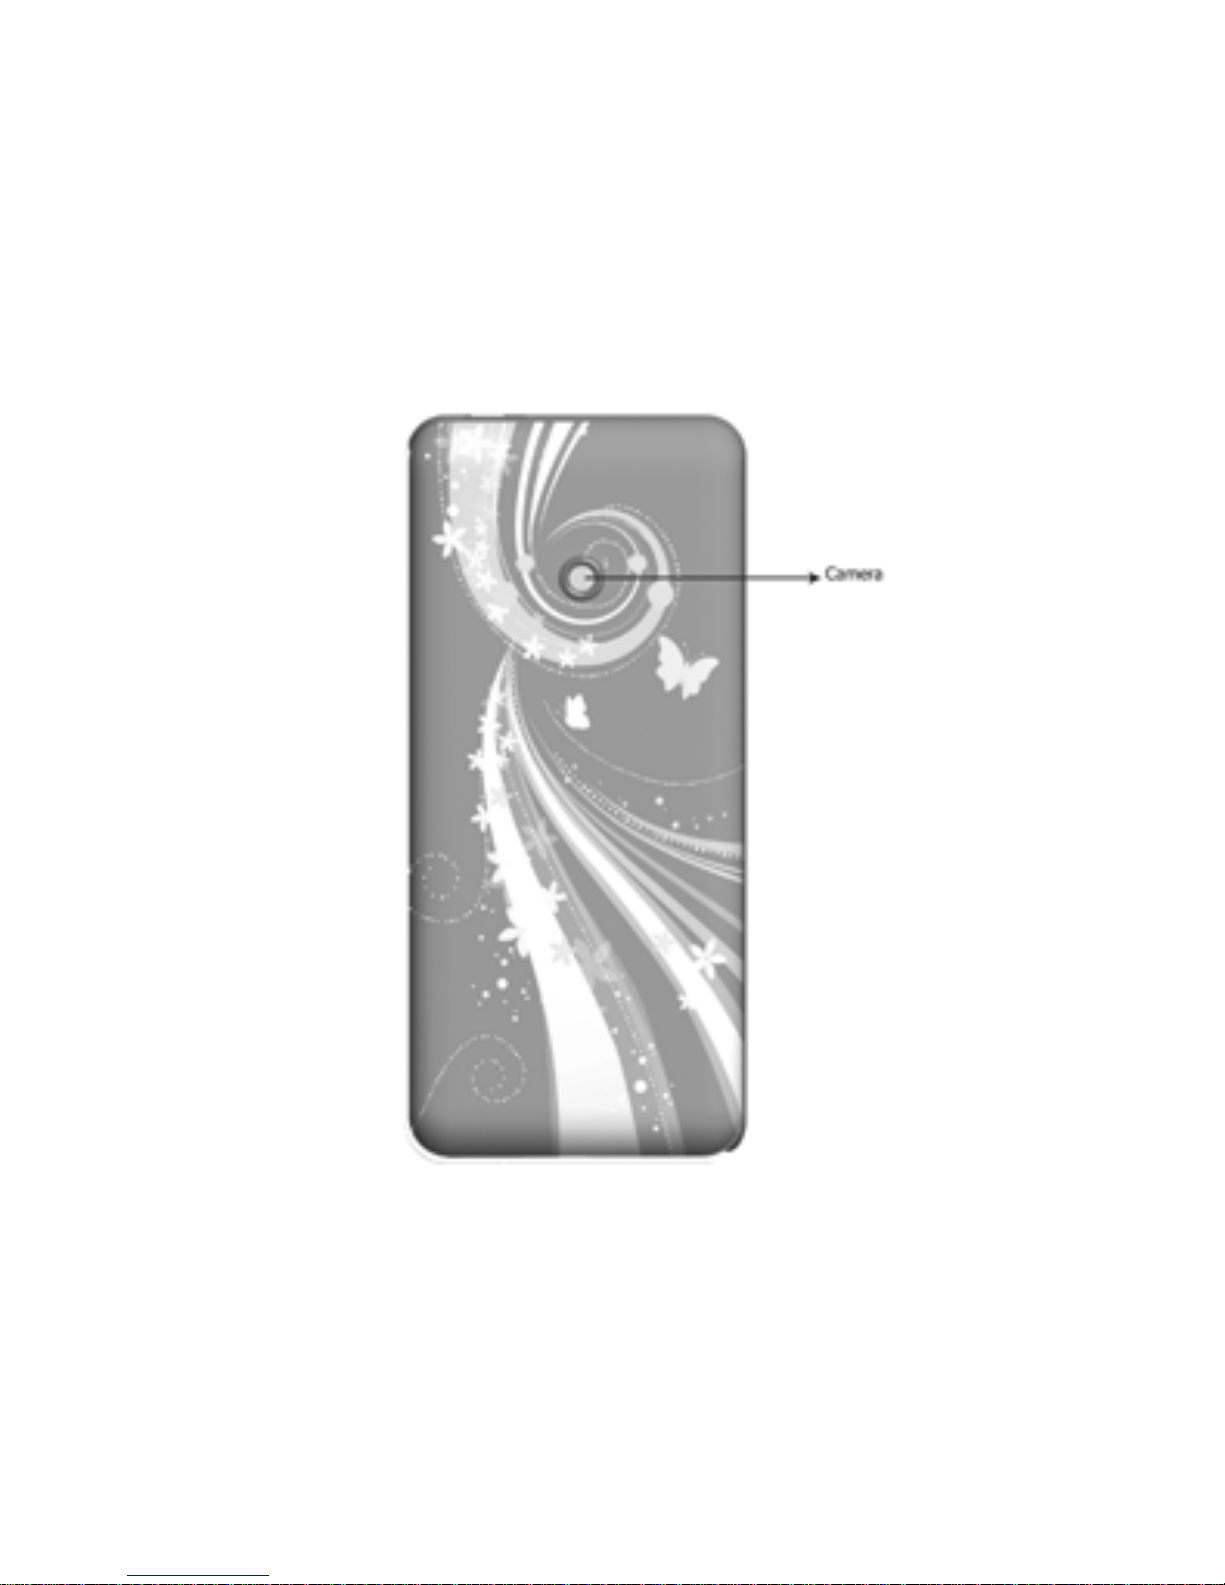
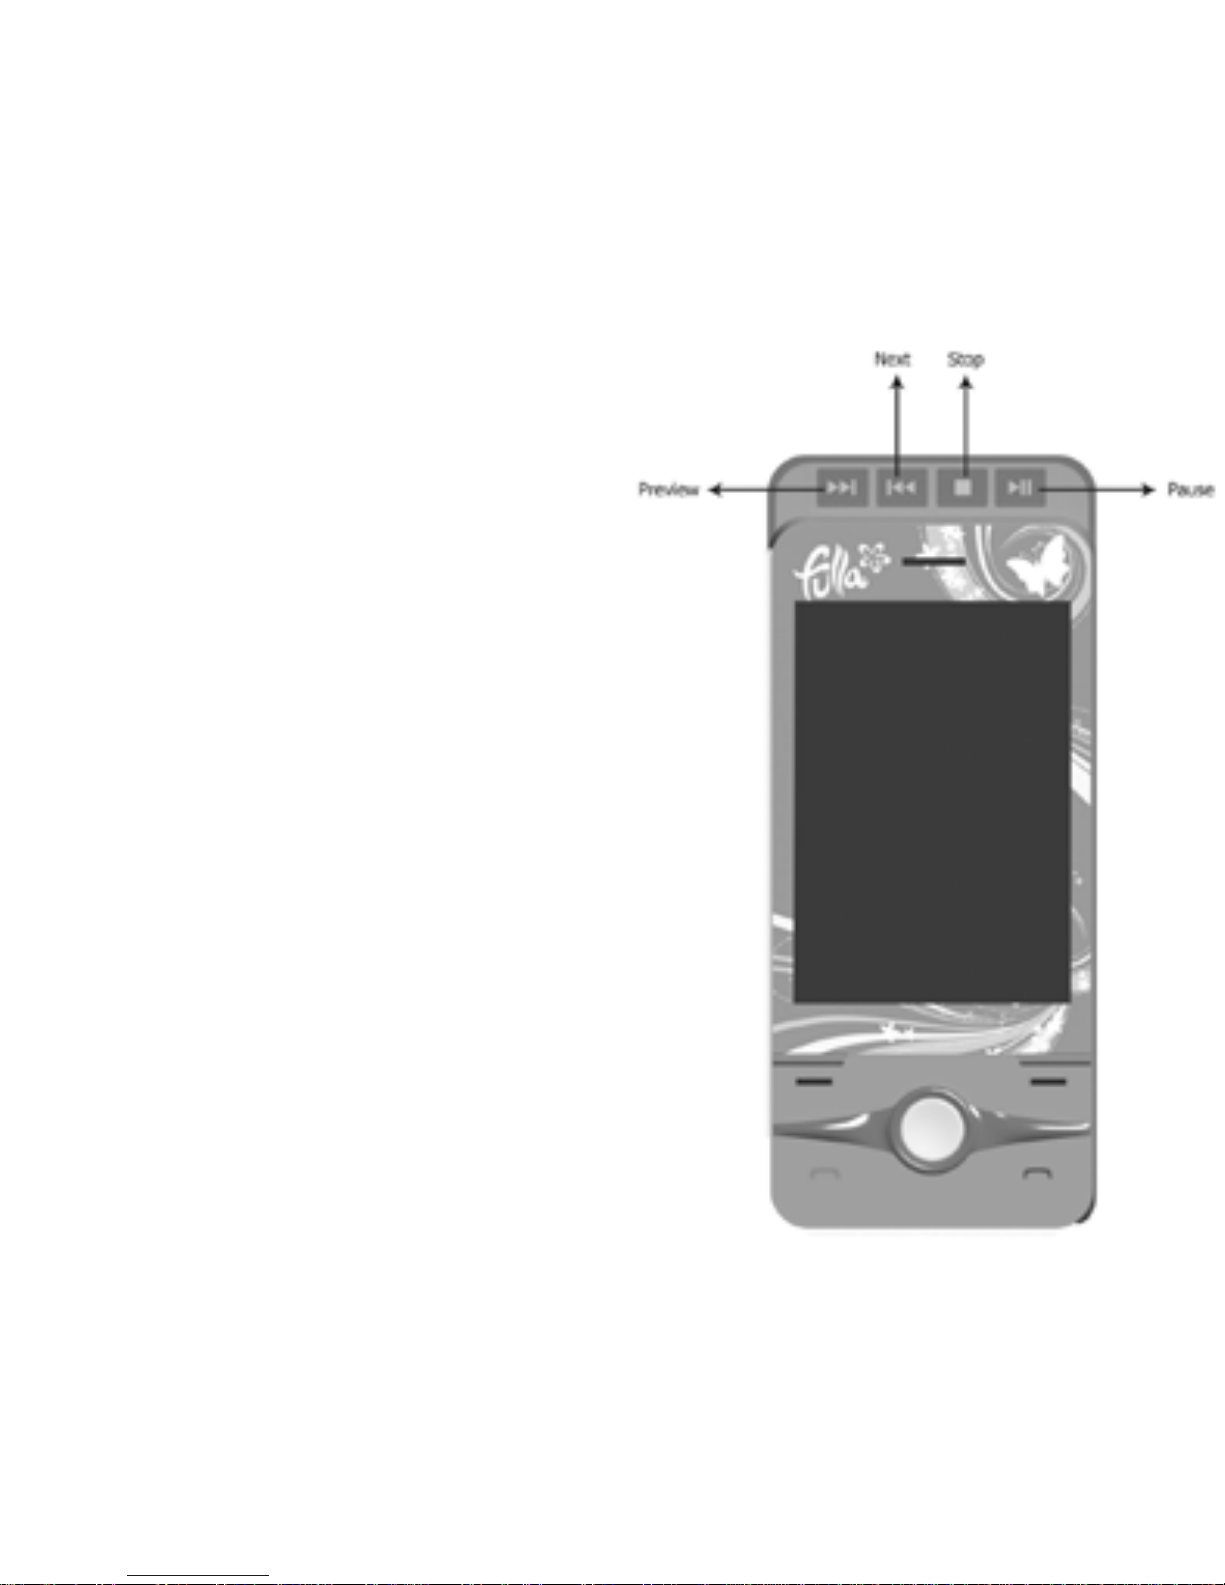
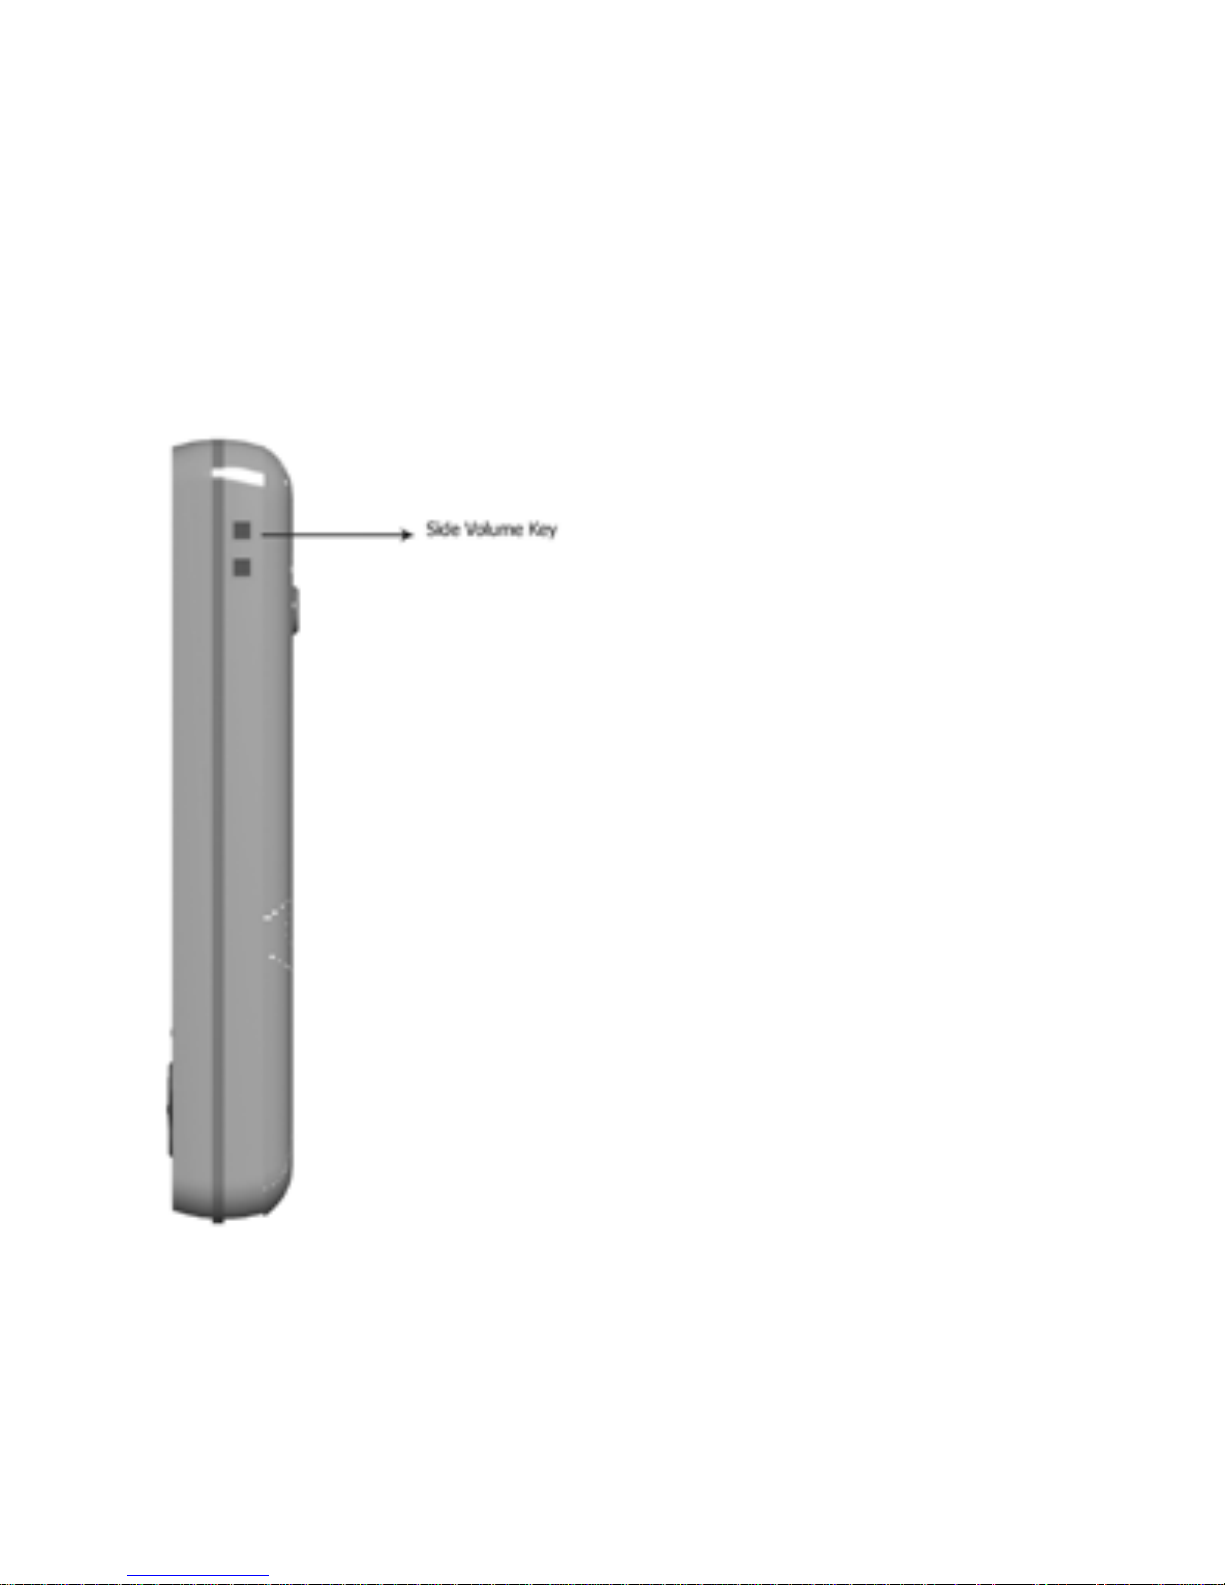
2.1 Names and Explanationsof Each Part........................................................................................ 9
2.1.1 Appearance ................................................................................................................................. 9
2.1.2 Keypad Instructions................................................................................................................. 12
2.2 Insertion of the SIM Card and Memory Card ......................................................................... 13
2.2.1 Insertion of SIM Card ............................................................................................................. 13
2.2.2 Insertion of Memory Card ...................................................................................................... 13
2.3 Battery.......................................................................................................................................... 14
2.3.1 Removal and Installation of the Battery ................................................................................ 14
2.3.2 B attery charging....................................................................................................................... 14
2.4 Sfety password............................................................................................................................. 15
3 Fleetly User manual ....................................................................................................................... 15
3.1 Dialling ......................................................................................................................................... 15
3.2 Refusing calls ............................................................................................................................... 16
3.3 Receiving calls.............................................................................................................................. 16
3.4 Ending a call ................................................................................................................................ 16
3.5 Emergency calls........................................................................................................................... 16
3.6 Extension dialing ......................................................................................................................... 16
3.7 Call history................................................................................................................................... 16
3.8 Call divert .................................................................................................................................... 16
3.9 Call waiting.................................................................................................................................. 18
3.10 Call barring................................................................................................................................ 17
3.11 Turning the Pho ne On and Off................................................................................................. 17
Page 3

2
4 Function Menu ............................................................................................................................... 17
4.1 How to Use the Function Menu.................................................................................................. 17
4.1.1 Scroll to select Function........................................................................................................... 17
4.1.2 Speedily to select function ....................................................................................................... 17
4.1.3 Exit a Menu............................................................................................................................... 17
4.2 Phonebook.................................................................................................................................... 17
4.3 Messages....................................................................................................................................... 19
4.3.1 SMS............................................................................................................................................ 19
4.3.2 MMS.......................................................................................................................................... 22
4.3.3 Chat ........................................................................................................................................... 26
4.3.4 Voicemail server ....................................................................................................................... 26
4.2.5 Broadcast message ................................................................................................................... 26
4.4 Caller center ................................................................................................................................ 27
4.4.1 Log ............................................................................................................................................. 27
4.4.2 General call setting................................................................................................................... 28
4.5 Settings ......................................................................................................................................... 30
4.5.1 SIM Appl................................................................................................................................... 30
4.5.2 Pen calibration.......................................................................................................................... 30
4.5.3 Accelerometer Settings............................................................................................................. 30
4.5.4 Phone setup............................................................................................................................... 30
4.5.5 Security setup ........................................................................................................................... 31
4.5.6 Restore factory settings............................................................................................................ 32
4.5.7 Sound effect............................................................................................................................... 33
4.6 Media............................................................................................................................................ 33
4.6.1 Camera...................................................................................................................................... 33
4.6.2 Image viewer............................................................................................................................. 34
4.6.3 Video recorder .......................................................................................................................... 34
.4.6.4 Video player ............................................................................................................................. 35
4.6.5 Audio player.............................................................................................................................. 35
4.6.6 Sound recorder ......................................................................................................................... 36
4.6.7 FM radio ................................................................................................................................... 36
4.7 File manager ................................................................................................................................ 37
4.8 Games........................................................................................................................................... 38
4.8.1 Games........................................................................................................................................ 38
Page 4

3
4.8.2 MeRig ........................................................................................................................................ 38
4.9 Profiles.......................................................................................................................................... 38
4.10 Organiser ................................................................................................................................... 39
4.10.1 QQ............................................................................................................................................ 39
4.10.2 Calendar.................................................................................................................................. 39
4.10.3 To do ........................................................................................................................................ 40
4.10.4 Alarm....................................................................................................................................... 40
4.10.5World clock.............................................................................................................................. 40
4.11 Web ............................................................................................................................................. 40
4.11.1 STK*........................................................................................................................................ 40
4.11.2 Internet service ....................................................................................................................... 40
4.11.3 Data account ........................................................................................................................... 42
4.12 Appl............................................................................................................................................. 43
4.12.1 Calculator................................................................................................................................ 43
4.12.2 Currency converrter .............................................................................................................. 43
4.12.3 Stopwatch................................................................................................................................ 43
4.12.4 Ebook reader .......................................................................................................................... 44
4.12.5 Bluetooth ................................................................................................................................. 44
4.13 SIM Appl.................................................................................................................................... 45
5 Input Method.................................................................................................................................. 45
5.1 G eneral Outline ........................................................................................................................... 45
5.2 Screen Key values........................................................................................................................ 46
6 Trouble shoot ing ............................................................................................................................. 46
1 Basic informat ion
1.1 Introduction
Thank you for choosing the PT 118 GSM/GPRS digital mobile phone. After reading this guide
you will be able to fully master the use of your PT 118 mobile phone and appreciate all its
functions and ease of use.
Page 5

4
The PT 118 mobile phone is designed for use on the GSM/GPRS networks. Not only does the
PT 118 provide you with basic c alling functions, but also with many practical functions such as
handwrite input text,a name card style phonebook, personalized 64 chord ring tones and pictures,
clock, a larm , cam era , phonic kinesc ope, Audio play er, Mem or y ( T-Flash) card, sound re corder,
calculator, automatic power on/power off, to do list, GPRS surfing, MMS,TV, H-Free etc, to
improve the time you spend working and playing. Moreover, the PT 118 uses a personalized man-
machine interface and the perfect functional design will satisfy all your needs. The PT 118 mobile
phone is compatible with GSM/GPRS technology and has been approved by certification
authorities both domestically and abroad.
Our company reserves the right to revise this manual content without prior notice.
1.2 Safety Notice
n If y our mobile phone is lost or stolen, please contact the telecommunications authorities or a
sales agent immediat e ly to ha ve a hol d put on the SI M card. T his wi ll preve nt e conomic loss
cause d by unaut hori z e d ca ll s ma de fr om your mobil e phone .
n When you contact the telecommunications authorities or a sales agent, they will need to
k now the IME I number of y our mobi le phone (remove batt e ry to expose number l ocated on
t he la be l on ba ck of phone). Pl e ase copy thi s number a nd ke e p in a s afe place for futur e use .
n In order to av oid the misuse of your mobile phone please t ake the following prevent ative
measures:
- Set the PIN number of your mobile phone’s SIM card and change this number
immediately if it becomes known to a third party.
- Please keep the phone out of sight when leav ing it in a vehicle. It is best to keep the
phone on your pe rson, or l ocked in the tr unk.
- Set call restrictions.
1.3 For Your Safety
Plea se read these safety guidelines before using y our mobile phone to assure the sa fe and
proper use of the phone.
1.3.1General m a t ters
n Please turn off your mobile phone on airplanes, in hospitals and in other locations with
restricted mobile phone use, otherwise the normal operation of electrical equipment and
medical instruments will be affected. Please obey local regulations when using your mobile
phone.
n While driving please obey local laws and regulations with regard to mobile phone
use. When talking on the phone while driving, please obey the following rules:
Page 6

5
Concent ra te on dri ving and be aw ar e of tr affic condit ions; if y our mobile phone has a handsfree function, please use it in t his mode. Under poor driving conditions, please stop the car
before you dia l or pick up the phone .
n Please obey laws, regulations and signs when near an area storing fuel, chemicals, or volatile
materials.
n Please keep mobile phone s, batteries and chargers aw ay from children, to prev ent t hem
from inj uri ng themse lves wit h the m.
n In order to prevent damage t o y our mobile phone, only accessories, such as batt eries and
char ge rs, ma y be us e d wi th your mobile phone. The use of othe r ba tte ri e s or chargers could
result in batt ery leak age, ov erheating, cracking, fire or other malfunctions.
n Please do not use y our mobile ph one near low signal or precisio n electronic eq uipment.
Radio wav e inter ference may cause t he malfunctioning o f suc h electr onic equip ment and
ot he r pr oblems. Spe cial attenti on must be pai d nea r the fol low ing e quipment: he ar ing ai ds,
pacema ke rs and ot her e lectr onic medica l equipment, smoke de te ctor s, automati c doors and
other automatic control installations. To find out the effect of mobile phones on a
pacemaker or other piece of electr onic me dical equipment please cont act the ma nufactur e rs
or local sales agent s of the equipment.
n This mobile phone is equipped wit h an auto pow er on function. Please refer to the mobile
phone’s clo ck sett ing to assure that the mobile phone will not automatically t urn on during a
plane flight.
n To avoid the mobile phone malfunctioning, or catching fire, please do not violently impact,
jolt or throw your mobile phone .
n Please do not place the batteries, mobile phone or charger in a microwave oven or high-
pressur e equipment . Othe rw ise it coul d lead to unexpecte d accident s s uch a s da ma ge to the
circuitry or fire.
n Please do not use your mobile phone near flammable or volatile gases, otherwise it could
cause malfunctioning or fire.
n Please do not subject your mobile phone to high temperatures, high humidity or dusty
places; otherwise this may lead t o the malfunction of y our mobile phone .
n To avoid your mobile phone falling and malfun ctioning or being damaged, please d o not
place your phone on une ven or unstabl e surfaces .
1.3.2 Phone Safe ty
n Do not disassemble or modify the mobile phone, as it will lead to damage to the
phone such as bat ter y leakage or circuitry failure.
Page 7

6
n Pl e ase do not subject the LCD to i mpa ct or use the s cr e e n to stri ke thing s , as thi s wil l da ma ge
t he LCD boar d and cause leakage of t he liquid crystal. There is a risk of blindness if the liquid
crystal substance gets into the eyes. If this occurs rinse eyes immediately with clear water
(under no ci rcumsta nces rub your eye s) a nd go i mmedi ately to a hos pit al for treatment.
n Under very r ar e circumstances using the mobil e phone in certa in model car s ma y ne ga tively
affect the internal electronic equipment. In order to assure your safety under such
circumstances please do not use the mobile phone. If your car is equipped with an airbag,
ple ase do not pl ace your phone on top of, or wi thin the conta ct ar e a of t he ai rbag in or de r to
avoid se ri ously ha rming the driver or pa ss e nger when the air bag infla te s .
n Please do not use needles, pen tips, or other sharp objects on the keypad as this may
dama ge the mobi le phone or caus e it to ma lfuncti on.
n Avoid let ting the phone come i nt o close c ontact w ith magnetic objects su ch as magnetic
cards as the radiation waves of the mobile phone may erase the information stored on
floppy di sks , pay ca rds and cre dit cards.
n Please keep small metal object s, such as thumbtacks, far away from t he receiver. When the
receiver is in use it becomes magnetic and may attract these small metal objects and thus
t he s e ma y ca use injury or da mage the mobi l e phone.
n A void ha ving t he mobi le phone come into cont act wit h water or othe r l iqui ds. I f l iqui ds e nte r
t he phone , this could ca use a short circuit, battery l e ak or ot he r ma l funct ion.
n A s much as possi ble, please use the mobil e phone in a place a way from landl ine telephones,
televisions, radios, and automated of fice eq uipment in order t o avoid affe cting both the
equi pme nt a nd the mobi le phone
1.3.3 Battery Safety
n Do not disassemble or modify the battery, as this will cause the battery to leak, overheat,
cr ack an d catch fire.
n Do not dispose of old batteries with everyday domestic garbage. Please dispose of old
batteries at the direct ed places with specific rules for their disposal.
n Please do not put/throw batt eries int o a fire, as this will cause the battery to catch fir e and
explode.
n When installing t he bat tery, do not use force or pressure, as this will cause t he battery to
leak, overheat , crack and catch fire.
n Please do not use wires, needles or other met a l objects to short-ci rcuit the bat te ry. Also, do
not put the bat t ery near necklaces or other metal objects, as this will cause the battery
to leak, ov erheat, crack and catch fire.
Page 8

7
n Please do not solder the contact points of the battery, as this will cause the battery to leak,
overheat, crack and catch fire.
n If the li quid in the batteries goes into the eyes, ther e is a risk of blindness. If this occurs do
not rub t he eyes, but immediat ely rinse ey es wit h clear w ater and go t o the hospital for
treatment.
n Pl e ase do not use or place the ba tteri e s ne ar hig h te mpera ture pla ces such as near a fire or
heating vessel, as this will cause the battery to leak, overheat, crack and cat ch fire.
n If the battery overheats, changes colour, or becomes distorted during use, charging, or
st ora ge , please s top using and r e pla ce it wit h a new battery.
n If t he li quid from the bat te ry comes i n conta ct wi th skin or cl othi ng thi s coul d ca use burni ng
of the skin. Immediately use clear wat er to rinse and seek medical attention if necessary.
n Please do not let the battery become wet as this will cause the battery to overheat, smoke
and cor rode .
n Pl e ase do not use or pl ace ba tte ri e s i n pla ces of hig h te mpera ture such as in di rect sunli ght,
as this will cause the battery to leak and overheat, lower performance, and shorten t he
batt er y’s life.
n Pl e ase do not cont inuousl y cha rge for mor e tha n 2 4 hours.
n Please place the battery in a cool, shady and well-vent il ate d place out of direct sunl ig ht.
n The life of all mobile phone batteries is limited. The usable time of batteries decreases with
freque nt cha rging. Whe n charg ing be comes ineffecti ve this mea ns that t he batte ry i s at the
end of its li fe and t he ba ttery should be re pl aced wi th a new one of the de sig nated t ype .
1.3.4 Charger S a fet y
n Please do not disassemble or modi fy the charger, as it will lead to bodily harm, e le ct r i cal
shock , fire or da mage to the cha rger.
n Please use AC 220 volts. The use of any other voltage will cause battery leakage, fire and
cause damage to the mobi le phone and charger.
n It is forbidden to short circuit the charger, as this will cause electrical shock, smoking and
dama ge to the cha rg e r.
n Please do not use the charger if the power cord is damaged, as this will cause fire or
electr ical shock.
n Please immediately clean any dust g athered on t he electrical out let.
n Please do not place vessels with water near the charger in order to avoid water splashing
onto the charger and causing an electrical shortage, leakage or other malfunction.
n If t he charger comes in contact with water or other liquid the power must
Page 9

8
immediately be swit ched off to avoid an electrical short or sh ock, fire or malfunction of t h e
charger.
n Please do not use the charger in the bathroom or other excessively moist areas, as this will
cause electrical shock, fire or damag e to the charger.
n Pl e ase do not touch t he cha rger w ith w et ha nds, as this will cause elect rical shock.
n Do not modify or place heavy objects on the power cord, as this will cause electrical shock or
fire.
n Before cleaning or carrying out maintenance please unplug the charger from the electrical
outlet.
n When unplugging charger, do not pull on the cord, but rat her hold on to the body of the
charger, as pulling on the cord will damag e the cord and lead to electrical shock or fire.
n Please do not charge in the following places: moist, humid, or dusty places, or places with
excessive vibration (this will cause malfunctioning); near televisions, radios, electronic
products (t his wi ll affect the pict ure and sound).
1.3.5 Cleani ng a nd Ma i nte na nce
n The mobile phone, bat ter y and charger are not wat er r esistant. Please do not use t hem in
the bathroom or other excessively moist areas and likewise avoid allowing them to get wet
in the ra in.
n Use a soft , dry cloth to cle an the mobi le phone , batt er y and charg er .
n Pl e ase do not use al cohol , thinner, be nze ne or other solvents to wi pe the mobi le phone.
n A dirty outlet w ill cause poor electrical contact, lose of power and ev en inability to recharge.
Please clean regularly.
Page 10
9
2 Bef ore Use
2.1 Na mes a nd Expl a nati ons of Ea ch Par t
2.1.1 Appe a ra nce
Page 11
10
②
Page 12
11
Page 13
12
④
2.1.2 Keypad Instructions
Page 14

13
1. Navigation key: Le ft/right keys:for moving the cursor when editing text; on standby. At
the camera preview mode, press the left/right keys to c irc ularly sw itch w ith EV settings
(Exposure Va lue se ttings). in m ost subm enus, press the le ft ke y to retur n the upper menu,
press the right key to open the file.
2. Navigation key: Up/down keys:scroll to view na mes, phone numbers, SMS, MMS etc,
moves the cursor up and down when editing text
3. Left soft key:to pe rform the f unc tion of the prom pt display ed in low er left c orner of the
screen.
4. Right soft key:to perform the function of the prompt displayed in lower right corner of the
screen.
5. Dial ke y: to dial and pick up calls; on standby, to see the all calls record list.
6. Hang-up key: to e nd a call or r eje ct incoming calls; under most circ um stances pressing this
key will put the mobile phone into standby mode.
7. Number keys: to enter numbers and letters with the number keys from 0-9; to rapidly select
menu items; can dial the number of setting speed dial numbers by long pressing number key,
etc.
8. * Key:this key has different functions in different modes and menus.
9. # Key:this key has different functions in different modes and menus.
10. O k ke y:OK key function is same with the left soft key.
11. Side volume k ey : w hile playing MP3 or audio files related to t he inter face this but ton i s us ed
t o adjus t vol ume.
A tte nti on: I n this ha ndbook , the phra s e “pre s s the ke y” r efe rs to pres s i ng and t her eafter
releasing a k ey ; “Hold dow n a k ey ” refer s to pres sing a key a nd ke eping it pressed for 2 se conds
or long er .
2.2 Insertion of the SI M C a rd and Memory Ca rd
2.2.1 Inser t i on of SIM Card
The Metal interface of SIM card can be scraped easily so you must insert or r emove it
carefully.
n Turn off the phone ; remove the battery and unplug other e xt e rna l power sour ces .
n Inse rt t he S I M card i nt o the SIM slot a s s hown i n the following picture.
n When you ne e d to remove the SI M card, please fi rst tur n off the phone , remov e the bat te ry,
t he n remove the SI M card.
2. 2 . 2 I nser tion of Memory Car d
Page 15

14
n Turn off the phone ; remove the battery and unplug ot her external power sources.
n Put t he Memor y Car d into t he Me mor y Car d troug h.
n When y ou need to remove the Memory Card, please first turn off the phone, remove the
batt er y, t hen remov e t he Memory Card.
2.3 Bat t ery
The batter y is initially charg ed with 50% of it s total capacit y ; you can unpack and use it. Please
recharg e the batt er y to ful l a ft er it's exha uste d for the first 3 times, and thi s w ay you can ma ke
t he be s t use of your bat te ry.
2.3.1 Remova l and I ns ta ll at ion of the Ba tte ry
n When removing the battery follow the following steps:
①Push the battery cover towards bottom;
②Raise the battery bottom, break out the battery from the mobile-phone.
War ning: You must turn off your mobile phone befor e removing the battery. Under no
circumstances should you remove the battery when the mobile phone is on as this may
damage the SIM car d and your mobile phone.
n When installing the battery follow the following steps:
①According to arrowhead direction, push the battery to inset mobile-phone.
②Cover it with the battery cover.
③Push the battery cover towards top.
2.3.2 Battery char g ing
n Connect the cha rg e r wi th the of the phone (w ith the arr ow poi nting upwa rd).
n Connect the cha rg e r wit h the elect rical source.
n The battery capacity indicator in Icon Area will flash periodically. When charging at power-
off sta tus, the char gi ng indi cator on the scree n means the phone is char gi ng now. I f you a re
usi ng the phone in l ow ba ttery, it may ne e d ce rt ai n time for the cha rg ing indi ca tor t o appear
on t he scree n afte r star ti ng to cha rg e .
n When the Capacity Indicator in Icon Area is full and doesn't flash any more, the char ging
proce ss is compl e te . If y our phone is char ged in power off st atus, char ging comple te scre e n
will also display. Charging process usually takes 1-2.5 hours. Batt ery , phone and charger
norma ll y turns hot dur ing cha rgi ng pr ocess .
n When cha rg ing pr ocess i s complete, disconnect connections bet we e n AC power outl e t, your
phone a nd the cha rg er .
Attention:
Page 16

15
n Be sure to charge in vent ilat ed place with the temperature ranging from -10℃ to +45℃,
and alway s use the charger provided by original manufacturer. Using unauthorized charger
may cause danger, and also violates warranty coverage of t he manufacturer.
n Charge your battery in time when the phone automatically powers off or displays low
battery warning. The phone will automatically decrease charging time when the battery is
not e xha uste d be for e cha rg ing .
2.4 Safety passw or d
PIN cod e
The PI N code (indivi dual identification number ) pr e ve nts your SIM card from the il lega l use. T he
PIN code comes orig ina ll y with the SI M ca rd. I f you e nte red the wr ong PI N code for cont inua l
t hree times, you should i nput the P UK unlock ing code. For more de tai ls a sk y our network
operation company. (The de fa ult PIN code i s 1 23 4 )
PIN2 code
T h e PIN co d e come s origina l ly wi th the S I M card. I f you entere d the wrong PI N2 code for
continua l t hre e ti me s, you should i nput the PUK2 unlock ing code. For more de tai ls a sk your
networ k ope ra ti on company.
PUK code
When your mobile is l ocked after 3 wrong P IN code e ntri e s, y ou ne e d to input the P UK code
(indi vidua l unl ocki ng code). When you enter the wrong PU K code for continual te n times, you wil l
not be abl e to use the SI M card ag ai n. Please contact wi th your se rvi ce suppli e r to pur cha s e a
new SIM card. T his code comes or ig ina ll y with the SIM ca rd, and you cannot modi fy it. So if you
lost it or if it wasn’t provided, please contact w ith yours service supplier.
PUK2 c ode
When your mobile is l ocked after 3 wrong P IN 2 code ent ri e s , you ne e d to input the PU K code
(individual unlock ing code). When you e nter the wrong PU K2 code for cont inua l ten times, you
will not be able t o use the SIM card again. Please contact w it h yours service supplier t o purchase
a new SIM card. This code comes orig inally wit h the SIM card, and you cannot modi fy i t. So if y ou
lost it or if it wasn’t provided, please contact w ith yours service supplier.
3 Fleetly User manual
3.1 Dialing
Page 17

16
You ca n dia l and re ceive ca ll s on y our phone whe n the symbol of y our ne twor k provi de r
appe ar s on the scr e e n. The informa ti on bar on the uppe r l e ft corne r of the scre e n indi ca te s
networ k strength (t he s ig nal is strong e s t when the re are four li ne s visibl e ).
3.2 Ref using calls
You ca n press the ha ng up ke y or right soft key t o refuse an incoming call.
3. 3 Rece ivi ng cal ls
You ca n select the different mode to receive calls. If the e ar phone s a re alr e ady pl ugg e d in, you
can use the button l oca te d on the e arphones to pi ck up the phone . I f i t is i nconvenient to pr ess
t he button, then you ca n s e t the“Auto” a s “On”, w it h the ea rphones plug ged in, and the phone
will automatically pick up after ringing or vibrating for 5 seconds. If you have set the “Any Key”,
y ou ca n pick up the ca ll by press ing any key ot he r tha n the ha ng up ke y, right soft key.
3.4 E ndi ng a call
Duri ng a ca ll you can press the hang up k ey to end a call. You can also cancel a call you ha ve
just dia ll e d by press ing the hang up k ey or right soft key.
3. 5 Emerg ency ca ll s
If y ou ar e locate d withi n the networ k ar ea (y ou ca n fi nd this out by r e ferr ing to the network
st re ngth i ndi ca tor l oca te d on the uppe r l e ft -hand cor ne r of y our mobile phone scre e n), you
shoul d be abl e to make e mergency call s. I f your ne twor k provider does not pr ovide roa mi ng
where y ou are, the w ord “Emergency” w ill appear on the scr e e n. I f you are located wit hin a
network area, even if you do not have a SIM card, you will be able to transmit emergency calls.
3.6 E xte ns i on dia ling
S ome fi xed phone e xt e ns i ons cannot be ca ll e d dir e ctl y. Y ou must first g o throug h the
sw itchboard befor e you ca n dia l t he e xtension. H old dow n the * key to switch as long as the
screen displays the letter “P”, and the n dia l t he ext e ns i on number.
3.7 Call history
Put in this menu to view the missed /received/dialed calls.
3.8 Call waiting
A fter a cti vati ng thi s functi on, the net work w ill noti fy you that you have a ne w incoming ca ll when
y ou ar e talki ng on the phone . For detai ls of how to use t his function you can cont act your
networ k provi de r.
3.8 Call divert
The ca ll diversion network s e rvice permits you to dive rt, unde r cer tai n preset situations, certain
incoming call s to a te lephone number desig nated by you. T his se rvice r e quir e s
networ k support. Please cont act your network provider to activate this service. You can set
Page 18

17
and cancel the incoming call diversion function of your mobi le phone .
3.10 Call barring
The Call Barring al low s t he user to pr eve nt i ncoming or outgoi ng call s base d on use r-defined
conditions. The ne twor k provi de r pr ovides you with a 4 digi t Barring PW to al low you to a cti vate
t he “Call Barring” servi ce. W he n you use this function, please conta ct your ne twor k provi de r
3.11 Tur ning the Phone On and Of f
TO tur n on or off the phone pleas e hold dow n the H ang -up k e y.
4 Functi on Menu
4.1 How t o U se t he Function Menu
4. 1 .1 Scroll to s e le ct Fu nction
n On standby , press the l ef t s of t k ey “Menu” to enter the main function menu. During a call
press the left soft k ey “Option” to ente r the cal l opti on menu, then use the u p/d own keys
to scroll to the desired it em on the call menu and press the left soft key to select the
function.
n In a ll the me nus and submenus, use the N avigation ke y to sc roll to the de sire d func tion a nd
press the left soft key to enter the function item.
4.1.2 Spe e dil y to se lect functi on
Most m ain menus a nd subm enus have spee d number s. This speed num be r is the function’s
corresponding index number.
n On standby, press the left soft key “Menu” to enter the main menu, left/right keys to scroll to
the desired item on the menu.
n Enter the main menu’s speed number to enter the corresponding option. Enter the submenu’s
speed number to select the corresponding option.
4.1.3 Exi t a Menu
Usually, when in the function menu, you can exit a menu item by pressing the right soft key.
You can also press the hang-up ke y to return to the standby mode.
4.2 Phonebook
4.2.1 Q uick Search: enter into the browse screen of the phonebook. You can enter corresponding
information in the searching column below to sort the entries out. Modes of searching include: 1.
English (lower case); 3. Numbers.
Press the IME Key to switch among input methods.
Ø IP Dial: activate the IP dial-up of numbers in the phone book.
Page 19

18
Ø S e nd SMS: to send SMS to the curr e nt phone e ntry.
Ø S e nd MM S: to se nd MM S to the cur re nt phone e ntry
Ø V i ew : check the deta ils of entry .
Ø Edit: edit the e ntry.
Ø Delet e: delet e t he entr y.
Ø Copy : copy the e ntry.
Ø Move: mov e the entry .
Ø Dupli ca te : back up the e ntry.
Ø S e nd vCard: to Send By SMS, S e nd By MMS , or Sav e To File
4.2.2 Search contact: search the phonebook for entry by name.
4.2.3 Add new c ont ac t: add a new entry into the phone book. You can store the entry into the
SIM1 card, SIM2 card or the phone.
*Note: They are different from each other in terms of storage format.
4.2.4 Copy all: to select “ From SI M” to copy all the telephone entries on your SIM car d onto
your m obile phone, or to sele ct “From Phone” to copy all the telephone entries on your m obile
phone onto your SIM card.
* Note: When you copy telephone num ber entries f rom your mobile phone onto your SIM ca rd,
only the names, telephone number and caller group will be copied.
4.2.5 De lete: select the items to delete the call record. Select to delete all the call record from
SIM card1. Select to delete all the call record from SIM card2. Select to delete all the call record
from the phonebook. Select to delete one by one of the call record.
4.2.6 Caller Groups: the phone is programme d with 5 ca lls groups. You can make individua l
setting for e ac h group, such as re na me, ring ty pe, inc oming ca ll picture , inc om ing ca ll film and
each group member’s personal setting.
4.2.7 Extra numbers: mobile telephone hold out incoming caller group function, you can select
group in the list of the caller group, view and edit the Caller Group Deta il. Caller Group Detail
include group name, ring of the incoming caller, picture link of the incoming caller (can select the
seemly picture from the file),video link of the incoming caller, add and delete operating to
groups member list
4.2.8 Se ttings: se t the phone book in four ca tegories: Mem ory Check, Stora ge Loc ation, Card
Setting and My Card.
Ø Memory Check: check the memor y of t he SI M card a nd the phone .
Ø Storage Location: choose the preferred st ora ge locati on, the phone or the SI M card.
Ø Card Setting: set the content of the entries in the phone book.
Page 20

19
Ø My Car d: edi t a nd s ave the de tail e d information of the us e r.
4.2.9 Caller Ring tone: choose a ring for an incoming call.
4.3 M e ssa ges
In the main menu interface you can scroll to select “Messages” then press the left soft key to
ent er the “Messages” main menu.
4.3.1 SMS
If your ne twork supports text message and you have applied for this service from your network
provider, you can send a short message through the short messa ge se rvic e centre . The m obile phone supports the short information (EMS) of the enhanced mode, can insert picture, animation,
m elody , sound ,etc In the case of shor t information you ca n use the tem plate to produc e short
information.
Enter SMS submenu, then you can select menu as follows: Write Message, Inbox, Out box,
Templates, Text message Settings.
4.3.1.1 Inbox
Ente r the “ Inbox” subm enu to view receive d messages. When you receive a short message,
your mobile phone will vibrate (if Al e r t Typ e set to the Vibration) and ring (if Alert Type set to
the Ring), display the prompt information. If you do not wish to read it immediately, after y ou exit
this interface, the envelope icon appears at the top of the screen on standby and the short message
will automatically be saved on the SIM card. The amount of short messages that can be saved (this
includes received messages as well as saved messages) is based on the mem ory size of the SIM
card.
n When viewing the short message list in “Inbox”, the sender’s phone number or name (if
the name has already been saved in the phonebook) will be displayed, and show the date
of short messages by floating item.
n When looking at the short m essage list, y ou ca n use the up/down ke ys to se le ct the shor t
message. When the “Inbox” short message list appears, you can press the left soft key “Ok”
to read the detailed contents of a message, the date and time of receipt and the name (if the
name has already been saved in the phone book) or telephone num ber of the se nde r. At this
time you can also press the left soft key “ options” to perform the following operations:
Reply to send a short message to the sender of the current message.
Delete to delete the current short message.
Edit
Forward to edit the current message and then select to Send Only it to one person, Send
To Many, or Send By Group.
Page 21

20
Chat you can chat with others in the separate chat room by SMS
Delete al l t o delete all short message of inbox.
Use Number to extract the telephone number of the sender in the current short message and
contain the num ber( 3—40 bit) in the current short m essage , then display them by list
for m. If you se lect one of the num ber s, you can save the num be r to your phone book, or
dial.
Use URL to e xtr ac t the URL address ( fir st of address must http://、www or wap) in the
curre nt short message; then display them by list form . If you se lect one of the a ddr ess,
you can connect directly or add it to bookmark
4.3.1.2 Outbox
Enter the “Outbox” submenu to view the short messages (saved in the SIM card a nd owner
phone) in the mobile phone.
After the “Outbox” short message list appears, y ou can use the up/down ke ys to se lec t the
shor t m e ssage ; pre ss the left soft key “Ok” to read the detailed c ontents of the selected short
m e ssage s. A t thi s tim e you may also pr e ss the left soft key “ options ” to perfor m the follow ing
functions:
n Send to send the current message.
n Edit to edit the current message.
n Delete to delete the current short message.
n Delete all to delete all short message of outbox.
n Use Number to extract the telephone number of the receiver in the current short message and
contain the number(3—40 bit) in the current short message, then display them by list form. If
you select one of the numbers, you can save the number to your phonebook, or dial.
n Use URL to e xtr act the URL a ddr ess (fir st of addre ss mus t http://、www or wap) in the
current short message; then display them by list form. If you select one of the addresses , you
can connect to it directly.
4.3.1.3 Write Message
Before writing a short m essa ge, please conf irm that y ou ha ve se t the short message service
centre number.
You can edit your short message by entering the “Write Message” submenu.
Press the left soft key to enter the “ options menu:
n Done After finishing your message you can select this option and use the up/down keys
to select “Se nd Only” , “Save and Send”, “Save”, “Send To Many” or “Send By
Group”.
Page 22

21
n Use Template to insert character information of prearranging at the currently
cursor place.
n Insert Object to support the short information (EMS) of the enhanced mode,
select insert object to appear the EMS. Edit the menu as follows:
Picture: to select picture in the owner mobile-phone to insert currently cursor place.
My Picture: to sa ve pic tur e tha t is inte rce pte d fr om re ce iving EMS inf or mation, a nd can se lect
these pictures to insert curr ent l y curs or pl ace.
Predefined Animation: to insert predefined animation picture to currently cursor place.
My Animation:to save anim ation icon that is inter ce pted fr om rece iving EMS informa tion, and
can select these icons to insert currently cursor place.
Melody: to select music in the owner mobile-phone to insert curr ent l y cur sor pla ce.
My Melody to save music that is interce pte d from receiving EMS information, and can select
these music to insert currently cursor place.
Predefined Sound to select predefine sound of system in the owner mobile-phone to insert
currently cursor pla ce.
n Format Text under this menu, you can set format of the text:
Te xt Size :you can select the text size: Small, Medium, Large.
Text Style:you can apart set the text style, Bold, Italics, Underline, Strikethrough.
Alignment:you can select the alignment mode: Automatic, Left, Center, Right.
New Paragraph: you can add a new paragraph with Automatic A lignm ent mode, Left
Alignment mode, Center Alignment mode, Right Alignment mode.
n Insert Number to insert PHB number to SMS
n Insert contact to insert PHB name to SMS
n Insert bookmar k to insert bookmark to SMS.
n Input me t hod to offer 25 kinds of input methods .
After selecting “ Done”, if you select “Save” to save the current message into “Outbox” , if
you select “Send Only” to one person, it will prompt you to input the addressee’s telephone
number. At this time you can input the num ber with the number ke ys , or pre ss the left soft key
“Search” to bring up the phonebook whe re you ca n se lect the addressee’s num ber. I f you selec t
“Save and Send”, you can send the message to one person and save it into “Outbox”. If you select
“Se nd To Many ” to enter the Edit List to allow you to send one short message consec utively to
several people.If you select “Send By Group” to send information to corresponding group
member.
Attention: short message centres of some cities and districts do not support shor t
Page 23

22
messages over 160 letters (160 English letters), only the compatibility mobile-phone can
incept and send the picture, Animation and Melody.
4.3.1.4 Templates
Press the left soft key to e nte r inf orm ation tem pla te list,y ou ca n Edit or Er as e the tem pl a te
message or Write Message .
4.3.1.5 Message Settings
When using the short message function you must first make the necessary settings.
Enter the “Message Settings” submenu to select operate as follows:
n Profile Setting Please contact your network provider to get the SC Address. Profile list have
one profile, two profiles and four pr ofile s bec ause the diff er ent networ k supports and SIM
card. Select one Profile, press the left soft key “Edit”, y ou can se t the Prof ile Name , SC
Address, Valid Pe riod and M essage Type. Dur ing Valid Per iod, the short message ser vice
c entre will c ontinuous ly resend a me ssa ge until it is r ec eive d. T he me ssa ge Valid Pe riod is
applicable for all sent messages. You can set the message Valid Period a s a ny of the
follow ing: “ 1 hour”, “ 6 hou rs” , “12 hour s” , “ 1 day”, “3 days”,“1 We e k” or “maxi mum”.
The network ope ra tors m ust support this func tion for it to be a va ilable . Me ssage Type can
select the Te xt , Fax, Page, E-mail by the left/right keys.
Note: Message Valid Period, Fax, Page and E-mail need support by the network operator.
n Com mon Setting to set On/Off to the Delivery Report. I f y ou set it a s “On”, then w he n the
recipient receives your short message, or if the short message is not received for some
reason, the short messag e centre wi ll se nd a sta tus re port so that you ca n see whe the r the
message has been delivered.
Note: The network operator must support this function for it to be available.
n Mem ory Status to di s pla y the me mor y by n/m form in the SI M card a nd phone, the reinto,
“n” denote the current memory message, “m” de note the most message capability in the
S I M card or phone . Y our mobile -phone can save 2 00 items( include Inbox and Outbox) SMS
at most. SMS numbers ar e de ci de d with SIM card capabi lit y in the SI M card.
n Preferred Storage t o select to sav e the messages to “SIM” or “Phone”.
4.3.2 MMS
MMS is a m ultim e dia me ssage se rvic e. I ts bigge st distinc tion is tha t it suppor ts m ultim e dia
functions and can send text, images, sound and many formats of multimedia data.
The network operators must support MMS function. Before using this function please confirm
that your SIM card supports this service or c ontact your network ope rator . If your m obile
phone supports MMS function, then a fter the necessary MMS settings, you can send and
Page 24

23
receive MMS.
One could say that each MMS is a slide projector with continuous pages, each page containing
text, images, sound, etc.
Enter the “MMS” submenu, the following option will be available: “Write Message”,
“Inbox”, “Outbox”, “Drafts”, “Te mplat es”and “Message Settings”.
4.3.2.1 Write Message
In this interface, you need make out: To (addressee), Cc (copy the current MMS to this object),
Bcc (c onfidential copy the cur rent to this obj ec t, other a ddressee ca nnot know tha t the c urre nt
MMS sent to this object.), Subject and Edit content.
You c an se lect the phone num be r or E-mail as sending object, every MMS ca n se nd to multi-
object.
When editing To, Cc and Bcc information, you can choose “Add Number” or “Add E- mail”.
After choosing the item ,y ou can input num ber or em ail dire ctly, a lso can press the left soft key
“Search” to choose number or email. Every MMS can send to multi-object.
At the addressee list interface, press the left soft key “Option”, have options as follows:
n Add Number: to add the addressee phone number.
n Add E-ma il: to add the addressee email
n Edit: to edit the selecting num ber.
n Delete: to delete the current number from the addressee list.
n Delete All: to de lete all num ber from the addressee list.
The MMS subject can be empty, if subject empty, default subject name is “No Subject”.
When you select “Edit c onte nt ”, press the l e ft sof t key “Edit” to enter edit content interface,
you can input content. After finishing it, press the left soft key “Options”, have options as follows:
n Done Complete editing of the current MMS.
n Input Method to choose one kind as acquiescence characters editor.
n A dd I mage to select a picture from [File Manager] subm enu and inser t into the cur rent
page.
n Edit Image to displace the current image.
n Remove Image to delete the current image.
n Add Audio to select an audio from [File Manager] submenu and insert into the current page.
n Edit Audio to displace the current audio.
n Remove Audio to delete the current audio.
n A dd Vi deo to se lect a vide o from [ File Manager] submenu and insert into the
current page.
Page 25

24
n Edit Video to displace the current video.
n Remove Video to delete the current video.
n Add Attachment to add the attachment to the current page from the [File Manager].
n Edit Attac hment to displace the current attachment.
n Remove Attachment to delete the current attachment.
n Add Slide Before to insert the new slide before the current page.
n Add Slide After to insert the new slide after the current page.
n Delete Slide* to delete the current page.
n Previous Slide* to return to the previous page.
n Next Slide* to enter the next page.
n Add Bookmar k Te xt to insert the bookmark to the current page.
n Preview to preview the current MMS.
n Slide Ti mi ng to se t the display tim e with the c urr ent pa ge , the differ ent page can set the
different display timing.
Complete editing of the current MMS, press the right soft key to select "Done", you can select
operate as follows: Send Only, Save and Send, Save to Drafts, Send Options, Exit.
Thereinto Send Options have customized as follows:
n Validit y per iod: to set the duration that the current MMS is saved in the MMS centre (this is
related to the service provided by your network operator).
n Delivery report: to the information feedback whether the MMS successfully send to
addressee.
n Read report: to the information feedback whether addressee read the MMS.
n Priority: to se t the pr iority of the curre nt MMS. Note : Some of the options above o nly
appear under certain circumstances, for example, "Delete Slide" only appears when the
current MMS exceeds one page. Each page of a MMS can only contain one picture and
one sound. Whe n t he c ur re nt page cont ains a sound or pi ct ur e, "Edit image " or "Edit
Audio" will a ppear. When editing an MMS, the status informatio n line bar at the top of
the screen will display the following: the current page/total pages; and the entire size of
the MMS.
4.3.2.2 Inbox
All of received MMS is saved in the "Inbox".
When you receive an MMS, your mobile phone will ring (if the function of message alert ring
ha s bee n on ), the m obile phone ’s screen will show message alert icon.
Enter the "Inbox" submenu. Your mobile phone will display a list of the MMS in the
Page 26

25
"Inbox " (include download prom pt). Press the up/down keys to scr oll to the MMS, you wish to
read, by pressing the left soft key, "Options", y ou can carry out the following operations on the
current MMS.
n Download: to download the current MMS content (if the MMS is not download to the phone).
n View: to look over the current MMS content.
n Reply: to edit the MMS to reply se nde r, a t the same tim e, subject cha nge to "Re:" and old
subject.
n Reply by SMS: to edit the SMS to reply sender
n Reply all: to edit the MMS to r eply a ll, at the same time, subje ct change to "Re:" and old
subject.
n Forward: to edit the c orre lative message to forward the current MMS, at the same time,
subject change to "Fw:" and old subject.
n Delete: to delete the current MMS.
n Delete All: to de lete all the MMS in the inbox.
n Properties: to look over the sender's number, subject, and sent time and date, MMS Size and
so on.
n Use Details: to pick up the number of sender and the bookmarks of content. you can Dial the
number or Save To Phone Book, also you can Go to the bookmarks or add boo kmar ks.
4.3.2.3 Outbox
Select the preservation when you sent MMS, and they will be saved in the "Outbox".
4.3.2.4 Drafts
"Draft" cont ai ns MMS that a re not ready to se nd out i n orde r t o fur the r edit, and the n se nd.
4.3.2.5 Templates
P re ss the left soft key "Ok" to e nte r inf ormation tem pla te list, can View it‘s Properties and
Write Mes sage .
4.3.2.6 MMS Settings
The user must make the necessary settings in order to use the MMS.
Enter the "Message Settings" submenu and make the following settings:
n Compose: include Creation Mode, Image Resizing and Auto Signature.
n Send: include Validity period, Delivery report, Read report, Priority, Slide Timing,
Delivery time.
n Retrieve: include Home network, Roaming, Read Report, Delivery Report.
n Filter: include Anonymous and Advertisement.
n Server Profile: inc lude Rename Profile, Homepage, Data Account, Connection
Page 27

26
Typ e , Username and Password.
n Memory Status: view Usage, Used Space, Free Space.
4.3.3 Chat
Press the left soft key “OK” to enter Chat menu, you can set two chat rooms at most. To enter
Chat Room Inf o menu, can set your Nicknam e and Rem ote Num ber . The n se lect Start New, you
can chat with others in the separate chat room by SMS. During the chat, you can select Resume or
End.
4.3.4 Voicemai l ser v e r
This will autom atically direct incoming calls to the voice mail centre when you cannot accept a
call so that the caller can leave a message on the voice mail sy stem of service network. If a
message is left, you can access the message by visiting the voice mail system.
n Enter “Voice Mail Server” submenu, can set two voice mai l se rvers at most.
n P re ss the le ft sof t ke y “Option” to e nter m ail option, can Edit to enter your voice mailbox
number, or Connect to Voice to tune voice leave word.
n The network oper ators must support the “Voice Mail Server” function for it to be a va ila ble.
You m ay ha ve to apply for it be for e it w ill be ac tivate d. For de tails and the voice ma ilbox
number, please contact your network operator.
4.2.5 Broa dcast messag e
Broadca st messages refer to public messages sent by your ne twork ope rator . If you use the
broadcast message service you can receive messages on all different subjects from your network
operator such as: the weather, taxis, hospitals, etc. Please contact your network operator for
available subjects.
n When you enter the “Broadcast Message” submenu you will see four menu options:
“Re cei ve Mod e”, “Read Message”, “Languages” and “Channel Setting”
n You can read current broadcast message through “Read Message”.
n Select the “Channel Setting”, can Add broadcast channel and set Channel Title a nd
Channel ID; you can Select On/Off operation to preparing broadcast channel, filtrate
needless broadcast channel; can select “Edit” to reinstall current channel; can select “Delete”
to delete broadcast channel of preparing.
Note: The network operators must support the “Broadcast Message ” function f or it to be
available .
Page 28

27
4.4 Caller center
4.4.1 Log
In the menu interface, pres s the Navigat ion key to scroll and select “Log”. Press the left soft
key “Ok” to enter t he “Log” submenu. H e re you ca n look up i nforma tion on the call records
4.4.1.1 Missed calls
Enter “Missed Calls” submenu, will show the telephone number or name of missed calls (if this
number is already stored in the telephone book). Select a record of missed calls list, press the left
soft key “Ok” to loo k over recor d de tails, it will show da te, tim e , nam e of the ca ll, tele phone
number of incoming telephone and times of incoming telephone.
Press the left soft key “Option”, include operate as follows:
Delete to delete the current record
Save to Phone book to save the current number to phone book.
Call to call up the current number.
Edit to edit and save number of incoming telephone.
Send text message to send the text message to this number.
Se nd mult i me dia me ss age to send the multimedia message to this number.
4.4.1.2 Dialed call s
Ente r “ Diale d Calls” subm enu, show the dia l calls list of the c urre nt record. Select a re cord,
press the left soft key “Ok” to look over call info.
Press the left soft key “Option”, operate same with “Missed Calls”.
4.4.1.3 Received calls
Ente r “ Received Calls” subm enu, show a ll received calls list of the cur rent record. Select a
record, press the left soft key “Ok” to look over call info.
Press the left soft key “Options operate same with “Missed Calls”.
4.4.1.4 Delete all log
Press the left soft key “Ok” to enter “Delete Call Log” submenu. When the record is not empty,
you can delete record of M isse d Calls, Dialle d Calls and R ece ive d Calls. , or select the “Delete
All” option to delete all call record.
4.4.1.5 Call timers
Press the left soft key “Ok” to enter “Call Time” submenu, can look over call time record up to
now.
n Last Call Time to view the tim e of the last call.
n Total Sent to view the total time of the sent calls.
Page 29

28
n Total Received to view the total time of the received calls.
n Reset All Time All call time will be cleared to zero.
4.4.1..6 Call cost
Press the left soft key “Ok” to enter “Call Cost” submenu, can look over call cost record up to
now.
n Last Call Cost to view the cost of the last call.
n Total Cost to view the accumulated cost of all calls.
n Reset Cost to clear the call cost log record after entering the PIN2.
n Max Cost to view and set the limit on call cost, no limit display “0”.
n Pri ce Per Un it to view and set the call cost unit.
Note: to be used, your network operator must support the “Call Cost” function. You need to enter
y our PIN2 num be r to set the “Max Cost”, “Re set C ost” and “Price Per Unit”. Please contact
your network provider to obtain this number
4.4.1.7 Text message counter
To view the c urrent text me ssage counter, include the two options: “Sent” and “Received”.
Press the left soft key “Reset” to cl ea r
4.4.1.8 GPRS counter
Enter the “GPRS Counter” submenu to view the quantity of data flow transmitted on the
network via GPRS. This includes to view the Last Sent, Last Received, All Sent or All Received
data flow quantity. You can also reset it to zero by the Reset Counter.
4.4.2 General call sett ing
Ente r the “General call settings” submenu. H e re you ca n ma ke the followi ng setting s:
4.4.2.1 Call settings
Ø Caller ID Se tting up the local number "Se t by net work", "H ide ID " or "Send I D . "
Ø call waiting Afte r a cti vati ng thi s function, the ne twork wil l not ify you that you have a new
incoming call when you are talking on the phone . For detai ls of how to use this functi on you
can cont act your networ k provi de r.
Activate to activate this function.
Deactivate to cancel this function.
Q uery Status to view the status of this function
Ø call divert The call div ersion network service permits you to divert, under cer tain preset
situations, certain incoming calls to a t elephone n umber de signat ed by you. This serv ice
requires network support . Please contact your network provider to activate this
Page 30

29
servi ce. You can se t and cancel t he incoming ca l l di ve rsion functi on of your mobil e phone .
² D ive rt All V oic e Calls: to dive rt ca lls under all cir cum sta nc e s. The num ber of rings at
that shall trigger depends on network.
² Divert If Unreachable: to divert all incoming calls when the phone is unreachable due
to some network error or other reasons.
² Divert If No Answer: to divert the incoming call if it is not answered.
² Divert If Busy: to divert all incoming calls when there is at least one call in progress on
the handset.
² Divert All Data Calls: to divert all data calls.
² Cancel All Divert: this shall deactivate this facility.
When you have selected one of the above modes, you may carry out the following operations:
Activate to activate this function.
Deactivate to cancel this function.
Quer y Sta tus t o view the status of this function.
Ø Call barring The Call Barr ing al low s the use r to preve nt incoming or outg oing ca ll s base d on
user-defined conditions. The network provider pr ovides y ou with a 4 digit Barring PW to
allow you to activate the “Call Barring” service. When you use t his function, please contact
y our ne twor k provider.
² Outgoing Calls to allow the user to preve nt ca lls being made to other num ber s. It
includes: All Calls, bars user from making any outgoing call; International Calls, prevents
the user from making international calls only ; International Calls Except To Home
prevents the user from making any international call other than to home .You can
Activate, Deactivate, Query Status above options .When All Calls is activate, SOS
number can call only.
² Incoming Calls: to allow the user to prevent calls being received from other numbers.
It includes: All Calls, The user may not receive any incoming call; When Roaming,
pre vents user from receiving any incom ing call whe n the user is out of home. You can
Activate, Deactivate, Query Status above options.
² Cancel All to input the Bar .Password, can cancel all limits.
² Change Barring PW to input the old password, set the new password.
Ø Li ne s w itching t o choose to use one li ne t o cal l.
4.4.2.2 Auto r edial
Turn on or off this option, c an activa te or deactivate this function.
4.4.2.3 Speed dial
Page 31

30
This function can turn on/off Speed Dial feature and set speed dial numbers. By turn On or
Off to active or forbid spee d dial. Sele ct “Se t Numbe r ” item , press the left soft key “Ok”, can
enter and se lect the num ber of speed dial to 2-9 number keys. On standby, y ou ca n dial the
number of setting by long pressing number key
4.3.2.4 IP dial
The mobile-phone sustains the IP number call, can set three group IP number at best. The
first e dit IP num ber, the n ac tivate it, whe n you call, IP num be r will a utom a tically a dd bef ore
the phone number.
When you have selected the IP N um ber, you may touch “Option” to carry out the following
operations:
Activate to activate this function.
Edit to edit the IP Number.
4.4.2.6 More
Ope ns or the closure tele phone c onve rsation tim e dem onstra tion, the tele phone conversation
time prompt type, the automatic time limit function.4.5 Setting
4.5 Set t i ngs
4.5.1 S IM Appl
May c ut be twe en ha ndset's movem ent pa tter n: The double model opens, only SIM1 to open,
only the SIM2 card to open, the flight mode.
4.5.2 Pen calibrati on
Ac cording to calibration show displayed in the sc reen, touch cross’s centre in the scr ee n to
calibrate the Pen, make the Pen more exact.
4.5.3 Acceleromet er S ettings
In the accelerometer settings you can set Song Switch and Wallpaper Switch.
4.5.4 Phone s e t up
Enter the “Phone Setup” submenu. Here you can make the following settings:
Time and data
Use this m enu to change the time and date displayed on your phone . Ente r the “ Time and
Date” submenu. Here you can make the following settings:
n Set Home City to select the different city
in 77 cities.
n Set Time/Date to set the curre nt time and da te of mobile-phone acc ording as established
format. The mobile-phone allows to set date between 2000 and 2030 year.
n Se t Format to set tim e for ma t , 12- hour or 24-hour, set date format to select
Page 32

31
YYYY-MM-DD, MM DD,YYYY, DD-MM-YYYY, DD/MM/YYYY,MM/DD/YYYY,
YYYY/MM/DD.
Schedule Power On/Off
You can edit four times to turn on/off the mobile-phone. Each time includes to set as follows:
Status ( Disable or Enable), Power On or Off and tim e. Finish sett ing, whe n the t ime ar rive,
mobile-phone will turn on/off according to the status.
Note :time cannot repeat, because same time cannot be actived at one time.
Language
To set the current language type, menu interface changes according to setting.
Display Characteristics
Wallpaper: the first is br owse and se lect the wa llpape r fr om System by t he up/down keys,
the second is User Define, browse and select the wallpaper from file manager.
Screen Saver select “Setting” to set the status and waiting time of screen saver. Select
“Select” submenu and enter, you can choose “System” and “User Define”, this function operation
same with the Wallpaper.
Idle shortcut you can open or close the idle shortcut.
Show Date and Time to turn On or Off, set whether display the date and time on standby
Clock type you can set the clock type.
Themes
You Can select a different theme and set up the theme update frequency.
Greeting text
Turn On or Off status, and Edit the start-up greeting for the phone.
Auto update of dat a and time
Set the auto update of data and time to off or on
UART setup
to switch between the SIM card1 and SIM card 2. Set after the phone restart.
Misc. setting
LCD Backlight to set Brightness and Time of LCD backlight. Brightness has 5 classes, Time
can select from 5~60 sec.
Breath light
You can set the breath light opened or closed, If the open, call or play a sound file with the music
breat he l ant ern fl ickering.
4.5.5 Security set up
Enter the “Se cur it y Se tup” submenu. Here you can set the security options of your mobile
Page 33

32
phone to avoid the illegal use of your mobile phone and SIM card
4.5.5.1 SIM lock
The PIN number can prevent the illegal use of your SIM card. Enter the “SIM Lock” submenu.
Floating bar register the current state, here you can make the following operates:
n If SIM Lock is Off, select “ON” and input PIN number to activate SIM Lock protection. The
next time when you turn on your phone you will be asked for your PIN number;
n If your PIN num ber protection is curre ntly in use, selec t “Off” to turn off the PIN num ber
protection.
Note: If you successively input your PIN number three times incorrectly, your SIM card will
be loc ked. At this time you need the PUK number to unloc k the SIM card. T he PIN number
and PUK number may have been provided to yo u together with the SIM car d. If you do not
have it, please contact your network provider. T he default PIN number is usually 1234. Y ou
should change it to your own code as soon as possible.
4.5.5.2 Phone lock
The Phone Lock can prevent the unauthorized use of your mobile phone.
Enter the “Phone Lock” submenu. Here you can make the following operates:
n If y our phone lock protection is c urre ntly inac tive, se lect “On” to activate the phone loc k
protection. The next time when you turn on your phone you will be asked for your phone l oc k
code;
n If your ha ndset lock protection is cur rently in use, select “Off” to turn off the handset lock
protection;
Atte ntion: The de fault phone lock code is 0000. You s hould change it to your own code as
soon as possible.
4.5.5.3 Auto keypad lock
A time se lec t fr om 5 se c, 30sec, 1min and 5min, on sta ndby, if y ou do nothing in the time of
setting, keypad will automatically lock. If y ou select “None”, that will cancel this function.
4.5.5.4 Change password
User is allowed to change PIN, PIN2 and Phone Lock Password.
If user want to change PIN, but SIM lock is not enabled, then user cannot change PIN, a popup
window shows “PIN Lock Must Be Enabled!” along with an error tone.
Note: Password number must be more than 4 digits (include 4 digits) and maximum 8 digits
4.5.6 Restore factory settings
Enter the “Restore Factory Settings” submenu. Here you can restore the relevant
settings to the manufacturer’s settings.
Page 34

33
Note: Restoring the manufacturer’s settings requires the correct handset loc k code to be
e nt ere d. Some se t t ings cannot be re st ore d to t he manuf act ure r’s se tt ings unt il t he pho ne is
restarted.
4.5.7 Sound e ff e ct
Set the sound effect of audio player: Equalizer, Reverb, 3D surround effect.
4.6 Media
4.6.1 Camer a
Camera Settings
Enter preview window of the camera, press the left\right keys to switch with EV; touch right
screen icon to set corresponding parameters.
In preview window of the camera, press the left soft key “options you can put up operation as
follows:
n Album to go to album, display picture list that it is saved in the current album. At this time,
display the Memory Card:\ [Photos] in the [File Manager].
n Camera Settings to set content as follows, include Shutter Sound, EV, Banding,
De lay Timer ,Cont Shot, finish se tting, pr e ss the left soft key “Ok” to activate the current
setting.
n Image Set tings to include c ontent: Image Size and Image Q uality. Image Size yo u can
select from 240×320、 60×80、 160×120、 320×240、 640×480Image Quality can select
from Normal, High and Low.
n White Balance you can select from Auto, Daylight, Tungsten, Fluorescent, Cloud,
Incandescence.
n Scene Mode to set Auto or Night.
n Effect Settings to set the special effect when you are taking photo.
n Add Frame to set photo frame, photo offer the frame only 176×220 size..
n Restore Default to parameter of camera revert default setting except self capture
mode.
Taking a photo
n During the view-finding mode, adjust the lens to allow what is being photographed to appear
in the viewfinder.
n After framing the picture you wish to take, keep the camera steady and press the OK ke y or
touch “ ” to take pictures.
n After taking photos, press the left soft key to save it, then return to view-finding
Page 35

34
mode. Or press the right soft key to clear the picture and return to the view-finding mode.
n When Cont Shot set the On, save and take a photo will finish at the same time.
Acquiescence name of saving the image is “IMG” + “four serial number of pictures
(increase according as time) ” + the letter, thereinto, the lette r change fr om A to Z. You can look
over the photos from the “ Image Viewer” menu, or from the [Photos] doc um ent in the [ File
Manager] (display Memory Card:\ )
4.6.2 Ima ge v i e we r
Sele c t “Image Viewe r” subm enu, you can have convenient look ove r the photos list. Pr ess
the left soft key “opt ions to selec t cont ent as follow s: Vie w, B rowse St yl e , Forward, Rename,
Delete, Delete All Files and Sor t.
“Forward” operation can select to send To Wallpaper, To Screen Saver, To Power On
Display,To Power Off Display, To Phonebook, To MMS, the idiographic operation succeed or
defeat, relate with the MMS space size, screen size ,and so on.
4.6.3 Video recorder
To enter “Video Recorder” submenu, the recorder display the view-finding interface.
Video Recorder Settings
Press the left soft key “options to put up operation as follows:
n To Player to go to Video Player m enu, display movies list that it is saved in the cur rent
video player menu. (display Memory Card:\).
n Camcorder Setting to set content as follows, include W hit e B alanc e ,EV, Night
Mode and Banding. Finish setting, Press the left soft key “Ok” to activate the current setting.
n Video Setting to include content: Video Q uality, File Size Limit, Rec Time Limit,
Record Audio, Encode Format.
n Effect Setting to set the special effect when you are shooting the movies.
n Restore Default to parameter of video revert default setting.
Video
n During the view-finding mode, adjust the lens to allow what is being photographed to appear
in the viewfinder.
n After finding view, press the OK key or touch icon “ ”to begin to kinescope
n Touch “ ” icon or press the OK key to intermit record, then touch“ ” icon or press the
OK ke y to continue record.
n When the movies is being recorded, touch “Stop” or press the right soft key, stop
and save the movies, then return vi e w - finding mode.
Page 36

35
Acquiescence name of savi ng the movies is “MOV” + “four serial number of movies (incr ea se
according as time)” + the lett er . Y ou can look over the movies from the “Video Pla ye r” menu or
from [V ideo] d ocument in the [File Manager] (display Memory Card:\ )
.4.6.4 Video play e r
Select “Video Player” submenu, you can look over list of movies saved in the “Video Player”,
press the left soft key “options can select the operation as follows:
n Play to play the current movies.
n Send to select To Phoneboo k, To MMS.
n Rename to reedit the current movies name.
n Delete to delete the current movies.
n Delete All Files to delete the all movies in the mobile-phone.
n Sort by to array all movies to select By Name, By Type, By Time and B y Size, or not array
movies to select None.
n Shortage ( Phone, Memory card)
When the movi e is pl ayi ng, y ou ca n adjus t the s pe e d by press ing the left/right key, and a dj us t
t he ra te of pr ogr e s s by pres sing up/down k e y. W he n the mov ie i s be ing played press the 2 and 8
k e ys to a djust the volume, pre ss the left soft k ey or OK k ey to pa use or resume to pla y the video,
t ouch i con “ ” t o s nat ch the image in the movi e s . . T he s nat ched image wil l be save d in the
Memory card:\[ Phot o] in the “F i le Manag er ”. T ouch i con “ ” or pr e ss the * key to pl ay the
movi e full screen
4.6.5 Audi o pl ayer
In the Audi o Pla ye r menu interface, pres s the up/down key to control the musi c to pl ay,
paus e , resume or stop; Pr e s s the left/right key circularly t o play the music in the play list; Press
the S i de volume k ey t o adj ust the volume.
In the Audio Player menu interface, press the left soft key “List” to display the list of music,,
press the left soft key “options can Play the c urrent music, look ove r Detail m essa ge of m usic,
Add To Rings, Refresh List and Settings of the attribute about the Audio Player.
You can set the item of Settings menu by the hint above the screen:
Ø List Auto G en to turn on or off. Turn on this item, music will automatically upda te the
play list in the [My Music] submenu. Turn off this item, return “Option” menu, can select
“Add” to add music to the play list, selec t “Re move” or “ Rem ove All” to remove the
se lecte d file or a ll file s f rom the play list.
Ø Repeat to change the repeat mode, to set “Off” (not repeat),
Page 37

36
“One” (repeat one music) and “All” (circularly play all music).
Ø Shuffle to change the order of playing, can set “On” (random order) or
“Off” (play according to order of the play list).
Ø Background Play to se t “On”, c an play the m usic in othe r interface (except Sound
operation, Camera operation , Video Recorder operation and sound recorder operation).
4.6.6 Sound recor de r
In this submenu, m obile-phone will r ecord voice mem os, suffixal nam e is amr or wav, and
display size and date above the interface. If sound recorder is empty, it will register [Empty
Folder].
Press the left soft key to select “options and access the following options:
Ø Record to record a new voice memo. In the record interface, press the left soft key to
select “Pause” or “Cont.”, can pause or continue record, press the right soft key to select
“Stop”, edit and save the file. Press the hang-up key to exit and save the file automatically.
The record is saved to [Audio] file in the [File Manager] (save to Memory
Card:\[Audio] ).
Ø Play to play the curr ent voice memo.
Ø Append to “a mr” file, can add record to the current file, and save quondam name.
Ø Rename to change the name of the voice memo.
Ø Delete to delete the voice memo.
Ø Delete all files to delete all voice memos.
Ø Settings to change the File Format. select "AMR" or "WAV" by the left/right keys.
Ø Use to select current file to send To User Profile, To MMS.
4.6.7 FM r a dio
Enter this menu, pr ess Up/down Nnavigation keys to adj ust the volum e, press Left/right
Nnavigation keys to a djust the c hanne l, press down navigation ke y to control the Fm ra dio to
play. Press left key “option” can select the operation as follows:
Ø cha nnel l ist M ost ma y e dit 9 gr oups of t abl e s of contents.
Ø Manual input May the manual input broadcast frequency. I n the input procedur e
presses # the ke y t o be poss i ble to input “.” .
Ø Preset auto search The auto search may receive the broadcast frequency and
esta bli s he s pres e rves the cha nnel det ai led list menu.
Ø Settings Whether the establishment FM broadcast does begin using background
player, loud spe aker.
Page 38

37
4.7 Fil e manag er
P re ss the left soft key "Ok" to enter this subm enu, m enu display "Memory Card" ( if the
Memory card have been inserted into the mobile-phone).
n Open to display the list in the root catalog and file.
n New Folder to edit the name to create new folder.
n Format to for mat Mem ory card, this ope ration will de lete data in the c urre nt P hone or
Memor y card.
Open the file, can display the list in the file, select one datum, press the left soft key “0ptions
n Open to display the list in the current datum.
n New Folder to edit the name to create new
folder.
n Rename to change the current file name.
n Delete to delete the current file.
n Sort by to select sort means with the current files, By Name, By Type, By Time and By
Size, or not array to select None.
Select one file, press the left soft key “options
n View to look over the picture file. If photo format is not supported, the phone shall show an
error prompt.
n Play to play multimedia file. If file format is not supported, the option shall not show.
n Print to use Bluetooth to send print
n Edit image files can automatically change the size of the main screen size of the cutting,
manual crop settings, the specific cutting operations can refer to help cut.
n Use as set the image file as wallpaper, screen save r, boot anim ation, shutdown animations
and caller images; for the sound files can be set to ring tones profile.
n Send Bluetooth, or multimedia files to be sent.
n Details to display details including Date and Size.
n Rename to change the file name.
n Copy to c opy the current file to destination. Pre ss the left soft key “Ok” to se lec t this
operation, display the all file under the same root list. If you will copy the file in the same root
list, carry out “options operation. Include: Done, finish and copy; Open, enter the underling
file and copy; New Folder, set up the new file and copy.
n Move to move the current file to destination, Move conforms with Copy, but Move is Done,
file will not save in situ.
n Delete to de lete the curre nt f ile(Note: if the f ile a ttribute is Re ad Onl y, it cannot
Page 39

38
be deleted
n Delete all files to delete all file in the current catalog.
n Sor t by to se le ct sor t me ans with the curre nt f iles, B y Name, B y Type, B y Ti me and By
Size, or not array to select None.
4.8 Gam es
4.8.1 Gam es
In thi s menu the re a re four games( bowli ng , doudi z hu, ma gi c eye , Vsmj) for y our leisure t i me
entertainment.
4.8.2 MeR ig
MeRig platform is where you can download g ames and applications, integrated platform for
the first time you can enjoy the lat est business; specific tariffs please consult your local operator.
4.9 Profile s
Your mobile phone provides many diff erent user profiles for you to set your mobile phones
ring tone, according to case and environments.
In the main menu interface, press the navigation keys to select “User Profiles”. Press the left
soft key to enter the “User Profiles” m ain menu where y ou will be a ble to see the options:
“General”, “Meeting”, “Outdoor ”, “Indoor ” and “ Headset”.
n General for use under general circumstances.
n Meeting for use in meetings. This requires presetting (for example, Alert Ty pe set to the
Vibration Only).
n Outdoor for use in outdoor activitie s. This r equires pre setting (for exam ple , you ca n set the
volume of the receiver and ring tone higher).
n Indoor for use in indoor activities. This requires presetting.
n Headset f or use in he adset a ctivities, this m ode will ac tivate when ea rphone inse rt. This
requires presetting (for example, you can set the volume of the receiver and ring tone lower).
Note: These five profiles have already been set and the default profile is “General” when the
mobile phon e le aves t he fac t ory. On st an dby, hol d down press # key to quickly turn silence
on or off.
Press the up/dow n ke ys to select the needful profile, then press the left soft key “Option”:
Activate: to activate selecting profile.
Customize: for y ou to set y our profile, select corresponding setting to rejecter.
Page 40

39
Select “Customize” menu, press the left soft key “Ok”, will display the menu a s follows:
n Ton e Set up: to allow the use r to custom ize differe nt ring tone s with different option, for
example, incoming call, power on or off, and so on.
n Volume:Two type of volume can be set: Ring Tone (including incoming call, alarm, power
on, power off, message tone) and Key Tone (associated with key press).
n Alert Type: This option allows the user to set the kind of alert he expects whenever there
is an incoming call. user can select only one option from Ring and Vibration Only.
n Ring Type:This option allows the user to set mode of ring, include Single, Repeat and
Ascending.
n Extra Tone:The user can turn on or off the tone as follows: Warning, Error, Camp on and
Connect.
n Answer Mode:The user can select different modes
of answering: Any Key (except for the Hang-up key, right soft key) and Auto (display when
the earphone insert).
4.10 Organizer
4.10.1 QQ
QQ allows you to chat anytime, anywhere to, the relevant tariff y ou c an consult a loca l
operator.
4.10.2 Calendar
Enter “Calendar” submenu, screen will display the current month, press the navigation key to
change date.
View Tasks
You can enter “View Tasks” menu to set item of routing, list display the routing today.
View Look up the current routing.
Add Edit operation as follows:
Date: to set the remindful date.
Time: to set the remindful time range.
Note: to edit the remindful content.
Alarm: to turn on or off the alarm.
Repeat:to set repeat periods with alarm.
Note: When the alarm is turned on, repeat item is effectively.
Edit Tas k To edit and amend the current routing.
Delete Task To delete the current routing.
Page 41

40
Delete All To delete all routings.
Jump To Date
Input the Date, press the left soft key “Ok” to jump to the appointed date.
4.10.3 To do
Displa y a ll the task a rrangement, under option menu, including Browse, Add, Edit , D e le t e
Record and Delete All.
4.10.4 Alar m
The mobile-phone can set five alarms at most, and hold out the alarm when the phone is power
off. Select one alarm, can set to turn on/off,time , Repeat and Snooze(Mins) and Alert Type
4.10.5World clock
Enter World Clock subm enu, display wor ld tim e zone ma p, move coordinate location by the
left/right key s, the interface will show the city time located by the coordinate.
4.11 Web
4.11.1 STK*
Press the up/down keys to select “STK”. Press the left soft key to enter the “STK” main menu.
Here you can use the value-added services provided by your network operator.
Your mobile phone supports STK functions. This service is provided by your network operator. If
y our SIM ca rd a nd ne twor k operator do not provide this service, the n you will not be able to use
this function. For more information please contact your network operator
4.11.2 Inte r net ser v i ce
Your mobile phone suppor ts wi reles s appl ication pr otocol (WAP) servi ce. You can access
many di ffer e nt WAP s e rvi ces such a s ne ws, we ather r e ports, fl ight i nforma tion, and ot he rs.
These services are especial ly designed for mobile phones a nd ma int ai ne d by W AP ser vice
providers.
Network support is necessary for WAP services. Please contact your network provider and/or
the service provider of the desire d service . The se rvice provider will also provide instruc tions
about how to use their service.
In the services main menu, press the up/dow n ke ys to scroll and select “WAP” and press the
left soft key to enter menu Here you will see the following menu options: “Homepage”,
“Bookmarks”, “Recent Pages”, “Offline page s”“Input address”, “Service Inbox” a nd
“Settings”.
Homepage
Select “Homepage” to enter the home page, use this menu to connect your phone to the
Page 42

41
network and load the home page of the wireless web service provider.The Home page is the WAP
site set by y ou in the activate d connection method. Home is settled in the [Settings]\[Edit
Profile]\[Homepage].
Bookmar ks
Display the bookmark list. Press the up\dow n ke y s to select one bookmark, press the left soft
ke y “ options to access the following options:
Go to : to connect the address of appointed bookmark .
Edit: to edit the Title and Address of the bookmark.
send : to send the bookmark to others via SMS or MMS.
Delete: to delete the selected bookmark.
Delete All: to delete all bookmark messages
Add Bookmar k:to edit the title and address of new bookmark.
Note:If bookmarks is empty, you need input website at first, then connect it. If you add sina
website to bookmarks, you only need to input: wap.sina.com.
Recent Pages
Display the recent pages. Select one page, can go to at first ha nd.
Offline pages
Input address
Use this menu to manually enter the URL address of a website and access the website. Except
for Bookmarks and Recent Pages, E n ter Ad d res s provides the other route to access the website.
Note:If you go up to sina website, you only need to input: wap.sina.com.
Service Inbox
Select “Service Inbox” to view received service messages.
Your mobile phone can receive service messages sent by your service provider. For example,
service messages may consist of notifications on ne ws briefings, or a line of a text message, or a
WAP service address.
Settings
Select “Settings” to enter se ttings for online br owsing, including “Edit acc ou nt”, “Brow ser
Options”, “Service Message Settings”, “Clear Cache”, “Clear Cookies” a nd “Trusted
Certificates”.
n Edit Profile to display the edit profile list. After edit and save the list,
select “Activate Profile” to activate .
Page 43

42
Ø Rename Profile: to change the name.
Ø Homepage: to change the homepage.
Ø Data Account: to select the data account from GSM Data and GPRS.
Ø C onne c tion Typ e: to select the connection ty pe from WAP and HTTP, depend on the
gateway. Press the up\dow n ke ys to select.
If you sele ct WAP, you can set:
IP Address: to input gateway IP address.
Security: to set joint security, depend on the gateway.
If you select HTTP, you can set:
Proxy Address: to input gateway Proxy address.
Proxy Port: to set the proxy port.
Ø Username: to set the user degree of APN Service.
Ø Password: to set the user password of APN Service.
n Browser Options to set the Timeout and Show Images:
Ø Timeout:to se t a tim e lim it, integer of 30-300 (second) , if there is no data e ntered or
transferred beyond this time limit the service will autom atically turn off.
Ø Show Images: to set the images, show and not show, by turn On or Off.
n S ervi ce Message Se tti ngs to set to incept or not incept the WAP service message.
n Clear Cache Data or se rvice s that y ou have visited will be sa ved in the cac he
memory of your mobile phone. Please promptly clear these temporary files which record your
online data.
n Clear Cookies Data or services that you have visited will be saved in the cookies memory of
your mobile phone. Please clear these temporary files which record your online data.
n Trusted Certificates to display the WAP browser the trusted certificate.
Note: If you tried to visit, or suc ce ssfully visited confide nt ial informat ion that re quire d a
pas sw or d ( suc h as a bank account), please clear your mobile phone’s cache memory each
time.
4.11.3 Data a ccount
GSM Dat a
In this menu, the mobile-phone will list Data Account listing of GSM data. You can select and
edit the GSM data:
Account Name: to edit specify a name for the account.
Page 44

43
Number: to the phone number to dial for connecting to the account server.
User Name: to the user identification to login the account.
Password: to the passwor d to logi n the a ccount .
Line Ty pe : to the options have Analogue and ISDN.
Speed: to ra te for tr ansmit/ receive data to/ fr om t he account se rve r. T he opt ions ha ve
4.8Kbps、9.6Kbps and 14.4Kbps.
DNS: to edit the DNS Address.
GPRS
In this menu, the mobile-phone will list Data Account listing of G P RS da ta. You c an se lect
and edit the GPRS data:
Account Name: to edit specify a name for the account
APN: to edit APN.
User Name: to the user identification to login the APN.
Password: to the password to login the APN.
Auth .Ty pe : to the options have Normal and Secure
4.12 Appl
4.12.1 Calculator
Your mobile phone provides a calculator with 4 basic functions to facilitate simple calculations.
Enter the “Calculator” submenu to display the operation interface of the calculator:
² Use the Number keys from 0 to 9 to enter the numbers you wish to enter, use the # ke y
to enter the decimal point.
² Press the up/down keys and left/right keys to enter the symbols for the four
mathematical ope rators +, –, x or ÷.
² By pressing the right soft key “Clear” you can delete the latest entry or resu l t, press the
right soft key, “B ac k”, to exit the calculator, press the left soft key “OK” “=” to
calculate the result.
Note: The precision of this calculator is limited so that rounding errors may occur, especially
in the case of indivisibility.
4.12.2 Curr ency co nver ter
Allow you to perform simple conversions from one type of currency to another. Input a
currency rate and then the local currency value to perform the function.
4.12.3 Stopwatch
Page 45

44
Typical stopwatch
Featur es [Split tim ing] f or measur ing eac h play e r’s r ec ord fr om the sta rt, a nd [ La p tim ing] to
m ea sure each lap record. The save d tim ing records ca n be display e d by sele cting [View r ec ord]
from the menu.
ON Way stopwatch
Uses four navigation keys or tap icons to measure, short press left soft key to stop timing, long
press center key to delete the data
4.12.4 E-Book r eader
This function may help you to read the preservation in the memory card (inserted the memo r y
card) txt form writing document. You only need the document copy which is going to read to the
[ E-Book] folder, then enters electricity classical philosophical works function then to read.
Press the left soft key “ options” carrying on the following option operations:
Ø Open E-boo k Reading chooses the document content.
Ø Cleanup Booksheif Reor ga nizes in folder's document.
Ø Global Settings Establishment electricity classical philosophical works demonstration
font, font si z e , stora ge location i nfor ma tion a nd s o on choice.
Ø Book Inf o Demonstrates the electronic label topic, the size and t he document format
infor ma tion conte nt.
Ø Delete to delete the current file.
Ø Delete All Files to delete all files in the E-Book Reader .
Ø Sor t to select sort means with the current files, By Name, By Type, B y Time and By
Size, or not array to select None.
Ø Appl y G l obal Se tti ngs Appli ca tion system pr e insta ll establ ishment cont e nt.
Ø Help 0-9 numeric keyboard's in electricity classical philosophical works browsing
proce ss quick ope ra ting instr ucti ons.
4.12. 5 Blue toot h
In thi s menu, Contai ns the followi ng child menu, ca rr ies on the e s ta bli s hment for you to the
Bluetooth servi ce rela t ed content:
n Power press left soft key on/off Bluetooth function.
n Inqu ir y A udio De vi c e According to the left soft ke y “OK” the sea rch exem pts holds the
installment, like Bluetooth earphone and so on. If neighbor has the Bluetooth equipment, and
it is a lre a dy opened, the ha ndse t will f ind this equipment, according to the left soft
key “connect”, inputs the Bluetooth password pair, the success joint.
Page 46

45
My Device According to the left soft key “OK” enters my installment, demonstrated already
and this handset has established the joint installment record. Chooses an item of record, press left
key “ options” can select the operation as follows:
Ø Conne ct Ca rr ies on t o thi s e quipment on-line, may choose in the record of serv i ce the
service to carry in-line.
Ø D iscon ne ct T he separ ati on ca rr ies on to thi s e quipment on-line.
Ø Renam e Enters may rev ise the installment name.
Ø Delet e Delete this record.
Ø Delet e A l l delete all rec ord.
Ø S erv ice list Demonstr ates thi s e quipment 's recor d of se rvi ce.
Ø I nqui ry ne w De vice Se ar ches for the ne w bluetoooth i nstal lment .
n Active Device Display on-line installment and the service, may “the broken line” the
separ ation ca rry on accor di ng to the le ft so ft key to this e qui pme nt on-line.
n Setting press left key “ options” can select the operation as follows:
Ø Visibility Press left soft key to turn on or off this function.
Ø Change Device Name After choosing the corresponding input method, makes the
revision to this aircraft installment name.
Ø A ut he ntic at ion Press left soft key to turn on or off this function, open authentication
demand permits other installments and this installment on-line.
Ø Audio path Set Leave in phone or Forward to BT headset.
Ø FTP Setting press left soft key enter this submenu : S hared F older May choose the
memory stick or the memory stick /document manage ment/fol de r; A ccess Right choose
ful ly cont rol or Re ad onl y.
Ø About Display Device Name, BD Adder and Supported Service
4.13 SIM Appl
May c ut be twe en ha ndset's movem ent pa tter n: The double model opens, only SIM1 to open,
only the SIM2 card to open, the flight mode.
5 Input Method
5.1 Ge ner al Outl ine
This mobile phone provides many input methods. Charac ter e ntry functions perm itted by this
mobile phone are:
- Inputting and editing of shor t messages
Page 47

46
- Inputting and editing of names in the phone book
- Looking up the phone entry by name
- Editing of text in MMS
5.2 Screen Key values
The keyboard values are as follows:
Generally the Left soft key indicates confirmation; the Right soft key is to return or eliminate.
Navigation keys (up/down and left/right keys): Generally used to move the cursor or
candidat e characters for inputting.
OK ke y: Generally indicates OK.
# ke y : to switch between different input methods.
* key: to display symbol input interface.
Number keys from 2 to 9: in the Intelligent language input modes, indicate the letters on the
corresponding key.
6 T roubl e shooting
If anything unusual occurs while using your mobile phone, please refer to the following table.
Frequently
Occurring
Problems
Cause
How to Fix
Poor
reception
Using the m obile phone in an
area with poor rece ption such
as near tall buildings or in a
basement where radio waves
cannot be transmitted.
Try to avoid.
Using the mobile phone whe n
the network is busy, such as
during rush hour, when the
lines are full making it
impossible to get through.
Try to avoid.
Page 48
47
Related to the distance from
the base station built by the
network.
You can request that the network
service provider provide a service area
plan.
Echo or
noise
Caused by poor network re lay,
a regional problem.
Hang up and redial, if the relay is
changed then the line may be better.
Some calling regions have
poor lines.
Shortening
of the
standby
time
Standby tim e is re la ted to the
network system.
Please temporarily turn off your
mobile phone, as you are located in an
area with poor reception.
Batteries need to be replaced
Replace the batteries
When you cannot get a signal,
the phone will continue to
transmit in order to find a base
station,
thereby expending
large amounts of electricity
will ca use the sta ndby time to
decrease.
Please move to an area with a strong
signal or temporarily turn off your
mobile phone.
Unable to
turn on the
phone
The battery is empty.
Look at the remaining electricity or
recharge.
SIM card
malfunction
SIM card is damaged.
Contact your network service provider.
SIM card is not properly
inserted.
Confirm SIM card is properly inserted.
There is a foreign substance on
the metal surface of the SIM
card.
Use a clean cloth to wipe off the metal
contact point of the SIM card.
Unable to
connect
with the
Expired SIM card
Contact your network provider.
Outside the GSM service area
Consult y our network pr ovider on the
servi ce ar ea.
Page 49
48
network
Poor signal.
Please move to a place with a better
signal and try again.
Unable to
mak e a call
Using the call bar function
Cancel the call bar function.
Using the fixed dialing
function.
Cancel the fixed call setting.
Incorrect
PIN number
Conse cutively ente r the wrong
password three times.
Contact your network provider.
Page 50

 Loading...