

Page 1
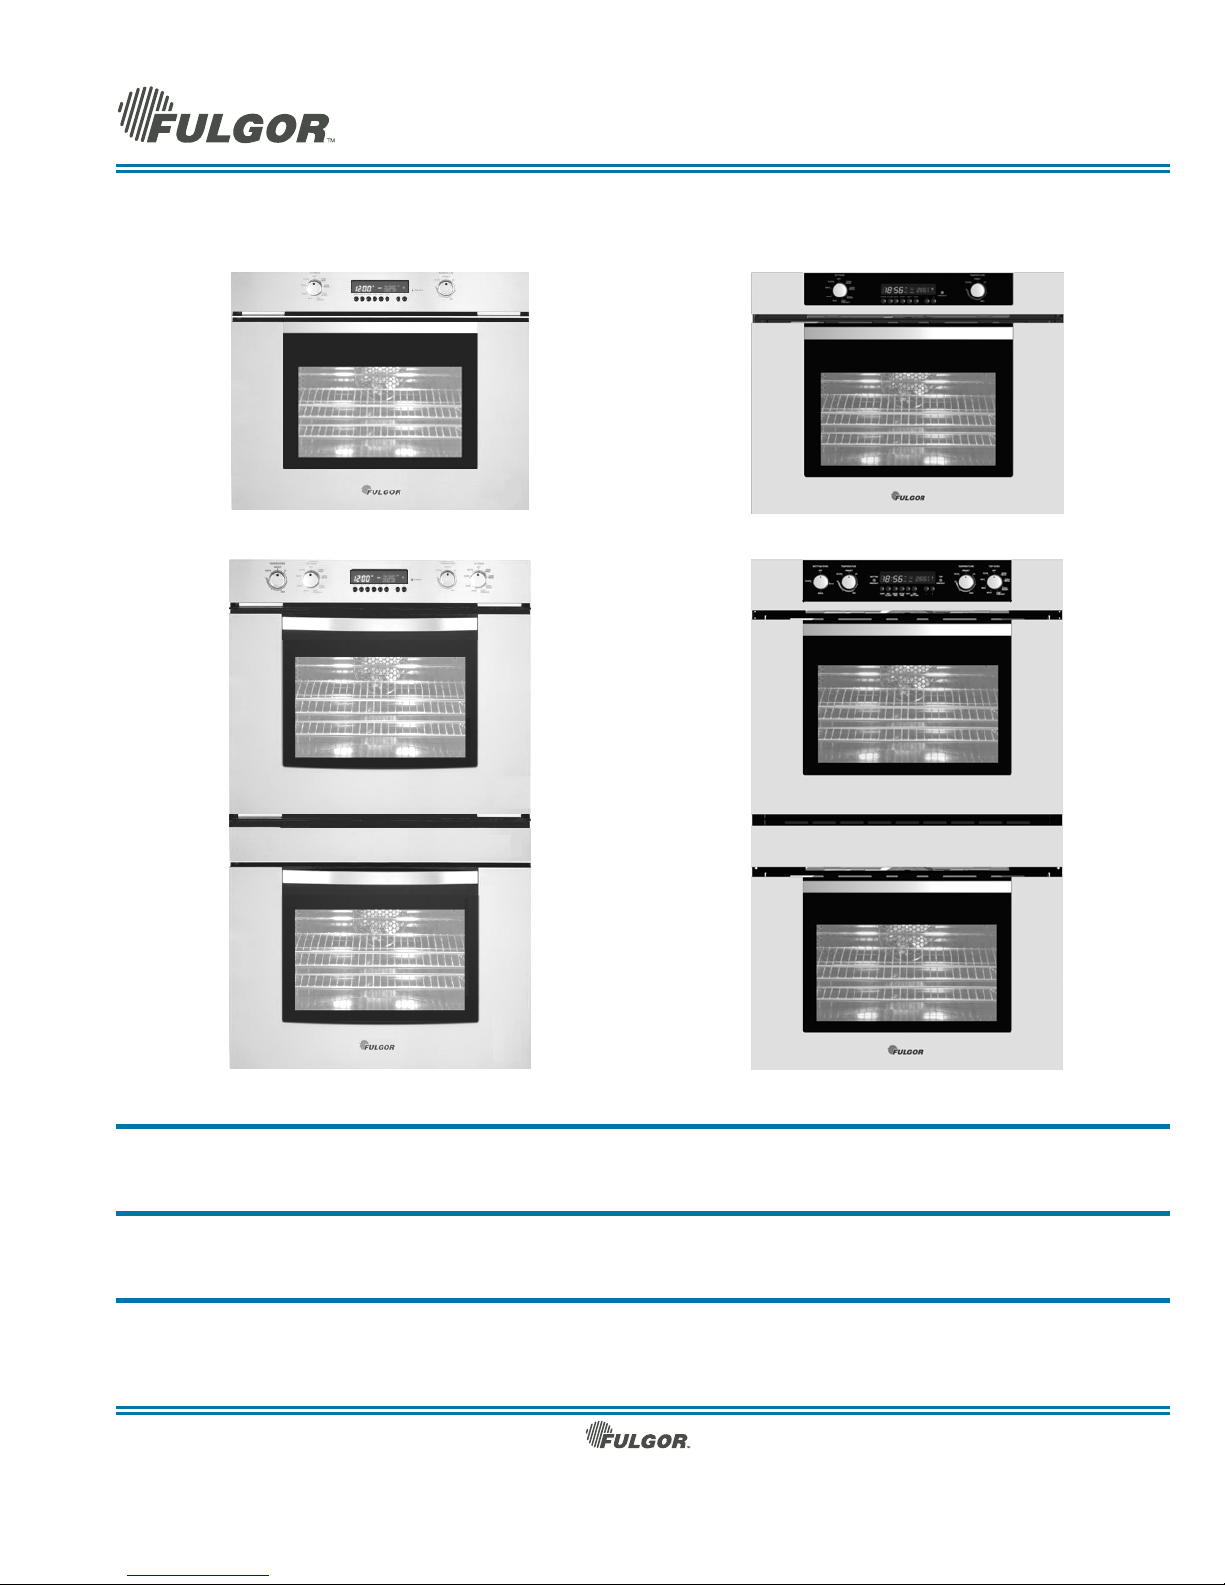
Use & Care Manual
for Single and Double Built-in Ovens
SERIES 200 SERIES 300
Models
SOVB
Models
DOVB
ENGLISH: Before you begin, read these instructions completely and carefully. Page 3
IMPORTANT FOR OWNER: Save these instructions for the local electrical inspector use. Leave this manual with owner for
future reference.
FRENCH: Avant de commencer, lisez ces instructions complètement et soigneusement. Page 34
IMPORTANT POUR LE PROPRIETAIRE : Gardez ces instructions pour une utilisation d’inspection électrique locale. Le
propriétaire doit garder ce manuel pour de futures références.
ESPAÑOL: Antes de que usted comience, lea este el inrtuction totalmente y carrefully. Página 66
IMPORTANTE PARA EL PROPIETARIO: Guarde estas instrucciones para el uso del inspector eléctrico local. Deje este
manual al propietario para futuras referencias.
The contents are subject to change without notice
Page 2

Use & Care Manual
Models SOVB - DOVB ENGLISH
Table of Contents
Page
Safety Precautions 3 Convection Roast Tips and Techniques 18
Safety Instructions 4 Convection Roast Chart 18
Safety for the Oven
Safety for the Self Cleaning Oven
4
Convection Broil Tips and Techniques 19
4
Convection Broil Chart 19
Cooking with FULGOR Convection Oven 5 Dehydrate Tips and Techniques 20
Advantages of Convection Cooking
5
Dehydrate Chart 20
Features of Your Oven 6 Broil Tips and Techniques 21
The Control Panels 7 Broil Chart 21
Command Key
7
Food Service Temperature Guidelines from
FSIS
Display
Knobs
7
Special Features 22
7
Sabbath Mode Instructions 23
Oven Modes 8 Oven Care and Cleaning 24
Page
21
General Oven Information 9 Self-Cleaning the Oven
General Oven Tips 10 Preparing the Oven for Self-Cleaning
24
24
Setting the Clock and Timer 12 Setting the Self-Cleaning Mode 25
To Set the Clock
To Set the Timer
12
To Set the Self-Cleaning Mode
12
To Change the Cleaning Time
Selecting the Oven Mode 13 To Delay the Start of Cleaning
To Set the Cooking Mode and the Temperature
Using Oven Light
13
General Oven Care 26
13
How to Use the Oven Cleaning Chart
Time Oven Mode Operation 14 Cleaning Chart
To Set Timed Mode
To Delay the Start of a Timed Mode
14
Oven Finishes / Cleaning Methods 27
14
Oven Door Removal 28
25
25
25
26
26
Bake Tips and Techniques 15 Replace an Oven Light 29
Bake Cook Chart 15 To Replace a Light Bulb 29
Convection Bake Tips and Techniques 16 Solving Baking Problems 30
Convection Bake Chart 17 Solving Operational Problems 31
FULGOR WARRANTY for Home Appliances 32
2
Page 3
Use & Care Manual
IMPORTANT
General Appliance and Oven
Safety Precautions
Please read all instructions before using this appliance.
WARNING
When properly cared for, your new FULGOR oven has
been designed to be a safe, reliable appliance. Read
all instructions carefully before using this oven.
These precautions will reduce the risk of burns,
electric shock, fire, and injury to persons. When
using kitchen appliances, basic safety precautions
must be followed, including the following:
This appliance must be properly installed and grounded
by a qualified technician. Connect only to properly
grounded outlet. See “Grounding Instructions” found in
the Installation Instructions.
• This appliance should be serviced only by a
qualified service technician. Contact the nearest
authorized service center for examination, repair or
adjustment.
• Do not repair or replace any part of the oven unless
specifically recommended. Refer service to an
authorized servicer.
• Do not operate this appliance if it is not working
properly or if it has been damaged, until an
authorized servicer has examined it.
• Install or locate this appliance only in accordance
with the Installation Instructions.
• Use this oven only as intended by the
manufacturer. If you have any questions, contact
the manufacturer.
• Do not cover or block any openings on this
appliance.
• Use this appliance only for its intended use as
described in this manual. Do not use corrosive
chemicals, vapors, or nonfood products in this
appliance. This type of oven is specifically designed
to heat or cook. It is not designed for industrial or
laboratory use. The use of corrosive chemicals in
heating or cleaning will damage the appliance.
• In the event that personal clothing or hair catches
fire, DROP AND ROLL IMMEDIATELY to
extinguish flames.
Models SOVB - DOVB ENGLISH
• Do not allow children to use this appliance unless
closely supervised by an adult. Children and pets
should not be left alone or unattended in the area
where the appliance is in use. Never allow children
to sit or stand on any part of the oven.
• Do not store items of interest to children above the
oven. If children should climb onto the appliance to
reach these items, they could be seriously injured.
To reduce the risk of fire in the oven cavity:
1. Do not store flammable materials in or near the
oven.
2. Do not use water on a grease fire. Smother fire or
use a dry chemical or foam-type extinguisher.
3. It is highly recommended that a fire extinguisher be
readily available and highly visible next to any
cooking appliance.
4. Do not overcook food. Carefully attend oven if
paper, plastic or other combustible materials are
placed inside the oven.
5. Do not use the cavity for storage purposes. Do not
leave paper products, cooking utensils or food in the
cavity when not being used.
6. If materials inside the oven should ignite, keep oven
door closed. Turn oven off and disconnect the circuit
at the circuit breaker box.
7. Do not block any vent openings.
8. Be sure the blower fan runs whenever the oven is in
operation. If the fan does not operate, do not use
the oven. Call an authorized service center.
9. Never use the oven to warm or heat a room. This
can damage the oven parts.
10. For personal safety, wear proper clothing. Loose
fitting or garments with hanging sleeves should
never be worn while using this appliance.
3
Page 4
Use & Care Manual
IMPORTANT
General Appliance and Oven
Safety Instructions
Safety for the Oven
• Tie long hair so that it doesn't hang loose.
• Do not touch heating elements or interior surfaces
of oven.
• The heating elements may be hot even though
they are dark in color. Interior surfaces of an oven
become hot enough to cause burns.
• During and after use, do not touch or let clothing or
other flammable materials contact the heating
elements or the interior surfaces of the oven until
they have had sufficient time to cool.
• The trim on the top and sides of the oven door
may become hot enough to cause burns.
• Use care when opening the door. Open the door
slightly to let hot air or steam escape before
removing or replacing food.
• Do not heat unopened food containers.
Build-up of pressure may cause the container to
burst and cause injury.
• Always place oven racks in desired location while
oven is cool. If a rack must be moved while oven is
hot, do not let pot holder contact the hot heating
elements.
• Use only dry pot holders. Moist or damp pot
holders on hot surfaces may result in burns from
steam. Do not let pot holder touch hot heating
elements. Do not use a towel or other bulky cloth.
Models SOVB - DOVB ENGLISH
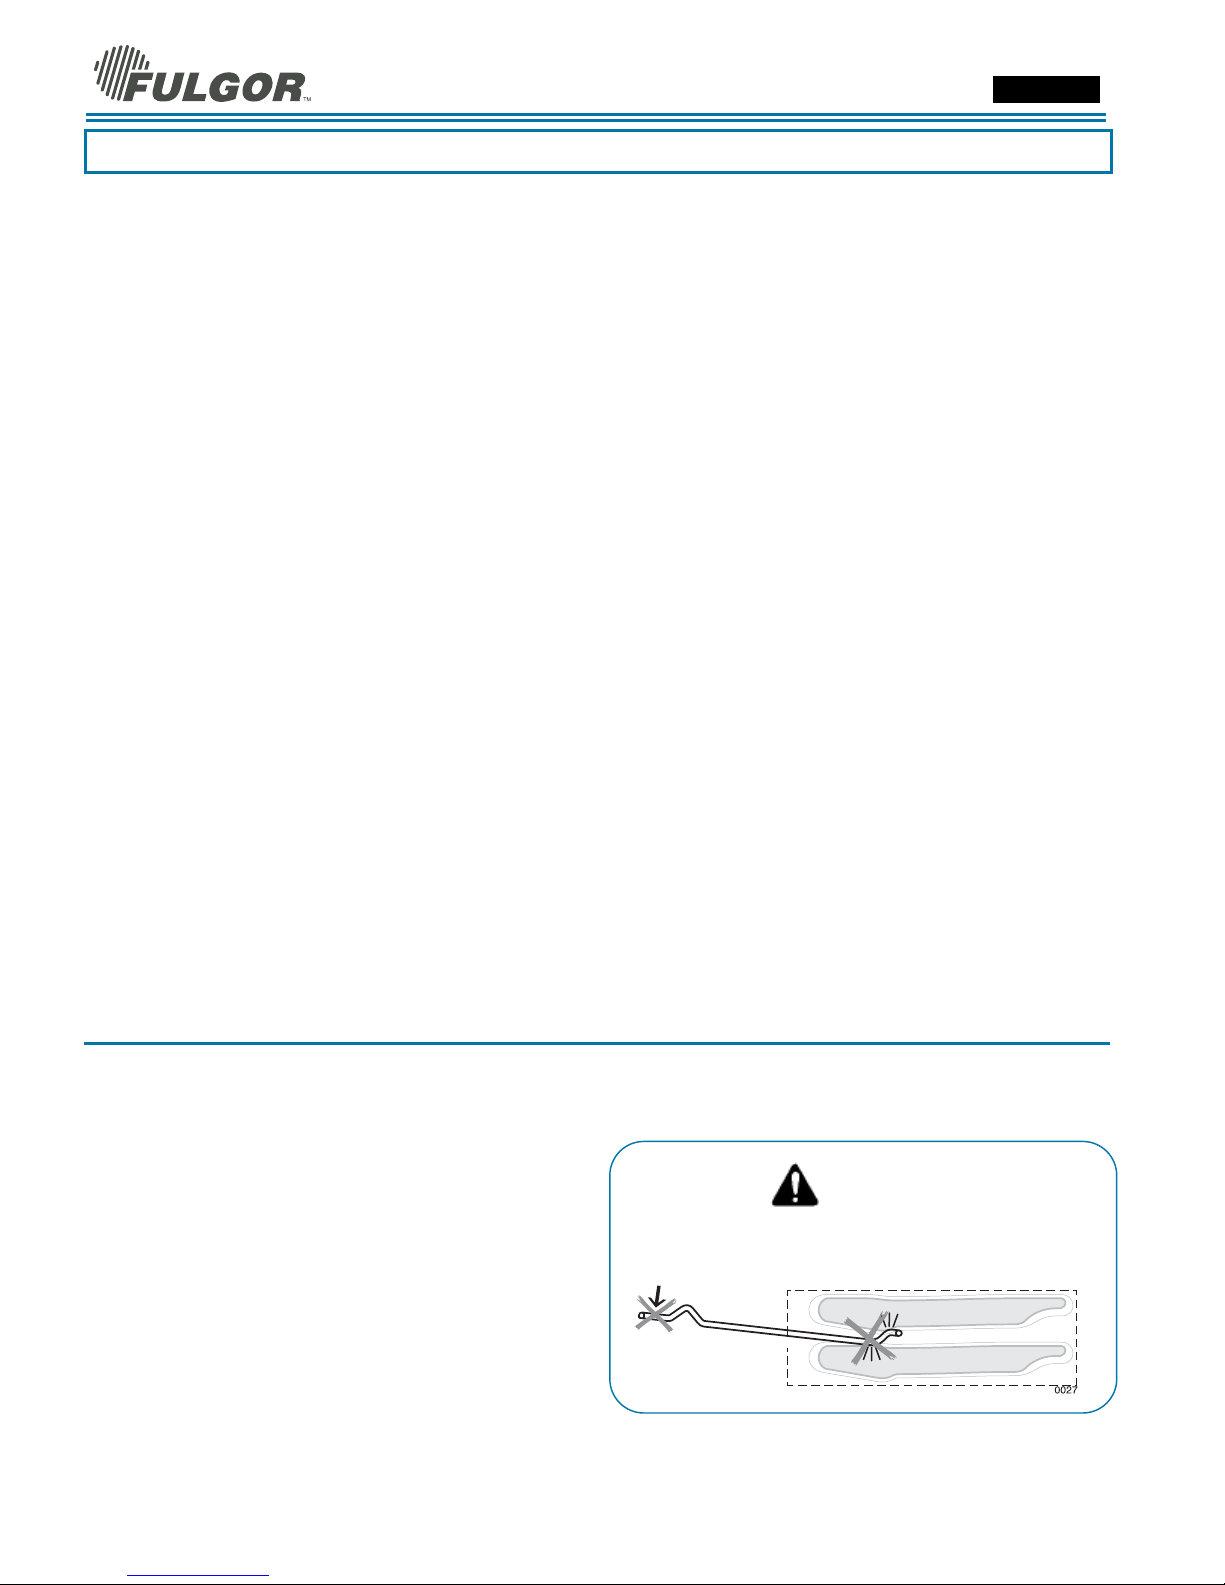
Safety for the Self-Cleaning Oven
• Confirm that the door locks and will not open once
both selectors are in CLEAN position and the door
lock icon appears. If the door does not lock, turn the
cook mode selector to OFF and do not run SelfClean. Phone for Service.
• Do not clean the door gasket. It is essential for a
good seal. Care should be taken not to rub,
damage, move or remove the door gasket.
• Do not use commercial oven cleaners or oven liner
protective coatings of any kind in or around any part
of the oven.
• Clean only oven parts listed in this manual.
• Before self-cleaning the oven, remove the broiler
pan, oven racks, other utensils and excess soft
spillage.
WARNING
The California Safe Drinking Water and Toxic
Enforcement Act requires businesses to warn
customers of potential exposure to substances
which are known by the State of California to cause
cancer or reproductive harm.
The elimination of soil during self-cleaning
generates some by-products which are on this list of
substances.
To minimize exposure to these substances, always
operate this oven according to the instructions in
this manual and provide good ventilation to the
room during and immediately after self-cleaning the
oven.
4
Page 5

Use & Care Manual
Models SOVB - DOVB ENGLISH
Cooking with the FULGOR Convection Oven
In a conventional oven, the heat source cycles on and off to maintain an average temperature in the oven cavity.
As the temperature gradually rises and falls, gentle air currents are produced within the oven. This natural
convection tends to be inefficient because the currents are irregular and slow. In this convection system, the heat
is “conveyed” by a fan that provides continuous circulation of the hot air.
This European Convection system provides state-of-the-art engineering and advanced design to create the finest
convection oven. In standard convection ovens, a fan simply circulates the hot air around the food. The system is
characterized by the combination of an additional heating element located around the convection fan and the
venting panel that distributes heated air in three dimensions: along the sides, the top and the full depth of the oven
cavity. This European Convection system aids in maintaining a more even oven temperature throughout the oven
cavity.
The circulating air aids in speeding up the baking process and cooks the food more evenly. By controlling the
movement of heated air, convection cooking produces evenly browned foods that are crispy on the outside yet
moist inside. Convection cooking works best for breads and pastries as well as meats and poultry. Air-leavened
foods like angel food cakes, soufflés and cream puffs rise higher than in a conventional oven. Meats stay juicy
and tender while the outside is flavourful and crisp.
By using European Convection, foods can be cooked at a lower temperature and cooking times can be shorter.
When using this mode, the standard oven temperature should be lowered by 25°F (15°C).
Foods requiring less cooking time should be checked slightly earlier than normal. For best results, foods should
be cooked uncovered, in low-sided pans to take advantage of the forced air circulation. When using the
Convection Roast mode, the standard oven temperature does not need to be reduced.
Advantages of Convection Cooking
Even baking, browning and crisping are achieved.
During roasting, juices and flavors are sealed in while the exterior is crisp.
Yeast breads are lighter, more evenly textured, more golden and crustier.
Air-leavened foods such as cream puffs, soufflés and meringues are higher and lighter.
Baking on multiple racks at the same time is possible with even results.
Multiple-rack baking saves time.
Prepare whole meals at once with no flavor transfer.
Dehydrates herbs, fruits and vegetables.
Requires no specialized bake ware.
Saves time and energy.
Convection broiling allows for extraordinary grilling with thicker cuts of food.
5
Page 6
Use & Care Manual
Models SOVB - DOVB ENGLISH
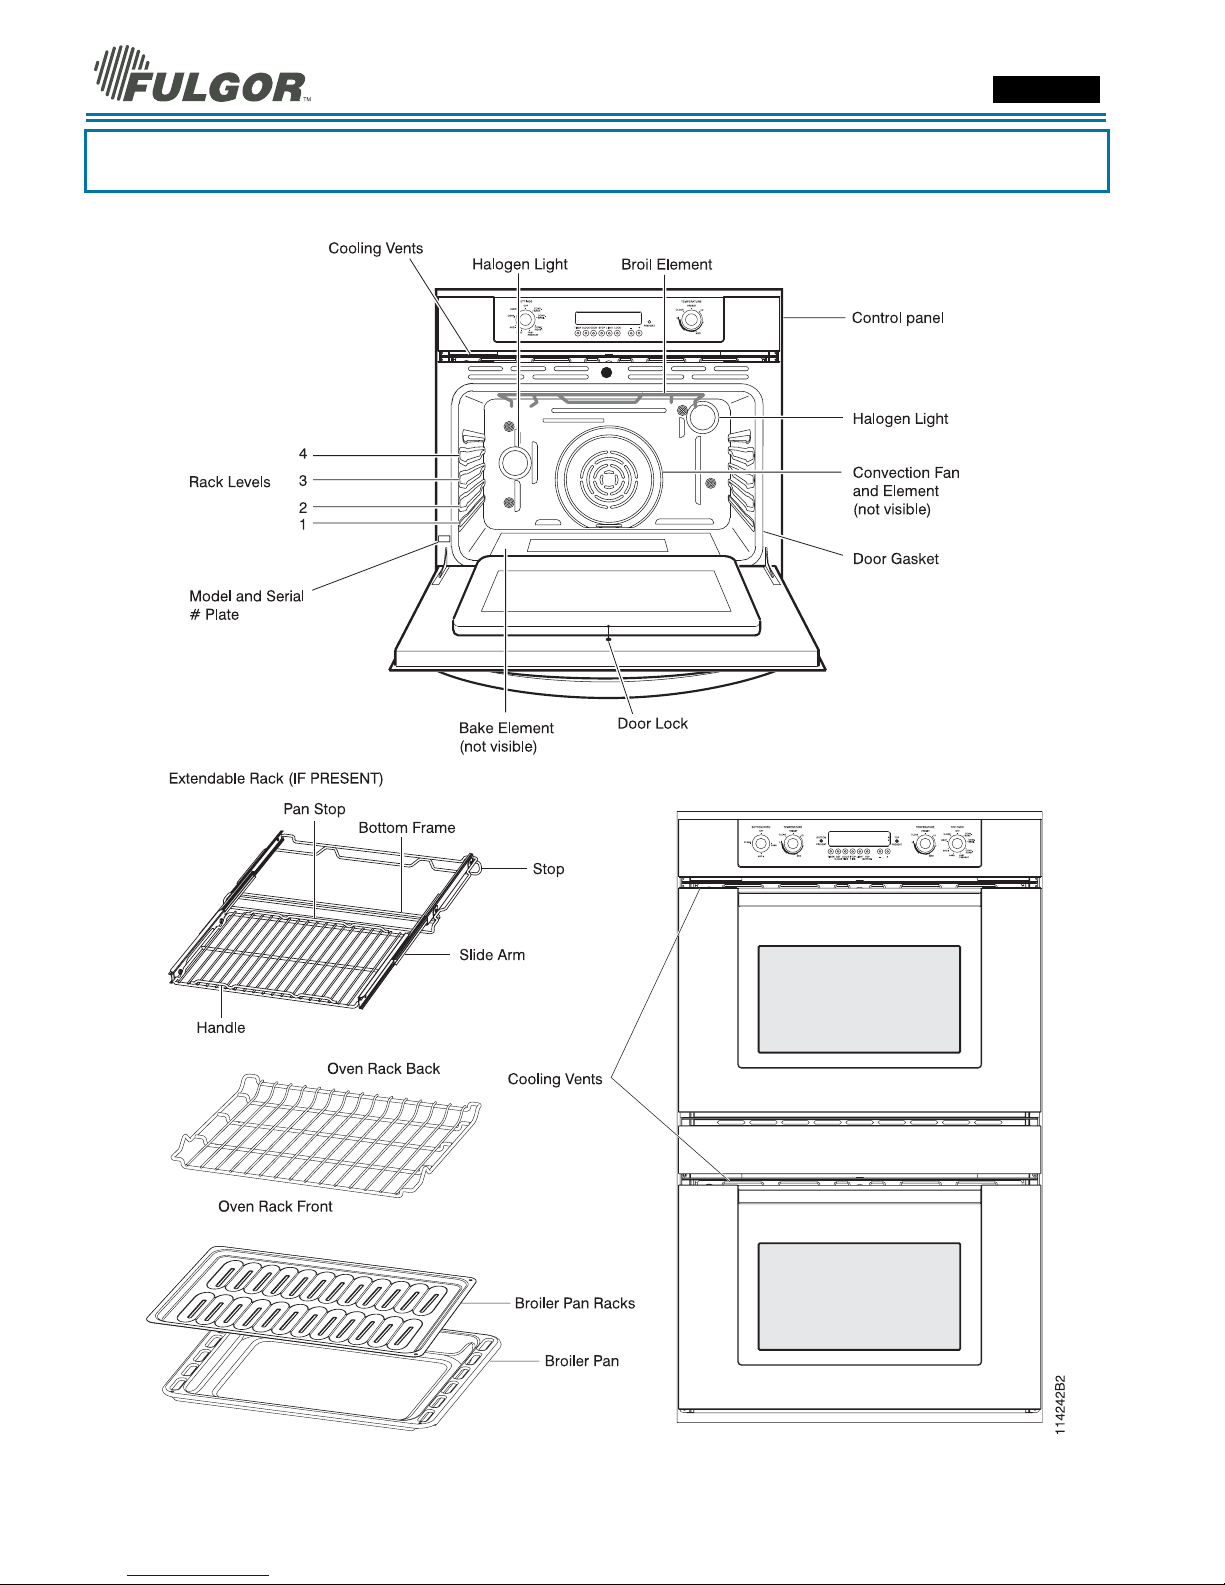
Features of your Oven
6
Page 7

Use & Care Manual
Models SOVB - DOVB ENGLISH
The Control Panels
The user interface has the following features: display, preheat light indicators, keys for commands,
cooking mode and temperature selectors.
DOUBLE OVEN SINGLE OVEN
Command Keys
[SET CLOCK or CLOCK ]: press it to set or change the
time of day.
[TIMER]: press it to set or clear the minute minder.
[COOK TIME or COOK]: press this key to set or change
the duration of a cooking activity.
[STOP TIME or STOP]: press to set or change the stop
time in a timed or delayed cooking.
-Whenever one of the former keys has been pressed and
the time digits are blinking, press and/or hold the
following keys to change the values.
[LIGHT]: Press it to switch the oven lights status.
The function of this key depends on the oven model:
[TOP / BOTTOM] (double oven): Press it to select the
upper cavity if none is selected. If one of the two is
already selected, simply toggle to the other one.
[LOCK] (single oven): hold it together with [+] to operate
safety lock.
[INCREMENT] [+]: press to increase the value of the
currently selected variable.
[DECREMENT] [-]: press to decrease the value of the
currently selected variable.
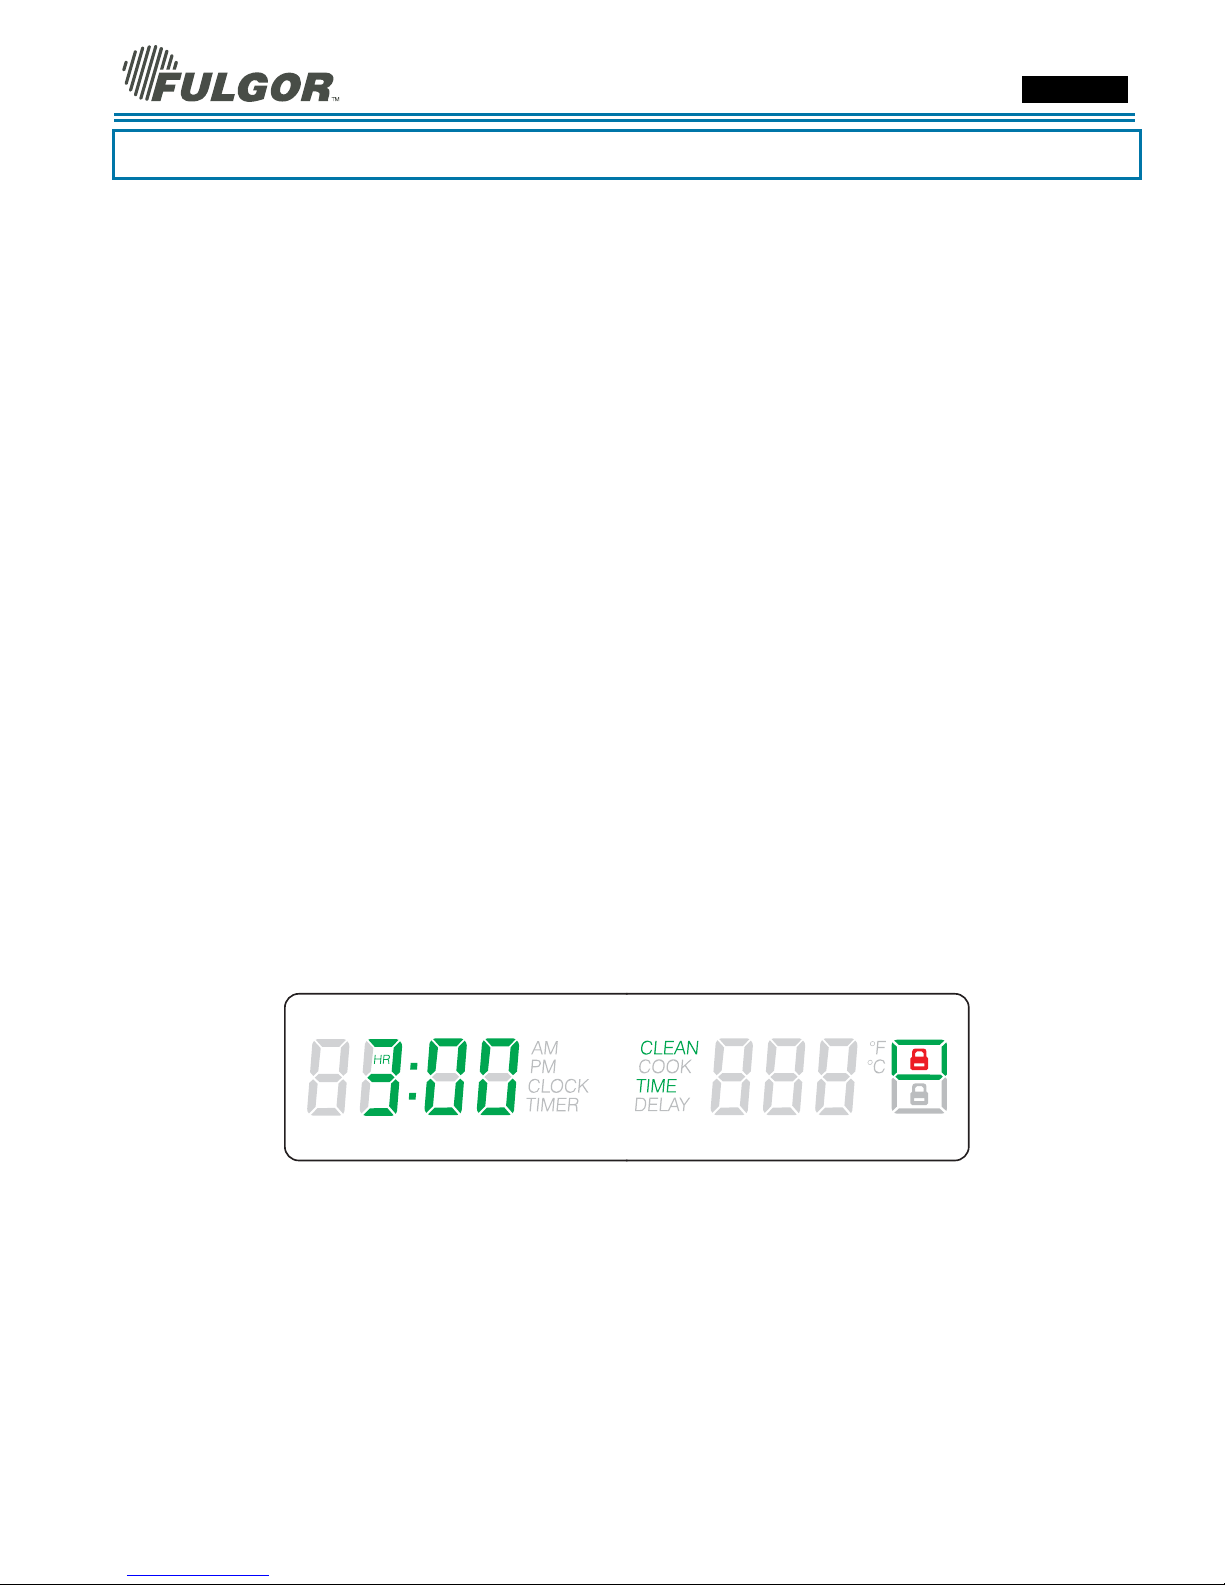
Display
Preheat light (external).
Four time digits (green), for time of day, minute
minder, automatic cooking. AM/PM indication is also
present.
Three temperature digits (red), for oven temperature.
Degree unit (°C or °F) indication is present. It shows
the temperature set-point for the current cooking
mode, in the selected cavity.
Box and lock icons to show which cavity is currently
selected and which door, if any, is fully locked, while
running in clean or cooling down after a clean.
Writings to indicate which function is active (steady)
or waiting for a user input (blink).
Knobs
Cooking mode selector (convection). Eight cooking
modes + OFF position.
Cooking mode selector (thermal). Three cooking
modes + OFF position.
Temperature selector. PRESET and CLEAN
positions + continuous range between MIN and MAX
values.
Thermal
Knobs
Multifunction
Knobs
7
Page 8

Use & Care Manual
Models SOVB - DOVB ENGLISH
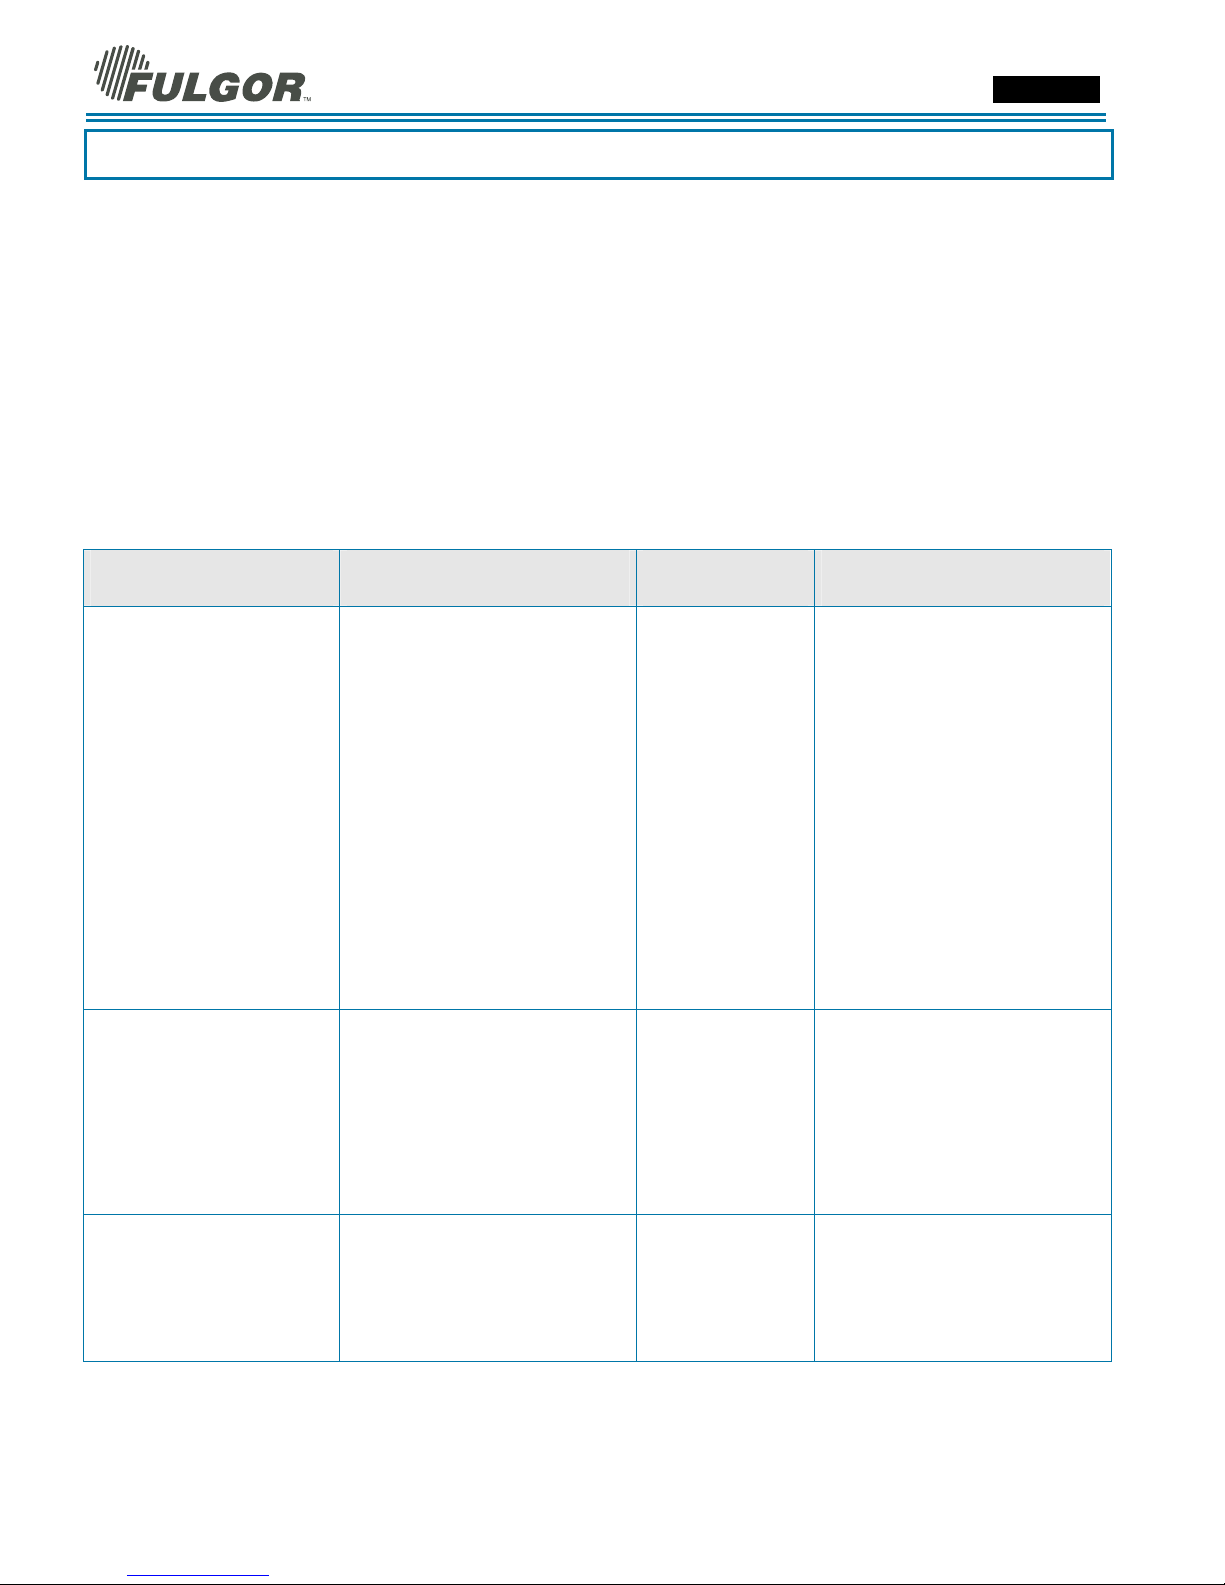
Oven Modes
The following illustrations give an overview of what happens in the oven with each mode setting. The arrows
represent the location of the heat source during specific modes. The lower element is concealed under the oven
floor.
Convection Bake and Dehydrate
Convection Bake cooks with heat from a third element
behind the back wall of the oven. The heat is circulated
throughout the oven by the convection fan. Dehydrating
is similar to convection cooking and holds an optimum
low temperature while circulating the heated air to
remove moisture slowly for food preservation.
Fast Preheat
Fast Preheat uses the ring element and the additional
element to heat rapidly the cavity.
When the preheat tone is sounded and the red light
turns off, select the desired cooking mode.
Convection Broil
Convection Broil combines the intense heat from the
upper element with the heat circulated by the convection
fan.
Convection Roast
Convection Roast uses the top element, bottom element
and convection fan.
8
Bake
Is cooking with heated air. Both the upper and lower
element cycle to maintain the oven temperature.
Broil
Broiling uses intense heat radiated from the upper
element.
Page 9

Use & Care Manual
General Oven Information
Before using your oven for the first time remove all
packing and foreign materials from the oven(s). Any
material of this sort left in the oven(s) may melt and/ or
burn when the oven(s) is(are) used.
Flashing Symbols or Numbers
Signals an incomplete setting and calls for another input.
Beeps
Signals that more information must be entered or
confirms the receipt of an entry. Beeps also signal the
end of a function or an oven fault.
Fast Preheat
Whenever the oven must heat rapidly, turn the cooking
mode selector to fast preheat position. As soon as the
preheat tone is sounded and the red light turns off, select
the desired cooking mode and put food inside.
Lock Symbol
It’s displayed when the door is locked, during the SelfClean mode or following cooling down. The symbol
flashes when the latch is moving to lock or unlock the
door. Do not attempt to open the door. Door can be
opened when the symbol no longer appears.
Models SOVB - DOVB ENGLISH
Convection Fan
The convection fan operates during any convection
mode. When the oven is operating in the convection
mode, the fan will turn off automatically when the door
is opened. The convection fan will run during the
preheat time
Component Cooling Fan
Activates during any cooking or self-cleaning mode to
cool inner components and outer door surfaces. This
air is exhausted through the vent located above the
oven door. It continues to run until components have
cooled sufficiently. The cooling fan speed is high in
self-clean and whenever the internal components
temperature becomes high.
Safety door lock
The door latch mechanism is not used only to lock the
door in self-clean but also to lock the door manually for
safety reasons (to prevent children from touching hot
parts) during ordinary cooking activities.
Single oven
seconds. The latch will lock the door. Repeat the same
operation to unlock.
Double oven
3 seconds. The latch will lock the door. Repeat the same
operation to unlock.
: hold both the INC (+) and LOCK keys for 3
: hold both the INC (+) and DEC (-) keys for
Power Failure
After the power returns to the oven, the clock displays
the time 12.00
AM
.
Default Settings
The cooking modes automatically select a suitable
temperature when the selector is in the preset position.
These can be changed when a different one is needed.
F Failure Number Codes
These codes are displayed when the electronic control
detects a problem in the oven or in the electronics.
9
Page 10
Use & Care Manual
General Oven Tips
Preheating the Oven
• Preheat the oven when using the Bake, Convection
Bake and Convection Roast modes.
• Use fast preheat mode when a short time is
requested to preheat the oven.
• Selecting a higher temperature does not shorten the
preheat time.
• Preheating is necessary for good results when
baking cakes, cookies, pastry and breads.
• Preheating will help to sear roasts and seal in meat
juices.
• Place oven racks in their proper position before
preheating.
• During preheat, the selected cooking temperature is
always displayed.
• A beep will confirm that the oven is preheated and
the preheat light will turn off.
• Fast Preheat can be used when time is crucial.
Operational Suggestions
• Use the cooking charts as a guide.
• Do not set pans on the open oven door.
• Use the interior oven light to view the food through
the oven door window rather than opening the door
frequently.
Utensils
• Glass baking dishes absorb heat. Reduce oven
temperature 25°F (15°C) when baking in glass.
• Use pans that give the desired browning. The type
of finish on the pan will help determine the amount
of browning that will occur.
• Shiny, smooth metal or light non-stick / anodized
pans reflect heat, resulting in lighter, more delicate
browning. Cakes and cookies require this type of
utensil.
Models SOVB - DOVB ENGLISH
• Dark, rough or dull pans will absorb heat resulting
in a browner, crisper crust. Use this type for pies.
• For brown, crisp crusts, use dark non-stick /
anodized or dark, dull metal utensils or glass bake
ware. Insulated baking pans may increase the
length of cooking time.
• Do not cook with the empty broiler pan in the
oven, as this could change cooking performance.
Store the broil pan outside of the oven.
Oven Condensation and Temperature
• It is normal for a certain amount of moisture to
evaporate from the food during any cooking
process. The amount depends on the moisture
content of the food. The moisture may condense
on any surface cooler than the inside of the oven,
such as the control panel.
• Your new oven has an electronic temperature
sensor that accurately maintains the temperature
selected. Your previous oven may have had a
mechanical thermostat that drifted gradually over
time to a higher temperature. It is normal that you
may need to adjust your favourite recipes when
cooking in a new oven.
High Altitude Baking
• When cooking at high altitude, recipes and
cooking time will vary from the standard.
120/240 vs. 120/208 Volt Connection
• Most oven installations will have a 120/240
voltage connection.
• If your oven is installed with 120/208 voltage, the
preheat time may be slightly longer than with
120/240 voltage.
• The oven is designed to assure the same clean
time at 208V.
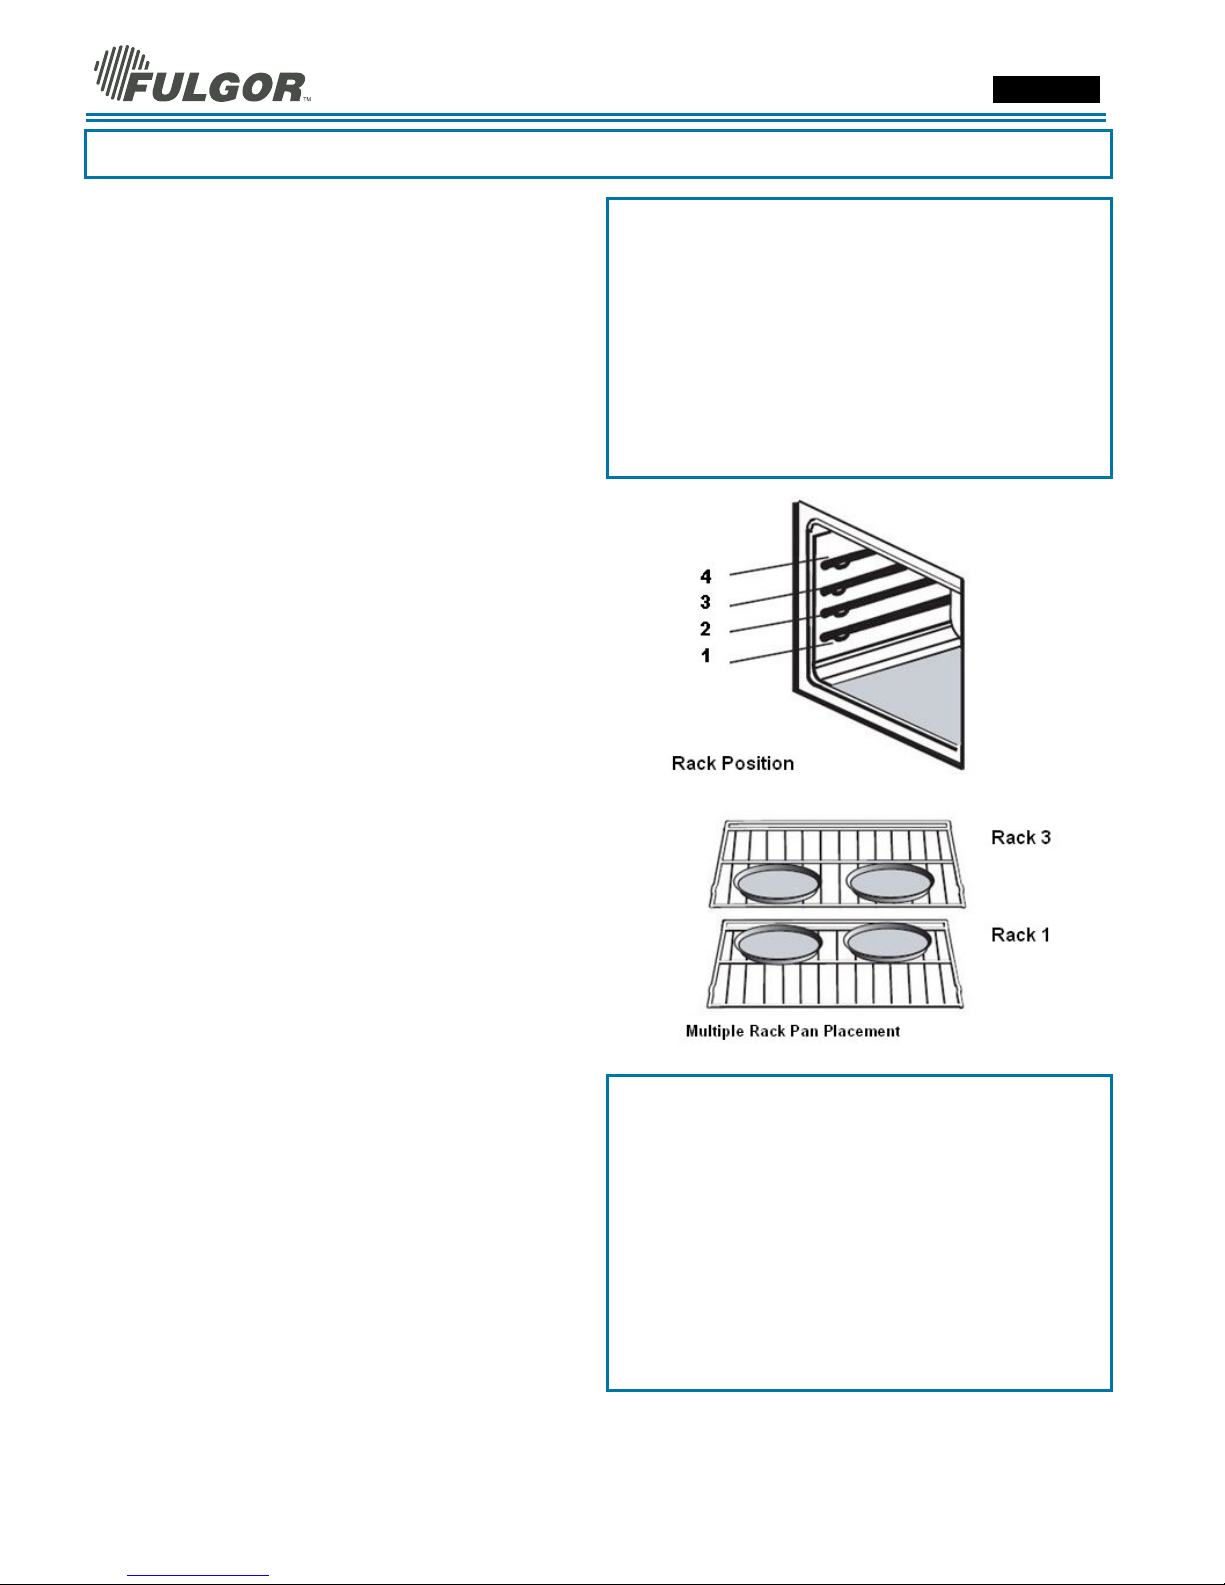
Oven Racks
• The oven has rack guides at four levels as shown in
the illustration on Page 6.
• Rack positions are numbered from the bottom rack
guide (#1) to the top (#4).
• Check cooking charts for best rack positions to use
when cooking.
• Each level guide consists of paired supports formed
in the walls on each side of the oven cavity.
• Always be sure to position the oven racks before
turning on the oven. Make sure that the racks are
level once they are in position.
Please refer to illustration on Page 6 if there is any
question as to which side is the front of the rack.
• The racks are designed to stop when pulled forward
to their limit.
10
CAUTION! Never use aluminum foil to cover the oven
racks or to line the oven. It can cause damage to the
oven liner if heat is trapped under the foil.
CAUTION
Make sure you do not force it to avoid damage to
the enamel.
Page 11

Use & Care Manual
To remove oven rack from the oven:
1. Pull rack forward
2. Lift rack up at front and then remove it
Oven Extendable Racks
• The extendable rack allows for easier access to
cooking foods. It extends beyond the standard flat
rack bringing he food closer to the user.
CAUTION
When the rack is outside of the oven, slide arms do not
lock. They could unexpectedly extend if the rack is
carried incorrectly. Extending slide arms could
cause injury. Rack should only be held or carried
by grasping the sides.
To remove extendable rack from the oven:
1. Lift of rack slightly and push it until the stop
release
Models SOVB - DOVB ENGLISH
To replace an oven rack:
1. Place rear of rack between rack level guides
2. While lifting front of rack, slide rack in all the
way while lowering the front
NOTE: Always remove the extendable rack before
self-cleaning the oven.
CAUTION! To avoid burns, pull rack all the way out
and lift pan above handle when transferring food to and
from oven.
Please refer to illustration on Page 6 if there is any
question as to which side is the front of the rack.
To replace an extendable rack:
1. Grasp rack firmly on both sides. Place rack
(including frame) above desired rack guide
2. Raise back of rack until frame and stop clear
rack guide
3. Pull rack down and out
2. Push all the way in until the back of the rack
drops into place
3. Pull both sections forward until stops activates.
Rack should be straight and flat, not crooked
11
Page 12
Use & Care Manual
Models SOVB - DOVB ENGLISH
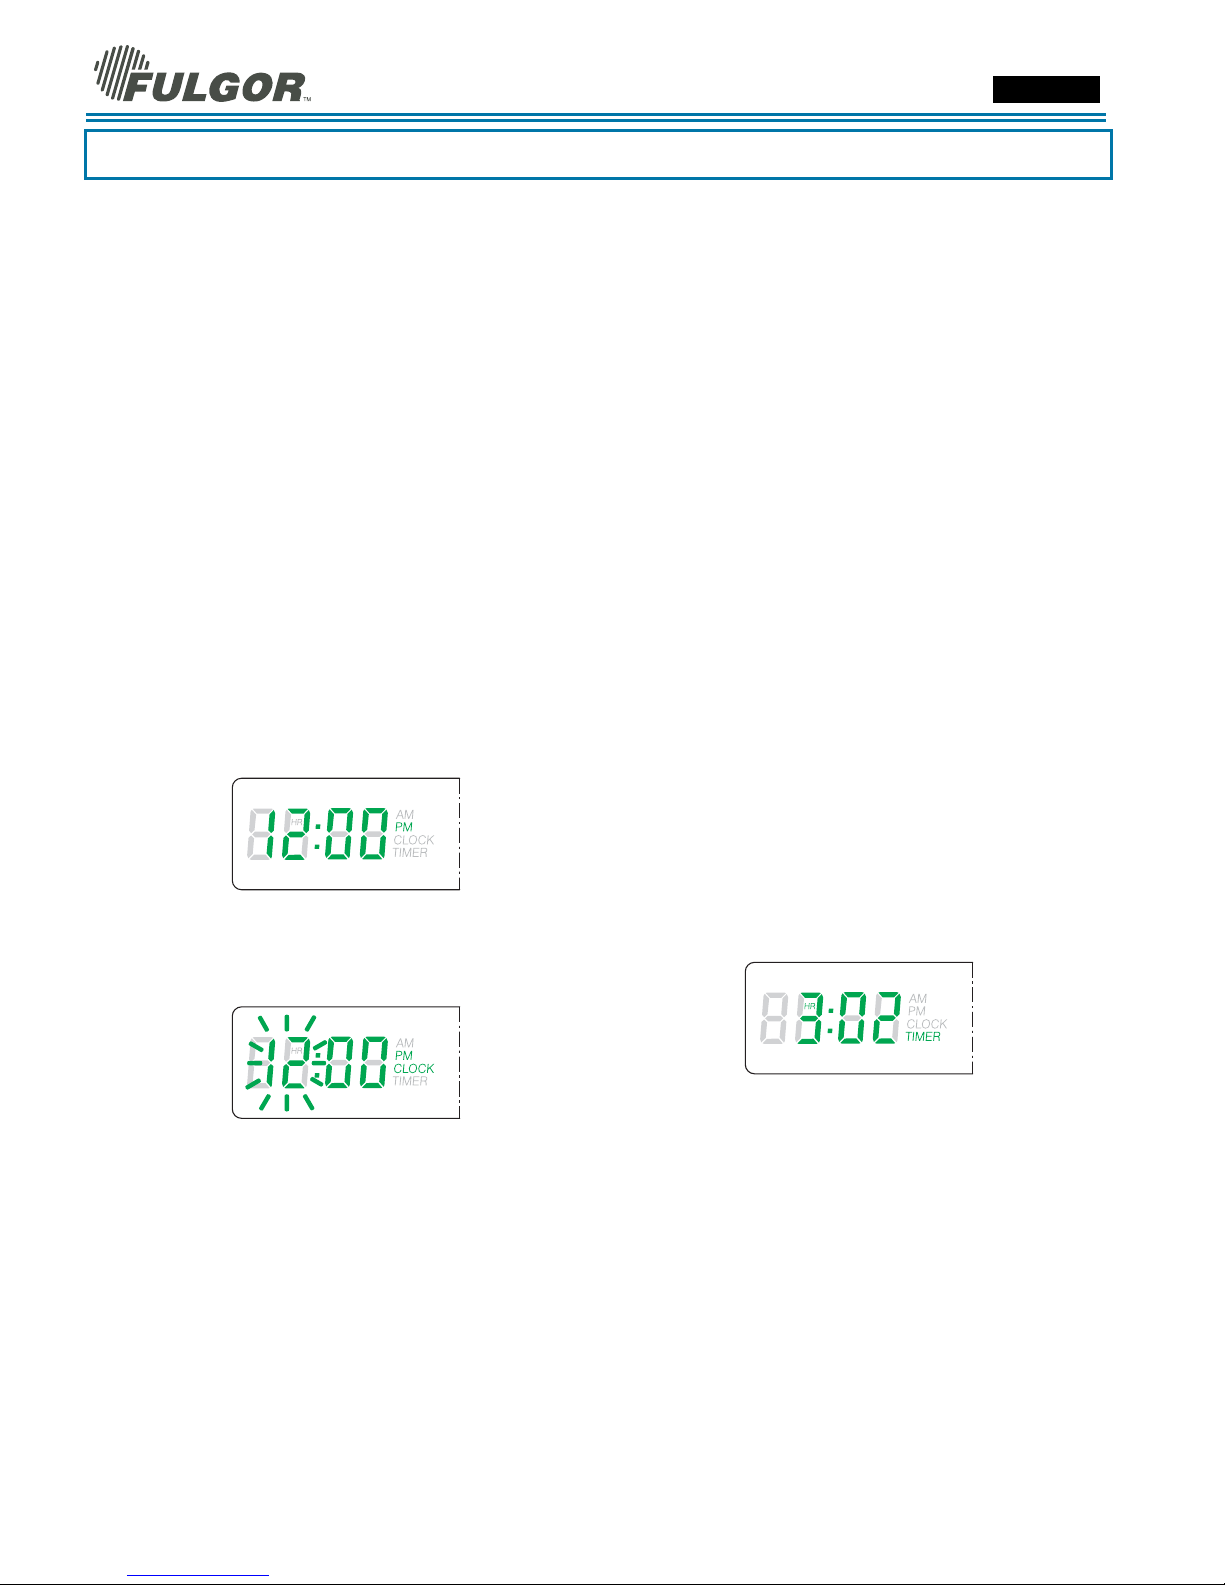
Setting the Clock and Timer
The time of day is displayed in hours and minutes.
Always set the clock immediately after installation or after a power failure. Once power returns to the oven, the
clock displays the time 12:00
The clock time will appear during all oven operations except when the timer or a timed cooking operation is
running.
The oven is preset to a 12-hour clock and indicates AM and PM.
To Set the Clock
1.
Press [SET CLOCK]. The hours will begin flashing
and the display will show the CLOCK writing.
2.
Press [+] or [-] to set the desired hour. Continue until
correct AM or PM is selected.
3.
Press [SET CLOCK] again to confirm the hour and
minutes will start flashing.
4.
Press [+] or [-] to set the desired minutes value, hold
the key to change by 10 minute steps.
5.
Press [SET CLOCK] again to confirm the time or wait
for 5 seconds.
The following appears when edit mode is active to set or
change the value.
AM
.
To Set the Timer
1.
Press [TIMER]. The timer and TIMER writing will
appear on the display.
2.
Press [TIMER] again. The hours value will start
flashing.
3.
Press [+] or [-] to set the desired hour.
4.
Press [TIMER] again to confirm the hour and
minutes will start flashing.
5.
Press [+] or [-] to set the desired minutes value,
hold the key to change by 10 minute steps.
6.
Press [TIMER] again to confirm the value or wait
for 5 seconds.
7.
TIMER will be steadily displayed.
8.
When the time ends, reminder beeps will sound for
15 minutes or until the key is pressed.
9.
Timer format is usually HR:MIN but it switches to
MIN:SEC during the last minute.
10.
The displayed value is always rounded to the lower
minute.
12
Page 13
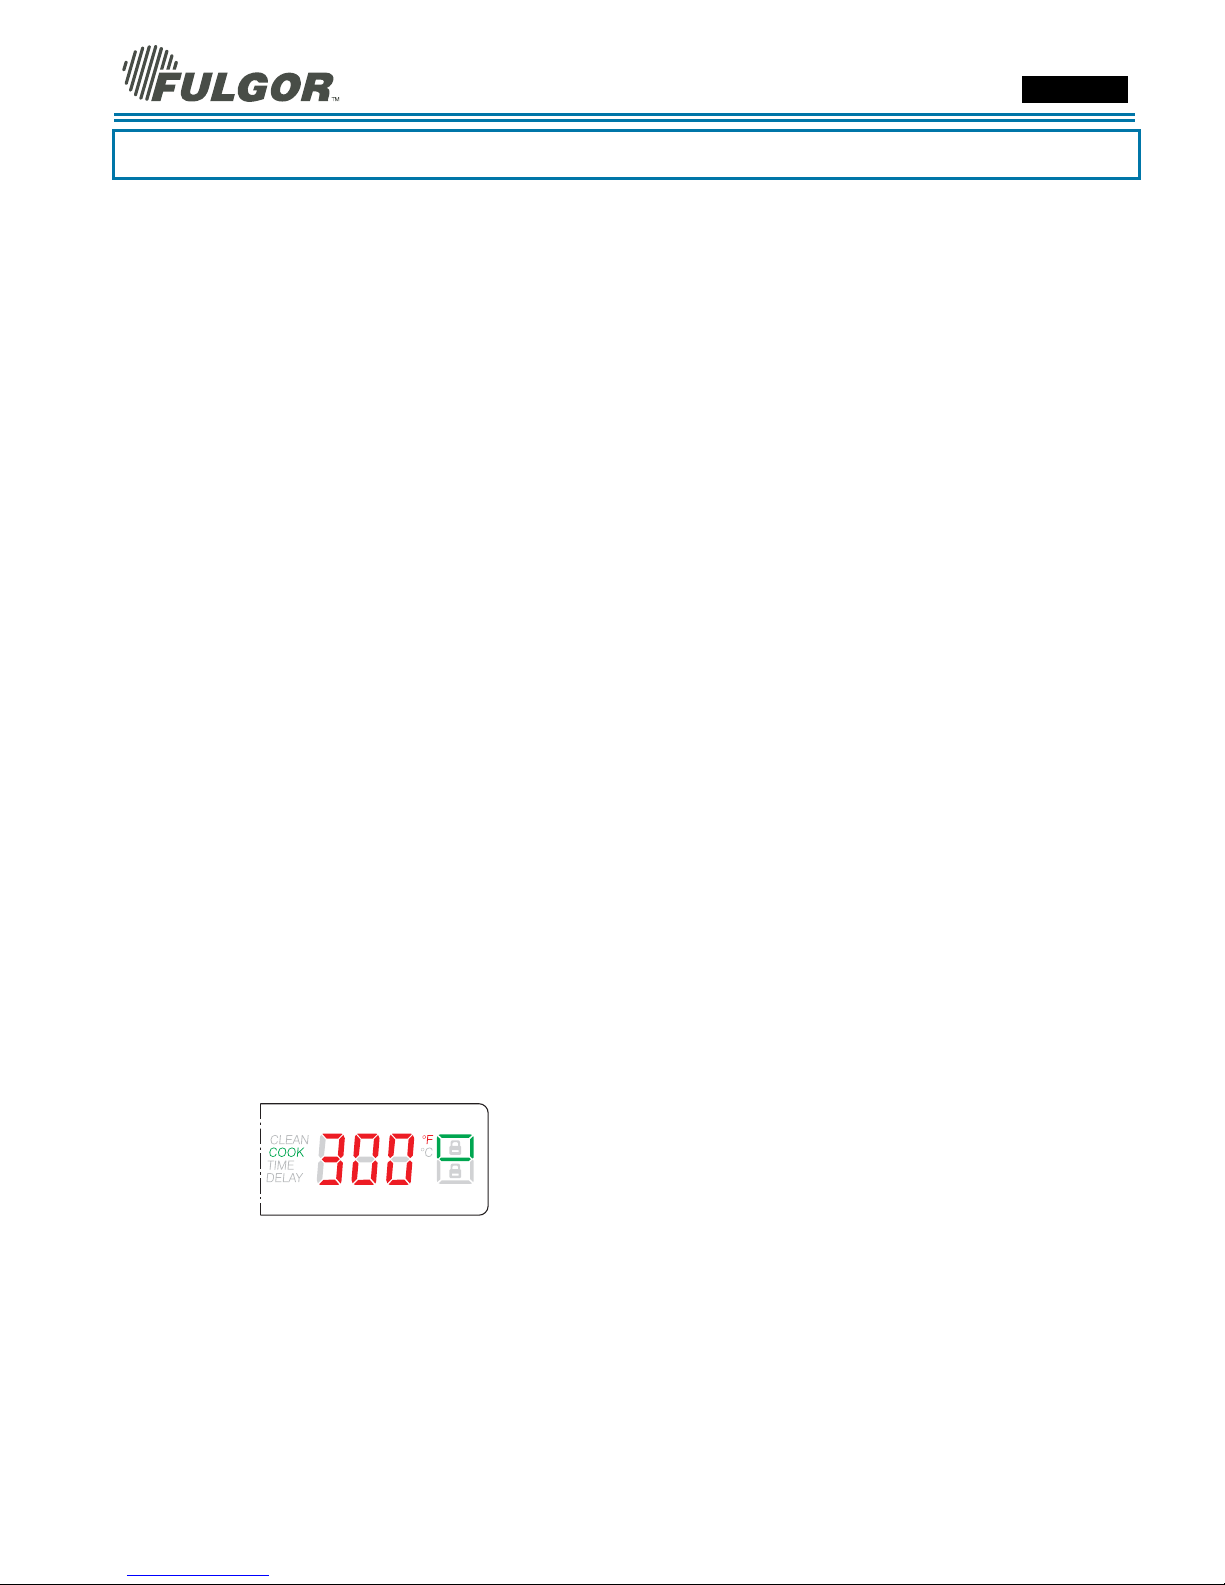
Use & Care Manual
Selecting the Oven Mode
To Set a Cooking Mode and Temperature
• The following modes can be selected by moving the
cooking mode knob to the desired position. To select
Clean, the temperature knob must also be moved
into the appropriate Clean position.
OFF
CONVECTION BAKE
CONVECTION BROIL
COVECTION ROAST
FAST PREHEAT
BAKE
BROIL
DEHYDRATE
CLEAN
• Select the desired temperature moving the selector
or leave it in the PRESET position if the proposed
value is fine. The temperature can be changed by
5°F or 5°C steps.
• As soon as one of the knobs is moved, the control
switches automatically to display the value in the
correspondent cavity. The corresponding box will be
displayed.
• Cavity will begin to heat and oven light will turn on.
• Preheat light will turn on. When the oven has
preheated, it will beep and switch the red light off.
• To change the temperature while cooking, simply
turn the temperature knob until the display shows the
desired value.
• Press [UPPER/LOWER] to select the desired cavity
and check the related temperature or time values,
even is there’s no need to change those.
• Move the cooking mode selector to OFF if you intend
to stop cooking.
Models SOVB - DOVB ENGLISH
Using Oven Lights
• A single light key activates the lights in either oven.
• If LIGHT key is touched when both ovens are off,
lights in both the upper and lower oven will turn on.
Touch LIGHT key again, and both oven lights will
turn off.
• Oven lights turn on and off automatically when the
door is opened and closed.
• When an oven is in use, oven lights turn on
automatically when a mode is started. Oven lights
will turn off automatically when the oven mode is
cancelled.
• The lights do not operate in the Self-Clean mode.
To manually control the interior oven lights in
either the upper or lower oven if one or both ovens
are in use:
1.
Press UPPER/LOWER, the display will indicate
which oven is selected.
2.
Press UPPER/LOWER to highlight the other
oven.
3.
Press LIGHT to turn lights on or off.
13
Page 14
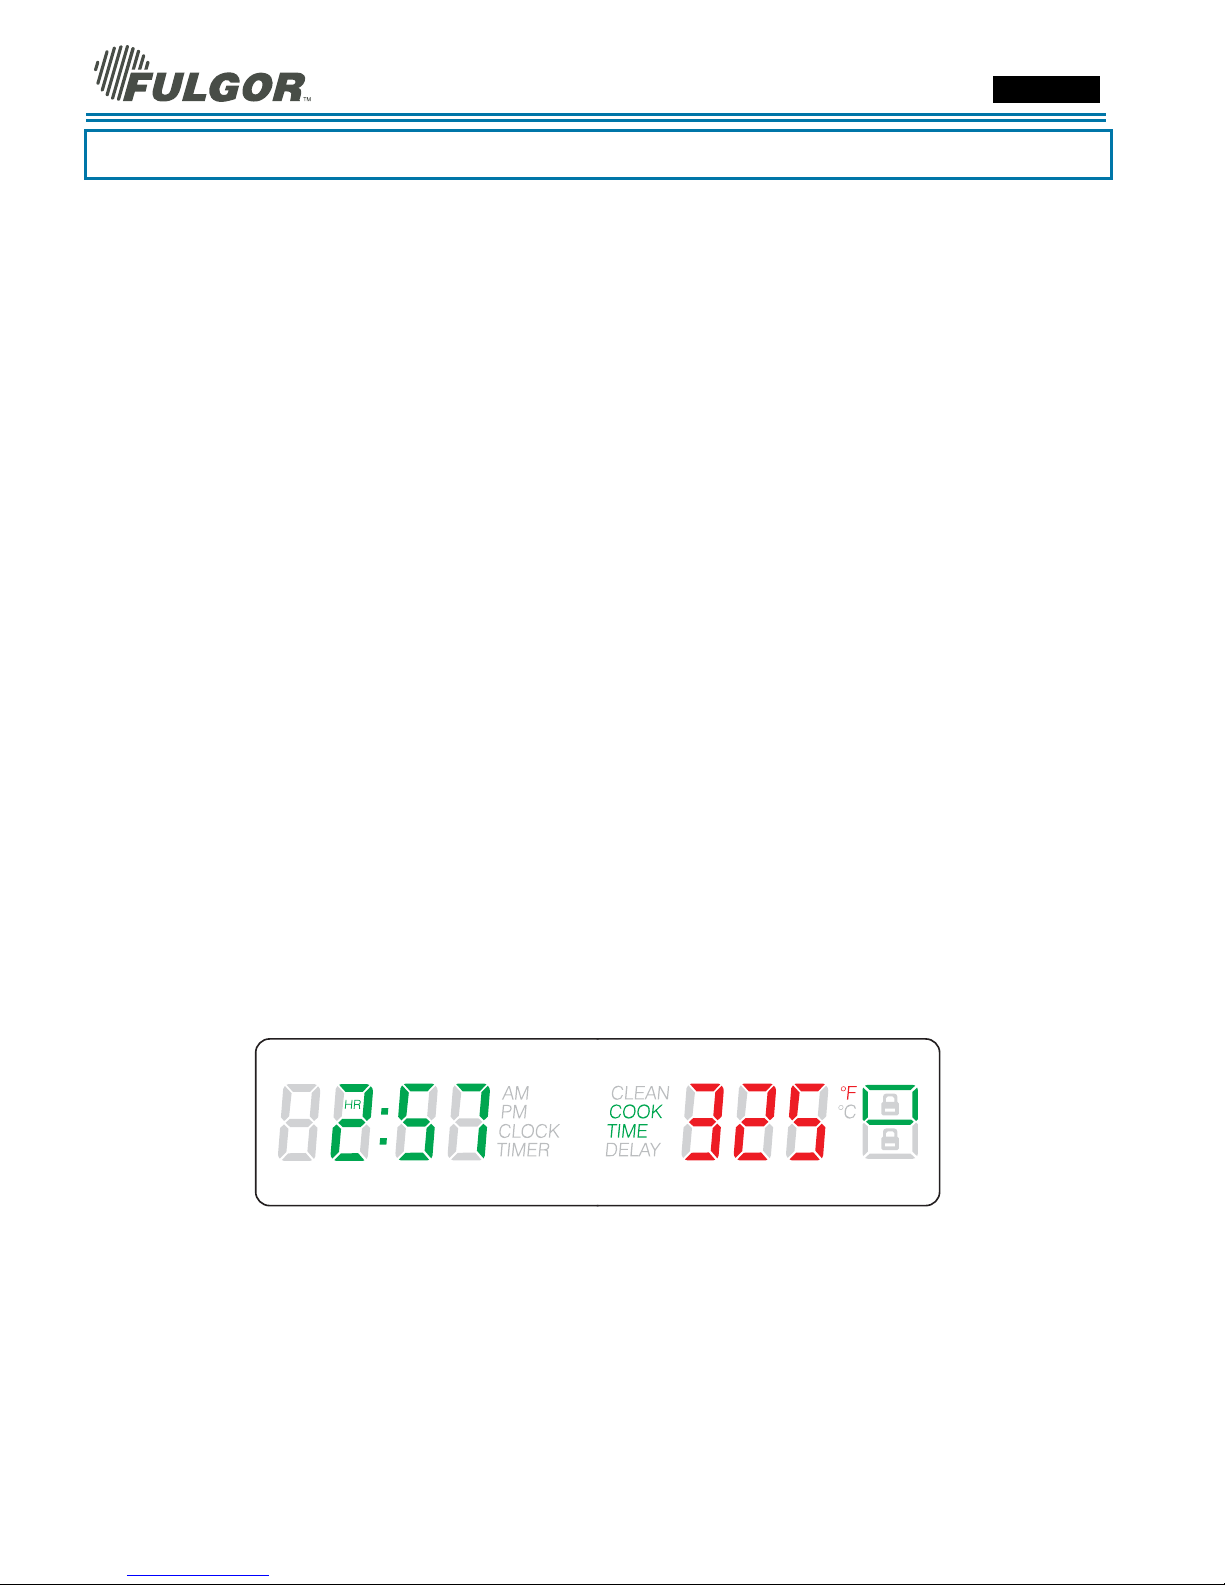
Use & Care Manual
Time Oven Mode Operation
• In double oven models, both ovens can be set
independently to operate a timed mode.
• Be sure that the time-of-day clock is displaying the
correct time.
• The timed mode turns off the oven at the end of the
cook time.
To Set Timed Mode
1. Select the cooking mode and the temperature by
means of the knobs.
2. Select oven by means of [UPPER/LOWER] key, if
necessary.
3. If necessary, change the default temperature at this
time by turning the knob.
4. Press [COOK TIME] key. The COOK and the TIME
writings will appear in the display beside the cook
time and the hour digits will begin flashing.
5. Press [+] or [-] to change the hours. Keep in mind
that the time required for the oven to reach the
temperature must be included in the set cooking
time.
6. Press [COOK TIME] again, the hours will be
confirmed and the minutes digits will begin flashing.
7. Press [+] or [-] to change the minutes. Hold the key
to change by 10 minutes steps.
8. Press [COOK TIME] once again or wait for a few
seconds to confirm the whole cook time value.
9. At the end of the programmed cooking time, the
oven will automatically turn off.
Models SOVB - DOVB ENGLISH
To Delay the Start of a Timed Mode
Follow steps 1 through 9 above.
• Press [STOP TIME] key. DELAY will appear in the
display, beside the stop time and the hour digits
will begin flashing.
• Press [+] or [-] to change the hours.
• Press [STOP TIME] again, the hours will be
confirmed and the minutes digits will begin
flashing.
• Press [+] or [-] to change the minutes. Hold the key
to change by 10 minutes steps.
• Press [STOP TIME] once again or wait for a few
seconds to confirm the whole stop time value.
• The clock automatically calculates the time of day
at which the mode starts and stops. The displayed
cooking time counts down by the minute. The oven
turns on and heats to the set temperature, for the
selected number of hours and minutes.
• At the end of the programmed cooking time, the
oven will automatically turn off. Display will show
End and the oven will beep. Reminder beeps will
sound for up to fifteen minutes until any key is
touched.
• Whenever it’s necessary to check a time value that
is not displayed, press the corresponding key to
view the desired value for 5 seconds.
• Example: if the timer value is displayed, press cook
time key to view the cook time for 5 seconds.
• Timer value is displayed when both timer and cook
time are running.
14
Page 15
Use & Care Manual
Bake Tips and Techniques
Baking is cooking with heated air. Both upper and lower
elements in the oven are used to heat the air but no fan
is used to circulate the heat.
Follow the recipe or convenience food directions for
baking temperature, time and rack position. Baking time
will vary with the temperature of ingredients and the
size, shape and finish of the baking utensil.
General Guidelines
• For best results, bake food on a single rack with at
least 1" - 1 ½” (2,5 - 3cm) space between utensils
and oven walls.
• Use one rack when selecting the bake mode.
• Check for doneness at the minimum time.
• Use metal bake ware (with or without a non stick
finish), heatproof glass, glass-ceramic, pottery or
other utensils suitable for the oven.
Models SOVB - DOVB ENGLISH
• When using heatproof glass, reduce temperature by
25°F (15°C) from recommended temperature.
• Use baking sheets with or without sides or jelly roll
pans.
• Dark metal pans or nonstick coatings will cook
faster with more browning. Insulated bake ware will
slightly lengthen the cooking time for most foods.
• Do not use aluminum foil or disposable aluminum
trays to line any part of the oven. Foil is an
excellent heat insulator and heat will be trapped
beneath it. This will alter the cooking performance
and can damage the finish of the oven.
• Avoid using the opened door as a shelf to place
pans.
• Tips for Solving Baking Problems is found on Page
30.
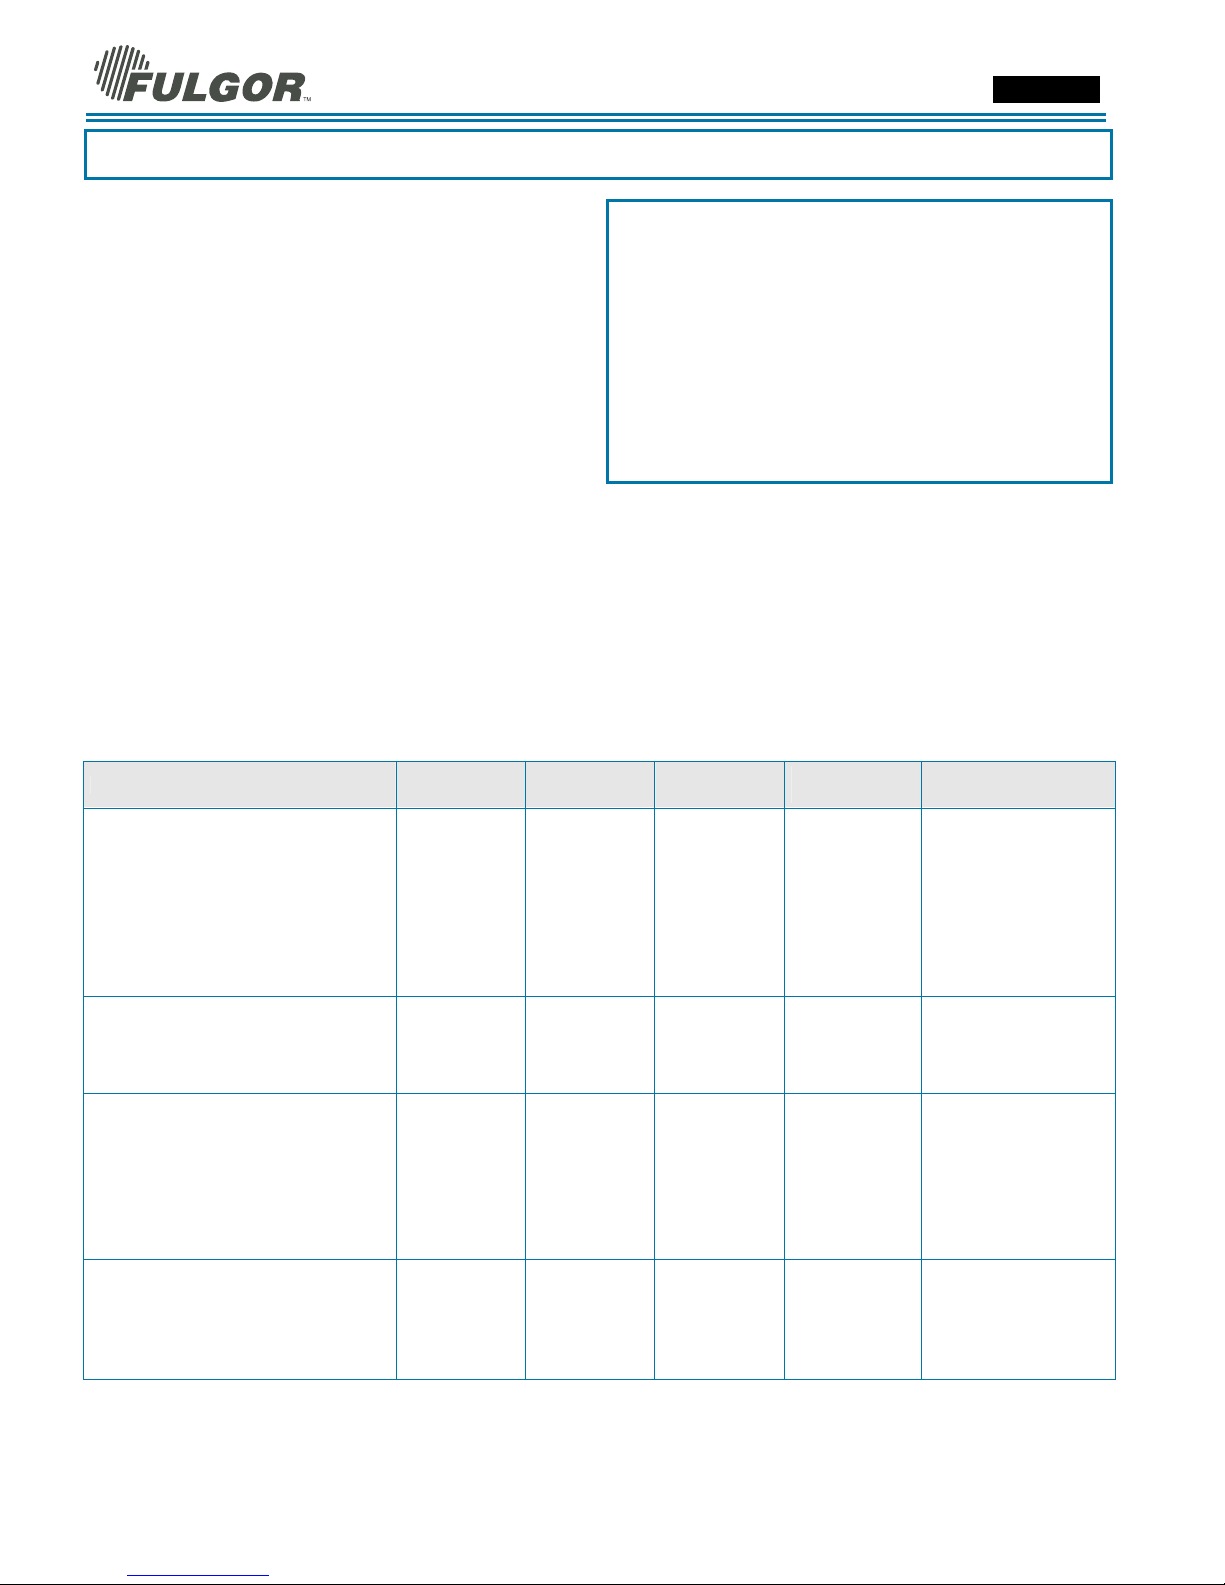
Bake Chart
FOOD ITEM RACK POSITION
Cake
Cupcakes 2 350 (175) 17-19
Bundt Cake 1 350 (175) 37-43
Angel Food 1 350 (175) 35-39
Pie
2 crust, fresh, 9" 2 375-425 (190-220) 45-55
2 crust, frozen fruit, 9" 2 375 (190) 68-78
Cookies
Sugar 2 350-375 (175-190) 6-11
Chocolate Chip 2 350-375 (175-190) 8-13
Brownies 2 350 (175) 29-36
Breads
Yeast bread loaf, 9x5 2 375 (190) 18-22
Yeast rolls 2 375-400 (190-205) 12-15
Biscuits 2 375-400 (190-205) 11-15
Muffins 2 425 (220) 15-19
Pizza
Frozen 2 400-450 (205-235) 23-26
Fresh 2 425-450 (220-235) 12-15
TEMP. °F (°C)
(PREHEATED OVEN)
TIME (MIN)
15
Page 16
Use & Care Manual
Convection Bake Tips and Techniques
Reduce recipe baking temperatures by 25°F (15°C).
• For best results, foods should be cooked uncovered,
in low-sided pans to take advantage of the forced air
circulation. Use shiny aluminum pans for best results
unless otherwise specified.
• Heatproof glass or ceramic can be used. Reduce
temperature by another 25°F (15°C) when using
heatproof glass dishes for a total reduction of 50°F
(30°C).
• Dark metal pans may be used. Note that food may
brown faster when using dark metal bake ware.
• The number of racks used is determined by the
height of the food to be cooked.
• Baked items, for the most part, cook extremely well
in convection. Don’t try to convert recipes such as
custards, quiches, pumpkin pie , or cheesecakes,
which do not benefit from the convection-heating
process. Use the regular Bake mode for these foods.
• Multiple rack cooking for oven meals is done on rack
positions 1, 2 and 3. All four racks can be used for
cookies, biscuits and appetizers.
- 2 Rack baking: Use positions 1 and 3.
- 3 rack baking: Use positions 2, 3 and 4.
- When baking four cake layers at the same time,
stagger pans so that one pan is not directly above
another. For best results, place cake son front of
upper rack and back of lower rack (See graphic at
right). Allow 1" - 1 ½” (2,5 - 3cm).air space around
pans.
• Converting your own recipe can be easy. Choose a
recipe that will work well in convection.
• Reduce the temperature and cooking time if
necessary. It may take some trial and error to
achieve a perfect result. Keep track of your technique
for the next time you want to prepare the recipe using
convection.
• Tips for Solving Baking Problems are found on Page
30.
Models SOVB - DOVB ENGLISH
Foods recommended for
Convection Bake mode:
Appetizers Biscuits Coffee Cakes
Cookies (2 to 4 racks) Yeast Breads
Cream Puffs
Popovers
Casseroles and One-Dish Entreés
Oven Meals (rack positions 1, 2, 3)
Air Leavened Foods (Soufflés, Meringue, MeringueTopped Desserts, Angel Food Cakes, Chiffon Cakes)
Quick and easy recipe tips
Converting from standard BAKE
to CONVECTION BAKE:
• Reduce the temperature by 25°F (15°C).
• Use the same baking time as Bake mode if
under 10 to 15 minutes.
• Foods with a baking time of less than 30
minutes should be checked for doneness 5
minutes earlier than in standard bake recipes.
• If food is baked for more than 40 to 45
minutes, bake time should be reduced by 25%.
16
Page 17

Use & Care Manual
Models SOVB - DOVB ENGLISH
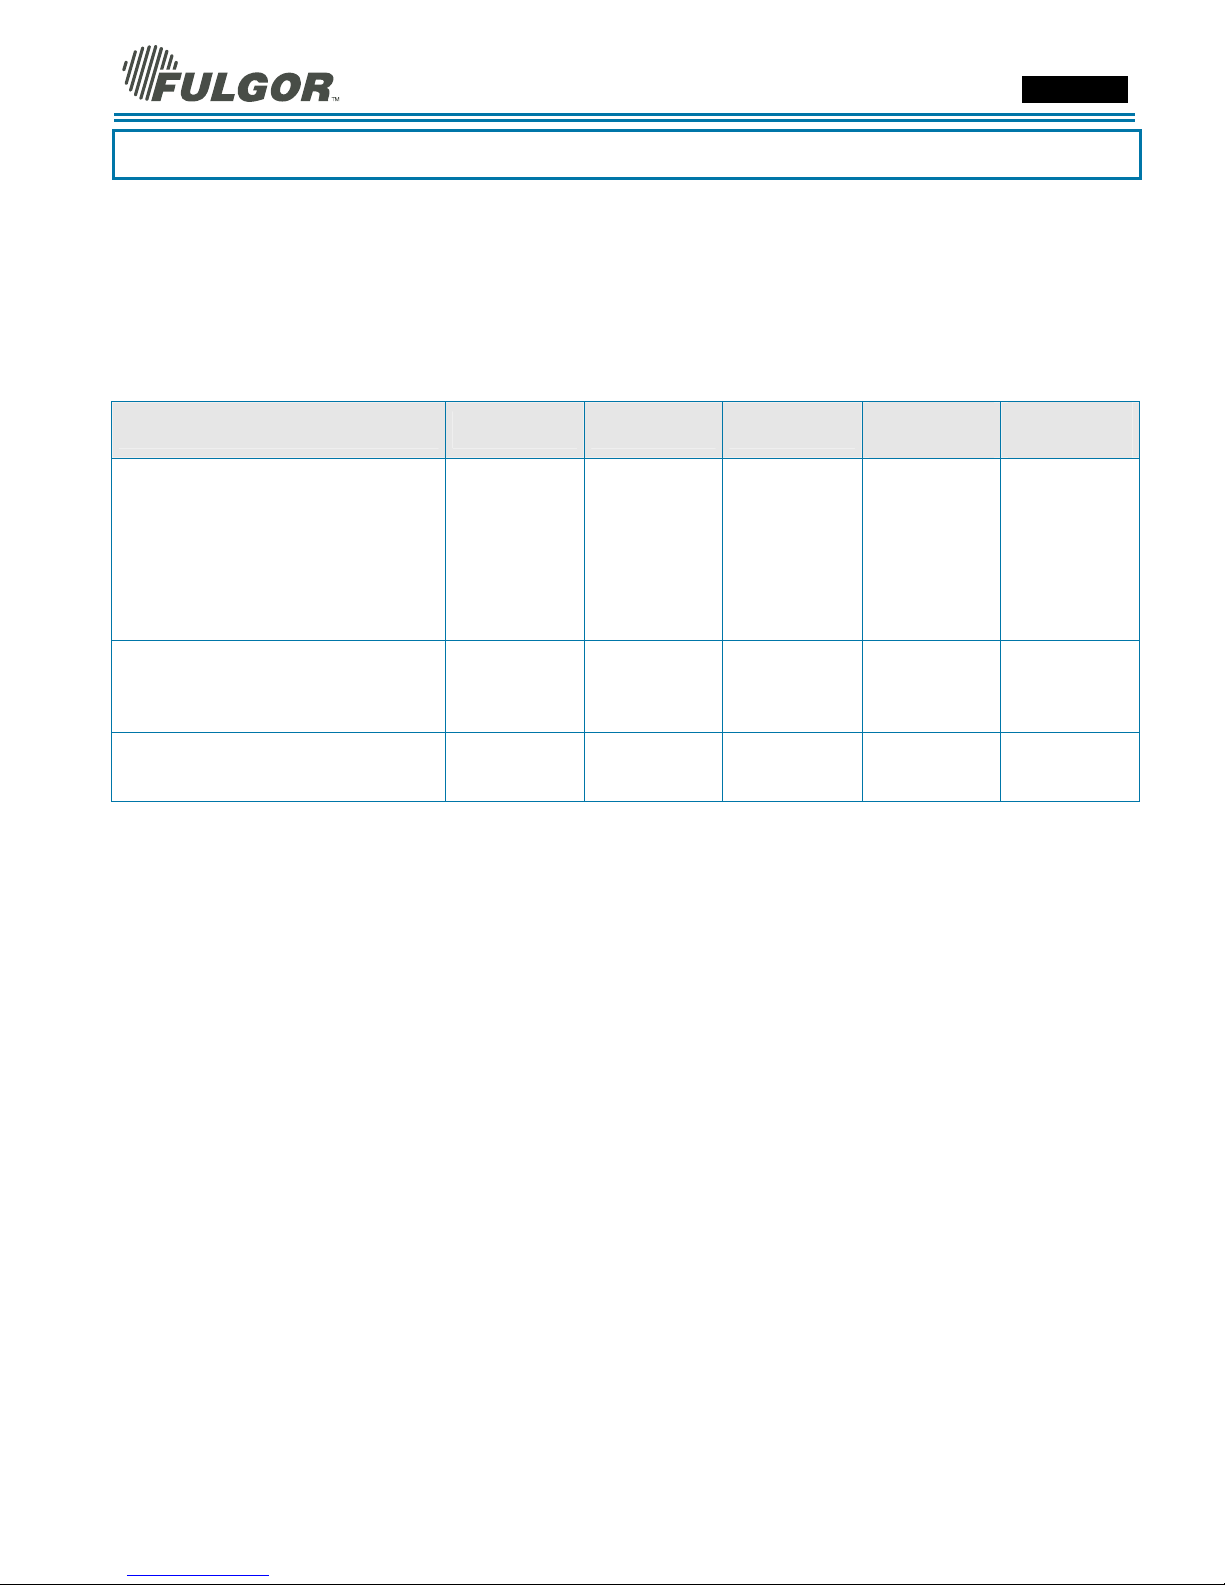
Convection Bake Chart
Reduce standard recipe temperature by 25ºF(15°C) for Convection Bake.
Temperatures have been reduced in this chart.
FOOD ITEM RACK POSITION
Cake
Cupcakes 2 325 (160) 17-19
Bundt Cake 1 325 (160) 37-43
Angel Food 1 325 (160) 35-39
Pie
2 crust, fresh, 9" 2 350-400 (175-205) 45-55
2 crust, frozen fruit, 9" 2 350 (175) 68-78
Cookies
Sugar 2 325-350 (160-175) 6-11
Chocolate Chip 2 325-350 (160-175) 8-13
Brownies 2 325 (160) 29-36
Breads
Yeast bread, loaf, 9x5 2 350 (175) 18-22
Yeast rolls 2 350-375 (175-190) 12-15
Biscuits 2 350-375 (175-190) 11-15
Muffins 2 400 (205) 15-19
Pizza
Frozen 2 375-425 (190-220) 23-26
Fresh 2 400-425 (205-220) 12-15
TEMP. °F (°C)
(PREHEATED OVEN)
TIME (MIN)
This chart is a guide.
Follow recipe or package directions and reduce temperatures appropriately.
17
Page 18
Use & Care Manual
Convection Roast Tips and Techniques
• Preheat for Convection Roast.
• Roast in a low-sided, uncovered pan.
• When roasting whole chickens or turkey, tuck wings
behind back and loosely tie legs with kitchen string.
• Use the 2-piece broil pan for roasting uncovered.
• Use the probe or a meat thermometer to determine
the internal doneness on “END” temperature (see
cooking chart).
• Double-check the internal temperature of
meat/poultry by inserting meat thermometer into
another position.
• When roasting a large roast or turkey, roasting pan
may need to be rotated during roasting time. This will
allow for more even cooking. Large birds may also
need to be covered with foil (and pan roasted) during
a portion of the roasting time to prevent overbrowning.
Models SOVB - DOVB ENGLISH
Quick and easy recipe tips
Converting fr
RO
AST:
•
T
emperatur
•
Roasts,
10-20% less cooking time
•
Casser
CONVECTION ROAST
same amount of time.
•
The minimum safe temperature for stuffing in
poultry is 165ºF (75ºC).
•
After removing the item from the oven, cover
loosely with foil for 10 to 15 minutes before
carving.
•
While covered, roast temperatures increase by
5° to 10°F (3°to 6°C).
om standard
e does not have
BAKE to
to be lowered.
CONVECTION
large cuts of meat and poultry generall
.
Check doneness early.
oles or pot r
oasts that ar
e baked cover
will cook in about the
y tak
e
ed in
Convection Roast Chart
MEATS WEIGHT (lb)
Beef
Rib Roast 4-6 325 (160) 2 24-30 145 (63) medium rare
27-33 160 (71) medium
Rib Eye Roast, (boneless) 4-6 325 (160) 2 22-30 145 (63) medium rare
27-33 160 (71) medium
Rump, Eye, Tip, Sirloin (boneless) 3-6 325 (160) 2 22-28 145 (63) medium rare
27-33 160 (71) medium
Tenderloin Roast 2-3 425 (220) 2 15-25 145 (63) medium rare
Pork
Loin Roast 5-8 350 (175) 2 20-30 160 (71) medium
(boneless or bone-in)
Shoulder 3-6 350 (175) 2 25-35 160 (71) medium
Poultry
Chicken whole 3-4 375 (190) 2 18-21 180 (82)
Turkey, not stuffed 12-15 325 (160) 1 10-14 180 (82)
Turkey, not stuffed 16-20 325 (160) 1 9-11 180 (82)
Turkey, not stuffed 21-25 325 (160) 1 6-10 180 (82)
Turkey Breast 3-8 325 (160) 1 15-20 170 (77)
Comish Hen 1-1 ½ 350 (175) 2 45-75 total 180 (82)
Lamb
Half Leg 3-4 325 (160) 2 25-30 160 (71) medium
30-35 170 (77) well
Whole Leg 6-8 325 (160) 1 25-30 160 (71) medium
30-35 170 (77) well
OVEN TEMP.
°F (°C)
RACK
POSITION
TIME
(min. per lb)
INTERNAL
TEMP. °F (°C)
18
Page 19
Use & Care Manual
Models SOVB - DOVB ENGLISH
Convection Broil Tips and Techniques
• Place rack in the required position needed before turning on the oven.
• Use Convection Broil mode with the oven door closed.
• Do not preheat oven.
• Use the 2-piece broil pan.
• Turn meats once halfway through the cooking time (see convection broil chart).
Convection Broil Chart
FOOD AND
THICKNESS
Beef
Steak (1-½" or more)
Medium rare 2 450 (235) 145 (65) 12-14 11-13
Medium 2 450 (235) 160 (71) 15-17 13-15
Well 2 450 (235) 170 (77) 18-20 16-17
Hamburgers (more than 1")
Medium 3 550 (290) 160 (71) 9-11 5-8
Well 3 550 (290) 170 (77) 11-13 8-10
Poultry
Chicken Quarters 3 450 (235) 180 (82) 16-18 14-16
(thigh)
Chicken Breasts 3 450 (235) 170 (77) 14-16 12-14
Pork
Pork Chops (1¼" or more) 2 450 (235) 160 (71) 12-14 13-15
Sausage - fresh 3 450 (235) 160 (71) 4-6 3-5
* Broiling and convection broiling times are approximate and may vary slightly.
RACK
POSITION
BROIL
SETTING °F (°C)
INTERNAL
TEMP. °F (°C)
TIME
SIDE 1
(MIN.)*
TIME
SIDE 2
(MIN.)*
19
Page 20
Use & Care Manual
Models SOVB - DOVB ENGLISH
Dehydrate Tips and Techniques
• Dehydrating can be done using the Dehydrate mode. A lower temperature is used and the circulating
heated air slowly removes the moisture for food preservation.
• The Dehydrate mode temperature is pre programmed at 140ºF (60ºC).
• The Dehydrate mode temperatures available are 120ºF (50ºC) to 160ºF (70ºC).
• Multiple racks can be used simultaneously.
• Some foods require as much as 14-15 hours of time to fully dehydrate.
• Consult a food preservation book for specific times and the handling of various foods.
• This mode is suitable for a variety of fruits, vegetables, herbs and meat strips.
• Drying screens can be purchased at specialty kitchen shops.
• By using paper towels, some food moisture can be absorbed before dehydrating begins (such as with
sliced tomatoes or sliced peaches).
Dehydrate Chart
FOOD
Fruit
Apples
Bananas
Cherries
Oranges Peels
and slices
Pineapple rings
Strawberries
Vegetable
Peppers
Mushrooms
Tomatoes
Herbs
Oregano, sage parsley and
thyme, and fennel
Basil
Dipped in 1/4 cup lemon juice
and 2 cups water, 1/4 slices
Dipped in 1/4 cup lemon juice
and 2 cups water, 1/4 slices
Wash and towel dry.
For fresh cherries, remove pits
¼ slices of orange;
orange part of skin thinly peeled
Wash and towel dry.
skin (outside) down on rack
Wash and towel dry.
Remove membrane of pepper,
coarsely chopped about 1" pieces
Wash and towel dry.
Cut of stem end. Cut into 1/8" slices
Wash and towel dry.
Cut this slices, 1/8" thick, dry well
Rinse and dry with paper towel
Use basil leaves 3 to 4 inches
from top. Spray with water,
shake off moisture and pat dry
PREPARATION
from oranges
Towel dried
Sliced ½" thick,
APPROXIMATE
DRYING TIME*
(hrs)
11-15 Slightly pliable
11-15 Slightly pliable
10-15 Pliable, leathery, chewy
Peels 2-4
Slices: 12-16
Canned: 9-13
Fresh: 8-12
12-17 Dry, brittle
16-20
7-12 Tough and leathery, dry
16-23 Dry, brick red color
Dry at 120°F (60°C)
3-5 hrs
Dry at 120°F (60°C)
3-5 hrs
TEST FOR DONENESS
Orange peel: dry and brittle
Orange slices: skins are dry
and brittle, fruit is slightly moist
Leathery with no moisture
Soft and pliable
inside
Crisp and brittle
Crisp and brittle
20
Page 21
Use & Care Manual
Models SOVB - DOVB ENGLISH
Broil Tips and Techniques
• Place rack in the required position needed before turning on the oven.
• Use Broil mode with the oven door closed.
• Do not preheat oven.
• Use the 2-piece broil pan.
• Meats may be brushed with cooking oil or butter to prevent sticking.
• Turn meats once halfway through the cooking time (see broil chart).
Broil Chart
FOOD AND
THICKNESS
Beef
Steak (3/4"-1")
Medium rare 3 5 145 (63) 5-7 4-6
Medium 3 5 160 (71) 6-8 5-7
Well 3 5 170 (77) 8-10 7-9
Hamburgers (3/4"-1")
Medium 3 5 160 (71) 7-9 5-7
Well 3 5 170 (77) 8-10 7-9
Poultry
Breast (bone-in) 3 3 170 (77) 14-16 14-16
Thigh (very well done) 3 3 180 (82) 28-30 13-15
Pork
Pork Chops (1") 3 5
Sausage - fresh 3 5
Ham Slice (½") 3 5
Seafood
Fish Filets, 1" 3 4 10-14
Buttered
Lamb
Chops (1")
Medium Rare 3 5 145 (63) 5-7 4-6
Medium 3 5 160 (71) 6-8 5-7
Well 3 5 170 (77) 8-10 7-9
Bread
Garlic Bread, 1" slices 4 5 2-2,30
Garlic Bread, 1" slices 3 5 4-6
* Broiling and convection broiling times are approximate and may vary slightly
RACK
POSITION
BROIL
SETTING
INTERNAL
TEMP. °F (°C)
160 (71)
160 (71)
160 (71)
Cook until
opaque & flakes
easily with fork
Food Service Temperature Guidelines from FSIS (USDA food Safety & Inspection Service)
140°F(60°C) Ham, precooked ( to Reheat) Stuffing (cooked alone or in bird)
145°F(63°C) Fresh beef, Veal, Lamb (medium rare)
Ground Meat & Meat mixtures (Beef, Pork, Veal Lamb) Fresh beef, Veal, Lamb (well done)
Fresh beef, Veal, Lamb (medium) Poultry breast
160°F(71°C)
165°F(74°C) Ground Meat & Meat mixtures (Turkey, Chicken)
Note : Eggs (alone, not used in a recipe) – cook until yolk & white are firm
Fresh Pork (medium)
Fresh Ham (raw) Chicken and Turkey (Whole)
Egg Dishes Poultry (thighs and wings)
165°F
(74°C)
170°F
(77°C)
180°F
(82°C)
Leftovers & Casseroles
Fresh Pork (well done)
Duck and Goose
TIME
SIDE 1
(MIN.)*
7-9 5-7
5-7 3-5
3-5 4-6
TIME
SIDE 2
(MIN.)*
Do not turn
21
Page 22
Use & Care Manual
Models SOVB - DOVB ENGLISH
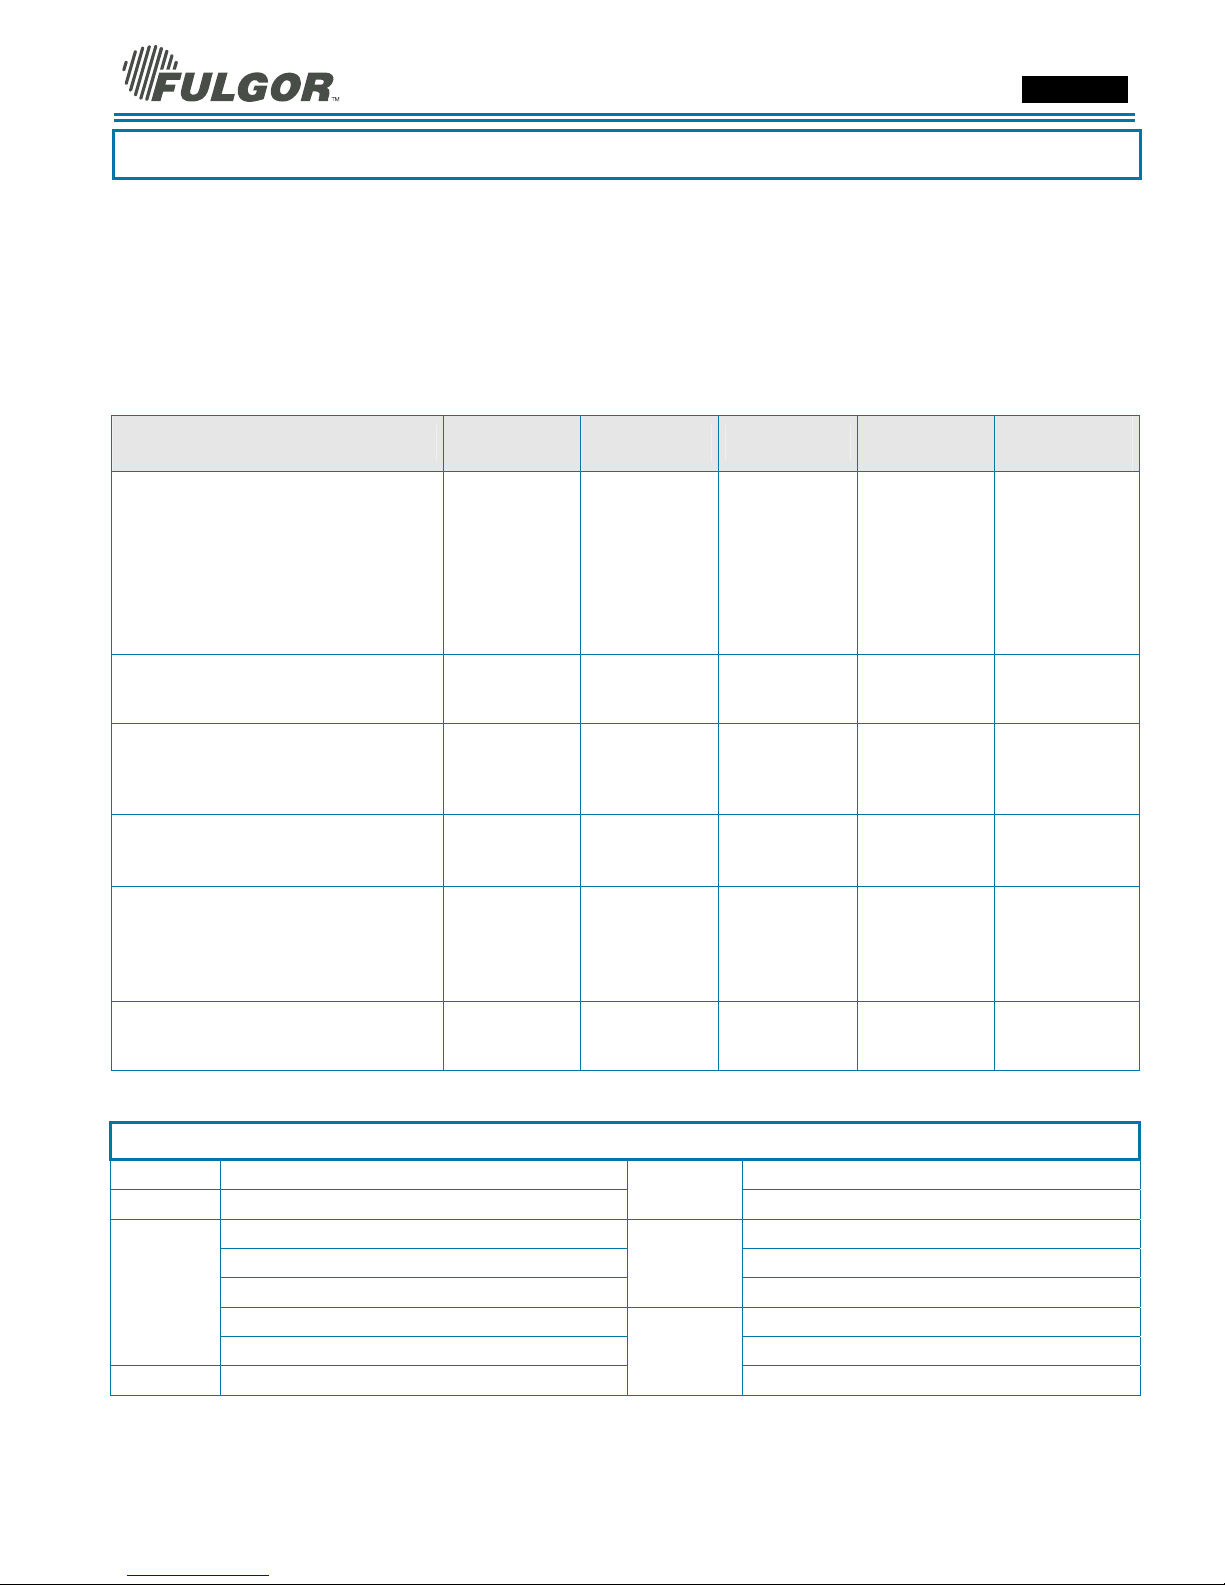
Special Features
The Special Features function can be used to select the following special oven features:
1. SAB => SABBATH MODE (for religious faiths with “no work” requirements on the Sabbath)
2. OFS => OVEN OFFSET (used to calibrate the oven temperature)
3. dEG => °UNIT (used to select Farenheit or Centigrade)
4. Hr => CLOCK FORMAT (used to set the time of day format as 12 am/pm or 24 hr).
To select special features, follow the steps below:
Touch and hold CLOCK and TIMER for at least 3 seconds. Clock time disappears and the following display is
shown.
1. Press the INC or the DEC key to scroll all available options until the desired one is found.
2. Press CLOCK key to enter the change mode.
3.
The value will blink, change it by means of INC or DEC keys. In a double oven it’s possible to set a
different offset in each cavity. Select the cavity with UPPER/LOWER key.
4. Hold the CLOCK key to confirm and go back to the clock original screen.
22
Page 23
Use & Care Manual
Models SOVB - DOVB ENGLISH
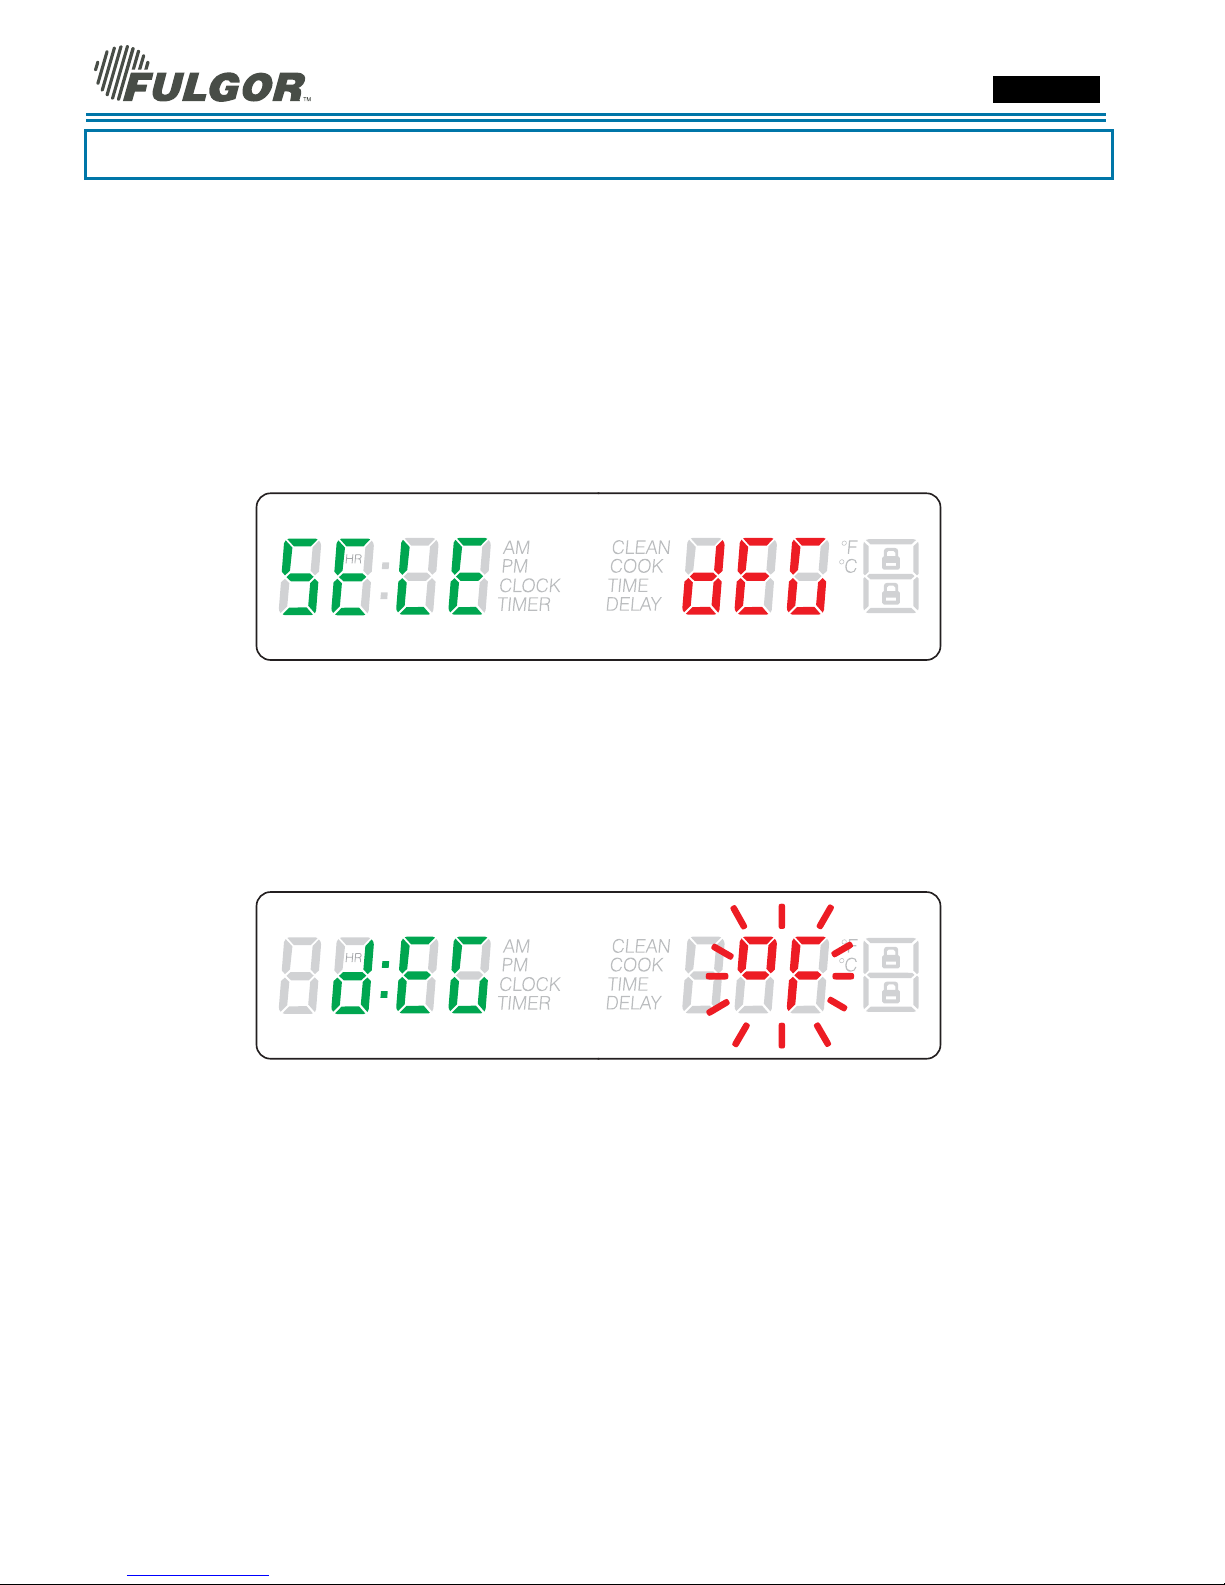
Sabbath Mode Instruction
Enter the user option menu holding CLOCK and TIMER keys at the same time. Scroll the option list in the red
digits field (dEG, OFF, Hr, Sab), by pressing INC/DEC, until Sabbath item is found.
1. Press CLOCK to enter edit mode: the selected item switches to the green digits on the left and its status in
the red digits field starts blinking.
2. Press again INC/DEC keys to set Sabbath mode ON or OFF (Default=OFF). Press CLOCK to confirm and
come back to the option list. Hold CLOCK key for 3 seconds to quit the selection menu and go back to
normal operations.
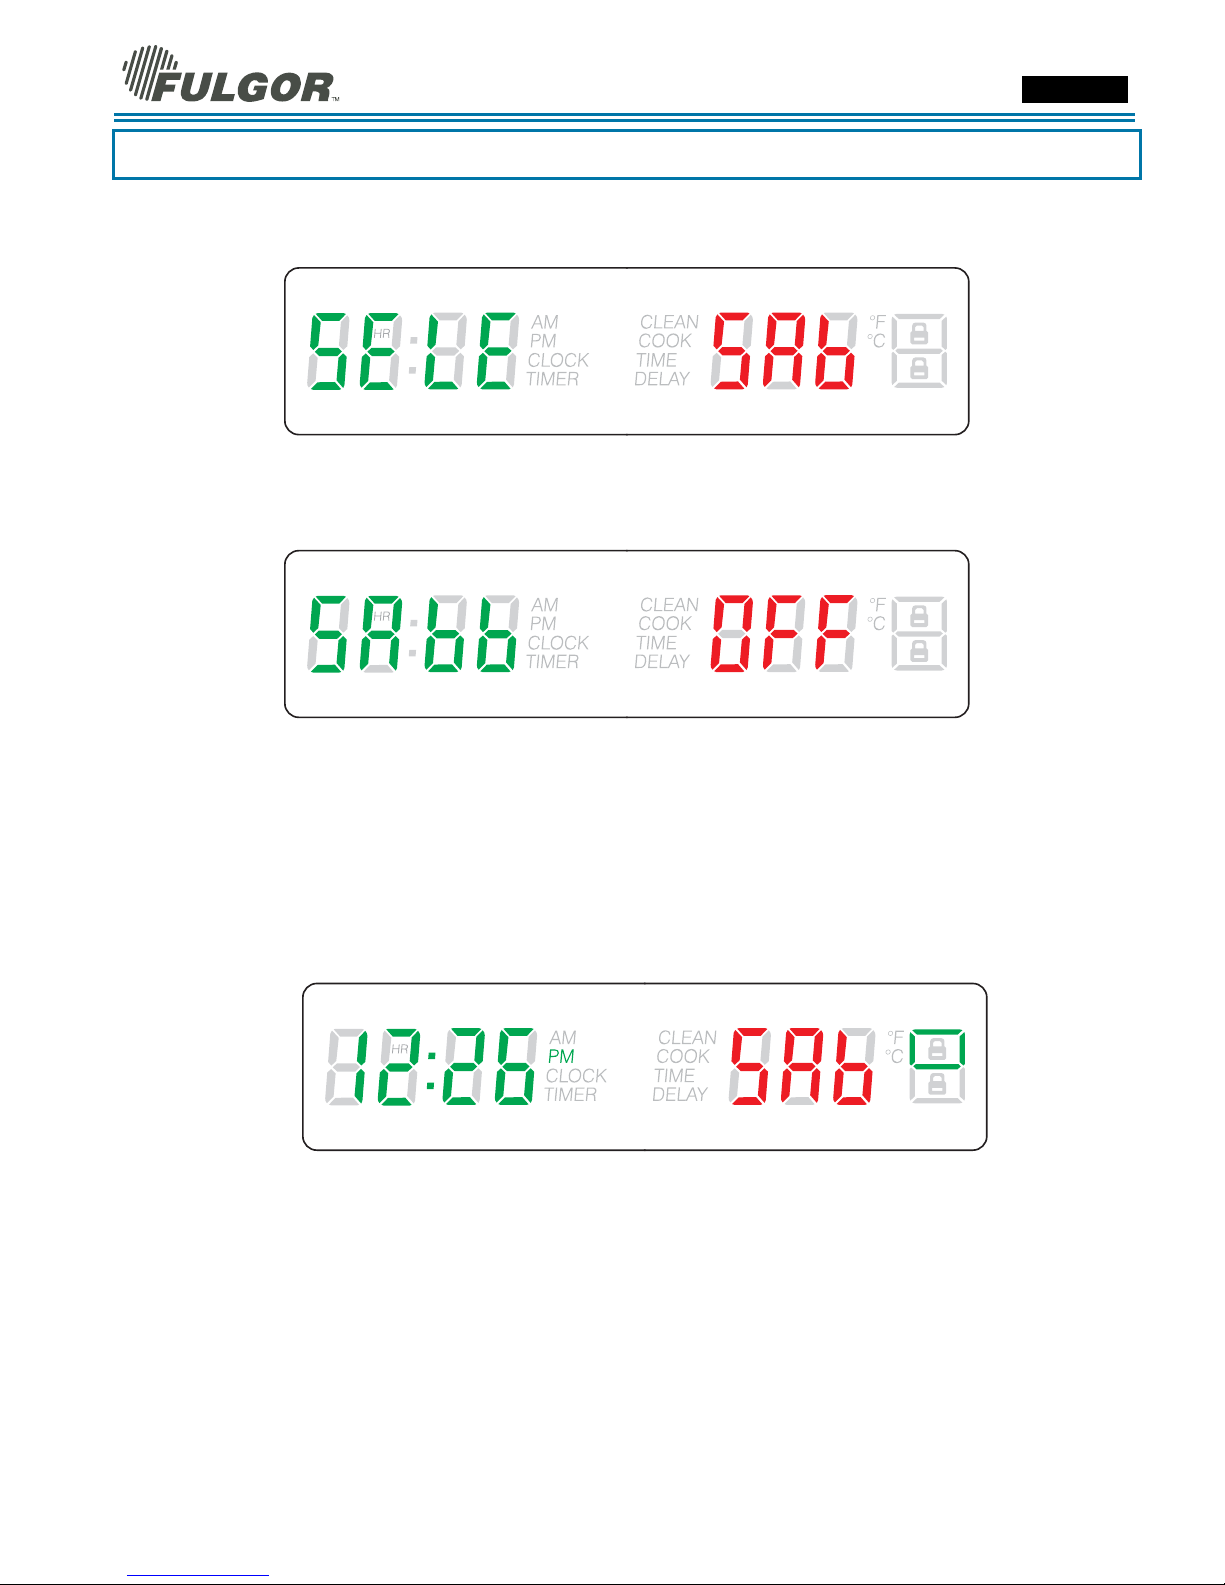
3. Once Sabbath mode is set, only BAKE and OFF positions are available in the cooking mode selector.
Move the selector to BAKE then set the temperature to the desired value within 5 minutes. After 5
minutes, the temperature cannot be shown any more and the display appears as below: Sabbath mode is
active. In a double oven, the upper/lower cavity indications are still available. Both boxes are on if both
cavities are working.
• Oven lights status cannot be changed during Sabbath time.
• Oven temperature can only be lowered but no information can be displayed.
• The cooling fan must run in Sabbath mode.
• Preheat lights are inhibited during Sabbath mode.
• The buzzer must always be silent, regardless of any fault, end of activity, etc.
• Maximum allowed cooking time must be 72 hours.
• The user is allowed to stop the oven manually, also during Sabbath, moving the cooking mode selector to
OFF position.
23
Page 24
Use & Care Manual
Models SOVB - DOVB ENGLISH
Oven Care and Cleaning
Self-Cleaning the Oven
This oven features a pyrolytic self-cleaning function that eliminates the difficult and time consuming manual
scrubbing of the oven interior. During self-cleaning, the oven uses a very high temperature (approx. 885°F/470°C)
to burn away food soil and grease.
• Only one oven at a time can be set to Self-Clean.
• It is common to see smoke and/or an occasional flame-up during the Self-Clean cycle, depending on the
content and amount of soil remaining in the oven. If a flame persists, turn off the oven and allow it to cool
before opening the door to wipe up the excessive food soil.
• The door latch is automatically activated after selecting the Self-Clean cycle. The door lock symbol will
appear in the display. This ensures that the door cannot be opened while the oven interior is at clean
temperatures.
• The oven light does not operate during this mode.
• During Self-Clean, the kitchen should be well ventilated to help eliminate odors associated with Self-
Clean. Odors will lessen with use.
• Three hours is the preset length of cleaning.
• The mode automatically stops at the end of the clean hours.
• When the oven heat drops to a safe temperature, the automatic door lock will release and the door can be
opened.
Preparing the Oven for Self-Clean
1. Remove all utensils and bake ware.
2. Remove oven racks. If oven racks are left in the oven during the self-clean cycle, they will permanently
lose the shiny finish and change to a dull dark finish. See Oven Cleaning Chart for proper care, Pages 26
to 27.
3. Wipe up any soft soil spills and grease with paper towels. Excess grease will cause flames and smoke
inside the oven during self-cleaning.
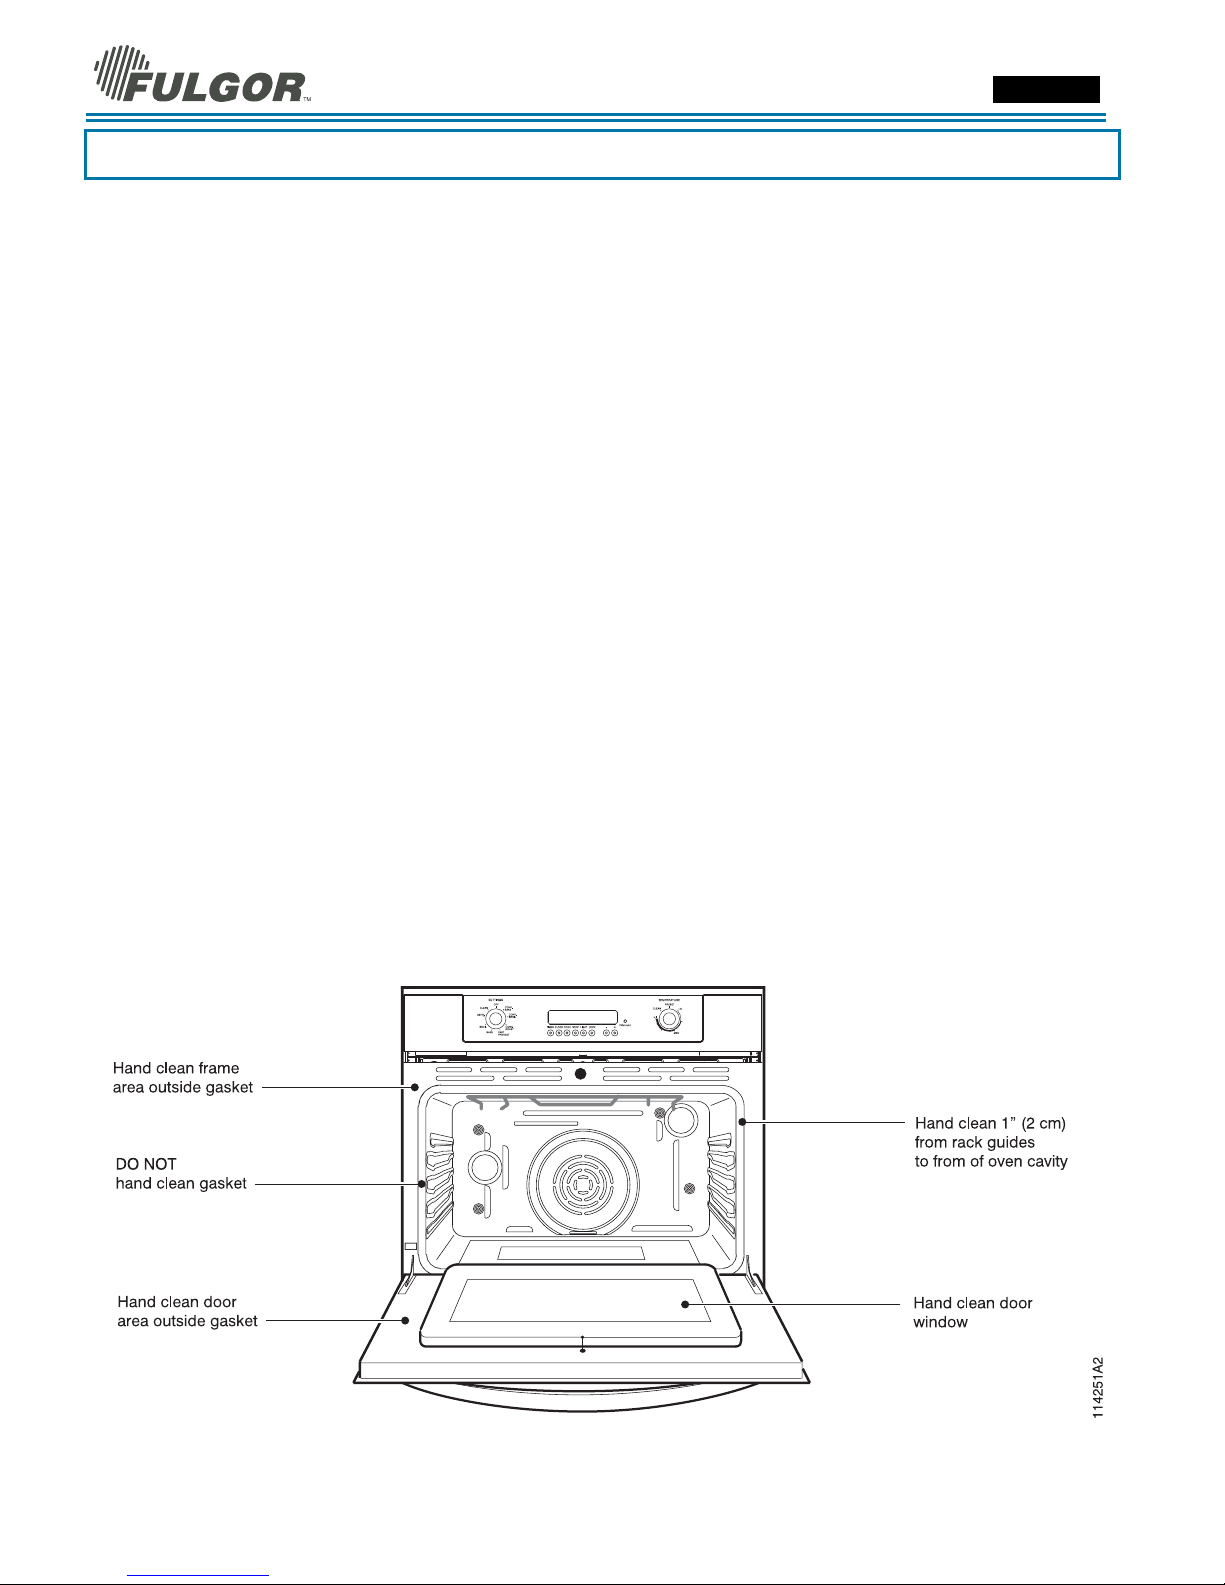
4. Review illustration below. Some areas of the oven must be cleaned by hand before the cycle begins.
They do not get hot enough during the cleaning cycle for soil to burn away. Use a soapy sponge or plastic
scrubber or a detergent-filled S.O.S.® pad. Hand-clean the oven door edge, oven front frame and up to
1-½ “ (2-3 cm) inside the frame with detergent and hot water. Do not rub the gasket on oven. Hand clean
the oven door window. Rinse all areas thoroughly then dry.
5. Be sure oven interior lights are turned off and the light bulbs and lens covers are in place. See Pages 29.
24
Page 25
Use & Care Manual
Setting the Self-Clean Mode
To Set the Self-Clean Mode
1. Press UPPER/LOWER key to select the cavity
to be cleaned, if the oven is a double.
2. Rotate both knobs into the clean position.
3. CLEAN & TIME appear.
4. The number of cleaning hours is displayed
automatically, standard cleaning time is 3 hours.
5. At the end of the programmed cleaning time,
the oven will automatically turn off.
6. To stop the cleaning mode at any moment,
move one of the two knobs from the cleaning
position.
Do not attempt to open the door while the door is
locked. The lock symbol will flash until the motor stops.
When the lock symbol is displayed, the door cannot be
opened. Check that the door has been locked and will
not open before starting the Self-Clean mode.
If door does not lock, rotate the cooking mode knob into
the OFF position and do not start self-clean; phone for
service.
If the door is in the open position when this mode is
selected, the lock symbol will flash until the door is
closed. The latch doesn’t move.
To Change the Cleaning Time
1. To change the setting from 3 hours, select
either 2 hours for light soil or 4 hours for heavy
soil immediately before starting.
2. To change the hours, touch the COOK TIME
key.
3. The number of hours for cleaning will flash.
4. Use INC or DEC buttons to change the number
of hours.
Models SOVB - DOVB ENGLISH
5. To change the minutes, touch the COOK TIME
key.
6. The number of minutes for cleaning will flash.
7. Use INC or DEC buttons to change the number
of minutes. Hold the key to change by 10
minutes.
Press COOK TIME or wait a few seconds to confirm the
new value.
To Delay the Start of Cleaning
1. Follow steps 1 through 7 above.
2. Touch the STOP TIME key and the hour to stop
will begin flashing.
3. Use INC or DEC buttons to change the stop
hour.
4. To change the minutes, touch the STOP TIME
key.
5. The minutes to stop cleaning will flash.
6. Use INC or DEC buttons to change the minutes.
Hold the key to change by 10 minutes.
7. Press STOP TIME or wait a few seconds to
confirm the new value.
8. Oven door will lock and display shows DELAY.
9. When the delay time ends, cleaning will start.
10. At the end of the programmed cleaning time,
the oven will automatically turn off.
11. END will appear on the display, CLEAN & TIME
will flash until any time key is touched or the
knob is moved to the OFF position.
TO CHECK CLEAN TIME OR STOP TIME during
a delayed clean, simply press COOK TIME
or STOP TIME buttons.
25
Page 26
Use & Care Manual
Models SOVB - DOVB ENGLISH
General Oven Care
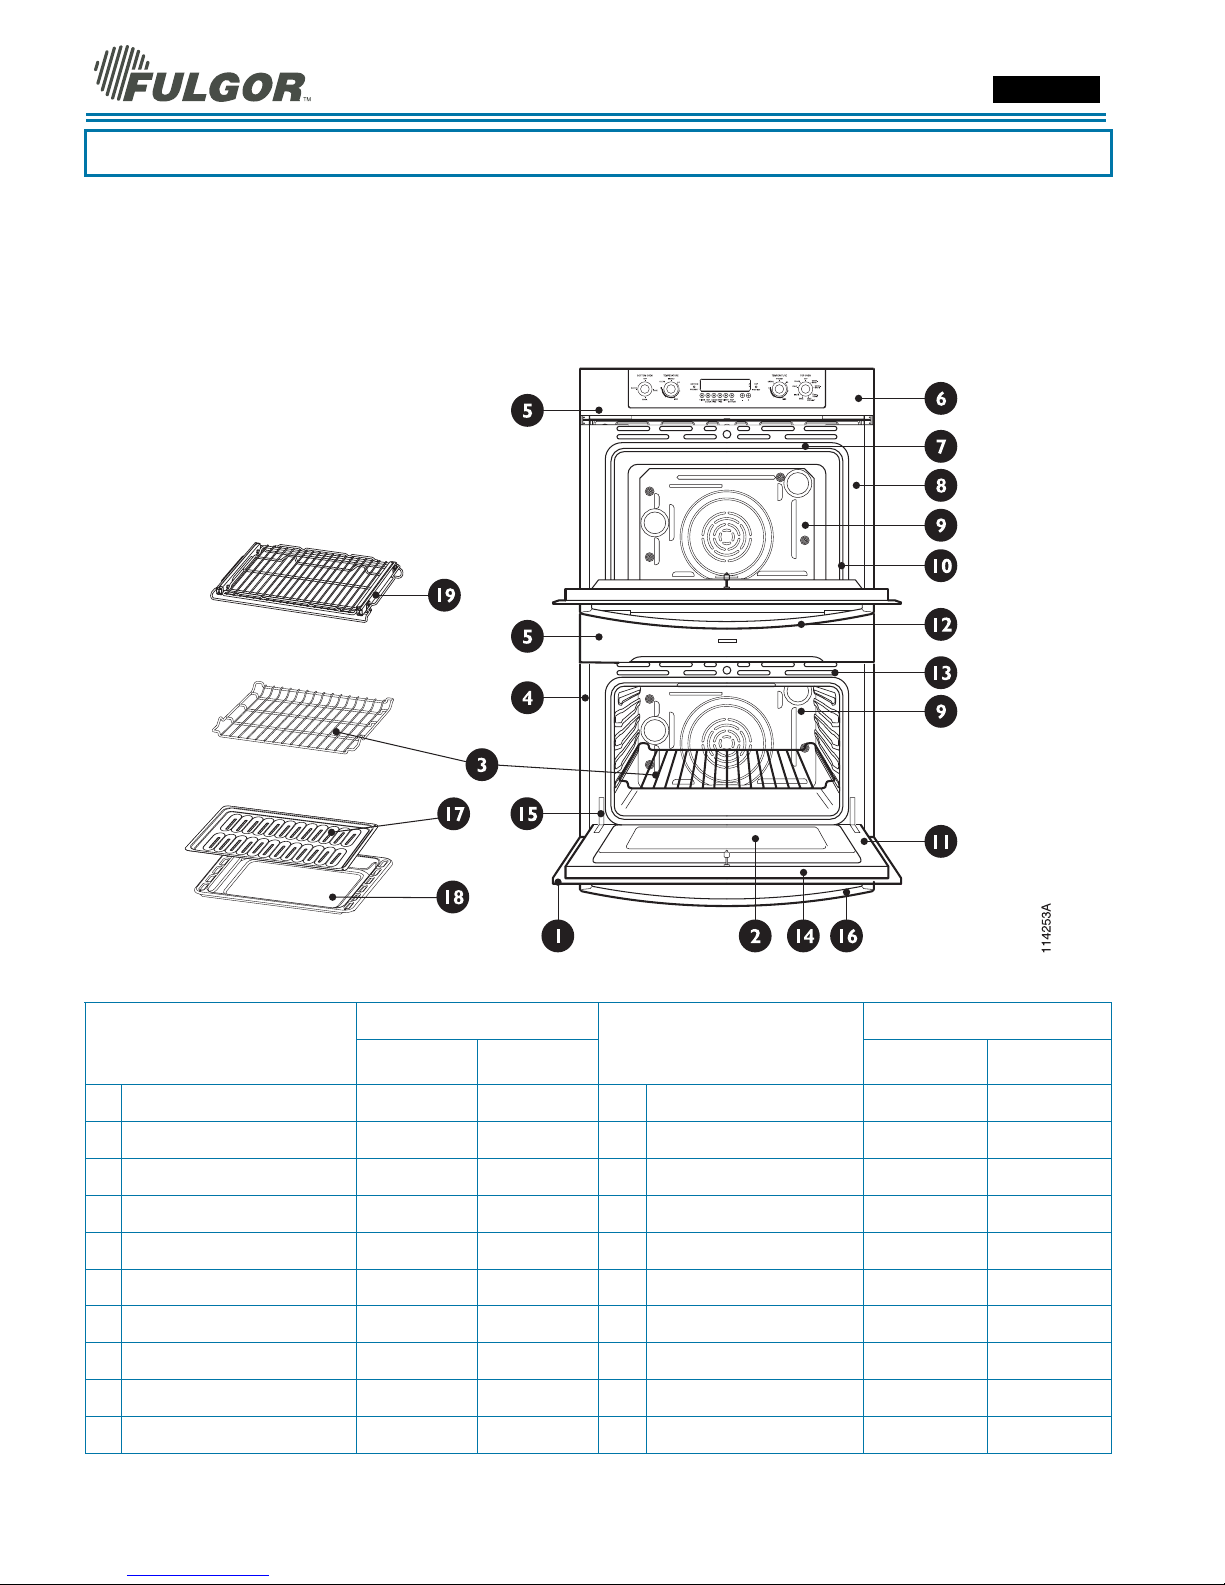
How to Use the Oven Cleaning Chart
1. Locate the number of the part to be cleaned in the illustration on this page.
2. Find the part name in the chart.
• Use the cleaning method in the left column if the oven is black or white.
• Use the cleaning method in the right column if the oven is stainless steel.
3. Match the letter with the cleaning method on following page.
Cleaning Chart
Cleaning Method Cleaning Method
Part
Door frame
1
Interior door windows
2
Removable Oven Racks
3
Slide Trim
4
Control Panel Trim
5
Control Panel
6
Oven Cooling Vents
7
Oven Front Frame
8
Oven Cavity
9
Mesh Gasket
10
26
Black & White
Oven
Stainless Stell
Oven
E E
F F
A or E A or E
D D
C G
C C
D D
E E
E E
B B
Interior Oven Door
11
Door Handle
12
Door Cooling Vent
13
Door Front
14
Oven Trim
15
End Caps
16
Broil Pan Rack
17
Broil pan Bottom
18
Extendable rack
19
Part
Black & White
Oven
Stainless Stell
Oven
E E
D D
E E
C&D C&D
D D
D D
E E
E E
A A
Page 27
Use & Care Manual
Models SOVB - DOVB ENGLISH
Oven Finishes / Cleaning Methods
The entire oven can be safely cleaned with a soapy sponge, rinsed and dried. If stubborn soil remains, follow
the recommended cleaning methods below.
• Always use the mildest cleaner that will do the job.
• Rub metal finishes in the direction of the grain.
• Use clean, soft cloths, sponges or paper towels.
• Rinse thoroughly with a minimum of water so it does not drip into door slots.
• Dry to avoid water marks.
The cleaners listed below indicate types of products to use and are not being endorsed. Use all products
according to package directions.
Part Cleaning Method
A Chrome Plated Wash with hot sudsy water. Rinse thoroughly and dry. Or, gently rub with Soft
Scrub®,
Bon-Ami®, Comet®, Ajax®, Brillo® or S.O.S.® pads as directed. Easy Off® or Dow®
Oven
Cleaners (cold oven formula) can be used, but may cause darkening and discoloration.
Racks may be cleaned in the oven during the self-clean mode. However, they will lose
their shiny finish and permanently change to a metallic gray.
B Fiberglass Knit
C Glass Spray Windex® or Glass Plus® onto a cloth first, then wipe to clean. Use Fantastik®
D Painted Clean with hot sudsy water or apply Fantastik® or Formula 409® first to a clean
E Porcelain Immediately wipe up acid spills like fruit juice, milk and tomatoes with a dry towel. Do
F Reflective Glass Clean with hot sudsy water and sponge or plastic scrubber. Rub stubborn stains with
G Stainless Always wipe or rub with grain. Clean with a soapy sponge then rinse and dry. Or, wipe
H Probe (if present)
DO NOT HAND CLEAN GASKET.
or Formula 409® to remove grease spatters.
sponge or paper towel and wipe clean. Avoid using powdered cleansers and steel wool
pads.
not use a moistened sponge/towel on hot porcelain. When cool, clean with hot sudsy
water or apply Bon-Ami® or Soft Scrub® to a damp sponge. Rinse and dry. For
stubborn stains, gently use Brillo® or S.O.S.® pads. It is normal for porcelain to craze
(fine lines) with age due to exposure from heat and food soil.
vinegar, Windex®, ammonia or Bon-Ami®. DO NOT USE HARSH ABRASIVES.
with Fantastik® or Formula 409® sprayed onto a paper towel. Protect and polish with
Stainless Steel Magic® and a soft cloth. Remove water spots with a cloth dampened
with white vinegar. Use Zud®, Cameo®, Bar Keeper’s Friend® or RevereWare
Stainless Steel Cleaner®, to remove heat discoloration.
Clean probe by hand with detergent and hot water.
Do not
so or clean in dishwasher.
Then rinse and dry.
27
Page 28
Use & Care Manual
Models SOVB - DOVB ENGLISH
Do-it-Yourself Maintenance
Oven Door Removal
WARNING
• Make sure oven is cool and power to the oven has been turned off before removing the door. Failure to do
so could result in electrical shock or burns.
• The oven door is heavy and fragile. Use both hands to remove the oven door. The door front is glass.
Handle carefully to avoid breakage.
• Grasp only the sides of the oven door. Do not grasp the handle as it may swing in your hand and cause
damage or injury.
• Failure to grasp the oven door firmly and properly could result in personal injury or product damage.
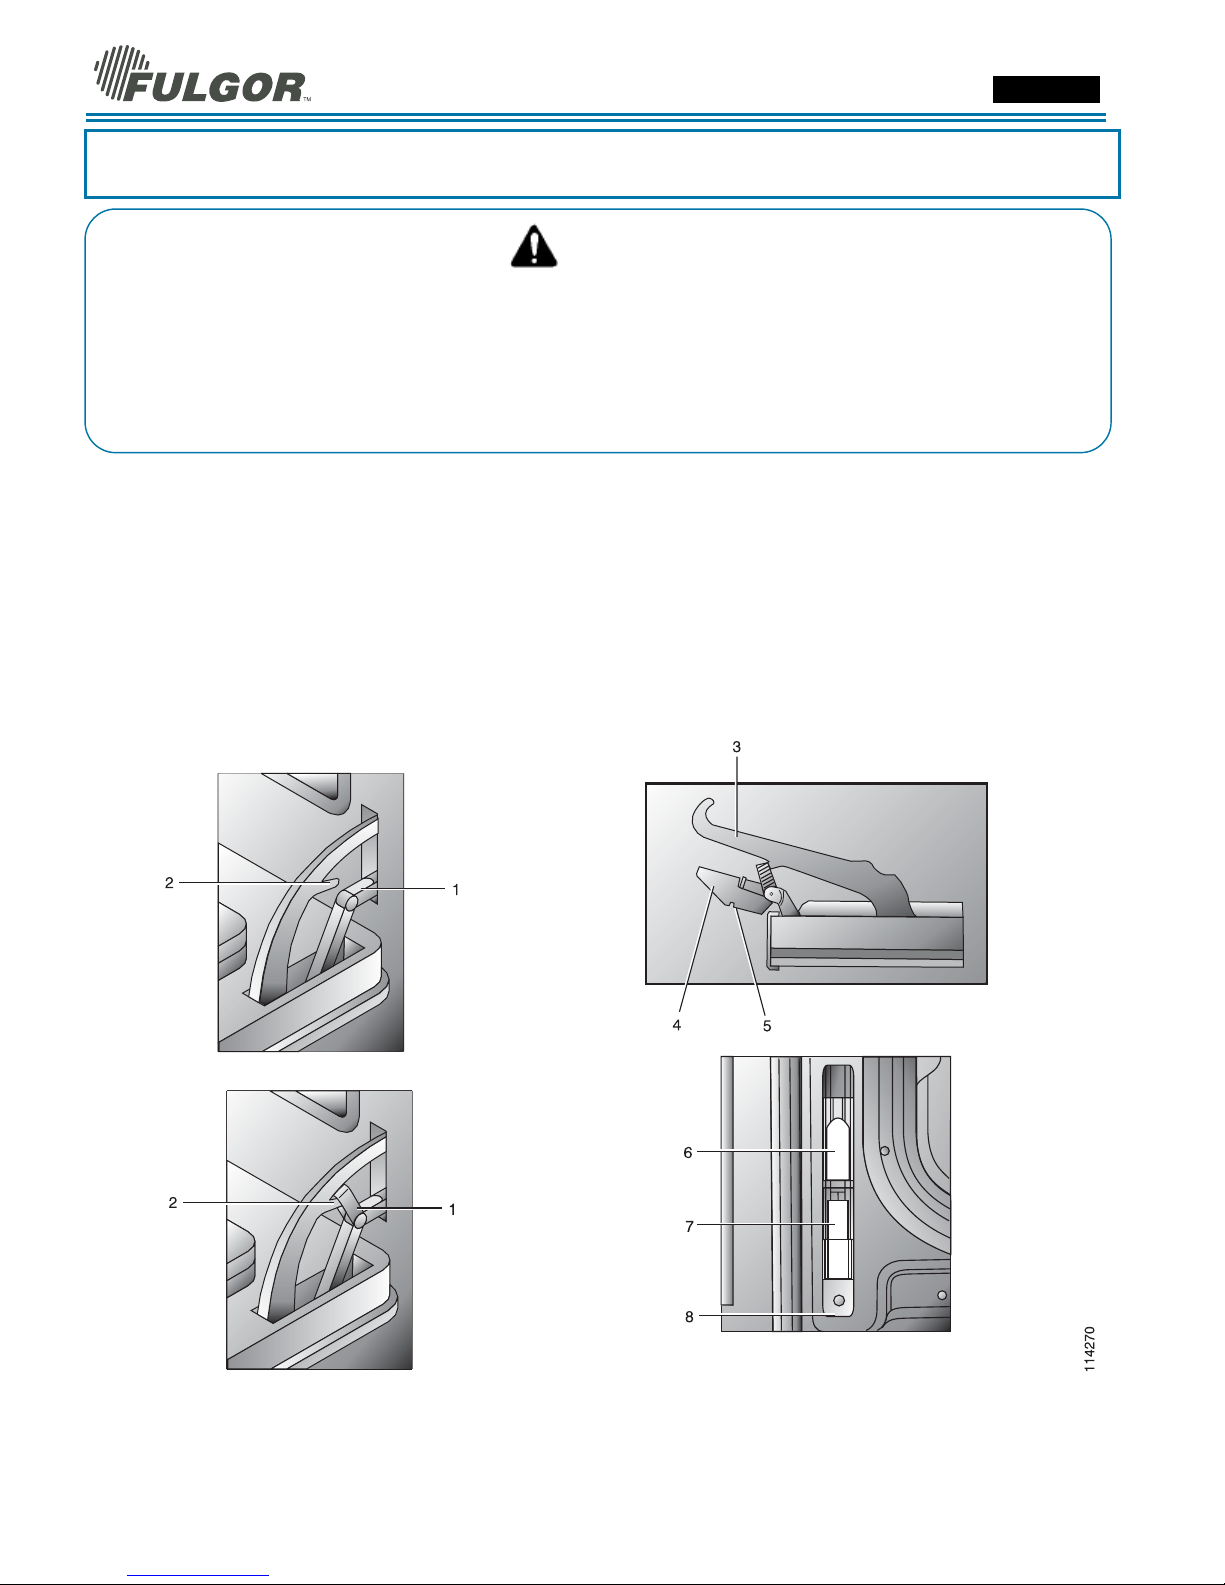
To Remove Door
1. Open the door completely.
2. Lift up the hinge bracket (1) into the slot (2).
3. Hold the door firmly on both sides using both
hands and close the door.
4. Hold firmly; the door is heavy.
5. Place the door in a convenient location.
To Replace Door
1. Insert the upper arms (3) of both hinges into the
upper slots (6) and the lower arms (4) into the
lower slots (7). The recesses (5) must hook on the
lips (8).
2. Move the hinge brackets (1) back down into
position.
3. Close and open the door slowly to assure that it is
correctly and securely in place.
28
Page 29

Use & Care Manual
Replacing an Oven Light
• Each oven is equipped with two halogen lights
located in the back wall of the oven.
• The lights are switched on when the door is
opened or when the oven is in a cooking cycle.
• The oven lights are not illuminated during
SELF- CLEAN.
• Each light assembly consists of a removable
lens, a light bulb as well as a light socket
housing that is fixed in place. See figure on this
page.
• Light bulb replacement is considered to be a
routine maintenance item.
To Replace a Light Bulb
1. Read WARNING on this page.
2. Turn off power at the main power supply (fuse
or breaker box).
3. In convection ovens, remove the fan cover by
unscrewing the four screws.
4. Remove the lens by unscrewing it.
5. Remove the light bulb from its socket by pulling
it.
6. Replace the bulb with a new one. Avoid
touching the bulb with fingers, as oils from
hands can damage the bulb when it becomes
hot.
7. The bulb is halogen: use one with the same
Volt and Watt (see figures on this page
8. Screw the lens back on.
9. Replace the fan cover if it is provided with the
oven model.
Turn power back on at the main power supply (fuse or
breaker box).
).
Models SOVB - DOVB ENGLISH
WARNING
• Make sure the oven and lights are cool and
power to the oven has been turned off before
replacing the light bulb(s). Failure to do so
could result in electrical shock or burns.
• The lenses must be in place when using the
oven.
• The lenses serve to protect the light bulb from
breaking.
• The lenses are made of glass. Handle carefully
to avoid breakage. Broken glass could cause
an injury.
29
Page 30

Use & Care Manual
Models SOVB - DOVB ENGLISH
Solving Baking Problems
With either Bake or Convection Bake, poor results can occur for many reasons other than a malfunction of the
oven. Check the chart below for causes of the most common problems. Since the size, shape and material of
baking utensils directly affect the baking results, the best solution may be to replace old baking utensils that have
darkened and warped with age and use. Check the Baking Charts from Page 15 to 21 for the correct rack position
and baking time
Baking Problem
Food browns unevenly
Food too brown on bottom
Food is dry or has shrunk
excessively
Food is baking or roasting
too slowly
Pie crusts do not brown on
bottom or have soggy crust
Cakes pale, flat and may
not be done inside
Cakes high in middle with
crack on top
Pie crust edges too brown
• Oven not preheated
• Aluminum foil on oven rack or oven bottom
• Baking utensil too large for recipe
• Pans touching each other or oven walls
• Oven not preheated
• Using glass, dull or darkened metal pans
• Incorrect rack position
• Pans touching each other or oven walls
• Oven temperature too high
• Baking time too long
• Oven door opened frequently
• Pan size too large
• Oven temperature too low
• Oven not preheated
• Oven door opened frequently
• Tightly sealed with aluminum foil
• Pan size too small
• Baking time not long enough
• Using shiny steel pans
• Incorrect rack position
• Oven temperature is too low
• Oven temperature too low
• Incorrect baking time
• Cake tested too soon
• Oven door opened too often
• Pan size may be too large
• Baking temperature too high
• Baking time too long
• Pans touching each other or oven walls
• Incorrect rack position
• Pan size too small
• Oven temperature too high
• Edges of crust too thin
Cause
30
Page 31

Use & Care Manual
Models SOVB - DOVB ENGLISH
Solving Operational Problems
Before calling for assistance or service, please check "Troubleshooting." It may save you the cost of a service call.
If you still need help, follow the instructions below. When calling, please know the purchase date and the complete
model and serial number of your appliance. This information will help us to better respond to your request.
Oven Problem Problem Solving Steps
F03 or F04 Error appear in
the display window.
Other F__ Error appear in the
display window.
The oven display stay OFF Turn off power at the main power supply (fuse or breaker box). Turn breaker back on. The oven
Cooling fan continues to
run after oven is turned off
Oven door is locked and
will not release, even after
cooling
Oven is not heating Check the circuit breaker or fuse box to your house. Make sure there is proper electrical power
A problem with latch mechanism occurred. Remove power and turn it back on again after a few
seconds. The oven should run a latch auto–test. If condition persists, note the code number
and call an authorized servicer.
Remove power and turn it back on again after a few seconds. If condition persists, note the
code number and call an authorized servicer.
should reset itself and will be operable. If condition persists, call an authorized service center.
The fan turns off automatically when the electronic components have cooled sufficiently.
Turn the oven off at the circuit breaker and wait a few seconds. Turn breaker back on.
The oven should reset itself and will be operable.
to the oven. Make sure the oven temperature has been selected.
Oven is not cooking evenly Check oven calibration. Adjust calibration if necessary (see To Set Temperature, Page 13).
Refer to cook charts for recommended rack position. Always reduce recipe temperature by
25°F (15°C) when baking with Convention Bake mode.
Oven temperature is too hot
or too cold
Oven light is not working
properly
Oven light stays on Check for obstruction in oven door. Check to see if hinge is bent.
Cannot remove lens cover on
light
Oven will not Self-Clean
properly
Clock and timer are not
working properly
Excessive moisture When using Bake mode, preheat the oven first. Convection Bake and Convection Roast will
Porcelain chips When oven racks are removed and replaced, always tilt racks upward and do not force them to
The oven thermostat needs adjustment. See Calibrating Oven Temperature, Page 13.
Replace or reinsert the light bulb if loose or defective. See Page 29. Touching the bulb with
fingers may cause the bulb to burn out.
There may be a soil build-up around the lens cover. Wipe lens cover area with a clean dry
towel prior to attempting to remove the lens cover.
Allow the oven to cool before running Self-Clean. Always wipe out loose soils or heavy spillover before running Self-Clean. If oven is badly soiled, set oven for a four-hour
Self-Clean. See Preparing the Oven to Self-Clean, Page 24.
Make sure there is proper electrical power to the oven. See the Clock and Timer sections on
Page 12.
eliminate any moisture in oven (this is one of the advantages of convection).
avoid chipping the porcelain.
Service Data Record
For authorized service or parts information see paragraph “Fulgor Warranty ..”.
The location of the serial tag on the product can be seen when the oven door is opened. It is located on the left side, centered
vertically just inside the oven cavity. See Page 7. Now is a good time to write this information in the space provided below.
Keep your invoice for warranty validation.
Model Number _____________Serial Number ______________________Date of Installation or Occupancy_______________
31
Page 32

Use & Care Manual
Models SOVB - DOVB ENGLISH
FULGOR WARRANTY for Home Appliances
Duration of warranty:
Fulgor USA grants for the Continental U.S and Canada a 24 month full warranty from the date of purchase
indicated on the invoice. During this period Fulgor will pay the cost for replaced parts and labor needed to repair
the appliance.
For proof of warranty, please retain the original purchase invoice and the delivery slip.
Fulgor USA maintains a unique provision for a one time financial contribution for any repair which occurs within 1
year after the standard Fulgor warranty terms. This provision states that if a technical failure occurs after the twoyear warranty period, beginning with the first day of month 25 until the last day of month 36 after the purchase
date, Fulgor will pay the customer directly the amount of $ 50.00 to help defray the cost of one service occurrence
as result of a technical failure. This service contribution is limited to only one claim per customer in the third year
after the date of purchase.
To obtain service under this warranty, you must:
1. Visit our web site at www.fulgorusa.com, or visit any authorized dealer, or send written notice of the claimed
condition to Fulgor USA L.L.C., Technical Services Department, 1076 Miners Rd., Saint Joseph, MI 49085.
2. Provide a copy of your original sales receipt.
3. Call 1(800)-232-4907 for guidance in receiving service for your appliance.
4. Provide Fulgor reasonable opportunity to investigate the claim before the Product or any component of the
Product has been removed.
Coverage:
Read the Use and Care Manual before using the appliance for the first time!
This warranty applies to Fulgor appliances utilized only for residential use. Our appliances are not intended for
commercial use. This warranty is only valid for the original owner and is not transferable.
During the warranty period Fulgor will, at its discretion, repair or exchange the product without charge for parts
and labor.
The warranty does not cover :
1. Damage to the appliance caused intentionally or by accident
2. Improper installation or incorrect connection to the power supply
3. Modifications to the appliance
4. Malfunctions due to improper usage
5. Breakage or normal usage scratches of the ceramic glass surface
6. Operation under professional or commercial conditions
7. Lightning, fire, flood damages or other Acts of God
8. Replacement or attachment of parts other than original, provided by Fulgor
9. Cosmetic claims such as scratches on stainless steel parts are under a limited warranty only, and must be
claimed within 2 weeks after the date of purchase.
This warranty covers only the appliance and its components. Damage of any items in direct contact or placed near
to the appliance are excluded from the warranty. Charges from any third parties other than Fulgor authorized
service agencies will not be accepted.
Should the appliance prove defective in workmanship or material, the end user shall be granted repair or
replacement only. Under no circumstances shall Fulgor be liable for any loss or damage, whether it be direct,
consequential, or incidental, arising out of the use or incorrect use of the appliance.
In order to obtain warranty rights, the original invoice must be provided to the Technical Services Department,
Fulgor USA to verify the date of purchase. Some states do not allow limitations of incidental or consequential
damages, therefore the above named limitations or exclusions may not apply.
In case of technical claims or for service, first contact the dealer where the Fulgor appliance was
purchased!
Fulgor USA, LLC
service@fulgorusa.com
Product, User & Warranty Information: 1.800.926.2032
Service & Claim Issues: 1.800.232.4907
32
Page 33

Manuel d’utilisation et d’entretien
Modèles de four SOVB - DOVB FRANÇAIS
Page Page
Table des matieres
Précaution de sécurité 34 Conseils et techniques de convection cuisson 49
Instructions de sûreté 35 Tableau de convection cuisson
Securite pour le four
Securite pour l’auto-nettoyage du four
35
Conseils et techniques de convection grill 50
35
Tableau de convection grill
Cuisiner avec un four à convection FULGOR 36 Conseils et techniques de déshydratation 51
Avantages de la cuisson par convection
36
Tableau de grillade à déshydratation
Caractéristiques de votre four 37 Conseils et techniques de grill 52
Les panneaux de contrôle 37 Tableau de grill
Touches de commande
Affichage
Buttons
+
38
Guide de Temperature de Service de la FSIS
38
Options spéciales 53
38
Instruction du mode sabbat 54
49
50
51
52
52
Modèles de four 39 Entretien du four et nettoyage 55
Information générale sur le four 40 Auto-nettoyage du four
Conseils généraux sur le four 41 Preparation du four pour l’auto-nettoyant
55
55
Réglage de l’horloge et de la minuterie 43 Réglage du mode auto-nettoyant 56
Pour regler la pendule
Pour regler la minuterie
43
Pour régler le mode auto-nettoyant
43
Pour changer le temps de nettoyage
Sélection du mode four 44 Pour retarder le debut du nettoyage
Pour regler un mode de cuisson et température
Utilisation des lumieres du four
44
Entretien général du four 57
44
Comment utiliser le tableau de nettoyage du four
Fonction de mode four minuté 45 Tabelau de nettoyage du four
Pour regler le mode programme
Pour differer le depart d’un mode programme
45
Finitions du four / méthodes de nettoyage 58
45
Retrait de la porte du four 59
56
56
56
57
57
Conseils et techniques de cuisson 46 Remplacement des ampoules du four 60
Tableau de cuisson
46
Pour remplacer une ampoule
60
Conseils et technique de convection
européenne
Tableau de convection européenne
47 Solution des problèmes de cuisson 61
48
Solution des problèmes de fonctionnement 62
GARANTIE FULGOR pour l’électroménager 63
33
Page 34

Manuel d’utilisation et d’entretien
Modèles de four SOVB - DOVB FRANÇAIS
IMPORTANT
Appareil domestique et four
Précaution de sécurité
Veuillez lire les instructions avant toute utilisation.
AVERTISSEMENT
A condition de bien l’entretenir, votre nouveau four
FULGOR a été conçu pour être un appareil fiable et
sûr. Lisez toutes les instructions soigneusement avant
d’utiliser ce four. Ces précautions réduiront le risque de
brûlures, d’électrocutions, d’incendie, et de blessures à
des personnes. Lorsque vous utilisez des appareils
électroménagers de cuisine, il faut suivre les mesures
de sécurité basiques, y compris les suivantes :
Cet appareil doit être correctement installé et branché
par un technicien qualifié. Branchez-le uniquement à
une prise de courant de terre correcte. Reportez-vous à
“Instructions de mise à la terre” dans les Instructions
d’installation.
• Cet appareil ne doit être mis en service uniquement
par un technicien apte et agréé. Contactez le
centre de service agréé le plus proche de chez
vous pour une inspection, une réparation ou un
réglage.
• Ne réparez pas ou ne remplacez pas des pièces du
four sauf si on vous le recommande
spécifiquement. Faites appel au service agréé.
• Ne faites pas fonctionner cet appareil s’il ne
fonctionne pas correctement ou s’il a été abîmé
jusqu’à l’inspection du service après-vente agréé.
• Installez ou placez cet appareil uniquement et
conformément aux Instructions d’installation.
• Utilisez ce four uniquement dans le but pour lequel
il a été conçu par le fabricant. Pour toute question,
contactez le fabricant..
• Ne couvrez pas ou ne bloquez pas les ouvertures
de cet appareil.
• N’utilisez l’appareil que selon l’usage décrit dans ce
manuel. N’utilisez pas de produits chimiques
corrosifs, des vapeurs ou des produits non alimentaires dans cet appareil. Ce type de four est
spécifiquement conçu pour chauffer ou cuire. Il
n’est pas conçu pour une utilisation industrielle ou
en laboratoire. L’utilisation de produits chimiques
corrosifs pour le chauffage et le nettoyage
endommagera cet appareil.
• Si vos vêtements ou vos cheveux prennent feu,
LAISSEZ-VOUS TOMBER ET ROULEZ
IMMEDIATEMENT pour éteindre les flammes.
+
• Ne laissez pas les enfants utiliser cet appareil
électroménager sans la surveillance stricte d’un
adulte. Les enfants et les animaux domestiques ne
devraient pas être laissés seuls ou sans
surveillance près d’appareil électroménager lorsqu’il
est utilisé. Ne laissez jamais un enfant s’asseoir ou
se mettre debout sur toute pièce du four.
• Ne mettez pas des objets d’intérêt pour les enfants
sur le four. Si un enfant devait grimper sur l’appareil
électroménager pour atteindre ces objets, il pourrait
se blesser gravement.
Pour réduire les risques de feu dans le four :
1. Ne mettez pas des matériaux inflammables près du
four ou dedans.
2. N’utilisez pas d’eau sur un feu de friture. Etouffez le
feu en utilisant un extincteur à poudre ou à mousse.
3. Il est hautement recommandé que l’extincteur soit
prêt à l’utilisation et bien visible non loin de tout
appareil de cuisson.
4. Ne surcuisez pas les aliments. Surveillez le four si
des produits en papier, en plastique ou des matières
combustibles sont placés dedans.
5. N’utilisez pas l’intérieur du four pour ranger des
objets. Ne laissez pas des produits en papier, des
ustensiles de cuisine ou de la nourriture dans le four
lorsqu’il n’est pas utilisé.
6. Si des matériaux à l’intérieur du four s’enflamment,
laissez la porte du four. Eteignez le four et
débranchez le circuit aux boîtiers disjoncteurs.
7. N’obstruez pas les ouvertures de ventilation.
8. Assurez-vous que le ventilateur fonctionne lorsque
le four est en marche. Si le ventilateur ne fonctionne
pas, n’utilisez pas le four. Appelez le service aprèsvente agréé.
9. N’utilisez jamais le four pour chauffer ou réchauffer
une pièce. Cela peut endommager les pièces du
four.
10. Pour votre sécurité, portez des vêtements
appropriés. Des vêtements amples ou de grandes
manches ne doivent jamais être portés en utilisant
ce four.
34
Page 35

Manuel d’utilisation et d’entretien
IMPORTANT
Appareil domestique et four
Instructions de sûreté
Securite pour le four
• Attachez les cheveux longs.
• Ne touchez pas les éléments chauffants ou
l’intérieur des surfaces du four.
• Les éléments chauffants peuvent être chauds
même lorsqu’ils sont sombres. Les surfaces
intérieures d’un four deviennent assez chaudes
pour provoquer des brûlures.
• Pendant et après l’utilisation, ne touchez pas ou
ne laissez pas des vêtements ou d’autres matières
inflammables en contact avec les éléments
chauffants ou les surfaces intérieures du four
jusqu’à ce qu’ils aient eu le temps de refroidir
suffisamment.
• L’habillage sur le dessus et sur les côtés de la
porte du four peut être assez chaud pour
provoquer des brûlures.
• Ouvrez la porte avec précaution. Ouvrez la porte
doucement pour laisser échapper l’air chaud ou la
vapeur avant d’enlever ou de remplacer la
nourriture.
• Ne chauffez pas des emballages alimentaires non
ouverts. L’accumulation de pression pourrait faire
exploser l’emballage et donc blesser.
• Placez toujours les grilles du four dans la position
voulue lorsque le four est froid. Si une grille doit
être déplacée lorsque le four est chaud, ne laissez
pas les moufles en contact avec les éléments
chauffants.
• Utilisez toujours des moufles sèches. Des moufles
humides sur des surfaces chaudes peuvent brûler
à cause de la vapeur. La moufle ne doit pas
toucher des parties brûlantes. N’utilisez pas de
torchons ou d’autres serviettes volumineuses.
+
Modèles de four SOVB - DOVB FRANÇAIS
Securite pour l’auto-nettoyage du four
• Assurez-vous que la porte est verrouillée et ne
s’ouvrira pas lorsque les deux sélecteurs sont sur la
position CLEAN et que l’icône de fermeture de porte
apparaît. Si la porte ne ferme pas, tournez le
sélecteur de mode de cuisson sur OFF et ne
commencez pas d’auto - nettoyage. Téléphonez
pour un Service.
• Ne nettoyez pas le joint de la porte. Il est essentiel
pour une bonne étanchéité. Faites extrêmement
attention à ne pas frotter, endommager, déplacer ou
enlever le joint de la porte.
• N’utilisez pas de nettoyants pour four de type
commercial ou d’enduit protecteur de toutes sortes
à l’intérieur et à l’extérieur du four.
• Ne nettoyez que les pièces indiquées dans ce
manuel.
• Avant d’auto - nettoyer le four, enlevez le lèche-frite,
les grilles de four, et les autres ustensiles et les
excès d’éclaboussures.
AVERTISSEMENT
La loi applicable sur les produits toxiques et l’eau
potable de Californie requiert que les industriels
avisent les utilisateurs d’exposition potentielle aux
substances qui sont reconnues par l’Etat de
Californie comme provoquant des cancers ou des
déformations natales.
L’élimination de résidus pendant l’auto-nettoyage
provoque des dérivés qui sont sur cette liste de
substances.
Pour minimiser l’exposition à ces substances, faites
fonctionner ce four toujours conformément aux
instructions dans ce manuel et ventilez bien la pièce
pendant et immédiatement après l’auto-nettoyage
du four.
35
Page 36

Manuel d’utilisation et d’entretien
Modèles de four SOVB - DOVB FRANÇAIS
Cuisiner avec un four à convection FULGOR
Dans un four à convection, les cycles de source de chaleur s’allument et s’éteignent pour maintenir une
température moyenne dans l’intérieur du four. Comme la température augmente et descend graduellement, de
légers courants d’air se produisent dans le four. Cette convection naturelle tend à être inefficace parce que les
courants sont irréguliers et lents. Dans ce système de convection, la chaleur est “transportée” par un ventilateur
qui apporte une circulation continue d’air chaud.
Ce système à convection européen apporte une ingénierie de pointe et un design avancé pour créer le four à
convection le plus intelligent. Dans les fours à convection standard, un ventilateur fait simplement circuler l’air
chaud autour de la nourriture. Le système se caractérise par la combinaison d’un élément de chauffage
supplémentaire situé autour du ventilateur à convection et le tableau de ventilation qui distribue l’air chauffé en
trois dimensions : le long des côtés, en haut et tout au fond du four. Ce système à convection européen aide à
maintenir une température plus homogène dans tout le four.
L’air circulant aide à accélérer le processus de cuisson et cuit la nourriture plus uniformément. En contrôlant le
mouvement de l’air chauffé, la cuisson par convection produit des aliments uniformément revenus qui sont
croustillants à l’extérieur et encore moelleux à l’intérieur. La cuisson par convection fonctionne mieux pour les
pains et les gâteaux ainsi que pour les viandes et les volailles. Les aliments levés à la levure comme les gâteux
d’ange, les pâtes à chou et les soufflés à la crème montent plus haut que dans un four conventionnel. Les
viandes restent juteuses et tendres alors que l’extérieur garde sa saveur et reste croquant.
En utilisant un four à convection européen, les aliments peuvent être cuits à une température plus basse et les
temps de cuisson peuvent être réduits. En utilisant ce mode, la température de four standard devrait être
inférieure de 25°F (15°C).
Les aliments nécessitant un temps moins long de cuisson devront être vérifiés plus tôt que normal. Pour de
meilleurs résultats, les aliments devraient être cuits non couverts, dans des plats avec des bords peu élevés pour
profiter davantage de la circulation d’air forcée. Lors de l’utilisation du mode de rôtissage à convection, la
température du four standard ne doit pas être réduite.
Avantages de la cuisson par convection
Possibilité de cuire, de faire revenir et de faire croustiller les aliments.
Pendant le rôtissage, les jus et les saveurs restent à l’intérieur alors que l’extérieur devient croquant.
Les pains à levure sont plus légers, ils ont une texture plus ferme, ils sont plus dorés et plus croustillants
Les aliments levés à la levure comme les choux à la crème, les soufflés et les meringues sont plus
gonflés et sont plus légers.
Cuisiner sur plusieurs niveaux en même temps est possible avec les mêmes résultats.
Plusieurs grilles de cuisson forment un gain de temps.
Préparation d’un repas entier en une seule fois sans transfert de saveur.
Déshydratation des herbes, des fruits et des légumes.
Aucune spécialisation de cuisinière nécessaire.
Gain de temps et d’énergie.
Les grillades par convection permettent des grillades extraordinaires avec des tranches plus épaisses.
+
36
Page 37

Manuel d’utilisation et d’entretien
Modèles de four SOVB - DOVB FRANÇAIS
Caractéristiques de votre four
+
37
Page 38

Manuel d’utilisation et d’entretien
Modèles de four SOVB - DOVB FRANÇAIS
Les tableaux de commande
L’interface d’utilisation a les caractéristiques suivantes: affichage, indicateurs lumineux de préchauffage, touches
de commande, mode de cuisson et sélecteurs de température.
FOUR DOUBLE FOUR SIMPLE
Touches de commande
[HOROLOGE]: appuyez pour régler ou changer l’heure.
[MINUTERIE]: appuyez pour régler ou effacer la
minuterie.
[TEMPS CUISSON]: appuyez pour régler ou changer la
durée de l’activité de cuisson.
[FIN CUISSON]: appuyez pour régler ou changer l’heure
d’arrêt ou la cuisson différée.
- Lorsque l’une des anciennes touches est appuyée et
que les chiffres clignotent, appuyez et/ou appuyez sur les
touches suivantes pour changer la valeur.
[ECLAIRAGE]: appuyez pour éteindre le four.
La fonction de cette touche dépend du modèle du four :
[FOUR SUP./INF.] (four double): appuyez pour
sélectionner la cavité supérieure si aucune n’est
sélectionnée. Si l’une des deux est déjà sélectionnée,
passez simplement à l’autre.
[VERROU] (four simple): appuyez la touche en même
temps que [+] pour actionner le verrouillage de sécurité.
[INCREMENT] [+] : appuyez pour augmenter la valeur
de la variable actuellement sélectionnée.
[DECREMENT] [-] : appuyez pour diminuer la valeur de
la variable actuellement sélectionnée.
+
Affichage
Voyant de préchauffage (externe).
Quatre chiffres (vert), pour heure, minuterie, cuisson
automatique. Indication AM/PM également présente.
Trois chiffres de température (rouge), pour la
température du four. L’indication de l’unité de degré
(°C ou °F) est présente. Elle montre le point de réglage
de la température pour le mode de cuisson courant,
dans le four sélectionné.
Icônes de verrouillage et boîte icônes indiquent quel
four est actuellement sélectionné et quelle porte, s’il y
a en a un ou une, est complètement verrouillée, s’il y
en a une, lors de l’auto-nettoyage ou le
refroidissement après celui-ci.
Ecritures pour indiquer quelle fonction est active
(allumé) ou en attente d’une entrée d’un utilisateur
(clignotant).
Boutons
Cooking mode selector (convection). Huit modes de
cuisson + position ARRET.
Cooking mode selector (thermal). Trois modes de
cuisson + position ARRET.
Temperature selector. Positions PER-SEL et AUTO
NETTOYANT + variation continue entre les valeurs
MOY. et FORT.
Thermal
Boutons
38
Multifonction
Boutons
Page 39

Manuel d’utilisation et d’entretien
Modèles de four SOVB - DOVB FRANÇAIS
Modes de four
Les illustrations suivantes indiquent une vue générale de ce qui se passe dans le four avec chaque mode de
cuisson. Les flèches représentent la situation de la source de chaleur pendant les modes spécifiques. L’élément
inférieur est dissimulé sous la sole du four.
Cuisson au four a convection européenne
et deshydratation
La cuisson au four à convection cuit avec la chaleur d’un
troisième élément derrière la paroi arrière du four. La
chaleur circule à travers le four par un ventilateur à
convection. Déshydrater est similaire à la cuisine à
convection et cela garde une température basse
optimale alors que l’air chauffé circule pour enlever
l’humidité doucement pour préserver les aliments.
+
Préchauffage rapide
Le préchauffage rapide utilise l'élément derrière la
paroi arrière du four et l'élément additionnel pour
chauffer rapidement la cavité.
Dès que la sonnerie de préchauffage sonne et que le
voyant rouge s’éteint, sélectionnez le mode de cuisson
désiré
Gril a convection
Le gril à convection combine la chaleur intense de
l’élément supérieur avec une chaleur qui circule grâce au
ventilateur.
Cuisson a convection
Le rôtissage à convection utilise l’élément supérieur, du
milieu et le ventilateur à convection.
Cuisson au four
La cuisson au four est une cuisine avec de l’air
chauffé. Les deux éléments du cycle, celui inférieur et
celui supérieur fonctionnent pour garder la température
du four.
Gril
Le gril utilise la chaleur intense émise depuis l’élément
supérieur.
39
Page 40

Manuel d’utilisation et d’entretien
Modèles de four SOVB - DOVB FRANÇAIS
Information générale du four
Avant d’utiliser pour la première fois votre four, enlevez
tous les emballages et matériaux étrangers du ou des
fours. Tous ces matériaux dans le ou les fours
pourraient fondre et/ou brûler lorsque le ou les fours
fonctionnent.
Symboles et nombres clignotants
Cela signale un réglage incomplet et requiert un
nouveau réglage.
Bips
Cela signale que plus d’informations doivent être entrées
ou cela confirme la réception d’une entrée. Un bip
signale aussi la fin d’une fonction ou une erreur du four.
Préchauffage rapide
Lorsque le four doit chauffer rapidement, tournez le
sélecteur de mode de cuisson sur la position de
préchauffage rapide. Dès que la sonnerie de
préchauffage sonne et que le voyant rouge s’éteint,
sélectionnez le mode de cuisson désiré et mettez les
aliments dedans.
Symbole de verrouillage
Il est affiché lorsque la porte est verrouillée, pendant le
mode auto-nettoyage ou le refroidissement qui le suit. Le
symbole flash lorsque le loquet se déplace pour
verrouiller ou déverrouiller la porte. N’essayez pas
d’ouvrir la porte. La porte peut être ouverte lorsque le
symbole n’apparaît plus.
Verrouillage de sécurité de la porte
Le mécanisme du loquet de verrouillage n’est pas utilisé
seulement pour verrouiller la porte pendant l’autonettoyage mais aussi pour verrouiller la porte
manuellement pour des raisons de sécurité (empêcher
un enfant de toucher des parties brûlantes) pendant des
cuissons ordinaires.
+
Réglages par défaut
Les modes de cuisson sélectionnent automatiquement
la température appropriée lorsque le sélecteur est
dans une position préréglée. On peut le modifier
lorsqu’une température différente est nécessaire.
Codes de chiffre erreur F (Failure)
Ces codes sont affichés lorsque le contrôle
électronique détecte un problème dans le four ou sur
les parties électroniques.
Ventilateur à convection
Le ventilateur fonctionne pendant tous les modes à
convection. Lorsque le four fonctionne dans un mode à
convection, le ventilateur s’arrêtera automatiquement
lorsque la porte est ouverte. Le ventilateur fonctionner
pendant la durée du préchauffage pour des modes
spécifiques.
Composant du ventilateur de refroidissement
Il fonctionne pendant tous les modes de cuisson ou
d’auto-nettoyage pour refroidir les composants internes
et les surfaces de la porte extérieure. Cet air
s’échappe des évents situés au-dessus de la porte du
four. Il continue à fonctionner jusqu’à un
refroidissement suffisant. La vitesse du ventilateur de
refroidissement s’accélère pendant l’auto-nettoyage et
lorsque la température des composants intérieurs
devient élevée.
Four simple
secondes les touches INC (+) et VERROU. Le loquet
verrouillera la porte. Recommencez la même opération
pour déverrouiller.
Four double
secondes les touches INC (+) et DEC (-).Le loquet
verrouillera la porte. Recommencez la même opération
pour déverrouiller.
: appuyez en même temps pendant 3
: appuyez en même temps pendant 3
Coupure de courant
Après le retour du courant, la pendule affiche 12.00AM
40
Page 41

Manuel d’utilisation et d’entretien
Modèles de four SOVB - DOVB FRANÇAIS
Conseils généraux sur le four
Préchauffage du four
• Préchauffez le four pour les modes de Cuisson,
Convection Europ. et Convection Cuisson.
• Utilisez le préchauffage rapide lorsqu’un délai court
est nécessaire pour préchauffer le four.
• Sélectionnez une température plus élevée ne réduit
pas le temps de préchauffage.
• Le préchauffage est nécessaire pour de bons
résultats lorsque vous cuisinez des gâteaux, des
biscuits, des pâtisseries et du pain.
• Le préchauffage aidera à saisir les rôtis et à garder la
viande juteuse.
• Places les grilles de four dans leur position
appropriée avant le préchauffage.
• Pendant le préchauffage, la température de cuisson
choisie est toujours affichée.
• Un bip confirmera que le four est préchauffé et le
voyant de préchauffage s’éteindra.
• Le préchauffage rapide peut être utilisé lorsque vous
êtes pressé.
Suggestions d’utilisation
• Utilisez les tableaux de cuisson comme guide.
• Ne posez pas les plats sur la porte ouverte.
• Utilisez la lumière intérieure du four pour voir la
nourriture à travers la fenêtre de la porte du four
plutôt que d’ouvrir la porte fréquemment.
Ustensiles
• Les plats en verre absorbent la chaleur. Réduisez la
température du four de 25°F (15°C) lorsque vous
utilisez des plats en verre.
• Utilisez des plats qui donnent le brunissage désiré.
Le type du finissage du plat aide à déterminer le
brunissage.
• Les plats métallisés lisses et brillants ou anodisés/
antiadhésifs plus pâles réfléchissent la chaleur,
donnant un brunissage plus léger, plus délicat. Les
gâteaux et les biscuits nécessitent ce type de plat.
+
• Les plats mats, rugueux, foncés vont absorber la chaleur donnant une croûte plus brune plus croustillante.
Utilisez ceux-ci pour les tartes.
• Pour des croûtes croustillantes, brunes, utilisez des
plats anodisés/antiadhésifs ou foncés ou en métal mat
ou en verre. Des plats isolés peuvent augmenter le
temps de cuisson.
• Ne cuisez pas avec le gril vide dans le four, cela pourrait changer la performance de cuisson. Rangez-le en
dehors du four.
Condensation du four et température
• Il est normal qu’une certaine quantité d’humidité s’évapore des aliments pendant la cuisson. La quantité dépend de l’humidité contenue dans la nourriture. L’humidité peut se condenser sur toute surface plus froide que
l’intérieur du four, comme le tableau de commande.
• Votre nouveau four a un capteur électronique de température qui maintient de façon précise la température
choisie. Votre ancien four devait avoir un thermostat
mécanique qui passait graduellement à une température plus élevée. Il est normal que vous ayez à ajuster
vos recettes préférées en cuisinant dans un nouveau
four.
Cuisson à haute altitude
• Lorsque vous cuisinez à haute altitude, les recettes et
les durées de cuisson varient de la norme.
Branchement de 120/240 ou de 0/208 Volt
• La plupart des installations de four auront un
branchement de 120/240.
• Si votre four est installé avec une tension de 120/208,
le temps de préchauffage peut être légèrement plus
long qu’avec une tension de 120/240.
• Le four est conçu pour assurer le même temps de
nettoyage à 208V.
Grilles de four
• Le four est pourvu de guides de grilles à quatre
niveaux comme indiqué dans l’illustration Page 38.
• Les positions sont numérotées du bas (n°1) vers le
haut (n° 4).
• Vérifiez le tableau des cuissons pour la meilleure
position de la grille à utiliser pendant la cuisson.
• Chaque niveau de guide comprend des supports par
paire formés dans les parois de chaque côté du four.
• Assurez-vous de toujours placer les grilles avant d’allumer votre four. Assurez-vous que les grilles sont au
bon niveau lorsqu’elles sont placées.
Veuillez-vous reporter à l’illustration Page 37 si
vous avez des questions comme savoir où est le
devant de la grille.
• Les grilles dont dessinées pour s’arrêter lorsqu’elles
sont poussées jusqu’à leur limite.
REMARQUE! N’utilisez jamais de feuille en aluminium
pour couvrir les grilles ou le fond du four. La chaleur
coincée sous l’aluminium peut causer des dégâts au four.
ATTENTION
Veillez à ne pas forcer pour éviter d’endommager
l’émail
41
Page 42

Manuel d’utilisation et d’entretien
Modèles de four SOVB - DOVB FRANÇAIS
Pour enlever les grilles:
1. Tirez-les vers vous
2. Soulevez-les vers devant et ensuite enlever-les
Grille rallonge
• Cette grille facilite l’accès aux aliments cuisants. Elle
s’allonge plus que la grille standard pour rapprocher
les aliments de l’utilisateur.
+
ATTENTION
Lorsque la grille est hors du four, les bras latéraux ne
se verrouillent pas, ils peuvent s’allonger de façon
inattendue si la grille est tirée incorrectement et causes
des blessures. La grille doit être tenue ou tirée en
saississant les côtés.
Retrait du four:
1. Soulever égèrement le devant de la grille et
pousser jusqu’à ce que la buttée se dégage
Pour remplacer une grille:
1. Placez l’arrière de la grille entre les guides de
niveau de grille
2. En soulevant vers le haut la grille, faites-la glisser
tout le long en baissant le devant
NOTE: Toujours enlever la grille rallonge avant
l’autonettoyage..
ATTENTION! Pour éviter les brûlures, tirer
complètement la grille et soulever la casserole audessus de la poignée au moment de transférer des
alimenta hors du et dans le four.
Veuillez-vous reporter à l’illustration Page 37 si vous
avez des questions comme savoir où est le devant de la
grille.
Mise en place dans le four:
1. Saisir la grille fermement par les côtés.
Placer la grille et le cadre au-dessus du guide de
grille désiré
2. Soulever l’arrière de la grille jusqu’à ce que le
cadre et la butée se dégagent du guide
3. Tirer vers le bas et sortir
42
2. Pousser au fond jusqu’à ce que l’arrière de la
grille se mette en position
3. Tirer les deux sections vers l’avant jusqu’à la
butèe. La grille doit être droite et non croche
Page 43

Manuel d’utilisation et d’entretien
Modèles de four SOVB - DOVB FRANÇAIS
Réglage de la pendule et la minuterie
L’heure est affichée en heures et en minutes.
Réglez toujours la pendule immédiatement après une installation ou une coupure de courant. Quand le courant
revient, la pendule affiche 12:00
L’heure apparaîtra pendant toutes les fonctions du four sauf lorsque la minuterie ou une cuisson programmée est
entrain de s’exécuter.
Le four est préréglé sur midi et il indique AM et PM.
Pour regler la pendule
1.
Appuyez sur [HORLOGE]. Les heures vont clignoter
et l’affichage va indiquer les inscriptions HRURE.
2.
Appuyez sur [+] ou [-] pour régler l’heure voulue.
Continuez jusqu’à ce que le correct AM ou PM soit
choisi.
3.
Appuyez sur [HORLOGE] de nouveau pour
confirmer l’heure et les minutes vont commencer à
clignoter.
4.
Appuyez sur [+] or [-] pour régler les minutes, tenez
la touche pour changer par pas de 10 minutes.
5.
Appuyez sur [Horologe] encore pour confirmer
l’heure ou attendez 5 secondes.
Ce qui sui s’affiche lorsque le mode édition est activé
pour régler ou changer l’heure.
AM
.
Pour regler la minuterie
1.
Appuyez sur [MINUTERIE]. La minuterie ou les
inscriptions ALARME vont apparaître sur
l’affichage.
2.
Appuyez sur [MINUTERIE] encore une fois. Les
+
heures vont commencer à clignoter.
3.
Appuyez sur [+] ou [-] pour régler l’heure.
4.
Appuyez sur [MINUTERIE] encore une fois pour
confirmer l’heure et les minutes vont commencer à
clignoter.
5.
Appuyez sur [+] ou [-] pour régler les minutes,
maintenez la touche par pas de 10 minutes.
6.
Appuyez sur [MINUTERIE] encore une fois pour
confirmer ou attendez 5 secondes.
7.
Le ALARME sera régulièrement affiché.
8.
Lorsque le délai expire, le bip va sonner pendant
15 minutes ou jusqu’à ce que vous appuyiez sur le
bouton.
9.
Le format de la minuterie est d’habitude HR:MIN
mais il devient MIN:SEC pendant la dernière
minute.
10.
La valeur de l’affichage est toujours arrondie à la
minute inférieure.
43
Page 44

Manuel d’utilisation et d’entretien
Modèles de four SOVB - DOVB FRANÇAIS
Sélection du mode de four
Pour regler un mode de cuisson et température
• Les modes de cuisson peuvent être sélectionnées en
déplaçant le bouton de mode de cuisson sur la
position voulue. Pour choisir Nettoyage, il faut aussi
déplacer le bouton de température sur la position
Nettoyage.
ARRET
CONVECTION EUROPEENNE
CONVECTION GRILL
CONVECTION CUISSON
PRECHAUFFAGE RAPIDE
CUISSON
GRILL
DESHYDRATATION
AUTO NETTOYANT
• Sélectionnez la température voulue en déplaçant le
sélecteur ou en le laissant sur la position PRE-SEL
si la valeur proposée est bonne. La température
peut être changée par étapes de 5°F ou 5°C.
• Dès que vous tournez le bouton, la commande
affiche automatiquement la valeur sur le four
correspondant. La boîte correspondante sera
affichée.
• Le four va commencer à chauffer et la lumière du
four s’allume.
• Le voyant de préchauffage va s’allumer. Lorsque le
four est préchauffé, il va biper et la lumière rouge
s’éteint.
• Pour changer la température pendant une cuisson,
tournez simplement le bouton de température
jusqu’à ce que l’affichage indique la valeur voulue.
• Appuyez sur [SUP/INF] pour choisir la cavité voulue
et vérifiez la température correspondante ou la
minuterie lorsqu’il n’a pas lieu de les modifier.
• Placez le sélecteur de mode de cuisson sur ARRET
si vous voulez arrêter la cuisson.
+
Utilisation des lumieres du four
• Une simple touche lumière active les lumières
dans les deux fours.
• Si vous appuyez sur la touche ECLAIRAGE
lorsque les deux fours sont éteints, les lumières
vont s’allumer dans les fours supérieur et inférieur.
Appuyez de nouveau sur la touche ECLAIRAGE,
et les lumières des deux fours vont s’éteindre.
• Les lumières du four s’allument et s’éteignent
automatiquement lorsque la porte est ouverte ou
fermée.
• Lorsqu’un four est en marche, les lumières du four
s’allumeront automatiquement lorsqu’un mode
démarre. Les lumières du four s’éteindront
automatiquement lorsque le mode four est annulé.
• Les lumières ne fonctionnent pas pendant l’autonettoyage.
Pour contrôler manuellement les lumières
intérieures du four lorsque les deux fours ou un
seul four sont utilisés :
1. Appuyez sur SUP/INF, l’affichage va indiquer
quel four est sélectionné.
2. Appuyez sur SUP/INFpour éclairer l’autre four.
3. Appuyez sur ECLAIRAGE pour éteindre et
allumer les lumières.
44
Page 45

Manuel d’utilisation et d’entretien
Fonction de mode four minuté
• Dans les modèles four double, les deux fours
peuvent être réglés indépendamment pour mettre
en place un mode programmé.
• Assurez-vous que la pendule indique l’heure
correcte.
• Le mode programmé éteint le four à la fin du temps
de cuisson.
Pour regler le mode programme
1. Sélectionnez le mode de cuisson et la température
grâce aux boutons.
2. Sélectionnez le four par la touche [SUP/INF]
(supérieur/inférieur), si nécessaire.
3. Si nécessaire, changez la température par défaut
maintenant en tournant le bouton.
4. Appuyez sur la touche [TEMPS CUISSON]. Les
inscriptions CUISSON et DOREE vont s’afficher,
ensuite le temps de cuisson et les chiffres de
l’horloge vont se mettre à clignoter.
5. Appuyez sur [+] ou [-] pour changer les heures.
Gardez à l’esprit que le temps nécessaire pour que
le four atteigne la température doit être comprise
dans le réglage du temps de cuisson.
6. Appuyez de nouveau sur [TEMPS CUISSON], les
heures vont être confirmées et les minutes vont
commencer à clignoter.
7. Appuyez sur [+] ou [-] pour changer les minutes.
Maintenez la touche pour changer par pas de 10
minutes.
8. Appuyez de nouveau sur [TEMPS CUISSON] ou
attendez quelques secondes pour confirmer toute la
valeur de temps de cuisson.
9. À la fin du temps de cuisson programmé, le four
s'éteindra automatiquement.
+
Modèles de four SOVB - DOVB FRANÇAIS
Pour differer le depart d’un mode programme
Suivez les étapes de 1 à 9 ci-dessous.
• Appuyez sur la touche [FIN CUISSON].
L'inscription AUTO va s’afficher, après le temps
d’arrêt et les heures vont commencer à clignoter.
• Appuyez sur [+] ou [-] pour changer les heures.
• Appuyez de nouveau sur [FIN CUISSON], les
heures seront confirmées et les minutes vont
clignoter.
• Appuyez sur [+] ou [-] pour changer les minutes.
Maintenez la touche pour changer par pas de 10
minutes..
• Appuyez de nouveau sur [FIN CUISSON] ou
attendez quelques secondes pour confirmer toute
la valeur de temps d’arrêt
• L’horloge calcule automatiquement le temps de la
journée pendant lequel le mode démarre et
s’arrête. Le temps de cuisson affiche le décompte
par minute. Le four s’allume et chauffe jusqu’à la
température préréglée, pour le temps d’heures et
de minutes choisies.
• A la fin du temps de cuisson programmée, le four
s’éteindra automatiquement. L’affichage indiquera
End (fin) et le four va sonner. Un rappel de
sonnerie continuera à sonner jusqu’à quinze
minutes tant que vous n’appuyez sur aucune
touche.
• Lorsqu’il est nécessaire de vérifier une durée qui
n’est pas affichée, appuyez sur le bouton
correspondant pour voir le chiffre voulu pendant 5
secondes.
• Exemple : si la valeur minutée est affichée,
appuyez sur la touche de temps de cuisson pour
voir le temps de cuisson pendant 5 secondes.
45
Page 46

Manuel d’utilisation et d’entretien
Modèles de four SOVB - DOVB FRANÇAIS
Conseils et technique de cuisson
La cuisson est une sorte de cuisson à air chaud.
Les éléments supérieur et inférieur sont utilisés pour
chauffer l’air mais le ventilateur n’est pas utilisé pour
faire circuler la chaleur.
Suivez la recette ou les instructions pour la température
de cuisson et la position de la grille. Le temps de
cuisson varie avec la température des ingrédients et
leur taille, leur forme et la finition du plat de cuisson.
Guides générales
• Pour de meilleurs résultats, cuisiner les aliments,
cuisinez sur une simple grille avec au moins
1" - 1½” (2,5 – 3 cm) d’espace entre les plats
et les parois du four.
• N’’utilisez qu’une grille lorsque vous choisissez le
mode cuisson.
• Vérifiez la cuisson au temps minimum.
• Utilisez des plats en métal (avec une finition
antiadhésive ou non), en verre résistant à la
chaleur, en verre céramique, en poterie ou d’autres
plats appropriés au four.
+
• Lorsque vous utilisez un plat en verre résistant à
la chaleur, réduisez la température de 25°F
(15°C) par rapport à la température
recommandée.
• Utilisez des plats avec ou sans bord.
• Des plats en métal foncé ou avec des finitions
non adhésives cuiront plus vite en brunissant plus
le met. Des plats isolés ralentiront légèrement le
temps de cuisson dans la plupart des cas.
• N’utilisez pas de feuille en aluminium ou de
plateaux en aluminium. Une feuille est un
excellent insolant de chaleur et donc la chaleur
sera attrapée dessous. Cela altère la performance
de cuisson et cela endommage la finition du four.
• Evitez de placer sur la porte ouverte des plats.
• Veuillez lire 58 Solution des problèmes de
cuisson.
Tableau de cuisson
ALIMENTS POSITION DE GRILLE
Gâteau
Petits gâteaux 2 350 (175) 17-19
Gâteau bundt 1 350 (175) 37-43
Gâteau des anges 1 350 (175) 35-39
Tarte
2 croûtes, fraiches, 9po 2 375-425 (190-220) 45-55
2 croûtes, fruits surgelés, 9po 2 375 (190) 68-78
Biscuit
Sucre 2 350-375 (175-190) 6-11
Brisures de chocolat 2 350-375 (175-190) 8-13
Carrés au chocolat (brownies) 2 350 (175) 29-36
Pains
Pain à levure, 9x5 2 375 (190) 18-22
Petits pains à levure 2 375-400 (190-205) 12-15
Biscuits 2 375-400 (190-205) 11-15
Muffins 2 425 (220) 15-19
Pizza
Surgelée 2 400-450 (205-235) 23-26
Fraîche 2 425-450 (220-235) 12-15
TEMP. °F (°C)
(FOUR PRÉCHAUFFE)
TEMPS (MIN)
46
Page 47

Manuel d’utilisation et d’entretien
Modèles de four SOVB - DOVB FRANÇAIS
Conseils et techniques de convection européenne
Réduisez les températures de recette de cuisson de
25°F (15°C).
• Pour de meilleurs résultats, il faut cuire les aliments
non couverts, dans des plats à bord bas pour mieux
profiter de la circulation d’air forcé. Utilisez des plats
en aluminium brillant pour de meilleurs résultats à
moins que cela soit spécifié autrement.
• Le verre résistant à la chaleur et la céramique
peuvent être utilisés. Réduisez encore la
température de 25°F (15°C) si vous utilisez un verre
résistant à la chaleur, donc une réduction totale de
50°F (30°C).
• Les plats en métal foncé peuvent être utilisés. Notez
que la nourriture peut brunir plus vite lorsque vous
utilisez un plat en métal foncé.
• Le nombre de grilles utilisées est déterminé par la
hauteur des aliments à cuire.
• Les aliments cuits, en général, cuisent extrêmement
bien avec la convection. N’essayez pas de convertir
des recettes comme les crèmes anglaises, les
quiches, les tartes à la citrouille, les tartes au
fromage, qui ne tirent pas de bénéfice de la
convection. Utilisez le mode de cuisson normal pour
ces recettes.
• Plusieurs grilles de cuisson sont disponibles aux
positions 1, 2 et 3. Les quatre grilles peuvent être
utilisées pour des gâteaux, des biscuits et des
biscuits apéritifs.
- 2 grille de cuisson : Utilisez positions 1 et 3.
- 3 grille de cuisson : Utilisez positions 2, 3 et 4.
- Lorsque vous cuisez plusieurs gâteaux en même
temps, distribuez les plats de telle façon qu’ils ne
soient pas juste l’un au-dessus de l’autre. Pour de
meilleurs résultats, placez les gâteaux devant sur la
grille du dessus et à l’arrière sur la grille du dessous.
(Voyez le dessin à droite). Laissez 1" -
1 ½” (2,5 – 3 cm).
• Convertir vos propres recettes peut être facile.
Choisissez une recette qui marche bien en
convection.
• Réduisez la température et le temps de cuisson si
nécessaire. Il peut parfois y avoir des essais et des
erreurs avant d’arriver au résultat parfait. Gardez
des traces de votre technique pour la prochaine
préparation à convection.
• Veuillez lire 58 Solution des problèmes de cuisson
+
Aliments recommandés pour le
mode convection européenne :
Biscuits apéritifs Biscuits pour café Gâteaux
Biscuits (2 à 4 grilles) levure pains
Choux à la crème
Popovers
Casseroles et Entrées un plat
Plats à four (grille positions 1, 2, 3)
Aliments levés à la levure (Soufflés, Meringue,
Desserts garnis de meringue, Gâteaux ange, Gâteaux
mousseline)
Conseils rapides et faciles de recette
Convertir de la CUISSON
à la CONVECTION EUROPÉENNE:
• Réduisez la température de 25°F (15°C).
• Utilisez le même temps de cuisson que la cuisson
normale si la durée est de 10 à 15 minutes.
• Les aliments avec un temps de cuisson de moins
de 30 minutes doivent être vérifiés pour leur
cuisson 5 minutes plus tôt que dans les recettes
standard.
• Si la nourriture cuit plus de 40 – 45 minutes,
réduisez le temps de cuisson de 25%.
47
Page 48

Manuel d’utilisation et d’entretien
Modèles de four SOVB - DOVB FRANÇAIS
Tableau de convection européenne
Réduisez la température standard des recettes de 25ºF(15°C) pour la convection européenne
Les températures ont été réduites dans ce tableau.
ALIMENTS POSITION DE GRILLE
Gâteau
Petits gâteaux 2 325 (160) 17-19
Gâteau bundt 1 325 (160) 37-43
Gâteau des anges 1 325 (160) 35-39
Tarte
2 croûtes, fraiches, 9po 2 350-400 (175-205) 45-55
2 croûtes, fruits surgelés, 9po 2 350 (175) 68-78
Biscuit
Sucre 2 325-350 (160-175) 6-11
Brisures de chocolat 2 325-350 (160-175) 8-13
Carrés au chocolat (brownies) 2 325 (160) 29-36
Pains
Pain à levure, 9x5 2 350 (175) 18-22
Petits pains à levure 2 350-375 (175-190) 12-15
Biscuits 2 350-375 (175-190) 11-15
Muffins 2 400 (205) 15-19
Pizza
Surgelée 2 375-425 (190-220) 23-26
Fraîche 2 400-425 (205-220) 12-15
+
Ce tableau est un guide. Suivez votre recette ou les directions de l’emballage et réduisez les températures de
façon appropriée.
TEMP. °F (°C)
(FOUR PRÉCHAUFFE)
TEMPS (MIN)
48
Page 49

Manuel d’utilisation et d’entretien
Modèles de four SOVB - DOVB FRANÇAIS
Conseils et techniques de convection cuisson
• Préchauffez le rôtissage à convection.
• Rôtissez dans un plat peu profond et non couvert.
• Lorsque vous rôtissez des poulets entiers ou des
dindes, groupez les ailes et attachez légèrement les
pattes avec une ficelle de cuisine.
• Utilisez le plat de grill 2-pièces pour les rôtissages
non-couverts.
• Utilisez la sonde ou le thermomètre pour déterminer
la cuisson intérieure sur la température “END” (fin)
(voir le tableau de cuisson) .
• Vérifiez de nouveau la température de la viande/
volaille en insérant le thermomètre à viande dans
une autre position.
• Lorsque vous rôtissez un gros rôti ou une dinde, il
+
faut parfois tourner le plat pendant le temps de
rôtissage. Cela permet de rôtir plus uniformément.
Les gros oiseaux peuvent aussi devoir être couverts
de feuille (et les plats rôtis) pendant une partie du
temps de rôtissage pour que le met ne brûle pas.
Tableau de convection cuisson
VIANDES POIDS (lb)
Boeuf
Côte de beouf 4-6 325 (160) 2 24-30 145 (63) med saignant
27-33 160 (71) médium
Rosbif de faux-filet (sans os) 4-6 325 (160) 2 22-30 145 (63) med saignant
27-33 160 (71) médium
Pointe de surlonge (sans os) 3-6 325 (160) 2 22-28 145 (63) med saignant
27-33 160 (71) médium
Filet 2-3 425 (220) 2 15-25 145 (63) med saignant
Porc
Longe de porc 5-8 350 (175) 2 20-30 160 (71) médium
(sans os ou avec os)
Épaule 3-6 350 (175) 2 25-35 160 (71) médium
Volaille
Poulet-entier 3-4 375 (190) 2 18-21 180 (82)
Dinde non farcie 12-15 325 (160) 1 10-14 180 (82)
Dinde non farcie 16-20 325 (160) 1 9-11 180 (82)
Dinde non farcie 21-25 325 (160) 1 6-10 180 (82)
Poitrine 3-8 325 (160) 1 15-20 170 (77)
Poulet de Comouailles 1-1 ½ 350 (175) 2 45-75 total 180 (82)
Agneau
Demi gigot 3-4 325 (160) 2 25-30 160 (71) médium
30-35 170 (77) bien cuit
Gigot entier 6-8 325 (160) 1 25-30 160 (71) médium
30-35 170 (77) bien cuit
TEMP. FOUR
Conseils de recettes faciles et rapides
Conversion de la CUISSON
au CONVECTION CUISSON:
• Les températures ne doivent pas être diminuées.
• Les rôtis, les gros morceaux de viande et de
volaille prennent généralement de 10 à 20% moins
de temps. Vérifiez la cuisson plus tôt.
• Casseroles ou plat à rôti qui sont cuits couverts par
ROTISSAGE A CONVECTION cuiront le même
temps que
•
La température minimum de sécurité pour la
farce dans la volaille est de 165ºF (75ºC).
•
Après avoir enlevé le plat du four, couvrez-le
partiellement de feuille pendant 10 à 15 minutes
avant de le couper.
•
Lorsqu’il est couvert, la température du rôti
augmente de 5°F à 10°F (3°à 6°C).
TEMPS
RÔTISSAGE
(min. per lb)
TEMP. INTERNE °F (°C)
°F (°C)
POSITION
GRILLE
49
Page 50

Manuel d’utilisation et d’entretien
Modèles de four SOVB - DOVB FRANÇAIS
Conseils et techniques pour le convection grill
• Placez le gril dans la position appropriée avant d’allumer votre four.
• Utilisez le gril à convection avec la porte fermée.
• Ne pas préchauffé pour le four.
• Utilisez le plat de rôtissage à 2-pièces.
• Tourner les viandes une fois à mi-cuisson du temps de ciosson recommandé (voir le tableau de gril à
convection).
Tableau de convection grill
ALIMENTS ET ÉPAISSEUR
Beouf
Steak (1-½po ou plus)
Médium saignant 2 450 (235) 145 (65) 12-14 11-13
Médium 2 450 (235) 160 (71) 15-17 13-15
Bien cuit 2 450 (235) 170 (77) 18-20 16-17
Hamburgers (plus que 1 po)
Médium 3 550 (290) 160 (71) 9-11 5-8
Bien cuit 3 550 (290) 170 (77) 11-13 8-10
Volaille
Poitrine (avec os) 3 450 (235) 180 (82) 16-18 14-16
(Cuisse)
Cuisses 3 450 (235) 170 (77) 14-16 12-14
Porc
Porc Cotelettes (1¼po ou plus) 2 450 (235) 160 (71) 12-14 13-15
Saucisses fraîches 3 450 (235) 160 (71) 4-6 3-5
* Temps de gril à convection sont approximatifs et peuvent varier
POSITION DE
GRILLE
+
REGLAGE DU
GRIL °F (°C)
TEMP. INTERNE
°F (°C)
TEMPS
CÔTÉ 1
(MIN.)*
TEMPS
CÔTÉ 2
(MIN.)*
50
Page 51

Manuel d’utilisation et d’entretien
Modèles de four SOVB - DOVB FRANÇAIS
Conseils et techniques de déshydratation
• On peut déshydrater des aliments en utilisant le mode déshydratation. Une température plus faible est
utilisée et l’air chauffé circulant enlève doucement l’humidité pour préserver la nourriture.
• La température en mode déshydratation est préprogrammée à 140ºF (60ºC).
• Les températures du mode déshydratation possibles sont de 120ºF (50ºC) à 160ºF (70ºC).
• Plusieurs grilles peuvent être utilisées en même temps.
• Certains aliments requièrent 14/15 heures pour complètement se déshydrater.
• Consultez un livre sur la conservation des aliments pour les temps spécifiques et la conservation de
certains aliments.
• Ce mode est approprié pour des fruits, des légumes, des herbes et des morceaux de viande.
• Des écrans de séchage peuvent être achetés dans les magasins spécialisés.
• En utilisant des feuilles de papier, une certaine humidité peut être absorbée avant la déshydratation
(comme des morceaux de tomate ou de pêche).
Tableau de grillade à déshydratation
ALIMENT
Fruit
Pommes
Bananas
Cerises
Pelures d’orange
et tranches
Tranches d’ananas
Fraises
Légumes
Poivrons
Champignons
Tomates
Fines herbes
Origan, sauge, persil et thym,
et fenouil
Basilique
Dans jus de citron ¼ t. et 2 t. d’eau,
Dans jus de citron ¼ t. et 2 t. d’eau,
Laver et assécher à la serviette. Pour
les cerises fraîches, dénoyauter
¼Po d’épaisseur ; partie de la pelure
Séchées a la serviette
Lavées et sechées à la serviette.
Tranches ½po d’épaisseur, dessus sur
Lavées et sechés à la serviette.
Retirer la mambrane, grssierèment
couplés environ 1po
Lavées et sechés à la serviette.
Couper la tige. Morceaux de 1/8po
Lavées et sechés à la serviette.
Tranches minces 1/8po d’epaisseur.
Rincer et assécher à la servette
Feuilles 3 à 4po du haut. Vaporiser
d’eau, secouer et assécher
+
PRÉPARATION
tranches ¼po
tranches ¼po
finement peléée
la grille
Bien drainer
TEMPS DE
SECHAGE APPROX.*
(heures)
11-15
11-15
10-15
Peels 2-4
Slices: 12-16
Canned: 9-13
Fresh: 8-12
12-17 Sèches et cassantes
16-20 Cassants sans humidité à l’intérieur
7-12 Fermes et cassant, secs
16-23 Sèches, rouge
Sécher à 120°F (60°C)
de 3 à 5 heures
Sécher à 120°F (60°C)
de 3 à 5 heures
VERIFIER LA CUISSON
Légèrement pliables
Légèrement pliables
Pliables, tannees, moelleuses
Orange pelee, séchée et cassante.
Tranches : sèches et cassantes, fruitm
légèrement humide
Souples et pliables
Croustillant et cassant
Croustillant et cassant
51
Page 52

Manuel d’utilisation et d’entretien
Modèles de four SOVB - DOVB FRANÇAIS
Conseils et techniques de grill
• Placez le gril dans la position appropriée avant d’allumer votre four.
• Utilisez le gril à convection avec la porte fermée.
• Ne pas préchauffé pour le four.
• Utilisez le plat de rôtissage à 2-pièces.
• Enduisez les viandes d’huile de cuisson ou du beurre pour qu’elles n’attachent pas.
• Tourner les viandes une fois à mi-cuisson du temps de ciosson recommandé (voir le tableau gril).
Tableau de grill
ALIMENTS ET ÉPAISSEUR
Beouf
Steak (¾ à 1po)
Médium saignant 3 5 145 (63) 5-7 4-6
Médium 3 5 160 (71) 6-8 5-7
Bien cuit 3 5 170 (77) 8-10 7-9
Hamburgers (¾ à 1po)
Médium 3 5 7-9 5-7
Bien cuit 3 5 160 (71) 8-10 7-9
Volaille 170 (77)
Poitrine (avec os) 3 3 14-16 14-16
Cuisses (bien cuit) 3 3 170 (77) 28-30 13-15
Porc 180 (82)
Porc Cotelettes (1po) 3 5 7-9 5-7
Saucisses fraîches 3 5
Tranche de jambon (½po) 3 5
Seafood
Fruits de mer 3 4 10-14
Filets de poisson (1po)
Beurrés
Agenau
Côtelettes (1po)
Médium saignant 3 5 145 (63) 5-7 4-6
Médium 3 5 160 (71) 6-8 5-7
Bien cuit 3 5 170 (77) 8-10 7-9
Pain
 l’ail (1po) tranches 4 5 2-2,30
3 5 4-6
* Temps de gril à convection sont approximatifs et peuvent varier
POSITION DE
GRILLE
+
REGLAGE DU
GRIL
TEMP. INTERNE
°F (°C)
160 (71)
160 (71)
Cuire jusqu'à
opaticé et que
l’aliment se défasse
facilement avac une
fourchette
Guide de temperature de service de la FSIS (Service d’inspection et securute des aliments USDA)
140°F(60°C) Jambon précuirt (pour réchauffer) Farce (seule ou dans une voaille)
145°F(63°C) Bœuf, veau, agneau frais (médium saignant)
Viande hachee et melange de viande (bœuf, porc, veau,
agneau)
Bœuf, veau, agneau frais (médium saignant) Poitrine de volaille
160°F(71°C)
165°F(74°C) Viande hachée et melange de viande (dinde, poulet)
Remarque : oeufus (seuls,non dans une recette) - cuire jusqu'à ce que le jaune et le blanc soient fermes.
Porc frais (médium)
Jambon Frais (non cuit) Poulet et dinde (entier)
Platsaux oeufs Volaille (cuisses, ailes)
165°F(74°C)
Restes, casseroles
Bœuf, veau, agneau frais (bien cuit)
170°F(77°C)
Porc frais (bien cuit)
180°F(82°C)
Canard et oie
TEMPS
CÔTÉ 1
(MIN.)*
5-7 3-5
3-5 4-6
TEMPS
CÔTÉ 2
(MIN.)*
Ne pas tourner
52
Page 53

Manuel d’utilisation et d’entretien
Modèles de four SOVB - DOVB FRANÇAIS
Options spéciales
Ces options spéciales de fonction peuvent être utilisées dans les options suivantes :
1. SAB => MODE SABBAT (pour les croyances religieuses nécessitant “aucun travail ” le jour du sabbat)
2. OFS => OVEN OFFSET (décalage du four) (utilisé pour étalonner la température du four)
3. dEG => °UNITE’ (utilisé pour choisir ou Fahrenheit ou Centigrade)
4. Hr => FORMAT PENDULE (format pendule) (utilisé pour régler l’heure de la journée dans le format 12
am/pm ou 24 heures).
Pour choisir les options spéciales, veuillez suivre les étapes suivantes :
Appuyez sur HORLOGE et MINUTERIE pendant au moins 3 secondes. L’heure de la pendule s’efface et l’écran
suivant s’affiche.
+
1. Appuyez sur les touches INC ou DEC pour dérouler toutes les options disponibles jusqu’à celle
recherchée.
2. Appuyez sur la touche HORLOGE pour entrer le mode de changement.
3. La valeur va clignoter, modifiez-la à l’aide des touches INC ou DEC. Sur un four double, il est possible de
régler chaque cavité de façon différente. Choisissez la cavité avec la touche SUP./INF.
4. Gardez la touche HORLOGE appuyée pour confirmer et revenir à l’écran d’affichage initial.
53
Page 54

Manuel d’utilisation et d’entretien
Modèles de four SOVB - DOVB FRANÇAIS
Instruction du mode sabbat
Entrez le menu option de l’utilisateur en maintenant les touches HORLOGE et MINUTERIE en même temps.
Déroulez la liste des options dans les champs de données en rouge (dEG, OFF, Hr, Sab), en appuyant INC/DEC,
jusqu’à ce que Sabbat s’affiche.
1. Appuyez sur HORLOGE pour entrer le mode édition : l’élément sélectionné change les données en vert
sur la gauche et son statut dans les données rouges commencent à clignoter.
+
2. Appuyez à nouveau sur les touches INC/DEC pour régler le mode Sabbat sur ON ou OFF (par
défaut=OFF). Appuyez sur HORLOGE pour confirmer et revenir sur la liste des options. Maintenez la
touche HORLOGE pendant 3 secondes pour quitter le menu sélection et revenir aux fonctions normales.
3. Une fois que le mode Sabbat est sélectionné, uniquement les positions CUISSON et ARRET sont
disponibles sur le sélecteur de mode de cuisson. Déplacez le sélecteur sur CUISSON ensuite réglez la
température sur la valeur désirée dans les 5 minutes. Après 5 minutes, la température ne peut plus
s’afficher et l’affichage apparaît comme ci-dessous : le mode Sabbat est activé. Dans le four double, les
indications de la cavité supérieure/inférieure sont toujours disponibles. Les deux boîtiers dans les deux
cavités fonctionnement.
• Les statuts des voyants du four ne peuvent pas être changés pendant le Sabbat.
• La température du four peut uniquement être baissée mais aucune information ne peut être affichée.
• Le ventilateur de refroidissement doit fonctionner pendant le mode Sabbat.
• Les voyants de préchauffage sont inactivés pendant le mode Sabbat.
• L’avertisseur doit toujours resté silencieux, sans prendre en considération les erreurs, une fin d’activité,
etc.
• Le temps de cuisson maximum permis est de 72 heures.
• L’utilisateur peut arrêter le four manuellement, même pendant le Sabbat, en déplaçant le sélecteur de
mode de cuisson sur la position ARRET.
54
Page 55

Manuel d’utilisation et d’entretien
Modèles de four SOVB - DOVB FRANÇAIS
Entretien du four et nettoyage
Auto-nettoyage du four
Ce four a un auto-nettoyage qui élimine les difficultés et les pertes de temps d’un lavage manuel de l’intérieur du
four. Pendant l’auto-nettoyage, le four utilise une température très élevée (approx. 885°F/470°C) pour brûler les
résidus de nourriture et la graisse.
• Uniquement un four à la fois peut être auto-nettoyé.
• Il est normal de voir des fumées et/ou une flammèche occasionnelle pendant le cycle d’auto-nettoyage,
selon le contenu et la quantité de résidus dans le four. Si une flamme persiste, éteignez le four et laissez-le
se refroidir avant d’ouvrir la porte pour essuyer les résidus en surplus.
• Le loquet de la porte est automatiquement active après la sélection de l’auto-nettoyage. Le symbole de
verrouillage de la porte va s’afficher. Cela assure que la porte ne peut pas être ouverte lorsque le four est en
auto-nettoyage.
• Les lumières du four ne fonctionnent pas pendant ce mode.
• Pendant l’Auto-nettoyage, ventilez bien la cuisine pour éliminer les odeurs associées à l’auto-nettoayge. Les
odeurs vont diminuer au fur et à mesure.
• La durée préprogrammée du nettoyage est de trois heures.
• Le mode s’arrête automatiquement à la fin des heures de nettoyage.
• Lorsque la température du four descend à une température plus sûre, le verrouillage automatique de la porte
se déverrouille et la porte peut être ouverte.
Preparation du four pour l’auto-nettoyage
1. Enlevez tous les ustensiles et les plats.
2. Enlevez les grilles. Si vous laissez les grilles pendant l’auto-nettoyage, elles perdront définitivement leur
brillant et deviennent sombres. Voyez le Tableau de nettoyage du four pour leur bon entretien, Pages 57 à
58.
3. Essuyez avec des serviettes en papier les résidus d’éclaboussure et d’huile. Les excès de graisse
provoquent des flammes et de la fumée pendant l’auto-nettoyage.
4. Revoyez l’illustration ci-dessous. Certaines parties du four doivent être nettoyées à la main avant le début du
cycle. Elles ne chauffent pas suffisamment pendant le cycle de nettoyage pour brûler. Utilisez une éponge
savonneuse ou en plastique ou un tampon de détergent de S.O.S.® . Nettoyez à la main l’angle de la porte
du four, le cadre avant du four et jusqu’à 1-½po (2-3 cm) dans le cadre avec du détergent ou de l’eau
chaude. Ne frottez pas le joint du four. Nettoyez à la main la fenêtre de la porte du four. Rincez tout et
ensuite séchez.
5. Assurez-vous que les lumières intérieures sont éteintes et que les ampoules et les lentilles sont en place.
Voyez les Page 60.
+
55
Page 56

Manuel d’utilisation et d’entretien
Modèles de four SOVB - DOVB FRANÇAIS
Réglage du mode auto-nettoyage
Pour régler le mode auto-nettoyage
1. Appuyez sur la touche SUP./INF. pour choisir la
cavité à nettoyer, si le four est double.
2. Tournez les deux boutons sur la position
nettoyage.
3. PYRO & DUREE apparaîtront.
4. Le nombre d’heures de nettoyage est affiché
automatiquement, le temps de nettoyage
standard est de 3 heures.
5. A la fin du temps de nettoyage programmé, le
four va automatiquement s’éteindre.
6. Pour arrêter le mode nettoyage à tout moment,
enlevez le ou les boutons de la position
nettoyage.
N’essayez pas d’ouvrir la porte lorsqu’elle est
verrouillée. Le symbole de verrouillage clignote jusqu’à
l’arrêt du moteur. Lorsque le symbole de verrouillage est
affiché, la porte ne peut pas être ouverte. Vérifiez que la
porte a été verrouillée et ne s’ouvrira pas avant le
démarrage de l’Auto-nettoyage.
Si la porte ne se verrouille pas, tournez le bouton de
mode de cuisson sur la position ARRET et ne
commencez pas l’auto-nettoyage ; Téléphonez pour un
service.
Si la porte est une position ouverte lorsque ce mode est
sélectionné, le symbole de verrouillage clignotera
jusqu’à ce que la porte soit fermée. Le loquet ne bouge
pas.
Pour changer le temps de nettoyage
1. Pour changer le réglage de 3 heures,
sélectionnez moins d'heures lorsqu’il y a peu de
résidus ou 4 heures lorsqu'il y a beaucoup de
résidus immédiatement, après le début.
2. Pour changer les heures, appuyez sur la touche
TEMPS CUISSON.
3. Le nombre d’heure va clignoter.
4. Utilisez les boutons INC ou DEC pour changer
le nombre d’heures.
+
5. Pour changer les minutes, appuyez sur la
TEMPS CUISSON.
6. Le nombre de minutes de nettoyage va
clignoter.
7. Utilisez les boutons INC ou DEC pour changer
le nombre de minutes. Maintenez la touche
pour changer by 10 minutes.
Appuyez sur TEMPS CUISSON ou attendez quelques
secondes pour confirmer la nouvelle valeur.
Pour retarder le debut du nettoyage
1. Suivez les étapes 1 à 7 ci-dessous.
2. Appuyez sur la touche FIN CUISSON et l’heure
pour arrêter va clignoter.
3. Utilisez les boutons INC ou DEC pour changer
l’heure d’arrêt.
4. Pour changer les minutes, appuyez sur la
touche FIN CUISSON.
5. Les minutes pour arrêter le nettoyage vont
clignoter.
6. Utilisez les boutons INC ou DEC pour changer
les minutes. Maintenez la touche par pas de 10
minutes.
7. Appuyez sur FIN CUISSON ou attendez
quelques secondes pour confirmer la nouvelle
valeur.
8. La porte du four va se verrouiller et indiquer
AUTO.
9. Lorsque le temps de retard est fini, le nettoyage
commence.
10. A la fin du programme de nettoyage, le four va
automatiquement s’arrêter.
11. END (fin) s’affiche, PYRO & DUREE va
clignoter jusqu’à ce qu’une touche soit appuyée
ou que le bouton soit déplacé sur la position
ARRET.
POUR VERIFIER LE TEMPS DE NETTOYAGE OU LE
TEMPS D’ARRET pendant un nettoyage retardé,
appuyez simplement sur les boutons TEMPS
CUISSON ou FIN CUISSON.
56
Page 57

Manuel d’utilisation et d’entretien
Modèles de four SOVB - DOVB FRANÇAIS
Entretien général du four
Comment utiliser le tableau de nettoyage du four
1. Repérez le chiffre de la partie à nettoyer dans l’illustration de cette page.
2. Trouvez le nom de cette partie dans le tableau.
• Utilisez la méthode de nettoyage dans la colonne de gauche si le four est noir ou blanc.
• Utilisez la méthode de nettoyage dans la colonne de droite si le four est en acier inoxydable.
3. Faites concorder le chiffre avec la méthode de nettoyage de la page suivante.
+
Tabelau de nettoyage du four
Pièce
Méthode de nettoyage Méthode de nettoyage
Cadre de porte
1
Fenêtre de porte intérieure
2
Grilles de four démontable
3
Habillage latérale
4
Habillage du tableau de
5
commande
Tableau de commande
6
Ouvertures de
7
refroidissement du four
Cadre avant du four
8
Cavité du four
9
Joint de maille
10
Four
noir/blanc
Four acier
inoxydable
E E
F F
A or E A or E
D D
C G
C C
D D
E E
E E
B B
Pièce
Porte de four intérieure
11
Poignée de porte
12
Ouvertures de
13
refroidissement de la porte
Porte avant
14
Habillage du four
15
End caps
16
Grille de plat de gril
17
Arrière de plat de gril
18
Grille rallonge
19
Four
noir/blanc
E E
D D
E E
C&D C&D
D D
D D
E E
E E
A A
Four acier
inoxydable
57
Page 58

Manuel d’utilisation et d’entretien
Modèles de four SOVB - DOVB FRANÇAIS
Finitions du four / méthodes de nettoyage
Le four entier peut être nettoyé de façon sure avec une éponge savonneuse, puis rincé et séché. Si des résidus
excédentaires ne partent pas, suivez les méthodes de nettoyage ci-dessous.
• Utilisez toujours le chiffon le plus doux possible.
• Frottez les finitions en métal dans la direction du grain.
• Utilisez des chiffons, des éponges ou des tissus en papier doux et propres.
• Rincez le tout avec un minimum d’eau pour qu’elle ne coule pas dans les fentes de la porte.
• Essuyez pour éviter les traces d’eau.
Les nettoyeurs dans la liste ci-dessous indiquent les types de produits à utiliser ne sont qu’à titre indicatif. Utilisez
tous les produits selon les indications de l’emballage.
Pièce Méthode de nettoyage
A Chromé Lavez avec de l’eau chaude savonneuse. Rincez et séchez soigneusement. Ou, frottez
légèrement avec du Soft Scrub ®, Bon-Ami®, Comet®, Ajax®, Brillo®, ou les chiffons
S.O.S. ®. Les nettoyants Easy Off® ou Dow Oven Cleaners® (formule four froid)
peuvent être utilisés, mais ils peuvent noircir ou décolorer le chromé.
Les grilles peuvent être nettoyées dans le four pendant l’auto-nettoyage. Cependant,
elles vont perdre leur brillant et devenir grises de façon permanente.
B Tressage en fibre
de verre
C Verre Vaporisez du Windex® ou du Glass Plus® d’abord sur le chiffon, ensuite essuyez pour
D Peint Nettoyez avec une eau savonneuse ou appliquez du Fantastik® ou du Formula 409®
E Porcelaine Essuyez immédiatement les éclaboussures acides comme les jus de fruit, le lait, les
F Verre réfléchissant Nettoyez avec de l’eau chaude savonneuse ou un nettoyant en plastique. Frottez
G Acier inoxydable Essuyez toujours avec un chiffon ou un nettoyant avec grain. Nettoyez avec une
H Sonde (si existe)
NE NETTOYEZ PAS LE JOINT A LA MAIN.
nettoyer. Utilisez du Fantastik® ou du Formula 409® pour enlever les éclaboussures
de graisse.
d’abord sur une éponge propre ou sur des feuilles en papier et essuyez pour nettoyer.
Evitez d’utiliser des nettoyants en poudre ou des tampons métalliques à récurer.
tomates avec un chiffon sec. N’utilisez pas d’éponge/chiffon humide sur de la
porcelaine chaude. Lorsqu’elle est froide, nettoyez avec de l’eau chaude savonneuse
ou appliquez du Soft Scrub ® ou du Bon-Ami® sur une éponge humide. Rincez et
séchez. Pour les tâches récalcitrantes, utilisez doucement du Brillo®, ou les chiffons
S.O.S. ®. Il est normal que la porcelaine se craquèlent très légèrement (de fines
lignes) avec l’âge à cause des expositions à la chaleur et aux résidus alimentaires.
vigoureusement avec du vinaigre, du Windex®, de l’ammoniac, ou du Bon-Ami®.
N’UTILISEZ PAS D’ABRASIFS FORTS.
éponge savonneuse ensuite rincez et séchez. Ou essuyez avec du Fantastik® ou du
Formula 409® vaporisé sur des feuilles en papier. Protégez ou polissez avec du
Stainless Steel Magic® et un chiffon doux. Enlevez les taches d’eau avec un chiffon
imbibé de vinaigre blanc. Utilisez du Zud®, Cameo®, Bar Keeper’s Friend® ou
RevereWare Steel Cleaner®, pour enlever la décoloration due à la chaleur.
Nettoyez la sonde à la main avec un détergent et de l’eau chaude. Ensuite rincez et séchez.
Ne la trempez pas ou ne la mettez pas au lave-vaisselle.
+
58
Page 59

Manuel d’utilisation et d’entretien
Modèles de four SOVB - DOVB FRANÇAIS
Entretien à faire soi-même
Retrait de la porte du four
AVERTISSEMENT
• Assurez-vous que le four est froid et qu’il est bien éteint avant d’enlever la porte sinon vous pouvez vous
électrocuter ou vous brûler.
• La porte du four est lourde et fragile. Utilisez vos deux mains pour enlever la porte du four. Le devant est
en verre. Manipulez-la avec soin pour ne pas la briser.
• Ne saisissez que les côtés de la porte du four. Ne saisissez pas la poignée car elle pourrait glisser et
provoquer des dégâts ou vous blesser.
• Si vous ne tenez pas la porte du four de façon sûre et correctement, cela pourrait provoquer des dégâts
Pour enlever la porte
ou blesser des gens.
1. Ouvrez la porte complètement.
2. Soulevez les fixations de la charnière (1) de la
fente (2).
3. Saisissez la porte fermement des deux côtés en
utilisant les deux mains et fermez la porte.
4. Saisissez fermement ; la porte est lourde.
5. Placez la porte dans un endroit adéquat.
+
Pour remettre la porte
1. Insérez les bras de montant (3) des deux
charnières dans les fentes supérieures (6) et les
montants inférieurs (4) dans les fentes inférieures
(7). Les interstices (5) doivent s’accrocher sur les
lèvres (8).
2. Insérez les fixations de la charnière (1) vers le
bas dans leur position.
3. Fermez et ouvrez la porte doucement pour vous
assurer qu’elle est correctement mise en place.
59
Page 60

Manuel d’utilisation et d’entretien
Entretien à faire soi-même
Remplacement d’une ampoule du four
• Chaque four est équipé de deux halogènes
situés sur la paroi du fond du four.
• Les lumières s’allument lorsque la porte est
ouverte ou lorsque le four est dans un cycle de
cuisson.
• Les lumières du four ne s’allument pas pendant
l’AUTO - NETTOYANT.
• Chaque assemblage d’éclairage comprend une
lentille amovible, une lampe à incandescence
ainsi qu’une boîte de douille qui sont fixés.
Voyez l’illustration de cette page.
• Le remplacement de l’ampoule est considéré
comme un entretien de routine.
Pour remplacer une ampoule
1. Lisez les AVERTISSEMENTS de cette page.
2. Coupez l’alimentation à la source principale
(fusible ou disjoncteur).
3. Dans les fours à convection, enlevez le
couvercle du ventilateur en dévissant les quatre
vis.
4. Enlevez le couvercle en le dévissant.
5. Enlevez l’ampoule de sa douille en la tirant.
6. Remplacez l’ampoule avec une nouvelle. Evitez
de toucher l’ampoule avec vos doigts, car la
graisse des mains peut endommager l’ampoule
lorsqu’elle devient chaude.
7. L’ampoule est de type halogène: employer un
avec les memes Volt et Watt (voir les figures
de cette page).
8. Vissez la lentille.
9. Remplacez le couvercle du ventilateur si le four
en est pourvu.
Rebranchez l’alimentation principale à la source
principale (fusible ou disjoncteur).
+
Modèles de four SOVB - DOVB FRANÇAIS
AVERTISSEMENT
• Assurez-vous que le four et que les lumières
sont froides et que le four est bien éteint avant
de remplacer les ampoules. Sinon vous risquez
de vous électrocuter ou de vous brûler.
• Les lentilles doivent être remises en place
lorsque vous utilisez le four.
• Les lentilles servent à protéger l'ampoule pour
qu'elle ne se casse pas.
• Les lentilles sont en verre. Manipulez-les avec
précaution pour éviter de les casser. Les verres
cassés peuvent blesser.
60
Page 61

Manuel d’utilisation et d’entretien
Modèles de four SOVB - DOVB FRANÇAIS
Solution pour des problèmes de cuisson
Avec la cuisson comme la cuisson à convection, des problèmes de cuisson peuvent arriver pour de nombreuses
raisons autre qu’un mauvais fonctionnement du four. Vérifiez le tableau ci-dessous qui répond à la plupart des
problèmes communs. Etant donné que la taille, la forme et le matériel de cuisson affectent les résultats de la
cuisson, la meilleure solution est de remplacer les vieux plats qui sont devenus sombres et qui se sont voilés
avec le temps et leur utilisation. Vérifiez les tableaux de cuisson de la page 46 à 52 pour une position correcte
des grilles et du temps de cuisson
Problème de cuisson
Aliment brunissant de façon
hétérogène
Aliment trop brun au fond
Aliment sec ou ayant
excessivement rétréci
Aliment cuisant ou rôtissant trop
lentement
Croûte à tarte non brunie au
fond ou croûte non cuit
Gâteau pâle, plat, ou non cuit à
l’intérieur
Gâteau haut au centre avec
craquelure sur le dessus.
Bords de croûte de tarte trop
bruns
• Four non préchauffé
• Papier aluminium sur la grille ou au fond du four
• Plat de cuisson trop grand pour la recette
• Plat touchant aux autres plats ou la paroi du four
• Four non préchauffé
• Utilisation de plat en verre, mat ou foncé
• Position de grille incorrecte
+
• Plat touchant aux autres plats ou la paroi du four
• Température du four trop élevé
• Temps de cuisson trop long
• Porte du four trop souvent ouverte
• Plat trop grand
• Température du four top basse
• Four non préchauffé
• Porte du four trop souvent ouverte
• Scellé hermétiquement avec du papier aluminium
• Plat trop petit
• Temps de cuisson pas assez long
• Utilisation de plat en acier brillant
• Position de grille incorrecte
• Température du four trop basse
• Température du four trop basse
• Temps de cuisson incorrect
• Gâteau vérifié trop tôt
• Porte du four trop souvent ouverte
• Plat trop grand
• Température du four trop élevée
• Temps de cuisson trop long
• Plat touchant aux autres plats ou la paroi du four
• Position de grille incorrecte
• Plat trop petit
• Température du four trop élevée
• Bords de croûte trop minces
Cause
61
Page 62

Manuel d’utilisation et d’entretien
Modèles de four SOVB - DOVB FRANÇAIS
Résolution des problèmes de fonctionnement
Avant d’appeler l’assistance ou le service aprèsvente, veuillez bien vérifier la table suivant « Solution des
problèmes ..». Ceci peut vous faire économiser le coût d’un appel à un centre de service. Si vous avez cependant
besoin d’aide, suivre les indications cidessous. Lorsque vous appelez, soyez prêt à indiquer la date d’achat, le
modèle complet ainsi que le numéro de série de votre appareil. Ces informations nous permettront de mieux
répondre à vos questions.
Problème de four Solution des problèmes par étape
Erreur F03 ou F04 figurant à
l’affichage
Autre erreur F________
figurant à l’affichage
Le display du four ne s’éteint
pas
Ventilateur de refroidissement
continuant à fonctionner une
fois le four éteint
La porte est verrouillée et ne
s’ouvre pas même après le
refroidissement
Le four ne chauffe pas Vérifiez le disjoncteur et les fusibles de chez vous. Vérifiez que la température du four est
Le four ne cuit pas
uniformément
La température four est trop
froide ou trop chaude
L’éclairage du four ne
fonctionne pas correctement
L’éclairage du four ne s’éteint
pas
Impossibilité d’enlever le
couvercle de la lentille du four
L’auto-nettoyage du four ne
fonctionne pas correctement
La pendule et la minuterie ne
fonctionnent pas
correctement
Humidité excessive Lorsque vous utilisez le mode cuisson , préchauffez d’abord le four. La cuisson à convection et
Eclats de porcelaine Lorsque vous enlevez et replacez les grilles, inclinez-les toujours vers le haut et ne forcez pas
Il y a un problème avec le loquet de verrouillage. Eteignez le four et le rallumez après quelques
secondes. Le four va effectuer un auto-test de loquet. Si le problème persiste, notez le code
d’erreur et téléphonez au centre de service agréé.
Eteignez l’appareil et rallumez-le après quelques secondes. Si le problème persiste, notez le
code d’erreur et téléphonez au centre de service agréé.
Coupez l’alimentation à la source principale (fusible ou disjoncteur). Remettez le disjoncteur. Le
four devrait se régler seul et devrait fonctionner.Si le problème persiste, téléphonez au centre
de service agréé.
Le ventilateur s’éteint automatiquement lorsque les composants électroniques sont
suffisamment froids.
Eteignez le four avec le disjoncteur et attendez quelques secondes. Remettez le disjoncteur. Le
four devrait se régler seul et devrait fonctionner.
correctement sélectionnée.
Vérifiez l’étalonnage du four. Réglez l’étalonnage si nécessaire (reportez-vous au Décalage du
four, Page 44). Reportez-vous aux tableaux de cuisson pour la position des grilles
recommandée. Réduisez toujours votre recette de 25°F (15°C) lorsque vous cuisinez avec le
mode de cuisson à convection.
Le thermostat du four doit être réglé. Voyez Etalonnage de la température du four, Page 44.
Remplacez ou réinsérez l’ampoule si elle est desserrée ou en panne. Voyez Page 60. Ne
touchez pas l’ampoule avec vos doigts car cela peut la faire griller.
Vérifiez que la porte du four n’est pas obstruée.
Il se peut qu’il y ait une accumulation de saleté autour du couvercle de la lentille. Essuyez-le
avec un chiffon sec et propre avant d’essayer d’enlever le couvercle de la lentille.
Laissez le four refroidir avant l’auto-nettoyage. Essuyez toujours les résidus ou les
éclaboussures avant l’auto-nettoyage. Si le four est vraiment sale, réglez l’auto-nettoyage sur 4
heures. Voyez Préparation du four pour l’auto-nettoyage, Page 55.
Assurez-vous que le four est bien branché. Voyez Pendule et minuterie, Page 43.
le rôtissage à convection éliminent l’humidité du four (c’est un des avantages de la convection).
pour éviter les éclats de porcelaine.
+
Données de service
Pour un centre de service autorisé ou de l’information sur les pièces, voir le paragraphe « Fulgor Warranty .. ».
L’emplacement du numéro de série sur le produit est visible sur la porte du four lorsque la porte du four est ouverte. Il est situé
du côté gauche, centré verticalement juste en dessous de la cavité du four. Voyez Page 37. Notez cette information dans
l’espace prévu à cet effet ci-dessous. Gardez votre facture pour la validation de votre garantie.
Numéro de modèle _____________ Numéro de série ___________________ Date d’installation ou Occupancy____________
62
Page 63

Manuel d’utilisation et d’entretien
Modèles de four SOVB - DOVB FRANÇAIS
GARANTIE FULGOR pour l’électroménager
Durée de la garantie :
Fulgor USA garantit pour le Canada et les Etats-Unis continentaux 24 mois de garantie totale depuis la date
d’achat indiquée sur la facture à l’utilisateur final. Pendant cette période Fulgor payera le coût des pièces de
remplacement et du travail fourni pour réparer l’appareil.
Pour une preuve de garantie, veuillez garder la facture d’achat originale et le bon de livraison.
Fulgor USA maintient une provision unique pour une contribution financière exceptionnelle pour toute réparation
qui arrive dans l’année 1 an après les termes de la garantie Fulgor standard. Cette provision établit que si une
panne technique arrive après la période de garantie de deux ans, commençant par le premier jour du 25
jusqu’au dernier jour du 36
e
mois après la date d’achat, Fulgor payera le client directement la somme de $ 50.00
pour le coût de dépannage provenant d’une panne technique. Cette contribution de service est limitée
uniquement à une plainte par client dans la troisième année après la date d’achat.
Pour obtenir ce service sous cette garantie, vous devez :
1. Visitez notre site web www.fulgorusa.com, ou adressez-vous à un revendeur agréé, ou envoyez une lettre
écrite de réclamation à Fulgor USA L.L.C., Technical Services Department, 1076 Miners Rd., Saint Joseph, MI
49085.
2. Fournissez une copie de votre reçu original de vente.
3. Appelez 1(800)-232-4907 pour vous faire guider afin de recevoir le dépannage de votre appareil.
+
4. Laissez à Fulgor un temps raisonnable pour enregistrer la réclamation avant que le produit ou toute autre pièce
soit enlevée.
Couverture :
Lisez le Manuel d’utilisation et d’entretien avant d’utiliser l’appareil pour la première fois !
Cette garantie s’applique aux appareils Fulgor utilisés uniquement pour une utilisation privée. Nos appareils ne
sont pas conçus pour une utilisation commerciale. Cette garantie est uniquement valable pour le propriétaire
d’origine et elle n’est pas transférable.
Pendant la période garantie Fulgor, à sa discrétion, réparera ou échangera le produit gratuitement pour les
pièces ou pour le travail.
Cette garantie ne couvre pas :
1. Endommagement de l’appareil provoqué intentionnellement ou par accident
2. Installation incorrecte ou mauvais branchement à l’alimentation électrique
3. Si l’appareil a été modifié
4. Dysfonctionnements dus à une utilisation incorrecte
5. Fêlure ou rayures normales dues à l’utilisation de la surface de verre en céramique
6. Fonctionnement dans des conditions commerciales ou professionnelles
7. Foudre, incendie, inondations ou autres catastrophes naturelles
8. Si une pièce ou un accessoire a été rajouté sur l’appareil qui ne soit pas un original fourni par Fulgor
9. Les réclamations cosmétiques comme les rayures sur les pièces en acier inoxydable sont comprises
uniquement dans une garantie limitée, et doivent être réclamées dans les 2 semaines après la date d’achat.
Cette garantie ne couvre que l’appareil et ses composants. Les endommagements de tout élément en contact
direct ou placé près de l’appareil sont généralement exclus de la garantie. Les charges des parties tiers autres
que les services après-ventes Fulgor ne seront pas acceptés.
Si l’appareil faisait preuve de dysfonctionnement à cause de la main d’œuvre ou du matériel, l’utilisateur final a
uniquement une garantie de réparation ou de remplacement. Dans aucune circonstance, Fulgor pourrait être
responsable de perte ou d’endommagement, qu’il soit direct, indirect, ou accidentel, découlant de l’utilisation ou
de la mauvaise utilisation de l’appareil.
Afin d’obtenir les droits de garantie, la facture originale doit être fournie au Département des entretiens
techniques pour vérifier la date d’achat. Certains Etats ne permettent pas de limitations des endommagements
accidentels ou indirects, par conséquent les limitations susmentionnées ou exclusions ne s’appliquent pas.
Dans le cas des réclamations techniques et pour demander un support de service, veuillez contacter
d’abord le revendeur où votre appareil Fulgor a été acheté !
Fulgor USA, LLC
service@fulgorusa.com
Product, User & Warranty Information: 1.800.926.2032
Service & Claim Issues: 1.800.232.4907
e
mois
63
Page 64

+
Page 65

Manual de uso & Mantenimiento
Modelos SOVB - DOVB ESPAÑOL
Tabela de Contenido
Pagina
Precauciones de seguridad 66 Consejos y técnicas de grill de convección 81
Instrucciones de seguridad 67 Tabla de grill de convección
Precauciones de seguridad para el horno
Precauciones de seguridad para la autolimpieza
67
Consejos y técnicas del asado de convección 82
67
Tabla de asado de convección
del horno
Cocinar con hornos de convección FULGOR 68 Consejos y técnicas de deshidratado 83
Ventajas de cocinar por convección
68
Tabla de deshidratado
Características de su horno 69 Consejos y técnicas del asado 84
Paneles de control 70 Tabla de asado
Mandos
70
Pautas e seguir para la temperatura de
alimentos de FSIS
Pantallas
Perillas
+
70
Características especiales 85
70
Instrucciones del modo sábado 86
Modos del horno 71 Cuidado y limpieza del horno 87
Pagina
81
82
83
84
84
Generalidades del horno 72 Autolimpieza del horno
Consejos generales para el horno 73 Antes de la autolimpieza
87
87
Configurar el reloj y el temporizador 75 Configuración del modo de Autolimpieza 88
Para configurar el reloj
Para configurar el temporizador (timer)
75
Para configurar el modo de autolimpieza
75
Para cambiar el tiempo de limpieza
Selección de los modos del horno 76 Para retardar el inicio de la limpieza
Para configurar el modo de cocinar y temperatura
Uso de las lámparas del horno
76
Cuidado general del horno 89
76
Cómo usar la tabla de la limpieza del horno
Modos cronometrados de cocinar 77 Tabla de limpieza
Para configurar el modo cronometrado
Para retrasar el inicio del modo cronometrado
77
Acabados del horno / métodos de limpieza 90
77
Quitar la puerta del horno 91
88
88
88
89
89
Consejos y técnicas de horneado 78 Cambiar una lámpara del horno 92
Tabla de cocción por horneado 78 Para remplazar la bombilla
Consejos y técnicas de horneado de
79 Resolución de los problemas de horneado 93
92
convección
Tabla de horneado de convección
80
Resolución de los problemas de
94
funcionamiento
FULGOR GARANTÍA para electrodomésticos 95
65
Page 66

Manual de uso & Mantenimiento
IMPORTANTE
Electrodoméstico y horno
Precauciones de seguridad
Por favor, lea todas las instrucciones antes de utilizar este aparato.
Advertencia
Su nuevo horno Bosh se ha diseñado para ser un
aparato seguro y fiable si se usa de la manera
apropiada. Lea atentamente todas las
instrucciones antes de utilizar este aparato. Estas
precauciones reducirán los riesgos de sufrir
quemaduras, descargas eléctricas, fuego y
lesiones. Cuando se utilizan aparatos de cocina es
preciso seguir algunas precauciones básicas de
seguridad, incluyendo las siguientes:
Un técnico cualificado tiene que instalar correctamente
este aparato y realizar una buena puesta a tierra.
Conecte solo a una puesta a tierra apropiada. Vea las
instrucciones de Conexión de puesta a tierra que se
encuentran en las Instrucciones de Instalación.
• Solo un técnico calificado debe dar el servicio a
este aparato. Póngase en contacto con el centro de
servicio autorizado más cercano para la
inspección, reparación y ajustes.
• No repare o remplace ninguna parte del horno a
menos que le haya sido recomendado
específicamente. Solicite el servicio de un centro
autorizado.
• No utilice esta unidad si no funciona bien o si está
dañada hasta que un técnico del servicio
autorizado la haya inspeccionado.
• Instale o coloque este aparato de acuerdo con las
instrucciones de instalación.
• Use etse horno solo para lo que lo ha concebido
su fabricante. Si tiene alguna duda, contacte con él
• No cubra ni bloquee las aberturas de este aparato.
• Use este aparato solo el uso para el que ha sido
concebido como se describe en este manual. No
use productos químicos corrosivos, vapores,
productos inflamables o no alimenticios en este
aparato. Este tipo de horno ha sido diseñado
específicamente para calentar o cocinar alimentos.
No está diseñado para uso industrial o de
laboratorio. El uso de productos químicos
corrosivos cuando calienta o limpia el horno dañará
el aparato.
• En el caso de encenderse la ropa o el cabello,
ÉCHESE AL PISO y DESE VUELTAS DE
INMEDIATO para apagar las llamas.
+
Modelos SOVB - DOVB ESPAÑOL
• No permita que los niños utilicen este aparato sin la
supervisión de un adulto. Los niños y animales
domésticos no deben quedarse solos cerca del
horno cuando se está utilizando el aparato. No
permita nunca que los niños se sienten o se pongan
de pie sobre ninguna parte del horno.
• No deje cosas que puedan atraer la atención de los
niños encima del horno. Si se suben al horno para
alcanzar estas cosas podrían sufrir graves daños.
Para reducir el riesgo de fuego en el interior del horno:
1. No guarde materiales inflamables en el interior o
cerca del horno.
2. No use agua cuando se produce un incendio de
grasa. Apague el fuego con un extintor químico de
polvo o espuma.
3. Se recomienda tener un extintor a mano y muy a la
vista cerca de cualquier electrodoméstico, que se
pueda usar rápidamente.
4. No recueza demasiado los alimentos. Vigile el
horno con cuidado cuando utiliza materiales de
papel, plástico u otros materiales combustibles
5. No utilice el horno para almacenar cosas. Nunca
deje productos de papel, utensilios de cocina o
alimentos en su interior cuando no se usa.
6. En caso de que se enciendan materiales dentro del
horno, mantenga cerrada la puerta. Apague el
horno y desconecte el circuito en la caja del
cortacircuito.
7. No obstruya los conductos de ventilación del horno.
8. Asegúrese de que funciona el ventilador cuando el
horno está funcionando. En caso contrario no utilice
el horno. Llame a un centro de servicio autorizado.
9. Nunca utilice el horno para calentar una habitación.
Esto podría dañar partes del horno.
10. Use ropa apropiada por cuestión de seguridad.
Nunca use prendas sueltas o que tengan mangas
largas mientras utiliza este aparato.
66
Page 67

Manual de uso & Mantenimiento
IMPORTANTE
Electrodoméstico y horno
Instrucciones de seguridad
Precauciones de seguridad para el horno
• Mantenga recogido el cabello largo.
• No toque elementos de calentamiento o superficies
internas del horno.
• Los elementos de calentamiento podrían estar
calientes incluso si presentan un color oscuro. Las
superficies internas del hormo podrían estar lo
suficientemente calientes como para causar
quemaduras.
• Durante y después del uso, no permita que la ropa
u otros materiales inflamables entren en contacto
con los elementos de calentamiento o con las
superficies internas del horno hasta que no se
hayan enfriado.
• La moldura de la parte superior y de los lados de la
puerta del horno podría estar los suficientemente
calientes como para provocar quemaduras.
• Tenga cuidado cuando abra la puerta del horno.
Abra la puerta ligeramente para dejar escapar el
aire o el vapor caliente antes de sacar los
alimentos.
• No caliente recipientes de alimentos cerrados. La
presión acumulada podría hacer reventar el
recipiente o provocar lesiones.
• Coloque siempre las rejillas del horno en el lugar
deseado mientras el horno esté frío. Si tiene que
mover una rejilla cuando el horno está caliente,
evite el contacto del asa de la olla con los
elementos calientes.
• Use siempre asas secas para las ollas. Las asas
mojadas o húmedas sobres superficies calientes
pueden provocar quemaduras por el vapor. Evite el
contacto de las asas con los elementos de
calentamiento. No use toallas o trapos
voluminosos.
+
Modelos SOVB - DOVB ESPAÑOL
Precauciones de seguridad para la
autolimpieza del horno
• Confirme que la puerta se cierra y que no se abre
un vez que ambas perillas están en la posición de
LIMPIEZA y aparece el icono de puerta cerrada. Si
la puerta no estuviera cerrada, gire el selector de
modo de cocción en OFF y no ejecute la
autolimpieza. Llame al número del Servicio.
• No limpie los empaques de la puerta. Es esencial
para un buen sellado. Preste atención a no frotar,
dañar, mover o quitar el empaque de la puerta.
• No use detergentes comerciales para hornos o
recubrimientos de protección de ningún tipo por
encima o alrededor de cualquier parte del horno.
• Limpie solo las partes del horno que aparecen
listadas en este manual.
• Quite la bandeja de asado, las rejillas del horno, los
otros utensilios y limpie los derrames excesivos de
alimentos antes de autolimpiar el horno.
ADVERTENCIA
La Ley del Estado de California respecto al Agua
Potable y Tóxicos requiere que las empresas
adviertan a sus clientes de la exposición potencial
ante sustancias conocidas que provocan cáncer,
defectos de nacimiento u otros daños de
reproducción.
La eliminación de residuos durante la autolimpieza
genera algunos derivados que están en esta lista
de sustancias.
Para reducir la exposición a estas sustancias,
siempre haga funcionar este horno siguiendo las
instrucciones de este manual y ventile la cocina
durante e inmediatamente después de la
autolimpieza.
67
Page 68

Manual de uso & Mantenimiento
Modelos SOVB - DOVB ESPAÑOL
Cocinar con hornos de convección FULGOR
En un horno de convección, la fuente de calor realiza ciclos de encendido y apagado para mantener una
temperatura media en el interior del horno. Como la temperatura se alza o desciende gradualmente, se producen
suaves corrientes de aire en el horno. Esta convección natural tiende a ser ineficiente porque las corrientes son
irregulares y suaves. En este sistema de convección, el calor se “transporta” por medio de un ventilador que
suministra la circulación continua de aire caliente.
Este sistema de convección europeo suministra la energía de vanguardia y el diseño avanzado para producir el
mejor horno de convección. En los hornos de convección estándar, un simple ventilador hace circular el aire
caliente alrededor de los alimentos. El sistema se caracteriza por la combinación de un elemento de
calentamiento adicional colocado alrededor del ventilador de convección y de un panel de ventilación que
distribuye aire caliente en tres dimensiones: a lo largo de los costados, por la parte de arriba y por la parte más
baja del interior del horno. Este sistema de Convección europeo ayuda a mantener una temperatura incluso
mejor a lo largo de la cavidad del horno.
El aire que circula ayuda a realizar el proceso de horneado y de cocción de los alimentos más uniformemente. Al
controlar el movimiento del aire caliente, la cocción por convección produce alimentos dorados más
uniformemente que son crujientes por la parte de fuera y jugosos dentro. La cocción por convección trabaja mejor
tanto para panes y pastelerías como para carnes o aves. Alimentos que suben por medio de aire caliente como el
bizcocho ángel, los suflés y las bombas de crema suben más que en los hornos convencionales. Las carnes se
mantienen jugosas y tiernas, y por fueran son sabrosas y crujientes.
Si utiliza la Convección europea los alimentos se pueden cocinar a una temperatura más baja y los tiempos de
cocción se reducen. Cuando se utiliza este modo, la temperatura estándar puede bajarse
de 25°F (15°C).
Los alimentos que requieren un tiempo de cocción menor pueden controlarse ligeramente antes de lo normal.
Para obtener resultados mejores, los alimentos deberían cocinarse descubiertos, en cazuelas de lados bajos
para poder aprovecharse de la circulación del aire forzado. Cuando se usa el Grill de convección, la temperatura
estándar del horno no necesita reducirse.
Ventajas de cocinar por convección
Incluso horneando, se logran alimentos dorados y crujientes.
Durante el asado, los jugos y aromas quedan sellados en el interior mientras que el exterior es
crujiente.
La masa de levadura es más ligera, presentan una textura más uniformes, más dorados y
crujientes.
Los alimentos que suben mucho como los bollos de crema, los suflés, merengues se elevan más
y son más ligeros.
Es posible cocinar al mismo tiempo con múltiples rejillas sin transferir el sabor con buenos
resultados.
Cocinar con múltiples rejillas ahorra tiempo.
Prepara comidas completas de una sola vez sin transferir los sabores.
Verduras deshidratadas, frutas y vegetales.
No precisa moldes para horneados especiales.
Ahorra tiempo y energía.
La convección que asa permite el asado a la parilla extraordinario con cortes más gruesos del
alimento.
+
68
Page 69

Manual de uso & Mantenimiento
Modelos SOVB - DOVB ESPAÑOL
Características de su horno
+
69
Page 70

Manual de uso & Mantenimiento
Modelos SOVB - DOVB ESPAÑOL
Paneles de control
La intefaz del usuario tiene las siguientes características: pantalla, indicadores luminosos de precalentamiento,
interruptores de control, perillas de modo de cocción y temperatura.
HORNO DOBLE HORNO INDIVIDUAL
Mandos
[SET CLOCK]: pulse este botón para configurar o
cambiar la hora del día.
[TIMER]: pulse este botón para configurar o borrar el
+
temporizador.
[COOK TIME o COOK]: pulse este botón para
configurar o cambiar la duración de la actividad de
cocción.
[STOP TIME o STOP]: pulse este botón para configurar
o cambiar el tiempo de acabado en un modo de cocinar
programado o retardado.
- En el caso de que se haya pulsado uno de los botones
precedentes y los dígitos del tiempo parpadeen, pulse
y/o mantenga pulsados los siguientes botones para
cambiar los valores.
[LIGHT]: pulse este botón para encender o apagar las
luces.
Las funciones de estos botones dependen del modelo
del horno:
[TOP / BOTTOM] (horno doble): pulse este botón para
seleccionar la cavidad del horno superior si uno no está
seleccionado. Si uno de los dos ya está seleccionado,
simplemente conmute para el otro.
[LOCK] (horno individual): mantenga pulsado ese botón
con [+] para actuar el bloqueo de seguridad.
[INCREMENT] [+]: pulse este botón para aumentar el
valor de la variable seleccionada en ese momento.
Pantallas
Luz de precalentamiento (externa).
Cuatro dígitos para el tiempo (verde), para la hora
del día, el cronómetro y la cocción automática.
También hay un indicador de AM/PM.
Tres dígitos para la temperatura (rojo), para la
temperatura del horno. Hay un indicador de las
unidades de los grados (°C o °F). Muestra el punto de
ajuste de la temperatura para el modo de cocción de
ese momento en el interior del horno seleccionado.
Iconos de cuadros e iconos de bloqueo para
mostrar cual de los dos hornos está seleccionado en
ese momento y qué puerta, si ambos, está trabajando,
limpiando o enfriándose tras una limpieza.
Rótulos para indicar las funciones activas (texto fijo) o
las funciones que requieren información por parte del
usuario (texto parpadeante).
Perillas
Selector del modo de cocción (convección). Ocho
modos de cocción + la posición OFF.
Selector del modo de cocción (térmico). Tres
modos de cocción + posición de OFF.
Selector de temperatura. Posiciones de PRESET y
CLEAN + campo continuo entre los valores MIN y
MAX .
[DECREMENT] [-]: pulse este botón para disminuir el
valor de la variable seleccionada en ese momento.
Perillas
Térmica
70
Perillas
Convencionales
Page 71

Manual de uso & Mantenimiento
Modelos SOVB - DOVB ESPAÑOL
Modos del horno
Las siguientes ilustraciones dan una vista general de lo que sucede en el horno en cada modo de ajuste. Las
flechas representan la posición de la fuente de calor durante cada uno de los modos. Los elementos inferiores
están ocultos bajo el piso inferior.
Horneado de convección y deshidratado
El horneado de convección cocina con aire que proviene
de un tercer elemento que se encuentra detrás de la
pared trasera del horno. Este calor circula a través del
horno por medio de un ventilador de convección. El
deshidratado es similar al cocinado de convección y
soporta una baja temperatura óptima mientras circula el
aire seco caliente para quitar la ligera humedad para
conservar los alimentos.
+
Precalentamiento rápido
Rápido precaliente las aplicaciones el elemento del
anillo y el elemento adicional de calentar rápidamente
la cavidad. Cuando se suena el tono del precalentar y
la luz roja da vuelta apagado, seleccione el modo
deseado el cocinar.
Asado de convección
El Asado de convección combina el calor intenso del
elemento superior con el aire que circula por medio del
ventilador de convección.
Grill de convección
El Grill de Convección usa el calor de los elementos
superiores e inferiores, así como el calor del ventilador
de convección.
Horneado
Hornear es cocinar con aire seco, caliente. Tanto el
elemento superior como el inferior se encienden en
ciclos para mantener la temperatura del horno.
Asado
El Asado usa el calor intenso que radia el elemento
superior.
71
Page 72

Manual de uso & Mantenimiento
Generalidades del horno
Antes de usar su horno por primera vez quite el
embalaje y los materiales que no forman parte del
horno o de los hornos. Cualquier material de este tipo
que se deje en el horno (hornos) puede fundirse y /o
quemarse cuando se usa el horno.
Símbolos parpadeantes o Números
Señalan un ajuste incompleto o llaman la atención
sobre otra información.
Pitidos
Los pitidos señalan que hay que introducir más
información o confirman que se aceptó la entrada. Los
pitidos también señalan el final de una función o un error
del horno.
Precalentamiento rápido
En el caso de que sea necesario calentar el horno
rápidamente, gire el selector de modo de cocción en la
posición de precalentamiento rápido. En cuanto suene el
tono de precalentamiento y se apague la luz roja,
seleccione el modo de cocción deseado y coloque
dentro los alimentos.
Símbolo de bloqueado
Se muestra cuando la puerta está bloqueada durante el
modo de Autolimpieza o durante el siguiente
enfriamiento. El símbolo parpadea cuando el pestillo se
está moviendo para bloquear o desbloquear la puerta.
No intente abrir la puerta. La puerta solo se podrá abrir
cuando el símbolo haya desaparecido.
Cierre de seguridad de la puerta
El pestillo de la puerta no solo se usa para cerrar la
puerta durante el autolimpiado sino que también se usa
pare cerrar la puerta manualmente por razones de
seguridad (prevenir que los niños tomen o toquen partes
calientes) durante las normales actividades de cocción.
Un solo horno
durante 3 segundos los botones INC (+) y LOCK. El
gancho bloqueará la puerta. Repita la operación para
desbloquearla.
Doble horno
durante 3 segundos los botones INC (+) y DEC (-). El
pestillo bloqueará la puerta. Repita la misma operación
para desbloquearla.
: mantenga pulsados al mismo tiempo
: mantenga pulsados al mismo tiempo
+
Modelos SOVB - DOVB ESPAÑOL
Error de apagón
Cuando vuelva la corriente, la pantalla del reloj
marcará las 12.00
Ajustes por defecto
Los modos de cocción seleccionan una temperatura
apropiada cuando el selector se encuentra en esta
posición. Se puede cambiar cuando se necesite una
diferente.
Códigos de Números error F
Estos códigos aparecen en la pantalla cuando el
control electrónico detecta un problema en el horno o
en sus componentes electrónicos.
Ventilador de convección
El ventilador de convección trabaja durante el modo de
convección. Cuando el horno está trabajando en el
modo de convección, el ventilador se para
automáticamente cuando se abre la puerta. El
ventilador de convección funcionará durante el
precalentamiento para modos específicos.
Ventilador de enfriado de los componentes
Se activa durante todos los modos de cocción y de
autolimpieza para enfriar los componentes internos y
la superficie de la puerta exterior. El aire se expulsa a
través de las aberturas colocadas por encima de la
puerta del horno. Sigue funcionando hasta que los
componentes se han enfriado lo suficiente. El
ventilador de enfriamiento va más rápido en el modo
de autolimpieza y cada vez que los componentes
internos aumentan su temperatura.
AM
72
Page 73

Manual de uso & Mantenimiento
Consejos generales para el horno
Precalentar el horno
• Precaliente el horno cuando utiliza los modos de Horneado, Horneado de convección y Grill de convección.
• Use el modo de precalentar rápido para acortar el
tiempo del modo de precalentado.
• Seleccionar una temperatura más alta no acorta el
tiempo de precalentado.
• Se necesita precalentar para obtener buenos resultados al hornear pasteles, galletas, pastelelitos y panes.
• El precalentado ayudará a dorar los asados y a que la
carne conserve sus jugos.
• Coloque las rejillas del horno en su posición correcta
antes de precalentar.
• Durante el precalentado la pantalla muestra la temperatura de cocción seleccionada.
• Un pitido confirmará que el horno se ha precalentado
y la luz indicadora de precalentado se apagará.
• El precalentado rápido se puede utilizar cuando el
tiempo es fundamental.
Sugerencias para el uso
• Use las tablas de cocinar como una guía
• No ponga recipientes sobre la puerta abierta del horno
• Utilice la luz interna del horno para mirar los alimentos
a través de la ventana del horno en lugar de abrir la
puerta frecuentemente.
Recipientes
• Los recipientes de vidrio para hornear absorben el
calor. Reduzca la temperatura del horno 25°F (15°C)
cuando hornea con moldes de vidrio.
• Use los recipientes que producen el dorado deseado.
El tipo de acabado del recipiente ayuda a determinar la
cantidad de dorado que se producirá en el horno.
• Los moldes brillantes, de metal liso o ligeramente antiadherentes/anodizados reflejan el calor y dan como
resultado un dorado más ligero y delicado. Los
pasteles y galletas requieren este tipo de molde.
+
Modelos SOVB - DOVB ESPAÑOL
• Los recipientes oscuros, ásperos o sin brillo absor
ben el calor y producen una costra más dorada y
crujiente. Use este tipo para pasteles.
• Utilice recipientes de metales oscuros antiadherentes/anodizados o moldes de metal sin brillo o moldes
de vidrio de horneado para obtener una costra dorada. Los moldes aislantes de horneado pueden
aumentar el tiempo de cocción.
• No hornee con la bandeja de asado vacía dentro del
horno ya que esto puede cambia el rendimiento del
horneado. Guarde
Condensación y temperatura del horno
• Es normal que una cierta cantidad de humedad se
evapore de los alimentos durante el proceso de cocción. La cantidad depende del contenido de humedad que contienen los alimentos. La humedad se
puede condensar sobre una superficie más fría o en
el interior del horno, así como en el panel de control.
• Su nuevo horno lleva un sensor electrónico de temperatura que mantiene cuidadosamente la temperatura seleccionada. Su horno anterior tal vez tenía un
termostato mecánico que gradualmente cambiaba a
una temperatura más alta. Será normal que usted
tenga que ajustar sus recetas favoritas cuando
empiece a cocinar con su nuevo horno.
Horneado a gran altitud
• Cuando se hornea a gran altitud, las recetas y el
tiempo de cocción varían con respecto a los
estándares.
Conexión de 120/240 contra 120/208 Voltios
• La mayoría de las instalaciones de hornos tiene un
voltaje de 120/240 voltios.
• Si su horno está instalado con un voltaje de 120/208
voltios, el precalentado puede ser ligeramente más
largo que con un voltaje de 120/240 voltios.
• El horno está diseñado para asegurar el mismo
tiempo di limpieza a 208V.
la bandeja de asado fuera del horno
Rejillas del horno
• El horno tiene guías para las rejillas en cuatro niveles
como se muestran en la figura de la pág. 69.
• Las posiciones de las rejillas están numeradas desde la
guía de la rejilla inferior (#1) a la superior (#4).
• Consulte las tablas de cocinar para determinar las mejores
posiciones de la rejilla para usar cuando se cocina.
• Cada guía de nivel consiste en un par de soportes formados en las paredes de cada lado del interior del horno.
• Asegúrese siempre de que las rejillas del horno se
encuentran en la posición correcta antes de encender el
horno. Asegúrese de que las rejillas estén niveladas una
vez colocadas en posición.
Si tiene dudas, como por ejemplo, qué lado es la parte
frontal de la rejilla, tome como referencia la figura de
la pág. 69.
• Las rejillas están diseñadas para pararse cuando se
tiran hacia atrás hasta el tope.
PRECAUCIÓN! Nunca utilice papel de aluminio para
tapar las rejillas del horno o para forrar el horno. El
calor atrapado por debajo del papel de aluminio puede
dañar el revestimiento del horno.
PRECAUCIÓN
Asegúrese de que no la ha forzado para evitar
daños al esmalte.
73
Page 74

Manual de uso & Mantenimiento
Para sacar las rejillas del horno:
1. Agarre la rejilla y empújela hacia atrás
Incline la rejilla hacia arriba y sáquela
2.
La rejilla extensible
• La rejilla extensible facilita el acceso a los alimentos
en el horno. Se extiende más allá de la rejilla plana
normal acercando los alimentos al usuario.
+
PRECAUCIÓN
Cuando la rejilla sale del horno no se bloquean los
brazos laterales de deslizamiento. Éstos se podrían
extender inesperadamente si se transporta la rejilla de
modo incorrecto. Extender los brazos de deslizamiento
puede causar lesiones. Se debe sostener o tran-
sportar la rejilla solamente agarrando los lados.
Sacarla del horno:
1. Levante el frente de la rejilla ligeramente y empuje la rejilla hacia adentro hasta que se libera
el tope
Modelos SOVB - DOVB ESPAÑOL
Para meter una rejilla del horno:
1. Coloque la parte de atrás de la rejilla entre las guías
de nivel de rejilla
2.
Mientras inclina la parte frontal de la rejilla hacia
arriba, deslice la rejilla a lo largo de la vía mientras
baja la parte frontal
NOTA: Siempre saque la rejilla extensible antes de
autolimpiar el horno.
PRECAUCIÓN! Para evitar quemaduras, jale la rejilla
completamente y levante el molde arriba de la
agarradera cuando transporta los alimentos al y del
horno.
Si tiene dudas, como por ejemplo, qué lado es la parte
frontal de la rejilla, tome como referencia la figura de la
pág. 69.
Colocar la rejilla en el horno:
1. Agarre la rejilla firmemente en ambos lados. Coloque la rejilla (incluyendo el marco) arriba de la
guía de rejilla deseada
2. Levante el fondo de la rejilla hasta que el marco
y el tope queden libres de la guía
3. Jale la rejilla hacia abajo y sáquela
74
2. Empuje la rejilla completamente hasta que el fondo de la rejilla caiga en su lugar
3. Hale ambas secciones hacia delante hasta que se
active el tope. La rejilla debe estar recta no torcida
Page 75

Manual de uso & Mantenimiento
Modelos SOVB - DOVB ESPAÑOL
Configurar el reloj y el temporizador
La hora del día aparece en la pantalla en horas y minutos.
Configure siempre el reloj inmediatamente después de la instalación o después de un apagón. Una vez que ha
vuelto la corriente al horno, el reloj marca las 12:00
La hora del reloj aparecerá durante todas las operaciones del horno excepto cuando el temporizador o el
cocinado retardado están funcionando.
El horno esta configurado con un reloj de 12 horas e indica AM y PM.
Para configurar el reloj
1.
Pulse [SET CLOCK]. Las horas empezarán a
parpadear y en la pantalla aparecerá el escrito
CLOCK (reloj).
2.
Pulse [+] o [-] para configurar la hora deseada. Siga
hasta que se haya seleccionado el correcto AM o
PM.
3.
Pulse [SET CLOCK] de nuevo para confirmar la hora
y los minutos empezarán a parpadear.
4.
Pulse [+] o [-] para configurar el valor de los minutos
deseados, mantenga el botón para cambiar con
incrementos de 10 minutos.
5.
Pulse [SET CLOCK] de nuevo para confirmar el
tiempo de espera durante 5 segundos.
Aparecerá lo siguiente cuando el modo de edición está
activo para configurar o cambiar el valor.
+
AM
.
Para configurar el temporizador (timer)
1.
Pulse [TIMER]. El temporizador y el texto TIMER
aparecerán en la pantalla.
2.
Pulse [TIMER] de nuevo. El valor de las horas
empezará a parpadear.
3.
Pulse [+] o [-] para configurar la hora deseada.
4.
Pulse [TIMER] de nuevo para confirmar la hora y
los minutos y empezará a parpadear.
5.
Pulse [+] o [-] para configurar el valor de los
minutos deseados, mantenga pulsado el botón
para cambiar con incrementos de 10 minutos.
6.
Pulse [TIMER] de nuevo para confirmar el valor o
espere durante 5 segundos.
7.
TIMER aparecerá ininterrumpidamente.
8.
Cuando el tiempo termine, los pitidos de
recordatorio sonaran durante 15 minutos o hasta
que se pulse el botón.
9.
El formato del temporizador es normalmente en
Horas: minutos, pero se puede cambiar en
Minutos: segundos durante el último minuto.
10.
El valor que se mostrará siempre se redondeará
en el último minuto.
75
Page 76

Manual de uso & Mantenimiento
Selección de los modos del horno
Para configurar el modo de cocinar y
temperatura
• Los siguientes modos se pueden seleccionar girando
la perilla de los modos de cocinado en la posición
deseada. Para seleccionar Limpieza, también es
necesario mover la perilla de la temperatura en la
posición de limpieza apropiada.
OFF (off)
CONVECTION BAKE (horneado de convección )
CONVECTION BROIL (asado de convección)
COVECTION ROAST (grill de convección)
FAST PREHEAT (precalentamiento rápido)
BAKE (horneado)
BROIL (asado)
DEHYDRATE (deshidratado)
CLEAN (limpieza)
• Seleccione la temperatura deseada moviendo el
selector o soltándolo en la posición de PRESET si el
valor propuesto es bueno. La temperatura puede
cambiarse con incrementos de 5°F o 5°C.
• En cuanto se mueve una de las perillas, el control
cambia automáticamente para mostrar el valor en la
cavidad del horno correspondiente. Se mostrará el
cuadro correspondiente.
• El interior del horno empezará a calentarse y la luz
del horno se encenderá.
• La luz de precalentamiento se encenderá. Cuando el
horno se haya precalentado, sonará un pitido y la luz
roja se apagará.
• Para cambiar la temperatura mientras se está
cocinando, basta girar la perilla de la temperatura
hasta que la pantalla muestre el valor deseado.
• Pulse [UPPER/LOWER] (Superior/Inferior) para
seleccionar el horno y controle la temperatura
referida o el valor del tiempo, en el caso de que no
sea necesario cambiarlo.
• Mueva el selector del modo de cocción en OFF si
pretende parar de cocinar
.
+
Modelos SOVB - DOVB ESPAÑOL
Uso de las lámparas del horno
• Un único botón de luces activa las luces de ambos
hornos.
• Si el botón LIGHT (LÁMPARA) se acciona cuando
ambos hornos están apagados, las lámparas de
los hornos superior e inferior se encenderán. Si se
acciona el botón LIGHT de nuevo, ambas luces se
encenderán.
• Las lámparas de horno se encienden o apagan
automáticamente cuando las puertas están
abiertas y cerradas.
• Cuando un horno está en función, las lámparas del
horno se encienden automáticamente cuando
inicia el modo. Las lámparas del horno se apagan
automáticamente cuando el modo del horno se
anula.
• Las lámparas no funcionan en el modo de
autolimpieza.
Para controlar manualmente las luces del interior
del horno en ambos hornos superior e inferior si
uno o ambos hornos se están utilizando:
1.
Pulse UPPER/LOWER, la pantalla indicará qué
horno se ha seleccionado.
2.
Pulse UPPER/LOWER para resaltar el otro horno.
3.
Pulse LIGHT para encender o apagar las luces.
76
Page 77

Manual de uso & Mantenimiento
Modos cronometrados de cocinar
• En los modelos de horno dobles, se pueden
configurar ambos hornos independientemente para
funcionar en el modo cronometrado.
• Asegúrese de que el reloj de la hora del día
aparezca en la pantalla con el tiempo correcto.
• El modo cronometrado apaga el horno al final del
tiempo de cocción.
Para configurar el modo cronometrado
1.
Seleccione el modo de cocinar y la temperatura
como se señala en la perilla.
2.
Seleccione el horno que señalan los botones de
[UPPER/LOWER], si fuera necesario.
3.
Si fuera necesario, cambie la temperatura por
defecto en ese momento girando la perilla.
4.
Pulse el botón [COOK TIME] (tiempo de cocción).
Los rótulos de COOK y TIME aparecerán en la
pantalla, junto con el tiempo del cocción y los dígitos
de las horas empezarán a parpadear.
5.
Pulse [+] o [-] para cambiar las horas. Tenga
presente que el tiempo que precisa el horno para
alcanzar la temperatura tiene que incluir la
configuración del tiempo de cocción.
6.
Pulse [COOK TIME] de nuevo, las horas se
confirmarán y los dígitos de los minutos empezarán
a parpadear.
7.
Pulse [+] o [-] para cambiar los minutos. Mantenga
pulsado el botón para cambiar con incrementos de
20 minutos.
8.
Pulse [COOK TIME] otra vez o espere unos pocos
segundos para confirmar el valor de tiempo de
cocción completo.
9.
Al final del tiempo de cocción programado, el horno
se apagará automáticamente.
+
Modelos SOVB - DOVB ESPAÑOL
Para retrasar el inicio del modo cronometrado
Siga los paso del 1 al 9 de arriba.
• Pulse el botón [STOP TIME]. El rótulo DELAY
(Retraso) aparecerá en la pantalla junto con el
tiempo de parada y los dígitos de las horas
empezarán a parpadear.
• Pulse [+] o [-] para cambiar las horas.
• Pulse de nuevo el botón [STOP TIME], las horas
se confirmarán y los dígitos de los minutos
empezarán a parpadear.
• Pulse el botón Press [+] o [-] para cambiar los
minutos. Mantenga pulsado el botón para cambiar
con incrementos de 10 minutos.
• Pulse el botón [STOP TIME] una vez más y espere
uno segundos para confirmar el valor del tiempo
de parada completo.
• El reloj calcula automáticamente las horas del día
en las que el modo empieza y se para. El tiempo
de cocción que aparece en la pantalla se
cronometra en minutos. El horno se enciende y
calienta a la temperatura configurada, para el
número seleccionado de horas y minutos.
• Al final del tiempo de cocción programado el horno
se apaga automáticamente. En la pantalla
aparecerá End y el horno emitirá pitidos. Los
pitidos sonaran durante 15 minutos o hasta que se
toque un botón.
• En el caso de que sea necesario controlar el valor
del tiempo que no se muestra en la pantalla, pulse
el botón correspondiente para ver el valor deseado
durante 5 segundos.
• Ejemplo: si se muestra el valor del temporizador,
pulse el botón del tiempo de cocción para verlo
durante 5 segundos.
77
Page 78

Manual de uso & Mantenimiento
Consejos y técnicas de horneado
Hornear es cocinar con aire caliente. Tanto el elemento
superior como el inferior del horno se encienden para
calentar el aire pero no se utiliza el ventilador para
hacer circular el horneado.
Siga la receta o las orientaciones de los alimentos
convenientes para la temperatura de horneado, el
tiempo y la posición de las rejillas. El tiempo de
horneado cambiará con la temperatura de los
ingredientes y con las dimensiones, la forma y el
acabado del molde de horneado.
Directrices generales
• Para obtener los mejores resultados hornee los
alimentos en una única rejilla con al menos
1" - 1½” (2,5 – 3 cm) espacio entre los moldes y las
paredes del horno.
• Use una rejilla cuando selecciona el modo de
horneado.
+
Modelos SOVB - DOVB ESPAÑOL
• Use bandejas de horneado con o sin lados o
moldes de charlotas.
• Las cazuelas de metal oscuro o con recubrimiento
antiadherente cuecen más rápidamente y se doran
más. Los moldes aislantes alargarán ligeramente el
tiempo de cocción para la mayoría de los alimentos.
• No utilice hojas de aluminio o bandejas de aluminio
desechables para cubrir cualquier parte del horno.
Las hojas son un excelente aislante de calor y el
calor quedará atrapado por debajo. Esto alterará el
rendimiento de la cocción y podrá dañar el acabado
del horno.
• Evite el uso de las puertas abiertas para apoyar las
cazuelas.
• Los consejos para Resolver los problemas de
horneado se encuentran en la página 93.
• Controle para que estén cocidos en el menor
tiempo.
• Use moldes del metal (con o sin acabado
antiadherente), vidrio refractario, vitrocerámica,
cerámica u otros utensilios adecuados para el
horno.
• Cuando use vidrio refractario, reduzca la
temperatura 25°F (15°C) con respecto a la
temperatura recomendada.
Tabla de cocción por horneado
ALIMIENTO POSICIÓN DE REJILLA
Pastel
Glaseado 2 350 (175) 17-19
Pastel 1 350 (175) 37-43
Bizcochos 1 350 (175) 35-39
Pay
2 cortezas, fresco 9” 2 375-425 (190-220) 45-55
2 cortezas. fruta congel. 9” 2 375 (190) 68-78
Galletas
Azúcar 2 350-375 (175-190) 6-11
Cholocate chip 2 350-375 (175-190) 8-13
Brownies 2 350 (175) 29-36
Panes
Pan de levadura, 9x5 2 375 (190) 18-22
Rollos de levadura 2 375-400 (190-205) 12-15
Bollo, Panecillo 2 375-400 (190-205) 11-15
Molletes 2 425 (220) 15-19
Pizza
Congelada 2 400-450 (205-235) 23-26
Fresca 2 425-450 (220-235) 12-15
TEMP. °F (°C)
(HORNO PRECALENDADO)
TIEMPO (MIN)
78
Page 79

Manual de uso & Mantenimiento
Consejos y técnicas de horneado de convección
Reduzca las temperaturas del horneado de las recetas
25°F (15°C).
• Para obtener mejores resultados, se recomienda
poner los alimentos en bandejas planas, no tapadas
para aprovechar la circulación del aire forzado.
Utilice moldes de aluminio brillante para obtener los
mejores resultados si no se especifica nada más.
• Se puede utilice vidrio refractario o cerámica.
Reduzca la temperatura otros 25°F (15°C) cuando
utiliza platos de vidrio refractario, con una reducción
total de 50°F (30°C).
• Se pueden usar moldes de metales oscuros. Tenga
presente que los alimentos se dorarán más
rápidamente si usa recipientes de metal oscuro.
• El número de rejillas utilizadas lo determina la altura
del alimento que tienen que cocinar.
• Cocinar con múltiples rejillas para comidas
realizadas al horno se debe a la posición de las
rejillas 1, 2 y 3.Se pueden utilizar todas las rejillas,
para las galletas, bollos y galletitas saladas.
- Con 2 rejillas de horneado. Use las posiciones 1
- Con 3 rejillas de horneado. Use las posiciones
- Cuando hornea cuatro capas con pasteles al
• Transformar su propia receta puede ser fácil. Elija
una receta que funcione bien en el modo de
convección.
• Reduzca la temperatura y el tiempo de cocción si
fuera necesario. Puede ser necesario algún juicio y
cometer algún error para obtener un resultado
perfecto. Conserve los resultados de su técnica para
la próxima vez que quiera preparar la misma receta
utilizando el sistema por convección.
• Los consejos para resolver los problemas de
horneado se encuentran en la página 93.
+
y 3.
2, 3 y 4.
mismo tiempo, coloque los moldes de tal modo
que ningún molde quede directamente encima de
otro. Para lograr mejores resultados, coloque los
moldes en la parte frontal de rejilla superior y en
el fondo de la rejilla inferior (vea la figura a la
derecha). Permita 1” -1 1/2” de espacio libre
alrededor de los moldes.
Modelos SOVB - DOVB ESPAÑOL
Alimentos recomendados para
modo de horneado de convección:
Galletitas saladas y hojaldres
Galletas para el café
Pasteles (de 2 a 4 rejillas) Masa de levadura
Bollos de crema
Popovers
Guisos y entrantes
Comidas preparadas al horno (posición de las rejillas
1, 2, 3)
Alimentos que se elevan con aire (Suflés, Merengues,
Postres recubiertos con merengues, Bizcocho Angel,
Bizcochos)
Consejos para recetar rápidas y fáciles
Para transformar el HORNEADO estándar
en HORNEADO DE CONVECCIÓN:
• Reduzca la temperatura 25°F.
• Use el mismo tiempo de horneado que para el
modo de Horneado si es por debajo de los 10 a15
minutos.
• Los alimentos con un tiempo de horneado inferior a
30 minutos deberían controlarse para ver si están
bien cocidos 5 minutos antes que las recetas de
horneado estándar.
• Si los alimentos se hornean durante más de 40 a
45 minutos, el tiempo de horneado se debería
reducir un 25%.
79
Page 80

Manual de uso & Mantenimiento
Modelos SOVB - DOVB ESPAÑOL
Tabla de horneado de convección
Reduzca la temperatura de la receta estándar de 25ºF(15°C) para el horneado de Convección. La temperaturas
se han reducido en esta
ALIMIENTO POSICIÓN DE REJILLA
Pastel
Glaseado 2 325 (160) 17-19
Pastel 1 325 (160) 37-43
Bizcochos 1 325 (160) 35-39
Pay
2 cortezas, fresco 9” 2 350-400 (175-205) 45-55
2 cortezas. fruta congel. 9” 2 350 (175) 68-78
Galletas
Azúcar 2 325-350 (160-175) 6-11
Cholocate chip 2 325-350 (160-175) 8-13
Brownies 2 325 (160) 29-36
Panes
Pan de levadura, 9x5 2 350 (175) 18-22
Rollos de levadura 2 350-375 (175-190) 12-15
Bollo, Panecillo 2 350-375 (175-190) 11-15
Molletes 2 400 (205) 15-19
Pizza
Congelada 2 375-425 (190-220) 23-26
Fresca 2 400-425 (205-220) 12-15
+
TEMP. °F (°C)
(HORNO PRECALENDADO)
TIEMPO (MIN)
Esta tabla es una guía. Siga la receta o las instrucciones del paquete y
reduzca la temperatura de la manera apropiada.
80
Page 81

Manual de uso & Mantenimiento
Modelos SOVB - DOVB ESPAÑOL
Consejos y técnicas de grill de convección
• Precaliente para cocinar con Grill de convección.
• Cocine con grill en una bandeja baja y sin tapar.
• Cuando se gratinan pollos y pavos enteros, suba las
alas hacia atrás y ate fuerte las patas con cuerda de
cocina.
• Use el recipiente para asar a la parrilla de 2 piezas para
gratinar descubierto.
• Use una sonda o un termómetro de carne para
determinar la cocción del interior cuando en la
temperatura “END” (véase la tabla de cocción).
• Controle dos veces el interior de la temperatura de la
carne/de la ave introduciendo un termómetro de carne
en otra posición.
+
• Cuando se está asando un gran asado o un pavo,
podría ser preciso girar el recipiente del asado durante
el tiempo de gril. Esto permitiría una cocción aún mejor.
Las aves grande también precisan ser cubiertas con
láminas (y recipientes de asar) durante una porción del
tiempo de asado para evitar que se quemen por
encima.
Tabla de grill de convección
CARNES PESO (lb)
Res
Costillas 4-6 325 (160) 2 24-30 145 (63) medium rare
27-33 160 (71) medium
Rib Eye (sin heuso) 4-6 325 (160) 2 22-30 145 (63) medium rare
27-33 160 (71) medium
Churrasco, Eye Tip, Sirlion (sin heuso) 3-6 325 (160) 2 22-28 145 (63) medium rare
27-33 160 (71) medium
Tenderloin Tostado 2-3 425 (220) 2 15-25 145 (63) medium rare
Puerco
Lomo 5-8 350 (175) 2 20-30 160 (71) medium
(con o sin hueso)
Hombro 3-6 350 (175) 2 25-35 160 (71) medium
Aves
Pollo Entero 3-4 375 (190) 2 18-21 180 (82)
Pavo sin ralleno 12-15 325 (160) 1 10-14 180 (82)
Pavo sin ralleno
Pavo sin ralleno
Pechuga Pavo 3-8 325 (160) 1 15-20 170 (77)
Codorniz 1-1 ½ 350 (175) 2 45-75 total 180 (82)
Cordero
Media Pierna 3-4 325 (160) 2 25-30 160 (71) medium
30-35 170 (77) well
Pierna Entera 6-8 325 (160) 1 25-30 160 (71) medium
30-35 170 (77) well
16-20 325 (160) 1 9-11 180 (82)
21-25 325 (160) 1 6-10 180 (82)
TEMP. HORNO
Consejos para recetas rápidas y fáciles
Convierta el HORNEADO estándar
en GRILL DE CONVECCIÓN:
• No hay que reducir la temperatura.
• Los asados, los grandes cortes de carne y las
aves en general utilizan un 10-20% menos de
tiempo de cocción. Controle si los alimentos están
cocidos antes.
• Los guisos y los asados a la cazuela se hornean
cubiertos en el modo de GRILL DE
CONVECCIÓN y cuecen aproximadamente en el
mismo tiempo.
• La temperatura de seguridad mínima para el relleno
de las aves es de 165ºF (75ºC).
• Después de sacar los alimentos del horno, cúbralos
con papel de aluminio durante aproximadamente de
10 a 15 minutos antes de trincharlos.
• Mientras está cubierta, la temperatura del asado
°F (°C)
aumenta de
POSICIÓN DE
REJILLA
5° to 10°F (3°to 6°C).
TIEMPO
(min. per lb)
TEMPERATURA
INTERNA °F (°C)
81
Page 82

Manual de uso & Mantenimiento
Modelos SOVB - DOVB ESPAÑOL
Consejos y técnicas del asado de convección
• Coloque la rejilla en la posición requerida antes de encender el horno.
• Use el modo de Asado de Convección con la puerta del horno cerrada.
• No precaliente el horno.
• Use un recipiente de 2 piezas.
• Voltee la carne una vez a mitad del tiempo recomendado pare cocinar (vea la tabela de
convección)
Tabla de asado de convección
ALIMIENTO Y GROSOR
Carne de res
Filete (1-½" o más)
Vuelta y Vuelta 2 450 (235) 145 (65) 12-14 11-13
Medio 2 450 (235) 160 (71) 15-17 13-15
Bien Cocido 2 450 (235) 170 (77) 18-20 16-17
Hamburguesas (más de 1")
Medio 3 550 (290) 160 (71) 9-11 5-8
Bien Cocido 3 550 (290) 170 (77) 11-13 8-10
Aves
Cuartod de Pollo 3 450 (235) 180 (82) 16-18 14-16
(thigh)
Pechuga de Pollo 3 450 (235) 170 (77) 14-16 12-14
Puerco
Chuletas (1¼" o más) 2 450 (235) 160 (71) 12-14 13-15
Salchicha - fresca 3 450 (235) 160 (71) 4-6 3-5
* Los tiempos del Asado y Asado de Conveccion son aproximados y pueden variar ligeramente.
POSICIÓN DE
REJILLA
+
POSICIÓN DE
ASADO °F (°C)
TEMPERATURA
INTERNA °F (°C)
TIEMPO
LADO 1
(MIN.)*
asado de
TIEMPO
LADO 2
(MIN.)*
82
Page 83

Manual de uso & Mantenimiento
Modelos SOVB - DOVB ESPAÑOL
Consejos y técnicas de deshidratado
• Para deshidratar use el modo de deshidratado. Se usa una baja temperatura y el aire caliente que circula
suavemente elimina la humedad de los alimentos para conservarlos.
• La temperatura del modo de Deshidratado está programada a 140ºF (60ºC).
• Las temperaturas del modo de Deshidratado se encuentran entre 120ºF (50ºC) y 160ºF (70ºC).
• Se pueden usar múltiples rejillas al mismo tiempo.
• Algunos alimentos requieren como 14-15 horas para su total deshidratación.
• Consulte un libro de conservación de alimentos para los tiempos específicos y para el manejo de los
distintos alimentos.
• Este modo es apropiado para una variedad de frutas, vegetales, verduras y tiras de carne.
• Las rejillas especiales de secado se pueden comprar en tiendas de menaje de cocina especializadas.
• Si se usan servilletas de papel, algunas humedades de los alimentos pueden ser absorbidas antes de
empezar la deshidratación (como por los tomates o duraznos cortados en rodajas).
Tabla de deshidratado
ALIMIENTO
Fruta
Manzana
Platano
Cereza
Cáscara y trozos de naranja
Anillos de piña
Fresa
Verduras
Chiles
Hongos
Jitomates
Especies
Orégano, perejil verde, tomillo e
hinojo
Albahaca
Sumergido en ¼ vaso con jugo de
limon y 2 vasos de agua, rebanadas ¼”
Sumergido en ¼ vaso con jugo de
limon y 2 vasos de agua, rebanadas ¼”
Lavar y secar con toalla. Para cerezas
frescas, quitar huesos
Trozos de naranja ¼”; la parte de la
cáscara está lageramente pelada de la
Secado con toalla
Lavar y secar c/toalla.
Rebanadas de ½", la piel (exterior) está
Lavar y secar c/toalla.
Quitar la membrana del chile, cortada
en rebanadas grandes de aprox. 1”
Lavar y secar c/toalla.
Cortar el tallo, cortar en rebanadas de
Lavar y secar c/toalla.
Cortar en rebanadas de 1/8”, drenar
Enjuagar y secar con toalla de papel
Usar las hojas de albahaca de 3 a 4
pulgadas desde la punta.Rociar con
agua sacudirlo y secarlo a golpecitos
+
PREPARACIÓN
naranja
sobre la rejilla
1/8”
bien
TIEMPO* DE
SECADO (hrs)
APROXIMADO
11-15 Ligeramente flexible
11-15 Ligeramente flexible
10-15 Flexible, duro, masticable
Cáscara 2-4
Trozos: 12-16
En lata: 9-13
Fresca: 8-12
12-17 Deco, frágil
16-20 Duro sin tener humedad en el interior
7-12 Duro y seco
16-23 Seco, color de ladrillo rojo
Secar a 120°F (60°C)
3-5 hrs
Secar a 120°F (60°C)
3-5 hrs
PRUEBA DEL TERMINADO
Cáscara de Naranja: seca y frágil
Suave y flexible
Crujiente y frágil
Crujiente y frágil
83
Page 84

Manual de uso & Mantenimiento
Modelos SOVB - DOVB ESPAÑOL
Consejos y técnicas del asado
• Coloque la rejilla en la posición requerida antes de encender el horno.
• Use el modo de Asado de Convección con la puerta del horno cerrada.
• No precaliente el horno.
• Use un recipiente de 2 piezas.
• Se puede untar las carnes con un pincel mojado en aceite o mantequilla para evitar que se pegue.
• Voltee la carne una vez a mitad del tiempo recomendado pare cocinar (vea la tabela de
Tabla de asado
ALIMIENTO Y GROSOR
Carne de res
Filete (1-½" o más)
Vuelta y Vuelta 3 5 145 (63) 5-7 4-6
Medio 3 5 160 (71) 6-8 5-7
Bien Cocido 3 5 170 (77) 8-10 7-9
Hamburguesas (más de 1")
Medio 3 5 160 (71) 7-9 5-7
Bien Cocido 3 5 170 (77) 8-10 7-9
Aves
Pechuga (con hueso) 3 3 170 (77) 14-16 14-16
Muslo 3 3 180 (82) 28-30 13-15
Puerco
Chuletas (1") 3 5
Salchicha - fresca 3 5
Rebanada de Jamon (½") 3 5
Mariscos
Filetes de Pescado, 1" 3 4 10-14
Con manequilla
Cordero
Chuletas (1")
Vuelta y Vuelta 3 5 145 (63) 5-7 4-6
Medio 3 5 160 (71) 6-8 5-7
Bien Cocido 3 5 170 (77) 8-10 7-9
Bread
Pan, rebanadas de 1" 4 5 2-2,30
Pan de ajo, rebanadas de 1" 3 5 4-6
* Los tiempos del Asado y Asado de Conveccion son aproximados y pueden variar ligeramente.
POSICIÓN DE
REJILLA
+
POSICIÓN DE
ASADO
TEMPERATURA
INTERNA °F (°C)
160 (71)
160 (71)
160 (71)
Cook until
opaque & flakes
easily
with fork
TIEMPO
LADO 1
(MIN.)*
Pautas e seguir para la temperatura de alimentos de FSIS
(Servicio de Inspección y Seguridad de Alimentos USDA)
140°F(60°C) Jamón , precocido (para recalentar) Relleno (cocido solo o en el ave)
145°F(63°C) Carne fresca de res, tenera, cordero (vuelta y vuelta)
Carne molida y mezcalas de carne (res, puerco, tenera,
cordero)
Carne fresca de res, tenera, cordero (medio) Pechuga de pollo (aves)
160°F(71°C)
165°F(74°C) Carne molida y mezcalas de carne (pavo, pollo)
Note : Huevos (solos, no utilizados en una receta) – cocer hasta que la yema y la clara estén duras
Carne fresca de puerco (media)
Jamón fresco (crudo) Pollo y jamón (entero)
Platillos con huevos Carne de aves (muslos y alas)
165°F(74°C)
Sobras y guisados
Carne fresca de res, tenera, cordero (bien cocida)
170°F(77°C)
Carne fresca de puerco (bien cocida)
180°F(82°C)
Pato y ganso
asado)
TIEMPO
LADO 2
(MIN.)*
7-9 5-7
5-7 3-5
3-5 4-6
Do not
turn
84
Page 85

Manual de uso & Mantenimiento
Modelos SOVB - DOVB ESPAÑOL
Características especiales
La función de las Características especiales se puede utilizar para seleccionar las siguientes características
especiales del horno:
1. SAB => MODO SÁBADO (para creyentes de religiones que no permiten “trabajar” los sábados)
2. OFS => CONFIGURACIÓN DE OFF DEL HORNO (se usa para calibrar la temperatura del horno)
3. dEG => UNIDADES DE GRADOS (se usa para seleccionar los grados Fahrenheit o Centígrados)
4. Hr => FORMATO DEL RELOJ (se usa para configurar el formato de la hora del día en 12 12 am/pm o 24
horas).
Para seleccionar las características especiales, sigua los pasos abajo indicados:
Pulse y mantenga oprimido el CLOCK (Reloj) y el TIMER (cronómetro) durante al menos 3 segundos. La hora del
reloj desaparecerá y se mostrará la siguiente pantalla.
+
1. Pulse el botón INC o el botón DEC para desplazar todas las opciones posibles hasta encontrar la
deseada.
2. Pulse el botón CLOCK para iniciar el cambio del modo.
3. El valor parpadeará, cambiando este utilizando los botones INC o DEC. En los hornos dobles es posible
configurar un desplazamiento diferente en cada horno. Seleccione el interior de cada horno con los
botones UPPER/LOWER (Superior/inferior).
4. Mantenga pulsado el botón CLOCK para confirmar y volver a la pantalla del reloj original.
85
Page 86

Manual de uso & Mantenimiento
Modelos SOVB - DOVB ESPAÑOL
Instrucciones del modo sábado
Entre en el menú de las opciones de los usuarios pulsando al mismo tiempo los botones CLOCK (RELOJ) y
TIMER (TEMPORIZADOR). Desplácese por la lista de opciones en el campo de los dígitos rojos (dEG, OFF, Hr,
Sab), pulsando INC/DEC, hasta que aparezca Sábado.
1. Pulse el botón CLOCK para entrar en el modo de edición: el punto seleccionado cambia los dígitos
verdes en la parte izquierda y su estado en los campos de los dígitos rojos empieza a parpadear.
+
2. Pulse de nuevo los botones INC/DEC para configurar el modo Sábado ON o OFF (Default=OFF). Pulse
CLOCK para confirmar y volver a la lista de opciones. Mantenga pulsado el botón durante 3 segundos
para dejar el menú de selección y volver a las operaciones normales.
3. Una vez que se ha configurado el modo Sábado, solo las posiciones de BAKE y OFF están disponibles
en el selector del modo de cocción. Mueva el selector a BAKE, luego configure la temperatura en el valor
deseado antes de 5 minutos. Después de 5 minutos, la temperatura no se muestra más y la pantalla
aparece como la de abajo: el modo Sábado está activo. En un horno doble, los indicadores del interior del
horno superior/inferior ya están disponibles. Ambos iconos están encendidos y ambos interiores están
funcionando.
• El estado de las luces del horno no se puede cambiar durante el tiempo Sábado.
• La temperatura del horno solo se puede bajar pero no aparece ninguna información en la pantalla.
• El ventilador de enfriamiento puede funcionar en el modo Sábado.
• Las luces de precalentamiento están inhabilitadas durante el modo Sábado.
• El avisador estará siempre silencioso, aunque haya algún fallo, interrupción de funcionamiento etc.
• El tiempo de cocción máximo permitido tiene que ser de 72 horas.
• El usuario puede parar el horno manualmente, también durante el modo Sábado, moviendo el selector de
modo de cocción a la posición OFF.
86
Page 87

Manual de uso & Mantenimiento
Modelos SOVB - DOVB ESPAÑOL
Cuidado y limpieza del horno
Autolimpieza del horno
Este horno se caracteriza por una función de autolimpieza pirolítica que elimina la dificultad y el tiempo utilizado
en una limpieza manual del interior del horno. Durante la autolimpieza el horno usa una temperatura muy alta
(approx. 885°F/470°C) para eliminar los residuos de comida y grasa.
• Se puede autolimpiar un solo horno a la vez.
• Es normal ver humo y/o una llama ocasional durante el ciclo de autolimpieza, dependiendo del contenido
y de la cantidad de suciedad que queda en el horno. Si la llama persiste, apague el horno y permita que
se enfríe antes de abrir la puerta para limpiar los residuos de comida con un trapo.
• El pestillo de la puerta se activa automáticamente tras seleccionar el ciclo de autolimpieza. El icono de
puerta cerrada aparecerá en la pantalla. Esto asegura que la puerta no se pueda abrir mientras el interior
del horno se encuentra a la temperatura d elimpieza.
• La lámpara del horno no funciona durante el modo de autolimpieza.
• Durante la autolimpieza es preciso ventilar bien la cocina para ayudar a eliminar los olores asociados con
la autolimpieza. Los olores se perderán con el uso.
• El tiempo de autolimpieza presente dura tres horas.
• El modo se para automáticamente al final de las horas de limpieza.
• Cuando el calor del horno baja a una temperatura segura, se activa el bloqueo automático de la puerta y
esta se puede abrir.
Antes de la autolimpieza
+
1. Quite todos los recipientes y la bandeja de asado.
2. Quite las rejillas del horno. Si se dejan las rejillas en el horno durante la autolimpieza perderán su
acabado brillante y dejarán de deslizarse suavemente sobre las guías de las rejillas. Vea la Tabla de
limpieza del horno para un cuidado apropiado, páginas 89 y 90.
3. Limpie cualquier resto y la grasa con toallas de papel. El exceso de grasa provocaría llamas y humos
dentro del horno durante la autolimpieza.
4. Repase la figura de aquí abajo. Algunas zonas del horno se tienen limpiar a mano antes de iniciar este
ciclo. No se calientan lo suficiente durante el ciclo de limpieza para quemar los residuos. Use una esponja
jabonosa, un raspador de plástico o una esponjilla con detergente S.O.S.®. Limpie a mano el borde de la
puerta, el marco delantero y superior hasta 1-½ “(2-3 cm) pulgadas por el interior del marco con
detergente y agua caliente. No frote el empaque. Limpie a mano la ventana de la puerta del horno.
Enjuague a fondo todas las zonas y luego séquelas.
5. Asegúrese de que las lámparas del interior estén apagadas y que las bombillas y la cubierta estén en sus
lugares. Vése las página 92.
87
Page 88

Manual de uso & Mantenimiento
Configuración del modo de Autolimpieza
Para configurar el modo de autolimpieza
1. Pulse el botón UPPER/LOWER para
seleccionar el interior del horno que hay que
limpiar, si el horno el doble.
2. Gire ambas perillas a la posición de
autolimpieza.
3. CLEAN & TIME aparecen en la pantalla.
4. El número de las horas de limpieza aparecerá
en la pantalla automáticamente. El tiempo de
limpieza estándar es de 3 horas.
5. Al final del tiempo de limpieza, el horno se
apagará automáticamente.
6. Pare el modo de limpieza en cualquier
momento, quite de la posición de limpieza una
de las perillas.
No intente abrir la puerta cuando la puerta está
bloqueada. El icono de bloqueo empezará a parpadear
hasta que el motor se pare. Cuando aparece el símbolo
de bloqueo, la puerta no se puede abrir. Controle que la
puerta se ha bloqueado y no la abra antes de empezar
el modo de autolimpieza.
Si la puerta no se bloquea, gire la perilla del modo de
cocción en la posición OFF y no iniciar la autolimpieza;
llame por teléfono el servicio (véase a página 94 para
obtener el servicIo).
Si la puerta se encuentra en la posición de abierta
cuando está seleccionado el modo, el icono de bloqueo
parpadeará hasta que la puerta se cierre. El pestillo no
se mueve.
Para cambiar el tiempo de limpieza
1. Para cambiar el tiempo prefijado de 3 horas,
selecciones otra hora para residuos ligeros o 4
horas para residuos resistentes inmediatamente
antes de iniciar.
2. Para cambiar el número de horas, pulse el
botón COOK TIME.
3. El número de horas de limpieza parpadeará.
4. Utilice los botones INC o DEC para cambiar el
número de horas.
+
Modelos SOVB - DOVB ESPAÑOL
5. Para cambiar los minutos, pulse el botón COOK
TIME.
6. El número de minutos de limpieza parpadeará.
7. Use los botones INC o DEC para cambiar los
números de los minutos. Mantenga pulsado
para cambiar de 10 en 10 minutos.
Pulse COOK TIME o espere unos segundos para
confirmar el nuevo valor.
Para retardar el inicio de la limpieza
1. Siga los pasos que aparecen arriba del 1 a 7.
2. Pulse el botón STOP TIME y la hora de parada
empezará a parpadear.
3. Use los botones INC o DEC para cambiar la
hora de parada.
4. Para cambiar los minutos, pulse el botón STOP
TIME.
5. Los minutos para la limpieza parpadearán.
6. Use los botones INC or DEC para cambiar los
minutos. Mantenga pulsados el botón para
cambiar de 10 en 10 minutos.
7. Pulse STOP TIME o espere unos segundos
para confirmar el nuevo valor.
8. La puerta del horno se bloqueará y en la
pantalla aparecerá DELAY.
9. Al terminar el tiempo de retardo, empieza la
autolimipieza
10. El horno se apagará automáticamente al final
del tiempo de limpieza programado.
11. END aparecerá en la pantalla, CLEAN y TIME
parpadearán hasta que se pulse un botón o se
gire la perilla en la posición de OFF.
PARA COMPROBAR EL TIEMPO DE LIMPIEZA O EL
TIEMPO DE PARADA durante la limpieza retardada,
simplemente pulse los botones de COOK TIME o
STOP TIME.
88
Page 89

Manual de uso & Mantenimiento
Modelos SOVB - DOVB ESPAÑOL
Cuidado general del horno
Cómo usar la tabla de la limpieza del horno
1. Localice el número de la parte que tiene que limpiar en la figura de esta página.
2. Busque el nombre de la parte en la tabla.
• Use el método de limpieza que aparece en la columna de la izquierda si el horno es blanco o negro.
• Use el método de limpieza que aparece en la columna de la derecha si el horno es de acero inoxidable.
3. Haga coincidir la letra con el método de limpieza Phe de la página siguiente.
+
Tabla de limpieza
Método de limpieza Método de limpieza
Parte
Marco de la puerta
1
Interior de la ventana de
2
la puerta
Rejillas removibles del
3
horno
Molduras laterales
4
Moldura del panel de
5
control
Panel de control
6
Aberturas de enfriamiento
7
del horno
Marco frontal del horno
8
Cavidad del horno
9
Empaque metálico
10
Horno
Negro/Blanco
Horno de Acero
Inoxidable
E E
F F
A o E A o E
D D
C G
C C
D D
E E
E E
B B
Parte
Puerta del horno interior
11
Agarradera de la puerta
12
Aberturas de enfriamiento
13
de la puerta
Frente de la puerta
14
Molduras del horno
15
Tapa terminal
16
Bandeja de grill
17
Bandeja del horno inferior
18
Rejilla extensible
19
Horno
Negro/Blanco
Horno de Acero
Inoxidable
E E
D D
E E
C&D C&D
D D
D D
E E
E E
A A
89
Page 90

Manual de uso & Mantenimiento
Modelos SOVB - DOVB ESPAÑOL
Acabados del horno / métodos de limpieza
El horno completo se tiene que limpiar de manera segura con una esponja jabonosa, enjuagar y secar. Si no se
consiguen eliminar residuos persistentes, siga los métodos de limpieza que se muestran aquí abajo.
• Use siempre el limpiador más suave para hacer el trabajo.
• Frote el acabado del metal en la dirección del granulado.
• Use trapos limpios y suaves, esponjas o toallas de papel.
• Enjuague a fondo con el mínimo de agua posible para que no gotee agua en el interior de las ranuras.
• Seque para evitar que se formen alones.
Los limpiadores que se enumeran aquí abajo indican el tipo de productos que hay que usar y no se recomiendan.
Use todos los productos según las instrucciones del paquete.
Parte Método de limpieza
A Cromo placado Lave con agua jabonosa caliente. O frote suavemente con esponjillas con Soft
Scrub®, Bon-Ami®, Comet®, Ajax®, Brillo® o S.O.S® directamente. Se puede usar
los limpiadores de horno Easy Off® o Dow® (fórmula de horno en frío), pero podrían
provocar oscurecimientos y decoloración.
Se pueden limpiar las rejillas en el horno durante el modo de autolimpieza, pero
perderán su acabado brillante y cambiar permanentemente a un gris metálico.
B Fibra de vidrio
C Cristal Eche Spary Windex® o Glass Plus en una tela primero, y luego llímpielo. Use
D Pintura Limpie con agua jabonosa caliente o aplique Fantastik® o Formula 409® primero a
E Porcelana Limpie de inmediato derrames ácidos como jugos de fruta, leche y jitomate con una
F Cristal reflectante Limpie con agua caliente jabonosa y una esponja o un estropajo de plástico. Para las
G Acero inoxidable Siempre limpie con el grano. Limpie con una esponja jabonosa luego enjuague y
H Sonda (si presente)
NO LIMPIE EL EMPAQUE A MANO.
Fantastik® o Formula 409® para quitar salpicaduras grasientas.
una
esponja limpia o una toalla de papel y limpie. Evite el uso de limpiadores en polvo y
esponjillas de fibra metálica y detergentes para hornos.
toalla seca. No use una esponja/toalla húmeda sobre porcelana caliente. Cuando ya
está fría, limpie con agua jabonosa caliente o aplique Bon-Ami® o Soft Scrub® a una
esponja húmeda. Enjuague y seque. Para manchas resistentes, use suavemente
esponjillas con Brillo® o S.O.S.®. Es normal que la porcelana se agriete (líneas finas)
con el tiempo debido a la exposición al calor y a los residuos de comida.
manchas de agua, use vinagre, Windex®, amoniaco o Bon-Ami®. NO USE
ABRASIVOS DUROS
seque o limpie con Fantastik® o Formula 409® aplicado a una toalla de papel. Proteja
y limpie con Stainless Steel Magic® y un trapo suave. Quite las manchas de agua con
un trapo humedecido con vinagre blanco. Use Bar Keeper’s Friend® para quitar la
decoloración térmica.
La limpieza de la sonda ha de realizarse con detergente y agua caliente.
Luego enjuague y seque.
No ponga a remojo ni meta en el lavavajillas.
+
90
Page 91

Manual de uso & Mantenimiento
Modelos SOVB - DOVB ESPAÑOL
Operaciones de mantenimiento que puede hacer usted mismo
Quitar la puerta del horno
ADVERTENCIA
• Asegúrese de que el horno esté frío y de que se haya apagado la corriente antes de quitarla puerta.
De otro modo podría causar una descarga eléctrica o quemaduras.
• La puerta del horno es pesada y frágil. Use ambas manos para quitar la puerta. La parte frontal de la
puerta es de vidrio. Maneje con cuidado para evitar que se rompa.
• Agarre solo los costados de la puerta del horno. No use la agarradera ya que podría girar en su mano y
causar daños o heridas.
• Si no agarra firmemente y de la manera correcta la puerta del horno podría causar lesiones a personas
o daños al producto
Para quitar la puerta
1. Abra la puerta completamente.
2. Levante los soportes de las bisagras (1) en las
ranuras (2).
3. Sujete la puerta firmemente por los dos costados
usando las dos manos y cierre la puerta.
4. Sujétela firmemente; la puerta es pesada.
5. Coloque la puerta en un lugar apropiado.
+
Para volver a colocar la puerta
1. Introduzca las patillas superiores (3) de las dos
bisagras en las ranuras superiores (6) y las
patillas inferiores (4) en las ranuras inferiores (7).
Los batientes (5) se tienen que enganchar en los
rebordes (8).
2. Coloque las bisagras (1) hacia atrás en su
posición.
3. Cierre y abra la puerta lentamente para
asegurarse de que está colocada correctamente
y de manera segura.
91
Page 92

Manual de uso & Mantenimiento
Cambiar una lámpara del horno
• Cada horno está equipado con dos lámparas
con bombillas halógenas colocadas en la pared
posterior del horno.
• Las luces se enciende cuando las puertas se
abren o cuando se encuentra en el ciclo de
cocción.
• Las lámparas del horno no están encendidas
durante la AUTOLIMPIEZA.
• Cada lámpara consiste en unas lentes
removibles, una bombilla y un casquillo que
está fijado en su lugar. Vea la figura de esta
página.
• La sustitución de la bombilla se considera un
mantenimiento de rutina.
Para remplazar la bombilla
1. Lea la ADVERTENCIA de esta página.
2. Apague la corriente general (caja de fusibles o
cortocircuito).
3. En los hornos de convección quite la tapa del
ventilador destornillando los 4 tornillos con un
destornillador.
4. Desenrosque las lentes.
5. Extraiga la bombilla de su casquillo.
6. Sustituya la bombilla con otra. Evite tocar la
bombilla con los dedos, porque la grasa de las
manos podría dañar la bombilla cuando se
calienta.
7. El foco es de halógeno: Utilizar uno con los
mismos Volt y Watt (ver las figuras de esta
página).
8. Enrosque las lentes.
9. Vuelva a colocar la tapa del ventilador si el
modelo está dotado con ello.
10. Restablezca la corriente general (caja de
fusibles o cortocicuito).
+
Modelos SOVB - DOVB ESPAÑOL
ADVERTENCIA
• Asegúrese de que el horno y las lámparas estén
frías y la corriente está apagada antes de
remplazar la(s) bombilla(s).
Puede haber un fallo debido a una descarga
eléctrica o a quemaduras.
• Las lentes tienen que estar montadas cuando se
usa el horno.
• Las lentes sirven para evitar que se rompan las
bombillas.
• Las lentes son de vidrio. Manéjelas con cuidado
para evitar que se rompan. Los vidrios rotos
pueden causar lesiones.
92
Page 93

Manual de uso & Mantenimiento
Modelos SOVB - DOVB ESPAÑOL
Resolución de los problemas de horneado
Tanto con el Horneado como con el Horneado de convección, los resultados escasos pueden ocurrir por muchas
razones además de por un mal funcionamiento del horno. Controle la tabla para las causas de los problemas
más comunes. Debido a que el tamaño, la forma y el material de los utensilios de hornear tienen un efecto
directo sobre los resultados del horneado, la mejor solución podría ser remplazar los viejos utensilios de hornear
que se han oscurecido y deformado con el tiempo y el uso. Revise también la tabla de Horneado de las páginas
de la 78 a la 84, la posición de la rejilla y el tiempo de hornear
Problema de horneado
Los alimentos se doran poco
uniformes
Los alimentos quedan muy
Los alimentos quedan muy
secos o muy encogidos
Los alimentos se hornean o
asan muy lentamente
Las costras de pays no se doran
en el fondo o quedan muy
empapadas.
Los pasteles no se doran y
quedan planos, tal vez sin
terminar por adentro
Los pasteles quedan elevados
en el centro con grietas en la
parte superior
Los bordes de la costra de pays
quedan muy dorados
• El horno no está precalentado
• Papel de aluminio en la rejilla o fondo del horno
• Utensilios de hornear son demasiado grandes
• Los moldes tienen contacto o tocan la pared
• El horno no está precalentado
• Se usa un molde de vidrio, mate o de metal oscuro
• Posición incorrecta de la rejilla
• Los moldes tienen contacto o tocan la pared
+
• Temperatura del horno muy alta
• Tiempo de hornear muy largo
• Se abrió la puerta del horno frecuentemente
• El molde es demasiado grande
• Temperatura del horno muy baja
• El horno no está precalentado
• Se abrió la puerta del horno frecuentemente
• Muy sellado con papel de aluminio
• El molde es demasiado pequeño
• Tiempo de hornear insuficiente
• Se usan moldes de acero brillosos
• Posición incorrecta de la rejilla
• Temperatura del horno muy baja
• Temperatura del horno muy baja
• Tiempo de hornear incorrecto
• Se probó el pastel antes de tiempo
• Se abrió la puerta del horno frecuentemente
• El molde es demasiado grande
• Temperatura del horno muy alta
• Tiempo de hornear muy largo
• Los moldes tienen contacto o tocan la pared
• Posición incorrecta de la rejilla
• El molde es demasiado pequeño
• Temperatura del horno muy alta
• Los bordes de la costra son muy delgados
Causa
93
Page 94

Manual de uso & Mantenimiento
Modelos SOVB - DOVB ESPAÑOL
Resolución de los problemas de funcionamiento
Antes de ponerse en contacto con el servicio de asistencia técnica, lea la sección “Solución de problemas”. Puede que
hacerlo le ahorre la llamada. Si no encuentra la solución a su problema en esta sección, siga las instrucciones que
encontrará más abajo. Cuando llame al servicio de asistencia, tenga a mano los siguientes datos: fecha de compra,
referencia completa del modelo y número de serie de su placa de cocción. Esa información nos ayudará a atenderle.
Problema del horno
F03 o F04 aparecen en la
pantalla
Otro error_F aparece en la
pantalla
La pantalla del horno se
quedaapagado
El ventilador de enfriamiento
sigue funcionando después
de apagar el horno
La puerta del horno está
cerrada y no se abre, aún
estando fría
El horno no calienta Revise el cortacircuito o la caja de fusibles en su casa. Asegúrese de que hay una alimentación
El horno no cocina de un
modo uniforme
La temperatura del horno
está muy alta o muy baja
Las luces del horno no
funcionan correctamente
La luz del horno se queda
encendida
No se puede quitar la cubierta
del lente
El horno no se autolimpia
bien
El reloj y cronómetro no
funcionan bien
Hay mucha humedad Cuando utiliza el modo de hornear debe precalentar el horno. El horneado de convección
Astillas de porcelana Al quitar y reemplazar las rejillas del horno, siempre debe inclinarlas hacia arriba y no forzarlas
Ocurrió un problema con el bloqueo. Apague la corriente y vuelva a encenderla después de
unos segundos. El horno debe realizar una autoprueba de bloqueo. Si la condición sigue igual,
anote el número del código y llame a un centro de servicio autorizado.
Apague la corriente y vuelva a encenderla después de unos segundos. El horno debe realizar
una autoprueba de bloqueo. Si la condición sigue igual, anote el número del código y llame a
un centro de servicio autorizado.
Apague la corriente general (caja de fusibles o cortocircuito). Vuelva a conectar el circuito. El
horno debe reiniciarse y se podrá operar.Si la condición sigue igual, llame el centro de servicio
autorizado.
Esto es normal. El ventilador se apaga automáticamente cuando los componentes electrónicos
se hayan enfriado suficientemente.
Apague el horno en el cortacircuito y espere unos segundos. Vuelva a conectar el circuito. El
horno debe reiniciarse y se podrá operar.
eléctrica correcta para el horno. Asegúrese de haber seleccionado la temperatura del horno.
Revise la calibración del horno. Ajuste la calibración si es necesario (vea Compensación de la
Temperatura del Horno, Pág. 76). Consulte las tablas de cocinar para las posiciones
recomendadas de rejillas. Siempre reduzca la temperatura de recetas 25°F (15°C) cuando
hornea con el modo de horneado de convección.
Se debe ajustar el termostato del horno. Vea Calibrar la Temperatura del Horno, Pág. 76.
Reemplace o reinserte el foco si está flojo o defectuoso. Vea la Pág. 92. La bombilla se puede
quemar si lo toca con los dedos.
Revise si la puerta del horno está obstruida.
Puede haber sólidos acumulados alrededor de la cubierta. Limpie el área del lente con una
toalla seca y limpia antes de tratar de quitar la cubierta de la lente.
Permita que el horno se enfríe antes de ejecutar la autolimpieza. Siempre elimine suciedades
sueltas o derrames pesados antes de la autolimpieza. Si el horno está muy sucio, configure
una autolimpieza de cuatro horas. Vea Autolimpieza del Horno, Pág. 87.
Asegúrese de que la corriente eléctrica sea correcta para el horno. Vea las secciones sobre
Reloj y Temporizador, Páginas 75.
elimina cualquier humedad en el horno (esta es una de las ventajas de la convección).
para evitar astillar la porcelana.
+
Pasos para resolver los problemas
Registro de datos para el servicio
Cómo obtener servicio Para información sobre servicio autorizado o refacciones, ver el pàrrafo “Fulgor Garantia ..”.
Al abrir la puerta del horno se puede ver la etiqueta con el número de serie del producto. Se encuentra del lado izquierdo,
centrada verticalmente justo dentro de la cavidad del horno. Vea la Pág. 69. Ahora es un buen momento para anotar esta
información en el espacio proporcionado abajo. Guarde su factura para validar la garantía.
Número del Modelo _____________ Número de Serie ___________________ Fecha de instalación y ocupación___________
94
Page 95

Manual de uso & Mantenimiento
Modelos SOVB - DOVB ESPAÑOL
FULGOR GARANTÍA para electrodomésticos
Vigencia de la garantía:
Fulgor USA concede una garantía completa de 24 meses desde la fecha de compra indicada en la factura para el
territorio continental de EE.UU. y Canadá. Durante este período, Fulgor abonará el importe de las piezas sustituidas y
la mano de obra necesarias para reparar el aparato
Para validar la garantía, guarde la factura de compra y el albarán de entrega originales.
Fulgor USA establece una disposición exclusiva para ofrecer una sola contribución económica en caso de cualquier
reparación realizada en el período de 1 año tras los términos estándar de la garantía de Fulgor. Esta disposición
establece que si se produce un fallo técnico después del período de dos años de garantía, el cual comienza con el
primer día del mes 25 hasta el último día del mes 36 tras la fecha de compra, Fulgor abonará directamente al cliente la
cantidad de 50,00 $ para ayudar a sufragar el importe del servicio derivado de un fallo técnico. Esta contribución para
el servicio estará limitada a una única reclamación por cliente hasta el tercer año tras la fecha de compra.
Para obtener servicio en virtud de esta garantía, debe:
1. Visitar nuestro sitio web en www.fulgorusa.com o a cualquier proveedor autorizado, o bien enviar una notificación por
escrito de los motivos de reclamación a Fulgor USA L.L.C., Technical Services Department, 1076 Miners Rd., Saint
Joseph, MI 49085.
2. Proporcionar una copia del recibo de ventas original.
3. Llamar al +1-(800)-232-4907 para obtener información del servicio para el aparato.
4. Ofrecer a Fulgor la oportunidad razonable de investigar la reclamación antes de retirar el producto o cualquier
componente del mismo.
+
Cobertura:
Lea el Manual de uso y mantenimiento antes de utilizar el aparato por primera vez.
Esta garantía es aplicable a los aparatos Fulgor utilizados sólo para uso doméstico. Nuestros aparatos no están
destinados a uso comercial. Esta garantía será válida únicamente para el propietario original y se podrá
transferir.
Durante el período de garantía, Fulgor, a su propia discreción, reparará o cambiará el producto sin cargo alguno
por las piezas y la mano de obra.
La garantía no cubrirá:
1. Los daños al aparato provocados intencionadamente o por accidente
2. La instalación inadecuada o la conexión incorrecta al suministro eléctrico
3. Las modificaciones al aparato
4. El funcionamiento defectuoso debido a un uso inadecuado
5. La rotura o las ralladuras producidas por el uso habitual en la superficie vitrocerámica
6. El funcionamiento en condiciones profesionales o comerciales
7. Los daños provocados por rayos, fuego o inundación, u otros casos de fuerza mayor
8. La sustitución o el acoplamiento de piezas que no son las originales suministradas por Fulgor
9. Las reclamaciones por daños superficiales, como ralladuras en piezas de acero inoxidable, sólo están
cubiertas por garantía limitada y deben efectuarse en un período de dos semanas tras la fecha de compra.
Esta garantía cubre solamente el aparato y sus componentes. Se excluyen de la garantía los daños a objetos
que estén en contacto directo o colocados cerca del aparato. No se aceptarán cargos de terceros que no sean
agencias de servicio autorizadas de Fulgor.
En caso de que se demuestren defectos de fábrica o materiales en el aparato, se garantizará al usuario final sólo
la reparación o la sustitución. Bajo ningún concepto Fulgor será responsable de pérdidas o daños, ya sean
directos, consecuentes o accesorios, producidos por el uso o el uso inadecuado del aparato.
Con el objeto de adquirir los derechos de garantía, se debe proporcionar la factura original al Departamento de
servicio técnico de Fulgor USA para verificar la fecha de compra. Algunos estados no contemplan la limitación de
daños accesorios o consecuentes, por lo que es posible que no se apliquen las limitaciones o exclusiones
anteriores.
En caso de reclamaciones de carácter técnico o para solicitar servicio, póngase en contacto en primer
lugar con el distribuidor al que compró el aparato Fulgor.
Fulgor USA, LLC
service@fulgorusa.com
Información del producto, el usuario y la garantía: +1-800-926-2032
Información sobre servicio y reclamaciones: +1-800-232-4907
.
95
Page 96

FULGOR USA, LLC
1076 Miners Rd.,
Saint Joseph, MI 49085
09FU3640 – 03/08
 Loading...