

Page 1
FM36CDFDS1
REFRIGERATOR
RÉFRIGÉRATEUR
REFRIGERADOR
EN
FR
ES INSTRUCCIONES PARA LA INSTALACIÓN Y USO
INSTRUCTIONS FOR INSTALLATION AND USE
INSTRUCTIONS POUR L’INSTALLATION ET L’UTILISATION
Page 2

Welcome to the world of
simple handling and no worries
Thank you for choosing Fulgor Milano .This manual contains all the information
you will need to safely and correctly use your refrigerator. Please read all the
instructions prior to using the appliance and keep this manual in a secure place
for future reference. Do not remove the attached adhesive identification label
containing code, model number, manufacturer and other information from the
refrigerator. This label will be used by the authorized service Fulgor Milano
representative in the event that your refrigerator needs servicing.
Environmental advice
The packaging material used is recyclable; we recommend that you separate
plastic, paper and cardboard and give them to recycling companies. To help
preserve the environment, the refrigerant used in this product is R134a
(Hydrofluorocarbon - HFC), which does not affect the ozone layer and has little
impact on the greenhouse effect.
future, do NOT throw it away with the rest of your domestic garbage. Remove
the doors and drawers and cut the power cord and recycle in accordance with
local ordinances.
. If you need to dispose of this appliance in the
01
Page 3

Contents
Safety.........................................................................................................03
Product Description...................................................................................05
Installation........................... ...............................................................07........
Door Handles....................................... ................................................17.....
Making Minor Adjustments between doors................................................18
Installing the water line..............................................................................19
Operation...................................................................................................21
Cleaning and Maintenance.......................................................................25
Solutions to Problems.............................................................................. 26
Attention
The refrigerator you have just purchased may be slightly different from the one shown in
the drawings in this manual, but its overall design intent is the same.
Please read the information referring to its operation.This refrigerator is intended for
domestic use only.
The plug on the refrigerator you have purchased may be different from the one shown in
the manual, as the plug that accompanies the product meets your country's electrical
specifications.
02
Page 4

Safety
For children
Please keep children from entering or climbing the refrigerator to avoid locking the
children inside the refrigerator and hurting them should the refrigerator tip over due
to their weight.
Be mindful of children's whereabouts when closing and opening doors and drawers
to avoid injuries to probing hands and fingers.
Children should be supervised to ensure that they do not play with the appliance.
For the user
Never pull out the plug by pulling the power cable. Always hold the plug and pull it
out from the socket. Don't have the power cable pinched under the refrigerator or
feet. When the refrigerator is moved away from the wall, never pinch or damage
the power cable. If the power cable is damaged or the plug is worn, don't use
it anymore.You must have the damaged cable replaced by an authorized service
technician. Any repairs made by unauthorized persons will void the warranty.
When coal gas or other inflammable gases are leaked, close the valve for leaking
gases. Open the door and windows. Don't pull out or insert the plug of refrigerator
or other electric appliances.
Don't put inflammable, explosive, volatile or strongly corrosive substances into
the refrigerator to avoid damaging the refrigerator or starting fire or other
accidents.
Don't use inflammable solvent near the refrigerator to avoid injury due to freezing.
It is advisable that you don't put the power socket, voltage stabilizer, microwave
oven and other electric appliances on top of refrigerator to ensure safety. Don't
use any electric
recommended) to avoid electromagnetic interference or other accidents.
When the refrigerator starts to work, don't touch the cold surface of the freezer
compartment, especially with wet hands, to avoid injury due to freezing.
The gap between doors and between the door and refrigerator body is small.
Don't put your hands into these areas to avoid pinching.
appliances inside the refrigerator (except for the model
Don't
refrigerator in wet or places exposed to water spray so as not to compromise
the electric insulation property of the refrigerator.
Don't disassemble or modify the refrigerator by yourself. Never damage the
refrigeration tubing or components. Please get the refrigerator repaired by
professionals.
03
spray water onto or rinse the refrigerator with water. Don't put the
Page 5

Don't put fluid in bottles or sealed containers into the freezer, such as
bottled beer or drinks to avoid the containers cracking or exploding and
potentially causing damage to other contents or the appliance.
During a power outage or cleaning, pull out the plug.
after cutting the power before restarting to allow the refrigeration system to
equilize as immediate
startup might damage the compressor
Wait at least 5 minutes
When the refrigerator is out of service, please remove the refrigerator's doors
and drawers, remove the door seal and shelves and dispose of them appropriately
to avoid that children might play inside and become trapped or injured.
This product is a household refrigerator and is only suitable for storage of food
according to applicable standards. It can't be used for other purposes, like storage
of blood, drugs, biological products, etc.
04
Page 6
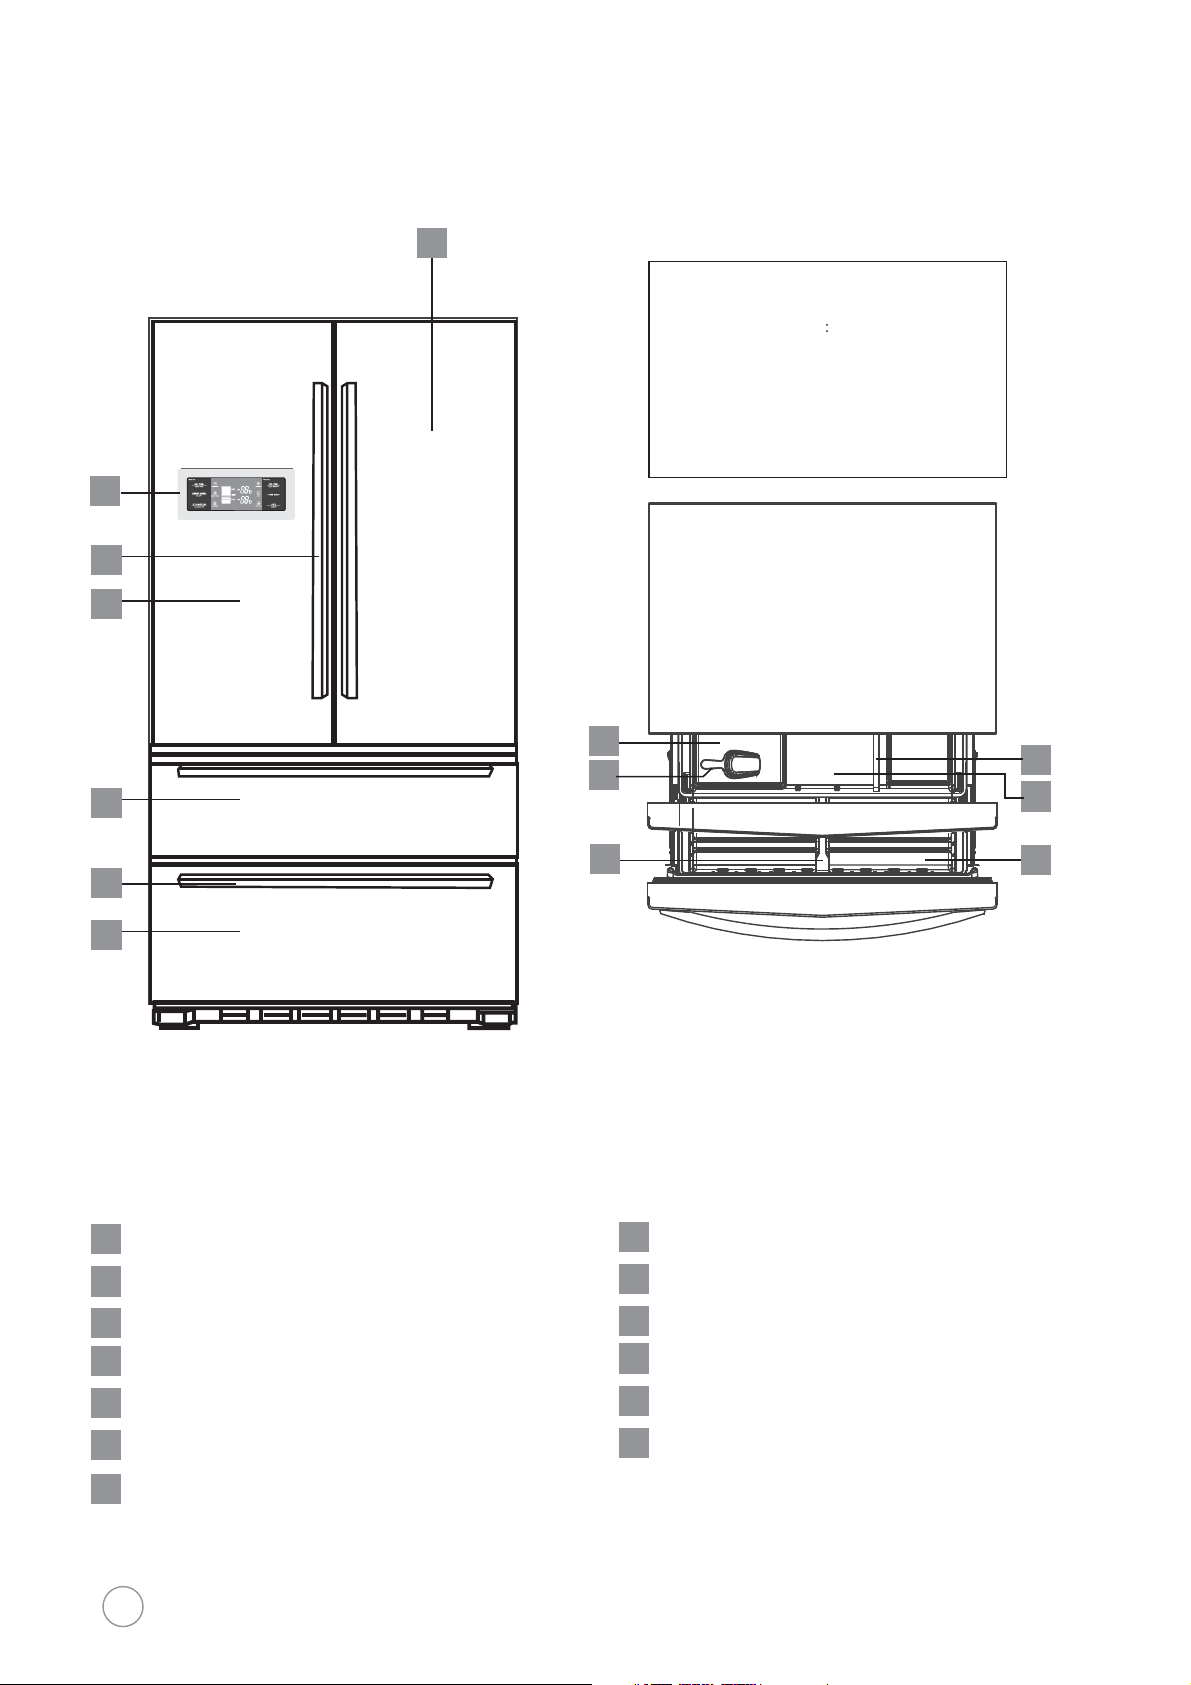
Product description
1
5
6
Rated Voltage/Frequency: 115V~/60Hz
Rated Current: 2.7A
Total Storage Volume
Freezer Storage Volume: 6cu.ft/169L
Refrigerator Storage Volume: 14.7cu.ft/420L
Net Weight: 133kg
Gross Weight: 144kg
Product Dimensions: 911x728.5x1775mm
(without handle)
20.7cu.ft/585L
35.9x28.7x69.1in
2
Refrigerator body
8
9
3
10
7
4
11
12
13
1
Display
2
Left door for refrigerator compartment
3
Upper drawer for freezer compartment
4
Lower drawer for freezer compartment
5
Door handle
6
Right door for refrigerator compartment
7
Drawer handle
05
Ice storage bin
8
Ice scoop
9
Partition plate for lower freezer drawer
10
11
Partition plate for upper freezer drawer
Upper freezer drawer
12
Lower freezer drawer
13
Page 7
11
12
1
13
3
2
4
5
6
7
8
9
14
15
17
16
18
19
20
21
22
23
10
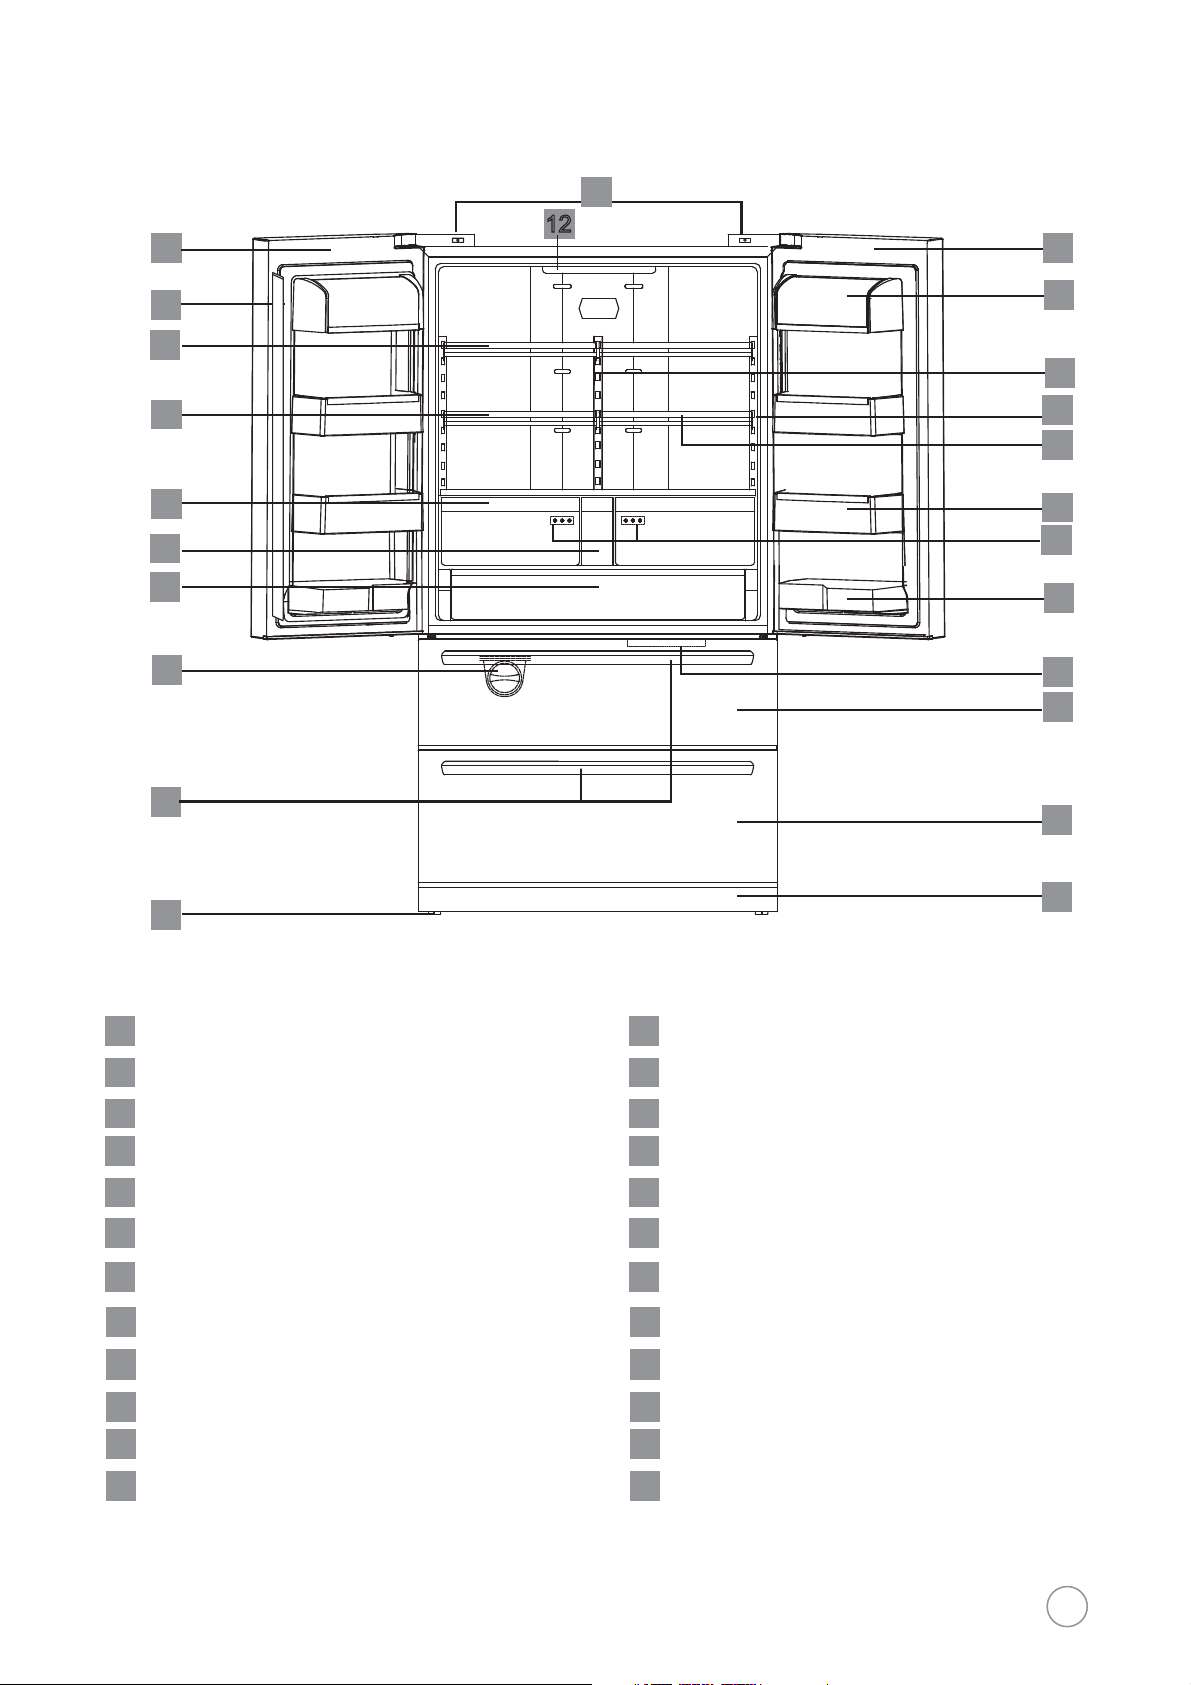
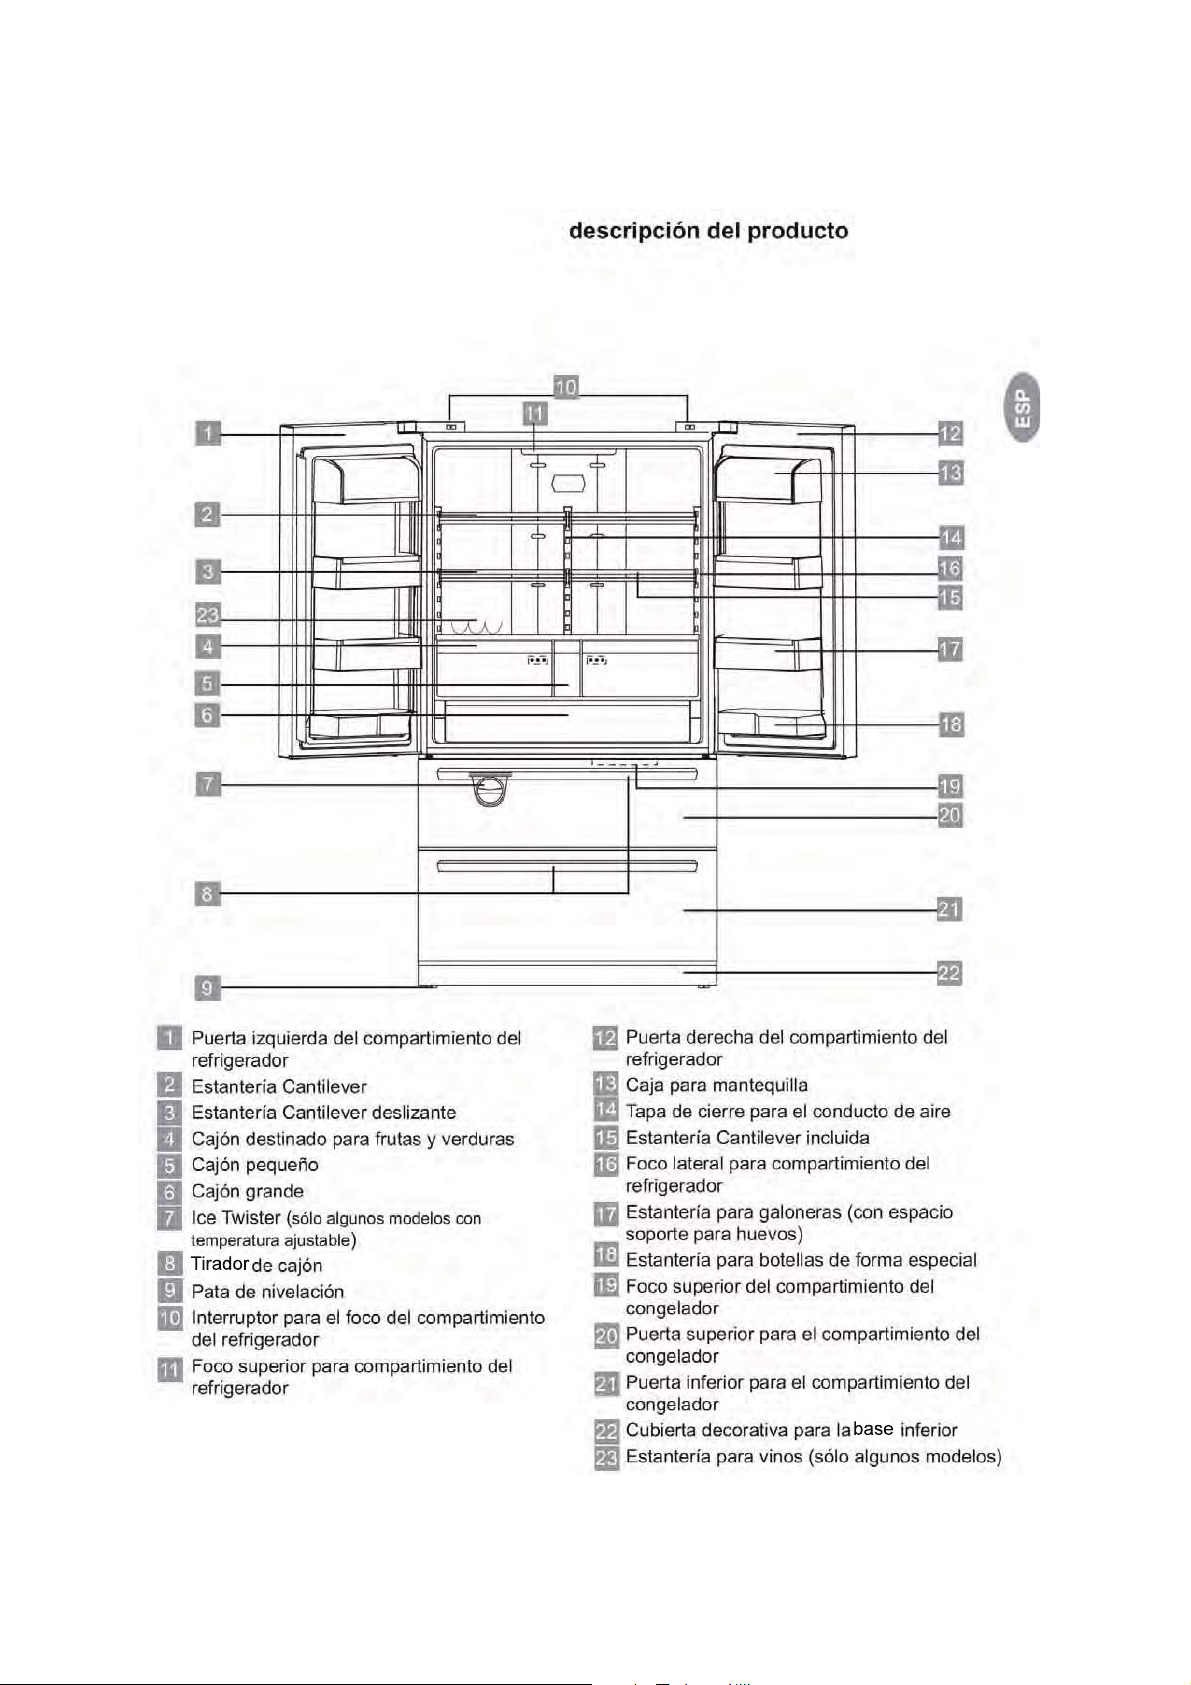
1
Left door for refrigerator compartment
2
Cantilever shelf
3
French door sealing flap
4
Sliding cantilever shelf
5
Fruit and vegetable drawer
6
Water tank
7
Large drawer
8
Automatic ice maker
9
Drawer handle
Leveling leg
10
11
Switch for refrigerator compartment lamp
13
Right door for refrigerator compartment
14
Butter box
15
Air duct cover plate
16
Folded cantilever shelf
17
Side lamp for refrigerator compartment
18
Gallon bottle shelf (with egg holder)
19
Light-wave freshness lamp
20
Specialty bottle shelf
Top lamp for freezer compartment
21
Upper door for freezer compartment
22
23
Lower door for freezer compartment
24
12
Top lamp for refrigerator compartment
Decorative toe kick cover
24
0406
Page 8
Installation
Remove all packaging material before
using the new refrigerator. This
includes the foam base and all
adhesive tape holding the refrigerator
accessories inside and outside.
Clean both the inside and outside of
the refrigerator with wet cloth (a little
detergent could be added into the
warm water to wash the cloth and
then wipe it again with the clean
water);
Prepare an independent three-pole
socket with grounding contact
/60Hz
not share a multi-purpose socket with
other electrical appliances.
Do not remove grounding prong
from appliance cord or in any other
way adapt the cord to an ungrounded
receptacle.The receptacle must have
a reliable ground back to the service
panel.
for the refrigerator and it shall
115V
Transport and Placing of Your
Refrigerator
Transport
Keep upright and avoid squeezing or
vibration during transport. Avoid a
slant angle over 45 degree during
handling.
Avoid the door or top cap from being
under excessive stress when moving;
otherwise, it may become deformed.
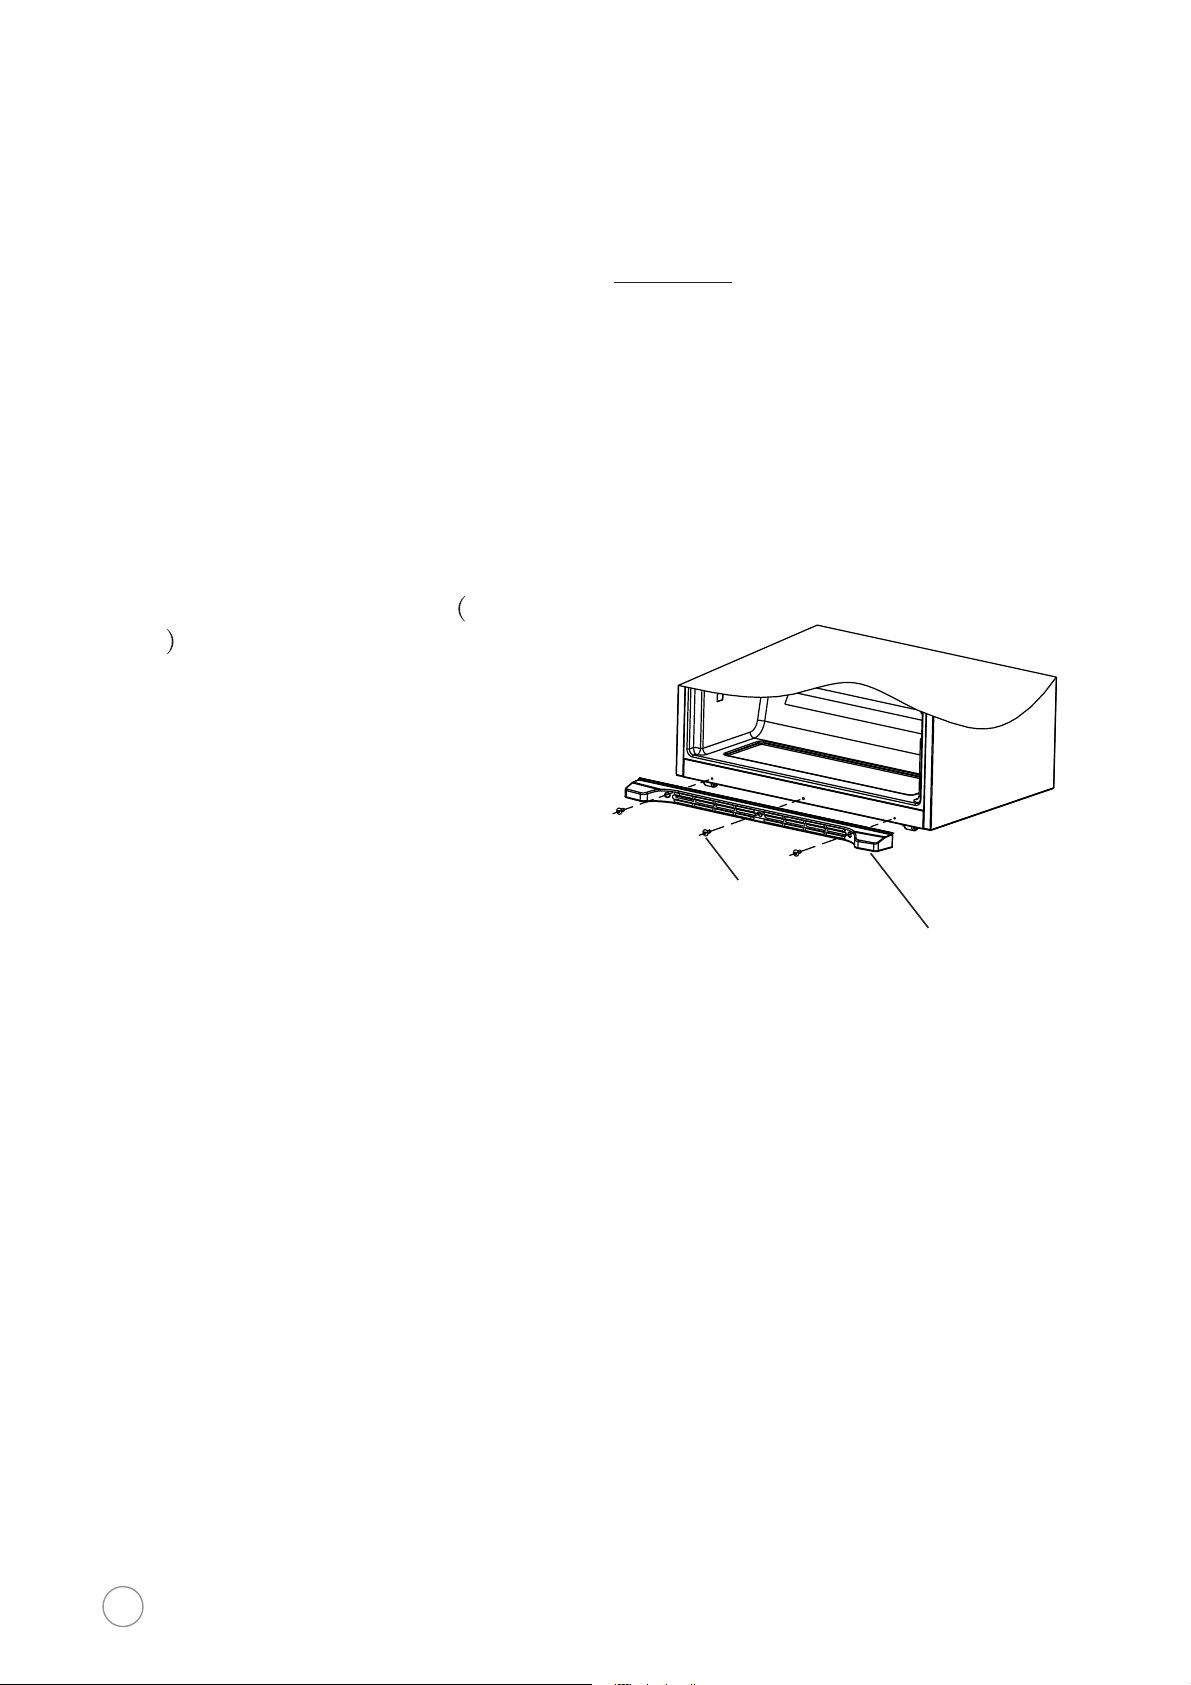
Screws
Open the refrigerator body and take
out the accessory (decorative toe kick
cover ) and the three screws from the
instruction packaging bag; then install
them into the bottom beam as shown
by the schematic diagram on the right.
The decorative cover is non-functional
beam is used as ornament, so you
can choose not to install it. It won't
affect the refrigerator's performance
or conditions whether you install it or
not.
Decorative toe kick cover for bottom beam
Page 9

Placement
Place your refrigerator in a wellventilated place and avoid proximity to
heat sources and direct sunlight. Don't
place it in any humid or wet place so
as to avoid rust and reduction to the
effectiveness of the insulation.
There must be a space not less than
1 inch from the top of your refrigerator
and not less than 1 inch from both
sides or the back of the refrigerator to
the adjacent walls respectively. This
requirement is necessary for door
clearance and proper ventilation.
The refrigerator must be placed on
solid, level flooring (if not flat, you
can use the leveling legs for
adjustment).
Keep Your Refrigerator Standing
If it was necessary at any point to lay
the appliance horizontal or tip beyond
a 45° angle, be sure to allow the
appliance to stand vertically for 24
hours prior to connecting to a power
supply to ensure all lubrication is
allowed to return to the compressor.
Make sure the power cord is not
pinched or pressured by the
refrigerator or other objects so as
to avoid accidents arising from power
wire faults or overheating due to
increased resistance in the cord.
Please ensure the power supply
matches the power requirements of
the appliance prior to connecting it
and switching it on.
Attention
The refrigerator must be disconnected
from the source of electrical supply
before attempting the installation of
any electrical accessories..
Don't use mechanical or heating
equipment or other methods to
accelerate the defrosting process except
the means recommended by the
manufacturer
Don't use any electrical appliances in
the food storage compartments except
any models recommended by the
manufacturer.
The cyclopentane foam insulation
blowing agent used in the refrigerator
is inflammable. All waste and discarded
refrigerators must not be exposed to
open flame.
Page 10

Start Up
You must observe all safety
precautions and make sure that
your refrigerator has been placed
properly in its final position before
using.
1. Unpacking
Please install the decorative cover for
bottom beam onto your refrigerator
after unpacking and adjust the front
leveling legs to level your refrigerator.
(Installation of this piece is optional
and exists only for aesthetic purposes)
2. Connecting Your Refrigerator to
the Power Supply
Your refrigerator will start in the
factory default state after connecting
to the power supply and it will display
the set temperatures for the refrigerator
compartment and freezer
compartment.
4. Put Food into Your Refrigerator
Depending on ambient conditions it
may take several hours for the cooling
and freezing compartments to reach
their set temperatures. Avoid adding
food to these compartments prior to
set temperatures being reached.
Tips: The interior temperature may
require a certain period of time to
reach balance if the setting
temperature is changed or other food
is put into the refrigerator. Such a
period of time depends on the change
to the setting temperature, the
surrounding temperature, opening
frequency, the amount of the stored
food and etc.
3. Operating Modes of
You can configure your refrigerator in either
of the following two ways:
Auto mode: we suggest you
choose this mode if you have no
special requirements. Your
refrigerator will work automatically
at the factory default settings.
Manual mode: You can set the
temperature by pressing the
temperature adjustment key.Refer to the
section "Appliance Functions" later in this
manual for more details.
Your Refrigerator
Page 11
Refrigerator compartment
The refrigerator compartment is designed
to maintain a temperature in the range of
2°C to 8°C (36°F to 46°F) and should be
considered as short term storage. Always
ensure items are fit for consumption prior to
ingesting. For longer term storage, place
items in the freezer compartment where
appropriate. Always adhere to supplier
Lower end of fixed leg
recommended storage directions for
consumable items.
French door sealing flap
Please adhere to the warnings on the
French door sealing flap. The flap
contains an anti-condensation heating
source so it is normal that it will feel warm
to the touch. In exceptionally humid areas
or times of the year, it is normal to still see
some accumulation of moisture in this area.
Simply wipe away with a towel or cloth.
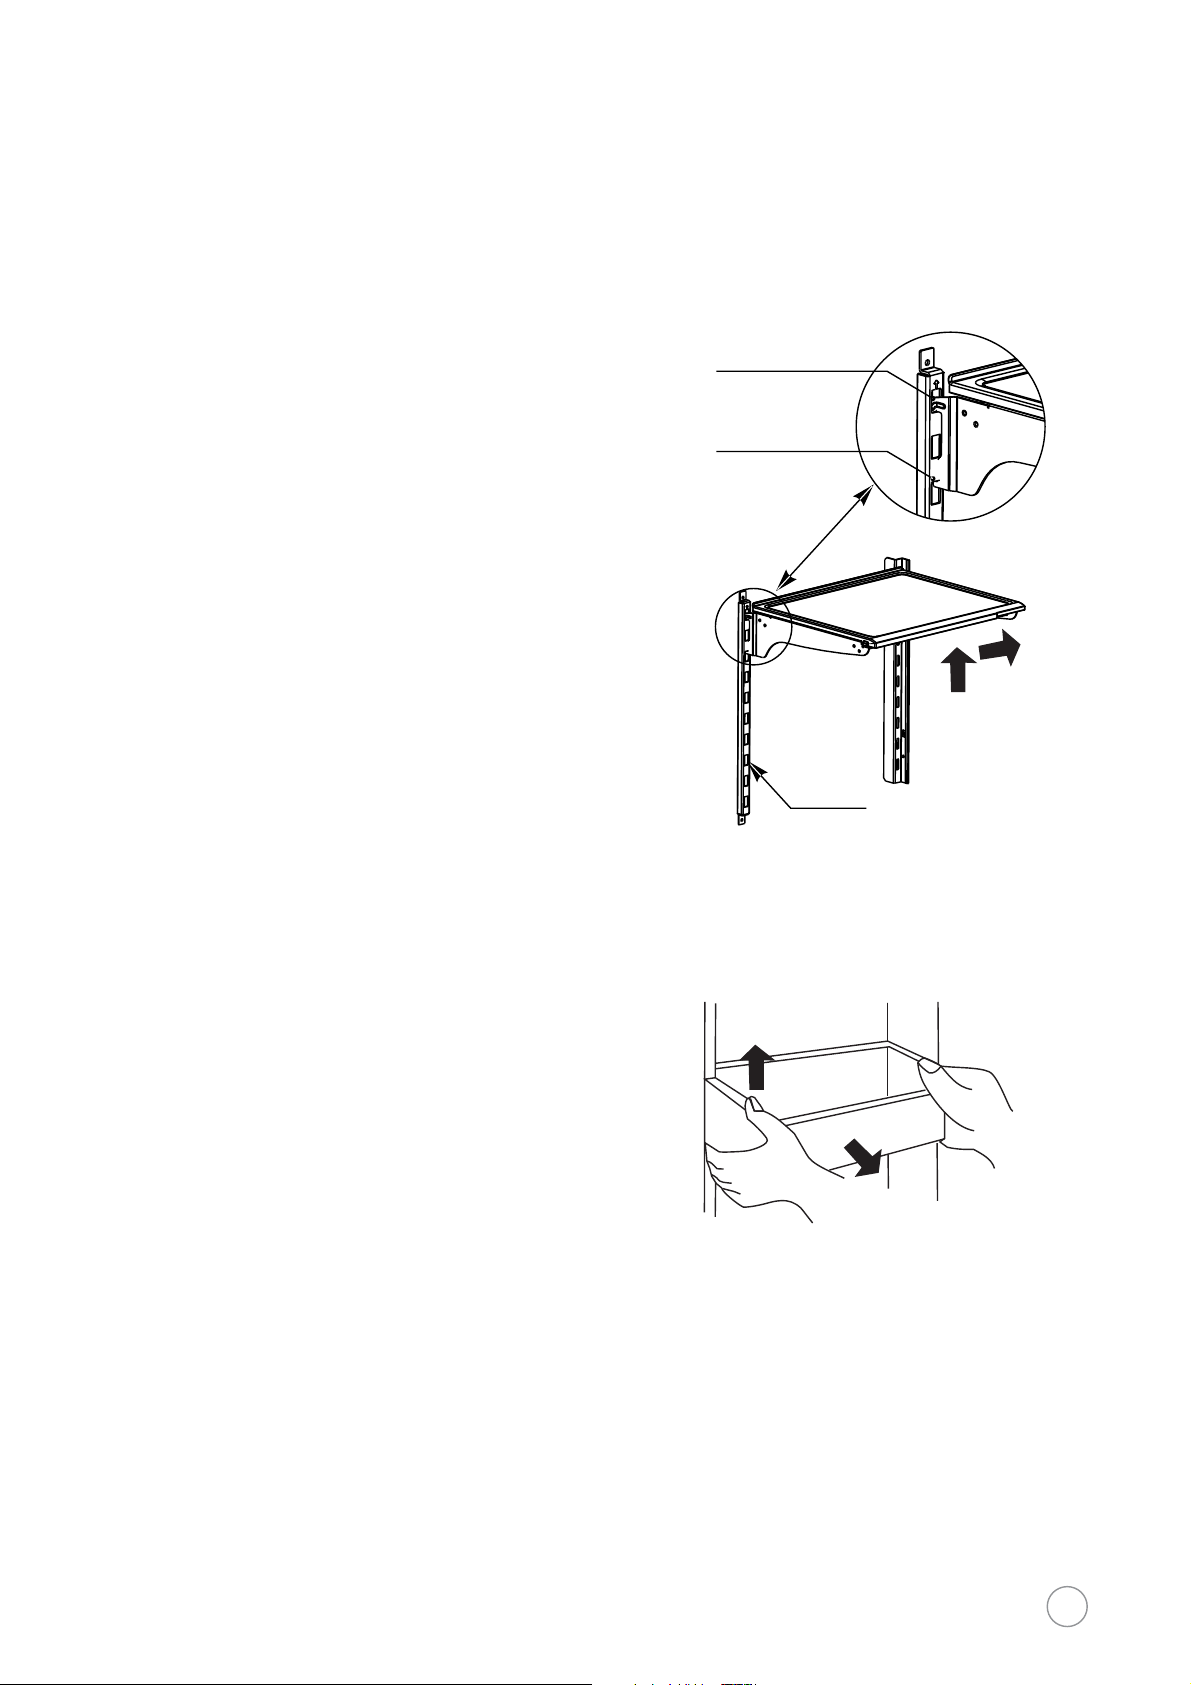
Adjustment of cantilever shelf
Upper end of fixed leg
Slot
Adjustment of cantilever shelf
The cantilever shelves' height can be
adjusted as desired to accommodate
a variety of items. Remove any items
from shelves prior to adjusting.
Please adjust the cantilever shelves
by following the arrows as shown in
the diagram. Raise it upward first and
then take it out by tilting it and pulling
toward you.To reinstall, put the upper end
of the rear wall brackets into one of the upper
slots on the supporting iron first and
then put the lower end of the supports
into position two slots below.
Ensure the shelves are level.
Height adjustment and cleaning of
door-mounted bottle shelf
Adjustment of door-mounted bottle shelf
1
2
Raise the bottle shelf in the direction,
1.hold it with both hands and take it out
in the direction . 2.After cleaning, you
can install the rack in the reverse order
and you can also adjust the height of
the rack.
Page 12

Food suggested to store in
refrigerator compartment
2. Ice storage bin is used to store the
ice.
1. Leftovers
2. Snack food, food subject to
tainting, dairy product
3. Cooked cold meat, sausage
4. Fruit, vegetables
5. Eggs, butter, cheese
6. Cans, seasoning
7. Drinks, other jarred food
Freezer compartment
The temperature in the freezer
compartment is very low so it could
preserve the freshness of food for
longer periods compared to the
refrigerator compartment.Those items
which can be stored for longer
3. The lower drawer of the freezer is
used to store fish, meat and
packaged poultry meat.
periods could be put in this compartment
but should not exceed the storage period
specified on the packaging of each
kind of food.
You can take out the drawers of the
freezer compartment to increase its
capacity and store more food.
Food suggested to store in freezer
compartment
1. The upper drawer of the freezer
could be used to store fish, meat,
ice-cream frozen juices, breads, etc.
Page 13

7aking-out and installation of the
lower freezer drawer
1. Pull out the lower freezer drawer
first.
2. Take out the two fixed screws from
the partition plate of the lower
freezer drawer with screw driver
and then take off the partition plate.
3. Take off the rear stopper for the
lower drawer as shown by Fig. A.
4. Take out the lower drawer body
with force as directed by the arrows
in Fig. B.
5. The installation of the lower drawer
body is conducted in the reverse
order. You should install the lower
drawer body first and then install
the rear stopper for the lower
drawer as shown in Fig. C. Finally,
both sides of the drawer shall be
connected to the position shown by
the arrows respectively.
6. The partition plate is installed into
the corresponding slots and then is
fixed with screws. The position of
the partition plate for the lower
drawer could be adjusted
according to your preference.
Rear stopper for the lower drawer
Lower drawer body
Partition plate for the
lower drawer
Align with the slot
Insert into
the edge
Align with
the slot
Don't remove the lower freezer drawer
if not necessary.
Positioning hole for
the partition plate
Page 14

Large crisper drawer
The large crisper drawer has a maximum
load of 10kg.
Removal and installation of large crisper drawer
1. Extend the large crisper drawer.
2. Find the hook at the left and right
sides at the drawer bottom (shown
Sliding rail
in the figure).
3. Hold the hook at two sides with needlenose pliers or tweezers and push it
up and out of the groove of the on sliding
rail, remove the hook on the
other side with the same method.
4. Take out the drawer.
5. Install the drawer by putting the
hooks back into the same position.
Hook
Big drawer
Page 15
Ice-maker
Operating instructions for the ice-
maker
1. When the refrigerator is used for the
first time, wait at least 20 minutes before
. The ice-maker is
starting the ice maker.
capable of producing 1.2~1.7Kg(2.5 - 3.75 lbs),
ice in 24hr depending on the temperature
of freezer compartment, ambient
temperature, frequency of door
opening/closing and other working
conditions.
2. If the ice-maker isn't to be used for a long
period, please disable the ice-maker
at the control panel of the
refrigerator door, clear the ice cube
tray and ice storage bin.
8. When the refrigerator is used for the
3. When the ice maker starts again
after a long period of power outage,
discard any melted ice (water).
4. Check the level of water tank(between
the two fruit and vegetable drawers)
from time to time (if the level of water
tank is too low, ice cubes will be
smaller).
5. The ice-maker checks the ice
bin level automatically and stops
ice- making when the storage bin
is full.
6. When bin is not full, during normal
9.
operation you may hear the sound
of ice being dispensed and water
being supplied to the ice maker
approximately every two hours.
7. It is normal that several ice cubes
may stick together or get crushed.
)LJ
)LJ
Rack
Ice cube box
first time, the ice maker starts to
work after the freezer compartment
has cooled for about three hours.
Initial operation may be delayed
depending on ambient conditions
and the amount of product (if any)
which has initially been placed in the
compartment. If no ice appears after
24 hours, refer to the section on
'Troubleshooting' and ensure all
instructions for installation and
operation have been completed
prior to calling for service.
The ice maker is designed for automatic
operation using a plumbed connection.
Do not remove the ice cube tray and
add water by yourself.
If the ice maker is being turned on after
a long period of not being used, clean
the ice tray and storage bin and throw
away the initial 24 hours worth of ice
production to ensure ice being consumed
is suitable.
Page 16
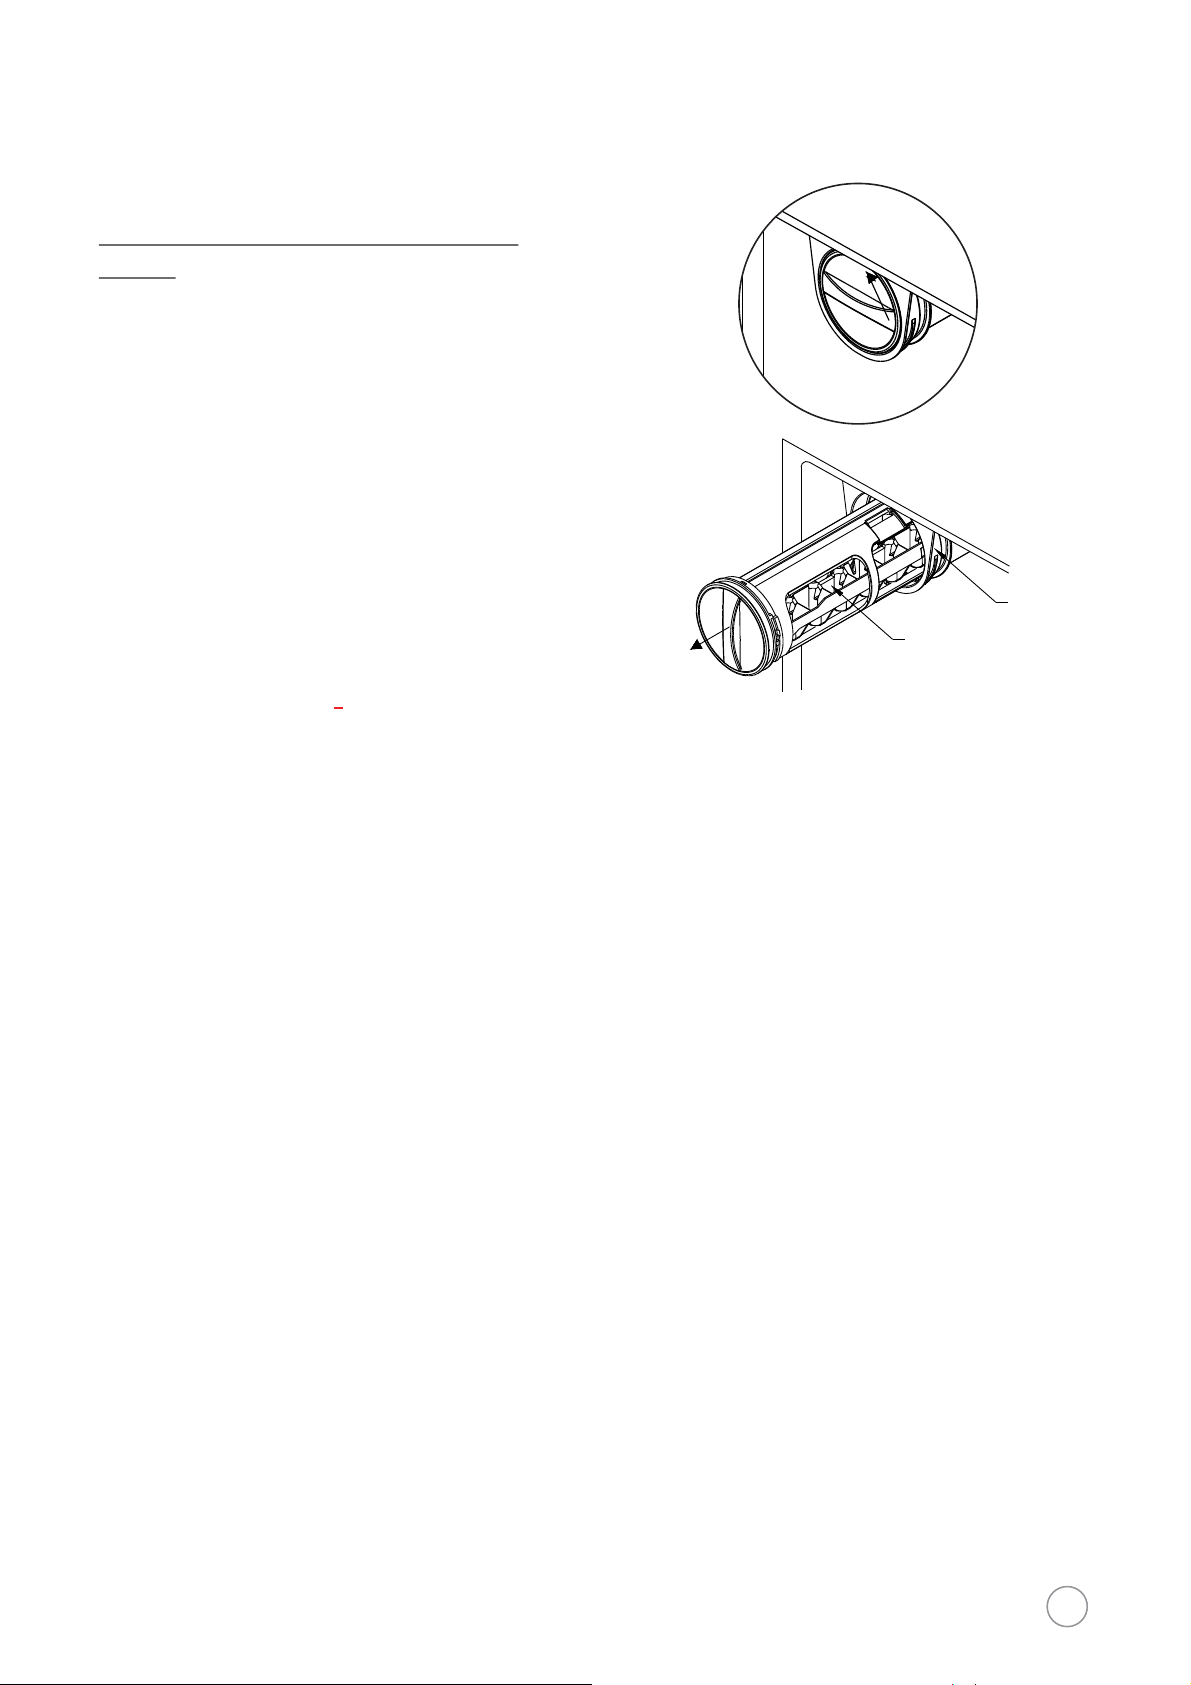
Removal, cleaning and installation
of ice tray
lf the ice maker isn't used for a long
period, ice cubes that are just
produced might have unpleasant
odor and / or taste. You must take out
and clean the ice cube tray.
Open the upper drawer in the freezer
compartment, rotate the knob of ice
maker counterclockwise by 90°, turn
the handle from the horizontal position
to vertical position to release the lock
(as shown in Fig. 1 of Pg. 14), pull it
out (as shown in Fig. 2 of Pg. 14) and
take out the ice cube tray.
Rinse the ice cube tray with warm
water (below 60ć) and don't use
detergent as residue can affect the
taste of future ice.
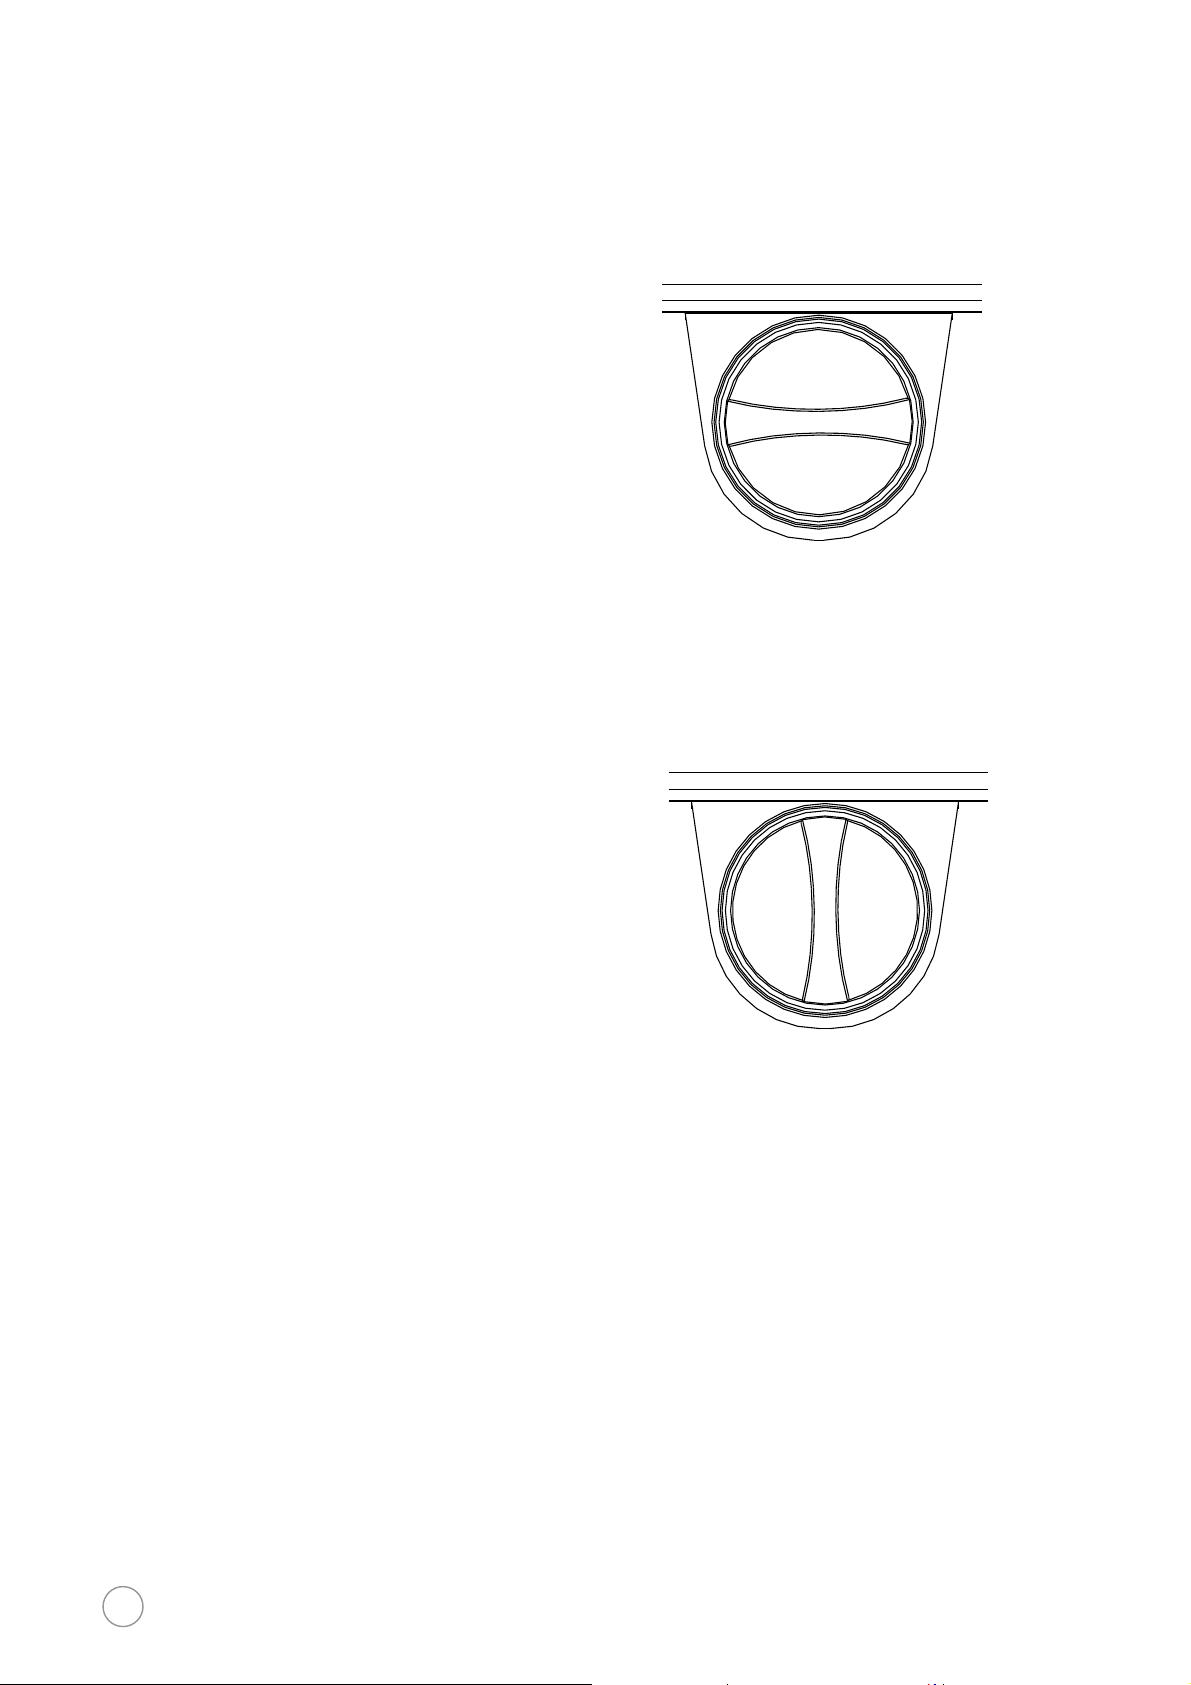
Fig.3
Locked position
Fig.3
Allow the ice cube tray to air dry
completely before reinstalling in the
appliance as excess moisture could
freeze the mechanism and cause
malfunction.
On the occasion where the ice maker
is immobilized due to ice build up,
remove the tray following the procedure
shown in Fig. 1 and Fig. 2, dispose of ice
and allow tray to dry prior to reinsertion.
Insert the ice cube tray onto the holder
according to original sequence and
rotate to the locked position.
Unlocked position
Page 17

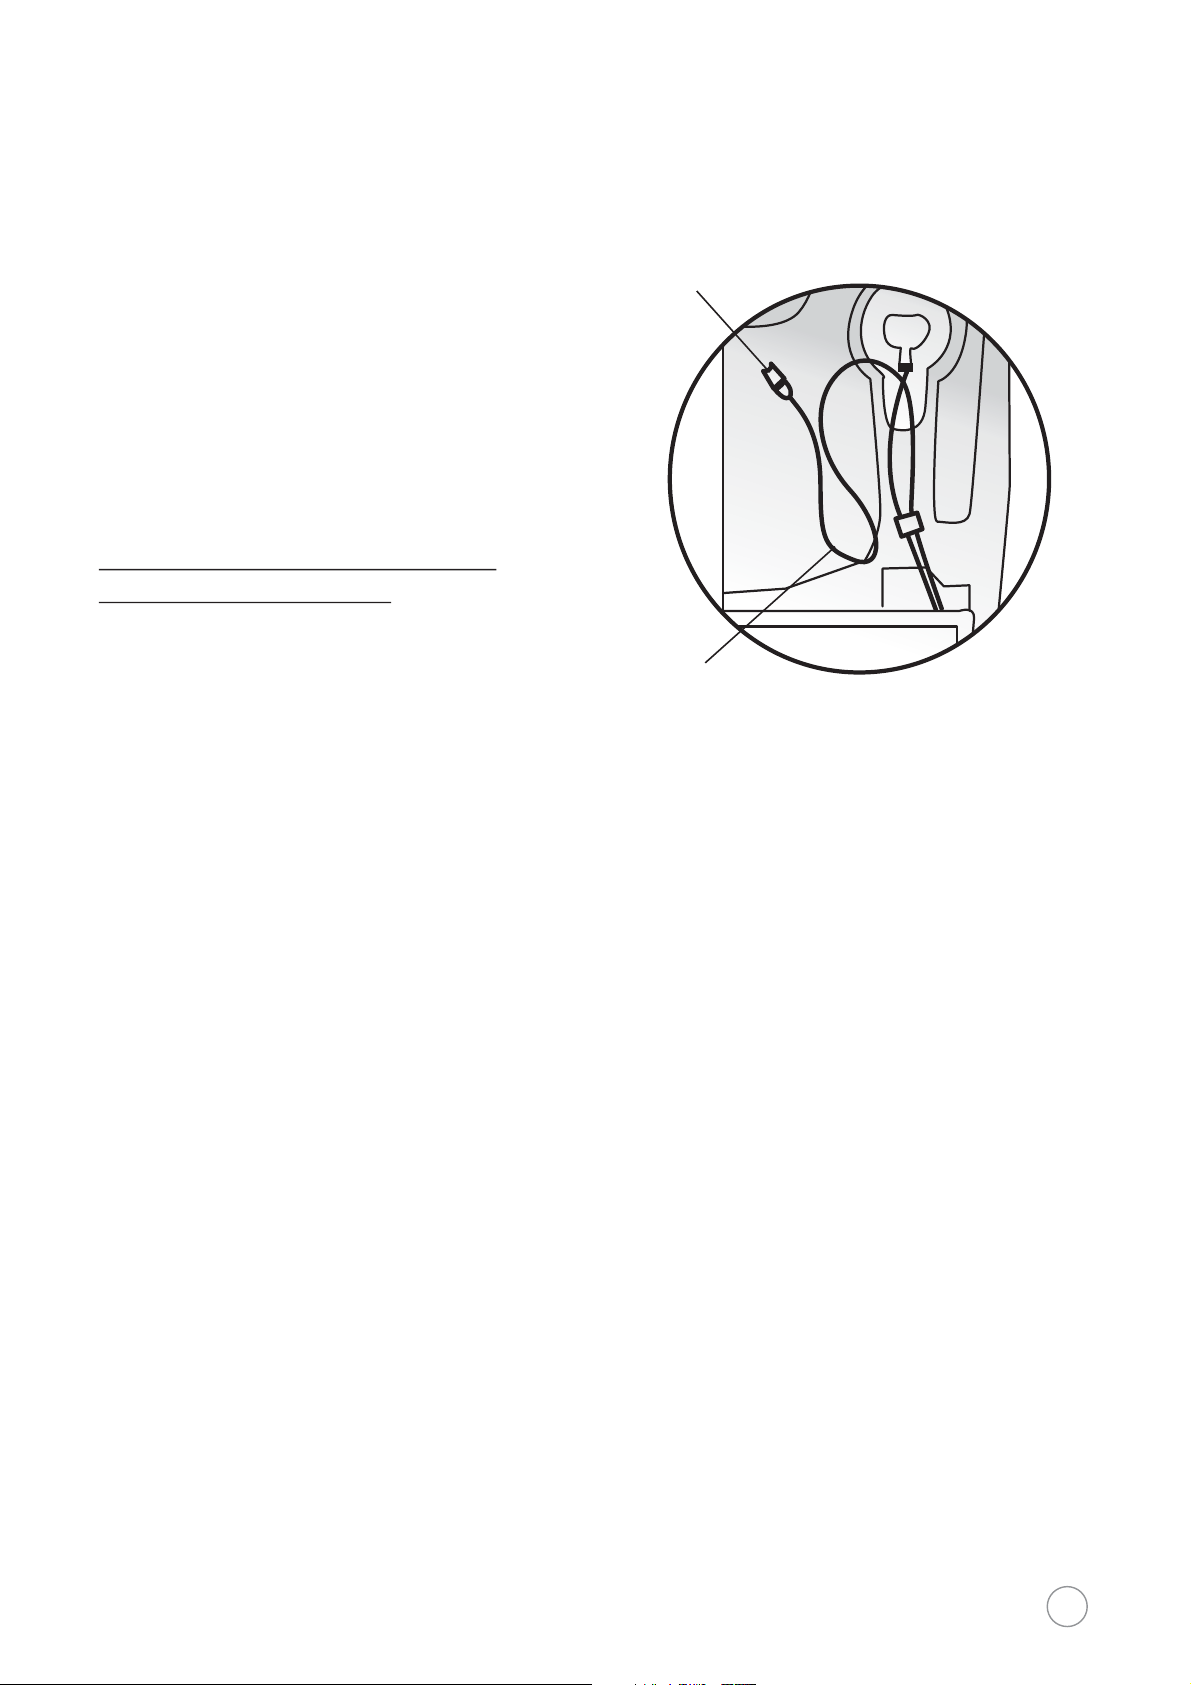
Removal and installation of ice maker assembly
Fig.4
If the ice maker is not being used,
it can be removed to provide
additional storage space for frozen
goods.
Ice maker's
power socket
Ice maker's
power plug
Push the Ice Maker button on the
control panel at the refrigerator door
and confirm the icemaking icon disappears.
Open the drawer and remove the
bin.
Pull the ice-maker out (as shown in
Fig.4.1), and then downwards, so that
the ice maker is unhooked (as shown
in Fig. 4.2).
Ice
maker's
hook
3
1
2
Pull down the ice maker's power plug
so that it is detached from the icemaker's power socket (as shown in
Fig. 4.3)
Installation is the reverse of removal,
push the Ice Maker button,the
ice-making symbol appears.
Ensure the ice maker assembly is
installed and positioned correctly.
If not correctly seated the ice maker
could be damaged when closing the
freezer drawer.
Page 18

Handle Installation
Assembly instructions of refrigerator
door handle:
1. Find the mounting studs in the
refrigerator. Thread by hand into
the receivers on the door face.
Tighten snug using an appropriate
screw driver.
Inner socket head cap
screw for handle fixing
Bolt
refrigerator
door handle
2. Slide the handle over the mounting
studs - attempt to engage both studs
at the same time for ease of installation.
Do not force as damage could occur.
Ensure the threaded set screw holes
are facing a direction which is less
easily viewed.
3. Using an Allen / hex key, tighten
the set screws through the threaded
holes on the handles until handles
are firmly secured to the door face.
Assembly instructions of the
freezer drawer handle:
Bolt
Inner socket head cap
screw for handle fixing
Handle Installation
Difference between the chilling and refrigeration
handle: lie them flat, the one with higher chordal
height is the refrigeration handle
61
Freezer drawer handle
Attach the freezer handles in the
same manner as the fridge door
handles. Refer to the diagram to
ensure you are installing the
appropriate handle for each door /
drawer as they are different.
78
Refrigeration door handle
Page 19
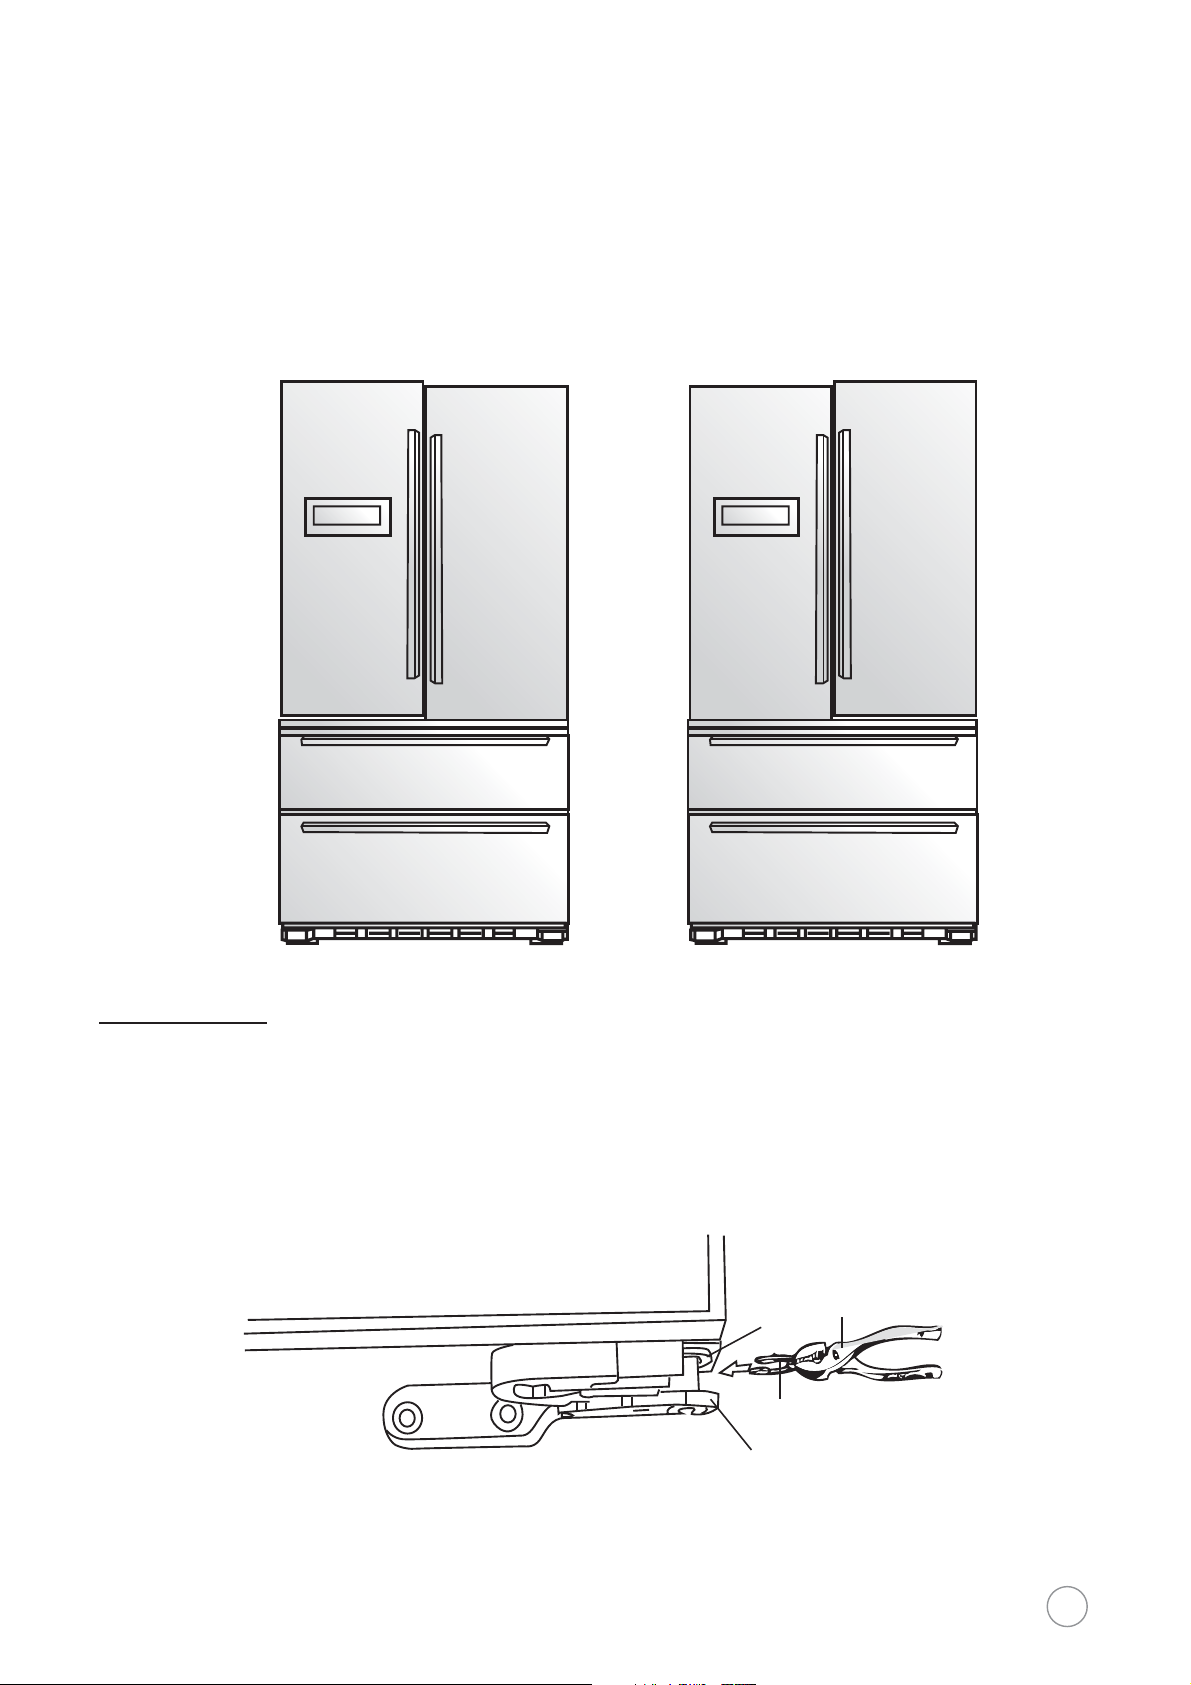
Making minor adjustments between doors
Remember a level refrigerator is necessary for getting the doors perfectly even.
If doors are uneven, follow the procedure below to raise the lower door up to
be even with the higher door
.
Do as follows
1) Raise the left door or the right door.
2) Insert the supplied fastener-ring using (2) using a pair of pliers (3) in the gap
between the hinge-grommet (1) and the lower hinge Insert as many spacer rings
as required until doors are even with each other.
Page 20

Installing the water line
The appliance can be connected to a
water line using a standard 1/4" ice
maker connection kit available at your
dealer or at hardware or plumbing stores.
Connecting to the water supply line
1. First shut off the main water supply
line and turn the ice-maker off.
Cold water line
Pipe clamp
2. Locate the nearest cold water
drinking line.
3. After connecting the water supply
to the water valve, turn your main
water supply back on and flush
the water lines to clear any air
and impurities.
Connecting the water line to the
refrigerator
Shut off walve
Water line installation kit
Page 21
Using the supplied water connector,
join the water line on the back of the
appliance to the supply line from the
ice maker connection kit (not supplied).
Turn on water and ensure there are
no leaks. Fulgor Milano is not
responsible for water damage due
to improperly connected water lines.
Only connect the water line to a
drinkable water source.
If your water line is not drinkable,
please add an external water filter.
If you have to repair or disassemble
the water line, cut off the plastic
tubing to make sure you get a snug,
leak-free connection.
Water connector
Water tube
Page 22
Appliance Functions
a
e
1
3
5
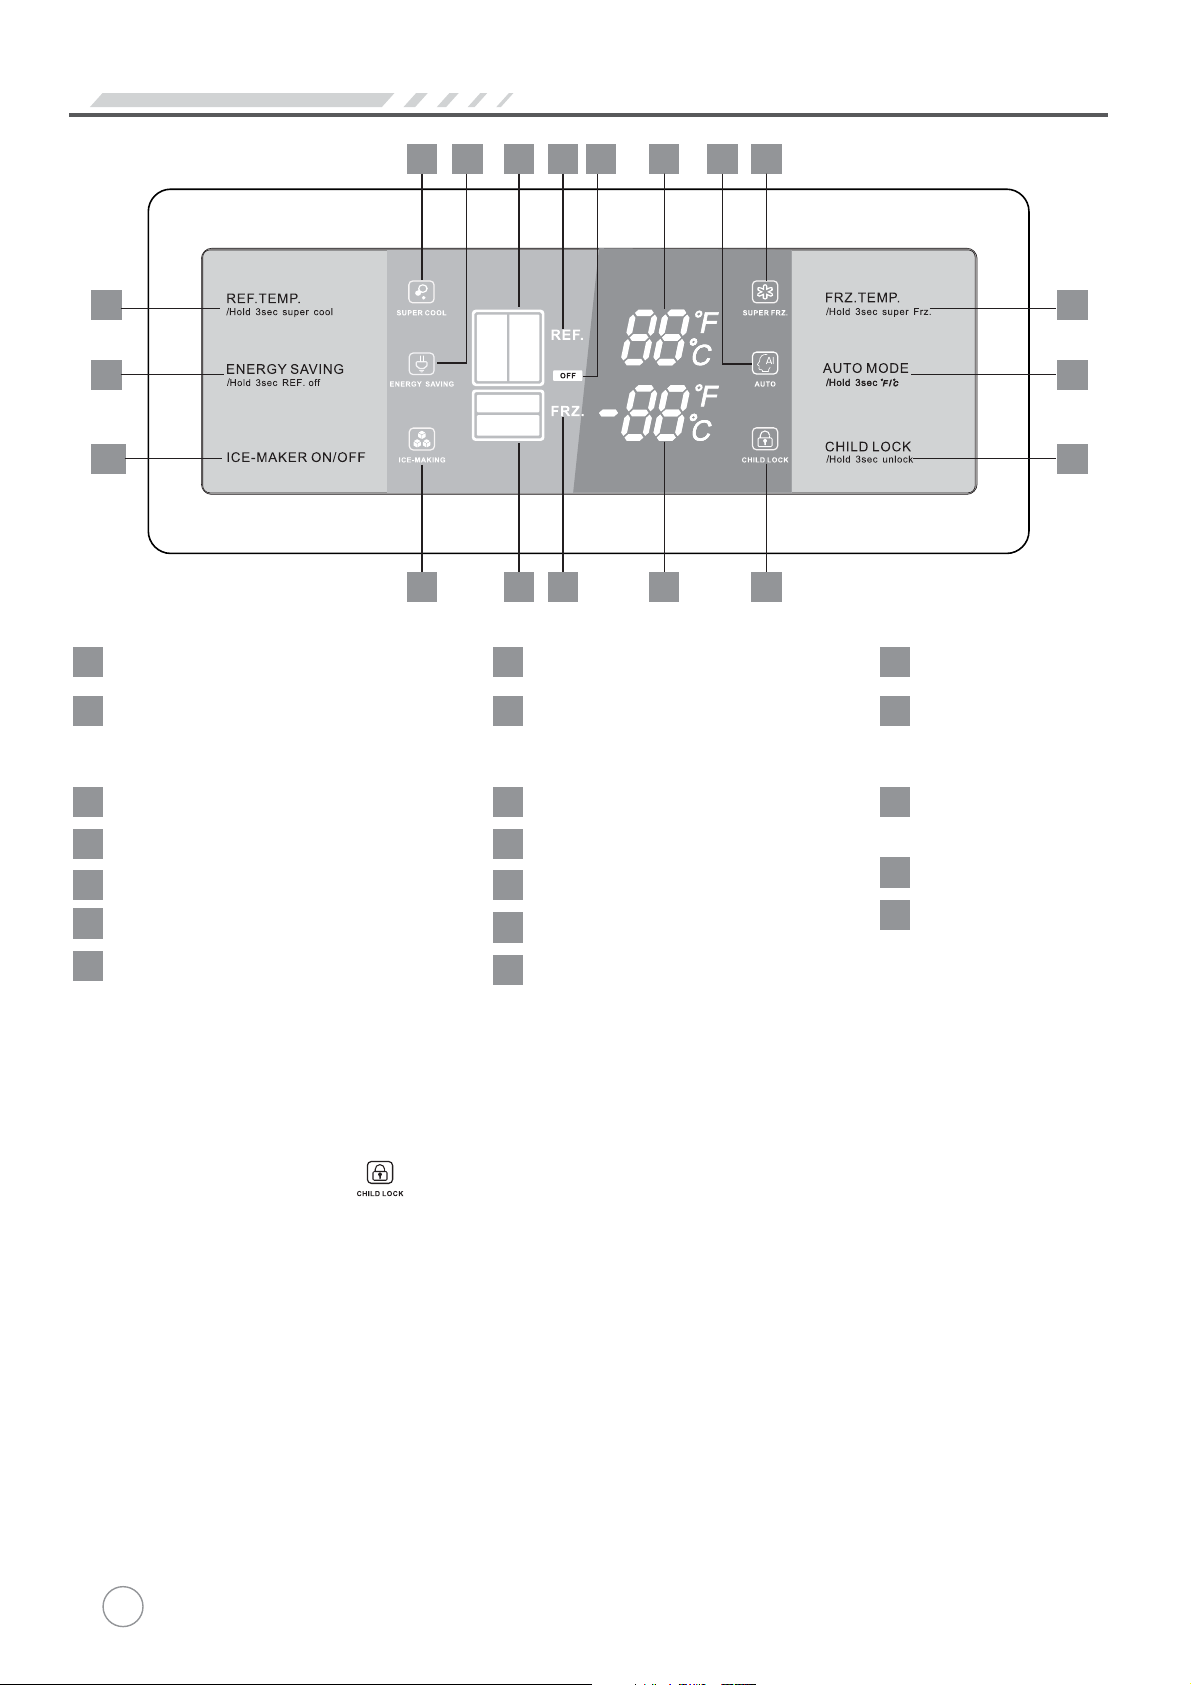
Control buttons
1
Refrigerator temperature control
2
Freezer temperature control
7 9 13 15 17
11 1214 16 19
3
Energy saving mode
4
Auto mode
1018
8
2
4
6
5
Ice-making switch
6
Child Lock
Display items
7
Fast-cooling icon
8
Fast-freezing icon
9
Energy-saving icon
10
Auto icon
11
Ice-making icon
12
Locked icon
13
Refrigerator compartment icon
Freezer compartment icon
14
Refrigerator indicator
15
Freezer
16
indicator
17
Off icon: means refriger
shut down
18
Refrigerator temperatur
19
Freezer temperature
Initial power-on status
All on
Locking and unlocking
When theĀLOCKāicon on the display screen is not illuminated, the door
is not locked. In order to activate the child-proof lock, press the CHILD LOCK
button.TheĀLOCKāicon will illuminate and the door will be locked.To unlock,
press and hold the CHILD LOCK button for three seconds. The ĀLOCKā icon
will go out and the door will be unlocked. If no other keys are pressed within
25 seconds of the door being unlocked, it will automatically re-lock.
The below functions can be performed while in the ĀUnlockedāstatus.
Page 23

Appliance Functions
Energy saving mode
In order to save energy, this mode sets the temperature in the refrigerator at
7ć and the temperature in the freezer at -15ć, ĀAUTOā mode default
settings are 5ć and -18 ć, respectively .
To activate the ĀEnergy Savingāmode, Press the ENERGY SAVING MODE
button and the ĀENERGY SAVINGāicon will illuminate. Enabling the
energy saving mode for the refrigerator will automatically disable all other
modes.
To de-activate ĀEnergy Savingā mode, do any of the following:
1. Select another mode.
2. Press REF. TEMP. or FRZ. TEMP. to exit setup.
3. ENERGY SAVING MODE button to exit the energy-saving mode
Press
when any of the above situations occur.
4. AUTO MODE to exit the energy-saving mode when any of above
Press
situations occurs.
Auto mode
ator
e
This function will set the temperature of the refrigerator to 5ćand the freezer
compartment to -18ć
mode will still be in effect for the freezer compartment.
To activate Auto Mode: Press AUTO MODE and the ĀAUTO āicon will
illuminate, indicating the activation of ĀAUTO MODEā. Selecting ĀAUTO
MODEāwill automatically de-activate all other modes.
To toggle between Celsius and Fahrenheit display, press and hold the
ĀAUTO MODEābutton for 3 seconds. .
To de-activate AUTO MODE:
1. Select another mode
2. Press REF. TEMP. or FRZ. TEMP. to exit setup.
he refrigerator compartment is turned off, the auto
. If t
Fast-cooling mode
This mode is used to counteract a sudden rise in the temperature of the
refrigerator compartment,such as when a large amount of items placed into
the refrigerator after a trip to the supermarket.The compressor will work for
longer cycles to maintain the desired temperature.
To activate the mode: Press REF Temp for three seconds and theĀSuper
Cool āicon will illuminate. When the fast-cooling mode is activated for the
refrigerator compartment, all other modes are automatically de-activated.
TheĀFast-Coolingāmode can be de-activated by doing any of the following:
1. Activate the ĀEnergy-Savingā or ĀAUTOā mode;
2. Press REF. TEMP. to adjust the temperature;
3. Hold down REF. TEMP. for three seconds.When the temperature of the
refrigerator compartment reaches the set temperature,ĀFast-coolingāmode
will be automatically de-activated.
Page 24

Appliance Functions
Fast-freezing mode
This function is used to counteract a sudden rise in thefreezer compartment
in order to preserve the nutritionalcontent of the food. It is recommended that
this mode be activated at least twohours before a large quantity of items are
placed into thefreezer.
To activatethe ĀFast-freezingāmode:Press FRZ Tempfor three seconds and
the Super Frz. icon will illuminate. When the ĀFast-freezingāmode is
activated forthe freezer compartment, and the ĀEnergy-savingāmode or
AUTO MODE will automatically be de-activated.
TheĀFast-Freezingāmodecan be de-a
1. Activate theĀEnergy-savingāor ĀAUTOā MODE,
2. Press FRZ.TEMP. to adjust the temperature,
3. Press andholdĀFRZ. TEMPā. for three seconds. Whenthe temperature
of the freezercompartment reaches the set temperature,ĀFast-freezingā
mode will be automatically de-activated.
ctivated by doingany of the following:
Turning off the refrigerator compartment
The refrigeratorcompartment can be independentlyturned off. Whenthe
refrigerator compartment is turned off, the freezer compartment will remain
working. This function is recommendedwhen the refrigerator compartment
will remainempty for a longperiod of time.
eht dloh dna sserP,tnemtrapmoc rotaregirfer eht ffo nrut yltnednepedni oT
ENERGY SAVING MODE buttonfor three seconds.TheĀRefrigerator
Compartmentāiconwill go out and theĀOFFāicon will illuminate.The
REFRIGERATOR TEMPERATURE digital display will readshowsĀüā.
To turnthe refrigerator compartment back on, pressand hold the ĀEnergy
Savingābuttonfor threeseconds.TheĀRefrigerator Compartmentāicon will
illuminate, theĀOFFāic
TEMPERATURE digital displaywill return to normal. When turning the refrigerator
compartment off for an extended period after it has been running, leave doors ajar
to allow compartment to dry out to prevent mold growth in the compartment.
on will go out and the REFRIGERATOR
To set the temperature of the refrigerator compartment
Press the REF. TEMP. button andthe REFRIGERATOR TEMPERATURE
digital displaywill illuminate.To changethe temperaturesetting, press the
REF.TEMP. buttonagain until thedesired temperature is displayed. The
temperature of therefrigerator compartment can be adjusted between 2 and
8 degrees C with a step of 1eC or between 36 and 46 degrees Fahrenheit
with a step of 1eF .
23
Page 25

Appliance Functions
To set the temperature of the freezer compartment
Press the FRZ.TEMP button and the Freezer Temperature digital display will
illuminate. To change the temperature setting, press the FRZ. TEMP. button
again, until the desired temperature is displayed. The temperature of the
freezer compartment can be adjusted between -13 and -22 degrees C with a
step of 1eC or between 9 and -8 degrees Fahrenheitwith a step of 1 eF .
Ice-making switch
To activate the ice maker, press theĀICE-MAKINGāand theĀICE-MAKINGā
icon will illuminate. The ice maker will begin to make ice. To turn off the ice
maker, pressĀICE-MAKERā. The ice maker will stop making ice. Depending
on the various ambient conditions; once the freezer achieves a temperature below -5°C,
the ice maker will produce one harvest every 135 to 240 minutes.
Backlight action
When the refrigerator/ freezer door is open or any button is pressed, the
Function Display Screen will become illuminated. If no button is pressed and
the refrigerator/freezer door has remained open for 30 seconds, the Function
Display will turn off.
24
Page 26

Cleaning and maintenance
Refrigerator's maintenance and repair
Cleaning
Clean regularly dust from the back of refrigerator and floor
Clean regularly the space inside the refrigerator to avoid any unpleasant odor.
Before cleaning, pull out the plug and use soft towels and neutral detergent and
clean it finally with clear water. It is recommended to clean every six months..
Never use following substances to clean the space inside the refrigerator:
Alkaline or weakly alkaline detergent (it might cause cracking of the liner and
plastic parts).
Soap powder, benzoline, thinner, alcohol, etc (might damage plastic parts).
Wipe off edible oil or flavoring immediately (might cause cracking of plastic parts)
Lights and replacement
Replace by professionals.
Refrigerator compartment keep fresh with optical wave (only some models)
Keep fresh with optical wave--- use the optical-wave lamp to maintain the
Photosynthesis of fruit and vegetables, prolong the growth period and keep it
fresh effectively.
Shutdown
When the refrigerator isn't used for a long period:
Pull out the power cable to avoid that the power cable gets old and causes
electric shock or fire.
Clean the space inside the refrigerator
Open the door for a period for drying, close the door with a gap left to avoid
unpleasant odor.
Power outage
Reduce the times of door opening during power outage, don't put fresh food
inside the refrigerator until power has been restored and cooling and freezer
set temperatures have been achieved by the respective compartments.
Disposal
When you discard an unused refrigerator, remove the door seal to avoid locking
children inside the refrigerator.
Danger
Risk of child entrapment. Before you throw away your old refrigerator or freezer:
1. Take off the doors.
2. Leave the shelves in place so that children may not easily climb inside.
25
Page 27

Solutions to problems
Please read the following contents before repair request:
Symptom
Not working
Can't freeze properly
Loud noises
Possible cause / inspection items
Whether the power is switched on, whether
the plug is secured?
Whether the voltage is too low?
Whether the temperature is set too high
(might reduce the temperature as required). ?
Whether too much food is stored?
Whether hot food is stored?
Whether the door is opened and closed too
frequently?
Whether there a heat source around the
refrigerator?
Whether the door is sealing properly?
Whether the floor is level and the
refrigerator is placed on leveled surface?
Whether accessories of the refrigerator are
installed properly?
Food is frozen inside the
refrigerator compartment.
The refrigerator has unpleasant
smell
Whether the food is put near the air outlet?
Food with special odor shall be tightly
wrapped.
Check whether the food has gone bad.
Clean inside the refrigerator.
If the above troubleshooting does not address your concern please contact service:
For Eastern Canada (Ontario -> east):
For Western Canada (Manitoba -> west):
For United States:
Distinctive Appliances Service Department
Toll free: 1-800-361-0799
Email: service@distinctive-online.com
www.distinctive-online.com
Pacific Specialty Brands Service Department
Email: service@pacificspecialtybrands.com or
Toll free: 1-877-430-5253x106
Fulgor-Milano USA Service
Email: fulgor@adcoservice.com or
Toll free: 1-855-4-fulgor
(855-438-5467)
26
Page 28

If power cables are damaged, please get it changed by a qualified technician
recommended / assigned by our Service Centers to avoid any risk.
Sounds attributable to normal operation
During cooling cycles, the sound of refrigerant traveling through the capillary
into the evaporator may manifest as gurgling, hissing or occassionally popping.
When the air humidity is excessively high, moisture or water droplets might appear
around the refrigerator's door. Wipe away moisture with a cloth or towel.
No extension cord used
Page 29

Duration of warranty:
For 24 months from the original date of purchase, the Fulgor
Milano warranty covers all parts and labor to repair or replace,
under normal residential use, any part of the product proving
to be defective in material or workmanship as a result of the
original manufacturing process.
This warranty is applicable to all products bearing the Fulgor
Milano name with the exception of the French door refrigerator
(FM36CDFDS1) which has a 12 month warranty duration.
For proof of warranty, please retain the original purchase invoice
and the delivery slip.
To obtain service under this warranty you must:
1. Contact Fulgor-Milano Authorized Service
For all of North America:
website: http://www.thevettagroup.com/servicerequest.a5w
In the United States
email: fulgor@appliance-support.com
phone: 1-855-4-fulgor (1-855-438-5467)
In Eastern Canada (Ontario->East)
email: service@distinctive-online.com
phone: 1-800-361-0799
In Western Canada (Manitoba<-West)
email: service@pacificspecialtybrands.com
phone: 1-877-430-5253 x106
2. Provide a copy of your original sales receipt along with model
number and serial number information for the product.
3. Provide Fulgor Milano reasonable opportunity to investigate
the claim before the Product or any component of the Product
has been modified or removed.
locations are defined as being outside of a 50 mile (80
kilometre) radius from any authorized dealer. This warranty
does not cover any parts or labor to correct any defect caused
by negligence, transport, delivery, improper voltage, accident
or improper use, maintenance, installation,
including but not limited to improper removal and reinstallation
of any component of the product (ie. removing handles to fit
through doors) prior to or during product delivery / installation.
The remedies described herein are the only ones which Fulgor
Milano will provide, either under this warranty or under any
warranty arising by operation of law. Fulgor Milano will not be
responsible for product loss due to spoilage or burning nor for
consequential damages to surrounding cabinetry, construction
materials or finishing materials such as but not limited to flooring.
Fulgor Milano will not be responsible for any consequential or
incidental damages arising from the breach of these warranties
or any other warranties, whether express, implied or statutory.
The warranty will be valid and eective only upon presentation
of the document stating the purchase date of the appliance, and
more specifically of the relevant invoice, proof of purchase, or
equivalent document showing the name of the seller, the delivery
date and the identification data of the appliance. (Such as;
Model number, Serial Number). In the case of new product
being included in the purchase of new residential construction;
this warranty applies to the original resident of the location
containing the Fulgor Milano product and warranty coverage
will begin
occupancy required) to a maximum additional six months from
the date of purchase of the product by the development company
from the distributor or dealer. This extension does not apply to
footnote 1 below.
This warranty is only valid where the dierence between the
purchase date and the production date of the product is less than
one year. Any product which has been warehoused for more
than this one year period will only be covered by Fulgor Milano ’s
B-Stock warranty.
on the date of occupancy of the residence (proof of
service or repair,
Terms applicable to this warranty:
This warranty is valid in only the contiguous states of the U.S.A.
including the District of Columbia and Alaska and the country
of Canada. This warranty applies to the original purchaser only
and is non-transferable. All service provided by Fulgor Milano
on the stated warranty must be performed by a Fulgor Milano
authorized servicer, unless otherwise specified by Fulgor Milano.
This service will be provided during the regular business hours of
each specific region.
This warranty applies only to products purchased from an
authorized dealer through an approved distribution chain and
is installed for normal residential use and does not apply to
commercial use or use on yachts. This warranty only covers
service performed at the location of product installation and will
not cover costs associated with repairing o-site unless expressly
authorized by Fulgor Milano nor does it cover the travel costs
associated with providing service to remote locations. Remote
During the warranty period Fulgor Milano reserves the right
to evaluate the opportunity to repair the appliance or, at their
discretion, oer to replace it with a Fulgor Milano product of
equivalent features and functionality. Fulgor Milano reserves the
right to revise this warranty at any time.
Some states do not allow the exclusion or limitation of incidental
or consequential damages so the above limitation or exclusion
may not apply to you. This warranty gives you specific legal
rights and you may also have other rights which vary from state
to state.
Fulgor Milano
1
Doors, handles, glass, product frames, racking, interior and
exterior surfaces are covered by a limited 30-day parts only
warranty for cosmetic defects originating from the factory.
NOTE Replacement light bulbs are not covered
warranty.
by the product
28
Page 30

G
f
i
f
f
f
(
O
29
manejo simple y sin preocupaciones
racias por elegir Fulgor como marca para su refrigerador. .
Los re
cos. Poseen características especiales desarrolladas para ofrecer aun más co
modidad al usuario. Para que usted pueda disfrutar todos los recursos que su
nuevo re
y prácticas usted conocerá sus
aparato de modo adecuado y seguro.
Lea las instrucciones sobre instalación y operación antes de utilizar su re
dor y guárdelas en un lugar seguro para futuras consultas. Fulgor una vez más
rigeradores Fulgor han sido concebidos bajo altísimos estándares técn
rigerador ofrece, Fulgor creó este manual. Con orientaciones simples
unciones y aprenderá la manera de operar este
rigera
Consejos ambientales
papel y cartón y enviarlos a las compañias de reciclaje.
De acuerdo con la directriz de la RAEE
trónicos), en inglés WEEE (Waste of Electrical and Electronic Equipment), se
debe colectar y disponer de los residuos de aparatos eléctricos y electrónicos se
paradamente. Si en el futuro usted necesita desechar este electrodoméstico, N
lo haga echándolo con el resto de la basura doméstica. Sírvase enviar el aparato
a los puntos de colecta de RAEE donde los haya disponibles.
Residuos de Aparatos Eléctricos y Elec
Page 31

30 Fulgor
31
33
35
45
46
47
49
53
54
Page 32

31 Fulgor
Page 33

32 Fulgor
Page 34

33 Fulgor
Page 35
34 Fulgor
Page 36

35 Fulgor
Page 37

LQFK
LQFK
LQFK
36 Fulgor
1 inch
1 inch
1 inch
Page 38

37 Fulgor
Page 39

38 Fulgor
Page 40

39 Fulgor
Page 41

40 Fulgor
Page 42

41 Fulgor
Page 43

42 Fulgor
Page 44

43 Fulgor
Page 45

44 Fulgor
Page 46

45 Fulgor
61
78
Page 47

46 Fulgor
Page 48

47 Fulgor
Page 49

48 Fulgor
Page 50

49 Fulgor
7 9 13 15 17 81018
1
3
5
11 1214 16 19
2
4
6
Page 51
50 Fulgor
Page 52

51 Fulgor
Page 53

52 Fulgor
Page 54

53 Fulgor
Page 55

54 Fulgor
Si la instrucción indicada aquí arriba no resuelve el problema, por favor contacte el
centro de asistencia:
Por Eastern Canada (Ontario -> east):
Por Western Canada (Manitoba -> west):
Por United States:
Distinctive Appliances Service Department
nùmero gratuito: 1-800-361-0799
Email: service@distinctive-online.com
www.distinctive-online.com
Pacific Specialty Brands Service Department
Email: service@pacificspecialtybrands.com or
nùmero gratuito: 1-877-430-5253x106
Fulgor-Milano USA Service
Email: fulgor@adcoservice.com or
nùmero gratuito: 1-855-4-fulgor
(855-438-5467)
Page 56

55 Fulgor
Duración de la garantía:
La garantía de Fulgor Milano cubre durante 24 meses, a contar
desde la fecha de compra, todas las partes y operaciones
de reparación o cambio, en caso de uso residencial normal,
y cualquier parte del producto en la que se hayan detectado
defectos de material o de elaboración como resultado del
proceso de manufactura original.
Esta garantía se aplica a todos los productos de la marca Fulgor
Milano , salvo la puerta del refrigerador francés (FM36CDFDS1)
que tiene una garantía de 12 meses.
Como prueba de la garantía conserve el recibo de compra original
y el albarán de entrega.
Para obtener servicio en virtud de esta garantía debe:
1. Contactar el servicio autorizado Fulgor-Milano
Para toda Norteamérica
online: http://www.thevettagroup.com/servicerequest.a5w
En los Estados Unidos
email: fulgor@appliance-support.com
teléfono: 1-855-4-fulgor (1-855-438-5467)
En Canadá oriental (Ontario->Este)
email: service@distinctive-online.com
teléfono: 1-800-361-0799
En Canadá occidental (Manitoba<-Oeste)
email: service@pacificspecialtybrands.com
teléfono: 1-877-430-5253 x106
2. Envíe una copia de su recibo de venta origina e información
sobre el número de modelo y de serie del producto.
3. Deje tiempo suficiente para que Fulgor Milano examine la
reclamación antes de modificar o eliminar el producto o
cualquier componente del producto.
Términos aplicables a esta garantía:
Esta garantía solo es válida en los Estados colindantes de los
Estados Unidos, incluido el distrito de Columbia y Alaska, y en
Canadá. Esta garantía solo se aplica al comprador original
y no es transferible. El servicio prestado por Fulgor Milano
en relación con esta garantía debe ser llevado a cabo por
un técnico autorizado por Fulgor Milano , a menos que Fulgor
Milano estipule otra cosa. Este servicio se prestará durante las
horas laborales normales de cada región.
Esta garantía solo se aplica a productos comprados a un
vendedor autorizado en una cadena de distribución aprobada e
instalados para uso residencial normal, no se aplica en caso de
uso comercial o uso en yates. Esta garantía solo cubre el servicio
prestado en el lugar de instalación del producto y no cubre los
costes asociados a la reparación en el exterior, a menos que
Fulgor Milano lo haya autorizado expresamente, tampoco cubre
los gastos de viaje asociados a la prestación del servicio en
lugares apartados. Por lugares apartados se entienden los que
se encuentran a más de un radio de 50 millas (80 kilómetros)
de cualquier comerciante autorizado. Esta garantía no cubre
ninguna parte u operación destinada a corregir los defectos
debidos a negligencia, transpo
accidente o uso impropio, mantenimiento, instalación, asistencia
o reparación, incluida, aunque sin limitación, la extracción
impropia y la nueva instalación de cualquier componente del
producto (por ejemplo, extracción de manijas de puertas) antes
o durante la entrega/instalación del producto. Las soluciones
descritas aquí son las únicas que ofrece Fulgor Milano, tanto
en virtud de esta garantía como en virtud de cualquier garantía
establecida por la ley. Fulgor Milano no será responsable por
la pérdida de producto debida a deterioro o quemaduras ni
a consecuencia de daños a la ebanistería circunstante, los
materiales de construcción o los materiales acabados, como,
por ejemplo, pero sin limitación, el suelo. Fulgor Milano no será
responsable de los daños derivados o incidentales derivados del
incumplimiento de estas garantías o de cualquier otra garantía,
ya sea expresa, implícita o estatutaria.
La garantía será válida y efectiva previa presentación del
documento donde figura la fecha de compra del aparato y,
en concreto, de la correspondiente factura, comprobante de
compra o documento equivalente que contenga el nombre del
vendedor, la fecha de entrega y los datos de identificación del
aparato. (Como número de modelo, número de serie). En caso
de que el nuevo producto se incluya en la compra de nueva
construcción residencial, esta garantía
original del lugar que contiene el producto Fulgor Milano y la
cobertura de la garantía iniciará en la fecha de ocupación de
la residencia (se requiere prueba de esta ocupación) hasta un
máximo de seis meses adicionales a contar desde la fecha de
compra del producto por parte de la empresa de desarrollo
al comerciante o vendedor. Esta extensión no se aplica a la
siguiente nota a pie de página 1.
Esta garantía solo será válida si la diferencia entre la fecha de
compra y la fecha de producción del producto es inferior a un
año. Cualquier producto que haya estado almacenado durante
más de un año solo estará cubierto por la garantía B-Stock de
Fulgor Milano .
Durante el periodo de garantía, Fulgor Milano se reserva el
derecho a evaluar la conveniencia de reparar el aparato o, a
su discreción, de cambiarlo por un producto Fulgor Milano de
características y funcionalidades equivalentes. Fulgor Milano se
reserva el derecho a revisar esta garantía en cualquier momento.
Algunos Estados no permiten la exclusión o limitación de los
daños accidentales o indirectos, de forma que la limitación o
exclusión anterior quizá no se aplique en su caso. Esta garantía
le confiere derechos legales específicos y quizá también otros
derechos que pueden variar de un Estado a otro.
1
Las puertas, manijas, cristal, marcos producto, estanterías,
superficies internas y externas están cubiertos por una garantía
limitada a 30 días por los defectos estéticos que se hayan
originado en fábrica.
NOTA El cambio de bombillas no está cubierto por la garantía
rte, entrega, voltaje impropio,
se aplica al residente
Fulgor Milano
Page 57

- 56 -
Page 58

- 57 -
Page 59

- 58 -
Page 60

- 59 -
Page 61

- 60 -
Page 62

- 61 -
Page 63

- 62 -
Page 64

- 63 -
Page 65

- 64 -
Page 66

- 65 -
Page 67

- 66 -
Page 68

- 67 -
Page 69

- 68 -
Page 70

- 69 -
Page 71

- 70 -
Page 72

- 71 -
Page 73

- 72 -
Page 74

- 73 -
Page 75

- 74 -
Page 76

Si ce qui précède ne suffit pas à résoudre les problèmes, s'il vous plaît contacter le
support technique:
Pour Eastern Canada (Ontario -> east):
Pour Western Canada (Manitoba -> west):
Pour United States:
Distinctive Appliances Service Department
gratuit: 1-800-361-0799
Email: service@distinctive-online.com
www.distinctive-online.com
Pacific Specialty Brands Service Department
Email: service@pacificspecialtybrands.com or
gratuit: 1-877-430-5253x106
Fulgor-Milano USA Service
Email: fulgor@adcoservice.com or
gratuit: 1-855-4-fulgor (855-438-5467)
- 75 -
Page 77

Durée de la garantie :
Pendant 24 mois, à compter de la date d’achat originale,
la garantie Fulgor Milano couvre toutes les pièces et la main
d’œuvre nécessaires à réparer ou remplacer dans des conditions
d’utilisation résidentielle normale, toute pièce s’avérant
défectueuse en raison d’un vice de matière ou de fabrication
survenu au cours du processus de production original.
Cette garantie s’applique à tous les produits portant le nom
Fulgor Milano à l’exception du réfrigérateur à deux portes
(FM36CDFDS1) qui a une durée de garantie de 12 mois.
Comme preuve de garantie, merci de conserver la facture d’achat
et le bon de livraison originaux.
Pour obtenir un service dans le cadre de cette garantie, il est
nécessaire de :
1. contacter le service autorisé Fulgor-Milano
Pour toute l’Amérique du Nord :
site: http://www.thevettagroup.com/servicerequest.a5w
Aux Etats-Unis
E-mail : fulgor@appliance-support.com
téléphone : 1-855-4-fulgor (1-855-438-5467)
A l’Est du Canada (Ontario->Est)
E-mail : service@distinctive-online.com
téléphone : 1-800-361-0799
A l’Ouest du Canada (Manitoba<-Ouest)
E-mail : service@pacificspecialtybrands.com
téléphone : 1-877-430-5253 x106
2. Fournir une copie de votre ticket de caisse original et indiquer
le numéro de modèle et le numéro de série du produit.
3. Fournir à Fulgor Milano une opportunité raisonnable d’analyser
la réclamation avant que le produit ou tout composant de ce
dernier ne soit modifié ou retiré.
Conditions de la garantie :
Cette garantie est valable uniquement dans les Etats contigus
des Etats-Unis, y compris le District of Columbia et l’Alaska et
au Canada. Cette garantie s’applique uniquement au premier
acheteur et ne peut être transférée. Tous les services fournis
par Fulgor Milano en vertu de la garantie indiquée doivent être
eectués par un technicien de service autorisé Fulgor Milano ,
sauf indication contraire de Fulgor Milano . Ce service sera fourni
pendant les heures de travail normales de chaque région.
Cette garantie s’applique uniquement à des produits achetés à
un revendeur agréé par le biais d’une chaîne de distribution
approuvée et qui sont installés pour un usage résidentiel normal
et elle ne s’applique pas à un usage commercial ni à un usage
sur les yachts. Cette garantie couvre uniquement les services
eectués sur le lieu d’installation du produit et ne couvre pas les
frais associés à la réparation hors site, sauf autorisation explicite
de Fulgor Milano et elle ne couvre pas non plus les frais de
déplacement associés à la prestation de service dans des sites
distants. Les sites distants sont définis comme se trouvant hors
d’un rayon de 50 miles (80 kilomètres) d’un revendeur agréé.
Cette garantie ne couvre pas la main d’œuvre ou les pièces
employées pour corriger un défaut quelconque
causé par une
négligence, le transport, la livraison, une tension incorrecte, un
accident ou une utilisation, une maintenance, une installation,
un entretien ou une réparation incorrects, y compris mais sans
s’y limiter, un démontage et la réinstallation incorrects de tout
composant du produit (par ex. retirer des poignées pour passer
par des portes) avant ou pendant la livraison/l’installation
du produit. Les solutions décrites ici sont les seules qui seront
fournies par Fulgor Milano, en vertu de cette garantie ou en vertu
de toute garantie naissant du fait de la loi. Fulgor Milano décline
toute responsabilité en cas de perte de produit suite à une
détérioration ou à un incendie ou en cas de dommages indirects
aux meubles environnants, à des matériaux de construction ou à
des matériaux de finition tels que, entre autres, le revêtement de
sol. Fulgor Milano ne saura être tenue responsable de dommages
indirects ou accessoires dérivant d’une violation de ces garanties
ou de toute autre garantie, explicites, implicites ou statutaires.
La garantie sera valable et prendra eet uniquement sur
présentation du document indiquant la date d’achat de l’appareil,
et plus précisément de la facture correspondante, d’une preuve
d’achat ou un document équivalent indiquant le nom du
vendeur, la date de livraison et les données d’identification de
l’appareil (telles
que numéro de modèle, numéro de série). Dans
le cas d’un nouveau produit inclus dans l’achat d’une nouvelle
construction résidentielle, cette garantie s’applique au premier
résident du lieu contenant le produit Fulgor Milano et la garantie
prendra eet à la date d’occupation de la résidence (preuve
d’occupation nécessaire) jusqu’à un maximum de six mois
supplémentaires à compter de la date d’achat du produit par la
société de promotion immobilière auprès du distributeur ou du
revendeur. Cette extension ne s’applique pas à la note de bas
de page 1 suivante.
Cette garantie est valable uniquement dans les cas où la diérence
entre la date d’achat et la date de production est inférieure à
un an. Tout produit qui a été stocké pendant plus d’un an sera
uniquement couvert par la garantie B-Stock de Fulgor Milano .
Pendant la période de garantie, Fulgor Milano se réserve le
droit d’évaluer l’opportunité de réparer l’appareil ou, à sa
discrétion, de le remplacer par un produit Fulgor Milano ayant
les caractéristiques et une fonction équivalentes. Fulgor Milano
se réserve le droit de revoir cette garantie à tout moment.
Certains Etats n’autorisent pas l’exclusion ou la limitation de
dommages indirects ou accessoires, dans ce cas, la limitation
ou l’exclusion ci-dessus ne s’applique pas. Cette garantie vous
donne des droits légaux spécifiques et vous pouvez également
disposer d’autres droits qui varient d’un Etat à l’autre.
Fulgor Milano
1
Portes, poignées, vitres, cadres de produit, grilles, surfaces
intérieures et extérieurs sont couvertes par une garantie de
30 jours pour pièces seulement, pour les défauts esthétiques
d’usine.
REMARQUE
Les ampoules de remplacement ne sont pas
couvertes par la garantie du produit.
- 76 -
Page 78

DOC COD. 11/2018
 Loading...