

Page 1
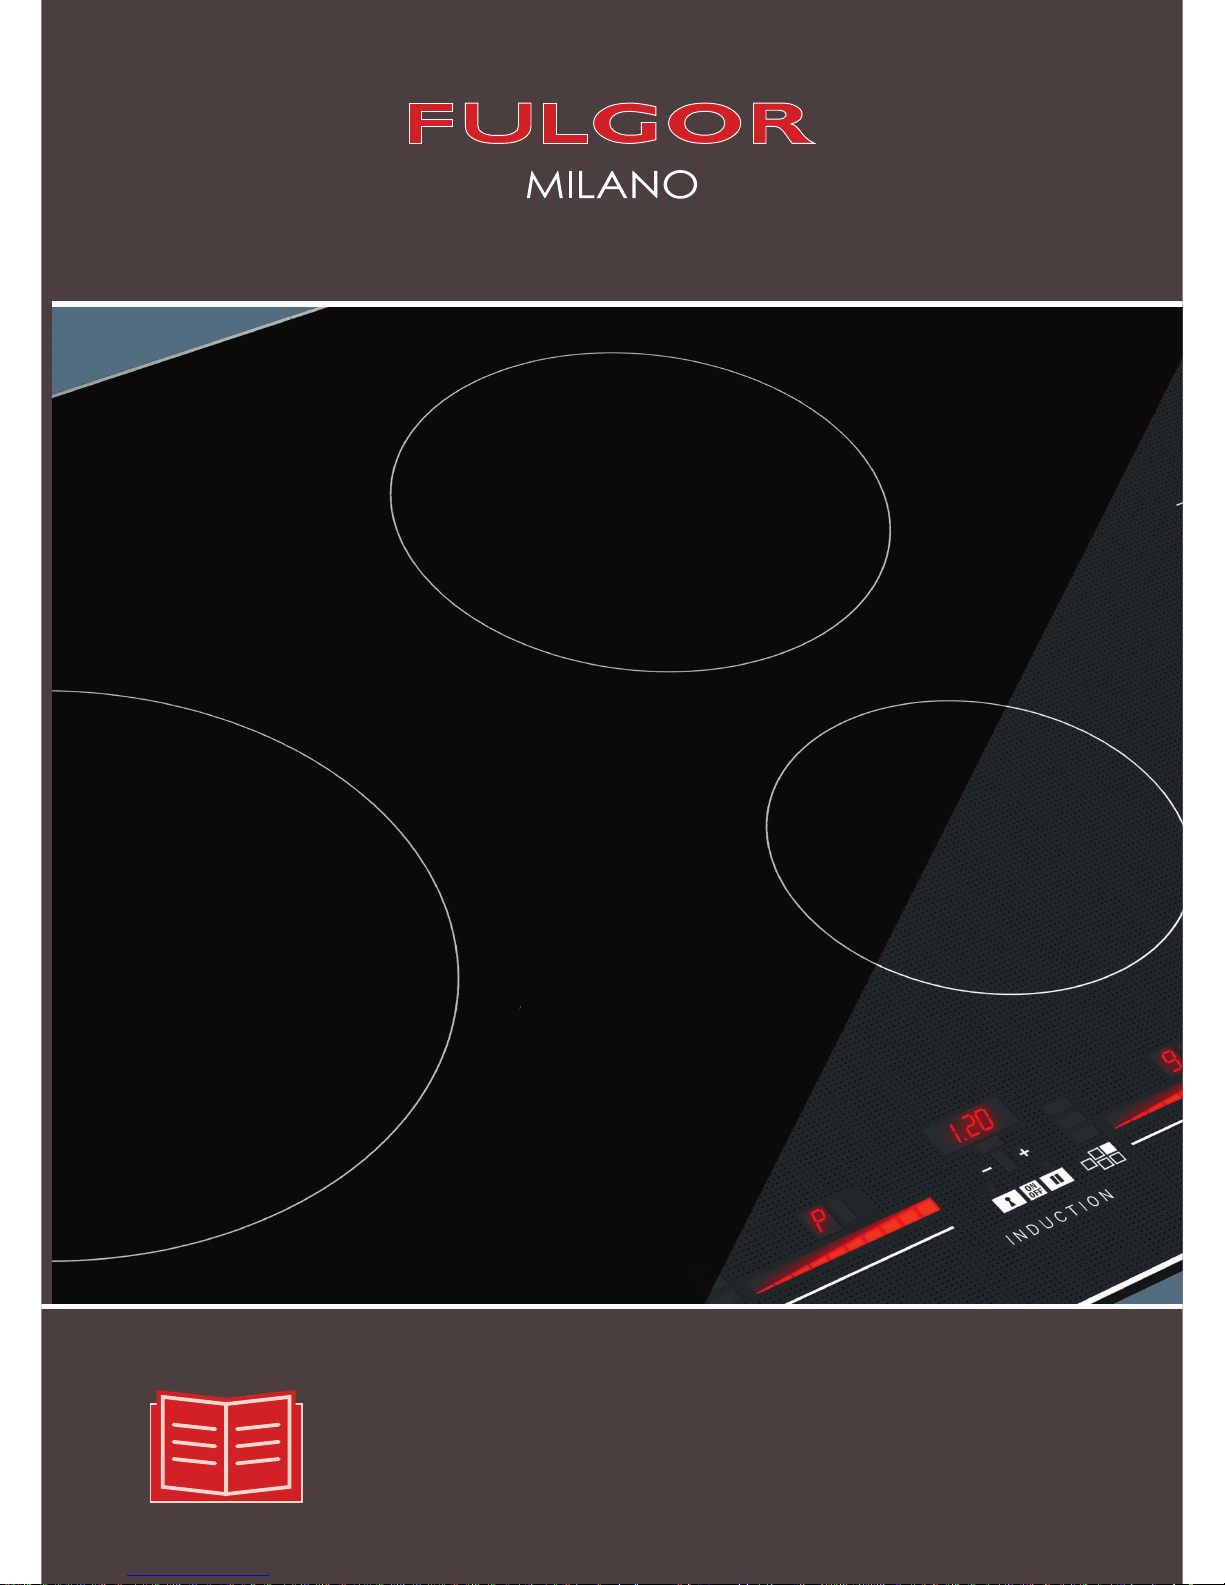
INDUCTION
COOKTOPS
SERIES 700
USE & CARE MANUAL
GUIDE D’UTILISATION ET D’ENTRETIEN
MANUAL DE USO Y CUIDADO
Page 2

Page 3

Dear Customer,
Thank you for purchasing a Fulgor Milano product. Fulgor Milano is
committed to excellence and our signature technologies provide you with
professional tools for your kitchen. One of our central philosophies is
continuous investment in research that is rooted in developing life enhancing
technology. Our goal is to deliver products that are worthy of your family
recipes and that will breathe life into your kitchen, the heart of your home.
We invite you to enjoy your new Fulgor Milano product with same amount
of care and attention that we have put into creating it.
Your Life | Our Passion
Page 4

Page 5

EN
1
TABLE OF CONTENTS PAG E
Warnings For Electrical Connection 2
1 - Safety Instructions 3
Cooktop Safety 3
Personal Safety 4
2 - Models and Part Identification 5
3 - How Induction Heating Works 6
Induction 6
Operating principle 6
4 - Induction Cooktop Operation 7
Before using the cooktop for the first time 7
Power Sharing 7
Cookware “noise” 7
5 - User instructions 9
Use 9
Pan detection 9
Residual heat indicator 9
Protection in the event of accidental switching on
9
Precautions 10
Pans 10
Maintenance 10
Turning the cooktop on and off 10
Acoustic signal (buzzer) 10
Turning on a cooking area 10
TABLE OF CONTENTS PAG E
Turning off a cooking area 11
Power level 11
Booster and power management 11
Automatic preheating (or “heat-up” function) 11
Activating automatic heating (or “heat-up”
function) 11
Bridge function (For large pans) 11
Special functions (low temp) 11
Control lock (child safety) 12
Deactivating control lock 12
Key 12
Pause 12
Deactivating Pause 12
Timer function 12
Independent timer 12
Turning off/changing the timer 12
Programming the timer for the cooking areas 13
Error codes 13
6 - Troubleshooting 14
7 - Assistance or Service 15
Service Data Record 15
8 - Fulgor Milano WARRANTY for Home Appliances 16
Page 6
EN
2
Pay attention to these symbols present in this manual:
WARNING
• This is the safety alert symbol. This symbol alerts you to
potential hazards that can kill or hurt you and others.
• You can be killed or seriously injured if you don’t follow
these instructions.
READ AND SAVE THESE INSTRUCTIONS.
Warnings For Electrical Connection
WARNING
• Installation and service must be performed by a qualified
installer or service agency.
• The models may be powered at 240V or 208V.
CAUTION
• Always disable the electrical supply source before
servicing this unit.
• For personal safety, this appliance must be properly
grounded.
Changes or modifications not expressly approved by the party
responsible for compliance could void the user’s authority to
operate the equipment.
Note: This equipment complies with part 18 of the FCC Rules.
This equipment generates, uses and can radiate radio
frequency energy and, if not installed and used in
accordance with the instructions, may cause harmful
interference to radio communications. However, there
is no guarantee that interference will not occur in a
particular installation. If this equipment does cause
harmful interference to radio or television reception,
which can be determined by turning the equipment off
and on, the user is encouraged to try to correct the
interference by one or more of the following measures:
• Reorient or relocate the receiving antennae.
• Increase the distance between the equipment and
receiver.
• Connect the equipment into an outlet or a circuit
different from that to which the receiver is connected.
• Consult the dealer or an experienced radio/TV
technician for help.
WARNING
Persons with a pacemaker or similar medical device should
exercise caution when using or standing near an induction
unit while it is in operation. The electromagnetic field may
affect the working of the pacemaker or similar medical
device. It is advisable to consult your doctor or the pacemaker
manufacturer about your particular situation.
Page 7

EN
3
1 - Safety Instructions
Cooktop Safety
WARNING
Proper Installation
• Be sure your appliance is properly installed and grounded
by a qualified technician.
Never Use Your Appliance for Warming or Heating the Room
Do Not Leave Children Alone
• Children should not be left alone or unattended in area
where appliance is in use.
They should never be allowed to sit or stand on any part
of the appliance.
Wear Proper Apparel
• Loose-fitting or hanging garments should never be worn
while using the appliance.
User Servicing
• Do not repair or replace any part of the appliance
unless specifically recommended in the manual. All other
servicing should be referred to a qualified technician.
Storage in or on Appliance
• Flammable materials should not be stored in an oven or
near surface units.
Do Not Use Water on Grease Fires
• Smother fire or flame or use dry chemical or foam-type
extinguisher.
Use Only Dry Potholders
• Moist or damp potholders on hot surfaces may result in
burns from steam. Do not use a towel or other bulky cloth.
Never Leave Surface Units Unattended at High Heat Settings
• Boil over causes smoking and greasy spillovers that may
ignite.
WARNING
• Do not place metallic objects such as knives, forks, spoons,
and lids on the cooktop surface since they can get hot.
Do Not Cook on Broken Cook-Top
• If cook-top should break, cleaning solutions and spillovers
may penetrate the broken cooktop and create a risk of
electric shock. Contact a qualified technician immediately.
Clean Cook-Top With Caution
• If a wet sponge or cloth is used to wipe spills on a hot
cooking area, be careful to avoid steam burn. Some
cleaners can produce noxious fumes if applied to a hot
surface.
IMPORTANT INSTRUCTION
Please read all instructions before using this appliance.
Page 8
EN
4
Personal Safety
WARNING
To reduce the risk of injury to persons, in the event of a grease
fire, observe the following:
• Grease is flammable and should be handled carefully.
• Do not use water on grease fires.
• Never pick up a flaming pan. Smother with a baking sheet
or flat, metal tray.
• Flaming grease outside of utensil can be extinguished with
baking soda or, if available, a multipurpose dry chemical
or foam type extinguisher.
• Let fat cool before attempting to handle it.
• Wipe up spill-over immediately.
• If you are “flaming” liquors or other spirits under an
exhaust, turn the fan off. The draft could cause the flames
to spread out of control.
• Never leave the surface area unattended at high heat
setting. Boil over cause smoking and greasy spill over,
which may ignite.
CAUTION
Do not allow aluminum foil, plastic, paper or cloth to come
in contact with a hot Surface. Do not allow pans to boil dry.
• Be careful to prevent burns. If the flames do not go out
immediately, evacuate and call the fire department.
• Always have a working smoke detector near the kitchen.
• Leave the hood ventilator on when flambéing food only if
there is smoke without flames.
Use an extinguisher only if
• You know you have a Class ABC extinguisher, and you
already know how to operate it.
• The fire is small and contained in the area where it started.
• The fire department is being called.
• You can fight the fire with your back to an exit.
• Never use water on cooking fires.
• In the event that personal clothing catches fire, drop and
roll immediately to extinguish flames.
WARNING
To reduce the risk of burn injuries during cooktop use, observe
the following:
• Never use the cooktop to warm or heat a room.
• Children or pets should not be left alone or unattended in
an area where appliances are in use. They should never
be allowed to sit or stand on any part of the appliance.
CAUTION
Do not store items of interest to children in cabinets above a
range or on the backguard of a range; children climbing on
the range to reach items could be seriously injured.
When using the cooktop
• Do not touch surface units or areas near units. Surface
areas may become hot enough to cause burns. Surface
elements may be hot even though they are dark in color.
During and after use, do not touch or let flammable
materials contact heating elements until they have had
time to cool.
Page 9
EN
5
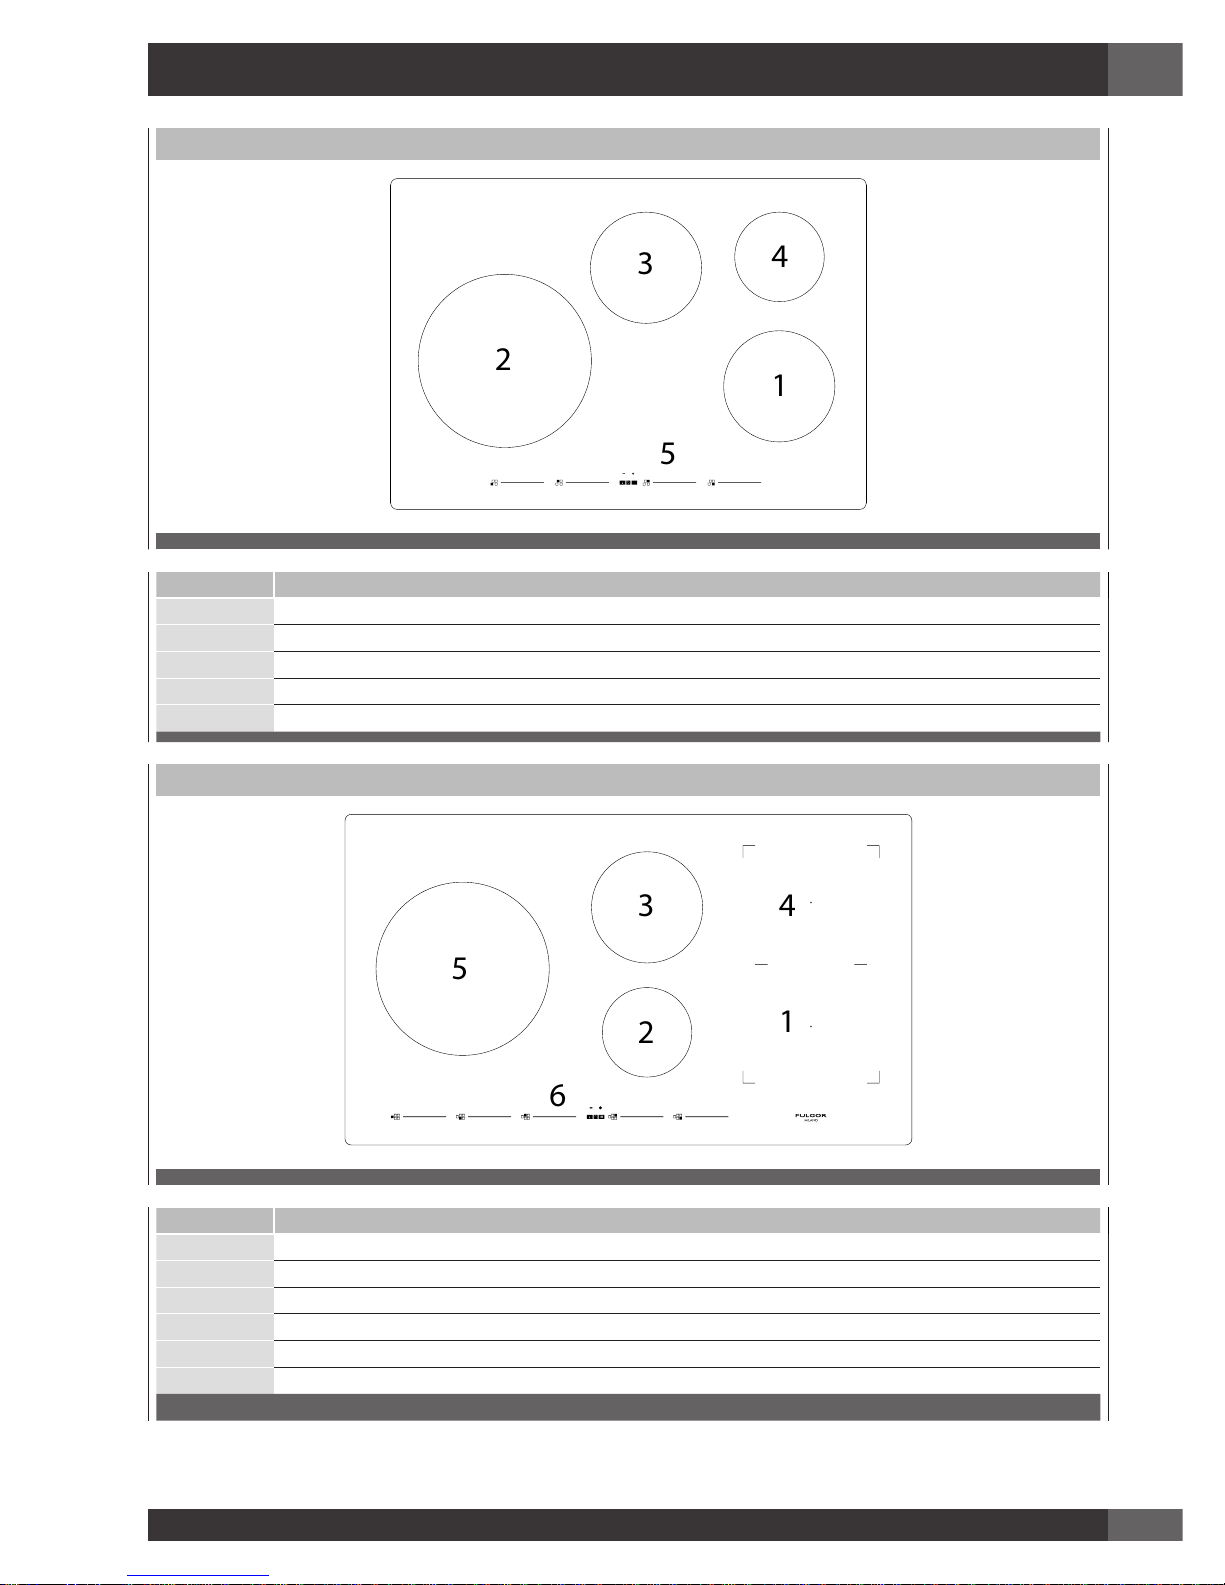
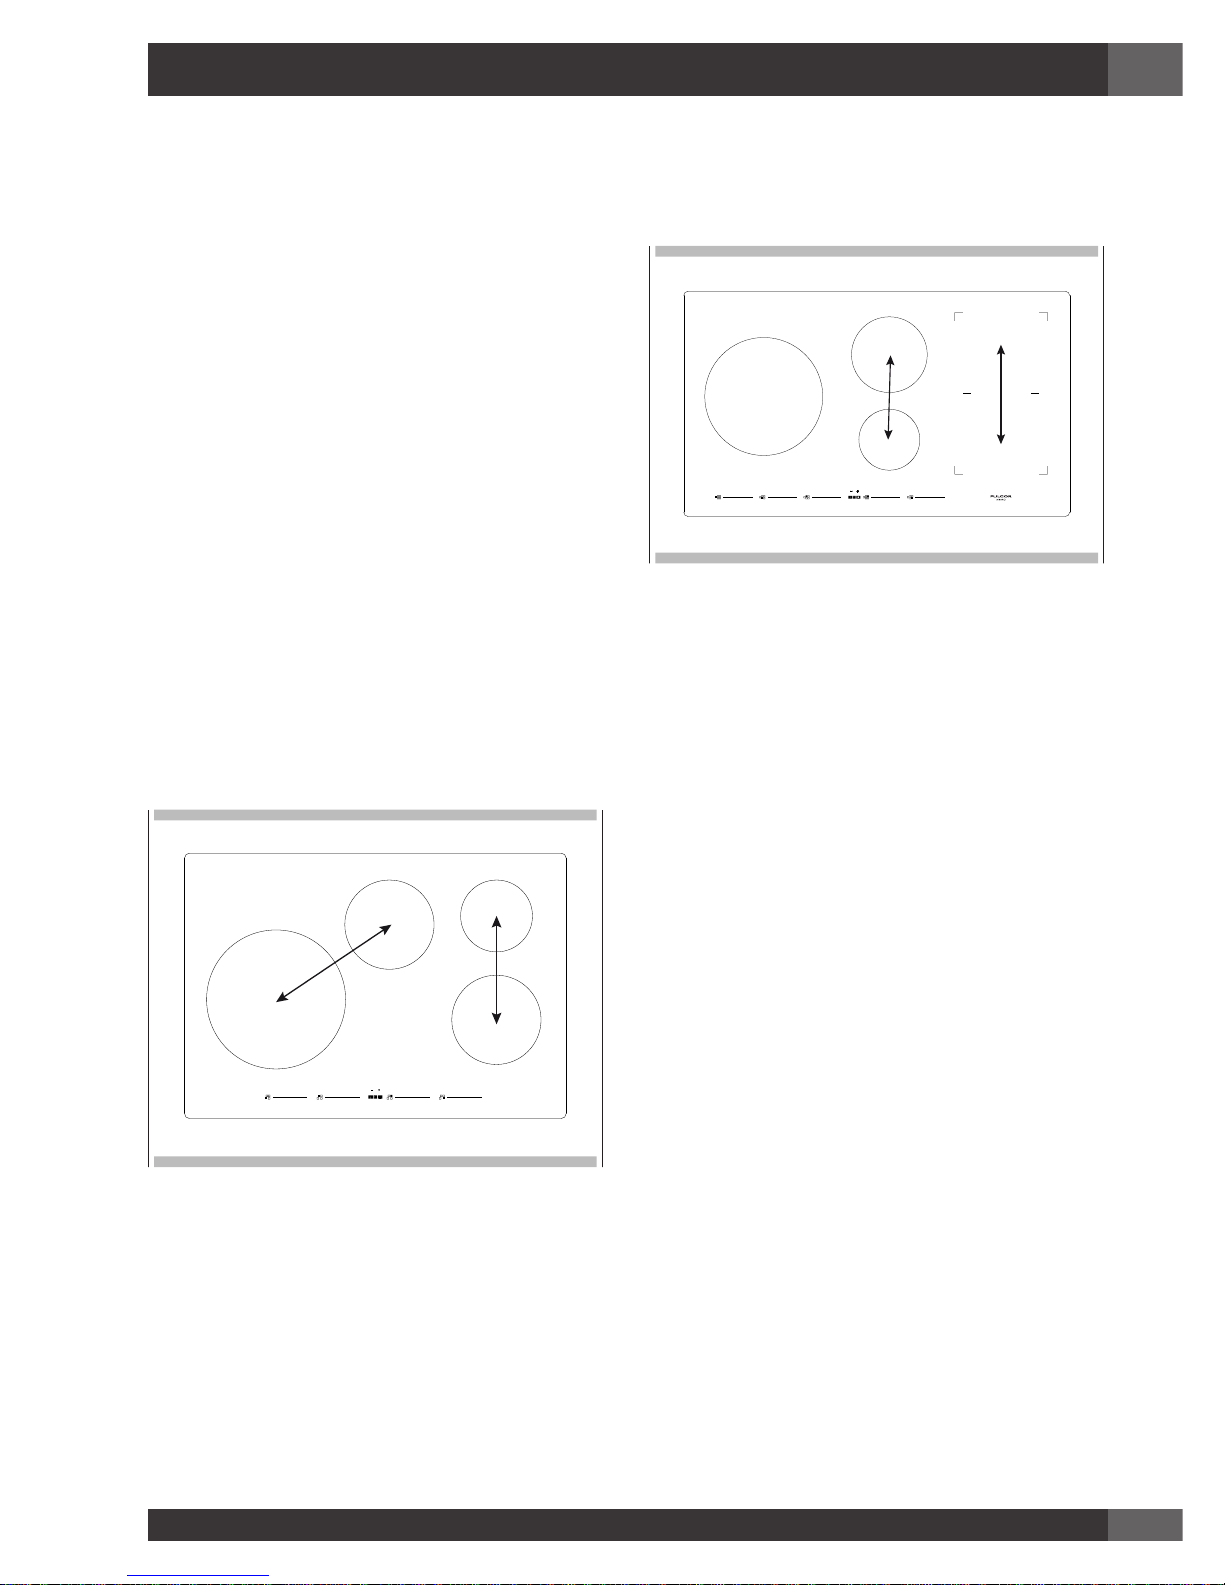
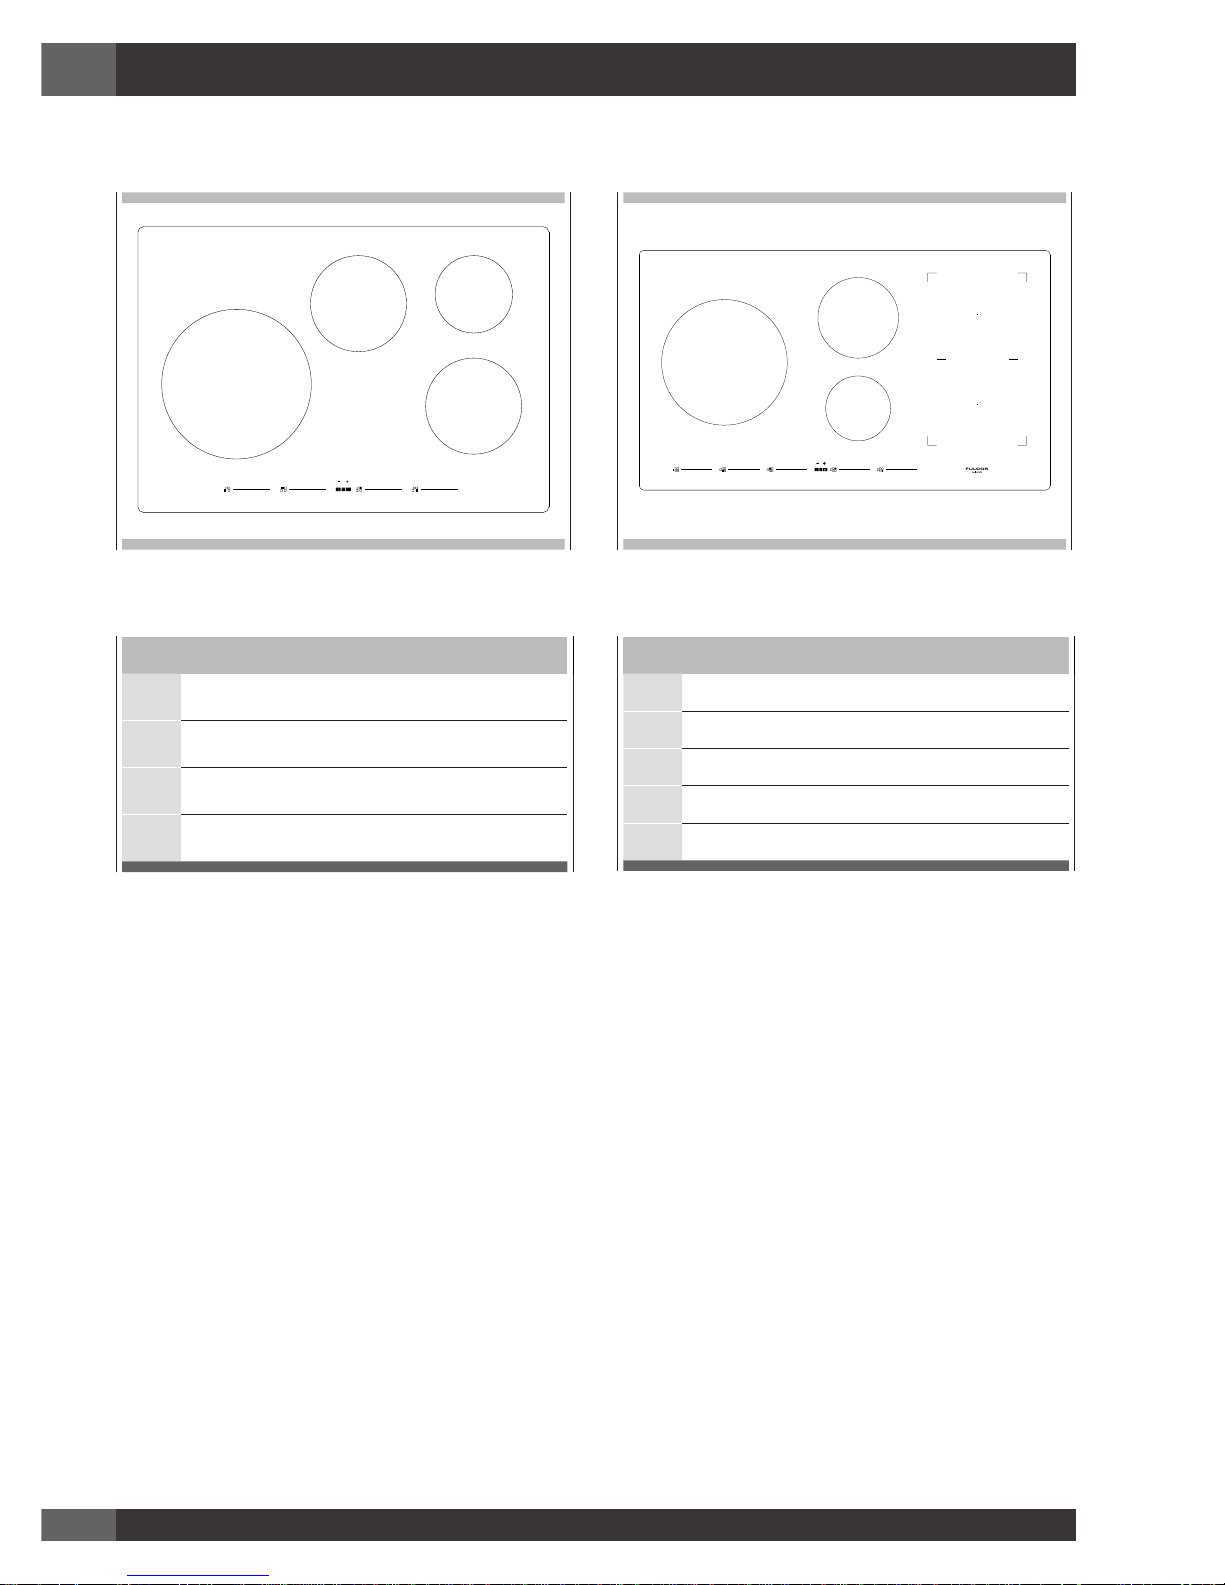
2 - Models and Part Identification
30” MODELS
1
2
3
4
5
F7IT30*1
Position 1
7” (180 mm) - 1850W (Booster 3000W)
Position 2
11” (280 mm) - 2300W (Booster 3600W)
Position 3
7” (180 mm) - 1850W (Booster 3000W)
Position 4
5 3/4” (145 mm) - 1400W (Booster 2200W)
Position 5
touch control
36” MODELS
5
3
2
4
1
6
F7IT36*1
Position 1
7 1/2” x 8 1/2” (190 mm x 220 mm) - 2000W (Booster 3600W)
Position 2
5 3/4” (145 mm) - 1400W (Booster 2200W)
Position 3
7” (180 mm) - 1850W (Booster 3000W)
Position 4
7 1/2” x 8 1/2”
(190 mm x 220 mm) - 2000W (Booster 3600W)
Position 5
11” (280 mm) - 2300W (Booster 3600W)
Position 6
touch control
Page 10

EN
6
3 - How Induction Heating Works
Induction
Heating by induction is the most efficient form of cooking
available.
The heat is generated by an electromagnetic field, directly on
the bottom of the pan or pot used.
The surface which is free from contact remains virtually cold.
When the cooking time is up and the container is removed,
there is no residual heat. It is efficient become there is no waste
of energy due to dispersion, as happens with gas burners, it is
30 to 50% faster than normal hobs using HGL technology and
allows energy savings of up to 25%.
If liquid overflow from the container, it does not stick to the
surface of the hob, because this is just slightly warm.
Operating principle
This is based on the electromagnetic properties of most cooking
containers.
The electronic circuit governs the operation of the coil (inductor),
creating a magnetic field.
The heat is transmitted by the container to the food.
Te cooking process takes place as follows:
• minimum dispersion (high performance);
• the removal of the pan (simply lifting it) automatically stops
the system;
• the electronic system allows maximum flexibility and
precision of regulation.
1 - Recipient
2 - Induced current
3 - Magnetic field
4 - Inductor
5 - Electronic circuit
6 - Electricity supply
Page 11
EN
7
4 - Induction Cooktop Operation
Before using the cooktop for the first time
• All products are wiped clean with solvents at the actory to
remove any visible signs of dirt, oil, and grease which may
have remained from the manufacturing process.
• If present, remove all packing and literature from the cooktop
surface.
• Clean your glass top before the first time you use it. A
thorough cleaning with a glass top cleaner is recommended.
It only takes a minute and puts a clean, shiny coating on the
glass top before its initial use.
• There may be a slight odour during the first several uses: this
is normal and will disappear.
• Optimum cooking result depends on the proper cookware
being selected and used.
• The cooking surface will hold the heat and remain hot over
20 minutes after the elements have been turned off.
• The glass ceramic cooking surface is a durable material
resistant to impact but not unbreakable if a pan or other
object is dropped on it.
• Do nor allow pans to boil dry. This can damage the pan,
element and /or cooktop.
• Do not slide cookware across cooking surface it may scratch
the glass
• Using cast iron cookware on the glass cooktop Is not
recommended. Cast iron retains heat and may result in
cooktop damage.
4 burner cooktops with right and lift side (2) induction
generators.
5 burner cooktops with right and lift center (3) induction
generators.
Power Sharing
Four burner cooktops are divided into two separate heating
zones.
Five burner cooktops are divided into 3 zones.
One generator controls 2 elements, or two cooking zones
within a heating section share the power of one generator.
Power Sharing is activated when both elements in the same
cooking zone are activated and one element is set for Boost
(P). The element that is not set for Boost will change to a lower
power level. This is called Power Sharing.
Cookware “noise”
When using adjacent elements that are set at certain power
level setting, magnetic fields may interact and produce a low
whistle or intermitted “hum”. Pens that completely cover the
elements ring will produce less noise. A low “humming” noise
is normal particularly on high settings. These noises can be
reduced or eliminated by lowering or raising the power level
settings of one or both of elements.
Page 12
EN
8
In some cooking areas an internal diameter is indicated with
a lighter outline.
A
B
C
D
30” Wide Cooktop. Use the minimum size pan shown for
each cooking element.
Diameter pan size 30”
A
5” ¾ (14.5 cm) minimum diameter pan size
B
7” (18.0 cm) minimum diameter pan size
C
5” ¾ (14.5 cm) minimum diameter pan size
D
4” ¾ (12.0 cm) minimum diameter pan size
E
C
B
D
A
36” Wide Cooktop. Use the minimum size pan shown for
each cooking element..
Diameter pan size 36”
A
5” ¾ (14.5 cm) minimum diameter pan size
B
4” ¾ (12.0 cm) minimum diameter pan size
C
5” ¾ (14.5 cm) minimum diameter pan size
D
5” ¾ (14.5 cm) minimum diameter pan size
E
7” (18.0 cm) minimum diameter pan size
Page 13
EN
9
5 - User instructions
Residual heat indicator
This tells the user that the glass is at a dangerously high
heat in case of contract with the whole area over the
cooking zone. The temperature is determined using a
mathematical model and any residual heat is indicated
with an “H” by the corresponding seven-segment display.
Heating and cooling are calculated in relation to:
• the power level selected (from “0“ to “9“);
• the relay activation period.
After switching off the cooking zone, the corresponding display
shows an “H” until the temperature in the zone falls below
the critical level (≤ 60°C) in compliance with the mathematical
model.
Protection in the event of accidental switching on
• If the electronic control sense continuous activation of a key
for about 10 sec. it switches off automatically. The control
gives off an acoustic error, warning the user of the presence
of an object on the sensors. The displays show the permanent
error code, which will be displayed as long as the electronic
control senses the error. If the cooking zone “burns”, an “H”
will appear on the display, alternating with the error signal.
• If no cooking zone is activated within 10 seconds of switching
on the touch control, the control returns to stand-by mode.
• When the touch control is on, the ON/OFF key takes priority
over all the other key, so the touch control can be switched
off at any time, even in the case of multiple or continuous
activation of the keys.
• In stand-by mode, continuous activation of the keys will
have no effect. However, before the electronic control can
be switched on again, it must acknowledge that no key is
active.
Use
First of all, position the pan in the chosen cooking area. The
absence of the pan display means the system cannot start.
Pan detection
A certainty which distinguishes the knowledgeable use of
technology in favour of the consumer.
3 4
5
1
6
7 8 9 10 11
24 23 22 21
20 19
2
18
17 16 15 14 13 12
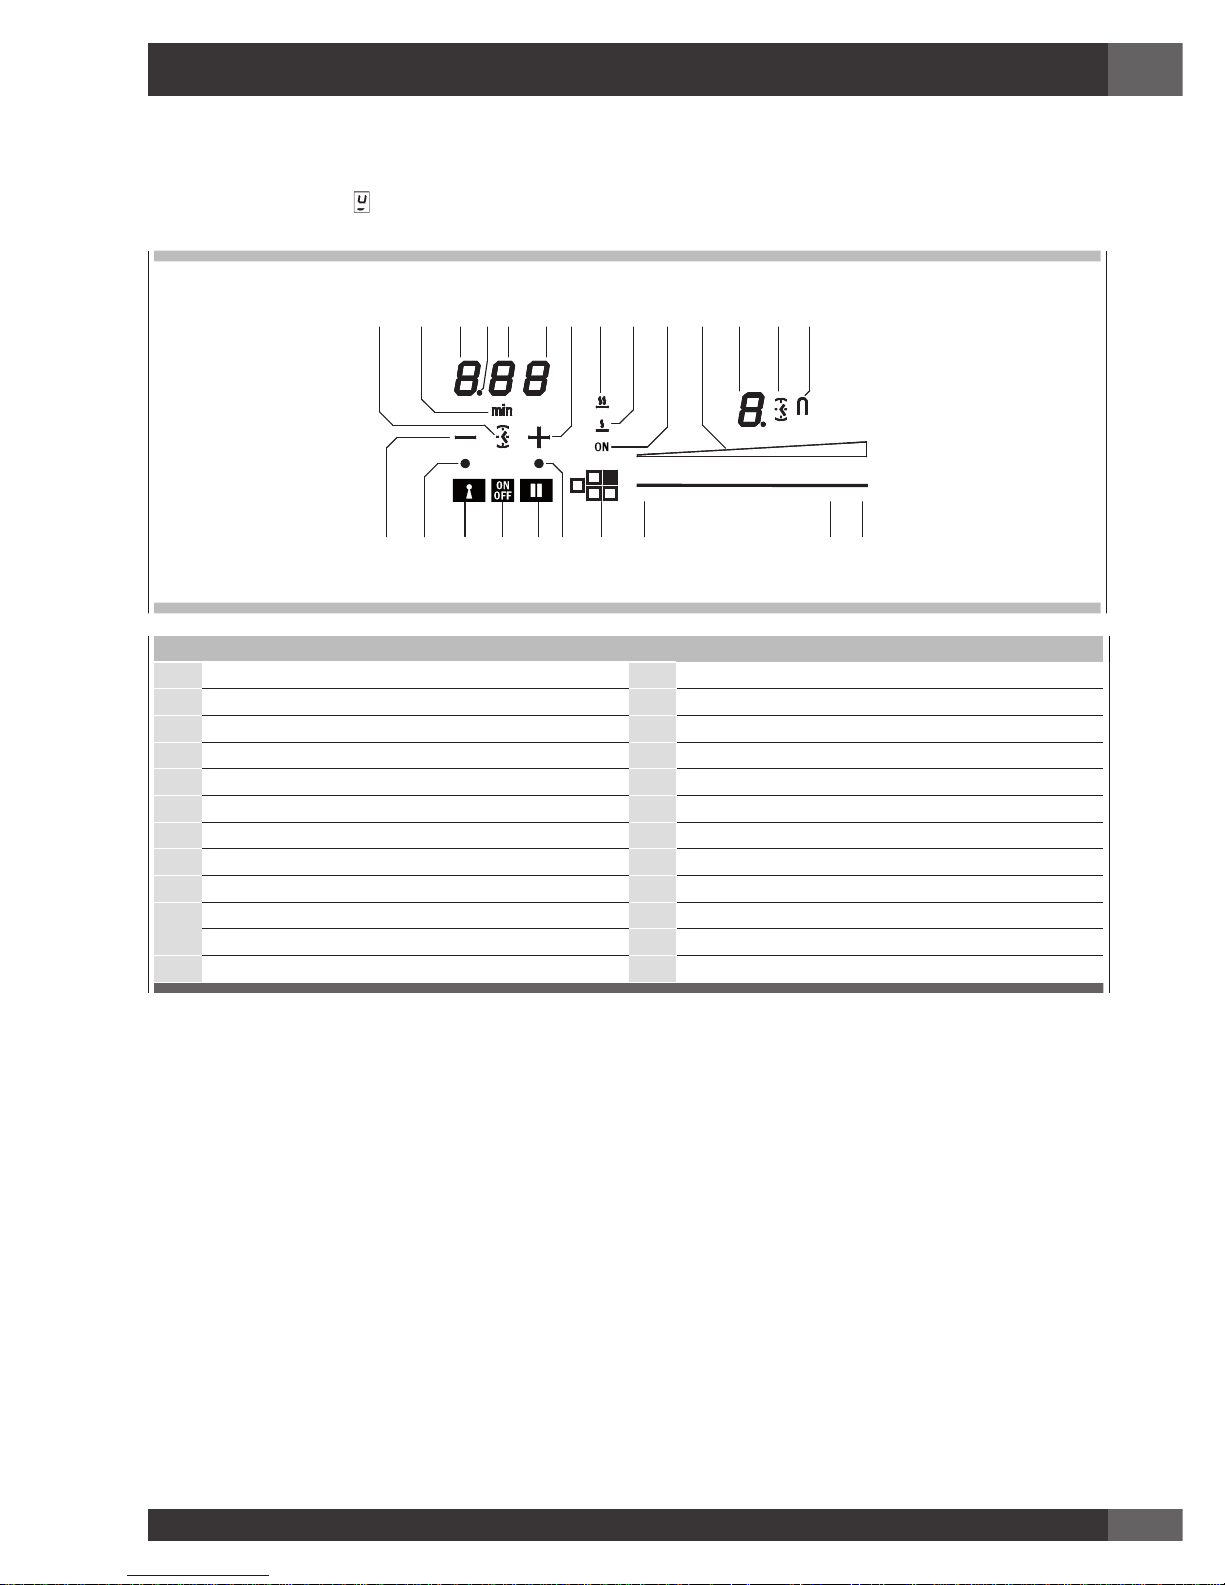
Parts
1 Main ON/OFF 13 Timer for cooking area activation icon
2 + Timer 14 Cooking area level display
3 - Timer 15 Cooking level illuminated bar
4 Key on LED 16 On area indication
5 Key on button 17 Melt function symbol
6
Pause on button 18 Simmering function symbol
7 Pause and Recall involuntary switch-off LED 19 Timer (minutes/seconds) display
8 ON/OFF Heating area 20 Timer (minutes/seconds) display
9 Minimum level activation cursor area 21 Separator dot (hours/minutes)
10
Maximum level activation cursor area 22 Timer display (hours/minutes)
11 Power Booster (P) activation cursor area 23 Icon indicating minutes
12 Bridge function on icon 24 Independent timer icon
Page 14
EN
10
Precautions
• If there is even the tiniest crack in the ceramic glass surface,
immediately disconnect the hob from the electricity supply;
• during operation, move any magnetic materials such as
credit cards, computer disks, calculators, etc., away from
the area;
• never use cooking foil or rest products wrapped in foil
directly on the hob;
• metallic objects such as knives, forks, spoons and lids must
not be rested on the surface of the hob to prevent them from
heating up;
• when cooking with non-stick cookware, without using water
or oil, limit any preheating time to one or two minutes;
• when cooking foods which tend to stick to the bottom of
the pan, start at minimum power and gradually increase the
heat, stirring frequently;
• after use, turn off element manually (decreasing to “0”)
rather than relying on the pan detection sensor.
Pans
• If a magnet is attracted to the bottom of your cookware then
it is suitable for induction cooking;
• try to use pans declared as suitable for induction cooking;
• flat, thick-bottomed pans will perform most effectively;
• a 20 cm (8”) diameter saucepan can benefit from maximum
power;
• a small saucepan reduces the power but will not cause
energy dispersion. The use of cookware with a diameter of
less than 12 cm (3”) is not recommended;
• stainless steel cookware with multilayer bottom or ferrite
stainless steel if the bottom indicates: for induction;
• cast iron containers, better with an enamelled bottom to
avoid scratching the ceramic glass hob;
• containers made of glass, ceramic, terracotta, aluminium,
copper or non-magnetic stainless steel (austenitic) are
not recommended and are unsuitable unless using Fulgor
Milano’s adapter kit (INDUKIT).
YesNo No
Maintenance
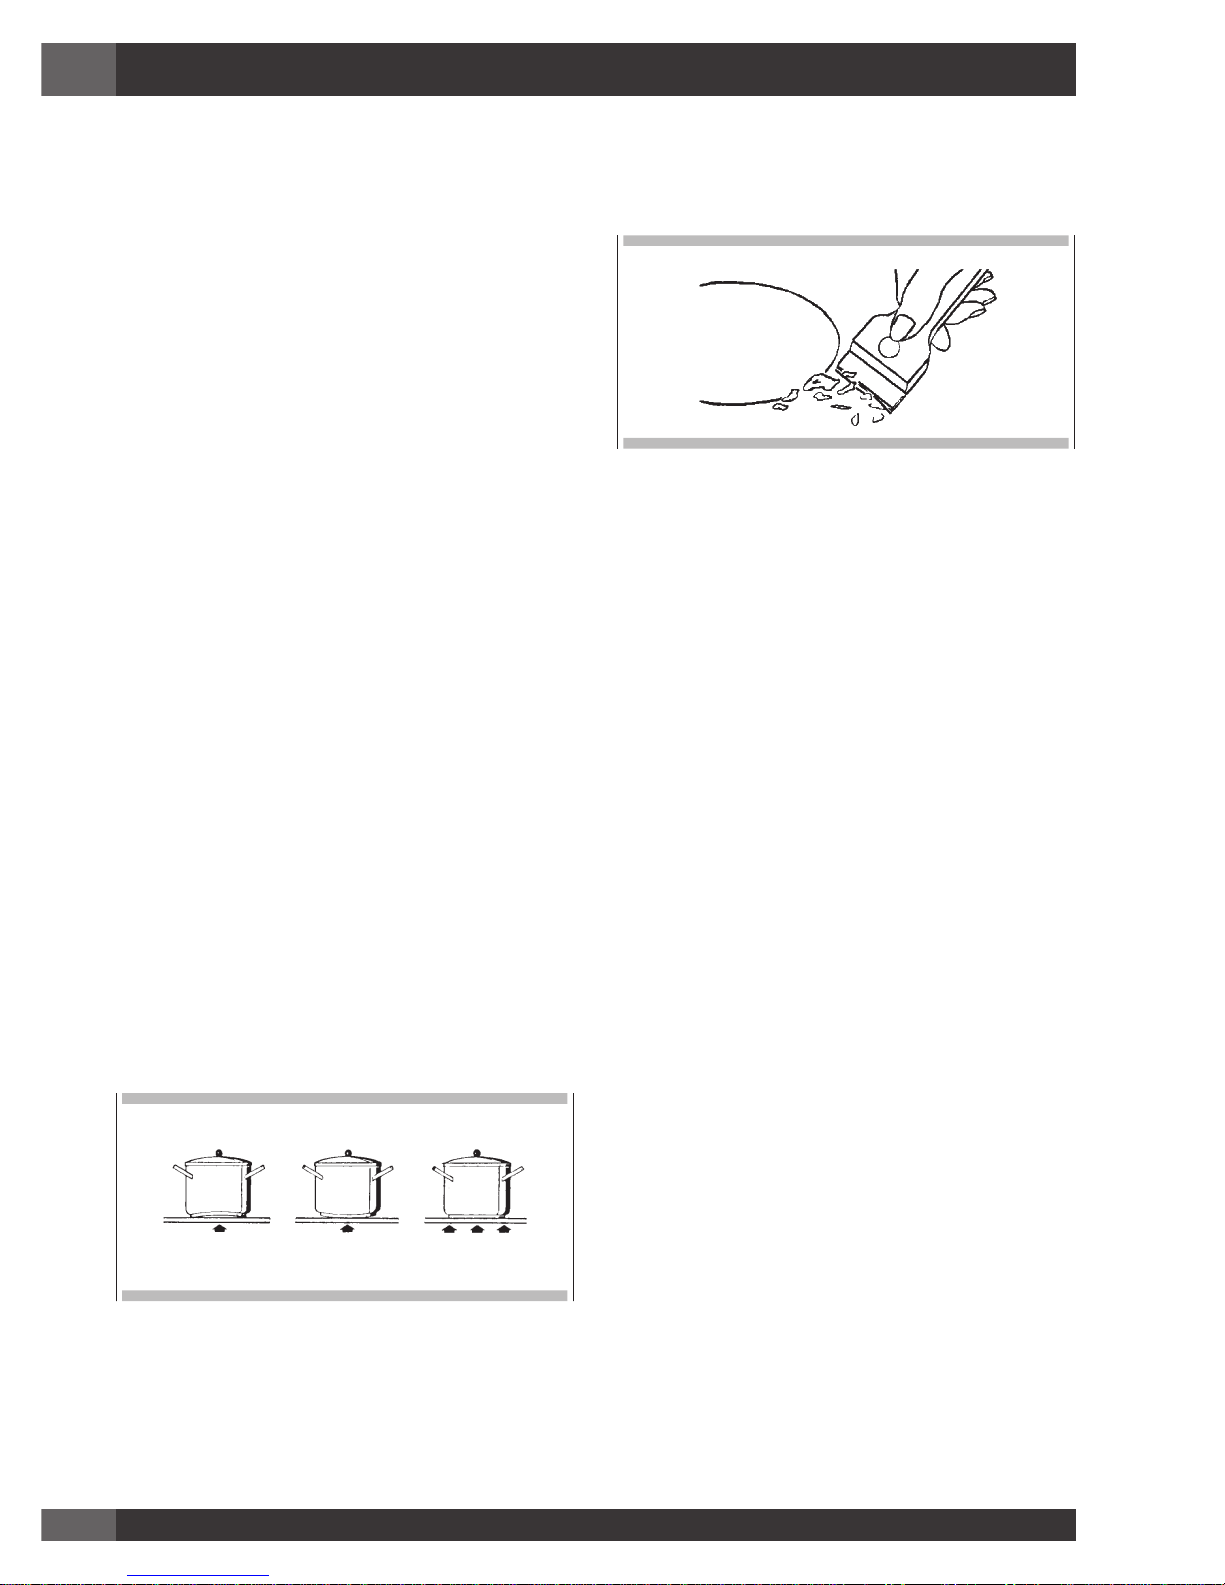
Traces of foil, food residues, splashes of fat, sugar or very
sugary foods must be removed immediately from the hob using
a scraper to avoid damaging the hob surface. Then clean with
a proper ceran top cleaner and kitchen paper, rinse with water
and dry with a clean cloth. Never use abrasive sponges or
clothes and avoid using aggressive chemical cleansers such as
OVEN SPRAYS or STAIN REMOVERS. DO NOT USE STEAM
CLEANERS
Turning the cooktop on and off
The cooktop is turned on by pressing the “centre” On/Off
button (1), you will hear a short beep and the corresponding led
lights up. If a cooking zone is “hot”, the display will alternate
between “H” and “0”. After switching on, the touch control
remains active for 10 seconds. If you do not select either a
cooking zone or the times, the touch control automatically
returns to stand-by mode.
Acoustic signal (buzzer)
During use, the following activities are signalled by a buzzer:
• Normal pressing of the buttons with a short beep.
• Holding down buttons for more than 10 seconds with a long
intermittent sound (an error symbol is displayed and, if you
continue, the touch control is turned off).
Turning on a cooking area
Position a pot and touch an area of the cursor for the cooking
area where the pot is (8), slide your finger to the right to
increase the cooking level (10), or slide your finger to the left
to decrease it (9).
Turning off a cooking area
A single cooking area can be turned off directly by pressing
the (8) key for the cooking area that is working. Hot cooking
areas will be displayed with a letter “H”. You can turn off all
cooking areas immediately at any time using the power On/
Off button (1). If, during cooking, you inadvertently turn off
the surface while using the controls, you can turn it on again
with the On/Off button and you will have 6 seconds to press
the pause button (6) that will be indicated by the (7) flashing
of an indicator light above the button; doing so will turn the
surface on again with the same settings it had before it was
accidentally turned off.
Page 15

EN
11
Power level
The power level of the cooking area can be set from level 1
to level 9. A further level P (Power Booster) is available that
allows a very rapid heating of food and, therefore, saves you
time. The power level represented by an intermittent letter “A”
is the activation of the automatic heating function.
Booster and power management
The generator, with Booster enabled, provides an individual
cooking area power that is significantly higher than the rated
power; the display of the selected cooking area shows a “P”.
The Booster function can be activated by pressing at the end
of the cursor of the cooking area (11). The power increase is
different depending on the size of the cooking area:
1. For a cooking area with a diameter of 5 3/4” (145 mm),
the power goes from a level 9 of 1400 W to the Booster
level of 2200 W for 10 minutes.
2. For a cooking area with a diameter of 7” (180 mm), the
power goes from a level 9 of 1850 W to the Booster level
of 3000 W for 10 minutes.
3. For a rectangular cooking area 7 1/2” x 8 1/2” (190 mm
x 220 mm), the power goes from a level 9 of 2000 W to
the Booster level of 3600 W for 10 minutes.
4. For a cooking area with a diameter of 11” (280 mm), the
power goes from a level 9 of 2300 W to the Booster level
of 3600 W for 10 minutes.
For safety reasons, the Booster function has a limited duration
(10 min), after 10 min the zone is reduced to level 9.
If the cooking vessel is removed from the cooking area during
the Booster time, the Booster remains active and the Booster
time is not deactivated. With the Booster activated, changing
the value set with your finger in the cursor area deactivates
the Booster. The Booster function “P” can be activated in all
cooking areas, but priority is given to the last Booster activated,
reducing any other cooking levels.
36” Power sharing table
LEFT CENTRAL RIGHT
9 P 6 P
P
P 8 P 6
30” Power sharing table
CENT/RIGHT RIGHT
P 6 P 8
7 P 9 P
Automatic preheating (or “heat-up” function)
This feature makes cooking easier by adding ‘boil and reduce’
functionality to the elements. The surface automatically heats
up at Full Power and then returns to the selected power level
after a certain time (see Table).
Activating automatic heating (or “heat-up” function)
Press and hold an area of the cursor for the cooking area that
is working for about 3 seconds until you hear a beep (such as
1/3 of the length of the cursor area). For example: Select level
3 and activate the automatic heating function by pressing your
finger for 3 seconds. The corresponding display shows the
letter “A” alternating with “3”. With these settings, the cooking
surface heats the cooking area at the maximum level “9” for 2
minutes and then continues cooking level at level “3”.
Power livel
Duration Automatic
Heating Function
(time in minutes)
Maximum time
elements will operate
at power setting (time
in minutes)
0 1 0m 40s 516
2 1m 12s 402
3 2m 318
4
2m 56s 258
5
4m 16s 210
6 7m 12s 138
7
2m 138
8 3m 12s 108
9
- 90
P
- 10
Bridge function (For large pans)
This function facilitates cooking with elongated pans, is only
available for the rectangular cooking areas and is activated
by simultaneously pressing the 2 cursors of the 2 cooking
areas involved. At this point, a “ ” icon will light up next
to the display of the levels and the cooking area can now
be controlled from only once cursor since the other will work
simultaneously at the same level. Once set to bridge mode,
the leftmost of the two sliders becomes the master controller
for both elements. To disable bridge mode, simply touch both
slider controls simultaneously at any point along the adjustment
bars.
Special functions (low temp)
This function is available in each cooking area and its activation
is indicated by one of the two dedicated icons (17 & 18). It is
possible to activate 2 “cooking” levels:
1. Melting with a temperature of approximately 45°C.
2. Simmering with a temperature of approximately 70°C.
These temperatures are approximate and are greatly
dependent on the pot and the quantity of food.
After turning on the desired heating zone by pressing the key
Page 16

EN
12
(8), press the initial part of the cursor area (9) to activate the
function (MELT), if you want to switch to the function (SIMMER)
keep hold the cursor in the same position for a couple of
seconds.
Both low temperature functions operate for a maximum of 2
hours.
Control lock (child safety)
It can only be activated when the appliance is on but no cooking
area is in operation. Simultaneously press the key button (5)
and the pause button (6) and then press the key button (5).
The letter “L” will appear on both displays for 10 seconds and
then they will turn off. When you try to turn on the cooking
surface with the On/Off button (1), the letters “L” will be
displayed and it will not be possible to cook.
Deactivating control lock
There are two types of unlocking:
1. Unlocking for one time only: To disable the function, turn
on the cooking surface and simultaneously press the pause
(6) and key (5) buttons. The letters L disappear and all
the zones are enabled. If you turn off the cooking surface
after use, when it is turned on again, the letters L will be
displayed to indicate that the surface is locked. Essentially,
the cooktop will be safety locked automatically whenever
not in use but the special key combination described above
will be needed each time to use.
2. Permanent unlocking: To disable the function permanently,
turn on the cooking surface and simultaneously press the
pause (6) and key (5) buttons. Then release these 2 buttons
and press the Pause button (6) again.
Key
This cooking surface allows setting a keypad lock using the
lock button (5). It may be useful to lock the keypad during
operation, for example for cleaning the control area or, in any
case, if you do not want to change any settings. The On/Off
button (1) remains functional.
Pause
This cooking surface allows setting a pause (6) during cooking
(which is useful, for example, when answering a phone call).
When this function is pressed, an LED lights above the button
and the symbol “II” is displayed in all the cooking areas and
the cooking settings and timers are frozen for a maximum of
10 minutes, after which the cooking surface turns off.
Deactivating Pause
Once activated, the function can be deactivated by pressing
the pause button (6) again. The LED for the pause setting turns
off and, within 10 seconds, you must slide your finger along
the cursor below the illuminated area (from left to right). This
allows the surface to resume cooking and the timer starts from
the same point at which it was stopped.
Timer function
NOTE: the timer is only intended as an acoustic advisor that
recalls the attention of the user.
Timers have no effect on the heating elements. Cooking
zones must always be stopped manually by touching
the corresponding [OFF] key.
There are two versions of the timer function:
• An independent timer from 1 to 59 minutes: it beeps when
the time has run out. This function is always available and is
indicated by the clock symbol (24) which is located between
the - and + buttons (the symbol may be less bright if another
cooking area timer has a remaining time that is less than that
set on the independent timer).
• A timer from 1 to 59 minutes for each cooking area: it
beeps when the time has run out. The cooking areas can be
programmed independently (the symbol may be less bright if
another cooking area timer has a remaining time that is less
than that set on the independent timer).
The type of timer activated is shown in the dedicated displays.
The timer with the least time is highlighted and the related clock
icon is brighter (13-24). The other timer settings are still active
and running, but the clock icon (13-24) will be less bright.
Another icon with the word “min” (23) appears when you set
times longer than 10 minutes. For example 0.11 indicates 0
hours and 11 minutes. The separator dot (21) flashes when
the timer is running, while the dot is static while the timer is
selected and thus modifiable.
Independent timer
• If the touch display is on, the independent timer can be
used by simultaneously pressing the + and - buttons. If all
the cooking areas are in position “0”, this is the only timer
available. The clock icon (24) will turn on and the display
will show “0.00”. If you do not select any button, the timer
deactivates within 5 seconds.
• The time setting (0-1hour.59min) can be changed in
increments of one minute with the + button from 0 to 99.
• Holding down the + or - button dynamically increases the
rate of change up to a maximum value, without beeps.
• If the + (or -) button is released, the rate of increase (decrease)
starts again from the initial value.
• The timer can be set by either continuously pressing the +
or - buttons or by pressing successively (with beeps).
After the timer is set, it begins to count down. The expiry of
the time is signalled by a beep or by the flashing of the timer
display, which will show “00”.
Page 17
EN
13
Turning off/changing the timer
• The timer can be changed or turned off at any time by turning
on the touch display again, if no cooking area is on, and
pressing the + and - buttons simultaneously to select the timer.
At this point, set it to “0” by pressing the - button, to turn it
off, or by pressing the + button to increase the time setting.
• The independent timer remains active even when the On/
Off button is pressed
Programming the timer for the cooking areas
By turning on the touch display, you can program an
independent timer for each cooking area.
• At least one cooking area must be on and set to a certain
level.
• By pressing the + and - buttons simultaneously, you can set
a countdown for turning off the cooking area. There are
illuminated clock icons (13) next to the display of the cooking
area. To set the timer on a cooking area when there are
more than one cooking area on, you must press the + and buttons simultaneously. You will note that the clock icon will
light and move to successive cooking areas each time you
simultaneously press the + and - buttons.
• When the timer of the cooking area is selected, the related
clock icon near the display becomes brighter (13). The timers
programmed for each cooking zone remain active.
• Other functions of the timer are the same as the independent
timer. To increase the time, use the + (plus) button.
• The beeping and flashing of the display stops:
a- Automatically after 2 minutes.
b- When you press the + or - buttons, the timer display turns off.
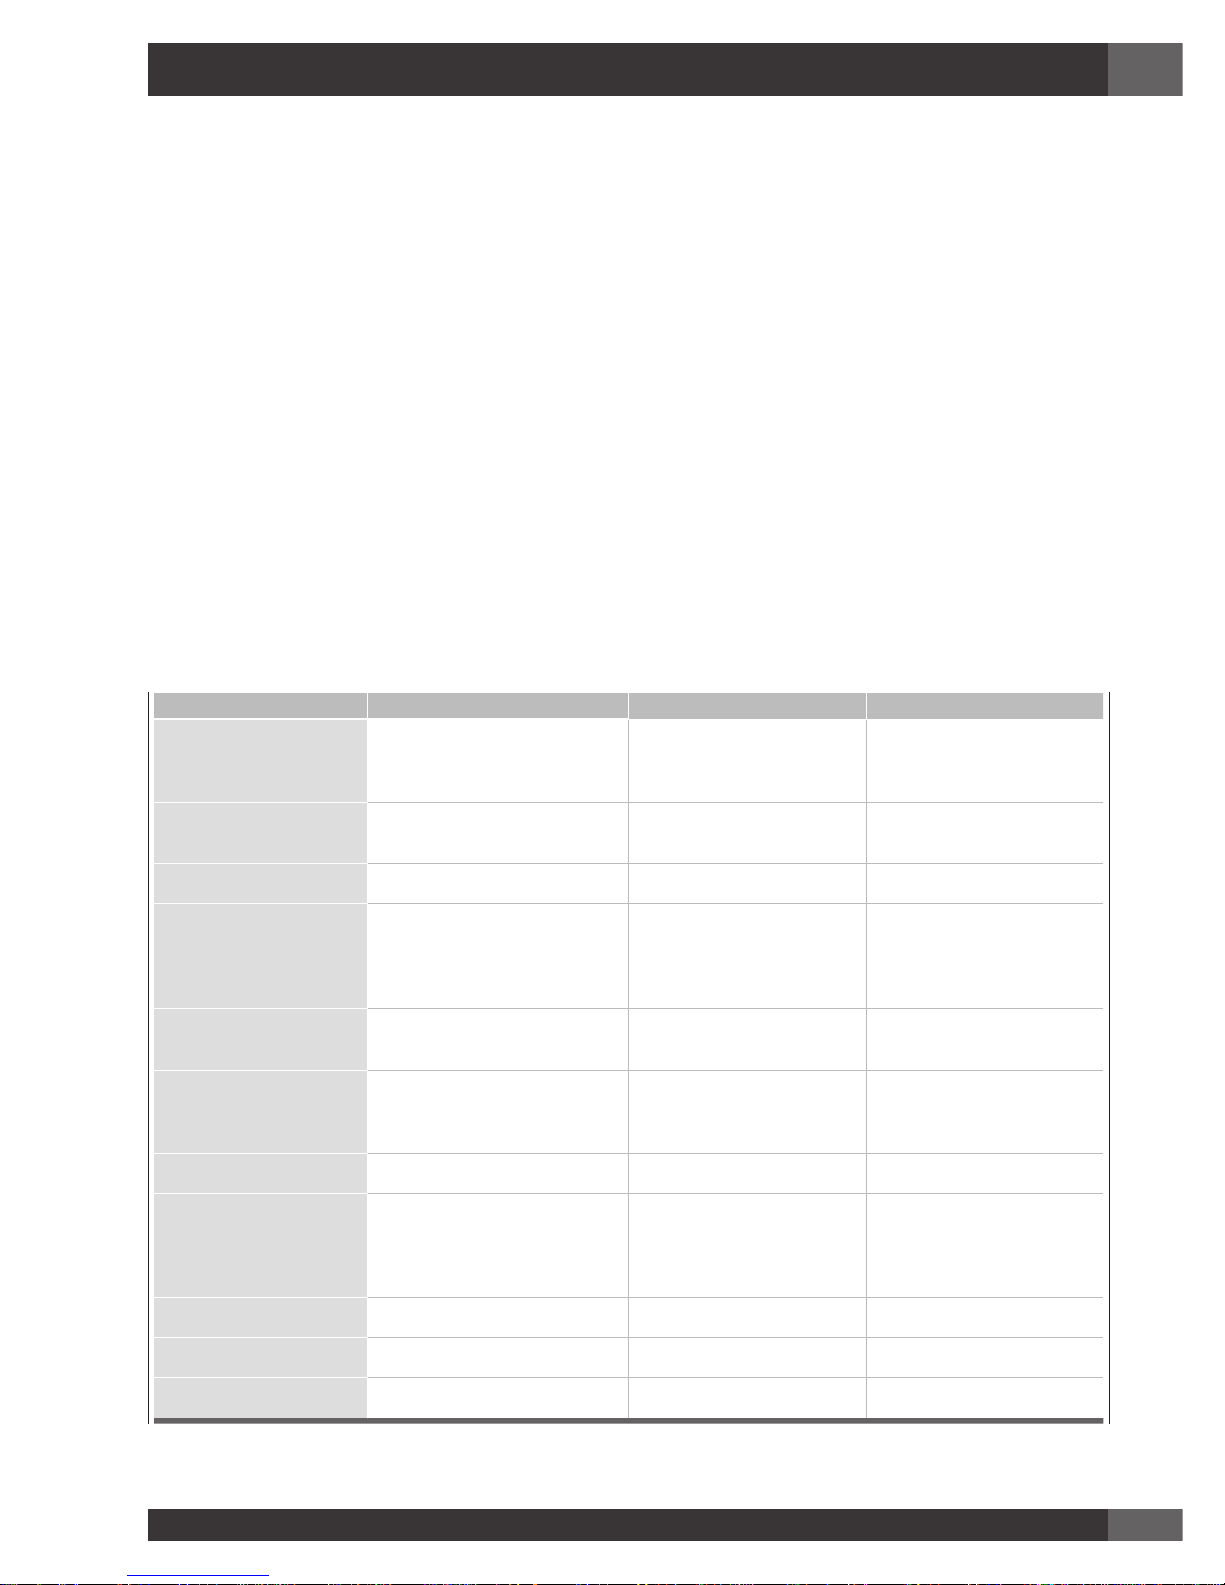
Error codes
Error codes are displayed by the 7-segment display with “E” or “ER” plus the error number.
Error message Description Possible error reason Troubleshooting
“flash” Control is detecting a button
being activated for more than 10
seconds.
Water or cooking utensils on
the glass above the control unit
Cleaning of the operational
surface
Er 22 Defective Key evaluation . Control
unit cuts off after 3.5 - “7.5 sec.
Short-circuit or no continuity in
the range of the key evaluation
Exchange control unit
Er20 Flash-failure Faulty microcontroller Exchange control unit
Er36 NTC value is not
within its specification
(value < 200mV or > 4.9V;
control unit cuts off
Short-circuit or cut-off at NTC Exchange control unit
Er31 Configuration data incorrect Configuration of induction
necessary
New Configuration
Er47 Communication error between TC
and induction
None or faulty communication! Ensure that connection cable
is plugged on correctly and
functional.
E2 Overheating of the induction coils Cooling down necessary
U400 Secondary voltage of the power
unit too high (primary > 300V).
Control unit cuts off after 1 sec
releasing a permanent tone.
Control unit is wrongly
connected
Connect to correct mains
voltage
E5 Error on filter board Exchange filter board
E6 Error on power unit Exchange power unit
E9 Coil temperature sensor defective Exchange temperature sensor
Page 18
EN
14
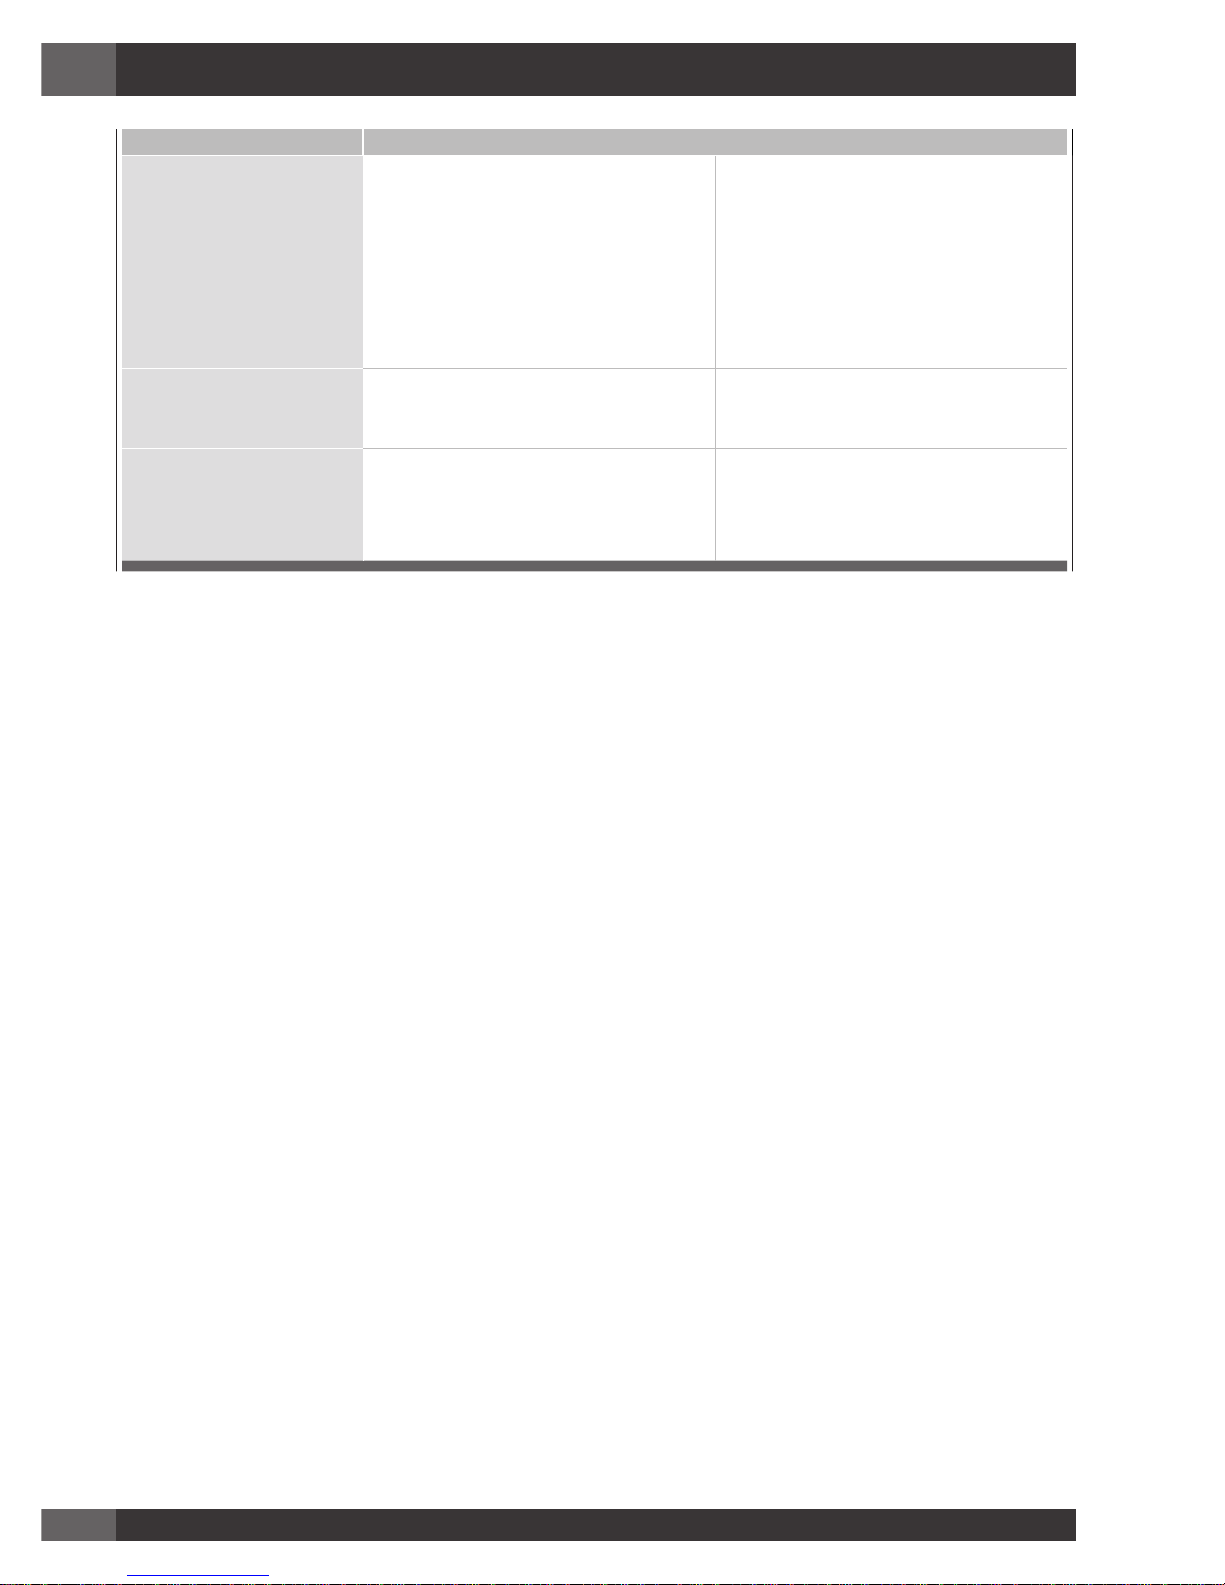
6 - Troubleshooting
Problem Cause Possible Remedy
Nothing works
Cooktop not connected to proper electrical
circuit.
Have electrician verify that the proper rated
cooktop voltage is being supplied to the
cooktop.
Fuse is blown or circuit breaker is tripped. Have electrician replace fuse or reset circuit
breaker.
No electricity to the cooktop. Have electrician check your power supply.
Cooktop is in lockout mode. Unlock cooktop.
Heating elements do not heat
properly
Improper cookware is being used. Select proper cookware as outlined in the
Cooktop Operation section of this manual.
Glass ceramic surface is seethrough or appears to be red
in color
Under direct or bright lighting, you will
sometimes be able to see through the glass
and into the chassis due to its transparent
quality. You may also notice a red tint under
these conditions.
These are normal properties of black ceramic
glass panels.
Page 19

EN
15
7 - Assistance or Service
Service Data Record
For authorized service or parts information see paragraph
“FULGOR WARRANTY for Home Appliances”.
The location of the serial tag is below the cooktop box. Now
is a good time to write this information in the space provided
below. Keep your invoice for warranty validation.
Service Data Record
Model Number _________________________________
Serial Number __________________________________
Date of Installation or Occupancy __________________
Before calling for assistance or service, please check “Troubleshooting.” It may save you the cost of a service call.
If you still need help, follow the instructions below.
When calling, please know the purchase date and the complete model and serial number of your appliance.
This information will help us to better respond to your request.
Page 20

EN
16
8 - Fulgor Milano WARRANTY for Home Appliances
Duration of warranty:
For twenty-four (24) months from the original date of purchase,
the Fulgor Milano warranty covers all parts and labor to repair
or replace, under normal residential use, any part of the
product proving to be defective in material or workmanship as
a result of the original manufacturing process.
For proof of warranty, please retain the original
purchase invoice and the delivery slip.
To obtain service under this warranty you must:
1. Contact Fulgor-Milano Authorized Service
a. For all of North America:
online at http://www.thevettagroup.com/servicerequest.a5w
b. In the United States by email at fulgor@adcoservice.com
or by toll free number at 1-855-4-fulgor (1-855-438-5467)
c. In Eastern Canada (Ontario->East)
by email service@distinctive-online.com or by toll free
number at 1-800-361-0799
d. In Western Canada (Manitoba<-West)
by email at service@pacicspecialtybrands.com
or toll
free at 1-877-430-5253 x106
2. Provide a copy of your original sales receipt along with
model number and serial number information for the
product.
3. Provide Fulgor Milano reasonable opportunity to investigate
the claim before the Product or any component of the
Product has been modified or removed.
TERMS APPLICABLE TO THIS WARRANTY
This warranty is valid in only the 50 continental states of the
U.S.A. and the country of Canada. This warranty applies to
the original purchaser only and is non-transferable.
All service provided by Fulgor Milano on the stated warranty
must be performed by a Fulgor Milano authorized servicer,
unless otherwise specified by Fulgor Milano.
This service will be provided during the regular business hours
of each specific region.
This warranty applies only to products purchased from an
authorized dealer through an approved distribution chain and
is installed for normal residential use and does not apply to
commercial use or use on yachts.
This warranty only covers service performed at the location of
product installation and will not cover costs associated with
repairing off-site unless expressly authorized by Fulgor Milano
nor does it cover the travel costs associated with providing
service to remote locations.
Remote locations are defined as being outside of a 50 mile (80
kilometre) radius from any authorized dealer. This warranty
does not cover any parts or labor to correct any defect caused
by negligence, transport, delivery, improper voltage, accident
or improper use, maintenance, installation, service or repair,
including but not limited to improper removal and reinstallation
of any component of the product (ie. removing handles to fit
through doors) prior to or during product delivery / installation.
The remedies described herein are the only ones which Fulgor
Milano will provide, either under this warranty or under any
warranty arising by operation of law. Fulgor Milano will not be
responsible for product loss due to spoilage or burning nor for
consequential damages to surrounding cabinetry, construction
materials or finishing materials such as but not limited to
flooring.
Fulgor Milano will not be responsible for any consequential or
incidental damages arising from the breach of these warranties
or any other warranties, whether express, implied or statutory.
The warranty will be valid and effective only upon presentation
of the document stating the purchase date of the appliance,
and more specifically of the relevant invoice, proof of purchase,
or equivalent document showing the name of the seller, the
delivery date and the identification data of the appliance.
(Such as; Model number, Serial Number).
In the case of new product being included in the purchase
of new residential construction; this warranty applies to the
original resident of the location containing the Fulgor Milano
product and warranty coverage will begin on the date of
occupancy of the residence (proof of occupancy required) to a
maximum additional six months from the date of purchase of
the product by the development company from the distributor
or dealer. This extension does not apply to footnote 1 below.
This warranty is only valid where the difference between the
purchase date and the production date of the product is less
than one year. Any product which has been warehoused for
more than this one year period will only be covered under the
terms of Fulgor Milano’s B-Stock / Display Model warranty.
During the warranty period Fulgor Milano reserves the right
to evaluate the opportunity to repair the appliance or, at their
discretion, offer to replace it with a Fulgor Milano product of
equivalent features and functionality. Fulgor Milano reserves
the right to revise this warranty at any time.
Some states do not allow the exclusion or limitation of incidental
or consequential damages so the above limitation or exclusion
may not apply to you. This warranty gives you specific legal
rights and you may also have other rights which vary from
state to state.
1
Doors, handles, glass, product frames, racking, interior and
exterior surfaces are covered by a limited 30-day parts only
warranty for cosmetic defects originating from the factory.
*Replacement light bulbs are not covered by the product
warranty.
Page 21

FR
1
TABLE DES MATIERES PAG E
Avertissements pour la connexion électrique 2
1 - Précaution de Sécurité 3
Securite de la Table de Cuisson 3
Securite Personnelle 4
2 - Modèles et nomenclature des pièces 5
3 - Fonctionnement du chauffage par induction 6
Induction 6
Principe de fonctionnement 6
4 - Fonctionnement de la Table de Cuisson 7
Avant D’utiliser La Table De Cuisson Pour La
Premiere Fois
7
Partage de Puissance 7
Batterie de cuisine «bruyante» 7
5 - Instructions pour l’utilisateur 9
Utilisation 9
Détection du récipient 9
Indicateur de chaleur résiduelle 9
Protection en cas d’allumage involontaire 9
Précautions 10
Récipients 10
Entretien 10
Turning the cooktop on and off 10
Signal sonore (vibreur) 10
Allumage d’une zone de cuisson 10
Extinction d’une zone de cuisson 11
TABLE DES MATIERES PAG E
Niveau de puissance 11
Booster et gestion de la puissance 11
Réchauffage automatique
(ou fonction «heat-up») 11
Activer le réchauffage automatique
(ou fonction “heat-up”) 11
Fonction de pontage (pour grandes casseroles) 11
Special functions (low temp) 12
Blocage des commandes (sécurité enfants) 12
Désactivation du verrou de contrôle 12
Clé 12
Pause 12
Désactivation Pause 12
Fonction de Minuterie 12
Minuterie autonome 13
Éteindre/modifier la minuterie 13
Programmation de la minuterie :
pour les zones de cuisson 13
Indications d’erreur 14
6 - Pannes 15
7 - Assistance ou Service Après-Vente 16
Données de Service 16
8 - GARANTIE Fulgor Milano sur les appareils
électroménagers 17
Page 22

FR
2
Veuillez prêter attention à ces symboles que vous rencontrerez
dans ce manuel:
AVERTISSEMENT
• Ce symbole signifie que la sécurité est en danger. Il signale
les risques potentiels qui peuvent entraîner la mort ou des
blessures à l’operateur ou aux autres.
• Si vous ne suivez pas ces instructions à la lettre, vous
courez le risque de mourir ou d’être sérieusement blessé.
BIEN LIRE CES INSTRUCTIONS ET LES CONSERVER.
Avertissements pour la connexion électrique
AVERTISSEMENT
• L’installation et l’entretien de l’appareil doivent être exécutés
par un installateur qualifié ou un boreau technique.
• Les modèles peuvent êre actionnés à 240V ou à 208V.
ATTENTION
• Toujours désactiver la source d’alimentation électrique
avant d’entretenir cet appareil.
• Pour des raisons de sécurité personnelle, cet appareil doit
être mis à la terre correctement.
Les changements ou les modifications non explicitement
approuvés par la partie garante de la conformité risquerait
d’annuler le droit de l’utilisateur à employer l’équipement.
Note: Cet équipement est conforme à la partie 18 des Règles
de la FCC. Cet appareil génère, utilise et peut émettre
de l’énergie sous la forme de fréquence radio et,
s’il n’est pas installé et utilisé en conformité avec les
instructions, il peut provoquer des interférences nocives
sur les communications radio. Cependant, il n’existe
aucune garantie que des interférences se produiront
dans une installation particulière. Si cet appareil
provoque des interférences nocives sur la réception
radio ou télévision, ce qui peut être détecté en mettant
l’appareil sous et hors tension, l’utilisateur est encouragé
à essayer de corriger ces interférences en appliquant
l’une ou plusieurs des measures suivantes :
• Réorientez ou déplacez l’antenne réceptrice.
• Augmentez la distance entre l’appareil et le récepteur.
• Branchez l’appareil dans une prise ou un circuit
différent de celui sur lequel est branché le récepteur.
• S’adresser au revendeur ou à un technicien radio/
TV expérimenté.
AVERTISSEMENT
Les personnes avec un stimulateur cardiaque ou un dispositif
médical similaire doivent redoubler de prudence lors
de l’utilisation d’une unité à induction ou à proximité de
l’appareil en fonctionnement. Le champ électromagnétique
peut affecter la bonne marche du stimulateur cardiaque ou
du dispositif médical similaire. Il est conseillé de consulter
votre médecin ou le fabricant du stimulateur sur votre
situation particulière.
Page 23

FR
3
1 - Précaution de Sécurité
Securite de la Table de Cuisson
AVERTISSEMENT
Installation Correcte
• Assurez-vous que votre appareil est correctement installé
et mis à la masse par un technicien qualifié.
N’utilisez Jamais Votre Appareil Pour Réchauffer Ou
Chauffer La Pièce
Ne Laissez Pas Des Enfants Sans Surveillance
• Il ne faut pas laisser des enfants seuls ou sans surveillance
dans la pièce où l’appareil est utilisé. Il ne faut jamais les
laisser s’asseoir ou s’appuyer sur l’appareil.
Portez Des Vêtements Corrects
• Il ne faut pas porter de vêtements larges ou avec de
grandes manches lorsque vous utilisez l’appareil.
Utilisation Du Service Après-Vente
• Ne réparez pas ou ne remplacez pas des pièces de
l’appareil à moins que le manuel ne le recommande
spécifiquement. Tous les services après-vente doivent être
effectués par un technicien qualifié.
Entreposage Dans Ou Sur L’appareil
• Les matériaux inflammables ne doivent pas être entreposés
dans le four ou à côté.
N’utilisez Pas D’eau Ou Sur Les Feux De Friture
• Sur un début de feu, utilisez des extincteurs à poudre ou
à mousse.
Utilisez Uniquement Des Poignées Sèches
• Les poignées humides ou mouillées sur des surfaces chaudes
peuvent brûler en se transformant e vapeur. N’utilisez pas
de serviettes ou d’autres torchons volumineux.
AVERTISSEMENT
Ne Laissez Jamais Des Surfaces De L’appareil Lorsque Les
Réglages Sont Élevés
• Les débordements peuvent provoquer des fumées et les
déversements graisseux peuvent s’enflammer.
• Ne placer pas des objets métalliques tels que les couteaux,
les fourchettes, les cuillères et les couvercles sur la surface
de caisson puisqu’ils peuvent devenir chauds.
Ne Cuisinez Pas Sur Une Table De Cuisson Fêlée
• Si la table de cuisson était fêlée, les nettoyants et les
déversements peuvent pénétrer dans la fêlure de la
table de cuisson et provoquer un risqué d’électrochoc.
Contactez un technicien qualifié.
Nettoyez La Table De Cuisson Avec Attention
• Si une éponge ou un chiffon humide est utilisé pour essuyer
les déversements sur une surface chaude, évitez les
brûlures de vapeur. Certains nettoyants peuvent entraîner
des fumées nocives s’ils sont appliqués sur des surfaces
chaudes.
INSTRUCTION IMPORTANT
Veuillez lire les instructions avant toute utilisation.
Page 24

FR
4
Securite Personnelle
AVERTISSEMENT
Afin de réduire le risque de blessures à personne au cas où la
graisse de cuisson prendrait feu, veuillez vous comporter de
la sorte:
• La graisse est inflammable et il faut la manier avec
précaution.
• N’utilisez pas d’eau sur les feux de friture.
• Ne prenez jamais une casserole enflammée. Mouiller
avec une plaque à pâtisserie ou un plateau en métal plat.
• La graisse en feu peut être éteinte en dehors de la casserole
avec du bicarbonate de sodium, ou si vous en avez, un
extincteur polyvalent à produit chimique sec ou à mousse.
• Laissez la graisse refroidir avant d’essayer de l’enlever.
• Essuyez les éclaboussures immédiatement.
• Si vous faites une flambée avec des liqueurs ou d’autres
alcools sous une hotte, coupez la ventilation. Les flammes
peuvent devenir hors de contrôle à cause de l’aspiration.
• Ne laissez jamais l’endroit sans surveillance lorsque le
réglage est sur une chaleur élevée. Le débordement peut
entraîner des fumées et des éclaboussures qui peuvent
prendre feu.
ATTENTION
Ne laissez jamais en contact avec la surface chaude des
feuilles d’aluminium, le plastique, le papier ou chiffon. Ne
laissez pas une casserole chauffée à sec.
• Prévenir les brûlures. Si les flammes ne s’étendent pas
immédiatement, évacuez et appelez immédiatement les
pompiers.
• Ayez toujours un détecteur de fume près de la cuisine.
• Laissez le ventilateur de la hotte allume lorsque vous
flambez de la nourriture (seulement en cas de fumée sans
flammes).
Utilisez un extincteur uniquement si:
• Vous savez que vous avez un extincteur Class ABC, et que
vous savez déjà vous en servir.
• Le feu est petit et qu’il est contenu dans la zone ou il a
démarré.
• Les pompiers sont prévenus.
• Vous pouvez combattre le feu avec le dos près d’une
sortie.
• N’utilisez jamais d’eau sur les incendies de cuisine
• Si vos vêtements prennent feu, allongez -vous et roulez-
vous immédiatement pour éteindre les flammes.
AVERTISSEMENT
Afin de réduire le risque de brûlures lorsque vous utilisez la
table de cuisson, observez ce qui suit:
• N’utilisez jamais la table de cuisson pour chauffer ou
réchauffer la pièce.
• Les enfants et les animaux ne doivent pas être laissés seuls
ou sans surveillance dans la pièce où l’appareil est utilisé.
Il ne faut jamais les laisser s’asseoir ou se mettre debout
sur cet appareil.
ATTENTION
Ne pas conserver des objets qui pourraient intéresser les
enfants au-dessus ou à l’arrière de la table de cuisson.
Lorsque vous utilisez la table de cuisson
• Ne touchez jamais la surface en verre. La surface peut
devenir assez chaude pour entraîner des brûlures. Les
éléments en surface peuvent être assez chauds pour
devenir sombres. Pendant et après utilisation, ne touchez
pas ou ne laissez pas de matériaux inflammables en
contact avec les éléments de chauffage jusqu’à ce qu’ils
refroidissent.
Page 25

FR
5
2 - Modèles et nomenclature des pièces
30” MODÈLES
1
2
3
4
5
F7IT30*1
Position 1
7” (180 mm) - 1850W (Booster 3000W)
Position 2
11” (280 mm) - 2300W (Booster 3600W)
Position 3
7” (180 mm) - 1850W (Booster 3000W)
Position 4
5 3/4” (145 mm) - 1400W (Booster 2200W)
Position 5
Boutons de commande par effleurement
36” MODÈLES
5
3
2
4
1
6
F7IT36*1
Position 1
7 1/2” x 8 1/2” (190 mm x 220 mm) - 2000W (Booster 3600W)
Position 2
5 3/4” (145 mm) - 1400W (Booster 2200W)
Position 3
7” (180 mm) - 1850W (Booster 3000W)
Position 4
7 1/2” x 8 1/2”
(190 mm x 220 mm) - 2000W (Booster 3600W)
Position 5
11” (280 mm) - 2300W (Booster 3600W)
Position 6
Boutons de commande par effleurement
Page 26

FR
6
3 - Fonctionnement du Chauffage par Induction
Induction
Le réchauffage par induction est la méthode la plus efficiente et
immédiate pour cuisiner.
La chaleur est produite moyennant un champ électromagnétique,
directement au niveau du fond de la casserole ou de la poêle
utilisée.
La surface non concernée par le contact reste pratiquement
froide ; il ne reste pas de chaleur résiduelle une fois la cuisson
terminée et après le retrait de la casserole. Le réchauffage par
induction est plus efficient car il évite tout gaspillage d’énergie
par dispersion, comme les brûleurs à gaz ; plus rapide de
30 à 50% que les tables de cuisson normales appliquant
la technologie HGL, il permet d’économiser jusqu’à 25%
d’énergie.
En présence d’un débordement de liquide, celui-ci n’adhère
pas à la surface de la table car elle est tiède.
Principe de fonctionnement
Le fonctionnement est basé sur les propriétés électromagnétiques
de la plupart des récipients de cuisson.
Le circuit électronique commande le fonctionnement de la
bobine (inducteur) créant un champ magnétique.
La chaleur est transmise du récipient aux aliments.
La cuisson se produit tel qu’on le décrit ci-après:
• Dispersion minimale (haut rendement);
• L’enlèvement de la casserole (il suffit de la soulever) provoque
automatiquement l’arrêt du système;
• le système électronique permet la plus grande flexibilité et
finesse de réglage.
1 - Récipient
2 - Courant induit
3 - Champ magnétique
4 - Inducteur
5 - Circuit électronique
6 - Alimentation électrique
Page 27

FR
7
4 - Fonctionnement de la Table de Cuisson
Avant D’utiliser La Table De Cuisson Pour La
Premiere Fois
• Tous les produits sont essuyés avec des solvants à l’usine
pour enlever tous les signes visibles de saleté, d’huile ou de
graisse qui peuvent être restés après la fabrication.
• Si vous en avez, enlevez tous les emballages et les manuels
de la surface de la table de cuisson.
• Nettoyez le verre avant de l’utiliser pour la première fois. Un
nettoyage soigné sur le verre supérieur avec un nettoyant est
recommandé. Cela ne prend qu’une minute et le verre est
propre, brillant et enduit avant la première utilisation.
• Il peut se dégager une légère odeur pendant les premières
utilisations: c’est normal et l’odeur disparaîtra.
• Les meilleures cuissons dépendront de la cuisson correcte
sélectionnée.
• La surface de cuisson va garder la chaleur et rester chaude
pendant plus de 20 minutes après avoir éteint les éléments.
• La surface de cuisson vitrocéramique est un matériau durable
résistant aux chocs mais cassable si une casserole ou un
autre objet tombe dessus.
• Ne laissez pas les récipients vides chauffer. Cela peut
endommager le récipient, l’élément et /ou la table de
cuisson.
• Ne faites pas glisser des casseroles sur la surface de cuisson,
cela peut rayer le verre.
• L’utilisation de récipient en fonte sur le verre de la table de
cuisson n’est pas recommandée. La fonte retient la chaleur et
elle peut endommager la table de cuisson.
Table de cuisson à 4 brûleurs avec 2 générateurs d’induction
côté gauche et côté droit
Table de cuisson à 5 brûleurs avec 3 générateurs d’induction
côté gauche, centre et côté droit.
Partage de Puissance
Les tables de cuisson à quatre brûleurs sont divisées en deux
zones de chauffe séparées.
Les tables de cuisson à cinq brûleurs sont divisées en trois zones.
Un générateur pilote 2 éléments ou les deux zones de cuisson
d’une section de chauffe partagent la puissance d’un générateur.
Le partage de puissance est actif lorsque tous les éléments
de la même zone de cuisson sont activés et qu’un élément
est réglé sur le niveau de puissance renforcée (P). Le niveau
de l’élément qui n’est pas réglé sur le niveau de puissance
renforcée bascule alors sur une puissance plus faible. Cela
s’appelle le partage de puissance
Batterie de cuisine «bruyante»
Lors de l’utilisation d’éléments adjacents avec un certain niveau
de puissance, les champs magnétiques peuvent interagir entre
eux et produire un faible sifflement ou un « bourdonnement
» intermittent. Les récipients qui recouvrent entièrement le
cercle de l’élément produiront moins de bruit. Un faible bruit
de « bourdonnement » est normal, notamment avec une
puissance élevée. Ces bruits peuvent être réduits ou éliminés
en diminuant ou en augmentant le niveau de puissance de l’un
ou de l’ensemble des éléments:
Page 28

FR
8
Sur certaines zones de cuisson, un diamètre interne est indiqué.
A
B
C
D
Table de cuisson d’une largeur de 76,2 cm (30”). Utilisez un
récipient de la taille minimale indiquée pour chaque élément
de cuisson.
Dimensions casserole 30”
A
5” ¾ (14,5 cm)
diamètre minimum
dimensions casserole
B
7” (18,0 cm)
diamètre minimum
dimensions casserole
C
5” ¾ (14,5 cm)
diamètre minimum
dimensions casserole
D
4” ¾ (12,0 cm)
diamètre minimum
dimensions casserole
E
C
B
D
A
Table de cuisson d’une largeur de 91,4 cm (36”). Utilisez un
récipient de la taille minimale indiquée pour chaque élèment
de cuisson.
Dimensions casserole 36”
A
5” ¾ (14,5 cm)
diamètre minimum
dimensions casserole
B
4” ¾ (12,0 cm)
diamètre minimum
dimensions casserole
C
5” ¾ (14,5 cm)
diamètre minimum
dimensions casserole
D
5” ¾ (14,5 cm)
diamètre minimum
dimensions casserole
E
7” (18,0 cm)
diamètre minimum
dimensions casserole
Page 29

FR
9
5 - Instructions pour l’utilisateur
Indicateur de chaleur résiduelle
Il sert à indiquer à l’utilisateur que la température du verre est
dangereuse en cas de contact avec l’ensemble de la zone se
trouvant au-dessus de la zone de cuisson. La température est
déterminée suivant un modèle mathématique et une éventuelle
chaleur résiduelle est indiquée par un « H » sur l’afficheur
correspondant à sept segments.
Le réchauffage et le refroidissement sont calculés par rapport:
• u niveau de puissance sélectionné (de 0 à 9 )
• à la période d’activation des relais.
Après avoir éteint la zone de cuisson, l’afficheur correspondant
affiche « H » jusqu’à ce que la température de la zone baisse
sous le niveau critique (≤ 60° C) selon le modèle mathématique.
Protection en cas d’allumage involontaire
• Si le contrôle électronique détermine l’activation
continue d’une touche pendant env. 10 s., celle-ci s’éteint
automatiquement. Le contrôle émet un signal sonore
d’erreur, informant l’utilisateur de la présence d’un objet
sur les capteurs. Les afficheurs indiquent le code d’erreur
d’utilisation permanente, qui s’affichera aussi longtemps
que le contrôle électronique détecte l’erreur. Si la zone de
cuisson « brûle », un « H » alterne avec le signal d’erreur.
• Si aucune zone de cuisson n’est activée dans un délai de 10
secondes après l’activation du Touch, le contrôle revient en
modalité stand-by.
• Quand le dispositif de contrôle est actif, la touche ON/OFF
a la priorité sur toutes les autres touches, de manière à ce
qu’on puisse désactiver le contrôle à tout moment même en
cas d’activation multiple ou continue de touches.
• En modalité stand-by, une activation continue des touches ne
produit aucun effet. Mais pour pouvoir de nouveau activer
le contrôle électronique, celui-ci doit identifier qu’aucune
touche n’est allumée.
Utilisation
Tout d’abord, positionner la casserole sur la zone de cuisson
choisie. L’activation du système est inhibée en l’absence de
casserole (affichage du symbole ).
Détection du récipient
Le système de détection du récipient est une certitude our le
consommateur qui permet une utilisation responsable e la
technologie.
3 4
5
1
6
7 8 9 10 11
24 23 22 21
20 19
2
18
17 16 15 14 13 12
Parties
1 Bouton de marche/arrêt principal 13 Icône Minuterie active pour zone de cuisson
2 + Minuterie 14 Afficheur niveau zone de cuisson
3 - Minuterie 15 Barre lumineuse niveau de cuisson
4 Voyant à DEL clé insérée 16 Indication sur la zone
5 Bouton introduction clé 17 Symbole de la fonction de fusion
6
Bouton activation pause 18 Symbole fonction mijoter
7 Voyant à DEL Pause et Rappel extinction involontaire 19 Afficheur Minuterie (minutes/secondes)
8 Marche/arrêt zone de chauffage 20 Afficheur Minuterie (minutes/secondes)
9 Zone du curseur activation niveau Minimum 21 Point de séparation (heures/minutes)
10
Zone du curseur activation niveau Maximum 22 Afficheur Minuterie (heure/minutes)
11 Zone du curseur activation Power Booster (P) 23 Icône indication minutes
12 Fonction de pontage sur l’icône 24 Icône Minuterie autonome
Page 30

FR
10
Précautions
• Couper immédiatement l’alimentation électrique à la
moindre fracture de la surface en vitrocéramique;
• durant le fonctionnement, éloigner tout matériel
démagnétisable comme les cartes de crédit, les disquettes,
les calculatrices, etc.;
• ne jamais utiliser du papier aluminium et ne pas poser
directement sur la table des produits enveloppés dans de
l’aluminium;
• ne pas poser d’objets métalliques comme des couteaux, des
fourchettes, des cuillers ou des couvercles sur la surface de
la table pour éviter qu’ils ne chauffent;
• Lors de la cuisson avec des ustensiles antiadhésifs, sans
utiliser d’eau ou d’huile, limiter tout temps de préchauffage à
une ou deux minutes ;
• pour cuire des aliments ayant tendance à se coller sur le
fond, commencer à la puissance minimale puis augmenter
en mélangeant fréquemment;
• Après utilisation, éteignez l’élément manuellement (en
diminuant à “0”) plutôt que compter sur capteur de détection
de casserole.
Récipients
• Si un aimant est attiré vers le bas de votre ustensile de
cuisine, c’est qu’il convient à la cuisine par induction ;
• essayez d’utiliser des casseroles déclarées comme aptes à
la cuisine à induction;
• Les casseroles à fond plat et à fond épais seront les plus
performantes ;
• une casserole de 20 cm (8”) de diamètre permet d’utiliser la
puissance maximale;
• une casserole d’un diamètre inférieur réduit la puissance
mais ne provoquera aucune dispersion d’énergie. L’utilisation
d’ustensiles de cuisine d’un diamètre inférieur à 12 cm (3”)
est déconseillée ;
• Ustensiles de cuisine en acier inoxydable avec fond
multicouches ou ferrite en acier inoxydable si le bas indique
: pour la cuisson par induction ;
• des récipients en fonte, éventuellement à fond émaillé pour
éviter de rayer la table de cuisson en vitrocéramique;
• Les récipients en verre, en céramique, en terre cuite, en
aluminium, en cuivre ou en acier inox non magnétique
(austénitique) ne sont pas recommandés et ne conviennent
pas à l’aide du kit adaptateur Fulgor Milano (INDUKIT).
OuiNon Non
Entretien
Des traces de papier aluminium, des résidus d’aliments, des
éclaboussures de graisse, du sucre ou des aliments fortement
sucrés doivent immédiatement être éliminés de la table de
cuisson avec un racloir pour éviter d’endommager la surface
de la table.
Ensuite, nettoyez avec un nettoyant supérieur certifié Ceran et
du papier de cuisine, rincer à l’eau et sécher avec un chiffon
propre.
Ne jamais utiliser d’éponges ou de chiffons abrasifs ; éviter
également les détergents chimiques agressifs comme des
SPRAY NETTOYANTS POUR FOUR ou des DETACHANTS.
NE PAS UTILISER D’APPAREILS DE NETTOYAGE A LA VAPEUR
Pour allumer et éteindre la table de caisson
Pour allumer la table de cuisson appuyez sur le bouton de
Marche / Arrêt (1) “Central”, vous entendez un bip court et la
lampe-témoin correspondante s’allume.
Si une zone de cuisson “est brûlante”, l’afficheur indique en
alternance “H” et “0”.
Après la mise sous tension, le touch control reste actif pendant
10 secondes. Si l’on ne sélectionne ni une zone de cuisson
ni la minuterie, le touch revient automatiquement à l’état de
stand-by.
Signal sonore (vibreur)
Au cours de l’utilisation, les activités suivantes sont signalées
par un vibreur sonore:
• Activation normale des touches signalée par un son bref.
• Activation continue des touches pendant plus de 10 secondes
avec un son long intermittent (un symbole d’erreur s’affiche
et le touch control s’éteint si l’on poursuit l’opération).
Allumage d’une zone de cuisson
Positionner une casserole et effleurer une zone du curseur
relative à la zone de cuisson sur laquelle se trouve la casserole
(8), faire glisser le doigt vers la droite pour augmenter le
niveau de cuisson (10), et le faire glisser vers la gauche pour
diminuer (9).
Page 31

FR
11
Extinction d’une zone de cuisson
Une seule zone de cuisson peut être désactivée directement
en appuyant sur la touche (8) pour la zone de cuisson qui
fonctionne. Les zones de cuisson chaudes s’afficheront avec
une lettre “H”. On obtient l’extinction immédiate de toutes les
zones de cuisson, à tout moment, par l’intermédiaire de la
touche d’alimentation On/Off (1).
Si le plan s’éteint involontairement durant la cuisson, pendant
l’utilisation des commandes on peut le rallumer avec la
touche On/Off et l’on dispose de 6 secondes pour appuyer
sur la touche pause (6); cette condition sera indiquée par
le clignotement d’un voyant lumineux à DEL au-dessus de
la commande. Ainsi, le plan se rallume avec les sélections
antécédentes à l’extinction involontaire.
Niveau de puissance
La puissance de la zone de cuisson peut être sélectionnée
du niveau 1 au haut niveau 9. Un ultérieur niveau P (Power
booster) est disponible pour un réchauffage particulièrement
rapide des aliments, et cours permettre à l’utilisateur
d’économiser du temps. Le niveau de puissance représenté par
la lettre “A” clignotante représente l’activation de la fonction
de réchauffage automatique.
Booster et gestion de la puissance
Le générateur, avec Booster activé, fournit une puissance
de zone de cuisson individuelle significativement supérieure
à la puissance nominale ; l’afficheur de la zone de cuisson
sélectionnée indique un “P”. La fonction Booster peut être
activée en appuyant dans la partie finale du curseur de la
zone de cuisson (11).
L’augmentation de puissance est différente suivant la grandeur
de la zone de cuisson :
1. Pour la zone de cuisson ø 5 3/4” (145 mm) la puissance
passe du niveau 9 de 1400 W au niveau Booster 2200 W
pendant 10 minutes.
2. Pour la zone de cuisson ø 7” (180 mm) la puissance passe
du niveau 9 de 1850 W au niveau Booster 3000 W
pendant 10 minutes.
3.
Pour la zone de cuisson Rectangulaire 7 1/2” x 8 1/2”
(190 mm x 220 mm) la puissance passe du niveau 9 de
2000 W au niveau Booster 3600 W pendant 10 minutes.
4. Pour la zone de cuisson ø 11” (280 mm) la puissance
passe du niveau 9 de 2300 W au niveau Booster 3600
W pendant 10 minutes. Pour des raisons de sécurité, la
fonction Booster a une durée limitée.
Pour des raisons de sécurité, la fonction Booster a une durée
limitée (10 minutes), après ce délai, la zone est réduite au
niveau 9.
Si le récipient de cuisson est retiré de la zone de cuisson
pendant le temps de rappel, le servomoteur reste actif et le
temps de Booster n’est pas désactivé. Lorsque le Booster est
activé, le déplacement de la valeur sélectionnée avec le doigt
dans la zone du curseur de la zone de cuisson, détermine la
désactivation du Booster.La fonction Booster “P” est activable
dans toutes les zones de cuisson mais le dernier Booster activé
est prioritaire, réduisant d’autres niveaux de cuisson éventuels.
Tableau de partage d’alimentation 36 “
GAUCHE CENTRAL DROIT
9 P 6 P
P
P 8 P 6
Tableau de partage d’alimentation 36 “
CENTR/DROIT DROIT
P 6 P 8
7 P 9 P
Réchauffage automatique (ou fonction «heat-up»)
Cette fonctionnalité rend la cuisine plus facile en ajoutant
la fonctionnalité «bouillir et réduire» aux éléments. Le plan
chauffe automatiquement à la pleine puissance et revient au
niveau de puissance sélectionné au bout d’un certain temps
(voir tableau 1).
Activer le réchauffage automatique (ou fonction
“heat-up”)
Presser une zone du curseur relative à la zone de cuisson et
la maintenir enfoncée pendant environ trois secondes jusqu’au
bip (par exemple à 1/3 de la longueur de la zone du curseur).
Ex. Sélectionner le niveau 3 et activer la fonction de réchauffage
automatique en maintenant la pression du doigt pendant 3
secondes : la fonction s’active. L’afficheur correspondant
indique la lettre “A” alternant avec le “3”. Avec ses sélections,
le plan de cuisson réchauffe la zone de cuisson au niveau
maximum «9» pendant deux minutes puis il continue la cuisson
au niveau «3».
Niveau de
Puissance
Durée Fonction
Réchauffage
Automatique (temps
en minutes)
Les éléments
temporels maximum
fonctionneront
au réglage de
l’alimentation
(temps en minutes)
0 1 0m 40s 516
2 1m 12s 402
3 2m 318
4
2m 56s 258
5
4m 16s 210
6 7m 12s 138
7
2m 138
8 3m 12s 108
9
- 90
P
- 10
Page 32

FR
12
Fonction de pontage (pour grandes casseroles)
Cette fonction facilite la cuisson avec des casseroles allongées,
n’est disponible que pour les zones de cuisson rectangulaires
et est activée en appuyant simultanément sur les 2 curseurs
des 2 zones de cuisson impliquées. À ce stade, une icône “
” s’allume à côté de l’affichage des niveaux et la zone de
cuisson peut maintenant être contrôlée à partir d’un curseur
unique, car l’autre fonctionnera simultanément au même
niveau. Une fois réglé en mode pontage, le plus à gauche
des deux curseurs devient le contrôleur principal des deux
éléments. Pour désactiver le mode de pontage, il suffit de
toucher les deux commandes de curseur simultanément en tout
point le long des barres de réglage.
Fonctions spéciales (basse température)
Cette fonction est disponible dans chaque zone de cuisson et
son activation est indiquée par l’une des deux icônes dédiées
(17 et 18). Il est possible d’activer 2 niveaux “de cuisson” :
1. Fondre à une température d’environ 45 ° C.
2. Mijoter à une température d’environ 70 ° C.
Ces températures sont approximatives et dépendent
considérablement du pot et de la quantité de nourriture.
Après avoir allumé la zone de chauffage souhaitée en
appuyant sur la touche (8), appuyez sur la partie initiale de la
zone du curseur (9) pour activer la fonction (FONDRE), si vous
souhaitez passer à la fonction (MIJOTER), maintenez le curseur
à la même position pendant quelques secondes.
Les deux fonctions à basse température fonctionnent pendant
un maximum de 2 heures.
Blocage des commandes (sécurité enfants)
Il ne peut être activé que lorsque l’appareil est allumé
mais aucune zone de cuisson n’est en service. Appuyer
simultanément sur la touche clé (5) et sur la touche pause (6)
puis appuyer sur la touche clé (5). Les lettres “L” s’affichent
pendant 10 secondes, après quoi les afficheurs s’éteignent. Si
l’on essaye d’allumer le plan de cuisson avec la touche On/Off
(1), les lettres “L” s’affichent de nouveau et il sera impossible
de cuisiner.
Désactivation du verrou de contrôle
On dispose de 2 types de déblocage:
1. Déverrouillage pour une seule fois : pour désactiver
la fonction, allumez la surface de cuisson et appuyez
simultanément sur les boutons de pause (6) et de touche (5).
Les lettres L disparaissent et toutes les zones sont activées.
Si vous éteignez la surface de cuisson après l’utilisation,
quand elle est rallumée, les lettres L seront affichées pour
indiquer que la surface est verrouillée. Essentiellement, la
table de cuisson sera sécurisée automatiquement lorsque
vous ne l’utiliserez pas, mais la combinaison de touches
spéciale décrite ci-dessus sera nécessaire à chaque fois.
2. Déblocage définitif : Pour désactiver la fonction de façon
définitive, il faut allumer le plan de cuisson et appuyer
simultanément sur la touche clé (5) et sur la touche pause (6),
relâcher ces deux commandes puis appuyer de nouveau
sur la touche pause (6).
Clé
Ce plan de cuisson permet de sélectionner un blocage
du clavier au moyen de la touche clé spécifique (5). Il peut
être utile de bloquer le clavier durant le fonctionnement, par
exemple pour le nettoyage de la zone des commandes ou
quoi qu’il en soit si l’on ne souhaite modifier aucune sélection.
Le bouton Marche / Arrêt (1) reste fonctionnel.
Pause
Ce plan de cuisson permet de sélectionner une pause (6) durant
la cuisson (ce qui peut être utile par exemple pour répondre à
un appel téléphonique). Une fois que l’on a appuyé sur cette
fonction, le bouton à DEL devient lumineux au-dessus de la
commande, il provoque l’indication sur tous les afficheurs des
zones de cuisson du symbole “II” et bloque les sélections de
cuisson et les minuteries pendant un maximum de 10 minutes,
après quoi le plan de cuisson s’éteint.
Désactivation Pause
Une fois la fonction activée, on peut la désactiver en appuyant
de nouveau sur le bouton pause (6). La DEL correspondant à
la sélection pause s’éteint, et, dans un délai de 10 secondes,
il faut faire glisser le doigt le long de toute la zone du curseur
située en dessous de la zone éclairée en mouvement (de
gauche à droite). De cette manière, le plan reprend la cuisson
et la minuterie redémarre à partir du point où elle s’était
arrêtée.
Fonction de Minuterie
REMARQUE: la minuterie est uniquement conçue comme un
conseiller sonore qui rappelle l’attention de l’utilisateur.
Les temporisateurs n’ont aucun effet sur les éléments
chauffants. Les temporisateurs n’ont aucun effet sur
les éléments chauffants. Les zones de cuisson doivent
toujours être arrêtées manuellement en appuyant sur la
touche [OFF] correspondante.
La fonction minuterie est réalisée en deux versions:
• Une Minuterie autonome, de 1 minute à 1 heure et 59 min.:
signal sonore lorsque le temps s’est écoulé. Cette fonction
est toujours disponible et elle est indiquée par l’allumage
du symbole de l’horloge (24) qui se trouve entre le – et le +
(le symbole peut avoir une luminosité inférieure si une autre
minuterie est active, pour une zone de cuisson ayant un
temps résiduel inférieur à celui sélectionné pour la minuterie
autonome)
• Une minuterie de 1 à 59 minutes pour chaque zone de
cuisson: elle sonne lorsque le temps s’est écoulé. Les zones
de cuisson peuvent être programmées indépendamment (le
symbole peut être moins lumineux si un autre temporisateur
de zone de cuisson a un temps restant inférieur à celui réglé
sur la minuterie indépendante).
Page 33

FR
13
The type of timer activated is shown in the dedicated displays.
The timer with the least time is highlighted and the related clock
icon is brighter (13-24). The other timer settings are still active
and running, but the clock icon (13-24) will be less bright.
Another icon with the word “min” (23) appears when you set
times longer than 10 minutes. For example 0.11 indicates 0
hours and 11 minutes. The separator dot (21) flashes when
the timer is running, while the dot is static while the timer is
selected and thus modifiable.
Minuterie autonome
• Si le touch est allumé, la minuterie autonome peut être
utilisée simultanément en appliquant les doigts à proximité
des touches + et -. Si toutes les positions de cuisson sont
sur “0”, la seule minuterie disponible est celle-ci ; l’icône en
forme d’horloge (24) s’allume et l’afficheur indique “0.00”.
Dans un délai de cinq secondes, la minuterie désactive sa
sélection si aucune touche n’est sélectionnée.
• Modifications de la valeur (0-1heure.59min.), elles peuvent
être effectuées en augmentant d’une minute avec la touche
+ de 0 à 99.
• Une activation continue de la touche + ou - provoque
l’augmentation dynamique de la vitesse de variation jusqu’à
une valeur maximale, sans signaux sonores.
• Si la touche + (o -) est relâchée, la vitesse d’augmentation
(diminution) recommence à partir de la valeur initiale.
• Le réglage de la minuterie peut être effectuée avec des
activations continues des touches + et - ou avec des activations
par effleurements successifs (avec un signal sonore).
Le compte à rebours commence après le réglage de la
minuterie. L’échéance du temps sera notifiée par un signal
sonore ou par le clignotement de l’afficheur de la minuterie qui
indiquera “00”.
Éteindre/modifier la minuterie
• La minuterie peut être modifiée ou éteinte à tout moment en
activant de nouveau le touch si aucune zone de cuisson n’est
allumée, en actionnant les touches + et – simultanément pour
sélectionner la minuterie, et donc l’amener à “0” avec la
touche – pour l’éteindre ou bien avec la touche + on modifie
en augmentant le temps sélectionné.
• La minuterie autonome reste active même lorsqu’on appuie
sur la touche On/Off.
Programmation de la minuterie : pour les zones
de cuisson
En activant le touch, on peut programmer une minuterie
indépendante pour chaque zone de cuisson.
• Au moins une zone de cuisson doit être allumée et
sélectionnée à un niveau donné.
• En activant simultanément la touche + et la touche –, on
peut sélectionner un compte à rebours pour éteindre la zone
de cuisson. À côté de l’afficheur de la zone de cuisson se
trouvent des icônes lumineuses en forme d’horloge (13). Pour
sélectionner la minuterie sur une zone de cuisson en présence
de plusieurs zones de cuisson allumées, il faut continuer à
appuyer simultanément sur la touche + et sur la touche – ;
on notera que l’icône en forme d’horloge devient lumineuse
et se déplace dans les différentes zones de cuisson au fur et
à mesure que l’on appuie simultanément sur la touche + et
sur la touche – .
• Quand la minuterie de la zone de cuisson est sélectionnée,
l’icône correspondante de l’horloge à proximité de l’afficheur
devient plus lumineuse (13). Les minuteries programmées
pour chaque zone de cuisson restent quoi qu’il en soit
actives.
• Les autres comportements de la minuterie correspondent à
ceux de la minuterie autonome. Pour augmenter la durée,
utilisez le bouton + (plus).
• Le bip et le clignotement de l’affichage s’arrêtent :
A- Automatiquement après 2 minutes.
B- Lorsque vous appuyez sur les boutons + ou -, l’affichage
de la minuterie s’éteint.
Page 34

FR
14
Indications d’erreur
Codes d’erreur indiqués par les afficheurs à 7 segments “E” “ER” plus le numéro de l’erreur.
Message d’erreur Description Cause possible Solution du problème
“flash” Le contrôle détecte un bouton
activé pendant plus de 10
secondes
Présence d’eau ou d’ustensiles
de cuisine sur le verre audessus de l’unité de contrôle
Nettoyage de la surface de
travail
Er 22 Evaluation touche défectueuse.
L’unité de contrôle coupe le
courant au bout de 3,5-7,5 s.
Court-circuit ou pas de
continuité dans la gamme de
l’évaluation de la clé
Changer l’unité de contrôle.
Er20 Erreur flash Microcontrôleur défectueux Changer l’unité de contrôle.
Er36 La valeur de NTC ne se trouve
pas dans sa plage de valeurs
(valeur < 200mV ou > 4.9V;
l’unité de contrôle coupe le
courant
Court-circuit ou interruption au
niveau de NTC
Changer l’unité de contrôle.
Er31 Données de configuration
erronées
Configuration de l’induction
nécessaire
Nouvelle configuration
Er47 Erreur de communication entre
TC et l’induction
Communication absente ou
défectueuse
Vérifier que le câble de
raccordement est bien branché
et fonctionne correctement.
E2 Surchauffe des bobines
d’induction
Refroidissement nécessaire.
U400 Voltage secondaire de l’unité
d’alimentation trop haut
(primaire > 300V). L’unité de
contrôle coupe le courant au
bout de 1 s tout en émettant un
son permanent.
L’unité de contrôle est mal
branchée.
Brancher à la tension
d’alimentation correcte.
E5 Erreur sur carte filtre Changer carte filtre
E6 Erreur sur unité d’alimentation Changer l’unité d’alimentation
E9 Détecteur température bobine
défectueux
Changer le détecteur de
température
Page 35

FR
15
6 - Pannes
Problème Cause Remèdes possibles
Rien ne fonctionne
La table de cuisson n’est pas branchée
correctement au circuit électrique.
Inspectez que la bonne tension alimente la
table de cuisson.
Le fusible ou le disjoncteur ont sauté. Remplacez le fusible ou réenclenchez le
disjoncteur.
Il n’y a pas d’électricité dans la table de
cuisson.
Inspectez l’alimentation électrique.
La table de cuisson est en mode verrouillage. Déverrouillez la table de cuisson.
Les éléments chauffants ne
chauffent pas correctement.
La casserole utilisée est incorrecte. Choisissez une casserole correcte comme
dans la section de fonctionnement de la Table
de cuisson dans ce manuel.
Le surface vitrocéramique
est transparente ou semble
devenir rouge
Sous des lumières fortes ou directes, vous
pouvez parfois voir à travers le verre et dans
le châssis à cause de sa qualité transparente.
Dans ces conditions, vous pouvez voir
également une teinte rouge.
Ces sont les propriétés normales des panneaux
en vitrocéramique noir.
Page 36

FR
16
7 - Assistance ou Service Après-Vente
Données de Service
Pour un centre de service autorisé ou de l’information sur les
pièces, voir le paragraphe “GARANTIE pour l’électroménager”.
L’emplacement du numéro de série sur le produit il est situé sur
la base de la table de cuisson. Notez cette information dans
l’espace prévu à cet effet ci-dessous. Gardez votre facture pour
la validation de votre garantie.
Données de Service
Numéro de modèle ______________________________
Numéro de série ________________________________
Date d’installation ou Occupancy __________________
Avant d’appeler l’assistance ou le service après-vente, veuillez bien vérifier la section « Solution aux problèmes ». Ceci peut vous
faire économiser le coût d’un appel à un centre de service. Si vous avez cependant besoin d’aide, suivre les indications ci-dessous.
Lorsque vous appelez, soyez prêt à indiquer la date d’achat, le modèle complet ainsi que le numéro de série de votre appareil.
Ces informations nous permettront de mieux répondre à vos questions.
Page 37

FR
17
8 - GARANTIE Fulgor Milano sur les appareils électroménagers
Durée de la garantie:
La garantie Fulgor Milano couvre, pendant vingt-quatre mois à
partir de la date originale d’achat, toutes les pièces et le travail
mis en œuvre pour la réparation et le remplacement de toutes
parties du produit utilisées dans un contexte résidentiel normal
et frappées de vices de matériau et de fabrication.
Conserver la facture originale et le bordereau de
livraison comme attestation du droit à la garantie.
Pour pouvoir bénéficier du service de garantie, procéder de la
manière suivante:
1. Contactez le service agréé Fulgor-Milano
a. Pour toute l’Amérique du Nord:
En ligne à http://www.thevettagroup.com/servicerequest.a5w
b. Aux États-Unis par courrier électronique à
fulgor@adcoservice.com ou par numéro sans frais au
1-855-4-fulgor (1-855-438-5467)
c. Dans l’est du Canada (Ontario-> Est)
par e-mail au service@distinctive-online.com ou par
numéro sans frais 1-800-361-0799
d. Dans l’est du Canada (Manitoba-> Ouest)
par e-mail au service@pacicspecialtybrands.com ou par
numéro sans frais 1-877-430-5253 x106
2. Présentez une copie de votre ticket d’achat original avec le
numéro de modèle et le numéro de série du produit.
3. Permettez à Fulgor Milan de vérifier votre réclamation avant
que le Produit ou une quelconque partie du Produit aient été
modifiées ou supprimées
CLAUSES DE GARANTIE
Cette garantie est valable uniquement dans les 50 états
continentaux des États-unis et au Canada. Elle s’applique
uniquement à l’acheteur original et n’est pas transférable.
Tous les services fournis par Fulgor Milano au titre de la
garantie doivent être effectués auprès d’un service d’assistance
agréé Fulgor Milano sauf indication contraire de ce dernier.
Les services seront prêtés aux heures de travail habituelles de
chaque région. La présente garantie s’applique uniquement
aux produits achetés auprès d’un revendeur autorisé à
travers une chaîne de distribution agréée; il est destiné à une
utilisation résidentielle normale, tout usage commercial ou
installation sur une embarcation étant expressément exclus. La
garantie couvre les activités réalisés sur le site d’installation du
produit ; les frais d’une réparation réalisée en un autre lieu sont
exclus sauf autorisation expresse de Fulgor Milano. Les frais de
déplacement dérivés d’une prestation d’assistance à réaliser
dans un endroit éloigné sont exclus. Par endroit éloigné, on
entend à une distance supérieure à un rayon de 50 miles (80
kilomètres) du siège du revendeur autorisé. Cette garantie ne
couvre pas les pièces de rechange ni les réparations en cas de
défaillances dérivés de négligence, transport, livraison, tension
inadéquate, accident ou usage, entretien, installation, révision
ou réparation ou installation impropres, ce qui comprend
notamment, entre autres, le démontage et la réinstallation
impropres d’un composant du produit quel qu’il soit (par
exemple démontage des poignées pour le faire passer par une
porte) avant ou pendant la livraison/installation du produit.
Les interventions décrites ici sont les seules que fournit Fulgor
Milano aussi bien au titre de cette garantie que dans le cadre
de toute autre garantie applicable aux termes de la loi.
Fulgor Milano n’est pas responsable de la perte du produit
par détérioration ou par combustion, ni des dommages subis
par le mobilier et les matériaux de construction ou de finition,
notamment les revêtements de sol.
Fulgor Milano décline toute responsabilité pour tout dommage
conséquent ou indirect dérivé du non-respect de ces garanties
ou d’autres garanties explicites, implicites ou obligatoires.
La présente garantie ne deviendra valide et efficace qu’avec
la présentation du document attestant la date d’achat de
l’appareil, précisément de la facture ou du ticket d’achat ou
tout document équivalent indiquant le nom du vendeur, la date
de livraison et les données d’identification de l’appareil (par
ex. numéro du modèle, numéro de série). Dans le cas d’un
produit neuf inclus dans l’achat d’une nouvelle construction
résidentielle, la garantie s’applique au premier habitant des
locaux contenant le produit Fulgor Milano et la date de prise
d’effet de la garantie sera celle de prise de possession de la
résidence (certificat d’occupation requis) et, de toutes façons,
à six mois au plus de la date d’achat du produit par la société
auprès du distributeur ou revendeur.
Cette extension ne s’applique pas aux éléments décrits dans la
note 1 ci-dessous.
Cette garantie n’est valide que si la différence entre la date
d’achat et la date de fabrication du produit est inférieure à
un an.
Un produit resté en stock pendant plus d’un an sera couvert
par la garantie Stock B/Modèle destiné à l’exposition de
Fulgor Milano.
Pendant la période de garantie, Fulgor Milano se réserve le
droit d’évaluer l’opportunité de réparer l’appareil ou, à sa
discrétion, de le remplacer par un produit Fulgor Milano de
caractéristiques et fonctions équivalentes.
Fulgor Milano se réserve le droit de revoir à tout moment la
présente garantie.
Certains États ne permettent pas l’exclusion ni la limitation
des dommages accessoires ou conséquents; la limitation ou
exclusion visée plus haut pourrait donc ne pas s’appliquer
dans votre cas. La présente garantie vous octroie des droits
légaux spécifiques; vous pourriez bénéficier d’autres droits qui
peuvent varier d’un État à l’autre.
1
Les portes, poignées, cadres, supports, surfaces intérieures et
extérieures du produit sont couverts par une garantie limitée de
30 jours pour défauts cosmétiques en sortie d’usine.
*Les ampoules électriques de rechange ne sont pas couvertes
par la garantie de produit.
Page 38

FR
18
Page 39

ES
1
TABLA DE MATERIAS
Pagina
Advertencias para conexión eléctrica 2
1 - Instrucciones de Seguridad 3
Seguridad de la Placa de Coccion 3
Seguridad Personal 4
2 - Modelos y Nomenclatura de Piezas 5
3 - Cómo funciona el calentamiento por inducción 6
Inducción 6
Principio de funcionamiento 6
4 - Funcionamiento de la Encimera de Inducción 7
Antes de utilizar la placa por primera vez 7
Distribución de energía 7
“Ruidos” de recipientes de cocción 7
5 - Instrucciones para el usuario 9
Utilización 9
Detección de la olla 9
Indicador de calor restante 9
Protección en caso de encendido involuntario 9
Precauciones 10
Batería de cocina 10
Mantenimiento 10
Turning the cooktop on and off 10
Señal acústica (zumbador) 10
Encendido de una zona de cocción 10
Apagado de una zona de cocción 11
TABLA DE MATERIAS
Pagina
Nivel de potencia 11
Booster y gestión de la potencia. 11
Activar el calentamiento automático 11
(o función “heat-up”) 11
Función extensión
(para bandejas de gran tamaño) 11
Función de puente (para grandes recipientes) 12
Bloqueo controles (seguridad niños) 12
Desactivación del bloqueo de control 12
Llave 12
Pausa 12
Desactivación Pausa 12
Función de Timer 12
Timer autónomo 13
Apagar/modificar el timer 13
Programación del timer para las zonas de
cocción 13
Indicaciones de error 14
6 - Solución de Problemas 15
7 - Servicio de Asistencia Técnica 16
Registro de datos para el servicio 16
8 - GARANTÍAS Fulgor Milano sobre aparatos
electrodomésticos 17
Page 40

ES
2
Preste la debida atenció³n a los siguientes símbolos que
encontrará en el manual:
ADVERTENCIA
• Este es el símbolo de los avisos relacionados con la
seguridad: alerta sobre potenciales peligros que pueden
derivar en muerte o daños a las personas.
• Si no sigue estas instrucciones, puede correr peligro de
muerte o de resultar gravemente herido.
LEA Y CONSERVE ESTAS INSTRUCCIONES.
Advertencias para conexión eléctrica
ADVERTENCIA
• La instalación y el mantenimiento de este
• electrodoméstico deben ser efectuados por un instalador
cualificado o una agencia técnica.
• Los modelos de se pueden accionar en 240V o 208V.
ATENCIÓN
• Siempre desactivar la fuente de alimentación eléctrica
antes de realizar el mantenimiento de esta unidad.
• Estos dispositivos deben contar con una toma de tierra
para su seguridad.
Cualquier cambio o modificación que no hayan sido
autorizados expresamente por la parte responsable de la
conformidad podrá anular la autorización al usuario para
hacer funcionar el equipo.
Nota: Este equipo cumple con las Directivas FCC parte 18.
Esta unidad genera, utiliza y puede irradiar energía de
frecuencia de radio y, si no se instala y usa de acuerdo
con las instrucciones, puede provocar una interferencia
dañina a las comunicaciones de radio. Sin embargo,
no hay garantía de que no haya interferencia en
una instalación determinada. Si la unidad provoca
interferencia nociva a la recepción de radio y televisión,
lo que puede determinarse encendiendo y apagando
la unidad, el usuario puede corregir la interferencia a
través de una o más de las siguientes medidas:
• Reoriente o cambie la posición de las antenas
receptoras.
• Incremente la distancia entre la unidad y el receptor.
• Conecte la unidad a un tomacorriente o un circuito
diferente del que está usando el receptor.
• Para cualquier ayuda, diríjase al vendedor o a un
técnico radio/TV competente.
ADVERTENCIA
Las personas que utilicen un marcapasos o un dispositivo
médico similar deben tener cui dado cuando utilicen y
se encuentren cerca de una unidad por inducción. El
campo electromagnético puede afectar el funcionamiento
del marcapasos o del dispositivo médico similar. Es
recomendable consultar a su médico o al fabricante del
marcapasos sobre su situación particular.
Page 41

ES
3
1 - Instrucciones de Seguridad
Seguridad de la Placa de Coccion
ADVERTENCIA
Instalación Adecuada
• El electrodoméstico debe ser instalado y conectado a
tierra por un electricista cualificado.
No Utilice Jamás El Electrodoméstico Para Calentar Una
Habitación.
No Deje A Los Niños Solos
• No deje a niños solos o sin supervisión en una habitación
en la que haya electrodomésticos en funcionamiento. No
permita que se suban o se sienten en ninguna parte del
electrodoméstico.
Lleve Ropa Adecuada
• No lleve nunca ropa demasiado amplia o con
mangas o complementos que cuelguen mientras use el
electrodoméstico.
Mantenimiento
• No repare ni sustituya ningún componente del
electrodoméstico si no se recomienda explícitamente en
este manual. Cualquier otra operación debe ser efectuada
por un técnico cualificado.
Almacenamiento En El Interior Y Encima Del Electrodoméstico
• No almacene materiales inflamables dentro de un horno
ni cerca de las unidades de superficie.
No Utilice Agua Para Sofocar Los Incendios Provocados Por
Grasa
• Sofoque las llamas con una tapa, bandeja o un extintor
de polvo químico o de espuma.
No Utilice Agarradores Húmedos
• Si los agarradores entran en contacto con una superficie
caliente, el vapor resultante podría provocar quemaduras.
No utilice toallas o trapos gruesos o doblados.
ADVERTENCIA
No Deje El Electrodoméstico Desatendido Si Está Utilizando
Temperaturas Elevadas
• Las salpicaduras provocan humo y, si se derrama grasa,
puede prender fuego.
• No coloque objetos metálicos como cuchillos, tenedores,
cucharas, y tapas sobre la superficie de las placas de
cocción ya que pueden calentarse
No Utilice La Placa De Cocción Si Tiene Fisuras
• Si la placa de cocción se rompiera, los limpiadores y los
derrames de alimentos podrían filtrarse por las fisuras
y provocar un riesgo de descarga eléctrica. Si detecta
alguna fisura, póngase de inmediato en contacto con un
técnico cualificado.
Limpie La Placa Con Cuidado
• Si utiliza una esponja o un trapo mojados para limpiar
salpicaduras de la placa en caliente, hágalo con cuidado:
podría quemarse con el vapor. Algunos productos de
limpieza emanan vapores tóxicos si se aplican a una
superficie caliente.
INSTRUCCIONES IMPORTANTE
Por favor, lea todas las instrucciones antes de utilizar este aparato
Page 42

ES
4
Seguridad Personal
ADVERTENCIA
Para reducir el riesgo de daños a las personas, en caso de
que el aceite con el que cocina prenda fuego, siga los pasos
siguientes:
• La grasa es un material inflamable y debe manipularse
con cuidado.
• No utilice agua para sofocar los incendios provocados
por grasa.
• Nunca levante una sartén en llamas. Sofocar con una
bandeja para hornear o una bandeja de metal plana.
• Si prende fuego algo de grasa que se encuentre fuera de
la sartén, puede sofocarlo con bicarbonato sódico o con
un extintor de polvo químico seco o de espuma.
• No toque la grasa hasta que se haya enfriado.
• Limpie cualquier derrame de inmediato.
• Si va a flambear un alimento sobre la placa, apague
el extractor de la campana. La corriente de aire podría
extender y descontrolar la llama.
• No deje nunca la superficie desatendida si está cocinando
con temperaturas altas. Las salpicaduras provocan humo
y, si se derrama grasa, puede prender y provocar un
incendio.
ATENCIÓN
Evite que la placa entre en contacto con papel de aluminio,
plástico, papel o tela cuando esté caliente. No coloque
sartenes o recipientes vacíos sobre el fuego encendido.
• Si tiene cuidado, evitará quemaduras. Si las llamas no se
apagan inmediatamente, salga de la habitación y llame a
los bomberos.
• Tenga siempre un detector de incendios que funcione
correctamente cerca de la cocina.
• Deje siempre la campana extractora de humos encendida
cuando flambee alimentos (solamemte en caso de humo
sin llamas).
Utilice un extintor solo si
• Dispone de un extintor ABC y sabe cómo utilizarlo.
• El fuego es pequeño y está limitado a la zona en la que
se inició.
• Ya ha llamado a los bomberos.
• Tiene una salida a su espalda mientras combate el fuego.
• No utilice jamás agua para extinguir fuegos en la cocina.
• Si su ropa prende fuego, tírese al suelo de inmediato y gire
sobre sí mismo para extinguir las llamas.
ADVERTENCIA
Para reducir el riesgo de quemaduras en el uso de la placa
siga estos consejos:
• No utilice jamás la placa de cocción para calentar una
habitación.
• No deje a niños o mascotas solos en una habitación en
la que haya electrodomésticos en funcionamiento. No
permita que se sienten o apoyen en ninguna parte del
electrodoméstico.
ATENCIÓN
No almacene objetos que puedan llamar la atención de
los niños ni en los armarios que se encuentren sobre el
electrodoméstico ni en la parte posterior: los niños podrían
resultar gravemente heridos si intentaran alcanzarlos.
Cuando utilice la placa de cocción
• No toque la superficie de los fuegos ni la zona de
alrededor. La superficie puede emitir calor suficiente
para causar quemaduras. Los elementos de la superficie
pueden estar calientes incluso cuando están de color
oscuro. No toque la superficie de la placa ni permita
que ningún material inflamable entre en contacto con ella
mientras esté caliente.
Page 43

ES
5
2 - Modelos y Nomenclatura de Piezas
30” MODELOS
1
2
3
4
5
F7IT30*1
Position 1
7” (180 mm) - 1850W (Booster 3000W)
Position 2
11” (280 mm) - 2300W (Booster 3600W)
Position 3
7” (180 mm) - 1850W (Booster 3000W)
Position 4
5 3/4” (145 mm) - 1400W (Booster 2200W)
Position 5
Mandos táctiles
36” MODELOS
5
3
2
4
1
6
F7IT36*1
Position 1
7 1/2” x 8 1/2” (190 mm x 220 mm) - 2000W (Booster 3600W)
Position 2
5 3/4” (145 mm) - 1400W (Booster 2200W)
Position 3
7” (180 mm) - 1850W (Booster 3000W)
Position 4
7 1/2” x 8 1/2”
(190 mm x 220 mm) - 2000W (Booster 3600W)
Position 5
11” (280 mm) - 2300W (Booster 3600W)
Position 6
Mandos táctiles
Page 44

ES
6
3 - Cómo Funciona el Calentamiento por Inducción
Inducción
El calentamiento por inducción es la forma más eficiente,
disponible en la actualidad, para cocinar.
El calor se produce, con un campo electromagnético,
directamente debajo de la olla o de la sartén utilizada.
La superficie no interesada en el contacto permanece casi
fría; después de la cocción y después de haber sacado el
recipiente no queda calor restante. Es eficiente porque no
malgasta energía por dispersión, como los quemadores de
gas, es entre un 30 y un 50% más rápido que las placas de
cocción normales con tecnología HGL y permite un ahorro
energético de hasta el 25%.
Ante un desbordamiento del recipiente el líquido no se
engancha a la superficie de la placa de cocción ya que está
fría.
Principio de funcionamiento
Se basa en las propiedades electromagnéticas de la mayor
parte de los recipientes para la cocción.
El circuito electrónico gobierna el funcionamiento de la bobina
(inductor) que crea un campo magnético.
El calor se transmite desde el recipiente a los alimentos.
La cocción se efectúa tal como se describe a continuación:
• mínima dispersión (alta rentabilidad);
• el hecho de retirar la olla (aunque sea sólo levantarla)
provoca la parada automática del sistema;
• el sistema electrónico permite la máxima flexibilidad y
delicadeza en la regulación.
1 - Recipiente
2 - Corriente inducida
3 - Campo magnético
4 - Inductor
5 - Circuito electrónico
6 - Alimentación eléctrica
Page 45

ES
7
4 - Funcionamiento de la Encimera de Inducción
Antes de utilizar la placa por primera vez
• Todos los productos se limpian en fábrica con solventes que
eliminan cualquier signo visible de suciedad, aceite y grasa
que haya podido fijarse en la placa durante el proceso de
producción.
• Retire el embalaje de la placa y la documentación que haya
sobre ella.
• Limpie la superficie de cristal antes de utilizarla por vez
primera. Se recomienda efectuar una limpieza exhaustiva
con un limpiador especí fico. No le llevará más de un minuto
y dejará una pelí cula protectora limpia y brillante sobre el
cristal antes de su primer uso.
• Las primeras veces que utilice la placa, podrí a percibir un
ligero olor: es perfectamente normal y desaparecerá con el
tiempo
• Para obtener buenos resultados en la cocina, deberá elegir
los recipientes adecuados.
• La superficie de cocción conservará calor y permanecerá
caliente aproximadamente 20 minutos después de haber
apagado los fuegos
• La superficie vitrocerámica de la placa es muy duradera y
resistente a los impactos, pero se puede romper si algún
objeto cae sobre ella.
• No coloque sartenes o recipientes vacíos sobre el fuego
encendido. Podría dañar el recipiente, el fuego o la placa
de cocción.
• No deslice ningún recipiente sobre la superficie: podría
rayar el cristal.
• No es recomendable utilizar sartenes o recipientes de hierro
fundido en esta placa de cocción. El hierro fundido retiene
el calor y podría provocar daños en la placa.
Anafe de 4 quemadores con generadores de inducción de
lados derecho e izquierdo (2).
Los anafes de cinco quemadores están divididos en 3 zonas.
Distribución de energí³a
Los anafes de cuatro quemadores están divididos en dos zonas
de calentamiento individuales.
Los anafes de cinco quemadores están divididos en 3 zonas.
Un generador controla 2 elementos, o dos zonas de cocción
dentro de una sección de calentamiento comparten la energía
de un generador. La distribución de energía se activa cuando
ambos elementos de la misma zona de cocción se activan y
un elemento se configura para Impulso (P). El elemento que no
esté configurado para Impulso cambiará a un nivel de energía
más bajo. Esto se denomina distribución de energía
“Ruidos” de recipientes de cocción
Cuando se usan elementos cercanos que están programados
en configuraciones de energía determinadas, los campos
magnéticos pueden interactuar y producir un silbido bajo
o un “zumbido” intermitente. Los recipientes que cubren
por completo el anillo del elemento producen menos ruido.
Un “zumbido” bajo resulta normal particularmente en
configuraciones altas. Estos ruidos pueden reducirse o
eliminarse bajando o subiendo las configuraciones de nivel
de energía de uno o ambos elementos.
Page 46

ES
8
Algunos focos de cocción presentan un diámetro interno
delimitado con una línea fina que sugiere al usuario.
A
B
C
D
Anafe de 30” de ancho. Utilice el recipiente de tamaño
mínimo ilustrado para cada elemento de cocción.
Tamaño cacerola 30”
A
5” ¾ (14,5 cm)
diámetro mínimo
tamaño cacerola
B
7” (18,0 cm)
diámetro mínimo
tamaño cacerola
C
5” ¾ (14,5 cm)
diámetro mínimo
tamaño cacerola
D
4” ¾ (12,0 cm)
diámetro mínimo
tamaño cacerola
E
C
B
D
A
Anafe de 36” de ancho. Utilice el recipiente de tamaño
mínimo ilustrado para cada elemento de cocción.
Tamaño cacerola 36”
A
5” ¾ (14,5 cm)
diámetro mínimo
tamaño cacerola
B
4” ¾ (12,0 cm)
diámetro mínimo
tamaño cacerola
C
5” ¾ (14,5 cm)
diámetro mínimo
tamaño cacerola
D
5” ¾ (14,5 cm)
diámetro mínimo
tamaño cacerola
E
7” (18,0 cm)
diámetro mínimo
tamaño cacerola
Page 47

ES
9
5 - Instrucciones para el usuario
Indicador de calor restante
Sirve para indicar al usuario que el vidrio se encuentra a una
temperatura peligrosa en caso de contacto con todo el área
de la zona de cocción. La temperatura se determina siguiendo
un modelo matemático y un eventual calor restante se indica
mediante una “H” desde el correspondiente display de siete
segmentos.
El calentamiento y el enfriamiento se calculan en relación con:
• el nivel de potencia seleccionado (de “0“ a “9“);
• el periodo de activación de los relés.
Tras haber apagado la zona de cocción, el correspondiente
display muestra “H” hasta que la temperatura de la zona
no desciende por debajo del nivel crítico (≤ 60°C) según el
modelo matemático.
Protección en caso de encendido involuntario
• Si el control electrónico detecta una activación continua de
una tecla durante aproximadamente 10 segundos se apaga
de forma automática. El control emite una señal acústica
de error que avisa al usuario de la presencia de un objeto
sobre los sensores. Las pantallas de visualización muestran
el código de error de uso permanente, que aparece en la
pantalla de visualización mientras el control electrónico
advierte el error. Si la zona de cocción “quema”, aparecerá
una “H“ en el display de forma alternativa con la señal de
error.
• Si ninguna zona de cocción se activa en los siguientes 10
segundos tras el encendido del Touch, el control vuelve a la
modalidad stand-by.
• Cuando el control está encendido la tecla ON/OFF tiene
prioridad sobre todas las demás teclas, de forma que el
control se puede apagar en cualquier momento incluso en
caso de activación múltiple o continua de teclas.
• En la modalidad stand-by una activación continua de teclas
no tendrá ningún tipo de efecto. De todas formas, antes
de que el control electrónico se pueda encender de nuevo,
tiene que reconocer q-ue no hay ninguna tecla activa.
Utilización
Para empezar colocar la olla en la zona de cocción escogida.
La ausencia de olla (display ) no permite la puesta en
marcha del sistema.
Detección de la olla
Una certeza que caracteriza la utilización consciente de la
tecnología en favor del consumidor.
3 4
5
1
6
7 8 9 10 11
24 23 22 21
20 19
2
18
17 16 15 14 13 12
Partes
1 ENCENDIDO/APAGADO principal 13 Icono Timer activo para zona de cocción
2 + Timer 14 Pantalla de visualización nivel zona de cocción
3 - Timer 15 Barra luminosa nivel cocción
4 Piloto led llave activada 16 Indicación de área de encendido
5 Botón activación llave 17 Símbolo de la función de fundido
6
Botón activación pausa 18 Símbolo función hervir a fuego lento
7 Piloto led Pausa y Aviso apagado involuntario 19 Pantalla de visualización Timer (minutos/segundos)
8 Zona de calefacción ENCENDIDO/APAGADO 20 Pantalla de visualización Timer (minutos/segundos)
9 Área cursor activación nivel Mínimo 21 Punto de separación (horas/minutos)
10
Área cursor activación nivel Máximo 22 Pantalla de visualización Timer (horas/minutos)
11 Área cursor activación Power Booster (P) 23 Icono indicación minutos
12 Icono de función de puente encendido 24 Icono Timer autónomo
Page 48

ES
10
Precauciones
• Cuando se verifica una fractura, incluso mínima, de la
superficie vitrocerámica es necesario desconectar de forma
inmediata la alimentación eléctrica;
• durante el funcionamiento es necesario alejar el material
magnetizable como tarjetas de crédito, disquetes,
calculadoras, etc.;
• no utilizar nunca papel de aluminio o apoyar productos
envueltos con papel de aluminio directamente sobre la
placa de cocción;
• los objetos metálicos como cuchillos, tenedores, cucharas y
tapas no se pueden colocar sobre la superficie de la placa
de cocción para evitar que se calienten;
• cuando se cocina con utensilios de cocina antiadherentes, sin
utilizar agua o aceite, limitar el tiempo de precalentamiento
a uno o dos minutos.
• la cocción de alimentos con tendencia a engancharse en
el fondo empieza con la potencia mínima para aumentar
luego mezclando con frecuencia;
• después del uso, desactivar el elemento manualmente
(disminuyendo a “0”) en lugar de depender del sensor de
detección de la sartén.
Batería de cocina
• Si un imán es atraído hacia la parte inferior de su vajilla,
entonces es apta para cocinar por inducción.
• Intente utilizar recipientes que se han declarado como aptos
para cocinar por inducción,
• de fondo grueso y plano con un rendimiento más eficaz.
• una olla de 20 cm (8”) de diámetro permite aprovechar la
máxima potencia;
• una olla más pequeña reduce la potencia pero no provocará
dispersión de energía. El uso de utensilios de cocina con un
diámetro inferior a 12 cm (3”) no es recomendado;
• utensilios de cocina de acero inoxidable con base multicapa
o de ferrita si la base de acero inoxidable indica: para la
inducción.
• recipientes en arrabio mejor si con el fondo esmaltado para
evitar rasguños en la placa de cocción vitrocerámica;
• los recipientes de vidrio, cerámica, terracota, aluminio,
cobre o acero inoxidable no magnético (austeníticos) no son
recomendables y son inadecuados, a menos que utilicen un
kit adaptador de Fulgor Milano (INDUKIT).
SiNo No
Mantenimiento
Restos de hojas de aluminio, residuos de alimentos,
salpicaduras de grasa, azúcar o alimentos muy sacaríferos
se tienen que eliminar inmediatamente de la placa de cocción
con una rasqueta para evitar posibles desperfectos en la
superficie.
A continuación, limpie con un buen limpiador superior ceran
y papel de cocina, enjuague con agua y seque con un paño
limpio.
No utilizar en ningún caso esponjas o estropajos abrasivos;
evitar también la utilización de detersivos químicos agresivos
como FORNOSPRAY o QUITAMANCHAS.
NO UTILIZAR LIMPIADORES DE VAPOR
Encendido y apagado de las placas de cocción
Las placas de cocción se encienden pulsando el botón
On/off del “centro” (1), oirá un pitido corto y se ilumina la
correspondiente luz de LED.
Si una zona de cocción “quema”, la pantalla de visualización
muestra de forma alternada “H” y “0”.
Tras el encendido el touch control permanece activo durante
10 segundos. Si no se selecciona ni una zona de cocción
ni el timer el touch vuelve al estado de standby de forma
automática.
Señal acústica (zumbador)
Durante la utilización se señalan las siguientes actividades
mediante un zumbador:
• Activación normal de las teclas con un sonido breve.
• Activación continua de las teclas durante más de 10 seg.
con un sonido largo intermitente (aparece un símbolo de
error y si se prolonga la operación el touch control se apaga)
Encendido de una zona de cocción
Colocar una olla y tocar un área del cursor correspondiente
a la zona de cocción donde se encuentra la olla (8), hacer
resbalar el dedo hacia la derecha para aumentar el nivel de
cocción (10) y hacia la izquierda para disminuirlo (9).
Page 49

ES
11
Apagado de una zona de cocción
Una única zona de cocción se puede apagar directamente
pulsando la tecla (8) para la zona de cocción en la que está
trabajando. Las zonas de cocción calientes se mostrarán con
una letra “H”.
El apagado inmediato de todas las zonas de cocción se
puede obtener en cualquier momento mediante el botón de
alimentación On/Off (1).
Si durante la cocción se apaga de forma involuntaria la placa,
durante la utilización de los controles será posible encenderla
de nuevo con la tecla On/Off. Se dispondrá de 6 segundos
para pulsar la tecla pausa (6) que se señalará con el parpadeo
de un piloto luminoso led encima del control. De esta forma la
placa se encenderá de nuevo con las mismas configuraciones
que tenía antes del apagado involuntario.
Nivel de potencia
La potencia de la zona de cocción se puede configurar del nivel
1 al nivel 9. Un ulterior nivel P (Power booster) se encuentra
disponible para permitir un calentamiento especialmente
rápido de los alimentos y permitir ahorrar tiempo al usuario.
El nivel de potencia representado por la letra “A” intermitente
representa la activación de la función calentamiento
automático.
Booster y gestión de la potencia.
El generador, con Elevador Booster activado, ofrece un área
de energía de cocción individual que es considerablemente
superior a la potencia nominal. La función Booster se puede
activar pulsando la parte final del área del cursor de la zona
de cocción (11). El aumento de potencia es distinto según el
tamaño de la zona de cocción:
1. Para una zona de cocción ø 5 3/4” (145 mm) la potencia
pasa del nivel 9 de 1400 W al nivel Booster 2200 W y
dura 10 minutos.
2. Para una zona de cocción ø 7” (180 mm) la potencia pasa
del nivel 9 de 1850 W al nivel Booster 3000 W y dura 10
minutos
3. Para una zona de cocción Rectangular 7 1/2” x 8 1/2”
(190 mm x 220 mm) la potencia pasa del nivel 9 de 2000
W al nivel Booster 3600 W y dura 10 minutos.
4. Para una zona de cocción ø 11” (280 mm) la potencia
pasa del nivel 9 de 2300 W al nivel Booster 3600 W y
dura 10 minutos.
Por razones de seguridad, la función auxiliar tiene una
duración limitada (10 min), después de 10 minutos la zona
se reduce al nivel 9.
Si el recipiente de cocción se retira de la zona de cocción
durante el tiempo de elevación (Booster), el booster permanece
activo y el tiempo de elevación no se desactiva.
Con el Booster activado el desplazamiento del valor
configurado con el dedo en el área del cursor de la zona de
cocción determina la desactivación del Booster.
La función Booster “P” se puede activar en todas las zonas
de cocción pero se da prioridad al último Booster activado
reduciendo otros eventuales niveles de cocción.
Tabla de distribución de potencia de 36”
IZQUIERDA CENTRAL DERECHA
9 P 6 P
P
P 8 P 6
Tabla de distribución de potencia de 36”
CENT/DERECHA DERECHA
P 6 P 8
7 P 9 P
Calentamiento automático (o función “heat-up”)
Esta función hace más fácil la cocción, añadiendo la
funcionalidad “hervir y reducir” a los elementos. La superficie
se calienta automáticamente a Potencia Completa y luego
regresa al nivel de potencia seleccionado tras un período de
tiempo (ver Tabla).
Activar el calentamiento automático (o función
“heat-up”)
Mantener pulsada un área del cursor correspondiente a la
zona de cocción en función durante aproximadamente 3
segundos hasta que suene un bip (por ejemplo a 1/3 de la
longitud de la zona del cursor). Ej. Seleccionar el nivel 3 y
activar la función de calentamiento automático manteniendo
el dedo pulsado durante 3 segundos, se activará la función.
La pantalla de visualización correspondiente mostrará la letra
“A” intermitente con el “3”. Con estas configuraciones la
placa de cocción calienta la zona de cocción al nivel máximo
“9” durante 2 minutos y luego sigue la cocción al nivel “3”.
Nivel de
potencia
Duración Función
Calentamiento
Automático (tiempo
en minutos)
Los elementos de
tiempo máximo
funcionarán
en el valor de
alimentación (tiempo
en minutos)
0 1 0m 40s 516
2 1m 12s 402
3 2m 318
4
2m 56s 258
5
4m 16s 210
6 7m 12s 138
7
2m 138
8 3m 12s 108
9
- 90
P
- 10
Page 50

ES
12
Función de puente (para grandes recipientes)
Esta función que facilita la cocción con recipientes alargados,
sólo está disponible para las zonas de cocción rectangulares
y se activa presionando simultáneamente los 2 cursores de las
2 zonas de cocción involucradas. En este punto, el icono “
“ se enciende junto a la pantalla de los niveles y la zona
de cocción puede ser controlada desde un solo cursor ya que
el otro funcionará simultáneamente en el mismo nivel. Una
vez configurado en modo puente, el deslizador izquierdo se
transforma en el controlador maestro para ambos elementos.
Para desactivar el modo puente, simplemente toque ambos
controles deslizantes simultáneamente en cualquier punto a lo
largo de las barras de ajuste.
Funciones especiales (baja temperatura)
Esta función está disponible en cada zona de cocción y su
activación es indicada por uno de los dos iconos dedicados
(17 & 18). Es posible activar 2 niveles de “cocción”:
1. Derretir a una temperatura aproximada de 45°C.
2. Cocción lenta con una temperatura aproximada de 70°C.
Estas temperaturas son aproximadas y dependen en gran
medida de la olla y la cantidad de alimentos.
Después de encender la zona de calefacción deseada
pulsando la tecla (8) pulse la parte inicial de la zona cursor (9)
para activar la función (DERRETIR), si desea pasar a la función
(COCCIÓN LENTA) mantenga el cursor en la misma posición
durante un par de segundos.
Ambas funcionan a baja temperatura durante un máximo de
2 horas.
Bloqueo controles (seguridad niños)
Sólo puede activarse cuando el aparato está encendido pero
no hay zona de cocción en funcionamiento. Pulsar de forma
contemporánea la tecla llave (5) y la tecla pausa (6) y luego
sucesivamente pulsar la tecla llave (5). Durante 10 segundos
se mostrarán las letras “L” en las pantallas de visualización
que luego se apagarán. Intentando encender la placa de
cocción desde la tecla On/Off (1) la placa mostrará de nuevo
las letras “L” y ya no será posible cocinar.
Desactivación del bloqueo de control
Existen 2 tipos de desbloqueo:
1. Desbloqueo sólo una vez: Para desactivar la función,
encienda la superficie de cocción y pulse simultáneamente
el botón de pausa (6) y el botón de tecla (5). Las letras
L desaparecen y todas las zonas están habilitadas. Si
desactiva la superficie de cocción después de su uso,
cuando se encienda de nuevo, las letras L aparecerán para
indicar que la superficie está bloqueada. Básicamente, la
placa de cocción se bloquea automáticamente cuando no
está en uso, pero se debe usar la combinación especial de
teclas anteriormente descritas con cada uso.
2. Desbloqueo definitivo: Para desactivar la función de forma
definitiva es necesario encender la placa de cocción y
pulsar de forma contemporánea la llave (5) y la pausa (6),
soltar estos 2 controles y luego de forma sucesiva pulsar de
nuevo la tecla pausa (6).
Llave
Esta placa de cocción permite configurar un bloqueo del
teclado con la correspondiente tecla llave (5). Puede ser útil
bloquear el teclado durante el funcionamiento por ejemplo
para la limpieza de la zona de controles o en cualquier caso
si no se desea modificar ninguna configuración.
El botón de encendido/apagado (1) sigue siendo funcional.
Pausa
Esta placa de cocción permite configurar una pausa (6)
durante la cocción (útil por ejemplo para responder a una
llamada de teléfono). Esta función enciende, tras pulsar
el botón, un led encima del control, muestra en todas las
pantallas de visualización de las zonas de cocción el símbolo
“II” y congela las configuraciones de cocción y de los timer
durante un máximo de 10 minutos, luego la placa de cocción
se apaga.
Desactivación Pausa
Tras la activación de la función, es posible desactivarla
pulsando de nuevo el botón pausa (6). El led de configuración
de la pausa se apaga y en los siguientes 10 segundos es
necesario pasar el dedo sobre toda el área del cursor inferior
a la zona iluminada en movimiento (de izquierda a derecha).
De esta forma la placa reanuda la cocción y el timer sigue
contando desde el mismo punto en el que se había detenido.
Función de Timer
NOTA: El temporizador sólo está pensado como un
recordatorio acústico que llama la atención del usuario.
Los temporizadores no tienen ningún efecto sobre
los elementos de calefacción. Las zonas de cocción
siempre deben ser detenidas manualmente pulsando la
correspondiente tecla [OFF].
La función timer se realiza en dos versiones:
• Un Timer autónomo, de 1 minuto hasta 1 hora y 59 min:
señal sonora cuando el tiempo ha vencido. Esta función se
encuentra siempre disponible y se señala con el encendido
del símbolo reloj (24) que se encuentra entre el – y el +
(el símbolo puede presentar una luminosidad inferior si otro
timer para zona de cocción, con un tiempo restante inferior
al configurado en el timer autónomo, se encuentra activo).
• Un temporizador de 1 a 59 minutos para cada zona de
cocción: emite un pitido cuando el tiempo se agota. Las zonas
de cocción pueden programarse de manera independiente
(el símbolo puede ser menos brillante si otra zona de cocción
tiene un temporizador de tiempo restante que es inferior al
Page 51

ES
13
establecido en el temporizador independiente).
Sea cual sea el timer que se active en las pantallas de
visualización exclusivas se señala el timer con tiempo menor
en vencimiento y el correspondiente icono en forma de reloj
es más luminoso (13-24). Los demás timer configurados están
de todas formas activos y en funcionamiento, pero dispondrán
del icono en forma de reloj (13-24) con una luminosidad
reducida. Un ulterior icono con el mensaje min (23) aparece
cuando se configuran tiempos superiores a los 10 minutos.
Por ejemplo 0.11 indica 0 horas y 11 minutos. El punto de
separación (21) parpadea cuando el timer está funcionando
hacia adelante, y se mantiene estático mientras el timer está
seleccionado y es por tanto modificable.
Timer autónomo
• Si el touch está encendido el timer autónomo se puede
utilizar pulsando de forma contemporánea con los dedos
unidos la tecla + y -. Si todas las posiciones de cocción
están en posición “0”, el único timer disponible es este, se
encenderá el icono con forma de reloj (24) y la pantalla de
visualización mostrará “0.00”. En los siguientes 5 segundos
el timer desactivará la selección si no se selecciona ninguna
tecla.
• Se pueden efectuar modificaciones del valor (0-1 hora y
59min) con aumentos de un minuto con la tecla + de 0 a 99.
• Una activación continua de la tecla + o - dan lugar a un
aumento dinámico de la velocidad de variación hasta un
valor máximo, sin señales sonoras.
• Si la tecla + (o -) se suelta, la velocidad de aumento
(disminución) empieza de nuevo desde el valor inicial.
• La configuración del timer se puede efectuar tanto con
activaciones continuas de las teclas + y - como con
activaciones con toques sucesivos (con señal sonora).
Tras la configuración del timer empieza la cuenta atrás. Se
notificará que el tiempo ha terminado con una señal sonora o
con el parpadeo de la pantalla de visualización del timer que
mostrará “00”.
Apagar/modificar el timer
• El timer se puede modificar o apagar en cualquier momento
encendiendo de nuevo el touch si ninguna zona de cocción
está encendida y luego accionando las teclas + y – de forma
contemporánea para seleccionar el timer (con la tecla – se
coloca en el “0” para apagarlo y con la tecla + se aumenta
el valor para modificar el tiempo configurado).
• El timer autónomo permanece activo también pulsando la
tecla On/Off
Programación del timer para las zonas de cocción
Encendiendo el touch se puede programar un timer
independiente para cada zona de cocción.
• Tiene que haber por lo menos una zona de cocción
encendida y configurada a un cierto nivel.
• Activando el + y el – de forma contemporánea es posible
configurar una cuenta atrás para apagar la zona de cocción.
Al lado de la pantalla de visualización de la zona de cocción
se encuentran los iconos luminosos en forma de reloj (13).
Para configurar el timer en una zona de cocción cuando hay
diversas zonas de cocción encendidas es necesario seguir
pulsando el + y el – de forma contemporánea, se notará que
el icono con forma de reloj se ilumina y se desplaza en las
diversas zonas de cocción a medida que se pulsa de forma
contemporánea el + y el –.
• Cuando el timer de la zona de cocción se selecciona, el
icono correspondiente del reloj al lado de la pantalla
de visualización se vuelve más luminoso (13). Los timer
programados para cada zona de cocción siguen en
cualquier caso activos.
• Ulteriores comportamientos del timer coinciden con los del
timer autónomo. Para aumentar el tiempo, utilice el botón
+ (plus).
• El pitido y el parpadeo de la pantalla se detienen:
a- automáticamente después de 2 minutos.
b- cuando pulse los botones + o -, la pantalla de temporizador
se apaga.
Page 52

ES
14
Indicaciones de error
Error codes are displayed by the 7-segment display with “E” or “ER” plus the error number.
Mensaje de error Descripción Causa posible Solución del problemazación
“flash” El control detecta que un botón
está activado durante más de
10 segundos.
Presencia de agua o de
herramientas de cocina sobre
el cristal encima de la unidad
de control
Limpiar la superficie de trabajo
Er 22 Evaluación de la tecla
defectuosa. La unidad de
control corta la corriente trás
3,5 - 7,5 seg.
Cortocircuito o no continuidad
en la gama de evaluación
clave
Cambiar la unidad de control.
Er20 Error flash Microcontrolador defectuoso Cambiar la unidad de control.
Er36 El valor de NTC no se
encuentra en su zona de
valores (valor < 200mV o
> 4.9V; la unidad de control
corta la corriente
Corto-circuito o interrupción a
nivel de NTC
Cambiar la unidad de control.
Er31 Datos de configuración
erróneos
Configuración de la inducción
necesaria
Nueva configuración
Er47 Error de comunicación entre
TC y la inducción
Comunicación ausente o
defectuosa
Comprobar que el cable de
conexión está bien enchufado
y funciona correctamente.
E2 Sobrecalentamiento de las
bobinas de inducción
Enfriamiento necesario.
U400 Voltaje secundario de la unidad
de alimentación demasiado
alto (primario > 300V). La
unidad de control corta la
corriente tras 1 seg emitiendo
un sonido permanente.
La unidad de control está mal
conectada.
Conectar la tensión de
alimentación correcta.
E5 Error en el papel del filtro Cambiar el papel del filtro
E6 Error en la unidad de
alimentación
Cambiar la unidad de
alimentación
E9 Detector de temperatura de las
bobinas defectuoso
Cambiar el detector de
temperaturas
Page 53

ES
15
6 - Solución de Problemas
Problema Causa Posible Solució³n
La placa no funciona
La placa no está conectada a una red eléctrica
adecuada
Llame a un electricista para que compruebe si
la placa está conectada al voltaje apropiado.
El fusible o el diferencial han saltado. Llame a un electricista para que sustituya el
fusible o el diferencial.
La placa no está conectada a la red. Llame a un electricista para que analice la red
eléctrica.
La placa está bloqueada. Desbloquee la placa.
Los fuegos no se calientan
como deberían.
No está utilizando recipientes adecuados. Utilice los recipientes adecuados (encontrará
indicaciones en este manual).
La superficie vitrocerámica
es transparente o aparece de
color rojo.
Bajo una luz fuerte y directa se puede ver
a través del cristal. El color rojo también es
efecto de una luz fuerte.
Son características normales de las placas de
vitrocerámica negras.
Page 54

ES
16
7 - Servicio de Asistencia Técnica
Registro de datos para el servicio
Cómo obtener servicio Para información sobre servicio
autorizado o refacciones, ver el pàrrafo “GARANTÍA para
electrodomésticos”.
A la base de la placa de cocción se puede ver la etiqueta con
el número de serie del producto. Ahora es un buen momento
para anotar esta información en el espacio proporcionado
abajo. Guarde su factura para validar la garantía.
Registro de datos para el servicio
Número del Modelo _____________________________
Número de Serie ________________________________
Fecha de Instalación y Ocupación _________________
Antes de ponerse en contacto con el servicio de asistencia técnica, lea la sección “Solución de problemas”. Puede que hacerlo le
ahorre la llamada. Si no encuentra la solución a su problema en esta sección, siga las instrucciones que encontrará más abajo.
Cuando llame al servicio de asistencia, tenga a mano los siguientes datos: fecha de compra, referencia completa del modelo y
número de serie de su placa de cocción. Esa información nos ayudará a atenderle.
Page 55

ES
17
8 - GARANTÍAS Fulgor Milano sobre aparatos electrodomésticos
Duración de la garantía:
La garantía Fulgor Milano cubre, durante un plazo de
veinticuatro meses à partir de la fecha original de compra,
todas las piezas y el trabajo que se realice para la reparación
y el reemplazamiento de todas las piezas del producto
utilizadas en un contexto residencial normal y que manifiesten
vicios en los materiales y en la fabricación.
Conservar la factura original y el albarán
de entrega como testimonio del derecho a la
garantía.
Para poder beneficiarse de la garantía, proceder de la
manera siguiente :
1. Ponerse en contacto con el servicio autorizado
Fulgor-Milano.
a. Para todo el territorio de América del Norte:
en línea en http://www.thevettagroup.com/servicerequest.a5w
b. En los Estados Unidos por correo electrónico a fulgor@
adcoservice.com o al número gratuito 1-855-4-fulgor
(1-855-438-5467)
c. En el este de Canadá (Ontario->Este)
por correo electrónico a service@distinctive-online.com o
al número gratuito 1-800-361-0799
d. En el oeste de Canadá (Manitoba<-Oeste)
por correo electrónico a service@pacicspecialtybrands.
com o al número gratuito 1-877-430-5253 x106
2. Presentar una copia de su tiqué de compra original con el
número de modelo y el número de serie del producto.
3. Permitir a Fulgor Milan que compruebe su reclamación
antes de que el Producto o cualquier parte del Producto
hayan sido modificados o suprimidos.
CLAÚSULAS DE GARANTÍA
Esta garantía es válida únicamente en los 50 estados
continentales de los Estados Unidos y en Canadá. Se aplica
únicamente al comprador original y no se puede transferir.
Todos los servicios suministrados por Fulgor Milano a título
de la garantía deben efectuarse en un servicio de asistencia
autorizado por Fulgor Milano salvo indicación contraria de
este último. Los servicios se deben realizar en las horas de
trabajo habituales de cada región.
La presente garantía se aplica únicamente a los productos
comprados en un vendedor aceptado a través de una cadena
de distribución autorizada; está destinado a una utilización
residencial normal, cualquier uso comercial o instalación en
una embarcación quedan expresamente excluidos. La garantía
cubre las actividades realizadas en el lugar de instalación del
producto ; los gastos de una reparación realizada en otro
lugar quedan excluidos salvo autorización expresa de Fulgor
Milano. Los gastos de desplazamiento derivados de una
prestación de asistencia a realizar en un lugar alejado quedan
excluidos. Se considera lugar alejado, el que se encuentra a
una distancia superior a un radio de 50 millas (80 kilómetros)
desde la sede del vendedor autorizado.
Esta garantía no cubre las piezas de repuesto ni las
reparaciones en caso de fallos derivados de negligencia, del
transporte y de la entrega, tensión inadecuada, accidente o
utilización, mantenimiento, instalación, revisión o reparación o
instalación impropia, lo que comprende especialmente, entre
otras cosas, el desmontaje y la nueva instalación impropia
de un componente del producto cualquiera que sea (por
ejemplo desmontaje de los picaportes para hacer que pueda
pasar por una puerta) antes o durante la entrega/instalación
del producto. Las intervenciones descritas anteriormente
son las únicas que suministra Fulgor Milano tanto a título de
esta garantía como en el cuadro de cualquier otra garantía
aplicable según los términos de la ley. Fulgor Milano no es
responsable de la pérdida del producto por deterioro o por
incendio, ni de los daños sufridos por el mobiliario y los
materiales de construcción o de acabado, especialmente
los revestimientos del suelo. Fulgor Milano declina toda
responsabilidad por cualquier daño consiguiente o indirecto
derivado del no-respeto de estas garantías o de otras garantías
explícitas, implícitas u obligatorias.
La presente garantía no será válida y eficaz antes de haber
presentado el documento que atestigüe la fecha de la compra
del aparato, precisamente de la factura o del tique de compra
o cualquier documento equivalente que indique el nombre del
vendedor, la fecha de entrega y los datos de identificación
del aparato (por ej. número del modelo, número de serie). En
el caso de un producto nuevo incluido en la compra de una
nueva construcción residencial, la garantía se aplica al primer
habitante de los locales en los que se encuentre el producto
Fulgor Milano y la fecha de entrada de la garantía será la de
toma de posesión de la residencia (se requiere el certificado
de ocupación) y, de todas maneras, lo más tarde a seis meses
de la fecha de compra del producto por la sociedad en el
distribuidor o vendedor. Esta extensión se aplica solo a los
elementos descritos en la nota 1 a continuación.
Esta garantía no es válida nada más que si la diferencia entre
la fecha de compra y la fecha de fabricación del producto es
inferior a un año. Un producto que ha permanecido en stock
durante más de un año estará cubierto por la garantía Stock
B/Modelo destinado a la exposición de Fulgor Milano.
Durante el periodo de garantía, Fulgor Milano se reserva el
derecho de evaluar la oportunidad de reparar el aparato o,
a su discreción, reemplazarlo por un producto Fulgor Milano
de características y funciones equivalentes. Fulgor Milano
se reserva el derecho de revisar en cualquier momento la
presente garantía.
Algunos Paises no permiten la exclusión ni la limitación de
los daños accesorios o consiguientes, la limitación o exclusión
dirigida a otros recursos más altos, podría, pues, no aplicarse
en su caso. La presente garantía le otorga los derechos legales
específicos : podrá beneficiarse de otros derechos que pueden
variar de un País a otro.
1
Las puertas, picaportes, cuadros, soportes, superficies
interiores y exteriores del producto están cubiertas durante
una garantía limitada de 30 días por los defectos estéticos a
la salida de la fábrica.
*Las bombillas eléctricas de repuesto no están cubiertas por la
garantía del producto.
Page 56

18
Notes / Note / Nota
Page 57

19
Notes / Note / Nota
Page 58

20
Notes / Note / Nota
Page 59

Page 60

09FL8710 ed 05/2017
 Loading...