

Page 1

Use & Care Manual
Guide d’utilisation et d’entretien
Manual de uso y cuidado
F6SP30*1
F6DP30*1
Page 2

Table of Contents
Page Page
Safety Precautions 4 Convection Bake Tips and Techniques 18
Safety Instructions 5 Convection Bake Chart
19
Safety for the Oven
5
Convection Roast Tips and Techniques 20
Safety for the Self Cleaning Oven
5
Convection Roast Chart
20
Cooking with Convection Oven 6 Convection Broil Tips and Techniques 22
Advantages of Convection Cooking
6
Convection Broil Chart
22
Features of Your Oven 7 Dehydrate Tips and Techniques 23
The Control Panels 8 Dehydrate Chart
23
Command Key
8
Broil Tips and Techniques 24
Display
8
Broil Chart
24
Knobs
8
Food Service Temperature Guidelines from FSIS
24
Oven Modes 9 Special Features 25
General Oven Information 10 Sabbath Mode Instructions 26
General Oven Tips 11 Oven Care and Cleaning 27
Oven Racks
11
Self-Cleaning the Oven
27
Oven Extendable Racks
12
Preparing the Oven for Self-Cleaning
27
Setting the Clock and Timer 13 Setting the Self-Cleaning Mode 28
To Set the Time of Day
13
To Set the Self-Cleaning Mode
28
To Set the Timer
13
To Change the Cleaning Time
28
Selecting the Oven Mode 14 To Delay the Start of Cleaning
28
Setting Cooking Mode and the Temperature
14
General Oven Care 29
Using [OPTIONS] key to select low temperature
functions
14
How to Use the Oven Cleaning Chart
29
Using Oven Lights
14
Cleaning Chart
29
Time Oven Mode Operation 15 Oven Finishes / Cleaning Methods 30
To Set Timed Mode
15
Oven Door Removal 31
To Delay the Start of a Timed Mode
15
Replacing an Oven Light 32
When a Timed Mode is running
15
To Replace a Light Bulb 32
How to check a time value
15
Solving Baking Problems 33
Setting the meat probe options 16 Solving Operational Problems 34
Bake Tips and Techniques 17 FULGOR WARRANTY for Home Appliances 35
Bake Chart
17
Page 3

ENGLISH
Use & Care Manual
3
Table of Contents
Page Page
Safety Precautions 4 Convection Bake Tips and Techniques 18
Safety Instructions 5 Convection Bake Chart
19
Safety for the Oven
5
Convection Roast Tips and Techniques 20
Safety for the Self Cleaning Oven
5
Convection Roast Chart
20
Cooking with Convection Oven 6 Convection Broil Tips and Techniques 22
Advantages of Convection Cooking
6
Convection Broil Chart
22
Features of Your Oven 7 Dehydrate Tips and Techniques 23
The Control Panels 8 Dehydrate Chart
23
Command Key
8
Broil Tips and Techniques 24
Display
8
Broil Chart
24
Knobs
8
Food Service Temperature Guidelines from FSIS
24
Oven Modes 9 Special Features 25
General Oven Information 10 Sabbath Mode Instructions 26
General Oven Tips 11 Oven Care and Cleaning 27
Oven Racks
11
Self-Cleaning the Oven
27
Oven Extendable Racks
12
Preparing the Oven for Self-Cleaning
27
Setting the Clock and Timer 13 Setting the Self-Cleaning Mode 28
To Set the Time of Day
13
To Set the Self-Cleaning Mode
28
To Set the Timer
13
To Change the Cleaning Time
28
Selecting the Oven Mode 14 To Delay the Start of Cleaning
28
Setting Cooking Mode and the Temperature
14
General Oven Care 29
Using [OPTIONS] key to select low temperature
functions
14
How to Use the Oven Cleaning Chart
29
Using Oven Lights
14
Cleaning Chart
29
Time Oven Mode Operation 15 Oven Finishes / Cleaning Methods 30
To Set Timed Mode
15
Oven Door Removal 31
To Delay the Start of a Timed Mode
15
Replacing an Oven Light 32
When a Timed Mode is running
15
To Replace a Light Bulb 32
How to check a time value
15
Solving Baking Problems 33
Setting the meat probe options 16 Solving Operational Problems 34
Bake Tips and Techniques 17 FULGOR WARRANTY for Home Appliances 35
Bake Chart
17
Page 4
ENGLISH
Use & Care Manual
4
IMPORTANT
General Appliance and Oven
Safety Instructions
Safety for the Self-Cleaning Oven
Confirm that the door locks and will not open once
both selectors are in CLEAN position and the door
lock icon appears. If the door does not lock, turn the
cook mode selector to OFF and do not run Self-
Clean. Phone for Service.
Do not clean the door gasket. It is essential for a
good seal. Care should be taken not to rub,
damage, move or remove the door gasket.
Do not use commercial oven cleaners or oven liner
protective coatings of any kind in or around any part
of the oven.
Clean only oven parts listed in this manual.
Safety for the Oven
Tie long hair so that it doesn't hang loose.
Do not touch heating elements or interior
surfaces of oven.
The heating elements may be hot even though
they are dark in color. Interior surfaces of an
oven become hot enough to cause burns.
During and after use, do not touch or let clothing
or other flammable materials contact the heating
elements or the interior surfaces of the oven until
they have had sufficient time to cool.
The trim on the top and sides of the oven door
may become hot enough to cause burns.
Use care when opening the door. Open the door
slightly to let hot air or steam escape before
removing or replacing food.
Do not heat unopened food containers.
Build-up of pressure may cause the container to
burst and cause injury.
Always place oven racks in desired location while
oven is cool. If a rack must be moved while oven
is hot, do not let pot holder contact the hot
heating elements.
Use only dry pot holders. Moist or damp pot
holders on hot surfaces may result in burns from
steam. Do not let pot holder touch hot heating
elements. Do not use a towel or other bulky cloth.
WARNING
The California Safe Drinking Water and Toxic
Enforcement Act requires businesses to warn
customers of potential exposure to substances
which are known by the State of California to cause
cancer or reproductive harm.
The elimination of soil during self-cleaning
generates some by-products which are on this list of
substances.
To minimize exposure to these substances, always
operate this oven according to the instructions in
this manual and provide good ventilation to the
room during and immediately after self-cleaning the
oven.
Before self-cleaning the oven, remove the broiler
pan, oven racks (only when not made of porcelain),
other utensils and excess soft spillage.
Other surfaces of the appliance may become hot
enough to cause burns - among these surfaces are
(identification of surfaces - for example, oven vent
openings and surfaces near these openings, oven
doors, and windows of oven doors).
IMPORTANT
General Appliance and Oven
Safety Precautions
Please read all instructions before using this appliance.
WARNING
When properly cared for, your new oven has been
designed to be a safe, reliable appliance. Read all
instructions carefully before using this oven. These
precautions will reduce the risk of burns, electric
shock, fire, and injury to persons. When using
kitchen appliances, basic safety precautions must
be followed, including the following:
This appliance must be properly installed and
grounded by a qualified technician. Connect only to
properly grounded outlet. See “Grounding
Instructions” found in the Installation Instructions.
This appliance should be serviced only by a
qualified service technician. Contact the nearest
authorized service center for examination, repair
or adjustment.
Do not repair or replace any part of the oven
unless specifically recommended. Refer service to
an authorized servicer.
Do not operate this appliance if it is not working
properly or if it has been damaged, until an
authorized servicer has examined it.
Install or locate this appliance only in accordance
with the Installation Instructions.
Use this oven only as intended by the
manufacturer. If you have any questions, contact
the manufacturer.
Do not cover or block any openings on this
appliance.
Use this appliance only for its intended use as
described in this manual. Do not use corrosive
chemicals, vapors, or nonfood products in this
appliance. This type of oven is specifically
designed to heat or cook. It is not designed for
industrial or laboratory use. The use of corrosive
chemicals in heating or cleaning will damage the
appliance.
In the event that personal clothing or hair catches
fire, DROP AND ROLL IMMEDIATELY to
extinguish flames.
Do not allow children to use this appliance unless
closely supervised by an adult. Children and pets
should not be left alone or unattended in the area
where the appliance is in use. Never allow children
to sit or stand on any part of the oven.
Do not store items of interest to children above the
oven. If children should climb onto the appliance to
reach these items, they could be seriously injured.
To reduce the risk of fire in the oven cavity:
1. Do not store flammable materials in or near the
oven.
2. Do not use water on a grease fire. Smother fire or
use a dry chemical or foam-type extinguisher.
3. It is highly recommended that a fire extinguisher be
readily available and highly visible next to any
cooking appliance.
4. Do not overcook food. Carefully attend oven if
paper, plastic or other combustible materials are
placed inside the oven.
5. Do not use the cavity for storage purposes. Do not
leave paper products, cooking utensils or food in
the cavity when not being used.
6. If materials inside the oven should ignite, keep oven
door closed. Turn oven off and disconnect the
circuit at the circuit breaker box.
7. Do not block any vent openings.
8. Be sure the blower fan runs whenever the oven is in
operation. If the fan does not operate, do not use
the oven. Call an authorized service center.
9. Never use the oven to warm or heat a room. This
can damage the oven parts.
10. For personal safety, wear proper clothing. Loose
fitting or garments with hanging sleeves should
never be worn while using this appliance.
CAUTION
Page 5
ENGLISH
Use & Care Manual
5
IMPORTANT
General Appliance and Oven
Safety Instructions
Safety for the Self-Cleaning Oven
Confirm that the door locks and will not open once
both selectors are in CLEAN position and the door
lock icon appears. If the door does not lock, turn the
cook mode selector to OFF and do not run SelfClean. Phone for Service.
Do not clean the door gasket. It is essential for a
good seal. Care should be taken not to rub,
damage, move or remove the door gasket.
Do not use commercial oven cleaners or oven liner
protective coatings of any kind in or around any part
of the oven.
Clean only oven parts listed in this manual.
Safety for the Oven
Tie long hair so that it doesn't hang loose.
Do not touch heating elements or interior
surfaces of oven.
The heating elements may be hot even though
they are dark in color. Interior surfaces of an
oven become hot enough to cause burns.
During and after use, do not touch or let clothing
or other flammable materials contact the heating
elements or the interior surfaces of the oven until
they have had sufficient time to cool.
The trim on the top and sides of the oven door
may become hot enough to cause burns.
Use care when opening the door. Open the door
slightly to let hot air or steam escape before
removing or replacing food.
Do not heat unopened food containers.
Build-up of pressure may cause the container to
burst and cause injury.
Always place oven racks in desired location while
oven is cool. If a rack must be moved while oven
is hot, do not let pot holder contact the hot
heating elements.
Use only dry pot holders. Moist or damp pot
holders on hot surfaces may result in burns from
steam. Do not let pot holder touch hot heating
elements. Do not use a towel or other bulky cloth.
WARNING
The California Safe Drinking Water and Toxic
Enforcement Act requires businesses to warn
customers of potential exposure to substances
which are known by the State of California to cause
cancer or reproductive harm.
The elimination of soil during self-cleaning
generates some by-products which are on this list of
substances.
To minimize exposure to these substances, always
operate this oven according to the instructions in
this manual and provide good ventilation to the
room during and immediately after self-cleaning the
oven.
Before self-cleaning the oven, remove the broiler
pan, oven racks (only when not made of porcelain),
other utensils and excess soft spillage.
Other surfaces of the appliance may become hot
enough to cause burns - among these surfaces are
(identification of surfaces - for example, oven vent
openings and surfaces near these openings, oven
doors, and windows of oven doors).
Page 6

ENGLISH
Use & Care Manual
6
Features of your Oven
Cooking with the Convection Oven
In a conventional oven, the heat sources cycle on and off to maintain an average temperature in the oven cavity.
As the temperature gradually rises and falls, gentle air currents are produced within the oven. This natural
convection tends to be inefficient because the currents are irregular and slow. In this convection system, the heat
is “conveyed” by a fan that provides continuous circulation of the hot air.
This European Convection system provides state-of-the-art engineering and advanced design to create the finest
convection oven. In standard convection ovens, a fan simply circulates the hot air around the food. The system is
characterized by the combination of an additional heating element located around the convection fan and the
venting panel that distributes heated air in three dimensions: along the sides, the top and the full depth of the
oven cavity. This European Convection system aids in maintaining a more even oven temperature throughout the
oven cavity.
The circulating air aids in speeding up the baking process and cooks the food more evenly. By controlling the
movement of heated air, convection cooking produces evenly browned foods that are crispy on the outside yet
moist inside. Convection cooking works best for breads and pastries as well as meats and poultry. Air-leavened
foods like angel food cakes, soufflés and cream puffs rise higher than in a conventional oven. Meats stay juicy
and tender while the outside is flavourful and crisp.
By using European Convection, foods can be cooked at a lower temperature and cooking times can be shorter.
When using this mode, the standard oven temperature should be lowered by 25°F (15°C).
Foods requiring less cooking time should be checked slightly earlier than normal. For best results, foods should
be cooked uncovered, in low-sided pans to take advantage of the forced air circulation. When using the
Convection Roast mode, the standard oven temperature does not need to be reduced.
Advantages of Convection Cooking
Even baking, browning and crisping are achieved.
During roasting, juices and flavors are sealed in while the exterior is crisp.
Yeast breads are lighter, more evenly textured, more golden and crustier.
Air-leavened foods such as cream puffs, soufflés and meringues are higher and lighter.
Baking on multiple racks at the same time is possible with even results.
Multiple-rack baking saves time.
Prepare whole meals at once with no flavor transfer.
Dehydrates herbs, fruits and vegetables.
Requires no specialized bake ware.
Saves time and energy.
Convection broiling allows for extraordinary grilling with thicker cuts of food.
Page 7

ENGLISH
Use & Care Manual
7
Features of your Oven
Page 8
ENGLISH
Use & Care Manual
8
Oven Modes
The following illustrations give an overview of what happens in the oven with each mode setting. The arrows
represent the location of the heat sources during specific modes. The lower element is concealed under the oven
floor.
Thermal Cavity
Convection Cavity
Double Convection Cavity
Convection Bake (CONV BAKE)
Set temperature:
from 170 °F (75 °C) to 550 °F (290 °C)
(preset position 325 °F (165 °C)
Convection Bake cooks with heat
from a ring element behind the back
wall of the oven. The heat is
circulated throughout the oven by the
convection fan.
Bake (BAKE)
Set temperature:
from 170 °F (75 °C) to 550 °F (290 °C)
(preset position 350 °F (175 °C)
Is cooking with heated air. Both the
upper and lower elements cycle to
maintain the oven temperature.
Dehydrate (CONV DEHY)
Set temperature:
from 120 °F (50 °C) to 160 °F (70 °C)
(preset position 140 °F (60 °C)
Dehydrating is similar to convection
cooking but holds an optimum low
temperature while circulating the
heated air to remove moisture slowly
for food preservation.
Convection Broil (CONV BROIL)
Set temperature:
from 170 °F (75 °C) to 550 °F (290 °C)
(preset position 450°F(230°C)
Convection Broil combines the
intense heat from the upper element
with the heat circulated by the
convection fan.
Broil (BROIL)
Set temperature:
from L1 to L5
(preset position L3)
Broiling uses intense heat radiated
from the upper element.
Pizza (PIZZA)
Set temperature:
from 170 °F (75 °C) to 550 °F (290 °C)
(preset position 450 °F (232 °C)
Is a special cooking mode with
heated air. The lower elements cycle
to cook Pizza.
Convection Roast (CONV ROAST)
Set temperature:
from 170 °F (75 °C) to 550 °F (290 °C)
(preset position 325 °F(165 °C)
Convection Roast uses the upper
and lower elements and convection
fan.
Proof (WARM)
Set temperature:
from 80 °F (25 °C) to 120 °F (50 °C)
(preset position 100 °F (35 °C)
Warming (WARM PLUS)
Set temperature:
from 130 °F (55 °C) to 210 °F (100 °C)
(preset position 170 °F (75 °C)
Proof and Warming use the lower
elements to keep foods warm.
Defrost (CONV)
Does not used any heating element,
only the convection fan is used to
defrost foods.
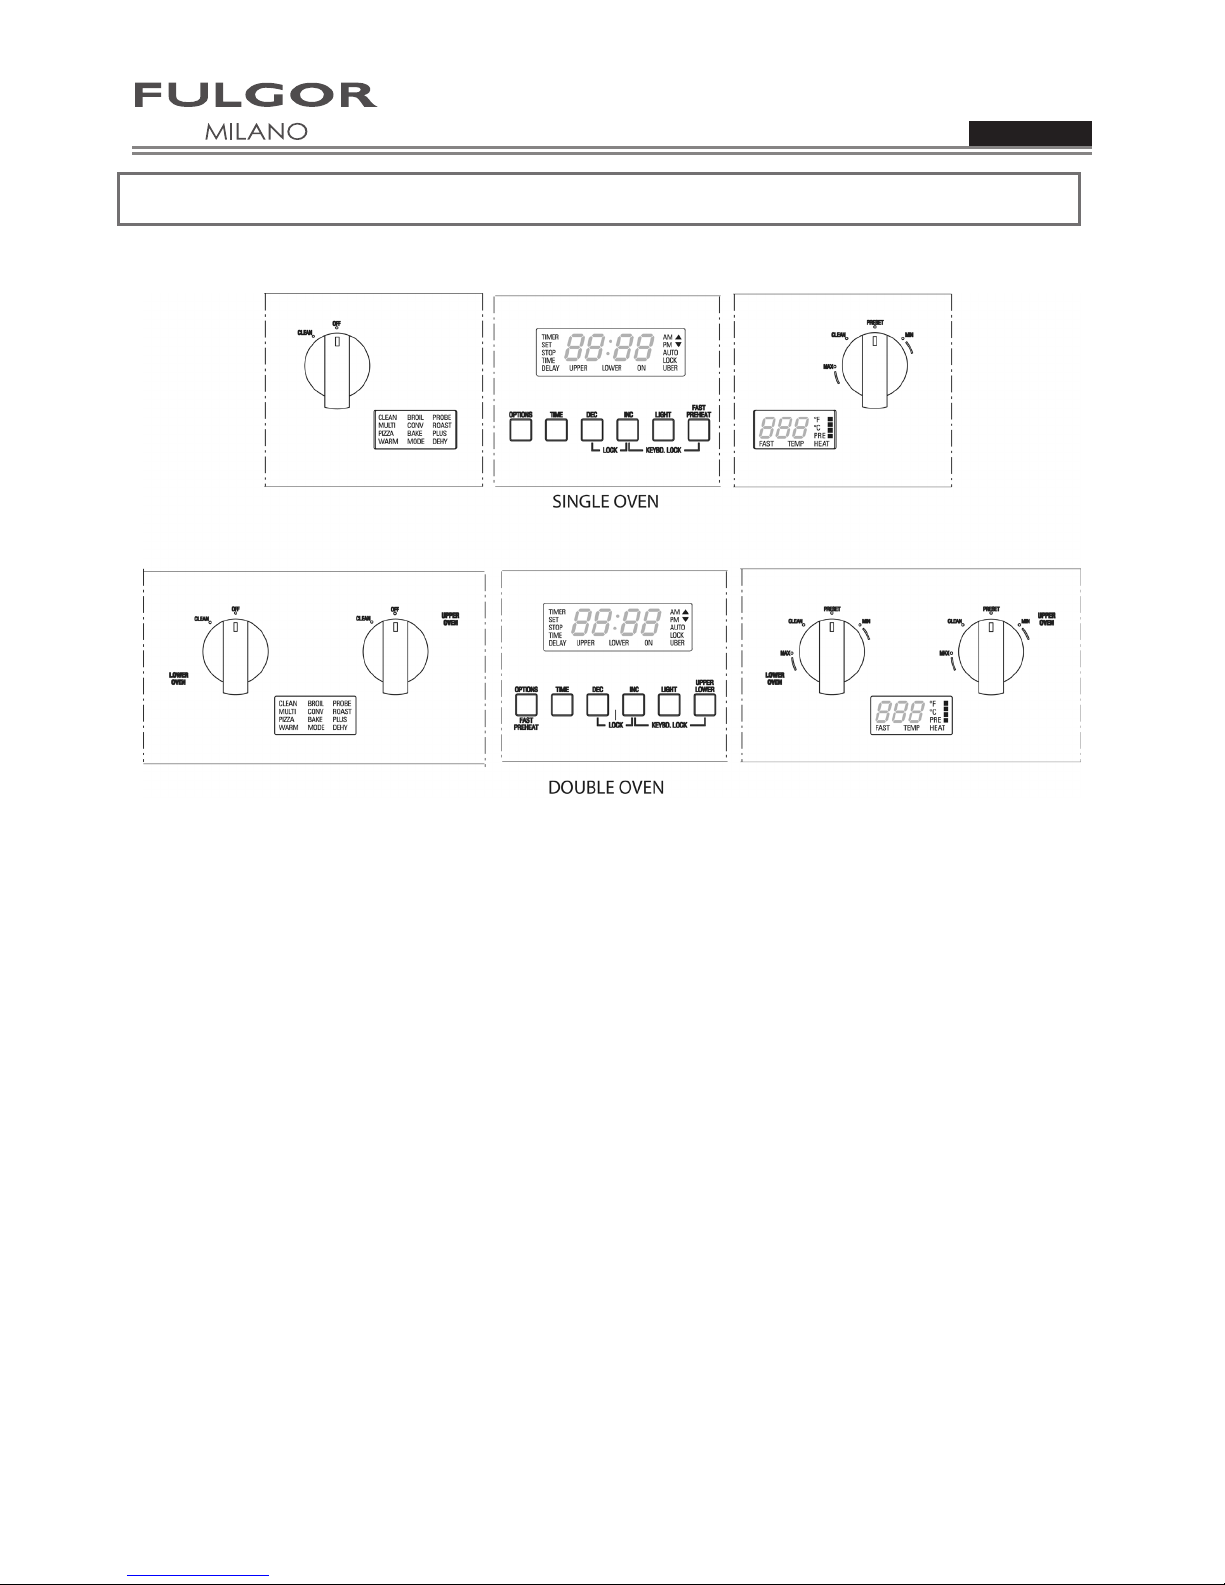
The Control Panels
The user interface has the following features: display, preheat light indicators, keys for commands, cooking mode
and temperature selectors.
SINGLE OVEN
DOUBLE OVEN
Command Keys
- [INC] key to increase the value.
- [DEC] key to decrease the value.
[FAST PREHEAT] When a cooking function has been
selected, touch this key to enable the fast preheat
mode. The fast preheat is not available for all functions.
[OPTIONS] Touch this key to enable special functions,
low temperature modes or to enter special menu.
[LIGHT]: Touch to switch the oven lights status.
[UPPER/LOWER] (double oven): Touch this key to
select the upper cavity if none is selected. If one of the
two is already selected, touch it and switch to the other
one.
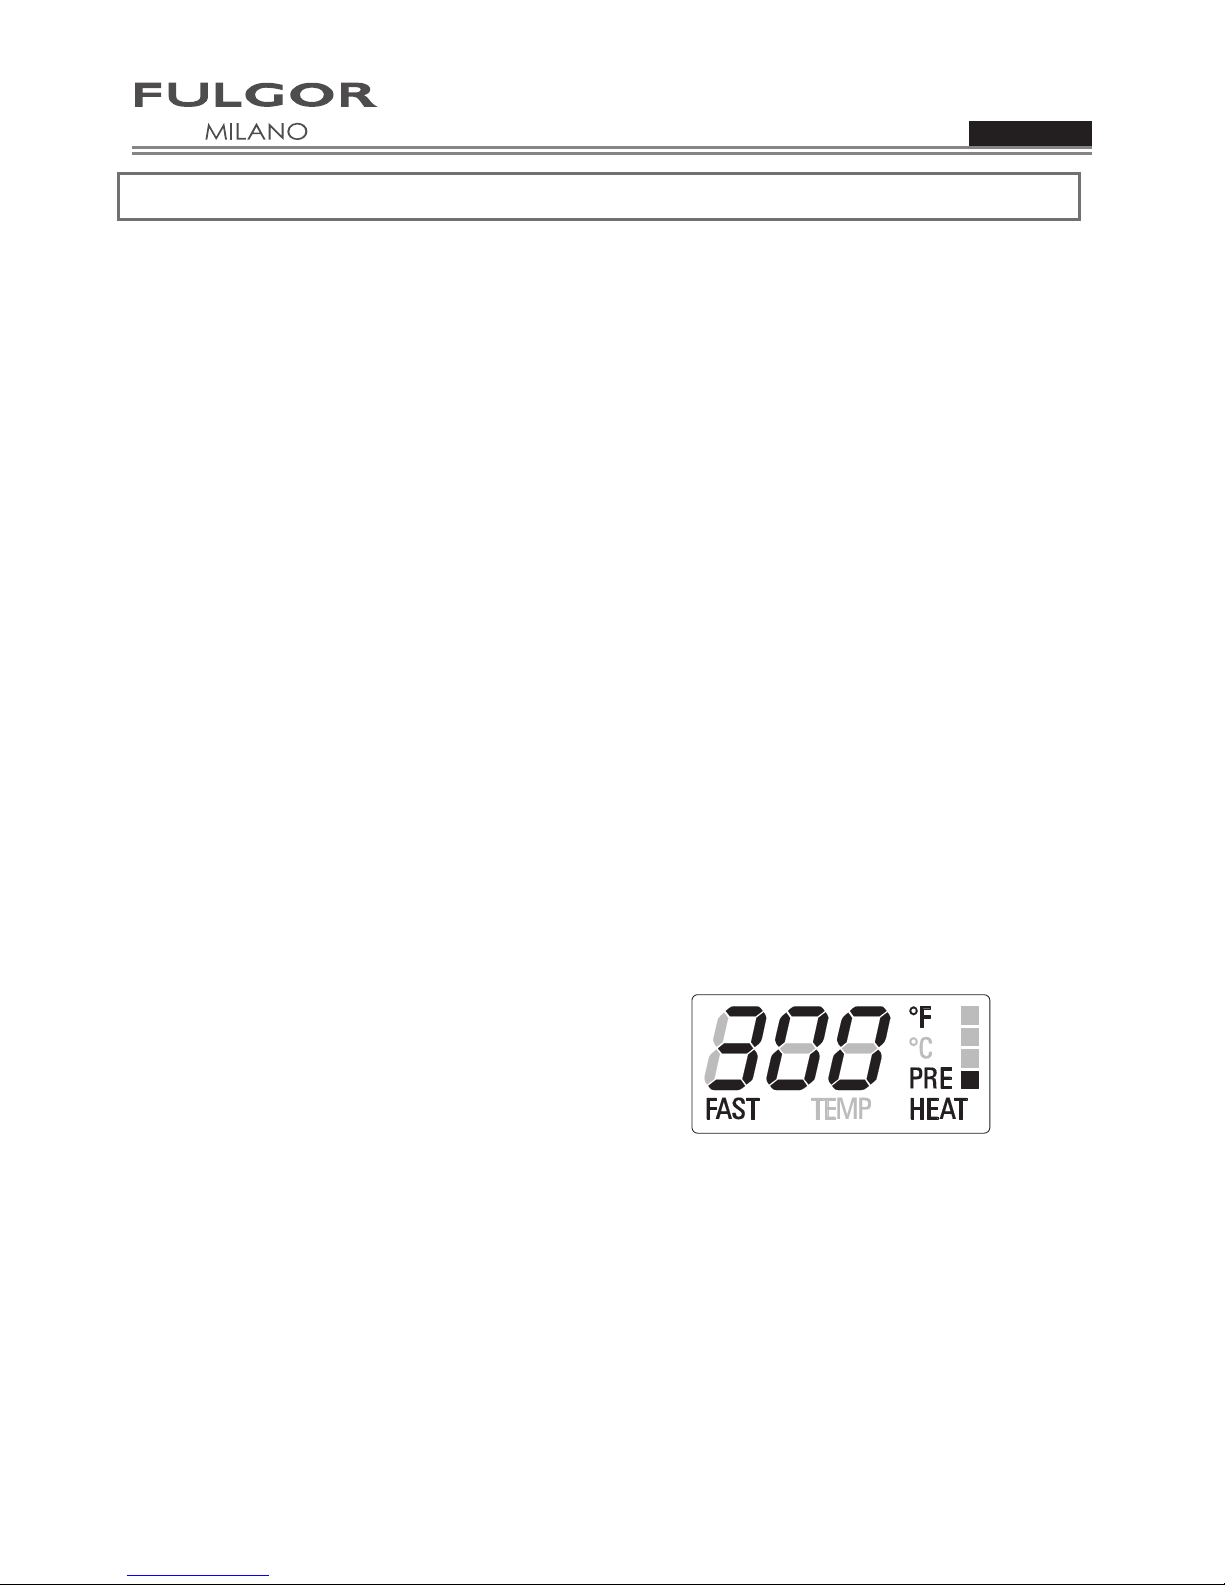
Display
Central Blue Display for time and miscellaneous
functions: for time of day, minute minder, automatic
cooking. AM/PM indication is also present.
Miscellaneous indications are also available to show
which cavity is currently selected and whether any
door has been locked, automatically for self-clean or
manually by the user.
Red Display for Temperature indications: Degree
unit (°C or °F) indication is present. It shows the
temperature set-point for the current cooking mode, in
the selected cavity.
Red Display with writings for Cooking Modes
indication to indicate which function has been
selected.
Knobs
Cooking mode selector (multifunction), with eight
cooking modes + OFF position.
Cooking mode selector (thermal), with three
cooking modes + OFF position.
Temperature selector with PRESET and CLEAN
positions + continuous range between MIN and MAX
values.
[TIME]: touch this key until “SET TIME” appears to set or
change the time of day. Touch this key until “TIMER”
appears to set, modify or clear the minute minder value.
Once a cooking function has been selected, touch this
key until “TIME” appears in order to set, modify or cancel
the cooking time. Touch this key until “STOP TIME”
appears in order to set, modify or cancel the end of
cooking time. Whenever one of the former modes has
been enabled and its digits flash, touch or hold:
Page 9
ENGLISH
Use & Care Manual
9
Oven Modes
The following illustrations give an overview of what happens in the oven with each mode setting. The arrows
represent the location of the heat sources during specific modes. The lower element is concealed under the oven
floor.
Thermal Cavity
Convection Cavity
Double Convection Cavity
Convection Bake (CONV BAKE)
Set temperature:
from 170 °F (75 °C) to 550 °F (290 °C)
(preset position 325 °F (165 °C)
Convection Bake cooks with heat
from a ring element behind the back
wall of the oven. The heat is
circulated throughout the oven by the
convection fan.
Bake (BAKE)
Set temperature:
from 170 °F (75 °C) to 550 °F (290 °C)
(preset position 350 °F (175 °C)
Is cooking with heated air. Both the
upper and lower elements cycle to
maintain the oven temperature.
Dehydrate (CONV DEHY)
Set temperature:
from 120 °F (50 °C) to 160 °F (70 °C)
(preset position 140 °F (60 °C)
Dehydrating is similar to convection
cooking but holds an optimum low
temperature while circulating the
heated air to remove moisture slowly
for food preservation.
Convection Broil (CONV BROIL)
Set temperature:
from 170 °F (75 °C) to 550 °F (290 °C)
(preset position 450°F(230°C)
Convection Broil combines the
intense heat from the upper element
with the heat circulated by the
convection fan.
Broil (BROIL)
Set temperature:
from L1 to L5
(preset position L3)
Broiling uses intense heat radiated
from the upper element.
Pizza (PIZZA)
Set temperature:
from 170 °F (75 °C) to 550 °F (290 °C)
(preset position 450 °F (232 °C)
Is a special cooking mode with
heated air. The lower elements cycle
to cook Pizza.
Convection Roast (CONV ROAST)
Set temperature:
from 170 °F (75 °C) to 550 °F (290 °C)
(preset position 325 °F(165 °C)
Convection Roast uses the upper
and lower elements and convection
fan.
Proof (WARM)
Set temperature:
from 80 °F (25 °C) to 120 °F (50 °C)
(preset position 100 °F (35 °C)
Warming (WARM PLUS)
Set temperature:
from 130 °F (55 °C) to 210 °F (100 °C)
(preset position 170 °F (75 °C)
Proof and Warming use the lower
elements to keep foods warm.
Defrost (CONV)
Does not used any heating element,
only the convection fan is used to
defrost foods.
Page 10
ENGLISH
Use & Care Manual
10
General Oven Tips
Preheating the Oven
Preheat the oven when using the Bake, Convection
Bake and Convection Roast modes.
Use Fast Preheat mode when a shorter time
is desired to preheat the oven.
Selecting a higher temperature does not shorten
the preheat time.
Preheating is necessary for good results when
baking cakes, cookies, pastry and breads.
Preheating will help to sear roasts and seal in meat
juices.
Place oven racks in their proper position before
preheating.
During preheating, the selected cooking
temperature is always displayed.
A beep will confirm that the oven is preheated and
the “PREHEAT” writing will turn off.
Operational Suggestions
Use the cooking charts as a guide.
Do not set pans on the open oven door.
Use the interior oven lights to view the food through
the oven door window rather than opening the door
frequently.
Utensils
Glass baking dishes absorb heat. Reduce oven
temperature 25°F (15°C) when baking in glass.
Use pans that give the desired browning. The type
of finish on the pan will help determine the amount
of browning that will occur.
Shiny, smooth metal or light non-stick / anodized
pans reflect heat, resulting in lighter, more delicate
browning. Cakes and cookies require this type of
utensil.
Dark, rough or dull pans will absorb heat resulting
in a browner, crisper crust. Use this type for pies.
For brown, crisp crusts, use dark non-stick /
anodized or dark, dull metal utensils or glass
bake ware. Insulated baking pans may increase
the length of cooking time.
Do not cook with the empty broiler pan in the
oven, as this could change cooking performance.
Store the broil pan outside of the oven.
Oven Condensation and Temperature
It is normal for a certain amount of moisture to
evaporate from the food during any cooking
process. The amount depends on the moisture
content of the food. The moisture may condense
on any surface cooler than the inside of the oven,
such as the control panel.
High Altitude Baking
When cooking at high altitude, recipes and
cooking time will vary from the standard.
120/240 vs. 120/208 Volt Connection
Most oven installations will have a 120/240
voltage connection.
If your oven is installed with 120/208 voltage, the
preheat time may be slightly longer than with
120/240 voltage.
The oven is designed to assure the same clean
time at 208V.
Oven Racks
The oven has rack guides at six levels as shown in
the illustration on Page 7.
Rack positions are numbered from the bottom rack
guide (#1) to the top (#6).
Check cooking charts for best rack positions to use
when cooking.
Each level guide consists of paired supports
formed in the walls on each side of the oven cavity.
Always be sure to position the oven racks before
turning on the oven. Make sure that the racks are
level once they are in position.
Please refer to illustration on Page 7 if there is any
question as to which side is the front of the rack.
The racks are designed to stop when pulled
forward to their limit.
CAUTION! Never use aluminum foil to cover the
oven racks or to line the oven. It can cause damage
to the oven liner if heat is trapped under the foil.
CAUTION
Make sure you do not force it to avoid damage to
the enamel.
Your new oven has an electronic temperature
sensor that allows maintaining an accurate
temperature. Your previous oven may have had
a mechanical thermostat that drifted gradually
over time to a higher temperature. It is normal
that you may need to adjust your favorite recipes
when cooking in a new oven.
General Oven Information
Before using your oven for the first time remove all
packing and foreign materials from the oven(s). Any
material of this sort left inside may melt or burn when
the appliance is used.
Flashing Symbols or Numbers
Signals an incomplete action that is in progress (locking
the door, preheat, etc.) or an incomplete setting that
calls for another input.
Beeps
Signals that more information must be entered or
confirms the receipt of an entry. Beeps also signal the
end of a function or an oven fault.
It’s displayed steadily when the door is locked. The
symbol flashes when the latch is moving in order to lock
or unlock the door. Do not attempt to open the door at
this time. Door can be opened when the symbol no
longer appears. “AUTO LOCK” appears when the door
has been locked automatically due to self-clean mode.
“USER LOCK” is displayed when the door has been
locked manually by the user, for example to prevent
children from having free access to the oven cavity.
Hold both the [INC] and [DEC] keys for 3 seconds. The
latch will lock the door. Repeat the same operation to
unlock.
Locking the keyboard
Hold both the keys indicated by “KEYBD. LOCK” legend
for 3 seconds. Commands are now locked and “SENS
LOCK” will be displayed every time you touch any keys.
Repeat the same operation for 3 seconds to unlock the
keyboard.
Power Failure
After the power returns to the oven, the clock displays
the time 12.00
AM
.
Default Settings
The cooking modes automatically select a suitable
temperature when the selector is in the preset position.
These can be changed when a different one is needed.
It’s also possible to set a user option in order to save the
last used temperature per every cooking mode.
F Failure Number Codes
These codes are displayed when the electronic control
detects a problem in the oven or in the electronics.
Convection Fan
The convection fan operates during any convection
mode. When the oven is operating in the convection
mode, the fan will turn off automatically when the door
is opened. The convection fan always runs during the
preheat time.
Component Cooling Fan
Preheat and Fast Preheat
Whenever a cooking mode is set and the oven is
heating, the “PREHEAT” writing appears in the
temperature display: the vertical bar indicates, in four
steps, when the oven reaches the 25%, 50%, 75%,
100% of the set-point temperature.
As soon as the 100% is reached, the control sounds
an “end of preheat” tone and the “PREHEAT” writing
disappears.
When it’s necessary to heat up the oven rapidly, a
Fast Preheat mode is available: it uses the heating
elements and the convection fan in a special way, in
order to reduce the heating time as long as possible.
After having set one of the cooking functions for which
the fast preheat is available, touch the [FAST
PREHEAT] key, the “FAST” writing is shown in
addition to the “PREHEAT” one.
As soon as the set-point temperature is reached, the
control sounds an “end of preheat” tone and both
“FAST” and “PREHEAT” writings disappear. The oven
switches automatically to the desired cooking mode
that was previously set: put the food inside now.
Activates during any cooking or self-cleaning mode
to cool inner components and outer door surfaces.
This air is exhausted through the vent located
above the oven door. It continues to run until
components have cooled sufficiently. The cooling
ffan operates at double speed (or RPM's) in self-clean
and whenever the internal components temperature becomes high.
Page 11
ENGLISH
Use & Care Manual
11
General Oven Tips
Preheating the Oven
Preheat the oven when using the Bake, Convection
Bake and Convection Roast modes.
Use Fast Preheat mode when a shorter time
is desired to preheat the oven.
Selecting a higher temperature does not shorten
the preheat time.
Preheating is necessary for good results when
baking cakes, cookies, pastry and breads.
Preheating will help to sear roasts and seal in meat
juices.
Place oven racks in their proper position before
preheating.
During preheating, the selected cooking
temperature is always displayed.
A beep will confirm that the oven is preheated and
the “PREHEAT” writing will turn off.
Operational Suggestions
Use the cooking charts as a guide.
Do not set pans on the open oven door.
Use the interior oven lights to view the food through
the oven door window rather than opening the door
frequently.
Utensils
Glass baking dishes absorb heat. Reduce oven
temperature 25°F (15°C) when baking in glass.
Use pans that give the desired browning. The type
of finish on the pan will help determine the amount
of browning that will occur.
Shiny, smooth metal or light non-stick / anodized
pans reflect heat, resulting in lighter, more delicate
browning. Cakes and cookies require this type of
utensil.
Dark, rough or dull pans will absorb heat resulting
in a browner, crisper crust. Use this type for pies.
For brown, crisp crusts, use dark non-stick /
anodized or dark, dull metal utensils or glass
bake ware. Insulated baking pans may increase
the length of cooking time.
Do not cook with the empty broiler pan in the
oven, as this could change cooking performance.
Store the broil pan outside of the oven.
Oven Condensation and Temperature
It is normal for a certain amount of moisture to
evaporate from the food during any cooking
process. The amount depends on the moisture
content of the food. The moisture may condense
on any surface cooler than the inside of the oven,
such as the control panel.
High Altitude Baking
When cooking at high altitude, recipes and
cooking time will vary from the standard.
120/240 vs. 120/208 Volt Connection
Most oven installations will have a 120/240
voltage connection.
If your oven is installed with 120/208 voltage, the
preheat time may be slightly longer than with
120/240 voltage.
The oven is designed to assure the same clean
time at 208V.
Oven Racks
The oven has rack guides at six levels as shown in
the illustration on Page 7.
Rack positions are numbered from the bottom rack
guide (#1) to the top (#6).
Check cooking charts for best rack positions to use
when cooking.
Each level guide consists of paired supports
formed in the walls on each side of the oven cavity.
Always be sure to position the oven racks before
turning on the oven. Make sure that the racks are
level once they are in position.
Please refer to illustration on Page 7 if there is any
question as to which side is the front of the rack.
The racks are designed to stop when pulled
forward to their limit.
CAUTION! Never use aluminum foil to cover the
oven racks or to line the oven. It can cause damage
to the oven liner if heat is trapped under the foil.
CAUTION
Make sure you do not force it to avoid damage to
the enamel.
Your new oven has an electronic temperature
sensor that allows maintaining an accurate
temperature. Your previous oven may have had
a mechanical thermostat that drifted gradually
over time to a higher temperature. It is normal
that you may need to adjust your favorite recipes
when cooking in a new oven.
Page 12

ENGLISH
Use & Care Manual
12
Setting the Clock and Timer
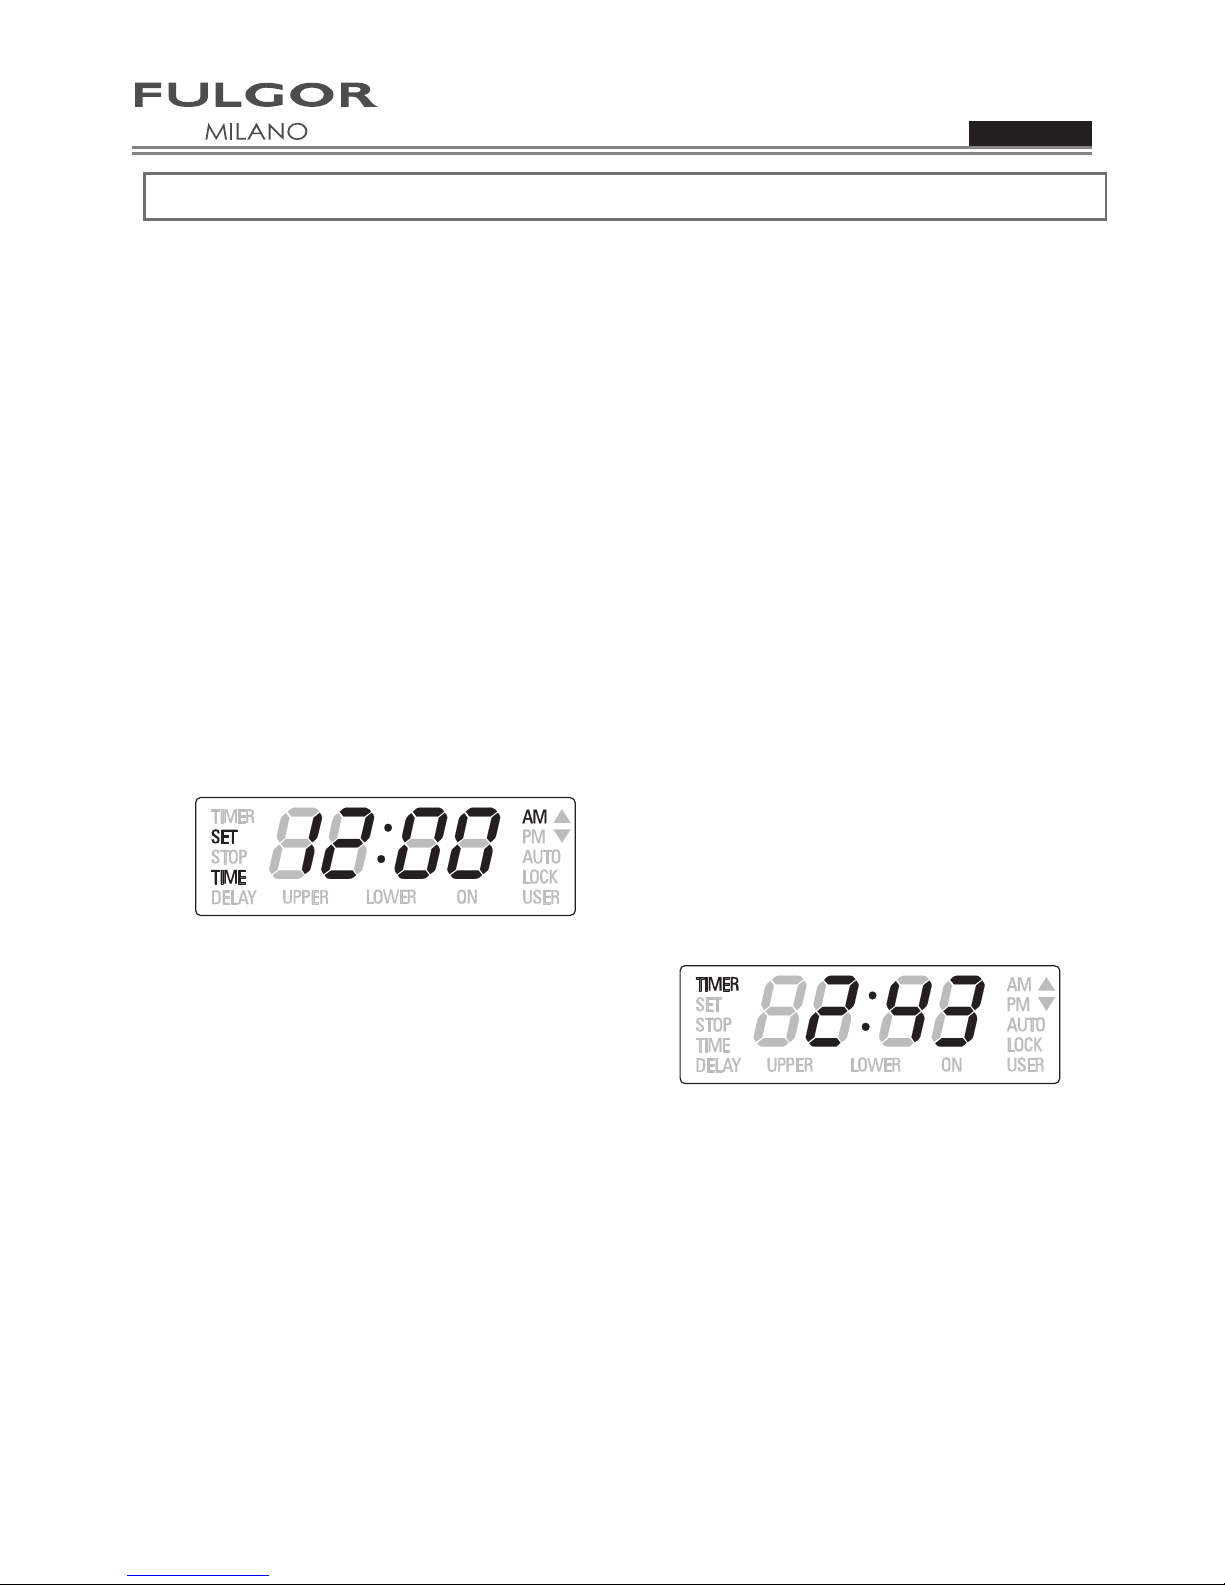
The time of day is displayed in hours and minutes.
Always set the clock immediately after installation or after a power failure. Once power returns to the oven, the
clock displays the time 12:00
AM
.
The clock time will appear during all oven operations except when there is the timer or any timed cooking
operations running.
The oven is preset to a 12-hour clock and indicates
AM
and PM.
To Set the Time of Day
1.
Touch [TIME] until the display shows the “SET
TIME” writing.
2.
Touch [INC] or [DEC] to set the desired time, the
hours will begin flashing: continue until the correct
hour value and
AM
or PM indication is selected.
3.
Touch [TIME] again to confirm the hour and minutes
will start flashing.
4.
Touch [INC] or [DEC] to set the desired minutes
value or hold the key to change by 10 minute steps.
5.
Touch [TIME] again or wait for 5 seconds in order to
confirm the time.
NOTE: The Time of Day can never be set if any time
function is already set: first delete all the active time
functions.
To Set the Timer
1.
Touch [TIME] until the display shows the
“TIMER” writing.
2.
Touch [INC] or [DEC] to set the desired timer
value, the hours will begin flashing: continue until
the desired value is set.
3.
Touch [TIME] again to confirm the hour and
minutes will start flashing.
4.
Touch [INC] or [DEC] to set the desired minutes
value or hold the key to change by 10 minute
steps.
5.
Touch [TIME] again or wait for 5 seconds in order
to confirm the time.
6.
“TIMER” will be steadily displayed.
7.
When the time ends, reminder beeps will sound
for 15 minutes or until the [TIME] key is pressed.
8.
Timer format is usually HR:MIN, switching into
MIN:SEC during the last minute.
9.
The displayed value is always rounded to the
lower minute.
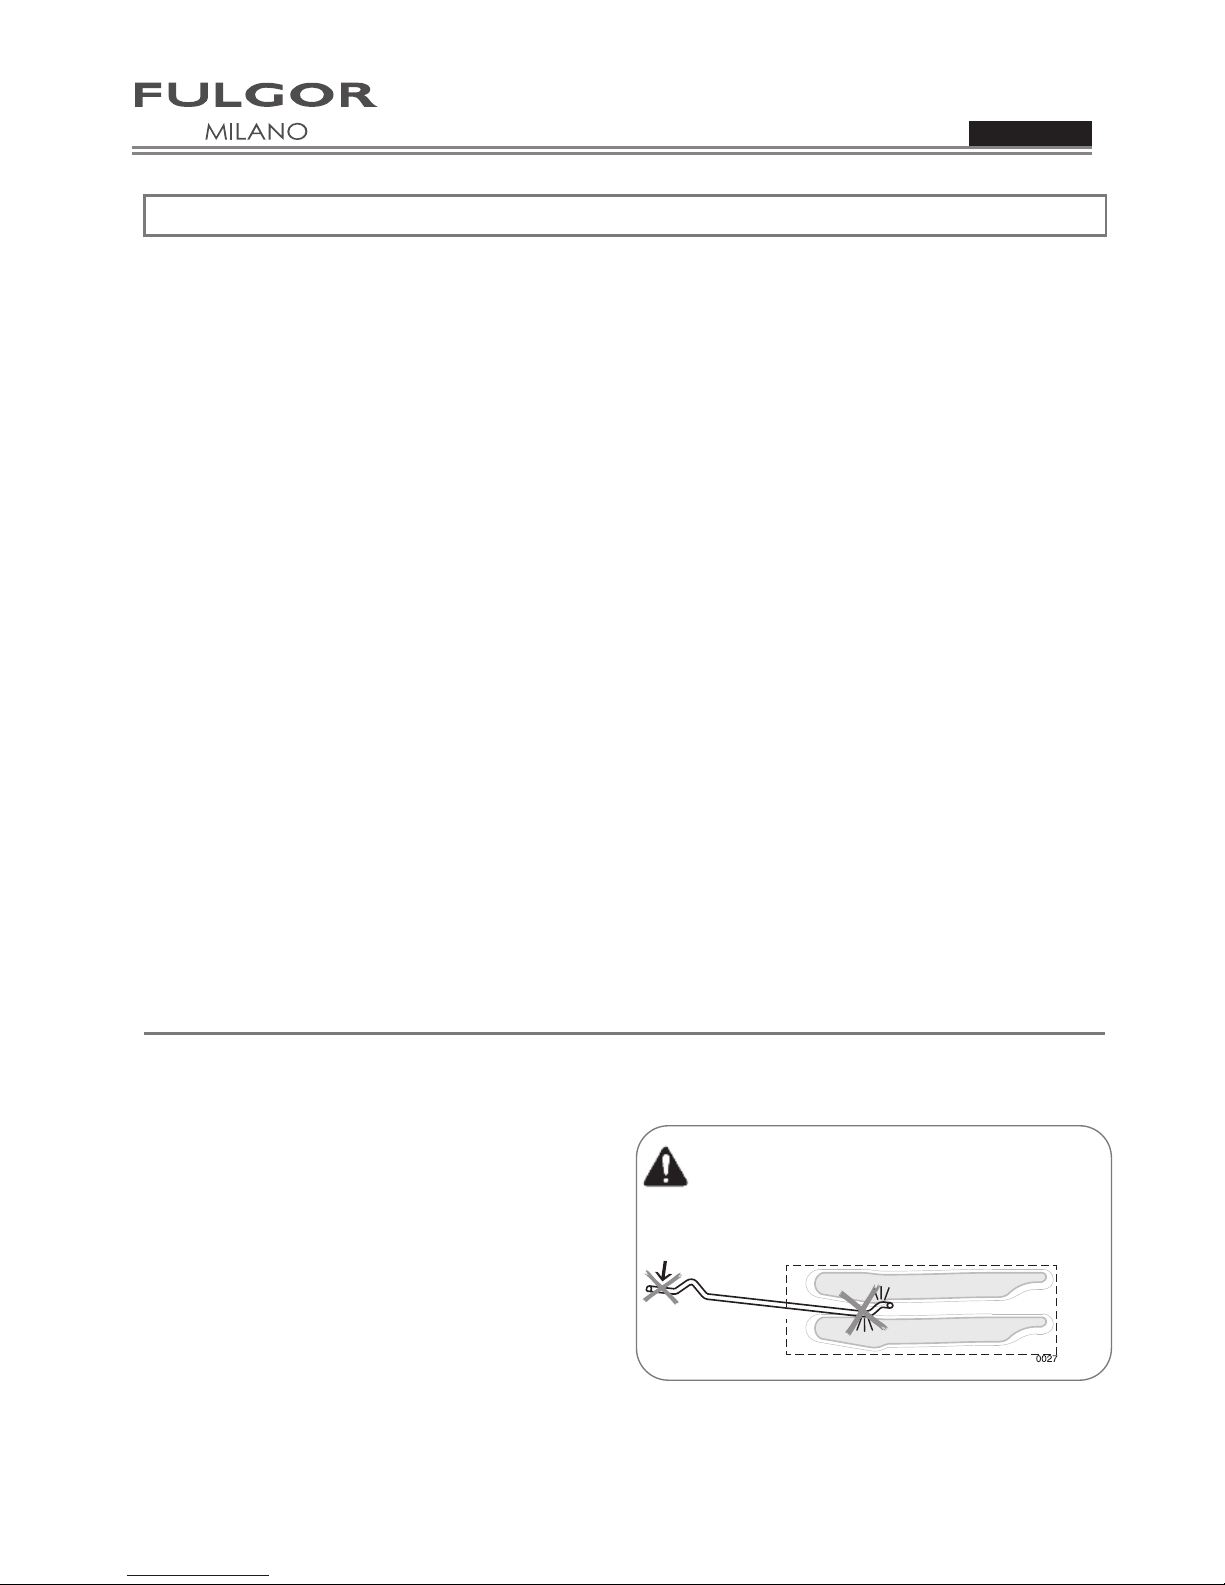
To remove oven rack from the oven:
1. Pull rack forward
2. Lift rack up at front and then remove it
To replace an oven rack:
1. Place rear of rack between rack level guides
2. While lifting front of rack, slide rack in all the
way while lowering the front
Oven Telescopic Racks
The extendable rack allows for easier access to
cooking foods. It extends beyond the standard
flat rack bringing the food closer to the user.
CAUTION
When the rack is outside of the oven, slide arms do
not lock. They could unexpectedly extend if the rack
is carried incorrectly. Extending slide arms could
cause injury. Rack should only be held or carried
by grasping the sides.
NOTE: Always remove the extendable rack before
self-cleaning the oven.
CAUTION! To avoid burns, pull rack all the way out
and lift pan above handle when transferring food to
and from oven.
Please refer to illustration on Page 7 if there is any
question as to which side is the front of the rack.
To remove extendable rack from the oven:
1. Lift of rack slightly and push it until the stop
release
2. Raise back of rack until frame and stop clear
rack guide
3. Pull rack down and out
To replace an extendable rack:
1. Grasp rack firmly on both sides. Place rack
(including frame) above desired rack guide
2. Push all the way in until the back of the rack
drops into place
3. Pull both sections forward until stops activate.
Rack should be straight and flat, not crooked
Page 13
ENGLISH
Use & Care Manual
13
Setting the Clock and Timer
The time of day is displayed in hours and minutes.
Always set the clock immediately after installation or after a power failure. Once power returns to the oven, the
clock displays the time 12:00
AM
.
The clock time will appear during all oven operations except when there is the timer or any timed cooking
operations running.
The oven is preset to a 12-hour clock and indicates
AM
and PM.
To Set the Time of Day
1.
Touch [TIME] until the display shows the “SET
TIME” writing.
2.
Touch [INC] or [DEC] to set the desired time, the
hours will begin flashing: continue until the correct
hour value and
AM
or PM indication is selected.
3.
Touch [TIME] again to confirm the hour and minutes
will start flashing.
4.
Touch [INC] or [DEC] to set the desired minutes
value or hold the key to change by 10 minute steps.
5.
Touch [TIME] again or wait for 5 seconds in order to
confirm the time.
NOTE: The Time of Day can never be set if any time
function is already set: first delete all the active time
functions.
To Set the Timer
1.
Touch [TIME] until the display shows the
“TIMER” writing.
2.
Touch [INC] or [DEC] to set the desired timer
value, the hours will begin flashing: continue until
the desired value is set.
3.
Touch [TIME] again to confirm the hour and
minutes will start flashing.
4.
Touch [INC] or [DEC] to set the desired minutes
value or hold the key to change by 10 minute
steps.
5.
Touch [TIME] again or wait for 5 seconds in order
to confirm the time.
6.
“TIMER” will be steadily displayed.
7.
When the time ends, reminder beeps will sound
for 15 minutes or until the [TIME] key is pressed.
8.
Timer format is usually HR:MIN, switching into
MIN:SEC during the last minute.
9.
The displayed value is always rounded to the
lower minute.
Page 14

ENGLISH
Use & Care Manual
14
Time Oven Mode Operation
In double oven models, both ovens can be set
independently to operate a timed mode.
Be sure that the time-of-day clock is displaying the
correct time.
The timed mode turns off the oven at the end of the
cook time.
To Set a Timed Mode
1. Select the oven by means of [UPPER/LOWER]
key, if necessary.
2. Select the cooking mode and the temperature by
means of the knobs. The “ON” writing will appear in
the display.
3. Touch [TIME] key until the “TIME” writings will
appear in the display.
4. Touch [INC] or [DEC], the hour digits will begin
flashing. Continue to set the desired cooking time.
Keep in mind that the time required for the oven to
reach the temperature must be included in the set
cooking time.
5. Touch [TIME] again, the hours will be confirmed
and the minute digits will begin flashing.
6. Touch [INC] or [DEC] to change the minutes. Hold
the key to change by 10 minutes steps. Continue to
set the desired cooking time.
7. Touch [TIME] once again or wait for a few seconds
to confirm the cooking time value.
To Delay the Start of a Timed Mode
Follow steps 1 through 6 or 7 above.
Touch [TIME] key until “STOP TIME” will appear in
the display.
The control automatically calculates and displays the
initial value, adding the cooking time already set to
the time of day.
Touch [INC] or [DEC], the hour digits will begin
flashing. Continue to set the desired stop time.
Touch [TIME] again, the hours will be confirmed
and the minute digits will begin flashing.
Touch [INC] or [DEC] to change the minutes. Hold
the key to change by 10 minutes steps. Continue
to set the desired stop time.
Touch [TIME] once again or wait for a few
seconds to confirm the stop time value.
The clock automatically calculates the time of day
at which the mode starts and stops. The “DELAY”
writing is displayed until the starting time is
reached.
When a Timed Mode is running
As soon as the oven actually starts cooking, the
display shows the cooking time and counts down
by one minute steps. The oven will cook for the
programmed time.
When the time expires, the oven automatically
turns off, the writings “ON” and “TIME” start
flashing and an “end of activity” beep sequence
sounds. Reminder beeps will sound for up to
fifteen minutes until any key is touched in order to
recall the user attention.
How to check a time value
Whenever it’s necessary to check a time value
that is not displayed, touch the [TIME] key until the
proper writing is displayed to view the desired
value for 5 seconds.
Example: if the timer value is displayed and you
want to check the cooking time, touch the [TIME]
key until “TIME” is displayed to view the cooking
time for 5 seconds.
Selecting the Oven Mode
Setting Cooking Mode and Temperature
The following modes can be selected by moving the
cooking mode knob to the desired position. To
select Clean, the temperature knob must be moved
into the appropriate Clean position too.
OFF
CONVECTION BAKE (CONV BAKE)
CONVECTION BROIL (CONV BROIL)
CONVECTION ROAST (CONV ROAST)
PIZZA (MULTI PIZZA)
BAKE (BAKE)
BROIL (BROIL)
DEHYDRATE(CONV DEHY)
PROOF (WARM)
DEFROST (CONV)
WARMING (WARM PLUS)
CLEAN
Select the desired temperature by moving the selector
or leave it in the PRESET position if the proposed
value is fine. The temperature can be changed by
5°F or 5°C steps.
As soon as one of the knobs is moved, the control
switches automatically to display the value in the
corresponding cavity. The corresponding writing
“UPPER” or “LOWER” appears.
Cavity will begin to heat, the “ON” writing is
displayed when the selected oven is active, oven
lights will turn on.
“PREHEAT” writing will turn on. Once the oven has
preheated, it will beep and switch the writing off.
To change the temperature while cooking, simply
turn the temperature knob until the display shows
the desired value.
Touch [UPPER/LOWER] to select the desired cavity
and check the related temperature or time values,
even is there’s no need to change those.
Move the cooking mode selector to OFF if you
intend to stop cooking.
The triangles in the upper right corner of the display
are active when a cavity is running, even if it is not
selected on the display.
Using [OPTIONS] key to select low
temperature functions
DEHYDRATE (CONV DEHY)
PROOF (WARM)
DEFROST (CONV)
WARMING (WARM PLUS)
Touch [OPTIONS] key to toggle between these
four modes.
The last used is kept in memory for the next
selection.
Using Oven Lights
A single light key activates the lights in either
oven.
If [LIGHT] key is touched when both ovens are off,
lights in both the upper and lower oven will turn
on. Touch [LIGHT] key again, and both oven lights
will turn off.
Oven lights turn on and off automatically when the
door is opened and closed.
When an oven is in use, oven lights turn on
automatically when a mode is started. Oven lights
will turn off automatically when the oven mode is
cancelled.
The lights do not operate in the Self-Clean mode.
To manually control the interior oven lights in
either the upper or lower oven if one or both ovens
are in use:
1.
Touch [UPPER/LOWER] and the display will
indicate which oven is selected.
2.
Touch [UPPER/LOWER] to select the other
oven.
3.
Touch [LIGHT] to turn lights on or off in the
desired cavity.
To move the cooking mode selector to Low Temp
modes, one of the following functions must be
displayed:
Page 15

ENGLISH
Use & Care Manual
15
Time Oven Mode Operation
In double oven models, both ovens can be set
independently to operate a timed mode.
Be sure that the time-of-day clock is displaying the
correct time.
The timed mode turns off the oven at the end of the
cook time.
To Set a Timed Mode
1. Select the oven by means of [UPPER/LOWER]
key, if necessary.
2. Select the cooking mode and the temperature by
means of the knobs. The “ON” writing will appear in
the display.
3. Touch [TIME] key until the “TIME” writings will
appear in the display.
4. Touch [INC] or [DEC], the hour digits will begin
flashing. Continue to set the desired cooking time.
Keep in mind that the time required for the oven to
reach the temperature must be included in the set
cooking time.
5. Touch [TIME] again, the hours will be confirmed
and the minute digits will begin flashing.
6. Touch [INC] or [DEC] to change the minutes. Hold
the key to change by 10 minutes steps. Continue to
set the desired cooking time.
7. Touch [TIME] once again or wait for a few seconds
to confirm the cooking time value.
To Delay the Start of a Timed Mode
Follow steps 1 through 6 or 7 above.
Touch [TIME] key until “STOP TIME” will appear in
the display.
The control automatically calculates and displays the
initial value, adding the cooking time already set to
the time of day.
Touch [INC] or [DEC], the hour digits will begin
flashing. Continue to set the desired stop time.
Touch [TIME] again, the hours will be confirmed
and the minute digits will begin flashing.
Touch [INC] or [DEC] to change the minutes. Hold
the key to change by 10 minutes steps. Continue
to set the desired stop time.
Touch [TIME] once again or wait for a few
seconds to confirm the stop time value.
The clock automatically calculates the time of day
at which the mode starts and stops. The “DELAY”
writing is displayed until the starting time is
reached.
When a Timed Mode is running
As soon as the oven actually starts cooking, the
display shows the cooking time and counts down
by one minute steps. The oven will cook for the
programmed time.
When the time expires, the oven automatically
turns off, the writings “ON” and “TIME” start
flashing and an “end of activity” beep sequence
sounds. Reminder beeps will sound for up to
fifteen minutes until any key is touched in order to
recall the user attention.
How to check a time value
Whenever it’s necessary to check a time value
that is not displayed, touch the [TIME] key until the
proper writing is displayed to view the desired
value for 5 seconds.
Example: if the timer value is displayed and you
want to check the cooking time, touch the [TIME]
key until “TIME” is displayed to view the cooking
time for 5 seconds.
Page 16

ENGLISH
Use & Care Manual
16
Bake Tips and Techniques
Baking is cooking with heated air. Both upper and
lower elements in the oven are used to heat the air
but no fan is used to circulate the heat.
Follow the recipe or convenience food directions for
baking temperature, time and rack position. Baking
time will vary with the temperature of ingredients and
the size, shape and finish of the baking utensil.
General Guidelines
For best results, bake food on a single rack with
at least 1" - 1 ½” (2,5 - 3cm) space between
utensils and oven walls.
Use one rack when selecting the bake mode.
Check for doneness at the minimum time.
Use metal bake ware (with or without a non stick
finish), heatproof glass, glass-ceramic, pottery or
other utensils suitable for the oven.
When using heatproof glass, reduce temperature
by 25°F (15°C) from recommended temperature.
Use baking sheets with or without sides or jelly roll
pans.
Dark metal pans or nonstick coatings will cook
faster with more browning. Insulated bake ware will
slightly lengthen the cooking time for most foods.
Do not use aluminum foil or disposable aluminum
trays to line any part of the oven. Foil is an
excellent heat insulator and heat will be trapped
beneath it. This will alter the cooking performance
and can damage the finish of the oven.
Avoid using the opened door as a shelf to place
pans.
Tips for Solving Baking Problems are found on
Page 33.
Bake Chart
FOOD ITEM RACK POSITION
TEMP. °F (°C)
(PREHEATED OVEN)
TIME (MIN)
Cake
Cupcakes 2 350 (175) 19-22
Bundt Cake 1 350 (175)
40-45
Angel Food 1 350 (175)
35-39
Pie
2 crust, fresh, 9" 2 375-400 (190-205) 45-50
2 crust, frozen fruit, 9" 2 375 (190) 68-78
Cookies
Sugar 2 350-375 (175-190) 8-10
Chocolate Chip 2 350-375 (175-190) 8-13
Brownies 2 350 (175) 29-36
Breads
Yeast bread loaf, 9x5 2 375 (190) 18-22
Yeast rolls 2 375-400 (190-205) 12-15
Biscuits 2 375-400 (190-205) 7-9
Muffins 2 425 (220) 15-19
Pizza
Frozen 2 400-450 (205-235) 23-26
Fresh 2 475 (246) 15-18
Setting the meat probe options
This oven is optionally provided with the meat probe
feature to sense the temperature inside meat and stop
cooking as soon as the set value is reached. In a double
oven it’s available only in the upper cavity.
The following modes can be selected to work with the
meat probe:
CONVECTION BAKE
CONVECTION ROAST
BAKE
Other modes are not allowed to start if the probe is
inserted.
Once the probe has been inserted in its receptacle and
detected by the control, turn the cooking mode knob into a
valid position, the PROBE writing appears on the cooking
mode display with the selected function.
The meat probe standard temperature (170°F) flashes on
the clock module for 5 seconds. Using the [INC]/[DEC]
keys, it’s possible to change the probe set. The standard
probe temperature set-point is 170°F. The allowed range
is between 130°F and 210°F. The maximum cavity
temperature during cooking with meat probe is 475°F.
The resolution must be 5°F or 2.5°C both for set and
actual temperature.
After 5 seconds the value on the display is accepted and
the control starts cooking. The actual probe temperature
is now displayed.
Touch [INC] or [DEC] once to check the probe set
temperature. When it’s flashing touch it further or hold to
modify the value. As soon as the set probe temperature
is reached, the control sounds an end of cooking tone
and stops the oven.
Always turn the cooking mode in the OFF position before
re-using the oven.
The PROBE writing flashes when the mode is not valid for
cooking with probe. If the probe is removed during
cooking, or in case of a short or open circuit, a fault
message will be displayed.
Automatic time functions are disabled when using the
meat probe, only the timer can work.
Page 17

ENGLISH
Use & Care Manual
17
Bake Tips and Techniques
Baking is cooking with heated air. Both upper and
lower elements in the oven are used to heat the air
but no fan is used to circulate the heat.
Follow the recipe or convenience food directions for
baking temperature, time and rack position. Baking
time will vary with the temperature of ingredients and
the size, shape and finish of the baking utensil.
General Guidelines
For best results, bake food on a single rack with
at least 1" - 1 ½” (2,5 - 3cm) space between
utensils and oven walls.
Use one rack when selecting the bake mode.
Check for doneness at the minimum time.
Use metal bake ware (with or without a non stick
finish), heatproof glass, glass-ceramic, pottery or
other utensils suitable for the oven.
When using heatproof glass, reduce temperature
by 25°F (15°C) from recommended temperature.
Use baking sheets with or without sides or jelly roll
pans.
Dark metal pans or nonstick coatings will cook
faster with more browning. Insulated bake ware will
slightly lengthen the cooking time for most foods.
Do not use aluminum foil or disposable aluminum
trays to line any part of the oven. Foil is an
excellent heat insulator and heat will be trapped
beneath it. This will alter the cooking performance
and can damage the finish of the oven.
Avoid using the opened door as a shelf to place
pans.
Tips for Solving Baking Problems are found on
Page 33.
Bake Chart
FOOD ITEM RACK POSITION
TEMP. °F (°C)
(PREHEATED OVEN)
TIME (MIN)
Cake
Cupcakes 2 350 (175) 19-22
Bundt Cake 1 350 (175) 40-45
Angel Food 1 350 (175) 35-39
Pie
2 crust, fresh, 9" 2 375-400 (190-205) 45-50
2 crust, frozen fruit, 9" 2 375 (190) 68-78
Cookies
Sugar 2 350-375 (175-190) 8-10
Chocolate Chip 2 350-375 (175-190) 8-13
Brownies 2 350 (175) 29-36
Breads
Yeast bread loaf, 9x5 2 375 (190) 18-22
Yeast rolls 2 375-400 (190-205) 12-15
Biscuits 2 375-400 (190-205) 7-9
Muffins 2 425 (220) 15-19
Pizza
Frozen 2 400-450 (205-235) 23-26
Fresh 2 475 (246) 15-18
Page 18

ENGLISH
Use & Care Manual
18
Convection Bake Chart
Reduce standard recipe temperature by 25 ºF (15 °C) for Convection Bake.
Temperatures have been reduced in this chart.
CONVECTION CAVITY
FOOD ITEM RACK POSITION
TEMP. °F (°C)
(PREHEATED OVEN)
TIME (MIN)
Cake
Cupcakes 2 325 (160) 20-22
Bundt Cake 1 325 (160) 43-50
Angel Food 1 325 (160) 43-47
Pie
2 crust, fresh, 9" 2 350-400 (175-205) 40-52
2 crust, frozen fruit, 9" 2 350 (175) 68-78
Cookies
Sugar 2 325-350 (160-175) 9-12
Chocolate Chip 2 325-350 (160-175) 8-13
Brownies 2 325 (160) 29-36
Breads
Yeast bread, loaf, 9x5 2 350 (175) 18-22
Yeast rolls 2 350-375 (175-190) 12-15
Biscuits 2 375 (190) 8-10
Muffins 2 400 (205) 17-21
Pizza
Frozen 2 375-425 (190-220) 23-26
Fresh 2 450 (232) 15-18
DOUBLE CONVECTION CAVITY
FOOD ITEM RACK POSITION
TEMP. °F (°C)
(PREHEATED OVEN)
TIME (MIN)
Cake
Cupcakes 2 325 (160) 16-18
Bundt Cake 1 325 (160) 37-43
Angel Food 1 325 (160) 35-39
Pie
2 crust, fresh, 9" 2 350-400 (175-205) 35-45
2 crust, frozen fruit, 9" 2 350 (175) 68-78
Cookies
Sugar 2 325-350 (160-175) 6-9
Chocolate Chip 2 325-350 (160-175) 8-13
Brownies 2 325 (160) 29-36
Breads
Yeast bread, loaf, 9x5 2 350 (175) 18-22
Yeast rolls 2 350-375 (175-190) 12-15
Biscuits 2 375 (190) 6-8
Muffins 2 400 (205) 13-16
Pizza
Frozen 2 375-425 (190-220) 23-26
Fresh 2 450 (232) 15-18
This chart is a guide. Follow recipe or package directions and reduce temperatures appropriately.
Convection Bake Tips and Techniques
Foods recommended for
Convection Bake mode:
Appetizers Biscuits Coffee Cakes
Cookies (2 to 4 racks) Yeast Breads
Cream Puffs
Popovers
Casseroles and One-Dish Entreés
Oven Meals (rack positions 1, 2, 3)
Air Leavened Foods (Soufflés, Meringue, MeringueTopped Desserts, Angel Food Cakes, Chiffon Cakes)
4
6
5
3
2
1
Rack position
Multiple rack pan placement
Reduce recipe baking temperatures by 25°F (15°C).
For best results, foods should be cooked
uncovered, in low-sided pans to take advantage of
the forced air circulation. Use shiny aluminum pans
for best results unless otherwise specified.
Heatproof glass or ceramic can be used. Reduce
temperature by another 25°F (15°C) when using
heatproof glass dishes for a total reduction of 50°F
(30°C).
Dark metal pans may be used. Note that food may
brown faster when using dark metal bake ware.
The number of racks used is determined by the
height of the food to be cooked.
Baked items, for the most part, cook extremely well
in convection. Don’t try to convert recipes such as
custards, quiches, pumpkin pie , or cheesecakes,
which do not benefit from the convection-heating
process. Use the regular Bake mode for these
foods.
Multiple rack cooking for oven meals is done on
rack positions 1, 2, 3 , 4 and 5. All five racks can be
used for cookies, biscuits and appetizers.
- 2 Rack baking: Use positions 1 and 3.
- 3 rack baking: Use positions 2, 3 and 4 or 1, 3 and
5.
- When baking four cake layers at the same time,
stagger pans so that one pan is not directly above
another. For best results, place cakes on front of
upper rack and back of lower rack (See graphic at
right). Allow 1" - 1 ½” (2,5 - 3cm).air space around
pans.
Converting your own recipe can be easy. Choose a
recipe that will work well in convection.
Reduce the temperature and cooking time if
necessary. It may take some trial and error to
achieve a perfect result. Keep track of your
technique for the next time you want to prepare the
recipe using convection.
Tips for Solving Baking Problems are found on
Page 33.
Quick and easy recipe tips
Converting from standard BAKE
to CONVECTION BAKE:
Reduce the temperature by 25°F (15°C).
Use the same baking time as Bake mode if
under 10 to 15 minutes.
Foods with a baking time of less than 30
minutes should be checked for doneness 5
minutes earlier than in standard bake recipes.
If food is baked for more than 40 to 45
minutes, bake time should be reduced by 25%.
Page 19

ENGLISH
Use & Care Manual
19
Convection Bake Chart
Reduce standard recipe temperature by 25 ºF (15 °C) for Convection Bake.
Temperatures have been reduced in this chart.
CONVECTION CAVITY
FOOD ITEM RACK POSITION
TEMP. °F (°C)
(PREHEATED OVEN)
TIME (MIN)
Cake
Cupcakes 2 325 (160) 20-22
Bundt Cake 1 325 (160) 43-50
Angel Food 1 325 (160) 43-47
Pie
2 crust, fresh, 9" 2 350-400 (175-205) 40-52
2 crust, frozen fruit, 9" 2 350 (175) 68-78
Cookies
Sugar 2 325-350 (160-175) 9-12
Chocolate Chip 2 325-350 (160-175) 8-13
Brownies 2 325 (160) 29-36
Breads
Yeast bread, loaf, 9x5 2 350 (175) 18-22
Yeast rolls 2 350-375 (175-190) 12-15
Biscuits 2 375 (190) 8-10
Muffins 2 400 (205) 17-21
Pizza
Frozen 2 375-425 (190-220) 23-26
Fresh 2 450 (232) 15-18
DOUBLE CONVECTION CAVITY
FOOD ITEM RACK POSITION
TEMP. °F (°C)
(PREHEATED OVEN)
TIME (MIN)
Cake
Cupcakes 2 325 (160) 16-18
Bundt Cake 1 325 (160) 37-43
Angel Food 1 325 (160) 35-39
Pie
2 crust, fresh, 9" 2 350-400 (175-205) 35-45
2 crust, frozen fruit, 9" 2 350 (175) 68-78
Cookies
Sugar 2 325-350 (160-175) 6-9
Chocolate Chip 2 325-350 (160-175) 8-13
Brownies 2 325 (160) 29-36
Breads
Yeast bread, loaf, 9x5 2 350 (175) 18-22
Yeast rolls 2 350-375 (175-190) 12-15
Biscuits 2 375 (190) 6-8
Muffins 2 400 (205) 13-16
Pizza
Frozen 2 375-425 (190-220) 23-26
Fresh 2 450 (232) 15-18
This chart is a guide. Follow recipe or package directions and reduce temperatures appropriately.
Page 20

ENGLISH
Use & Care Manual
20
DOUBLE CONVECTION CAVITY
MEATS WEIGHT (lb)
OVEN TEMP.
°F (°C)
RACK
POSITION
TIME
(min. per lb)
INTERNAL
TEMP. °F (°C)
Beef
Rib Roast 4-6 325 (160) 2 18-22 145 (63) medium rare
20-25 160 (71) medium
Rib Eye Roast, (boneless) 4-6 325 (160) 2 18-22 145 (63) medium rare
20-25 160 (71) medium
Rump, Eye, Tip, Sirloin (boneless) 3-6 325 (160) 2 18-22 145 (63) medium rare
20-25 160 (71) medium
Tenderloin Roast 2-3 425 (220) 2 15-20 145 (63) medium rare
Pork
Loin Roast 5-8 350 (175) 2 18-22 160 (71) medium
(boneless or bone-in)
Shoulder 3-6 350 (175) 2 20-25 160 (71) medium
Poultry
Chicken whole 3-4 375 (190) 2 20-23 180 (82)
Turkey, not stuffed 12-15 325 (160) 1 10-14 180 (82)
Turkey, not stuffed 16-20 325 (160) 1 9-11 180 (82)
Turkey, not stuffed 21-25 325 (160) 1 6-10 180 (82)
Turkey Breast 3-8 325 (160) 1 15-20 170 (77)
Comish Hen 1-1 ½ 350 (175) 2 45-75 total 180 (82)
Lamb
Half Leg 3-4 325 (160) 2 20-27 160 (71) medium
25-32 170 (77) well
Whole Leg 6-8 325 (160) 1 20-27 160 (71) medium
25-32 170 (77) well
Cooking times are indicative and also depend on the thickness and the starting temperature of the meat before cooking
Convection Roast Tips and Techniques
Quick and easy recipe tips
Converting fr
om standard
BAKE to
CONVECTION
RO
AST:
T
emperatur
e does not have
to be lowered.
Roasts,
large cuts of meat and poultry generall
y tak
e
10-20% less cooking time
.
Check doneness early.
Casser
oles or pot r
oasts that ar
e baked cover
ed in
CONVECTION ROAST
will cook in about the
same amount of time.
Do not preheat for Convection Roast.
Roast in a low-sided, uncovered pan.
When roasting whole chickens or turkey, tuck wings
behind back and loosely tie legs with kitchen string.
Use the 2-piece broil pan for roasting uncovered.
Use the probe or a meat thermometer to determine
the internal doneness on “END” temperature (see
cooking chart).
Double-check the internal temperature of meat or
poultry by inserting meat thermometer into another
position.
Large birds may also need to be covered with foil
(and pan roasted) during a portion of the roasting
time to prevent over-browning.
The minimum safe temperature for stuffing in
poultry is 165ºF (75ºC).
After removing the item from the oven, cover
loosely with foil for 10 to 15 minutes before
carving if necessary to increase the final foodstuff
temperature by 5° to 10°F (3° to 6° C)
Convection Roast Chart
CONVECTION CAVITY
MEATS WEIGHT (lb)
OVEN TEMP.
°F (°C)
RACK
POSITION
TIME
(min. per lb)
INTERNAL
TEMP. °F (°C)
Beef
Rib Roast 4-6 325 (160) 2 16-20 145 (63) medium rare
18-22 160 (71) medium
Rib Eye Roast, (boneless) 4-6 325 (160) 2 16-20 145 (63) medium rare
18-22 160 (71) medium
Rump, Eye, Tip, Sirloin (boneless) 3-6 325 (160) 2 16-20 145 (63) medium rare
18-22 160 (71) medium
Tenderloin Roast 2-3 400 (205) 2 15-20 145 (63) medium rare
Pork
Loin Roast 5-8 350 (175) 2 16-20 160 (71) medium
(boneless or bone-in)
Shoulder 3-6 350 (175) 2 20-25 160 (71) medium
Poultry
Chicken whole 3-4 375 (190) 2 18-21 180 (82)
Turkey, not stuffed 12-15 325 (160) 1 10-14 180 (82)
Turkey, not stuffed 16-20 325 (160) 1 9-11 180 (82)
Turkey, not stuffed 21-25 325 (160) 1 6-10 180 (82)
Turkey Breast 3-8 325 (160) 1 15-20 170 (77)
Comish Hen 1-1 ½ 350 (175) 2 45-75 total 180 (82)
Lamb
Half Leg 3-4 325 (160) 2 22-27 160 (71) medium
28-33 170 (77) well
Whole Leg 6-8 325 (160) 1 22-27 160 (71) medium
28-33 170 (77) well
Page 21

ENGLISH
Use & Care Manual
21
DOUBLE CONVECTION CAVITY
MEATS WEIGHT (lb)
OVEN TEMP.
°F (°C)
RACK
POSITION
TIME
(min. per lb)
INTERNAL
TEMP. °F (°C)
Beef
Rib Roast 4-6 325 (160) 2 18-22 145 (63) medium rare
20-25 160 (71) medium
Rib Eye Roast, (boneless) 4-6 325 (160) 2 18-22 145 (63) medium rare
20-25 160 (71) medium
Rump, Eye, Tip, Sirloin (boneless) 3-6 325 (160) 2 18-22 145 (63) medium rare
20-25 160 (71) medium
Tenderloin Roast 2-3 425 (220) 2 15-20 145 (63) medium rare
Pork
Loin Roast 5-8 350 (175) 2 18-22 160 (71) medium
(boneless or bone-in)
Shoulder 3-6 350 (175) 2 20-25 160 (71) medium
Poultry
Chicken whole 3-4 375 (190) 2 20-23 180 (82)
Turkey, not stuffed 12-15 325 (160) 1 10-14 180 (82)
Turkey, not stuffed 16-20 325 (160) 1 9-11 180 (82)
Turkey, not stuffed 21-25 325 (160) 1 6-10 180 (82)
Turkey Breast 3-8 325 (160) 1 15-20 170 (77)
Comish Hen 1-1 ½ 350 (175) 2 45-75 total 180 (82)
Lamb
Half Leg 3-4 325 (160) 2 20-27 160 (71) medium
25-32 170 (77) well
Whole Leg 6-8 325 (160) 1 20-27 160 (71) medium
25-32 170 (77) well
Cooking times are indicative and also depend on the thickness and the starting temperature of the meat before cooking
Page 22

ENGLISH
Use & Care Manual
22
Dehydrate Tips and Techniques
Dehydrating can be done using the Dehydrate mode. A lower temperature is used and the circulating
heated air slowly removes the moisture for food preservation.
The Dehydrate mode temperature is pre-programmed at 140ºF (60ºC).
The Dehydrate mode temperatures available are 120ºF (50ºC) to 160ºF (70ºC).
Multiple racks can be used simultaneously.
Some foods require as much as 14-15 hours of time to fully dehydrate.
Consult a food preservation book for specific times and the handling of various foods.
This mode is suitable for a variety of fruits, vegetables, herbs and meat strips.
Drying screens can be purchased at specialty kitchen shops.
By using paper towels, some food moisture can be absorbed before dehydrating begins (such as with
sliced tomatoes or sliced peaches).
Dehydrate Chart
FOOD
PREPARATION
APPROXIMATE
DRYING TIME*
(hrs)
TEST FOR DONENESS
Fruit
Apples
Dipped in 1/4 cup lemon juice
and 2 cups water, 1/4 slices
11-15 Slightly pliable
Bananas
Dipped in 1/4 cup lemon juice
and 2 cups water, 1/4 slices
11-15 Slightly pliable
Cherries
Wash and towel dry.
For fresh cherries, remove pits
10-15 Pliable, leathery, chewy
Oranges Peels
and slices
¼ slices of orange;
orange part of skin thinly peeled
from oranges
Peels 2-4
Slices: 12-16
Orange peel: dry and brittle
Orange slices: skins are dry
and brittle, fruit is slightly moist
Pineapple rings
Towel dried
Canned: 9-13
Fresh: 8-12
Soft and pliable
Strawberries
Wash and towel dry.
Sliced ½" thick,
skin (outside) down on rack
12-17 Dry, brittle
Vegetable
Peppers
Wash and towel dry.
Remove membrane of pepper,
coarsely chopped about 1" pieces
16-20
Leathery with no moisture
inside
Mushrooms
Wash and towel dry.
Cut of stem end. Cut into 1/8" slices
7-12 Tough and leathery, dry
Tomatoes
Wash and towel dry.
Cut this slices, 1/8" thick, dry well
16-23 Dry, brick red color
Herbs
Oregano, sage parsley and
thyme, and fennel
Rinse and dry with paper towel
Dry at 120°F (60°C)
3-5 hrs
Crisp and brittle
Basil
Use basil leaves 3 to 4 inches
from top. Spray with water,
shake off moisture and pat dry
Dry at 120°F (60°C)
3-5 hrs
Crisp and brittle
Convection Broil Tips and Techniques
Place rack in the required position needed before turning on the oven.
Use Convection Broil mode with the oven door closed.
Do not preheat oven.
Use the 2-piece broil pan.
Turn meats once halfway through the cooking time (see convection broil chart).
Convection Broil Chart
CONVECTION CAVITY
FOOD AND
THICKNESS
RACK
POSITION
BROIL
SETTING °F (°C)
INTERNAL
TEMP. °F (°C)
TIME
SIDE 1
(MIN.)*
TIME
SIDE 2
(MIN.)*
Beef
Steak (1-½" or more)
Medium rare 4 450 (235) 145 (65) 9-12 8-10
Medium 4 450 (235) 160 (71) 11-13 10-12
Well 4 450 (235) 170 (77) 18-20 16-17
Hamburgers (more than 1")
Medium 4 550 (290) 160 (71) 8-11 5-7
Well 4 550 (290) 170 (77) 11-13 8-10
Poultry
Chicken Quarters 4 450 (235) 180 (82) 16-18 10-13
Chicken Halves 3 450 (235) 180 (82) 25-27 15-18
Chicken Breasts 4 450 (235) 170 (77) 13-15 9-13
Pork
Pork Chops (1¼" or more) 4 450 (235) 160 (71) 12-14 11-13
Sausage - fresh 4 450 (235) 160 (71) 4-6 3-5
* Broiling and convection broiling times are approximate and may vary slightly.
Cooking times are indicative and also depend on the thickness and the starting temperature of the meat before cooking .
DOUBLE CONVECTION CAVITY
FOOD AND
THICKNESS
RACK
POSITION
BROIL
SETTING °F (°C)
INTERNAL
TEMP. °F (°C)
TIME
SIDE 1
(MIN.)*
TIME
SIDE 2
(MIN.)*
Beef
Steak (1-½" or more)
Medium rare 4 450 (235) 145 (65) 11-13 10-12
Medium 4 450 (235) 160 (71) 15-17 13-15
Well 4 450 (235) 170 (77) 16-18 13-15
Hamburgers (more than 1")
Medium 4 550 (290) 160 (71) 9-11 5-8
Well 4 550 (290) 170 (77) 11-13 8-10
Poultry
Chicken Quarters 4 450 (235) 180 (82) 18-20 13-15
Chicken Halves 3 450 (235) 180 (82) 25-27 15-18
Chicken Breasts 4 450 (235) 170 (77) 14-16 10-14
Pork
Pork Chops (1¼" or more) 4 450 (235) 160 (71) 13-15 12-14
Sausage - fresh 4 450 (235) 160 (71) 4-6 3-5
* Broiling and convection broiling times are approximate and may vary slightly.
Cooking times are indicative and also depend on the thickness and the starting temperature of the meat before cooking .
Page 23

ENGLISH
Use & Care Manual
23
Dehydrate Tips and Techniques
Dehydrating can be done using the Dehydrate mode. A lower temperature is used and the circulating
heated air slowly removes the moisture for food preservation.
The Dehydrate mode temperature is pre-programmed at 140ºF (60ºC).
The Dehydrate mode temperatures available are 120ºF (50ºC) to 160ºF (70ºC).
Multiple racks can be used simultaneously.
Some foods require as much as 14-15 hours of time to fully dehydrate.
Consult a food preservation book for specific times and the handling of various foods.
This mode is suitable for a variety of fruits, vegetables, herbs and meat strips.
Drying screens can be purchased at specialty kitchen shops.
By using paper towels, some food moisture can be absorbed before dehydrating begins (such as with
sliced tomatoes or sliced peaches).
Dehydrate Chart
FOOD
PREPARATION
APPROXIMATE
DRYING TIME*
(hrs)
TEST FOR DONENESS
Fruit
Apples
Dipped in 1/4 cup lemon juice
and 2 cups water, 1/4 slices
11-15 Slightly pliable
Bananas
Dipped in 1/4 cup lemon juice
and 2 cups water, 1/4 slices
11-15 Slightly pliable
Cherries
Wash and towel dry.
For fresh cherries, remove pits
10-15 Pliable, leathery, chewy
Oranges Peels
and slices
¼ slices of orange;
orange part of skin thinly peeled
from oranges
Peels 2-4
Slices: 12-16
Orange peel: dry and brittle
Orange slices: skins are dry
and brittle, fruit is slightly moist
Pineapple rings
Towel dried
Canned: 9-13
Fresh: 8-12
Soft and pliable
Strawberries
Wash and towel dry.
Sliced ½" thick,
skin (outside) down on rack
12-17 Dry, brittle
Vegetable
Peppers
Wash and towel dry.
Remove membrane of pepper,
coarsely chopped about 1" pieces
16-20
Leathery with no moisture
inside
Mushrooms
Wash and towel dry.
Cut of stem end. Cut into 1/8" slices
7-12 Tough and leathery, dry
Tomatoes
Wash and towel dry.
Cut this slices, 1/8" thick, dry well
16-23 Dry, brick red color
Herbs
Oregano, sage parsley and
thyme, and fennel
Rinse and dry with paper towel
Dry at 120°F (60°C)
3-5 hrs
Crisp and brittle
Basil
Use basil leaves 3 to 4 inches
from top. Spray with water,
shake off moisture and pat dry
Dry at 120°F (60°C)
3-5 hrs
Crisp and brittle
Page 24

ENGLISH
Use & Care Manual
24
Special Features
The Special Features function can be used to select the following special oven features:
1. SAB => SABBATH MODE (for religious faiths with “no work” requirements on the Sabbath).
2. OFS => OVEN OFFSET (used to calibrate the oven temperature).
3. dEG => °UNIT (used to select Farhenheit or Celsius).
4. Hr => CLOCK FORMAT (used to set the time of day format as 12:00
AM/PM
or 24:00).
5. Set => PRESET TEMPERATURE (it’s possible to save the standard preset temperature per every
cooking mode or to keep in memory the last used temperature).
To select special features, follow the steps below:
Touch and hold [OPTIONS] and [TIME] keys for at least 3 seconds. Clock time disappears and the
following display is shown:
Touch the [INC] or the [DEC] key to scroll all available options described above, until the desired one is
found.
Touch [OPTIONS] key to edit the selected options.
Change the value by means of [INC] or [DEC] keys.
In a double oven it’s possible to set a different offset in each cavity. Select the cavity with
UPPER/LOWER key.
Touch the [OPTIONS] key to confirm the option and go back to the selection menu or hold the key for 3
second to quit the User Option Menu and go back to the clock original screen.
Broil Tips and Techniques
Place rack in the required position needed before turning on the oven.
Use Broil mode with the oven door closed.
Preheat oven for 5 minutes before use.
Use the 2-piece broil pan.
Turn meats once halfway through the cooking time (see convection broil chart).
Broil Chart
FOOD AND
THICKNESS
RACK
POSITION
BROIL
SETTING
INTERNAL
TEMP. °F (°C)
TIME
SIDE 1
(MIN.)*
TIME
SIDE 2
(MIN.)*
Beef
Steak (3/4"-1")
Medium rare 5 5 145 (63) 5-7 4-6
Medium 5 5 160 (71) 6-8 5-7
Well 5 5 170 (77) 8-10 7-9
Hamburgers (3/4"-1")
Medium 4 5 160 (71) 8-11 6-9
Well 4 5 170 (77) 10-13 8-10
Poultry
Breast (bone-in) 4 4 170 (77) 10-12 8-10
Thigh (very well done) 4 3 180 (82) 28-30 13-15
Pork
Pork Chops (1") 5 5
160 (71)
7-9 5-7
Sausage - fresh 5 5
160 (71)
5-7 3-5
Ham Slice (½") 5 5
160 (71)
4-6 3-5
Seafood
Fish Filets, 1" 4 4 10-14
Buttered
Cook until
opaque & flakes
easily with fork
Do not turn
Lamb
Chops (1")
Medium Rare 5 5 145 (63) 5-7 4-6
Medium 5 5 160 (71) 6-8 4-6
Well 5 5 170 (77) 7-9 5-7
Bread
Garlic Bread, 1" slices 4 5 2-2,30
Garlic Bread, 1" slices 3 5 4-6
* Broiling and convection broiling times are approximate and may vary slightly
Cooking times are indicative and also depend on the thickness and the starting temperature of the meat before cooking .
Food Service Temperature Guidelines from FSIS (USDA food Safety & Inspection Service)
140°F(60°C) Ham, precooked ( to Reheat) Stuffing (cooked alone or in bird)
145°F(63°C) Fresh beef, Veal, Lamb (medium rare)
165°F
(74°C)
Leftovers & Casseroles
Ground Meat & Meat mixtures (Beef, Pork, Veal Lamb) Fresh beef, Veal, Lamb (well done)
Fresh beef, Veal, Lamb (medium) Poultry breast
Fresh Pork (medium)
170°F
(77°C)
Fresh Pork (well done)
Fresh Ham (raw) Chicken and Turkey (Whole)
160°F(71°C)
Egg Dishes Poultry (thighs and wings)
165°F(74°C) Ground Meat & Meat mixtures (Turkey, Chicken)
180°F
(82°C)
Duck and Goose
Note : Eggs (alone, not used in a recipe) – cook until yolk & white are firm
Page 25

ENGLISH
Use & Care Manual
25
Special Features
The Special Features function can be used to select the following special oven features:
1. SAB => SABBATH MODE (for religious faiths with “no work” requirements on the Sabbath).
2. OFS => OVEN OFFSET (used to calibrate the oven temperature).
3. dEG => °UNIT (used to select Farhenheit or Celsius).
4. Hr => CLOCK FORMAT (used to set the time of day format as 12:00
AM/PM
or 24:00).
5. Set => PRESET TEMPERATURE (it’s possible to save the standard preset temperature per every
cooking mode or to keep in memory the last used temperature).
To select special features, follow the steps below:
Touch and hold [OPTIONS] and [TIME] keys for at least 3 seconds. Clock time disappears and the
following display is shown:
Touch the [INC] or the [DEC] key to scroll all available options described above, until the desired one is
found.
Touch [OPTIONS] key to edit the selected options.
Change the value by means of [INC] or [DEC] keys.
In a double oven it’s possible to set a different offset in each cavity. Select the cavity with
UPPER/LOWER key.
Touch the [OPTIONS] key to confirm the option and go back to the selection menu or hold the key for 3
second to quit the User Option Menu and go back to the clock original screen.
Page 26

ENGLISH
Use & Care Manual
26
Oven Care and Cleaning
Self-Cleaning the Oven
This oven features a pyrolytic self-cleaning function that eliminates the difficult and time consuming manual
scrubbing of the oven interior. During self-cleaning, the oven uses a very high temperature (approx. 885°F/470°C)
to burn away food soil and grease.
Only one oven at a time can be set to Self-Clean.
It is common to see smoke and/or an occasional flame-up during the Self-Clean cycle, depending on the
content and amount of soil remaining in the oven. If a flame persists, turn off the oven and allow it to cool
before opening the door to wipe up the excessive food soil.
The door latch is automatically activated after selecting the Self-Clean cycle. The “AUTO LOCK” writings
will appear in the display. This ensures that the door cannot be opened while the oven interior is at clean
temperatures.
The oven light does not operate during this mode.
During Self-Clean, the kitchen should be well ventilated to help eliminate odors associated with Self-
Clean. Odors will lessen with use.
Three hours is the preset length of cleaning.
The mode automatically stops at the end of the clean hours.
When the oven heat drops to a safe temperature, the automatic door lock will release and the door can
be opened.
Preparing the Oven for Self-Clean
1. Remove all utensils and bake ware.
2.
3. Wipe up any soft soil spills and grease with paper towels. Excess grease will cause flames and smoke
inside the oven during self-cleaning.
4. Review illustration below. Some areas of the oven must be cleaned by hand before the cycle begins.
They do not get hot enough during the cleaning cycle for soil to burn away. Use a soapy sponge or plastic
scrubber or a detergent-filled S.O.S.® pad. Hand-clean the oven door edge, oven front frame and up to
1-½ “ (2-3 cm) inside the frame with detergent and hot water. Do not rub the gasket on oven. Clean by
hand the oven door window. Rinse all areas thoroughly then dry.
5. Be sure oven interior lights are turned off and the light bulbs and lens covers are in place. See Pages 32.
Remove non-porcelain oven racks. If chromed racks are left in the oven during the self-clean cycle, they
will permanently lose the shiny finish and change to a dull dark finish. See Oven Cleaning Chart for
proper care, Pages 29 to 30.
front
Sabbath Mode Instruction
Enter the user option menu holding [OPTIONS] and [TIME] keys for 3 seconds. Scroll the option list
(dEG, OFS, Hr, Sab), shown by the red temperature module, by pressing [INC]/[DEC], until Sabbath item
is found.
Touch [OPTIONS] to enter edit mode: the selected item switches to the green digits on the left and its status
in the red digits field starts blinking.
Touch again [INC]/[DEC] keys to set Sabbath mode ON or OFF
(Default=OFF). Touch [OPTIONS] to confirm
and come back to the option list. Hold [OPTIONS] key for 3 seconds to quit the selection menu and go back
to normal operations.
Once Sabbath mode is set, only BAKE and OFF positions are available in the cooking mode selector. Move
the selector to BAKE then set the temperature to the desired value within 5 minutes.
After 5 minutes, the temperature cannot be shown any more and the display appears as below: Sabbath
mode is active. In a double oven, the upper/lower cavity indications are still available. Both triangle are on if
both cavities are working.
Oven lights status cannot be changed during Sabbath time.
Oven temperature can only be lowered but no information can be displayed.
The cooling fan must run in Sabbath mode.
Preheat lights are inhibited during Sabbath mode.
The buzzer must always be silent, regardless of any fault, end of activity, etc.
The meat probe can never be used in Sabbath mode.
Maximum allowed cooking time must be 72 hours.
The user is allowed to stop the oven manually, also during Sabbath, moving the cooking mode selector to
OFF position.
Heating elements cycling must not depend on the door switch status. Opening or closing the door must not
switch the relays directly.
Page 27

ENGLISH
Use & Care Manual
27
Oven Care and Cleaning
Self-Cleaning the Oven
This oven features a pyrolytic self-cleaning function that eliminates the difficult and time consuming manual
scrubbing of the oven interior. During self-cleaning, the oven uses a very high temperature (approx. 885°F/470°C)
to burn away food soil and grease.
Only one oven at a time can be set to Self-Clean.
It is common to see smoke and/or an occasional flame-up during the Self-Clean cycle, depending on the
content and amount of soil remaining in the oven. If a flame persists, turn off the oven and allow it to cool
before opening the door to wipe up the excessive food soil.
The door latch is automatically activated after selecting the Self-Clean cycle. The “AUTO LOCK” writings
will appear in the display. This ensures that the door cannot be opened while the oven interior is at clean
temperatures.
The oven light does not operate during this mode.
During Self-Clean, the kitchen should be well ventilated to help eliminate odors associated with Self-
Clean. Odors will lessen with use.
Three hours is the preset length of cleaning.
The mode automatically stops at the end of the clean hours.
When the oven heat drops to a safe temperature, the automatic door lock will release and the door can
be opened.
Preparing the Oven for Self-Clean
1. Remove all utensils and bake ware.
2.
3. Wipe up any soft soil spills and grease with paper towels. Excess grease will cause flames and smoke
inside the oven during self-cleaning.
4. Review illustration below. Some areas of the oven must be cleaned by hand before the cycle begins.
They do not get hot enough during the cleaning cycle for soil to burn away. Use a soapy sponge or plastic
scrubber or a detergent-filled S.O.S.® pad. Hand-clean the oven door edge, oven front frame and up to
1-½ “ (2-3 cm) inside the frame with detergent and hot water. Do not rub the gasket on oven. Clean by
hand the oven door window. Rinse all areas thoroughly then dry.
5. Be sure oven interior lights are turned off and the light bulbs and lens covers are in place. See Pages 32.
Remove non-porcelain oven racks. If chromed racks are left in the oven during the self-clean cycle, they
will permanently lose the shiny finish and change to a dull dark finish. See Oven Cleaning Chart for
proper care, Pages 29 to 30.
front
Page 28

ENGLISH
Use & Care Manual
28
General Oven Care
How to Use the Oven Cleaning Chart
1. Locate the number of the part to be cleaned in the illustration on this page.
2. Find the part name in the chart.
Use the cleaning method in the left column if the oven is black or white.
Use the cleaning method in the right column if the oven is stainless steel.
3. Match the letter with the cleaning method on following page.
Cleaning Chart
Cleaning Method Cleaning Method
Part
Black & White
Oven
Stainless Stell
Oven
Part
Black & White
Oven
Stainless Stell
Oven
1
Door frame
E E
11
Interior Oven Door
E E
2
Interior door windows
F F
12
Door Handle
D D
3
Removable Oven Racks
A or E A or E
13
Door Cooling Vent
E E
4
Slide Trim
D D
14
Door Front
C&D C&D
5
Control Panel Trim
C G
15
Oven Trim
D D
6
Control Panel
C C
16
End Caps
D D
7
Oven Cooling Vents
D D
17
Broil Pan Rack
E E
8
Oven Front Frame
E E
18
Broil pan Bottom
E E
9
Oven Cavity
E E
19
Extendable rack
A A
10
Mesh Gasket
B B
Setting the Self-Clean Mode
To Set the Self-Clean Mode
1. Touch [UPPER/LOWER] key to select the
cavity to be cleaned, if the oven is a double.
2. Rotate both knobs into the clean position.
3. CLEAN & TIME appear.
4. The clean time is displayed automatically, its
standard value is 3 hours.
5. At the end of the programmed cleaning time,
the oven will automatically turn off.
6. To stop the cleaning mode at any moment,
move one of the two knobs from the cleaning
position.
Do not attempt to open the door while the door is
locked. The “AUTO LOCK” writings will flash until the
motor stops. When they are displayed, the door
cannot be opened. Check that the door has been
locked and will not open before starting the Self-Clean
mode.
If door does not lock, rotate the cooking mode knob
into the OFF position and do not start self-clean;
phone for service.
If the door is in the open position when this mode is
selected, the “AUTO LOCK” writings will flash until the
door is closed. The latch doesn’t move.
To Change the Cleaning Time
1. To change the setting from 3 hours, select
either 2 hours for light soil or 4 hours for
heavy soil immediately before starting.
2. To change the hours, touch the [TIME] key.
3. The hours will flash.
4. Use [INC] or [DEC] keys to change the value.
5. To change the minutes, touch the [TIME] key
again.
6. The minutes will flash.
7. Use [INC] or [DEC] keys to change the value.
Hold the key to change by 10 minutes steps.
8. Touch [TIME] or wait a few seconds to confirm
the new value.
To Delay the Start of Cleaning
1. Follow steps 1 through 7 above.
2. Touch the [TIME] key and verify that “STOP
TIME” appears on the display. The hours will
begin flashing.
3. Use [INC] or [DEC] keys to change the stop
time value.
4. To change the minutes, touch the [TIME] key,
the minutes will flash.
5. Use [INC] or [DEC] keys to change the value.
Hold the key to change by 10 minutes steps.
6. Touch [TIME] or wait a few seconds to confirm
the new value.
7. The latch starts moving to lock the oven door,
the display shows “DELAY”.
8. When the delay time expires, self-cleaning will
start.
9. At the end of the programmed cleaning time,
the oven will automatically turn off.
10. “End” will appear on the temperature display,
“CLEAN” on the mode display and “TIME” on
the clock display will start flashing until the
[TIME] key is touched or the knob is moved to
the OFF position.
In order to check the cleaning or the stop time during a
delayed clean, simply touch the [TIME] key until “TIME”
or “STOP TIME” writings are displayed.
Page 29

ENGLISH
Use & Care Manual
29
General Oven Care
How to Use the Oven Cleaning Chart
1. Locate the number of the part to be cleaned in the illustration on this page.
2. Find the part name in the chart.
Use the cleaning method in the left column if the oven is black or white.
Use the cleaning method in the right column if the oven is stainless steel.
3. Match the letter with the cleaning method on following page.
Cleaning Chart
Cleaning Method Cleaning Method
Part
Black & White
Oven
Stainless Stell
Oven
Part
Black & White
Oven
Stainless Stell
Oven
1
Door frame
E E
11
Interior Oven Door
E E
2
Interior door windows
F F
12
Door Handle
D D
3
Removable Oven Racks
A or E A or E
13
Door Cooling Vent
E E
4
Slide Trim
D D
14
Door Front
C&D C&D
5
Control Panel Trim
C G
15
Oven Trim
D D
6
Control Panel
C C
16
End Caps
D D
7
Oven Cooling Vents
D D
17
Broil Pan Rack
E E
8
Oven Front Frame
E E
18
Broil pan Bottom
E E
9
Oven Cavity
E E
19
Extendable rack
A A
10
Mesh Gasket
B B
Page 30

ENGLISH
Use & Care Manual
30
Do-it-Yourself Maintenance
Oven Door Removal
WARNING
Make sure oven is cool and power to the oven has been turned off before removing the door. Failure to
do so could result in electrical shock or burns.
The oven door is heavy and fragile. Use both hands to remove the oven door. The door front is glass.
Handle carefully to avoid breakage.
Grasp only the sides of the oven door. Do not grasp the handle as it may swing in your hand and cause
damage or injury.
Failure to grasp the oven door firmly and properly could result in personal injury or product damage.
To Remove Door
1. Open the door completely.
2. Lift up the hinge bracket (1).
3. Hold the door firmly on both sides using both
hands and close the door.
4. Hold firmly; the door is heavy.
5. Place the door in a convenient location.
To Replace Door
1. Insert the upper arms (2) of both hinges into the
slots (3). The recesses (4) must hook on the lips
(5).
2. Move the hinge brackets (1) back down into
position.
3. Close and open the door slowly to assure that it is
correctly and securely in place.
Oven Finishes / Cleaning Methods
The entire oven can be safely cleaned with a soapy sponge, rinsed and dried. If stubborn soil remains, follow
the recommended cleaning methods below.
Always use the mildest cleaner that will do the job.
Rub metal finishes in the direction of the grain.
Use clean, soft cloths, sponges or paper towels.
Rinse thoroughly with a minimum of water so it does not drip into door slots.
Dry to avoid water marks.
The cleaners listed below indicate types of products to use and are not being endorsed. Use all products
according to package directions.
Part Cleaning Method
A Chrome Plated Wash with hot sudsy water. Rinse thoroughly and dry. Or, gently rub with Soft
Scrub®,
Bon-Ami®, Comet®, Ajax®, Brillo® or S.O.S.® pads as directed. Easy Off® or
Dow® Oven
Cleaners (cold oven formula) can be used, but may cause darkening and
discoloration.
Racks may be cleaned in the oven during the self-clean mode. However, chromed
racks will lose their shiny finish and permanently change to a metallic gray.
B Fiberglass Knit
DO NOT HAND CLEAN GASKET.
C Glass Spray Windex® or Glass Plus® onto a cloth first then wipe to clean. Use Fantastik®
or Formula 409® to remove grease spatters.
D Painted Clean with hot sudsy water or apply Fantastik® or Formula 409® first to a clean
sponge or paper towel and wipe clean. Avoid using powdered cleansers and steel
wool pads.
E Porcelain Immediately wipe up acidic spills like frui t juice, milk and tomatoes with a dry towel. Do
not use a moistened sponge/towel on hot porcelain. When cool, clean with hot sudsy
water or apply Bon-Ami® or Soft Scrub® to a damp sponge. Rinse and dry. For
stubborn stains, gently use Brillo® or S.O.S. ® pads. It is normal for porcelain to
craze (fine lines) with age due to exposure from heat and food soil.
F Reflective Glass Clean with hot sudsy water and sponge or plastic scrubber. Rub stubborn stains with
vinegar, Windex®, ammonia or Bon-Ami®. DO NOT USE HARSH ABRASIVES.
G Stainless Always wipe or rub with grain. Clean with a soapy sponge then rinse and dry. Or,
wipe with Fantastik® or Formula 409® sprayed onto a paper towel. Protect and
polish with Stainless Steel Magic® and a soft cloth. Remove water spots with a cloth
dampened with white vinegar. Use Zud®, Cameo®, Bar Keeper’s Friend® or
RevereWare Stainless Steel Cleaner®, to remove heat discoloration.
H Probe (if present) Clean probe by hand with detergent and hot water. Then rinse and dry.
Do not so or clean in dishwasher
.
Page 31

ENGLISH
Use & Care Manual
31
Do-it-Yourself Maintenance
Oven Door Removal
WARNING
Make sure oven is cool and power to the oven has been turned off before removing the door. Failure to
do so could result in electrical shock or burns.
The oven door is heavy and fragile. Use both hands to remove the oven door. The door front is glass.
Handle carefully to avoid breakage.
Grasp only the sides of the oven door. Do not grasp the handle as it may swing in your hand and cause
damage or injury.
Failure to grasp the oven door firmly and properly could result in personal injury or product damage.
To Remove Door
1. Open the door completely.
2. Lift up the hinge bracket (1).
3. Hold the door firmly on both sides using both
hands and close the door.
4. Hold firmly; the door is heavy.
5. Place the door in a convenient location.
To Replace Door
1. Insert the upper arms (2) of both hinges into the
slots (3). The recesses (4) must hook on the lips
(5).
2. Move the hinge brackets (1) back down into
position.
3. Close and open the door slowly to assure that it is
correctly and securely in place.
Page 32

ENGLISH
Use & Care Manual
32
Solving Baking Problems
With either Bake or Convection Bake, poor results can occur for many reasons other than a malfunction of the
oven. Check the chart below for causes of the most common problems. Since the size, shape and material of
baking utensils directly affect the baking results, the best solution may be to replace old baking utensils that
have darkened and warped with age and use. Check the Baking Charts from Page 17 to 24 for the correct rack
position and baking time
Baking Problem
Cause
Food browns unevenly
Oven not preheated
Aluminum foil on oven rack or oven bottom
Baking utensil too large for recipe
Pans touching each other or oven walls
Food too brown on bottom
Oven not preheated
Using glass, dull or darkened metal pans
Incorrect rack position
Pans touching each other or oven walls
Food is dry or has shrunk
excessively
Oven temperature too high
Baking time too long
Oven door opened frequently
Pan size too large
Food is baking or roasting
too slowly
Oven temperature too low
Oven not preheated
Oven door opened frequently
Tightly sealed with aluminum foil
Pan size too small
Pie crusts do not brown on
bottom or have soggy crust
Baking time not long enough
Using shiny steel pans
Incorrect rack position
Oven temperature is too low
Cakes pale, flat and may
not be done inside
Oven temperature too low
Incorrect baking time
Cake tested too soon
Oven door opened too often
Pan size may be too large
Cakes high in middle with
crack on top
Baking temperature too high
Baking time too long
Pans touching each other or oven walls
Incorrect rack position
Pan size too small
Pie crust edges too brown
Oven temperature too high
Edges of crust too thin
Replacing an Oven Light
The lights are switched on when the door is
opened or when the oven is in a cooking
cycle.
The oven lights are not illuminated during
SELF- CLEAN.
Each light assembly consists of a removable
lens, a light bulb as well as a light socket
housing that is fixed in place. See figure on
this page.
Light bulb replacement is considered to be a
routine maintenance item.
To Replace a Light Bulb
1. Read WARNING on this page.
2. Turn off power at the main power supply (fuse
or breaker box).
3.
5. Remove the light bulb from its socket by
pulling it.
6. Replace the bulb with a new one. Avoid
touching the bulb with fingers, as oils from
hands can damage the bulb when it becomes
hot.
7. The bulb is halogen: use one with the same
type checking Voltage and Wattage.
8. Place the lens back on.
9.
Turn power back on at the main power supply (fuse or
breaker box).
WARNING
Make sure the oven and lights are cool and
power to the oven has been turned off before
replacing the light bulb(s). Failure to do so could
result in electrical shock or burns.
The lenses must be in place when using the
oven.
The lenses serve to protect the light bulb from
breaking.
The lenses are made of glass. Handle carefully
to avoid breakage. Broken glass could cause an
injury.
Each oven is equipped with three halogen lights
(per cavity) located in the lateral walls of the oven.
In ovens with lateral rack supports, remove
them by unscrewing the four screws.
Remove the lens between screw and glass
using a screw driver.
4.
Replace the rack supports if provided is
provided with the oven model.
Page 33

ENGLISH
Use & Care Manual
33
Solving Baking Problems
With either Bake or Convection Bake, poor results can occur for many reasons other than a malfunction of the
oven. Check the chart below for causes of the most common problems. Since the size, shape and material of
baking utensils directly affect the baking results, the best solution may be to replace old baking utensils that
have darkened and warped with age and use. Check the Baking Charts from Page 17 to 24 for the correct rack
position and baking time
Baking Problem
Cause
Food browns unevenly
Oven not preheated
Aluminum foil on oven rack or oven bottom
Baking utensil too large for recipe
Pans touching each other or oven walls
Food too brown on bottom
Oven not preheated
Using glass, dull or darkened metal pans
Incorrect rack position
Pans touching each other or oven walls
Food is dry or has shrunk
excessively
Oven temperature too high
Baking time too long
Oven door opened frequently
Pan size too large
Food is baking or roasting
too slowly
Oven temperature too low
Oven not preheated
Oven door opened frequently
Tightly sealed with aluminum foil
Pan size too small
Pie crusts do not brown on
bottom or have soggy crust
Baking time not long enough
Using shiny steel pans
Incorrect rack position
Oven temperature is too low
Cakes pale, flat and may
not be done inside
Oven temperature too low
Incorrect baking time
Cake tested too soon
Oven door opened too often
Pan size may be too large
Cakes high in middle with
crack on top
Baking temperature too high
Baking time too long
Pans touching each other or oven walls
Incorrect rack position
Pan size too small
Pie crust edges too brown
Oven temperature too high
Edges of crust too thin
Page 34

ENGLISH
Use & Care Manual
34
Solving Operational Problems
Before calling for service, check the following to avoid unnecessary service charges.
Oven Problem Problem Solving Steps
F03 or F04 Error appears
in the display window.
A problem with latch mechanism occurred. Remove power and turn it back on again after
a few seconds. The oven should run a latch auto–test. If condition persists, note the code
number and call an authorized service.
Other F__ Error appears in
the display window.
Remove power and turn it back on again after a few seconds. If condition persists, note
the code number and call an authorized service.
The oven display stays OFF
Turn off power at the main power supply (fuse or breaker box). Turn breaker back on.
If condition persists, call an authorized service center.
Cooling fan continues to
run after oven is turned off
The fan turns off automatically when the electronic components have cooled sufficiently.
Oven door is locked and
will not release, even after
cooling
Turn the oven off at the circuit breaker and wait a few seconds. Turn breaker back on.
The oven should reset itself and will be operable.
Oven is not heating Check the circuit breaker or fuse box to your house. Make sure there is proper electrical
power to the oven. Make sure the oven temperature has been selected.
Oven is not cooking evenly Check oven calibration. Adjust calibration if necessary (see To Set Temperature, Page
14). Refer to cook charts for recommended rack position. Always reduce recipe
temperature by 25°F (15°C) when baking with Convention Bake mode.
Oven temperature is too
hot or too cold
The oven thermostat needs adjustment. See Calibrating Oven Temperature, Page 14.
Oven light is not working
properly
Replace or reinsert the light bulb if loose or defective. See Page 32. Touching the bulb
with fingers may cause the bulb to burn out.
Oven light stays on Check for obstruction in oven door. Check to see if hinge is bent or door switch broken.
Cannot remove lens cover
on light
There may be a soil build-up around the lens cover. Wipe lens cover area with a clean dry
towel prior to attempting to remove the lens cover.
Oven will not Self-Clean
properly
Allow the oven to cool before running Self-Clean. Always wipe out loose soils or heavy
spill-over before running Self-Clean. If oven is badly soiled, set oven for a four-hour
Self-Clean. See Preparing the Oven to Self-Clean, Page 28.
Clock and timer are not
working properly
Make sure there is proper electrical power to the oven. See the Clock and Timer sections
on Page 13.
Excessive moisture When using Bake mode, preheat the oven first. Convection Bake and Convection Roast
will eliminate any moisture in oven (this is one of the advantages of convection).
Porcelain chips When oven racks are removed and replaced, always tilt racks upward and do not force
them to avoid chipping the porcelain.
Service Data Record
For authorized service or parts information see paragraph “Fulgor Warranty ..”.
The location of the serial tag on the product can be seen when the oven door is opened. It is located on the left side, centered
vertically just inside the oven cavity. See Page 7. Now is a good time to write this information in the space below provided.
Keep your invoice for warranty validation.
Model Number _____________Serial Number ______________________Date of Installation or Occupancy_______________
Page 35

Fulgor Milano WARRANTY for Home Appliances
Duration of warranty:
Fulgor Milano grants for the Continental U.S and Canada a 24 month full warranty from the date of purchase indicated on the
invoice. During this period Fulgor Milano will pay the cost for replaced parts and labor needed to repair the appliance.
For proof of warranty, please retain the original purchase invoice and the delivery slip.
To obtain service under this warranty, you must:
1. Contact Fulgor-Milano North America Service by email at fulgor@adcoservice.com or by toll free number at 1-855-4-fulgor
(855-438-5467) for guidance in receiving service for your appliance.
2. Provide a copy of your original sales receipt.
3. Provide Fulgor Milano reasonable opportunity to investigate the claim before the Product or any component of the Product
has been removed.
Coverage:
Read the Use and Care Manual before using the appliance for the rst time!
This warranty applies to Fulgor Milano appliances utilized only for residential use. Our appliances are not intended for commercial use. This warranty is only valid for the original owner and is not transferable.
During the warranty period Fulgor Milano will, at its discretion, repair or exchange the product without charge for parts and labor.
The warranty does not cover :
1. Damage to the appliance caused intentionally or by accident.
2. Improper installation or incorrect connection to the power supply.
3. Damage due to the excessive heat generated by exterior sources, water damage.
4. Transport damage.
5. Modications to the appliance.
6. Malfunctions due to improper usage
7. Breakage or normal usage scratches of the ceramic glass surface.
8. Light bulbs damage or exterior fuses.
9. Operation under professional or commercial conditions.
10. Lightning, re, ood damages or other Acts of God.
11. Replacement or attachment of parts other than original, provided by Fulgor Milano
12. Cosmetic claims such as scratches on stainless steel, handle damage, etc. are under a limited warranty only, and must be
claimed within 2 weeks after the date of purchase.
This warranty covers only the appliance and its components. Damage of any items in direct contact or placed near to the appliance are excluded from the warranty. Charges from any third parties other than Fulgor Milano authorized service agencies will not
be accepted.
Should the appliance prove defective in workmanship or material, the end user shall be granted repair or replacement only. Under
no circumstances shall Fulgor be liable for any loss or damage, whether it be direct, consequential, or incidental, arising out of
the use or incorrect use of the appliance.
In order to obtain warranty rights, the original invoice must be provided to the Technical Services Department, Fulgor Milano
to verify the date of purchase. Some states do not allow limitations of incidental or consequential damages, therefore the above
named limitations or exclusions may not apply.
In case of technical claims or for service, rst contact the dealer where the Fulgor Milano appliance was purchased!
Fulgor Milano
After Sales Service Support & Warranty Information:
1-855-4-fulgor (855-438-5467)
fulgor@adcoservice.com
 Loading...