

Page 1
DRAWER DISHWASHER
INSTALLATION INSTRUCTIONS
INSTRUCCIONES DE INSTALACIÓN
DE LA LAVAVAJILLAS DE CAJÓN
INSTRUCTIONS D’INSTALLATION
LAVE-VAISSELLE À TIROIR(S)
Table of Contents/Índice/Table des matières..................................................................2
IMPORTANT:
Save for local electrical inspector's use.
Installer: Leave installation instructions with the homeowner.
Homeowner: Keep installation instructions for future reference.
IMPORTANTE:
Guarde para tenerlas a disposición del inspector de electricidad local.
Instalador: Deje las instrucciones de instalación con el propietario.
Propietario: Conserve las instrucciones de instalación para referencia futura.
IMPORTANT :
Conserver pour consultation par l'inspecteur local des installations électriques.
Installateur : Remettre les instructions d'installation au propriétaire.
Propriétaire : Conserver les instructions d'installation pour référence ultérieure.
W10219172A DD524P1ACU
Page 2

TABLE OF CONTENTS
DISHWASHER SAFETY...............................................................................3
INSTALLATION REQUIREMENTS .............................................................4
Tools and Parts.........................................................................................4
Location Requirements............................................................................. 4
Water Supply Requirements..................................................................... 5
Electrical Requirements............................................................................6
Drain Requirements .................................................................................. 6
INSTALLATION INSTRUCTIONS ...............................................................7
Unpack Dish Drawer.................................................................................7
Prepare Cabinet Opening ......................................................................... 7
Prepare Dishwasher.................................................................................. 8
Route Electrical Wiring..............................................................................9
ÍNDICE
SEGURIDAD DE LA LAVAVAJILLAS .......................................................19
REQUISITOS DE INSTALACIÓN ..............................................................20
Piezas y herramientas.............................................................................20
Requisitos de ubicación .........................................................................21
Requisitos del suministro de agua .........................................................21
Requisitos eléctricos...............................................................................22
Requisitos de desagüe ........................................................................... 22
INSTRUCCIONES DE INSTALACIÓN ......................................................23
Desempaque el cajón para platos..........................................................23
Prepare la abertura en el armario ...........................................................23
Prepare la lavavajillas.............................................................................. 24
Dirija el cableado eléctrico...................................................................... 25
Route Water Supply Line and Drain Hose ............................................. 10
Connect Water Supply Line and Drain Hoses ....................................... 11
Make Electrical Connection.................................................................... 12
Install Trim Pieces and Level Dishwasher..............................................13
Secure Dishwasher................................................................................. 14
Complete Installation.............................................................................. 15
CUSTOM PANEL INSTALLATION INSTRUCTIONS .............................. 16
Custom Drawer Panel............................................................................. 16
Preparing Custom Panel ........................................................................ 16
Install Panel Fasteners............................................................................ 17
Mount the Custom Panel........................................................................ 17
Dirija la línea de suministro de agua y la manguera de desagüe .......... 26
Conecte la línea de suministro de agua y las mangueras de desagüe. 27
Conexión del suministro eléctrico ..........................................................28
Instale las piezas de adorno y nivele la lavavajillas................................ 29
Asegure la lavavajillas............................................................................. 31
Complete la instalación ..........................................................................32
INSTRUCCIONES DE INSTALACIÓN DEL PANEL A LA MEDIDA ....... 33
Panel del cajón a la medida ................................................................... 33
Preparación del panel a la medida......................................................... 33
Cómo instalar los sujetadores del panel ................................................33
Cómo montar el panel a la medida ........................................................34
TABLE DES MATIÈRES
SÉCURITÉ DU LAVE-VAISSELLE ............................................................36
EXIGENCES D'INSTALLATION ................................................................ 37
Outillage et composants.........................................................................37
Exigences d’emplacement .....................................................................38
Spécifications de l’alimentation en eau.................................................. 38
Spécifications électriques....................................................................... 39
Évacuation de l'eau de lavage—Critères à respecter............................39
INSTRUCTIONS D'INSTALLATION ......................................................... 40
Déballage du lave-vaisselle ....................................................................40
Préparation de l'espace d'installation entre les placards ...................... 40
Préparation du lave-vaisselle.................................................................. 41
Installation du câblage électrique........................................................... 42
Installation du tuyau d'arrivée d'eau et du tuyau d'évacuation ............. 43
Raccordement du tuyau d'arrivée d'eau et du tuyau d'évacuation ...... 44
Raccordement du circuit électrique ....................................................... 45
Installation des pièces de garniture; etablissement
de l'aplomb du lave-vaisselle .................................................................46
Arrimage de lave-vaisselle...................................................................... 48
Achever l'installation...............................................................................49
INSTRUCTIONS D'INSTALLATION DU PANNEAU DÉCORATIF ......... 50
Panneaux décoratifs de tiroirs personnalisés ........................................ 50
Préparation des panneaux personnalisés.............................................. 50
Installation des dispositifs de fixation de panneau ................................ 50
Montage du panneau décoratif.............................................................. 51
2
Page 3
DISHWASHER SAFETY
Your safety and the safety of others are very important.
We have provided many important safety messages in this manual and on your appliance. Always read and obey all safety
messages.
This is the safety alert symbol.
This symbol alerts you to potential hazards that can kill or hurt you and others.
All safety messages will follow the safety alert symbol and either the word “DANGER” or “WARNING.”
These words mean:
You can be killed or seriously injured if you don't immediately
DANGER
WARNING
All safety messages will tell you what the potential hazard is, tell you how to reduce the chance of injury, and tell you what can
happen if the instructions are not followed.
IMPORTANT SAFETY INSTRUCTIONS
WARNING: When using the dishwasher, follow basic precautions, including the following:
follow instructions.
can be killed or seriously injured if you don't
You
instructions.
follow
■ Read all instructions before using the dishwasher.
■ Use the dishwasher only for its intended function.
■ Use only detergents or rinse agents recommended for use
in a dishwasher, and keep them out of the reach of children.
■ When loading items to be washed:
1) Locate sharp items so that they are not likely to damage
the door seal; and
2) Load sharp knives with the handles up to reduce the risk
of cut-type injuries.
■ Do not wash plastic items unless they are marked
“dishwasher safe” or the equivalent. For plastic items not so
marked, check the manufacturer's recommendations.
■ Do not touch the heating element during or immediately
after use.
■ Do not operate the dishwasher unless all enclosure panels
are properly in place.
SAVE THESE INSTRUCTIONS
Do not open dishwasher drawer until inside cabinet opening.
Doing so can result in death or serious injury.
■ Do not tamper with controls.
■ Do not abuse, sit on, or stand on the door, lid, or dish racks
of the dishwasher.
■ To reduce the risk of injury, do not allow children to play in
or on the dishwasher.
■ Under certain conditions, hydrogen gas may be produced in
a hot water system that has not been used for two weeks or
more. HYDROGEN GAS IS EXPLOSIVE. If the hot water
system has not been used for such a period, before using
the dishwasher turn on all hot water faucets and let the
water flow from each for several minutes. This will release
any accumulated hydrogen gas. As the gas is flammable,
do not smoke or use an open flame during this time.
■ Remove the door or lid to the washing compartment
when removing an old dishwasher from service or
discarding it.
WARNING
Tip Over Hazard
You nee d to:
■ Slowly open dishwasher drawer while someone grasps the
rear of the dishwasher. Remove shipping materials. Close
dishwasher drawer. Latch the dishwasher drawer shut.
■ Observe all governing codes and ordinances.
■ Install this dishwasher as specified in these instructions.
■ Have everything you need to properly install dishwasher.
■ Contact a qualified installer to ensure that dishwasher is
installed to meet all electrical and plumbing national and local
codes and ordinances.
3
Page 4

INSTALLATION REQUIREMENTS
Tools and Parts
Gather the required tools and parts before starting installation.
Read and follow the instructions provided with any tools listed
here.
Too l s n ee de d
■ Pliers
■ Phillips screwdriver
■ Flat-blade screwdriver
■ ³⁄₁₆" and ¼" nut drivers or
hex sockets
■ Measuring tape or ruler
■ 1½" hole saw bit
Parts needed
A
■ 10" adjustable wrench
■ Utility knife
■ Level
■ Cordless drill
■ ¹⁄₈" drill bit
■ Security T-20 TORX
®†
driver (if installing custom
front panel)
Parts Supplied
Check that all parts are included.
A
B
C
E F
I
G
B
J
C
K
D
H
L
E
A. 72" (182.9 cm) flexible water supply line
B. Zip tie
C. Appropriate sized UL-listed wire connectors (2)
D. Handle (if installing custom front panel)
E. Custom panel (if installing custom front panel)
M
A.
³⁄₄
" UL-listed strain relief
B. 1.25" hose clamp
D
C. Mounting bracket screws (8)
D. Unit mounting screws (4)
E. Y drain connector
F. Mounting brackets (4)
G. Drain connector spring
clamps
H. Trim strips (2)
I. Toe kick brackets (2)
J. Toe kick bracket screws (2)
K. Toe kick trim
L. Panel fasteners (on some
models) (2)
®†
M. TORX
screws (on some
models) (10)
Location Requirements
IMPORTANT: Observe all governing codes and ordinances.
Failure to meet codes and ordinances could lead to fire or
electrical shock.
Proper installation is your responsibility.
■ Contact a qualified installer to ensure that the dishwasher is
installed to meet all electrical and plumbing national and local
codes and ordinances.
■ Install the dishwasher as specified in these instructions.
■ Have everything you need to properly install dishwasher.
■ Avoid damage from freezing to dishwasher and water lines
leading to dishwasher. Damage from freezing is not covered
by the warranty.
■ This dishwasher is manufactured for indoor use only.
■ Install and level dishwasher on a floor that will hold the weight,
and in an area suitable for its size and use.
†®TORX is a registered trademark of Acument Intellectual Properties, LLC
4
Page 5

Product Dimensions
Preferred Utililty Area
24"
(61 cm)
¹⁄₄"
19
(48.9 cm)
Installation Clearances
Cutout Dimensions
23³⁄₈"
(59.5 cm)
¹⁄₂"
1
(3.75 cm)
33³⁄₄"
(85.7 cm)
A
¹⁄₂"
(1.3 cm)
25"
(63.5 cm)
B
8"
(20.3 cm)
A. Left-hand or right-hand drain and water connection route.
B. Left-hand or right-hand electric connection route.
NOTES:
■ All holes should be drilled at 1½" (3.8 cm) diameter.
■ If the cabinet is wood, sand the hole until smooth. If the
cabinet is metal, cover the hole with a grommet (not provided).
■ A mating, grounded 3 prong outlet is required in a cabinet next
to the dishwasher opening.
Water Supply Requirements
■ A hot water line with 20-120 psi (138-862 kPa) water pressure.
■ 120°F (49°C) water temperature at dishwasher.
■ Flexible braided fill line (½" minimum plastic tubing is not
recommended).
23¹⁄₂"
(59.7 cm)
24"
(61 cm)
33³⁄₄"
(85.7 cm)
5
Page 6
Electrical Requirements
WARNING
Electrical Shock Hazard
Plug into a grounded 3 prong outlet.
Do not remove ground prong.
Do not use an adapter.
Do not use an extension cord.
Failure to follow these instructions can result in death,
fire, or electrical shock.
GROUNDING INSTRUCTIONS
■
For a grounded, cord-connected dishwasher:
The dishwasher must be grounded. In the event of a
malfunction or breakdown, grounding will reduce the
risk of electric shock by providing a path of least
resistance for electric current. The dishwasher is
equipped with a cord having an equipment-grounding
conductor and a grounding plug. The plug must be
plugged into an appropriate outlet that is installed and
grounded in accordance with all local codes and
ordinances.
WARNING: Improper connection of the
equipment-grounding conductor can result in a risk of
electric shock. Check with a qualified electrician or
service representative if you are in doubt whether the
dishwasher is properly grounded. Do not modify the
plug provided with the dishwasher; if it will not fit the
outlet, have a proper outlet installed by a qualified
electrician.
■
For a permanently connected dishwasher:
The dishwasher must be connected to a grounded
metal, permanent wiring system, or an equipmentgrounding conductor must be run with the circuit
conductors and connected to the equipmentgrounding terminal or lead on the dishwasher.
SAVE THESE INSTRUCTIONS
Direct Wire Connection
■ Use flexible, armored or nonmetalic sheathed, copper wire
with grounding wire that meets the wiring requirements for
your home and local codes and ordinances.
■ Use strain relief method provided with house wiring junction
box or install a UL-listed/CSA-certified clamp connector to the
house wiring junction box. If using conduit, use a
UL-listed/CSA-certified conduit connector.
Power Supply Cord Connection
Use Power Supply Cord Kit marked for use with dishwashers. Kit
contents include:
■ Voltex, Inc., UL-listed 16 gauge 3-wire power supply cord with
3 prong grounding plug
■ Neer C-500 ⁷⁄₈" strain relief
■ 3 wire connectors
■ Grommet
Follow the kit instructions for installing the power supply cord.
NOTE: Power supply cord must plug into a mating three prong,
grounded outlet, located in the cabinet next to the dishwasher
opening. Outlet must meet all local codes and ordinances.
IMPORTANT: If you plan to install a garbage disposal, an
additional separate 120-volt, 60 Hz, AC-only, 15- or 20-amp fused
electrical supply is required.
Drain Requirements
■ Use the new drain hose supplied with your dishwasher. If this
is not long enough, use a new drain hose with maximum
length of 12 ft (3.7 m) that meets all current AHAM/IAPMO test
standards, is resistant to heat and detergent, and fits the
1" (2.5 cm) drain connector of the dishwasher.
■ Connect drain hose to waste tee or disposer inlet above drain
trap in house plumbing and 20" (50.8 cm) minimum above the
floor. It is recommended that the drain hose either be looped
up and securely fastened to the underside of the counter, or
be connected to an air gap.
■ Use a drain air gap if the drain hose is connected to house
plumbing lower than 20" (50.8 cm) above the subfloor or floor.
Drain Air Gap
■ Use ½" (1.3 cm) minimum I.D. drain line fittings.
Contact a qualified electrician.
Ensure that the electrical installation is adequate and in
conformance with all national and local codes and ordinances.
Requirements:
■ 120-volt, 60 Hz, AC-only, 15- or 20-amp fused electrical
supply
■ Copper wire only, 2 wire with ground
Recommended:
■ Time-delay fuse or circuit breaker
■ Separate circuit
6
Page 7

INSTALLATION INSTRUCTIONS
WARNING
2. Drill 1½" (3.8 cm) diameter holes for drain and water hoses
and electrical wiring as shown. Holes should be placed
½" (1.3 cm) from back wall.
Electrical Shock Hazard
Disconnect electrical power at the fuse box or circuit
breaker box before installing dishwasher.
Failure to do so can result in death or electrical shock.
1. Disconnect power.
2. Turn off water supply.
Unpack Dish Drawer
WARNING
Excessive Weight Hazard
Use two or more people to move and install
dishwasher.
Failure to do so can result in back or other injury.
1. Read valuable information on exterior of shipping box before
opening.
2. Remove shipping materials, tape and film from the
dishwasher. Remove parts package from inside the
dishwasher.
A
¹⁄₂"
(1.3 cm)
25"
(63.5 cm)
B
8"
(20.3 cm)
A. Choose left-hand or right-hand drain and water hose route.
B. Choose left-hand or right-hand electric wire route.
3. Install mounting brackets 17" (43.2 cm) from floor using
screws provided. If needed, drill ¹⁄₈" pilot holes in cabinet.
Prepare Cabinet Opening
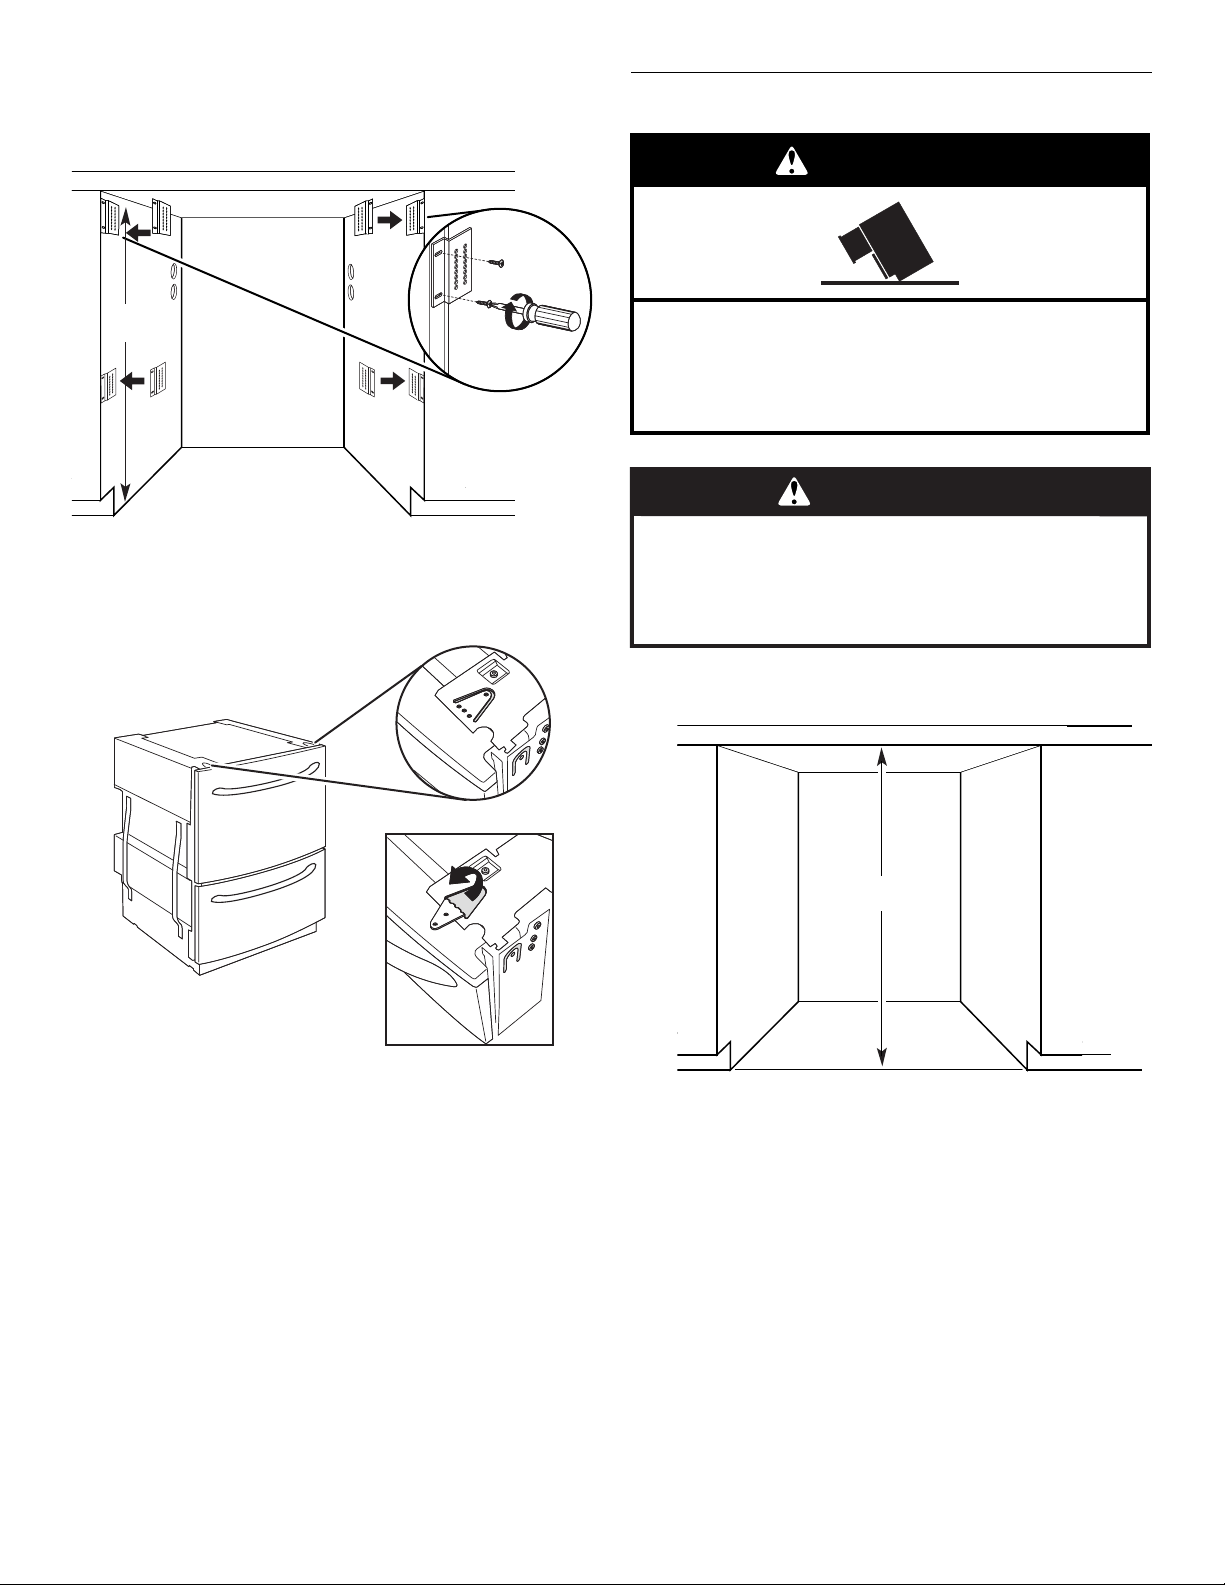
1. To ensure minimum clearance dimensions exist:
■ Measure the distance from the cabinet countertop to the
floor and ensure 33³⁄₄" (85.7 cm) minimum height.
■ Measure the distance from the front of the cabinet to the
back wall and ensure 24" (61 cm) minimum depth.
■ Measure the distance from the left-hand side to the right-
hand side of opening and ensure 23½" (59.7 cm) minimum
width.
17"
(43.2 cm)
4. Decide which dishwasher-to-counter attachment method will
be used.
7
Page 8
Option 1: Solid surface countertop installation
ST
A
R
T
S
T
A
T
■ Install second set of mounting brackets 33½" (85 cm) from
floor. If needed, drill ¹⁄₈" pilot holes in cabinet.
Prepare Dishwasher
WARNING
33¹⁄₂"
(85 cm)
Option 2: Wood countertop installation
■ Prepare dishwasher by folding over tabs located on the
top front as shown.
Tip Over Hazard
Do not open dishwasher drawer until inside cabinet
opening.
Doing so can result in death or serious injury.
WARNING
Excessive Weight Hazard
Use two or more people to move and install
dishwasher.
Failure to do so can result in back or other injury.
1. Measure cabinet opening height from floor to bottom of
countertop.
H
2. Place corner packaging on the floor and place dishwasher on
its back.
8
Page 9

3. Adjust leveling legs based on the cabinet opening
measurement and the chart below.
H : X H : X
33
³⁄₄
" (85.7 cm) : 0" 34
34" (86.3 cm) :
¹⁄₈
" (86.7 cm) :¼" (0.6 cm) 34
34
34
¹⁄₄
" (87 cm) :
34
³⁄₈
" (87.3 cm) :½" (1.3 cm) 35" (88.9 cm) :1
¹⁄₈
" (0.3 cm) 34
³⁄₈
" (1 cm) 34
¹⁄₂
" (87.6 cm) :
⁵⁄₈
" (87.9 cm) :
³⁄₄
" (88.3 cm) :
⁷⁄₈
" (88.6 cm) :1" (2.5 cm)
⁵⁄₈
" (1.6 cm)
³⁄₄
" (1.9 cm)
⁷⁄₈
" (2.2 cm)
¹⁄₈
" (2.9 cm)
Option 1: Right-hand side utility route
X
Route wire through 1½" (3.81 cm) hole located
8" (20.32 cm) above the floor.
After routing the electrical wire through the right-hand hole, attach
the wire to back left-hand side of cabinet wall 8" (20.32 cm) above
the floor. Then continue routing the wire along the left-hand side of
cabinet opening to the front of the opening.
4. Place dishwasher in upright position.
Route Electrical Wiring
WARNING
Electrical Shock Hazard
Disconnect electrical power at the fuse box or circuit
breaker box before installing dishwasher.
Failure to do so can result in death or electrical shock.
Follow all national and local codes and ordinances for completing
electrical supply to cabinet.
Option 2: Left-hand side utility route
Route wire through 1½" (3.81 cm) hole located 8"
(20.32 cm) above the floor.
After routing the electrical wire through the left-hand hole,
continue routing the wire along the left-hand side of cabinet to the
front of the opening.
9
Page 10
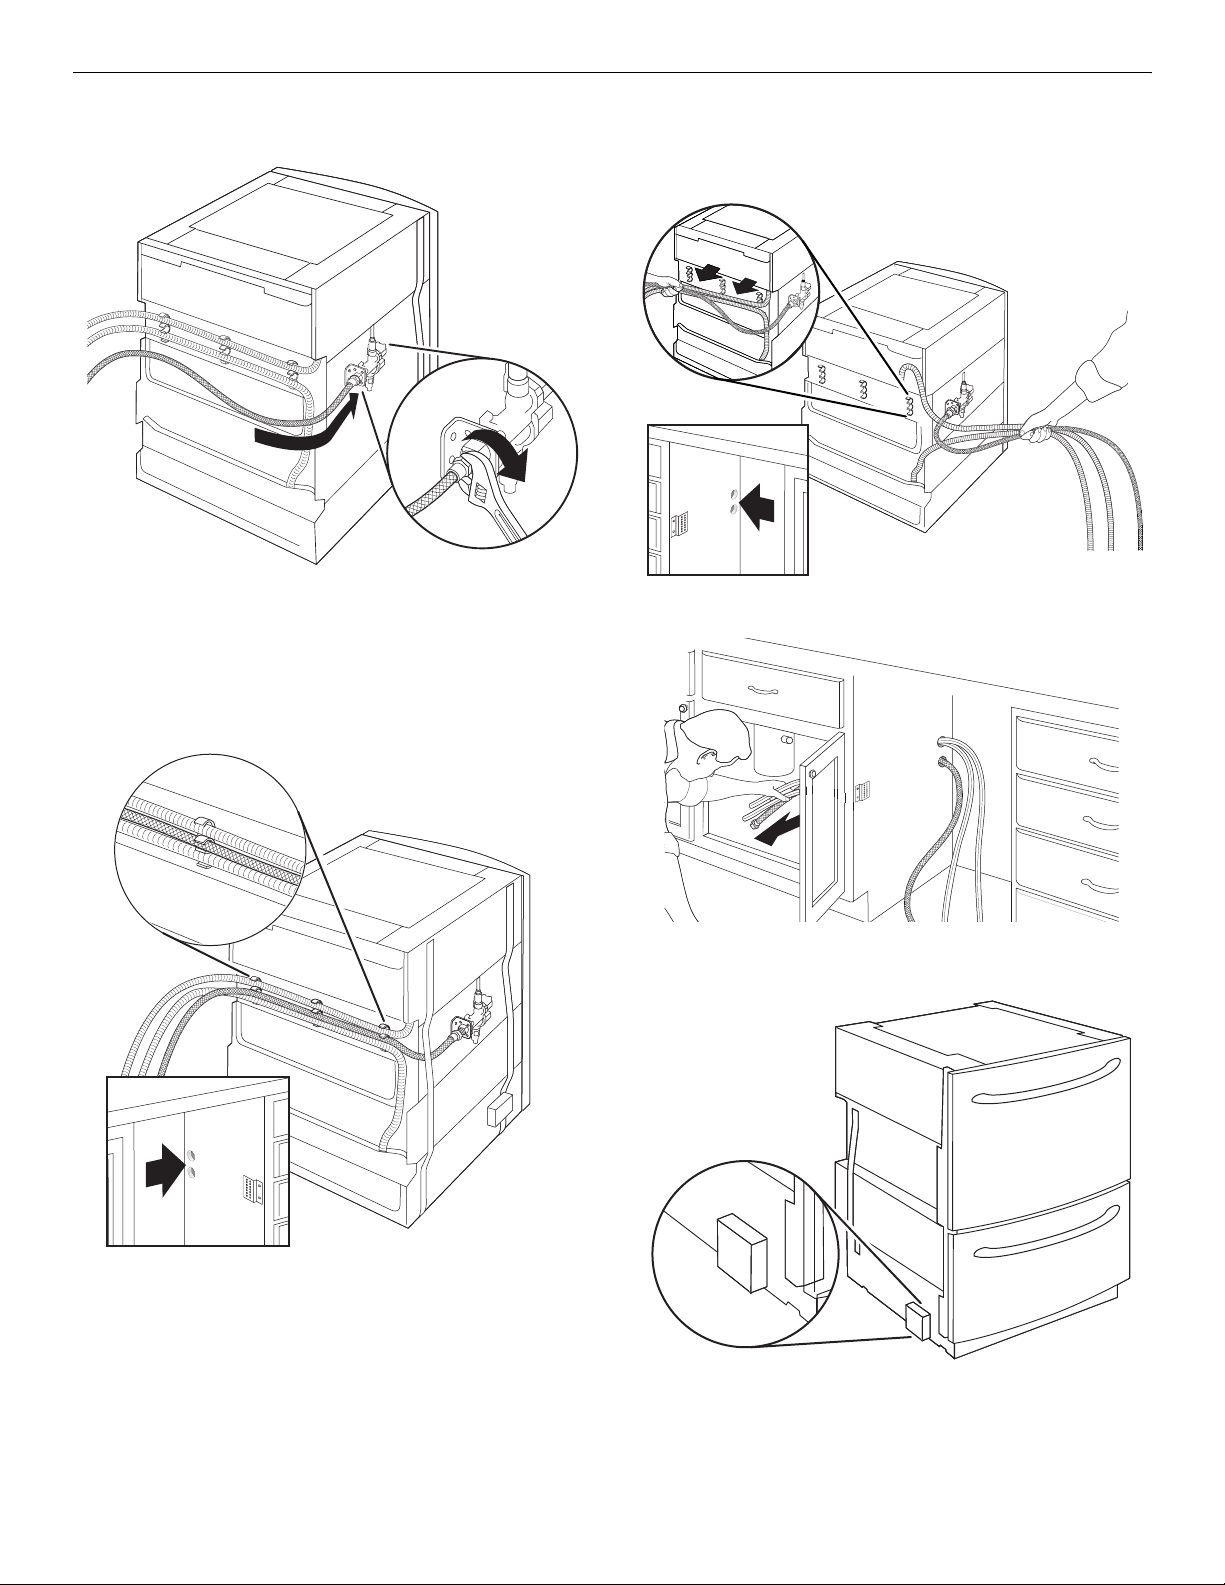
Route Water Supply Line and Drain Hose
1. Connect water supply line to water valve on dishwasher.
Option 2: Left-hand side utility access
■ For left-hand routing, remove drain hoses from the clips in
the rear bracket as shown.
2. Route water supply line and drain hoses based on your
cabinet requirements.
Option 1: Right-hand side utility access
■ For right-hand routing, water supply and drain hoses are
shipped in the correct position. Place the water supply line
in the clip as shown.
■ Route water supply line and drain hoses into the cabinet.
■ Slide dishwasher partway into the cabinet opening. Allow
for access to the electrical terminal box.
10
Page 11
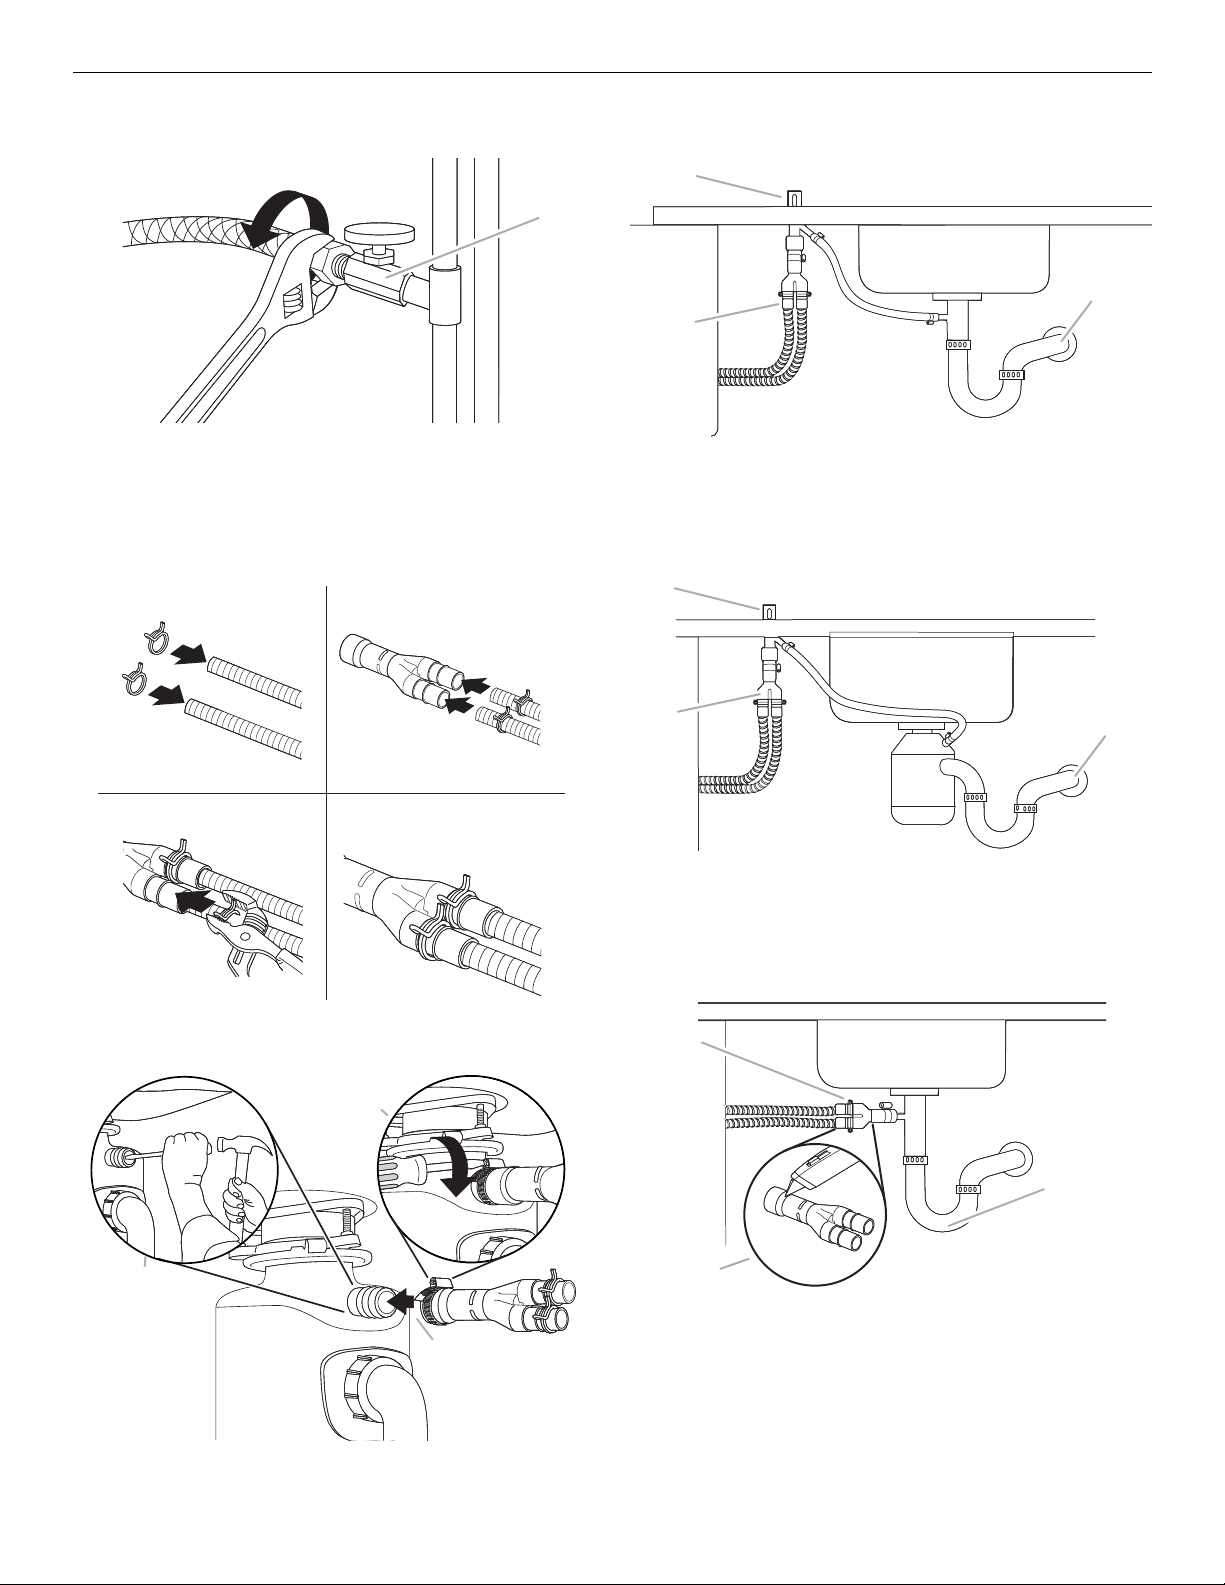
Connect Water Supply Line and Drain Hoses
A
C
1. Connect water supply line to the water valve under the sink.
A. Hot water supply
2. Slide clamps onto drain hoses (Figure A). Do not cut drain
hoses.
3. Push hoses into Y drain connector until fully seated (Figure B).
Several “clicks” will be heard.
4. Slide clamps into position (figures C and D).
AB
Option 2: No waste disposer and drain air gap
B
C
A
A. Drain hose connector
B. Drain air gap
C. Waste
Option 3: Waste disposer and drain air gap
A
CD
5. Connect the drain hose using one of the following options:
Option 1: Waste disposer no drain air gap
C
A
B
A. Drain hose connector
B. Drain air gap
C. Waste
Option 4: No waste disposer, no drain air gap
A
C
B
B
A. For new construction, remove disposer plug.
B. Connect drain connector to waste disposer.
C. Tighten clamp.
A. Drain hose connector
B. Cut drain connector
C. Waste
NOTE: Attach the drain hose connector to the water waste
line using the supplied hose clamp.
6. Turn on water and check for leaks.
11
Page 12
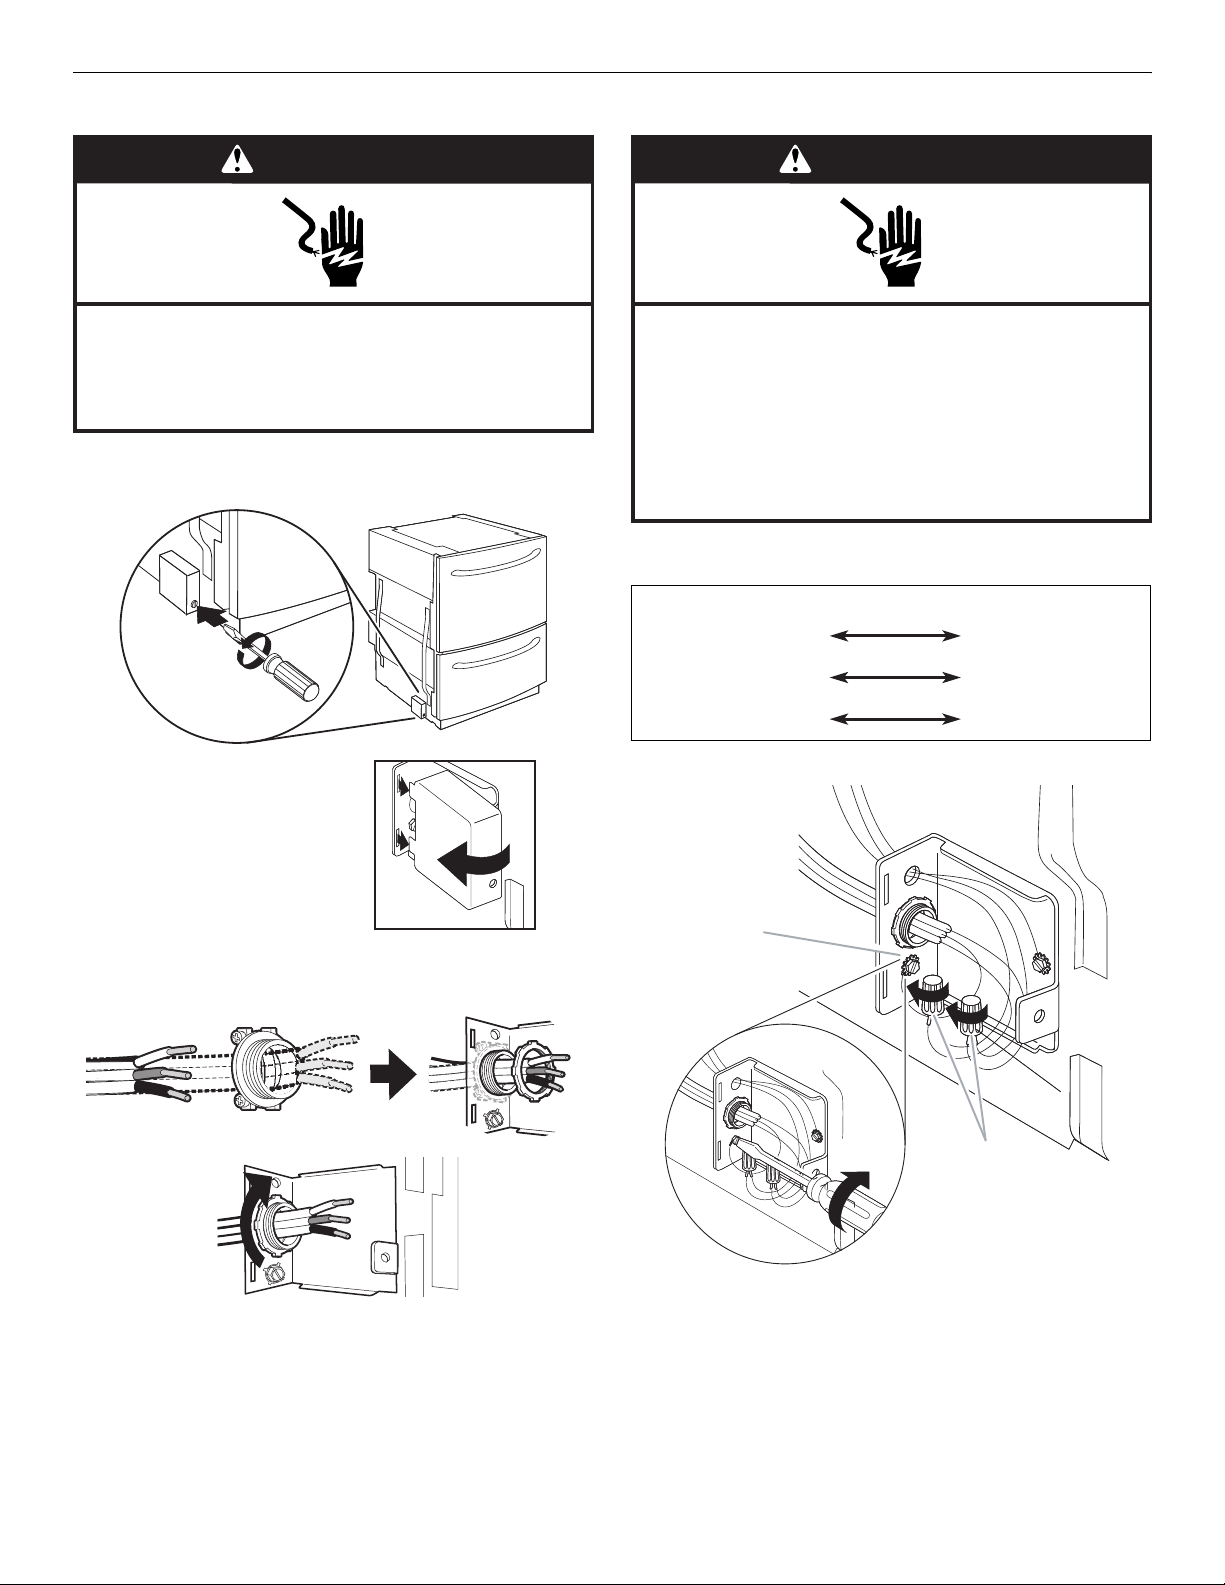
Make Electrical Connection
WARNING
Electrical Shock Hazard
Disconnect electrical power at the fuse box or circuit
breaker box before installing dishwasher.
Failure to do so can result in death or electrical shock.
1. Remove screw securing the electrical box cover. Remove
cover.
WARNING
Electrical Shock Hazard
Electrically ground dishwasher.
Connect ground wire to green ground connector in
terminal box.
Do not use an extension cord.
Failure to follow these instructions can result in death,
fire, or electrical shock.
4. Connect wires as follows using twist-on connectors sized to
connect direct wire to 16 gauge dishwasher wire.
Power supply wire: Terminal box wire:
white white
black black
ground wire ground connector
2. Route electrical wires through strain relief and secure to
electrical plate.
3. Tighten the conduit connector and strain relief screws.
5. Attach ground wire to the green ground screw.
A
B
A. Attach ground wire to green screw.
B. Attach white and black wires.
12
Page 13
6. Reinstall electric box cover with all wires contained inside the
terminal box.
4. Slide the dishwasher into position in the cabinet opening.
Check to ensure that the drain hose and electrical wiring are
not kinked.
5. Check left to right level by placing the level on the top of the
drawer. Check front to back level by placing level on the slide
rails.
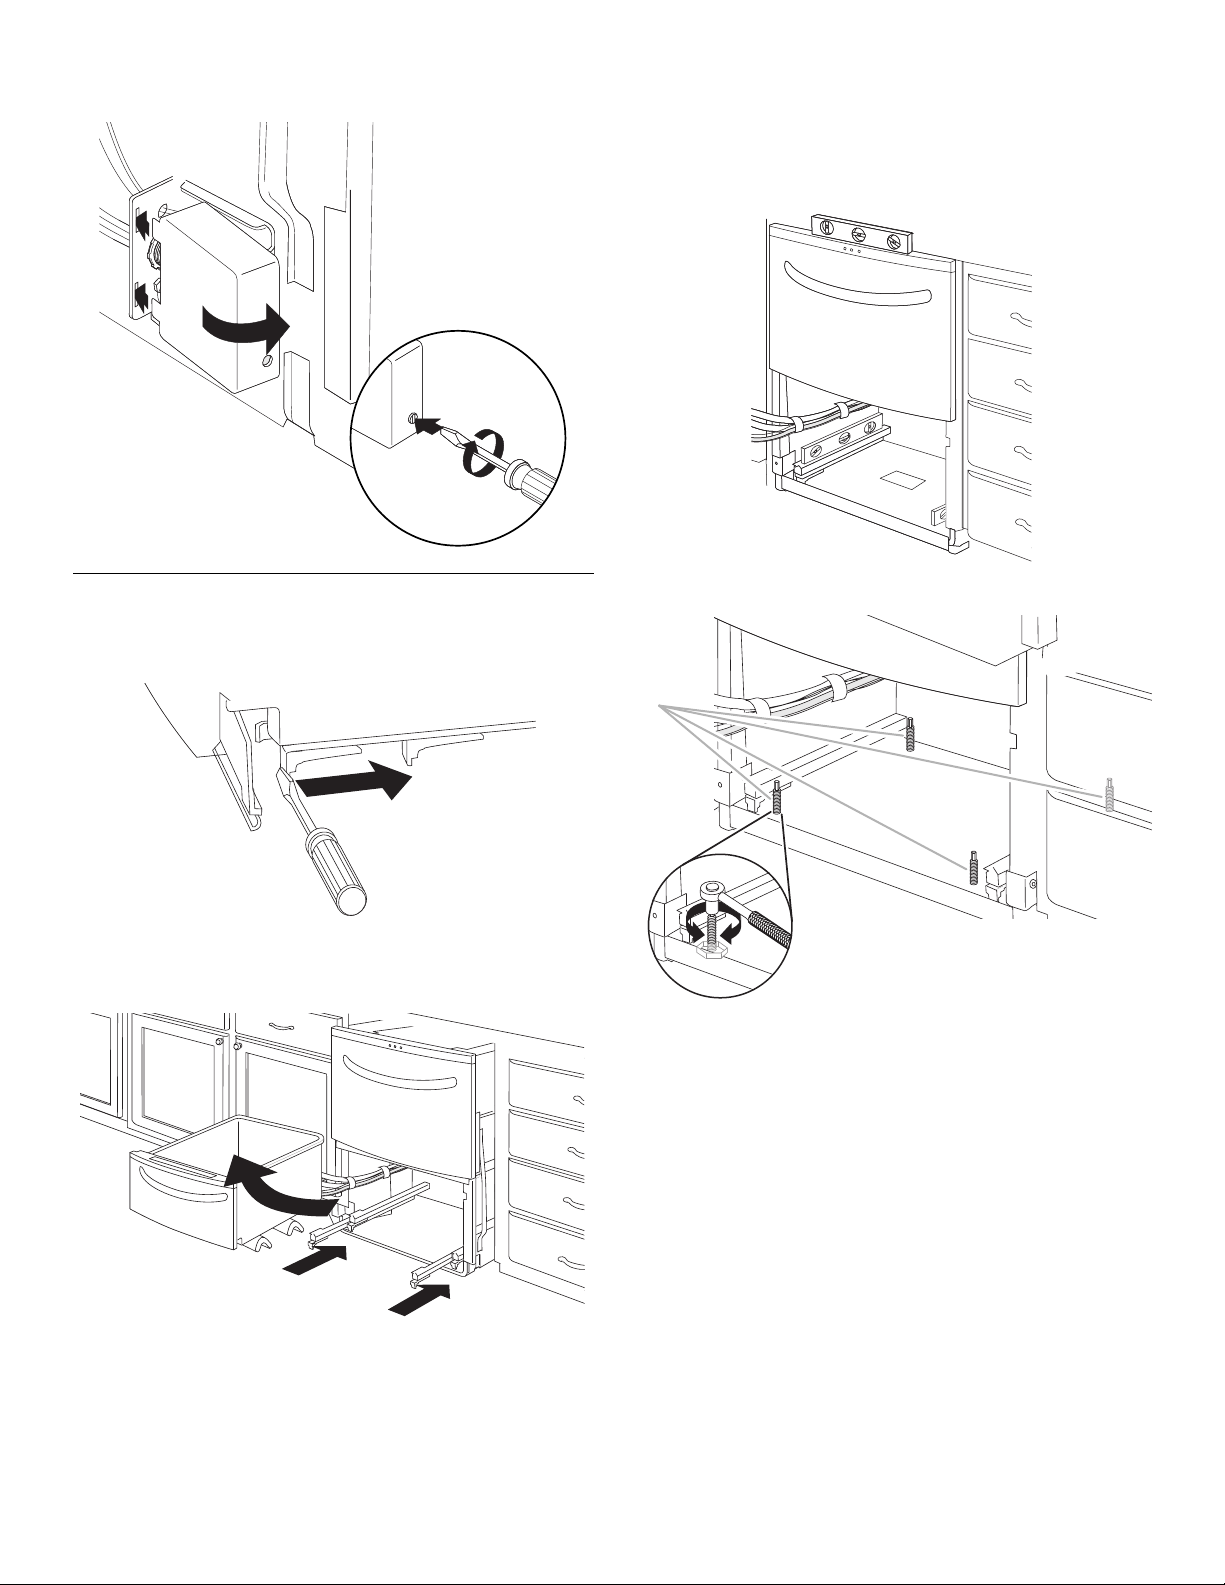
Install Trim Pieces and Level Dishwasher
1. Open bottom drawer.
2. Push in clips and slide rails back 5" (12.7 cm).
3. Lift drawer off slide rails. Place drawer off to the left on
covering. Slide rails into dishwasher.
1
1
6. Adjust legs with a ³⁄₁₆" socket wrench to level the dishwasher.
A
A. Adjust legs.
2
2
13
Page 14
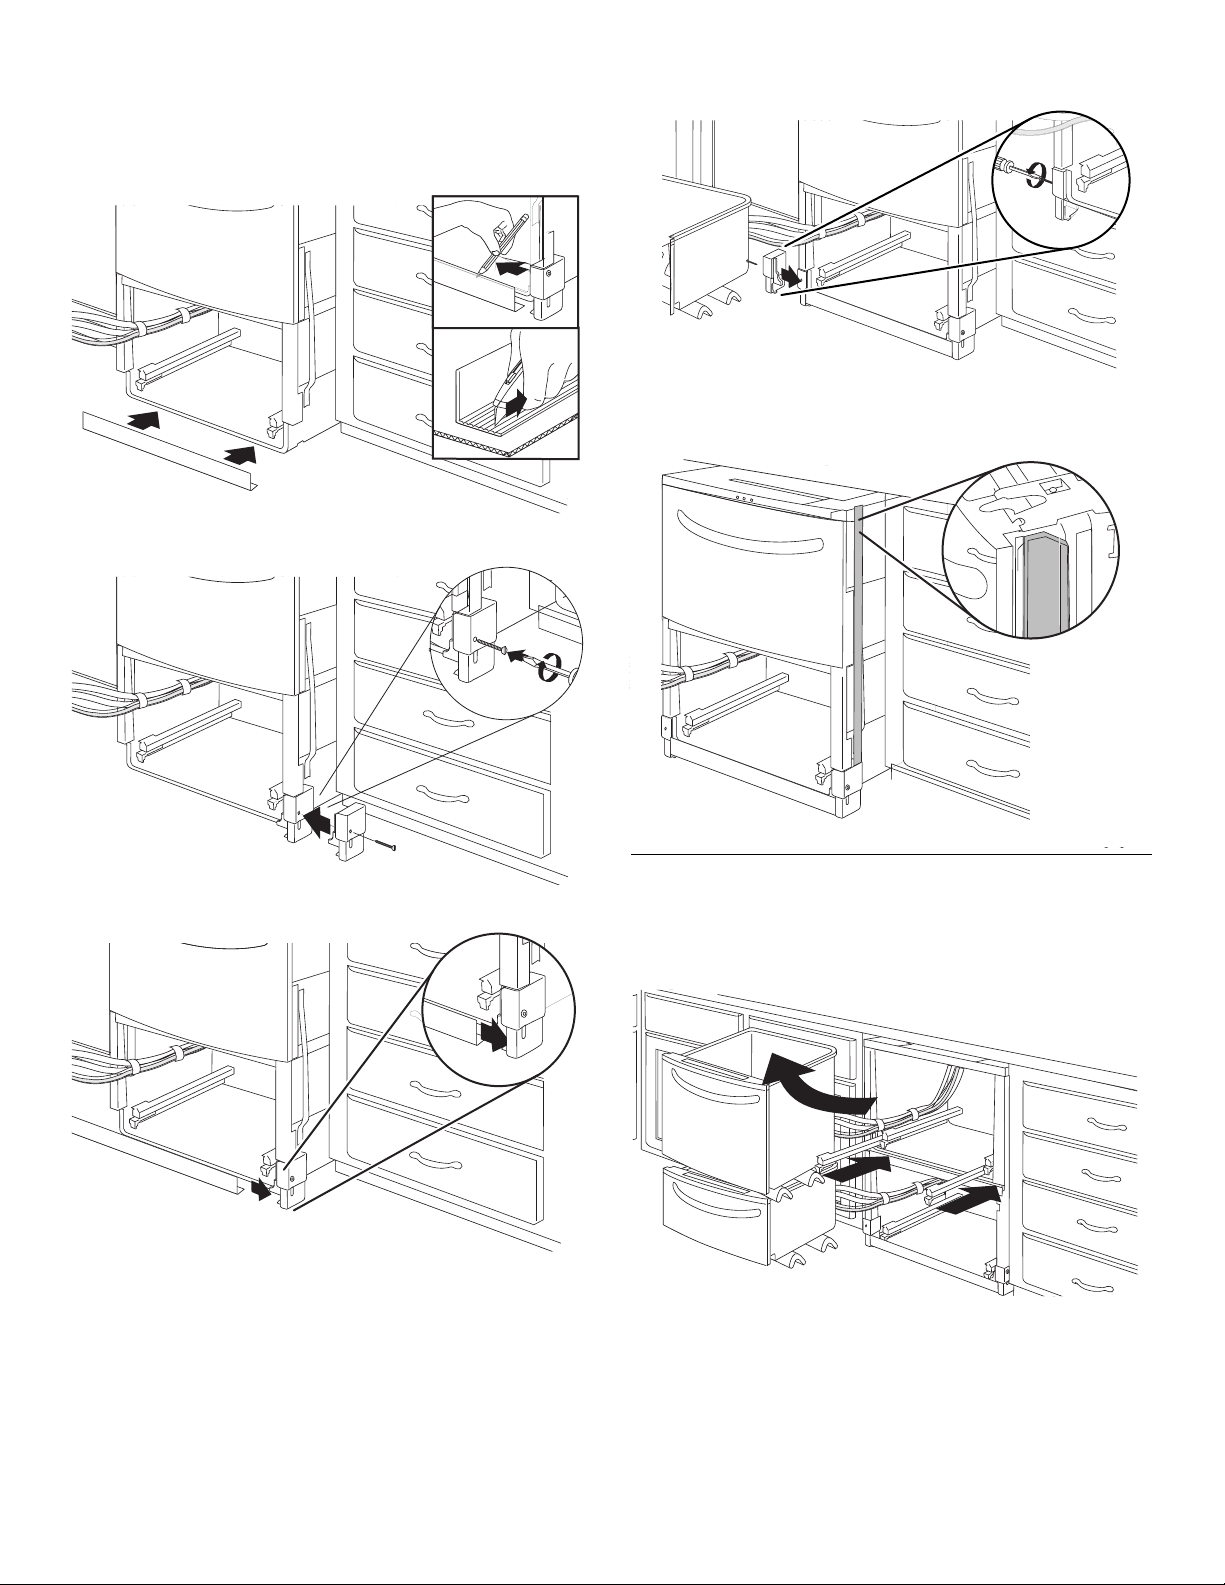
7. Rest trim strip on floor and mark trim at the top of the frame
flange height. Pick the closest groove to the mark. If the mark
is between two grooves, choose the groove that makes the
trim strip the shortest. On a covered surface, cut the trim strip
at the selected groove.
2
10. Attach toe kick bracket on the opposite side.
1
1
8. Attach the toe kick bracket to the frame.
9. Place trim strip into toe kick bracket.
3
11. Place flexible side trim strips on both sides as shown.
Secure Dishwasher
1. Remove top drawer (same procedure as followed to remove
bottom drawer) and set drawer on bottom drawer separated
with corner packaging.
14
1
1
2
2
Page 15
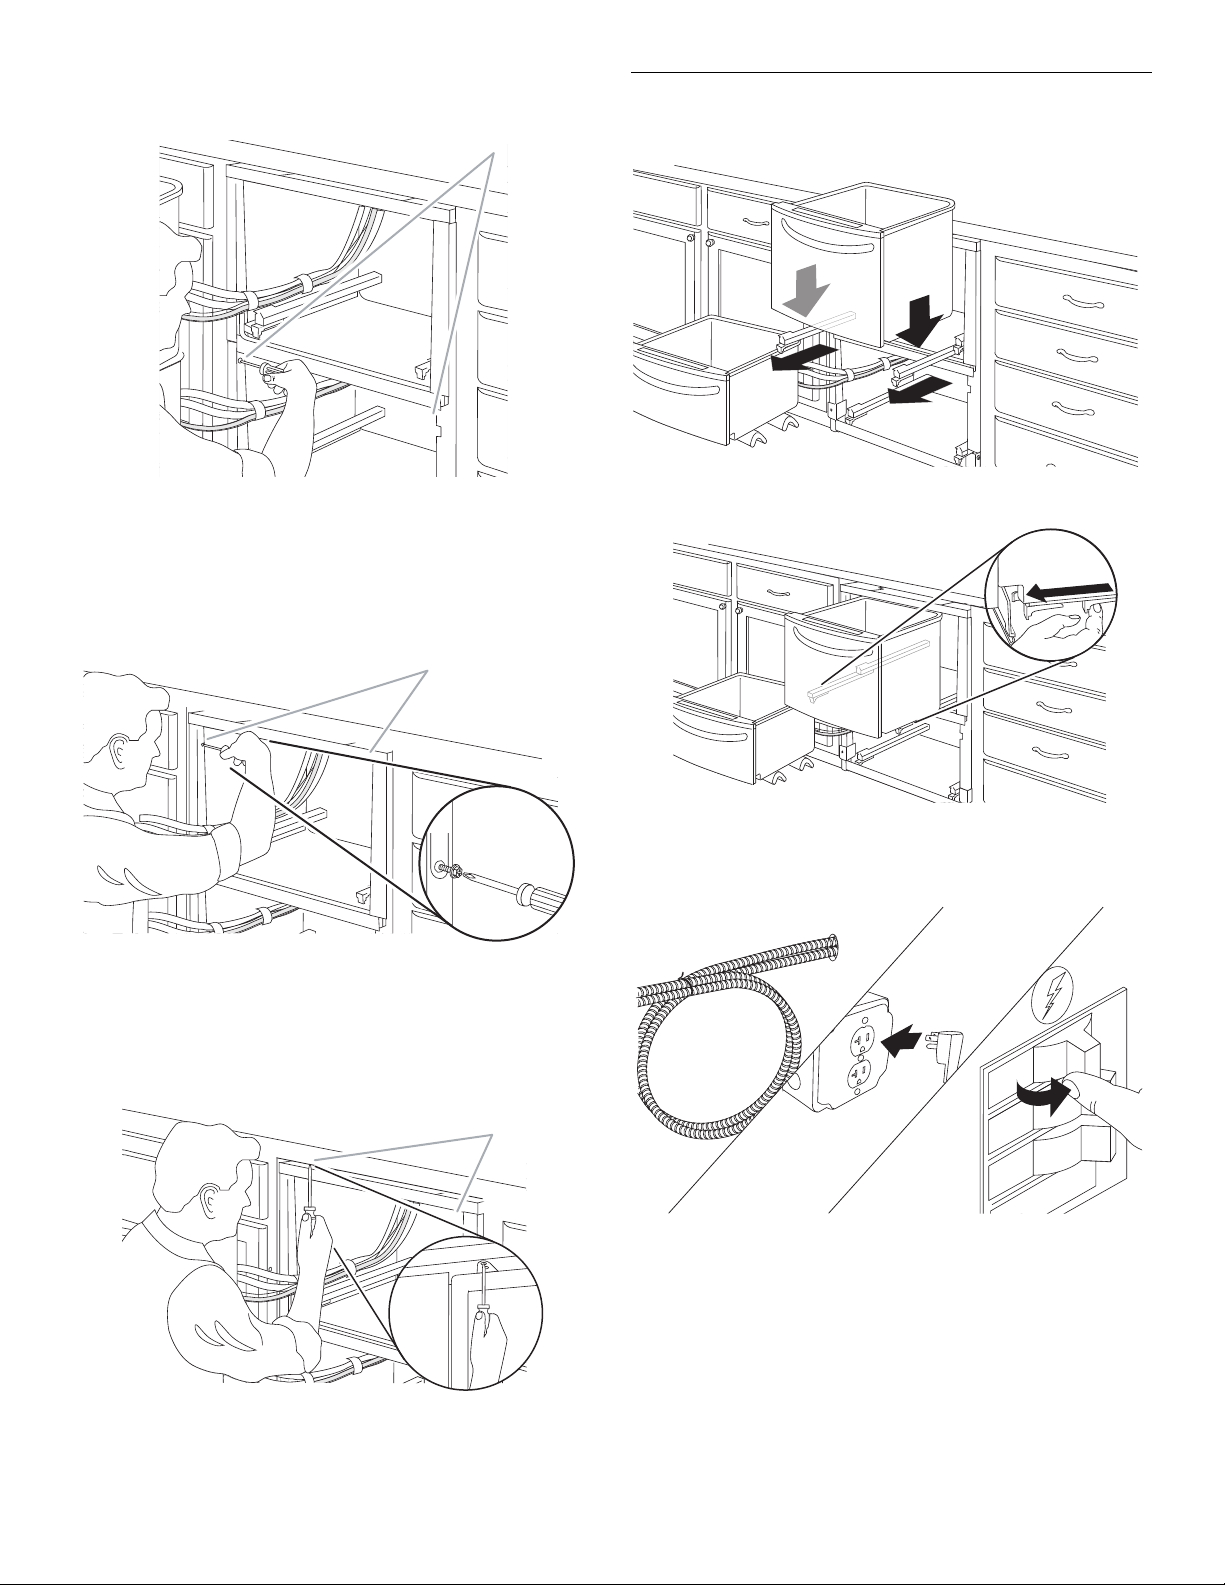
2. Attach dishwasher to the lower cabinet mounting bracket
1
2
ON
OFF
ON
OFF
OFF
(installed earlier).
A
Complete Installation
1. Pull top drawer slide rails out and set top drawer on slide rails.
2
2
1
1
A. Attach dishwasher to lower cabinet mounting bracket.
3. Attach dishwasher to upper cabinet mounting brackets.
Option 1: Solid surface countertop
Attach dishwasher to the side cabinet mounting brackets
(installed earlier).
A
A. Attach dishwasher to side cabinet mounting brackets.
Option 2: Wood countertop
Attach the dishwasher to the countertop using the folded over
mounting tabs located on the top of the dishwasher.
2. Pull slide rails forward until they snap into position.
3. Push top drawer in and repeat above steps for bottom drawer.
4. In the cabinet under the sink, coil excess drain hose and wrap
with a zip tie. Plug in dishwasher or reconnect the power.
A
A. Attach dishwasher to countertop using folded over mounting tabs.
5. Select the Rinse Only cycle and press START/RESUME. Allow
the dishwasher to fill, rinse and drain. Check for leaks. If leaks
are found, secure the connection and repeat this step.
If you need Assistance or Service:
Please reference the “Assistance or Service” section of the User
Instructions or contact the dealer from whom you purchased your
dishwasher.
15
Page 16
CUSTOM PANEL INSTALLATION INSTRUCTIONS
Custom Drawer Panel
If you plan to install a custom wood panel, you will need to create
the panel yourself or consult a qualified cabinetmaker or
carpenter. See dimension drawings for panel specifications.
IMPORTANT:
■ The thickness of the custom panel must be ¹⁄₂" (12.7 mm) to
³⁄₄" (19.05 mm).
■ Do not exceed the height dimension for the custom panel.
Panel that exceeds the height dimension may damage the
drawer dishwasher, cabinets or countertop.
■ The width of the custom panel may vary according to the
width of the cabinet opening.
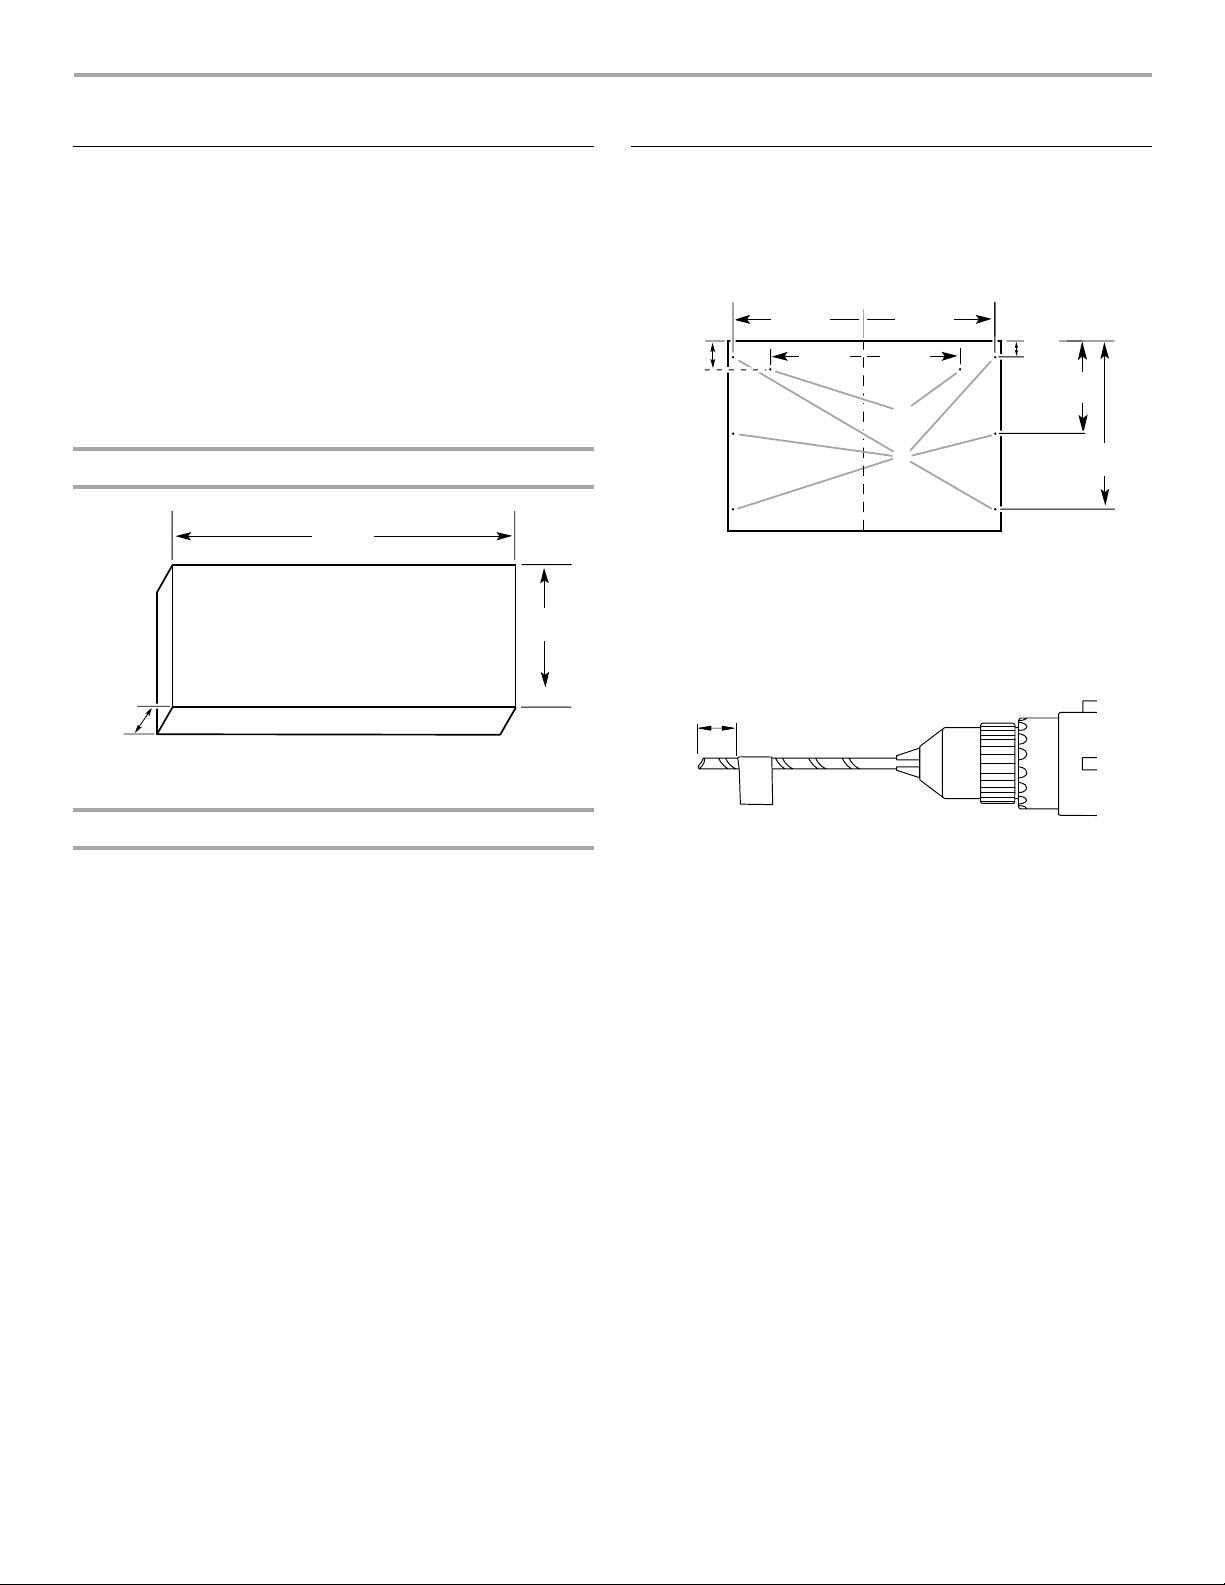
Custom Panel Dimensions
23⁷⁄₁₆"
(59.5 cm)
16¹⁄₄"
(41.3 cm)
³⁄₄"
(1.9 cm)
Preparing Custom Panel
1. Lay the custom panel face down on a clean, soft work
surface.
2. On the back of the panel, use a pencil to mark the
centerpoints for the 8 pilot holes needed for the panel.
11¹⁄₄"
2¹⁄₂"
(6.3 cm)
(28.5 cm)
(20.7 cm)
A. Center line
B. Panel fastener pilot holes (2)
C. Pilot holes (6)
3. Using a ¹⁄₈" drill, drill each hole ³⁄₈" (1 cm) deep.
³⁄₈" (1 cm)
A
11¹⁄₄"
8¹⁄₈"
(28.5 cm)
8¹⁄₈"
(20.7 cm)
B
C
1¹⁄₂"
(3.8 cm)
(20.2 cm)
8"
(36.6 cm)
14¹⁄₈"
Hardware Installation
Center the hardware (left to right) onto the custom panel. When
installing the hardware, be sure that the mounting screws are flush
with the back of the custom panel.
IMPORTANT: To avoid drilling through to the front of the
custom panel, do not drill deeper than ³⁄₈" (1 cm).
16
Page 17

Install Panel Fasteners
1. Remove the 2 panel fasteners from the face of the inner door.
2. Screw the 2 panel fasteners into the panel fastener pilot holes
of the custom panel.
Custom Decorative Panel
Mount the Custom Panel
Custom Decorative Panel Only
1. Remove the tape from the green ground wire on the custom
decorative panel. The end of the green ground wire is factoryattached to the custom decorative panel.
2. Attach the ring connector end of the green ground wire on the
custom decorative panel to the ring connector and ground
screw on the dishwasher drawer intermediate panel.
A
B
Custom Wood Panel
2. To secure the custom panel onto the drawer, push the custom
panel down until the top of the custom panel is flush with the
top of the control panel.
3. Using the screws provided, secure the custom panel to the
inner door by screwing through the inner door and into the ¹⁄₈"
(3.2 mm) pilot holes.
A. Green ground wire
B. Ground screw
Custom Decorative Panel or Custom Wood Panel
1. Mount the custom panel to the drawer by aligning the panel
fasteners to the 2 keyhole slots and insert the panel.
17
Page 18

Notes
18
Page 19

SEGURIDAD DE LA LAVAVAJILLAS
Su seguridad y la seguridad de los demás es muy importante.
Hemos incluido muchos mensajes importantes de seguridad en este manual y en su electrodoméstico. Lea y obedezca siempre
todos los mensajes de seguridad.
Este es el símbolo de advertencia de seguridad.
Este símbolo le llama la atención sobre peligros potenciales que pueden ocasionar la muerte o una lesión a
usted y a los demás.
Todos los mensajes de seguridad irán a continuación del símbolo de advertencia de seguridad y de la palabra
“PELIGRO” o “ADVERTENCIA”. Estas palabras significan:
PELIGRO
ADVERTENCIA
Todos los mensajes de seguridad le dirán el peligro potencial, le dirán cómo reducir las posibilidades de sufrir una lesión y lo que
puede suceder si no se siguen las instrucciones.
Si no sigue las instrucciones de inmediato, usted puede
morir o sufrir una lesión grave.
Si no sigue las instrucciones, usted puede morir o sufrir
una lesión grave.
INSTRUCCIONES IMPORTANTES DE SEGURIDAD
ADVERTENCIA: Cuando use la lavavajillas siga precauciones básicas, incluyendo las siguientes:
■ Lea todas las instrucciones antes de usar la lavavajillas.
■ Use la lavavajillas únicamente para las funciones que fue
diseñada.
■ Use únicamente detergentes o agentes de enjuague
recomendados para ser usados en las lavavajillas y
manténgalos fuera del alcance de los niños.
■ Al introducir los artículos para lavar:
1) Coloque los artículos puntiagudos de manera que no
dañen el sello de la puerta
2) Introduzca los cuchillos filosos con los mangos hacia
arriba para reducir el riesgo de cortaduras.
■ No lave artículos de plástico que no lleven la indicación
“lavables en la lavavajillas” u otra similar. Lea las
recomendaciones del fabricante para los artículos de
plástico que no lleven tal indicación.
■ No toque el elemento de calefacción durante o
inmediatamente después de usar la lavavajillas.
■ No haga funcionar la lavavajillas a menos que todos los
paneles estén colocados debidamente en su lugar.
■ No juegue con los controles.
■ No abuse, ni se siente ni se pare sobre la puerta, la tapa o
sobre las canastas de la lavavajillas.
■ Para reducir el riesgo de lesión, no permita que los niños
jueguen dentro ni sobre la lavavajillas.
■ Bajo ciertas condiciones, un sistema de agua caliente que
no ha sido usado por dos semanas o más puede producir
gas hidrógeno. EL GAS HIDRÓGENO ES EXPLOSIVO. Si
el sistema de agua caliente no ha sido usado por ese
período, abra todas las llaves de agua caliente y deje que
corra el agua por varios minutos antes de usar la
lavavajillas. Esto permitirá que los gases acumulados
escapen. Debido a que el gas es inflamable, no fume ni
encienda ninguna llama abierta durante este tiempo.
■ Quite la puerta o la tapa del compartimiento de lavado
cuando remueva o deje de usar para siempre una vieja
lavavajillas.
GUARDE ESTAS INSTRUCCIONES
ADVERTENCIA
Peligro de Vuelco
No abra el cajón de la lavavajillas hasta que la misma esté dentro de la abertura del armario.
No seguir estas instrucciones puede ocasionar la muerte o heridas serias.
19
Page 20

Usted necesita:
■ Abrir despacio el cajón de la lavavajillas mientras otra persona
agarra la parte posterior de la lavavajillas. Quite el material de
transporte. Cierre el cajón de la lavavajillas. Cierre y asegure el
cajón de la lavavajillas.
■ Observar todos los códigos y reglamentos aplicables.
REQUISITOS DE INSTALACIÓN
Piezas y herramientas
Reúna las herramientas y piezas necesarias antes de comenzar la
instalación. Lea y siga las instrucciones provistas con cualquiera
de las herramientas enlistadas aquí.
Herramientas necesarias
■ Pinzas
■ Destornillador Phillips
■ Destornillador de hoja
plana
■ Llave de tuercas o llave
de tubo hexagonal de ³⁄₁₆"
y ¼".
■ Cinta de medir o regla
■ Sierra perforadora de 1½"
Piezas necesarias
■ Llave de tuercas ajustable
de 10"
■ Cuchillo para uso general
■ Nivel
■ Taladro inalámbrico
■ Broca de ¹⁄₈"
■ Destornillador de
seguridad T-20 TORX
®†
(si
va a instalar un panel
frontal a la medida)
■ Instalar esta lavavajillas como se especifica en estas
instrucciones.
■ Tener todo lo necesario para instalar la lavavajillas
adecuadamente.
■ Ponerse en contacto con un instalador calificado para
asegurarse de que la lavavajillas haya sido instalada de
manera que cumpla con todos los códigos y ordenanzas
eléctricos y de plomería nacionales y locales.
Piezas suministradas
Verifique que estén todas las piezas.
A
B
E F
I
C
G
D
A
E
A. Línea de suministro de agua flexible de 72" (182,9 cm)
B. Atadura
C. Conectores de tamaño apropiado para cables que se
encuentren en la lista de UL (2)
D. Herrajes (si va a instalar un panel frontal a la medida)
E. Panel a la medida (si va a instalar un panel frontal a la
medida)
B
H
J
C
K
L
M
A. Protector de cables de
que esté en la lista de UL
D
B. Abrazadera para manguera
de 1,25"
C. Tornillos para los soportes
de montaje (8)
D. Tornillos de montaje para la
unidad (4)
E. Conector de desagüe en
forma de “Y”
F. Soportes de montaje (4)
G. Abrazaderas tipo resorte
para el conector del
desagüe
³⁄₄
"
H. Tiras de adorno (2)
I. Soportes para la cubierta
protectora (2)
J. Tornillos para el soporte de la
cubierta protectora (2)
K. Adorno para la cubierta
protectora
L. Sujetadores para panel (en
algunos modelos) (2)
M. Tornillos TORX
modelos) (10)
®†
(en algunos
†®TORX es una marca registrada de Acument Intellectual
Properties, LLC
20
Page 21

Requisitos de ubicación
IMPORTANTE: Observe todos los códigos y reglamentos
aplicables. Si no se siguen los códigos y ordenanzas, esto podría
hacer que se produzca un incendio o choque eléctrico.
La instalación correcta es su responsabilidad.
■ Póngase en contacto con un instalador calificado para
asegurarse que la lavavajillas haya sido instalada de manera
que cumpla con todos los códigos y ordenanzas eléctricos y
de plomería nacionales y locales.
■ Instale la lavavajillas como se especifica en estas
instrucciones.
■ Tenga todo lo necesario para instalar la lavavajillas
adecuadamente.
■ Evite los daños ocasionados por congelamiento a la
lavavajillas y a las líneas de agua que van a la misma. Los
daños ocasionados por congelamiento no están cubiertos
bajo la garantía.
■ Esta lavavajillas fue fabricada únicamente para uso interior.
■ Instale y nivele la lavavajillas en un piso que pueda soportar
su peso y en un área adecuada para su tamaño y uso.
Espacios libres para la instalación
Dimensiones de corte
23¹⁄₂"
(59,7 cm)
24"
(61 cm)
33³⁄₄"
(85,7 cm)
Medidas del producto
24"
(61 cm)
¹⁄₄"
19
(48,9 cm)
23³⁄₈"
(59,5 cm)
¹⁄₂"
1
(3,75 cm)
33³⁄₄"
(85,7 cm)
Área de servicio preferida
A
¹⁄₂"
(1,3 cm)
25"
(63,5 cm)
B
8"
(20,3 cm)
A. Ruta hacia la izquierda o hacia la derecha para la conexión
del desagüe y del agua.
B. Ruta hacia la izquierda o hacia la derecha para la conexión
eléctrica.
NOTAS:
■ Todos los orificios deben ser taladrados con un diámetro de
1½" (3,8 cm).
■ Si el armario es de madera, lije el orificio hasta que esté liso.
Si el armario es de metal, cubra el orificio con un aro de
refuerzo (no provisto).
■ Se requiere que haya un contacto apropiado de pared de
3 terminales, conectado a tierra, en un armario que se
encuentre al lado de la abertura de la lavavajillas.
Requisitos del suministro de agua
■ Una tubería de agua caliente con presión de agua de 20-
120 lb/pulg² (138-862 kPa).
■ Temperatura del agua en la lavavajillas de 120°F (49°C).
■ Línea de llenado flexible trenzada (no se recomienda una
tubería de plástico de un mínimo de ½".
21
Page 22

Requisitos eléctricos
ADVERTENCIA
Peligro de Choque Eléctrico
Conecte a un contacto de pared de conexión a tierra de
3 terminales.
No quite la terminal de conexión a tierra.
No use un adaptador.
No use un cable eléctrico de extensión.
No seguir estas instrucciones puede ocasionar
la muerte, incendio o choque eléctrico.
INSTRUCCIONES DE
CONEXIÓN A TIERRA
■
Para una lavavajillas con cable eléctrico y conexión a
tierra:
La lavavajillas debe estar conectada a tierra. En caso de
funcionamiento defectuoso o avería, la conexión a tierra
reduce el riesgo de choque eléctrico al establecer una
ruta de menor resistencia para la corriente eléctrica. La
lavavajillas viene equipada con un cable eléctrico que
tiene un conductor para conexión a tierra y un enchufe
con conexión a tierra. El enchufe debe ser conectado a
un contacto apropiado que esté instalado y conectado a
tierra de acuerdo con todos los códigos y ordenanzas
locales.
ADVERTENCIA:
conductor de conexión a tierra puede resultar en riesgo
de choque eléctrico. Pregunte a un electricista calificado
o a un agente de servicio si no está seguro si la
lavavajillas está adecuadamente conectada a tierra. No
modifique el enchufe que viene con la lavavajillas. Si no
cabe en el contacto, pida que un electricista calificado
instale un contacto apropiado.
■
Para lavavajillas con conexión permanente:
La lavavajillas deberá estar conectada a un sistema
permanente de cableado eléctrico con conexión a tierra
de metal, o se debe instalar un alambre de tierra junto
con los alambres del circuito y conectarse a la terminal o
al alambre de tierra del equipo en la lavavajillas.
GUARDE ESTAS INSTRUCCIONES
La conexión inadecuada del
Recomendamos:
■ Un fusible retardador o un cortacircuitos.
■ Un circuito separado.
Conexión por cable directo
■ Use alambre de cobre blindado flexible o forrado no metálico
con el alambre de puesta a tierra, el cual cumpla con los
requisitos de cableado para su casa y con los códigos y
ordenanzas locales.
■ Use el método de protector de cables provisto con la caja de
empalmes del cableado de la casa, o instale un conector tipo
abrazadera que esté en la lista de UL y certificado por CSA, a
la caja de empalmes del cableado de la casa. Si va a usar un
conducto, utilice un conector de conducto que esté en la lista
de UL y sea certificado por CSA.
Conexión por cable de suministro de energía
■ Use el juego del cable de suministro eléctrico que esté
marcado para usarse con lavavajillas. El juego incluye:
■ Cable de suministro eléctrico de 3 hilos, calibre 16, en la
lista de UL, marca Voltex, Inc. con un enchufe con
conexión a tierra de 3 hilos.
■ Protector de cables marca Neer C-500 de ⁷⁄₈"
■ Conectores para 3 hilos
■ Aro de refuerzo
Para la instalación del cable de suministro eléctrico, siga las
instrucciones del juego.
NOTA: El cable de suministro eléctrico debe conectarse a un
contacto apropiado de pared de 3 terminales, con conexión a
tierra, ubicado en el armario que se encuentra al lado de la
abertura de la lavavajillas. El contacto debe cumplir con todos los
códigos y ordenanzas locales.
IMPORTANTE: Si planea instalar un recipiente de desechos, se
requiere tener un suministro eléctrico separado adicional, de
120 voltios, 60 Hz, CA solamente, de 15 ó 20 amperios, con
fusible.
Requisitos de desagüe
■ Use la manguera nueva de desagüe provista con su
lavavajillas. Si no es lo suficientemente larga, use una
manguera de desagüe nueva con una longitud máxima de
12 pies (3,7 m), que cumpla con todos los estándares
actuales de AHAM/IAMPO (por sus siglas en inglés, los
Fabricantes Estadounidenses de Electrodomésticos para Uso
Doméstico y la Asociación Internacional de Funcionarios de
Fontanería y Mecánica), que sea resistente al calor y al
detergente y encaje en el conector de desagüe de 1" (2,5 cm)
de la lavavajillas.
■ Conecte la manguera de desagüe al tubo de desperdicios en
“T” o a la entrada del recipiente de desechos que se
encuentra arriba del sifón de desagüe en la tubería de la casa,
y a un mínimo de 20" (50,8 cm) del piso. Se recomienda que la
manguera de desagüe se enlace y quede asegurada
firmemente a la parte inferior del mostrador, o que se conecte
a una purga de aire.
■ Use una purga de aire del desagüe si la manguera de desagüe
está conectada a la tubería de la casa a una altura menor a las
20" (50,8 cm) sobre el contrapiso o el piso.
Póngase en contacto con un electricista calificado.
Asegúrese que la conexión eléctrica sea adecuada y de
conformidad con todos los códigos y ordenanzas locales.
Usted debe tener:
■ Un suministro eléctrico de 120 voltios, 60 hertzios, CA
solamente, de 15 ó 20 amperios y protegido con fusible.
■ Solamente alambre de cobre de 2 hilos con conexión a tierra.
22
Page 23

Purga de aire del desagüe
INSTRUCCIONES DE INSTALACIÓN
ADVERTENCIA
Peligro de Choque Eléctrico
Desconecte el suministro de energía en la caja de
fusibles o cortacircuitos antes de instalar
la lavavajillas.
No seguir esta instrucción puede ocasionar la muerte o
choque eléctrico.
1. Desconecte el suministro de energía.
2. Cierre el suministro de agua.
■ Use accesorios para la linea de desagüe con un diámetro
interior de ½" (1,3 cm) como mínimo.
2. Taladre orificios de 1½" (3,8 cm) de diámetro para las
mangueras de agua y desagüe, y para el cableado eléctrico,
como se muestra. Los orificios se deben hacer a una distancia
de ½" (1,3 cm) de la pared posterior.
A
¹⁄₂"
(1,3 cm)
25"
(63,5 cm)
B
8"
(20,3 cm)
Desempaque el cajón para platos
ADVERTENCIA
Peligro de Peso Excesivo
Use dos o más personas para mover e instalar
la lavavajillas.
No seguir esta instrucción puede ocasionar una
lesión en la espalda u otro tipo de lesiones.
1. Antes de abrirlo, lea la información importante que se
encuentra en el exterior de la caja de embalaje.
2. Quite los materiales de envío, la cinta adhesiva y la película
protectora de la lavavajillas. Retire el paquete de piezas del
interior de la lavavajillas.
Prepare la abertura en el armario
1. Para aseguarse de que tenga los espacios libres mínimos:
■ Mida la distancia del mostrador del armario al piso y
asegúrese de tener un mínimo de 33³⁄₄" (85,7 cm) de
altura.
■ Mida la distancia del frente del armario a la pared
posterior y asegúrese de tener un mínimo de 24" (61 cm)
de profundidad.
■ Mida la distancia del lado izquierdo al derecho de la
abertura y asegúrese de tener un mínimo de 23½"
(59,7 cm) de ancho.
A. Elija una ruta hacia la derecha o hacia la izquierda para las
mangueras de desagüe y de agua.
B. Elija una ruta hacia la derecha o hacia la izquierda para el
cableado eléctrico.
3. Instale los soportes de montaje a una distancia de 17"
(43,2 cm) del piso, usando los tornillos provistos. De ser
necesario, taladre orificios piloto de ¹⁄₈" en el armario.
17"
(43,2 cm)
4. Decida qué método de sujeción usará para asegurar la
lavavajillas al mostrador.
23
Page 24

Opción 1: Instalación para un mostrador de superficie
ST
A
R
T
S
T
A
T
sólida
■ Instale el segundo juego de soportes de montaje a una
distancia de 33½" (85 cm) del piso. De ser necesario,
taladre orificios piloto de ¹⁄₈" en el armario.
Prepare la lavavajillas
ADVERTENCIA
33¹⁄₂"
(85 cm)
Opción 2: Instalación para un mostrador de madera
■ Prepare la lavavajillas doblando las lengüetas ubicadas en
la parte frontal superior, como se muestra.
Peligro de Vuelco
No abra el cajón de la lavavajillas hasta que la misma
esté dentro de la abertura del armario.
No seguir estas instrucciones puede ocasionar
la muerte o heridas serias.
ADVERTENCIA
Peligro de Peso Excesivo
Use dos o más personas para mover e instalar
la lavavajillas.
No seguir esta instrucción puede ocasionar una
lesión en la espalda u otro tipo de lesiones.
1. Mida la altura de la abertura del armario del piso a la parte
inferior del mostrador.
H
2. Coloque los esquineros en el piso y apoye la lavavajillas sobre
su lado posterior.
24
Page 25

3. Ajuste las patas niveladoras según la medida de la abertura
del armario y la tabla a continuación.
X
H : X H : X
33
³⁄₄
" (85,7 cm) : 0" 34
34" (86,3 cm) :
¹⁄₈
" (86,7 cm) :¼" (0,6 cm) 34
34
34
¹⁄₄
" (87 cm) :
34
³⁄₈
" (87,3 cm) :½" (1,3 cm) 35" (88,9 cm) :1
¹⁄₈
" (0,3 cm) 34
³⁄₈
" (1 cm) 34
¹⁄₂
" (87,6 cm) :
⁵⁄₈
" (87,9 cm) :
³⁄₄
" (88,3 cm) :
⁷⁄₈
" (88,6 cm) :1" (2,5 cm)
⁵⁄₈
" (1,6 cm)
³⁄₄
" (1,9 cm)
⁷⁄₈
" (2,2 cm)
¹⁄₈
" (2,9 cm)
4. Coloque la lavavajillas en posición vertical.
Opción 1: Ruta de servicio del lado derecho
Dirija el cable a través del orificio de 1½" (3,81 cm)
ubicado a 8" (20,32 cm) del piso.
Después de dirigir el cable eléctrico a través del orificio en el lado
derecho, sujete el cable al lado posterior izquierdo de la pared del
armario a 8" (20,32 cm) del piso. Luego continúe dirigiendo el
cable a lo largo del lado izquierdo de la abertura del armario hacia
el frente de la misma.
Dirija el cableado eléctrico
ADVERTENCIA
Peligro de Choque Eléctrico
Desconecte el suministro de energía en la caja de
fusibles o cortacircuitos antes de instalar
la lavavajillas.
No seguir esta instrucción puede ocasionar la muerte o
choque eléctrico.
Siga todos los códigos y ordenanzas locales y nacionales para
completar el suministro eléctrico a la carcasa.
Opción 2: Ruta de servicio del lado izquierdo
Dirija el cable a través del orificio de 1½" (3,81 cm) ubicado a
8" (20,32 cm) del piso.
Después de dirigir el cable eléctrico a través del orificio en el lado
izquierdo, continúe dirigiendo el cable a lo largo del lado izquierdo
del armario hacia el frente de la abertura.
25
Page 26

Dirija la línea de suministro de agua y la manguera de desagüe
1. Conecte la línea de suministro de agua a la válvula de agua de
la lavavajillas.
Opción 2: Acceso de servicio por el lado izquierdo
■ Para dirigir por el lado izquierdo, saque las mangueras de
desagüe de los sujetadores en el soporte posterior, como
se muestra.
2. Dirija la línea de suministro de agua y las mangueras de
desagüe según los requisitos de su armario.
Opción 1: Acceso de servicio por el lado derecho
■ Para dirigir por el lado derecho, las mangueras de
suministro de agua y de desagüe vienen empaquetadas
en la posición correcta. Coloque la línea del suministro de
agua en el sujetador, como se muestra.
■ Dirija la línea del suministro de agua y las mangueras de
desagüe hacia el interior del armario.
■ Deslice la lavavajillas parcialmente dentro de la abertura
del armario. Deje espacio para tener acceso a la caja de
terminales eléctricas.
26
Page 27

Conecte la línea de suministro de agua y las mangueras de desagüe
A
1. Conecte la línea del suministro de agua a la válvula de agua
que se encuentra debajo del fregadero.
A. Suministro de agua caliente
5. Conecte la manguera de desagüe usando una de las
siguientes opciones:
Opción 1: Recipiente de desechos sin purga de aire de
desagüe
C
A
2. Deslice las agarraderas en las mangueras de desagüe
(Figura A). No corte las mangueras de desagüe.
3. Conecte las mangueras al conector de desagüe en forma de
“Y” hasta que encajen por completo (Figura B). Se
escucharán varios sonidos de “clic”.
4. Deslice las abrazaderas a su posición (figuras C y D).
AB
CD
B
A. Para una obra de contrucción nueva, quite el tapón del
recipiente de desechos.
B. Una el conector del desagüe al recipiente de desechos.
C. Apriete la abrazadera.
Opción 2: Sin recipiente de desechos ni purga de aire de
desagüe
B
C
A
A. Conector de la manguera de desagüe
B. Purga de aire del desagüe
C. Tubo de desechos
27
Page 28

Opción 3: Recipiente de desechos y purga de aire de
C
desagüe
A
B
A. Conector de la manguera de desagüe
B. Purga de aire del desagüe
C. Tubo de desechos
Opción 4: Sin recipiente de desechos ni purga de aire de
desagüe
A
C
B
A. Conector de la manguera de desagüe
B. Corte el conector del desagüe
C. Tubo de desechos
NOTA: Sujete el conector de la manguera de desagüe a la línea
de desechos de agua, usando la agarradera para manguera
provista.
6. Abra la llave del agua y revise si hay fugas.
Conexión del suministro eléctrico
2. Dirija los cables eléctricos a través del protector de cables y
sujételos a la placa eléctrica.
Apriete el conector del conducto y los tornillos del
3.
protector de cables.
ADVERTENCIA
ADVERTENCIA
Peligro de Choque Eléctrico
Desconecte el suministro de energía en la caja de
fusibles o cortacircuitos antes de instalar
la lavavajillas.
No seguir esta instrucción puede ocasionar la muerte o
choque eléctrico.
1. Quite el tornillo que sujeta la tapa de la caja eléctrica. Quite la
tapa.
28
Peligro de Choque Eléctrico
Conecte a tierra la lavavajillas.
Conecte el alambre de conexión a tierra al conector
verde de conexión a tierra en la caja de conexiones.
No use un cable eléctrico de extensión.
No seguir estas instrucciones puede ocasionar
la muerte, incendio o choque eléctrico.
4. Conecte los cables como se describe a continuación, usando
ataduras en los conectores del tamaño adecuado para
conectar el cable directo al cable de la lavavajillas de calibre
16.
Page 29

5.
Cable de
suministro
eléctrico:
blanco blanco
negro negro
Cable de la caja
de terminales:
Instale las piezas de adorno y nivele la
lavavajillas
1. Abra el cajón inferior.
2. Trabe los sujetadores y deslice los rieles 5" (12,7 cm) hacia
dentro.
hilo de puesta a
tierra
6. Conecte el alambre de conexión a tierra al tornillo verde de
conexión a tierra.
conector de
puesta a tierra
A
B
3. Levante y quite el cajón de los rieles deslizables. Coloque el
cajón a la izquierda, sobre una cubierta. Deslice los rieles
dentro de la lavavajillas.
1
1
2
A. Sujete el alambre de conexión a tierra al tornillo verde
B. Conecte el alambre blanco y el negro
7. Vuelva a colocar la tapa de la caja eléctrica con todos los
alambres dentro de la caja de terminales.
2
4. Deslice la lavavajillas a su posición en la abertura del armario.
Revise que la manguera de desagüe y el cableado eléctrico
no estén retorcidos.
5. Revise la nivelación de izquierda a derecha colocando el nivel
encima del cajón. Revise la nivelación de adelante hacia atrás
colocando el nivel sobre los rieles deslizables.
29
Page 30

6. Para nivelar la lavavajillas, ajuste las patas con una llave de
tubo de ³⁄₁₆".
A
A. Ajuste las patas
7. Coloque la tira de adorno en el piso y haga una marca en el
mismo, en la parte superior de la altura del reborde del marco.
Elija la ranura más cercana a la marca. Si la marca se
encuentra entre dos ranuras, elija la ranura que hace la tira de
adorno más corta. Sobre una superficie protectora, corte la
tira de adorno en la ranura elegida.
9. Coloque la tira de adorno en el soporte de la cubierta
protectora.
10. Sujete el soporte de la cubierta protectora al lado contrario.
1
1
8. Sujete el soporte de la cubierta protectora al marco.
2
11. Coloque las tiras de adorno flexibles en ambos lados, como
se muestra.
3
30
Page 31

Asegure la lavavajillas
1
1
2
1. Quite el cajón superior (se sigue el mismo procedimiento que
para quitar el cajón inferior), y colóquelo sobre el cajón
inferior, separándolos con los esquineros del embalaje.
1
Opción 1: Mostrador de superficie sólida
Sujete la lavavajillas a los soportes de montaje lateral de la
carcasa (los cuales se instalaron anteriormente).
A
1
2. Sujete la lavavajillas al soporte de montaje inferior de la
carcasa (el cual se instaló anteriormente).
2
2
A
A. Sujete la lavavajillas a los soportes de montaje laterales de la carcasa.
Opción 2: Mostrador de madera
Sujete la lavavajillas al mostrador usando las lengüetas de
montaje dobladas, ubicadas en la parte superior de la
lavavajillas.
A
A. Sujete la lavavajillas al soporte de montaje inferior de la carcasa.
3. Sujete la lavavajillas a los soportes de montaje superiores de
la carcasa.
A. Sujete la lavavajillas al mostrador usando las lengüetas
de montaje dobladas.
31
Page 32

Complete la instalación
ON
OFF
ON
OFF
OFF
1. Jale hacia afuera los rieles deslizables del cajón superior y
coloque el cajón superior en los mismos.
2
2
1
1
2. Jale hacia adelante los rieles deslizables hasta que encajen en
su posición.
3. Empuje el cajón superior hacia adentro y repita los pasos
anteriores con el cajón inferior.
4. En la carcasa que se encuentra debajo del fregadero,
enrosque la manguera de desagüe que sobre y amárrela con
una atadura. Enchufe la lavavajillas o reconecte el suministro
de energía.
5. Seleccione el ciclo Rinse Only (Sólo enjuague) y presione
START/RESUME (Inicio/Reanudar). Espere a que la
lavavajillas se llene y lleve a cabo el enjuague y el desagüe.
Revise si hay fugas. Si encuentra fugas, asegure la conexión y
repita este paso.
Si necesita ayuda o servicio técnico:
Sírvase consultar la sección “Ayuda o servicio técnico” de las
Instrucciones para el usuario o póngase en contacto con el
distribuidor en donde usted compró la lavavajillas.
32
Page 33

INSTRUCCIONES DE INSTALACIÓN DEL PANEL A LA MEDIDA
Panel del cajon a la medida
Si va a instalar un panel de madera a la medida, deberá hacerlo
usted mismo o consultar un carpintero o fabricante de armarios
calificado. Para obtener información acerca de las
especificaciones de los paneles, vea los gráficos dimensionales.
IMPORTANTE:
■ El grosor del panel a la medida debe ser de ¹⁄₂" (12,7 mm) a ³⁄₄"
(19,05 mm).
■ No sobrepase la medida de altura establecida para el panel a
la medida. El panel que sobrepasa la medida de altura puede
dañar la lavavajillas de cajón, los armarios o el mostrador.
■ El ancho del panel a la medida puede variar de acuerdo con el
ancho de la abertura del armario.
Dimensiones del panel a la medida
23⁷⁄₁₆"
(59,5 cm)
16¹⁄₄"
(41,3 cm)
¹⁄₄"
(1,9 cm)
Preparación del panel a la medida
1. Coloque el panel a la medida boca abajo en una superficie
limpia y lisa.
2. Sobre la parte posterior del panel, use un lápiz para marcar
los puntos centrales de los 8 orificios guía que son necesarios
para el panel.
11¹⁄₄"
2¹⁄₂"
(6,3 cm)
(28,5 cm)
(20,7 cm)
A. Línea central
B. Orificios guía para el sujetador del panel (2)
C. Orificios guía (6)
3. Con un taladro de ¹⁄₈", haga cada orificio de una profundidad
de ³⁄₈" (1 cm).
³⁄₈" (1 cm)
A
8¹⁄₈"
11¹⁄₄"
(28,5 cm)
8¹⁄₈"
(20,7 cm)
B
C
1¹⁄₂"
(3,8 cm)
(20,2 cm)
8"
14¹⁄₈"
(36,6 cm)
Instalación de los herrajes
Centre los herrajes (de izquierda a derecha) sobre el panel a la
medida. Asegúrese al instalar los herrajes que los tornillos de
montaje estén al ras con la parte trasera del panel a la medida.
IMPORTANTE: Para evitar taladrar hasta atravesar el frente
del panel a la medida, no taladre a una profundidad de más
de ³⁄₈" (1 cm).
Cómo instalar los sujetadores del panel
1. Quite los 2 sujetadores del panel del frente de la puerta
interior.
2. Atornille los 2 sujetadores del panel en los orificios guía para
los sujetadores del panel a la medida.
33
Page 34

Cómo montar el panel a la medida
Panel decorativo a la medida solamente
1. Quite la cinta del hilo verde a tierra en el panel decorativo a la
medida. El extremo del hilo verde a tierra está sujetado al
panel decorativo a la medida.
2. Sujete el extremo del conector de anillo del alambre verde de
conexión a tierra, ubicado en el panel decorativo a la medida,
al conector de anillo y el tornillo de conexión a tierra en el
panel intermedio del cajón de la lavavajillas.
A
B
Panel de madera a la medida
2. Para asegurar el panel a la medida al cajón, ponga presión
sobre el panel hasta que la parte superior del panel a la
medida esté alineada con la parte superior del panel de
control.
3. Usando los tornillos provistos, asegure el panel a la medida a
la puerta interior atornillando a través de la misma, hasta los
orificios guía de ¹⁄₈" (3,2 mm).
A. Hilo verde a tierra
B. Tornillo a tierra
Panel decorativo a la medida o panel de madera a la
medida
1. Para colocar el panel a la medida en el cajón, alinee los
sujetadores del panel a las dos ranuras de cerradura e inserte
el panel.
Panel decorativo a la medida
34
Page 35

Notas
35
Page 36

SÉCURITÉ DU LAVE-VAISSELLE
Votre sécurité et celle des autres est très importante.
Nous donnons de nombreux messages de sécurité importants dans ce manuel et sur votre appareil ménager. Assurez-vous de
toujours lire tous les messages de sécurité et de vous y conformer.
Voici le symbole d’alerte de sécurité.
Ce symbole d’alerte de sécurité vous signale les dangers potentiels de décès et de blessures graves à vous
et à d’autres.
Tous les messages de sécurité suivront le symbole d’alerte de sécurité et le mot “DANGER” ou
“AVERTISSEMENT”. Ces mots signifient :
Risque possible de décès ou de blessure grave si vous ne
DANGER
AVERTISSEMENT
Tous les messages de sécurité vous diront quel est le danger potentiel et vous disent comment réduire le risque de blessure et
ce qui peut se produire en cas de non-respect des instructions.
IMPORTANTES INSTRUCTIONS DE SÉCURITÉ
AVERTISSEMENT :
Lors de l’utilisation du lave-vaisselle, suivre les précautions élémentaires dont les suivantes :
suivez pas immédiatement les instructions.
Risque possible de décès ou de blessure grave si vous
ne suivez pas les instructions.
■ Lire la totalité des instructions avant d’utiliser le
lave-vaisselle.
■ N’utiliser le lave-vaisselle que pour laver la vaisselle.
■ Utiliser les détersifs ou agents de rinçage recommandés
pour lave-vaisselle et les garder hors de la portée des
enfants.
■ Lorsque vous chargez le lave-vaisselle :
1) Placer les objets coupants de façon qu’ils ne puissent
endommager le joint de la porte; et
2) Placer les couteaux le manche vers le haut de façon à ne
pas vous couper.
■ Ne pas laver d’articles en plastique à moins qu’ils ne soient
marqués “Peut aller au lave-vaisselle” ou l’équivalent. Si
l’article ne porte aucune indication, vérifier auprès du
fabricant.
■ Ne pas toucher l’élément chauffant pendant le
fonctionnement ou immédiatement après.
CONSERVEZ CES INSTRUCTIONS
AVERTISSEMENT
Ne pas ouvrir le tiroir du lave-vaisselle jusqu'à ce qu'il soit placé à l'intérieur de l'ouverture
du placard.
Le non-respect de ces instructions peut causer un décès ou des blessures graves.
■ Ne pas faire fonctionner le lave-vaisselle si tous les
panneaux de l’enceinte ne sont pas en place.
■ Ne pas jouer avec les commandes.
■ Ne pas abuser, vous asseoir ni monter sur la porte,
le couvercle ou les paniers du lave-vaisselle.
■ Pour éviter tout risque d’accident, ne pas laisser les
enfants jouer dans ou sur le lave-vaisselle.
■ Sous certaines conditions, de l’hydrogène peut se former
dans un réseau d’eau chaude inutilisé depuis deux
semaines ou plus. L’HYDROGÈNE EST UN GAZ
EXPLOSIBLE. Si le système d’eau chaude n’a pas été
utilisé depuis un certain temps, laisser couler l’eau chaude
des robinets pendant quelques minutes avant de faire
fonctionner le lave-vaisselle. Cette mesure permettra à
l’hydrogène de s’évaporer. Ce gaz étant inflammable, ne
pas fumer ni utiliser de flamme nue pendant cette période.
■ Enlever la porte ou le couvercle du compartiment de lavage
lorsque vous remplacez ou mettez au rebut un vieux
lave-vaisselle.
Risque de basculement
36
Page 37

Opérations à exécuter :
■ Ouvrir lentement le tiroir du lave-vaisselle tandis qu'une autre
personne saisit/retient l'arrière du lave-vaisselle. Retirer les
matériaux d'emballage. Fermer le tiroir du lave-vaisselle.
Verrouiller le tiroir du lave-vaisselle.
■ Respecter les prescriptions de tous les codes et règlements
en vigueur.
EXIGENCES D'INSTALLATION
Outillage et composants
Rassembler les outils et pièces nécessaires avant de commencer
l’installation. Lire et suivre les instructions fournies avec les outils
indiqués ici.
Outillage nécessaire
■ Pince
■ Tournevis Philips
■ Tournevis à lame plate
■ Douilles hexagonales/
tourne-écrou—³⁄₁₆" et ¼"
■ Mètre ruban ou règle
■ Scie à trou—1½"
■ Clé à molette—10"
■ Couteau utilitaire
■ Niveau
■ Perceuse électrique
■ Foret de—¹⁄₈"
■ Tournevis TORX
®†
T-2 0
(pour l'installation de
panneaux de façade
personnalisés)
■ Installer le lave-vaisselle conformément aux présentes
instructions.
■ Veiller à disposer de tout ce qui est nécessaire pour
l'installation correcte du lave-vaisselle.
■ Contacter un installateur qualifié pour garantir que
l’installation du lave-vaisselle soit exécutée conformément
aux prescriptions de tous les codes et règlements nationaux
et locaux régissant les installations électriques et de
plomberie en vigueur.
Pièces fournies
Vérifier la présence de toutes les pièces.
A
B
E F
C
D
Composants nécessaires
A
A. Tuyau d'arrivée d'eau flexible 72" (182,9 cm)
B. Attache en plastique
C. Connecteurs de fils de taille appropriée—
homologation UL (2)
D. Pièces de quincaillerie (pour l'installation de
panneaux de façade personnalisés)
E. Panneau décoratif (pour l'installation de
panneaux de façade personnalisés)
I
B
G
H
J
C
K
L
M
A. Serre-câble
D
E
homologation UL
B. Bride de tuyau 1,25"
C. Vis de montage des brides (8)
D. Vis de fixation de l'appareil (4)
E. Raccord Y pour tuyau
d'évacuation
F. Brides de montage (4)
G. Brides de tuyau pour tuyau
d'évacuation (2)
³⁄₄
"—
H. Cornières de garniture (2)
I. Brides pour cornière de
plinthe (2)
J. Vis—fixation des brides de la
cornière de plinthe (2)
K. Cornière de plinthe
L. Vis de fixation de panneau
(certains modèles) (2)
M. Vis TORX
modèles) (10)
®†
(certains
†®TORX est une marque déposée de Acument Intellectual
Properties, LLC
37
Page 38

Exigences d’emplacement
IMPORTANT : Observer les dispositions de tous les codes et
règlements en vigueur. Le non-respect de ces codes et
règlements pourrait entraîner un incendie ou un choc électrique.
C'est à l'utilisateur du produit qu'incombe la responsabilité de
réaliser une installation correcte.
■ Contacter un installateur qualifié pour garantir que
l'installation du lave-vaisselle soit exécutée conformément
aux prescriptions de tous les codes locaux et nationaux en
vigueur régissant les installations d'électricité et de plomberie.
■ Réaliser l'installation du lave-vaisselle tel que spécifié dans
ces instructions.
■ Veiller à disposer de tous les outils et composants nécessaires
pour l'installation du lave-vaisselle.
■ Protéger le lave-vaisselle et les canalisations d’eau qui
l'alimentent contre les dommages imputables au gel. La
garantie ne couvre pas les dommages imputables au gel.
■ Ce lave-vaisselle est conçu et fabriqué uniquement pour une
utilisation à l'intérieur.
■ Installer le lave-vaisselle d'aplomb en un endroit approprié sur
un sol capable d'en soutenir le poids compte tenu de sa taille
et de son utilisation.
Dimensions du produit
Distances de dégagement à respecter
Dimensions de l'espace d'installation
23¹⁄₂"
(59,7 cm)
24"
(61 cm)
33³⁄₄"
(85,7 cm)
Emplacements préférentiels pour le passage des tuyaux et
du câble
(61 cm)
¹⁄₄"
19
(48,9 cm)
24"
23³⁄₈"
(59,5 cm)
¹⁄₂"
1
(3,75 cm)
33³⁄₄"
(85,7 cm)
A
¹⁄₂"
(1,3 cm)
25"
(63,5 cm)
B
8"
(20,3 cm)
A. Choisir la position d'installation des tuyaux d'eau et
d'évacuation—à gauche ou à droite.
B. Choisir la position d'installation du câblage électrique—à gauche
ou à droite.
REMARQUES :
■ Diamètre de 1½" (3,8 cm) pour tous les trous.
■ Si le placard est en bois, poncer le trou jusqu'à ce qu'il soit
lisse. Si le placard est en métal, recouvrir le trou avec un oeillet
(non fourni).
■ On doit disposer d'une prise de configuration correspondante
à trois alvéoles et reliée à la terre dans un placard qui se
trouve près de l'ouverture du lave-vaisselle.
38
Spécifications de l’alimentation en eau
■ Canalisation d'eau chaude avec pression de 20-120 lb/po2
(138-862 kPa).
■ Admission dans le lave-vaisselle d'eau à température de
120°F (49°C).
■ Raccordement entre l'appareil et la canalisation d'eau à l'aide
d'un conduit flexible à gaine tressée (on déconseille l'emploi
de tube de plastique—diamètre minimum ½").
Page 39

Spécifications électriques
AVERTISSEMENT
Risque de choc électrique
Brancher sur une prise à 3 alvéoles reliée à la terre.
Ne pas enlever la broche de liaison à la terre.
Ne pas utiliser un adaptateur.
Ne pas utiliser un câble de rallonge.
Le non-respect de ces instructions peut causer
un décès, un incendie ou un choc électrique.
INSTRUCTIONS DE MISE À LA TERRE
■
Pour un lave-vaisselle relié à la terre, branché avec
un cordon :
Le lave-vaisselle doit être relié à la terre. En cas d'un
mauvais fonctionnement ou d'une panne, la mise à terre
réduira le risque d'un choc électrique en fournissant le
moins de résistance pour le courant électrique. Le lavevaisselle est équipé d'un cordon avec un conducteur
pour relier les appareils à la terre. La fiche doit être
branchée sur une prise appropriée, installée et reliée à la
terre conformément aux codes et règlements locaux.
AVERTISSEMENT :
du conducteur pour relier les appareils à la terre peut
causer le risque de choc électrique. Vérifier avec un
électricien compétent ou un représentant de service si
vous avez des doutes si le lave-vaisselle est
correctement relié à la terre. Ne pas modifier la fiche
fournie avec le lave-vaisselle; si elle n'entre pas dans la
prise, faire installer une prise appropriée par un
électricien compétent.
■
Pour un lave-vaisselle branché en permanence :
Le lave-vaisselle doit être branché à un système
d'installation électrique permanent en métal relié à la
terre, ou un conducteur pour relier les appareils à la terre
doit être relié avec les conducteurs du circuit et branché
à une borne pour relier les appareils à la terre ou au
cordon d'alimentation électrique avec le lave-vaisselle.
La connexion incorrecte
Raccordement direct du lave-vaisselle
■ Utiliser un câble flexible à conducteurs de cuivre, avec gaine
métallique ou non métallique et conducteur de raccordement
à la terre, qui satisfait aux exigences des codes et règlements
locaux en vigueur.
■ Utiliser le serre-câble fourni pour le raccordement au boîtier
de raccordement de la maison, ou installer un serre-câble
(homologation UL/CSA) sur le boîtier de raccordement de la
maison. Dans le cas de l'utilisation de conduit, utiliser un
connecteur de conduit (homologation UL/CSA).
Branchement de l’appareil à l’aide d’un cordon
d’alimentation
■ Utiliser le cordon d'alimentation conçu pour l'utilisation avec
un lave-vaisselle; cet ensemble comporte :
■ Cordon d'alimentation à 3 conducteurs de calibre 16, avec
fiche de branchement à 3 broches, pour liaison à la terre homologation UL (Voltex, Inc.).
■ Serre-câble ⁷⁄₈" (Neer, C-500)
■ 3 connecteurs de fils
■ Passe-fil
Pour l'installation du cordon d'alimentation, exécuter les
instructions fournies avec l'ensemble.
REMARQUE : La fiche du cordon d'alimentation doit être
branchée sur une prise de courant de même configuration, à
3 alvéoles, reliée à la terre, installée dans le placard à côté de
l'espace d'installation du lave-vaisselle. La prise de courant doit
satisfaire les prescriptions de tous les codes et règlements locaux
en vigueur.
IMPORTANT : Si on envisage l'installation d'un broyeur à
déchets, un circuit électrique additionnel est également
nécessaire - 120 V, 60 H, CA, fusible de 15 ou 20 A seulement.
Évacuation de l'eau de lavage—Critères
à respecter
■ Utiliser le tuyau d'évacuation neuf fourni avec l'appareil. Si la
longueur de ce tuyau n'est pas suffisante, utiliser un autre
tuyau d'évacuation avec longueur maximale de 12 pi (3,7 m),
conforme aux prescriptions de la norme AHAM/IAPMO,
résistant à la chaleur et au détergent, et compatible avec le
raccord de connexion de 1" (2,5 cm) du lave-vaisselle.
■ Connecter le tuyau d'évacuation sur un raccord T ou à l'entrée
du broyeur à déchets au-dessus du siphon du circuit
d'évacuation de la maison et à au moins 20" (50,8 cm) audessus du plancher. On recommande de former une boucle
avec le tuyau d'évacuation (arrimage avec une attache de
plastique sous le plan de travail), ou de connecter le tuyau
d'évacuation à un brise-vide.
■ Si le tuyau d'évacuation doit être raccordé au circuit
d'évacuation de la maison à moins de 20" (50,8 cm) audessus du sous-sol ou du sol, utiliser un brise-vide.
Brise-vide
CONSERVEZ CES INSTRUCTIONS
Contacter un électricien qualifié.
Vérifier que le circuit d'alimentation disponible est adéquat et
conforme aux prescriptions de tous les codes et règlements
nationaux et locaux en vigueur.
Caractéristiques de la source d'électricité nécessaire :
■ 120 V, 60 Hz, CA, fusible de 15 ou 20 A.
■ Conducteurs de cuivre seulement.
Nous recommandons :
■ Fusible temporisé ou disjoncteur.
■ Alimentation par un circuit distinct.
■ Utiliser des raccords de diamètre interne de ½" (1,3 cm) ou
plus.
39
Page 40

INSTRUCTIONS D'INSTALLATION
AVERTISSEMENT
Risque de choc électrique
Interrompre l'alimentation électrique avant d'installer
le lave-vaisselle (au niveau du tableau de distribution fusible ou disjoncteur)
Le non-respect de cette instruction peut causer
un décès ou on choc électrique.
1. Déconnecter la source de courant électrique.
2. Fermer l'arrivée d'eau.
Déballage du lave-vaisselle
AVERTISSEMENT
Risque du poids excessif
Utiliser deux personnes ou plus pour déplacer et
installer le lave-vaisselle.
Le non-respect de cette instruction peut causer une
blessure au dos ou d'autre blessure.
2. Percer des trous de 1½" (3,8 cm) aux emplacements indiqués
sur l'illustration, pour le passage du tuyau d'évacuation, du
tuyau d'arrivée d'eau et du câblage électrique. Placer ces
trous à ½" (1,3 cm) du mur arrière.
A
¹⁄₂"
(1,3 cm)
25"
(63,5 cm)
B
8"
(20,3 cm)
A. Choisir la position d'installation des tuyaux d'eau et d'évacuation -
à gauche ou à droite.
B. Choisir la position d'installation du câblage électrique - à gauche
ou à droite.
3. Installer des brides de montage à 17" (43,2 cm) du sol - utiliser
les vis fournies. Si nécessaire, percer des avant-trous de ¹⁄₈"
dans la paroi de chaque placard.
1. Avant d'ouvrir l'emballage du produit, lire toute l'information
utile à l'extérieur.
2. Enlever les matériaux d'emballage, le ruban adhésif et le film
de protection du lave-vaisselle. Retirer le sachet de pièces qui
se trouve à l'intérieur du lave-vaisselle.
Préparation de l'espace d'installation
entre les placards
1. Pour respecter les valeurs minimales de dégagement de
séparation :
■ Mesurer la distance entre le plan de travail et le plancher;
veiller à disposer d'une hauteur libre de 33¾" (85,7 cm) ou
plus.
■ Mesurer la distance entre l'avant du placard et le mur
arrière; veiller à disposer d'une profondeur de 24" (61 cm)
ou plus.
■ Mesurer la distance entre le côté gauche et le côté droit de
l'espace d'installation; veiller à disposer d'une largeur de
23½" (59,7 cm) ou plus.
17"
(43,2 cm)
4. Choisir la méthode à employer pour la fixation du lave-
vaisselle au plan de travail.
40
Page 41

Option 1 : Plan de travail en matériau dur
ST
A
R
T
S
T
A
T
■ Installer un second jeu de brides de montage à 33½"
(85 cm) du plancher. Si nécessaire, percer des avant-trous
de ¹⁄₈" dans la paroi de chaque placard.
Préparation du lave-vaisselle
AVERTISSEMENT
33¹⁄₂"
(85 cm)
Option 2 : Plan de travail en bois
■ Préparer le lave-vaisselle - rabattre les pattes situées à
l'avant/au sommet - voir l'illustration.
Risque de basculement
Ne pas ouvrir le tiroir du lave-vaisselle jusqu'à ce qu'il
soit placé à l'intérieur de l'ouverture du placard.
Le non-respect de ces instructions peut causer
un décès ou des blessures graves.
AVERTISSEMENT
Risque du poids excessif
Utiliser deux personnes ou plus pour déplacer et
installer le lave-vaisselle.
Le non-respect de cette instruction peut causer une
blessure au dos ou d'autre blessure.
1. Mesurer la hauteur libre de l'espace d'installation, entre le
plancher et la face inférieure du plan de travail.
H
2. Placer des cornières de l'emballage sur le sol; placer le lave-
vaisselle en appui sur la face arrière.
41
Page 42

3. Ajuster la longueur de déploiement des pieds, selon la hauteur
libre de l'espace d'installation - voir le tableau ci-dessous.
X
H : X H : X
33
³⁄₄
" (85,7 cm) : 0" 34
34" (86,3 cm) :
¹⁄₈
" (86,7 cm) :¼" (0,6 cm) 34
34
34
¹⁄₄
" (87 cm) :
34
³⁄₈
" (87,3 cm) :½" (1,3 cm) 35" (88,9 cm) :1
¹⁄₈
" (0,3 cm) 34
³⁄₈
" (1 cm) 34
¹⁄₂
" (87,6 cm) :
⁵⁄₈
" (87,9 cm) :
³⁄₄
" (88,3 cm) :
⁷⁄₈
" (88,6 cm) :1" (2,5 cm)
⁵⁄₈
" (1,6 cm)
³⁄₄
" (1,9 cm)
⁷⁄₈
" (2,2 cm)
¹⁄₈
" (2,9 cm)
4. Redresser le lave-vaisselle à la position verticale.
Option 1 : Acheminement du câblage électrique par le côté
droit
Faire passer le câblage à travers un trou de 1½" (3,81 cm) placé à 8"
(20,32 cm) au-dessus du sol.
Après avoir fait passer le câble électrique à travers un trou sur le
côté droit, fixer le câble à l'arrière de l'espace d'installation à 8"
(20,32 cm) au-dessus du sol. Poursuivre l'installation du câble le
long du côté gauche de l'espace d'installation, jusqu'à l'avant de
l'espace d'installation.
Installation du câblage électrique
AVERTISSEMENT
Risque de choc électrique
Interrompre l'alimentation électrique avant d'installer
le lave-vaisselle (au niveau du tableau de distribution fusible ou disjoncteur)
Le non-respect de cette instruction peut causer
un décès ou on choc électrique.
Pour l'installation du câblage électrique jusqu'à l'appareil,
observer les dispositions de tous les codes et règlements
nationaux et locaux.
Option 2 : Acheminement du câblage électrique par le côté
gauche
Faire passer le câble à travers un trou de 1½" (3,81 cm) placé à 8"
(20,32 cm) au-dessus du sol.
Après avoir fait passer le câble électrique à travers un trou sur le
côté gauche, fixer le câble le long du côté gauche de l'espace
d'installation, jusqu'à l'avant de l'espace d'installation.
42
Page 43

Installation du tuyau d'arrivée d'eau et du tuyau d'évacuation
1. Connecter le tuyau d'arrivée d'eau sur l'électrovanne
d'admission sur le lave-vaisselle.
2.
3. Installer le tuyau d'arrivée d'eau et le tuyau d'évacuation,
selon la configuration d'installation.
Option 1 : Acheminement des tuyaux par le côté droit
■ Pour l'arrivée des tuyaux par le côté droit, le tuyau
d'arrivée d'eau et le tuyau d'évacuation sont fournis à la
position correcte. Placer le tuyau d'arrivée d'eau dans les
agrafes - voir l'illustration.
Option 2 : Acheminement des tuyaux par le côté gauche
■ Pour l'arrivée des tuyaux par le côté gauche, dégager les
deux parties du tuyau d'évacuation des agrafes à l'arrière
de l'appareil - voir l'illustration.
■ Faire passer le tuyau d'arrivée d'eau et le tuyau
d'évacuation à travers les trous percés dans le placard.
■ Engager partiellement le lave-vaisselle dans l'espace
d'installation. Veiller à ce qu'il demeure possible d'accéder
au boîtier de raccordement électrique.
43
Page 44

Raccordement du tuyau d'arrivée d'eau et du tuyau d'évacuation
A
1. Connecter le tuyau d'arrivée d'eau au robinet d'arrêt sous
l'évier.
5. Connecter le tuyau d'évacuation - utiliser l'une des options
suivantes :
Option 1 : Installation avec broyeur à déchets/pas de
brise-vide
C
A. Arrivée d'eau chaude
2. Enfiler les brides sur les tuyaux d'évacuation (Figure A). Ne
pas couper les tuyaux d'évacuation.
3. Engager complètement les tuyaux sur les branches du
raccord Y du circuit d'évacuation (Figure B); on doit percevoir
plusieurs “clics”.
4. Placer la bride de serrage à la position appropriée sur chaque
branche du raccord Y (figures C et D).
AB
CD
A
B
A. Pour une construction neuve, ôter l'opercule d'obturation du
broyeur à déchets.
B. Raccorder le raccord Y du circuit d'évacuation au broyeur à
déchets.
C. Serrer la bride.
Option 2 : Installation sans broyeur à déchets/avec brisevide
B
C
A
44
A. Raccord Y du circuit d'évacuation
B. Brise-vide
C. Circuit d'évacuation de la maison
Page 45

Option 3 : Installation avec broyeur à déchets et brise-vide
C
A
B
A. Raccord Y du circuit d'évacuation.
B. Brise-vide
C. Circuit d'évacuation de la maison
Option 4 : Installation sans broyeur à déchets/sans brisevide
Raccordement du circuit électrique
AVERTISSEMENT
Risque de choc électrique
Interrompre l'alimentation électrique avant d'installer
le lave-vaisselle (au niveau du tableau de distribution fusible ou disjoncteur)
Le non-respect de cette instruction peut causer
un décès ou on choc électrique.
1. Ôter la vis fixant le couvercle du boîtier de raccordement
électrique. Ôter le couvercle.
A
C
B
A. Raccord Y du circuit d'évacuation
B. Couper le raccord de connexion
C. Circuit d'évacuation de la maison
REMARQUE : Raccorder le raccord Y du circuit d'évacuation
au circuit d'évacuation de la maison - utiliser la bride de tuyau
fournie.
6. Ouvrir l'arrivée d'eau; inspecter pour rechercher des fuites.
2. Insérer les conducteurs électriques à travers le serre-câble;
serrer le câble dans le serre-câble; fixer le serre-câble sur la
plaque du boîtier de raccordement.
45
Page 46

3. Serrer le connecteur de conduit et les vis du serre-câble.
AVERTISSEMENT
Risque de choc électrique
Relier le lave-vaisselle à la terre d’une méthode
électrique.
Brancher le fil relié à la terre au connecteur vert relié à
la terre dans la boîte de la borne.
Ne pas utiliser un câble de rallonge.
Le non-respect de ces instructions peut causer
un décès, un incendie ou un choc électrique.
4. Raccorder les conducteurs à l'aide de connecteurs de fils de
taille appropriée pour le raccordement des conducteurs du
câble et des conducteurs de calibre 16 du lave-vaisselle,
comme suit.
Conducteur
d'alimentation :
Blanc Blanc
Noir Noir
Conducteur dans
le boîtier de
l'appareil :
6. Réinstaller le couvercle du boîtier de raccordement
électrique.Veiller à ce que tous les conducteurs soient bien
placés à l'intérieur du boîtier.
Installation des pièces de
garniture; etablissement de l'aplomb
du lave-vaisselle
1. Ouvrir le tiroir inférieur de l'appareil.
2. Pousser les agrafes et faire glisser les glissières vers l'arrière,
de 5" (12,7 cm).
Conducteur de
liaison à la terre
5. Fixer le conducteur de liaison à la terre sous la vis verte de
liaison à la terre.
A
Vis de liaison à la
terre
B
3. Soulever le tiroir pour le séparer des glissières. Placer le tiroir à
gauche sur la protection. Insérer les glissières dans le lavevaisselle.
1
1
2
46
A. Fixer le conducteur de liaison à la terre sous la vis
verte de liaison à la terre.
B. Connecter ensemble les conducteurs blancs et les
conducteurs noirs.
2
Page 47

4. Faire glisser le lave-vaisselle jusqu'à sa position de service
finale dans l'espace d'installation entre les placards. Vérifier
que les tuyaux et le câblage électrique ne sont pas déformés/
écrasés.
5. Contrôler l'aplomb transversal : placer un niveau au sommet
du tiroir. Contrôler l'aplomb avant/arrière : placer un niveau sur
une glissière.
7. Placer la cornière de garniture sur le sol et marquer sur la
garniture le niveau correspondant au sommet du rebord du
châssis. Choisir la rainure la plus proche du repère tracé. Si le
repère est entre deux rainures, choisir la rainure pour laquelle
la cornière de garniture sera la plus courte. Sur une surface
protégée, couper la cornière de garniture au niveau de la
rainure choisie.
2
6. Établir l'aplomb du lave-vaisselle : ajuster la longueur de
déploiement des pieds - utiliser une douille de ³⁄₁₆".
A
1
3
1
8. Fixer la bride de la cornière de plinthe sur le châssis.
9. Insérer la cornière de garniture (plinthe) dans la bride de
plinthe.
A. Réglage du déploiement des pieds
47
Page 48

10. Fixer la bride de la cornière de plinthe du côté opposé.
Arrimage de lave-vaisselle
1. Ôter le tiroir supérieur (même processus que pour le tiroir
inférieur); placer le tiroir supérieur sur le tiroir inférieur, en
appui sur des cornières de carton séparant les deux tiroirs.
1
11. Installer une cornière de garniture latérale flexible de chaque
côté - voir l'illustration.
1
2. Assujettir le lave-vaisselle aux brides de montage inférieures
(installées précédemment sur les placards).
2
2
A
A. Assujettir le lave-vaisselle aux brides de montage
inférieures.
3. Assujettir le lave-vaisselle aux brides de montage supérieures.
48
Page 49

Option 1 : Plan de travail en matériau dur
1
2
ON
OFF
ON
OFF
OFF
Assujettir le lave-vaisselle aux brides de montage latérales
(installées précédemment sur les parois des placards).
A
Option 2 : Plan de travail en bois
Assujettir le lave-vaisselle au plan de travail - utiliser les pattes
de montage qui ont été précédemment rabattues au sommet
du lave-vaisselle.
A
A. Assujettir le lave-vaisselle aux brides de montage latérales.
Achever l'installation
1. Déployer les glissières du tiroir supérieur; installer le tiroir
supérieur sur les glissières.
2
2
1
1
2. Déployer les glissières jusqu'à la position d'emboîtement.
A. Assujettir le lave-vaisselle au plan de travail—utiliser les
pattes de montage qui ont été précédemment rabattues au
sommet du lave-vaisselle.
3. Pousser complètement le tiroir dans son logement; répéter le
processus ci-dessus pour le tiroir inférieur.
4. Dans le placard sous l'évier, former une boucle avec l'excès
de longueur du tuyau d'évacuation. Utiliser l'attache pour
former et immobiliser la boucle. Brancher le lave-vaisselle ou
reconnecter la source de courant électrique.
5. Sélectionner le programme Rinse Only (rinçage seulement) et
appuyer sur le bouton START/RESUME. Laisser le lavevaisselle effectuer le processus de remplissage, rinçage et
vidange de l'eau. Inspecter l'appareil pour identifier toute fuite.
Si des fuites sont détectées, resserrer les connexions
concernées et répéter cette étape.
Si vous avez besoin d'assistance ou de service :
Consulter la section “Assistance ou service” des Instructions
d'utilisation ou contacter le marchand chez qui vous avez acheté
votre lave-vaisselle.
49
Page 50

INSTRUCTIONS D'INSTALLATION DU PANNEAU DÉCORATIF
Panneaux décoratifs de tiroirs
personnalisés
Si vous envisagez d'installer des panneaux personnalisés en bois,
vous devrez les créer vous-même ou consulter un ébéniste ou un
menuisier qualifié. Voir le dessin des dimensions pour les
spécifications du panneau.
IMPORTANT :
■ L'épaisseur du panneau décoratif doit être comprise entre
¹⁄₂"(12,7 mm) et ³⁄₄" (19,05 mm).
■ Respecter les dimensions indiquées pour la hauteur des
panneaux décoratifs. Si la hauteur est supérieure à la valeur
recommandée, le tiroir du lave-vaisselle, les placards ou le
plan de travail risquent d'être endommagés.
■ La largeur des panneaux décoratifs peut varier en fonction de
la largeur de l'espace d'installation de la caisse.
Dimensions du panneau décoratif
23⁷⁄₁₆"
(59,5 cm)
16¹⁄₄"
(41,3 cm)
Préparation des panneaux personnalisés
1. Placer les panneaux personnalisés (haut et bas) face vers le
bas sur une surface propre et souple.
2. À l'aide d'un crayon, noter les points centraux pour les huit
avant-trous nécessaires pour le panneau.
11¹⁄₄"
2¹⁄₂"
(6,3 cm)
A. Ligne centrale
B. Avant-trous pour le dispositif de fixation du panneau (2)
C. Avant-trous (6)
(28,5 cm)
(20,7 cm)
3. À l’aide d’un foret de ¹⁄₈", percer chaque trou à ³⁄₈" (1 cm) de
profondeur.
³⁄₈" (1 cm)
A
11¹⁄₄"
8¹⁄₈"
(28,5 cm)
8¹⁄₈"
(20,7 cm)
B
C
1¹⁄₂"
(3,8 cm)
(20,2 cm)
8"
14¹⁄₈"
(36,6 cm)
¹⁄₄"
(1,9 cm)
Installation des pièces de quincaillerie
Centrer les pièces de quincaillerie (de gauche à droite) sur le
panneau décoratif. Lors de l'installation des pièces de
quincaillerie, veiller à ce que les vis de fixation soient en
affleurement avec l'arrière des panneaux décoratifs.
IMPORTANT : Ne pas percer à plus de ³⁄₈" (1 cm) de
profondeur ou vous risqueriez de percer à travers la face
avant du panneau.
Installation des dispositifs de fixation de
panneau
1. Ôter les 2 dispositifs de fixation de panneau de la face de la
porte interne du tiroir supérieur.
2. Visser les 2 dispositifs de fixation de panneau dans les avant-
trous percés à cet effet dans le panneau décoratif.
50
Page 51

Montage du panneau décoratif
Panneau décoratif personnalisé seulement
1. Ôter le ruban adhésif du conducteur vert de mise à la terre sur
le panneau décoratif personnalisé. L'extrémité du conducteur
vert de mise à la terre est accrochée au panneau décoratif
personnalisé.
2. Fixer l’autre extrémité du conducteur vert de mise à la terre
sur le panneau décoratif au connecteur en anneau et à la vis
de mise à la terre sur le panneau intermédiaire du tiroir du
lave-vaisselle.
A
Panneau de bois personnalisé
2. Pour fixer le panneau décoratif sur le tiroir, pousser le panneau
décoratif vers le bas jusqu'à ce que la partie supérieure du
panneau décoratif soit en affleurement avec la partie
supérieure du panneau de commande.
3. À l'aide des vis fournies, fixer le panneau décoratif sur la porte
interne en vissant à travers la porte interne et dans les avanttrous de ¹⁄₈" (3,2 mm).
B
A. Conducteur vert de mise à la terre
B. Vis de mise à la terre
Panneau décoratif personnalisé ou panneau de bois
personnalisé
1. Monter le panneau décoratif supérieur sur le tiroir en alignant
les dispositifs de fixation de panneau avec les deux encoches
en trou de serrure et insérer le panneau.
Panneau décoratif personnalisé
51
Page 52

W10219172A
© 2008. Fulgor USA, LLC
All rights reserved.
Todos los derechos reservados.
Tous droits réservés.
FULGORAPPLIANCES.COM. © 2008 Fulgor USA, LLC. A division of Fulgor Europe S.p.A. All Rights Reserved.
FULGORAPPLIANCES.COM. © 2008 Fulgor USA, LLC. Una división de Fulgor Europe S.p.A. Todos los derechos reservados.
FULGORAPPLIANCES.COM. © 2008 Fulgor USA, LLC. Une division de Fulgor Europe S.p.A. Tous droits réservés.
Fulgor is a registered trademark of Fulgor USA, LLC.
Fulgor es una marca registrada de Fulgor USA, LLC.
Fulgor est une marque déposée de Fulgor USA, LLC.
Printed in U.S.A.
Impreso en EE. UU.
Imprimé aux É.-U.
11/08
 Loading...