

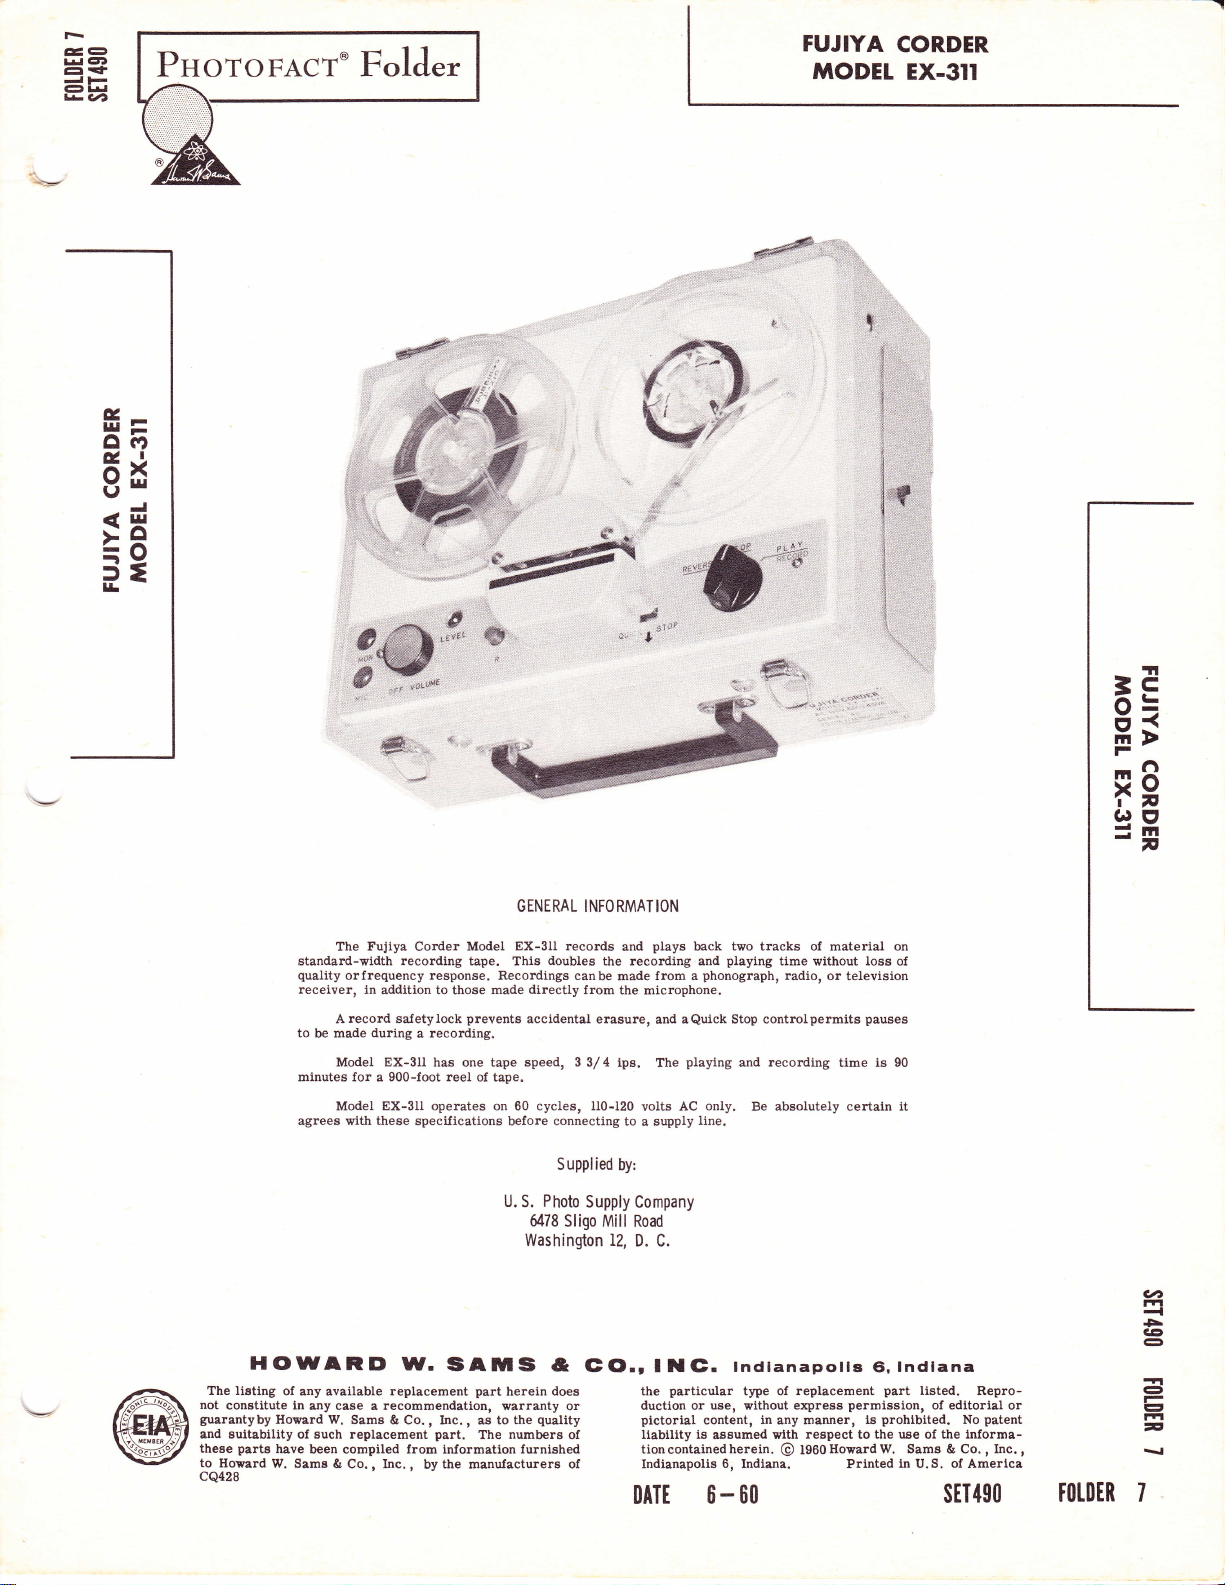
Fujiya EX-311 Service manual
GEE
r*l
E-f
et r*l
-l
rv?
ct':)
l-
ff=
ob
gil
J
ir
5-
lr
FUJIYA
MODET
',
i.
CORDER
EX.3II
.t|].'.
iiifi
ffi
The Fujiya
standard-width
quality
orfrequency
receiver,
record
A
to
be made
Model
minutes for a 900-foot reel
Model EX-3ll operates on
agrees
with
Corder
recording
in
response. Recordings
addition to those
safetylock
during
a recording.
EX-3ll
has one tape speed, 3 3/ 4
these
specifications before connecting to
GENERAL
EX-3ll records
Model
tape. This
made directly
prevents
of tape.
60
U.
S.
Washington l.2,
INFORMATION
doubles
the recording
canbe
from
accidental
6/78 Sligo Mill
erasure, and aQuick Stop controlpermits
cycles, Il0-I20
Supplied
Photo
Supply Company
plays
and
made
the microphone.
ips. The
by:
back two tracks of material on
and
from
a
playing
volts
AC
line.
a supply
Road
D.
C.
playing
phonograph,
only.
time without loss of
radio,
and recording
Be absolutely certain it
or television
pauses
time is 90
3F
o=
H;
F
Fg
(.)E
=E
HOWARD
The listing
not
guarantyby
and suitability of such replacement
these
to
Hovard
cQ428
of any
constitute in
Howard W.
parte
have
W. Samg
available
any case a recommendation, varranty
been compiled from information furnished
& Co. , Inc.
W.
replacement
Sams & Co.
,
!sAInS
part
herein does
,
as to
The
the
numbere
Inc.
,
part.
the manufacturers of
by
&
quality
a
FFl
-l
F
CE
et
(E
(o.r
or
of
(G.
I t
particular
the
duction or
pictorial
Itability
tion
contained
Indianapolis
0ATE
lndlanapolls
type of
use,
without
in
content,
is
assumed
herein.
6, Indiana.
wlth
6- 60
replacement
permission,
express
any manner,
respect to the use
Howard W. Sams & Co.
tggO
@
Printed
lndlana
6,
part
prohibited.
is
in
listed.
Repro-
of editorial or
No
the lnforma-
of
of
U.S.
America
sET490
patent
Inc.
,
-ll
€
et
r-l
,
toLoER
-
PREPARING
FOR
OPIRATION
1. Remove
Removethe
f romthe
-Volu
off
Turning
turns
t}le
creases
Safety
Button
me
the
lid
the
AC cord, mlcrophone,
storage compartment
thekllob clockwise
power
o! to the
volume.
The SaJety
escutcheon, must
placed
of
Th reading
in Record,
prerecorded
a
ihe
l. Place
empty leel
2. Unwind
taut
and insert it into
tain
the dul.I-aoated
tape.
Tape
a reel of tape
on right reel
about
recorder.
3.
Insert
thefree end into
thehubofthe take-up reel.
turlls counterclockwise
reel
and to
tal<e up the slack
To Record
l. Thread
2. Plug
3.
4. Depress
5.
NOTE:
From
a Microphone
the tape
the microphone
Turn
the Off-Volume
allow about 30
Knob
Hold
mouth
OIf-VoIume
cator
the SaJety
to Play-Record.
the
mj.crophone
and spea.li in
control
flashes
Correct volume level
durlng
(record
result in
nolse.
flashea
recording.
a
level
weak
Too strong
continuously)
tion during playback.
from
the
carlying
until
unit, Further rotation
Button, marked
be depressed
This
belore the urilt can
prevents
on Left reel
cup
l0
inches
of tape. Hold
t}le tape
side faces
one ofthe radiat
Turn the reel
to
secure the tapeto the
(see
"Threading
into
the Mic
control
seconds
forthe tubes
Button and turn
6 to 12
a normal
until the record ]evel indi-
oll the loudest
sound.
is very important
Too
itrdicator does not
playback
veak a signal
and high background
a signal
reEult
witl
case.
and earphone
onth€ right side.
FUNCTION OF
a click
isheard
in-
with an
accidental erasure
(l).
R
on the
OPERATING
(I)
cup
and an
be
a section
slotr making cer-
the rear of the
slots in
Eeveral
between reels.
the Tape").
jack,
clockvise,
tovarm
t}Ie Control
inches
voice.
ilash) witl
(indicator
in distor-
and
up.
your
from
Adjust the
Plug the
3.
proper
Thread the
4.
CONTROLS
ick Stop
Qu
To
pu.ll
stop the tape
the lever
lever is releaaed,
Control
Knob
The
knob
to the
rewind the tape
right places
to the
when the SaJety
INSTRUCTIONS
Record From a Radio
To
Recordings
three methods:
Through
l.
spea]{er:
Place the
the radio
to
anormal level.
distortion.
or high.
described
phone".
2.
Through
Make
phone plug
the other
the voice-coil
and
the radio
Setthe recording
under
3. Through
control:
Make
phone
across
phone
level,
cord From
and tone
they
AC cord into
specilications.
(see
tape
momentarily
in tlle direction
t}le tape $rill stalt
center is
the stop
left places
onto the supply ree1.
the recorderin
button i6 depreseed.
can be made
microphone,
a
rnictophone
speaker.
Turnthe radiotone
)
Set
the recordj.ng
under
direct
a
up a shielded
on
one end
end. Connectthe
terminals
insert
phone
the
volume
level,
Record
"To
a direct
up a shielded
plug
connection
on one
the radio
plug
into the Mic
proceed
and
a Micfophone,'.
controls do
may be left
in any
a convenient
"Threading
play
in
the
ol
arrov,
moving
position.
the recorder
Turning the knob
Ptay
llom a radio
pickup
by
j.nches
6 to 12
Turn the radio
(Setting
it
too high
control
level,
"T:o
Record
From a Micro-
connectiontothe
cable
with a two-conduetor
and two
al.ligator clips
alllgator clip6
of the
plug
into
and tone controls
From
cable
the
proceed
and
a Microphone".
to
the radio
with a two-couductor
end. Connect
volume control.
jack.
as deacribed
not affect
position.
Set the recording
The radio
outlet of
the Tape").
Recor.d,
or
When the
again.
the
Turning the
i.n reverse
in Record
and
by one of
from
a ladio
in frolt
volume control.
will cause
totreble
and lecord
radio
speaker:
across
tadio
speaker,
jack.
Mic
ae
as
the other end
Insert
Set
in
Step l.
described
volume
the
underi,To Re-
volume
this setup; so
to
of
as
on
Page
2
I
I
A
\
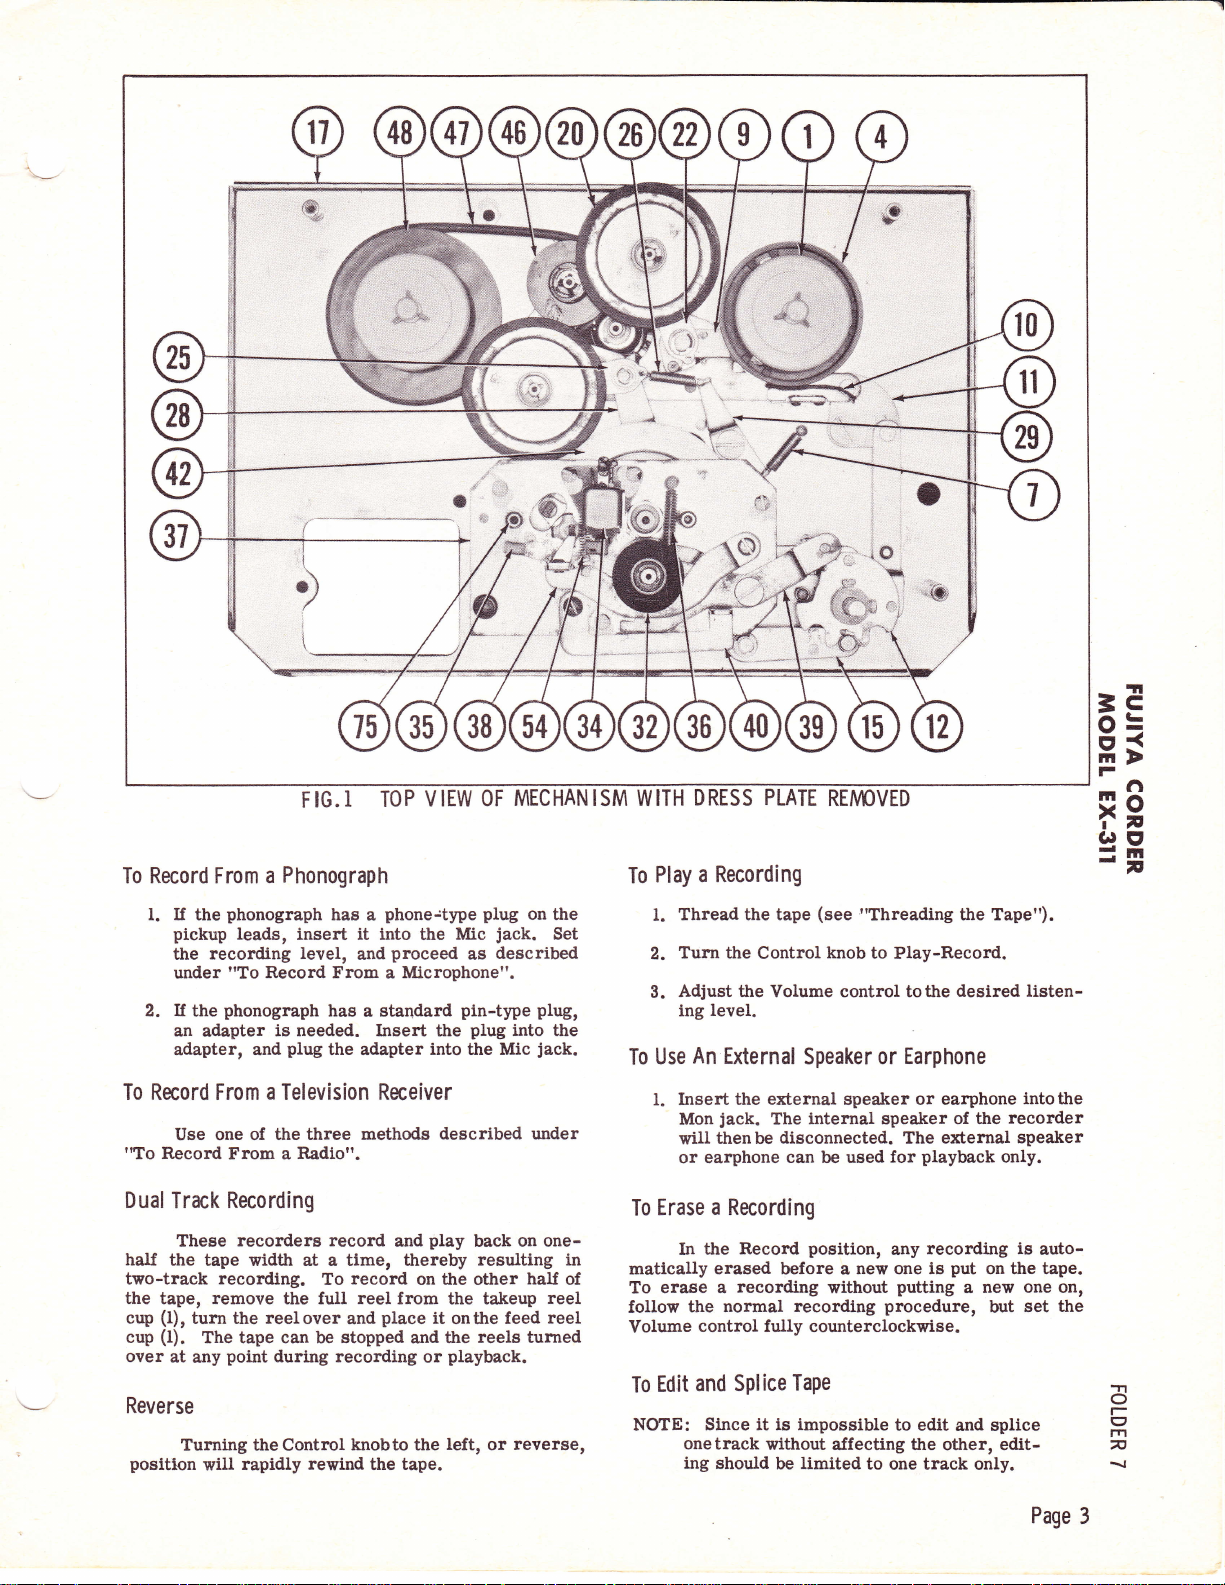
FIG.I
TOP
VIEW OF
MECHANISM WITH
DRESS
PLATE
REAMVED
=E
o=
H;
F
*g
c)E,
To Record From a
l. If the
pickup
recording
the
under
2. If
the
an
adapter
adapter, and
To Record From
Use one of
Record
"To
Dual
Track Recording
These
half the tape
two-track
the
cup
cup
over
Reverse
position
recording.
tape, remove the full reel from the
(1),
turn the
(l).
The tape can be
at
any
Turnfurg the Control
will
Phonograph
phonograph
leads,
insert it lnto the
level,
Record From a Microphone".
"To
phonograph
phone:t1pe plug
has
a
proceed
and
has a standard
is needed. Insert the
plug
the adapter into the Mic
a
Television
the three methods
From a
Radio".
Receiver
recorders record
width at a tlme, thereby
record
To
reelover
point
during recording
rapidly
rewind
place
and
stopped
knobto the
the
Mic
as
pin-type
plug
described under
play
and
the
on
it
ontfie
the reels turned
and
playback.
or
left,
tape.
on
the
jack.
Set
described
plugr
into
the
jack.
on one-
back
resulting in
half
other
takeup
or
reel
reel
feed
reverse,
auto-
on,
=F
.T1
o
I
rft
n
Play a Recording
To
I'Threading
Thread the tape
t.
Turn the
2.
Adjust the
3.
level.
ing
An
To Use
l.
External
Insert the external speaker or
jack.
Mon
thenbe
will
or earphone
a Recording
Erase
To
the Record
In
of
matically
To
follow
Volume
To
NOTE:
erased
erase a
Edit
recording
normal recording
the
control fully counterclockwise.
SPlice
and
Since it is impossible
onetrack
ing should
(see
knob
Control
Volume control tothe
Speaker or
internal speaker of the
The
disconnected. The external
can be used
position,
before a
to
new one is
without
Play-Record.
Earphone
earphone
playback
for
recording is
any
put
putting
procedure,
TaPe
to edit
without
affecting tlre other, edit-
be limited
to one track
the Tape").
desired listen-
intothe
recorder
speaker
only.
on the tape.
one
new
a
set the
but
and splice
only.
Page
3
l.
Tape
tions,
quence.
between
for re-use.
can
be edited
joining
or by
Announcements,
selections.
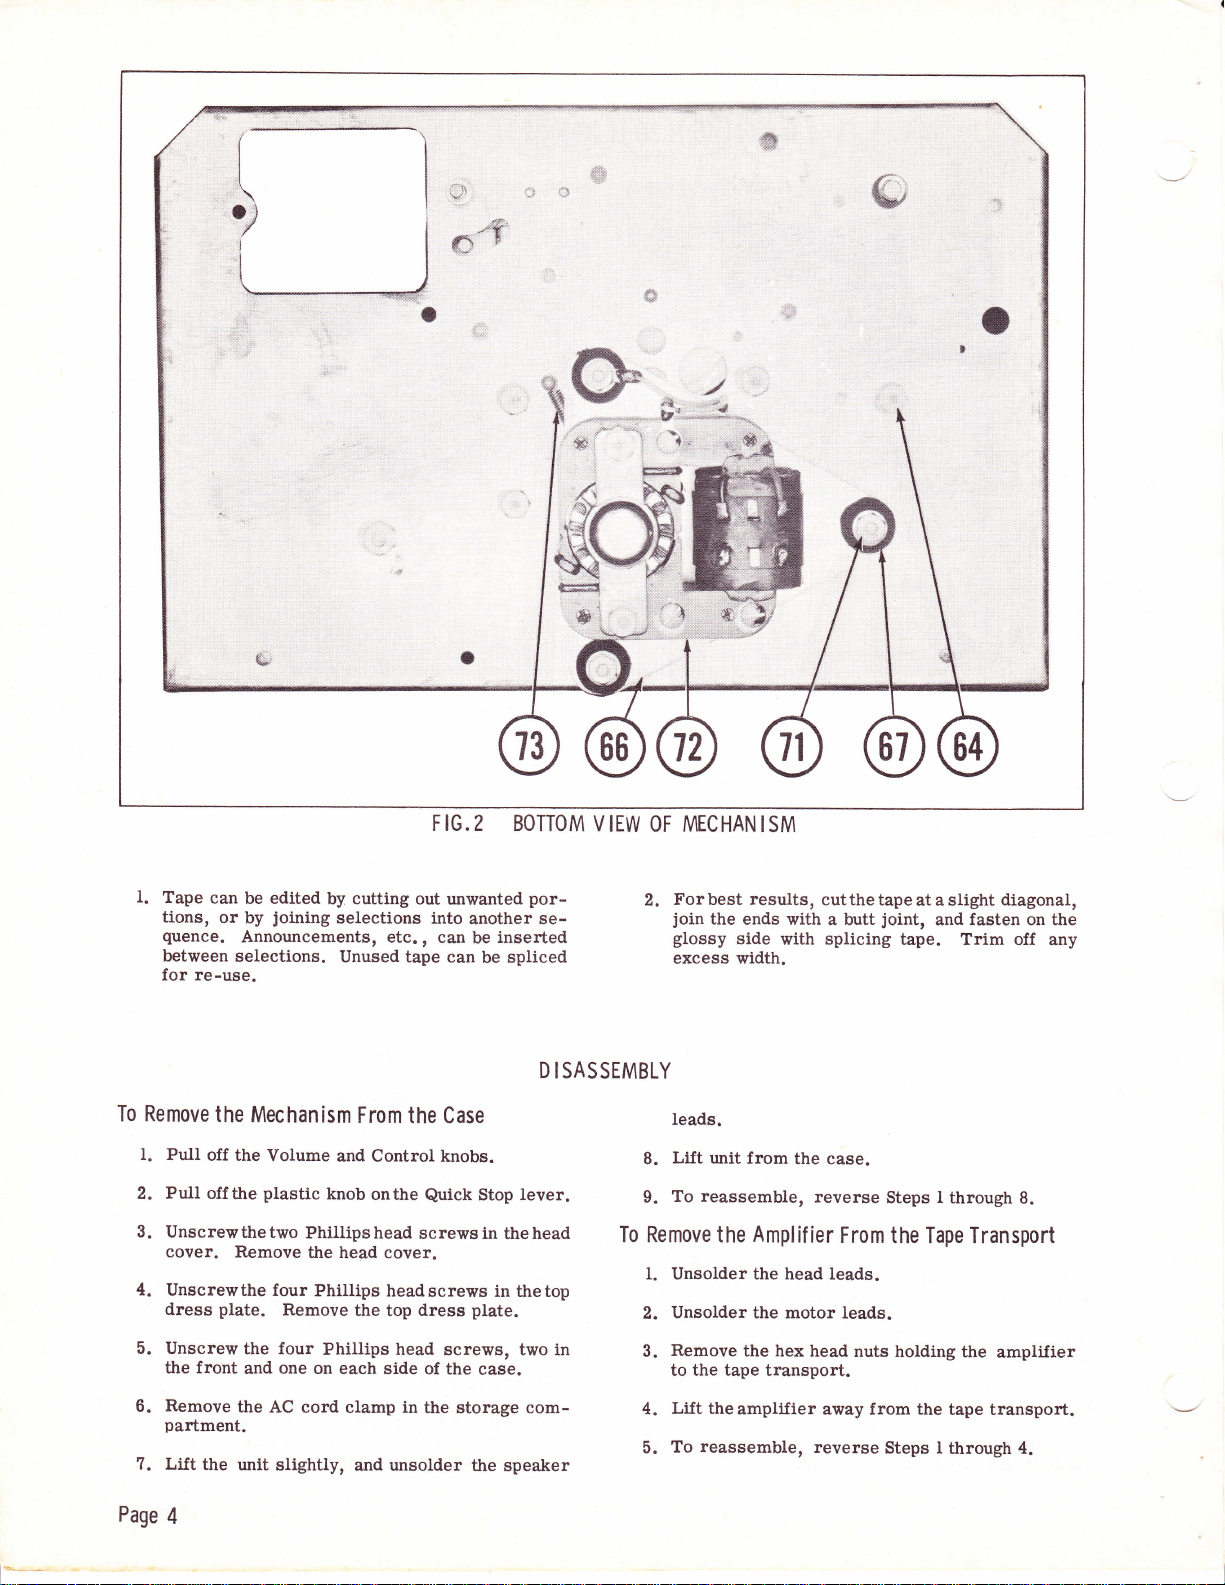
F IG.2 BOTTOM
by cutting
out unwanted
selections into
etc.
Unused tape can
,
another se-
can
be
be spliced
por-
inserted
D ISASSEMBLY
V
IEW OF MECHAN
Forbest results,
2.
join
glossy
excess
the
ends with
side
width.
ISM
cutthetape
a butt
with splicing
at
aslight
joint,
and fasten on the
tape. Trim off
diagonal,
any
To Remove
1. Putl
2.
Pull
off the
off
3. Unscrewthe
cover. Remove
4.
Unscrewthe
dress
5. Unscrew
the front
Remove
6.
partment.
7. Lift
Page
the unit
4
the
Mechanism
Volume
plastic
the
two
four
plate.
the four
one
and
the AC cord
slightly,
From the Case
and Control
knob
Phillips head
the head cover.
Phittips
Remove
the top dress
Phillips head
on
each side
clamp in
and
knobs.
onthe
Quick
screws in
headscrews
screws, two in
of the case.
the storage com-
unsolder
Stop lever.
head
the
in thetop
plate.
the
speaker
leads.
Lift unit from
8.
To reassemble,
9.
To Remove
the
the case.
Amplif
I. Unsolder the head leads.
Unsolder
2.
Remove
3.
to the tape transport.
Lift the
4.
To
5.
the motor leads.
the hex head
amplifier away from the
reassemble,
reverse
ier
From
nuts holding
reverse
I
Steps
through
8.
the Tape Transport
the
amplifier
tape transport.
Steps I
through 4.
 Loading...