

Fuji Xerox DocuWide 6035, DocuWide 6055 User Manual

DocuWide 6035/6055
Before Using the Machine
Copy
Scan
Direct Scan
Printing
Job Status
Stored Programming
Maintenance
Ploblem Solving
Authentication
System Settings
Machine Status
Appendix

Microsoft,Windows,WindowsServer,WindowsVista,andMicrosoftNetworkare
trademarksorregisteredtrademarksofMicrosoftCorporationintheU.S.andothercountries.
Adobe,Acrobat,PostScript,andAdobePostScript3aretrademarksofAdobeSystemsIncorporated.
HP,HP-GL,HP-GL/2,andHPRTL,areregisteredtrademarksofHewlett-PackardCorporation.
Allproduct/brandnamesaretrademarksorregisteredtrademarksoftherespectiveholders.
PermissionhasbeenobtainedfromMicrosoftCorporationforuseofsoftwarescreenshots.
Forinformationonlicense,refertoAboutLicense.
Inthismanual,safetyinstructionsareprecededbythesymbol .
Alwaysreadandfollowtheinstructionsbeforeperformingtherequiredprocedures.
Thedatasavedintheharddiskofthemachinemaybelostifthereisanyproblemintheharddisk.
FujiXeroxisnotresponsibleforanydirectandindirectdamagesarisingfromorcausedbysuchdata
loss.
AsforthedatasetforAuthentication/LogicalPrinters/StoredProgramming/Mailboxes,werecommendthat
youbackitupwithCentreWareInternetServices.
FujiXeroxisnotresponsibleforanybreakdownofmachinesduetoinfectionofcomputervirusor
computerhacking.
Important
1.Thismanualiscopyrightedwithallrightsreserved.Underthecopyrightlaws,thismanualmaynot
becopiedormodifiedinwholeorpart,withoutthewrittenconsentofthepublisher.
2.Partsofthismanualaresubjecttochangewithoutpriornotice.
3.Wewelcomeanycommentsonambiguities,errors,omissions,ormissingpages.
4.Neverattemptanyprocedureonthemachinethatisnotspecificallydescribedinthismanual.
Unauthorizedoperationcancausefaultsoraccidents.FujiXeroxisnotliableforanyproblems
resultingfromunauthorizedoperationoftheequipment.
AnexportofthisproductisstrictlycontrolledinaccordancewithLawsconcerningForeign
ExchangeandForeignTradeofJapanand/ortheexportcontrolregulationsoftheUnitedStates.
XEROX,thesphereofconnectivitydesign,CentreWare,andDocuWidearetrademarksor
registeredtrademarksofXeroxCorporationintheU.S.orFujiXeroxCo.,Ltd.
DocuWorksisatrademarkofFujiXeroxCo.,Ltd.

TableofContents
Preface......................................................................................................................... 8
About the DocuWide 6035/6055 Models ............................................................... 9
About the Provided CD-ROM ................................................................................10
Types of Manuals ....................................................................................................11
Using This Guide ..................................................................................................... 12
Safety Notes ............................................................................................................. 14
Electrical Safety ........................................................................................................................... 14
Machine Installation..................................................................................................................... 16
Operational Safety ....................................................................................................................... 17
Consumable ................................................................................................................................. 19
Locations of Warning and Caution Labels ................................................................................ 20
Regulation.................................................................................................................21
Radio Frequency Emissions (Class A)...................................................................................... 21
Environment ............................................................................................................. 22
TableofContents
Legal Notice..............................................................................................................23
1 Before Using the Machine
Machine Components and their Functions........................................................ 26
Names and Functions of Components of Machine .................................................................. 26
Control Panel................................................................................................................................ 29
Using the Touch screen .............................................................................................................. 31
Power On/Off ............................................................................................................ 33
Powering On................................................................................................................................. 33
Powering Off................................................................................................................................. 34
Power Saver Mode...................................................................................................35
Changing the Power Saver Mode Change Interval.................................................................. 35
Exiting the Power Saver Mode ................................................................................................... 37
About Documents.................................................................................................... 38
Usable Documents ...................................................................................................................... 38
Documents that Require the Use of the Document Carrier..................................................... 38
Precautions When Handling Documents................................................................................... 38
Media Types..............................................................................................................39
Media Type................................................................................................................................... 39
Handling and Storing Media ....................................................................................................... 40
Loading Media.......................................................................................................... 41
Loading Roll Media/Trimming Roll Media ................................................................................. 41
Using the Manual Feed Tray (Bypass) ...................................................................................... 43
Media Settings..........................................................................................................44
2 Copy
Copying Procedure .................................................................................................48
1

TableofContents
Stopping the Copy Job .......................................................................................... 51
Copying Multiple Documents (Collated Output) ............................................... 52
Copying with Manual Feeding .............................................................................. 55
Copying with Auto R/E ........................................................................................... 56
Interrupting for a Copy Job................................................................................... 58
Reprinting (Copy from Memory)........................................................................... 59
Making Sample Copies........................................................................................... 61
Applying Stamp to Copies..................................................................................... 63
Printing Control Number on the Background (Watermark)............................ 65
Folding Copies......................................................................................................... 66
Copy Features.......................................................................................................... 67
[Copy - Basic Copy] screen .................................................................................. 69
Step1 Selecting Features ............................................................................................................48
Step2 Entering the Quantity ........................................................................................................49
Step3 Scanning Document..........................................................................................................49
Registering Distribution Patterns ................................................................................................54
Reduce/Enlarge ............................................................................................................................69
Media Supply ................................................................................................................................70
Media Type....................................................................................................................................71
Media Cut Mode ...........................................................................................................................72
[Copy - Basic Copy (Auto R/E)] screen............................................................... 73
Original Orientation ......................................................................................................................73
Media Size.....................................................................................................................................74
Media Type....................................................................................................................................74
Advanced Settings of Auto R/E...................................................................................................75
[Copy - Image Quality] screen .............................................................................. 76
Original Type.................................................................................................................................76
Copy Density.................................................................................................................................77
Background Suppression.............................................................................................................77
Sharpness .....................................................................................................................................78
Contrast .........................................................................................................................................78
Black/White Threshold .................................................................................................................78
Adjust Color Density.....................................................................................................................79
[Copy - More Features] screen ............................................................................. 80
Folder.............................................................................................................................................80
Collation.........................................................................................................................................81
Stamp.............................................................................................................................................82
Watermark.....................................................................................................................................84
Sample Copy.................................................................................................................................85
Multi-job
Scan Size ......................................................................................................................................88
Original Orientation ......................................................................................................................88
Image Location .............................................................................................................................90
Scan Start Position.......................................................................................................................91
Edge Erase....................................................................................................................................91
Lead & Tail Margins .....................................................................................................................92
Invert Image ..................................................................................................................................92
.........................................................................................................................................86
2

TableofContents
Mirror Image ................................................................................................................................. 93
Scan Speed.................................................................................................................................. 93
3 Scan
Overview of Scanning.............................................................................................96
Preparation for Network Scanning ...................................................................... 97
Network Settings.......................................................................................................................... 97
Creating Mailboxes...................................................................................................................... 98
Deleting Mailboxes ....................................................................................................................100
Installing Scanning Software ....................................................................................................101
Network Scanning Procedure .............................................................................103
Step1 Selecting Mailboxes ....................................................................................................... 103
Step2 Selecting Features..........................................................................................................104
Step3 Starting Scan Jobs ......................................................................................................... 105
Step4 Importing Documents from Mailboxes..........................................................................105
Importing Documents from Mailboxes..............................................................106
Using Scanner Drivers ..............................................................................................................106
Using Wide Format Scan Service ............................................................................................108
Using CentreWare Internet Services ....................................................................................... 110
Deleting Documents in Mailboxes .....................................................................112
Scanning Multiple Documents as One Set ......................................................113
Stopping Scan Job................................................................................................115
Interrupting for a Scan Job..................................................................................116
Scan Features ........................................................................................................117
[Scan - Basic Scan] screen..................................................................................118
Output Color/Halftone................................................................................................................118
File Format .................................................................................................................................118
Scan Resolution......................................................................................................................... 119
Reduce/Enlarge ......................................................................................................................... 120
[Scan - Image Quality] screen.............................................................................121
Original Type ..............................................................................................................................121
Scan Density ..............................................................................................................................122
Background Suppression..........................................................................................................122
Image Q/F Size ..........................................................................................................................123
Sharpness...................................................................................................................................123
Contrast ......................................................................................................................................123
Black/White Threshold ..............................................................................................................124
Adjust Color Density ..................................................................................................................124
Adjust Color Saturation ............................................................................................................. 124
[Scan - More Features] screen............................................................................126
Scan Size....................................................................................................................................126
Edge Erase.................................................................................................................................126
Scan Start Position ....................................................................................................................127
Scan Speed................................................................................................................................128
4 Direct Scan
3

TableofContents
Overview of Direct Scanning ..............................................................................130
Preparation for Direct Scanning.........................................................................131
Importing Documents by Direct Scanning.......................................................132
5 Printing
Setting up your Printer......................................................................................... 136
Printing .................................................................................................................... 140
Installing USB TWAIN Driver....................................................................................................131
Using USB TWAIN Driver ......................................................................................................... 132
Data Formats ............................................................................................................................. 136
Setting up Your Printer.............................................................................................................. 136
Network Settings........................................................................................................................ 137
Browser Settings........................................................................................................................ 137
Logical Printer Settings ............................................................................................................. 138
Software Installation ..................................................................................................................138
Using the Printer Driver to Print a Document .........................................................................140
Confirming Printing Status and Conditions with CentreWare Internet Services ................. 140
Cancel Printing (Operating the machine from its control panel)...........................................141
About Confidential Print ......................................................................................142
Secure Print................................................................................................................................143
Private Charge Print ..................................................................................................................147
6 Job Status
Overview of Job Status........................................................................................152
Job History ................................................................................................................................. 152
Confirming a Completed Job..............................................................................153
Printing and Deleting Stored Documents ........................................................ 154
Secure Print................................................................................................................................154
Private Charge Print ..................................................................................................................156
7 Stored Programming
Overview of Stored Programming ..................................................................... 160
Registering Stored Programming ......................................................................161
Deleting Information from Stored Programming............................................ 163
Recalling Stored Programming ..........................................................................164
8 Maintenance
Replacing Consumables...................................................................................... 166
Loading Toner............................................................................................................................167
Replacing the Waste Toner Bottle ........................................................................................... 169
Cleaning the Machine ........................................................................................... 172
4

TableofContents
9 Problem Solving
Troubleshooting ....................................................................................................176
General Trouble .....................................................................................................177
Image Quality Problems.......................................................................................178
Jam Problems ........................................................................................................182
Trouble during Copying/Scanning/Printing .....................................................183
Trouble during Copying/Scanning............................................................................................ 183
Trouble during Printing............................................................................................................. 184
Error Message ........................................................................................................185
Document Jams.....................................................................................................186
Paper Jams .............................................................................................................187
Paper jams in roll tray (mis-setting of roll, feeding failure) ....................................................188
Paper jams in roll tray (jam in the area from feeding area to developer area) ....................189
Paper jams in manual feed tray................................................................................................190
Paper Jams in Upper Unit.........................................................................................................190
Paper jams in Folder .................................................................................................................191
10 Authentication
Authentication Feature.........................................................................................194
Types of Authentication.............................................................................................................194
Functions Restricted by Authentication ................................................................................... 195
Users Controlled by Authentication..........................................................................................196
Authentication and Mailboxes................................................................................................... 197
Authentication Feature Settings.........................................................................199
Step1 Authentication Settings ..................................................................................................199
Step2 User Registration (on the Control Panel on the Machine).......................................... 201
Authentication........................................................................................................202
Changing Passwords ................................................................................................................203
IC Card Authentication ..............................................................................................................203
11 System Settings
System Settings Overview...................................................................................206
System Settings Menu List..................................................................................207
System Settings Procedure.................................................................................211
Step1 Entering System Administration Mode .........................................................................211
Step2 Entering System Administrator UserID and Password ...............................................211
Step3 Selecting Operation Mode with System Administrator Menu.....................................212
Step4 Selecting/Configuring Items...........................................................................................212
Step5 Exiting System Administration Mode............................................................................212
Common Settings..................................................................................................213
Machine Clock/Timer.................................................................................................................214
Audio Tones ...............................................................................................................................215
Custom Buttons..........................................................................................................................216
Default Language ......................................................................................................................216
5

TableofContents
Network Settings ................................................................................................... 222
Stored Document Settings .................................................................................. 225
Copy Settings.........................................................................................................228
Scan Start Mode ........................................................................................................................217
Toner Density............................................................................................................................. 217
Watermark..................................................................................................................................217
Folder Settings........................................................................................................................... 218
Maintenance............................................................................................................................... 219
Other Settings ............................................................................................................................219
Detailed Settings........................................................................................................................221
Port Settings............................................................................................................................... 222
Protocol Settings........................................................................................................................223
Presets........................................................................................................................................ 229
Copy Defaults............................................................................................................................. 230
Media Size Buttons ................................................................................................................... 232
Reduce/Enlarge Buttons........................................................................................................... 233
Scan Size Preset Size Buttons ................................................................................................234
Variable Length Preset ............................................................................................................. 234
Stamp Default Value Settings ..................................................................................................235
Stamp Location Auto Settings..................................................................................................237
Original Direction
Auto R/E Default Settings ......................................................................................................... 238
Detailed Settings........................................................................................................................239
....................................................................................................................... 238
Scan Settings .........................................................................................................240
Presets........................................................................................................................................ 240
Scan Defaults............................................................................................................................. 241
Preset Size Buttons................................................................................................................... 243
Reduce/Enlarge Buttons........................................................................................................... 244
Other Settings ............................................................................................................................244
Detailed Settings........................................................................................................................245
Printer Settings...................................................................................................... 246
Job Recovery ............................................................................................................................. 246
Other Settings ............................................................................................................................247
Detailed Settings........................................................................................................................248
System Administrator Settings ..........................................................................249
System Administrator ID ........................................................................................................... 249
System Administrator Password..............................................................................................250
Maximum Login Attempts ......................................................................................................... 250
Stamp Data Admin Settings ................................................................................ 251
Stamp Data Administrator ID....................................................................................................251
Stamp Data Administrator Password....................................................................................... 252
Login Settings........................................................................................................ 253
Create User Account ................................................................................................................. 253
Reset User Accounts ................................................................................................................254
Password Entry - Control Panel............................................................................................... 254
Private Charge Print Settings................................................................................................... 255
Login Setup ................................................................................................................................256
6

TableofContents
12 Machine Status
Overview of Machine Status................................................................................258
Machine Information .............................................................................................259
Billing Meter............................................................................................................261
Media/Settings........................................................................................................262
13 Appendix
Specifications.........................................................................................................266
List of Options........................................................................................................276
Document Catch Tray...........................................................................................278
Notes and Restrictions.........................................................................................279
Notes and Restrictions on Using the Machine........................................................................279
Index .........................................................................................................................281
7

Preface
Preface
Thank you for selecting the DocuWide 6035/6055 (hereafter referred to as the
"machine").
This is a multi-function product capable of corresponding to wide A0 size.
This guide explains how to operate the machine and the precautions that must
be followed during operation. To get the most out of the machine and to use it
effectively, be sure to read this guide before use.
This guide assumes that an operator has a basic knowledge of the operating
environment of the personal computer in use, networking environments, and
how to operate a personal computer. For information on the environment of the
personal computer in use, basic knowledge of networking environments, and
how to operate a personal computer, refer to the manuals provided with the
personal computer, operating system, and network system.
After reading this guide, be sure to keep it handy for quick reference. It will be
useful in case you forget how to perform operations or if a problem occurs with
the machine.
8
The equipment is certified by NEMKO in compliance with [IEC60950-1 (AS/NZS3260)].
The equipment is manufactured under an ISO 9001 Quality System. The equipment is
also certified in compliance with applicable standards by various national bodies.
The equipment was tested and is certified by the New Zealand Ministry of Commerce in
conformance with CISPR publ. 22 (AS/NZISS CISPR22:2002) which relates to radio
frequency interference regulations, and also complies with the Australian Communication
Authority requirements.
NOTE: Machines intended for use in South Korea and Taiwan have been certified
separately in compliance with their requirements.
Any unauthorized alteration, which includes the addition of new functions or the
onnection of external devices, may impact this certification.
Contact your local Xerox representative for a list of approved accessories.

About the DocuWide 6035/6055 Models
About the DocuWide 6035/6055 Models
The DocuWide 6035/6055 has two models as follows:
DocuWide 6035/6055 MF
This model has copy/print/scan
functions.
This type provides
two rolls for paper
feeding.
This type provides
four rolls for paper
feeding.
DocuWide 6035/6055
This model has only print function.
The DocuWide 6055 MF 4 roll model is used for explanation on this manual.
9

About the Provided CD-ROM
About the Provided CD-ROM
Set the CD-ROM supplied with the machine in the CD-ROM drive of the computer, and install the required software.
The CD-ROM that came with the machine contains the following.
Printer Driver
The printer driver is software to print on the machine from your computer.
Scanner Driver
The scanner driver is software to import scanned documents on the machine
to your computer.
Wide Format Scan Service
Wide Format Scan Service is software to import scanned documents on the
machine to your computer with simple operations on your computer.
Stamp Tool
Create stamp data with a computer, and send it to DocuWide 6035/6055.
DocuWide 6035/6055 Utilities help
The help describes procedures to install the printer driver and scanner driver
and to configure the print settings.
PDF manuals
10
These are the PDF versions of the supplied printed manuals, User Guide and
Quick Guide.

Types of Manuals
This section describes the manuals of this machine and the manuals of
optional accessories.
Included Manuals
The following manuals are provided with the machine.
Types of Manuals
User Guide (This Document)
Quick Guide
DocuWide 6035/6055 Utilities
help
This guide describes all the necessary steps for copy/print/scan,
clearing paper jams, daily care, various settings items and
safety information.
Introduces the main features of the machine, as well as simple
operating instructions.
A guide to installing printer driver, configuring the printer environment, etc. This help is included in the CD-ROM provided
with the machine.
Guides for Optional Accessories
The guides for optional accessories are as follows.
See • "List of Options" (P.276)
Simple Folder User Guide This explains how to use Simple Folder.
BT-PlotAssistant User Guide This explains the operation and functions of BT-PlotAssistant.
DocuWide Series Stamp Tool User
Guide
This explains the operation and functions of the electronic
stamp tool.
11

Using This Guide
Using This Guide
This section describes the notations and configuration of this manual.
Contents of this Guide
This guide consists of the following chapters:
1 Before Using the Machine
Describes basic information such as identifying the major components, how to
switch the machine on and off, how to use the touch screen, how to set the
power saver feature, usable media, cautions for handling media, and how to
load media.
2 Copy
Describes the copy features and operations.
3 Scan
Describes the scan features and operations.
4 Direct Scan
Describes the direct scan features and operations.
5 Printing
Describes the operations of printing from a computer.
6 Job Status
Describes procedures for confirming jobs, and printing/deleting saved documents.
7 Stored Programming
Describes the stored programming feature.
8 Maintenance
Describes procedures for replacing consumables, and cleaning the machine.
9 Problem Solving
Describes troubles that may occur with the machine and their solutions.
10 Authentication
Describes the authentication feature.
12
11 System Settings
Describes how to manage the system settings.
12 Machine Status
Describes the machine status feature.
13 Appendix
Describes the specifications and cautions/restrictions.

Conventions
Using This Guide
z
The screen images and illustrations that are used in this guide are based on the
machine configuration with the various options installed. Some of the items in the
screen images may not be displayed or there may be features that cannot be used
depending on the machine configuration.
z
In this document, "Computer" refers to a personal computer or workstation.
z
The following icons are used in this guide.
Important : Indicates important information which you should read.
Note : Indicates additional information on operations or features.
See : Indicates cross-references to the content.
z
The following conventions are used in this guide:
" " : The cross-reference is within this manual.
" " : The cross-references are in other manuals.
" " : Refers to CD-ROM, names of features, touch screen mes-
sages, and entered text.
[ ] : Refers to folders, files, applications, button or menu names
displayed in the touch screen, as well as the names of menus,
commands, windows, or dialog boxes displayed on the computer screen and their button and menu names.
< > button : Indicates a hardware button on the control panel.
< > key : Indicates a key on the keyboard of the computer.
> : Indicates a path to a certain item within a procedure on the
control panel.
Example: When you see the procedure "Select [Tools] >
[Setup] > [Mailbox]", this means that you need to select
[Tools], select [Setup], and then select [Mailbox].
Indicates a path to a certain item within a procedure on a computer.
Example: When you see the procedure "To search for files
and folders, click [Start] > [Search] > [For Files or Folders]",
this means that you need to click [Start], click [Search], and
then click [For Files or Folders] in order to search for files and
folders.
z
Orientation of documents or paper is described in this guide as follows:
, , Short Edge Feed (SEF): Loading with one of the short edges of the document
or paper.
, ,Long Edge Feed (LEF): Loading with one of the long edges of the document
or paper.
SEFOrientation LEFOrientation
Paperfeeddirection
Paperfeeddirection
13

Safety Notes
j
Safety Notes
Before using this product, read "Safety Notes"carefully for safety use.
This product and recommended supplies have been tested and found to comply with strict safety requirements including safety agency approvals and compliance with environmental standards. Follow the following instructions for
safety use.
WARNING
Any unauthorized alteration including an addition of new functions or connection to
external devices may not be covered by the product warranty. Contact your local
Fuji Xerox representative for more information.
Follow all warning instructions marked on this product. The warning marks
stand for the followings:
Used for item that if not followed strictly, can lead death or severe or
fatal injuries and the possibility to do it is comparatively high.
Used for items that if not followed strictly, can lead to severe or fatal
injuries.
: A symbol for items to pay attention to when handling machine. Follow instructions
carefully to use machine safely.
: A symbol for prohibited items. Follow instructions carefully to avoid any dangerous acts.
Prohibited No fire Do not
: A symbol for items that must be performed. Follow instructions carefully to carry out
these essential tasks.
Instructions Unplug Ground/
Electrical Safety
Static
Sensitive
Used for items that if not followed strictly, can cause injuries to user or
damages to machine.
Caution Flammable Explodable Electric
touch
Earth
Do not use
in bathroom
shock
Do not
tear down
Heated
surface
Keep away
from wet
Moving
ob
Never
touch
ect
Pinched
fingers
14
Insert the power plugs (Printer: 3-pin, T-shaped plug, Scanner: plug with
grounding wire) respectively into rated voltage AC208-240V/13A receptacles.

Safety Notes
This product shall be operated by the power source as indicated on the
product's data plate. Consult your local power company to check if your
power source meets the requirements.
WARNING: Connect this product to a protective earth circuit.
This product is supplied with a plug that has a protective earth pin. The plug
fits only into an earthed electrical outlet. This is a safety feature. If the plug
doesn't fit to the outlet, contact an electrician to replace the outlet to avoid
risk of electric shock. Never use an earthed adapter plug to connect the
product to the electrical outlet that has no earth connection terminal.
Improper connection of a grounding conductor may cause electric shock.
Connect this product to a branch circuit or an outlet that has larger capacity
than the rated ampere and voltage of this product. See the data plate on the
rear panel of this product for its rated ampere and voltage.
Never touch the power cord with wet hands. It may cause electric shock.
Do not place an object on the power cord.
Always keep the plug connection free of dust. The dusty and damp
environment may bring about minute electric current in a connector. It may
generate heat and eventually cause a fire accident.
To avoid the risk of electric shock and a fire accident, only use the power
cord supplied with this product or the ones designated by Fuji Xerox.
The power cord is exclusive use for this product. Do not use it for any other
product.
Do not damage or alter the power cord. Damage and alteration may generate
heat and eventually cause electric shock or a fire accident.
If the power cord is damaged or insulated wires are exposed, contact your
local Fuji Xerox representative for its replacement. Do not use a damaged or
uninsulated cord to avoid the risk of electric shock and a fire accident.
When cleaning this product, always switch off and unplug it. Access to a live
machine interior may cause electric shock.
Do not unplug or re-plug this product with the switch on. Plugging and
unplugging a live connector may deform the plug and generate heat, and
eventually cause a fire accident.
Hold the plug not the cord when unplugging this product, or it may damage
the cord and cause electric shock or a fire accident.
Always switch off and unplug the machine when it is not used over weekends
or long holidays.
Once a month, switch off this product and check if
z
the power cord is plugged firmly into an electrical outlet;
z
the plug is not excessively heated, rusted or bent;
15

Safety Notes
z
the plug and electrical outlet are free of dust; and
z
the power cord is not cracked or worn down.
Once you notice any unusual condition, switch off and unplug this product
first and contact your local Fuji Xerox representative
Machine Installation
Do not locate this product where people might step on or trip over the power
cord. Friction or excessive pressure may generate heat and eventually
cause electric shock or a fire accident.
Never locate this product in the following places:
z
-Near radiators or any other heat sources
z
Near volatile flammable materials such as curtains
z
In the hot, humid, dusty or poorly ventilated environment
z
In the place receiving direct sunlight
z
Near cookers or humidifiers
Locate this product on a level and sturdy surface that can withstand a weight
of 345 Kg. Otherwise, if tilted, the product may fall over and cause injuries.
Locate this product in a well-ventilated area. Do not obstruct ventilation
openings of the product.
Keep the minimum clearance as follows for ventilation and an access to the
power plug. Unplug the product if an abnormal condition is noted.
16
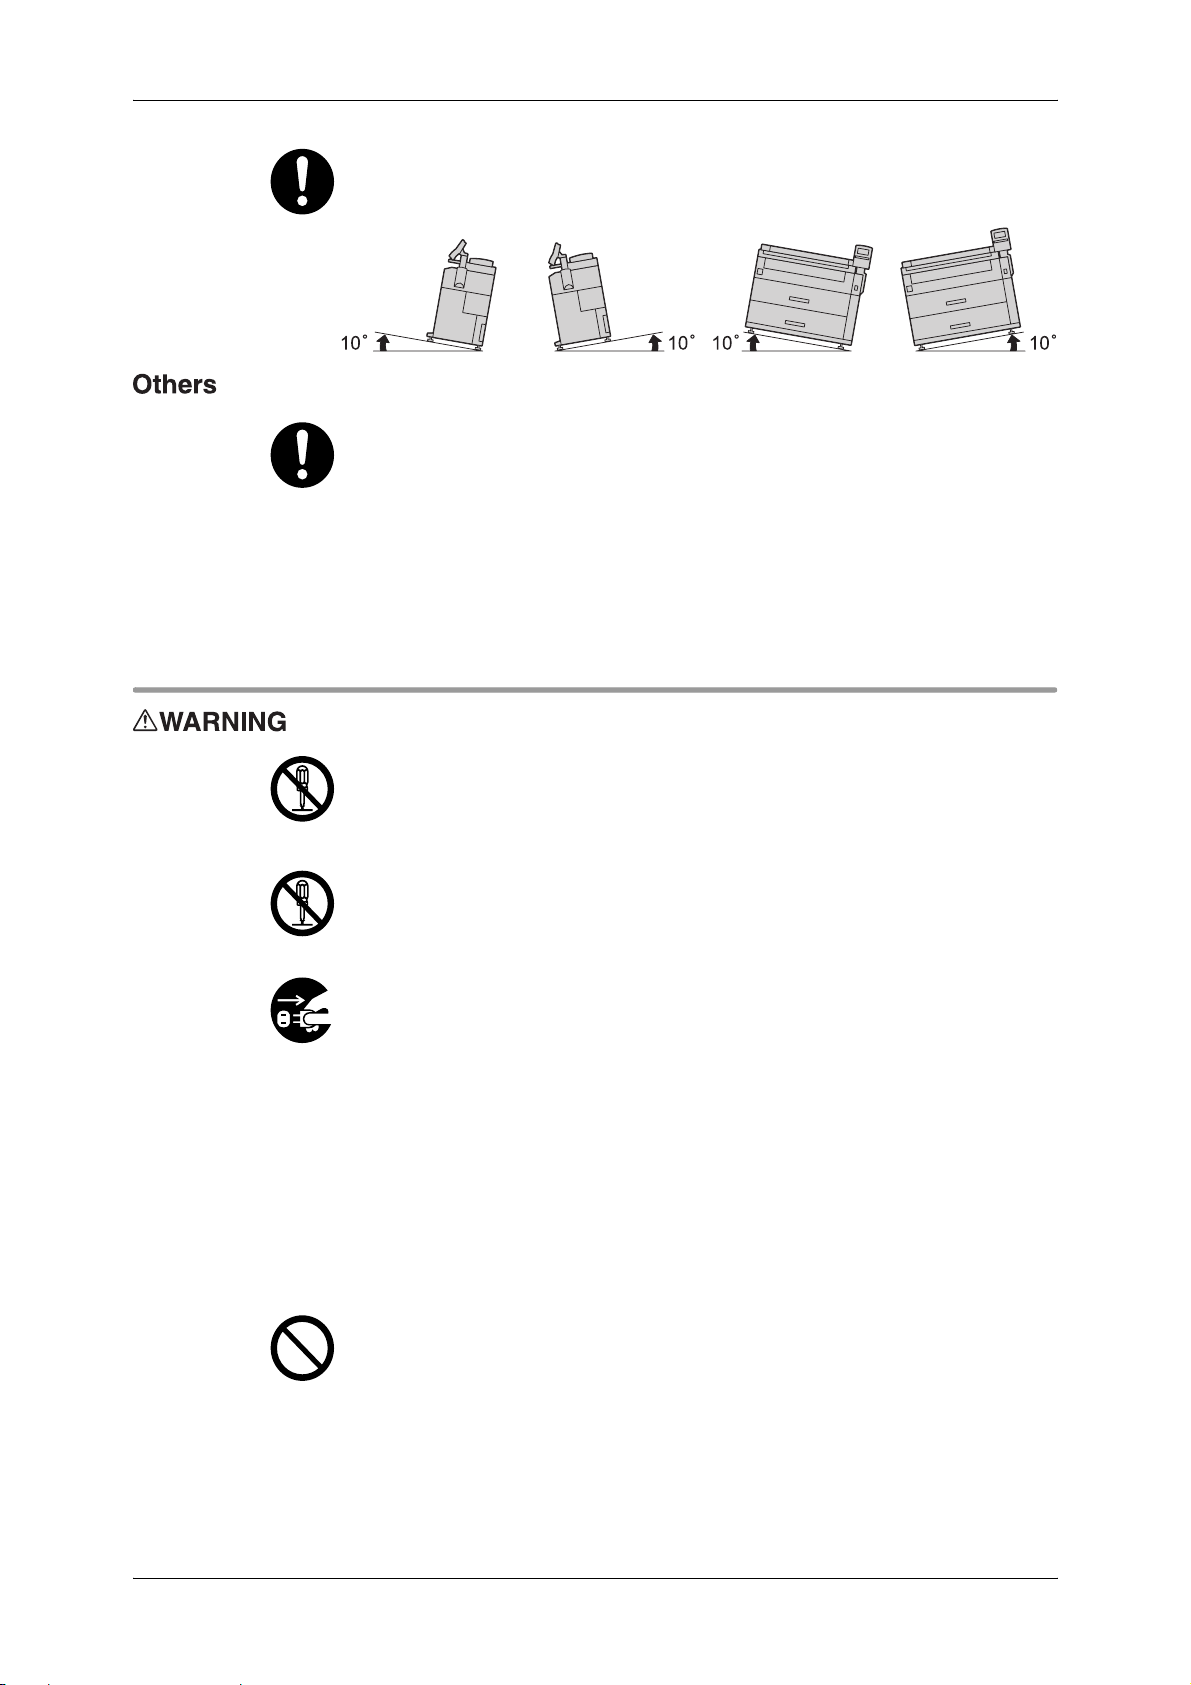
Safety Notes
Do not incline the product at more than 10 degree angle. Otherwise, it may
fall over and cause injuries.
To keep this product in a good performance and condition, always use it in
the following environment:
z
Temperature : 10 - 32 °C
z
Humidity : 15 - 85 %
When the product is left in a chilly room and the room is rapidly warmed up by
heater, dew condensation may form inside the product and cause a partial
deletion on printing.
Operational Safety
The operator's product maintenance procedures are described in the
customer documentation supplied with this product. Do not carry out any
other maintenance procedures not described in the documentation.
This product features safety design not to allow operators access to hazard
areas. The hazard areas are isolated from operators by covers or protectors
which require a tool to remove. To prevent electric shock and injuries, never
remove those covers and protectors.
To avoid the risk of electric shock and a fire accident, switch off and unplug
the product promptly in the following conditions, then contact your local Fuji
Xerox representative.
z
z
z
z
z
z
z
The product emits smoke or its surface is unusually hot.
The product emits unusual noise or odor.
The power cord is cracked or worn down.
A circuit breaker, fuse or any other safety device is activated.
Any liquid is spilled into the product.
The product is soaked in water.
Any part of the product is damaged.
Do not insert any object into slots or openings of this product.
Do not place any of the followings on the product:
z
Liquid container such as flower vases or coffee cups
z
Metal parts such as staples or clips
z
Heavy objects
If liquid is spilled over or metal parts are slipped into the product, it may
cause electric shock or a fire accident.
17
Safety Notes
Do not use conductive paper such as origami paper, carbonic paper or
conductively-coated paper. When paper jam occurs, it may cause shortcircuit and eventually a fire accident.
When cleaning this product, use the designated cleaning materials exclusive
to it. Other cleaning materials may result in poor performance of the product.
Never use aerosol cleaners, or it may catch fire and cause explosion.
Never play the CD-ROM supplied with the product on an audio player.
Always use a CD-ROM player. Otherwise, large sound may damage audio
players or your ears.
Always follow all warning instructions marked on or supplied with this
product.
To avoid the risk of burn injuries and electric shock, never touch the area with
the "High Temperature" or "Sharp Edges" marks on.
Keep electrical and mechanical safety interlocks active. Keep the safety
interlocks away from magnetic materials. Magnetic materials may
accidentally activate the product and cause injuries or electric shock.
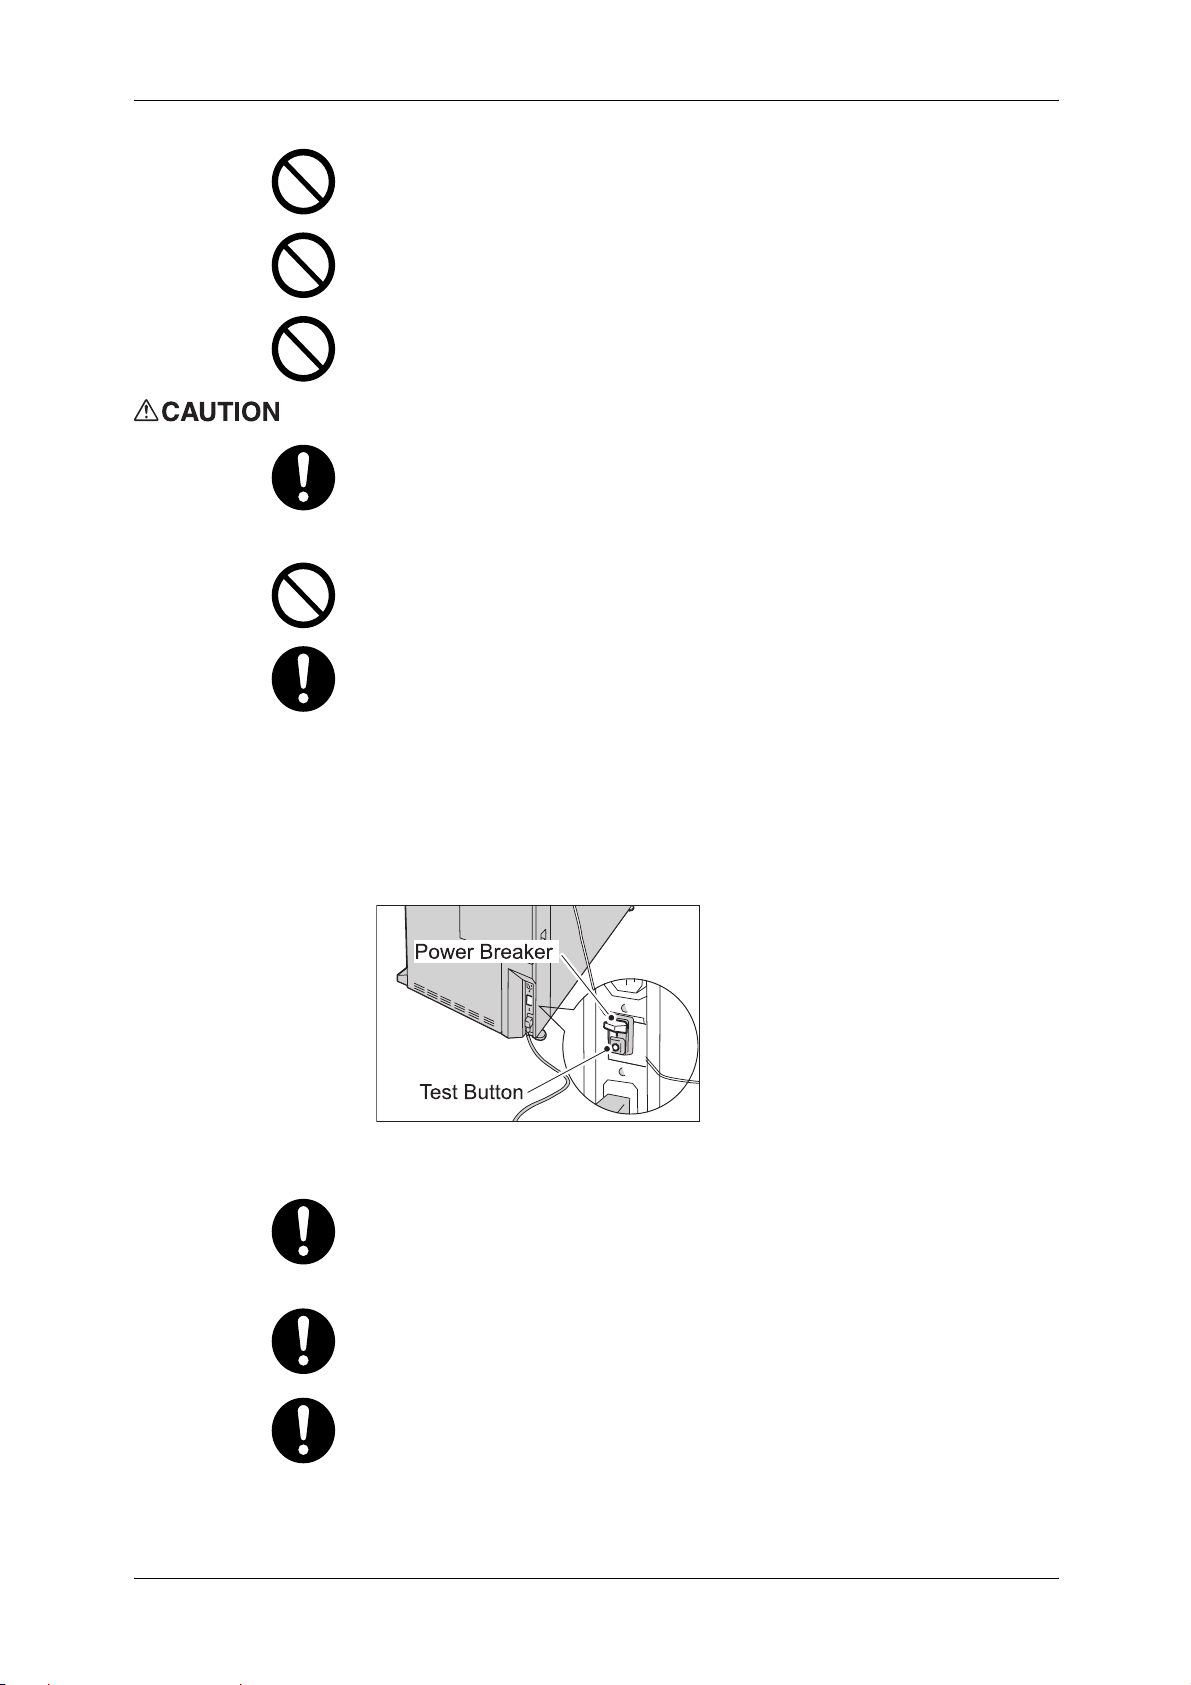
A ground fault interrupter is embedded in this product. If current leakage
occurs, the ground fault interrupter automatically cuts off power circuit to
prevent electric shock and a fire accident. The ground fault interrupter is
normally ON [(indicated as "|")]. Check once a month if the ground fault
interrupter works properly in accordance with the following procedures:
(1) Turn off the power switch of the product.
(2) With the power of the power breaker turned on, press the TEST button.
(3) If the power of the power breaker is turned off, the circuit is working
properly,
If the circuit does not work properly, contact your local Fuji Xerox
representative.
Do not attempt to remove a paper jammed deeply inside the product,
particularly a paper wrapped around a fuser or a heat roller. Otherwise, it
may cause injuries or burns. Switch off the product promptly and contact
your local Fuji Xerox representative.
To move this product to another location, contact your local Fuji Xerox
representative.
18
Ventilate well during extended operation or mass copying. It may affect the
office air environment due to odor such as ozone in a poorly ventilated room.
Provide proper ventilation to ensure the comfortable and safe environment.

Consumable
Safety Notes
Never touch the exposed connectors around this label. It may cause damage
to the parts due to static discharge.
Store all consumables in accordance with the instructions given on its
package or container.
Use a broom or a wet cloth to wipe off spilled toner. Never use a vacuum
cleaner for the spills. It may catch fire by electric sparks inside the vacuum
cleaner and cause explosion. If you spill a large volume of toner, contact your
local Fuji Xerox representative.
Never throw a toner cartridge into an open flame. Remaining toner in the
cartridge may catch fire and cause burn injuries or explosion.
If you have a used toner cartridge no longer needed, contact your local Fuji
Xerox representative for its disposal.
Keep the [drum] and toner cartridges out of the reach of children. If a child
accidentally swallows toner, spit it out, rinse mouth with water, drink water
and consult a physician immediately.
When replacing the [drum] and toner cartridges, be careful not to spill the
toner. In case of any toner spills, avoid contact with clothes, skin, eyes and
mouth as well as inhalation.
If toner spills onto your skin or clothing, wash it off with soap and water.
If you get toner particles in your eyes, wash it out with plenty of water for at
least 15 minutes until irritation is gone. Consult a physician if necessary.
If you inhale toner particles, move to a fresh air location and rinse your mouth
with water.
If you swallow toner, spit it out, rinse your mouth with water, drink plenty of
water and consult a physician immediately.
This product uses roll printing paper. Be careful not to drop it as it is heavy
and may cause injuries.
19
Safety Notes
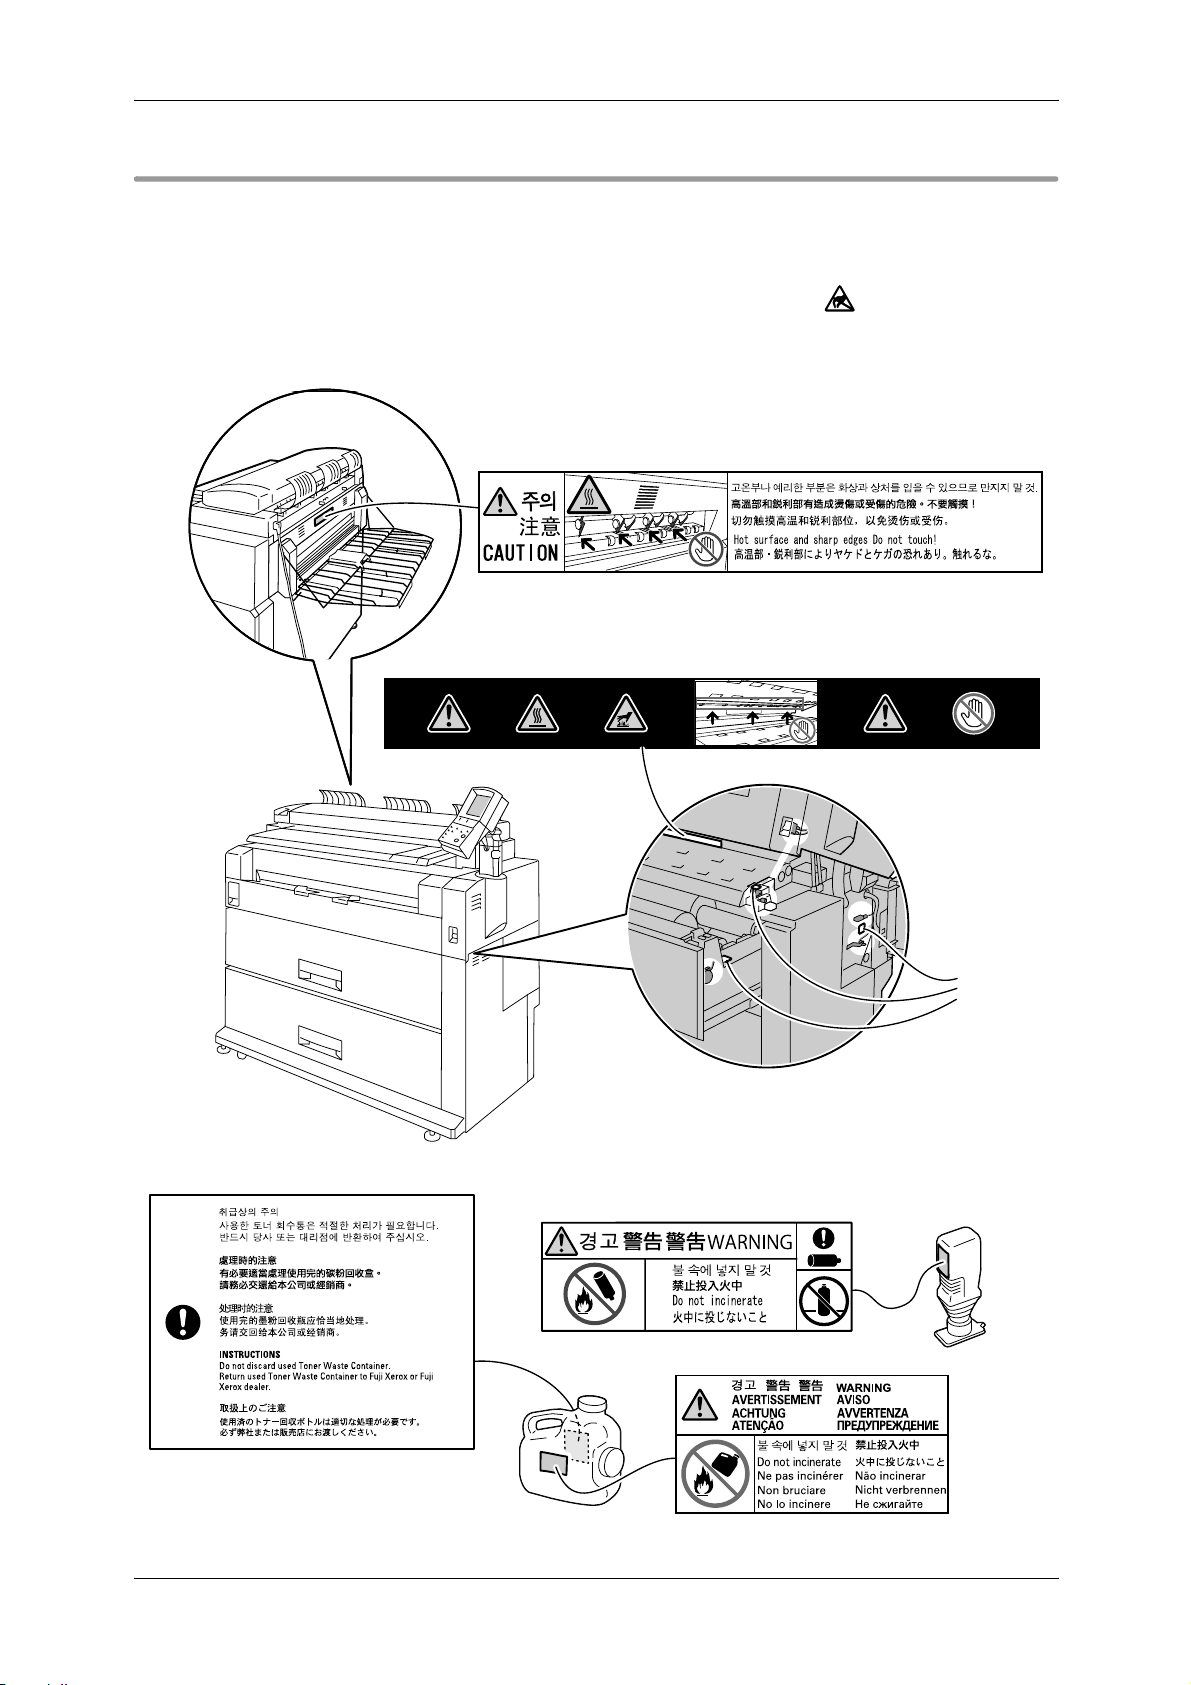
Locations of Warning and Caution Labels
Always follow all warning instructions marked on or supplied with this product.
To avoid the risk of burns and injuries, never touch the area with the "High
Temperature" or "Sharp Edges" marks on.
Never touch the exposed connectors around this label . It may cause
damage to the parts due to static discharge.
20

Regulation
Radio Frequency Emissions (Class A)
This product has been tested and found to comply with the limits for a
Class B digital device, pursuant to the International Standard for
Electromagnetic Interference (CISPR Publ. 22) and
Radiocommunications Act 1992 in Australia/New Zealand. These limits
are designed to provide reasonable protection against harmful
interference in a residential installation. This product generates, uses
and can radiate radio frequency energy and, if not installed and used in
accordance with the instructions, may cause harmful interference to
radio communications. However, there is no guarantee that interference
will not occur in a particular installation. If this product does cause
harmful interference to radio or television reception, which can be
determined by turning this product off and on, the user is encouraged to
try to correct the interference by one or more of the following measures:
z
Reorient or relocate the receiving antenna.
z
Increase the separation between this product and the receiver.
z
Connect this product into an outlet on a circuit different from that to which the
receiver is connected.
z
Consult the dealer or an experienced radio/TV technician for help.
Regulation
Changes and modifications to this product not specifically approved by Fuji
Xerox may void the user’s authority to operate this product.
21

Environment
Environment
z
For environmental protection and efficient use of resources, Fuji Xerox reuses
returned "toner cartridges or toner containers and drums (photoreceptors)" to make
recycle parts, recycle materials, or energy recovery.
z
Proper disposal is required for "toner cartridges or waste toner containers and
drums (photoreceptors)" no longer needed. Do not open "toner cartridges or waste
toner containers and drums (photoreceptors)" containers. Return them to your local
Fuji Xerox representative.
z
Spares for the standard configuration of installed machines are supported for up to
7 years from the date of launch.
22

Legal Notice
Copying or printing certain documents may be illegal in your country. Penalties
of fines or imprisonment may be imposed on those found guilty. The following
are examples of items that may be illegal to copy or print in your country.
z
Currency
z
Banknotes and checks
z
Bank and government bonds and securities
z
Passports and identification cards
z
Copyright material or trademarks without the consent of the owner
z
Postage stamps and other negotiable instruments
This list is not inclusive and no liability is assumed for either its completeness
or accuracy. In case of doubt, contact your legal counsel.
Legal Notice
23


1 Before Using the Machine
Describes the basic operation of the machine such as naming each component,
switching the machine on and off, the operation of the touch screen, and power
saving settings.
z
Machine Components and their Functions ................................................. 26
z
Power On/Off .............................................................................................. 33
z
Power Saver Mode ..................................................................................... 35
z
About Documents ....................................................................................... 38
z
Media Types ...............................................................................................39
z
Loading Media ............................................................................................41
z
Media Settings ............................................................................................44
1

1 Before Using the Machine
Machine Components and their Functions
Before Using the Machine
This section describes the main components of the DocuWide 6035/6055 and their
functions.
Names and Functions of Components of Machine
Front
23 4
1
13
12
651
7
8
9
10
11
No.
1 Document Thickness
2 Document Table Load document here.
3 Document Cover Raise the right-edge lever and open this cover to clear a document jam.
4 Document Guide Align the right edge of document with this guide.
5 Document Measuring
6 Control Panel It consists of operation buttons, LED indicators and a touch screen.
7 Document Catch Tray Horizontally receives documents output toward the rear of the machine.
8 Size Guide When loading paper in the manual feed tray, align both edges of the
9 Manual Feed Tray
Component Function
This adjusts the Document Cover in seven levels according to the
Adjustment Lever
Gauge
(Bypass)
thickness of the document.
Remove this gauge to measure thick documents to be scanned.
See • "Control Panel" (P.29)
(Optional)
paper with these guides.
Load media here when making copies or prints onto cut paper.
26

Machine Components and their Functions
No.
10 Power Switch Used to switch the power to the machine on/off.
11 Roll Tray Load roll media here.
12 Upper Unit Access the upper unit to clear a paper jam.
13 Upper Unit Releasing Lever Lift this lever to open the upper unit.
Component Function
Right and Rear
14
15
16 17 18
19
20
21
22
Inside
26
Before Using the Machine
1
23
25 24
282930
No.
14 Document Output Port Scanned documents exit this port.
15 U-turn Output Guide Enables scanned documents to return to the front instead of to the rear.
16 USB Connector Used to connect a computer.
17 Maintenance Connector Do not use this connector because it is available only for our customer
18 Option Interface Connector Used to connect Scan Counter Kit, the optional document counter.
19 Output Port Face up copies and prints exit here.
20 Paper Catch Tray Receives sheets of copied or printed media. (Optional)
21 Right-side Cover Open this cover to replace the waste toner bottle or to turn the media
22 Waste Toner Bottle This bottle receives used toner.
Component Function
Apply the magnetic area to the attachment on the back of this machine.
Note • Remove this to use Document Catch Tray (Optional).
engineers.
heater switch on/off.
Note • Open the upper unit, and then open the right-side cover.
27
23 Media Heater Switch Switches the media heater on/off.
By switching on the media heater, the paper loaded in the machine can
be dehumidified. Normally, the media heater switch is off.
27

1 Before Using the Machine
Before Using the Machine
1
No.
24 Power Breaker
25 Interface Cover Contains the LAN port and service port. Do not use the service port. It is
26 Toner Supply Port Toner is replenished in the machine through this port.
27 IC Card Reader Reads and authenticates the IC card. (Optional)
28 Cutter Button Trims the lead edge of roll media.
29 Cutter Cover Covers the cutter to trim media. Do not open this cover.
30 Roll1, Roll2 Load roll media here.
Component Function
Used to switch the main power to the machine on/off.
(Main Power Switch)
intended to be used only by our customer engineers.
Important • Turn off the power of the machine, and then connect the LAN
cable.
Simple Folder (Optional) When connected
28
See • For details about Simple Folder: Optional accessory guides
 Loading...