

Fuji Xerox DocuPrint P365 d, DocuPrint P368 d User Manual

DocuPrint P365 d
DocuPrint P368 d
User Guide

Apple, Bonjour, Macintosh, and Mac OS are trademarks of Apple Inc. in the United States and/or other countries.
Adobe, Acrobat, Photoshop, PostScript, and PostScript 3 are either registered trademarks or trademarks of Adobe Systems Incorporated
in the United States and/or other countries.
Microsoft, Windows Vista, Windows, and Windows Server are trademarks of Microsoft Corporation in the United States and/or other
countries.
RSA and BSAFE are either registered trademarks or trademarks of EMC Corporation in the United States and/or other countries.
All product/brand names are trademarks or registered trademarks of the respective holders.
Microsoft product screen shot(s) reprinted with permission from Microsoft Corporation.
In this manual, safety instructions are preceded by the symbol . Always read and follow the instructions before performing the
required procedures.
It may be a legal offence to print currency notes, certificates of stocks and securities, or any other documents of similar nature,
regardless of whether they will be used.
Fuji Xerox is not responsible for any breakdown of machines due to infection of computer virus or computer hacking.
IMPORTANT:
1. This manual is copyrighted with all rights reserved. Under the copyright laws, this manual may not be copied or modified in
whole or part, without the written consent of the publisher.
2. Parts of this manual are subject to change without prior notice.
3. We welcome any comments on ambiguities, errors, omissions, or missing pages.
4. Never attempt any procedure on the machine that is not specifically described in this manual. Unauthorized operation
can cause faults or accidents. Fuji Xerox is not liable for any problems resulting from unauthorized operation of the equipment.
5. An export of this product is strictly controlled in accordance with Laws concerning Foreign Exchange and Foreign Trade of
Japan and/or the export control regulations of the United States.
Xerox, Xerox and Design, Fuji Xerox and Design, as well as CentreWare are registered trademarks or trademarks of Xerox Corporation in
Japan and/or other countries.
DocuPrint is a registered trademark of Fuji Xerox Co., Ltd.
2

Preface
Thank you for purchasing the DocuPrint P365 d/DocuPrint P368 d.
This guide is intended for users who use the printer for the first time, and provides all the necessary operating information
about the print function.
Please read this guide to achieve the best performance from this printer.
This guide assumes you are familiar with computers and the basics of network operation and configuration.
After reading this guide, keep it safe and handy for future reference.
Fuji Xerox Co., Ltd.
Preface
3

4
Preface

Contents
Preface........................................................................................................................................................................................... 3
Types of Manuals...................................................................................................................................................................... 9
Using This Guide......................................................................................................................................................................10
Organization............................................................................................................................................................11
Conventions .............................................................................................................................................................12
About License ...........................................................................................................................................................................13
Product Features .....................................................................................................................................................................14
1 Specifications ..................................................................................................15
2 Basic Operation...............................................................................................19
Main Components......................................................................................................................20
Front View ...............................................................................................................................................20
Rear View.................................................................................................................................................21
Operator Panel.......................................................................................................................................22
Securing the Printer .............................................................................................................................23
Installing Optional Accessories .............................................................................................24
Installing the Optional 512MB Memory.....................................................................................24
Installing the Optional 550 Sheet Feeder ..................................................................................27
Installing the Optional Wireless Printer Adapter.....................................................................31
Installing the Optional Font ROM..................................................................................................33
Turning on the Printer...............................................................................................................36
Printing a Panel Settings Page ..............................................................................................37
Power Saver Mode......................................................................................................................38
Exiting the Power Saver Mode.........................................................................................................38
3 Printer Management Software .................................................................39
Print Drivers...................................................................................................................................40
CentreWare Internet Services .................................................................. 41
Creating an Administrative Password..........................................................................................41
Document Monitor (Windows® Only)................................................................................42
SimpleMonitor (Windows
Setup Disk Creation Tool (Windows
®
Only) .......................................................................................43
®
Only)................................................................44
4 Printer Connection and Software Installation ....................................45
Connecting Your Printer...........................................................................................................46
Connecting Printer to Computer or Network ............................................................................46
Setting the IP Address ..............................................................................................................48
TCP/IP and IP Addresses...................................................................................................................48
Dynamic Methods of Setting the Printer’s IP Address .........................................................48
Assigning an IP Address (for IPv4 Mode)...................................................................................49
Contents
5

Verifying the IP Settings ...................................................................................................................50
Printing and Checking the Printer Settings Page.....................................................................51
Installing Print Driver on Computers Running Windows
Identifying Print Driver Pre-install Status (For Network Connection Setup)................52
Inserting the CD-ROM ........................................................................................................................53
USB Connection Setup.......................................................................................................................53
Network Connection Setup ..............................................................................................................55
Setting Up for Shared Printing........................................................................................................57
Point and Print.......................................................................................................................................59
Peer-to-Peer ............................................................................................................................................60
®.....................................................52
Installing Print Driver on Computers Running
Mac OS X ..............................................................................................................................63
Installing Print Driver on Computers Running Linux (CUPS).....................................64
Configuring Wireless Settings (Windows
®
& Mac OS X)............................................65
5 Printing Basics.................................................................................................71
About Print Media ......................................................................................................................72
Print Media Usage Guidelines.........................................................................................................72
Print Media That Can Damage Your Printer .............................................................................73
Print Media Storage Guidelines......................................................................................................73
Supported Print Media .............................................................................................................74
Usable Print Media ..............................................................................................................................74
Recommended Print Media..............................................................................................................77
Loading Print Media ..................................................................................................................78
Capacity ...................................................................................................................................................78
Print Media Dimensions.....................................................................................................................78
Loading Print Media in the Standard 250 Sheet Tray and the Optional 550 Sheet
Feeder ............................................................................................................................................78
Loading Print Media in the Bypass Tray......................................................................................80
Setting Paper Sizes and Types...............................................................................................88
Setting Paper Sizes...............................................................................................................................88
Setting Paper Types ............................................................................................................................88
Printing............................................................................................................................................89
Sending a Job to Print ........................................................................................................................89
Canceling a Print Job ..........................................................................................................................89
Using the Stored Print Feature .......................................................................................................90
Duplex Printing......................................................................................................................................92
Selecting Printing Options ................................................................................................................93
Printing Custom Size Paper ..............................................................................................................97
Auditron ................................................................................................................................................100
Checking Status of Print Data......................................................................................................100
Printing a Report Page ....................................................................................................................101
Printer Settings................................................................................................................................... 102
Printing With Web Services on Devices (WSD) ...........................................................103
Adding Roles of Print Services...................................................................................................... 103
Printer Setup........................................................................................................................................103
6 Using the Operator Panel Menus ..........................................................105
6
Contents

Understanding the Printer Menus ....................................................................................106
Report / List..........................................................................................................................................106
Meter Readings ..................................................................................................................................107
Admin Menu........................................................................................................................................107
Tray Settings........................................................................................................................................130
Panel Lock Function................................................................................................................ 136
Enabling the Panel Lock.................................................................................................................. 136
Disabling the Panel Lock.................................................................................................................136
Setting the Power Saver Time Option..............................................................................137
Resetting to Factory Defaults.............................................................................................138
7 Troubleshooting .......................................................................................... 139
Clearing Jams............................................................................................................................140
Avoiding Jams.....................................................................................................................................140
Identifying the Location of Paper Jams...................................................................................141
Clearing Paper Jams From the Bypass Tray............................................................................142
Clearing Paper Jams From the Standard 250 Sheet Tray.................................................144
Clearing Paper Jams From the Fusing Unit.............................................................................146
Clearing Paper Jams From the Duplexer..................................................................................149
Clearing Paper Jams From the Regi Roll................................................................................... 150
Clearing Paper Jams From the Optional 550 Sheet Feeder .............................................152
Jam Problems......................................................................................................................................153
Basic Printer Problems ........................................................................................................... 158
Display Problems......................................................................................................................159
Printing Problems..................................................................................................................... 160
Print Quality Problems ...........................................................................................................161
The Output Is Too Light .................................................................................................................162
Toner Smears or Print Comes Off ...............................................................................................163
Random Spots/Blurred Images....................................................................................................164
The Entire Output Is Blank ............................................................................................................165
Streaks Appear on the Output .....................................................................................................166
Vertical Blanks ....................................................................................................................................167
Mottle.....................................................................................................................................................167
Ghosting................................................................................................................................................168
Light-Induced Fatigue.....................................................................................................................168
Fog...........................................................................................................................................................169
Bead-Carry-Out (BCO) .....................................................................................................................169
Jagged Characters ............................................................................................................................170
Banding .................................................................................................................................................170
Auger Mark...........................................................................................................................................171
Wrinkled/Stained Paper.................................................................................................................. 172
Damage on the Leading Edge of Paper................................................................................... 173
The Top and Side Margins Are Incorrect.................................................................................173
Protrudent/Bumpy Paper ...............................................................................................................174
Images Are Skewed.......................................................................................................................... 174
Noise .............................................................................................................................................175
Problems With Installed Optional Accessories ............................................................176
Other Problems.........................................................................................................................177
Contents
7

Understanding Printer Messages ......................................................................................178
Contacting Service .................................................................................................................. 180
Getting Help...............................................................................................................................181
LCD Panel Messages.........................................................................................................................181
SimpleMonitor Alerts .......................................................................................................................181
Obtaining the Product Information...........................................................................................181
Non-Genuine Mode.................................................................................................................182
8 Maintenance................................................................................................. 183
Cleaning the Printer................................................................................................................ 184
Cleaning Inside the Printer............................................................................................................184
Replacing Consumables........................................................................................................ 187
Replacing the Toner Cartridge .....................................................................................................187
Replacing the Drum Cartridge .....................................................................................................189
Replacing the Fusing Unit, Transfer Unit and Retard Roll.................................................192
Ordering Supplies.....................................................................................................................198
Consumables.......................................................................................................................................198
When to Order Supplies.................................................................................................................. 198
Recycling Supplies.............................................................................................................................198
Storing Print Media................................................................................................................. 199
Storing Consumables .............................................................................................................200
Managing the Printer............................................................................................................. 201
Checking or Managing the Printer with CentreWare Internet Services.......................201
Checking Printer Status with SimpleMonitor (Windows® Only) ....................................201
Conserving Supplies................................................................................................................ 202
Checking Page Counts...........................................................................................................203
Moving the Printer...................................................................................................................204
Removing Options................................................................................................................... 205
Removing the Optional 512MB Memory.................................................................................205
Removing the Optional 550 Sheet Feeder.............................................................................. 207
Removing the Optional Wireless Printer Adapter.................................................................209
Removing the Optional Font ROM .............................................................................................211
Contacting Fuji Xerox ...........................................................................................................................213
Technical Support....................................................................................................................214
Online Services.......................................................................................................................... 215
8
Contents

Types of Manuals
Manuals included with the printer
The following manuals are provided with the DocuPrint P365 d/DocuPrint P368 d.
Safety Guide Describes the information you need to know before using the printer and to operate the
printer safely.
Setup Guide Provides step-by-step instructions on how to set up your printer.
User Guide (this guide) Describes how to get ready to print and set various features. It also covers the operator
panel menus, troubleshooting tips, and maintenance information.
This guide is on the Software/Product Manual disc.
®
PostScript User Guide Describes how to set up your printer as a PostScript
configured on your print driver.
This guide is on the PostScript Driver Library CD.
Manuals included with an optional accessory
The following manual is provided with the optional accessories (sold separately).
Installation Guide Optional accessories that require an installation at the customer's site are provided with an
Installation Guide.
printer and the features that can be
Types of Manuals
9

Using This Guide
This section includes:
•
"Organization" on page 11
•
"Conventions" on page 12
10
Using This Guide

Organization
This guide is organized into the following chapters. The summary of each chapter is as follows:
1 Specifications Describes the printer specifications.
2 Basic Operation Describes the main components of the printer, the Power Saver mode, and the
preparation of the printer to use.
3 Printer Management Software Describes the software available for the printer.
4 Printer Connection and Software
Installation
5 Printing Basics Describes the supported paper, how to load paper, and how to print data
6 Using the Operator Panel Menus Describes the setting items available on the operator panel, and their setup
7 Troubleshooting Describes the troubleshooting tips for printer problems such as paper jams.
8 Maintenance Describes how to clean the printer, how to replace consumables, and how to
9 Contacting Fuji Xerox Describes support information.
Describes the basic information about how to connect the printer to your
computer via the network or USB and how to install the print driver.
using various print features.
procedures.
see the printer status.
Using This Guide
11
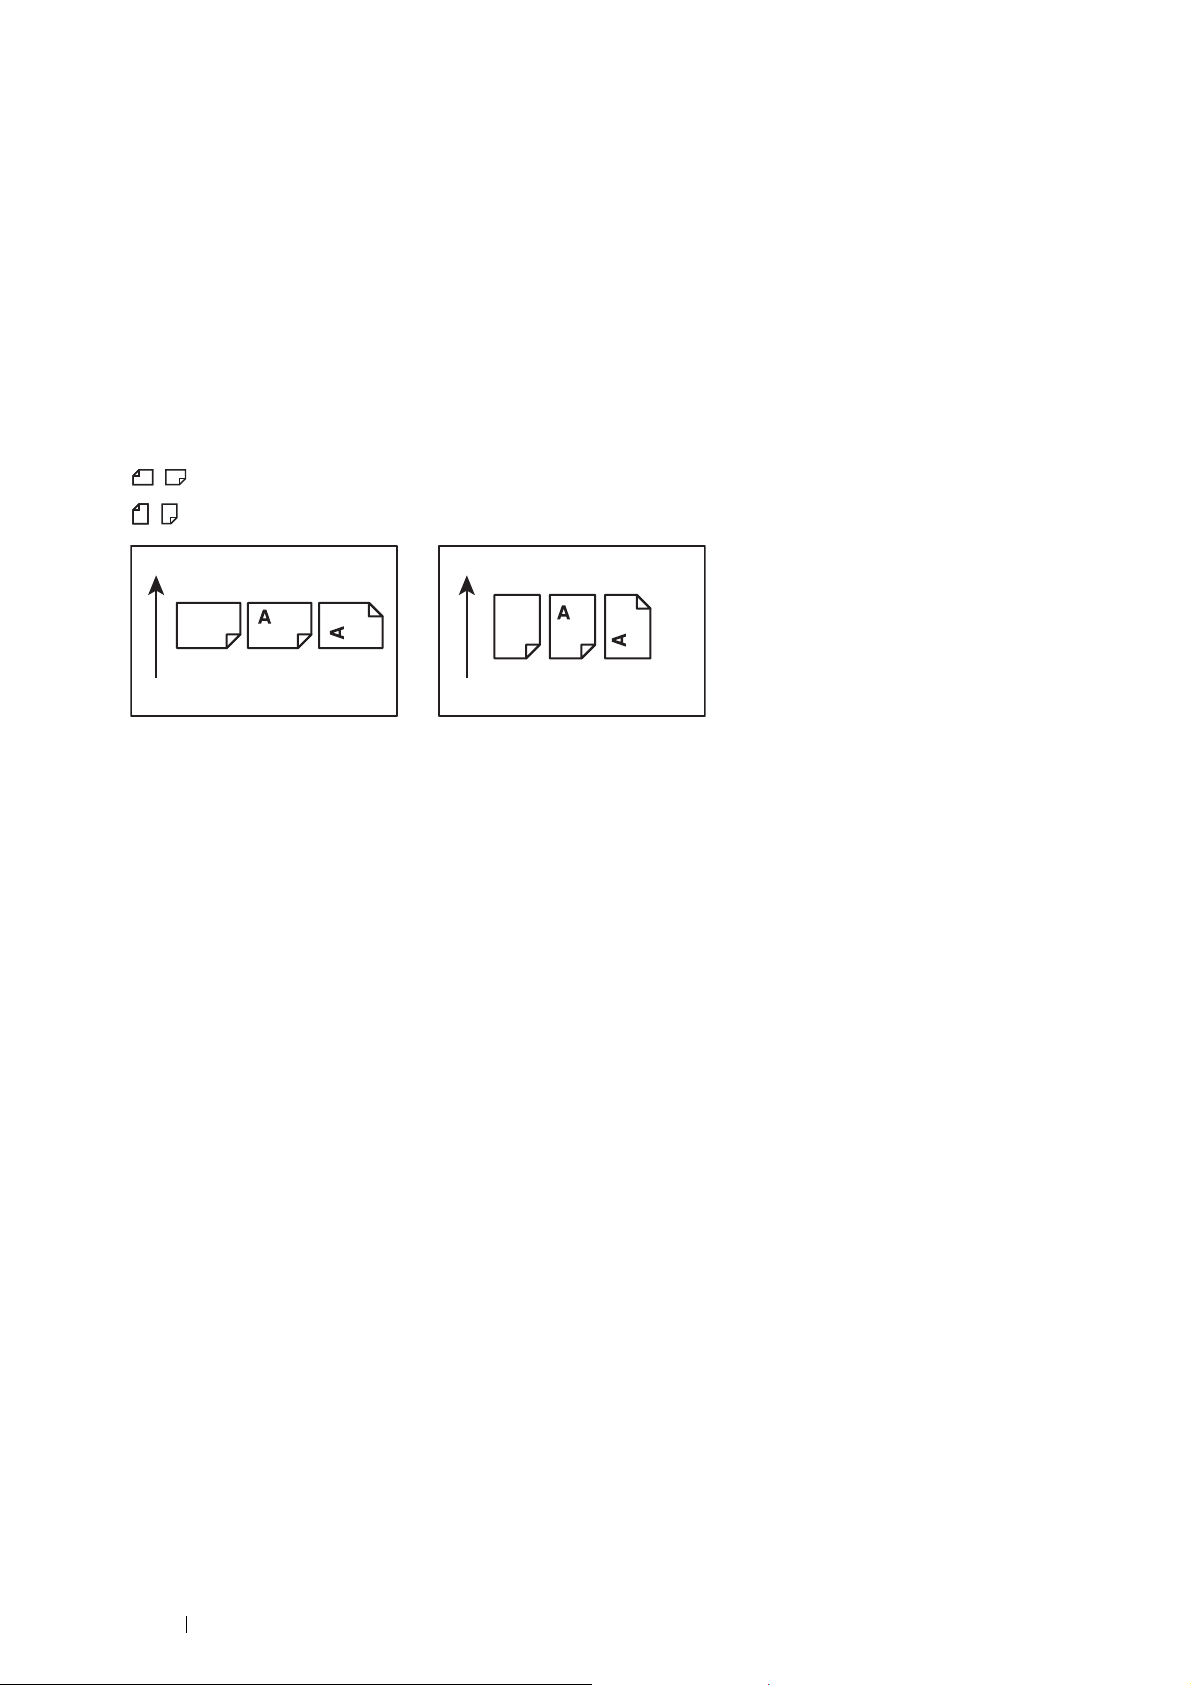
Conventions
LEF Orientation SEF Orientation
Paper feed direction Paper feed direction
1
In this guide, personal computers and workstations are collectively called “computers”.
2
The following terms are used throughout this guide:
IMPORTANT:
•
Important information that must be read and followed.
NOTE:
•
Additional information that merits emphasis.
See also:
•
References within this guide.
3
Orientation of documents or paper is described in this guide as follows:
, , Long Edge Feed (LEF): Loading the document or paper in landscape orientation.
, , Short Edge Feed (SEF): Loading the document or paper in portrait orientation.
12
Using This Guide

About License
RSA BSAFE
This product includes RSA BSAFE® Cryptographic software from EMC Corporation.
DES
This product includes software developed by Eric Young.
(eay@mincom.oz.au)
AES
Copyright© 2003, Dr BrianGladman, Worcester, UK. All rights reserved. This product uses published AES software provided
by Dr Brian Gladmanunder BSD licensing terms.
TIFF(libtiff)
LibTIFFCopyright© 1988-1997 SamLeffler
Copyright
©
1991-1997 Silicon Graphics, Inc.
ICC Profile (Little cms)
LittlecmsCopyright© 1998-2004 Marti Maria
JPEG
Our printer software uses some of the codes defined by the Independent JPEG Group.
About License
13

Product Features
This section describes the product features and indicates their links.
Duplex Print
The 2-Sided Print feature is to print two or more pages on the
front and back side of a single sheet of paper. This feature
helps reduce the paper consumption.
For more information, see "Duplex Printing" on page 92.
N-up Print
Stored Print
The Stored Print feature allows you to temporarily store your
print data in the printer memory and output it later. You can
effectively manage your time when you print confidential
data or large-volume data at off-peak hours.
For more information, see "Using the Stored Print Feature" on
page 90.
The Pages Per Sheet (N-Up) feature allows you to print
multiple pages on a single sheet of paper. This feature helps
reduce the paper consumption.
For more information, see the print driver's help.
14
Product Features
1
Specifications
This chapter lists the main specifications of the printer. Note that the specifications of the product may change without
prior notice.
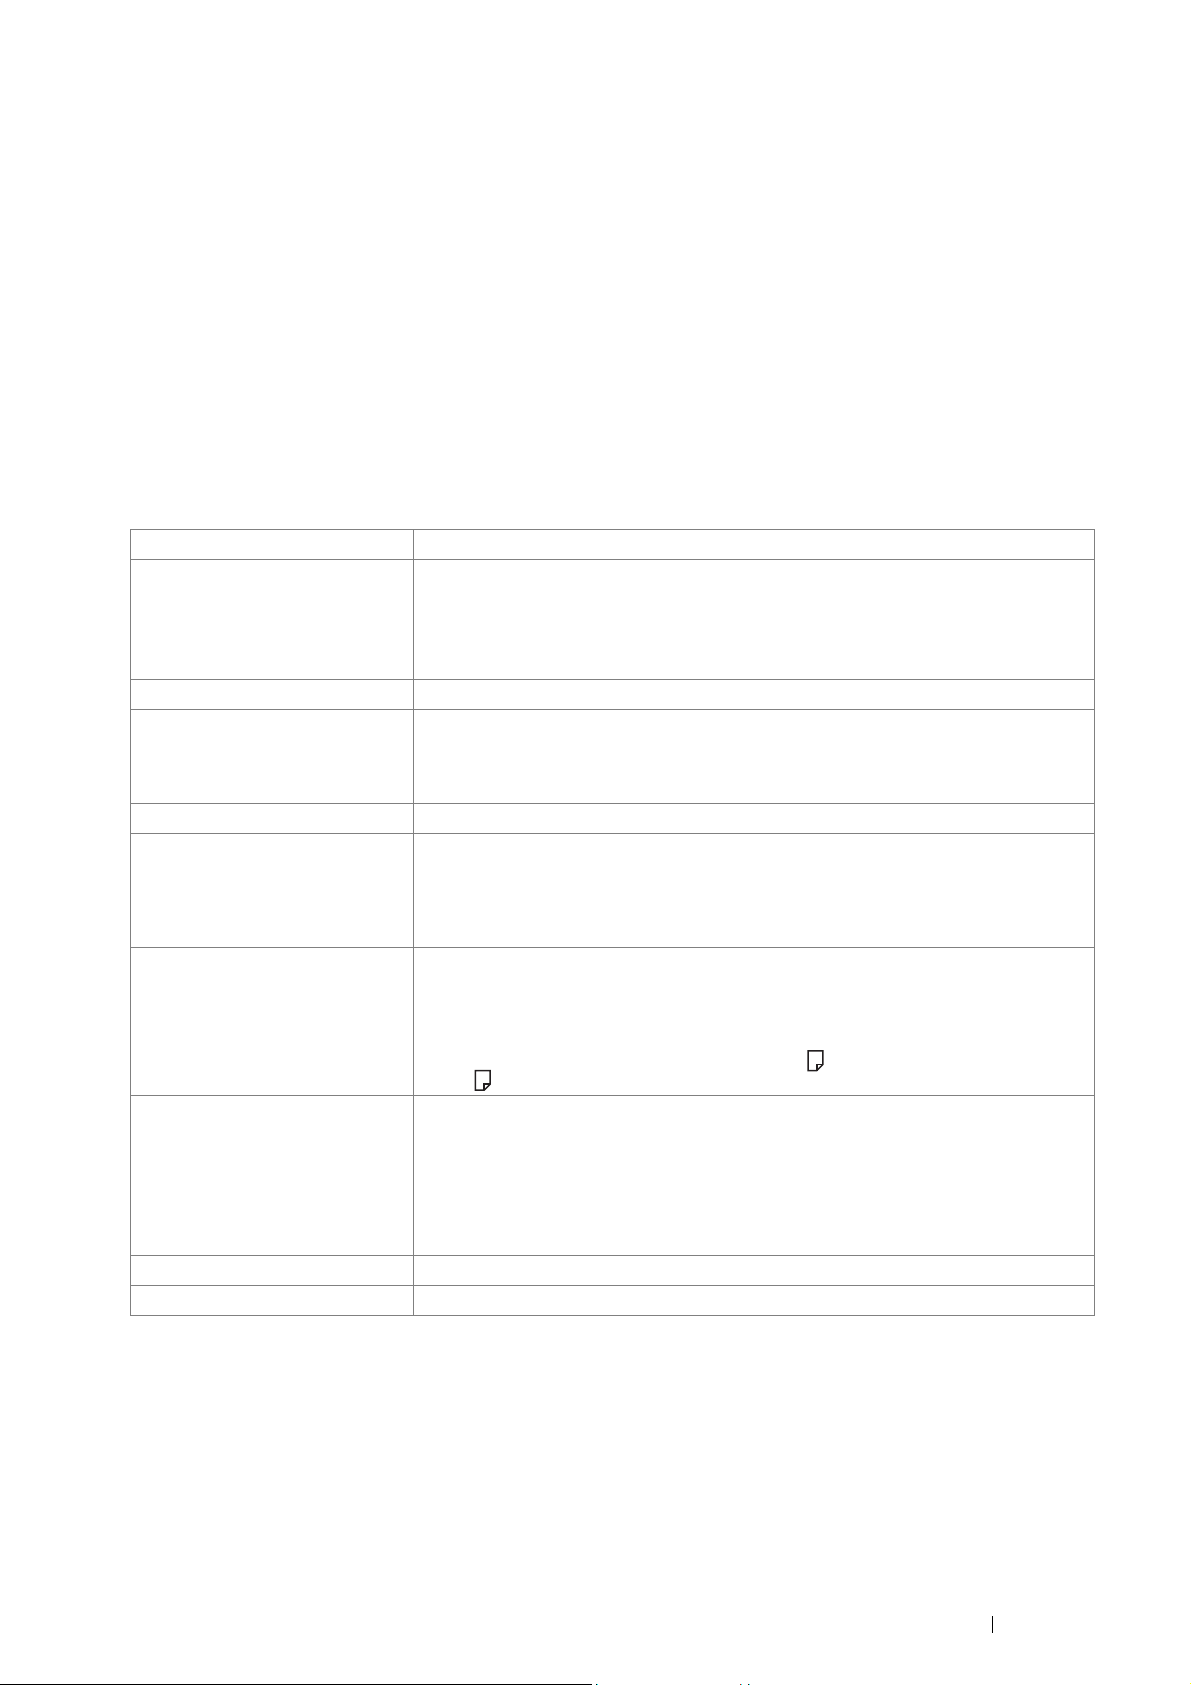
Items Description
Product Code DocuPrint P365 d 220 V: TL300991
DocuPrint P368 d 220 V: TL300989
DocuPrint P365 d 220 V KOREA: TL300990
DocuPrint P365 d 110 V TAIWAN: TL300988
Ty pe D es kt op
Printing Method Laser Xerography
IMPORTANT:
•
Laser + electrophotographic system
Fusing System Thermal fusing system
Warm-up Time 19 seconds or less
* The values are based on a room temperature of 20 °C and on the factory default setting.
*
IMPORTANT:
•
It may take longer due to the image quality adjustment.
Continuous Print Speed
First Print Output Time 5.2 seconds
Print Resolution 600 600 dpi, 1,200 1,200 dpi (Low speed)
Tone 256 gray level
*1
1 Sided*2: 38 sheets/minute; 2 Sided*3: 24 pages/minute
IMPORTANT:
*1 Print speed may decrease due to factors such as paper type, paper size, and printing conditions.
Print speed may also decrease for image quality adjustment.
*2 When continuously printing a single document of A4 plain paper.
*3 A4 continuous printing
IMPORTANT:
•
Measurements based on Fuji Xerox test pattern. Time from printer startup until output
of the first page is complete. In the case of feeding paper from the standard 250
sheet tray and the bypass tray. Numerics depend on the output environment. 5.7
seconds for the optional 550 sheet feeder.
Specifications
15

Items Description
Paper Size Bypass tray:
A4, B5, A5, Legal (8.5 14"), Folio (8.5 13"), Letter (8.5 11"), Executive, C5, Com-10,
DL, Monarch, Custom (Width: 76.2 – 215.9 mm, Length: 127 – 355.6 mm)
Standard 250 sheet tray:
A4, B5, A5, Legal (8.5 14"), Folio (8.5 13"), Letter (8.5 11"), Executive, Custom
(Width: 139.7 – 215.9 mm, Length: 210 – 355.6 mm)
Optional 550 sheet feeder:
A4, B5, A5, Legal (8.5 14"), Folio (8.5 13"), Letter (8.5 11"), Executive, Custom
(Width: 139.7 – 215.9 mm, Length: 210 – 355.6 mm)
Paper Type Plain (60 – 80 gsm), Plain Thick (81 – 105 gsm), Light Card (106 – 163 gsm), Heavy Card
(164 – 216 gsm), Envelope, Labels, Letterhead, Hole Punched, Colored, Other Type
IMPORTANT:
•
For 2 sided printing, use the 60 – 163 gsm plain paper.
•
Use only the recommended paper. Using paper other than that recommended for the
printer can cause printing problems. Do not use special ink jet paper. For information
about the kind of the recommended paper, contact your local Fuji Xerox
representative.
•
Note that poor printing quality due to paper-related printing problems can occur
when using the printer in an environment that is dry, cold, or very humid.
•
Printing over the printed side or on the reverse side of paper that already has been
printed on can result in poor print quality.
•
When printing on envelopes, use envelopes that do not have adhesive applied.
•
The type of paper being used and environmental conditions can affect printing
quality. Because of this, it is recommended that you test print and confirm proper
print quality before using the printer.
Paper Tray Capacity Standard:
250 sheets (Standard 250 sheet tray) + 50 sheets (Bypass tray)
Optional:
550 sheets (Optional 550 sheet feeder)
Maximum paper capacity:
850 sheets (Standard + Optional 550 sheet feeder)
IMPORTANT:
•
For special paper (cardstock, envelope, label), there is a limitation of the following.
•
From the bottom of the tray, up to 10 mm height (Standard 250 sheet tray)
•
From the bottom of the tray, up to 5.5 mm height (Bypass tray)
•
From the bottom of the tray, up to 20 mm height (Optional 550 sheet feeder)
•
When using Fuji Xerox P paper (64 gsm)
Output Tray Capacity Approximately 150 sheets (A4 ) (face down)
IMPORTANT:
•
When using Fuji Xerox P paper (64 gsm)
2-sided Printing Feature Standard
Memory Standard: 256 MB (Onboard)
Optional: 512 MB
Maximum memory capacity: 768 MB (Standard + optional 512MB memory)
IMPORTANT:
•
Depending on the function, the optional 512MB memory is required.
•
The above memory capacity does not guarantee print quality depending on the type
and content of print data.
HDD —
Standard Fonts Built-in fonts
PCL 5 and PCL 6 fonts: 81 fonts and 36 symbol sets
® 3™
PostScript
PDF Font: 14 fonts
: 136 fonts
16
Specifications

Items Description
PDL PCL 5, PCL 6, PostScript®, FX-PDF, HBPL
®
Operating System Standard: PCL 6 and PostScript
®
Windows
10 (32-bit)
drivers
Windows® 10 (64-bit)
®
Windows
Windows
8.1 (32-bit)
®
8.1 (64-bit)
Windows® 7 (32-bit)
®
Windows
Windows Vista
7 (64-bit)
®
(32-bit)
Windows Vista® (64-bit)
®
Windows Server
Windows Server
2012 R2 (64-bit)
®
2012 (64-bit)
Windows Server® 2008 R2 (64-bit)
®
Windows Server
Windows Server
2008 (32-bit)
®
2008 (64-bit)
OS X 10.11 El Capitan
OS X 10.10 Yosemite
OS X 10.9 Mavericks
OS X 10.8 Mountain Lion
Mac OS X 10.7 Lion
IMPORTANT:
•
For information about the latest supported OS, visit the Fuji Xerox web site.
Connectivity Standard: Ethernet (1000BASE-T/100BASE-TX/10BASE-T), USB 2.0
Optional: IEEE802.11 b/g/n
IMPORTANT:
•
When the optional wireless printer adapter is installed on the printer, the standard
Ethernet connection cannot be used.
Protocol TCP/IP (LPD, Port9100, WSD, HTTP, HTTPS, SMTP, RARP, AutoIP, WINS, FTP, Telnet, DNS,
DDNS, IPP, SNTP, SMB, NetBEUI), SNMP, DHCP, BOOTP, Bonjour
®
(mDNS)
IMPORTANT:
•
WSD stands for Web Services on Devices.
Power Supply AC 110 – 127 V ± 10%; 11 A or less; both 50/60 Hz ± 3%
AC 220 – 240 V ± 10%; 6 A or less; both 50/60 Hz ± 3%
Operating Noise
(main unit only)
During operation: 7.61 B; 54.3 dB (A)
During stand-by: 5.3 B; 24.1 dB (A)
IMPORTANT:
•
Measurements based on ISO7779
Unit B: acoustic power level (LwAd)
Unit dB (A): radiated sound pressure (bystander position)
Power Consumption AC 110 – 127 V:
Maximum power consumption: 888 W or less (110 V)
Sleep mode: 3.8 W or less
AC 220 – 240 V:
Maximum power consumption: 952 W or less (220 V)
Sleep mode: 3.8 W or less
Dimensions Width 393 Depth 428 Height 277 mm
Specifications
17

Items Description
Machine Weight 11.3 kg
IMPORTANT:
• Consumables and accessories are not included.
Usage Environment During Use: Temperature: 10 - 32 °C; Humidity: 10 - 85% (except malfunctions due to
dew condensation)
Non-Use: Temperature: -20 - 40 °C; Humidity: 5 - 85% (except malfunctions due to dew
condensation)
IMPORTANT:
• Until the conditions (temperature and humidity) inside the printer become acclimated
to the installation environment, certain qualities of the paper can cause poor printing.
18 Specifications

Basic Operation
This chapter includes:
•
"Main Components" on page 20
•
"Installing Optional Accessories" on page 24
•
"Turning on the Printer" on page 36
•
"Printing a Panel Settings Page" on page 37
•
"Power Saver Mode" on page 38
2
Basic Operation
19

Main Components
234
6 57
1
This section provides an overview of your DocuPrint P365 d/DocuPrint P368 d.
This section includes:
•
"Front View" on page 20
•
"Rear View" on page 21
•
"Operator Panel" on page 22
•
"Securing the Printer" on page 23
Front View
1 Operator Panel 5 Toner Cartridge
2 Bypass Tray 6 Drum Cartridge
3 Standard 250 Sheet Tray
4 Optional 550 Sheet Feeder
IMPORTANT:
•
To avoid irregular screen image or malfunctioning of your printer, avoid placing the printer in direct sunlight with the bypass tray
opened.
(Tray1)
(Tray2)
7Front Cover
20
Basic Operation
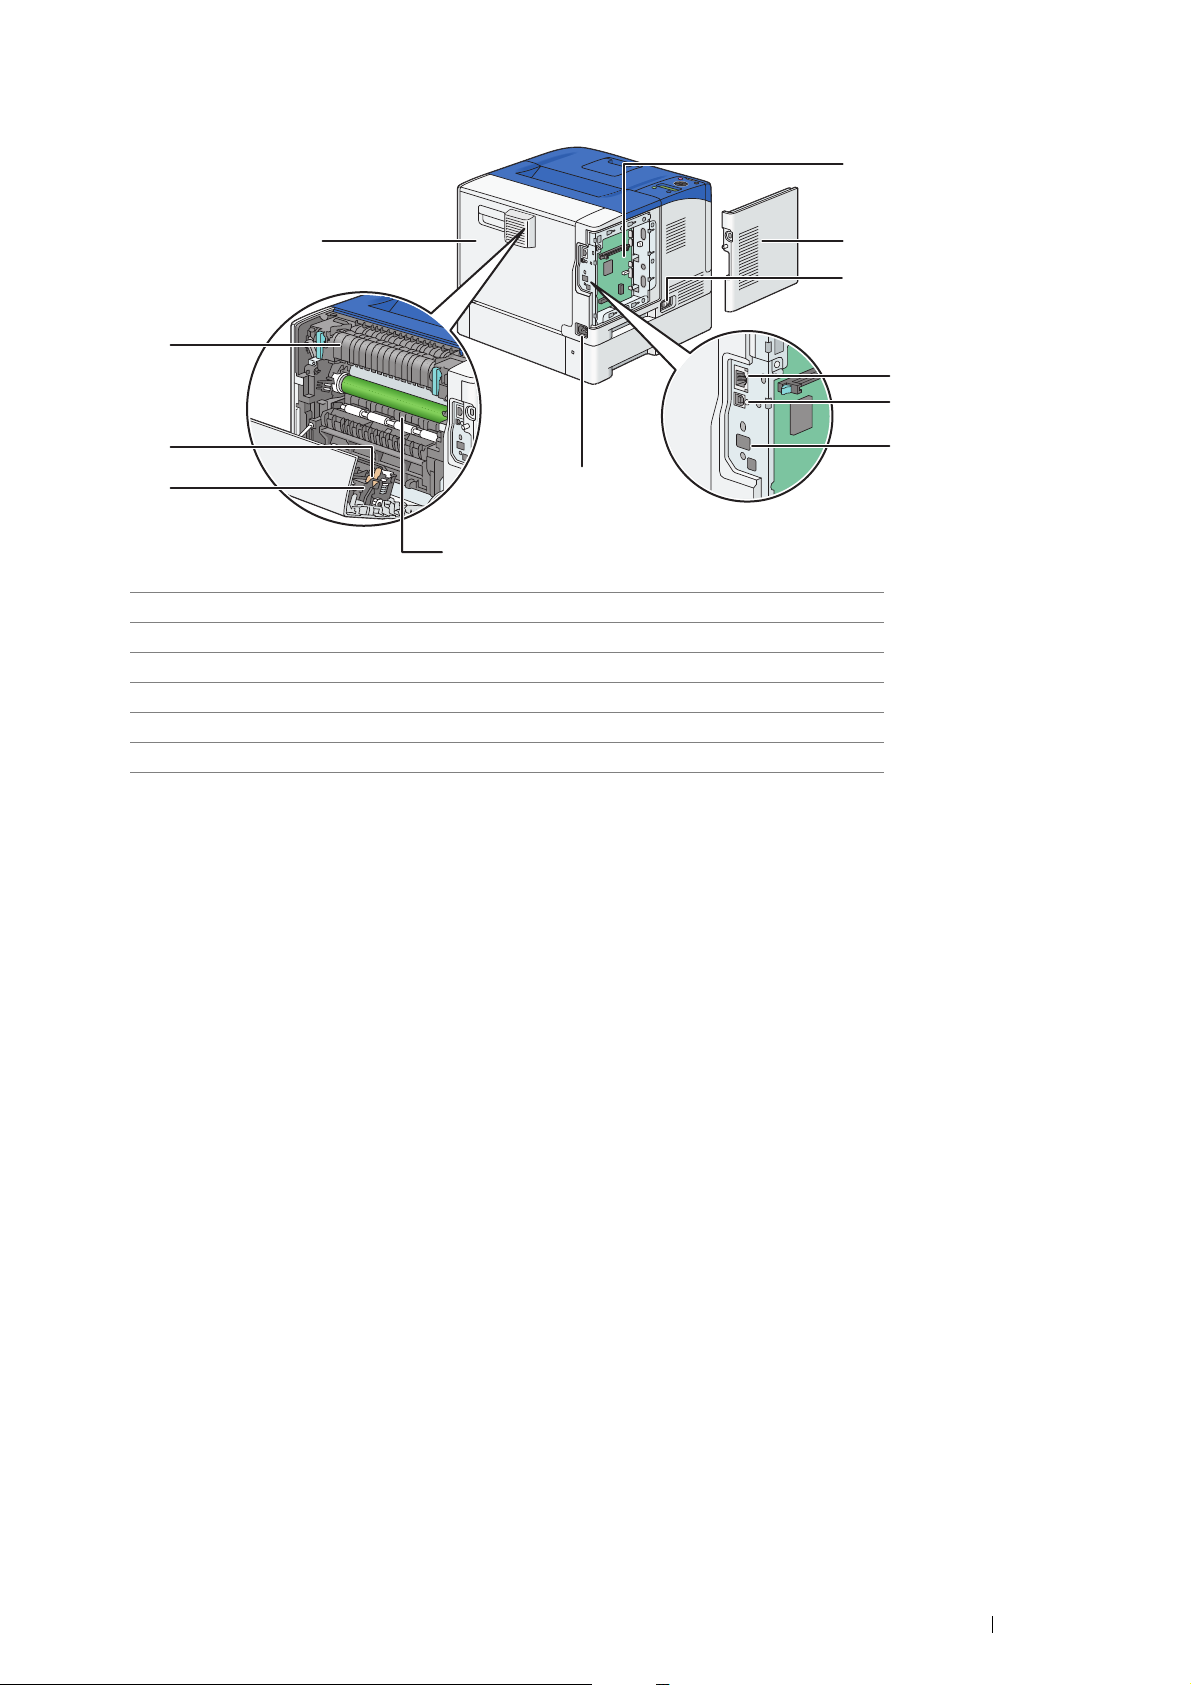
Rear View
1
12
11
10
9
8
1 Control Board 7 Power Connector
2 Control Board Cover 8 Chute
3Power Switch 9Duplexer
4 Ethernet Port 10 Transfer Unit
5USB Port 11Fusing Unit
6 Wireless Adapter Socket
*1: The optional wireless printer adapter is not supplied in some regions.
*1
7
12 Rear Door
2
3
4
5
6
Basic Operation
21
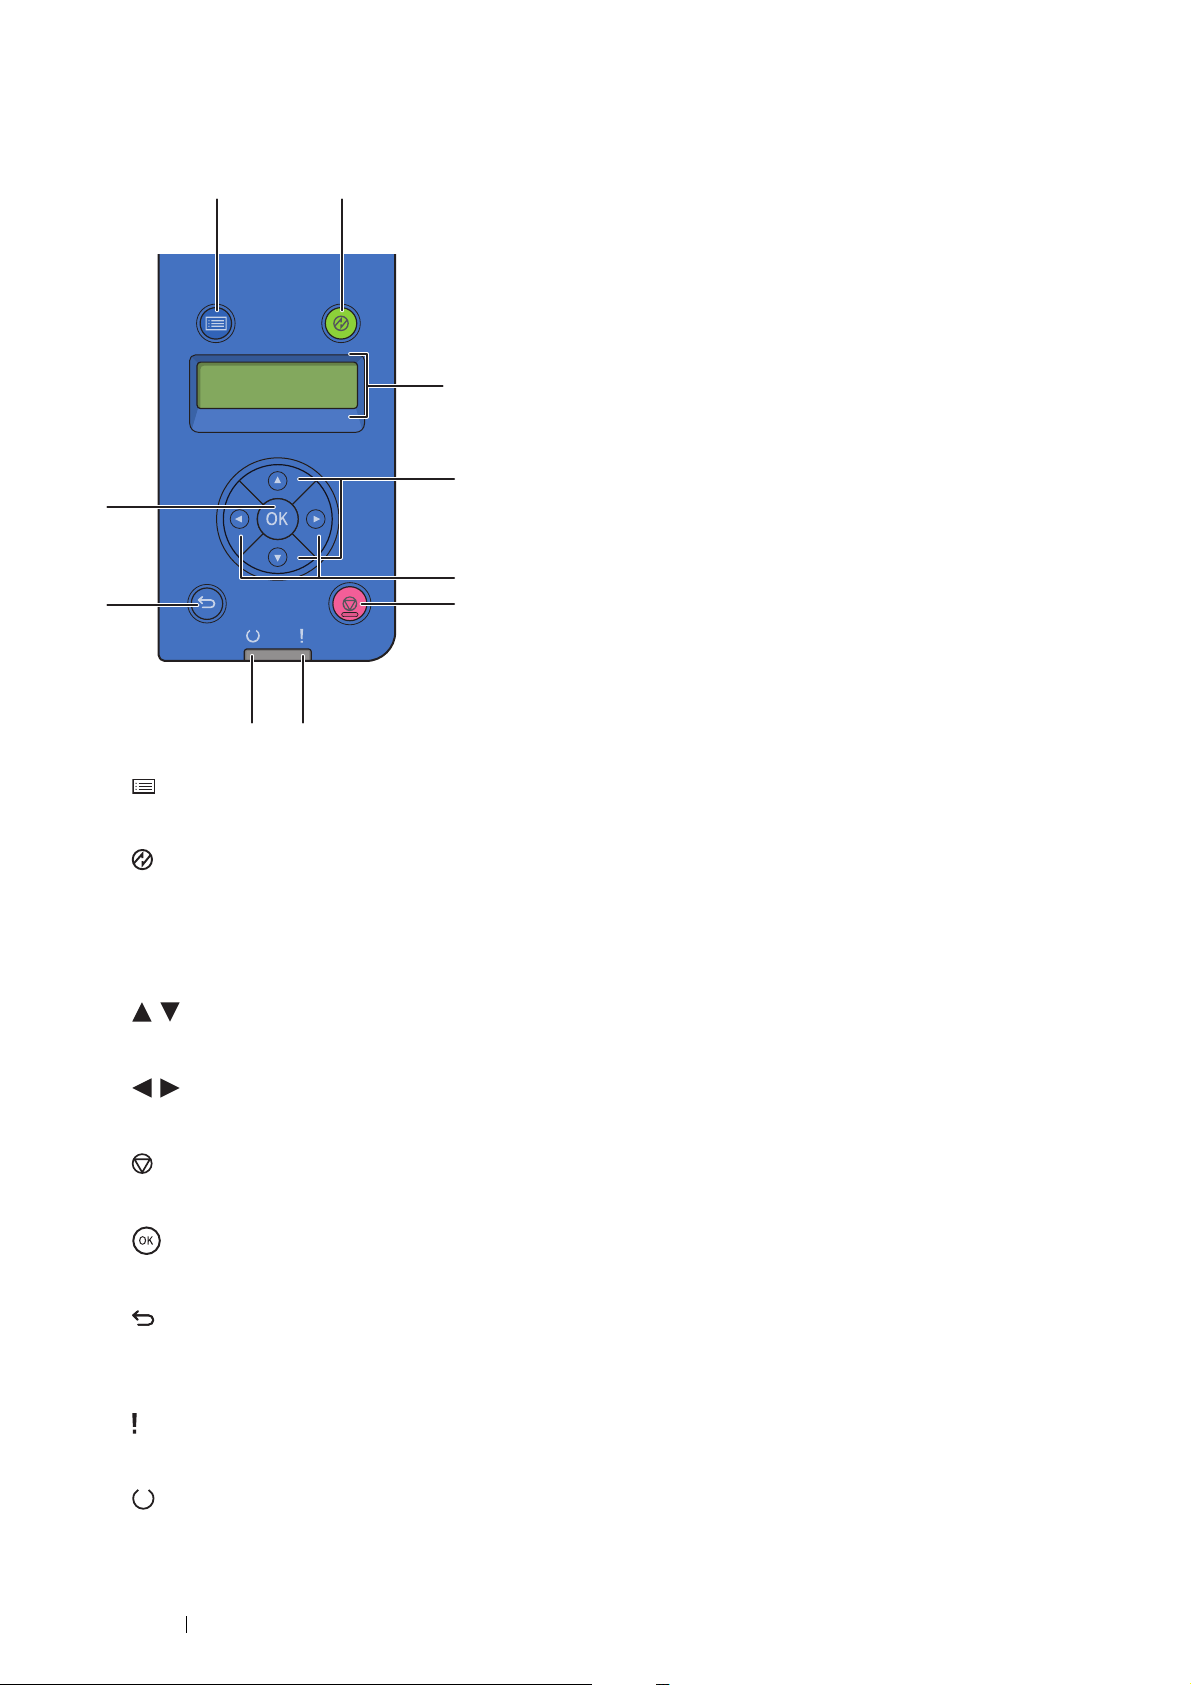
Operator Panel
1 2
3
4
6
5
7
8
910
The operator panel has a liquid crystal display (LCD) and buttons.
1
2
3
4
5
6
7
8
9
(Menu) button
•
Moves to the top menu.
(Energy Saver) button
•
Lights up in the Power Saver mode. Press this button to enter or exit the Power Saver mode.
LCD Panel
•
Displays various settings, instructions, and error messages.
buttons
•
Scrolls through menus or items in the Menu mode. To enter numbers or passwords, press these buttons.
buttons
•
Selects submenus or setting values in the Menu mode.
(Stop) button
•
Cancels the current processing or pending job.
button
•
Displays the selected menu or item and determines the selected value in the Menu mode.
(Back) button
•
Switches to the Print mode from the top menu of the Menu mode.
•
Returns to the upper hierarchy of the menu from the submenu of the Menu mode.
(Error) LED
•
Lights up when the printer has an error.
10
(Ready) LED
•
Lights up when the printer is ready.
22
Basic Operation

Securing the Printer
Security slot
To protect your printer from theft, you can use the Kensington lock.
Attach the Kensington lock to the security slot on your printer.
For details, see the operating instructions supplied with the Kensington lock.
Basic Operation
23
Installing Optional Accessories
You can make the printer more functional by installing the optional accessories such as the 512MB Memory, the 550 Sheet
Feeder, the Wireless Network Kit b/g/n, and the Font Kit. This section describes how to install these printer's options.
This section includes:
•
"Installing the Optional 512MB Memory" on page 24
•
"Installing the Optional 550 Sheet Feeder" on page 27
•
"Installing the Optional Wireless Printer Adapter" on page 31
•
"Installing the Optional Font ROM" on page 33
Installing the Optional 512MB Memory
NOTE:
•
Your printer supports additional 512 MB memory module.
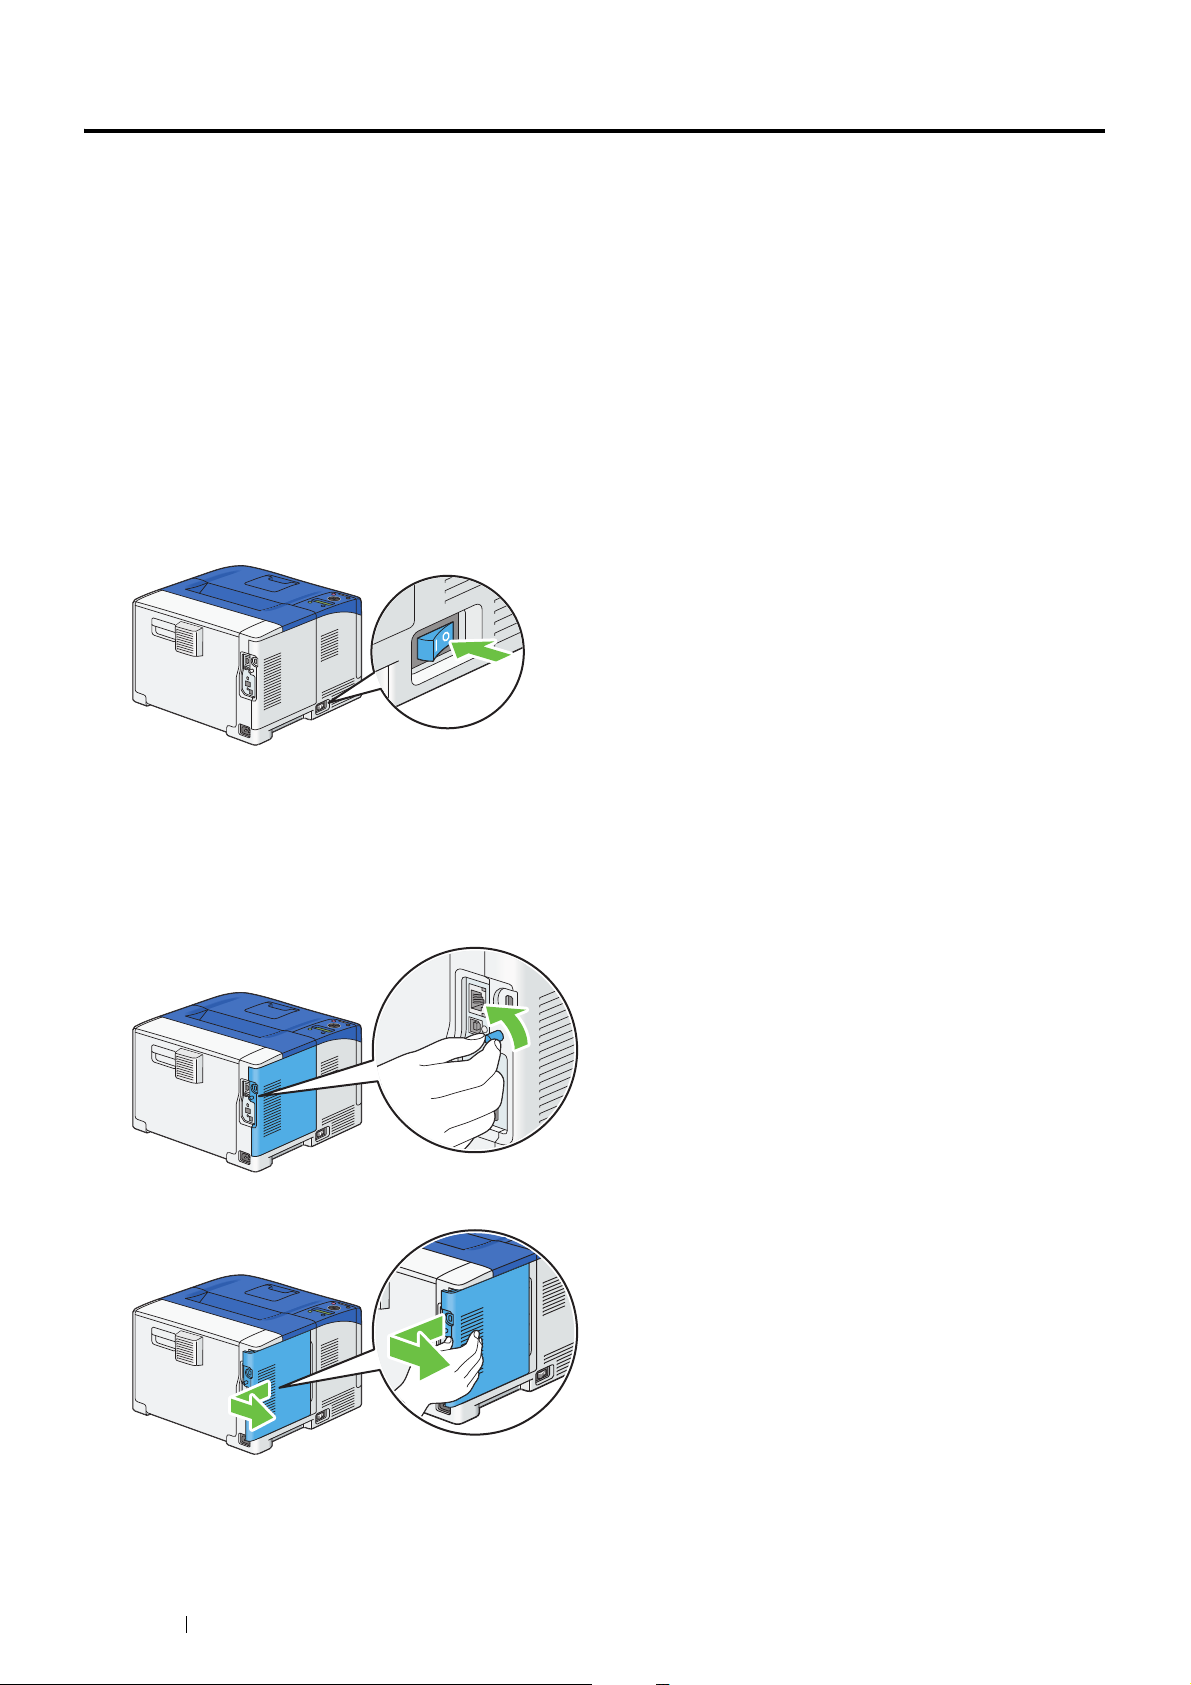
1
Turn off the printer.
IMPORTANT:
•
Note that the data in the memory are cleared when the printer is turned off.
2
Turn the screw on the control board cover counterclockwise.
NOTE:
•
Loosen the screw. You do not need to remove the screw.
3
Slide the control board cover towards the rear of the printer and remove the cover.
24
Basic Operation
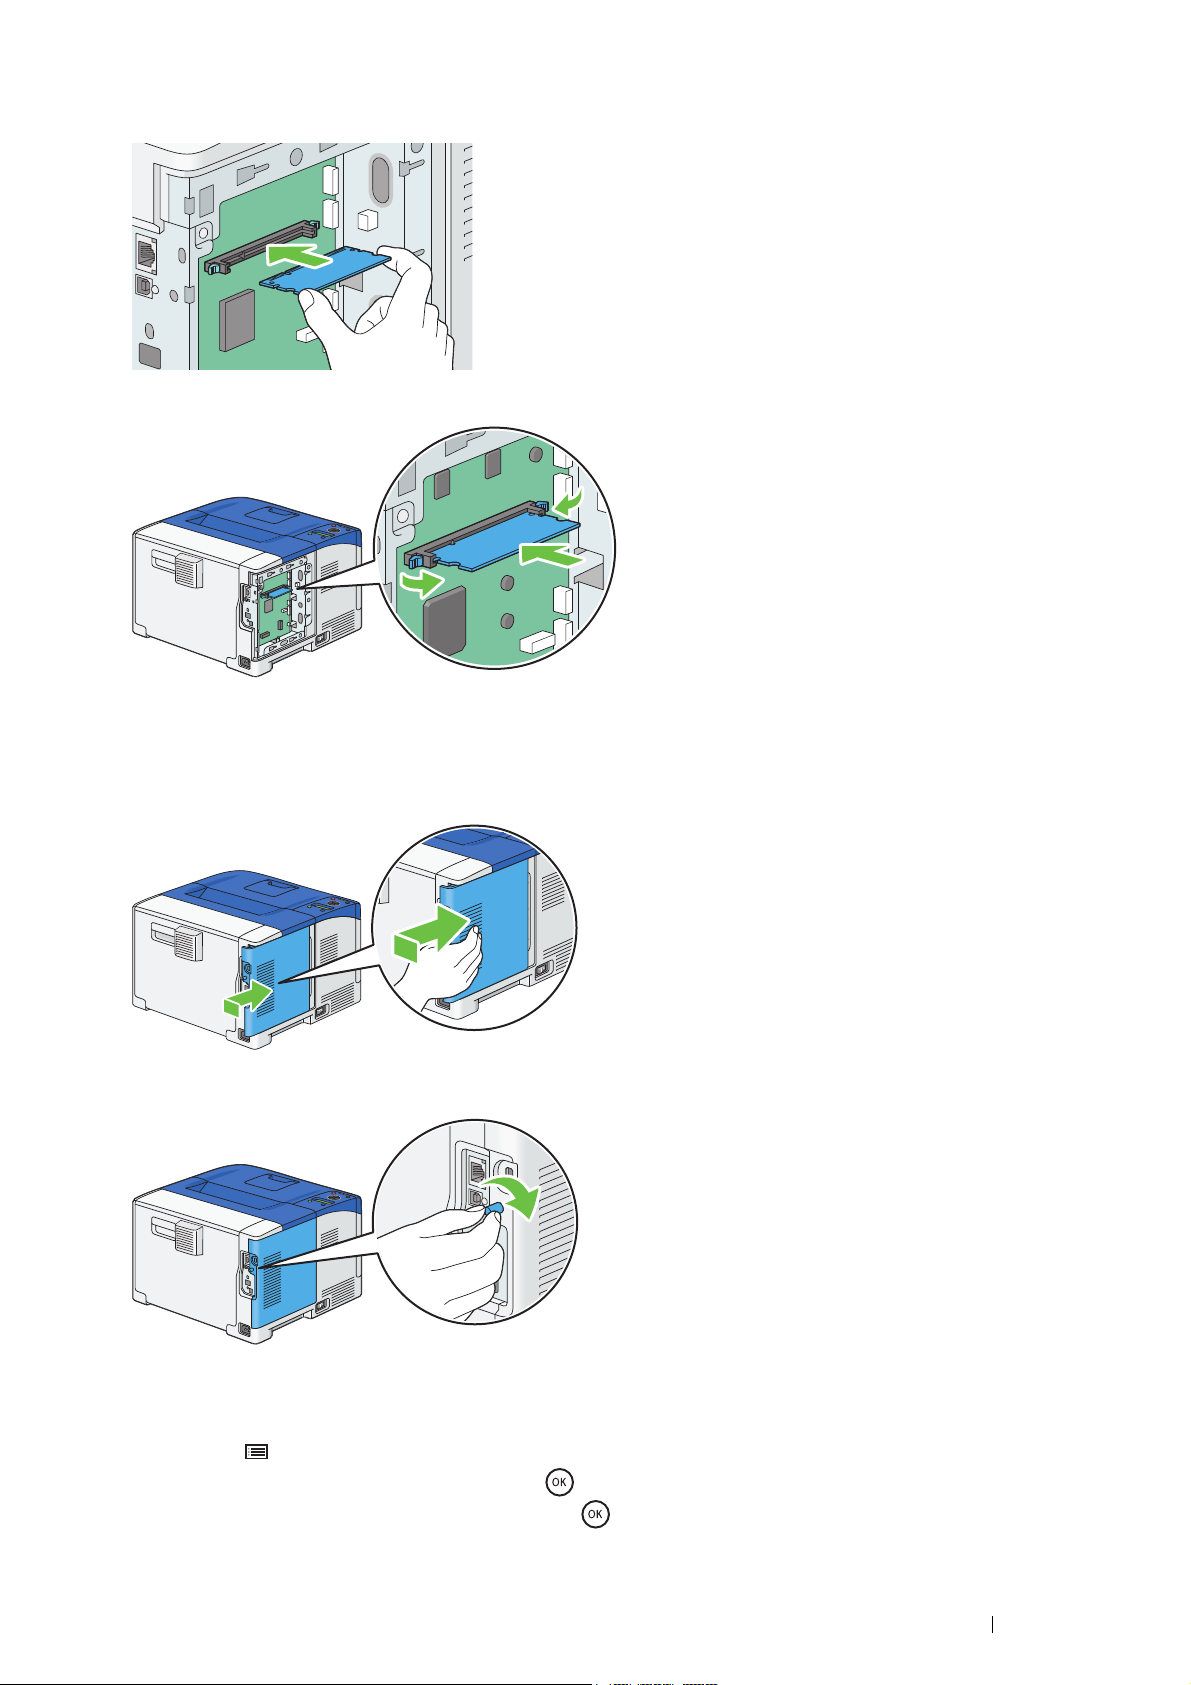
4
Hold the edge of the memory module with the labeled side down and the connector toward the control board, and
then insert it into the slot.
5
Push the memory module firmly into the slot.
NOTE:
•
Ensure that the memory module is firmly fixed in the slot and does not move easily.
6
Align the guide on the control board cover with the slot around the control board, and slide it towards the front of the
printer.
7
Tur n th e s cre w cl oc kw ise .
8
Turn on the printer.
9
Print the Printer Settings page to confirm that the newly installed memory module is detected by the printer.
a
Press the (Menu) button.
b
Select Report / List, and then press the button.
c
Select Printer Settings, and then press the button.
The Printer Settings page is printed.
Basic Operation
25

10
Confirm the amount of Memory Capacity listed under General in the Printer Settings page.
If the memory capacity has not increased, turn off the printer, and re-install the memory module.
11
If you installed the optional 512MB memory after installing the print driver, update your driver by following the
instructions for the operating system you are using. If the printer is on a network, update the driver for each client.
Updating Your Driver to Detect Optional 512MB Memory
The following procedure uses the PCL 6/PS driver on Windows® 7 and Windows® 10 as examples.
NOTE:
•
When you use XML Paper Specification (XPS) driver, the following settings are not required.
Windows® 7 1 Click Start Devices and Printers.
2 Right-click the printer icon of the DocuPrint P365 d or DocuPrint P368 d and select
Printer properties.
3 Click the Configuration tab, and then select Bi-Directional Setup.
4 Select Get Information from Printer and then select OK.
5 Click Apply, and then click OK.
6 Close the Devices and Printers dialog box.
®
Windows
10 1 Right-Click Start Control Panel.
2 Click Hardware and Sound Devices and Printers.
3 Right-click the printer icon of the DocuPrint P365 d or DocuPrint P368 d and select
Printer Properties.
4 Click the Configuration tab, and then select Bi-Directional Setup.
5 Select Get Information from Printer and then select OK.
6 Click Apply, and then click OK.
7 Close the Devices and Printers dialog box.
If the printer information is not updated automatically after clicking Get Information from Printer, follow these steps:
1
Click the Configuration tab, and then select Installable Options.
2
Select RAM Disk in the Items list box.
3
Select Installed in the RAM Disk drop-down menu under Setting for.
4
Select Memory Capacity in the Items list box.
5
Select the total amount of the installed printer memory in the Memory Capacity drop-down menu under Setting for.
6
Click OK.
7
Click Apply, and then click OK.
The following procedure uses OS X 10.11 as an example.
OS X 10.11 1 Select the Printers & Scanners in System Preferences.
2 Select the printer in the Printers list, and click Options & Supplies.
3 Select Driver, select the options that have been installed on the printers, and then click
OK.
26
Basic Operation
Installing the Optional 550 Sheet Feeder
IMPORTANT:
•
If you install the optional 550 sheet feeder after setting up the printer, be sure to turn off the printer, unplug the power cord, and
disconnect all cables from the rear of the printer before installing the feeder.
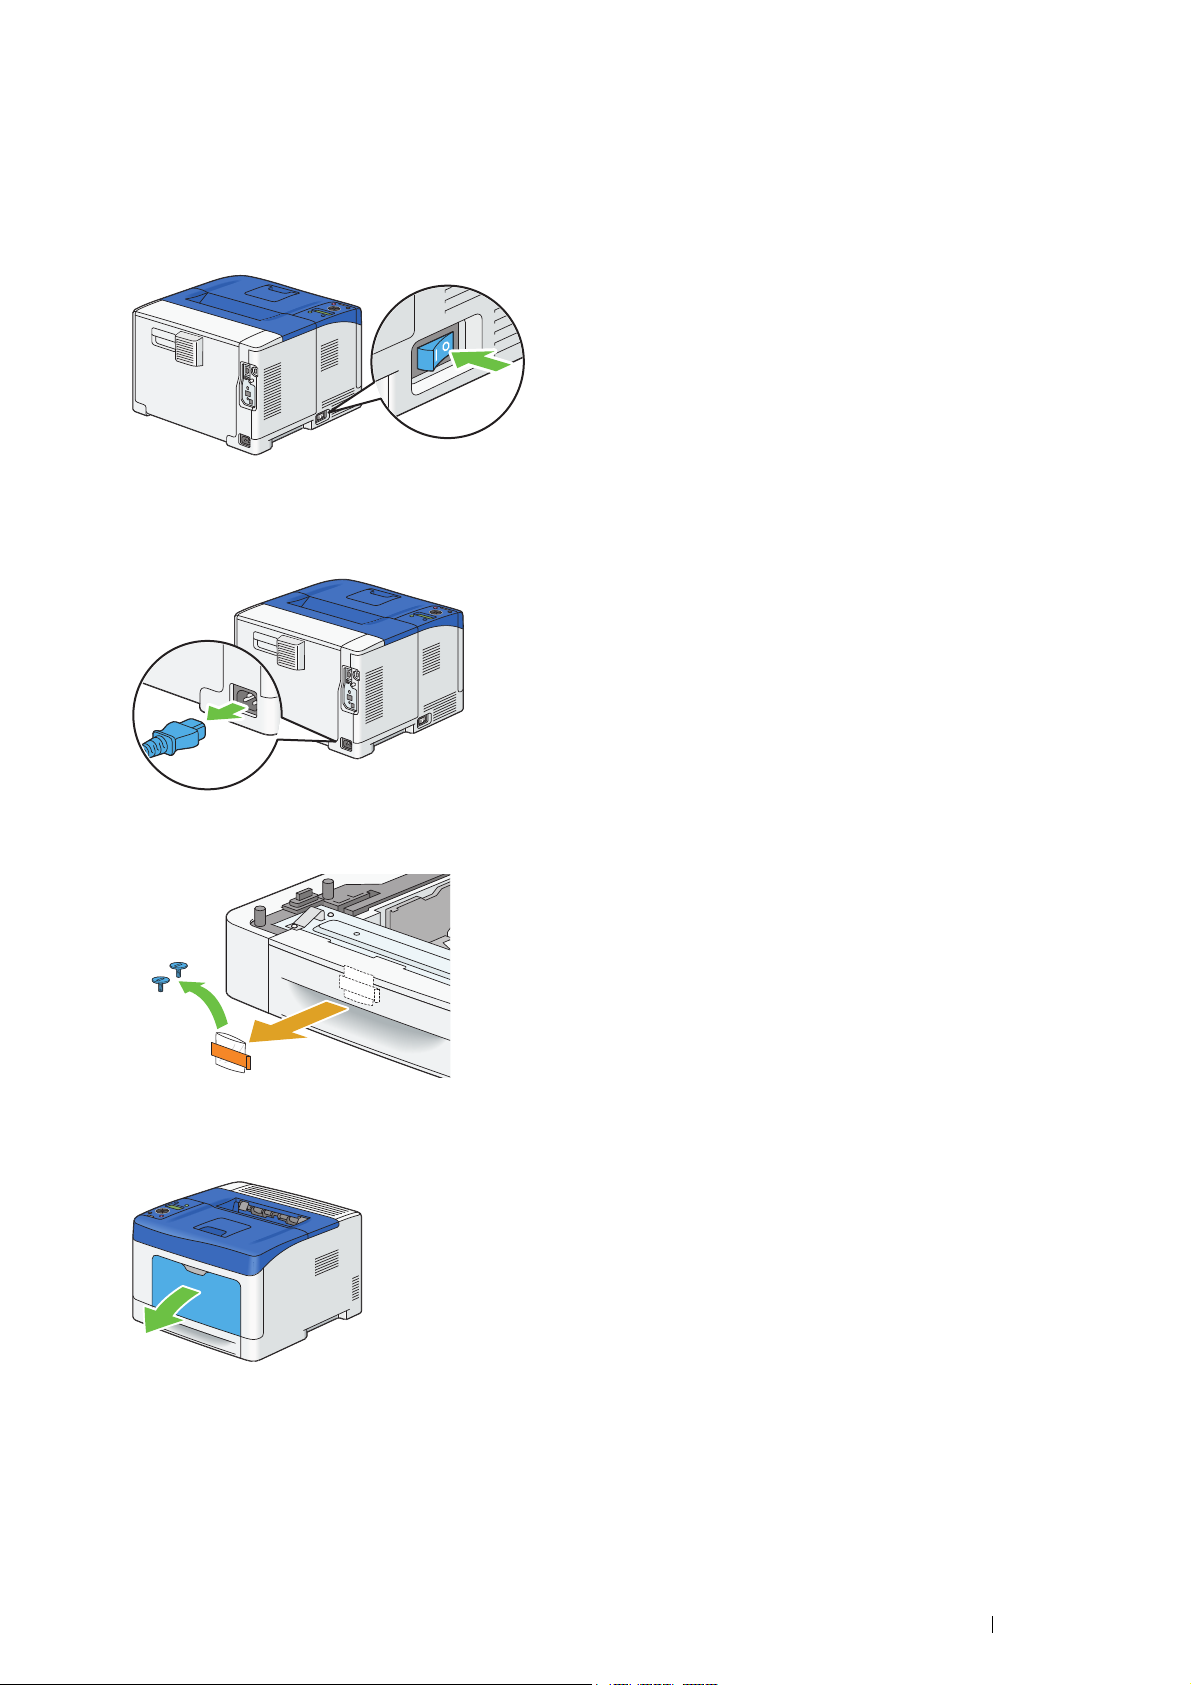
1
Turn off the printer.
IMPORTANT:
•
Note that the data in the memory are cleared when the printer is turned off.
2
Disconnect all cables from the rear of the printer.
3
Remove the tape and the bag holding the screws on the front of the optional 550 sheet feeder, and then remove the
screws from the bag.
4
Place the optional 550 sheet feeder in the location that the printer is located.
5
Gently pull open the bypass tray cover.
Basic Operation
27
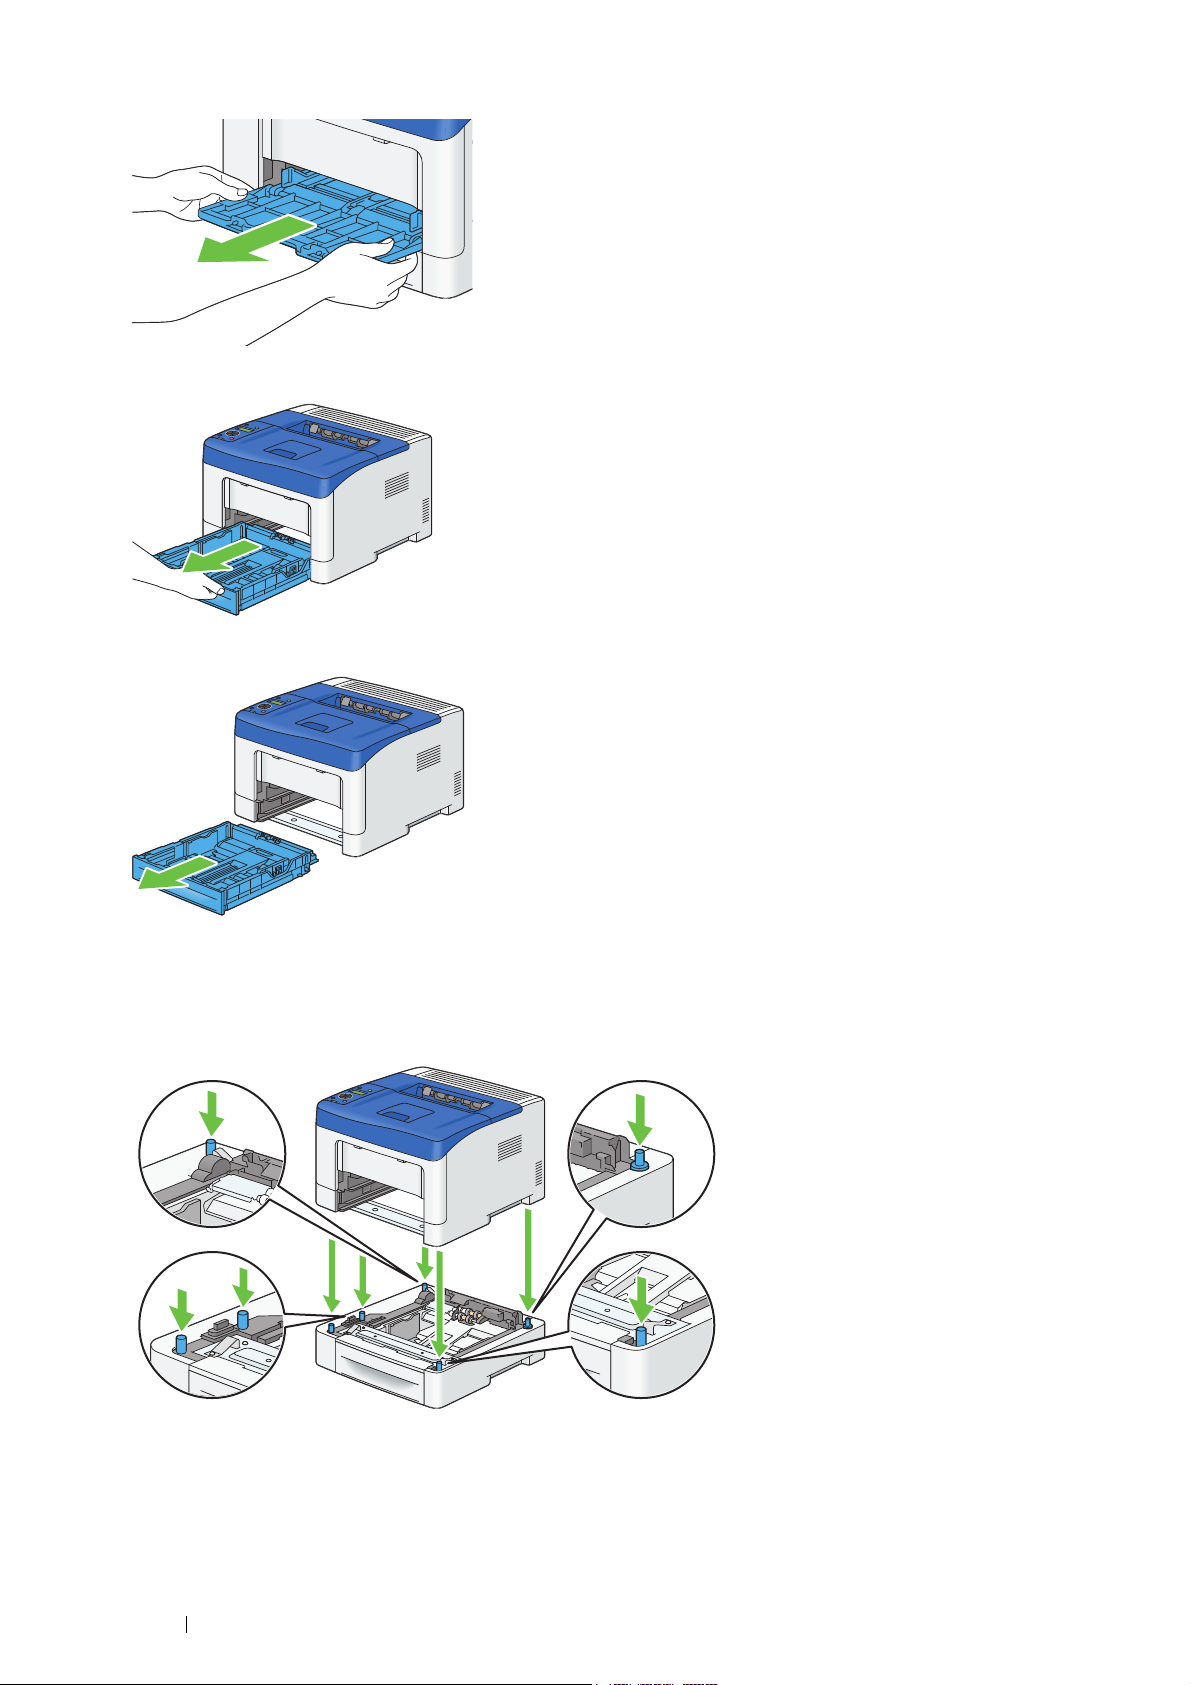
6
Grasp both sides of the bypass tray, and then pull the bypass tray from the printer.
7
Pull the standard 250 sheet tray out of the printer about 200 mm.
8
Hold the standard 250 sheet tray with both hands, and remove it from the printer.
9
Lift the printer and align the five guide pins of the optional 550 sheet feeder with the holes at the bottom of the
printer. Gently lower the printer onto the optional 550 sheet feeder.
IMPORTANT:
•
Be careful not to pinch your fingers when lowering the printer onto the optional 550 sheet feeder.
28
Basic Operation
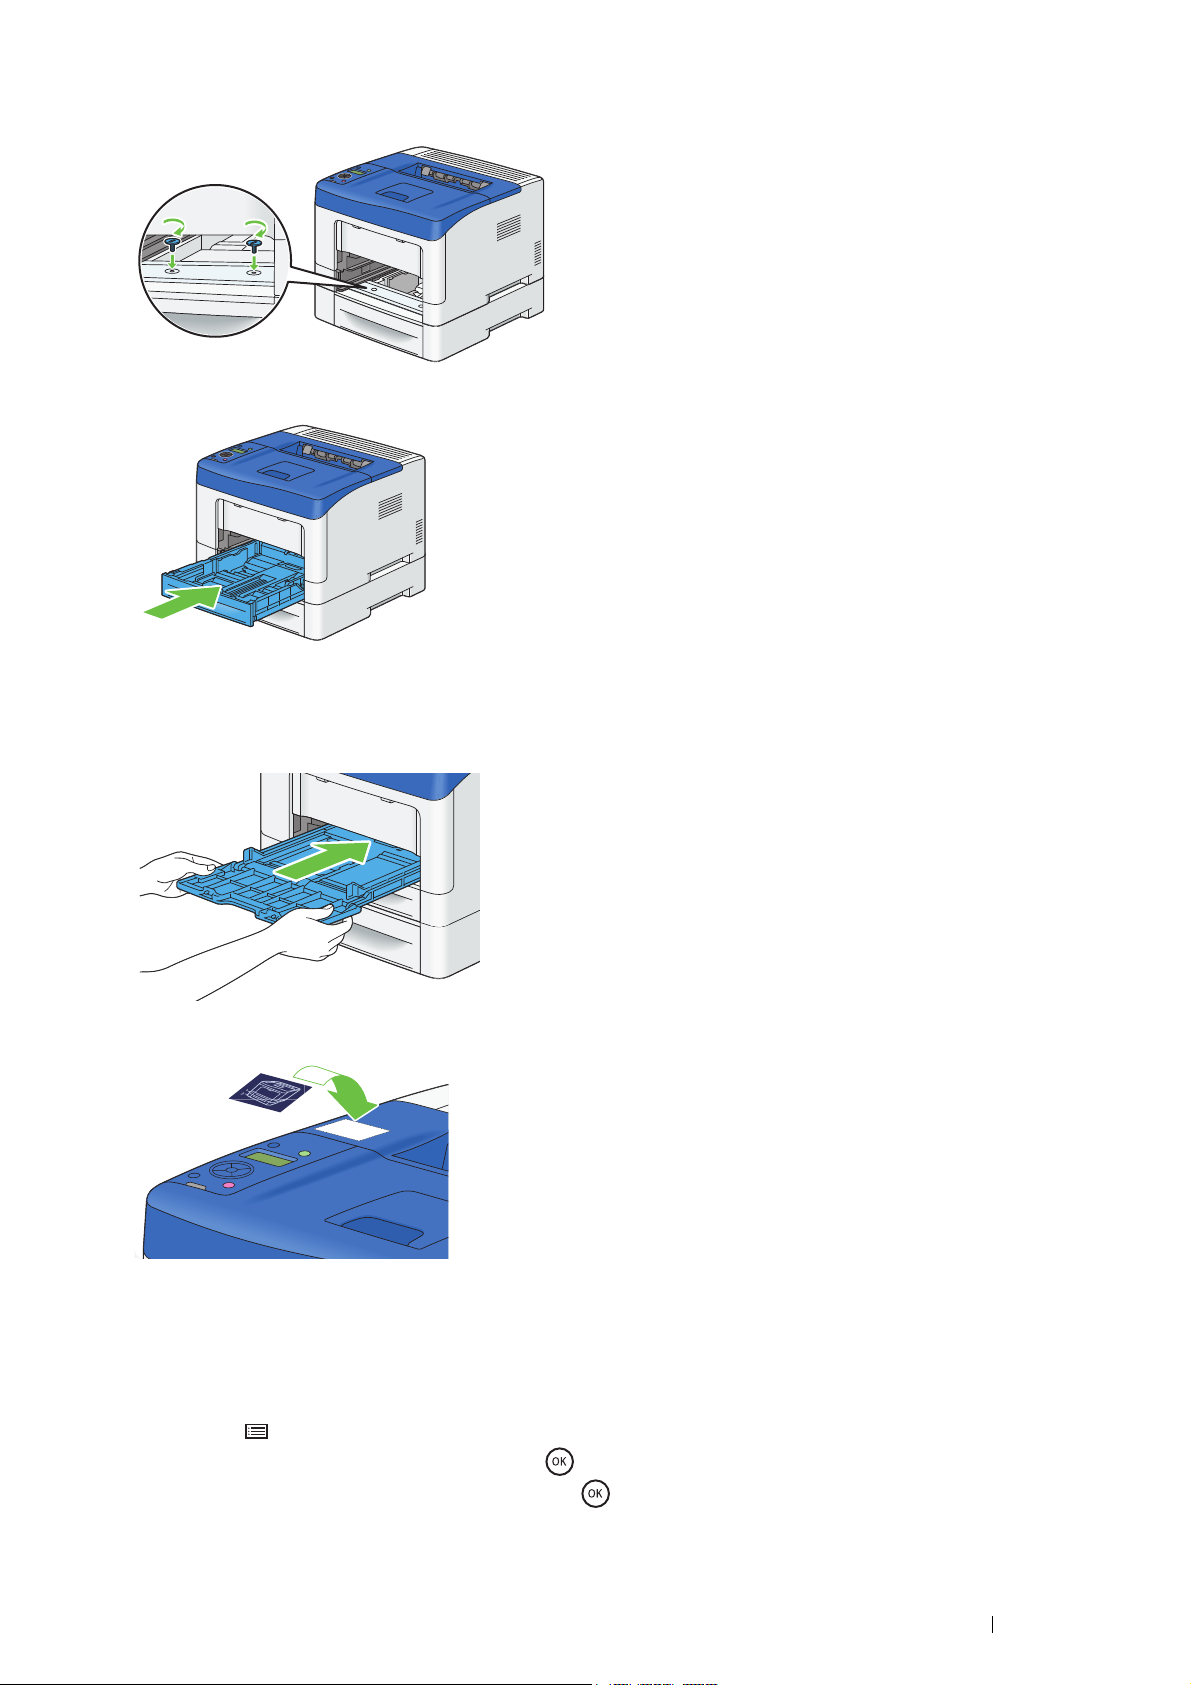
10
Secure the optional 550 sheet feeder to the printer by tightening the two screws provided with the feeder with a coin
or similar object.
11
Insert the standard 250 sheet tray into the printer, and push until it stops.
IMPORTANT:
•
Do not use excessive force on the tray. Doing so could damage the tray or the inside of the printer.
12
Insert the bypass tray into the printer, push until it stops, and close the cover.
13
Apply the label to the upper part of the operator panel on the printer.
14
Reconnect all cables into the rear of the printer and turn on the printer.
NOTE:
•
The printer will automatically detect the attached tray but will not detect the paper type.
15
Print the Printer Settings page to confirm the optional 550 sheet feeder is installed correctly.
a
Press the (Menu) button.
b
Select Report / List, and then press the button.
c
Select Printer Settings, and then press the button.
The Printer Settings page is printed.
Basic Operation
29

16
Confirm Tray 2 (550 Sheet Feeder) is listed under Printer Options in the Printer Settings page.
If the feeder is not listed, turn off the printer, unplug the power cord, and re-install the optional 550 sheet feeder.
17
After loading paper in the optional 550 sheet feeder, specify the paper type from the printer operator panel.
a
Press the (Menu) button.
b
Select Tray Settings, and then press the
c
Select Tray 2, and then press the
d
Select Paper Type, and then press the
e
Select the paper type for the optional 550 sheet feeder, and then press the
18
If you installed the optional 550 sheet feeder after installing the print driver, update your driver by following the
button
button
.
button
.
.
button
.
instructions for each operating system. If the printer is on a network, update the driver for each client.
Updating Your Driver to Detect Optional 550 Sheet Feeder
The following procedure uses the PCL 6/PS driver on Windows® 7 and Windows® 10 as examples.
NOTE:
•
When you use XML Paper Specification (XPS) driver, the following settings are not required.
Windows® 7 1 Click Start Devices and Printers.
2 Right-click the printer icon of the DocuPrint P365 d or DocuPrint P368 d and select Printer
properties.
3 Click the Configuration tab, and then select Bi-Directional Setup.
4 Select Get Information from Printer and then select OK.
5 Click Apply, and then click OK.
6 Close the Devices and Printers dialog box.
®
Windows
10 1 Right-Click Start Control Panel.
2 Click Hardware and Sound Devices and Printers.
3 Right-click the printer icon of the DocuPrint P365 d or DocuPrint P368 d and select Printer
Properties.
4 Click the Configuration tab, and then select Bi-Directional Setup.
5 Select Get Information from Printer and then select OK.
6 Click Apply, and then click OK.
7 Close the Devices and Printers dialog box.
If the printer information is not updated automatically after clicking Get Information from Printer, follow these steps:
1
Click the Configuration tab, and then select Installable Options.
2
Select Paper Tray Configuration in the Items list box.
3
Select 2 Trays in the Paper Tray Configuration drop-down menu under Setting for.
4
Click OK.
5
Click Apply, and then click OK.
The following procedure uses OS X 10.11 as an example.
OS X 10.11 1 Select the Printers & Scanners in System Preferences.
2 Select the printer in the Printers list, and click Options & Supplies.
3 Select Driver, select the options that have been installed on the printers, and then click
OK.
30
Basic Operation
 Loading...