

Fuji Xerox DocuPrint CP116 w, DocuPrint CP115 w User Manual

DocuPrint CP116 w
DocuPrint CP115 w
User Guide

Apple, Bonjour, ColorSync, iPad, iPhone, iPod touch, Macintosh, Mac OS, and OS X are trademarks of Apple Inc.,
registered in the U.S. and other countries. AirPrint and the AirPrint logo are trademarks of Apple Inc. App Store is a
service mark of Apple Inc.
Android and Google Play are either registered trademarks or trademarks of Google Inc.
Microsoft, Windows Vista, Windows, Windows Server, Visual C++, Visual Studio, and Internet Explorer are either
registered trademarks or trademarks of Microsoft Corporation in the United States and/or other countries.
Linux is a registered trademark of Linus Torvalds.
Novell and SUSE are registered trademarks of Novell, Inc. in the United States and other countries.
Red Hat and Red Hat Enterprise Linux are registered trademarks of Red Hat, Inc. in the U.S. and other countries.
Ubuntu is a registered trademark of Canonical Ltd.
Wi-Fi and Wi-Fi Direct are registered trademarks of the Wi-Fi Alliance. Wi-Fi Protected Setup, WPA, and WPA2 are
trademarks of the Wi-Fi Alliance.
All product/brand names are trademarks or registered trademarks of the respective holders.
Microsoft product screen shot(s) reprinted with permission from Microsoft Corporation.
In this manual, safety instructions are preceded by the symbol . Always read and follow the instructions before performing the
required procedures.
It may be a legal offence to print currency notes, certificates of stocks and securities, or any other documents of similar nature,
regardless of whether they will be used.
Fuji Xerox is not responsible for any breakdown of machines due to infection of computer virus or computer hacking.
IMPORTANT:
1. This manual is copyrighted with all rights reserved. Under the copyright laws, this manual may not be copied or modified in
whole or part, without the written consent of the publisher.
2. Parts of this manual are subject to change without prior notice.
3. We welcome any comments on ambiguities, errors, omissions, or missing pages.
4. Never attempt any procedure on the machine that is not specifically described in this manual. Unauthorized operation can
cause faults or accidents. Fuji Xerox is not liable for any problems resulting from unauthorized operation of the equipment.
Xerox, Xerox and Design, as well as Fuji Xerox and Design are registered trademarks or trademarks of Xerox
Corporation in Japan and/or other countries.
DocuPrint and CentreWare are registered trademarks or trademarks of Xerox Corporation in Japan and/or other
countries.
2

Preface
Thank you for purchasing the DocuPrint CP116 w/DocuPrint CP115 w.
This guide is intended for users who use the printer for the first time, and provides all the necessary operating
information about the print function.
Please read this guide to achieve the best performance from this printer.
This guide assumes you are familiar with computers and the basics of network operation and configuration.
After reading this guide, keep it safe and handy for future reference.
Fuji Xerox Co., Ltd.
Preface 3

Contents
Preface ........................................................................................................................................3
Types of Manuals ........................................................................................................................8
Using This Guide .........................................................................................................................9
Organization....................................................................................................................9
Conventions....................................................................................................................9
Product Features .......................................................................................................................10
1 Specifications ........................................................................................... 11
2 Basic Operation ........................................................................................ 14
Main Components.........................................................................................................15
Front View ........................................................................................................15
Rear View.........................................................................................................15
Operator Panel.................................................................................................16
Turning On/Off the Printer.............................................................................................18
Turning On Your Printer ...................................................................................18
Turning Off Your Printer ...................................................................................18
Power Saver Mode .......................................................................................................19
Setting the Time of the Power Saver Mode......................................................19
Exiting the Power Saver Mode.........................................................................19
3 Printer Management Software.................................................................. 20
Print Driver ....................................................................................................................21
CentreWare Internet Services.......................................................................................22
Creating an Administrative Password ..............................................................22
Printer Setting Utility .....................................................................................................23
SimpleMonitor (Windows Only).....................................................................................24
Launcher (Windows Only).............................................................................................25
Setup Disk Creation Tool ..............................................................................................26
4 Printer Connection and Software Installation ........................................... 27
Overview of Printer Connection and Software Installation............................................28
USB Connection...............................................................................................28
Wireless Connection ........................................................................................28
Connecting Your Printer................................................................................................30
Available Features for Each Connection Type.................................................30
Connecting Printer to Your Computer ..............................................................31
Setting the IP Address (for IPv4 Mode) ........................................................................34
Printer's TCP/IP and IP Addresses ..................................................................34
Dynamic Methods of Setting the Printer's IP Address......................................34
Assigning an IP Address Manually...................................................................35
Verifying the IP Settings...................................................................................36
Configuring Printer and Installing Software on Windows ..............................................37
Identifying Print Driver Pre-install Status (for Network Connection Setup) ......37
Using Installer to Set Up Connection and Install Software...............................38
Using Installer to Install Software.....................................................................40
Installing the XML Paper Specification (XPS) Print Driver ...............................40
Setting Up for Web Services on Devices (WSD) .............................................48
4 Contents

Setting Up for Shared Printing .........................................................................50
Configuring Printer and Installing Software on Mac OS X ............................................59
Installing Software............................................................................................59
Adding a Printer ...............................................................................................59
Configuring Printer and Installing the Print Driver on Linux (CUPS).............................64
Installing the Print Driver..................................................................................64
Setting Up the Queue.......................................................................................65
Setting the Default Queue................................................................................65
Specifying the Printing Options ........................................................................66
5 Printing Basics .......................................................................................... 67
About Print Media .........................................................................................................68
Print Media Usage Guidelines..........................................................................68
Print Media That Can Damage Your Printer ....................................................68
Print Media Storage Guidelines .......................................................................69
Supported Print Media ..................................................................................................70
Usable Print Media...........................................................................................70
Loading Print Media......................................................................................................71
Capacity ...........................................................................................................71
Print Media Dimensions ...................................................................................71
Loading Print Media in the Multipurpose Feeder .............................................72
Manual Duplex Printing ....................................................................................78
Using the Output Tray Extension .....................................................................81
Printing..........................................................................................................................82
Sending a Job to Print......................................................................................82
Canceling a Print Job.......................................................................................82
Selecting Printing Options................................................................................84
Printing on Custom Size Paper ........................................................................87
Checking Status of Print Job............................................................................89
Printing With Wi-Fi Direct.................................................................................89
Mobile Printing .................................................................................................94
Printing With AirPrint ........................................................................................94
Printing a Report Page.....................................................................................95
Printer Settings.................................................................................................96
6 Using the Operator Panel ......................................................................... 97
Understanding the Operator Panel Indicators...............................................................98
Warnings ..........................................................................................................99
Common Errors..............................................................................................100
Fatal Errors ....................................................................................................102
Firmware Errors .............................................................................................103
Resetting to Factory Defaults......................................................................................104
7 Digital Certificates................................................................................... 105
Using Digital Certificates.............................................................................................106
Setting a Digital Certificate.............................................................................106
Managing the Digital Certificate .....................................................................108
Setting the SSL/TLS Communication Feature ...............................................109
8 Troubleshooting...................................................................................... 110
Clearing Jams.............................................................................................................111
Avoiding Jams................................................................................................111
Contents 5

Identifying the Location of Paper Jams ..........................................................112
Clearing Paper Jams From the Front of the Printer .......................................113
Clearing Paper Jams From the Rear of the Printer........................................114
Clearing Paper Jams From the Center Output Tray.......................................116
Jam Problems ................................................................................................118
Basic Printer Problems ...............................................................................................119
Printing Problems........................................................................................................120
Print Quality Problems ................................................................................................121
The Output Is Too Light .................................................................................121
Toner Smears or Print Comes Off/Stain on Back Side ..................................122
Random Spots/Blurred Images ......................................................................122
The Entire Output Is Blank.............................................................................123
Streaks Appear on the Output........................................................................123
Pitched Color Dots .........................................................................................123
Vertical Blanks ...............................................................................................123
Mottle .............................................................................................................124
Ghosting.........................................................................................................124
Fog .................................................................................................................125
Bead-Carry-Out (BCO)...................................................................................125
Auger Mark.....................................................................................................126
Wrinkled/Stained Paper .................................................................................127
The Top Margin Is Incorrect...........................................................................127
Color Registration Is Out of Alignment...........................................................128
Protrudent/Bumpy Paper................................................................................129
Adjusting Color Registration .......................................................................................130
Performing Auto Correct ................................................................................130
Printing the Color Registration Chart .............................................................130
Determining Values........................................................................................131
Entering Values..............................................................................................132
Wireless Problems......................................................................................................133
Wi-Fi Direct Problems .................................................................................................134
Digital Certificate Problems.........................................................................................135
Other Problem.............................................................................................................136
Contacting Service......................................................................................................137
Getting Help ................................................................................................................138
Operator Panel Indicator ................................................................................138
SimpleMonitor Alerts (Windows Only)............................................................138
Obtaining the Product Information .................................................................138
Non-Genuine Mode.....................................................................................................139
Using the Printer Setting Utility ......................................................................139
9 Maintenance ........................................................................................... 140
Cleaning the Printer ....................................................................................................141
Cleaning Inside the Printer.............................................................................141
Cleaning the Color Toner Density (CTD) Sensor...........................................144
Replacing Toner Cartridges ........................................................................................145
Overview ........................................................................................................146
Removing the Toner Cartridges .....................................................................147
Installing a Toner Cartridge ............................................................................148
Ordering Supplies .......................................................................................................150
Consumables .................................................................................................150
When to Order Toner Cartridges....................................................................150
Recycling Supplies.........................................................................................150
6 Contents

Storing Consumables..................................................................................................151
Managing the Printer...................................................................................................152
Checking or Managing the Printer With the CentreWare Internet Services ...152
Checking Printer Status With the SimpleMonitor (Windows Only).................152
Checking Printer Status Through E-mail ........................................................152
Conserving Supplies...................................................................................................154
Checking Page Counts ...............................................................................................155
Moving the Printer.......................................................................................................156
10 Contacting Fuji Xerox ............................................................................. 159
Technical Support.......................................................................................................160
Online Services...........................................................................................................161
Index.................................................................................................................. 162
Contents 7

Types of Manuals
Paper Manuals
Safety Guide Describes the information you need to know before using the printer and how to
operate the printer safely.
Setup Guide Provides step-by-step instructions on how to set up your printer. Also describes
how to check network connection.
Operator Panel Guide Describes the icons assigned to the buttons or indicators on the operator panel.
Manuals Included on the Software Pack CD-ROM
User Guide (this guide) Describes how to get ready to print and set various features. It also covers the
operator panel indicators, troubleshooting tips, and maintenance information.
Troubleshooting Guide Describes the troubleshooting tips for printer problems such as paper jams.
This guide can be opened from the Launcher.
Product Features Describes the product features.
This guide can be opened from the installer.
Show Me How Describes the error recovery procedures for the printer.
This can be opened from the SimpleMonitor.
8 Types of Manuals
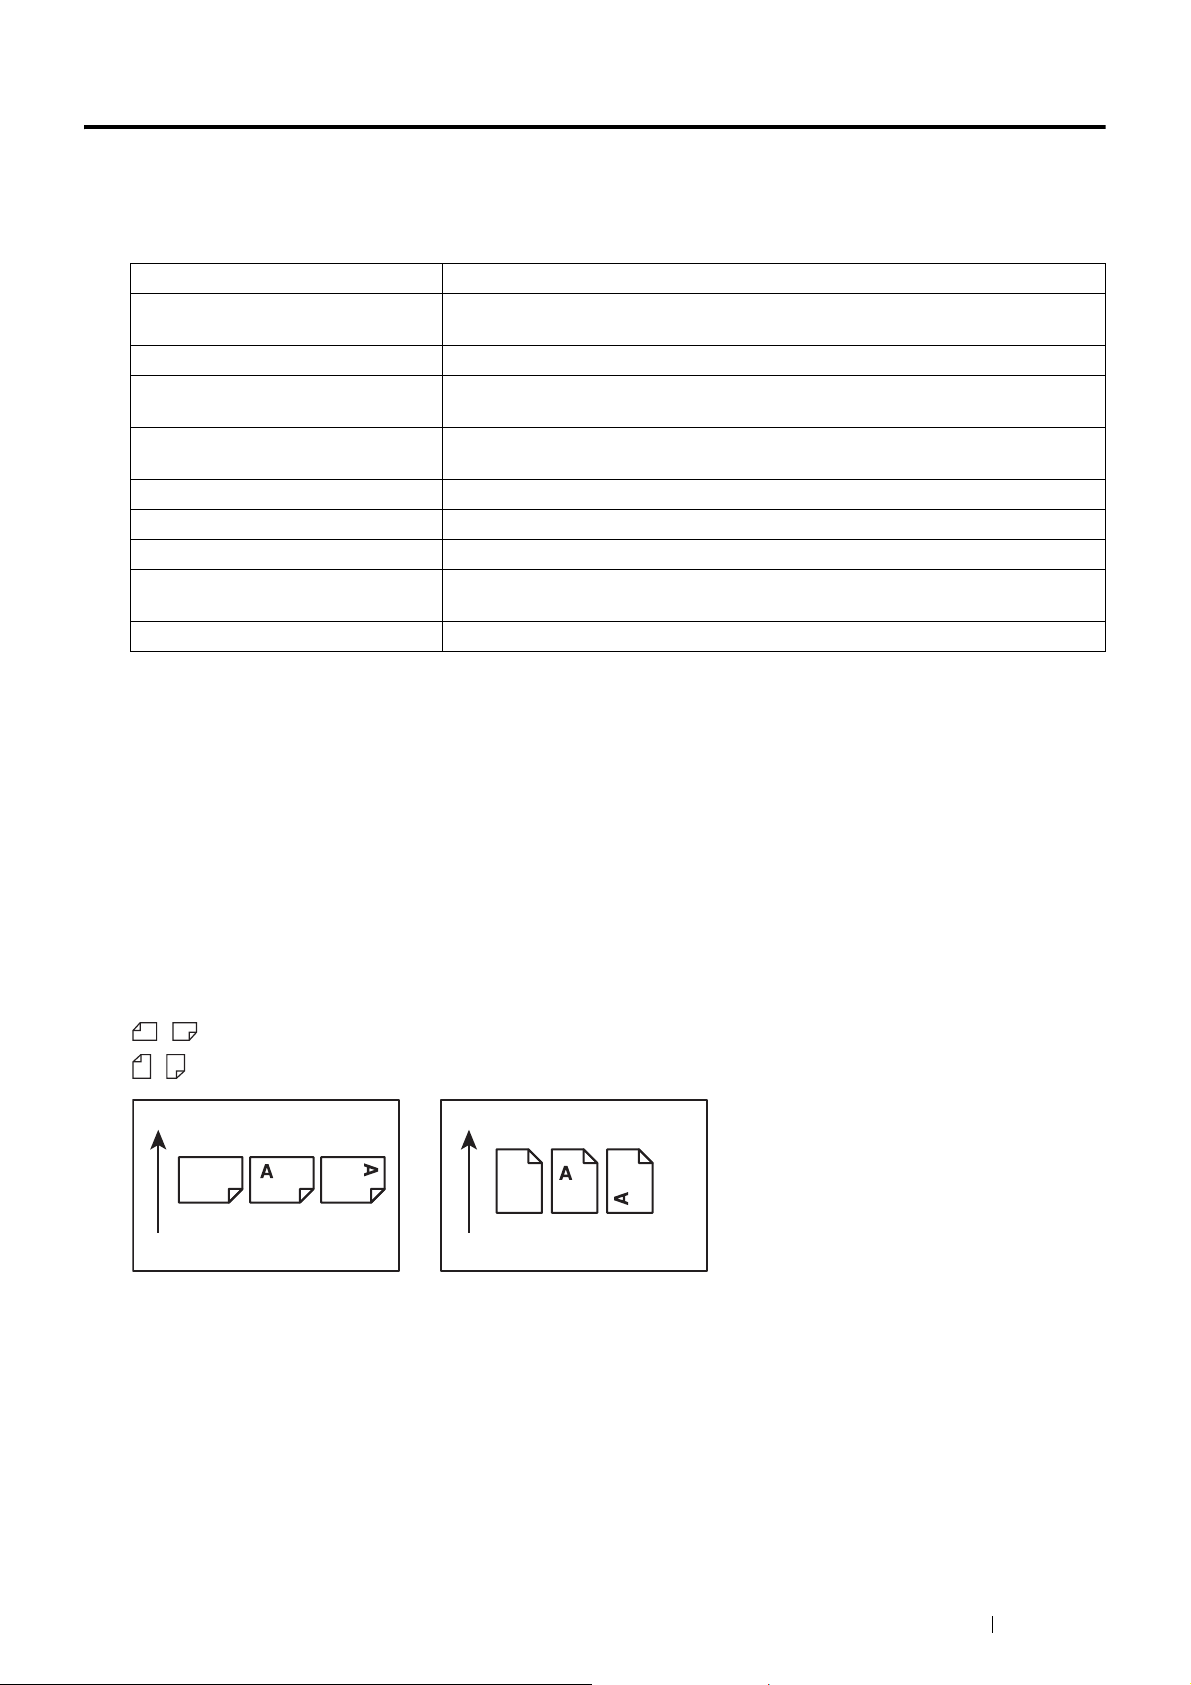
Using This Guide
LEF Orientation SEF Orientation
Paper feed direction Paper feed direction
Organization
This guide is organized into the following chapters. The summary of each chapter is as follows:
1 Specifications Describes the printer specifications.
2 Basic Operation Describes the main components of the printer, the power saver mode, and how to
turn on/off the printer.
3 Printer Management Software Describes the software available for the printer.
4 Printer Connection and Software
Installation
5 Printing Basics Describes the supported paper, how to load paper, and how to print data using
6 Using the Operator Panel Describes the indicators on the operator panel.
7 Digital Certificates Describes how to create and manage digital certificates.
8 Troubleshooting Describes the troubleshooting tips for printer problems such as paper jams.
9 Maintenance Describes how to clean the printer, how to replace toner cartridges, and how to
10Contacting Fuji Xerox Describes support information.
Describes the basic information about how to connect the printer to your computer
and how to install the print driver.
various print features.
see the printer status.
Conventions
• In this guide, personal computers and workstations are collectively called "computers".
• The following terms are used throughout this guide:
IMPORTANT:
• Important information that must be read and followed.
NOTE:
• Additional information that merits emphasis.
See also:
• References within this guide.
• Orientation of documents or paper is described in this guide as follows:
, , Long Edge Feed (LEF): Loading the document or paper in landscape orientation.
, , Short Edge Feed (SEF): Loading the document or paper in portrait orientation.
• Some of the items in the screen shots and illustrations may not be displayed or available depending on your
printer model.
Using This Guide 9

Product Features
Conventional technology
Jagged line
Enhanced image
Smooth line
Easy Wireless Connection Set Up (EZInstall)
You can easily connect the printer to a wireless network
by using the installer on the Software Pack CD-ROM.
For more information, see "Configuring Wireless
Connection Settings" on page 39.
Multiple Up Print
Manual Duplex Print
The duplex print feature allows you to print two or more
pages on the front and back sides of a single sheet of
paper manually. This feature helps reduce paper
consumption.
For more information, see "Manual Duplex Printing" on
page 78.
Printing Through Wireless Connection (Wireless
Print)
The multiple up print feature allows you to print multiple
pages on a single sheet of paper. This feature helps
reduce paper consumption.
For more information, refer to the Help provided for the
print driver.
Fuji Xerox Imaging Technology
This printer reproduces smooth lines and gradations by 1200 x 2400 dpi high-resolution LED print heads and Micro
Accurate Control Screen (MACS) Technology.
In addition, the color registration of each toner is corrected with ultra high precision through a digital process by
Image Registration Control Technology (IReCT).
The wireless LAN feature on your printer allows you to
install the printer at any location, and enables printing
without a wired connection to your computer.
For more information, see "Wireless Connection" on
page 31.
10 Product Features
1
Specifications
This chapter lists the main specifications of the printer. Note that the specifications of the product may change
without prior notice.
Items Description
Product Code DocuPrint CP116 w 220V: TL300860
DocuPrint CP116 w 110V: TL300863
DocuPrint CP115 w 220V: TL300855
DocuPrint CP115 w 110V: TL300858
Type Desktop
Printing Method LED Xerography
IMPORTANT:
• LED + LED electrophotographic system
Warm-up Time 28 seconds or less (at 22°C room temperature)
Continuous Print Speed Color 1 Sided: 10 sheets/min
Monochrome 1 Sided: 12 sheets/min
IMPORTANT:
• Print speed may decrease due to factors such as paper type, paper size, and
printing conditions.
• When continuously printing a single document of A4 .
First Print Color: 17.3 seconds (A4 )
Monochrome: 15.0 seconds (A4 )
IMPORTANT:
• The values may vary depending on the machine configuration.
Resolution 1200 2400 dpi
Tone/Color 256 tones/color (16.7 million colors)
Paper Size A4 (210 297 mm), B5 (182 257 mm), A5 (148 210 mm), C5 (162 229 mm),
Monarch (3.875 7.5"), Com 10 (4.125 9.5"), DL (110 220 mm),
Letter (8.5 11"), Legal (8.5 14"), Folio (8.5 13"), Executive (7.25 10.5"),
Custom Size: 76.2 – 215.9 127 – 355.6 mm (3.0 – 8.5" 5.0 – 14.0")
Image loss: 4 mm from the top, bottom, left, and right edges
Paper Weight 60 – 163 gsm
IMPORTANT:
• Use only the recommended paper. Using paper other than that recommended
for the printer can cause printing problems. Do not use special ink jet paper.
• The type of paper being used and environmental conditions can affect printing
quality. Because of this, it is recommended to perform a test print and confirm
proper print quality before using the printer.
Paper Capacity 150 sheets
IMPORTANT:
• Fuji Xerox P paper (64 gsm)
Output Tray Capacity Approximately 100 sheets (face down)
IMPORTANT:
• Fuji Xerox P paper (64 gsm)
Specifications 11

Items Description
2-sided Printing Feature Standard (Manual)
Memory Capacity Standard: 128 MB (Onboard)
Optional: —
IMPORTANT:
• The above memory capacity does not guarantee print quality depending on
the type and content of print data.
Page Description Language Host-based
®
Supported OS Microsoft
Microsoft
Microsoft
Microsoft
Microsoft
Microsoft
Microsoft
Microsoft
Microsoft
Microsoft
Microsoft
Microsoft
Microsoft
Microsoft
Microsoft
Mac OS X 10.5 Leopard
Mac OS X 10.6 Snow Leopard
Mac OS X 10.7 Lion
OS X 10.8 Mountain Lion
OS X 10.9 Mavericks
Red Hat
SUSE
Ubuntu
Red Hat
SUSE
Ubuntu
Windows Server® 2003 (32-bit)
®
Windows Vista® (32-bit)
®
Windows Server® 2008 (32-bit)
®
Windows® 7 (32-bit)
®
Windows® 8 (32-bit)
®
Windows® 8.1 (32-bit)
®
Windows Server® 2003 (64-bit)
®
Windows Vista® (64-bit)
®
Windows Server® 2008 (64-bit)
®
Windows® 7 (64-bit)
®
Windows Server® 2008 R2 (64-bit)
®
Windows® 8 (64-bit)
®
Windows Server® 2012 (64-bit)
®
Windows® 8.1 (64-bit)
®
Windows Server® 2012 R2 (64-bit)
®
Enterprise Linux® 6 Desktop (32-bit)
®
Linux Enterprise Desktop 11 (32-bit)
®
12.04 (32-bit)
®
Enterprise Linux® 6 Desktop (64-bit)
®
Linux Enterprise Desktop 11 (64-bit)
®
12.04 (64-bit)
IMPORTANT:
• For information about the latest supported OS, refer to the Fuji Xerox web site.
Interface USB 2.0 (Hi-Speed), IEEE 802.11b/802.11g/802.11n
Supported Protocol TCP/IP (IPv4/IPv6, LPD, IPP, IPPS, Port9100, WSD, HTTP, HTTPS, RARP,
AutoIP), SNMP, DHCP, DHCPv6, BOOTP, Bonjour (mDNS), AirPrint
NOTE:
• WSD stands for Web Services on Devices.
Power Supply AC 100 – 127 V ± 10%; 7 A; both 50/60 Hz ± 3 Hz
AC 220 – 240 V ± 10%; 5 A; both 50/60 Hz ± 3 Hz
IMPORTANT:
• Power outlets that provide the above power level are recommended.
12 Specifications

Items Description
Operating Noise During operation: 6.1 B; 46.8 dB (A)
During stand-by: 3.6 B; 25.6 dB (A)
IMPORTANT:
• Measurements based on ISO7779
Unit B: acoustic power level (LwAd)
Unit dB (A): radiated sound pressure (bystander position)
Power Consumption Maximum power consumption: 790 W or less
Low power mode : 9 W or less
Sleep mode : 2.0 W or less
Standby mode : 42 W or less
IMPORTANT:
• The printer does not use electricity when the power is switched off even with
the power cord is plugged in.
Dimensions 394 (W) 304 (D) 234 (H) mm
IMPORTANT:
• When the front cover is closed.
Weight Approximately 10.9 kg (including toner cartridges)
Usage Environment During Use: Temperature: 10 – 32°C; Humidity: 10 – 85% (except malfunctions
due to dew condensation)
Non-Use: Temperature: -20 – 40°C; Humidity: 5 – 85% (except malfunctions due
to dew condensation)
IMPORTANT:
• Until the conditions (temperature and humidity) inside the printer become
acclimated to the installation environment, certain conditions of paper can
cause poor printing quality.
Specifications 13

Basic Operation
• "Main Components" on page 15
• "Turning On/Off the Printer" on page 18
• "Power Saver Mode" on page 19
2
14 Basic Operation

Main Components
21 34
58769101112
3
4
5
6
7
8
9
21
Front View
1 Operator Panel 2 Center Output Tray
3 Output Tray Extension 4 Print Head Cleaning Rod
5 Toner Access Cover 6 Power Switch
7 Paper Width Guides 8 Multipurpose Feeder
9 Front Cover 10 Slide Bar
11 Length Guide 12 Paper Cover
Rear View
1 Power Connector 2 Rear Cover Handle
3 USB Port 4 Rear Cover
5 Transfer Roller 6 Paper Chute
7 Paper Feed Roller 8 Transfer Belt
9 Levers
Basic Operation 15
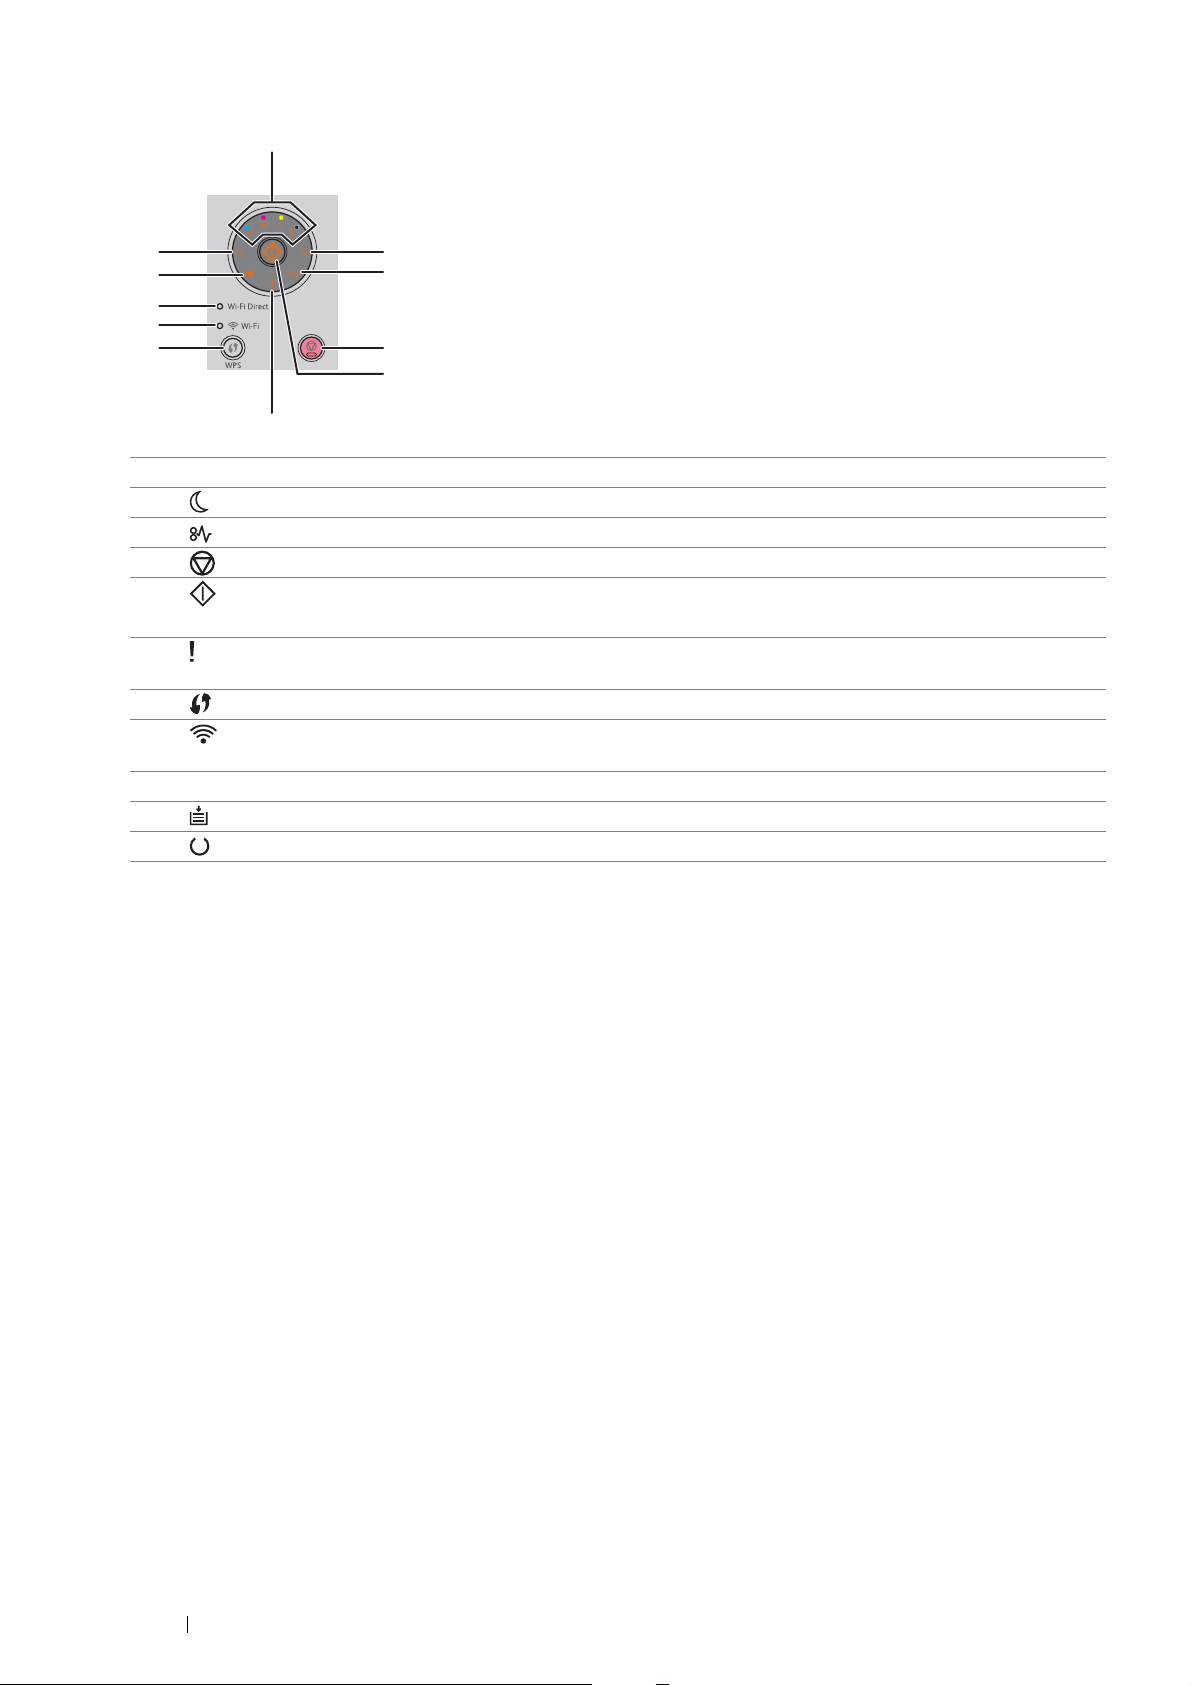
Operator Panel
6
211
10
9
8
7
3
4
5
1
1 Toner indicators Indicates that the toner is low or empty, or toner error occurred.
2(Power Saver) indicator Lights up in the power saver mode.
3(Jam) indicator Lights up when a paper jam occurs.
4(Stop) button Cancels the current print job or clears an error.
5(Start) button/indicator Starts 2 sided printing after loading paper.
Prints the report pages by holding.
6(Error) indicator Lights up when an error occurs, and blinks when an unrecoverable error
occurs.
7(WPS) button Starts Wi-Fi Protected Setup™ (Push Button Configuration).
8(Wi-Fi) LED Lights up when wireless connection is established, and blinks in certain
conditions.
®
9 Wi-Fi Direct LED Lights up when Wi-Fi Direct
10 (Load Paper) indicator Indicates when no paper or the wrong size of paper is loaded.
11 (Ready) indicator Lights up when the printer is ready, and blinks when data is being received.
connection is established.
The indicators provide information on the status of the printer and help you locate each problem. For details about
indicators, see "Understanding the Operator Panel Indicators" on page 98.
16 Basic Operation
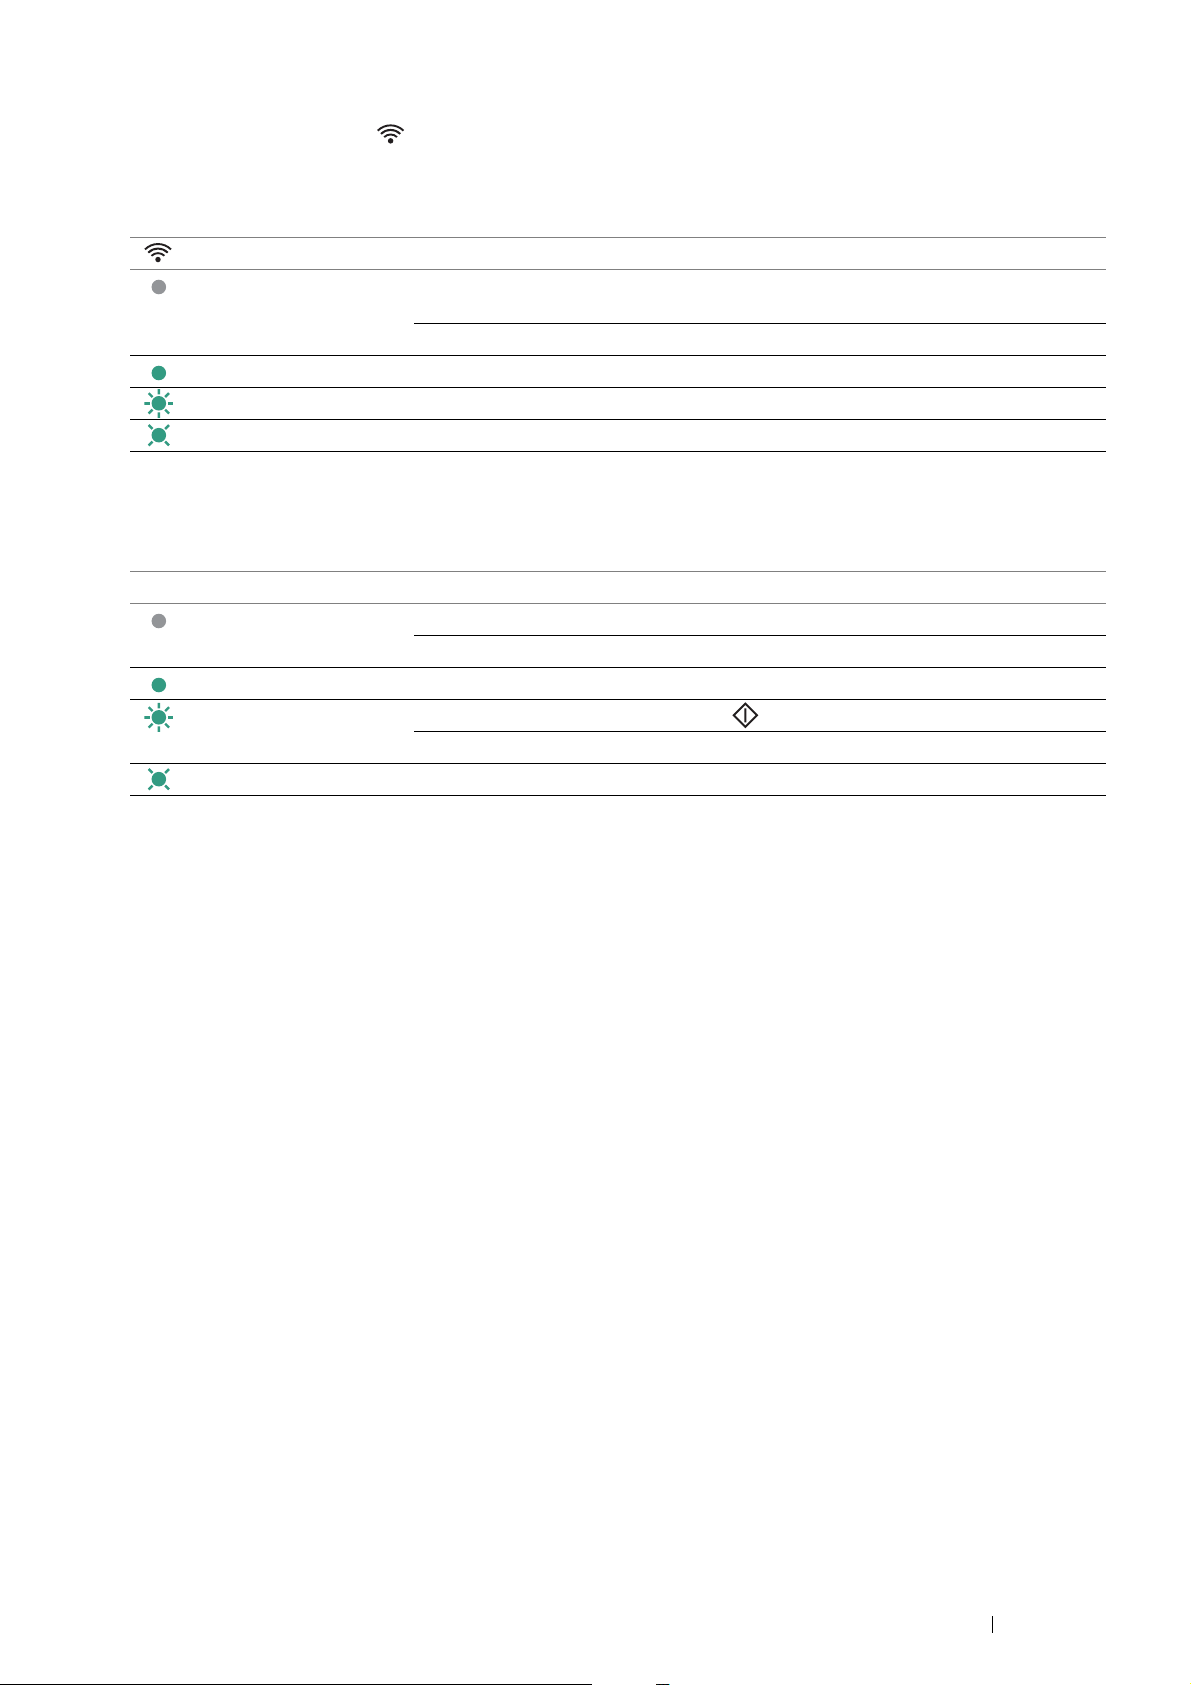
Status of Wi-Fi LED
This section describes when the (Wi-Fi) LED lights up or blinks.
See also:
• "Wireless Problems" on page 133
(Wi-Fi) LED Printer Status
Off No wireless LAN access point or router on which the WPS operation is being
performed found within the specified time
Entering the power saver mode
On Wireless link established
Blinking normal Searching/Connecting with wireless LAN access point or router
Blinking slowly Searching/Connecting with WPS access point or router during wireless operation
Status of Wi-Fi Direct LED
This section describes when the Wi-Fi Direct LED lights up or blinks.
Wi-Fi Direct LED Printer Status
Off Wi-Fi Direct Setup set to Disable
Entering the power saver mode
On Waiting for the pairing request
Blinking normal Received pairing request and blinking (Start) button
Entering the PIN code required
Blinking slowly Wi-Fi Direct connection established
Basic Operation 17
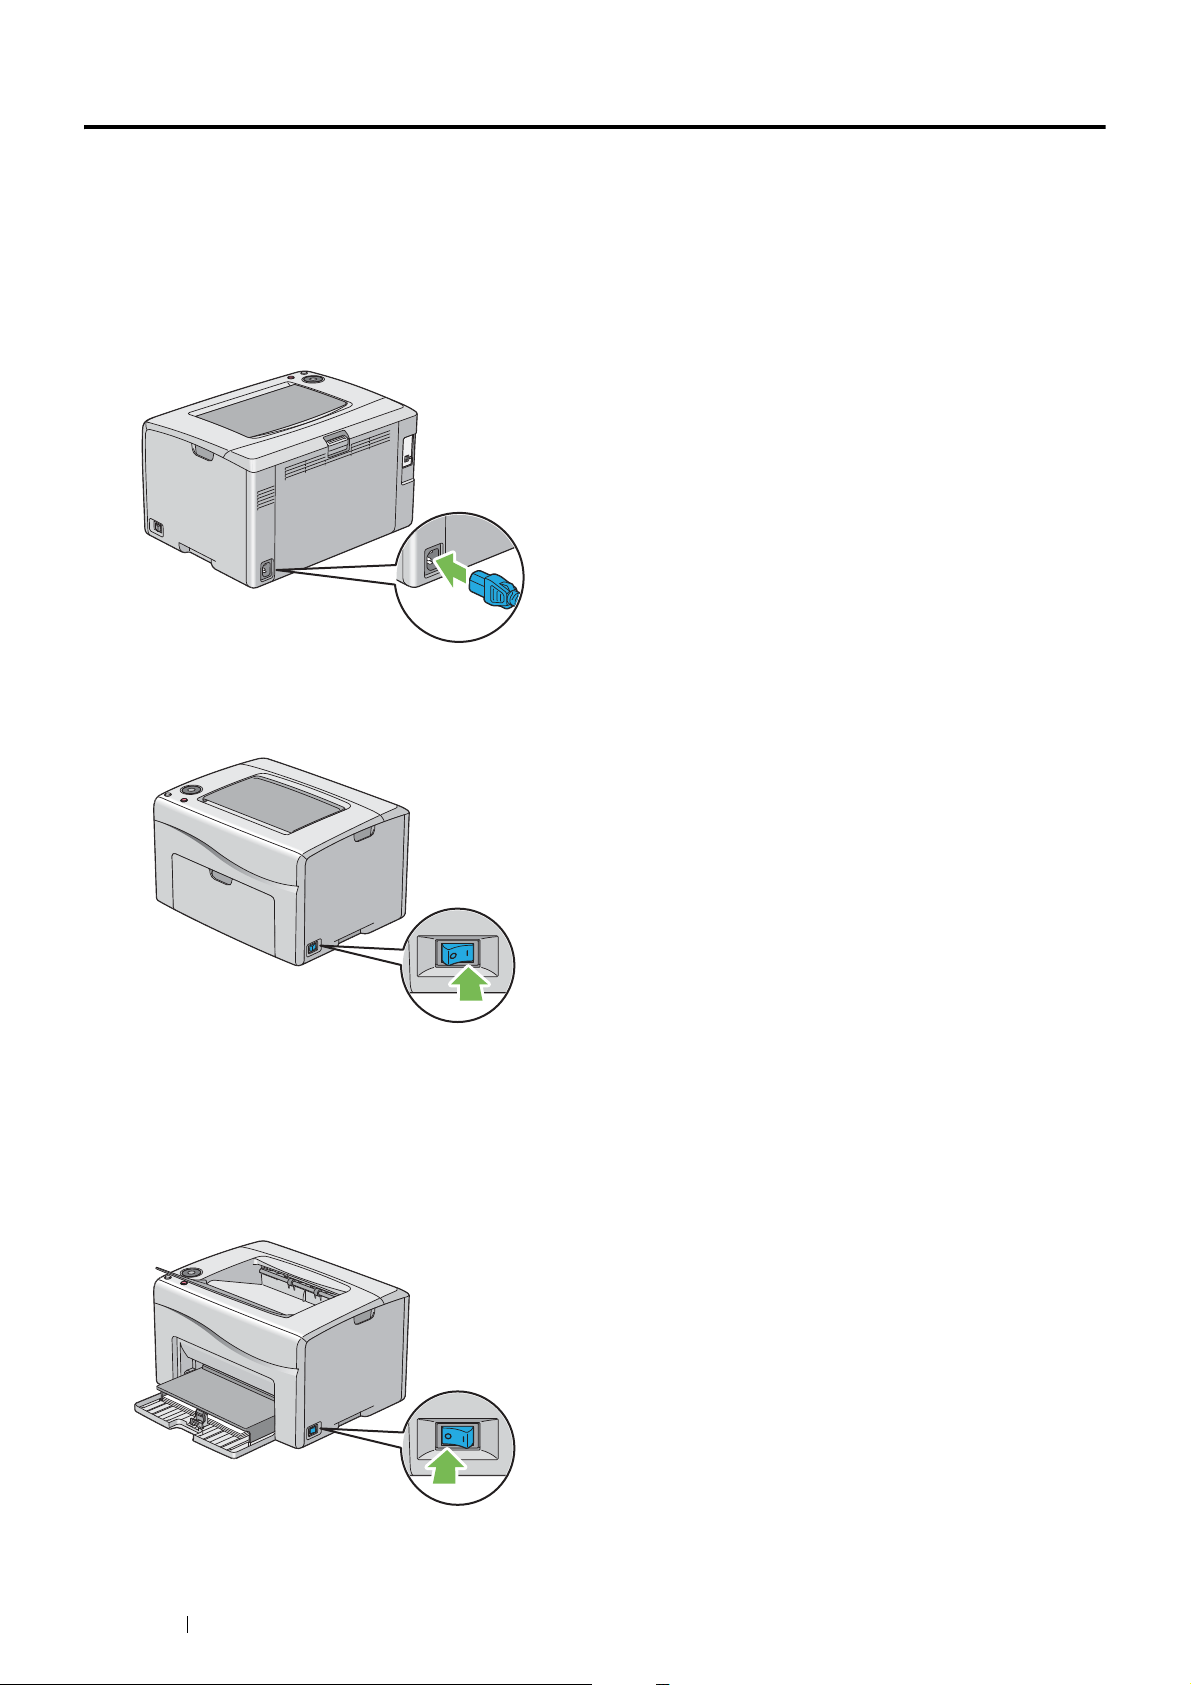
Turning On/Off the Printer
Turning On Your Printer
IMPORTANT:
• Do not use extension cords or power strips.
• The printer should not be connected to an uninterruptible power supply (UPS) system.
1 Connect the power cord to the power connector on the rear of your printer (see "Rear View" on page 15).
2 Connect the other end of the cord to the power source.
3 Turn on the printer.
Turning Off Your Printer
1 Turn off the printer.
NOTE:
• The data in the memory is cleared when the printer is turned off.
18 Basic Operation

Power Saver Mode
The printer has a power saving feature which reduces power consumption during periods of inactivity. This feature
operates in two modes: the low power mode and sleep mode. As delivered, the printer switches to the low power
mode five minutes after the last print job is finished. The printer then switches to the sleep mode after another six
minutes of inactivity. When the printer is in the low power mode, all operator panel indicators except for the
(Power Saver) indicator and the indicator announcing that a problem occurs go out. In the sleep mode, all
operator panel indicators except for the (Power Saver) indicator go out.
The factory default settings of five minutes (Low Power Timer) and six minutes (Sleep Timer) are changeable within
the range of 5 to 30 minutes (Low Power Timer) and 1 to 6 minutes (Sleep Timer). The printer returns to the ready-toprint state in about 28 seconds when re-activated.
Setting the Time of the Power Saver Mode
You can specify the time of the power saver mode. The printer switches to the power saver mode after the specified
time.
The following procedure uses Microsoft
1 Click Start All Programs Fuji Xerox Fuji Xerox Printer Software for Asia-Pacific your printer
Printer Setting Utility.
NOTE:
• The window to select a printer appears in this step, when multiple print drivers are installed on your computer. In this
case, click the name of the desired printer listed in Printer Name.
The Printer Setting Utility appears.
®
Windows® 7 as an example.
2 Click the Printer Maintenance tab.
3 Select System Settings from the list at the left side of the page.
The System Settings page is displayed.
4 Specify the time for Low Power Timer and Sleep Timer of Power Saver Timer.
5 Click Apply New Settings to take effect.
Exiting the Power Saver Mode
The printer automatically exits the power saver mode when it receives a print job from a computer. To manually exit
the power saver mode, press (Stop) button on the operator panel.
Basic Operation 19

3
Printer Management Software
Use the Software Pack CD-ROM that shipped with your printer to install a combination of software programs,
depending on your operating system.
• "Print Driver" on page 21
• "CentreWare Internet Services" on page 22
• "Printer Setting Utility" on page 23
• "SimpleMonitor (Windows Only)" on page 24
• "Launcher (Windows Only)" on page 25
• "Setup Disk Creation Tool" on page 26
20 Printer Management Software

Print Driver
To access all of your printer's features, install the print driver from the Software Pack CD-ROM.
The print driver enables your computer and printer to communicate and provides access to your printer features.
See also:
• "Configuring Printer and Installing Software on Windows" on page 37
• "Configuring Printer and Installing Software on Mac OS X" on page 59
Printer Management Software 21

CentreWare Internet Services
The CentreWare Internet Services is a hypertext transfer protocol (HTTP)-based web page service that is accessed
through your web browser.
Using the CentreWare Internet Services, you can confirm the printer status, and change the printer configuration
options easily. Anyone on your network can access the printer using the CentreWare Internet Services. In
administrative mode, you can change the configuration of the printer, and manage your printer settings without
leaving your computer.
NOTE:
• Users who are not given passwords by the administrator can still view the configuration settings in user mode. However, they
cannot save or apply any changes to the current configuration and settings.
Creating an Administrative Password
1 Launch your web browser.
2 Enter the IP address of the printer in the address bar, and then press the Enter key.
3 Click the Properties tab.
4 In the left navigation panel, scroll down to Security and select Administrator Settings.
5 Select Enabled for Administrator Mode.
6 In the Administrator Login ID field, enter a name for the administrator.
NOTE:
• Th e d e f ault ID an d p a ssword ar e " 11111 " a n d "x-admin" r e s p ectively.
7 In the Administrator Password and Re-enter Password fields, enter a password for the administrator.
8 In the Maximum Login Attempts field, enter the number of login attempts allowed.
Setting to 0 does not limit the number of login attempts.
9 Click Apply.
Your new password has been set and anyone with the administrator name and password can log in and
change the printer configuration and settings.
22 Printer Management Software

Printer Setting Utility
The Printer Setting Utility is installed with the print driver.
The Printer Setting Utility allows you to view or specify the system settings. You can also diagnose the system
settings by using the Printer Setting Utility.
The Printer Setting Utility consists of the Printer Settings Report, Printer Maintenance, and Diagnosis tabs.
Printer Management Software 23

SimpleMonitor (Windows Only)
The SimpleMonitor is installed with the print driver.
You can check the printer status with the SimpleMonitor. Double-click the SimpleMonitor printer icon on the taskbar
at the bottom right of the screen. The window to select a printer appears, which displays the printer name, printer
connection ports, and printer status. Click one of the printer name listed on the window to select a printer. The
Printer Status window appears. Check the column Status to know the current status of your printer.
The Printer Status window alerts you when there is a warning or when an error occurs, for example, when a paper
jam occurs or toner is running low.
By default, the Printer Status window launches automatically when printing error occurs. You can specify the
conditions for starting the Printer Status window in Printer Status Window Properties.
To change the pop-up settings for the Printer Status window:
®
The following procedure uses Microsoft
1 Right-click the SimpleMonitor printer icon on the taskbar at the bottom right of the screen.
2 Select Printer Status Window Properties.
The Printer Status Window Properties window appears.
3 Select the type of the pop-up and then click OK.
You can also check the toner level of your printer and the job information on the Printer Status window.
NOTE:
• To modify the SimpleMonitor settings, select Settings in the window to select a printer.
Windows® 7 as an example.
24 Printer Management Software
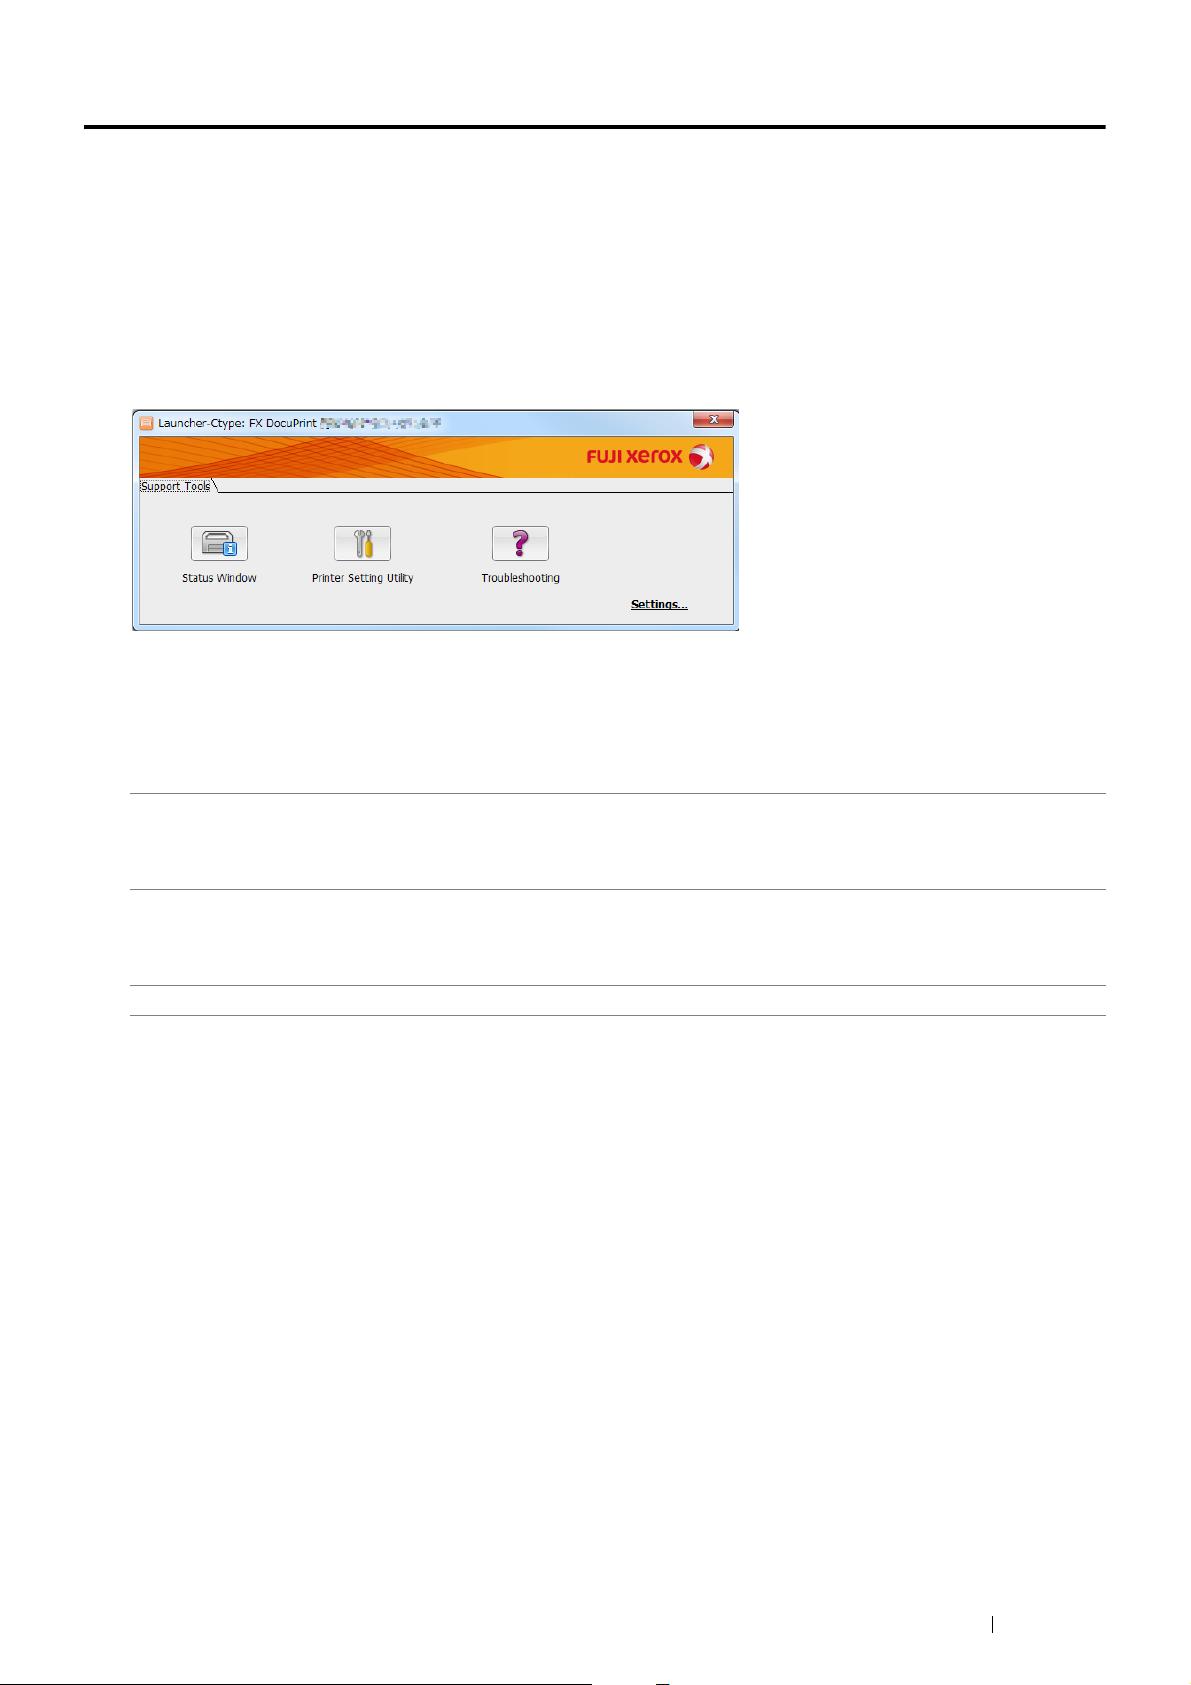
Launcher (Windows Only)
The Launcher is installed with your print driver.
Using the Launcher-Ctype window, you can open the Printer Status window, Printer Setting Utility, and
Troubleshooting Guide.
The following procedure uses Microsoft Windows 7 as an example.
To open the Launcher-Ctype window:
1 Click Start All Programs Fuji Xerox Fuji Xerox Printer Software for Asia-Pacific your printer
Launcher.
The Launcher-Ctype window appears.
2 The Launcher-Ctype window provides the following buttons; Status Window, Printer Setting Utility, and
Troubleshooting.
To exit, click X (Close) at the top-right of the window.
For details, see the help for each application.
Status Window Opens the Printer Status window.
See also:
• "SimpleMonitor (Windows Only)" on page 24
Printer Setting Utility Opens the Printer Setting Utility.
See also:
• "Printer Setting Utility" on page 23
Troubleshooting Opens the Troubleshooting Guide, which allows you to resolve issues by yourself.
Printer Management Software 25

Setup Disk Creation Tool
The Setup Disk Creation Tool program located in the MakeDisk folder of the Utilities folder on the Software Pack
CD-ROM and the print driver located on the Software Pack CD-ROM are used to create driver installation packages
that contain custom driver settings. A driver installation package can contain a group of saved print driver settings
and other data such as:
• Print orientation and multiple-up (document settings)
• Output color (graphic setting)
If you want to install the print driver with the same settings on multiple computers running on the same operating
system, create a setup disk in a media or in a server on the network. Using the setup disk that you have created will
reduce the amount of work required when installing the print driver.
• Install the print driver for your printer on the computer on which the setup disk is to be created.
• The setup disk can only be used on the operating system on which the disk was created or computers running
the same operating system. Create a separate setup disk for each of the operating systems.
26 Printer Management Software

4
Printer Connection and Software Installation
• "Overview of Printer Connection and Software Installation" on page 28
• "Connecting Your Printer" on page 30
• "Setting the IP Address (for IPv4 Mode)" on page 34
• "Configuring Printer and Installing Software on Windows" on page 37
• "Configuring Printer and Installing Software on Mac OS X" on page 59
• "Configuring Printer and Installing the Print Driver on Linux (CUPS)" on page 64
Printer Connection and Software Installation 27

Overview of Printer Connection and Software Installation
Read this section to know the overall steps to complete the printer connection and software installation.
Select one of the following connection methods.
• USB connection
• Wireless connection
NOTE:
• If the Software Pack CD-ROM is not available, you can download the latest driver from our web site:
http://www.fujixeroxprinters.com/
• To use this printer in a Linux
these, see also "Configuring Printer and Installing the Print Driver on Linux (CUPS)" on page 64.
USB Connection
®
environment, you need to install a Linux driver. For more information on how to install and use
• For Microsoft® Windows
®
1 Connect the printer and the computer with the USB cable.
Refer to "USB Connection" on page 31.
2 Install the driver software on the computer from the Software Pack CD-ROM.
Refer to "Using Installer to Set Up Connection and Install Software" on page 38.
• For Mac OS X
1 Connect the printer and the computer with the USB cable.
Refer to "USB Connection" on page 31.
2 Install the driver software on the computer from the Software Pack CD-ROM.
Refer to "Configuring Printer and Installing Software on Mac OS X" on page 59.
Wireless Connection
• For Windows
1 Connect the printer to a wireless network.
Refer to "Wireless Connection" on page 31.
Perform the following steps as necessary.
If you set up wireless connection using the installer on the Software Pack CD-ROM, the following steps are not
necessary.
2 Set the printer's IP address.
• If DHCP is available on your network, refer to "Dynamic Methods of Setting the Printer's IP Address" on
page 34.
• You can also manually set the printer's IP address. Refer to "Assigning an IP Address Manually" on page 35.
3 Install the driver software on the computer from the Software Pack CD-ROM.
Refer to "Configuring Printer and Installing Software on Windows" on page 37.
28 Printer Connection and Software Installation

• For Mac OS X
1 Connect the printer to a wireless network.
Refer to "Wireless Connection" on page 31.
2 Set the printer's IP address.
• If DHCP is available on your network, refer to "Dynamic Methods of Setting the Printer's IP Address" on
page 34.
• You can also manually set the printer's IP address. Refer to "Assigning an IP Address Manually" on page 35.
3 Install the driver software on the computer from the Software Pack CD-ROM.
Refer to "Configuring Printer and Installing Software on Mac OS X" on page 59.
Printer Connection and Software Installation 29
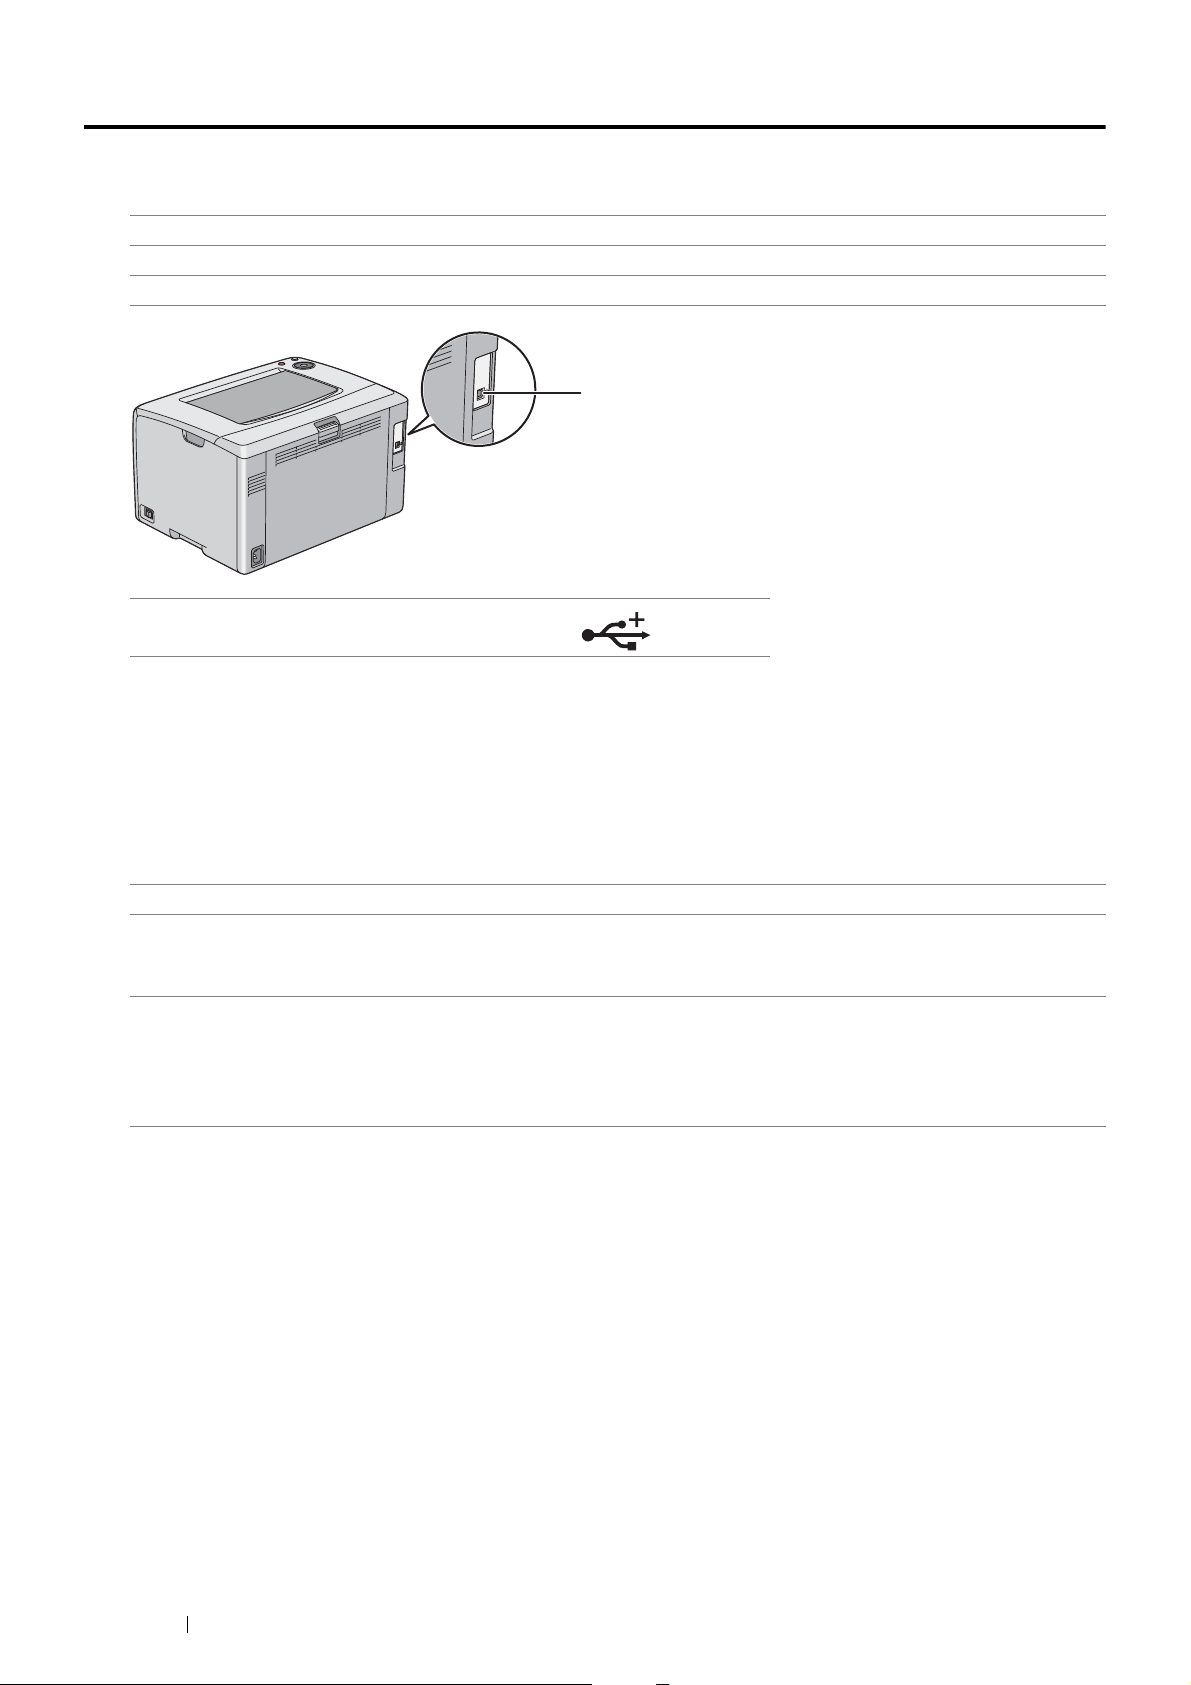
Connecting Your Printer
1
To connect your printer to a computer or device, the following specification must be met for each of the connection
type:
Connection Type Connection Specifications
USB USB2.0 compatible
Wireless IEEE 802.11b/802.11g/802.11n
1 USB Port
Available Features for Each Connection Type
Connect the printer via USB or Wireless. A USB connection is a direct connection and is not used for networking.
Wireless connection is used for networking. Hardware and cabling requirements vary for the different connection
methods. Wireless LAN access point (Registrar) or router is not included with your printer and must be purchased
separately.
The available features for each connection type are shown in the following table.
Connection Type Available Feature
USB • Instruct print jobs from a computer.
• Use the Printer Setting Utility to view, specify or diagnose the system settings.
• Use the SimpleMonitor to check the printer status. (Windows only)
Wireless • Instruct print jobs from a computer on the network.
• Use the CentreWare Internet Services to view the printer status or specify the
printer settings.
• Use the Printer Setting Utility to view, specify or diagnose the system settings.
• Use the SimpleMonitor to check the printer status. (Windows only)
30 Printer Connection and Software Installation
 Loading...