

Page 1

DocuPrint CM205 b
User Guide
Page 2

Contents
Preface....................................................................................................................... 7
Trademarks and Document Disclaimer ...................................................................... 8
Types of Manuals.......................................................................................................9
Using This Guide...................................................................................................... 10
Organization ................................................................................................11
Conventions................................................................................................. 12
Safety Notes............................................................................................................. 13
Electrical Safety...........................................................................................14
Machine Installation..................................................................................... 16
Operational Safety....................................................................................... 18
Consumable ................................................................................................ 20
Warning and Caution Labels .......................................................................21
Environment ............................................................................................................. 22
Regulation ................................................................................................................ 23
Radio Frequency Emissions (Class B) ........................................................ 23
Product Safety Certification (CB)................................................................. 23
Illegal Copies and Printouts...................................................................................... 24
Product Features...................................................................................................... 25
1 Specifications............................................................................. 27
Copy Function ............................................................................................. 28
Print Function .............................................................................................. 30
Scan Function.............................................................................................. 31
2 Basic Operation ......................................................................... 33
Main Components ....................................................................................... 34
Front View....................................................................................... 35
Rear View .......................................................................................36
Operator Panel ...............................................................................37
Turning On the Printer .................................................................................39
Setting Initial Settings on the Operator Panel.............................................. 40
Printing a Panel Settings Page.................................................................... 41
The Operator Panel ........................................................................ 42
The Printer Setting Utility ................................................................ 43
Power Saver Mode ...................................................................................... 44
Exiting the Power Saver Mode .......................................................45
3 Printer Management Software ................................................... 47
Print and Scan Drivers................................................................................. 48
Printer Setting Utility (Windows Only).......................................................... 49
SimpleMonitor (Windows Only) ................................................................... 50
1
Page 3

Launcher (Windows Only) ........................................................................... 51
Express Scan Manager ............................................................................... 52
4 Installing the Print Driver............................................................ 53
Connecting Your Printer ..............................................................................54
Connecting Printer to Computer ..................................................... 55
Installing Print Driver on Computers Running Windows..............................57
Inserting the Software Pack CD-ROM ............................................ 58
USB Connection Setup................................................................... 59
Installing Print Driver on Computers Running Mac OS X ............................ 60
Installing the Drivers and Software ................................................. 61
5 Printing Basics ........................................................................... 63
About Print Media ........................................................................................ 64
Print Media Usage Guidelines ........................................................ 65
Print Media That Can Damage Your Printer ................................... 66
Print Media Storage Guidelines ...................................................... 67
Supported Print Media................................................................................. 68
Usable Print Media .........................................................................69
Loading Print Media..................................................................................... 71
Capacity.......................................................................................... 72
Print Media Dimensions.................................................................. 73
Loading Print Media in the Multipurpose Feeder (MPF) ................. 74
Loading Print Media in the Priority Sheet Inserter (PSI) ................. 81
Manual Duplex Printing (Windows Print Driver Only) ..................... 86
Using the Output Tray Extension....................................................90
Setting Paper Sizes and Types ................................................................... 91
Setting Paper Sizes ........................................................................ 92
Setting Paper Types ....................................................................... 93
Printing ........................................................................................................94
Sending a Job to Print ....................................................................95
Canceling a Print Job...................................................................... 96
Direct Print Using the USB Storage Device....................................97
Selecting Printing Options ..............................................................98
Printing Custom Size Paper (Windows Only) ............................... 103
Checking Status of Print Data....................................................... 105
Printing a Report Page .................................................................106
Printer Settings ............................................................................. 107
6 Copying.................................................................................... 111
Loading Paper for Copying........................................................................ 112
Preparing a Document...............................................................................113
Making Copies From the Document Glass................................................114
Setting Copy Options................................................................................. 116
Number of Copies......................................................................... 117
2
Page 4

Color ............................................................................................. 118
Collated......................................................................................... 119
Reduce/Enlarge ............................................................................ 120
Document Size ............................................................................. 122
Original Type ................................................................................ 123
Lighten/Darken ............................................................................. 124
Sharpness..................................................................................... 125
Auto Exposure .............................................................................. 126
Color Balance R............................................................................ 127
Color Balance G ........................................................................... 128
Color Balance B............................................................................ 129
Gray Balance ................................................................................ 130
N-Up ............................................................................................. 131
Margin Top/Bottom ....................................................................... 133
Margin Left/Right .......................................................................... 134
Margin Middle ............................................................................... 135
Changing the Default Settings................................................................... 136
7 Scanning.................................................................................. 137
Scanning Overview.................................................................................... 138
Scanning to a Computer............................................................................ 139
Scanning From the Operator Panel .............................................. 140
Scanning Using the TWAIN Driver ...............................................141
Scanning Using the WIA Driver .................................................... 143
Scanning to USB Storage Device.............................................................. 144
Adjusting Scanning Options ...................................................................... 145
Adjusting the Default Scan Settings ............................................. 146
Changing the Scan Settings for an Individual Job ........................ 148
8 Using the Operator Panel Menus and Keypad ........................ 149
Understanding the Printer Menus.............................................................. 150
Report / List .................................................................................. 151
Meter Readings ............................................................................ 152
Admin Menu.................................................................................. 153
Defaults Settings........................................................................... 162
Tray Settings................................................................................. 170
Panel Language............................................................................ 172
Panel Lock Function .................................................................................. 173
Enabling the Panel Lock ............................................................... 174
Disabling the Panel Lock .............................................................. 175
Limiting Access to Copy, Scan and Print From USB Memory Operations 176
Setting the Power Saving Timer Option ....................................................177
Resetting to Factory Defaults .................................................................... 178
Using the Numeric Keypad........................................................................ 179
Changing Numbers.......................................................................180
3
Page 5

9 Troubleshooting ....................................................................... 181
Clearing Jams............................................................................................ 182
Avoiding Jams .............................................................................. 183
Identifying the Location of Paper Jams......................................... 184
Clearing Paper Jams From the Front of the Printer...................... 185
Clearing Paper Jams From the Back of the Printer ...................... 186
Clearing Paper Jams From the Center Output Tray ..................... 188
Jam Problems............................................................................... 191
Basic Printer Problems .............................................................................. 192
Display Problems....................................................................................... 193
Printing Problems ......................................................................................194
Print Quality Problems............................................................................... 195
The Output Is Too Light ................................................................ 196
Toner Smears or Print Comes Off/Stain on Back Side.................197
Random Spots/Blurred Images..................................................... 198
The Entire Output Is Blank............................................................ 199
Streaks Appear on the Output ...................................................... 200
Pitched Color Dots........................................................................201
Vertical Blanks .............................................................................. 202
Mottle ............................................................................................ 203
Ghosting ....................................................................................... 204
Fog................................................................................................ 205
Bead-Carry-Out (BCO) ................................................................. 206
Auger Mark ................................................................................... 207
Wrinkled/Stained Paper ................................................................ 208
The Top Margin Is Incorrect.......................................................... 209
Color Registration Is out of Alignment .......................................... 210
Protrudent/Bumpy Paper .............................................................. 211
Copy Quality Problems.............................................................................. 212
Adjusting Color Registration ...................................................................... 213
Performing Auto Correct ............................................................... 214
Printing the Color Registration Chart ............................................ 215
Determining Values ...................................................................... 216
Entering Values ............................................................................217
Scanning Problems ................................................................................... 218
Scan Driver/Printer Utility Problems .......................................................... 219
Other Problems .........................................................................................220
Understanding Printer Messages .............................................................. 221
Contacting Service .................................................................................... 225
Getting Help............................................................................................... 226
LCD Panel Messages ................................................................... 227
SimpleMonitor Alerts..................................................................... 228
Obtaining the Product Information ................................................ 229
Non-Genuine Mode ...................................................................................230
The Operator Panel ...................................................................... 231
The Printer Setting Utility .............................................................. 232
4
Page 6

10 Maintenance ............................................................................ 233
Cleaning the Printer...................................................................................234
Cleaning the Scanner ................................................................... 235
Cleaning Inside the Printer ...........................................................237
Cleaning the Color Toner Density (CTD) Sensor ......................... 240
Replacing Toner Cartridges....................................................................... 241
Overview....................................................................................... 242
Removing the Toner Cartridges.................................................... 243
Installing a Toner Cartridge .......................................................... 244
Ordering Supplies...................................................................................... 246
Consumables................................................................................ 247
When to Order Toner Cartridges .................................................. 248
Recycling Supplies ....................................................................... 249
Storing Consumables ................................................................................250
Managing the Printer .................................................................................251
Checking Printer Status with SimpleMonitor (Windows Only) ...... 252
Conserving Supplies.................................................................................. 253
Checking Page Counts.............................................................................. 254
Moving the Printer ..................................................................................... 255
Contacting Fuji Xerox ......................................................................... 259
Technical Support...................................................................................... 260
Online Services ......................................................................................... 261
5
Page 7

6
Page 8

Preface
Thank you for purchasing the DocuPrint CM205 b.
This guide is intended for users who use the printer for the first time, and provides all the necessary
operating information about the printer, copier, and scanner functions.
Please read this guide to achieve the best performance from this printer.
This guide assumes you are familiar with computers.
After reading this guide, keep it safe and handy for future reference.
7 Preface
DocuPrint CM205 b User Guide Help
Copyright© 2010 by Fuji Xerox Co., Ltd.
Fuji Xerox Co., Ltd.
November 2010 (Edition 1)
No. ME5051E2-1
Page 9

Trademarks and Document Disclaimer
Apple®, Bonjour®, ColorSync®, Macintosh®, and Mac OS® are trademarks of Apple Inc. in the United
States and/or other countries.
Microsoft
Microsoft Corporation in the United States and/or other countries.
All product/brand names are trademarks or registered trademarks of the respective holders.
In this manual, safety instructions are preceded by the symbol . Always read and follow the instructions
before performing the required procedures.
IMPORTANT:
1. This manual is copyrighted with all rights reserved. Under the copyright laws, this manual may not be copied
2. Parts of this manual are subject to change without prior notice.
3. We welcome any comments on ambiguities, errors, omissions, or missing pages.
4. Never attempt any procedure on the machine that is not specifically described in this manual. Unauthorized
5. Decompiling this manual is prohibited.
®
, Windows Vista®, Windows®, and Windows Server® are trademarks of
or modified in whole or part, without the written consent of the publisher.
operation can cause faults or accidents. Fuji Xerox is not liable for any problems resulting from unauthorized
operation of the equipment.
An export of this product is strictly controlled in accordance with Laws concerning Foreign Exchange and
Foreign Trade of Japan and/or the export control regulations of the United States.
XEROX, the sphere of connectivity design, and DocuPrint are trademarks or registered trademarks of
Xerox Corporation in the U.S. or Fuji Xerox Co., Ltd.
DocuWorks is a trademark of Fuji Xerox Co., Ltd.
All Xerox and Fuji Xerox product names are either registered trademarks or trademarks of Xerox
Corporation or Fuji Xerox Co., Ltd.
Trademarks and Document Disclaimer 8
Page 10

Types of Manuals
Safety Guide Describes the information you need to know before using the printer
and to operate the printer safely.
Setup Guide Provides step-by-step instructions on how to set up your printer
including the initial settings of the Scan function.
User Guide (HTML files)
(this guide)
Operator Panel Guide Describes the icons assigned to the buttons or indicators on the
Lifting Your Printer Describes how to lift and hold your printer.
Describes how to get ready to print and set various features. It also
covers the operator panel menus, troubleshooting tips, and
maintenance information.
This guide is on the Software Pack CD-ROM.
operator panel.
9 Types of Manuals
Page 11

Using This Guide
This section includes:
• "Organization" on page 11
• "Conventions" on page 12
Using This Guide 10
Page 12

Organization
This guide is organized into the following chapters. The summary of each chapter is as follows:
1 Specifications Describes the printer specifications.
2 Basic Operation Describes the main components of the printer, the power saver mode,
and how to turn on the printer.
3 Printer Management Software Describes the software available for the printer.
4 Installing the Print Driver Describes the basic information about how to connect the printer to
your computer and how to install the print driver.
5 Printing Basics Describes the supported paper, how to load paper, and how to print
data using various print features.
6 Copying Describes how to copy documents and the adjustment features.
7 Scanning Describes how to set and use the Scan features.
8 Using the Operator Panel
Menus and Keypad
9 Troubleshooting Describes the troubleshooting tips for printer problems such as paper
10Maintenance Describes how to clean the printer, how to replace toner cartridges,
11 Contacting Fuji Xerox Describes support information.
Describes the setting items available on the operator panel, their
setup procedures, and how to use the numeric keypad.
jams.
and how to see the printer status.
11 Using This Guide
Page 13
Conventions
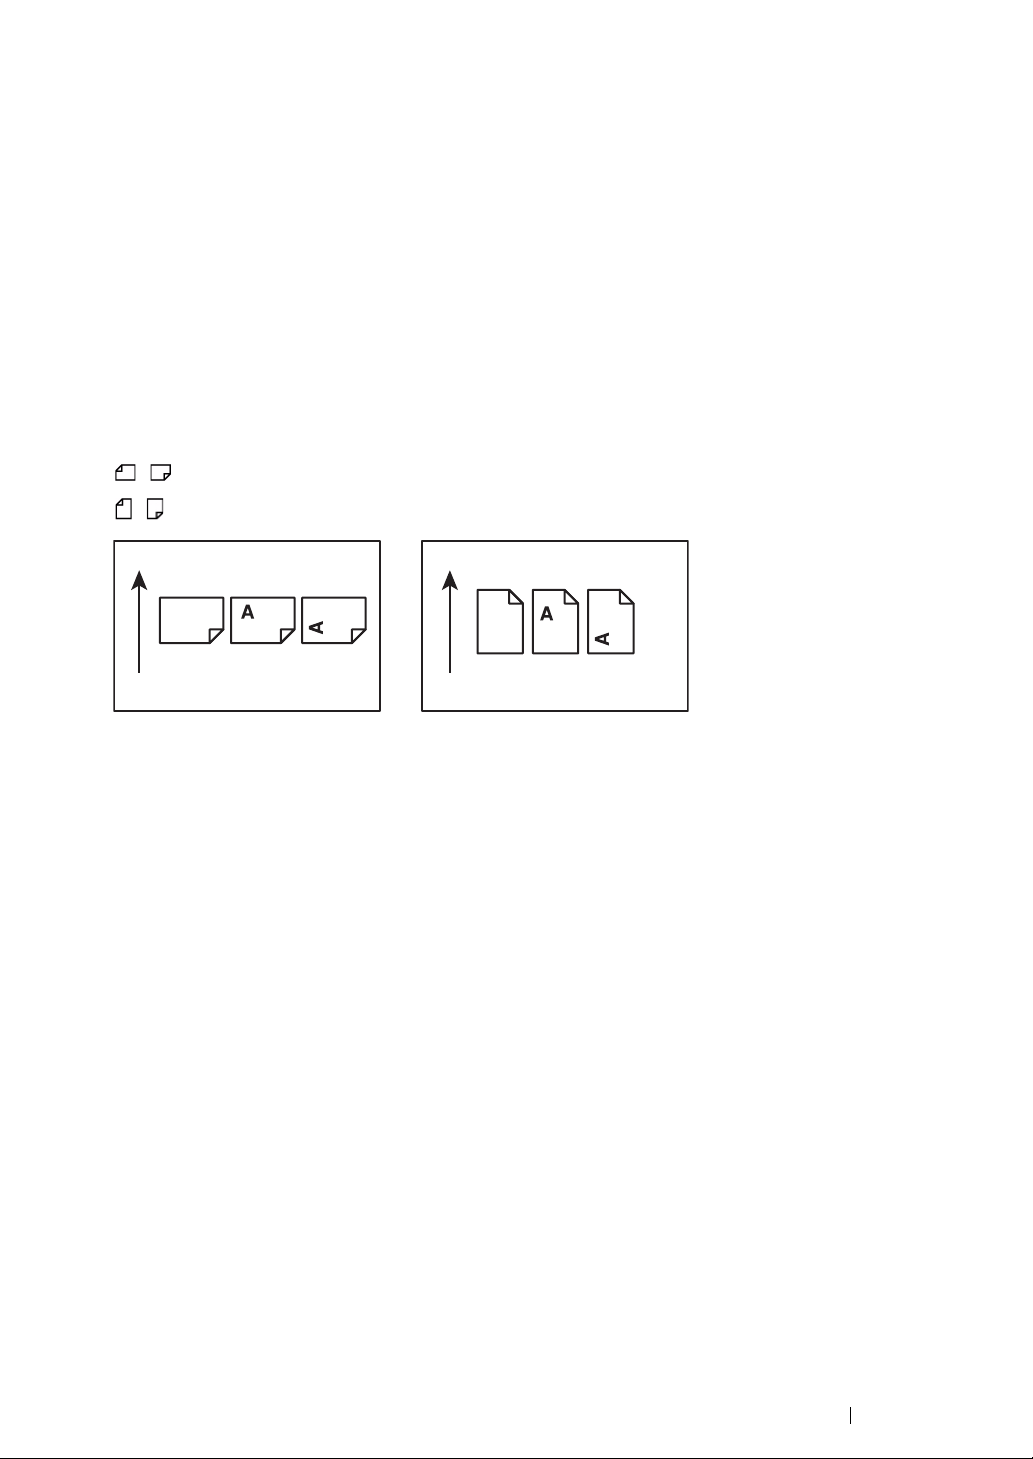
LEF Orientation SEF Orientation
Paper feed direction Paper feed direction
1 In this guide, personal computers and workstations are collectively called “computers”.
2 The following terms are used throughout this guide:
IMPORTANT:
• Important information that must be read and followed.
NOTE:
• Additional information that merits emphasis.
See also:
• References within this guide.
3 Orientation of documents or paper is described in this guide as follows:
, , Long Edge Feed (LEF): Loading the document or paper in portrait orientation.
, , Short Edge Feed (SEF): Loading the document or paper in landscape orientation.
Using This Guide 12
Page 14

Safety Notes
WARNING :
Caution Flammable Explodable Electric
shock
Heated
surface
Moving
object
Pinched
fingers
Prohibited No fire Do not touch Do not use in
bathroom
Do not tear
down
Keep away
from wet
Never touch
with wet hand
Instructions Unplug Ground/
Earth
Before using this product, read “Safety Notes” carefully for safety use.
This product and recommended supplies have been tested and found to comply with strict safety
requirements including safety agency approvals and compliance with environmental standards. Follow
the following instructions for safety use.
• Any unauthorized alteration including an addition of new functions or connection to external devices
may not be covered by the product warranty. Contact your local Fuji Xerox representative for more
information.
Follow all warning instructions marked on this product. The warning marks stand for the followings:
Used for item that if not followed strictly, can lead death or severe or
fatal injuries and the possibility to do it is comparatively high.
Used for items that if not followed strictly, can lead to severe or fatal
injuries.
Used for items that if not followed strictly, can cause injuries to user or
damages to machine.
: A symbol for items to pay attention to when handling machine.
Follow instructions carefully to use machine safely.
: A symbol for prohibited items. Follow instructions carefully to avoid
any dangerous acts.
: A symbol for items that must be performed. Follow instructions
carefully to carry out these essential tasks.
13 Safety Notes
Page 15
Electrical Safety
WARNING
This product shall be operated by the power source as indicated on the product's data plate. Consult
your local power company to check if your power source meets the requirements.
WARNING:
• Connect this product to a protective earth circuit.
This product is supplied with a plug that has a protective earth pin. The plug fits only into an
earthed electrical outlet. This is a safety feature. If the plug doesn't fit to the outlet, contact an
electrician to replace the outlet to avoid risk of electric shock. Never use an earthed adapter
plug to connect the product to the electrical outlet that has no earth connection terminal.
Improper connection of a grounding conductor may cause electric shock.
Plug the power cord directly into a grounded electrical outlet. To prevent overheat and a fire
accident, do not use an extension cord, a multi-plug adaptor or a multiple connector. Consult
your local Fuji Xerox representative to check if an outlet is grounded.
Connect this product to a branch circuit or an outlet that has larger capacity than the rated
ampere and voltage of this product. See the data plate on the rear panel of this product for its
rated ampere and voltage.
Never touch the power cord with wet hands. It may cause electric shock.
Do not place an object on the power cord.
Always keep the plug connection free of dust. The dusty and damp environment may bring
about minute electric current in a connector. It may generate heat and eventually cause a fire
accident.
To avoid the risk of electric shock and a fire accident, only use the power cord supplied with this
product or the ones designated by Fuji Xerox.
The power cord is exclusive use for this product. Do not use it for any other product.
Do not damage or alter the power cord. Damage and alteration may generate heat and
eventually cause electric shock or a fire accident.
If the power cord is damaged or insulated wires are exposed, contact your local Fuji Xerox
representative for its replacement. Do not use a damaged or uninsulated cord to avoid the risk
of electric shock and a fire accident.
CAUTION
When cleaning this product, always switch off and unplug it. Access to a live machine interior
may cause electric shock.
Do not unplug or re-plug this product with the switch on. Plugging and unplugging a live
connector may deform the plug and generate heat, and eventually cause a fire accident.
Hold the plug not the cord when unplugging this product, or it may damage the cord and cause
electric shock or a fire accident.
Safety Notes 14
Page 16

Always switch off and unplug the machine when it is not used over weekends or long holidays.
It may cause deterioration of insulations and eventually electric shock or a fire accident.
Once a month, switch off this product and check if
• the power cord is plugged firmly into an electrical outlet;
• the plug is not excessively heated, rusted or bent;
• the plug and electrical outlet are free of dust; and
• the power cord is not cracked or worn down.
Once you notice any unusual condition, switch off and unplug this product first and contact your
local Fuji Xerox representative.
15 Safety Notes
Page 17
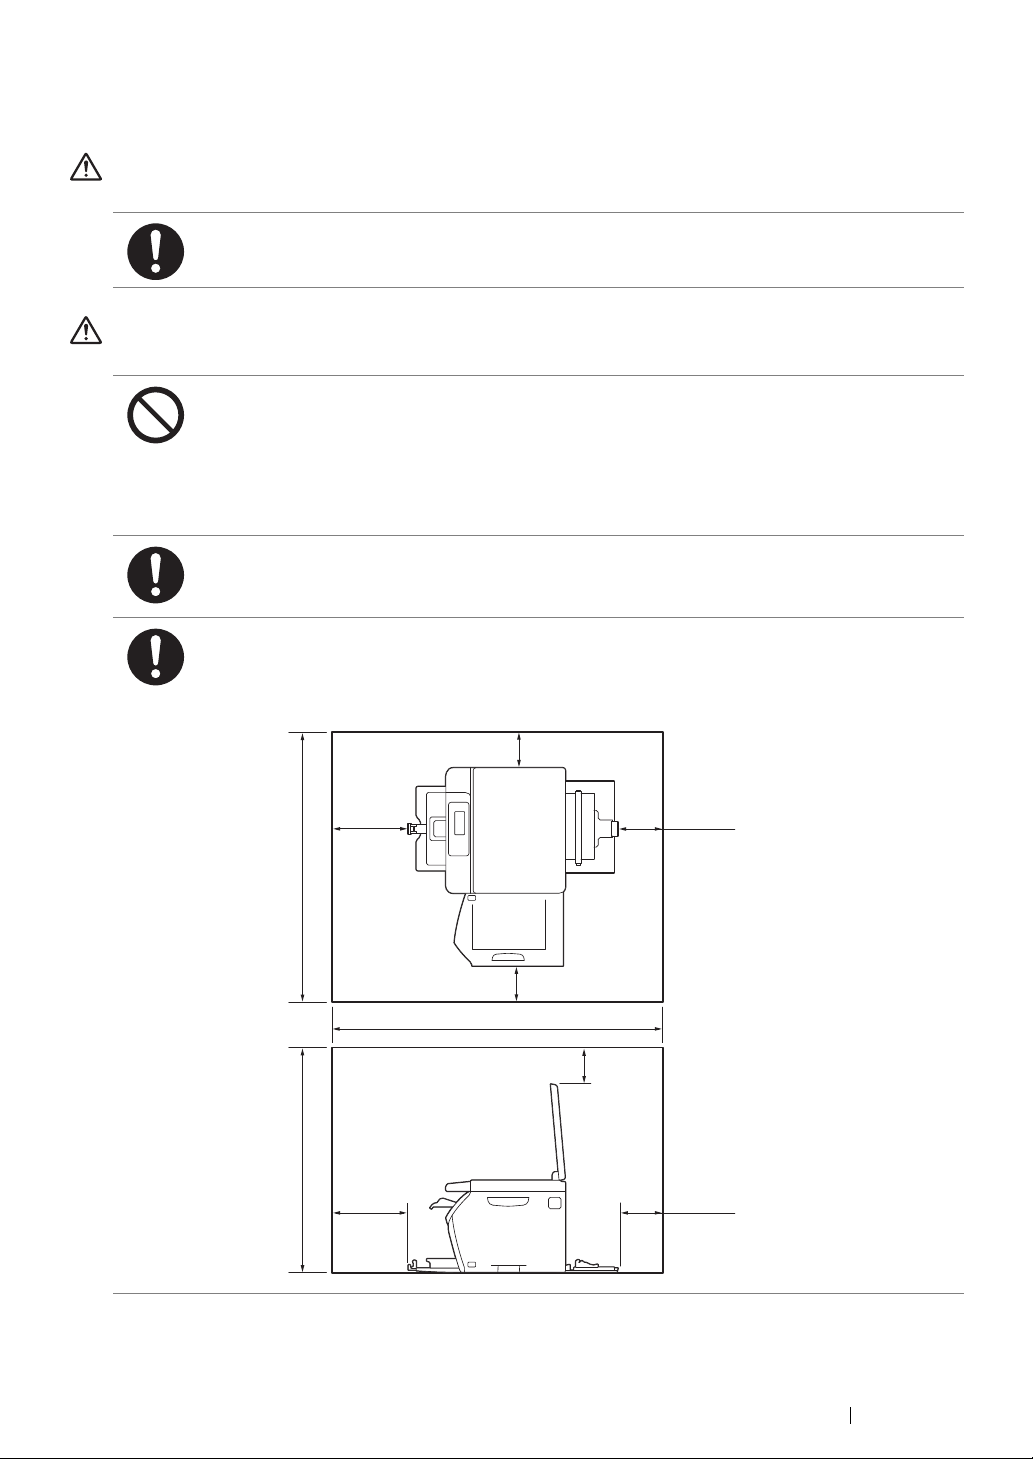
Machine Installation
848 mm
690.5 mm
200 mm
200 mm
100 mm
100 mm
100 mm
114 mm
114 mm
936.5 mm
WARNING
Do not locate this product where people might step on or trip over the power cord. Friction or
excessive pressure may generate heat and eventually cause electric shock or a fire accident.
CAUTION
Never locate this product in the following places:
• Near radiators or any other heat sources
• Near volatile flammable materials such as curtains
• In the hot, humid, dusty or poorly ventilated environment
• In the place receiving direct sunlight
• Near cookers or humidifiers
Locate this product on a level and sturdy surface that can withstand a weight of 15 Kg.
Otherwise, if tilted, the product may fall over and cause injuries.
Locate this product in a well-ventilated area. Do not obstruct ventilation openings of the
product.
Keep the minimum clearance as follows for ventilation and an access to the power plug.
Unplug the product if an abnormal condition is noted.
Safety Notes 16
Page 18
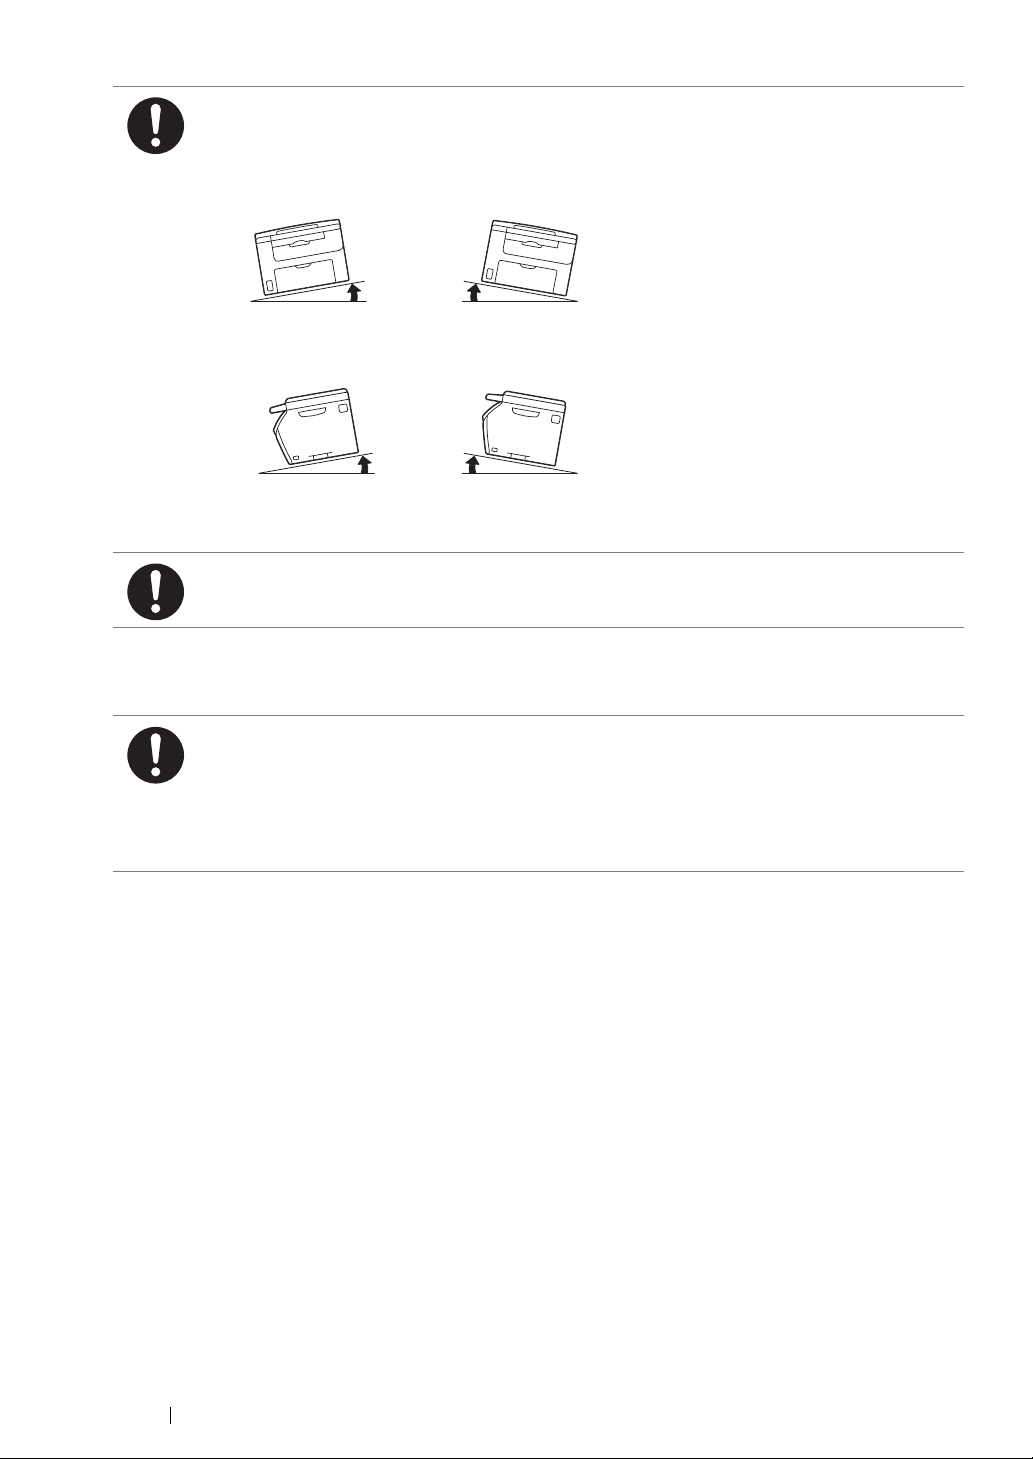
Others
10° 10°
10° 10°
Left
Front
Right
Back
Left
Front
Right
Back
Do not incline the product at more than 10 degree angle. Otherwise, it may fall over and cause
injuries.
To bundle wires and cables, always use the cable ties and spiral tubes that Fuji Xerox supplies.
Otherwise, it may cause some defects.
To keep this product in a good performance and condition, always use it in the following
environment:
• Temperature: 10 – 32 °C
• Humidity: 10 – 85%
When the product is left in a chilly room and the room is rapidly warmed up by heater, dew
condensation may form inside the product and cause a partial deletion on printing.
17 Safety Notes
Page 19
Operational Safety
WARNING
The operator's product maintenance procedures are described in the customer documentation
supplied with this product. Do not carry out any other maintenance procedures not described in
the documentation.
This product features safety design not to allow operators access to hazard areas. The hazard
areas are isolated from operators by covers or protectors which require a tool to remove. To
prevent electric shock and injuries, never remove those covers and protectors.
To avoid the risk of electric shock and a fire accident, switch off and unplug the product
promptly in the following conditions, then contact your local Fuji Xerox representative.
• The product emits smoke or its surface is unusually hot.
• The product emits unusual noise or odor.
• The power cord is cracked or worn down.
• A circuit breaker, fuse or any other safety device is activated.
• Any liquid is spilled into the product.
• The product is soaked in water.
• Any part of the product is damaged.
Do not insert any object into slots or openings of this product.
Do not place any of the followings on the product:
• Liquid container such as flower vases or coffee cups
• Metal parts such as staples or clips
• Heavy objects
If liquid is spilled over or metal parts are slipped into the product, it may cause electric shock or
a fire accident.
Do not use conductive paper such as origami paper, carbonic paper or conductively-coated
paper. When paper jam occurs, it may cause short-circuit and eventually a fire accident.
When cleaning this product, use the designated cleaning materials exclusive to it. Other
cleaning materials may result in poor performance of the product. Never use aerosol cleaners,
or it may catch fire and cause explosion.
Never play the CD-ROM supplied with the product on an audio player. Always use a CD-ROM
player. Otherwise, large sound may damage audio players or your ears.
CAUTION
Always follow all warning instructions marked on or supplied with this product.
To avoid the risk of burn injuries and electric shock, never touch the area with the “High
Temperature” or “High Voltage” marks on.
Keep electrical and mechanical safety interlocks active. Keep the safety interlocks away from
magnetic materials. Magnetic materials may accidentally activate the product and cause
injuries or electric shock.
Do not attempt to remove a paper jammed deeply inside the product, particularly a paper
wrapped around a Fusing Unit or a heat roller. Otherwise, it may cause injuries or burns.
Switch off the product promptly and contact your local Fuji Xerox representative.
Safety Notes 18
Page 20

Do not apply excessive force to hold thick document on the document glass. It may break the
glass and cause injuries.
Ventilate well during extended operation or mass copying. It may affect the office air
environment due to odor such as ozone in a poorly ventilated room.
Provide proper ventilation to ensure the comfortable and safe environment.
19 Safety Notes
Page 21

Consumable
WARNING
Store all consumables in accordance with the instructions given on its package or container.
Use a broom or a wet cloth to wipe off spilled toner. Never use a vacuum cleaner for the spills.
It may catch fire by electric sparks inside the vacuum cleaner and cause explosion. If you spill
a large volume of toner, contact your local Fuji Xerox representative.
Never throw a toner cartridge into an open flame. Remaining toner in the cartridge may catch
fire and cause burn injuries or explosion.
If you have a used toner cartridge no longer needed, contact your local Fuji Xerox
representative for its disposal.
CAUTION
Keep toner cartridges out of the reach of children. If a child accidentally swallows toner, spit it
out, rinse mouth with water, drink water and consult a physician immediately.
When replacing toner cartridges, be careful not to spill the toner. In case of any toner spills,
avoid contact with clothes, skin, eyes and mouth as well as inhalation.
If toner spills onto your skin or clothing, wash it off with soap and water.
If you get toner particles in your eyes, wash it out with plenty of water for at least 15 minutes
until irritation is gone. Consult a physician if necessary.
If you inhale toner particles, move to a fresh air location and rinse your mouth with water.
If you swallow toner, spit it out, rinse your mouth with water, drink plenty of water and consult a
physician immediately.
Safety Notes 20
Page 22
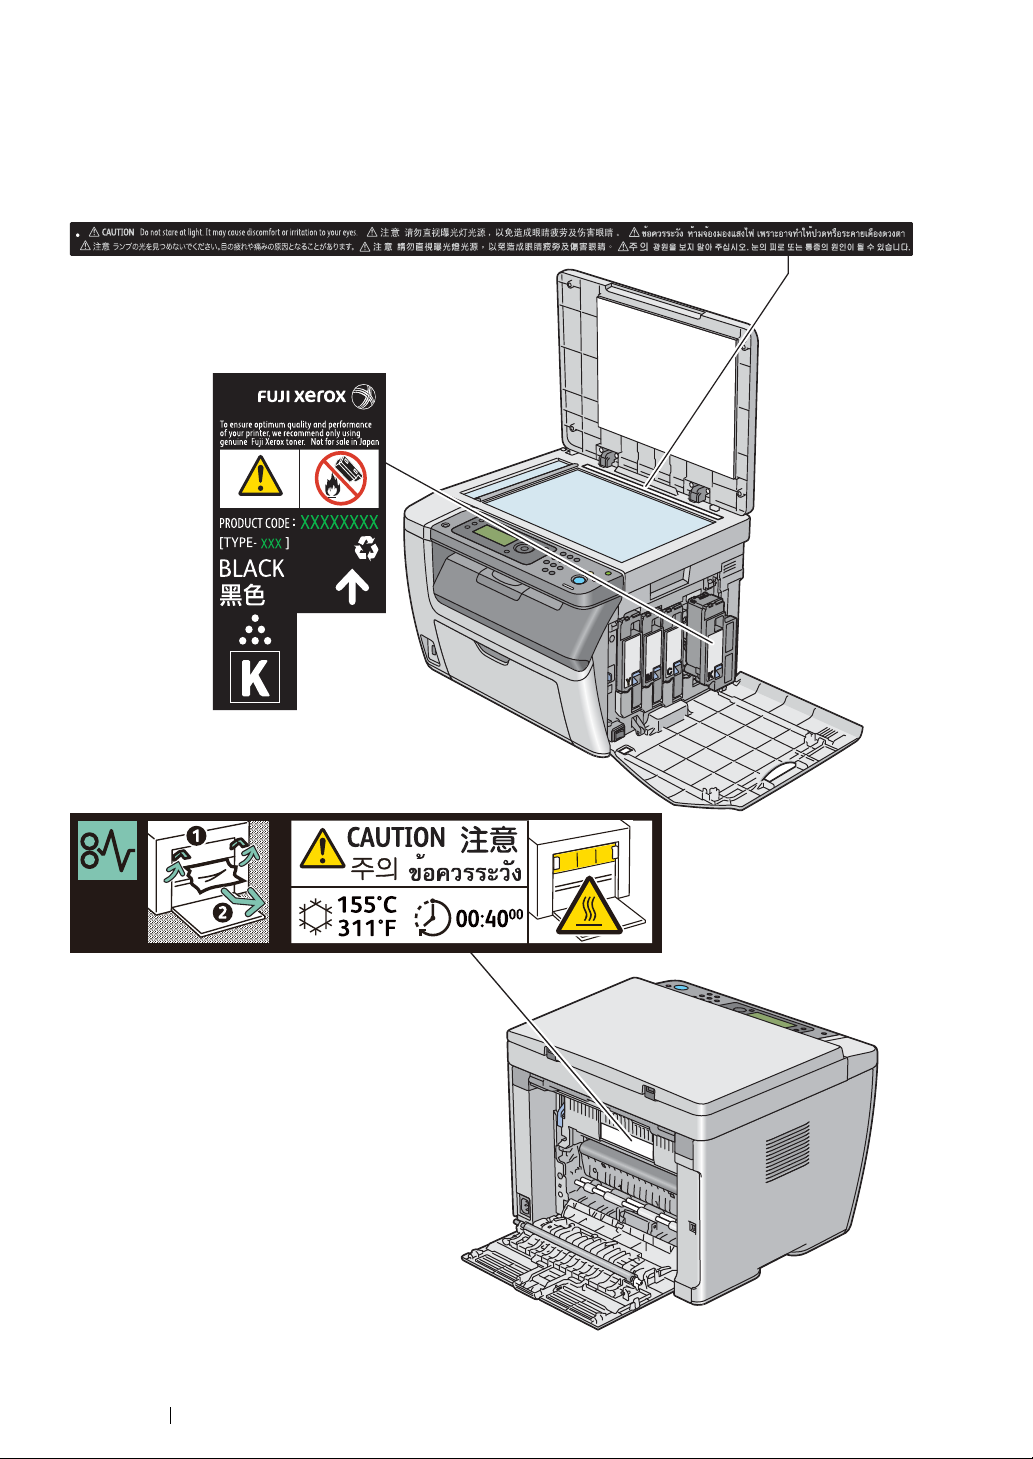
Warning and Caution Labels
Always follow all warning instructions marked on or supplied with this product.
To avoid the risk of burn injuries and electric shock, never touch the area with the "High Temperature"
or "High Voltage" marks on.
21 Safety Notes
Page 23

Environment
• For environmental protection and efficient use of resources, Fuji Xerox reuses returned toner
cartridges to make recycle parts, recycle materials or energy recovery.
• Proper disposal is required for toner cartridges no longer needed. Do not open toner cartridges
containers. Return them to your local Fuji Xerox representative.
Environment 22
Page 24

Regulation
Radio Frequency Emissions (Class B)
This product has been tested and found to comply with the limits for a Class B digital device,
pursuant to the International Standard for Electromagnetic Interference (CISPR Publ. 22) and
Radiocommunications Act 1992 in Australia/New Zealand. These limits are designed to
provide reasonable protection against harmful interference in a residential installation. This
product generates, uses and can radiate radio frequency energy and, if not installed and used
in accordance with the instructions, may cause harmful interference to radio communications.
However, there is no guarantee that interference will not occur in a particular installation. If this
product does cause harmful interference to radio or television reception, which can be
determined by turning this product off and on, the user is encouraged to try to correct the
interference by one or more of the following measures:
• Reorient or relocate the receiving antenna.
• Increase the separation between this product and the receiver.
• Connect this product into an outlet on a circuit different from that to which the receiver is
connected.
• Consult the dealer or an experienced radio/TV technician for help.
Changes and modifications to this product not specifically approved by Fuji Xerox may void the
user’s authority to operate this product.
Product Safety Certification (CB)
This product is certified by the following agency using the safety standards listed.
Agency Standard
TUV-Rh IEC60950-1:ed. 2
23 Regulation
Page 25

Illegal Copies and Printouts
Copying or printing certain documents may be illegal in your country. Penalties of fines or
imprisonment may be imposed on those found guilty. The following are examples of items that may be
illegal to copy or print in your country.
• Currency
• Banknotes and checks
• Bank and government bonds and securities
• Passports and identification cards
• Copyright material or trademarks without the consent of the owner
• Postage stamps and other negotiable instruments
This list is not inclusive and no liability is assumed for either its completeness or accuracy. In case of
doubt, contact your legal counsel.
Illegal Copies and Printouts 24
Page 26
Product Features
This chapter describes the product features and indicates their links.
Manual Duplex Print
Duplex print is to print two or more pages on the
front and back sides of a single sheet of paper
manually. This feature allows you to reduce the
paper consumption.
For more information, see "Manual Duplex
Printing (Windows Print Driver Only)" on
page 86.
Printing From a USB Storage Device (USB
Direct Print)
N-Up (2-in-1 Copy)
N-Up copy enables you to print multiple pages
on a single sheet of paper. This feature allows
you to reduce the paper consumption.
For more information, see "N-Up" on page 131.
Scanning to a USB Storage Device
Print From USB Memory feature allows you to
print directly from your USB storage device
without starting your computer. Without
requiring you to start your computer and an
application, this feature allows quick printing
with simple procedures.
For more information, see "Direct Print Using
the USB Storage Device" on page 97.
You do not need a computer to connect your
USB storage device to save the scanned data.
Insert your USB storage device in the port on
the printer, and save the scanned data directly
to your USB storage device.
For more information, see "Scanning to USB
Storage Device" on page 144.
25 Product Features
Page 27

Priority Sheet Inserter (PSI)
Print media loaded on the PSI is given
precedence over those loaded on the
multipurpose feeder (MPF). Using the PSI
allows you to use other types or sizes of print
media preferentially over the regular print media
loaded on the MPF.
For more information, see "Loading Print Media
in the Priority Sheet Inserter (PSI)" on page 89.
Product Features 26
Page 28

1
Specifications
This chapter lists the main specifications of the printer. Note that the specifications of the product may
change without prior notice.
This chapter includes:
• "Copy Function" on page 28
• "Print Function" on page 30
• "Scan Function" on page 31
27 Specifications
Page 29

Copy Function
Type Console
Memory 128 MB
HDD —
Color Capability Full color
Scanning Resolution Document glass: 600 600 dpi
Printing Resolution Output resolution: 1200 2400 dpi
Data processing resolution: 600 600 dpi
Halftone/Printable Colors 256 color gradation for each color (16,700,000 colors)
Warm-up Time 36 seconds or less*
*: The values are based on a room temperature of 22 °C and on the factory
default setting.
IMPORTANT:
• It may take longer due to the image quality adjustment.
Original Paper Size Document glass: The maximum size is 215.9 297 mm for both
sheets and books.
Output Paper Size Multipurpose feeder:
Maximum: Legal (8.5 14"), 215.9 355.6 mm
Minimum: 76.2 127 mm (3 5")
Priority sheet inserter:
Maximum: Legal (8.5 14"), 215.9 355.6 mm
Minimum: 76.2 190.5 mm (3 7.5")
Image loss width: Top edge, 4 mm or less; bottom edge, 4 mm or
less; left and right edges, 4 mm or less
Output Paper Weight Multipurpose feeder/Priority sheet inserter:
60 – 163 gsm
IMPORTANT:
• Use paper recommended by Fuji Xerox. Copying may not be
performed correctly depending on the conditions.
First Copy Output Time Monochrome: 24 seconds (for A4 /monochrome priority mode)
Color: 40 seconds (for A4 /color priority mode)
Reduction/Enlargement Size-for-Size: 1:1
Preset %: 1:0.500, 1:0.707, 1:0.816, 1:1.225, 1:1.414, 1:2.000
Variable %: 1:0.25 – 1:4.00 (1% increments)
Continuous Copy Speed Monochrome:
A4: 15 sheets/minute
Color:
A4: 12 sheets/minute
± 1.3%
IMPORTANT:
• The speed may be reduced due to image quality adjustment.
• The performance may be reduced depending on the paper type or
paper tray.
Specifications 28
Page 30

Paper Tray Capacity Standard:
150 sheets (Multipurpose feeder) + 10 sheets (Priority sheet
inserter)
Maximum paper capacity:
160 sheets (standard)
IMPORTANT:
• When using Fuji Xerox P paper (64 gsm)
Continuous Copy 99 images
NOTE:
• The machine may pause temporarily to perform image
stabilization.
Output Tray Capacity Approximately 100 sheets (A4 )
IMPORTANT:
• When using Fuji Xerox P paper (64 gsm)
Power Supply AC 220 – 240 V ± 10%/100 – 127 V ± 10%, 4/8 A for both 50/60 Hz ±
3 Hz
Power Consumption Maximum power consumption:
950 W
Low Power mode:
16 W or less
Sleep mode:
7 W or less
Standby mode:
65 W or less
Dimensions
Machine Weight 15 kg
Width 410 Depth 389* Height 318 mm
*: When the front cover is closed.
Space Requirement
29 Specifications
IMPORTANT:
• The weight of paper is not included.
• The weight of the toner cartridges are included.
Width 848 Depth 936.5* mm
*: When the front cover and rear cover are open.
Page 31

Print Function
Type Built-in
Continuous Print Speed Same as the Copy Function
Print Resolution Output resolution: 1200 2400 dpi
Data processing resolution: 600 600 dpi
PDL — (Host-based)
Operating System Standard: GDI driver
Microsoft
Microsoft
Microsoft® Windows Server® 2008,
Microsoft
Microsoft
Microsoft® Windows® XP x64,
Microsoft
Microsoft
Microsoft
Microsoft® Windows Server® 2008 R2 x64,
Microsoft
Mac OS
IMPORTANT:
• For information about the latest supported OS, contact our
Customer Support Center.
Connectivity Standard: USB 1.1/2.0*
*: USB 2.0 is supported by the following:
Windows
Server
x64, Windows Vista
2008 R2 x64, Windows
®
Windows® XP,
®
Windows Server® 2003,
®
Windows Vista®,
®
Windows® 7,
®
Windows Server® 2003 x64,
®
Windows Server® 2008 x64,
®
Windows Vista® x64,
®
Windows® 7 x64,
®
X 10.4/10.5/10.6
®
XP, Windows Server® 2003, Windows Vista®, Windows
®
2008, Windows® 7, Windows® XP x64, Windows Server® 2003
®
x64, Windows Server® 2008 x64, Windows Server®
®
7 x64, and Mac OS® X 10.4/10.5/10.6.
Specifications 30
Page 32

Scan Function
Type Color scanner
Original Paper Size Same as the Copy Function
Scanning Resolution 1200 1200 dpi, 600 600 dpi, 300 300 dpi, 200 200 dpi
Scanning Halftone Monochrome : 8 bit
Color : 24 bit
Connectivity Standard: USB 1.1/2.0*
*: USB 2.0 is supported by the following:
Windows
Server
x64, Windows Vista
2008 R2 x64, Windows
Scan to PC Operating System:
Microsoft® Windows® XP,
Microsoft
Microsoft
Microsoft
Microsoft® Windows® 7,
Microsoft
Microsoft
Microsoft® Windows Server® 2003 x64,
Microsoft
Microsoft
Microsoft® Windows® 7 x64,
Mac OS
®
XP, Windows Server® 2003, Windows Vista®, Windows
®
2008, Windows® 7, Windows® XP x64, Windows Server® 2003
®
Windows Vista®,
®
Windows Server® 2003,
®
Windows Server® 2008,
®
Windows XP x64,
®
Windows Vista® x64,
®
Windows Server® 2008 x64,
®
Windows Server® 2008 R2 x64,
®
X 10.4/10.5/10.6
®
x64, Windows Server® 2008 x64, Windows Server®
®
7 x64, and Mac OS® X 10.4/10.5/10.6.
IMPORTANT:
• For information about the latest supported OS, refer to the Fuji
Xerox Web site.
File Format:
TIFF (MMR, JPEG)
JPEG
PDF (v 1.3)
31 Specifications
Page 33

Specifications 32
Page 34

Basic Operation
This chapter includes:
• "Main Components" on page 34
• "Turning On the Printer" on page 39
• "Setting Initial Settings on the Operator Panel" on page 40
• "Printing a Panel Settings Page" on page 41
• "Power Saver Mode" on page 44
2
33 Basic Operation
Page 35

Main Components
This section provides an overview of your DocuPrint CM205 b.
This section includes:
• "Front View" on page 35
• "Rear View" on page 36
• "Operator Panel" on page 37
Basic Operation 34
Page 36

Front View
3 45
6
10
15 1413 12 11 10 9 8
12
7
1 Output Tray Extension 2 Center Output Tray
3 Operator Panel 4 Document Cover
5 Toner Access Cover 6 Document Glass
7 Cleaning Rod 8 Power Switch
9 Front Cover 10 Paper Width Guides
11 Slide Bar 12 Length Guide
13 Multipurpose feeder (MPF) 14 USB Drive
15 Priority Sheet Inserter (PSI)
35 Basic Operation
Page 37

Rear View
9
8
7
6
5
43
1
2
1 USB Port 2 Rear Cover Handle
3 Power Connector 4 Rear Cover
5 Transfer Roller 6 Paper Chute
7 Paper Feed Roller 8 Transfer Belt
9 Levers
Basic Operation 36
Page 38

Operator Panel
OK
9C8
0
7
4
6
5
1
3
2
CA
PQRS
TUV
WXYZ
GHI
JKL
MNO
ABC
DEF
21 3 4 56 78
9101112131415171819 16
The operator panel has a 4-line by 28-character liquid crystal display (LCD), light-emitting diodes
(LED), control buttons, and numeric keypad, which allow you to control the printer.
1 (Copy) button/LED
• Moves to the top level of the Copy menu.
2 (Scan) button/LED
• Moves to the top level of the Scan menu.
3 buttons
• Moves a cursor or highlight up or down.
4 buttons
• Moves a cursor or highlight right or left.
5 (System) button/LED
• Moves to the top level of the System menu.
6 Numeric keypad
• Enters numbers.
7 CA (Clear All) button
• Resets the current setting, and returns to the top level of each service menu.
8 (Energy Saver) button/LED
• Lights up in the Sleep mode. Press this button to exit the Sleep mode.
9 (Stop) button
• Cancels the current processing or pending job.
10 (Start) button
11 (Error) LED
12 (Data) LED
• Starts a job.
• Lights up when the printer has an error.
• Lights up for incoming, outgoing, or pending jobs.
37 Basic Operation
Page 39

13 C (Clear) button
• Deletes numbers.
14 button
• Confirms the entry of values.
15 (Back) button
• Returns to the previous screen.
16 LCD Panel
• Displays various settings, instructions, and error messages.
17 (Print) button/LED
• Moves to the top level of the Print menu.
18 Color Mode button
• Switches the color mode.
19 B&W/Color LED
• Lights up to indicate which color mode is selected.
NOTE:
• Moving to a different menu or returning to a previous screen cancels the current entry or setting. Make sure to
press the button to save the current entry or setting.
Basic Operation 38
Page 40

Turning On the Printer
IMPORTANT:
• Do not use extension cords or power strips.
• The printer should not be connected to an uninterruptible power supply (UPS) system.
1 Connect the power cord to the power connector on the rear of your printer (see "Rear View" on
page 36).
2 Connect the other end of the cord to the power source.
3 Turn on the printer.
NOTE:
• When you turn on the printer for the first time, follow the on-screen instructions on the LCD panel to
configure the initial settings of your printer.
See also:
• "Setting Initial Settings on the Operator Panel" on page 40
39 Basic Operation
Page 41

Setting Initial Settings on the Operator Panel
You need to set the printer language when you turn on the printer for the first time.
When you turn on the printer, a wizard appears on the LCD panel. Follow the step below to set the
initial settings.
NOTE:
• If you do not start configuring the initial settings, Select Function appears on the LCD panel in three
minutes. After that, you can set the following initial setup by enabling Power On Wizard on the operator
panel if needed.
For more information about the operator panel, see "Understanding the Printer Menus" on page 150.
1 Select the language you want to use on the operator panel, and then press the button.
Basic Operation 40
Page 42

Printing a Panel Settings Page
The Panel Settings page shows current settings for the operator panel menus.
This section includes:
• "The Operator Panel" on page 42
• "The Printer Setting Utility" on page 43
41 Basic Operation
Page 43

The Operator Panel
1 Press the (System) button.
2 Select Report / List, and then press the button.
3 Select Panel Settings, and then press the button.
The Panel Settings page is printed.
Basic Operation 42
Page 44

The Printer Setting Utility
The following procedure uses Microsoft® Windows® XP as an example.
1 Click start All Programs Fuji Xerox Fuji Xerox Printer Software for Asia-Pacific
DocuPrint CM205 b
NOTE:
• The window to select a printer appears in this step, when multiple print drivers are installed on your
computer. In this case, click the name of the desired printer listed in Printer Name.
The Printer Setting Utility appears.
2 Click the Printer Settings Report tab.
3 Select Reports from the list at the left side of the page.
The Reports page is displayed.
4 Click the Panel Settings button.
The Panel Settings page is printed.
Printer Setting Utility.
43 Basic Operation
Page 45

Power Saver Mode
The printer has a power saving feature which reduces power consumption during periods of inactivity.
This feature operates in two modes: Low Power mode and Sleep mode. As delivered, the printer
switches to the Low Power mode five minutes after the last print job is printed. The printer then
switches to the Sleep mode after another six minutes of inactivity. When the printer is in the Low
Power mode, the LCD backlight turns off. In the Sleep mode, the (Energy Saver) button lights up.
The display goes blank and displays nothing.
The factory default settings of five minutes (Low Power mode) and six minutes (Sleep mode) are
changeable within the range of 5 to 30 minutes (Low Power mode) and 1 to 6 minutes (Sleep mode).
The printer returns to the ready-to-print state in about 25 seconds when re-activated.
See also:
• "Setting the Power Saving Timer Option" on page 177
Basic Operation 44
Page 46

Exiting the Power Saver Mode
The printer automatically exits the Power Saver mode when it receives a job from a computer. To
manually exit the Low Power mode, press any button on the operator panel. To exit the Sleep mode,
press the (Energy Saver) button.
NOTE:
• When the printer is in the Sleep mode, all buttons on the operator panel except for the (Energy Saver
do not function. To use the buttons on the operator panel, press the (Energy Saver
button
the Power Saver mode.
) button
See also:
• "Setting the Power Saving Timer Option" on page 177
)
to exit
45 Basic Operation
Page 47

Basic Operation 46
Page 48

3
Printer Management Software
Use the Software Pack CD-ROM that is shipped with your printer to install a combination of software
programs, depending on your operating system.
This chapter includes:
• "Print and Scan Drivers" on page 48
• "Printer Setting Utility (Windows Only)" on page 49
• "SimpleMonitor (Windows Only)" on page 50
• "Launcher (Windows Only)" on page 51
• "Express Scan Manager" on page 52
47 Printer Management Software
Page 49

Print and Scan Drivers
To access all of your printer’s features, install the print and scan drivers from the Software Pack
CD-ROM.
• The print driver enables your computer and printer to communicate and provides access to your
printer features.
• The scan driver enables you to scan images directly to your personal computer and place
scanned images directly into an application via USB.
The scan driver is installed with your Fuji Xerox print driver. It is available for Microsoft
and Mac OS
See also:
• "Installing Print Driver on Computers Running Windows" on page 57
• "Installing Print Driver on Computers Running Mac OS X" on page 60
®
X.
®
Windows®
Printer Management Software 48
Page 50

Printer Setting Utility (Windows Only)
The Printer Setting Utility allows you to view or specify the system settings. You can also diagnose the
system settings by using the Printer Setting Utility.
The Printer Setting Utility consists of the Printer Settings Report, Printer Maintenance, and
Diagnosis tabs.
The Printer Setting Utility is installed with your Fuji Xerox print driver.
NOTE:
• The Password dialog box appears the first time you try to change settings on Printer Setting Utility when
Panel Lock is set on the printer. In this case, enter the password you specified, and click OK to apply the
settings.
49 Printer Management Software
Page 51

SimpleMonitor (Windows Only)
You can check the printer status with SimpleMonitor. Double-click the SimpleMonitor printer icon on
the taskbar at the bottom right of the screen. The Printer Selection window appears, which displays
the printer name, printer connection port, printer status, and model name. Check the column Status to
know the current status of your printer.
Settings button: Displays the Settings screen and allows you to modify the SimpleMonitor settings.
Click the name of the desired printer listed on the Printer Selection window. The Printer Status
window appears.
The Printer Status window alerts you when there is a warning or when an error occurs, for example,
when a paper jam occurs or toner is running low.
By default, the Printer Status window launches automatically when an error occurs. You can specify
the conditions for starting the Printer Status window in Printer Status Window Properties.
To change the pop-up settings for the Printer Status window:
1 Right-click the SimpleMonitor printer icon on the taskbar at the bottom right of the screen.
2 Select Printer Status Window Properties.
The Printer Status Window Properties window appears.
3 Select the type of the pop-up and then click OK.
You can also check the toner level of your printer and the job information on the Printer Status
window.
The SimpleMonitor is installed with your Fuji Xerox print driver.
Printer Management Software 50
Page 52

Launcher (Windows Only)
Using the Launcher-Btype window, you can open the Status Window, Printer Setting Utility,
Troubleshooting, and Express Scan Manager.
The following procedure uses Windows XP as an example.
To open the Launcher-Btype window:
1 Click start All Programs Fuji Xerox Fuji Xerox Printer Software for Asia-Pacific
DocuPrint CM205 b
The Launcher-Btype window appears.
Launcher.
2 The Launcher-Btype window provides four buttons; Status Window, Printer Setting Utility,
Troubleshooting, and Express Scan Manager.
To exit, click the X button at the top-right of the window.
For details, click the Help button/icon of each application.
Status Window Click to open the Printer Status window.
See also:
• "SimpleMonitor (Windows Only)" on page 50
Printer Setting Utility Click to open the Printer Setting Utility.
See also:
• "Printer Setting Utility (Windows Only)" on page 49
Troubleshooting Click to open the Troubleshooting guide, which allows you to resolve
issues by yourself.
Express Scan Manager Click to open the Express Scan Manager.
See also:
• "Express Scan Manager" on page 52
The Launcher is installed with your Fuji Xerox print driver.
51 Printer Management Software
Page 53

Express Scan Manager
The Express Scan Manager handles scan jobs sent from the printer to your computer via USB. When
a scan jobs is sent from the printer to the computer, Express Scan Manager automatically manages
the scan job.
Before scanning to your computer, start Express Scan Manager and configure the output destination
of the scanned image files.
Click Open the image file to display scanned files saved in the specified destination after scanning.
The Express Scan Manager is installed with your Fuji Xerox print driver. It is available for Windows
and Mac OS X.
See also:
• "Scanning From the Operator Panel" on page 140
Printer Management Software 52
Page 54

Installing the Print Driver
This chapter includes:
• "Connecting Your Printer" on page 54
• "Installing Print Driver on Computers Running Windows" on page 57
• "Installing Print Driver on Computers Running Mac OS X" on page 60
4
53 Installing the Print Driver
Page 55

Connecting Your Printer
1
Your DocuPrint CM205 b interconnection cable must meet the following requirement:
Connection Type Connection Specification
USB USB 1.1/2.0 compatible
1 USB Port
Installing the Print Driver 54
Page 56

Connecting Printer to Computer
Connect the printer via USB. A USB connection is a direct connection and is not used for networking.
The available features are shown in the following table.
Connection Type Available Features
USB You can:
• Instruct print jobs from a computer.
• Scan and print an image into an application.
• Scan and print an image to a folder on the computer.
55 Installing the Print Driver
Page 57

USB Connection
USB port
A local printer is a printer which is directly attached to your computer using the USB cable.
The following operating systems support USB connection:
• Microsoft
• Windows XP 64-bit Edition
• Windows Server
• Windows Server 2003 x64 Edition
• Windows Server 2008
• Windows Server 2008 64-bit Edition
• Windows Server 2008 R2
• Windows Vista
• Windows Vista 64-bit Edition
• Windows 7
• Windows 7 64-bit Edition
• Mac OS
To attach the printer to a computer:
1 Ensure that the printer, computer, and any other attached devices are turned off and unplugged
from the power source/outlet.
®
Windows® XP
®
2003
®
®
X 10.4/10.5/10.6
NOTE:
• If the USB storage device is inserted into the USB drive of the printer, remove it.
2 Connect the smaller USB connector into the USB port at the back of the printer and the other end
of the cable into a USB port of the computer.
NOTE:
• Do not connect the printer USB cable to the USB connector available on the keyboard.
Installing the Print Driver 56
Page 58

Installing Print Driver on Computers Running Windows
This section includes:
• "Inserting the Software Pack CD-ROM" on page 58
• "USB Connection Setup" on page 59
57 Installing the Print Driver
Page 59

Inserting the Software Pack CD-ROM
1 Insert the Software Pack CD-ROM into your computer’s CD-ROM drive to start Easy Install
Navi.
NOTE:
• If the CD does not automatically launch, click Start (start for Windows XP) All Programs (for
Windows Vista and Windows 7) Accessories (for Windows Vista and Windows 7) Run, and then
enter D:\setup_assist.exe (where D is the drive letter of your CD), and then click OK.
Installing the Print Driver 58
Page 60

USB Connection Setup
The following procedure uses Windows XP as an example.
1 Connect the computer and the printer with the USB cable.
2 Turn on the printer.
NOTE:
• If Found New Hardware Wizard appears, click Cancel at this time.
3 Click Installing Drivers and Software.
4 Select Personal Installation, and then click Next.
5 Click Install.
6 Select Typical Installation(recommended) to perform the standard installation, and then click
Install.
For the custom installation, select
you want to install, and then click
7 Click Finish to exit the wizard. If necessary, click Print Test Page to print a test page.
Custom Installation
Install
.
, and then click
Next
. Select the items that
59 Installing the Print Driver
Page 61

Installing Print Driver on Computers Running Mac OS X
This section includes:
• "Installing the Drivers and Software" on page 61
Installing the Print Driver 60
Page 62

Installing the Drivers and Software
The following procedure uses Mac OS X 10.6 as an example.
1 Run the Software Pack CD-ROM on the Mac OS X.
2 Double-click the FX DocuPrint CM205 b Installer icon.
3 Click Continue on the Introduction screen.
4 Select a language for the Software License Agreement.
5 After reading the Software License Agreement, click Continue.
6 If you agree to the terms of the Software License Agreement, click Agree to continue the
installation process.
7 Click Continue if Select a Destination screen appears.
8 Click Install to perform the standard installation.
9 Enter the administrator's name and password, and then click OK.
10 Click Continue Installation.
11 Click Restart to complete installation.
Adding a Printer on Mac OS X 10.5/10.6
1 Turn off the printer and your computer.
2 Connect the printer and your computer with the USB cable.
3 Turn on the printer and your computer.
4 Display System Preferences, and then click Print & Fax.
5 Confirm your USB printer is added to Print & Fax.
If your USB printer is not displayed, execute the following procedures.
6 Click the plus (+) sign, and then click Default.
7 Select the printer connected via USB from the Printer Name list.
Name, Location, and Print Using are automatically entered.
8 Click Add.
61 Installing the Print Driver
Page 63

Adding a Printer on Mac OS X 10.4
1 Turn off the printer and your computer.
2 Connect the printer and your computer with the USB cable.
3 Turn on the printer and your computer.
4 Start Printer Setup Utility.
NOTE:
• You can find Printer Setup Utility in the Utilities folder in Applications.
5 Confirm your USB printer is added to Printer List.
If your USB printer is not displayed, execute the following procedures.
6 Click Add.
7 Click Default Browser in the Printer Browser dialog box.
8 Select the printer connected via USB from the Printer Name list.
Name, Location and Print Using are automatically entered.
9 Click Add.
Installing the Print Driver 62
Page 64

Printing Basics
This chapter includes:
• "About Print Media" on page 64
• "Supported Print Media" on page 68
• "Loading Print Media" on page 71
• "Setting Paper Sizes and Types" on page 91
• "Printing" on page 94
5
63 Printing Basics
Page 65

About Print Media
This section includes:
• "Print Media Usage Guidelines" on page 65
• "Print Media That Can Damage Your Printer" on page 66
• "Print Media Storage Guidelines" on page 67
Using paper that is not appropriate for the printer can cause paper jams, image quality problems, or
printer failure. To achieve the best performance from your printer, we recommend you to use only the
paper described in this section.
When using paper other than that recommended, contact the Fuji Xerox local representative office or
an authorised dealer.
Printing Basics 64
Page 66

Print Media Usage Guidelines
WARNING :
The printer tray accommodates most sizes and types of paper and other specialty media. Follow these
guidelines when loading paper and media in the tray:
• Envelopes can be printed from the multipurpose feeder (MPF) and priority sheet inserter (PSI).
• Fan paper or other specialty media before loading in the tray.
• Do not print on label stock once a label has been removed from a sheet.
• Use only paper envelopes. Do not use envelopes with windows, metal clasps, or adhesives with
release strips.
• Print all envelopes single-sided only.
• Some wrinkling and embossing may occur when printing envelopes.
• Do not overload the tray. Do not load print media above the fill line on the inside of the paper
width guides.
• Adjust the paper width guides to fit the paper size.
• If excessive jams occur, use paper or other media from a new package.
• Do not use conductive paper such as origami paper, carbonic paper or conductively-coated paper.
When paper jam occurs, it may cause short-circuit and eventually a fire accident.
See also:
• "Loading Print Media in the Multipurpose Feeder (MPF)" on page 74
• "Loading Print Media in the Priority Sheet Inserter (PSI)" on page 81
• "Loading Envelope in the Multipurpose Feeder (MPF)" on page 78
• "Loading Envelope in the Priority Sheet Inserter (PSI)" on page 82
• "Printing on Custom Size Paper" on page 104
65 Printing Basics
Page 67

Print Media That Can Damage Your Printer
WARNING :
Your printer is designed to use a variety of media types for print jobs. However, some media can
cause poor output quality, increased paper jams, or damage to your printer.
Unacceptable media includes:
• Rough or porous media
• Plastic media
• Paper that has been folded or wrinkled
• Paper with staples
• Envelopes with windows or metal clasps
• Padded envelopes
• Non-laser glossy or coated paper
• Perforated media
• Do not use conductive paper such as origami paper, carbonic paper or conductively-coated paper.
When paper jam occurs, it may cause short-circuit and eventually a fire accident.
Printing Basics 66
Page 68

Print Media Storage Guidelines
Providing good storage conditions for your paper and other media contributes to optimum print quality.
• Store print media in dark, cool, relatively dry locations. Most paper items are susceptible to
damage from ultraviolet (UV) and visible light. UV radiation, which is emitted by the sun and
fluorescent bulbs, is particularly damaging to paper items. The intensity and length of exposure
to visible light on paper items should be reduced as much as possible.
• Maintain constant temperatures and relative humidity.
• Avoid attics, kitchens, garages, and basements for storing print media.
• Store print media flat. Print media should be stored on pallets, cartons, shelves, or in cabinets.
• Avoid having food or drinks in the area where print media is stored or handled.
• Do not open sealed packages of paper until you are ready to load them into the printer. Leave
paper in the original packaging. For most commercial cut-size grades, the ream wrapper
contains an inner lining that protects the paper from moisture loss or gain.
• Leave the media inside the bag until you are ready to use it; reinsert unused media in the bag
and reseal it for protection. Some specialty media is packaged inside resealable plastic bags.
67 Printing Basics
Page 69

Supported Print Media
Using unsuitable print media may lead to paper jams, poor print quality, breakdown and damage to
your printer. To use the features of this printer effectively, use the suggested print media that is
recommended here.
IMPORTANT:
• The toner may come off the print media, if it gets wet by water, rain, steam and so on. For details, contact the
Fuji Xerox local representative office or an authorized dealer.
Printing Basics 68
Page 70

Usable Print Media
The types of print media that can be used on this printer are as follows:
Paper Size A4 SEF (210 297 mm)
B5 SEF (182
A5 SEF (148
Letter SEF (8.5
Legal SEF (8.5
Folio SEF (8.5
Executive SEF (7.25
C5 SEF (162
Monarch SEF (3.875
Monarch LEF (7.5
Envelope #10 SEF (4.125 9.5 inches)
DL SEF (110
DL LEF (220
Custom size:
Multipurpose Feeder (MPF):
Width: 76.2–215.9 mm (3–8.5 inches)
Length: 127–355.6 mm (5 –14 inches)
Priority Sheet Inserter (PSI):
Width: 76.2–215.9 mm (3–8.5 inches)
Length: 190.5–355.6 mm (7.5 –14 inches)
Paper Type (Weight) Plain
Bond
Lightweight Cardstock
Lightweight Glossy Cardstock
Envelope
Labels
Recycled
Loading Capacity Multipurpose Feeder (MPF): 150 sheets of standard paper
Priority Sheet Inserter (PSI): 10 sheets of standard paper
*
Monarch and DL envelopes can be supported by LEF with their flap open.
257 mm)
210 mm)
11 inches)
14 inches)
13 inches)
10.5 inches)
229 mm)
7.5 inches)
3.875 inches)
220 mm)
110 mm)
*
*
NOTE:
• SEF and LEF indicate the paper feed direction; SEF stands for short-edge feed. LEF stands for long-
edge feed.
• Use only laser print media. Do not use ink jet paper in this printer.
See also:
• "Loading Print Media in the Multipurpose Feeder (MPF)" on page 74
• "Loading Print Media in the Priority Sheet Inserter (PSI)" on page 81
• "Loading Envelope in the Multipurpose Feeder (MPF)" on page 78
• "Loading Envelope in the Priority Sheet Inserter (PSI)" on page 82
Printing on print media that differs from the paper size or paper type selected on the print driver may
lead to paper jams. To ensure that printing is correctly done, select the correct paper size and paper
69 Printing Basics
Page 71

type.
Printing Basics 70
Page 72

Loading Print Media
Loading print media properly helps prevent jams and ensures trouble-free printing.
Before loading print media, identify the recommended print side of the print media. This information is
usually on the print media package.
NOTE:
• After loading paper in the feeder, specify the same paper type on the operator panel.
71 Printing Basics
Page 73

Capacity
Multipurpose feeder (MPF) can hold:
• 150 sheets of standard paper
• 16.2 mm (0.64 inches) of thick paper
• One sheet of coated paper
• 16.2 mm (0.64 inches) of post cards
• Five envelopes
• 16.2 mm (0.64 inches) of labels
Priority sheet inserter (PSI) can hold:
• 10 sheets of standard paper or one sheet of other paper
Printing Basics 72
Page 74

Print Media Dimensions
The MPF accepts print media within the following dimensions:
• Width: 76.2 –215.9 mm (3.00–8.50 inches)
• Length: 127–355.6 mm (5.00–14.00 inches)
The PSI accepts print media within the following dimensions:
• Width: 76.2-215.9 mm (3.00–8.50 inches)
• Length: 190.5–355.6 mm (7.50–14.00 inches)
73 Printing Basics
Page 75

Loading Print Media in the Multipurpose Feeder (MPF)
NOTE:
• To avoid paper jams, do not remove the priority sheet inserter (PSI) while printing is in progress.
• Use only laser print media. Do not use ink jet paper in this printer.
1 Open the front cover.
NOTE:
• When you use the MPF for the first time, open the front cover by pulling out the instruction sheet.
2 Pull the PSI out.
NOTE:
• When you use the MPF for the first time, remove the instruction sheet attached to the PSI with adhesive
tape.
Printing Basics 74
Page 76

• Read the instruction sheet before you use the PSI.
3 Pull the slide bar forward until it stops.
4 Pull the length guide forward until it stops.
5 Adjust the paper width guides to their maximum width.
6 Before loading the print media, flex the sheets back and forth, and then fan them. Straighten the
edges of the stack on a level surface.
75 Printing Basics
Page 77

7 Load print media on the MPF with the top edge first and with the recommended print side facing
up.
8 Adjust the paper width guides until they rest lightly against the edges of the stack of print media.
9 Slide the length guide towards the printer until it touches the print media.
Printing Basics 76
Page 78

NOTE:
• Depending on the size of print media, first slide the slide bar backward until it stops, and then pinch the
length guide and slide it backward until it touches print media.
10 Insert the PSI into the printer and then align the PSI to the marking on the MPF.
11 Select the paper type from the print driver if the loaded print media is not standard plain paper. If
a user-specified print media is loaded in the MPF, you must specify the paper size setting by
using the print driver.
NOTE:
• For more information about setting the paper size and type on the print driver, refer to the online Help
provided for the print driver.
NOTE:
• For standard-size paper, adjust the guides first and then set paper.
77 Printing Basics
Page 79

Loading Envelope in the Multipurpose Feeder (MPF)
NOTE:
• When you print on envelopes, be sure to specify the envelope setting on the print driver. If not specified, the
print image will be rotated 180 degrees.
• When Loading Envelope #10, DL, or Monarch
Load envelopes with the side to be printed on facing up, the flap side facing down, and the flap turned
to the right.
To prevent DL and Monarch from being wrinkled, they are recommended to be loaded with the printside facing up, flap opened, and facing you.
NOTE:
• When you load the envelopes in the long-edge feed (LEF) orientation, be sure to specify the landscape
orientation on the print driver.
Printing Basics 78
Page 80

• When Loading C5
Load envelopes with the side to be printed on facing up, flap opened, and facing you.
IMPORTANT:
• Never use envelopes with windows, or coated linings. These lead to paper jams and can cause damage to the
printer.
NOTE:
• If you do not load envelopes in the MPF right after they have been removed from the packaging, they may
bulge. To avoid jams, flatten them as shown below when loading them in the MPF.
• If envelopes are still not fed correctly, add some bending to the flap of the envelopes as shown in the following
illustration.
The amount of the bending shall be 5 mm (0.20 inches) or less.
79 Printing Basics
Page 81

• To confirm the correct orientation of each print media such as envelopes, see the instruction on the
Envelope/Paper Setup Navigator on the print driver.
Printing Basics 80
Page 82

Loading Print Media in the Priority Sheet Inserter (PSI)
NOTE:
• To avoid paper jams, do not remove the PSI while printing is in progress.
• Use only laser print media. Do not use ink jet paper in this printer.
1 Open the front cover.
2 Slide the PSI forward, and then align the PSI to the marking on the MPF.
3 Adjust the paper width guides to their maximum width.
4 Before loading the print media, flex the sheets back and forth, and then fan them. Straighten the
edges of the stack on a level surface.
81 Printing Basics
Page 83

5 Load print media on the PSI with the top edge first and with the recommended print side facing
up.
6 Adjust the paper width guides until they rest lightly against the edges of the stack of print media.
7 Select the paper type from the print driver if the loaded print media is not standard plain paper. If
a user-specified print media is loaded in the PSI, you must specify the paper size setting by using
the print driver.
NOTE:
• For more information about setting the paper size and type on the print driver, refer to the online Help provided
for the print driver.
Loading Envelope in the Priority Sheet Inserter (PSI)
NOTE:
• Be sure to fully insert the envelope until it stops. Otherwise, print media that is loaded on the MPF will be fed.
• When you print on envelopes, be sure to specify the envelope setting on the print driver. If not specified, the
print image will be rotated 180 degrees.
Printing Basics 82
Page 84

• When Loading Envelope #10, DL, or Monarch
Load the envelope with the side to be printed on facing up, the flap side facing down, and the flap
turned to the right.
To prevent DL and Monarch from being wrinkled, they are recommended to be loaded with the printside facing up, flap opened, and facing you.
NOTE:
• When you load the envelopes in the long-edge feed (LEF) orientation, be sure to specify the landscape
orientation on the print driver.
83 Printing Basics
Page 85

• When Loading C5
Load the envelope with the side to be printed on facing up, flap opened, and facing you.
IMPORTANT:
• Never use envelopes with windows, or coated linings. These lead to paper jams and can cause damage to the
printer.
NOTE:
• If you do not load envelopes in the PSI right after they have been removed from the packaging, they may
bulge. To avoid jams, flatten them as shown below when loading them in the PSI.
• If envelopes are still not fed correctly, add some bending to the flap of the envelopes as shown in the following
illustration.
The amount of the bending shall be 5 mm (0.20 inches) or less.
Printing Basics 84
Page 86

• To confirm the correct orientation of each print media such as envelopes, see the instruction on the
Envelope/Paper Setup Navigator on the print driver.
85 Printing Basics
Page 87

Manual Duplex Printing (Windows Print Driver Only)
This section includes:
• "Operations on Your Computer" on page 87
• "Loading Print Media in the Multipurpose Feeder (MPF)" on page 88
• "Loading Print Media in the Priority Sheet Inserter (PSI)" on page 89
NOTE:
• When printing on curled paper, straighten the paper and then insert it into the feeder.
When you start manual duplex printing, the instruction window appears. Note that the window cannot
be reopened once it is closed. Do not close the window until duplex printing is complete.
Manual duplex printing can be done using the multipurpose feeder (MPF) or the priority sheet inserter
(PSI).
Printing Basics 86
Page 88

Operations on Your Computer
3
4
5
The following procedure uses Microsoft® Windows® XP WordPad as an example.
NOTE:
• The way to display the printer Properties/Printing Preferences dialog box differs according to the application
software. Refer to the manual of your respective application software.
1 From the File menu, select Print.
2 Select the printer from the Select Printer list box, and then click Preferences.
3 The Paper/Output tab appears.
From Duplex, select either Flip on Short Edge or Flip on Long Edge to define the way 2-sided
print pages are bound.
4 From Paper Size, select the size of the document to be printed.
5 From Paper Type, select the paper type to be used.
6 Click OK to close the Printing Preferences dialog box.
7 Click Print in the Print dialog box to start printing.
IMPORTANT:
• When you start manual duplex printing, the instruction window appears. Note that the window cannot be
reopened once it is closed. Do not close the window until duplex printing is complete.
87 Printing Basics
Page 89

Loading Print Media in the Multipurpose Feeder (MPF)
1 First print the even pages (rear sides).
For a six page document, rear sides are printed in the order of page 6, page 4, then page 2.
The (Data) LED blinks and the Insert Output to Tray message appears on the LCD
panel when the even pages finish printing.
2 After the even pages are printed, remove the paper stack from the center output tray.
NOTE:
• Warped or curled prints can cause paper jams. Straighten them before setting them.
3 Stack the prints and set them as they are (with the blank side facing up) into the MPF, and then
press the button.
Pages are printed in the order of page 1 (rear of page 2), page 3 (rear of page 4), and then page
5 (rear of page 6).
NOTE:
• Printing on both sides of the paper is not possible if the document consists of various sizes of paper.
Printing Basics 88
Page 90

Loading Print Media in the Priority Sheet Inserter (PSI)
1 First print the even pages (rear sides).
For a six page document, even pages are printed in the order page 6, page 4, then page 2.
The (Data) LED blinks and the Insert Output to Tray message appears on the LCD
panel when the even pages finish printing.
2 After the even pages are printed, remove the paper stack from the center output tray.
NOTE:
• Warped or curled prints can cause paper jams. Straighten them before setting them.
3 Stack the prints and set them as they are (with the blank side face up) into the PSI, and then
press the button.
Pages are printed in order of page 1 (rear of page 2), page 3 (rear of page 4), and then page 5
(rear of page 6).
NOTE:
• Printing on both sides of the paper is not possible if the document consists of various sizes of paper.
89 Printing Basics
Page 91

Using the Output Tray Extension
The output tray extension is designed to prevent print media from falling from the printer after the print
job is complete.
Before printing a long length document, ensure that the output tray extension is fully extended.
NOTE:
• When you pull out envelopes or small size print media from the center output tray, lift up the scanner.
Printing Basics 90
Page 92

Setting Paper Sizes and Types
When loading print media, set the paper size and type on the operator panel before printing.
This section describes how to set the paper size and type on the operator panel.
See also:
• "Understanding the Printer Menus" on page 150
This section includes:
• "Setting Paper Sizes" on page 92
• "Setting Paper Types" on page 93
91 Printing Basics
Page 93

Setting Paper Sizes
1 Press the (System) button.
2 Select Tray Settings, and then press the button.
3 Select MPF, and then press the button.
4 Select Paper Size, and then press the button.
5 Select the correct paper size for the print media loaded, and then press the button.
Printing Basics 92
Page 94

Setting Paper Types
IMPORTANT:
• Paper type settings must match those of the actual print media loaded in the tray. Otherwise, print-quality
problems can occur.
1 Press the (System) button.
2 Select Tray Settings, and then press the button.
3 Select MPF, and then press the button.
4 Select Paper Type, and then press the button.
5 Select the correct paper type for the print media loaded, and then press the button.
93 Printing Basics
Page 95

Printing
This section covers how to print certain lists of information from your printer and how to cancel a job.
This section includes:
• "Sending a Job to Print" on page 95
• "Canceling a Print Job" on page 96
• "Direct Print Using the USB Storage Device" on page 97
• "Selecting Printing Options" on page 98
• "Printing Custom Size Paper (Windows Only)" on page 103
• "Checking Status of Print Data" on page 105
• "Printing a Report Page" on page 106
• "Printer Settings" on page 107
Printing Basics 94
Page 96

Sending a Job to Print
Install the print driver to use all the features of the printer. When you choose Print from a software
program, a window representing the print driver opens. Select the appropriate settings for the specific
job you are sending to print. Print settings selected from the driver have precedence over the default
menu settings selected from the operator panel or Printer Setting Utility.
You may need to click Properties/Preferences from the initial Print dialog box to see all the available
system settings you can change. If you are not familiar with a feature in the print driver window, open
the online Help for more information.
The following procedure uses Windows XP WordPad as an example.
To print a job from an application:
1 Open the file you want to print.
2 From the File menu, select Print.
3 Verify that the correct printer is selected in the dialog box. Modify the system settings as needed
(such as the pages you want to print or the number of copies).
4 To adjust system settings not available from the first screen, such as Paper Size, Paper Type, or
MPF Orientation, click Preferences.
The Printing Preferences dialog box appears.
5 Specify the print settings. For more information, click Help.
6 Click OK to close the Printing Preferences dialog box.
7 Click Print to send the job to the selected printer.
95 Printing Basics
Page 97

Canceling a Print Job
There are several methods for canceling a print job.
This section includes:
• "Canceling From the Operator Panel" on page 96
• "Canceling a Job From the Computer Running Windows" on page 96
Canceling From the Operator Panel
To cancel a job after it has started printing:
1 Press the (Stop) button.
NOTE:
• Printing is canceled only for the current job. All the following jobs will continue to print.
Canceling a Job From the Computer Running Windows
• Canceling a Job From the Taskbar
When you send a job to print, a small printer icon appears in the right corner of the taskbar.
1 Double-click the printer icon.
A list of print jobs appears in the printer window.
2 Select the job you want to cancel.
3 Press the Delete key.
4 Click Yes on the Printers dialog box to cancel a print job.
• Canceling a Job From the Desktop
1 Minimize all programs to reveal the desktop.
Click start Printers and Faxes (for Windows XP).
Click Start Printers and Faxes (for Windows Server
Click Start Devices and Printers (for Windows 7 and Windows Server 2008 R2).
Click Start Control Panel Hardware and Sound Printers (for Windows Vista
Windows Server 2008).
A list of available printers appears.
®
2003).
2 Double-click the printer you selected when you sent the job.
A list of print jobs appears in the printer window.
3 Select the job you want to cancel.
4 Press the Delete key.
®
and
5 Click Yes on the Printers dialog box to cancel a print job.
Printing Basics 96
Page 98

Direct Print Using the USB Storage Device
The Print From USB Memory feature allows you to print files stored in a USB storage device by
operating from the operator panel.
To print a file in a USB storage device:
1 Insert a USB storage device to the USB drive of the printer.
USB Memory appears.
2 Select Print From, and then press the button.
Select Document appears.
3 Select the desired file, and then press the button.
4 Select printing options as required.
5 Press the (Start) button.
NOTE:
• You can print files scanned and stored using the Scan to USB Memory feature. Files saved without using
the feature such as files created by user may not be printed properly.
Supported File Formats
Files in the following file formats can be printed directly from a USB storage device.
• PDF
• TIFF
• JPEG
97 Printing Basics
Page 99

Selecting Printing Options
This section includes:
• "Selecting Printing Preferences (Windows)" on page 98
• "Selecting Options for an Individual Job (Windows)" on page 99
• "Selecting Options for an Individual Job (Mac OS X)" on page 101
Selecting Printing Preferences (Windows)
Printer preferences control all of your print jobs, unless you override them specifically for a job. For
example, if you want to use duplex printing for most jobs, set this option in printer settings.
To select printer preferences:
1 Click start Printers and Faxes (for Windows XP).
Click Start Printers and Faxes (for Windows Server 2003).
Click Start Devices and Printers (for Windows 7 and Windows Server 2008 R2).
Click Start Control Panel Hardware and Sound Printers (for Windows Vista and
Windows Server 2008).
A list of available printers appears.
2 Right-click the icon for your printer, and then select Printing Preferences.
The FX DocuPrint CM205 b Printing Preferences screen appears.
3 Make selections on the driver tabs, and then click OK to save your selections.
NOTE:
• For more information about Windows print driver options, click Help on the print driver tab to view the online
Help.
Printing Basics 98
Page 100

Selecting Options for an Individual Job (Windows)
If you want to use special printing options for a particular job, change the driver settings before
sending the job to the printer. For example, if you want to use Photo print-quality mode for a particular
graphic, select this setting in the driver before printing that job.
1 With the desired document or graphic open in your application, access the Print dialog box.
2 Select the DocuPrint CM205 b and click Preferences to open the print driver.
3 Make selections on the driver tabs. See the following table for specific printing options.
NOTE:
• In Windows, you can save current printing options with a distinctive name and apply them to other print
jobs. Make selections on the Paper/Output, Graphics, Layout, or Watermarks/Forms tab, and then
click Save under Favorites on the Paper/Output tab. Click Help for more information.
4 Click OK to save your selections.
5 Print the job.
See the following table for specific printing options:
Printing Options for Windows
99 Printing Basics
 Loading...