

Fuji Xerox DocuPrint C2090 FS User Manual

DocuPrint C2090 FS
User Guide

- 2 -
Adobe, the Adobe logo, Acrobat Reader are trademarks of Adobe Systems Incorporated.
Microsoft, Windows, Windows Server are either registered trademarks or trademarks of Microsoft Corporation
in the United States and/or other countries.
Permission has been obtained from Microsoft Corporation for use of software screen shots.
Intel and Pentium are trademarks or registered trademarks of Intel Corporation or its subsidiaries in the
United States and other countries
All product/brand names are trademarks or registered trademarks of the respective holders.
Important:
• This manual is copyrighted with all rights reserved. Under the copyright laws, this manual may not be
copied or modified in whole or part, without the written consent of the publisher.
• Parts of this manual are subject to change without prior notice.
• We welcome any comments on ambiguities, errors, omissions, or missing pages.
• Never attempt any procedure on the machine that is not specifically described in this manual.
Unauthorized operation can cause faults or accidents. Fuji Xerox is not liable for any problems
resulting from unauthorized operation of the equipment.
To lessen the effect on the environment, this manual is manufactured with recycling in mind. After the product
has been used, please send this manual for recycling.
It may be a legal offence to print currency notes, certificates of stocks and securities, or any other documents
of similar nature, regardless of whether they will be used.
Fuji Xerox is not responsible for any breakdown of machines due to infection of computer virus or computer
hacking.
Xerox, The Document Company and the stylized X are
registered trademarks of Xerox Corporation and Fuji Xerox Co., Ltd.
All Xerox and Fuji Xerox product names are either registered trademarks or trademarks of Xerox Corporation
and Fuji Xerox Co., Ltd.

- 3 -
Contents
1. Preface.......................................................................................................................... 7
1.1 About this manual......................................................................................................7
1.2 Copyright and trademarks .........................................................................................7
1.3 Regulatory notices.....................................................................................................7
1.4 Responsible use of copyright materials.....................................................................7
1.5 Illegal copies and printouts........................................................................................7
1.6 Symbols and terminologies .......................................................................................8
1.7 Types of manuals ......................................................................................................9
1.8 Safety notes...............................................................................................................9
1.9 Using this manual .................................................................................................... 11
2. Introducing the DocuPrint C2090 FS........................................................................ 12
2.1 Features...................................................................................................................12
2.2 Package contents ....................................................................................................13
2.3 Overview of the DocuPrint C2090 FS components.................................................15
2.3.1 Front view ................................................................................................................15
2.3.2 Rear view.................................................................................................................15
2.3.3 Inside the DocuPrint C2090 FS...............................................................................16
2.3.4 Printer components .................................................................................................16
2.3.5 Scanner Components..............................................................................................17
2.3.6 Control panel ...........................................................................................................18
3. Getting started ........................................................................................................... 20
3.1 Placing the DocuPrint C2090 FS.............................................................................20
3.1.1 Power cable.............................................................................................................20
3.2 Switching On and Off the Power .............................................................................21
3.2.1 Switching on the power ...........................................................................................21
3.2.2 Switching off the power ...........................................................................................22
3.2.3 Setting the time........................................................................................................22
3.3 Setting the environment...........................................................................................22
3.3.1 Setting the Date.......................................................................................................22
3.3.2 Setting IP address ...................................................................................................23
3.3.3 Setting languages mode..........................................................................................23
3.3.4 Setting country code................................................................................................24
3.3.5 Setting subnet mask/gateway address....................................................................24
3.4 Power save mode....................................................................................................24
3.5 Exiting the power save mode ..................................................................................25
3.6 Installing the toner cartridges ..................................................................................25
3.7 Installing the drum cartridge ....................................................................................27
3.8 Installing extra memory ...........................................................................................29
3.9 Connecting cables ...................................................................................................31
3.9.1 USB cable................................................................................................................31
3.9.2 LAN cable ................................................................................................................31
3.9.3 Phone cables...........................................................................................................32
3.10 Installing software....................................................................................................33
3.11 Software Installation ................................................................................................33
3.12 USB connection.......................................................................................................35
3.13 Network connection .................................................................................................36
3.14 Setting Configuration of Paper ................................................................................39
3.15 Uninstalling the Drivers and Scan Tool Box ............................................................40
3.16 Uninstalling the Software.........................................................................................41
4. Printing ....................................................................................................................... 42
4.1 Printing a document.................................................................................................42
4.2 Canceling printing....................................................................................................42
4.2.1 Canceling printing of data being printed or received at the printer..........................42
4.2.2 Canceling printing data being processed at the computer ......................................42
4.3 Specifying the printer settings .................................................................................43
4.3.1 Number of prints ......................................................................................................43
4.3.2 Resizing the prints ...................................................................................................43
4.3.3 Adjusting layout .......................................................................................................44

- 4 -
4.3.4 Adding watermarks..................................................................................................45
4.3.5 Advanced settings ...................................................................................................46
5. Scanning..................................................................................................................... 47
5.1 Placing the originals ................................................................................................47
5.2 Scanning an image with operating panel ................................................................47
5.2.1 Setting scan mode from control panel.....................................................................47
5.2.2 Setting color scan from control panel ......................................................................48
5.2.3 Setting original paper size and file type...................................................................48
5.2.4 Image quality ...........................................................................................................48
5.2.5 Scanning an image from the DocuPrint C2090 FS .................................................49
5.2.6 Scanning to FTP......................................................................................................49
5.2.7 Scanning to USB-Key..............................................................................................50
5.3 Scanning an image with computer ..........................................................................50
5.3.1 Scan via WIA (Windows Image Acquisition)............................................................50
5.3.2 Scan to a file via WIA: .............................................................................................52
5.3.3 Scanning from application via TWAIN driver...........................................................54
5.3.4 Previewing and adjusting the scan area from TWAIN driver...................................56
5.3.5 Scan adjustment from TWAIN driver.......................................................................56
5.3.6 Image adjustment from TWAIN driver .....................................................................57
6. Copying ...................................................................................................................... 59
6.1 Placing the originals ................................................................................................59
6.2 Making copies..........................................................................................................60
6.3 Specifying copy settings ..........................................................................................60
6.3.1 Number of copies ....................................................................................................60
6.3.2 Selecting the paper..................................................................................................60
6.4 Image quality ...........................................................................................................60
6.5 Enlarging/Reducing the copy size ...........................................................................61
6.6 Resetting the copy settings .....................................................................................63
6.7 Restrictions on copying ...........................................................................................64
7. Sending a fax ............................................................................................................. 65
7.1 Placing the originals ................................................................................................65
7.2 Sending faxes..........................................................................................................66
7.2.1 Sending a fax from PC FAX & Network FAX...........................................................66
7.2.2 Sending a fax from One-touch / Speed-dial Direct FAX..........................................68
7.2.3 Sending a fax from Tx reservation FAX...................................................................68
7.2.4 Sending a fax from Forward FAX ............................................................................69
7.2.5 Setting a fax from Broadcast Fax ............................................................................69
7.3 Receiving faxes .......................................................................................................70
7.3.1 Auto-answering FAX Rx ..........................................................................................70
7.3.2 Direct Fax Rx...........................................................................................................70
7.4 Specifying fax settings.............................................................................................70
7.4.1 Input and output paper size and type ......................................................................70
7.4.2 Image quality ...........................................................................................................71
7.4.3 Adjust fax size .........................................................................................................71
7.4.4 FAX Tx mode setting (Resolution)...........................................................................72
8. Advanced functions................................................................................................... 73
8.1 Using the setup menu..............................................................................................73
8.2 Basic settings ..........................................................................................................73
8.3 Scanner settings......................................................................................................75
8.4 Copy settings...........................................................................................................75
8.5 Fax settings .............................................................................................................76
8.6 Host settings ............................................................................................................78
8.7 System settings .......................................................................................................79
8.8 Printing a status sheet.............................................................................................80
8.8.1 Printing a status for Copy Mode: .............................................................................80
8.8.2 Fax Report...............................................................................................................81
8.8.3 Scan Report.............................................................................................................82
8.9 Job canceling...........................................................................................................82
8.9.1 Jobs initiated from OP Panel ...................................................................................82
8.9.2 Jobs initiated from Application .................................................................................83
8.9.3 Jobs initiated from Scan Tool Box ...........................................................................84
8.9.4 Canceling an operation............................................................................................85

- 5 -
8.9.5 Fax stop & Fax cancel .............................................................................................85
8.9.6 Fax Broadcast cancel ..............................................................................................85
8.10 Using Scan Tool Box ...............................................................................................86
8.10.1 Application ...............................................................................................................87
8.10.2 Copy ........................................................................................................................89
8.10.3 Fax...........................................................................................................................91
8.10.4 File ...........................................................................................................................93
8.10.5 E-mail.......................................................................................................................95
8.10.6 OCR.........................................................................................................................97
8.10.7 Setting......................................................................................................................99
9. Paper handling......................................................................................................... 101
9.1 Paper sources .......................................................................................................101
9.1.1 Usable paper .........................................................................................................101
9.1.2 Supported paper....................................................................................................102
9.1.3 Special media ........................................................................................................102
9.1.4 Unusable paper .....................................................................................................103
9.2 Loading paper........................................................................................................103
9.3. Loading envelopes ................................................................................................105
9.4. Setting paper sizes and types ...............................................................................105
9.5. Removing printouts or copies ................................................................................106
10. Troubleshooting guide .......................................................................................... 107
10.1 When paper jams ..................................................................................................107
10.1.1 Near the fuser unit .................................................................................................107
10.1.2 When the printer interior gets dirty ........................................................................109
10.2 Printer problems .................................................................................................... 111
10.3 Print quality problem..............................................................................................112
10.4 Scanning problems................................................................................................114
10.5 Scanning quality problems ....................................................................................115
10.6 Copying problems.................................................................................................. 116
10.7 Fax problems.........................................................................................................116
10.8 Paper handling problems.......................................................................................117
10.9 Menu tree...............................................................................................................118
10.9.1 LCD screen definition ............................................................................................118
10.9.2 DocuPrint language initialization & LCD indication ...............................................120
10.10 Major function keys and menu flow chart ..............................................................121
10.10.1 <Size/Type> key ....................................................................................................121
10.10.2 <Image Quality> key..............................................................................................122
10.10.3 <Reduce/Enlarge> key ..........................................................................................122
10.10.4 <Menu> key ...........................................................................................................123
10.10.5 <Scan> Key ...........................................................................................................127
10.10.6 <FAX> Key ............................................................................................................134
10.10.7 <Reduce / Enlarge > Key under Fax mode ...........................................................136
10.10.8 <Copy> Key ...........................................................................................................141
10.10.9 <Size / Type> Key under Scan mode....................................................................143
10.10.10 <MENU> key under Copy mode ...........................................................................144
11. Appendix ................................................................................................................ 149
11.1 Specifications.........................................................................................................149
11.2 Optional accessories and consumables................................................................150
11.2.1 Optional accessories .............................................................................................151
11.2.3 Handling consumables ..........................................................................................152
11.3 Replacing the consumables ..................................................................................152
11.3.1 Replacement parts.................................................................................................152
11.4 Obtaining product information ...............................................................................152
11.4.1 Laser printer driver ................................................................................................152
11.5 Upgrading the firmware version of this Multi-Functions Printer.............................153
11.5.1 PC (USB upgrade).................................................................................................153
11.5.2 Upgrade procedure................................................................................................153
11.5.3 Web server upgrade ..............................................................................................156
11.6 Status and error messages....................................................................................157
11.6.1 Printer error messages ..........................................................................................157
11.6.2 Scanner error messages .......................................................................................161
11.6.3 Scanner driver error...............................................................................................162

- 6 -
11.6.4 Copier error messages ..........................................................................................162
11.6.5 Fax error messages...............................................................................................162
11.6.6 System error messages.........................................................................................163
11.7 Replacing components..........................................................................................164
11.7.1 Replacing the retard pad .......................................................................................164
12. CentreWare Internet Services Tool ...................................................................... 167
12.1 Access to CentreWare...........................................................................................167
12.1.1 What is CentreWare Internet Services? ................................................................167
12.1.2 Environment setting for browser............................................................................167
12.2 Web page details ...................................................................................................168
12.2.1 Status.....................................................................................................................168
12.2.2 Jobs .......................................................................................................................169
12.2.3 Setup Menu ...........................................................................................................171
12.3 Properties ..............................................................................................................173
12.3.1 Machine Details .....................................................................................................173
12.3.2 Machine Configuration...........................................................................................174
12.4 Maintenance ..........................................................................................................180
12.4.1 Error History...........................................................................................................180
12.5 Support ..................................................................................................................180
Index ............................................................................................................................. 181

- 7 -
1. Preface
1.1 About this manual
Thank you for choosing the DocuPrint C2090 FS MFP (Multi Function Printer). With your DocuPrint C2090 FS
you can print, copy, scan and fax. This is a manual on operating this MFP and the important points to note. It
also tells you how to maintain it and troubleshoot problems.
For instructions on setting up your products and installing your software, see your Quick Installation Guide
and Setup and Quick Reference Guide
This manual is written with the assumption that you are familiar with the basic knowledge and way of
operating your computer environment and the network environment.
Since the machine is equipped with anti-counterfeit features, in some rare cases, certain kinds of documents
may be unable to copy.
1.2 Copyright and trademarks
Information presented in this manual has been reviewed and validated for accuracy. The instructions and
descriptions are accurate at the time of this manual’s production. However, the manufacturer reserves the
right to make changes without notice and assumes no liability for damages incurred directly or indirectly from
errors, omissions, or discrepancies between this and any other future documents.
© Copyright 2006. All rights reserved. Under copyright laws, this manual cannot be reproduced in any form
without the prior written permission of the manufacturer. No patent liability is assumed with respect to the use
of the information contained herein.
Microsoft, Windows, Windows Server are either registered trademarks or trademarks of Microsoft Corporation
in the United States and/or other countries. Adobe and Acrobat are either registered trademarks or
trademarks of Adobe Systems Incorporated in the United States and/or other countries.
XEROX, The Document Company, and the digital X is a trademarks of Xerox Corporation. All Xerox and Fuji
Xerox product names are either registered trademarks or trademarks of Xerox Corporation and Fuji Xerox Co.,
Ltd. Other product names and company names are the registered trademarks or trademarks of their
respective holders.
1.3 Regulatory notices
Users of this machine must observe the following restrictions to ensure the responsible and legal use of this
machine.
1.4 Responsible use of copyright materials
Scanners can be misused by improperly copying copyrighted materials. Unless acting on the advice of a
knowledgeable attorney, be responsible and respectful by attaining the consent from the copyright holder
before copying published material.
1.5 Illegal copies and printouts
Copying or printing certain documents may be illegal in your country. Penalties of fines or imprisonment may
be imposed on those found guilty. The following are examples of items that may be illegal to copy or print in

- 8 -
your country.
• Currency
• Bank notes and checks
• Bank and government bonds and securities
• Passports and identification cards
• Copyright material or trademarks without the consent of the owner
• Postage stamps and other negotiable instruments
Exercise caution when copying the following items:
• Private marketable securities (stock certificates, negotiable notes, checks, etc.)
• Driver’s license, warrants of fitness, road passes, food stamps, tickets, etc.
This list is not inclusive and no liability is assumed for either its completeness or accuracy. In case of doubt,
contact your legal counsel.
Notice:
• This machine is provided with the recognition function to prevent the copying of currency. Also, in case
currency or securities are copied, the forgery tracing function can identify a machine used for the copy.
• Note that the recognition function prevents a limited range of illegal copies. Always put your machine
under careful charge to prevent illegal copies from being made.
1.6 Symbols and terminologies
The following table describes the conventions for the symbols and terms used in this User Guide.
Terms / Symbols Description
Important
Indicates essential information that you must read.
Note
Indicates additional information on operation or features of the
MFP.
Warning
Indicate important safety issues which you must note while
operating the MFP.
[ ]
Indicates items or commands on the computer and the printer
control panel.
< >
Indicates the hard buttons on the MFP.

- 9 -
1.7 Types of manuals
Quick Installation Guide
Explains the installation procedure of each
optional accessory.
This manual is bundled with each optional
product.
Setup and Quick Reference Guide Explains the way of installation, loading paper,
and troubleshooting of this MFP
User Guide (PDF) (This manual)
Explains MFP settings, and describes control
panel items and daily care in detail. Refer to
all
the contents of the Setup and Quick
Reference Guide is included except the
installation of this MFP.
This PDF file is included in the Software
CD-ROM.
Documentation in the Software
CD-ROM
Explains how to set the MFP environment and
how to install the MFP driver and our company
software
Note:
• Adobe® Acrobat® Reader needs to be installed to display PDF files. Install the Acrobat Reader using
the CentreWare CD-ROM first if it is not already installed.
1.8 Safety notes
For your own safety, please read this page carefully before using the DocuPrint C2090 FS.
WARNING
Used for items that if not followed directly, can lead to severe or
fatal injuries.
CAUTION
Used for items that if not followed directly, can cause injuries to
user or damages to the machine.
A symbol for items to pay attention to
when handling the machine. Follow
instructions carefully to use the machine
safely
Heated
surface
Flammable
Electric
shock
Pinched
fingers
A symbol for items to pay attention to
when handling the machine. Follow
instructions carefully to use the machine
safely
Prohibited
No fire Do not
tear
down
Do not
touch
A symbol for items to pay attention to
when handling the machine. Follow
instructions carefully to use the machine
safely
Instructions
Unplug Ground/
Earth
Graphic Symbols used throughout the guide

- 10 -
Laser Printer Precautions
The DocuPrint C2090 FS utilizes laser technology. Follow the precautions below to ensure safe, efficient
operation.
Unless specifically instructed in the manual, be careful not to touch the fuser, which
is marked CAUTION HOT SURFACE. If you have been using the DocuPrint C2090
FS for an extended period of time, the fuser may be very hot.
Do not attempt to modify or not to disassemble the toner cartridge. It cannot be
refilled.
Do not touch the toner and avoid contact with your eyes.
Do not use a vacuum cleaner if the toner is spilled. Use a broom and dustpan or a
damp cloth with soap and water to clean up. Because the fine particles in the toner
cartridge can cause a fire or an explosion if they come into contact with a spark.
Do not dispose of used toner cartridges or fuser in fire. Doing so may cause fire and
injury. Dispose of them according to local regulations.
Do not unplug or reconnect the machine while it is on. Unplugging a live connector
can deform the plug and cause a fire.
When unplugging the machine, grasp the plug instead of the cord. Forcibly pulling
on a cord can damage it and cause fire or electric shock.
Be sure to switch off and unplug the machine before accessing the interior of the
machine for cleaning, maintenance, or fault clearance. Access to a live machine's
interior can cause electric shock.
When the machine is not used over an extended period of time, switch it off and
unplug it. If an unused machine is left connected to power for a long time, degraded
insulation can cause electric shock, current leakage, or fire.

- 11 -
1.9 Using this manual
Chapter summary
The DocuPrint C2090 FS User Guide consists of the following chapters to help you use the product efficiently
with ease.
Chapter Title Description
Preface This chapter provides safety information,
regulatory notices, important warning and
cautions that should be noted by the user.
Introducing the
DocuPrint C2090 FS
This chapter provides an overview of the
features of the DocuPrint C2090 FS, and an
introduction of the components of the machine.
Getting started This chapter helps you to get started with the
MFP with information on installing cartridges and
connecting the cables appropriately.
Printing This chapter provides information on how to
perform a printing task.
Scanning This chapter provides information on how to
perform a scanning task.
Copying This chapter provides information on how to
perform a copying task.
Sending a fax This chapter provides information on both how
to send and receive a fax.
Paper handling This chapter provides detailed information on
the types paper to be used for different purposes
and how to load them properly.
Trouble shooting Guide &
Menu Tree
This chapter provides detailed information to
guide users to trouble shooting and introducing
LCD operating menu tree
Advance functions This chapter covers information on configuration
of settings for different modes and
miscellaneous functions.
Appendix This chapter covers specification of the
DocuPrint C2090 FS and Firmware upgrade
process
CentreWare Internet
Services Tool
This chapter covers configure and change
default setting by using browser or control panel

- 12 -
2. Introducing the DocuPrint C2090 FS
This chapter explains the features, package contents, and the components of the DocuPrint C2090 FS.
2.1 Features
Printer
• Prints multiple pages on a single sheet
• Prints watermarks or specific stamps over printed material
• Prints single images over multiple pages to produce poster sized images
• Adjusts image quality depending on document type and requirement
• 'Favorite' print settings can be saved and reused
• Prints on special media such as envelopes or transparencies using the bypass tray
• IP filtering can be used to limit users of the printer functions
• Print status and management possible from remote computer
Fax
• Serves as a PC fax machine to send documents
• Faxes the scanned documents or images from the computer
• Fax speed up to 33.6K with Super G3.
• Sends a fax through the phone book from the Tool Box by using fax driver
• Auto-redialing
• Reports fax status
Important:
• While sending or receiving a fax, the DocuPrint C2090 FS still performs other functions such as printing
and scanning simultaneously, but at a slower speed.
Copier
• Copy resolution up to 600 dpi
• Copy speed up to 3 cpm @ 600 dpi for color print
• Copy speed up to 8 cpm @ 600 dpi for B/W print
• Enlarges or reduces copy sizes with custom copy ratios or manually
• Adjusts the image quality
• Adjusts the copy exposure
• Adjusts color balance of the copy
• Sorts copies in page order
Scanner
• Flatbed, CCD scanner
• High scanner resolution: 4800 dpi x 4800 dpi enhanced, 1200 dpi x 1200 dpi full color optical
• Full Color scan speed 3 ms/line (Flatbed Scan)
• Mono scan speed 0.75 ms/line (Flatbed Scan)
• Scan area up to A4/Letter on flatbed; up to Legal via Auto Document Feeder (ADF)
• Integrated Simplex Auto Document Feeder (ADF) max 50 sheets (@ 75 gsm paper)

- 13 -
2.2 Package contents
All the following items should be present in the package. If anything appears to be missing or damaged,
contact your dealer immediately.
• DocuPrint C2090 FS
• Drum cartridge
• 4 Toner cartridges ([K]: 4K, [Y] [M] [C]: 1.5K)
• Setup and Quick Reference Guide
• Software CD-ROM
• Multi-language panel sheet x 3 (TC/SC/KR)
• AC power cable
• Phone cable
• USB cable
• Retard pad (x 2)
• Quick Installation Guide
• DocuWorks License
Note:
• Language abbreviation: TC (Traditional Chinese). SC (Simplified Chinese), KR (Korean).
Unpacking the printer
Note:
• Before using the DocuPrint C2090 FS, make sure you have removed all the tapes and styrofoam from
the machine. Failure to do so may cause damage to the machine or it may not function properly.
Remove the DocuPrint C2090 FS from its packaging box and move it to the desired location for installation.
When the DocuPrint C2090 FS is first taken out of the packaging box, the cover of the machine is taped.
Remove the tape.
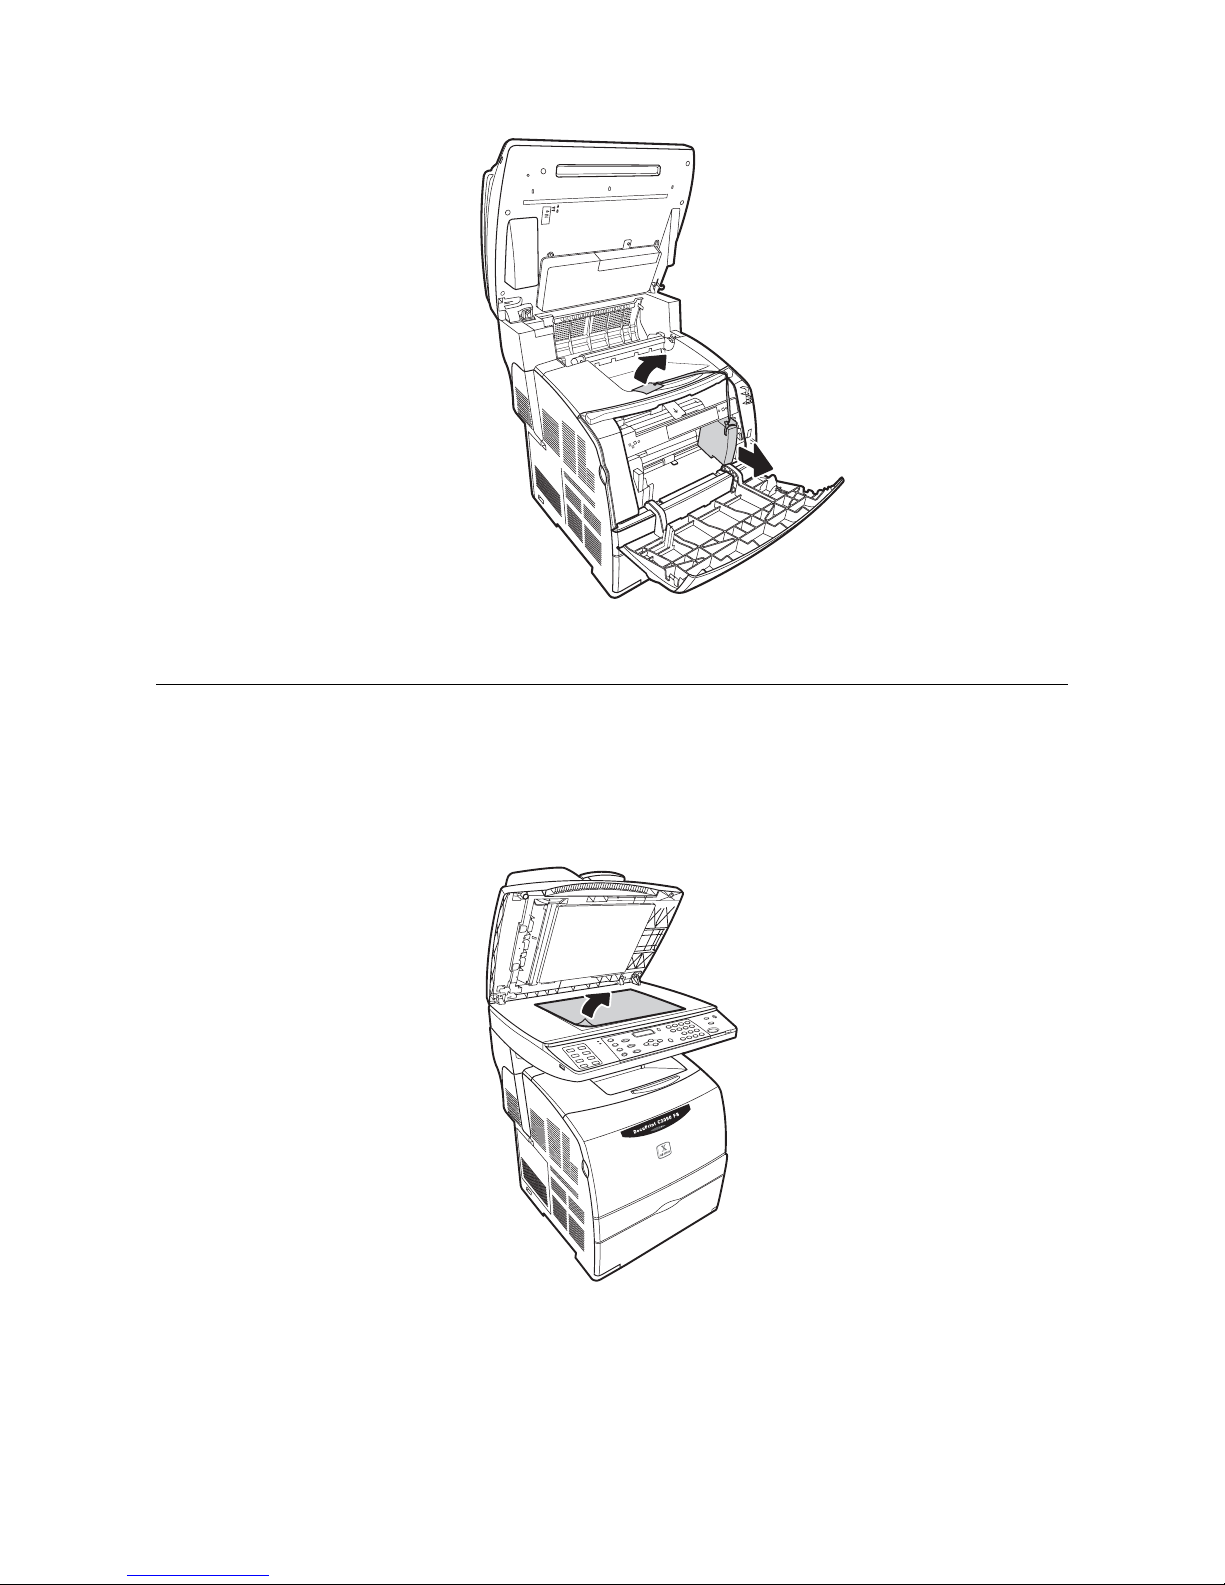
Slowly lift up part B and Cover C .
2
1
3
3
Push up the green levers on both sides and remove the spacer. Push down the levers and close the cover.
- 14 -
Note:
• Transportation lock is located at the back of part B. Slowly flip over the scanner unit and move the
transportation lock to unlocked position before using the DocuPrint C2090 FS.
Open document cover and remove the paper on the document glass.
- 15 -
2.3 Overview of the DocuPrint C2090 FS components
This section provides a brief description of the main components of the DocuPrint C2090 FS.
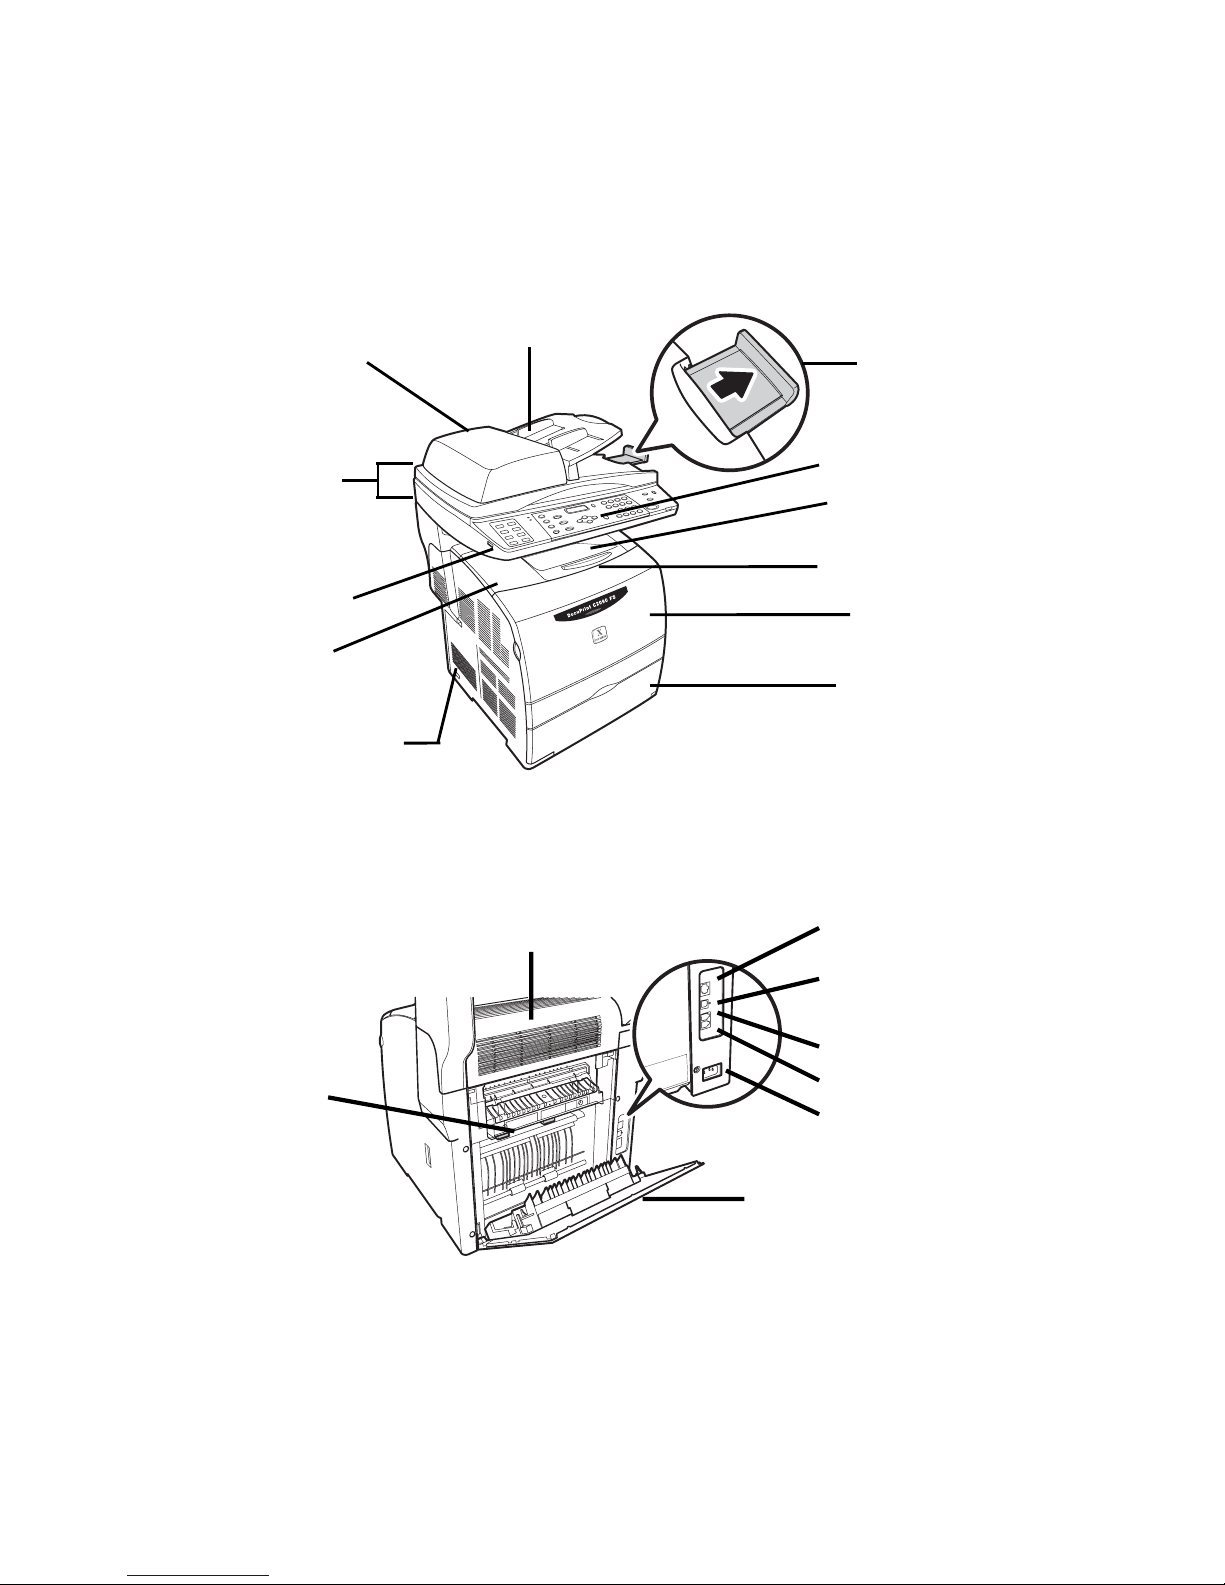
2.3.1 Front view
2.3.2 Rear view
Cover E
Cover C
Cover F
LAN cable
Connector
USB cable
Connector
LINE Connector
PHONE Connector
AC inlet
Control panel
Output tray
Paper stopper
Extension output tray
Front cover
Auto Document
feeder (ADF)
Power switch
Cover A
Part B
Top cover
USB port
Cover D

- 16 -
2.3.3 Inside the DocuPrint C2090 FS
2.3.4 Printer components
Note:
• For instructions on installing cartridges, see “Installing the toner cartridges” & “Installing the drum
cartridge” section.
Cover C
Fuser
Paper Guide
Drum cartridge slot
Tonercartridge slot

- 17 -
2.3.5 Scanner Components
,,
Note:
• Transportation lock is located at the back of the part B. Slowly flip over the scanner unit and remove the
transportation lock to unlocked position before using the DocuPrint C2090 FS
Output tray
Pa
per
tra
y
Document Glass
Scanner unit
USB Port
Document Cover
Part B
Transportation lock

- 18 -
2.3.6 Control panel
1
23
456
789
*
0c#
1
234
56 7
8
910
13 1214
15
11

- 19 -
No. Button Name Functions
1 Fast keys Specific registered dial fast key.
2 Transmission light (green) Indicates data transmission.
3 Job in Memory (red) Indicates job processed in memory.
4 Copy options From top to bottom:
<Size/Type>: Press to choose type/size of the original document
or the paper to be used.
<Reduce/Enlarge>: Press to set the percentage to enlarge or
reduce the copy output.
<Image quality>: Press to set brightness, sharpness, and the
color balance.
<Color mode>: Press to toggle between color and mono mode.
(Green light indicates color mode.)
5 Mode
buttons
From top to bottom:
<Copy/ Fax/ Scan>
Press to choose the mode for specified task.
6 LCD screen Displays current job status, menu selection.
7 Menu/
Set
From top to bottom:
<Menu>: Press to show current setting of the machine and modify
with the arrow keys.
<Set>: Press to confirm the new settings.
8 Dial buttons From top to bottom:
<Redial/Pause>: Press to call the last number dialed.
<Speed dial>: Press the button and then the digit set for a
specified telephone number without inputting the complete
number.
9 Numeric keys Press to input number of copies or fax number.
10 Clear all/ Stop/
Start
From top to bottom:
Press <Clear all> to cancel current settings or clear the number of
copies to make.
Press <Stop> to terminate current job.
Press <Start> to perform current job.
11 Power saver Press to cancel the Power Save Mode. (Green light indicates
power saver on.)
12 Error LED Lights up when an error occurred during operation.
13 Clear Press to clear the number entered with the numeric keys.
14 Arrow keys Press to view and select options in the menu tree.
15 USB port Connects USB device to scan documents to USB memory.

- 20 -
3. Getting started
This chapter helps you get started using the DocuPrint C2090 FS.
3.1 Placing the DocuPrint C2090 FS
The DocuPrint C2090 FS should be located at a well-ventilated place so that the exhaust gases and heat
generated are not directly blown onto the user’s face. Proper ventilation is necessary to prevent the machine
from overheating.
c
d
e
b
a
Important:
Ensure that the DocuPrint C2090 FS is installed at a location with the following conditions:
• Temperature range 10-32° C, humidity range 15 - 85% (no condensation). Humidity should be 70% or
below at 32° C, and temperature should be 28° C or below at 85% humidity.
• Do not expose the machine to direct sunlight.
• Do not expose the machine to direct draft from an air-conditioner or heater.
Note:
• When using the printer with the bypass tray opened, do not expose the printer to direct sunlight. Doing
so may cause a malfunction connecting power
3.1.1 Power cable
You can load the paper or install the toner cartridge and drum cartridge into the printer after the printer is
switched on.
Important:
• The power cable does not support hot plug. Make sure the power switch is in off position before
connecting the power cable to the printer.
• Connect the power cord to the power cord connector at the back of the printer.
• Connect the other end of the power cord to the power outlet.
Recommend Distance
a 910 mm
b 210 mm
c 830 mm
d 180 mm
e 300 mm

- 21 -
2
1
• Press the power switch of the printer to the <|> position. The toner cartridge carrier rotates and then
stops. The [Load XXXX (the color of the toner) Cartridge] message is displayed on the control
panel.
Note:
• Before removing the power cord from the machine, make sure the power is switched off properly.
3.2 Switching On and Off the Power
3.2.1 Switching on the power
Press the power switch of the printer to the <|> position.
O
ON
When the power is turned on, [Wait...] will be displayed on the control panel.
When turning on for the first time, follow the steps below to configure the setting for time and date.

- 22 -
3.2.2 Switching off the power
1. Make sure that the printer is not processing any data by checking the display on the control panel.
[(mode) Ready]
2. Push the power switch of the printer to the <O> position to switch the power off.
OFF
Important:
• Do not switch off the power of the printer when printing is in progress. It may lead to a paper jam.
• Once the power is switched off, print data remaining in this printer or information saved in the memory
of this printer will be deleted.
• After you switch the power off, wait for 5 seconds before switching it on again.
3.2.3 Setting the time
1. In Copy mode, <Menu> button on the control panel. Press <▼> button four times and press
<Set>.
2. In the Password screen, press <0> four times, press <Set>.
3. In the Network screen, press <►> button once.
4. In the System screen, press set, press <►> button five times.
5. In the Time and Date screen, press <Set>.
6. In the Time Setting screen, set the time by the numeric keys key, press <Set>.
3.3 Setting the environment
3.3.1 Setting the Date
1. Follow steps 3 to 5 in the Time setting section, and then press <►> button once.
2. In the Date setting screen, set the date by the numeric keys and press <Set>.
3. In the Network screen, press the <Copy> button or turn the power off and on.
Remove the DocuPrint C2090 FS from its packaging box and move it to the desired location for
installation.

- 23 -
3.3.2 Setting IP address
1. In Copy Mode, press <Menu> on the control panel. Press <▼> for four times and press <Set>.
2. On the Password screen, press <0> four times, press <Set>.
3. On the Network screen, press <Set>.
4. Select Ethernet, TCP IP, or Protocol with <◄/►> and press <Set>.
5. In the IP address screen, select the desired option <◄/►> and press <Set>.
6. Enter the IP address with the numeric keypad and press <Set>.
7. Need Power off message messages appears within a few seconds.
8. In the Network screen, press <Copy> or turn the power off and on.
Configuration ▲
Need Password
Password ? ▲
Input : ****
Not Match
Match
SET
Password
Invalid
Configuration ▲
Network ◄►
Network Config ▲
Ethernet ◄►
Network Config ▲
TCP/IP ◄►
TCP/IP ▲
IP Address ◄►
IP Address ▲
XXX.XXX.XXX.XXX
Need Power Off
To Enable
SET
SET
SET
MENU
SET
Note:
• For detail instructions on Network configuration setting, please see the chapter 10 troubleshooting
guide, “10.10.10.4 <Menu> key” section
• When you finished IP address change or modify, please switch power OFF then ON again, otherwise
changed IP address will not available.
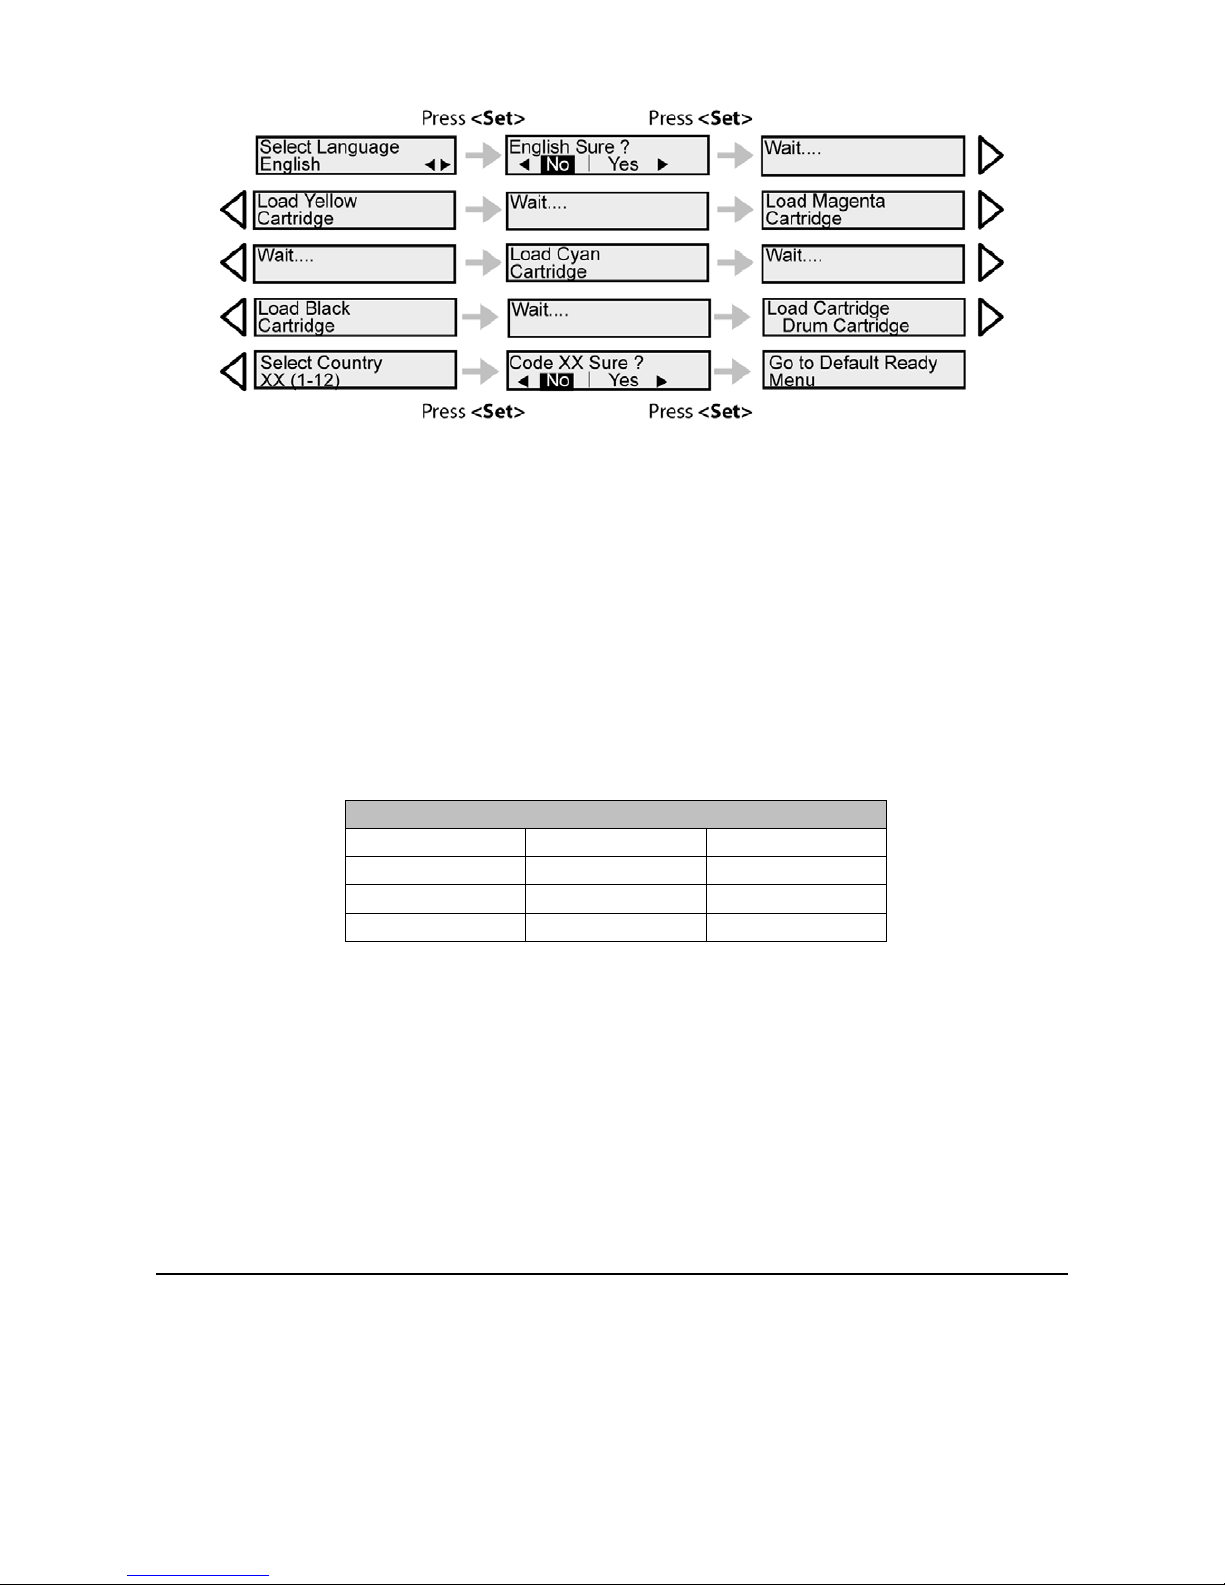
3.3.3 Setting languages mode
Refer to the menu tree below to select the languages and insert the toner cartridges when using the device for
the first time
- 24 -
3.3.4 Setting country code
The DocuPrint C2090FS Fax function requires telecommunication certification by countries. Before you using
DocuPrint C2090FS Fax function, you need configuring the fax setting for location of the certified countries
that offer fax as standard capability.
1. In FAX Mode, press <Menu> on the control panel. Press <▼> to find [Configuration – Need
password?] screen then press <Set>
2. On the password screen, press <0> four times, press <Set>.
3. Press <▼> find out [Configuration – Network] screen.
4. Press <◄/►> to go to [Maintenance – Country code] the press <Set>.
5. Please refer to below table for your country code selection.
6. Press <Set> to confirm your setting
Country Code
1. Hong Kong 5. Singapore 9. Malaysia
2. China 6. Australia 10. Vietnam
3. South Korea 7. New Zealand 11. Philippines
4. Taiwan 8. Indonesia 12. Thailand
3.3.5 Setting subnet mask/gateway address
1. When [IP Address] is displayed, press the <▲> or <▼> button to display [Subnet Mask], then
press the <►> or the <Set> button.
2. Press the <▲> <▼> <►> <◄> buttons to enter the subnet mask, then press the <Set> button.
3. Press <◄> button to return to [Subnet Mask].
4. Press the <▲> or <▼> button until [Gateway Address] is displayed, then press the <►> button.
5. Press the <▲> <▼> <►> <◄> buttons to enter the gateway address, then press the <Set>
button.
6. Switch off the printer and then switch it on again.
Note:
• When “Ready to print“ is displayed, follow steps 1 to 4 in the previous section before proceeding to the
next procedure.
3.4 Power save mode
This printer is equipped with a power saver mode to reduce power consumption when it is left idle.

- 25 -
When no print data is received for 5 minutes, the printer will enter the power saver mode.
When the printer enter power saver mode, only the <Power Saver> indicator lights, the screen on the control
panel becomes dark and all the other indicator goes out. The display also goes out, and nothing is displayed.
3.5 Exiting the power save mode
The printer is automatically cancels the power save mode once it receives data from the computer.
To cancel power saver mode manually, press the <Power Saver> button.
3.6 Installing the toner cartridges
Warning
Never throw a toner cartridge into an open flame. It can cause an explosion and burn injuries.
1. After confirming the [Load XXXX (the color of the toner) Cartridge] message on the control panel,
open the front cover.
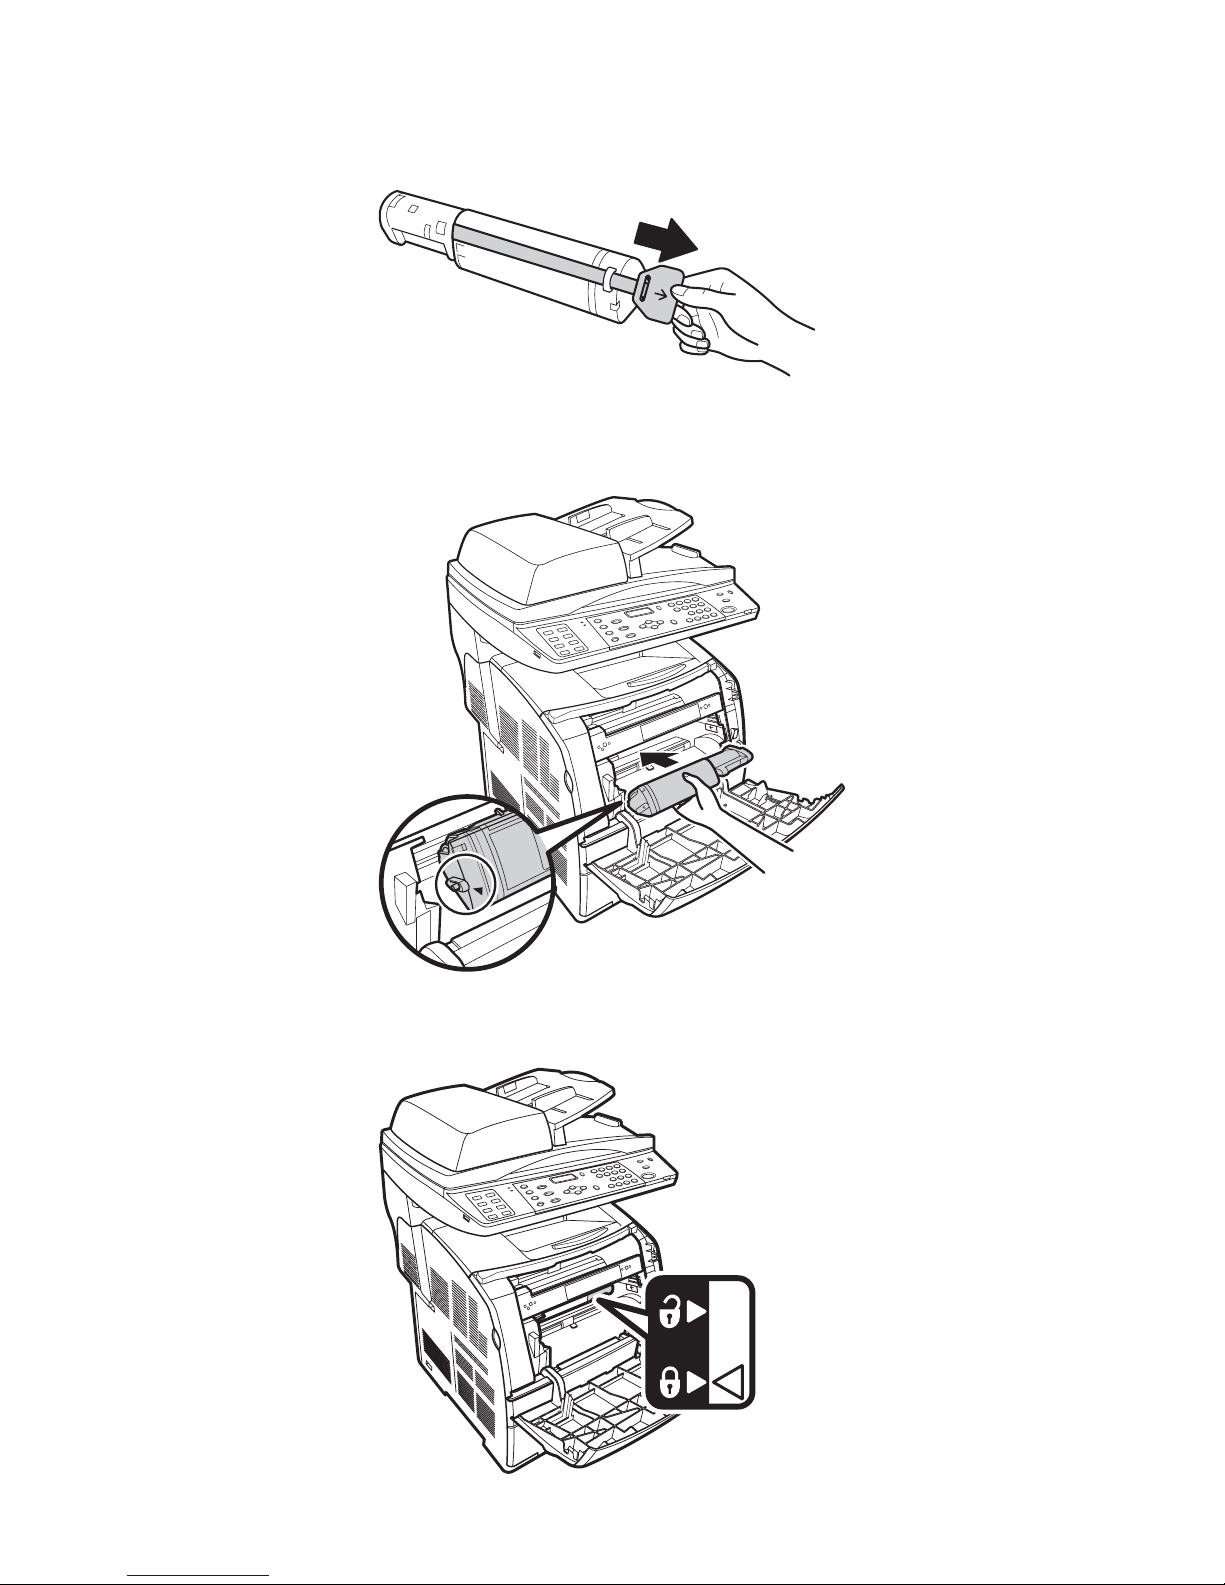
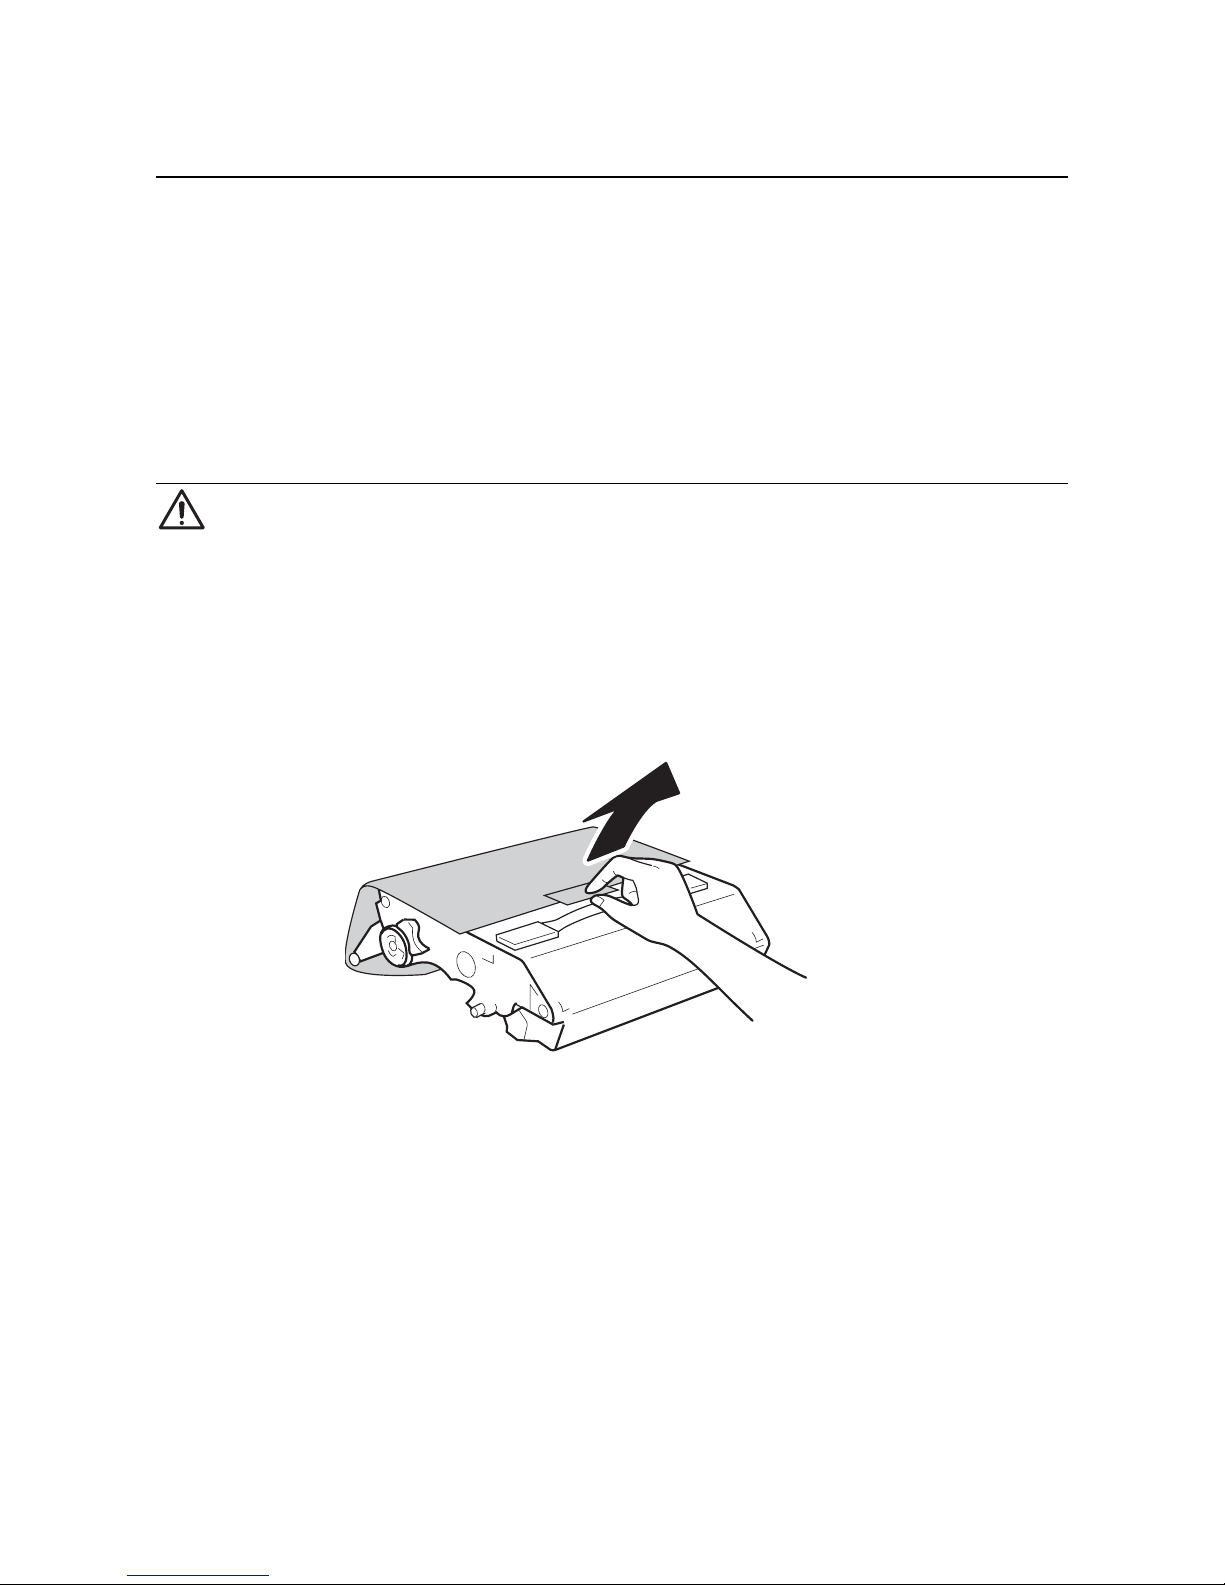
2. Hold the tape and gently pull it forward to remove the protective cover from the toner cartridge.
3. Take the toner cartridge out of the box, and gently shake it several times as shown in the diagram to
distribute the toner evenly.
- 26 -
4. Remove the top part of the seal from the toner cartridge and pull the seal in the direction of the arrow,
keeping it parallel with the toner cartridge.
5. Insert the toner cartridge with the arrow facing you. Push the cartridge all the way into the slot. Push
both sides evenly until it is secure.
6. Push down the side lever to lock the toner cartridge.
- 27 -
7. Close the front cover. The toner cartridge carrier rotates to the next empty slot.
8. Repeat steps 1 through 7 until all cartridges are installed.
Notes:
• The toner cartridge is installed securely when the lock lever cannot be turned further.
• Although the toner is not harmful to your body, wash it off immediately if your hands or clothes are
stained with it.
• The protective cover is attached to each toner cartridge slot at the factory. You only have to remove the
cover from each toner cartridge slot the first time that you install the toner.
• When pulling out the seal, pull it out horizontally. The tape might break if it is pulled out diagonally.
• After the seal has been pulled out, do not shake or bump the toner cartridge.
• Make sure the toner cartridge is installed correctly. Otherwise, the front cover cannot close firmly.
3.7 Installing the drum cartridge
Warning
• Never throw a drum cartridge into an open flame. It can cause an explosion and burn injuries.
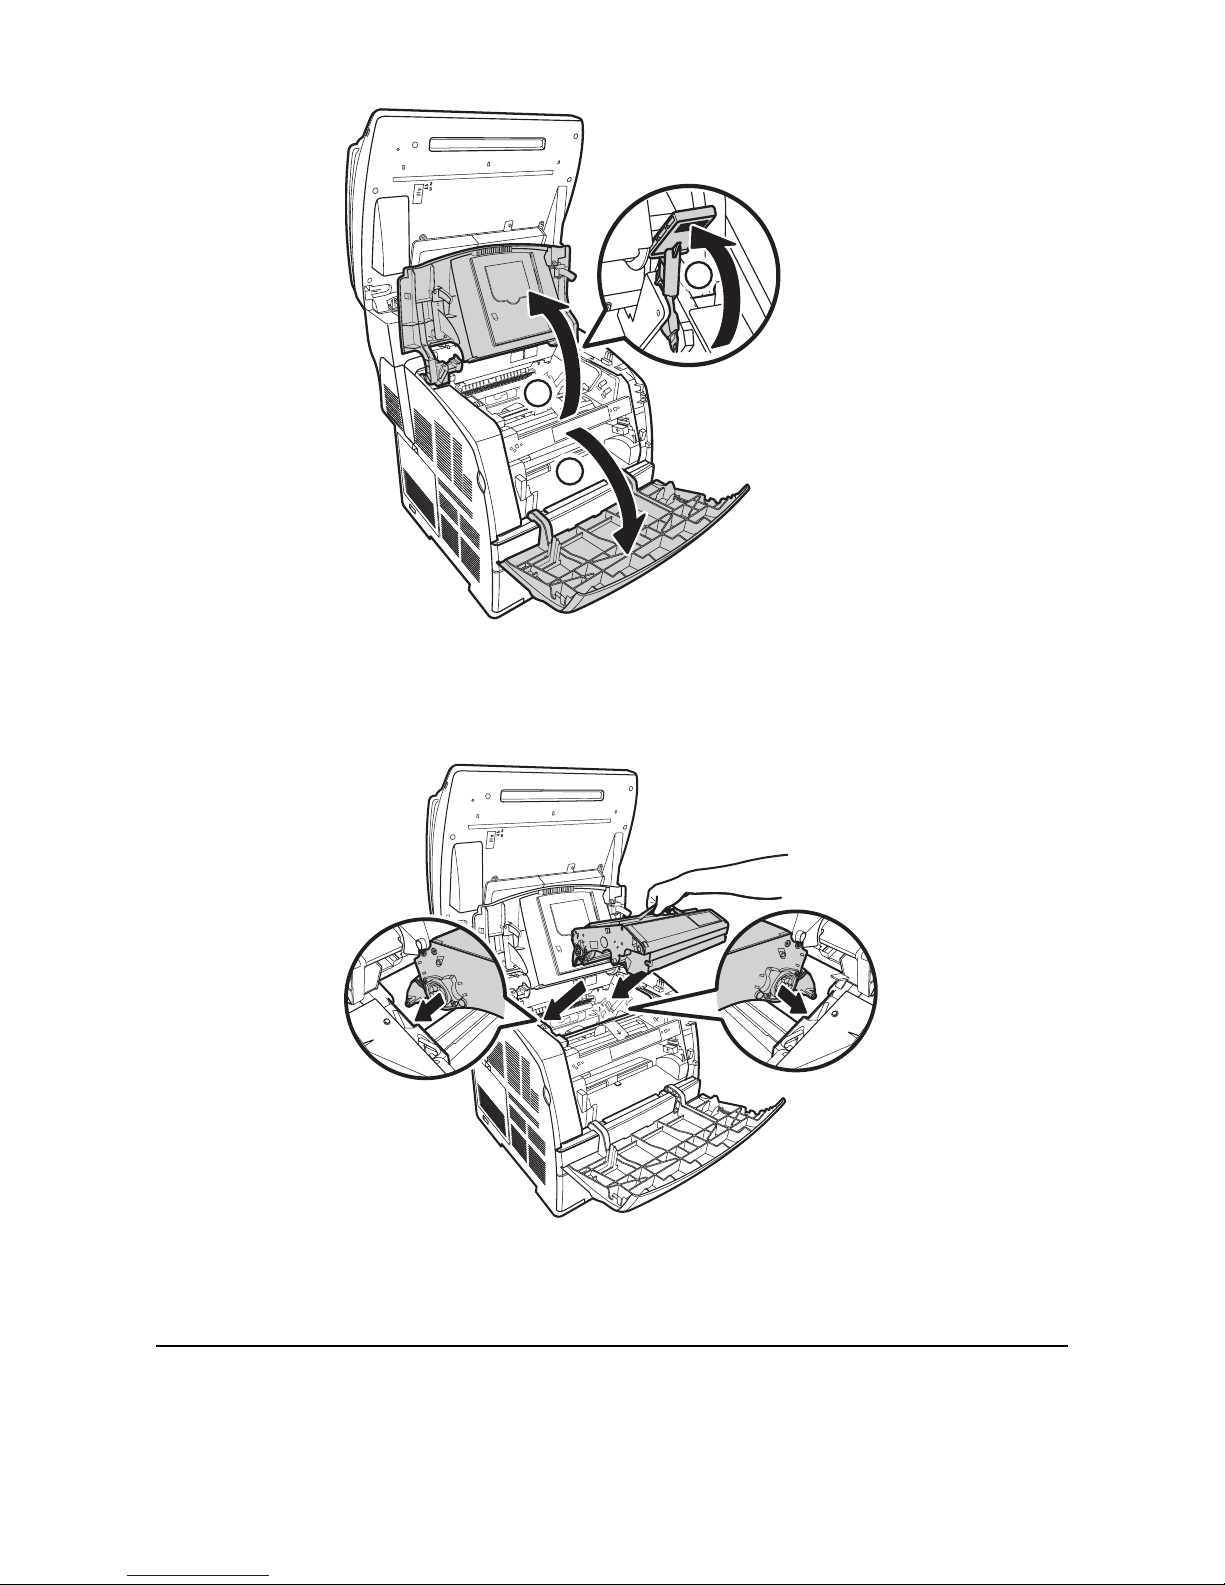
1. When the [Load Drum Cartridge] message is displayed on the control panel, slowly flip back part B
until it stops.
2. Open the front cover, and then lift up the top cover.
3. Take the drum cartridge out of the packaging box, and then remove the protective sheet.
4. To insert the drum cartridge, push up the lever on the right side of the printer.
- 28 -
2
1
3
5. With the lever in the upright position, hold the drum cartridge by the handle, align the arrows on the
drum cartridge with the corresponding arrows on the printer and guide the cartridge in until it snaps
into place.
6. Pull down the lever on the right to lock the drum cartridge in place. Flip down the top cover, and then
close the front cover.
7. Slowly push down part B to its original position.
Notes:
• Hold the drum cartridge by the handle. Do not touch the surface of the drum (blue colored part). Also,
never allow any material to hit or rub the surface of the drum.
• Do not expose the drum cartridge to direct sunlight or strong light.
• To ensure good print quality, always keep the drum cartridge level when handling it.
- 29 -
• After installing the drum cartridge, the printer makes an adjustment for about one to two minutes. Do
not switch off the printer during this time.
3.8 Installing extra memory
Memory expansion to 256 MB is supported for this printer. When additional memory is installed, the total
memory capacity becomes 352 MB respectively. This total 352MB memory size is included front-end and
back-end memory.
Important:
• Do not touch the connectors of the additional memory module
• Do not bend or damage the additional memory.
• Be sure to touch a metal surface to eliminate static electricity before touching the additional memory
with your bare hands.
To add more memory when the printer is in use, you need to configure the memory capacity in the print driver.
For details, refer to the Online Help for the print driver.
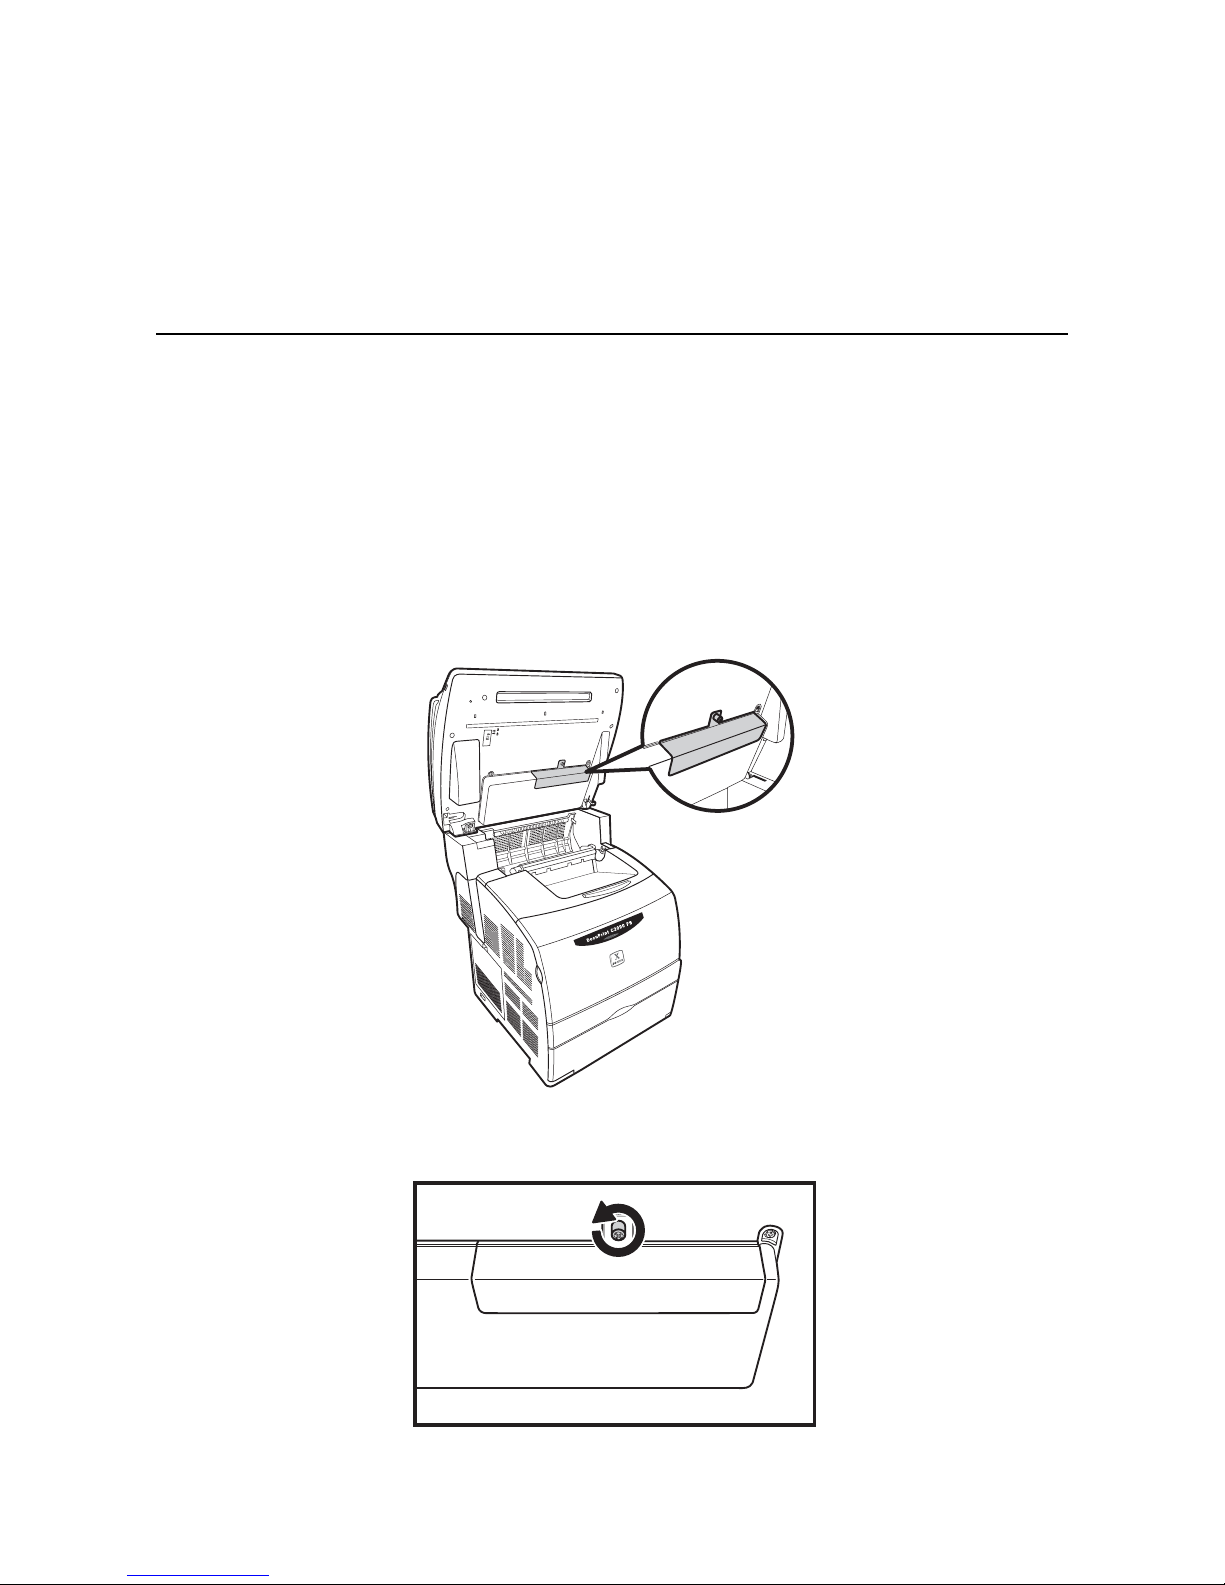
1. Make sure the machine is turned off when adding or removing the SDRAM module.
2. Slowly flip up part B, you will find the cover of the memory slot.
3. To open the cover, release the screws, and then pull the cover out of the printer.
- 30 -
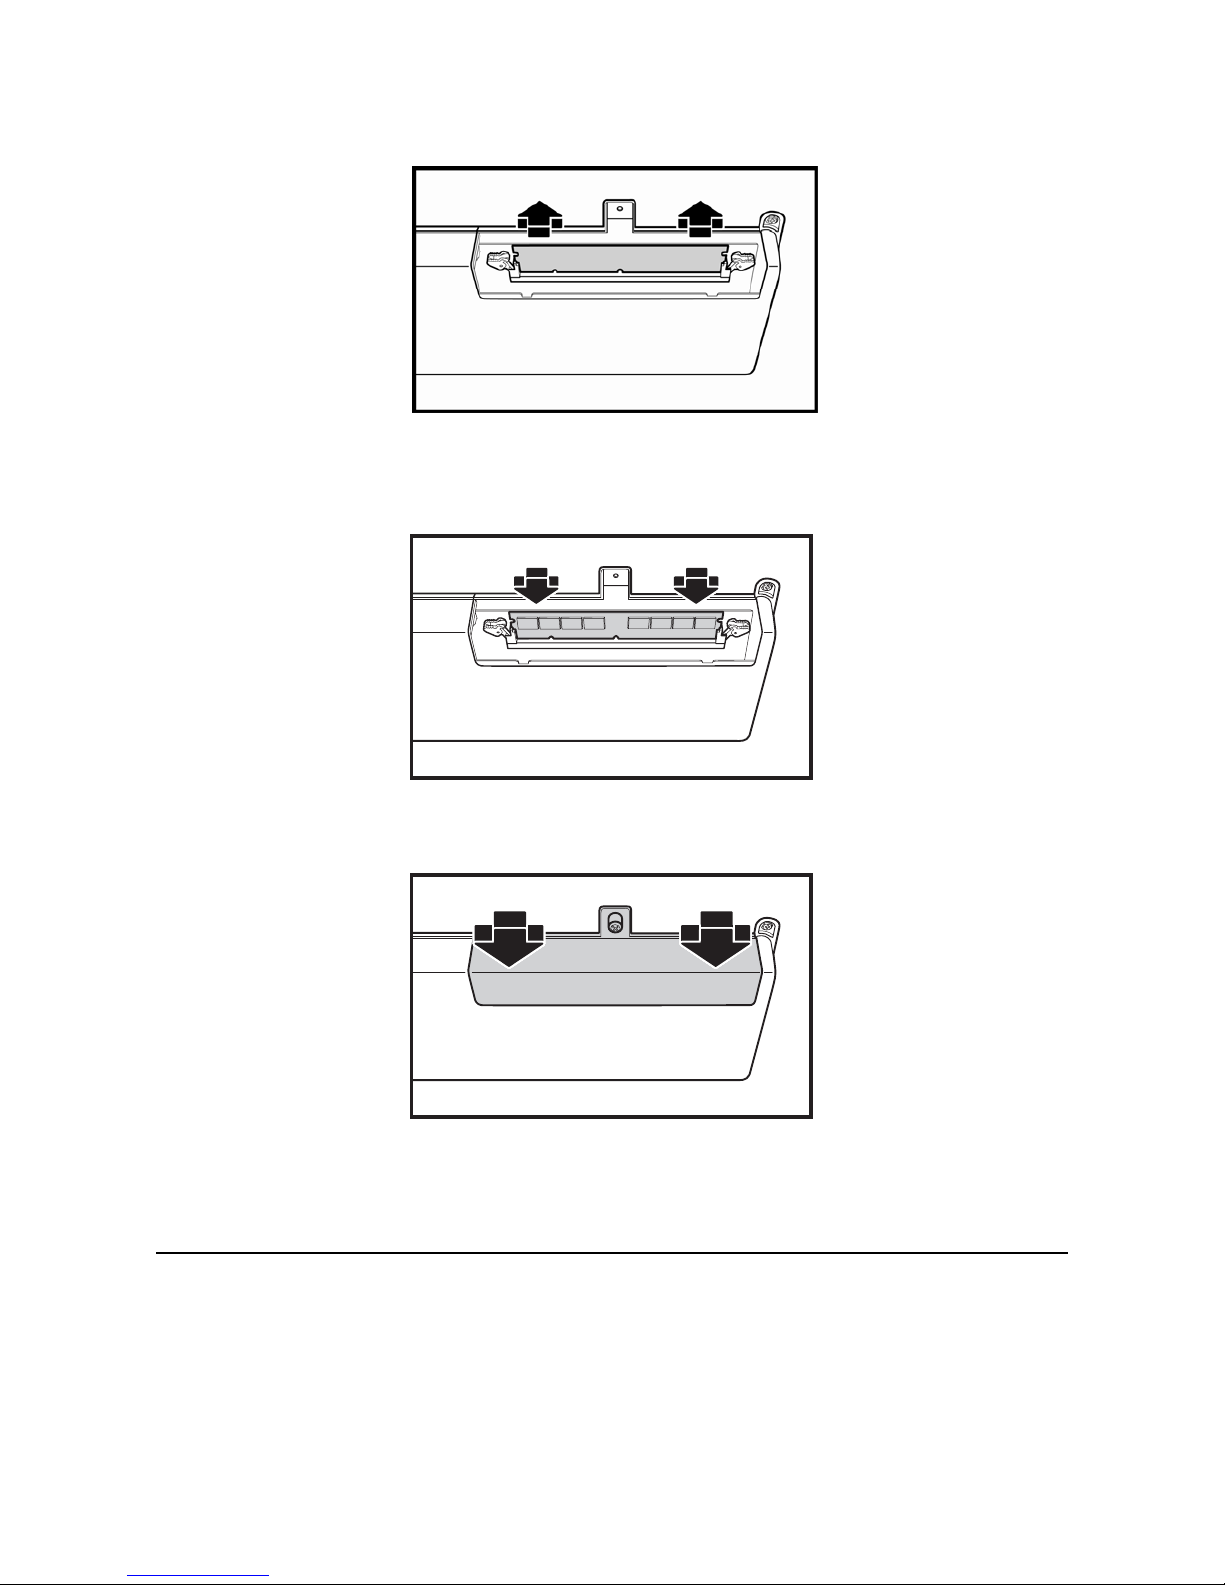
4. Before you insert additional memory to machine, please remove presented dummy DIMM card, firstly.
5. Hold the additional memory so that the notch is aligned with the protrusion on the slot, and insert the
additional memory into the slot firmly.
6. Reattach the cover to the printer.
7. Slowly flip down part B to its original position.
Notes:
• Dummy DIMM card is default set for DocuPrint C2090FS
• Insert the additional memory firmly by pushing it from the top.
• We recommend you to use our verified additional memory module, please refer the 11.2 section
indicated product code information, other third parties memory product is not be guarantee complete
compatible with Docuprint C2090FS.
 Loading...