

Page 1

QUICK GUIDE
DC 236/286/336
Online Support: www.fujixerox.com.my/support
Website : http://www.fujixerox.com.my
PRINTED BY FUJI XEROX OFFICE COLOR PRODUCT
Version 1.0 updated Nov 2006
Page 2

INTRODUCTION
The main objective of compiling this Quick Guide is to serve
as an easy reference to customers. We understand customers
are tight up with daily schedules and can only learn up limited
machine feature in the training sessions. Thus, we hope this Quick
Guide will provide you with all the essential feature should you
encounter any operation problems with the machine.
Kindly contact the following number :
For General Service & Supplies
Toll Free : 1-300-88-1163
Or
To contact us kindly email to us at:
mysallcto@mys.fujixerox.com
Page 3

TABLE OF CONTENTS
Section A: Copy Features
1. 2-Sided Copy
2. IC Copy – 2 Methods
3. Reduce / Enlarge
4. Finishing
5. Edge Erase
.
6. Margin Shift.
7. Book Copying
8. Multi-Up
.
9. Booklet Creation
10. Repeat Image + Original Size
Section B : Fax Feature
Section C : Scan to FTP / SMB Feature
Section D : Scan to Mailbox Feature
Section E : Printing Features
Section F : Maintenance
1. Checking Billing Meter
2. Checking Consumables Status
3. Replacing Toner Cartridge
4. Replacing Waste Toner Container
5. Clearing Paper Jams
Online Service & Support Request
Online Support Assistant
Page 4

Section A: COPY
2-Sided Copying
Steps: 1. Load document on feeder
2.Goto [Scan Options Tab]
3. Select required options:
1Æ 1Sided
Makes a copy of a 1 sided document on one side of the paper.
1Æ 2 Sided
Makes a copy of a 1 sided document on both sides of the paper.
2Æ 2 Sided
Makes a copy of a 2 sided document on both sides of the paper.
2Æ 1Sided
Makes a copy of a 2 sided document on one side of the paper.
4. Press Start
Page 5

IC Copy – 2 methods
I.) Copy IC both sides on the same page
1. Goto [Basic Copying Tab] – Select A4 Paper (Portrait) – Press Save
2. Goto [Image Quality Tab] – Select Original Type: Text/Photograph – Press
Save
3. Put IC onto platen glass (Top Left corner) and press Start
4. Take the printed copy and load it to Tray 5 (Bypass)
(Note: Do not change paper order)
5. Open the Cover and Flip IC to the opposite point of A4, press Start
II.) Copy IC both sides front and back page
1. Goto [Basic Copying Tab] – Select A4 Paper (Portrait) – Press Save
2. Goto [Image Quality Tab] – Select Original Type: Text/Photograph – Press
Save
3. Goto [Scan Options Tab] – Select 2 Sided – Change to 1Æ 2 – Press Save
4. Load the first side of your IC onto platen glass (Top Left corner) and
press Start
5. Open the Cover and Flip IC to the opposite point of A4, press Start
Page 6

Reduce/ Enlarge
(Allows to select/specify the reduction/enlargement ratio within range of 25 - 400%)
Steps: 1. Load document on feeder
2. Goto [Basic Copying Tab]
3. Select Reduce / Enlarge
4. Select copy ratio
5. Select Save
6. Press Start
¨ 100%
Copies are made at the same size as the original document.
¨ Auto%
The copy ratio is automatically set based upon the document and paper
sizes, and the document is copied to fit in the selected paper.
¨ Presets % (7 Types)
Select from among 7 preset ratios.
¨ Variable %
You can enter any ratio for copying. Set the ratio within the range from 25 to
400% in 1% increments.
Page 7

Finishing
(Allows to sort copy outputs collated or uncollated)
Steps: 1. Load document on feeder
2. Goto [Output Format Tab]
3. Select Finishing
4. Select required options
5. Select Save
6. Press Start
¨ Auto
Copies are output collated
¨ Collated / Stapling / Punching
The machine can output sheets sorted into sets that are arranged in page order.
¨ Uncollated
The machine can output the specified number of copies and sort sheets by page
Page 8

Edge Erase
(To erase shadows/unwanted marks e.g. hole punch from edges or centre of page)
Steps: 1. Load document on feeder
2. Goto [Scan Options Tab]
3. Select Edge Erase
4. Change the default from Normal to Edge Erase
5. Use the arrow up or down button to set the amount of area to
be erased
6. Select Save
7. Press Start
Margin Shift
(Allows to change the position of the image on an output page)
Steps: 1. Load document on feeder
2. Goto [Scan Options Tab]
3. Select Image Shift/Variable Shift
4. Select any items for image shift options
- Auto Center; Corner Shift or Variable Shift
5. Select Save twice
6. Press Save
Page 9

Bound Original
(To copy bound documents using document glass into 2 separate pages)
Steps: 1. Open and place book at top left on the platen glass
2. Goto [Scan Option Tab]
3. Select Book Copying
4. Select required option
- Left Page then Right OR Right Page then Left
5. Select Save
6. Press Start
Multi-up
(To copy 2, 4 or 8 documents onto 1 sheet of paper. Document Centre will
automatically reduce/enlarge the images)
Steps: 1. Load document on feeder
2. Goto [Output Format Tab]
3. Select Multiple-Up
4. Select 2up, 4up or 8up
5. Select required Image Order
6. Select Save
7. Press Start
Page 10

Booklet Creation
(To print the images side by side on both sides of each pages in the correct order to make
a booklet. Fold the copies in half and staple in the middle to create a finished booklet)
Steps: 1. Load document on feeder
2. Goto [Output Format Tab]
3. Select Booklet Creation
4. Select Left Bind/ Top Bind or Right Bind
5. Select Save
6. Goto [Basic Copying Tab]
7. Select paper tray that contains of Landscape paper
9. Press Start
Repeat Image + Original Size
(Print original image repeatedly on one sheet of paper)
Steps: 1. Load document on platen glass
2. Goto [Output Format Tab]
3. Select Repeat Image
4. Select Auto Repeat
5. Select Save
6. Goto [Scan Options Tab]
7. Select Originals Size
8. Set document size using left-right for value “X” and top-bottom
for value “Y”
9. Select Save
10. Press Start
Page 11

Section B: FAX
Keypad Dialing
(Direct Dialing using numeric Keypads)
Steps: 1. Load document(s) onto the Document Feeder
2. Enter fax number using numeric keypad
3. Press Start
One Touch Dialing
(Using Speed Dial Number for pre-programmed fax number)
Steps: 1. Load document(s) onto the Document Feeder
2. Select Speed Dial number using One Touch Keypad
3. Press Start
Dial Directory
(Search by pre-programmed Recipient’s Name from the Address book)
Steps: 1. Load document(s) onto the Document Feeder
2. Select Dial Directory
3. Select Recipient’s Name
4. Press Start
Page 12

Broadcast Send
(Transmitting fax to multiple destinations)
Steps: 1. Load document(s) onto the Document Feeder
2. Enter Fax number using:
- Numeric keypad
- One Touch Dial Button
- Speed dial
3. Select Next Recipient to add new recipients.
4. Repeat steps 2 - 3 until all numbers are entered.
5. Press Start
Note: Max number of recipients specified at one time is as follow:
- using numeric keypad : 200 locations
- using address number : 500 locations
- using numeric keypad + address number : 699 locations.
Programming Fax Address Book (Speed Dial)
Steps: 1. Select All Services Screen
2. Select Setup Menu - Select Address Book
3. Select an Address Number (e.g 001, or 002..[not in use] )
4. Press [Create / Delete]
5. Select Address Type – Press [Change Settings]
6. Select Fax option - Press Save
7. Select item Fax Number - Press [Change Settings]
8. Enter Fax Number - Press Save
9. Select item Recipient Name - Press [Change Settings]
10. Key in Recipient Name - Press Save
11. Select item Index - Press [Change Settings]
12. Enter a single alphanumeric character - Press Save
13. Press Save to save current entry
14. Repeat Step 3 to Step 13 to add new numbers -orPress Close to Exit Setup Address Book
Page 13

Programming Group Send
(Max 50 Groups containing 20 addresses can be registered)
Steps: 1. Select All Services Screen
2. Select Setup Menu - Select Group Send
3. Select a Group Number (e.g. #01; #02..)
4. Press [Create/Delete]
5. Use numeric keypad to enter the 3-digit Address
number (e.g 001) and Press [Add]
6. Repeat Steps to continue registering fax number into the
group
7. Press Save to Exit Setup Group Send Menu
Transmission Report
(To activate transmission report option in order to print a deliver ed/undelivered report
after transmission)
Steps: 1. Load document(s) onto the Document Feeder
2. Enter fax number
3. Go to Send Option Tab - Select Transmission Report
4. Select On and press Save
5. Press Start
* A transmission report is automatically printed when the transmission completes.
Page 14

2-sided Originals
(transmitting both sides of documents automatically)
Steps: 1. Load document(s) onto the Document Feeder
2. Enter fax number
3. On the Basic Features Tab - Select 2-sided Originals
4. Select the required option (H to H / H to T)
5. Press Save
6. Press Start
On-Hook Dialing
(Use this feature when using Manual Send or for troubleshooting line)
Steps: 1. Load document(s) onto the Document Feeder
2. Enter fax number
3. On the On-Hook/Others Tab
4. Select On-Hook (Manual Send/Receive) button
5. Enter Fax Number and wait for connection.
6. Press Start button once connected to transmit fax..
7. Press Exit (Line Cut) button to hang up
How to Cancel A Fax Job
Steps: 1. On the Control Panel of the machine
2. Press [Job Status] Button
3. Select the fax job to be cancel
4. Press Stop button on the touch screen
5. Press Exit
Page 15

Section C: SCAN TO PC (FTP/SMB)
Scan to PC (FTP/SMB) – From Address Book
Steps: 1. Press All Services button
2. Select Scan to FTP/SMB
3. Select Address Book
4. Select Recipient Name
5. Select Save
6. Under [Basic Scanning Tab], select File Format
7. Goto [Output Format Tab]
8. Select File Name (example: PDF)
9. Key in File Name
10. Select Save
11. Press Start
Page 16

Section D: SCAN TO MAILBOX
Scan to Mailbox
(This feature scan and save document(s) on the machine mailbox an import/retrieve
scanned documents using specific program.)
Steps: 1. Press All Services button
2. Select Scan to Mailbox
3. Select your own Mailbox Number
4. Goto [Scan Options Tab] to change optional settings:
- Select 2 sided originals (Head to Head)
- Select Scan Size
- Select Reduce/Enlarge
5. Goto [Output Format Tab]
6. Select Document Name
7. Key in Document Name
8. Select Save
9. Press Start
Retrieving / Importing Scanned Documents
Steps: 1. Go to START > PROGRAMS > FUJI XEROX > UTILITY >
MAILBOX VIEWER2
2. Identify the scanner (by printer name) and press Select
Scanner button
3. Enter your Mailbox Number into the text box (e.g. 1)
4. Enter your 4-digit password (if any)
5. Click on Open Mailbox button
6. Click ‘Import’ to import the scanned file
7. Select Close button once completed file transfer
8. By default the Scanned documents are stored in
My Documents folder, Fuji Xerox, Network Scan
Page 17

Section E: PRINTING
Printing Job Types
Main Features
1. Normal Print
To print documents from your PC as a normal print job
2. Secure Print
Allows you to set user ID and password for the document on your
PC. When send for printing, it temporary stores the documents on
the machine and only prints out when you select your user ID and
password on the physical machine
3. Sample Print
Before printing multiple sets of a document, you may print one
sample set for trial before proceeding the next sets
4. Delay Print
Allows you to print your documents at a specific time
Page 18
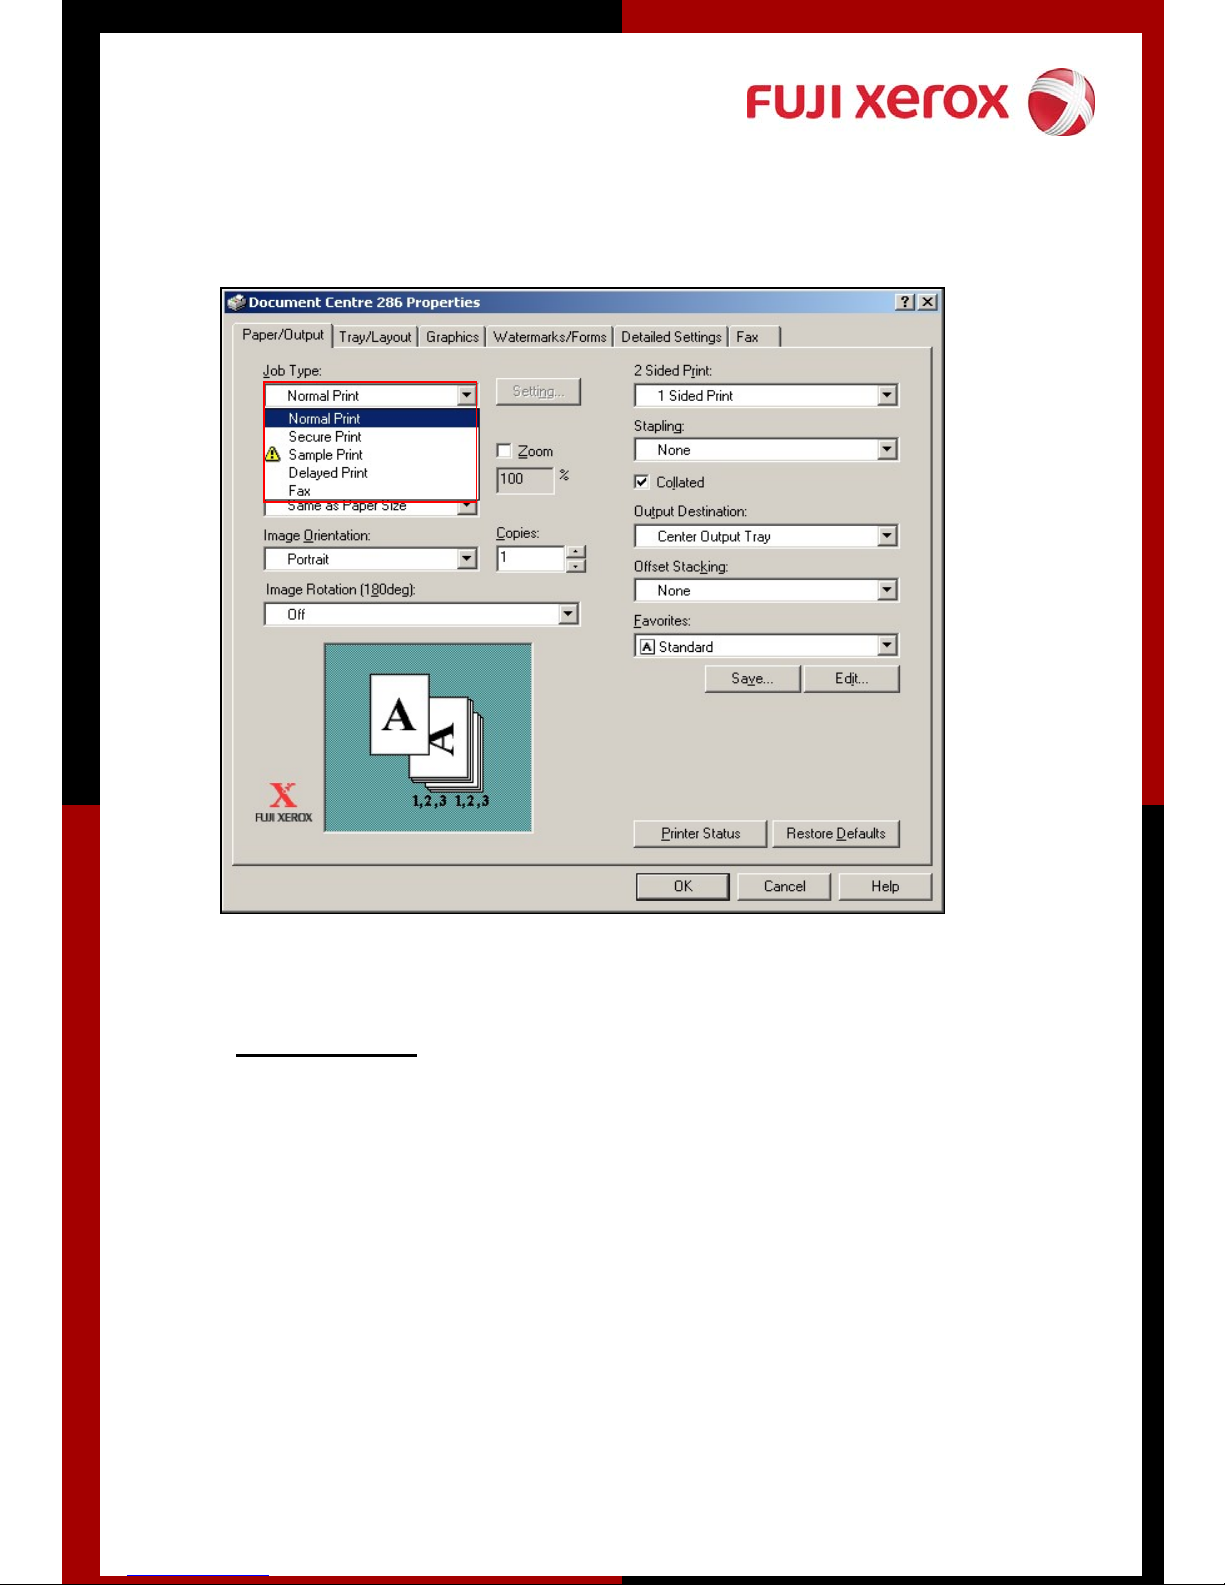
Normal Print
Steps : 1. Go to File, Select Print
2. Select Printing Preferences
3. Under Job Type, Select Normal Print
4. Select OK
Page 19

Secure Print
Steps : 1. Go to File, Select Print
2. Select Printing Preferences
3. Under Job Type, Select Secure Print
4. Under Secure Print Message Box, key in:-
-User ID
- Password
- Document Name
Secure Print (Document Retrieval)
Steps: 1. Select Job Status Button (at the machine)
2. Click Stored Documents
3. Select User ID
4. Select Document List
5. Key-in Password and Confirm
6. Select Job and Print
Page 20

2-sided Print
Steps : 1. Go to File, Select Print
2. Select Printing Preferences
3. Under 2 Sided Print, Select Flip on Long Edge or Short Edge
4. Select OK
Note: Flip on Long Edge is known as Head to Head
Flip on Short Edge is known as Head to Toe
Page 21

Multi-Up
Multiple Up
Booklet Creation
Steps : 1. Go to File, Select Print
2. Select Printing Preferences
3. Goto [Tray/Layout Tab]
4. Select Multiple-Up (1Up to 32 Up)
5. Select OK
Page 22

Booklet Printing
Steps : 1. Go to File, Select Print
2. Select Printing Preferences
3. Goto [Tray/Layout Tab]
4. Select Booklet/ Poster/ Mix Document/ Rotation
5. Select Booklet Creation Option Button
6. Select OK to the pop-up message box
7. Select OK
Page 23

PC Faxing
1. On your document, Select File Menu - Select Print
2. Select printer Document Centre 236/286 - Select printing Properties
3. On the Jobs Type list – Select FAX
4. Click OK on all open windows
5. The Fax Recipient dialog box appear.
Fuji Xerox
1
Fuji Xerox
79567011
2
Fuji Xerox <79567011>
6. Enter Recipient Name and Fax
Fuji Xerox <79567011>
Number into the respective field
7. Press “To->” button.
9. Repeat step 8 & step 9 to add
more recipients
10. Press OK
11. On the Fax Job Confirmation
box, check Delayed Send (if
necessary) or Click OK to
proceed.
Page 24

Watermarks
1. Go to File Menu of your document - Select Print
2. Select Document Centre 236 or 286
3. Select Printing Properties
4. Select Watermarks/Forms tab
5. Select Required Watermark (e.g Confidential / Copy Prohibited)
Or Click New Text to enter user defined text as required.
6. Click OK on all open windows
Page 25

Section F: Maintenance
Checking Billing Meter
1. Press <Machine Status> button on the control panel.
2. Select Billing Meter/Print Report Tab
3. Select Billing Meter
4. Press Close button once done
Notes:
Serial Number – Displays the serial number of the machine
Meter 1 – Total Meter 2 + Meter 3 + Meter 4
Meter 2 – Number of copies
Meter 3 – Number of prints
Meter 4 – Number of fax
Page 26

Checking Consumables
You can check the status of consumables in the [Consumables] screen.
The status of consumables is shown as "Ready", "Replace Soon", or
"Replace Now". For toner, the amount is shown in percentage (0 to
100%).
Steps: 1. Press <Machine Status> button on the control panel
2. Select Consumables Tab
3. Press Close button once done
*Consumables Status Reminder:
REPLACE SOON: To Order New Cartridges
REPLACE NOW: To Replace Immediately and Place New Order for
Standby
Page 27

Replacing Drum Cartridge
1 2
Open the front cover of the machine Lift lever to open Cover A
43
Lift orange lever. Slide out the drum Remove new cartridge from the box.
cartridge slowly. Hold orange handle and Place cartridge strai ght in position as
remove the cartridge from machine. shown. Slide it into the slot until it clicks.
Close Cover A until it latches. Close front cover.
65
26
Page 28
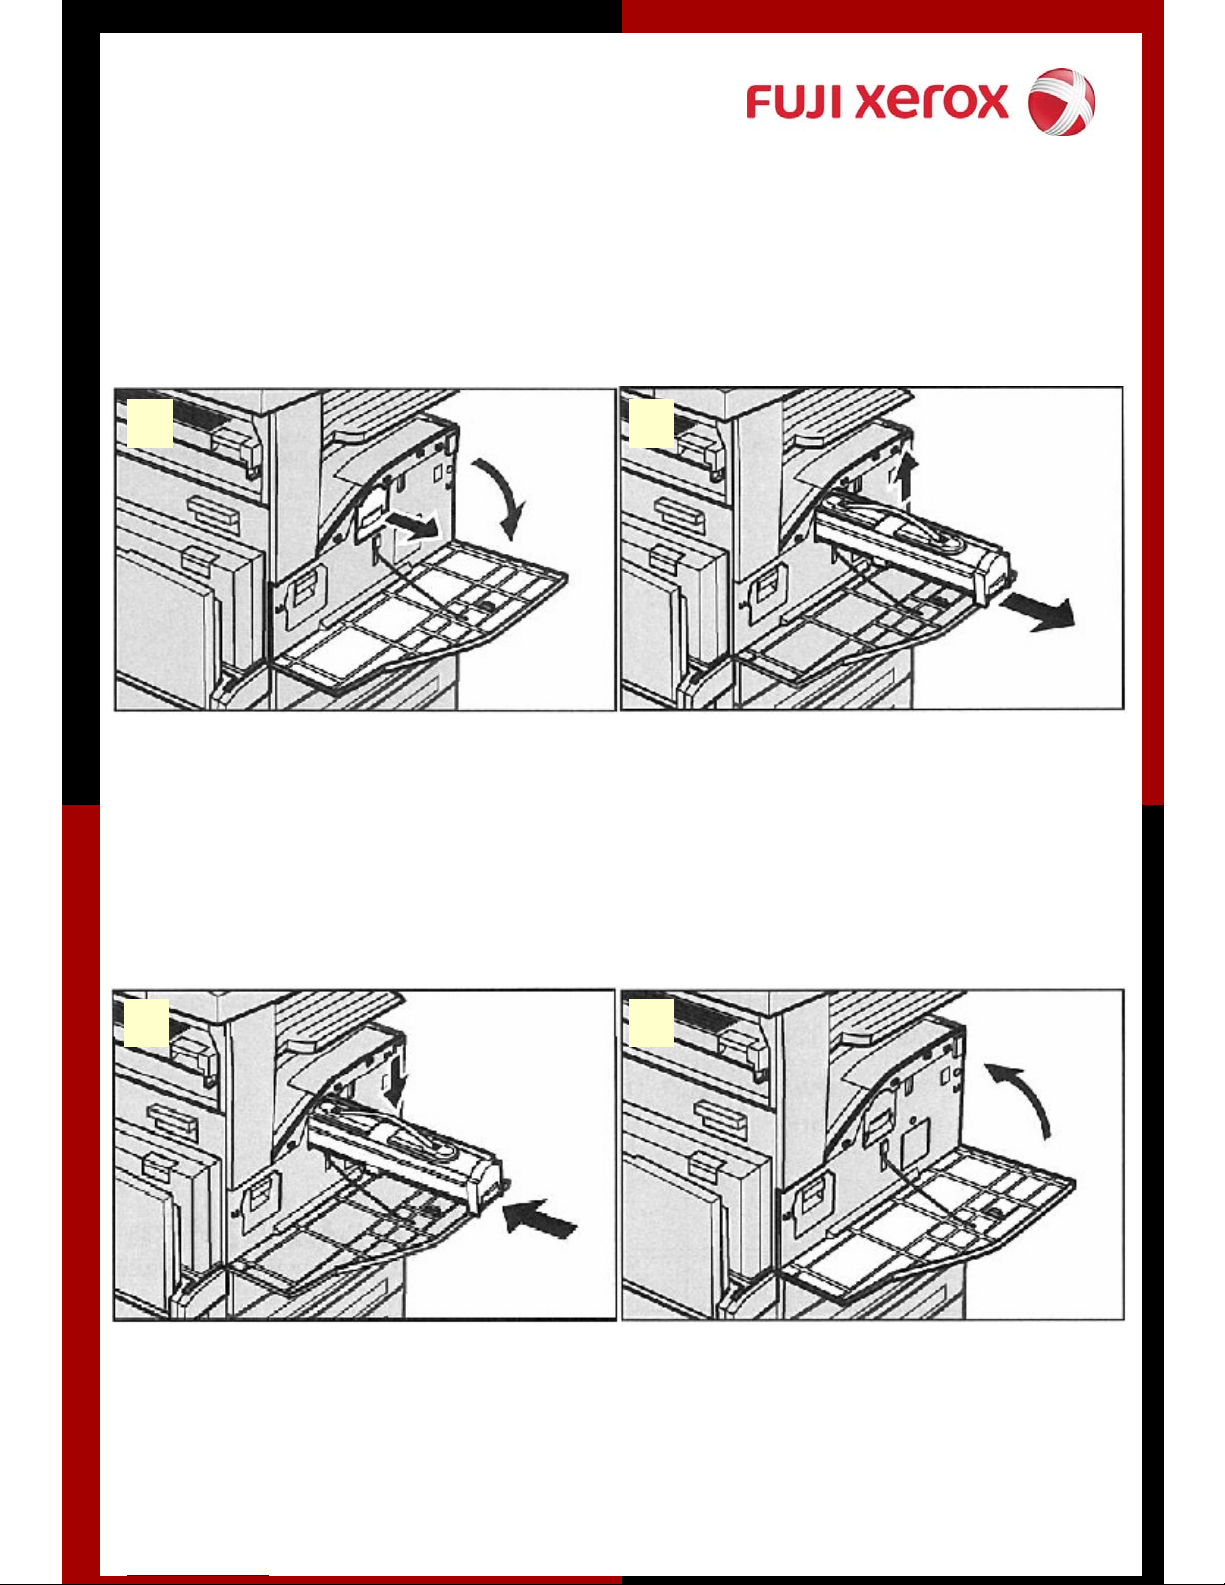
Replacing Toner Cartridge
1 2
Open the front cover of the machine Pull the toner cartridge out until you
can lift the handle on top of the
cartridge. Hold the handle and remove
the cartridge from the machine.
3 4
Slide the new toner cartridge into the Close the machine front cover.
machine until it clicks
27
Page 29

Paper Jams in Cover A
Open Cover A
Clearing Paper Jams
A1
A2
If the jammed paper is inside the fuser If the edge of the jammed paper does
unit, rotate the green lever A1 in the not reach the fuser unit, remove the
direction of the arrow to pull the paper paper in the direction of the arrow.
out of the fuser unit from the top.
A3
A4
If the jammed paper is inside the fuser If the jammed paper is found
unit, rotate the green lever A2 in the behind the fuser unit, carefully remove
direction of the arrow to open the fuser it from the machine
unit cover.
Note: Do not touch the fuser unit because it
may be hot.
28
Page 30

Clearing Paper Jams
Paper Jams in Cover B
B1 B2
If the jammed paper is inside Cover B Remove the jammed paper. Close
open Cover B while lifting up the Cover B until it latches.
the release lever.
Paper Jams in Cover C
C1 C2
If the jammed paper is inside Cover C Remove the jammed paper. Close
open Cover B while lifting up the Cover C until it latches.
the release lever.
29
Page 31

Clearing Paper Jams
Paper Jams in Cover D Paper Jams in Cover E
D1 E1
Open the Cover D while lifting up the Open the bypass tray, and then open
release lever. Remove jammed paper Cover A while lifting up the release
and close Cover D until latches. Lever.
E2 E3
Lift up the handle to open Cover E. Remove the jammed paper & close
Cover E until it latches. Close bypass
tray.
30
Page 32

Clearing Paper Jams
Document Jams in Document Feeder
DF1 DF2
Open the document feeder cover, then If a 2-sided document is jammed
remove the jammed document. Turn underneath the inner cover, open it
the green wheel to feed the jammed and turn the green wheel to remove
document out of the document feeder. document. Close inner cover and close
Close document feeder cover document feeder cover.
Paper Jams in the Bypass Tray
Remove jammed paper in the bypass tray.
Note: Please remove staples & paper clips before inserting paper into the Trays
31
Page 33

1
Log onto www.fujixerox.com.my
& Select Online Support Assistant
3
Type a problem & search
2
4
You’ve got the solution !
Select product
Feedback from you !
5
Select ‘Contact Xerox Support’ if
you can’t find a solution - you
can report your problem online
34
Page 34

Online Service & Support Request
1
2
Log onto
www.fujixerox.com.my
& Select Service & Support
Request
Input the machine’s info
Another service to bring us closer to you
Another service to bring us closer to you
Upon receiving your request by
FXM Call Center, the request
will be logged into our system
and you will be notified through
e-mail with a report number.
Benefits :
1. No phone call is
require
Submit your request-
3
You’ve done it !!
2. No more
waiting/holding on
the phone line
3. Your call will be
logged into our
service system on
time
Fuji Xerox Asia Pacific Pte. Ltd.
Call Center Manager
Page 35

SAFETY NOTE
ITEM DO DON’T
1.Sharing of Supply socket One socket for one plug Do not share socket with
heavy load unit. Do not use
cable extension/multiple
socket extension.
2.Power cord length Proper length to allow
certain loosening
3.Power cord routing Avoid obstruction. Keep away
4.Power cord surface
condition
5.Ground/Earthing Do not use 2-pin plug type
6.Condition of Plug/socket Discard if found cracked/
Do not allow cable pull to
tension
from combustable/water/
twisting around table& chair
Discard if surface found
stripped
/exposed/cracked/burnt
without grounding wire
discolored/deterioration/defor
med
7.Plug/socket contact Ensure plug & socket are
tightly connected.
35
Page 36

Fuji Xerox Malaysia HQ
Fuji Xerox Asia Pacific Pte Ltd
Malaysia Operations Headquarters
No 10 Jalan Bersatu 13/4, 46200 Petaling Jaya, Selangor
 Loading...