

Fujitsu Technology Solutions MOB75001 User Manual

Introduction
Innovative technology and ergonomic design make this notebook the ideal user-friendly and reliable
travel companion. Your operating system is pre-installed on the hard disk to facilitate the procedure
when you use your notebook for the first time.
The energy-saving processor and the energy-saving functions that can be configured allow you to use
the battery capacity of your notebook effectively. By using an additional battery instead of the disk
drive, you can double the notebook’s mobile operation time.
Your notebook has 32 - 192 MB of main memory installed, depending on the upgrade level. Data is
saved on an Enhanced-IDE hard disk drive. Your notebook is also equipped with a 3 1/2" floppy disk
drive and a CD-ROM drive. In addition, your notebook can be equipped with a DVD drive or with a 2
hard disk drive. Two PC card slots (CardBus or PCMCIA) enable the notebook to operate two type II
PC cards or one type III PC card.
For mouse control the notebook provides a touchpad. A double-touch directly on the touchpad is all
that is needed, for example, to open an application.
Your notebook has connectors for external devices such as, e.g. external monitor, printer and mouse.
The parallel port (which supports ECP and EPP modes) is designed to accommodate bi-directional
data transfer. You can connect peripherals such as, e. g. scanner, loudspeakers, gamepads, keyboard
or mouse via the USB interface.
The notebook disposes of a infrared interface for wireless data transfer.
In addition, the notebook has a connection port for a MobiDock or a QuickPort.
An audio controller, two loudspeakers, a microphone, an audio input and output and a loudspeaker
output provide your notebook with an audio capability. You can thus incorporate voice, noise effects
and music into your notebook environment. You can also connect an external microphone and an
external loudspeaker.
The system settings of the notebook can be configured via the user-friendly
Certain system settings (e.g. screen display, power-management functions) can be modified via
various key combinations while you are using the notebook.
Your notebook has a number of security features to ensure that no unauthorized persons can access
your data. For example, you can activate a screen saver with password protection. The security
functions in the
This Operating Manual tells you how to put your notebook into operation and how to operate it in daily
use.
Further information on this notebook is provided:
in the "Safety Notes" manual which is included with your notebook
•
in the documentation of your operating system
•
on the SCENIC Mobile CD "Drivers & Utilities"
•
in the information files (e. g.
•
on the Internet under
•
BIOS Setup
also allow you to protect your data by means of passwords.
*.TXT, *.WRI, *.DOC, *.HLP
www.sni-pc.de/drivercd
)
BIOS Setup
program.
ndd
A26391-K84-Z100-1-7619
1

Introduction Notational conventions
g
Notational conventions
The meanings of the symbols and fonts used in this manual are as follows:
Pay particular attention to texts marked with this symbol. Failure to observe this warning
endangers your life, destroys the notebook, or may lead to loss of data.
!
This symbol is followed by supplementary information, remarks and tips.
i
Texts which follow this symbol describe activities that must be performed in the order shown.
²
Texts in this typeface
Texts in italics
indicate commands or menu item.
are screen outputs from the PC.
Installing an ergonomic video workstation
Before you set up your equipment you should select a suitable position for working at the monitor.
Please observe the following advices when installing a video workstation.
edge of desk
Window
permissible
reaching sector
600 mm
permissible
reaching sector
600 mm
Avoid direct and reflected glare.
preferable viewin
0°
60°
permissible
viewing sector
permissible viewing sector
Position the monitor for optimum viewing. The
viewing distance to the monitor should be
approximately 50 cm.
2
Avoid glare from electric lighting. Position the keyboard where it is
sector
65°
30°
30°
65°
easiest to reach.
approx. 90°
approx. 90°
and
more
Remember to maintain correct posture.
A26391-K84-Z100-1-7619
Important notes
In this chapter you will find information regarding safety which it is essential to take note of when
working with your notebook. The manufacturer's notes contain helpful information on your notebook.
This chapter also contains information on the licenses like CE certificate and RFI suppression of the
notebook.
Safety
Pay attention to the information provided in the manual "Safety Notes".
!
During installation and before operating the device, observe the instructions on environmental
•
conditions in the chapter entitled "Technical data" as well as the instructions in the chapter
"Preparation for use and operation".
When cleaning the device, observe the relevant notes in the paragraph "Cleaning the notebook".
•
Keep this Operating Manual together with your device. If you pass on the device to third parties,
•
you should also pass on this manual.
Notes on installing and removing boards and modules
Only qualified technicians may repair the device.
repair may greatly endanger the user (electric shock, fire risk).
!
Unauthorized opening or incorrect
A26391-K84-Z100-1-7619
Boards with electrostatic sensitive devices (ESD) may be identified by the
label shown.
When you handle boards fitted with ESDs, you must observe the following
points under all circumstances:
You must always discharge yourself (e.g. by touching a grounded object)
•
before working.
The equipment and tools you use must be free of static charges.
•
Pull out the power plug before inserting or pulling out boards containing
•
ESDs.
Always hold boards with ESDs by their edges.
•
Never touch pins or conductors on boards fitted with ESDs.
•
3

Important notes Manufacturer’s notes
Manufacturer’s notes
Energy saving
Make use of the device's power management features (see "Preparation for use and operation").
If you will not be using your notebook, switch it off.
•
The notebook uses less power when the power management features are enabled. You will then
•
be able to work for longer before having to recharge the battery.
Energy saving under Windows
If a monitor with energy saving features is connected to your notebook, you can use the
tab to set the energy saving features of the monitor. Select the following item in the start menu:
- Control Panel - Display - Display Properties - Screen Saver - Energy saving features of monitor
set additional energy saving functions in the
Start - Settings - System control - Energy - Extended
Disposal and recycling
This device has been manufactured to the greatest possible degree from materials which can be
recycled or disposed of in a manner that is not environmentally damaging. The device is taken back
after use, so that it can be recycled, provided that it is returned in a condition which is the result of
normal use. Any components not recuperated will be disposed of in an environmentally acceptable
manner.
For devices marked with this symbol Siemens AG offers a guarantee for
36 months with a Bring-in-Service. The guarantee starts on the day of
delivery (sale date) by Siemens or a Siemens partner.
We herewith declare that it will be possible to repair any device marked
with the eco-label for at least 5 years after production of that device has
discontinued.
Information on power management and energy saving mode can be
found in chapter "Technical data".
Screen Saver
Settings
. You can
menu.
Do not throw lithium batteries or accumulators into the trashcan. They must be disposed of in
accordance with local regulations concerning special waste.
If you have any questions on disposal, please contact your local office, our service department, or,
directly:
Siemens AG
Recycling Center
D-33094 Paderborn
Tel.: ..49 5251 818010
Fax: ..49 5251 818015
CE certificate
The shipped version of this device complies with the requirements of the EEC directives
89/336/EEC "Electromagnetic compatibility" and 73/23/EEC "Low voltage directive".
4
A26391-K84-Z100-1-7619

FCC Class B Compliance Statement Important notes
FCC Class B Compliance Statement
If there is an FCC statement on the device, then:
The following statement applies to the products covered in this manual, unless otherwise specified
herein. The statement for other products will appear in the accompanying documentation.
NOTE:
This equipment has been tested and found to comply with the limits for a "Class B" digital device,
pursuant to Part 15 of the FCC rules and meets all requirements of the Canadian Interference-Causing
Equipment Regulations. These limits are designed to provide reasonable protection against harmful
interference in a residential installation. This equipment generates, uses and can radiate radio
frequency energy and, if not installed and used in strict accordance with the instructions, may cause
harmful interference to radio communications. However, there is no guarantee that interference will not
occur in a particular installation. If this equipment does cause harmful interference to radio or television
reception, which can be determined by turning the equipment off and on, the user is encouraged to try
to correct the interference by one or more of the following measures:
Reorient or relocate the receiving antenna.
•
Increase the separation between equipment and the receiver.
•
Connect the equipment into an outlet on a circuit different from that to which the receiver is
•
connected.
Consult the dealer or an experienced radio/TV technician for help.
•
Siemens AG is not responsible for any radio or television interference caused by unauthorized
modifications of this equipment or the substitution or attachment of connecting cables and equipment
other than those specified by Siemens AG. The correction of interferences caused by such
unauthorized modification, substitution or attachment will be the responsibility of the user.
The use of shielded I/O cables is required when connecting this equipment to any and all optional
peripheral or host devices. Failure to do so may violate FCC rules.
A26391-K84-Z100-1-7619
5
Important notes Power cord selection
Power cord selection
The power cord for this unit has been packed separately and has been selected according to the
country of destination. It must be used to prevent electric shock. Use the following guidelines if it is
necessary to replace the original cord set.
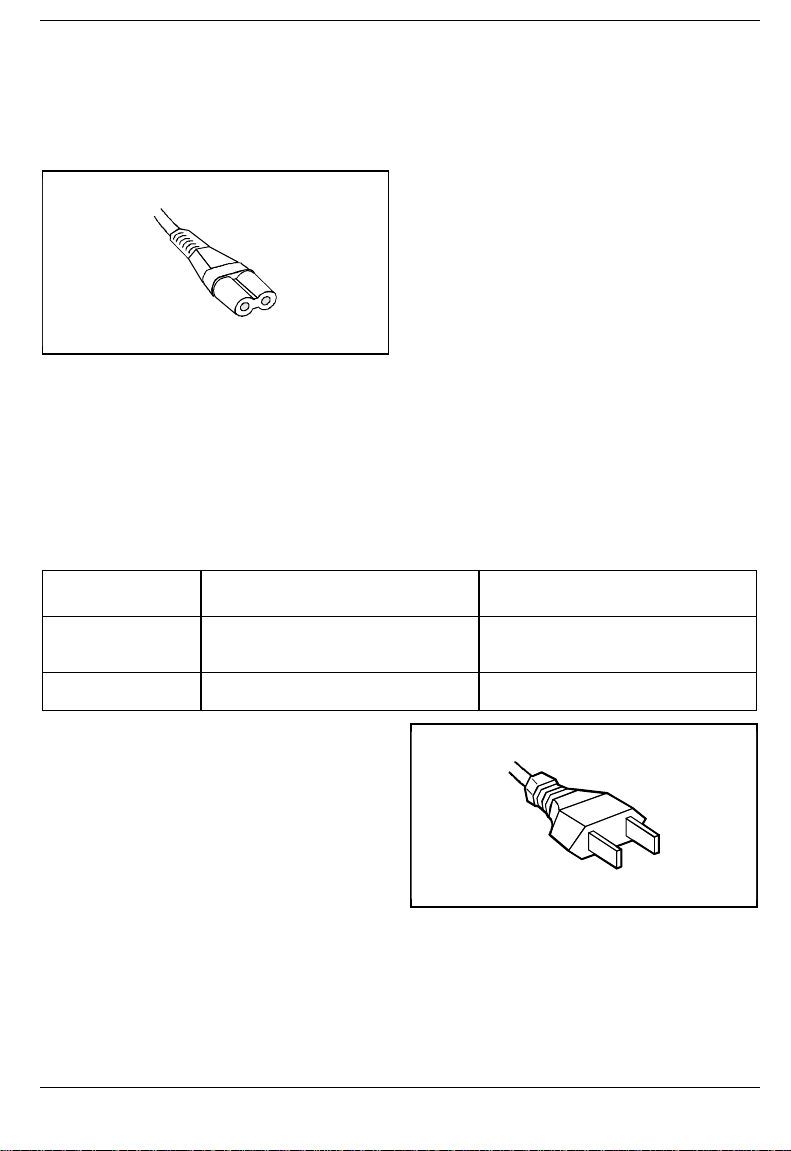
The female receptacle of the cord set must meet
IEC 320 requirements.
For the United States and Canada
Use a UL listed and CSA labeled cord set consisting of a two conductor cord with a maximum length of
15 feet.
For units which stand on a desk or table, type SVT or SJT cord sets shall be used.
For units which stand on floor, only SJT type cord sets shall be used.
The cord set must be selected according to the current rating for your unit. Please consult Table A for
the selection criteria for power cords used in the United States and Canada.
Table A:
Cord Type Size of Conductors
in Cord
SJT 18 AWG
16 AWG
14 AWG
SVT 18 AWG
17 AWG
Maximum Current
Rating of Unit
10 Amps
12 Amps
12 Amps
10 Amps
12 Amps
For units set at 115 V:
use a parallel blade attachment plug rated 15 A,
125 V.
For units set at 230 V (outside of the United States and Canada):
use a cord set consisting of a minimum AWG according to Table A and an attachment plug rated 15 A,
250 V. The cord set should have the appropriate safety approvals for the country in which the
equipment will be installed and should be marked HAR.
6
A26391-K84-Z100-1-7619

On the move with the notebook Important notes
On the move with the notebook
Please observe the points listed below when transporting your notebook.
Transporting the notebook
Do not carry the notebook by its open screen or by an empty slot.
•
Switch off the notebook.
•
Remove all data carriers (e.g. floppy disk, CD) from the drives.
•
Always use the bag supplied when transporting the notebook.
•
If it needs to be shipped, use the original packaging or other suitable packaging to protect it from
damage through mishandling.
The carrying bag provided protects against dust, but offers no protection against jolts or impacts.
•
Protect the notebook from severe shocks and extreme temperatures (e.g., direct sunlight in a
•
car).
Before starting the journey
Copy important data from the hard disk to a floppy disk.
•
Remove all data carriers (e.g. floppy disk, CD) from the drives.
•
If you wish to use your notebook during a flight, check first with the flight attendants if it is
•
permissible to do so.
If you are travelling abroad, ensure that the power adapter can be operated on the local line
•
voltage. If this is not the case, obtain the appropriate power adapter for your notebook.
Do not use any other voltage converter!
A26391-K84-Z100-1-7619
7

Important notes Cleaning the notebook
Cleaning the notebook
Switch the notebook off and pull the power plug of the power adapter out of the power
socket.
!
Do not clean any interior parts yourself, leave this job to a service technician.
Do not use any cleaning agents that contain abrasives or may corrode plastic.
Ensure that no liquid enters the notebook.
Wipe the casing with a dry cloth. If particularly dirty, use a cloth which has been moistened in mild
domestic detergent and then carefully wrung out.
To clean the keyboard and the touchpad, you can use disinfectant wipes..
Wipe the monitor casing with a soft, moistened cloth.
8
A26391-K84-Z100-1-7619
Unpacking and checking the delivery Preparation for use and operation
Preparation for use and operation
Pay attention to the chapter "Important notes".
!
You must charge the battery and install the application programs before you can work with the
notebook. The operating system and required drivers are preinstalled.
When used away from a wall power outlet, the notebook runs on its built-in battery. You can increase
battery life by enabling its power management features.
If you use the notebook in a normal office situation, you run it off the mains with the aid of the power
adapter, or in a MobiDock or QuickPort/QuickPort/Plus.
Refer to the chapter on "System expansions" for instructions on how to connect external devices (e.g.
mouse, printer) to the notebook.
Unpacking and checking the delivery
Unpack all the individual parts.
²²
Check the delivery for damage incurred during transport.
²²
Check whether the delivery agrees with the details in the delivery note.
²²
Check whether all necessary details have been entered on the first page of the guarantee coupon
²²
booklet.
Should you discover that the delivery does not correspond to the delivery note, notify your local sales
office immediately.
Do not discard the original packing material of the devices. Keep it for future transportation of
the drive.
i
Choosing where to set up your notebook
Select a suitable location for the notebook before setting it up. Bear the following points in mind when
looking for a location.
We recommend that you place your notebook on a surface with good anti-slip qualities. In view of
•
the multitude of different finishes and varnishes used on furniture, it is possible that the rubber feet
of the devices will mark the surface they stand on.
Do not expose the notebook to extreme environmental conditions. Protect it from dust, humidity
•
and heat.
Keep other objects 100 mm clear of the notebook and its power adapter to ensure adequate
•
ventilation. The space between the notebook's feet must be clear. Do not place it on a soft
surface (e.g., a carpet or soft furnishings).
The power adapter must be at least 200 mm away from the notebook. It must be free-standing
•
and may not be covered. Do not stand the power adapter on heat-sensitive material.
A26391-K84-Z100-1-7619
9
Preparation for use and operation Preparing the notebook for use
For wireless data transfer you must align the notebook's infrared interface with that of the partner
•
device (e.g. PC). The devices must not be more than one meter apart.
Preparing the notebook for use
The supplied power cord conforms to the requirements of the country in which you
purchased your notebook. Make sure that the power cable is approved for use in the country
!
in which you intend to use it.
The notebook and the power adapter should be at least 200 mm apart. Keep other objects
100 mm clear of the notebook and its power adapter.
Do not cover the ventilation slots in the notebook.
Place the notebook on a level, stable surface.
²²
Depending on the version, your notebook will be supplied with and internal or an external power
adapter.
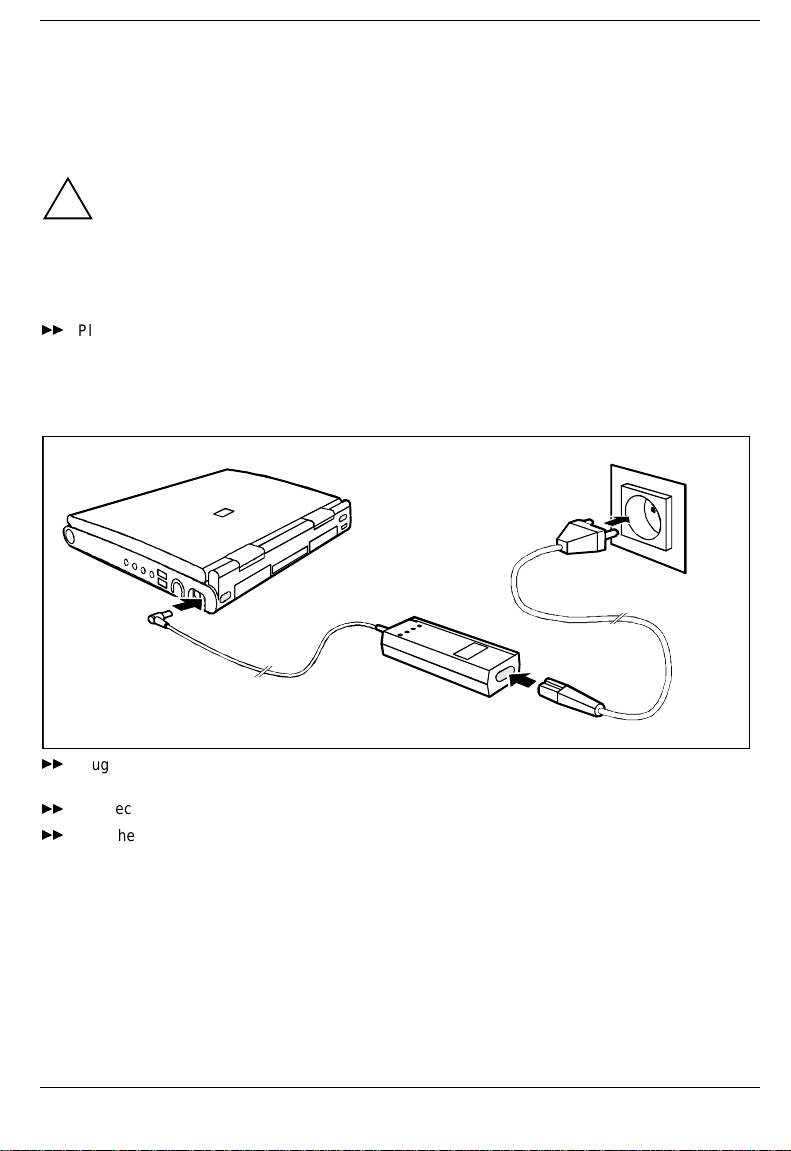
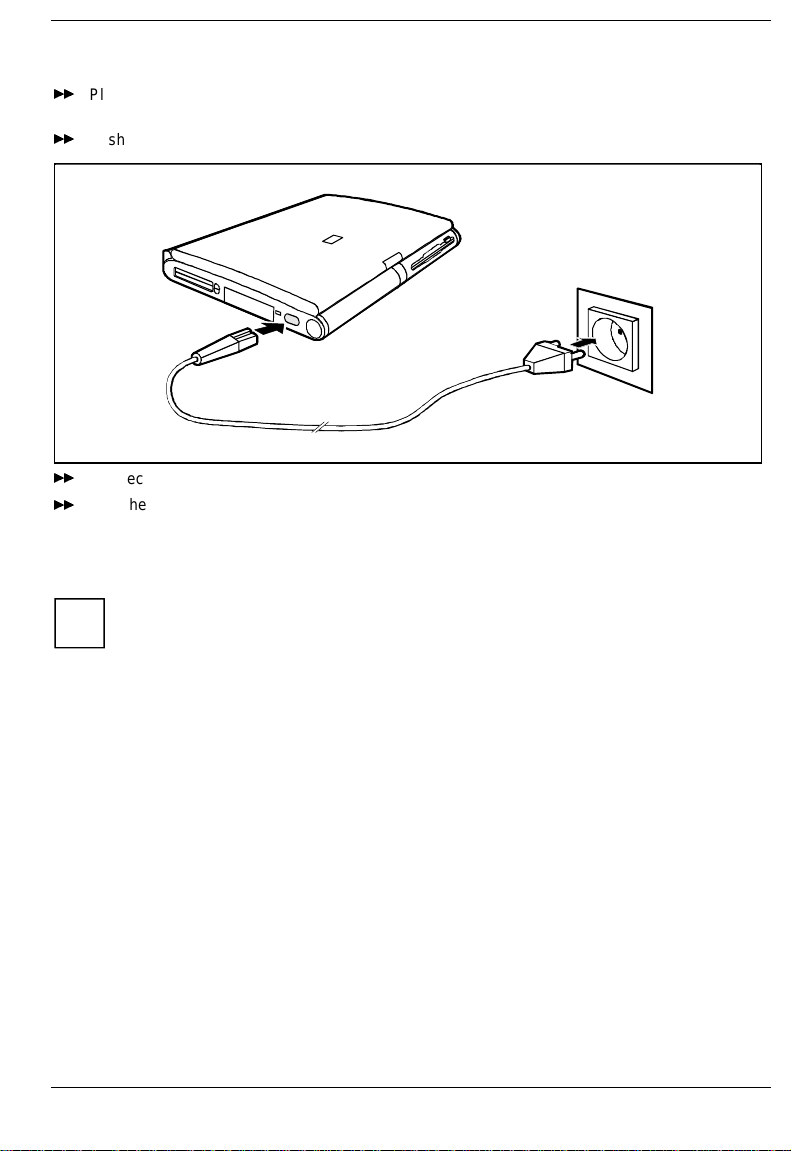
External power adapter
3
1
2
Plug the DC output connector on the power adapter into the DC input connector (DC IN) on the
²²
notebook (1).
Connect the AC power cable to the power adapter (2).
²²
Plug the power cable into the power outlet (3).
²²
The power adapter indicator lights up.
10
A26391-K84-Z100-1-7619
Preparing the notebook for use Preparation for use and operation
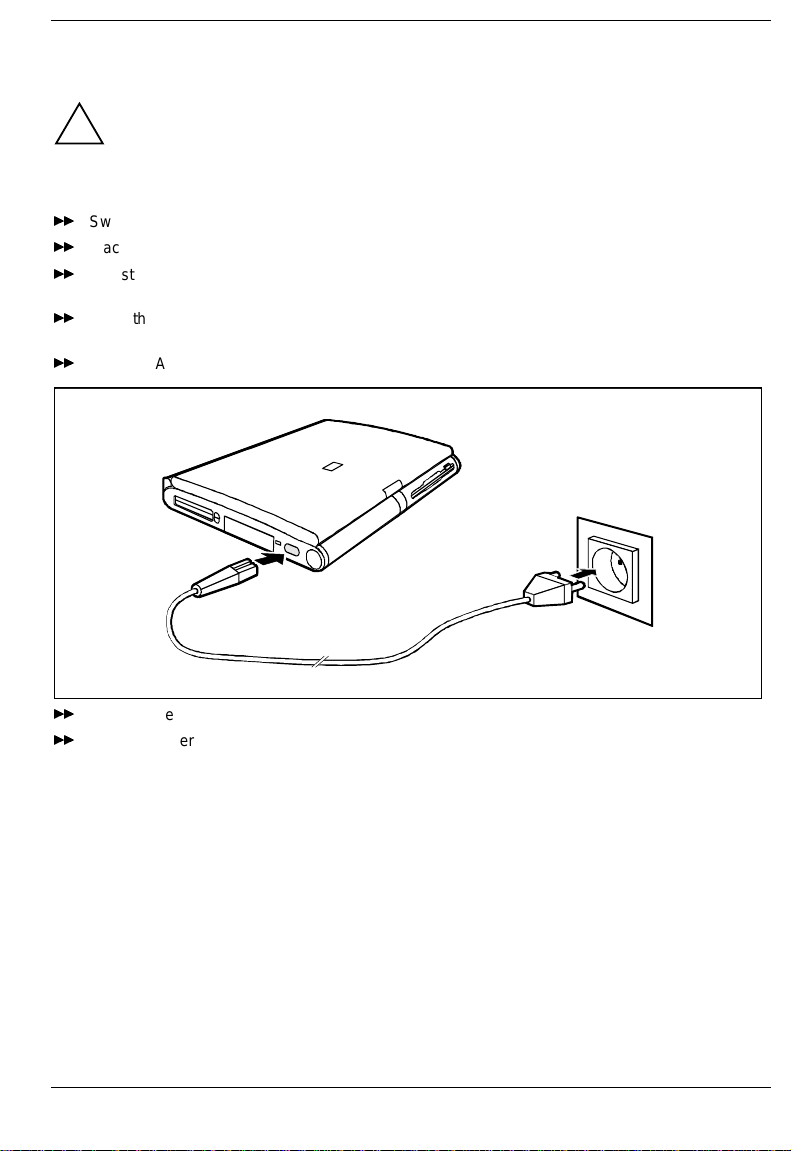
Internal power adapter
Place the AC adapter in the left-hand slot so that the contacts enter first. The connector for the AC
²²
adapter power cable must face outwards.
Push the AC adapter into the slot until you feel it locking into place.
²²
1
Connect the power cable to the AC IN connector on the notebook (1).
²²
Plug the power cable into the power outlet (2).
²²
A battery built into the right slot is recharged in this configuration. A battery is fully charged in
approximately three hours if the notebook is switched on. If the notebook is switched on, it will charge
in roughly five to six hours.
You can also make your notebook operational by connecting it to the optional power
adapter or car adapter (see "Charging, caring for and maintaining the battery"). The
i
AC adapter can also be operated as an external power adapter (see "Using AC
adapter as external power adapter").
2
A26391-K84-Z100-1-7619
11

Preparation for use and operation Preparing the notebook for use
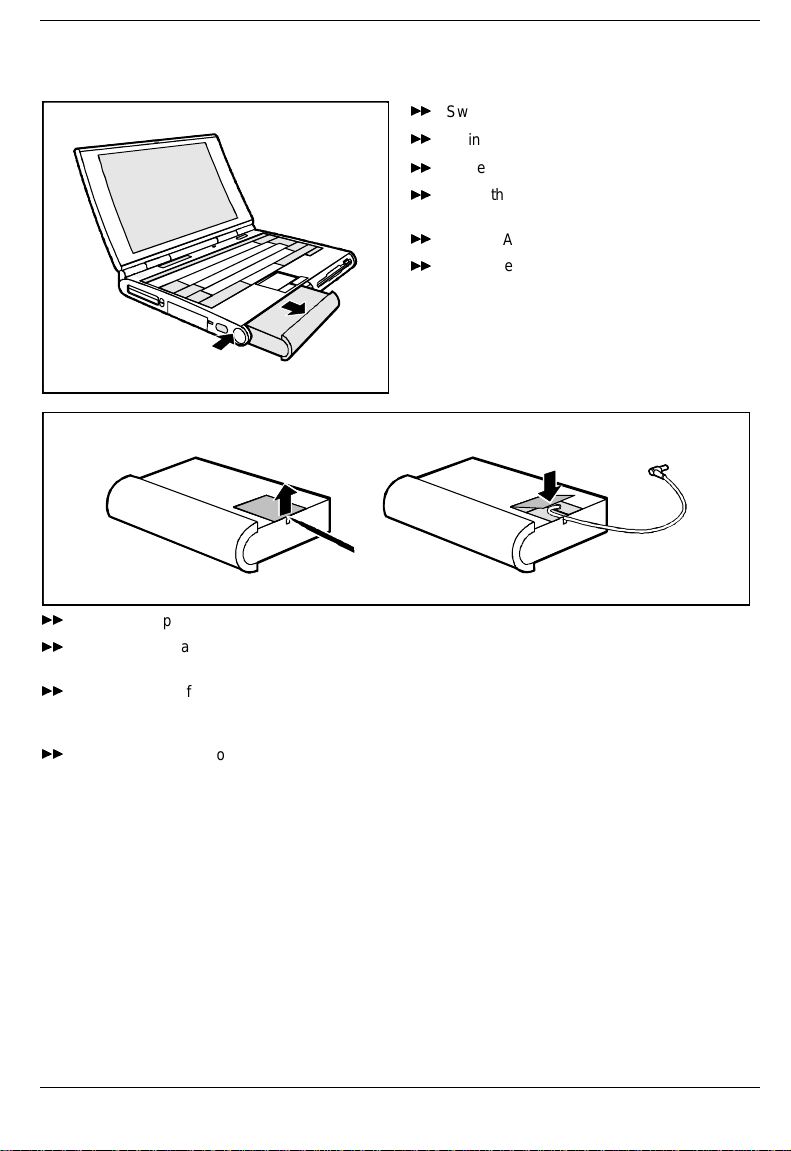
Switching on the notebook
3
2
1
Press the release button (1) and unfold the display upwards (2).
²²
Press the ON/OFF switch (3) for roughly one second.
²²
You must not switch off or warm-boot your notebook during first-time installation .
!
When you switch on your notebook for the first time the supplied software is set up and
configured. Please follow the instructions on the screen.
i
If you want to partition your hard disk, please refer to chapter "Restoring the hard disk
contents under Windows 9x".
If you have assigned a password, you must enter this when requested to do so, in order to
start the operating system.
Notes on Windows
The license number for Windows is printed on the front cover of the Windows manual supplied.
12
A26391-K84-Z100-1-7619
Indicators and input devices Preparation for use and operation
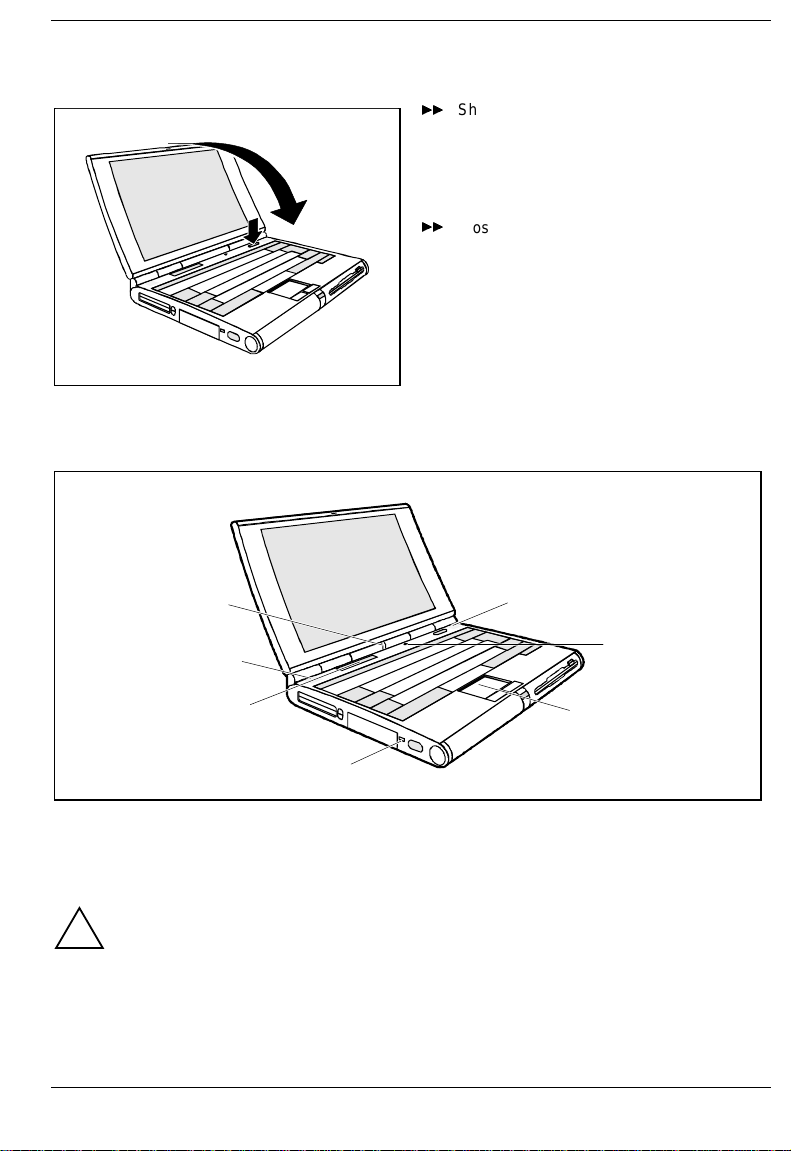
Switching off the notebook
Shut down the operating system properly. If
²²
Windows 9x is installed on your notebook,
the system is shut down and the notebook is
switched off. If the notebook is not switched
off automatically, press the ON/OFF switch
2
1
(1) for approx. one second.
Close the display of the notebook (2) so that
²²
it locks into place.
Indicators and input devices
6
1
5
4
1 = LCD lock
2 = LCD switch-off
3 = Touchpad with touchpad buttons
4 = Kensington Lock device
Only release the LCD lock when required.
!
You can protect your notebook from theft with the Kensington Lock device (3) and with a
Kensington MicroSaver.
Battery indicator
Glows green: Battery is being charged
Glows red: Battery capacity is below 12% or battery is defective
A26391-K84-Z100-1-7619
5 = Display field
6 = Battery indicator (right)
power-on indicator (left)
1
2
3
13
Preparation for use and operation Indicators and input devices
>6&52//
/2&.@
/2&.@
>3DG
1XP@
Power-on indicator
Glows green: Notebook is switched on
Glows red: Processor is in idle mode
Glows orange: Processor operates at half frequency
Flashes: Notebook is in standby mode
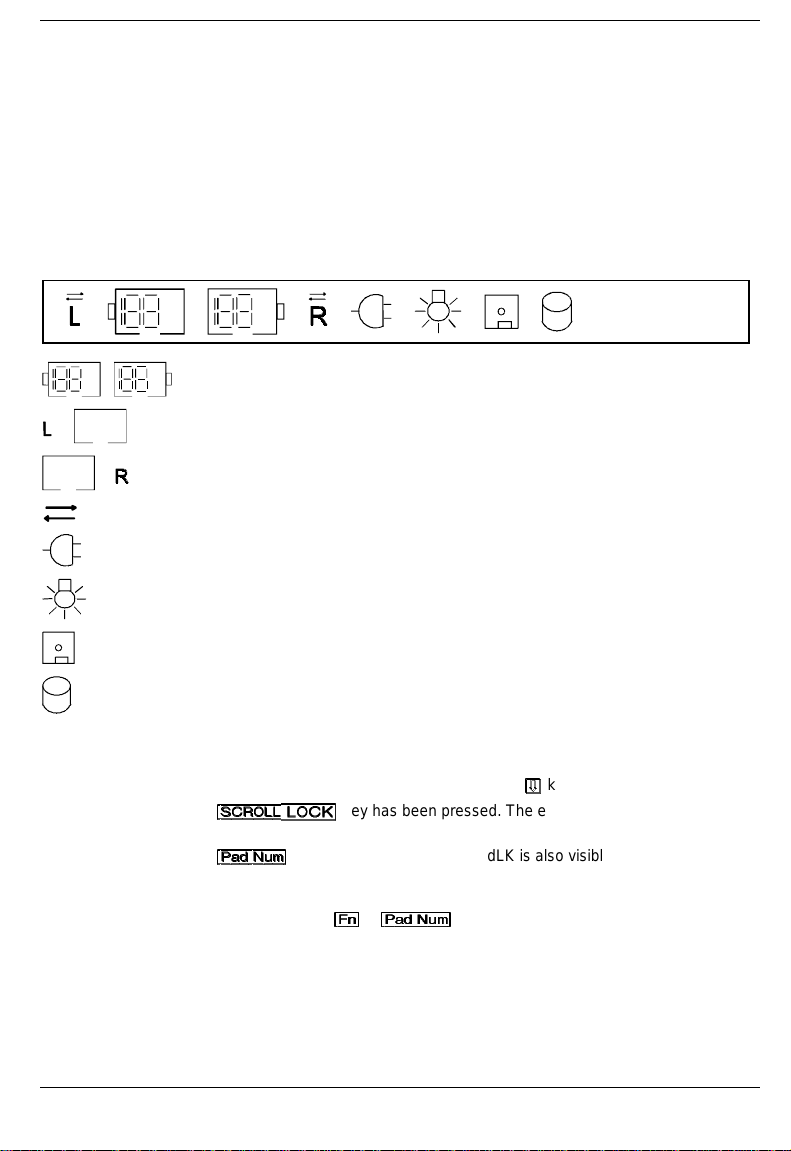
Display field
Symbols and texts in the display field indicate the operating state of the notebook. The meaning of the
symbols and texts are as follows:
CapsLK
ScrLK
NumLK
PadLK
% %
% %
Indicates the approximate capacity of the installed batteries in percent.
The left battery is installed. When the symbol flashes, the left battery is drained or
defective (for measures, see "Charging, caring for and maintaining the battery").
The right battery is installed. When the symbol flashes, the right battery is drained
or defective (for measures, see "Charging, caring for and maintaining the battery").
The arrow shows whether the battery is being charged or drained.
The notebook is connected to an external power source (e.g. via the power
adapter).
The notebook is switched to Suspend to DRAM mode.
The floppy disk in the floppy disk drive is being accessed. You must not remove
the floppy disk when this symbol is visible.
A drive (hard disk drive, CD-ROM drive, DVD drive or Zip drive) is being
accessed. When this symbol appears, do not remove the data carrier from the
drive.
All the characters you type appear as uppercase. In the case of overlay keys, the
character on the upper left on the keycap appears when that key is pressed. The
CapsLock indicator appears when you press the
The
>6&52//
program to program.
The
display, the blue numbers on the lower right on keys in the integrated numeric
keypad are enabled.
The key combination
>3DG
1XP@
key has been pressed. The effect this key has varies from
key has been pressed. If PadLK is also visible in the function
>)Q@
>)Q@
+
>3DG
>3DG
has been pressed.
1XP@
1XP@
©
©
key.
CapsLk
PadLk
NumLk ScrLk
14
A26391-K84-Z100-1-7619
Indicators and input devices Preparation for use and operation
Touchpad and Touchpad Keys
Make sure that the touchpad does not come into contact with dirt, liquids or grease.
!
Do not touch the touchpad if your fingers are dirty.
Do not rest heavy objects (e.g., books) on the touchpad or the touchpad buttons.
The touchpad enables you to move the mouse pointer on the screen. If, for example, you move one
finger to the left over the touchpad, the mouse pointer also moves to the left.
A brief tap with the finger on the touchpad has the same effect as clicking with the left mouse button. A
brief "double-tap" with the finger on the touchpad has the same effect as double-clicking with the left
mouse button.
The left and right touchpad buttons have the same functions as the left and right mouse buttons.
If you attach and install an external mouse, the touchpad and its buttons are disabled. If you
attach an external serial mouse, you must select the
i
PS/2 Pointing Device
field in the
Main Setup
. This also releases interrupt 12, so that you can
Disabled
option for the
use it for other applications.
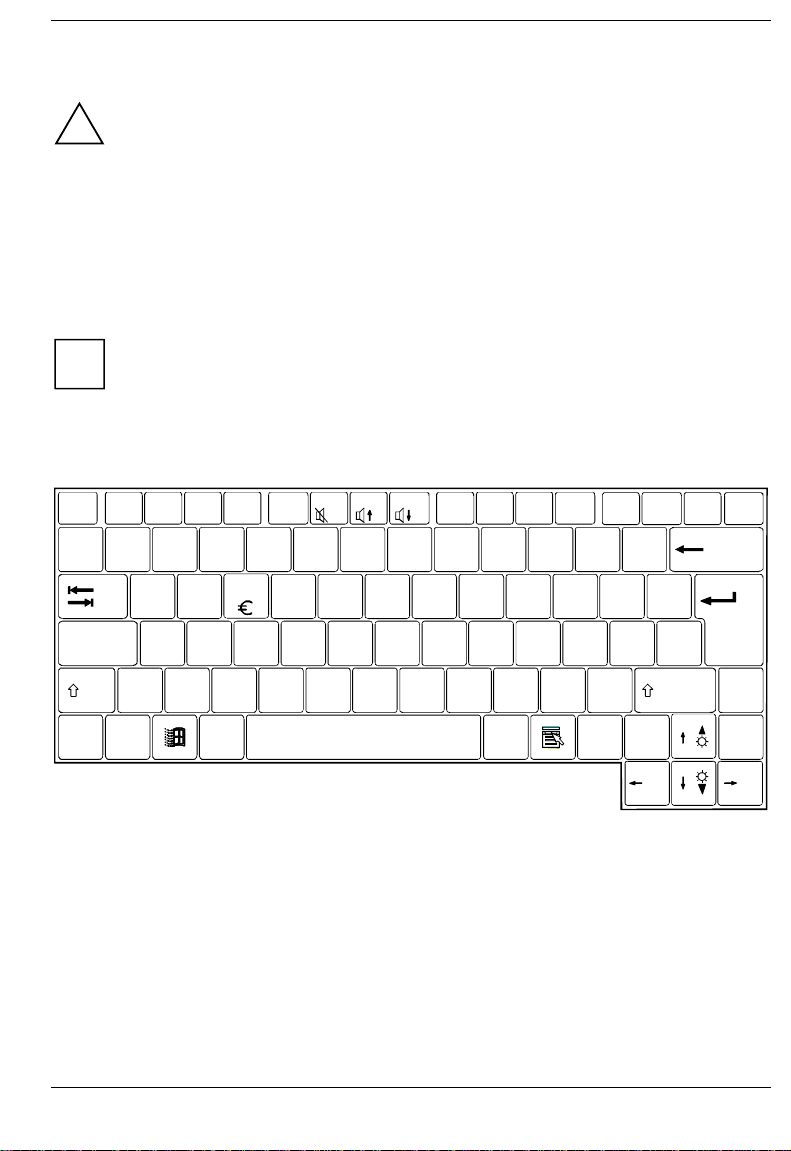
Keyboard
EscF1F2F3F4 F5F6F7F8 F9F10F11F12
~
!1@2#3$4%5^
`
Caps Lock
|
\
Ctrl
Fn
Standby
*8(9)/_+
&
H
N
7
456*
J
K
123-
M
0
67890-
QW RTY UI OP{ }
A
E
S
D
F
G
Z
X
C
V
B
Alt Alt Gr Ins Del
LCD/CRTCD slow LCD Off Suspend CPU slow Info LCD TV on/off
L
:"
<
>?
,./
.
Lock
[
,;
PrtScrn
=
+
SysRqPad Num
]
\
Scroll
Break
Lock
Pause
PgUp
Home
PgDn
The following description of keys and key combinations refers to Windows 9x Additional functions
supported by the keys are described in the relevant manuals supplied with your application programs.
End
A26391-K84-Z100-1-7619
15
Preparation for use and operation Indicators and input devices
>$OW
*U@
>)Q@
>)Q@
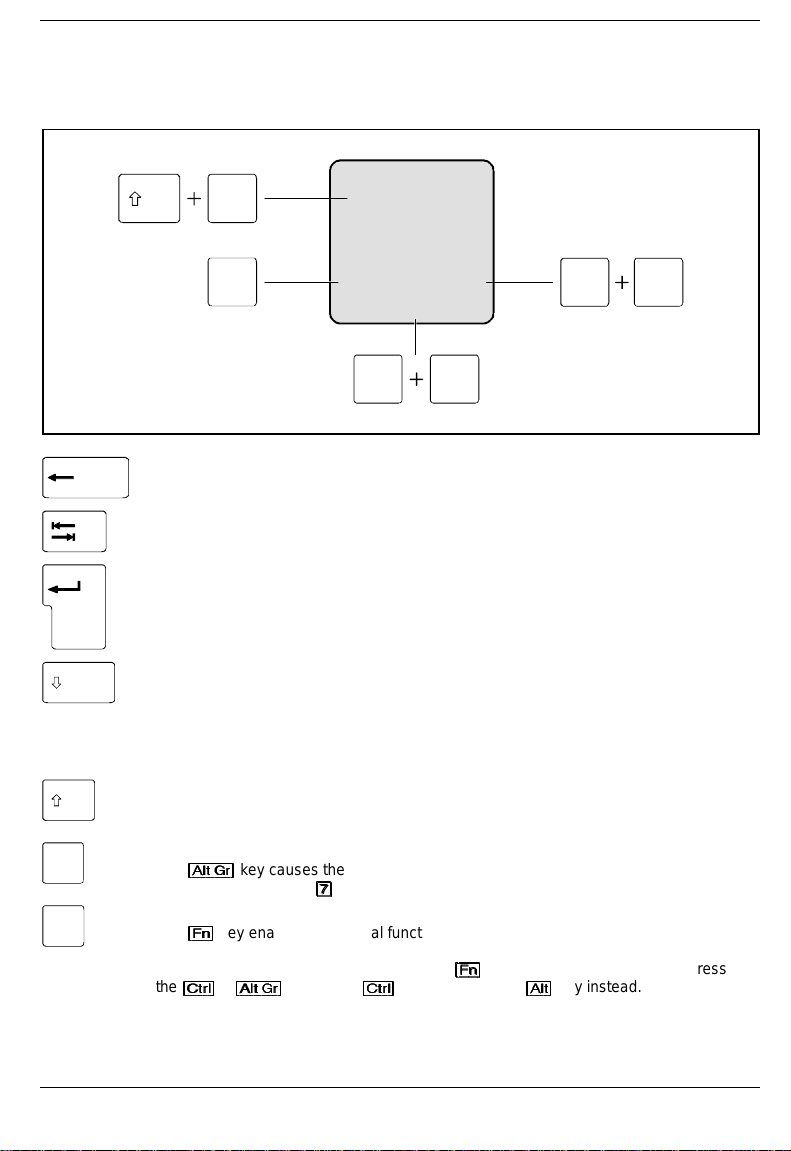
The figure below shows how to access the different characters on keys with overlaid functions. The
keystrokes shown in the example only work if
they are not visible in the display field).
7
7/{
CapsLK, NumLK
, and
have not been enabled (i.e.
PadLK
Example from a German keyboard
Backspace key
The Backspace key deletes the character to the left of the cursor.
Tab key
The Tab key moves the cursor to the next tab stop.
Enter key (return, enter, line feed, carriage return)
The enter key terminates a command line. The command you have entered is
executed when you press Enter.
Caps Lock key
The Caps Lock key activates uppercase mode (CapsLK is shown in the display field).
The Caps Lock function causes all the characters you type to appear as uppercase. In
the case of overlay keys, the character on the upper left on the keycap appears when
that key is pressed.
To cancel the Caps Lock function, simply press the Caps Lock key again.
Shift key
The Shift key causes uppercase characters to appear. In the case of overlay keys, the
character on the upper left on the keycap appears when that key is pressed.
Alt Gr
Alt Gr key
The
(e.g. in the case of the
Fn
Fn
The
combinations").
If the external keyboard does not feature a
the
key instead.
>$OW@
>$OW@
Fn
7/{
7
7/{
key causes the characters in the lower middle of the keycap to appear
*U@
>$OW
key enables the special functions indicated in blue on overlay keys (see "Key
>)Q@
>&WUO@
>&WUO@
+
>$OW
>$OW
key or the
*U@
*U@
>@
>@
key).
7/{
Alt Gr
key and the right
>&WUO@
>&WUO@
7
7
7/{
key, you can simultaneously press
>)Q@
7
16
A26391-K84-Z100-1-7619
Indicators and input devices Preparation for use and operation
>3DG
1XP@
>3DXVH@
y
Cursor keys
The cursor keys move the cursor in the direction of the arrow, i.e., up, down, left, or
right.
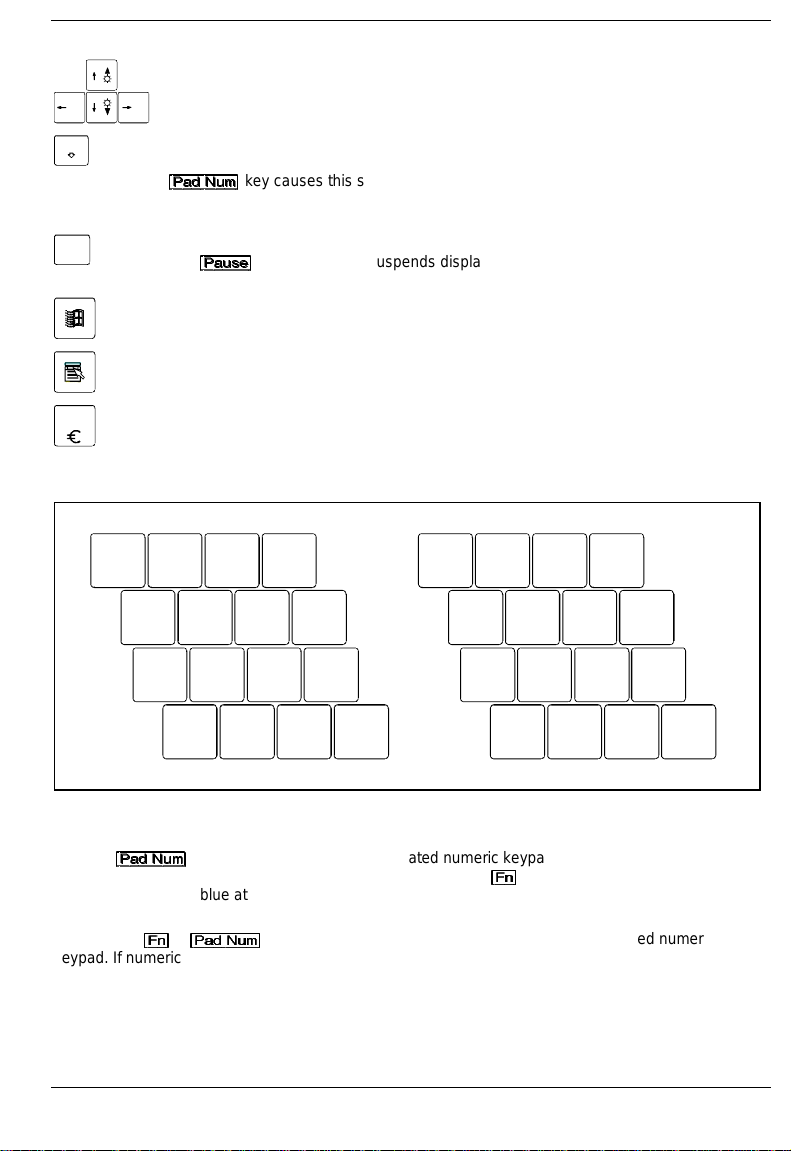
Pad Num
Pad Num key
When the numeric keypad is enabled (PadLK is visible in the display field), the
key causes this set of keys to produce numbers (NumLK appears in the
1XP@
>3DG
display field). Pressing them produces the blue characters shown on the bottom right
on the keycaps.
Break
Pause
Pause key
The
>3DXVH@
key temporarily suspends display output. Output will resume when press
any other key.
Start key
invokes the
menu of Windows.
START
Menu key
The Menu key invokes the menu for the marked item (Windows).
E
Euro ke
The Euro-key produces the Euro character (Windows 98 and Windows NT5.0).
Numeric keypad
/
(
7890
{
[
)
]
=
}
789 /
UI OP
12
456*
J
K
L
Ö
123-
M
;
:_
µ, . -
0+,
1 = Characters enabled when neither PadLK, nor NumLK are visible in the display field.
2 = Characters enabled when PadLK and NumLK are visible in the display field.
The key
enabled (
>3DG
>3DG
NumLK
enables and disables the integrated numeric keypad. If the numeric keypad is
1XP@
1XP@
is shown in the display field) and you hold the
key down, you can output the
>)Q@
>)Q@
characters printed in blue at the right bottom of the keys.
When the numeric keypad is enabled (
combination
>)Q@
>)Q@
+
>3DG
>3DG
enables and disables the numeric entry in the integrated numeric
1XP@
1XP@
keypad. If numeric entry is enabled (
NumLK
is visible in the display field), pressing the key
NumLK
and
are shown in the display field), the blue
PadLK
characters at the bottom right of the keys are effective.
A26391-K84-Z100-1-7619
17
Preparation for use and operation Indicators and input devices
>)Q@
If the numeric keypad and numeric entry are both enabled (NumLK and PadLK are shown in the
display field), you can also output standard characters with the numeric keypad. If you press and hold
the key
keycaps. If you press and hold the key combination
, the keys will produce lowercase letters and numbers indicated on the lower left of the
>)Q@
>)Q@
+ Shift, the keys will produce uppercase
>)Q@
>)Q@
letters and the characters indicated on the upper left of the keycaps.
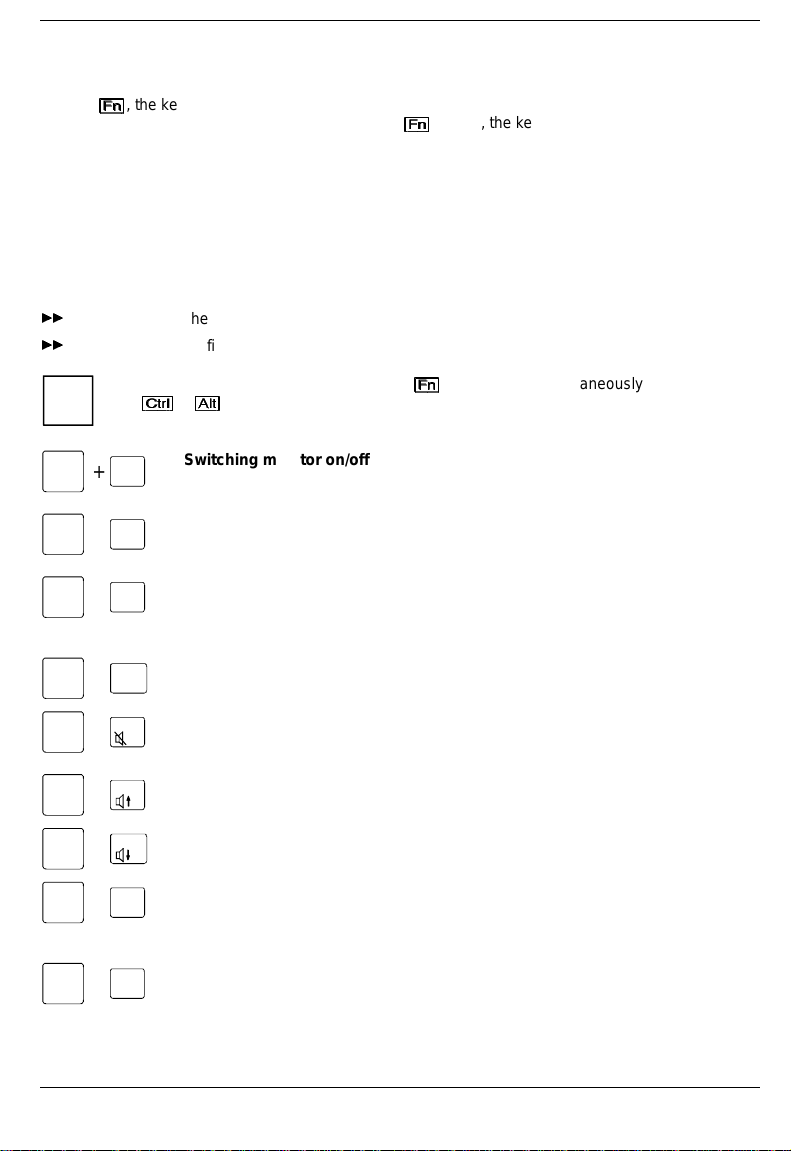
Key combination
The following description of keys and key combinations refers to Windows 9x Some of the following
key combinations may not function in other operating systems and with some device drivers.
Other key combinations are described in the relevant manuals supplied with your application programs.
You enter key combinations as follows:
Press and hold the first key in the combination.
²²
While keeping the first key pressed, press the other key or keys in the combination.
²²
If the external keyboard does not feature a
the
i
Fn
F1
+
LCD Off
+
>&WUO@
>&WUO@
keys instead.
>$OW@
>$OW@
Switching monitor on/off
This key combination switches your notebook's display on and off. Doing so does
key, you can simultaneously press
>)Q@
not affect any running programs.
Fn
F3
+
Standby
Enabling Standby mode
This key combination enables Standby mode. The power-on indicator flashes.
You can cancel Standby mode by pressing any key.
Fn
F4
+
Suspend
Enabling Suspend mode
This key combination switches the Suspend mode on (see Section "Suspend
mode "). When you switch the notebook on again, it returns to the same place
you were in the program that was running when you switched to Suspend mode.
Fn
Fn
F5
+
CPU slow
F6
+
Reducing CPU speed
This key combination reduces the CPU speed by 50 %.
Switching the loudspeaker on/off
This key combination switches your notebook's integrated loudspeaker on and
off.
Fn
Fn
Fn
F7
+
F8
+
F10
+
Info LCD
Increasing the volume
This key combination raises the volume of the integrated loudspeaker.
Reducing the volume
This key combination decreases the volume of the integrated loudspeaker.
Switching over battery indicator
This key combination switches the battery indicator in the display field between
battery capacity in %, as time (notebook will still run xx:xx hours) or the battery
charge level display.
Fn
F11
+
TV on/off
Switching TV out on/off
This key combination switches the video output (TV out) on or off.
18
A26391-K84-Z100-1-7619
Indicators and input devices Preparation for use and operation
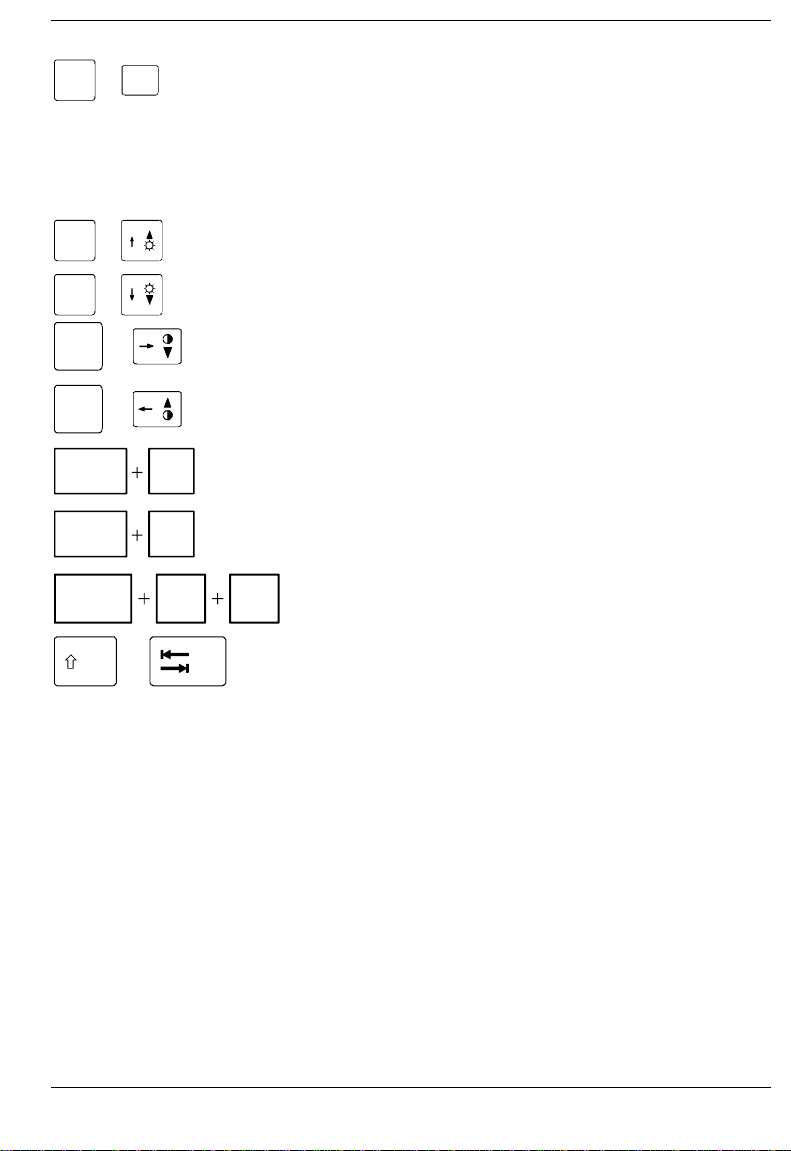
Fn
Fn
Fn
Fn
Fn
Ctrl
Ctrl
Ctrl
+
+
+
+
+
F12
LCD/CRT
Break
Pause
C
Alt Del
+
Switching between internal and external display
If an external display is connected to your notebook, you can switch to it with this
key combination. You can opt to use:
just the notebook's internal display
•
just the external display
•
both the internal and the external display
•
just the television
•
both the internal display and the television
•
Increasing the display brightness
This key combination increases the brightness of the display.
Reducing the display brightness
This key combination reduces the brightness of the display.
Reducing display contrast
If the notebook has an ADS color monitor, this key combination reduces the
display contrast.
Increasing display contrast
If the notebook has an ADS color monitor, this key combination increases the
display contrast.
Halting the current operation
This key combination can be used to halt an operation instantly (its effect depends
on the program that is running).
Halting the current operation
This key combination can be used to halt an operation instantly without clearing
the keyboard buffer.
Warm boot
This key combination triggers a reset and warm-boots the notebook.
Negative tabulator jump, Backtab (Shift+Tab)
This key combination moves the cursor back to the previous tabular
stop.
A26391-K84-Z100-1-7619
19

Preparation for use and operation The battery
The battery
The battery supplies your notebook with the necessary power during mobile use. You can increase
battery life by enabling its power management features.
The battery charge is indicated by the battery symbol in the display field (see the section "Indicators
and input devices") When you switch on the notebook, it takes a few seconds before the battery status
is displayed.
The battery will last for roughly 500 charge/discharge cycles.
Charging, caring for and maintaining the battery
The battery can only be charged, when the ambient temperature is between 5°C and 40°C.
The battery charge is indicated by the battery symbol in the display field.
A battery is fully charged in approximately three hours if the notebook is switched on. If the notebook is
switched on, the battery will charge in roughly five to six hours.
You can charge the battery by:
connecting the notebook to the AC adapter
•
connecting the notebook to the power adapter
•
connecting the notebook to the car adapter
•
connecting the notebook to the MobiDock
•
connecting the notebook to the QuickPort
•
Batteries are to be stored in a charged state of approximately 50% over a long period of time (longer
than two months). If you store the batteries up to two months, the charge status of the batteries must
be approximately 30%. The batteries should be stored in a dry environment in temperatures between
+10°C and +25°C.
20
If you do not use the batteries for longer periods, remove them from the notebook. Never
store the batteries in the unit.
i
A26391-K84-Z100-1-7619
The battery Preparation for use and operation
Connecting the AC adapter
The supplied power cord conforms to the requirements of the country in which you
purchased your notebook. Make sure that the power cable is approved for use in the country
!
in which you intend to use it.
Keep other objects 100 mm clear of the notebook. Do not cover the ventilation slots in the
notebook.
Switch off the notebook.
²²
Place the notebook on a level, stable surface.
²²
Deinstall the battery from the left slot and install it in the right slot (see "Removing and installing
²²
drives and batteries").
Place the AC adapter in the left-hand slot so that the contacts enter first. The connector for the AC
²²
adapter power cable must face outwards.
Push the AC adapter into the slot until you feel it locking into place.
²²
1
Connect the power cable to the AC IN connector on the notebook (1).
²²
Plug the power cable into the power outlet (2). The battery charges.
²²
A26391-K84-Z100-1-7619
2
21
Preparation for use and operation The battery
Using AC adapter as external power adapter
Switch off the notebook.
²²
Swing open the display.
²²
Place the notebook on a level surface.
²²
Press the release button of the AC adapters
²²
(1).
Pull the AC adapter out of the slot (2).
²²
Install the battery in the slide-in module.
²²
2
1
2
1
3
Open the flap of the AC adapter (1).
²²
Pull the power adapter cable somewhat out of the AC adapter (2). The power adapter cable is
²²
permanently attached to the AC adapter and cannot be completely removed from the AC adapter.
Close the flap of the AC adapter (3). When doing so, make sure that the power adapter cable is
²²
located in the groove of the AC adapter provided, and is not pinched between the flap and the AC
adapter.
Place the notebook on a level, stable surface.
²²
22
A26391-K84-Z100-1-7619

The battery Preparation for use and operation
3
1
2
Connect the power adapter cable of the AC adapters to the direct current socket (DC IN) of the
²²
notebook (1).
Connect the power cable to the AC adapter (2).
²²
Plug the power cable into the power outlet (3).
²²
The power adapter indicator lights up.
A26391-K84-Z100-1-7619
23
Preparation for use and operation The battery
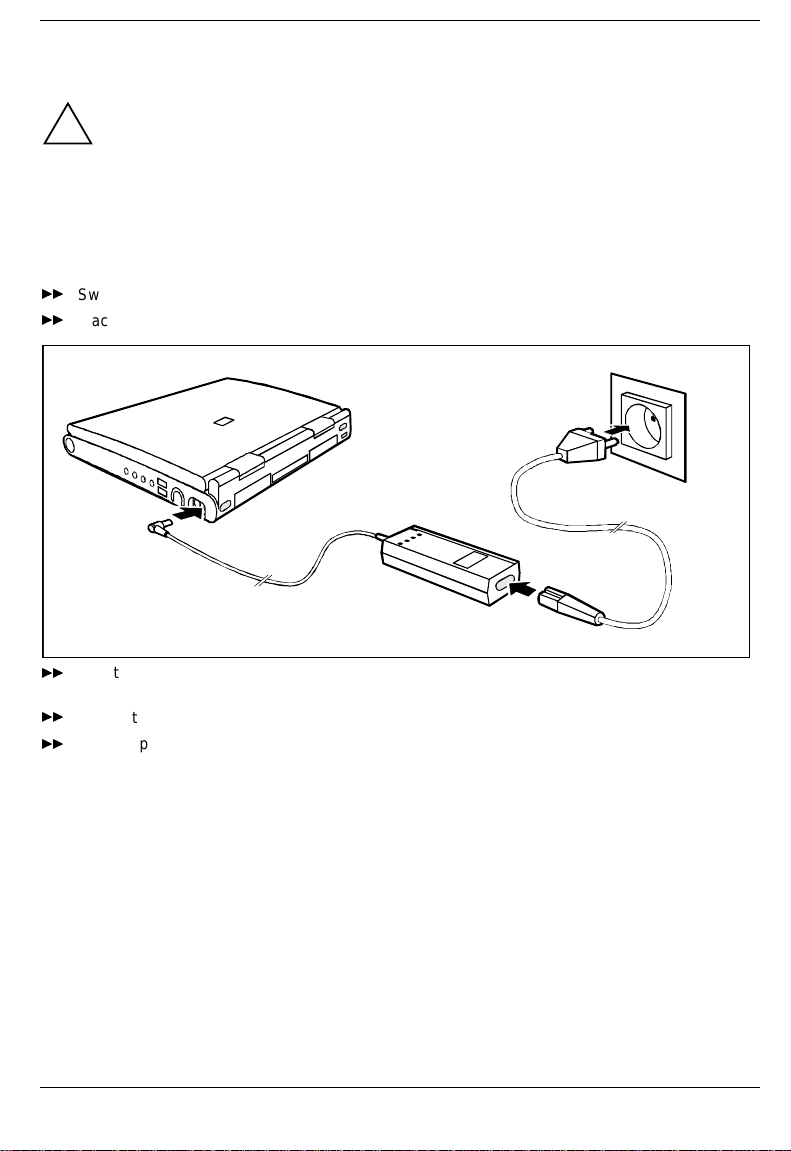
Connecting the power adapter
The supplied power cord conforms to the requirements of the country in which you
purchased your notebook. Make sure that the power cable is approved for use in the country
!
in which you intend to use it.
The notebook and the power adapter should be at least 200 mm apart. Keep other objects
100 mm clear of the notebook and its power adapter. Do not cover the ventilation slots in the
notebook and the power adapter.
Do not stand the power adapter on heat-sensitive material.
The power adapter's AC cord may only be connected to a wall outlet if the notebook is
connected to the power adapter.
Switch off the notebook.
²²
Place the notebook on a level, stable surface.
²²
3
1
2
Plug the DC output connector on the power adapter into the DC input connector (DC IN) on the
²²
notebook (1).
Connect the AC power cable to the power adapter (2).
²²
Plug the power cable into the power outlet (3).
²²
The power adapter indicator lights up. The battery charges.
24
A26391-K84-Z100-1-7619
The battery Preparation for use and operation
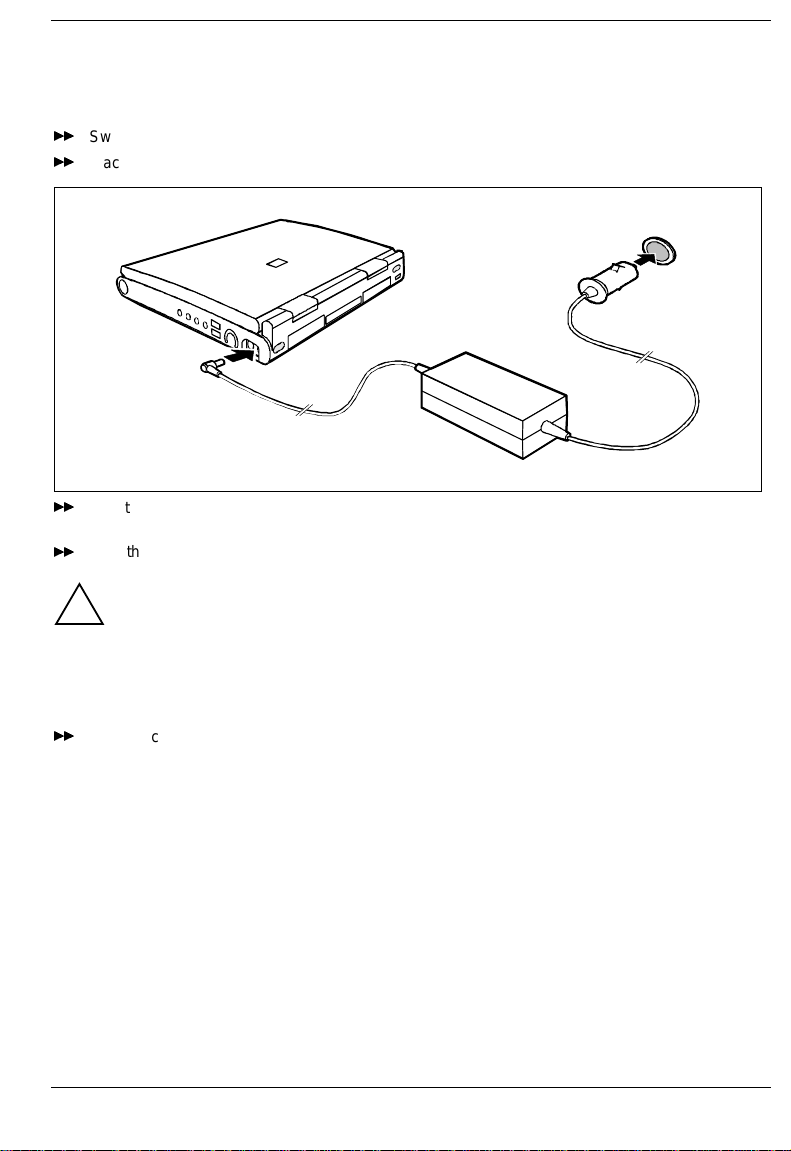
Connecting the car adapter
You can use the car adapter to charge your notebook's battery if the car has a 12V electrical system.
Switch off the notebook.
²²
Place the notebook on a level, stable surface.
²²
2
1
Plug the DC output connector on the car adapter into the DC input connector (DC IN) on the
²²
notebook (1).
Start the car's engine.
²²
You should only use the car adapter while the car's engine is running. You must not start the
car's engine while the car adapter is connected to the car's electrical system.
!
Do not stand the car adapter on heat-sensitive material. When in operation, the car adapter
must be free-standing and may not be covered.
Keep other objects 200 mm clear of the notebook. Do not cover the ventilation slots in the
notebook.
Plug the car adapter's input connector into the car's cigarette lighter (2). The battery charges.
²²
A26391-K84-Z100-1-7619
25

Preparation for use and operation The battery
Removing and installing drives and batteries
Only use batteries designed for the this notebook.
!
Never use force when inserting or removing a battery.
Make sure that no foreign objects enter the slots.
Drives can only be installed in the right slide-in module.
Batteries can be installed in the left and right slide-in module.
Removing drive/battery
Switch off the notebook. You can leave the
²²
notebook on provided the battery is not the
notebook’s only power source.
Swing open the display.
²²
Place the notebook on a level surface.
²²
Press the battery’s unlock button (1).
²²
The release button for drives is located on the
right side.
Pull the battery (2) or, on the right side, the
²²
2
1
drive out of the slide-in module.
Installing drive/battery
26
Swing open the display.
²²
Place the notebook on a level surface.
²²
Place the battery in the slot so that the
²²
contacts enter first.
Push the battery into the slot until you feel it
²²
locking into place.
A26391-K84-Z100-1-7619
Floppy disk drive Preparation for use and operation
Floppy disk drive
Use only the floppy disk drive designed for this notebook.
Do not use force when installing or removing the floppy disk drive.
!
Make sure that no foreign objects enter the slot.
The disk drive can also be removed or installed while in operation (but not when the disk
drive is being accessed).
i
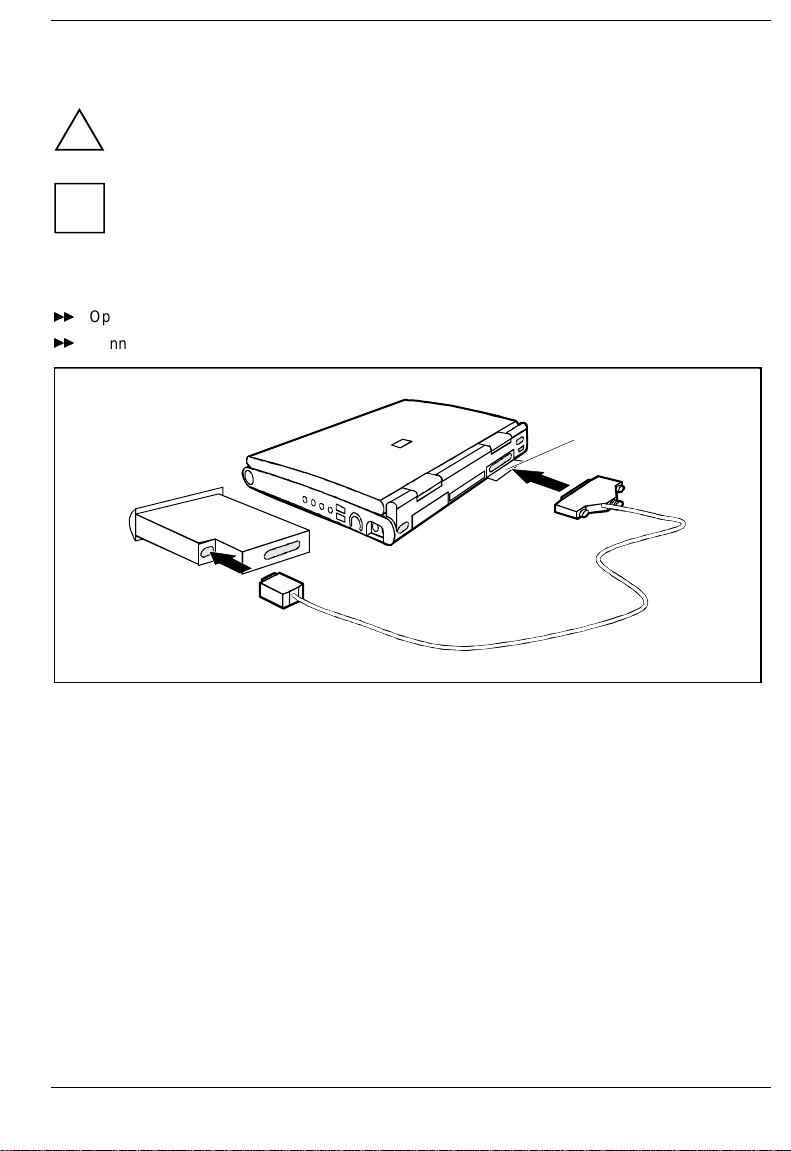
Connecting the floppy disk drive externally
Open the cover (1).
²²
Connect the floppy disk drive externally to the parallel port via an adapter cable.
²²
1
A26391-K84-Z100-1-7619
27
Preparation for use and operation Floppy disk drive
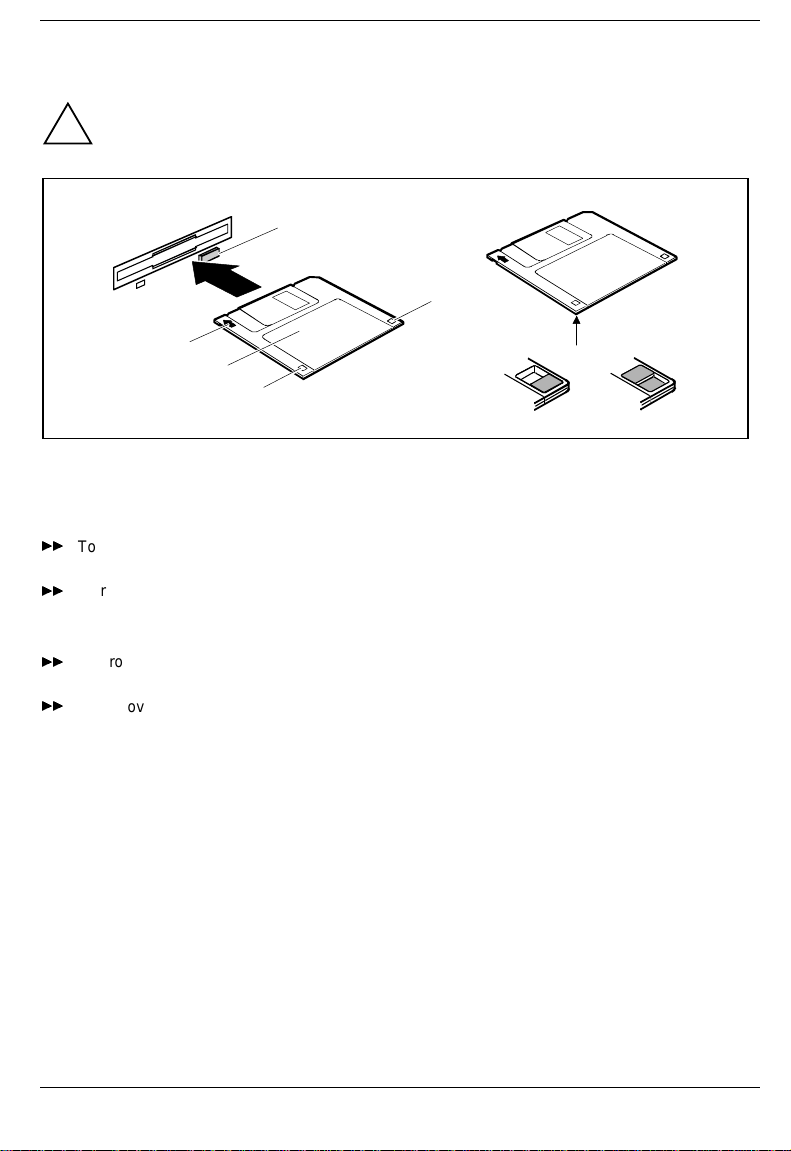
Working with floppy disks
Follow the instructions supplied by the vendor of the floppy disks.
!
5
4
1
2
3
1 = Insertion direction
2 = Label area
3 = Write-protect slider
4 = Hole for recognition of 1.44 Mbytes disk
To insert a floppy disk, push it into the drive in the insertion direction (1) until it engages. The label
²²
should be facing upward.
To remove the floppy disk, press the eject button (5).
²²
The write-protect slider enables you to protect the data on the floppy disk from inadvertent overwriting
or deletion.
To protect the data on the floppy disk from being overwritten, push the write-protect slider to
²²
position (6). The hole is now visible.
To remove write protection, push the slider to position (7). The hole is now covered.
²²
5 = Eject button for inserted floppy disks
6 = Floppy disk is write protected
7 = Floppy disk is not write-protected
6
7
28
A26391-K84-Z100-1-7619
Operating the CD-ROM drive and the DVD drive Preparation for use and operation
Operating the CD-ROM drive and the DVD drive
This device contains a light-emitting diode, classified according to IEC 825-1:1993: LASER
CLASS 1 (LUOKAN 1 LASERLAITE, KLASS 1 LASER APPARAT), and must not be
!
opened.
There is an invisible laser radiation when the cover is open. Avoid exposure to the beam.
Avoid touching the surface of a CD. Handle CDs only by their edges!
Always store CDs/DVDs in their cases. You avoid dust contamination, scratches, bending
or other damage.
Protect your CDs/DVDs from dust, mechanical vibration and direct sunlight!
Avoid storing a CD/DVD in areas subject to high temperatures or humidity.
You may use both 8-cm and 12-cm CDs.
When using CDs/DVDs of minor quality vibrations and reading errors may occur.
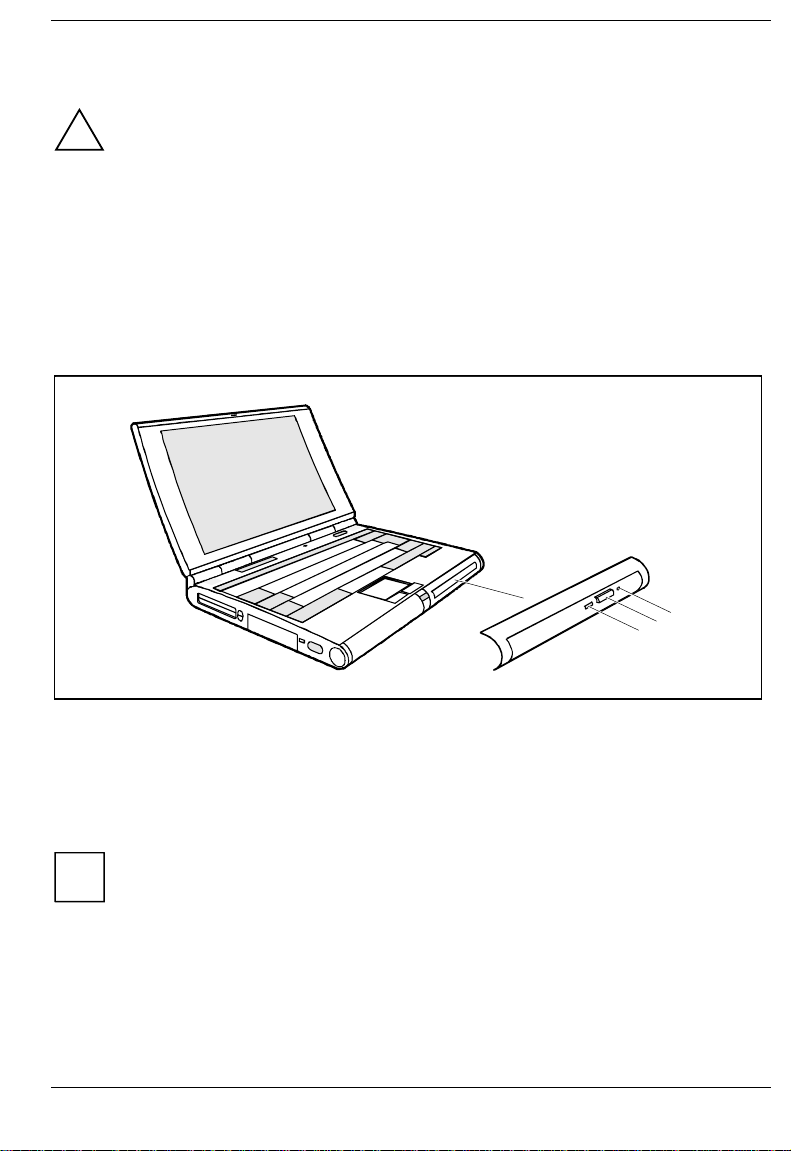
3
2
1
1 = Power-on indicator
2 = Insert/Eject button
Power-on indicator
The power-on indicator (1) flashes when a CD/DVD is inserted. It goes out when the drive is ready for
reading. It lights up when the drive is accessed.
If the power-on indicator does not go out after the CD/DVD is inserted, and continues to
flash, the CD/DVD is probably damaged or dirty.
i
If the inserted CD/DVD vibrates and/or reading errors occur, then it may be possible to
eliminate the vibrations or reading errors by reducing the rotating speed. Press the
Insert/Eject button for roughly two seconds. Reducing the rotating speed also saves power.
A26391-K84-Z100-1-7619
3 = Opening for manual ejection
29
Preparation for use and operation Operating the CD-ROM drive and the DVD drive
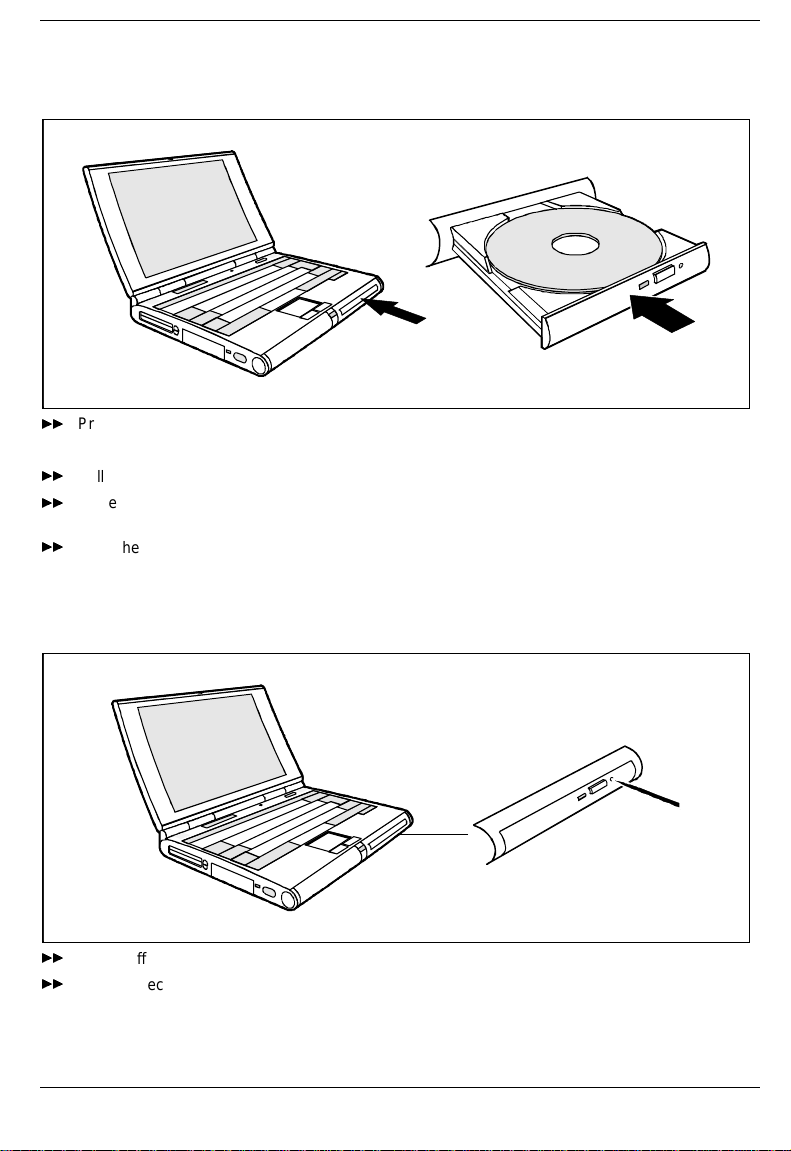
Inserting or removing a CD/DVD
The notebook must be switched on.
Press the Insert/Eject button for roughly one second.
²²
The CD/DVD tray opens.
Pull the CD/DVD tray completely out.
²²
Place the CD/DVD in the CD/DVD tray with the labeled side facing upwards, and carefully push
²²
the CD/DVD into the mount or remove an inserted CD/DVD.
Push the CD/DVD tray in until you feel it locking into place.
²²
Manual removal (emergency removal)
In the event of a power failure or damage to the drive it may be necessary to manually remove the
CD/DVD.
Switch off the notebook.
²²
Press a piece of wire (e. g. a paper clip) firmly into the opening.
²²
The CD/DVD tray is unlocked. You can now pull it out of the drive.
30
A26391-K84-Z100-1-7619
 Loading...