

Page 1

Areas Covered
Before Reading This Manual
This section explains the notes for your safety and conventions used in this manual.
Make sure to read this section.
PRIMERGY RX100 S4 User’s Guide
Chapter 1
Chapter 2
Chapter3
Chapter4
Chapter5
Chapter 6
Chapter 7
Overview
This chapter explains component names and basic operations of this server, as well as an
overview of the software provided with this server. In addition, the workflow, from placing the
server to starting the operation, is also described.
Checking before OS Installation
This chapter explains the preparation on the server and cautions necessary before OS
installation. Please read this chapter before starting installation.
OS Installation Using ServerStart
This chapter explains how to install the OS in the server using ServerStart.
Manual OS Installation
This chapter explains how to install the OS in the server without using ServerStart.
Operations after OS Installation
This chapter explains the operations to be performed after OS installation. Make sure to
perform those operations before operating the server.
High Reliability Tools
For stable PRIMERGY server operations, we recommend that high reliability tools be installed.
This chapter explains the installation and necessary settings of high reliability tools.
Installing Internal Options
This chapter explains how to install internal options on this server.
Chapter 8
Chapter 9
Appendix
Configuring Hardware and Utilities
This chapter explains how to make the environment settings necessary to operate the server and
how to use each utility.
Operation and Maintenance
This chapter explains the operations that become necessary after starting to use this server as
well as daily care and maintenance.
This appendix explains the specifications for the server and internal options. It also covers how
to recycle the products.
1
Page 2

Before Reading This Manual
For Your Safety...
This manual contains important information, required to operate the server safely.
Thoroughly review the information in this manual before using the server. Especially note the points under "Safety Precautions", and only
operate the server with a complete understanding of the material provided.
This manual and "Safety Precautions" should be kept in an easy-to-access location for quick reference when using this server.
Data Backup
To protect data stored in this device (including basic software such as the operating system and application software), perform backup and
other necessary operations. Note that data protection is not guaranteed when repairs are performed. It is the customer's responsibility to
maintain backup copies in advance.
In case of data loss, Fujitsu assumes no liability for data maintenance or restoration and damages that occur as a result of the data loss for any
reason, except for items covered under warranty.
High Safety
The Products are designed, developed and manufactured as contemplated or general use, including without limitation, general office use,
personal use, household use, and ordinary industrial use, but are not designed, developed and manufactured as contemplated for use
accompanying fatal risks or dangers that, unless extremely high safety is secured, could lead directly to death, personal injury, severe physical
damage, or other loss (hereinafter "High Safety Required Use"), including without limitation, nuclear reaction control in nuclear facility,
aircraft flight control, air traffic control, mass transport control, medical life support system, missile launch control in weapon system. You
shall not use this Product without securing the sufficient safety required for the High Safety Required Use. If you wish to use this Product for
High Safety Required Use, please consult with our sales representatives in charge before such use.
Problems may occur with this device in the event of an instantaneous voltage drop of the power supply due to lightening, etc. To prevent an
instantaneous voltage drop of power supply, we recommended that you use an uninterruptible power supply system.
■ Trademarks
Microsoft, Windows, and Windows Server are trademarks or registered trademarks of Microsoft Corporation in the United
States and other countries.
Intel, Xeon, Pentium, and Celeron are trademarks or registered trademarks of Intel Corporation or its subsidiaries in the
USA and other countries.
Linux is a trademark or registered trademark of Linus Torvalds in the USA and other countries.
Red Hat and all Red Hat-based trademarks and logos are trademarks or registered trademarks of Red Hat, Inc. in the
United States and other countries.
BrightStor and ARCserve are registered trademarks of CA, Inc.
Other product names used are trademarks or registered trademarks of their respective manufacturers.
Other products are copyrights of their respective manufacturers.
All Rights Reserved, Copyright© FUJITSU LIMITED 2007
Screen shot(s) reprinted with permission from Microsoft Corporation.
2
Page 3

PRIMERGY RX100 S4 User’s Guide
Remarks
■ Warning Descriptions
Various symbols are used throughout this manual. These are used to emphasize important points for your
safety and that of others. The following are the symbols and their meanings. It is important to fully
understand these symbols before reading this manual.
Ignoring this symbol could be potentially lethal.
Ignoring this symbol may lead to injury and/or damage the server or internal options.
The following symbols are used to indicate the type of warning or caution being described.
A triangle mark emphasizes the urgency of the WARNING and CAUTION.
Details are described next to the triangle.
A barred circle ( ) warns against certain actions (Do Not).
Details are described next to the circle.
A black circle indicates actions that must be taken.
Details are described next to the black circle.
■ Symbols
Symbols used in this manual have the following meanings.
These sections explain prohibited actions and points to note when using this device.
Make sure to read these sections.
These sections explain information needed to operate the hardware and software properly.
Make sure to read these sections.
→ This mark indicates reference pages or manuals.
■ Key Descriptions/Operations
Keys are represented throughout this manual in the following manner:
E.g.: [Ctrl] key, [Enter] key, [→] key, etc.
The following indicate pressing several keys at once:
E.g.: [Ctrl] + [F3] key, [Shift] + [↑] key, etc.
■ CD-ROM Drive and DVD-RAM Drive Descriptions
In this manual, both CD-ROM and DVD-RAM drives are described as "CD-ROM drive". Unless
otherwise noted, a CD-ROM drive can also mean a DVD-RAM drive.
3
Page 4

■ Entering Commands (Keys)
Command entries are displayed in the following way:
• At each blank in command line (such as pointed place above), press the [Space] key once.
• When using Windows, commands are not case sensitive.
• CD-ROM drive names are shown as [CD-ROM drive]. Enter your drive name according to your
environment.
[CD-ROM drive]:\setup.exe
■ Screen Shots and Figures
Screen shots and figures are used as visual aids throughout this manual. Windows, screens, and file
names may vary depending on the OS, software, or configuration of the server used. Figures in this
manual may not show cables that are actually connected for convenience of explanation.
■ Consecutive Operations
Consecutive operations are described by connecting them with arrows (→).
Example: Procedure of clicking the [Start] button, pointing to [Programs], and clicking [Accessories]
↓
Click [Start] → [Programs] → [Accessories].
4
Page 5
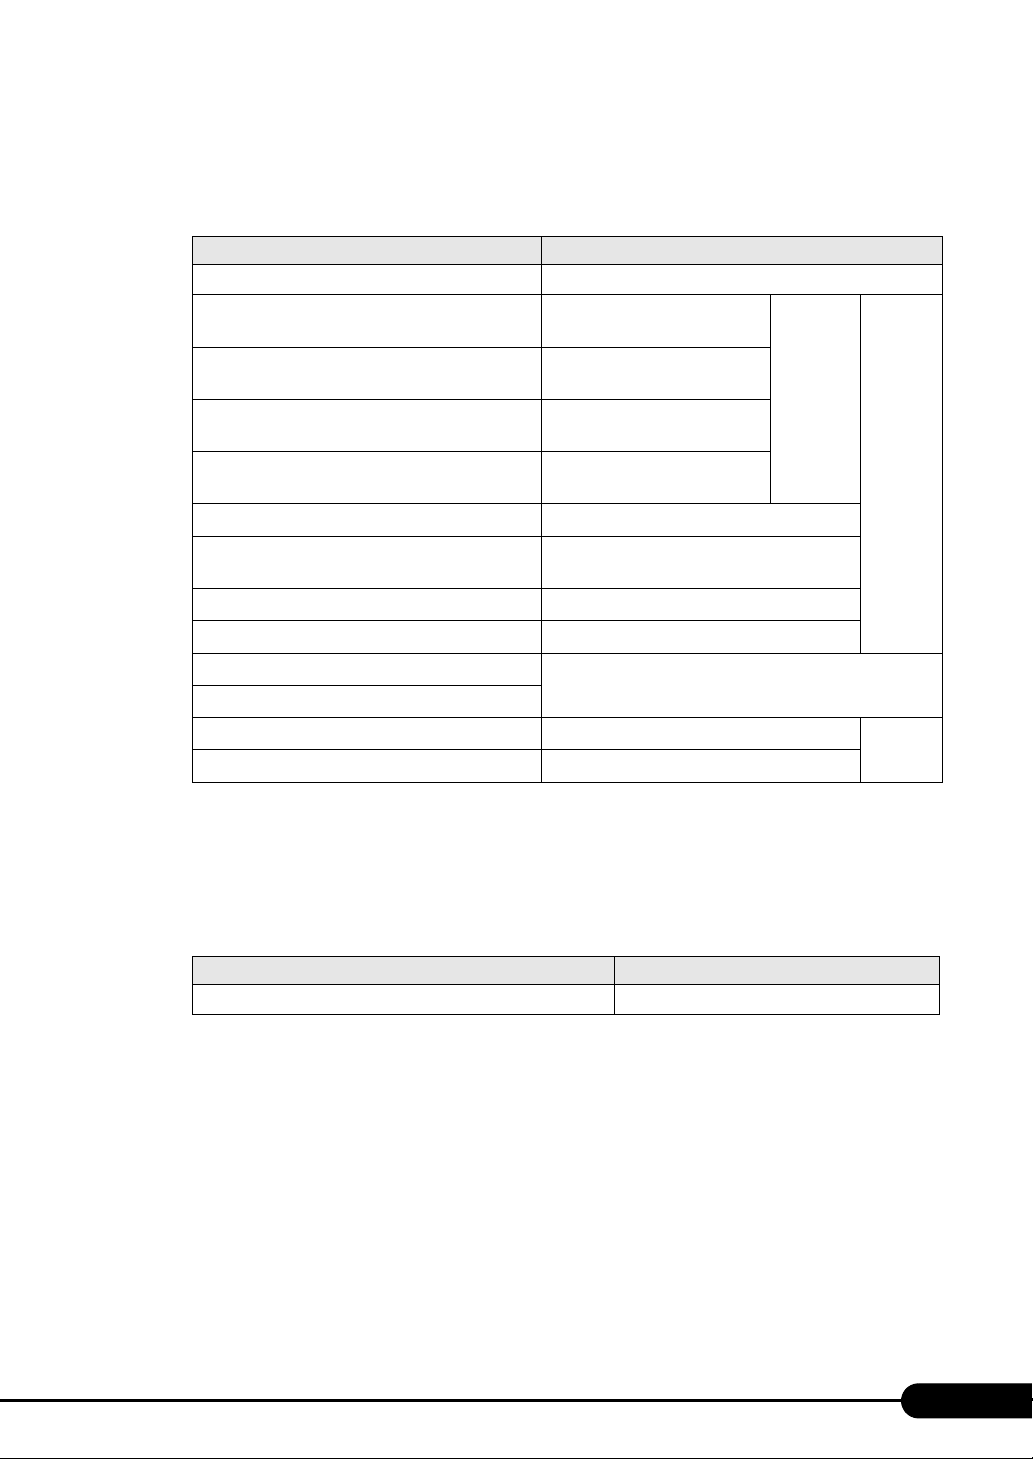
■ Abbreviations
The following expressions and abbreviations are used throughout this manual.
table: Abbreviations of Product Names
Product name Expressions and abbreviations
PRIMERGY RX100 S4
®
Microsoft
Windows Server® 2003, Standard x64
Edition
Microsoft
®
Windows Server® 2003, Standard
Edition
Microsoft
®
Windows Server® 2003 R2, Standard
x64 Edition
®
Microsoft
Windows Server® 2003 R2, Standard
Edition
®
Microsoft
Microsoft
Windows® 2000 Server
®
Windows® Preinstallation
Environment
®
Microsoft
Microsoft
Red Hat
Red Hat
Microsoft
Microsoft
Windows® XP Professional
®
Windows® 2000 Professional
®
Enterprise Linux® ES (v.4 for x86)
®
Enterprise Linux® ES (v.4 for EM64T)
®
Windows® 2000 Service Pack 4
®
Windows Server® 2003 Service Pack 1
This server or the server
Windows Server 2003 x64
Windows Server 2003, Standard
Edition
Windows Server 2003 R2 x64
Windows Server 2003 R2
Windows 2000 Server
Windows PE
Windows XP Professional
Windows 2000 Professional
Linux
Windows 2000 Service Pack 4
Windows Server 2003 Service Pack 1
PRIMERGY RX100 S4 User’s Guide
*1
Windows
Server
2
*
2003
Windows
Service
Pack
*1: Unless otherwise specified, R2 is also included in "Windows Server 2003 x64".
*2: Unless otherwise specified, R2 is also included in "Windows Server 2003".
■ Server Types
Server types are described as follows.
table: Server Types
Type Expressions and abbreviations
Servers without an internal hard disk unit Diskless type
5
Page 6

Reference Information
■ Software Manuals
Software Manual contains other reference information and cautions for ServerStart not described in this
manual. Please read it before using ServerStart.
Software Manual is contained as a "README.TXT" file in the root directory on the ServerStart CD-
ROM. Use a text editor to read it.
■ Latest Information about Software Provided with This Server
For the latest information regarding ServerStart and other software provided with this server, refer to the
Fujitsu PRIMERGY website (http://primergy.fujitsu.com).
Warning and Caution Labels
Warning and caution labels are found on the server.
Do not remove or stain these labels.
6
Page 7

Contents
Chapter 1 Overview
1.1 RX100 S4 . . . . . . . . . . . . . . . . . . . . . . . . . . . . . . . . . . . . . . . . . . . . 14
1.2 Supplied Software . . . . . . . . . . . . . . . . . . . . . . . . . . . . . . . . . . . . 16
1.2.1 Setup Support Tool - ServerStart . . . . . . . . . . . . . . . . . . . . . . . . . . . . . . . .16
1.2.2 High Reliability Tools . . . . . . . . . . . . . . . . . . . . . . . . . . . . . . . . . . . . . . . . .20
1.2.3 Installing High Reliability Tools . . . . . . . . . . . . . . . . . . . . . . . . . . . . . . . . . .21
1.3 Component Names and Functions . . . . . . . . . . . . . . . . . . . . . . . 23
1.3.1 Server (Front View) . . . . . . . . . . . . . . . . . . . . . . . . . . . . . . . . . . . . . . . . . .23
1.3.2 Server (Rear View) . . . . . . . . . . . . . . . . . . . . . . . . . . . . . . . . . . . . . . . . . . .24
1.3.3 Server (Internal) . . . . . . . . . . . . . . . . . . . . . . . . . . . . . . . . . . . . . . . . . . . . .26
1.3.4 Baseboard . . . . . . . . . . . . . . . . . . . . . . . . . . . . . . . . . . . . . . . . . . . . . . . . .27
1.4 Standard Operations . . . . . . . . . . . . . . . . . . . . . . . . . . . . . . . . . . 29
1.4.1 Open the Rack Door . . . . . . . . . . . . . . . . . . . . . . . . . . . . . . . . . . . . . . . . .29
1.4.2 Turning On the Server . . . . . . . . . . . . . . . . . . . . . . . . . . . . . . . . . . . . . . . . 31
1.4.3 Turning Off the Server . . . . . . . . . . . . . . . . . . . . . . . . . . . . . . . . . . . . . . . . 33
1.4.4 Inserting and Ejecting a CD-ROM (DVD-RAM) . . . . . . . . . . . . . . . . . . . . .34
1.5 Workflow . . . . . . . . . . . . . . . . . . . . . . . . . . . . . . . . . . . . . . . . . . . . 37
PRIMERGY RX100 S4 User’s Guide
Chapter 2 Checking before OS Installation
2.1 Preparation on the Server . . . . . . . . . . . . . . . . . . . . . . . . . . . . . . 40
2.1.1 Installing Internal Options . . . . . . . . . . . . . . . . . . . . . . . . . . . . . . . . . . . . . .40
2.1.2 Hardware Settings . . . . . . . . . . . . . . . . . . . . . . . . . . . . . . . . . . . . . . . . . . .41
2.2 Selecting the Installation Method . . . . . . . . . . . . . . . . . . . . . . . . 43
2.3 Precautions on Installation . . . . . . . . . . . . . . . . . . . . . . . . . . . . . 44
2.3.1 Installation Partition Size . . . . . . . . . . . . . . . . . . . . . . . . . . . . . . . . . . . . . . 44
2.3.2 Notes on Configuring RAID . . . . . . . . . . . . . . . . . . . . . . . . . . . . . . . . . . . .45
2.3.3 Notes on a Multiple LAN Adapter Configuration . . . . . . . . . . . . . . . . . . . .45
2.3.4 Cautions for Using ServerStart . . . . . . . . . . . . . . . . . . . . . . . . . . . . . . . . .46
2.3.5 Expansion Cards Supported by ServerStart . . . . . . . . . . . . . . . . . . . . . . .47
2.3.6 Cautions for Manual Installation . . . . . . . . . . . . . . . . . . . . . . . . . . . . . . . . .47
2.4 Preparation for Using ServerStart on a Client Computer . . . . . 49
2.4.1 Installing ServerStart . . . . . . . . . . . . . . . . . . . . . . . . . . . . . . . . . . . . . . . . .49
2.4.2 Uninstalling ServerStart . . . . . . . . . . . . . . . . . . . . . . . . . . . . . . . . . . . . . . .51
2.4.3 Creating the ServerStart Floppy Disk . . . . . . . . . . . . . . . . . . . . . . . . . . . .52
Chapter 3 OS Installation Using ServerStart
3.1 Guided Mode . . . . . . . . . . . . . . . . . . . . . . . . . . . . . . . . . . . . . . . . . 56
3.1.1 Starting Up the Guided Mode . . . . . . . . . . . . . . . . . . . . . . . . . . . . . . . . . . .56
3.1.2 Opening/Creating a Configuration File . . . . . . . . . . . . . . . . . . . . . . . . . . .60
7
Page 8

3.1.3 RAID and Disk Wizard . . . . . . . . . . . . . . . . . . . . . . . . . . . . . . . . . . . . . . . . 61
3.1.4 OS Installation Wizard . . . . . . . . . . . . . . . . . . . . . . . . . . . . . . . . . . . . . . . . 64
3.1.5 Application Wizard . . . . . . . . . . . . . . . . . . . . . . . . . . . . . . . . . . . . . . . . . . . 69
3.1.6 Closing/Saving the Configuration File . . . . . . . . . . . . . . . . . . . . . . . . . . . . 70
3.1.7 Starting OS Installation . . . . . . . . . . . . . . . . . . . . . . . . . . . . . . . . . . . . . . . 70
3.2 Preparation Mode . . . . . . . . . . . . . . . . . . . . . . . . . . . . . . . . . . . . . 73
3.2.1 Starting Up the Preparation Mode . . . . . . . . . . . . . . . . . . . . . . . . . . . . . . . 73
3.2.2 Configuring Settings in Wizards . . . . . . . . . . . . . . . . . . . . . . . . . . . . . . . . 75
3.2.3 Closing/Saving the Configuration File . . . . . . . . . . . . . . . . . . . . . . . . . . . . 76
3.2.4 Starting OS Installation . . . . . . . . . . . . . . . . . . . . . . . . . . . . . . . . . . . . . . . 77
3.3 Expert Mode . . . . . . . . . . . . . . . . . . . . . . . . . . . . . . . . . . . . . . . . . 79
3.3.1 Starting Up the Expert Mode . . . . . . . . . . . . . . . . . . . . . . . . . . . . . . . . . . . 79
3.3.2 Disk Manager . . . . . . . . . . . . . . . . . . . . . . . . . . . . . . . . . . . . . . . . . . . . . . . 81
3.3.3 OS Installation Wizard . . . . . . . . . . . . . . . . . . . . . . . . . . . . . . . . . . . . . . . . 82
3.3.4 Application Wizard . . . . . . . . . . . . . . . . . . . . . . . . . . . . . . . . . . . . . . . . . . . 83
3.3.5 Starting OS Installation . . . . . . . . . . . . . . . . . . . . . . . . . . . . . . . . . . . . . . . 83
3.4 Remote Installation . . . . . . . . . . . . . . . . . . . . . . . . . . . . . . . . . . . 86
3.4.1 Overview of Remote Installation . . . . . . . . . . . . . . . . . . . . . . . . . . . . . . . . 86
3.4.2 System Requirements for Remote Resource/PXE Servers . . . . . . . . . . . 87
3.4.3 Preparation of the PXE Server (When the PXE Server is Used) . . . . . . . 89
3.4.4 Preparation of Remote Resources . . . . . . . . . . . . . . . . . . . . . . . . . . . . . . 97
3.4.5 Starting Remote Installation Using a PXE Server . . . . . . . . . . . . . . . . . . . 97
3.4.6 Starting Remote Installation Using a Remote Resource Server . . . . . . . 101
3.5 Installation on Multiple (the Second and Subsequent) Servers
. . . . . . . . . . . . . . . . . . . . . . . . . . . . . . . . . . . . . . . . . . . . . . . . . . . 105
3.5.1 Preparation for Installation . . . . . . . . . . . . . . . . . . . . . . . . . . . . . . . . . . . . 105
3.5.2 Installation in Guided Mode . . . . . . . . . . . . . . . . . . . . . . . . . . . . . . . . . . . 106
3.5.3 Installation in Preparation Mode . . . . . . . . . . . . . . . . . . . . . . . . . . . . . . . 107
Chapter 4 Manual OS Installation
4.1 Creating Driver Disks . . . . . . . . . . . . . . . . . . . . . . . . . . . . . . . . . 110
4.1.1 Required Driver Disks . . . . . . . . . . . . . . . . . . . . . . . . . . . . . . . . . . . . . . . 110
4.1.2 How to Create Driver Disks [FloppyBuilder function] . . . . . . . . . . . . . . . 112
4.2 Starting Manual Installation . . . . . . . . . . . . . . . . . . . . . . . . . . . 115
4.2.1 Installing Windows Server 2003 x64 . . . . . . . . . . . . . . . . . . . . . . . . . . . . 115
4.2.2 Installing Windows Server 2003 . . . . . . . . . . . . . . . . . . . . . . . . . . . . . . . 118
4.2.3 Installing Windows 2000 Server . . . . . . . . . . . . . . . . . . . . . . . . . . . . . . . 121
4.2.4 Installing Linux . . . . . . . . . . . . . . . . . . . . . . . . . . . . . . . . . . . . . . . . . . . . . 124
4.3 Installing the LAN Driver . . . . . . . . . . . . . . . . . . . . . . . . . . . . . . 125
4.3.1 Installing the LAN Driver (Windows Server 2003 x64) . . . . . . . . . . . . . . 126
4.3.2 Installing the LAN Driver (Windows Server 2003) . . . . . . . . . . . . . . . . . . 128
4.3.3 Installing the LAN Driver (Windows 2000 Server) . . . . . . . . . . . . . . . . . . 129
4.3.4 Latest Drivers . . . . . . . . . . . . . . . . . . . . . . . . . . . . . . . . . . . . . . . . . . . . . . 131
8
Page 9

Chapter 5 Operations after OS Installation
5.1 Memory Dump/Paging File Setting . . . . . . . . . . . . . . . . . . . . . . 134
5.1.1 How to Obtain Memory Dump for
Windows Server 2003 and Windows Server 2003 x64 . . . . . . . . . . . . . . . . . .134
5.1.2 How to Obtain Memory Dump for
Windows 2000 Server . . . . . . . . . . . . . . . . . . . . . . . . . . . . . . . . . . . . . . . . . . . .139
5.2 Creating a Disk for System Recovery . . . . . . . . . . . . . . . . . . . . 144
5.2.1 Creating the Automated System Recovery (ASR) Set
(For Windows Server 2003 and Windows Server 2003 x64) . . . . . . . . . . . . . .144
5.2.2 Creating a System Recovery Disk (For Windows 2000 Server) . . . . . . .145
5.3 Storing the System Configuration Information . . . . . . . . . . . . 146
5.3.1 Storing the BIOS Information and the Remote Management Controller
Information . . . . . . . . . . . . . . . . . . . . . . . . . . . . . . . . . . . . . . . . . . . . . . . . . . . . .147
5.3.2 Recovering the BIOS Information . . . . . . . . . . . . . . . . . . . . . . . . . . . . . .148
5.3.3 Recovering the Remote Management Controller Information . . . . . . . .149
5.4 Creating Maintenance Tools . . . . . . . . . . . . . . . . . . . . . . . . . . . 150
5.4.1 Creating a Hardware Configuration Tool . . . . . . . . . . . . . . . . . . . . . . . . .150
5.4.2 Creating a DOS Floppy Disk . . . . . . . . . . . . . . . . . . . . . . . . . . . . . . . . . .154
5.5 Notes before Operating the Server . . . . . . . . . . . . . . . . . . . . . . 155
5.5.1 Applying the Hotfix . . . . . . . . . . . . . . . . . . . . . . . . . . . . . . . . . . . . . . . . . .155
5.5.2 Auto-run Function from CD-ROM Drives . . . . . . . . . . . . . . . . . . . . . . . . . 156
5.5.3 Drive Letter Assignment in Expert Mode . . . . . . . . . . . . . . . . . . . . . . . . .156
5.5.4 Notes on Advanced Uninterruptible Power Supply (UPS) . . . . . . . . . . . .157
5.5.5 Turning the Power On via a LAN . . . . . . . . . . . . . . . . . . . . . . . . . . . . . . . 158
5.5.6 Other Notes on Operation . . . . . . . . . . . . . . . . . . . . . . . . . . . . . . . . . . . . 159
5.6 LAN Driver Advanced Setup [BACS] . . . . . . . . . . . . . . . . . . . . 160
5.6.1 BACS Installation . . . . . . . . . . . . . . . . . . . . . . . . . . . . . . . . . . . . . . . . . . .160
5.6.2 VLAN Setup Procedure . . . . . . . . . . . . . . . . . . . . . . . . . . . . . . . . . . . . . .162
5.6.3 Cautions for Onboard LAN Driver Ver9.25.0.0 . . . . . . . . . . . . . . . . . . . .164
5.7 LAN Driver Advanced Setup [Intel® PROSet] . . . . . . . . . . . . . 165
5.7.1 Intel® PROSet Installation . . . . . . . . . . . . . . . . . . . . . . . . . . . . . . . . . . . .165
5.7.2 Cautions for PG-185x/186x/188x/189x/286x LAN Driver V10.3 . . . . . . .166
5.7.3 Teaming Function . . . . . . . . . . . . . . . . . . . . . . . . . . . . . . . . . . . . . . . . . . .166
5.7.4 VLAN . . . . . . . . . . . . . . . . . . . . . . . . . . . . . . . . . . . . . . . . . . . . . . . . . . . .168
PRIMERGY RX100 S4 User’s Guide
Chapter 6 High Reliability Tools
6.1 RAID Management Tool . . . . . . . . . . . . . . . . . . . . . . . . . . . . . . . 170
6.1.1 Installing RAID Management Tool . . . . . . . . . . . . . . . . . . . . . . . . . . . . . .170
6.2 Server Monitoring Tool [ServerView] . . . . . . . . . . . . . . . . . . . . 171
6.2.1 Installing ServerView . . . . . . . . . . . . . . . . . . . . . . . . . . . . . . . . . . . . . . . .172
6.2.2 Setting Required after Installation . . . . . . . . . . . . . . . . . . . . . . . . . . . . . .173
6.3 Solving Problems Early [DSNAP] . . . . . . . . . . . . . . . . . . . . . . . 174
6.3.1 Installing DSNAP . . . . . . . . . . . . . . . . . . . . . . . . . . . . . . . . . . . . . . . . . . .174
9
Page 10

6.3.2 How to Use DSNAP . . . . . . . . . . . . . . . . . . . . . . . . . . . . . . . . . . . . . . . . . 174
Chapter 7 Installing Internal Options
7.1 Before Installing Internal Options . . . . . . . . . . . . . . . . . . . . . . 176
7.2 Removing and Attaching the Top Cover . . . . . . . . . . . . . . . . . . 178
7.2.1 Removing and Attaching the Top Cover . . . . . . . . . . . . . . . . . . . . . . . . . 178
7.3 Installing Memory Modules . . . . . . . . . . . . . . . . . . . . . . . . . . . . 181
7.3.1 Where to Install Memory Modules . . . . . . . . . . . . . . . . . . . . . . . . . . . . . . 182
7.3.2 Installable Memory Modules . . . . . . . . . . . . . . . . . . . . . . . . . . . . . . . . . . 182
7.3.3 How to Install/Remove Memory Modules . . . . . . . . . . . . . . . . . . . . . . . . 183
7.3.4 Defective Memory Disconnection Function . . . . . . . . . . . . . . . . . . . . . . . 184
7.4 Installing Expansion Cards . . . . . . . . . . . . . . . . . . . . . . . . . . . . 185
7.4.1 Where to Install an Expansion Card . . . . . . . . . . . . . . . . . . . . . . . . . . . . 186
7.4.2 Installable Expansion Cards and Notes . . . . . . . . . . . . . . . . . . . . . . . . . 187
7.4.3 How to Install an Expansion Card . . . . . . . . . . . . . . . . . . . . . . . . . . . . . . 190
7.5 Installing an Internal CD-ROM Drive Unit . . . . . . . . . . . . . . . . 193
7.5.1 Installable CD-ROM Drive Units . . . . . . . . . . . . . . . . . . . . . . . . . . . . . . . 193
7.5.2 How to Install the Internal CD-ROM Drive Unit . . . . . . . . . . . . . . . . . . . . 194
7.6 Installing an Internal Hard Disk Unit . . . . . . . . . . . . . . . . . . . . 196
7.6.1 Installation Location of Internal Hard Disk Unit . . . . . . . . . . . . . . . . . . . . 197
7.6.2 Installable Internal Hard Disk Units and Notes . . . . . . . . . . . . . . . . . . . . 197
7.6.3 How to Install the Internal Hard Disk Unit . . . . . . . . . . . . . . . . . . . . . . . . 198
7.6.4 Replacing Internal Hard Disk Unit at Failure
(Only for array configurations) . . . . . . . . . . . . . . . . . . . . . . . . . . . . . . . . . . . . . 200
7.7 Connection of Optional Devices . . . . . . . . . . . . . . . . . . . . . . . . 201
7.7.1 Connecting an External SCSI Option . . . . . . . . . . . . . . . . . . . . . . . . . . . 201
Chapter 8 Configuring Hardware and Utilities
8.1 Jumper Settings . . . . . . . . . . . . . . . . . . . . . . . . . . . . . . . . . . . . . 204
8.1.1 Jumper Location and Settings . . . . . . . . . . . . . . . . . . . . . . . . . . . . . . . . . 204
8.2 BIOS Setup Utility . . . . . . . . . . . . . . . . . . . . . . . . . . . . . . . . . . . . 205
8.2.1 Starting and Exiting the BIOS Setup Utility . . . . . . . . . . . . . . . . . . . . . . . 205
8.2.2 Main Menu . . . . . . . . . . . . . . . . . . . . . . . . . . . . . . . . . . . . . . . . . . . . . . . . 208
8.2.3 Standard IDE Submenu . . . . . . . . . . . . . . . . . . . . . . . . . . . . . . . . . . . . . . 209
8.2.4 Boot Options Submenu . . . . . . . . . . . . . . . . . . . . . . . . . . . . . . . . . . . . . . 210
8.2.5 Advanced Menu . . . . . . . . . . . . . . . . . . . . . . . . . . . . . . . . . . . . . . . . . . . . 212
8.2.6 Peripheral Configuration Submenu . . . . . . . . . . . . . . . . . . . . . . . . . . . . . 213
8.2.7 PCI Configuration Submenu . . . . . . . . . . . . . . . . . . . . . . . . . . . . . . . . . . 215
8.2.8 Advanced System Configuration Submenu . . . . . . . . . . . . . . . . . . . . . . 216
8.2.9 Power On/Off Submenu . . . . . . . . . . . . . . . . . . . . . . . . . . . . . . . . . . . . . 218
8.2.10 IPMI Submenu . . . . . . . . . . . . . . . . . . . . . . . . . . . . . . . . . . . . . . . . . . . . 219
8.2.11 Security Menu . . . . . . . . . . . . . . . . . . . . . . . . . . . . . . . . . . . . . . . . . . . . 221
8.2.12 Server Menu . . . . . . . . . . . . . . . . . . . . . . . . . . . . . . . . . . . . . . . . . . . . . 223
10
Page 11

8.2.13 Exit Menu . . . . . . . . . . . . . . . . . . . . . . . . . . . . . . . . . . . . . . . . . . . . . . . .226
Chapter 9 Operation and Maintenance
9.1 Daily Maintenance . . . . . . . . . . . . . . . . . . . . . . . . . . . . . . . . . . . 228
9.1.1 Checking the Server Status . . . . . . . . . . . . . . . . . . . . . . . . . . . . . . . . . . .228
9.1.2 Cleaning . . . . . . . . . . . . . . . . . . . . . . . . . . . . . . . . . . . . . . . . . . . . . . . . . .228
9.2 Troubleshooting . . . . . . . . . . . . . . . . . . . . . . . . . . . . . . . . . . . . . 230
9.2.1 Hardware Troubleshooting . . . . . . . . . . . . . . . . . . . . . . . . . . . . . . . . . . . .230
9.2.2 Error Messages . . . . . . . . . . . . . . . . . . . . . . . . . . . . . . . . . . . . . . . . . . . .233
9.2.3 Software Troubleshooting . . . . . . . . . . . . . . . . . . . . . . . . . . . . . . . . . . . .238
9.3 System Event Log . . . . . . . . . . . . . . . . . . . . . . . . . . . . . . . . . . . . 245
9.3.1 How to Use Server Management Tools . . . . . . . . . . . . . . . . . . . . . . . . . . 245
9.3.2 Viewing the System Event Log . . . . . . . . . . . . . . . . . . . . . . . . . . . . . . . .247
9.3.3 Saving/Deleting the System Event Log . . . . . . . . . . . . . . . . . . . . . . . . . . 248
9.4 Security . . . . . . . . . . . . . . . . . . . . . . . . . . . . . . . . . . . . . . . . . . . . 249
9.4.1 Hardware Security . . . . . . . . . . . . . . . . . . . . . . . . . . . . . . . . . . . . . . . . . .249
9.4.2 Security against Unauthorized Use . . . . . . . . . . . . . . . . . . . . . . . . . . . . .250
9.4.3 Security When Disposing of the Server . . . . . . . . . . . . . . . . . . . . . . . . . .252
9.5 Backup . . . . . . . . . . . . . . . . . . . . . . . . . . . . . . . . . . . . . . . . . . . . . 253
9.5.1 Importance of Backups . . . . . . . . . . . . . . . . . . . . . . . . . . . . . . . . . . . . . .253
9.5.2 Backup Devices, Software and Their Operations . . . . . . . . . . . . . . . . . .253
9.6 Restoring the System . . . . . . . . . . . . . . . . . . . . . . . . . . . . . . . . . 256
9.6.1 For Windows Server 2003/Windows Server 2003 x64 . . . . . . . . . . . . . .256
9.6.2 For Windows 2000 Server . . . . . . . . . . . . . . . . . . . . . . . . . . . . . . . . . . . .257
9.7 Reinstalling the OS . . . . . . . . . . . . . . . . . . . . . . . . . . . . . . . . . . . 258
9.7.1 Checking before OS Reinstallation . . . . . . . . . . . . . . . . . . . . . . . . . . . . .258
9.7.2 Reinstallation Using ServerStart . . . . . . . . . . . . . . . . . . . . . . . . . . . . . . .258
9.8 Maintenance Service . . . . . . . . . . . . . . . . . . . . . . . . . . . . . . . . . 259
9.8.1 Maintenance Service . . . . . . . . . . . . . . . . . . . . . . . . . . . . . . . . . . . . . . . .259
9.8.2 Contacting Maintenance Support . . . . . . . . . . . . . . . . . . . . . . . . . . . . . . .260
PRIMERGY RX100 S4 User’s Guide
Appendix
A Server Specifications . . . . . . . . . . . . . . . . . . . . . . . . . . . . . . . . 262
A.1 Diskless Type . . . . . . . . . . . . . . . . . . . . . . . . . . . . . . . . . . . . . . . . . . . . . . . 262
B Specifications for Internal Options . . . . . . . . . . . . . . . . . . . . . 263
B.1 Memory Specifications . . . . . . . . . . . . . . . . . . . . . . . . . . . . . . . . . . . . . . . .263
B.2 Internal CD-ROM Drive Unit Specifications . . . . . . . . . . . . . . . . . . . . . . . .264
B.3 Internal Hard Disk Unit Specifications . . . . . . . . . . . . . . . . . . . . . . . . . . . .264
B.4 Power Cord Selection . . . . . . . . . . . . . . . . . . . . . . . . . . . . . . . . . . . . . . . . .265
C Remote Control Function . . . . . . . . . . . . . . . . . . . . . . . . . . . . . 267
C.1 Preparation for Using Remote Control Function . . . . . . . . . . . . . . . . . . . .267
C.2 Remote Power Supply Control . . . . . . . . . . . . . . . . . . . . . . . . . . . . . . . . . .270
D Remote Management Controller . . . . . . . . . . . . . . . . . . . . . . . 273
D.1 Overview of the Remote Management Controller . . . . . . . . . . . . . . . . . . .273
11
Page 12

D.2 Preparation for Using Remote Management Controller . . . . . . . . . . . . . . 274
D.3 Window of the Remote Management Controller . . . . . . . . . . . . . . . . . . . . 275
D.4 Remote Management Ctrl Upgrade kit (PG-RMCU1) . . . . . . . . . . . . . . . . 276
D.5 Notes on Security . . . . . . . . . . . . . . . . . . . . . . . . . . . . . . . . . . . . . . . . . . . . 278
E External Floppy Disk Drive (USB) Notes on Usage . . . . . . . . 279
F Recycling . . . . . . . . . . . . . . . . . . . . . . . . . . . . . . . . . . . . . . . . . . 280
12
Page 13
Chapter 1
Overview
This chapter explains component names and
basic operations of this server, as well as an
overview of the software provided with this
server. In addition, the workflow, from placing the
server to starting the operation, is also
described.
1.1 RX100 S4
1.2 Supplied Software
1.3 Component Names and Functions
1.4 Standard Operations
1.5 Workflow
. . . . . . . . . . . . . . . . . . . . . . . . . . . . . . . . . . . . 14
. . . . . . . . . . . . . . . . . . . . . . . . . . . . . . 16
. . . . . . . . . . . . . . . . . . . . . . . . . . . . 29
. . . . . . . . . . . . . . . . . . . . . . . . . . . . . . . . . . . . . 37
. . . . . . . . . . . . . . . . . . 23
13
Page 14

Chapter 1 Overview
1.1 RX100 S4
This server has the following features.
■ High Reliability
● Disk Array System Configuration
A disk array system (RAID1) can be configured using the onboard SAS controller.
● Redundancy Function
By configuring the disk array system, when the hard disk unit has failed, replacing the hard disk and
performing recovery operation is possible for the internal hard disk unit without turning off the power
source of the server and the peripheral devices (hot pluggable).
● Hardware and Software Designed for Data Security
The locks on the rack and security (password) setting in the BIOS Setup Utility protect hardware and
data assets in the server against theft, ensuring data security with high reliability.
● Proactive Fan Function
When a fan fails or the ambient temperature rises, the system fan speed is increased automatically to
avoid increase in temperature in the server, ensuring stable server operation.
● High Reliability Tools
High reliability tools offer stable system operation. For information about high reliability tools, refer to
"1.2.2 High Reliability Tools" (
pg.20).
■ High-speed Processing
● Intel
®
Xeon® Processor/Intel® Pentium® D Processor/Intel® Celeron® D
Processor are installed
One of the following items is installed; high speed data processing Intel® Xeon® Processor, Intel®
®
Pentium
Intel
physically as two CPUs.
D Processor, or Intel® Celeron® D Processor.
®
Xeon® Processor and Intel® Pentium® D Processor are dual core processor, and dual core works
● PCI-Express and PCI-X
A PCI-X bus with a maximum data transmission speed of 533MB/sec is installed in this server enabling
high-speed data transmission.
Furthermore, a PCI Slot Conversion kit (optional) has PCI-Express bus with a maximum data
transmission speed of 2.5GB/sec and PCI-X bus with a maximum data transmission speed of 800MB/
sec, enabling high-speed data transmission.
14
Page 15

PRIMERGY RX100 S4 User’s Guide
● DDR2 SDRAM Memory
DDR2 SDRAM (PC2-4200) is installed in this server as a memory module, which enables a high-speed
memory access.
■ Compact Design and Scalability
● Space Saving 1U Design
This server is slim, with a thickness of 1U. The server, display device, keyboard, and external SCSI
options fit in a 19-inch rack, which saves the installation space.
● Maximum Memory Size of 8GB
In addition to the preinstalled 512MB memory, the system supports up to 8GB memory.
● Maximum Hard Disk Size of 293.6GB
Up to two internal hard disk units can be installed in the 3.5-inch storage bays and the hard disk size can
be increased up to 293.6GB.
● Internal CD-ROM Drive Unit (or internal DVD-RAM drive unit)
One optional CD-ROM drive unit (or internal DVD-RAM drive unit) can be installed in the server.
● Two PCI Slots
The server has two 64-bit, 66MHz PCI slots.
When a PCI Slot Conversion kit (optional) is installed, PCI-Express correspondent expansion card can
be used.
1
Overview
15
Page 16
Chapter 1 Overview
1.2 Supplied Software
ServerStart for supporting setup and high reliability tools for avoiding problems during
server operation are supplied with this server.
1.2.1 Setup Support Tool - ServerStart
ServerStart is a setup support tool that helps to install PRIMERGY.
It offers easy server installation and proper installation of recommended drivers.
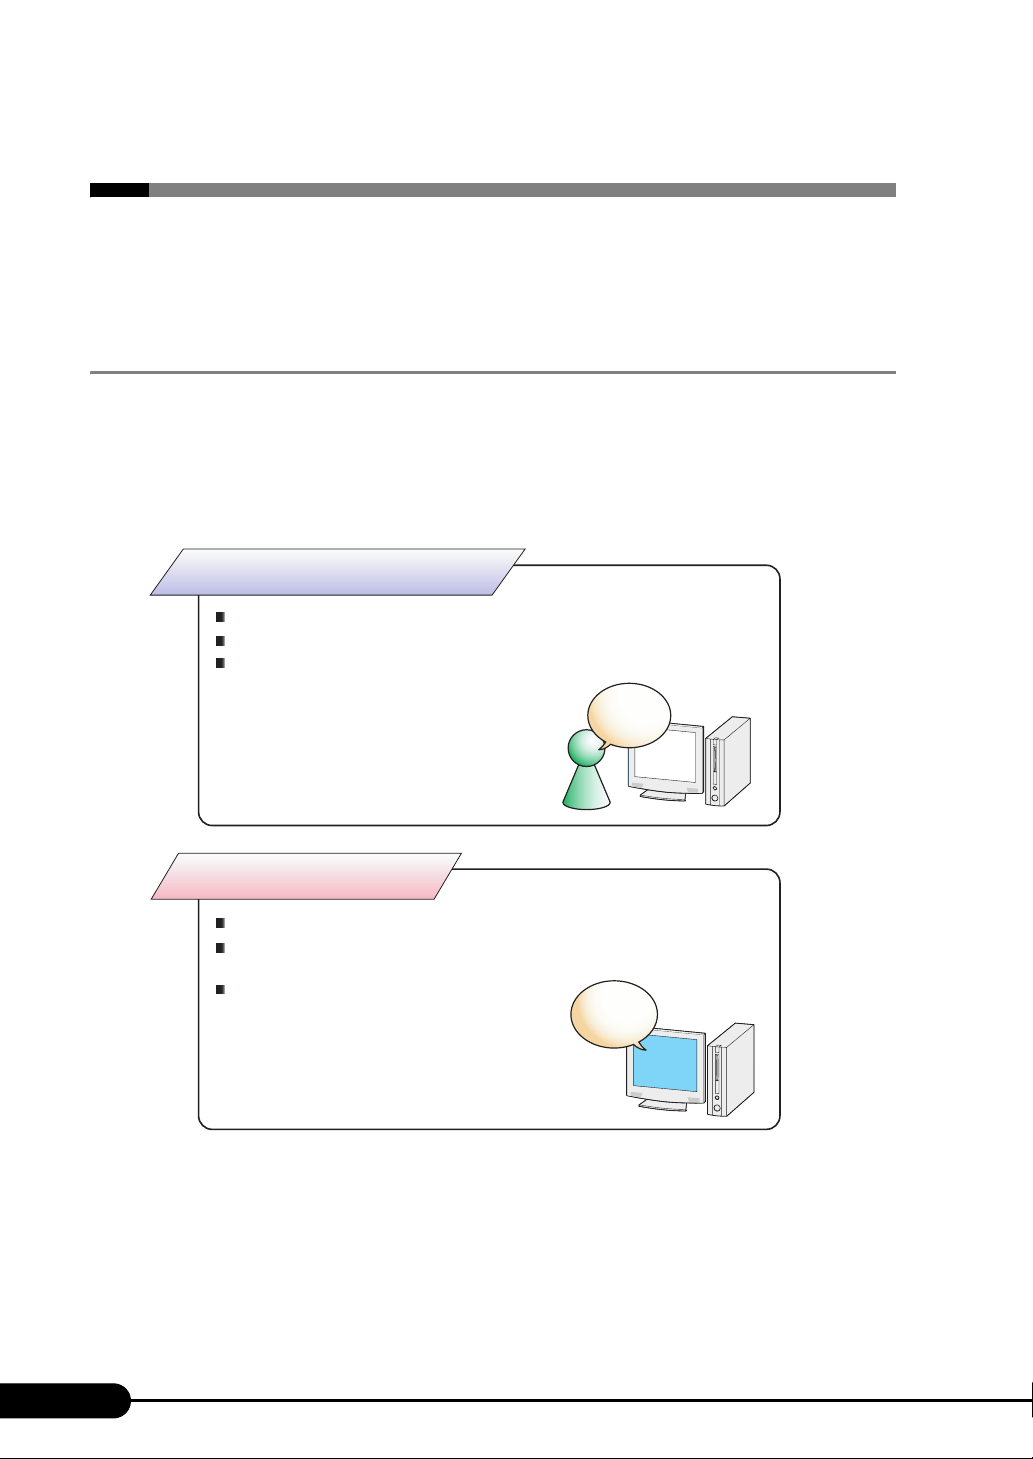
■ Installing Using ServerStart
Using ServerStart when installing OS offers the following merits.
Not using ServerStart
Complicated hardware configuration (RAID configuration, etc.)
User definition, access privileges, network settings
It is necessary to input successively for installation,
resulting in more mistakes and longer time
Example:
Operations such as setting IP address,
creating users, and registering computer
name are required
Install
&
Setup
16
Using ServerStart
Automatic RAID configuration is possible
Auto installation of recommended drivers (SCSI, LAN,
etc.) enables high reliable installation
High reliability tools can be installed
automatically *1
Example:
Operations during OS installation are automated *2
High reliability tools are software with comprehensive strength that enable
*1
stable system operation of the server management
Some input (License window, etc.) and media repositioning is excluded
*2
Auto setup
ServerStart
Page 17

● Supporting OS
Using ServerStart V6.609, the following OSs can be installed.
• Microsoft
• Microsoft
• Microsoft
• Microsoft
• Microsoft
• Microsoft
• Microsoft
• Microsoft
• Microsoft
• Microsoft
ServerStart does not support to install Linux.
The OS which is not supported by the server cannot be installed.
®
Windows Server® 2003, Standard Edition
®
Windows Server® 2003, Enterprise Edition
®
Windows Server® 2003, Standard x64 Edition
®
Windows Server® 2003, Enterprise x64 Edition
®
Windows Server® 2003 R2, Standard Edition
®
Windows Server® 2003 R2, Enterprise Edition
®
Windows Server® 2003 R2, Standard x64 Edition
®
Windows Server® 2003 R2, Enterprise x64 Edition
®
Windows® 2000 Server, SP4 already applied.
®
Windows® 2000 Advanced Server, SP4 already applied.
PRIMERGY RX100 S4 User’s Guide
1
Overview
● Configuration File (SerStartBatch.ini)
A configuration file stores the server setup information configured in ServerStart. To create a
configuration file, use the ServerStart floppy disk supplied with this server. Store only one file on each
floppy disk. Do not set the ServerStart floppy disk to the write-protected state.
You can use any name for the configuration file. However, the file must be installed in the server as
"SerStartBatch.ini". When installing the configuration file, make sure to save it as "SerStartBatch.ini" on
the ServerStart floppy disk.
Start up ServerStart, insert the ServerStart floppy disk containing "SerStartBatch.ini", and click [Start] to
install the server.
17
Page 18
Chapter 1 Overview
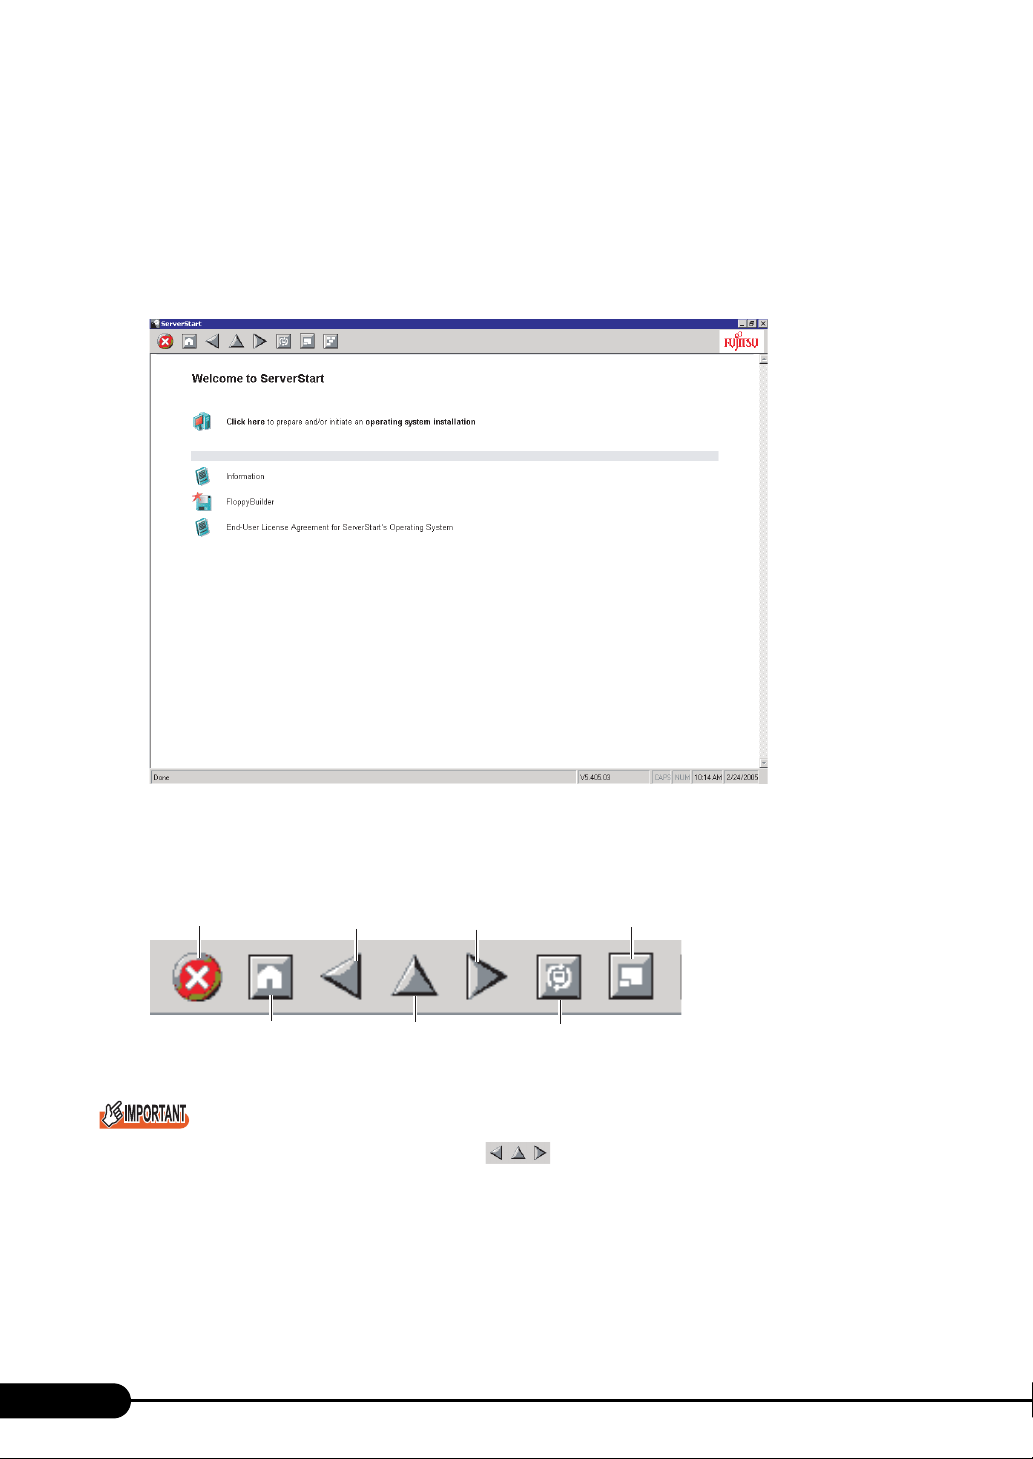
■ Intuitive User Interface
The intuitive user interface allows you to easily set the necessary information.
● Main Window
When ServerStart is started, the following window appears. The window and tool bar differ depending
on the mode.
18
● Toolbar
In Guided Mode/Expert Mode
Ends ServerStart.
Brings you to
the main screen.
While the wizard is running, do not click the icons to move to the previous or next page or to
the upper tier. To move to a different window, click the [Previous], [Up], or [Next] button at the bottom of
the wizard window.
Brings you to
the previous page.
Brings you up
one tier.
Brings you to
the next page.
Resets the status
function.
Changes the size
of icons.
Page 19
PRIMERGY RX100 S4 User’s Guide
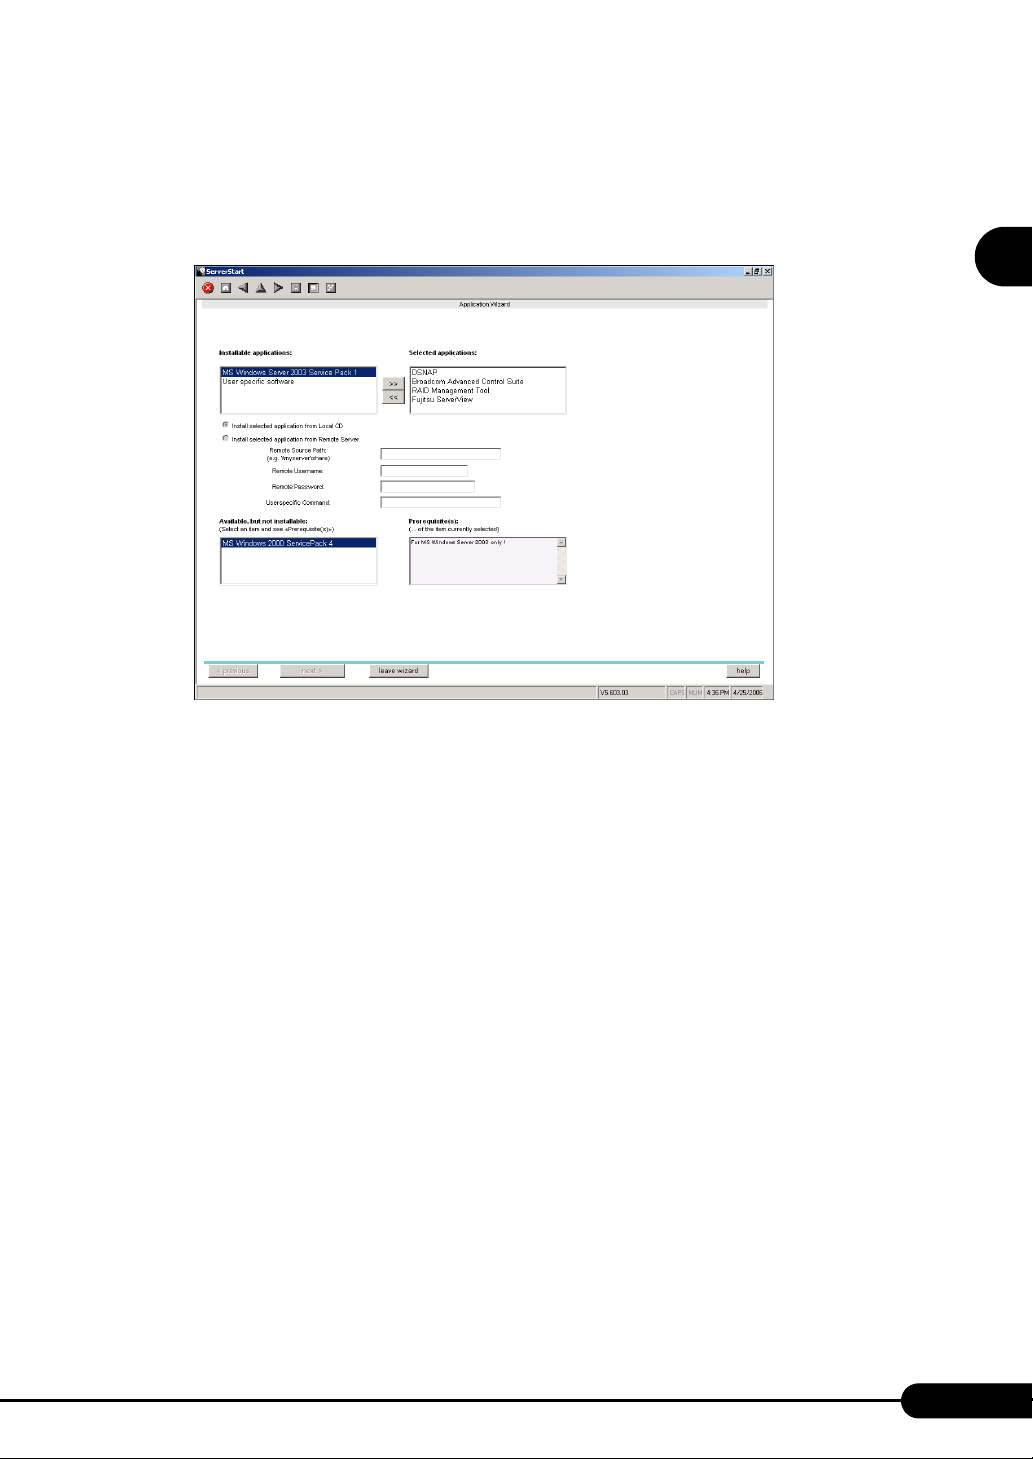
● Wizard Window
Clicking a wizard displays a wizard window.
Set items in the wizard window. To move to a step in the next wizard window, click the operation button
at the bottom of the window. Clicking [help] displays a tip for setting the item.
1
Overview
■ Network Configuration
ServerStart can configure a network at server installation.
For details on available network patterns, refer to "Using ServerStart to Configure the Network".
■ Automatic Driver Installation
Recommended drivers for automatically recognized expansion cards are installed with the server. This
prevents possible mistakes in driver installation, such as installation of an older version or drivers which
were not supplied with this server.
■ Automatic RAID Configuration
By specifying the RAID type and the number of hard disk units before starting installation using an
onboard SAS controller, a disk array can be configured without starting the RAID utility.
■ Remote Installation
ServerStart can store resources necessary for installation, such as the OS and Service Pack, in a different
server on the network and install the OS via the network. This method is useful when the server does not
have a CD-ROM or floppy disk drive.
19
Page 20

Chapter 1 Overview
1.2.2 High Reliability Tools
High reliability tools are a comprehensively useful set of software for stable system operations of the
server. The following tools have respective roles to manage normal operations or recovery from errors:
• Server Monitoring Tool
• System Diagnosis Support Tools
• LAN Driver Advanced Setup Tools
■ Server Monitoring Tools
The server monitoring tools monitor the hardware status on behalf of the administrator and notify him/
her in the event of an error.
● Early Detection of a Server Failure [ServerView]
ServerView is software that protects important server resources by monitoring whether the server
hardware is in a normal state. When using ServerView, the server hardware is monitored all the time. If
an error that could cause trouble is detected, the administrator is notified in real-time. This allows the
server administrator to remove a system error early and avoid trouble.
For notes on ServerView safety, refer to "ServerView User's guide".
● Early Detection of a Disk Problem [RAID Management Tool]
RAID Management Tool is software that performs array configurations, disk initialization, and storage
system monitoring. When an event occurs, it leaves an event log in the event viewer's application logs.
At the same time, a pop-up window indicates a hard disk failure, rebuild status, etc.
■ System Diagnosis Support Tools
The system diagnosis support tool is for supporting system diagnosis during normal operation or in the
event of trouble.
● Early Solution to Problems [DSNAP]
DSNAP is a command line utility that collects all the troubleshooting information. System file
configuration information, major registry settings, and event logs can be collected easily from the
command line.
DSNAP is used for a support engineer to understand your system software configuration and settings
correctly and ensure smooth investigations when a problem occurs in your Windows Server 2003/
Windows 2000 Server system. Provide this with memory dump to your support engineer.
■ LAN Driver Advanced Setup Tools
LAN Driver Advanced Setup Tool sets details on the LAN, including the use of the Teaming function
and VLAN configuration.
20
Page 21

PRIMERGY RX100 S4 User’s Guide
● Broadcom Advanced Control Suite (BACS)
BACS is a tool for setting details on the onboard LAN when it is used to setup a VLAN.
● Intel
®
PROSet
Intel® PROSet is a tool for setting details on the LAN card when using the Teaming function or when
configuring a VLAN.
1.2.3 Installing High Reliability Tools
You can install all high reliability tools provided with PRIMERGY by specifying them in "Application
Wizard" when the OS is installed with ServerStart.
The following high reliability tools are installed.
table: High reliability tool installation
High reliability tools
RAID Management Tool/ServerView
(for apache)
RAID Management Tool/ServerView
(for IIS)
DSNAP S S
Broadcom Advanced Control Suite
(BACS)
®
PROSet
Intel
ServerStart new installation
Guided mode Expert mode
SN
NN
AN
AA
1
Overview
A: Installed in any case.
N: Installed if selected. Not selected by default.
S: Installed if selected. Selected by default.
Linux does not support batch installation with ServerStart.
ServerView must be configured after installation even when the high reliability tools have been
installed at once with ServerStart. Refer to "Chapter 6 High Reliability Tools" (pg.169).
When using ServerStart to install the OS, RAID Management Tool and ServerView are installed at a
time. These cannot be selected individually.
To use all functions of ServerView, "Java2 Runtime Environment Standard Edition" and "Web server"
are required. When using ServerStart to install a OS, "Java2 Runtime Environment Standard Edition"
is installed automatically. For Web servers, you can use either of the followings by selecting from the
menu.
• ServerView (for apache)
Install ServerView Web-Server (Web server for ServerView, Apache for Win32 base) and install
ServerView, and install ServerView using it.
21
Page 22

Chapter 1 Overview
• ServerView (for IIS)
Install Microsoft Internet Information Server (IIS) supplied with Windows separately. ServerView is
installed with the setting to operate using the IIS installed on the system.
When IIS is not found in the system, ServerView Web-Server is installed even if "ServerView (for IIS)"
is selected. ServerView (for apache) is selected by default for guided mode. To install ServerView (for
IIS), select "RAID Management Tool/ServerView (for IIS)". If "RAID Management Tool/ServerView (for
IIS)" is selected, ServerView (for apache) is not installed.
In guided mode, both ServerView (for IIS) and ServerView (for apache) cannot be released.
®
Intel
PROSet will be installed when an optional LAN card is installed properly and a driver is applied
correctly.
If the OS is installed on other than drive C using ServerStart, Intel
case, install Intel
®
®
PROSet manually. For details, refer to "5.7.1 Intel® PROSet Installation" (pg.165).
PROSet will not be installed. In this
22
Page 23
PRIMERGY RX100 S4 User’s Guide
RST
ID
NMI
ID
1.3 Component Names and Functions
This section explains the component names and functions of the server.
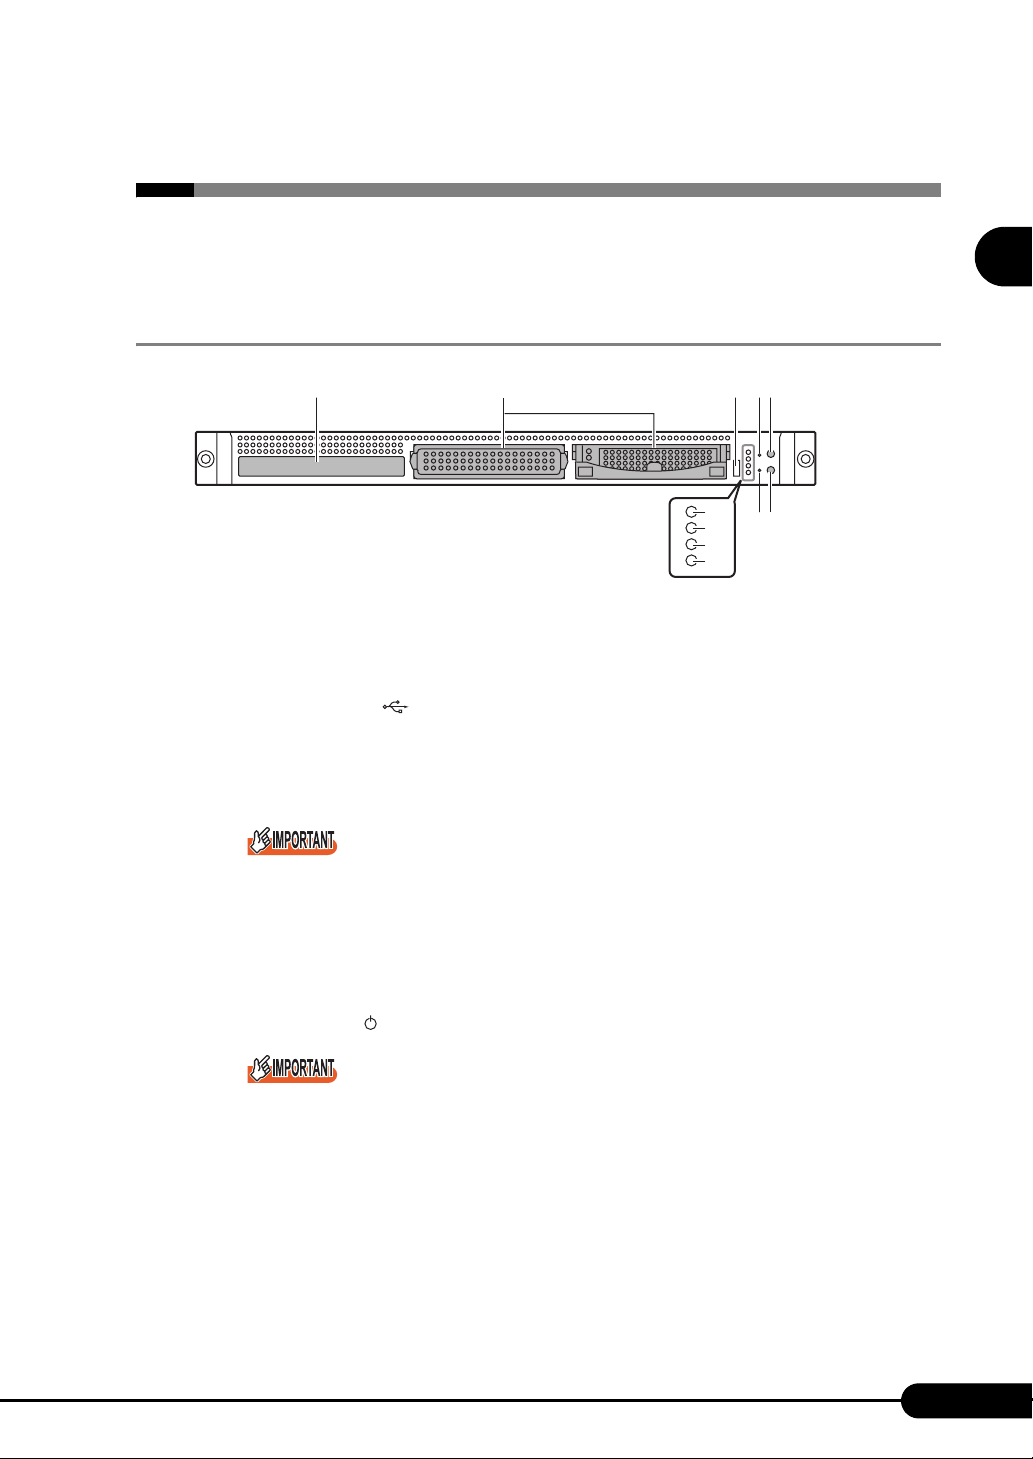
1.3.1 Server (Front View)
adb
a Internal CD-ROM drive unit (optional)
Reads data or programs from a CD-ROM.
b 3.5-inch storage bay
Contains an internal hard disk unit. This server can have up to two internal hard disk units.
c USB connector ( )
Connects peripheral equipment conforming to the USB standard (2.0 or 1.1).
d Reset switch ( )
Pressing this switch resets and restarts the system.
1
Overview
e
c
h
k
fg
i
j
Do not reset when the hard disk access display LED is on.
Data in the hard disk may be damaged.
e System identification LED button ( )
When pressing this button, the front and rear system identification LEDs turn on blue so that the
locations of devices being maintained can be determined.
f Power switch ( )
Do not turn the server off when the hard disk access display LED is blinking.
Data in the hard disk may be damaged.
g Maintenance switch ( )
This switch is used only by maintenance personnel. Do not touch this.
h System identification LED ( )
This LED is used for maintenance. When pressing the system identification LED button, the
front and rear system identification LEDs turn on blue so that the locations of devices being
maintained can be determined. Also, the "System Identification LED Display" button of
ServerView can be used to turn them on.
23
Page 24
Chapter 1 Overview
i Hard disk access display LED ( )
This LED is on in green when data is being written to or read from the hard disk.
j Front maintenance LED ( )
This LED turns on or blinks in amber when an error is detected in the server components.
If this LED is on or blinking, contact an office listed in the "Contact Information" of "Start
Guide".
k Power LED ( )
This LED is on in green when the server is turned on.
This is on in amber when the server is not turned on (standby mode).
This does not turn on when the power cable is unplugged from the outlet.
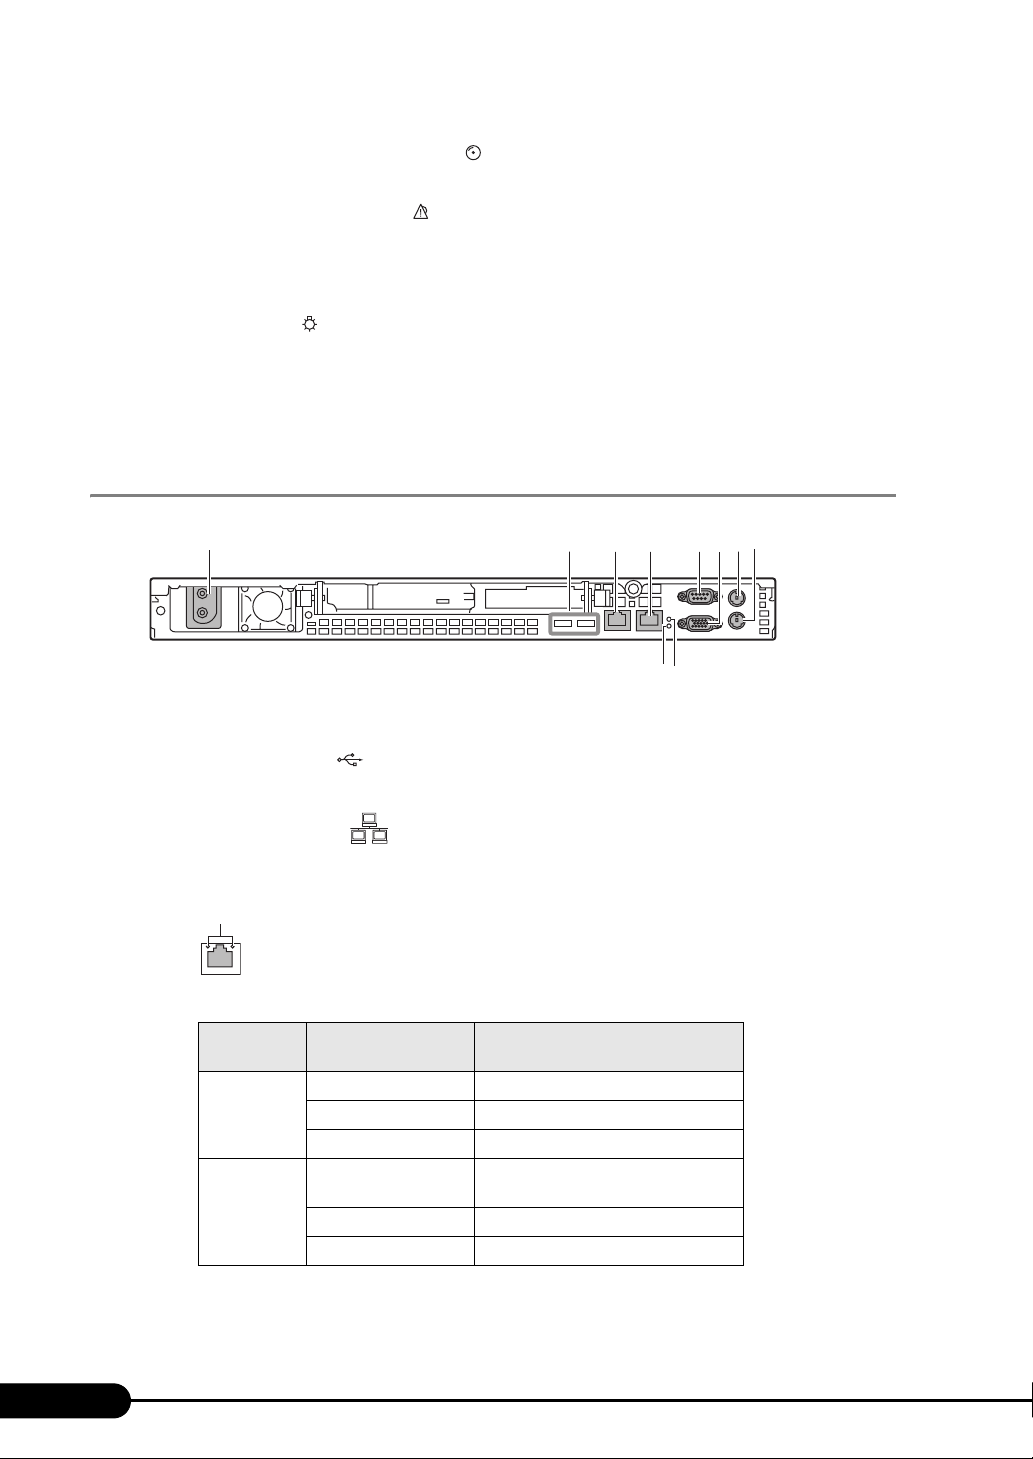
1.3.2 Server (Rear View)
abd
cefgh
j
i
a Inlet
AC power cables are plugged in.
b USB connector ( )
Connects peripheral equipment conforming to the USB standard (2.0 or 1.1).
c LAN connector 2 ( )
An Unshielded Twisted Pair (UTP) cable is plugged in. For 1000Mbps connection, a cable
conforming to category 5 enhanced is required.
LED
LED
The meanings of the two LEDs are shown in the table below.
LED
location
Left ON (green) Link is being established.
Blinking (green) Data is being transferred.
OFF Link is not established.
Right ON (amber) Connection is established at
ON (green) Connection is established at 100Mbps.
OFF Connection is established at 10Mbps.
2
table: LAN connector LED
LED status LAN status
1000Mbps.
24
Page 25

PRIMERGY RX100 S4 User’s Guide
ID
d LAN connector 1 ( )
This is a LAN port. The applicable cable and meanings of the LEDs are the same as those for
LAN connector 1.
By connecting LAN cable, Remote Management Controller function can be used by Web
interface. To use Remote Management Controller, refer to "Appendix D Remote Management
Controller" (
pg.273).
1
e Serial port (9 pin) ( )
Cables of peripheral devices conforming to the RS-232C standard such as modems are plugged
in.
f Display connector (15 pin) ( )
A display cable is plugged in.
g Mouse connector (6 pin) ( )
A mouse is plugged in.
h Keyboard connector (6 pin) ( )
A keyboard is plugged in.
i Rear maintenance LED ( )
When the server is not turned on (standby mode), this LED is on in amber.
This LED turns on or blinks in amber when an error is detected in the server components.
If this LED is on or blinking, contact an office listed in the "Contact Information" of "Start
Guide".
j System identification LED ( )
This LED is used for maintenance. When pressing the System identification LED button, the
front and rear system identification LEDs turn on blue so that the locations of devices being
maintained can be determined. Also, the "System Identification LED Display" button of
ServerView can be used to turn them on.
1
Overview
25
Page 26
Chapter 1 Overview
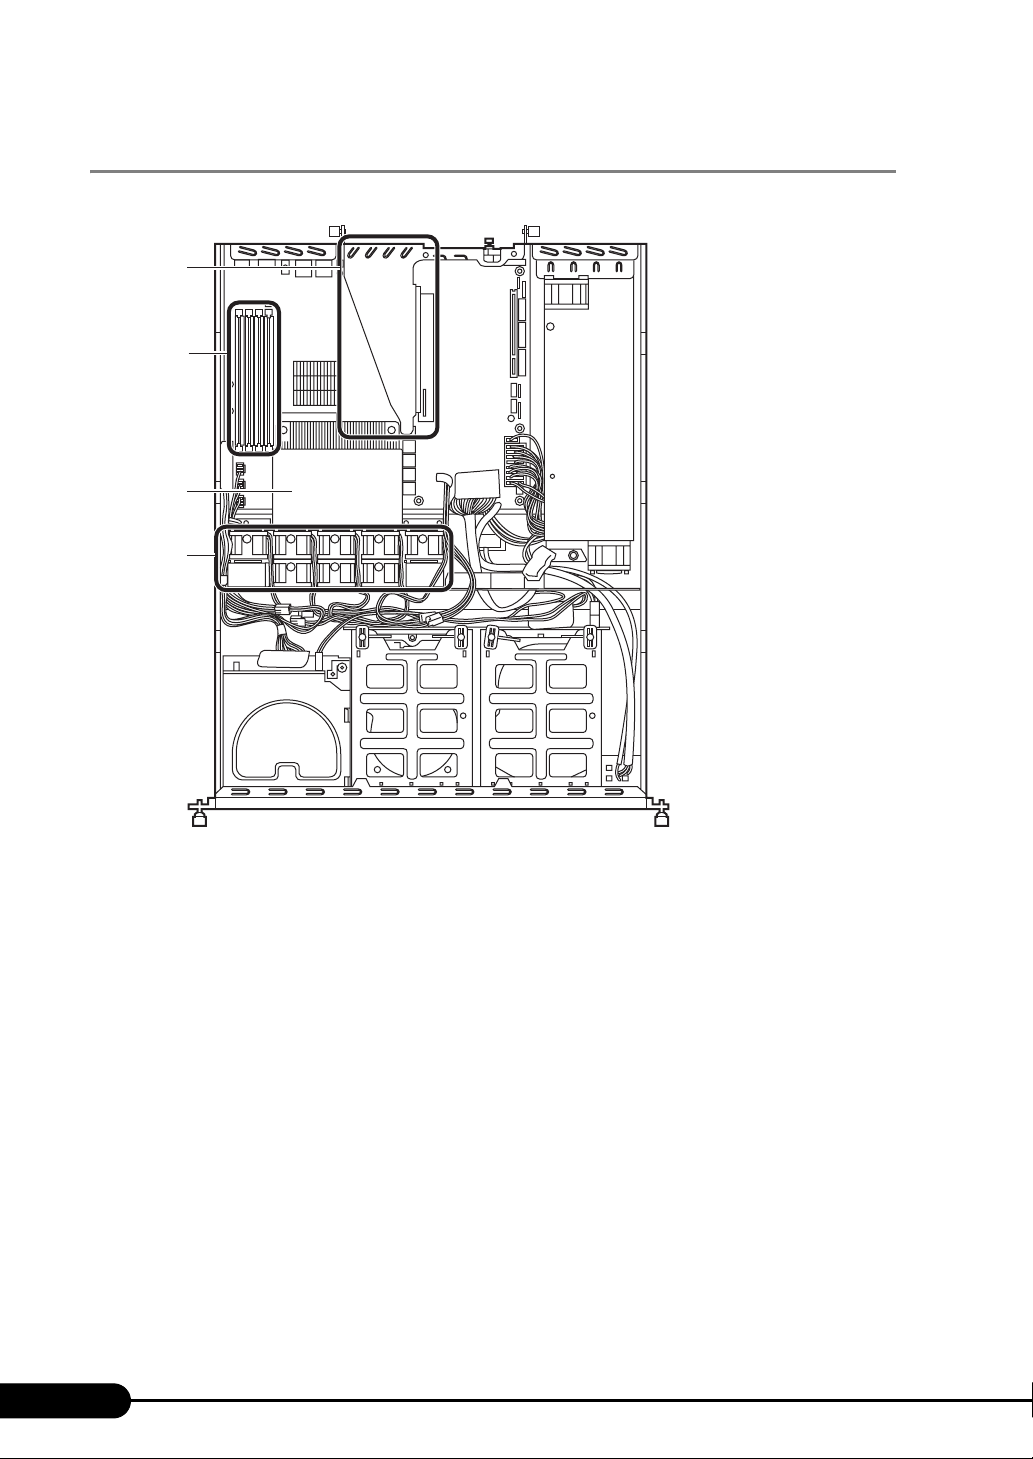
1.3.3 Server (Internal)
[Rear]
a
b
c
d
26
a PCI slots
Install expansion cards which expand functions of the server. Expansion cards with the PCI bus
interface can be installed in the PCI slots.
b Memory slots
Contain memory.
c CPU
One CPU is installed by default on this server.
d System fan
Contact an office listed in the "Contact Information" of "Start Guide" for the system fan
replacement.
Page 27
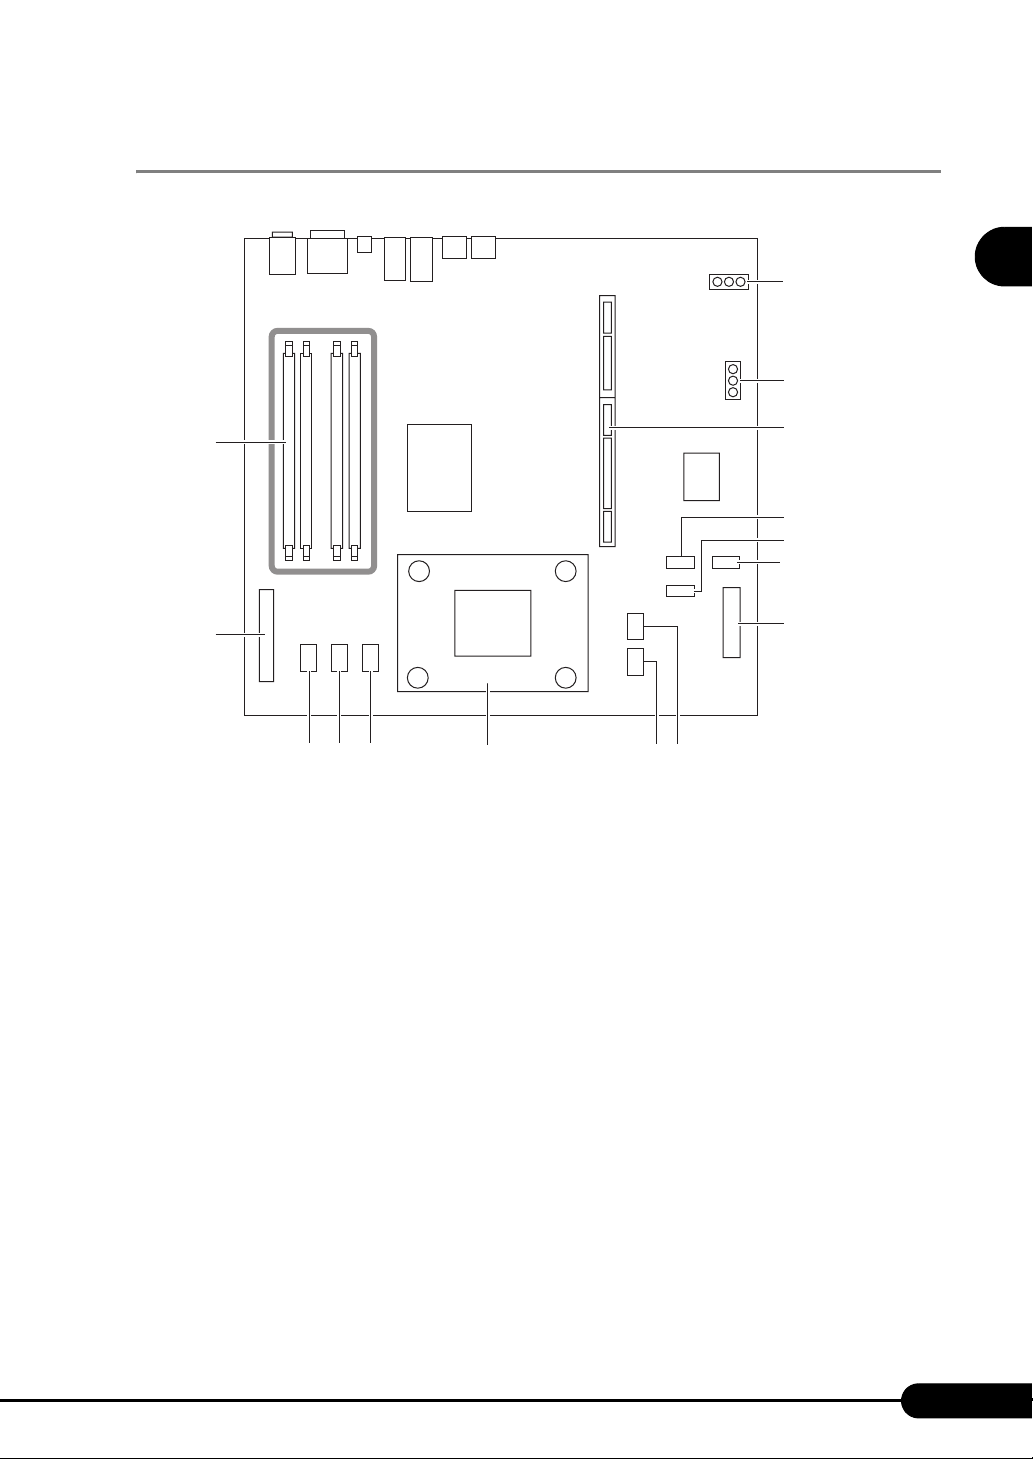
1.3.4 Baseboard
[Rear]
PRIMERGY RX100 S4 User’s Guide
o
n
[Front]
m
a JP1 (Fixed)
b JP3
For jumper settings, refer to "8.1 Jumper Settings" (pg.204).
c PCI riser card locking frame connector
An expansion card locking frame is installed.
d SAS/SATA1 connector
Internal hard disk unit (bay1) SAS cable is plugged in.
e SAS/SATA2 connector
Internal hard disk unit (bay2) SAS cable is plugged in
f SATA3 connector
Not being used.
g ATX power connector
The power unit cable is plugged in.
h Fan 4 connector
The system fan 4 cable is plugged in.
i Fan 5 connector
The system fan 5 cable is plugged in.
a
b
c
d
e
f
g
hjikl
1
Overview
27
Page 28

Chapter 1 Overview
j CPU socket
k Fan 3 connector
The cable of system fan 3 is plugged in.
l Fan 2 connector
The cable of system fan 2 is plugged in.
m Fan 1 connector
The cable of system fan 1 is plugged in.
n IDE connector for CD-ROM drive/DVD-RAM drive
IDE cables for optional internal CD-ROM drive/internal DVD-RAM drive are plugged in.
o Memory slots
Contain memory.
28
Page 29
1.4 Standard Operations
PRIMERGY RX100 S4 User’s Guide
This section explains standard server operations, including how to turn the server
on/off and how to insert/eject a floppy disk.
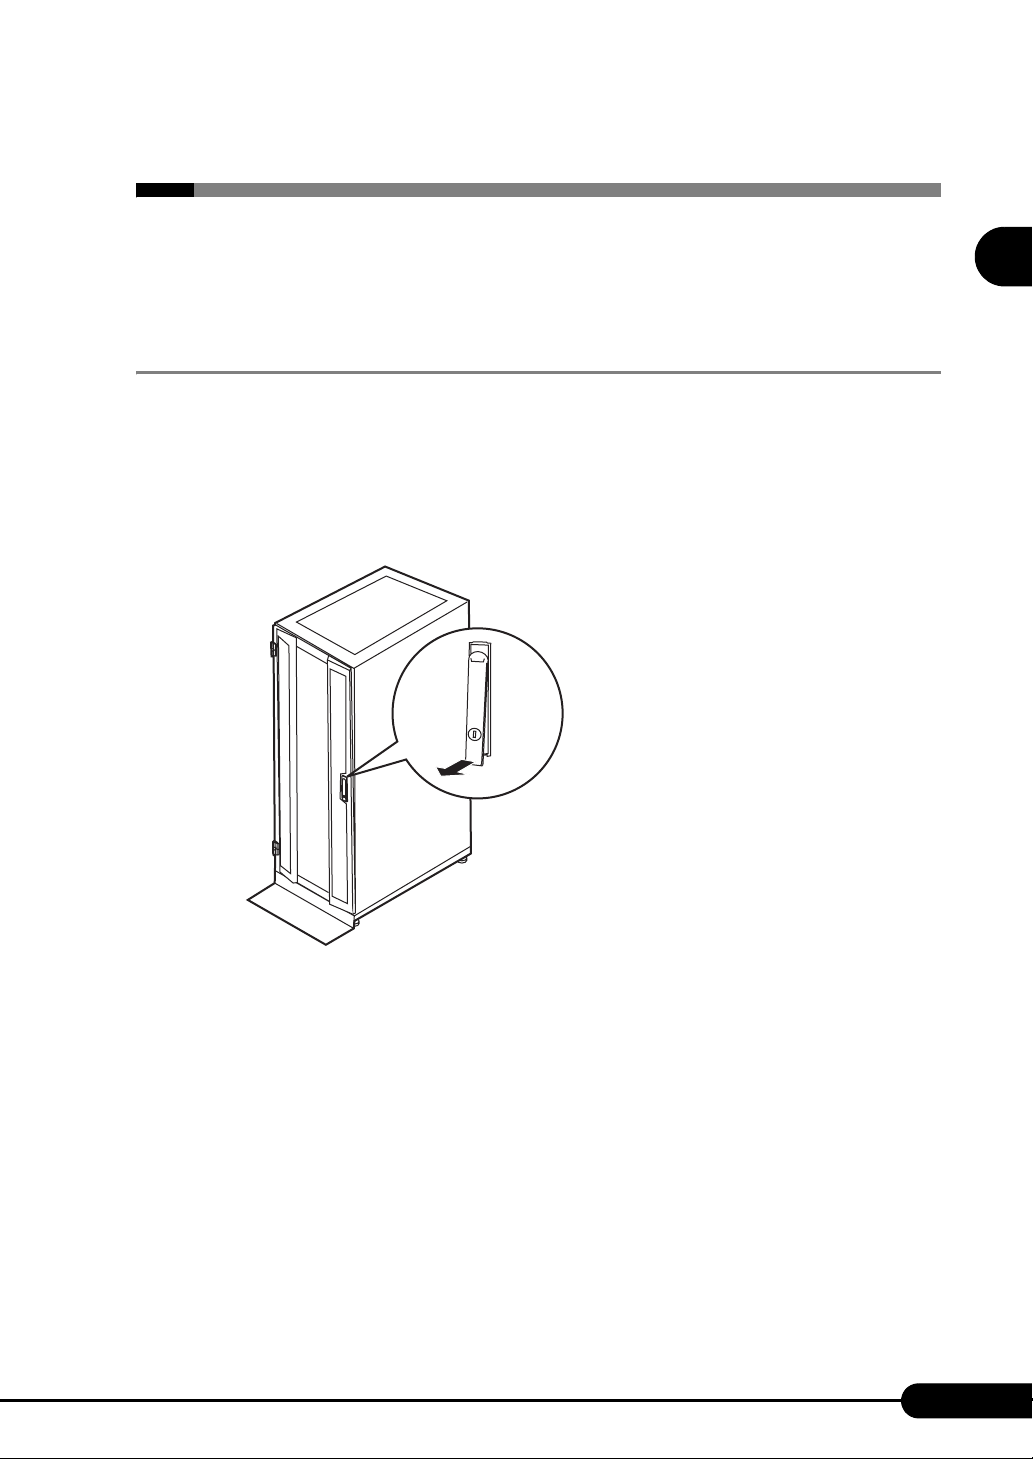
1.4.1 Open the Rack Door
This section explains how to open the front and rear doors of the 40U standard rack.
Refer to the manual included with the rack for procedures on opening other rack doors.
■ Opening the Front Door
1 Turn the rack key and pull the rack handle up.
1
Overview
29
Page 30
Chapter 1 Overview
2 Turn the handle in the direction of the arrow and pull it forward.
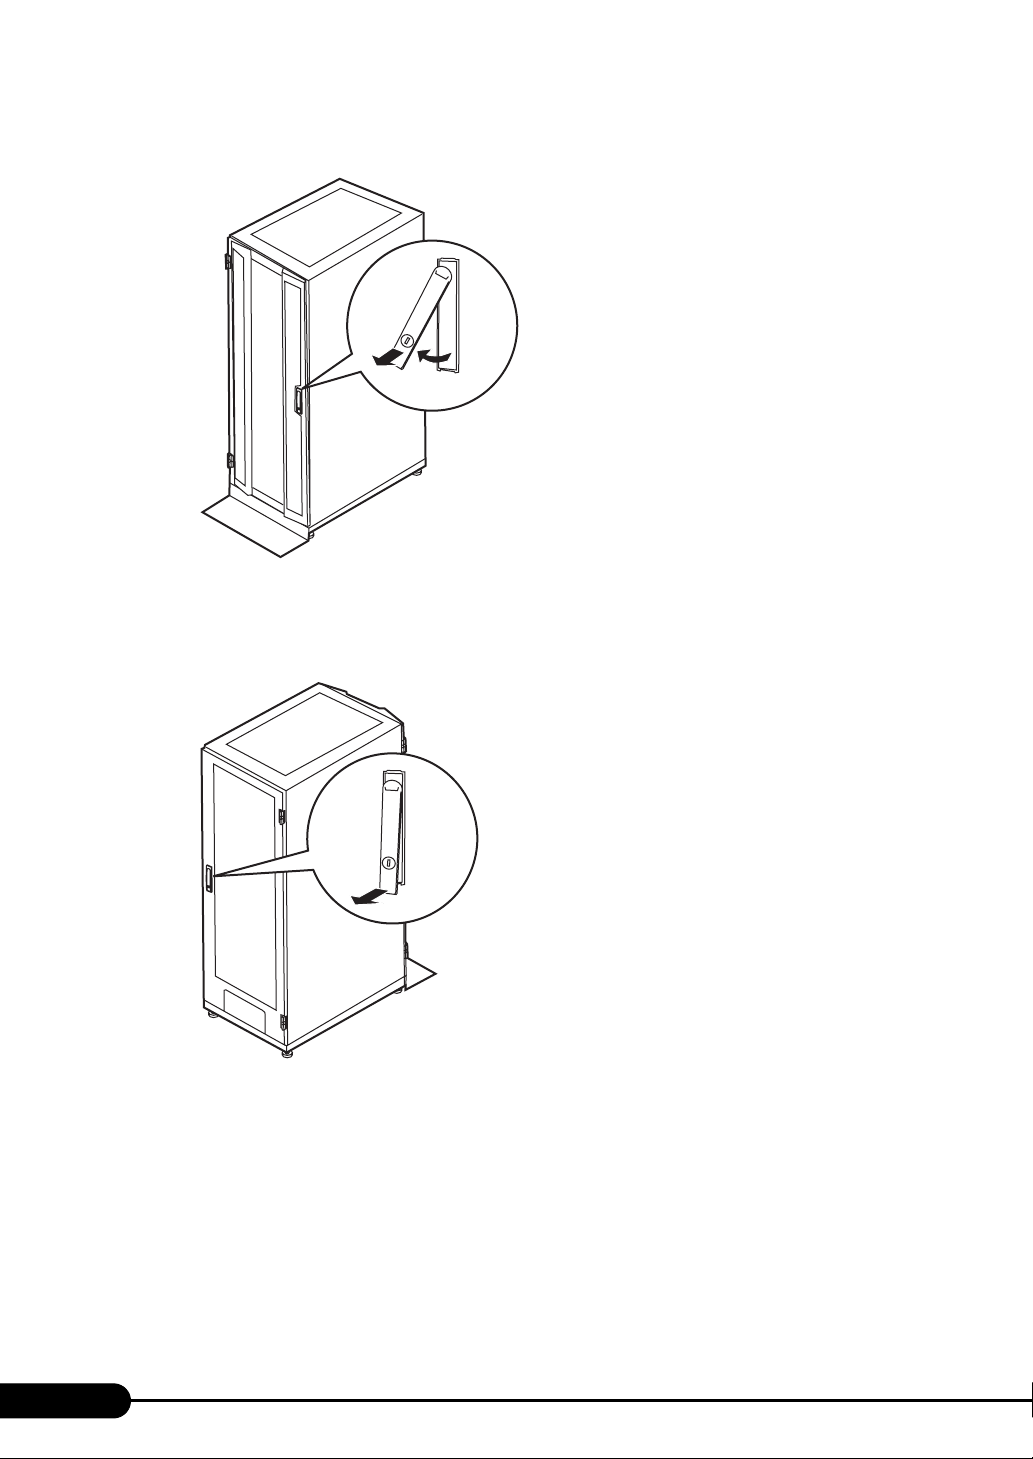
■ Opening the Rear Door
Turn and then pull
1 Turn the rack key and pull the rack handle up.
30
Page 31

PRIMERGY RX100 S4 User’s Guide
2 Turn the handle in the direction of the arrow and pull it forward.
Turn and then pull
Unless you are inserting/ejecting media or turning the power on/off, keep the rack door closed. Doing
so blocks electric waves from cell phones, etc.
Do not lose the keys. If the key is lost, contact an office listed in the "Contact Information" of "Start
Guide".
1
Overview
1.4.2 Turning On the Server
• Do not move, strike, or shake the server when it is turned on. This can damage
the hard disk in the server and cause data loss.
• Turn the server on when the temperature is in its operating environment range
(from 10 to 35 °C). For details about the operating environment, refer to "Start
Guide" and "Safety Precautions".
When operating the device outside of this operating environment, the server
may operate improperly, data may be damaged, etc.
Furthermore, Fujitsu cannot be held responsible for any related damage,
malfunction, or loss of data, etc.
• The fans rotate at high speed immediately after the server is turned on, but this
is not an error. When the temperature is within the server's operating
environment range (from 10 to 35 °C), they will start to rotate at normal speed
later.
• Make sure to wait for 10 seconds or longer after shutdown before turning the
server on.
31
Page 32

Chapter 1 Overview
1 Open the rack door.
2 Make sure that the CD-ROM drives are empty.
3 Press the power switch of the display and peripheral devices.
4 Press the power switch on the front of the server with a penpoint or thin object.
The server's power LED turns green. When the power is turned on, the server performs "Power
On Self Test (POST)" which checks the devices of the server. If any errors are detected by POST,
error messages appear.
"9.2.2 Error Messages" (pg.233)
The server’s
power LED
turns green
The server turn off time can be set with the ASR setting (on the [Power On/Off] tab) using ServerView
supplied with this server. For details, refer to "3.4 Serious Error Handling (ASR)" in "ServerView User's
Guide" on the PRIMERGY Document & Tool CD.
If you press the [F12] key immediately after the POST memory amount check, the Boot Menu is
displayed, where you can change the boot disk ("
Power switch
■ How to Start the BIOS Setup Utility" (pg.205)).
32
Page 33

1.4.3 Turning Off the Server
• In the event of smoke or sparks, immediately unplug the power plug from the
outlet. Failure to do so may lead to a fire or electric shock.
PRIMERGY RX100 S4 User’s Guide
1
• When turning off the server, make sure to follow the procedures described in
this section. Data may be lost if these procedures are not followed correctly.
1 Make sure that the CD-ROM drives are empty.
2 Shut down the OS.
In the following cases, the server is turned off after the OS is shut down (Step 3 is not necessary).
• Windows OS
• When ServerView is installed
In other cases, shut down the OS and make sure that hard disk access LEDs are off.
3 Press the power switch at the front of the server with a penpoint or thin object.
The server's power LED turns amber.
The server’s
power LED
turns amber
Power switch
Overview
4 Turn off the display and peripheral devices.
• Make sure to wait for 10 seconds or longer after shutdown before turning the
server on.
The server turn off time can be set with the ASR setting (on the [Power On/Off] tab) using ServerView
supplied with this server. For details, refer to "3.4 Serious Error Handling (ASR)" in "ServerView User's
Guide" on the PRIMERGY Document & Tool CD.
33
Page 34

Chapter 1 Overview
■ Cautions for Turning the Power On/Off (for a Windows OS)
For the server power switch, the following operation modes can be specified by OS settings.
• For Windows Server 2003, Windows Server 2003 x64
"Do Nothing", "Prompt Input", "Standby", "Hibernation", or "Shutdown" (Normally, "Shutdown").
• For Windows 2000 Server
"Standby", "Hibernation", "Power Off" (Normally "Power Off")
On this server, functions corresponding to "Standby" and "Hibernation" are supported as BIOS and
hardware functions. However, some drivers and software installed in the server do not support these
functions. For this reason, functions corresponding to "Standby" and "Hibernation" are unavailable on
this server.
When the operating mode is set to "Standby" or "Hibernation", the system may operate improperly or
hard disk data may be corrupted.
For details of operating mode settings, refer to the manual supplied with the OS.
1.4.4 Inserting and Ejecting a CD-ROM (DVD-RAM)
CD-ROM drive and DVD-RAM drive are available as options for this server. Unless otherwise noted, a
CD-ROM drive also means a DVD-RAM drive.
When using CD-ROMs, note the following points to avoid failures.
For DVD-RAM drive, refer to the manual supplied with the internal DVD-RAM drive unit.
■ Cautions for Handling CD-ROM Drive
• Use the drive in a dry place with low airborne dust levels. Entry of water, a paper clip, or other liquids
or metal objects can cause electric shock or failures.
• Do not use the drive in a place exposed to shocks or vibration.
• Do not insert any object other than the specified CD-ROMs.
• Do not pull or push the CD-ROM tray forcibly.
• Do not disassemble the CD-ROM drive.
• Clean the CD-ROM tray before use. Use a dry, soft cloth for cleaning.
• When the CD-ROM drive is not used for a prolonged period, eject the CD-ROM to prevent accidents.
To avoid dust or dirt particles, keep the CD-ROM tray closed (in the loaded position).
• This server supports CD-ROMs with the following logo. Do not use CD-ROMs without the
logo.Doing so may cause failures.
34
Page 35

PRIMERGY RX100 S4 User’s Guide
■ Cautions for Handling CD-ROMs
• When removing the disk from the case, pull the disk up while pressing the center holder of the case as
shown in the figure below.
• Hold the CR-ROM on its edge to avoid contact with the disk surface.
• Do not contaminate the CD-ROM surface with fingerprints, oil, or dust.If the disk is dirty, wipe it
from the center to the edge with a dry, soft cloth.Do not use benzine, thinner, water, record sprays,
antistatics, or silicone clothes.
• Be careful not to scratch the CD-ROM surface.
• Avoid heat.
• Do not bend the floppy disk or place heavy objects on it.
• Do not use a ball point pen or pencil on the label (printed) side.
• Do not apply stickers to the label side. Abnormal vibration can occur due to eccentricity.
• When the CD-ROM is moved from a cold place into a warm place, dew condensation may occur,
resulting in data read errors. If this is the case, wipe droplets away with a dry, soft cloth and let the
unit dry naturally. Do not use a hair dryer.
• To avoid dust, scratches, or deformation, store CD-ROMs in the case whenever not in use.
• Do not store CD-ROMs in areas of high temperature exposed to direct sunlight for many hours or
near heating appliances.
1
Overview
■ Inserting the CD-ROM
1 Make sure the server is turned on and press the CD-ROM eject button.
The CD-ROM tray comes out a little.
CD-ROM
eject button
2 Pull the CD-ROM tray out.
CD-ROM tray
35
Page 36

Chapter 1 Overview
3 Place the CD-ROM at the center of the tray.
While supporting the CD-ROM tray, push the tray until it clicks into position.
4 Move the tray back.
Push the tray gently until it clicks into position.
Label side up
CD-ROM tray
If the CD-ROM is placed improperly when the tray is pushed into the unit, the CD-ROM or the
drive may be damaged.
Be careful not to touch the lens of the CD-ROM drive.
CD-ROM tray
■ Ejecting the CD-ROM
To eject the CD-ROM, press the CD-ROM eject button (EJECT) in the same way as steps 1 to 2 in "■
Inserting the CD-ROM" (
pg.35).
36
Page 37

1.5 Workflow
PRIMERGY RX100 S4 User’s Guide
Use the following workflow from server installation to start of operation.
Installing the server
Referring to "Safety Precautions" and "Start Guide", install the server to a suitable place.
Preparing the server
- install internal options
- Set hardware
Referring to "2.1 Preparation on the server ", "Chapter7 Installing Internal Options", and
"Chapter8 Configuring Hardware and Utilities", prepare the server.
Selecting the installation method
Referring to "2.2 Selecting the Installation Method", decide what installation method to use.
ServerStart, a software program that enables everything from OS installation/setup to the installation of high
reliability tools to be performed in one operation, comes with this server. It is recommended that ServerStart is
used to perform installation.
Checking precautions on installation
Before installing the OS, check the precautions on installation by referring to "2.3 Precautions on Installation".
OS installation
Using ServerStart
Referring to "Chapter3 OS Installation Using ServerStart",
perform OS Installation.
Manual installation
Referring to "Chapter 4 Manual OS Installation",
perform OS installation.
1
Overview
Installing internal options
Referring to "Chapter 7 Installing Internal Options", install the internal options.
Procedures before operation
Before operating the server, refer to "Chapter 5 Operations after OS Installation".
High reliability tool installation
When the OS is installed manually, it is necessary to install high reliability tools.
When you performed batch installation using ServerStart, ServerView requires settings before server operations.
Refer to "Chapter 6 High Reliability Tools”.
Start Operations
37
Page 38

Chapter 1 Overview
38
Page 39

Chapter 2
Checking before OS
Installation
This chapter explains the preparation on the
server and cautions necessary before OS
installation. Please read this chapter before
starting installation.
2.1 Preparation on the Server
2.2 Selecting the Installation Method
2.3 Precautions on Installation
2.4 Preparation for Using ServerStart on a Client Computer
. . . . . . . . . . . . . . . . . . . . . . . . 40
. . . . . . . . . . . . . . . . . . . 43
. . . . . . . . . . . . . . . . . . . . . . . . 44
. . 49
39
Page 40

Chapter 2 Checking before OS Installation
2.1 Preparation on the Server
Before starting installation, install internal options to the server and perform
necessary hardware settings.
2.1.1 Installing Internal Options
Internal options are classified into those that must be installed before the OS installation and those that
must be installed after the OS installation.
For installation procedures, refer to "Chapter 7 Installing Internal Options" (
Options That Must be Installed before the OS Installation
• Memory modules
• Expansion cards
• USB floppy disk drive
pg.175).
ServerStart floppy disk or driver disk is used to install the OS. Connect the USB floppy disk
drive in advance.
Options That Must be Installed after the OS Installation
• Optional SCSI devices
• Internal hard disk units where the OS is not installed
If an internal option device that must be installed after the OS installation has been already installed,
remove the device, install the OS, and then reinstall the device.
Installing Optional External Devices
When installing external hard disk drives and/or USB devices (except for the USB floppy disk drive),
turn off their power or unplug their connection cables from the server during the OS installation.
Connect them after the OS installation.
Cautions for Installing an Expansion Card
When using an expansion card, read the notes on the expansion card.
40
Page 41

PRIMERGY RX100 S4 User’s Guide
Cautions for Installing a Memory Module
This server supports up to 8GB of memory. However, the maximum installable size varies depending on
the OS. Furthermore, since the server uses part of the memory as PCI resources, the maximum available
size is limited.
The following shows the maximum installable size and the maximum available size.
table: Maximum Installable Size and Maximum Available Size
OS
Windows 2000 Server 3.5GB or smaller Same as the installed memory size
Windows Server 2003
Windows Server 2003 R2
Windows Server 2003 x64
Windows Server 2003 R2 x64
*1: The PCI resource is decreased, unless Service Pack 1 is applied and the following settings are configured
using the BIOS Setup Utility.
Available memory size shifts depending on the types and numbers of cards installed.
1. Start the BIOS Setup Utility.
2. Select the [Advanced System Configuration] submenu from the [Advanced] menu.
3. Set [NX Memory Protection] to [Enabled].
Installed memory
size
4.0GB Installed memory size - (0.1GB)
3.5GB or smaller Same as the installed memory size
4.0GB
Installed memory size Same as the installed memory size
Same as the installed memory size
Available memory size
2
Checking before OS Installation
*1
LAN Cable
Make sure to connect the LAN cable when the server is not connected to the Internet.
Connecting to the Internet during setup can cause security problems. Do not connect to the Internet
until the setup completes.
If the OS is installed or applications are automatically installed without connecting the LAN cable to the
LAN card, an error may be recorded in the event viewer after setup completes.
2.1.2 Hardware Settings
Before starting installation, set necessary hardware, such as the BIOS Setup Utility.
BIOS Setup Utility
The BIOS Setup Utility must be set in the following cases. For details on how to set the BIOS Setup
Utility, refer to "8.2 BIOS Setup Utility" (
Changing the Boot Drive
To change the boot drive, start up the BIOS Setup Utility, select [Boot Option], and set the boot drive.
"8.2.4 Boot Options Submenu" (pg.210)
pg.205).
41
Page 42

Chapter 2 Checking before OS Installation
Performing Remote Installation
Before performing remote installation of ServerStart, use the following procedures to enable network
startup (PXE). In addition, check the MAC address.
1 Take the following steps in the BIOS Setup Utility.
1. Start the BIOS Setup Utility.
"8.2.1 Starting and Exiting the BIOS Setup Utility" (pg.205)
2. Select the [Peripheral Configuration] submenu from the [Advanced] menu and
press the [Enter] key.
3. Set [LAN Remote Boot] to [PXE].
4. Select [Save Changes & Exit] from the [Exit] menu and exit BIOS Setup Utility.
5. Start the BIOS Setup Utility again.
6. Select the [Boot Option] submenu from the [Main] menu and press the [Enter] key.
The Boot Option submenu window appears.
7. Change the [Boot Sequence] settings as shown below.
1 CD-ROM Drive
2 Diskette
3 Hard Drive
4 Legacy LAN Card
5 Boot Manage PXE, Slot 0820 (or 0821)
8. Exit the BIOS Setup Utility and turn off the server.
2 Check the MAC address.
Start up the server from the network.
The MAC address is displayed as shown below.
CLIENT MAC ADDR: XX XX XX XX XX XX
The MAC address is required for remote installation. Write it down.
You can turn the power on/off from a client (via a LAN) by utilizing the Wakeup On LAN (WOL)
function. Refer to "5.5.5 Turning the Power On via a LAN" (pg.158).
Make sure to install ServerView to control the power supply via a LAN.
Unless ServerView is installed, the server is not turned off automatically after shutting down the OS.
42
Page 43

PRIMERGY RX100 S4 User’s Guide
2.2 Selecting the Installation Method
When installing the OS for the first time, there are multiple installation methods. Refer
to the following to decide on the method.
To set up multiple servers with the same model and configuration, refer to "3.5 Installation on Multiple
(the Second and Subsequent) Servers" (pg.105).
2
Checking before OS Installation
What OS will you use?
Linux
Windows Server 2003 R2 x64
Windows Server 2003 x64
Windows Server 2003 R2
Windows Server 2003
Windows 2000 Server
No
Will you use ServerStart?
Yes
Refer to "3.1 Guided Mode" and perform installation.
* If you follow the wizard, setup will be performed
correctly.
For the use of Linux, refer to the Fujitsu PRIMERGY
website (http://primergy.fujitsu.com).
Installation is performed manually.
Refer to "4.2 Starting Manual Installation" and
perform installation.
When setting setup information in advance on
the client computer, refer to "3.2 Preparation
Mode" and perform installation.
Installation Using ServerStart
When an OS is installed using ServerStart, the driver for the expansion card that is automatically
recognized will be installed automatically. In addition, high reliability tools and array controller
administrative tools are installed automatically. Installation using ServerStart is recommended because it
helps install the OS without mistakes.
For features of ServerStart, refer to "1.2.1 Setup Support Tool - ServerStart" (
pg.16).
Installation While Maintaining the Established RAID Environment
In guided mode or preparation mode, select [Logical Drive View] at [Raid and Disk Configuration
Wizard] (in the [Configuration for Disks and RAID Controllers] window) and install the OS.
Installation Using ServerStart While Maintaining the Existing
Partitions
In expert mode of ServerStart, start up Disk Manager, format the installation partition, and install the
OS.
43
Page 44

Chapter 2 Checking before OS Installation
2.3 Precautions on Installation
Read the following notes before starting OS installation.
2.3.1 Installation Partition Size
For installation using ServerStart, the installation partition size can be set as follows, depending on the
OS to be installed and format.
table: Installation Partition Size
Available size Windows Server 2003 R2 x64 Windows Server 2003 R2 Windows 2000 Server
Minimum 2200MB 2048MB
Maximum 2TB 2TB
Notes
• When you want to set the OS and BOOT partitions in different partitions, specify the partition size
directly.
(The BOOT partition is the partition for startup. Minimum information required for startup, such as
"ntldr", is stored. The OS partition is the partition for installing the OS.)
• In either of the following cases, specify a partition size less than 2TB.
• When the same partition is specified as the OS and BOOT partitions
• When different partitions are specified as the OS and BOOT partitions
• The OS cannot be installed in a partition larger than 2TB.
44
Page 45

PRIMERGY RX100 S4 User’s Guide
2.3.2 Notes on Configuring RAID
RAID can be configured with hard disk units connected to the SAS controller on the baseboard.
Check the following notes before configuring the RAID.
Hardware Configuration
• Only internal hard disk units can be used. Up to two internal hard disk units can be installed on this
server. Hard disk units exceeding the number cannot be installed.
• Make sure to use hard disk units of the same model and with the same capacity.
2
Array Configuration
Only RAID 1 level can be configured. The array is configured for two internal hard disks on the server.
For details, refer to "Integrated Mirroring SAS User’s Guide" in the Array Controller Document & Tool
CD.
Notes
• When a RAID-configured disk is used
Hard disk units that have been used before may have unwanted partition information or array
configuration information, which may cause unexpected problems. If you connect any hard disk units
with usage history to this server, format them at low level on another system before connecting them
to the server. For information on how to format the hard disk units, refer to the manual supplied with
the system to be used.
• To remove disks
When configuring RAID using ServerStart, use the background initialization function for the array
initialization. Before removing the disk units, confirm that the initialization is complete using the
RAID Management Tool. For more details, refer to "Integrated Mirroring SAS User’s Guide" in the
Array Controller Document & Tool CD.
2.3.3 Notes on a Multiple LAN Adapter Configuration
Checking before OS Installation
Using the OS installation wizard of ServerStart, you can configure multiple LAN adapters (network
adapters) on the system. However, there are the following limitations.
Adapter Numbers
To configure multiple LAN cards, select the adapter numbers in order of Adapter 1 and Adapter 2, and
enter settings for each adapter. Note that the order of adapter numbers is not necessarily the same as the
order of slots for the installed LAN adapters. This means that the setting for Adapter 1 is not always
applied to the onboard LAN. After installing the OS, check the LAN adapters to make sure that they are
configured as intended.
45
Page 46

Chapter 2 Checking before OS Installation
2.3.4 Cautions for Using ServerStart
Operating ServerStart
Most ServerStart operations are performed with the mouse. Items may not be moved with the [Tab] key
or cursor keys. Make sure to use the mouse when operating ServerStart.
Ejecting the CD-ROM
Do not eject the ServerStart CD-ROM while ServerStart is running. If the ServerStart CD-ROM is
ejected and inserted again, ServerStart starts up in multiple windows, and settings you have made can be
lost.
ServerStart CD-ROM
ServerStart supplied with this server contains Disk1 and Disk2.
Disk 1 creates a configuration file and installs the OS.
When required, insert Disk 2 during the installation.
Onboard LAN Display
When installing the OS using ServerStart, the onboard LAN display on the OS is as shown in the table
below.
table: Onboard LAN Display
My network properties LAN device name
Onboard LAN1
Onboard LAN2
Local area connection 2
Local area connection
BroadcomNetXtreme Gigabit Ethernet #2
BroadcomNetXtreme Gigabit Ethernet
Switching the Mode
When opening the configuration file and inputting information in the installation fields in the wizard, do
not switch any other mode by manipulating the tree or by any other means (e.g. do not start up the
Windows 2000 Server guided mode during Windows Server 2003 guided mode operation).
Before switching the mode while inputting information, you must save the configuration file. If you do
not save the configuration file, clicking [Cancel] will delete any changes that have been made.
Installing Windows 2000 Server
To install Windows 2000 Server, make sure to use the OS CD with Service Pack 4 applied. Required
update module is automatically applied.
If Service Pack 4 is not installed, the RAID failure module at OS shutdown cannot be applied.
Exiting ServerStart
After operation in guided or expert mode, exiting ServerStart restarts the system. Remove disks from the
floppy disk and CD-ROM drives and click [OK]. When the display on the screen disappears, turn off the
system.
46
Page 47

PRIMERGY RX100 S4 User’s Guide
License for Use of System for ServerStart
"License for Use of System for ServerStart" linked from the ServerStart startup window is a license for
use of Windows PE contained in the ServerStart CD-ROM. Windows PE for starting up ServerStart can
be only used for installing Windows Server 2003 or Windows 2000 Server provided under a separate
legal license.
Setting Up the Printer
ServerStart does not support setup of printers. Perform installation after setup is completed.
2
2.3.5 Expansion Cards Supported by ServerStart
ServerStart supports automatic driver installation for the following expansion cards.
table: Automatic Expansion Card Driver Installation
Name Model Bus
Onboard FDD/IDE - -
Onboard LAN -
Onboard VGA - PCI
LAN card PG-1862 PCI-X
PG-1882L PCI-X
PG-1892L PCI-X
PG-2861L PCI-E
PG-289L PCI-E
SCSI card PG-1301L PCI
PCI-E
2.3.6 Cautions for Manual Installation
Notes on Using an Array Controller
Before the OS is installed, the array controller must be configured and the system drive under the array
controller must be initialized. For more details, refer to the manual in the Array Controller Document &
Tool CD.
Checking before OS Installation
Installing Windows 2000 Server
To install Windows 2000 Server manually, use the OS CD-ROM with Service Pack 4 applied. Apply the
following hotfix module stored in ServerStart Disk 1 CD-ROM after installation.
[CD-ROM drive]: \HOTFIX\W2K\
Free Space Required for Installation
The partition where the OS is installed must have enough free space for obtaining memory dump. For
more details, refer to "5.1 Memory Dump/Paging File Setting" (
pg.134).
47
Page 48

Chapter 2 Checking before OS Installation
Cautions on Restarting
In the course of installation, a message appears to indicate that the setup program restarts. Wait until it
restarts automatically.
48
Page 49

PRIMERGY RX100 S4 User’s Guide
2.4 Preparation for Using ServerStart on a Client Computer
When using the preparation mode for setting installation information in advance or
when creating a driver disk using the FloppyBuilder function, install ServerStart on
the client computer.
System Requirements for Client Computers
Client computers must satisfy the following requirements.
Hardware Personal computers operated with Windows XP Professional, or Windows 2000
Professional
(A CD-ROM drive and 10MB or more of free space are required.)
Software Microsoft® Internet Explorer 5.5 or later
(However, Microsoft® Internet Explorer 7.0 and newer versions cannot be operated.)
Using ServerStart on the server
ServerStart can be installed to the server where Windows 2000 Server or Windows Server 2003 is
installed. Perform the procedure in "2.4.1 Installing ServerStart" (pg.49) to install ServerStart.
2.4.1 Installing ServerStart
If a different version of ServerStart has been installed, uninstall it. The FloppyBuilder function or
installation wizard may not operate properly on a different version.
For details on how to uninstall ServerStart, refer to "2.4.2 Uninstalling ServerStart" (pg.51).
2
Checking before OS Installation
49
Page 50

Chapter 2 Checking before OS Installation
1 Insert the ServerStart Disc 1 CD-ROM into the client computer.
The [Fujitsu Siemens ServerStart Setup] window appears. When the [Fujitsu Siemens ServerStart
Setup] window does not appear, execute "SeStSetup.exe" in the CD-ROM.
2 Check only [Classic] and click [Ok].
The Setup window appears.
3 Click [Next].
The [License Agreement] window appears.
4 Select [I accept the license agreement] and click [Next].
The [User Information] window appears.
5 Enter the user information of the software and click [Next].
The [Destination Folder] window appears.
50
Page 51

6 Specify the installation folder and click [Next]. To change the installation folder,
click [Browse] and select the folder.
The [Ready to Install the Application] window appears.
7 Click [Next].
Installation is executed.
If a message prompts you to restart the system before or after installation, eject the CD-ROM
and restart the system according to the message. When the system restarts, insert the ServerStart CD-ROM and start installation again.
If the "This program does not respond." message appears during restart operation, click [Exit]
to continue the restart operation.
When the installation is completed, the completion window appears.
8 Click [Exit].
ServerStart has been installed to the client computer.
2.4.2 Uninstalling ServerStart
PRIMERGY RX100 S4 User’s Guide
2
Checking before OS Installation
Perform the following procedure to uninstall ServerStart from the client computer.
1 Click [Start] → [Programs] → [Fujitsu Siemens ServerStart] → [Uninstall
ServerStart].
2 Click [OK].
When the uninstallation is executed successfully, Fujitsu ServerStart is deleted.
51
Page 52

Chapter 2 Checking before OS Installation
2.4.3 Creating the ServerStart Floppy Disk
When using a floppy disk (new disk) other than the ServerStart floppy disk in guided mode, create the
ServerStart floppy disk in advance. If you use the floppy disk supplied with ServerStart, creating the
ServerStart floppy disk is not required since the disk is already ServerStart floppy disk.
1 Start up ServerStart.
If ServerStart has already been started, it is not necessary to start it up again. If it has not, start it
up according to the following procedures:
1. Click [Start] → [Programs] → [Fujitsu Siemens ServerStart] → [ServerStart(Start
from CD)].
ServerStart starts up and the [Welcome to ServerStart] window appears.
52
2 Click [FloppyBuilder].
The [ServerStart FloppyBuilder] window appears.
3 Click [ServerStart Status Diskette].
A message prompts you to insert the floppy disk.
Page 53

PRIMERGY RX100 S4 User’s Guide
4 Insert the floppy disk and click [OK].
Set the floppy disk in the write-enabled state.
Creation of a ServerStart floppy disk starts. When the creation is completed, the message "Floppy
disk has been created." appears.
5 Click [OK].
2
Checking before OS Installation
53
Page 54

Chapter 2 Checking before OS Installation
54
Page 55

Chapter 3
OS Installation Using
ServerStart
This chapter explains how to install the OS in the
server using ServerStart.
3.1 Guided Mode
3.2 Preparation Mode
3.3 Expert Mode
3.4 Remote Installation
3.5 Installation on Multiple (the Second and Subsequent) Servers
. . . . . . . . . . . . . . . . . . . . . . . . . . . . . . . . . . . . . . . . . . . . . . . 105
. . . . . . . . . . . . . . . . . . . . . . . . . . . . . . . . . 56
. . . . . . . . . . . . . . . . . . . . . . . . . . . . . . 73
. . . . . . . . . . . . . . . . . . . . . . . . . . . . . . . . . . 79
. . . . . . . . . . . . . . . . . . . . . . . . . . . . . 86
55
Page 56

Chapter 3 OS Installation Using ServerStart
3.1 Guided Mode
In guided mode, follow the wizard to specify hardware configuration and the OS to be
installed, save the information necessary for installation in a configuration file, and
install the OS.
3.1.1 Starting Up the Guided Mode
Start up the guided mode.
Confirm that the floppy disk drive of the USB connection is connected before turning on the power
supply of the server.
1 Turn on the server and insert the ServerStart Disc 1 CD-ROM immediately.
ServerStart starts up and a message prompts you to insert the ServerStart floppy disk.
56
2 Insert the ServerStart floppy disk supplied with the server. Make sure that
"Removable media" and "A:" are selected and click [Create].
Set the ServerStart floppy disk in the write-enabled state.
When installing an OS other than Windows Server 2003 x64 in a server without a floppy disk
drive, choose “No Status backup”. When installing an OS without using a floppy disk, RAID
configuration using ServerStart cannot be performed. Perform RAID configuration manually
before starting ServerStart.
Page 57

The network setting window for remote installation appears.
PRIMERGY RX100 S4 User ’s Guide
3
OS Installation Using ServerStart
3 Click [OK].
The [Initialization of ServerStart core running] window appears and the ServerStart initialization
process starts. Depending on the hardware configuration, this process may take a few minutes.
57
Page 58

Chapter 3 OS Installation Using ServerStart
When the process is completed, the [Create a ServerStart Floppy Disk] window appears.
4 Click [Build a ServerStart Floppy Disk].
Creation of a ServerStart floppy disk starts. When the creation is completed, the "Floppy disk has
been created
" message appears.
5 Click [OK].
Please Select your keyboard] window appears.
[
6 Select your keyboard language from the drop-down list and click [OK].
The subsequent start procedure may take several minutes. The [Welcome to ServerStart] window
appears.
7 Click [Click here to prepare and/or initiate an operating system installation].
The [Select the operating system to be installed] window appears.
Click [Special Hints on Operating System Installation] and read the contents. Important
information such as limitations on disk configuration is described.
8 Click [MS Windows Operating Systems].
The [Microsoft Windows Operating System Installation] window appears.
58
9 Click the OS to install.
Page 59

PRIMERGY RX100 S4 User ’s Guide
10 Click [Prepare & initiate an unattended installation of (OS)].
The guided mode for the selected OS starts up.
3
OS Installation Using ServerStart
Start up the wizards to set items in the following procedures.
Exiting the wizard returns the display to the guided mode window.
㪦㫇㪼㫅㪆㪺㫉㪼㪸㫋㪼㩷㪺㫆㫅㪽㫀㪾㫌㫉㪸㫋㫀㫆㫅㩷㪽㫀㫃㪼
㪩㪘㪠㪛㩷㪸㫅㪻㩷㪛㫀㫊㫂㩷㫎㫀㫑㪸㫉㪻
䋨㪺㫆㫅㫅㪼㪺㫋㪼㪻㩷㪻㫀㫊㫂㫊㩷㪸㫉㪼㩷㪻㫀㫊㫇㫃㪸㫐㪼㪻䋩
㪦㪪㩷㫀㫅㫊㫋㪸㫃㫃㪸㫋㫀㫆㫅㩷㫎㫀㫑㪸㫉㪻
㪘㫇㫇㫃㫀㪺㪸㫋㫀㫆㫅㩷㫎㫀㫑㪸㫉㪻
㪚㫃㫆㫊㪼㪆㫊㪸㫍㪼㩷㪺㫆㫅㪽㫀㪾㫌㫉㪸㫋㫀㫆㫅㩷㪽㫀㫃㪼
㪪㫋㪸㫉㫋㫀㫅㪾㩷㪦㪪㩷㫀㫅㫊㫋㪸㫃㫃㪸㫋㫀㫆㫅
Make sure to open the menu of each wizard and confirm the settings.
59
Page 60

Chapter 3 OS Installation Using ServerStart
3.1.2 Opening/Creating a Configuration File
Open a configuration file. Or create a new one.
1 Click [Start here to create a complete configuration file].
The [Open ServerStart Configuration File] window appears.
Once a configuration file is opened, another file cannot be opened until you click [Close and
save Configuration File].
2 Select the configuration file and click [Create].
The [RAID and Disk Wizard] starts up automatically.
"3.1.3 RAID and Disk Wizard" (pg.61)
60
Page 61

3.1.3 RAID and Disk Wizard
Configure RAID, and create and format hard disk partitions.
1 Click [RAID and Disk Wizard: RAID configuration and hard disk partitioning /
formatting].
The [Configuration for Disks and RAID Controllers] window appears.
PRIMERGY RX100 S4 User ’s Guide
3
OS Installation Using ServerStart
Only array controllers already installed are displayed.
2 Select the method of RAID configuration.
To install the OS while maintaining the established RAID environment
Select [Logical Drive View], and add partitions as necessary. For more details, refer to "
Installation While Maintaining the Established RAID Environment" (
To configure RAID
Select [Mass Storage Controller View], and add controllers as necessary. For more details, refer
to "
Configuring RAID" (pg.63).
pg.62).
3 Set items and click [leave wizard].
The RAID and Disk wizard closes.
61
Page 62

Chapter 3 OS Installation Using ServerStart
Installation While Maintaining the Established RAID Environment
1 Select [Logical Drive View] on the [Configuration for Disks and RAID
Controllers] window.
Add a partition
1. Click [Add Partition].
A partition is added.
Add required partitions.
2. Click [Details] and modify the settings as necessary.
The partition configuration is displayed. As the default values are configured, confirm the
settings and modify them as necessary.
62
Partition size of the FAT file system
When "FAT" is selected in [File system] and a value equal to or more than 4090MB or "Auto-
matic setting" is specified in [Partition size], the size of created partitions will be 4090MB.
The following limits apply to the volume label length. A volume label longer than the limit may
be used. However, it can cause installation failure. Enter a volume label within the limit.
•FAT: Up to 11 characters
•NTFS: Up to 32 characters
Page 63

Configuring RAID
1 Select [Mass Storage Controller View] on the [Configuration for Disks and RAID
Controllers] window.
Click [Details] and check the controller settings.
Add partitions as necessary.
PRIMERGY RX100 S4 User ’s Guide
3
OS Installation Using ServerStart
Set the [Number of Disks] to "0" when configuring the RAID with all installed hard disk units.
Add a partition
1. Click [Add Partition].
A partition is added.
Add required partitions.
63
Page 64

Chapter 3 OS Installation Using ServerStart
2. Click [Details] and modify the settings as necessary.
The partition configuration is displayed. As the default values are configured, confirm the
settings and modify them as necessary.
3.1.4 OS Installation Wizard
Set computer information, user information, and the network protocol.
ServerStart can configure multiple network patterns. When configuring a domain controller, refer to
"Using ServerStart to Configure the Network".
The setup window differs depending on the OS to be installed. The following describes operations on
Windows Server 2003 R2.
To install another OS, interpret Windows Server 2003 R2 as your OS.
1 Click [Operating System Wizard: Specify operating system parameters].
The [Windows Installation] window appears.
64
Page 65

PRIMERGY RX100 S4 User ’s Guide
2 Enter the password in [Password for Administrator account] and [Please repeat
Password] and click [Next].
If the password differs between [Password for Administrator account] and [Please repeat Pass-
word], an error dialog window appears. Enter the password correctly.
The [Computer Identification] window appears.
3
OS Installation Using ServerStart
3 Set items and click [Next].
When using the CD-ROM applied Service Pack 1 on Windows Server 2003, select the [(OS)
including SP1] menu from the [Operating System Type] list.
The [Installation Directory and Time Zone] window appears.
65
Page 66

Chapter 3 OS Installation Using ServerStart
4 Set items and click [Next].
The [User Name] window appears.
5 Set items and click [Next].
The [Display Settings] window appears.
66
6 Set items and click [Next].
The [Network Protocol] window appears.
Page 67

7 Set items and click [Next].
The [Software Components] window appears.
PRIMERGY RX100 S4 User ’s Guide
3
OS Installation Using ServerStart
67
Page 68

Chapter 3 OS Installation Using ServerStart
If Windows Server 2003 R2 is selected at the Computer Identification, R2 components are
always copied to the hard disk. To install the components, click [Properties] and check the
components to be installed.
8 Set items and click [next].
The [Services] window appears.
SNMP Service is always installed. Click [Properties] to change the settings, if needed.
9 Set items and click [leave wizard].
The OS installation wizard closes.
68
Page 69

3.1.5 Application Wizard
Specify installation of supplied applications such as high reliability tools.
1 Click [Application Wizard: Select additional software components].
The application wizard appears.
PRIMERGY RX100 S4 User ’s Guide
3
OS Installation Using ServerStart
2 From the [Installable applications] list, select applications to be installed and
click [>>].
Set all applications to be installed on the [Selected applications] list.
The following applications are always installed in guided mode. In expert mode, the selection
can be released.
•Broadcom Advanced Control Suite
•RAID Management Tool
•Fujitsu ServerView (for apache) or Fujitsu ServerView (for IIS)
3 Click [leave wizard].
The application wizard closes.
69
Page 70

Chapter 3 OS Installation Using ServerStart
3.1.6 Closing/Saving the Configuration File
When settings in all wizards are completed, save the configuration file.
1 Click [Close and save Configuration File].
The [Save ServerStart Configuration File] window appears.
2 Click [Save As].
The configuration file is saved.
You can specify any name for the configuration file. However, OS installation is possible only
when it is saved as "SerStartBatch.ini". When installing the OS, make sure to save it as "Ser-
StartBatch.ini" on the ServerStart floppy disk.
3.1.7 Starting OS Installation
Install the OS to the server.
During installation, do not use the mouse or keyboard unless it is necessary for installation operations.
Otherwise, installation may fail.
1 Click [Click here, to Start the Installation of (OS)].
The [ServerStart Unattended Mode] window appears.
70
Page 71

PRIMERGY RX100 S4 User ’s Guide
2 Click [Start now].
Clicking [Start now] deletes all disk contents and starts installation. Click [Stop] when you do
not perform installation.
After 10 seconds, installation starts automatically.
1. When RAID has been configured, the system restarts.
2. If a message prompts you to insert the Array Controller Document & Tool CD, insert
the CD-ROM and click [OK].
3. If a message prompts you to insert the Document & Tool CD, insert the PRIMERGY
Document & Tool CD and click [OK].
4. If a message prompts you to insert the Service Pack CD-ROM, insert the CD-ROM
and click [OK].
5. For Windows Server 2003 x64, a message prompts you to insert the ServerStart
Disc 2 and restart the system. Insert the ServerStart Disc 2 and restart the system.
3 When a message prompts you to insert the OS CD-ROM, insert the CD-ROM
and click [OK].
For Windows 2000 Server/Windows Server 2003/Windows Server 2003 x64
1. Insert the OS CD-ROM (Installation CD-ROM).
The License Agreement window appears.
2. Click [I agree].
After files are copied, a message prompts you to eject the CD-ROM and floppy disk.
For Windows Server 2003 R2/Windows Server 2003 R2 x64
1. Insert the OS CD-ROM (Installation CD-ROM) Disc 1.
The License Agreement window appears.
2. Click [I agree].
After files are copied, a message prompts you to insert the Disc 2.
3. Eject the Disc 1 and insert the Disc 2.
After files are copied, a message prompts you to eject the CD-ROM and floppy disk.
3
OS Installation Using ServerStart
4 Eject the CD-ROM and floppy disk and click [OK].
Then the system is restarted.
The system continues the installation operation after restart.
OS GUI setup, LAN utility installation, Service Pack installation, and Active Directory
installation are performed automatically.
5 When a confirmation message to restart appears, click [Restart].
The system restarts and installs high reliability tools.
6 When a message on installation completion appears, press any key.
7 Restart the system.
Click [Start] → [Shutdown]. Select [Restart] and click [OK].
The system restarts.
71
Page 72

Chapter 3 OS Installation Using ServerStart
8 When the system restarts, log on to the server using the Administrator account
for the local computer.
The server setup and OS installation have been completed.
Refer to "Chapter 5 Operations after OS Installation" (pg.133) and perform necessary procedures
before starting server operations.
72
Page 73

PRIMERGY RX100 S4 User ’s Guide
3.2 Preparation Mode
In preparation mode, set and save the information necessary for installation in a
configuration file on a client computer (with a CD-ROM drive and 10MB or more of
free space). Set the saved configuration file on the server for installation.
If ServerStart is not installed in the client computer where the preparation mode is executed, refer to
"2.4 Preparation for Using ServerStart on a Client Computer" (pg.49) to install ServerStart. If a
different version of ServerStart has been installed, uninstall it and install the proper version. For details
on how to uninstall ServerStart, refer to "2.4.2 Uninstalling ServerStart" (pg.51).
Prepare the ServerStart floppy disk. When using a formatted new disk, create the ServerStart floppy
disk in advance, referring to "2.4.3 Creating the ServerStart Floppy Disk" (pg.52).
3.2.1 Starting Up the Preparation Mode
3
OS Installation Using ServerStart
Start up the preparation mode.
1 Start up ServerStart.
If ServerStart has already been started, it is not necessary to start it up again. If it has not, start it
up according to the following procedures:
1. Click [Start] → [Programs] → [Fujitsu Siemens ServerStart] → [ServerStart(Start
from CD)].
ServerStart starts up and the [Welcome to ServerStart] window appears.
2 Click [Click here to prepare an operating system installation for a PRIMERGY
Server].
The [Prepare the installation of an operating system for PRIMERGY Server] window appears.
73
Page 74

Chapter 3 OS Installation Using ServerStart
Click [Special on Hints on Operating System Installation] and read this section carefully before
starting the installation. This section describes the important information such as restrictions of
the disk configurations.
3 Click [Creation of ServerStart Configuration file for the installation of an
Microsoft Windows Operating System].
The [Microsoft Windows Operating System Installation] window appears.
4 Select [Create a configuration file for the installation of (OS)].
The [Preparing the Installation of MS Windows Server 2003] window appears.
74
Page 75

PRIMERGY RX100 S4 User ’s Guide
3.2.2 Configuring Settings in Wizards
Click the wizards to set items in the following procedures. For setting procedures, refer to description on
guided mode wizards ("3.1.2 Opening/Creating a Configuration File" (
Wizard" (
Exiting a wizard returns the display to the preparation mode window.
pg.69)).
㪦㫇㪼㫅㪆㪺㫉㪼㪸㫋㪼㩷㪺㫆㫅㪽㫀㪾㫌㫉㪸㫋㫀㫆㫅㩷㪽㫀㫃㪼
㪩㪘㪠㪛㩷㪸㫅㪻㩷㪛㫀㫊㫂㩷㫎㫀㫑㪸㫉㪻
㪦㪪㩷㫀㫅㫊㫋㪸㫃㫃㪸㫋㫀㫆㫅㩷㫎㫀㫑㪸㫉㪻
㪘㫇㫇㫃㫀㪺㪸㫋㫀㫆㫅㩷㫎㫀㫑㪸㫉㪻
㪚㫃㫆㫊㪼㪆㫊㪸㫍㪼㩷㪺㫆㫅㪽㫀㪾㫌㫉㪸㫋㫀㫆㫅㩷㪽㫀㫃㪼
pg.60) to "3.1.5 Application
3
OS Installation Using ServerStart
㪘㪺㫋㫀㫍㪸㫋㪼㩷㪪㪼㫉㫍㪼㫉㪪㫋㪸㫉㫋㩷㫀㫅㩷㫋㪿㪼㩷㫊㪼㫉㫍㪼㫉
㪪㫋㪸㫉㫋㫀㫅㪾㩷㪦㪪㩷㫀㫅㫊㫋㪸㫃㫃㪸㫋㫀㫆㫅
Make sure to open the menu of each wizard and confirm the settings.
75
Page 76

Chapter 3 OS Installation Using ServerStart
3.2.3 Closing/Saving the Configuration File
When settings in all wizards are completed, save the configuration file.
1 Click [Close and save Configuration File].
The [Save ServerStart Configuration File] window appears.
2 Click [Save As].
The [ServerStart Session IP Settings] window appears.
3 Set items when performing remote installation.
4 Click [Set].
The configuration file is saved.
You can specify any name for the configuration file. However, OS installation is possible only when it is
saved as "SerStartBatch.ini". When installing the OS, make sure to save it as "SerStartBatch.ini" on
the ServerStart floppy disk.
76
Page 77

PRIMERGY RX100 S4 User ’s Guide
3.2.4 Starting OS Installation
Install the OS to the server using the created configuration file.
During installation, do not use the mouse or keyboard unless it is necessary for installation operations.
Otherwise, installation may fail.
Confirm that the floppy disk drive of the USB connection is connected before turning on the power
supply of the server.
1 Turn on the server and insert the ServerStart Disc 1 CD-ROM immediately.
A message prompts you to insert the ServerStart floppy disk.
2 Insert the ServerStart floppy disk containing the created configuration file and
click [OK].
Set the ServerStart floppy disk in the write-enabled state. If it is write protected, installation will
fail.
The [Initializing ServerStart] window appears and the ServerStart initialization process starts.
Depending on the hardware configuration, this process may take a few minutes. When
initialization is completed, the [ServerStart Unattended Mode] window appears.
3
OS Installation Using ServerStart
3 Click [Start].
A message appears.
4 Click [OK].
Installation starts.
1. When RAID has been configured, the system restarts.
77
Page 78

Chapter 3 OS Installation Using ServerStart
2. If a message prompts you to insert the Array Controller Document & Tool CD, insert
the CD-ROM and click [OK].
3. If a message prompts you to insert the Document & Tool CD, insert the PRIMERGY
Document & Tool CD and click [OK].
This message does not appear when the PRIMERGY Document & Tool CD has been
inserted already.
4. If a message prompts you to insert the Service Pack CD-ROM, insert the CD-ROM
and click [OK].
This message does not appear when Service Pack is not selected.
5. If a message prompts you to insert the ServerStart CD-ROM, insert the ServerStart
Disc 1 CD-ROM and click [OK].
5 When a message prompts you to insert the OS CD-ROM, insert the CD-ROM
and click [OK].
For Windows 2000 Server/Windows Server 2003/Windows Server 2003 x64
1. Insert the OS CD-ROM (Installation CD-ROM).
The License Agreement window appears.
2. Click [I agree].
After files are copied, a message prompts you to eject the CD-ROM and floppy disk.
For Windows Server 2003 R2/Windows Server 2003 R2 x64
1. Insert the OS CD-ROM (Installation CD-ROM) Disc 1.
The License Agreement window appears.
2. Click [I agree].
After files are copied, a message prompts you to insert the Disc 2.
3. Eject the Disc 1 and insert the Disc 2.
After files are copied, a message prompts you to eject the CD-ROM and floppy disk.
78
6 Eject the CD-ROM and floppy disk and click [OK].
The system restarts. The system continues the installation operation after restart. OS GUI setup,
LAN utility installation, Service Pack installation, and Active Directory installation are
performed automatically.
7 When a confirmation message appears on restart, click [Restart].
The system restarts and installs high reliability tools.
8 When a message on installation completion appears, press any key.
9 Restart the system.
Click [Start] → [Shutdown]. Select [Restart] and click [OK]. The system restarts.
10 When the system restarts, log on to the server using the Administrator account
for the local computer.
The server setup and OS installation have been completed.
Refer to "Chapter 5 Operations after OS Installation" (
before starting server operations.
pg.133) and perform necessary procedures
Page 79

PRIMERGY RX100 S4 User ’s Guide
3.3 Expert Mode
In expert mode, start up Disk Manager, format the installation partition, and install the
OS.
Use the expert mode only when you want to perform installation while maintaining the
existing partitions. Use the guided mode for normal installation.
3.3.1 Starting Up the Expert Mode
Start up the expert mode.
3
Confirm that the floppy disk drive of the USB connection is connected before turning on the power
supply of the server.
1 Turn on the server and insert the ServerStart Disc 1 CD-ROM immediately.
ServerStart starts up and a message prompts you to insert the ServerStart floppy disk.
2 Insert the ServerStart floppy disk supplied with the server. Make sure that
"Removable media" and "A:" are selected and click [Create].
The network setting window for remote installation appears.
Set the ServerStart floppy disk in the write-enabled state.
3 Click [OK].
The [Initialization of ServerStart core running] window appears and the ServerStart initialization
process starts. Depending on the hardware configuration, this process may take a few minutes.
When the process is completed, the [Create a ServerStart Floppy Disk] window appears.
4 Click [Build a ServerStart Floppy Disk].
Creation of a ServerStart floppy disk starts. When the creation is completed, the "Floppy disk has
been created." message appears.
5 Click [OK].
[Please Select your keyboard] window appears.
OS Installation Using ServerStart
6 Select your keyboard language from the drop-down list and click [OK].
The subsequent start procedure may take several minutes. The [Welcome to ServerStart] window
appears.
79
Page 80

Chapter 3 OS Installation Using ServerStart
7 Click [Click here to prepare and/or initiate an operating system installation].
The [Select the operating system to be installed] window appears.
Click [Special Hints on Operating System Installation] and read the contents. Important
information such as limitations on disk configuration is described.
8 Click [MS Windows Operating Systems].
The [Microsoft Windows Operating System Installation] window appears.
9 Select the OS to install.
10 Click [Install MS Windows Server 2003 interactively (expertise required)].
The expert mode starts.
80
Start up the configuration tools to set items in the following procedures. Exiting a tool returns to
the display to the expert mode window.
Disk manager
OS installation wizard
Application wizard
Starting OS installation
Make sure to open the menu of each wizard and confirm the settings.
Page 81

3.3.2 Disk Manager
Start up Disk Manager and format the installation partition.
1 Click [Use Disk Manager to partition and format your disk drives].
Disk Manager starts up.
PRIMERGY RX100 S4 User ’s Guide
2 Format the OS installation partition. Select the OS installation partition and click
the [Partition] menu → [Format].
The [Format Partition] window appears.
Make sure to specify the active partition on drive C.
Partitions equal to or larger than 4096MB cannot be FAT formatted.
3 Set items and click [Format].
The partition is formatted.
4 When the formatting is completed, click the [File] menu → [Exit].
Disk Manager closes and the display returns to the expert mode window.
3
OS Installation Using ServerStart
81
Page 82

Chapter 3 OS Installation Using ServerStart
3.3.3 OS Installation Wizard
Set computer information, user information, and the network protocol.
ServerStart can configure multiple network patterns. When configuring a domain controller, refer to
"Using ServerStart to Configure the Network".
The setting window differs depending on the OS to be installed. The following describes operations on
Windows Server 2003 R2.
To install another OS, interpret Windows Server 2003 R2 as your OS.
1 Click [Installation Wizard for MS Windows Server 2003].
A message prompts you to specify the configuration file.
2 Click [No].
The [Windows Server 2003 Installation] window appears.
3 Enter the password in [Password for Administrator account] and [Please repeat
Password] and click [Next].
If the password differs between [Password for Administrator account] and [Please repeat Pass-
word], an error dialog window appears. Enter the password correctly.
The [Computer Identification] window appears.
4 Set items and click [Next].
The [Installation Directory and Time Zone] window appears.
When using the CD-ROM applied Service Pack 1 on Windows Server 2003, select the [(OS)
including SP1] menu from the [Operating System Type] list.
5 Set items and click [Next].
The [User Name] window appears.
6 Set items and click [Next].
The [Display Settings] window appears.
82
7 Set items and click [Next].
The [Network Protocol] window appears.
Page 83

8 Set items and click [Next].
The [Software Components] window appears.
If Windows Server 2003 R2 is selected at the Computer Identification, R2 components are
always copied to the hard disk. To install the components, click [Properties] and check the
components to be installed.
9 Set items and click [Next].
The [Services] window appears.
Simple Network Management Protocol is always installed. Click [Properties] to change the set-
tings.
PRIMERGY RX100 S4 User ’s Guide
10 Set items and click [leave wizard].
The display returns to the expert mode window.
3.3.4 Application Wizard
Specify installation of supplied applications such as high reliability tools.
For details on the application wizard, refer to "3.1.5 Application Wizard" (pg.69).
3.3.5 Starting OS Installation
Install the OS to the server.
Notes on the Installation
When the installation partition is not empty, a confirmation message appears. If it does not matter, click
[OK] to continue the installation procedure.
If an incorrect setting (such as the CD key) is found during installation, an error window will appear.
Enter the correct value in the window to continue the installation procedure. However, corrections
made here are not reflected to the configuration file.
1 Click [Click here, to Start the Installation of (OS)].
A confirmation window asking whether you want to save the current settings appears.
3
OS Installation Using ServerStart
83
Page 84

Chapter 3 OS Installation Using ServerStart
2 Click [Yes].
The following window appears.
3 Enter the file name and click [Save As].
Installation starts automatically.
1. If a message prompts you to insert the Array Controller Document & Tool CD, insert
the CD-ROM and click [OK].
2. If a message prompts you to insert the Document & Tool CD, insert the PRIMERGY
Document & Tool CD and click [OK].
3. If a message prompts you to insert the Service Pack CD-ROM, insert the CD-ROM
and click [OK].
4. For Windows Server 2003 x64, a message prompts you to insert the ServerStart
Disc 2 and restart the system. Insert the ServerStart Disc 2 and restart the system.
84
Page 85

PRIMERGY RX100 S4 User ’s Guide
4 When a message prompts you to insert the OS CD-ROM, insert the CD-ROM
and click [OK].
For Windows 2000 Server/Windows Server 2003/Windows Server 2003 x64
1. Insert the OS CD-ROM (Installation CD-ROM).
The License Agreement window appears.
2. Click [I agree].
After files are copied, a message prompts you to eject the CD-ROM and floppy disk.
For Windows Server 2003 R2/Windows Server 2003 R2 x64
1. Insert the OS CD-ROM (Installation CD-ROM) Disc 1.
The License Agreement window appears.
2. Click [I agree].
After files are copied, a message prompts you to insert the Disc 2.
3. Eject the Disc 1 and insert the Disc 2.
After files are copied, a message prompts you to eject the CD-ROM and floppy disk.
3
5 Eject the CD-ROM and floppy disk and click [OK].
Then the system is restarted.
The system continues the installation operation after restart.
OS GUI setup, LAN utility installation, Service Pack installation, and Active Directory
installation are performed automatically.
6 When a confirmation message to restart appears, click [Restart].
The system restarts and installs high reliability tools.
7 When a message on installation completion appears, press any key.
8 Restart the system.
Click [Start] → [Shutdown]. Select [Restart] and click [OK].
The system restarts.
9 When the system restarts, log on to the server using the Administrator account
for the local computer.
The server setup and OS installation have been completed.
Refer to "Chapter 5 Operations after OS Installation" (
before starting server operations.
pg.133) and perform necessary procedures
OS Installation Using ServerStart
85
Page 86

Chapter 3 OS Installation Using ServerStart
3.4 Remote Installation
ServerStart supports remote installation.
3.4.1 Overview of Remote Installation
Remote installation is a method to save resources necessary for installation, such as the OS and Service
Pack, in a different server on the network and install them via the network.
If a remote resource server is configured, you can install the same resources to multiple servers. This
method is useful in configuring multiple servers.
Target Server and Remote Resource Server/PXE Server
A server to which resources are installed is called a "target server". A server that stores resources
necessary for remote installation is called a "remote resource server". A server that can start up a target
server through network startup (PXE) is called a "PXE server".
Installation Method
Remote installation uses a PXE or a remote resource server.
Remote Installation Using a PXE Server
In remote installation using a PXE server, the network startup (PXE) function of the PXE server starts
up the target server and performs installation in preparation mode. This method is used when the target
server does not have a CD-ROM or floppy disk drive.
Installation
using ServerStart
Activated by I
1)
boot image
Request resources2)
Target server
In addition to the PXE server, a "remote resource server" that stores remote resources and a "DHCP
server" that performs the DHCP service are required for remote installation using a PXE server. When
you have only one server, store remote resources on the PXE server to install the DHCP service. When
you have multiple servers, select one for performing the DHCP service and another for storing remote
resources.
3) Supply resources
P address,
- OS
- Service Pack
- Application
etc.
PXE server
86
Page 87

PRIMERGY RX100 S4 User ’s Guide
A
Remote Installation Using a Remote Resource Server
In remote installation using a remote resource server, ServerStart starts up on the target server.
Procedures for starting installation are the same as those in normal installation (preparation, guided, and
expert modes). Once installation started, resources necessary for installation are provided from the
remote resource server. Thus, procedures such as inserting a CR-ROM are not necessary.
ctive ServerStart
and start installation
1) Request resources
- OS
- Service Pack
- Application
etc.
Target server
Supply resources2)
Remote resource server
3.4.2 System Requirements for Remote Resource/PXE Servers
Because remote installation is performed via a network, the environment must have at least one
Windows server and a local area network.
In addition, the following environment is required.
Remote Resource/PXE Server Requirements
table: System Requirements for Remote Resource/PXE Servers
Remote resource server PXE server
OS Windows Server 2003
Windows 2000 Server
Memory 256MB or more 256MB or more
Operating
environment
Notes on the PXE server
Check that no other PXE server exists on the same LAN.
Servers installed with software with the PXE function such as the Microsoft RIS function cannot be
used as a PXE server.
• File sharing function (required) • DHCP server function (required on the same network)
Windows 2000 Server SP2 to 4
Windows Server 2003
• File sharing function (required)
3
OS Installation Using ServerStart
87
Page 88

Chapter 3 OS Installation Using ServerStart
Checking Server Free Space
Decide a server to use as a remote resource server/PXE server and check it for enough free space for
storing resources.
Checking the Number of Servers
• When you have only one server, use it as the remote resource server, PXE server, and DHCP service
server. Check it for the required amount of free space.
• When you have multiple servers
• Check if a server performing the DHCP service exists. If not, decide a server for the DHCP
service.
• When there are multiple resources, they can be divided and stored in multiple remote resource
servers.
Checking Server Free Space
The following table shows the amount of free space required for each installation resource.
table: Free Space Required for Resources
Resource Required free space
ServerStart Disc 1 approx. 650MB
ServerStart Disc 2 approx. 450MB
Windows Server 2003 644MB
Windows Server 2003 Service Pack 1 389MB
Windows 2000 Server SP4 is already applied 462MB
Windows Server 2003 R2, Standard Edition Disc 1 609MB
Windows Server 2003 R2, Standard Edition Disc 2 125MB
Windows Server 2003 R2, Standard x64 Edition Disc 1 629MB
Windows Server 2003 R2, Standard x64 Edition Disc 2 172MB
88
Calculate the total resource size. Check that the remote resource server/PXE server has enough free
space (free space greater than the space required for the resources). When the amount of free space is
insufficient, you must use more remote resource servers.
Page 89

PRIMERGY RX100 S4 User ’s Guide
3.4.3 Preparation of the PXE Server (When the PXE Server is Used)
When performing remote installation using a PXE server, preparatory procedures, such as installing
ServerStart, are required.
Perform the following procedures to prepare the PXE server.
Starting the DHCP Service
Installing ServerStart
Checking Services
Setting TFTP
Preparation of Resources
Starting the DHCP Service
Check that the DHCP service is running on the same network.
If the DHCP service function is not installed, perform the following procedures to install the DHCP
service. The following procedures are examples for Windows Server 2003.
1 Click [Start] → [Control Panel] → [Add or Remove Applications].
2 Click [Add or Remove Windows Components]. Click the [Dynamic Host
Configuration Protocol (DHCP)] service from [Network Services].
The DHCP service is installed.
3 Create and configure a DHCP scope so that the IP address can be distributed.
3
OS Installation Using ServerStart
89
Page 90

Chapter 3 OS Installation Using ServerStart
Installing ServerStart
1 Insert the ServerStart Disc 1 CD-ROM into the PXE server.
The [Fujitsu Siemens ServerStart Setup] window appears.
When the [Fujitsu Siemens ServerStart Setup] window does not appear, execute "SeStSetup.exe"
in the CD-ROM.
2 Check [Classic+Remote Installation], [PXE Server] and [Data packages for
Remote Installation], and click [Ok].
For [Classic + Remote Installation (OS)] and [Data packages for Remote Installation (OS)],
check the items of the corresponding OS.
The setup window appears.
3 Click [Next].
The [Destination Folder] window appears.
4 Select the installation folder and click [Next].
To change the installation folder, click [Browse] and select the folder.
The [Selection of LAN card] window appears.
90
Page 91

PRIMERGY RX100 S4 User ’s Guide
5 Select the LAN controller to use and click [Next].
The [proxy DHCP Configuration] window appears.
6 Select [Yes] to run the DHCP service on the PXE server or select [No] to run
the DHCP service on the other server on the network, and click [OK].
The [Ready to Install the Application] window appears.
7 Click [Install].
Installation starts. When the installation is completed, the [InstallShield Wizard Completed]
window appears.
8 Click [finish].
The setup window appears.
9 Click [Next].
The [License Agreement] window appears.
10 Select [I accept the license agreement] and click [Next].
The [User Information] window appears.
11 Enter the user information of the software and click [Next].
The [Destination Folder] window appears.
3
OS Installation Using ServerStart
91
Page 92

Chapter 3 OS Installation Using ServerStart
12 Select the installation folder, configure ServerStart image that is required for
network booting (PXE), and click [Next].
To change the installation folder, click [Browse] and select the folder.
The [Select Features] window appears.
Clicking [Disk Cost] displays the following window where you can check the amount of free
space.
92
Page 93

PRIMERGY RX100 S4 User ’s Guide
13 Click [Next].
The [Useraccount for access to the ServerStart Data packages] window appears.
Clicking [Create New User] displays the [Create New User] window. Configure each item to
create a new user.
3
OS Installation Using ServerStart
14 Enter a user name and a password, and click [Next].
The [Ready to Install the Application] window appears.
15 Click [Install].
Installation starts. When the installation is completed, the [InstallShield Wizard Completed]
window appears.
16 Click [finish].
The setup window appears.
17 Click [Next].
The [License Agreement] window appears.
18 Select [I accept the license agreement] and click [Next].
The [User Information] window appears.
93
Page 94

Chapter 3 OS Installation Using ServerStart
19 Enter the user information of the software and click [Next].
The [Destination Folder] window appears.
20 Specify the installation folder and click [Next]. To change the installation folder,
click [Browse] and select the folder.
The [Select Features] window appears. Clicking [Disk Cost] displays the following window
where you can check the amount of free space.
21 Click [Next].
The [Ready to Install the Application] window appears.
22 Click [Next].
Installation is executed.
If a message prompting you to restart the system appears before or after installation, eject the
CD-ROM and restart the system according to the message. When the system restarts, insert
the ServerStart CD-ROM and start installation again.
If the "This program does not respond." message appears during restart operation, click [Exit]
to continue the restart operation.
When the installation is completed, the completion window appears.
23 Click [Exit].
In case of Windows Server 2003 x64 installation, the [Browse for Folder] window appears. Insert
the ServerStart Disc 2 CD-ROM and continue installation.
ServerStart has been installed to the client computer.
24 Click [Start] → [Shutdown]. Select [Restart] and click [OK].
The system restarts.
94
Page 95

Checking Services
Checking [PXE Services] and [TFTP Service]
1 Right-click the [My Computer] icon and click [Manage].
2 Select [Services] from [Services and Applications].
On the Services list, check that PXE Services and TFTP Service have been installed and started.
PRIMERGY RX100 S4 User ’s Guide
3
OS Installation Using ServerStart
Checking the DHCP Service
Perform the following check only when the PXE server performs the DHCP service.
1 On the PXE server, click [Start] → [Programs] → [Administrative Tools] →
[DHCP] to start up the DHCP administrative tool.
2 Click [Server Options] and check that the "060 ClassID" server option is added.
95
Page 96

Chapter 3 OS Installation Using ServerStart
Setting TFTP
TFTP is an FTP service function that requires no authentication. In remote installation, the TFTP service
is used to distribute the boot image required for startup. For the TFTP path, set the appropriate access
rights for the Guest account to obtain the image via network startup (PXE).
1 Click [Start] → [Programs] → [Accessories] → [Windows Explorer] and move to
the TFTP path (the default is C:\Program Files\Fujitsu
Siemens\DeploymentService\tftp).
2 Right-click the TFTP folder and click [Properties].
3 Click the [Security] tab, add the Guest account, and set the "Read & Execute",
"List Folder Contents", and "Read" access permissions.
96
The preparation of the PXE server has been completed.
Then, perform "3.4.4 Preparation of Remote Resources" (
pg.97).
Page 97

PRIMERGY RX100 S4 User ’s Guide
3.4.4 Preparation of Remote Resources
Store resources to be installed on the remote resource server (PXE server) before starting installation.
For sharing resources, log on to the remote resource/PXE server with the Administrator account.
1 Prepare resources required for installation.
• CD-ROM for the OS to be installed
• Service Pack CD-ROM for the OS to be installed
• ServerStart floppy disk
• PRIMERGY Document & Tool CD (for installing ServerView)
• Array Controller Document & Tool CD (for RAID configuration)
•Others
2 Create a shared folder for storing resources.
Create a shared folder for each CD prepared in Step 1.
E.g.:E:\W2K3Sv for Windows Server 2003
3
OS Installation Using ServerStart
3 Extract the resources.
Using Windows Explorer, copy the CD-ROM for the resource to the shared folder.
3.4.5 Starting Remote Installation Using a PXE Server
Perform remote installation using a PXE server in the following procedures.
Checking the Network Startup (PXE) Setting
Checking the MAC Address
Creating a Configuration File
(Setting of remote installation)
Starting remote Installation
Checking the Network Startup (PXE) Setting
Remote installation using a PXE server is performed via the onboard LAN. Enable the network startup
(PXE) of the target server.
For more details on network startup, refer to "2.1.2 Hardware Settings" (
pg.41).
97
Page 98

Chapter 3 OS Installation Using ServerStart
Checking the MAC Address of the Onboard LAN
In remote installation, target servers are identified according to the MAC address. MAC addresses are
unique information to LAN cards. Check the MAC address on each target server. Write down the MAC
address of the onboard LAN. For details on how to check the MAC address of an onboard LAN, refer to
"2.1.2 Hardware Settings" (
pg.41).
Creating a Configuration File
You can create a configuration file on a client computer before starting installation. For the procedure,
refer to "3.2.1 Starting Up the Preparation Mode" (
pg.75).
(
When creating a configuration file on the PXE server, start installation.
Specify the shared name prepared instead of the local CD-ROM as installation information.
pg.73) and "3.2.2 Configuring Settings in Wizards"
Starting Installation
1 On the PXE server, start up ServerStart.
If ServerStart has already been started, you do not have to restart it. If it is not started, click
[Start] → [Programs] → [Fujitsu Siemens ServerStart] → [ServerStart(start from HD)].
The [Welcome to ServerStart] window appears.
2 Click [Click here to prepare an operating system installation for a PRIMERGY
Server].
The [Select an Operating System] window appears.
3 Click [Microsoft Windows Server Operating System -Preparing and/or initiating
a Remote Installation].
The [Microsoft Windows Operating System Installation] window appears.
98
Page 99

4 Click the OS to install.
The [Preparing the Installation of (OS)] window appears.
If a configuration file has already been created, go to Step 6.
PRIMERGY RX100 S4 User ’s Guide
3
OS Installation Using ServerStart
5 Set items in wizards to create a configuration file.
Refer to "3.2.2 Configuring Settings in Wizards" (pg.75). Set items in wizards and save the
configuration file.
Exiting a wizard returns to the preparation mode window.
6 Click [Click here to initiate the Remote Installation process].
The [Remote Installation Target Server] window appears.
99
Page 100

Chapter 3 OS Installation Using ServerStart
7 Configure remote installation.
1. Enter the "MAC address of target system".
2. Select the "PRIMERGY model type".
3. Specify the "Configuration File" containing the installation settings.
8 Click [Start Installation].
Installation starts. All disk contents on the target server are deleted.
The [ServerStart Boot Manager] window appears.
Check that the status is "Waiting for client".
100
 Loading...