

Fujitsu Siemens Computers Lifebook E Series Easy Manual
LIFEBOOK
LIFEBOOK
LIFEBOOKLIFEBOOK
E Series
E Series
E SeriesE Series
EasyGuide

Are there ...
... any technical problems or other questions which you would like to be clarified?
Please contact:
• your sales partner
• your sales outlet
Further information can be found in the "Safety and Warranty" manual.
The latest information on our products, tips, updates, etc., can be found on the internet under:
http://www.fujitsu-siemens.com


Published by
Fujitsu Siemens Computers GmbH
A26391-K114-Z120-1-7619
Order No.:
AG 0701 07/01
A26391-K114-Z120-1-7619
A26391-K114-Z120-1-7619A26391-K114-Z120-1-7619
A26391-K114-Z120-1-7619

Introduction
Important notes
LIFEBOOK E Series
Operating Manual
Working with the
Notebook
Connecting external
devices
Connecting docking
devices
Energy saving functions
Settings in BIOS Setup
July 2001 edition
Troubleshooting and tips
Technical data
Index

DPMS and VESA are registered trademarks of Video Electronics Standards Association.
Intel is a registered trademark, Pentium and Celeron are trademarks of Intel Corporation,
USA.
Microsoft, MS, MS-DOS, Windows, and Windows NT are registered trademarks of Microsoft
Corporation.
OS/2 and PS/2 are registered trademarks of International Business Machines, Inc.
Zip is a trademark of Iomega Corporation.
All other trademarks referenced are trademarks or registered trademarks of their respective
owners, whose protected rights are acknowledged.
Copyright ã Fujitsu Siemens Computers GmbH 2001
All rights, including rights of translation, reproduction by printing, copying or similar methods,
in part or in whole, are reserved.
Offenders will be liable for damages.
All rights, including rights created by patent grant or registration of a utility model or design,
are reserved.
Delivery subject to availability. Right of technical modification reserved.

Contents
Introduction .....................................................................................................................................1
Using this Manual..............................................................................................................................2
Important notes ...............................................................................................................................3
Energy saving....................................................................................................................................3
Energy saving under Windows ..................................................................................................3
CE marking........................................................................................................................................4
Disposal and recycling.......................................................................................................................4
Working with your Notebook..........................................................................................................5
Preparing for operation......................................................................................................................5
Selecting a location ...................................................................................................................5
Connecting the power adapter...........................................................................................................6
Switching the notebook on.................................................................................................................7
Switching the notebook off.................................................................................................................7
Switching off the notebook via the operating system .................................................................7
Re-starting the notebook ...........................................................................................................8
Security panel....................................................................................................................................8
Interior view.....................................................................................................................................10
Left side panel................................................................................................................................. 11
Right side panel...............................................................................................................................11
Back panel ......................................................................................................................................12
Under side.......................................................................................................................................12
Power adapter................................................................................................................................. 12
Battery.............................................................................................................................................13
Charging, caring for and maintaining the battery......................................................................13
Battery storage ........................................................................................................................14
Inserting and removing the battery...........................................................................................14
Indicators and input devices ............................................................................................................ 16
Status indicator panel ..............................................................................................................17
Keyboard.........................................................................................................................................18
Key combinations .................................................................................................................... 20
Touchpad and touchpad buttons .....................................................................................................21
LCD display panel ...........................................................................................................................22
LCD display settings................................................................................................................22
Hard disk .........................................................................................................................................23
Installing and removing modules .....................................................................................................23
Removing modules..................................................................................................................24
Installing modules....................................................................................................................24
CD / DVD-ROM drive ......................................................................................................................25
CD/DVD indicator .................................................................................................................... 25
Inserting or removing a CD/DVD..............................................................................................26
Floppy Disk Drive ............................................................................................................................27
Working with floppy disks ........................................................................................................28
Connecting the modem....................................................................................................................29
Connecting LAN .............................................................................................................................. 29
PC cards .........................................................................................................................................30
Installing a PC card .................................................................................................................30
Removing a PC card................................................................................................................31
Using PC memory cards..........................................................................................................31
Memory expansion ..........................................................................................................................32
Installing and removing memory modules................................................................................32
Microphone and loudspeakers......................................................................................................... 34
A26391-K114-Z120-1-7619

Contents
Connecting external devices........................................................................................................ 35
Port symbols ........................................................................................................................... 36
Connecting an external monitor ...................................................................................................... 38
Connecting an external keyboard.................................................................................................... 38
Connecting an external mouse........................................................................................................ 39
PS/2 mouse ............................................................................................................................ 39
Serial mouse........................................................................................................................... 39
Fujitsu Siemens infrared mouse.............................................................................................. 40
Connecting a printer........................................................................................................................ 42
Using the parallel port ............................................................................................................. 42
Using the serial port ................................................................................................................ 42
Establishing a direct connection to a PC ......................................................................................... 42
Establishing an infrared connection................................................................................................. 42
Configuring the infrared connection......................................................................................... 43
Other infrared devices............................................................................................................. 43
Connecting USB devices ................................................................................................................ 43
Connecting external audio devices.................................................................................................. 43
Connecting docking devices........................................................................................................ 45
Docking the notebook ..................................................................................................................... 45
Undocking the notebook ................................................................................................................. 45
Energy saving functions .............................................................................................................. 47
Energy-saving modes ..................................................................................................................... 47
Operating systems with ACPI ......................................................................................................... 48
Operating systems with APM .......................................................................................................... 49
PHDISK (for Windows NT only) ...................................................................................................... 50
Settings in BIOS Setup................................................................................................................. 51
Start BIOS Setup ............................................................................................................................ 51
Operating BIOS Setup .................................................................................................................... 51
Setting the password............................................................................................................... 52
Troubleshooting and tips ............................................................................................................. 53
Installing new software............................................................................................................ 53
Saving and restoring system files............................................................................................ 53
Restoring the hard disk contents under Windows 9x............................................................... 54
The notebook's date or time is incorrect.................................................................................. 54
Battery indicator does not light up ........................................................................................... 54
The LCD display panel of the notebook remains blank............................................................ 54
The LCD display panel is difficult to read ................................................................................ 55
The external monitor stays blank ............................................................................................ 55
The external monitor is blank or the image is unstable............................................................ 55
The notebook cannot be started.............................................................................................. 56
The notebook stops working ................................................................................................... 56
The mouse does not work....................................................................................................... 57
The floppy disk cannot be written............................................................................................ 57
The printer does not print ........................................................................................................ 57
Acoustic warnings ................................................................................................................... 57
Error messages on the screen ................................................................................................ 58
Technical data............................................................................................................................... 61
Notebook ........................................................................................................................................ 61
Battery ............................................................................................................................................ 62
Power adapter................................................................................................................................. 62
Index .............................................................................................................................................. 63
A26391-K114-Z120-1-7619

Introduction
Your LIFEBOOK is a versatile and ergonomic notebook. Innovative technology and ergonomic design
make this notebook the ideal user-friendly and reliable travel companion. Your operating system is
pre-installed on the hard disk for your convenience when you use your notebook for the first time.
Depending on the configuration level chosen, your notebook is supplied with Windows 98, Windows
Millenium Edition, Windows 2000, Windows XP or Windows NT as the operating system.
The energy-saving processor and the configurable energy-saving functions allow you to make the
most effective use of the battery capacity.
Depending on the configuration ordered, your
capacity and 1 Gbyte of main memory installed. A PC card slot enables the notebook to operate two
type I / II PC cards or one type III PC card.
Your
LIFEBOOK is also equipped with a module bay, which can accomodate the following modules:
LIFEBOOK has up to 30 Gbyte Hard Disk storage
• CD-ROM drive
• DVD drive
• CD-RW drive
• CD-RW / DVD Combo drive
• Floppy Disk Drive
• Second battery
You can connect external devices, for example a scanner, active loudspeakers, gamepads,
keyboard or mouse via the two USB ports.
The parallel port is designed for fast bidirectional data transfer.
For mouse control, the notebook has a touchpad with touchpad buttons.
Your notebook can be used in conjunction with various docking devices (for information about
docking devices, please see the
connectors for external devices such as external monitor, printer and mouse. The internal floppy
disk drive can be connected to the docking device externally via an optionally available floppy disk
cable.
An audio controller, two built in loudspeakers and a built in microphone provide your notebook with
audio options, enabling to incoporate voice, noise effects and music into your
environment. You can also connect an external microphone and active loudspeakers.
LIFEBOOK Accessories catalogue). The docking devices have
LIFEBOOK
The system settings of the notebook can be configured via the user-friendly BIOS Setup programme.
Certain system settings (e.g. screen display, energy saving functions) can be modified via various
key combinations while you are using the notebook.
Your
LIFEBOOK has a number of security features to ensure that no unauthorised persons can
access your data. For example, you can protect access to your data with the security functions in
the BIOS Setup or with the security panel.
This manual tells you how to set up and operate your
Further information on this notebook is provided:
• in the "Getting Started" manual
• in the "Safety and Warranty" manual
• in the information files, which accompany any software (e. g. *.TXT, *.DOC, *.WRI, *.HLP)
• in your operating system help files
A26391-K114-Z120-1-7619 1
LIFEBOOK.

Introduction Using this Manual
Using this Manual
The meanings of the symbols and fonts used in this manual are as follows:
Indicates information which is important for your health or for preventing physical damage.
!
Failure to follow the instructions may lead to loss of data, invalidate your warranty, destroy
the notebook, or endanger your life.
Indicates important information which is required to use the system properly.
i
Ê Text which follows this symbol describes activities that must be performed in the order shown.
Text in this typeface indicates screen outputs.
Text in italics indicates commands or menu items.
"Quotation marks" indicate names of chapters, storage media and terms that are being emphasised.
2 A26391-K114-Z120-1-7619

Important notes
In this chapter you will find information regarding efficient use of your notebook and certification.
You will also find information disposal and recycling of the notebook and battery.
Energy saving
If you will not be using your notebook, switch it off and disconnect the power adapter from the power
supply.
Make use of the device's energy saving functions (see "Energy saving functions"). The notebook
uses less power when the power management features are enabled. You will then be able to work
for longer before having to recharge the battery.
Energy saving under Windows
If a monitor with energy saving features is connected to your notebook, you can use the Screen Saver
tab to activate the energy saving features of the monitor. Select the following item in the start menu:
Settings - Control Panel - Display - Display Properties - Screen Saver - Energy saving functions for the
display. You can set additional energy saving functions in the start menu by selecting the following
item: Settings - Control Panel - Energy - Extended .
Energy Star
The Fujitsu Siemens Computers LIFEBOOKlifebook is designed to conserve
electricity by dropping to less than 8 W when it goes into standby/suspend
mode and to less than 3 W when it goes into OFF mode. With this new
The EPA estimates that computer equipment uses 5 percent of all business electricity and that this
is growing rapidly. If all desktop PCs and peripherals enter a low-power mode when not in use, the
overall savings in electricity could amount to $ 2 milliard annually. These savings could also prevent
the emission of 20 million tons of carbon dioxide into the atmosphere - the equivalent of 5 million
automobiles.
As an Energy Star Partner, Fujitsu Siemens Computers GmbH has determined that this product
meets the Energy Star guidelines for energy efficiency.
power management the
Environmental Protection Agency's (EPA) Energy Star Computers award.
LIFEBOOKlifebook qualifies for the U.S.
A26391-K114-Z120-1-7619 3

Important notes CE marking
CE marking
The shipped version of this device complies with the requirements of the EEC directives
89/336/EEC "Electromagnetic compatibility" and 73/23/EEC "Low voltage directive".
Disposal and recycling
This device has been manufactured to the highest possible degree from materials which can be
recycled or disposed of in a manner that is not environmentally damaging. The device may be taken
back after use to be recycled, provided that it is returned in a condition that is the result of normal
use. Any components not reclaimed will be disposed of in an environmentally acceptable manner.
Do not throw lithium batteries into the household waste. They must be disposed of in accordance
with local regulations concerning special waste.
If you have any questions on disposal, please contact your local office, our Hotline/Help Desk, or:
Fujitsu Siemens Computers GmbH
Recycling Center
D-33106 Paderborn
Tel: +49 5251 81 80 10
Fax: +49 5251 81 80 15
4 A26391-K114-Z120-1-7619

Working with your Notebook
In this chapter you will find advice on the safe positioning and use of your notebook and power
adapter, as well as information about each connector and LIFEBOOK feature.
Preparing for operation
The power cable supplied conforms to the requirements of the country in which you
!
purchased your notebook. Make sure that the power cable is approved for use in the
country in which you intend to use it.
The notebook and the power adapter should be at least 200 mm apart. Keep other objects
100 mm clear of the notebook and its power adapter.
Do not cover the ventilation slots in the notebook.
Do not place the power adapter on heat-sensitive material.
The power adapter's AC cord should only be connected to a mains outlet if the notebook
is connected to the power adapter.
Do not use the power adapter for other notebooks or devices.
Do not use a power adapter that is not especially intended for this
LIFEBOOK.
Selecting a location
Select a suitable location for the notebook before setting it up. Consider the following points when
looking for a location.
• We recommend that you place your notebook on a surface with good anti-slip qualities. In view
of the multitude of different finishes and varnishes used on furniture, it is possible that the
rubber feet will mark the surface they stand on.
• Do not expose the notebook to extreme environmental conditions. Protect it from dust, humidity
and heat.
• Keep other objects 100 mm away from the notebook and its power adapter to ensure adequate
ventilation. The space between the notebook's feet must be clear. Do not place it on a soft
surface (e.g., a carpet or soft furnishings). Do not cover the ventilation slots in the notebook or
the power adapter.
• The power adapter must be at least 200 mm away from the notebook. It must be free-standing
and must not be covered. Do not place the power adapter on heat-sensitive material.
• For infrared data transfer you must align the notebook's infrared interface with that of the
partner device (e.g. PC). The devices must not be more than one metre apart.
A26391-K114-Z120-1-7619 5
Working with your Notebook Connecting the power adapter
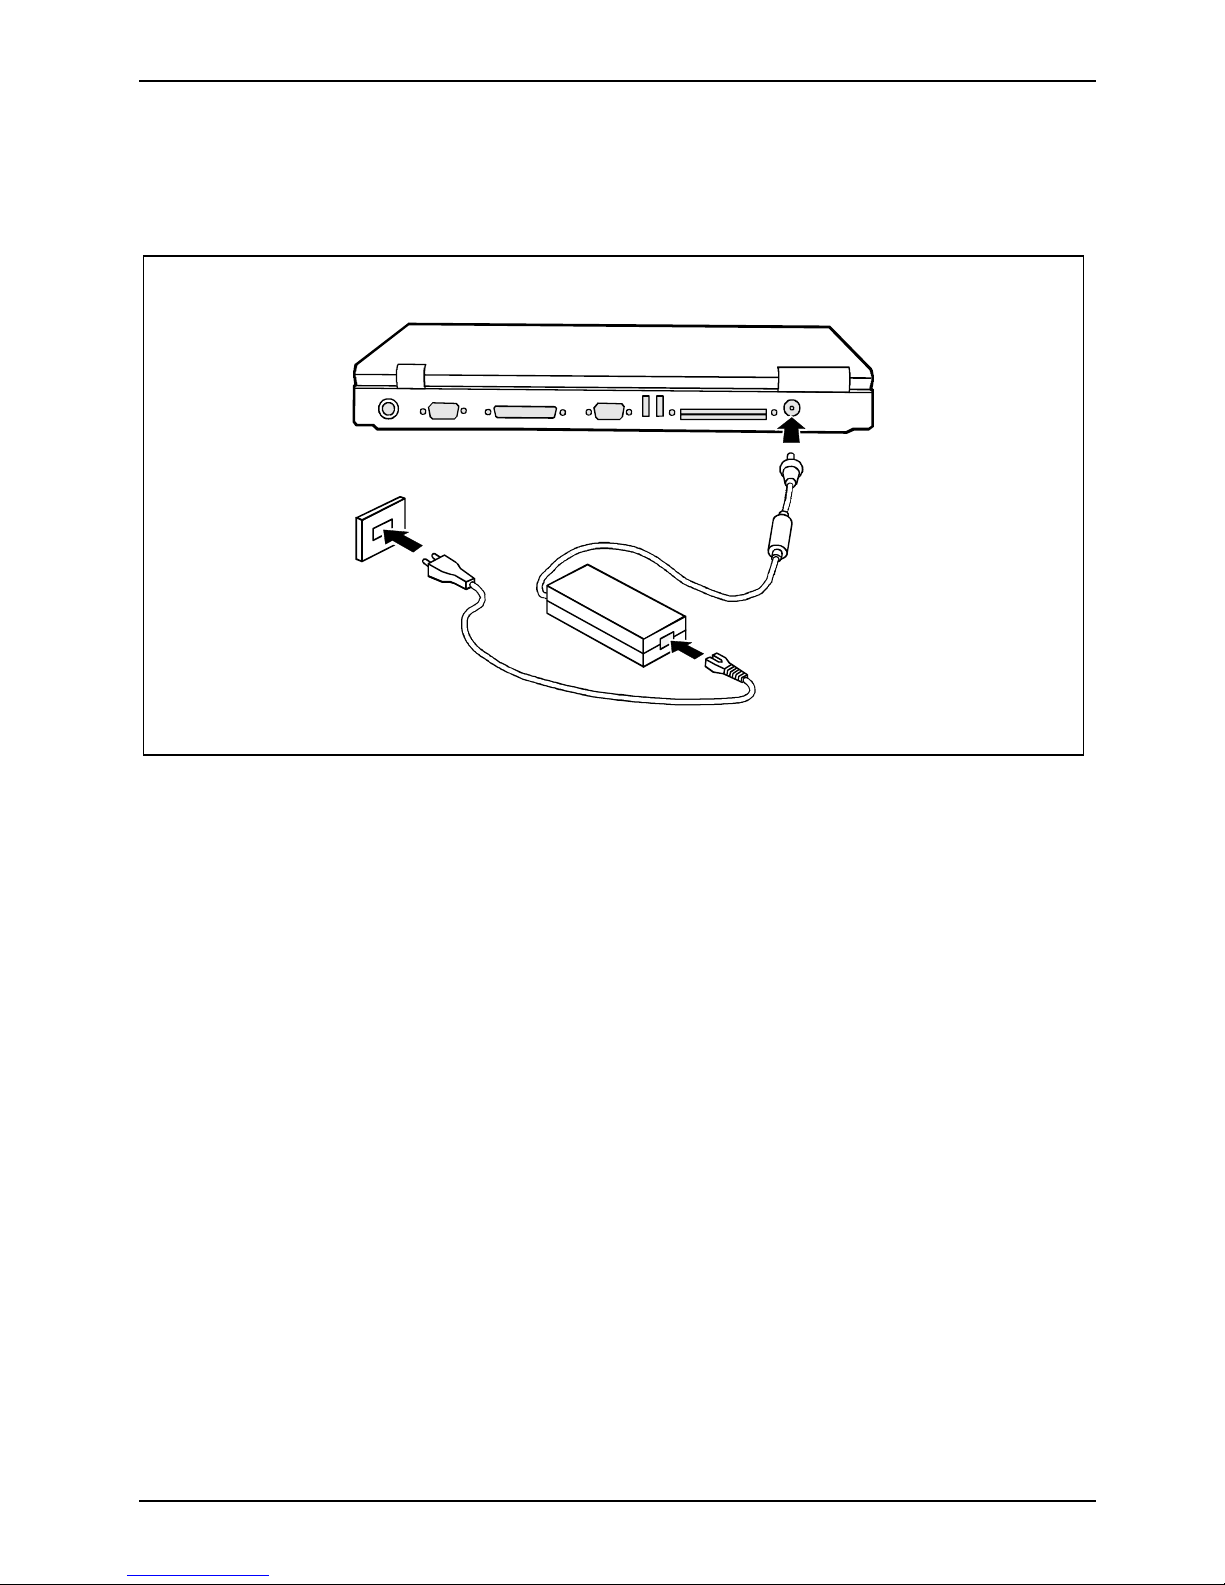
Connecting the power adapter
Ê Place the notebook on a flat, sturdy surface.
1
3
2
Ê Connect the power adapter cable to the DC jack (DC IN) of the notebook (1).
Ê Connect the power cable to the power adapter (2).
Ê Plug the power cable into the mains outlet (3).
Upon delivery the battery is in the battery compartment.
The power indicator of the notebook lights up. The battery will charge.
6 A26391-K114-Z120-1-7619

Switching the notebook on Working with your Notebook
Switching the notebook on
Ê Press the release button and open the LCD display panel.
1
2
Ê Connect the external power adapter to your notebook (1).
Ê Press the Suspend/Resume button to switch on the notebook (2).
When you switch on your notebook for the first time the supplied software is already
!
i
installed. Please follow the instructions on the screen, which will take aproximately 20
minutes, during which you should ensure that the power supply is connected. You must
not switch off or re-start your notebook during this initial installation, unless instructed to
do so.
Make sure that no CD-ROM and no floppy disk are inserted during initial installation.
If you have assigned a password, you must enter this when requested to do so, in order to
start the operating system password.
Switching the notebook off
Ê Always shut down the operating system properly. If the notebook does not switch off
automatically, press the Suspend/Resume button for approximately four seconds.
Ê Close the LCD screen so that it locks into place.
Switching off the notebook via the operating system
The way that your notebook is switched off is dependent on the operating system and powermanagement settings. Refer to the "Energy saving functions" chapter.
Save all open files before switching the notebook into Standby mode to avoid data loss
i
A26391-K114-Z120-1-7619 7
when the notebook remains switched off for a longer time.

Working with your Notebook Security panel
Re-starting the notebook
Restarting the computer without turning the power off, referred to as "Warm Boot". This is performed
via the operating system using Start – Shut Down – Restart.
Security panel
The security panel enables you to protect your notebook from unauthorised use with a hardware
password. When a Security Panel password is activated, the notebook will not start without the
correct insertion of a password. The password is entered before the BIOS is read out and the
hardware activated.
The password is requested from all suspend and resume modes. As a result, a security level is also
provided with the energy-saving mode activated.
The Security Lock function can be used when the notebook is started from Resume mode, when
switched off and from the Save-to-Disk mode.
Password protection of Save-to-RAM Mode is also supported. This function can be deactivated in
the BIOS Setup. In the Security Panel on Resume menu the default value is set to Enable at the factory.
It is possible to assign a supervisor password and a user password.
If you have forgotten your user password, the supervisor password can be used to reset
i
The supervisor password must be set so that the notebook can be unlocked again, and so that new
user passwords can be assigned when the existing ones have been forgotten.
No passwords are assigned when the notebook is delivered. The passwords can be assigned with
the FJSECS.EXE (supervisor password) and FJSECU.EXE (user password) programmes. The
supervisor password and the user password can be assigned with up to 5 key entries. Multiple keys
(1+2) can be used together as one key entry.
the user password.
If the security panel is active and you have forgotten both passwords, please contact your
our Hotline/Help Desk.
The supervisor password has to be set before the user password can be assigned.
i
Assigning a supervisor password
The setup programme can be found under Start - AddOn Software.
Ê Enter the programme name FJSECS.EXE under Start - Run.
Ê Click on OK.
Ê Follow the instructions of the programme.
8 A26391-K114-Z120-1-7619

Security panel Working with your Notebook
Assigning a user password
The setup programme can be found under Start - AddOn Software.
Ê Enter the programme name FJSECU.EXE under Start - Run.
Ê Click on OK.
Ê Follow the instructions of the programme.
Examples of possible password combinations
"1" followed by Enter
"1" + "2" followed by Enter
"1" + "2" + "3" followed by Enter
"1" + "2" + "3" + "4" followed by Enter
"1" + "2" + "3" + "4" + "5" followed by Enter
("1"+"2") + ("1" + "2" + "3" ) + ("1" + "2" + "3" + "4" ) + "1" + "2" followed by Enter
("1" + "2") means that the key "1" and "2" must be pressed simultaneously.
i
"Enter" refers to the the Security Panel Enter key, under the LCD screen.
Password error alarm
If a password is entered incorrectly three times, a one-minute alarm is triggered, if the correct
password is entered during the alarm, the notebook starts up normally.
After one minute the notebook stops the alarm and the indicator lamp goes out, the user must press
the Suspend/Resume key to start or enter the Resume mode.
After pressing the Suspend/Resume button, the notebook is still locked and the LED will light; the
user must now enter the correct user password again, if the entry is correct, the notebook will start.
A26391-K114-Z120-1-7619 9
Working with your Notebook Interior view
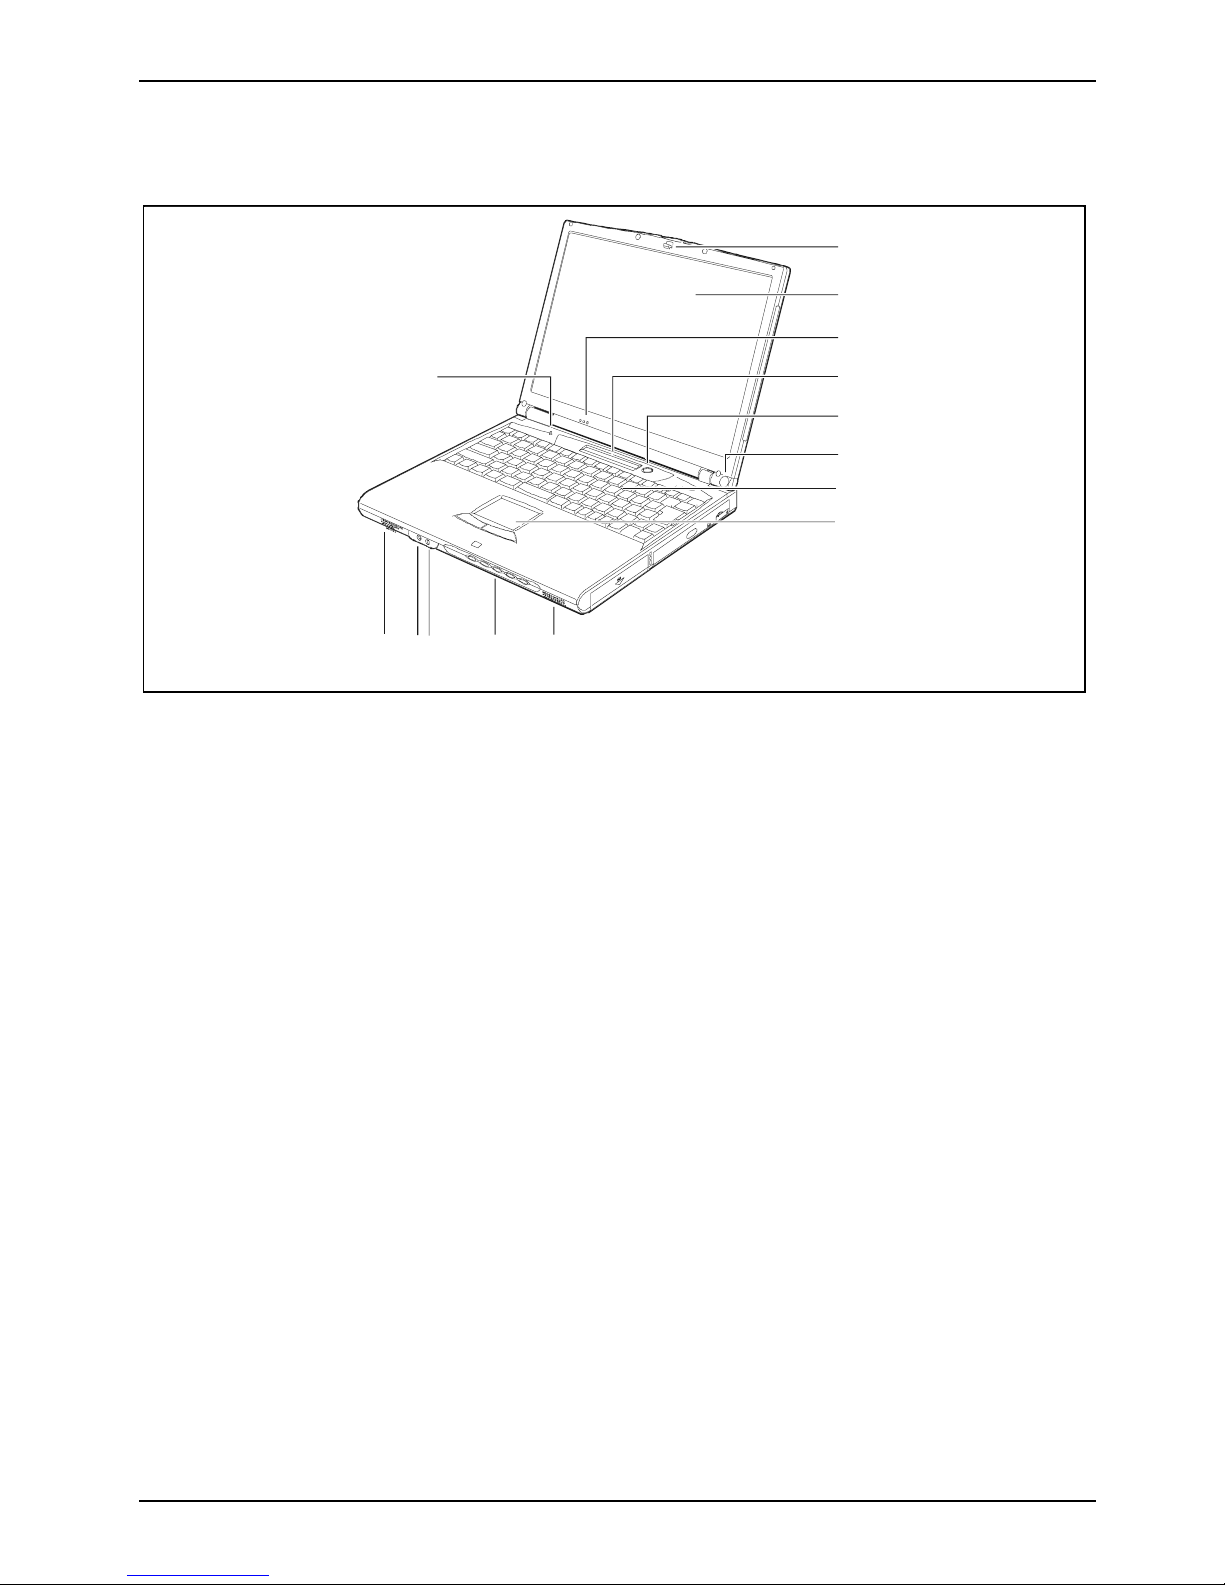
Interior view
2
3
4
1
14
1 = LID switch
2 = Device lock
3 = LCD display panel
4 = Microphone
5 = LCD status display
6 = Suspend/Resume button
7 = Infrared port for infrared mouse
5
6
7
8
9
10111213
8 = Keyboard
9 = Touchpad and touchpad buttons
10 = Loudspeakers
11 = Security panel
12 = Headphones port
13 = Microphone connector
14 = Loudspeakers
10 A26391-K114-Z120-1-7619
Left side panel Working with your Notebook
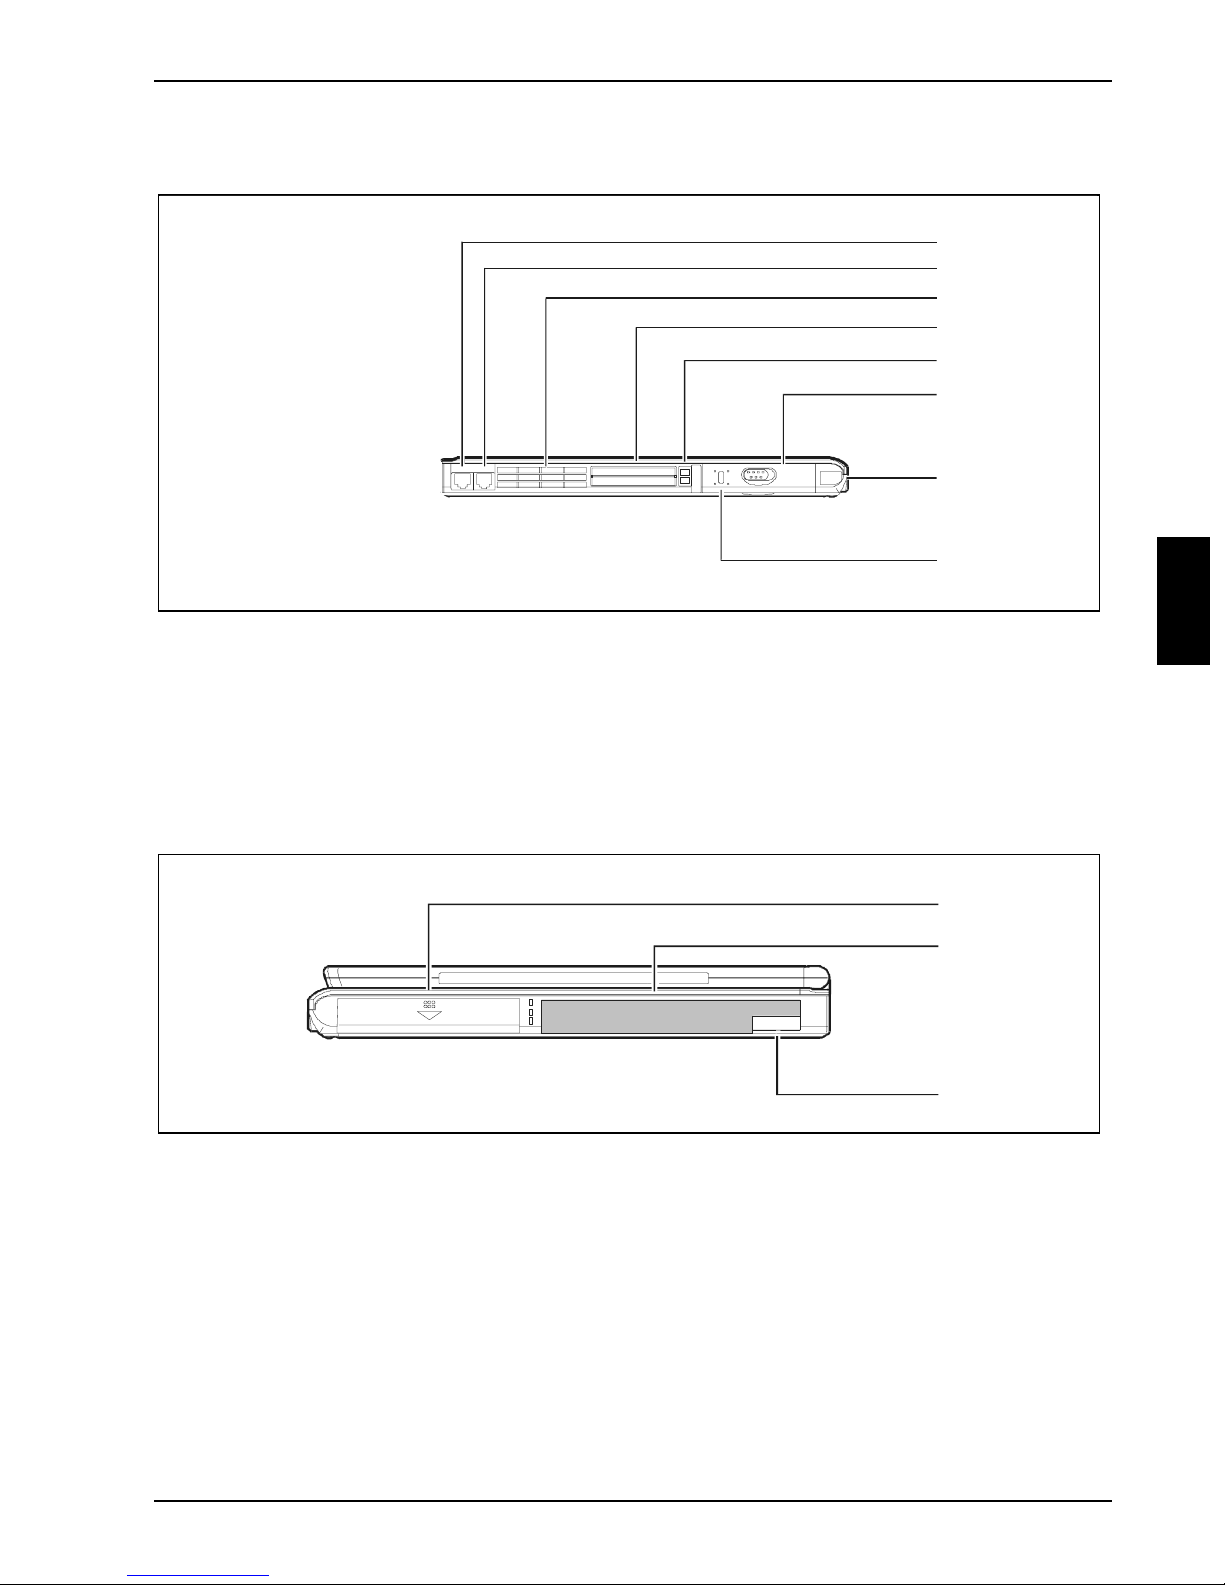
Left side panel
1
2
3
4
5
6
7
8
1 = LAN connector
2 = Modem connector
3 = Fan openings
4 = PC card slot
Right side panel
1 = Battery compartment
2 = Module bay
5 = Eject buttons for PC cards
6 = Kensington Lock
7 = Hard disk lock
8 = Infrared interface
1
2
3
3 = Eject lever for module bay
A26391-K114-Z120-1-7619 11
Working with your Notebook Back panel
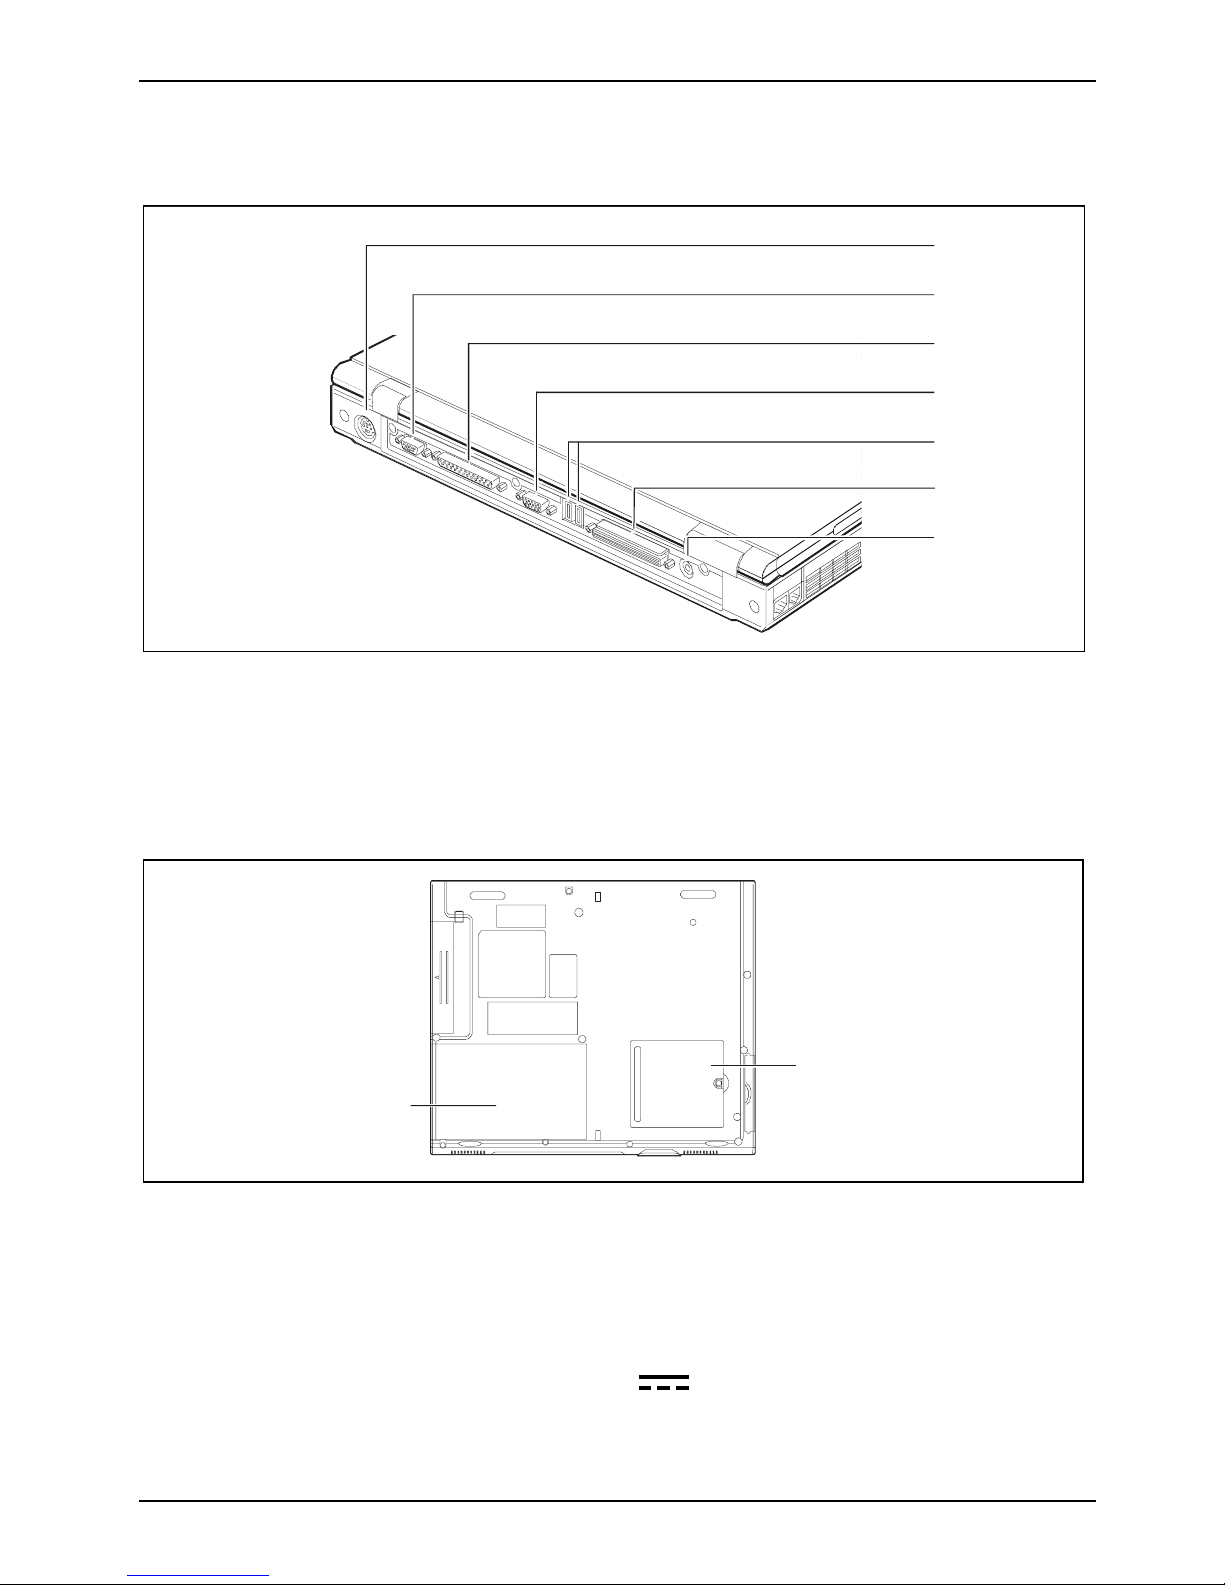
Back panel
1
2
3
4
5
6
7
1 = PS/2 port
2 = Serial port
3 = Parallel port
4 = VGA interface
5 = USB ports
6 = Port for docking devices
7 = DC jack (DC IN)
Under side
2
1
1 = Battery compartment 2 = Memory compartment
Power adapter
• The power adapter is designed for a voltage between 100 V and 240 V and a frequency
between 50 Hz and 60 Hz.
• When the notebook is supplied with power, the symbol (power indicator) appears in the
status indicator panel of your notebook.
• You can order an additional optional power adapter and an additional power cable.
12 A26391-K114-Z120-1-7619
Battery Working with your Notebook
Battery
The battery supplies your notebook with the necessary power during mobile use. You can increase
battery life by enabling the system's power management features.
The battery charge is indicated by the battery symbol in the "Status indicator panel". When you
switch on the notebook, it takes a few seconds before the battery status is displayed.
The standard battery will last for roughly 500 charge/discharge cycles, this will vary according to
which battery pack is fitted.
Charging, caring for and maintaining the battery
Only use batteries designed for this LIFEBOOK.
!
The notebook battery can only be charged, when the ambient temperature is between 5°C and
40°C.
The notebook battery charge is indicated by the battery symbol in the "Status indicator panel"
You can charge the battery by connecting the notebook to the power adapter. A battery will fully
charge in approximately two and a half hours.
It is a good idea to occasionally discharge the battery completely before re-charging, as this
increases battery life.
Work in the battery mode until an acoustic warning prompts you to recharge and the battery
indicator in the status indicator panel begins to flash, the battery should not be charged before this
point.
If you do not connect the power adapter within five minutes of the signals described above, your
notebook will automatically switch off.
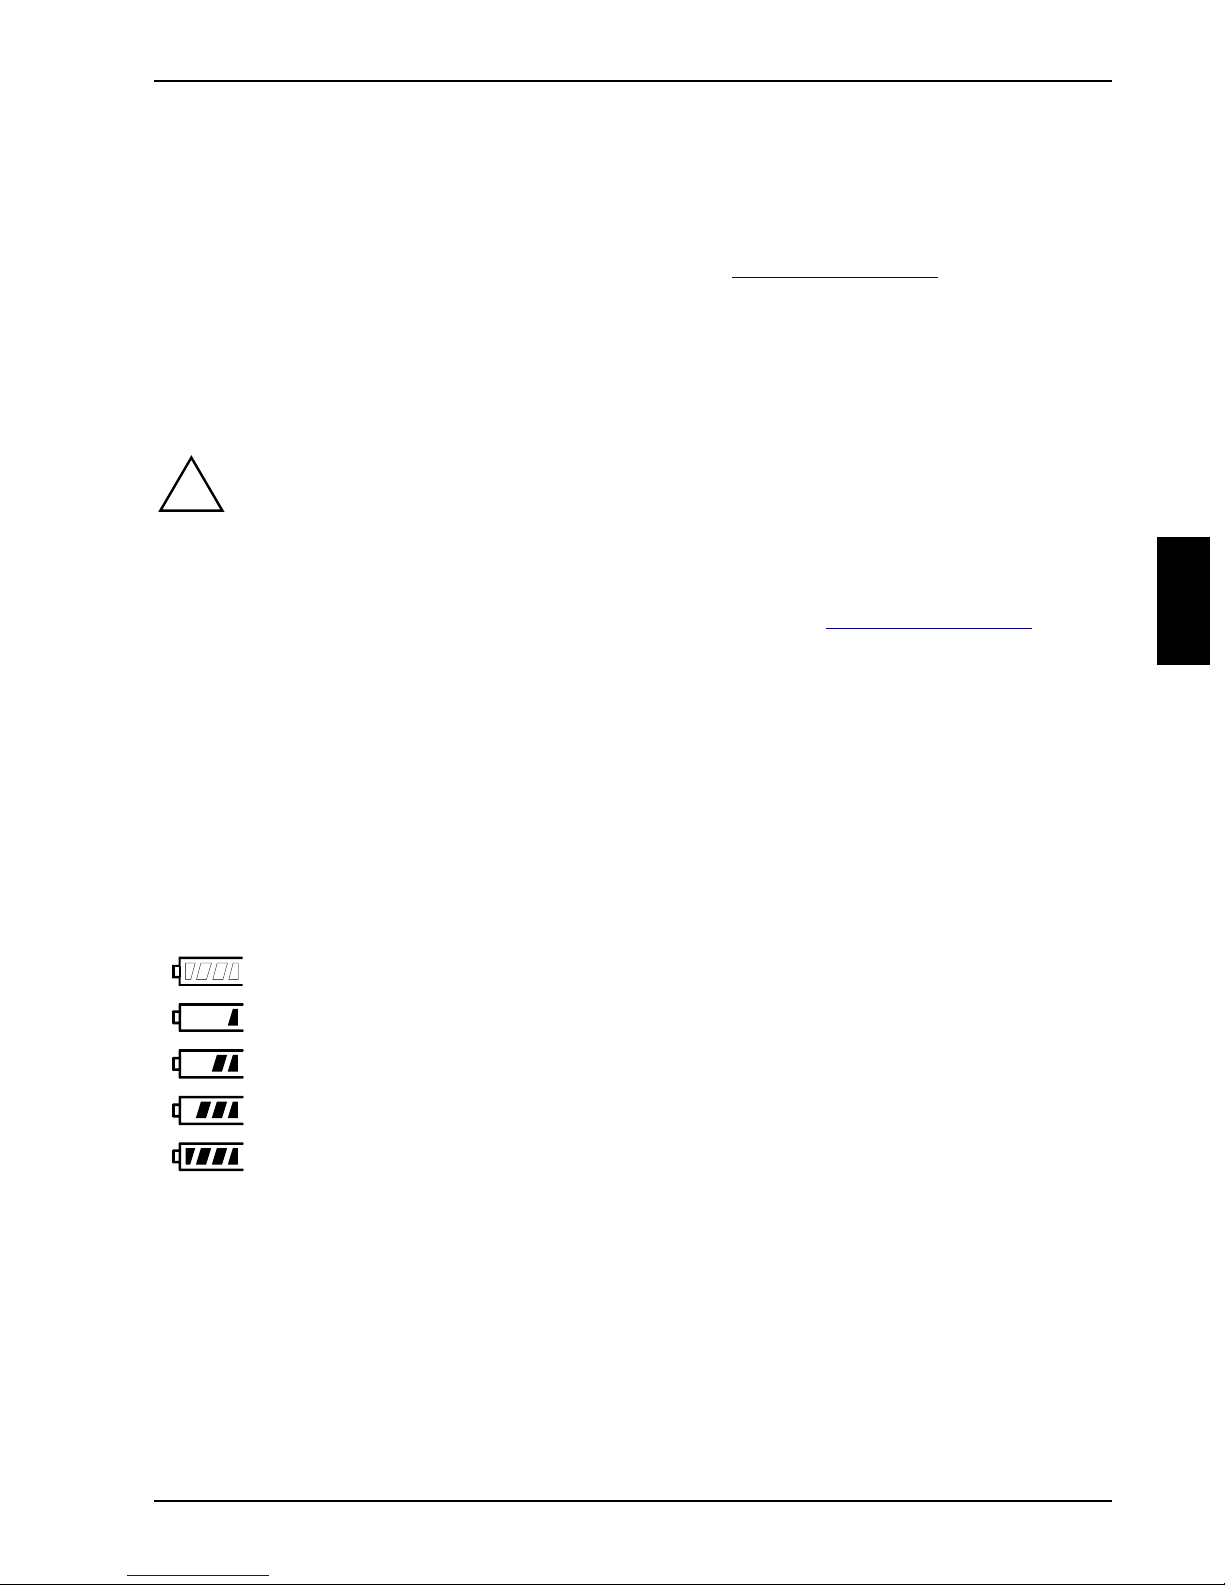
You can check the remaining battery capacity with the battery indicator in the status indicator panel:
The battery charge state is indicated in the status indicator panel.
Indicates that the battery is 0%-25% charged.
Indicates that the battery is 25%-50% charged.
Indicates that the battery is 50%-75% charged.
Indicates that the battery is 75%-100% charged.
Power management includes a "battery charge meter" located in the task bar. When you position
the cursor on the battery, the battery charge level is displayed. The battery symbol will become
more yellow as the charge level goes down.
A26391-K114-Z120-1-7619 13
Working with your Notebook Battery
Battery storage
Keep the battery pack between 0°C and +30°C (32 and 122 degrees Fahrenheit).
If you do not intend to use the battery for long periods of time, remove it from the
i
notebook. Never store the battery in the notebook.
The lower the temperature at which the batteries are stored, the lower is the rate of self-
discharge.
Inserting and removing the battery
Only use batteries designed for this LIFEBOOK.
!
Ê Switch the notebook off.
Ê Place the notebook on a flat surface.
Ê Close the LCD display panel.
Never use force when inserting or removing a battery.
Make sure that no foreign objects enter the slots.
Ê Turn the notebook over.
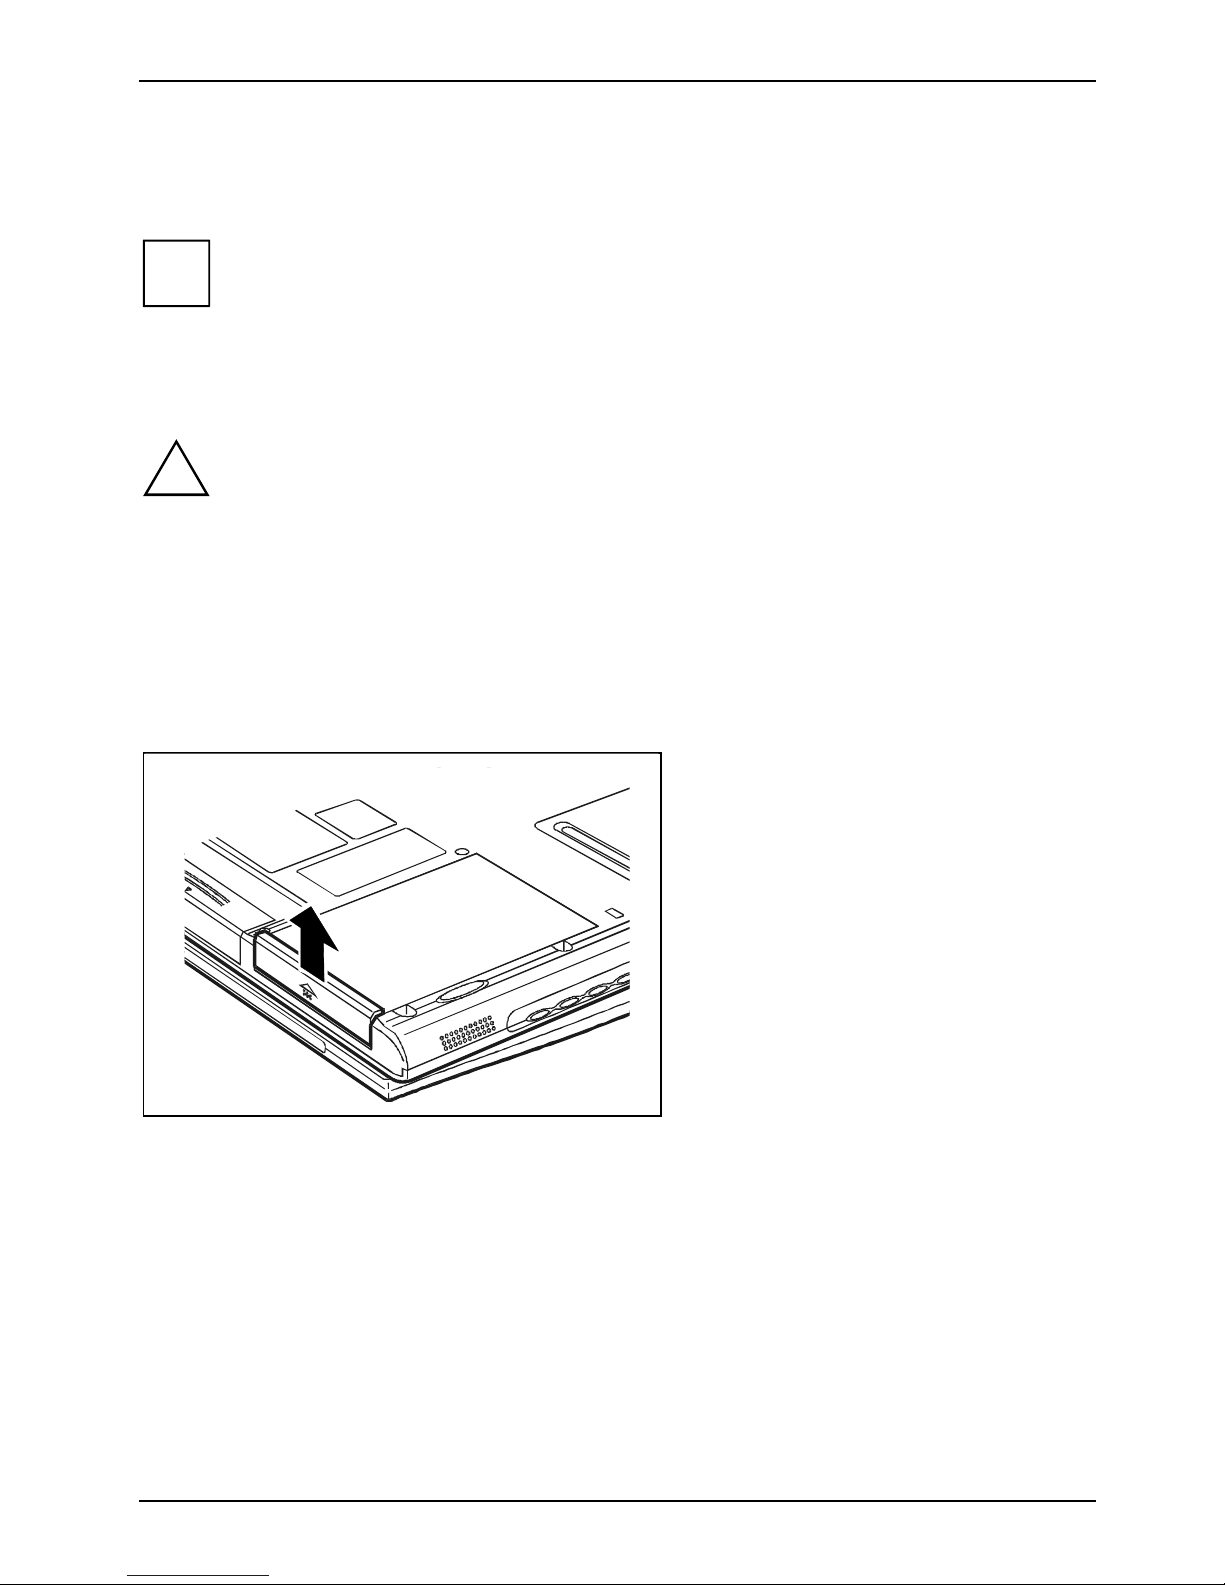
Removing the battery
Ê Push the battery lock in the direction
of the arrow.
14 A26391-K114-Z120-1-7619

Battery Working with your Notebook
Ê Pull the battery slightly out of the
battery compartment (1).
Ê Lift out the battery upward in the
direction of the arrow (2).
Installing the battery
Ê Position the battery at a 45 degree
angle over the battery compartment.
Ê Tilt (1) and press (2) the battery into
the battery compartment.
Ê Push the battery lock down in the
direction of the arrow.
A26391-K114-Z120-1-7619 15
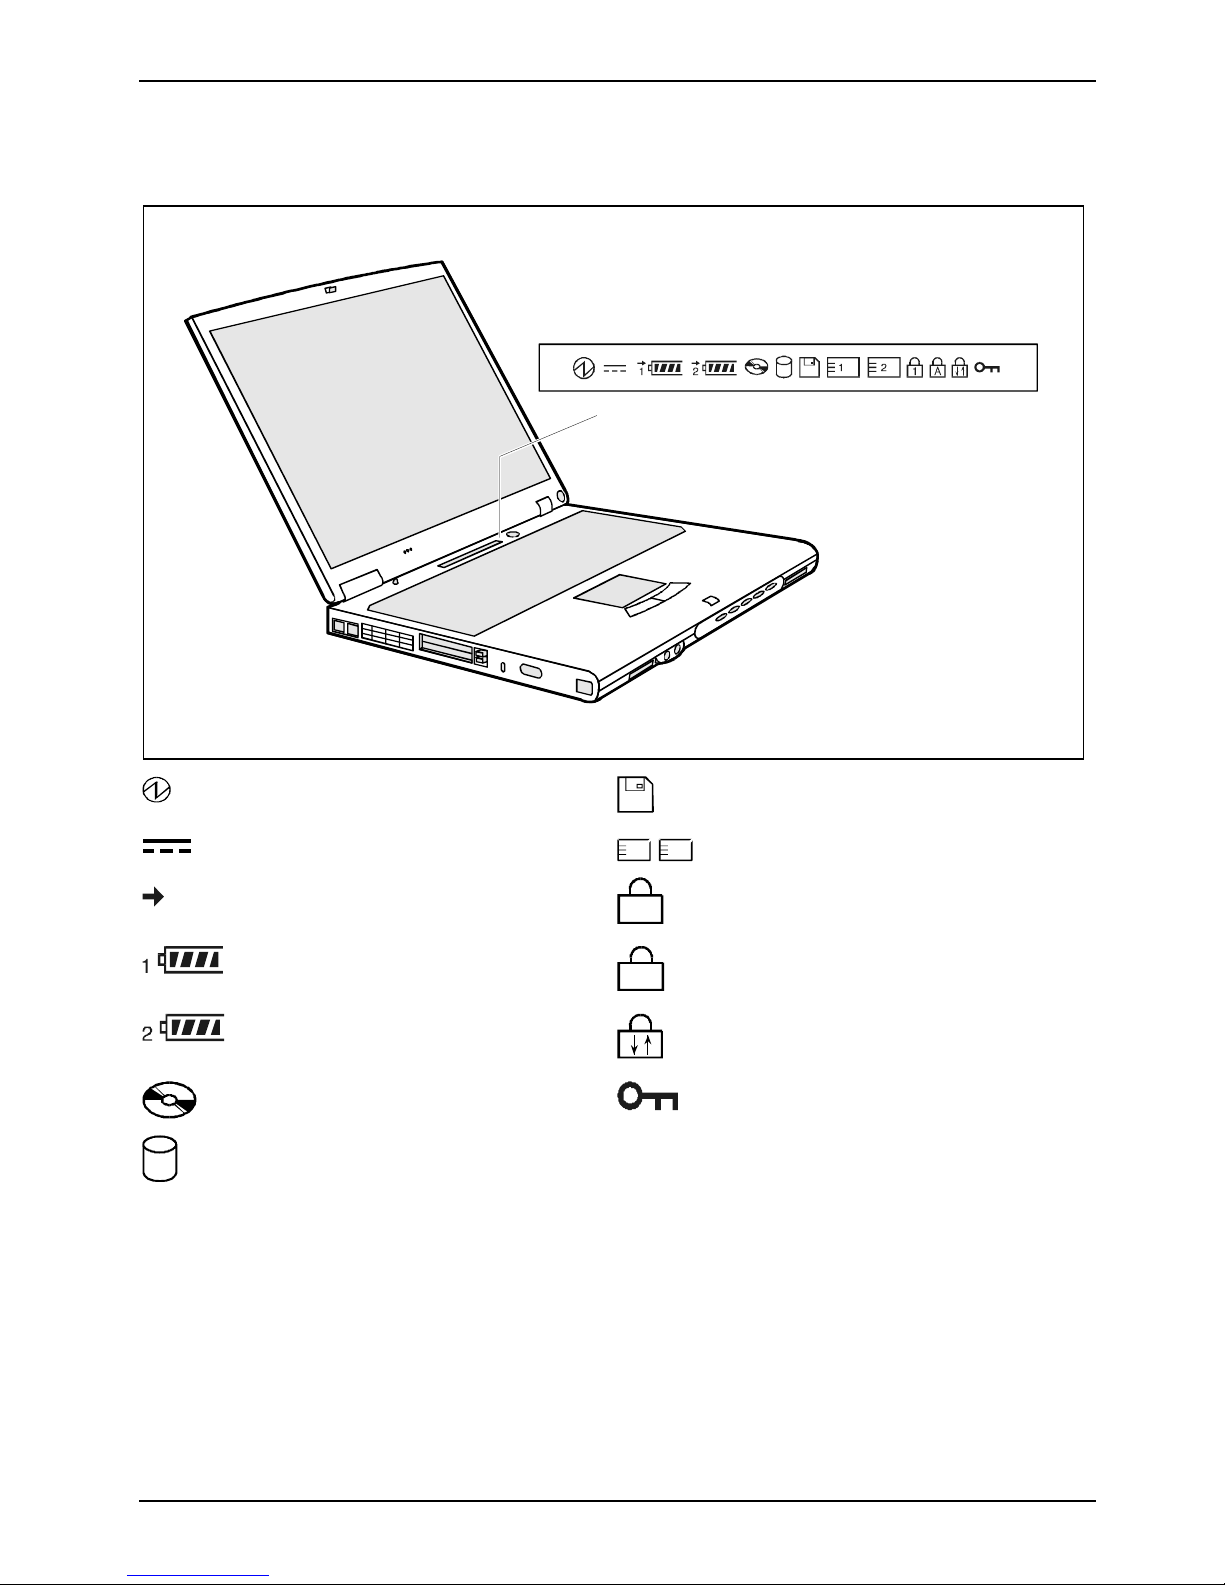
Working with your Notebook Indicators and input devices
Indicators and input devices
Power-on indicator Floppy disk drive indicator
Power indicator
Battery being charged
1 2
PC card indicators
NumLK indicator (Num Lock)
1
First battery indicator
CapsLK indicator (Caps Lock)
A
Second battery indicator
Scroll indicator (Scroll Lock)
CD/DVD indicator Security panel indicator
Hard disk indicator
16 A26391-K114-Z120-1-7619
 Loading...