

Fujitsu Siemens Computers AMILO A1650G, AMILO A7600, AMILO A7618, AMILO A1667G, AMILO A Series Operating Manual
Page 1

answers
AMILO A Series
English
2
EasyGuide
Page 2

Are there ...
... any technical problems or other questions which you would like to be clarified?
Please contact :
• your sales partner
• your sales outlet
Additional informat i on i s contained in the "Warranty" manual and the Help Desk li st.
The latest informat i on on our products, tips, updates, etc., c an be found on the internet under:
http://www.fujitsu-siemens.com
Page 3

Page 4

Herausgegeben von/Published by
Fujitsu Siemens Computers GmbH
Bestell-Nr./Order No.:
Bestell-Nr./Order No.: 440 N30115
Printed in the Federal Republic of Germany
AG 0703 07/03
SAP:10600366086
Page 5

Introduction
Index
Important notes
AMILO A Series
Operating manual
Preparing the notebook
for use
Working with the
notebook
Security functions
Connecting external
devices
Settings in BIOS Setup
July 2003 edition
Troubleshooting and tips
Memory expansion
Technical data
Page 6

Microsoft, MS, MS-DOS, Windows, and Windows NT are registered trademarks of Microsoft
Corporation.
VESA and DPMS are registered trademarks of Video Electronics Standards Association.
PS/2 is a registered trademark of International Business Mac hi nes, Inc.
Acrobat Reader is a tradem ark of Adobe Systems Incorporated.
All other trademarks referenced are trademarks or registered trademarks of t hei r respective
owners, whose protect ed ri ght s are acknowledged.
Copyright Fujitsu Siemens Computers GmbH 2003
All rights, including rights of translation, reproduction by pri nting, copying or sim i l ar m ethods,
in part or in whole, are reserved.
Offenders will be liable for damages.
All rights, including rights created by patent grant or regis t ration of a utility model or design,
are reserved.
Delivery subject to availability. Right of technical modification reserved.
This manual was produced by
cognitas. Gesel l schaft für Technik -Dok umentation mbH
www.cognitas.de
Page 7

Contents
Introduction ..................................................................................................................................... 1
Notational conventions ......................................................................................................................2
Important notes ...............................................................................................................................3
Safety notes......................................................................................................................................3
Notes on installing and removing boards and modules..............................................................4
Manufacturer’s notes.........................................................................................................................5
Copyright-protected technology .................................................................................................5
Energy saving............................................................................................................................ 5
Disposal and recycling...............................................................................................................6
CE marking........................................................................................................................................6
Storing the battery.............................................................................................................................6
Transporting the notebook.................................................................................................................7
Before you travel .......................................................................................................................7
Transporting the notebook.........................................................................................................7
Cleaning the notebook.......................................................................................................................8
Preparing the notebook for use......................................................................................................9
Unpacking and checki ng the de livery................................................................................................. 9
Selecting a location ........................................................................................................................... 9
Connecting the power adapter.........................................................................................................10
Switching on the notebook for the first time.....................................................................................10
Switching on the notebook...............................................................................................................11
Switching the notebook off...............................................................................................................11
Working with the notebook...........................................................................................................13
Views...............................................................................................................................................13
Interior view.............................................................................................................................13
Front........................................................................................................................................14
Right side panel.......................................................................................................................14
Left side panel.........................................................................................................................14
Back panel...............................................................................................................................15
Under side...............................................................................................................................15
Status indicators..............................................................................................................................16
Keyboard.........................................................................................................................................18
Letter keys...............................................................................................................................18
Function keys..........................................................................................................................19
Windows logo keys..................................................................................................................19
Virtual numeric keypad............................................................................................................ 20
Key combinations....................................................................................................................21
Easy buttons....................................................................................................................................23
Touchpad and touchpad buttons......................................................................................................23
Closed cover switch......................................................................................................................... 24
LCD display panel ...........................................................................................................................25
Information on LCD monitor.....................................................................................................25
Display settings.......................................................................................................................25
Battery .............................................................................................................................................26
Charging, caring for and maintaining the battery......................................................................26
Monitoring the battery charging level.......................................................................................27
Inserting and removing the battery...........................................................................................27
Performing the battery learning cycle....................................................................................... 28
Energy saving functions...........................................................................................................29
Hard disk.........................................................................................................................................29
SAP:10600366086
Page 8

Contents
Optical drive.................................................................................................................................... 30
Combo drive (CD-RW/DVD) .................................................................................................... 30
DVD+RW drive........................................................................................................................ 31
Handling CD/DVDs..................................................................................................................31
Regional codes for DVD films and DVD players...................................................................... 33
Adjusting AutoPlay function of optical drive............................................................................. 33
Floppy Disk Drive............................................................................................................................ 34
Working with floppy disks........................................................................................................34
PC cards......................................................................................................................................... 35
Installing a PC card................................................................................................................. 35
Removing a PC card............................................................................................................... 36
Microphone and loudspeakers ........................................................................................................ 36
Adjusting the volume............................................................................................................... 36
Switching the loudspeakers on/off...........................................................................................36
Integrated 56k modem ....................................................................................................................37
Connecting notebook modem to telephone connection........................................................... 37
Ethernet and LAN/DSL ready..........................................................................................................38
Security functions......................................................................................................................... 39
Overview of all security functions.................................................................................................... 39
Kensington Lock...................................................................................................................... 39
BIOS password protection.......................................................................................................39
Brief overview of the security functions...........................................................................................40
Using Kensington Lock ................................................................................................................... 40
Configuring password protection in BIOS Setup..............................................................................41
Protecting BIOS Setup (supervisor and user password).......................................................... 41
Password protecti on of operating system................................................................................ 42
Password protection for hard disk........................................................................................... 43
Connecting external devices........................................................................................................ 45
Connecting an external monitor....................................................................................................... 46
Connecting an external PS/2 mouse or keyboard ........................................................................... 46
Using the parallel port..................................................................................................................... 46
Connecting USB devices (up to 12 Mbps)....................................................................................... 47
Connecting external audio devices.................................................................................................. 47
Connecting a television set to S-Video Out..................................................................................... 48
Connecting FireWire devices .......................................................................................................... 48
Settings in BIOS Setup.................................................................................................................49
Start BIOS Setup............................................................................................................................ 49
Operating BIOS Setup .................................................................................................................... 50
Exiting BIOS Setup.........................................................................................................................50
SAP:10600366086
Page 9

Contents
Troubleshooting and tips..............................................................................................................51
Restoring operating system.............................................................................................................51
The notebook's date or time is incorrect..........................................................................................51
The LCD screen of the notebook remains blank..............................................................................52
The LCD screen is difficult to read...................................................................................................52
The external monitor stays blank.....................................................................................................52
The external monitor is blank or the image is unstable (under Windows).........................................53
The notebook cannot be started ...................................................................................................... 53
The notebook stops working............................................................................................................54
The mouse does not work ...............................................................................................................54
The floppy disk cannot be written ....................................................................................................54
The printer does not print.................................................................................................................55
The DVD film does not continue to play...........................................................................................55
Acoustic warnings............................................................................................................................55
System configuration contains invalid data......................................................................................55
Error messages on the screen.........................................................................................................56
Memory expansion........................................................................................................................59
Installing/removing memory ..................................................................................................... ........59
Technical data................................................................................................................................61
Notebook.........................................................................................................................................61
Battery .............................................................................................................................................62
Power adapter.................................................................................................................................62
Index...............................................................................................................................................63
SAP:10600366086
Page 10

Page 11

Introduction
Innovative tec hnol ogy and ergonomic design make your AMILO the ideal user-f ri endl y and reliable
notebook. Your operating system is preinstalled on the hard disk and optimally configured to
facilitate the procedure when y ou use your AMILO for the fi rst time.
Depending on the initial configuration, the main memory of your notebook can be upgraded t o 128 1024 Mbyte with a 128, 256 or 512 Mbyte memory module. Depending on the variant, your
notebook is shipped wi t h a DVD+RW drive or a combo drive (CD-RW/DV D). As an option your
notebook can also be equipped with a 3 1/2-inch floppy disc drive. Up to two PC card slots
(CardBus or PCMIA) enable the notebook to operate a type II or type III PC card. Your notebook is
equipped with an internal modem and LA N. In addition, your notebook is equipped with a S Video
out socket to connect to a television. You can connect external devices s uch as digital audio/vi deo
devices or other high-speed devices to IEEE1394 (FireWire).
For mouse control, t he not ebook has a touchpad.
Your notebook has connec tors for external devices such as an ext ernal monitor, a printer, and a
mouse. The ECP capable paral l el port is designed for fast bi-directional data trans fer. You can
connect peripheral devices such as a sc anner, loudspeakers, gamepads , keyboard, or mouse vi a
the three USB ports.
An audio controller and two internal loudspeakers provide your AMILO with an audio capability. You
can also connect an external microphone and an external l oudspeaker.
The system settings of the notebook can be configured via the user-friendly BIOS Setup program me.
This operating manual tell s you how to put your AMI LO i nt o operation, and how to operate it in dail y
use.
Further information on this notebook is provided:
• in the "Getting St arted" manual
• in the "Safety and Ergonomics" manual
• in the "Warranty" manual
• in the information files (e.g. *.TXT, *.DOC, *.WRI, *.HLP, *.PDF)
• in the documentation of the operating system
SAP:10600366086 1
Page 12

Introduction
Notational conventions
The following symbols are used in this manual:
Indicates inf orm ation which is important for your health or for prevent i ng
!
i
Ê Text which follows this symbol describes activ i t ies that must be perfo rm ed
This font indicates sc reen outputs.
This font indicates programme nam es, commands or menu it em s.
"Quotation marks " indicate names of chapters, data carriers , and terms that are being
physical damage. Fai l ure to follow the instruc tions may lead to los s of data,
invalidate your warranty, destroy the notebook, or endanger your life.
Indicates important information whic h i s required to use the system
properly.
in the order shown.
emphasised.
2 SAP:10600366086
Page 13
Important notes
Here you will find essential s af et y information regarding your notebook. In addit i on, the
manufacturer's not es contain helpful inform ation about your notebook.
Safety notes
Pay attention t o t he i nformation provided in the "S afety and Ergonomics" manual and in
!
the following safety notes.
Observe the sect i ons in the manual marked with the symbol on the left .
During installation and before operating the device, pl ease observe the instruc tions on
•
environmental condit i ons in the "Technical data" chapter as well as t he instructions in the
"Preparing the notebook for use" chapter.
• When connecting and disc onnecting cables, obs erve the relevant notes in t hi s operating
manual.
• When cleaning the device, please observe the relev ant notes in the "Cleaning the notebook"
paragraph.
• Only use batteries designed for this notebook.
Do not store batteries for longer periods in the notebook.
Take care not to drop the batteries or otherwise damage thei r casing (fire risk).
If the rechargeable batt eri es are defective, t hey must not be used.
Do not touch the contacts of the batteri es.
Never interconnect the positive and negative terminals of a battery.
Used batteries mus t be disposed of in acc ordance with local regulations (special waste).
• The notebook includes a li thium battery (button cell) for real-time buff eri ng. Please note that:
The lithium battery m ay be replaced only by authorised personnel. Incorrect handl i ng m ay lead
to a risk of expl osion.
The lithium battery m ay be replaced only with an ident i cal battery or with a type recommended
by the manufacturer.
The lithium battery m ust be disposed of in ac cordance with local regulati ons concerning special
waste.
• All batteries containing pollutants are m arked with one of the two sy m bol s below (crossed-out
garbage can).
SAP:10600366086 3
Page 14

Important notes
In addition, the mark ing is provided with the c hem i cal symbol of the heavy metal decisi ve for
the classif i cation as a pollutant.
Cd Cadmium
Hg Mercury
Pb Lead
• Your notebook is equipped with security func tions that offer y ou a hi gh l evel of security
according to a multi -l evel concept. Detail ed i nformation can be found in "S ecurity functions"
chapter.
This notebook complies with the relevant safety regulations for data processing equipment . If you
have questions as to whether you can set up the not ebook in the intended environment , pl ease
contact your s al es point or our hotline/help desk.
Notes on installing and removing boards and modules
Only qualified tec hni cians should repair the devi ce. Unauthorised opening or incorrect
!
repair may greatly endanger the user (electric shock, fire risk).
Boards with elect rostatic sensitive devices (E S D) are i dentifiable by the label s hown.
When you handle boards fitt ed wi t h E SDs, you must, under al l circumstances , observe the following
points:
• You must stat i cally discharge y ourself before working with boards (e.g. by touching a grounded
object).
• The equipment and tools you use must be free of static charges.
• Remove the power plug from the m ai ns supply before insert i ng or rem oving boards containing
ESDs.
• Always hold boards with ESDs by their edges .
• Never touch pins or c onductors on boards fitt ed wi t h E SDs.
4 SAP:10600366086
Page 15

Important notes
Manufacturer’s notes
Copyright-protected technology
This product incorporat es copyright protect i on technology that is protected by method clai m s of
certain U. S. pat ents and other intellect ual property rights owned by Mac rovision Corporation and
other rights owners. Use of this copyright protection technology must be authorised by M acrovision
Corporation, and is intended f o r hom e and ot her l imited viewing uses onl y unless otherwise
authorised by Macrov ision Corporation. Reverse engi neeri ng or di sassembly is prohi bi ted.
Energy saving
If you will not be using your notebook, switch it off.
Make use of the devi ce's energy saving f unctions (see sect i on "Working with the notebook" ). The
notebook uses less power when t he power management features are enabled. You will then be able
to work for longer before havi ng to recharge the battery.
Energy saving under Windows
If a monitor with energy saving features is connected to your notebook, you can use the Screen Saver
tab to activat e the energy saving features of the monitor. Select the following item i n the start menu:
Settings - Control Panel - Display - Display Properties - Screen Saver - Energy saving functions for the
display. You can set additional energy saving functi ons in the start menu by selecting the foll owi ng
item: Settings - Control Panel - Energy - Extended.
Energy Star
The notebook from Fujits u Siemens Computers is designed to conserve
electricity by dropping to less than 8 W when i t goes into standby/ suspend
mode and to less than 3 W when it goes into OFF mode. With this l evel of
power management, the notebook qual i fies for the U.S. Environmental
Protection Agency's (EPA) Energy Star Computers award.
The EPA estimates that comput er equipment uses 5 percent of all busines s electricity and that this
is growing rapidly. I f all desktop PCs and peri pheral s enter a low-power mode when not in use, t he
overall savings in electric it y could amount to $ 2 milliard annually. These sav i ngs could also prevent
the emission of 20 million tons of carbon dioxide into the atmos phere - t he equivalent of 5 million
automobiles.
As an Energy Star P artner, Fujitsu Siemens Computers GmbH has determi ned t hat this product
meets the Energy S tar guidelines for energy eff i ciency.
SAP:10600366086 5
Page 16
Important notes
Disposal and recycling
This device has been m anuf actured to the highest pos sible degree from materials whi ch can be
recycled or disposed of in a manner that is not environmentally damaging. The device may be t aken
back after use to be recycled, provided that it is returned in a condition that i s the result of normal
use. Any components not reclaimed will be disposed of in an environmentally acceptable manner.
Do not throw batteries or accumulators into the household waste.
If you have any ques t i ons on disposal, please contact your local of fice, our hotline/help desk, or:
Fujitsu Siemens Com puters GmbH
Recyclingcenter
D-33106 Paderborn
Tel: +49 5251 81 80 10
Fax: +49 5251 81 80 15
CE marking
The shipped version of t hi s device complies with the requirements of t he EEC directives
89/336/EEC "Electromagnetic compatibility" and 73/23/EEC "Low volt age directive".
Storing the battery
Store the battery i n a fully charged state. Keep the battery pack between 0°C and +30°C (32 and
122 degrees Fahrenheit). The lower the tem perature at which the batteries are stored, the lower is
the rate of self-discharge.
If storing for a long peri od of time (longer than two months) batteries should be f ul l y charged before
storage.
To be able to make use of t he opt i mal charging capacity of the batteries, the battery should be
completely discharged and then fully recharged.
If you do not use the batteries for long periods, rem ove them from the notebook. Never
i
store the batteries i n the unit.
6 SAP:10600366086
Page 17

Important notes
Transporting the notebook
Please observe the poi nt s listed below when transporting your notebook.
Before you travel
• Back up important dat a stored on your hard disk.
• If you wish to use your notebook during a flight , first check wi th the flight attendants if it is
permissible to do s o .
• If you are travell i ng abroad, ensure that the power adapter can be operated wi th the local
mains voltage. If this is not the case, obtain the appropriate power adapter for your notebook.
Do not use any other voltage converter!
If you travel i n anot her country, check whether the local power supply and t he
i
specificat i ons of the power cable are compati bl e. If this is not the case, buy a power cable
that matches t he l ocal conditions. Do not use a connection adapter f or el ectrical devices
to connect the notebook.
If you use a modem, incompatibilities with the local telecommunications system may
result.
Transporting the notebook
• Remove all data carriers (e.g. CD) from the drives.
• Unplug the power adapter and all external devices from the mains outlet.
• Disconnect the power adapter cable and the data cables for all external devic es.
• Close the LCD screen s o t hat it locks into place.
• If the device needs to be shipped, use the original packaging or other suitable pac kaging to
protect it from dam age caused by mishandling.
• To protect against dam agi ng j ol t s and bumps, use a notebook carrying case to trans port your
notebook.
Fujitsu Siemens Com puters offers a number of s ol utions for transporting y our notebook. The
current offering can be viewed on the Internet at http://www.e-shop2.de.
• Protect the notebook from severe shocks and extreme temperatures (e.g. direc t sunlight in a
car).
SAP:10600366086 7
Page 18

Important notes
Cleaning the notebook
Ê Switch the notebook off.
Ê Pull the power plug of the network adapter out of the mains outlet.
Ê Remove the battery.
Do not clean any interior parts yourself; leave this job to a serv i ce technician.
!
Wipe the casing with a dry cloth.
If particularly dirty, use a cloth that has been moistened i n m i l d dom estic detergent and then
carefully wrung out.
To clean the touchpad, y ou can use disinfect ant wipes.
Wipe the LCD screen with a soft, moistened cloth.
Do not use any cleaning agent s that contain abrasives or may corrode plast i c. The use of
improper cleaning agents c an damage the markings on the keyboard and the notebook,
the paintwork of the dev i ce or the device its el f.
Ensure that no liquid ent ers the notebook.
8 SAP:10600366086
Page 19

Preparing the notebook for use
!
You must charge the bat tery and install the appl i cation programmes before you can work with the
notebook. The operating system and drivers requi red are prei nstalled.
When not plugged into a mains out l et, the notebook runs on its built-in battery. You can increase the
battery's life by enabling the system's energy saving f unctions.
If you use the notebook in a normal office s i tuation, run it from the m ains using the power adapter.
Please see the "Connec t i ng external devices" chapter for instructi ons on how to connect devices
such as a mouse and a print e r t o the notebook.
Please take note of the information in the "I m portant notes" chapter.
Unpacking and checking the delivery
Ê Unpack all the individual parts.
Ê Check the delivery for damage incurred during transportation.
Do not discard the original packing material of the devices. Keep the origi nal packing
i
material in case you need to ship the equipment again.
Selecting a location
Select a suit abl e l ocation for the notebook bef ore setting it up. Consi der t he following points when
looking for a locati on:
• Do not place it on a sof t surface (e.g., a carpet or soft furnishings). The space between the
notebook's feet m ust be clear.
Place the notebook on a s table, flat, nonsl i ppery surface. In vi ew of the multitude of different
finishes used on furniture, it is possible that t he rubber f eet of the notebook will mark the
surface they s tand on.
• Never place the notebook and the power adapter on a heat-sensitive surface.
• The notebook and the power adapter should be at l east 200 mm apart.
• Keep other objects 100 m m away from the notebook and its power adapter to ensure adequate
ventilation.
• Never cover the fan intake or exhaust openings of the notebook or the power adapter.
• Do not expose the notebook to extreme environmental conditions.
Protect the notebook from dust, humidity, and heat.
SAP:10600366086 9
Page 20
Preparing the notebook for use
Connecting the power adapter
Please take note of the information in the section "Selecting a l ocation".
!
The power cable supplied conform s to the requirements of the country in which y ou
purchased your notebook. M ake sure that the power cable is approved for use in the
country in which y ou i n t end to use it.
The power adapter's AC cord shoul d onl y be connected to a mains outlet if the notebook
is connected to the power adapter. (electric shock!)
Upon delivery, the bat t ery can be found in the battery compartment.
Do not use the power adapter for other notebooks or devices.
Do not use a power adapter that is not specially int ended for this notebook.
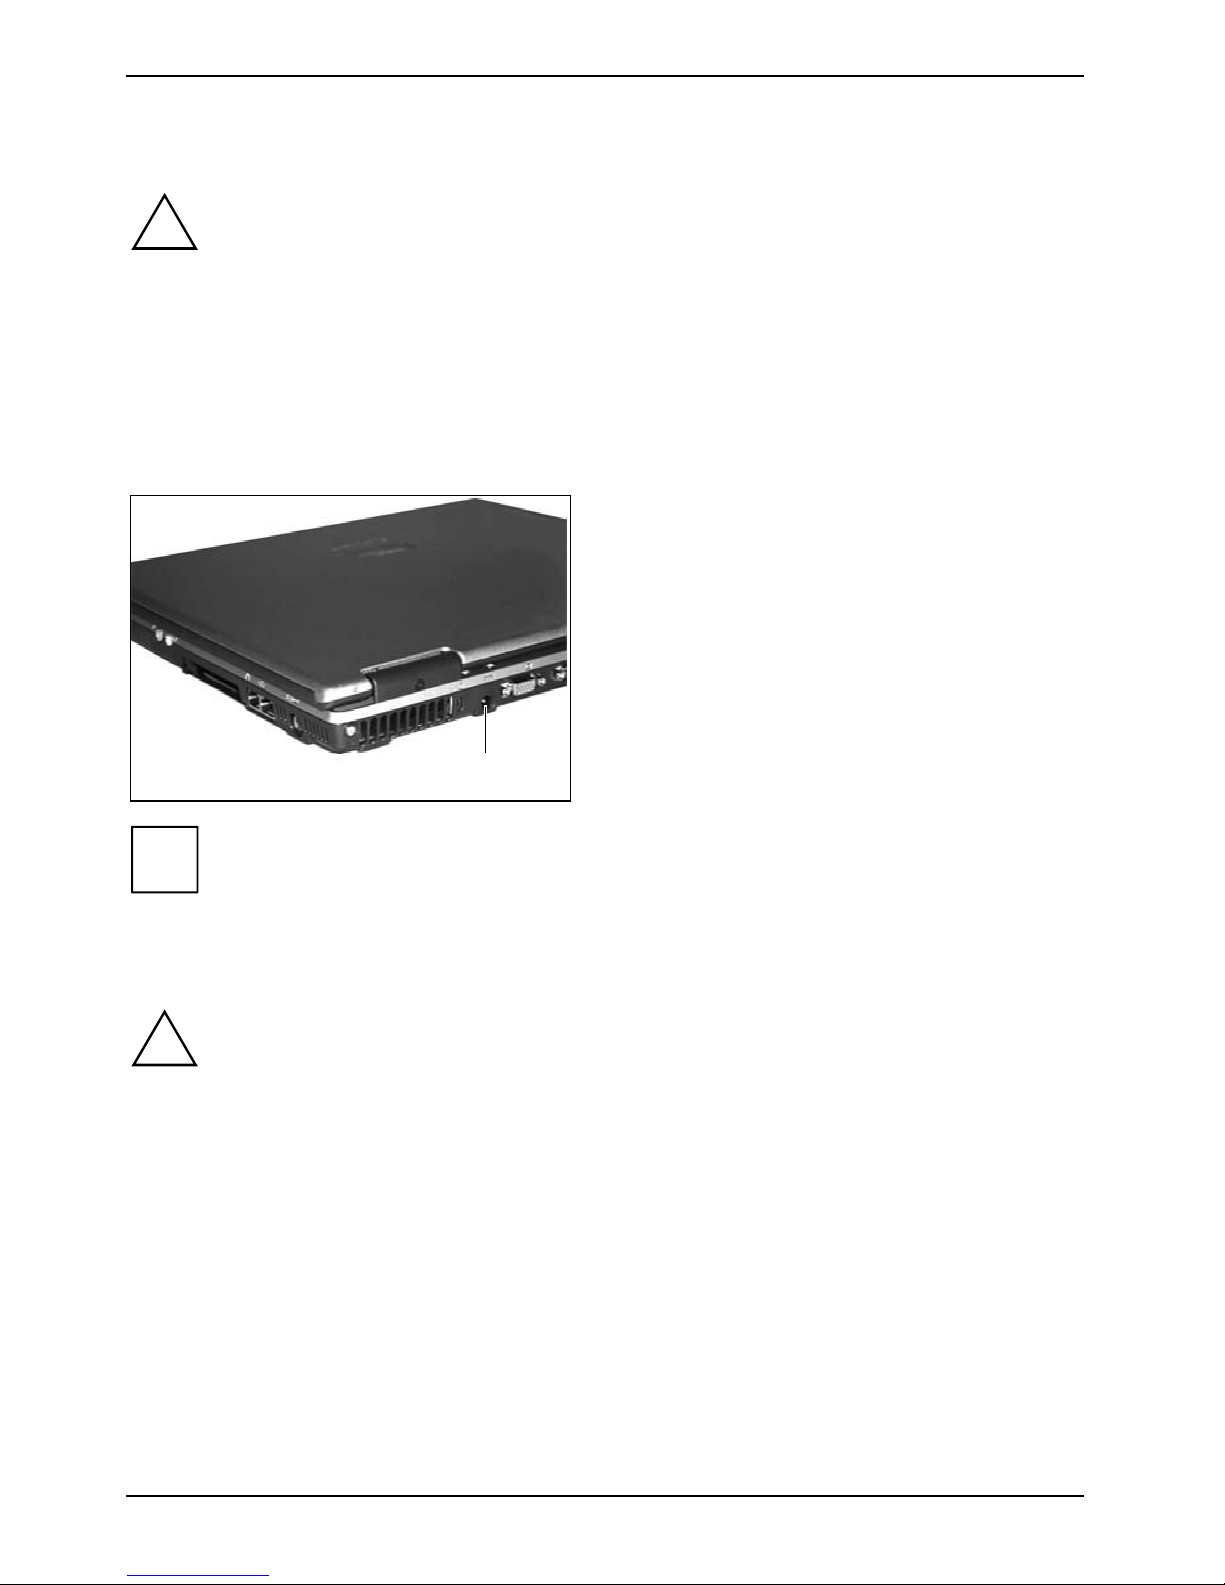
Ê Connect the power adapter cable to the DC
Ê Connect the power cable into the power
Ê Plug the power cable into the mains supply.
jack (DC IN) of the not ebook (1).
adapter.
The battery will charge. The battery indicator
flashes green.
1
The meaning of the various di splays can be found in the section "Status indicators" in t he
i
"Working with the notebook" chapter.
Switching on the notebook for the first ti me
When you switch on your notebook for the first time, the supplied s oftware is installed and
!
Ê Switch the notebook on.
Ê During installation, follow the i nstructions on sc reen.
configured. Due to the f act that this installation must not be interrupted, you should set
aside enough time for it t o be fully completed and c onnect the notebook to the mai ns
outlet using the power adapter.
During installation, the notebook may only be rebooted when you are requested to do so!
Consult the operating system manual if there is anything unclear about the requested input data.
10 SAP:10600366086
Page 21

Switching on the notebook
2
1
Preparing the notebook for use
Ê Slide the release button (1) to the right and
open the LCD panel (2).
Ê Press the ON/OFF switch.
The power-on indicator lights up.
After switch-on a self-test (POST, Power On Self Test) is automatically c arried out. Never
!
i
switch the notebook off during the self-test.
If you have ass i gned a password, you must ent er this when requested to do so, i n order
to start the operati ng system password. Detailed information can be found in "Security
functions" c hapter.
Switching the notebook off
Ê Shut down the operating system properly (with the Exit function in the Start menu).
With Windows XP the not ebook switches off automatically. If the notebook does not
i
Ê Close the LCD screen so that it locks into place.
SAP:10600366086 11
switch off autom atically, press the ON/OFF switch for approx. four seconds.
Page 22

Page 23
Working with the notebook
This chapter descri bes the basics for operating your notebook.
Please see the "Connecting external devices " chapter for instructions on how to connect dev i ces
such as a mouse and a print er to the notebook.
!
Please take note of t he i nformation in the "Import ant notes" chapter.
Views
In this sect i on the various hardware components of your notebook are introduced. You can open an
overview of the display s and connections of t he notebook. Please familiarise yourself with these
components before y ou start to work with y our notebook.
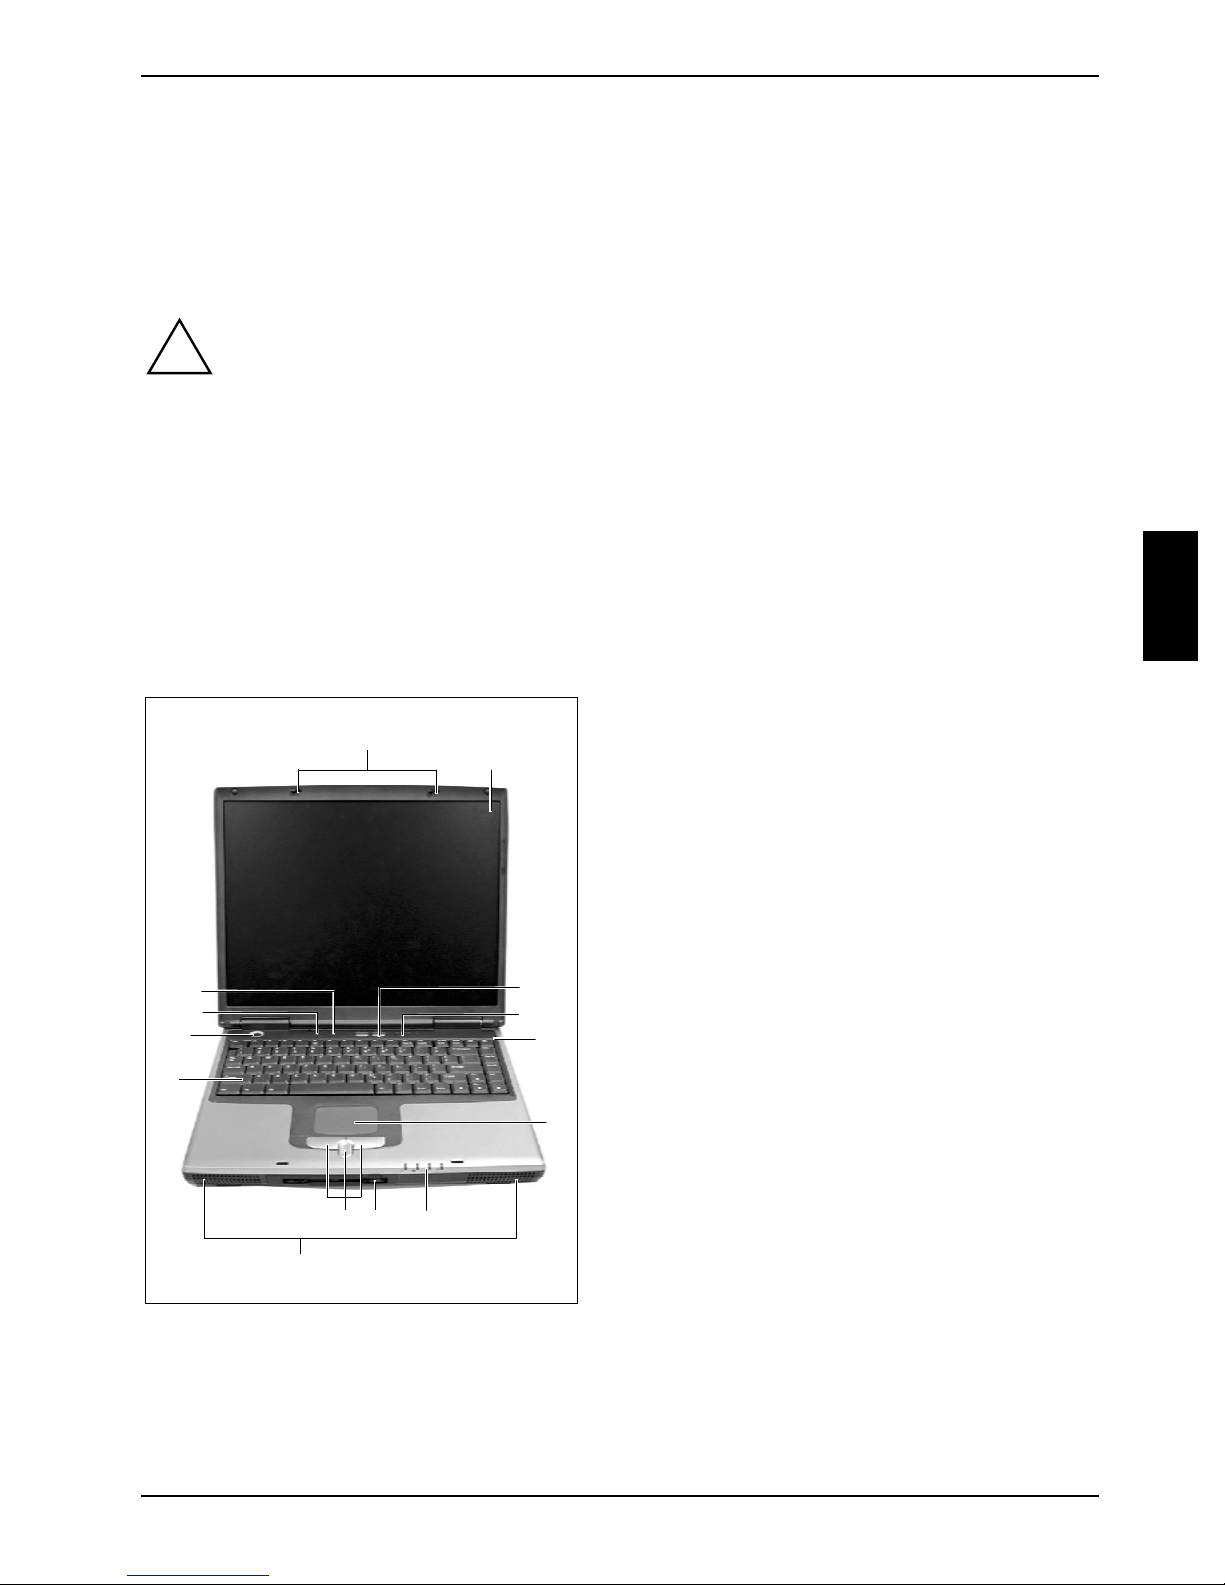
Interior view
1 = LCD display panel releases
2 = LCD display panel
3 = Easy buttons
4 = On/Off swit ch for Wireless LAN (opti onal )
5 = Microphone
6 = Touchpad
7 = Touchpad keys wi t h touchpad scroll key
8 = Floppy disc drive (optional)
9 = Status indicators
10 = Loudspeakers
11 = Keyboard
12 = ON/OFF switch
13 = Closed cover switch
14 = Status indicators
11
12
14
13
1
2
3
4
5
78
10
SAP:10600366086 13
6
9
Page 24

Working with the notebook
Front
1
4 2
3
1 = Screen lock
2 = Status indicators
Right side panel
1 = Microphone jack
2 = Headphones port
3 = PC card slot
Left side panel
3 = Loudspeakers
4 = Floppy disc drive (optional)
1 2 3
4 = Modem port
5 = LAN connector
6 = PS/2 port for keyboard and mouse
4 5
6
1
1 = Optical drive
2 = Status indicators
14 SAP:10600366086
2 3
4
3 = Insert/eject butt on of optical drive
4 = Opening for manual ejection
Page 25

Working with the notebook
Back panel
1 2 3 4 5 687
1 = Kensington Lock
2 = DC jack (DC IN)
3 = Monitor port
4 = Parallel port
5 = Serial port
Under side
1
6 = S Video out socket
7 = FireWire port
8 = USB ports
4
3
2
5
1 = Hard disk
2 = Lock for battery lock
3 = Battery lock
SAP:10600366086 15
4 = Battery
5 = Memory cover
Page 26

Working with the notebook
Status indicators
The status indic at ors provide information about t he status of the power suppl y, the drives and the
keyboard functions.
Power-on indicator
Battery indicator
Caps Lock indicat or
A
Num Lock indicat or
1
Hard disk indicat or Scroll indicator (Scroll Lock)
Floppy disk indicator
16 SAP:10600366086
Page 27

Working with the notebook
The meanings of the sy m bol s are as follows:
Power-on indicator
• The indicator is green: The not ebook is on.
• The indicator lights orange: The notebook is in energy-sav i ng m ode.
• The indicator is dark: The notebook is switched off.
Battery indicator
• The indicator is green: The bat tery is fully charged, and the power adapter is
connected.
• The indicator flashes green ((1 second on; 3 seconds of f): battery is being charged.
• The indicator is orange: t he battery capacity is very low. The remaini ng operating
time is approx. 5 - 10 % of the battery capacity.
• The indicator flashes orange: The battery is nearly empty. The remaining operati ng
time is a maxi m um of 4 % of the battery c apacity.
• The indicator is red: The bat tery is defecti ve or temperature is extrem el y high/low.
• The indicator does not li ght up: the notebook runs on its built-in battery or t he
notebook is switched off.
A
1
Hard disk indicator
The indicator flashes green when the hard disk is ac cessed.
Floppy disk indicator
The indicator flashes green, when a floppy disk i n the floppy disk drive is being
accessed. When t he f l oppy disk drive is bei ng accessed, do not remov e the floppy disk
from the drive.
Caps Lock indicator
The Ï key has been pressed. All the characters you type appear i n uppercase. In the
case of overlay keys, the charac t e r pri nt ed on the upper left of the key appears when that
key is pressed.
Num Lock indicator
The [Num] key has been press ed. The numeric keypad is activated. You can output the
characters located at the upper right on the key s.
Scroll indicator (Scroll Lock)
The key combination [Fn] + [Scr] has been pressed. The effect this key has varies from
programme to programme.
SAP:10600366086 17
Page 28

Working with the notebook
Keyboard
The keyboard of your notebook i s subject to cont i nuous wear due to normal use. The
i
The keyboard has been designed to provide all the functions of an enhanced keyboard. Som e
enhanced keyboard funct i ons are mapped with key combi nations.
The following descript i on of keys and key c om bi nations refers to Windows.
Letter keys
keyboard markings are subjected to particul arl y high loads. The keyboard markings can
wear off in the course of using the notebook.
Backspace key
The Backspace k ey deletes the charact er to the left of the cursor.
Tab key
The Tab key moves the cursor to the next tab s top.
Enter key (return)
Caps
Lock
Alt Gr
Fn
The enter key terminates a command line. The command you have entered is
executed when you press this key.
Caps Lock key
The Caps Lock key ac tivates uppercase m ode (Caps Lock indicator li t ). The
Caps Lock funct i on causes all the charac t e rs you type to appear in uppercas e.
In the case of ov erl ay keys, the character printed on the upper left of the key
appears when that key is pressed.
To cancel the Caps Lock function, sim pl y press the Caps Lock key again.
Shift key
The Shift key c auses uppercase charact ers to appear. In the case of overlay
keys, the c haracter printed on the upper left of the key appears when that key is
pressed.
Alt Gr key
The [Alt Gr] key allows one to type the characters printed on the lower right of
the keycaps (e. g. { in the case of the [7] k ey on the German keyboard).
Fn key
The [Fn] key acti vates the special functions at the lower edge of a on overlay
key (see "Key combinations").
Cursor keys
The cursor keys m ove the cursor in the direc t i on of the arrow, i.e. up, down, left,
or right.
Pause
Break
18 SAP:10600366086
Pause key
The [Pause] key temporarily suspends display output. Output will resume when
you press any other k ey.
Page 29

Working with the notebook
Function keys
Function keys (do not mix up with [Fn] key ) are the 12 keys on the top of keyboard.
F4 F7 F11F8F3F2F1 F6
F9 F10F5 F12
Pad Lk
Nm Lk
Scr Lk
The keys [F1] to [F12] are called function keys, bec ause it is possibl e to execute programmed
functions. The f unction keys wit h addi tional symbols enable other functions in conj unction with
key [Fn].
Windows logo keys
With Windows this both keys enable speci al functions (see also the "Key combinati ons" section).
Start key (on Windows systems)
The Start key inv okes the Windows Start menu.
Menu key (on Windows systems)
The Menu key invokes the menu for the marked item.
SAP:10600366086 19
Page 30

Working with the notebook
Virtual numeric keypad
The keyboard of your notebook does not have a Num Lock key . To provide the convenienc e of a
numeric keypad, y our keyboard is equipped with a vi rtual numeric keypad. The special keys of the
virtual numeric k eypad are recognisable by the num bers and symbols printed i n t he upper ri ght
corner of each key (see the illustrations that follow).
/
7
(
{
8
)
[
]
9
U I O
=
}
0
Pos1 7
8
9Bild
x
P
456
-
ÖLKJ
Ende 1 2 3Bild +
M
;
,
:
.
_
-
Einfg/0
Entf
,
12
Illustration (example of German keyboard lay out)
1 = Characters enabled when Num Lock indi cator is not lit (s ee "Status indicators").
2 = Characters enabled when Num Lock indi cator is lit (see " S tatus indicators " ).
When the virtual number bloc k is switched on (the Num Lock indicator lights up), you can output the
characters located at the upper right on the key s.
20 SAP:10600366086
Page 31

Working with the notebook
Key combinations
The following descript i on of key combinations refers to functi ons when using Microsoft Wi ndows.
Some of the following key combinations may not function in ot her operating systems and with some
device drivers.
The figure below shows how to ac cess the different characters on keys wi th overlaid functions.
/
{
7
7
/
/
Alt Gr
F11
Nm Lk
Fn
7
7
F10
Pad Lk
{
7
Pos1
/
{
7
7
{
7
Fn
Illustration (example of German keyboard lay out)
Key combinations are performed as follows:
Ê Press and hold the first key i n the combination.
Ê While holding the first key down, pres s the other key or key s in the combination.
Decreasing screen brightness
This key combination decreases screen bri ghtness.
Fn
+
/
{
7
7
/
{
7
7
+
Fn
Fn
F5
+
This key combination increases sc reen brightness.
Switching between internal and external screen
If an external monit or is connected, the m oni tor on which the output is t o be
displayed can be sel ected with this key combination.
You can opt to use:
• just the notebook' s LCD screen
• just the external m oni tor
• both the LCD screen and the ex t ernal monitor.
SAP:10600366086 21
Increasing screen brightness
Page 32

Working with the notebook
Switching on PadLK
When the numeric keypad is switched on, the k ey combination acti vates the
Fn
F10
+
number function of the numeric keypad. The charac ters on the lower right on
keys in the int egrated numeric keypad are enabled.
Switching on NumLK
This key combination activates the numeric keypad. The characters on the
Fn
F11
+
lower left on keys i n the integrated numeric key pad are enabl ed.
Halting the current operation
This key combi nat i on can be used to halt an operation ins tantly without
Ctrl
C
+
clearing the keyboard buf fer.
Backtab (Shift+Tab)
+
This key combi nat i on moves the cursor back to the previous tabular stop.
Windows key combinations
E
+
Opening Windows Explorer
This key combination opens Windows Explorer.
R
+
Opening "Run" dialog box
This key combination opens the Run dialog box.
F
+
Opening "Find for: All files" dialog box
This key combination opens the Find: All files dialog box.
+ Ctrl +
Pause
+
Break
Opening "Find: Computer" dialog box
F
This key combination opens the Find: Computer dialog box.
Opening "System Properties" dialog box
This key combination opens the System Properties dialog box.
22 SAP:10600366086
Page 33

Working with the notebook
Easy buttons
Your notebook is equipped wit h two easy buttons.
1 = Internet:
1 2
With this key you can start the standard
internet browser for your system.
2 = E-Mail:
Use this key t o start the standard e-mai l
programme for your system.
Touchpad and touchpad buttons
Keep the touchpad clean, protect it from dirt , l i qui ds, and grease.
!
The touchpad enables you to m ove the mouse pointer on the screen. The touchpad buttons all ow
the selection and ex ecution of commands. They correspond to the buttons on a conventional
mouse.
Do not use the touchpad if your fingers are dirty.
Do not rest heavy objects (e.g. books) on the touchpad or the touchpad butt ons.
1 = Left touchpad button
2 = Touchpad scroll button
3 = Right touchpad button
2 31
SAP:10600366086 23
Page 34

Working with the notebook
Moving the pointer
Ê Move your finger on the touchpad.
The pointer will move accordingly.
Selecting an item
Ê Move the pointer to the item you wis h t o select.
Ê Tap the touchpad once or press the left button once.
The item will be selected.
Executing a command
Ê Move the pointer to the field you wis h to select.
Ê Tap the touchpad twice or press the left but ton twice.
The command will be executed.
Dragging an object
Ê Move the pointer to the item you wis h t o select.
Ê Select the desired object and hold down on the left button.
Ê Drag the object to the desired position.
Ê Lift your finger from the touchpad.
The item will be moved.
Scrolling up
Ê Press the upper side of the touchpad scroll button to scrol l up.
The information/tex ts above the display area appear.
Scrolling down
Ê Press the lower side of the touchpad s croll button to sc roll down.
The information/tex ts below the display area appear.
Closed cover switch
The lid switch is a contact switch that causes the notebook to switch into t he S tandby mode when
the LCD screen is fol ded closed. You can set the lid switch under Windows X P.
Ê Select the Advanced tab under Start - Settings - Control Panel - Energy Options to set the closed
cover switch.
24 SAP:10600366086
Page 35

Working with the notebook
LCD display panel
Information on LCD monitor
High-quality TFT monitors are installed in notebooks from Fujitsu Siemens Computers GmbH. The
specificat i on of the monitor resolution i ndi cates how many pixels can be displayed. For example,
"XGA" stands f or 1024 x 768 pixels. Each pi xel consists of three so-called subpixels of the colours
red, green and blue. As a result, an XGA monitor consists of 1024 x 768 x 3 = 2,359,296 subpixels.
The standard of production t echniques today cannot guarant ee an absolutely fault-f ree m oni t or. A
few isolated cons t ant lit or unlit pixel s may be present. To ensure t he hi ghest possible quality,
Fujitsu Siemens Com puters uses only monitors that at least comply with the st andard
DIN ISO 13406-2 (Class III).
TFT monitors are operated with background lighting. The luminosity of the background light ing can
decrease during the period of us e of the notebook. The brightness of your monitor can be set
individually with the brightness cont rol keys of the key board.
Display settings
Setting resolution under Windows
You can change the sc reen resolution under Start - Settings- Control Panel - Display - Settings and then
selecting from the Resolution field.
Setting font size under Windows
Under Start - Settings - Control Panel - Display - Settings you can choose between a larger and a
smaller font in t he Font size field.
Setting the display brightness
You can adjust the bri ght ness of your LCD display with the keys [Fn] and
You can reduce screen brightness with [Fn] and
increased.
Synchronising the display on the LCD screen and an external monitor
Your notebook supports the simultaneous dis pl a y on the LCD screen and an external moni tor. If the
picture does not appear correctly on the LCD monitor, press the key combination [Fn] + [F5]
several times, or switch the ext ernal m oni tor off and then on again. This ac hi eves good picture
synchronisation.
Adjusting pointer speed
Under Windows you can change the speed of the mouse pointer under Start - Settings - Control Panel
- Mouse and clicking on the Motion tab.
, with [Fn] and screen brightness will be
or [Fn] and :
SAP:10600366086 25
Page 36

Working with the notebook
Battery
The battery is one of t he m ost important component s of your notebook. When not pl ugged i nto a
mains outlet, the notebook runs on its buil t-in battery. You can i ncrease battery life by enabling the
system's power management features.
When you switch on the not ebook, it takes a f ew seconds before the battery status is di splayed.
The standard battery will last for roughly 500 charge/discharge cycles, this will vary according to
which battery pack is fitted.
Charging, caring for and maintaining the battery
Only use batteries rel eased for your notebook.
!
Take care not to drop the batteries or otherwise damage thei r casing (fire risk).
If the rechargeable batt eri es are defective, t hey must not be used.
Do not touch the contacts of the batteri es.
Never interconnect the positive and negative terminals of a battery.
Used batteries must be disposed of in accordance with local regulations (special waste).
Observe the informat i on on battery storage in the "Important notes" chapter.
You can charge the battery by connecting the not ebook to the power adapter.
The battery can only be charged when the ambient temperature is between 5°C and max. 40°C.
Work in the battery m ode until an acoustic warni ng prom pts you to recharge and the battery
indicator in the st atus indicator panel begins to flash. The battery should not be charged before this
point.
If you do not connec t the power adapter within five mi nutes of the signals described above, your
notebook will automatically s wit ch to the energy-saving mode or off (s ee also the "Energy saving
functions" s ection).
Storing the battery
Store the battery i n a fully charged state. Keep the battery pack between 0°C and +30°C (32 and
122 degrees Fahrenheit). The lower the tem perature at which the batteries are stored, the lower is
the rate of self-discharge.
If storing for a long peri od of time (longer than two months) batteries should be f ul l y charged before
storage.
To be able to make use of t he opt i mal charging capacity of the batteries, the battery should be
completely discharged and then fully recharged.
If you do not use the batteries for long periods, rem ove them from the notebook. Never
i
26 SAP:10600366086
store the batteries i n the unit.
Page 37

Working with the notebook
Monitoring the battery charging level
Power management includes a "battery charge meter" l ocated in the task bar. When you place the
mouse pointer on the battery symbol, the system displays the battery status.
Inserting and removing the battery
Only use batteries rel eased for this notebook.
!
Ê Switch the notebook off.
Ê Close the LCD screen so that it locks into place.
Ê Unplug the power adapter from the mains outlet.
Ê Disconnect all cables connec ted to the notebook.
Ê Place the notebook on a flat surfac e.
Ê Turn the notebook over.
Never use force when ins ert i ng or removing a battery.
Make sure that forei gn obj ects do not fall int o t he battery compartment .
Ê Place the notebook on a flat surfac e.
Removing the battery
2
1
Installing the battery
a
Ê Press the lock for battery l ock (1) and hold
it down.
Ê Push the battery lock (2) in the di rection of
the arrow.
Ê Pull the battery out of the batt ery
compartment.
Ê Position the battery at the edge of t he
casing (a).
Ê Tilt and put the battery into the batt ery
compartment.
SAP:10600366086 27
Page 38

Working with the notebook
Performing the battery learning cycle
The battery contains el ectronics that c ontinuously monitor t he bat tery charging level and dis pl ay the
current charging level. To compensate for meas uri ng errors in the electronics , and because the
chemical properties of the battery change over time, the electronics must be recalibrated regularly.
This calibration is carried out using a battery learning cycle. Using the battery learning cycle ensures
that the maximum battery capacity can always be used. Duri ng t he l earni ng cycle a defined charging
cycle is carried out.
The battery learning cycle lasts between four and six hours and must not be aborted.
i
Ê Connect the power adapter to the notebook (also see the section "Connect i ng t he power
Ê Restart the notebook (switching ON/ O FF or warm boot ).
The following display bri efly appears on the screen duri ng start-up:
<ESC> Boot Menu <F2> BIOS Setup <F6> Battery learning <F12> Boot from
LAN
During this period you c an not work with the notebook!
After six m ont hs, at the latest , you should run a learning cycle with the battery again.
adapter").
Ê Press function key [F6].
Ê Press the [C] button to start the learning cycle.
When the learning cycle is ended, a corresponding message is displayed.
Ê Exit the menu with the [S] key.
28 SAP:10600366086
Page 39

Working with the notebook
Energy saving functions
The notebook uses less power when t he power m anagement features are enabled. You will then be
able to work longer when using the battery before having to rec harge i t.
If you are connect ed t o a network or use an integrated modem, PC LAN card, or PC
i
The operating system uses ACPI (Advanced Configuration and Power Interface) for power
management under Windows XP. The energy saving functions can be activated under Start - Settings
- Control Panel - Power Options.
modem card, we advise agai nst enabling an energy saving m ode. This could lead to an
interruption of your network connection.
When not using the notebook f or l ong peri ods of time, firs t end the energy saving mode,
then switch off the notebook. Never swit ch the notebook off wit h t he Suspend/Resume
button while the notebook i s in one of the energy-savi ng m odes.
If your notebook is in an energy-saving mode:
• Do not connect any ex ternal devices.
• Do not disconnect any external devices .
• Do not attempt to s wi tch the notebook on if the bui l t-in battery is fl at.
• Do not change or remove the fl oppy disk, if inserted.
• Do not add or remove RAM.
• Do not add or remove a PC card.
Under Windows, Hibernate is activated by default.
Hard disk
The hard disk is the most important storage m edi um of your notebook. You c an work considerably
faster and more efficiently if you copy applications and f i l es from floppy disks and/or CDs t o your
hard disk.
When the hard disk is ac cessed, the hard disk indicator lights up.
SAP:10600366086 29
Page 40

Working with the notebook
Optical drive
Your notebook is delivered with an optical driv e. Dependi ng on the variant, your notebook i s
equipped with a DVD+RW drive or a combo drive (CD-RW/DVD).
Optical drives can either only read or both read and write different optical data storage media. The
meaning of the respect i ve optical data storage m edi a i s described in the foll owi ng:
CD-ROM
Abbreviation for Compact Disc - Read Only Memory. A CD-ROM i s an optical data st orage m edi um
that can contain a m ax i mum of 700 Mbytes. These data cannot be changed.
CD-R
Abbreviation for Compact Disc Recordable. A CD-R is an optical data storage medium t hat can only
be written with a maxi m um of 700 Mbytes of data. Then t hese data cannot be changed, but can be
read as often as desired.
CD-RW
Abbreviation for Compact Disc ReWriteable. A CD-RW is an optic al data storage medium that can
be written with a maxi m um of 700 Mbyte of data a virtually unlimited number of times. This m eans
the data can be deleted and changed.
DVD (DVD-ROM and DVD vide o )
Abbreviation for Digital Versatile Disc or Digital Video Disc. A DVD is an optical data storage
medium that can contain a maximum of 17 Gbyt es of data. These data cannot be changed.
DVD+RW
Abbreviation for Digital Versatile Disc or Digital Video Disc + ReWriteable. A DVD+RW is an optical
data storage medium that can be written with a max i m um of 4.7 Gbytes of data virtually an unlimited
number of times. Thi s means the data can be deleted and changed.
DVD+RW, DVD-RAM and DVD-RW are dif ferent standards. The notebooks from Fujitsu
i
Siemens Computers Gm bH only s upport the DVD+RW standard.
Combo drive (CD-RW/DVD)
The combo drive in your notebook contains a light-em i tting diode (LED), classification as
!
With the combo drive you can read all optical dat a storage media named above. You c an al so write
CD-Rs and CD-RWs.
per IEC 825-1:1993: CLASS 1 LASER, and may therefore not be opened.
30 SAP:10600366086
Page 41

Working with the notebook
DVD+RW drive
The DVD+RW drive in your notebook contains a light-emit ting diode (LED), class i fication
!
With the DVD+RW drive you can read all optical data s torage media named above. You can also
write CD-R, CD-RW and DVD+RW.
as per IEC 825-1:1993: CLASS 1 LASER, and may theref ore not be opened.
Handling CD/DVDs
From this point all different optical data storage media will be referred to as CD/DVDs ; the writeable
optical data st orage m edi a are called blanks.
Observe the followi ng when handl i ng CD/DVDs:
!
• Avoid touching t he surface of a CD/DVD. Handl e CDs/DVDs only by t hei r edges!
• Always store CDs/DVDs in their cas es. Thus you avoid dust contamination,
scratches, bendi ng or other damage.
• Protect your CDs/DVDs from dust, mechanical vibrati on and di rect sunlight!
• Avoid storing a CD/ DV D i n areas subject to high temperatures or humidity.
To utilise the optimum writing speed, use CD blanks marked "Multispeed" or "High
i
Inserting or removing a CD/DVD
The notebook must be switched on.
Ê Push the insert/eject button.
Speed".
Use only DVD blanks of the type DVD+RW. Other types of DVD blanks are not s upported
by your optical drive.
The drive tray will open.
SAP:10600366086 31
Page 42

Working with the notebook
2
1
Ê Pull the drive tray all the way out (1).
Ê Place the CD/DVD in the drive tray wi th the label facing upwards (2).
or
Ê Take out an inserted CD/DVD.
Ê Push in the drive tray until you f eel i t lock into place.
Manual removal (emergency removal)
In the event of a power fai l ure or dam age to the drive it may be necessary to manually remove the
CD/DVD.
Ê Switch the notebook off.
Ê Press a pen or a piece of wire (e.g. a paper clip) firmly into the opening.
32 SAP:10600366086
Page 43

Working with the notebook
The drive tray is unlocked. You can now pull the dri ve tray out of the drive.
Regional codes for DVD films and DVD players
DVD films and DVD pl ayers (e.g. the optic al dri ve of your notebook) are always provided with a
regional code. The regional codes of DVD films and DV D pl ayers must matc h so that the DVD film
can be played back.
There are six different regi onal codes:
• Regional code 1: USA and Canada
• Regional code 2: Egypt, Europe, Japan, South A f ri ca and the Middle East
• Regional code 3: Southeast Asia (including Hong Kong, Indonesia, Philippines, South Korea,
Taiwan)
• Regional code 4: Austral ia, New Zeeland, Southeastern P acific, Central and S outh America
and the Caribbean
• Regional code 5: Africa (except South Af ri ca), India and the former states of the USSR
• Regional code 6: China
The optical drive of your notebook supports the function RPC-II (Phase II System of Regi onal
Playback Control ). Thi s function permits the final user to change the regi onal code of the drive up to
five times to play back correspondi ng DVD films. Then the last regional code select ed is retained
and cannot be changed again.
If a DVD film is to be playable in all regions, it has the regional c ode 0.
i
Before buying a DVD fil m you should check that the regional code of the DV D film
matches the regional code set for the optic al dri ve of your notebook.
Adjusting AutoPlay function of optical drive
With the AutoPlay function you can s pecify whether or not a program or action is to be run/carried
out depending on the CD/DVD cont ent type of Windows XP. For example, you can s pecify that
when an Audio CD is inserted, the Media Player is automatically s tarted and automatically plays the
Audio CD.
You can set the AutoPlay function of the optical drive according to your needs. Proc eed as follows:
Ê Click on the Start menu with the ri ght mouse button or touchpad key.
A context menu appears.
Ê Click on Explorer.
Ê Click on the corresponding drive with the right mouse button or touchpad key.
A context menu appears.
Ê Click on Properties.
Ê Click on the AutoPlay tab.
Ê Adjust the AutoPlay function to meet your needs.
Please note that y ou m ust select the desired action and confirm i t with Apply for each
i
SAP:10600366086 33
individual CD/DVD c ontent type.
Page 44

Working with the notebook
Floppy Disk Drive
Your notebook is equipped wit h a floppy disc drive as an option.
Never clean the floppy di sk drive with cleani ng di sks. Any attempt would destroy the
!
Working with floppy disks
read/write head in the disk drive within 20 seconds.
Make sure that no fl oppy disk is inserted in the floppy disk dri ve during transport.
Otherwise the eject button may break off and the floppy dis k drive will be damaged.
i
1 = Insertion direction
2 = Label area
3 = Write protection tab for a 1.44 Mbyte floppy disk
4 = Identification of a 1. 44 MB floppy disk or wri te protect switch on a 120 MB floppy disk
5 = Eject button for ins ert ed floppy disks
6 = Disk is write-protected
7 = Disk is not write-prot ected
Follow the instruct ions supplied by the vendor of the floppy disks.
5
6
4
1
2
3
7
To insert a diskette
Ê Push the floppy disk into the dri ve in the insertion direc t i on (1) until it engages. The label
should be facing upward.
To remove a diskette
Ê Push the eject button (5).
34 SAP:10600366086
Page 45

Working with the notebook
Protect the floppy disk against being overwritten or erased
Ê Slide the write-protect slider int o position (6). The hole is now v i sible.
Deactivate write protection
Ê Slide the write-protect slider int o position (7). The hole is now c overed.
PC cards
Two PC card slots enable the device to operate two type II PC cards or one type III PC card
(CardBus or PCMCIA).
Consult the document ation supplied by the PC c ard' s manufacturer and follow t he
!
instructions provided.
Never use force when ins ert i ng or removing a PC card.
Make sure that forei gn obj ects do not fall int o t he PC card slot.
Installing a PC card
Consult the document ation supplied with the PC card for information on how to install the
i
necessary devi ce drivers.
For further information refer to the information files (e.g. *.TXT, *.DOC, *.WRI, *.HLP or
*.PDF) provided on the PC card driver diskette or in the operating system manual.
Ê Insert the PC card, contacts first, into the
slot guide. The labelled side of the PC card
should be facing upward.
Ê Gently push the PC card into the slot until
you feel it cli ck into place.
SAP:10600366086 35
Page 46

Working with the notebook
Removing a PC card
Use the small PC card icon located in your task bar to stop the card.
Ê Click on the PC card icon in the task bar with the right mouse button.
Ê Select PC card Properties.
Ê Select the card you wish to stop and click on Stop.
Wait for the dialogue box whi ch tells you that i t is now safe to remov e the PC card.
Ê Press the eject button (1) to remov e the PC
card. If the ejec t buttons are pushed in flush
with the case, first press the buttons to
snap them out.
Ê After the eject button is pres sed, the PC
Card (2) extends somewhat out of the
notebook and can be removed.
2
1
Microphone and loudspeakers
Your notebook contains a bui l t-in microphone and two loudspeak ers.
If you attach an external microphone, the buil t-in microphone is disabl ed. The internal loudspeakers
switch off when y ou attach headphones or external l oudspeakers to the audio jack.
Adjusting the volume
Ê To adjust the volume use the Windows vol um e control from the Start menu All Programs -
Accessories - Multimedia - Volume Control,
or
Ê use the loudspeaker symbol in the t ask bar.
Switching the loudspeakers on/off
Ê To switch the loudspeakers on and off use the Windows volume cont rol from the menu Start -
All Programs - Accessories - Multimedia - Volume Control.
or
Ê use the loudspeaker symbol in the t ask bar.
36 SAP:10600366086
Page 47

Working with the notebook
Integrated 56k modem
The integrated 56k modem supports data communicat i on appl i cations, such as :
• Modem operation: High-speed downl oads at up to 56,000 bit/s (V.90). Downward-compatible t o
V.34 modems.
• Fax mode: Transmitting and receiving at up to 14,400 bi t/s
• Simple country adaptation with programme
The modem complies with the EU Directive 91/ 263/EEC (Telecommunicat i ons terminal equipment
directive) and has been c hecked in agreement with the guidel i ne TBR-21.
The modem can be operated in the fol l owi ng countries:
Multifrequency (MFC) dialling
Belgium, Denmark, Germ any, Finland, France, Greece, Great Britain, Holland, Ireland, Iceland,
Italy, Luxem bourg, Norway, Austria, Portugal, Sweden, Switzerland and Spain.
Pulse dialling:
Belgium, France, Holl and and Italy.
Also in: Poland, Slovenia, South Af ri ca and Hungary.
Connecting notebook modem to telephone connection
3
1
2
Ê Connect the modem cable supplied to the c ountry-specific telephone adapter (1).
Ê Connect the modem cable to the modem port of the notebook (2).
SAP:10600366086 37
Page 48

Working with the notebook
Ê Connect the modem cable to your telephone wall socket (3).
If you attach your modem on a TAE-N-connector the phone respectively data cable is
i
busy. The cable cannot be used for other communication devices at the same time. Pull
the modem plug out of the TA E-N-power socket after t he data transfer, because al so with
connected cable no other communication devices can be used.
Ethernet and LAN/DSL ready
The internal LAN module of y our not ebook supports Ethernet-LA N (10/100 Mbps).
2
1
Ê Connect the LAN cable to the notebook's LAN connector (1).
Ê Connect the network cable to your LAN net work connector (2).
38 SAP:10600366086
Page 49

Security functions
Your notebook enables you t o protect your system and personal data in a number of ways against
unauthorised access. By combining these options, you c an achieve maximum protection for your
system.
In this chapter you will learn which security functions your notebook is equipped with, which
advantages these f unctions offer you and how to configure and use them.
Please consider that in t he case of improper use, you yours elf will also be unable to
!
access your system and your data. Please note therefore the following hints:
• Back up your data on ex ternal data carriers at regular intervals.
• Passwords must be assigned for some s ecurity functions. Please be sure to not e
these passwords, as otherwise you will no longer be able to access your system.
We recommend that you make a note of the passwords and keep them in a safe
place.
If you lose both t he user and the admin passwords, you must contact our help desk. The
loss of passwords is not a warranty case and is therefore subject to charge.
Overview of all security functions
The following secti ons contain a brief desc ription of the security functions that are provided with your
notebook as standard equipm ent.
Kensington Lock
With the Kensington MicroSaver, a sturdy steel cable, you can protect your notebook from theft. For
this reason your notebook is equipped with a devic e f or the Kensington MicroS aver. The Kensington
MicroSaver is available as an accessory.
BIOS password protection
You can protect you personal data from unauthorised access with vari ous passwords. By combining
these different options, you can achieve maximum protection for your system.
Password protection for the BIOS setup
With the Supervisor password you prevent unauthorised opening of the BIOS Setup, and with it
access to important system settings. In the BIOS Setup you can also activate protec tion for the
operating system and your hard disk.
SAP:10600366086 39
Page 50

Security functions
Password protection for the operating system
With corresponding set tings in the BIOS Setup you can block starting of the operating system. Only
those who know the superv i sor or user password can acc ess the system.
Password protection for your hard disk
By activat i ng the hard disk protecti on i n t he BIOS Setup you prevent unauthorised access to the hard
disk drive. The hard disk password is checked internally during each system start-up and ensures
that the hard disk can only be used in conjunct ion with the related devic e.
Brief overview of the security functions
Security function Type of protection Preparation
Kensington Lock Mechanical Mount and lock K ensington
MicroSaver (accessory)
BIOS password protec tion Password protecti on for BIOS
Setup and operating system with
Setup and Power-on password.
The passwords consist of a
maximum of eight al phanumeric
characters.
Specify at least one setup
password in the BIOS Setup and
activate the password
protection for the operat i ng
system as desired.
Using Kensington Lock
1
Ê Fit the Kensington MicroSaver on t he device (1) on your notebook.
1 = Kensington Lock
40 SAP:10600366086
Page 51

Security functions
Configuring password protection in BIOS Setup
Before using the vari ous options of password prot ection for your data sec uri ty in the BIOS
!
i
Protecting BIOS Setup (supervisor and user password)
We recommend that you print out the following instructions, as t hese cannot be displayed whil e
setting the password.
Setup, please note the fol l owi ng hi nts:
• Please keep in mind your pass words in any case, as you will not be able t o ac cess
your BIOS Setup and/or your system any longer, if you forget both the user password
and the supervisor password.
The loss of passwords is not a warranty cas e and i s therefore subject t o charge.
• Back up your data on ex ternal data carriers at regular intervals.
Passwords can be up to ei ght characters long. Y ou can use all alphanumeric c haracters
and need not distinguish between uppercase and lowercase characters.
You prevent unauthorised opening of the BIOS Setup with both the superv i sor and the user
password. With the s upervisor password you have access to all f unctions of the BIOS Setup, and
with the user password onl y to part of the funct i ons. You can only set a user password if a
supervisor pass word has al ready been assigned.
Please refer to sec tion "Settings in BIOS Setup" for a description of calling and operat i ng
i
the BIOS Setup.
Set the supervisor and user password
Ê Call BIOS Setup and select the Security menu.
Ê Mark the Set Supervisor Password field and press the Enter key.
With Enter new Pa ssword: you are then requested t o enter a password.
Ê Enter the password and press the Enter k ey.
With Re-Enter new Password you are asked to confirm t he password.
Ê Enter the password again and press the Enter key.
With Notice: Changes have been saved you receive a c onfirmation that the new pas sword has been
saved.
Ê To assign the user password, mark the f i el d Set User Password and proceed exactl y as when
configuring the superv i sor password.
If you do not want to m ake any other settings , you can exit BIOS Setup.
Ê Select the Exit Saving Changes option in the Exit menu.
The notebook is rebooted and the new pas sword is effective. If you now want to open t he BIOS
Setup, you must fi rst enter your supervisor or user password. Pleas e not e that you only have access
to a few BIOS set tings with the user pas sword.
SAP:10600366086 41
Page 52

Security functions
Change supervisor or user password
Ê Open the BIOS Setup again and there the Security menu.
Ê When changing the password, proceed exactly as for password ass i gnm ent.
You can only change the supervisor password when you have logged into the BIOS Setup with the
supervisor pass word.
Cancelling passwords
To cancel a password (wit hout setting a new password) run t he f ol l owi ng steps:
Ê Call BIOS Setup and select the Security menu.
Ê Mark the Set User Password or Set Supervisor Password field and press the Enter key.
With Enter new Pa ssword you will then be asked to ent er a password.
Ê Press the Enter key twice.
Ê Select the Exit Saving Changes option in the Exit menu.
The notebook is rebooted and the pas sword is cancelled.
With the supervis or password you simultaneously deactivate the user password.
Password protection of operating system
With the supervis or password or the user password, you have assigned in the BIOS Setup
i
Activating system protection
Ê Call BIOS Setup and select the Security menu.
Ê If you have not assigned BIOS passwords yet, defi ne t he supervisor and the user password
Ê Mark the Password on Boot field and press the Enter key.
If you do not want to m ake any other settings , you can exit BIOS Setup.
Ê Select the Exit Saving Changes option in the Exit menu.
The notebook reboots and you are as ked to enter your password (the supervisor or user password).
(see section "S et the supervisor and user password"), you can also prevent booting of the
operating system.
now, if desired (see "Set the supervisor and us er password" section).
42 SAP:10600366086
Page 53

Security functions
Deactivating system protection
Ê Call BIOS Setup and select the Security menu.
Ê Mark the Password on Boot field and press the Enter key.
Ê Select Disabled and press the Enter key .
If you do not want to m ake any other settings , you can exit BIOS Setup.
Ê Select the Exit Saving Changes option in the Exit menu.
The notebook reboots and there is no l onger any password protection f or the operating system.
Password protection for hard disk
The had disk password prevents unauthorised access to the hard disk drives and is
i
Activating hard disk protection
checked internally each time the system is booted. The condition for this is t hat you have
assigned at least the supervisor password.
Ê Call BIOS Setup and select the Security menu.
If you have not assigned BIOS passwords yet, define the superv i sor and the user password now, if
desired (see "Set t he supervisor and user password" section).
Ê Mark the Hard Disk Security field and s el ect the Enabled entry.
If you do not want to m ake any other settings , you can exit BIOS Setup.
Ê Select the Exit Saving Changes option in the Exit menu.
The notebook reboots and your hard disk is now protected with a password.
Deactivating hard disk protection
Ê Call BIOS Setup and select the Security menu.
Ê Mark the Hard Disk Security field and s el ect the Disabled entry.
If you do not want to m ake any other settings , you can exit BIOS Setup.
Ê Select the Exit Saving Changes option in the Exit menu.
The notebook reboots and there is no l onger any password protection f or the hard disk.
SAP:10600366086 43
Page 54

Page 55

Connecting external devices
Under all circumst ances, please observe the safety notes provided in the "Important
!
notes" chapter.
Read the documentation on the external device before c onnecting it.
Do not connect or disconnect cables during a thunderstorm.
Do not pull on the cable when dis connecting a cable. Al ways take hold of the ac tual plug.
Adhere to the order described in t he following when you connect external devices t o t he
notebook or separate them f rom the notebook:
Connecting devices to notebook
1) Turn off all power and equipment switches.
2) Remove all power plugs from the mains outlets.
3) Connect al l the cables to the notebook and t he external devices.
4) Plug all data communication cables into the utility sockets.
5) Plug al l power cables into the mains supply.
Disconnecting devices from notebook
1) Turn off all power and equipment switches.
2) Remove all power plugs from the mains outlets.
3) Unplug all data communication cables from the utility sockets.
4) Disconnect all the cables from the notebook and the ex t ernal devices.
The ports are marked with t he following symbols (or wi t h similar symbols):
LAN-port (Local Area Network , for
Network connection)
PS/2 port for keyboard and mouse
Parallel port Microphone jack
Monitor port Modem port
S Video out sock et (video output)
Port for power adapter
Headphones port
USB port
Serial port FireWire port
Some of the external devices require specia l dri vers (see the operating system and
i
SAP:10600366086 45
external device doc um entation).
Page 56

Connecting external devices
Connecting an external monitor
An external monitor can be connected to the notebook .
Ê Using the [Fn] + [F5] key combination y ou can switch back and f orth between the external
monitor and the LCD screen.
Ê If your notebook is equipped with a TFT monitor, you can display the same picture on the
external monitor and the LCD screen simultaneousl y.
Ê Switch off the notebook and the ext ernal monitor.
Ê Connect the external monitor to the moni tor port on your notebook.
Ê First switch on the monitor and then t he not ebook.
Setting the refresh rate for your external m o n itor
The refresh rate must be c orrectly set so that the image does not fli cker.
Ê To change the refresh rate or resolution selec t the monitor type in the menu Start - Settings -
Control Panel - Display - Settings - Advanced - Monitor.
Ê Now select the Adapter tab.
Ê Adjust the refresh rate and then click Apply.
If the refresh rate set is too high, the m oni tor may be damaged. Please s ee the
!
documentation incl uded wi th your monitor for the maximum possible refresh rate.
Connecting an external PS/2 mouse or keyboard
You do not need to switc h your notebook off.
Ê Simply connect the external keyboard or mouse to the PS /2 port on your notebook.
Using the parallel port
Ê Switch the notebook off.
Ê Connect the data cable of the printer to t he paral l el port on the notebook.
Ê Plug the printer power cable into the mains outlet.
Ê First switch the printer on, then t he notebook.
46 SAP:10600366086
Page 57

Connecting external devices
Connecting USB devices (up to 12 Mbps)
On the USB ports you can connect external dev i ces that also have a US B port (e.g. a printer, a
scanner or a modem).
USB devices are hot -pl uggabl e. This allows cables from USB devices to be connected
i
Ê Connect the data cable to the external dev ice.
Ê Connect the data cable to a USB port of t he notebook.
i
and disconnected wit h the system switched on.
Additional informat i on can be found in the documentati on for the USB devices .
Device drivers
The devices you c onnect to the USB ports usually require no driver of t hei r own, as the
required software is already included in the operating system. However, if the USB device
requires its own sof tware, please install i t from the data carrier provided wi th the USB
device.
Connecting external audio devices
Headphones port
Via the headphone port you can c onnect either headphones or external l oudspeakers to your
notebook.
Microphone jack
Via the microphone port y ou can connect an external m i crophone to your notebook.
Adjusting the volume
Ê To adjust the volume use the Windows vol um e control from the Start menu All Programs -
Accessories - Multimedia - Volume Control,
or
Ê use the loudspeaker symbol in the t ask bar.
Switching the loudspeakers on/off
Ê To switch the loudspeakers on and off use the Windows volume cont rol from the menu Start -
All Programs - Accessories - Multimedia - Volume Control.
or
Ê use the loudspeaker symbol in the t ask bar.
SAP:10600366086 47
Page 58

Connecting external devices
Connecting a television set to S-Video Out
You can connect a te l evision set to the notebook, e.g. to vi ew a DV D comfortably.
Ê With the key combination [Fn] + [F5] you can switch between the t el evision set and the LCD
screen of the notebook.
Ê Switch off the notebook and the television set.
Ê Connect the television set t o t he S-Video Out socket of your notebook.
Ê First switch on the televis i on set and then the notebook.
Activating television set and selecting country setting
Ê Select the Settings tab via Start - Control Panel - Appearance and Themes - Display.
Ê Click on the Advanced button.
The Default Monitor and Mobility Radeon Properties window opens.
Ê Select the Display tab.
Ê Click on the TV button and then on the Apply button.
The TV Properties window opens.
Ê Select the desired country setting in the Format tab in t he TV Format Selector field.
Ê Click on the Apply button to save the sel ected settings.
Connecting FireWire devices
External devic es such as digital audi o/ video devices or other high-speed devices can be connected
to the FireWire port. The FireWire port operates at a speed of 400 Mbit per second.
FireWire devices are hot-pl uggabl e. Therefore, the cables of FireWi re devices can be
i
Ê Connect this data cable of the ext ernal devices to the FireWire port of the notebook.
Ê Plug the power cable of the external device into the mains outlet.
connected and disconnected with the system switched on.
Additional informat i on i s provided in the documentat i on of the FireWire devices.
48 SAP:10600366086
Page 59

Settings in BIOS Setup
In BIOS Setup you can set the system functions and the hardware configuration of the notebook. The
settings can onl y be changed via the keyboard.
When it is delivered, the notebook is set t o f actory default set tings. You can change these settings
in BIOS Setup. Any changes you m ake take effect as soon as you save and quit the BIOS Setup.
The BIOS Setup programme contains the following menus:
Main: for system settings as time, date, hard disk and monitor selection
Advanced: for system settings such as ports and keyboard
Security: for password setti ngs and safety functions
Power: for setting the energy saving functions
Boot: for configuring the boot sequence
Exit: to ex i t the BIOS Setup
Start BIOS Setup
Ê Restart the notebook (switching ON/ O FF or warm boot ).
The following or a simil ar di splay appears on the screen during booting:
<ESC> Boot Menu <F2> BIOS Setup <F6> Battery Learning <F12> Boot
from LAN
Ê When this message appears, press t he key [F2].
If a password has been assigned:
i
Ê Enter the password and press the Enter k ey.
If you have forgotten the password, contact your system administrator or contact our
hotline/help desk.
SAP:10600366086 49
Page 60

Settings in BIOS Setup
Operating BIOS Setup
Press the [F1] key to display help on the operation of BIOS Setup.
i
Ê Use the cursor key å or ç to select the menu you wish to acc ess to make changes .
Ê Press the Enter key.
The menu is displayed on t he screen.
Ê Use the cursor key æ or è to select the field you wish to change.
Ê Press the Enter key to confirm your selection.
Ê Press the [ESC] key to exit the selected menu.
Ê For future reference, make a note of the changes you have made (for example, in this manual).
The description of the individual settings is shown in the right-hand wi ndow of the BIOS
Setup.
You can revert to the default settings for the BIOS Setup menu you are currently i n, by
using the [F9] functi on key.
Exiting BIOS Setup
To exit BIOS Setup, select the Exit menu from the menu bar. You can then decide which settings you
want to save. The Exit menu offers the following opt i ons.
You must mark t he requi red option and activate it wi th the Enter key.
Exit Saving Changes
Select Exit Saving Changes and Yes to save the current set tings and exit the BIOS Setup. The dev i ce is
rebooted and the new settings come into effect.
Exit Discarding Changes
Select Exit Discarding Changes and Yes to discard the changes you have made. The settings which
were in force when BIOS Setup was called remain effective. BIOS Setup is terminated and the device
is rebooted.
Load Setup Default
To revert all the menus of BIOS Setup to the default entries, select Load Setup Default and Yes.
Discard Changes
To load the values of all t he m enus of BIOS Setup that were in effec t when BIOS Setup was called,
select Discard Changes and Yes. If you want to exit BIOS Setup with these settings, select Exit Saving
Changes and Yes.
Save Changes
To save settings without exiting BIOS Setup, select Save Changes and Yes.
50 SAP:10600366086
Page 61

Troubleshooting and tips
Take note of the safety hints in the "I m portant notes" chapter, when you connect or
!
disconnect cabl es.
If a fault occ urs, try to correc t i t as described. If you fail to correct t he probl em, proceed as follows:
Ê Make a note of the steps and the circumstances that l ed to the fault. Als o m ake a note of any
error messages displ ayed.
Ê Switch the notebook off.
Ê Contact your sales outlet or our customer service centre.
Restoring operating system
Using the “Windows Recovery CD" and the “Drivers & Utilities CD", you can restore the operating
system of your notebook.
All hard disk contents are deleted during operating system restoration. After this, operating system,
drivers and software utilities will be reins t alled. For this reason you should try t o save important data
to a backup medium before you restore the hard disk contents.
Ê Insert the "Windows Recovery CD" i nto the optical drive.
Ê Switch the notebook on.
Ê Follow the instructions on the screen.
i
You must then reinstall all the drivers. Use the "Drivers & Ut ilities" CD provided.
Detailed PC knowledge is requi red f or manual partitioning.
The notebook's date or time is incorrect
Ê Set the time and/or date in the Main menu.
If the date and time are repeatedly incorrect when y ou switch on the notebook, the buffer
i
battery that suppl i es the internal clock is dead.
Connect the notebook v i a i t s power adapter to a grounded mains outlet or i nstall a fresh
battery. The buffer batt ery will take approximately two days t o complete its recharge. If
the problem persists, contact your sales office or our hotline/help desk.
SAP:10600366086 51
Page 62

Troubleshooting and tips
The LCD screen of the notebook remains blank
If your LCD screen remai ns blank this may be due to the following:
Monitor is switched off
Ê Press a key or enter the password
External monitor or television set connected
Ê Set the setting Display Settings to LCD BIOS-Setup in the menu Advanced - Video Features.
The LCD screen is difficult to read
Reflection
Ê Turn the notebook or alter the tilt of the LCD screen.
The external monitor stays blank
If your screen remai ns blank this may be due to the following:
Monitor is switched off
Ê Switch the external monitor on.
Power saving has been activated (screen is blank)
Ê Press any key to continue.
Brightness control is set to dark
Ê Adjust the brightness control .
Screen output is set to the notebook’s LCD screen
Ê Press the key combination [Fn] + [F5] (selecting internal/ external display).
The external monitor's power cable or data cable is not connected properly
Ê Switch off the external monit or and the notebook.
Ê Check whether the power cable is plugged properly into the external monitor and into the power
socket.
Ê Check whether the data cable is properly c onnected to the notebook and the external monitor
(if it is plugged in wi th a connector).
Ê Switch on the external monitor and the not ebook.
52 SAP:10600366086
Page 63

Troubleshooting and tips
The external monitor is blank or the image is
unstable (under Windows)
The wrong external monitor has been selected or the wrong screen resolution has been set for t he
application programme.
Ê Terminate the application programme in Windows wi th [Alt] + [F4]. If the fault continues to
occur after ending the program m e, switch over to t he notebook's internal LCD screen with [Fn]
+ [F5] and carry out the f ol l owi ng routine:
Ê Select the correct monitor or s et the correct screen resolution.
− Setting the sc reen resolution: Select Start - Settings - Control Panel - Display - Settings and
then the screen resolution you require in the Resolution field.
− Selecting the moni tor: Select the correct monitor under Start - Settings- Control Panel Display - Settings - Advanced Properties - Monitor - Modify.
The notebook cannot be started
The battery is not installed correctly
Ê Switch the notebook off.
Ê Check whether the battery is ins t al l ed correctly in its compartment.
Ê Switch the notebook on.
The battery is dead
Ê Charge the battery.
or
Ê Install a charged battery.
or
Ê Connect the power adapter to the notebook.
The power adapter is not connected correctly
Ê Switch the notebook off.
Ê Check whether the power adapter is connected c orrectly to the notebook .
Ê Check whether the power cable is plugged properly into the power adapter and into the mains
outlet. The indicator on the power adapt er should illuminate.
Ê Switch the notebook on.
The notebook is prevented from booting by a disk in the floppy disk drive.
Ê Check whether this floppy disk is a system disk. Remove the floppy disk.
Operating system files may be damaged or mi ssi ng.
Ê Boot the notebook with a system floppy disk, v i a t he floppy disk drive.
SAP:10600366086 53
Page 64

Troubleshooting and tips
The notebook stops working
The notebook is in Standby or Suspend mode
Ê Exit the Standby mode or the Sus pend m ode (switch on the notebook).
An application programme has caused the malfunction
Ê Close the application programme or restart the notebook by switc hi ng i t on/off or with a warm
boot.
The battery is dead
Ê Charge the battery.
or
Ê Install a charged battery.
or
Ê Connect the power adapter to the notebook.
The mouse does not work
Mouse driver is not loaded
Ê Check whether the correct mouse driv er i s properly installed and is present before the
application programme is started.
Detailed information can be found in the User Guides for the mouse, the applicat i on
programme or the operating system.
Mouse is not connected
Ê Switch the notebook off.
Ê Check whether the mouse cable is correctly connected t o the notebook.
If you use an adapter or ex t ension lead with the mouse c abl e, check the connec t i ons.
Ê Switch the notebook on.
The floppy disk cannot be written
Ê Check whether the disk is OK and is not write-protected.
54 SAP:10600366086
Page 65

Troubleshooting and tips
The printer does not print
Ê Make sure that the printer is switched on and is on-line (see the m anual s supplied with the
printer).
Ê Check that the cable connecting the notebook and the printer is connected properly.
Ê Check that the correct printer driver is installed.
Ê Check in the BIOS Setup whether the Onboard Devices Configuration field is set correctly for the
port you are using.
The DVD film does not continue to play
Should the picture freeze when playing some DVD fi l ms, deactivat e the accelerated hardware
decryption (it is activated in the default setting; t hi s can be recognised from t he checkmark in the
corresponding check box).
Ê Open the drive tray.
Ê Place the DVD in the drive tray with the label facing upwards.
Ê Push in the drive tray until you f eel i t lock into place.
Ê Wait until the WinDVD starts.
Ê Press the right mouse button or touc hpad key.
A context menu appears.
Ê Click on Configuration and then on Video.
Ê Click on the checkmark in t he checkbox of Hardware Acceleration.
The checkmark dis appears.
Ê Click on OK.
The function is now deac t i vated.
Acoustic warnings
A beep sounds approx. ev ery 15 seconds.
The battery is almos t flat.
Ê Charge the battery.
System configuration contains invali d data
Ê Switch the notebook off.
Ê Switch the notebook on.
Ê Enter the BIOS Setup programme by pressing [F2].
Ê Select the default values under Load Default Settings.
Ê Mark Yes in the Do you want to load default settings? dialogue box.
Ê Press the Enter key.
SAP:10600366086 55
Page 66

Troubleshooting and tips
If the error message appears repeatedly, please contact the place of purc hase or our
hotline/help desk.
Error messages on the screen
This section des cribes the error messages generated by the BIOS Setup. Error mess ages displayed
by the operating system or programmes are described in the relevant documentation.
Setup Warning Invalid Password <Continue>
This message is di splayed following password entry.
Ê Press the key combination [Fn] + [PadLK].
Ê Re-enter the password once.
If the problem persists, contact your sales office or our hotline/help desk.
CMOS Battery Bad
If the error message occurs repeatedly, t hen the buffer battery in t he not ebook is flat.
Ê Connect the notebook via its power adapter to the mains outlet. The buffer battery will take
approximately two days to complete it s recharge.
If the error message appears repeatedly, please contact the place of purc hase or our
hotline/help desk.
System CMOS checksum bad - Default configuration used
The system configuration information is incorrect.
Ê Switch the notebook off.
Ê Switch the notebook on.
Ê Enter the BIOS Setup programme by pressing [F2].
Ê Select the Exit menu in the BIOS Setup.
Ê Select the Default Setup entry and click on OK.
If the error message appears repeatedly, please contact the place of purc hase or our
hotline/help desk.
Insert system diskette and press Enter key to reboot
The operating system cannot be loaded or the hard disk c ontains no operating system or is not
formatted.
Ê Insert a system disk.
Ê Press any key to continue.
56 SAP:10600366086
Page 67

Troubleshooting and tips
Invalid system disk - Replace the di sk, and then press any key
The inserted disk is not a system disk or the inserted system disk is defective.
Ê Insert another system disk.
Ê Press any key to continue.
If you wish to boot from floppy disk:
Ê Insert a system disk.
Ê Press any key to continue.
If the operating system cannot be loaded from floppy disk:
Ê Remove the floppy disk from the dri ve.
Diskette drive A error
Ê Start the BIOS Setup and make sure that the paramet er for floppy disk drive A has been set to
the format 1.44 Mby t e, 3 1/2 inch.
Extended memory failed at offset: xxxx Failing Bits: zzzz zzzz
When testing the ext ended m emory an error has resulted at t he address xxxx.
Ê Check whether the additional memory module has been inserted correctl y.
If the error message appears repeatedly, please contact the place of purc hase or our
hotline/help desk.
Failure Fixed Disk n
The settings of t he hard di sk drive are incorrect .
Ê Start the BIOS Setup (IDE Adapter 0 Master submenu) and select the correct settings.
Fixed Disk address conflict Diskette Drive address confli ct
There is an I/O address conflict.
Ê Start the BIOS Setup and check the correspondi ng settings.
Incorrect Drive A type - run SETUP
Ê Start the BIOS Setup and make sure that the paramet er for floppy disk drive A has been set to
the format 1.44 Mby t e, 3 1/2 inch.
Keyboard controller error
Ê Switch the notebook off with the ON/O FF s wi tch.
Ê Wait 3 - 5 seconds and switch on the notebook again.
If the error message appears repeatedly, please contact the place of purc hase or our
hotline/help desk.
Keyboard error
If you use an ext ernal keyboard:
Ê Check the connection and reboot the notebook .
If the error message appears repeatedly, please contact the place of purc hase or our
hotline/help desk.
SAP:10600366086 57
Page 68

Troubleshooting and tips
nn Stuck key
Ê Make sure that no key is press ed.
If the error message appears repeatedly, please contact the place of purc hase or our
hotline/help desk.
Operating system not found
Ê Check in the BIOS Setup whether your hard disk has been s et correctly.
Ê Make sure that the operating system is installed on the corresponding drive.
Press <F1> to resume, <F2> to SETUP.
This error message appears i f an error occurs during the self -test before starti ng t he operating
system.
Ê Press the [F1] function key t o start the operating system.
Ê Enter the BIOS Setup programme by pressing [F2].
Previous boot incomplete - Default configuration used
Due to an error during the previous system boot, default values were used for certain set tings.
Check the BIOS Setup and the settings.
Ê Press the [F1] function key when prom pt ed to do so.
Real Time clock error
Ê Contact your sales outlet or our hotl i ne/help desk.
nnnnK Shadow RAM failed at offset: xxxx Failing Bits: zzzz
Ê Contact your sales outlet or our hotl i ne/help desk.
System battery is dead - Replace and run SETUP
Ê Contact your sales outlet or our hotl i ne/help desk.
System cache error - Cache disabled
Ê Contact your sales outlet or our hotl i ne/help desk.
nnnnK System RAM failed at offset: xxxx Failing Bits: zzzz
If the error message appears repeatedly, please contact the place of purc hase or our
hotline/help desk.
System timer error
Ê Contact your sales outlet or our hotl i ne/help desk.
58 SAP:10600366086
Page 69

Memory expansion
Depending on the upgrade level, your notebook is equipped with a 128MB, 256MB or 512MB
memory module.
The notebook must be switched off when installing/removing the memory modules , it
!
must not be in Suspend mode.
Use only memory ex pansions which have been released for your notebook (128, 256, or
512 Mbyte modules, P C 266 DDR SO DIMM, 200 pin JEDEC).
Never use force when installing or remov i ng memory modules.
Make sure that forei gn obj ects do not fall int o t he memory module compartment.
Installing/re movi ng memory
During installation, note that the first slot is ass i gned at the factory and is t herefore not available.
The second slot is free and can be used for upgrading.
Ê Switch the notebook off.
Ê Close the LCD screen so that it locks into place.
Ê Unplug the power adapter from the mains outlet.
Ê Disconnect all cables connec ted to the notebook.
Ê Turn the notebook over.
Ê Place the notebook on a flat surfac e.
Ê Remove the battery (see "Removing t he bat tery").
Removing cover
Ê Remove the screw (1).
1
Ê Open the cover.
Ê Pull off the cover.
SAP:10600366086 59
Page 70

Memory expansion
Removing a memory module
2
3
1
Installing a memory module
2
1
3
1
Ê Carefully push the two mounting clips
outwards (1).
The memory module will flap upward (2).
Ê Pull the memory module out of its slot in the
direction of the arrow (3).
Ê Insert the memory module with the contacts
and the recess (a) fac i ng the slot (1).
Ê Carefully push the memory module
downwards until you feel i t latch into
place (2).
3
a
Testing memory modules after the installation
Ê Switch the notebook on and check whether the changed memory size i s detected.
60 SAP:10600366086
Page 71

Technical data
Notebook
Processor: Athlon XP from 1400+
Main memory (SO DIM M 3.3 V): Maximum 1 Gbyte PC 266 DDR So DIMM
2 slots for 128, 256 or 512 M byte modules
JEDEC 200-pin; of t hese one slot is avail abl e for
upgrading the memory.
Possible drives:
Floppy Disk Drive
•
• Hard disk drive
• Optical drive
Electrical data
Regulations compli ed wi th:
Maximum power draw:
(notebook on with battery charging)
LCD display panel
Display diagonal:
CE, Energy Star
70/75/80 W
14.1-inch XGA TFT
•
• 15-inch XGA TFT
• 15-inch SXGA+TFT
Graphics
Chip: Radeon IGP 320M
Video memory: 8 Mbyte up to 128 Mbyt e (dependi ng on available main
memory)
Supported resolutions on external
monitor:
Colour depth:
1600x1200
32 bit
Audio
Sound: Realtek ALC 2002 (AC’97)
Input devices
Keyboard: 85/86 keys
Touchpad: 2 key s, 1 scroll
SAP:10600366086 61
Page 72

Technical data
Slots
PC Card slots (CardBus/ PCMCIA): PCMCIA 2 x Type II or 1 x Type III
Ports
• PS/2 port: 6-pin mini DIN female connect or
• Parallel port: 25-pin female connector, bi-directional, ECP
capable
• Monitor port: 15-pin female connector
• Serial port: 9-pin plug
• Microphone jack: connector, mono
• Video port: 7-pin mini DIN female c onnector
• USB (Universal Serial Bus) triple
• LAN connector: Female connector, RJ -45
• Modem port: Female connector, RJ-11
• IEEE1394 connect i on S400, 4-pin
• Kensington Lock
Environmental conditions
Environment class 7K1 DIN IEC 721
Environment class 7M2 DIN IEC 721
Temperature:
•
Operating (7K1) 5 °C .... 35 °C
• Transport (2K2) -15 °C .... 60 °C
Dimensions
Width/depth/height: 322 mm/272 mm/35.3/ 38 m m
Weight (depending on configurati on): approx. 3,2 kg
Battery
Charging time (when not in operation): approx. 3 hours
Operating time depending on applic ations: approx. 2 to 3 hours
Power adapter
Primary
•
Rated voltage: 100 V to 240 V (automatic)
• Frequency: 50 Hz to 60 Hz (automati c)
• Max. rated current: 1,5 A
Secondary
•
Rated voltage: 19 V
• Max. rated current: 3,7 A / 3,95 A
62 SAP:10600366086
Page 73

Index
56k modem 37
A
Acoustic warni ngs 55
Alt Gr key 18
Anti-theft prot ection 40
Audio
adjusting the volum e 36
ports 36, 47
Audio devices, connecting 47, 48
AutoPlay function 33
B
Backtab 22
Battery 15
charging 26
disposal 6
installing 27
learning cycle 28
lifetime 26
lock 15
maintenance 26
monitoring the charging level 27
removing 27
self-discharge 6, 26
storing 6, 26
technical data 62
Battery charge metre 27
Battery charging l evel, monitoring 27
Battery indicator 17
Beep, error message 55
BIOS password protec tion 39
BIOS Setup 49
exiting 50
operating 50
password protection 41
settings 49
starting 49
Blank 31
Board, note 4
C
CardBus, see PC card
CD blank 31
CD/DVD
AutoPlay function 33
emergency removal 32
inserting 31
removing 31
working with 31
CD-R 30
CD-ROM 30
CD-RW 30
CE marking 6
Charging capacity, battery 26
Cleaning 8
Closed cover switch 13, 24
Combo drive 30
AutoPlay function 33
Configuration, BIOS S etup 49
Content type, CD/DVD 33
Contents of deliv ery 9
Copyright-protected technology 5
Cursor keys 18
D
Damage during transport 9
Data, technical 61
Date, not correct 51
Date/Time incorrect 51
DC IN jack 15
Devices
connecting 45
disconnecting 45
Display, difficult to read 52
Disposal 6
DVD 30
regional codes 33
DVD blank 31
DVD film
picture frozen 55
regional codes 33
DVD video 30
DVD+RW 30
DVD+RW drive 31
AutoPlay function 33
DVD-ROM 30
DVD-RW 30
E
Easy Buttons 13, 23
Electrical dat a 61
E-Mail Easy Button 23
Emergency removal, CD/DVD 32
Energy consumpti on 29
Energy saving 5
Energy saving func tions 5, 29
Energy Star 5
Enter key 18
Error correction 51
SAP:10600366086 63
Page 74

Index
Error message
acoustic 55
on the screen 56
ESD 4
Ethernet LAN 38
External devices, connecting 45
External keyboard, connecting 46
External monitor
connecting 46
no screen display 53
remains blank 52
screen display drifts 53
selecting the display 21, 25
synchronising t he di splay 21, 25
External PS/2 m ouse, connecting 46
F
FireWire devices, connecting 48
FireWire port 15, 45
First time swit ching on 10
Floppy disk
cannot write 54
inserting 34
removing 34
working with 34
write-protection 35
Floppy disk drive 13, 14, 34
indicator 17
Floppy disk indic at or 17
Front, view 14
Function keys 19
H
Halt an operation 22
Hard disk 15, 29
restoring the content s 51
Hard disk indicat or 17
Hardware, configuring 49
Headphone port 14, 45
Hole for manual ejection 14
Key
Backspace 18
Caps Lock 18
cursor control keys 18
Fn key 18
Return 18
Shift 18
Tab key 18
Key combination 21
Keyboard 13, 18
activating number function 22
activating numeri c keypad 22
cleaning 8
connecting 46
Keyboard port 14, 45
L
LAN module 38
LAN port 14, 38, 45
LCD display panel release 13
LCD screen 13
cleaning 8
increasing the brightness 21, 25
is blank 52
is difficul t to read 52
notes 25
reducing the brightness 21, 25
remains blank 52
selecting the display 21, 25
setting the Desk top Area 25
setting the font size 25
settings 25
synchronising t he di splay 21, 25
too bright 52
Left-hand side, view 14
Letter keys 18
Lifetime, battery 26
Location, selec t i ng the 9
Lock for battery lock 15
Loudspeaker 13, 36
I
IEEE 1394 port, see FireWire port
Important notes 3
Indicators 16
Caps Lock 17
Num Lock 17
Scroll 17
Internet Easy Button 23
K
Kensington Lock 15, 39
applying 40
Kensington MicroS aver 40
64 SAP:10600366086
M
Main Memory, ext ension 59
Manual removal, CD 32
Manufacturer, notes 5
Memory cover 15
Memory expansion 59
installing 60
removing 60
testing 60
Memory module
installing 60
removing 60
testing 60
Page 75

Index
Menu key/Windows 19
Microphone 13, 36
Microphone jack 14, 45
Mobile operation 7
Modem 37
connecting 37
Modem port 14, 45
Monitor port 15, 45
Monitor settings 25
Mouse
does not work 54
no mouse pointer 54
Mouse port 14, 45
N
Notational conventi ons 2
Notebook
not starting 53
operating 13
setting up 9
stops working 54
switching off 11
switching on 11
switching on for the first time 10
Notes, important 3
Numeric keypad 20
O
ON/OFF switch 13
switching off 11
switching on 11
ON/OFF switch, Wireless LAN 13
Open notebook, view 13
Opening
Windows Explorer 22
Opening dialog box
Find 22
Run 22
System properties 22
Operating system, restoring 51
Operation, preparing for 10
Optical data storage m edi a
handling 31
overview 30
Optical drive 14, 30
AutoPlay function 33
P
Packing material 9
Parallel port 15, 45
Password protecti on
BIOS Setup 39
Hard disk 40
Operating system 40
Pause key 18
PC card 35
installing 35
removing 36
slot 14
PCMCIA, see PC card
Peripherals, see dev i ces
Picture frozen, DVD film 55
Power adapter
connecting 10
setting up 9
technical data 62
Power-on indicator 17
Preparing for use 9
Printer
connecting 46
does not print 55
PS/2 mouse, c onnecting 46
PS/2 port 14, 45
R
Rear, view 15
Recycling 6
Reflection 52
Regional codes 33
Release for opening 14
Right-hand side, view 14
S
S Video Out sock et 15, 45
Safety 3
Screen brightness
decreasing 21, 25
increasing 21, 25
Screen lock 14
Scroll indicat or 17
Security functions 39
overview 39
survey 40
Select monitor 21, 25
Self-discharge, bat tery 6, 26
Serial port 15, 45
Setting font si ze under Windows 25
Setting pointer speed 25
Setting resolution under Windows 25
Setup, see BIOS Setup
Shift key 18
Signs and symbols 2
Start key/Wi ndows 19
Status indicators 13, 14, 16
Storage, battery 6
Summer time 51
Survey, security functions 40
S-Video Out 48
SAP:10600366086 65
Page 76

Index
Storage, battery 6
Summer time 51
Survey, security functions 40
S-Video Out 48
Switching on
NumLK 22
PadLK 22
System configuration 49
System settings, BIOS Setup 49
T
Technical data 61
Time
daylight savings 51
not correct 51
Tips 51
Touchpad 13, 23
cleaning 8
dragging items 24
executing commands 24
moving the pointer 24
scrolling 24
selecting item s 24
Touchpad buttons 13, 23
Transport 7
Travel preparations 7
Trouble, correction 51
Troubleshooting 51
TV set, connect i ng 48
U
Underside, view 15
USB devices
connecting 47
software 47
USB port 15, 45, 47
V
VGA port, see moni t or port
Video units, connecting 48
View
front 14
left-hand side 14
open notebook 13
rear 15
right-hand side 14
underside 15
W
Windows logo keys 19
Windows XP 29
Wireless LAN, ON/OFF switch 13
Write protection, floppy disk 35
66 SAP:10600366086
 Loading...