

Page 1

answers 2
User Guide
Wireless LAN
English
Page 2

Page 3

Page 4

Dieses Handbuch wurde auf Recycling-Papier gedruckt.
This manual has been printed on recycled paper.
Ce manuel est imprimé sur du papier recyclé.
Este manual ha sido impreso sobre papel reciclado.
Questo manuale è stato stampato su carta da riciclaggio.
Denna handbok är tryckt på recyclingpapper.
Dit handboek werd op recycling-papier gedrukt.
Herausgegeben von/Published by
Fujitsu Siemens Computers GmbH
Bestell-Nr./Order No.: A26391-K133-Z131-1-7619
Ausgabe/Edition 3
Printed in the Federal Republic of Germany
AG 0704 07/04
Page 5

Wireless LAN (general)
Wireless LAN
User Guide
Installation of Odyssey
Using Odyssey Client
Index
July 2004 edition
Page 6

Microsoft, MS, MS-DOS, W indows, and Windows NT are registered trademarks of Microsoft
Corporation.
Odyssey is a registered trademark of Funk Software.
All other trademarks referenced are trademarks or registered trademarks of their respective
owners, whose protected rights are acknowledged.
Copyright Fujitsu Siemens Computers GmbH 2004
All rights, including rights of translation, reproduction by printing, copying or similar methods,
in part or in whole, are reserved.
Offenders will be liable for damages.
All rights, including rights created by patent grant or registration of a utility model or design,
are reserved.
Delivery subject to availability. Right of technical modification reserved.
This manual was produced by
cognitas. Gesellschaft für Technik-Dokumentation mbH
www.cognitas.de
Page 7

Contents
Wireless LAN (general)....................................................................................................................1
Wireless network as per IEEE 802.11 standard.................................................................................1
Ad hoc mode .............................................................................................................................2
Infrastructure mode....................................................................................................................2
Operating system requirements ................................................................................................. 2
Wireless network names (SSID)................................................................................................3
802.11 network security.............................................................................................................3
Wired-Equivalent Privacy (WEP) with preconfigured keys .........................................................4
Wi-Fi Protected Access (WPA) and TKIP encryption.................................................................4
802.1X standard ................................................................................................................................5
Extensible Authentication Protocol (EAP) ..................................................................................5
Important notes .................................................................................................................................6
Safety notes...............................................................................................................................6
CE marking................................................................................................................................6
Radio frequencies and security standards .................................................................................7
Installation of Odyssey....................................................................................................................9
Installing Odyssey Client ...................................................................................................................9
Configure and Enable Wizard ....................................................................................................9
Using Odyssey Client ....................................................................................................................11
Odyssey Client Manager Overview.................................................................................................. 11
Odyssey Client Manager display..............................................................................................12
Controlling network connections - "Connection" window..................................................................12
Selecting an adapter................................................................................................................13
Connecting to a network ..........................................................................................................13
Scanning for wireless networks................................................................................................13
Reconnecting to a network ......................................................................................................15
Reauthenticating in a network..................................................................................................15
Disconnecting from a network connection................................................................................ 15
Viewing connection information ...............................................................................................15
Defining profiles - "Profiles" window.................................................................................................16
Adding or changing profile - "Profile Properties" window.......................................................... 17
"Authentication" tab .................................................................................................................20
Configuring wireless networks - "Networks" window ........................................................................27
Adding or changing networks – "Network Properties" window..................................................28
Specifying trusted servers - "Trusted Servers" window ............................................................34
Simple method for configuring trusted servers .........................................................................35
Advanced method for configuring trusted servers ....................................................................37
Untrusted servers ....................................................................................................................42
Configuring network adapters - "Adapters" window..........................................................................43
Adding a wireless adapter........................................................................................................45
Removing an adapter from the list of adapters.........................................................................45
Odyssey Client Manager - "Settings" menu .....................................................................................46
"Preferences" menu item .........................................................................................................46
"Security settings" menu item ..................................................................................................47
"Enable/Disable Odyssey" menu item......................................................................................49
"Close" menu item ...................................................................................................................49
Odyssey Client Manager - "Commands" menu ................................................................................ 49
"Forget Password" menu item .................................................................................................50
"Forget Temporary Trust" menu item .......................................................................................50
A26391-K133-Z131-1-7619, edition 3
Page 8

Contents
Odyssey Client Manager - "Help" menu .......................................................................................... 50
"Help topics" menu.................................................................................................................. 50
"License keys" menu item ....................................................................................................... 51
"Odyssey" context menu ................................................................................................................. 51
"Odyssey for Fujitsu Siemens Computers" menu item ............................................................ 51
"Enable Odyssey/Disable Odyssey" menu item ...................................................................... 51
"Help" menu item .................................................................................................................... 52
"Exit" menu item...................................................................................................................... 52
Features......................................................................................................................................... 53
Overview......................................................................................................................................... 53
Technical details ............................................................................................................................. 54
Declaration of Conformity ............................................................................................................ 57
Index .............................................................................................................................................. 59
A26391-K133-Z131-1-7619, edition 3
Page 9

Wireless LAN (general)
A wireless network card is integrated in your device. This User Guide describes how to make the
settings for your wireless LAN.
Notational conventions
The meanings of the symbols and fonts used in this manual are as follows:
Pay particular attention to texts marked with this symbol. Failure to observe this warning
endangers your life, destroys the system, or may lead to loss of data. Failure to follow the
!
instructions may lead to loss of data, invalidate your warranty, destroy the device, or
endanger your life.
Indicates important information which is required to use the system properly.
i
► Text which follows this symbol describes activities that must be performed in the order shown.
Text in this typeface indicates screen outputs.
Text in italics indicates programme names, commands or menu items.
"Quotation marks" indicate names of chapters, disks and other media and terms that are being
emphasised.
Wireless network as per IEEE 802.11 standard
The integrated network card operates in accordance with the IEEE 802.11 standard. Frequencies
from the ISM frequency bands are used as a communication medium (ISM, Industrial, Scientific,
Medical). The wireless network card may be operated without registration and free of charge. The
IEEE 802.11 standard provides several options for using the ISM frequency bands:
IEEE 802.11a 5.0 GHz band 54 Mbit/s
IEEE 802.11b 2.4 GHz band 11 Mbit/s
IEEE 802.11g 2.4 GHz band 54 Mbit/s
The wireless networks operating in accordance with 802.11 can easily be connected to existing
Ethernet networks. With the exception of a few additional parameters, wireless network cards that
operate in accordance with 802.11 are one system with a normal Ethernet card. This means that
you can use all protocols via a 802.11 wireless network just as with a cable-connected Ethernet (IP,
IPX, NetBIOS,...). The only difference is that you need not lay cables between the computers. The
number of all wireless LAN stations that can reach each other directly is generally referred to as a
cell. The IEEE standard offers two operating modes - the ad hoc mode (peer-to-peer) and the
infrastructure mode.
In addition to describing modulation and data framing, this standard includes an authentication and
encryption method called Wired Equivalent Privacy (WEP). Many corporations are deploying
wireless 802.11 networks. 802.11 networks are beginning to appear in hotels, airports, and other
"hotspots" as a means of internet access.
A26391-K133-Z131-1-7619, edition 3 1
Page 10

Wireless LAN (general)
Ad hoc mode
A wireless LAN in the ad hoc mode, also called peer-to-peer mode, consists of a single closed cell.
Ad hoc wireless networks result when a workgroup comes together with its systems and would like
to interconnect these for data exchange. Any number of systems can be added to this type of
network and can leave it again.
So that several ad hoc wireless networks do not interfere with each other in radio traffic, there is a
unique network name, the SSID (Service Set Identifier). The SSID is used for addressing so that a
data packet can always be assigned to a certain cell.
If you want to join an existing cell, you require the network name (SSID), which you enter in the
settings for the network card. The network card then searches for a wireless network with this SSID
during start-up. When the network card has found a wireless network, it connects to it and you can
communicate with the systems in this wireless network. If two cells are very close together, the radio
channels of these networks should be 4 to 5 channels apart. This applies to 802.11b and 802.11g.
Infrastructure mode
In the infrastructure mode, a base station, referred to as an access point, exists in addition to the
mobile stations. In the infrastructure mode the access point assumes the function of a "guard". In
contrast to the adhoc mode, each system must log on to the AccessPoint before it is allowed to
exchange data in the cell.
Another task of the access point is the connection of the cells with a cable-connected Ethernet. As
due to the logon requirement, the access point knows at all times exactly which stations are on the
radio side, it can decide exactly which data must be sent to it and which don't. This process is also
referred to as bridging.
To increase the range of a wireless network, several access points with the same SSID can be
used.
When a system enters the wireless net, it searches among the reachable access points for the one
with the strongest signal and logs on there. Two systems logged on to different access points
communicate with each other in this way, even when they are not within direct radio reach. If a
system also continuously monitors the radio situation after the logon, it can detect how the signals
from an access point become weaker and those of another become stronger, and can then log on to
the stronger one without the user noticing. This procedure is referred to as roaming.
Operating system requirements
Windows 2000 and Windows XP
2 A26391-K133-Z131-1-7619, edition 3
Page 11

Wireless LAN (general)
Wireless network names (SSID)
Each wireless network has a name. You can select the wireless network you want to connect to, by
specifying its name. Network names allow different wireless networks in the same vicinity to coexist
without intruding on each other. For example, the company next door to yours may also use wireless
networking, and you want to make sure that your PC connects to your company’s network, and not
the other’s, even though your PC is within range of their access points. (How to prevent intruders
from connecting to your company’s network is the subject of the security discussion, below.) A
network name is simply a text sequence up to 32 characters long, such as "Bayonne Office", or
"Acme-Marketronics", or "BE45789", for example. A network name is case-sensitive, so you have to
be careful if you type it in. You always have the option to scan for available networks. This allows
you select the network from a list, preventing any network naming errors. The 802.11 standard
refers to network names as "Service Set Identifier", or SSID for short.
802.11 network security
With the advent of wireless networking, security becomes a critical concern to a far greater extent
than it had been previously, for the simple reason that it is easy for an attacker to eavesdrop on
such connections. With wired networking, most organisations can rely on physical security to protect
their networks. An attacker would have to get inside a company’s offices to be able to plug in to the
LAN and observe network traffic.
All it takes to observe wireless network traffic is a PC with a wireless card and a comfortable spot in
the parking lot outside or in the office next door. The following are some of the things that are
required to make a wireless network safe:
● A user must be authenticated by the network before he or she is allowed access, to make the
network safe from intruders.
● The network must be authenticated by the user before the user allows his or her PC to connect
to the network. This is to prevent a wireless device posing as a legitimate network from gaining
access to the user’s PC.
● The mutual authentication between user and network must be cryptographically protected.
This insures that you are connecting to the network you want, and not some phony one.
● The wireless connection between a PC and access point must be encrypted, so
eavesdroppers cannot access data that is supposed to be private.
There are two basic mechanisms for providing this type of secure encryption over a wireless
network:
● Preconfigured secrets, called WEP keys. These keep unauthorised users off the wireless
network and encrypt the data of legitimate users.
● Authentication using a protocol called 802.1X. This uses a variety of underlying authentication
protocols to control network access. The strongest of these protocols can provide mutual
authentication of user and network, and can dynamically create keys to encrypt wireless data.
A26391-K133-Z131-1-7619, edition 3 3
Page 12

Wireless LAN (general)
Wired-Equivalent Privacy (WEP) with preconfigured keys
With preconfigured WEP (Wired-Equivalent Privacy), both the client PC and access point are
assigned the same secret key. This key is used to encrypt all the data between the PC and access
point. In addition, the W EP key can be used to authenticate the client PC to the access point.
Unless the PC can prove it knows the WEP key, it is not allowed onto the network.
● If the access point requires a WEP key for authentication, you must carry out the assignment
to the access point in the Shared mode. The association mode is set in the network properties.
● If the access point does not require a WEP key for authentication, this is referred to as the
"open" mode. The association mode is set in the network properties.
● If the access point requires a WEP encryption for WPA instead of TKIP for the authentication,
all required WEP keys are generated from an ASCII passphrase, which you configure for your
access point and for Odyssey Client.
See the following topics:
● "Specifying association mode", for directions for selecting an association mode in Odyssey
Client
● "Specifying an appropriate encryption method for your association mode", for directions for
selecting WEP encryption when using shared mode
● "Preconfigured keys (WEP)", to use static WEP keys with Odyssey Client
● "Pre-shared keys (WPA)", to configure W EP encryption in W PA mode
Wi-Fi Protected Access (WPA) and TKIP encryption
As an enhancement to the 802.11 wireless standard, Wi-Fi Protected Access (WPA) encompasses
a number of security enhancements over Wired-Equivalent Privacy. These enhancements include
the following:
● Improved data encryption via TKIP (temporal key integrity protocol). TKIP provides stronger
encryption than WEP, by dynamically updating the encryption keys every 10,000 packets.
● 802.1X authentication with EAP. If the hardware of the access points in your network requires
that you carry out the authentication via the extended WPA mode, you can configure Odyssey
Client so that the authentication is carried out in the W PA mode. If the hardware is configured
for TKIP encryption, you can configure Odyssey Client for this enhanced data encryption
method as well. In addition to conforming to 802.1X specifications for dynamic key generation
(available with the strongest authentication methods), W PA allows for pre-shared keys to be
generated for TKIP (or WEP) encryption from a passphrase. If you configure a passphrase for
key generation in your access points, you must configure the same passphrase in Odyssey
Client.
4 A26391-K133-Z131-1-7619, edition 3
Page 13

Wireless LAN (general)
See the following topics:
● "Specifying association mode", to use W PA mode with Odyssey Client
● "Specifying an appropriate encryption method for your association mode", to use TKIP
encryption in WPA mode
● "Pre-shared keys (WPA)" to configure a static passphrase
802.1X standard
The IEEE 802.1X protocol provides authenticated access to a LAN. This standard applies to
wireless as well as wired networks. In a wireless network, the 802.1X authentication occurs after the
802.11 association is implemented. Wired networks use the 802.1X standard without any 802.11
association.
The WEP protocol using preconfigured keys has various shortcomings, both in terms of ease of
administration, as well as security. To alleviate these problems, the IEEE introduced another
standard, 802.1X. 802.1X provides better security than preconfigured WEP keys, and is easier to
deploy, particularly on large networks.
Using preconfigured WEP keys, it is the wireless client PC that is authenticated to the network. W ith
802.1X, it is the user that is authenticated to the network with the user credentials, which may be a
password, a certificate, or a token card. The authentication is not performed by the access point, but
rather by a central server. If this server uses the RADIUS protocol, it is called a RADIUS server.
With 802.1X, a user can log in to the network from any PC, and many access points can share a
single RADIUS server to perform the authentication. This makes it much easier for the network
administrator to control access to the network.
See the following topics for details:
● Extensible Authentication Protocol (EAP)
● Session resumption
● Reauthentication
Extensible Authentication Protocol (EAP)
802.1X uses the protocol called EAP (Extensible Authentication Protocol), to perform authentication.
EAP is not an authentication mechanism per se, but is a common framework for transporting actual
authentication protocols. The advantage of EAP is that the basic EAP mechanism does not have to
be altered as new authentication protocols are developed.
A26391-K133-Z131-1-7619, edition 3 5
Page 14

Wireless LAN (general)
Important notes
Safety notes
Most of the safety information is contained in the "Getting Started" manual of your device. Some of
the most important information is outlined below.
● Switch off the radio components (Bluetooth or wireless LAN) on the device when you are in a
hospital, an operating room or near a medical electronics system. The transmitted radio waves
can impair the operation of the medical devices.
● The "EasyGuide" manual provided with your device describes how to deactivate the radio
component.
● Keep the device at least 20 cm from a pacemaker, as otherwise the proper operation of the
pacemaker may be impaired by radio waves.
● The transmitted radio waves can cause an unpleasant humming in hearing aids.
● Switch off the device when you are in an aircraft or driving in a car.
● Do not let the device near flammable gases or into hazardous environments (e.g. paintshops)
with radio components switched on, as the transmitted radio waves can cause an explosion or
a fire.
The company Fujitsu Siemens Computers GmbH cannot be held responsible for radio or television
faults arising from unauthorised changes made to this device. Fujitsu Siemens is, furthermore, not
responsible for replacing and / or exchanging connector cables and devices which have not been
specified by Fujitsu Siemens Computers GmbH. The user is solely responsible for repairing faults
arising from such unauthorised changes made to a device and for replacing and/or exchanging
devices.
CE marking
This equipment complies with the requirements of Directive 1999/5/EC of the European Parliament
and Commission from 9 March, 1999 governing Radio and Telecommunications Equipment and
mutual recognition of conformity.
This device is approved for use in Belgium, Denmark, Germany, Finland, Greece, Great Britain,
Ireland, Italy, Luxembourg, the Netherlands, Austria, Portugal, Sweden, Switzerland, Spain, Iceland,
Liechtenstein and Norway. Contact the corresponding government office of the respective country
for current information on possible operating restrictions. If your country is not included in the list,
then please contact the corresponding supervisory authority as to whether the use of this product is
permitted in your country.
6 A26391-K133-Z131-1-7619, edition 3
Page 15

Wireless LAN (general)
Restrictions
● France
– Limited frequency range: only the channels 10 to 13 (2457 MHz or 2472 MHz) may be
used in France. It is prohibited to use the device outdoors.
● Italy
– A ministerial permit is also required for use indoors. Please contact the seller concerning
the required procedure. It is prohibited to use the device outdoors.
● Netherlands
– A licence is required for use outdoors. Please contact the seller concerning the required
procedure.
Radio frequencies and security standards
The following information represents the status of January 2002. Current information is available
from the corresponding government office of your country (e.g. www.regtp.de).
IEEE standard 802.11a frequencies
Country Channel
36
5180
MHz
Austria X X X X
Belgium X X X X X X X X
Denmark X X X X
Finland X X X X X X X X
France X X X X
Germany X X X X
Greece
Italy
Ireland X X X X X X X X
Luxembourg
Netherlands X X X X
Norway X X X X
Portugal X X X X
Spain
Sweden X X X X
Switzerland X X X X
Great Britain X X X X X X X X
Channel
40
5200
MHz
Channel
44
5220
MHz
Channel
48
5240
MHz
Channel
52
5260
MHz
Channel
56
5280
MHz
Channel
60
5300
MHz
Channel
64
5320
MHz
A26391-K133-Z131-1-7619, edition 3 7
Page 16

Wireless LAN (general)
IEEE standard 802.11b (11 Mbits/s) / 802.11g (54 Mbits/s) frequencies
Wireless network cards and adapters are intended for operation in the ISM (Industrial, Scientific,
Medical) frequency range between 2.4 and 2.4835 GHz in accordance with the IEEE 802.11b
standard. As each of the 13 usable radio channels requires a bandwidth of 22 MHz due to the DSSS
(Direct Sequence Spread Spectrum) process, a maximum of three mutually independent channels
(e.g. 1, 6 and 11) are available. In the following tables you will find the channels permitted in your
country:
Channel No. /
MHz
1 / 2412 X X X
2 / 2417 X X X
3 / 2422 X X X
4 / 2427 X X X
5 / 2432 X X X
6 / 2437 X X X
7 / 2442 X X X
8 / 2447 X X X
9 / 2452 X X X
10 / 2457 X X X X
11 / 2462 X X X X
12 / 2467 X X
13 / 2472 X X
Europe,
R&TTE
France,
R&TTE
US
FCC
CA
RSS-210
8 A26391-K133-Z131-1-7619, edition 3
Page 17

Installation of Odyssey
The installation software for Odyssey Client is located in the directory C:\Add on\Software.
Before you install, please note the following:
● Your wireless network adapter card and associated driver software should have already been
installed.
● Under Windows 2000 and Windows XP you must have administrator rights.
Installing Odyssey Client
To install Odyssey Client:
► Double-click on the file FSC-OdysseyClient.msi in the directory C:\Add on\Software.
The installation wizard is run to guide you through the installation process.
► Click on Next to continue.
The licence conditions are shown.
► Click on the option I accept the terms in the license agreement to recognise the licence conditions
and click on Next to continue.
► Enter your user data and click on Next to continue.
► Select the Complete option in the Setup Type window to carry out the installation in the default
directory. Select the Custom option if you want to specify the installation directory yourself. This
option should only be used by experienced users. Click on Next to continue.
The installation wizard now has all information required to begin with the installation.
► Click on Back if you want to check or change your entries, and click on Install to start the
installation.
The installation is started. This can take a few minutes. When the installation is completed, the
InstallShield Wizard Completed window will appear. You can run the Odyssey Client immediately or
have the Readme file displayed first.
► Click on Finish to complete the installation.
On a computer with several user accounts, Odyssey Client is available following installation of all
users. However, the settings for control of the Odyssey Client operation are user-specific and must
be carried out for each user account individually.
Configure and Enable Wizard
When you install Odyssey Client for the first time, Configure and Enable Wizard automatically appears
following the installation to complete configuration of and activate Odyssey Client.
If you do not want to carry out the configuration at this time, you can do this later. Start the Odyssey
Client Manager under Start – Programs – Fujitsu Siemens Computers – Odyssey Client for Fujitsu Siemens
Computers – Odyssey Client Manager for Fujitsu Siemens Computers. Configure and Enable Odyssey
Wizard automatically starts up.
A26391-K133-Z131-1-7619, edition 3 9
Page 18

Page 19
Using Odyssey Client
Odyssey Client Manager Overview
Odyssey Client for Fujitsu Siemens Computers is the name of the Windows interface of the Odyssey
Client Manager with which you can control and configure your wireless LAN. This interface is
consistent for all Fujitsu Siemens Computers platforms on which you can run the product.
► Start the Odyssey Client Manager under Start – All Programs – Fujitsu Siemens Computers –
Odyssey Client for Fujitsu Siemens Computers – Odyssey Client Manager or double-click on the
Odyssey Client Manager icon in the task bar.
A26391-K133-Z131-1-7619, edition 3 11
Page 20
Using Odyssey Client
Odyssey Client Manager display
For most network connections, Odyssey Client Manager consists of a number of windows that allow
you to control different aspects of its operation:
● In the Connection window you can control your network connection and view your current
connection status.
● Use the Profiles window to set information that is used when you authenticate, or log in, to the
network, such as your password or certificate.
● Use the Networks window to configure different wireless networks and how you want to connect
to them.
● Use the Trusted Servers window to set certificate and identity information about the servers that
may authenticate you when you connect, to ensure that you are logging in to the network that
you intend.
● The Adapters window lets you configure one or more network adapters (interface cards) for
wireless networks.
All of the windows are listed at the left of the Odyssey Client Manager display. Click the name of any
window to view or modify it.
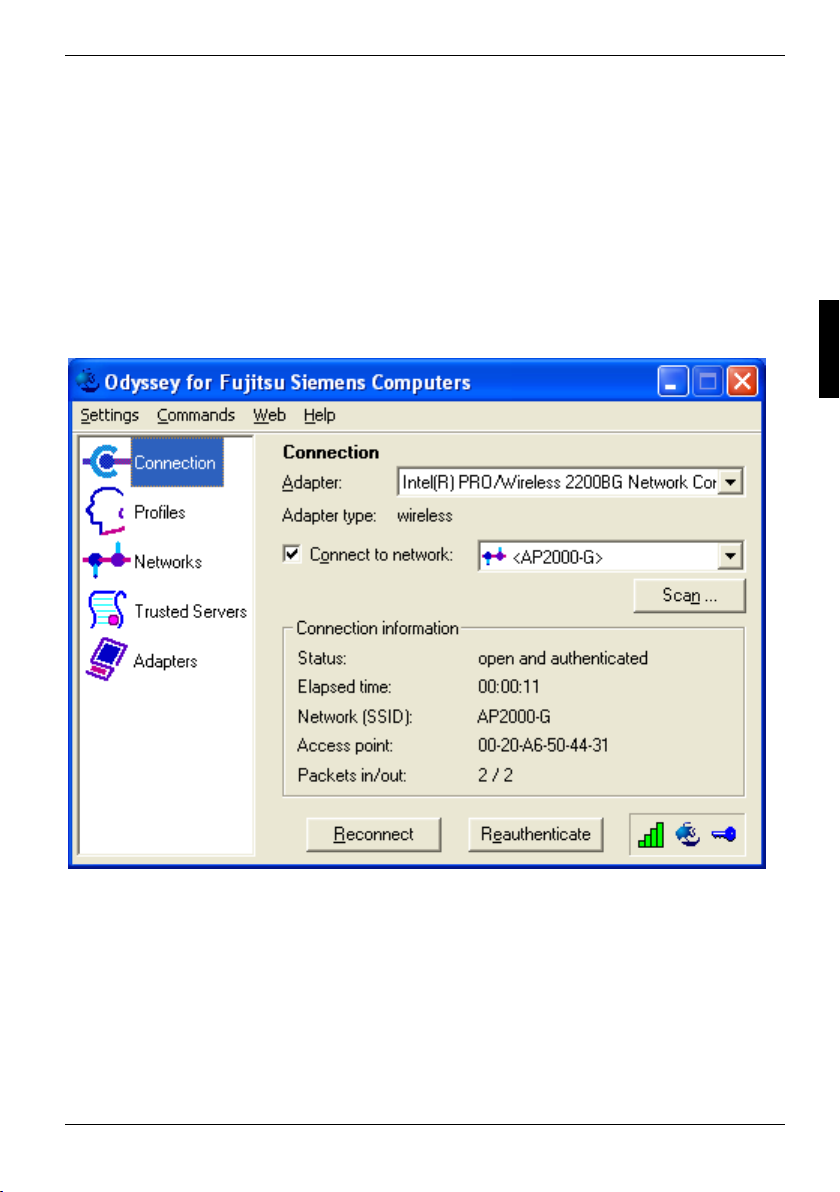
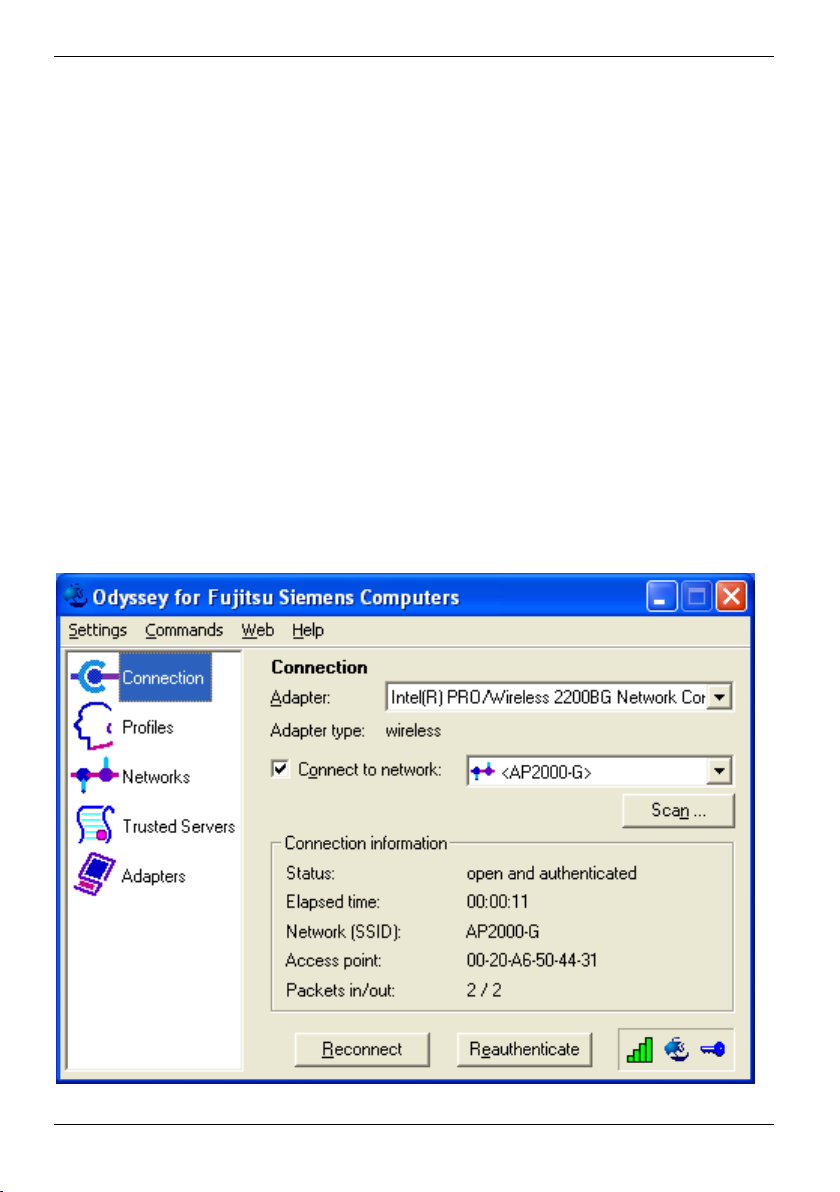
Controlling network connections - "Connection" window
12 A26391-K133-Z131-1-7619, edition 3
Page 21

Using Odyssey Client
Selecting an adapter
If you or your administrator has configured more than one adapter for use with Odyssey, then you
can use the Adapter drop-down list in the Connection window to associate any of those adapter cards
with a network connection.
Once you select an adapter, the Adapter type field in the Connection window is updated to reflect the
type of wireless adapter you select.
Connecting to a network
When you connect to a network using a wireless adapter, you specify all the information required for
the connection using an Odyssey Client network definition. In the process, you must also enter the
authentication information you have previously defined in an Odyssey Client profile (see "Adding or
changing profile - "Profile Properties" window" in the "Defining profiles - "Profiles" window" section).
The Connect to network checkbox lets you connect and disconnect from the wireless network. If you
want to be connected to a wireless network, make sure this box is marked.
The drop-down list to the right of Connect to network lets you select a wireless network to connect to.
All networks you have already configured using the Networks window appear in this list.
The network names are shown in square brackets after the network description.
The following symbol is located before the name:
for networks
To connect to a network that you have already configured:
► Select the network you wish to establish the connection to from the selection menu.
► Mark Connect to network, if it is not already marked.
To disconnect from a network, unmark Connect to network.
Scanning for wireless networks
If you travel frequently, you may want to want to authenticate through locally available wireless
networks that you have not already configured. To connect to a wireless network that is not yet
configured, follow these steps:
► Click on Scan in the Connection window.
Odyssey Client surveys the air waves and displays a list of all wireless networks that are currently
reachable.
A26391-K133-Z131-1-7619, edition 3 13
Page 22

Using Odyssey Client
► Select the network to which you want to connect, and click OK.
– If you have already configured the settings for this network, Odyssey Client attempts to
connect to it using those settings.
– If you have not yet configured settings for this network, the Network Properties window
first appears. Specify settings and click OK.
Odyssey Client attempts to connect to the network.
14 A26391-K133-Z131-1-7619, edition 3
Only those wireless networks for which the administrator has configured SSID (network
name) as visible ("send beacons") are visible during scanning.) If the SSID is not visible,
i
then you must enter the network from the Networks window.
Page 23

Using Odyssey Client
Reconnecting to a network
If the radio connection to a network does not function properly, you can disconnect the existing
connection and establish a new connection.
► Click on Reconnect in the Connection window.
The existing connection is disconnected and a new connection to the selected wireless network is
established. The new connection may be with a different access point (on the same network) than
your previous connection, depending on factors such as signal strength. If authentication is required
on this network, you are reauthenticated when the new connection starts. If dynamic encryption keys
are in use, they are refreshed.
Reauthenticating in a network
When you click Reauthenticate in the Connection window, Odyssey Client reauthenticates you over
the existing connection shown in the display, without starting a new connection. If dynamic
encryption keys are in use, they are refreshed.
Disconnecting from a network connection
To disconnect a network connection, remove the marking in the checkbox Connect to network for
wireless connections.
Viewing connection information
The Status field in the Connection window displays the current status of your connection to the
network through this adapter. One of the following messages appears:
Status message Definition
open and authenticated The connection is authenticated, and you are connected.
open / authenticating Reauthentication is in progress, and you are connected.
open / requesting authentication You have requested reauthentication, and you are connected.
open The connection is not authenticated, but you are connected.
peer-to-peer The network type is peer-to-peer (ad hoc), and you are
authenticating You are not yet connected, but authentication is in progress.
requesting authentication You are not yet connected, but you have requested
waiting to authenticate You are not yet connected and the last authentication was
A26391-K133-Z131-1-7619, edition 3 15
connected.
authentication from the access point.
unsuccessful, however you are waiting for another attempt.
Page 24

Using Odyssey Client
Status message Definition
searching for access point You are not connected, and communication with an access
searching for peer(s) You are not connected, and communication with other PCs
disconnected You are not connected, and Connect to network may be
Odyssey is disabled You are not connected and Odyssey Client has been
adapter not present You are not connected and the configured adapter is not
The Elapsed time field in the Connection window displays the time that has elapsed since the current
connection has begun.
The Network (SSID) field displays the name of the wireless network to which you are connected.
Refer also to "Wireless network names (SSID)".
The Access point field displays the MAC address of the wireless access point to which you are
connected. (A MAC address is a unique 48-bit number encoded into a device by the manufacturer.)
The Packets in/out field displays the total number of network packets received and transmitted since
this connection began.
point on the requested network has not been established.
This may occur when your adapter does not support 802.1X,
or if your access point is not within range.
on the peer-to-peer network has not been established.
unmarked. Refer to "Connecting to a network".
disabled.
currently available. This may occur when your adapter does
not support 802.1X.
Defining profiles - "Profiles" window
An Odyssey Client profile contains all the information necessary to authenticate you to the network.
This includes information such as your login name, your password or certificate, and the protocols
by which you can be authenticated. Your profile is, in effect, the identity that you present to the
network and the means that you use to prove that identity.
You can have different profiles for different networks. For example, you may have different login
names or passwords on different networks, or you may use a password on one network, and a
certificate on another.
► Click in the Odyssey Client Manager on Profiles to display the window.
16 A26391-K133-Z131-1-7619, edition 3
Page 25

Using Odyssey Client
The Profiles window lists all the profiles that have been configured. When you first use Odyssey Client
Manager, you may find a profile called Initial Profile, containing commonly used settings.
Alternatively, your network administrator may have already created one or more profiles for you.
● To add a profile, click Add. The Profile Properties window appears. Set the name for the new
profile, configure the settings, and click OK.
● To remove a profile, select the profile and click Remove.
● To modify a profile, select the profile and click Properties, or double-click the profile. The Profile
Properties window appears. Modify the settings and click OK.
Adding or changing profile - "Profile Properties" window
The Profile Properties window allows you to configure a profile. The window is displayed when you
click Add or Properties from the Profiles window.
When you add a new profile, you must enter a unique name in the Profile Name field. For example,
you may want to use "Office", for your profile associated with your place of employment, and
"Home" for your home network.
Once you specify and save a profile, you do not have the ability to edit the profile name when you
edit any of its other profile properties. You can, however, remove the profile and create a new one
with a different name.
A26391-K133-Z131-1-7619, edition 3 17
Page 26

Using Odyssey Client
In addition to the profile name, you can configure (and edit) the following parameters in a profile:
● Login name in the User Info tab
● Password and/or certificate in the Authentication tab
● A specification of the authentication protocols which can be used for your authentication for the
network in the TTLS Settings and PEAP Setting tabs
"User Info" tab
The User Info tab lets you configure the name you use to log in, as well as your password and/or
certificate information.
18 A26391-K133-Z131-1-7619, edition 3
Page 27

Using Odyssey Client
Login name
Enter your user name into the Login name field. This is the name that is presented to the network
when you authenticate. If you are authenticating against a Windows Active Directory, use the form,
domain\user name, (for example, Acme\george). Otherwise you use a login name in accordance
with the syntax which your administrator has specified for user names in the authentication
database.
Please note that:
● If you are logged in to your network domain, (as opposed to local logon), by default, Odyssey
Client populates this field with the standard network form, domain\user name, where user
name is your user name.
● If you are logged in to your client locally (as opposed to a network domain), Odyssey Client
only enters your user name in this field.
● It is possible that you must add the server name after your login name for the purpose of
routing your authentication to the proper server.
For example, acme\george@sales.acme.com. Your network administrator can tell you how to set
this field correctly.
Password
Mark Permit login using password to enable authentication methods that use your password for
authentication. You can specify which password Odyssey Client uses:
● Select use Windows password if you want to authenticate to the network using the same
password you present when you log in to Windows.
● Select prompt for password if you want Odyssey Client to prompt you when it is time to
authenticate.
● Select use the following password and enter a password in the box below, if you want Odyssey
Client to save your password and use it each time you authenticate with this profile.
If you select prompt for password, you are generally only prompted the first time you are
authenticated after startup. Odyssey Client remembers this password and reuses it for the duration
of your Windows session. The password you enter applies only to a single profile. If you are
authenticated using a different profile, you are prompted again.
You may also be prompted to enter your Windows password when connecting to the network on
some occasions.
● If you accidentally enter an incorrect password or have any other type of authentication failure.
This feature is in place, in part, so as to prevent accidental lockout due to the reuse of bad
passwords.
● If you are required to change your Windows password periodically, and you are accessing the
network with EAP-TTLS or PEAP authentication before Windows logon.
Certificate
Mark Permit login using my certificate to enable authentication methods that use your certificate for
authentication.
To select a personal certificate with which to authenticate, click Browse. A list of your personal
certificates appears. Select a certificate and click OK.
A26391-K133-Z131-1-7619, edition 3 19
This is an advanced feature. See your network administrator for information on which
certificate to select if you require one.
i
Page 28

Using Odyssey Client
"Authentication" tab
In the Authentication tab you can specify protocols with which you authenticate yourself in the
network.
20 A26391-K133-Z131-1-7619, edition 3
Page 29

Using Odyssey Client
Selecting Authentication Protocols
The Authentication protocols list displays the protocols that you have enabled for authentication. You
may have a single authentication protocol in the list, or you may have several. If you have more than
one, you can order them by preference. The sequence determines the protocol which the server
uses when more than one common protocol is available.
● To reorder protocols, select a protocol and use the up and down arrow buttons to reposition it.
● To remove a protocol, select the protocol, and click Remove.
● To add a protocol to the list, click Add. The Add EAP Protocol window appears. Select one or
more protocols to add, and click OK. You can select more than one protocol if you hold down
Ctrl on your keyboard as you select with your mouse. Note that any protocols you have
already selected are not listed in this window.
Validating the Server Certificate
Certain protocols, such as EAP-TTLS, PEAP, and EAP-TLS, allow you to verify the identity of the
authentication server as the server verifies your identity. This is called mutual authentication.
Mark Validate server certificate to verify the identity of the authentication server based on its
certificate when using EAP-TTLS, PEAP, and EAP-TLS. (This field is marked by default.) You can
select trusted authentication server certificates using the Trusted Servers window. Refer to
"Specifying trusted servers - "Trusted Servers" window".
You should, as a general rule, mark Validate server certificate. As an option, you can deactivate this
important security measure, however only when no certificate is required by the server. You should
only do so when your network administrator instructs you to.
A26391-K133-Z131-1-7619, edition 3 21
Page 30

Using Odyssey Client
"TTLS Settings" tab
The TTLS Settings tab lets you configure the use of EAP-TTLS as an authentication protocol. These
settings are only relevant when you select EAP-TTLS as one of your authentication protocols in the
Authentication tab.
EAP-TTLS works by creating a secure, encrypted tunnel through which you present your credentials
to the authentication server. Thus, inside EAP-TTLS there is yet another inner authentication
protocol that you must configure.
22 A26391-K133-Z131-1-7619, edition 3
Page 31

Using Odyssey Client
Selection of inner authentication protocol
Select the desired inner authentication protocol in the Inner Authentication Protocol selection menu.
The following protocols are available:
● PAP
● CHAP
● MS-CHAP
● MS-CHAP-V2
● PAP/Token
● EAP
The most commonly used protocol is MS-CHAP-V2. The protocol allows you to be authenticated
against a Windows Domain Controller as well as other, non-Windows user databases.
CHAP is the most frequently used protocol for the authentication of user databases which do not run
under Windows.
PAP/Token is the protocol to use with token cards. W hen you use PAP/Token, the password value
you enter into the password dialogue is never cached, since any Token-based password is only
good for one use.
Check with your network administrator to determine which inner authentication protocol can be used
on your network.
EAP as inner authentication protocol
If you select EAP as your inner authentication protocol, you must configure the list of Inner EAP
protocols with one or more protocols.
● To add a protocol to the list, click Add. The Add EAP Protocol window appears. Select one or
● To remove a protocol, select the protocol, and click Remove.
● To reorder protocols, select a protocol and use the up and down arrow buttons to reposition it.
You cannot use CHAP as a process for the inner authentication for a Windows NT
domain or Active Directory. Therefore, do not use CHAP for authentication on the
i
Odyssey-Server, as it only authenticates itself for a Windows domain or an Active
Directory.
more protocols to add, and click OK. You can select more than one protocol if you hold down
Ctrl on your keyboard as you select with your mouse. Note that any protocols you have
already added are not listed in this window.
A26391-K133-Z131-1-7619, edition 3 23
Page 32

Using Odyssey Client
Setting an anonymous name
EAP-TTLS has a unique feature that other protocols do not offer. Because EAP-TTLS sets up an
encrypted tunnel for your credentials, it is also able to pass your login name through that tunnel.
That means that not only are your credentials secure from eavesdropping, but your identity is
protected as well.
Thus, with EAP-TTLS you have two identities: an inner one, and an outer one. The inner identity is
your actual login name, and is taken from the Login name field in the User Info tab. Your outer identity
can be completely anonymous. Set your outer identity in the Anonymous name field.
As a general rule, set Anonymous name to anonymous, that is, its default value. In some cases you are
required to add additional text. For example, if this outer identity is used to route your authentication
to the proper server, and you may be required to use anonymous@acme.com. Your network
administrator can tell you how to configure this field correctly.
"PEAP Settings" tab
If you select EAP/PEAP as an authentication method in the Authentication tab, then you can use up to
three inner EAP authentication methods:
● EAP/MS-CHAP-V2
● EAP/Token Card
● EAP/MD5-Challengeto add or remove any inner authentication methods used with PEAP:
► Select the PEAP Settings tab.
Your outer identity can be anonymous only if EAP-TTLS is the only authentication
protocol configured on the Authentication Protocols tab. If other protocols are also enabled,
i
Odyssey Client cannot keep your identity private, and the Anonymous name field is
disabled. If you would like the anonymity EAP-TTLS provides, you must configure EAPTTLS as the sole authentication protocol.
24 A26391-K133-Z131-1-7619, edition 3
Page 33

Using Odyssey Client
► Select any protocols you want to remove and click Remove.
► Click Add to add a protocol.
A26391-K133-Z131-1-7619, edition 3 25
Page 34

Using Odyssey Client
The Add EAP Protocol window appears.
► Select one or more protocols to add, and click OK.
Note that any protocols you have already selected are not listed in this window.
► Click OK when you are completely done modifying the profile configuration.
26 A26391-K133-Z131-1-7619, edition 3
Page 35

Using Odyssey Client
Configuring wireless networks - "Networks" window
The Networks window allows you to configure settings for connecting to any number of wireless
networks.
► Click in the Odyssey Client Manager on Networks to display the window.
All configured networks are listed. You can perform the following tasks in the Networks window:
● To add a network, click Add. The Network Properties window appears. Configure the settings for
the new network and click OK (see section "Adding or changing networks – "Network
Properties" window").
● To remove a network, select the network and click Remove.
● To modify the settings for a network, select the network and click Properties, or double-click the
network name. The Network Properties window appears. Modify the settings and click OK (see
section "Adding or changing networks – "Network Properties" window").
A26391-K133-Z131-1-7619, edition 3 27
Page 36

Using Odyssey Client
Network titles
The network designations in the Networks window are structured as follows:
● The name of the network appears in angled brackets.
● The description of the network precedes the name. This description is taken from the
Description field in the Network Properties window. You can add your own description to any
network you configure. This helps you to distinguish networks.
The field for the network description is useful in situations in which you want to switch between
different "personalities" in one and the same network. For example, you may want to use different
credentials at different times. The description field also makes it possible to distinguish between two
different networks with the same network name.
Network names are arbitrary text chosen by an administrator. So it is possible for two unrelated
networks to have the same name. In the illustration of the Networks window, there are two Toronto
networks. The configured descriptions indicate that password credentials are used with one and
certificate credentials with the other.
Adding or changing networks – "Network Properties" window
You can configure wireless network settings in the Network Properties window. Click Add or Properties
from the Networks window to view the network properties. The Add Network or Network Properties
window appears.
28 A26391-K133-Z131-1-7619, edition 3
Page 37

Using Odyssey Client
Here you can configure the following parameters.
● Network properties in the Network section
● Authentication fields in the Authentication section
● Pre-configured keys (WEP or WPA) in the Pre-configured keys section
A26391-K133-Z131-1-7619, edition 3 29
Page 38

Using Odyssey Client
Network
You can perform the following tasks in this section of the Network Properties window:
● Specifying network name
● Searching for a network
● Configuring Odyssey to connect to any available network
● Specifying a description of the network
● Specifying the network type
● Specifying association mode
● Specifying an appropriate encryption method for your association mode
Specifying network name
Set Network name (SSID) to the name of the wireless network. The network name may be up to 32
characters long. It is case-sensitive. This name must be entered correctly in order to successfully
connect.
Searching for a network
You can type in the name of the network directly, or you can click Scan to select from a list of all
currently visible networks.
When you are in the vicinity of the network you are configuring, using the Scan button is not only
easier than typing, but also guarantees that the network name is set correctly.
Note that only access points that transmit beacons are visible to you when you use the Scan button.
Configuring Odyssey for connection to any desired network
Odyssey Client Manager provides a special network configuration called [any]. The [any] network
connects to any available network, regardless of its name. The [any] network is useful when you are
wandering through conferences, hotels or other locations that provide network access. When you
select the [any] network, from the Connection window, you can connect to such networks without
having to configure them individually.
To configure an [any] network, mark Connect to any available network and click on OK.
Although you can use WEP keys and profiles with [any], the more common practice is to use [any]
without 802.11 or 802.1X authentication.
Specifying a description of the network
Network descriptions are useful for distinguishing between networks with the same or similar names.
You can enter the network description in the Description field.
30 A26391-K133-Z131-1-7619, edition 3
Page 39

Using Odyssey Client
Specifying the network type
If you did not use the Scan button to select your network, you must specify the type of network by
choosing one of the options from the Network type drop-down list.
● Select Access point (infrastructure mode) if this network uses access points to provide
connectivity to the corporate network or the internet. This is the most common setting.
● Select Peer-to-peer (ad-hoc mode) to set up a private network with one or more other PCs.
Specifying association mode
Before authentication can take place, you must associate your client to an access point. The
association mode that is required of you depends on your access point hardware, and how it is
configured. Your network administrator can help you configure the association mode that is required
for your network.
See "Wired-Equivalent Privacy (WEP) with preconfigured keys" and "Wi-Fi Protected Access (WPA)
and TKIP encryption" for more information on these encryption and association mode choices.
You can chose one of three association modes:
● Open for the connection to a network by an access point or switch with 802.1X authentication.
Choose this mode if you are not required to select Shared mode or W PA.
● Shared, for connecting to a network through an access point that requires WEP keys for
association and data encryption.
● WPA, for connecting to a network through an access point that implements WPA (Wi-Fi
Protected Access).
Specifying an appropriate encryption method for your association mode
Your choice of encryption method also depends on the access point requirements. Your selection
options differ in accordance with the selected association mode. Further information can be found
under "Wired-Equivalent Privacy (WEP) with preconfigured keys" and "Wi-Fi Protected Access
(WPA) and TKIP encryption".
You have the following options:
● none, for using 802.1X authentication without WEP keys. This option is only available when
you have selected the open association mode.
● WEP, for using WEP keys for data encryption. This option is available for all association
modes, and is required when you associate in Shared mode. When you select this option, you
must fill in WEP keys in the Pre-configured keys section of the Network Properties window. You
must select this option when the access points in your network require WEP keys for the
authentication (Shared mode).
● TKIP, for using the temporal key integrity protocol. Choose this option when the access points
in your network require WPA association, and are configured for TKIP data encryption.
● AES when using the extended default encryption protocol. Choose this option when the access
points in your network require WPA association, and are configured for AES data encryption.
A26391-K133-Z131-1-7619, edition 3 31
Page 40

Using Odyssey Client
Authentication fields
In the Authentication section you can configure network authentication with the following
characteristics:
● Authenticate using profile
● Automatic key generation
Authenticate using profile
If the wireless network you are configuring requires that you authenticate using your personal
credentials, mark Authenticate using profile, and select the profile to use for authentication from the
drop-down list at the right. You must have already configured a profile appropriate for
authenticating onto this network.
When you mark Authenticate using profile, Odyssey Client performs an 802.1X authentication using
your password, certificate, or by other means, as is configured in the selected profile.
Automatic key generation
Mark Keys will be generated automatically for data privacy if the authentication method specified in the
profile results in the creation of dynamic WEP keys for use between your PC and the access point.
Certain authentication methods, such as EAP-TTLS, PEAP, and EAP-TLS, generate keys. Other
authentication methods do no generate keys. If you use EAP-TTLS, PEAP, or EAP-TLS to
authenticate, mark this field. You can use any of these authentication methods for access points
with 802.1x authentication. This option is more secure than using static (preconfigured) keys. Leave
this option unmarked if you are required to use preconfigured WEP keys, or, in the case of WPA
authentication, a pre-shared key.
Preconfigured keys (WEP or WPA)
The wireless network may require that you preconfigure WEP keys, or that you pre-share a
passphrase, in the case of WPA authentication. You can enter keys in the lower portion of Network
Properties.
Pre-shared keys (WPA)
If you associate in W PA mode, and you do not generate keys automatically when you associate an
authentication profile to the network connection, then you must supply a pre-shared ASCII
passphrase in Passphrase field. This passphrase is used as a seed to generate the required keys.
32 A26391-K133-Z131-1-7619, edition 3
Page 41

Using Odyssey Client
Preconfigured keys (WEP)
If you select the Shared mode, you must configure at least one WEP key. You must also configure
at least one WEP key when you select WEP encryption for the open mode, and you do not generate
keys automatically when you associate an authentication profile to the network connection. W EP
keys serve the following purposes:
● Associate with an access point before a connection can be established (shared mode).
● Encrypt data between your PC and the access point (or other PCs in a peer-to-peer network)
see "Wired-Equivalent Privacy (WEP) with preconfigured keys".
If the wireless network uses 802.1X authentication and dynamic WEP keys are generated (i.e., you
mark Authenticate using profile and Keys will be generated automatically for data privacy), then you do
not need to enter preconfigured WEP keys for data privacy. However, it is possible, though not
typical, to use preconfigured WEP keys for authentication in addition to 802.1X. For example, EAPMD5 does not generate WEP keys for data encryption, so you must supply one when your profile is
set to authenticate with this method.
If you implement either of these uses of preconfigured WEP keys, you must mark the appropriate
boxes and set one or more WEP keys appropriately:
● Mark authenticate to access points (shared mode) if preconfigured WEP keys are required to
authenticate to an access point prior to connection to the wireless network.
● Mark Keys will be generated automatically for data privacy to use preconfigured WEP keys for
encryption of data over the wireless network. Enter the WEP keys in fields Key 0 through Key 3.
The values entered here must match those of the access points or peer computer to which you
connect. It is most common for Key 0 to be used, although your network may require other
keys as well. You can enter keys either as ordinary text characters (ASCII) or hexadecimal
characters.
WEP keys are either 40 or 104 bits long. This corresponds to either 5 or 13 characters when you
enter them as ASCII characters, or 10 or 26 characters when you enter them as hexadecimal digits.
To enter any preconfigured WEP keys:
► In the Format for entering keys list, select either ASCII characters or hexadecimal digits, depending
on how you want to enter the keys.
► Type in the text fields Key 0 through Key 3, each key that you want to preconfigure.
A26391-K133-Z131-1-7619, edition 3 33
Page 42

Using Odyssey Client
Specifying trusted servers - "Trusted Servers" window
The Trusted Servers window allows you to configure which authentication servers you trust for the
purpose of logging you in to the network.
► Click in the Odyssey Client Manager on Trusted Servers to open the window.
When you configure trust in a server, you must not only specify the name of the server, but also the
certificate chain to which it belongs. Odyssey Client is very flexible and offers a simple, highly
developed method for configuring trusted servers.
Further information can be found under "Extensible Authentication Protocol (EAP)".
34 A26391-K133-Z131-1-7619, edition 3
Page 43

Using Odyssey Client
Simple method for configuring trusted servers
In the large majority of cases, you can use the simple method of configuring trust. With this method,
you must specify two items:
● The server domain name, or the ending of the domain name (for example, acme.com)
● The certificate of any certificate authority in the chain. This could be the certificate of a root or
an intermediate certificate authority.
Domain Names
Each server has a domain name that uniquely identifies it and that domain name is normally
contained in the "Subject CN" field of the server certificate.
A server domain name ends with the name of a larger administrative domain, to which the server
belongs. For example, the Acme company might have the a domain name, such as acme.com. The
company might also have several authentication servers, with the names auth1.acme.com,
auth2.acme.com, and auth3.acme.com, for example.
As is apparent from this example, by specifying what the server domain name must end with, you
can configure trust for all the servers in an organisation with a single entry.
Adding a trusted server entry
To add an entry to the trusted servers list, follow these steps:
► Click Add. The Add Trusted Servers Entry window appears.
► In the Server domain name must end with field, enter the name (or final elements of the name) of
the domain to which the trusted server must belong. You are not allowed to leave this entry
blank.
A26391-K133-Z131-1-7619, edition 3 35
Page 44

Using Odyssey Client
► Set the Server certificate must be issued by field to the certificate of the certificate authority that
must have directly or indirectly issued the server certificate. To assign a certificate, follow
these steps:
– Click Browse to get a list of certificates.
– Select one certificate from the list and click on OK.
You can select a Root or Intermediate Certificate Authority as a certificate. It need not be the
certificate that directly issued the server certificate. It may be any certificate in the chain.
Removing a trusted server entry
To remove an entry from the trusted servers list, select the entry and click Remove.
Editing a trusted server entry
To edit an entry in the trusted servers list, select the entry and click Edit. The Edit Trusted Servers
Entry window appears, allowing you to modify the server domain and the certificate of the issuer.
36 A26391-K133-Z131-1-7619, edition 3
Page 45

Using Odyssey Client
Advanced method for configuring trusted servers
If you need more trust control, you can use the advanced method.
With this method, the entire tree of trust is displayed. The trust tree shows all configured trusted
servers.
Each path through the trust tree defines a set of rules for matching a certificate chain. Odyssey
Client trusts an authentication server only if its certificate chain matches at least one path through
the trust tree.
A path through the trust tree is composed of two or more nodes:
● Each top-level node is the certificate of a root or intermediate certificate authority.
● Each intermediate node (if present) is the name of an intermediate certificate authority in the
● Each end node is the name of a server you trust with the authentication. The names of
If you do not have a working knowledge of certificates and certificate chains, you should
not attempt to configure trust using the advanced method. Consult your network
i
administrator as to how to configure trusted servers.
chain.
certificate authorities and servers may be specified as subject names or as domain names. In
addition, you may specify that the name in a certificate must match the configured name
exactly or that it must end in the configured name.
A26391-K133-Z131-1-7619, edition 3 37
Page 46

Using Odyssey Client
Displaying the trust tree
To display the trust tree, click Advanced. The Trusted Servers window appears in which you can
display and change the trust rules.
Adding certificate nodes
To add a new certificate to the top level of the trust tree:
► Click on Add certificate. The Select Certificate windows appears.
► Select a certificate and click OK. You may select either from the list of intermediate or trusted
root certificates.
For detailed information about any certificate before you add it, select the certificate and click View.
38 A26391-K133-Z131-1-7619, edition 3
Page 47

Using Odyssey Client
Adding authentication servers or intermediate CA nodes
All nodes below the top level identify either authentication servers or intermediate certificate
authorities. With an end node it is assumed that it designates an authentication server. Otherwise, it
is assumed to identify an intermediate certificate authority. To add an authentication server or
intermediate certificate authority to the tree:
► Select the node in the tree, beneath which you want to add the new item.
► Click on Add Identity. The Add Identity window appears.
► Enter the information that defines the rules that Odyssey Client uses to match a certificate in
the server certificate chain to this node.
► Click on OK.
A26391-K133-Z131-1-7619, edition 3 39
Page 48

Using Odyssey Client
The Add Identity window lets you set the matching rules for a single node in the trust tree.
To specify a trusted server or an Intermediate CA with a valid certificate, select:
● regardless of its name to match any certificate, provided it is signed by the certificate authority in
the node above.
● if its name matches the following name exactly to require that the name in the certificate exactly
match the name you specify.
● if its name ends with the following name to require that the name in the certificate is subordinate
to the name you specify. For example, a certificate with name "sales.acme.com" would match
an entry of "acme.com".
For Name of server or intermediate CA, enter the name (or final elements of a name) you want to
match. (This field is not required if you make the selection regardless of the name.). The form of the
name depends on your choice of Name type.
For the certificate authority Name type, you must indicate how the name is interpreted and where in
the certificate the name is found. Select one of the following options:
● Domain name in Subject Alternative Name or Common Name if the domain name (e.g., acme.com)
is found in the Subject Alternative Name field in the certificate or, if that is not present, the
Common Name within the Subject field of the certificate (this is the most typical choice).
● Domain name in Subject Alternative Name if the domain name is found in the Subject Alternative
Name field in the certificate. This is similar to the previous selection with entry.
40 A26391-K133-Z131-1-7619, edition 3
Page 49

Using Odyssey Client
● Subject Name if the name is an X.500 name and is found in the Subject field in the certificate. If
you completely or partially enter a subject name, you must do this in the X.500 form. It
corresponds to any same or lower-level certificate subject name.
● For example, if you enter the following:
OU=acme.com, C=US
it matches any of the following subject names::
O=sales, OU=acme.com, C=USCN=george, O=sales, OU=acme.com, C=US
For the maximum number of intermediate certificates, set the maximum number of certificates that
may appear in the chain between this node and the node directly above this node. You many select
a number between 0 and 5, or unlimited:
● If you choose 0, the certificate that matches this node must have been signed using the
● If you choose 1, the certificate that matches this node may have been signed by the certificate
● If you choose unlimited, any number of certificates may appear in the chain between the
If you enter text that includes commas, each comma must be enclosed by single
quotation marks.
i
certificate that matches the node above this node.
that matches the node above, or by a certificate that in turn has been signed by the certificate
that matches the node above.
certificate that matches this node and the one that matches the node above.
Removing nodes
To remove a node, select the node in the tree you want to remove, and click Remove. The selected
node, and any node beneath it is removed from the tree.
The following nodes can be removed:
● Top level certificate node
● Intermediate CA node
● Server node
Displaying certificate information
For detailed information about any certificate at the top level of the trust tree, select the certificate
and click View Certificate.
A26391-K133-Z131-1-7619, edition 3 41
Page 50

Using Odyssey Client
Untrusted servers
Under the following conditions, you are given the option to trust a previously untrusted server during
network authentication:
● You have set temporary trust (Enable Server temporary trust) in the Security Settings menu.
● The authenticating profile mandates server validation.
● The trusted root certificate authority of the server certificate (in the example shown below, the
certificate "ACMERootCA") is installed on your client machine.
If this is the case, the following dialog appears while you are authenticating to the network.
42 A26391-K133-Z131-1-7619, edition 3
Page 51

Using Odyssey Client
The dialog shows the entire certificate chain between the authentication server and a trusted root
certificate authority. To see detailed information about any certificate in the chain, select the
certificate and click View.
If you want to temporarily trust this server (i.e., until Odyssey is restarted) in order to authenticate
and connect to the network, click Yes. Otherwise, click No. You may be asked to type in your
password, depending on the profile you set up for this connection.
If you want to permanently trust this server by adding to the Trusted Servers list, mark Add this trusted
server to the database and click Yes. The server is added to the trusted servers list, using the name
shown in the Server name must end with field. You may edit the server name. For example, if the
server name is "auth2.acme.com", you can change it to acme.com, if you want to trust all
authentication servers belonging to the "acme.com" domain.
Configuring network adapters - "Adapters" window
The Adapters window lets you select one or more network adapters (interface cards) for wireless
networking. You can select more than one adapter if you hold down Ctrl on your keyboard as you
select with your mouse.
The Adapters window lists all the wireless adapters that are configured in Odyssey Client. Most likely
you have configured a single adapter. However, you may configure more than one adapter. You can
use the Adapters window for the following tasks:
● Adding a wireless adapter
● Removing an adapter from the list of adapters
► Click in the Odyssey Client Manager on Adapters to open the window.
Your adapter must already have been installed on your system before you can configure
Odyssey Client to use it.
i
A26391-K133-Z131-1-7619, edition 3 43
Page 52

Using Odyssey Client
44 A26391-K133-Z131-1-7619, edition 3
Page 53

Using Odyssey Client
Adding a wireless adapter
To add a wireless adapter that Odyssey Client has not yet recognised, follow these steps from the
Adapters window of Odyssey Client Manager:
► Click Add. The Add Adapter window appears, displaying a list of all network adapters that are
installed on your PC (except for the ones Odyssey Client is already configured to use).
► Select the Wireless tab.
► Select your desired adapter from the list of adapters displayed, and click OK.
Note that only adapters that you have not yet added to the Adapters window are displayed. If you do
not see your wireless adapter in the list, select All Adapters.
Make sure that all adapters you select on the Wireless tab are indeed wireless.
!
Removing an adapter from the list of adapters
To remove an adapter from the list of adapters in the Adapters window, select the adapter you want
to remove and click Remove.
Odyssey Client stops using the adapter. The adapter is still installed on your system, but operates
as if Odyssey Client is not present.
A26391-K133-Z131-1-7619, edition 3 45
Page 54

Using Odyssey Client
Odyssey Client Manager - "Settings" menu
In the Settings menu of the Odyssey Client Manager window, the following menu items are available:
● Preferences
● Security settings
● Enable/Disable Odyssey
● Close
"Preferences" menu item
You can change the way that Odyssey Client operates by selecting the Preferences menu item. The
Odyssey Preferences window appears.
Set your preferences, and click OK to make them effective:
● If you select Hide tray icon, then the Odyssey icon is not displayed in the task bar (at the
bottom right of your screen).
● If you select Hide control panel icon, then the Odyssey icon is not displayed on the Windows
Control Panel.
If you have the Windows Control Panel open when you select Hide control panel icon and
click OK, then your control panel is refreshed. (Press the F5 key to see the effects). In
i
some cases, you may only see the effect after rebooting.
46 A26391-K133-Z131-1-7619, edition 3
Page 55

Using Odyssey Client
"Security settings" menu item
To configure advanced security options related to authentication, select Security Settings. The
Security Settings window appears.
The security options are initially set to default values that should suit most purposes. You can
restore the defaults at any time by clicking Set defaults.
Time fields are expressed in hours, with up to two decimal places. For example, to specify one hour
and fifteen minutes, enter 1.25.
Session resumption
You can enable the use of session resumption from the Security Settings window.
To use enable session resumption:
● Mark Enable session resumption.
● Set Do not resume sessions older than to the maximum number of hours that an initial
authentication can be used to accelerate reauthentication. Once the time limit has elapsed, a
completely fresh authentication is performed on your next reauthentication. The number of
hours can have up to two decimal places. For example, to specify one hour and fifteen
minutes, enter 1.25.
By default, session resumption is enabled, and an initial authentication is resumed for up to 12
hours.
To disable this feature, unmark Enable session resumption.
A26391-K133-Z131-1-7619, edition 3 47
Page 56

Using Odyssey Client
Automatic reauthentication
You can enable or disable the Automatic reauthentification feature of Odyssey Client as well.
Mark Enable automatic reauthentication in the Security Settings window, in order to cause Odyssey
Client to periodically initiate reauthentication with the server.
Set in Reauthenticate every, the time period, in hours, for reauthentication to take place automatically.
Unmark Enable automatic reauthentication in the Security Settings window, in order to disable this
feature.
By default, Automatic reauthentification is not enabled. This is because your network administrator
may have already configured your access points or authentication server to perform periodic
reauthentication. Ask your network administrator for the correct setting for this option.
Server temporary trust
Normally, you configure your authentication server in the Trusted Servers window. However, there
may be times when you are visiting a network whose authentication server is not yet configured as
trusted in the Trusted Servers window. In this case, you can activate the Temporary Trust option for
this untrusted server.
Mark Enable server temporary trust from the Security Settings window, in order to enable temporary
trust. Unmark this field to disable this feature. Notice the following about this feature:
● If temporary trust is enabled, you are given the option of whether or not to trust an untrusted
server temporarily when you attempt to authenticate to an untrusted server. Refer also to
"Untrusted servers".
● The Untrusted Server window that opens when you attempt to authenticate to a server for which
you have not configured trust, permits you to permanently add the server to your trust tree.
Thus, you can use temporary trust as an alternative to the Trusted Servers window, and
configure trusted servers as they are encountered.
● If temporary trust is not enabled, then any authentication attempt that requires the validation of
a server certificate fails when the server is not explicitly trusted.
Set Maximum time for temporary trust to the maximum number of hours you want Odyssey Client to
continue to trust a server once you accept it.
The default behaviour is that temporary trust is enabled, and that 12 hours is the maximum time that
a particular server is trusted once you accept.
These settings are not relevant if you decide to permanently trust the server by marking
Add this trusted server to the database in the Untrusted Server window.
i
48 A26391-K133-Z131-1-7619, edition 3
Page 57

Using Odyssey Client
"Enable/Disable Odyssey" menu item
Select Enable Odyssey or Disable Odyssey to turn Odyssey Client on or off. Odyssey Client is initially
enabled, and normally you should not need to disable it. If you choose Disable Odyssey Client, it
disconnects all adapters without changing any Connection window settings. The Odyssey Client
programme still runs, but it is totally isolated from wireless network connections.
You should only disable Odyssey Client if you had concerns about your current Odyssey
configuration. You might disable Odyssey Client, for example, if you are worried that Odyssey Client
is in an insecure state and you just want to make sure you are off the network until you get a chance
to inspect your settings.
Odyssey Client can also be enabled and disabled from the pop-up menu that appears when you
right-click the Odyssey icon in the task bar.
To stop Odyssey Client from running entirely, select the Exit menu item when you rightclick the Odyssey icon in the task bar.
i
"Close" menu item
Select Close to close the Odyssey Client Manager window. Although the user interface is no longer
visible, Odyssey Client continues to perform its networking operations normally.
You can restart Odyssey Client Manager at any time, in any of the following ways:
● from the task bar: Double-click the Odyssey icon, or right-click it and choose Odyssey for Fujitsu
Siemens Computers.
● from Control Panel: Double-click the Odyssey for Fujitsu Siemens Computers icon.
● from the Windows Start menu: select Start – Programs – Fujitsu Siemens Computers – Odyssey
Client for Fujitsu Siemens Computers – Odyssey Client Manager for Fujitsu Siemens Computers.
To stop Odyssey Client from running entirely, select the Exit menu item when you rightclick the Odyssey icon in the task bar.
i
Odyssey Client Manager - "Commands" menu
The following menu items are available from the Commands menu:
● Forget Password
● Forget Temporary Trust
A26391-K133-Z131-1-7619, edition 3 49
Page 58

Using Odyssey Client
"Forget Password" menu item
When you first authenticate using a profile set to prompt for password, you are asked to type in your
password. Odyssey Client saves this password and uses it for each subsequent authentication with
the aid of this profile without you being asked for this entry again. This password normally remains
saved until you restart your computer or Odyssey Client.
If Odyssey Client is not to save the entered passwords, select Forget Password. When your
password is needed again, you are prompted to enter it.
You might need to use this menu item if you enter your password incorrectly or if your password has
been changed on the authentication server.
"Forget Temporary Trust" menu item
If you enable Temporary trust from Settings - Security Settings, then whenever you encounter an
untrusted authentication server, a window pops up. This window allows you to use that server as
trusted server temporarily. Odyssey Client remembers that trusted server for as long a period of
time as is configured in Security Settings.
If the list of temporary trusted servers is to be deleted again immediately, select Forget Temporary
Trust.
You might need to use this menu item if you accept a server as temporarily trusted and then decide
to break your connection with it. If you want to be sure the connection is broken immediately, you
should disable session resumption and then click Reconnect in the Connection window.
Odyssey Client Manager - "Help" menu
The Help menu has the following items:
● Help topics
● License keys
● View Readme File
● About
"Help topics" menu
Select Help Topics to bring up the Odyssey Client help system.
You can also get context-sensitive help at any time by pressing F1 . The help system appears
opened at the section that best explains your current situation.
50 A26391-K133-Z131-1-7619, edition 3
Page 59

Using Odyssey Client
"License keys" menu item
Select License Keys from the help menu, to manage your Odyssey Client licence keys.
A licence key is a text sequence that represents your licence to use Odyssey Client.
"Odyssey" context menu
If you right-click on the Odyssey icon in the task bar, the following menu items appear:
● Odyssey for Fujitsu Siemens Computers
● Enable Odyssey or Disable Odyssey
● Help
● Exit
"Odyssey for Fujitsu Siemens Computers" menu item
If you select the Odyssey for Fujitsu Siemens Computers menu item the Odyssey Client Manager (the
user interface for Odyssey Client) is displayed.
"Enable Odyssey/Disable Odyssey" menu item
Select Enable Odyssey or Disable Odyssey to turn Odyssey Client on or off.
Odyssey Client is initially enabled, and usually you should not need to disable it. If you choose
Disable Odyssey Client, it disconnects all adapters without changing any Connection window settings.
The Odyssey Client programme still runs, but it is totally isolated from wireless network connections.
You should only disable Odyssey Client if you had concerns about your current Odyssey
configuration. You might disable Odyssey Client, for example, if you are worried that Odyssey Client
is in an insecure state and you just want to make sure you are off the network until you get a chance
to inspect your settings.
Odyssey Client can also be activated and deactivated with the Odyssey Client Manager.
A26391-K133-Z131-1-7619, edition 3 51
Page 60

Using Odyssey Client
"Help" menu item
One of the menu items that appears when you right-click on the Odyssey icon in the task bar is
Help. There are two further options: Help Topics and About.
If you select Help Topics, the Help system appears in a window opened to the table of contents.
If you select About, product version and copyright information are displayed.
"Exit" menu item
If you select Exit, Odyssey Client immediately stops running in the background. You may want to
use this option when you are not using wireless networking for an extended period.
You can restart Odyssey Client using the Odyssey Client Manager under Start – Programs – Fujitsu
Siemens Computers – Odyssey Client for Fujitsu Siemens Computers – Odyssey Client Manager for Fujitsu
Siemens Computers.
52 A26391-K133-Z131-1-7619, edition 3
Page 61

Features
Features
Overview
Standard
● IEEE802.11g
● IEEE802.11b
● IEEE802.11 legacy
Baseband MAC
● GlobespanVirata / Intersil: Cohiba
● Wireless LAN Integrated Medium Access Controller with Baseband Processor
● ISL3887IK 192pin BGA
Memory
● 64 kBit Serial I2C bus EEPROM
● On Baseband MAC SRAM
RF Frontend
● GlobespanVirata / Intersil: Cohiba
● VCO: 5GHz Voltage Controlled Oscillator ISL3084IR
● TX/RX Direct Down Conversion Transceiver ISL3686BIR
● Low Cost Zero IF architecture
● TX: Power Amplifier ISL3980
● Transmit Power Control
● Frequency Range: 2412 to 2472 MHz (EU)
RF I/O Power
● RF Output Power: max: +19 dBm
● RF Receive Sensitivity : min -96 dBm
Communication
● Interface: USB 2.0
● RF Link: omni antenna 2.4 GHz
● Channels: 1 to 13 (EU) selectable
● Time access: CSMA/CA
Data Rates
● 802.11g-Prism Nitro: 100 Mbps OFDM
● 802.11g: 54, 48, 36, 24, 18, 12, 9 and 6 Mbps OFDM
● 802.11b: 11 and 5,5 Mbps CCK
● 802.11 legacy: 2 and 1 Mbps
Modulation
● RF modulations: OFDM and CCK
● Baseband modulations: BPSK, QPSK, 16QAM and 64 QAM
● Convolutional Coding and Interleaving
● Targeted for Multipath Delayed Spreads of 120 ns at 54 Mbps
A26391-K133-Z131-1-7619, edition 3 53
Page 62

Features
Regulatory Approvals
● Compliance to ETSI (EU)
● Compliance to FCCI (US)
● Quality: WIFI (tested without label)
● Software Driver: WHQL
Power Supply
● U = 5V (from USB)
● I < 495 mA
Basic security features
● WLAN security By WIN Software
● Internal 64 or 128 bit WEP engine
● Encryption protocol is RSA RC4
Software drivers
● Supported Operating Systems: WIN 98/ME/2k/XP and follower
Software Access Point
● Soft AP with PC-Tel Segue SAM (when required)
Wake On WLAN
● Supported (depends from Software)
Form factor
● 54 x 88,8 mm
Technical details
RF Output Power
Typical Output Power
Transmitter Specifications Condition Power [dBm]
IEEE802.11g
IEEE802.11b 1 Mbps BPSK
54 A26391-K133-Z131-1-7619, edition 3
6 Mbps OFDM 19
9 Mbps OFDM 19
12 Mbps OFDM 18.2
18 Mbps OFDM 18.3
24 Mbps OFDM 17
36 Mbps OFDM 17
48 Mbps OFDM 13.9
54 Mbps OFDM 13.9
18.7
2 Mbps QPSK
5.5 Mbps CCK
11 Mbps CCK
Page 63

Features
RF Input Sensitivity
Typical Input Sensitivity
Transmitter Specifications Condition Power [dBm]
IEEE802.11g
@ 10 % PERI
IEEE802.11b
@ 8% PER
Communication Range
Typical communication range:
Please note that this is valid for typical environment!
Data Rate [Mbps] Indoor Range [m] Outdoor Range [m]
54 9,5 116
48 12 180
36 19 270
24 25 370
18 30 480
12 36 570
9 44 650
6 55 700
6 Mbps OFDM -91.1
9 Mbps OFDM -89.2
12 Mbps OFDM -87.7
18 Mbps OFDM -85
24 Mbps OFDM -81.1
36 Mbps OFDM -77.3
48 Mbps OFDM -72.1
54 Mbps OFDM -70.2
1 Mbps BPSK -96.0
2 Mbps QPSK -92.5
5.5 Mbps CCK -91.0
11 Mbps CCK -86.7
A26391-K133-Z131-1-7619, edition 3 55
Page 64

Features
Communication
Channels
Channel Number Channel Frequency Geographic Usage
1 2412 MHz US, EU, J
2 2417 MHz US, EU, J
3 2422 MHz US, EU, J
4 2427 MHz US, EU, J
5 2432 MHz US, EU, J
6 2437 MHz US, EU, J
7 2442 MHz US, EU, J
8 2447 MHz US, EU, J
9 2452 MHz US, EU, J
10 2457 MHz US, EU, FR, J
11 2462 MHz US, EU, FR, J
12 2467 MHz EU, FR, J
13 2472 MHz EU, FR, J
14 2484 MHz J (802.11b only)
Regulatory Aprovals
Compliance:
Country Approval Notes
USA FCC part 15, sec 15.107,
15.109. 15.207, 15.209, 15.247
EU EN60950 incl. A1 - A4
ETSI EN300328 P1 V1.2.2
ETSI EN300328 P2 V1.1.1
ETSI EN301893 V1.2.1
ETSI EN301489-1 V1.4.1
ETSI EN301489-17 V1.1.1
Japan ARIB STD-T71 V1.0, 14
ARIB RCR STD-T33
ARIB STD-T66 V2.0
Yes
Yes
No
56 A26391-K133-Z131-1-7619, edition 3
Page 65

Declaration of Conformity
Declaration of Conformity
A26391-K133-Z131-1-7619, edition 3 57
Page 66

Declaration of Conformity
58 A26391-K133-Z131-1-7619, edition 3
Page 67

Index
802.11 network security 3
802.1X authentication 33
description 4
Open mode 31
without WEP key 31
802.1X standard 5
A
Access point (infrastructure mode) 31
AccessPoint 2
Ad hoc mode 2
Adapters 12
AES data encryption 31
Anonymous name 24
specifying 24
Authentication 4
advanced security options 47
automatic key generation 32
automatic reauthentication 48
Open mode 31
protocol 21
EAP 5
EAP-TLS 21
EAP-TTLS 22
inner 23
PEAP 21
server 21
adding to trust tree 39
Enable Server temporary trust 42
Server temporary trust 48
trusted server 34
verifying identity 21
Shared mode 31
specifying association mode 31
using profile 32
WEP key 4, 31
WPA mode 31
Automatic reauthentication 48
C
CE marking 6
Certificate 19, 35
Authority 35
chain 37
information, viewing 41
node, adding 38
CHAP 23
Close 49
Configuration, Odyssey Client 11
Configure and Enable Wizard 9
Connect to any available network 30
Connection 12
viewing connection status 15
Council Directive 1999/5/EC 6
E
EAP 5
EAP/PEAP 24
EAP-TLS 32
EAP-TTLS 22, 32
specifying anonymous name 24
Enable Odyssey/Disable Odyssey 51
Enable Server temporary trust 42
Enable session resumption 47
Enable/Disable Odyssey 49
Extensible Authentication Protocol 5
F
Forget Password 50
Forget Temporary Trust 50
I
IEEE 802.11a standard, frequencies 7
IEEE 802.11b standard, frequencies 8
Infrastructure mode 2
Inner Authentication Protocol 23
Installation, Odyssey Client 9
Intermediate certificates
adding to trust tree 39
maximum number 41
L
Licence keys 51
Login name 19
M
Menu
Commands 49
Help 50
Settings 46
MS-CHAP-V2. 23
N
Network adapter
activating 45
configuring 43
deactivating 45
Network connection
controlling 12
disconnecting 15
establishing 13
A26391-K133-Z131-1-7619, edition 3 59
Page 68

Index
Network connection (continued)
establishing (to any desired
network) 30
reauthenticating 15
viewing status 15
Network description 30
Network name 28
Network name (SSID) 30
Network scanning 30
Network security
authentication 3
WEP key 3
Network title 28
Network type
ad hoc 2
Infrastructure 2
specifying 31
Networks 12, 27
Notational conventions 1
O
Odyssey Client
closing 49, 52
configuring 11
installing 9
Manager 11
Manager, viewing 51
Odyssey Client licence key 51
Odyssey context menu 51
Odyssey icon
displaying in the task bar 46
hiding in the task bar 46
Odyssey session resumption 47
Open, mode 31
P
PAP/Token 23
Password
entering 19
not saving 50
PEAP 32
PEAP Settings 25
Peer-to-peer (ad hoc mode) 31
Peer-to-peer mode 2
Poor wireless connection 15
Pre-shared key
description 4
entering 33
Profiles 12, 16
defining 16
R
Radio frequencies 7
S
Safety 6
Server domain 35
Server temporary trust 48
Shared, mode 31
T
TKIP encryption 4, 31
Trust tree 37
adding certificate nodes 38
removing certificate nodes 41
viewing 38
Trusted Root Certificate Authority 43
Trusted servers 12, 34
adding 35
advanced trust check 37
editing 36
removing 36
simple trust check 35
trust tree 37
U
Untrusted server 42
User
credential 5
name 19
W
WEP key 4
enter 33
Wi-Fi Protected Access (WPA) 4
Window
Adapters 12, 43
Connection 12, 15
Networks 12, 27
Profiles 12, 16
Trusted Servers 12, 34
Wired-Equivalent Privacy (WEP) 4
Wireless adapter, configuring 45
Wireless network
configuring 27, 28
establishing network connection 13
IEEE 802.11 standard 1
name 3
Reconnect 15
scanning for 13
Service Set Identifier (SSID) 3
WPA authentication 31
AES 31
passphrase 32
pre-shared key 32
WPA description 4
60 A26391-K133-Z131-1-7619, edition 3
 Loading...