

Page 1

Accessories Deutsch, English, Français,
Operating Manual
Español, Italiano
STORAGEBIRD Solo 25-UP
Page 2

Are there ...
... any technical problems or other questions you need clarified?
Please contact:
•ourHelpDesk
• your sales partner
• your sales outlet
The latest information on our products, tips, updates, etc., can be found on
the Internet under: "
Help Desk list on the internet: "www.fujitsu-siemens.com/rl/servicesupport/helpdes ks"
www.fujitsu-siemens.com"
Page 3

Page 4

This manual was produced by Xerox Global Services
Published by Fujitsu Siemens Computers GmbH
AG 01/08
Edition 1
A26381-F103-Z104-1-8N19
*A26381-F103-Z104-1-8N19*
Page 5

STORAGEBIRD Solo 25-UP
Operating Manual
Deutsch
English
Français
Español
Italiano
Page 6

Copyright © Fujitsu Siemens Computers GmbH 20 08
STORAGEBIRD ist ein eingetragenes Warenzeichen der Fujitsu Siemens Computers GmbH.
MS, MS-DOS, Windows, Windows NT, Windows XP and Windows VISTA are
registered trademarks of Microsoft Corporation.
All other trademarks referenced are trademarks or registered trademarks of their
respective owners, whose protected rights are acknowledged.
All rights, including rights of translation, reproduction by printing, copying or
similar methods, even of parts are reserved.
Offenders will be liable for damages.
All rights, including rights created by patent grant or registration of a utility
model or design, are reserved.
Delivery subject to availability. Right of technical modi fication reserved.
Page 7

Inhalt
Deutsch
Inhalt
STORAGEBIRD ........................................................................ 1
Systemvoraussetzung ................................................................... 1
Sicherheitshinweise ..................................................................... 2
CE Kennzeichnung ...................................................................... 2
Installation/Entfernen .................................................................... 3
Installation unter Windows XP/Window s Vista . ........................................ 3
ExternesNetzteil .................................................................... 3
Registrieren eines Fingerabdruckes unter Windows .................................... 4
Ändern oder Neuregistrierung eines Fingerabdrucks . . .. . .............................. 5
Ändern oder Neuregistrierung eines Kennwortes . . . .................................... 6
Anmeldung am Laufwerk "Security" ................................................... 7
Laufwerksgrößen ändern . ........................................................... 7
Entfernendes Geräts ................................................................ 8
Entfernen unter Windows XP/W indows Vista . . ........................................ 8
Problemlösungenund Tipps ............................................................. 9
TechnischeDaten ....................................................................... 11
A26381-F103-Z104-1-8N19, Ausgabe 1 Deutsch
Page 8

Inhalt
Deutsch A26381-F103-Z104-1-8N19, Ausgabe 1
Page 9

STORAGEBIRD
STORAGEBIRD
1
2
Als Plug & Play-Gerät verbinden Sie den STORAGEBIRD mit dem mitgelieferten
USB-Kabel und dem Computer.
Der STORAGEBIRD wird automatisch als weiteres Laufwerk erkannt.
Ein Netzteil ist nur erforderlich, wenn der STORAGEBIRD an einen USB-Hub ohne Netzteil oder an
ein System mit nicht genügender Leistung auf der USB-Leitung angeschlossen wird.
Backup-Taste (1) – Mit dieser Taste starten Sie die Nero BackITUp Essentials Software.
Anleitungen zu Installation und Bedienung dieser Software finden Sie im Benutzerhandbuch,
das auf der "Nero BackItUp Essentials CD ROM" enthalten ist.
Ihr Gerät verfügt über einen Fingerabdruck-Sensor (2), mit dem Sie Ihre Daten
vor unbefugtem Zugriff schützen können.
Systemvoraussetzung
• Computer mit W indows XP, Windows Vista
• Mindestens ein freier USB-Anschluss
A26381-F103-Z104-1-8N19, Ausgabe 1 Deutsch - 1
Page 10

STORAGEBIRD
Sicherheitshinweise
Zur Vermeidung von Bränden darf der STORAGEBIRD Solo 25-UP nur mit
dem Orginal-Adapter Sunny SYS1193-1005-W2E 5V DC / 2.0 A betrieben
werden.
Der mitgelieferte AC/DC-Netzadapter darf nur für den STORAGEBIRD
25-UP verwendet werden.
CE Kennzeichnung
CE-Kennzeichnung für aus
bei Markteinführung ab
Dieses Gerät erfüllt in
der EG-Richtlinien 200
2006/95/EG "Niederspa
gelieferte Geräte ohne Funkkomponente
20.07.2007
der ausgelieferten Ausführung die Anforderungen
4/108/EG "Elektromagnetische Verträglichkeit" un d
nnungsrichtlinie".
2 - Deutsch A26381-F103-Z104-1-8N19, Ausgabe 1
Page 11

STORAGEBIRD
Installation/Entfernen
Eine Partitionierung und Formatierung des Geräts ist nicht erforderlich. Das Gerät
wurde we rkseitig schon formatiert. Ein nachträgliches Formatieren ist möglich, löscht
allerdings unwiederbringlich alle gespeicherten Daten auf dem Gerät.
Wie Sie ein nachträgliches Formatieren vornehmen, entnehmen Sie dem
Kapitel "
Installation unter Windows XP/Windows Vista
► Verbinden Sie das Gerät mit dem USB-Anschluss am Computer.
Zwei neue Lauf werke werden erkannt und die LED am Gerät leuchtet.
Externes Netzteil
Wird der STORAGEBIRD vom Computer nicht erkannt oder ist kein Datentransfer mit dem
Gerät möglich, so liefert die USB-Schnittstelle möglicherweise zu wenig Strom. Verwenden
Sie in diesem Fall das externe Netzteil von Fujitsu Siemens Computers. In Abhängigkeit
von der Produktvariante, die Sie erworben haben, ist entweder ein externes N etzteil
mitgeliefert oder Sie können ein en tsprechendes Netzteil als Z ubehör erwerben. Wenden
Sie sich an Ihren Fujitsu Siemens C omputers Vertragshändler.
Laufwerksgrößen ändern", Seite 7
A26381-F103-Z104-1-8N19, Ausgabe 1 Deutsch - 3
Page 12
STORAGEBIRD
Registrieren eines Fingerabdruckes unter Windows
Ihr G erät ist in zwei Laufwerke aufgeteilt, die im Windows-Explorer als Laufwerke
"AP" und "Public" angezeigt werden.
Das La ufwerk "Public" wird nicht verschlüsselt und ist ohne Registrierung nutzbar.
► Verbinden Sie das Gerät mit dem USB-Anschluss a m Computer.
Die Laufwerke "AP" und "Public" werden im Windows Explorer angezeigt.
► Öffnen Sie das Laufwerk "AP".
► Starten Sie die Anwendung fingerverify.exe .
Das Auswahlfenster Fingerprint Registrierung erscheint.
4 - Deutsch A26381-F103-Z104-1-8N19, Ausgabe 1
Page 13
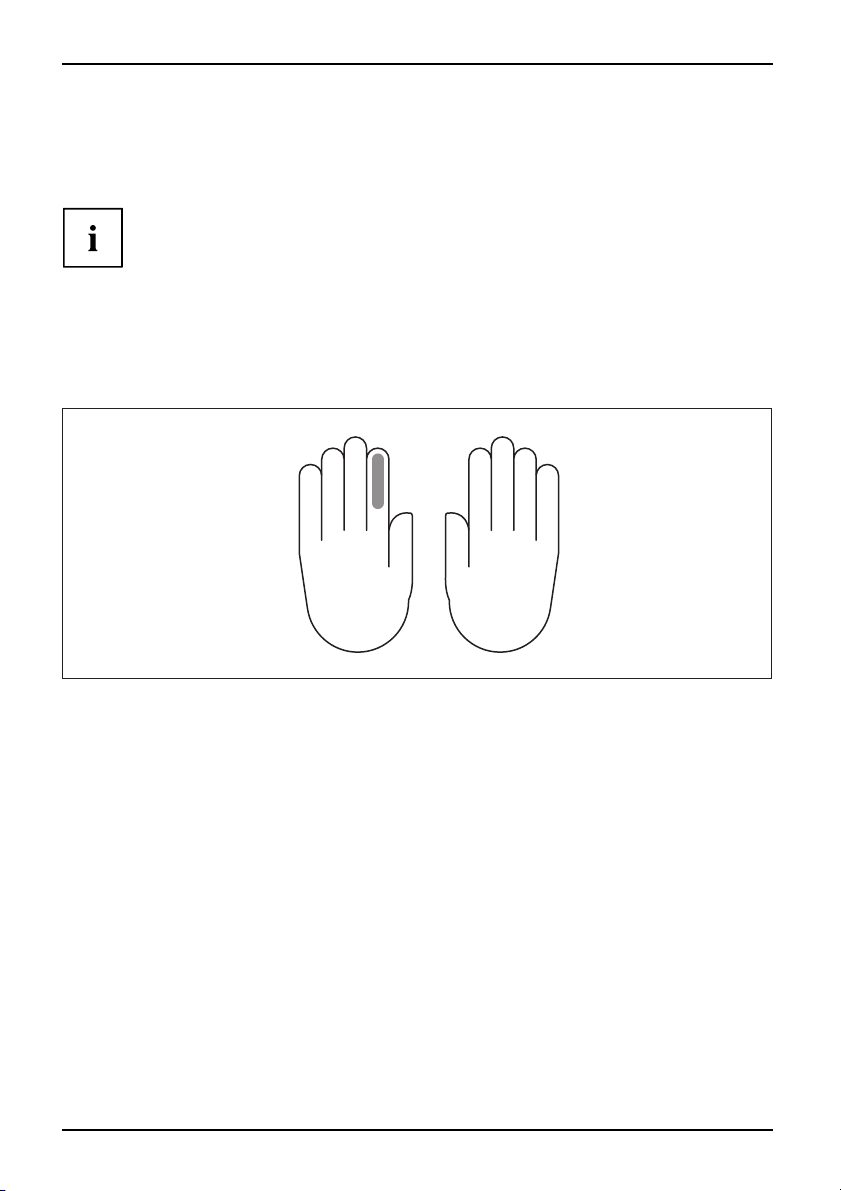
► Wählen Sie mit der Maus einen beliebigen Finger aus und gehen Sie auf Weiter.
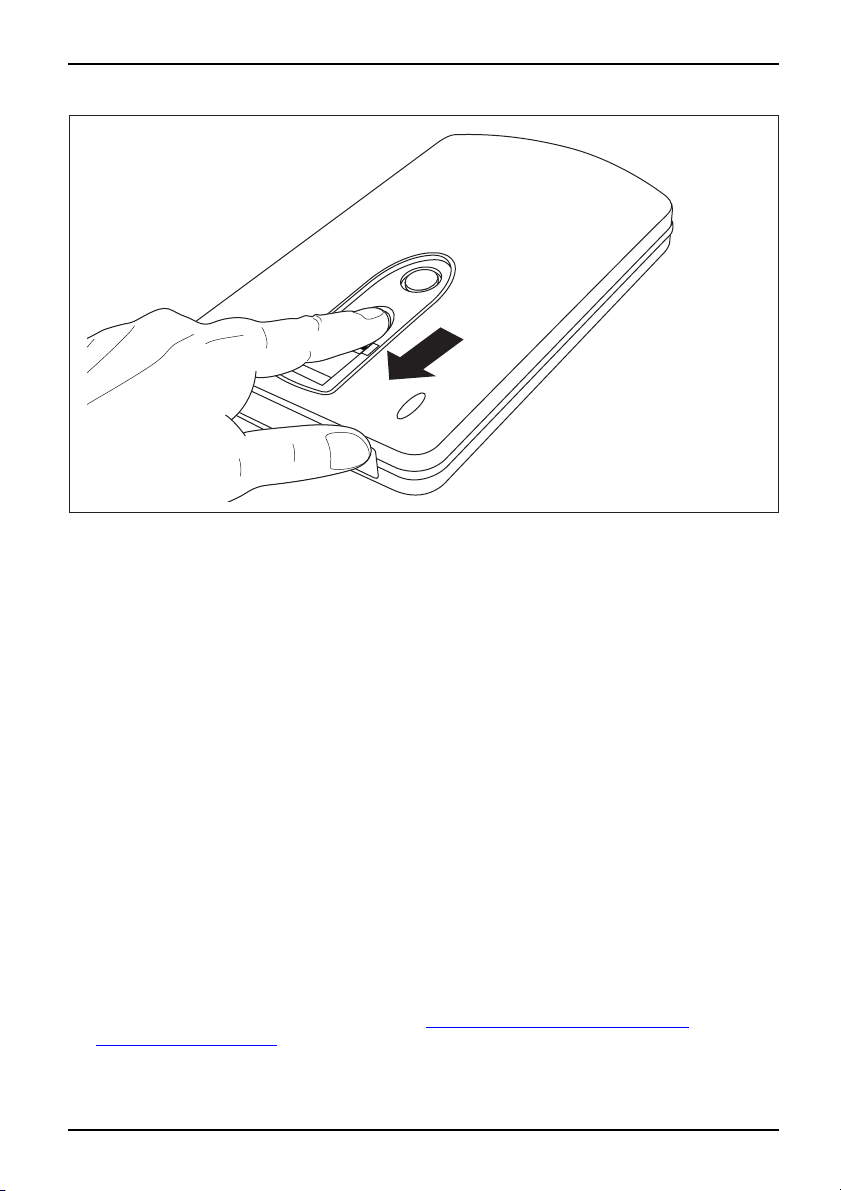
► Streichen Sie mindestens drei Mal mit dem gewählten Finger fest über den
Fingerabdruck-Sensor Ihres Geräts.
Das Auswahlfenster Fingerprint Registrierung erscheint nach erfolgreicher
Registrierung des Fingers erneut.
► Wählen Sie einen weiteren Finger zur Registrierung.
oder
► Wählen Sie beenden.
Ein Fenster zur Kennwort einstellung erscheint.
► Tragen Sie ein Kennw
► Wählen Sie Bestätigen.
Das Laufwerk "AP" wir
wird entschlüsselt u
Es ist nur noch nach erfolgreicher Fingerabdruck-Verifizierung zugänglich.
ort und einen Tipp zu Ihrem Kennwort ein.
d ausgeblendet. Der verschlüsselte Laufwerk "Security"
nd angezeigt.
STORAGEBIRD
Ändern oder Neuregistrierung eines Fingerabdrucks
Voraussetzung: Sie haben sich per Fingerabdruck bzw. Passwort angemeldet
und das Laufwerk "Security" ist verfügbar.
► Klicken Sie mit der linken Maustaste auf die Anwendung FingerVerify im
Symbolbereich Ihrer Task-Leiste.
► Wählen Sie Benutzereinstellung - Fing erprint Registrierung.
Folgen Sie den Anweisungen wie im Kapitel "Registrieren eines Fingerabdruckes
unter Windows", Seite 4 beschrieben.
A26381-F103-Z104-1-8N19, Ausgabe 1 Deutsch - 5
Page 14
STORAGEBIRD
Ändern oder Neuregistrierung e
Voraussetzung: Sie haben sich per Fingerabdruck bzw. Passwort angemeldet
und das Laufwerk "Security" ist verfügbar.
► Klicken Sie mit der linken Maustaste auf die Anwendung FingerVerify im
Symbolbereich Ihrer Task-Leiste.
► Wählen Sie Benutzereinstellun
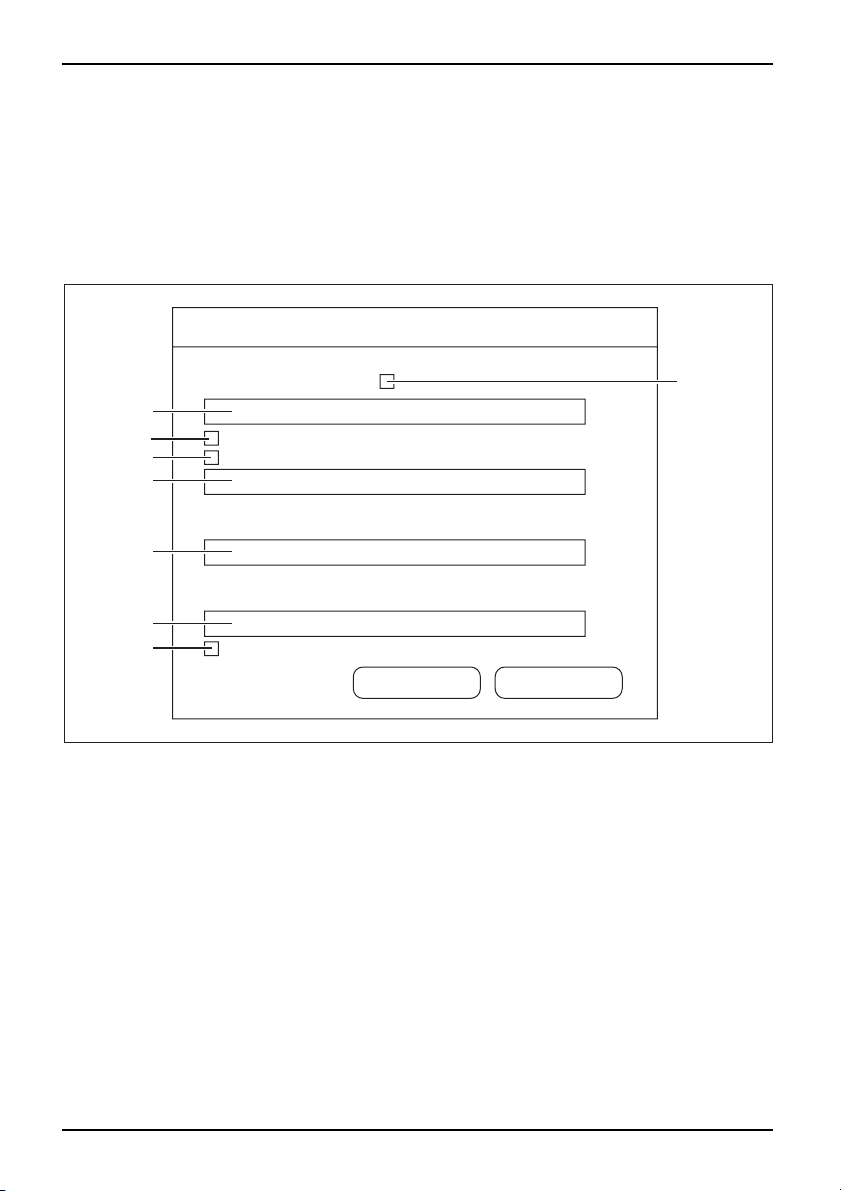
Das Dialogfeld zur Änderung oder Neuregistrierung eines Kennwortes erscheint.
2
3
4
5
6
7
8
g - Fingerprint Kennworteinstellung.
ines Kennwortes
1
► Aktivieren Sie das Käst chen Nr. 1, wenn ein Kennworttipp bei jeder
Passworteingabe angezeigt werden soll.
► Geben Sie im Feld
► Aktivieren Sie das Kästchen Nr. 3, wenn Sie zur Verifizierung nur Ihren
Fingerabdruck verwenden möchten.
► Aktivieren Sie d
Kennwort verwen
► Geben Sie im Feld Nr. 5 das bisherige Kennwort ein.
► Geben Sie im Feld N
► Geben Sie im Feld Nr. 7 das neue Kennwort erneut ein.
► Aktivieren Sie das
durch das Kennwor
6 - Deutsch A26381-F103-Z104-1-8N19, Ausgabe 1
Nr. 2 einen Kennworttipp ein.
as Kästchen Nr. 4, wenn Sie zur Verifizierung nur Ihr
den möchten.
r. 6 das neue Kennwort ein.
Kästchen Nr. 8, wenn die Funktionalität von FingerVerify
t geschützt werden soll.
Page 15
STORAGEBIRD
Anmeldung am Laufwerk "Security"
► Verbinden Sie das Gerät mit dem USB-Anschluss am Computer.
Die Laufwerke "AP" und "Public" sind im Windows Explorer verfügbar.
► Öffnen Sie das Laufwerk "AP".
► Starten Sie die Anwendung fingerverify.exe.
Der Dialog zur Fingerabdrucküberprüfung wird angezeigt.
► Streichen Sie mit dem registrierten Finger über d en Fingerabdruck-Sensor.
Ein grüner Kreis bestätigt die erfolgreiche Registrierung.
Der Dialog wird geschlossen, das Laufwerk "AP" wird ersetzt durch das Laufwerk "Security".
Ihre verschlüsselten Daten stehen zur Verfügung.
oder
Ein rotes Kreuz zeigt einen Fehler an.
► Streichen Sie erneut mit dem Finger über den Sensor.
Nach mehreren Fehlversuchen müssen Sie das bei der Registrierung
vergebene Kennwort eingeben.
Laufwerksgrößen ändern
► Verbinden Sie das Gerät mit dem US
► Legen Sie die CD "STORAGEBIRD Solo 25-UP" in das Laufwerk I hres Co mputers.
► Starten Sie das Programm initial.e
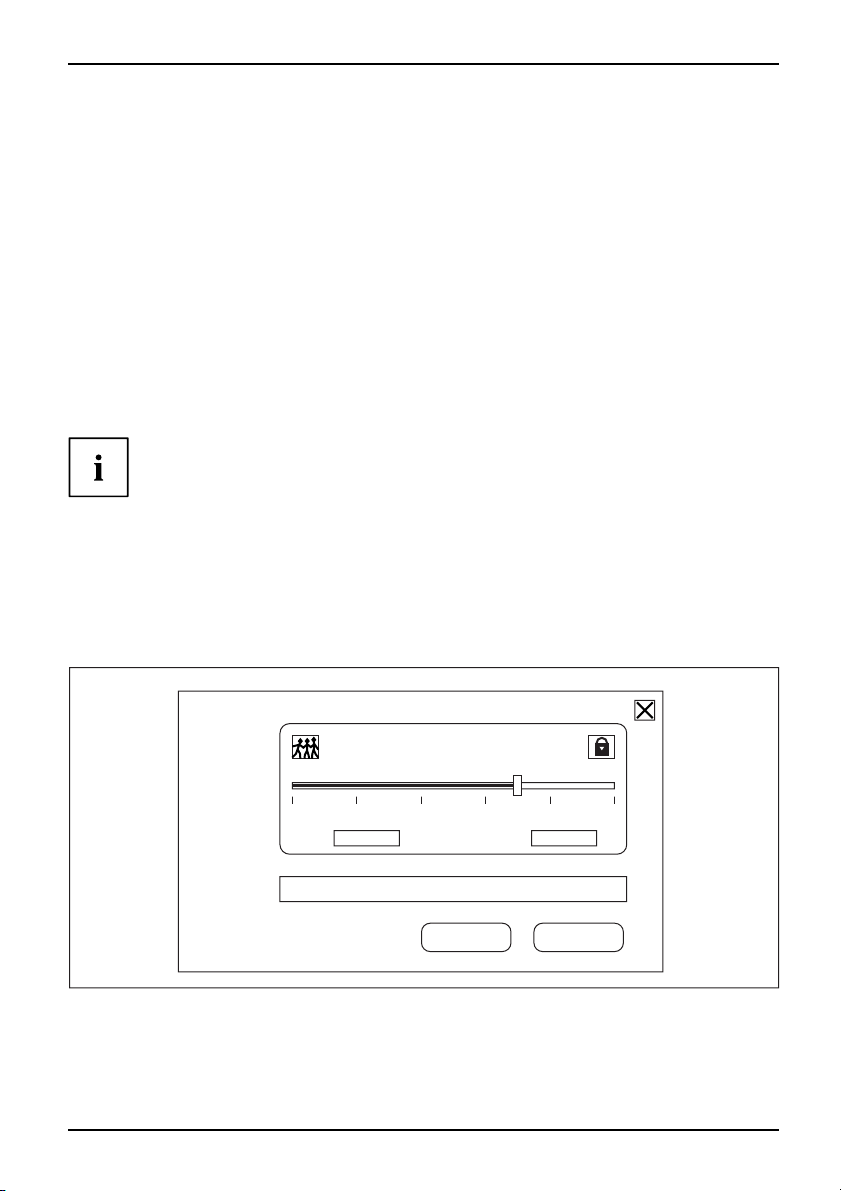
Auf dem Bildschirm erscheint der Dialog zur Einstellung des öffentlichen
Bereiches und des Sicherheitsbereiches.
B-Anschluss am Computer.
xe.
► Verschieben Sie den Regler in die gewünschte Position.
► Bestätigen Sie mit START.
A26381-F103-Z104-1-8N19, Ausgabe 1 Deutsch - 7
Page 16

STORAGEBIRD
Entfernen des Geräts
Bevor Sie Ihr Gerät vom USB-Anschluss Ihres Computers entfernen, oder Ihre n
Computer herunterfahren bzw. einen Neustart durchführen, müssen Sie das
Programm FingerVerify in der Taskleiste Ihres Desktops beenden.
► Klicken Sie mit der rechten Maustaste auf die Anwendung FingerVerify im
Symbolbereich Ihrer Task-Leiste.
► Wählen Sie Beenden.
Alle Daten auf dem Laufwerk "Security" werden verschlüsselt, es wird
ersetzt durch das Laufwerk "AP".
Das Laufwerk ist gegen unberechtigten Zugriff geschützt.
► Entfernen Sie das Gerät wie im Kapitel "
Seite 8 beschrieben vom USB-Anschluss Ihres Computers.
Entfernen unter Windows XP/Windows Vista",
Entfernen unter Windows XP/Windows Vista
Vor dem Entfernen muss das Ge
rät unbedingt deaktiviert werden.
Mit Hilfe des entsprechend
Mass Storage Device" deakt
► Klicken Sie doppelt auf das
Auf dem Bildschirm erscheint die Aufforderung die H ardw arekomponente
zu entfe rnen oder auszuwerfen.
► Markieren Sie die entsprech
► Bestätigen Sie mit Deaktivieren.
8 - Deutsch A26381-F103-Z104-1-8N19, Ausgabe 1
en Symbols in der Taskleiste können Sie "USB
ivieren.
in der Taskleiste befindliche Symbol.
ende Komponente.
Page 17

Problemlösungen und Tipps
Ursache Fehlerbehebung
Während Sie Daten mit einer Größe von mehr als
4 GB auf das Gerät kopieren, wird Microsoft
Windows den Vorgang mit einer Fe hlermeldung
abbrechen.
Um die größtmögliche Kompatibilität mit
allen gängigen Betriebssystemen und
Verwendungsmöglichkeiten zu gewährleisten,
ist das Gerät mit dem FAT32 Dateisystem
vorformatiert. Dieses Dateisystem unterstützt
keine Daten, die größer als 4 GB sind.
Solche Daten können zum Beispiel
DVD-Image-Dateien, digitale TV-Aufnahmen
o. ä. sein.
Um Dateien mit einer Größe von > 4GB auf dem
Gerät speichern zu können, muss das Gerät in
NTFS konvertiert werden.
Nehmen Sie eine Datensicherung der
Daten auf dem Gerät vor, bevor Sie
die nachfolgenden Schritte ausführen.
Andere Betriebssysteme als Microsoft Window s
können ggf. die Daten nicht mehr erkennen.
► Notieren Sie sich den Laufwerksbuchstaben
(z. B. F:) Ihres Laufwerks.
► Halten Sie die Windows-Taste auf Ihrer
Tastatur gedrückt und drücken Sie die
R-Taste.
Ein Eingabefenster erscheint.
► Geben Sie "cmd" in das Eingabefeld ein.
► Geben Sie den Befehl "vol F:" ein.
"F:" ist ein Platzhalter. Geben Sie für "F:"
den Laufwerksbuchstaben Ihres Laufwerks
ein.
Es erscheint eine Meldung mit dem Namen
Ihres Geräts.
► Notieren Sie sich den Namen Ihres Geräts.
► Geben Sie "convert F: /FS:NTFS"
ein. Benutzen Sie wieder Ihren
Laufwerksbuchstaben anstelle des
Platzhalters "F:".
Einige Versionen von Windows benötigen den
Namen de s Laufwerks als Bestätigung:
► Wenn Sie nach dem Namen des Laufwerks
gefragt werden, geben Sie den von Ihnen
notierten Namen ein.
Das Dateisystem des G eräts wird ohne
Datenverlust in NTFS konvertiert.
STORAGEBIRD
A26381-F103-Z104-1-8N19, Ausgabe 1 Deutsch - 9
Page 18

STORAGEBIRD
Ursache Fehlerbehebung
Mit dem Gerät ist kein Datenaustausch möglich. Ist nach dem Verbinden mit dem Computer
nur das Laufwerkssymbols sichtbar, aber kein
Datenaustausch möglich, so ist das externe
Netzteil erforderlich.
► Entfernen Sie das USB-Kabel vom Gerät.
► Stecken Sie das Netzteil in die Steckdose
und in den vorgesehenen Anschluss am
Gerät.
► Verbinden Sie das Gerät mit dem
USB-Anschluss am Computer.
Funktion zum sicheren Entfern
ausgeführt werden.
en kann nicht
► Schließen S ie alle Programme d
Laufwerk zugreifen könnten (z
ie auf das
.B.Norton
Papierkorbschutz).
Kann das Gerät v on einem Virus befallen
werden?
Das Gerät verhält sich wie ein
Festplattenlaufwerk. Es kann über jede
Datei, die Sie darauf abspeichern, mit einem
Virus infiziert werden. Aus diesem Grund
wird der Einsatz eines Virenschutzprogramms
empfohlen.
Muss ich meinen Computer ausschalten, wenn
ich das Gerät installieren möchte?
Der STORAGEBIRD ist ein "Plug & Play"-Gerät.
Sie können ihn jederzeit installieren, selbst bei
eingeschaltetem Computer.
10 - Deutsch A26381-F103-Z104-1-8N19, Ausgabe 1
Page 19

Technische Daten
Schnittstelle USB 2.0 (abwärtskompatibel)
Übertragungsrate der Schn ittstelle
Betriebssystem
Anzeige der Datenübertragung LED flackert
Stromversorgung
Externes Netzteil
Abmessungen (LxBxH)
Gewicht ca. 260 g (340 g inkl. Netzteil)
Backup-Taste
Finger Print Software Festplattenlaufwerk "AP":
Bis zu 480 Mbit/s bei USB 2.0
Windows XP / Windwos Vista
Über den USB-Anschluss des Computers
5 V DC/ 2,0 A
136mmx80mmx17mm
Mit dieser Taste starten Sie die
Essentials Software. Anleitun
und Bedienung dieser Software
Benutzerhandbuch, das auf der
Essentials CD enthalten ist
fingerverify.exe zum Öffnen der verschlüsselten
Daten
CD "STORAGEBIRD Solo 25-UP":
initial.exe zum Verändern der Laufwerksgrößen
STORAGEBIRD
Nero BackITUp
gen zu Installation
finden Sie im
Nero BackItUp
.
A26381-F103-Z104-1-8N19, Ausgabe 1 Deutsch - 11
Page 20

STORAGEBIRD
12 - Deutsch A26381-F103-Z104-1-8N19, Ausgabe 1
Page 21

Contents
English
Contents
STORAGEBIRD ........................................................................ 1
Systemrequirements .................................................................... 1
Safetyinformation ....................................................................... 2
CEmarking ............................................................................ 2
Installation/Removal ..................................................................... 3
Installation under Windows XP/Windows Vista . ........................................ 3
Externalpower supply ............................................................... 3
Registration of a fingerprint under Windows . . . ........................................ 4
Changing a fingerprintorregisteringanewone ........................................ 5
Changing a password or registering a new one ........................................ 6
Logging into the "security" drive . . . ................................................... 7
Changing drive sizes . . . . . ........................................................... 7
Removingthedevice ................................................................ 8
Removal under Windows XP / Windows Vista . ........................................ 8
Troubleshooting and tips . . . .. . ........................................................... 9
Technicaldata .......................................................................... 11
A26381-F103-Z104-1-8N19, edition 1 English
Page 22

Contents
English A26381-F103-Z104-1-8N19, edition 1
Page 23

STORAGEBIRD
STORAGEBIRD
1
2
The STORAGEBIRD is a Plug&Play device - simply connect it to your computer
with the supplied USB cable.
The STORAGEBIRD is automatically recognised as another disk drive.
An external power supply is only needed if the STORAGEBIRD is connected to a USB hub
without a power supply, or to a system w ith insufficient power on the USB cable.
Backup key ( 1) – Use this key to launch the Nero BackITUp Essentials software.
Instructions for installation and use of t his software can be found in the user guide
included on the "Nero BackItUp Essentials CD-ROM".
Your device is equipped with a fingerprint sensor (2), which you can use to
protect your d a ta from unauthorised a ccess.
System requirements
• Computer with Windows XP, Windows Vista
• At least one free USB port
A26381-F103-Z104-1-8N19, edition 1 English - 1
Page 24

STORAGEBIRD
Safety information
In o rder to prevent the risk of fire, the STORAGEBIRD Solo 25-UP must
only be operated with the original adapter Sunny SYS1193-1005-W2E
5V DC / 2.0 A.
The supplied AC/DC m ains adapter must only be used with the STORAGEBIRD 25-UP.
CE marking
CE marking for devices wit
from 20.07.2007
The s hipped version of t
directives 2004/108/E
"Low voltage directive
hout wireless component supplied at launch
his device complies with the requirements of EEC
C "Electromagnetic compatibility" and 2006/95/EC
".
2 - English A26381-F103-Z104-1-8N19, edition 1
Page 25

STORAGEBIRD
Installation/Removal
The device does not require partitioning or formatting. The device has
been formatted in the factory. Reformatting is possible, but all data stored
on the device will be irrevocably deleted.
If you do wish to reformat, please refer to the chapter "
Installation under Windows XP/Windows Vista
► Connect the device to the computer via the USB port.
Two new drives will be recognised and the LED on the device will light up.
External power supply
If the computer does not recognise the STORAGEBIRD, or if data cannot be transferred to
and from the device, it is possible the USB port is not providing enough power. In that case,
use the Fujitsu Siemens Computers external power supply. Depending on the model you
have purchased, an external power supply is provided, or you can purchase a suitable power
supply as an accessory. Contact your Fujitsu Siemens Computers dealer.
Changing drive sizes", Page 7.
A26381-F103-Z104-1-8N19, edition 1 English - 3
Page 26

STORAGEBIRD
Registration of a fingerprint under Windows
Your device is partitioned into tw o drives which are denoted as the "AP" and
"public" drives in W indows Explorer.
The "public" drive is not en crypted and can be used without registration.
► Connect the device to the computer via the USB port.
The "AP" and "public" drives wi
► Open the "AP" drive.
► Start the fingerverify.exe appl
The Fingerprint Registration selection window appears.
ll be displayed in Windows Explorer.
ication.
4 - English A26381-F103-Z104-1-8N19, edition 1
Page 27

STORAGEBIRD
► Use the mouse to select the finger required and go to Next.
► Firmly run the selected finger at least three times over the fing erprint sensor of your device.
After successful registration of the finger, the Fingerprint Registration selection window reappears.
► Select another finger for registration.
or
► Select Exit.
A window for setting a password appears.
► Enter a password and a h
► Select Confirm.
The"AP"drivewilldis
ItcanonlybeaccessedafterFingerprin t Verification is successful.
int for your password.
appear. The encrypted "security" drive will be decrypted and displayed.
Changing a fingerprint or registering a new one
Requirement: You have already logged in by fingerprint or password and
the " se curity" drive is available.
► Left-click on the Fin ge rVerify application in the symbol a rea of your task bar.
► Select User Settin gs - Fingerprint Registration.
Follow the instructions given in the chapter "Registration of a fingerprint under Windows ", Page 4.
A26381-F103-Z104-1-8N19, edition 1 English - 5
Page 28

STORAGEBIRD
Changing a password or registering a new one
Requirement: You have already logged in by fingerprint or password and
the "security" drive is available.
► Left-click on the FingerVerify application in the symbol area of your task bar.
► Select User Settings - Set Fingerprint Password.
The dialogue box for changing or registering a new password appears.
2
3
4
5
6
7
8
1
► Enable box 1 if a password hint should be displayed for every password entry.
► Enter a password hint in field 2.
► Enable box 3 if you would like only your fingerprint to be used for verification of yo ur identity.
► Enable box 4 if you would like only your password to be used for verification of your identity.
► Enter your previous password in field 5.
► Enter your new password in field 6.
► Re-enter your new password in field 7.
► Enable box 8 if the FingerVerify functionality should be protected by the password.
6 - English A26381-F103-Z104-1-8N19, edition 1
Page 29

STORAGEBIRD
Logging into the "security" drive
► Connect the device to the computer via the USB port.
The "AP" and "public" drives are available in Windows Explorer.
► Open the "AP" drive.
► Start the fingerverify.exe application.
The fingerprint verification dialogue will be displayed.
► Run your registered finger over the fingerprint sensor.
A green circle confirms successful registration.
The dialogue closes, the "AP" drive is replaced by the "security" drive.
Your encryp ted data is available.
or
A red cross means that an error has occurred.
► Run your finger over the sensor again .
After several unsuccessful attempts you must enter the password
which you assigned at registration.
Changing drive sizes
► Connect the device to the compute
► Place the "STORAGEBIRD Solo 25-UP" CD in your computer drive.
► Start the initial.exe programme.
The dialogue for setting the public region and the security region w ill appear on the screen.
r via the USB port.
► Slide the control to the required position.
► Click on START to confirm.
A26381-F103-Z104-1-8N19, edition 1 English - 7
Page 30

STORAGEBIRD
Removing the device
Before removing your device from the USB port or shutting down and/or restarting your
computer, you must close the FingerVerify programme in your desktop task bar.
► Right-click on the Fing erVerify application in the symbol area of your task bar.
► Select Exit.
All data on the "security" drive will be encrypted, it will be replaced by the "AP" drive.
The drive is protected against unauthorised access.
► Follow the instructions given in c hap ter "
Page 8 to remove the device from the USB port of your computer.
Removal under Windows XP / Windows Vista",
Removal under Windows XP / Windows Vista
You must always deactivate th
e device before r emoving it.
You can de activate a "USB mass
► Double-click on the taskbar b
You are then asked to select the hardware device to un plug or eject.
► Select the relevant device.
► Click on Deactivate to confirm.
storage device" using the corresponding taskbar button.
utton.
8 - English A26381-F103-Z104-1-8N19, edition 1
Page 31

Troubleshooting and tips
Cause
Ifyouattempttocopymorethan4GBofdatato
the device then Microsoft Windows will abort the
process and display an error message.
The Safely Remove Hardware function does not
work.
STORAGEBIRD
Troubleshooting
In order to ensure maximum compa
all standard operating systems
applications, the device has be
with the FAT32 file system. This
does not support data files wh
than 4 GB. D ata which might ex
include for example DVD ima
recordings etc.
The device must be converte
files larger than 4GB to be st
Always ba ck up any data stor
before performing the step
is possible that operati
Microsoft Windows may no
recognise the data.
► Makeanoteofthedrivele
your drive.
► Press and hold the Windows key on your
keyboard and press the "R" key.
An input window appears.
► Enter "cmd" in the input
► Enter the command "vol F:" ."F:" is a
placeholder. Rather than "F:", enter the drive
letter for your drive.
A message is then display
of your device.
► Make a note of the name of y
► Enter "convert F: /FS:NTFS". Again, use
your particular drive letter in place o f the
placeholder "F:".
Some versions of Window
the drive as confirm atio
► Ifyouareaskedforthen
enter the name you wrote
The file system of the device will be converted
to NTFS without loss of d ata.
► Close all programs that might access the
drive (e.g. Norton Protected R ecycle Bin).
s described below. It
ng systems other than
ed showing the name
s require the name of
n:
tibility with
and potential
en pre-formatted
file system
ich are larger
ceed this limit
ge files, digital TV
dtoNTFStoallow
ored.
ed on the device
longer be able to
tter (e.g. F:) of
field.
our device.
ame of the drive,
down before.
A26381-F103-Z104-1-8N19, edition 1 English - 9
Page 32

STORAGEBIRD
Cause
Can the device be attacked by a vir
Do I have to turn off my computer w
to install the device?
us?
hen I want
Troubleshooting
The device behaves like a hard drive. It can be
infected by a virus through any file that you save
on it. For this reason we recommend th e use of
an anti-virus program.
The S TORAGEBIRD is a "Plug & Play
You can install it whenever you l
"device.
ike - even while
the computer is switched on.
10 - English A26381-F103-Z104-1-8N19, edition 1
Page 33

STORAGEBIRD
Technical data
Port
Transfer rate Up to 480 MB/s with USB 2.0
Operating system Windows XP / Windows Vista
Data transfer indication LED flickers
Power supply
External power supply
Dimensions (LxWxH)
Weight
Backup key Use this key to launch Nero BackITUp Essentials.
Fingerprint software
USB 2.0 (backwards-compatible
Via the computer’s USB port.
5 V DC/ 2.0 A
136mmx80mmx17mm
approx. 260 g (340 g including power supply)
Instructions for installation and use of this software
can be found in the user guide included on the
Nero BackItUp Essentials CD.
"AP" hard disk drive:
fingerverify.exe to open encrypted data
"STORAGEBIRD Solo 25-UP" CD:
initial.exe to change drive sizes
)
A26381-F103-Z104-1-8N19, edition 1 English - 11
Page 34

STORAGEBIRD
12 - English A26381-F103-Z104-1-8N19, edition 1
Page 35

Sommaire
Français
Sommaire
STORAGEBIRD ........................................................................ 1
Système requis . . . ...................................................................... 1
Consignesdesécurité ................................................................... 2
Marquage CE . .......................................................................... 2
Installation/retrait ........................................................................ 3
Installation sous Windows XP/Windows Vista . . ........................................ 3
Blocd’alimentation externe ........................................................... 3
Inscription d’une empreinte digitale sous W indows . .................................... 4
Modificationouréinscription d’une empreinte digitale ................................... 5
Modificationouréinscription d’un mot de passe ........................................ 6
Connexion au lecteur "Sécurité" . . . ................................................... 7
Modifierlatailledulecteur ........................................................... 7
Débranchement du périphérique . . . ................................................... 8
Retraitsous Windows XP/Windows Vista .............................................. 8
Analysedesproblèmesetconseils ....................................................... 9
Caractéristiques techniques . . . ........................................................... 11
A26381-F103-Z104-1-8N19, édition 1 Français
Page 36

Sommaire
Français A26381-F103-Z104-1-8N19, édition 1
Page 37

STORAGEBIRD
STORAGEBIRD
1
2
STORAGEBIRD étant un périphérique Plug&Play, raccordez-le au câble USB fourni et à l’ordinateur.
Le STORAGEBIRD sera automatiquement reconnu comme lecteur supplémentaire.
Le bloc d’alimentation est nécessaire uniquement si le STORAGEBIRD est relié à un Hub USB
sans bloc d’alimentation ou à un système avec une puissance insuffisante sur la ligne USB.
Touche Bakup –(1) Cette touche vous permet de démarrer le logiciel Nero BackITUp
Essentials. Vous trouverez des inst ructio ns pour l’installation et l’emploi de ce logiciel dans
le Manuel de l’utilisateur da ns le CD ROM "Nero BackItUp Essentials".
Votre appareil dispose d’un capteur d’empreinte digitale (2) qui vous permet de
protéger vos données contre tout accès non autorisé.
Système requis
• Ordinateur sous Windows XP, W indows Vista
• Un port USB libre minimum
A26381-F103-Z104-1-8N19, édition 1 Français - 1
Page 38

STORAGEBIRD
Consignes de sécurité
Pour éviter tout risque d’incendie, utilisez STORAGEBIRD Solo 25-UP
uniquement avec l’adaptateur d’origine Sunny SYS1193-1005-W2E 5V
DC / 2,0 A.
Utilisez l’adaptateur d’alimentation AC/DC fourni uniquement pour
le STORAGEBIRD 25-UP.
Marquage CE
Marquage CE pour appareil
mise sur le marché à part
Tel qu’il est livré, cet
"Compatibilité électr
s fournis sans composants radio lors de la
ir du 20.07.07
appareil est conforme aux directives CE 2004/108/CE
omagnétique" et 2006/95/CE "Basse tension".
2 - Français A26381-F103-Z104-1-8N19, édition 1
Page 39

STORAGEBIRD
Installation/retrait
Il n’est pas nécessaire de partitionner ni de formater l’appareil. L’appareil
a été formaté en usine. Un formatage ultérieur est possible, mais efface
définitivement toutes les données enregistrées sur l’appareil.
Pour plus d’informations sur la procédure à suivre pour effectuer un formatage
ultérieur, reportez-vo us au chapitre "
Installation sous Windows XP/Windows Vista
► Raccordez le périphérique au port USB de l’ordinateur.
Deux nouveaux lecteurs sont reconnus et la L ED de l’appareil clignote.
Bloc d’alimentation externe
Si l’ordinateur ne reconnaît pas le STORAGEBIRD ou si le transfe rt de données avec l’appareil
s’avère impossible, il est probable que le courant fourni par l’interface USB soit insuffisant. Dans ce
cas, utilisez le bloc d’alimentation externe de Fujitsu Siemens Computers. Selon la version du produit
que vous ave z acquis, le bloc d’alimentation externe sera fourni ou vous pourrez en acquérir un
comme accessoire. Informez-vous auprès de votre point de vente agréé Fujitsu Siemens Com puters.
Modifier la taille du lecteur", Pa ge 7
A26381-F103-Z104-1-8N19, édition 1 Français - 3
Page 40

STORAGEBIRD
Inscription d’une empreinte digitale sous Windows
Votre appareil est subdivisé en deux lecteurs qui s’affichent dans Windows
Explorer comme lecteurs "AP" et "Publique".
Le lecteur "Publique" n’est jamais crypté et peut être utilisé sans inscription.
► Raccordez le périphérique au port USB de l’ordinateur.
Les lecteurs "AP" et "Publique
► Ouvrez le lecteur "AP".
► Démarrez l’application fingerv
La fenêtre de sélection Enregi strement des empre intes s’affiche.
" sont affichés dans Windows Explorer.
erify.exe.
4 - Français A26381-F103-Z104-1-8N19, édition 1
Page 41

► Avec la souris, sélectionnez un doigt et cliquez sur Suivant.
► Passez fermement le doigt choisi au moins trois fois sur le capteur
d’empreinte digitale de votre appareil.
Une fois l’inscription réussie, la fenêtre de sélection Enregis trement des
empreintes s’affiche à nouveau.
► Sélectionnez un autre doigt à inscrire.
ou
► Sélectionnez Quitt
La fenêtre de configuration du mot de passe s’affiche.
► Entrez votre mot de p
► Sélectionnez Confirmer.
Le lecteur "AP" est ca
Il n’est accessible qu’après une Vé ri fica tio n de l’empreinte réussie.
er.
asse et un aide-mémoire pour votre mot de passe.
ché. Le lecteur crypté "Sécurité" est décrypté et affiché.
STORAGEBIRD
Modification ou réinscription d’une empreinte digitale
Conditions préalables : Vous avez ouvert la session en vous servant de l’empreinte
digitale ou du mot de passe et le lecteur "Sécurité" est disponible.
► Cliquez avec le bouton gauche de la souris sur l’application FingerVerify dans
la zone des icônes de la barre des tâches.
► Sélectionnez Param è tre utilisateur - Enregistrement des empreintes.
Suivez les instructions du chapitre "Inscription d’une em preinte digitale sous Win dows", Page 4.
A26381-F103-Z104-1-8N19, édition 1 Français - 5
Page 42

STORAGEBIRD
Modification ou réinscription d’un mot de passe
Conditions p réalables : Vous avez ouvert la session en vous servant de l’empreinte
digitale ou du mot de passe et le lecteur "Sécurité" est disponible.
► Cliquez avec le bouton gauche de la souris sur l’application FingerVerify dans
la zone des icônes de la barre des tâches.
► Sélectionnez Paramètre utilisateur - Enregistrement des empreintes.
La boîte de dialogue de modification ou réinscription d’un mot de passe s ’affiche.
2
3
4
5
6
7
8
1
► Cochez la case no 1 si vous souhaite z qu’un aide-mémoire s’affiche pour
chaque entrée de mot de passe.
► Entrez un aide-mémoire dans le champ no 2.
► Cochez la case no 3 si vous souhaitez n’utiliser que votre empreinte digitale pour la vérification.
► Cochez la case no 4 si vous souhaitez n’utiliser que votre mot de passe pour la vérification.
► Entrez le mot de passe actuel dans le champ no 5.
► Entrez le mot de passe no uvea u dans le champ no 6.
► Entrez à nouveau le mot de passe nouveau dans le champ no 7.
► Cochez la case no 8 si vous souhaitez que la fonctionnalité de FingerVerify
soit protégée par mot de passe.
6 - Français A26381-F103-Z104-1-8N19, édition 1
Page 43

STORAGEBIRD
Connexion au lecteur "Sécurité"
► Raccordez le périphérique au port USB de l’ordinateur.
Les lecteurs "AP" et "Publique" sont disponibles dans Windows E xplorer.
► Ouvrez le lecteur "AP".
► Démarrez l’application fingerverify.exe.
La boîte de dialogue de reconnaissance de l’empreinte digitale s’affiche.
► Passez le doigt inscrit sur le capteur d’empreinte digitale.
Un cercle vert confirme que l’enregist rement a r éussi.
La boîte de dialogue se ferme et le lecteur "AP" est remplacé par le lecteur "Sécurité".
Vos d onnées cryptées sont disponibles.
ou
Un cercle rouge indique qu’une erreur est survenue.
► Passez à nouveau le doigt inscrit sur le capteur.
Après plusieurs tentatives échouées, il faudra entrer le mot de passe
défini lors de l’enregistrement.
Modifier la taille du lecteur
► Raccordez le périphérique au por
► Insérez le CD "STORAGEBIRD Solo 25-UP" dans le lecteur de votre ordinateur.
► Démarrez le programme initial.exe
La boîte de dialogue de configuration de la zone publique et de la zone de sécurité s’affiche.
t USB de l’ordinateur.
.
► Poussez le sélecteur dans la position souhaitée.
► Confirmez avec DEMARRER.
A26381-F103-Z104-1-8N19, édition 1 Français - 7
Page 44

STORAGEBIRD
Débranchement du périphérique
Avant de débrancher votre périphérique du port USB de votre ordinateur,
d’arrêter votre ordinateur ou d’effecteur un redémarrage , vous devez arrêter le
programmeFingerVerify dans la barre des tâches de votre bureau.
► Cliquez avec le bouton droit de la souris sur l’application FingerVerify dans
la zone des icônes de la barre des tâches.
► Sélectionnez Quitter.
Toutes les données sur le lecteur "Sécurité" sont alors cryptées et le lecteur
est remplacé par le lecteur "AP".
Le lecteur est protégé contre tout accès non autorisé.
► Débranchez le périphérique du port USB de l’ordinateur comme décrit au chapitre
Retrait sous Windows XP/Windows Vista", Page 8.
"
Retrait sous Windows XP/Windows Vista
Avant le retrait, désactive
Le symbole correspondant dans la barre des tâches vous permet de désactiver
le "USB Mass Storage Device".
► Cliquez deux fois sur l’icône de la barre des tâches.
Sur l’écran s’affiche un message demandant de retirer ou d’éjecter les composants matériels.
► Sélectionnez les composants correspondants.
► Validez votre choix avec Désactiver.
z impéra tivement l’appareil.
8 - Français A26381-F103-Z104-1-8N19, édition 1
Page 45

Analyse des problèmes et conseils
Cause Solution
Si vous tentez de copier sur l’appareil un volume
de données dépassant 4 Go, Microsoft Window s
interrompt l’opération par un message d’erreur.
La fonction de retrait sûr ne peut pas être
exécutée.
Pour garantir la compatibilité maximum avec
tous les systèmes d’exploitation et toutes
les possibilités d’application, l’appareil a été
préformaté avec le système de fichiers FAT32.
Ce système de fichiers ne supporte aucune
donnée excédant 4 Go. Ces données peuvent
être, entre autres, des fichiers d’image DVD,
des enregistrements TV numériques, etc.
Pour pouvoir enregistrer des fichiers d’une taille
> 4 Go sur l’appareil, il faut convertir l’appareil
en NTFS.
Effectuez une copie de sauvegarde des
données qui se trouvent sur l’appareil avant
de procéder aux étapes suivantes. D’autres
systèmes d’exploitation que Microsoft Windows
risquent, le cas échéant, de ne plus reconnaître
les données.
► Prenez note de la lettre de lecteur (p. ex. F:)
associée à votre lecteur.
► Maintenez la touche Windows de votre
clavier enfoncée et appuyez sur la touche R.
Unefenêtredesaisies’affiche.
► Saisissez "cmd" dans le champ de saisie.
► Entrez la commande "vol F:" ."F:" n’est
utilisée ici qu’à titre d’exemple. Entrez à
laplacede"F:"lalettreassociéeàvotre
lecteur.
Un message indiquant le nom de votre
périphérique s’affiche.
► Prenez note du nom de votre périphérique.
► Entrez "convert F: /FS:NTFS". De nouveau,
utilisez la lettre associée à votre lecteur au
lieu de "F:" (utilisée ici à titre d’exemple).
Certaines versions de Window s demandent le
nom du lecteur comme confirmation :
► si votre version de Windows vous demande
le nom du lecteur, entrez le nom que vous
avez noté.
La conve rsion du système de fichiers de
l’appareil en NTFS s’effectue sans perte de
données.
► Fermez tous les programmes pouvant
accéder au lecteur (p. ex. la protection de
la corbeille Norton).
STORAGEBIRD
A26381-F103-Z104-1-8N19, édition 1 Français - 9
Page 46

STORAGEBIRD
Cause Solution
Est-il possible qu’un virus s’at
taque à l’appareil ?
L’appareil se comporte com m e un lecteur de
disque dur. Par conséquent, un virus pourra
s’attaquer à l’appareil si vous enregistrez
un fichier infecté. C’est pourquoi nous
recommandons d’insta ller un programme
anti-virus.
Dois-je arrêter mon ordinateur pour installer
l’appareil ?
Le STORAGEBIRD est un apparei
Play". Vous pouvez l’instal
même lorsque l’ordinateur e
l"Plug&
ler à tout moment,
st en marche.
10 - Français A26381-F103-Z104-1-8N19, édition 1
Page 47

Caractéristiques techniques
Interface USB 2.0 (rétrocompatible)
Débit de transmission de l’interface Jusqu’à 480 Mbit/s avec USB 2.0
Système d’exploitation Windows XP / Windows Vista
Voyant de transm issio n de données
Alimentation électrique Via le port USB de l’ordinateur
Bloc d’alimentation externe
Dimensions (LxPxH)
Poids
Touche Backup
Logiciel Finger Print (empreinte digitale)
LED vacillante
5VDC/2,0A
136mmx80mmx17mm
env. 260 g (340 g, bloc d’alimentation compris)
Cette touche vous permet d e déma
Nero BackITUp Essentials. Vou
instructions pour l’installa
logiciel dans le Manuel de l’ut
Nero BackItUp Essentials.
Disque dur "AP" :
fingerverify.exe pour ouvri
CD "STORAGEBIRD Solo 25-UP" :
initial.exe pour modifier les
tion et l’emploi de ce
rlesfichiers cryptés
dimensions du lecteur
STORAGEBIRD
rrer le logiciel
s trouverez des
ilisateur dans le CD
A26381-F103-Z104-1-8N19, édition 1 Français - 11
Page 48

STORAGEBIRD
12 - Français A26381-F103-Z104-1-8N19, édition 1
Page 49

Contenido
Español
Contenido
STORAGEBIRD ........................................................................ 1
Requerimientos del sistema . . . ........................................................... 1
Indicacionesde seguridad ............................................................... 2
MarcadoCE ............................................................................ 2
Instalación/Quitar hardware .............................................................. 3
Instalar en Windows XP/Windows Vista . . . ............................................ 3
Fuentedealimentaciónexterna ...................................................... 3
Registro de huellas dactilares en Windows ............................................ 4
Modificación o nuevo registro de una huella dactilar .................................... 5
Modificación o nuevo registro de una contraseña . . .................................... 6
Accesoalaunidad"Security" ........................................................ 7
Modificacióndeltamañodelaunidad ................................................. 7
Desconexióndel equipo ............................................................. 8
Desconexión del dispositivo en Windows XP/Windows Vista . . . ......................... 8
Solucióndeproblemasyconsejos ........................................................ 9
Características técnicas ................................................................. 11
A26381-F103-Z104-1-8N19, edición 1 Español
Page 50

Contenido
Español A26381-F103-Z104-1-8N19, edición 1
Page 51

STORAGEBIRD
STORAGEBIRD
1
2
Como equ ipo Plug & Play, conecte STORAGEBIRD con el cable USB suministrado y el PC.
El STORAGEBIRD se rá detectado automáticamente como nueva unidad.
Una fuente de alimentación solo es necesaria si el STORAGEBIRD se conecta a un hub USB sin
fuente de alimentación o a un sistema que suministra u na potencia insuficiente al cable USB.
Tecla Backup (1) – Con esta tecla puede iniciar el software Nero BackITUp Essentials.
Puede encontrar las instrucciones de instalación y manejo de este softw are en el Manual
del usuario incluido en el "CD ROM Nero BackItUp Essentials".
El equipo dispone de un sensor de huellas dactilares (2) para proteger los
datos del acceso por personas no autorizadas.
Requerimientos del sistema
• Ordenador con Wi ndows XP, Windows Vista
• Un puerto USB libre como mínimo
A26381-F103-Z104-1-8N19, edición 1 Español - 1
Page 52

STORAGEBIRD
Indicaciones de seguridad
Para evitar q ue pueda producirs
solo puede utilizarse con el ada
5 V de CC/2,0 A.
e un incendio STORAGEBIRD Solo 25-UP
ptador original Sunny SYS1193-1005-W2E
El adapta dor de red de CA/C
Marcado CE
C solo puede utilizarse para STORAGEBIRD 25-UP.
Marcado CE para equipos suministrados sin módulo de radio al
introducirlos en el mercad o a partir del 20.07.2007
Este aparato, en la versión suministrada, cumple todos los requisitos de
las directivas de la CE 2004/108/CE "Compatibilidad electromagnética" y
2006/95/CE "Directiva sobre baja tensión".
2 - Español A26381-F103-Z104-1-8N19, edición 1
Page 53

STORAGEBIRD
Instalación/Quitar hardware
No es necesario particionar ni formatear el dispositivo. El dispositivo se suministra
de fábrica ya formateado. Es posible el formateado posterior; sin embargo, todos
los datos almacenados en el dispositivo se borrarán de forma irrecuperable.
Si desea realizar un formateado posterior, consulte el capítulo "
del tamaño de la unidad" , Página 7
Instalar en Windows XP/Windows Vista
► Conecte el equipo a la conexión USB del ordenador.
Se reconocerán dos nuevas unidades y iluminará el LED en el equipo.
Fuente de alimentación externa
Si el ordenador no detecta el STORAGEBIRD o no es posible el intercambio de datos
con el dispositivo, es posible que la interfaz USB no suministre la corriente suficiente.
Utilice en este c aso la fuente de alimentación externa de Fujitsu Siemens Computers. En
función de la variante de prod u cto que haya adquirido, la fuente de alimentación externa
se suministra conjuntamente o bien debe adquirirse como accesorio. Diríjase en este
caso a su distribuidor autorizado Fujitsu Siemens Com puters.
Modificación
A26381-F103-Z104-1-8N19, edición 1 Español - 3
Page 54

STORAGEBIRD
Registro de huellas dactilares en Windows
El equipo está dividido en dos unidades que aparecen como "AP" y "Public" en Windows Explorer.
La unidad "Public" no está codificada y puede utilizarse sin registro.
► Conecte el equipo al puerto USB del ordenador.
Las unidades "AP" y "Public" aparecen en Windows Explorer.
► Abra la unidad "AP".
► Inicie la aplicación fingerverify.exe .
Aparece la ventana de selección Registro de huella dactilar.
4 - Español A26381-F103-Z104-1-8N19, edición 1
Page 55

STORAGEBIRD
► Utilice el ratón para seleccionar el dedo deseado y vaya a Siguiente.
► Pase el dedo seleccionado un mínimo de 3 veces por el lector de huellas dactilares del equipo.
Después de que se haya registrado la huella, volverá a aparecer la
ventana Registro de huella dactilar .
► Seleccione otro dedo para realizar el registro.
o
► Seleccione Finaliz
Aparecerá una ventana para configurar la contraseña.
► Introduzca u na cont
► Seleccione Confirmar.
La unidad "AP" quedar
Solo podrá accederse después de que se haya producido la Verificación de hu e lla dactilar.
ar.
raseña y un recordatorio para la contraseña.
á oculta. La unidad codificada "Security" se descifrará y podrá verse.
Modificación o nuevo registro de una huella dactilar
Requisito: Ya se ha accedido mediante huella dactilar o contraseña y la
unidad "Security" está disponible.
► Haga clic con el botón izquierdo del ratón en la aplicación FingerVerify en
el área del símbolo de la barra de tareas.
► Seleccione Configuración del usuario - Registro de huella dactilar.
Siga las instrucciones del capítulo "Re gistro de huellas dactilares en Windows", Página 4.
A26381-F103-Z104-1-8N19, edición 1 Español - 5
Page 56

STORAGEBIRD
Modificación o nuevo registro de una contraseña
Requisito: Ya se ha accedido mediante huella dactilar o contraseña y la
unidad "Se curity" está disponible.
► Haga clic con el botón izquierdo del ratón en la aplicación FingerVerify en
el área del símbolo de la barra de tareas.
► Seleccione Configuración del usuario - Configuración de contraseña.
Aparecerá el cuadro d e diálogo para modificar o realizar un nuevo registro de una contraseña.
1
2
3
4
5
6
7
8
► Active la casilla 1 si debe aparecer el recordatorio cada vez que haya que introducir la contraseña.
► Introduzca un recordatorio de contraseña en el campo 2.
► Active la casilla 3 si para realizar la verificación desea ut ilizar solamente la huella dactilar.
► Active la casilla 4 si para realizar la verificación desea utilizar solamente la contraseñ a.
► Introduzca la contraseña anterior en el campo 5.
► Introduzca la nueva contraseña en el campo 6.
► Vuelva a introducir la nueva contraseña en el campo 7.
► Active la casilla 8 si la función FingerVerify debe protegerse mediante contraseña.
6 - Español A26381-F103-Z104-1-8N19, edición 1
Page 57

STORAGEBIRD
Acceso a la unidad "Security"
► Conecte el equipo al puerto USB del ordenador.
Las unidades "AP" y "Public" aparecen en Windows Explorer.
► Abra la unidad "AP".
► Inicie la aplicación fingerverify.exe .
Aparecerá el diálogo de verificación de huella dactilar.
► Pase el dedo seleccionado por el lector de huellas dactilares.
Un círculo verde confirma que el registro se ha realizado correctamente.
El cuadro de diálogo se cerrará y la unidad "AP" será sustituida por la unidad "Security".
Los datos codificados estarán disponibles.
o
Una cruz roja indica que se ha producido un fallo.
► Vuelva a pasar el dedo por el lector.
Tras varios intentos fallidos, será necesario introducir la contraseña
asignada durante el registro.
Modificación del tamaño de la unidad
► Conecte el equipo al puerto USB de
► Introduzca el CD "STORAGEBI RD Solo 25-UP" en la unidad del ordenador.
► Inicie el programa initial.exe.
En la pantalla aparece el diálogo de config uración del área pública y del área de seguridad.
l ordenador.
► Desplace el regulador a la posición deseada.
► Confirme con INICIAR.
A26381-F103-Z104-1-8N19, edición 1 Español - 7
Page 58

STORAGEBIRD
Desconexión del equipo
Antes de desconectar el equipo del puerto USB del ordenador o apagar
el ordenador y/o reiniciar el sistema, es necesario cerrar el progra m a
FingerVerify en la barra de tareas del escritorio.
► Haga clic con el botón derecho del ratón en la aplicación FingerVerify en
el área del símbolo de la barra de tareas.
► Seleccione Finalizar.
Todos los datos de la unidad "Security" se codificarán y será sustituida por la unidad"AP".
La unidad estará protegida frente a un acceso no autorizado.
► Desconecte el equipo como se describe en el capítulo "
Windows XP/Windows Vista", Página 8 del puerto USB del ordenador.
Desconexión del dispositivo en
Desconexión del dispositivo en Windows XP/Windows Vista
Antes de realizar la descone
Puede desactivar el "USB Mass Stora ge Device" con ayuda del icono correspondiente
que se encuentra en la barra de tareas.
► Haga doble clic en el símbolo que se encuentra en la barra de tareas.
En la pantalla aparece el mensaje de desconectar o expulsar c omponen tes de hardware.
► Marque los componentes correspondientes.
► Confirme con Desactivar.
xión es imprescindible desactivar el equipo.
8 - Español A26381-F103-Z104-1-8N19, edición 1
Page 59

Solución de problemas y consejos
Causa Solución
Mientras copia datos de un tamaño superior
a 4 GB en el equipo, Microsoft Windows
interrumpirá el proceso con un mensaje de error.
No puede ejecutarse la función para quitar
hardware con seguridad.
Para ga rantizar la mayor compatibilidad
posible con todos los sistemas operativos
y las posibilidades de utilización, el equipo
está preformateado con el sistema de datos
FAT32 . Este sistema de datos no soporta datos
superiores a 4 GB. Puede tratarse por ejemplo
de datos de imagen de DVD, grabaciones de
TV digitales, etc.
Para poder grabar datos de un tamaño de >
4 GB en el equipo, es necesario convertir el
equipo a NTFS.
Cree una copia de seguridad de los datos en el
equipo, antes de continuar con los siguientes
pasos. Es posible que otros sistemas operativos
que no sean Microsoft Windows no reconozcan
los datos.
► Apunte la identificación de la unidad (p. ej.
F:) Su unidad.
► Mantenga pulsada la tecla de Windows en
el teclado y pulse la tecla R.
Aparece u na ventana de entrada.
► Introduzca "cmd" en el campo de entrada.
► Introduzca el comando "vol F:" ."F:" es un
marcador de posición. Introduzca para "F:"
la identificación de su unidad.
Aparece un mensaje con el nombre del equipo.
► Anote el nombre de su equipo.
► Introduzca "convert F: /FS:NTFS". Vuelva a
utilizar la identificación de la unidad en lugar
del m arcad or de posición "F:".
Algunas versiones de Windows requ ieren el
nombre de la unidad como confirmación:
► Si se le pre gunta por el nombre de la
unidad, i ntrod uzca el nombre anotado
anteriormente.
El sistema de datos del equipo se convertirá a
NTFS sin que se pierdan datos.
► Cierre todos los programas que pudieran
tener acceso a la unidad (p. ej. protección
de la papelera de reciclaje de Norton).
STORAGEBIRD
A26381-F103-Z104-1-8N19, edición 1 Español - 9
Page 60

STORAGEBIRD
Causa Solución
¿Puede haber afectado u n virus al
dispositivo?
El dispositivo se comporta como una unidad de
disco duro. Puede haber resultado infectado por
cualquier archivo que haya guardado en él. Por
esa razón se recomienda la utilización de un
programa antivirus.
¿Debo apagar mi ordenador si quiero instalar
el dispositivo?
El STORAGEBIRD es un dispositiv
& Play". Puede instalarlo en t
incluso con el ordenador enc
o"Plug
odo momento,
endido.
10 - Español A26381-F103-Z104-1-8N19, edición 1
Page 61

STORAGEBIRD
Características técnicas
Interfaz USB 2.0 (compatible con versiones anteriores)
Velocidad de transferencia de la interfaz Hasta 48 0 Mbps para el puerto USB 2.0
Sistema operativo Windows XP/Windows Vista
Indicador de transmisión de datos
Alimentación A través del puerto USB del PC
Fuente de alimentación extern
Dimensiones(AlxAnxF)
Peso
Tecla Backup
Finger Print Software
a
El LED parpadea
5 V de CC/2,0 A
136mmx80mmx17mm
Aprox.260g(340gincl.lafuentedealimentación)
Con esta tecla puede iniciar el s
BackITUp Essentials. Puede en
instrucciones de instalación
software en el Manual del usuar
Nero BackItUp Essentials.
Unidad de disco duro "AP":
fingerverify.exe para desco
codificados
CD "STORAGEBIRD Solo 25-UP"
initial.exe para modificar el
oftware Nero
contrar las
y manejo de este
io incluido en el CD
dificar los datos
:
tamaño de la unidad
A26381-F103-Z104-1-8N19, edición 1 Español - 11
Page 62

STORAGEBIRD
12 - Español A26381-F103-Z104-1-8N19, edición 1
Page 63

Contenuto
Italiano
Contenuto
STORAGEBIRD ........................................................................ 1
Requisiti del sistema . . .................................................................. 1
Normedisicurezza ..................................................................... 2
MarchioCE ............................................................................ 2
Installazione/rimozione .................................................................. 3
Installazione con Windows XP / Window s Vista ........................................ 3
Alimentatore esterno ................................................................ 3
Registrazione di un’impronta digitale in Windows . . . .................................... 4
Modificaonuovaregistrazionediunaimprontadigitale ................................. 5
Modificaonuovaregistrazionediunapassword ....................................... 6
Accessoall’unità "Security" .......................................................... 7
Modificadimensioniunità ............................................................ 7
Smontaggio del dispositivo ........................................................... 8
Rimozione con Windows XP/Windows Vista . .. ........................................ 8
Risoluzione dei problemi e suggerimenti . . . . . . ............................................ 9
Datitecnici ............................................................................. 11
A26381-F103-Z104-1-8N19, edizione 1 Italiano
Page 64

Contenuto
Italiano A26381-F103-Z104-1-8N19, edizione 1
Page 65

STORAGEBIRD
STORAGEBIRD
1
2
Lo STORAGEBIRD è un dispositivo Plug & Play che va collegato al cavo USB fornito e a l computer.
Lo STORAGEBIRD viene riconosciuto automaticamente come un’ulteriore unità del computer.
L’alimentatore è necessario solo quando lo STORAGEBIRD viene collegato a uno hub USB senza
alimentatore oppure a un sistema che non riceve alimentazione sufficiente tramite il cavo USB.
Tasto di backup (1) – Con questo tasto si avvia il software Nero BackITUp Essentials.
Le istruzioni relative all’installazione e all’utilizzo d el presente software sono riportate nel
Manuale di istruzioni contenuto nel CD ROM "Nero BackItU p Essentials".
Il dispositivo dispone di un sensore d’impronte digitali (2) con il quale è possibile
proteggere i propri dati contro un accesso non autorizzato.
Requisiti del sistema
• Computer con Windows XP, Windows Vista
• Almeno una porta USB libera
A26381-F103-Z104-1-8N19, edizione 1 Italiano - 1
Page 66

STORAGEBIRD
Norme di sicurezza
Per evitare incendi STORAGEBIR
con l’adattatore originale Sun
D Solo 25-UP può essere azionato solo
ny SYS1193-1005-W2E 5V DC / 2,0 A.
L’adattatore di rete CA/C
Marchio CE
C fornito può essere utilizzato solo con STORAGEBIRD 25-UP.
Marchio CE per dispositivi senza componente radio al momento
dell’introduzione nel mercato dal 20/07/2007
Questo dispositivo nella versione consegnata è conforme alle direttive CEE
2004/108/CE relative alla "compatibilità elettromagnetica" e alla direttiva
2006/95/CE sulla "bassa tensione".
2 - Italiano A26381-F103-Z104-1-8N19, edizione 1
Page 67

STORAGEBIRD
Installazione/rimozione
Non è necessaria una partizione o una formattazione del dispositivo. Il dispositivo viene
fornito già formattato in f abbrica. È possibile effettuare una nuova formattazione, tuttavia,
i dati presenti sul dispositivo verranno cancellati e non potranno essere più recuperati.
Per eseguire una nuova formattazione, fare riferimento al capitolo
Modifica dimensioni unità", Pagina 7
"
Installazione con Windows XP / Windows Vista
► Collegare il dispositivo alla porta USB del computer.
Vengono riconosciute due nuove unità e la spia LED sul dispositivo si illumina.
Alimentatore esterno
Se lo STORAGEBIRD non viene rilevato dal compu ter oppure non è possibile uno trasferimento
di dati tra il computer e il dispositivo, è possibile che l’interfaccia USB non fornisca alimentazione
sufficiente. In questo caso, utilizzare l’alimentatore esterno di Fujitsu Siemens Computers. A seconda
della versione del prodotto acquistata, l’alimentatore esterno è fornito con il dispositivo o può essere
acquistato come accessorio. Rivolgersi al rivenditore Fujitsu Siemens Computers di fiducia.
A26381-F103-Z104-1-8N19, edizione 1 Italiano - 3
Page 68

STORAGEBIRD
Registrazione di un’impronta digitale in Windows
Il dispositivo è suddiviso in due unità, che vengono mostrate in Windows-Explorer come unità "AP" e
"Public".
L’unità "Public" non viene crittografata e può essere utilizzata senza registrazione.
► Collegare il dispositivo alla porta USB del computer.
Le unità "AP" e "Public" vengono visualizzate in Windows Explorer.
► Aprire l’unità "AP".
► Avviare l’applicazione fingerverify.exe .
Appare la finestra di scelta Registrazione Fingerprint.
4 - Italiano A26381-F103-Z104-1-8N19, edizione 1
Page 69

STORAGEBIRD
► Selezionare con il mouse un dito qualsiasi e premere Con tinua.
► Passare il dito prescelto, tenendolo rigido, almeno tre volte sul sensore
d’impronte digitali del dispo sitivo.
La finestra di scelta Registrazione Fingerprint appare nuovamente dopo
la registrazione riuscita del dito.
► Scegliere un altro dito per la registrazione.
o
► Selezionare Esci.
Appare una finestra per l’impostazione della password.
► Inserire una passwo
► Selezionare Conferma.
L’unità "AP" viene na
È possibile accedervi nuovamente solo dopo un esito positivo della verifica delle impronte digitali.
rd e un suggerimento ad essa relativo.
scosta. L’unità crittografata "Security" viene decrittografata e visualizzata.
Modifica o nuova registrazione di un a impronta digitale
Requisito: L’accesso è stato ottenuto tramite impronta digitale o password
e l’unità "Security" è disponibile.
► Fare clic con il pulsante sinistro del mouse sull’applicazione F in gerVerify nella
zona simboli d ella barra delle applicazioni.
► Selezionare Impostazione utente - Registrazione Fingerprint.
Seguire le istruzioni come descritto nel capitolo "Registrazione di un’impronta
digitale in Windows", Pagina 4.
A26381-F103-Z104-1-8N19, edizione 1 Italiano - 5
Page 70

STORAGEBIRD
Modifica o nuova registrazione di una password
Requisito: L’accesso è stato ottenuto tramite impronta digitale o password
e l’unità "Security" è disponibile.
► Fare clic con il pulsante sinistro del mouse sull’applicazione FingerVerify nella
zona simboli della barra delle applicazioni.
► Selezionare Impostazione utente - Impostazione password Fingerprint.
Appare la finestra di dialogo per la modifica o la nuova registrazione di una password.
2
3
4
5
6
7
8
1
► Attivare la casella n. 1, se è necessario visualizzare un suggerimento password
ad ogni inserimento della password.
► Inserire nel campo n. 2 un suggerimento per la password.
► Attivare la casella n. 3, se si desidera utilizzare solo la propria impronta digitale ai fini della verifica.
► Attivare la casella n. 4, se si desidera utilizzare solo la propria password ai fini della verifica.
► Inserire la password utilizzata finora nel campo n. 5.
► Inserire la nuova password nel campo n. 6.
► Inserire ancora la nuova password nel ca mpo n. 7.
► Attivare la casella n. 8, se è necessario proteggere la funzionalità di FingerVerify con la password.
6 - Italiano A26381-F103-Z104-1-8N19, edizione 1
Page 71

Accesso all’unità "Security"
► Collegare il dispositivo alla porta USB del computer.
Le unità "AP" e "Public" sono disponibili su Windows Explorer.
► Aprire l’unità "AP".
► Avviare l’applicazione fingerverify.exe .
Viene visualizzata la finestra di dialogo per il controllo delle impronte digitali.
► Passare il dito r egistrato sul senso re d’impronte digitali.
Un cerchio verde conferma l’avvenuta registrazione.
La finestra di dialogo viene chiusa, l’unità "AP" viene sostituita con l’unità "Security".
I dati crittografati sono disponibili.
oppure
Una croce rossa indica che si è verificato un errore.
► Passare nuovamente il dito sul sensore.
Dopo diversi tentativi falliti è necessario inserire la password
fornita durante la registrazione.
Modifica dimensioni unità
► Collegare il dispositivo alla po
► Inserire il CD "STORAGEBIRD Solo 25-U P" nell’unità del computer.
► Avviare il programma in itial.exe.
Sullo schermo appare la finestra di dialogo per l’impostazione della zona
pubblica e della zona di sicurezza.
rta USB del computer.
STORAGEBIRD
► Far scorrere il regolatore nella posizione desiderata.
► Confermare con START (Avvio).
A26381-F103-Z104-1-8N19, edizione 1 Italiano - 7
Page 72

STORAGEBIRD
Smontaggio del dispositivo
Prima di rimuovere il dispositivo dalla porta USB del computer, oppure arrestare
il computer o eseguire un nuovo avvio, è nece ssario interrompere il programma
FingerVerify nella barra delle applicazioni del desktop.
► Fare clic con il pulsante destro del mouse sull’applicazione FingerVerify nella
zona simboli della barra delle applicazioni.
► Selezionare Esci.
Tutti i dati sull’unità "Security" vengono crittografati, l’unità viene sostituita dall’unità "AP".
L’unità è protetta contro un accesso non autorizzato.
► Rimuovere il dispositivo dalla porta USB del computer come descritto nel capitolo
Rimozione con Windows XP/Windows Vista", Pagina 8.
"
Rimozione con Windows X P/Windows Vista
Prima della rimozione è asso
Tramite l’icona corrispondente sulla barra delle applicazioni, è possibile
disattivare "USB Mass Storage Device".
► Fare doppio clic sull’icona presente sulla barra delle applicazioni.
Sullo schermo compare la richiesta di rimuovere o espellere il componente hardware.
► Contrassegnare i componenti corrispondenti.
► Confermare con Disattiva.
lutamente necessario disattivare il dispositivo.
8 - Italiano A26381-F103-Z104-1-8N19, edizione 1
Page 73

STORAGEBIRD
Risoluzione d ei problemi e sugg
Causa
Mentre si copiano sul dispositi
dimensioni superiori a 4 GB, Mic
interrompe la procedura con un m
errore.
La funzione per la rimozione sicura dell’hardware
non può essere eseguita.
vo i dati con
rosoft Windows
essaggio di
Eliminazione del guasto
Per garantire il più possibile l
con tutti i sistemi operativi no
uso e le possibilità di utilizzo
preformattato con il file syste
file system non supporta dati
GB. Tali dati possono essere
file immagine per DVD, regis
digitale, ecc.
Per poter salvare file di dim
4 GB, il dispositivo deve es
NTFS.
Prima di eseguire le seguen
i dati sul dispositivo. A
diversi da Microsoft Win
riconoscere i dati.
► Prendere nota della lett
propria unità.
► Tenere premuto il tasto Windows della
tastiera e premere il tasto R.
Viene visualizzata una fi
► Inserire "cmd" nel camp
► Inserire il comando "vol F:". "F:" è un
fermaposto. Per "F:" inserire la lettera della
propria unità.
Viene visualizzato un me
del dispositivo.
► Prendere nota del no me de
dispositivo.
► Inserire "convert F: /FS:NTFS". Utilizzare
nuovamente la lettera della propria unità
invece d el fermaposto "F:".
Alcune versioni di Wind
dell’unità come confe
► In caso venga chiesto il
inserire il nome anno
Il file system del dispositivo viene convertito in
NTFS senza perdita di dati.
► Chiudere tutti i programmi che possono
accedere all’unità, ad esempio la protezione
del cestino Norton.
erimenti
a compatibilità
rmalmente in
, il dispositivo è
m FAT32. Questo
superiori a 4
, ad esempio,
trazioni della TV
ensioni superiori a
sere convertito in
ti operazioni, salvare
ltri sistemi operativi
dows non possono più
era (ad es. F:) della
nestra di inserimento.
o di immissione.
ssaggio con il nome
l proprio
ows richiedono il nome
rma:
nome dell’unità,
tato.
A26381-F103-Z104-1-8N19, edizione 1 Italiano - 9
Page 74

STORAGEBIRD
Causa
Il dispositivo può contenere un v
Devo spegnere il computer prima
il dispositivo?
irus?
di installare
Eliminazione del guasto
Il dispositivo funziona in modo a
un’unità disco rigido, pertanto
virus provenienti dai file che l’
salvato. Si consiglia dunque di
nalogo a
, può contenere
utente vi ha
installare un
programma antivirus.
Lo STORAGEBIRD è un dispositivo "Plug &
Play". Ciò significa che può essere installato in
qualsiasi momento a computer acceso.
10 - Italiano A 26 381-F 103-Z104-1-8N19, edizione 1
Page 75

Dati tecnici
Interfaccia USB 2.0 (retrocompatibile)
Velocità di trasmissione dell’int erfaccia Fino a 480 Mbit/s per USB 2.0
Sistema operativo Windows XP / Windows Vista
Spia della trasmissione dati
Alimentazione
Alimentatore esterno
Dimensioni (LxLxH)
Peso
Tasto di backup
Software Finger Print
LED lampeggiante
Tramite la porta USB del computer
5VDC/2,0A
136mmx80mmx17mm
circa 260 g (340 g incl. alimentatore)
Con questo tasto si avvia il software Nero BackITUp
Essentials. Le istruzioni relative all’installazione
e all’utilizzo del presente software sono riportate
nel Manuale di istruzioni contenuto nel CD Nero
BackItUp Essentials.
Unità disco rigido "AP":
fingerverify.exe per aprire i dati codificati
CD "STORAGEBIRD Solo 25-UP":
initial.exe per modificare le dimensioni dell’unità
STORAGEBIRD
A26381-F103-Z104-1-8N19, edizione 1 Italiano - 11
 Loading...