

Page 1

Notebook English, Norsk, Português,
Getting Started
Česky, Türkçe, Slovensko,
Slovenský
AMILO Li Series
Page 2

Are there...
... any technical problems or other questions that you need help with?
Please contact:
• our Hotline/Help Desk (see Help Desk List) or visit "
• Your sales partner
• Your sales office
Additional information is contained in the Help Desk list and the "Warranty" manual.
www.fujitsu-siemens.com/helpdesk"
The "Warranty" manual can be found on your notebook under Star t -
or on the "Drivers & Utilities" CD/DVD or on our website.
For the latest information on our products, tips, updates etc., visit "
www.fujitsu-siemens.com"
Manuals
Page 3

Page 4

This manual w as produced by Xerox Global Services
Published by
Fujitsu Siemens Computers GmbH
AG 01/07
Edition 1
Order No.: 10600794864
Order No.: 440 N00421
Page 5

English
Norsk
Português
Česky
Türkçe
Slovensko
Slovenský
AMILO Li Series
Getting Started
Page 6

Microsoft, MS, MS-DOS and Windows are registered trademarks of Microsoft Corporation.
Pentium is a registered trademark of Intel Corporation, USA.
Acrobat Reader is a trademark of Adobe Systems Incorporated.
Macrovision is a trademark of Macrovision Corporation, USA.
MultiMediaCard is a registered trademark of Infineon Technologies AG
Sony and Memory Stick are registered trademarks of Sony Electronics, Inc.
All other trademarks referenced are trademarks or registered trademarks of their respective
owners, whose protected rights are acknowledged.
Copyright © F ujitsu Siemens Computers GmbH 2007
All rights, including rights of translation, reproduction by printing, copying or similar
methods, in part or in whole, are reserved.
Offenders will be liable for damages.
All rights reserved, including rights created by patent grant or registration of a utility model or design.
Delivery subject to availability. Right of technical modification reserved.
Page 7

Contents
English
Contents
Innovativetechnology... ................................................................ 1
Are youmissing information? ............................................................ 1
Notational conventions .................................................................. 1
Important notes ........................................................................ 2
Declarations of Conformi
Informationsources ..................................................................... 2
Safety information ....................................................................... 3
Drivers andutilities ...................................................................... 3
Ports andoperating elements .......................................................... 4
Preparation for use a
Unpacking a nd checki
Selecting the locati
Connecting the powe
Switching the noteb
SwitchingontheNo
Switching off the N
Battery ................................................................................. 8
Easy Launch keys
Touchpad and tou
Using touchpad b
Loudspeaker . .......................................................................... 10
Switching the l
Volume: adjust
Radio com pone
Switching wir
BIOS Setup Uti
Troubleshooting andtips .............................................................. 12
Restoring installedsoftware .............................................................. 12
Restoring the operating system, drivers, manuals and special software . . . . . .............. 13
The no tebook’s date or time is incorrect ................................................... 13
A beep sounds at a rate of one per second . . . . ............................................ 13
The no tebook stops working . . ........................................................... 13
The no tebook’s LCD screen remains blank .. . . ............................................ 14
The LC D screen is difficultto read ........................................................ 14
The externalmonitorremainsblank ....................................................... 14
The externalmonitorisblankor theimage isunstable ...................................... 15
The printerdoes notprint ................................................................ 15
The r adio connection to a network does not work . . ........................................ 15
nets (Wireless LAN) ......................................................
lity .......................................................................
ty ...............................................................
ndoperation ......................................................
ng your notebook ...................................................
on ....................................................................
r adapter ...........................................................
ook on for the firsttime ................................................
tebook ...............................................................
otebook . . . . ...........................................................
......................................................................
chpad buttons ..........................................................
uttons ..............................................................
oudspeaker on/off ......................................................
ing ...................................................................
eless LANmodule onand off .............................................
10
10
11
11
11
11
2
5
5
5
6
7
7
8
9
9
10600794864, edition 1 English
Page 8
Innovative technology...
Innovative technology...
and ergonomic design make your AMILO a reliable, convenient notebook. Your Windows operating
system is already pre-installed and optimally configured. That mean s you’re ready to
start when you switch on your AMILO for the first time.
This "Getting Started" guide tells you how to prepare your AMILO for use. If you encounter any
problems, helpful information can be found in the section "
Troubleshooting and tips", Page 12
.
Are you missing informatio
An overview with further information about your notebook can be found
Information sources", Page 2.
in "
.
n?
Notational conventions
Pay p articu lar attention to text marked with this symbol. Failure to observe
this warning may endanger your health, cause the equipment to malfunction
or lead t o loss of data. The warranty does not cover defects of t he
equipment caused by failure to follow these instructions.
indicates important information that is required to use the device properly.
►
This style
This style
This style
"This style"
Abc
This style
refers to an action which you must carry out.
indicates a result
flags data entered using the keyboard in a program dialog or command
line, e.g. your password (Name123) or a command to launch a program
(start.exe)
refers to information displayed by a progra m on the screen, e.g.:
Installation is completed
is for
• terms and texts in a software user interface, e.g.: ClickSave.
• names of programs or fil
is for
• cross-references to ano ther section, e.g. "Safety information"
• Cross-references to an external source, such as a web address: For
further information visit "
• indicates names of CDs and DVDs as well as names and titles of other
materials, e.g.: "CD/DVD Drivers & Utilities" or "Safety" manual
refers to a key on the keybo ard, e.g.:
flags concepts and text
switch off device
es, e.g. Windows or setup.exe.
www.fujitsu-siemens.com"
F10
that are emphasised or highlighted, e.g.: Do not
1 - English 10600794864, edition 1
Page 9
Important notes
Important notes
ImportantnotesNotes
This chapter contains references to oth er sources of information. It is essential that
you observe the safety information for your notebook.
Declarations of Conformity
Declarationof conformity
You w i l l find the Declaration of Co
Hereby, Fujitsu Siemens Compute
essential requirements and othe
Information sources
s
Information source
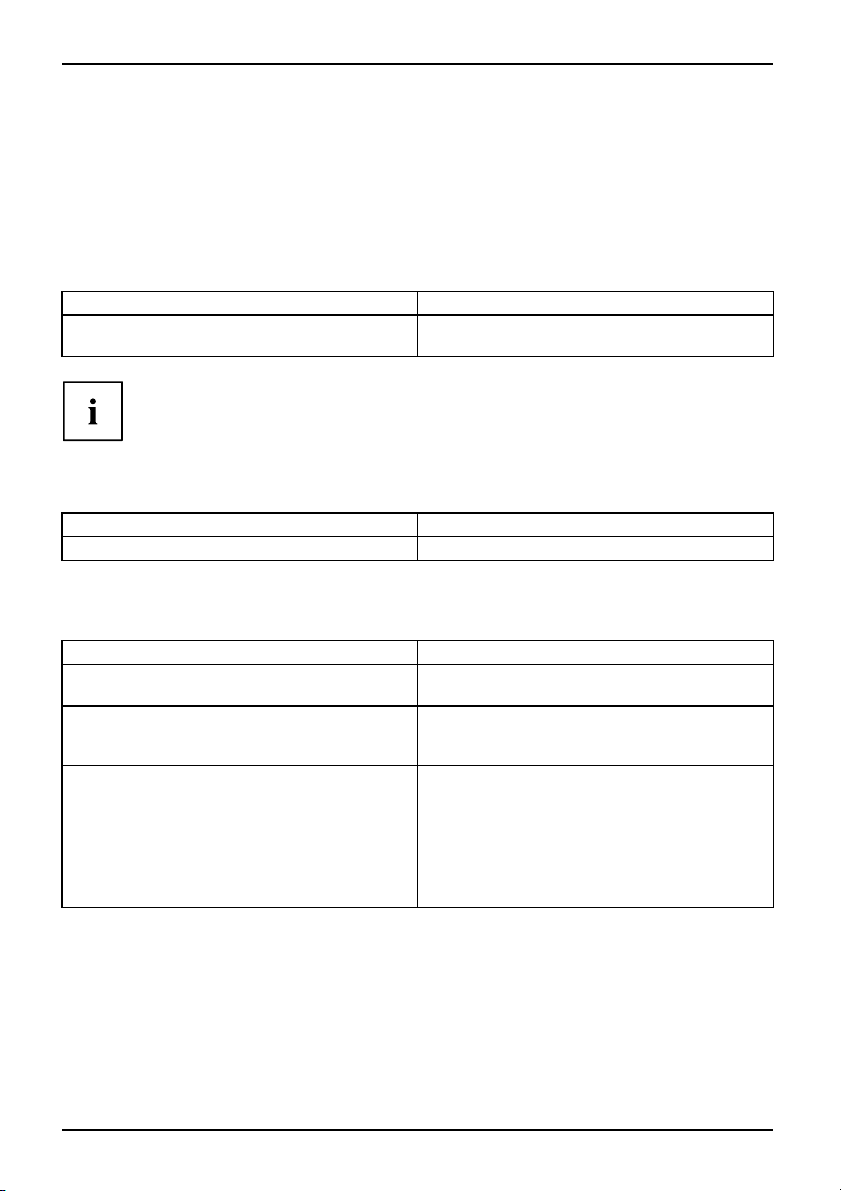
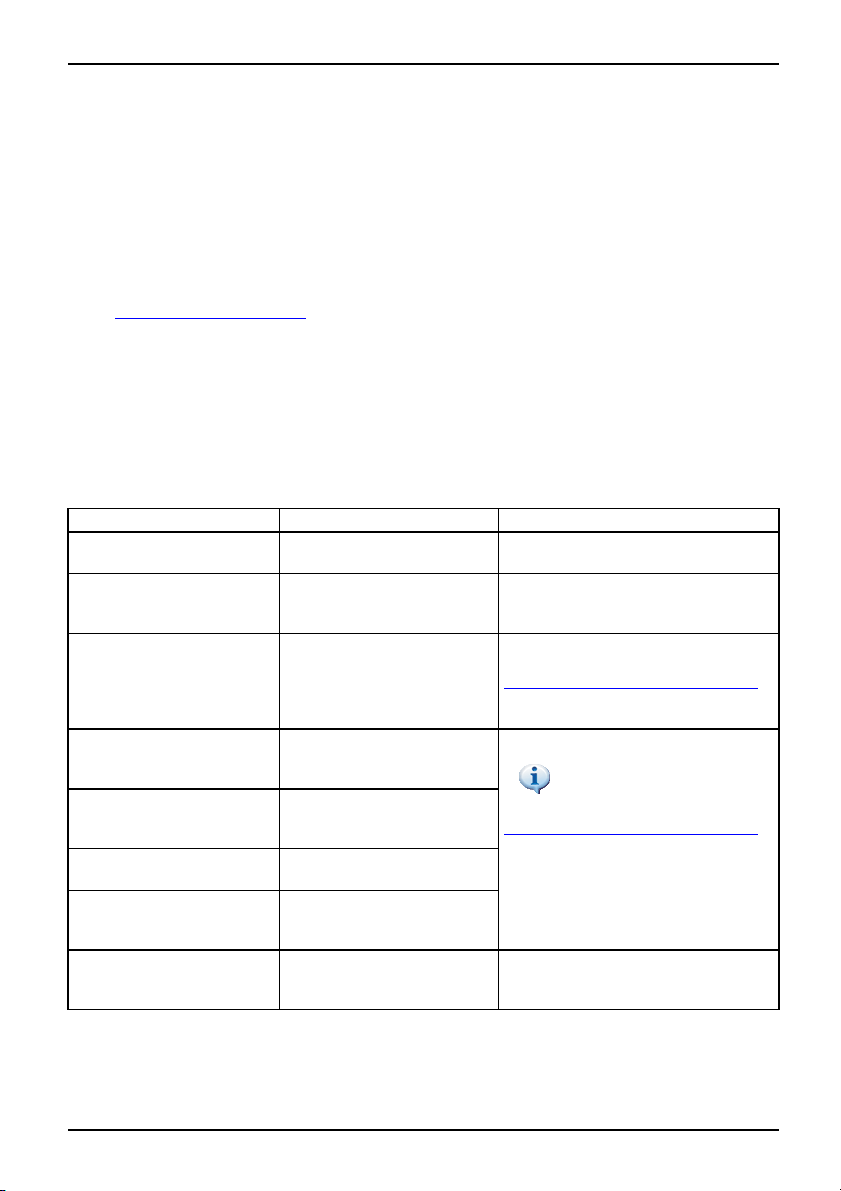
This manual contains more detailed instructions and technical information for your notebook.
Manuals available only as PDF files can be printed out if you connect a printer to your notebook.
Information source Type of information Where?
Quick S tart Guide (printed) Poster with information abo ut
"Safety" manual (printed
and/or PDF file)
"Recovery Process" manual
(printed and/or PDF file)
"EasyGuide" manual (PDF
file)
"Wireless LAN" manual
(PDF file)
"Warranty" manual (PDF
file)
Information files (e.g. *.TXT,
*.DOC, *.CHM, *.HLP)
Information files (e.g. *.TXT,
*.DOC, *.CHM, *.HLP)
nformity for the AMILO on the Internet at: "
www.fujitsu-siemens.com".
rs, declares that the AMILO is in compliance with the
r relevant provisions of Directive 1999/5/EC.
Accessories kit
getting started
Safety information Accessories kit and/or on your
notebook
Information on restoring the
operating system, drivers,
manuals and special software
Detailed instructions for
Accessories kit, on your
notebook or on the internet at
"
www.fujitsu-siemens.com/support/"
The manuals are located on your
startup, operation an d
technical information
Detailed instructions for using
wireless LAN and technical
information
notebook under Start
or, in some cases, updated versions
can be found on the Internet at:
"
www.fujitsu-siemens.com/support/"
Manuals
General guarantee
conditions
Information on utilities and
programs
Information about the
In the software for these applications
operating system
10600794864, edition 1 English - 2
Page 10

Important notes
Safety information
SafetyinformationNotes
• When cleaning the notebook, observe the relevant notes in the "EasyGuide"manual.
• Your notebook is equipped with numerous security features that offer you a high
• Pay attention to the additional safety notes for devices with radio compo nents
• Keep this operating manual together with the device. If you pass this device on to
This notebook complies with the relevant safety regulations for data processing
equipment. If you have questions about using your notebook in a particular area,
please contact your sales outlet or our Hotline/Help Desk.
Pay attention to the information provided in the "Safety" manual and
in the following safety notes.
level of security according to a multi-level concept. Details are contained in the
"Security functions" chapter in the "EasyGuide" manua l.
provided in the "Safety" manual.
others, you should also give them the operating manual.
Drivers and utilities
If a Windows operating system is installed on your notebook, you will find additional
information on the system and drivers, help programs and updates on your notebook
or on our website "
If you have to reinstall your operating system, you will find the necessary information
in the "Recovery Process" manual (see
www.fujitsu-siemens.com/support/".
).
rmation sources", Page 2
"Info
3 - English 10600794864, edition 1
Page 11

Ports and operatin g elements
Ports and operating elements
Portsand operating elementsModemportLCDscreenMonitor portBuilt-inloudspeakersLoudspeaker portWireless LANKensington LockLANportUSBportBatteryBatteryreleaseSIM cardHarddiskTouchpad buttonsTouchp adNotebookON/OFFswitchCD/DVDdriveHeadphone portMicrophone portLineinLineoutDCIN jackStatusindicators
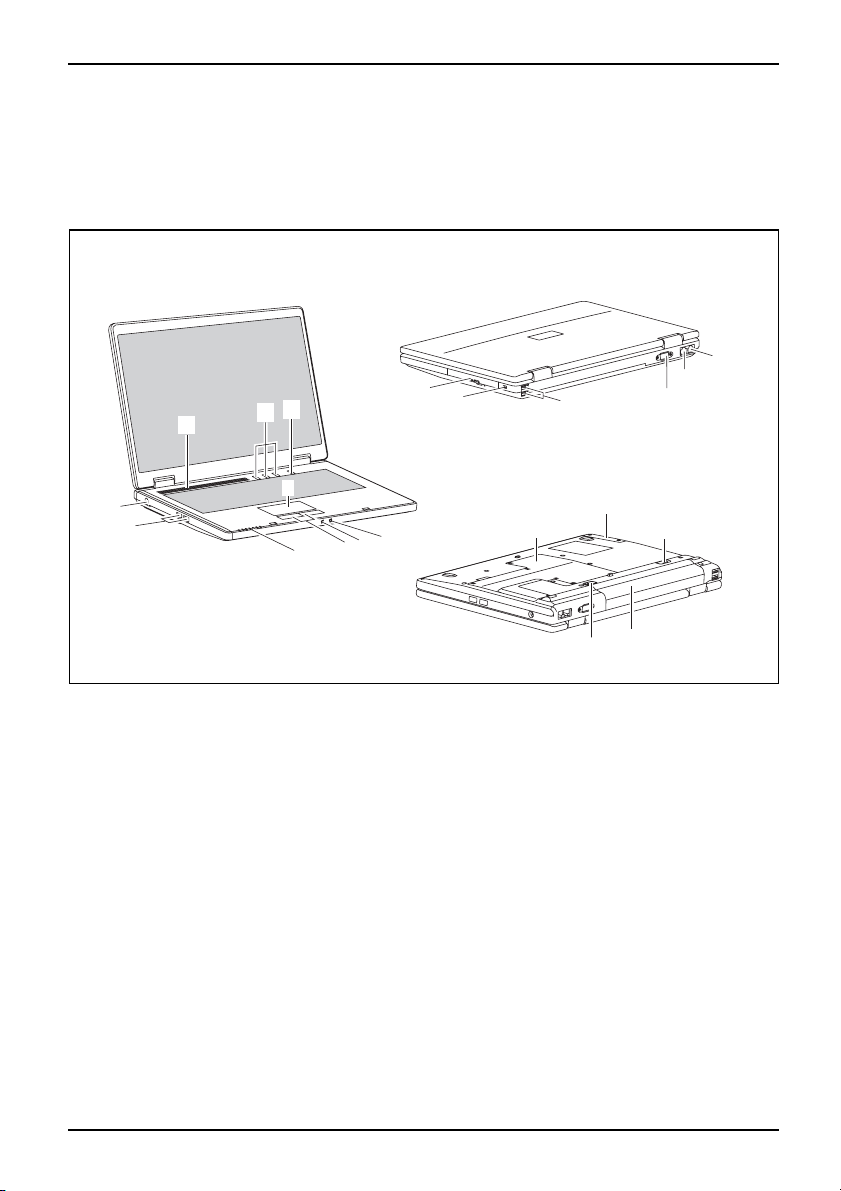
This chapter presents the individual hardware components of your notebook. It provides
an overview of the notebook’s displays and ports. Please familiarise yourself with these
components before you start to work with your notebook.
11
3
1
2
12
13
15
14
16
10
4
9
8
1 = Built-in loudspeakers
2 = Easy Launch keys
3 = ON/OFF switch of the Notebook
4 = Touchpad
5 = Headphones port / Line out
6 = Microphone connection / Line In
7 = Touchpad buttons
8 = Status indicators
9 = USB ports
10=DCINjack
17
5
6
7
11 = CD/DVD dr ive
12 = Kensington Lock
13 = USB ports
14 = Screen port
15 = LAN port
16 = Modem port
17 = Service compartment (hard disk)
18 = Battery release
19 = Battery
20 = Service com partment (memory)
20
18
18
19
10600794864, edition 1 English - 4
Page 12

Preparation for use and operation
Preparation for use and operat
Please observe the safety information in the section "Important notes", Page 2.
You must charge the battery and install the application programmes before you can work with
the notebook. The operating system and drivers required are preinstalled.
This chapter also describes the basics for operating your notebook.
Unpacking and checking yo
Should you discover any damage incurred during transportation, notify
your local sales outlet immediately!
► Unpack all the individual pa rts.
PackagingTransport
► Check your notebook for damage incurred during transportation.
We recommend that you keep the original packaging material.
You may need the packaging in the future if you need to transport your device.
Selecting the location
Location,sel ectingtheNotebookPowerad apter
Select a suitable location for the notebook before setting it up. Consider
the following points when selecting a location:
• Never place the notebook on a soft surface (e.g. carpeting, upholstered furniture,
bed). This can block the air vents and cause damage due to overheating.
• Do not place the notebook directly on your legs for extended periods. The
underside of the notebook heats up during normal operation. Extended contact
with the skin can become unpleasant or even result in burns.
• Place the notebook on a stable, flat, non-slip surface. Please note that
the rubber feet may mark c erta in types of surfaces.
• Keep other objects 100 mm away from the notebook and its mains
adapter to ensure adequate ventilation.
• Never cover the ventilation slots on the notebook or the mains adapter.
• Do not expose the notebook to extreme environm ental conditions. Protect
the not ebook against dust, humidity and heat.
ur notebook
ion
5 - English 10600794864, edition 1
Page 13
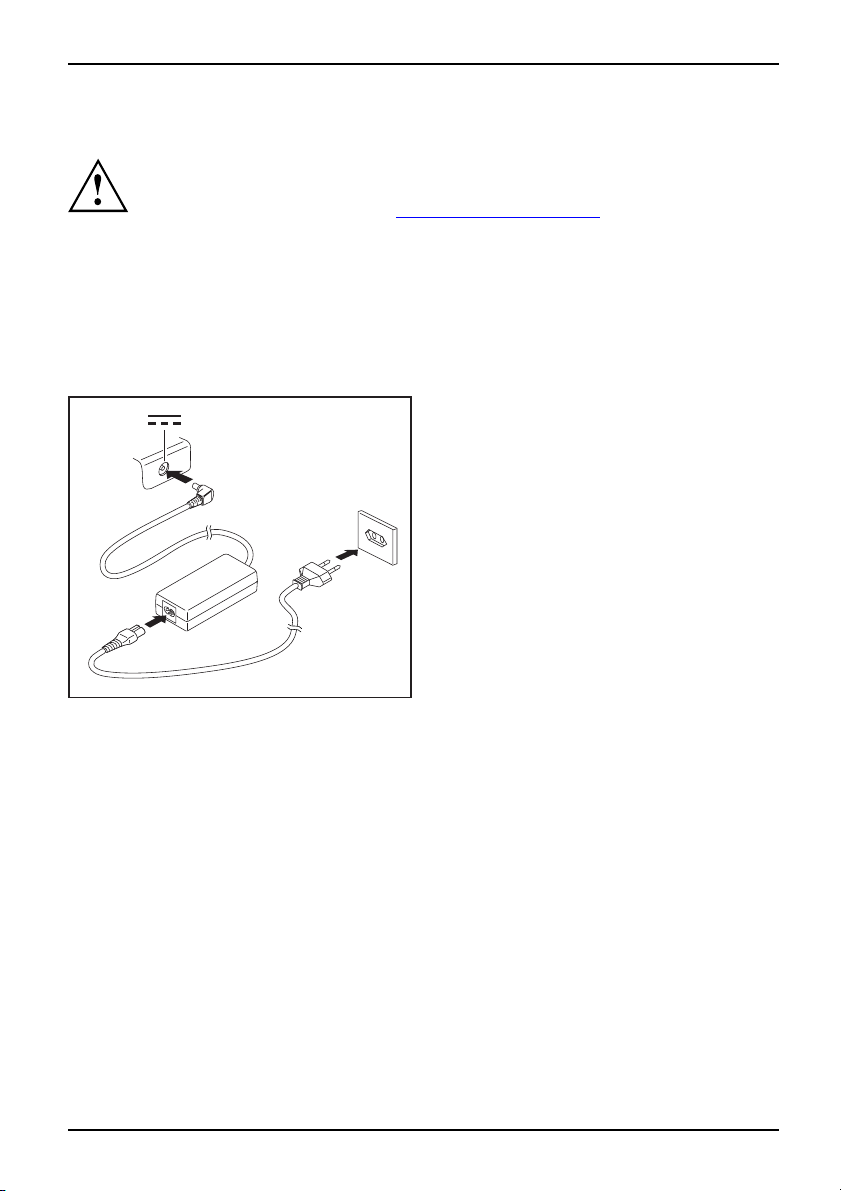
Connecting the power adapter
Preparingfor operationPoweradapter
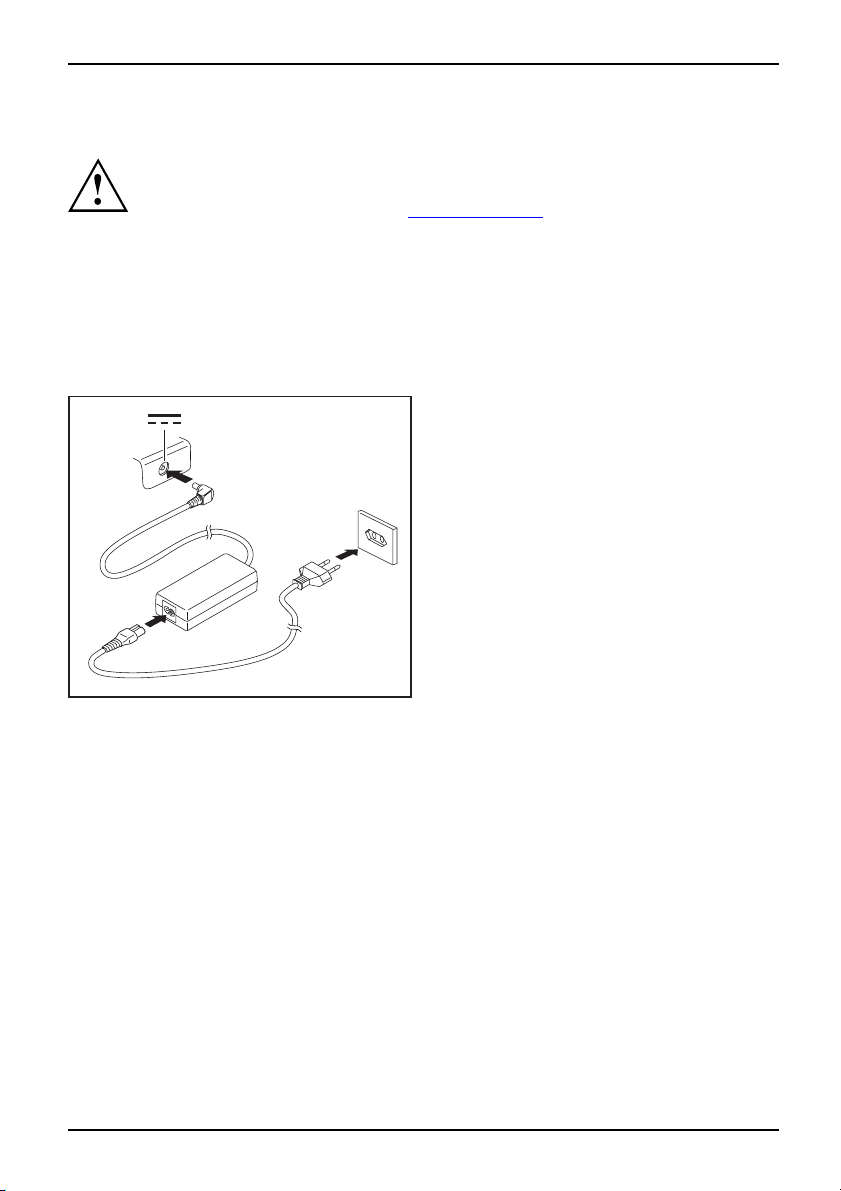
Two different mains adapters are available for this computer. Use only the
mains adapter supplied with your computer.
Please refer to the instructions in "
Safety information", Page 3.
The power cable supplied conforms to the requirements of the country in which
you purchased your note book. Make sure that the power cable is approved
for use in the country in which you intend to use it.
The mains adapter’s power cable must only be connected to a mains socket
if the notebook is connected to the mains adapter.
Make sure that the rated current of the mains adapter is not higher than that of the
power system to which you connect it (see technical data for the mains adapter).
Preparation for use and operation
► Connect the mains adapter cabl
DC jack (DC IN) on the noteboo
e (1) to the
k.
► Plug the power cable (2) into the
mains adapter.
1
► Plug the power cable (3) into a
mains outlet.
3
2
10600794864, edition 1 English - 6
Page 14
Preparation for use and operation
Switching the notebook on for the first time
Switchingon for the first time
When you switch your notebook on for the first time, the supplied software is
installed and configured. Due to the fact that this installation procedure must no t
be interrupted, you should set aside enough time for it to be fully completed and
connect the notebook to the mains outlet using the mains adapter.
During installation, the notebook must only be rebooted when you are requested to do so!
Your operating system is prewhen you use your notebook for
► Switch the notebook on (see "
► During installation, follow the on-screen instructions.
Consult the operating system m
If a Windows operating syste
information on the system as
on your notebook or on the "D
rmation sources", Page 2).
"Info
installed on the hard disk to facilitate the procedure
the first time.
witching on the Notebook", Page 7).
S
anual if a nything is unclear about the requested input data.
m is installed on your notebook, you will find additional
well as the drivers, help programs, updates, manuals, etc.
rivers & Utilities" CD/DVD or on our website (see
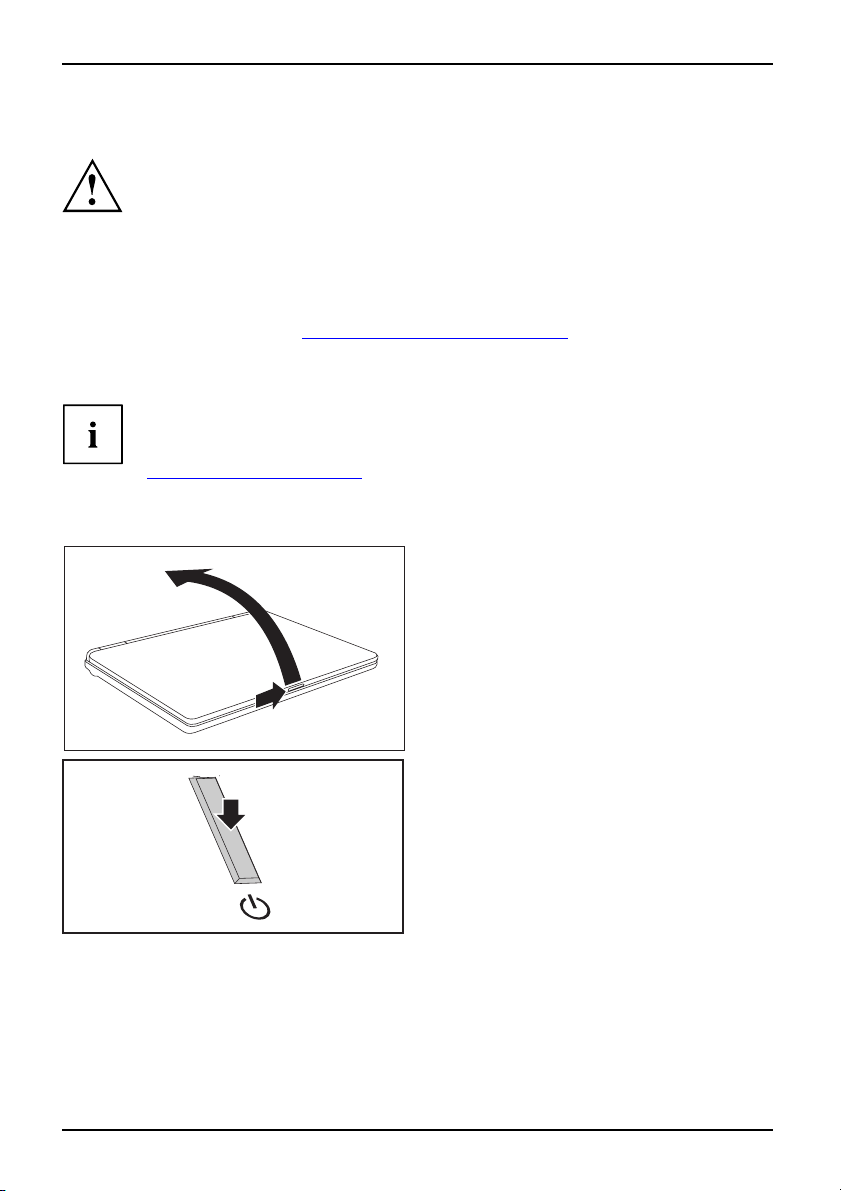
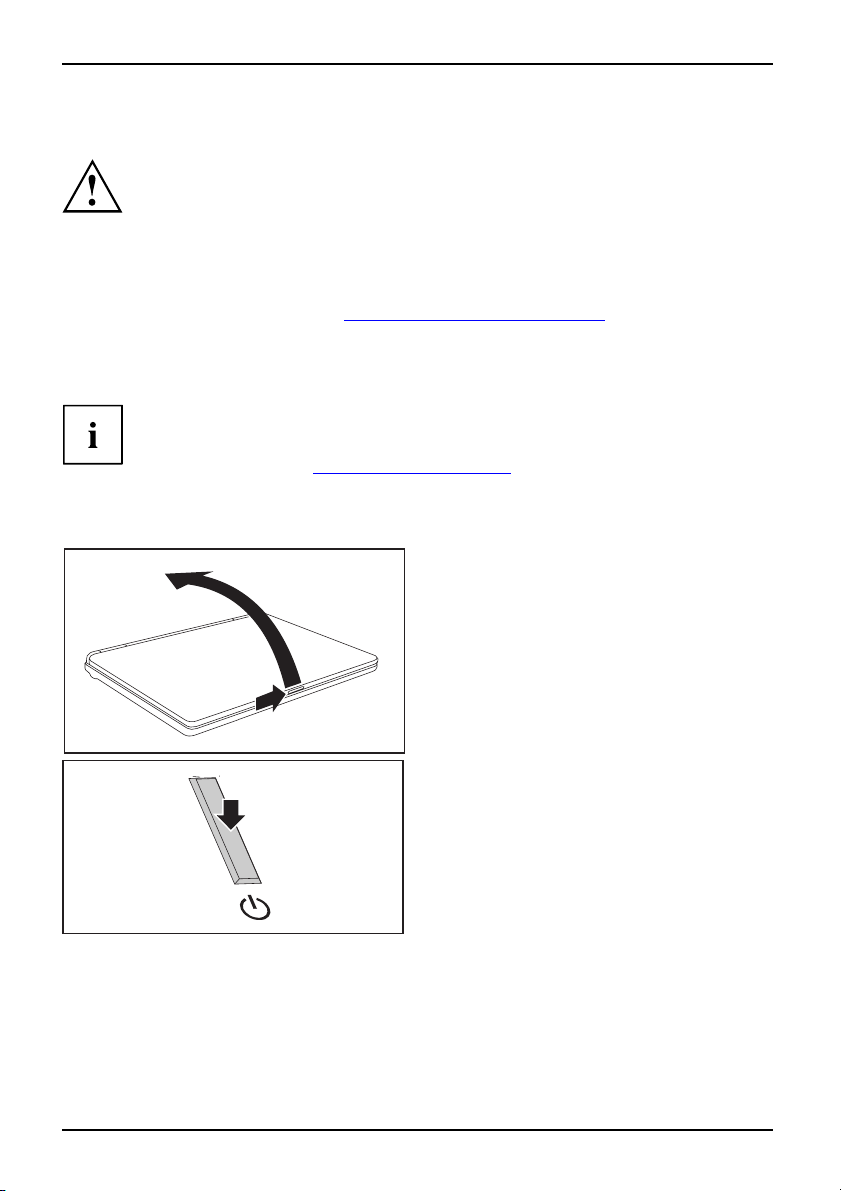
Switching on the Notebook
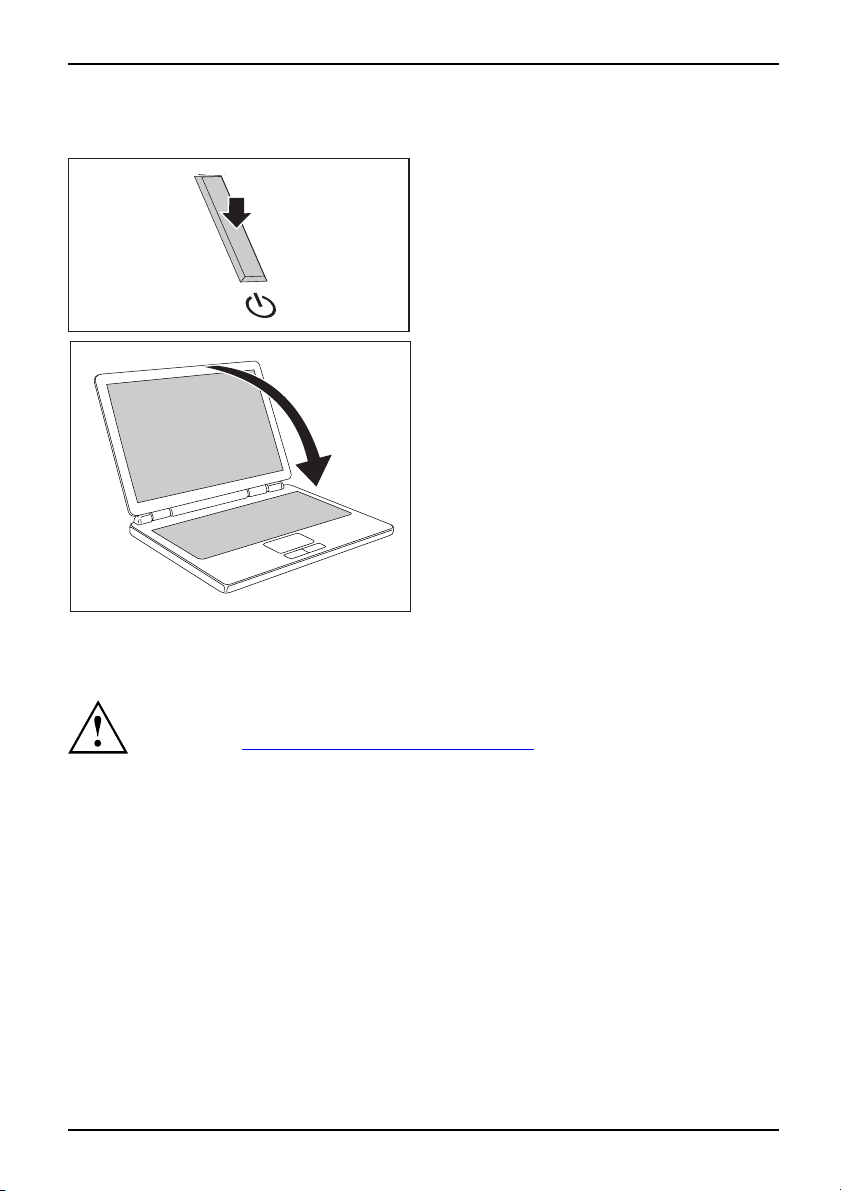
► Slide the release button in t
2
1
► Press the ON/OFF swi
1
of the arrow (1) and unfold
screen upward (2).
Notebook:
the notebook on.
tch (1) to switch
he direction
the LCD
The power-on indicator is lit.
7 - English 10600794864, edition 1
Page 15
Switching off the Notebook
1
Preparation for use and operation
► Shut down the operating system properly (e.
g. from the Windows Start menu, by clicking
on Start – Shut Down – Shut down – OK).
Notebook:
► If the notebook is not switched off
automatically, press the ON/OFF switch (1)
for approx. five seconds.
► Close the LCD screen (1)
it locks into place.
1
so that
Battery
The battery in the notebook is not fully charged at the time o f delivery. You
must first charge the battery with the mains adapter connected to the power
socket (see "
The battery supplies yo ur notebook with the necessary power during mobile use. The
battery indicator displays the current state of the battery.
Information on how to install and remove the battery, how to maintain and service it, and how
to optimise the battery operating time can be found in the "EasyGuide" manual.
Connecting the power adapter", Page 6).
10600794864, edition 1 English - 8
Page 16
Preparation for use and operation
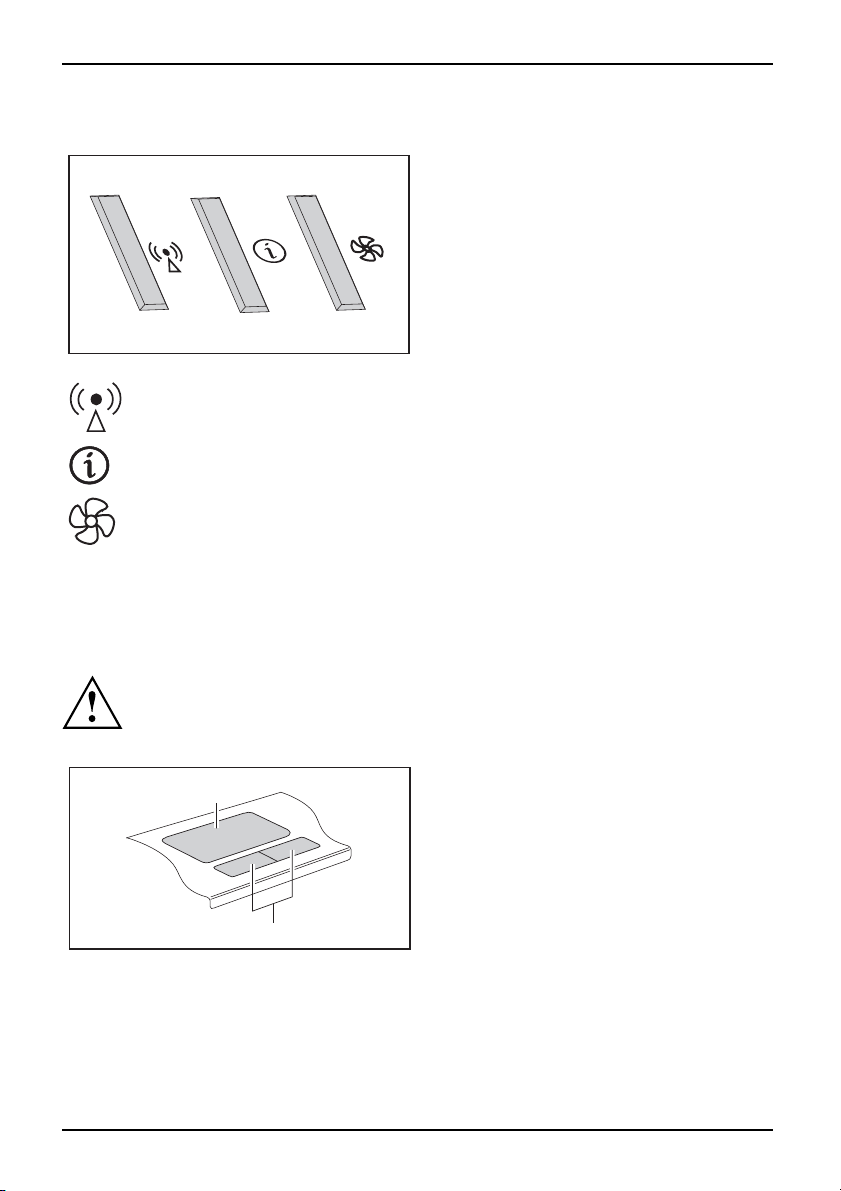
Easy Launch keys
EasyLaunch keys
Switching wireless LAN on/off
With this button you can switch on or off the wireless LAN module.
WirelessLAN EasyLaunch key
Internet
With this button you ca n start the standard internet browser of your system.
Internet, EasyLau nchkey
Silent Mode (whisper mod
This key reduces the speed
When the Silent Mode is swi
the full performance le
Whispermode, EasyLaunch keySilentMode, EasyLaunch key
vel.
Your notebook is equipped with Easy Launch
keys. You can start the following applications
or functions by pressing a single key.
e)
of the fan.
tched on, the processor and graphics do not operate at
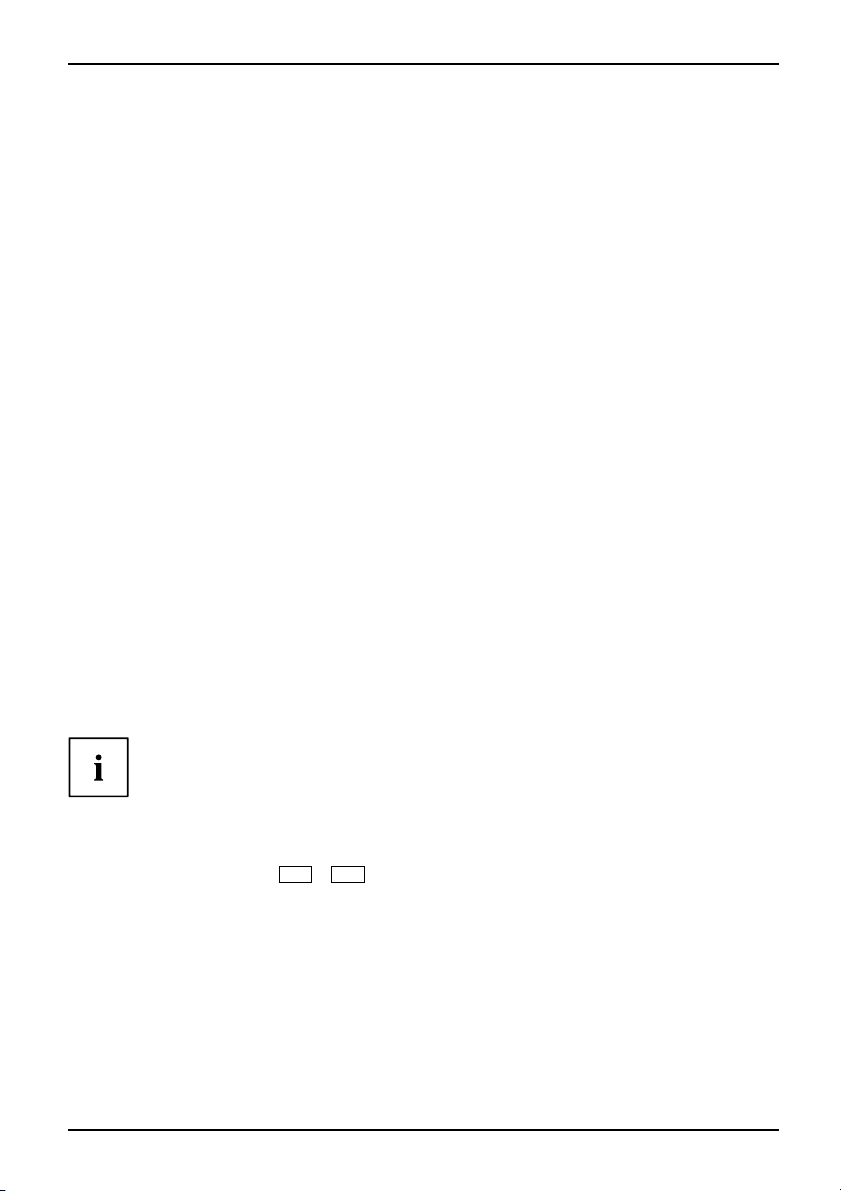
Touchpad and touchpad buttons
Keep the touchpad clean. Protect it from dirt, liquids, and grease.
TouchpadButtons
Do not use the touchpad if your fingers are dirty.
Do not rest heavy objects (e.g. books) on the touchpad or the touchpad buttons.
1
2
The touchpad enables you to move the mouse pointer on the screen.
The touchpad buttons allow you to select and execute commands. They correspond
to the buttons on a conventional mouse.
9 - English 10600794864, edition 1
1 = Touchpad
2 = Touchpad buttons
Page 17
Preparation for use and operation
Using touchpad buttons
Moving the pointer
► Move your finger on the touchpad.
Touchpad
The pointer will move accordingly.
Selecting an item
► Move the pointer to the item you wish to select.
Touchpad
► Tap the touchpad once or press the left button once.
The item is selected.
Executing a command
► Move the pointer to the field you wish to select.
Touchpad
► Tap the touchpad twice or press the left button twice.
The command is executed.
Dragging an item
► Select the desired item.
Touchpad
► Press and hold the left button and drag the item to the desired position
with the finger on the touchpad.
The item will be moved.
Loudspeaker
Loudspeaker
Your notebook has a built-in loudspeaker.
If you connect headphones or external loudspeakers, the built-in
loudspeaker will be disabled.
Switching the loudspeaker on/off
► Use the key combination
10600794864, edition 1 English - 10
Fn+F3
to switch the loudspeaker on/off.
Page 18
Preparation for use and operation
Volume: adjusting
► Set the desired volume with the key combination
Fn+F5
or
► Double-click the loudspeaker symbol in the tool bar and Mixer.
or
► Select Startsymbol– (Settings) – ControlPanel – Hardware and Sound – Sound: Adjust volume control.
► Use the slide control to change the volume.
Volume
► To turn the loudspeaker on or off, double-click the loudspeaker symbol in the tool bar.
or
Fn+F6
.
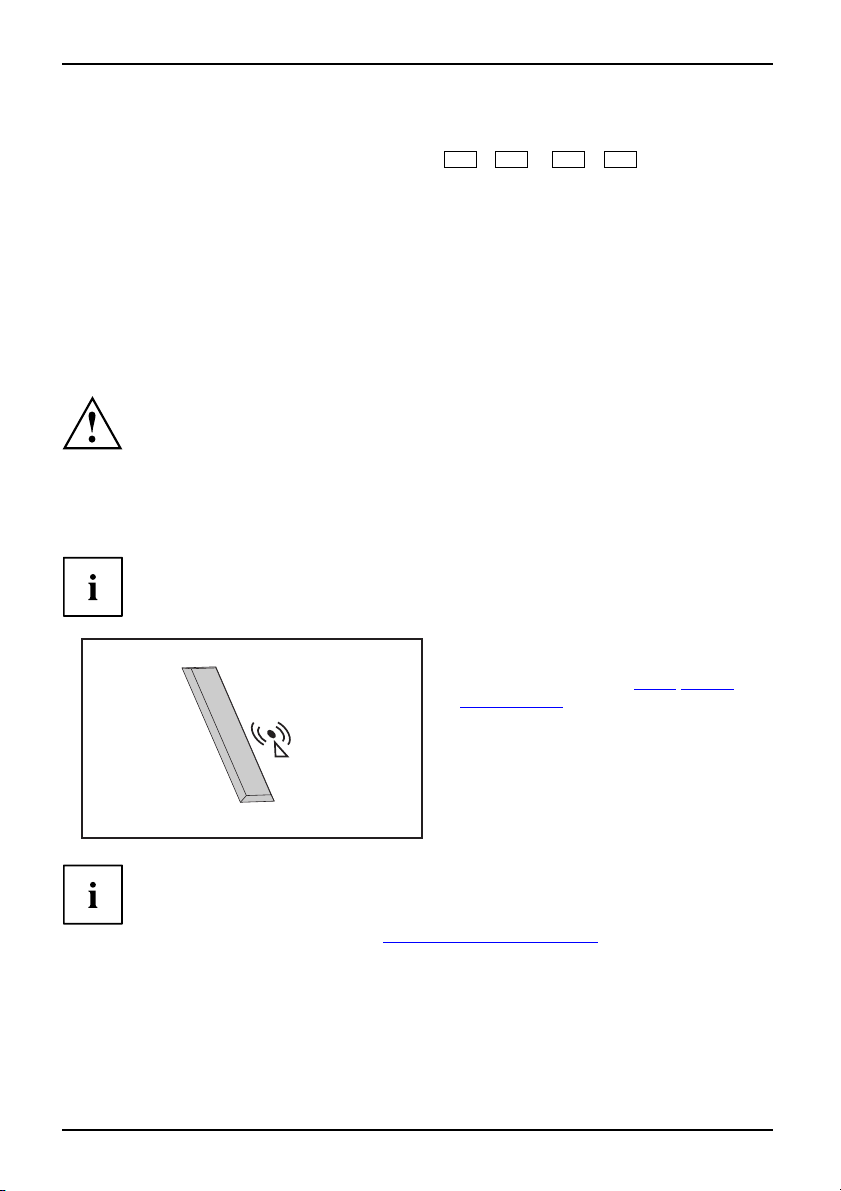
Radio componenets (Wireless LAN)
The installation of a wireless LAN modu le not approved by Fujitsu Siemens
Computers GmbH will invalidate the permits (CE!) issued for this device.
WirelessL AN
Wireless LAN is integrated in your notebook.
Switching wireless LAN module on and off
Check w
the in
WirelessL ANWireless LAN
hether the wireless LAN module is activated/deactivated in
stalled wireless LAN software.
► You ca
n use the Wireless LAN Easy Launch
switch the wireless LAN module
key to
on and
", Page 9.
keys
off, see chapter "
Easy Launch
The wireless LAN indicator lights up when
the wireless LAN module is switched on.
Pay attention to the additional safety notes for devices with radio components
provided in the "Safety" manual.
Further information on using a wireless LAN can be found in the corresponding
manual or in the help files (see
rmation sources", Page 2).
"Info
BIOS Setup U tility
With the BIOS Setup Utility you can change a number of parameters and thus the c on figuration
of your notebook. For example, you can use the BIOS Setup Utility to set the date and
time. The BIOS Setup Utility can also be used to assign passwords. The "EasyGuide"
manual explains how to open and close the BIOS Setup U tility.
11 - English 10600794864, edition 1
Page 19
Troubleshooting and tips
Troubleshooting and tips
TroubleshootingTipsFaultTroubleshooting
If a fault occurs, try to correct it as described. If you fail to correct the problem, proceed as follows:
► Make a note of the steps and the circumstances that led to the fault. Also
► Switch the notebook off.
► Contact the Hotline/Help Desk.
Refer to the safety information in the "Safety" manual when
connecting or disconnecting cables.
make a note of any error messages displayed.
You c a n find the telephone numbers in the help desk list. Please have
the following information ready when you call:
• The model name and serial number
located on a sticker on the under
• Notes of any messages that appear on the screen and information on acoustic signals.
• Any changes you have made to the ha
receiving the notebook.
• Any changes you have m ade to the BIOS Setup settings since receiving the notebook.
• Your system configuration and all p
• Your sales contract.
Our notebooks have been designed primarily with mobile applications in mind.
This means that considerable effort has been made to optimise components and
equipment in terms of weight, space and e nergy requirements. Depending on the
particular configuration you have purchased, it is possible that fun ctionality may be
slightly reduced compared to a desktop PC if you are running processor-intensive
gaming software, e.g. games with intensive 3D graphics. Updating your hardware
with drivers w hich have not been approved by Fujitsu Siemens Computers may
result in performance losses, data losses or malfunction of the equipment. A
list of approved drivers and current BIOS versions can be downloaded from:
"
http://www.fujitsu-siemens.de/support/downloads.h tml"
of the notebook. The serial number is
side of the notebook.
rdware or software since
eripheral d evices connected to your system.
Restoring installed software
Please create backup copies of yo ur files on a regular basis. If data is lost, you can
restore your applications using the data carriers. However, if you do not have backup
copies of your own data files, it is no longer possible to restore them.
If your op erating system will not start, or if there are errors on the hard disk, the
pre-installed software may have to be re-installed.
10600794864, edition 1 English - 12
Page 20
Troubleshooting and tips
Restoring the operating system, drivers, manuals
and special software
You c a n find information on how to restore the operating system, drivers, manuals
and special software in the "Recovery Process" manual.
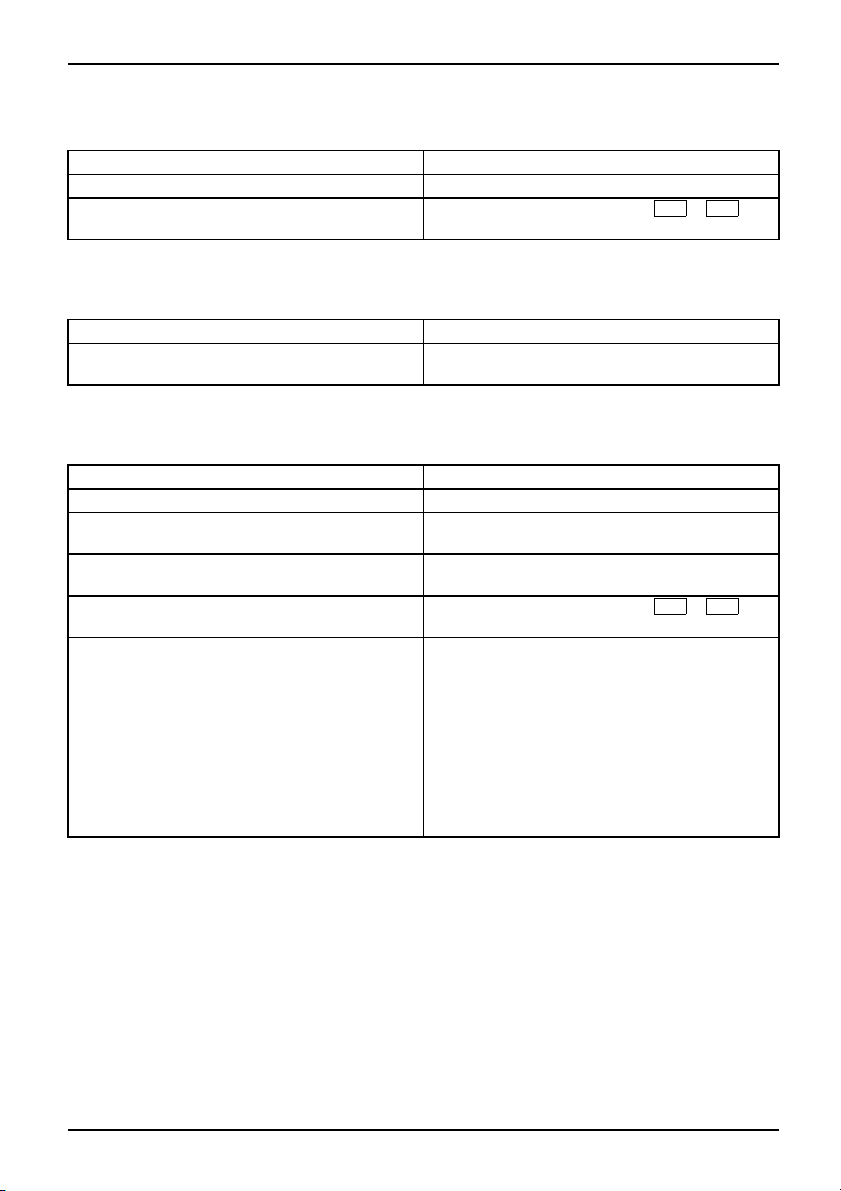
Thenotebook’sdateortimeisincorrect
SummertimeTime, daylight savingsTime not correc tTime not cor rectIncorrect date/timeDateis incorrectBuffer battery, load
Cause Troubleshooting
Time and date are incorrect.
If the time and date are repeatedly incorrect when you switch on the notebook,
the buffer battery that supplies the internal clock is d ead.
► Please contact your sales outlet or our hotline/helpdesk.
A beep sounds at a rate of one per second
Abeep sounds every second
Cause Troubleshooting
The battery is almost flat. ► Charge the battery.
► Set the time or date in the Main menu of t
BIOS Setup Utility.
The notebook stops working
NotebookDisabling Standby modeSuspendmode
Cause Troubleshooting
The no tebook is in Standby or Suspend mode. ► Disable Standby mode (press a key) or
An application programme has caused the
malfunction.
The battery is dead.
Suspend mode (switch notebook on).
► Close the application program or restart
the notebook by switching it on/off or with
a warm boot.
► Charge the battery.
or
► Install a charged battery.
or
► Connect the mains adapter to t he
notebook.
he
13 - English 10600794864, edition 1
Page 21
Troubleshooting and tips
The notebook’s LCD screen remains blank
LCDscreenLCDscreenis too dark
Cause Troubleshooting
Monitor is switched off.
External monitor or television set connected. ► Press the key combination
The LCD screen is difficult to read
LCDscreenLCDs creen
Cause Troubleshooting
Reflected glare ► Turn the notebook or alter the tilt o f the LCD
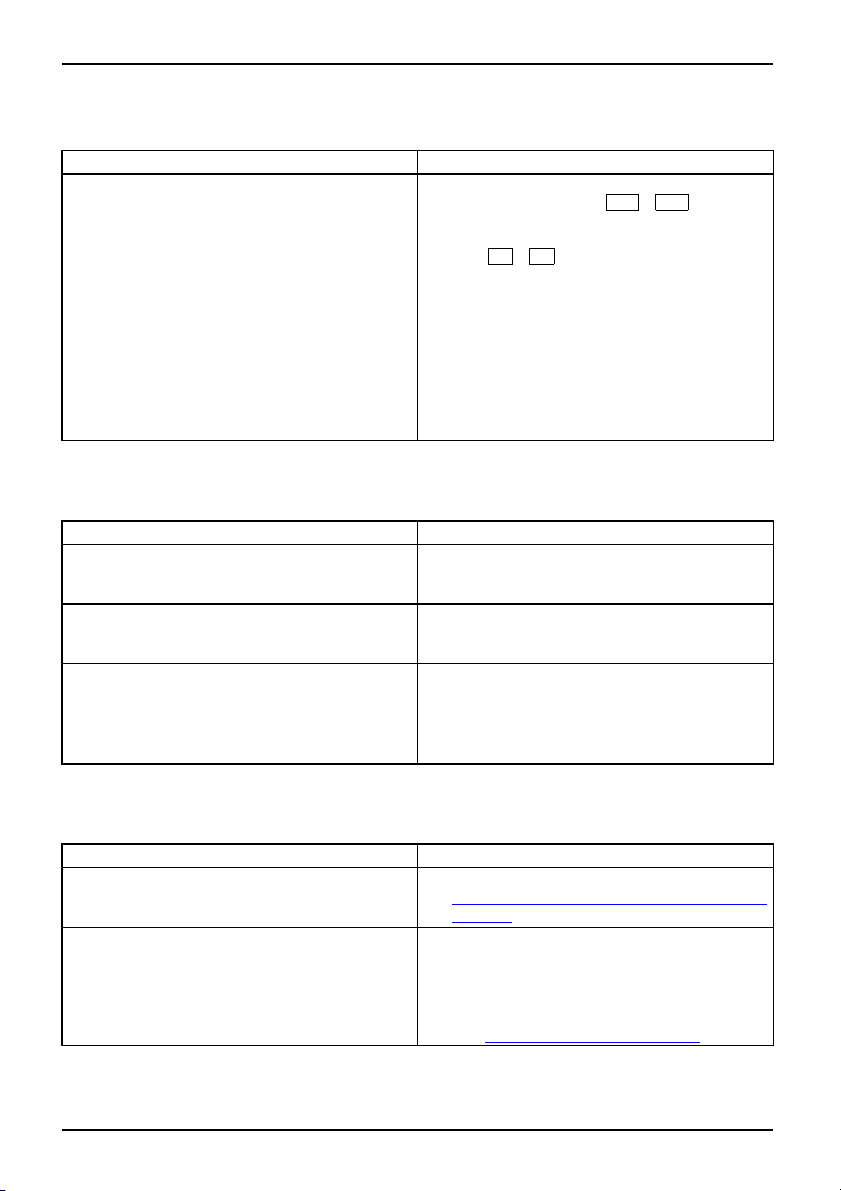
The external monitor remains blank
Screen
Cause Troubleshooting
Monitor is switched off. ► Switch the external monitor on
Power saving has been activated (monitor i s
blank).
Brightness is set to ’dark’.
Screen output is set to the no
tebook’s LCD
screen
The external monitor’s powe
r cable or data cable
is not connected properly.
► Press a key or ente r the password
(switch screen output).
Fn+F4
screen.
.
► Press any key to continue.
► Adjust the brightness of the monitor to
’bright’.
► Press the key combination
Fn+F4
(switch screen output).
► Switch off the external monitor and the
notebook.
► Check whether the power cable is correctly
plugged into the external monitor and into
the power socket.
► Check whether the data cable is properly
connected to the notebook and the external
monitor (if it is plugged in with a connector).
► Switch on the external monitor and the
notebook.
10600794864, edition 1 English - 14
Page 22
Troubleshooting and tips
The external monitor is blank or
ScreenMonitor
Cause Troubleshooting
The wrong external monitor has been
or the wrong screen resolution has b
the application program.
selected
een set for
► Terminate the application program
► Set the screen resolution: Select the
► Select monitor: Right-click t
the image is unstable
Windows by pressing
persists after closing the progra
over to the notebook’s internal LC
Fn+F4
with
required resolution with Startsymbol –
(Settings) – Control Panel – App e arance and
Personalization – Personalization: Adjust screen
resolution.
Choose screen 1 or 2 with Person
Display Settings and the cor
Advanced Settings – Monito
. Change the following se
Alt+F4
rect monitor with
r.
in
. If the fault
m, switch
Dscreen
he desktop.
alization –
The printer does not print
Printerdoes not print
Cause Troubleshooting
The printer is not switched on. ► Make sure that the printer is switched on
The printer is not connected correctly.
The printer driver is faulty or not correctly
installed, or it is the wrong printer driver.
and is online (see the manuals supplied with
the printer).
► Check that the cable connecting the
notebook and the printer is connected
properly.
► Check that the cable connecting the
notebook and the printer is connected
properly.
► Check whether the co rre
loaded (see printer do
ct printer driver is
cumentation).
tting:
The radio connection to a network does not work
Theradio connection to anetwor kdoes not work
Cause Troubleshooting
The wireless component is disabled.
The wireless component is enabled. Despite
this, the wireless connection to a network does
not work.
15 - English 10600794864, edition 1
► Switch the radio components on (see
"
Switching wireless LAN module o n a nd off",
Page 11).
► Check whe ther the radio connection is
switched on via the software.
► Further information
wireless componen t c
the corresponding ma
(see
rmation sources", Page 2).
"Info
on using the
an be found in
nual or in the help files
Page 23

Innhold
Norsk
Innhold
Innovativ teknologi … .................................................................. 1
Savner duinformasjon? ................................................................. 1
Tegnforklaring .......................................................................... 1
Viktiginformasjon ..................................................................... 2
Samsvarserklæringer .................................................................... 2
Informasjonskilder ...................................................................... 2
Sikkerhet ............................................................................... 3
Drivere og programverkt
Tilkoplingerogbetjeningselementer .................................................... 4
Oppstart ogbruk ...................................................................... 5
Utpakking og kontrol
Velgeplassering ........................................................................ 5
Tilkopling av netta
Slå notebook-maski
Slå Notebook-mask
Slå Notebook-mask
Batteri ................................................................................. 8
Snarveitaster ........................................................................... 9
Pekeplate o g pek
Bruke pekeplate
Høyttaler ............................................................................... 11
Slåavogpåhøyt
Regulere volum
Radiosignalk
Slåpåogavtrå
BIOS Setup-Ut
Problemløsningognyttige tips ......................................................... 13
Gjenopprette installert programvare ....................................................... 13
Gjenopprette operativsystemet, drivere, håndbøker og spesialprogramvare . .............. 14
Klokkeslett og dato i notebook-maskinen stemmer ikke . .................................... 14
Lydsignal i sekundintervall . . . . ........................................................... 14
Notebook-maskinen slutter å arbeide . . ................................................... 14
LCD-skjermen i notebook-maskinen forblir mørk . . . ........................................ 15
Bildet påLCD-skjermeninotebook-maskinenervanskeligålese ............................ 15
Ekstern skjerm forblirmørk .............................................................. 15
Bildet på den eksterne skjermen vises ikke eller vandrer .................................... 16
Skriveren fungerer ikke .................................................................. 16
Radiosignalforbindelsen til et nettverk fungerer ikke ........................................ 17
omponenter (trådløs LAN) ...................................................
ility ......................................................................
øy ...............................................................
l av notebook-maskinen . . ............................................
dapter .................................................................
nen på for første gang . . . . . ............................................
inen på ..............................................................
inen av ..............................................................
eplate-taster ............................................................
-taster ...............................................................
taleren .............................................................
et ...................................................................
dløs LAN-modul ......................................................
10
10
11
11
12
12
12
3
5
6
7
7
8
10600794864, utgave 1 Norsk
Page 24

Innovativ teknologi …
Innovativ teknologi …
og ergonomisk u tforming gjør din AMILO til en brukervennlig og pålitelig Notebook-maskin.
Operativsystemet Microsoft Windows er forhåndsinstallert og optimalt konfigurert slik at du
kan starte med en gang når du slår på din AMILO for første gang.
Hurtigveiledningen "Komme i gang" viser deg blant annet hvordan du kan begynne å bruke din AMILO.
Skulle det oppstå et teknisk problem, får du hjelp i kapittelet "
Savner du informasjon?
En oversikt med ytterligere informasjon om datamaskinen finnes i kapittelet
"
Informasjonskilder", Side 2.
Tegnforklaring
indikerer informasjon som må tas hensyn til for å unngå fare for
personskade, maskinskade eller tap av data. Garantien opphører å gjelde
dersom det oppstår skader på maskinen som skyldes at det ikke ble tatt
hensyn til denne informasjonen
markerer viktige opplysninger for korrekt behandling av apparatet.
Problemløsning og nyttige tips", Side 13.
►
Denne skriften
Denne skriften
Denne skrifte n
"Denne skriften"
Abc
Denne skriften kjennetegner begreper og tekster som vektlegges eller framheves, f.eks.:
1 - Norsk 10600794864, utgave 1
markerer et arbeidstrinn du må utføre
kjennetegner et resultat
kjennetegner inntastinger som du må legge inn via tastaturet i en
programdialog eller i en kommandolinje, f.eks. passordet ditt (Navn123)
eller en kommando, for å starte et program (start.exe)
markerer opplysninger som et program viser på skjermen, f.eks.:
Installasjonen er avsluttet.
markerer
• ord og uttrykk i et program, f.eks.: Klikk på Lagre.
• navn på prog rammer eller filer, f.eks. Windows eller setup.exe.
markerer
• henvisninger til et annet avsnitt, f.eks. "Sikkerhetsanvisninger"
• krysshenvisning til en ekstern kilde, f.eks. en nettadresse: Les også på
"www.fujitsu-siemens.com"
• navn på CD-er, DVD-er samt betegnelser og titler på andre media,
f.eks.: "CD-/DVD-en Drivers & Utilities" eller håndboka "Safety"
(Sikkerhet)
betyr er tast på tastaturet, f.eks.:
Slå ikke av maskinen
F10
Page 25
Viktig informasjon
Viktig informasjon
ViktiginformasjonInformasjo n
I dette kapittelet finner du henvisninger til andre informasjonskilder. Ta alltid hensyn
til sikkerhetsinformasjonen når du bruker datamaskinen.
Samsvarserklæringer
Samsvarserklæring
Samsvarserklæringer (Declara
under "
www.fujitsu-siemens.c
Herved erklærer Fujitsu Siemen
kravene og andre relevante fors
Informasjonskilder
Informasjonskild er
I denne håndboka finner du mer utførlige anvisninger og teknisk informasjon om din
Notebook-maskin. Håndbøker, som bare er tilgjengelige s om PDF-filer, kan skrives
ut hvis du kopler en skriver til Notebook-maskinen din.
Informasjonskilde Type informasjon Hvor?
Hurtigveiledning (trykt) Oppslag for første gangs
Håndbok "Safety"
(Sikkerhet) (trykt og/eller
PDF-fil)
Håndbok "Recovery
Process" (Gjenoppretting)
(trykt og/eller PDF -fil)
Håndbok "EasyGuide"
(PDF-fil)
Håndbok "Wireless LAN"
(Trådløst LAN) (PDF-fil)
Håndbok "Warranty"
(Garanti) (PDF-fil)
Informasjonsfiler (f.eks.
*.TXT, *.DOC, *.CHM,
*.HLP)
Informasjonsfiler (f.eks.
*.TXT, *.DOC, *.CHM,
*.HLP)
tions of Conformity) for AMILO finner du på Internett
om".
s Computers at AMILO-maskinen oppfyller de grunnleggende
krifter i direktiv 1999/5/EF (BMWi), (Wien).
bruk
Sikkerhetsanvisninger
Informasjon om
gjenoppretting av
operativsystemet,
drivere, håndbøker og
spesialprogramvare
Utførlig veiledning om
oppstart, bruk og teknisk
informasjon
Utførlig veiledning om bruk
av trådløst LAN og teknisk
informasjon
Generelle garantibetingelse r
Informasjon om
programverktøy o g
programmer
Informasjon om
operativsystem
Vedlegg
Vedlegg og/eller på
notebook-maskinen
Vedlegg, på notebook-maskinen
eller på våre Internettsider
"
www.fujitsu-siemens.com/support/"
Håndbøkene finner du på
notebook-maskinen under Start
–
Håndbøker eller delvis
oppdatert på våre Internettsider
"
www.fujitsu-siemens.com/support/"
I programvaren til disse
brukerprogrammene
10600794864, utgave 1 Norsk - 2
Page 26

Viktig informasjon
Sikkerhet
SikkerhetAnvisning
• Følg veiledningen i håndboka "EasyGuide" ved rengjøring av datamaskinen.
• Din Notebook-maskin har en rekke sikkerhetsfunksjoner som ut fra et flertrinnskonsept
• Følg de ekstra sikkerhetsanvisningene for maskiner med radiosignalkomponenter
• Oppbevar denne hurtigveiledning sammen med maskinen. Hvis du overlater maskinen
Denne notebook-maskinen retter seg etter gjeldende sikkerhetsbestemmelser for
informasjonstekniske apparater. Hvis du har spørsmål om bruken av notebook-maskinen i det
tiltenkte miljøet, er du velkommen til å kontakte forhandleren eller vår hotline/kundestøtte.
Følg sikkerhetsanvisningene i håndboka "Sikkerhet" samt følgende sikkerhetsanvisninger.
gir en hø y grad av sikkerhet. Mer informasjon om dette finner du i kapittelet
"Sikkerhetsfunksjoner" i håndboken "EasyGuide".
i håndboka "Sikkerhet".
til en annen person, bes du samtidig om å overleve re hurtigveiledningen.
Drivere og programverktøy
Hvis det er installert et Windows-operativsystem på notebook-maskinen, finner du mer informasjon
om systemet samt drivere, hjelpeprogrammer og oppdateringer på notebook-maskinen
eller på våre Internettsider "
Hvis du skal installere operativsystemet på nytt, finner du nø dvendig informasjon i
håndboka "Recovery Process" (se "
www.fujitsu-siemens.com/support/".
Informasjonskilder" , Side 2).
3 - Norsk 10600794864, utgave 1
Page 27
Tilkoplinger og betjenin gselement
er
Tilkoplinger og betjeningsel
lementer
Tilkoplingerog betjeningse
ModemtilkoplingLCD-bildeskjermSkjermtilkoplingInnebygd høyttalerHøyttalertilkoplingTrådløsLANKensington-låsLAN-tilkoplingUSB-portBatteriBatterisperreSIM-kortHarddiskPekeplate-tasterPekeplateNotebookPÅ-/AV-bryterCD-/DVD-stasjonHodetelefontilkoplingMikrofontilkoplingLinjeinnLinje utLikestrømskontakt (DC IN)Statusindikatorer
I dette kapitlet finner du informasjon om Notebo ok-maskinens forskjellige maskinvarekomponenter.
Du finner en oversikt over Notebook-maskinens skjermvisninger og tilkoplinger. Gjør deg
kjent med disse funksjonene før du tar Notebook-maskinen i bruk.
ementer
16
11
3
1
2
12
13
15
14
4
18
17
18
19
10
9
6
7
8
1 = Innebygd høyttaler
2 = Snarveitaster
3 = PÅ-/AV-bryteren på Notebook-maskinen
4 = Pekeplate
5 = Hodetelefontilkopling/linje ut
6 = Mikrofontilkopling/linje inn
7 = Pekeplate-taster
8 = Statusindikatorer
9 = USB-porter
10 = Likestrømskontakt (DC IN)
5
11 = CD-/DVD-stasjon
12 = Kensington-lås
13 = USB-porter
14 = Skjermtilkopling
15 = LAN-tilkopling
16 = Modemtilkopling
17 = Adgangshylle (harddisk)
18 = Batterisperre
19 = Batteri
20 = Adgangshylle (minne)
20
10600794864, utgave 1 Norsk - 4
Page 28

Oppstart og bru k
Oppstart og bruk
Merk deg sikkerhetsinformasjonen i kapittelet "Viktig informasjon", Side 2.
Før du kan begynne å arbeide med notebook-maskinen, må du lade opp batteriet
og installere de aktuelle brukerprogrammene. Operativsystemet og de nødvendige
driverne er allerede fo rhåndsinstallert.
I dette kapittelet beskrives også den grunnleggende bruken av notebook-maskinen.
Utpakking og kontroll av n
Hvis du konstaterer transportskader, tar du straks kontakt med forhandleren!
► Pakk ut alle delene.
PakningTran sport
► Kontroller notebook-maskinen for eventuelle transportskader.
Vi anbefaler at du ikke kaster maskinens originalforpakning.
Ta isteden vare på originalforpakningen for en eventuell tilbakesending.
Velge plassering
VelgeplasseringNotebookNettadapter
Før du setter opp notebo ok-maskinen for bruk, bør du velge et velegnet sted å
plassere den. Ta i den forbindelse hensyn til følgende anvisninger:
• Sett aldri notebook-maskinen på et mykt eller fjærende underlag (for eksempel
teppe, møbelpolstring, seng). Det kan blokkere ventilasjonen som dermed
kan føre til skader på grunn av overoppheting.
• Ikke la notebook-maskinen ligge direkte på bena dine over lengre tid. Under
normal drift blir undersiden av notebook-maskinen varm. Lengre tids hudkontakt
kan bli ubehagelig, eller til og med føre til forbrenninger.
• Sett notebook-maskinen på et stabilt, jevnt og sklisikkert underlag. Vær oppmerksom
på at gummiføttene på notebook-maskinen kan sette avtrykk på ømfintlige overflater.
• Rundt notebook-maskinen og nettadapteren må det være minst 100 mm
åpen plass for å sikre tilstrekkelig ventilasjon.
• Dekk aldri luftåpningen på notebook-maskinen og på nettadapteren.
• Notebook-maskinen må ikke utsettes for ekstreme miljøpåvirkninger. Beskytt
notebook-maskinen mot støv, fuktighet og varme.
otebook-maskinen
5 - Norsk 10600794864, utgave 1
Page 29
Tilkopling av nettadapter
Gjøreklar for bruk avmaskinenNettadapter
For denne maskinen finnes det to forskjellige nettadaptere. Bruk kun den
nettadapteren som fulgte med maskinen når den ble levert.
Merk deg informasjonen i avsnittet "
Den medfølgende strømkabelen overholder kravene i det landet der du har
kjøpt notebook-maskinen. Forsikre deg om at strømkabelen også er tillatt
å bruke i det landet du skal bruke maskinen.
Strømkabelen til nettadapteren skal bare være satt inn i et veggu ttak for strøm
når noteb ook-maskinen er koplet til nettadapteren.
Kontroller at nettadapterens effektopptak ikke er høyere enn effektopptaket til det
nettet som du kobler adapteren til (se nettadapterens tekniske data).
1
3
2
Oppstart og bruk
Sikkerhet", Side 3.
► Kople nettadapterledningen (1) til
likestrømsinngangen (DC IN) på
notebook-maskinen.
► Kople strømkabelen (2) til nettadapteren.
► Plugg strømkabelen (3) inn i en
stikkontakt i veggen.
10600794864, utgave 1 Norsk - 6
Page 30
Oppstart og bru k
Slå notebook-maskinen på for fø
Slåpåforførstegang
For å gjøre oppstart av notebook-maskinen så enkel som mulig, er operativsystemet
allerede installert på harddisken.
► Slå på datamaskinen (se kapittelet "
► Under installasjonen følger du anvisningene på skjermen.
Den medleverte programvaren blir installert og konfigurert første gang du starter
notebook-maskinen. Siden denne prosessen ikke m å avbryt es, bør du sette av litt tid til
det og koble notebook-maskinen til strømnettet ved hjelp av nettadapteren.
Mens installasjonen pågår, må notebook-maskinen kun sta rtes om igjen på oppfordring!
Slå Notebook-maskinen på", Side 7).
Hvis du er usikker på data og opplysninger du blir bedt om å oppgi, leser
du håndboka for operativsystemet.
Hvis Windows er installert på datamaskinen, finner du mer informasjon om
systemet samt drivere, hjelpeprogrammer, opp dateringer, håndbøker osv. på
maskinen, eller på CD-/DVD-en "Drivers & Utilities". Dette finnes også på våre
nettsider (se kapittelet "
Informasjonskilder" , Sid e 2).
rste gang
Slå Notebook-maskinen på
► Skyv låseknappen (1) i pilen
og slå opp LCD-skjermen (2
2
1
SlåNoteboo k
s retning,
).
► Trykk på PÅ/AV-bryteren (1) for å slå
på N otebook-maskinen.
1
Notebook-maskinens driftsindikator lyser.
7 - Norsk 10600794864, utgave 1
Page 31

Slå Notebook-maskinen av
1
1
Oppstart og bruk
► Avslutt operativsystemet på vanlig måte (i
Windows skjer dette for eksempel ved å
velge Start (startmenyen) under – Shut down
(Avslutt) – Shut down (Avslutt) – OK).
SlåNoteboo k
► Skulle Notebook-maskinen ikke slå seg
av automatisk, trykker du i om lag fem
sekunder på PÅ/AV-bryteren (1).
► Lukk LCD-skjermen (1) slik at den
smekker hørbart på plass.
Batteri
Når du mottar notebook-maskinen, er batteriet ikke helt fulladet. Du må
først lade opp batteriet med nettadapteren koplet til et strømuttak (se
kapittelet "
Batteriet forsyne r notebook-maskinen med strøm ved mobil bruk. Batteriindikatoren
viser gjeldende ladenivå for batteriet.
I håndboka "EasyGuide" beskrives hvordan du tar batteriet inn og ut, hvordan du vedlikeholder
det samt hvordan du kan optima lisere brukstiden for batteriet.
10600794864, utgave 1 Norsk - 8
Tilkopling av nettadapter", Side 6).
Page 32

Oppstart og bru k
Snarveitaster
Snarveitaster
SlåavellerpåtrådløsLAN
Med denne tasten slår du den trådløse LAN-modulen på eller av.
itast
Trådløs LAN,s narve
Internett
Med denne tasten kan du starte standard-nettleseren på systemet ditt.
Internett, snarveitast
Stillemodus (silent mo de)
Med denne tasten kan du redusere prosessorviftens omdreiningstall.
Hvis stillemodus er aktivert, fungerer ikke prosessoren og grafikken med maksimal
kapasitet.
Stillemodus,snarveitastStillemodus,snarveitast
Notebook-maskinen er utstyrt m
snarveitaster. Med et eneste tr
kan du aktivere følgende anven
funksjoner:
ed tre
ykk på tasten
delser eller
9 - Norsk 10600794864, utgave 1
Page 33

Pekeplate og pekeplate-taster
Pass på at pekeplata ikke kommer i kontakt med smuss, væsker eller fett.
PekeplatePekeplate
Unngå å berøre pekeplata med skitne fingre.
Ikke legg tunge gjenstander oppå pekeplata eller pekeplate-tastene.
Oppstart og bruk
1
2 = Pekeplate-taster
2
Med pekeplata kan du flytte pekeren rundt på skjermen.
Bruk pekeplate-tastene til å velge og utføre kommandoer. Disse tastene
tilsvarer knappene på en vanlig mus.
Bruke pekeplate-taster
Flytte pekeren
1 = Pekep late
► Flytt fingere n over pekepl
Pekeplate
Pekeren beveger seg.
Merke et objekt
► Beveg pekeren til det ø nskede objekte t på skjermen.
Pekeplate
► Berør pekeplata én gang elle
Objektet er merket.
Utføre en komm ando
► Beveg pekeren til det ønskede feltet på skjermen.
te
Pekepla
► Trykk to ganger på pekeplata e
Kommandoen blir utført.
ata.
r trykk én gang på venstre tast.
ller trykk to ganger på venstre tast.
Dra et objekt
► Merk det ønskede objektet.
Pekeplate
► Hold den venst re tasten nede og fly
Objektet er flyttet.
10600794864, utgave 1 Norsk - 10
tt objektet med fingeren på pekeplata til det ønskede stedet.
Page 34

Oppstart og bru k
Høyttaler
Høyttaler
Notebook-maskinen har en innebygget høyttaler.
Når du kopler til hodetelefoner eller eksterne høyttalere, blir den
innebygde høyttaleren slått av.
Slåavogpåhøyttaleren
► Med tastekombinasjonen
Regulere volumet
► Still inn ønsket volum ved hjelp av tastekombinasjonen
eller
► Dobbelklikk på høyttalersymbolet på Task bar (oppgaveliste), og på Mixer (Volumkontroll).
eller
► Velg Startknappen – (settings)
for maskinvare og lyd) – Sound (l
► For å endre lydstyrken, trykker du på glidebryteren.
Regulere
► Foråslåhøyttalerneavogpå,do
Fn+F3
kan du slå av og på høyttaleren.
Fn+F5
eller
Fn+F6
– Control panel (kontrollpanel) – Hardware and Sound (Innstillinger
yd): Adjust volume control (Regulere systemvolumet) .
bbeltklikker du på høyttalersymbolet på Task bar (oppgavelinjen).
.
11 - Norsk 10600794864, utgave 1
Page 35

Oppstart og bruk
Radiosignalkomponenter (tråd
Montering av en trådløs LAN-modul som ikke er godkjent av Fujitsu Siemens
Computers GmbH gjør typegodkjenningene for denne maskinen (CE!) ugyldig.
TrådløsLAN
Trådløs LAN er integrert i din no
Slå på og av trådløs LAN-modul
Kontroller om den trådløse LAN-modulen i den installerte trådløse
LAN-programvaren er aktivert eller deaktivert.
SlåpåSlåav
Følg de ekstra sikkerhetsanvisn ingene for maskiner med radiosignalkomponenter
i håndboken "Safety" (Sikkerhet).
Nærmere informasjon om bruk av trådløs LAN finner du i den tilhørende håndboka
eller i hjelpfilene (se kapittel "
tebook-maskin.
► Du kan slå på og av den trådløse
Informasjonskilder" , Side 2).
løs LAN)
LAN-modulen med snarveitasten, se
kapittel "
Indikatoren trådløs LAN lyser når trådløs
LAN-modulen er slått på.
Snarveitaster", Side 9.
BIOS Setup-Utility
Med BIOS Setup Utility kan du endre en rekke parametere og dermed konfigurasjonen
av datamaskinen. Slik kan du for eksempel bruke BIOS Setup Utility til innstilling av dato
og klokkeslett. BIOS Setup Utility benyttes dessuten for tildeling av passord. Håndboka
"EasyGuide" beskriver hvordan du starter og avslutter BIOS-Setup-Utility.
10600794864, utgave 1 Norsk - 12
Page 36

Problemløsning og nyttige tips
Problemløsning og nyttige tip
ProblemløsningTipsFeilProblemløsing
Hvis det oppstår et problem, fo rsøker du først å løse det ved hjelp av ett av tiltakene nedenfor.
Hvis du ikke er i stand til å løse problemet, går du fram som følger:
► Noter deg hvilke trinn som ble utført fram til problemet oppstod, og hvilke programmer eller
► Slå av notebook-maskinen.
► Ta kontakt med hotline/kundestøtte.
Følg sikkerhetsanvisningene i håndboka "Sikkerhet" når du skal kople til eller fra ledninger.
funksjoner som var i bruk. Noter deg også den komplette teksten i en eventuell feilmelding.
Telefonnumrene finner du i den vedlagte kundestøttelisten. Når du ringer,
må du ha opplysningene nedenfor klare:
• Modellbetegnelsen og serienummeret til notebook-maskinen. Serienummeret
finner du på en etikett på undersiden av notebook-maskinen.
• Notater med meldingene som vises på skjermen og opplysninger
om akustiske signaler.
• Samtlige endringer som du har foretatt etter at du m ot tok notebook-maskinen
mht. maskin-/programvare.
• Samtlige e ndringer som du har foretatt i BIOS Setup etter at du mottok datamaskinen.
•Systemkonfigurasjonen og alt periferiutstyr som er koplet til systemet.
• Din kjøpekontrakt.
Våre notebook-maskiner er kons
strømsparende komponenter fø r
konfigurasjoner du har anskaff
svært prosessorkrevende spil
en stasjonær datamaskin. Oppd
Siemens Computers kan i viss
Frigitte drivere og aktuell
"
http://www.fujitsu-sie
mens.de/support/downloads.html"
truert og forbedret med vekt-, plass- og
st og fremst for mobil bruk. Avhengig av hvilke
et deg, kan funksjonaliteten reduseres noe ved
lprogrammer, f.eks. 3D-grafikk, sammenlignet med
atering av drivere som ikke er godkjent av Fujitsu
e tilfeller føre til effekttap, datatap og feilfunksjoner.
e BIOS-versjoner kan du laste ned fra følgende adresse:
s
Gjenopprette installert pr
Sikkerhetskopier filene dine regelmessig. Hvis data skulle gå tapt, kan du gjenopprette
den installerte programvaren ved hjelp av datamediumet. Hvis du ikke har
sikkerhetskopiert filene dine, er det ikke mulig å gjenopprette disse.
Hvis operativsystemet ik
være nødvendig å installe
13 - Norsk 10600794864, utgave 1
ke starter, eller hvis det oppstår feil på harddisken, kan det
re programvaren på ny.
ogramvare
Page 37

Problemløsning og nyttige tips
Gjenopprette operativsystemet, drivere, håndbøker
og spesialprogramvare
Informasjon om gjenoppretting av operativsystemet, drivere, håndbøker og spesialprogramvare
finner du i håndboka "Recovery Process" (gjenoppretting).
Klokkeslett og dato i notebook-maskinen stemmer ikke
SommertidVintertidKlokke slettstemme rikkeTid stemme rik keTid/dato, feilDatostem merikkeLadereservebatteriet
Årsak Feilretting
Klokkeslett og dato er feil innstilt
.
► Gå til BIOS-Setup-Utility og still klokka eller
datoen på menyen Main.
Skulle klokkeslett og dato fort
det fordi det innebygde reserve
► Ta kontakt med forhandlere n el
Lydsignal i sekundintervall
ndintervall
Lydsignali seku
Årsak Feilretting
Batteriet er nesten utladet. ► Lad opp batteriet.
satt vise feil når notebook-maskinen slås på igjen, er
batteriet i notebook-maskinen er tomt.
ler med vår hotline/help desk.
Notebook-maskinen slutter å arbeide
NotebookAvslutte ventemodusHvilemodus
Årsak Feilretting
Notebook-maskinen er i ventemodus eller i
hvilemodus
Et brukerprogram har forårsaket feilen.
Batteriet er tomt. ► Lad opp batteriet.
► Avslutt ventemodus (trykk en tast) eller
hvilemodus (slå maskinen på).
► Avslutt programmet eller start
notebook-maskinen på ny (bruk varmstart,
eller slå maskinen av og på).
eller
► Sett inn et oppladet batteri.
eller
► Kople nettadapteren til
notebook-maskinen.
10600794864, utgave 1 Norsk - 14
Page 38

Problemløsning og nyttige tips
LCD-skjermen i notebook-maskinen forblir mørk
LCD-skjermMørk LCD-skjerm
Årsak Feilretting
Skjermen er slått av. ► Trykk en vilkårlig tast eller tast inn passordet.
Ekstern skjerm eller fjernsynsapparat tilkoplet.
► Trykk tastekombinasjonen
(veksling mellom skjermvisninger).
Fn+F4
Bildet på LCD-skjermen i notebook-maskinen er vanskelig å lese
LCD-skjermLCD -skjerm
Årsak Feilretting
Refleksblending
Ekstern skjerm forblir mørk
Skjerm
Årsak Feilretting
Skjermen er slått av. ► Slå på den eksterne skjermen.
Skjermen er nedkoplet av str
Lysstyrken er stilt inn på m
ValgtskjermerLCD-skjermeni
notebook-maskinen.
Den eksterne bildeskjermens strømledning eller
datakabel er ikke koplet korrekt til.
ømsparingen.
ørk.
► Drei litt på notebook-maskinen, eller forandre
vinkelen på LCD-skjermen.
► Trykk på en vilkårlig tast.
► Still b ildeskjermens lyss
► Trykk tastekombinasjonen
(veksling mellom skjermvi
► Slå av både den eksterne skje
notebook-maskinen.
► Kontroller om strømledningene er ordentlig
koplet til både den eksterne skjermen og
stikkontakten.
► Kontroller om datakabele
til notebook-maskinen og
skjermen (hvis kontakt fin
► Slå på både den eksterne skjermen og
notebook-maskinen.
tyrkepålyst.
Fn+F4
sninger).
rmen og
n er ordentlig koplet
den eksterne
nes).
15 - Norsk 10600794864, utgave 1
Page 39

Problemløsning og nyttige tips
Bildet på den eksterne skjermen
ikke eller vandrer
IkkebildeBildet vandrer
Årsak Feilretting
Det er valgt feil skjerm for den eksterne
skjermen eller feil skjermoppløsning for
brukerprogrammet.
Skriveren fungerer ikke
Skriverenskriverikke ut
Årsak Feilretting
Skriveren er ikke s lått på. ► Kontroller at skriveren er slått på og kla r til
Skriveren er ikke rik tig tilkoplet.
Skriverdriveren er defekt eller ikke riktig installert,
eller feil skriverdriver installert.
► Avslutt brukerprogrammet under
med
oppstår etter at programmet er
Skift til Notebook-maskinen
ved hjelp av
innstilling:
► Still inn skjermoppløsningen: Velg
Startknappen – (innstillinger) – Control
panel (kontrollpanel) – Appearance
and Personalization (I n nstillinger for
visning og tilpasninger) – Personalization
(tilpasning): Adjust screen resolution (Tilpass
skjermoppløsningen) etter ønske.
► Velg skjerm: Klikk med høy
på skrivebordet. Velg rik
Personalize (Tilpasnin
(skjerm) skjerm 1 eller 2
(Avanserte innstillin
bruk (se dokum entasjonen for skriveren).
► Kontroller at datakabelen mellom
notebook-maskinen og skriveren er riktig
tilkoplet.
► Kontroller at datakabelen mellom
notebook-maskinen og skriveren er riktig
tilkoplet.
► Kontroller at den riktige skriverdriveren
er lastet inn (se dokumentasjonen for
skriveren).
vises
Alt+F4
. Hvis feilen fremdeles
Fn+F4
g) – Display settings
ger) – Monitor (skjerm).
avsluttet:
s LCD-skjerm
. Endre følgende
re museknapp
tig skjerm under
og Advanced settings
Windows
10600794864, utgave 1 Norsk - 16
Page 40

Problemløsning og nyttige tips
Radiosignalforbindelsen til et nettverk fungerer ikke
let nettverkfungerer ikke
Radiosignalforbindelsen ti
Årsak Feilretting
Radiokomponentene er frakople
Radiokomponentene er tilkoplet.
Radiosignalforbindelsen til et nettverk
fungerer likevel ikke.
t.
► Slå på radiosignalkomponentene (se "
Slå på
og av trådløs LAN-modul", Side 12).
► Kontroller om radiosignalforbindelsen er
aktivert via programvaren.
► Nærmere informasjon om bruk av
radiokomponentene finner du i den
tilhørende håndboka eller i hjelpfilene (se
kapitlet "
Informasjonskilder" , Side 2).
17 - Norsk 10600794864, utgave 1
Page 41

Índice
Português
Índice
Tecnologia inovadora … ............................................................... 1
Falta-lhealgumainformação? ............................................................ 1
Símbolos ............................................................................... 2
Instruções importantes ................................................................ 3
Declarações de conformid
Fontes deinformação ................................................................... 3
Instruções de segurança
Controladores e utilitá
Ligações eelementos decomando ..................................................... 5
Colocação em funcion
Desembalar e verifica
Escolher local de ins
Ligar o adaptador de
Ligar o Notebook pel
Ligar o Notebook . . ...................................................................... 8
Desligar o Noteboo
Acumulador . . .......................................................................... 9
Teclas "Easy Lau
Touchpad e tecla
Utilizar as tecl
Altifalante .............................................................................. 11
Ligar e desliga
Ajustar o volum
Componentes r
Ligar e deslig
BIOS Setup Uti
Resolução deproblemas esugestões .................................................. 14
Restaurar software instalado ............................................................. 14
Restaurar o sistema operativo, controladores, manuais e software especial .............. 15
AdataeahoradoNotebook estão erradas . . . ............................................ 15
É emitido um sinal repetidamente com intervalos de segundos . ............................. 15
O N otebook deixa de trabalhar ........................................................... 15
Oecrã LCDdoNotebook continua escuro ................................................. 16
A imagem no ecrã LCD do Notebook está mal visível . . .................................... 16
Oecrã externo continuaescuro .......................................................... 16
A imagem no ecrã externo não aparece ou move-se . . . .................................... 17
Aimpressoranãoimprime ............................................................... 17
Aligação radioeléctricaauma redenãofunciona .......................................... 18
nch" ...................................................................
sdo Touchpad ..........................................................
adioeléctricos(Wireless LAN) ..............................................
ar omóduloWireless LAN ...............................................
lity ......................................................................
ade (Declarations ofConformity) .................................
.................................................................
rios ................................................................
amento e utilização . . ............................................
r o Notebook .......................................................
talação ..............................................................
rede ...............................................................
aprimeiravez .......................................................
k .....................................................................
asdo Touchpad ........................................................
ro altifalante ..........................................................
e ....................................................................
10
10
11
11
12
12
12
13
3
4
4
6
6
6
7
8
9
10600794864, edição 1 Português
Page 42

Tecnologia inovadora …
Tecnologia inovadora …
e um design ergonómico fazem do seu AMILO um Notebook fiável e fácil de utilizar. O
sistema operativo Windows já s e encontra instalado e configurado de modo a poder começar
a utilizar o seu AMILO de imediato quando o ligar pela primeira vez.
Estas instruções resumidas "Iniciação" indicam-lhe, e ntre outras coisas, a forma de colocar o
AMILO em funcionamento. Caso po ssa vir a surgir um problema, poderá encontrar informações
úteis no capítulo "
Resolução de problemas e sugestões", Página 14.
Falta-lhe alguma informaç
Pode encontrar uma apresentação geral com mais informações sobre o Notebook
no capítulo "
Fontes de informação", Página 3.
ão?
1 - Português 10600794864, edição 1
Page 43

Símbolos
Tecnologia inovadora …
Representa instruções que, se não forem cumpridas, colocam em risco
a saúde, o funcionamento do seu aparelho ou a segurança do s dados.
Os danos causados no aparelho devido a não observância destes avisos
implicam a perda da garantia.
Representa informações importantes sobre a utilização correcta do
aparelho.
►
Este tipo de
letra
Este tipo de
letra
Este tipo de letra
"Este tipo de letra" Representa
Abc
Este tipo de letra representa conceitos e textos que se pretende evidenciar ou salientar, po r
Representa um passo de trabalho que deve ser executado
Representa um resultado
representa introdução de dados com o teclado num diálogo do programa
ou n uma linha de comando, por exemplo, a sua palavra-passe (Name123)
ou uma ordem para iniciar um programa (start.exe)
Representa informações indicadas por um programa no ecrã, por ex.: A
instalação foi concluída!
Representa
• Conceitos e textos numa interface de software, por ex.: Clique em
Guardar.
• nomes de programas ou dados, por exemplo, Windows ou setup.exe.
• Referências cruzadas a outras secção, por ex., "Instruções de
segurança"
• Referências cruzadas a uma fonte externa, por ex., um endereço na
Internet: Consulte mais informações em "
• nomes de CDs, DVDs, bem como designações e títulos de outros
materiais, por exemplo: "Drivers de CD/DVD & Utilidades" ou Manual
"Segurança"
Representa uma tecla do teclado, por ex.:
exemplo: Não desligar o aparelho
www.fujitsu-siemens.com"
F10
10600794864, edição 1 Português - 2
Page 44

Instruções imp ortantes
Instruções importantes
Instruções importantesInforma ções
Neste capítulo encontrará referências a outras fontes de informação. É indispensável que
respeite as instruções de segurança ao manusear o seu Notebook.
Declarações de conformidade (Declarations of Conformity)
Declaraçãode conformidade
As declarações de conformidade (Declarations of Conformity) relativas ao AMILO podem
ser encontradas na Internet em "
A Fujitsu Siemens Computers declara por este meio que o AMILO está em conformidade com os
requisitos essenciais e outras normas relevantes da Directiva 199 9/5/CE (BMWi), (Viena).
Fontes de informação
Fontesde informação
No presente manual irá encontrar instruções mais detalhadas e informações técnicas
sobre o seu Notebook. Pode imprimir os manuais que se apresentem apenas n o
formato PDF, ligando uma impressora ao seu Notebook.
Fonte de informação Tipo de informação Onde?
Quick Start Guide
(impresso)
Manual "Segurança"
(impresso e/ou ficheiro
PDF)
Manual "R eco very Process"
(impresso e/ou ficheiro
PDF)
Manual "EasyGuide"
(ficheiro PDF)
Manual "Wireless LAN"
(ficheiro PDF)
Manual "Garantie" (ficheiro
PDF)
Ficheiros de informações
(por exemplo *.TXT, *.DOC,
*.CHM, *.HLP)
Ficheiros de informações
(por exemplo *.TXT, *.DOC,
*.CHM, *.HLP)
www.fujitsu-siemens.com".
Poster para a primeira
colocação em funcionamento
Instruções de segurança
Informações sobre a
restauração do sistema
operativo, do s controladores,
dos manuais e de software
específico
Instruções detalhadas
sobre a colocação em
funcionamento, utilização e
informações técnicas
Instruções detalhadas sobre
autilizaçãodeWirelessLAN
e informações técnicas
Condições gerais da garantia
Informações relativas a
utilitários e programas
Informações sobre o sistema
operativo
Pacote fornecido com o a p arelho
Pacote fornecido com o aparelho e/ou
no Notebook
Pacote fornecido com o
aparelho, no seu Noteb ook
ou no nosso site na Internet
"
www.fujitsu-siemens.com/support/"
Os manuais encontram-se no seu
Notebook em Start –
nalguns casos, numa versão m ais
actual, na nossa página de Internet
"
www.fujitsu-siemens.com/support/"
No software s obre estas aplicações
Manuais ou,
3 - Português 10600794864, edição 1
Page 45

Instruções im po rtantes
Instruções de segurança
Instruçõesde segurançaInform ações
• Durante a limpeza do Notebook observe as instruções no manual "EasyGuide".
• O Notebook disponibiliza inúmeras funções de segurança que lhe podem oferecer um
• Observe as instruções de segurança adicionais para aparelhos com componentes
• Guarde as presentes instruções resumidas junto do aparelho. Se entregar o aparelho
O Notebook satisfaz os requisitos principais de segurança para equipamento da tecnologia
informática. Se tiver questões relacionadas com a colocação d o Notebook no ambiente previsto,
dirija-se ao local de venda ou contacte a nossa assistência telefónica/Help Desk.
Observe as instruções de segurança no manual "Safety" (Segurança) e
as instruções de segurança seg uintes.
alto nível de segurança através de múltiplos níveis. Pode encontrar mais informações
no capítulo "Funções de seg urança" no manual "EasyGuide".
radioeléctricos no manual "Security" (Segura nça).
a terceiros, entregue também as instruções resumidas.
Controladores e utilitários
Se no Notebook estiver instalado um sistema operativo Windows, encontrará mais informações
sobre o sistema, assim como controladores, programas auxiliares e actualizações no próprio
Notebook ou na nossa página de Internet "
Se necessitar de fazer uma nova instalação do sistema operativo, consulte as infrmações
necessárias no manual "Recovery Process" (consulte "
www.fujitsu-siemens.com/support/".
Fontes de informação", Página 3).
10600794864, edição 1 Português - 4
Page 46

Ligações e elem ent os de comando
Ligações e elementos de comand
IN)
Ligaçõese elementos de comandoPortado modemEcrã LCDPortado monitorAltifalantes internosPorta dos altifalantesWir elessLANKensingtonL ockPorta LANPorta USBBateriaBloqueio da bateriaPlaca SIMDisco rígidoTec las do Touc hpadTo uchpa dNotebookTecla de ligar/desligarUnidade deCD/DVDPorta dos auscultadoresPortado microfoneLine InLineOutTomada de tensãocontínua (DC
Indicadord eestado
Neste capítulo são apresentados os diferentes componentes de hardware do seu Notebook.
Obtém uma síntese dos indicad ores e das portas do Notebook. F amiliarize-se com estes
elementos an tes de começar a trabalhar com o Notebook.
11
3
1
2
12
13
o
15
14
4
18
17
18
19
10
9
7
8
1 = Altifalantes internos
2 = Teclas "Easy Launch"
3 = Tecla de ligar/desligar o Notebook
4 = Touchpad
5 = Porta dos auscultadores / Line O ut
6 = Portadomicrofone/LineIn
7 = Teclas do Touchpad
8 = Indicador de estado
9=PortasUSB
10 = Tomada de tensão contínua (DC IN)
11 = Unidade de CD/DVD
5
6
12 = Dispositivo Kensington Lock
13 = Portas USB
14 = Porta do monitor
15 = Porta LAN
16 = Porta do modem
17 = Compartimento para assistência
18 = Bloqueio da bateria
19 = Bateria
20 = Compartimento para assistência
20
técnica (disco rígido)
técnica (memória)
16
5 - Português 10600794864, edição 1
Page 47

Colocação em fu ncio namento e utiliz
ação
Colocação em funcionamento e u
Observe as instruções de se gurança no capítulo "I nstruções importantes", Página 3.
Antes de poder trabalhar com o Notebook, é necessário carregar o acumulador e insta lar os
programas a utilizar. O sistema operativo e o s controladores necessários já estão pré-instalados.
Neste capítulo são também descritas as bases do funcionamento do Notebook.
Desembalar e verificar o No
Se detectar danos devido ao transporte, informe imediatamente o local de venda!
► Desembale todas as peças.
EmbalagemTransporte
► Verifique se o Notebook não apresenta danos visí veis devido ao transporte.
Recomendamos que não deite fora a embalagem original do apa relho.
Guarde a embalagem original para o caso de ser necessário devolver os aparelhos.
Escolher local de instalação
Escolherlo calde instalaçãoNotebookAdaptadorde rede
Antes de colocar o Notebook em funcionamento, deve escolher um local próprio
para o Notebook. Para isso, siga as seguintes instruções:
• Nunca coloque o Notebook sobre uma superfície mole (por ex., tapete,
móveis estofados, cama). Dessa forma a v entilação pode ficar bloqueada,
provocando danos por sobreaquecimento.
• Não coloque o Notebook durante muito tempo directamente sobre
as pernas. Durante o funcionamento normal a parte de baixo do
Notebook aquece. Um contacto prolongado com a pele pode torn ar-se
desagradável ou mesmo provocar queimaduras.
• Coloque o Notebook sobre uma superfície firme, plana e não derrapante.
Tenha em atenção que os pés de borracha da caixa do Notebook podem
deixar marcas em superfícies sensíveis.
• O espaço livre em torno do Notebook e do adaptador de rede deve ser no
mínimo de 100 mm, para assegurar uma boa ventilação.
• Nunca tape as ranhuras de ventilação do Notebo ok e do adaptador de rede.
• O Notebook não deve estar sujeito a condições ambientais extremas.
Proteja o Notebook das poeiras, humidade e calor.
tebook
tilização
10600794864, edição 1 Português - 6
Page 48

Colocação em funcionamento e utiliz
ação
Ligar o adaptador de rede
Preparaçãopa rafuncionamentoAdaptadorde rede
Há dois transformadores disponíveis para este aparelho. Utilize apenas o
transformador que foi fornecido com este aparelho.
Observe as indicações na secção "
Instruções de segurança", Página 4.
O cabo de alimentação incluído corresponde aos requisitos do país no qual
adquiriu o seu Notebook. Certifique-se de que o cabo de alimentação está
homologado para o país no qual o pretende utilizar.
O cabo de alimentação do adaptador de rede só deve ser ligado a uma tomada
se o Notebook estiver ligado ao adaptador de rede.
Certifique-se de que o consumo de corrente do adaptador de rede não
é superior ao da rede eléctrica a que este está ligado (consulte as
características técnicas do adapt ador de rede).
1
3
► Ligue o cabo do adaptador de rede (1) à
entrada de corrente contínua (DC IN)
do Notebook.
► Ligue o cabo de alimentação (2) ao
adaptador de rede.
► Ligue o cabo de alimentação (3)
a uma tomada.
2
7 - Português 10600794864, edição 1
Page 49

Colocação em fu ncio namento e utiliz
ação
Ligar o Notebook pela primeira v
Ligarpela primeira vez
Para lhe facilitar a colocação em funcionamento do Notebook, o sistema operativo
já está instalado no disco rígido.
► Ligue o Notebook (ver capítulo "
► Durante a instalação, siga as instruções no ecrã.
Quando ligar o Notebook pela primeira vez, o software fornecido é instalado e
configurado. Uma vez que este processo não deve ser interrompido, reserve algum
tempo para o efeito e ligue o Notebook à te nsão de rede através do adaptador de rede.
Durante a instalação o Notebook só deve ser reiniciado a pedido do próprio software!
Ligar o Notebook", Página 8).
Se não tiver a certeza relativamente aos dados pedidos, leia o manual do sistema operativo.
Se no Notebook estiver instalado um sistema operativo Windows, encontrará mais
informações sobre o sistema, assim como controladores, programas auxiliares,
actualizações, manuais, etc. no próprio Notebook, no CD/DVD "Drivers & Utilities" ou
na nossa página de Internet (ver capítulo "
ez
Fontes de informação", Página 3).
Ligar o Notebook
► Desloque o fecho (1) no sentido da seta
elevanteoecrãLCD(2).
2
1
Notebook
► Prima a tecla de ligar/desligar (1)
para ligar o Notebook.
1
O indicador de fun
10600794864, edição 1 Português - 8
cionamento do Notebook ilumina-se.
Page 50

Colocação em funcionamento e utiliz
Desligar o Notebook
1
ação
► Encerre correctamente o sistema o perativo
(por exemplo no menu Start (Iniciar) do
Windows, através da função Símbolo Iniciar
– Encerrar – Encerrar – OK).
Notebook
► Se o No tebook não desligar
automaticamente, prima a tecla
de ligar/desligar (1) durante aprox.
cinco segundos.
► FecheoecrãLCD(1)atéqu
1
e engate.
Acumulador
Aquando do fornecimento do Notebook, o acumulador não está totalmente carregado.
Em primeiro lugar, terá de carregar o acumulador ligando o adaptador de rede à
tomada (ver capítulo "
Quando o Notebook é utilizado em mobilidade, é alimentado com energia através do acumulador.
O indicador do acumulador mostra o estado actual do acumulador.
No manual "EasyGuide" pode encontrar informações sob re como deve desmontar e montar
o acumulador, como deve tratá-lo e efectuar a sua manutenção, assim como instruções
sobre como pode optimizar o tempo de operacionalidade do acumulador.
Ligar o adaptado r de rede", Página 7).
9 - Português 10600794864, edição 1
Page 51

Teclas "Easy Launch"
Teclas"Easy Launch"
Tecla de ligar/desligar a Wireless LAN
Esta tecla liga ou desliga o módulo Wireless LAN.
WirelessLAN, tecla"Easy Launch"
Internet
Esta tecla inicia o browser da Internet predefinido do seu sistema.
Internet,tecla "EasyLaunch"
Silent Mode (modo silenc
Esta tecla reduz o número d
Se o modo silencioso estiv
com a potência máxima.
Modosilencioso, tecla"Easy Launch"SilentMode, tecla"Easy Launch"
ioso)
er activo, o processador e a placa gráfica não trabalharão
Colocação em fu ncio namento e utiliz
O seu Notebook vem equipado com tec
"Easy Laun ch". Basta premir uma v
correspondente para iniciar as a
funções a seguir descritas.
e rotações da ven toinha do processador.
ação
las
ez a tecla
plicações ou
Touchpad e teclas do Touchpad
Assegure-se que o Touchpad não entra em contacto com sujidade, líquidos nem gordura.
TouchpadTouchpad
Não toque no Touchpad com os dedos sujos.
Não coloque objectos pesados sobre o Touchpad nem sobre as teclas do Touchpad.
1
2
Como Touchpad é possível mover o cursor no ecrã.
As teclas do Touchpad servem para seleccionar e executar comandos. Correspondem
às teclas de um rato comum.
10600794864, edição 1 Português - 10
1 = Touchpad
2 = Teclas do Touchpad
Page 52

Colocação em funcionamento e utiliz
ação
Utilizar as teclas do Touchpad
Deslocar o cursor
► Desloque o dedo sobre o Touchpad.
Touchpad
O cursor desloca-se.
Seleccionar objecto
► Desloque o cursor para o objecto pretendido.
Touchpad
► Toque uma vez no Touchpad ou prima uma vez a tecla esquerda.
O objecto está seleccionado.
Executar comando
► Desloque o cursor para o campo pretendido.
Touchpad
► Toque duas vezes no Touchpad ou prima duas vezes a tecla esq uerda.
O comando é executado.
Deslocar objecto
► Seleccione o objecto pretendido.
Touchpad
► Mantenha premida a tecla esquerda e desloque o objecto como o dedo sobre
o Touchpad para o local pretendido.
O objecto foi deslocado.
Altifalante
Altifalante
O seu Notebook tem um altifalante incorporado.
Se ligar auscultadores ou altifalantes externos no Notebook, o
altifalante interno é desligado.
Ligar e desligar o altifalante
► Com a combinaçã o de teclas
11 - Português 106 0079486 4, edição 1
Fn+F3
, pode ligar e desligar o altifalante.
Page 53

Colocação em fu ncio namento e utiliz
ação
Ajustar o volume
► Ajuste o volume pretendido com a combinação de teclas
Fn+F5
ou
► Faça duplo clique no símbolo do altifalante na barra de tarefas e em Mixer (Misturador).
ou
► Seleccione Símbolo Iniciar – (Settings) (Definições) – Control Panel (Painel de controlo) – Hardware
and Sound (Hardware e som) – Sound (Som): Adjust volume control (Ajustar o volume do sistema) .
► Para alterar o volume, utilize o c
Volume
ursor de deslocamento.
► Para ligar ou desligar os altifalantes, faça duplo clique no símbolo do altifalante na barra de tarefas.
ou
Fn+F6
.
Componentes radioeléctricos (Wireless LAN)
A instalação de um módulo de Wire
Computers GmbH invalida as auto
WirelessL AN
less LAN não autorizado pela Fujitsu Siemens
rizações (CE!) concedidas a este aparelho.
O Notebook tem Wireless LAN integ
rada.
Ligar e desligar o módulo Wireless LAN
Verifique se o módulo Wireless LAN está activado/desactivado no
software Wireless LAN instalado.
WirelessL ANWireless LAN
► Pode ligar e desligar o m ódu lo Wireless
LAN com o auxílio da tecla "Easy Launch"
para Wireless LAN (consulte o capítulo
"
Teclas "Easy Launch"", Página 10).
O indicador Wireless LAN ilumina-se
quando se liga o módulo Wireless LAN.
Respeite as instruções de segurança adicionais para aparelhos com componentes
audiovisuais incluída s no manual "Segurança".
Encontrará informações mais detalhadas sobre a utilização da Wireless
LAN no manual correspondente ou nos ficheiros da Ajuda (consulte o
capítulo "
Fontes de informação", Página 3).
10600794864, edição 1 Português - 12
Page 54

Colocação em funcionamento e utiliz
ação
BIOS Setup U tility
Com a BIOS-Setup-Utility pode alterar uma série de parâmetros e, logo, a configuração
do seu N otebook. Pode utilizar a BIOS-Setup-Utility, por exemplo, para ajustar a data e a
hora. A BIOS-Setup-Utility serve ainda para atribuir palavras-passe. No manual "EasyGu ide"
está descrito como pode abrir e fechar a BIOS-Setup-Utility.
13 - Português 10600794864, edição 1
Page 55

Resolução de problemas e sugestões
Resolução de problemas e suges
Resolução deproblem asSugestõesFalhasEliminaçãodeerros
Se ocorrer uma falha, tente resolvê-la de acordo com as seguintes medidas. Se não
conseguir resolver a falha, proceda da seguinte forma:
► Aponte os passos efectuados e o estado do aparelho aqu ando da ocorrência da falha.
► Desligue o Notebook.
► Entre em contacto com a assistência telefónica/Help Desk.
Observe as instruções de segurança no manual "Safety" (Segurança)
se pretender soltar ou ligar cabos.
Aponte também eventuais mensagens de erro apresentadas.
Pode encontrar o número de telefone na lista de Help Desk. Antes de
telefonar, tenha presentes as seguintes informações:
• O nome de modelo e o n úmero de séri
encontra-se na etiqueta na par
• Apontamentos com as mensagens que apareceram no ecrã e
informações sobre os sinais acústicos.
• Todas as alterações de hardware
desde a aquisição d o Notebook.
• Todas as alterações que foram efectuadas, desde a aquisição do
Notebook,à BIOS-Setup (configuraçãodaBIOS).
•Aconfiguração de sistema e todo
• O contrato de compra.
Os nossos Not ebooks estão equipados e optimizados com compon entes que poupam
peso, espaço e energia, prioritariamente para a utilização móvel. Dependendo
da configuração adquirida por si, no caso de software de jogos com uso intenso
dos recursos do computador, como, por exemplo, gráficos a 3D, pode perder-se
ligeiramente a funcionalidade relativamente a um Desktop PC. Uma actualização
de controladores não homologados pela Fujitsu Siemens Computers pode levar, em
certas circunstâncias, a perda de desempenho, de dados ou a erros de funcionamento.
Pode descarregar controladores autorizados e versões actualizadas da BIOS no
endereço seguinte: "
http://www.fujitsu-siemens.de/support/downloads.h tml"
e do Notebook. O número de série
te de baixo do Notebook.
ou software que foram efectuadas
s os periféricos ligados ao sistema.
tões
Restaurar software instalado
Crie regularmente cópias de segurança dos seus ficheiros. Caso se verifique
uma perda de dados, poderá resta urar o software instalado com a ajuda dos
suportes de dados. Mas se não tiver feito cópias de segurança dos seus próprios
ficheiros, não será possível restaurar esses ficheiros.
Caso o seu sistema operati
ser necessário reinstal
10600794864, edição 1 Português - 14
vo não arranque ou surjam erros no seu disco rígido, poderá
ar o software previamente instalado.
Page 56

Resolução de problemas e sugestões
Restaurar o sistema operativo, controladores,
manuais e software especial
Poderá encontrar informações sobre a restauração do sistema operativo, dos controladores, dos
manuais e de software especial no manual "Recovery Process" (Processo de restauração ).
AdataeahoradoNotebookestãoerradas
Horade VerãoHora deInvernoHoraerradaHoraerradaData/horaerradaDataerradaCarregarapilhadereserva
Causa Resolução de falhas
A hora e a data estão incorrectas. ► Ajuste na BIOS Setup Utility a hora ou a data
Se a hora e a data c ontinuare m incorrectas após o reinício do Notebook, a
bateria de segurança incorporada no Notebook está gasta.
► Entre em contacto com o local de venda ou a nossa assistência telefónica/Help Desk.
no menu Main.
É emitido um sinal repetidamente
com
intervalos de segundos
Éemitido um sinal repetidamente comintervalos de segundos
Causa Resolução de falhas
O acumulador está praticamente
vazio.
► Carregue o acumulador.
O Notebook deixa de trabalhar
doStandby
o
NotebookTerminar omo
Modosuspens
Causa Resolução de falhas
O Notebook encontra-se em modo Standby ou
em modo suspenso.
O programa em execução causou um erro.
O acumulador está vazio. ► Carregue o acumulador.
► Termine o modo Standby (premindo uma
tecla) ou o modo suspenso (ligando o
Notebook).
► Termine o programa em execução ou
reinicie o Notebook (arranque a quente ou
desligar/ligar).
ou
► Instale um acumulador carregado.
ou
► Ligue o adaptador de rede ao Notebook.
15 - Português 10600794864, edição 1
Page 57

Resolução de problemas e sugestões
O ecrã LCD do Notebook continua escuro
EcrãLCDEcrã LCDmai s escuro
Causa Resolução de falhas
O ecrã está desligado.
Ecrã externo ou televisão ligados. ► Prima a combinação de teclas
A imagem no ecrã LCD do Notebook está mal visível
EcrãLCDEcrã LC D
Causa Resolução de falhas
Reflexos
► Prima uma tecla ou introduza a
palavra-passe.
Fn+F4
(alternar a imagem do ecrã).
► Rode o Notebook ou altere a inclinação do
ecrã LCD.
O ecrã externo continua escu
Ecrã
Causa Resolução de falhas
O ecrã está desligado.
O ecrã está definido para escuro.
Brilho está definido para esc
A imagem do ecrã está definida para o ecrã LCD
do Notebook.
Cabo de alimentação ou cabo de dados do ecrã
externo n ão estão correctamente ligados.
uro.
ro
► Ligue o ecrã externo.
► Prima uma tecla qualquer.
► Ajusteobrilhodoecrãparaclaro.
► Prima a combinação de teclas
(alternar a imagem do ecrã).
► DesligueoecrãexternoeoNotebook.
► Verifique se o cabo de alimentação está
correctamente ligado ao ecrã externo e à
tomada.
► Verifique se o cabo de dados está
correctamente ligado ao Notebook e ao
ecrã externo (desde que sejam usados
conectores).
► Ligue o ecrã externo e o Notebook.
Fn+F4
10600794864, edição 1 Português - 16
Page 58

Resolução de problemas e sugestões
A imagem no ecrã externo não apar
EcrãEcrã
Causa Resolução de falhas
Foi seleccionado um ecrã errado par
externo ou foi ajustada a resolução
o programa em execução.
aoecrã
errada para
► Termine o programa em execução no
Windows com
persistir após o programa ser ence
alterne com
do Notebook. Altere a seguinte
► Definir a resolução do ecrã: Seleccione
Símbolo Iniciar – (Settings) (Definições) –
Control Panel (Painel de controlo) – Appearance
and Personalization (Aspecto e personalização)
– Personalization (Personalização): Adjust
screen resolution (Ajustar a resolução do ecrã)
para definir a resolução do ecrã pretendida.
► Seleccionar ecrã: Clique no
de trabalho com o botão dire
Seleccione em Personalize
Display settings (Visual
em Advanced Settings (Defi
Monitor (Monitor) oecrãc
ece ou move-se
A impressora não imprime
Impressoranão imprime
Causa Resolução de falhas
A impressora não está ligada.
A impresso ra não está correctamente ligada.
O controlador da impressora tem erros, não
foi correctamente instalado ou é o contro lado r
errado para a impressora.
► Verifique se a impressora está ligada e a
funcionar (consulte a documentação da
impressora).
► Verifique se o cabo de dados entre o
Notebook e a impressora está correctamente
ligado.
► Verifique se o cabo de dados entre o
Notebook e a impressora está correctamente
ligado.
► Verifique se está instalado o controlador
correcto para a impressora (consulte a
documentação da impressora).
Alt+F4
Fn+F4
. Seoerro
para o ecrã LCD
(Personalização) –
ização) oecrã1ou2e
nições avançadas) –
orrecto.
rrado,
definição:
ambiente
ito do rato.
17 - Português 10600794864, edição 1
Page 59

Resolução de problemas e sugestões
A ligação radioeléctrica a uma rede não funciona
arede não funciona
Aligação radioeléctrica a um
Causa Resolução de falhas
O componente radioeléctrico está desligado. ► Ligue o seu componente radioeléctrico (ver
O componente radioeléctrico es
Apesar disso, a ligação radio
tá ligado.
eléctrica para uma
rede não funciona.
"
Ligar e desligar o módulo Wir eless LAN",
Página 12)
► Verifique se a ligação radioeléc
trica está
ligada através do software.
► Para mais informações sobre a utiliz ação
dos componentes radioeléctricos, consulte o
manual respectivo ou os ficheiros de ajuda
(ver capítulo "
Fontes de informação", Página
3).
10600794864, edição 1 Português - 18
Page 60

Resolução de problemas e sugestões
19 - Português 10600794864, edição 1
Page 61

Obsah
Česky
Obsah
Inovačnítechnologie... ................................................................. 1
Postrádáte nějakou informaci? ........................................................... 1
Použité symboly ........................................................................ 1
Důležité pokyny ........................................................................ 2
Prohlášení o shodě (Decla
Zdroje informací ........................................................................ 2
Bezpečnostnípokyny .................................................................... 3
Ovladačea utility ........................................................................ 3
Přípojky aovládací prvky .............................................................. 4
Uvedení do p rovozu a o
Vybalení a kontrola n
Výběr m ís ta instalac
Připojení síťového
První zapnutí noteb
Spuštění notebook
Vypnutí notebooku
Akumulátor ............................................................................. 8
Tlačítka Easy La
Touchpad a tlačí
Použití tlačíte
Reproduktor ............................................................................ 11
Zapínání a vypí
Nastavení hlas
Komponenty pr
Vypnutí a zapn
Nástroj k nast
Řešení problémů arady ................................................................ 13
Obnovení nainstalovaného softwaru . . . ................................................... 13
Obnovení operačního systému, ovladačů
Nesprávný aktuální čas nebo datum notebooku ............................................ 14
V intervalu jedné sekundy se ozývá signál . . . . . ............................................ 14
Notebook nef unguje . . . .................................................................. 14
LCD obrazovka notebooku zůstávátmavá ................................................. 15
Špatněčitelné údaje na LCD monitoru notebooku . . ........................................ 15
Externí obrazovka zůstávátmavá ......................................................... 15
Zobrazení na externí obrazovce se neobjeví nebo putuje . . . . . . ............................. 16
Tiskárnanetiskne ....................................................................... 16
Bezdrátové spojení se sítí nefunguje . . . ................................................... 17
unch ...................................................................
tka touch padu ...........................................................
k touchpadu . ...........................................................
obezdrátovoukomunikaci (Wireless LAN) ..................................
avení systému BIOS ........................................................
rations ofConformity) ...........................................
bsluha .........................................................
otebooku ...........................................................
e ...................................................................
adaptéru . . . ...........................................................
ooku .................................................................
u .....................................................................
......................................................................
nání reprodukto ru . . ...................................................
itosti ..................................................................
utí modulu pro bezdrátovou místní síť ...................................
,příručekaspeciálníhosoftwaru ................ 14
10
10
11
11
12
12
12
2
5
5
5
6
7
7
8
9
10600794864, vydání 1 Česky
Page 62

Inovační technologie...
Inovační technologie...
a ergonomický design jsou vlastnosti, díky kterým je notebook AMILO spolehlivý a pro uživatele
optimální. Váš operační systém W indows je již předem nainstalován a optimálně konfigurovaný,
takže můžete odstartovat hned, jakmile svůj AMIL O poprvé zapnete.
Vtomtostručné m návo du "První kroky" naleznete kromě jiného postup uvedení
notebooku AMILO do provozu. Pokud by nastal nějaký problém, naleznete potřebné
údaje v kapitole "
Řešení problémů a rady", Strany 13.
Postrádáte nějakou infor
Přehled dalších informací o notebooku naleznete v kapitole "Zdroje informací", Stran y 2.
maci?
Použité symboly
Označuje pokyny, při jejichž nedodržování je ohroženo vaše zdra ví,
funkčnost vašeho p řístroje nebo bezpečnost vašich dat. Pokud v důsledku
nedodržování těchto pokyn ů dojde k závadám přístroje, zaniká záruka.
Označuje důležité informace o správném zacházení s přístrojem.
►
Toto písmo
Toto písmo
Toto písm o
"Toto písmo" označuje
Abc
Tot o písm o
Označuje pracovní krok, který musíte provést.
označuje výsledek
označuje údaje, které pomocí klávesnice zadáte do dialogu programu nebo
příkazového řádku, např. Vaše heslo (Jméno123) nebo p říkaz ke spuštění
programu (start.exe)
označuje informace zobrazované programem na obrazovce, např.
Instalace je dokončena!
označuje
• pojmy a texty uživatelského rozhraní, např. Klepněte na tlačítko Uložit.
• Názvy programů nebo souborů, např. Windows nebo setup.exe.
•křížové odkazy na jiné části, např. "Bezpečnostní pokyny"
•Příčné odkazy na externí zdroj, např. webovou adresu: Čtěte dále na
"
www.fujitsu-siemens.com"
• Názvy CD, DVD i názvy a tituly jiných podkladů, např.: "CD/DVD Drivers
& Utilities" nebo příručka "Bezpečnost"
Označuje klávesu na kl
označuje pojmy a texty, které jsou zdůrazněny nebo zvýrazněny, např.:
Přístroj nevypínejte
ávesnici, např.
F10
1-Česky 10600794864, vydání 1
Page 63

Důležité pokyny
Důležité pokyny
Důležitépo kynyUpozornění
V této kapitole naleznete odkazy na další zdroje informací. Při zacházení s notebookem
musíte bezpodmínečně dodržovat bezpečnostní pokyny.
Prohlášení o shodě (Declarations of Conformity)
prohlášenío shodě
Prohlášení o shodě (Declaration
na webu na adrese "
Fujitsu Siemens Computers tímto p
adalšímipříslušnými ustanoven
Zdroje informací
Zdrojeinformací
Vtétopříručce naleznete podrobné pokyny a technické informace o svém notebooku. Příručky, které
jsou k dispozici pouze jako soubory PDF, můžete vytisknout, když k notebooku připojíte tiskárnu.
Zdroj informací Druh informací Kde?
Quick Start Guide
(vytištěná)
Příručka "Bezpečnost"
(vytištěná anebo soubor
PDF)
Příručka "Recove ry
Process" (vytištěná anebo
soubor PDF)
Příručka "EasyGuide"
(soubor PDF)
Příručka "Wireless LAN"
(soubor PDF)
Příručka "Záruka" (soubor
PDF)
Informační soubory (např.
*.TXT,*.DOC, *.CHM, *.HLP)
Informační soubory (např.
*.TXT,*.DOC, *.CHM, *.HLP)
www.fujitsu-s
s of Conformity) k notebooku AMILO naleznete
iemens.com".
rohlašuje, že AMILO je ve shodě se základními požadavky
ími směrnice 1999/5/ES.
Plakát pro první uvedení do
provozu
Bezpečnostní pokyny Přiloženo anebo na Všem notebooku
Informace ke znovuobnovení
operačního systému,
ovladačů,příruček a
speciálního software.
Podrobný návod k uved ení
do provozu a technické
informace
Podrobný návod k použití
bezdrátové m ístní sítě a
technické informace
Všeobecné záruční
podmínky
Informace k nástrojůma
programům
Informace o opera čním
systému
Příslušenství
Přiloženo, na Všem note booku
nebo na webových stránkách
"
www.fujitsu-siemens.com/support/"
Příručky naleznete na Vašem
notebooku na Start -
nebo částečně aktualizovány
na našich webových stránkách
"
www.fujitsu-siemens.com/support/"
V softwaru k těmto aplikacím
Příručky
10600794864, vydání 1 Česky - 2
Page 64

Důležité pokyny
Bezpečnostní pokyny
Bezpečnostní pokynypokyny
•Při čištění notebo oku dodržujte pokyny uvedené v příručce "EasyGuide".
• Váš notebook má k dispozici řadu bezpečnostních funkcí, které Vám podle více stupňové
• Dodržujte doplňující bezpečnostní pokyny pro zařízení s bezdrátovými přenosovými
• Tento stručný návod ukládejte společně s notebookem. Když notebook předáváte
Tento notebook odpovídá příslušným bezpečnostním předpisůmprozařízení informační
techniky. Pokud máte dotazy týkající se umístění notebooku v určitém prostředí, obraťte
se na prodejce, na naši horkou linku ne bo odd
Dodržujte bezpodmínečně bezpečnostní pokyny uvedené v příručce "Sicherheit"
(Bezpečnost) a následující bezp ečnostní pokyny.
koncepce poskytují vysokou míru bezpečnosti. Podrobnější informace naleznete
vkapitole"Bezpečnostní funkce" v příručce "EasyGuide".
součástmi, uvedené v příručce "Sicherheit" (Bezpečnost).
dalším osobám, předejte s ním i tento stručný návod.
ělení Help Desk.
Ovladačeautility
Jestliže je na Vašem notebooku instalován operační systém Windows, pak naleznete další
informace o systému a také ovladače, pomocné programy a aktualizace na Vašem notebooku
nebo na našich internetových stránkách "
Jestliže by bylo nutné instalovat Váš operační systém znovu, naleznete potřebné inform ace
vpříručce "Recovery Process" (viz "
www.fujitsu-siemens.com/support/".
Zdroje informací", Strany 2).
3-Česky 10600794864, vydání 1
Page 65

Přípojky a ovládací prvky
Přípojky a ovládací prvky
tky
ětí(DC IN)
Přípojkya ovládací prvkyPřípojkapro modemLCD monitorPřipojení zobrazovací jedno
Interní reproduktorPřípojka proreprodu ktorBezdrátová místnísí ťZámek KensingtonPřípojkapromístní síťPřípojkaUSBAkum u látorZajištěníakumulátoruKartaSIMPevný diskTlačítkatouchpaduTouchpadNotebookVypí načJednotkaCD/DVDPřípoj pro sluchátkaPřípojka prom ikrofonLine In(vs tupaudio)Line out(výstup audio)Zásuvkapro stejnosměrné nap
Indikátorys tavu
V této kapitole budou představeny jednot livé komponenty hardware Vašeho notebooku.
Získáte zde přehled o indikátorech a přípojkách notebooku. Před zahájením
práce s notebookem se s těmito prvky seznamte.
11
3
1
2
12
13
15
14
16
10
4
9
5
6
7
8
1 = Interní reproduktor
2=Tlačítka Easy L aunch
3=Spínač /vypínač notebooku
4 = Touchpad
5=Přípojka pro sluchátka / line out
6=Přípojka pro mikrofon / line in
7=Tlačítka touchpadu
8 = Indikátory stavu
9=Přípoje USB
10 = Zásuvka pro stejnosměrné napětí (DC IN)
17
20
19
18
11 = Jednotka CD/DVD
12 = Zařízení Kensington Lock
13 = Přípoje USB
14 = Přípojka pro monitor
15 = Přípojka pro místní síť
16 = Přípojka pro modem
17 = Servisní část (pevný disk)
18 = Zajištění akumulátoru
19 = Akumulátor
20 = Servisní část (paměť)
18
10600794864, vydání 1 Česky - 4
Page 66
Uvedení do provozu a obsluha
Uvedení do provozu a obsluha
Dodržujte bezpečnostní pokyny uvedené v kapitole "Důležité pokyny", Strany 2.
Před zahájením práce s notebookem musíte nabít akumulátor a nainstalovat aplikace.
Operační systém a potřebné ovladače jsou již nainstalovány.
V této kapitole jsou popsány také základy obsluhy notebooku.
Vybalení a kontrola noteb
Pokud zjistíte škody vzniklé připřepravě, neprodleně informujte prodejce!
► Vybalte všechny díly.
obalpřeprava
► Zkontrolujte, zda není notebook po přepravě viditelně poškoze n.
Doporučujeme n evyhazovat originální obal přístroje.
Uschovejte originální obal pro případné odeslání.
Výběr místa instalace
výběrm ístain stalacenotebo oksíťový adaptér
Předtím, než notebook postavíte, měli byste pro nějměli vybrat vhodné
místo. Respektujte přitom následující pokyny:
• Notebook nikdy nestavte na měkký podklad (např. koberec, čalouněný
nábytek, postel). Tím by se mohlo blokovat větrání a to by mohlo
mítzanásledekškodyzpřehřátí.
• Nikdy nepokládejte notebook na delší dobu přímo na Vaše nohy. Během normálního
provozu se spodní s trana notebooku zahřívá. Delší kontakt s pokožkou může
být nepříjemný nebo může dokonce způsobit popáleniny.
• Postavte notebook na pevnou, rovnou a neklouza vou podložku.
Upozorňujeme, že pryžové nohy notebooku mohou zanechávat otisky
na snadno poškoditelném povrchu.
• Kolem notebooku a síťového adaptéru m usí být volný prostor nejméně
100 mm, aby bylo zaručeno řádné větrání.
• Nikdy nezakrývejte větrací otvory notebooku a síťového adaptéru.
• Notebook by neměl být vystavován extrémním okolním podmínkám. Chraňte
notebook před prachem, vlhkostí a horkem.
ooku
5-Česky 10600794864, vydání 1
Page 67

Připojení síťového adaptéru
přípravak provozusíťový adaptér
K tomuto přístroji jsou nabízeny dva různé síťové adaptéry. Používejte výhradně te n
síťový adaptér, který byl přibalen k Vašemu přístroji při jeho expedici.
Dodržujte pokyny uvedené v části "
Bezpečnostní pokyny", St rany 3.
Dodané napájecí kabely odpovídají požadavkůmzemě, ve které jste notebook zakoupili.
Dbejte na to, aby byly napájecí kabely schváleny pro zemi, ve které je používáte.
Napájecí kabely adaptéru se smí připojovat do zásuvky, jen když je
notebook připojen k adaptéru.
Zkontrolujte, zda příkon síťového adaptéru není vyšší než parametry sítě,kekteré
připojujete síťový adaptér (viz techn ické údaje síťového adaptéru).
Uvedení do provozu a obsluha
► Připojte kabel síťového adapt
do zásuvky stejnosměrného nap
éru (1)
ětí
(DC IN) notebooku.
► Napájecí kabel (2) připojte k síťovému
1
adaptéru.
► Napájecí kabel (3) zapojte do
zásuvky.
3
2
10600794864, vydání 1 Česky - 6
Page 68

Uvedení do provozu a obsluha
První zapnutí notebooku
prvnízapnutí
Při prvním zapnutí notebooku je nainstalován a nakonfigurován dodaný software.
Protože se tento proces nesmí přerušit, je vhodné pro něj naplánovat dostatečnou
dobuapřipojit notebook přes síťový adaptér k síťovému napětí.
Během instalace se smí notebook restartovat jen po zobrazení pokynu!
K usnadnění uvedení notebooku
nainstalován operační systé
► Zapněte not ebook (viz kapitol
► Při instalaci postupujte podle pokynů na zobrazovací jednotce.
Vpřípadě nejasností o požadova
příručku k operačnímu systému
Pokud je v notebooku nainsta
další informace o systému a o
v notebooku nebo na disku CD
webu (viz kapitola "
do provozu je na pevném disku předem
m.
a "
Spuštění notebooku", Strany 7).
ných zadávaných údajích si přečtěte
.
lován operační systém Windows, naleznete
vladače, nástroje, aktualizace, příručky atd.
/DVD "Drivers & Utilities" nebo na našem
informací", Strany 2).
Zdroje
Spuštění notebooku
► Posuňte odblokování (1) ve směru šipky a
vyklopte LCD-displej směrem nahoru (2).
2
1
1
Spuštění
► Pro zapnutí notebooku stisknete
zapínač/vypínač (1).
Rozsvítí se prov
7-Česky 10600794864, vydání 1
ozní kontrolka notebooku.
Page 69

Vypnutí notebooku
1
Uvedení do provozu a obsluha
► Správně vypněte operační systém (např.
Windows v nabídce Start funkcí Startsymbol
(symbol startu) – Vypnout – Vypnout – O K).
Vypnutí
► Pokud se notebook nevypne sám, podržte
asi pět sekund stis knutý vypínač (1).
► Zavřete LCD displej (1)
1
,ažcitelně zaklapne.
Akumulátor
Akumulátor není při dodání notebooku úplně nabitý. Akumulátor musíte
nejdříve nabít síťovým adaptérem připojeným do z ásuvky (viz kapitola
"
Připojení síťového adaptéru", Strany 6).
Akumulátor napájí notebook potřebnou energií při mobilním použití. Indikátor
akumulátoru udává aktuální stav akumulátoru.
Způsob montáže a demontáže, ošetřování a údržby akumulátoru a pokyny k optimalizaci
doby provozu akumulátoru naleznete v příručce "EasyGuide".
10600794864, vydání 1 Česky - 8
Page 70

Uvedení do provozu a obsluha
Tlačítka Easy Launch
TlačítkaEasy Launch
Zapnutí/vypnutí bezdrátové místní sítě
Tímto tlačítkem můžete zapnout nebo vypnout modul bezdrátové místní sítě.
íť,tlačí tkopro snadnéspuštění
Bezdrátovámístní s
Internet
Touto klávesou spustíte standardní prohlížeč Vašeho systému.
Internet, tlačítkoEasy Launch
Silent Mode (tichý provoz)
Tímto tlačítkem můžete snížit počet otáček větráku procesoru.
Pokud je zapnut Silent Mode, nepracují procesor a grafika na plný výkon.
Tichýprovoz, tlačítkoEasy LaunchSilentMode,t lačí tk oEasy Launch
Tento notebook má tlačítka pro s
spuštění. Jediným stiskem tlač
spustit následující aplikace
, resp. funkce.
nadné
ítka můžete
9-Česky 10600794864, vydání 1
Page 71

Touchpad a tlačítka touchpadu
Dbejte na to, aby se touchpad nedostal do styku s nečistotami,
s kapalinami nebo mastnotou.
TouchpadTouchpad
Nikdy se touchpadu nedotkejte špinavými prsty.
Nikdy na touchpad nebo na tlačítka touchpadu nepokládejte těžké p ředměty.
Uvedení do provozu a obsluha
1
2=Tlačítka touchpadu
2
1 = touchpad
Pomocí touchpadu můžete
Tlačítka touchpadu slouž
pohybovat kurzorem na displeji.
í k výběruaprovádění příkaz ů. Odpovídají tlačítkůmběžné myši.
Použití tlačítek touchpadu
Pohybování kurzorem
► Pohybujte prstem po touchpadu.
Touchpad
Kurzor se pohybuje.
Zvolení objektu
► Posuňte kurzor na požadovaný objekt.
Touchpad
► Klepněte jednou na touchpad nebo jednou stiskněte levé tlačítk o.
Objekt je zvolený.
Provádění příkazů
► Posuňte kurzor na požadované pole.
d
Touchpa
► Dvakrát klepněte na touchpad nebo dvakrát stiskněte levé tla čítko.
Příkaz se provede.
Přetahování objektu
► Zvolte požadovaný objekt.
Touchpad
► Držtelevétlačít ko stisknuté a posuňte objekt prstem na touchpadu na požadované místo.
Objekt se posunul.
10600794864, vydání 1 Česky - 10
Page 72

Uvedení do provozu a obsluha
Reproduktor
Reproduktor
Ve Vašem notebooku je integrovaný reproduktor.
Pokud připojíte sluchátka nebo e xterní reprod uktory, interní reproduktor se vypne.
Zapínání a vypínání reprodukto
► Pomocí klávesové zkratky
Fn+F3
ru
můžete reproduktory vypnout a zapnout.
Nastavení hlasitosti
► Požadovanou hlasitost nastavte pomocí klávesové zkratky
nebo
► Klikněte dvojitě na symbol rep
nebo
► Zvolte Startsymbol (symbol startu) – Settings (Nastavení) – Control Panel ( Ovládací panely) –
Hardware and Sound (Hardware a zvuk) – Sound (Zvuk): Adjust volume control (regulace hlasitosti) .
► Ke změně hlasitosti použijte posuvný regulátor.
Nastavení
► Pro zapnutí nebo vypnutí reproduktoru klikněte dvojitě na symbol reproduktoru na příkazové liště.
roduktoru v příkazové liště anaMixér.
Fn+F5
nebo
Fn+F6
..
11 - Česky 10600794864, vydání 1
Page 73

Uvedení do provozu a obsluha
Komponenty pro bezdrátovou komunikaci (Wireless LAN)
Montáží modulu pro bezdrátovou místní síť, který nebyl schválen společností Fujitsu
Siemens Computers GmbH, pozbývají platnosti schválení udělená tomuto pří stroji (C E!).
Bezdrátová místnísíť
Tento notebook má integrovaný modul pro bezdrátovou místní síť.
Vypnutí a zapnutí modulu pr
Překontrolujte, zda je aktivován/deaktivován modul Wireless Lan
v instalovaném software Wireless LAN.
Bezdrátová místnísíťBezdrátová místní síť
Dbejte na doplňující bezpečnostní pokyny pro zařízení s rá diovými
komponentami v příručce "Bezpečnost".
Další informace k používání bezdrátových místních sítí nalezne te v příslušné příručce
nebo v souborech nápovědy (viz kapitola "
o bezd rátovou místní síť
► Tlačítkem pro snadné spuštění bezdrátové
místní sítě můžete zapnout a vypnout
modul bezdrátové místní sítě, viz kapitola
"
Tlačítka Easy Launch", Strany 9.
Když je modul pro bezdrátovou místní síť
zapnutý, svítí příslušný indikátor.
Zdroje inform ací", Strany 2).
Nástroj k nastavení systému BIOS
Pomocí nástroje k nastavení systému BIOS můžete pomocí řady parametrů změnit konfiguraci
notebooku. Po mocí nástroje k nastavení systému BIOS můžete např. nastavit datum a čas.
Nástroj k nastavení systému B IOS slouží také k přidělování hesel. V příručce "EasyGuide" je
popsán způsob spuštění a ukončení nástroje k nastavení systému BIOS.
10600794864, vydání 1 Česky - 12
Page 74

Řešení problémů arady
Řešení problémů arady
řešeníproblémůtipych ybyodstraňováníporuch
Případnou poruchu se pokuste odstranit následujícími opatřeními. Nemůžete-li
poruchu odstranit, postupujte takto:
► Poznamenejte si provedené kroky a stav, při kte rém k chybě došlo. Poznamenejte
► Vypněte notebook.
► Obraťte se na horkou linku nebo oddělení Help Desk.
Při odpojování a připojování kabelů dodržujte bezpečnostní pokyny
uvedené v příručce "Bezpečnost".
si případné chybové hlášení, které se zobrazilo.
Telefonní čísla naleznete na seznamu oddělení Help Desk. Při telefonickém
kontaktu mějte prosím připraveny následující informace:
• název modelu a číslo série notebooku; číslo série je uvedeno na
štítku na dolní straně notebooku,
• poznámky o zobrazených hlášeních a údaje o akustických signálech ,
• veškeré změny hardwaru nebo softwaru, které jste provedli po obdržení notebooku,
• veškeré změny, k teré jste provedli v nastaveních systému BIOS
po obdržení notebooku,
•konfiguraci systému a všechna periferní zařízení, která jsou k systému připojena,
• kupní smlouvu.
Naše notebooky jsou díky součás
náročností určeny a optimaliz
na zakoupené konfiguraci může b
strojrozměrnou grafikou, poně
počítačem. Při aktualizaci o
Siemens Computers, může něk
fungování. Schválené ovla
na této adrese: "
http://ww
Obnovení nainstalovaného s
Soubory pravidelně zálohujte. V případě ztráty dat můžete nainstalovaný
software obnovit pomocí nosičů dat. Pokud jste však nevytvořili zálohy
souborů, není již možné jejich obnovení.
Pokud nelze spustit opera
být nutné znovu nainstalo
13 - Česky 10600794864, vydání 1
ční systém nebo pokud jsou chyby na pevn ém disku, může
vat předem nainstalovaný software.
tem s nízkou hmotností, prostorovou a energetickou
ovány především pro mobilní využití. V závislosti
ýt u velmi náročných herních aplikací, nap ř.
kud omezena funkčnost v porovnání se sto lním
vladačů, které nebyly schváleny společností Fujitsu
dy dojít ke snížení výkonu, ztrátě dat a nesprávnému
dače a aktuální verze systému BIOS si můžete stáhnout
w.fujitsu-siemens.de/support/downloads.html"
oftwaru
Page 75

Řešení pro blém ů arady
Obnovení operačního systému, ovladačů,příruček
a speciálního softwaru
Informace k obnovení operačního systému, ovladačů,příruček a speciálního softwaru
naleznete v příručce "Recovery Process" (Postup obnovení).
Nesprávný aktuální čas nebo datum notebooku
letní časzimní časnesprávný časnesprávnýčasnesprávné datum nebo časnesprávnédatumnabití záložní baterie
Příčina Odstranění chyb
Je chybně nastavený čas a datum. ► Pomocí nástroje k nastavení systému BIOS
Pokud čas a datum opět nejsou správné po zapnutí notebooku, je vybitá záložní
baterie, která je pevně nainstalována v notebooku.
► Obraťte se na prodejce, na naši horkou linku nebo oddělení Help Desk.
V intervalu jedné sekundy se ozývá signál
Vintervalu jedné sekundy seozý vásignál
Příčina Odstranění chyb
Akumulátor je téměř vybitý. ► Nabijte akumulátor.
nastavte čas nebo datum v nabídce Main
(Hlavní).
Notebook nefunguje
notebookUkončení úsporného r ežimurežim spánku
Příčina Odstranění chyb
Notebook je v úsporném režimu nebo režimu
spánku.
Chybu způsobila aplikace.
Akumulátor je vybitý. ► Nabijte akumulátor.
10600794864, vydání 1 Česky - 14
► Ukončete úsporný režim (stisknutím některé
klávesy) nebo režim spánku (zapnutím
notebooku).
► Ukončete aplikaci nebo restartujte notebook
(částečným resetem nebo vypnutím a
zapnutím).
nebo
► Nasaďte nabitý akumulátor.
nebo
► Připojte k notebooku síťový adaptér.
Page 76

Řešení problémů arady
LCD obrazovka notebooku zůstáv
LCDmonitorTmavý LCD monitor
Příčina Odstranění chyb
Zobrazovací jednotka je vypnutá.
Připojená externí obrazovka nebo televizor.
► Stiskněte některou klávesu nebo zadejte
heslo.
► Stiskněte klávesovou zkratku
(přepnutí výstupu na obrazovku).
á tmavá
Fn+F4
Špatněčitelné údaje na LCD monitoru notebooku
LCDmonitorLCD monitor
Příčina Odstranění chyb
Oslnění odrazem ► Otočte notebook nebo změňte sklon LCD
Externí obrazovka zůstává tmavá
Monitor
Příčina Odstranění chyb
Zobrazovací jednotka je vypnutá. ► Zapněte externí obrazovku.
Řízené zatemnění obrazovky.
Jas je nastaven na tmavý. ► Nastavte jas obrazovky na světlý.
Výstup na obrazovku je nastaven na LCD
obrazovku notebooku.
Síťové vedení nebo vedení dat
není správně připojeno.
externí obrazovky
monitoru.
► Stiskněte libovolné tlačítko.
► Stiskněte klávesovou zkratku
(přepnutí výstupu na obrazovku).
► Vypněte externí obrazovku a notebook.
► Zkontrolujte, jestli je napájecí kabel správně
připojen k externí obrazovce a do zásuvky.
► Zkontrolujte, jestli je datový kabel řádně
připojen k notebooku a k externí obrazovce
(pokud je zástrčka k dispozici).
► Zapněte externí obrazovku a notebook.
Fn+F4
15 - Česky 10600794864, vydání 1
Page 77

Řešení pro blém ů arady
Zobrazení na externí obrazovce se neobjeví nebo putuje
MonitorMonitor
Příčina Odstranění chyb
Pro externí obrazovku je zvolena
obrazovka nebo je pro uživatelsk
nastaveno nesprávné rozlišení
nesprávná
ýprogram
obrazovky.
► Pomocí klávesové zkratky
ukončete v systému Windows apli
Pokud chyba trvá po ukončení pro
přepněte pomocí klávesové zk
F4
na LCD monitor notebooku. Zm
následující nastavení:
► Nastavení rozlišení obrazovky: Zvolte
pomocí Star tsymb ol (symbol startu) – Settings
(Nastavení) – Control Panel (Ovládací panely) –
Appearance and Settings (Zobrazení a úpravy)
– Customize (Úpravy): Adjust screen resolution
(Upravit rozlišení o brazovky) potřebné
rozlišení obrazovky.
► Výběr monitoru: Pravým t
klikněte na desktop. Zvo
Personalize (Úprava) – D
(Zobrazení) monitor 1 n
Advanced Settings (Roz
Monitor správný monito
Tiskárna netiskne
iskne
Tiskárnanet
Příčina Odstranění chyb
Tiskárna není zapnutá. ► Zkontrolujte, zda je tiskárna zapnutá a
připravená k provozu (viz dokumentace k
tiskárně).
Tiskárna není správně připojená. ► Zkontrolujte, zda je datový kabel mezi
notebookem a tiskárnou správně připojený.
Ovladač tiskárny je vadný, nesprávně
nainstalovaný n ebo je nainstalovaný nesprávný
ovladač tiskárny.
► Zkontrolujte, zda je datový kabel mezi
notebookem a tiskárnou správně připojený.
► Zkontrolujte, zda je nainstalovaný správný
ovladač tiskárny (viz dokumentace k
tiskárně).
Alt+F4
kaci.
gramu,
ratky
lačítkem myši
lte pomocí
isplay settings
ebo 2 a pomocí
šířená nastavení) –
r.
Fn
ěňte
+
10600794864, vydání 1 Česky - 16
Page 78

Řešení problémů arady
Bezdrátové spojení se sítí nefunguje
funguje
Bezdrátovésp ojeníse sítí ne
Příčina Odstranění chyb
Radiová komponenta je vypnutá.
Radiová komponenta je zapnutá. Přesto
nefunguje bezdrátové spojení se sítí.
► Zapněte Vaši bezdrátovou komponentu (viz
Vypnutí a zapnutí modulu pro bezdrátovou
"
místní síť", Strany 12).
► Zkontrolujte, zda je bezdrátové připojení v
softwaru zapnuté.
► Další informace k používání radiové
komponenty naleznete v příslušné příručce
nebo v souborech nápov ědy (viz kapitola
"
Zdroje informací" , Strany 2).
17 - Česky 10600794864, vydání 1
Page 79

İçindekiler
Türkçe
İçindekiler
Yenilikçi teknoloji… .................................................................... 1
Bilgi mi arıyorsunuz? . . .................................................................. 1
Semboller .............................................................................. 1
Önemli Uyarılar ........................................................................ 2
Uygunluk bildirgesi , (U
Bilgi kaynakları ......................................................................... 2
Güvenlik uyarıları ....................................................................... 3
Sürücüler ve Utilityle
Bağlantılar ve kumanda elemanları ..................................................... 4
Çalıştırma ve kulla
Notebook’un paketi
Konulacağı yerin se
Şebeke adaptörünü
Notebook’un ilk ke
Notebook’un açıl
Notebook’un kapa
Akü .................................................................................... 8
Easy Launch tuş
Touchpad ve Tou
Touchpad tuşla
Hoparlör . . . . . .......................................................................... 11
Hopörlörü kap
Ses gücünün ay
Telsiz parça
BIOS-Setup
Problem çözümleri vetavsiyeler ........................................................ 13
Yüklenmiş o lan yazılımınkurtarılması ..................................................... 13
Notebook’un saati ve tarihi doğru değil .................................................... 14
Saniyelikritimlerde birsinyal duyulur ...................................................... 14
Notebook çal ışmaya devametmiyor ...................................................... 14
Notebook’un LCD ekranı karanlıkkalıyor .................................................. 15
Notebook’un LCD ekranındaki gösterge iyi okunamıyor ..................................... 15
Harici ekran karanlıkkalıyor .............................................................. 15
Harici ekranda display(görüntü)yokveya geziyor .......................................... 16
Yazıcı yazmıyor ......................................................................... 16
A
ğ sistemine telsiz bağlantısı gerçekleşmiyor .............................................. 17
ları (WirelessLAN) ...........................................................
Wireless LAN
-Utility ......................................................................
İşletim sisteminin, sürücülerin, el kitaplarınınveözelyazılımlarınkurtarılması ............. 14
ygunluk Deklerasyonu) ............................................
r ....................................................................
nım .................................................................
nden çıkarılması ve kontrol edilmesi ....................................
çilmesi ...............................................................
nbağlanması .........................................................
zaçılması .............................................................
ması ...................................................................
tılması ................................................................
ları .....................................................................
chpad tu şları ............................................................
rını kullanı n ...........................................................
atmak veyaaçmak .....................................................
arlanması ............................................................
modülünün açılması ve kapatılması ......................................
10
10
11
11
12
12
12
2
3
5
5
5
6
7
7
8
9
10600794864, bas ım1 Türkçe
Page 80

Yenilikçi teknoloji…
Yenilikçi teknoloji…
ve ergonomik dizayn AMILO’nuzun kolay kullanılabilir ve güvenilir bir Note book olmasını sağlar.
AMILO’nuzu ilk kez çalıştırdığınızda derhal çalışmaya hazırolmanıziçinişletim sisteminiz
Windows yüklenmiş ve konfigürasyonu optimal şekilde yapılmış vaziyettedir.
Bu "Getting Started" kılavuzu size AMİLO’unuzu n asılçalıştıracağınızı gösterir. Eğer teknik bir sorunla
karşılaşırsanız, yardımcı bilgileri "
Bilgimiarıyorsunuz?
Notebook’unuza ilişkin kalan bilgilerle bir genel bakışı "Bilgi kaynakları",
Sayfa 2 bölümünde bulabilirsiniz.
Semboller
riayet edilmediği takdirde sağlığınızın, cihazınızınçalışmasınınveya
verilerinizin güvenliğinin tehlikeye gireceğine dair uyarılara işaret eder. Eğer
bu uyarıları dikkate almayıp cihazda hasara yol açarsanız, garanti hakkınızı
kaybedersiniz.
cihazla doğru çalışma için önemli bilgileri tanımlar.
Problem çözümleri ve tavsiyeler", Sayfa 13 bölümünde bulabilirsiniz.
►
Bu yazım biçimi
Bu yazım biçimi
Bu yazım biçimi
"Bu yazım biçimi" işaretlendi
Abc
Bu yazım biçimi
1 - Türkçe 10600794864, basım1
gerçekleştirmek zorunda olduğunuz bir işleme işaret eder
bir sonuç gösterilmiştir
Klavyeniz yardımıyla bir Progra m -Dialog’unu açmak için veya bir emir
satırı oluşturmak için; Örnek olarak şifrenizi (Name123) veya bir programı
başlatmak için emir olarak (start.exe) girin.
bir programdan ekranda gösterilen bilgileri işaretler, örneğin: Kurulum
tamamlandı!
işaretlendi
• Bir yazılım yüze yindeki kavramlar ve metinler, örneğin: Şuna
tıklayınKaydet.
• Programların veya dosyalarınadı,örn. Windows veya setup.exe.
•Başka bir bölümde çapraz şekilde örn. "Güvenlik uyarıları"
• Harici bir kaynakta çapraz yöntem, örn. bir Web adresi:
"
www.fujitsu-siemens.com" okumaya devam edin
• CD´’lerin, DVD´lerin ve diğer malzemelerin tanımları ve başlıkları,örn.:
"CD/DVD Drivers & Utilities" veya el kitabı "Güvenlik"
klavyedeki bir tuşuişaretler, örn:
vurgulanan kavraml
kapatmayınız
ar ve metinler işaretlenm iştir, örneğin: Cih a zı
F10
Page 81

Önemli Uyarılar
Önemli Uyarılar
ÖnemliUyarılarTalimatlar
Bu bölüm içinde diğer bilgi kaynaklarına ilişkin bilgileri bulabilirsiniz. Notebook’unuzla
çalışırken güvenlik uya rılarına mutlaka riayet etmelisiniz.
Uygunluk bildirgesi , (Uygunluk Deklerasyonu)
Uyumlulukaçılaması
AMILO ile ilgili uyumluluk dekla
adreste bulabilirsiniz: "
Fujitsu Siemens Computers, bu ve
Viyana) temel şartlarına ve diğe
Bilgi kaynakları
Bilgikaynakları
Bu el kitabı içinde Notebook’unuz ile ilgili daha ayrıntılı uyarıları ve teknik bilgileri
bulabilirsiniz. Notebook’unuza bir yazıcı bağlı olması halinde, sadece PDF dosya
formatındaki el kitapçıklarını yazdırabiirsiniz.
Bilgi kaynağı Bilgi türü Nerede?
Quick Start Guide(yazdırıldı)
El Kitabı "Safety" (Güvenlik)
(bastırılmış ve PDF dosyası)
El Kitabı "Recovery
Process" (yeniden
oluşturma süreci)
(bastırılmış ve PDF dosyası)
El Kitabı "EasyGu ide" (PDF
dosyası)
El Kitabı "Wireless LAN"
(PDF dosyası)
El Kitabı "Garanti" (PDF
dosyası)
Bilgi dosyaları (örn. *.TXT,
*.DOC, *.CHM, *.HLP)
Bilgi dosyaları (örn. *.TXT,
*.DOC, *.CHM, *.HLP)
rasyonu (Declarations of Conformity) Internette şu
ujitsu-siemens.com".
www.f
sileyle/bu belgeyle, AMILO’nun, 1999/5/EG Direktifinin (BMWi,
r ilgili yönetmeliklerine uygun olduğunu onaylar.
İlk çalıştırma posteri
Güvenlik uyarıları Ek ve/veya dizüstü bilgisayarınızda
İşletme sistemini, sürücüyü,
el kitaplarını veya özel
yazılımları kurtarmaya dair
bilgiler
İşletime alma, kullanımile
ilgili ayrıntılı kılavuz ve teknik
bilgiler
Wireless LAN’ınkullanımı ile
ilgili ayrıntılı kılavuz ve teknik
bilgiler
Genel garanti koşulları
Utilityler ve programlara
ilişkin bilgiler
İşletim sistemine yönelik
bilgiler
Ek
Ek, Notebook’unuzda
veya internet sitelerimizde
"
www.fujitsu-siemens.com/support/"
El kitaplarını dizüstü bilgisayarınızda
Start –
veya kısmen güncellenmiş olarak
Internet sayfamızda "
siemens.com/support/" bulabilirsiniz.
Bu uygulamalarınyazılımında
El Kitaplari kısmında
www.fujitsu
10600794864, bas ım1 Türkçe-2
Page 82

Önemli Uyarılar
Güvenlik uyarıları
GüvenlikuyarılarıNotlar
• Notebook’u temizlerken, "EasyGuide" el kitabı içindeki uyarıları dikkate alın
• Notebook’nuz, çok kademeli bir konsept sayesinde yüksek ölçüde güvenlik sunan çok
• "Safety" ( G ü ven lik) el kitabı içinde bulunan ve uzaktan erişimli sistemli cihazlar
•Bukılavuzu cihazla birlikte muhafaza ediniz. Eğer cihazı üçüncü kişilere
Bu Notebook bilgi teknolojisi sistemleri için geçerli olan emniyet y önetmeliklerine uygundur.
Notebook’u öngördü ğünüz ortamda kurup kuramayacağınıza dair sorularınızvarsa
lütfen s atış yerine veya Hotline/Help Desk’imize danışın.
Mutlaka "Güvenlik" el kitabı içindeki ve aşağıda sıralanan güvenlik
uyarılarını dikkate alınız.
sayıda güvenlik fonksiyonuna sahiptir. Bu konu ile ilgili daha a yr ıntılı bilgiyi "EasyGuide"
el kitabı içinde "Güvenlik Fonksiyonları" bölümünde bulabilirsiniz.
için olan ek güvenlik bilgilerini dikkate alın.
verirseniz lütfen kılavuzu da teslim ediniz.
Sürücüler ve Utilityler
Dizüstü bilgisayarınıza bir Windows işletme sistemi kurulmuşsa, s istemle, sürücüyle,
yardımcı programla ve güncellemeyle ilgili bilgileri ve dizüstü bilgisayarın ızda veya Internet
sayfamızda bulabilirsiniz "
Eğer işletim sisteminizi yeniden kurmanız zorunlu olursa, gerekli bilgileri el kitapçığında yer alan
"Recovery Process" (bkz. "
www.fujitsu siemens.com/support/".
Bilgi kaynakları", Sayfa 2) adlı başlıkta bulabilirsiniz.
3 - Türkçe 10600794864, basım1
Page 83

Bağlantılar ve ku man da elemanlar ı
Bağlantılar ve kumanda eleman
nları
tınoktası
tınoktası
Bağlantılarve kumanda elema
ModembağlantısıLCD ekranEkran bağlantısıDahilihoparlörHoparlör girişiWireless LANKensingt onLockLAN-bağlantısıUSBba ğlantısıAküPilkilitleme mekanizmasıSIM kartıSabit diskTo uchpa dt uşlarıTo uchpa dNotebookAçma/Kapama ş alteriCD/DVD sürücüsükulaklıkbağlantısı /bağlan
mikrofonbağla ntısı/bağlan
LineInLineoutDoğru akım yuvası (DCIN)Durumgöstergeleri
ları
Bu bölümde Notebook’unuzun donanım komponentleri tanıtılır. Size Notebook’uzun
göstergeleri ve bağlantıları hakkında bir genel bakış sunulur. Notebook ile çalışmadan
önce bu elemanları öğreninvetanıyın.
11
3
1
2
12
13
14
4
18
17
18
19
10
9
8
1 = Dahili hoparlör
2 = Easy L aunch tuşları
3 = Notebook’un açma/kapatma şalteri
4 = Touchpad
5=Kulaklıkbağlantısı/LineOut
6=MikrofonBağlantısı/LineIn
7 = Touchpad tuşları
8 = Durum göstergeleri
9=USBbağlantıları
10 = Doğru ak ım yuvası (DC IN)
5
6
7
20
11 = CD/DVD sürücüsü
12 = Kensington Lock düzeni
13 = USB bağlantıları
14 = Ekran: bağlantısı
15 = LAN-bağlantısı
16 = modem bağlantısı /bağlantı noktası
17 = Servis gözü (sabit disk)
18 = Pil kilitleme mekanizması
19 = Akü
20 = Servis gözü (hafıza)
16
15
10600794864, bas ım1 Türkçe-4
Page 84

Çalıştırma ve kullanım
Çalıştırma ve kullanım
Şu bölümdeki emniyet bilgilerini dikkate alın "Önemli Uyarılar", Sayfa 2.
Notebook ile çalışabilmeniz için aküyü şarj etmelisiniz ve kendi uygulama programların ızı
yüklemelisiniz. İşletim sistemi ve gerekli sürücüler ön yüklenmiştir.
Bu bölümde Notebook´unuzun kullanımı ile ilgili temel esaslar açıklanmıştır.
Notebook’un paketinden ç
ıkarılması ve
kontrol edilmesi
Eğer transport hasarl
► Tüm parçaları paketinden çıkarın.
taşıma/nakliyesırasında
AmbalajTa şıma/nakliye
► Notebook’u gözle görülür transport hasarlarına yönelik kontrol edin.
Cihazların orijinal am balajın ı atmamanızı öneririz.
Orijinal ambalajı, cihazı muhtemelen göndermeniz gerektiğinde
kullanmak üzere muhafaza ediniz.
Konulacağı yerin seçilmesi
yerinseçilmesi
nün
Konulacağı
NotebookAğ adaptörü
Notebook’unuzu kurmada n önce Notebook için uygun bir yer seçmelisiniz.
Müteakip uyarıları dikkate alınız:
• Notebook’u asla yumuşak bir altlığın üzerine (örneğin halı,döşemeli mobilya,
yatak) koymayınız. Bunun sayesinde havalandırma b loke edilebilir ve sonuç
olarak aşırıısınmadan dolayı hasarlar me ydana gelebilir.
• Notebook’u uzun süre doğrudan bacaklarınızın üzerine koymayınız. Normal
işletim esnasında Notebook’un alt tarafıısınır. Uzun süreli olarak cilde temas
etmesi rahatsızlık verebilir veya hatta yanıklara yol açabilir.
• Notebook ’u sağlam, düz ve kaymayan bir altlığın üzerine koyunuz. Notebook’un
lastik ayaklarının hassas yüzeyler üzerinde iz bırakabileceğini dikkate alın.
• Yeterli bir havalandırmanınsağlanması için Notebook’un ve şebeke adaptörünün
etraf
ındaki serbest alan en az 100 m m olmalıdır.
• Notebook’un v e şebeke adaptörünün havalandırma yarıklarını kesinlikle kapatmayın.
• Notebook aşırı çevre koşullarında çalıştırılmamalıdır. Notebo ok ’u
toz, rutubet ve sıcaktan koruyunuz.
arı tespit ederseniz, bunu derhal satış yerinize bildiriniz!
5 - Türkçe 10600794864, basım1
Page 85

Şebeke adaptörünün bağlanması
lmesi
İşletime hazırdurumagetiri
Şebekeadaptör ünün
Bu cihaz için iki ağ adaptörü mevcuttur. Bu yüzden cihazınızla birlikte
size teslim edilen ağ adaptörünü kullanın.
Güvenlik uyarıları", Sayfa 3 bölümündeki bilgileri dikkate alınız.
"
Beraberinde sevk edilen elektrik kablosu Notebook’u satınaldığınız ülkenin taleplerine
uygundur. Elektrik kablosunun kullanıldığı ülke için onaylanmış olduğuna dikkat ediniz.
Şebeke adaptörü elektrik kablosunun prize takılmasına, yalnızca Notebook
şebeke adaptörüne bağlıysa izin verilmiştir.
Şebeke adaptörünün çektiğielektrikakımının şebeke adaptörünü bağladığınız
elektrik şebekesinden daha yüksek olmadığından emin olun (Şebeke
adaptörünün teknik özelliklerine bakın).
Çalıştırmavekullanım
►Şebeke adaptör kablosunu (1) N
düz gerilim yuvasına (DC IN)
otebook’un
bağlayın.
► Elektrik kablosunu (2) şebeke
adaptörüne bağlayın.
1
► Elektrik kablosunu (3) bir pr
ize bağlayın.
3
2
10600794864, bas ım1 Türkçe-6
Page 86

Çalıştırma ve kullanım
Notebook’un ilk kez açılması
İlkçalıştırma
İşletim sistemi, Notebook’unuzun işletime alınmasını kolaylaştırmak için sabit
disk üzerine kurulmuş vaziyettedir.
► Notebook’u açınız("
► Yükleme işlemi esnasında ekrandaki ta limatlara riayet ediniz.
Eğer Notebook’u ilk kez açarsanız beraberinde gönderilen yazılım kurulur ve ayarlanır. Bu
işleminkesilmesineizinverilmediğinden dolayı bu işlem için belirli bir süre planlamalısınız
ve Notebook’u şebeke adaptörü ü zerinden şebeke gerilimine bağlamalısınız.
Kurulum esnasında Notebo ok’un yeniden başlatılmasına yalnızca sistem
tarafından talep edilmesi durumunda izin verilmiştir!
Notebook’un açılması", Sayfa 7 Bölümüne bakınız).
Girilmesi istenen verilerle ilgili olarak şüphe ettiğiniz durumlarda işletim
sisteminin el kitabını okuyun.
Dizüstü bilgisayarınıza bir Windows işletim sistemi kurduğunuz zaman sürücü,
yardımcı programlar, güncellemeler, el kitapları v.s ile ilgili kalan bilgileri dizüstü
bilgisayarınızda veya "Drivers & U tilities" CD/DVD‘de veya Internet sayfamızda
bulabilirsiniz (bkz. Bölüm "
Bilgi kaynakları", Sayfa 2).
Notebook’un açılması
► Kilitlemeyi (1) ok yönünde itiniz ve LCD
ekranı yukarıya doğru kapatınız(2).
2
Notebook’un
1
► Notebook’u çalıştırmak için Açma-/Kapatma
şalterine (1) bastırın.
1
Notebook’un işl
7 - Türkçe 10600794864, basım1
etme göstergesi yanar.
Page 87

Notebook’un kapatılması
Çalıştırmavekullanım
Akü
►İşletim sisteminizi normal b
(örneğin Windows XP Başlat m
Bilgisayarı kapat fonksiyo
1
1
Notebook te slim edildiğinde akü tam olarak şarj edili değildir. Pili ilkönce
şebeke adaptörü ile bir toprak hatlı priz üzerinden şarj etmeniz şarttır(bkz.
"
Şebeke adaptörünün bağlanması", Sayfa 6).
Notebook’un
► Eğer Notebook kendiliğinden kapanmıyorsa,
açma/kapatma şalterine yakl. beş
saniye basınız(1).
► LCD ekranı hissedilir şekilde yerine
geçecek şekilde kapatın(1).
ir şekilde kapatın
nu üzerinden).
enüsü içinde
Pil, Notebook’u seyyar kullanımda gerekli enerji ile besler. Akü göstergesi ile
akünün aktüel durumu gösterilir.
Akünün sökülüp ve takılması, temizliği ve bakımı,ayrıca akü ömrünün optimizasyonu
ile ilgili bilgileri "EasyGuide" el kitabı içinde bulabilirsiniz.
10600794864, bas ım1 Türkçe-8
Page 88
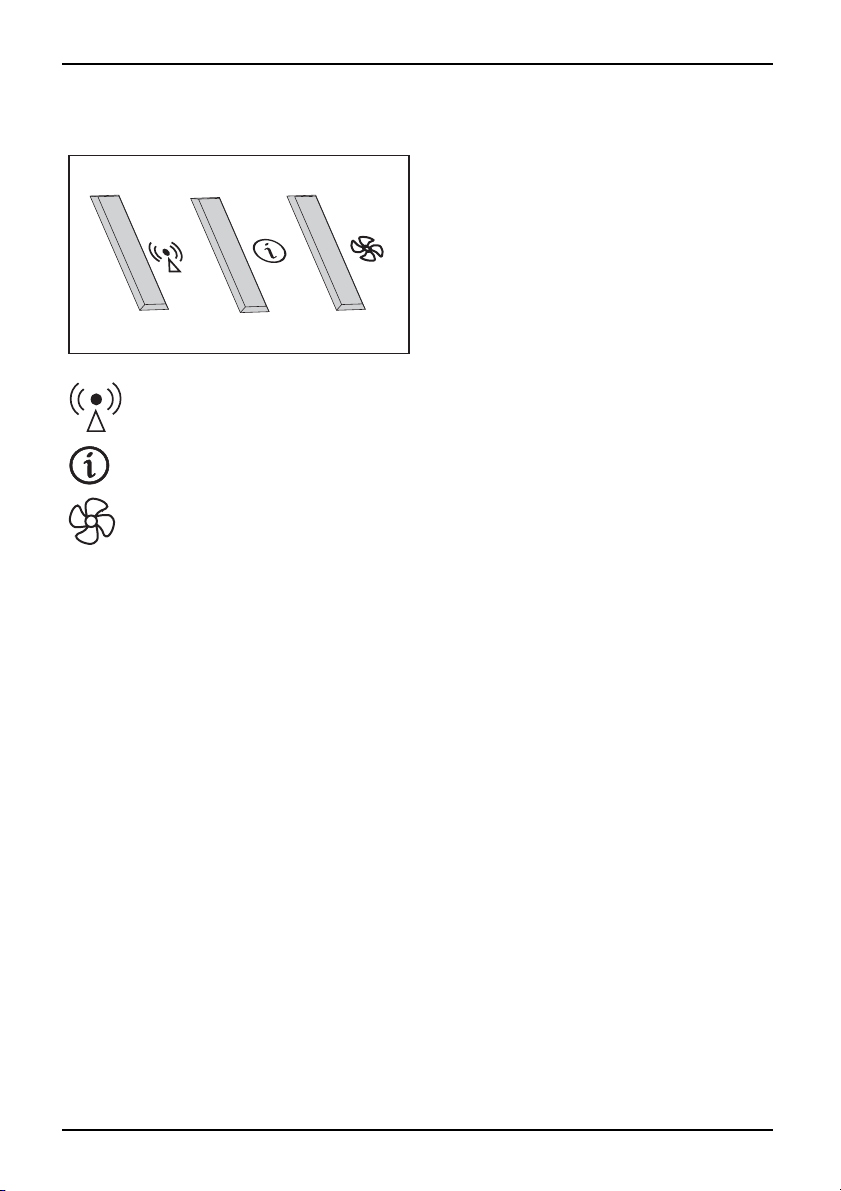
Çalıştırma ve kullanım
Easy Launch tuşları
EasyLaunch tuşları
Wireless LAN için açma/kapatma şalteri
Bu tuşla Wireless LAN modülünü açabilir veya kapatabilirsiniz.
WirelessLAN,Easy Launchtuşu
Internet
Bu tuş ile sisteminizin internet browser’ini başlatabilirsiniz.
Internet, EasyLau nch-Tuşları
Silent Mode (Sessiz işle
Bu tuş ile işlemci fanının
Eğer Silent Mode devrede i
Flüsterbetrieb,Easy Launch-TuşlarıSessizişletim,Easy Launch-Tuşları
Notebook’unuz Easy Launch tuşuile
donatılmıştır. Tek bir tuşa basarak
aşağıdaki uygulamaları yada fonksiyonları
başlatabilirsiniz.
tim)
devirini azaltabilirsiniz.
se, işlemci ve grafik tam kapasi te çalışmaz.
9 - Türkçe 10600794864, basım1
Page 89

Touchpad ve Touchpad tuşları
Touchpad’in kirle, sıvı veya yağla temas etmemesine dikkat ediniz.
TouchpadTouchpad
Touchpad’e kesinlikle kirli parmaklarla dokunmayın.
Touchpad’in veya Touchpad tuşlarınınüzerineağır cisimleri koymayınız.
Çalıştırmavekullanım
1
2 = Touchpad tuşları
2
Touchpad ile ekran üzerinde oku hareket ettirebilirsiniz.
Touchpad tuşları komutların seçilmesi ve çalıştırılması içindir. Bu tuşlarınişlevi
normal bir farenin tuşları gibidir.
1 = Touchpad
Touchpad tuşlarını kulla
nın
Oku hareket ettirme
► Parmaklarınızı Touchpad
Touchpad
Ok ha reket eder.
’in üzerin de hareket gezdirin.
Nesne seçme
► Oku hareket ettirmek istediğiniz nesnenin üzerine götürün.
Touchpad
► Touchpad’in üzerine bir kez
Nesne seçilmiştir.
dokunun veya sol tuşa bir kez basın.
Komut çalıştırma
► Oku istediğniz alanın üzerine getirin.
d
Touchpa
► Touchpad’e iki kez dokunun ve
Komut çalıştırılır.
yaikikezsoltuşa basın.
Nesnenin çekilmesi
►İstediğiniz ne sneyi seçin.
Touchpad
► Sol tuşu basılı tutun ve nesneyi T
Nesne kaydırılmışt ır.
10600794864, bas ım1 Türkçe-10
ouchpad üzerindeki p arma ğınızla istediğiniz yere kaydırın.
Page 90

Çalıştırma ve kullanım
Hoparlör
Hoparlör
Notebook’unuzda yerleşik bir hoparlör bulunmaktadır.
Eğer bir kulaklık veya harici bir hoparlör bağlarsanız, dahili hoparlörler devreden çıkarılır.
Hopörlörü kapatmak veya açmak
Fn+F3
►
Ses gücünün ayarlanması
► Arzu edilen ses seviyesini
veya
► Görev çubuğunda veya Mixer de bulunan hopörlör simgesine çift tıklayın.
veya
► Startsymbol (Başlat Menüsü) –
Masası) – Hardware and Sound (D
Adjust volume control (Ses sev
► Ses seviyesini ayarlamak için, kaydırma kumandasını kullanın.
Sesgücünün
► Ses seviyesini kapatmak veya a
tuş kombinasyonuyla hopörlörü kapatabilir veya açabilirsiniz.
Fn+F5
veya
Fn+F6
tuş kombinasyonu ile ayarlayın.
Settings (Ayarlar) – Control Panel (Denetim
onanım ve Ses) – Sound (Ses denetimini) açın:
iyesini ayarlayın) .
çmak için, görev çubuğundaki hopörlör simgesine çift tıklayın.
11 - Türkçe 10600794864, basım1
Page 91

Çalıştırmavekullanım
Telsiz parçaları (Wireless LAN)
Fujitsu Siemens Computers GmbH firması tarafından kullanımı için onay
verilmeyen bir Wireless LAN modüllerinin montajı bu cihaz için verilen izinlerin
(CE!) geçerliliğini kaybetmesine neden olur.
WirelessL AN
Notebook’unuzun içinde Wireless LAN entegre edilmiştir.
Wireless LAN modülünün açılması ve kapatılması
Kurulu olan Wireless LAN yaz
konumda olup olmadığını kon
WirelessL ANWireless LAN
ılımı içinde Wireless LAN m odülünün aktif/deaktif
trol edin.
► Wireess LAN Easy Launch tuşu
Lan modülünü kapatıp, aça
Bölüm "
Easy Launch tuşlar
Wireless LAN modülü açı kken Wireless LAN
göstergesi yanar.
"Safety" (Güvenlik) el kitabı içinde bulunan ve uzaktan erişimli sistemli cihazlar
için olan ek güvenlik bilgilerini dikkate alın.
Wireless LAN modülünün kullanılmasına ilişkin detaylı bilgileri buna ait olan el kitabında
veya yardım dosyalarında bulabilirsiniz (b kz. Bölüm "
Bilgi kaynakları", Sayfa 2).
ile Wireless
bilirsiniz. bkz.
ı", Sayfa 9.
BIOS-Setup-Utility
BIOS-Setup-Utility ile bir dizi parametreyi ve böylece Notebook’unuzun konfigürasyonunu
değiştirebilirsiniz. BIOS-Setup-Utility ’i örneğin tarihin ve saatin ayarlanması için kullanabilirsiniz.
Ayrıca BIOS-Setup-Utility ’nin şifre belirleme fonksiyonu da devam etmektedir. "EasyGuide" El
Kitabı içinde BIOS-Setup-Utility ’i n asıl açacağınız ve kapatacağınızaçıklanır.
10600794864, bas ım1 Türkçe-12
Page 92
Problem çözümleri ve tavsiyeler
Problem çözümleri ve tavsiyel
ÇözümlerTavsiyelerHataArıza giderme
Bir arıza meydana geldiğinde bunu aşağıda sıralanan önlemlere göre gidermeye çalışın.
Eğer bir arızayı gideremezseniz şu şekilde hareket edin:
► Arıza meydana geldiğinde yapılan işlemleri ve o anda aktif olan durumu not alın.
► Notebook’u kapatınız.
► Hotline/Help Desk’imiz ile irtibat kuru nuz.
Kabloları çözerken veya bağlarken "Safety" (Güvenlik) el kitabı içindeki
güvenlik bilgilerini dikkate alın.
Muhtemelen gösterilen hata bildirimini not ediniz.
Telefon numaralarını Help Desk listesinde bulabilirsiniz. Telefonla aradığınızda
aşağıdaki bilgileri hazır bulundurun:
• Model ismini ve Notebook’un se
alt tarafında bir etiket üzeri
• Ekranda görünen bildirilerin notlarını ve akustik sinyaller ile ilgili bilgiler.
• Notebook’u teslim aldıktan son
•Topğlu değişiklikler, bunlar Notebook alındıktan sonra BIOS-Setup
ayarlarında yapılmıştır.
•Sistemkonfigürasyonu ve siste
•Satınalmasözleşmeniz.
Notebook’umuz donanımınızda ağırlık-, yer ve enerji tasarrufu sağlayan
parçalarıyla öncelikle mobil kullanım için tasarlanmıştır ve uygun hale getirilmiştir.
İstediğiniz konfigürasyona bağımlı olarak çok yoğun olarak kullanılan oyun
yazılımlarında örneğin 3D grafikleri, bir masaüstü PC’ye karşılıkazaltılmış işlev
kullanılabilir. Fujitsu Siemens Computers tarafından onaylanmayan sürücüleri
güncellemek performans kayıplarına, veri kaybına ve eksik çalışmalara neden
olur. Onaylanan sürücüler ve güncel BIO S versiyonları şu adresten indirilebilir:
"
http://www.fujitsu-siemens.de/support/downloads.h tml"
ri numarasını. Seri numarası Notebook’un
nde yazılıdır.
ra donanımveyayazılımda yaptığınız tüm değişiklikleri.
minize bağlı tüm çevrebirimler.
er
Yüklenmiş olan yazılımınkurtarılması
Lütfen düzenli olarak dosyalarınızın yedeklemesini gerçekleştirin. Eğer bir veri kaybı
meydana gelirse, yüklenmiş olan yazılımı veri taşıyıcıları ile kurtarabilirsiniz. Eğer kendi
dosyalarınızı yedeklemediyseniz, bu dosyalarınkurtarılması mümkün değildir.
İşletim sisteminiz başlamazsa veya sabit diskinizin üzerinde hatalar oluşursa, ön kurulumu
yapılmış olan yazılımın yeniden kuru lması gerekli olabilir.
13 - Türkçe 10600794864, basım1
Page 93

Problem çö zü mleri ve tavsiyeler
İşletim sisteminin, sürücüle
rin, el kitaplarınınve
özel yazılımlarınkurtarılması
İşletme sistemini, sürücüyü, el kitaplarını veya özel yazılımları kurtarmaya dair bilgileri
"Recovery Process" el kitabında bulabilirsiniz.
Notebook’un saati ve tari
Yazsa ati uygulamasıKışsaa tiuygulama sıSaat doğru değilZaman doğru değilYanlışTarih/ SaatTarih doğru değilYedekleme pilinişarj etme
hi doğru değil
Nedeni Arıza giderme
Saat, tarih yanlış ayarlanmıştır
► BIOS-Setup-Utility saati ve tarihi menüden
Main ayarlayın.
Eğer Notebook açıldıktan sonra saat ve tarih tekrar yanlışsa o zaman
Notebook içinde sabit takılı yedekleme pili boştur.
► Satış yeri veya Hotline/Help Desk’imiz ile irtibat kurun.
Saniyelik ritimlerde bir sinyal duyulur
Saniyelikritimde bir sinyal duyulur
Nedeni Arıza giderme
Pilin büyük ölçüde deşarj olmuş
tur.
► Pili şarj ediniz.
Notebook çalışmaya devam etmiyor
nukapatma
nu
NotebookStandby modu
Suspendmodu
Nedeni Arıza giderme
Notebook Standby modunda veya Suspend
modunda.
Hataya uygulama programı neden olmuştur. ► Uygulama programı nı ka pat ınızveya
Pil boştur. ► Pili şarj ediniz.
► Standby modunu (tuşa bastırın) veya
Suspend modunu (Notebook’u açın)
kapatınız.
Notebook’u yeniden başlatınız (yeniden
başlatma veya kapatıp/açma).
veya
►Şarj edilimiş bir aküyü takınız.
veya
►Şebeke adaptörünü Notebook’a
bağlayın.
10600794864, bas ım1 Türkçe-14
Page 94

Problem çözümleri ve tavsiyeler
Notebook’un LCD ekranı karanlık kalıyor
LCD-EkranKaranlıkLCDekran
Nedeni Arıza giderme
Ekran kapatılmıştır.
Harici ekran veya televizyon takılı. ►
► Bir tuşa basınveyaşifreyi girin.
Fn+F4
(Ekran çıktısınındeğiştirilmesi).
tuş kombinasyonuna basın
Notebook’un LCD ekranındaki gösterge iyi okunamıyor
LCDekranLCD ekran
Nedeni Arıza giderme
Refleksiyon yansıması ► Notebook’u döndürün veya LCD ekranın
eğimini değiştirin.
Harici ekran karanlık kalıyor
Ekran
Nedeni Arıza giderme
Ekran kapatılmıştır. ► Harici ekranı açınız.
Ekran belirli fonksiyonlardan dolayı karanlıktır.
Parlaklıkdeğeri karanlık olarak ayarlanmıştır. ► Ekranın parlaklık derecesini parlağa getiriniz.
Ekran çıktısı Notebook’un L
ayarlanmıştır.
Harici ekranınelektrikkab
düzenli şekilde takılı değ
CD ekranına
losu veya veri kablosu
il.
► Bir tuşabasın.
Fn+F4
►
(Ekran çıktısınındeğiştirilmesi).
► Harici ekranı ve Notebook’u
► Elektrik kablosunun doğru şekilde harici
ekrana ve prize takılı olup olmadığını kontrol
ediniz.
► Veri kablosunun do ğru şeki
ve harici ekrana (fişin mev
durumunda) takılı olup ol
ediniz.
► Harici ekranı ve Notebook’u açınız.
tuş kombinasyonuna basın
kapatınız.
lde Notebook’a
cut olması
madığını kontrol
15 - Türkçe 10600794864, basım1
Page 95

Problem çö zü mleri ve tavsiyeler
Harici ekranda display (görüntü) yok veya geziyor
EkranEkran
Nedeni Arıza giderme
Harici ekran için yanlış ekran aya
uygulama programı için yanlış ek
ayarlanmıştır.
rlanmıştırveya
ran çözülümü
► Uygulama programını Windows içi
F4
+
ile kapatınız. Eğer b u ha ta prog
kapatıldıktan sonra da meydana g
Fn+F4
ile Notebook’un LCD ekranını
devreye sokunuz. Şuayarı değ
nde
eliyorsa,
iştiriniz:
► Ekran çözünürlüğünü ayarlamak: Startsymbol
(Başlat menüs ü) – Settings (Ayarlar) – Control
Panel (Denetim Masası) – Appeara nce
and Personalization (Görüntü Ayarları)
– Personalization (Ayarları)açın: Adjust
screen resolution (ekran çözünürlüğünü
ayarlayın)istenilen ekran çözünürlüğü.
► Ekranı seçme: Masa üstünd
sağ tuşuna basın. Persona
– Display settings (Ayarl
2 Advance d Settings (Gel
– Monitor (Monitör) ayar
e farenin
lize (Özellikler)
ar) Ekran 1 veya
işmiş seçenekler)
larından doğru
monitörü seçin.
Yazı cı yazmıyor
Yazıcıya zmıyor
Nedeni Arıza giderme
Yazıcı çalıştırılmadı. ► Yazıcınınaçıkveişletime hazırolup
Yazıcı doğru bağlanmamıştır. ► Notebook ve yazıcı arasındaki veri
Yazıcı sürücüsü arızalıdırveyadoğru
kurulmamıştır veya yan lış yazıcı sürücüsü.
olmadığını kontrol ediniz (yazıcı ile ilgili
dokümantasyona bakınız).
kablosunun doğru şekilde bağlanıp
bağlanmadığını kontrol ediniz.
► Notebook ve yazıcı arasındaki veri
kablosunun doğru şekilde bağlanıp
bağlanmadığını kontrol ediniz.
► Doğru yazıcı sürücü
olmadığını kontro
dokümantasyona ba
sünün yüklü olup
l edin (yazıcıya ilişkin
kınız).
Alt
ram
10600794864, bas ım1 Türkçe-16
Page 96

Problem çözümleri ve tavsiyeler
Ağ sistemine telsiz bağlantısı gerçekleşmiyor
sıgerçekleşmi yor
Ağsisteminetelsiz bağlantı
Nedeni Arıza giderme
Telsiz komponentleri kapatılm
Telsiz komponentleri kapatılmıştır. Telsiz
bağlantısı buna rağmen çalışmıyor.
ıştır.
► Telsiz komponentini açın(bkz. "
LAN modülünün açılması ve kapatılması",
Sayfa 12).
► Telsiz bağlantısı nınyazılım üzerinden açılıp
açılmadığını kontrol edin.
► Telsiz komponenti modülünün kullanı lmasına
ilişkin detaylı bilgileri buna ait olan el
kitabında veya yardımdosyalarında
bulabilirsiniz (bkz. Bölüm "
Bilgi kaynakları",
Sayfa 2).
Wireless
17 - Türkçe 10600794864, basım1
Page 97

Vsebina
Slovensko
Vsebina
Inovativna tehnologija… ............................................................... 1
Pogrešate informacijo? .................................................................. 1
Uporabljenisimboli ...................................................................... 1
Pomembni napotki ..................................................................... 2
Izjave o skladnosti (Decl
Viri informacij ........................................................................... 2
Varnostni napotki . ...................................................................... 3
Gonilniki in pripomočki
Priključki inelementi zaupravljanje .................................................... 4
Začetek uporabe in na
Razpakiranje in prev
Izbira mesta postavi
Priključitev omrež
Prvi vklop prenosne
Vklop prenosnega r
Izklop prenosnega
Akumulator ............................................................................. 8
Tipke Easy Launc
Sledilna površi
Uporaba tipk Tou
Zvočnik ................................................................................ 11
Izključite / vk
Nastavitev gla
Radijski deli
Vklopinizklo
Orodje za nast
Reševanje problemov in napo tki ....................................................... 13
Povrnitev nam eščene programske opreme ................................................ 13
Ponovna namestitev operacijskega sistema, gonilnikov, priročnikov in posebne programske
opreme ............................................................................. 14
Ura ali datum v prenosnem računalnikunista pravilna ...................................... 14
Vsako sekundo se ponavljajoče vključuje zvočni signal . .................................... 14
Prenosni računalnik ne deluje več ........................................................ 14
Zaslon LCD prenosnega računalnika ostaja temen . ........................................ 15
Prikaz na zaslonu LCD na prenosnem računalniku je slabo čitljiv ............................ 15
Zunanji zaslon ostaja temen . . ........................................................... 15
Slika na zunanjem monitorju se ne prikaže ali pa plava . .................................... 16
Tiskalnikne tiska ........................................................................ 16
Radijska povezava zomrežjem nedeluje ................................................. 17
naTouchpadintipke Touchpad .............................................
(brezžičniLAN) .............................................................
avitve BIOS ..............................................................
arationsofConformity) ............................................
...................................................................
vodila zauporabo ................................................
erjanje stanja prenosnega računalnika . . . . .............................
tve ..................................................................
nega napajalnika .......................................................
ga računalnika .......................................................
ačunalnika ...........................................................
računalnika ...........................................................
h ......................................................................
chpad ..............................................................
ljučite zvočnike ..........................................................
snosti .................................................................
p modula za brezžična omrežja LAN ......................................
10
10
11
11
12
12
12
2
3
5
5
5
6
7
7
8
9
10600794864, izdaja 1 Slovensko
Page 98

Inovativna tehnologija …
Inovativna tehnologija …
in ergonomska oblika pomenita, da je vaš prenosni računalnik AMILO prijazen za uporabo in
zanesljiv. Vaš operacijski sistem Windows je že predhodno instalirani in optimalno konfigurirani
tako,dagajemožnotakojuporabljati,koprvič priključite Vaš AMILO.
Ta kratka navodila "Prvi koraki" med drugim kažejo, kako začnete uporabljati
prenosni račun alnik AMILO. Če naletite na težave, lahko pomoč najdete v poglavju
"
Reševanje problemov in napotki", Stran 13.
Pogrešate informacijo?
Pregled z nadaljnjimi informacijami o prenosnem računalniku je v poglavju "Viri informacij", Str an 2.
Uporabljeni simboli
označuje opozorila, kjer je v primeru neupoštevanja ogroženo zdravje,
delovanje naprave ali varnost podatkov. Garancija izgubi veljavnost, če
zaradi neupo števanja teh opozoril povzročite okvare na napravi.
označuje pomembne informacije za pravilno ravnanje z napravo.
►
Ta pisava
Ta pisava
Ta pi s a va
"Ta pisava" označuje
Abc
Ta pisava označuje pojme in besedila, ki so poudarjena ali kako drugače izstopajo;
1 - Slovensko 10600794864, izdaja 1
označuje delovni korak, ki ga morate izvršiti.
označuje rezultat
označuje vnos, ki ga izvedete v programskem dialogu ali v upravni liniji; npr.
svoje geslo (Ime123) ali komando za zagon programa (start.exe).
označuje informacije, ki jih je prikazal zaslonski program, npr.: Namestitev
je končana!
označuje
• izraze in besedila uporabniškega vmesnika, npr.: Kliknite Shrani.
• Nazivi programov ali datotek; npr. Windows ali setup.exe.
• sklice na drug razdelek, npr. "Varnostni napotki"
• Sklici na zunanje vire, na prime r spletni naslov: Več informacij najdete
na naslovu "
• Nazivi CD-jev ali DVD-jev glede oznak in naslovov za druge materiale;
npr.: "CD/DVD Drivers & Utilities" ali priročnik "Varnost".
označuje tipko na tipkovnici, npr.:
npr.: Naprave ne izklapljajte
www.fujitsu-siemens.com".
F10
Page 99

Pomembni napotki
Pomembni napotki
PomembninapotkiNasveti
V tem poglavju so povezave do nadaljnjih virov informacij. Pri uporabi prenosnega
računalnika morate obvezno upoštevati varnostne napotke.
Izjave o skladnosti (Declarations of Conformity)
Izjava osk ladnosti
Izjave o skladnosti (Declaratio
internetni strani "
Podjetje Fujitsu Siemens Comput
in drugimi upoštevnimi predpisi
Viri informacij
Viriin formacij
V tem priročniku lahko preberete izčrpne napotke in tehnične informacije o Vašem
prenosnem računalniku. Čenasvojprenosniračunalnik priključite tiskalnik, lahko
natisnete priložen priročnik (PDF datoteka).
Vir informacij Vrsta informacije Kje?
Priročnik Prvi koraki
(natisnjen)
Priročnik "Sicherheit"
(Varnost) (natisnjen in/ali
datoteka PDF)
Priročnik "Recovery
Process" (Postopek
ponovne namestitve)
(natisnjen in/ali datoteka
PDF)
Priročnik "EasyGuide" (PDF
datoteka)
Priročnik "Wireless LAN"
(PDF datoteka)
Priročnik "Garancija" (PDF
datoteka)
Informacijske datoteke
(npr. *.TXT, *.DOC, *.CHM,
*.HLP)
Informacijske datoteke
(npr. *.TXT, *.DOC, *.CHM,
*.HLP)
www.fujits
ns of Conformity) za AMILO so Vam na voljo na
u-siemens.com".
ers izjavlja, da je AMILO izdelan v skladu z osnovnimi zahtevami
1999/5/ES. (Zvezno ministrstvo za gospodarstvo.
Poster za začetek uporabe Priložen
Varnostni napotki
Informacije o ponovni
namestitvi gonilnikov,
priročnikov in posebne
programske opreme
Izčrpna navodila za z ago n,
uporabo in tehnične
informacije
Izčrpna navodila za uporabo
brezžičnih omrežij LAN in
tehnične informacije
Splošni ga rancijski pogoji
Informacije o pripomočkih in
programih
Informacije o tehnologiji
gonilnih sistemov
Priložen in/ali v prenosnem
računalniku
Priloženo v prenosnem
računalniku ali na spletnih straneh
"
www.fujitsu-siemens.com/support/"
Priročnike najdete v prenosnem
računalniku pod Start –
Manuals, najnovejše različice
pa na naših spletnih straneh
"
www.fujitsu-siemens.com/support/"
V programski opremi za ta namen
10600794864, izdaja 1 Slovensko - 2
Page 100

Pomembni napotki
Varnostni napotki
Varnostni napotkiNapotki
•Pričiščenju prenosnega računalnika upoštevajte napotke v priročniku "Preprosti vodnik".
• Vaš prenosni računalnik ima številne varnostne funkcije, ki večstopenjsko zagotavljajo
• Upoštevajte dodatne varnostne napotke za naprave z radijskimi d eli v priročniku "Varnost".
• Ta kratka navodila shranite skupaj z napravo. Če napravo predate drug im
Ta prenosni računalnik je skladen z veljavnimi varnostnimi določili za opremo v informacijski
tehniki. Če imate vprašanja, če lahko vaš prenosni računalnik uporabljate v predvidenem okolju,
se obrnite na svoje prodajno mesto ali na našo linijo/službo za stranke.
Brezpogojno upoštevajte varnostna navodila v priročniku "Varnost" in
naslednje varnostne napotke.
visoko stopnjo varnosti. Podrobnejše informacije glede tega lahko preberete v poglavju
"Sicherheitsfunktionen" (Varnostne funkcije) v priročniku "EasyGuide" (Preprosti vodnik).
osebam, jim predajte tudi kratka navodila.
Gonilniki in pripomočki
Če je v vašem prenosnem računalniku nameščen operacijski sistem Windows, najdete
dodatne informacije o sistemu, gonilnikih, pomožnih programih in posodobitvah v prenosnem
računalniku ali na naših spletnih straneh "
Če morate napeljati novo električno povezavo gonilnega sistema, poiščite potrebne informacije
v priročniku "Recovery Process" (glejte "
www.fujitsu-siemens.com/support/".
Viri informacij", Stran 2).
3 - Slovensko 10600794864, izdaja 1
 Loading...