

Page 1

Copyright
© Fujitsu Siemens Computers 2008
Published by
Fujitsu Siemens Computers GmbH
Mies-van-der-Rohe-Straße 8
80807 München, Germany
Contact
www.fujitsu-siemens.com/support
All rights reserved, including intellectual property rights.
Technical data subject to modi cations and delivery subject
to availability. Any liability that the data and illustrations are
complete, actual or correct is excluded. Designations may be
trademarks and/or copyrights of the respective manufacturer,
the use of which by third parties for their own purposes may
infringe the rights of such owner. For further information see
http://www.fujitsu-siemens.com/terms_of_use.html
AMILO Desktop S Series
First-time setup
SAP: 10600985321
FSP: 440000382
English
Български
Hrvatski
Română
Slovenščina
Srpski
10 60 09 85 32 1
AMILO_Desktop_S_Cover.indd 1 28.08.2008 14:39:52
Page 2
English
Български
AMILO Desktop S Series
Starting up for the first t ime
Hrvatski
Română
Slovenščina
Srpski
.
Page 3
Microsoft, MS
Windows and Windows Vista are registered trademarks of the Microsoft Corporation.
Adobe Reader is
MultiMediaCard
Sony and Memory
All other tradem
respective own
ers, whose protected rights are acknowledged.
Copyright © Fuji
All rights r eserv
ed, including rights of translation, reproduction by printing, copying
or similar method
Non-compliance i
All rights reserv
ed, including rights created by patent grant or registration of a utility model or design.
Subject to ava ila
a trademark of Adobe Systems Incorporated.
is a registered trademark of Infineon Technologies AG
Stick are registered trademarks of Sony Electronics, Inc.
arks referenced are trademarks or registered trademarks of their
tsu Siemens Computers GmbH2008
s, either in part or in whole.
s subject to compensation for damages.
bility and tech nical modifications.
Page 4
Contents
English
Contents
Innovativetechnology ................................................................. 1
Furtherinformation ...................................................................... 1
Operatinginstructionsforthe "AMILODesktop" ........................................ 1
Notational conventions .................................................................. 1
Importantinformation .................................................................. 3
Connectionsand Controls ............................................................. 4
Connections . . .......................................................................... 4
Displays and controls ................................................................... 6
Getting started ......................................................................... 7
Unpacking and checking the equipment supplied . . ........................................ 7
Steps for initial startup ................................................................... 7
Setting upthedevice .................................................................... 8
Connecting external devices . ............................................................ 8
Connecting the cables . . . . ........................................................... 8
Disconnecting the cables . ........................................................... 8
Connecting the monitor . . . ........................................................... 9
LX300 Wireless Keyboard Set . ....................................................... 9
Connecting external devices to the USB ports . ........................................ 13
Connecting the machine to the mains . . ................................................... 14
Switchingonforthefirst time: installing the software ....................................... 14
Switch on themonitor and the machine ............................................... 14
Installing the software ............................................................... 15
Operation .............................................................................. 16
Switch thedevice on .................................................................... 16
Switching off the device ................................................................. 16
Operational display ...................................................................... 17
Memory card reader . .. .................................................................. 18
Inserting thememory card ........................................................... 19
Taking outthe memory card .......................................................... 19
Opening and closing the casing for service or system expansion . . . ......................... 20
Opening the casing .................................................................. 20
Closing the casing ................................................................... 21
Technical data ......................................................................... 21
AMILO Desktop S ....................................................................... 21
LX300 Wireless Keyboard Set ........................................................... 22
10600985321, edition 1 English
Page 5
Contents
English 10600985321, edition 1
Page 6

Innovative technology
Innovative technology
... and ergonomic design ma ke your AMILO Desktop a user-friendly and reliable Desktop PC.
Your machine is equ ipped with a Microsoft Windows operating system. This is already pre-installed
and optimally configured for you. The machine is ready to start immediately when you first switch it on.
Your machine is equipped with the latest technology so that you can fully
exploit your computer experience.
• power-saving Intel CPU
• quick WLAN to the b/g/Draft standard, at up to 300 Mbit/s
• very quiet processor fan
With the user-friendly "BIOS Setup Utility" you can control the hardware of your machine and better
protect your system against unauthorised acce ss, using the powerful password facilities.
These operating instructions show you amongst other things how to start
up and operate your machine.
Further information
General information on your machine can be found in the "AMILO
Desktop" operating instructions.
Software-related parts of these instructions refer to Microsoft products, where
these are included in the scope of supply of your ma chine.
When installing other software products, refer to the operating instructions
issued by the manufacturer.
Operating instructions for the "AMILO Desktop"
The operating instructions for the "AMILO Desktop" can be found in the Windows Start menu under
All Programs - Fujitsu Siemens Comp uters or on the Internet under "www.fujitsu-siemens.com/support".
Notational conventions
Pay particular attention to text marked with this symbol. Failure to observe
this warning will en danger your life, w ill damage the device or lead to loss
of data. The warranty will be invalidated if you cause defects in the device
through failure to take notice of this warning
indicates important information that is required to use the device properly.
►
10600985321, edition 1 English - 1
indicates an activity that must be performed in the order shown
indicates a result
Page 7
Innovative technology
This style
This style
This style
"This style"
Abc
This style
flags data entered using the keyboard in a program dialog or command
line, e.g. your password (Name123) or a command to launch a program
(start.exe)
refers to information displayed by a program on the screen, e.g.:
Installation is completed
is for
• terms and texts in a software user interface, e.g.: Click Save.
• names of programs or files, e.g. Windows or setup.exe.
is for
• cross-references to another section, e.g. "Safety information"
• cross-references to an external source, e.g. a web address: For more
information, go to "www.fujitsu-siemens.com"
• indicates names of CDs and DVDs as well as names and titles of other
materials, e.g.: "CD/DVD Drivers & Utilities" or "Safety" manual
refers to a key on the keyboa rd, e.g.:
F10
flags concepts and text that are emphasised or highlighted, e.g.: Do not
switch off device
2 - English 10600985321, edition 1
Page 8

Important information
Comply with the safety information in the "Safety" m a nual and in the
operating instructions "AMILO Desktop".
Important information
10600985321, edition 1 English - 3
Page 9

Connections and Controls
Connections and Controls
This chapter describes the individual hardware components of your machine. It gives
you an overview of the displays and connections of the machine . Familiarise yourself
with these elements before you start to use the machine.
Connections
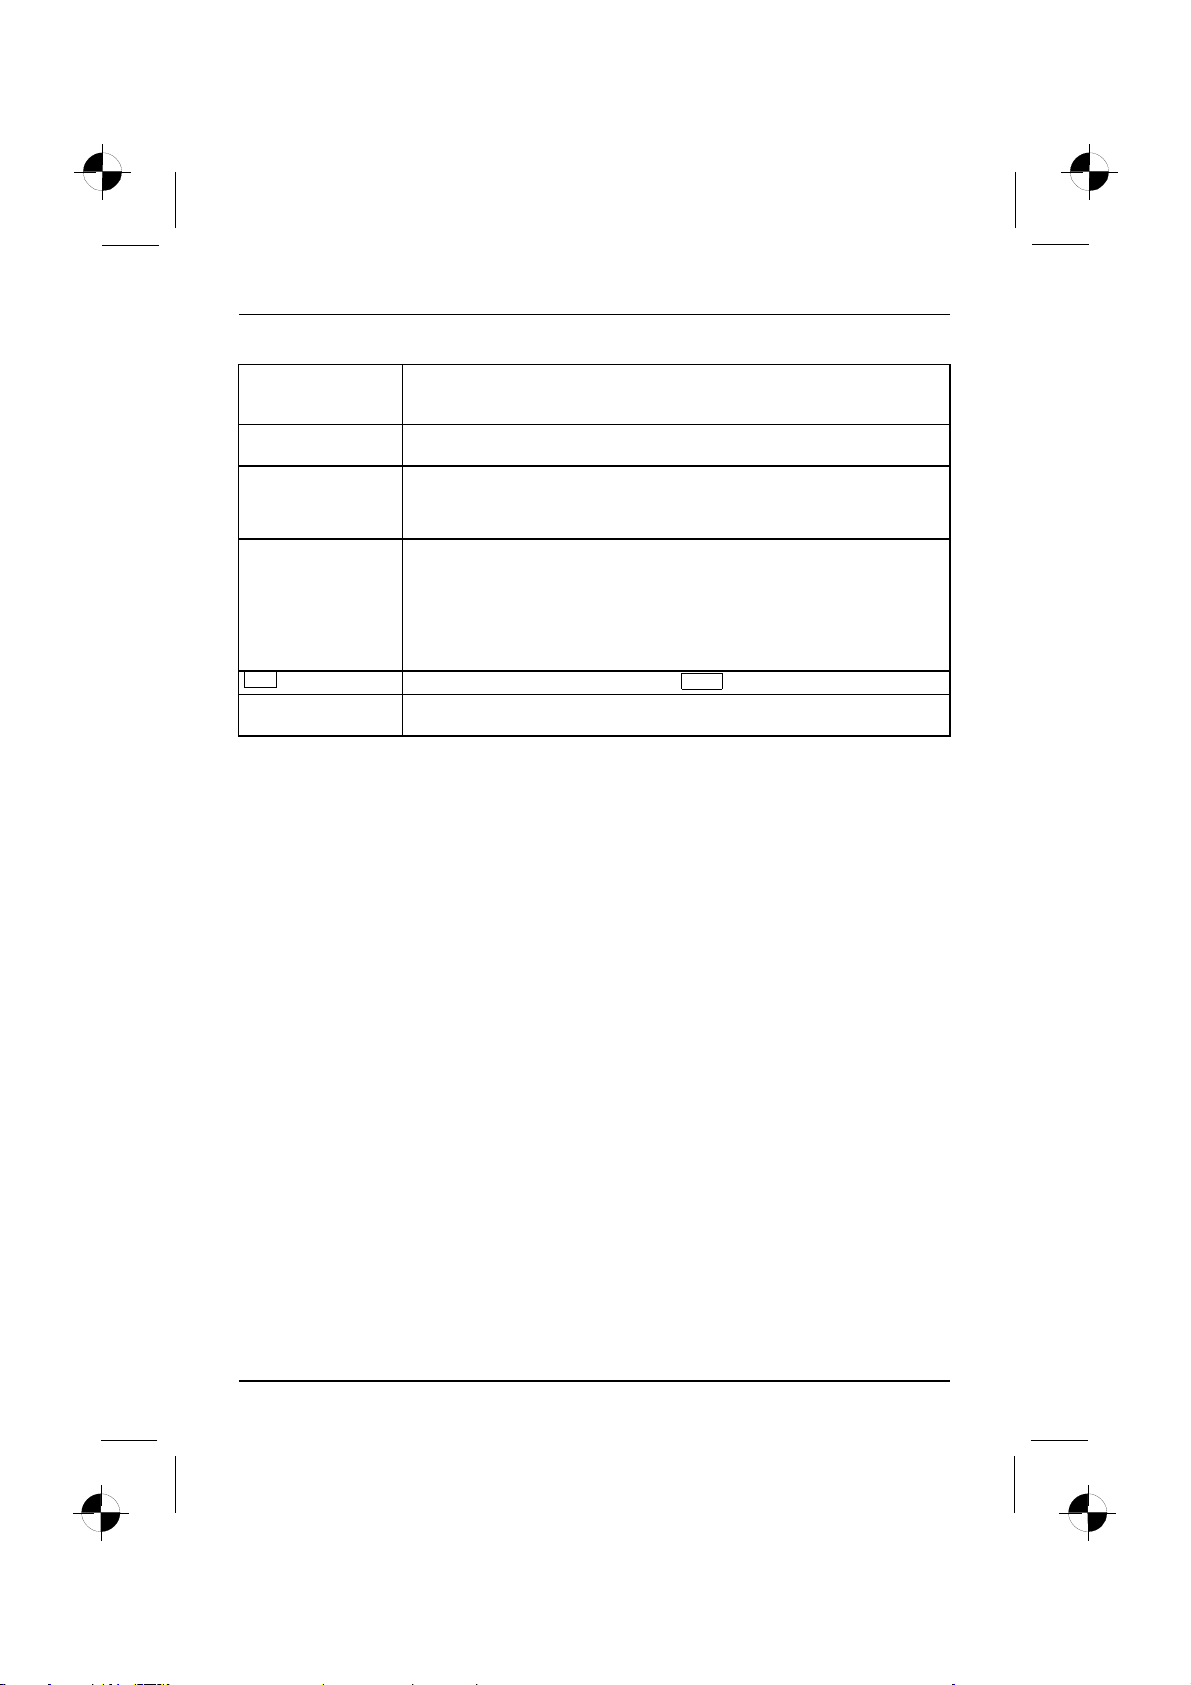
Description Figure Symbol
PC power supply
Mains connection
Sound (external sound sources, e.g.
active loudspeaker, microphone)
• Sound onboard
When a n additional sound card is
installed, there is no sound function
on the motherboard, and “Sound
onboard“ is not available.
3.5 mm jack sockets
4 - English 10600985321, edition 1
Line In
Line Out
Mic
Page 10
Connections and Controls
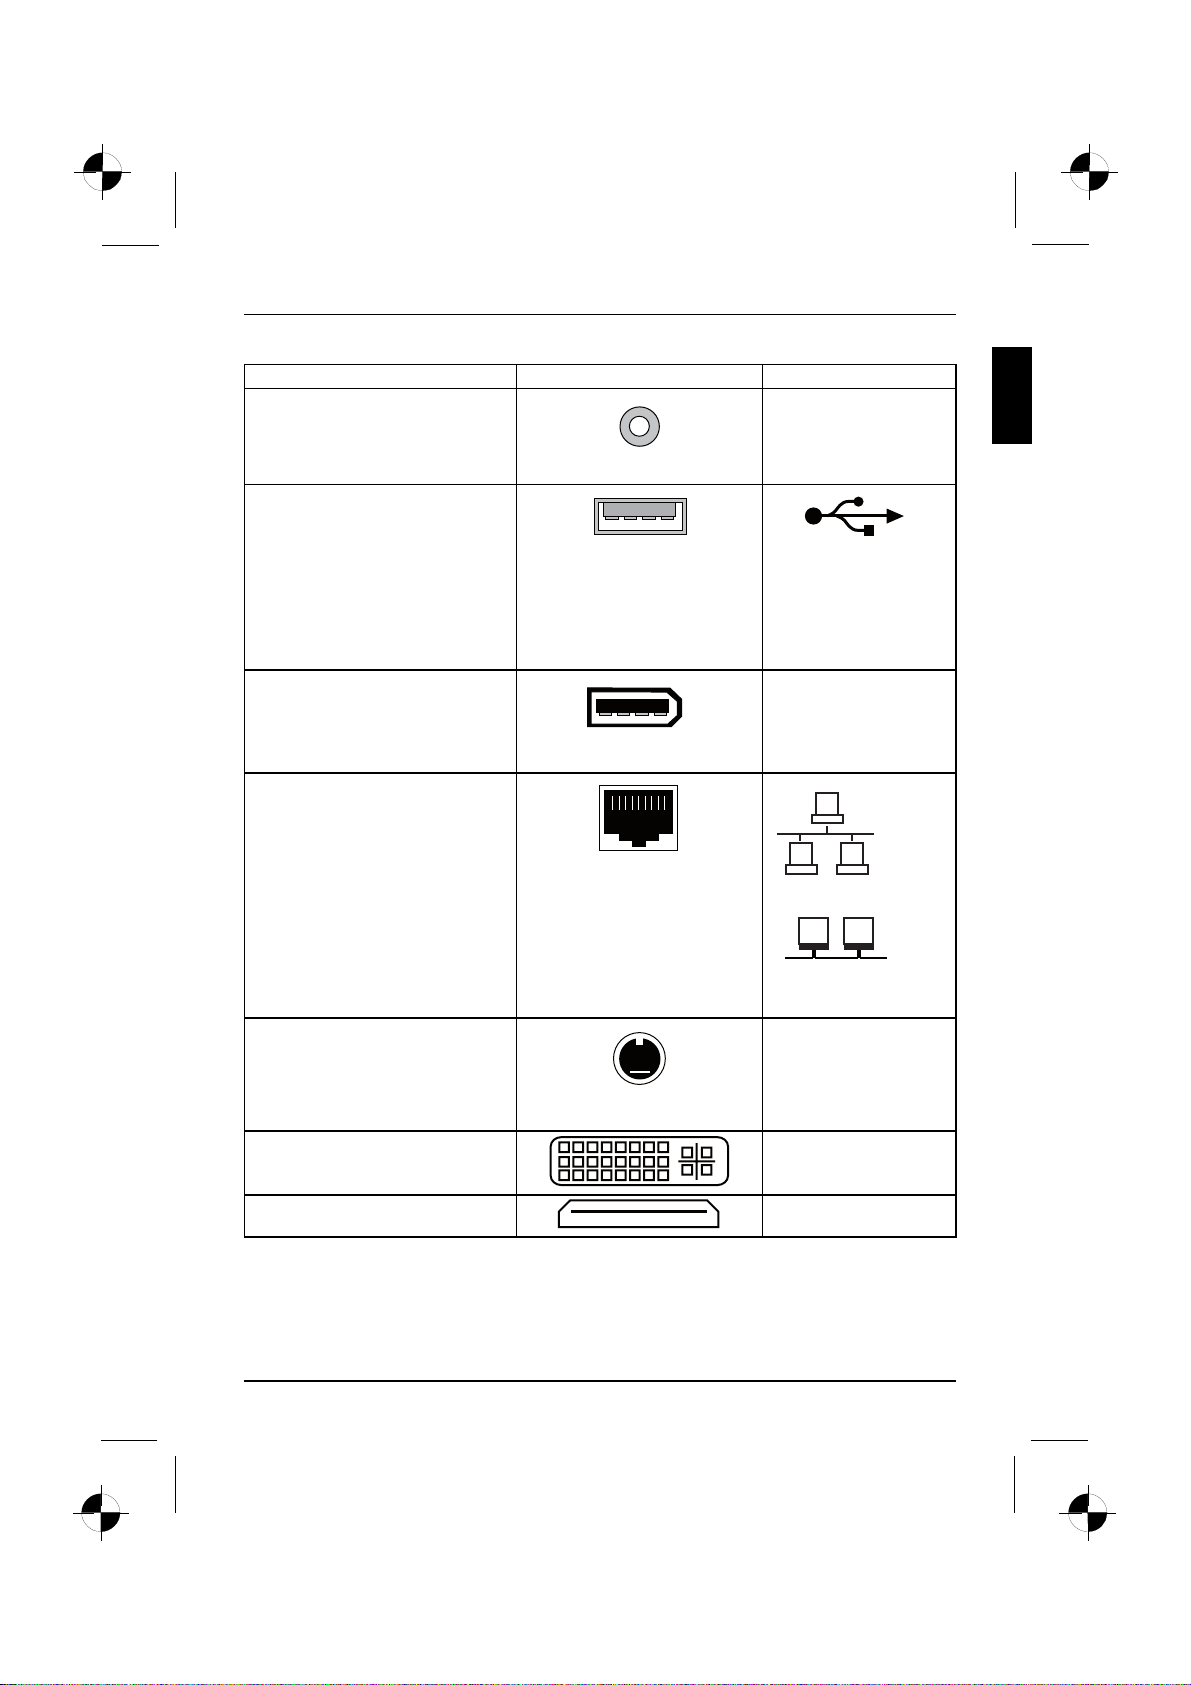
Description Figure Symbol
Digital sound connection, see also
SPDIF Out
motherboard manual.
Cinch connection (Coax)
Connection for USB devices (e.g.
keyboard, mouse IR sender/receiver
module, scanner, printer)
USB 2.0
USB socket
or USB
Important information on USB 2 .0:
In order to guarantee a reliable data
transfer rate, we recommend that
you use a USB connection cable no
longer than 3 m.
Connection for FireWire or
1394
IEEE-1394-compatible devices (e.g.
video recorder, digital camera)
FireWire
FireWire socket
Network or DSL modem
RJ-45 socket
or
or LAN
Video input and out put connection
(optional)
SVIDEO IN
SVIDEO OUT
(see documentation about the
VGA/TV card)
4-pin or multi-pin socket
Connection for digital video signal
DVI
(monitor)
Digital Audio-Video Interface
HDMI
10600985321, edition 1 English - 5
Page 11
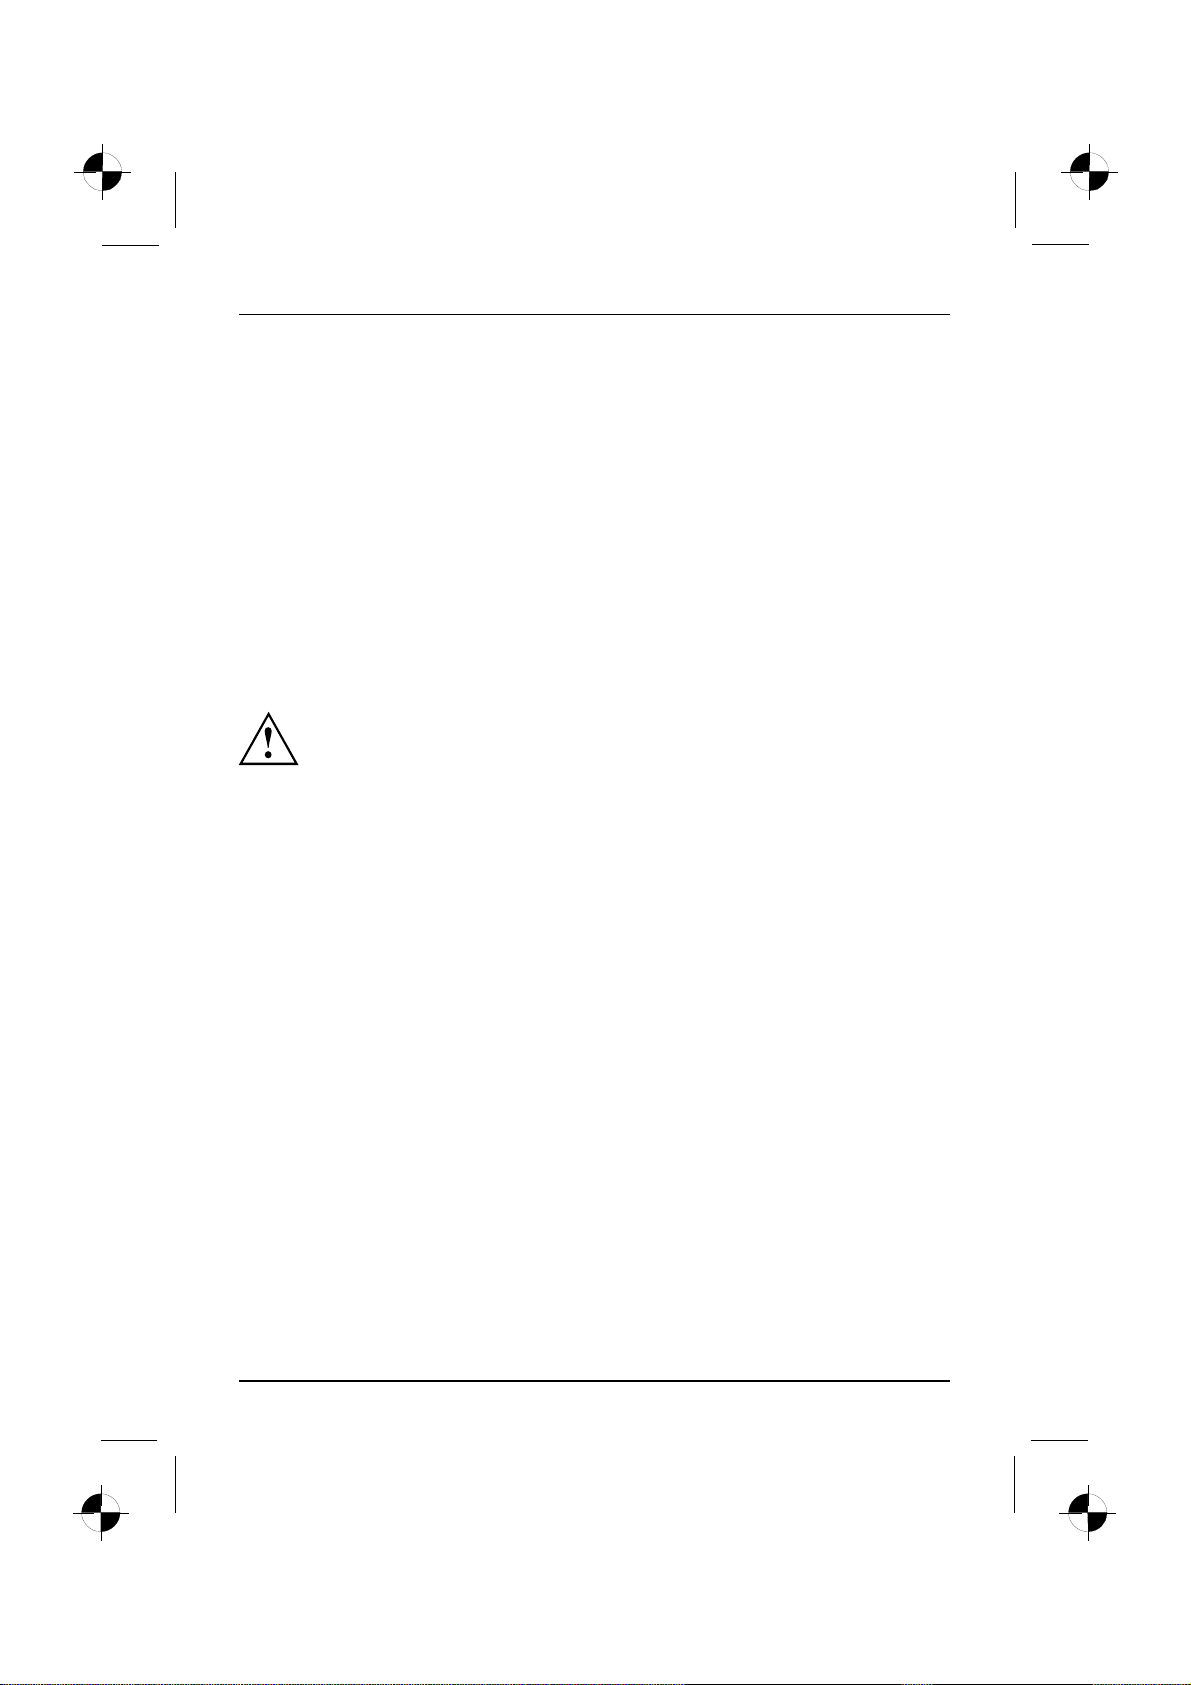
Connections and Controls
Displays and controls
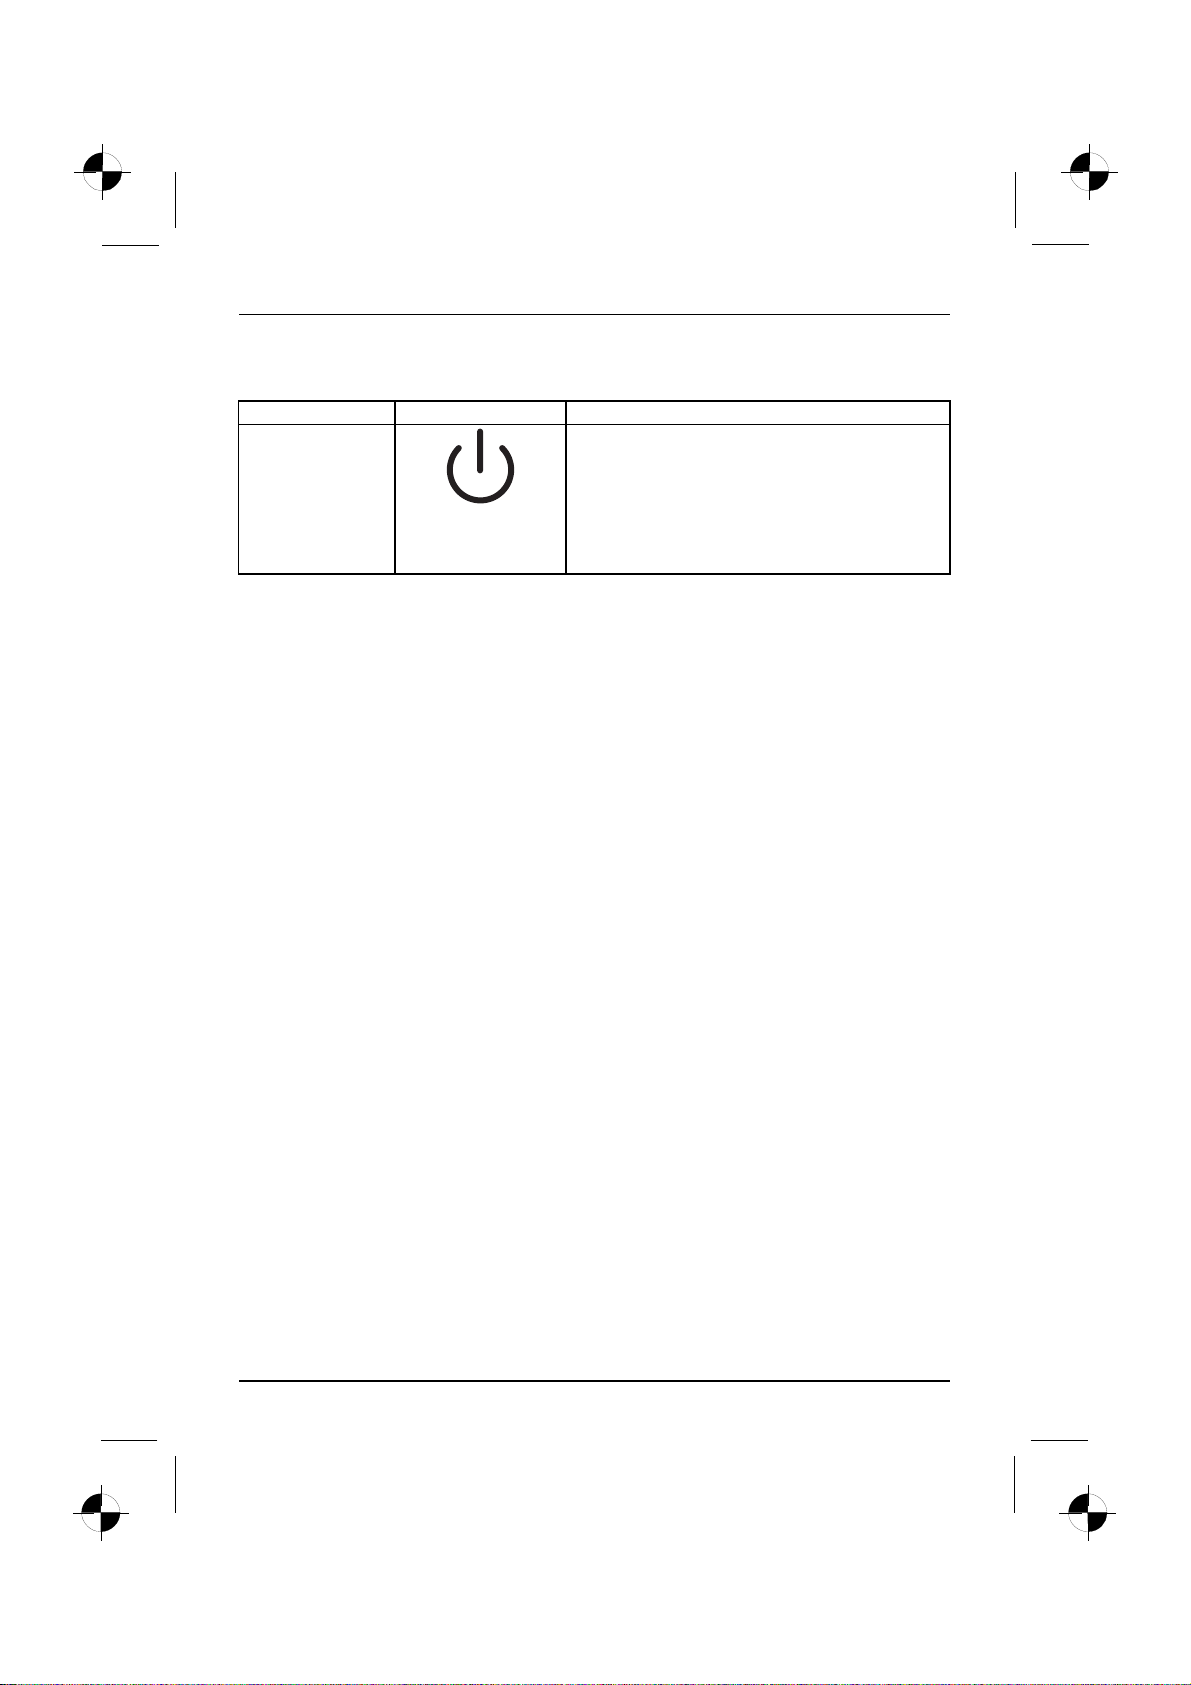
Description Symbol Meaning
On/off switch Switch for booting up the system.
• On/off switch lights up white: The system is
switched on.
• On/off switch flashes yellow: The hard disk is
being acce ssed.
• On/off switch flashes white: T he system is in
power-saving mode.
6 - English 10600985321, edition 1
Page 12
Getting started
Getting started
Gettingstarted
Unpacking and checking the equipment supplied
Keep the original packaging of the equipment in case you need to return it.
PackagingEquipmentsuppliedPackaging,
► Remove all the equipment from the packaging.
► After removal from the packaging, check the equipment for evidence of damage in transport.
► Check that that the equipment matches the delivery note.
Steps for initial startup
Initialstartup,overviewStartingUp
Only a few steps are required to start up your machine for the first time:
• Select the position for your machine and place it there
• Connect the ext ernal devices
• Check the rated voltage and connect the machine to the mains
• Switchonthemachine
You c a n find more details on the individual steps in the following sections.
Please observe the safety information in the "Important information", Page 3 chapter.
If you find damage in transport or a mismatch with the delivery note,
inform your sales office without delay!
External devices
If you wish to attach other external devices (such as a printer) to your machine,
complete the initial installation of your machine before connecting them. The steps for
connecting these external devices are described in the following sections.
Drives and modules
If you wish to fit other drives or modules to your machine, complete the initial installation
of your machine before fittingthem.Thestepsforfitting drives and modules are
described in the "AMILO Desktop" manual in the chapter"System expansion" .
10600985321, edition 1 English - 7
Page 13
Getting started
Setting up the device
VideoworkstationErgonomicDevice,
When installing your device, please read the recommendations and
safety notes in the "Safety" manual.
Do not place the machine in any position other than the one intended (upright on its feet).
We recommend that you place your device on a surface with good anti-slip qualities.
In view of the multitude of different finishes and varnishes used on furniture, it is
possible that the rubber feet will mark the surface they stand on.
Do not stack severa l devices on top of each other.
Do not start the machine in any position other than upright on its feet.
Depending on the location of your machine, it may emit annoying vibration or noises.
To avoid this, allow a minimum clearance of 3 mm from other equipment or objects
at the sides of the casing where there are no ventilation grilles.
Make sure that the device is adequately ventilated. In order to avoid overheating,
do not cover the ventilation area of the monitor or the device.
Do not expose the device to extreme ambient conditions (see "AMILO Desktop S", Page
21, "Ambient conditions"). Protect the device against dust, humidity and heat.
Connecting external devices
Read the documentation on the external device before connecting it.
With the exception of USB devices, always remove all power plugs
before connecting external devices!
Do not connect or disconnect cables during a thunderstorm.
Always take hold of the actu al plug. Never unplug a cable by pulling the cable itself.
Connect and disconnect the cables in the order described below.
Connecting the cables
► Turn off all power and equipment switches.
CordCable,
► Remove all powe r plugs from the grounded mains outlets.
► Connect all the cables to the device and the external devices. Please make sure that you
always observe the safety notes provided in "Important information", Page 3 .
► Plug all data communication cables into the appropriate sockets.
► Plug all po w er cables into the grounded mains outlets.
Disconnecting the cables
► Switch off all affected devices.
Cable,
► Remove all powe r plugs from the grounded mains outlets.
► Unplug all data communication cables from the a ppropriate sockets.
► Disconnect all of the cables from the device and from the external devices.
8 - English 10600985321, edition 1
Page 14
Getting started
Connecting the monitor
► Follow the instructions contained in the monitor manual to prepare the monitor
for operation (e.g. connecting cables).
Monitor
► Plug the data cable into the monitor port of the device.
Depending on the expansion stage of your machine and your monitor, you
can also connect the data cable to the DVI interface.
► Plug the monitor power cable into the grounded mains outlet.
LX300 Wireless Keyboard Set
The LX300 Wireless Keyboard Set with wireless mouse and keyboard is supplied with your
machine. Digital radio technology frees you from cumbersome cables.
Comply with the safety information in the safety manual and in the
operating instructions for the "AMILO Desktop".
Always use type AAA batteries.
A symbol in the battery compartment shows you which way round to insert the batteries.
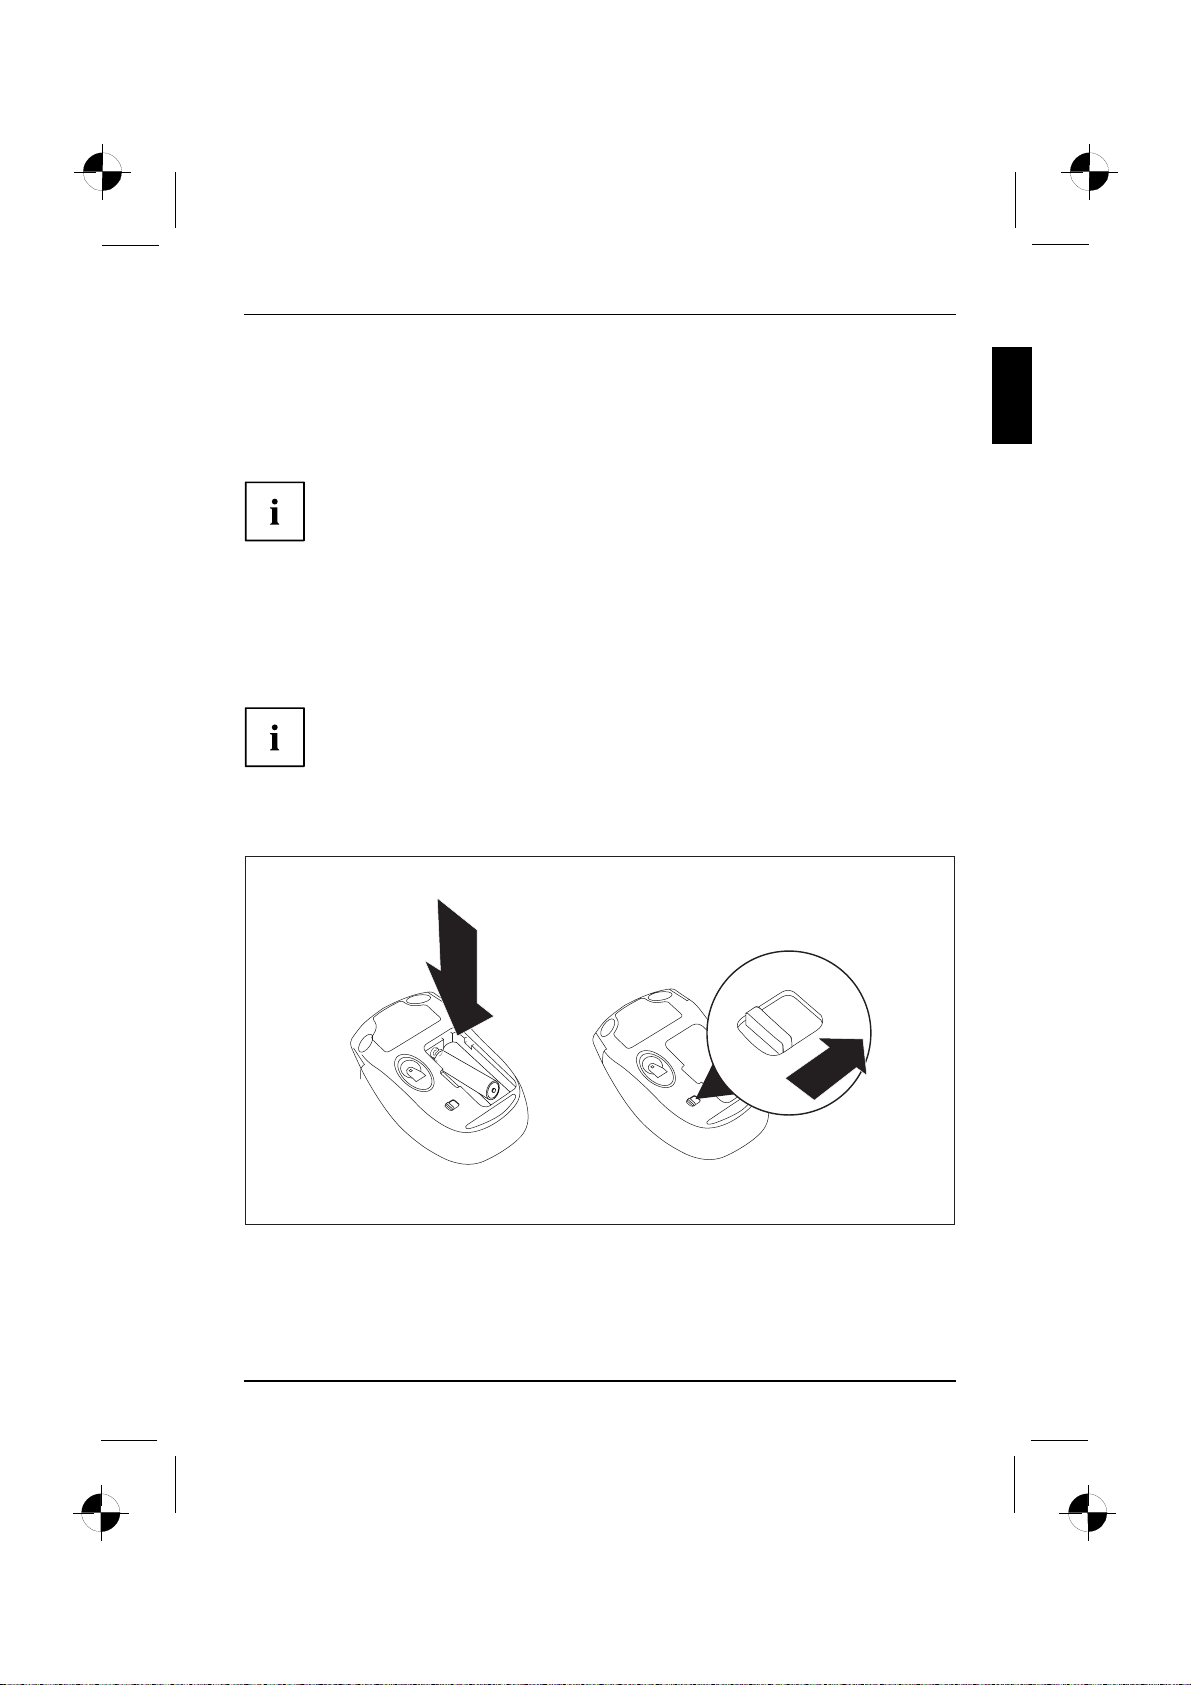
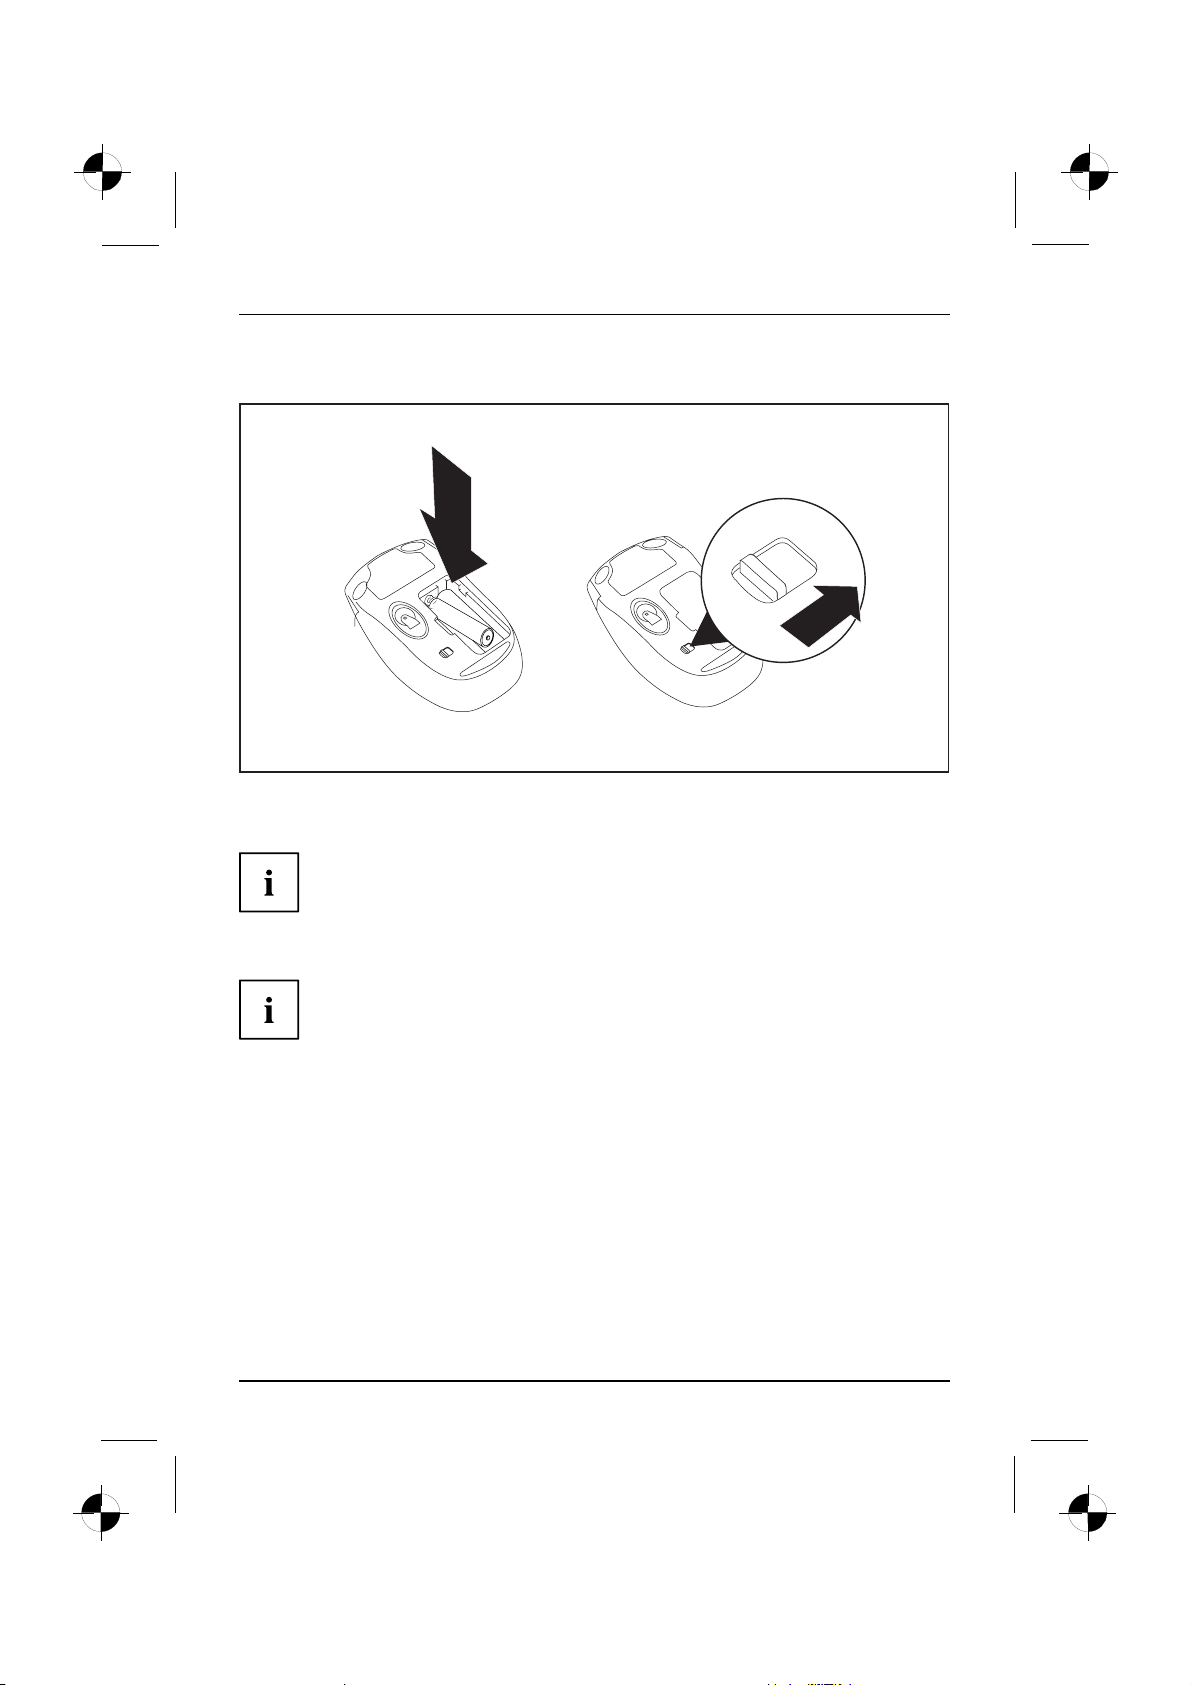
Inserting batteries in the mouse
1
2
► Insert the batteries (1).
► Set the on/off switch on the underside of the mouse to "ON" (2).
10600985321, edition 1 English - 9
Page 15
Getting started
To save power, set the on/off switch on the un derside of the mouse to "OFF"
when you are not going to use the mouse for an extended period.
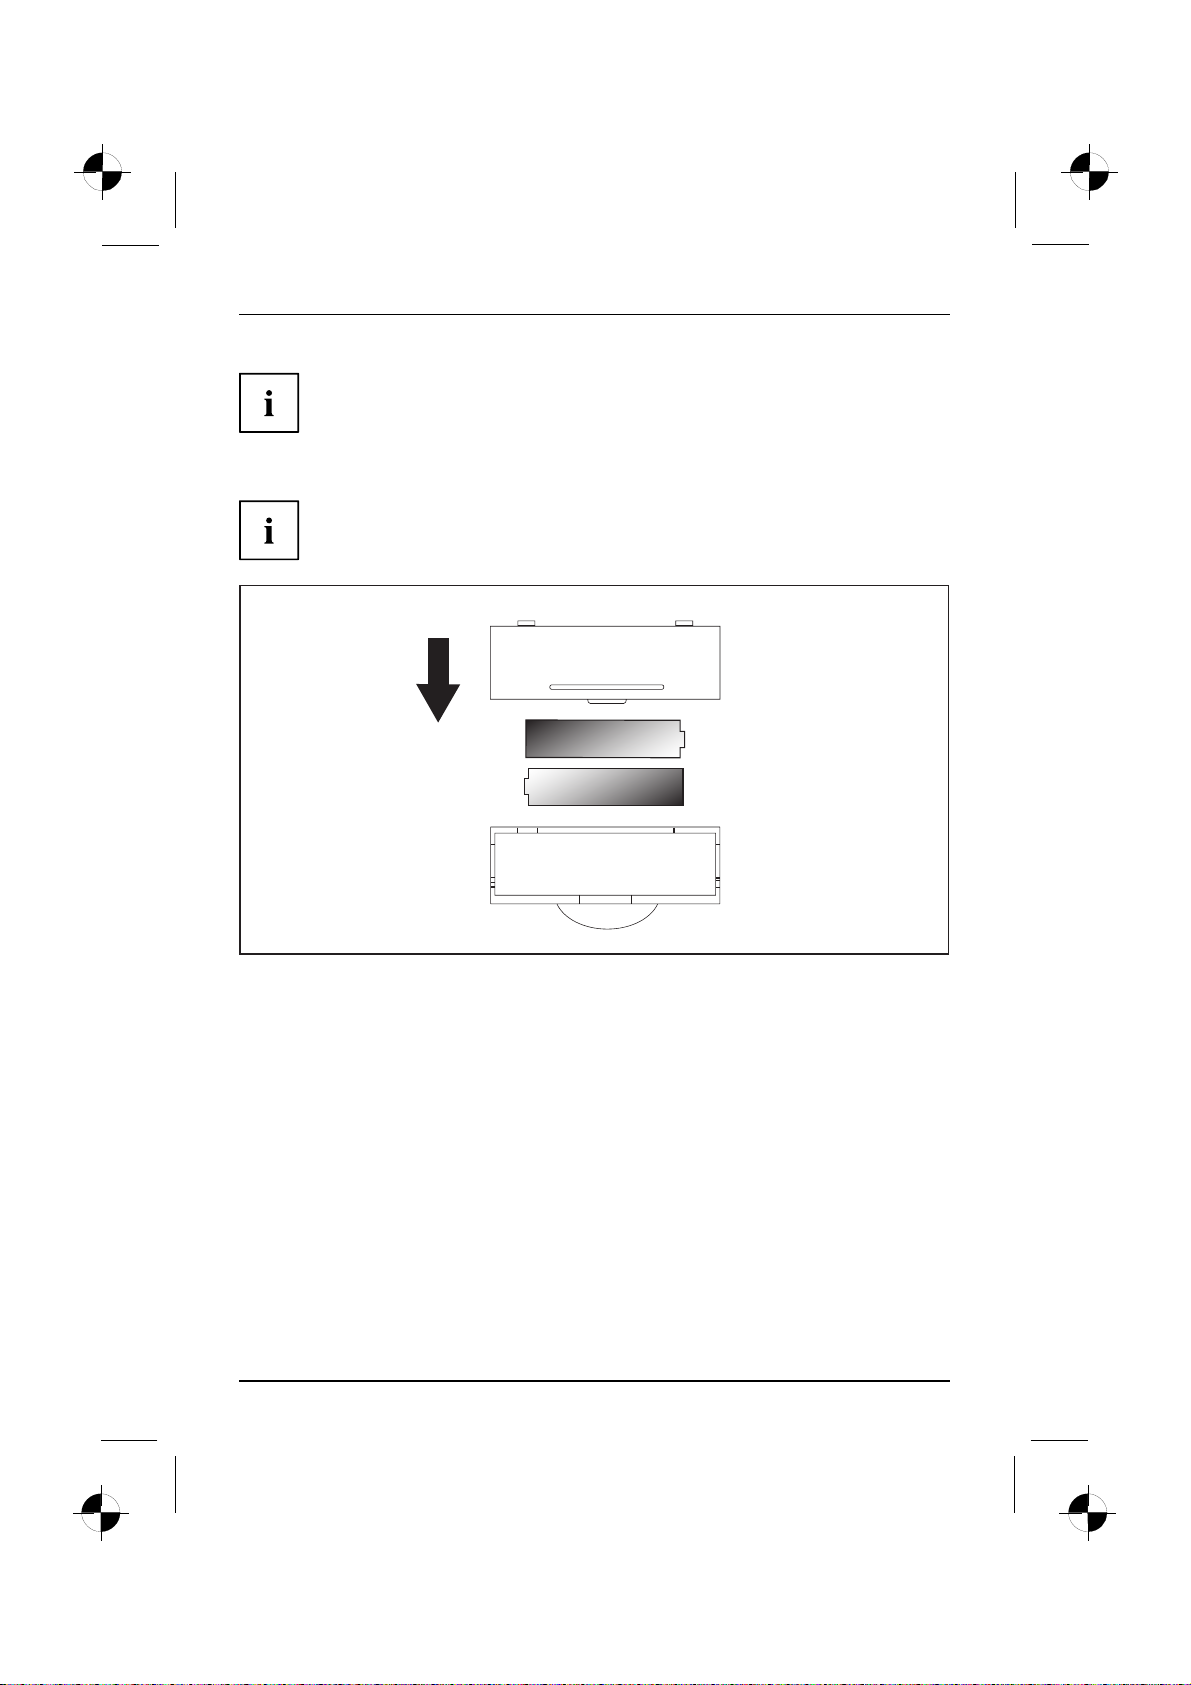
Inserting batteries in the keyboard
A symbol in the battery compartment shows you which way round to insert the batteries.
► Insert the batteries.
10 - English 10600985321, edition 1
Page 16
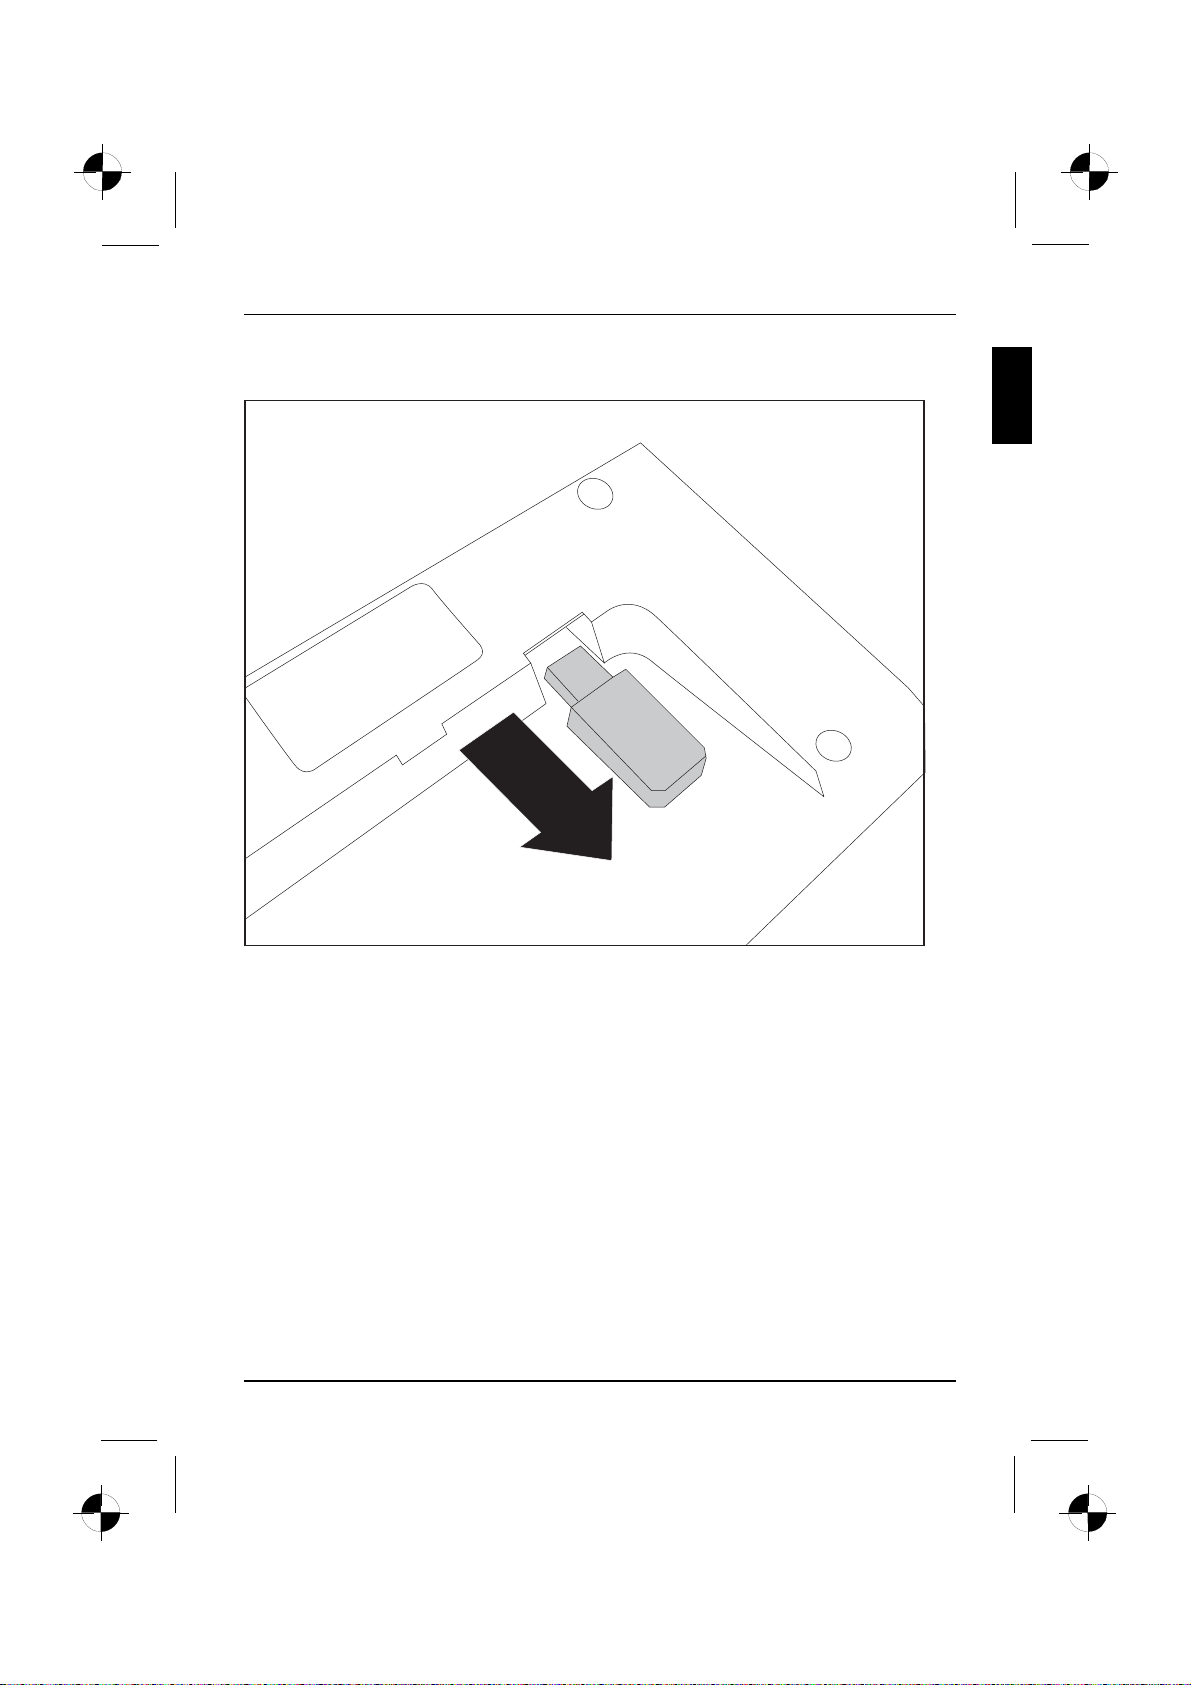
Connect the receiver
Getting started
► Move the receiver in the direction of the arrow to take it out of the keyboard.
10600985321, edition 1 English - 11
Page 17
Getting started
► Plug the receiver into a free USB port on your computer.
The radio connection will be established automatically.
Re-establishing the radio connection to the Keyboard Set if required
Normally a radio connection code is generated automatically and the Keyboard Set
is then immediately ready for operation. When the connection has successfully been
established the LED on the receiver lights up green. T he LEDs on the keyboard and
mouse light up red if the battery voltage falls below 2.2 V.
If the connection is not established automatically, or if it breaks down, proceed as follows:
► Unplug the receiver from your computer and plug it in again.
► Place the mouse at a distance no greater than 30 cm from th e receiver.
► Keep the left m ouse button pressed for five seconds.
The LED on the receiver will flash green 4 times to indicate that the connection
to the mou se has been established successfully.
Esc
► Keep the Esc key on the keyboard pressed for five seconds.
The LED on the receiver will flash green 4 times to indicate that the connection
to the keyboard has been established successfully.
.
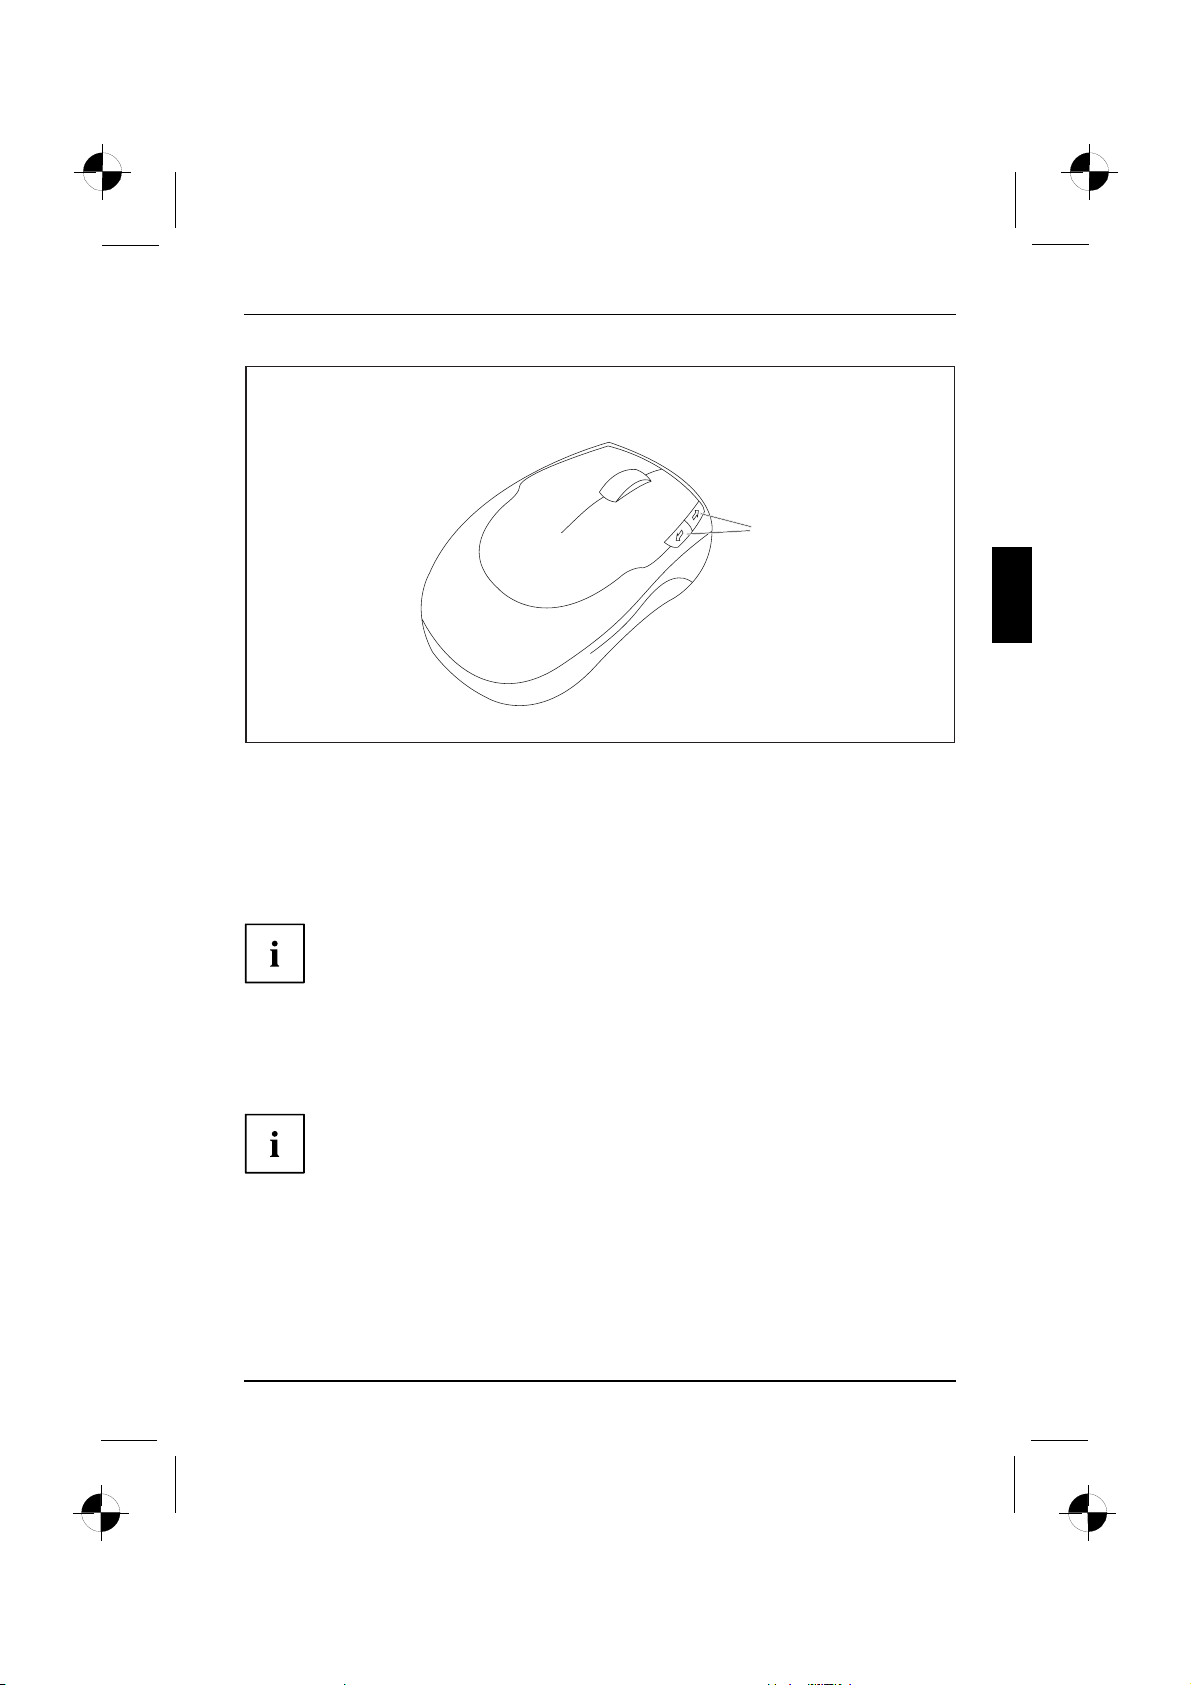
Skip forward and back buttons on the mouse
In addition to the right and left m ouse buttons and a mouse wheel, your
mouse has two additional buttons (1 ):
12 - English 10600985321, edition 1
Page 18
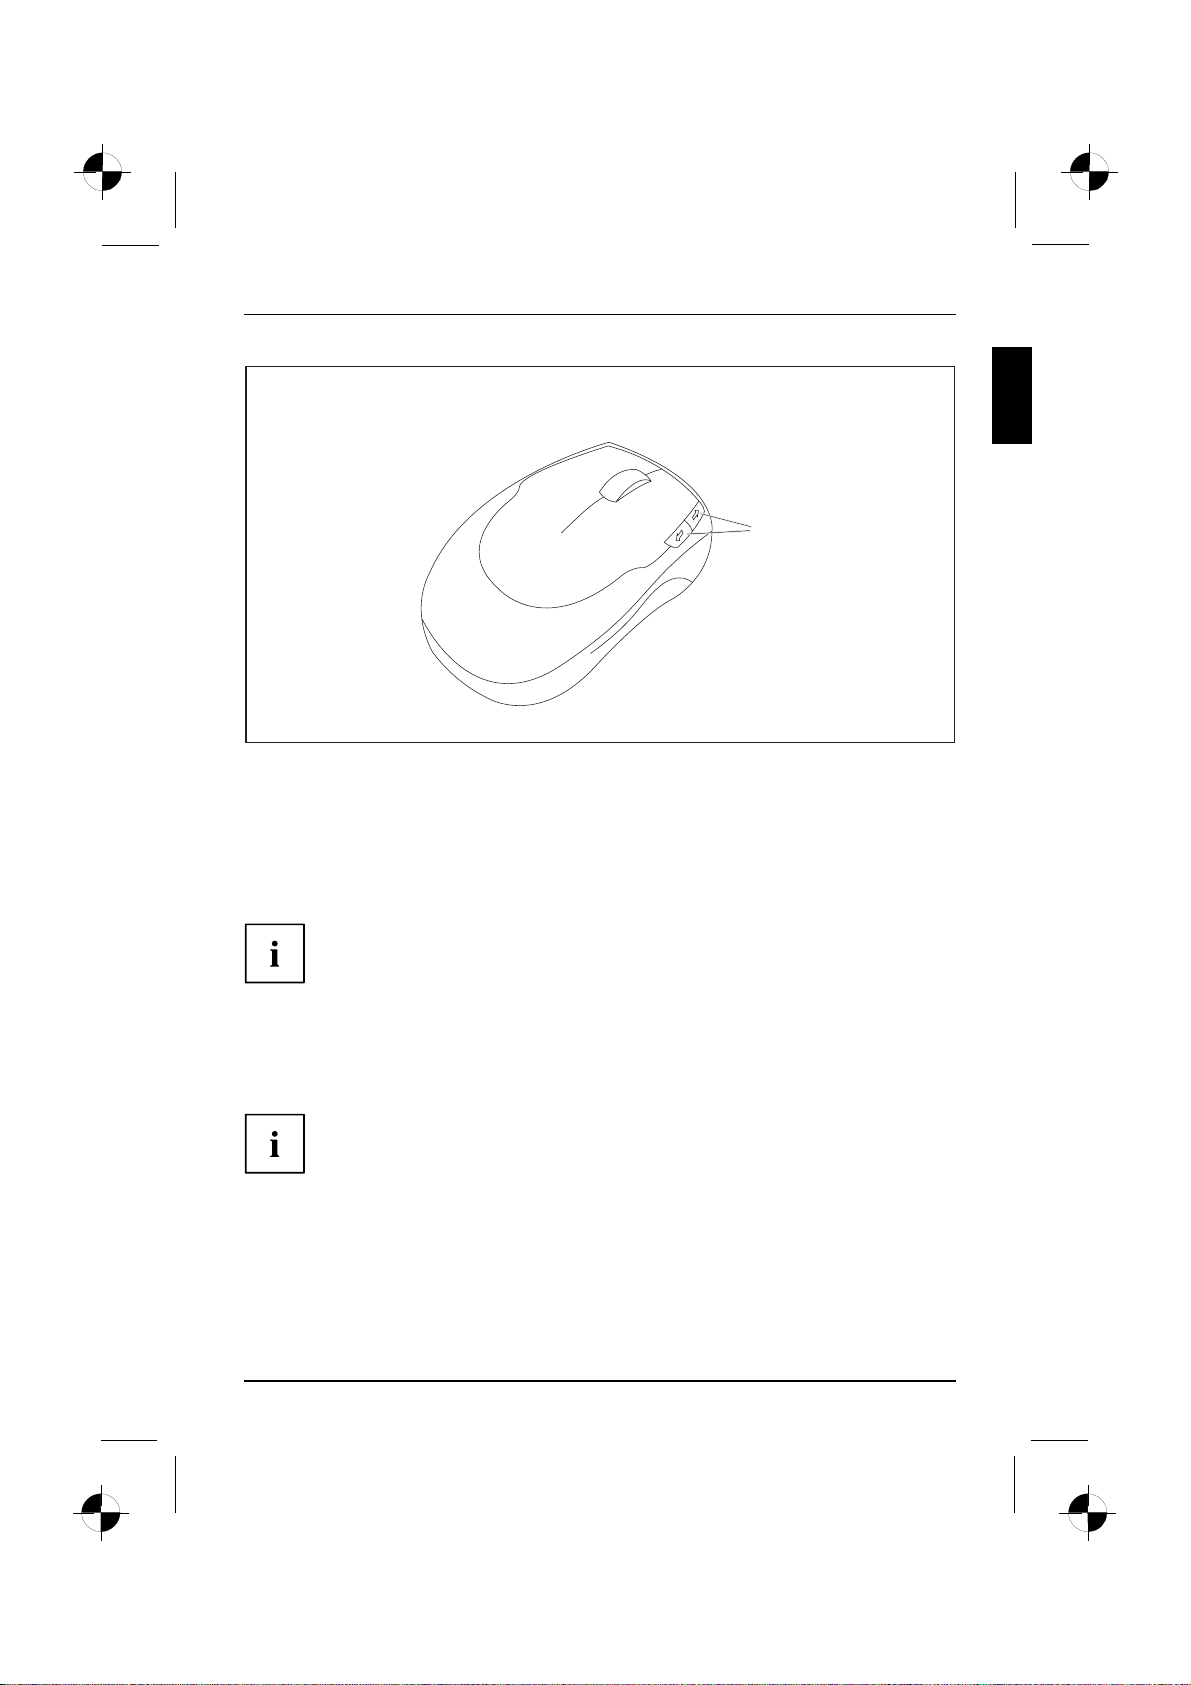
1
These two buttons allow you to skip easily forward and back within an application,
e.g. between Internet pages in a Web browser.
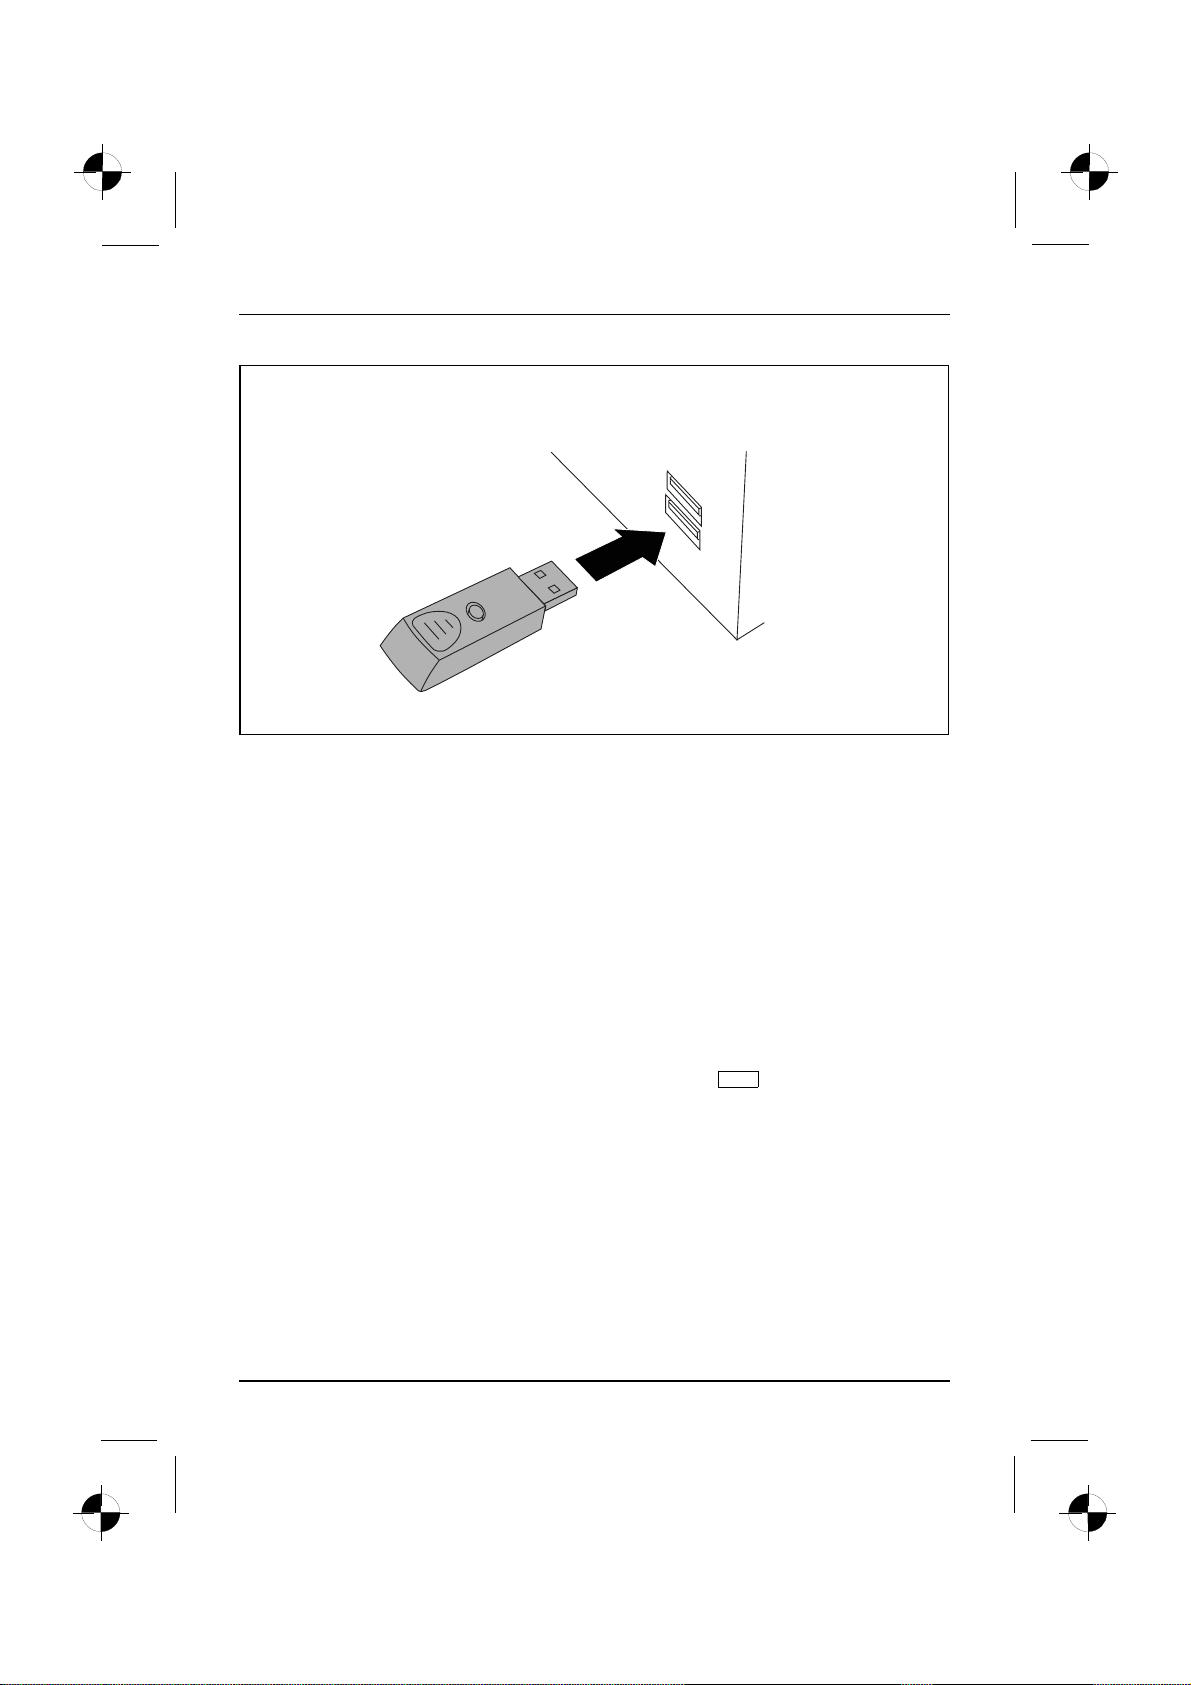
Connecting external devices to the USB ports
USBdevices,USBport,Externald evices,Devices,
You can connect a wide range of external devices to the USB ports (e.g.
printer, scanner, modem or keyboard).
Getting started
USB devices are hot-pluggable. This means you can connect and d isco nnect
USB cables while your device is s witched on.
Additional information can be found in the documentation for the USB devices.
► Connect the data cable to the external device.
► Connect the data cable to one of the USB ports on your device.
Device drivers
The external USB devices you connect to the USB ports usually require no
driver of their own, as the required software is already included in the operating
system. However, if the external USB device requires its own software, please
install it from the data carrier provided with the USB device.
To ensure USB 2.0, the length of the cable used between the front USB port of
your device and the external USB device must not exceed 3 m.
10600985321, edition 1 English - 13
Page 19
Getting started
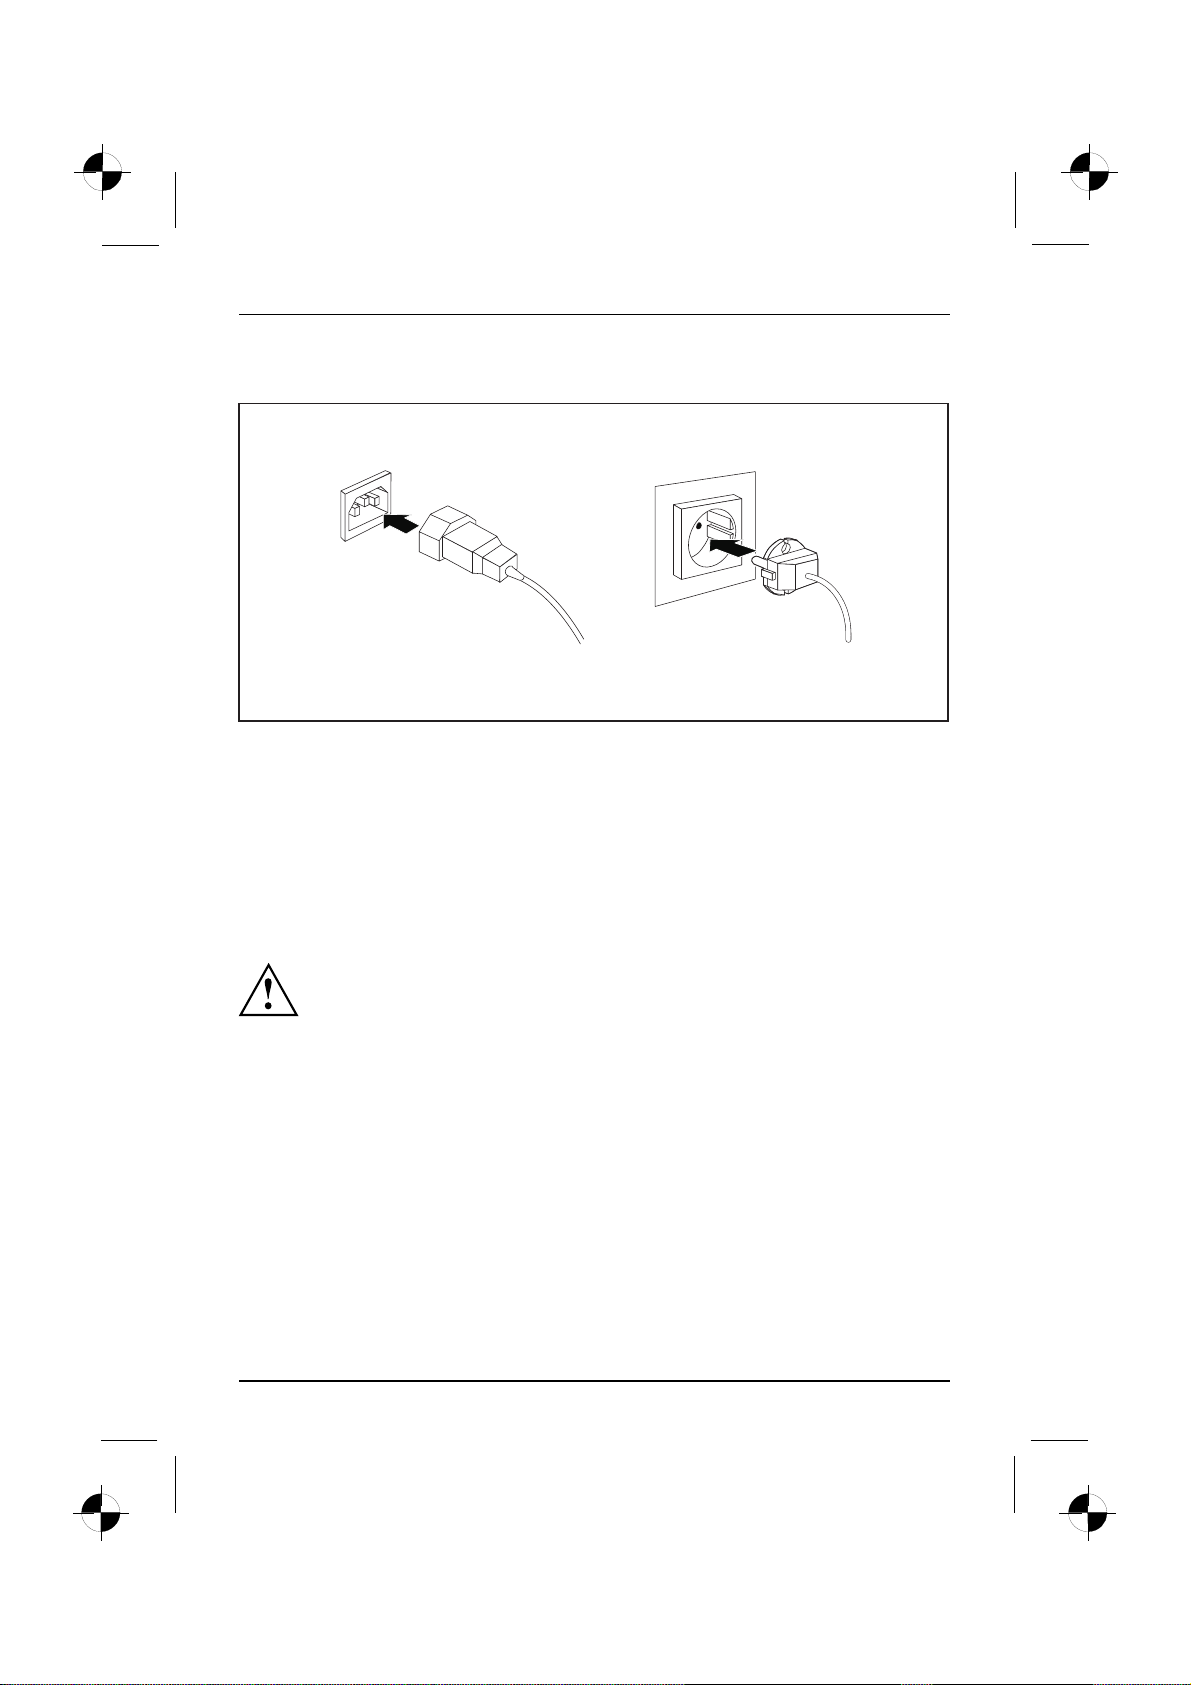
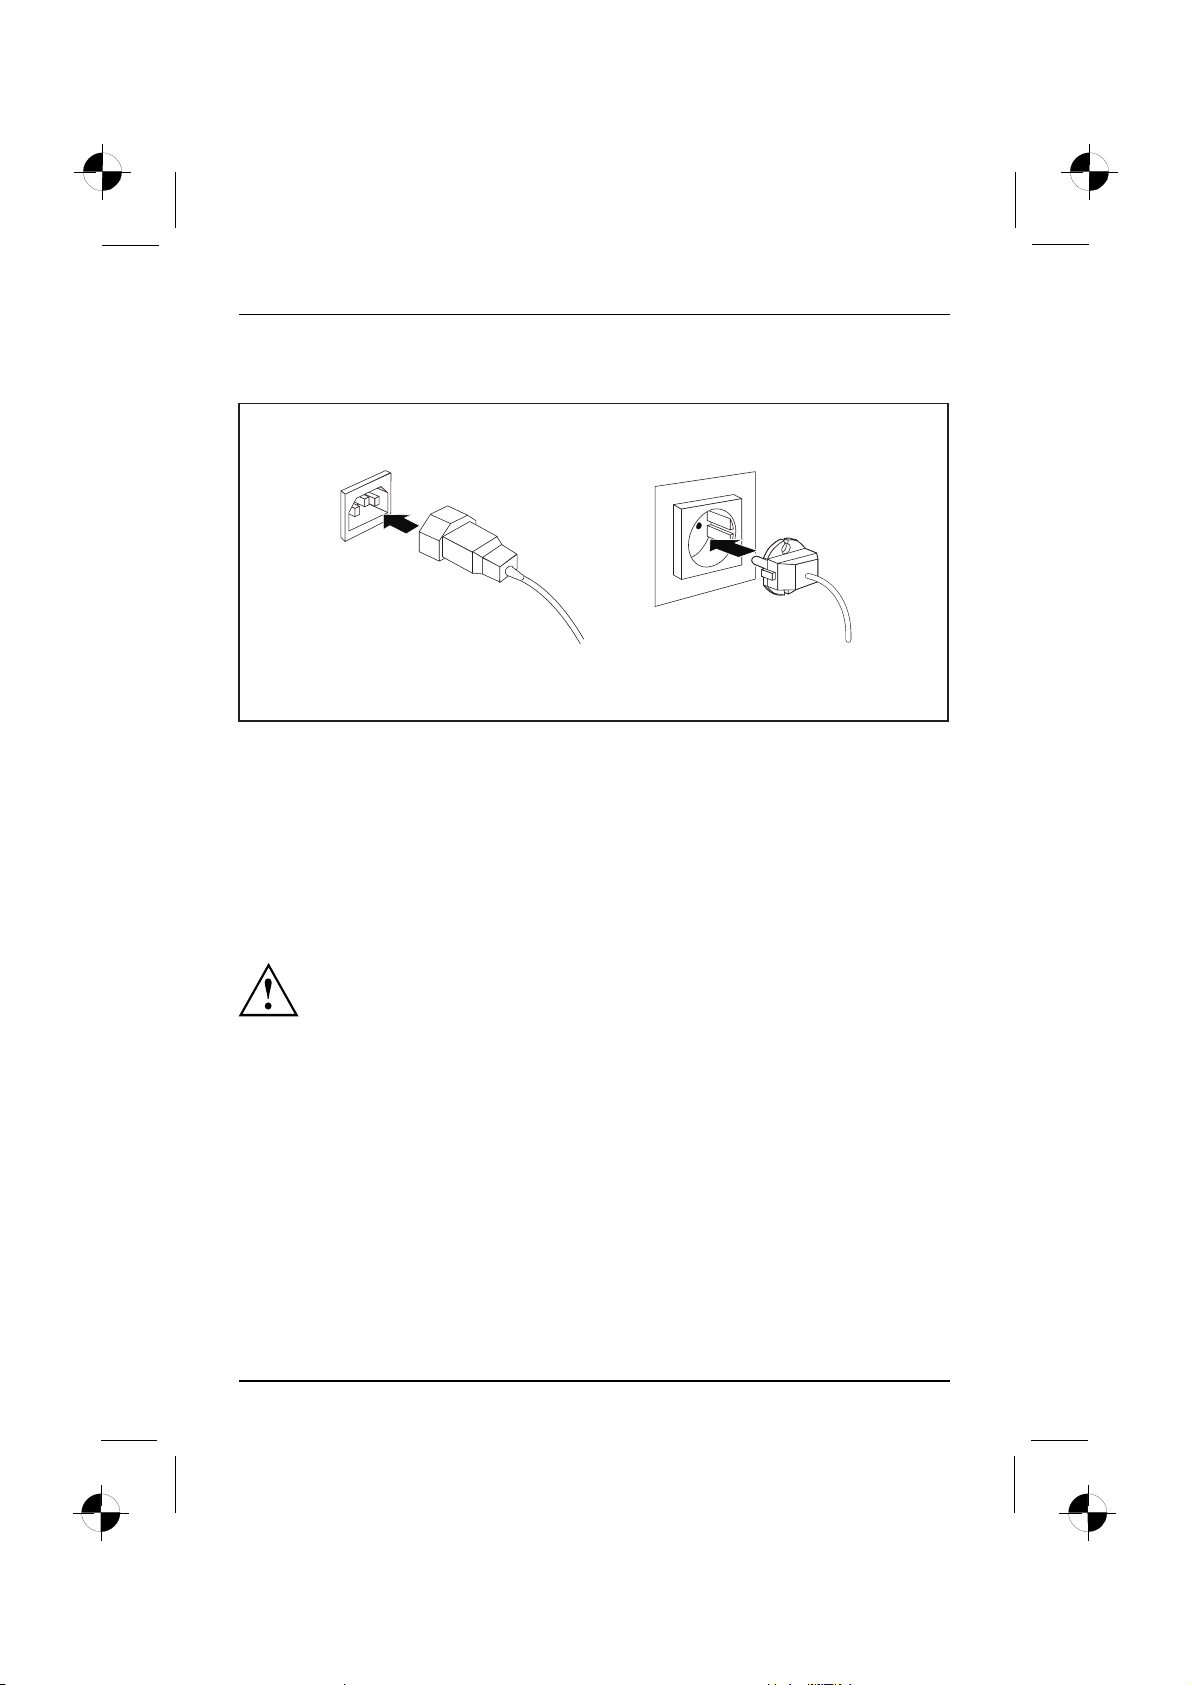
Connecting the machine to the mains
Mainsadapter,
1
2
► Connect the mains cable to the ma chine (1).
► Plug the mains plug into a three-pin socket (2).
Switching on for the first time: installing the software
Installing,Software,Installing,
If the device is integrated into a network, the user and server details as well as the
network protocol are required during the software installation.
When you switch on the device for the first time, the supplied software is installed and configured.
Plan a reasonable amount of time for this, as this process must not be interrupted.
Once the installation has been started the device must not be switched
off, unless the installation has been completed.
During installation, the device may only be rebooted when you are requested to do so!
The installation will othe rwise not be carried out correctly and the contents
of the hard disk must be completely restored.
Switch on the monitor and the machine
► Switch on the monitor (see operating instructions for the monitor).
14 - English 10600985321, edition 1
Page 20
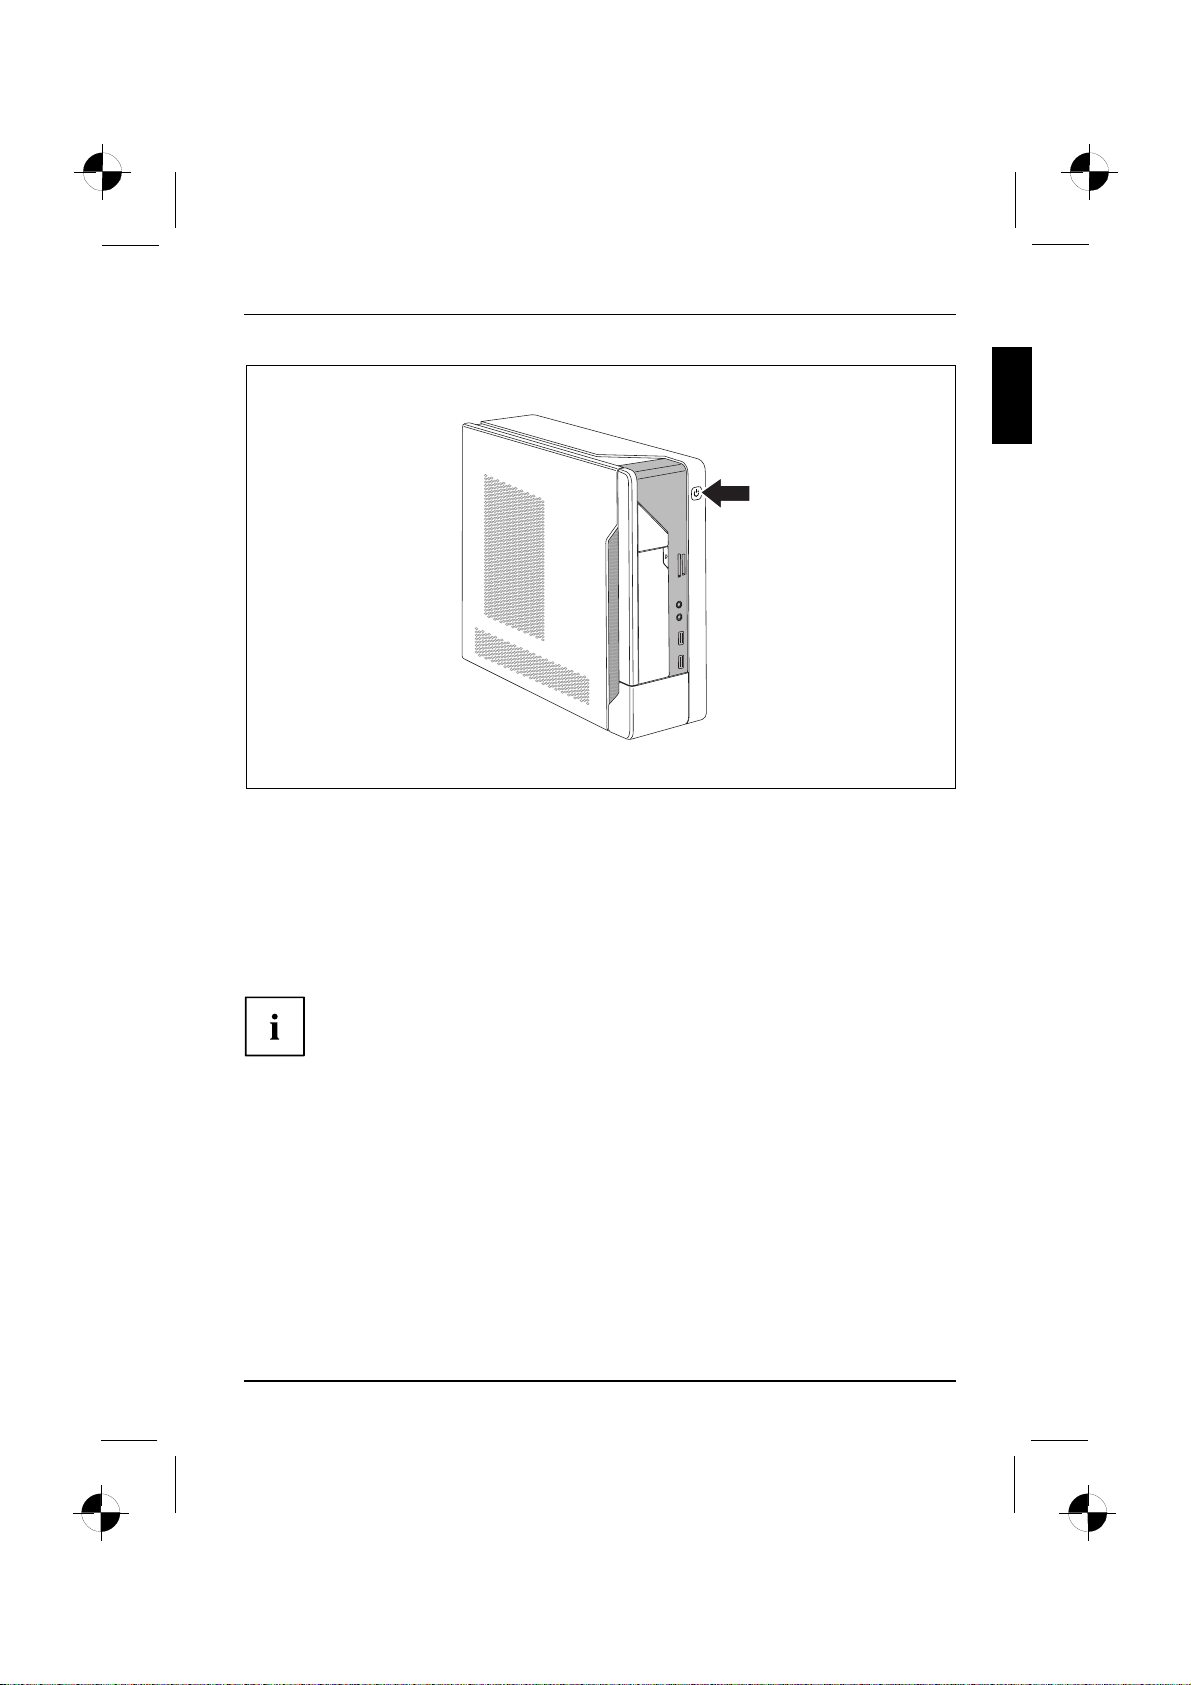
► Press the on/off bu tton on the front of the machine.
The operational display will light up and the machine will start.
Getting started
Installing the software
► During installation, follow the on-screen instructions.
Software,Installing,
► If anything is unclear regarding the data you are asked to input, read the
online Help in your operating system.
Further information on the system, its drivers, utilities and updates can
be found on the DVD "D rivers & Utilities" and on the Internet under
"http://www.fujitsu-siemens.com/support".
10600985321, edition 1 English - 15
Page 21
Operation
Operation
Switch the device on
► If necessary, switch the monitor on (see the operating manual for the monitor).
Device,Monitor,
► Press the ON/OFF switch on the front of the device.
The operational display will light up white an d the machine will start.
Switching off the device
► Shut down the operating system properly.
DeviceMonitor
► If the operating system does not automatically switch the device into power-saving mode
or switch it off, press the ON/OFF switch for at least 4 seconds.
The device then consumes a minimum amount of energy.
The ON/OFF s witch does not fully disconnect the TV from the mains voltage. To
completely disconnect the mains voltage, remove the power plug from the power socket.
► If necessary, switch the monitor off (see the operating manual for the monitor).
16 - English 10600985321, edition 1
Page 22
Operational display
OperationaldisplayMachine
The operational display appears on the front of the casing.
Operation
1
1 = Operational display
Operationaldisplay
Do not disconnect the machine from the mains whilst in power-saving
mode, otherw ise data may be lost.
• The display lights up white: The machine is switched on.
• The display flashes white: The machine is in power-saving mode. Aft
on at the on/off switch the machine switches on or reverts to the st
er switching
atus it was
in before power-saving mode was initiated.
• The display flashes yellow: T he hard disk is being accessed.
• The display remains unlit: The machine is not connected to the mains o
operation. If the machine is ready for operation, it can be switche
r is not ready for
donattheon/offswitch.
10600985321, edition 1 English - 17
Page 23
Operation
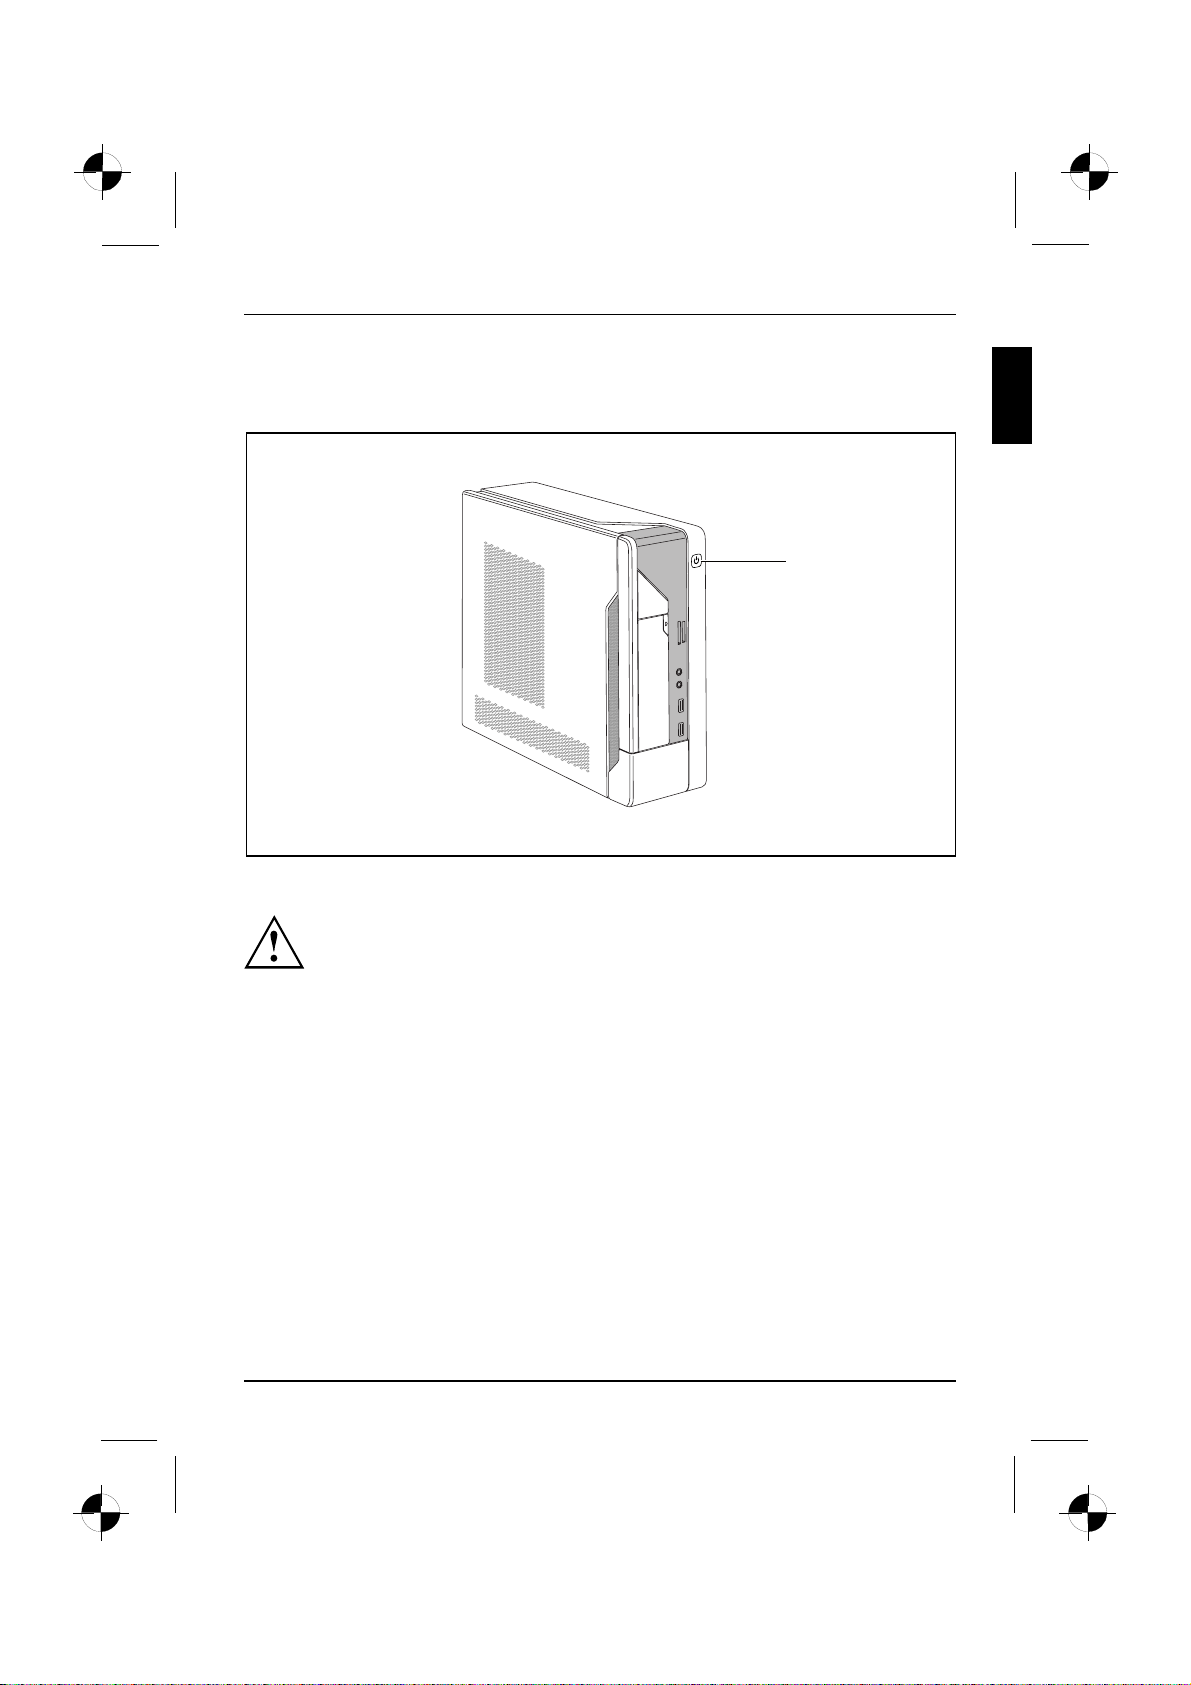
Memory card reader
Slot
A memory card reader is incorporated in the front of yo ur machine.
Card types that can be read without an adapter:
• Secure Digital Card (SD Card)
• SecureDigital Card HC (SD HC)
• MultiMedia Card (MMC)
• MMC Plus
• MultiMedia C ard mobile (MMC mobile)
•MemoryStick(MS)
•MemoryStickPro
Card types that can be read with an adapter:
• MemoryStick Pro Duo
• Reduced-Size MultiMedia Card (RS-MMC)
• Mini-SecureDigital Card (Mini SD)
Always wait until the data access is completed before removing a card from the slot.
When handling memory cards, comply with the manufacturer’s instructions.
Your dealer can supply you with an adapter for your memory card.
18 - English 10600985321, edition 1
Page 24
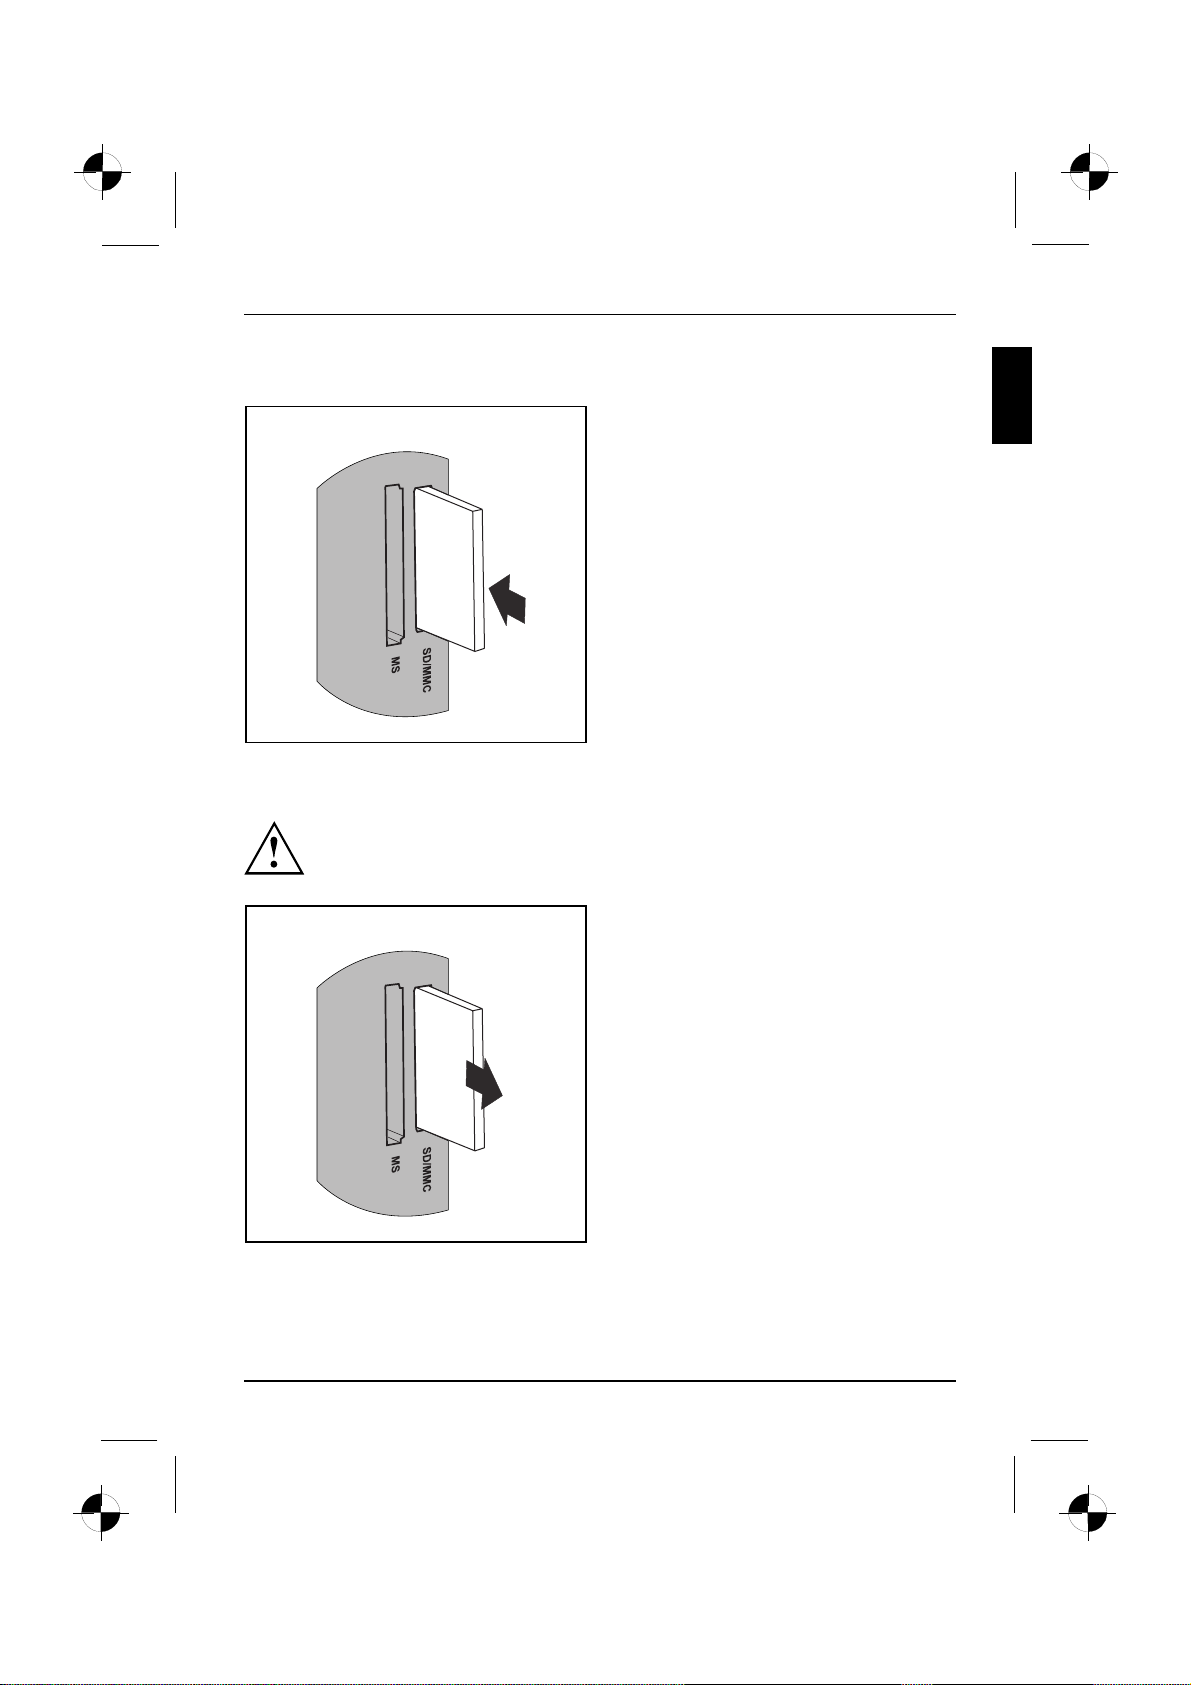
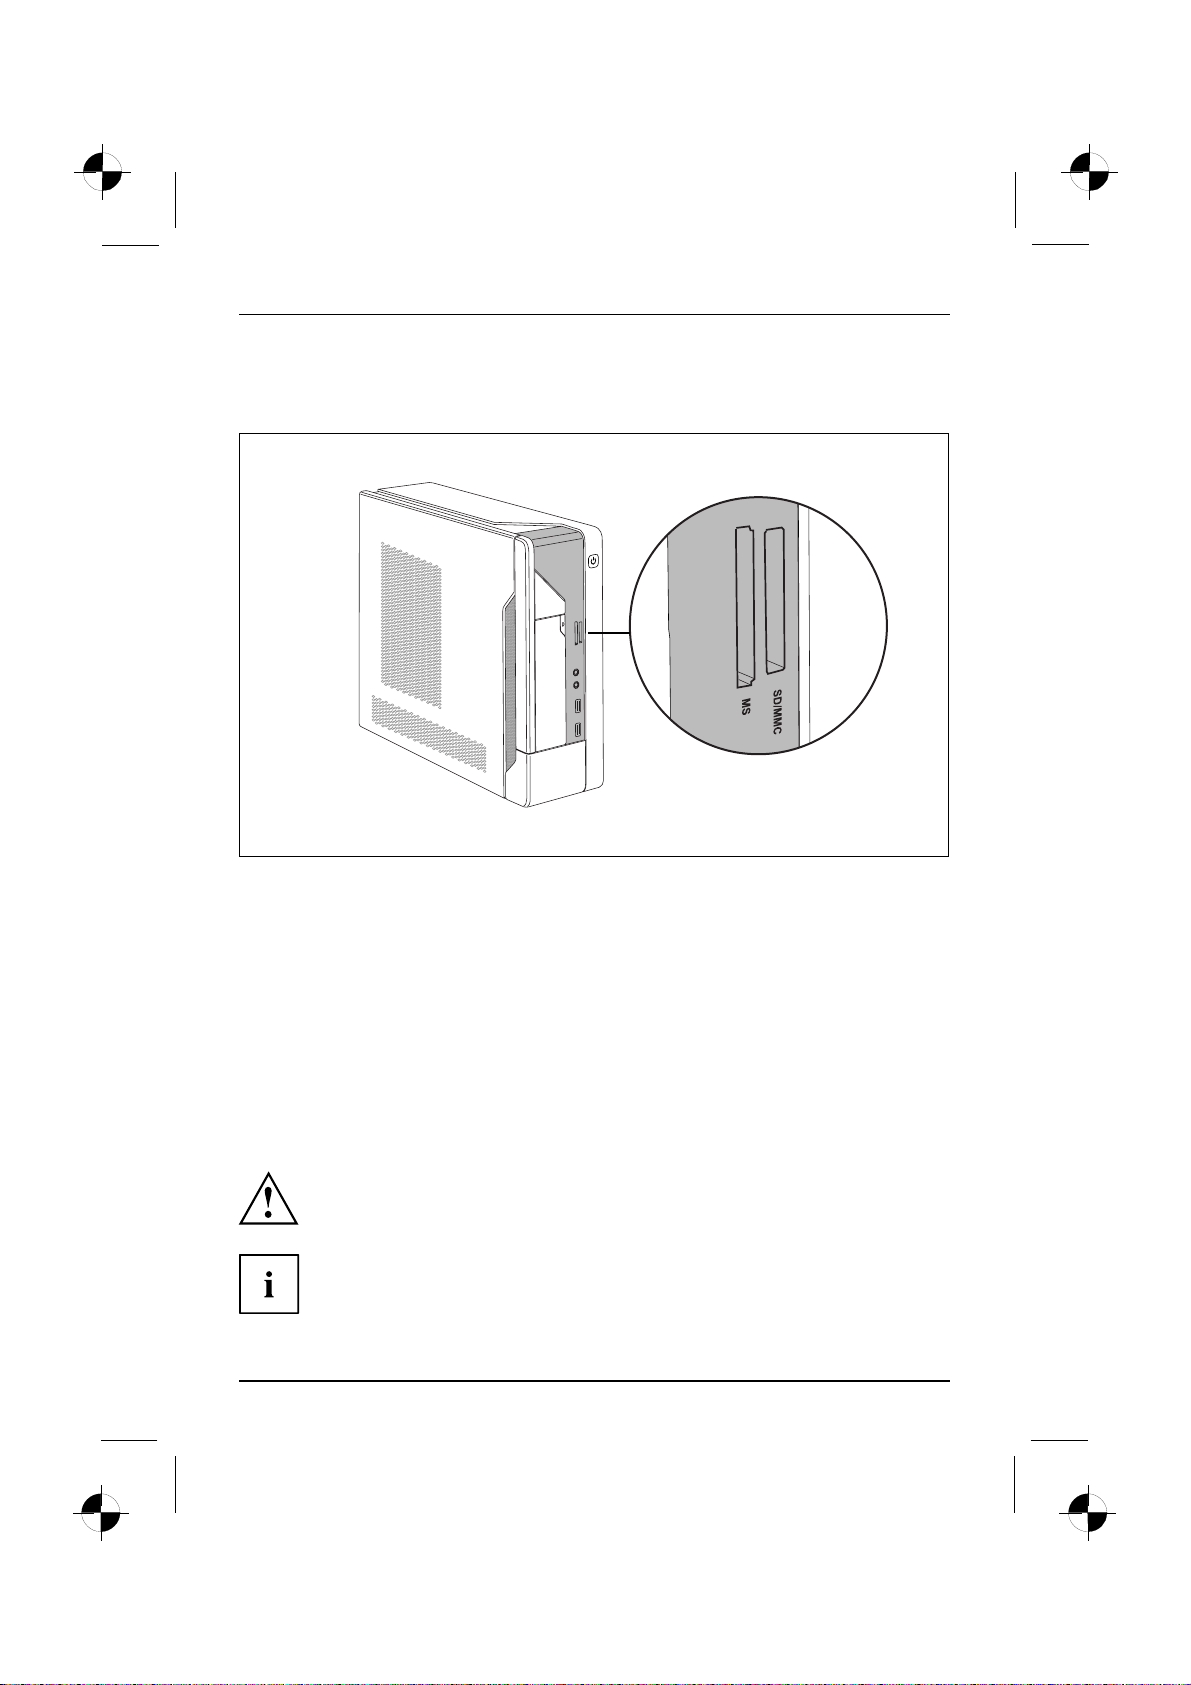
Inserting the memory card
Taking out the memory card
Memorycard,
Always wait until the data access is completed before removing a card from the slot.
Operation
► Carefully insert the memory card into
the slot. The memory card contacts
must face to the right. Do not force the
card in, otherwise the delicate contact
surfaces can be damaged.
Memorycard,
► Carefully take the memory card
out of the slot.
10600985321, edition 1 English - 19
Page 25
Operation
Opening and closing the casing for service
or system expansion
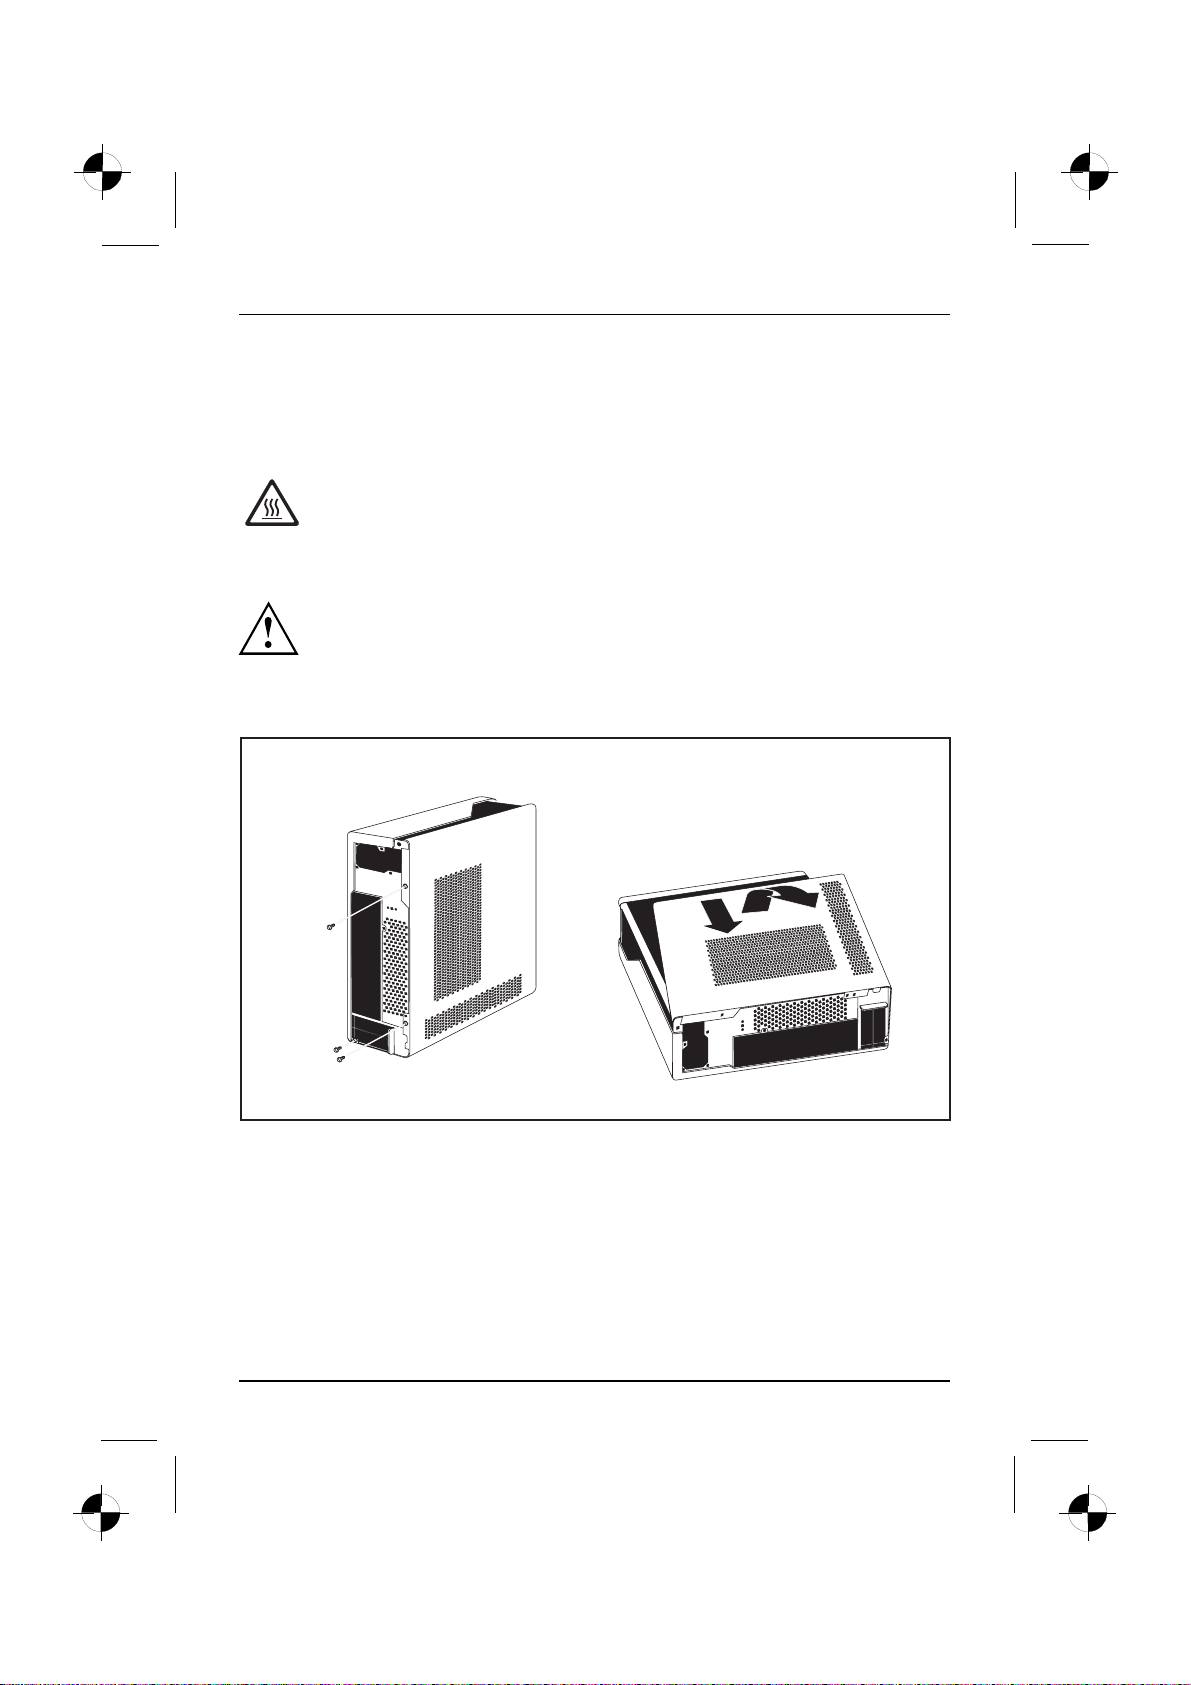
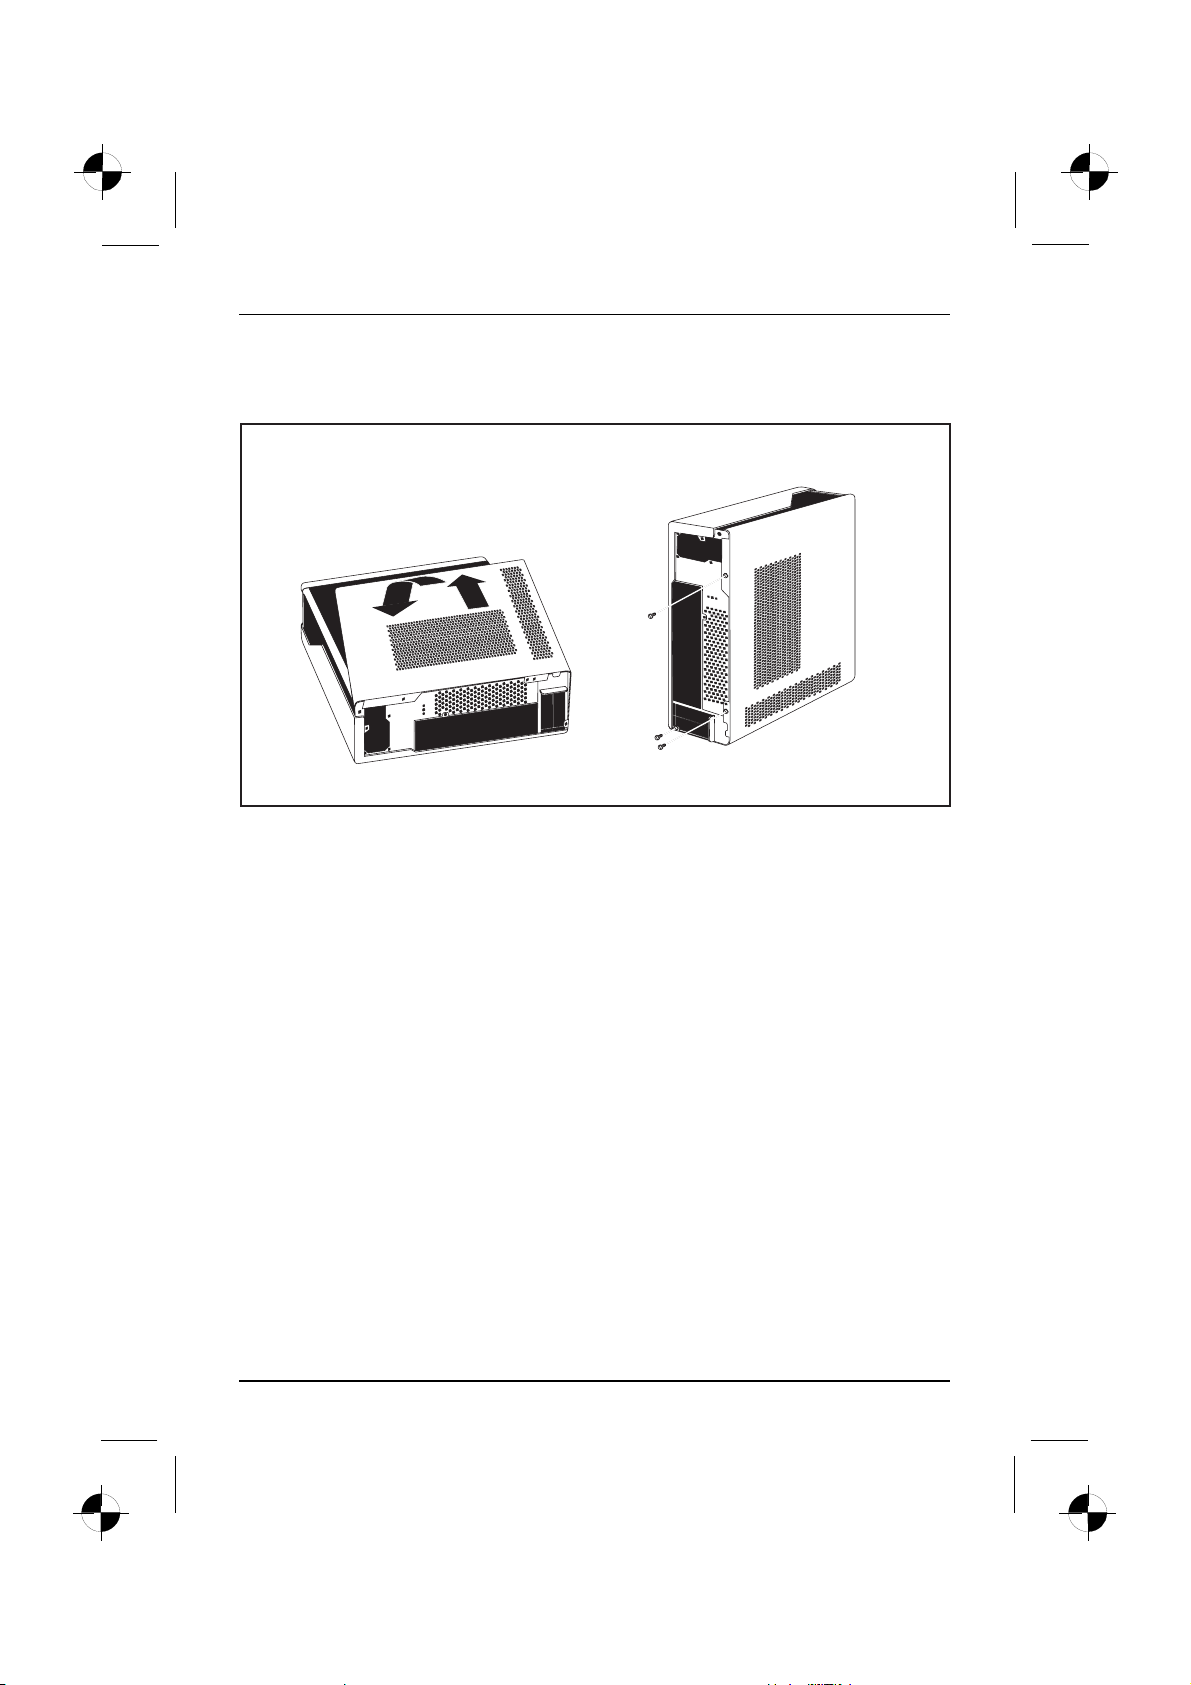
Opening the casing
Casing,Machine
► Switch the m achine off. Make sure the machine is off, and not in power-saving mode!
► Disconnect any cables that make access difficult.
Note that various of the components on the motherboard can be still very hot if the
machine had been in use a short while previously.
These components can be identified by the following symbol.
Comply with the safety information in the "Safety" manual and in the
operating instructions for the "AMILO Desktop".
Unplug the mains plug from the mains socket.
Don’t plug the mains plug back into the ma ins socket until you have
closed the casing up again.
1
2
1
1
► Using a cross-head screwdriver (1), unscrew the casing screws.
► Place the machine on its side as shown.
► Push the side p anel in the direction of the arrow (2).
► Swing the side panel in the direction of the arrow (3) and lift it off the casing.
20 - English 10600985321, edition 1
3
Page 26
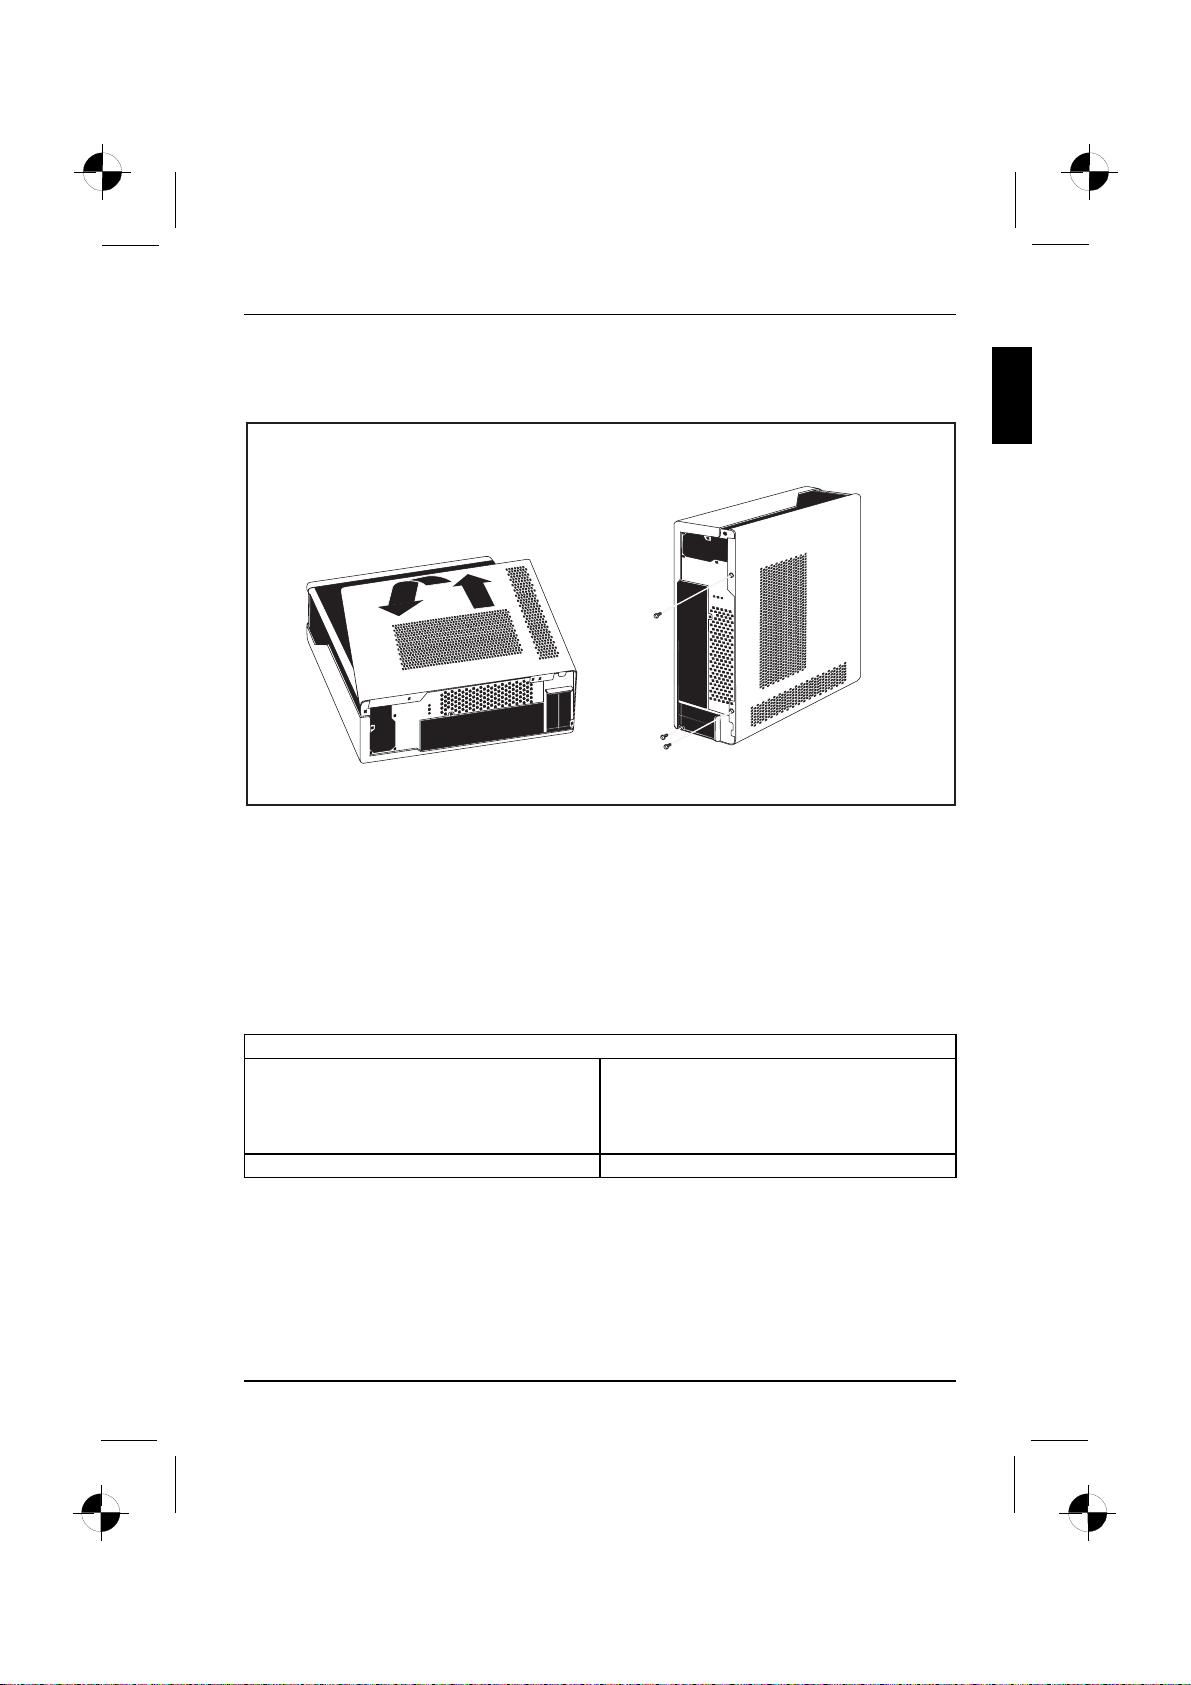
Closing the casing
► Insert the side panel into the guide rail on the base of the casing.
Casing,Machine
Technical data
1
► Swing the side panel in the direction of the arrow (1).
► Push the side panel in the direction of the arrow (2) until it clicks home.
► Using a cross-head screwd river (3), tighten the casing screws.
► Reconnect any cables that were disconnected.
2
3
3
3
Technical data
AMILO Desktop S
Electrical data
Safety standards complied with: CE, product safety LVD 2006/95/EC,
Protective rating: I
IEC60950-1, EN60950-1, EMC: 2004/108/EC,
EN55022, class B, EN55024, EN61000-3-2/3,
RTTE 1 999/5/EC, environmental standards:
RoHS F SC-03230
10600985321, edition 1 English - 21
Page 27
Technical data
Electrical data
Supply voltage range
Rated f requency
Dimensions
Width/depth/height:
Weight
Basic set-up:
Ambient conditions
Climatic category 3K2
Climatic category 2K2
Temperature
Operation (3K2) 15 ° C .... 35 °C
Transport (2K2) –25 °C .... 60 °C
Make sure no co ndensation is present during operation!
The data sheet for this machine contains further technical data. The data sheet
can be found on the Internet under "www.fujitsu-siemens.com ".
110 V -240 V
50 Hz
108 mm x 355.5 mm x 293.6 mm
6.9 kg (AMILO Desktop Si 3535)
DIN IEC 721 part 3-3
DIN IEC 721 part 3-2
LX300 Wireless Keyboard Set
Electrical data - keyboard
Safety standards complied with:
EN 60950
• Power supply
• Power consumption:
Interface: USB 2.0 and 1.1 compatible
Frequency band
ID codes
Number of channels
Electrical data - mouse
Safety standards complied with:
• Power supply
• Power consumption (on white paper)
• Resolution (scanning sensitivity)
Interface: USB 2.0 and 1.1 compatible
Frequency band
ID codes
Number of channels
22 - English 10600985321, edition 1
• 2 x AAA alkali batteries 1.5 V, 2.2 – 3.0 V
• Active mod e: 8 mA, standby mode: 5 µA
2.4 GHz
8,388,608 IDs (24-bit)
64
EN 60950
• 2 x AAA alkali batteries 1.5 V, 2.2 – 3.0 V
• Active mode: 25 mA, standby mode: <9 mA
• 1000 dpi
2.4 GHz
8,388,608 IDs (24-bit)
64
Page 28

Technical data
Electrical data - mouse
Receiver:
• Power supply
• Power consumption:
•USBmode:5VDC
• Active mode: 100 mA
Ambient conditions
Operating temperature: 0 °C – 40 °C
Range of keyboard / mouse Up to 10 m (dependent on radio interference in
the e nvironment)
10600985321, edition 1 English - 23
Page 29
Technical data
24 - English 10600985321, edition 1
Page 30
English
Български
AMILO Desktop S Series
Първоначално въвеждане
вексплоатация
Hrvatski
Română
Slovenščina
Srpski
.
Page 31
Microsoft, MS
, Windows, Windows Vista са регистрирани запазени марки на Microsoft Corporation.
Adobe Reade r ер
MultiMediaCard
е регистрирана запазени марка на Infineon Technologies AG.
Sony и Memory St
Всички други зап
на различни соб
Copyright © Fuji
ственици и са признати за защитени.
tsu Siemens Computers GmbH 2008
Всички права запа
разпространение
Нарушенията водя
Всички права запа
Запазва се правот
егистрирана запазена марка на Adobe Systems Incorporated.
ick са запазени марки на Sony Electronics, Inc.
азени марки са запазени марки или регистрирани запазени марки
зени, особено (ичастичносъщо) тези, свързани с превода, препечатването,
то чрез копия или други подобни методи.
т до задължителни обезщетения.
зени, особено тези за получаване на патент или GM-регистрация.
о на промени в доставката и правото на технически изменения.
Page 32
Съдържание
Български
Съдържание
Новаторска технология ............................................................... 1
Допълнителна информация ............................................................ 1
Упътване за експлоатация "AMILO Desktop" ......................................... 1
Символи ............................................................................... 1
Важни указания ....................................................................... 3
Връзкииелементизаобслужване ................................................... 4
Изводи ................................................................................ 4
Индикации и елементи за обслужване .................................................. 6
Пускане в експлоатация .............................................................. 7
Разопаковане и проверка на съдържанието на доставката .............................. 7
Стъпки за първи пуск в експлоатация ................................................... 7
Позициониране на уреда ............................................................... 8
Свързване към външни устройства ..................................................... 8
Свързваненакабели ............................................................... 8
Разкачване на кабели .............................................................. 9
Свързваненамонитора ............................................................ 9
Wireless Keyboard Set LX300 ........................................................ 9
СвързваненавъншниустройствакъмUSB-изводи .................................. 14
Свързване на уреда към електрическата мрежа ......................................... 15
Първо включване: инсталира се софтуерът ............................................. 15
Включване на монитора и уреда .................................................... 15
Инсталация на софтуера ........................................................... 16
Работаскомпютъра .................................................................. 17
Включваненауреда ................................................................... 17
Изключване на уреда .................................................................. 17
Оперативна индикация ................................................................. 18
Устройство за четене на карти с памет ................................................. 19
Поставяне на картата с памет ...................................................... 20
Изважданенакартатаспамет ...................................................... 20
Отваряне и затваряне на корпуса в случай на сервизна поддръжка или за разширение на
системата ............................................................................. 21
Отваряне на кутията ............................................................... 21
Затваряненакутията ............................................................... 22
Технически данни ..................................................................... 23
AMILO Desktop S ....................................................................... 23
Wireless KeyboardSet LX300 ........................................................... 23
10600985321, Издание 1 Български
Page 33
Съдържание
Български 10600985321, Издание 1
Page 34
Новаторска технология
Новаторска технология
... и ергономичният дизайн правят Вашия AMILO Desktop лесен за обслужване
и надежден настолен персонален компютър.
Компютърът е снабден с оперативна система Microsoft Windows. Тя е напълно
инсталирана и конфигурирана оптимално за Вас. Уредът може да се стартира
незабавно, когато го включите за първи път.
Вашият уред е оборудван с най-модерна технология, за да можете да използвате
максимално компютърните си умения на практика.
• енергоспестяващ Intel CPU
• бърза връзка WLAN от стандарта b/g/Draft n със скорост до 300 Mbit/s
• много тих вентилатор на процесора
С лесната за обслужване помощна програма "BIOS-Setup-Utility" можете да управлявате
хардуера на Вашия компютър и да запазите системата си по-добре от неразрешен
достъп, като използвате мощните характеристики за паролата.
Това упътване за експлоатац ия, наред с останалото, ще Ви покаже как
да включите и работите с уреда си.
Допълнителна информация
Обща информация за Вашия уред ще намерите в упътването "AMILO Desktop".
Частитенатоваупътване, свързани със софтуера, касаят продукти на Microsoft,
акотесавключенивобеманадоставканаВашияуред.
При инсталиране на други софтуерни продукти спазвайте
упътваниятанапроизводителя.
Упътване за експлоатация "AMILO Desktop"
Упътването за експлоатация "AM ILO Desktop" ще намерите в стартовото меню
на Windows при Всички програми - Fujitsu Siemens Computers или в интернет
на адрес "www.fujitsu-siemens.com/support".
Символи
обозначава указания, чието неспазване застрашава Вашето здраве,
експлоатационната годност на Вашия уред или сигурността на Вашата
информация. Гаранцията отпада, ако поради неспазването на тези
указания възникнат дефекти в уреда.
обозначава важна информация за правилно боравене с уреда
►
10600985321, Издание 1 Български -1
обозначава работната стъпка, коятоследвадаизпълните.
Page 35
Новаторска технология
Този шрифт
Този шрифт
Този шрифт
"Този шрифт"
Abc
Този шрифт
обозначава резултат
обозначава действия, които предприемате с клавиатурата в диалог с
програма или в ред команди, например Вашата парола (име123) или
команда, за да бъде стартирана определена програма (start.exe)
обозначава информация, коятосеизобразяваотопределенапрограма
на монитора, например: Инсталацията е завършена!
обозначава
• понятия и текстове в една софтуерна плоскост, например: Кликнете
върху Запаметяване.
• Имена на програми или информация, например Windows или
setup.exe.
обозначава
• Преки препратки към друг раздел, например "Указания за
безопасност"
• Преки препратки към външен източник, например уеб-адрес:
Повече прочетете на "www.fujitsu-siemens.com"
• Имена на CD, DVD, както и обозначения и заглавия на други
материали, като: "CD/DVD Drivers & Utilities" или наръчник
"Безопасност"
обозначава бутон на клавиатурата, например:
обозначава понятия и текст, на които се акцентира и които се изтъкват,
като: Да не се изключва уреда
F10
2-Български 10600985321, Издание 1
Page 36

Важни указания
Спазвайте указанията за безопасност в наръчника "Безопасност" ив
упътването за експлоатация "AMILO Desktop".
Важни указания
10600985321, Издание 1 Български -3
Page 37

Връзки и елементи за обслужване
Връзкииелементизаобслужване
В тази глава се представят отделните хардуерни компоненти на Вашия компютър.
Ще получите преглед на индикациите и връзките на Вашия уред. Запознайте
се с тези елементи, преди да работите с уреда.
Изводи
Означение Фигура Символ
Захранване на РС
Свързване към захранващата
Sound (външни източници на звук,
напр. активни високоговорители,
микрофон)
• Sound onboard
При допълнително вградена
звуковакартафункциятазазвук
нееактивиранавдъннатаплатка,
респ. липсва "Sound onboard"
("Вграден звук").
4-Български 10600985321, Издание 1
3,5 мм комутационни букси
мрежа
Line In
Line Out
Mic
Page 38

Връзкииелементизаобслужване
Означение Фигура Символ
Цифров звуков извод, виж също
SPDIF Out
ръководството към дъната платка.
Извод за USB устройства
(напр. клавиатура,
модул за инфрачервено
предаване/приемане за мишка,
скенер, принтер)
USB 2.0
Важно указание за USB 2.0: За да
се гарантира сигурно предаване
на данните, Ви препоръчваме да
използвате USB-свързващ кабел с
макс. дължина 3 м.
Свързване на съвместими с
IEEЕ-1394 или FireWire устройства
(напр. видеорекордер, цифрова
камера)
FireWire
Мрежа или DSL модем
„Чинч” изход (коаксиален
кабел)
USB гнездо
FireWire гнездо
RJ-45 гнездо
или USB
1394
или
или LAN
Видеовход и видеоизход (по
избор)
SVIDEO IN
SVIDEO OUT
(виж документацията за
VGA-/TV-картата)
4- илиповечепиновогнездо
Извод за цифров видеосигнал
DVI
(монитор)
Дигитален аудио-видео-порт HDMI
10600985321, Издание 1 Български -5
Page 39
Връзки и елементи за обслужване
Индикациииелементизаобслужване
Означение Символ Значение
Ключ за вкл./изкл. Ключ за активиране на системата в работен
режим.
• Ключът за вкл./изкл. свети в бяло: Системата
евключена.
• Ключът за вкл./изкл. мига жълто: Твърдият
диск е в работен режим.
• Ключът за вкл./изкл. мига бяло: Системата е
в енергоспестяващ режим.
6-Български 10600985321, Издание 1
Page 40
Пускане в експлоатация
Пускане в експлоатация
Пусканевексплоатация
Разопаковане и проверка на съдържанието
на доставката
Би трябвало да съхраните оригиналната опаковка на уредите за евентуално транспортиране.
ОпаковкаСъдържаниенадоставкатаОпаковка
► Разопаковайте частите.
► Проверете съдържанието на опаковката за видими повреди при транспорта.
► Проверете дали доставеното съответства с данните, цитирани на товарителницата.
Стъпки за първи пуск в експлоатация
Първипусквексплоатация,прегледВъвежданевексплоатация
Необходими са само няколко стъпки, за да въведете Вашия уред в експлоатация:
• Изберете място за уреда и поставете уреда
• Свържете външните устройства
• Проверете захранващото напрежение и свържете уреда към електрическата мрежа
• Включете уреда
Повече за отделните стъпки ще научите в следващите раздели.
Съблюдавайте указанията за безопасност в раздел "Važne napomene", Strana 3 .
Ако установите повреди при транспорта или несъответствие между
съдържанието на опаковката и товарителницата, незабавно уведомете
мястото, откъдето сте закупили уредите!
Външни устройства
Когато като допълнение към уреда си сте получили други външни устройства
(напр. принтер), свържете ги едва след първоначалната инсталация. Как да
свържете тези външни устройства е описано в следващите раздели.
Механизми и конструктивни групи
Когато към уреда си имате допълнително механизми или конструктивни
групи, вградете ги едва след първата инсталация. Монтажът на
механизмииконструктивнигрупиеописанвнаръчника"AMILO
Desktop" вглава"Разширения на системата".
10600985321, Издание 1 Български -7
Page 41
Пускане в експлоатация
Позиционираненауреда
Работномястона монитораЕргономичноУред
При позиционирането на уреда съблюдавайте препоръките и указанията
за безопасност в наръчника "Безопасност".
Позиционирайте уреда само в предвиденото за целта работно
положение (вертикално върху крачетата).
Препоръчваме Ви да поставите уреда върху нехлъзгаща се подложка.
При многообразието на използваните при мебелите покрития и
лакове не може да се изключи възможността от повреди в мястото
за поставяне на пластмасовите крачета.
Не поставяйте няколко уреда един върху друг.
Уредът може да се пуска в експлоатация само ако стои върху крачетата.
В зависимост от мястото на Вашия уред могат да възникнат смущаващи
вибрации и шумове. За да избегнете това, откъм страните на корпуса
без вентилационни отвори трябва да се съблюдава разстояние от
най-малко 3mmдо други уреди или предмети.
Внимавайте уредът да бъде достатъчно вентилиран. За да се избегне прегряване,
вентилационните отвори на монитора и на уреда не трябва да бъдат покрити.
Не излагайте уреда на екстремни условия на околната среда (виж
"AMILO Desktop S", Strana 23, раздел "Условиянаоколнатасреда").
Предпазвайте уреда от прах, влага и горещина.
Свързване към външни устройства
Прочетете документацията към външното устройство преди да го свържете.
Освен при USB-устройства мрежовият щепсел трябва да е изваден от
контакта, когато включвате външни устройства!
Прибурясгръмотевицинетрябванитодавключвате, нито да разкачвате кабели.
Хващайте винаги щепсела, когато разкачвате даден кабел.
Не дърпайте самия кабел!
При включване или разкачване на кабели спазвайте описаната
по-долу последователност.
Свързваненакабели
► Изключете всички засегнати уреди.
КабелКабели
► Извадете мрежовите щепсели на всички засегнати уреди от мрежовите контакти.
► Свързват се всички кабели към уреда и към външните устройства. Съблюдавайте
указанията за безопасност, приведени в раздел ""Važne napomene", Strana 3 ".
► Всички информационни кабели за пренос на информация се свързват в предвидените
приспособления за включване на информационните/далекосъобщителните мрежи.
► Всички мрежови щепсели се включват в заземените мрежови контакти.
8-Български 10600985321, Издание 1
Page 42

Пускане в експлоатация
Разкачване на кабели
► Изключетевсичисвързаниуреди.
Кабели
► Извадете мрежовите щепсели на всички засегнати уреди от мрежовите контакти.
► Разкачете всички информационни кабели за пренос на информация от предвидените
приспособления за включване на информационните/далекосъобщителните мрежи.
► Разкачат се всички кабели от уреда и от външните устройства.
Свързване на монитора
► Подгответе монитора, кактоеописановръководствотозаексплоатация
към монитора (напр. свързваненакабели).
Монитор
► Поставете информационния кабел в извода за монитор на уреда.
В зависимост от класа на Вашия уред и монитора Ви можете да
свържете кабела за данни и към DVI-порта.
► Свържете мрежовия кабел на монитора към заземен мрежов контакт.
Wireless Keyboard Set LX300
В обема на доставката на Вашия уред е включен комплектът Wireless Keyboard
Set LX300 с безжична мишка и клавиатура. Създаващите проблеми кабели
отпадат благодарение на дигиталната радиотехника.
Спазвайте указанията за безопасност в наръчника "Безопасност" ив
упътването за употреба "AMILO Desktop".
Използвайте само батерии от тип AAA.
Символ в отделението за батерии Ви показва как да положите батериите правилно.
10600985321, Издание 1 Български -9
Page 43
Пускане в експлоатация
Поставяне на батериите в мишката
1
2
► Поставете батериите (1).
► Поставете ключа за включване/изключваненадолнатастрананамишкатана"ON (вкл.)" (2).
За да спестите енергия, поставете ключа за включване/изключване на мишката на
"OFF (изкл.)", когато няма да използвате мишката по-продължително време.
Поставяне на батериите в клавиатурата
Символ в отделението за батерии Ви показва как да положите батериите правилно.
10 - Български 10600985321, Издание 1
Page 44

► Поставете батериите.
Пускане в експлоатация
10600985321, Издание 1 Български -11
Page 45

Пускане в експлоатация
Свързваненаприемника
► Отстранете приемника от клавиатурата в указаната със стрелка посока.
12 - Български 10600985321, Издание 1
Page 46

Пускане в експлоатация
► Поставете приемника на свободен USB-порт на Вашия компютър.
Радиовръзката се осъществява автоматично.
При необходимост радиовръзката към комплекта за клавиатура
може да се изгради наново
Нормално се генерира автоматично код за радиовръзка и комплектът за клавиатурата
е веднага в готовност за употреба. При успешна връзка светлинната индикация на
приемника свети в зелено. Светлинната индикация на клавиатурата, съотв. мишката
свети червено, когато напрежението на батериите падне под 2,2 V.
Аковръзкатанесеосъществиавтоматичноилисепрекъсне, процедирайте, както следва:
► Изтеглете приемника от компютъра и го включете отново.
► Насочете мишката към приемника в разстояние от макс.30см.
► Натиснете левия бутон на мишката в продължение на пет секунди.
Светлинната индикация на приемника премигва 4 пъти в зелено, осъществяването
на връзката към мишката е било успешно.
► Натиснете в продължение на пет секунди клавиш
Светлинната индикация на приемника премигва 4 пъти в зелено, осъществяването
на връзката към клавиатурата е било успешно.
Esc на клавиатурата
.
Клавиши напред и назад на мишката
Освендеснияилевиябутониколелотонамишката, мишката Ви разполага
с два допълнителни бутона (1):
10600985321, Издание 1 Български -13
Page 47

Пускане в експлоатация
1
С тези два бутона можете да прескачате удобно при дадена програма напред и
назад, например между интернет-страниците във уеб-браузер.
СвързваненавъншниустройствакъмUSB-изводи
USB-устройстваUSB-изводВъншниустройстваУреди
Към USB-изводите можете да свържете множество външни устройства (напр.
принтер, скенер, модем или клавиатура).
USB-устройствата са с активна способност за свързване. Поради това кабелите на
USB-устройства могат да бъдат свързвани и разкачвани при включен уред.
Повече информация ще намерите в документацията към USB-устройствата.
► Свържете информационния кабел към външното устройство.
► Свържете информационния кабел към едно USB-устройство на Вашия уред.
Драйвери за устройства
Външните USB-устройства, които свързвате към един от USB-изводите,
обикновено не се нуждаят от собствен драйвер, тъй като необходимият
софтуер вече е наличен в операционната система. Ако въпреки това външното
USB-устройство изисква собствен софтуер, можете да го инсталирате от
носителя на информация, който съпътства USB-устройството.
От предния USB-извод на Вашия уред до външното USB-устройство трябва да се
използва кабел с максимална дължина 3m,за да се осигури USB 2.0.
14 - Български 10600985321, Издание 1
Page 48

Пускане в експлоатация
Свързване на уреда към електрическата мрежа
Мрежовадаптер
1
2
► Свържете захранващия кабел към уреда (1).
► Поставете щепсела в заземен контакт с предпазител (2).
Първо включване: инсталира се софтуерът
ИнсталацияСофтуерИнсталация
Когато уредът се включва в мрежа, при инсталацията на софтуера са необходими
данни за потребител, сървър и мрежов протокол.
Когато включите уреда за първи път, доставеният с уреда софтуер се инсталира и конфигурира.
Предвидете малко време за това, тъй като този процес не трябва да бъде прекъсван.
Следзапочваненаинсталациятауредътнетрябвадасеизключва,
докато инсталацията не приключи!
Повременаинсталациятауредътможедасерестартирасамоприприканване!
В противен случай инсталацията няма да е правилно проведена и съдържанието
натвърдиядисктрябваизцялодасевъзстанови.
Включваненамонитораиуреда
► Включете монитора (виж упътването на монитора).
10600985321, Издание 1 Български -15
Page 49

Пускане в експлоатация
► Натиснете бутона за вкл./изкл. на предната страна на уреда.
Светва оперативната индикация, уредът стартира.
Инсталация на софтуера
► По време на инсталацията следвайте инструкциите, появяващи се на монитора.
СофтуерИнсталация
► При неясноти относно исканите данни за въвеждане прочетете в помощните
материали към Вашата операционна система.
Повече информация за системата, както и информация относно драйвери,
помощнипрограмииподобрения, ще намерите на DVD "Drivers & Utilities"
ивинтернетна"http://www.fujitsu-siemens.com/support".
16 - Български 10600985321, Издание 1
Page 50
Работа с компютъра
Работа с компютъра
Включваненауреда
► При необходимост включете монитора (виж ръководството за експлоатация на монитора).
УредМонитор
► Натиснете бутона за вкл./изкл. напреднатастрананауреда.
Оперативната индикация свети в бяло, уредът стартира.
Изключване на уреда
► Излезте коректно от Вашата операционната система.
УредМонитор
► Ако операционната система не въвежда автоматично уреда в енергоспестяващ режим или
не го изключва, натиснетебутоназавкл./изкл. впродължениенанай-малко 4 секунди.
Тогава уредът изразходва минимална енергия.
Бутонът за вкл./изкл. не разкача уреда от мрежовото напрежение. За да разкачите
напълно щепсела от мрежовото напрежение, трябва да го извадите от контакта.
► При необходимост изключете монитора (виж ръководството за експлоатация към
монитора).
10600985321, Издание 1 Български -17
Page 51

Работа с компютъра
Оперативна индикация
ОперативнаиндикацияУред
Оперативната индикация ще намерите на предната страна на корпуса.
1
1=Оперативна индикация
Оперативнаиндикация
В енергоспестяващ режим уредът не трябва да се отделя от мрежата, тъй
катовпротивенслучайможедасезагубиинформация.
• Индикацията свети бяло: Уредът е включен.
• Индикацията мига бяло: Уредът е в енергоспестяващ режим. След вкл
сбутоназавкл./изкл. уредът се включва или се връща в състояниет
ючване
о, което
е било налице преди енергоспестяващия режим.
• Индикацията мига жълто: Твърдият диск е в работен режим.
• Индикацията не свети: Уредът е отделен от електрическата мрежа или
е в режим на готовност. Ако уредът е в режим на готовност, уредът
може да се включи с бутона за вкл./изкл.
18 - Български 10600985321, Издание 1
Page 52
Устройство за четене на карти с памет
Мястозапоставяне
Вашият уред има фронтално устройство за четене на карти с памет.
Работа с компютъра
Разрешени типове карти без адаптер:
• Secure Digital Card (SD Card)
• SecureDigital Card HC (SD HC)
• MultiMedia Card (MMC)
• MMC Plus
• MultiMedia Card mobile (MMC mobile)
• Memory Stick (MS)
• Memory Stick Pro
Разрешени типове карти с адаптер:
• MemoryStick Pro Duo
• Reduced-Size MultiMedia Card (RS-MMC)
• Mini-SecureDigital Card (Mini SD)
Непременно изчакайте, докато приключи достъпът до данните, преди
да извадите картата от мястото за поставянето й.
При работа с карти с памет спазвайте указанията на производителя.
Адаптер за Вашата карта с памет ще намерите в специализираната търговска
мрежа.
10600985321, Издание 1 Български -19
Page 53

Работа с компютъра
Поставяне на картата с памет
Изважданенакартатаспамет
Картаспамет
Непременно изчакайте, докато приключи достъпът до данните, преди
да извадите картата от мястото за поставянето й.
► Внимателно вкарайта картата с памет
в мястото за поставяне. Контактите на
картата с памет трябва да са насочени
надясно. Не използвайте сила, тъй като
в противен случай могат да се увредят
чувствителните контактни повърхности.
Картаспамет
► Изтеглете картата с памет внимателно
от мястото за поставяне.
20 - Български 10600985321, Издание 1
Page 54

Работа с компютъра
Отваряне и затваряне на корпуса в
случай на сервизна поддръжка или за
разширение на системата
Отваряне на кутията
КорпусУред
►Изключетеуреда. Уредът не трябва да е в енергийно икономичен режим!
► Отстранете предизвикващите проблеми, включени кабели.
Имайте предвид, че различни компоненти на дънната платка могат да са много
горещи, когато уредът е бил активен преди кратко време.
Тези компоненти могат да са обозначени със следния символ.
Спазвайте указанията за безопасност в наръчника "Безопасност" ив
упътването за експлоатация "AMILO Desktop".
Изтеглете щепсела от контакта.
Включетещепселаотновоедва, когато сте затворили корпуса.
1
2
1
1
► Отстранете болтчетата на корпуса с кръстата отвертка (1) .
► Поставете уреда настрана, кактоепоказанонафигурата.
► Избутайте страничната част в указаната със стрелка посока (2).
► Изместете страничната част в указаната със стрелка посока (3) ия
отстранете с вдигане от корпуса.
10600985321, Издание 1 Български -21
3
Page 55
Работа с компютъра
Затваряненакутията
► Поставете страничната част във водещата шина на долната част на корпуса.
КорпусУред
1
2
3
3
3
► Изместете страничната част в указаната със стрелка посока (1).
► Избутайте страничната част в указаната със стрелка посока (2), докато прилегне добре.
► Завийте болтчетата на корпуса с кръстата отвертка (3).
► Отново включете преди това разкачените кабели.
22 - Български 10600985321, Издание 1
Page 56

Технически данни
Технически данни
AMILO Desktop S
Електрически характеристики
Спазени стандарти за безопасност:CE,Безопасност на продукта LVD 2006/95/ЕО,
Клас на защита:I
Диапазон на захранващо напрежение 110 V -240 V
Номинална честота 50 Hz
Размери
ширина/дълбочина/височина:
Тегло
основна конфигурация:
Условия на заобикалящата среда
климатичен клас 3K2
климатичен клас 2K2
температура
работа/експлоатация (3K2) 15 °C .... 35°C
транспорт (2K2) –25 °C .... 60 °C
При работа не се разрешава намокрянето и увлажняването!
IEC60950-1, EN60950-1, Електромагнитна
съвместимост (EMV): 2004/108/EО, EN55022,
клас B, EN55024, EN61000-3-2/3 , RTTE
1999/5/EО, Екологични стандарти:RoHS
FSC-03230
108 mm x 355,5 mm x 293,6 mm
6,9 kg (AMILO Desktop Si 3535)
DIN IEC 721 част 3-3
DIN IEC 721 част 3-2
Допълнителни технически параметри ще намерите в информационната
листовка към уреда. Ще намерите информационната листовка в
интернет на адрес "www.fujitsu-siemens.com ".
Wireless Keyboard Set LX300
Електрически параметри - клавиатура
Спазени стандарти за безопасност
• Електрозахранване
• Разход на електроенергия
Интерфейсен порт
Честотен диапазон
10600985321, Издание 1 Български -23
EN 60950
•2xAAA-алкални батерии 1,5 V, 2,2 – 3,0 V
• Активен режим:8mA,режим на готовнос
Standby: 5 µA
USB 2.0- и 1.1 съвместим
2,4 GHz
Page 57

Технически данни
Електрически параметри - клавиатура
ID кодове
8,388,608 IDs (24 бита)
Брой на каналите 64
Електрически параметри - мишка
Спазени стандарти за безопасност
• Електрозахранване
• Потребление на електроенергия (върху
бяла хартия)
• Разделителна способност
EN 60950
•2xAAA-алкални батерии 1,5 V, 2,2 – 3,0 V
• Активен режим:25mA,режим на готовнос
Standby: <9 mA
• 1000 dpi
(чувствителност за проверка и тестване)
Интерфейсен порт
Честотен диапазон
ID кодове
USB 2.0- и 1.1 съвместим
2,4 GHz
8,388,608 IDs (24 бита)
Брой на каналите 64
Приемник
• Захранващо напрежение
• Разход на електроенергия
•USB-режим:5VDC(прав ток)
• Активен режим:100mA
Условия на заобикалящата среда
Работна температура 0°C–40°C
Диапазон на действие клавиатура / мишка До 10 м (в зависимост от радиосмущенията в
околната среда)
24 - Български 10600985321, Издание 1
Page 58
English
Български
AMILO Desktop S Series
Prvo puštanje u rad
Hrvatski
Română
Slovenščina
Srpski
.
Page 59
Microsoft, MS
, Windows, Windows Vista su registrirani zaštitni znaci tvrtke Microsoft Corporat ion.
Adobe Reader je
MultiMediaCard
Sony i Memory St
Sviostalizašti
vlasnika i smat
tni znaci su zaštitni znaci ili registrirani zaštitni znaci odnosnog
raju se zaštićenima.
Copyright © Fuji
Sva prava pridrža
prijevod, dodatn
Kršenja navednog
Sva prava pridrža
Pridržano pravo n
zaštitni znak tvrtke Adobe Systems Incorporated.
je registrirani zaštitni znak tvrtke In fineon Technologies AG.
ick su zaštitni znaci tvrtke Sony Electronics, Inc.
tsu Siemens Computers GmbH2008
na, naročito (također i u obliku izvadaka) prava koja se odnose na
i tisak, reprodukciju kopiranjem ili slične postupke.
podliježu obvezi naknade štete.
na, naročitozaslučaj dodjele patenta ili registracije dizajna.
a mogućnosti isporuke i tehničke promjene.
Page 60

Sadržaj
Hrvatski
Sadržaj
Inovativna tehnologija ................................................................. 1
Dodatne informacije . . . .................................................................. 1
Upute za rad"AMILO Desktop" ....................................................... 1
Načini prikaza .......................................................................... 1
Važnenapomene ...................................................................... 3
Priključciiupravljački elementi ........................................................ 4
Priključci ............................................................................... 4
Indikatori i upravljačkielementi ........................................................... 6
Puštanje urad ......................................................................... 7
Raspakirajte iprovjerite sadržajisporuke .................................................. 7
Koraci prvogpuštanja urad .............................................................. 7
Postavljanje uređaja ..................................................................... 8
Priključivanje vanjskih uređaja ........................................................... 8
Priključivanje vodova ................................................................ 8
Isključivanje vodova . . . . . . ........................................................... 8
Priključivanje monitora ............................................................... 9
Wireless Keyboard Set LX300 ........................................................ 9
Priključivanje vanjskih uređajanaUSB-priključke ...................................... 13
Priključivanje uređajana mrežni napon ................................................... 14
Prvo uključivanje: instalira se softver ...................................................... 14
Uključivanje monitora i uređaja ....................................................... 14
Instalacijasoftvera .................................................................. 15
Rukovanje ............................................................................. 16
Uključivanje uređaja ..................................................................... 16
Isključivanje uređaja ..................................................................... 16
Pokazivač načina rada .................................................................. 17
Laserski uređaj za memorijske kartice .................................................... 18
Umetanje memorijske kartice ......................................................... 19
Vađenje memorijske kartice .......................................................... 19
Otvaranje i zatvaranje kućišta u slučaju servisa ili kod nadograđivanja sustava ............... 20
Otvaranje kućišta .................................................................... 20
Zatvaranje kućišta ................................................................... 21
Teh nički podaci ........................................................................ 22
AMILO Desktop S ....................................................................... 22
Wireless KeyboardSet LX300 ........................................................... 22
10600985321, Izdanje 1 Hrvatski
Page 61

Sadržaj
Hrvatski 10600985321, Izdanje 1
Page 62
Inovativna tehnologija
Inovativna tehnologija
... i ergonomski dizajn vaše AMILO Desktop računalo čine pouzdanim i korisniku
prilagođenim stolnim osobnim računalom.
Uređaj je opremljen operacijskim sustavom Microsoft Windows. Taj je sustav prethodno instaliran
i optimalno konfiguriran. Uređaj je spreman za korištenje prilikom prvog uključivanja.
Vaš je uređaj opre m ljen najnovijom tehnologijom koja omogu ćuje optimalnu
prilagođeno iskustvo korištenja računala.
• Intel procesor koji štedi energiju
• brza WLAN mreža sa standardom b/g/Draft n i do 300 Mbit/s
• iznimno tiho hlađenje procesora
Korisnički prilagođen uslužni program "BIOS-Setup-Utility" omogućuje upravljanje hardverom vašeg
uređaja i bolju zaštitu sustava od neovlaštenog pristupa kroz korištenje učinkovitih svojstava lozinki.
Ove upute za rad donose informacije o, između ostalog, pokretanju i korištenju vašeg uređaja.
Dodatne informacije
Općenite informacije o vašem uređaju možete pronaći u uputama
za rad "AMILO Desktop".
Dijelovi ovih uputa koji opisuju softver odnose se na proizvode tvrtke Microsoft,
ako ti proizvodi ulaze u opseg isporuke za vaš uređaj.
Prilikom instalacije drugih softverskih proizvoda pratite upute za korištenje
izdane od proizvođača tih proizvoda.
Upute za rad "AMILO Desktop"
Upute za rad "AMILO Desktop" možete pronaćiupočetnom izborniku sustava Windows, pod Svi
programi - Fujitsu Siemens Computers ili na internetskoj adresi "w ww.fujitsu-siemens.com/support".
Načini prikaza
označava napomene čije nepoštivanje može ugroziti Vaše zdravlje,
funkcionalnost Vašeg uređaja ili sigurn ost Vaših podataka. Jam stvo za
uređaj prestaje ukoliko nepoštivanjem ovih napomena izazovete kvarove
na uređaju.
označava važne podatke za stručno rukovanje uređajem
►
10600985321, Izdanje 1 Hrvatski - 1
označava radni postupak koji morate izvršiti
označava rezultat
Page 63

Inovativna tehnologija
Ovaj font
Ovaj font
Ovaj font
"Ovaj fo n t"
Abc
Ovaj font
označava unose koje pomoću tipkovnice vršite u dijalogu programa ili u
retku za naredbe, npr. Vaša loznika (Name123) ili naredbu za pokretanje
programa (start.exe)
označava podatke koje program prikazuje na zaslonu, np r.: Instalacija
je završena!
označava
• pojmove i tekstove u softverskom sučelju, npr.: Pritisnite na Spremi.
• nazive programa ili datoteka, npr. Windows ili setup.exe.
označava
• križne reference na drugi odjeljak, npr. "Sigurnosne u pute"
• križne reference na vanjski izvor, npr. Web adresu: Ostatak pročitajte
na "www.fujitsu-siemens.com"
• nazive CD-a, DVD-a te natpise i nazive drugih materijala, npr.:
"CD/DVD Drivers & Utilities (upravljački i uslužni programi za CD/DVD)"
ili priručnik "Sigurnost"
označava tipku na tipkovnici, npr.:
F10
označava naglašene ili ista knu te pojmove i tekstove, npr.: Nemojte
isključivati uređaj
2 - Hrvatski 10600985321, Izdanje 1
Page 64
Važne napomene
Pročitajte sigurnosne upute u priručniku "Sigurnost" i upute za rad
računala "AMILO Desktop".
Važne napomene
10600985321, Izdanje 1 Hrvatski - 3
Page 65

Priključci i upravljački elementi
Priključci i upravljački elementi
U ovom poglavlju opisane su po jedinačne hardverske komponente vašeg uređaja. Donosi pregled
indikatora i priključaka na uređaju. Dobro se upoznajte s tim elementima prije rada s uređajem.
Priključci
Oznaka Slika Simbol
Napajanje računala
Priključak na mrežu
Zvuk (vanjski izvori zvuka, npr.
aktivni zvučnik, mikrofon)
• Sound onboard
Kod naknadno ugrađene zvučne
kartice nije aktivirana funkcija zvuka
na matičnoj ploči, odnosno ne postoji
„Sound onboard“ (Interna zvučna
kartica).
4 - Hrvatski 10600985321, Izdanje 1
3,5 mm priključci
Line In
Line Out
Mic
Page 66
Priključci i upravljački elementi
Oznaka Slika Simbol
Digitalni priključak za zvuk,
SPDIF Out
pogledajte priručnik za matičnu
ploču.
Cinch-priključak (koaksijalni)
Priključak za USB-uređaje (npr.
tipkovnicu; IC-odašiljač/prijamnik
modul miša, skener, pisač)
USB 2.0
USB-utičnica
ili USB
Važna uputa za USB 2.0:
Za sigurnu brzinu prijenosa
podataka preporučujemo korištenje
USB-priključnog kabela maksimalne
duljinedo3m.
Priključak za Firewire uređaje ili
1394
uređaje kompatibilne s IEEE-1394
(npr. videorekorder, digitalna
kamera)
FireWire
FireWire utičnica
Mrežni ili DSL modem
RJ-45 utičnica
ili
ili LAN
Ulazni i izlazni video priključak
(dodatno)
SVIDEO IN
SVIDEO OUT
(pogledajte dokumentaciju za
VGA/TV karticu)
Utičnica s 4 ili više pinova
Priključak za digitalni videosignal
DVI
(monitor)
Digitalno audio/video sučelje
HDMI
10600985321, Izdanje 1 Hrvatski - 5
Page 67

Priključci i upravljački elementi
Indikatori i upravljački elementi
Oznaka Simbol Značenje
Prekidač za
uključivanje/isključivanje
Prekidač za pokretanje sustava.
•Prekidač za uključivanje/isključivanje svijetli
bijelo: Sustav je uključen.
•Prekidač za uključivanje/isključivanje treperi
žuto: U tijeku je pristupanje tvrdom disku.
•Prekidač za uključivanje/isključivanje treperi
bijelo: Sustav se nalazi u stanju štednje energije.
6 - Hrvatski 10600985321, Izdanje 1
Page 68

Puštanje u rad
Puštanje u rad
Puštanjeurad
Raspakirajte i provjerite sadržaj isporuke
Originalno pakiranje uređaja trebali biste sačuvati radi eventualnog transporta.
PakiranjeSadr ža jisporukePakiranje
► Raspakirajte sve dijelove.
► Pregledajte sadržaj isporuke radi mogućih vidljivih oštećenja nastalih tijekom transporta.
► Provjerite podudara li se sadržaj isporuke s dostavnicom.
Koraci prvog puštanja u rad
Prvopuštanjeurad,pregledPuštanjeurad
Za prvo pokretanje vašeg novog uređaja potrebno je tek nekoliko koraka:
• Odaberite mjesto z a postavljanje uređaja i postavite uređaj
•Priključite vanjske uređaje
• Provjerite nazivni napon i priključite uređaj u električnu mrežu
•Uključite uređaj
Više o pojedinačnim koracima možete doznati u narednim odjeljcima.
Pročitajte sigurnosn e upute u poglavlju "Važne napomene", Strana 3 .
Ustanovite li oštećenja nastala tijekom transporta ili razlike između sadržaja pakiranja
i dostavnice, bez odgode se obratite prodavatelju!
Vanjski uređaji
Ako ste uz svoj uređaj primili i vanjske uređaje (npr. pisač), te uređaje priključite tek nakon
početne instalacije. Način priključivanjavanjskihuređaja opisan je u narednim odjeljcima.
Pogoni i sklopovi
Ako ste uz svoj uređaj primili dodatne pogone i sklopove, ugradite ih tek
nakon početne instalacije. Ugradnja pogona i sklopova opisana je u priručniku
"AMILO Desktop" u poglavlju"Nadograđivanje sustava" .
10600985321, Izdanje 1 Hrvatski - 7
Page 69

Puštanje u rad
Postavljanje uređaja
RadnapovršinazaslonaErgonomskaPostavljanje
Prilikom postavljanja uređaja držite se preporuka i sigurnosnih
uputa iz priručnika "Sigurnost".
Uređaj postavite samo u predviđeni radni položaj (uspravno, na nožice).
Preporučujemo da uređaj postavite na površinu koja nije skliska. U slučajudanavašem
namještaju postoji više premaza boja i lakova ne može se isključiti mogućnost nastanka
oštećenja zbog plastičnih nožica ure đaja na površini na koju će se postaviti.
Nemojte više uređaja postavljati jedan na drugi.
Uređaj se smije pokrenuti samo kada stoji na nožicama.
Ovisno o smještaju uređa ja, može doći d o neugodnih vibracija i zvukova. Kako
biste to izbjegli, razmak izmeđustranicauređaja na kojima se ne nalaze otvori za
prozračivanje i drugih uređaja ili objekata m ora biti najmanje 3 mm.
Uređaj se mora dostatno prozračivati. Otvori za prozračivanje na monitoru i
uređaju ne smiju se prekrivati kako ne bi došlo do pregrijavanja.
Uređaj nemojte izlagati ekstremnim uvjetima okoline (pogledajte "AMILO Desktop S",
Strana 23, odjeljak "Uvjeti u okolini"). Uređaj zaštitite od prašine, vlage i vrućine.
Priključivanje vanjskih uređaja
Prije priključivanja vanjskog uređaja pročitajte dokumentaciju uređaja.
Osim kod USB-uređaja, prilikom priključivanja vanjskih uređaja moraju
se koristiti mrežni utikači!
Kod nevremena vodovi se ne smiju priključivatiniisključivati.
Prilikom isključivanja voda uvijek držite za utikač. Nemojte vući za vod!
Prilikom priključivanja ili isključivanja vodova držite se redoslijeda opisanog u nastavku .
Priključivanje vodova
► Isključite sve zahvaćene uređaje.
KabelVod
► Mrežne utikačesvihzahvaćenih uređaja izvucite iz zaštitnih utičnica.
► Priključite sve vodove na uređaju i na vanjskim uređajima. Svakako pročitajte
sigurnosne upute u poglavlju "Važne napomene", Strana 3 .
► Sve vodove za prijenos podataka priključiteupredviđene priključke
podatkovne/telekomunikacijske mreže.
► Sve naponske vodove priključite u uzemljene zaštitne utičnice.
Isključivanje vodova
► Isključite sve zahvaćene uređaje.
Vod
► Mrežne utikačesvihzahvaćenih uređaja izvucite iz zaštitnih utičnica.
► Sve vodove za prijenos podataka izvucite iz priključak podatkovne/telekomunikacijske mreže.
► Isključite sve vodove iz uređaja i iz vanjskih uređaja.
8 - Hrvatski 10600985321, Izdanje 1
Page 70
Puštanje u rad
Priključivanje monitora
► Monitor pripremite na način opisan u uputama za korištenje monitora (npr. priključite vodove).
Monitor
► Upriključak za monitor na ure đaju umetnite podatkovni kabel.
Ovisno o razini konfiguracije ur eđaja i monitora, podatkovni kabel
može se umetnuti i u DVI-sučelje.
► Mrežni vod monitora priključite u uzem ljenu zaštitnu utičnicu.
Wireless Keyboard Set LX300
U opseg isporuke vašeg uređaja uključen je komplet Wireless Keyboard Set LX300 s bežičnim
mišem i tipkovnicom. Tehnika digitalnog bežičnog prijenosa omogućuje uklanjanje smetajućih kabela.
Pročitajte sigurnosne upute u priručniku Sigurnost i uputama za rad "AMILO Desktop".
Koristite samo baterije vrste AAA.
Simbol u pretincu za baterije prikazuje pravila način umetanja baterija.
Umetanje baterija u miš
1
2
► Umetnite baterije (1).
► Prekidač za uključivanje/isključivanje na donjoj stran i miša postavite u
položaj "ON (UKLJUČENO)" (2).
10600985321, Izdanje 1 Hrvatski - 9
Page 71

Puštanje u rad
Kako biste uštedjeli energiju, prekidač za uključivanje/isključivanje miša postavite
u položaj "OFF (ISKLJUČENO)"ako miš nećete koristiti dulje vrijeme.
Umetanje baterija u tipkovnicu
Simbol u pretincu za baterije prikazuje pravila način umetanja baterija.
► Umetnite bat erije.
10 - Hrvatski 10600985321, Izdanje 1
Page 72
Priključivanje pri jemnika
Puštanje u rad
► Prijemnik izvadite iz tipkovnice u smjeru strelice.
10600985321, Izdanje 1 Hrvatski - 11
Page 73

Puštanje u rad
► Prijemnik priključite u slobodan USB-priključak na računalu.
Bežična veza uspostavlja se a utomatski.
Ponovno uspostavljanje bežične veze s tipkovnicom prema potrebi
U uobičajenim okolnostima šifra za bežično povezivanje generira se automatski i komplet
tipkovnice je odmah spreman za korištenje. Ako je veza uspješno uspostavljena, LED
indikator na prijemniku svijetli zeleno. LED indikatori na tipkovnici, odn. mišu počinju
svijetliti crveno kada napon baterija padne ispod 2,2 V.
Ako ne uspije automatsko povezivanje ili se veza prekine, učinite sljedeće:
► Isključite prijemnik iz računala i ponovo ga priključite.
► Miš usmjerite prema prijemniku s udaljenosti od najviše 30 cm.
► Pritisnite lijevu tipku miša i držite je pritisnutom pet sekundi.
LED indikator na prijemniku zatreperit će z eleno 4 puta, što značidaje
povezivanje s mišem uspjelo.
Esc
► Na tipkovnici pet sekundi držite pritisnutom tipku
LED indikator na prijemniku zatreperit će z eleno 4 puta, što značidaje
povezivanje s tipkovnicom uspjelo.
.
Tipke miša za kretanje unaprijed i unatrag
Osim de sne i lijeve tipke te kotačića, vaš miš sadrži i dvije dodatne tipke (1):
12 - Hrvatski 10600985321, Izdanje 1
Page 74
1
Te dvije tipke omogućuju lagano pomicanje unaprijed i unatrag u aplikaciji, npr.
između internetskih stranica u web-pregledniku.
Priključivanje vanjskih uređajanaUSB-priključke
USB-uređajiUSB-priključakVanjsk iuređajiUređaji
Na USB-priključke možete priključiti velik broj vanjskih uređaja (npr. pisač,
skener, modem ili tipkovn icu).
Puštanje u rad
USB-uređaji su omogućeni za hot-plug. Stoga se vodovi USB-uređaja mogu
priključivati i isključivatiikadsuuređaji uključeni.
Dodatne informacije potražite u dokumentaciji USB-uređaja.
► Na vanjski uređaj priključite podatkovni kabel.
► Podatkovni kabel priključitenaUSB-priključak vašeg uređaja.
Upravljački programi uređaja
Vanjski USB-uređaji koje priključujetenaUSB-priključke obično ne zahtijevaju
vlastite upravljačke programe jer je potreban softver već uključen u operacijski
sustav. Međutim, ako je za vanjski USB-uređaj ipak potreban zasebni softver,
instalirajte ga s n osača podataka koji je isporučen s USB-uređajem.
Za postizanje standarda USB 2.0 duljina kabela koji se koristi za povezivanje prednjeg
USB-priključka na vašem uređaju i vanjskog USB-uređaja ne bi smjela biti većaod3m.
10600985321, Izdanje 1 Hrvatski - 13
Page 75
Puštanje u rad
Priključivanje uređajanamrežninapon
Mrežniprilagodnik
1
2
► Na računalo priključite mrežni v od (1).
► Mrežni utikač priključite u uzemljenu zaštitnu utičnicu (2).
Prvo uključivanje: instalira se softver
InstalacijaSoftverInstalacija
Ako ste uređaj povezali s mrežom, prilikom instalacije softvera potreban je unos
podataka o korisniku, poslužitelju i mrežnom p rotokolu.
Prilikom prvog uključivanja računala instalira se i konfigurira softver isporučen s računalom.
Odvojite nešto vremena za to, jer taj se postupak ne smije prekidati.
Nakon pokretanja instalacije uređaj se ne smije isključivati do dovršenja instalacije!
Tijekom instalacije uređaj se smije ponovo p okretati samo na traženje sustava!
Instalacija se u protivnom neće izvesti na pravilan način i sadržaj tvrdog
diska u potpunosti će se morati obnoviti.
Uključivanje monitora i uređaja
► Uključite monitor (pogledajte Upute za korištenje monitora).
14 - Hrvatski 10600985321, Izdanje 1
Page 76

► Pritisnite prekidač za uključivanje/isključivanje na prednjoj strani uređaja.
Pokazivač načina rada svijetli, uređaj se pokreće.
Puštanje u rad
Instalacija softvera
► Tijekom instalacije slijedite upute na zaslonu.
SoftverInstalacija
► Uslučaju nejasnoćapročitajte navode u pomoći za o peracijski sustav.
Dodatne informacije o sustavu te upravljačkim programima, uslužnim programima
i ažuriranjima potražite na DVD mediju "Drivers & Utilities (Upravljački i uslužni
programi)" i na internetskoj adresi "http://www.fujitsu-siemens.com/support".
10600985321, Izdanje 1 Hrvatski - 15
Page 77

Rukovanje
Rukovanje
Uključivanje uređaja
► Ako je potrebno, uključite monitor (pogledajte Upute za korištenje monitora).
UređajMonitor
► Pritisnite prekidač za uključivanje/isključivanje na prednjoj strani uređaja.
Pokazivač načina rada svijetli bijelo, uređaj se pokreće.
Isključivanje uređaja
► Na pravilan način prekinite izvođenje operacijskog sustava.
UređajMonitor
► Ako operacijski sustav ne isključiuređaj ili ga ne uvede u stanje štednje energije automatski,
prekidač za uključivanje/isključivanje držite pritisnutim najmanje 4 sekunde.
Uređaja tada koristi minimalnu količinu energije.
Prekidačem za uključivanje/isključivanje uređaj se ne isključuje s mrežnog napona. Za
potpuno isključivanje s mrežnog napona morate mrežni utikač izvućiizutičnice.
► Ako je potrebno, isključite monitor (pogledajte Upute za korištenje monitora).
16 - Hrvatski 10600985321, Izdanje 1
Page 78
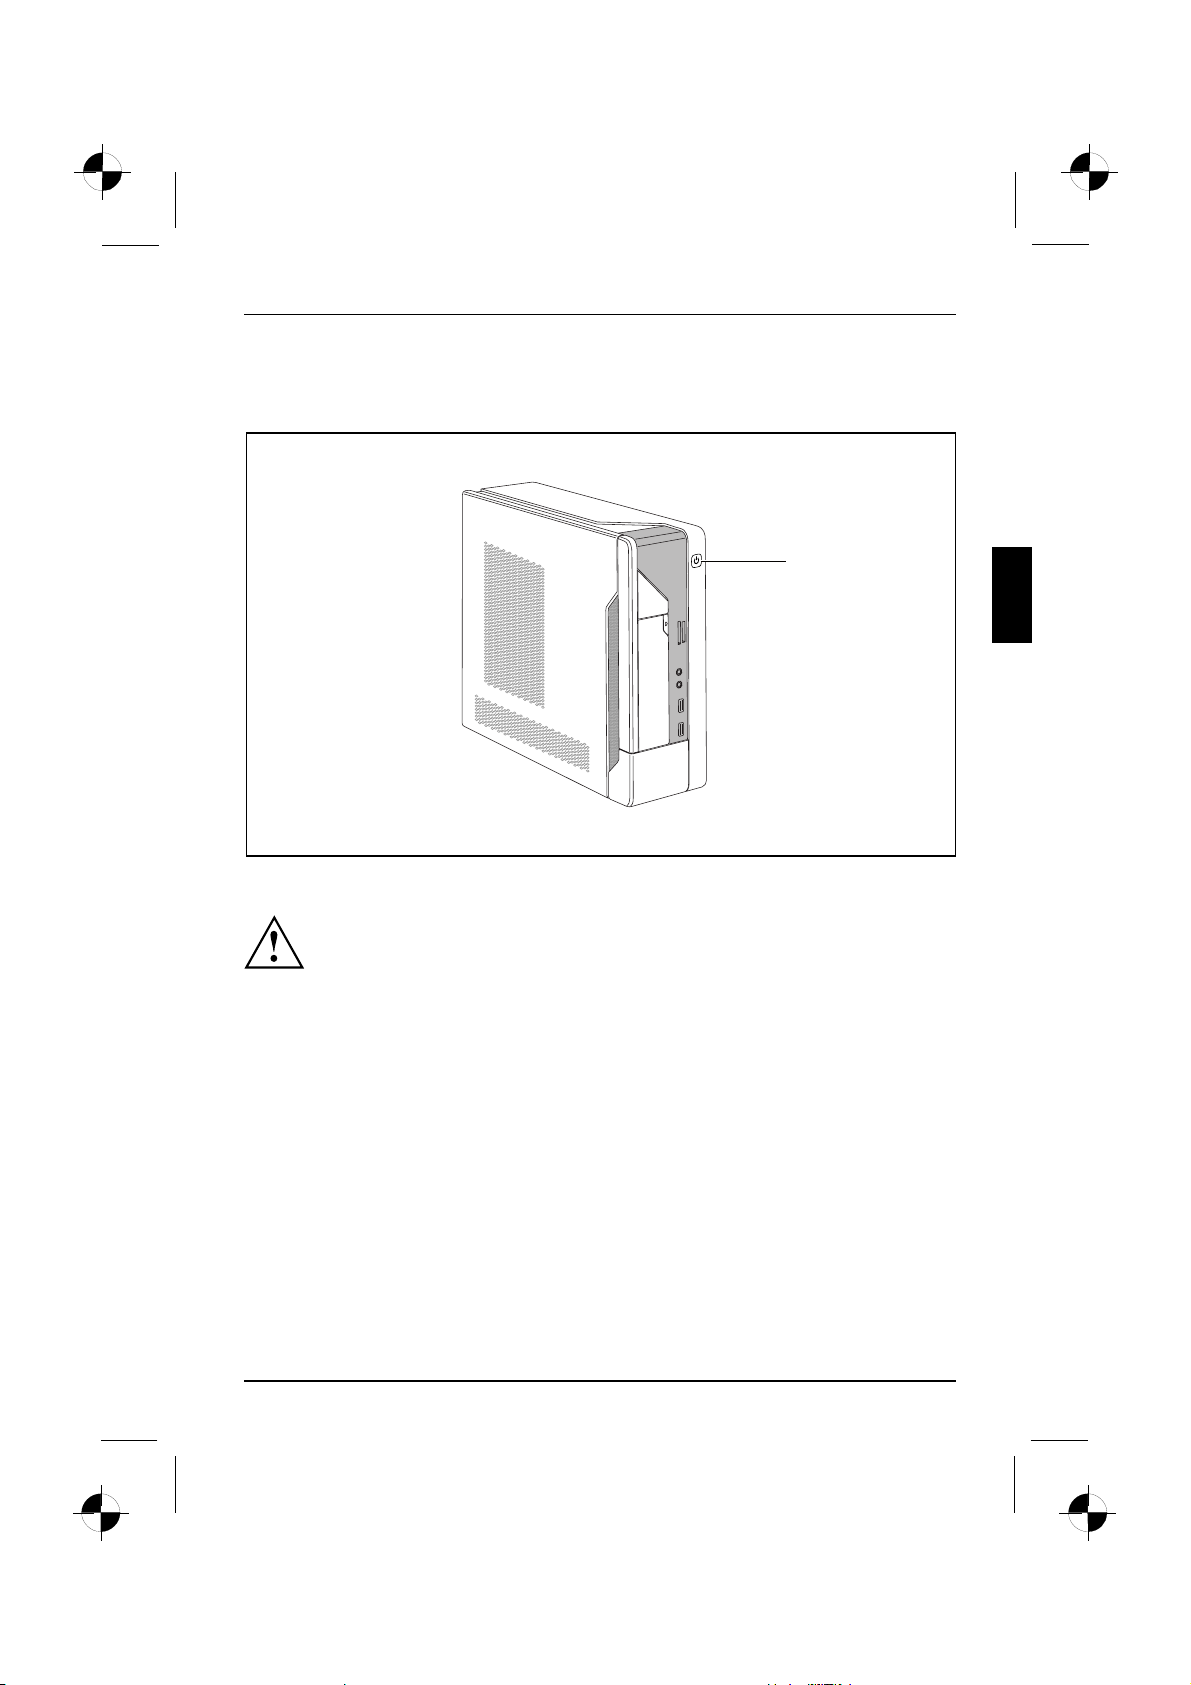
Pokazivač načina rada
PokazivačnačinaradaUređaj
Pokazivačinačina rada nalaze se na prednjoj strani kućišta.
Rukovanje
1
1 = Pokazivač načina rada
Pokazivačnačinarada
Uređaj se u stanju štednje energije ne smije isključivati s mreže jer
to može dovesti do gubitka podataka.
• Indikator svijetli b ijelo: Uređaj je priključen.
• Indikator treperi bijelo: Uređaj je u stanju štednje energije. Nakon uključivanja pomoću
prekidačazauključivanje/isključivanje, uređaj se uključuje ili se vraćaustanjeu
kojem se nalazio prije ulaska u stanje štednje energije.
• Indikator treperi žu to: U tijeku je pristupanje tvrdom disku.
• Indikator ne svijetli: Uređaj je isključen s mreže ili spreman za korištenje. Ako je uređaj spreman
za korištenje, može se uključiti pomoćuprekidačazauključivanje/isključivanje.
10600985321, Izdanje 1 Hrvatski - 17
Page 79

Rukovanje
Laserski uređaj za memorijske kartice
Utor
Na prednjoj strani uređaja nalazi se laserski uređaj za memorijske kartice.
Dopuštene vrste kartica bez prilagodnika:
• Secure Digital Card (SD Card)
• SecureDigital Card HC (SD HC)
• MultiMedia Card (MMC)
• MMC Plus
• MultiMedia C ard mobile (MMC mobile)
•MemoryStick(MS)
•MemoryStickPro
Dopuštene vrste kartica s prilagodnikom:
• MemoryStick Pro Duo
• Reduced-Size MultiMedia Card (RS-MMC)
• Mini-SecureDigital Card (Mini SD)
Prije vađenja kartice iz utora svakako pričekajte da se dovrši pristup podacima na njoj.
Prilikom rada s memorijskim karticama slijedite upute proizvođa ča.
Prilagodnike za m emorijske kartice možete nabaviti u specijaliziranim trgovinama.
18 - Hrvatski 10600985321, Izdanje 1
Page 80

Umetanje memorijske kartice
Vađenje memorijske kartice
Memorijskakartica
Prije vađenja kartice iz utora svakako pričekajte da se dovrši pristup podacima na njoj.
Rukovanje
► Pažljivo gurnite memorijsku karticu u utor.
Kontakti na memorijskoj kartici moraju biti
okrenuti udesno. Ne primjenjujte silu jer
u suprotnom može doćidooštećivanja
osjetljivih kontaktnih površina.
Memorijskakartica
► Pažljivo izvucite memorijsku karticu iz utora.
10600985321, Izdanje 1 Hrvatski - 19
Page 81

Rukovanje
Otvaranje i zatvaranje kućišta u slučaju servisa
ili kod nadograđivanja sustava
Otvaranje kućišta
KućišteUređaj
► Isključite uređaj. Uređaj se ne smije nalaziti u stanju štednje energije!
► Uklonite nakupljene vodove koji smetaju.
Napominjemo da se različite komponente na matičnoj ploči mogu jako zagrijati ako je
uređaj prije kratkog vremena bio aktivan.
Ta kve komponente možda su ozna čene sljedećim simbolom.
Pročitajte sigurnosne upute u priručniku "Sigurnost" i upute za rad
računala "AMILO Desktop".
Mrežni utikač izvucite iz utičnice.
Utikač ponovo priključiteuutičnicu tek nakon zatvaranja kućišta.
1
2
1
1
► Izvadite vijke kućišta pomoću križnog odvijača(1).
► Uređaj položite na bok, kako je prikazano.
► Bočni poklopac gurnite u smjeru strelice (2).
► Bočni po klopac zakrenite u smjeru strelice (3) i podignite ga s kućišta.
20 - Hrvatski 10600985321, Izdanje 1
3
Page 82

Zatvaranje kućišta
► Bočni poklopac umetnite u vodilicu na donjem d ijelu kućišta.
KućišteUređaj
Rukovanje
1
2
3
3
3
► Bočni poklopac zakrenite u smjeru strelice (1).
► Bočni p oklopac gurnite u smjeru strelice (2) da sjedne na svoje mjesto.
► Pričvrstite vijke kućišta pomoću križnog odvijača(3).
► Ponovo priključite prethodno isključene vodove.
10600985321, Izdanje 1 Hrvatski - 21
Page 83

Tehnički podaci
Tehnički podaci
AMILO Desktop S
Električni podaci
Poštivani sigurnosni standardi:
Klasa zaštite: I
Područje nazivnog napona 110 V - 240 V
Nazivna frekvencija
Dimenzije
Širina / dubina / visina:
Tež ina
u osnovnoj konfiguraciji: 6,9 kg (AMILO Desktop Si 3535)
Uvjeti u okolini
Klimatska klasa 3K2
Klimatska klasa 2K2
Temperatura
Rad (3K2) 15 °C .... 35 °C
Transport (2K2) –25 °C .... 60 °C
U radnom prostoru nije dopušteno korištenje ovlaživača!
CE, Sigurnost proizvoda LVD 2006/95/CE,
IEC60950-1, EN60950-1, EMV: 2004/108/EC ,
EN55022, class B, EN55024, EN61000-3-2/3,
RTTE 1999/5/EC, standardi zaštite okoliša:
RoHS FSC -0323 0
50 Hz
108 mm x 355,5 mm x 293,6 mm
DIN IEC 721 dio 3-3
DIN IEC 721 dio 3-2
Ostali tehnički podaci nalaze se u tehni čkoj specifikaciji za ovaj uređaj. Tehničku
specifikaciju možete pronaći na internetskoj adresi "www.fujitsu-siemens.com ".
Wireless Keyboard Set LX300
Električni p od aci - tipkovnica
Poštivani sigurnosni standardi EN 60950
• Napajanje strujom
•Potrošnjastruje
Sučelje USB 2.0- i 1.1 kompatibilno
Frekvencijski pojas
22 - Hrvatski 10600985321, Izdanje 1
• 2 x AAA alkalne baterije od 1,5 V, 2,2 – 3,0 V
• Aktivni način rada: 8 mA, pasivni način rada:
5µA
2,4 GHz
Page 84

Teh nički podaci
Električni podaci - tipkovnica
ID šifre 8.388.608 ID šifri (24-b itne)
Broj kanala 64
Električni podaci - miš
Poštivani sigurnosni standardi EN 60950
• Napajanje strujom
• Potrošnja struje (na bijelom papiru)
• Rezolucija (osjetljivost skeniranja)
• 2 x AAA alkalne baterije od 1,5 V, 2,2 – 3,0 V
• Aktivni način rada: 25 mA, pasivni način
rada: < 9 mA
• 1000 dpi
Sučelje U S B 2.0- i 1.1 kompatibilno
Frekvencijski pojas
2,4 GHz
ID šifre 8.388.608 ID šifri (24-b itne)
Broj kanala 64
Prijemnik
• Napajanje
• Potrošnja struje
•USBnačin rada: 5 V DC
• Aktivni način rada: 100 mA
Uvjeti u okolini
Radna te mperatura
0°C–40°C
Domet tipkovnice/miša Do 10 m (ovisno o radijskim sme tnjama u
okolini)
10600985321, Izdanje 1 Hrvatski - 23
Page 85

Tehnički podaci
24 - Hrvatski 10600985321, Izdanje 1
Page 86

English
Български
AMILO Desktop S Series
Prima punere în funcţiune
Hrvatski
Română
Slovenščina
Srpski
.
Page 87

Microsoft, MS,
Windows, Windows Vista sunt mărci comerciale înregistrate ale Microsoft Corporation.
Adobe Reader est
MultiMediaCard e
steomarcă comercială înregistrată aInfineon Technologies AG.
Sony şi Memory Sti
Toate celelalte m
ale deţinătorul
Copyright © Fujit
Toate drepturile r
copiilor, reedit
Încălcările acest
ărci comerciale sunt mărci comerciale sau mărci comerciale înregistrate
ui respectiv şi sunt recunoscute ca protejate.
su Siemens Computers GmbH 2008
ezervate, în special (şi extrasurile) cele asupra traducerilor,
ărilor, reproducerilor prin copiere etc.
ei dispoziţii implică obligativitatea unor despăgubiri.
Toate drepturile re
înregistrării ca
Posibilităţile d
marcă de fabrică.
elivrareşi modificările te hnice sunt rezervate.
eomarcă înregistrată a Adobe Systems Incorporated.
ck aunt mărci comerciale ale Sony Electronics, Inc.
zervate, în special în cazul acordării de brevete sau a
Page 88

Cuprins
Română
Cuprins
Tehnologia inovatoare ................................................................. 1
Alte informaţii ........................................................................... 1
Manualul de exploatare „AMILO Desktop” . ............................................ 1
Simboluri ............................................................................... 1
Indicaţiiimportante .................................................................... 3
Conectori şi elemente de comandă ..................................................... 4
Conectori . . . . . .......................................................................... 4
Indicatoare şi elemnete de comandă ...................................................... 6
Punerea în funcţiune ................................................................... 7
Despachetarea şiverificarea completului de livrare ........................................ 7
Paşii pentru prima punere în funcţiune .................................................... 7
Amplasarea aparatului .................................................................. 8
Conectarea aparatelor externe ........................................................... 8
Conectarea cablurilor . . . . . ........................................................... 8
Deconectarea cablurilor . . . ........................................................... 8
Conectarea ecranului . . . . . ........................................................... 9
Set Wireless Keyboard LX300 . ....................................................... 9
Conectarea aparatelor externe la porturile USB ........................................ 13
Conectarea echipamentului la sursa de alimentare de la reţea .............................. 14
Prima pornire: se instalează software-ul ................................................... 14
Pornirea monitorului şi aechipamentului .............................................. 14
Instalarea software-ului .............................................................. 15
Exploatarea ............................................................................ 16
Pornirea aparatului ...................................................................... 16
Oprirea aparatului . ...................................................................... 16
Indicator de funcţionare .................................................................. 17
Dispozitivul decitire acartelelor de memorie .............................................. 18
Introducerea cartelei dememorie ..................................................... 19
Scoaterea cartelei ................................................................... 19
Deschiderea şi închiderea carcasei pentru lucrări de service sau pentru extinderi de sistem . . . . 20
Deschiderea carcasei ................................................................ 20
Închiderea carcasei .................................................................. 21
Date tehnice ........................................................................... 22
AMILO Desktop S ....................................................................... 22
SetWireless Keyboard LX300 ........................................................... 22
10600985321, ediţie 1 Română
Page 89
Cuprins
Română 10600985321, ediţie 1
Page 90
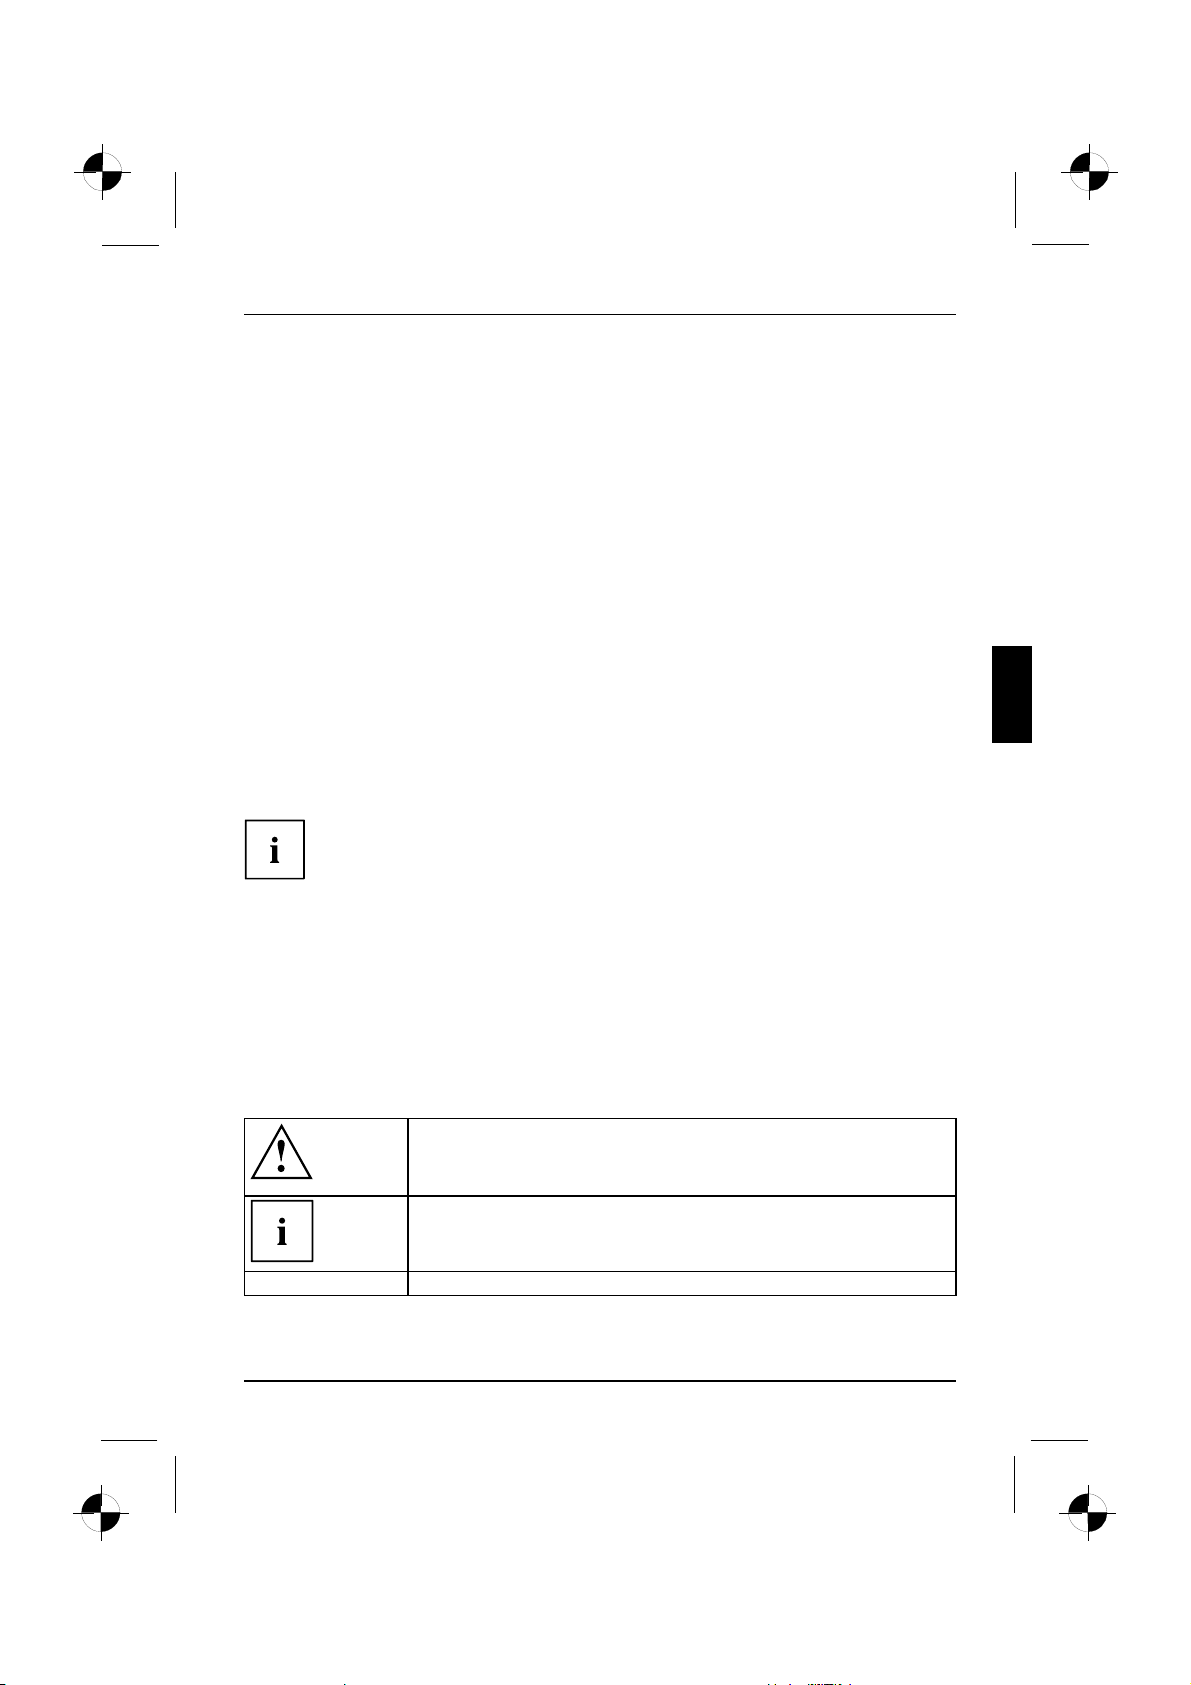
Tehnologia inovatoare
Tehnologia inovatoare
... şi designul ergonomic asigură facilităţi utilizatorului echipamentului AMILO Desktop
şiofiabilitate corespunzătoare unui PC-Desktop.
Echipamentul dvs. este prev ăzut cu un sistem de operare M i crosoft Windows. Ace sta
este deja instalat şiconfigurat în mod optim. Echipamentul este pregătit pentru utilizare
imediată, atunci când îl porniţi pentru prima dată.
Este echipat cu cea mai recentă tehnologie, asigurând transpunerea facilă în practică
a experienţei dvs. în materie de computere.
• Intel CPU cu economisire de energie
•reţea rapidă WLAN pentru standard b/g/Draft n cu până la 300 Mbit/s
•ventilaţie extrem de silenţioasă a procesorului
Prin utilitarul "BIOS-Setup-Utility cu facilităţi pentru utilizator," aveţi posibilitatea
să comandaţi hardware-ul echipamentului şisă vă protejaţisistemuldeaccesul
neautorizat, utilizând caracteristicile eficiente de parolă.
Acest manual de exploatare vă prezintă, printre altele, modul de punere în
funcţiune şi de exploatare a echipamentului.
Alte informaţii
Găsiţi informaţii generale despre echipamentul dvs. în manualul de
exploatare „AMILO Desktop”.
Secţiunile din acest manual relative la software se referă la produse Microsoft, în
cazul în care sunt incluse în completul de livrare al echipamentului.
La instalarea altor produse de software, ţineţi cont de instrucţiunile
de exploatare ale producătorului.
Manualul de exploatare „AMILO Desktop”
Manualul de exploatare "AMILO Desktop" se găseşte în meniul de start Windows, Toate programele
(All programs) - Fujitsu Siemens Computers sau în Internet la adresa "www.fujitsu-siemens.com/support".
Simboluri
marchează instruc ţiuni a căror nerespectare pune în pericol sănătatea
dumneavoastră, capacitatea funcţională a aparatului sau siguran ţa datelor.
Garanţia se pierde în cazul în care aţi provocat defecţiuni ale aparatului
prin nerespectarea acestor instrucţiuni
marchează informaţii impo rtante pentru folosirea corectă a aparatului
►
10600985321, ediţie 1 Română -1
marchează o sec venţă de operaţie pe care trebuie să oexecutaţi
Page 91
Tehnologia inovatoare
Acest scris
Acest scris
Acest scris
"Acest scris" marchează
Abc
Acest scris marchează termeni şi texte, care sunt accentuat e sau evidenţiate, ca de
marchează un rezultat
marchează introduceri de date, pe care le realizaţi într-un dialog prin
intermediul tastaturii sau într-un câmp de comandă, de ex. parola dvs.
(Nume123) sau o comandă de pornire a unui program (start.exe)
marchează informaţiile, care sunt date pe display de un program, de ex.:
Instalaţia este încheiată!
marchează
• termeni şi texte pe suprafaţa unui software, ca de ex.: Faceţi clic pe
Salvare.
• Numele programelor sau fişierelor, ca de ex. Windows sau setup.exe.
• referinţe de trecere la un alt paragraf, ca de ex. "Indicaţii de siguranţă"
• referinţedetrecerelaosursă externă,cadeex.oadresă de Web:
Citiţi mai departe în "www.fujitsu-siemens.com"
• Nume de CD-uri, DVD-uri precum şi denumiri şi titluri ale altor materiale,
ca de ex.: "CD/D VD Drivers & Utilities" sau manualul "Siguranţă"
marchează otastă de pe tastatură,cadeex.:
ex.: Nu opriţiaparatul
F10
2-Română 10600985321, ediţie 1
Page 92

Indicaţii importante
Ţineţi cont de indicaţiile referitoare la siguranţă din manualul "Siguranţa"
şi din manualul de exploatare "AMILO Desktop".
Indicaţii importante
10600985321, ediţie 1 Română -3
Page 93

Conectori şielementedecomandă
Conectori şielementedecomandă
În acest capitol sunt prezentate componentele hardware individuale ale echipamentului.
Vi se oferă o privire de ansamblu asupra conectorilor şi indicatoarelor echipamentului.
Familiarizaţi-vă cu aceste elemente, înainte de a începe lucrul.
Conectori
Denumire Ilustraţie Simbol
Alimentarea electrică a calculatorului
Conector reţea
Sunet (surse audio externe, de ex.
difuzoare active, microfon)
• Sunet încorporat
Dacă este montată oplacă de sunet
adiţională,funcţia de sunet de pe
placa de bază nu este activă.„Sound
onboard„ nu este disponibil.
Conectori de tip jack 3,5-mm
4-Română 10600985321, ediţie 1
Line In
Line Out
Mic
Page 94
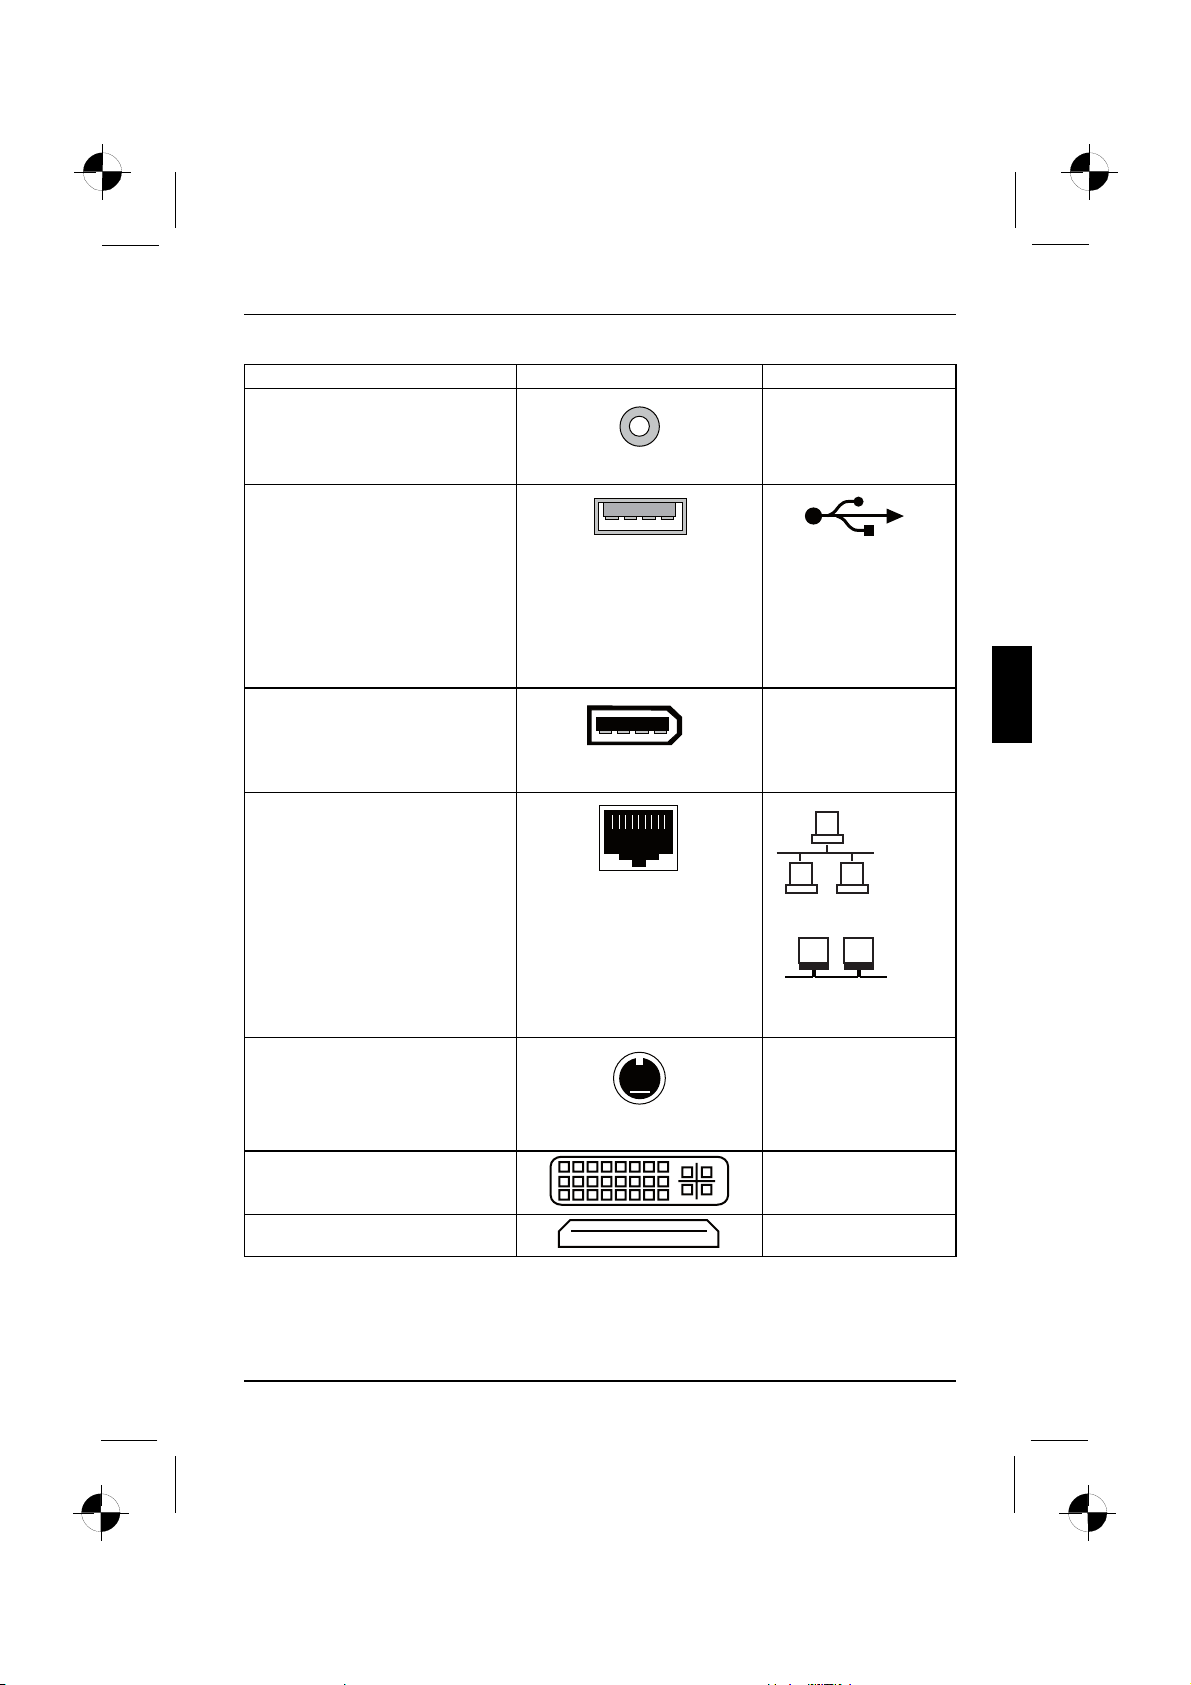
Conectori şielementedecomandă
Denumire Ilustraţie Simbol
Conexiune digitală pentru sunet,
Ieşire SPDIF
consultaţi şi manualul plăcii de bază.
Conector tip Cinch (Coax)
Conexiune pentru sisteme USB
(de ex. tastatură; mouse , modul
de emisie/recepţie IR, scaner,
imprimantă)
USB 2.0
Conector USB
sau USB
Recomandare importantă pentru
USB 2.0: Pentru a obţineorată
stabilă de transfer a datelor, vă
recomandăm utilizarea unui cablu
USB cu o lungime maximă de 3 m.
Conexiune pentru aparate
1394
compatibile FireWire sau IEE-1394
(de ex. videorecorder, cameră video
digitală)
FireWire
Conector FireWire
Reţea sau modem DSL
Conector RJ-45
sau
sau LAN
Conector intrare/ieşire video
(opţional)
SVIDEO IN
SVIDEO OUT
(consultaţi documentaţia pentru
placa VGA/TV)
Conector cu 4 sau mai mulţipini
Conexiune pentru semnal video
DVI
digital (Monitor)
Interfaţă digitală Audio-Video
HDMI
10600985321, ediţie 1 Română -5
Page 95
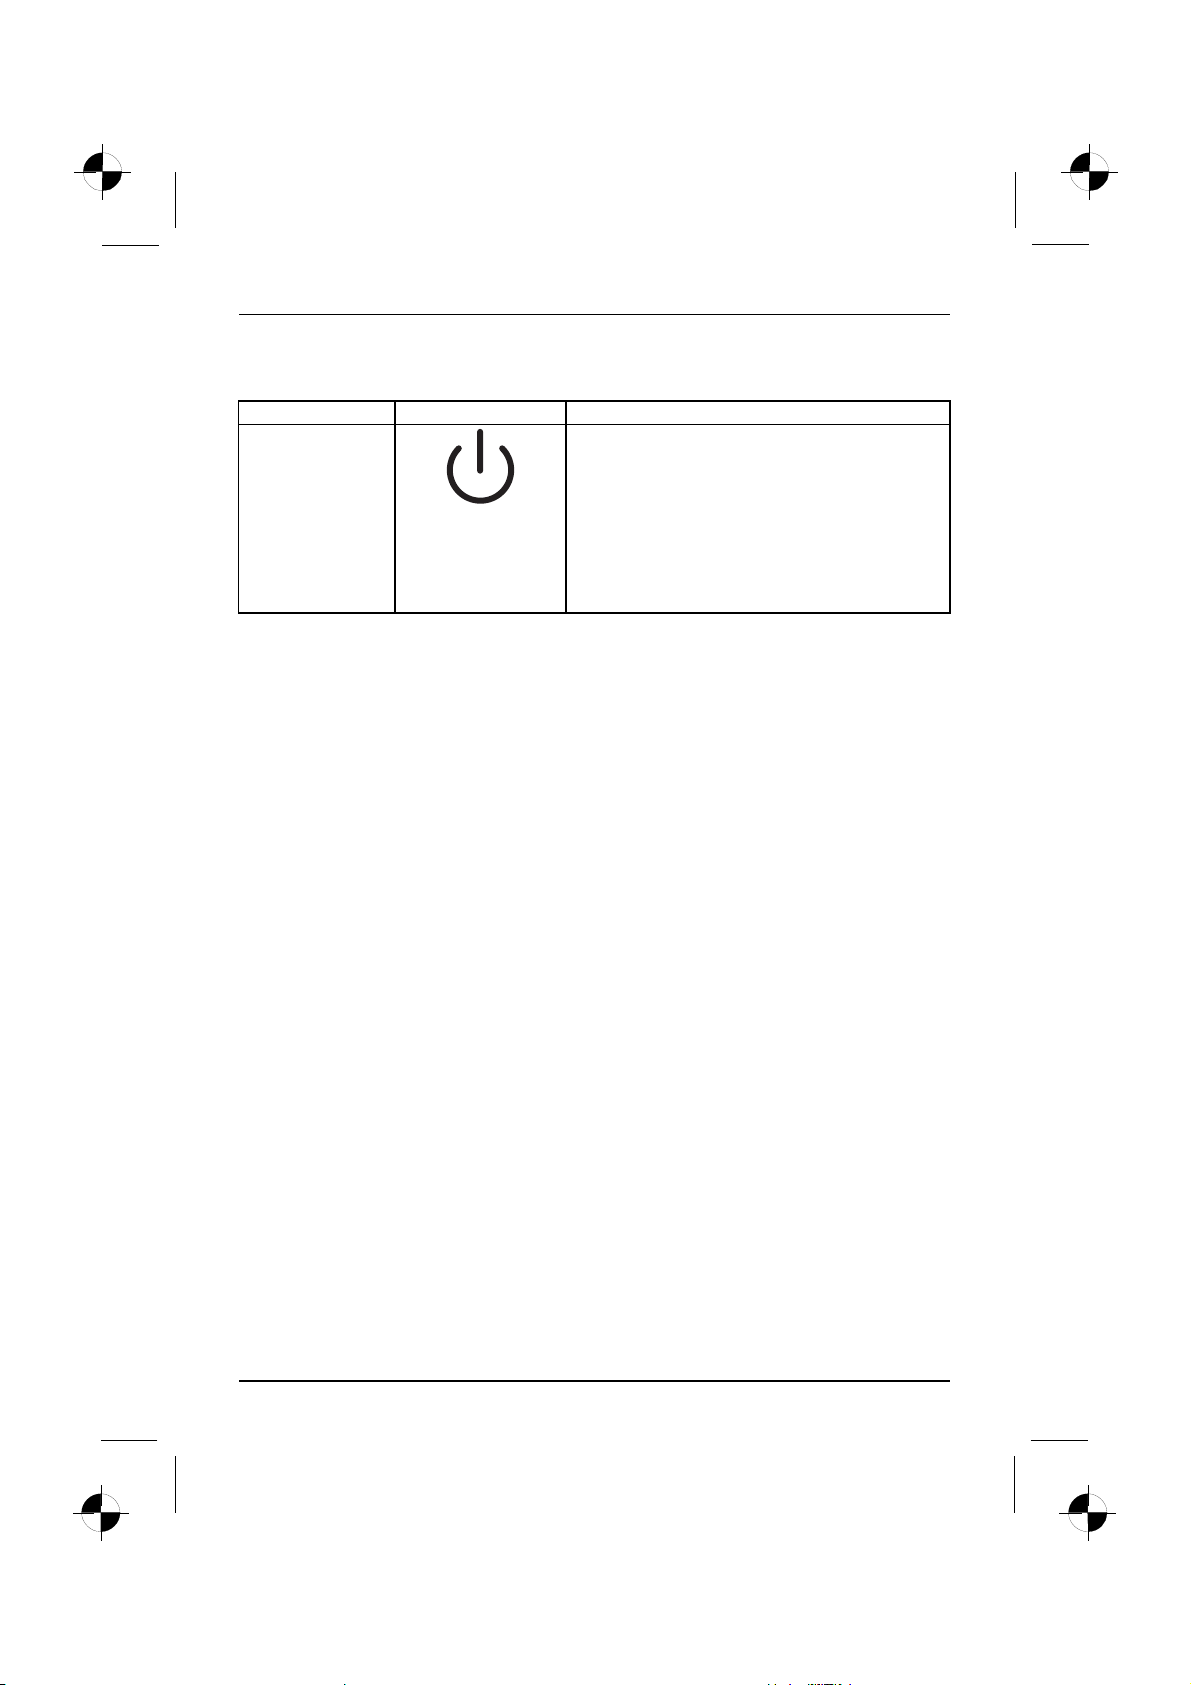
Conectori şielementedecomandă
Indicatoare şielemnetedecomandă
Denumire Simbol Semnificaţie
Întrerupător de
pornire/oprire
Întrerupător pentru pornirea sistemului.
•Întrerupătorul de pornire/oprire luminează în
culoare albă: Sistemul este pornit.
•Întrerupătorul de pornire/oprire luminează
intermitent în culoare galbenă: Este accesat
discul fix.
•Întrerupătorul de pornire/oprire luminează
intermitent în cu loare albă: Sistemul este în
modul de economisire a energiei.
6-Română 10600985321, ediţie 1
Page 96

Punerea în funcţiune
Punerea în funcţiune
Punereaînfuncţiune
Despachetarea şiverificarea completului de livrare
Păstraţi ambalajul original al echipamentului în eventualitatea unui transport.
ambalajcompletdelivrareambalaj
► Despachetaţi toate componentele
► Examinaţi vizual conţinutul ambalajului în privinţa eventualelor daune datorate transportului.
► Verificaţidacă livrarea corespun de specificaţiilordinfoaiadelivrare.
Paşii pentru prima punere în funcţiune
Primapunereînfuncţiune,vedere deansamblupunereînfuncţiune
Pentru prima punere în funcţiune a echipamentului, sunt necesari câţiva paşi:
• Alegeţi amplasamentul adecvat şiamplasaţi echipamentul.
• Conectaţi dispozitivele externe.
•Verificaţi tensiunea nominalăşi conectaţi echipamentul la sursa de alimentare.
• Porniţi echipamentul.
Aflaţiinformaţii suplimentare despre paşii individuali în paragrafele următoare.
Respectaţi instrucţiunile de siguranţă din capitolul "Važne napomene", Strana 3
Dacă constataţi daune datorate transportului s au neconcordanţeîntreconţinutul ambalajului şi
foaia de livrare, informaţi neîntârziat centrul de vânzări de unde aţiachiziţionat produsul.
Dispozitive externe
Dacă v-au fost furnizate suplimentar a lte dispozitive externe (de exemplu o imprimantă),
atunci conectaţi-le abia după prima instalare a echipamentului. Modul de conectare
a acestor dispozitive exte rne este descris în paragrafele următ oare.
Unitatea de disc şi subansambluri
Dacă v-au fost furnizate suplimentar unităţidediscşi subansambluri, montaţi-le abia
după prima instalare a echipamentului. Instalarea unităţilor de disc şi a subansamblurilor
este descrisă în manualul "AMILO Desktop" în capitolul"Extinderi ale sistemului" .
10600985321, ediţie 1 Română -7
Page 97

Punerea în funcţiune
Amplasarea aparatului
Loculdelucru înfaţaecranuluiErgonomicAparat
La instalarea aparatului, asiguraţi-vă că respectaţi întocmai r ecomandările şi
indicaţiile de protecţie menţionate în manualul "Siguranţă".
Aşezaţi aparatul doar în poziţia de operare prev ăzută (pe verticală
pe picioarele de susţinere).
Vă recomandămsă amplasaţi aparatul pe o suprafaţă-suport aderentă. Din cauza
varietăţii materialelor de acoperire şilăcuire folosite pentru mobilier, nu se poate exclude
posibilitatea ca picioarele din plastic ale aparatului să deterioreze suprafaţa de suport.
Nu aşezaţi mai multe aparate unul peste celălalt.
Aparatul va fi pus în funcţiune numai în poziţia stând pe picioarele de susţinere.
În funcţie de locul de amplasare a aparatului, pot apare vibraţii şi zgomote supărătoare.
Pentru evitarea acestora ar trebui ca între părţile laterale lipsite de suprafeţe de ventilare
ale carcasei şi celelalte aparate sau obiecte să existe o distan
Aveţigrijă ca aparatul să fie ventilat suficient. Suprafeţele de ventilare ale ecranului
şiaparatuluinuvorfi acoperite, pe ntru a evita astfel supraîncălzirea.
Nu expuneţi aparatul la condiţii ambiante extreme (a se vedea "AMILO Desktop S ", Strana
23, fragmentul "Condiţii ambiante"). Protejaţi aparatul de praf, umezealăşicăldură.
Conectarea aparatelor externe
Înainte de conectarea aparatului extern, citiţi documentaţia acestuia.
În afară de dispozitivele USB, fişele de alimentare trebuie să fiescoase,
atunci când conectaţi aparate externe!
Pe timp de furtună nu conectaţi şi nici nu deconectaţi cabluri.
Apucaţi întotdeauna de ştecăr la deconectarea unui cablu. Nu trageţidecablu!
La conectarea sau deconectarea cablurilor, respectaţi ordinea descrisă mai jos.
ţă de cel puţin 3 mm.
Conectarea cablurilor
► Opriţi toate aparatele respective.
CabluCablu
► Scoateţi fişele de alimentare ale tuturor aparatelor respective din priza cu contact de protecţie.
► Conectaţi toate cablurile la aparat şi la aparatele externe. Respectaţi instrucţiunile
de siguranţă din capitolul "Važne napomene", Strana 3 .
► Conectaţi toate cablurile pentru transferul datelor la porturile prevăzute ale
reţelelor de date/transferului de date.
► Introduceţi toate fi şeledealimentareînprizelecuîmpământare şi contact de prote cţie.
Deconectarea cablurilor
► Deconectaţi dispozitivele respective.
Cablu
► Scoateţi fişele de alimentare ale tuturor aparatelor respective din priza cu contact de protecţie.
► Scoateţi toate cablurile pentru transmiterea datelor din porturile prevăzute
ale reţelelor de date/transfer de date.
8-Română 10600985321, ediţie 1
Page 98

Punerea în funcţiune
► Deconectaţi toate cablurile de la aparat şi de la aparatele externe.
Conectarea ecranului
► Pregătiţi ecranul după cum este descris în instrucţiunile de utilizare ale
acestuia (de exemplu conectarea cablurilor).
Ecran
► Conectaţi cablurile pentru transferul datelor în porturile aflate pe ecranul aparatului.
În funcţie de nivelul de extindere al echipamentului şialmonitorului,puteţi
să conectaţi cablul de date şi la interfaţaDVI.
► Conectaţi cablul de reţea al ecranului la o p riză cu contact de protec ţie şiîmpământare.
Set Wireless Keyboard LX300
Completul de livrare al echipamentului dvs. include setul Wireless Keyboard LX300 cu tastaturăşi
mouse fără fir. Prin tehnologia digitală radio, se renunţă astfel la utilizarea cablurilor incomode.
Ţineţi cont de instrucţiunile de siguranţă din manualul referitor la siguranţă
şi din manualul "AMILO Desktop".
Utilizaţi numai baterii de tipul AAA.
Un simbol în com partimentul pentru baterii vă indică modul de introducere a bateriilor.
Introducerea bateriilor în mouse
1
2
► Introduceţi bate riile (1).
► Treceţiîntrerupătorul de pornire/oprire de la partea inferioară pe poziţia "ON" (2).
10600985321, ediţie 1 Română -9
Page 99

Punerea în funcţiune
Pentru economisirea energiei, treceţiîntrerupătorul de pornire/oprire al mouse-ului pe
poziţia "OFF", în ca zul în care nu utilizaţimouse-uloperioadă mai îndelungată.
Introducerea bateriilor în tastatură
Un simbol în compartime ntul pentru baterii vă indică modul de introducere a bateriilor.
► Introduceţi bateriile.
10 - Română 10600985321, ediţie 1
Page 100
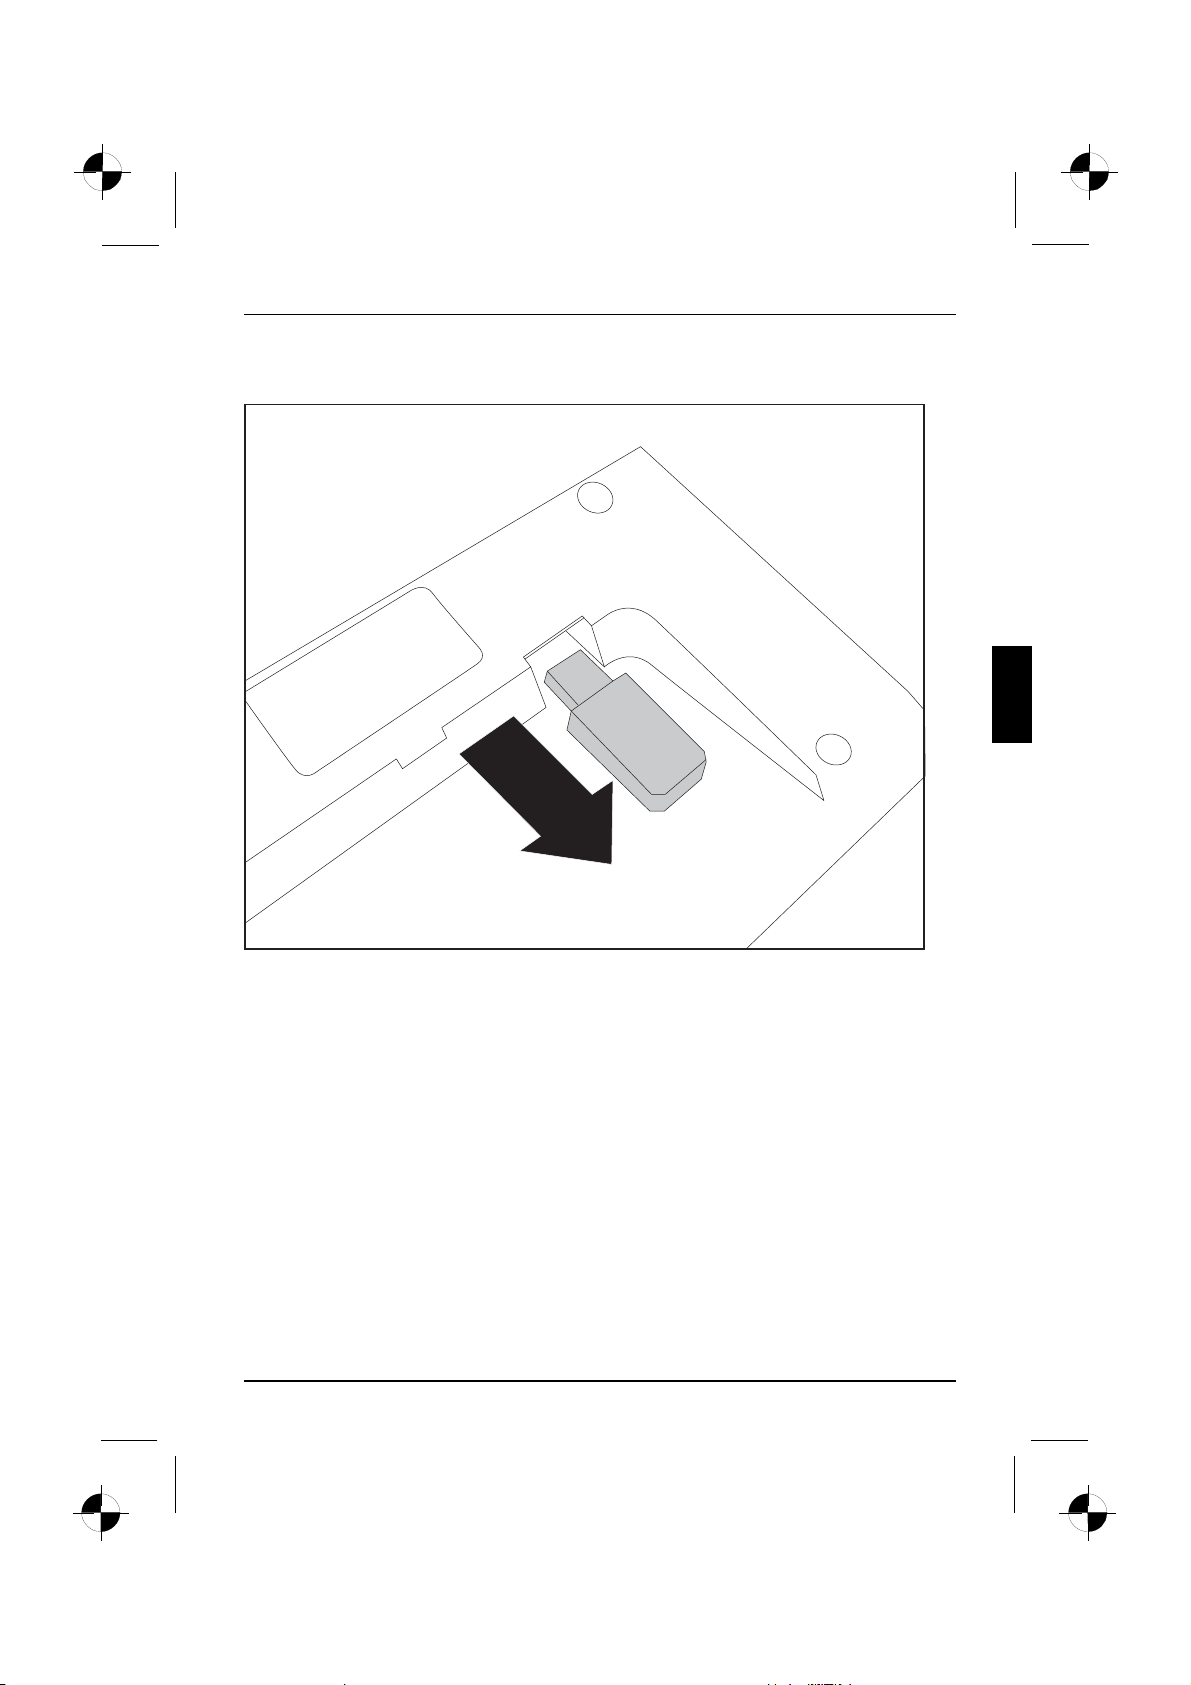
Conectarea receptorului
Punerea în funcţiune
► Scoateţi receptorul din tastatu ră în direcţia indicată de s ăgeată.
10600985321, ediţie 1 Română -11
 Loading...