

Page 1

Consumer Mobile English
Operating Manual
AMILO Notebook
Page 2

Are there ...
... any technical problems or other questions you wish to discuss?
Please conta ct:
• our Hotline/Help Desk (see Help Desk list or visit: "
• your sales partner
• your sales outlet
Additional information is contained in the Help Desk list and the "Warranty" manual.
You w i l l find the "Warranty" manual on your device under Startsymbol – Manual or on our website.
The latest information on our products, tips, updates, etc. can be found on
our website at: "
www.fujitsu-siemens.com"
www.fujitsu-siemens.com/helpdesk")
Page 3

Page 4

This manual was produced by Xerox Global Services
Published by
Fujitsu Siemens Computers GmbH
Edition 3, October 2008
Page 5

AMILO Notebook
First-time setup
Innovative technology 1
Important notes
Preparing your no
Working with the notebook 11
Security functions
Connecting e
Removing and installing components
during servicing
Settings i
Troubleshooting and tips 74
Manufacturer’s notes
Index
n BIOS Setup Utility
tebook for use
xternal devices
52
56
64
72
79
81
3
7
Page 6

Microsoft, MS Windows and Windows Vista are registered trademarks of the Microsoft Corporation.
Adobe Reader is a trademark of Adobe Systems Incorporated.
MultiMediaCard is a registered trademark of Infineon Technologies AG
Sony and Memory Stick are registered trademarks of Sony Electronics, Inc.
All other trademarks referenced are trademarks or registered trademarks of their
respective owners, whose protected rights are acknowledged.
Copyright © Fujitsu Siemens Computers GmbH 2008
All rights reserved, including rights of translation, reproduction by printing, copying
or similar methods, either in part o r in whole.
Non-compliance is subject to compensation for damages.
All rights reserved, including rights crea ted by patent grant or registration of a utility model or design.
Subject to availability an d technical modifications.
Page 7

Contents
Contents
Innovativetechnology ................................................................. 1
Furtherinformation ...................................................................... 1
"AMILO Note book" Operating Manual . . . . . ............................................ 1
Notational conventions .................................................................. 2
Importantnotes ........................................................................ 3
Safetyinformation ....................................................................... 3
Energysaving .......................................................................... 3
Energy saving under Win
Informationsources ..................................................................... 4
Travelling with your n
Beforeyou travel ................................................................... 5
Transporting the not
Cleaning the noteboo
Preparingyour notebookforuse ....................................................... 7
Unpacking an d checking your notebook ................................................... 7
Selectingthe location ................................................................... 8
Connecting the mains adapter ........................................................... 9
Switching the notebook on for the first time ................................................ 10
Working with the
Notebook switc
Devices with a
Devices witho
Switching off
Devices with
Devices with
Status indic
On-Screen d
Keyboard ............................................................................... 15
Virtual nu
Separate k
Key combi
Country a
Quick Sta
Touchpa
Multime
LCD sc
Webc
Batt
Usi
Hy
rtbuttons ......................................................................
dandtouchpad buttons ..........................................................
Using to
dia remote control (device dependent) . ............................................
Removi
Using t
ns .............................................................................
Butto
reen ............................................................................
mation on LCD screen ...........................................................
Infor
en settings .....................................................................
Scre
am ...............................................................................
ery .................................................................................
ging, caring forand maintaining the battery .......................................
Char
oving and installing the battery ...................................................
Rem
ng the power-management features ...................................................
brid graphics (device-dependent) . . . ...................................................
notebook ............................................................
hing on ..................................................................
release mechanism ...................................................
ut arelease mechanism ................................................
the notebook . . . . ...........................................................
a release mechanism ...................................................
out arelease mechanism ................................................
ators ........................................................................
isplay (OSD) ................................................................
meric keypad (notebooks without separate numeric keypad) . . . . . ..............
eypad with application buttons (device-dependent) . . .........................
nations ...................................................................
nd keyboard settings .......................................................
uchpad buttons ..............................................................
ng remote control ............................................................
he remote control .............................................................
dows .......................................................
otebook ............................................................
ebook ...........................................................
k ..................................................................
11
11
11
12
13
13
14
14
15
18
19
19
21
22
23
23
24
24
24
25
26
27
28
29
29
30
30
34
35
3
5
5
6
AMILO Notebook operating manual, edition 3
Page 8

Contents
Change graphics mode . ............................................................ 35
ExpressCards (optional) . ................................................................ 35
Inserting theExpressCard ........................................................... 36
ExpressCard removing .............................................................. 37
Memory cards .......................................................................... 38
Inserting thememorycard ........................................................... 38
Removing the memorycard .......................................................... 39
Hard disk ............................................................................... 39
Second hard disk in RAID group (device-dependent) . .................................. 39
CD/DVD/Blu-ray disc .................................................................... 41
CD/DVD data storage media (certain devices only) ..................................... 41
Handling data carriers . . . ............................................................ 43
CD/DVD/Blu-ray drives (device-dependent) . . . ......................................... 43
Inserting or removing adata carrier ................................................... 43
Regional codes for DVD films andDVDplayers ........................................ 46
Adjusting theAutoPlay function ofthedrive ............................................ 46
Loudspeakers and microphone s . . ........................................................ 47
Switching the loudspeaker off and on ................................................. 47
Adjusting thevolume ................................................................ 47
Wireless USB (device-dependent) ........................................................ 48
General characteristics of Wireless USB . ............................................. 48
Install FujitsuSiemens Wireless USB S1adapter. ...................................... 49
Wireless LAN / Bluetooth wireless components (device-dependent) . . . . . . ................... 50
Switching Wireless LAN and Bluetooth on andoff ...................................... 50
Ethernet and LAN ....................................................................... 51
Security functions ..................................................................... 52
Brief overviewofsecurity functions ....................................................... 52
Using aKensingtonLock ................................................................ 52
Configuring passwordprotection in BIOSSetupUtility ...................................... 53
Protecting BIOS Setup Utility (supervisor and user password) . .......................... 53
Password protection for booting of the operating system . .............................. 54
Connecting externaldevices ........................................................... 56
Connecting an external monitor . . ........................................................ 57
HDMI port (device-dependent) ........................................................ 58
Setting the refresh rate foryourexternal monitor ...................................... 58
Connecting USB devices ................................................................ 59
Connecting an external SATA hard disk (eSATA) . . ......................................... 60
Connecting exte rnal audio devices . . . . . . ................................................. 61
Microphone port / Line In ............................................................ 61
Headphones/SPDIF port . ............................................................ 61
AMILO Graph ic Booster (device dependent) . . ............................................. 63
Connecting the device . . . ............................................................ 63
Removing and inst alling comp onents du ring servicing . . . .............................. 64
Notes on installing and removing boards and components .................................. 64
Removing and installing the battery ....................................................... 64
Installing and removing the memory expansion m odules . .................................. 65
Removing the memorycover ......................................................... 65
Removing memory modules . . ........................................................ 66
Installing amemorymodule .......................................................... 67
Fastening the memorycover ......................................................... 67
Removing and installing the harddisk .................................................... 68
AMILO Notebook operating manual, edition 3
Page 9

Contents
Devices with ajoint compartmentformemoryandharddisk ............................ 69
Devices with separate compartments for memory and hard disk ......................... 70
Settings in BIOS Setu p Utility . . . ....................................................... 72
Starting the BIOS Setup Utility ........................................................... 72
Operating BIOS Setup Utility ............................................................. 72
Exiting BIOS Setup Utility ................................................................ 73
Exit Saving Changes - save changes and exit BIOS Setup Utility . . ..................... 73
Exit Discarding Changes – Discard changes an d exit BIOS Setup Utility . . . .............. 73
Load Setup Defaults – Copy Standard Entries . ........................................ 73
Discard Changes – Discard changes without exiting the BIOS Setup Utility . .............. 73
Save Changes - save changes without exiting the BIOS Setup Utility . . . . . . .............. 73
Troubleshooting and tips .............................................................. 74
Restoring installed software .............................................................. 74
Restoring the operating system, drivers, manuals and special software . . . . .............. 75
The notebook’s date or time is incorrect ................................................... 75
Whencertain charactersareentered on thekeyboard, only numerals are written ............. 75
A beep sounds at a rate of one per second . . . ............................................ 76
The notebook’s LCD screen remains blank . . . . ............................................ 76
The LCD screen is difficulttoread ........................................................ 76
The external monitor remainsblank ...................................................... 76
The external monitor is blankortheimageisunstable ..................................... 77
The notebook cannot be started . . . ....................................................... 77
The notebook stops working . . ........................................................... 78
The printer does not print . . . . . ........................................................... 78
The radio connection to a network does not work . . ........................................ 78
Manufacturer’s notes .................................................................. 79
Disposal and recycling .................................................................. 79
Declarations ofConformity ............................................................... 79
Copyright-protected technology .......................................................... 79
CEmarking ............................................................................ 80
Index .................................................................................. 81
AMILO Notebook operating manual, edition 3
Page 10

Contents
AMILO Notebook operating manual, edition 3
Page 11
Innovative tec hnology
Innovative technology
... and ergonomic design make your AMILO a reliable, convenient notebook.
Your notebook is available in several different versions. Most of the sections in this manual
apply to all models – any differences are indicated separately. Some of the illustrations
and feature s in this manual may differ from your model and are for guidance only. The
"optional" components described in this manual are only available on some versions of the
device and must be selected directly when purchasing. At the time of publication of this
manual, it is not yet possible to state whether the "device-specific" components and functions
described in this manual are available for your version of the device.
If you have purchased a notebook with a Microsoft Windows operating system, this is pre-installed and
optimally configured for you. The notebook is ready to use immediately the first time you switch it on.
Your notebook features the very latest technology so that you get the best
performance from your computing experience.
The user-friendly "BIOS Setup Utility" offers powerful password protection functions which can be
used to control your notebook’s hardware and protect your system better against unauthorised use.
For information about the connections and control elements of your notebook,
please refer to the enclosed user manual entitled "Preparing for use".
Further information
General information about your AMILO Notebook can be found in the
"AMILO Notebook" operating manual.
The Windows Vista drivers for your AMILO notebook are available to download
from our website. This computer is not designed to support any other operating
systems. Fujitsu Siemens Computers accepts no liability for consequences
arising from the use of other operating systems.
Software-related portions of this manual relate to Microsoft products if
they are included with your AMILO Notebook.
Please refer to the relevant manu fact urer ’s operating instructions when
installing other software products.
"AMILO Notebook" Operating Manual
The "AMILO Notebook
or on the Internet at
AMILO Notebook operating manual, edition 3 1
" Operating Manual can be found in the Windows Start menu
"
www.fujitsu-siemens.com/support".
Page 12
Innovative technology
Notational conventions
Pay particular attention to text marked with this symbol. Failure to observe
this warning w ill endanger your life, will damage the device or lead to loss
of data. The warranty will be i nvalidated if you cause defects in the device
through failure to take notice of this warning
indicates important informat
ion that is required to use the device properly.
►
This style
This style
This style
"This style"
Abc
This style
indicates an activity that must be performed in the order shown
indicates a result
flags data entered using the keyboard in a program dialog or command
line, e.g. your password (Name123) or a command to launch a program
(start.exe)
refers to information displayed by a program on the screen, e.g.:
Installation is completed
is for
• terms and texts in a softwar
• names of programs or files, e.g. Windows or setup.exe.
is for
• cross-references to anot her section, e.g. "Safety information"
• cross-references to an external s ource , e.g . a web address: For more
information, go to "
• indicates name s of CDs and DVDs as well as names and titles of other
materials, e.g.: "CD/DVD Drivers & Utilities" or "Safety" manual
refers to a key on the keyboard, e.g.:
flags concepts and text that are emphasised or highlighted, e.g.: Do not
switch off device
www.fujitsu-siemens.com"
e user interface, e.g.: Click Save.
F10
2 AMILO Notebook operating manual, edition 3
Page 13
Important notes
ImportantnotesNotes
Safety information
SafetyinformationNotes
This chapter contains essential safety information which must be followed
when working with your notebook. Other notes also provide useful information
which will help you with your notebook.
Please note the information provided in the "Safety" manual and
in the following safety notes.
Observe the sections in the manual marked with the symbol on the left.
When connecting and disconnecting cables, observe the relevant
notes in this operating ma nual.
Read the information on the ambient conditions in the technical data given in the
"First-time setup" manual and the chapter "
before preparing your notebook for use and switching it on for the first time.
When cleaning the device, please observe the relevant notes in the
section "
Pay atten tion to the additional safety notes for devices with radio
components provided in the "Safety" manual.
Please refer to the notes in the chapter "
components during servicing", Page 64.
Cleaning the notebook", Page 6.
Important notes
Preparing your notebook for use " , Page 7
Removing and installing
This notebook complies with the relevant safety regulations for data processing
equipment. If you have questions about using your notebook in a particular area,
please contact your sales outlet or our Hotline/Help Desk.
Energy saving
NotesEnergyEnergysaving
Switch the notebook off when it is not in use. Switch off external, connected devices if you
are not using them. If you use the energy saving functions, the notebook uses less energy.
You will then be able to work for longer before having to recharge the battery.
Energy efficiency is increased and the environmental impact is reduced.
You save money while protecting the environment.
Energy saving under Windows
► Make use of the power management features (see ""Using the power-management features",
Page 34").
AMILO Notebook operating manual, edition 3 3
Page 14

Important notes
Information sources
Informationsou rces
This manual co ntains more detailed instructions and technical information for your notebook.
Manuals a vailable only as PDF files can be printed out if you connect a printer to your notebook.
Information source Type of information Where?
"Safety" manual (printed
and/or PDF file)
"Recovery Process" manual
(printed and/or PD F file)
"Preparing for use" manual
(printed)
"Warranty" manual (PDF
file)
information files (e.g. *.TXT,
*.DOC, *.CHM, *.HLP)
information files (e.g. *
*.DOC, *.CHM, *.HLP)
information files (e.g. *.TXT,
*.DOC, *.CHM, *.HLP )or
Windows help [ F1].
Safety information Accessories kit and/or on your
notebook
Information on restoring
the o perating system,
drivers, ma nuals and special
Accessories kit, on your
notebook or at our website
"
www.fujitsu-siemens.com/support/"
software
Instructions on preparing
the device before using it
for the first time, technical
information
General guarantee
conditions
Information on utilities and
programs
.TXT,
Information on the opera
The manuals are located on your
notebook under Start – Manual,or
in some cases updated versions
can be found on our website at:
"
www.fujitsu-siemens.com/support/".
ting
In the software for these
system
Information on Wireless LAN I n the software/application of the
wireless LAN router from your Internet
provider or Windows help [ F1].
applications
4 AMILO Notebook operating manual, edition 3
Page 15
Important notes
Travelling with your notebook
MobileoperationNotesTransportationNotebook
Please observe the points listed below when travelling with your notebook.
Before you travel
► Back up important data stored on your hard disk.
NotebookTravel,notebook
► Switch off the radio component for data security reasons. With data traffic via a wireless
connection, it is also possible for unauthorised third parties to receive data.
Information on activating data encryption is provided in the documentation
for your radio component.
► If you wish to use your notebook during a flight, first check with the flight
attendants if it is OK to do so.
When travelling in other countries
► If you are travelling abroad, check that the mains adapter can be operated with the
local mains voltage. If this is not the case, obtain the appropriate mains ada pter for
your notebook. Do not use any other voltage converter!
► Check whether the local power supply and the spe cifications of the power cable are
compatible. If this is not the case, buy a power cable that matches the local conditions. Do
not use a connection adapter for electrical devices to connect the notebook.
► Enquire with the corresponding government office of the country you will be
travelling in as to whether you may operate the radio component integrated in
your notebook there (see also "
► If you are planning to use a modem, please be aware that it may not necessa rily be compatible
with the local telephone system. This may result in poor performance, or the modem may not work
at all. You may re quire a country-specific telephone adapter (available as an optional accessory).
CE marking", Page 80).
Transporting the notebook
A placeholder must occupy the ExpressCard slot. This will prevent any
foreign bodies from entering the notebook via the slot.
Protect the notebook from severe shocks and extreme temperatures
(e.g. direct sunlight in a car).
► Remove all data carriers (e.g. CD, DVD) from the drives.
TransportationNotebook
► Switch the notebook off.
► Unplug the mains adapter and all external devices from the po wer socket.
► Disconnect the mains adapter cable and the data cables for all external devices.
► Close the LCD screen.
► To p rotect against damaging jolts and bumps, use a notebook carrying
case to transport your notebook.
AMILO Notebook operating manual, edition 3 5
Page 16

Important notes
Cleaning the notebook
Do not clean any interior parts yourself; leave this job to a service technician.
Only use cleaning products designed for computers. Normal household
cleaners and polishes can damage the markings on the ke yboard and the
device, the paintwork or the notebook itself.
Ensure that no liquid enters the notebook.
The LCD screen very sensitive to scratches. Only clean the display
surface with a very soft, slightly damp cloth.
► Switch the notebook off.
CleaningNotesNotebookKeyboardTouchpadLCDscreenCrystalViewdisplay
► Remove the m ains plug for the mains adapter from the mains socket.
► Remove the battery (see Chapter "
The surface can be cleaned with a dry cloth. If particularly dirty, use a cloth which has
been moistened in mild domestic detergent and then carefully wrung out.
To clean the keyboard and the touchpad, you can use disinfectant wipes.
ng and installing the battery", Page 30).
Removi
6 AMILO Notebook operating manual, edition 3
Page 17
Preparing your notebook for use
Preparing your notebook for us
First-timesetu pNotebookGettingstartedNotebook
Before you can use your notebook for the first time you will need to charge the battery.
On delivery, the battery can be found in the battery compartment or in the accessories kit. The
battery must be charged if you want to operate your notebook with the battery.
When not plugged into a mains socket, the notebook runs on its built-in battery. You can
increase the battery’s life by enabling the system ’s energy saving functions.
If you use the notebook in at home or in an office, we recommend you use
the mains adapter instead of the battery.
Please refer to the "AMILO Notebook" operating manual for instructions on how to connect
external devices (e.g. a mouse or a printer) to the notebook..
Unpacking and checking your no
Refer to the "Important notes", Page 3 chapter.
If your notebook comes with a Windows operating system then all of the necessary
hardware drivers and the supplied software will already be pre-installed.
With the operating system Microsoft Vista, it may take up to 20 minutes to prepare your
notebook for use depending on the hardware fitted and the software supplied.
When you switch on the notebook for the first time it will perform a system
check. A number of different messages may be displayed. In the process,
the display may flicker or darken temporarily.
Please follow the instructions on the screen.
It is very important that you do not switch the notebook off during this initial set-up process.
tebook
Should you discover any damage incurred during transportation, notify
your local sales outlet immediately!
e
► Unpack all th e individual parts.
PackagingTransport
► Check your notebook for damage incurred during transportation.
We recommend that you keep the original packaging material.
You may need the packaging in the future if you need to transport your device.
AMILO Notebook operating manual, edition 3 7
Page 18

Preparing your notebook for use
Selecting the location
Location,selectingtheNotebookPoweradapter
Select a suitable location for the notebook before setting it up. Consider
the following points when selecting a location:
• Never place the notebook and the mains adapter on a heat-sensitive
surface. This could damage the surface.
• Never place the notebook on a soft surface (e.g. carpeting, upholstered furniture,
bed). This can block the air vents and cause damage due to overheating.
• Do not place the notebook directly on your legs for extended periods. T he
underside of the notebo ok heats up during normal operation. Extended contact
with the skin can become u npleasan t or even result in burns.
• Place the notebook on a stable, flat, non-slip surface. Please note that
the rubber feet may mark certain types of surfaces.
• Keep other objects 100 mm away from the notebook and its mains
adapter to ensure adequate ventilation.
• Never cover the ventilation slots on the notebook.
• Do not expose the notebook to extreme environmental conditions. Protect
the notebook against dust, humidity and heat.
8 AMILO Notebook operating manual, edition 3
Page 19
Connecting the mains adapter
PreparingforoperationMainsadapter
Follow the instructions in "Safety information", Page 3.
The mains power cable supplied conforms to the requirements of the country
in which you purchased your notebook. Make sure that the mains cable is
approved for use in the country in which you intend to use it.
The mains cable of the mains adapter must only be connected to a mains
socket if the notebook is connected to the mains adapter.
Check tha t your mains supply is capable of supplying the power required by the mains
adapter (refer to the information printed on the mains adapter and the technical
data for the mains adapter in the "Preparing for use" manual).
For more information, please refer to the " Preparing for use" manual for your notebook.
Preparing your notebook for use
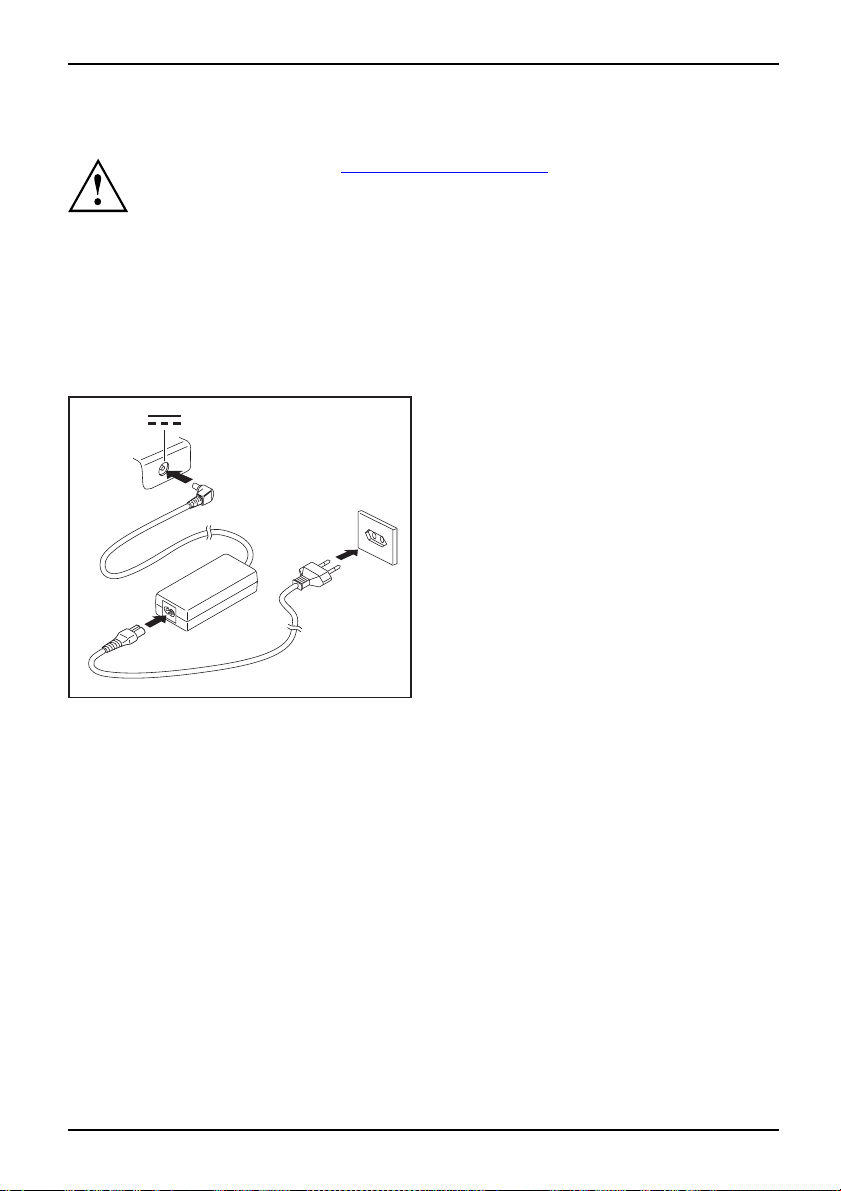
► Connect the mains adapter cabl
DC jack (DC IN) on the noteboo
e (1) to the
k.
► Connect the mains cable (2) to the
mains adapter.
1
► Plug the mains cable (3) into a
mains outlet.
3
2
AMILO Notebook operating manual, edition 3 9
Page 20
Preparing your notebook for use
Switching the notebook on for the first time
Switchingonforthefirsttime
We recommend that the notebook is supplied with power through
the mains adapter during this procedure.
When you switch your notebook on for the first time, the supplied software is
installed and configured. Due to the fact that this installation procedure must not
be interrupted, you should set aside enough time for it to be fully completed and
connect the notebook to the mains outlet using the mains adapter.
During installation, the notebook must only be rebooted when you are requested to do so!
You will be prompted to create a backup copy of the pre-installed operating system. This
backup copy can be used later to restore your notebook to its delivery configuration.
You c a n find information on how to restore the operating system, drivers, manuals
and special software in the Recovery Process manual.
Your operating system is pre
when you use your notebook f
► Switch the notebook on (see "
► During installation, follow the on-screen instructions.
Consult the operating system
If a Windows operating syste
information on the system a
on your notebook, or you ca
-installed on the hard disk to facilitate the procedure
or the first time.
Notebook switching on", Page 11).
manual if anything is unclear about the requested input data.
m is installed on your notebook, you will find additional
s well as the drivers, help programs, updates, manuals, etc.
n order it via our website (see "
Information sources", Page 4).
10 AMILO Notebook operating manual, edition 3
Page 21
Working with the notebook
Working with the notebook
Notebook,operationNotebook
This chapter describes the basics for operating your notebook. Please read the chapter
entitled "
devices such as a mouse and a printer to the notebook.
Notebook switching on
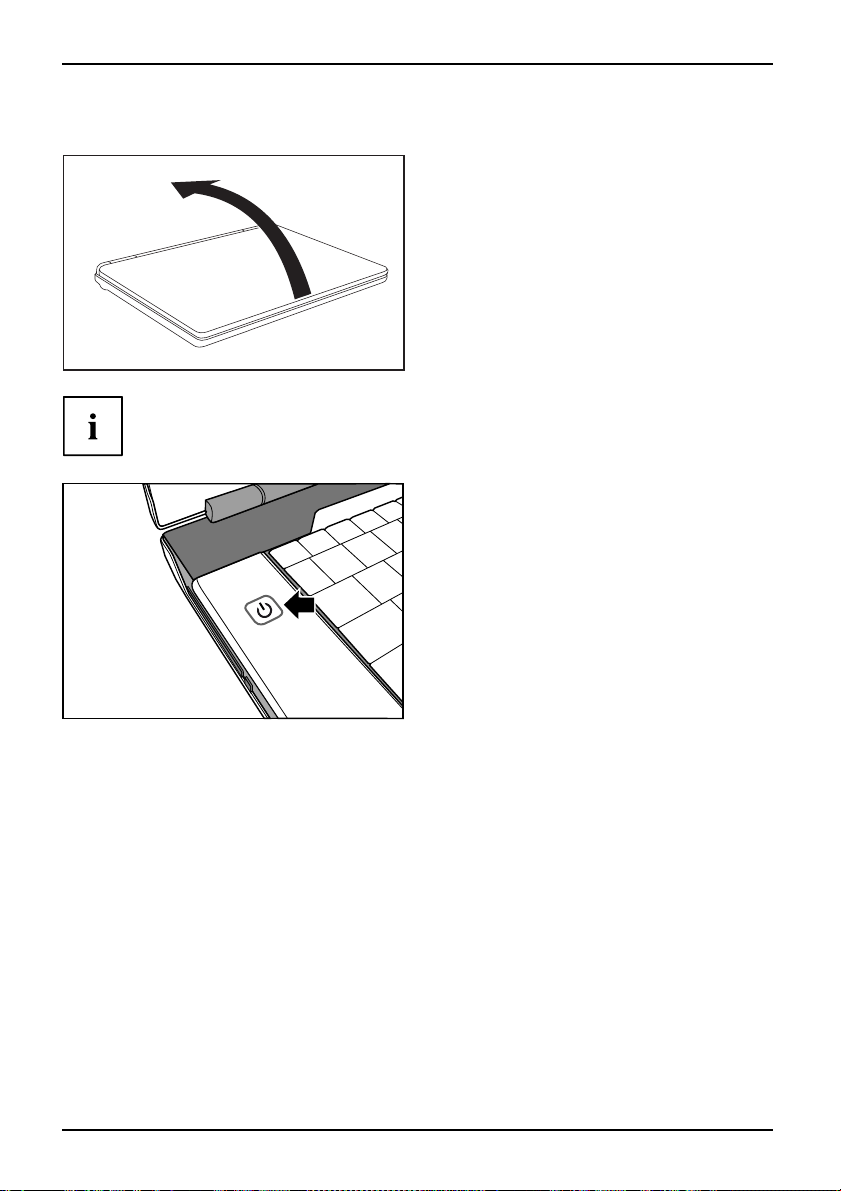
Devices with a release mechanism
Connecting external devices", Page 56 for instructions on how to connect
Please refer to the notes in "Important notes", Page 3.
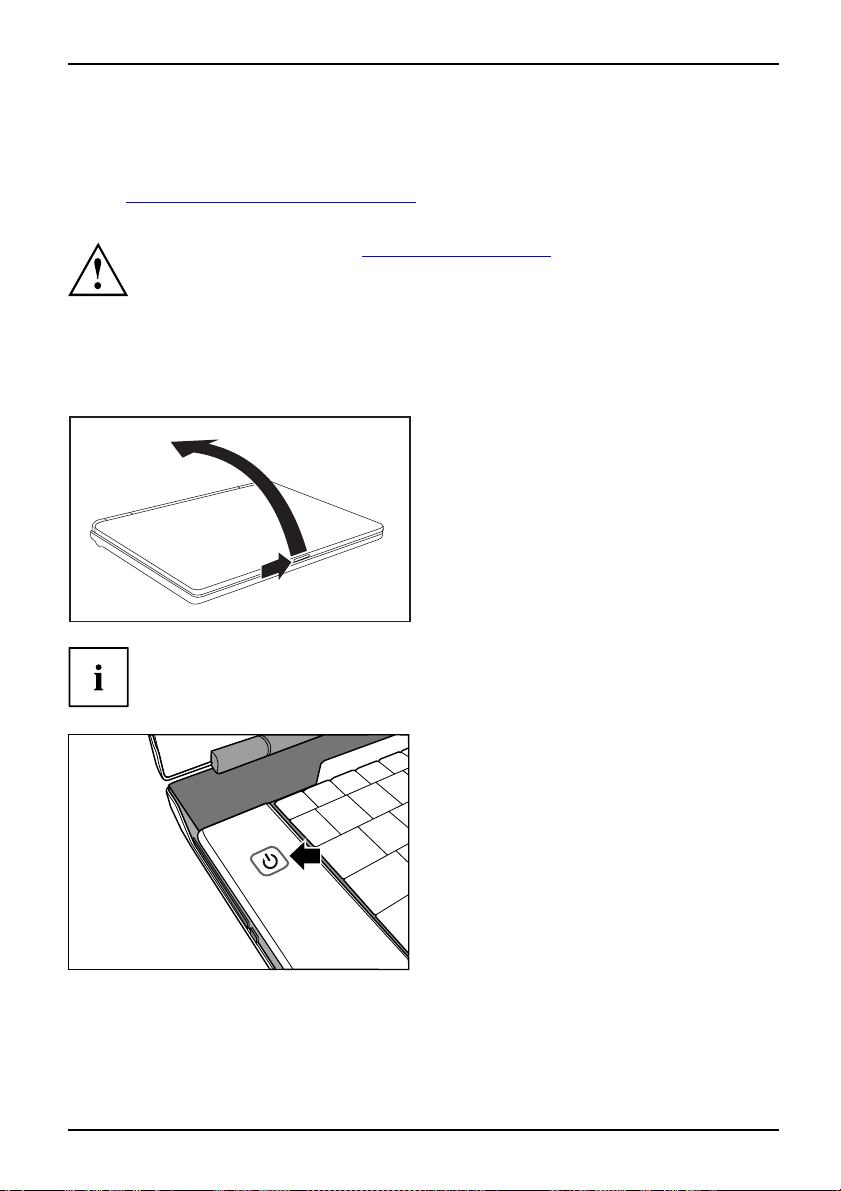
► Slide the release button in direction
2
1
of the arrow (1) and fold the LCD
screen upwards (2).
Notebook
The position of the on/off switch may vary from device to device.
► Press the ON/OFF switch (1) for
approximately 1 second to switch
on the notebook.
1
The power-on indicator of the notebook glows.
AMILO Notebook operating manual, edition 3 11
Page 22
Working with the notebook
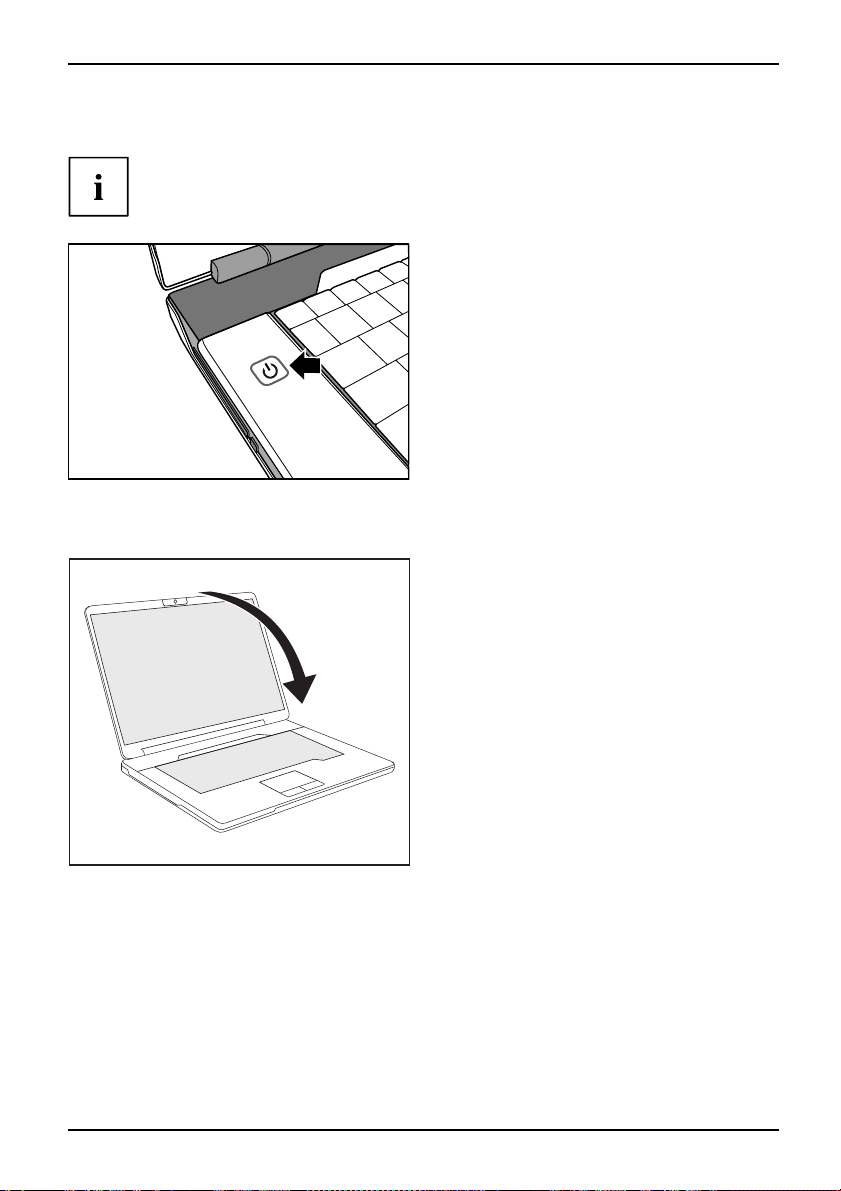
Devices without a release mechanism
► Fold up the LCD screen (1).
Notebook
1
The position of the on/off switch may vary from device to device.
1
The power-on indicator of the notebook glows.
► Press the ON/OFF swit
approximately 1 sec
ond to switch
on the notebook.
ch (1) for
12 AMILO Notebook operating manual, edition 3
Page 23
Switching off the notebook
The position of the on/off switch may vary from device to device.
► Shut down t he operating system properly
► If the notebook is not switched off
1
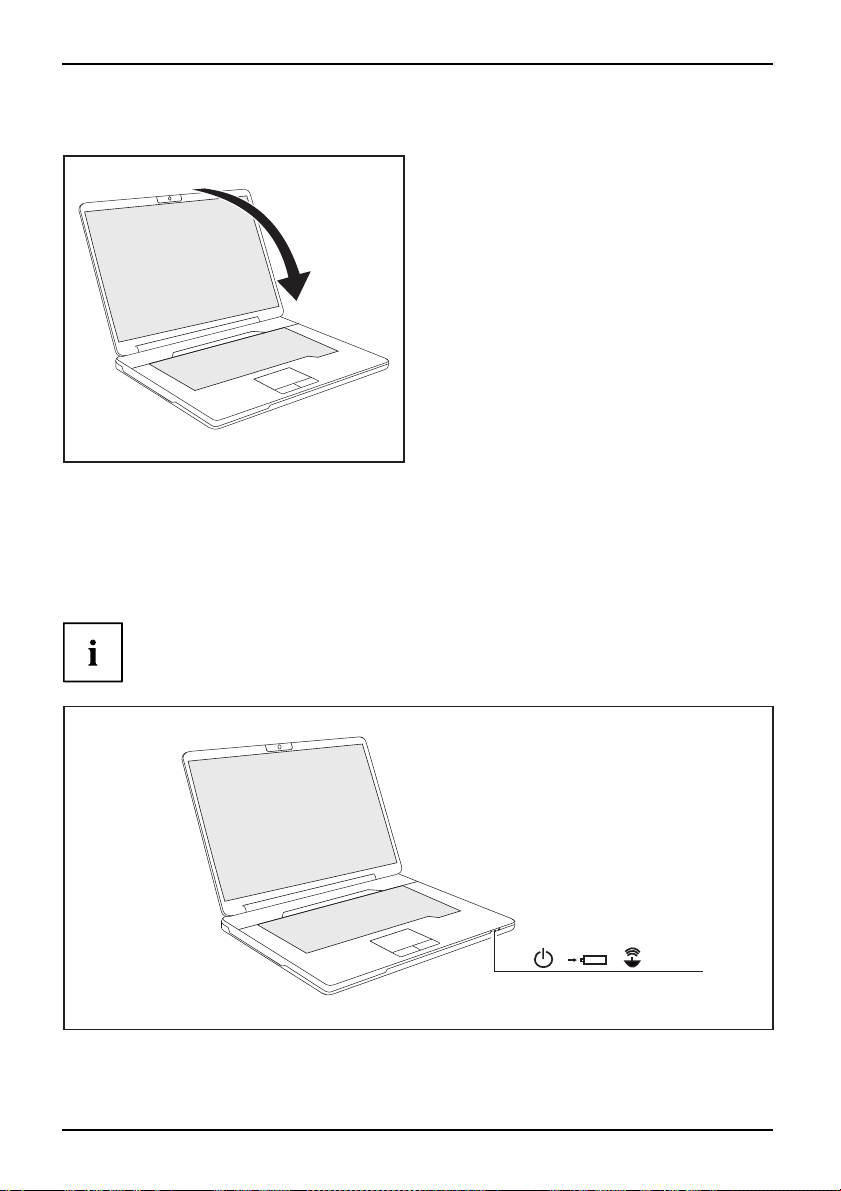
Devices with a release mechanism
► Close the LCD screen (1) until you
Working with the notebook
(in Windows via the Start menu by clicking
Start Symbol – Shut Down – Shut Down – OK).
Notebook
automatically, press the ON/OFF switch (1)
for approx. five seconds.
feel it click and engage.
1
AMILO Notebook operating manual, edition 3 13
Page 24
Working with the notebook
Devices without a release mechanism
► Close the LCD screen (1).
1
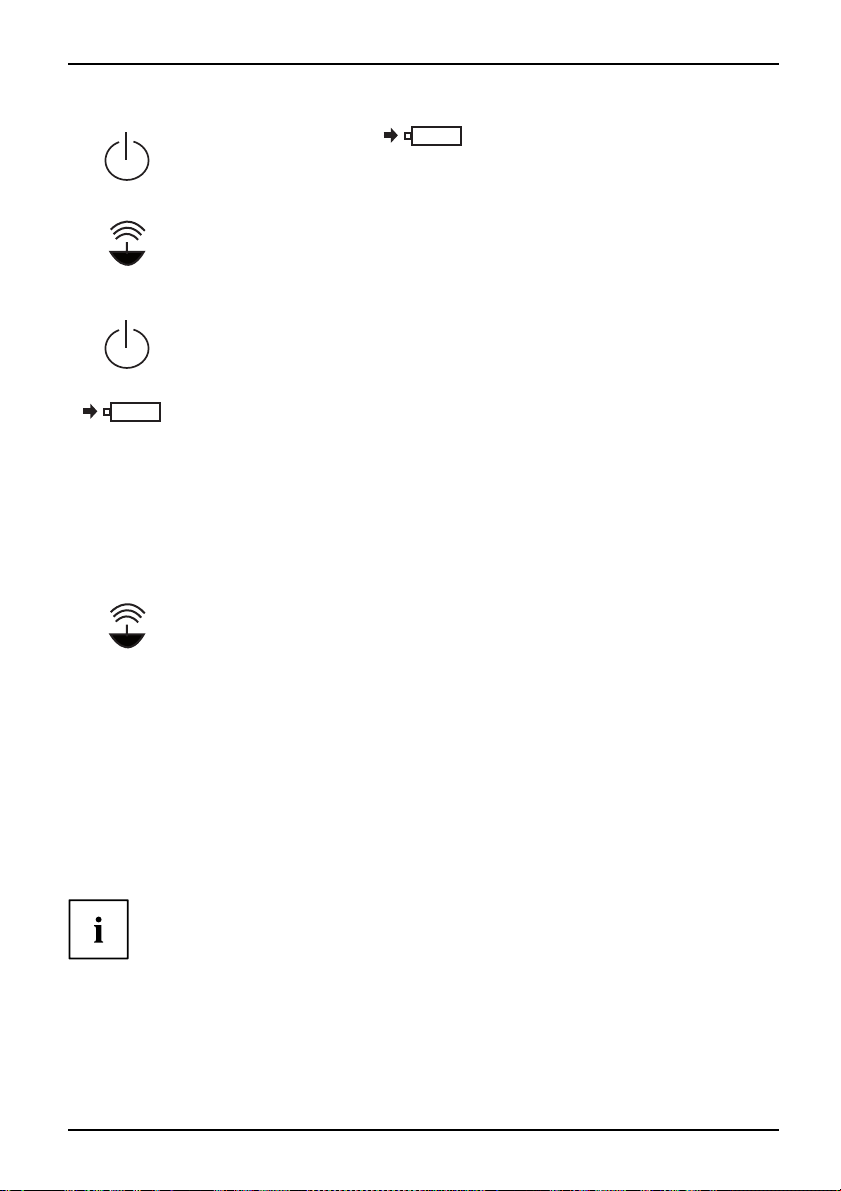
Status indicators
Statusindicators
The status indicators provide information about the status of the power supply, the drives
and the keyboard functions. Three indicators are visible when the device is closed:
Power-on indicator, wireless LAN indicator, battery indicator
Depending on the model, the status indicators on your device may be
in a different order to that shown below.
14 AMILO Notebook operating manual, edition 3
Page 25
Working with the notebook
Power-on indicator /
Rechargeable battery indicator
Standby
Wireless LAN indicator
Power-on indicator / Standby
StandbyindicatorPower-onindicator
• Indicator is on: The notebook is switched on.
• Indicator flashes: The notebook is in standby mode.
• Indicator is off: The notebook is switched off.
Rechargeable battery indicator
The battery charge status is shown by the rechargeable battery indicato r.
• The indicator is blue: The battery is fully charged, the mains adapter is
connected.
• Indicator flashes blue: the battery is charging.
• Indicator flashes red: the battery is nearly empty.
• Indicator is o ff: The battery is empty (the notebook is switched off) or the
notebook is being run without a mains adapter and the battery is not fully
charged.
BatterystatusindicatorBatterysymbolRechargeablebatteryindicator
Wireless LAN indicator
• The indicator is blue: The wireless LAN module is switched on.
• Indicator is off: The wireless LAN module is switched off.
WirelessLANindicator
On-Screen display (OSD)
Your AMILO is equipped with an on-scree n display (OSD).
Various keyboard inputs, e.g. changes to the volume or screen b rightness or activation
of the Caps Lock function, are displayed directly by the OSD.
Keyboard
ckeypad
ckeypad
s
KeyboardNumeri
Numeri
Button
The keyboard has been designed to provide all the functions of an enhanced keyboard.
Some enhanced keybo ard functions are mapped with key combinations.
The following description of keys refers t o Windows. Additional functions supported by the keys
are described in the relevant manuals supplied with your application programs.
AMILO Notebook operating manual, edition 3 15
The keyboard of your notebook is subject to continuous wear through normal
use. The k ey markings are especially prone to wear. The key markings are
liable to wear away over the life of the notebook.
Page 26
Working with the notebook
The figure below shows how to access the different characters on keys with overlaid functions.
The exa mple applies when the Caps Lock key has not been activated.
7
+
Num
Fn
7
+
/
7
{
/
7
+
/
7
{
7
/
{
7
Illustration (general example of German keyboard layout)
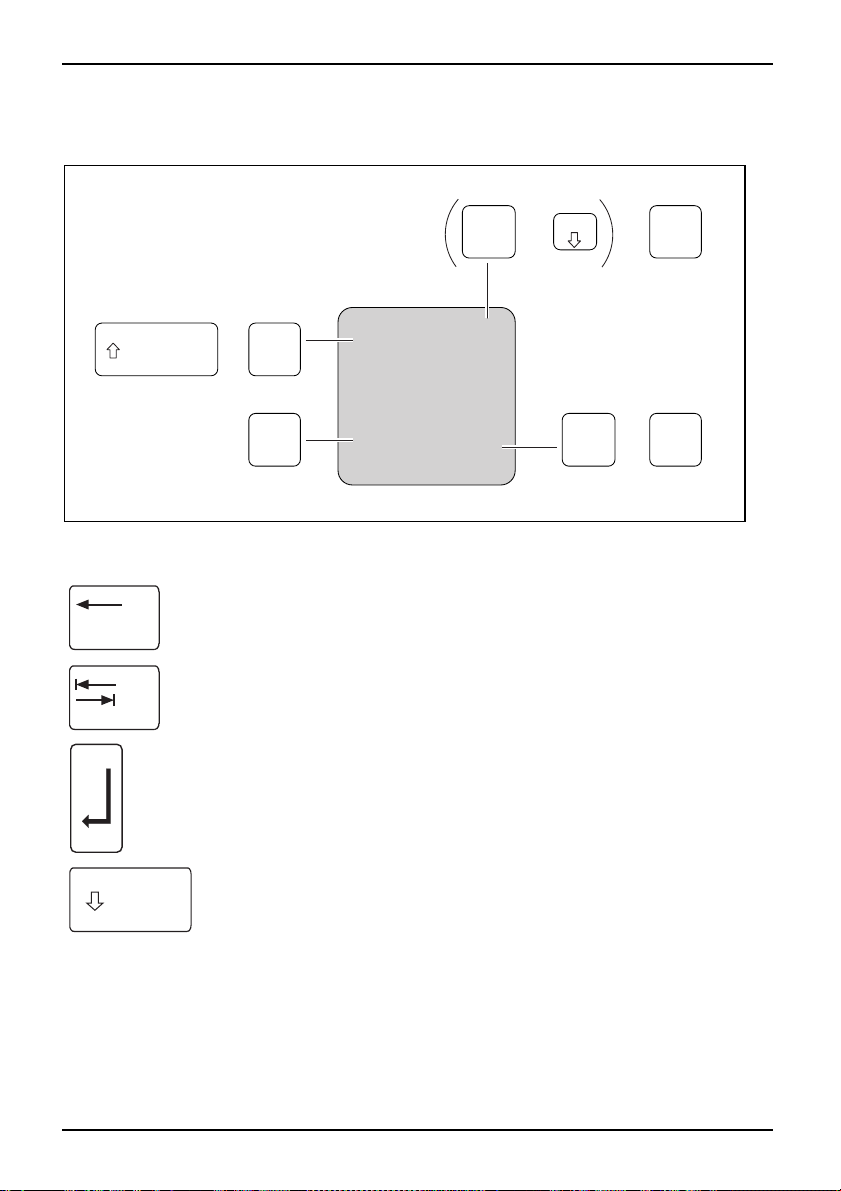
Backspace key
The Backspace key deletes th e charact er to the left of the cursor.
BackspaceBackspace
Tab key
The Tab key moves the cursor to the next tab stop.
Tabkey
Enter key (return)
The Enter key terminates a command line. The command you have entered
is executed when you press this key.
EnterkeyReturnEnterLinefeed
Caps Lock key
The Caps Lock key activates the Caps Lock mode, and the corresponding
icon is displayed in the W indows information area. In Caps Lock mode, all
of the characters y ou type appear in upper case. In the case of overlay
keys, the character printed on the upper left of the key will appear when
that key is pressed. To cancel the Ca ps Lock function, simply press the
Caps Lock key again.
tkey
Lock
Shif
Caps
7
+
/
7
{
{
Alt Gr
7
16 AMILO Notebook operating manual, edition 3
Page 27
Working with the notebook
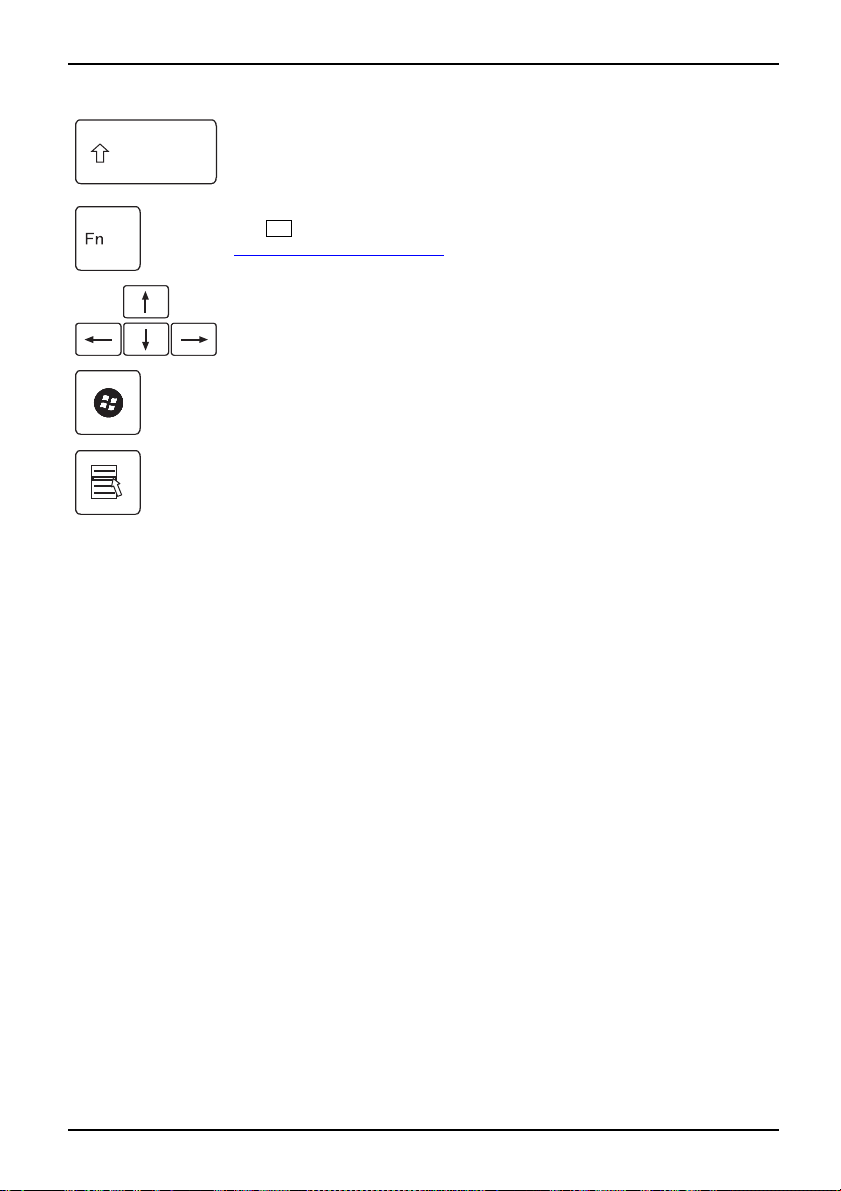
Shift key
The Shift key causes uppercase characters to appear. In the case of overlay
keys, the character printed on the upper left of the key appears when that
keyispressed.
ShiftkeyShift
Fn button
Fn
The
"
Key combinations", Pa ge 19).
Fnkey
key enables the special functions indicated on overlay keys (see
Cursor keys
The cursor keys move the cursor in the direction of the arrow, i.e. up, down,
left, or right.
CursorkeysCursorcontrolkeys
Start key
The Start key opens the Windows Start menu.
Startkey
Menu key
The Menu key opens the menu for
Menukey
the selected item.
AMILO Notebook operating manual, edition 3 17
Page 28
Working with the notebook
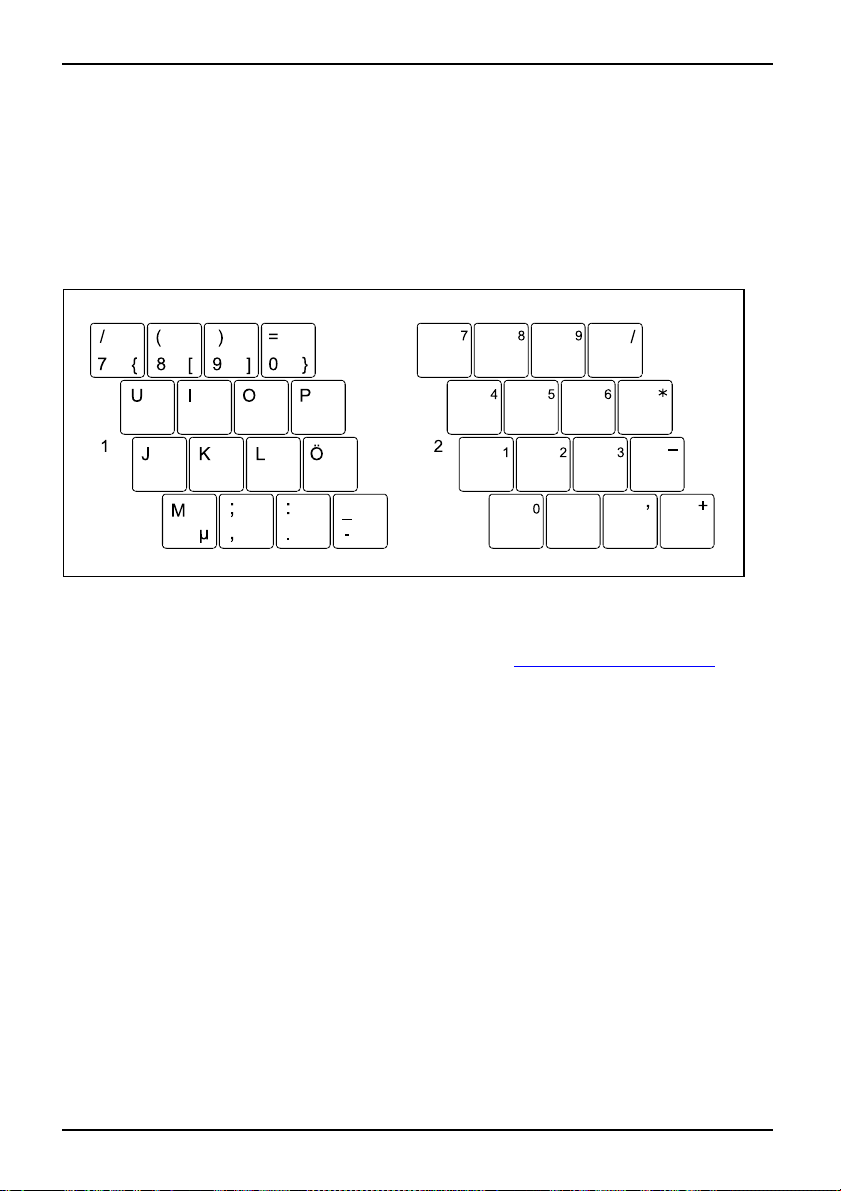
Virtual numeric keypad (n otebooks without separate numeric keypad)
NumerickeypadVirtual numerickeypadNumLock
To provide the convenience of a numeric keypad for c ertain applications, your keyboard is equipped
with a virtual numeric keypad. The special keys of the virtual numeric keypad are recognisable by
the numbers and symbols printed in the upper right corner of each key. If you have switched on the
virtual numeric keypad, you can output the characters shown on the upper right of the keys.
Illustration (the example shows a German keyboard layout):
1 = Valid characters when the Num
key is not activated
Further information about the status indica tors can be found in "
18 AMILO Notebook operating manual, edition 3
2 = Valid characters when the Num
keyisactivated
Status indicators", Page 14.
Page 29

Working with the notebook
Separate keypad with application buttons (device-dependent)
Depending on the configuration of your notebook, the keyboard may have a separate
numeric keypad with four application buttons. You can assign a function to these keys
and by pressing the relevant button, for example, you can access a previously defined
file on your computer, an Internet page or your e-mail account.
The four application buttons are located on notebooks on a separate
keypad directly above the numeric keypad.
A3
A1
A2
A4
987
6
5
4
3
1
2
0
For information on how to change the keyboard configuration and about the related software
installed on your device, please refer to the Initial Operation manual.
AMILO Notebook operating manual, edition 3 19
Page 30

Working with the notebook
Key combinations
Keycombinations
The key combinations described below apply when using Microsoft Windows
operating systems. Some of the following key combinations may not function in
other operating systems and with some device drivers.
Other key combinations are described in the r elevant manuals supplied
with your application programs.
Key c ombinations are entered as follow s:
► Press and hold the first key in the combination.
► While holding the first key down, press the other key or keys in the combination.
Switching WLAN/Bluetooth on/of
With the aid of this key combinatio
Bluetooth functionality of your
Fn+F1WL ANBluetoothWLAN
f
nyoucanswitchtheWLANor
notebook on and off.
Switching the TV tuner on/off (device-dependent)
You can use this key combination to switch the TV tuner on and off.
Fn+F2TV tuner
Switching the loudspeaker on and off
This key combination switches your notebook’s loudspeaker off
and on.
Fn+F3Loud speakersLoudspeakers
Decrease volume
This key combination reduces the volume of the integrated
loudspeakers.
Fn+F4Vo lume
Increases volume
This key combination increases the volume of the integrated
loudspeakers.
Fn+F5Vo lume
Touchpad and touchpad buttons, switching on/off
This key combination switches the touchpad and the touchpad
buttons on or off.
Fn+F6TouchpadTouchpadbuttonsTouchpad
Switching the camera on
Use this key combinatio
of the notebook.
Fn+F7Camera switchingoff
/off
n to switch on or off the integral webcam
Decrease screen brightness
This key combination decreases the brightness of the screen.
reen
nbrightness
Fn+F8LC Dsc
Scree
Increase screen b rig
This key combination
Fn+F9S cr eenbrightness
htness
increases the brightness of the screen.
20 AMILO Notebook operating manual, edition 3
Page 31

++
SysRq
Del
AltCtrl
Working with the notebook
Toggle outpu t screen
Use this key combination to select which screen(s) is/are used for
display if an external monitor is connected.
You can opt to use:
• just the notebook’s LC D screen
• both the LCD screen and the external monitor
• just the ext ernal monitor
Fn+F10Toggleoutputscreen
Switching Silent Mode on/off
Changing into Silent Mode (whisper mode).
To lower the noise level of the drive, the rotating speed is reduced.
Key:Fn+F11SilentMode
Enabling/restoring from suspend mode
Use this key combination to switch suspend mode on/off.
Fn+F12SuspendmodeSuspendm od e
Switch between op en applications
Use this key combination to switch between several open
applications.
Alt+Tab
Performwarmreboot
This key c ombination restarts the notebook. First, press and hold
both the
Ctrl
and
Alt
keys, then press the
Del
key. Fir st of
all the Task Manager will be displayed. You must then press all
three keys again to reboot .
Ctrl+Alt+DelRestart
Back tab
This key combination moves the cursor back to the previous
tabular stop.
Shift+TabBacktab
Key combinations using the Windows keys are detailed in the manual
for your operating system.
Country and keyboard settings
If you want to change the country and keyboard settings, proceed as follows:
► Enter the settings by clicking Start – (Settings) – Control Panel – Time, Regional and Language Options.
AMILO Notebook operating manual, edition 3 21
Page 32

Working with the notebook
Quick Start buttons
QuickStartbuttons
Your notebook is equipped with q uick start buttons.
Depending o n configuration, there may be a variety of quick start
buttons on your AMILO Notebook.
You can start the following applications or functions by pressing a s ingle key.
Silent Mode (whisper mode)
This key reduces the speed of th
When the Silent Mode is switched
the full performance level.
Whispermode,QuickStartbuttonSilentmode,QuickStartbutton
Internet
Internet,Quick Startbutton
With this button you c a n start your
Hybrid VGA
This key allows you to switch between an external and an internal graphics card.
e fan.
on, the processor and graphics do not operate at
default Internet browser.
ODD eject
This key allows you to eject a CD/
DVD from the drive.
Mute
This key s witches the loudspeakers of your AMILO Not ebook on and off.
Multimedia
You can use th is button to launc
installed on your system.
Multimedia,QuickStartbutton
Play/Pause
PlayPause
h the software for playing back multimedia files which is
This key allows you to pause and resume the playback in your multimedia player. The
playback then resumes at the point where it was paused.
Skip reverse, Skip forward
SkipSkip
You can use these keys to skip to the previous or next title in your multimedia player.
Stop
Stop
This key allows you to stop or restart the playback in your multimedia player.
Playback will then restart from the beginning of the item.
Vol u m e
Volume
This key allows you to set the volume level of your AMILO Notebook
during replay.
22 AMILO Notebook operating manual, edition 3
Page 33

Touchpad and touchpad buttons
Keep the touchpad clean. Protect it from dirt, liquids, and grease.
TouchpadButtons
Do not use the touchpad if your fingers are dirty.
Do not rest heavy objects (e.g. books) on the touchpad or the touchpad buttons.
Working with the notebook
1
2 = Touchpad buttons
2
The to uchpad ena bles you to move the mouse pointer on the screen.
The touchpad buttons allow you to select and execute c ommands. They correspond
to the buttons on a conventional mouse.
Using touchpad buttons
Moving the pointer
1 = Touchpad
► Move your finger on the touc
Touchpad
The pointer will move accordingly.
Selecting an item
► Move the pointer to the item you wish to select.
Touchpad
► Tap the to uch pad once or pres
The item is selected.
Executing a command
► Move the pointer to the field you wish to select.
Touchpad
► Tap the touchpad twice or pres
The command is executed.
hpad.
s the left button once.
s the left button twice.
Dragging an item
► Select the desired item.
hpad
Touc
► Press and hold the left button and
with the finger on the touchpad.
The item will be moved.
AMILO Notebook operating manual, edition 3 23
drag the item to the desired position
Page 34

Working with the notebook
Multimedia remote control (device dependent)
Remotecontrol
Removing remote control
Using the remote control
Usingthe
Before using the remote control for the first time, pull out the transparent
film from the battery contacts.
Further information can be found in the Windows online manual (section
"
Information sources", Page 4).
► Press the eject button (1) twice, until
the remote control projects slightly from
the ExpressCard slot.
Remotecontrol
1 (2 x)
► Pull the remote control out of the
ExpressCard slot (2).
2
1
30
3
2
The remote control (2) must be in the effective range (horizontally approx. 30°) of the notebook’s
CIR interface (1). Use the remote control within the reception zone (3) of the CIR interface.
The range (3) may vary depending on the effective angle to the CIR interface.
24 AMILO Notebook operating manual, edition 3
Page 35

Buttons
Working with the notebook
Navigation key
The navigation key scrolls within the menus (up, down, left
and right).
► The "OK" key activates the selected menu entries.
Energy saving mode On/Off
switch (S3)
Use this key to switch the notebook
to energy saving mode (S3) or to
leave energy saving mode (S3).
Stop
This key ends the current
playback.
Rewind
This key rewinds the playback.
Replay
This key starts the playback.
Fast forward
This key advances the playback.
Back
This key takes you to the previous
menu.
Change channel
This key changes the television
channel.
Rec
This key records the current
television programme on the hard
disk of your device.
Pause
Thiskeypausesthecurrent
playback.
Jump back
Thiskeystartsplaybackofthe
previous track, picture or previous
film sequence.
Jump forward
This key starts playback of the next
track, picture or next film sequence.
Information
This key gives you extra information
on multimedia applications.
Mute key
This key switches the sound
playback on and off.
Increase/decrease volume
This key increases or decreases the
volume.
AMILO Notebook operating manual, edition 3 25
Page 36

Working with the notebook
Replay recording
This key replays the television
programmes stored on the hard
drive of the device .
Live TV
This key changes from the
replay of recorded te levision
programmes to the current
television programme on the
chosen television channel.
Thekeycanonlybeusedwhen
a correctly adjusted TV tuner is
connected.
TV Programme Overview
Use this key to open the TV
Programme Overview.
The TV Programme Overview
is not yet available from al
lTV
networks in all countries.
Thekeycanonlybeusedwhen
a correctly adjusted TV tun
er is
connected.
Start
Use this key to call up the Windows
Vista Start menu
DVD menu
This key starts the main menu of a
DVD which is loaded in the drive.
26 AMILO Notebook operating manual, edition 3
Page 37

Working with the notebook
LCD screen
Information on LCD screen
LCDscreenNotes
High-quality TFT displays are installed in notebooks from Fujitsu Siemens Computers GmbH.
For technical rea sons, TFT monitors are manufactured for a specific resolution. An optimal,
clear picture can only be ensured in the resolution intended for the particular TFT monitor. A
monitor resolution which differs from the speci fication can result in an unclear picture.
The expression "monitor resolution" is used to describe the number of horizontal and vertical
pixels ("picture elements") which make up the monitor display. For example, "WUXGA" stands fo r
1920 x 1200 pixels. Each pixel consists of three so-called subpixels of the colours red, green and
blue. As a result, a WUXGA monitor consists of 1920 x 1200 x 3 = 6,912,000 subpixels.
Screen resolutions Number of pixels
CGA
QVGA
VGA
NTSC
PAL 768 x 576
SVGA
WVGA
SWVGA LCD (e.g. AMILO Mini)
XGA
HD 720 1280 x 720
WXGA
SXGA
HD 1366 x 768
SXGA+
WXGA+
WSXGA (Wide SXGA) • 1600 x 900 (16:9 monitor)
UXGA
HD+ 1680 x 945
WSXGA+ (Wide SXGA plus)
Full HD 1080 1920 x 1080
WUXGA
QXGA
WQXGA
QSXGA
320 x 200
320 x 240
640 x 480
720 x 480
800 x 600
854 x 480
1024 x 600
1024 x 768
1280 x 768
1280 x 1024
1400 x 1050
1440 x 900
• 1600 x 1024 (16:10 monitor)
1600 x 1200
1680 x 1050
1920 x 1200
2048 x 1536
2560 x 1600
2560 x 2048
The screen resolution of the L
AMILO Notebook operating manual, edition 3 27
CD monitor of your notebook is optimally set at th e factory.
Page 38

Working with the notebook
Permanently unlit or lit pixels
The standard of production techniques today cannot guarantee an absolutely fault-free screen
display. A few isolated constant lit or unlit pixels may be present. T he maximum permitted number
of pixels faults is stipulated in the strict international standard ISO 13406-2 (Class II).
Example:
A 15" LCD screen monitor with a resolution of 1280 x 800 has 1280 x 800 = 1,024,000 pixels. Each
pixel consists of three subpixels (red, green and blue), so there are almost 3 million subpixels in
total. According to ISO 13406-2 (Class II), a maximum of 4 pixels and 5 subpixels may be defective,
i.e. a total of 17 defective subpixels. That is approx. 0,0005 % of the entire subpixel!
Background lighting
TFT monitors are operated with background lighting. The luminosity of the background
lighting can decrease during the period of use of the notebook. However, you can
set the brightness of your monitor individually.
Screen settings
Setting the re solution
LCDscreen
The screen resolution of the L
Changing the font size
ChangingthefontsizeLCDscreen
You can choose between a larger
► Right-click on the desktop. En
(DPI) (in the left pane) – Cont
or
► Enter your s ettings by clicking Start – (Settings) – Control Panel – Appearance and
Personalization – Personalization – Adjust Font Size (DPI) (in the left pane) – Continue.
CD monitor of your notebook is optimally set at the factory.
and a smaller font.
ter your settings by clicking Personalization – Adjust Font Size
inue.
Synchronising the display on the LCD screen and an external monitor
isation,screendisplay
LCDscreenMonitorSynchron
Your notebook supports simultaneous display on the LCD screen and an external monitor.
Pressing the key combination
Fn+F10
switches between LCD monitor only, external
monitor only and LCD and external monitor. The last setting is useful if you would like
a high resolution and a high refresh rate on an external monitor.
28 AMILO Notebook operating manual, edition 3
Page 39

Working with the notebook
Webcam
Webcam
Your notebook is equipped with a WebCam. Depending on the software used, you can
take pictures, record video clips or take part in web chats.
• The picture quality depends on the lighting conditions and the s oftware being used.
• You can enable and disable the webcam using the key combination
Fn+F7
.
• You can only used the WebCam with a particular application ( e.g. an Internet telephony
program or a video conferencing pr ogram which supports WebCams).
• When using the webcam the notebook support must not wobble.
• The webcam automatically adjusts itself to the current light level. For this reason
the LCD screen may flicker while the light level is adjusted.
Further information on use of the WebCam and additional settings can be found
in the Help function of the program which uses the Webcam.
The webcam LED indicates the status of the webcam.
• LED lights up blue: The WebCam is switched on.
• The LED lights up red: The WebCam software is accessing the WebCam
(displays an image or records an image sequence).
Battery
BatteryBatteryLife,batteryRechargeablebatteryRechargeablebattery
The battery is one of the most important components of your notebook. When not plugged into a
mains socket, the notebook runs on its built-in battery. You can increase the life of the battery by
caring for the battery properly. The average battery life is around 500 charge/discharge cycles.
You can extend the battery life by taking advantage of the available energy saving functions.
You can increase the time for which your notebook will operate under b attery
power. We therefore recommend that while operating under battery power, you
should switch off the Windows Vista Aero graphics user interface.
► Select Startsymbol – (Settings)
appearance – Open the Properties
Windows Vista –or–Standard Wind
– Control Panel– Appearance and Personalization – Screen colour and
for Classical Appearance to set further options and select – Basic
ows –or–Classic Windows –toswitchoffWindows Vista Aero.
AMILO Notebook operating manual, edition 3 29
Page 40

Working with the notebook
Charging, caring for and maintaining the battery
BatteryBattery
The noteb ook battery can only be charged, when the ambient temperature
is between 5 °C and max. 35 °C.
You can charge the battery by connecting the notebook to the mains adapter
(see "
Connecting the mains adapter", Page 9).
You c an increase the life of your battery by allowing it to fully discharge before recharging it again.
To do this, leave your notebook turned on when it is operated with the battery. Once the battery
is running low you will hear a warning alarm. If you do not connect the m ains adapter within five
minutes of the warning alarm described above, your notebook will automatically switch off.
For information about battery charging times, please refer to the technical data
section in the manual entitled "Preparing for use".
monitoring the battery charging level
BatteryBatterystatusmeter
Windows also has a "Battery sta tus meter" in the taskbar for monitoring the battery capacity. When
you place the mouse pointer on the battery symbol, the system displays the battery status.
Battery storage
BatteryBatterySelf-discharge,batteryChargingcapacity,battery
Keep the battery pack between 0°C and +30°C. The lower the temperature at which
the batteries are stored, the lower the rate of self-discharge.
If you will be storing batteries for a longer period (more than two months), the battery
charge level should be approx. 30 %. To prevent exhaustive discharge, check the
charging level of the battery at regular intervals.
To be able to make use of the optimal charging capacity of the batteries, the battery
should be completely discharged and then fully recharged.
If you do not use the batteries for long periods, remove them from the
notebook. Never store the batteries in the device.
30 AMILO Notebook operating manual, edition 3
Page 41

Working with the notebook
Removing and installing the battery
Only use batteries approved by Fujitsu Siemens Computers for your notebook.
Never use force when fitting or removing a battery.
Make sure that no foreign bodies get into the battery connections.
► Switch off your notebook and disconnect the power plug from the mains socket.
Battery
► Close the LCD screen so that it lock
► Disconnect all cables connected to the notebook.
► Turn your notebook over and place it
non-slip cloth on this surface to p
Positions of the battery locks:
sintoplace.
on a stable, sturdy, flat surface. If necessary, lay a
revent the notebook from being scratched.
The battery is released. The battery is locked.
AMILO Notebook operating manual, edition 3 31
Page 42

Working with the notebook
Removing the battery
The actual position of the battery compartment and the battery locks may
differ from those shown in the following illustrations.
Device with fold-out battery:
1
3
2
► Push the battery lock (1) in the direction of the arrow.
► Slide the battery lo
► Remove th e battery from the battery compartment (3).
ck (2) in the direction of the arrow and hold it in place.
Device with pull-out battery:
1
2
3
32 AMILO Notebook operating manual, edition 3
Page 43

Installing the battery
The actual position of the battery compartment and the battery locks may
differ from those shown in the following illustrations.
Working with the notebook
Device with fold-out battery:
2
1
► Insert the battery in the battery compartment (1).
► Carefully push the b
► Push the battery lock (2) in the direction of the arrow.
attery into the battery compartment until it can be felt to engage.
Device with pull-out battery:
2
1
AMILO Notebook operating manual, edition 3 33
Page 44

Working with the notebook
Using the power-management features
PowerPowerBattery
The notebook uses less power when the available power-management features are used. You
will then be able to work longer when using the battery before having to recharge it.
Power efficiency is increased and environmen tal pollution reduced. By
choosing the best power options, you can make significant savings and
at the same time help protect the environment.
When you fold down and close the LCD screen, depending on the setting in Windows,
the notebook automatically enters a power saving m ode.
Under Windows Vista the Energy saving mode is active as the default setting.
We recommend the following settings:
Function On external power On battery power
Turn off monitor After 10 minutes After 5 minutes
Turn off hard disk(s) After 15 minutes After 10 minutes
Energy saving (S3) After 20 minutes After 15 minutes
Hibernate mode (S4) After 1 h our After 30 minutes
► Activate the power-management features with Start – (Settings) – Control Panel – Mobile PC –
Power Options.
► Activate the screen saver by clicking Start – (Settings) – Control Panel – Appearance and
Personalization – Personalization – Change screen saver.
or
► Right-click on the desktop. Switch on the screen saver by clicking Personalization –
Change screen saver.
If you need further information about an option, you can get help with most
settings by pressing
F1
to open the Microso ft Help.
If your notebook is in a power saving mode, be sure to rememb e r the following:
During power saving mode, open files are held in the main memory
orinaswapfile on the hard disk.
Never turn off your notebook while it is in a power saving mode. If the built-in battery is
nearly flat, close the open files and do not go into power saving mode.
If you do not intend to use your notebook for a long period of time:
► Exit power saving mode if necessary via the mouse or keyboard or by switching on the
notebook.
► Close all opened programs and completely shut down the notebook.
34 AMILO Notebook operating manual, edition 3
Page 45

Working with the notebook
Hybrid graphics (device-dependent)
If your Noteboo k is equipped with a hybrid graphics solution, you can switch betwee n
battery-saver and performance mode by clicking the Quick Start button.
Use the graphics unit integrated in the c hip set for applications which are
less g raphics-intensive, such as video playb ack, e-mail and Internet surfing.
This reduces heat generation, noise levels and power consumption. As a
result, battery life is increased (battery saver mode).
If you require a high level of performance, for example, for games, you can
switch to the external graphics unit (performance mode).
Change graphics mode
In your notebook, the external graphics mode is preconfigured ex works (performance mode).
A device connected to an HDMI port of your notebook (FullHD resolution, device-dependent)
can only be activated in performance mode via the external graphics unit.
► Click the Quick Start button
The graphics display switches to battery-saver mode.
The switch from performance mode to battery-saver mode can
take more than ten seconds.
► Click the Quick Start
The graphics display switches to performance mode.
The switch from battery-saver mode to performance mode can tak e several seconds.
Hybrid VGA
Hybrid VGA
on the Multimedia Board of your n otebook:
button again.
ExpressCards (optional)
SlotExpressCar d
An ExpressCard slot enables operation of an ExpressC ard/34 or E xpressCard/54.
Consult the documentation supplied by the ExpressCard’s manufacturer
and follow the instructions p rovided.
Never use force when installing or removing an ExpressCard.
Make sure that no foreign objects enter the ExpressCard slot.
AMILO Notebook operating manual, edition 3 35
Page 46

Working with the notebook
Inserting the ExpressCard
Keep the placeholder f or the ExpressC ard in a safe place. If you decide to remove the
ExpressCard again you will need to insert the placeholder for the ExpressCard into the
slot again. This prevents foreign objects from getting into the ExpressCard slot.
► If the eject button is lowered, you mu st first cause the eject button to release from the
notebook casing. To do this, press the eject button until it pops out.
► Press the eject button (1) twice to make
the placeholder for the card protrude
from the notebook’s case.
► Pull the placeholder for the ExpressCard
out of the slot (2).
1 (2 x)
2
2
ExpressCard
► Insert the ExpressCard in the slot guide
with the connection contacts first.
► Gently push the ExpressCard into the slot
either until it will go no further or you feel it
engage. Do not use excessive force.
Depending on the particular type used,
the ExpressCard may protrude slightly
from the ExpressCard slot.
Please refer to the documentation for the ExpressCard for driver installation instructions.
36 AMILO Notebook operating manual, edition 3
Page 47

Working with the notebook
ExpressCard removing
ExpressCard
In order to protect your data, always follow the correct procedure
for removing the card outlined below.
You can stop the ExpressCard using the corresponding symbol in the task bar:
► Left-click on the icon.
► SelecttheExpressCardyouwanttostopandremove.
► Press the Enter key.
Wait for the dialogue box which tells you that it is now safe to remove the ExpressCard.
► Press the eject button (1) twice, until
the ExpressCard projects slightly
from the not ebook.
► Pull the ExpressCard out of the slot (2).
1 (2 x)
2
2
► Insert the placeholder for the ExpressCard
into the slot guide.
► Carefully slide the placeholder for the
ExpressCard as far as it will go into the
slot. Do not u se excessive force.
AMILO Notebook operating manual, edition 3 37
Page 48

Working with the notebook
Memory cards
Slot
Your notebook is equipped with an integrated memory card reader. It supports the following formats:
Without adapter:
TM
• Secure Digital (SD
MemorycardSecureDigital
•SDHC
• MultiMediaCard (MMC)
MemoryCardMultiMediaCard
• Memory Stick / Memory Stick pro (Sony®)
MemoryCardMemoryStickPro
• xD-Picture Card
With adapter:
• RS-MMC
• MMC-Micro
• miniSD
•MicroSD
•MS-Duo
•MS-PRODuo
•MS-PROHG
• MS-PROHGDuo
•M2
Observe the manufacturer’s instructions when handling the memory cards.
Memorycard
card)
TM
Inserting the memory card
► Carefully slide the m emory card into the
slot. T he label should be facing upward. Do
not apply excessive force, as otherwise the
delicate contact surfaces could be damaged.
d
Memorycar
Depending on the particular type
used, the memory card may protrude
slightly from the slot.
38 AMILO Notebook operating manual, edition 3
Page 49

Working with the notebook
Removing the memory card
Memorycard
In order to protect your data, always follow the correct procedure
for removing the card outlined below.
You can stop the memory card via the corresponding icon in the task bar:
► Left-click on the icon.
► Select th e card you want to stop and remove.
► Press the Enter key.
Wait for the dialogue box which tells you that it is now safe to remove the memory card.
► On devices with card locking: Press
on the storage card (1).
Memorycard
The storage card is released and
can now be removed.
► Pull the storage card out of the slot (2).
1
2
Hard disk
Harddisk
The hard disk is the most important storage medium of your notebook. You can work
considerably faster and more efficiently if you copy applications and files from external data
carriers, such as CDs/DVDs or USB storage media, to your hard disk.
Second hard d isk in RAID group (device-dependent)
RedundantArrayofIndependentDisksRAID
RAID (Redundant Array of Independent Disks, also: Disk Array) is a procedure for
combining two hard disks to create a logical unit.
A so-called disk array can be used advantageously to improve performance or
alternatively to improve error tolerance (data protection).
Error tolerance is fa cilitated by means of data redundancy. If one drive malfunctions,
a different drive contains an exact copy of the data. This can prevent an operating
system from malfunctioning or data from being lost.
AMILO Notebook operating manual, edition 3 39
Removal and installation of a second hard disk must only be performed by
authorised service agents of Fujitsu Siemens Computers GmbH . Unauthorised
removal and installation will invalidate your warranty.
For further information and addresses of our service partners, please
see "
http://www.fujitsu-siemens.com/ support".
Page 50

Working with the notebook
The operating system detects all hard disks in a disk array as a single physical
hard disk. The individual disk drives in a disk array are called "members". M ember
configuration information is recorded in th e reserved sector of the hard disk. With this
information the hard disk can be identified as a member.
There are usually a few methods by which hard disks can be combined. These methods
are referred to as different RAID levels. The different RAID levels represent different
performance and security levels as well as implementation costs.
Depending on the size of the hard disk, the process for combining two
hard drives to create a RAID group can take several hours. During this
time period, your screen will turn black.
For further information about how to configure your RAID system, refer to the
Help function of the RAID Manager software on your device.
RAID level
RAID 0 (Striping)
RAID 1 (Mirroring)
SPAN (JBOD)
Number of hard dis k
drives Capacity Benefits
2
2
2
Number of hard drives
x smallest size
Smallest size
Up to 4, total of all hard
disk drives
Highest performance
without data protection
Data protection
No performance
advantages, no data
protection
RAID 0 (Striping)
Reads and writes sectors of data interleaved between multiple drives.
RAID 0 does not support fault tolerance. If one hard drive fails, the entire
disk array is affected by the data loss.
RAID 0 is designed to deliver optimum performance. The disk array data capacity is
equal to the number of hard disks times the smallest hard disk capacity. The block
size can be set to be between 4 KB and 128 KB.
RAID 1 ( Mirroring)
Writing identical data on both hard disk drives (redundancy, mirroring) and parallel reading mode.
If one of the mirrored hard disks fails or no longer reacts due to a mechanical fault, the remaining
hard disk assumes the function. This protects the data from being lost.
Due to this redundancy, the data capacity of the disk a rray is equivalent to
the capacity of the smallest hard disk.
40 AMILO Notebook operating manual, edition 3
Page 51

Working with the notebook
SPAN (JBOD)
With SPAN disk array, the da ta capacity is equivalent to the sum of all hard disks
used. These hard disks can be of different sizes. The operating system treats the
hard disk drives as if they were one hard drive.
"Spanning" means that the data is stored on a hard disk drive until this is full. As s oon as
the hard drive is full, the data continues to b e stored on the next hard disk drive in the
disk array. If one ha rd drive fails, the entire disk array is affected. SPAN (JBOD) actually
does not belong to RAID and does not support any error tolerance.
CD/DVD/Blu-ray disc
CD/DVD data storage media (c
Datastoragemedia
CD/DVD
CD/DVD drives can either only read or both read and write different CDs or D VDs. The
ertain devices only)
meaning of the respective CD and DVD types is described in the following:
CD-ROM
CD-ROM
Abbreviation for Compact Disc - Read Only Memory. A CD-ROM is an optical data storage
medium that can contain a maximum of 700 Mbytes. These data can not be changed.
CD-R
CD-R
Abbreviation for Compact Disc Recordable. A CD-R is an optical data storage medium
that can only be written once with a maximum of 700 Mbytes of data. Then these data
cannot be changed, but can be read as often as desired.
CD-RW
CD-RW
Abbreviation for Compact D isc ReWriteable. A CD-RW is an optical data storage medium
that can be written with a maximum of 700 MByte of data a virtually unlimited number
of times. T his means the data can be deleted and changed.
DVD (DVD-ROM and DVD video)
DVDvideoDVD-ROMDVD
Abbreviation for Digital Versatile Disc or Digital Video Disc. A DVD is an optical data storage
medium that can contain a maximum of 17 GBytes of data. These data cannot be changed.
DVD+R/DVD-R
DVD+RDVD-R
Abbreviation for Digital Versatile Disc Recor dable or Digital Video Disc Recordable. A DVD+R or
a DVD-R is an optical data storage medium that can only be written once with a maximum of
4.7 Gbytes of data. Then these data cannot be changed, but can be read as often as desired.
DVD+R and DVD-R are different standards. DVD+Rs and DVD-Rs can only
be w ritten by drives which support the respective standard.
AMILO Notebook operating manual, edition 3 41
Page 52

Working with the notebook
DVD+RW/DVD-RW
DVD-RWDVD+RW
Abbreviation for Digital Versatile Disc or Digital Video Disc R eWriteable. A DVD+RW or a DVD-RW
is an optical data storage me dium that can be written with a maximum of 4.7 GBytes of data
virtually an unlimited number of times. This means the data can be deleted and changed.
DVD+RW and DVD-RW are different standards. DVD+RWs and DVD-RWs can
only be written by drives which support the respective standard.
DVD+R DL/DVD-R DL (Double Layer)
DVD+RDL/DVD-RDL
Abbreviation for Digital Versatile Disc Recordable Double Layer or Digital Video Disc
Recordable Double Layer. A DVD+R DL or a DVD-R DL is an optical data storage
medium that can only be written once with a maximum of 8.5 GBytes of data. Then these
data cannot be changed, but can be read as often as desired.
DVD-R LF (with Label Flash support)
DVD-RLF
Abbreviation for Digital Versatile Disc Recordable Label Flash. A DVD-R LF is an optical
data s torage medium that can only be written once with a maximum of 4.7 GBytes of
data. Then these data cannot be changed, but can be read as often as desired. This
type of data carrier is suitable for direct labelling with Label Flash.
Blu-ray
Blu-ray
This data format can only be read o r written by Blu-ray drives.
Blu-ray is an optical storage medium which comes in three different types:
• BD-ROM: These data cannot be changed, but can be read as often as desired.
• BD-R: The data memory can only be written once. Afterwards the data
can be read as often as desired.
• BD-RE: The data memory can be written and re-written virtually any number of
times, so the data can be deleted and/or changed.
The maximum memory capacity is 25 - 50 GBytes of data (25 GBytes per memory layer).
42 AMILO Notebook operating manual, edition 3
Page 53

Working with the notebook
Handling data carriers
Observe the following guidelines when handling data carriers:
• Avoid touching the surface of a data carrier. Only handle data carriers by their edges.
CD/DVD
• Always store data carriers in their cases. This will protect the data carrier against
being covered in dust, scratched or damaged in any other way.
• Protect your data carriers a gain st dust, mechanical vibrations and direct sunlight.
• Avoid storing a data carrier in areas subject to high temperatures or humidity.
In order to make use of the full recording speed of your drive, please use
blank disks marked "Multispeed" or "High Speed".
BlankCDblankDVDblank
CD/DVD/Blu-ray drives (device-dependent)
Your notebook is equipped with a multi-format DVD drive with double layer su pport.
Please ask your local computer store for assistance if you are not sure which CD or DVD type
suits best for your needs, e. g. backing up data, recording films, storing pictures etc..
Multi-format DVD burner with double layer support
CD/DVDdriveMulti-for matDVDburner,doublelayersupportDLsupport,Multi-formatDVDburner
With the multi-format DVD burner with d ouble layer support you can read all optical
data storage media named above. You can also write CD-Rs, CD-RWs, DVD+Rs,
DVD+RWs, DVD-Rs, DVD-RWs and DVD+R DL s.
Blu-ray drive (drive-dependent)
Your notebook’s Blue-ray drive will allow you to enjoy high-definition films with a
previously unparallelled quality. For maximum enjoyment we recommend connecting
an external monitor via the HDMI port of your AMILO.
Further information can be found in "
HDMI port (device-dependent)", Page 58.
Inserting or removing a data carrier
The notebook must be switched on.
• Never use f orce w hen inserting or removing a CD /DVD.
• Do not use mini CD/DVDs.
• Make sure that no foreign objects enter the d rive slot.
• It does not constitute grounds for a claim under warranty if foreign bodies enter the
drive slot or the CD/DVD cannot be removed as a result of improper handling.
You will need to have the foreign body removed by one of our authorised and
certified service centres, for which there will be a charge.
AMILO Notebook operating manual, edition 3 43
Page 54

Working with the notebook
Inserting or removing a data carrier (slot)
No mechanical C D/DVD eject function is provided (emergency remova l).
► If there is a CD/DVD in the drive, press
the "ODD eject" sensor button (see
also "
Quick Start button s", Page 22)
and remove the CD/DVD.
► Place the CD/DVD in th
the label facing upw
ards.
edriveslotwith
44 AMILO Notebook operating manual, edition 3
Page 55

Inserting or removing a data carrier (drive tray)
► Push the insert/eject button (1).
The drive tray will open.
► Gently pull the drive tray (2) completely out.
2
1
► Place the CD/DVD in the drive tray with
the label facing upwards.
or
► Take out an inserted CD/DVD.
► Push in the drive tray until you feel
it lock into place.
Working with the notebook
Manual removal of data carriers (emergency removal)
CD/DVDRemoving byh and, CD/DVDEmergencyremoval,CD/DVD
In the event of a pow er failure or damage to the drive it may be necessary
to manually remove the C D/DVD .
► Switch your notebook off.
► Push a pen or a piece of wire (such as a
paperclip) firmly into the opening (1).
The drive tray is ejected. You can now pull
the drive tray (2) ou t of the d r ive.
2
1
AMILO Notebook operating manual, edition 3 45
Page 56

Working with the notebook
Regional codes for DVD films an d DVD players
DVDfilmDVDRegionalcodes
DVD films and DVD players (e.g. the DVD drive of your notebook) are always
provided with a regional code. The regional codes of DVD films and DVD players
must match so that the DVD filmcanbeplayedback.
There are six different regional codes:
• Regional code 1:
• Regional code 2:
• Regional code 3:
USA and Canada
Egypt, Europe, Japan, South Africa and the M iddle E ast
South-east Asia (incl. Hong Kong, Indonesia, the Philippines, South Korea,
Taiwan)
• Regional code 4:
Australia, New Zealand, South-East Pacific, Central and South America,
and the Caribbean
• Regional code 5:
• Regional code 6:
Africa (except South Africa), India and the former Soviet states
China
The DVD drive of your notebook supports th e function RPC-II (Phase II
System of Regional Playback Control).
Before you can play video DVDs on your notebook, you will need to set the regional code
for your region. When you play a DVD for the first time, your notebook will automatically
detect the regional code of the inserted D VD and select this as your regional code.
Before you play your fi rst DVD no regional code will be set.
This function permits the final user to change the regional code of the drive up to
five times to play back corresponding DVD films. After this, the last regional code
selected is retained and cannot be changed again.
Fujitsu Siemens Computers therefore recommends that you should choose a
DVD from your region w hen playing a video DVD for the first time (in the UK and
Europe this would for example be a D VD with the region code 2).
If you wish to change the region code, you will first need to insert a DVD
with the new region code into the DVD recorder.
Before buying a DVD film you should check that the regional code of the DVD film
matches the region code set for the DVD drive of your notebook.
Adjusting the AutoPlay function of the drive
yfunction
type,CD/DVD
AutoPla
CD/DVDCont ent
Windows uses AutoPlay technology. This allows y ou to tell Windows what to
do with different types of CD or DVD disks.
You can set the AutoPlay function of the CD/DVD drive according to your needs. For example, if you
insert a m usic CD you ca n tell Windows to open M edia Player and sta rt to play it automatically.
Proceed as follows:
► Enter the settings by cl
Please note that you must select the desired action for each
individual CD/DVD content type.
46 AMILO Notebook operating manual, edition 3
icking Start – (Settings) – Control Panel – Hardware an d Sound – Autoplay.
Page 57

Working with the notebook
Loudspeakers and microphones
MicrophoneLoudspeakerBasslouds peaker(subwoofer)Volumecontro l
Your notebook is equipped with stereo loudspeakers, two microphones and, depending
on the equipment configuration, one bass loudspeaker.
For information on the exact position of loudspeakers and microphones, see the
"Initial Setup" User Guide for your AMILO notebook.
If you attach an external microphone, the built-in microph one is disabled.
When yo u connect headphones or external speakers, the bu ilt-in speakers are disabled.
Subwoofer system (optional)
The bass loudspeaker and the two loudspeakers form a so-called subwoofer system for true
listening pleasure. The internal loudspeakers are used to ge nerate the middle and high-frequency
tones, while the bass loudspeaker is used to generate the low-frequency tones. As it is impossible to
detect the exact direction of low-frequency sounds, only one bass loudspeaker is required. This
speaker can be positioned anywhere you like (e.g. on the underside of the notebook).
Switching the loudspeaker off and on
► To switch the loudspeaker off and on, either use the key combination
or use the quick start buttons (device dependent).
Adjusting the volume
► Set the desired volume with th
e key combination
or
► Double-click on the speaker symbol in the taskbar and on Mixer.
or
► Select Start symbol – (Settings) – Control Panel – Hardware and Sound
– Sound: Adjust system volume.
► Use the slide control to change the volume.
Volume
► To turn the speaker on or off, double-click on the speaker symbol in the taskbar.
Fn+F4
or
Fn+F3
Fn+F5
.
AMILO Notebook operating manual, edition 3 47
Page 58

Working with the notebook
Wireless USB (device-dependent)
Wireless U S B enables you to establish a reliable wireless USB connection between your computer
and any USB device. If Wireless USB functions are already integrated in your computer, we
recommend that you use the Fujitsu Siemens Wireless USB S1 adapter.
If yo u have purchased a computer with Wireless USB functions from Fujitsu
Siemens Computers, the necessary drivers are already pre-installed.
General characteristics o
• You can establish a wireless connection between your computer and USB devices
• Maximum range of up to 10 m (un
• fast host/device pairing
fWirelessUSB
der optimum conditions)
48 AMILO Notebook operating manual, edition 3
Page 59

Working with the notebook
Install Fujitsu Siemens Wireless USB S1 adapter
You can purchase the Fujitsu S iemens Wireless USB S1 adapter in a specialist
store. For detailed information on how to install and start-up the drivers,
please see the docu m entation regarding the adapter.
► Install the required drivers.
► Connect the adapter to the computer and establish the connection between the devices (pairs).
► Connect the adapter to the required USB device.
► Connect the USB device to the power supply.
AMILO Notebook operating manual, edition 3 49
Page 60

Working with the notebook
Wireless LAN / Bluetooth wireless components (device-dependent)
The installation of a wireless LAN/Bluetooth module not approved by Fujitsu Siemens
Computers GmbH invalidates the permits (CE!) issued for this device.
WirelessLANBluetooth
Your notebook is supplied with integrated wireless LAN and Bluetooth
(device-dependent on certain AMILO models).
Switching Wireless LAN and Bluetooth on and off
Check whether the wireless LAN module is activated/deactivated in
the installed wireless LAN software.
WirelessLANWirelessLAN
► You can activate or deactivate the wireless LAN module with the key combinationFn+F1.
If a Bluetooth module is present then it is automatically activated/deactivated
with the wireless LAN module.
Additional information about using wireless LAN and Bluetooth can be found
in the Help files. In order to be able to use the full scope of functions
available with Bluetooth, it may be necessary to install the additional software
supplied with your external Bluetooth device.
50 AMILO Notebook operating manual, edition 3
Page 61

Working with the notebook
Ethernet and LAN
EthernetLAN
The internal network module of your notebook supports Ethernet-LAN (10/100/1000 Mbps). This
allows you to establish a connection to a l ocal network (LAN = Local Area Network).
► Connect the network cab le to the LAN
port of the notebook (1).
► Connect the network cable to your
network connection (2).
1
2
Your net work administrator can help you to con figure and use the LAN connections.
The network cable is not included in the delivery scope. This type of
cable can be obtained from a specialist dealer.
AMILO Notebook operating manual, edition 3 51
Page 62

Security functions
Security functions
Securityfunctions
Your notebook has several security features that you can use to secure your
system from unauthorised access.
This chapter explains how to use each function, and what the benefits are.
Please remember that in some cases, for example, forgetting your password,
you may be locked out and unable to access your data. Therefore,
please note the following information:
• Make regular backups to external storage devices such as external
hard drives, CD or DVD disks.
• Some security functions need you to choose passwords. Make a note
of the passwords an d keep them in a safe place.
If you forget your passwords you will need to contact the help desk. Deletion or resetting
of passwords are not covered by your warranty and a charge will be made for assistance.
Brief overview of security functions
Security functions Type of protection Preparation
Kensington Lock Mechanically robust steel cable
BIOS password protection Password protection for BIOS
BriefoverviewSecurityfunctions
with lock
Setup Utility and operating
system with supe rvisor and
user password.
Using a Kensington Lock
► Fit the Kensington MicroSaver on the
device on your notebook.
KensingtonMicroSaverUsingaKensingtonLockMechanicalbackupAnti-theftprotection
Fit and lock Kensington
MicroSaver (optional
accessory)
Specify at least one supervisor
password in the BIOS Setup
Utility andactivatethe
password protection for the
operating system as desired.
52 AMILO Notebook operating manual, edition 3
Page 63

Security functions
Configuring password protection in BIOS Setup Utility
Before using the various options for password protection in the BIOS Setup utility
to increase data security, please observe the following:
Make a note of the passwords and keep them in a safe place. If you forget your
supervisor password you will not be able to access your notebo ok. Passwords are
not covered by your warranty and a charge will be made for assistance.
Passwordprotection
Your password can be up to eig
No distinction is made betwe
Protecting BIOS Setup Utility (supervisor and user password)
If you have opened these operating instructions on the screen, we recommend that
you print out the following instructions. Because you cannot call the instructions
onto the screen while you are setting up the password.
BIOSSetupUtility
You prevent unau thorised use of the BIOS Setup Utility with both the supervisor and the user
password. The supervisor password gives you access to all functions of the BIOS Setup
Utility, while the user password only provides some of the functions. You can only set a
user password if a supervisor password has already been assigned.
Please refer to the ""Settings in BIO S Setup Utility", Page 72 section for a
description of how to call up and operate the BIOS Setup Utility.
ht characters long and contain letters and numbers.
en uppercase and lowercase.
Setting supervisor and user password
► Start the BIOS Setup U tility and go to the Security menu.
► Select the Set Supervisor Password field and press the Enter key.
With Enter new Password: you are asked to enter a password.
► Enter the password and press the Enter key.
Confirm new Password requires you to confirm t he password.
► Enter the password aga in and press the Enter key.
Changes have been saved is a confirmation that the new password has been saved.
► To set the user password, select Set User Password and proceed exactly as
when configuring the supervisor password.
If you do not want to change any other settings, you can exit BIOS Setup Utility.
► In the Exit menu, select the option Save Changes & Exit.
► Select Ye s and press the Enter key.
word
rvisorpassword
password
Pass
Supe
User
The notebook will be rebooted and the new password will come into effect. It will now be
necessary to first enter your supervisor or user password in order to open the BIOS Setup U tility.
Please note that the user password only provides access to a few of the BIOS settings.
AMILO Notebook operating manual, edition 3 53
Page 64

Security functions
Changing the supervisor or user password
You can only change the s upervisor password when you have logged into the
BIOS Setup Utility with the supervisor password.
PasswordSupervisorpasswordUserpassword
► Call the BIOS Setup Utility andgototheSecurity menu.
► When changing the password, proceed exactly as for password assignment.
Removing passwords
To remove a password (without setting a new passwo rd) perform the following steps:
PasswordSupervisorpasswordUserpassword
► Start the BIOS Setup Utility and go to the Security menu.
► Highlight the Set Supervisor Password or Set User Password field and press the Enter key.
You will be requested to enter the current password by the Enter Current Password prompt.
You will be requested to enter a new password by the Enter New Password prompt.
► Press the Enter key twice.
► In the Exit menu, select the option Save Changes & Exit.
► Select Ye s and press the Enter key.
The notebook will now reboot with the password removed.
Removing the supervisor password simultaneously deactivates the user password.
Password protection for booting of the o
perating system
Make sure that you set a password during initial installation o f the operating
system. Do not leave the entry blank.
With the supervisor password you have set in the BIOS Setup Utility (see
section "
prevent booting of the operating system.
Operatingsystem
Setting supervisor and us er password", Page 53), you can also
Activating system protection
► Start the BIOS Setup Utility and go to t
Operatingsystem
► Select the Password on Boot option and press the Enter key.
► Select Enabled and press the Enter key.
► Select the Save Changes & Exit option under Exit.
The notebook will reboot. You will be pr
54 AMILO Notebook operating manual, edition 3
he Security menu.
ompted to enter your password (the supervisor password).
Page 65

Deactivating system protection
► Start the BIOS Setup U tility and go to the Security menu.
Operatingsystem
► Select the PasswordonBootoption and press the Enter key.
► Select the Disabled option and press the Enter key.
If you do not want to change any other settings, you can exit BIOS Setup Utility.
► Select the Save Changes & Exit option under Exit.
The notebook will reboot. The system is no longer password-protected.
Security functions
AMILO Notebook operating manual, edition 3 55
Page 66

Connecting external devices
Connecting external devices
Always refer to the safety information provided in "Important notes", Page 3 before
connecting or disconnecting any devices to or from your notebook.
Always read the documentation supplied with the device you wish to connect.
Never connect or disconn ect cables during a thunderstorm.
Never pull at a cable when disconnecting it. Always grasp the plug.
Follow the steps below in o rder, when connecting or disconnecting
devices to your notebook:
With some devices such as USB devices, it is not necessary to switch off
the notebook and the device before connecting/disconnecting. For more
information about whether or not devices need to be switched off, please refer
to the documentation supplied with the external device.
Some of the external devices require special drivers (see the operating
system and external device documentation).
Connecting devices to the notebook
1. Turn off your notebook and all external devices.
2. Unplug your notebook and al
3. Connect the cables for y our external devices following the instructions.
4. Plug all power cables into t
vices
DevicesPeripheralde
l devices from the mains sockets.
he mains sockets.
Disconnecting devices from the notebook
1. Turn off your notebook and all external devices.
2. Unplug your notebook and all dev
3. Disconnect the cables for your external devices following the instructions.
DevicesPeripheraldevices
ices from the mains sockets.
56 AMILO Notebook operating manual, edition 3
Page 67

Connecting external devices
Connecting an external monitor
An analogue monitor is connected to the analogue VGA monitor port, a digital monitor to
the DVI-I monitor port. Monitor output is limited to a maximum of two monitors at any one
time (see "
MonitorVGAconnectionsocketScreenportMonitorport
Key combinations", Page 19, section "Toggle output monitor").
Digital DVI-I monitor port
► Switch off the note book an
d the external monitor.
Analogue VGA monitor port
► Connect the d ata cable of the external monitor to the monitor port of the notebook.
► First switch on the externa
Using the
the external monitor and
You can display the same p
notebook LCD screen simu
l monitor and then the notebook.
Fn+F10
key combinati
the notebook’s LCD screen.
icture on the external monitor and the
ltaneously.
on, you can toggle back and forth between
AMILO Notebook operating manual, edition 3 57
Page 68

Connecting external devices
HDMI port (device-dependent)
HDMIport
The HDMI port of your notebook can be used to connect an external amplifier,
LCD TV or a plasma TV with an HDMI connection.
► Connect the data cable to the
external device.
► Connect the data cable to the HDMI
port of the notebook.
Some LCD televisions have only two loudspeaker connections and th erefore
cannot reproduce Dolby digital or DTS. In order to reproduce the sound, you
must go into Windows Vista and adjust the sound settings.
Proceed as follows:
► Select Startsymb o l – (Settings) – Control Panel – Hardware and Sound – Sound.
► Mark Realtek Digital Output.
► Select Properties – Supported formats.
► Deactivate the settings DTS audio and Dolby digital.
► Confirm the settings with OK.
Setting the refresh rate for your external monitor
Monitor
By setting the optimum refresh rate you will avoid screen flicker.
► Set the appropriate refresh rate for the type o f monitor connected.
► Select Startsymbol – (Settings) – Control Panel – Appearance and Personalization
or
► Select Advanced Settings – Monitor.
► Select Screen Refresh Rate to choose the optimum refresh rate f or the connected monitor type.
► Click Apply and OK.
58 AMILO Notebook operating manual, edition 3
If the refresh rate set is too high, the m onitor may be damaged. Please see the
documentation included with your monitor for the maximum possible refresh rate.
– Personalization: Adjust sc reen resolution.
► Right-click on the desktop. Under Personalization – Display Settings, choose screen type 1 or 2.
Page 69

Connecting external devices
Connecting USB devices
USBports
On the USB ports you can connect external devices that also have a USB
port (e. g. a printer, a scanner or a modem).
USB devices are hot-pluggable. This means you can connect and disconnect
devices while your operating system is running.
USB 1.x has a maximum data transfer rate of 12 Mbit/s.
USB 2.x has a dat a transfer rate of up to 480 Mbit/s.
Additional information can b
Device drivers
USB devices will be automatically recognised and installed by your operating system.
e found in the documentation for the USB devices.
► Connect the data cable to the
external device.
► Connect the data cable to a USB
port of the notebook.
AMILO Notebook operating manual, edition 3 59
Page 70

Connecting external devices
Connecting an external SATA hard disk (eSATA)
An external SATA hard disk can be connected at the eSATA/USB combination port. This allows you to
expand the internal hard disk capacity as you wish. You should obtain a hard disk with a robust casing.
The cable is not included in the delivery scope. It can be obtained thro ugh your
retailer. The length of the eSATA cable must not exceed 2 metres. Simple SATA
cables are designed for installation in devices and cannot be used due to the
differences in pin allocation. Please consult a specialist retailer for advice.
The data transfer rate is up to 2,400 Mbit/s.
► Connect the data cable to the external
device.
eSATA
Device driverThe eSATA hard disk is automatically recognised by
your operating system and installed.
► Connect the data cable to the eSATA/USB
combination port of the computer.
You will find more information in the documentation for the external SATA
hard disk and the operating system.
Safe removal of eSATA and USB devices
In order to protect your data, always follow the correct procedure
for removing the device outlined below.
► Left-click on the icon.
► Select the device you want to stop and remove.
► Press the Enter key.
Wait for the dialogue box which tells you that it is now safe to remove the device.
60 AMILO Notebook operating manual, edition 3
Page 71

Connecting external devices
Connecting external audio devices
Microphone port / Line In
Audiodevices,connectingAudiop ortsMicrophone,connecting
The microphone port/Line In allows you to connect an external microphone, a MiniDisc
player, MP3 player, CD player or a tape deck to your notebook.
► Connect the data cable to the
external device.
► Connect the data cable to the mic
port/Line In of the notebook.
rophone
AMILO Notebook operating manual, edition 3 61
Page 72

Connecting external devices
Headphones/SPDIF port
ConnectingaudiodevicesAudioportsConnectingheadphones
You can use the Headphones/SPDIF port to connect headphones, external loudspeakers
or an audio device with a digital optical input to your notebook.
► Connect the data cable to the
external device.
► Connect the data cable to the
headphones/SPDIF port of the notebook.
When you connect headphones or external speakers, the built-in speakers are disabled.
If you purchase a cable from a retailer, please note the following information:
The headphones / SPDIF port on your notebook is a "3.5 mm jack socket".
If you want to connect headphones or a speaker you will need a "3.5 mm jack plug".
If you want to connect audio devices with a digital optical input (such as an amplifier),
you will need a fibre optic cable with a "TOSLINK 3.5 mm miniplug (SPDIF 3.5 jack)".
Connectors Port Pin configuration
optical
Adjusting the volume
► To set the desired volume, see "Adjusting the volume", Page 47.
62 AMILO Notebook operating manual, edition 3
Page 73

Connecting external devices
AMILO Graphic Booster (device dependent)
The AMILO Graphic Booster is a compact design offering full graphics power
for demanding 3D applications.
The AMILO Graphic Booster has two digital monitor ports. Together with the DVI-I
output of your AMILO Notebook, you can connect up to three monitors. All the graphics
drivers needed will be installed on your AMIL O Notebook during first-time se tup.
Your AMILO Gra phic Booster is hot-plug capable. After connection it is recognised by
the Windows operating system and can be operated immediately.
Requirement:
Your AMILO Notebook has the port to the AMIL O Graphic Booster available and
all drivers are correctly installed and enabled.
Connecting the
► Switch on your AMILO Notebook.
► Connect the AMIL
The left-hand status LED will glow blue.
► Connect a monitor
► Connect the Graphic Booster to your AMILO Notebook as shown above, using the cable supplied.
The right-hand st
► Switch on the monitor.
Your monitor is now
AMILO Notebook operating manual, edition 3 63
device
O Graphic Booster to the mains supply.
to the DVI-I or HDMI port of the AMILO Graphic Booster.
atus LED will glow blue
ready for use.
Page 74

Removing and installing components
during servicing
Removing and installing compo
nents
during servicing
Only qualified technicians shou ld repair your notebook. Unauthorised
opening or incorrect repair may greatly endanger the user (electric shock,
fire risk) and will invalidate your warranty.
Servicing
Components
You may remove and install the components described in this chapter yourself
after consulting the Hotline/Help Desk.
If you remove and install component s without consulting the Hotline/Help
Desk, then the warranty of your notebook will be voided.
Notes on installing and removing boards and components
• Switch the notebook off and pull the power plug out of the mains socket.
• Always remove the battery.
• Take care when you use the locking mechanisms on the battery and any other component.
• Never use sharp objects suc
NotesBoardESD
Boards with electrostatic sensitive devices (ESD) are marked with the label
shown.
When handling boards fitted with ESDs, you must always observe the following
points:
• You must always discharge static build up (e.g. by touching a grounded
object) before working.
• The equipment and tools you use m u st be free of static charges.
• Remove the power plug from the mains supply befo re inserting or removing
boards containing ESDs.
• Always hold boards with ESDs by their edges.
• Never touch pins or conductors on boards fitted with ESDs.
h as screwdrivers, scissors or knives as leverage to remove covers.
Removing and installing the
How to remove and reinstall a battery is described in the "Removing
and installing the batter y", Page 30 chapter.
64 AMILO Notebook operating manual, edition 3
battery
Page 75

Removing and inst alling components
during servicing
Installing and removing the mem
ory
expansion modules
MemorymoduleRAMRemovingmemoryUpgradingsystemSystemexpan sion
Your notebook has up to 4 Gbyte of main me
configuration level. The notebook wil
fixed main memory is essential for oper
If you are asked by the Hot line/Help
expansion module yourself, procee
Please observe the safety informa
The notebook must be switched off wh
and must not be in one of the power sa
Only use memory expansion modules w
to the technical data section in th
Never use force when installing o
Make sure that no foreign objects
A memory module is located underneath the service compartment. You must open the service
compartment to remove or install a memory module. Once you have removed the cover,
the various components are e xposed. These components should be removed and replaced
only by authorised specialists. Therefore always observe the following:
Individual components (e.g. the processor heat sink) can become very hot
during operation. Therefore, we recommend that you wait one hour after
switching off the notebook before removing or installing the memory modules.
Otherwise, there is a risk of suffering burns!
As some electrostatically sensitive components are exposed, please read and fo llow the
instructions in "
Notes on installing and removing boards and components", Page 64.
l not start up without memory modules, as a
Desk to remove and install the memory
d as follows:
mory installed, depending on the
ation of the device.
tion in "
Important notes", Page 3.
en installing/removing the mem ory modules
ving modes.
hich have been approved fo r your notebook - refer
e manual entitled "Preparing for use" for your notebook.
r removing memory modules.
fall into the memory expansion compartment.
The second memory module is not accessible from the outside and must therefo re only be
removed or replaced by an authorised Fujitsu S iemens Computers service partner.
► Switch off your notebook.
► Fold the LCD screen onto the lower section of the notebook.
► Remove the mains plug for the mains ad apter from the mains socket.
► Disconnect all cables connected to the notebook.
► Place the notebook upside down on a fl at surface.
► Remove the batte ry (see "
Removing and installing the battery", Page 30 ).
Removingthememorycover
Depending on the particular v
have a shared compartment for
may be housed in two separate c
The casing covers shown here
Notebook. The operation st
AMILO Notebook operating manual, edition 3 65
ariant of notebook you have, it may either
memory and hard disk or these components
ompartments.
may differ fro m those of your AMILO
eps are identical however.
Page 76

Removing and installing components
during servicing
Devices with a joint compartment for memory and hard disk
► Remove the screws (1).
► Lift the cover off the notebook in the
1
2
direction of the arrow (2).
Devices with separate co
2
1
mpartments for memory and hard disk
Removing memory modules
3
2
1
1
► Remove the screws (1).
► Lift the cover off the no
direction of the arrow
► Carefully push the two mounting
clips outwards (1).
MemoryexpansionMemorymodule
The memory module snaps upwards (2).
► Pull the memory m odule out of its slot
in the direction of the arrow (3 ).
tebook in the
(2).
66 AMILO Notebook operating manual, edition 3
Page 77

Removing and inst alling components
Installing a memory module
► Insert the memory module with the contacts
and the recess (a) facing the slot (1).
MemoryexpansionMemorymodule
2
1
a
► Carefully push the memory module
downwards until you feel it click
into place (2).
Fastening the memory cover
Depending on the particular variant of notebook you have, it may have
a shared compartment for memory and hard disk, or these components
may be housed in two separate compartments.
Devices with a joint compartment for memory and hard disk
► Attach the cover in the direction
of the arrow (1).
2
1
► Secure the cover with the screws (2).
during servicing
► Reinstall the battery (see "
► Turn the notebook
► Reconnect the cables that you disconnected previously.
AMILO Notebook operating manual, edition 3 67
Removing and installing the battery", Page 30 ).
the right way up and place it on a flat surface.
Page 78

Removing and installing components
during servicing
Devices with separate compartments for memory and hard disk
► Attach the cover in the direction
of the arrow (1).
1
2
► Secure the cover with the screws (2).
► Reinstall the battery (see "
► Turn the notebook the right way up and place it on a flat surface.
► Reconnect the cables that you d isconnected previously.
Removing and installing
Depending on the particular variant of notebook you have, it may have
a shared compartment for memory and hard disk, or these components
may be housed in two separate compartments.
Removing and installing the battery", Page 30).
the hard disk
68 AMILO Notebook operating manual, edition 3
Page 79

Removing and inst alling components
during servicing
Devices with a joint compartment for memory and hard disk
Removing the hard disk
► Remove the memory cover (se e "Removing the memory cover", "Devices with a
joint compartment for memory and hard disk", Page 66).
a
1
3
2
1
► Remove the 4 screws from the frame of the hard disk.
► Pull the hard disk out of t
he frame.
Installing the hard disk
When installing the hard
compartment do not bend
Harddisk
► Slide the hard disk into the frame.
► Secure the hard disk to the frame using the 4 screws.
3
1
2
disk, ensure that the contacts in the hard disk
or become damaged.
3
► Remove the screws (1) from the
frame of the hard disk.
► Pull the hard disk by the pulling aid (a) in a
straight direction (2) towards the right.
► Removetheharddiskwiththeframe(3)
from the hard disk compartment.
► Working in the direction of the arrow (1),
insert the hard disk with the frame into
the hard disk compartment.
► Slide the hard disk in a straight direction
(2) to the left until the contacts engage.
If necessary, use a finger to guide the
left-hand edge of the hard disk along.
► Secure the frame with the screws (3).
► Fasten the memory cover (see "Fastening the memory cover", "
Devices with a
joint compartment for memory and hard disk", Page 67).
AMILO Notebook operating manual, edition 3 69
Page 80

Removing and installing components
during servicing
Devices with separate compartments for memory and hard disk
Removing the hard disk
► Switch off your notebook and disconnect the power plug from the mains socket.
► Close the LCD screen so that it locks into place.
► Disconnect all cables connected to the notebook.
► Turn your notebook over and place it on a flat surface.
► Remove the battery (see Chapter "
Harddisk
Removing and installing the battery", Page 30).
1
► Remove the screws (1).
► Slide off the cover in the direction
of the arrow (2).
2
a
2
1
► Remove the 4 screws fr
► Pull the hard disk out of the frame.
om the frame of the hard disk.
► Slide the hard disk in the dir
of the arrow (1).
► Remove the hard disk with the pulling aid
(a) from the hard disk compartment (2).
ection
70 AMILO Notebook operating manual, edition 3
Page 81

Installing the hard disk
When installing the hard disk, ensure that the c onta cts in the hard disk
compartment do not bend or become damaged.
Harddisk
► Slide the hard disk into the frame.
► Secure the hard disk to the fram
eusingthe4screws.
a
1
2
Removing and inst alling components
► Insert the hard disk in the direction of the
arrow (1) into the hard disk compartment.
► Pull the hard disk by the pullin
straight in the direction of t
until the contacts engage.
during servicing
gaid(a)
he arrow (2)
► Slide the cover in the d
2
(1) onto the hard disk c
► Secure the cover with the screws (2).
1
► Reinstall the battery (see "
► Turn the notebook the right way up and place it on a flat surface.
► Reconnect the cables that you disconnected previously.
Removing and installing the battery", Page 30 ).
irection of the a rrow
ompartment.
AMILO Notebook operating manual, edition 3 71
Page 82

Settings in BIO S Setup Utility
Settings in BIOS Setup Utility
BIOSSetupUtilitySystemsettings,BIOSSetupUtilityConfiguration,BIOSSetupUtilitySetupSystemconfigurationHardwareconfiguration
The BIOS Setup Utility allows you to set the system functions and the hardware
configuration for the notebook.
When it is delivered, the notebook is set to factory default settings. You can
change these settings in BIOS Setup Utility. Any change s you make take effect as
soon as you s ave and exit the BIOS Setup Utility.
The BIOS Setup Utility program contains the following menus:
Information
Main
Advanced
Security
Power
Boot
Exit
Starting the BIOS Setup Utility
► Reboot the notebook (switch off/on or reboot the operating system).
ity
BIOSSetupUtil
The following or a similar display appears on the screen at start-up:
<F2> BIOS Setup <F12> Boot Menu
► Press the function key
► If a password has been assigned, enter the password and press the Enter key.
Displays information relating to the BIOS, processor and notebook
System settings such as time and date
Advanced system settings
Password settings and security functions
Energy saving function
Configuration of the start-up sequence
Exits the BIOS Setup U tility
F2
.
If you have forgotten the password, contact your system administra tor
or co ntact our customer service centre.
The BIOS Setup Utility starts.
Operating BIOS Setup Utility
BIOSSetupUtility
Press the
of the individual settings is shown in the right-hand window of the BIOS Setup Utility.
With the
► Use the cursor keys
The menu is displayed on the screen.
► Select the option you want to change with the cursor keys
► Press the Enter key.
► Press the
► For future reference, ma ke a note of the changes you h ave made (for example, in this manual).
72 AMILO Notebook operating manual, edition 3
F1
key to display help on the operation of BIOS Setup Utility. The description
F9
key you can load the default settings of the BIOS Setup Utility.
←
→
or
to select the menu you wish to access to make changes.
ESC
key to exit the selected menu.
↑
or↓.
Page 83

Settings in BIOS Setup Util i ty
Exiting BIOS Setup Utility
BIOSSetupUtility
You need to s elect the desired optio n in the Exit menu and activate it by pressing the Enter key.
Exit Saving Changes - save chang
► To save the current menu settings and exit the BIOS Setup Utility,selectExit Saving Changes and Yes.
The notebook is rebooted and the
new settings come into effect.
es and exit BIOS Setup Utility
Exit Discarding Changes – Discard changes and exit BIOS Setup Utility
► To discard the changes, select Exit Discarding Changes and Ye s .
The settings in place whe n BIOS Setup Utility was called remain effective. BIOS
Setup Utility is terminated and the notebook is rebooted.
Load Setup D efa ults – Copy Sta
► To copy the standard entries for all menus of the BIOS Setup Utility,
choose Load Setup Defaults and Ye s .
ndard Entries
Discard Changes – Discard ch anges without exiting the BIOS Setup Utility
► To discard the changes you have made, select Discard Changes and Ye s .
ThesettingsinplacewhenBIOS Setup Utility was called remain effective.
You can now make additional settings in the BIOS Setup Utility.
► If you want to exit BIOS Setup Utility with these settings, select Exit Saving Changes and Ye s .
Save Changes - save changes without exiting the BIOS Setup Utility
► To save the changes, select Save Changes and Ye s .
The changes are saved. You can now make additional settings in the BIOS Setup U tility.
► If you want to exit BIOS-Setup-Utility with these settings, choose Exit Saving Changes and Ye s .
AMILO Notebook operating manual, edition 3 73
Page 84

Troubleshooting and tips
Troubleshooting and tips
TroubleshootingTipsFaultTroubleshooting
If a fault occurs, try to correct it as described. If you fail to correct the problem, proceed as follows:
► Make a note of the steps and the circumstances that led to the fault. Also
► Switch the notebook off.
► Contact the Hotline/Help Desk.
Refer to the safety information in the "Safety" manual when
connecting or disconnecting cables.
make a note of any error messages displayed.
You c a n find the telephone numbers in the help desk list. Please have
the following information ready when you call:
• The model name and serial number
located on a sticker on the under
• Notes of any messages that appear on the screen and information on acoustic signals.
• Any changes you have made to the ha
receiving the notebook.
• Any changes yo u have made to the BIOS Setup settings since receiving the notebook.
• Your system configuration and all p
• Your sales contract.
Our notebooks have been designed primarily with mobile applications in mind.
This means that considerable effort has been made to optimise components and
equipment in terms of weight, space and energy requirements. Depending on the
particular configuration you have purchased, it is possible that functionality may be
slightly reduced compared to a desktop PC if you are running processor-intensive
gaming software, e.g. games with intensive 3D graphics. Updating your hardware
with drivers which have not been approved by Fujitsu Siemens Computers may
result in performance losses, data losses or malfunction of the equipment. A
list of approved drivers and current BIOS versions can be downloaded from:
"
http://www.fujitsu-siemens.de/support/downloads.h tml"
of the notebook. The serial number is
side of the notebook.
rdware or software since
eripheral d evices connected to your system.
Restoring installed software
Please create backup copies of your files on a regular basis. If data is lost, you can
restore your applications using the data carriers. How ever, if you do not have backup
copies of your own data files, it is no longer possible to restore them.
If your operating system will not start, or if there are errors on the hard disk, the
pre-installed software may h ave to be re-installed.
74 AMILO Notebook operating manual, edition 3
Page 85

Troubleshooting and tips
Restoring t he operating system, drivers, manuals and special software
We strongly recommend that, as soon as possible after purchasing your equipment, you create
a backup copy on DVD of the pre-installed operating system in its delivery configuration.
If you have forgotten an operating system password which has already been assigned,
without previously having saved the operating system, recreation of the necessary data
media and return to the factory default setup will no longer be possible.
You c a n find further information on how to restore the operating system, drivers, manuals
and special software in the "Recovery Process" manual.
The notebook’s date or time is incorrect
SummertimeTime,daylightsavingsTimenotcorrectTimenotcorrectIncorrec tdate/timeDateisincorrectBufferbattery,load
Cause Troubleshooting
Time and date are incorrect. ► With the BIOS-Setup-Utility, you can set the
If the date and time are repeatedly incorrect when you switch on the notebook,
the built-in battery that supplies the internal clock has failed.
date and time in the main menu.
► Please contact your sales outl
et or our hotline/help desk.
When certain characters are entered on the keyboard, only numerals are written
Abeepsoundseverysecond
Cause Troubleshooting
The virtu al numeric keypad of your device
is activated, see "
(notebooks without separate numeric ke ypad)
", Page 18
AMILO Notebook operating manual, edition 3 75
Virtual numeric keypad
► Press the key combination
Fn+N
um
.
Page 86

Troubleshooting and tips
A beep sounds at a rate of one per second
Abeepsoundseverysecond
Cause Troubleshooting
The battery is almost flat. ► Charge the battery.
The notebook’s LCD screen remains blank
LCDscreenLCDscreenistoodark
Cause Troubleshooting
Monitor is switched off.
► Press a key or touch the touchpad.
External monitor or television set connected. ► Press the key combination
(switch screen output).
The LCD screen is difficult to read
LCDscreenLCDscreen
Cause Troubleshooting
Reflected glare ► Turn the notebook or alter the t
screen.
The external monitor remains blank
Monitor
Cause Troubleshooting
Monitor is switched off. ► Switch the external monitor on.
Power saving has been activated (monitor is
blank).
Brightness is set to dark.
Screen output is set to the notebook’s LCD
screen
The external monitor’s power cable or data
cable is not connected properly.
► Press any key to continue.
► Adjust the brightness of the monitor.
► Press the key combination
(switch screen output).
► Switch off the external monitor and the
notebook.
► Check whether the power cabl
properly into the external
monitor and into
the power socket.
► Check whether the data cable is properly
connected to the notebook and the external
monitor (if it is plugged in with a connector).
► Switch on the external mon
notebook.
Fn+F10
ilt of the LCD
Fn+F10
e is plugged
itor and the
76 AMILO Notebook operating manual, edition 3
Page 87

Troubleshooting and tips
The external monitor is blank or
ScreenMonitor
Cause Troubleshooting
The wrong external monitor has been
or the wrong screen resolution ha s b
the application program.
selected
een set for
► Terminate the application program
► Set the screen resolution: Select the
► Select monitor: Right-click o
the image is unstable
Windows by pressing
fault persists after closing the p
switch over to the notebook’s inte
screen with
following setting:
required resolution with Startsymbol –
(Settings) – Control Panel – Appearanc e and
Personalization – Personalization: Adjust the
screen resolution as required.
Under Personalization – Dis
choose monitor 1 or 2 and und
Settings – Mo nitor choose t
The notebook cannot be started
Notebook
Cause Troubleshooting
The battery is not installed correctly.
The battery is dead.
The power adapter is not connected correctly.
► Switch the notebook off.
► Check whether the battery is installed
correctly in its compartment.
► Switch the notebook on.
► Charge th e battery.
or
► Insert a charged battery.
or
► Connect the mains adapter to the
notebook.
► Switch the notebook off.
► Check whether the mains adapter is
connected correctly to the notebook.
► Switch the notebook on.
Fn+F10
Alt+F4
. Change the
play Settings
he correct monitor.
in
.Ifthe
rogram,
rnal LCD
n the desktop.
er Advanced
AMILO Notebook operating manual, edition 3 77
Page 88

Troubleshooting and tips
The notebook stops working
NotebookEnergysavingmode
Cause Troubleshooting
Notebook is in energy saving mode. ► Leave energy saving mode.
An application programme has cause
malfunction.
dthe
► Close the application program or restart
the notebook (by restarting the operating
system or switching the device off and back
on again).
The battery is dead.
► Charge the battery.
or
► Insert a charged battery.
or
► Connect the mains adapter to the
notebook.
The printer does not print
rint
Printerdoesnotp
Cause Troubleshooting
The printer is not switched on. ► Make sure that the printer is switched on
The printer is not connected correctly.
The p rinter drive r is faulty or not correctly
installed, or it is the wrong printer driver.
and is online (see the manuals supplied with
the printer).
► Check that the cable connecting the
notebook and the printer is connected
properly.
► Check that the cable connecting the
notebook and the printer is connected
properly.
► Check whether the correct pri
loaded (see printer docume
nter driver is
ntation).
The radio connection to a network d oes not work
oconnectiontoanetworkdoes notwork
Theradi
Cause Troubleshooting
The wireless component is disabled.
The wireless comp onent is enabled. Despite
this, the wireless connection to a network does
not work.
78 AMILO Notebook operating manual, edition 3
► Switch the radio components on (see
"
Switching Wireless LAN and B luetooth on
and off", Page 50).
► Check whether the radio connection is
switched on via the software.
► Further information on us
component can be found in
(see "
Information sourc
ing the wireless
the help files
es", Page 4).
Page 89

Manufacturer’s notes
Manufacturer’s notes
Disposal and recycling
Notes
Information about this sub ject can be found on your notebook or on our Internet pages.
Declarations of Conformity
Declarationofconformity
The "Declarations of Conformit
Internet address: "
Hereby, Fujitsu Siemens Comput
essential requirements and ot
www.fujit
Copyright-protected technology
Copyright-protectedtechnology
This product incorporates copyright protection technology that is protected by method claims of
certain U. S. patents and other intellectual property rights owned by Macrovision Corporation and
other rights owners. Use of this copyright protection technology must be authorised by Macrovision
Corporation, and is intended for home and other limited viewing uses only unless otherwise
authorised by Macrovision Corporation. Reverse engineering or disassembly is prohibited.
y" concerning the A MIL O can be found at our
su-siemens.com".
ers, declares that the AMILO is in compliance with the
her relevant provisions of Directive 1999/5/EC.
AMILO Notebook operating manual, edition 3 79
Page 90

Manufacturer’s notes
CE marking
CEmarking
CE marking for devices without wireless component supplied between
16.01.2007 and 19.07.2007
The shipped version of this device complies with the requirements of EEC
directives 89/336/EEC "Electromagnetic compatibility" and 2006/9 5/EC
"Low voltage directive".
CE marking for devices without wireless component supplied at
launch from 20.07.2007
The shipped version of this device complies with the requirements of EEC
directives 2004/108/EC "Electromagnetic compatibility" and 2006/95/EC
"Low voltage directive".
CE marking for devices with radio component
This equipment complies with the requirements of Directive 1999/5/EC of the
European Parliament and Commission from 9 March, 1999 governing Radio
and Telecommunications Equipment and mutual recognition of conformity.
This equipment can be used in the following countries:
Belgium Bulgaria Denmark
Estonia Finland France
Germany
Greece
UK Ireland Iceland Italy
Latvia Liechtenstein Lithuania Luxembourg
Malta Netherlands Norway Austria
Poland Portugal Romania
Sweden
Switzerland Slovakia Slovenia Spain
Czech Republic
Hungary
Cyprus
Contact the corresponding government office in the respective country for
current information on possible operating restrictions. If your country is
not included in the list, then please contact the corresponding supervisory
authority as to whether the use of this product is permitted in your country.
80 AMILO Notebook operating manual, edition 3
Page 91

Index
Index
A
A beep sounds every second 75–76
Alt+Tab 21
Anti-theft protection 52
Audio devices, conne cting 61
Audio ports 61–62
AutoPlay function 46
B
Back tab 21
Backspace 16
Bass loudspeaker (subwoofer) 47
Battery 29
caring for and maintaining 30
charge level 30, 34
charging 30
installing 31
life 29
self-discharge 30
storage 30
Battery status indicator
see Rechargeable battery indicator 15
Battery statu s meter 30
Battery symbol
see Rechargeable battery indicator 15
BIOS Setup Utility
calling 72
exiting 73
operating 72
protecting with password 53
settings 72
Blank 43
Blu-ray 42
Bluetooth 50
switching on 20
Board 64
Brief overview
security functions 52
Buffer battery, load 75
Buttons 15
touchpad 23
C
Cameraswitching off
switching on 20
Caps Lock 16
CD blank 43
CD/DVD
AutoPlay function 46
emergency removal 45
handling 43
overview 41
CD/DVD drive 43
CD-R 41
CD-ROM 41
CD-RW 41
CE marking 80
Changing the font size 28
Charging capacity, b attery 30
Cleaning 6
Components
installing / removing 64
Configuration, BIO S Setup Utility 72
Connecting audio devices 62
Connecting headphones 62
Content type, CD/DVD
AutoPlay function 46
Copyright-protected technology 79
Crystal View display
cleaning 6
Ctrl+Alt+Del 21
Cursor control keys 17
Cursor keys 17
D
Data storage media 41
Date is incorrect 75
Declaration of conformity 79
Devices
connecting 56
disconnecting 56
DL support, Multi-format DVD burner 43
DVD 41
regional codes 46
DVD blank 43
DVD film
regional codes 46
DVD video 41
DVD+R 41
DVD-R 41
DVD+R DL/DVD-R DL 42
DVD-R LF 42
DVD-ROM 41
DVD+RW 42
DVD-RW 42
E
Emergency removal, C D/DVD 45
Energy
energy saving 3
AMILO Notebook operating manual, edition 3 81
Page 92

Index
Energy saving 3
Energy saving mode
leaving 78
Enter 16
Enter key 16
ESD 64
Ethernet LAN 51
ExpressCard 35
inserting 36
removing 37
F
Fault
correction 74
First-time setup 7
Fn key 17
Fn+F1 20
Fn+F10 21
Fn+F12 21
Fn+F2 20
Fn+F3 20
Fn+F4 20
Fn+F5 20
Fn+F6 20
Fn+F7 20
Fn+F8 20
Fn+F9 20
G
Getting started 7
H
Hard disk 39
installing 69, 71
removing 70
Hardware configuration 72
HDMI port 58
I
Important notes 3
Incorrect date/time 75
Information sources 4
Internet, Quick Start button
Internet key 22
K
Kensington MicroSaver 52
Key c ombinations 20
Key: Fn+F11 21
Keyboard 15
cleaning 6
L
LCD screen
cleaning 6
decrease brightness 20
difficult to read 76
notes 27
reflected glare 76
remains blank 76
Setting the font siz e 28
settings 28
synchronising the display 28
LCD screen i s too dark 76
Life, battery 29
Line feed 16
Location, selecting the 8
Loudspeaker 47
Loudspeakers
disable 20
enable 20
M
Mains adapter
connecting 9
Mechanical backup 52
Memory card
handling 38
inserting 38
removing 39
Secure Digital 38
Memory Card
Memory Stick Pro 38
MultiMediaCard 38
Memory expansion
installing 67
removing 66
Memory module
important notes 65
installing 67
removing 66
Memory Stick Pro 38
Menu key 17
Microphone 47
Microphone, connecting 61
Mobile operation 5
Monitor
connecting 57
drifting display 77
refresh rate 58
remains blank 76
synchronising the display 28
Monitor port
see VGA connection socket 57
82 AMILO Notebook operating manual, edition 3
Page 93

Index
Multi-format DVD burner, double layer
support 43
Multimedia, Quick Start button 22
MultiMediaCard 38
N
Notebook
before you travel 5
cannot be started 77
cleaning 6
Getting started 7
Preparing for use 7
setting up 8
stops working 78
switching off 13
Switching on 11–12
transporting 5
using 11
Notebook, operation 11
Notes 3
boards 64
cleaning 6
disposal / recycling 79
energy saving 3
LCD screen 27
Safety 3
transport 5
Num Lock
indicator 18
Numeric keypad 15
see Virtual numeric keypad 18
O
Operating system
activating system protection 54
cancel system protection 55
protecting with password 54
P
Packaging 7
Password
changing 54
entering 53
removing 54
Password protection 53
Pause 22
Peripheral devices
connecting 56
disconnecting 56
Play 22
Power
power consumption 34
power-management features 34
Power adapter
setting up 8
Power-on indicator 15
Preparing for operation 9
Printer does not print 78
Q
Quick Start buttons 22
R
RAID 39
RAM
see Adding memory 65
Rechargeable battery
see Battery 29
Rechargeable battery indicator 15
Redundant Array of Independent Disks 39
Regional codes 46
Remote control 24
Removing 24
Removing by hand, CD/DVD 45
Removing memory
see Adding memory 65
Restart 21
Return 16
S
Safety information 3
Screen
no screen display 77
Screen brightness
decrease 20
increase 20
Screen port
see VGA connection socket 57
Secure Digital 38
Security functions 52
brief overview 52
Self-discharge, battery 30
Servicing 64
Setup
see BIOS Setup Utility 72
Shift 17
Shift key 16–17
Shift+Ta b 21
Silent Mode
switching off 21
Silent mode, Quick Start button 22
Skip
forward 22
reverse 22
AMILO Notebook operating manual, edition 3 83
Page 94

Index
Slot
ExpressCard 35
Memory cards 38
Standby indicator 15
Start key 17
Status indicators 14
Stop 22
Summer time 75
Supervisor password
changing 54
entering 53
removing 54
Suspend mode
entering 21
returning from 21
Switching on for the first time 10
Synchronisation, screen display 28
System configuration 72
System expansion 65
System settings, BIOS Setup Utility 72
T
Tab key 16
The radio connection to a network does
not work 78
Time not correct 75
Time, daylight s avings 75
Tips 74
Toggle output screen 21
Touchpad 20, 23
cleaning 6
dragging items 23
executing commands 23
moving the pointer 23
selecting an item 23
switching off 20
Touchpad buttons 20
Transport
Transport damage 7
Transportation 5
Travel, notebook 5
Troubleshooting 74
TV tuner
switching off 20
U
Upgrading system
see Adding memory 65
USB ports 59
User password
changing 54
entering 53
removing 54
Using a Kensington Lock 52
Using the
remote control 24
V
VGA connection socket 57
Virtual numeric keypad 18
Volume 22
adjusting 47
decrease 20
increase 20
Volume control 47
W
Webcam 29
Whisper mode, Quick S tart button 22
Wireless LAN 50
Switching off 50
Switching on 50
Wireless LAN indica tor 15
WLAN 20
switching off 20
84 AMILO Notebook operating manual, edition 3
 Loading...