

Page 1

Operating Manual
FUJITSU Tablet STYLISTIC R727
System
Page 2

Contact address in North America
FUJITSU AM
ERICA INC.
1250 East Arques Avenue, Sunnyvale,
CA 94085-3470, U.S.A.
e: 800 831 3183 or 408 746 6000
Telephon
http://solutions.us.fujitsu.com"
"
"http://solutions.us.fujitsu.com/contact"
Have a qu
estion? Email us at: "
AskFujitsu@us.fujitsu.com"
Copyright
ujitsu America, Inc. All rights reserved
©2016F
B5FK-7101-01ENZ0-00
Page 3

FUJITSU Tablet STYLISTIC R727
Operating Manual
Declarations of conformity 7
Fujitsu Contact Information 8
Ports and controls 10
Important notes 13
First-time setup of your device 18
WorkingwiththeTabletPC 24
Accessories for your Tablet PC
(optional) 43
Security functions 57
Connecting external devices 62
Settings in BIOS Setup Utility 68
Troubleshooting and tips 71
Technical data 80
Manufacturer’s notes 86
Declarations of conformity 89
FCC Regulatory Information 90
Canada, Industry Canada (IC) 93
Appendix 95
Index 105
Page 4

Copyright and Trademark Information
Fujitsu America, Inco rporated has made every effort to ensure the accuracy and completeness
of this document; however, as ongoing development efforts are continually improving the
capabilities of our products, we cannot guarantee the accuracy of the contents of this
document. We disclaim liability for errors, omissions, or future changes.
Fujitsu, the Fujitsu logo and STYLISTIC are registered trademarks of Fujitsu Limited
or its subsidiaries in the United States and other countries.
Intel and Intel Core are trademarks or registered trademarks of Intel Corporation or
its subsidiaries in the United States and other countries.
Microsoft and Windows are either registered trademarks or trademarks of Microsoft
Corporation in the United States and/or other countries.
Google is a trademark or registered trademark of Google Incorporated.
Bluetooth is a trademark of Bluetooth SIG, Inc., USA.
OmniPass is a trademark of Softex, Inc.
Roxio is a trademark of Roxio, a division of Sonic Solutions.
PowerDirector, PowerDVD, YouCam, and MakeDisc are trademarks of CyberLink Corp.
Adobe, Acrobat, and Adobe Reader are either registered trademarks or trademarks of Adobe
Systems Incorporated in the United States and/or other countries.
Page 5

Contents
Contents
Declarations ofconformity ............................................................. 7
Fujitsu Contact Informatio
Notational conventions .................................................................. 9
Portsandcontrols ..................................................................... 10
Importantnotes ........................................................................ 13
Safety instructions ...................................................................... 13
Additional safety note
Protecting the displa
Energy saving .......................................................................... 14
Energy saving under W
Traveling with your T
Before you travel ................................................................... 15
Transporting the T
Cleaning the Table
Further informat
Cleaning with dis
First-time setup ofyourdevice ......................................................... 18
Unpacking and checking the device . ..................................................... 18
Choose a location ....................................................................... 19
Settingupthe device .................................................................... 20
Connecting the AC adapter .............................................................. 21
Switching on the device for the first time .................................................. 22
Installing Bonus Apps . . . ............................................................. 23
Working with
Status indi
Switching t
Programmin
Switching
Handwrit
Touchscr
Select di
Using fin
Using t
Volu
Cam
Rec
Us
ing recognition ..................................................................
een ............................................................................
splayorientation (portraitor landscape format) ....................................
gers ...........................................................................
Calibra
Actions
Action
he stylus (optional, config uration dependent) ........................................
Energy
ting the stylus ..................................................................
Adjus
rating the stylus ................................................................
Calib
Remov
alling the stylus battery ...........................................................
Inst
ging the pen tip ................................................................
Chan
me rocker ..........................................................................
era ................................................................................
hargeable battery ...................................................................
rgingandmaintainingthe battery .................................................
Cha
ing the energy saving functions ........................................................
tPC ..................................................................
infectantwipes ..........................................................
theTabletPC ............................................................
cators ........................................................................
he TabletPC on ..............................................................
gtheON/OFF button .....................................................
theTablet PCoff ..............................................................
te the Dual Digitizer for finger-based operation of the device. .....................
with one finger ... . ...........................................................
s with two fingers . . ............................................................
s
a
ving functions ofthe stylus ..................................................
ingthestylus battery ..........................................................
n ............................................................
s for devices with wireless components . ..............................
yscreen ............................................................
indows .......................................................
abletPC ............................................................
abletPC ...........................................................
ionon cleaningtheTablet PC .........................................
14
14
14
15
16
16
16
17
24
24
25
25
26
26
27
28
28
28
29
30
32
33
33
33
34
34
35
36
37
37
37
38
8
Fujitsu 3
Page 6

Contents
Memory cards .......................................................................... 39
Supportedformats .................................................................. 39
Insertingthe memorycard ........................................................... 39
Removing the memorycard .......................................................... 40
Wireless LAN/Bluetooth/NFC wireless components (configuration dependent) . ............... 40
Switching the wireless components on and off ......................................... 40
Configuring WLANaccess ........................................................... 41
Furtherinformation onWLAN and Bluetooth ........................................... 41
NFC (Near Field Communication, configuration dependent) . . ........................... 41
Ethernet and LAN (only withdockingcradle) .............................................. 41
GPS ................................................................................... 42
Accessories for your Tablet PC (optional) . ............................................. 43
Your docking cradle(optional) ............................................................ 44
Cradle components .................................................................. 44
Settingupthe cradle ................................................................ 45
Connecting the Tablet PC to the cradle ............................................... 46
Disconnecting the Tablet PC from the cradle . ......................................... 47
Magnetic keyboard ( optional) ............................................................ 48
Components of the magnetic keyboard . ............................................... 48
Connecting the Tablet PC to the magnetic keyboard . ................................... 49
Separating the Tablet PC from the magnetic keyboard ................................. 51
Using the de vice with a docking cradle and magnetic keyboard (optional) . ................... 51
Connecting the Tablet PC with magnetic keyboard to the docking cradle . ............... 51
Separating the Tablet PC with magnetic keyboard from the docking cra dle ............... 54
Security functions ..................................................................... 57
Usingthesecurity lock(dockingcradle only) .............................................. 57
Configuring passwordprotectionin BIOSSetupUtility ...................................... 57
Protecting BIOS Setup Utility (supervisor passw ord and user password) ................. 58
Password protection for booting the operating system .................................. 59
Password protection for the hard disk ................................................. 60
Trusted Platform Module - TPM (configuration dependent) .................................. 61
Enabling TPM ....................................................................... 61
Disabling TPM ...................................................................... 61
Connecting external devices ........................................................... 62
Connecting an external monitor . . ........................................................ 62
Mini Display Port .................................................................... 62
DisplayPort(docking cradleonly) .................................................... 63
HDMI port(docking cradleonly) ...................................................... 63
External monitor port(VGA) (dockingcradleonly) ...................................... 64
Connecting USB devices ................................................................ 65
USBport withcharging function(AnytimeUSBcharge) ................................. 66
Howto removeUSBdevicescorrectly ................................................ 66
Connecting external audio devices ..... . ................................................. 67
Connecting headphones or other audio outp ut devices . ................................ 67
Connecting a microphone or other audio input devices . . . .............................. 67
Settings in BIOS Setup Utility . . ........................................................ 68
Starting the BIOSSetupUtility ........................................................... 68
BIOS Setup Utility operation . ............................................................ 69
ExitingBIOSSetupUtility ................................................................ 70
Exit Saving Ch anges - save changes and exit BIOS Setup Utility .... ................... 70
4 Fujitsu
Page 7

Contents
Exit Discarding Change s - Reject changes and exit BIOS Setup Utility . . . . ............... 70
Load Setup Defaults – load default values . ............................................ 70
Discard Changes - Discard C hanges without exiting BIOS Setup Utility .................. 70
Save Changes - save changes without exiting the BIOS Setup Utility . . . . ................ 70
Save changes and power off ........................................................ 70
Troubleshooting and tips .............................................................. 71
Executinga reset ....................................................................... 72
Forced shutdown .................................................................... 72
Carryoutasystem orbatteryreset ................................................... 72
Help ifproblems occur ................................................................... 72
Recovering yourFactory Image .......................................................... 72
TheTablet PC’sdate ortime isincorrect .................................................. 72
Batterychargingindicatornot lit .......................................................... 73
TheTablet PC’stouchscreen remains dark ................................................ 73
The display on the Tablet PC’s touchscreen is difficult to read. .............................. 73
Theexternal monitor remains blank ...................................................... 74
Theexternal monitor isblank ortheimage isunstable ..................................... 74
The cursor does not correctly follow the stylus movements . ................................ 74
Stylus input not working ................................................................. 75
TheTablet PCdoes notstart after switchon ............................................... 75
TheTablet PCstopsworking ............................................................. 75
The printer does not print .. . . . ........................................................... 76
The wireless connection t o a network does not work . . ..................................... 76
Thebatterydischarges too quickly ........................................................ 76
Acoustic warning ........................................................................ 77
Errormessages onthescreen ........................................................... 78
Technical data ......................................................................... 80
Tablet PC .............................................................................. 80
WLAN specifications .................................................................... 82
Screen resolutionsforintegrated screenandexternal screens .............................. 83
Rechargeablebattery ................................................................... 84
AC adapter 65 W for the Tablet PC and the docking cradle . . ............................... 84
Dockingcradle(optional) ................................................................ 84
Magnetic keyboard (optional) . ........................................................... 85
Manufacturer’snotes .................................................................. 86
Disposal and recycling .................................................................. 86
Recycling your battery ............................................................... 86
DOC(IndustryCANADA) Notices ..................................................... 86
ENERGY STAR Compliance ......................................................... 88
Declarations ofconformity ............................................................. 89
FCCRegulatory Information ........................................................... 90
Regulatory Notes and Statements . ....................................................... 90
Wireless LAN,HealthandAuthorizationfor use ........................................ 90
Regulatory In formation/Disclaimers ................................................... 91
FederalCommunicationsCommissionandIndustry Canadastatement: .................. 91
FCCInterference Statement ......................................................... 91
FCC Radio Frequency Exposure statement ............................................ 92
Export restrictions ................................................................... 92
Restrictionsconcernant l’exportation .................................................. 92
Fujitsu 5
Page 8

Contents
Canada,Industry Canada(IC) .......................................................... 93
Canadian Notice . ....................................................................... 93
Avis pour le Canada . .................................................................... 94
Appendix .............................................................................. 95
Before Using the Optional Wireless LAN . ................................................. 95
Wireless LAN Devices Covered bythis Document ...................................... 95
Characteristics oftheWLAN Device .................................................. 95
Wireless LAN Modes Using this Device . . ............................................. 96
Deactivating/Disconnecting theWLANDevice ......................................... 98
Configuring the WirelessLAN ............................................................ 98
Connection to the network ........................................................... 98
Troubleshooting the WLAN ........................................................... 99
Image Backup and Recovery Procedures ................................................. 101
Creating arecovery drive ............................................................ 101
Recovery options inWindows 10 ..................................................... 101
Downloading driver updates . ............................................................ 104
Index .................................................................................. 105
6 Fujitsu
Page 9
Declarations of conformity
Declarations of conformity
DECLARATION OF CONFORMITY
accordingtoFCCPart15
Responsible Party Name: Fujitsu America, Inc.
Address: 1250 E. Arques Avenue
Sunnyvale, CA 94085
Telephone: (408) 746-6000
Declares that product:
This device c omplies with Part 15 of the FCC rules. Operations are subject to the following two
conditions: (1) This de vice may not cause harmful interference. (2) This device must accept any
interference received, including interference that may cause undesired operation.
In order to see the FCC information:
With keyboard:
1. Power on.
2. Push
3. Push
Without k
1. Power on b
2. Touch the Regulatory display menu.
F2
key.
Enter
key.
eyboard:
y pushing the volume up key.
Base Model Configuration: STYLISTIC R727
Complies with Part 15 of the FCC Rules.
Fujitsu 7
Page 10

Fujitsu Contact Information
Fujitsu Contact Information
Service and Support
You can contact Fujitsu Service and Support in the following ways:
• Toll free phone: 1-800-8Fujitsu (1-800-838-5487)
• Website: "
Fujitsu Shopping Online
Please go to "
Maintaining Latest Configuration
To ensure that you always have the most current driver updates related to your system, you should
occasionally access the Fujitsu Software Download Manager (FSDM) utility. The FSDM utility is
available from the Fujitsu Support site. FSDM will allow you to view a list of the most current drivers,
utilities and applications to determine whether you have the latest versions. If you have a Windows
7 or Windows 8 / 8.1 / 10 operating system, you will need to go to the Support Site to downlo ad
the FSDM Utility: "
Limited Warranty
Your STYLISTIC Tablet PC is backed by a Fujitsu International Limited Warranty. Check the
Limited Warranty Terms and C ondition s Booklet that came with your Tablet PC.
http://solutions.us.fujitsu.com/www/content/support/contact/index.php"
Before you place the call, have the following information ready so that the c ustomer
support representative can provide you with the fastest possible solution:
• Product name
• Product configuration number
• Product serial number
• Purchase date
• Conditions under which the problem occurred
• Any error messages that have occurred
• Type of device connected, if any
http://www.shopfujitsu.com/store/ ".
http://support.fujitsupc.com/CS/Portal/support.do?srch=DOWNLOADS".
8 Fujitsu
Page 11
Notational conventions
Pay particular attention to text marked with this symbol. Failure to observe
this warning will endanger your life, will damage the device or lead to loss
of data. The warranty will be invalidated if the device becomes d efective
through failure to observe these warnings.
Indicates imp ortant informa
Fujitsu Contact Information
tion which is required to use the device properly.
►
This style
This style
This style
"This style" indicates
Key
This style indicates terms and text that are emphasized or highlighted, e.g.: Do not
indicates an activity th at must be performed
indicates a result
indicates data entered
the command line, e.g.
start a program (star
indicates information that is displayed on the screen by a program, e.g.:
Installation is complete.
indicates
• terms and texts used in a software interface, e.g.: Click on Save.
• names of programs or files, e.g. Windows or setup.exe.
• Cross-references to another section, e.g. "Safety information"
• cross-references to an external source, e .g. a web address: For more
information, go to "
• names of CDs, DVDs and titles or designations of other materials, e.g.:
"CD/DVD Drivers & Utilities" or "Safety/Regulations" manual
indicates a key on the keyboard, e.g:
switch off the device
using the keyboard in a program dialogue or at
your password (Name123)oracommandusedto
t.exe)
http://solutions.us.fujitsu.com/"
F10
Fujitsu 9
Page 12
Ports and controls
Ports and controls
This chapter presents the individual hardware components of your device. It gives an
overview of the indicators and connections of the device. Please familiarize yourself
with these items before you start to work with the device.
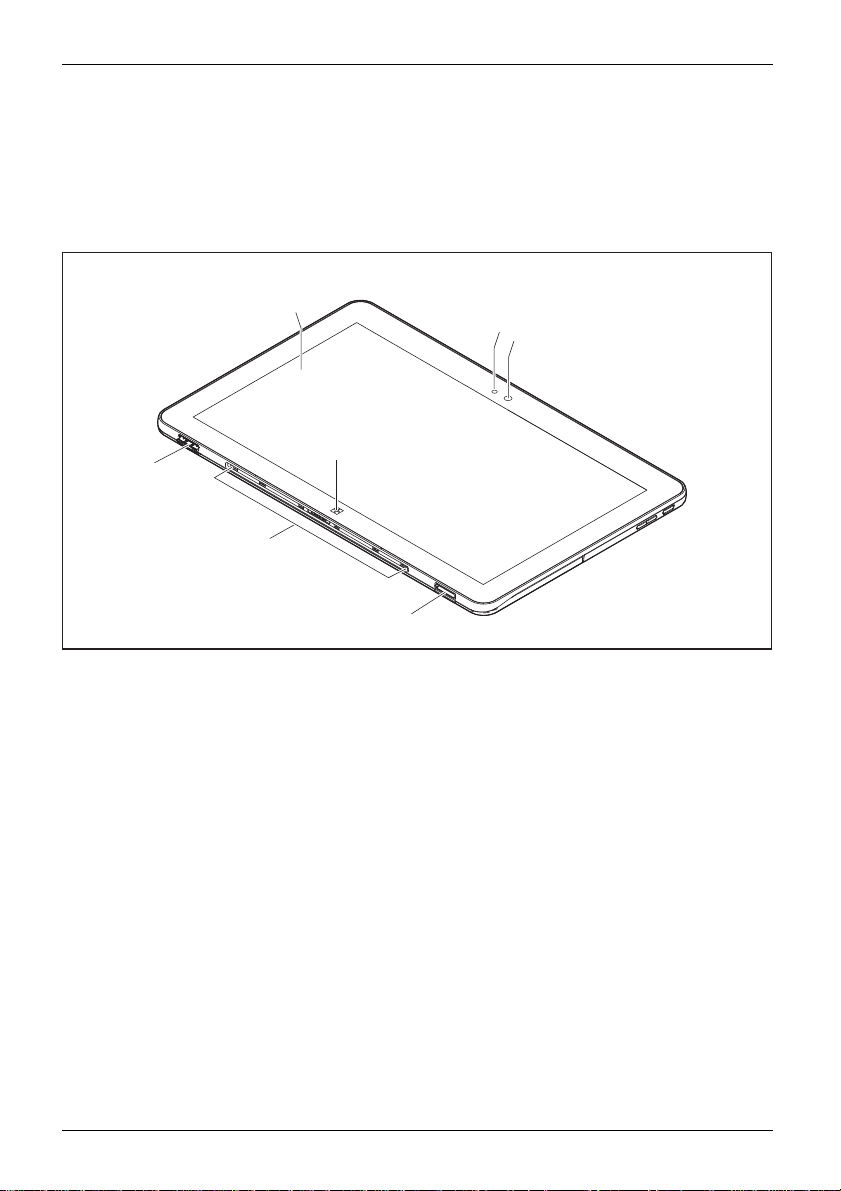
Front
7
1 = Touch screen
2 = Ambient ligh
3=Camera
4 = Mechanica
l fixture for docking cradle
t sensor
1
5
6
4
5 = Windows button
6 = Connector ra
7 = Docking port for the docking cradle
2
3
il for magnetic keyboard
10 Fujitsu
Page 13
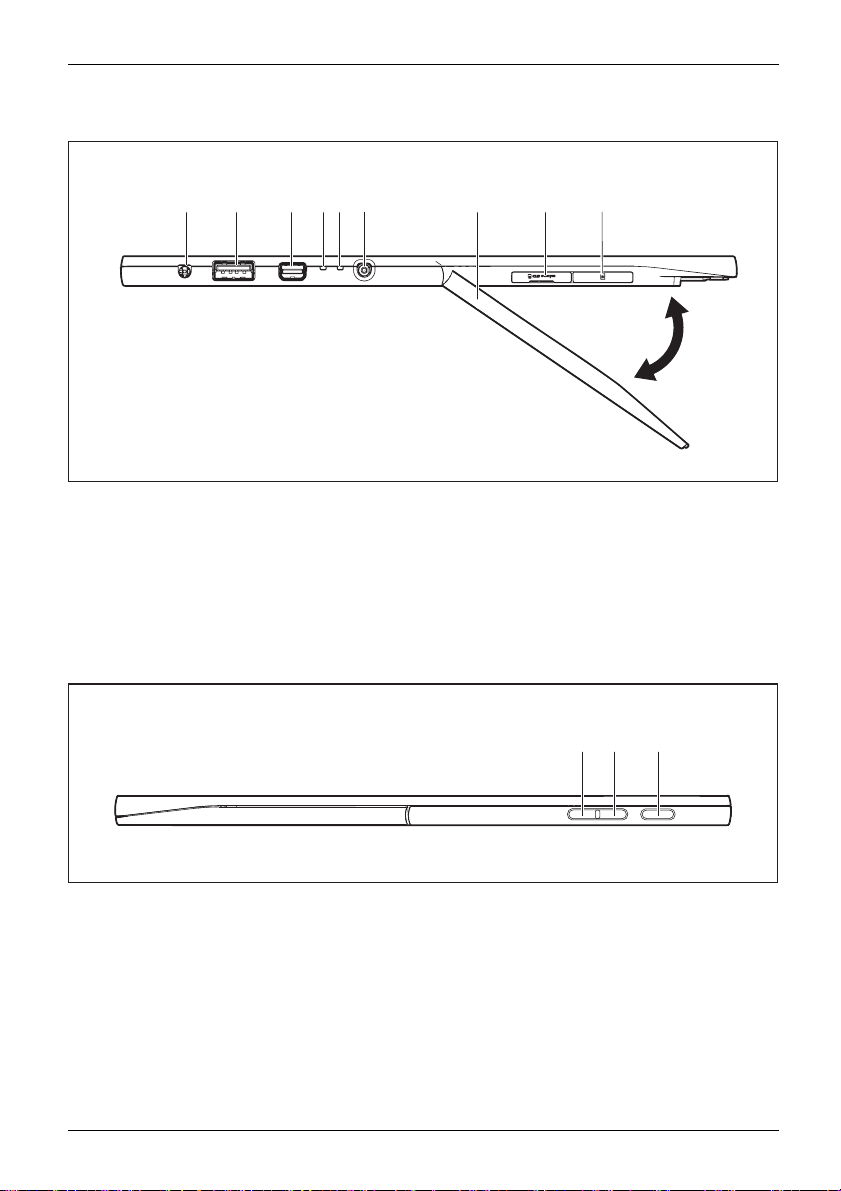
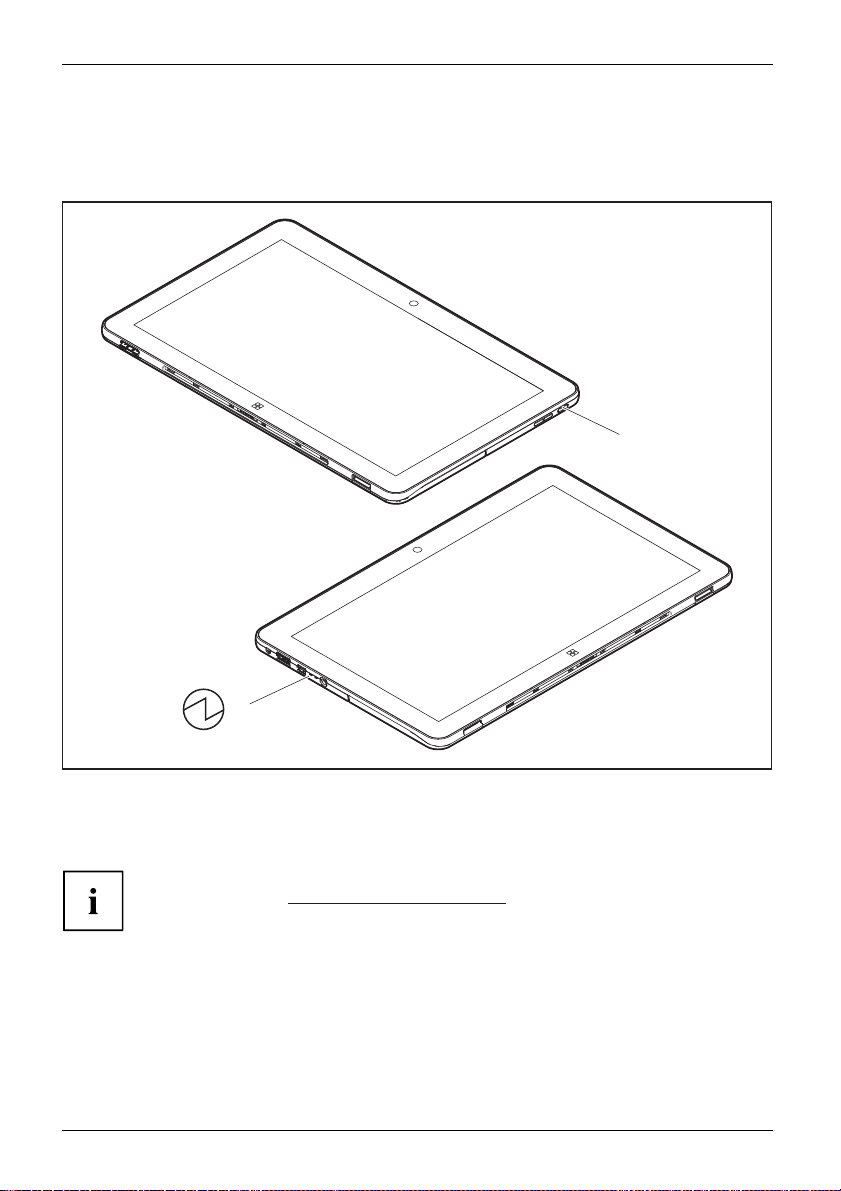
Left side
1 2 3
Ports and controls
6
5
4
87
9
90°
1 = Combined headphones and
microphone port
2 = USB port 3.0 with charging function
(Anytime USB charge)
3 = Mini Display Port
4 = Power-on indicator
5 = Battery charging indicator
Right side
1 = Volume Down Button
2 = Volume Up Button
6 = DC input connector (DC IN)
7 = Tablet stand
8 = Memory card slot (under tablet stand,
protected by additional cover)
9 = SIM card slot (under tablet stand,
protected by additional cover)
Even though existing SIM slot, this
Note)
product doesn't support Wireless-WAN
function in U.S.A and Canada.
1 32
3 = ON/OFF button
Fujitsu 11
Page 14

Ports and controls
Rear
3
2
1
1 = Tablet stand
2 = NFC (Near Field Communication,
depending on configuration)
3 = Speaker
4
3
5
4 = Camera
5 = Access to reset button
12 Fujitsu
Page 15
Important notes
ImportantnotesNotes
Safety instructions
SafetyinformationInformation,
This chapt er contains essential safety information which must be followed when working
with your Tablet PC. The other notes provide useful information about your Tablet PC.
Please follow the safety notes provided in the "Safety/Regulations" manual
as well as the safety notes given below.
Please pay special attention to the sections in the manual marked
with the symbol on the left.
When connecting and disconnecting cables, observe the relevant
notes in this operating manual.
Read the information on the ambient conditions in the "
and the information in the "
preparing your Tablet PC for use and switching it on for the first time.
When cleaning the device, please observe the relevant notes in the
section "
Pay attention to the additional safety notes for devices with wireless c omponents
provided in the "Safety/Regulations" manual.
When handling this device, you come into contact with lead, a chemical which in
California is held to be a possible cause of birth defects and other damage to fertility.
Wash your hands after using the de vice.
Cleaning the Tablet PC", Page 16.
Important notes
Technical data", Page 80 chapter
First-time setup of your device", Page 18 chapter before
This Tablet P
you have ques
please conta
Fujitsu 13
C complies with the relevant safety regulations for data processing equipment. If
tions as to whether you can set up the Tablet PC in the intended environment,
ct your sales out let or our hotline/service desk.
Page 16
Important notes
Additional safety notes for devices with wireless co mponents
WirelesscomponentsWirelessLANBluetooth,Safetynotes
If a wireless component (Wireless LAN, Bluetooth) is integrated in your Tablet PC, you must be
sure to observe the following safety precautions when using your Tablet PC:
• Switch off the wireless components when you are in an aircraft or driving in a car.
• Switch off the wireless compo nents when you are in a hospital, an operating
room or near a medical electronics system. The transmitted radio waves
can impair the operation of medical devices.
• Switch off the wireless components, when you let the device get near flammable
gases or into hazardous environments (e.g. gas station, paint stores), as the
transmitted radio waves can cause a n explosion or a fire.
For further information on how to switch the wireless components on and off, refer
to section "
Switching the wireless components on and off", Page 40.
Protecting the display screen
Do not pour liquid
items on the top o
During normal u
can become embe
warranty does
s on the system or wash it w ith a heavily soaked cloth. Do not place
f the monitor in order to prevent it from being damaged.
se of the device, small particles from the environment
dded in the stylus tip and scratch the screen. The
not cover a scratched screen.
Energy savin
g
NotesEnergyPowersavin
If you w ill not be using your Tablet PC, switch it off. Switch off any connected external devices when
they are not in use. If you use the energy-saving functions, the Tablet PC uses less p ower. If you do
this, you will be able to work longer with the Tablet PC before having to recharge the battery.
The energy efficiency is increased and environmental pollution is reduced.
You save money and help protect the environment.
g
Energy saving under Windows
► Make use of the available energy-saving functions as described in chapter
"
Using the energy saving functions", Page 38.
14 Fujitsu
Page 17
Traveling with your Tablet PC
MobileoperationNotesTrans portationTabletPC
Please follow the instructions below when traveling with your Tablet PC.
Before you travel
► Back up important data stored on your hard disk.
beforeyoutravelTravel
► Switch off the wireless c
connection, it is also po
omponent for data security reasons. With data trafficviaawireless
ssible for unauthorized third parties to receive data.
Important notes
Information on activat
for your wireless compo
ing data encryption is provided in the documentation
nent.
► If you want to use your Tablet PC during a flight, ask the flight attendants to seeit is safe to use it.
When traveling in other countries
► If you are traveling abroad, check that the AC adapter can be operated with the
local AC voltage. If this is not the case, obtain the appropriate AC adapter for
your Tablet PC. Do not use any other voltage converter!
► Check whether the local AC voltage and the AC cable are compatible. If this is not
the case, buy an AC cable that suits the local conditions.
► Enquire with the appropriate government office of the country you will be traveling in as to
whether you may there operate the wireless component integrated in your Tablet PC.
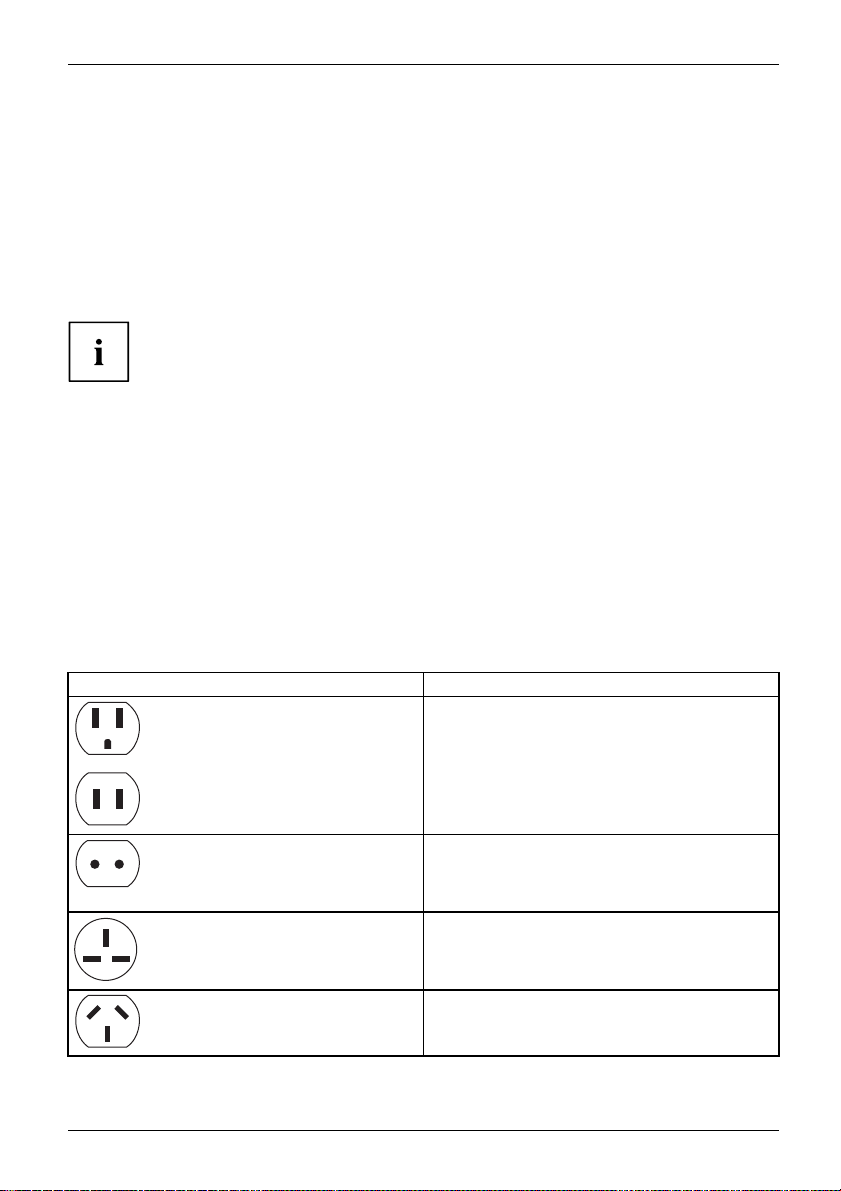
► Take th e necessary travel adapters with you when traveling abroad. Check in the following
table for which travel adapters you will need, or ask your travel organizer.
Power connection Travel destination
United States, C anada, Mexico, parts of Latin
America, Japan, Korea, Philippines, Taiwan
Russia and the Commonwealth of Independent
States (CIS), much of Europe, parts of Latin
America, the Middle East, parts of Africa, Hong
Kong, India, much of south-east Asia
United Kingdom, Ireland, Malaya, Singapore,
parts of Africa
China, Australia, New Zealand
Fujitsu 15
Page 18
Important notes
Transporting the Tablet PC
Protect the Tablet PC from severe shocks and extreme temperatures
(e.g. direct sunlight in a car).
• Do not transport your Tablet PC while it is turned on.
• Carry your Tablet PC with you while traveling. Do not check it in as baggage.
• Never put your Tablet PC through a metal detector. Have it hand-inspected by
security personnel. You can however put your Tablet PC through a properly
tuned X-ray machine. To avoid problems, place it close to the entrance of
the machine and remove it as soon as possible or have it hand-inspe cted by
security personnel. Security officials may require you to turn your Tablet PC
on. So make sure you have a charged battery on hand for this.
► Switch the Tablet PC off
► Unplug the AC plug of the AC adapter and all external devices from the power outlets.
► Disconnect the AC ad
► To protect against damaging jolts and bumps, use a suitable Tablet PC
carrying case to transport your Tablet PC.
.
apter cable and the data cables for all external devices.
Cleaning the Tablet PC
• Use of incorrect c
damage to the co
material safet
• Never use ammonia, acidic, or alkaline cleaners or organic chemicals
such as paint thinner, acetone or kerosene. It m ay damage surface
finishes and the coating of the LCD screen.
• Never use com
• If your Tablet PC has a Smart Card slot, be very careful to avoid any
liquid entering the slot as this can damage the unit.
Further information on cleaning the Tablet PC
The Tablet PC does not float.
If the Tablet PC is exposed to water or other liquids with its connections open, liquid
can penetrate the Tablet PC and cause a malfunction. Do not continue to use the
Tablet PC. Switch it off and contact our hotline / our service desk (see enclosed list of
service desks or visit our website at: "
leaners can result in optical impairment of the LCD and / or
mputer. Always refer to the cleaner manufacturer’s guidelines and
y data sheets for proper handling and use of the products.
pressed air for cleaning your computer.
http://www.fujitsu.com/us/support/").
16 Fujitsu
Page 19
Cleaning with disinfectant wipes
There are many ways of disinfecting surfaces. The following disinfectant wipes
have been tested successfully with the Tablet PC:
• MG Chemicals Multipurpose Alcohol Wipes (alcohol-based)
• PROSAT® Sterile™ PS-911EB/EtOH Life Sciences Wipes (alcohol-based)
• Clorox® Healthcare Bleach Germicidal Wipes (without alcohol)
Remember, if your Tablet PC is configured with the Smart Card sh ell, it does not
have a cover to close the port and liquid could enter and damage the device. Take
extra precautions when cleaning around the Smart Card reader.
For proper use of disinfectant wipes, please read the manufacturer’s instructions.
Before cleaning, please test the disinfectant wipe on a small area of the Tablet
PC. Some medical disinfectant wipes ma y leave residue on the Tablet PC which
is difficult to remove again, or they may dry out quickly. Therefore dispose of
the wipes after one single use and do not reuse them.
Important notes
Fujitsu 17
Page 20
First-time setup of your device
First-time setup of your devic
First-timesetu pGettingstarted
The battery must be charged if you want to operate your device using the battery.
When used on the move, the bu ilt-in battery provides the device with the necessary power. You
can increase the operating time by using the available energy-saving functions.
For instructions on how to connect external devices (e.g. mouse, printer) to your Tablet
PC, please refer to the operating manual for your device.
Unpacking and c
► Unpack all the individual parts.
► Check your d
Please read the chapter "Important notes", Page 13.
If your device is equipped with a Windows operating system, the necessary
hardware drivers an d supplied software are already pre-installed.
Beforeswitchingitonforthefirst time, connect the device to the AC voltage using
the AC adapter, see "
remain connected during the whole of the installation process.
A system test is performed when your device is first switched on. Various messages
can appear. The display may remain dark for a short time or may flicker.
Please follow the instructions on the screen.
NEVER switch off your device during the first-time setup process.
Connecting the AC adapter", Page 21. The AC adapter must
hecking the device
If you find that dama ge has occurred during transport, please notify
your local sales outlet immediately!
PackagingTransport
evice for any visible damage which may have occurred during transportation.
e
You may nee
you need t
18 Fujitsu
d to reuse the packaging in the future, for example if
o ship your device.
Page 21

Choosealocation
ChoosealocationSetupACadapter
Choose a suitable location for the device before s etting it up. In doing
so, please follow these instructions:
• Never place the device or the AC adapter on a heat-sensitive s urface.
The surface could be damaged as a result.
• Never place the device on a soft surface (e.g. carpeting, upholstered furniture,
bed). This can result in damage caused by overheating.
• The back of the device heats up during normal operation. Prolonged contact
with skin can become unp leasant or even result in burns.
• Place the device on a stable, flat, non-slippery surface. Please note that the
rubber feet of the device may mark certain types of delicate surfaces.
• Keep other objects at least 100 mm / 4 inches away from the device
and its AC adapter to ensure adequate ventilation.
• Do not expose the device to extreme environmental conditions. Protect
the device against dust, humidity and heat.
First-time setup of your device
Fujitsu 19
Page 22
First-time setup of your device
Setting up the device
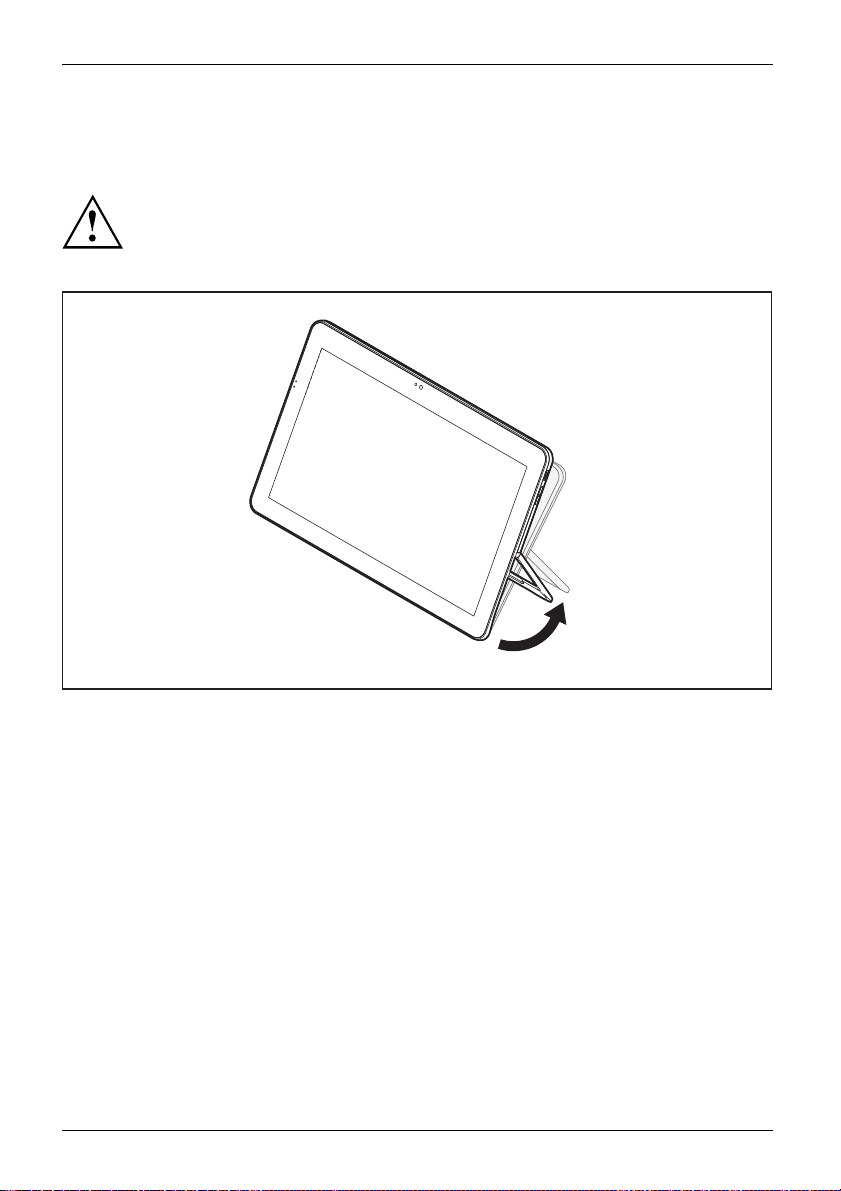
You can operate the device in an upright position on an even surface using the built-in tablet stand.
Make sure that the device is standing safe and securely and be careful that it does not
tip over. Otherwise the device may be damaged, particularly the touch screen.
Open the tablet stand to a maximum angle of 90 degrees. Otherwise
the joint of the tablet stand will be damaged.
90° max.
► Open the tablet stand in the direction of the arrow to the desired opening angle.
► Set the device in its place.
20 Fujitsu
Page 23
Connecting the AC adapter
MakingreadytouseACadapter
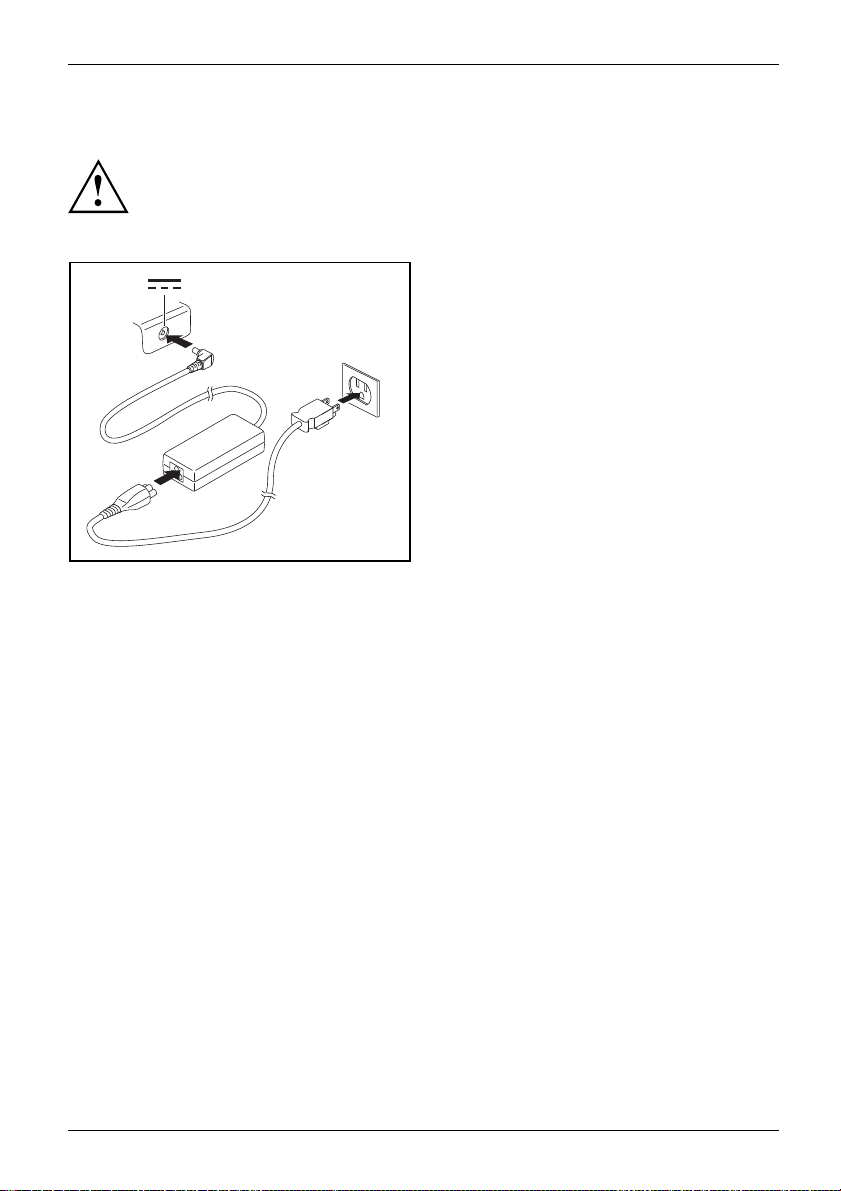
Observe the safety note s in the enclosed "Safety/Regulations" m anual.
The s upplied AC cable conforms to the requirements of the country in which
you purchased your device. Make sure that the AC cable is approved for
use in the country in which you intend to use it.
First-time setup of your device
► Connect the AC cable (1) t
o the AC adapter.
► Plug the AC cable (2) into a power outlet.
► Connect the AC adapter c
DC jack (DC IN) of the dev
able (3) to the
ice.
3
2
1
Fujitsu 21
Page 24
First-time setup of your device
Switching on the device for the first time
Switchingonforthefirsttime
To make it easier to use your device for the first time, the operating system
is pre-installed on the hard disk.
1
2
► Press the ON/OFF button (1) for about one second to switch the device on.
The power-on indicator (2) lights up whenever the system is switched on.
► During the installation process, follow the on-screen instructions.
You can find information and help on the Windows operating system
functions online at "
22 Fujitsu
http://windows.microsoft.com".
Page 25
First-time setup of your device
Installing Bonus A pps
BonusApps
After you have started your system the first time, you will see a Bonus Apps icon on your desktop.
► Click on the icon to s ee which additional applications are available for you to install.
Applications that are already installed appear in grey, those that are
available for installation appear in blue.
► Select the applications you wish to install by selecting the checkbox adjacent to your selection.
or
► Click Select All if you would like to install all available applications.
► To confirm your selection, click Install.
Note that in some cases (depending upon which application was selected for
installation) after installation completes, the system will prompt you to reboot.
There are also cases in which if multiple applications are selected to install
but one of the m needs a reboot, the system will reboot and continue
installing the rest of the selected applications.
Fujitsu 23
Page 26
Working with the Tablet PC
Working with the Tablet PC
Tablet,operationTablet
This chapter describes the basics for operating your Tablet PC. You can find instructions
on how to connect external devices (e.g. mouse, flash storage) to the Tablet PC in
the chapter "
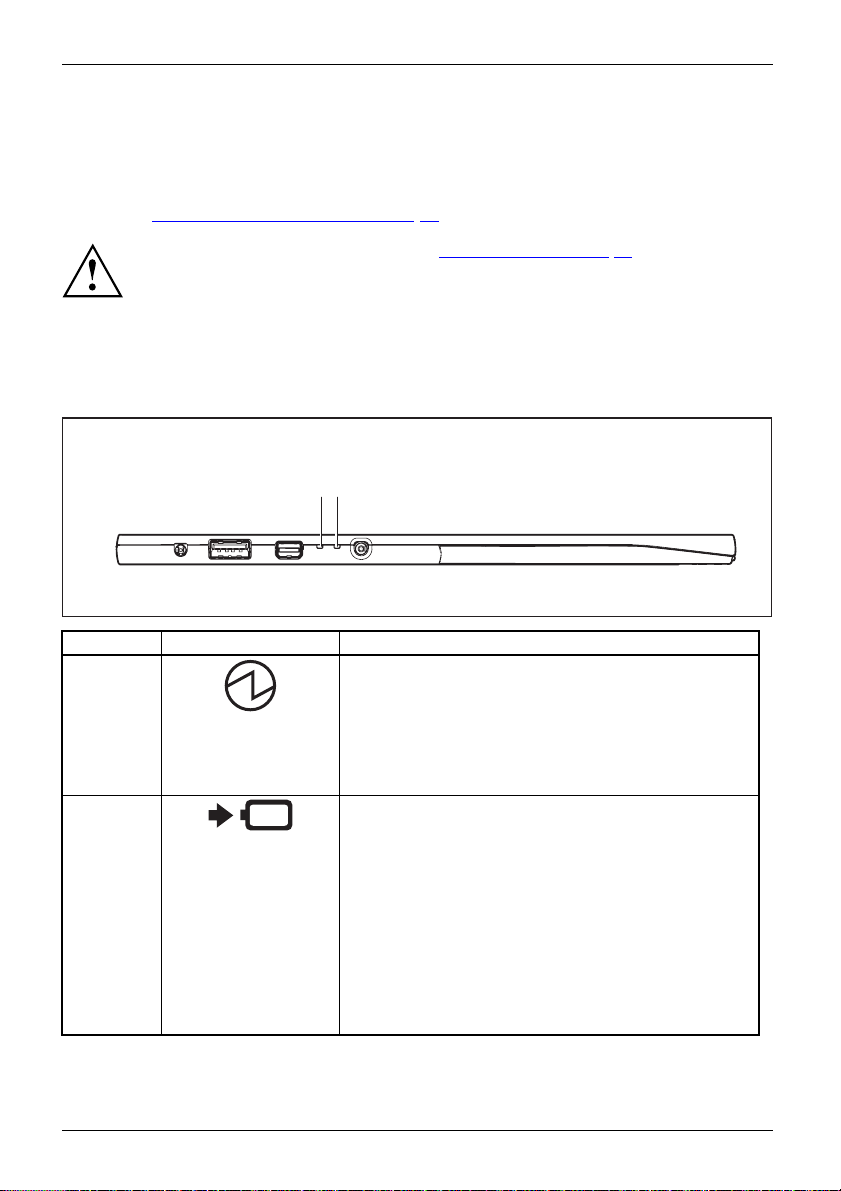
Status indicators
StatusindicatorsSymbols
The status indicators (1, 2) provide information about the status of the power
supply and of the rechargeable battery.
Connecting external devices", Page 62.
Please refer to the notes in the chapter "Important notes", Page 13.
2
1
No. Status indicator Description
1 Power-on indicator
2 Battery charging indicator
24 Fujitsu
• The indicator lights up white: The tablet PC is
switched on.
• The indicator flashes: The Tablet PC is in sleep mode
(Save-to-RAM).
• The indicator is not lit: The Tablet PC is switched off
or in Save -to-Disk mode.
Please note: If the mains adapter is connected when the
state of charge of the battery is more than 90%, charging
will not be started. When the state of charge of the battery
is less than 90%, the battery will be charged to 100% as
soon as the mains adapter is connected.
• The indicator is lit orange: The battery is being
charged.
• The indicator flashes orange: An error has occurred.
• The indicator is not lit:The battery is not being
charged (the battery is already more than 90%
charged or the mains adapter is not connected.)
Page 27
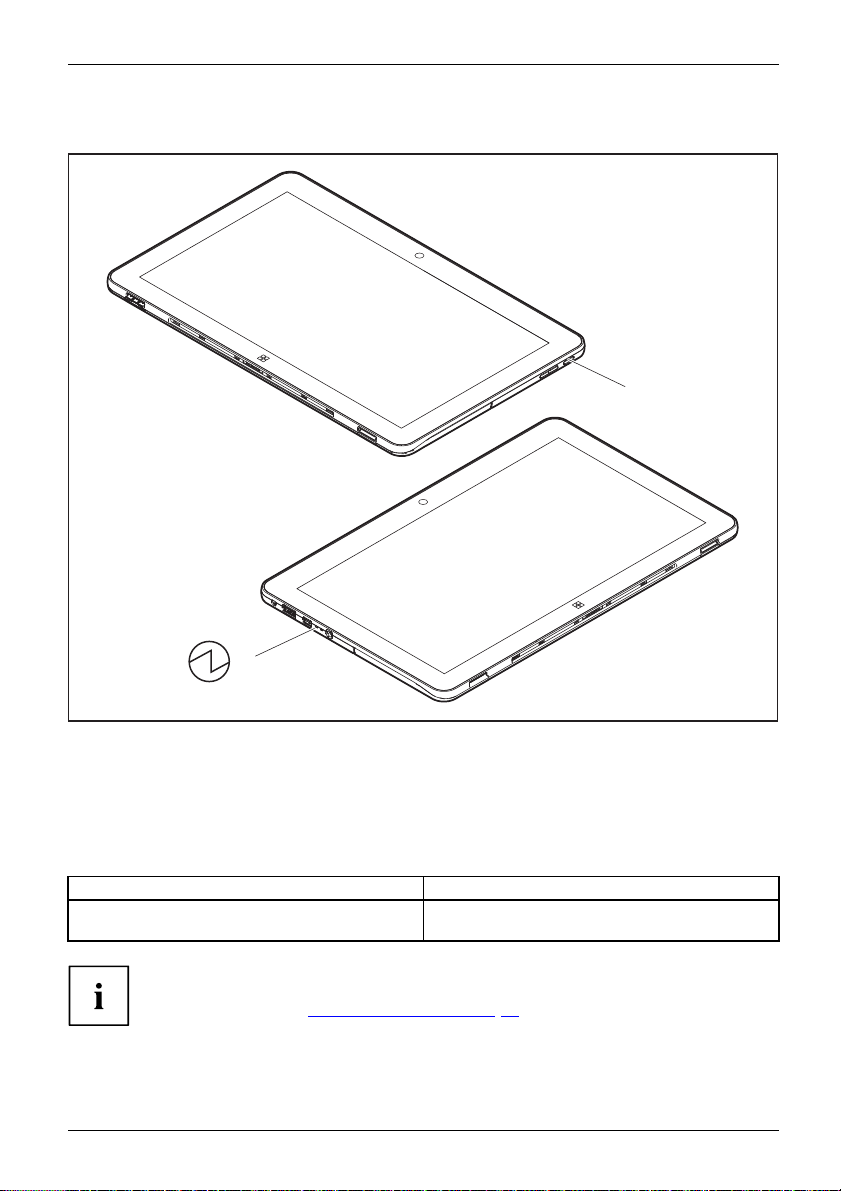
Switching the Tablet PC on
Tablet:SwitchingonPower-onPower-onindicatorSuspend/Resumebutton
Working with the Tablet PC
1
2
► Press the ON/OFF button (1) for about one second to switch the device on.
The power
-on indicator (2) lights up whenever the system is switched on.
Programming the ON/OFF button
You can program the ON/OFF button:
Operating system Menu
Windows 10
If you have assigned a password, you must enter this when requested to
do so, in order to start the operating system. Detailed information can be
found in the chapter "
Fujitsu 25
Security functions", Page 57.
Control Panel - Hardware and Sound - Energy
Options
Page 28

Working with the Tablet PC
Switching the Tablet PC off
Back up your data and close all applications before you switch off your
device. Otherwise data might be lost.
► Shut down the operating system correctly.
Switchingoffthe
► If the Tablet PC does not switch itself off automatically, press the ON/OFF
button for approx. five seconds.
Handwriting recognition
For detailed information on handwriting recognition, see the documentation for your operating system.
At present, handwriting recognition under Windows supports the following languages:
English, German, French, Italian, Japanese, Korean, Chinese (traditional and simplified), Dutch,
Portuguese, Spanish, Brazilian, Norwegian (Bokmål and Nynorsk), Swedish, Finnish, Danish,
Polish, Rumanian, Serbian (Cyrillic and Latin script), Catalan, Russian, Czech and Croatian.
Under Windows you can set the required language under Control Panel –
Time, Language and Region – Language.
26 Fujitsu
Page 29

Touchscreen
Touchsc reenNotes
Background lighting
LCD screens are operated w
lighting can decrease ove
can set the brightness of y
Ambient light sensor
If your Tablet PC was shi
regulated by means of th
This results in optim
If your Tablet PC was s
change the ambient l
Change plan setting
Select On to activa
Information on screen resolution can be found in the section "Screen resolutions
for integrated screen and external screens", Page 83.
r the period of use of the Tablet PC. However, you
pped with the Windows operating system, the screen brightness is
e ambient light sensor and depending on the respective light conditions.
um readability and longer battery life at the same time.
hipped with Windows 10, the adaptive brightness setting is deactivated. To
ight sensor settings, select Control Panel - System and Security - Power Options -
s - Change advanced power settings - Display - Activate adaptive brightness setting. .
te the adaptive brightness setting with the help of the ambient light sensor.
Working with the Tablet PC
ith background lighting. Th e luminosity of the background
our screen yourself.
Synchronizing the
In Windows 10 you
display on the touchscreen and an external monitor
can proceed as follows to set the output type:
► Wipe your finger over the screen starting from the right-hand edge.
► Select All Settings.
► Look for the keyword "project".
► Select the required function.
Fujitsu 27
Page 30
Working with the Tablet PC
Select display orientation (portrait or landscape format)
LandscapeformatPortraitformatDisplayorientation
You can choose to use either portrait or landscape orientation for the display, or whether the
display orientation should automatically adapt t o the orientation of the Tablet PC.
The automatic adaptation of the display orientation is disabled while
a magnetic keyboard is attached.
You can change these set
- Windows Mobility Cent
In the settings ther
These profiles have p
These settings do n
also on external mo
tings under Control Panel - Hardware and Sound
er / Rotate screen.
eareprofiles saved for operation with different screen orientations.
reset standard configurations that can be m odified as desired.
ot just affect the screen settings on the Tablet PC, but
nitors that are connected.
Using fingers
You can execute certain commands by using your finger tip on the touchscreen of your device.
Alternatively, everything which you can select or activate using your finger
tip can also be selected or activate d using the stylus.
Calibrate the Dual Digitizer for finger-based
operation of the device.
Before the first finger-based operation, you m ust calibrate your Tablet PC via the
operating system, so that it recognizes your fingertips as accurately as possible.
As soon as you notice that the accuracy is becoming worse, you
must recalibrate the device.
Please note: There are separate calibration programs available for calibrating
the sty lus and for calibrating finger-based operation. Do not use the calibration
tool for the stylus to calibrate finger-based operation.
Operating system Menu
Windows 10
28 Fujitsu
To calibrate, ru n the Hardware and Sound / Tablet PC Settings function in the
Control Panel. You need to calibrate both portrait and landscape formats.
Page 31

Actions with one finger
Action Description
Selecting objects (click with the left mouse
button)
Starting programs (double-click with the left
mouse button)
Moving objects/windows (while holding the left
mouse button pressed, drag & drop)
Opening a context menu (click with the right
mouse button)
Moving the cur
sor
► Tap once briefly with the finger on the object.
► Use one finger to tap twice in quick
succession on the program symbol.
► Place your finger on the object/window,
keep your fingertip pressed against
the touchscreen and move the desired
object/window.
► Tap your finger on the desired item.
Keep your fingertip pressed against the
touchscreen.
The context me
► Position one finger on the touchscreen and
move your fingers in the desired direction.
Working with the Tablet PC
nu appears.
Fujitsu 29
Page 32

Working with the Tablet PC
Actions with two fingers
Action Description
Scrolling
► Place two fingers on the touchscreen.
► Move the fingers up to s
or
► Move the fingers down to scroll down.
Rotating
croll up.
► Position your thumb on the touchscreen and
rotate the image clockwise o r anticlockwise
using your index finger.
30 Fujitsu
Page 33

Action Description
Increase or decrease zoom
► Put two fingers on the touchscreen and
move them apart to increase the size of the
zoom.
or
► Put two fingers on the touchscreen and
move them together to decrease the size
of the zoom/view.
Lock context-sensitive m enus
► Use two fingers to tap twice in quick
succession on the touchscreen.
Working with the Tablet PC
Fujitsu 31
Page 34

Working with the Tablet PC
Using the stylus (optional, configuration d ependent)
Pen
1 = stylus tip
2 = stylus button (eraser)
3 = stylus button (right mouse
wake-up)
button, stylus
2
1
You can use the stylus
navigate through th
write directly on th
e programs. Programs that support handwriting recognition also allow you to
e screen with the stylus. You can also use the stylus as a drawing tool.
Use only the stylus
object as a substit
the stylus tip if i
While writing, t
display (e.g. wi
The stylus of the Tablet PC is an electronic instrument that can be damaged
if used improperly. Handle the stylus with care.
Our recommendations for proper handling of the stylus are as follows:
• Do not gesture with the s tylus.
• Do not use the stylus as a pointer.
• Do not use the stylus on surfaces other than the screen of the Tablet PC.
• Do not try to tu rn the grip of the stylus. The grip is used to put the
stylus into its slot or to take it out of its slot.
• Never store the stylus with its weight on the tip (e.g. with the tip down in a stylus
container). If the stylus is stored with the tip pointing down, this may have an
adverse effect on the stylus mechanism (particularly in high temperatures). In this
case, the stylus tip may react as though it is constantly being pressed down. To
avoid damage, the stylus should be stored in the slot when not in use.
The stylus can be influenced by electrom agnetic fields (cursor quivers or
jumps). There may be a few areas on the screen where the cursor quivers
slightly in spite of pressing the stylus down firmly.
3
on your Tablet PC as an electronic writing tool, to select menu items and to
that was p rovide d with your Tablet PC. Do not use any other p ointed
ute, that was not specially designed for your Tablet PC . Replace
t is worn. The warranty does not cover a scratched screen.
ake care that you do not scratch the surface of the
th a wristwatch or bracelet).
The screen responds to entries made with the tip of the finger or the stylus when the
tip of the finger or the stylus directly touches the screen.
You can use the stylus to perform almost all functions for which you would otherwise use a mouse.
32 Fujitsu
Page 35

Working with the Tablet PC
Action Mouse
Selecting menu
items
Starting programs Double-click with the left mouse
Moving an object
or window
Opening a context
menu
Moving the cursor Move the mouse
Click with the left mouse button
button.
Drag with the left m ouse button
pressed.
Click with the right mouse button.
.
Stylus
Tap on the menu entry with the tip
the stylus.
Tap on the program symbol twice
rapid succession using the st
Place the stylus tip directly on the
object or window. Keep the stylus tip
held against the screen. Drag the
desired object or window.
Tap on the desired element with the
stylus and keep the stylus pressed
against the screen.
Place the tip of the stylus directly on
the screen.
ylus tip.
Energy saving functions of the stylus
In order to save energy, the stylus automatically enters suspend mode after 5 minutes
of inactivity (lower energy consumption than in active mode), and sleep mode after 10
minutes (lower energy consumption than in suspend mode).
You can set the stylus to active mode again using the lower button on the stylus.
Adjusting the stylus
Operating system Menu
Windows 10 Under System Control - Hardware and Sound - Pen and Touch you can make
various settings f or the stylus.
of
in
Calibrating the stylus
Before first use with the stylus, you must calibrate your Tablet PC via the operating
system, so that it recognizes the stylus as accurately as possible.
You should also always repeat the calibration if the co-ordination between the
stylus and the cursor movement deteriorates.
Operating system Menu
Windows 10
Fujitsu 33
To calibrate, run the Hardware and Sound / Tablet PC Settings function in the
Control Panel. You need to calibrate both portrait and landscape formats.
Page 36

Working with the Tablet PC
Removing the stylus battery
The stylus contains one AAAA battery.
2
1
3
Installing the stylus battery
2
► Turn the cap of the stylus in the direction of
the arrow (1) and lift it off the stylus (2).
► Remove the battery from the stylus cap (3).
► Insert the new bat
► Place the stylus cap on the stylus (2) and
screw itdown in thedirectionofthearrow(3).
tery into the stylus cap (1).
1
34 Fujitsu
3
Page 37

Working with the Tablet PC
Changing the pen tip
With use, the pen tip may become worn or may pick up foreign particles that can scratch the screen.
A damaged or worn tip may not m ove freely, causing unpredictable results when using the pen.
If these problems appear with your pen, you should change the pen tip.
► Pull the pen tip from the pen.
► Replace the pen tip with one of the
replacement tips that were supplied
your pen. Insert the pointed end of the
pen tip into the barrel and push it in
gently until it is in place.
Do not continue to use a tip which is worn or damaged.
Fujitsu 35
Page 38

Working with the Tablet PC
Volume rocker
In addition to the ON/OFF button (3), your Tablet PC is also equipped with a volume rocker (1, 2).
1 32
No. Description Functions
1 Volume down button Decrease the volume
Keeping the volume d
the Tablet PC, the B
F12
to the
During PXE boot th
to the
2 Volume up button Increase the vol
Keeping the vol
Tablet PC, the
the
3
ON/OFF button Switch the device on or off
F12
F2
keyonakey
key on a keybo
key on a keyb
.
own button pressed after turning on
oot Menu is started (this corresponds
ard).
evolumedownbuttonalsocorresponds
oard.
ume.
ume up button pressed after turning on the
BIOS Setup is started (this corresponds to
board).
36 Fujitsu
Page 39

Working with the Tablet PC
Camera
Camera
The camera has its own status indicator. The indicator lights up when the camera is active.
Depending on the software used, you can use your camera to take pictures,
record video clips or take part in web chats.
• The picture quality depends on the lighting conditions and the software being used.
• You can only use the camera with a particular application (e.g. an Internet telephony
• The support of the Tablet PC must not shake while the camera is being used.
• The camera automatically adjusts itself to the current light level. For this reason,
Your device h as two cameras: one on the front of the device and one on the rear.
program or a video conferencing program which supports cameras).
the touch screen may flicker while the light level is adjusted.
Further information on the use of the camera and additional settings for it can
be fo und in the help function of the program using the camera.
Rechargeable battery
BatteryBatteryServicelife,batteryRechargeablebatteryBattery
The built-in battery provides the Tablet PC with the necessary power for use on the move.
You can increase the service life of the battery by caring for the battery properly. The
average battery service life is around 500 charge/discharge cycles.
You can extend the battery service life by taking advantage of the available energy-saving functions.
Charging and maintaining the battery
BatteryBattery
The Tablet PC battery can only be charged when the ambient temperature is
between 5°C / 41 °F and max. 35°C / 95°F.
You can charge the battery by connecting the Tablet PC to the AC adapter
(see "
Connecting the AC adapter", Page 21).
If the AC adapter is connected when the state of charge of the battery is more than 90%,
charging will not be started. When the state of charge of the battery is less than 90%, the
battery will be charged to 100% as soon as the AC adapter is connected.
If the battery is running low you will hear a warning alarm. If you do not connect the AC adapter
within five minutes of hearing the warning alarm, your Tablet PC will switch off automatically.
Monitoring the battery state of charge
ery
erychargemeter
Batt
batt
A battery symbol for monitoring the battery cap acity is displayed in the system bar /
status indicator. The battery symbol shows you the battery charge.
Fujitsu 37
Page 40

Working with the Tablet PC
Using the energy saving functions
EnergyEnergyBattery
The Tablet PC uses less power when the energy s aving features are enabled. You will then
be able to work longer when using the battery before having to recharge it.
The energy efficiency is increased and environmental pollution is reduced.
By choosing the best power options, you can make significant savings and
at the same time help protect the environment.
► Set the energy saving fun
ctions in your Control Panel.
The recommended settings for the Windows energy saving functions are predefined as "Fujitsu
Computer EcoSettings" in the Power Options of the Control Panel and can be displayed there.
When the Tablet PC is in a pow er-saving mode, yo u must remember the following:
During power-saving mode, open data is held in main memory or
in a swap file on the hard disk.
Never switch off the Tablet PC while it is in a power-saving mode. If the built-in battery
is nearly flat, close all open files and do not go into power-saving mode.
If you do not intend to use your Tablet PC for a long period of time:
► Exit the power-sav
ing mode if necessary by touching the screen or by switching the Tablet
PC on.
► Close all opened programs and completely shut down the Tablet PC.
38 Fujitsu
Page 41

Working with the Tablet PC
Memory cards
Slot
Your Tablet PC is equipped with an integrated storage card reader. Use storage
cards to enlarge the storage of your Tablet PC.
Follow the manufacturer’s instructions when handling the memo ry cards.
Memorycard
Supported formats
The following formats are supported:
• Micro Secure Digital (microSD
•microSDHC
•microSDXC
Inserting the memory card
a
TM
Card)
3
2
1
► Fold out the tablet stand (1).
► Open the s
► Carefully push the memory card into the slot ( a) in the direction of the arrow (3) until you
feel the memory card engage. The label area must be facing downward. Do not apply
any force, otherwise the delicate contact surfaces could be damaged.
Memorycard
► Close t
Fujitsu 39
lot cover (2).
he slot cover again.
Page 42

Working with the Tablet PC
Removing the memory card
Memorycard
To avoid any loss of data, always follow the correct procedure for removing the
card (see the documentation for your o perating system).
a
3
2
1
► Fold out the tablet stand (1).
► Open the slot cover (2).
► Press the edge of the memory card so that the memory card jumps slightly out of the slot (a).
► Pull the memory card out of the slot (a) in the direction of the arrow (3).
► Close the slot cover again.
Wireless LAN/Bluetooth/NFC wireless components
(configura
Switching the wireless components on and off
The wireless components are switched on and off using the appropriate
functions of the operating system.
► To switch wireless components on and off individually, s elect Settings – Network & Internet.
tion dependent)
The installation of wireless components not approved by Fujitsu will
invalidate the certificat ions issued for this device.
40 Fujitsu
Page 43

Working with the Tablet PC
Configuring WLAN access
• Requirement: A WLAN is available and you have the necessary access d ata to hand.
Information on configuring WLAN access can be found in the
documentation for your operating system.
Further information on WLAN and Bluetooth
For further information about WLAN or Bluetooth, please refer to the
appendix of this Operating Manual.
For W LAN specifications, see chapter "
WLAN specifications", Page 82.
NFC (Near Field Commu
Depending on the configuration chosen, your Tablet PC may be equipped with an
integrated NFC chip. Near Field Communication is used for contactless exchange of
data via radio over short distances (a few centimeters).
nication, configuration dependent)
Ethernet and LAN (only with docking cradle)
EthernetLAN
The internal ne
establish a con
twork module of your Tablet PC supp orts Ethernet LAN. You can use it to
nection to a local network (LAN = Local Area Network).
► Connect the net
port of the doc
► Connect the network cable to your
network connection (2).
1
2
Your network administrator can help you to configure and use the LAN c onnections.
The network cable is not included in the delivery sco pe. This type of
cable can be obtained from a s pecialist dealer.
work cab le to the LAN
king cradle (1).
Fujitsu 41
Page 44

Working with the Tablet PC
GPS
GPS
Whether your device has this function depends on the chosen device configuration.
42 Fujitsu
Page 45

Accessories for your Tablet PC (opti
onal)
Accessories for your Tablet PC
The following accessories are available for your Tablet PC:
• Docking cradle for c harging the Tablet PC and with additional ports
• Magnetic keyboard with cover function
• Conversion adapter: MiniDP - VGA, MiniDP - HDMI and USB - LAN
• Notebook mouse
The following sections provide more information on handling the accessories.
(optional)
Fujitsu 43
Page 46

Accessories for your Tablet PC (opti
onal)
Your docking cradle (optional)
Your docking cradle is a device that also allows you to quickly connect your Tablet PC
to your peripherals such as a display, keyboard, mouse, etc. You only n eed to dock
the Tablet PC to be able to work with your peripheral devices.
Cradle components
PortsPortsCradle
1
2
3
4
5
6
7
8
9
10
11
1 = Docking port
2 = USB port (USB 3.0)
3 = USB port (USB 3.0)
4 = Microphone port
5 = Headphones port
6 = VGA monitor port
Information on screen resolution can be found in the section "Screen resolutions
for integrated screen and external screens", Page 83.
44 Fujitsu
7 = HDMI port
8 = Display Port
9 = LAN port
10 = Security Lock device
11 = DC jack socket (DC IN)
Page 47

Accessories for your Tablet PC (opti
Settingupthecradle
Select a suitable location for the cradle before setting it up. In doing
so, please follow these instructions:
• Placethecradleonaflat, stable, non-slippery surface.
• Never place the cradle or the AC adapter on a heat-sensitive surface.
• Do not expose the cradle to extreme environmental conditions.
• Protect the cradle from dust, moisture and heat.
onal)
Fujitsu 45
Page 48

Accessories for your Tablet PC (opti
onal)
Connecting the Tablet PC to the cradle
It is possible to connect the Tablet PC to the cradle while it is running.
Disconnect the AC adapter from the Tablet PC before connecting the
Tablet PC to the docking cradle.
When the Tablet PC is connected to the cradle, you must connect
the AC adapter to the cradle.
Cradle
► Remove the AC plug of the AC adapte r from the power outlet.
► Remove the AC adapter cable from the DC jack (DC IN) of the Tablet PC.
► Fold in the tablet stand so that it lies flat on the rear of the Tablet PC.
2
1
4
3
► Position the Tablet PC so that it lies against the storage surface of the cradle.
► Push the
until yo
Tablet PC on to the docking cradle in the direction of the arrow (1)
u feel it engage on the connector.
► Plug the AC adapter cable into the DC jack (D C IN) on the cradle (2).
► Connec
t the AC cable to the AC adapter (3).
► Plug the AC cable into the power outlet (4).
46 Fujitsu
Page 49

Accessories for your Tablet PC (opti
Disconnecting the Tablet PC from the cradle
It is possible to separate the Tablet PC from the cradle while it is running.
1
onal)
► While holding the lower area of the docking cradle, lift the Tablet PC in the direction
of the arrow an d away from the docking cradle (1).
Fujitsu 47
Page 50

Accessories for your Tablet PC (opti
onal)
Magnetic keyboard (optional)
The magnetic keyboard is an optimized device for the co nvenient input of text. It
only needs to be docked with the Tablet PC.
Components of the magnetic
MagnetickeyboardPorts
1 = Docking port for the Tablet PC
2 = Num Lock indicator (to switch virtual
numeric keypad on and off)
3 = Caps Lock indicator (to switch
capitalization function on a nd off)
keyboard
1
2
3
4
4 = Scroll Lock indicator (function dependent
on the application program)
48 Fujitsu
Page 51

Accessories for your Tablet PC (opti
Connecting the Tablet PC to the magnetic keyboard
Magnetickeyboard
2
1
90° max.
► Fold out the tablet stand (1).
Open the tablet stand to a maximum angle of 90 degrees. Otherwise
the joint of the tablet stand will be damaged.
onal)
► Position the
approach in t
Tablet PC so that the docking ports of the Tablet PC and the magnetic keyboard
he direction of the arrow (2) and the magnetic connection clicks into place.
Fujitsu 49
Page 52

Accessories for your Tablet PC (opti
onal)
3
5
4
► Connect the AC adapter cable to the DC input connector (DC IN) of the Tablet PC (3).
► Connect the pow
► Plug the power cable into the power outlet (5).
er cable to the AC adapter (4).
50 Fujitsu
Page 53

Accessories for your Tablet PC (opti
Separating the Tablet PC from the magnetic keyboard
It is possible to separate the Tablet PC from the magnetic keyboard while it is running.
1
2
onal)
► While holding t
the magnetic k
► Fold in the tablet stand (2) again.
he lower area of the magnetic keyboard, lift the Tablet PC away from
eyboard in the direction of the arrow (1).
Using the device with a docking cradle and magnetic keyboard (optional)
If you have both a docking cradle and a magnetic keyboard, you can also use
the device with these two accessory components.
Connect
to the doc king cradle
Fujitsu 51
ing the Tablet PC with magnetic keyboard
The magnetic keyboard must be connected to the Tablet PC before you
connect the Tablet PC to the docking cradle.
It is possible to connect the Tablet PC to the cradle while it is running.
Disconnect the AC adapter from the Tablet PC before connecting the
Tablet PC to the docking cradle.
Page 54

Accessories for your Tablet PC (opti
onal)
When the Tablet PC is connected to the cradle, you must connect
the AC adapter to the cradle.
Cradle
► Remove the AC adapter cable from the DC jack (DC IN) of the Tablet PC.
2
1
► Connect the Tablet PC with the magnetic keyboard (1) as described in the section
"
Connecting the Tablet PC to the magnetic keyboard", Page 49.
► Fold together the Tablet PC and the magnetic keyboard (2).
52 Fujitsu
Page 55

Accessories for your Tablet PC (opti
3
► Position the Tablet PC with the magnetic keyboard so that it lies on the
surface of the tray on the docking cradle.
► Push the Tablet PC on to the docking cradle in the direction of the arrow (3)
until you feel it engage on the connector.
onal)
Fujitsu 53
Page 56

Accessories for your Tablet PC (opti
6
► Fold down the magnetic keyboard in the direction of the arrow (4).
► Plug the AC adap
► Connect the power cable to the AC adapter (6).
► Plug the power
ter cable into the DC input connector (DC IN) on the docking cradle (5).
cable into the power outlet (7).
onal)
5
4
7
Separating the Tablet PC with magnetic keyboard from the docking cradle
It is possible to separate th e Tablet PC from the docking cradle during operation:
You must first separate the Tablet PC from the docking cradle before you can
remove the keyboard. Attempting to remove the magnetic keyboard while the Tablet
PC is in the docking cradle can damage the magnetic keyboard.
54 Fujitsu
Page 57

Accessories for your Tablet PC (opti
1
► Fold the magnetic keyboard in the direction of the arrow (1).
onal)
2
► While holding the lower part of the docking cradle, lift the Tablet PC with the
magnetic keyboard in the direction of the arrow (2).
Fujitsu 55
Page 58

Accessories for your Tablet PC (opti
onal)
3
4
► Fold the Tablet PC in the direction of the arrow (3).
► While holding the lower area of the magnetic keyboard, lift the Tablet PC away from
the magnetic ke yboard in the direction of the arrow (4).
56 Fujitsu
Page 59

Security functions
Security functions
Securityfunctions
Your Tablet PC has several security features that you can use to secure your system
and your personal data from un authorized access.
This chapter explains how to use these functions, and what the benefits are.
Please remember that in some cases, for example, forgetting your password,
you may be locked out of the system and unable to access your data.
Therefore, please note the following information:
• Back up your data on external data carriers at regular intervals.
• Some security functio
of the passwords and ke
If you forget your passwords you will need to contact our Service Desk.
Deletion or resetting of passwords are not covered by your warranty
and a charge will be made for assistance.
Using the security lock (docking cradle only)
SecurityLockAnti-theftprotectionSecurityLock
Your docking cradle (optional) is equipped with a security device for a Kensington lock cable.
You can use the Kensington lock cable, a sturdy steel cable, to protect your docking cradle
against theft. T he Kensington lock cable is available as an accessory.
ns need you to choose passwords. Make a note
eptheminasafeplace.
► Fit the lock cable to the device on
your docking cradle.
Configuring password protection in BIOS Setup Utility
Before using the various options for password protection in the BIOS Setup
Utility, please proceed as follows to increase data security:
Make a note of the passwords and keep them in a safe place. If you forget your
supervisor password you will not be able to access your Tablet PC. Passwords are
not covered by your warranty and a charge will be made for assistance.
Passwordprotection
assword can be up to 32 characters long and can co ntain letters, numbers and
Your p
ial characters. A distinction is made between upper and lower case.
spec
using special characters, please keep in mind that they depend on
When
ountry version of the attached keyboard.
the c
Fujitsu 57
Page 60

Security functions
Protecting BIOS Setup Utility (supervisor password and user password)
If you have opened these operating instructions on the screen, we recommend
that you print them out. You cannot call up the instructions on the screen
while you are s etting up the password.
BIOSSetupUtility
The supervisor password and the user password both prevent unauthorized use of the BIOS
Setup Utility. The supervisor password allows you to access all of t he functions of the BIOS Setup
Utility, while the user password will only give you access to some of the functions. You can
only set up a user password if a supervisor password has already been assigned.
Calling and using the BIOS Setup Utility is described in the chapter
"
Settings in BIOS Setup Utility", Page 68.
Assigning the supervisor and user passwords
► Start the BIOS Setup Utility and go to the Security menu.
► Select the Set Supervisor Password field and press the Enter key.
With Enter new Password: you are asked to enter a password.
► Enter the password and press the Enter key.
Confirm new Password requires you to confirm the password.
► Enter the password again and press the Enter key.
Changes have b een saved is displayed as a confirmation that the new password has been saved.
► To set the user password, select Set User Password and proceed exactly as
when configuring the supervisor password.
If you do not want to change any other settings, you can exit BIOS Setup Utility.
► In the Exit menu, select the option Save Changes & Exit.
► Select Yes and press the Enter key.
PasswordSupervisorpasswor dUserpassword
The Tablet PC is rebooted and the new password is effective. It will now be necessary to
first enter you r supervisor or user password in order to open the BIOS Setup Utility. Please
note that the user password only provides access to a few of the BIOS settings.
Changing the supervisor password or user password
You can only change the supervisor password when you have logged into the
BIOS Setup Utility with the supervisor password.
PasswordSupervisorpasswordUserpassword
► Start the BIOS Setup Utility and go to the Security menu.
► When changing the password , proceed exactly as when assigning a password.
58 Fujitsu
Page 61

Security functions
Removing passwords
To remove a password (without setting a new passw ord) perform the following steps:
PasswordSupervisorpasswordUserpassword
► Start the BIOS Setup Utility and go to the Security menu.
► Highlight the Set Supervisor Password or Set User Password field and press the Enter key.
You will be requested to enter the current password by the Enter Current Password prompt.
Enter New Password will appear and you will be requested to enter a new password.
► Press the Enter key twice at this request.
► In the Exit menu, select the option Save Changes & Exit.
► Select Yes and press the Enter key.
The Tablet PC is rebooted and the password is removed.
Removing the supervisor password simultaneously deactivates the user password.
Password protectio
n for booting the operating system
With the supervisor password y ou have set in the BIOS Setup U tility (see
section "
also prevent booting of the operating system.
Operatingsystem
Assigning the supervisor and user passwords", Page 58), you can
Activating system protection
► Start the BIOS Setup Utility and go to the Security menu.
Operatingsystem
► Select the PasswordonBootoption and press the Enter key.
► Select the option you require (First Boot or Every Boot) and press the enter key
► Select the Save Changes & Exit option under Exit.
The Tablet PC reboots. You will be prompted to enter your password (the supervisor password).
Deactivating system protection
► Start the BIOS Setup Utility and go to the Security menu.
Operatingsystem
► Select the PasswordonBootoption and press the Enter key.
► Select the Disabled option and press the Enter key.
If you do not want to change any other settings, you can exit BIOS Setup Utility.
► Select the Save Changes & Exit option under Exit.
The Tablet PC reboots. The system is no longer password-protected.
Fujitsu 59
Page 62

Security functions
Password protection for the hard disk
Passwordprotection
The hard disk password prevents unauthorized access to the hard disk drives
and is checked internally each time the system is boote d. The condition for this
is that you have assigned at least the supervisor password.
Activating hard disk protection
► Call up the BIOS Setup and select the Security menu.
If you have not assigned BIOS passwords yet, define the supervisor and the user
password now, if desired (see "
► Mark the Hard Disk Security field and press the Enter key.
► In the area Drive0, mark the field Set M aster Password an d press the Enter key.
Enter new Password then appears and you are asked to enter a password.
► Enter the password and press the Enter key.
Confirm new Password requires you to confirm the password.
► Enter the password again and press the Enter key.
With Setup Notice: Changes have been saved you receive confirmation that
the new password has been saved.
The field Password Entry on Boot is set to Enabled by default. You can exit the BIOS
Setup once you have finished changing the settings.
► From the Exit menu, choose the option Exit Saving Changes.
► Press the Enter key and select Yes.
The Tablet PC reboots and your hard disk is now protected with a password. The
password prompt is enabled as soon as the Tablet PC has rebooted.
Security functions", Page 57).
Deactivating hard disk protection
To cancel a password (without setting a new password) proceed as follows:
► Call up the BIOS Setup and select the Security menu.
► Mark the Hard Disk Security field and press the Enter key.
► In the area Drive0, mark the field Set M aster Password an d press the Enter key.
With the prompt Enter current Password you are first asked to enter the old password again.
With Enter new Password you are then prompted to enter a new password.
► After the request, press the Enter key three times.
► From the Exit menu, choose the option Exit Saving Changes.
► Press the Enter key and select Yes.
The Tablet PC reboots and there is no longer any password protection for this hard disk.
60 Fujitsu
Page 63

Security functions
Trusted Platform Module - TPM (configuration
dependent)
TPMTrustedPlatformModule
To use the TPM, you must enable the TPM in the BIOS Setup before the software is
installed. The requirement for this is that you have assigned at least the supervisor
password (see "
Enabling TPM
• Requirement: You have assigned a supervisor password (see "Security functions", Page 57).
► Call BIOS Setup and select the Security menu.
► Mark the TPM Security Chip Setting field and press the Enter key.
► Select the entry Enabled to enable the TPM
Once you have ena bled the TPM the Clear Security Chip menu item appears.
You can clear the holder in the TPM using Clear Security Chip.WithEnabled,
all secret keys (e.g. SRK - Storage Root Keys, AIK - Attestation Identity Keys
etc.) generated by applications are deleted.
Take note that you can then no longer access the data you have
encrypted on the holder-based keys!
► From the Exit menu, choose the option Exit Saving Changes.
► Press the Enter key and select Yes.
The Tablet PC restarts and the TPM is enabled after the reboot.
Security functions", Page 57).
Disabling TP
• Requirement: You have assigned a supervisor password (see "Security functions", Page 57).
► Call BIOS Se
► Mark the TPM Security Chip Setting field and press the Enter key.
► Select the
► From the Exit menu, choose the option Exit Saving Changes.
► Press the
The Tablet PC restarts and the TPM is disabled.
Fujitsu 61
M
tup and select the Security menu.
entry Disabled to disable the TPM.
Enter key and select Yes.
Page 64

Connecting external devices
Connecting external devices
Under all circumstances, please observe the safety notes provided in the
"
Important notes", Page 13 chapter before connecting or disconnecting
any devices to or from your Tablet PC.
Always read the documentation supplied with the device you wish to connect.
Never connect or disconnect cables during a thunderstorm.
Never pull at a cable when disconnecting it. Always grasp the plug.
With some devices, such as USB devices, it is not necessary to switch off
the Tablet PC and the device before connecting/discon necting. For more
information about whether or not devices need to b e switched off, please refer
to the documentation supplied with your external device.
Some of the external d evices require special drivers (see the operating
system and external device documentation).
Connecting an external monitor
Information on screen resolution can be found in the section "Screen resolutions
for integrated screen and external screens", Page 83.
Mini Display Port
DisplayPort
The mini Disp
TV or a plasma
lay Port of the Tablet PC can be used to connect a monitor, an LCD
TV with a corresponding connection.
► Connect the
external de
► Connect the data cable to the mini
Display Port of the Tablet PC.
data cable to the
vice.
Some LCD televisions ha ve only two speaker connections and therefore
cannot reproduce Dolby Digital or DTS. In order to reproduce the sound, you
must go into Windows and adjust the sound settings.
► To do
62 Fujitsu
this, deactivate the DTS Audio and D olby Digital settings in the control
el for the Realtek HDMI Output.
pan
Page 65

Connecting external devices
Display Port (docking cradle only)
DisplayPort
The Display Port of the docking cradle can be used to connect a monitor, an LCD
TV or a plasma T V with a corresponding connection. Display output is limited to a
maximum of two external screens at the same time.
► Connect the data cable to the
external device.
► Connect the data cable to the D isplay
Port of the cradle.
Some LCD televisions have only two speaker connections and therefore
cannot reproduce Dolby Digital or DTS. In order to reproduce the sound, you
must go into Windows and adjust the sound se tting s.
► To do this, deactivate the DT S Audio and Dolby Digital settings in the control
panel for the Realtek HDMI Output.
HDMI port (docking cradle only)
HDMIport
TheHDMIporto
LCD TV or a plas
maximum of two
f the docking cradle can be used to connect an external amplifier,
ma TV with an HDMI connection. Display outpu t is limited to a
external screens at the same time.
► Connect the d
external de
ata cable to the
vice.
► Connect the data cable to the HDMI
port of the docking cradle.
Some LCD televisions have only two speakers/speaker ports and therefore
cannot reproduce Dolby Digital or DTS. To play back H DMI sound, you
must change the HDMI sound settings accordingly.
You can find the settings under Control Panel - Hardware and Sound. Deactivate the
settings for DTS Audio and Dolby Digital to enable playback of HDMI sound.
Fujitsu 63
Page 66

Connecting external devices
External monitor port (VGA) (docking cradle only)
An analog monitor is connected to the analog external monitor port (VGA). Display output
is limited to a maximum of two external screens at the same time.
MonitorVGA portScreenconnectionMonitorconnection
You can also switch back and forth betwee n the external monitor and the LCD
screen of the Tablet PC, see "
Touchscreen", Page 27.
You can display the same image on the external monitor and on the LCD
screen of the Tablet PC at the same time.
► Switch off the Tablet PC and the
external monitor.
► Plug the data cable of the external
monitor into the monitor port.
► First switch on the external monitor and
then switch on the Tablet PC.
64 Fujitsu
Page 67

Connecting external devices
Connecting USB devices
USBports
On the USB ports you can connect external devices that also have a USB port
(e.g. a DVD drive, a printer, a scanner or a m od em).
USB devices are hot-pluggable. This means you can connect and disconnect the
cables of USB devices while the operating system is running.
USB 1.x has a maximum data transfer rate of 12 Mbps.
USB 2.0 has a data transfer rate of up to 480 Mbps.
USB 3.0 has a data transfer rate of up to 5 Gbps.
Additional information can be found in the d ocumentation for the USB devices.
Device driver
USB devices wi
► Connect the data cable
to the
external device.
► Connect the data cable to t he USB
port of the Tablet PC.
or
► Connect the data cable to a USB
port of the cradle.
s
ll be automatically recognized and installed by your operating system.
Fujitsu 65
Page 68

Connecting external devices
USB port with charging function (Anytime USB charge)
USBchargingfunction
It is recommended that the Tablet PC is operated with the power supply connected
whenever the USB port with charging function is in use, as the battery runtime
is reduced if additional USB devices are being charged.
The power supply must already be connected when the Tablet PC is
switched off, as otherwise the USB charging function will not be active and
the connected USB devices will not be charged.
Some USB devices (e.g. mobile phones) need a driver to be able to use the USB
charging function. In this case the USB charging function will not work when th e Tablet
PC is switched off, as no drivers are active when the Tablet PC is switched off.
You can use this
a PDA or a mobile
This is also po
the menu Advan
thereby, the d
How to remo
► Tap the
► Select the device you wish to shut down and remove.
► Tap OK .
Wait for the dialog box which tells you that it is now safe to remove the device.
66 Fujitsu
USB p ort to charge or supply power to a USB device (e.g. to charge
phone or to connect a USB lamp).
ssible even when the Tablet PC is switched off, if in the BIOS-Setup-Utility,in
ced, the function Anytime USB Charge is enabled. If the setting AC is selected
evice will only be charged when the mains adapter is connected.
Calling and
"
Settings i
using the BIOS Setup Utility is described in the section
n BIOS Setup Utility", Page 68.
ve USB devices correctly
Always correctly remove the device according to the rules described below,
to ensure that none of your data is lost.
symbol for safe removal of the hardware.
Page 69

Connecting external devices
Connecting external audio devices
Your Tablet PC has a combined headphone and microphone port, your (optional) docking
cradle has separate ports for headphones and a micro phone.
Connecting headphones or o
ConnectingaudiodevicesAudioconnectionsConnectingheadphones
The combined headphones and microphone port of the Tablet PC or the headphones
port of the docking cradle (optional) allows you to connect output devices, such as
headphones, external speakers, etc., to your Tablet PC.
If you buy a cable from a retailer, please note the following:
The combined headphone an d microphone port on your Tablet PC
isa"3.5mmjacksocket".
If you want to connect headphones or speakers you will need a "3.5 mm jack plug".
Connecting a microphone or other audio input devices
ConnectingaudiodevicesAudioconnectionsConnectingmicrophone
The combine
of the docki
player, MP
d headphones and microphone port of the Tablet PC or the microphone port
ng cradle (optional) allows you to connect an external microphone, a MiniDisc
3 player, CD player or a tape deck to your Tablet PC.
ther audio output devices
► Connect the aud io cable to the
external device.
► Connect the audio cabl
headphones and microp
Tablet PC or to the hea
the docking cradle (
The internal speakers are disabled.
► Connect th
external
► Connect the audio cable to the combined
headphones and microphone port of the
Tablet PC or to the microphone port of
the docking cradle (optional).
e audio cable to the
device.
e to the combined
hone port of the
dphone port of
optional).
Fujitsu 67
Page 70

Settings in BIOS Setup Utility
Settings in BIOS Setup Utility
BIOSSetupUtilitySystemsettings,BIOSSetupUtilityConfiguration,BIOSSetupUtilitySetupConfiguringsystemConfiguringhardware
The BIOS Setup Utility allows you to set the system functions and the hardware
configuration for the Tablet PC.
When the Tablet PC is delivered, the default settings are effective. You can change
these settings in the menus of the BIOS Setup Utility. Any changes you make take
effect as soon as you save and exit the BIOS Setup Utility.
The BIOS Setup Utility program contains the following m enus:
Info
System
Advanced
Security
Boot
Exit
Starting the BIOS Setup Utility
► Keep the Volume Down button pressed and switch on the Tablet PC.
► If a password has been assigned, enter the password and press the Enter key.
To navigate more easily in the BIOS Setup Utility, you can use an external USB keyboard.
Displays information relating to the BIOS, processor and Tablet PC
Advanced system settings
Configuration of various hardware components, such as mouse, keyboard,
processor
Password settings and security functions
Configuration of the start-up sequence
Exits the BIOS Setup Utility
BIOSSetupUtility
If you have forgotten the password, contact your system administrator
or contact our customer service centre.
The BIOS Setup Utility starts.
68 Fujitsu
Page 71

Settings in BIOS Setup Utility
BIOS Setup Utility operation
BIOSSetupUtility
► Use the cursor keys
► Select the option you want to change with the cursor keys
► Press the "Enter" key.
► Press the
► For future reference, make a note of the changes you have made (for example, in this manual).
Press theF1key to display help about operation of the BIOS Setup Utility. The description
of the individual settings is shown in the right-hand window of the BIOS Setup Utility.
With the
F9
key you can load the default settings of the BIOS Setup Utility.
←
→
or
to select the menu you wish to access to make changes.
The menu is displayed on the screen.
↑
or↓.
ESC
key to exit the selected menu.
Fujitsu 69
Page 72

Settings in BIOS Setup Utility
Exiting BIOS Setup Utility
BIOSSetupUtility
You need to select the desired option in the Exit menu and activate it by pressing the Enter key:
Exit Saving Changes - save ch
► To save the current menu settings and exit the BIOS Setup Utility, select Exit Saving Changes andYes.
The Tablet PC is rebooted
and the new settings come into effect.
anges and exit BIOS Setup Utility
Exit Discarding Changes - Reject changes and exit BIOS Setup Utility
► To discard the changes, select Exit Discarding Changes and Yes.
The settings which were valid when BIOS Setup Utility was called remain effective.
The BIOS Setup Utility ends and the Tablet PC is rebooted.
Load Setup Defaul
► To copy the standard entries for all menus of the BIOS Setup Utility,
choose Load Setup Defaults and Yes.
ts – load default values
Discard Changes - Discard Changes without exiting BIOS Setup Utility
► To discard the changes you have made, select Discard Changes and Yes.
The settings in place when BIOS Setup Utility was called remain effective.
You can now make additional settings in the BIOS S etup Utility.
► IfyouwanttoexittheBIOS Setup Utility with these settings, select Exit Saving Changes and Yes.
Save Cha n
ges - save changes without exiting
the BIOS Setup Utility
► To save the changes, select Save Changes and Yes.
The changes are saved. You can now make additional settings in the BIOS Setup Utility.
► If you want to exit BIOS Setup Utility with these s ettings, c hoose Exit Saving Changes and Yes.
Save changes and power off
► To save the changes and switch off your device, select Save Changes and Power Off and Yes.
The changes are saved. Your device is shut down.
70 Fujitsu
Page 73

Troubleshooting and tips
Troubleshooting and tips
TroubleshootingTipsFaultProblemsolving
If a fault occurs, try to co rrect it as described. If you fail to correct the problem, proceed as follows:
► Make a note of the steps and the c ircumst ances that led to the fault. Also
make a note of any error messages displayed.
► Switch the Tablet PC off.
► Please contact the Hotline/Service Desk.
You can contact Fujitsu Service and Support in the following ways:
• Toll free phone: 1-800-8Fujitsu (1-800-838-5487)
• Website: "
Before you place the call, have the following information ready so that the customer
support representative can provide you with the fastest possible solution:
• The model name and se rial number of the Tablet PC. The serial number
is located on a sticker on the underside of the Tablet PC.
• Notes with the mess
informationonaco
• All changes you have made to the hardware or software after receiving the TabletPC.
• All changes you ha
• Your system configura tion and all peripheral devices connected to your system.
• Your sales cont
Our Tablet PCs have been designed primarily with mobile applications in mind.
This means that considerable effort has been made to optimize components and
equipment in terms of weight, space and energy requirements. Depending on the
particular configuration you have purchased, it is possible that functionality may be
slightly reduced compared to a desktop PC if you are running processor-intensive
gaming software, e.g. games with intensive 3D graphics. Updating your hardware with
drivers which have not been approved by Fujitsu may result in performan ce losses,
data losses or malfunction of the equipment. A list of approved drivers and current
BIOS versions can be downloaded from: "
http://solu
tions.us.fujitsu.com/www/content/support/contact/index.php"
ages that appeared on the screen and
ustic signals.
ve made to the BIOS Setup settings after receiving the Tablet PC.
ract.
http://solutions.us.fujitsu.com"
Fujitsu 71
Page 74

Troubleshooting and tips
Executing a reset
If the device no longer responds to your inputs, choose one of the following options:
Forced shutdown
► Press and hold the ON/OFF button for at least 4 seconds.
The device will be s hut down. You can then restart it.
Carry out a system or batt
If the device d oes not resp ond, first try to force the shutdown, as
described in the previous section.
► Disconnect the mains adapter from the device.
On the rear side of the device you can find a small hole.
► Use a small pointed tool with caution to press the reset button below this hole.
The device performs a reset, comparable to removing the battery. You can then restart it.
ery reset
Help if problems occur
Should you encou nter a problem with your computer that you cannot resolve yourself:
► Note the ID nu m ber of your device. The ID number is found on the type rating
plate on the back or underside of the casing.
► For further clarification of the problem, contact the Fujitsu Service Desk. When you do
this, please have ready the ID number and serial number of yo ur system.
Recovering your Factory Image
In the event you need to restore your original Factory Image, please refer to
the appendix of this Operat ing Manual.
The Tab
SummertimeWintertim eIncorrecttimeTimenotcorrectWrongdate/timeDatenotcorrectChargingb ack-upbattery
Cause Troubl
Time a
Date and time are still set incorrectly after
switching on the Tablet PC.
72 Fujitsu
letPC’sdateortimeisincorrect
eshooting
nd date are incorrect.
► With t
► Plea
he BIOS-Setup-Utility, you can set the
nd time in the Main menu.
date a
se contact your sales outlet or our
ine/service desk.
hotl
Page 75

Troubleshooting and tips
Battery charging indicator not
Cause
The battery is not being charge
d.
Troubleshooting
► Connect the Tablet PC to a power outlet
Note: The battery will only be charged again
when the battery capacity is less than 90%.
lit
using the AC adapter.
The Tablet PC’s touchscreen remains dark
Touchsc reendarktouchsc reen
Cause Troubleshooting
Touchscreen is switched
External monitor or t
elevision set connected.
off.
► Press a key (external key
the touchscreen.
► Check whether the graphics driver settings
are correct or whether an external monitor
has been detected in "Intel Graphics Media
Accelerator Driver for mobile".
board) or tap on
The display on the Tablet PC’s touchscreen
is difficult to read.
Touchsc reenTou chscre en
Cause Troubleshooting
Reflected glare ► Move the Tablet PC into a different position.
► Increase the brightness of the screen.
Fujitsu 73
Page 76

Troubleshooting and tips
The external monitor remains bl
Monitor
Cause Troubleshooting
Monitor is switched off. ► Switch the external monitor on.
Power saving has been activated (monitor is
blank).
Brightness is set to dark.
Screen output is set to the Tablet PC
touchscreen.
The external monitor’s AC cable or data cable is
not connected properly.
The external m o
MonitorMonitor
Cause Troubleshooti
The wrong exte
or the wrong sc
the applicat
rnal monitor has been selected
reen resolution has been set for
ion program.
nitor is blank or the image is unstable
► Press a key (external keyboard) or tap on
► Adjust the brightness of the
► Check whether the graphics driver settings
► Switch off the Tablet PC and the external
► Check whether the AC cable is plugged
► Check that the data cable is properly
► Switch on the external monitor and the
► Shut down the application program in
► Set the screen resolution: Set the screen
► Select monitor: Select monitor 1 or 2 as
ank
the touchscreen.
are correct or w hether an external monitor
has been detected in "Intel Graphics Media
Accelerator Driver for mobile".
monitor.
properly into the external monitor and into
the power outlet.
connected to th e Tablet PC and the external
monitor (if it is plugged in with a connector).
Tablet PC.
ng
Windows. If the error persists after shutting
down the program, use the key combination
for switching the screen output in order to
switch to the touchscreen of the Tablet PC.
Change the following setting:
resolution as described in the documentation
foryouroperatingsystem.
described in the documentation for your
operating system.
monitor.
The cursor does not correctly follow the stylus movements
Cause
Stylus incorrectly calibrated. ► Calibrate the stylus as described in chapters
74 Fujitsu
Troubleshooting
"
Adjusting the stylus", Page 33 and
"
Calibrating the stylus", Page 33.
Page 77

Troubleshooting and tips
Stylus input not working
Cause
Incorrect driver inst alled.
Stylus is in sleep mode.
Stylus battery is completely discharged. ► Change the stylus battery as described in
Troubleshooting
► If your device is one which can only be
operated using the stylus, install the driver
for the standard model.
or
► If your device is one which can be
operated using the stylus and by finger,
install the driver for the "Dual Digitizer"
model.
► Press the upper stylus button to wake the
stylus from sleep mode.
chapters "
Page 34 and "Installing the stylus battery",
Page 34.
Removing the stylus battery",
The Tablet PC does not start after switch on
TabletPC
Cause Troubleshooting
The battery is dead.
The AC adapter is not connected properly. ► Check whether the AC adapter is properly
► Charge the battery.
or
► Connect the AC adapter to the Tablet
PC.
connected to the Tablet PC.
► Switch the Tablet PC on.
The Tablet PC stops working
TabletPCEnding
Cause Troubleshooting
The Tablet PC is in energy saving mode.
An application program has caused the
malfunction.
The battery is dead.
Fujitsu 75
► End energy saving mode.
► Close the application program or restart
the Tablet PC (by restarting the operating
system or switching the device off and back
on again).
► Charge the battery.
or
► Connect the AC adapter to the Tablet
PC.
Page 78

Troubleshooting and tips
The printer does not print
Printerdoesnotprint
Cause Troubleshooting
The printer is not switched on. ► Make sure that the printer is sw
The printer is not connecte d c
The printer driver is faulty or not correctly
installed, or it is the wrong printer driver.
orrectly.
on and ready for operation (ref
documentation supplied with t
► Check that the data cable between the Tablet
PC and the printer is properly connected.
► Check that the data cable between the Tablet
PC and the printer is properly connected.
► Check whether the correct printer driver is
loaded (refer to the printer documentation).
itched
er to the
he printer).
The wireless connect
ctiontoanetworkdoesnotw or k
Thewirelessconne
Cause Troubleshooting
The wireless component is switched off. ► Switch the wireless component on (see
The wireless component is switched on. Despite
this, the wireless connection to a network does
not work.
The battery di
Battery
Cause
The battery i
case the batt
You may have an application running that
consumes a great deal of power due to frequent
accessing of the hard disk or optical drive.
The maximum brightness may have been set
for the screen.
s either too hot or too cold. In this
ery indicator flashes.
scharges too quickly
ion to a network does not work
"
Switching the wireless components on and
off", Page 40).
► Check whether the wireless connection is
enabled by the software.
► Further information on using the wireless
component can be found in the help files.
Troubleshooting
► Bring the Tablet PC up/down to a normal
operating temperature again.
► If the operating time of the battery life is
extremely short, the battery is probably too
old. Replace the battery if necessary.
► Use the AC adapter whenever possible.
► Reduce the brightness of the screen to
lower energy consumption: You will find the
setting under Control Panel – Hardware and
Sounds – Windows Mobility Center.
76 Fujitsu
Page 79

Acoustic warning
Acousticwarn ingsErrors
Cause
A beep sounds every few seconds.
The battery is almost dead.
Troubleshooting and tips
Troubleshooting
► Charge the battery.
Fujitsu 77
Page 80

Troubleshooting and tips
Error messages on the screen
ErrormessagesonthescreenErrors
This section describes the error messages generated by the BIOS Setup. Error messages displayed
by the operating system or programs are described in the documentation for these programs.
If the error message appears repeatedly despite troubleshooting measures,
contact the place o f purchase or our customer service center.
78 Fujitsu
Page 81

Error message/cause Troubleshooting
CMOS battery bad
If the error message occurs repeatedly, the
► Contact your sales outlet or our
service center.
buffer battery in the Tablet PC is flat.
System CMOS checksum bad - Default con figuration
used
The system configuration information is
incorrect.
► Switch the Tablet PC off.
► Switch the Tablet PC on.
► In the BIOS Setup, select t
► Select the entry Load Setup Defaults.
► Select OK and press the En
Extended memory failed
zzzz zzzz
When testing the exten
has resulted at the ad
Failure Fixed Disk
The settings of th
Keyboard contro
at offset: xxxx Failing Bits:
ded memory. an error
dress xxxx.
n
e hard disk drive are incorrect.
ller error
► Contact your s ales outlet or our customer
service center.
► Start the BIOS Setup (Primary Master
submenu) and select the correct settings.
► Switch your Tablet PC off with the ON/OFF
button.
► Wait 3 - 5 seconds and switch the Tablet PC
on again.
Keyboard error
If you use an external keyboard:
► Check the connection and reboot the Tablet
PC.
nn Stuck key
Operating system not found
► Make sure that no key is pressed.
► Check in the BIOS Setup whether your hard
disk has been set correctly.
► Make sure t
d on the corresponding drive.
installe
Press <F1> to resume, <F2> to SETUP
This error message appears if an error occurs
during the self-test before starting the operating
system.
Real time clock error
nK Shadow RAM failed at offset: xxxx Failing
nnn
s: zzzz
Bit
System battery is dead - Replace and run SETUP
► Press th
BIOS Set
or
► If you use an external keyboard, press
► Conta
serv
► Contact your s ales outlet or our customer
service center.
► Contact your s ales outlet or our customer
e volume up button to start the
up.
F1orF2
the
ct your sales outlet or our customer
ice center.
service center.
System cache error - Cache disabled
System timer error
ntact your sales outlet or our customer
► Co
ervice center.
s
► Contact your s ales outlet or our customer
service center.
Troubleshooting and tips
customer
he Exit menu.
ter key.
hat the operating system is
key on the keyboard.
Fujitsu 79
Page 82

Technical data
Technical data
Tablet PC
General
Processor
Main memory (SO DIMM) 4 GB / 8 GB DIMM onboard
Electrical data
Safety regulations complied with CE
Protection class II
Maximum power consumption (when the Tablet
PC is switched on, connected to the magnetic
keyboard and the docking cradle, and the
battery is being charged):
Touch screen
Size
Screen resolution 1920 x 1080 / 16 million colors
Pixel class II
Brightness control 12 levels
Technology Wide-View High-Bright Display with LED
Digitizer and glass panel Dual digitizer with touch screen
Cameras
s card
Graphic
Chip Intel® HD Graphics 520 (CPU integrated)
Maximum resolution of external display:
Dimensions
Width x Depth x Height 12.56 x 7.93 x 0.37 inches
ght depending on configuration
Wei
put devices
In
ablet buttons
T
Stylus (optional) Stylus with tw o buttons
Slots
Memory card slot
7.
Generation Intel® Core
65 W
12.5" Full HD Wide View
background lighting
• Front: Full H D
• Rear: 5 megapixel, autofocus
4096 x 2304
319 x 201.3 x 9.5 mm
m 1.71 lbs / 775 g
fro
buttons
3
1xmicroSD
TM
m processor family
Ports
Combined headphones and microphone port
Docking port
80 Fujitsu
3.5mmstereominijack
1 x for magnetic keyboard
1 x for docking cradle
Page 83

Technical data
Mini Display Port 1 x
USB (Universal Serial Bus) 1 x USB 3.0 (Anytime USB Charge)
Ambient conditions
Environment class DIN IEC 72
Mechanism class DIN IEC 721
1
7K1
7M2
Operating temperature 41 °F .... 95 °F / 5 °C .... 35 °C
Transport temperature
(2K2)
5 °F .... 140 °F / –15 °C ..
.. 60 °C
Fujitsu 81
Page 84

Technical data
WLAN specifications
Type of network
Transfer rate (Automatic switching) IEEE802.11 a and g: 54
Active frequency • 802.11n: 2.4 GHz or 5 GHz
Typical operating distances
Number of channels
Security Encryption types: WEP, TKIP, AES, WPA 1.0
um recommended number of com puters
Maxim
connected over wireless LAN (during ad
to be
onnection)
hoc c
Intel® Dual Band Wireless-AC 8265 2x2 ac with
integrated Bluetooth 4.2
Mbps max. data rate; IEEE802.11n: 300 Mbps
max. data rate, IEEE802.11ac: 867 Mbps max.
data rate
• 802.11b/g: 2,400~2,473 MHz
• 802.11a. 4900~5850 MHz
• 802.11ac: 2.4 GHz / 5 GHz
• 802.11a: 40 ft. (12 m) @ 54 Mbps; 300 ft.
(91m)@6Mbps
• 802.11ac: 40 ft. (12 m) @ 54 Mbps; 300 ft.
(91m)@6Mbps
• 802.11b: 100 f t. (30 m) @ 11 Mbps; 300 ft.
(91m)@1Mbps
• 802.11g: 100 ft. (30 m) @ 54 Mbps; 300 ft.
(91m)@1Mbps
• 802.11n: Estimated double the operating
distance of 802.11g and 802.11a in their
respective frequencies
• 802.11a: 8 indepen dent channels
• 802.11b/g: 11 channels, 3 non-o verlapping
channels
• 802.11n: Channel bonding takes two of
the non-overlapping 20MHz channels and
combines it into one 40MHz channel. It is
actually 12 non-overlapping channels with
channel bonding and 24 without. Also it is 1
non-overlapping channel in 2.4GHz when
channel bonding is used.
• 802.11ac: 5 independent channels
and WPA 2.0 compliant
Encryption key, lengths supported: 64 bits and
128 bits
10 units or less
82 Fujitsu
Page 85

Screen resolutions for integrated screen and external screens
Port on
the Tablet
PC Portsonthedockingcradle
Mini
DisplayPort HDMI
4096x2304
@60Hz
4096x2160
@24Hz
3840x2160
-
--
---
4096x2304
@60Hz
4096x230
@60Hz
4096x23
@60Hz
-
-
--
@30Hz
1920x1080
@60Hz
4096x2160
@24Hz
3840x2160
@30Hz
1920x1080
@60Hz
4
04
1920x1
@60Hz
1920x
@60H
Display
Port VGA
---
4096x2304
4096x216
-
-080
1920x1
1080
z
192
Only
Tablet PC
Tablet
PC and
docking
cradle
Max.
number
of
screens
Number
of
external
screens
21
21
32
Integrated
screen
1920x1080
@60Hz
Technical data
--
1920x1200
@60Hz
0
1920x10
@60Hz
1920x
@60H
192
@60
-
-
1080
z
0x1080
Hz
@60Hz
--
@24Hz
080
@60Hz
-
0x1080
Hz
@60
80
Fujitsu 83
Page 86

Technical data
Rechargeable battery
For information on the batteries used in your device, please see
"
http://solutions.us.fujitsu.com/www/content/support/contact/index.php".
4-cell lithium ion rechargeable battery 4200
Rated voltage 7.8 V
Rated capacity 34 Wh
AC adapter 65 W for the Tablet PC and the docking cradle
Technicaldata
Rated voltage 19 Volts
Max. rated cu rrent 3.42 A
An additional AC adapter or AC cable can be ordered at any time.
Docking cradle (o
Electrical data
Safety regulat
Protection cla
Ports
Headphone po
Microphone
Docking po
Display P
HDMI por
VGA monitor port
USB (Universal Serial Bu s) 2 x USB 3.0
LAN port 1 x
rity Lock device
Secu
ent con ditions
Ambi
Environment class DIN IEC 721
Mechanism class DIN IEC 721
erating temperature
Op
emperature in transit
T
ions complied with
ss
rt
port
rt
ort
t
ptional)
CE
III
3.5 mm stereo
3.5 mm stere
50-pin
1x
1x
1x
1x
7K1
7M2
°F .... 95 °F / 5 °C .... 35 °C
41
5 °F .... 140 °F / –15 °C .... 6 0 °C
mini jack
ominijack
84 Fujitsu
Page 87

Magnetic keyboard (optional)
Electrical data
Safety regulations complied with CE
Protection class III
Ports
Docking port 6-pin
Ambient conditions
Environment class DIN IEC 721
Mechanism class DIN I
Operating temperature 41 °F .... 95 °F / 5 °C .... 35 °C
Temperature in transit
EC 721
7K1
7M2
5 °F .... 140 °F / –15 °C .... 60 °C
Technical data
Fujitsu 85
Page 88

Manufacturer’s notes
Manufacturer’s notes
Disposal and recycling
Notes
You can find information on this subject on your notebook or on our website
("
http://solutions.us.fujitsu.com/www/content/products/trade-in_program/").
Recycling your battery
Over time, the batteries that run your mobile computer will begin to hold a charge for a
shorter amount of time; this is a natural occurrence for all batteries. When this occurs,
you may want to re place the battery with a fresh one*. If you replace it, it is important
that you dispose of the old battery properly because batteries contain materials that
could cause environmental damage if disposed of improperly.
Fujitsu is very concerned with environ m ental protection, and has enlisted the services of the
Rechargeable Battery Recycling Corporation (RBRC)**, a nonprofit public service orga nization
dedicated to protecting our environment by recycling old batteries at no cost to you.
RBRC has drop-off points at tens of thousands of locations throughout the United States and
Canada. To find the location nearest you, go to "
If there are no convenient RBRC locations near you, you can also go to the EIA Consumer
Education Initiative website "
Remember – pro tecting the environment is a cooperative effort, and we must
make every effort to protect it for current and future generations.
* To order a new battery for your Fujitsu mobile computer, go to the Fujitsu shopping site
at "
www.shopfujitsu.com" in the US or "www.fujitsu.ca/products/notebooks" in Canada.
** RBRC is an independent third party to which Fujitsu provides funding for
battery recycling; RBRC is in no way affiliated with Fujitsu.
http://EIAE.org/ " and search for a convenient disposal location.
www.RBRC.org" or call 1-800-822-8837.
DOC (Indus
STRYCANADA)NOTICES
DOC(INDU
Radios and Television
This Class B digital apparatus meets all requirements of Canadian Interference-Causing Equipment
Regulations.
CET appareil numérique de la class B respecte toutes les exigence du Réglement
sur le matérial brouilleur du Canada.
86 Fujitsu
try CANADA) Notices
Page 89

Manufacturer’s notes
UL Notice
IMPORTANT SAFETY INSTRUCTIONS
This unit requires an AC adapter to operate. Only use UL Listed I.T.E. adapters with an output rating
of 19 VDC, with a minimum current of 3 .42 A (65 W). The correct output rating is indicated on the
AC adapter label. Refer to the illustration below for the correct AC Adapter output po larity:
When using your tablet PC equipment, basic safety precautions should always be followed to
reduce the risk of fire, electric shock and injury to persons, including the following:
• Do not use this product near water, for example near a bathtub, washbowl, kitchen
sink or laundry tub, in a wet basement or near a swimming pool.
• Use only the power cord and batteries indicated in this manual. Do not dispose of batteries in a
fire. They may explode. Check with local codes for possible special disposal instructions.
SAVE THESE INSTRUCTIONS
For Authorized Repair Technicians Only
CAUTION:
For continued protection against risk of fire, replace only with the
same type and rating fuse.
WARNING:
Danger of explosion if Lithium (CMOS) battery is incorrectly replaced. Replace only
with the same or equivalent type recommended by the manufacturer.
Dispose of used batteries according to the manufacturer’s instruction.
Fujitsu 87
Page 90

Manufacturer’s notes
ENERGY STAR Compliance
Your Fujitsu system is an ENERGY STAR qualified mob ile PC. By
choosing a computer with the latest ene rgy-saving technology, you’re
helping to preserve our environment for future generations. ENERGY
STAR is a joint program of the U.S. Environmental Protection Agency,
U.S. Department of Energy, Natural Resources Canada, and other
governments around the world helping us save money while protecting
the environment through energy efficient products and practices. With
energy costs and global warming top-of-mind for consumers, Fujitsu is
committed to offering solutions that help consumers conserve energy
and improve the quality of our environment.
Sleep mode:
You will notice that your computer is initially set so that the display turns off after 10 minutes of
user inactivity, and the computer goes into Sleep mode after 20 minutes of user inactivity. When
going into Sleep mode, the computer also reduces the speed of any active Ethernet network
links. To “wake” the computer from Sleep mode, pre ss the Suspend/Resume Button.
Energy saving benefits:
Fujitsu ENERGY STAR qualified mobile PCs use about half as much electricity as standard
equipment – saving half in utility costs. But more than that, ENERGY STAR also makes a difference
for the environment. Did you know that the average house can be responsible for twice the
greenhouse gas emissions as the average ca r? Tha t’s because every time you flip on a light
switch, run your dishwasher, or turn on your PC, you use energy, which means more greenho use
gas emissions from power plants. So the more energy we can save through energy efficiency,
the more we help to reduce greenhouse gases and the risks of global warming.
To learn more about the important ENERGY STAR program, visit:"
To read about how Fujitsu is supporting Sustainable Management along with
several other environmental activities, visit the Fujitsu Corporate Citizenship page at:
"
http://www.computers.us.fujitsu.com/www/content/aboutus/environmental/environment.php".
www.energystar.gov".
88 Fujitsu
Page 91

Declarations of conformity
Declarations of conformity
Declarationsofconformity
This device complies with Part 15 of the FCC Rules. Operations are subject to the following two
conditions: (1) This device may not cause harmful interference, (2) this device must accept any
interference received, including interferen ce that may cause undesired operation.
Fujitsu 89
Page 92

FCC Regulatory Information
FCC Regulatory Information
Please note the following regulatory information related to the wireless LAN
device.
You are cautioned that changes or modifications not expressly approved by the
part responsible for compliance could void the user’s authority to operate the
equipment.FCC RF R adiation Exposure Statement:
1. This Transmitter must not be co-located or operating in conjunction with any
other antenna or transmitter.
2. This equipment complies with FCC RF radiation exposure limits set forth for
an uncontrolled environment.
This equipment should be installed and operated with a minimum distance of 20
centimeters between the radiator and your body. For body wo rn operation, this
tablet has been tested and meets FCC RF exposure guidelines when used with
an accessory that contains no me tal and that positions the handset a minimum of
0 mm from the body.
Use of other accessories may not en sure compliance with FCC RF exposure
guidelines. This device complies with Part 15 of the FCC Rules. Operation is
subject to the following two conditions:
1. this device may not cause harmful interference and
2. this device must accept any interference received, including interference that
may cause undesired operation of the device.
The highest FCC SAR values: 1.163 W/Kg (Body)
Regulatory N
otes and Statements
Wireless LAN, Health and Authorization for use
Radio freque ncy electromagnetic energy is emitted from Wireless LAN devices. The energy levels of
these emissions, however, are far much less than the electromagnetic energy emissions from wireless
devices such as mobile phones. Wireless LAN devices are safe for use by consumers because they
operate within the guidelines found in radio frequency safety standards and recommendations. The
use of Wireless LAN devices may be restricted in some situations or environments, such as:
• On board an airplane, or
• In an explosive environment, or
• In situations where the interference risk to other devices or services is
perceived or identified as harmful.
In cases in which the policy regard ing use of Wireless LAN devices in specific environments is
not clear (e.g., airports, hospitals, chemical/oil/gas industrial plants, private buildings), obtain
authorization to use these devices prior to operating the equipment.
90 Fujitsu
Page 93

FCC Regulatory Information
Regulatory Information/Disclaimers
Installation and use of this Wireless L AN device must be in strict accordance with the instructions
included in the user documentation provided with the product. Any changes or modifications made
to this device that are not expressly approved by the manufacturer may void the u ser’s authority to
operate the equipment. The manufacturer is not responsible for any radio or television interference
caused by unauthorized modification of this device, or the substitution or attachment of connecting
cables and equipment other than those specified by the manufacturer. It is the responsibility of the
user to correct any interference caused by such unauthorized modification, substitution or attachment.
The manufacturer and its authorized resellers or distributors will assume no liability for any damage
or violation of government regulations arising from failure to comply with these guidelines.
This device must not be co-located or operated in conjunction with any other antenna or transmitter.
For IEEE 802.11a Wireless LAN: For operation within 5.15~5.25 GHz frequency range, it is
restricted to indoor environments, and the antenna of this device must be integral.
Federal Communications Commission and Industry Canada statement:
This device complies with Part 15 of FCC Rules.
Operation is subject to the following two conditions: (1) This device may not cause
interference, and, (2) This device must accept any interference, including interference
that may cause undesired operation of this device.
FCC Interference Statement
This equipment has been tested and found to comply with the limits for a Class B digital
device, pursuant to Part 15 of the FCC Rules. These limits are designed to provide reasonable
protection against harmful interference in a residential installation. This equipment generates,
uses, and can radiate radio frequency energy. I f not installed and used in accordance with
the instructions, it may cause harmful interference to radio communications. However, there
is no guarantee that interference will not occur in a particular installation.
If this equipment does cause harmful interference to radio or television reception, which
can be determined by turning the equipment off and on, the user is encouraged to try and
correct the interference by one or more of the following measures:
1. Reorient or relocate the receiving antenna.
2. Increase the distance between the equipment and the receiver.
3. Connect the equipment to an outlet on a circuit different from the one the receiver is connected to.
4. Consult the dealer or an experienced radio/TV technician for help.
Fujitsu 91
Page 94

FCC Regulatory Information
FCC Radio Frequency Exposure statement
The available scientific evidence does not show that any health problems are associated with
using low power wireless devices. There is no proof, however, that these lo w power wireless
devices are absolutely safe. Low power wireless devices emit low levels of radio frequency
energy (RF) in the microwave range while being used. Whereas high levels of RF can produce
health effects (by heating tissue), exposure to low-level RF that does not produce heating
effects causes no known adverse health effects. Many studies of low-level RF exposure have
not found any biological effects. Some studies have suggested that some biological effects
might occur, but such findings have not been confirme d by additional research.
The wireless LAN radio device has bee n tested and found to comply with FCC radiation
exposure limits set forth for an uncontrolled equipment and meets the FCC radio frequency
(RF) Exposure Guidelines in Supplement C to OET65.
The exposure standard for wireless devices employs a unit of measurement known as the
Specific Absorption Rate, or SAR. The SAR limit set by the FCC is 1.6W/kg.
This device is compliant with SAR for general population /uncontrolled exposure limits in ANSI/IEEE
C95.1-1992, and had been te sted in accordance with the measurement methods and procedures
specified in OET Bulletin 65 Supp lement C. This device has been tested, and meets the F CC,
IC RF exposure guidelines when tested with the device operating conditions.
Export restrictions
This product or so
from the US or Ca
This device com
Operation is su
interference
that may cause
America, Inc.
The highest F
ftware contains encryption code which may not be exported or transferred
nada without an approved US Department of Commerce export license.
plies with Part 15 of FCC Rules, as well as ICES 003 B / NMB 003 B.
bject to the following two conditions: (1) this device may not cause harmful
, and (2) this device must accept any interference received, including interference
undesirable operation. Modifications not expressly authorized by F ujitsu
may invalidate the user’s right to operate this equipment.
CC SAR value is 1.163 W/Kg (Body SAR).
Restrictions concernant l’exportation
Ce produit ou logiciel contient du code de chiffrement qui ne peut être exporté ou transféré du
Canada ou des États-Unis sans un permis d’exportation du département du commerce des
États-Unis. Ce matériel est conforme à la Partie 15 des règlements de la FCC, ainsi qu’à la
norme ICES 003 B/NMB 003 B. Son fonctionnement est soumis aux deux conditions suivantes
: (1) cet appareil ne doit pas causer d’interférence nuisible; (2) cet appareil doit accepter
toutes les interférences reçues, y compris celles pouvant causer un mauvais fonctionnement
de l’appareil. Toute modification n’ayant pas été expressément approuvée par la société Fujitsu
America Incorporated peut annuler le droit de l’utilisateur de se servir du matériel.
La valeur FCC SAR la plus élevée est de 1,163 W / Kg (SAR Body).
92 Fujitsu
Page 95

Canada, Industry Canada (IC)
Canada, Industry Canada (IC)
This Class B digital apparatus complies with Canadian ICES-003 and RSS-247. This device
complies with Industry Canada licence-exempt RSS stand ard(s).
Operation is subject to the following two conditions:
1. This device may not cause interference, and
2. This device must accept any interference, including interference that may
cause undesired operation of the device.
IC RF Radiation Exposure Statement:
For body worn operation, this device ha s been tested and meets RF exposure guidelines when used
with an accessory that contains no metal and that positions the device a minimum of 0 mm from the
body. Use of other accessories may not ensure compliance with RF exposure guidelines.
Cet appareil numérique de classe B est conforme à la norme NMB-003 et
RSS-247. Le présent appareil est conforme aux CNR d’Industrie Canada applicables
aux appareils radio exempts de licence.
L’exploitation est autorisée aux deux conditions suivantes:
1. l’appareil ne doit pas produire de brouillage, et
2. l’utilisateur de l’appareil doit accepter tout brouillage radioélectrique subi, même si le
brouillage est susceptible d’en compromettre le fonctionnement.
Déclaration de l’exposition au x radiations RF:
Pour le fonctionnement du corps, ce téléphone a été testé et répond aux directives
d’exposition RF lorsqu’il est utilisé avec un accessoire qui ne contient pas de métal et
qui place le combiné d’un minimum de 0 mm du corps. Utilisation d’autres accessoires
peut ne pas assurer le respect des directives d’exposition RF.
Canadian N
The device for the 5150 - 5250 MHz band is only for indoor usage to reduce the potential
for harmful interference to co-channel mobile satellite systems.
The maximum antenna gain of 6 dBi permitted (for devices in the 5250 - 5350 MHz, 5470 - 5725
MHz and 5725 - 5825 MHz bands) to comply with the e.i.r.p. limit as stated in RSS-247.
In addition, users are cautioned to take note t hat high power radars are allocated as primary
users (meaning they have priority) of 5250 - 5350 MHz and 5650 - 5850 MHz and these
radars could cause interference and/or damage to LE-LAN devices.
Fujitsu 93
otice
Page 96

Canada, Industry Canada (IC)
Avis pour le Canada
Le matériel destiné à un usage sur la bande 5 150 - 5 250 MHz doit être utilisé
uniquement à l’intérieur afin de réduire les risques de brouillage nuisible causé aux
systèmes mobiles par satellite fonctionnant sur un même canal.
Un gain d’antenne de 6 dBi est auto risé (pour le matériel utilisant les bandes 5 250 - 5 350
MHz, 5 470 - 5 7 25 MHz et 5 725 - 5 825 MHz), conformément à la limite p.i.r.e. maximale
permise selon l’annexe A9.2 afférent aux périphériques RSS-247.
En outre, les utilisateurs doivent prendre garde au fait que les radars de grande puissance
sont considérés comme des utilisateurs principaux (ce qui signifie qu’ils sont prioritaires) des
bandes 5 250 - 5 350 MHz et 5 650 - 5 850 MHz et qu’ils pourraient causer des interférences
et/ou des dommages aux appareils de réseau exempts de licence.
94 Fujitsu
Page 97

Appendix
Appendix
Before Using the Optional Wireless LAN
This manual describes the procedures required to properly set up and configure the optional
integrated Wireless LAN Mini-PCI device ( referred to as "WLAN device" in the rest of the
manual). Before using the WLAN device, read th is manual carefully to ensure its correct
operation. Keep this manual in a safe place for future reference.
Wireless LAN Devices Covered by this Document
This document is applicable to systems containing the following device:
•
Intel® Dual Band Wireless-AC 8265 2x2 ac with integrated Bluetooth 4.0
Characteristics of the WLAN Device
• The WLAN devices are PCI Express Minicardsattachedtothemainboardofthemobilecomputer.
• The WLAN devices operate in license-free RF bands, eliminating the need to procure
an FCC operating license. The WLAN operates in the 2.4GHz Industrial, Scientific,
and Medical (ISM) RF band and the lower, middle, and upper bands of the 5GHz
Unlicensed National Information Infrastructure (UNII) bands.
• The WLAN devices are capab le of five operating modes, IEEE802.11a, IEEE802.11ac,
IEEE802.11b, IEEE802.11g, and IEEE802.11n.
• The WLAN device is Wi-Fi certified and operates (as applicable) at a the maximum
data rate of 450 Mbps in IEEE802.11n mode (300 Mbps in this configuration); 54 Mbps
in IEEE802.11g mode; and 11 Mbps in IEEE802.11b mode.
• The WLAN devices support the following encryption methods - WEP,
TKIP, CKIP, and AES encryption.
• The Wireless LAN devices are compliant with the following standards: WPA,
WPA2, CCX1.0, CCX2.0, CCX3.0, and C CX4.0.
Fujitsu 95
Page 98

Appendix
Wireless LAN Modes Using this Device
Ad Hoc Mode
"Ad Hoc Mode" refers to a wireless network architecture where wireless network connectivity
between multiple computers is established without a central wireless network device, typically
known as Access Point(s). Connectivity is accomplished using only client devices in a peer-to-peer
fashion. That is why Ad Hoc networks are a lso known as peer-to-peer networks. Ad Hoc
networks are an easy and inexpensive method for establishing network connectivity between
multiple computers. Ad Hoc mode requires that the SSID, network authent ication, and encryption
key settings are identically configured on all computers in the Ad Hoc network.
96 Fujitsu
Page 99

Appendix
Access Point (Infrastructure) Mode
Infrastructure mode refers to a wireless network architecture in which devices communicate with
wireless or wired network devices by communica ting through an Access Point. In infrastructure
mode, wireless devices can communicate with eac h other or with a wired network. Corporate
wireless networks operate in infrastructure mode because they require access to the WLAN in
order to access services, devices, and computers (e.g., file servers, printers, databases).
**
*
* = An optiona
be require
of access p
Fujitsu 97
l hub for a wired LAN may
d depending upon the type
oint used.
** = A DSL modem
, cable modem, or similar
Page 100

Appendix
How to Handle This Device
The WLAN device is an optional device that may come pre-installed in your mobile computer. Under
normal circumstances, it should not be necessary for you to remove or re-install it. The Operating
System that your mo bile computer comes with has been pre-configured to support the WLAN device.
• Integrated Intel Centrino wireless LAN devices s upport IEEE802.11a, IEEE802.11b,
IEEE802.11ac, IEEE802.11g, and IEEE802.11n.
• The WLAN device operates in the 2.4 GHz ISM band and the 5 GHz
lower, middle, and upper UNII bands.
• Microwave ovens may interfere with the operation of WLAN devices since they operate in the
same 2.4 G Hz frequency range as IEEE802.11b/g/n devices. Interference by microwaves
does not occur with IEEE802.11a ra dio which operates in the 5 GHz RF band.
• Wireless devices that transmit in the 2.4 GH z range may interfere with operation of WLAN
devices in IEEE802.11b/g/n modes. Symptoms of interference include reduced throughput,
intermittent disconnects, and many frame errors. It is HIGHLY recommended that these
interfering devices be powered off to ensure proper operation of the WLAN device.
Deactivating/Disconnecting the WLAN Device
Disconnecting the
life) or where cer
WLAN device can be
(Note that discon
continues to tra
The radio compo
► To switch radi
PC settings – W
WLAN device may be desired in certain circumstances (to extend battery
tain environments require it (i.e. hospitals, clinics, airplanes, etc.). The
disconnected in Windows using the WLAN icon in the system tray
necting via the icon in the system tray does not turn off the radio; it
nsmit and receive even though it’s not connected.)
nents areswitched on and offusingtheappropriatefunctionsoftheoperatingsystem.
o components on and off individually, select Settings – Change
ireless – Wireless devices – Off.
Configuring the Wireless LAN
The opt ional WLAN device can be configured to establish wireless network connectivity
using the software that is built into Windows. Support for most industry standard
security solutions is contained in this software.
Pre-defined parameters will be required for this procedure. Please consult with
your network administrator for these parameters:
Connection to the network
After you have configured your computer, you can connect to an active network
by performing the following steps:
1. Click on the WLAN icon in the system tray.
2. Select Connect to a n etwork.
3. Select a network from the list that appears, and click the Connect button.
98 Fujitsu
 Loading...