

Page 1

answers
Pocket LOOX 610
English
2
EasyGuide
Page 2

Are there ...
... any technical problems or other questions which you would like to be clarified?
Please contact:
• your sales partner
• your sales outlet
Further information can be found in the "Safety and Ergonomics" and "Warranty" manuals.
The latest information on our produc t s, tips, updates, etc., can be found on the internet under:
http://www.fujitsu-siemens.com
Page 3

Page 4

Published by
Fujitsu Siemens Computers GmbH
Order No.:
A26391-K139-Z120-1-7619
Printed in the Federal Republic of Germany
AG 0803 08/03
Page 5

g
May I introduce myself?
Pocket LOOX 610
Technical data
Information before you
start
Index
Software overview
Operating pocket LOOX
610
Pocket LOOX 610 in
mobile use
FSC SpeedMenu
Confi
uring Pocket LOOX
610
August 2003 edition
Connecting and
networking Pocket LOOX
610 with other devices
Accessories and
additional components
Troubleshooting and tips
Page 6

Adobe and Acrobat are trademarks of Adobe systems Incorporated and may be protected in
certain countries.
Intel is a registered tradem ark, XScale is trademark of Intel Corporation, USA.
Microsoft, MS, Microsoft Pocket PC 2003 and Microsoft Windows for Pocket PC are
registered trademarks of Mi crosoft Corporation.
The BLUETOOTH trademarks are the property of BLUETOOTH SIG, Inc., U.S.A. licensed
for Fujitsu Siemens Comput ers GmbH.
All other trademarks referenced are trademarks or registered trademarks of their respective
owners, whose protected rights are acknowledged.
Copyright Fujitsu Si em ens Computers GmbH 2003
All rights, includi ng ri ghts of translation, reproduc t i on by printing, copying or sim i l ar methods,
in part or in whole, are reserved.
Offenders will be liable for damages.
All rights, including rights creat ed by patent grant or registration of a utilit y model or design,
are reserved.
Delivery subject to availability. Right of technical modification reserved.
Page 7

Contents
May I introduce myself? ..................................................................................................................1
Information before you start...........................................................................................................3
To make things clear.........................................................................................................................3
Important notes..................................................................................................................................4
Safety notes ..............................................................................................................................4
Energy saving............................................................................................................................5
Disposal and recycling...............................................................................................................5
CE markings..............................................................................................................................5
Battery storage..........................................................................................................................6
Cleaning Pocket LOOX 610.......................................................................................................6
Software overview...........................................................................................................................7
Operating pocket LOOX 610 ...........................................................................................................9
Overview of operating elements and connections............................................................................10
Initial start-up...................................................................................................................................11
Removing stylus from Pocket PC ............................................................................................ 12
Actuate full reset switch...........................................................................................................12
Installing the battery.................................................................................................................13
Connecting the power adapter.................................................................................................14
Starting Pocket LOOX 610 the first time..................................................................................15
Switching Pocket PC off and on.......................................................................................................16
Switch on and off in Suspend mode.........................................................................................16
Switching on and off with soft reset (warm boot)......................................................................17
Switching on and off with Full Reset switch.............................................................................17
Using standard operating elements .................................................................................................21
Using stylus.............................................................................................................................21
Using navigation key................................................................................................................21
Using the arrow keys...............................................................................................................22
Using the application buttons...................................................................................................23
Adjusting display lighting .................................................................................................................23
Making sound recordings.................................................................................................................24
Using the cradle...............................................................................................................................25
Selecting location for cradle.....................................................................................................25
Adjusting the locking catch......................................................................................................26
Charging battery in cradle........................................................................................................27
Using cradle for data synchronisation......................................................................................27
Synchronising data with ActiveSync................................................................................................28
Installing ActiveSync................................................................................................................28
Connecting Pocket PC directly to ActiveSync cable ................................................................28
Establishing an ActiveSync partnership...................................................................................28
Backing up data with FSC Backup...................................................................................................29
Backup....................................................................................................................................29
Restoring.................................................................................................................................30
Panning instead of scrolling with FSC Panning................................................................................30
Inserting and removing expansion cards..........................................................................................31
Inserting CompactFlash expansion card..................................................................................31
Inserting SD/MMC expansion card ..........................................................................................33
Removing CompactFlash expansion card................................................................................34
Removing SD/MMC expansion card........................................................................................35
A26391-K139-Z120-1-7619
Page 8

Contents
Pocket LOOX 610 in mobile use...................................................................................................37
Using battery................................................................................................................................... 37
Charging the battery................................................................................................................ 37
Optimising battery performance..............................................................................................38
Checking battery charge level................................................................................................. 38
Information on transport and travelling............................................................................................ 39
Transporting Pocket LOOX 610..............................................................................................39
Information on travelling.......................................................................................................... 39
FSC SpeedMenu - Operating pocket LOOX 610 quickly with one hand................................... 41
Operating FSC SpeedMenu............................................................................................................41
Programme structure ...................................................................................................................... 42
Main and quick menu..............................................................................................................42
Editing FSC SpeedMenu................................................................................................................. 44
Tips and tricks................................................................................................................................. 45
Configuring Pocket LOOX 610.....................................................................................................47
Optimising energy management...................................................................................................... 47
General information on energy management........................................................................... 47
Displaying battery status......................................................................................................... 47
Using energy-saving functions ................................................................................................ 48
Configuring hardware buttons ......................................................................................................... 50
FSC KeyLock: preventing switch-on via application buttons.................................................... 50
Assigning chosen functions to the hardware buttons............................................................... 50
Adjusting menus ............................................................................................................................. 51
Using security functions..................................................................................................................51
Password protection under Pocket PC 2003...........................................................................51
Changing time .................................................................................................................. ............... 52
Using alarm functions...................................................................................................................... 53
Connecting and networking Pocket LOOX 610 with other devices........................................... 55
Safety precautions when using radio components .......................................................................... 55
Wireless data transfer with infrared interface...................................................................................56
Wireless communication with BLUETOOTH (optional) .................................................................... 56
Selecting location for BLUETOOTH operation......................................................................... 57
Activating and deactivating BLUETOOTH...............................................................................57
Wireless connection via Wireless LAN (optional) ............................................................................ 57
Accessories and additional components.................................................................................... 59
Troubleshooting and tips............................................................................................................. 61
Installing new software............................................................................................................ 61
Date or time of the Pocket PC is incorrect...............................................................................61
The display of the Pocket PC remains dark............................................................................. 61
The information on the display of the Pocket PC is difficult to read......................................... 61
The Pocket PC switches off .................................................................................................... 62
The Pocket PC does not start after switch on.......................................................................... 62
The Pocket PC stops working.................................................................................................63
The battery discharges too quickly.......................................................................................... 66
The Suspend button does not respond properly...................................................................... 67
No sound or minimal volume................................................................................................... 67
Contact with hotline/help desk................................................................................................. 67
A26391-K139-Z120-1-7619
Page 9

Contents
Technical data................................................................................................................................69
Pocket LOOX 610............................................................................................................................69
Battery.............................................................................................................................................70
Power adapter.................................................................................................................................70
Index...............................................................................................................................................71
A26391-K139-Z120-1-7619
Page 10

Page 11

May I introduce myself?
My name is Pocket LOOX 610. I am part of the Pock et PC family, also call ed handhel ds.
I'm sure you've already noticed that I'm flat , handy and light-weight. Now I'd l i ke to draw your
attention to my extensive, diverse capabilities.
I am equipped with the Offic e appl i cations MS-Word, Excel and Outlook - naturally all in the Pocket
version. In Outlook you can not only receive and send e-mails, you can also manage your
appointments and let me remind y our of the things you have to do. Of course, you can also enter
your address list in me so that you can access names (e-mail) addresses and tel ephone num bers
when you're on the go. You can enter notes in me in writing or verbally as wi th a dictaphone.
Memory cards, which y ou can buy in various sizes, ensure that I can also rel i abl y hold and retain
large amounts of data.
In the office you can t hen effortlessly trans fer all your data and newly created doc um ents to your
notebook or PC. To do this, jus t insert me in my cradle, i nstall ActiveSync on your PC and you're
ready to synchronise y our dat a. In addition, a short st ay in the cradle also gives m e new power, as
my battery will be charged while I'm there. If you don't have your cradle at hand, for example in a
hotel room, it doesn't matter. You can synchronise your data using the Acti veSync cable via the
infrared interface or with BLUE TOOTH, and you can charge my battery wi t h the power adapter.
And since life isn't all work and no play, I offer you additional functions as well. You can read your
favourite book quite comfortably on my display or use me as an MP3 player. Insert the memory card
of your digital camera in the suitable card slot and you c an view the photos you just t ook on my
display.
Have you already noticed that I provide you with two slots? You can use different cards at the same
time. And how about the combination memory card and GSM/GPRS Com pactFlash card? Or you
can combine two memory cards for maximum memory capacity.
With BLUETOOTH, the infrared interface and the integrated Wireless LA N (dependi ng on the
model), you can also connec t to other devices in your of fice and on the go without bothersome
cables. For example, thanks to BLUETOOTH you can tak e m e i nt o the Internet without cables wi t h
your BLUETOOTH-capable cell phone. Nat ural l y, I also have the Pocket Internet Explorer ready for
you. With it you can v i sit both websites and WAP sites.
Incidentally, if you install a GSM/GPRS Com pactFlash card in me I am c om pl etely autonomous
when it comes to Internet and dat a connections: send your emai l s, carry out research in t he net or
synchronise your data (e. g. via XTND Connect), regardless of where you are at the moment.
For long hours far from a power connection and cradle, I can warmly recomm end the Main Battery
XL (also available as an accessory). In conjunc t i on with the Main Battery XL, I can offer you up to
24 hours of battery runtime, depending on your preferred applications.
A26391-K139-Z120-1-7619 1
Page 12

May I introduce myself?
But whether with or without access ories, you'll notice I'm fully willing and able to help you in a wide
variety of situati ons. Thanks to the FSC SpeedMenu and the corres pondi ng keys you can also operate
me with one hand. Test my diversity! - This manual will help you do that!
The following documentation contains additional information on your Pocket PC and the Pocket PC
2003 operating system:
• in the manuals "Safety and Ergonomics" and “Warranty"
• in the "Getting Started" manual
• in the help on your Pocket LOOX .
2 A26391-K139-Z120-1-7619
Page 13

Information before you start
To make things clear
The following symbols are us ed i n t hi s manual:
Pay particular attention to texts marked with this symbol. Failure to observe
!
i
this warning may endanger your lif e, destroy the system, or lead to loss of
data. Failure to follow the ins tructions may lead to loss of data, invalidate
your warranty, destroy t he P ocket PC, or endanger your life.
Indicates important i nformation which is required to us e the system
properly.
Ê Text which follows thi s symbol describes activities that m ust be performed
This font indicates screen output s.
This font indicates programme names, commands, or menu items.
"Quotation marks" indicate names of chapters, data carriers, and terms that are being
in the order shown.
emphasised.
A26391-K139-Z120-1-7619 3
Page 14

Information before you start
Important notes
This chapter contains information on the proper, safe use of your Pocket PC. Please be sure
to observe the following safety precautions to prevent damage to your device, data loss or
damage to your health. The information on saving energy , charging the battery and cleaning
your Pocket PC are very important for proper operation of the Pocket LOOX 610. To
protect the environment, we urgently ask that you observe the disposal and recycling
information.
Keep this operating manual together with the device. If you pass on the device to a third
party, please also pass on the operating manual.
Safety notes
Pay attention to the information provided in the "Safety and Ergonomics" and
!
l The Pocket LOOX 610 is a technical device that contains small parts. Therefore,
l When setting up and before operating the device, observe the information on the
l You may only operate the Pocket LOOX 610 with a power adapter if the nominal
l When transporting and during trips, observe the safety precautions in the "Pocket
This Pocket PC complies with the relevant safety regulations for data processing equipment.
If you have questions as to whether you can set up the cradle and the Pocket PC in the
intended environment, please contact your sales point or our hotline/help desk.
FCC 15.21 notes
This manufacture is not responsible for any radio or TV interference caused by
unauthorized modification to this equipment. Such modification could void the user’s
authority to operate the equipment.
"Warranty" manuals and in the following security notes.
Observe the sections in the manual marked with the symbol on the left.
please keep your Pocket PC out of reach of children under 36 months of age.
environmental conditions in the "Operating pocket LOOX 610“ and "Technical
data“ chapters, as well as the safety precautions in the "Safety and Ergonomics“ and
"Warranty" manuals.
voltage of the power adapter (100 V to 240 V) matches the local mains voltage.
LOOX 610 in mobile use“ chapter.
4 A26391-K139-Z120-1-7619
Page 15

Information before you start
Energy saving
Switch off your Poc ket PC with the Suspend key when you don't need it. In the Sy stem settings you
can specify after how m any minutes the Pocket PC switches off when it is not used (see the
"Configuring Pocket LOOX 610" chapter).
While you are working, and if the ambi ent light conditions permit, you can reduce the display
brightness or even switc h of f the display lighting completely. The Pocket LOOX 610 i s equipped with
a transflective display that reflects i ncident light and enables you to work even under unfavourable
lighting conditions.
You can also specify the switching off and on again of t he di splay lighting in the system settings of
your Pocket PC (see the " Conf i guri ng Pocket LOOX 610" chapter).
If you use the energy sav i ng functions, you can work wi th the Pocket PC longer before hav i ng to
recharge the battery. We partic ul arl y recommend that you reduce the di splay brightness to
effectively s ave energy and therefore appreciably inc rease the time you can work wit h the battery.
Disposal and recycling
The following applies for the Pocket PC itself and the M ai n Battery XL: batteries and accumulators
do not belong in the household rubbish bin.
Our devices are mostly produced of materials that c an be t urned over for proper recycling. The
device may be taken back after use to be recycled, provided that it is returned in a c ondi tion that is
the result of normal use. Any component s not reclaimed will be disposed of in an environmentally
acceptable manner. To give back a device please take advantage of your country's disposal and
recycling possibilities.
Further information about country-specific dispos al and recycling possibilities can be found on the
following website www.fujitsu-siemens.com/recycling.
If you have any questions on disposal, please cont act your local office or our Hel p Desk.
CE markings
The shipped version of this device complies with t he requi rem ents of the EC Guidelines
73/23/EEC.
This equipment complies wi th the requirements of Directi ve 1999/5/EC of the European Parliam ent
and Commission from 9 March, 1999 governing Radio and Telecommunicati ons Equipment and
mutual recognition of conf orm i ty.
BLUETOOTH is approved for use in Aus tria, Belgium, Denmark, Germ any, Finland, France,
Greece, Great Britain, Irel and, Iceland, Italy, Liechtenstein, Luxembourg, t he Netherlands, Norway,
Portugal, Sweden, Switz erl and and S pai n.
To all customers:
If you are not sure whether the use of BLUETOOTH is permitted in y our country, please contact the
corresponding supervisory authorities.
The user is responsible for radio i nt erference that may occur when operat i ng t he device.
!
A26391-K139-Z120-1-7619 5
Page 16

Information before you start
Battery storage
Store the Pocket PC in a fully charged state. The Pocket PC should be stored in a dry area at a
temperature between -20°C and +60°C. The lower the t em perature at which the batteries are s tored,
the lower is the rate of self-discharge. Avoid leavi ng your Pocket PC lying in di rect sunlight in a car.
If you want to store your Pocket PC unused for a longer ti m e (l onger than two months), charge the
battery 100% beforehand. Pleas e not e that batteries discharge t hem selves over time. Theref ore,
recharge the battery of your Pocket PC at regular intervals during the storage period.
Cleaning Pocket LOOX 610
Ê Switch the Pocket PC off.
Ê Pull the power plug of the network adapter out of t he m ai ns outlet.
Do not clean any interior parts yourself; leave this j ob to a service technici an.
!
Do not use any cleaning agents t hat contain abrasives or may corrode plastic.
Please ensure that no liquid ent ers the Pocket PC.
Wipe the casing with a dry c l ot h.
If it is very dirty, you can clean the c asing and the display with a damp c l oth.
6 A26391-K139-Z120-1-7619
Page 17

Software overview
In the following table you s ee whi ch programs are already installed on your Pocket PC and where
you can find information on t he use and operation of these programs.
Software Used for Operating information
PocketWord For word processing Help file on Pocket PC
PocketExel For spread-sheet functions Help file on Pocket PC
PocketOutlook Contacts/calendar//things to do Help file on Pocket PC
ActiveSync 3,7 For data synchronisation Help file on the notebook or
Pocket Internet Explorer Browser for websites and WAP si tes Hel p file on Pocket PC
Micrsoft Reader 2.0 for
Pocket PC
Microsoft Windows
Media Player 9 for Pocket
PC
MSN Messenger For online communication Help file on Pocket PC
FSC SpeedMenu For fast file and program
BLUETOOTH connection
software
FSC Panning For simple navigation in windows with
CONNECT2AIR For quic kly finding the Wireless LA N
Backup program FSC
Backup
Registry backup For backing up configuration set tings Help file on Pocket PC
For reading eBooks Help file on Pocket PC
For playing audio and video files Help file on Pocket PC
management; supports one-hand
operation
For BLUETOOTH configuration and
operation
extensive contents (panning instead
of scrolling!)
and BLUETOOTH functions
Partial and full data back up on
external storage modules or in
LOOXstore (if available)
PC on which you installed
ActiveSync.
EasyGuide on the "Pock et
LOOX AddOn &
Documentation" CD and help
file on Pocket PC
Help file on Pocket PC
Help file on Pocket PC
Help file on Pocket PC
Help file on Pocket PC
A26391-K139-Z120-1-7619 7
Page 18

Page 19

Operating pocket LOOX 610
This chapter describes t he operating elements of your Pocket PC and how you
• put the Pocket LOOX 610 i nto operation the first time
• switch the Pock et LOOX 610 on and off
• operate the Pocket LOOX 610 wi th the stylus
• operate the Pocket LOOX 610 wi th the navigation key
• operate the Pocket LOOX 610 wi th the scroll button
• switching the dis pl ay lighting on and off
• Making sound recordings
• connecting the dock i ng station
• synchronising data
• handling expansion cards
Please take note of the information in the "Important notes" chapter.
!
A26391-K139-Z120-1-7619 9
Page 20

Operating pocket LOOX 610
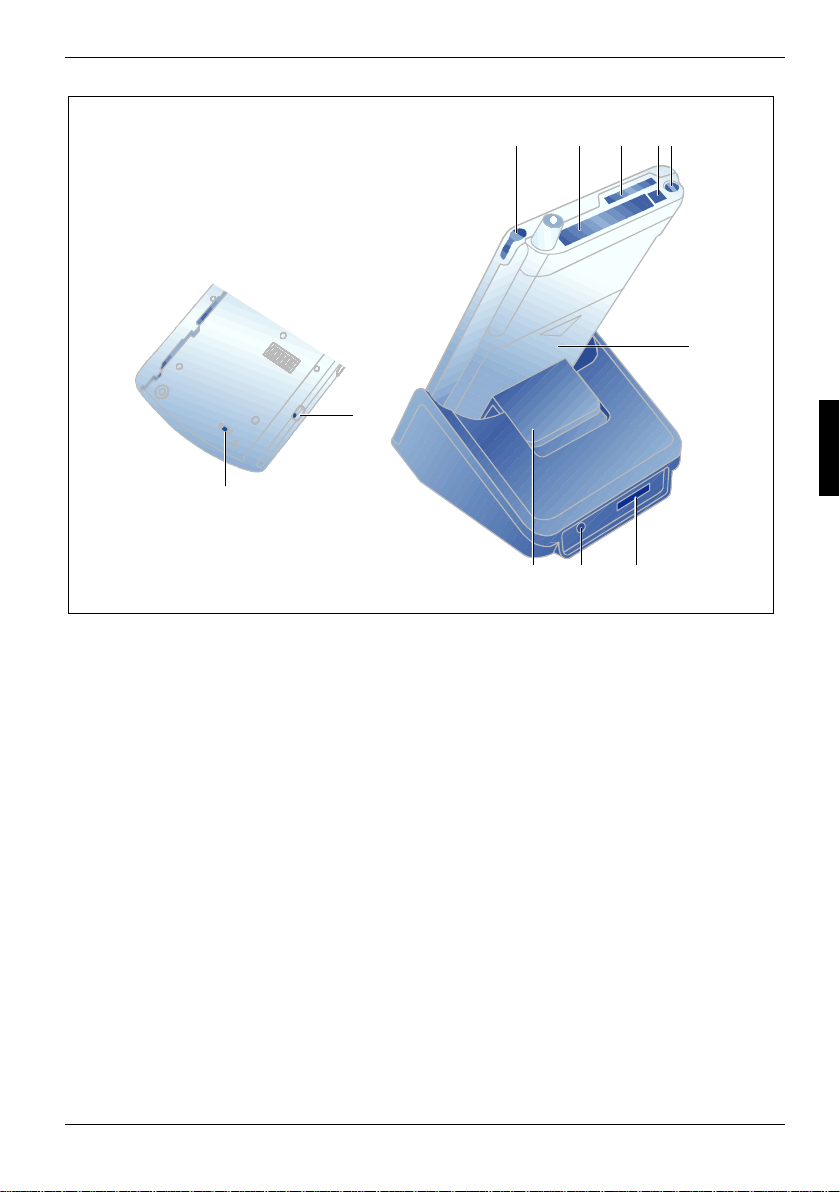
Overview of operating elements and connections
17
16
15
14
13
12
11
10
18
3
12
4
5
6
987
1 = Connection for ActiveSy nc cable and for
cradle
2 = Microphone
3 = DC jack (DC IN)
4 = CONNECT2AIR application button
5 = Navigation key
6 = Today application button
7 = Contacts application button
8 = Calendar application button
9 = Loudspeakers
10 A26391-K139-Z120-1-7619
10 = Inf rared i nterface
11 = Soft reset
12 = Lower arrow key
13 = Upper arrow key
14 = FSC Speed button
15 = LED (radio i ndi cator)
16 = LED (power-on indi cator)
17 = Antenna
18 = Sus pend button
Page 21
Operating pocket LOOX 610
13452
6
10
11
789
1 = Stylus
2 = Slot for expansion cards (CF Type I and I I)
3 = Slot for expansion cards (SD)
4 = Eject button
5 = Headphones port
6 = Battery
7 = Connection for ActiveSy nc cable
8 = DC jack (DC IN)
9 = Locking catch
10 = Battery interlock
11 = Full Reset switch
Initial start-up
Only a few steps are necessary to put your new Pocket PC into operation for the firs t time:
• Remove stylus from Pocket PC
• Carry out a full reset
• Install the batt ery
• Connecting the power adapter
• Carry out the initial start-up
You will learn more about the individual steps in the f ollowing sections.
A26391-K139-Z120-1-7619 11
Page 22
Operating pocket LOOX 610
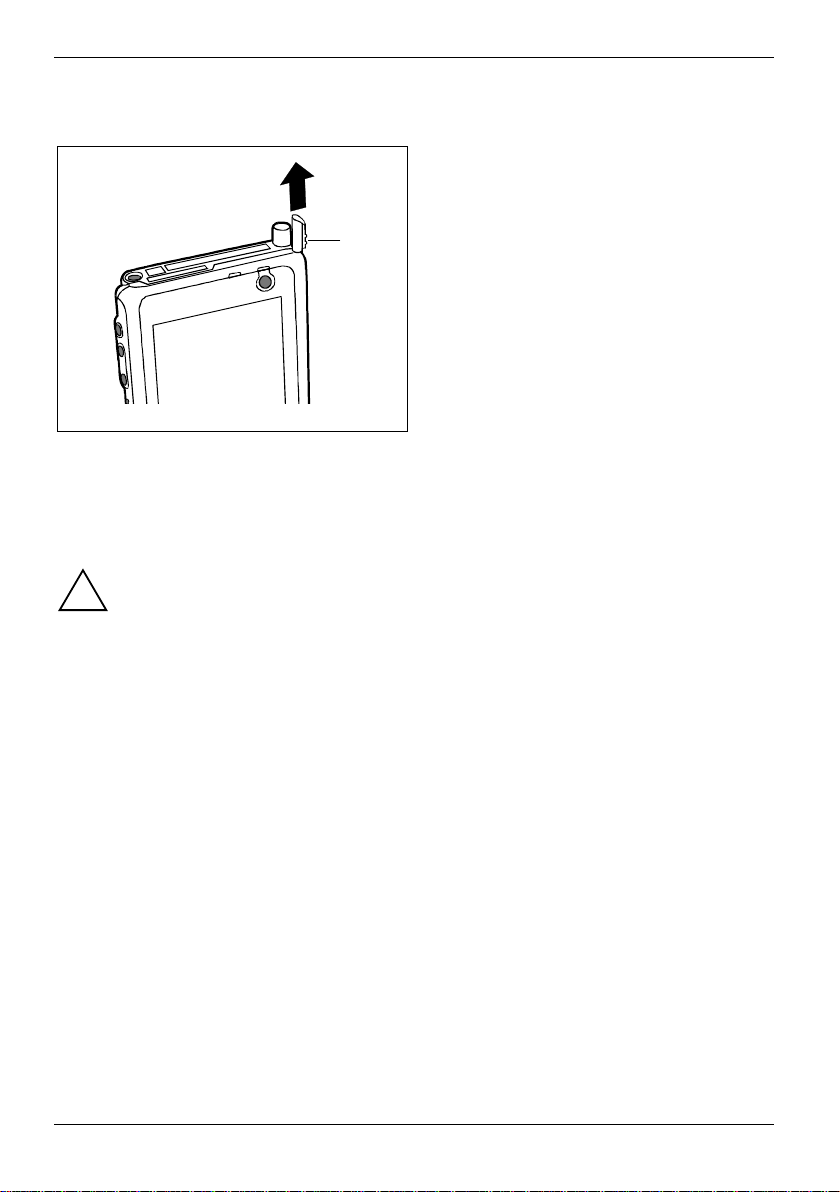
Removing stylus from Pocket PC
Ê Use the ribbed surface (1) to slide the s t ylus
2
1
slightly out.
Ê Pull out the stylus comple t el y (2).
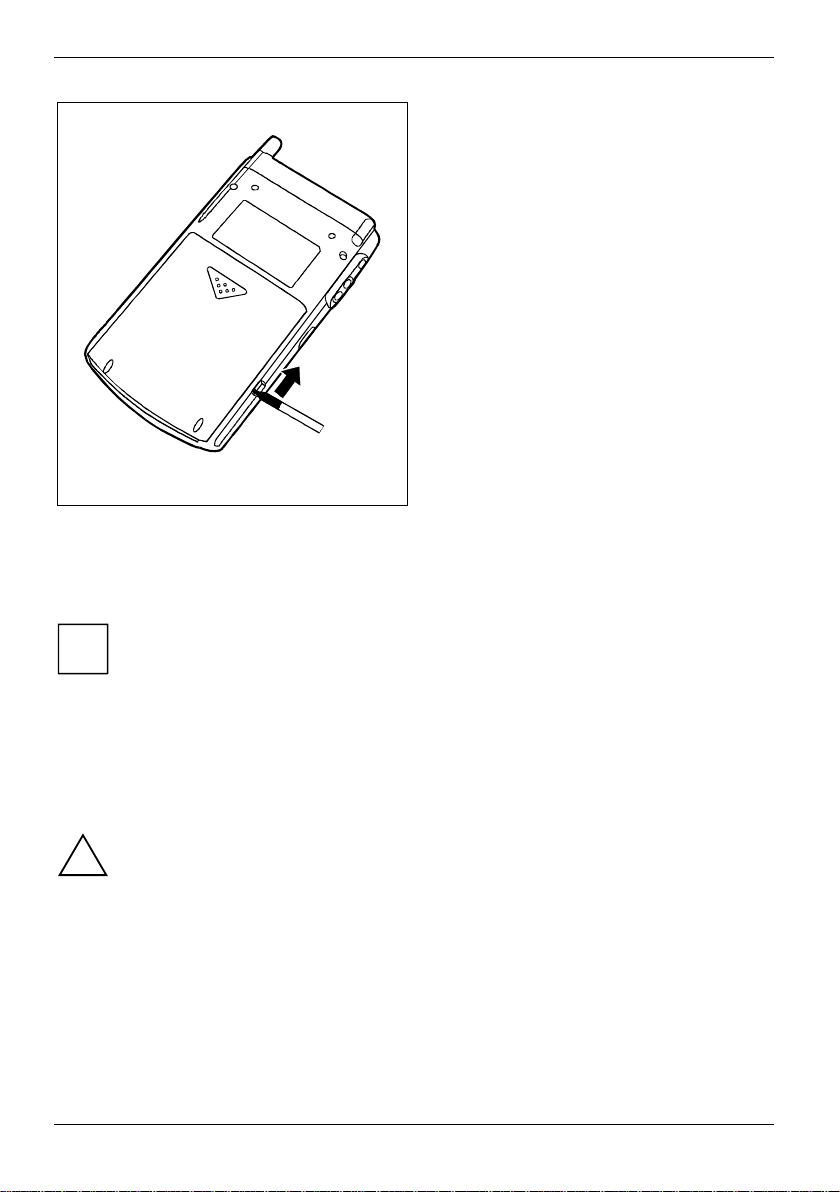
Actuate full reset switch
The first time you st art your Pocket LOOX 610, you m ust actuate the full reset switch. The full reset
switch is on the back of the Pocket LOOX and is c overed by the battery during normal operati on.
Only actuate the full res et switch during the initial start-up. To switch the Pocket PC on or
off after the initial start-up, briefly press the Suspend button.
!
If the full reset swi t ch is used to shut down the Pocket LOOX 610, this reset s it back to
the delivery state and the entire RAM contents are lost. This means you loose all data
(documents, additionally installed programs, personal settings) that you haven' t saved
elsewhere.
Therefore, remember to make a regular data bac kup with synchronisati on (see the
"Synchronising data with ActiveSync" chapter) or on corresponding memory cards
(available as an access ory). The FSC Backup program is provided on y our P ocket LOOX
610 for completely back i ng up the RAM memory on memory cards (see the "Backing up
data with FSC Backup“ chapt er ).
12 A26391-K139-Z120-1-7619
Page 23

Operating pocket LOOX 610
Ê Slide the switch to the left wi th the stylus.
Please note that your Poc ket PC does not
start up immediately after actuating the full
reset switch, but rat her a few seconds after
installing the battery and connecting the
mains power cable.
Installing the battery
Ê Install the battery as shown in the diagram
and then slide it in the direction of the arrow
until the edge of the battery i s flush with the
edge of the device.
A26391-K139-Z120-1-7619 13
Page 24
Operating pocket LOOX 610
Ê Slide the lock in the direction of t he arrow
with the stylus.
Connecting the power adapter
You can connect the power adapter directly to the Pocket PC at the DC socket.
In the following text t he l etters and numbers after the des i gnat i ons for the various cables
refer to the illustration Delivery scope in your "Getting Started“ manual (f ol d-out cover
i
page). Please look there if you're not sure which cable is m eant.
For information on how to connect the power adapter to the cradle, please read the " Using the
cradle" chapter.
Ê Connect the power adapter cable (F) to the DC socket of the Pocket PC (27).
Ê Connect the power cable (F) into the power adapter (F).
Ê Plug the power cable (F) into a mains outlet.
The power cable supplied conforms to the requirements of the country in which you
purchased your Pocket P C. M ake sure that the power cable is approved for use in the
!
country in which you int end t o use it.
The power adapter's power cable should only be connected to a mains outlet i f the Pocket
PC is connected to the power adapt er.
Do not use the power adapter for other devices.
Do not use a power adapter that is not s pecially intended for this Pocket PC.
14 A26391-K139-Z120-1-7619
Page 25
Operating pocket LOOX 610
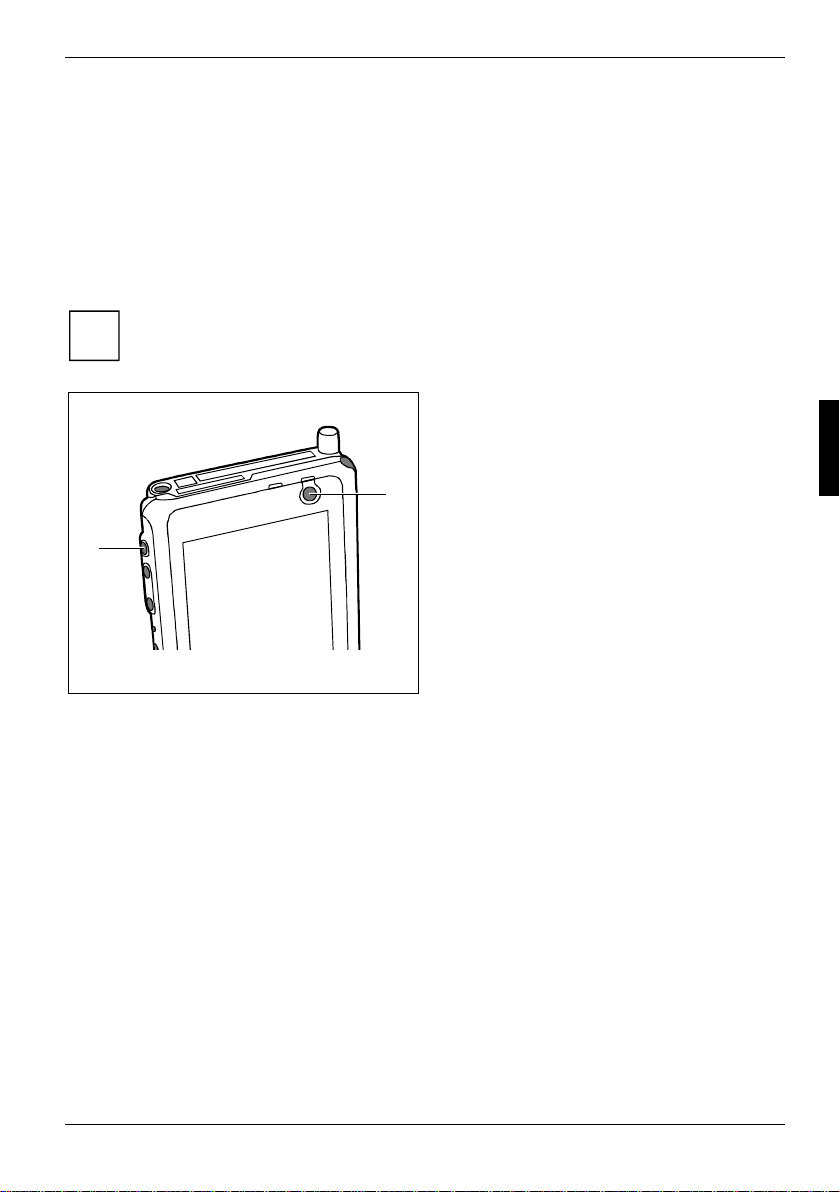
Starting Pocket LOOX 610 the first time
Adjusting touchscreen
The display of your Pock et PC is a touchscreen. To ensure t hat the touchscreen of your P ocket PC
reacts correctly when touched with the stylus, you will be asked to align the touchscreen aft er the
initial start-up.
Touch the centre of the cross hairs that appears on the displ ay with the stylus. Thi s procedure must
be repeated several times, whereby the cross hairs appear at different locations on the display each
time. Follow the instructions on the display.
To optimize the responsiv eness of the touchscreen when t ouched with the stylus, you can
also always realign the touc hscreen. To view the screen described abov e, simultaneously
i
press the Suspend button and the FS C Speed button.
1 = Suspend button
2 = FSC Speed button
1
2
Becoming familiar with basic operation
Next the Microsoft Windows for Pocket PC operating system provides a brief introduction to the
operation of the Pocket P C wi t h the stylus after the i ni tial start-up.
Ê Follow the instructions on the displ ay.
Setting the time zone
Ê Last, select the correct time zone for your current loc ation from a list.
Today screen
Then the Today screen appears. The Today s creen always appears when you switc h on t he Pocket
LOOX 610 again after you have not used it for four or more hours. The Today screen shows all
important current information at a glance. From this screen you have access to al l program s and to
the system settings.
Please also use the help function that is available on your Pocket LOOX if you want to know more
about operating the programs contained i n the Microsoft Pock et PC 2002 software.
A26391-K139-Z120-1-7619 15
Page 26

Operating pocket LOOX 610
Switching Pocket PC off and on
After the initial start-up, you usually swit ch the Pocket LOOX 610 into t he Suspend mode when not
in use. It is only practical or necessary to switch off the Pocket PC completely with the Full Reset
switch. In the following sections we will f i rst explain operation in the Suspend mode, and then t he
ability to restart the Pock et LOOX 610 with a soft or full reset.
Switch on and off in Suspend mode
Switching off with Suspend button
Ê Press the Suspend button (11) briefly to switch off the Poc ket PC.
If you have specified a switch-off time with the system settings, your Pocket PC will
automatically switch into the Suspend mode aft er t hi s specified time.
i
There are two ways to switch on y our Pocket PC:
Switching on with Suspend button
Ê Briefly press the Suspend button (11) to switch on the Pocket PC.
The application you have just been working on or the Today screen appears on the s creen when
you have not used your Pock et PC for at least four hours.
The application you were working on before y ou switched off the Pocket PC with the Suspend
button appears on the screen. The Today screen appears if you switc h on your Pocket PC again
with the Suspend button aft er m ore than four hours.
Switching on with application buttons
By default, you can also switch your Pocket LOOX on by briefly pressing one of the application
buttons (12, 14, 15, 16). The applications assigned to the res pective button appears on the screen.
The applications CONNECT2AIR, Today, Contacts and Calendar are preset. However, you can change
the applications to be cal l ed up at any time according to y our needs (see the "Configuring Pocket
LOOX 610“ chapter) so that your preferred program opens immediately at the pres s of a button.
By making the appropriate setting in FSC KeyLock (s ee chapter "Configuring Pocket LOOX
610"), you can also prevent t he Pocket PC from being swit ched on when an application
i
button is pressed.
16 A26391-K139-Z120-1-7619
Page 27

Operating pocket LOOX 610
Switching on and off with soft reset (warm boot)
After certain applicat i ons or the installation of new program s, it may be necessary to restart the
Pocket PC with the soft reset.
Data not yet saved in a file will be lost during this procedure. On the other hand, data in
the RAM memory are retained.
!
Ê End all applications before you carry out a soft reset.
1 = Soft reset (warm start)
1
Ê Take the stylus, insert it in the opening (1) and press briefly.
The warm boot is carried out. The application you have just been worki ng i n appears on the display
of your Pocket PC.
Switching on and off with Full Reset switch
If your Pocket PC does not continue operating and switc h i ng of f and on with the Suspend button
and the soft reset fail to function, you can reset your Pocket PC to the del i vered state.
If the device is s wi t ched off with the Full Reset switch, the battery i s switched off so that
the RAM contents are lost. This means you loose all data (documents, additionally
!
installed programs, personal settings) that you haven' t saved elsewhere.
Therefore, remember to make a regular data bac kup with synchronisati on (see the
"Synchronising data with ActiveSync" chapter) or on corresponding memory cards
(available as an access ory). The FSC Backup program is provided on y our P ocket LOOX
610 for completely back i ng up the RAM memory on memory cards (see the "Backing up
data with FSC Backup“ chapt er ).
A26391-K139-Z120-1-7619 17
Page 28

Operating pocket LOOX 610
Ê Slide the lock in the direction of t he arrow
with the stylus.
Ê Slide the battery slightly i n t he di rection of
the arrow (1).
Ê Lift out the battery upward in the direct i on of
the arrow (2).
1
2
18 A26391-K139-Z120-1-7619
Page 29

Operating pocket LOOX 610
Ê Slide the Full Reset switch to t he ri ght with
the stylus.
Ê After waiting a few moments, sl i de the Full
Reset switch to the left with the stylus.
Please note that your Poc ket PC does not
start up immediately after actuating the full
reset switch, but rat her a few seconds after
installing the battery and connecting the
mains power cable.
A26391-K139-Z120-1-7619 19
Page 30

Operating pocket LOOX 610
Ê Install the battery as shown in the diagram
and then slide it in the direction of the arrow
until the edge of the battery i s flush with the
edge of the device.
Ê Slide the lock in the direction of t he arrow
with the stylus.
After approximately 10 seconds a picture appears on the dis play and a tone sounds.
i
20 A26391-K139-Z120-1-7619
Page 31

Operating pocket LOOX 610
Using standard operating elements
Using stylus
You require the stylus for making entries on the touchs creen, for menu selection and for similar
tasks.
Ê Briefly touch the desired element on t he di splay with the styl us to trigger an action.
Ê To activate popup menus, also touch the desired element with the st ylus, however leave the
stylus on the element for a moment: the popup menu appears and you can select an element
by touching it.
Using navigation key
With the navigation key you scroll within the menus (up, down, to the left and right) and ac t i vate
menu entries by pressing the centre of the navigation key.
The navigation key is also useful for one-hand operation with FSC SpeedMenu. M ore i nformation on
using the FSC SpeedMenu is contained in the "FSC SpeedMenu - Operating pocket LOOX 610
quickly with one hand"chapter.
Selecting menu entry
Ê Press the up arrow, the down arrow, the
right arrow or the left arrow if you want to
select a menu entry.
Activating
Ê Press the centre of the navigation key to
activate a select ed m enu entry.
1
1 = Navigation key
A26391-K139-Z120-1-7619 21
Page 32

Operating pocket LOOX 610
Using the arrow keys
With the two arrow keys you scroll up, down, forward or back wi thin the menu. You activate menu
entries by briefly pressing the FSC Speed button. The arrow key s are particularly useful f or onehand operation with FSC SpeedMenu. More informati on on using the FSC SpeedMenu is contained in
the "FSC SpeedMenu - Operating pocket LOOX 610 quickly with one hand"c hapter.
Ê Press the upper arrow key (1) to select an
upper entry.
Ê Press the lower arrow key (2) to select a
lower entry.
1
2
Ê Briefly press the FSC Speed button (1) t o
activate a select ed entry.
1
22 A26391-K139-Z120-1-7619
Page 33

Operating pocket LOOX 610
Using the application buttons
1 = CONNECT2AIR
2 = Today
3 = Get Number
4 = (OOP) Calendar
4
1
23
With the application buttons and the appropriate preset (see chapter " Configuring Pocket LOOX
610"), you can open your preferred programs and appl i cations directly from suspend mode or from
within an application.
Upon delivery, the applicat i ons CONNECT2AIR, Contacts, Calendar as well as Today are assigned to
the four buttons. However, you can adapt the button assignment as you wish. Instructions on this
procedure can be found in the "Configuring Pocket LOOX 610“ chapter.
Because the application button react differently to short or long keystrok es you can assign a total of
eight different programmes or appli cations to the applicati on buttons.
Adjusting display lighting
If the ambient light c ondi t i ons permit, you can swit ch the display lighting off or reduce its brightness
to save energy. You can also specify the swit ching off and on again of the display l i ght i ng i n the
system settings of your Pocket PC (see the "Configuring Pocket LOOX 610" chapter). In the system
settings you can als o adj ust the brightness conti nuously.
Ê Press the Suspend button (1) for longer
than 1 second to switch t he di splay lighting
on or off.
1
A26391-K139-Z120-1-7619 23
Page 34

Operating pocket LOOX 610
Making sound recordings
1 = Microphone
1
A microphone is integrated in your Pocket PC. You can record sound and speech in the Notes
program. Speak into the internal microphone to do this.
You recording is automatic al l y saved under the name Recording1. To play back the recording, simply
touch the file name in the li st.
24 A26391-K139-Z120-1-7619
Page 35

Operating pocket LOOX 610
Using the cradle
The cradle fulfils two func tions:
• Charging the batteries in t he P ocket PC
• Data synchronisat i on between the Pocket PC and the PC/ not ebook
In the following sections you will learn what you should observe when setting up the cradle and
when using the above functions .
Selecting location for cradle
Place the cradle on a stable, flat and nonslippery surfac e. In view of the multit ude of di fferent
finishes used on furniture, it is possible that the rubber feet of the P oc ket PC will mark the surface
they stand on.
Never place the power adapter on a heat-sensi tive surface.
The cradle and the power adapter should be at least 200 mm apart.
Keep other objects 100 mm away from the cradle and its power adapter to ensure adequate
ventilation.
The Pocket PC and the cradle shoul d not be subjected to extreme env i ronm ental conditions. Protec t
the Pocket LOOX 610 and cradle from dust, moisture and heat.
1 = Connection for the ActiveS ync cable
2 = DC jack (DC IN)
12
A26391-K139-Z120-1-7619 25
Page 36

Operating pocket LOOX 610
Adjusting the locking catch
The docking station has an integrated locking catch t hat you can move to one of two posit i ons. This
ensures that your Pock et LOOX 610 retention is always opti m um regardless of whether you connect
it to the docking st ation with or without the Main Battery XL attached.
Ê Slide the locking catch in the di rection of
the arrow if you want to connect your
Pocket LOOX to the docking station without
a Main Battery XL attached.
Ê Slide the locking catch in the di rection of
the arrow if you want to connect your
Pocket LOOX to the docking station with a
Main Battery XL attached.
26 A26391-K139-Z120-1-7619
Page 37

Operating pocket LOOX 610
Charging battery in cradle
In the following text t he l etters and numbers after the des i gnat i ons for the various cables
refer to the illustration Delivery scope in your "Getting Started“ manual (f ol d-out cover
i
page). Please look there if you're not sure which cable is m eant.
Ê Connect the power adapter cable (F) to the DC socket (7) of the cradle (C).
Ê Connect the power cable (F) into the power adapter (F).
Ê Plug the power cable (F) into a mains outlet.
Ê Place the Pocket PC in the cradl e (C).
Please take note of the information on the power adapter in the "Connect i ng the power adapter"
chapter.
Using cradle for data synchronisation
In the following text t he l etters and numbers after the des i gnat i ons for the various cables
refer to the illustration Delivery scope in your "Getting Started“ manual (f ol d-out cover
i
page). Please look there if you're not sure which cable is m eant.
Please note that you have t o i nstall the program ActiveSync on your notebook/ P C before you carry
out the first data sy nchronisation between the Pocket LOOX 610 and notebook/PC. You will find
more information on this in chapter "Synchronising data with ActiveSync ".
Ê Connect the power adapter cable to the DC socket (7) of the cradle (C).
Ê Connect the power cable (F) into the power adapter (F).
Ê Connect the ActiveSync cable (E) to the connection for the ActiveSync cable (6).
Ê Connect the other end of the ActiveSync cable to the USB port of your notebook or PC.
A serial ActiveS ync cable for connection to serial ports of notebooks /PCs is available as an
accessory.
Ê Plug the power cable into a mains outlet.
Ê Switch your notebook or PC on.
Ê Place the Pocket PC in the cradl e (C).
If you have already inst al l ed ActiveSync on your PC, you can now synchronise the data of your
Pocket PC with the dat a on your PC.
You can always leave the c onnections between the cradle and power adapter, and
between the cradle and your notebook or PC s o that you only need to place your P ocket
i
PC in the cradle to charge the batt ery and for data synchronisat i on.
You can also connect your Pocket PC directly to your notebook or PC with the
ActiveSync c abl e.
You will find more information on data synchronis at i on in chapter "Synchronising data with
ActiveSync" and i n the help file on your Pocket LOOX .
A26391-K139-Z120-1-7619 27
Page 38

Operating pocket LOOX 610
Synchronising data with ActiveSync
To also have the current versi on of the data you have processed on t he road on your Pocket PC
available on your PC/notebook, you must copy these data to your PC/notebook. This procedure is
conveniently enabled with so-called data synchronis ation:
In the ActiveSync program you can specify that the respective latest v ersion of a file be detected and
then automatically updat ed on the respective data carrier - regardl ess of whether it is the Po cket
PC or a PC/notebook.
You can synchronise y our dat a between your Pocket PC and your notebook or PC via the cradle
(see the "Using the cradle“ chapter), using the ActiveSync cable or via infrared or BLUETOOTH.
Installing ActiveSync
The ActiveSync c abl e and the ActiveSync software are provided for data synchronisation. Using the
ActiveSync c abl e you connect the cradle or the Pocket PC itself to your PC/notebook. The
ActiveSync software enables you to carry out routine data synchronis ation. ActiveSync is already
installed on your Pocket PC. You need only install ActiveSync on y our PC or notebook.
The ActiveSync program and the required drivers are contai ned on the "Microsoft Companion CD" .
Ê Insert the "Microsoft Compani on CD" in the CD-ROM drive of your PC or notebook.
Ê Click on the yellow arrow.
Ê Click on Start here and follow the instructions on the screen.
You will find information on how you synchronise data using ActiveSync, in the ActiveSync help file
after installation on y our notebook/PC.
Connecting Pocket PC directly to ActiveSync cable
Ê Connect the ActiveSync cable (E) to the connection for the ActiveSync cable (25).
Ê Connect the other end of the ActiveSync cable to the USB port of your notebook or PC.
A serial ActiveS ync cable for connection to serial ports of notebooks /PCs is available as an
accessory.
Establishing an ActiveSync partnership
Before the first data s ynchronisation you must establish a partnership between the Pocket LOOX
610 and your PC or notebook. The ActiveSync Setup Wizard will help you do this. After you have
specified the desired and required s ettings for the synchroni sation in the Wizard, the fi rst
synchronisation st arts automatically.
You will find more detailed information on synchronising data with ActiveSync in the ActiveSync help
file on your notebook/PC.
28 A26391-K139-Z120-1-7619
Page 39

Operating pocket LOOX 610
Backing up data with FSC Backup
The Pocket LOOX 610 saves your data such as appointments , addresses, things to do and not es,
as well as all documents i n the RAM memory of the devic e. These data are backed up to your PC
during synchronisation with ActiveSync. However, to also make cu rrent data backups away from
home or while on business trips , there is FSC Backup.
FSC Backup backs up an image of your Pocket PC main RAM onto SD (Sec ure Di gi tal), MMC
(MultiMediaCard) or CF (CompactFlash) memory cards or into the integrated storage area of the
LOOXstore. If your Pocket PC has experienced a power fai l ure and t he data from the RAM memory
have been deleted, then you can restore a data backup you have made with FS C Ba cku p. This
provides you with the data s tatus at the time of t he backup again within just a few m i nut es.
As FSC Backup backs up and restores the entire RAM memory of your device, the registry, which
contains the configurat i on dat a of your device and any programs installed in the RAM memory, i s
also backed up.
FSC Backup also provides you with the option of backing up and rest ori ng single databases such as
contacts, calendar or tasks as well as your connection settings. Y ou will find information as to how
you proceed for this in the FSC Ba ckup help file on your Pocket LOOX .
Before you start a back up, make sure that sufficient memory space is available on the memory card
or in the device, and that t he bat tery holds a suffici ent charge. If the battery charge is low, connect
the power adapter or charge the battery.
When you conduct a backup, y ou m a y not carry out any other operating procedure before
the backup has been completed. Do not press any keys, touch the display or remove a
!
memory card.
Backup
The RAM memory content is saved to a memory card.
Ê Select Start - Programs - FSC Backup.
When the program FSC Backup appears on the screen, select the memory card on whi ch the backup
is to be made. Select t he memory card type as the des t i nation for the backup.
Pocket LOOX 610 lists the available memory cards . For SD or MMC cards you should
therefore select the SD-MM Card entry, for CF cards the CF Card entry and for the
i
integrated storage the LOOXstore entry.
Ê Press the Backup button.
Ê A message is output when the backup has been completed.
Ê When you press the OK button on the navigati on bar, the screen of FSC Backup appears again
on the display.
A26391-K139-Z120-1-7619 29
Page 40

Operating pocket LOOX 610
Restoring
The backup data saved on the memory card are restored in the RAM memory of the device. All dat a
in the RAM memory are restored as they were at the time of the bac kup. This also means that al l
data currently in the RAM m emory of the device are overwrit ten.
Ê Select Start - Programs - FSC Backup.
Ê When the screen of the FSC Backup appears, select the memory card from which the backup is
to be restored. FSC Backup indic at es whether backup data are present on a memory card and
when these were generated.
Ê Press the Restore button.
Ê FSC Backup asks you whether you really want to restore the data. Press the Yes button if the
data are to be restored and the No button if this is not the case.
Ê A message is output when the restorati on has been completed.
Ê When you press the OK button at the upper right, the device is reset and rest arted.
Panning instead of scrolling with FSC Panni ng
FSC Panning enables you to move any window content bi-directionally. You can now view windows
with extensive amounts of content (such as websites, Excel s heets or long Word files) quickl y and
easily on your Pocket LOOX display . This means: no more tedious scrolling!
By default, the program FSC Panning is assigned to the long key press on the Today (14) application
button.
Ê Press and hold the Today (14) application button to act i vate FSC Panning.
Ê Move the window content with your st ylus in the required direction.
Ê Release the application button to stop or to interrupt FSC Panning.
Please note: as long as FSC Panning is activated, your st ylus can only move window
content.
i
You will find further information and instruct ions on FSC Panning in the help file on your Pock et PC.
30 A26391-K139-Z120-1-7619
Page 41

Operating pocket LOOX 610
Inserting and removing expansion cards
Two slots allow the operation of di f ferent expansion cards in your Pocket PC. Possi bl e expansion
cards include memory cards (CF and SD/MMC), GPS cards, GSM/GPRS CompactFlash cards and
LAN cards.
Inserting CompactFlash expansion card
Consult the documentation supplied by the expansion card's manufacturer and follow the
instructions provided.
!
Never use force when inserting or rem oving an expansion card.
Only use expansion cards suitable for the Pocket LOOX 610.
Make sure that no foreign objects enter the slot.
Ê Press the eject button so that t he dum my expansion card projects slightly out of the s l ot on the
Pocket PC.
If the eject button is lowered, you must firs t cause the eject button to rel ease from the Pocket
PC casing. Press t he ej ect button until it snaps out.
A26391-K139-Z120-1-7619 31
Page 42

Operating pocket LOOX 610
Ê Pull the placeholder for the expansion card out of the slot.
Keep the placeholder for the expansion card in a safe place. If you remove the expansion
card, you should reinsert t he dum m y card into the slot. This prevents foreign bodies from
i
getting into the slot.
Ê Place the expansion card in the slot so that the contacts ent er first.
32 A26391-K139-Z120-1-7619
Page 43

Operating pocket LOOX 610
Ê Gently push the expansion card into the slot until you feel it click into place.
Ê Follow the instructions of the c ard m anufacturer in the documentation for your expansion card if
necessary.
Inserting SD/MMC expansion card
Ê Carefully push the expansion card into t he slot.
It projects two to three millimetres.
Ê Follow the instructions of the c ard m anufacturer in the documentation for your expansion card if
necessary.
A26391-K139-Z120-1-7619 33
Page 44

Operating pocket LOOX 610
Removing CompactFlash expansion card
2
1
Ê Press the eject button (1) so that the expansion card projects slightly out of the sl ot on the
Pocket PC.
If the eject button is lowered, you must firs t cause the eject button to rel ease from the Pocket
PC casing. Press t he ej ect button until it snaps out.
Ê Pull the expansion card out of the sl ot (2).
Ê Insert the placeholder again into the slot if necessary.
34 A26391-K139-Z120-1-7619
Page 45

Operating pocket LOOX 610
Removing SD/MMC expansion card
2
Ê Press on the edge of the expansion card (1) so that the expansion card jumps out of the slot
slightly.
Ê Slide the expansion card out of the Poc ket PC (2).
Ê Insert the placeholder again into the slot if necessary.
1
A26391-K139-Z120-1-7619 35
Page 46

Page 47

Pocket LOOX 610 in mobile use
The Pocket LOOX 610 is equipped wit h a powerful battery that allows you to work for several hours
without a connection to a power s uppl y. When you're on the road your Pock et PC is supplied with
power by the integrated battery. At your home or office you can recharge the battery in the cradl e.
You can also take along the power adapt er and connect your Pocket PC di rectly to an electrical
outlet to recharge the battery when you're on the go.
In this chapter you'll l earn how to charge the battery and use it m ost efficiently for mobile operation.
In addition, you'll fi nd i m portant information on transporting your Pocket LOOX 610 and explanati ons
on what you should watch when travelling with y our P ocket PC in this chapter.
Using battery
Charging the battery
The battery is not charged at t he time of delivery. Therefore, i nstall the battery on your Pocket
LOOX and charge it for 12 hours before the f i rst mobile use.
You have two ways of doing this:
Ê Connect the Pocket PC directly to an electrical outlet wi th the power adapter.
Ê Connect the cradle to an electrical out l et via the power adapter and place the Pock et PC in the
cradle.
In both cases you can work wi th the Pocket PC during chargi ng. Thi s extends the charging tim e
slightly.
During charging the LED (24) flashes green. When the battery is fully charged, the LED
lights continuously green.
i
Charging battery in cradle
In the following text t he l etters and numbers after the des i gnat i ons for the various cables
refer to the illustration Delivery scope in your "Getting Started“ manual (f ol d-out cover
i
page). Please look there if you're not sure which cable is m eant.
Ê Connect the power adapter cable (F) to the DC socket (7) of the cradle (8).
Ê Connect the power cable (F) into the power adapter (F).
Ê Plug the power cable (B) into a mains outlet .
Ê Place the Pocket PC in the cradl e (C).
A26391-K139-Z120-1-7619 37
Page 48

Pocket LOOX 610 in mobile use Using battery
Connecting Pocket PC directly to power adapter
In the following text t he l etters and numbers after the des i gnat i ons for the various cables
refer to the illustration Delivery scope in your "Getting Started“ manual (f ol d-out cover
i
page). Please look there if you're not sure which cable is m eant.
Ê Connect the power adapter cable to the DC socket (27) of the Pocket PC.
Ê Connect the power cable (F) into the power adapter (F).
Ê Plug the power cable (F) into a mains outlet.
The integrated battery of your Pocket PC will be recharged.
Optimising battery performance
When you have completely c harged the battery, you can operate the Pocket PC for up to 12 hours
without a power connection. Howev er, it is not possible t o exactly specify the maximum operating
time, as different appl i cations use more or less energy .
In the system settings you can make settings that help you save energy when using your
Pocket PC. These set tings enable you to use the batt ery operating time optimally . Please see the
"Configuring Pocket LOOX 610“ c hapter for information on how to save energy.
In the default setting, a setting is activ at ed that automatically switches the Pocket P C i nto
the Suspend mode after three minut es when working without a power connecti on i f no
i
entries are made during this tim e. You can switch on the Pocket PC again at any time by
briefly pressing the Suspend button and then continue working where y ou l eft off.
Checking battery charge level
You can display the batt ery charge level under Start - Settings - System - Power.
38 A26391-K139-Z120-1-7619
Page 49

Information on transport and travelling Pocket LOOX 610 in mobile use
r
Information on transport and travelling
Transporting Pocket LOOX 610
• Remove all data carriers (e.g. memory cards) from t he slots.
• Switch the Pock et PC into the Suspend mode.
• Pull the power plug of the power adapter and al l peri pheral devices out of the elect ri cal outlets
if necessary.
• Disconnect the power adapt er cable and the data cables of all peripheral devices.
• If the device needs to be shipped, use the original packaging or other suitable packaging t o
protect it from damage caused by mishandling.
• Use the bag for the Pock et PC, which protects agai nst jolts and impacts, for transport.
• Protect the Pocket PC from severe shocks and extreme temperatures (e.g., direct sunli ght in a
car).
Information on travelling
• If you wish to us e your Pocket PC during a flight, check first wi th the airline if this is allowed
and under which conditions. Switch BLUETOOTH and the Wireless LAN off. Also observe the
instructions regarding BLUE TOOTH i n chapter "Wireless communication with BLUETOOTH
(optional)" and the security information in the "Securi ty and Ergonomics" and "Warranty"
manuals.
• In some countries the use of BLUETOOTH is restricted or completely prohibit ed. Ask about the
regulations in the country you will be trav elling in bef ore starting your trip. As a precaut ion,
switch BLUETOOTH off in c ase there is any uncertainty at your place of residence.
• If you are travelli ng abroad, ensure that the power adapter can be operated with the local
mains voltage. If this is not the case, obtain the appropriate power adapter for your Poc ket PC.
Do not use any other voltage converter!
If you travel in another c ount ry, check whether the loc al power supply and the
specifications of the power cable are compatible. I f this is not the cas e , buy a
i
power cable that matches t he l ocal conditions. Do not use a connect i on adapter fo
electrical devices to connect the Pocket P C.
• If you use a modem, incompatibilities with the local telecommunications system may result.
A26391-K139-Z120-1-7619 39
Page 50

Page 51

FSC SpeedMenu - Operating pocket LOOX 610 quickly with one hand
FSC SpeedMenu simplifies the operati ng of your Pocket PC and speeds up everyday routines. FSC
SpeedMenu also allows you to operate y our P ocket PC with one hand: inst ead of using the stylus you
can select and activ ate menu items easily by using the arrow keys or the navi gation key via the FSC
SpeedMenu.
What advantages does the FSC SpeedMenu offer?
• It enables you to organise the documents, programmes and folders which you often use wi t h
the FSC SpeedMenu.
• It enables you to c reat e submenus for a better overview.
• It enables you to open doc um ents or folders directly from the menu.
• It enables you to s t art a programme directly from t he m enu.
Use the arrow keys and FSC Speed button, the navigation key or t he stylus.
In this chapter you'll learn how to use FSC SpeedMenu for your daily work.
Operating FSC SpeedMenu
The FSC Speed button is located on t he l eft hand side above the arrow keys. You start the FSC
SpeedMenu by pressing the FSC Speed butt on f or a l onger time.
Depending on your preferences, you can operate FSC SpeedMenu with the arrow keys, the navigation
key or the stylus.
Operating with the arrow keys
• Select entry: To select an entry in the top s ection press the upper arrow key (arrow up). To
select an entry that i s further down, press the lower arrow k ey (down arrow).
• To activate a selected entry (start the programm es, display submenus, open folders, display
documents): Press briefly the FSC Speed button.
• To return to the superior menu: P res s the FSC Speed button for a longer tim e.
If you are already in the main menu, the programme will be terminated.
Operating with the navigation key
• To select an entry us i ng the navigation key: Pres s the arrow up/down.
• To activate a selected entry (start the programm es, display submenus, open folders, display
documents): Press t he navigation key in the middle position.
• To activate a selected submenu: Press the navigation key in the middle pos i tion or the arrow
right.
• To return to the superior menu: P ress the arrow to the left.
If you are already in the main menu, the programme will be terminated.
A26391-K139-Z120-1-7619 41
Page 52

FSC SpeedMenu - Operating pocket LOOX 610 quickly with one hand
Operating with the stylus
• To trigger the desired action (activate the entry, select the submenu, displ ay help, terminate
the programme): Press the c orresponding menu entry or the corresponding but t on briefly.
• Return to a higher-level menu from a submenu: press the Back arrow button loc ated in the
navigation bar of the menu.
• To activate the pop-up menu: Press the desired entry a little bit longer. You can edit the menu
structure in the pop-up menu. Detai l s are contained in the "Editing FSC SpeedMenu" section.
Programme structure
The menu comprises two sec t i ons, which are either separated by a separating bar or by the arrow
button.
Main and quick menu
Main menu
• In the main menu you admini ster the
documents and programmes which you often
use into folders and subfolders.
• You can create up to 20 main ent ri es and
subentries.
• The menu title bar indicates which submenu is
currently open.
• If there is not enough space for all of the
entries on the display, m ove the section
displayed. Touch the desired arrow button with
the stylus to scroll. To scroll quickly to the top
or bottom entry in the Main menu, leave the
stylus on the respec t i ve arrow button for a
moment.
Quick menu
• The quick menu is meant for your favourite
programmes and documents i.e. the ones you
use often.
• Your entries in the quic k menu are always
visible and can therefore be cal l ed at any time
regardless of which submenu is activated in
FSC SpeedMenu default entries in Main and
Quick menu. Separation of areas with bars *
42 A26391-K139-Z120-1-7619
the main menu.
You can create up to five ent ri es.
Page 53

FSC SpeedMenu - Operating pocket LOOX 610 quickly with one hand
FSC SpeedMenu: default entries in Organizer*
submenu
*: The two illustrations show the def ault entries you will find when you start the FSC SpeedMenu the
first time. You c an l eave the default entries as t hey are or change them at any time.
A26391-K139-Z120-1-7619 43
Page 54

FSC SpeedMenu - Operating pocket LOOX 610 quickly with one hand
Editing FSC SpeedMenu
Within the defined program struc ture (see the "Programme struc ture" section) you can alt er FSC
SpeedMenu to meet your own needs. You can add new entries, rename entries, sort entries, create
submenu entries, move t he existing entries and, of course, also delete entries . In the following
sections you'll l earn how to proceed using the example "Addi ng m enu entry".
1. Opening the pop-up menu
Ê Press the chosen menu entry with t he
stylus for approx. 1 - 2 seconds.
The pop-up menu indicates the possi bl e
actions for that entry.
2. Add entry
Ê Press Add entry in the popup menu with
the stylus.
Ê Enter the desired title for the entry .
The new entry appears in the menu just
above the entry on which you have
activated the pop-up menu.
FSC SpeedMenu: default entries in Organizer*
submenu
If you have activat ed the pop-up menu on the arrow button, your new entry will appear at
the end of the list in the mai n menu.
i
44 A26391-K139-Z120-1-7619
Page 55

FSC SpeedMenu - Operating pocket LOOX 610 quickly with one hand
An overview of all possi bl e actions is contained in the FSC SpeedMenu help on your Pocket PC.
Example of a configured FSC SpeedMenu
Tips and tricks
Activating an entry in Quick menu immediately after starti ng FSC SpeedMenu:
You do not have to scroll through al l the entries until you reach t he bot tom, you can use the rollov er
function instead: af t er the program starts, sim pl y press the upper arrow key (up arrow) or the up
arrow on the navigation key and this takes you straight to the last entry.
Inserting first entry in an empty menu:
Open the popup menu of the elements Separating bar or Foot bar. The entry is t hen entered in the
Main menu or in the Quick menu.
Inserting entry at end of Main menu
If the list of the M ai n m enu entries is so long that it no longer fits on the display , an arrow button
appears at the lower end (also see the s ection "Programme structure“). To insert an entry at the end
of this long menu, proceed as follows:
Touch the arrow button (down arrow) and leave the st ylus on the arrow button for a moment. This
scrolls down through the entries. As soon as the bott om entry is reached, the arrow button turns
grey and can no longer be actuated. Briefly remove the styl us and then touch the button again. A
popup menu appears and you can add your new entry.
A26391-K139-Z120-1-7619 45
Page 56

Page 57

Configuring Pocket LOOX 610
You can already choose from a large num ber of programs when you use the Pock et PC for the first
time. In addition, prov en def aul t settings are defined for t he m enu structure, energy management,
memory management and securit y functions.
But, of course, you can add and remove programs and configure the P ocket PC as desired.
This chapter shows you how to
• optimise the energy managem ent of your Pocket PC
• configure the hardware buttons
• adjust the menus to your personal needs
• use the security functions
• change the time and use the al arm functions
For information on removing and adding programs , please refer to the documentat i on f rom the
software manufacturer and the ActiveSync help file, that you can call at any time after installing
ActiveSync on your notebook/PC.
We describe the configuration of the FSC SpeedMenu in the "Editing FSC SpeedMenu" chapter in this
manual and in the FSC SpeedMenu help on your Pocket P C.
Optimising energy management
General information on energy management
The battery operating time is considerably dependent on the applicat i ons used. Please consider t hat
a particularly large amount of energy is required to play sound fil es or make sound recordings.
Therefore, if you want to work f or several hours without a power connection, limit the use of energyintensive applications.
Data exchange with a PC or notebook also consumes additional battery power. Therefore, always
connect your Pocket P C t o an electrical outlet during data exchange if possible.
We also recommend that you reduc e t he di splay brightness to effectively save energy and therefore
appreciably increase the t i m e you can work with the battery.
Displaying battery status
Ê Touch Start.
Ê Select the Settings entry in the menu.
Ê Select the System tab.
Ê Tap the symbol Power.
In the Power control panel you can now read off the current battery status.
If the battery charge level is very low, you will be warned with a dialog window during operation.
Then immediately connect your Pocket LOOX 610 to an elect ri cal outlet.
If you do not immediately connect your Pocket PC to the mains power, the Pocket PC will
automatically switch itself off. The data in the RAM memory remains intact for several hours.
A26391-K139-Z120-1-7619 47
Page 58

Configuring Pocket LOOX 610
However, if the Pocket PC is still not connected to the mains power during this period, all data that
is only in RAM (such as documents, additionally installed programs, personal sett i ngs ) will be lost.
In other words, your Pock et PC is reset to the delivery state.
Using energy-saving functions
You can save energy in several ways to optimally utilise the battery charging t i me:
− Switch the Pocket PC into the Suspend mode when not i n use.
− Reduce the processor speed.
− Switch the display lighting off or reduce the bright ness.
− Switch off the sound, reduce the volume or only all ow acoustic signals f or certain
applications.
Switching Pocket LOOX 610 into Suspend mode
In the system settings you can specify after how many minutes without action the Pocket PC
switches into the Suspend mode
Ê Touch Start.
Ê Select the Settings entry in the menu.
Ê Select the System tab.
Ê Tap the symbol Power.
Ê Select after how many minutes without action the Pocket PC is to switch int o the Suspend
mode.
The desired settings are made separately for battery operation and with a power outlet.
If you set the Pocket PC to switch off automatically, you can continue at the point at whic h
you interrupted your work by brief l y pressing the Suspend button.
i
Reduce the processor clock speed (energy saving mode)
The energy saving mode with its reduced processor clock speed is adequate for many applications.
The battery uses less energy at a lower processor speed, enabli ng you to work longer during battery
operation. But if you wis h to view films on your Poc ket LOOX 610, you should selec t the turbo mode
with its high energy cons um pt ion.
Ê Touch Start.
Ê Select the Settings entry in the menu.
Ê Select the System tab.
Ê Touch the CPU Setting symbol.
Ê Mark the Energy saving mode option.
You can also mark the Automatic Power Saving option. Y our Pocket PC then takes over the job of
selecting the most suitable mode and the most favourable processor clock speed.
48 A26391-K139-Z120-1-7619
Page 59

Configuring Pocket LOOX 610
Switching off display lighting
In the system settings, you can specify the time in minutes after which the display lighting is
switched off if no entry is made.
Ê Touch Start.
Ê Select the Settings entry in the menu.
Ê Select the System tab.
Ê Touch the Brightness symbol.
Ê Select after how many minutes without action the display l i ght ing is to be switched off duri ng
battery operation.
To save energy, we advise y ou t o keep the time until automat i c switch-off for batt ery operation very
short.
Reducing brightness
Ê Touch Start.
Ê Select the Settings entry in the menu.
Ê Select the System tab.
Ê Touch the Brightness symbol.
Here you can adjust the displ ay brightness separately f or operation with an electrical outlet and for
battery operation.
Ê Touch OK (navigation bar) to confirm y our setting.
Switching off sound
Ê Touch the loudspeaker symbol in the navi gat i on bar (to the left of the time).
A popup window for the loudspeaker set t i ngs appears.
Ê Mark the selection field for Off with the stylus.
Adjusting volume
Ê Touch the loudspeaker symbol in the navi gat i on bar.
A popup window for the loudspeaker set t i ngs appears.
Ê Set the desired volume on the slide control with the stylus.
or
Ê Touch Start.
Ê Select the Settings entry in the menu.
Ê Select the Personal tab.
Ê Touch the Sounds & Messages symbol.
Ê Set the desired volume with the sli de control.
Ê Touch OK (navigation bar) to confirm y our setting.
A26391-K139-Z120-1-7619 49
Page 60

Configuring Pocket LOOX 610
Permitting sound only for certain actions
Ê Touch Start.
Ê Select the Settings entry in the menu.
Ê Select the Personal tab.
Ê Touch the Sounds & Messages symbol.
Under the heading Activate sound for you will find a list of actions t hat are usually assigned acoustic
signals. You can select yourself which applications or functions are t o be accompanied by sounds.
Ê Touch in an empty control and selection box to mark it.
Ê Touch in a marked control and selection box t o remove the marking.
Ê Touch OK (navigation bar) to confirm y our setting.
Configuring hardware buttons
FSC KeyLock: preventing switch-on via application buttons
By default, your Poc ket LOOX 610 starts up if the Suspend button and an application butt on are
pressed.
In the program FSC KeyLock y ou can specify that the P ocket PC only starts if the Suspend button is
pressed.
Ê Touch Start.
Ê Select the Settings entry in the menu.
Ê Touch the Buttons symbol on the Private tab.
Ê Select the FSC KeyLock tab.
Ê Mark the Application buttons locked option.
You will find further information in the help file on your P oc ket LOOX 610.
Assigning chosen functions to the hardware buttons
The buttons of your Pocket PC are assigned certain func tions such as running programs. However,
you can change these default settings and assign the but t ons the functions of your choice.
Ê Touch Start.
Ê Select the Settings entry in the menu.
Ê Touch the Buttons symbol on the Private tab.
A list of the hardware buttons and the assigned programs or funct i ons appears. The four application
buttons appear in the list t wi ce. This is because you c an assign different applicat i ons to these
buttons for short and for long keystrokes.
Ê Mark the button in the list for which you want to change the assi gnm ent.
Ê Select the program you want to assign to this button from the list below it.
Ê Touch OK (navigation bar) to confirm y our setting.
50 A26391-K139-Z120-1-7619
Page 61

Configuring Pocket LOOX 610
The button is now assigned the des i red program .
If you want to change the function of several buttons , we advise you to make a note of the new
functions.
Adjusting menus
Frequently used programs appear in the St art menu. You can adjust the S t art menu to meet your
needs.
Ê Touch Start.
Ê Select the Settings entry in the menu.
Ê Touch the Menus symbol on the Private tab.
A list of programs/appl i cations appears.
Ê To remove programs from the menu, click i n the checkbox of the program. The check mark is
removed from the checkbox.
Ê To add programs to the Start menu, click in the checkbox of t he desired program. A check
mark appears in the checkbox.
Ê Touch OK (navigation bar) to confirm y our setting.
You can also create a new menu that you can display in the tas k bar on the Today screen.
Ê Touch Start.
Ê Select the Settings entry in the menu.
Ê Touch the Menus symbol on the Private tab.
Ê Select the New Menu tab.
Ê Touch the checkbox for the entry Activate 'Neu' popup menu.
Ê Select those applications f rom t he l ist that are to appear in the new menu.
Ê Touch OK (navigation bar) to confirm y our setting.
Using security functions
Password protection under Pocket PC 2003
You can protect your Pocket PC from unauthorised acc ess with a password. This m akes your data
accessible only t o persons who know the password.
Ê Touch Start.
Ê Select the Settings entry in the menu.
Ê Touch the Password symbol on the Private tab.
Ê Select the type of password you pref er:
− A password consis ting of four numbers (simple 4-digi t password).
− A password of alphanumeric characters (a complex alphanumeric password).
A26391-K139-Z120-1-7619 51
Page 62

Configuring Pocket LOOX 610
Password of four numbers
Ê Touch the desired combination of numbers on the num ber field.
Ê Touch OK (navigation bar) to confirm y our setting.
A dialog box appears.
Ê Confirm with Yes.
Alphanumeric password
Ê Touch the desired password on the keypad. The pass word m ust consist of at l east
7 characters and a combinati on of uppercase and lowercase letters and num bers or
punctuation marks.
Ê Touch the lower entry field with the st ylus. Repeat the password entry to confirm it.
Ê Touch OK (navigation bar) to confirm y our setting.
A dialog box appears.
Ê Confirm with Yes.
The Pocket LOOX 610 is now protec ted with a password.
Switch off the Pocket PC by briefly press i ng the Suspend button.
The next time you switc h on your Pocket PC you must first enter the password bef ore t he Today
screen or the content on which you last worked appears on the displ ay.
If you have forgotten your password, you can restart y our Pocket LOOX 610 by resetti ng i t to the
delivered state with the Ful l Reset switch.
If the device is s wi t ched off with the Full Reset switch, the battery i s switched off so that
the RAM contents are los t . You loose all data (documents, addit i onally installed programs,
!
personal settings) that you haven't saved elsewhere.
Therefore, remember to make a regular data bac kup with synchronisati on (see the
"Synchronising data with ActiveSync" chapter) or on corresponding memory cards
(available as an access ory). The program FSC-Backup is provided on your P oc ket LOOX
610 for completely back i ng up the RAM memory.
Changing time
During the initial start-up you entered the time zone of your location and set you system clock.
If you would like to change the time, proceed as follows:
Ê Touch Start.
Ê Select the Settings entry in the menu.
Ê Select the System tab.
Ê Touch the Clock symbol.
Ê Depending on your preference, you can change the time by moving the click hands or by
entering the desired time.
Ê Touch OK (navigation bar) to confirm y our setting.
In addition, you can also activate a second time, for example in another time z one. Thi s informs you
of the time of day of y our business partners at all ti mes or provides you with an overview of both the
time in the country you are travelling in and at home.
52 A26391-K139-Z120-1-7619
Page 63

Configuring Pocket LOOX 610
Using alarm functions
The alarm function of the Poc ket PC is not only pract i cal in the morning, but can also be useful
before important appointments or deadlines. Have the Pocket LOOX 610 "wake you": your Pock et
LOOX 610 will remind you in advance of upcoming appointments or deadli nes with an acoustic
signal. By the way, you can also select from a l arge number of different alarm signals.
Ê Touch Start.
Ê Select the Settings entry in the menu.
Ê Select the System tab.
Ê Touch the Clock symbol.
Ê Select the Signal tab.
Ê Touch the top checkbox.
Ê Mark one or several days of the week.
Ê Touch the time.
Ê Depending on your preference, select the alarm t i m e by moving the clock hands or by entering
the desired time.
Ê Touch OK (navigation bar) to confirm y our setting.
Ê Touch the bell symbol.
Now you can select how you want t o be woken up or notified.
Ê Touch empty checkboxes to mark them.
Ê Touch marked checkboxes to remove an undesired marking.
If you have marked Play sound, you can select the desired signal i n t he l i st next to it (drop-down
menu).
Ê Touch the small button with the down arrow next to the title Alarm1.
The drop-down menu appears. You can view all menu i tems by sliding the scroll bar.
Ê Touch the desired signal.
The signal is then played.
Ê Touch OK (navigation bar) to confirm y our selection.
You return to the Signal tab, where you can enter a name or a short des cription for the specifi ed
alarm function.
Ê Touch the word Description with the stylus.
Ê Enter a name for this alarm function wi th the keypad.
Ê Touch OK (navigation bar) to confirm y our setting.
Ê Enter additional alarm times in the s ame way.
A26391-K139-Z120-1-7619 53
Page 64

Page 65

Connecting and networking Pocket LOOX 610 with other devices
The Pocket PC offers a wi de range of ways to exchange data with other devices or to work in a
network.
You have already become familiar with data synchronisation via ActiveSync and an Act i veSync cable
in the "Synchronising dat a wi th ActiveSync" chapter. You can connect t he A ctiveSync cable
provided to any PC or notebook equipped wit h a USB port. An active A ctiveSync cable for devices
with a serial port is als o available as an accessory.
In addition, you also have t he i nfrared interface, BLUETOOTH and, depending on t he m odel ,
Wireless LAN available t o you for wireless communication. With various c ards which you can
purchase as accessori es (LAN card, W-LAN or modem card) you can integrate your Pocket PC in
networks and establish a c onnection to the Internet.
This chapter provides you wi th information on wireless data transfer
− via infrared interfac e
− via BLUETOOTH (depending on model)
− via Wireless LAN (depending on m odel )
Please see the documentat i on of the respective card for i nformation on using LAN, W-LAN or
modem cards.
Safety precautions when using radio components
Switch off BLUETOOTH when you are i n a hospital or near a medical electroni cs system, as the
radio waves transmitted by the radio component may impair the operation of the medical devi ces.
Do not bring the Pocket LOOX 610 int o an operating room with the radio component s witched on, as
the radio waves transmitted by BLUETOOTH may impair the operati on of medical electronic
systems used there.
Keep Pocket LOOX 610 at leas t 20 cm from a pacemaker with the radi o components switched on,
as otherwise the proper functi oni ng of the pacemaker can be interfered with by the radio waves.
The radio waves transmitted by the radio component can cause an unpl easant humming in hearing
aids.
Switch off BLUETOOTH when you are i n an ai rcraft or driving in a car.
Do not bring the Pocket LOOX 610 near fl ammable gases or into potentiall y explosive atmospheres
with the radio component swit ched on (e.g. petrol station), as the radio waves transmit ted can cause
an explosion or a fire.
The company Fujitsu Siemens Computers GmbH cannot be held respons i bl e f or radi o or television
faults arising from unaut hori sed changes made to this device. Fujitsu Siemens i s, furthermore, not
responsible for replacing and / or ex changing connector cables and dev i ces which have not been
specified by Fujits u S i emens Computers GmbH. The user is solely responsible for repairing faults
arising from such unauthoris ed changes made to a device and for replac i ng and/or exchanging
devices.
A26391-K139-Z120-1-7619 55
Page 66

Connecting and networking Pocket LOOX 610 with other devices
Wireless data transfer with infrared interface
The infrared interface (IrDA) on the l eft side of your Pocket PC provides you with wireles s serial data
transfer of up to 4 Mbits/s. In general, Fast Inf rared i s the interface of choic e for the fastest possi bl e
data transfer rate of 4 Mbits/s. However, should y ou notice difficulties when exchanging data with
slower devices, pleas e switch to the Slow Infrared setting (115 kbits).
For data transfer, you must al i gn the infrared interface of your P ocket PC with that of the partner
device (e.g. PC). The devices must not be more than one metre apart. The infrared interface of one
device must be in the range of i nfluence (horizontally approx. 30 ° and vertically approx. 15 °) of the
infrared interface of the other device.
Run the program Infrared Receive under Programs on your Pocket PC. The Pocket PC immediately
begins to search for the partner device (infrared transmitt er) and i nforms you on any infrared
interface found.
If the infrared partner device has not been found, point the devic e i n another direction and then run
the program Infrared Receive again.
Wireless communication with BLUETOOTH (optional)
With your Pocket PC wit h an integrated BLUETOOTH™ module you can com municate wirelessly
with other BLUETOOTH devices, e.g. with another Pocket PC, a notebook or a mobile phone.
Your Pocket PC with int egrated BLUETOOTH is a Power Class 2 dev i ce, i.e. it has a maxi m um
range of 10 meters. The range of the communication paths is shortened depending on the user
environment (e.g. walls or f urni ture), building structure and output power class of the partner.
BLUETOOTH supports many func tions (Services), e.g. accessing the Internet and transmit ting or
receiving data or e-mails.
In the following sections, you will f ind out how to put BLUETOOTH into operation.
The help file for the software on y our P ocket LOOX 610 explains how you operat e the software
concerned.
56 A26391-K139-Z120-1-7619
Page 67

Connecting and networking Pocket LOOX 610 with other devices
Selecting location for BLUETOOTH operation
• We recommend that you use the Pocket PC with the BLUETOOTH components in a typical
operating environment. Other BLUETOOTH devices, which you want to communicate with,
should be located at a distance of up to 10 m.
• Only install a partner device within the recommended distance. Observe the output power class
of the partner device when doing so. Det ai l s are contained in the operating manual of t he
partner device.
• Use the Pocket P C wi t h the BLUETOOTH at least 2 m away f rom ot her el ectrical or electronic
systems. If you must use the Pocket PC near a microwave cooker, then maint ai n a di stance of
at least 3 m from the microwave cooker, as the reception is subject to int erference with regard
to microwaves.
• Should problems result when communicating via BLUETOOTH because radios or radio
devices are located in the vicinity, then move the Pocket PC to a different location.
Activating and deactivating BLUETOOTH
You can switch BLUETOOTH on and off just as you wish. I n this way you can also use your Pocket
PC in places where wireless modul es such as BLUETOOTH are not allowed, e.g. in hospitals and
aircraft (please also note the security informati on i n the manuals "Security and Ergonomics" and
"Warranty"). In such pl aces, simply mark the BLUETOOTH signals on option. This will interrupt the
BLUETOOTH connection.
You can make the setti ngs for activating and deact i vating in the program CONNECT2AIR.
Ê Call the program CONNECT2AIR by pressing the appropriate application button (12).
Ê Mark either the BLUETOOTH signals off or BLUETOOTH signals on option.
You can also switch BLUETOOTH on and off in the system settings.
Wireless connection via Wireless LAN (optional)
If your Pocket LOOX 610 has an int egrat ed Wireless LAN installed, you will find information on it in
the help file on your Pocket PC.
In the same way as BLUETOOTH, you can also activate and deac tivate the integrated Wireless
LAN just as you wish. Proceed in the same way as described in the "Activat i ng and deactivating
BLUETOOTH" section.
A26391-K139-Z120-1-7619 57
Page 68

Page 69

Accessories and additional components
Supplementary components such as e.g. the CONNECT2AIR GP RS/GSM CompactFlash card
extend the functionalit y of your Pocket PC: you can telephone, send and receive em ai l s and call up
web and WAP pages with your Pocket PC together with the CONNECT2AIR GPRS/GSM
CompactFlash card. The delivery scope of the CONNECT2AI R GP RS/GSM CompactFlash c ard
also includes a headset, al l owi ng you to telephone without disturbance.
And you can also mount an additi onal battery, the Main Battery XL, on the Pocket PC. Thi s
considerably extends t he operating time of the Pocket LOOX 610.
The external keyboard is usef ul for entering larger amounts of text.
A serial ActiveS ync cable is available i f you also want to use devices with serial ports during dat a
exchange.
A26391-K139-Z120-1-7619 59
Page 70

Page 71

Troubleshooting and tips
If a fault occurs i n your Pocket PC, try to eliminate it with the m easures described in this c hapter. If
you fail to correct t he probl em , proceed as follows:
Ê Make a note of the steps and the circ um stances that led to the f aul t. Also make a note of any
error messages displayed.
Ê Switch the Pocket PC off.
Ê Contact your sales outlet or our hotli ne/help desk.
Installing new software
You will find information on installing supplementary programs in the ActiveSync help f ile that you
can call up after instal l i ng ActiveSync on your PC/notebook.
When installing programmes or drivers, important files may be overwritten and modified. To be able
to access the original files in case of problems following installation, you should make a backup
copy prior to installat i on (see the chapters "Sync hroni sing data with ActiveSync“ and "Backing up
data with FSC Backup“).
Date or time of the Pocket PC is incorrect
Ê Touch Start.
Ê Select the Settings entry in the menu.
Ê Select the System tab.
Ê Touch the Clock symbol.
Ê Depending on your preference, you can change the time by moving the click hands or by
entering the desired time.
Ê Touch OK (navigation bar) to confirm y our setting.
The display of the Pocket PC remains dark
Display lighting is switched off
Ê Press the Suspend button longer than 1 sec ond.
The information on the display of the Pocket PC is difficult to
read
Reflection
Ê Turn the Pocket PC until you can see t he i nformation in the display again.
A26391-K139-Z120-1-7619 61
Page 72

Troubleshooting and tips
The Pocket PC switches off
If you operate the Pocket PC too long with only the battery, the Pocket PC switches into the
Suspend mode when the battery charging level is too low.
Ê Connect the power adapter to charge the battery.
Ê Press the Suspend button.
The Pocket PC does not start after switch on
If the Pocket PC does not start after swit ch on, this may be due to one of t he following:
The battery is dead
Ê Charge the battery.
Ê Connect the power adapter to the cradle with the Pocket PC.
Ê Check whether the power adapter is connected correctly to the cradle.
Ê Check whether the power cable is plugged properly int o the power adapter and into the mains
outlet. The indicator on the power adapter should illuminate.
The battery is charged. LED is blinking green.
The power adapter is not connected correctly
Ê Switch the Pocket PC off.
Ê Check whether the power adapter is connected correctly to the Pocket PC.
Ê Check whether the power cable is plugged properly int o the power adapter and into the mains
outlet.
Ê Then switch the Pocket PC on again
62 A26391-K139-Z120-1-7619
Page 73

Troubleshooting and tips
The Pocket PC stops working
If the Pocket PC stops working, this may have the following reasons:
An application programme has caused the malfunction
Ê Restart the Pocket PC (soft reset).
Or
Ê Reset the Pocket PC to the delivered state with the Full Reset switch.
When you reset the Pocket PC to the delivered state, your data are lost!
!
Ê Slide the lock in the direction of t he arrow
with the stylus.
A26391-K139-Z120-1-7619 63
Page 74

Troubleshooting and tips
1
2
Ê Slide the battery slightly i n t he di rection of
the arrow (1).
Ê Lift out the battery upward in the direct i on of
the arrow (2).
Ê Slide the Full Reset switch to t he ri ght with
the stylus.
64 A26391-K139-Z120-1-7619
Page 75

Troubleshooting and tips
Ê After waiting a few moments, sl i de the Full
Reset switch to the left with the stylus.
Please note that your Poc ket PC does not
start up immediately after actuating the full
reset switch, but rat her a few seconds after
installing the battery and connecting the
mains power cable.
Ê Install the battery as shown in the diagram
and then slide it in the direction of the arrow
until the edge of the battery i s flush with the
edge of the device.
A26391-K139-Z120-1-7619 65
Page 76

Troubleshooting and tips
After approximately 10 seconds a picture appears on the dis play and a tone sounds.
i
If the device is s wi t ched off with the Full Reset switch, the battery i s switched off so that
the RAM contents are lost. This means you loose all data (documents, additionally
!
installed programs, personal settings) that you haven' t saved elsewhere.
Therefore, remember to make a regular data bac kup with synchronisati on (see the
"Synchronising data with ActiveSync" chapter) or on corresponding memory cards
(available as an access ory). The program FSC-Backup is provided on your P oc ket LOOX
610 for completely back i ng up the RAM memory.
Ê Slide the lock in the direction of t he arrow
with the stylus.
The battery is dead
Ê Connect the power adapter to the Pocket PC t o charge the battery.
Or
Ê Connect the power adapter to the cradle and place the Pocket PC in the cradle for chargi ng.
The battery discharges too quickly
The battery is either too hot or too cold.
Ê Bring the Pocket PC up / down to a normal tem perature again.
If the operating time of t he battery mode is extremely short, the battery is probabl y old and should
be replaced. Please consult your local distributor if you want to buy a new Pocket LOOX 610
battery.
66 A26391-K139-Z120-1-7619
Page 77

Troubleshooting and tips
The Suspend button does not respond properly
You have pressed the Suspend button too long to switch the Pocket PC on or off.
Ê Briefly press the Suspend button until the Pocket PC swi tches on or off.
No sound or minimal volume
Check whether the volume is set correctly.
Ê Touch the loudspeaker symbol in the navi gat i on bar and set the volume with the s l i de control.
Make sure that the sound is switched on (marking in On sel ection box).
or
Ê Touch Start.
Ê Select the Settings entry in the menu.
Ê Select the Personal tab.
Ê Touch the Sounds & Messages symbol.
Ê Set the desired volume with the sli de control.
Ê Touch OK (navigation bar) to confirm y our setting.
Contact with hotline/help desk
If you are unable to solve a c ertain problem, please contact the hotline/help desk. Additional details
are contained in the "Safety and Ergonomics" and "Warranty" m anual s. Please have the followi ng
information ready when you call :
• The model name and serial number of the Pocket PC. The serial number is located on a sticker
on the backside of the Pocket PC.
• Notes of any mess ages that appear on the screen and informat i on on acoustic signals.
• Any changes you have m ade to the hardware or software after receiving the Pocket PC.
• Your system configuration and all peripheral devices connected to y our system (e. g.
keyboard).
• Your sales contract.
A26391-K139-Z120-1-7619 67
Page 78

Page 79

Technical data
Pocket LOOX 610
Processor: Intel PXA255 Applic at ions Processor with Intel®
Main memory:
• Model equipped with BLUETOOTH:
• Model equipped with BLUETOOTH and
Wireless LAN:
Possible modules: CompactFlash cards: WLA N, GPS, memory,
Electrical data
Regulations complied with: CE, FCC Part 15 Class B, E N60950, UL
Protection class : III
Maximum power draw:
(Pocket PC on with batt ery charging)
Display
Display diagonal:
Dimensions: (W x H)
Slots
SD/MMCard
CF Type I and II
Ports
Integrated microphone / loudspeaker 1 / 1
Headphones port 3.5 mm
USB port (Universal Serial Bus) / Serial port: USB 1.1 / RS232
Infrared interface: Fast IrDA (up to 4Mbit/s)
BLUETOOTH Class 2
XScale™ technology at 400 M Hz
64 MB RAM, 64 MB ROM
128 MB RAM, 64 MB ROM
Microdrive, modem, c am era, VGA
SD/MMCard: memory
Plug-on: Main Battery X L
12 W
240 x 320 transflective TFT display , resolution
65,536 colours
53.6 mm x 71.5 mm; 0.22 mm pixel spacing
1
1
Environmental conditions
Environment class 3K 2, 2K2 DIN IEC 721 EN 60721
Housing class 7M2 DIN IEC 721 EN 60721
Temperature:
• Operating (3K2)
• Transport (2K2)
A26391-K139-Z120-1-7619 69
5 °C .... 40 °C
-25 °C .... 60 °C
Page 80

Technical data
Dimensions
Width/depth/height: 147,5 mm/78 mm/19mm
Weight:
• Model equipped with BLUETOOTH:
• Model equipped with BLUETOOTH and
Wireless LAN:
approx. 197 g
approx. 205 g
Battery
Rated capacity: 1500 mAh
Charging time (when not in operation): Max. 4 hours
Operating time: up to 24 hours
up to 300 hours in stand-by mode
Power adapter
• Rated voltage: 100 V to 240 V (automatic)
• Frequency: 50 Hz to 60 Hz (automatic)
• Rated voltage: 5 V ±5%
• Max. rated current: 2,4 A
You can readily order an additional power adapter and an addi t i onal power cable.
70 A26391-K139-Z120-1-7619
Page 81

Index
A
Accessories 59
ActiveSync c abl e, connecting 28
ActiveSync part nership, establishing 28
ActiveSync, i nstalling 28
Additional components 59
Alarms 53
Antenna 10
Application buttons, using 23
Arrow keys, using 22
B
Battery 10
capacity 6
charging 37
discharging 66
installing 13
self-discharge 6
storing 6
technical data 70
Battery interlock 10
Battery performance
checking 38
optimising 38
BLUETOOTH 56
activating 57
deactivating 57
Buffer battery, load 61
C
Calendar application button 10
CE marking 5
Cleaning 6
CompactFlash expansion card
inserting 31
removing 34
Components, optional 59
CONNECT2AIR application button 10
Connection for Activ eS ync cable 10
Connection for cradle 10
Contacts application button 10
CPU Performance 48
Cradle, using 25
D
Dark display 61
Data backup 17, 29
Data loss 17
Data synchronisation 27, 28
Data transfer
BLUETOOTH 56
infrared 56
Wireless LAN 57
Data, technical 69
Date, not correct 61
Date/Time incorrect 61
DC IN jack 10
Display
cleaning 6
difficult to read 61
reflected glare 61
remains blank 61
Display lighting 49
adjusting 23
Disposal 5
E
Eject button 10
Electromagnetic compatibility 5
Energy management
battery status 47
optimising 47
Energy saving 5
Expansion card
handling 31
inserting 31
removing 34
F
First start 15
full reset switch 12
time zone 15
Today screen 15
touchscreen 15
FSC Backup 29
FSC KeyLock 50
FSC Panning 30
FSC Speed button 10
FSC SpeedMenu 41
editing 44
Main menu 42
navigation key 41
operating 41
programme structure 42
Quick menu 42
scroll button 41
stylus 42
troubleshooting and tips 45
Full Reset 17
Full reset switch 10, 12
A26391-K139-Z120-1-7619 71
Page 82

Index
G
GPRS module 59
H
Hardware keys, configuring 50
Hardware, overview 10
Headphones port 10
Hotline/Help Desk 67
I
Infrared interface 10, 56
Initial start-up
basic operation 15
connecting power adapter 14
first start 15
K
Keyboard, external 59
L
Locking catch 10
adjusting 26
Loudspeaker 10
Lower arrow key 10
M
Main Battery XL 59
Microphone 10, 24
N
Navigation key 10
using 21
No sound 67
Notational conventions 3
Notes
CE marking 5
cleaning 6
disposal 5
energy saving 5
safety 4
O
On/off time 16
Operating, basically 15
Overview
hardware 10
software 7
P
Password protection under Poc ket PC
2003 51
Pocket PC
before you travel 39
cleaning 6
configuring 47
connecting with other devices 55
does not start 62
does not work 63
networking 55
operating 9
operating with one hand 41
switch off 16
switches itself off 62
switching on 16
transporting 39
Pocket-PC
initial start-up 11
Power adapter
connecting 14
technical data 70
Power saving possibilities 48
Power-on indicator 10
Preparing for use, first time 11
R
Radio indicator 10
Recycling 5
S
Safety 4
Screen too bright 61
SD/MMC expansion card
inserting 33
removing 35
Security functions 51
Self-discharge 6
Signs and symbols 3
Slot for expansion cards 10
Soft reset 10, 17
Software
installing new software 61
new installation 61
overview 7
Sound
activating optionally 50
switching off 49
Sound recording, record button 24
Standard operating elements, us i ng 21
72 A26391-K139-Z120-1-7619
Page 83

Index
Start menu, customi sing 51
Storage, battery 6
Stylus 10
removing 12
using 21
Summer time 61
Suspend key 10, 16
does not react 67
switch off 16
switching on 16
Suspend mode 16
T
Technical data 69
battery 70
Pocket PC 69
power adapter 70
Time
changing 52
daylight savings 61
not correct 61
Time zone 15
Tips 61
Today application button 10
Today screen 15
Touchscreen, aligning 15
Transport 39
Travel, Pocket PC 39
Troubleshooting 61
U
Upper arrow key 10
USB adapter 59
V
Volume 49
minimal 67
W
Warm boot 17
Wireless data transfer 56, 57
Wireless LAN 57
A26391-K139-Z120-1-7619 73
 Loading...