

Page 1

Operating Manual
Zero Client
Zero Client DZ19-2
Zero Client DZ22-2
Page 2

Congratulations, you have
innovative Fujitsu product.
decided to buy an
The latest information about our products, useful tips, updates etc. is available
from our website: "
For automatic driver updates, go to: "http://support.ts.fujitsu.com/support/index.html"
Should you have any technical questions, please contact:
• our Hotline/Service Desk ( see the Service Desk list or visit:
"
http://ts.fujitsu.com/support/servicedesk. html")
• Your sales pa rtner
• Your sales office
We hope you really enjoy using your new Fujitsu system.
http://ts.fujitsu.com"
Page 3

Page 4

Copyright
Fujitsu Tec
Published by
Fujitsu Technology Solutions GmbH
Mies-van80807 Munich, Germany
Contact
h
All rights reserved, in cluding intellectual property rights. Subject to te c hnical alterations. Delivery subject to availability.
No warranty is offered or liability accepted in regard of the completeness, correctness, or current applicability of an y
data or
by copyright. Use of these by third parties for their own purposes may constitute an infringement of the holders’
rights. Further information can be found at "
hnology Solutions 2012/02
der-Rohe-Straße 8
s.fujitsu.com/support
ttp://t
illustrations. Brand names may be protected trademarks of the respective manufacturer and/or protected
http://ts.fujitsu.com/terms_of_use.html"
Order No. Fujitsu Technology Solutions GmbH: A26361-K1360-Z300-1-8N19, edition 4
Page 5

Zero Client DZ19-2
Zero Client DZ22-2
Operating Manual
English 3
Deutsch 35
Français 69
Italiano 103
Español 137
Nederlands 171
Dansk 205
Suomi 237
Svenska 271
Português 303
Pyccкий 337
Slovenčina 373
Page 6

Page 7

Contents English - 1
EnglishContents
YourZero Client... ..................................................................... 5
Further information ...................................................................... 6
Notational conventions .................................................................. 6
Importantnotes ........................................................................ 7
Safety instructions ...................................................................... 7
Powercable ............................................................................ 8
Transporting thedevice .................................................................. 8
Cleaningthe device ..................................................................... 8
CE marking ............................................................................ 9
Disposaland recycling .................................................................. 9
Getting started ......................................................................... 10
Unpacking and checking the delivery . . ................................................... 10
Setting upthe device .................................................................... 11
Setting up an ergonomic video workstation ............................................ 11
Attaching thebase .................................................................. 13
Adjusting theheight ................................................................. 13
Adjusting theinclination .............................................................. 13
Adjusting therotation ................................................................ 14
Adjusting portrait format ............................................................. 14
Fitting aswivelarm orwall bracket ................................................... 14
Connecting the device . .................................................................. 15
Connect the cables to the Zero C lient . .. . . ............................................ 15
Operation .............................................................................. 17
Switching thedeviceon andoff .......................................................... 17
Noteson power management ............................................................ 18
Working with the Zero Client ............................................................. 19
Changing the monitor settings . ........................................................... 20
Setting aturn-offtimerfor themonitor ................................................. 20
Setting the sleep timerfor Zero Client ................................................. 21
Changing the monitor settings with the buttons of the con trol panel . ......................... 21
Softkeys ............................................................................ 22
Language selection .................................................................. 22
Activate/deactivate ECO operating mode . ............................................ 22
Locking the OSDmenu .............................................................. 23
Locking the ON/OFFbutton .......................................................... 23
Changing the monitor settings using the O SD menu . . . .................................... 24
Adjusting thebrightness andcontrast ................................................. 25
Adjusting thevolume ................................................................ 25
Setting the colourtemperature and colours ............................................ 25
Adjusting thedisplay ofthe OSDmenu ................................................ 26
Setting functionsin theAdvanced menu ............................................... 26
Displaying information ............................................................... 26
Noteson ergonomic colouradjustment ................................................ 27
Troubleshooting ....................................................................... 28
Explanatory information about standard ISO 9241-307 . . . . . ............................. 29
Technical specification ................................................................. 30
Fujitsu Technology Solutions 3
Page 8

2 - English Contents
Preset operating modes ................................................................. 31
Most frequent operating modes . . . . . . ................................................. 31
DVI-Dport .............................................................................. 32
4 Fujitsu Technology Solutions
Page 9

Contents English - 3
Fujitsu Technology Solutions 5
Page 10

Windows 7, Windows Vista and Windows XP are registered trademarks of Microsoft Corporation.
All other trademarks used in this document are trademarks or registered trademarks of
their respective owners and are reco gnised as being protected.
Copyright © Fujitsu Technology Solutions GmbH 2012
All rights, including rights of translation, reproduction by printing, copying or similar
methods, of the whole document or parts thereof, are reserved.
Offenders will be liable to prosecution and payment of damages.
All rights reserved, including rights created by patent grant or registration of a utility model or design.
Delivery subject to availability. We reserve the right to m a ke technical modifications to the product.
Page 11
Your Zero Client... English - 5
Your Zero Client...
has a whole range of useful features and functions, e.g.:
• TFT d isplay (Thin Film Transistor; active matrix)
• minimal space requirement
• LED background lighting
• LAN port 100 MBit Etherne
• PoE (Pow er over Ethernet) for Zero Client DZ22-2
• Built-in Zero Client te
• DVI port for second monitor (it is not possible to connect to a PC via this socket)
• 4 USB sockets (for keyb
• 3.5 mm jack sockets for headphones and microphone
• optimum ergonomic ch
definition and colo
• high degree of brightness and good contrast
• High resolution 1050 pixels (Ze ro
• display of up to 16.7 million colours
• Automatic scann
DZ22-2)or31to
frequencies)
• digital screen controller with micropro cessor for storing 12 different display modes
• colour adjus
• convenient operation via integrated OSD (On Screen Display) menu
• VESA-DDC co
• VESA-FPMPMI compatibility (Flat Panel Monitor Physical Mounting Interface) –
Mounting device for swivel arm and wall bracket
• Plug & play
• ECO function
• Power man
This operating manual contains the important information that you need for the initial
operation and everyday use of your Zero Client.
ur purity right into the corners)
1280 x 1024 pixels (Zero Client DZ19-2) or 1680 x
ing of horizontal frequencies from 30 to 82 kHz (Zero Client
81 kHz (Zero Client DZ19-2) and ref resh rates (vertical
from 59 to 76 Hz (totally flicker-free)
tment for matching the screen image to individual viewing usage
mpatibility
capability
agement for reducing po w er consumption when the Zero Client is inactive
s because of the slim casing
t
chnology for easy access to the Virtual Desktop
oard, mouse and two further USB devices)
aracteristics ( totally distortion-free, excellent picture
Client DZ22-2)
Zero Client DZ22-2 is capable of being powered over the LAN. If you use
Power over Ethernet (PoE), you need the corresponding network infrastructure
but no additional power source. Note however that you always need a
power source to operate Zero Client DZ19-2.
To operate the Zero Client you need a LAN connection to a server
with desktop virtualisation software.
The LAN data cable is not included in the delivery. A keyboard and mouse
will also be needed and these can be ordered as options.
Fujitsu Technology Solutions 7
Page 12
6 - English Your Zero Client...
When you start the monitor for the first time, after logging in to the virtual desktop you
should set the screen resolution to 1280 x 1024 pixels (Zero Client DZ19-2) or 1680 x
1050 pixels (Zero Client DZ2 2-2) and adjust the display according to your needs (see
chapter "
Changing the monitor settings", Page 20 - English).
Further information
To find out how to set resolutions and refresh rates, refer to the documentation of the Zero Client
software.
For ergonomic reasons, we recommend a screen resolution of 1280 x 1024 pixels (Zero
Client DZ19-2) or 1680 x 1050 pixels (Zero Client DZ22-2).
Due to the technology used (active matrix), a Zero Client with LCD monitor provides a
totally flicker-free picture even with a refresh rate of 60 Hz.
Notational conventions
Pay particular atte
these wa rnings cou
to lo ss of data. The
defective through
Indicates important information for the proper use of the device.
ntion to text marked with this symbol. Failure to observe
ld pose a risk to health, damage the device or lead
warranty will be invalidated if the device becomes
failure to observe these warnings.
►
This font
This font
This font
"This font"
Key
This font
8 Fujitsu Technology Solutions
Indicates an activity that must be performed
Indicates a result
indicates data entered using the keyboard in a program dialogue or at
the command line, e.g. your password (Name123) or a command used to
start a program (start.exe)
indicates information that is displayed on the screen by a program, e.g.:
Installation is complete.
indicates
• terms and texts used in a software interface, e.g.: Click on Save
• names of programs or files, e.g. Windows or setup.exe.
indicates
• cross-references to another section, e.g. "Safety information"
• cross-references to an external source, e.g. a web address: For more
information, go to "http://ts.fujitsu.com"
• Names of CDs, DVDs and titles or designations for other materials,
e.g.: "CD/DVD Drivers & Utilities" or "Safety/Regulations" manual
indicates a key on the keyboard, e.g:
indicates terms and texts that are emphasised or highlighted, e.g.: Do
not switch off the device
F10
Page 13

Important notes English - 7
Important notes
ImportantnotesNotes
In this chapter you will find information regarding safety which it is essential to
take note of when working with your device.
Safety instructions
This device complies wit
including electronic of
any questions about whe
please contact your sal
• The display s urface of
be careful with the dis
• If the device is brought into the installation site from a cold environment, condensation
can form. Before op erating t he device, wait until it is absolutely dry and has reached
approximately the same temperature as the installation site.
• When installing an
conditions in Chap
in Chapter "
• To ensure sufficient ventilation, the air inlet and outlet openings of the device must be kept clear.
• The device autom
Make sure that t
• Ensure that the po wer socket on the device and the mains outlet are freely accessible.
• The ON/OFF swi
fully from the
• The device is equipped with a power cable that complies with safety standards.
• Use the suppl
• Lay the cables in such a way that they do not create a hazard (danger of tripping)
and cannot be damaged. W he n connecting the device, observe the relevant notes
in chapter "
• No data tra
• Make sure that no objects (e.g. jewellery chains, paper clips, etc.) or liquids get
inside the device (danger of electric shock, short circuit).
• The devic
it from s
• In an emergency (e .g. damaged casing, operation controls or cables, penetration
of liquids or foreign matter), switch off the device, disconnect the power plug
and contact your sales outlet or our Service Desk.
• Repai
and in
• Only use the screen resolution settings and refresh rates specified in Chapter "
specification", Page 30 - English. Otherwise you may damage the device. If you are
in any doubt, contact your sales outlet or our Help Desk.
•Usea
you
Setti
Connecting the device", Page 15 - English.
nsfer cables should be connected or disconnected during a thunderstorm.
e is not waterproof! Never immerse the device in water and protect
pray water (rain, sea water).
rs to the device must only be performed by qualified technicians. Unauthorised opening
correct repair may greatly endanger the user (electric shock, fire risk).
screen saver with moving images and activate the power management for
r monitor to prevent still images from "burning in".
h the relevant safety regulations for data processing equipment,
fice machines for use in a n office e nvironment. If you have
ther the device can be used in the intended environment,
es office or our Service Desk.
the device is sensitive to pressure and scratches. You should therefore
play surface in order to avoid lasting damage (scratches).
d operating the device, please observe the notes on environmental
ter "
Technical specification", Page 30 - English as well as the instructions
ng up an ergonomic video workstation", Page 11 - English.
atically sets itself to the correct voltage within the range from 100 V to 240 V.
he local mains voltage is neither higher nor lower than this range.
tch does not disconn ect the monitor from the mains voltage. To disconnect
mains supply, disconnect the power plug from the socket.
ied power cable only.
Technical
Fujitsu Technology Solutions 9
Page 14
8 - English Important notes
• If the device is used with the swivel arm or wall bracket, then avoid turning
the device by more tha n 180° or 270°.
• Store this manual close to the device. If you pass the device on to third
parties, you should pass this man ual on with it.
• We recommend that you place your device on a durable, non-slip surface. In view
of the many different finishes and varnishes used on furniture, it is possible that the
feet of the device may mark the surface they stand on.
Power cable
Use the supplied power cable only.
Use the following guidelines if it is necessary to replace the original cable set.
• The female/male receptacles of the cord set must meet IEC60320/CEE-22 requirements.
• The cable has to be HAR -certi fied or VDE-certified. The mark HAR or
VDE will appear on the outer sheath.
• For devices which are mounted on a desk or table, type SVT or SJT cable sets may be
used. For devices which sit on the floor, only SJT type cable sets may be used.
• The cable set must be selected according to the rated c urrent for your device.
• If necessary, replace the original power cable with a regular grounded 3-core mains lead.
Transporting the device
Device,TransportationRetransportation
Transport all parts separately in their original packaging or in a packaging which
protects them from knocks and jolts, to the new site.
Do not unpack them until all transportation manoeuvres are completed.
If the device is brought from a cold environment into th e room where it will be used,
condensation m ay occur. Before operating the device, wait until it is absolutely dry
and has reached approximately the same temperature as the installation site.
Cleaning the device
Switch of
Do not cle
Do not us
Ensure
The display surface of the device is sensitive to pressure and scratches. Clean
it only using a soft, slightly moistened cloth.
The surface of the casing can be cleaned with a dry cloth. If particularly dirty, use a cloth that
has been moistened in mild domestic detergent and then carefully wrung out.
10 Fujitsu Technology Solutions
f the device an d unplug the power plug.
an any interior parts yourself, leave this job to a service technician.
e any cleaning agents that contain abrasives or m ay corrode plastic.
that no liquid enters the device.
Page 15

Important notes English - 9
CE marking
The shipped version of this device complies with the requirements of
European Union directives 2004/108/EC "Electroma gnetic compatibility",
2006/95/EC "Low voltage directive" and 2009/125/EC "Ecodesign
Directive".
Disposal and recycling
This device has been manufactured as far as possible from materials which can be recycled or
disposed of in such a way that the environment is not damaged. The device may be taken back after
use to be reused or recycled, provided that it is returned in a condition that befits its intended use.
Any components not reclaimed will be d isposed of in an environmentally acceptable manner.
The device must be disposed of i n accordance with the local regulations for disposal of special waste.
Information on this subject is also available on the Internet at "
http://ts.fujitsu.com/recycling".
Fujitsu Technology Solutions 11
Page 16
10 - English Getting started
Getting started
Unpacking and checking the delivery
The display surface of the device is sensitive to pressure and scratches.
Always hold the device by the casing!
The following are delivered with the device:
• one Zero Client
• one power cable
• a security booklet
• one warranty booklet
• a CD with manuals
► Unpack all the individual parts.
► Check the contents for any visible damage which may have occurred during transportation.
► Check whether the delivery conforms to the details in the delivery note.
► Notify your local sales outlet immediately if you discover a ny transport damage or if
the contents of the delivery do not correspond to the delivery note.
We recommend that you do not discard the original packing m aterial that
comes with the devices. You may need to reuse t he packaging in future,
for example if you need to transport your device.
To operate your Zero Client it needs software which has to be installed
on the access server. To find the latest software packages, visit the
support area of the Fujitsu Technology Solutions website or follow t his link:
http://support.ts.fujitsu.com/com/support/downloads.html"
"
12 Fujitsu Technology Solutions
Page 17
Getting started English - 11
Settingupthedevice
To ensure sufficient ventilation, the air inlet and outlet openings of
the device m ust be kept clear.
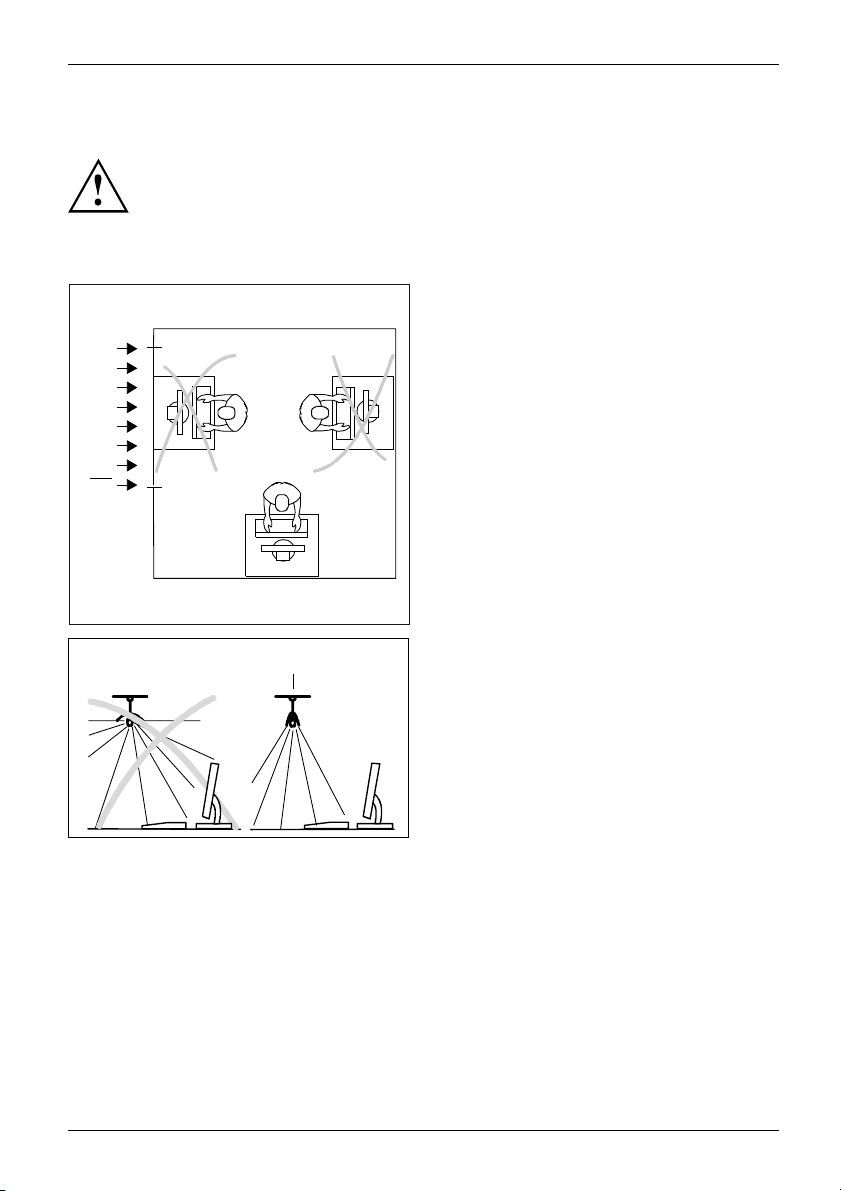
Setting up an ergonomic video workstation
► Do not position the video workstation
opposite a window (1).
1
► Position the Zero Client out of range
1
Fujitsu Technology Solutions 13
of a light source (1 ).
Page 18

12 - English Getting started
► Position the keyboard where it is
easiest to reach ( 1).
1
► Position the Zero Client so that the eye
distance to the screen (1) is around 50 cm.
1
50 cm
► Position the
(1). The moni
the accepta
ing on the situation, it may be advisable to use a swivel arm or wall
Depend
t (VESA FPMPMI), which are available from specialist dealers. For this
bracke
e the monitor base must be r emoved beforehand as described in C hapter
purpos
ing a swivel arm or wall bracket", Page 14 - English.
"
Fitt
14 Fujitsu Technology Solutions
Zero Client for optimum viewing
tor should not extend beyond
ble viewing range (2).
Page 19
Getting started English - 13
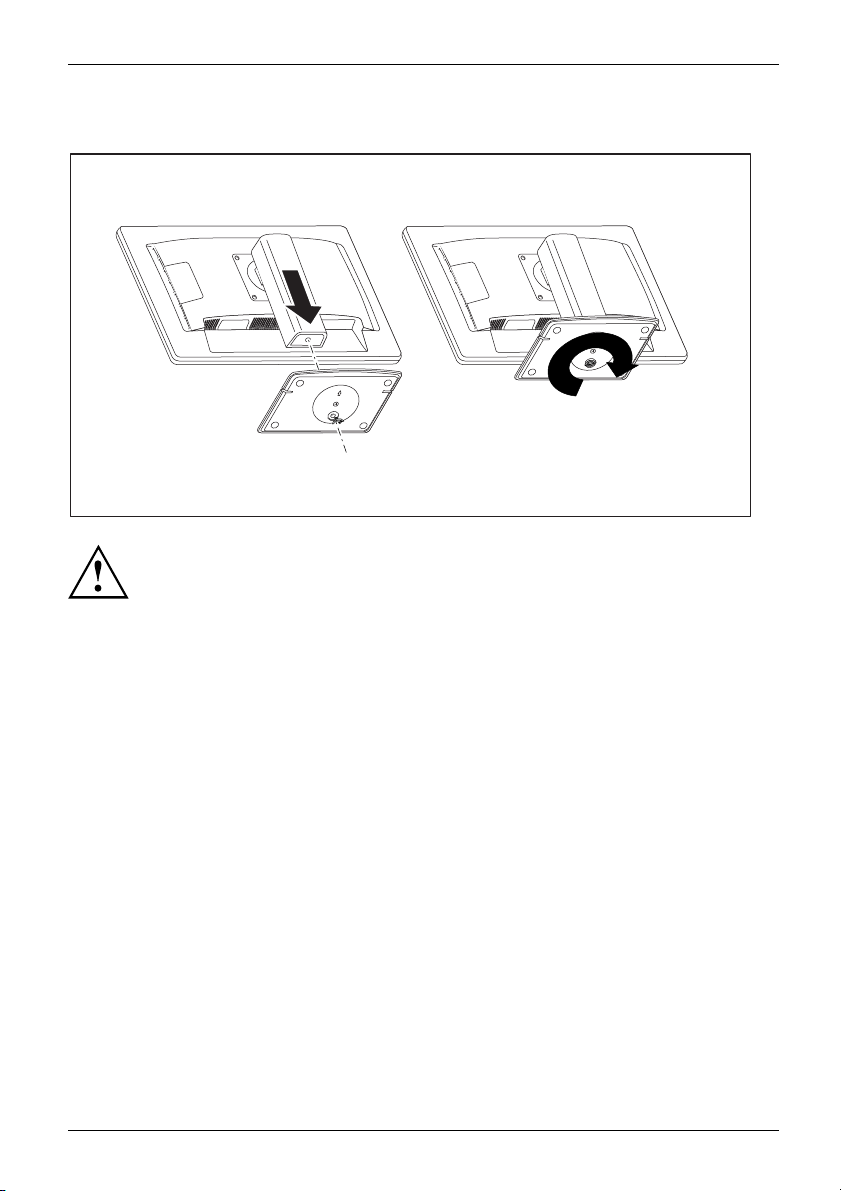
Attaching the base
1
3
2
Do not remove the locking pin before you have fixed the base plate on the Zero
Client and placed the Zero Client in the operating position.
► Insert the base plate on the foot (1).
► Guide the screw through the opening (2).
► Secure the base plate with the screw (3).
► Place the Z ero Client in the operating position.
Adjusting the height
The height of the Zero Client can be adjusted by approximately 110 mm.
► Remove the retaining sp lint on the rear of the height adjustment.
► Grasp the monitor with both hands at the left and right edges o f the
housing and move it up or down.
Adjusting the inclination
nitor of the Zero Client ca n be tilted -3° (forwards) and +35°
The mo
wards) from the vertical position.
(back
► Hold
Fujitsu Technology Solutions 15
the monitor with both hands on the left and right sides of the casing
ove it to the desired angle.
and m
Page 20
14 - English Getting started
Adjusting the rotation
► Grasp the Zero Client’s monitor with both hands on the right and left edge of
the casing and turn it to the desired position.
Adjusting portrait format
The Zero Client’s monitor
mode) to vertical format (
► Grasp the Zero Client’s m
the casing, tilt the moni
turn it clockwise until
can be rotated from horizontal format (landscape
portrait mode).
onitor with both hands on the right and left edge of
tor backwards, move it into the highest position and
it is in the portrait position.
To be able to display the
software must support
To reset the monitor to landscape mode, th e monitor should be turned anti-clockwise .
The OSD display can be reset again in the OSD menu.
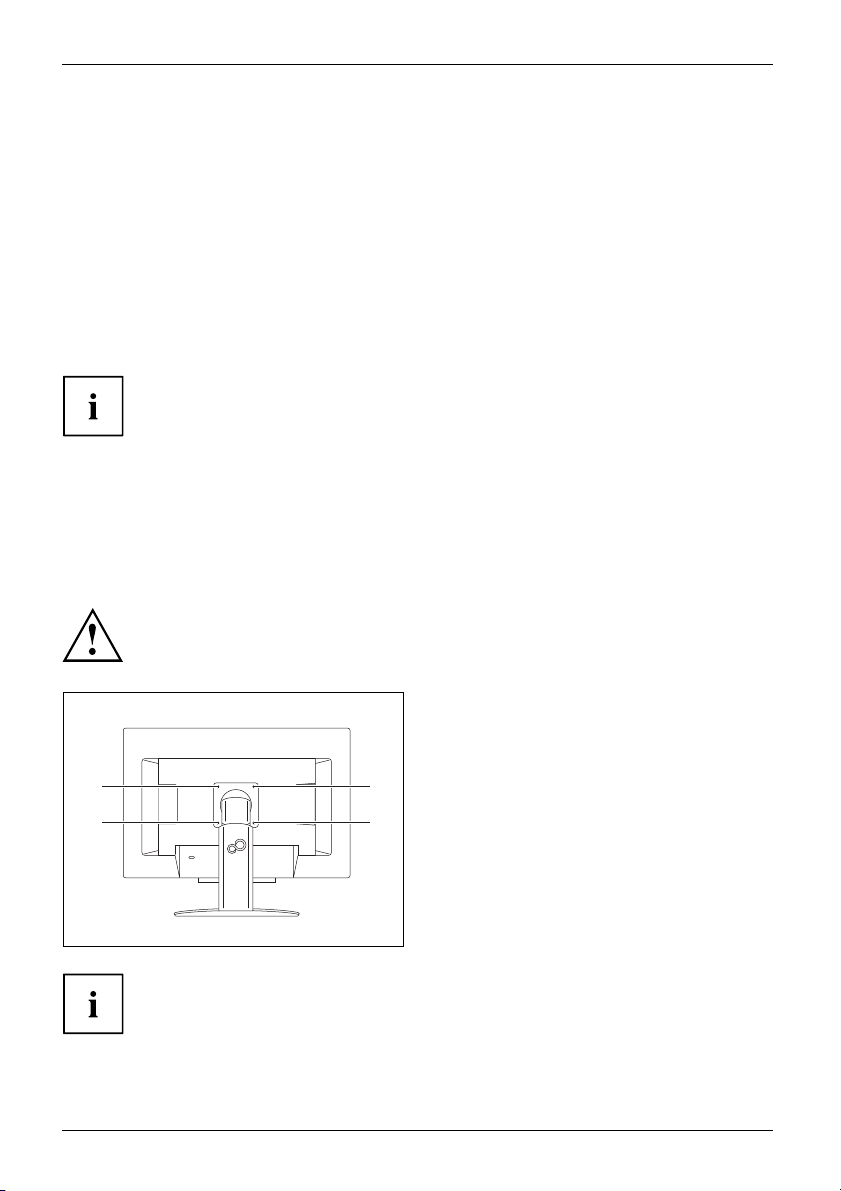
Fitting a swivel a
Beforeyoucanuseaswivelarmorawallbracket,youmustfirst remove the base of t he Zero Client.
The display surface of the Zero Client is sensitive to pressure a nd scratches.
1
2
rm or wall bracket
screen contents in portrait mode, the Zero Client Controller
this function or you will need to use additional software.
► Switch off the Zero Client and pu ll the
power plug out of the power socket.
► Remove all cables.
► Lay the Zero Client on its front on
3
4
asoftsurface.
► Remove the screws (1-4) on the rear
of the Zero Client.
Yo u can now mount a swivel arm or a wall
bracket in accordance with VESA FPMPMI
using a hole spacing of 100 mm.
For instructions on how to mount the swivel arm or wall bracket, please see
the documentation for the s wive l arm or wall bracket.
16 Fujitsu Technology Solutions
Page 21
Getting started English - 15
Connecting the device
Please observe the safety information in "Important notes", Page 7 - English.
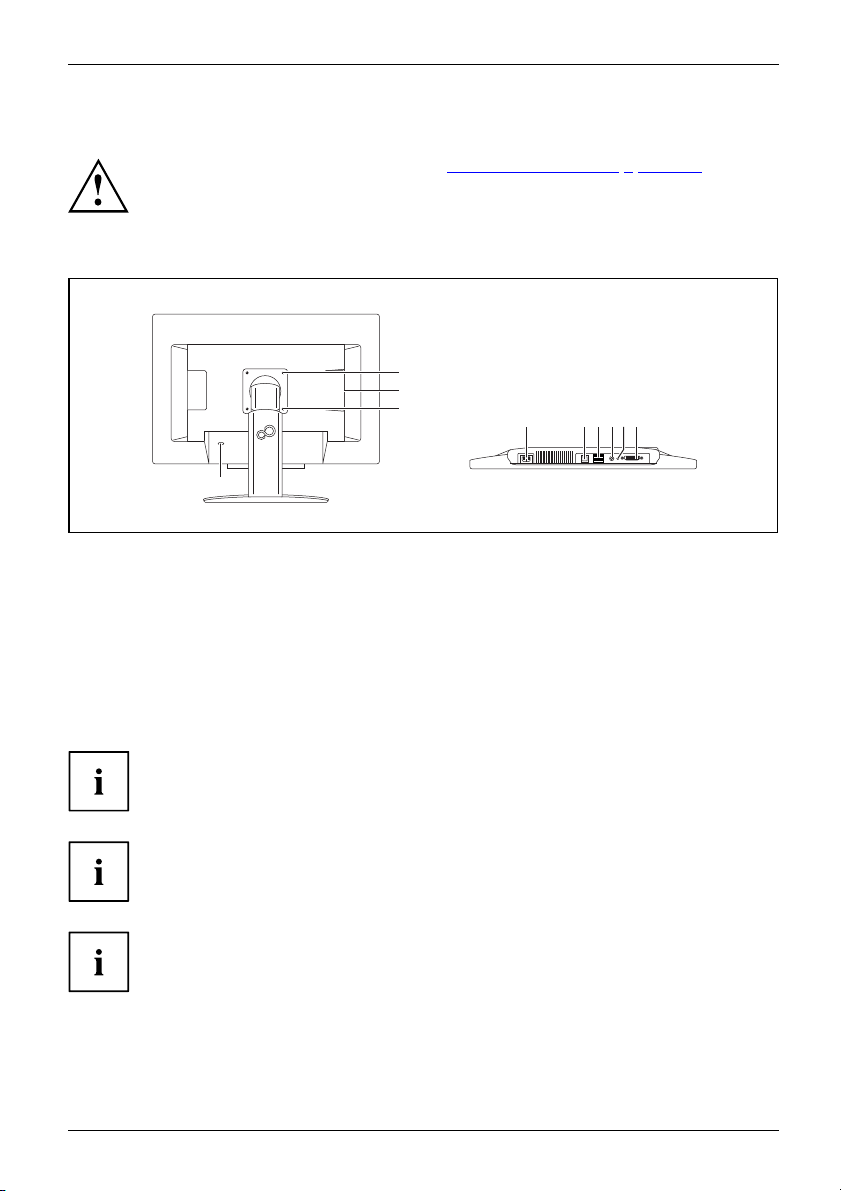
Connect the cables to the Zero Client
1
3
1
2
4
567 9
8
1 = Threads for sec
or wall mounti
2 = Se curity slot for the "Kensington Lock"
3=USBports
4 = Po wer connection
5 = L AN port
► Insert the plug of the shielded Ethernet data c able in the LAN port of the Zero Client,
making sure that it the connector is correctly connected.
If you connect your Zero Client DZ22-2 to a Power over Ethernet network, no
mains cable is needed to supply power. This does not apply to the Zero Client
DZ19-2, which always needs a mains cable to supply power.
For power supply through Power over Ethernet (only for Zero Client DZ22-2):
Only use the Power over Ethernet Midspans provided by Fujitsu, as only
these can supply the required output of up to 60 W.
The Zero Client DZ22-2 must be switched off before the power supply source can
be changed from mains power to Power over Ethernet (or vice versa).
► Plug the other end of the Ethernet cable into a LAN wall socket.
► Insert the USB plugs of your keyboard and mouse into USB ports on your Zero Client.
uring the swivel arm
ng
6 = USB ports
7 = Headphone output
8 = Microphone in
9 = DVI-D output
put
Fujitsu Technology Solutions 17
Page 22
16 - English Getting started
► Plug the supplied power cable into the power connector of the Zero Client.
To operate your workstation with screens, connect an additional monitor
to the DVI-D output of the Zero Client.
You c a n fix a Kensington Lock anti-theft device in the security slot. A
Kensington Lock is not supplied with the Zero Client.
The power supply to the USB ports is designed so that, in addition to the keyboard and
mouse (max. 100 mA each), a further 2 x 500 mA is available for two additional USB
devices. You can operate USB devices by connecting them to any of the USB ports.
18 Fujitsu Technology Solutions
Page 23
Operation English - 17
Operation
Switching the device on and off
2
1
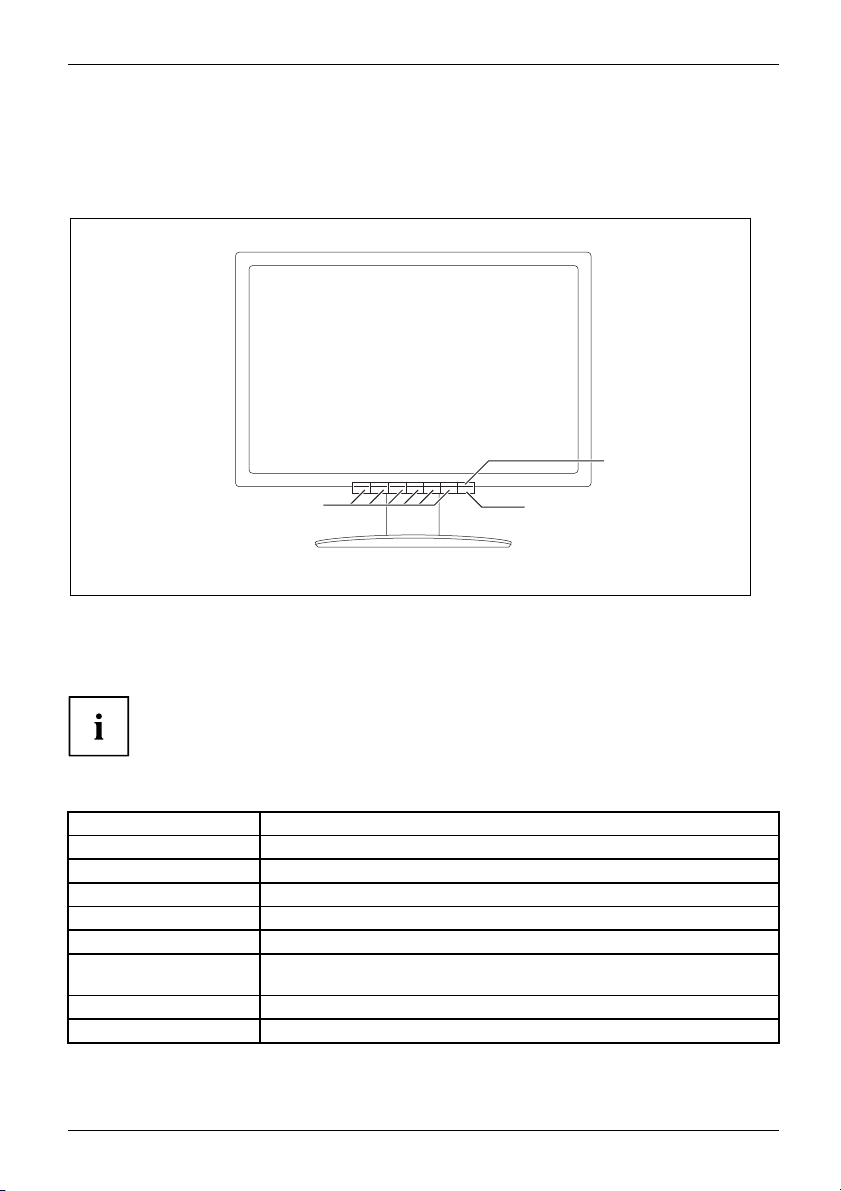
1 = Bu ttons for the OSD menu (On
Screen Display)
A long pres
Press the
cator
y indicator
s on the on/off switch turns the device on or off.
on/off switch briefly to log out from the Virtual Desktop.
Status
The Zero Client is switched on (Normal mode).
The Zero Client is switched on (ECO mode).
lient is in energy-saving mode.
Zero C
Zero Client is turned off.
o Client has obtained IP address from the DHCP server and is
Zer
ablishing a connection with the Zero Client Controller.
est
Zero Client has an error.
2 = Po wer suppl
The colour of the LED indicator changes as follows:
LED indi
blue
green
orange
it
not l
quickly flashing orange Zero Client is getting IP address from DHCP server.
wly flashing orange
slo
d
re
flashing red Zero Client has not found a network.
3 = On/off switch or log-out from
3
Virtual Desktop
Fujitsu Technology Solutions 19
Page 24
18 - English Operation
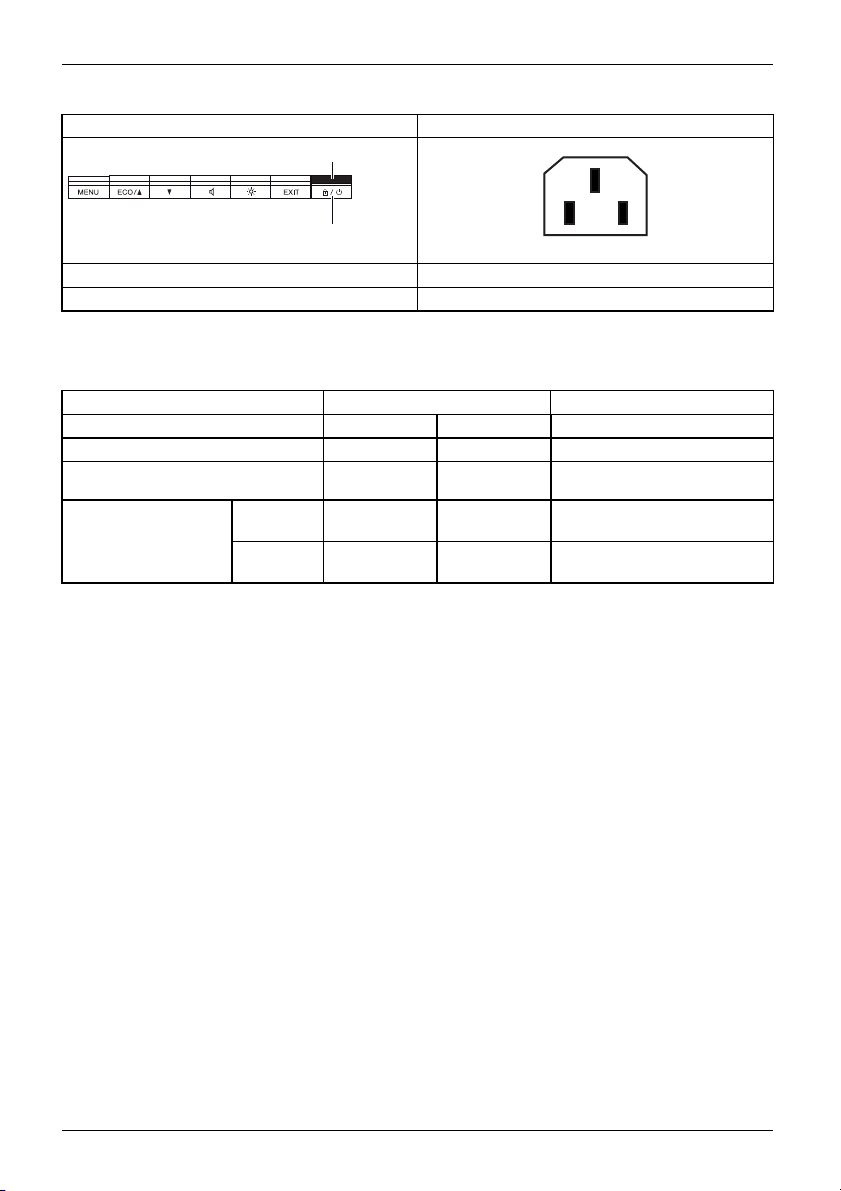
Front Rear
1
2
1 = power supply indicator
2 = On/off switch or log-out from Virtual Desktop
Notes on pow er managem ent
Level
Power supply indicator Lit blue Lit green illuminated orange
Monitor
Power consumption
(typical)*
* without any USB devices connected and without audio
ECO mode is the preset factory default.
The Zero Client Control Panel program allows you to select the period of inactivity after which the
Zero Client should be turned off. Power consumption is then reduced (energy-saving mode).
The pow er indicator of the Zero Client changes colour to show the change in status.
Once any input is made at the keyboard, the screen content is restored.
Zero Client
DZ22-2
Zero Client
DZ19-2
Operation
Normal
max.
brightness
< 40 W < 35 W reduced to ≤ 0.5 W
< 32 W < 27 W reduced to ≤ 0.5 W
ECO
typ. 200 cd/m
Energy-saving mode
2
Unlit
20 Fujitsu Technology Solutions
Page 25

Operation English - 19
Working with the Zero Client
To operate your Zero Client it needs software which has to be installed
on the access server. To find the latest software packages, v isit the
support area of the Fujitsu Technology Solutions website or follow this link:
http://support.ts.fujitsu.com/com/support/downloads.html".
"
User Name:
Password:
LogIn
LogIn
Options
Options
2
3
i
?
41
► Select the count ry version of your keyboard (1).
► Enter your user name (2) and password (3).
► Click on Login (4).
Fujitsu Technology Solutions 21
Page 26
20 - English Operation
Changing the monitor settings
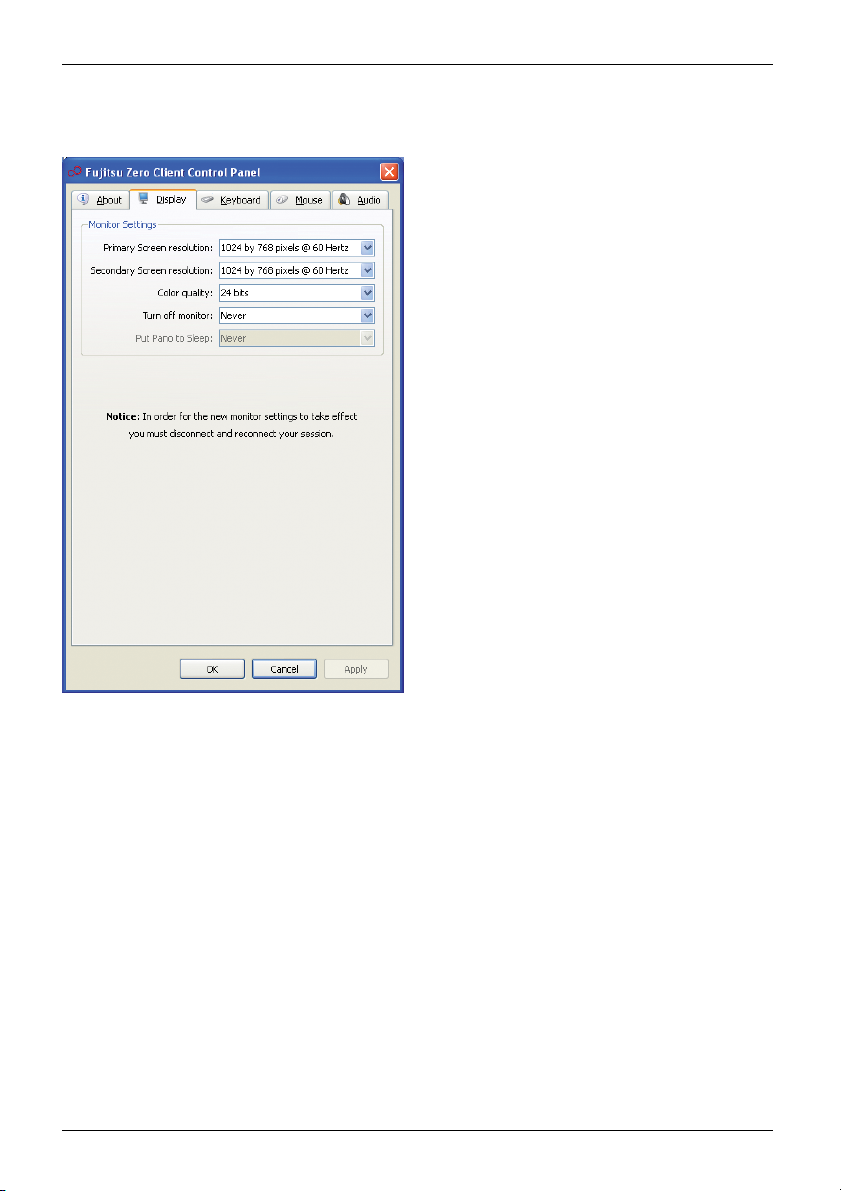
► When you start up the Zero Client for the
first time, after logging in to the system start
the Zero Client Control Panel program by
double-clicking the icon in the taskbar.
► Select Display and Screen resolution.
► Set the "Screen Resolution" to 1680 x
1050 pixels (Zero Client DZ22-2) or 1280
x 1024 pixels (Zero Client DZ19-2).
► Confirm with OK or Apply.
► Log out from the "Virtual Desktop" and then
log in again for the changes to take effect.
Setting a turn-off timer for the monitor
You can set a turn-off timer, which switches the monitor off if no inputs are made over a
specified period of time using input devices such as mouse or keyboard.
► To start the Zero Client Control Panel program, double-click on the icon in t he taskbar.
► Select Display and Turn off monitor.
► Set the time after which the monitor is to be turned off.
► Confirm with OK or Apply.
The monitor is turned off after the turn-off time set has elapsed, in order to save
energy (the monitor’s backlight is sw itched off).
If the mouse is mo ved or a button is pressed, Zero Client switches back
to normal operating mode again.
22 Fujitsu Technology Solutions
Page 27
Operation English - 21
Setting the sleep timer for Zero Client
You can define a sleep timer, which puts the Zero Client to sleep if no inputs are made over
aspecified period of time using input devices such as mouse or keyboard.
► To start the Zero Client Control Panel program, dou ble-click on the icon in the taskbar.
► Select Display and Put Zero Client to Sleep.
► Define the time after wh ich the Zero Client should be put to sleep.
► Confirm with OK or Apply.
The Zero Client is put to sleep after the time set h as elapsed. The Zero Client
has a very low energy consumption in sleep mode.
If the on/off switch of the Zero Client is pressed, the Zero Client is switched
back to normal operating mode.
If Put Zero Client to Sleep is not active in the Zero Client Control Panel program,
contact you r administrator to obtain corresponding rights to set the sleep timer. To
do this, the administrator sets the tick in the User Power Sleep Overrides fieldinthe
Zero Client Controller under Clients - Settings - Login Preferences.
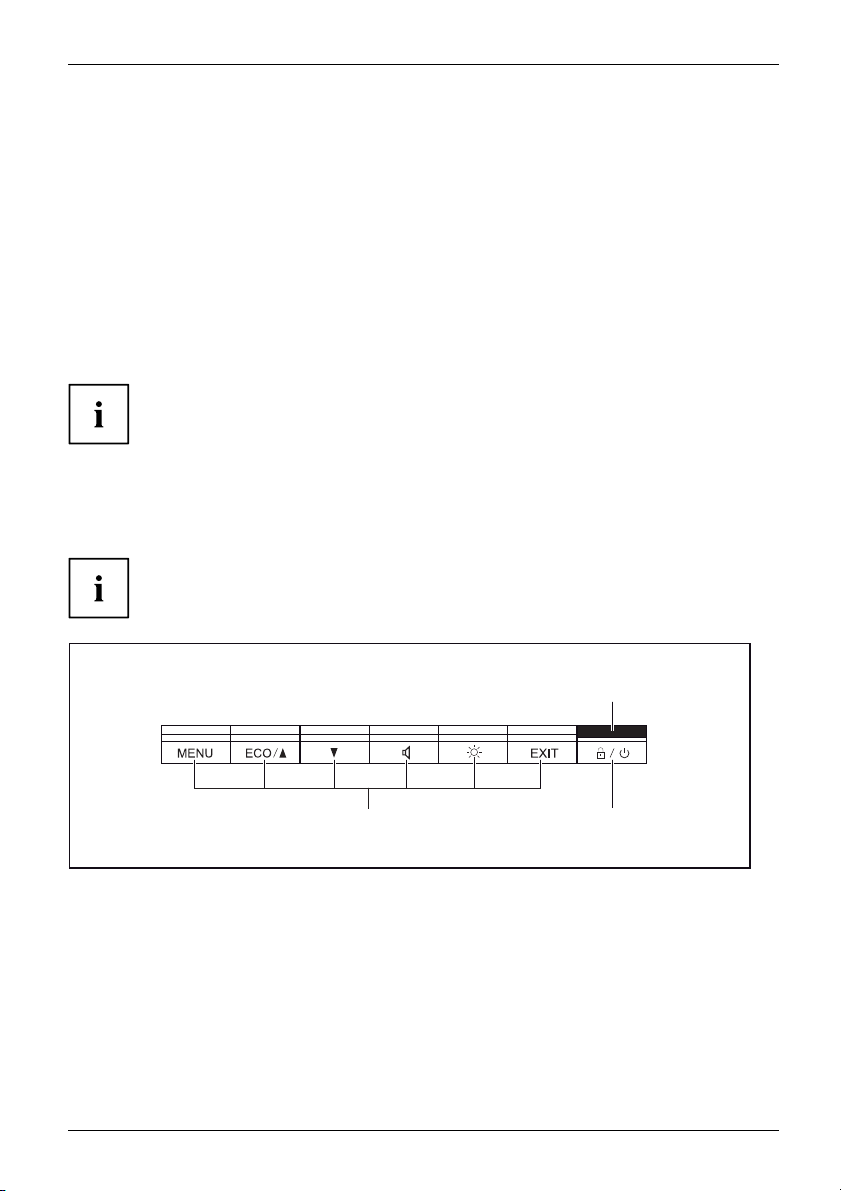
Changing the monitor settings with the buttons of the control panel
The buttons of the control panel have two functions. When the OSD menu is not
activated, you can call up quick start functions which are printed on the buttons. When the
OSD menu is activated, the navigation buttons (softkeys) displayed on the monitor apply.
3
12
1 = Bu ttons for the OSD menu (On
Screen Display)
2 = O n/o ff switch or log-out from
Virtual Desktop
Fujitsu Technology Solutions 23
3 = Power supply indicator
Page 28
22 - English Operation
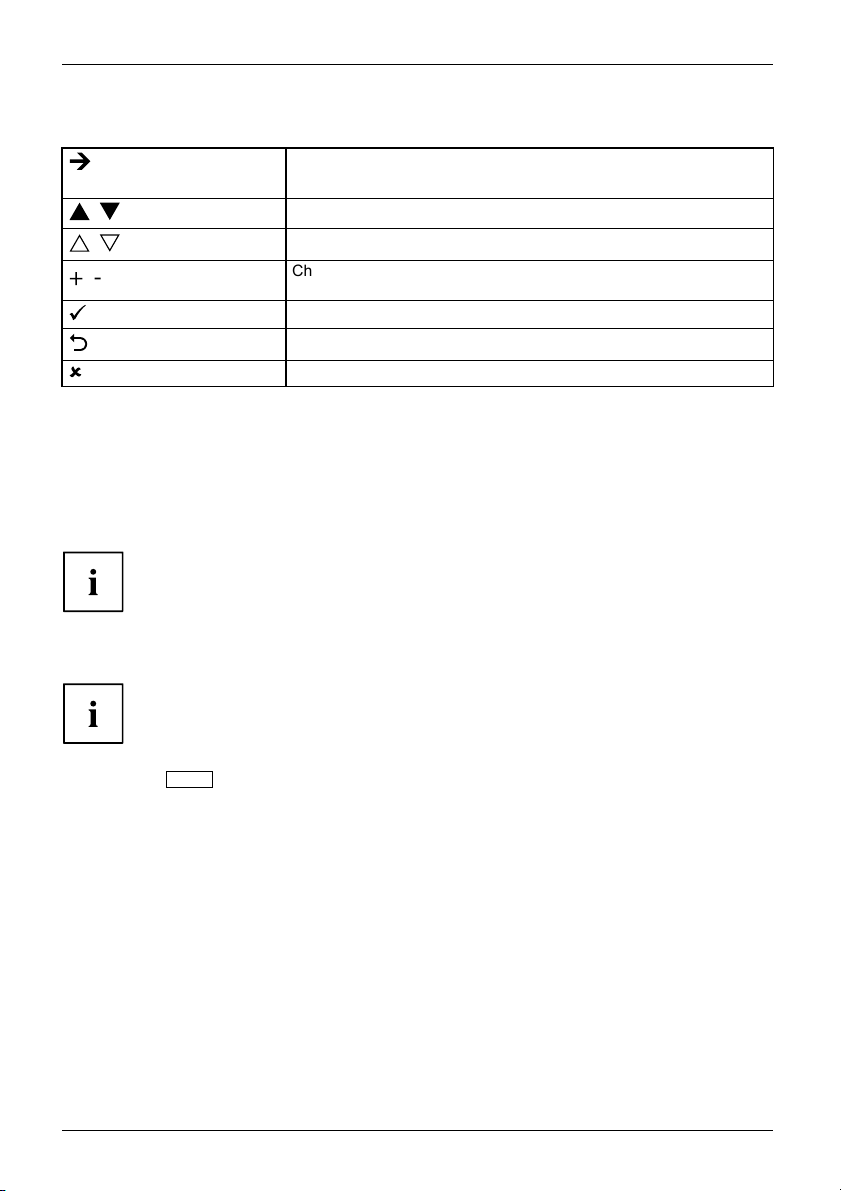
Softkeys
Switch to submenu
Start (with Auto level and Factory recall)
Navigation within a menu
Select option
+-
Change value
Apply changes and return to main menu
Reject changes and return to main menu
Exit the OSD menu
Language selection
The OSD menu is avail
A language selectio
► Select your desire
able in various languages.
n is displayed immediately after you switch the display on.
d language.
You can change the
Activate/deac
The power consumption of the device can be decreased by reducing
the brightness of the picture.
► Press the
The message ECO Mode ein or ECO Mode off appears.
If the ECO operating mode is activated, the following OSD settings are changed:
Mode
Colour
Brightness
After the ECO operating mode is switched off, the brightness previously set by the user is restored.
tivate ECO operating mode
ECO
button to switch the ECO operating mode on or off.
language using the OSD Language function in the OSD Setup menu.
Office
6500 K
reduced
24 Fujitsu Technology Solutions
Page 29
Operation English - 23
Locking the OSD menu
The OSD menu can be locked to prevent accidental or unauthorised changes to the monitor settings.
► Press and hold the
the monitor with the ON/OFF switch.
The message OSD locked / unlocked is displayed.
Please proceed in the same manner to release the locked OSD menu again.
MENU
button for a few seconds while you switch on
Locking the ON/OFF button
The ON/OFF switch can be locked to prevent accidental or unauthorised
changes to the monitor settings.
ECO
► Press and hold the
The message Power button locked / unlocked is displayed.
Please proceed in the same manner to release the locked ON/OFF switch again.
and buttons simultaneously for several seconds.
Fujitsu Technology Solutions 25
Page 30
24 - English Operation
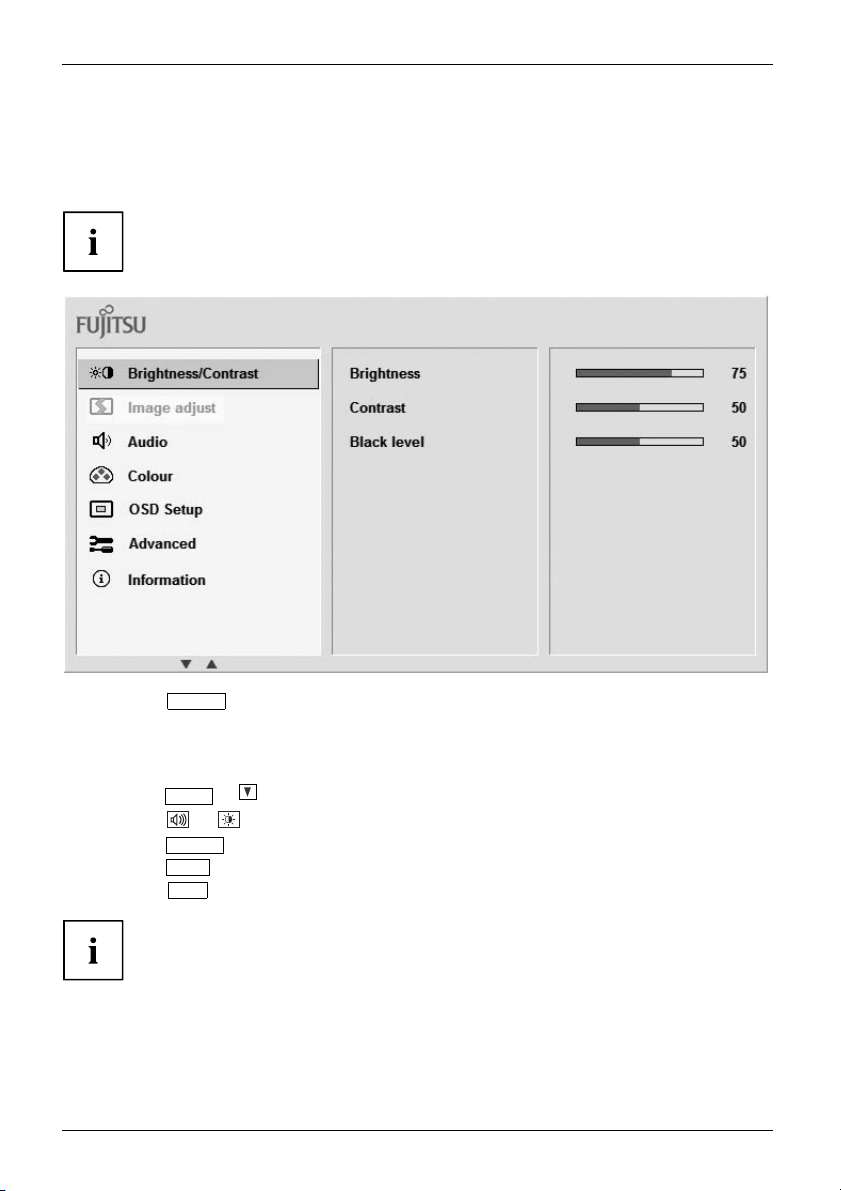
Changing the monitor settings using the OSD menu
You can use the buttons on the control panel to open and use the integrated
OSD (On-Screen Display) menu.
The English menu names are used in the following description (default setting).
NU
► Press the
Themainme
The first symbol, (Brightness/Contrast), is highlighted and the associated functions
are visible in the right-hand menu field.
► Press the
► Press th
► Press the
► Press t
► Press the
26 Fujitsu Technology Solutions
ME
button to activate the OSD menu.
nu appears, with icons for the setting functions.
ECO
or button to highlight another icon (e.g. Image adjust).
e
or button to change a value or make a selection.
MENU
button to apply the changes and quit the function.
EXIT
he
If you want to change other settings, select the corresponding function from the OSD
main menu. All possible adjustments of the main menu are described in the following.
button to discard the changes and quit the function.
EXIT
button to exit the OSD menu.
Page 31

Operation English - 25
Adjusting the brightness and contrast
Call up the Brightness/Contrast setting window
Brightness
Contrast
Black level
If the contrast is set too high, bright surfaces can no longer be distinguished from very
bright surfaces. If the contrast is set too low, the maximum brightness will not be achieved.
Set the brightness of the display
With this function you can change the brightness of the background lighting.
Set the contrast of the display
With this function you can modify the contrast of pale colours.
Set the brightness of the display
With this function you modify the contrast of dark colours.
Adjusting the volume
Call the Audio setting window
Volu m e
Mute
Excessive volume from the headphones can damage your hearing and cause
loss of hearing. If the volume in the audio application is increased above the
mid-position of the control, the voltage at the headphone output is also increased,
which can cause the sound pressure to be too high.
Setting the co
Set the volume for playback with the integrated loudspeakers
Switch the loudspeakers off or on
lour temperature and colours
Call the Colour setting window
Select the colour temperature
The "warmth" of the screen colours is set using the colour temperature. The
colour temperature is measured in Kelvin (K). You can choose between
sRGB, 6500 K, 7500 K, 9300 K, Native and Custom Colour.
In the user-defined setting you can change the colour ratios of the basic
colours (red, green, blue) as required.
Fujitsu Technology Solutions 27
Page 32

26 - English Operation
Adjusting the display of the OSD menu
Calling the OSD Setup adjustment window
Language
OSD Timeout
Selecting the language for the OSD menu
With this function you select the language for the OSD menu.
The default setting is English.
Setting the display du ration of the OSD menu
With this function you c an select a value from 10 to 120 seconds.
If the set time expires without a setting being made, the OSD menu is
automatically hidden.
Setting functions in the Advanced menu
Call up the Advanced setting window
Factory Recall
Activating the factory settings
With this function all settings are reset to the factory settings without
prompting for confirmation.
Press the
Processing is displayed.
button to activate the function. The message Auto
Displaying information
Call the Information setting window
This function displays the model designation, resolution, H/V frequency
and ECO mode.
28 Fujitsu Technology Solutions
Page 33

Notes on ergonomic colour adjustmen
t English - 27
Notes on ergonomic colour adju
If you select colours for the monitor in your application programmes,
take note of the information below.
The primary colours blue and red on a dark background do not produce the minimum
required contrast of 3:1 and are therefore not suitable for continuous text and data entry.
When using several colours for characters and background and giving the primary colours full
modulation, you can obtain ve ry suitable colour combinations (see the following table):
Background
black white purple blue
black
white
purple
blue
cyan
green
yellow
red
+ Colour c ombination very suitable
- Colour combination not suitable because colour h ues are too close together, thin characters
are not identifiable or rigorous focusing is demanded of the human eye.
+++
++
-
+
+
+
-
++
+
--
--
+
-
++
----
Characters
cyan green
-
-----
+
+
+++
---
+
---
--
-
---
stment
yellow red
+
+
+
-
+
Fujitsu Technology Solutions 29
Page 34

28 - English Troubleshooting
Troubleshooting
In the event of a fault, please start by checking the following points.
If you cannot solve the problem, please contact our Service Desk.
Having this problem? Check the following points:
No screen display
Power indicator does not light up
No screen display
Power indicator is lit
Picture is wrongly adjusted ► Press the
Indicator fl ashes red
Network ind
Indicator flashes slowly orange If the network or operating indicator is not
icator flashes fast orange
► Check that the mains cable or LAN cable
with Power over Ethernet (only on Zero
Client DZ22-2) is conn ected.
► If electricity is supplied via Power over
Ethernet, check that sufficient power is
available. Refer to the notes in the technical
data.
► Check whether the Zero Client is in
energy-saving mode by pressing any key on
the Zero Client’s keyboard .
► Alter the brightness and/or contrast until you
get a picture.
MENU
Factory Recall function.
There is no network cable connected to the Zero
Client, or the network cable is faulty.
► Check that the network cable is connected
at both ends so that there also really is a
contact made.
► Use a different n etwork cable to connect the
Zero Client to the network.
If the netwo
change to fl
minute, th
get an IP a
► If the Zer
► Check if there are any messages in the
permanently lit blue or green after one minute,
this means that the Zero Client cannot log in to
the Zero Client Controller.
► Check that the vendor class for the Zero
► Make sure that there is no port filter blocking
rk or operating indicator does not
ashing slowly orange after one
is means that the Zero Client cannot
ddress from the DHCP server.
o Client and the DHCP server are
rent sub-nets or VLANs, make sure
in diffe
appropriate DHCP relay is set in the
that the
switch.
DHCP server log files indicating that no IP
address is available on the server.
Client Controller is created in the DHCP
server and is enabled for the sco pe of the
Zero Client.
the data traffictotheZero Client Controller.
button to activate the
30 Fujitsu Technology Solutions
Page 35

Explanatory information about stan
dard ISO 9241-307 English - 29
Explanatory information abou
t
standard ISO 9241-307
Permanently unlit or lit pixels
Today’s production techniques cannot guarantee an absolutely fault-free screen display. Depending
on the total number of pixels (resolution), there may be a few constantly lit or u nlit pixels or subpixels.
Pixel
Subpixel
The maximu m permitted number of faulty pixels is stipulated in the international standard ISO
9241-307. In accordance with standard ISO 9241-3, LCD monitors by Fujitsu comply with Class II
for low resolutions and Class I for resolutions of 1680 x 1050 (1764000 pixel) and higher.
Examples:
A flat-screen monitor with a resolution of 1280 x 1024 has 1280 x 1024 = 1310720 pixels. Each pixel
consists of three subpixels (red, green and blue), so there are almost 3.9 million subpixels in total.
According to ISO 9241-3 (Class II), a maximum of 3 lit and 3 unlit pixels plus 7 lit or 13 unlit subpixels,
or a corresponding combination, may be faulty (1 lit subpixel counts as two un lit subpixels).
A flat-screen monitor with a resolution of 1920 x 1080 has 1920 x 1080 = 2073600 pixels. Each pixel
consists of three subpixels (red, green and blue), so there are almost 6.2 million subpixels in total.
According to ISO 924 1-3 (Class I), a maximum of 2 lit and 2 unlit pixels plus 5 lit or 10 unlit subpixels,
or a corresponding combination, may be faulty (1 lit subpixel counts as two un lit subpixels).
A pixel consists of 3 subpixels, normally red, green and blue. A pixel is
the smallest element that can be generated by complete functionality of
the display.
A subpixel is a sepa rately addressable internal structure within a pixel that
enhances the pixel function.
Fujitsu Technology Solutions 31
Page 36

30 - English Technical specification
Technical specification
Condensation is not permitted, neither in the rated range of operation
nor in the limit range of operation.
Zero Client DZ 19-2 Zero Client DZ22-2
Dimensions and weight
Visible diagonals 48.2 cm 55.9 cm
Pixel spacing 0.294 mm 0.282 mm
Width 376 mm 474 mmImage size
Height 301 mm 296.1 m m
Maximum resolution 1280 x 1024 1680 x 1050
Dimensions incl. monitor
base
Weight (without packaging)
Storable display modes
Pixel error classes
according to ISO 9241-307
Electrical data
Video Ou
tput
Width 410 mm 508 mm
Height (adjust
Depth 180 mm 180 mm
Class
Digital
able)
374 – 484 mm 369 – 479 mm
approx. 5.5 ±
12 12
II
DVI-D wi
0.2 kg
th HDCP
approx. 6.2 ±
DVI-D wi
0.2 kg
th HDCP
Synchronisation Separate sync. TTL,
Horizontal frequency
Refresh rate
Maximum pixel rate 135 MHz 165 MHz
Power supply 100 V – 240 V,
Total power consumption
(excl. audio)
Sound output 1.0 W left; 1.0 W right 1.5 W left; 1.5 W right
Ambient conditions
Environment class 3K2, DIN IEC 721
Rated range of operation
Humidity
Limit range of operation
32 Fujitsu Technology Solutions
Normal operation < 32 W < 4 0 W
ECO operating mode
Off Mode
positive or negative
31 kHz .... 81 kHz
(multi-scanning)
56 Hz .... 76 Hz 56 Hz .... 76 Hz
50Hz–60Hz
<27W <35W
<0.5W <0.5W
Zero Client DZ19-2 Zero Client DZ22-2
5 °C .... 35 °C
15 % .... 85 %
5 °C .... 35 °C
Separate Sync. TTL,
positive or negative
30 kHz .... 82 kHz
(multi-scanning)
100 V – 240 V,
50Hz–60Hz
5 °C .... 35 °C
15 % .... 85 %
5 °C .... 35 °C
Page 37

Technical specification English - 31
Instead of using m ains electricity, Zero Client DZ22-2 can be powered via
the Ethernet cable (Power over Ethernet, PoE).
Note that your network infrastructure m ust be set up for this.
• Make sure that only 8-core Gigabit Ethernet cables of at least category 5
(Cat-5) are used. P ower is supplied via all 8 cores.
• Make sure the supply is sufficient to power your Zero Client DZ22-2, even over long
distances of up to 100 metres. Fujitsu Technology Solutions recommends that you
only use approve d Ethernet power supplies that meet the following specifications:
– Rated voltage: 55 V
– Rated power: 6 0 W
– Conforming to IEEE802.3at.
Preset operating modes
The picture position and size have been set to optimum values at the factory for
the operating modes listed above. You can modify and save the settings (see
chapter "
For ergonomic reasons, we recommend a screen resolution of 1680 x 1050
pixels (Zero Client DZ22-2) or 1280 x 1024 pixels (Zero Client DZ19-2). Because
of the technology used (active matrix), an LCD monitor provides a totally
flicker-free picture, even with a refresh rate of 60 Hz.
Most frequent operating modes
Horizontal frequency Refresh ra te Screen resolution
37.9 kHz 60 Hz 800 x 600
48.4 kHz 60 Hz 1024 x 76 8
63.7 kHz 60 Hz
65.0 kHz 60 Hz
Changing the monitor settings", Page 20 - English
1280 x 1024 (native Zero Client DZ19-2)
1680 x 1050 (
native Zero Client DZ22-2)
Fujitsu Technology Solutions 33
Page 38

32 - English Technical specification
DVI-D port
1
9
17
Pin Meaning
1
2
3
4 not connected
5
6
7
8
9
10
11
12 not connec
13 not connec
14 +5V P ower
15 Earth
16 Hot Plu
17
18
19
20 not
21 no
2
2
23
24
TMDS D ata2–
TMDS D ata2+
TMDS Data 2/4 Shield
not connected
DDC Clock
DDC Data
Analog Vertica
TMDS D ata1–
TMDS D ata1+
TMDS Data 1/
TMDS D ata0–
TMDS D ata0+
TMDS
connected
t connected
TMDS Clock Shield
TMDS Clock+
TMDS Clock–
l Sync
3 Shield
ted
ted
g Detect
Data 0/5 Shield
34 Fujitsu Technology Solutions
Page 39

Inhalt Deutsch - 1
DeutschInhalt
Ihr Zero Client... ....................................................................... 5
Weitere Informationen ................................................................... 6
Darstellungsmittel ....................................................................... 7
WichtigeHinweise ..................................................................... 8
Sicherheitshinweise ..................................................................... 8
Netzleitung ............................................................................. 9
Gerättransportieren ..................................................................... 9
Gerätreinigen .......................................................................... 10
CE-Kennzeichnung . . . .................................................................. 10
Entsorgung und Recycling . . . . ........................................................... 10
Inbetriebnahme ........................................................................ 11
Lieferinhalt auspacken und überprüfen . ................................................... 11
Gerätaufstellen ......................................................................... 12
Einrichten eines ergonomischen Bildschirmarbeitsplatzes . . ............................. 12
Fuß montieren ..................................................................... 14
Höheeinstellen ..................................................................... 14
Neigung einstellen .................................................................. 14
Drehung einstellen .................................................................. 15
Hochformat einstellen ............................................................... 15
Schwenkarm oder eine Wandbefestigung montieren . . . . . . ............................. 15
Anschließen des Geräts ................................................................. 16
Leitungen an den Zero Client anschließen . ............................................ 16
Bedienung ............................................................................. 18
Gerätein-/ausschalten .................................................................. 18
Hinweise zum Power-Management ....................................................... 19
Mit dem Zero Client arbeiten ............................................................. 20
Bildschirmeinstellungen ändern . . . ....................................................... 21
Ausschalttimer für denBildschirm setzen .............................................. 21
Sleeptimer für denZero Clientsetzen ................................................. 22
Bildschirmeinstellungenmit denTasten des Bedienfeldes ändern ........................... 22
Softkeys ............................................................................ 23
Sprachauswahl . . . .................................................................. 23
ECO Betriebsart aktivieren/deaktivieren . . ............................................ 23
OSD-Menüsperren .................................................................. 24
Ein-/Ausschaltersperren ............................................................. 24
Bildschirmeinstellungen mit dem OSD-Menü ändern . . . .................................... 25
Helligkeit und Kontrast einstellen ..................................................... 26
Lautstärke einstellen . . . . . . ........................................................... 26
Farbtemperatur und Farben einstellen ................................................ 26
Darstellung des OSD-Menüs einstellen ................................................ 27
Funktionen im Menü Advanced einstellen . ............................................ 27
Informationen anzeigen .............................................................. 27
Hinweisezur ergonomischen Farbeinstellung .......................................... 28
Fehlerbehebung ....................................................................... 29
Erläuterungen zur Norm ISO 9241–307 . . . . . ............................................ 31
Technische Daten ...................................................................... 32
Fujitsu Technology Solutions 35
Page 40

2 - Deutsch Inhalt
Voreingestellte Betriebsarten ............................................................. 33
HäufigsteBetriebsarten .............................................................. 33
Anschluss DVI-D ........................................................................ 34
36 Fujitsu Technology Solutions
Page 41

Inhalt Deutsch - 3
Fujitsu Technology Solutions 37
Page 42

Windows 7, Window s Vista und Windows XP sind eingetragene Warenzeichen der Microsoft
Corporation.
Alle weiteren genannten Warenzeichen sind Warenzeichen oder eingetragene Warenzeichen
der jeweiligen Inhaber und werden als geschützt anerkannt.
Copyright © Fujitsu Technology Solutions GmbH 2012
Alle Rechte vorbehalten, insbesondere (auch auszugsweise) die der Übersetzung, des
Nachdrucks, der Wiedergabe durch Kopieren oder ähnliche Verfahren.
Zuwiderhandlungen verpflichten zu Schadenersatz.
Alle Rechte vorbehalten, insbesondere für den Fall der Patenterteilung oder GM-Eintragung.
Liefermöglichkeiten und technische Änderungen vorbehalten.
Page 43

Ihr Zero Client... Deutsch - 5
Ihr Zero Client...
verfügt über zahlreiche nützliche Eigenschaften und Funktionen, z. B.:
• TFT-Display (Thin Film Transistor, Aktiv -M atrix)
• geringer Platzbedarf wege
• LED Hintergrundbeleuchtung
• LAN Anschluss 100 MBit Et
• PoE (Pow er over Ethernet) für Zero Client DZ22-2
• Integrierte Zero Clien
• DVI Anschlussbuchse für zweiten Mon itor (Verbindung zu einem PC über
diese Buchse ist nicht m öglich)
• 4 USB Anschlussbuchs
• Kopfhöhrer- und Mikrofonanschluss 3,5 mm Klinken-Anschlussbuchsen
• optimale ergonomi
Schärfe und Farbre
• hohe Helligkeit und guter Kontrast
• hohe Auflösung - 12
1050 Punkte (Zer
• Darstellung von bis zu 16,7 Mio. Farben
• automatische A
DZ22-2) bzw. 3
(Vertikalfre
• digitale Bildschirmsteuerung mit Mikroprozessor für die Speicherung von
12 verschiedenen Darstellungsmodi
• Farbeinstel
• komfortable Bedienung über integriertes OSD-Menü (On-Screen-Display)
• VESA-DDC-K
• VESA-FPMPMI-Kompatibilität (Flat Panel Monitor Physical Mounting Interface) –
Montagevorrichtung für Schwenkarm und Wandhalterung
• Plug&Pla
• ECO-Function
• Power-M
In dieser Betriebsanleitung finden Sie wichtige Informationen, die Sie für die
Inbetriebnahme und Bedienung Ihres Zero Clients benötigen.
btastung der Horizontalfrequenzen von 30 bis 82 kHz (Zero Client
1 bis 81 kHz (Zero Client DZ19-2) und der Bildwiederholfrequenzen
quenzen) von 59 bis 76 Hz (absolut flimmerfrei)
lung zur Anpassung der Bildschirmdarstellung an individuelle Sehgewohnheiten
ompatibilität
y-Fähigkeit
anagement zur Red uzierung der Leistungsaufnahme bei Inaktivität des Zero Clients
n geringer Gehäusetiefe
hernet
t Technologie zum einfachen Zugriff auf Virtuelle Desktops
en (für Tastatur, Maus und weitere USB Geräte)
sche Eigenschaften (absolute Verzerrungsfreiheit, exzellente
inheit bis in die Ecken)
80 x 1024 Punkte (Zero Client DZ19-2) bzw. 1680 x
o Client DZ22-2)
Ihr Zero Client DZ22-2 verfügt über die Möglichkeit, über das LAN betrieben zu werden.
Wenn Sie Power over Ethernet (PoE) nutzen, benötigen Sie die entsprechende
Netzwerk-Infrastruktur und keinen zusätzlichen Stromanschluss. Beachten Sie, dass
zum Betrieb des Zero Clients DZ19-2 immer ein Stromanschluss notwendig ist .
Für den Betrieb des Zero Clients ist eine LAN Verbindung zu einem Server
mit Desktop Virtualisierungs-Software erforderlich.
Die LAN Datenleitung gehört nicht zum Lieferumfang. Desweiteren werden
Tastatur und Maus benötigt, die optional bestellbar sind.
Fujitsu Technology Solutions 39
Page 44

6 - Deutsch Ihr Zero Client...
Wenn Sie den Bildschirm das erste Mal in Betrieb nehmen, sollten Sie nach der Anmeldung am
Virtuellen Desktop die Bildschirmauflösung auf 1280 x 1024 Punkte (Zero Client DZ19-2), bzw. 1680
x 10 50 Punkte (Zero Client DZ22-2) einstellen und die Bildschirmanzeige Ihren Bedürfnissen
entsprechend anpassen (siehe Kapitel "
Bildschirmeinstellu ngen ändern", Seite 21 - Deutsch).
Weitere Informationen
Wie Sie Auflösungen und Bildwiederholfrequenzen einstellen, entnehmen Sie
der Dokumentation der Zero Client-Software.
Aus ergonomischen Gründen empfehlen wir eine Bildschirmauflösung von 1280 x 1024 Punkte
(Zero Client DZ19-2), bzw. 1680 x 1050 Punkte (Z ero Client DZ22-2).
Technologiebedingt (Aktiv-Matrix) bietet ein Zero Client mit LCD-Bildschirm auch bei einer
Bildwiederholfrequenz von 60 Hz ein absolut flimmerfreies Bild.
40 Fujitsu Technology Solutions
Page 45

Ihr Zero Client... Deutsch - 7
Darstellungsmittel
kennzeichnet Hinweise, bei der
Funktionsfähigkeit Ihres Gerä
sind. Die Gewährleistung erli
Hinweise Defekte am Gerät veru
kennzeichnet wichtige Informationen für den sachgerechten Umgang mit
dem Gerät
en Nichtbeachtung Ihre Gesundheit, die
ts oder die Sicherheit Ihrer Daten gefährdet
scht, wenn Sie durch Nichtbeachtung dieser
rsachen
►
Diese Schrift
Diese Schrift
Diese Schrift
"Diese Schrift"
Taste
Diese Schrift kennzeichnet Begriffe und Texte, die betont oder hervorgehoben werden,
kennzeichnet einen Arbeitsschritt, den Sie ausführen müssen
kennzeichnet ein Resultat
kennzeichnet Eingaben, die Sie mit der Tastatur in einem Programm-Dialog
oder in einer Kommandozeile vornehmen, z. B. Ihr Passwort (Name123)
oder einen Befehl, um ein Programm zu starten (start.exe)
kennzeichnet Infor
ausgegeben werden,
kennzeichnet
• Begriffe und Text
Speichern.
• Namen von Programmen oder Dateien, z. B. Windows oder setup.exe.
kennzeichnet
• Querverweise auf einen anderen Abschnitt z. B. "Sicherheitshinweise"
• Querverweise
Sie weiter auf
• Namen von CDs, DVDs sowie Bezeichnungen und Titel von anderen
Materialien, z. B.: "CD /DVD Drivers & Utilities" oder Handbuch
"Sicherheit/Regularien"
kennzeichnet eine Taste auf der Tastatur, z. B:
z. B.: Gerät nicht ausschalten
mationen, die von einem Programm am Bildschirm
z. B.: Die Installation ist abgeschlossen!
e in einer Softwareoberfläche, z. B.: Klicken Sie auf
auf eine externe Quelle, z. B. eine Webadresse: Lesen
"
http://ts.fujitsu.com"
F10
Fujitsu Technology Solutions 41
Page 46

8 - Deutsch Wichtige Hinweise
Wichtige Hinweise
WichtigeHinweiseHinweise
In diesem Kapitel finden Sie unter anderem Sicherheitshinweise, die Sie beim
Umgang mit Ihrem Gerät unbedingt beachten müssen.
Sicherheitshinweise
Dieses Gerät entspricht
Informationstechnik, e
Falls Sie Fragen haben,
wenden Sie sich an Ihre V
•DieDisplay-Oberfläch
die Display-Oberfläch
• Wenn das Gerät aus kalter Umgebung in den Betriebsraum gebracht wird, kann
Betauung auftreten. Warten Sie, bis das Gerät temperaturangeglichen und absolut
trocken ist, bevor Sie es in Betrieb nehmen.
• Beachten Sie beim A
Umgebungsbedingu
"
Einrichten eine
• Halten Sie Zuluft- und Abluftöffnungen des Ge räts frei, um eine ausreichende Belüftung zu
gewährleisten.
•DasGerätstell
100 V bis 240 V ei
diesen Bereic
• Stellen Sie sicher, dass die Steckdose am Gerät und die Schutzkontakt-Steckdose
der Hausinstallation frei zugänglich sind.
• Der Ein-/Aus
Trennung von
• Das Gerät ist mit einer sicherheitsgeprüften Netzleitung ausgestattet.
• Verwenden
• Verlegen Sie die Leitungen so, dass sie keine Gefahrenquelle (Stolpergefahr) bilden und
nicht beschädigt werden. Beachten Sie beim Anschließen des Geräts die entsprechenden
Hinweise im Kapitel "
• Während e
• Achten Sie darauf, dass keine Gegenstände (z. B. Schmuckkettchen, Büroklammern etc.) oder
Flüssigkeiten in das Innere des Geräts gelangen (Gefahr von elektrischem Schlag, Kurzschluss).
•DasGer
schütz
• In Notfällen (z. B. b ei Beschädigung von Gehäuse, Bedienelementen oder Netzleitung, bei
Eindringen von Flüssigke iten oder Fremdkörpern) schalten Sie das Gerät sofort aus, lösen Sie
den Netzstecker und verstän digen Sie Ihre Verkaufsstelle oder unseren Se rvice Desk.
• Repa
Durc
für d
ines Gewitters dürfen Sie Datenübertragungsleitungen weder anschließen noch lösen.
ät ist nicht wasserfest! Tauchen Sie das Gerät nie ins Wasser und
en Sie es vor Spritzwasser (Regen, Meerwasser).
raturen am Gerät dürfen nur von autorisiertem Fachpersonal durchgeführt werden.
h unbefugtes Öffnen und unsachgemäße Reparaturen können erhebliche Gefahren
en Benutzer entstehen (elektrischer Schlag, Brandgefahr).
den einschlägigen Sich erheitsbestimmungen für Einrichtungen der
inschließlich elektrischer Büromaschinen für den Einsatz in Büroumgebung.
ob Sie das Gerät in der vorgesehenen Umgebung aufstellen können,
erkaufsstelle oder an unseren Service Desk.
e des Geräts ist druck- und kratzempfindlich. Behandeln Sie deshalb
e vorsichtig, um bleibende Sch äden (Kratzer) zu vermeiden.
ufstellen und beim Betrieb des Geräts die Hinweise für die
ngen im Kapitel "
s ergonomischen Bildschirmarbeitsplatzes", Seite 12 - Deutsch.
t sich automatisch auf eine Netzspannung im Bereich von
n. St ellen Sie sicher, dass die örtliche Netzspannung
h weder unter- noch überschreitet.
schalter trennt den Monitor nicht von der Netzspannung. Zur vollständigen
der Netzspannung müssen Sie den Netzstecker ziehen.
Sie nur die mitgelieferte Netzleitung.
Anschließen des Geräts", Seite 16 - Deutsch.
Technische Daten", Seite 32 - Deutsch und das Kapitel
42 Fujitsu Technology Solutions
Page 47

Wichtige Hinweise Deutsch - 9
• Stellen Sie nur die Bildschirmau flö sun gen und Bildwiederholfrequenzen ein, die im
Kapitel "
Technische Daten", Seite 32 - Deutsch angegeben sind. Wenn Sie andere
Werte e instellen, kann das Gerät beschädigt werden. Wenden Sie sich im Zweifelsfall
an Ihre Verkaufsstelle oder an unseren Help Desk.
• Setzen Sie einen Bildschirmschoner mit bewegten Bildern ein und aktivieren Sie das
Power-Management für Ihren Bildschirm, um ein "Einbrennen" von Standbildern zu vermeiden.
• Wenn Sie das Gerät mit Schwenkarm oder Wandhalterung betreiben, darf es
nicht um 180° oder 270° gedreht werden.
• Heben Sie dieses Handbuch zusammen mit dem Gerät auf. Wenn Sie das Gerät an
Dritte weitergeben, geben Sie au ch dieses Handbuch weiter.
• Wir empfehlen Ihnen, das Gerät auf eine rutschfeste und unempfindliche Unterlage zu
stellen. Bei der Vielfalt der bei Möbeln verwendeten Beschichtungen und Lacke ist es nicht
auszuschließen, dass die Gerätefüße Schäden auf der Stellfläche verursachen.
Netzleitung
Verwenden Sie nur die mitgelieferte Netzleitung.
Wenn es notwendig ist, die ursprünglich mitgelieferte Leitung zu ersetze n, sind
die folge nden Richtlinien unbedingt zu beachten.
• Stecker und Buchse der Netzleitung müssen den Vorschriften von
IEC60320/CEE-22 entsprechen.
• Die Leitung muss den VDE- bzw. HAR-Bestimmungen entsprechen. Das VDEbzw. HAR-Zeichen ist auf der Kabelaußenhülle zu finden.
• Für Geräte, die auf Schreibtischen, Tischen etc. aufgestellt werden, ist die Verwendung
von Netzleitungsausführungen SVT bzw. SJT zulässig. Bei Aufstellung auf dem
Fußboden sind ausschließlich SJT-Netzleitungen zulässig.
• Bei der Auswahl der Leitung ist der für das Gerät erforderliche Nennstrom zu bea chte n.
• Falls notwendig, ersetzen Sie die ursprünglich mitgelieferte N etzleitung durch eine
landesübliche 3-polige Netzleitung mit Schutzkontakt.
Gerät transportieren
ansport
GerätTransportWiedertr
Fujitsu Technology Solutions 43
Transportieren Sie alle Geräte einzeln und nur in ihrer Originalverpackung oder in einer
anderen geeigneten Verpackung, die Schutz gegen Stoß und Schlag gewährt.
Packen Sie die Geräte erst am Aufstellungsort aus.
Wenn das Gerät aus kalter Umgebung in den Betriebsraum gebracht wird, kann
sich Kondenswasser bilden. Warten Sie, bis das Gerät temperaturangeglichen
und absolut trocken ist, bevor Sie es in Betrieb nehmen.
Page 48

10 - Deutsch Wichtige Hinweise
Gerät reinigen
Schalten Sie das Gerät aus und lösen Sie den Netzstecker.
Der Gehäuseinnenraum des Geräts darf nur von autorisiertem
Fachpersonal gereinigt werden .
Verwenden Sie für die Reinigung kein Scheuerpulver und keine
Kunststoff lösenden Reinigungsmittel.
Achten Sie darauf, dass keine Flüssigkeit in das Innere des Geräts gelangt.
Reinigen Sie die druckmit einem weichen, leic
Die Gehäuseoberfläche
Verschmutzung können
Spülmittel getaucht
und kratzempfindliche Display-Oberfläche des Geräts nur
ht angefeuchteten Tuch.
können Sie mit einem trockenen Tuch reinigen. Bei starker
Sie ein feuchtes Tuch benutzen, das Sie in Wasser mit mildem
und gut ausgewrun gen haben.
CE-Kennzeichnung
Dieses Gerät erfüllt in der ausgelieferten Ausführung die Anforderungen
der EG-Richtlinien 2004/108/EG "Elektromagnetische Verträglichkeit",
2006/95/EG "Niederspannun gsrichtlinie" und 200 9/125/EG "Ökodesign
Richtlinie".
Entsorgung und Recycling
Dieses Gerä t w
und einem fach
das Ge rät zur
zuzuführen,
Gebrauch en
Das Gerät m
Sie finden I
urde weitestgehend aus Materialien hergestellt, d ie umweltschonend entsorgt
gerechten Recycling zugeführt werden können. Nach seinem Gebrauch wird
ückgenommen, um es einer Wiederverwendung oder wertstofflichen Verwertung
soweit es in einem Zustand zurückgegeben wird, der dem bestimmungsgemäßen
tspricht. Nicht verwertbare Geräteteile werden sachgemäß entsorgt.
uss nach den örtlichen Vorschriften über Beseitigung von Sondermüll entsorgt werde n.
nformationen dazu auch im Internet unter "
http://ts.fujitsu.com/recycling".
44 Fujitsu Technology Solutions
Page 49

Inbetriebnahme Deutsch - 11
Inbetriebnahme
Lieferinhalt auspacken und überprüfen
Die Display-Oberfläche des Geräts ist druck- und k ra tzempfindlich. Fassen
Sie das Gerät deshalb nur am Gehäuse an.
Zur vollständigen Lieferung des Geräts gehören:
• ein Zero Client
• eine Netzleitung
• ein Sicherheitsheft
• ein Garantieheft
• eine CD mit Handbüchern
► Packen Sie alle Teile aus.
► Prüfen Sie den Verpackungsinhalt auf sichtbare Transportschäden.
► Prüfen Sie, ob die Lieferung mit den Angaben auf dem Lieferschein übereinstimmt.
► Informieren Sie unverzüglich Ihre Verkaufsstelle, wenn Sie Transportschäden oder
Unstimmigkeiten zwischen Verpackungsinhalt und Lieferschein feststellen.
Wir empfehlen Ihnen, die Originalverpackung der Geräte nicht wegzuwerfen. Bewahren
Sie die O riginalverpackung für einen eventuellen Wiederversand auf.
Zum Betrieb Ihres Zero Clients ist Software notwendig, die auf dem Zugangsserver
installiert werden muss. Die aktuellsten Software-Pakete finden Sie auf den
Support-Seiten von Fujitsu Technology Solutions od er unter folgendem Link:
http://support.ts.fujitsu.com/com/support/downloads.html"
"
Fujitsu Technology Solutions 45
Page 50

12 - Deutsch Inbetriebnahme
Gerät aufstellen
Halten Sie Zuluft- und Abluftöffnungen des Geräts frei, um eine
ausreichende Belüftung zu gewährleisten.
Einrichten eines ergonomischen Bildschirmarbeitsplatzes
► Stellen Sie den Bildschirmarbeitsplatz nicht
gegenüber einem Fenster (1) auf.
1
► Stellen Sie den Zero Client außerhalb der
1
46 Fujitsu Technology Solutions
Reichweite einer Lichtquelle (1) auf.
Page 51

Inbetriebnahme Deutsch - 13
► Platzieren Sie die Tastatur im optimalen
Greifbereich (1).
1
► Platzieren Sie den Zero C lient so, dass
der Augenabstand zum Bildschirm (1)
etwa 50 cm beträgt.
1
50 cm
► Platzieren Sie den Zero Client im
bevorzugten Sehraum (1). Der Bildschirm
sollte aus dem zulässigen Sehraum (2)
auf keinen Fall herausragen.
Je nach Situation kann sich die Verwendung eines Schwenkarms oder einer
Wandhalterung (VESA FPMPMI) anbieten, die im Fachhandel erhältlich sind. Dazu
muss der Bildschirmfuß vorher, wie im Kapitel "
montieren", Seite 15 - Deutsch erläutert, demontiert werd en.
Fujitsu Technology Solutions 47
Schwenkarm oder eine Wandbefestigung
Page 52

14 - Deutsch Inbetriebnahme
Fuß montieren
1
3
2
Entfernen Sie den Sicherungs-Splint nicht bevor Sie die Bodenplatte am Zero
Client befestigt, und ihn in der Betriebsposition aufgestellt haben.
► Setzen Sie die Bodenplatte am Standfuß ein (1).
► Führen Sie die Schraube durch die Öffnung (2).
► Befestigen Sie die Bodenplatte mit der Schraube (3).
► Stellen Sie den Zero Client in Betriebsposition auf.
Höhe einstellen
Der Bildschirm des Zero Clients kann im Bereich von etwa 110 mm in seiner Höhe verstellt werden.
► Entfernen Sie den Sicherungs-Splint auf der Rückseite der Höhenverstellung.
► Fassen Sie den Bildschirm mit beiden Händen am rechten und linken Gehäuserand
und bewegen Sie ihn auf- oder abwärts.
Neigung einstellen
ldschirm des Zero Clients kann in seiner Neigung um –3° (nach vorn) und +35°
Der Bi
hinten) aus seiner senkrechten Stellung verstellt werden.
(nach
► Fasse
48 Fujitsu Technology Solutions
n Sie den Bildschirm mit beiden Händen am rechten un d linken Gehäuserand
ewegen Sie ihn in die g ewünschte Neigung.
und b
Page 53

Inbetriebnahme Deutsch - 15
Drehung einstellen
► Fassen Sie den B ildschirm des Zero Clients mit beiden Händen am rechten und linken
Gehäuserand und drehen Sie ihn in die gewünschte Stellung.
Hochformat einstellen
Der Bildschirm des Zero Cl
in die Position Hochforma
► Fassen Sie den Bildschir
Gehäuserand, neigen Sie
Position und drehen Sie
ients kann aus der Position Breitformat (Landscape-Modus)
t (Portrait-Modus) gedreht werden.
m des Zero Clients m it beiden Händen am rechten und linken
den Bildschirm nach hinten, bewegen Sie ihn in die höchste
ihn im Uhrzeigersinn bis in die Hochformatposition.
Damit auch der Bildschi
die Zero Client Contro
benötigen gegebenen
Zur Rückstellung in
werden. Im OSD-Men
den Landscape-Modus muss der Bildschirm gegen den Uhrzeigersinn gedreht
ü kann die OSD-Anzeige wieder zurückgestellt werden.
rminhalt im P ortrait-Mod us angezeigt wird, muss
ller Software diese Funktion unterstützen oder Sie
falls eine zusätzliche Software.
Schwenkarm oder eine Wandbefestigung montieren
Bevor S ie einen Schwenkarm oder eine Wandbefestigung verwenden können,
müssen Sie den Fuß des Zero Client demontieren.
Die Display-Oberfläche des Zero Client ist druck- und kratzempfindlich!
► Schalten Sie
lösen Sie de
► Lösen Sie alle Leitungen.
► Legen Sie d
1
2
3
4
Vordersei
► Lösen Sie die Schrauben (1– 4) an der
Rückseite des Zero Clients.
Sie könne
eine Wan
mit 100 m
den Zero Client aus und
n Netzstecker.
en Zero Client mit der
te auf eine weiche Unterlage.
n jetzt einen Schwenkarm oder
dhalterung gemäß VESA FPMPMI
m Lochabstand montieren.
Wie Sie Schwenkarm bzw. Wandhalterung montieren, entnehmen Sie der
Dokumentation des Schwenkarmes oder der Wandhalterung.
Fujitsu Technology Solutions 49
Page 54

16 - Deutsch Inbetriebnahme
Anschließen des Geräts
Beachten Sie die Sicherheitshinweise im Kapitel "Wichtige Hinweise", Seite 8 - Deutsch.
Leitungen an den Zero Client anschließen
1
3
1
2
4
567 9
8
1 = G ewinde zur Be
Schwenkarms o
2 = Siche rheitsschlitz für "Kensington Lock"
3 = USB-Anschlü
4 = Netzanschluss
5 = LAN-Anschl
► Stecken Sie den Stecker der abgeschirmten Ethernet-Datenleitung in den LAN-Anschluss
des Zero Clients und achten Sie darauf, dass der Stecker korrekt verbunden ist.
Wenn Sie Ihren Zero Client DZ22-2 an ein Power over Ethernet Netzwerk anschließen,
benötigen Sie kein Netzkabel für die Stromversorgung. Dies gilt nicht für den Zero
Client DZ19-2, dieser benötigt immer ein Netzkabel für die Stromversorgung.
Bei Stromversorgung durch Power over Ethernet (nur beim Zero Client DZ22-2):
Verwenden Sie nur die von Fujitsu vorgesehenen Power over Ethernet Midspans,
da nur diese die benötigte Leistung von bis zu 60 W liefern können.
Um die Stromversorgung von Netzanschlu ss auf Power over Ethernet umzustellen,
bzw. umgekehrt, muss der Zero Client DZ22-2 zuerst ausgeschaltet werden.
► Stecken Sie das andere Ende der Ethernet-Datenleitung in die LAN-Wandsteckdose.
► Stecken Sie den USB-Stecker Ihrer Tastatur und -Maus in Anschlüsse ihres Zero Clients.
50 Fujitsu Technology Solutions
festigung des
der der Wandhalterung
sse
uss
6 = USB-Anschlüs
7 = Kopfhörer-Ausgang
8 = Mikrofon-Ei
9 = DVI-D-Ausgang
se
ngang
Page 55

Inbetriebnahme Deutsch - 17
► Stecken Sie die mitgelieferte Netzleitung an den Netzanschluss des Zero Clients.
Um Ihren Arbeitsplatz mit den Bildschirmen zu betreiben, schließen Sie an den
DVI-D Ausgang des Zero Clients einen zusätzlichen Monitor an.
Im Sicherheitsschlitz können Sie einen Diebstahlschutz (Kensington Lock) befestigen.
Ein Kensington Lock gehört nicht zum Lieferumfang des Zero Clients.
Die Stromversorgung für die USB-Anschlüsse ist so ausgelegt, dass neben Tastatur und
Maus (je max. 100 mA) noch 2 x 500 mA für zwei weitere USB-Geräte zur Verfügung
stehen. Sie können USB-Geräte an beliebigen USB-Anschlüssen betreiben.
Fujitsu Technology Solutions 51
Page 56

18 - Deutsch Bedienung
Bedienung
Gerät ein-/ausschalten
2
1 = Tasten für das OSD Menü
(On-Screen-Display)
2 = Netzanzeige
Ein-/Ausschalter lang drücken um Gerät ein-oder auszuschalten.
Ein-/Ausschalter kurz drücken um sich vom Virtuellen Desktop abzumelden.
Die Farbe d
LED-Anzeige Status
blau
grün
orange
leuchtet nicht
orange schnell blinkend
oran
rot
rot blinkend
er LED-Anzeige verändert sich folgendermaßen:
Zero Client ist eingeschaltet (Normal Mode).
Zero Cli
Zero Client befindet sich im Energiesparmodus.
Zero Client ist ausgeschaltet.
Zero C
ge langsam blinkend
Zero Client hat IP-Adresse vom DHCP-Server erhalten und baut
Verbindung zum Zero Client Controller auf.
Zero Client hat einen Fehler.
o Client hat kein Netzwerk gefunden.
Zer
1
3 = Ein-/Ausschalter oder Abmelden
ent ist eingeschaltet (ECO Mode).
lient bezieht IP-Adresse vom DHCP-Server.
3
vom Virtuell Desktop
52 Fujitsu Technology Solutions
Page 57

Bedienung Deutsch - 19
Vorderseite
1 = Netzanzeige
2 = Ein-/Ausschalter oder
Desktop
1
2
Abmelden vom Virtuell
Rückseite
Hinweise zum P ower-Management
Stufe
Netzanzeige leuchtet blau leuchtet grün leuchtet orange
Bildschirm
Leistungsaufnahme
typisch*
*ohne angesch lossene USB-Geräte und ohne Audio
Im Auslieferzustand ist der ECO Mode voreingestellt.
Mit dem Programm ZeroClient Control Panel kann eingestellt werden, nach welcher
Zeit der Inaktivität der ZeroClient ausgeschaltet werden soll. Dann wird die
Leistungsaufnahme reduziert (Energiesparmodus). Die Netzanzeige des Zero Clients
ändert die Farbe, um die Statusänderung anzuzeigen.
Nach einer Eingabe an der Tastatur wird der Bildschirminhalt wiederhergestellt.
Zero Client
DZ22-2
Zero Client
DZ19-2
Betrieb Energiesparmodus
Normal
max.
Helligkeit
<40W <35W
<32W <27W
ECO
typ. 200 cd/m
2
dunkel
reduziert auf ≤ 0,5 W
reduziert auf ≤ 0,5 W
Fujitsu Technology Solutions 53
Page 58

20 - Deutsch Bedienung
Mit dem Zero Client arbeiten
Zum Betrieb Ihres Zero Clients ist Software notwendig, die auf dem Zugangsserver
installiert werden muss. Die aktuellsten Software-Pakete finden Sie auf den
Support-Seiten von Fujitsu Technology Solutions oder unter folgendem Link:
http://support.ts.fujitsu.com/com/support/downloads.html".
"
User Name:
Password:
LogIn
LogIn
Options
Options
2
3
i
?
41
► Wählen Sie die Ländervariante Ihrer Tastatur aus (1).
► Geben Sie Ihren Benutzernamen (2) und Ihr Kennwort (3) ein.
► Klicken Sie auf Login (4).
54 Fujitsu Technology Solutions
Page 59

Bedienung Deutsch - 21
Bildschirmeinstellungen ändern
► Wenn Sie den Zero C lient das erste
Mal in Betrieb nehmen, öffnen Sie nach
anmelden am System das Programm
ZeroClient Control Panel durch doppelklicken
des Symbols in der Taskleiste.
► Wählen Sie Display und die
Bildschirmauflösung.
► Stellen Sie die "Screen Resolution" auf die
Bildschirmauflösung 1680 x 1050 P unkte
(Zero Client DZ22-2) bzw. 1280 x 1024
Punkte (Zero Client DZ19-2) ein.
► Bestätigen Sie mit OK od er Apply.
► Melden Sie sich vom "Virtuellen Desktop"
ab und wieder an, damit die Änderungen
wirksam werden.
Ausschalttimer für den Bildschirm setzen
Sie können einen Ausschalttimer definieren, der den Bildschirm ausschaltet, wenn für einen
bestimmten Zeitraum keine Eingaben durch Eingabegeräte wie Maus oder Tastatur erfolgen.
► Um das Programm Zero Client Control Panel zu starten, klicken Sie doppelt
auf das Symbol in der Taskleiste.
► Wählen Sie Display (Bilschirm) und Turn off monitor (Bildschirm ausschalten).
► Legen Sie die Zeit, nach der der Bildschirm ausgeschaltet werden soll, fest.
► Bestätigen Sie mit OK oder Apply (Bestätigen).
Der Bildschirm wird nach Ablauf des Ausschalttimers ausgeschaltet, um Energie zu
sparen (Hintergrundbeleuchtung des Bildschirms wird ausgeschaltet).
Wird die Maus bew egt oder eine Taste gedrückt, wird der Zero Client wieder
in den normalen Betriebsmodus versetzt.
Fujitsu Technology Solutions 55
Page 60

22 - Deutsch Bedienung
Sleeptimer für den Zero Client setzen
Sie könn en einen Sleeptimer definieren, der den Zero Client in einen Ruhezustand versetzt, wenn für
einen bestimmten Zeitraum keine Eingaben durch Eingabegeräte wie Maus oder Tastatur erfolgen.
► Um das Programm Zero Client Contro l Panel zu starten, klicken Sie doppelt
auf das Symbol in der Taskleiste.
► Wählen Sie Display (Bilschirm) und Put Zero Client to Sleep (Zero Client in Ruhemodus versetzen).
► Legen Sie die Zeit, na ch der der Zero Client in den Ruhezustand versetzt werden soll, fest.
► Bestätigen Sie m it OK oder Apply (Bestätigen).
Der Zero Client wird nach Ablauf des Sleeptimers in den Ruhezustand versetzt. Im
Ruhezustand hat der Zero Client einen sehr geringen Energieverbauch.
Wird der Ein-/Ausschalter des Zero Client gedrückt, wird der Zero Client
wieder in den normalen Betriebsmodus versetzt.
Wenn im Programm Zero Client Control Panel Put Zero Client to Sleep (Zero Client
in Ruhezustand versetzen) nicht aktiv ist, wenden Sie s ich an Ihren Administrator,
um entsprechende Rechte zum Setzen des Sleeptimers zu erhalten. Dazu
setzt der Administrator im Zero Client Controller unter Clients - Settings - Login
Preferences das Häkchen im Feld User Power Sleep Override.
Bildschirmeinstellungen mit den Tasten des Bedienfeldes ändern
Die Tasten des Bedienfeldes sind doppelt belegt. Bei nicht aktiviertem OSD-Menü könn en
Sie Schnellfunktionen aufrufen, die auf den Tasten aufgedruckt sind. Bei aktiviertem
OSD-Menü gelten die im Bildschirm eingeblendetet Navigations-Tasten (Soft keys).
3
12
1 = Tasten fü r das OSD-Menü
(On-Screen-Display)
2 = Ein-/Ausscha lter oder Abmelden
vom Virtuell Desktop
56 Fujitsu Technology Solutions
3 = Netzanzeige
Page 61

Bedienung Deutsch - 23
Softkeys
ins Untermenü wechseln
Start (bei Auto level und Factory recall)
Navigieren innerhalb eines Menüs
Option auswählen
+-
Wert ändern
Änderungen übernehmen und zurück ins Hauptmenü
Änderungen verwerfen und zurück ins Hauptmenü
OSD-Menü verlassen
Sprachauswahl
Das OSD-Menü gibt es in verschiedenen Sprachen.
Direkt nach d em Einschalten des Display wird eine Sprachauswahl angezeigt.
► Wählen Sie Ihre gewünschte Sprache aus.
Mit der OSD-Funktion Language im Menü OSD Setup können Sie die Sprache ändern.
ECO Betriebsart aktivieren/deaktivieren
Durch Reduzierung der Bildhelligkeit kann die Leistungsaufnahme
des Geräts reduziert werden.
ECO
► DrückenSiedieTaste
Die Meldung erscheint, ECO Mode ein bzw. ECO Mode aus.
Wird die ECO Betriebsart aktiviert, werden folgende OSD- Einstellungen geändert:
Mode
Colour
Brightness
Nach dem Ausschalten der ECO Betriebsart wird die vorher durch den Benutzer
eingestellte Helligkeit wiederhergestellt.
Fujitsu Technology Solutions 57
, um die ECO Betriebsart aus- oder einzuschalten.
Office
6500 K
reduziert
Page 62

24 - Deutsch Bedienung
OSD-Menü sperren
Das OSD-Menü kann gesperrt werden, um unbeabsichtigte oder unbefugte
Veränderungen an der Bildschirmeinstellung zu verhindern.
► Halten Sie die Taste
Bildschirm über den Ein-/Ausschalter einschalten.
Die Meldung erscheint, OSD locked / unlocked.
Um das gesp errte OSD-Menü wieder freizugeben, verfahren Sie auf die gleiche Weise.
MENU
einige Sekunden gedrückt, während Sie den
Ein-/Ausschalter sperren
Der Ein-/Ausschalter kann gesperrt werden, um unbeabsichtigte oder unbefugte
Veränderungen an der Bildschirmeinstellung zu verhindern.
ECO
► Halten Sie di e Taste
Die Meldung erscheint, Power button locked / unlocked.
Um den gesperrten Ein-/Ausschalter wieder freizugeben, verfahren
Sie auf die gleiche Weise.
und die Taste gleichzeitig einige Sekunden gedrückt.
58 Fujitsu Technology Solutions
Page 63

Bedienung Deutsch - 25
Bildschirmeinstellungen mit dem OSD-Menü ändern
Mit den Tasten des Bedienfeldes können Sie das integrierte OSD-Menü (O n-Screen
Display) am Zero Client aufrufen und bedienen.
In der folgenden Beschreibung werden die englischen Menübezeichnungen
verwendet (Standardeinstellung).
► Drücken Sie die Taste
Das Hauptm
Das erste Symbol (Brightness/Contrast) ist markiert und die dazugehörigen
Funktionen sind im rechten M enüfeld sichtb ar.
► Drücken Sie die Taste
zu markieren (z. B. Image adjust).
► Drücken Sie die Taste
bzw. eine Auswahl zu treffen.
► Drücken Sie die Taste
und die Funktion zu verlassen.
► Drücken Sie die Taste
► Drücken Sie die Taste
Fujitsu Technology Solutions 59
enü mit Symbolen für die Einstellfunktionen erscheint.
Wenn Sie andere Einstellungen ändern wollen, wählen Sie die entsprechende
Funktion aus dem OSD-Hauptmenü. Alle Einstellmöglichkeiten des
Hauptmenüs werden im Folgenden beschrieben.
MENU
, um das O SD-Menü zu aktivieren.
ECO
oder die Taste , um ein anderes Symbol
oder die Taste , um ein Wert zu verändern
MENU
, um die Änderungen zu übernehmen
EXIT
, um die Änderungen zu verwerfen und die Funktion zu verlassen.
EXIT
, um das OSD-Menü zu verlassen.
Page 64

26 - Deutsch Bedienung
Helligkeit und Kontrast einstellen
Einstellfenster Brightness/Contrast aufrufen
Brightness
Contrast
Black level
Wenn der Kontrast zu hoch eingestellt ist, kann man helle Flächen nicht
mehr von sehr hellen Flächen unterscheiden. Wenn der Kontrast zu niedrig
eingestellt ist, wird die maximale Helligkeit nicht erreicht.
Helligkeit der Anzeige einstellen
Mit dieser Funktion verändern Sie die Helligkeit der Hintergrundbeleuchtung.
Kontrast der Anzeige einstellen
Mit dieser Funktion verändern Sie den Kontrast von hellen Farbtönen.
Helligkeit der Anzeige einstellen
Mit dieser Funktion verändern Sie den Kontrast von dunklen Farbtönen.
Lautstärke einstellen
Einstellfenster Audio aufrufen
Volum e
Mute
Übermäßiger Schalldruck aus dem Kopfhörer kann zu Hörschäden und zu Hörverlust
führen. Wird die Lautstärke in der Audioanwendung über die Mittelstellung
des Reglers hinaus erhöht, wird auch die Spannung am Kopfhörerausgang
erhöht, was zu einem zu hohen Schalldruck führen kann.
Farbtemperat
Lautstärke für die Wiedergabe über die eingeb auten Lautsprecher einstellen
Lautsprecher aus- oder einschalten
ur und Farben einstellen
Einstellfenster Colour aufrufen
Farbtemperatur auswählen
Mit Hilfe der Farbtemperatur wird die "Wärme" der Bildschirmfarben
eingestellt. Die Farbtemperatur wird in K (= Kelvin) gemessen. Sie können
wählen zwischen sRGB, 6500 K, 7500 K, 9300 K, Native und Custom Colour.
In der benutzerdefinierten Einstellung können Sie die Farbanteile der
Grundfarben (Rot, Grün, Blau) nach Bedarf verändern.
60 Fujitsu Technology Solutions
Page 65

Bedienung Deutsch - 27
Darstellung des OSD-Menüs einstellen
Einstellfenster OSD Setup aufrufen
Language
OSD Timeout
Sprache für das OSD-Menü einstellen
Mit dieser Funktion wählen Sie die Sprache für das OSD-Menü.
Die Standardeinstellung ist Englisch.
Dauer der Anzeige de s OSD-Menüs einstellen
Mit dieser Funktion wählen Sie einen Wert zwischen 10 und 120 Sekunden.
Wenn d ie eingestellte Zeit abgelaufen ist, ohne dass eine Einstellung
vorgenommen wurde, w ird das OSD-Menü automatisch ausgeblendet.
Funktionen im Menü Advanced einstellen
Einstellfenster Adv anced aufrufen
Factory Recall
Informationen
Werkseinstellunge
Mit dieser Funktion
Werkseinstellung
Drücken Sie die T
die M eldung Auto
anzeigen
Einstellfenster Information aufrufen
Mit dieser Funktion werden Modellbezeichnung, Auflösung, H/V-Frequenz
und ECO-Mode angezeigt.
n aktivieren
werden a lle Einstellungen ohne Nachfrage auf die
en zurückgesetzt.
aste
, um die Funktion au szuführen. Es erscheint
Processing.
Fujitsu Technology Solutions 61
Page 66

28 - Deutsch Hinweise zur ergonomisc
hen Farbeinstellung
Hinweise zur ergonomischen Farbeinstellung
Wenn Sie in Ihren Anwendungsprogrammen Farben für den Bildschirm
einstellen, sollten Sie folgende Hinweise beachten.
Die Grundfarben Blau und Rot auf dunklem Hintergrund erreichen
nicht den Mindestkontrast von 3:1 und sind deshalb für d auernd e
Text- und Dateneingabe nicht geeignet.
Bei Einsatz von mehreren Farben für Zeichen und Hintergrund bei voller Aussteuerung der
Primärfarben können Sie gut geeignete Farbkombinationen aus folgender Tabelle wählen:
Hintergrund
schwarz
weiß
purpur
blau
cyan
grün
gelb
rot
schwarz
+++
++
+
+
+
-
weiß
++
+
--
--
+
purpur
-
++
----
Zeichen
blau
-
-----
+
+
cyan
+++
---
+
---
--
grün gelb
-
---
+
+
rot
+
-
+
+ Farbkombination gut geeignet
- Farbkombination nicht geeignet, da entweder Farborte zu nah beieinander
liegen, dünn linige Zeichen nicht erkennbar sind oder hohe Anforderungen an den
Scharfeinstellungsmechanismus der Augen gestellt werden.
62 Fujitsu Technology Solutions
Page 67

Fehlerbehebung Deutsch - 29
Fehlerbehebung
Bei Auftreten eines Fehlers prüfen Sie zunächst die im Folgenden genannten Punkte.
Wenn Sie das Problem nicht lösen können, verständigen Sie bitte unseren Service Desk.
Haben Sie dieses Problem? Überprüfen Sie die genannten Punkte:
Keine Bildschirmanzeige
Netzanzeige leuchtet nicht
Keine Bildschirman
Netzanzeige leuch
Bild verstellt
Anzeige blinkt rot
Netzanze
ige blinkt schnell orange
zeige
tet
► Prüfen Sie, ob das Netzkabel bzw. LAN
Kabel mit Power over Ethernet (nur bei Zero
Client DZ22-2) angeschlossen ist.
► Prüfen Sie, ob bei einer
über Power over Etherne
Leistung zur Verfügun
Beachten Sie dazu die H
technischen Daten.
► Prüfen Sie ob der Zero Client sich im
Energiesparmodus befindet. Drücken Sie
dazu eine beliebige Taste der Tastatur des
Zero Clients.
► Verändern Sie die Helligkeit und/oder den
Kontrast, bis Sie ein Bild erhalten.
► Drücken Sie die Taste
Funktion Factory Recall auszuführen.
An den Zero Client ist kein Netzwerkkabel
angeschlossen oder das Netzwerkkabel ist
defekt.
► Überprüfen Sie, ob das Netzwerkkabe l an
beiden Enden so angeschlossen ist, dass
auch wirklich ein Kontakt besteht.
► Verwenden S
um den Zero
verbinden
Wenn die N
nute nicht auf langsame Blinkfrequenz
einer Mi
e umschaltet, bedeutet dies, dass der
in orang
ent keine IP-Adresse vom DHCP-Server
Zero Cli
en kann.
bezieh
► Wenn Ze
unters
befind
passe
► Prüfen Sie, ob es in den
DHCP-Server-Logdateien Meldungen
gibt, die darauf hinweisen, dass auf dem
Server keine IP-Adresse mehr verfügbar ist.
ie ein anderes Netzwerkkabel,
Client mit dem Netzwerk zu
.
etzwerk- bzw. Betriebsanzeige nach
ro Client und DHCP-Server sich in
chiedlichen Subnetzen bzw. VLAN s
en, stellen S ie sicher, dass im Switch
nder DHCP Relay eingerichtet ist.
Stromversorgung
t ausreichend
g gestellt wird.
inweise in den
MENU
,umdie
Fujitsu Technology Solutions 63
Page 68

30 - Deutsch Fehlerbehebung
Haben Sie dieses Problem? Überprüfen Sie die genannten Punkte:
Anzeige blinkt langsam orange Wenn die Netzwerk- bzw. Betriebsanzeige nach
einer Minute nicht dauerhaft blau oder grün
leuchtet, bedeutet dies, dass sich d er Zero Client
nicht am Zero Client Controller anmelden kann.
► Prüfen Sie, ob die Vendor Class für den Zero
Client Controller im DHCP Server angelegt
und für den Scope der Zero Clients aktiviert
ist.
► Stellen Sie sicher, dass keine Portfilter den
Datenverkehr zum Zero Client Controllerr
blockieren.
64 Fujitsu Technology Solutions
Page 69

Erläuterungen zur Norm ISO 9241–307
Deutsch - 31
Erläuterungen zur Norm ISO 924
Helle oder dunkle Bildpunkte
Nach dem heutigen Stand der Produktionstechnik kann eine absolut fehlerfreie Bildschirmanzeige
nicht garantiert werden. Es können abhängig von der Gesamtanzahl der Pixel (Auflösung) einige
wenige konstant helle oder dunkle Pixel (Bildelemente) oder Subpixel (Bildpunkte) vorhanden sein.
Pixel
(= Bildelement)
Subpixel
(= Bildpunkt)
Die maximal zulässige Anzahl solcher fehlerhaften Pixel wird durch die internationale
Norm ISO 9241-307 festgelegt. Die LCD Monitore von Fujitsu halten bei niedrigen
Auflösungen die Klasse II und bei Auflösungen von 1680 x 1050 (1764000 Pixel)
und höher die Klasse I nach der Norm ISO 9241-3 ein.
Beispiele:
Ein Flachbildschirm mit der Auflösung 1280 x 1024 hat 1280 x 1024 = 1310720 Pixel.
Jedes Pixel besteht aus drei Subpixeln (Rot, Grün und Blau), sodass sich ca. 3,9
Millionen Subpixel ergeben. Laut ISO 9241-3 (Klasse II) dürfen maximal 3 helle und 3
dunkle Pixel und zusätzlich 7 helle oder 13 dunkle Subpixel oder ein entsprechender Mix
defekt sein (1 helles Subpixel zählt wie zwei dunkle Subpixel).
Ein Flachbildschirm mit der Auflösung 1920 x 1080 hat 1920 x 1080 = 2073600 Pixel. Jedes Pixel
besteht aus drei Subpixeln (Rot, Grün und Blau), sodass sich ca. 6,2 Millionen Subpixel ergeben. Laut
ISO 9241-3 (Klasse I) dürfen maximal 2 helle und 2 dunkle Pixel und zusätzlich 5 helle oder 10 dunkle
Subpixel oder ein entsprechender Mix defekt sein (1 helles Subpixe l zählt wie zwei dunkle Sub pixel).
Ein Pixel besteht aus 3 Subpixeln, in der Regel Rot, Grün und Blau.
Ein Pixel ist das kleinste Element, das die vollständige Funktionalität der
Anzeige erzeugen ka nn.
Ein Subpixel ist eine gesondert adressierbare interne Struktur in einem Pixel
(Bildelement), die die Bildelementfunktion erweitert.
1–307
Fujitsu Technology Solutions 65
Page 70

32 - Deutsch Technische Daten
Technische Daten
Betauung ist weder im Nennbetriebs- noch im Grenzbetriebsbereich zulässig.
Zero Client DZ 19-2 Zero Client DZ22-2
Abmessungen und Gewicht
Sichtbare Diagonale
Pixelabstand 0,294 mm 0,282 mm
Bildgröße
Maximale Auflösung
Abmessungen inkl.
Bildschirmfuß
Gewicht (ohne Verpackung)
Speicherbare Darstellungsmodi
Pixelfehler
ISO 9241-307
Elektrisch
Video Output
klassen nach
e Kennwerte
Breite 376 mm 474 mm
Höhe 301 mm 296,1 m m
Breite 410 mm 508 mm
Höhe (verstellbar)
Tiefe
Klasse I I
Digital
48,2 cm 55,9 cm
1280 x 1024 1680 x 1050
374 – 484 mm 369 – 479 mm
180 mm 180 mm
ca. 5,5 ± 0,2 kg ca. 6,2 ± 0,2 kg
12 12
DVI-D mit HDCP DVI-D mit HDCP
Synchronisation Separate Sync. TTL,
talfrequenz
Horizon
iederholfrequenz
Bildw
al P ixel ra te
Maxim
Spannungsversorgung
malbetrieb
Gesamtleistungsaufnahme
(ohne Audio)
Tonausgabe 1,0 W links;
Umgebungsbedingungen
Klimaklasse 3K2, DIN I EC 721
Nennbetriebsbereich
Luftfeuchtigkeit
Grenzbetriebsbereich
66 Fujitsu Technology Solutions
Nor
ECO Betriebsart
Off Modus
positiv oder negativ
31 kHz .... 81 kHz
(Multi-Scan)
56 Hz .... 76 Hz 56 Hz .... 76 Hz
z
135 MH
–240V,
100 V
–60Hz
50 Hz
W
<32
7W
<2
<0,5W <0,5W
1,0 W rechts
Zero Client DZ19-2 Zero Client DZ22-2
5 °C .... 35 °C
15 % .... 85 %
5 °C .... 35 °C
Separate Sync. TTL,
positiv oder negativ
30 kHz .... 82 kHz
(Multi-Scan)
z
165 MH
–240V,
100 V
–60Hz
50 Hz
W
<40
5W
<3
1,5 W links;
1,5 W rechts
5 °C .... 35 °C
15 % .... 85 %
5 °C .... 35 °C
Page 71

Technische Daten Deutsch - 33
Der Zero Client DZ22-2 kann altern ativ zur Stromversorgung über das elektrische Netz
und über die Ethernet-Leitung mit Strom versorgt werden (Power over Ethernet, PoE).
Bitte beachten Sie, dass Ihre Netzwerk-Infrastruktur darauf ausgelegt sein muss.
• Stellen Sie sicher, dass ausschließlich 8-adrige Ethernet-Leitungen
(Gbit-Ethernet-Leitungen) verwendet werden, die mindestens der Kategorie 5
(Cat 5) entsprechen. Der Strom wird übe r alle 8 Adern eingespeist.
• Stellen Sie sicher, dass die eingespeiste Leistung ausreicht, um Ihren Zero
Client DZ22-2 auch über größere Entfernungen von maximal 100 Metern mit
Strom zu versorgen. Fujitsu Technology Solutions empfiehlt, au sschließlich
freigegebene Ethernet-Stromversorgungen zur Einspeisung des Stromes
zu verwenden, die folgender Spezifikation genügen:
– Nennspannung: 55 V
– Nennleistung 60 W
– Konform zu IEEE802.3at.
Voreingestellte Betriebsarten
Für die aufgeführten Betriebsarten sind die Bildlage und Bildgröße werkseitig
optimal eingestellt. Sie können die Einstellungen ändern und speichern (siehe
Bildschirmeinstellu ngen ändern", Se ite 21 - Deutsch).
Kapitel "
Aus ergonomischen Gründen ist eine Bildschirmauflösung von 1680 x 1050 Punkten
(Zero Client DZ22-2) bzw. 1280 x 1024 Punkten (Zero Client DZ19-2) Punkten zu
empfehlen. Technologiebedingt (Aktiv-Matrix) bietet ein LCD-Bildschirm auch bei
einer Bildwiederholfrequenz von 60 Hz ein absolut flimmerfreies Bild.
Häufigste Betriebsarten
Horizontalfrequenz Bildwiederholfrequenz Bildschirmauflösung
37,9 kHz 60 Hz 800 x 600
48,4 kHz 60 Hz 1024 x 76 8
63,7 kHz 60 Hz
65,0 kHz 60 Hz
Fujitsu Technology Solutions 67
1280 x 1024 (nativ Zero Client DZ19-2)
1680 x 1050
(nativ Zero Client DZ22-2)
Page 72

34 - Deutsch Technische Daten
Anschluss DVI-D
1
9
17
Stift Bedeutung
1
2
3
4 Not connected
5
6
7
8
9
10
11
12 Not connect
13 Not connec
14 +5V P ower
15
16 Hot Plug Detect
17
18
19
20 Not connected
21 Not connected
22
23
4
2
TMDS D ata2–
TMDS D ata2+
TMDS Data 2/4 Shield
Not connected
DDC Clock
DDC Data
Analogue Vertic
TMDS D ata1–
TMDS D ata1+
TMDS Data 1/3
Ground
TMDS D ata0–
TMDS D
TMDS Data 0/5 Shield
TMDS Clock Shield
DS Clock+
TM
TMDS Clock–
al Sync
Shield
ed
ted
ata0+
68 Fujitsu Technology Solutions
Page 73

Sommaire Français - 1
FrançaisSommaire
VotreZero Client... .................................................................... 5
Informationscomplémentaires ........................................................... 6
Symboles .............................................................................. 7
Remarquesimportantes ............................................................... 8
Consignesde sécurité ................................................................... 8
Câblesecteur ........................................................................... 9
Transporter l’appareil . . .................................................................. 9
Nettoyer l’appareil . ...................................................................... 10
Marquage CE . .......................................................................... 10
Elimination etrecyclage ................................................................. 10
Mise enservice ........................................................................ 11
Déballage et contrôle du contenu de la livraison . . . ........................................ 11
Mise enplace de l’appareil ............................................................... 12
Pose dumoniteur ................................................................... 12
Pose dupied ....................................................................... 14
Régler la hauteur . . .................................................................. 14
Régler l’inclinaison .................................................................. 14
Régler larotation .................................................................... 15
Régler leformatvertical .............................................................. 15
Pose d’un bras pivotant ou d’un support mural . ........................................ 15
Raccordement de l’appareil . . . ........................................................... 16
Raccorder lescâblesau Zero Client .................................................. 16
Commande ............................................................................ 18
Allumer/éteindrel’appareil ............................................................... 18
Remarquesrelatives au Power Management .............................................. 19
Travailleravec leZero Client ............................................................. 20
Modification des réglages de l’écran . . . ................................................... 21
Réglage de la minuterie de coupure d’écran . . . ........................................ 21
Réglage dela minuterie deveille du Zero Client ....................................... 22
Modification des réglages de l’écran au moyen des touches du panneau de commande ...... 22
Touchesprogrammables ............................................................. 23
Sélection de la langue . . . . ........................................................... 23
Activer/désactiver lemode ECO ..................................................... 23
Verrouiller lemenu OSD ............................................................. 24
Verrouiller l’interrupteur Marche/Arrêt ................................................. 24
Modifier lesréglages del’écran àl’aide du menu OSD ..................................... 25
Régler lecontrasteetla luminosité ................................................... 26
Réglage duvolume .................................................................. 26
Régler latempérature decouleur et les couleurs ....................................... 26
Régler l’affichage du menu OSD . . . ................................................... 27
Régler les fonctions dans lemenu Avanced ........................................... 27
Afficherdes informations ............................................................. 27
Instructionspour leréglage ergonomique descouleurs ................................ 28
Solution ............................................................................... 29
Précisions concernant la norme ISO 9241-307 . . ........................................ 31
Caractéristiquestechniques ........................................................... 32
Fujitsu Technology Solutions 69
Page 74

2 - Français Sommaire
Modesde fonctionnement préréglés ...................................................... 33
Modes de fonctionnement les plus courants . . ......................................... 33
PortDVI-D ............................................................................. 34
70 Fujitsu Technology Solutions
Page 75

Sommaire Français - 3
Fujitsu Technology Solutions 71
Page 76

Windows 7, Windows Vista et Windows XP sont des marques déposées de Microsoft Corporation.
Toutes les autres marques commerciales citées sont des marques commerciales ou des marques
déposées de leurs propriétaires respectifs et sont protégées comme telles.
Copyright © Fujitsu Technology Solutions GmbH 2012
Tous droits réservés, y compris celui de la traduction, de la reproduction, de la duplication
(même partielles) par photocopie ou procédé analogue.
Tout manquement à cette règle expose son auteur au versement de dommages et intérêts.
Tous droits réservés, notamment en cas d’octroi de brevet ou d’enregistremen t comme modèle
d’utilité.
Sous réserve de disponibilité et de modifications techniques.
Page 77

Votre Zero Client... Français - 5
Votre Zero Client...
dispose de nombreuses fonctions utiles, par exemple :
• écran TFT (Thin Film Transistor, matrice active)
• faible encombrement grâce
• Rétroéclairage par LED
• Connexion LAN 100 Mbit Et
• PoE (Power over Ethernet) pour Zero Client DZ 22-2
• Technologie Zero Clien
• Prise DVI pour un deuxième moniteur (cette prise ne permet p as de connecter un PC)
• 4 prises USB (pour clav
• Prises microphone et casque (jacks 3,5 mm)
• caractéristiques er
netteté et pureté d
• luminosité élevée et bon contraste
• haute résolution
1050 points (Zero
•Affichage de 16,7 millions de couleurs
• balayage automa
et/ou entre 31 e
(fréquences v
• contrôle d’écran numérique avec microprocesseur permettant la mémorisation
de 12 modes d’affichage différents
• réglage des c
aux aptitude
• utilisation conviviale via un menu OSD intégré (On Screen Display)
• compatibil
• Compatibilité VESA-FPMPMI (Flat Panel Monitor Physical Mounting Interface) dispositif de montage pour bras pivotant et support mural
• Fonction
• Fonction ECO
• Power Ma
cas d’in
Vous trouverez dans ce manuel des informations importantes dont vous aurez besoin
pour la mise en service et l’utilisation du moniteur Zero Client.
Plug&Play
activité du Zero Client
gonomiques optimales (absence absolue de distorsion, excellente
es couleurs jusque dans les angles)
- 1280 x 1024 points (Zero Client DZ19-2) ou 1680 x
Client DZ22-2)
tique des fréquences horizontales entre 30 et 82 kHz (Zero Client DZ22-2)
t 81 kHz (Zero Client DZ19-2) et des fréquences de raf raîchissement
erticales) entre 59 et 76 Hz (sans aucun scintillement)
ouleurs permettant d’adapter la représentation à l’écran et
s visuelles individuelles
ité VESA-DDC
nagement permettant de réduire la puissance absorbée en
à la faible profondeur du boîtier
hernet
t intégrée pour accès facile aux bureaux virtuels
ier, souris et autres périphériques US B)
Votre Z ero Client DZ22-2 offre la possibilité d’être alimenté en courant par
l’intermédiaire du LAN. Si vous utilisez la fon ction Power over Ethernet (PoE),
vous a vez besoin de l’infrastructure de réseau appropriée mais aucune connexion
électrique supplémentaire n’est nécessaire. A noter que le Zero Client DZ19-2
ne peut pas fonctionner sans connexion électrique.
Fujitsu Technology Solutions 73
Page 78

6 - Français Votre Zero Client...
Pour utiliser le Zero Client, il est nécessaire de disposer d’une connexion LAN
vers un serveur équipé du logiciel de virtualisation du bureau.
Le câble de données LAN n’est pas fourni. Sont également nécessaire s un
clavier et une souris qui peuvent être commandés en option.
Si vous mettez en service l’éc
le bureau virtuel, vous de vr
Client DZ19-2) ou 1680 x 10
(voir chapitre "
Modificat
ran pour la première fois, après avoir ouvert une session sur
ez régler la résolution de l’écran sur 1280 x 1024 points (Zero
50 points (Zero Client DZ22-2) et adapter l’affichage à vos besoins
ion des réglages de l’ écran", Page 21 - Français).
Informations complémentaires
Pour le réglage de la résolution et de la fréquence de rafraîchissement, reportez-vous
à la documentation du logiciel Zero Client.
Pour des raisons d’ergonomie, il est recommandé d’utiliser une résolution d’écran de 1280 x
1024 points (Zero Client DZ19-2) ou 1680 x 1050 points (Zero Client DZ22-2).
De par sa technologie (matrice active), un Zero Client avec écran LCD affiche une image sans
aucun scintillement, même à une fréquence de rafraîchissement de 60 Hz.
74 Fujitsu Technology Solutions
Page 79

Votre Zero Client... Français - 7
Symboles
signale des consignes à respec
sécurité, celle de votre péri
ne s’applique plus dès l’inst
ne respectant pas ces consign
signale des informations importantes permettant d’utiliser le périphérique
de façon approprié e.
ter impérativement pour votre propre
phérique et celle de vos données. La garantie
ant où vous endommagez le périphérique en
es.
►
Cette police
Cette police
Cette po lice
"Cette police"
Bouton
Cette police
signale une action à exécuter.
signale un résultat.
signale des données à s
de commande, telles q
permettant d’exécu
signale des informations émises par un programme sur l’écran, par
exemple : L’installation est terminée !
signale
• des concepts et des textes dans une interface logicielle, par exemple :
Cliquez sur Enregistrer
• des noms de programmes ou de fichiers, comme Windows ou setup.exe.
signale
• des liens vers d’autres sections, par exemple "Consignes de sécurité"
• des liens vers une source externe, comme une adresse Web : pour en
savoir plus, rendez-vous sur "
• des noms d e CD et de DVD, ainsi que des désignations et titres
d’autres documents. Exemples : "CD/DVD Drivers & Utilities" ou
Manuel "Sécurité/règles"
signale une touche du clavier, par exemple :
signale des concepts et des textes que l’on souhaite souligner ou mettre en
évidence, par exemple : Ne pas éteindre l’appareil
aisir dans une boîte de dialogue ou dans une ligne
ue votre mot de passe Name123) ou une commande
ter un programme (start.exe)
http://ts.fujitsu.com"
F10
Fujitsu Technology Solutions 75
Page 80

8 - Français Remarques importantes
Remarques importantes
RemarquesimportantesRemarques
Ce chapitre contient des instructions de sécurité que vous devez respecter
impérativement en utilisant votre appareil.
Consignes de sécurité
Cet appareil est conform
les machines de bureau él
environnement donné, a
• La surface de l’écran de
griffures. Manipulez
éviter les dommages ir
• De la condensation peut apparaître si l’on transfère l’appareil d’un environnement froid
à la salle d’utilisation. Dans ce cas, avant de mettre l’appareil en service, attendez
qu’il soit à la température ambiante et absolument sec.
• Lorsdelamiseenpl
aux conditions amb
Français et dans l
• Veillez à ne pas obstruer les ouïes d’arrivée et d’évacuation d’air de l’appare il
afin de garantir une ventilation suffisante.
• Cet appareil se
100 V à 240 V. Ass
• Veillez à ce que la prise de l’appareil et la prise avec terre de protection
de l’immeuble soient facilement acce ssibles.
• L’interrupt
le séparer co
• L’appareil est livré avec un câble secteur de sécurité.
•Utilisezun
• Disposez les câbles de manière à ce qu’ils ne présentent aucun danger (risque de trébucher) et
ne soient pas endommangés. Pour le branchement de l’appareil, vous devez tenir compte des
instructions correspondantes dans le chapitre "
•Partemps
• Veillez à ce que ni objets (p. ex. bracelets, trombones, etc.) ni liquides ne pénètrent
à l’intérieur de l’appareil (risque d’électrocution, court-circuit).
• L’appar
protég
• En cas d’urgence (par ex. endommagement du boîtier, d’un élément de commande ou du câble
secteur, ou encore pénétration d’un liquide ou d’un corps étranger), arrêtez immédiatement
l’appareil, débranchez la fiche secteur et avisez votre point de vente ou notre Service Desk.
• Cet ap
ouve
grav
• Vous ne pouvez appliquer que les résolutions d’écran et les fréquences de rafraîchissement
indiquées dans le chapitre "
utilisez des valeurs différentes, l’appareil risque d’être endommagé. En cas de doute,
veuillez vous adresser à votre point de vente ou à notre Help Desk.
eur Marche/Arrêt ne sépare pas le moniteur de la tension de secteur. Pour
iquement le câble secteur fourni.
d’orage, le branchement ou débranchement de câbles de données doit être évité.
eil n’est pas imperméable ! Ne plongez jamais l’appareil dans l’eau et
ez-le contre les éclaboussures (pluie, eau de mer).
pareil ne peut être réparé que par un personnel spécialisé et autorisé. Une
rture non autorisée ou des réparations incorrectes peuvent entraîner des risques
es pour l’utilisateur (électrocution, risque d’incendie).
e aux règles de sécurité concernant les matériels informatiques, y compris
ectroniques. En cas de doute sur l’utilisation de l’appareil dans un
dressez-vous à votre point de vente ou à notre Service Desk.
l’appareil est sensible aux pressions des doigts et aux
par conséquent la surface de l’écran avec précaution pour
rémédiables (griffures).
ace et en service de l’appareil, respectez les consignes relatives
iantes dans le chapitre "
e chapitre "
règle automatiquement sur la tension de secteur correcte dans une plage de
urez-vous que la tension de secteur locale ne dépasse pas cette plage.
mplètement, vous devez débrancher la fichedesecteur.
Pose du moniteur", Page 12 - Français.
Caractéristiques techniques", Page 32 - Français. Si vous
Caractéristiques t echniques", Page 32 -
Raccordement de l’appareil", Page 16 - Français.
76 Fujitsu Technology Solutions
Page 81

Remarques importantes Français - 9
• Utilisez un écran de veille avec des images mobiles et activez les fonctions de gestion de
l’énergie pour votre moniteur a fin d’éviter que des images immobiles ne "brûlent" l’écran.
• Si vous utilisez l’appareil avec un bras pivotant ou un s upport mural, vous ne
pouvez pa s le faire pivoter de 180° ou 270°.
• Conservez ce manuel avec l’appareil. Si vous cédez cet appa reil à une
autre personne, remettez-lui aussi ce manuel.
• Nous vous conseillons de poser l’appareil sur un support antidérapa nt et résistant. Les pieds de
l’appareil peuvent endommager certains vernis et revêtements de surface utilisés sur les meubles.
Câble secteur
Utilisez uniquement le câble secteur fourni.
S’il s’avère nécessaire de remplacer le câble fourni à l’origine, il faut absolument
se conformer aux directives ci-après.
• Le connecteur et la prise de raccordement du câble secteur doivent être
conformes aux directives de IEC60320/CEE-22.
• Le câble doit être conforme aux prescriptions VDE ou HAR. Le sigle VDE ou
HAR doit être ap posé sur la gaine du câble.
• Pour les appareils de table, l’utilisation de modèles de câbles réseau SVT ou SJT est autorisée.
Pour les appareils posés sur le sol, seuls les câbles secteurs SJT sont autorisés.
• En choisissant le câble, veuillez prendre en considération le courant
nominal requis pour l’appareil.
• Si nécessaire, remplacez le câble secteur fourni à l’origine par un câble se cteu r 3
broches avec terre de protection spécifique au pays.
Transporter l’appareil
AppareilTransp ortTransportrépété
Fujitsu Technology Solutions 77
Transportez tous les appareils séparément et seulement dans leur
emballage d’origine ou da ns un autre emballage approprié qui garantit
une protection contre les chocs et les coups.
Ne déballez les appareils que su r leur site d’installation.
Si l’appareil que vous utilisez provient d’un environnem ent froid, une formation de
condensation est possible. Dans ce cas, avant de mettre l’appareil en service,
attendez qu’il soit à la température ambiante et totalement sec.
Page 82

10 - Français Remarques importantes
Nettoyer l’appareil
Mettez l’appareil hors tension et débranchez la fiche secteur.
Le nettoyage de l’intérieur de l’appareil ne doit être effectué que
par les techniciens autorisés.
N’utilisez pas de poudre abrasive ni de solvant attaquant les matières plastiques.
Evitez toute pénétration de liquide à l’intérieur de l’appareil.
Nettoyez uniquement la surface de l’écran de l’appareil – sensible aux pressions de doigts
et aux griffures – avec un chiffon doux légèrement humidifié.
Vous pouvez nettoyer la surface du boîtier avec un chiffon sec. S’il est très sale,
vous pouvez utiliser un chiffon humide trempé préalablement dans de l’eau mélangée
avec un détergent doux pour vaisselle et bien essoré.
Marquage CE
Tel qu’il est livré, cet appareil est conforme aux directives CE 2004/108/CE
"Compatibilité électromagnétique", 2006/95/CE "Basse tension" et
2009/125/CE "Ecoconception".
Elimination et recyclage
Cet appareil a été presque entièrement fabriqué dans des matériaux dont l’élimination e st
respectueuse de l’environnement et dont le recyclage peut être assuré de ma nière appropriée.
Après utilisation, l’appareil est repris par le constructeur qui le recyclera ou en récupérera les
matières premières, pour autant qu’il soit retourné dans un état conforme à une utilisation
appropriée. Les composants non récupérables sont éliminés de manière appropriée.
L’appareil doit être éliminé conformément à la réglementation locale relative aux déchets spéciaux.
Vous trouverez également plus d’informations à ce propos sur Internet à
l’adresse "
http://ts.fujitsu.com/recycling".
78 Fujitsu Technology Solutions
Page 83

Mise en service Français - 11
Mise en service
Déballage et contrôle du contenu de la livraison
La surface de l’écran de l’appareil est sensible aux pressions des doigts et
aux griffures. Ne saisissez l’appareil que par le boîtier !
La livraison complète de l’appareil comprend les éléments suivants :
• un mo niteur Zero Client
• un câble secteur
• un fascicule relatif à la sécurité
• un c arnet de garantie
• un CD contenant les manuels
► Déballez les différents éléments.
► Vérifez si le contenu de l’emballage présente des dommages apparents dus au transport.
► Vérifiez si la fourniture correspond aux indications du bon de livraison.
► Si vous constatez des dommages dus au transport ou des différences entre le contenu de
l’emballage et le b on de livraison, informe z-en immédiatement votre point de vente.
Nous vous conseillons de ne pas jeter l’emballage d’origine des appareils. Conservez
l’emballage d’origine, il pourra vous servir lors d’un transpo rt ultérieur.
Pour utiliser votre Zero Client, vous avez besoin d’installer un logiciel sur le
serveur d’accès. Vous trouverez les packs de logiciels les plus récents s ur
les pages Assistance de Fujitsu Technology Solutions ou sous le lien suivant :
http://support.ts.fujitsu.com/com/support/downloads.html"
"
Fujitsu Technology Solutions 79
Page 84

12 - Français Mise en service
Mise en place de l’appareil
Veillez à ne pas obstruer les ouïes d’arrivée et d’évacuation d’air de
l’appareil afin de garantir une ventilation suffisante.
Pose du moniteur
► Ne placez pas le moniteur en face
d’une fenêtre (1).
1
► Placez le Zero Client à l’écart de toute
1
80 Fujitsu Technology Solutions
source de chaleur (1).
Page 85

Mise en service Français - 13
► Positionnez le clavier de manière à ce qu’il
soit parfaitement accessible (1).
1
► Positionnez le Zero Client de manière
à ce que la distance entre les yeux et
l’écran (1) soit d’environ 50 cm.
1
50 cm
► Placez le Zer
recommandé (
cas sortir d
a situation, l’utilisation d’accessoires te ls qu’un bras pivotant ou un support
Selon l
VESA FPMPMI) disponibles dans les magasins spécialisés est possible. Il
mural (
nt au préalable de démonter le pied du moniteur comme décrit au chapitre
convie
d’un bras pivotant ou d’un support mural", Page 15 - Français.
"
Pose
Fujitsu Technology Solutions 81
o Client dans l’espace visuel
1). L’écran ne doit en aucun
e l’espace visuel autorisé (2).
Page 86

14 - Français Mise en service
Pose du pied
1
3
2
Ne retirez pas la goupille de sécurité avant d’avoir fixé la plaque de base sur
le Zero Client et placé ce dernier en position d’utilisation.
► Placez la plaque de base sur le pied (1).
► Faites passer la vis à travers l’ouverture (2).
► Fixez la plaque de base à l’aide de la vis (3).
► Placez le Zero Client en position d’utilisation.
Régler la hauteur
L’écran du Zero Client peut se régler en hauteur dans une plage d e 110 mm environ.
► Retirez la goupille de sécurité au dos du dispositif de réglage de hauteur.
► Saisissez le moniteur des deux mains sur les bords gauche et droit de son
boîtier et déplacez-le vers le haut ou vers le bas.
Régler l’inclinaison
iteur du Zero Client peut être incliné de –3° (vers l’avant) et de +35° (vers
Le mon
ière) par rapport à sa position verticale.
l’arr
► Sais
82 Fujitsu Technology Solutions
issez le moniteur des deux mains sur les bords gauche et droit de son boîtier
placez-le jusqu’à obtenir l’inclinaison souhaitée.
et dé
Page 87

Mise en service Français - 15
Régler la rotation
► Saisissez le moniteur du Zero Client des deux mains par les bords gauche et
droit du boîtier et tournez-le dans la p osition souhaitée.
Régler le format vertical
Le moniteur du Zero Client
Paysage) à la position for
► Saisissez le moniteur du
boîtier, inclinez le mon
tournez-le dans le sens
peut passer de la position format horizontal (mode
mat vertical (mode Portrait).
Zero Client des deux mains par les bords gauche et droit du
iteur vers l’arrière, placez-le dans la position la plus élevée, puis
des aiguilles d’une montre jusqu’en position Portrait.
Pour que le contenu de l’
Controller doit suppo
Pour ramener le moniteur en mode Paysage, il suffit de le tourner dans le sens contraire des
aiguilles d’une montre. L’affichage OSD peut être rétabli dans le menu OSD.
Pose d’un bras piv
Avant de pou voir utiliser un bras pivotant ou un support mural, vous devez
démonter le pied du Zero Client.
La surface de l’écran du Zero Client est sensible aux pressions des doigts et aux griffures.
1
2
écran s’affiche aussi en mode Portrait, le logiciel Zero Client
rter cette fonction ou vous devez utiliser un logiciel supplémentaire.
otant ou d’un support mural
► Mettez le Z ero Client hors tension et
débranchez la fiche secteur.
► Débranchez tous les câbles.
► Posez le Zero Client face avant sur
3
4
une surface souple.
► Desserrez les vis (1 – 4) sur la face
arrière du Zero Client.
Vous pouvez à présent monter un bras
pivotant ou un support mural conforme
à la norme VESA FPMPMI avec un
écartement des trous de 100 mm.
Pour une description du montage du bras pivotant ou du support mural,
reportez-vous à la documentation correspondante.
Fujitsu Technology Solutions 83
Page 88

16 - Français Mise en service
Raccordement de l’appareil
Respectez les consignes de sécurité indiquées au chapitre "Remarques
importantes", Page 8 - Français.
Raccorder les câbles au Zero Client
1
3
1
2
4
567 9
8
1 = F iletage pour la fi
ou de la fixation
2 = F ente de sécurité pour "Kensington Lock "
3 = Ports USB
4 = Prise secteur
5=PortLAN
► Branchez le connecteur du câble de données Ethernet blindé dans le port LAN
du Zero Client et assurez-vous qu’il est bien raccordé.
Si vous branchez votre Zero Client DZ22-2 sur un réseau Power over
Ethernet, vous n’avez pas besoin d’un câble secteur po ur l’alimentation
électrique. Ceci ne s’applique pas au Zero Client DZ19-2, qui a toujours
besoin d’un câble secteur pour son alimentation.
En cas d’alimentation via Power over Ethernet (uniquement pour le Zero Client
DZ22-2) : Utilisez exclusivement les injecteurs Power over Ethernet prévus par Fujitsu
car eux seuls peuvent fournir la puissance maximale requise de 60 W.
Avant de transférer l’alimentation de la prise secteur sur Power over Ethernet
et inversement, le Zero Client DZ22-2 doit être mis hors tension.
► Branchez l’autre extrémité du câble de données Ethernet dans la prise murale LAN.
► Branchez le connecteur USB de votre clavier et d e votre souris dans les ports de votre Zero Client.
xation du bras pivotant
murale
6=PortsUSB
7 = Sortie casque
8 = Entrée microph
9=SortieDVI-D
one
84 Fujitsu Technology Solutions
Page 89

Mise en service Français - 17
► Branchez le câble secteur fourni dans la prise secteur du Zero Client.
Pour utiliser votre poste de travail a ve c les écrans, branchez un moniteur
supplémentaire sur la sortie DVI-D du Zero Client.
Dans la fente de sécurité, vous pouvez fixer une protection antivol (Kensington
Lock). Le Kensington Lock n’est pas fourni avec le Zero Client.
L’alimentation é lectrique des ports USB est conçue pour que, en plus du
clavier et de la souris (100 mA max. chaque), 2 x 500 mA soient encore
disponibles pour deux autres périphériques USB. Vous pouvez utiliser des
dispositifs USB dans les ports USB de votre choix.
Fujitsu Technology Solutions 85
Page 90

18 - Français Commande
Commande
Allumer/éteindre l’appareil
2
1
1 = Touches pour le menu OSD (On
Screen Display)
2 = Voyant secteur
Appuyer longuement sur l’interrupteur Marche/Arrêt pour mettre le
système sous ou hors tension.
Appuyer brièvement sur l’interrupteur Marche/Arrêt pour vous
déconnecter du bureau virtuel.
La couleur du voyant DEL varie comme suit :
Voyant DEL Etat
bleu
vert
ange
or
n’est pas allumé
lignotement orange
c
apide
r
clignotement orange lent
rouge
clignotement rouge
ro Client est sous tension (mode normal).
Le Ze
Le Zero Client est sous tension (mode ECO).
Le Zero Client est en mode économie d’énergie
Zero Client est hors tension.
Le
Le Zero Client est en train d’obtenir l’adresse IP du serveur DHCP.
Le Zero Client a obtenu l’adresse IP du serveur DHCP et établit la
connexion avec le Zero Client Controller.
Le Zero Client présente une anomalie.
Le Zero Client n’a pas trouvé le réseau.
3
3 = Interrupteur Marche/Arrêt ou déconnexion
du bureau virtuel
86 Fujitsu Technology Solutions
Page 91

Commande Français - 19
Face avant
1
2
1 = Voyant Secteur
2 = Interrupteur Marche/Arrêt ou déconnexion
du bureau virtuel
Face arrière
Remarques relatives au Power Management
Niveau Fonctionnement
Normal
Voyant secteur s’allume en
Moniteur Luminosité
Puissance absorbée
(type)*
*sans périphériques USB branchés et sans Audio
A la livraison, le mode ECO est préréglé.
Le programme ZeroClient Control Panel permet de définir le délai d’inactivité à la fin duquel le
ZeroClient doit se mettre hors tension. La puissance absorbée est ensuite réduite (mode économie
d’énergie). Le voyant secteur du Zero C lient change de couleur pour indiquer le changement d’état.
Le contenu de l’écran sera rétabli intégralement dès que vous entrerez de
nouvelles données à l’aide du clavier.
Zero Client
DZ22-2
Zero Client
DZ19-2
bleu
max.
<40W <35W réduiteà≤ 0,5 W
<32W <27W réduiteà≤ 0,5 W
ECO
s’allume en
vert
type
200 cd/m
Mode économie d’énergie
s’allume en orange
sombre
2
Fujitsu Technology Solutions 87
Page 92

20 - Français Commande
Travailler avec le Zero Client
Pour utiliser votre Zero Client, vous avez besoin d’installer un logiciel sur le
serveur d’accès. Vous trouverez les packs de logiciels les plus récents sur
les pages Assistance de Fujitsu Technology Solutions ou sous le lien suivant :
http://support.ts.fujitsu.com/com/support/downloads.html" .
"
User Name:
Password:
LogIn
LogIn
Options
Options
2
3
i
?
41
► Sélectionnez la version nationale de votre clavier (1).
► Saisissez votre nom d’utilisateur (2) et votre mot de passe (3).
► Cliquez sur Login ( ouverture de session) (4) .
88 Fujitsu Technology Solutions
Page 93

Commande Français - 21
Modification des réglages de l’écran
► Si vous mettez en service pour la première
fois le Zero Client, après avoir ouvert une
session, ouvrez le programme ZeroClient
Control Panel en cliquant deux fois sur
l’icône de la barre de tâches.
► Sélectionnez l’onglet Affichage puis le
champ Résolution d’écran.
► Réglez la "Screen Resolution" (Résolution
d’écran) sur 1680 x 1050 points (Zero
Client DZ22-2) ou 1280 x 1024 points
(Zero Client DZ19-2).
► Confirmez en cliquant sur OK ou Apply.
► Fermez la session du "bureau virtuel" et
rouvrez-la pour que les changements
s’appliquent.
Réglage de la m inuterie de coupure d’écran
Vous pouvez définir une minuterie qui éteint l’écran lorsqu’aucune entrée n’a été réalisée pendant
un certain temps au moyen d’un périphérique d’entrée tel que souris ou clavier.
► Pour lancer le programme Zero Client Control Panel, cliquez deux fois
sur l’icône dans la barre de tâches.
► Sélectionnez Display (Ecran) et Turn off monitor (Eteindre l’écran).
► Définissez le temps après lequel l’écran doit être mis hors tension.
► Confirmez en cliquant sur OK ou Apply (confirmer).
L’écran s’éteint à l’expiration de la minuterie de coupure afin d’économiser
l’énergie (le rétroéclairage de l’écran est éteint).
Tout déplacement de la souris ou appui sur une touche remet le Zero Client
dans son état normal de fonctionnement.
Fujitsu Technology Solutions 89
Page 94

22 - Français Commande
Réglage de la minuterie de veille du Zero Client
Vous pouvez définir une minuterie de veille qui place le Zero Client en mode veille
lorsqu’aucune entrée n’a été réalisée pendant un certain temps au moyen d’un
périphérique d’entrée tel que souris ou clavier.
► Pour lancer le programme Zero Client Control Panel, cliquez deux fois
sur l’icône dans la barre de tâches.
► Sélectionnez Display (Ecran) et Put Zero Client to Sleep (Placer le Zero Client en mode veille).
► Définissez le temps après lequel le Zero Client doit passer en mode veille.
► Confirmez en cliquant sur OK ou Apply (confirmer).
Le Zero Client est placé en mode veille à l’expiration de la minuterie de veille. En mode
veille, la consommation électrique du Z ero Client est extrêmement faible.
Dès que l’interrupteur Marche/Arrêt du Zero Client est actionné, le Zero Client
revient en mode normal de fonctionnement.
Si la fonction Put Zero Client to Sleep (Placer le Zero Client en mod e veille) n’est
pas activée dans le programme Zero Client Control Panel, adressez-vous à votre
administrateur pour obtenir les droits appropriés de réglage de la minuterie de veille.
Pour ce faire, l’administrateur coch e dans le Zero Client Controller, sous Clients
- Settings - Login Preferences la case devant User Power Sleep Override.
Modification d es réglages de l’écran au moyen
des touches du panneau de commande
Les touches du panneau de commande présentent une double affectation.
Si le menu OSD n’est pas activé, vous pouvez appeler les fonctions rapides
inscrites sur les touches. Si le menu OSD est activé, les touches de navigation
affichées à l’écran s’appliquent (touches programmables).
3
12
1 = Touches pour le menu OSD (On
Screen Display)
2 = Interrupteur Marche/Arrêt ou déconnexion
du bureau virtuel
90 Fujitsu Technology Solutions
3 = Voyant secteur
Page 95

Commande Français - 23
Touches programmables
Passage au sous-menu
Démarrage (avecAuto level et Factory recall)
Navigation dans un menu
Sélectionner une option
+-
Changer la valeur
Appliquer les changements et retourner au menu principal
Rejeter les changements et retourne r au menu principal
Quitter le menu OS D
Sélection de la langue
Le menu OSD existe en différentes langues.
Une f onct ion de sélection de langue s’affiche immédiatement après la mise sous tension du moniteur.
► Sélectionnez la langue de votre choix.
La fonction OSD Language dans le menu OSD Setup vous permet de changer de langue.
Activer/désactiver le mode ECO
En réduisant la luminosité de l’image, il est possible de réduire la
puissance consommée par l’appareil.
ECO
► Appuyez sur la touche
Le message ECO Mode ein ou Mode ECO désactivé s’affiche.
Si l’on active le mode ECO, les réglages OSD suivants changent :
Mode
Colour
Brightness
Lorsque le mode ECO est désactivé, la luminosité prédéfinie par l’utilisateur est rétablie.
Fujitsu Technology Solutions 91
pour activer ou désactiver le mode ECO.
Office
6 500 K
réduite
Page 96

24 - Français Commande
Verrouiller le menu OSD
Il est possible de verrouiller le menu OSD pour empêcher toute modification
involontaire ou non autorisée des réglages de l’écran.
► Appuyez sur la touche
moniteur sous tension avec l’interrupteur Marche/Arrêt.
Le message OSD locked / unlocked s’affiche.
Pour déverrouiller le menu OSD, procédez de la même manière.
MENU
pendant quelques secondes tout en mettant le
Verrouiller l’interrupteur Marche/Arrêt
Il est possible de verrouiller l’interrupteur Marche/Arrêt pour empêcher une modification
involontaire ou non autorisée des réglages de l’écran.
ECO
► Maintenez les touches
Le message Power button locked / unlocked s’affiche.
Pour déverrouiller l’interrupteur Marche/Arrêt, procédez de la même manière.
et enfoncées simultanément pendant quelques secondes.
92 Fujitsu Technology Solutions
Page 97

Commande Français - 25
Modifier les réglages de l’écran à l’aide du menu OSD
Vous pouvez appeler et utiliser le menu OSD (affichage à l’écran) intégré du Zero
Client à l’aide des touches du panneau de commande.
Dans la description ci-après, vous trouverez les désignations des
menus en anglais (réglage par défaut).
► Appuyez sur la touche
Le menu principal et les icônes des fonctions de réglage s’affichent à l’écran
La première icône (Brightness/Contrast) est sélectionnée et les fonctions co rrespondantes
apparaissent da ns la partie d roite du menu.
► Appuyez sur la touche
► Appuyez
► Appuyez sur la touche
► Appuye
► Appuyez sur la touch e
Fujitsu Technology Solutions 93
sur la touche
z sur la touche
Pour procéder à d’autres réglages, sélectionnez la fonction correspondante dans le menu
principal OSD. Toutes les possibilités de réglage du menu principal sont décrites ci-après.
MENU
pour activer le menu OSD.
ECO
ou pour sélectionner une autre icône (par ex. Image adjust).
ou pour changer une v aleur ou effectuer une sélection.
MENU
pour appliquer les changeme nts et quitter la fonction.
EXIT
pour annuler les changements et quitter la fo nction.
EXIT
pour quitter le menu OSD.
Page 98

26 - Français Commande
Régler le contraste et la luminosité
Activer la fenêtre de réglage Brightness/Contrast
Brightness
Contrast
Black level
Lorsque le réglage du contraste est trop élevé, il est impossible de distinguer
les surfaces claires des surfaces très claires. Lorsque le réglage du contraste
est trop faible, la luminosité maximale n’est pas atteinte.
Régler la luminosité de l’affichage
Cette fonction p ermet de modifier la luminosité du rétro-éclairage.
Régler le contraste de l’affichage
Cette fonction permet de modifier le contraste des couleurs claires.
Régler la luminosité de l’affichage
Avec cette fonction, vous pouvez modifier le contraste des nuance s de
couleur sombres.
Réglage du volume
Activer la fenêtre de réglage Audio
Volum e
Désactiver le son
(Mute)
Unepressionac
lésions et per
sonore moyen,
du casque, ce q
Régler le volume de la lecture sur les haut-parleurs intégrés
Activer ou désactiver le haut-p arleur
oustique e xcessive en provenance du casque peut entraîner des
tes auditives. Si le volume de l’application audio dépasse le volume
il en résultera également une augmentation de la tension en sortie
ui pourra entraîner une pression acoustique trop élevée.
Régler la température de couleur et les c ouleurs
Appeler la fenêtre de réglage Colour
Sélectionner la température de couleur
La température de couleur permet de régler la "chaleur" des couleurs de
l’écran. La température de couleur se mesure en K (= Kelvin). Vous avez le
choix entre sRGB, 6500 K, 7500 K, 9300 K, Native et Custom Colour.
Au niveau du réglage défin i par l’utilisateur, vous po uvez modifier les parts
des couleurs de base (rouge, vert, bleu) en fonction de vos besoins.
94 Fujitsu Technology Solutions
Page 99

Commande Français - 27
Régler l’affichage du menu OSD
Appeler la fenêtre de réglage OSD Setup.
Language
OSD Timeout
Régler la langue du menu O SD
Avec cette fonction, vous sélectionnez la langue du menu OSD.
Le réglage standard est English.
Régler la durée d’affichage du menu OSD
Cette fonction vous permet de sélectionner une valeur entre 10 et 120
secondes.
Lorsque le temps d’affichage réglé s’est écoulé sans que vous ayez effectué
de réglage, le menu OSD d isparaît automatiquement.
Régler les fonctions dans le menu Avanced
Appeler la fenêtre de réglage Advanced
Factory Recall
Activer les réglage
Cette fonction per
de validation.
Appuyez sur la touche
Processing s’affiche.
susine
met de rétablir tous les réglages d’origine sans demande
pour exécuter la fonction. Le message Auto
Afficher des informations
Activer la fenêtre de réglage Information
Avec cette fonction, vous pouvez afficher la désignation du modèle, la
résolution, la fréquence H/V et le mode ECO.
Fujitsu Technology Solutions 95
Page 100

28 - Français Instructions pour le ré
glage ergonomique des couleurs
Instructions pour le réglage e
rgonomique
des couleurs
Au moment de définir les couleurs pour votre é cran dans vos programmes
d’application, suivez les instructions suivantes.
Les couleurs primaires bleu et rouge sur fond sombre n’atteignent
pas le contraste minimum de 3 :1 et ne conviennent donc pa s pour
l’affichage permanent de texte et de données.
Une com binaison de couleurs appropriées peut être choisie dans le tableau suivant :
Fond
noir blanc
noir
blanc
pourpre
bleu
cyan
vert
jaune
rouge
+ Combinaisons de couleurs conseillées
- Combinaisons de couleurs déconseillées : les deux tons de couleur se trouvent trop proches pour
permettre une détection correcte des lignes de faible épaisseur, ce qui engendre une fatigue visuelle.
+++
++
-
+
+
+
-
++
+
--
--
+
pourpre
-
++
----
Caractères
bleu
-
-----
+
+
cyan
+++
---
+
---
--
vert
-
---
jaune
+
+
rouge
+
-
+
96 Fujitsu Technology Solutions
 Loading...