

Page 1
1
1
2
10 60 09 69 19 5
Quick Start Guide
Copyright
© Fujitsu Siemens Computers 2008
SAP: 10600969195
FSP: 440N00692
Published by
Fujitsu Siemens Computers GmbH
Mies-van-der-Rohe-Straße 8
80807 München, Germany
Contact
www.fujitsu-siemens.com/support
All rights reserved, including intellectual property rights.
Technical data subject to modi cations and delivery subject
to availability. Any liability that the data and illustrations are
complete, actual or correct is excluded. Designations may be
trademarks and/or copyrights of the respective manufacturer,
the use of which by third parties for their own purposes may
infringe the rights of such owner. For further information see
http://www.fujitsu-siemens.com/terms_of_use.html
AMILO Notebook Xi 3650
Getting started
English
Deutsch
Français
Español
Italiano
Nederlands
Português
2
Page 2
3
Video
Audio-R
Audio-L
in
in
in
w
w
w
1
2
2x
5
4
6
Page 3

English
Deutsch
AMILO Notebook Xi 3650
First-time setup
Français
Español
Italiano
Nederlands
Português
Page 4

Microsoft, MS
Windows and Windows Vista are registered trademarks of the Microsoft Corporation.
Adobe Reader is
MultiMediaCard
Sony and Memory
All other tradem
respective own
ers, whose protected rights are acknowledged.
Copyright © Fuji
All rights r eserv
ed, including rights of translation, reproduction by printing, copying
or similar method
Non-compliance i
All rights reserv
ed, including rights created by patent grant or registration of a utility model or design.
Subject to ava ila
a trademark of Adobe Systems Incorporated.
is a registered trademark of Infineon Technologies AG
Stick are registered trademarks of Sony Electronics, Inc.
arks referenced are trademarks or registered trademarks of their
tsu Siemens Computers GmbH 2008
s, either in part or in whole.
s subject to compensation for damages.
bility and tech nical modifications.
Page 5

Contents
English
Contents
Thanksto innovativetechnology ....................................................... 1
Hybridgraphics ......................................................................... 2
Change graphics mode . . . . . . ........................................................... 2
Secondharddrive inRAIDgroup ........................................................ 3
®
CallupMatrix Storage Manager andHelp function ............................... 3
Intel
Further information ...................................................................... 4
"AMILO Notebook" Operating Manual . . . . . ............................................ 4
Ports and operating elements .......................................................... 5
Important notes ........................................................................ 7
Preparing yournotebook for use ....................................................... 8
Unpacking and checking your notebook ................................................... 8
Selecting thelocation ................................................................... 9
Connecting the mains adapter ........................................................... 10
Switching the notebook on for the firsttime ................................................ 11
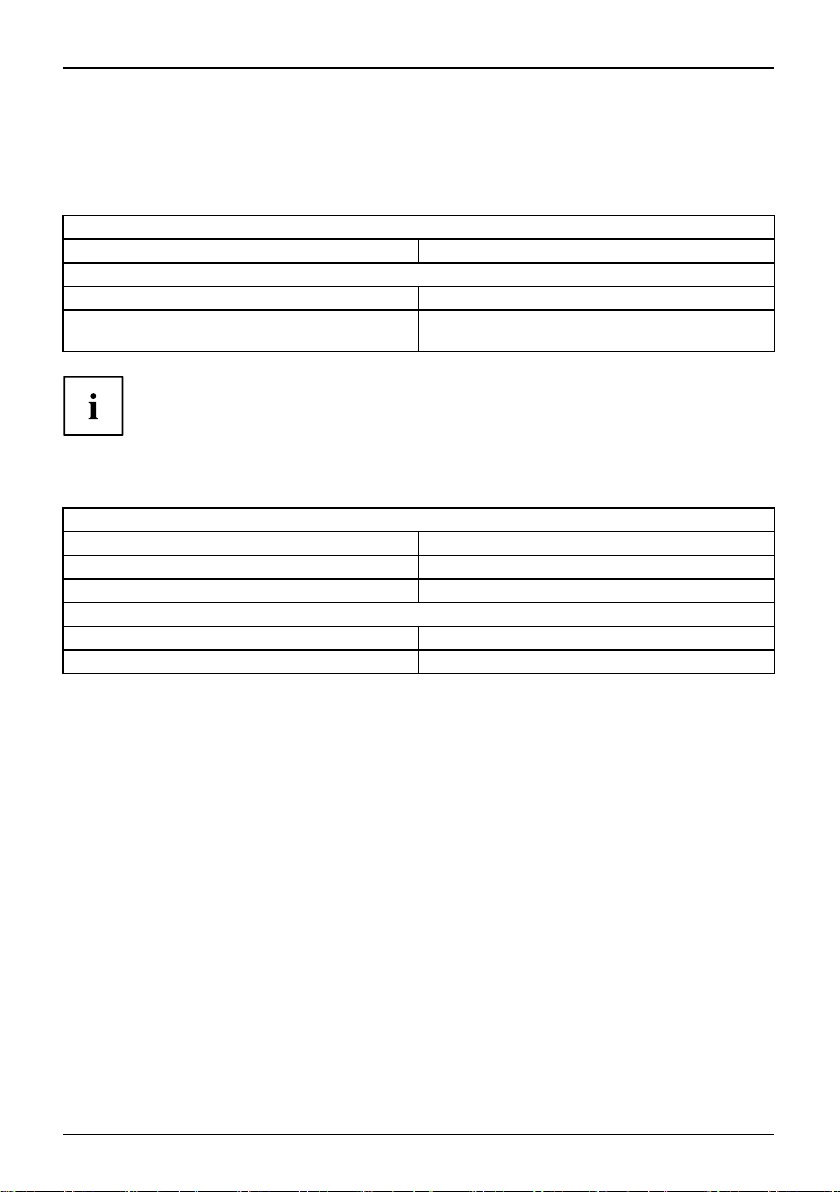
Technical data ......................................................................... 12
Notebook . . . . . .......................................................................... 12
Mains adapter .......................................................................... 12
10600969195, edition 1 English
Page 6

Contents
English 10600969195, edition 1
Page 7

Thanks to innovative technolog y
Thanks to innovative technology
... and ergonomic design, your AMILO Note book Xi 3650 is reliable and convenient.
If you have purchased a notebook with a Microsoft Windows operating system, this is pre-installed and
optimally configured for you. The notebook is ready to use immediately the first time you switch it on.
Your notebook features the v ery latest technology so that you get the best
performance from your computing experience.
• A drive for reading and writing CDs/DVDs and, depending on your particular
model, for reading Blu-ray discs.
• Three USB ports, providing simple expansion options f or game pads, printers and more
• A combined eSATA/USB port for connecting an external SATA hard disk or another USB device
• A Wireless USB (WUSB) interface (optional, cannot be retro fitted) for speedy data transfer
in accordance with the USB standard without a troublesome cable
• LAN and W ireless LAN for Interne t and network acce ss
• Depending on the device, there might be a second hard disk so you can operate
your notebook with two hard disks in the RAID group.
• A FireWire port for speedy data exchange with multimedia devices
• An HDMI port for all-digital transfer of audio and video data
• An integrated webcam and digital microphones for a wide variety of multimedia applications
• A multi-format card reader for rapid transf er of digital photos, music and
video clips onto your notebook
• An integrated audio controller, stereo loudspeaker, and a bass loudspeaker
(subwoofer) for optimum audio enjoyment.
• Bluetooth 2.1 for wireless operation of different a ccessories
• in addition, input and output ports for high-quality audio accessories
• An integrated TV tuner (optional, cannot be retrofitted) for receiving
terrestrial television p rogrammes
• A keyboa rd with separate number block
• An on-screen display for visual control of the key settings of your notebook
• Hybrid graphics for full perform ance and battery-saving working mode
for less demanding applications
• A multi-connector interface (optional, only in conjunction with the TV Tuner) to receive
audio and video signals from external multimedia devices.
The user-friendly "BIOS Setup Utility" offers powerful password protection functions wh ich can be
used to control your notebook’s ha rdware and protect your system better against unauthorised use.
This Operating Manual tells you how to get your AMILO No tebook up and
running and how to operate it in daily use.
10600969195, edition 1 English - 1
Page 8
Thanks to innovative technology
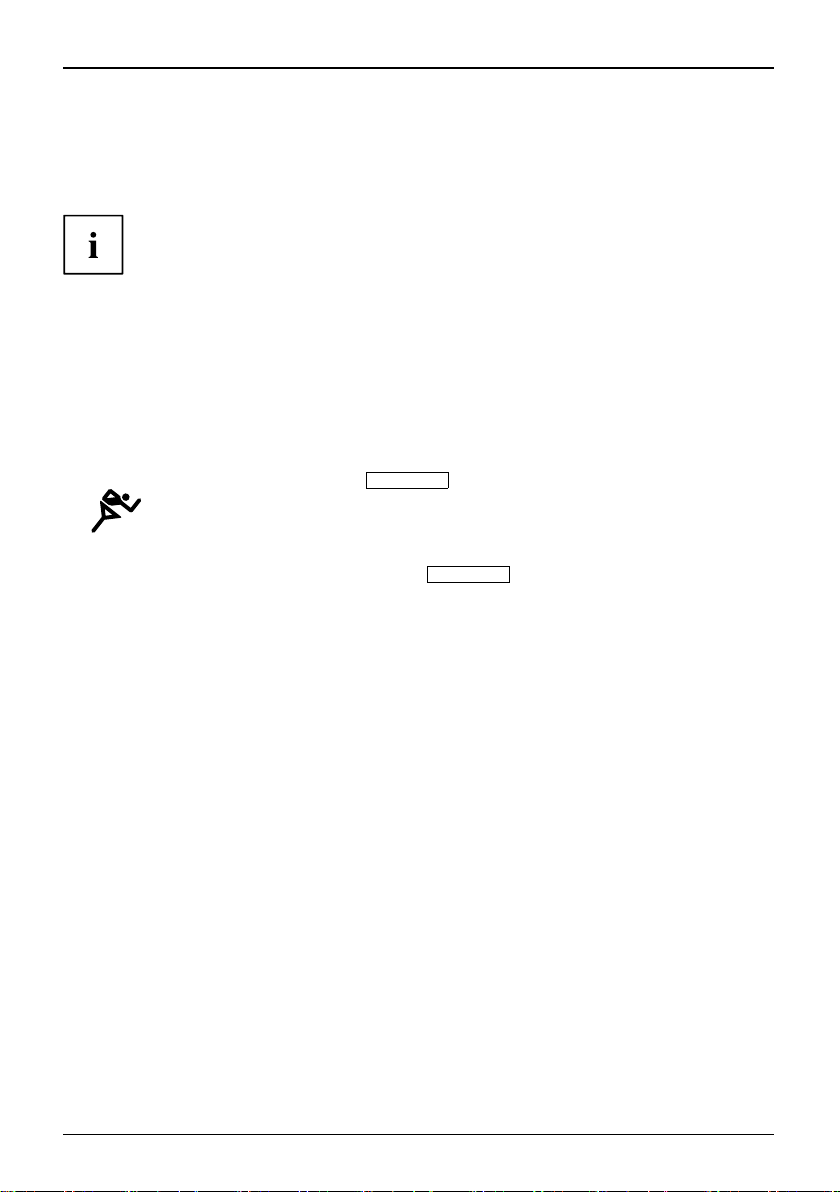
Hybrid graphics
Your notebook is e quipped with a hybrid graphics system. By clicking the Quick Start
button, you can switch between battery-saver and performan ce mode.
Use the graphics unit integrated in the chip set for applications which are
less graphics-intensive, such as video playback, e-mail and Internet surfing.
This reduces heat generation, noise levels and power consumption. As a
result, battery life is increased (battery saver mode).
If you require a high level of performance, for example, for ga m es, you can
switch to the external graphics unit (performance mode).
Change graphics mode
In your notebook, the e xternal graphics mode is preconfigured ex works (performance mode).
A device connected to an HDMI port of your notebook (FullHD resolution) can only be
activated in performance mode via the external graphics unit.
► Click the Quick Start button
The graphics display switches to battery-saver mode.
► Click the Quick Start
The graphics display switches to performance mode.
Hybrid VGA
Hybrid VGA
on the Multimedia Board of your notebook:
button again.
2 - English 10600969195, edition 1
Page 9
Thanks to innovative technology
Second hard drive in RAID group
RedundantArrayofIndependentDi sk sRAID
RAID (Redundant Array of Independent Disks, also: Disk Array) is a procedure for
combining two hard disks to create a logical unit.
A so-called disk array can be used advantageously to improve performance or
alternatively to improve error tolerance (data protection).
Error tolerance is facilitated by means of data redundancy. If one drive malfunctions,
a different drive contains an exact copy of the data. This can prevent an operating
system from malfunctioning or data from being lost.
The operating system detects all hard disks in a disk array as a s ingle physical
hard disk. The individual disk drives in a disk array are called "members". Member
configuration information is recorded in the reserved sector of the hard disk. With this
information the hard disk can be identified as a member.
There are usually a few methods by which hard disks can be combined. These methods
are referred to as different RAID levels. The different RAID levels represent different
performance and security levels as well as implementation costs.
Removal and installation of the second hard disk must only be performed by
authorised service agents of Fujitsu Siemens Computers GmbH. Unauthorised
removal and installation will invalidate your warranty.
For further information and addresses of our service partners, please
see "http://www.fujitsu-siemens.com/support".
Depending on the size of the hard disk, the process for combining two
hard drives to create a RAID group can take several hours. During this
time period, your screen will turn b lack.
For further information regarding the configuration of your RAID systems, please
see the Help function of your Intel
®
Matrix Stora ge Manager Program.
Intel®Call up Matrix Storage Manager and Help function
To call up the Intel®Matrix Storage Manager program and the Help funct ion, proceed as follows:
► Choose Start - All Programs - Intel
The programme is started.
► In the upper m enubar, click on Help.
The Help function for the Intel®Matrix Storage Manager program is called up.
10600969195, edition 1 English - 3
®
Matrix Storage Manager - Intel®Matrix Storage Manager.
Page 10

Thanks to innovative technology
Further information
General information about your AMILO Notebook can be found in the
"AMILO Notebook" operating manual.
The Windows Vista drivers for your AMILO notebook are available to download
from our website. This computer is not designed to support any other operating
systems. Fujitsu Siemens Computers accepts no liability for consequences
arising from the use of other operating systems.
Software-related portions of this manual relate to Microsoft products if
they are included with your AMILO Notebook.
Please refer to the relevant manufacturer’s operating instructions when
installing other software products.
"AMILO Notebook" Operating Manual
The "AMILO Notebook" Operating Manual can be found in the Windows Start menu
or on the Internet at "www.fujitsu-siemens.com/support".
4 - English 10600969195, edition 1
Page 11
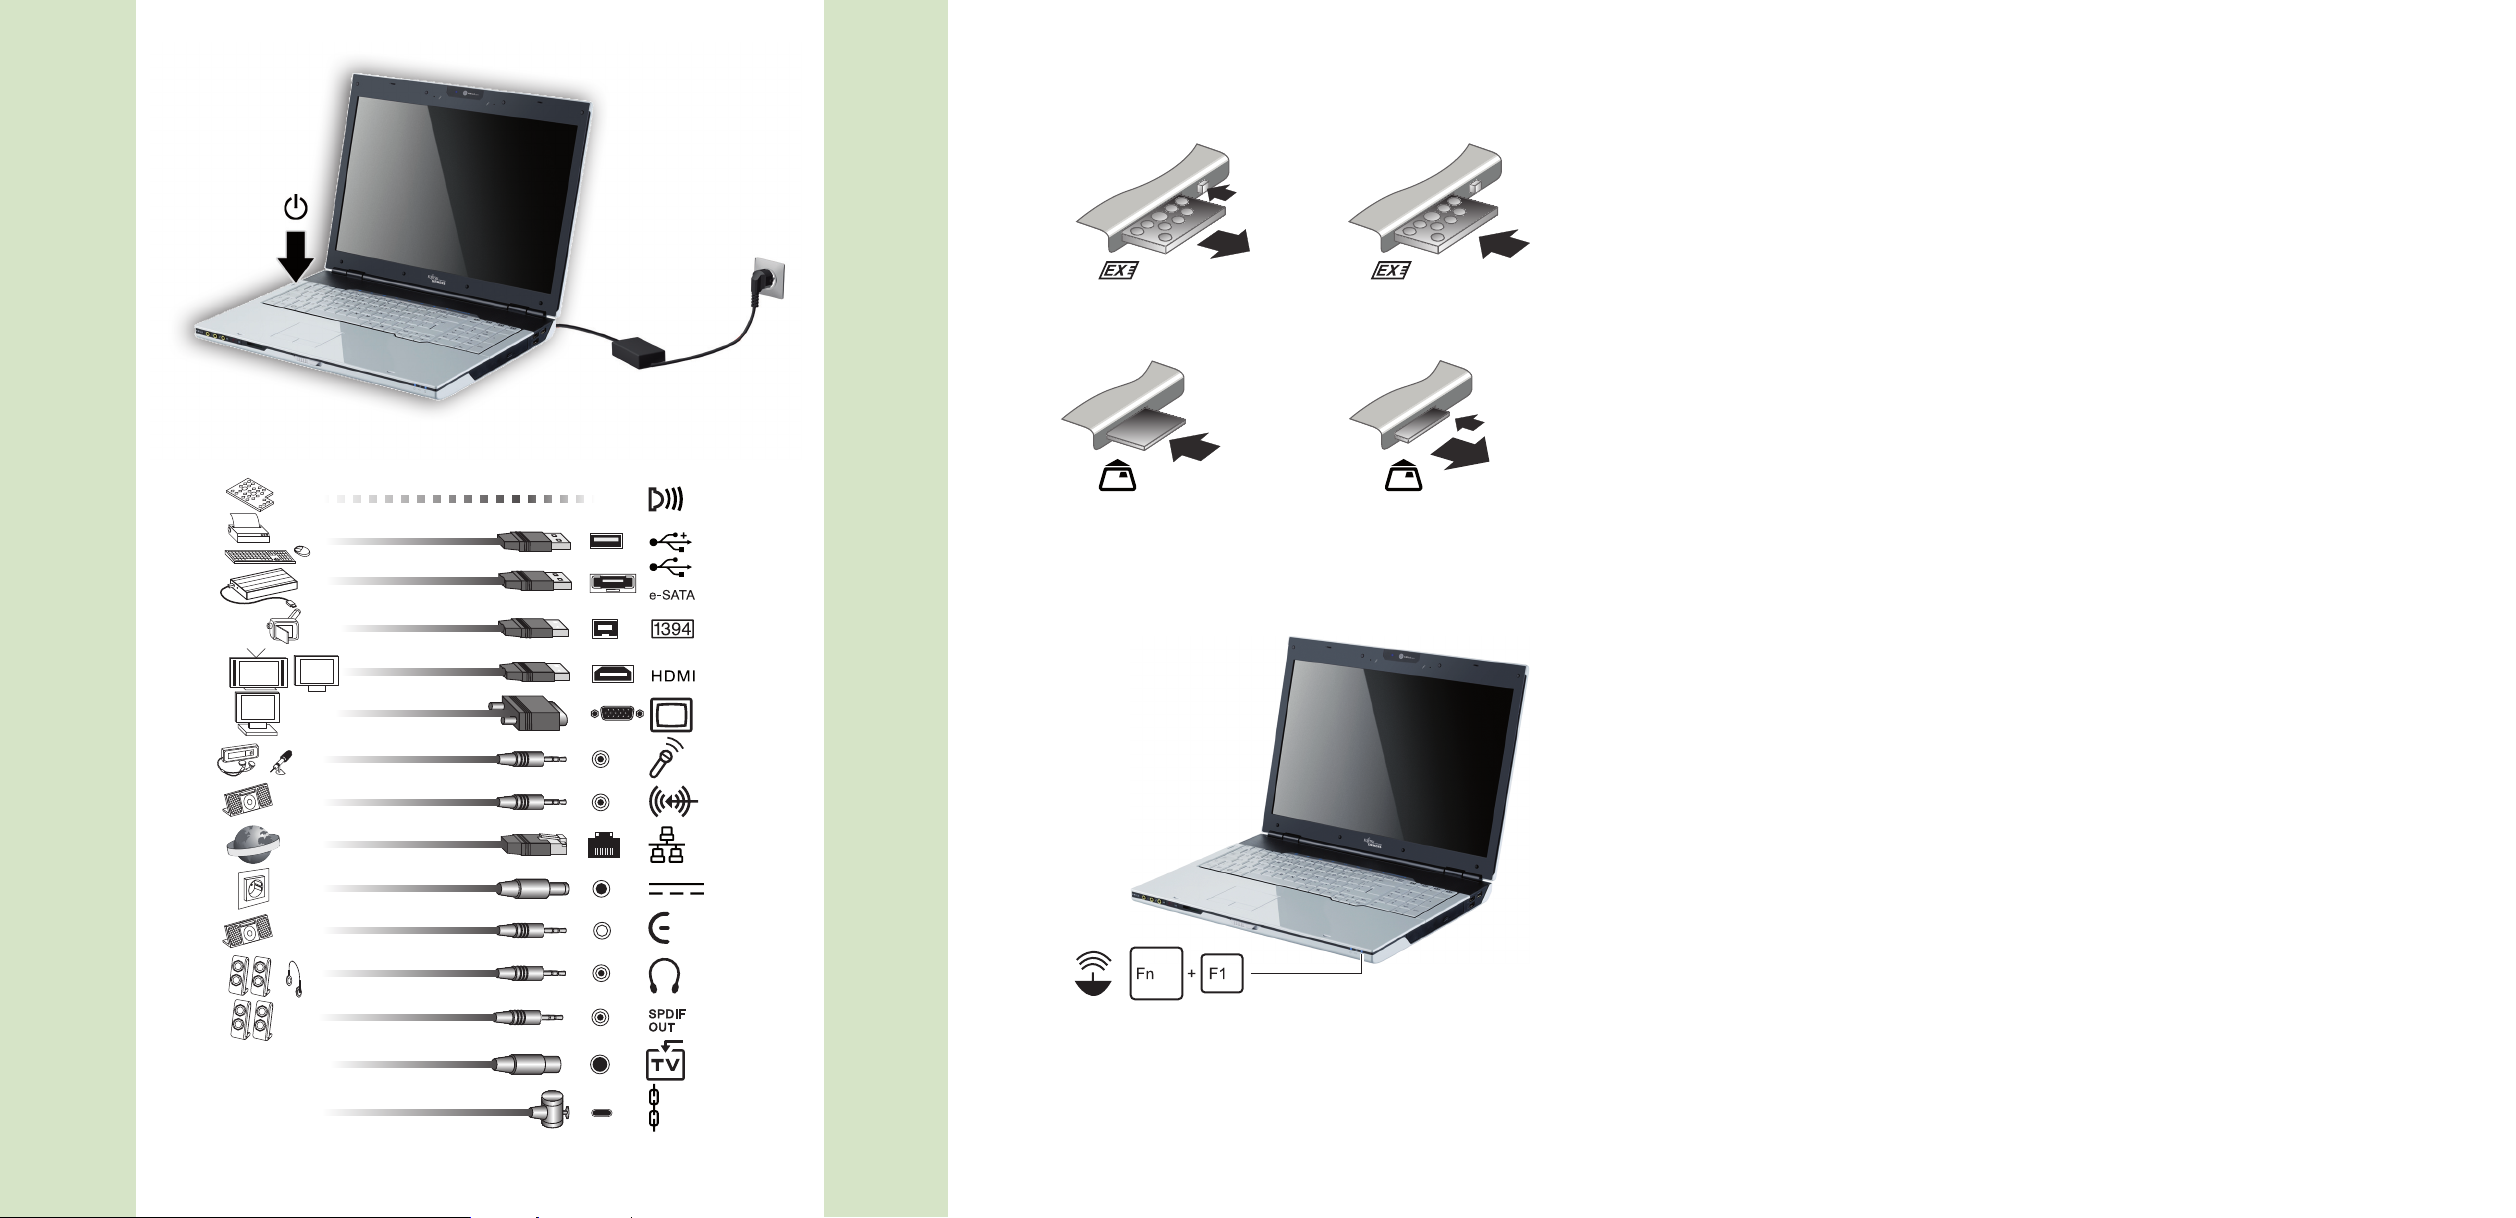
Ports and operating elements
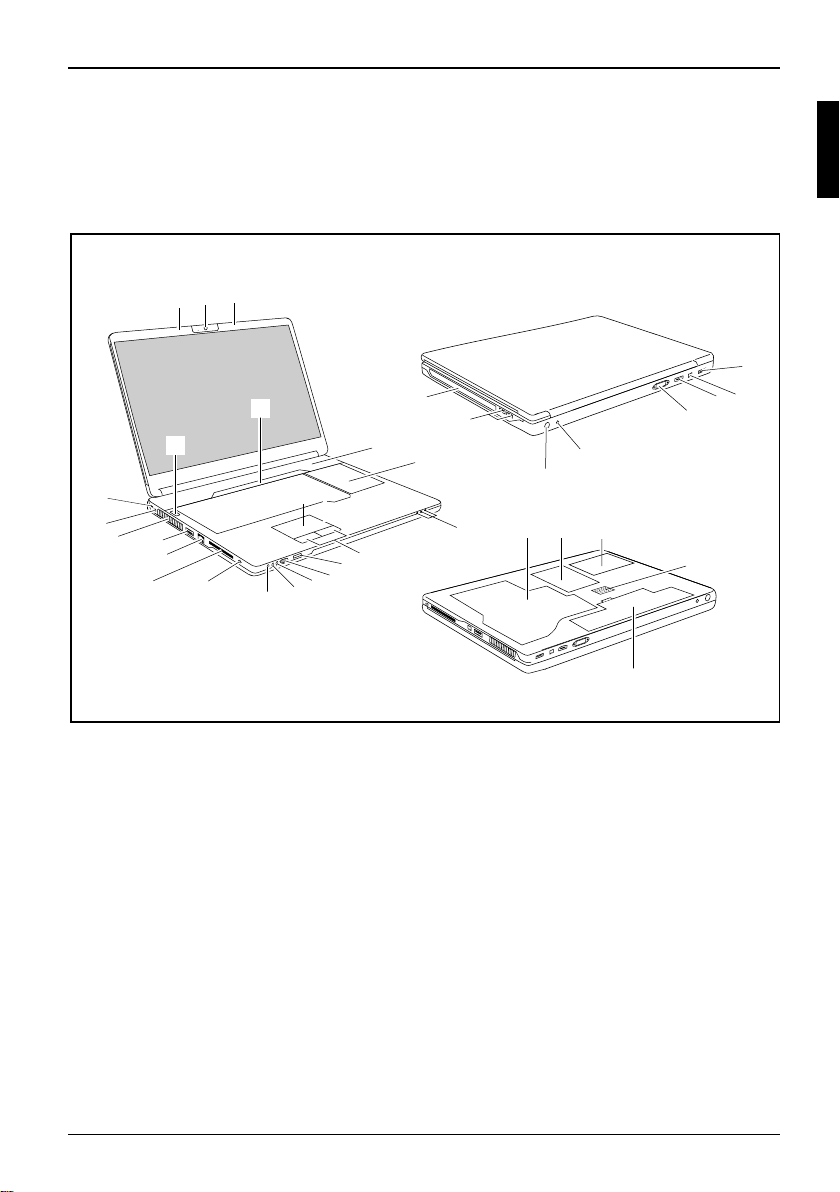
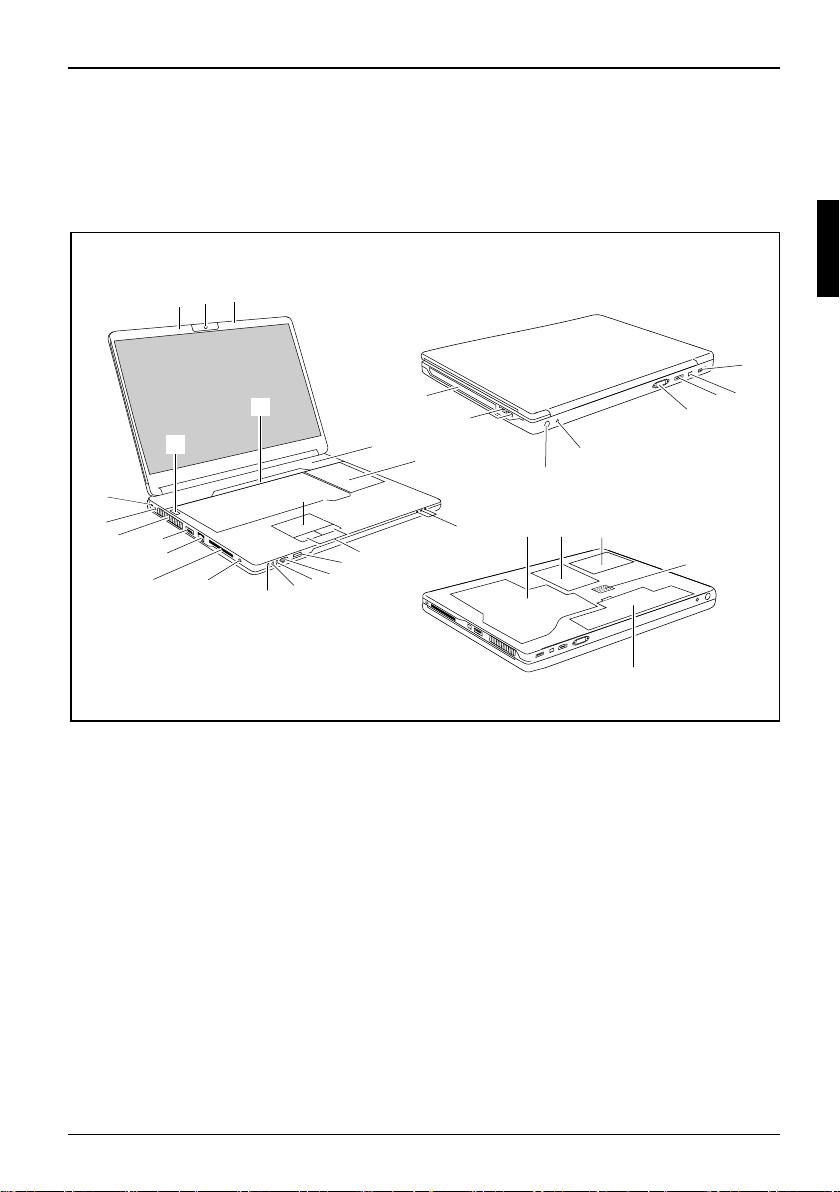
Ports and operating elements
This chapter presents the individual hardware components of your note book. It gives
an overview of the displays and ports of the notebook. Please familiarise yourself with
these components before you start using your notebook.
WebcamMultimediaboardTouchpad
SeparatenumerickeypadKeyboardStatusindicatorsTouchpadbuttonsMulti-formatcardreaderInfraredinterfaceforremotecontrolLine-inportMicrophoneportHeadphoneportLine-outportSPDIFportExpressCardslotMultimediaremotecontrolFireWireportCombinedeSATA/USBportLoudspeakerON/OFFswitchUSBportsAntennacableportHDMIportVGAmonitorportNetworkportDCinputconnector(DCIN)MemoryservicecompartmentHarddiskservicecompartmentBatteryMult iconnectorportSubwooferAn tennacableport
1
2
1
22
23
4
5
25
24
31
7
8
9
30
32
19
20
18
3
21
6
17
16
5
1
14
13
12
10
11
26
33
27
29
28
34
10600969195, edition 1 English - 5
Page 12

Ports and operating elements
1 = Microphones
2 = Webcam
3 = Multimedia board
4 = Loudspeaker
5 = Keyboard with separate number block
and application buttons
6 = Touchpad
7 = Status indicators
8 = Touchpad buttons
9 = Infrared interface for remote control
10 = Multi-format card reader
11 = Line-In port
12 = Microphone port
13 = Headphones/line-out port
14 = SPDIF/line-out port
15 = ExpressCard slot with multimedia
remote control
16 = LAN port
17 = eSATA/USB combination port
18 = Ventilation slots
19 = DC input connector (DC IN)
20 = Kensington lock device
21 = ON/OFF switch
22 = CD/DVD drive
23 = USB ports
24 = Antenna cable port (optional)
25 = Multi connector port (optional)
26 = VGA mo nitor port
27 = HDMI port
28 = FireWire port
29 = USB port
30 = Memory service compartment
31 = Hard disk 2 service compartment
32 = Hard disk 1 service compartment
33 = Subwoofer
34 = Battery
6 - English 10600969195, edition 1
Page 13

Important notes
Important notes
Please read and observe the safety instructions in the "Safety" manual
and in the "AMILO Notebook" operating manual.
If using a TV tuner card, ensu re that it complies with standard IEC 60950-1: 2005, paragraph 7.2.
Only ever connect an external TV tuner to a TNV-1 circuit.
When connecting a coaxial cable to an external TV tuner, ensure that it is correctly
connected to the building’s earthing system.
10600969195, edition 1 English - 7
Page 14
Preparing your notebook for use
Preparing your notebook for use
First-timesetupN o tebookGettingstartedNotebook
Before you can use your notebook for the first time you will need to charge the battery.
On delivery, the battery can be found in the battery compartment or in the accessories kit. The
battery must be charged if you want to operate your n otebook with the battery.
When not plugged into a mains socket, the notebook runs on its built-in battery. You can
increase the battery’s life by enabling the system’s energy saving functions.
If you use the notebook in at home or in an office, we recommend you use
the mains adapter instead of the battery.
Please refer to the "AMILO Notebook" operating manual for instructions on how to connect
external devices (e.g. a mouse or a printer) to the notebook.
If your notebook co mes with a Windows operating system then all of the necessary
hardware drivers and the supplied software will already be pre-installed.
With the operating system Microsoft Vista, it may take up to 20 minutes to pre pare your
notebook for use dep ending on the hardware fitted and the software supplied.
When you switch on the notebook for the first time it will perform a system
check. A number of different messages ma y be displayed. In the process,
the display may flicker or darken temporarily.
Please follow the instructions on the screen.
It is very important that you do not switch the notebook off during this initial set-up process.
Unpacking and checking your notebook
Should you discover any damage incurred during transportation, notify
your local sales outlet immediately!
► Unpack all the individual pa rts.
PackagingTransport
► Check your notebook for damage incurred d uring transportation.
We recommend that you keep the original packaging material.
You may need the packaging in the future if you need to transport your device.
8 - English 10600969195, edition 1
Page 15

Selecting the location
Location,selectingtheNotebookPoweradapter
Select a suitable location for the notebook before setting it up. Consider
the following points when selecting a location:
• Never place the notebook and the mains adapter on a heat-sensitive
surface. This could damage the surface.
• Never place the notebook on a soft surface (e.g. carpeting, upholstered furniture,
bed). This can block the air v ents and cause damage due to overheating.
• Do not place the notebook directly on your legs for extended pe riods. The
underside of the notebook heats up during normal operation. Extended contact
with the skin can become unpleasant or even result in burns.
• Place the notebook on a stable, flat, non-slip surface. Please note that
the rubber feet may mark certain types of surfaces.
• Keep other objects 100 mm away from the notebook and its mains
adapter to ensure adequate ventilation.
• Never cover the ventilation slots on the notebook.
• Do not expose the notebook to e xtreme environmental conditions. Protect
the notebook against dust, humidity and heat.
Preparing your notebook for use
10600969195, edition 1 English - 9
Page 16
Preparing your notebook for use
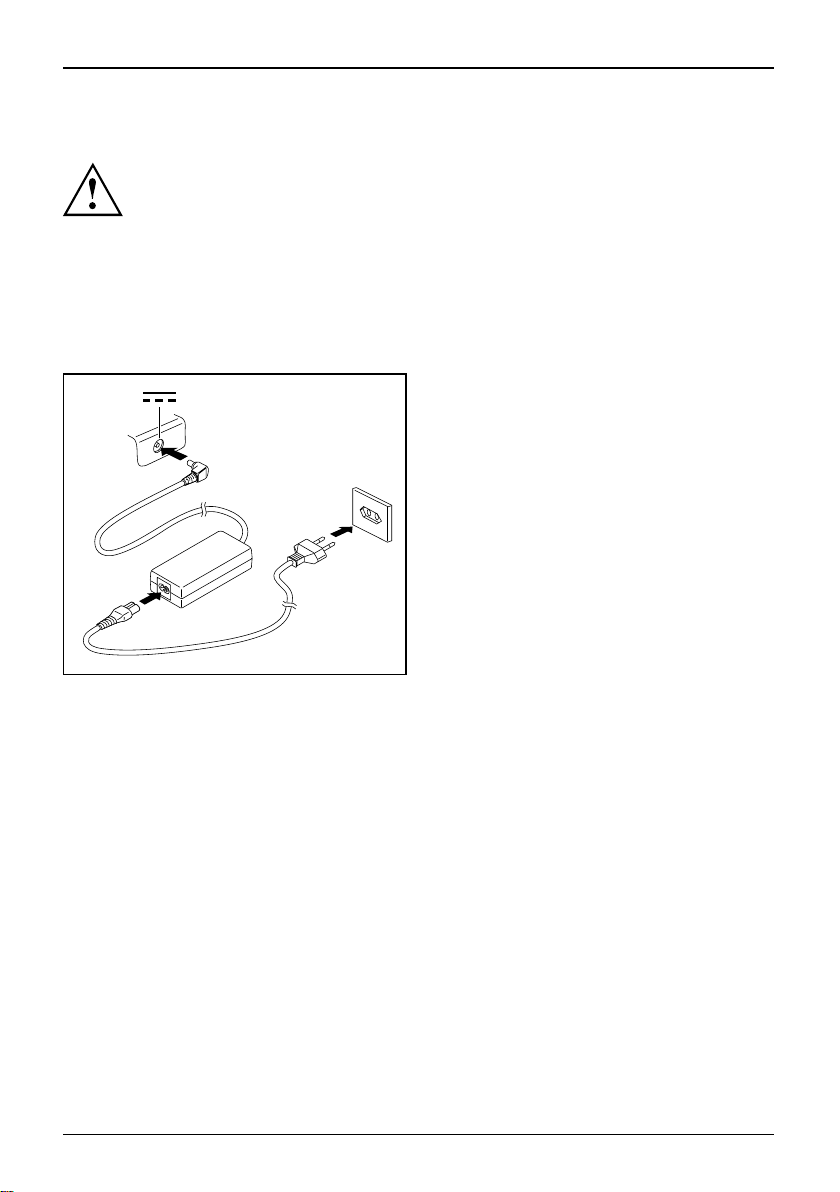
Connecting the mains adapter
PreparingforoperationMainsadapter
Please observe the safety precautions in the enclosed "Safety" manual.
The supplied mains cable conforms to the requirements of the country in which
you purchased your notebook. Make sure that the mains cable is ap proved
for use in the country in which you intend to use it.
The mains cable of the mains adapter must only be connected to a mains
socket if the notebook is connected to the mains adapter.
Make sure that the rated current of the mains adapter is not higher than that
of the power system to which you connect the mains adapter (refer to t he
"Te chnical Data" section, "Mains adapter", Page 12).
► Connect the mains adapter cable (1) to the
DC jack (DC IN) on the notebook.
► Connect the mains cable (2) to the
mains adapter.
1
► Plug t he mains cable (3) into a mains outlet.
3
2
10 - English 10600969195, edition 1
Page 17
Preparing your notebook for use
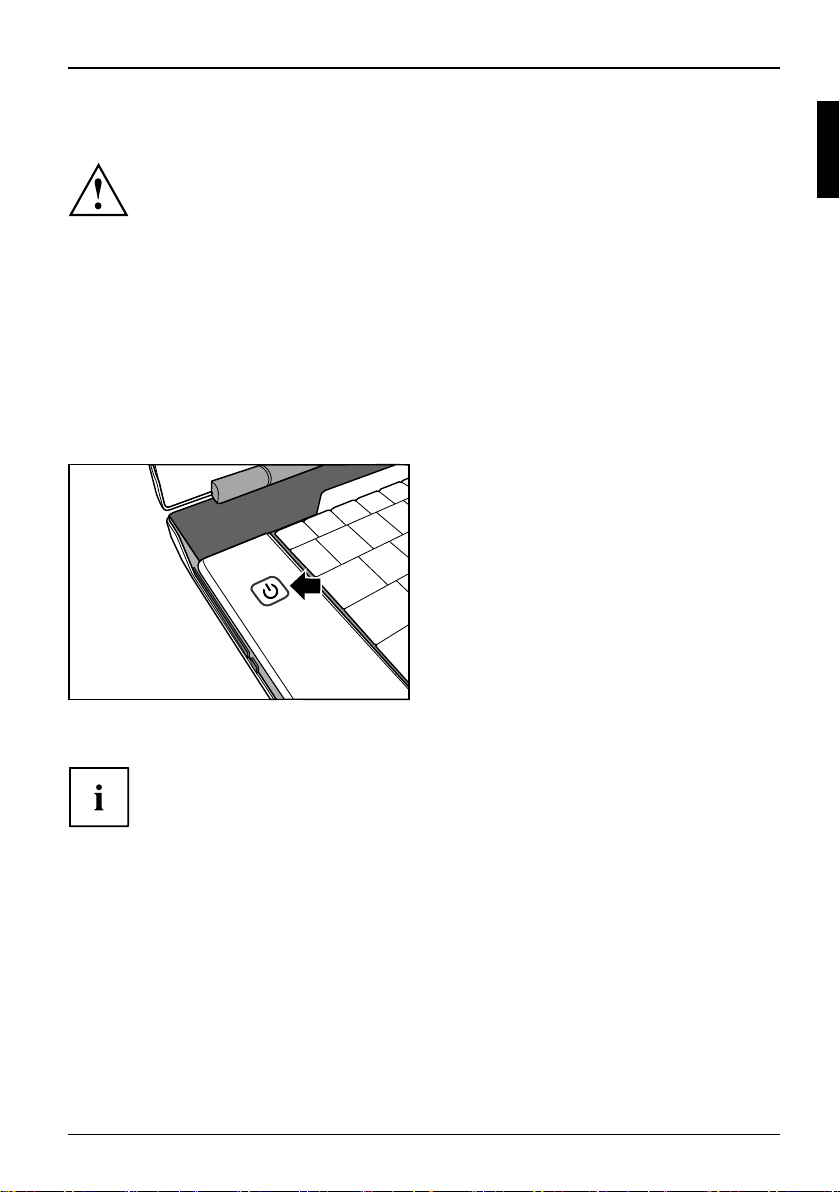
Switching the notebook on for the first time
Switchingonforthefirsttime
Your operating system is pre-installed on the hard disk to help you when you
start using your notebook for the first time.
We recommend that the notebook is supplied with power through
the mains adapter during this procedure.
When you switch your notebook on for the first time, the supplied software
is installed and configured. Because this installation p rocedure must not be
interrupted, you should set aside enough time for it to be fully completed and
connect the notebook to the mains outlet using the mains adapter.
During installation, the notebook must only be rebooted when you are requested to do so!
You will be prompted to create a backup co py of the pre-installed op erating system. This
backup copy can be used later to restore your notebook to its delivery configuration.
You can find information on how to restore the operating system, drivers, manuals
and special software in th e Recovery Process manual.
► Switch the notebook on (1).
1
► During installation, follow the on-screen instructions.
Consult the operating system manual if anything is unclear about the requested input data.
If a Windows operating system is installed on your notebook, you will find additional
information on the system and drivers, help programmes, updates, manuals etc. on
your notebook or on the Internet at "www.fujitsu-siemens.com/support".
10600969195, edition 1 English - 11
Page 18
Technical data
Technical data
Technicaldata
Notebook
Technicaldata
Ambient conditions
Operating temperature 5 °C – 35 °C
Dimensions
Width x Depth x Height (front/back) 440 mm x 294 mm x 40/48 mm
Weight (including 8-cell rechargeable battery
and 2 hard disks)
The data sheet for this notebook contains fu rther technical data. The data
sheet can be found on your notebook, or alternatively it is also available to
download from the Internet at " www.fujitsu-siemens.com".
Mains adapter
Technicaldata
Electrical data
Primary (device-dependent)
Rated voltage
Rated f requency 50 Hz – 60 Hz (automatic)
Secondary
Rated voltage 20 V
Maximum rated current (device-dependent)
Approx. 3.9 kg
90 W
100 V – 24 0 V (automatic)
4.5 A
An additional mains adapter or power cable can be ordered at any time.
12 - English 10600969195, edition 1
Page 19

English
Deutsch
AMILO Notebook Xi 3650
Erstinbetriebnahme
Français
Español
Italiano
Nederlands
Português
Page 20

Microsoft, MS
Windows and Windows Vista are registered trademarks of the Microsoft Corporation.
Adobe Reader is
MultiMediaCard
Sony and Memory
All other tradem
respective own
ers, whose protected rights are acknowledged.
Copyright © Fuji
All rights r eserv
ed, including rights of translation, reproduction by printing, copying
or similar method
Non-compliance i
All rights reserv
ed, including rights created by patent grant or registration of a utility model or design.
Subject to ava ila
a trademark of Adobe Systems Incorporated.
is a registered trademark of Infineon Technologies AG
Stick are registered trademarks of Sony Electronics, Inc.
arks referenced are trademarks or registered trademarks of their
tsu Siemens Computers GmbH 2008
s, either in part or in whole.
s subject to compensation for damages.
bility and tech nical modifications.
Page 21

Inhalt
Deutsch
Inhalt
Innovative Technologie ................................................................ 1
Hybrid-Grafik ........................................................................... 2
Grafikmodus wechseln .................................................................. 2
Zweite Festplatte im RAID-Verbund ...................................................... 3
®
Matrix Storage Manager und Hilfe-Funktion aufrufen . ............................. 3
Intel
Weitere Informationen ................................................................... 4
Betriebsanleitung "AMILO Notebook" . . . . . ............................................ 4
Anschlüsse undBedienelemente ....................................................... 5
Wichtige Hinweise ..................................................................... 7
Erstinbetriebnahmedes Notebook ..................................................... 8
Notebook auspacken und überprüfen . . ................................................... 8
Stellplatz auswählen .................................................................... 9
Netzadapter anschließen . . . . . ........................................................... 10
Notebook zum ersten Mal einschalten . ................................................... 11
Technische Daten ...................................................................... 12
Notebook . . . . . .......................................................................... 12
Netzadapter . .......................................................................... 12
10600969195, Ausgabe 1 Deutsch
Page 22

Inhalt
Deutsch 10600969195, Ausgabe 1
Page 23

Innovative Technologie
Innovative Technologie
... und ergonomisches Design machen Ihr AMILO Notebook Xi 3650 zu einem
benutzerfreundlichen und zuverlässigen Notebook.
Wenn Sie ein Notebook mit einem Microsoft W indow s-Betriebssystem gekauft haben,
ist dieses bereits vorinstalliert und für Sie optimal konfiguriert. Das Notebook ist sofort
startbereit, wenn Sie es zum ersten Mal einschalten.
Ihr Notebook ist mit neuester Technologie ausgestattet, damit Sie Ihre
Computer-Erfahrung optimal umsetzen können.
• ein Laufwerk zum Lesen und Beschreiben von CDs/DVDs und je nach
Geräteausstattung, zum Lesen von Blu-ray-Discs
• drei USB-Anschlüsse für eine einfache Erweiterung durch Game-Pads, Drucker und mehr
• ein eSATA-/USB-Kombinationsanschluss, um eine externe SATA-Festplatte oder
ein w eiteres USB-Gerät anschließen zu können
• eine Wireless USB (WUSB) Sch nittstelle (optional, nicht nachrüstbar) für schnelle
Datenübertragung nach dem USB-Standard ohne störend e Kabel
• LAN und Wireless LAN für Internet- und Netzwerkzugang
• geräteabhängig eine zweite Fe stplatte, um ihr Notebook mit zwei Festplatten
im RAID-Verbund betreiben zu kön nen
• ein Firewire-Anschluss für den schnellen Datenaustausch mit Multimedia-Geräten
• ein HDMI-Anschluss für die volldigitale Übertragung von Audio- und Video-Daten
• eine integrierte Webcam und digitale Mikrofone für die verschiedensten Multimedia-Anwendungen
• ein Multi-Format-Kartenleser, um digitale Fotos, Musik und Videoclips schnell
auf Ihr Notebook zu übertragen
• ein integrierter Audio-Controller, Stereo-Lautsprecher und ein Subwoofer für echte n Hörgenuss
• Bluethooth 2.1 für den drahtlosen Betrieb von verschiedenem Zubehör
• zusätzliche Ein- und Ausgänge für hochwertiges Audio-Zubehör
• ein integrierter TV-Tuner (optional, nicht nachrüstbar) für den Empfang
terrestrischer Fernsehprogramme
• eine Tastatur mit separatem Ziffernblock
• ein O n-Scree n-Display zur visuellen Ko ntrolle der wichtigsten Einstellungen Ihres Notebooks
•Hybrid-Grafik für volle Leistung und akkuschonende Arbeitsweise bei weniger
anspruchsvollen Anwendungen
• eine Multi-Connector-Schnittstelle (optional, nur in Verbindung mit dem TV-Tuner) als
Eingang für Audio- und Video-Signale von externen Multimedia-Geräten
Mit dem benutzerfreundlichen "BIOS-Setup-Utility" können Sie die Hardware Ihres
Notebook steuern und Ihr System besser vor unbefugtem Zugriff schützen, indem
Sie die leistungsfähigen Passwort-Eigenschaften nutzen.
Diese Betriebsanleitung zeigt Ihnen unter anderem, wie Sie Ihr AMILO Notebook
in Betrieb nehmen und bedienen.
10600969195, Ausgabe 1 Deutsch - 1
Page 24
Innovative Technologie
Hybrid-Grafik
Ihr Notebook ist mit einer Hybrid-Grafik-Lösung ausgestattet. Per Schnellstart-Taste können
Sie zwischen Ba tteriespar- und Performance-Mo dus wechseln.
Verwenden Sie bei weniger grafikintensiven Anwendungen, z. B. beim
Abspielen von Videos, E-Mail oder beim Internet-Surfen die im Chipsatz
integrierte Grafikeinheit. Dies senkt Hitzeentwicklung, Geräuschpegel un d
Stromverbrauch. Die Akkulaufzeit steigt (Batterie sparmodus).
Wenn Sie eine hohe Performance benötigen, z. B. für Spiele, kann auf die
externe Grafikeinheit gewechselt werden (Performance-Modus).
Grafikmodus wechseln
Bei Ihrem Notebook ist ab Werk der externe Grafikmodus (Performance-Modus) vo reingestellt.
Ein Gerät am HDMI-Anschluss Ihres N otebooks (FullHD-Auflösung) kann nur im
Performance-Modus über die externe Grafikeinh eit angesteuert werden.
► Tippen Sie auf die Schnell-Start-Taste
Die Grafik-Ausgabe wechselt in den Batteriespar-Modus.
► Tippen Sie erneut auf die Schnell-Start-Taste
Die Grafik-Ausgabe wechselt in den Performance-Modus.
Hybrid VGA
auf dem Multimedia-Board Ihres Notebooks:
Hybrid VGA
2 - Deutsch 10600969195, Ausgabe 1
Page 25
Innovative Technologie
Zweite Festplatte im RAID-Verbund
RedundantArrayofIndependentDi sk sRAID
RAID (Redundant Array of Independent Disks, auch: Disk-Array) ist ein Verfahren zur
Kombination von zwei Festplatten zu einer logischen Einheit.
Ein so g enannter Disk-Array lässt sich vorteilhaft zur Verbesserung der Performance oder
alternativ zu Verbesserung de r Fehlertoleranz (Datenschutz) einsetzen.
Fehlertoleranz wird mittels Datenredundanz ermöglicht. Bei Ausfall eines Laufwerks
enthält ein anderes Laufwerk eine gespiegelte Kopie der Daten. Dadurch können Ausfall
des Betriebssystems oder Datenverlust verhindert werden.
Das Betriebssystem erkennt alle Festplatten in einem Disk-Array als eine einzige physikalische
Festplatte. Die einzelnen Festplatten in einem Disk-Array werden als "Member" (Mitglieder)
bezeichnet. Angaben zur Konfiguration eines Members werden im reservierten Sektor der Festplatte
aufgezeichnet. Durch diese Angaben kann die Festplatte als ein Member identifiziert werden.
Gewöhnlich lassen sich Festplatten durch verschiedene Verfahren miteinander kombinieren. Diese
Verfahren werden als unterschiedliche RAID-Levels bezeichnet. Die unterschiedlichen RAID-Levels
verkörpern verschiedene Performance- und Sicherheitsstufen sowie Implementierungskosten.
Der Aus- und Einbau der zweiten Festplatte darf nur von autorisierten Servicepartnern
der F ujitsu Siemens Computers GmbH durchgeführt werden. Durch unbefugten
Aus- und Einbau erlischt der Garantieanspruch.
Weitere Informationen und Adressen unserer Servicepartner finden Sie im
Internet unter "http://www.fujitsu-siemens.com/support".
Abhängig von der Festplattengröße kann die Kombination von zwei
Festplatten zu einem RAID-Verbund mehrere Stunden dauern. Während
dieses Zeitraumes wird Ihr Display schwarz.
Weitere Informationen über das Konfigurieren Ihres RAID-Systems, finden Sie in
der Hilfe-Funktion Ihres Intel
®
Matrix Storage Manager Programms
Intel®Matrix Storage Manager und Hilfe-Funktion aufrufen
Um das Programm Intel®Matrix Storage Manager und die Hilfe-Funktion
aufzurufen, gehen Sie wie folgt vor:
► Wählen Sie Startmenü - Alle Programme - Intel
®
- Intel
Matrix Storage Manager.
Das Programm wird gestartet.
► Klicken Sie in der oberen Menüleiste auf Hilfe.
Die Hilfe-Funktion zum Programm Intel®Matrix Storage Manager wird aufgerufen.
10600969195, Ausgabe 1 Deutsch - 3
®
Matrix Storage Manager
Page 26

Innovative Technologie
Weitere Informationen
Allgemeine Informationen zu Ihrem AMILO Notebook finden Sie in
der Betriebsanleitung "AMILO Notebook".
Die Treiber für Windows Vista für Ihr AMILO Notebo ok finden Sie auf
unserer Internetseite. Werkseitig unterstützten diese Geräte keine anderen
Betriebssysteme. Fujitsu Siemens Computers übernimmt keine Haftung
bei der Verwendung anderer Betriebsysteme.
Softwarebezogene Teile dieser Anleitung beziehen sich auf Microsoft-Produkte,
falls sie zum Lieferumfang Ihres AMILO Notebook gehören.
Beachten Sie bei der Installation von anderen Softwareprodukten die
Bedienungsanleitungen des Herstellers.
Betriebsanleitung "AMILO Notebook"
Die Betriebsanleitung "AMILO Notebook" fin den Sie im Windows-Startmenü oder
im Internet unter "www.fujitsu-siemens.com/support".
4 - Deutsch 10600969195, Ausgabe 1
Page 27
Anschlüsse und Bedienelemente
Anschlüsse und Bedienelemente
In diesem Kapitel werden die einzelnen Hardware-Komponen ten Ihres Notebook vorgestellt.
Sie erhalten eine Übersicht über die Anzeigen und die Anschlüsse des Notebook. Machen
Sie sich mit diesen Elementen vertraut, bevor Sie mit dem Notebook arbeiten.
WebcamMultimedia-BoardTouchpadSeparater ZiffernblockTastaturStatusanzeigenTouchpad-TastenMulti-Format-KartenleserInfrarotschnittstellefürFernbed ienungLine-In-AnschlussMikrofonan sch lussKopfhöreranschlussLine-Out-AnschlussSPDIF-AnschlussExpressCard-SteckplatzMultimedia-FernbedienungFirewire-AnschlusseSATA-/USB-KombinationsanschlussLautsprecherEin-/AusschalterUSB-AnschlüsseAn tennenkabel-AnschlussHDMI-AnschlussVGA-BildschirmanschlussNetzwerkanschlussGleichspannungsbuchs e(DCIN)ServicefachSpeicherServicefach FestplatteAkkuMulti-Connector-AnschlussSubwooferAntennenkabel-Anschlus s
1
2
1
19
20
18
3
21
6
17
16
5
1
14
13
12
10
11
22
23
4
5
7
8
9
30
24
31
25
32
27
26
33
29
28
34
10600969195, Ausgabe 1 Deutsch - 5
Page 28

Anschlüsse und Bedienelemente
1 = Mikrofone
2 = WebCam
3 = Multimedia-Board
4 = Lautsprecher
5 = Tastatur mit separatem Ziffernblock
und Applikationstasten
6 = Touchpad
7 = Statusanzeigen
8 = Touchpad-Tasten
9 = Infrarotschnittstelle für Fernbedienung
10 = Multi-Format-Kartenleser
11 = Line-In-Anschluss
12 = Mikrofonanschluss
13 = Kopfhörer-/Line-Out-Anschluss
14 = SPDIF/Line-Out-Anschluss
15 = ExpressCard-Steckplatz mit
Multimedia-Fernbedienung
16 = LAN-Anschluss
17 = eSATA-/USB-Konbinationsanschluss
18 = Lüftungsschlitze
19 = Gleichspannungsbuchse (DC IN)
20 = Kensington Lock-Vorrichtung
21 = Ein-/Ausschalter
22 = CD/DVD-Laufwerk
23 = USB-Anschlüsse
24 = Antennenkabel-Anschluss (optional)
25 = Multi-Connector-Anschluss (optional)
26 = VGA-Bildschirmanschluss
27 = HDMI-Anschluss
28 = Firewire-Anschluss
29 = USB-Anschluss
30 = Servicefach Speicher
31 = Servicefach Festplatte 2
32 = Servicefach Festplatte 1
33 = Subwoofer
34 = Akku
6 - Deutsch 10600969195, Ausgabe 1
Page 29

Wichtige Hinweise
Wichtige Hinweise
Beachten Sie die Sicherheitshinweise im Handbuch "Sicherheit" und in
der Betriebsanleitung "AMILO Notebook".
Stellen Sie bei der Verwendung einer TV-Tuner-Karte sicher, dass diese der Norm
IEC 60950-1: 2005, Absatz 7.2, entspricht.
Schließen Sie einen externen TV-Tuner ausschließlich an einen TNV-1-Kreis an.
Vergewissern Sie sich beim Anschließen eines Koaxialkabels an den externen TV-Tuner,
dass es richtig mit dem Erdungssystem des Gebäudes verbu nden ist.
10600969195, Ausgabe 1 Deutsch - 7
Page 30

Erstinbetriebnahme des Notebook
Erstinbetriebnahme des Notebook
ErstinbetriebnahmeNotebookInbetriebnahmeNotebook
Bevor Sie zum ersten Mal mit I hrem Notebook arbeiten können, müssen Sie den Akku aufladen.
Bei der Lieferung befindet sich der Akku im Akkufach oder im Beipack. Der Akku muss
aufgeladen sein, wenn Sie Ihr Notebook im Akkubetrieb benutzen wollen.
Im mobilen Einsatz versorgt der eingebaute Akku das Notebook mit der erforderlichen Energie. Die
Betriebszeit können Sie erhöhen, wenn Sie die verfügbaren Energiesparfunktionen nutzen.
Wenn Sie das Notebook zu Hause oder im Büro benutzen, sollten Sie es über den
Netzadapter betreiben und nicht über den Akku.
Wie Sie externe Geräte (z. B. Maus, Drucker) an das No tebook anschließen, ist in
der Betriebsanleitung "AMILO Notebook" beschrieben.
Wenn Ihr Notebook mit einem Windows-Betriebssystem ausgestattet ist, sind die
notwendigen Hardwaretreiber und die mitgelieferte Software bereits vorinstalliert.
Der Erstinbetriebnahme-Prozess kann bei dem Betriebsystem Microsoft Vista, je nach
Hard- und Softwareausstattung bis zu 20 Minuten in Anspruch nehmen.
Beim erstmaligen Einschalten Ihres Notebook wird eine Systemprüfung
durchgeführt. Unterschiedliche Meldungen können erscheinen. Das Display
kann kurzzeitig dunkel bleiben oder flackern.
Befolgen Sie die Anweisungen am Bildschirm.
Schalten Sie Ihr N otebook während des Erstinbetriebnahme-Prozesses auf keinen Fall
aus.
Notebook auspacken und überprüfen
Wenn Sie Transportschäden feststellen, informieren Sie unverzüglich Ihre Verkaufsstelle!
► Packen Sie alle Teile aus.
VerpackungTransport
► Prüfen Sie das Notebook auf sichtbare Transportschäden.
Wir empfehlen Ihnen, die Originalverpackung des Geräts nicht wegzuwerfen.
Bewahren Sie die Originalverpackung für einen eventuellen Wiederversand auf.
8 - Deutsch 10600969195, Ausgabe 1
Page 31

Stellplatz auswählen
StellplatzauswählenNotebookNetzadapter
Bevor Sie Ihr Notebook aufstellen, sollten Sie einen geeigneten Platz für das
Notebook auswählen. Befolgen Sie dabei die folgenden Hinweise:
• Stellen Sie das Notebook und den Netzadapter niemals auf eine hitzeempfindliche
Unterlage. Als Folge kann die Unterlage b eschädigt werden.
• Stellen Sie das Notebook niemals auf eine weiche Unterlage (z. B. Teppich,
Polstermöbel, Bett). Dadurch kann die Belüftung blockiert werden und
als Folge können Überhitzungsschäden entstehen.
• Stellen Sie das Notebook nicht über längere Zeit unmittelbar auf Ihren
Beinen ab. Während des normalen Betriebs erhitzt sich die Unterseite
des Notebook. Ein längerer Hautkontakt kann unangene hm werden
oder sogar zu Verbrennungen führen.
• Stellen Sie das Notebook auf eine stabile, ebene und rutschfeste
Unterlage. Beachten Sie, dass die Gummifüße des Notebook Abdrücke
auf empfindlichen Oberflächen hinterlassen können.
• Der Freiraum um das Notebook und den Netzadapter muss mindestens 100 mm
betragen, damit eine ausreichende Belüftung gegeben ist.
• Verdecken Sie niemals die Lüftungsschlitze des Notebook.
• Das Notebook sollte keinen extremen Umgebungsbedingungen ausgesetzt werden.
Schützen Sie das Notebook vor Staub, Feuchtigkeit und Hitze.
Erstinbetriebnahme des Notebook
10600969195, Ausgabe 1 Deutsch - 9
Page 32

Erstinbetriebnahme des Notebook
Netzadapter anschließen
BetriebsbereitschaftherstellenNetzadapter
Beachten Sie die Sicherheitshinweise im beigefügten Handbuch "Sicherheit".
Die mitgelieferte Netzleitung entspricht den Anforderungen des Landes, in dem
Sie das Notebook gekauft haben. Achten Sie darauf, dass die Netzleitung für
das Land zugelassen ist, in dem sie verwendet wird.
Die Netzleitung des Netzadapters darf nur dann an eine Steckdose angeschlossen
sein, wenn das Notebook am Netzadapter angeschlossen ist.
Versichern Sie sich, dass die Stromaufnahme des Netzadapters nicht höher
ist als die des Stromnetzes, an das Sie den Netzadapter anschließen (siehe
Kapitel "Technische Daten", "Netzadapter ", Seite 12).
1
3
2
► Schließen Sie die Netzadapterleitung (1)
an die Gleichspannung sbu chse (DC IN)
des Notebook an.
► Schließen Sie die Netzleitung (2) an
den Netzadapter an.
► Schließen Sie die Netzleitung (3) an
eine Steckdose an.
10 - Deutsch 10600969195, Ausgabe 1
Page 33

Erstinbetriebnahme des Notebook
Notebook zum ersten Mal einschalten
ErstesEinschalten
Um Ihnen die Inbetriebnahme Ihres Notebook zu erleichtern, ist das Betriebssystem
auf der Festplatte vorinstalliert.
Bei diesem Vorgang muss das Notebook über den Netzadapter
mit Strom versorgt werden.
Wenn Sie das Notebook zum ersten Mal einschalten, wird die mitgelieferte
Software installiert und konfiguriert. Da dieser Vorgang nicht unterbrochen
werden darf, sollten S ie einige Zeit dafür einplanen und das Notebook über
den Netzadapter an die Netzspannung anschließen.
Während der Installation darf das Notebook nur bei Aufforderung neu gestartet werden!
Sie werden aufgefordert, eine Sicherungskopie des vorinstallierten Betriebssystems
zu erstellen. Mit Hilfe der Sicherungskopie können Sie spät er den
Auslieferungszustand Ihres Notebook wiederherstellen.
Informationen zum Wiederherstellen des Betriebssystems, der Treiber, Handbücher und
von Spezialsoftware finden S ie im Han dbuch zur Wiederherstellung installierter Software.
► Schalten Sie das Notebook ein (1).
1
► Befolgen Sie während der Installation die Anweisungen am Bildschirm.
Bei Unklarheiten bezüglich der angeforderten Eingabe daten lesen Sie das
Handbuch des Betriebssystems.
Wenn auf Ihrem Notebook ein Windows-Betriebssystem installiert ist, finden Sie weitere
Informationen zum System sowie Treiber, Hilfsprogramme, Updates, Handbücher usw.
auf Ihrem Notebook oder im Internet unter "www.fujitsu-siemens.com/support".
10600969195, Ausgabe 1 Deutsch - 11
Page 34

Technische Daten
Technische Daten
TechnischeDaten
Notebook
TechnischeDaten
Umgebungsbedingungen
Betriebstemperatur
Abmessungen
Breite x Tiefe x Höhe (Vorderseite/Rückseite) 440 mm x 294 mm x 40/48 mm
Gewicht (inklusive 8-Zellen-Akku und 2
Festplatten)
Das Datenblatt zu diesem Notebook bietet weitere technische Daten. Sie finden das
Datenblatt auf Ihrem Notebook oder im Internet unter "www.fujitsu-siemens.com".
Netzadapter
TechnischeDaten
Elektrische Daten
Primär (geräteabhängig)
Nennspannung
Nennfrequenz 50 Hz – 60 Hz (a utomatisch)
Sekundär
Nennspannung 20 V
Maximaler Nennstrom (geräteab hängig)
5°C–35°C
etwa 3,9 kg
90 W
100 V – 240 V (automatisch)
4,5 A
Sie können jederzeit einen zusätzlichen Netzadapter und eine zusätzliche Netzleitung bestellen.
12 - Deutsch 10600969195, Ausgabe 1
Page 35

English
Deutsch
AMILO Notebook Xi 3650
Première utilisation
Français
Español
Italiano
Nederlands
Português
Page 36

Microsoft, MS
Windows and Windows Vista are registered trademarks of the Microsoft Corporation.
Adobe Reader is
MultiMediaCard
Sony and Memory
All other tradem
respective own
ers, whose protected rights are acknowledged.
Copyright © Fuji
All rights r eserv
ed, including rights of translation, reproduction by printing, copying
or similar method
Non-compliance i
All rights reserv
ed, including rights created by patent grant or registration of a utility model or design.
Subject to ava ila
a trademark of Adobe Systems Incorporated.
is a registered trademark of Infineon Technologies AG
Stick are registered trademarks of Sony Electronics, Inc.
arks referenced are trademarks or registered trademarks of their
tsu Siemens Computers GmbH 2008
s, either in part or in whole.
s subject to compensation for damages.
bility and tech nical modifications.
Page 37

Sommaire
Français
Sommaire
Grâce àune technologie novatrice… ................................................... 1
Système graphique hybride . . . ........................................................... 2
Changer le mode graphique . . ........................................................... 2
Deuxième disqueduren RAID .......................................................... 3
Appeler le programme Intel
Autres informations ..................................................................... 4
Manuel d’utilisation "AMILO Notebook" . . . . ............................................ 4
Ports et éléments de commande ....................................................... 5
Remarques importantes ............................................................... 7
Première mise enservice du notebook ................................................. 8
Déballage et contrôle du N otebook ....................................................... 8
Choix d’un emplacement ................................................................ 9
Raccorder l’adaptateur d’alimentation . . ................................................... 10
Première mise sous tension du Notebook . . . . . ............................................ 11
Caractéristiquestechniques ........................................................... 12
Notebook . . . . . .......................................................................... 12
Adaptateur d’alimentation ............................................................... 12
®
Matrix StorageManager et safonction d’aide ............... 3
10600969195, édition 1 Français
Page 38

Sommaire
Français 10600969195, édition 1
Page 39

Grâce à une technologie novatrice…
Grâce à une technologie novatrice…
... et à son design ergonomique, votre Notebook AMILO Xi 3650 est un Notebook convivial et fiable.
Si vous avez acheté un Notebook avec un système d’exploitation Microsoft Windows, celui-ci
est déjà installé et configuré de manière optimale pour vous. Vous po uve z commencer
à travailler avec votre Notebook dès la première mise sous tension.
Votre Notebook intègre la technologie la plus récente pour vous permettre de
découvrir l’informatique dans des conditions optimales.
• un lecteur permettant de lire et de graver les CD/DVD et selon l’équipement
de l’appareil, de lire les disques Blu-ray
• trois p orts USB pour ajouter très facilement des consoles de jeu, des imprimantes et autres
• un port combiné eSATA/USB pour pouvoir brancher un disque dur SATA
externe ou un autre périphérique USB
• une interface sans fil USB (WUSB) (en option, non disponible en post-équipement) pour une
transmission rapide des données en conformité avec la norme USB sans câble gênant
• LAN et Wireless LAN pour l’accès Internet et réseau
• selon les caractéristiques de l’appareil, un deuxième disque dur vous permettant
d’utiliser votre Notebook avec deux disques durs en RAID
• un port Firewire pour l’échange rapide de données avec des appareils multimédia
• un port HDMI pour la transmission totalement numérique des données audio e t vidéo
• une Webcam intégrée et des microphones numériques pour les différentes applications
multimédia
• un lecteur de cartes multi-format pour transférer rapidement sur votre Notebook
des photos numériques, de la musique et des vidéoclips.
• un contrôleur audio intégré, un hau t-parleur stéréo et un Subwoofer pour le plaisir des oreilles.
• Bluethooth 2.1 pour l’utilisation sans fil de d ifférents accessoires
• entrées et sorties supplémentaires pour accessoires audio haut de gamme
• un tuner TV intégré ( en option, non disponible en post-équipement) pour la
réception de chaînes de télévision terrestres
• un cla vier avec pavé numérique séparé
•unaffichage sur écran (On-Screen-Display) pour le contrôle visuel des
paramètres essentiels de votre Notebook
• Système graphique hybride pour une puissance optimale et un fonctionnement en mode
économie d’énergie avec les applications les moins exigeantes
• une interface à connecteurs multiples (en option, uniquement en combinaison avec le tuner
TV) faisant office d’entrée pour les signaux audio et vidéo de périphériques multimédia
Grâce à l’"Utilitaire BIOS-Setup", vou s pouvez commander le matériel de votre
Notebook et mieux protéger votre système contre tout accès non autorisé en utilisant
la puissance de la protection par mots de passe.
Ce manuel d’utilisation vous montre, entre autres, comment mettre en service
et utiliser votre Notebook AMILO.
10600969195, édition 1 Français - 1
Page 40

Grâce à une technologie novatrice…
Système graphique hybride
Votre notebook est équipé d’un système graphique hybride. La touche de démarrage rapide vous
permet de sélectionner alternativement les modes économie d’énergie et performance.
Pour les applications avec un contenu graphique moins important, telles que le
visionnage de vidéos, la messagerie électroni que ou encore la navigation sur Internet,
utilisez la carte graphique intégrée au jeu de puces. C eci permettra une réduction
du dégage ment de chaleur, du niveau de bruit et de la consommation électrique.
Augmentation de l’autonomie de l’accumulateur (mode économie d’énergie).
Si vous avez besoin de performances élevées, notamment pour les applications de
jeux, vous pouvez passer sur la carte graphique externe (mode performance).
Changer le mode graphique
Le mode graphique externe (mode performance) est pré-réglé par défaut sur votre Notebook.
Un appareil raccordé au port HDMI de votre Notebook (résolution FullH D) ne peut être
commandé qu’en mode performance via la carte graphique externe.
► Appuyez sur la touche de démarrage rapide
multimédia de votre Notebook :
La sortie graphique passe en mode d’économie d’énergie.
► Appuyez à nouveau sur la touche de démarrage rapide
La sortie graphique passe en mode performance.
Hybrid VGA
sur le panneau
Hybrid VGA
2 - Français 10600969195, édition 1
Page 41

Grâce à une technologie novatrice…
Deuxième disque dur en RAID
RedundantArrayofIndependentDi sk sRAID
RAID (R edundan t Array of Independent Disks, ou : Disk-Array) est une méthode consistant à
combiner deux ou plusieurs disques durs pour n’en faire qu’une unité logique.
Ce que l’on appelle une pile de disques ou un "disk array" permet d’améliorer
considérablement les performances ou constitue une autre s olution pour améliorer
la tolérance aux pannes (protection des données).
La tolérance aux pannes s’obtient grâce à la redondance des données. En cas de défaillance
d’un lecteur, elle met à la disposition d’un autre lecteur une copie miroir des données. On
empêche ainsi les défaillances du système d’exploitation ou les pertes de donné es.
Le système d’exploitation reconnaît tous les disques durs d’un disk array comme formant un seul
et même disque dur physique. C hacun des disques durs d ’un disk array est appelé "Member"
(membre). Les données de configuration d’un membre sont enregistrées dans un secteur réservé
du disque dur. Ces données servent à identifier le disque dur comme membre.
Habituellement, les disques durs peuvent être combinés selon différentes méthodes. Ces méthodes
sont désignées comme autant de niveaux RAID. Les différents niveaux RAID correspondent à
des niveaux de performances et de sécurité et à des coûts d’implémentation différents.
La dépose et la pose du deuxième disque dur ne doivent être effectuées que par
des partenaires service autorisés de Fujitsu Siemens Computers. Tout démontage
ou montage non autorisé annule le droit à l a garantie.
Pour obtenir de plus amples informations et les adresses de nos partenaires service,
consultez notre site internet "http://www.fujitsu-siemens.com/support".
En fonction de la taille des disques durs, le regroupement de deux
disques durs pour former un RAID peut durer plusieurs heures. Pendant
cette période, vot re écran restera noir.
Pour obtenir de plus amples informations sur la configuration de votre système RAID,
consultez l’aide de votre p rogramme Intel
®
Matrix Storage Manager
Appeler le programme Intel®Matrix Storage Manager
et sa fonction d’aide
Pour appeler le programme Intel®Matrix Storage Manager et sa fonction d’aide, procé dez comme suit :
► Sélectionnez lemenu Démarrer - Programmes - Intel
► Cliquez dans la barre de menus supérieure sur Aide.
10600969195, édition 1 Français - 3
®
- Intel
Le programme démarre.
La fonct ion d’aide du programme Intel®Matrix Storage Manager est appelée.
Matrix Storage Manager.
®
Matrix Storage Manager
Page 42

Grâce à une technologie novatrice…
Autres informations
Vous trouverez des informations générales sur votre AMILO Notebook
dans le manuel d’utilisation "AMILO Notebook".
Vous trouverez les pilotes pour Windows Vista pour votre AMILO Notebook sur
nos pages Internet. La configuration usine de ces appareils ne supporte aucun
autre système d’exploitation. Fujitsu Siemens Computers n’assume aucune
responsabilité en cas d’utilisation d’autres système d’exploitation.
Les sections de ce manuel dédiées aux logiciels s e réfèrent aux produits Microsoft
s’ils sont inclus dans la fourniture de votre AMILO Notebook.
Lors d e l’installation d’autres produits logiciels, observez les manuels
d’utilisation des fabricants respectifs.
Manuel d’utilisation "AMILO Notebook"
Vous trouverez le manuel d’utilisation "AMILO Notebook" dans le menu de démarrage de
Windows ou sur Internet à l’adresse "www.fujitsu-siemens.com/support".
4 - Français 10600969195, édition 1
Page 43

Portsetélémentsdecommande
Portsetélémentsdecommande
Dans ce chapitre seront p résentés les différents composants matériels de votre notebook.
Vous y trouverez un aperçu des voyants et des ports du Notebook. Familiarisez-vous
avec ces différents éléments avant de tra vailler avec le notebook.
WebcamPanneaumultimédiaSurfacetactilePavénumériqueséparéClavierVoyantsd’étatTouchesd esurfacetactileLecteurdecartes multi-formatInterfaceinfrarougepourlatélécommandePortLineInPortmicrophonePort écouteursPortLineO utPortSPDIFLogementpourExpressCardTélécommandemultimédiaPortFi reWirePortcombinéeSATA/USBHaut-parleursInterrupteurMarche/ArrêtPortsUSBPrisepourcâbled’antennePortHDMIPortmoniteurVGAPortréseauPrisedetensioncontinue(DCIN)CompartimentdeservicemémoireCompartimentdeservicedisquedurAccumulateurPrisemulti-connecteursSubwooferPrisepourcâbled’antenne
1
2
1
22
23
4
5
7
8
9
30
24
31
25
32
26
33
19
20
18
3
21
6
17
16
5
1
14
13
12
10
11
27
29
28
34
10600969195, édition 1 Français - 5
Page 44

Ports et éléments de commande
1 = Microphones
2 = WebCam
3 = Panneau multimédia
4 = Haut-parleurs
5 = Clavier avec pavé numérique séparé
et des touches d’application
6 = Surface tactile
7 = Voyants d’état
8 = Touches de surface tactile
9 = Interface infrarouge pour la télécommande
10 = Lecteur de cartes multi-format
11 = Port L ine In
12 = Port microphone
13 = Port casque/Line Out
14 = Port SPDIF/Line Ou t
15 = Logement pour ExpressCard avec
télécommande multimédia
16 = Port LAN
17 = Port combiné eSATA/USB
18 = Ouïes de ventilation
19 = Prise de tension continue (DC IN)
20 = Dispositif Kensington Lock
21 = Interrupteur Marche/Arrêt
22 = Lecteur de CD /DVD
23 = Ports USB
24 = Prise pour câble d’antenne (option)
25 = Prise multi-connecteurs (en option)
26 = Port moniteur VG A
27 = Port HDMI
28 = Port FireWire
29 = Port USB
30 = Compartiment de service mémoire
31 = Compartiment de service disque dur 2
32 = Compartiment de service disque dur 1
33 = Subwoofer
34 = Accumulateur
6 - Français 10600969195, édition 1
Page 45

Remarques importantes
Remarques importantes
Respectez les consignes de sécurité reprises dans le manuel "Sécurité" et
dans le manuel d’utilisation "AMILO N otebook".
Si vous utilisez une carte T V-Tuner, assurez-vous qu’elle répond à la norme
IEC 60950-1 : 2005, par. 7.2.
Raccordez une carte TV-Tuner externe à un circuit TNV-1 uniquement.
Lors du raccordement d’un câble coaxial sur la carte TV-Tuner externe, assurez-vous qu’il
est correctement relié au système de mise à la terre du bâtiment.
10600969195, édition 1 Français - 7
Page 46

Première mise en service du notebook
Première mise en service du notebook
PremièremiseenserviceNotebookMise enserviceNotebook
Avant de pouvoir travailler avec votre Notebook pour la première fois, v ous
devez charger l’accumulateur.
A la livraison, l’accumulateur se trouve dans le logement pour accumulateur ou dans l’emballage. Pour
que vous puissiez utiliser votre Notebook en mode accumulateur, l’accumulateur doit être chargé.
Lorsque le Notebook est utilisé en déplacement, l’accumulateur intégré lui fournit l’énergie nécessaire.
Vous pouvez augmenter l’autonomie en tirant profit des fonctions d’économie d’énergie disponibles.
Lorsque vous utilisez le Notebook à la maison ou au bureau, nous vous conseillons de le
raccorder à l’adaptateur d’alimentation plutôt que d’utiliser l’accumulateur.
La connexion des périphériques (p. ex. imprimante, souris) au Notebook est expliquée
dans le Manuel d’utilisation "AMILO Notebook".
Si votre Notebook est équipé d’un système d’exploitation Windows, les pilotes
matériels nécessaires et les logiciels fournis sont déjà préinstallés.
La première mise en service sur le système d’exploitation Microsoft Vista peut demander
jusqu’à 20 minutes, selon la configuration matérielle et logicielle de l’appareil.
Lors de la première mise sous tension, un autodiagnostic s’exécuté. Différents
messages peuvent apparaître. L’écran peut rester sombre ou scintiller brièvement.
Suivez les indications données à l’écran.
En aucun cas, ne mettez l’appareil hors tension pendant la première mise en service.
Déballage et contrôle du Notebook
Si vous constatez des dommages dus au transport, nous vous prions d’en
informer immédiatement le point de vente compétent !
► Déballez les différents éléments.
EmballageTransport
► Vérifiez si le Notebook présente des dommages apparents dus au transport.
Nous vous conseillons de ne pas jeter l’emballage d’origine de l’appareil.
Conservez l’emballage d’origine, il pourra vous servir lors d’un transport ultérieur.
8 - Français 10600969195, édition 1
Page 47

Choix d ’un emplacement
Choixd’unemplacementNotebookAdaptateurd’alimentation
Avant de mettre votre notebook en place, choisissez un emplacement
adéquat. Suivez pour cela les consignes suivantes :
• Ne posez jamais le Notebook et l’adaptateur d’alimentation sur une surface sensible
à la chaleur. Dans le cas contraire, la surface risque d’être endommagée.
• Ne posez jamais votre noteboo k sur une surface non rigide (p. ex. sur
la moquette, des meubles rembourrés). Vous risquez ainsi d’entrave r la
ventilation et de provoquer des dégâts dus à une surchauffe.
• Ne posez pas le notebook directement sur vos jambes pendant une trop
longue période. Pendant le fonctionnement normal, la face inférieure
du notebook se réchauffe. Un contact prolongé avec la peau peut être
désagréable, voire provoquer des brûlures.
• Posez le notebook sur une surface plane, stable et anti-dérapante.
N’oubliez pas que les pieds en caoutchouc du notebook peuvent laisser
des marques sur les surfaces fragiles.
• L’espace libre auto ur du notebook et de l’adaptateur d’alimentation doit être
d’au moins 100 mm pour permettre une ventilation suffisante.
• Ne couvrez jamais les ouïes de ventilation de votre Notebook.
• Evitez d’exposer votre notebook à des conditions d’environnement extrêmes.
Protégez le notebook de la poussière, de l’humidité et de la chaleur.
Première mise en service du notebook
10600969195, édition 1 Français - 9
Page 48

Première mise en service du notebook
Raccorder l’adaptateur d’alimentation
MiseenserviceduNote bookAdaptateurd’alimentation
Respectez également les consignes de sécurité fi gurant dans le manuel "Sécurité" ci-joint.
Le câble secteur livré avec l’appareil répond aux exigences du pays dans
lequel vous avez acheté le Notebook. Assurez-vous que ce câble secteur
est autorisé dans le pays dans lequel vous l’utilisez.
Ne bra nchez pas le câble s ect eur de l’adaptateur d’alimentation s ur une prise de
courant avant d’avoir raccordé le Notebook à l’adaptateur d’alimentation.
Assurez-vous que la puissance absorbée de l’adaptateur d’alimentation ne dépasse
pas celle du circuit électrique sur lequel vous branchez l’adaptateur d’alimentation (voir
chapitre "Caractéristiques techniques", "Adaptateur d’alimentation ", Page 12).
► Raccordez le câble de l’adaptateur
d’alimentation (1) à la prise de tension
continue (DC IN) du Notebook.
► Raccordez le câble secteur (2) à
1
l’adaptateur d’alimentation.
► Branchez le câble s ecteur (3) sur
une prise de courant.
3
2
10 - Français 10600969195, édition 1
Page 49

Première mise en service du notebook
Première mise sous tension du Notebook
Premièremisesoustension
Le système d’exploitation est déjà installé sur le disque dur pour faciliter la
mise en service de votre Notebook.
Lors de cette opération, le Notebook doit être alimenté par l’intermédiaire
de l’adaptateur d’alimentation.
A la première mise sous tension du Notebook, l’installation et la configuration du
logiciel fourni so nt lancées. Cette procédure ne peut pas être interrompue ; prévoyez
par conséquent un certain temps pou r son exécution et raccordez le Notebook
à la tension secteur par l’intermédiaire de l’adaptateur d’alimentation.
Pendant l’installation, vous pouvez redémarrer le Notebook uniquement
si le système vous y invite !
Vous serez invité à créer une copie de sauvegarde du système d’exploitation préinstallé.
La copie de sauvegarde vous permettra de réinitialiser votre Notebook à l’état de livraison.
Vous trouverez des informations pour restaurer le système d’exploitation,
les pilotes, les manuels et des logiciels spéciaux dans le manuel
sur la restauration des logiciels installés.
► Mettez le Notebook sous tension (1).
1
► Pendant l’installation, suivez les indications données à l’écran.
En cas de doute sur les données que le système vous demande de saisir,
lisez le manuel du système d’exploitation.
Si un système d’exploitation Window s est installé sur votre Notebook, vous
trouverez plus d’informations sur le système, les pilotes, les programmes
d’aide, les mises à jour, les manuels, etc. sur votre No tebook ou sur
Internet sous "www.fujitsu-siemens.com/support".
10600969195, édition 1 Français - 11
Page 50

Caractéristiques techniques
Caractéristiques techniques
Caractéristiquestechniques
Notebook
Caractéristiquestechniques
Conditions d’environnement
Température de fonctionnement 5 °C – 35 °C
Dimensions
Largeur x Profondeur x Hauteur (face
avant/arrière)
Poids (incl. accumulateur à 8 cellules et 2
disques durs)
La fiche technique de ce Notebook contient d’autres caractéristiques
techniques. Vous trouverez la fiche technique sur votre Notebook ou sur
le site Internet "www.fujitsu-siemens.com".
Adaptateur d’alimentation
Caractéristiquestechniques
Caractéristiques électriques
Principal (selon l’appareil)
Tension nominale
Fréquence nominale
Secondaire
Tension nominale 20 V
Courant nominal maximum (selon l’appareil)
440 mm x 294 mm x 40/48 mm
environ 3 ,9 kg
90 W
100 V – 240 V (automatique)
50 Hz – 60 Hz (automatique)
4,5 A
Vous pouvez à tout moment commander un adaptateur d’alimentation et un
câble secteur supplémentaires.
12 - Français 10600969195, édition 1
Page 51

English
Deutsch
AMILO Notebook Xi 3650
Primera puesta en servicio
Français
Español
Italiano
Nederlands
Português
Page 52

Microsoft, MS
Windows and Windows Vista are registered trademarks of the Microsoft Corporation.
Adobe Reader is
MultiMediaCard
Sony and Memory
All other tradem
respective own
ers, whose protected rights are acknowledged.
Copyright © Fuji
All rights r eserv
ed, including rights of translation, reproduction by printing, copying
or similar method
Non-compliance i
All rights reserv
ed, including rights created by patent grant or registration of a utility model or design.
Subject to ava ila
a trademark of Adobe Systems Incorporated.
is a registered trademark of Infineon Technologies AG
Stick are registered trademarks of Sony Electronics, Inc.
arks referenced are trademarks or registered trademarks of their
tsu Siemens Computers GmbH 2008
s, either in part or in whole.
s subject to compensation for damages.
bility and tech nical modifications.
Page 53

Contenido
Español
Contenido
Suinnovadora tecnología .............................................................. 1
Tecnología gráfica híbrida ............................................................... 2
Cambio de modo gráfico ................................................................ 2
Segundo disco duro en u na matriz RAID . . . . . . ............................................ 3
Inicio de Intel
Información adicional .................................................................... 4
Manual de instrucciones "AMILO Notebook" . . . ........................................ 4
Puertos yelementosdemando ........................................................ 5
Indicaciones importantes . . . ........................................................... 7
Primera puestaenservicio del ordenador portátil ...................................... 8
Desembalaje y verificación del ordenador portátil . . ........................................ 8
Selección delemplazamiento ............................................................ 9
Conexión del adaptador de red ........................................................... 10
Primera conexión del ordenador po rtátil ................................................... 11
Característicastécnicas ............................................................... 12
Ordenador portátil . ...................................................................... 12
Adaptador de red . ...................................................................... 12
®
Matrix Storage Manager y la función de ayuda . . ......................... 3
10600969195, edición 1 Español
Page 54

Contenido
Español 10600969195, edición 1
Page 55

Su innovad ora tecnología
Su innovadora tecnología
... junto con un diseño ergonómico hacen de su AMILO Notebook Xi 36 50
un ordenador portátil fiable y fácil de usar.
Si ha comprado un ordenador portátil con un sistema operativo Microsoft Windows, este
ya se encuentra preinstalado y configurado de forma óptima. Podrá comenzar a trabajar
inmediatamente la primera vez que encienda su ordenador portátil.
Su ordenador portátil viene equipado con la última tecnología para que así pueda
aprovechar al máximo su experiencia en informática.
• una unidad para la lectura y escritura de CD/DVD y, según el equipamiento,
para la lectura de discos Blu-ray
• tres puertos USB para una sencilla ampliación mediante gamepads, impresoras y demás
• un puerto eSATA/USB combinado para poder conectar un disco duro SATA
externo u otro dispositivo USB
• una interfaz USB inalámbrica (WUSB) (opcional, no instalable como accesorio) para una
transmisión de datos rápida según el estándar USB sin cables molestos
• LAN y Wireless LAN para acceder a una red local y a Internet
• según el equipo, llevará un segundo disco duro que le permitirá utilizar el ordenador
portátil con dos discos duros en una matriz RAID
• un puerto F irewire para un intercambio de datos rápido con dispositivos multimedia
• un puerto HDMI para la transmisión en alta definición de datos de audio y vídeo
• una webcam integrada y micrófonos digitales para distintas aplicaciones multimedia
• un lector de tarjetas multiformato para tran sferir rápidamente a su ordenador
portátil fotos, música y vídeos digitales
• un c ontrolador de audio integrado, dos altavoces estéreo y un subwoofer que le
permiten disfrutar de una excelente calidad de sonido
• Bluethooth 2.1 para el funcionamiento inalámbrico de distintos accesorios
• entradas y salidas adicionales para accesorios de audio de alta calidad
• un sintonizador de TV integrado (opcional, no instalable c omo accesorio) para
la recepción de programas de televisión terrestres
• un teclado con bloque numérico extendido
• un On-Screen Display para el control visual de los ajustes más importantes de su ordenador
portátil
• tecnología gráfica híbrida para un rendimiento máximo o modo de ahorro de
batería con aplicaciones menos exigentes
• una interfaz de conexión múltiple (opcional, solo en conjunción con el sintonizador de TV)
para la entrada de señales de audio y vídeo de dispositivos multimedia externos
Con la sencilla utilidad "BIOS Setup Utility" podrá controlar el hardware de su ordenador
portátil y proteg er mejor su sistema de un acceso no autorizado, siempre y cuando
utilice las potentes prestaciones de la contraseña.
Estas instrucciones d e servicio describen, entre otras cosas, cómo poner en
marcha y manejar su ordenador portátil AMILO.
10600969195, edición 1 Español - 1
Page 56

Su innovadora tecnología
Tecnología gráfica híbrida
Su orden ador portátil dispone de tecnología gráfica híbrida. Con la tecla de inicio rápido se
puede cambiar entre los modos de ahorro de energía y de rendimiento.
Utilicelaunidadgráfica integrada en el chipset para aplicaciones que no
contienen muchos gráficos, por ejemplo, al reproducir vídeos, utilizar el correo
electrónico o navegar por Internet. De este modo se disminuye la generación
de calor, el nivel de ruido y el consumo de corriente. La autonomía de la
batería aumenta (modo de ahorro de la batería).
Cambie a la unidad gráfica externa cuando requiera un rendimiento alto,
p. ej. para juegos (modo de rendimiento).
Cambio de modo gráfico
El ordenador portátil se entrega de fábrica c on el modo e xterno de gráficos
(modo de rendimiento) activado.
Los dispositivos conectados al puerto HDMI del ordenador portátil (resolución Full HD) solo
funcionan mediante la unidad de gráficos externa en el modo de rendimiento.
► Pulse la tecla de inicio rápido
Se cambia al modo de ahorro de energía de los gráficos.
► Pulsedenuevolatecladeiniciorápido
Se cambia al modo de rendimiento de los gráficos.
Hybrid VGA
del Multimedia-Board del ordenador portátil:
Hybrid VGA
2 - Español 10600969195, edición 1
Page 57

Su innovad ora tecnología
Segundo disco duro en una matriz RAID
RedundantArrayofIndependentDi sk sRAID
RAID (Redundant Array of Independent Disks, también: Disk-Array) es un procedimiento
mediante el que se agrupan dos discos duros en una unidad lógica.
Un Disk-Array aporta beneficios en lo que se refiere a la mejora del rendimiento o,
alternativamente, la tolerancia a errores (protección de datos).
La tolerancia a errores se logra gracias a la re dundancia de los datos. En caso de que
una unidad falle, otra unidad contiene una copia espejo de los datos. De este modo puede
evitarse una pérdida de datos o la caída del sistema operativo.
El sistema operativo identifica todos los discos duros en un Disk-Array como un único disco duro
físico. Cada uno de los discos duros en un Disk-Array se designa como "Member" (miembro).
En el sector reservado del disco duro se graban los datos referidos a la configuración de un
miembro. A través de estos datos, el disco duro puede identificarse como miembro.
Por lo general, los discos duros se agrupan mediante distintos procedimientos. Estos
procedimientos se designan como diferentes niveles RAID. Los diferentes niveles RAID representan
los distintos niveles de rendimiento y seguridad, así como los costes de implementación.
La instalación y desmontaje del segundo disco duro solo debe llevarse a cabo
por un servicio técnico autorizado de Fujitsu Siemens Computers GmbH. En
caso contrario se extinguen los derechos de gara ntía.
Encontrará más información y las direcciones d e nuestros servicios técnicos
en Internet en "http://www.fujitsu-siemens.com/support".
Dependiendo del tamaño de los discos duros la combinación de dos
discos duros en una matriz RAID puede tardar varias horas. Durante este
periodo de tiempo su pantalla se volverá negra.
Encontrará más información sobre la configuracióndesusistemaRAIDenla
función de ayuda del programa Intel
®
Matrix Storage Manager.
Inicio de Intel®Matrix Storage Manager y la función de ayuda
Para abrir el programa Intel®Matrix Storage Manager y la f unción de ayuda
proceda de la siguiente forma:
► Seleccione Inicio - Todos los programas - Intel
®
- Intel
Matrix Storage Manager.
A continuación se abre el programa.
► Haga clic en Ayuda en la barra de menús superior.
A continuación se abre la ayuda del programa Intel®Matrix Storage Manager.
10600969195, edición 1 Español - 3
®
Matrix Storage Manager
Page 58

Su innovadora tecnología
Información adicional
En el Manual de instrucciones "AMILO Notebook" encontrará información
general sobre su ordenador portátil AMILO.
Los controladores d e Windows Vista para su ordenador portátil AMILO se encuentran
en nuestra página de Internet. Estos equipos no tienen soporte de fábrica
para otros sistemas operativos. Fujitsu Siemens Computers no asume ninguna
responsabilidad derivada del uso de otros s iste mas operativos.
Las partes de este manual relativas al software se refieren a los productos de
Microsoft, si forman parte del suministro de su ordenador portátil AMILO.
Tenga en cuenta las instrucciones del fabricante al instalar otros productos de software.
Manual de instrucciones "AMILO Notebook"
Puede acceder al Manual de instrucciones "AMILO Notebook" desde el menú de inicio
de Windows o en Internet en "www.fujitsu-siemens.com/support".
4 - Español 10600969195, edición 1
Page 59

Puertos y elementos de mando
Puertos y elementos de mando
En este capítulo se muestran los diferentes componentes de hardware de su ordenador portátil.
Aquí obtendrá una visión general de los indicadores y los puertos del ordenador portátil.
Familiarícese con estos elementos antes de trabajar con el ordenador portátil.
WebcamMultimedia-BoardAlmohadilladetacto
BloquenuméricoextendidoTecladoIndicadoresdeestadoTeclasdelaalmohadi lla detactoLectordetarjetasmultiformatoInterfazdeinfrarrojosparaelmandoadistanciaPuertoLineInPuertoparamicrófonoPuertoparaauricularesPuertoLineOutPuertoSPDIFRanuraparatarjetasExpressCardMandoadistanciamultimediaPuertoFirewirePu ertoeSATA/USBcombinadoAltavocesInterruptorde encendido/apagadoPuertosUSBPuertodecabledeantenaPuertoHDMIPuertoparamonitor V GAConexiónderedConector hembradetensióncontinua(DCIN)CompartimentodeserviciodememoriaCompartimentodeserviciodeldiscoduroBateríaPuertodeconexiónmúltipleSubw ooferPuertodecabledeantena
1
2
1
26
33
27
28
19
20
18
3
21
6
17
16
5
1
14
13
12
10
11
22
23
4
5
25
24
31
7
8
9
30
32
29
34
10600969195, edición 1 Español - 5
Page 60

Puertos y elementos de mando
1 = Micrófonos
2 = Webcam
3 = Multimedia-Board
4 = Altavoces
5 = Teclado con bloque numérico extendido
y teclas de aplicación
6 = Almohadilla de tacto
7 = Indicadores de estado
8 = Teclas de la almohadilla de tacto
9 = Interfaz de infrarrojos para el
mando a distancia
10 = Lector de tarjetas multiformato
11 = Puerto Line In
12 = Puerto para micrófono
13 = Puerto para auriculares/Line Out
14 = Puerto SPDIF/Line Out
15 = Ranura para tarjetas ExpressCard con
mando a distancia multimedia
16 = Puerto para LAN
17 = Puerto eSATA/USB combinado
18 = Ranuras de ventilación
19 = Conector hembra de tensión
continua (DC IN)
20 = Dispositivo Kensington Lock
21 = Interruptor de encendido/apagado
22 = Unidad de CD/DVD
23 = Puertos USB
24 = Puerto de c able de antena (opcional)
25 = Puerto de conexión múltiple (opcional)
26 = Puerto para monitor VGA
27 = Puerto HDMI
28 = Puerto Firewire
29 = Puerto USB
30 = Compartimento de servicio de memoria
31 = Compartimento de servicio de disco duro 2
32 = Compartimento de servicio de disco duro 1
33 = Subwoofer
34 = Batería
6 - Español 10600969195, edición 1
Page 61

Indicaciones importantes
Indicaciones importantes
Tenga en cuenta las indicaciones de seguridad incluidas en el manual "Seguridad"
y en el Manual de instrucciones "AMILO Notebook".
Al utilizar una tarjeta sintonizadora de TV se debe comprobar que cumpla
la norma IEC 60950-1: 2005, apartado 7.2.
Conecte la sintonizadora de TV externa solo a un circuito TNV-1.
Al conectar una cable coaxial a la sintonizadora de TV externa asegúrese de que la
conexiónconlatomaatierradeledificio es correcta.
10600969195, edición 1 Español - 7
Page 62

Primera pu esta en servicio del ordenador portátil
Primera puesta en servicio del
ordenador portátil
PrimerapuestaenservicioOrdenadorportátilPuestaenservicioOrdenadorportátil
Es necesario cargar la batería antes de poder trabajar por primera vez con el ordenador portátil.
El ordenador se suministra con la batería en el compartimento de la batería o en los accesorios. La
batería deberá estar cargada si quiere utilizar el ordenador portátil en el modo de servicio con batería.
La batería se encarga de abastecer el ordenador portátil con la energía necesaria cuando
este se utiliza en el modo de servicio móvil. La autonomía puede aumentarse si se
aprovechan las funciones disponibles para el ahorro de energía.
Cuando utilice el ordenador portátil e n casa o en la o ficina, debería alimentarlo con
energía mediante el adaptador de red y no mediante la batería.
La información sobre la conexión de dispositivos externos (p. ej., ratón, impresora) se
encuentra en el manual de instrucciones "AMILO Notebook".
Si su ordenador portátil incluye un sistema operativo de Windows, los controladores
de hardware necesarios y el software suministrado ya están preinstalados.
La primera puesta en servicio con el sistema operativo Microsoft Vista puede tardar
hasta 20 minutos, según el hardware y el software instala dos.
La primera vez que se enciende el ordenador portátil se ejecuta una
comprobación del sistema. Pueden aparecer distintos mensajes. La pantalla
puede apagarse o parpadear brevemente.
Siga las instrucciones en pantalla.
No apague en ningún caso el ordenador portátil durante la primera puesta en servicio.
Desembalaje y verificación del ordenador portátil
Si detecta daños causa dos por el transporte, informe inmediatamente a su distribuidor.
► Desembale todos los elementos.
EmbalajeTransporte
► Verifique el ordenador portátil y cerciórese de que no se han producido
daños visibles debidos al transporte.
Le recomendamos que guarde el material de embalaje original por si
lo necesitara para un futuro transporte.
Guarde el material de embalaje original por si lo necesita para
transportar nuevamente e l equipo.
8 - Español 10600969195, edición 1
Page 63

Primera puesta en servicio del ordenador portátil
Selección del emplazamiento
SeleccióndelemplazamientoOrdenadorportátilAdaptadordered
Antes de instalar el ordenador portátil, se debe elegir un lugar adecuado para el
ordenador portátil. A tal efecto, siga las indicaciones siguientes:
• No coloque bajo ninguna circunstancia ni el ordenador portátil ni el adaptador de red
sobre una supe rfi cie sensible al calor. De lo contrario la superficie podría sufrir daños.
• El ordenador portátil no debe colocarse nunca sobre una superficie blanda (p.
ej., alfombras, muebles tap izados o camas). Esto puede bloquear la ventilación
y consecuentemente originar daños por sobrecalentamiento.
• No coloque el ordenador portátil por mucho tiempo directamente sobre
las piernas. La parte inferior del ordenador portátil se calienta durante
el servicio normal. Un contacto prolongado con la piel puede llegar a
ser desagradable o incluso provocar quemaduras.
• Coloque el ordenador portátil sobre una super ficie plana, estable y
antideslizante. Tenga en cuenta que los pies de goma del ordenador
portátil pueden dejar marcas en superficies delicadas.
• Para que el equipo pueda ventilarse adecuadamente, debe guardar un espacio libre
mínimo de 100 mm alrededor del ordenador portátil y del adaptador de red.
• No cubra nunca las ranuras de ventilación del ordenador portátil.
• No exponga el ordenador portátil a condiciones ambientales extremas. Proteja
el ordenador p ortátil de la humedad, el polvo y el calor excesivo.
10600969195, edición 1 Español - 9
Page 64

Primera pu esta en servicio del ordenador portátil
Conexión del adaptador de red
PreparaciónparaelservicioAdaptadordered
Tenga en cuenta las indicaciones de seguridad incluidas en el
manual adjunto "Seguridad".
El cable de alimentación adjunto satisface las normas del país donde se ha
comprado el ordenador portátil. Asegúrese de que el cable de alimentación
está homologado en el país donde desea utilizarlo.
El cable de alimentación del adaptador de red solo puede enchufarse a una toma de
corriente cuando el ordenador portátil esté ya conectado al adaptador de red.
Asegúrese de que el consumo de energía del adaptador de red no supere al de
la red eléctrica donde piensa conectar el adaptador de red (véase el capítulo
"Características técnicas","Adaptador de red ", Página 12).
► Conecte el cable del adaptador de red (1)
al conector hem bra de tensión continua
(DC IN) del ordenador portát il.
► Enchufe el cable de alimentación (2)
1
al adaptador de red.
► Enchufe el cable de alimentación (3)
a una toma de corriente.
3
2
10 - Español 10600969195, edición 1
Page 65

Primera puesta en servicio del ordenador portátil
Primera conexión del ordenador portátil
Primeraconexión
Para facilitarle la puesta en servicio del ordenador portátil, el sistema operativo
está preinstalado en el disco duro.
Durante este proceso es necesario alimentar el ordenador portátil
con el adaptador de red.
Cuando conecte por primera vez el ordenador portátil, el software preinstalado se
instalará y configurará. Como esta operación no debe interrumpirse, debería calcular un
tiempo suficiente y conectar el ordenador portátil a la red mediante el adaptador de red.
¡Durante la instalación, el ordenador portátil solo debe arrancarse de
nuevo cuan do sea requerido explícitamente!
Se le pedirá que haga una copia de seguridad del sistema operativo
preinstalado. Esta copia de seguridad le permitirá restablecer en un momento
posterior el estado original del ordenador portátil.
La información sobre el restablecimiento del sistema operativo, controladores,
manuales y software especial puede encontrarse en el manual de
recuperación del software instalado.
► Conecte e l ordenador portátil (1).
1
► Durante la instalación siga las instrucciones que aparecerán en la pantalla.
Lea el manual del sistema operativo cuando tenga dudas con respecto
a los dato s de entrada solicitados.
Si en su ordenador portátil hay instalado un sistema operativo Windows,
puede encontrar más información sobre el sistema, así como controladores,
programas de ayuda, actualizaciones, manuales, etc., en el ordenador portátil
o en Internet en "www.fujitsu-siemens.com/support".
10600969195, edición 1 Español - 11
Page 66

Características técnicas
Características técnicas
Característicastécnicas
Ordenador portátil
Característicastécnicas
Condiciones ambientales
Temperatura de funcionamiento 5 °C – 35 °C
Dimensiones
Anchura x Fondo x Altura (parte delantera/parte
trasera)
Peso (con una batería de 8 células y 2 discos
duros)
La ficha técnica de este ordenador portátil contiene más características
técnicas. Encontrará la ficha técnica en el ordenador portátil o en
Internet en "www.fujitsu-siemens.com".
Adaptador de red
Característicastécnicas
Datos eléctricos
Principal (según equipo)
Tensión nominal
Frecuencia nominal
Secundario
Tensión nominal 20 V
Corriente nominal máxima (seg ún equipo)
440 mm x 294 mm x 40/48 mm
unos 3,9 k g
90 W
100 V – 2 40 V (automático)
50 Hz – 60 Hz (automático)
4,5 A
Si lo desea, puede solicitar un adaptador de red y un cable de alimentación adicionales.
12 - Español 10600969195, edición 1
Page 67

English
Deutsch
AMILO Notebook Xi 3650
Prima messa in esercizio
Français
Español
Italiano
Nederlands
Português
Page 68

Microsoft, MS
Windows and Windows Vista are registered trademarks of the Microsoft Corporation.
Adobe Reader is
MultiMediaCard
Sony and Memory
All other tradem
respective own
ers, whose protected rights are acknowledged.
Copyright © Fuji
All rights r eserv
ed, including rights of translation, reproduction by printing, copying
or similar method
Non-compliance i
All rights reserv
ed, including rights created by patent grant or registration of a utility model or design.
Subject to ava ila
a trademark of Adobe Systems Incorporated.
is a registered trademark of Infineon Technologies AG
Stick are registered trademarks of Sony Electronics, Inc.
arks referenced are trademarks or registered trademarks of their
tsu Siemens Computers GmbH 2008
s, either in part or in whole.
s subject to compensation for damages.
bility and tech nical modifications.
Page 69

Contenuto
Italiano
Contenuto
Grazie alla tecnologia innovativa ....................................................... 1
Grafica ibrida ........................................................................... 2
Cambio della modalità grafica ........................................................... 2
Secondo discorigido nel complesso RAID ................................................ 3
Richiamare Intel
Ulteriori informazioni .................................................................... 4
Istruzioni per l’uso "AMILO Notebook" . . . . . ............................................ 4
Collegamenti edelementi di comando .................................................. 5
Istruzioni importanti ................................................................... 7
Prima messa in funz ione del notebook . . . . . ............................................ 8
Disimballaggio e verifica del notebook . ................................................... 8
Scelta dellaposizione ................................................................... 9
Collegamento dell’adattatore di rete . . . ................................................... 10
Prima accensionedel notebook .......................................................... 11
Dati tecnici ............................................................................ 12
Notebook . . . . . .......................................................................... 12
Adattatore direte ....................................................................... 12
®
Matrix Storage Manager e la funzione di guida . . . ..................... 3
10600969195, edizione 1 Italiano
Page 70

Contenuto
Italiano 10600969195, edizione 1
Page 71

Grazie alla tecnologia innovativa
Grazie alla tecnologia innovativa
... e alla struttura ergonomica, i notebook AMILO Xi 3650 sono dispositivi affidabili e di facile utilizzo.
Se è stato acquistato un notebook con un sistema operativo Microsoft Windows,
quest’ultimo è preinstallato e con figurato in modo ottimale. Il not ebook è pronto
per il funzionamento alla prima accensione.
Il notebook è dotato della tecnologia più recente per consentire di sfruttare
in modo ottimale la propria esperienza:
• un’unità per leggere e scrivere su CD/DVD e, a seconda del dispositivo, per leggere dischi Blu-ray;
• tre porte USB per una semplice espansione tramite game pad, stampanti e altro;
• una porta combinata eSATA/USB per consentire il collegamento di un disco rigido
SATA esterno o di una periferica USB aggiuntiva;
• un’interfaccia Wireless USB (W USB) (opzionale, non modificabile) per la trasmissione rapida
di dati in base allo standard USB senza cavi che potrebbero essere di intralcio;
• LAN e W ireless LAN per l’accesso a I nterne t o di rete;
• un secondo disco rigido, dipendente dal dispositivo, per consentire il funzionamento
del notebook con due dischi rigidi in un sistema RAID;
• un collegamento FireWire per un o scambio di dati veloce con i dispositivi multimediali;
• un connettore HDMI per la trasmissione completamente digitale di fileaudioevideo;
• una webcam integrata e un microfono digitale per le applicazioni multimediali più svariate;
• un lettore schede multiformato per tra sferire ra pidamente foto digitali, file
musicali e video sul notebook;
• un controller audio integrato, altoparlanti stereo e un altoparlante subwoofer
per il massimo piacere di ascolto;
• Bluethooth 2.1 per l’azionamento senza cavo di dive rse periferiche;
• ingressi e uscite ausiliarie per periferiche audio di alta qualità;
• un sintonizzatore TV integrato (opzionale, non modificabile) per la ricezione
di programmi televisivi terrestri;
• una tastiera con blocco numerico se parato ;
• un On-Screen-Display per la visualizzazione d elle impostazioni principali del notebook;
•grafica ibrida per ottenere prestazioni ottimali a consumo ridotto della batteria
nelle applicazioni meno esigenti;
• un’interfaccia a connettore multiplo (opzionale, solo in abbinamento con il sintonizzatore
TV) come entrata per i segnali audio e video di dispositivi multimediali esterni.
Conla"BIOSSetupUtility"difacileutilizzoèpossibileconfigurare l’hardware del
notebook e proteggere meglio il sistema da accessi non autorizzati, utilizzando le
potenti funzionalità della protezione tramite password.
In queste istruzioni per l’uso viene descritto tra l’altro come mettere in funzione
e utilizzare il notebook AMILO.
10600969195, edizione 1 Italiano - 1
Page 72

Grazie alla tecnologia inno vativa
Grafica ibrida
Il notebook è provvisto di una soluzione a grafica ibrida. Tramite i tasti di avvio rapido è possibile
passare dalla modalità di risparmio batteria alla modalità prestazioni e viceversa.
Se si utilizzano applicazioni con grafica meno intensa, ad esempio durante
la riproduzione di video, o durante l’utilizzo della email o la navigazione in
Internet, usare l’unità grafica integrata nel chipset. In tal modo si riducono la
produzione di calore, il livello di rumorosità e il consumo di carburante. La
durata della batteria aumenta (modalità di risparmio batteria).
Se si necessita di prestazioni più elevate, ad esempio per giochi, è possibile
passare all’unità grafica esterna (modalità prestazioni).
Cambio della modalità grafica
Sul proprio notebook la modalità grafica esterna (modalità prestazioni) viene preimpostata in fabbrica.
Un dispositivo sul connettore HDMI del notebook (risoluzione piena HD ) può essere
azionato dall’unità g rafica esterna solo in modalità prestazioni.
► Premere il tasto di avvio rapido
L’immagine grafica cambia in modalità di risparmio batteria.
► Premere nuovamente il tasto di avvio rapido
L’immagine grafica cambia in modalità prestazioni.
VGA ibrido
sulla scheda multimediale del notebook:
VGA ibrido
2 - Italiano 10600969195, edizione 1
Page 73

Grazie alla tecnologia innovativa
Secondo disco rigido nel complesso RAID
RedundantArrayofIndependentDi sk sRAID
RAID (Redundant Array of Ind ependen t Disks, anche: D isk-Array) è una procedura
per la combinazione di due dischi rigidi in un’unità logica.
Per migliorare le prestazioni o, in alternativa, la tolleranza di errore (protezione
dati), si può utilizzare un cosiddetto disk array.
La tolleranza di errore si realizza tramite la ridondanza dei dati, facendo in modo che in
caso di guasto di un’unità, l’altra unità riceva una copia ‘specchiata’ dei dati. Si evitano
in questo modo un guasto del sistema operativo o la perdita dei dati.
Il sistema operativo riconosce tutti i dischi rigidi di un disk array come un un unico disco rigido
fisico. In un disk array i singoli dischi rigidi v engono definiti come "member" (membri) . I dati
per la configurazione di un membro vengono registrati in un settore riservato del disco rigido.
Grazie a questi dati è possibile identificareildiscorigidocomeunmembro.
Generalmente i dischi rigidi si possono combinare reciprocamente con diverse procedure.
Queste pro cedu re vengono definite come diversi RAID level. I diversi RAID level identificano
diversi livelli di performance e di sicurezza, nonché diversi costi di implementazione.
Lo smon taggio e il montaggio del second o disco rigido può essere eseguito solo
da un centro di assistenza autorizzato da Fujitsu Siemens Computers GmbH. In
caso di montaggio o smontaggio non autorizzato, la garanzia decade.
Ulteriori informazioni e indirizzi dei nostri centri di assistenza sono riperibili su
Internet all’indirizzo "http://www.fujitsu-siemens.com/support".
A seconda delle dimensioni del disco rigido, la combinazione di due dischi
rigidi in un complesso RAID può durare diverse ore. Durante questo
lasso di tempo, lo schermo diventa nero.
Ulteriori informazioni sulla configura zione del sistema RAId sono riportate nella
funzione di guida del programma Intel
®
Matrix Storage Manager.
Richiamare Intel®Matrix Storage Manager e la funzione di guida
Per richiamare il programma Intel®Matrix Storage Manager e la funzione di
guida, procedere come indicato di seguito:
► Selezionare Menu di avvio - Tutti i programmi - Intel
®
- Intel
Matrix Storage Manager.
Il programma viene avviato.
► Fare clic su Guida sulla barra dei menu superiore.
Viene richiamata la funzione di guida al programma Intel®Matrix Storage Manager.
10600969195, edizione 1 Italiano - 3
®
Matrix Storage Manager
Page 74

Grazie alla tecnologia inno vativa
Ulteriori informazioni
Per informazioni generali sul n otebook AMILO vedere le istruzioni
per l’uso "AMILO Notebook".
I driver per Windows Vista per il notebook AMILO si trovano sul nostro sito. Queste
periferiche non supportano altri sistemi operativi. Fujitsu Siemens Computers non
si assume alcuna responsabilità in caso di ut ilizzo di altri sistemi operativi.
I componenti software di queste istruzioni si riferiscono a prodotti Microsoft
forniti i n dota zione con il notebook AMILO.
In caso di installazione di prodotti software diversi, attenersi alle
istruzioni per l’uso fornite dal produttore.
Istruzioni per l’uso "AMILO Notebook"
Le istruzioni per l’uso "AMILO Notebook" sono reperibili nel menu di avvio di Windows
oppure in Internet al sito"www.fujitsu-siemens.com/support".
4 - Italiano 10600969195, edizione 1
Page 75

Collegamenti ed elementi di comando
Collegamenti ed elementi di comando
In questo capitolo vengono descritti i singoli componenti hardware del notebook. Viene fornita
una panoramica delle spie e dei collegamenti del notebook. Prima di iniziare a lavorare con il
notebook, è consigliabile acquisire familiarità con i singoli elementi che lo compongono.
WebcamSchedamultimedialeTouchpad
BlocconumericoseparatoTastieraSpiedistatoTastideltouchpadLettoreschedemultiformatoInterfacciaainfrarossiperiltelecomandoUscitaLine-InPresamicrofonoUs citacuffieUscitaLine-OutConnettoreSPDIFSlotpe rExpressCardTelecomandomultimedi aleCollegamentoFireW irePortacombinataeSATA/USBAltoparlanteInterruttoreON/OFFPorteUSBConnettorecavoantennaCo nnettoreHDMIConnett or eschermoVGAConnettoredireteUscita percorrentecon tinua(DCIN)AlloggiamentodiserviziomemoriaAlloggiament o diserviziodiscorigidoBatteriaPresaconnettoremultiploSubwooferCollegament ocavoantenna
1
2
1
19
20
18
3
21
6
17
16
5
1
14
13
12
10
11
22
23
4
5
25
24
31
7
8
9
30
32
27
26
33
29
28
34
10600969195, edizione 1 Italiano - 5
Page 76

Collegamentiedelementidicomando
1 = Microfono
2 = Webcam
3 = Scheda multimediale
4 = Altoparlante
5 = Tastiera con blocco numerico separato
e tasti applicazione
6 = Touchpad
7 = Spie di stato
8 = Tasti del touchpad
9 = Interfaccia a infrarossi per il telecomando
10 = Lettore schede multiformato
11 = Uscita Line-In
12 = Presa microfono
13 = Uscita cuffie/Line Out
14 = Uscita SPDIF/Line Out
15 = Slot per ExpressCard con telecomando
multimediale
16 = Connettore LAN
17 = Porta combinata eSATA/USB
18 = Fessure di ventilazione
19 = Uscita per corrente continua (DC IN)
20 = Dispositivo Kensington Lock
21 = Interruttore ON/OFF
22 = Unità CD/DVD
23 = Porte USB
24 = Collegamento cavo antenna (opzionale)
25 = Presa connettore mu ltiplo (opzionale)
26 = Connettore schermo VGA
27 = Connettore HDMI
28 = Collegamento FireWire
29 = Porta USB
30 = Alloggiamento di servizio memoria
31 = Alloggiamento di servizio disco rigido 2
32 = Alloggiamento di servizio disco rigido 1
33 = Subwoofer
34 = Batteria
6 - Italiano 10600969195, edizione 1
Page 77

Istruzioni importanti
Istruzioni importanti
Attenersi alle norme di sicurezza nel manuale "Sicurezza" e alle istruzioni
per l’uso del "Notebook AMILO".
In caso di utilizzo di una scheda sintonizzatore TV, assicurarsi che sia conforme
alla norma IEC 60950-1: 2005, paragrafo 7.2.
Collegare un sintonizzatore TV esterno solo ad un circuito TNV-1.
Quando si collega un cavo coassiale al sintonizza tore TV esterno, assicurarsi che sia
collegato correttamente all’impianto di messa a terra dell’edificio.
10600969195, edizione 1 Italiano - 7
Page 78

Prima messa in funzione del notebook
Prima messa in funzione del notebook
PrimamessainfunzioneNotebookMessainfunzioneNotebook
Prima di utilizzare per la prima volta il notebook, è necessario caricare la batteria.
Alla consegna la ba tteria è inserita nel relativo alloggiamento oppure è acclusa. Se si intende
utilizzare il notebook nel modo batteria, la batteria deve essere carica.
Se il notebook viene utilizzato come computer portatile, l’alimentazione viene fornita dalla batteria
integrata. Tramite l’uso delle funzioni di risparmio energetico è possibile prolungare i tempi di lavoro.
Se si utilizza il notebook a casa o in ufficio, è consigliabile utilizzare l’adattatore di rete e non la batteria.
Per il collegamento di periferiche esterne (ad esem pio mouse, stampante) al notebook,
attenersi alle istruzioni per l’uso "AMILO Notebook" .
Se sul notebook è installato un sistema operativo Windows, gli elementi di
hardware e software necessari sono già installati.
La procedura di prima messa in funzione sul sistema Microsoft Vista può richiedere
fino a 20 minuti, a seconda della versione di hardware e software.
La prima volta che il notebook viene attivato, viene effettuata una prova
del sistema. Possono essere visualizzati diversi messaggi. Il display
potrebbe oscurarsi o sfarfallare per alcuni istanti.
Seguite le istruzioni riportate sul monitor.
Durante la procedura di prima messa in funzione non spegnere il
notebook per alcun m otivo.
Disimballaggio e verifica del notebook
Se vengono rilevati danni da trasporto, informare immediatamente il rivenditore.
► Rimuovere tutti i componenti dall’imballaggio.
ImballaggioTrasporto
► Verificare che il notebook non abbia subito danni visibili durante il trasporto.
Si consiglia di non buttare via l’imballaggio originale del dispositivo.
Conservare l’imballaggio originale per un’eventuale spedizione.
8 - Italiano 10600969195, edizione 1
Page 79

Scelta della posizione
SceltadellaposizioneNotebookAdattatore direte
Il notebook va posizionato in un luogo adeguato. Attenersi alle istruzioni seguenti:
• Non posizionare mai il notebook e l’adattatore di rete su una superficie sensibile
al ca lore. In caso contrario, la superficie potrebbe subire dei danni.
• Non collocare mai il notebook su una superfi cie morbida (ad esempio
tappeti, divani oppure letti). In caso contrario, sussiste il rischio di bloccare
la ventilazione con possibili danni da surriscaldamento.
• Non tenere poggiato il noteboo k direttamente sulle gambe per un periodo prolungato.
Durante il funzionamento normale la parte inferiore d el notebook si riscalda. Un
contatto prolungato con la pelle può essere spiacevole o addirittura provocare ustioni.
• Posizionare il notebook su una superficie stabile, piana e non
sdrucciolevole. Assicurarsi che i piedini di gomma del note book non
lascino tracce sulle superfici sensibili.
• Lo spazio libero intorno al notebook e all’adattatore deve essere almeno di
10 cm in modo che sia garantita una ventilazione sufficiente.
• Non coprire mai le fessure di ventilazione del notebook.
• Il notebook non deve essere espo sto ad agent i atmosferici estremi. È necessario
proteggere il notebook dalla polvere, dall’umidità e dal calore.
Prima messa in funzione del notebook
10600969195, edizione 1 Italiano - 9
Page 80

Prima messa in funzione del notebook
Collegamento dell’adattatore di rete
Predisposizioneperl’usoAdattator edirete
Attenersi alle norme di sicurezza riportate nel manuale "Sicurezza" fornito.
Il cavo di alimentazione fornito con il notebook è conforme alla normativa in
vigore nel paese in cui il notebook è stato acquistato. Assicurarsi che il cavo di
alimentazione sia omologato anche per il paese in cui viene utilizzato.
Il cavo di alime ntazione dell’adattatore di rete deve essere collegato a una
presa solo se il notebook è collegato all’adattatore di rete.
Verificare che la potenza assorbita dall’adattatore di rete non sia superiore
a quella della rete alla quale esso è collegato (vedere il capitolo "Dati
tecnici", "Adattatore di rete ", Pagina 12).
► Collegare il cavo dell’adattatore di rete
(1) alla presa di corrente continua
(DC IN) del notebook.
► Collegare il cavo di alimentazione (2)
1
all’adattatore di rete.
► Collegare il cavo di alimentazione (3)
alla presa di corrente.
3
2
10 - Italiano 10600969195, edizione 1
Page 81

Prima messa in funzione del notebook
Prima accensione del notebook
Primaaccensione
Per facilitarVi la messa in funzione del Vostro notebook, il sistema operativo
è già preinstallato sul disco fisso.
Per questa procedura il notebook deve essere alimentato tramite l’adattatore.
Alla prima accensione del notebook, il software fornito viene installato e
configurato. Questo processo non deve essere interrotto, pertanto, è necessario
prevedere un certo intervallo di tempo per questa operazione e collegare il
notebook alla tensione di rete tramite l’adattatore di rete.
Durante l’installazione il notebook p uò essere riavviato solo su richiesta.
Viene richiesta la creazione di una copia di backup del sistema operativo
precedentemente installato. La copia di backup permette di ripristinare successivamente
le impostazioni predefinite in fabbrica del notebook.
Per informazioni sul ripristino del sistema operativo, dei driver, dei manuali e del
software speciale, fare riferimento a l manuale relativo al ripristino dei softwa re installati.
► Accendere il notebook (1).
1
► Durante l’installazione atten ersi alle istruzioni su schermo.
In caso di dubbio sui dati richiesti, fare riferimento al manu ale del sistema operativo.
Se è installato un sistema operativo Windows, ulteriori informazioni relative al sistema,
i driver, le utilità, gli aggiornamenti, i manuali ecc. sono disponibili nel notebook
stesso o in Internet all’indirizzo "www.fujitsu-siemens.com/support").
10600969195, edizione 1 Italiano - 11
Page 82

Dati tecnici
Dati tecnici
Datitecnici
Notebook
Datitecnici
Condizioni ambientali
Temperatura di esercizio
Dimensioni
Larghezza x Profondità x Altezza (lato
anteriore/lato posteriore)
Peso(inclusalabatteriaa8fotocellulee2
dischi rigidi)
La scheda tecnica di questo notebook offre ulteriori dati tecnici. La scheda tecnica è
disponibile nel notebook o nel nostro sito Web all’indirizzo "www.fujitsu-siemens.com".
Adattatore di rete
Datitecnici
Dati elettrici
Primario (variabile in funzione del dispositivo
utilizzato)
Tensione nominale
Frequenza nominale
Secondario
Tensione nominale 20 V
Corrente nominale massima (variabile in base
al dispositivo utilizzato)
5°C–35°C
440 mm x 294 mm x 40/48 mm
circa 3,9 kg
90 W
100 V – 240 V (commutazione automatica)
50 Hz – 60 Hz (commutazione automatica)
4,5 A
È sempre possibile ordinare un ulteriore adattatore di rete e un ulteriore cavo di alimentazione.
12 - Italiano 10600969195, edizione 1
Page 83

English
Deutsch
AMILO Notebook Xi 3650
Eerste ingebruikname
Français
Español
Italiano
Nederlands
Português
Page 84

Microsoft, MS
Windows and Windows Vista are registered trademarks of the Microsoft Corporation.
Adobe Reader is
MultiMediaCard
Sony and Memory
All other tradem
respective own
ers, whose protected rights are acknowledged.
Copyright © Fuji
All rights r eserv
ed, including rights of translation, reproduction by printing, copying
or similar method
Non-compliance i
All rights reserv
ed, including rights created by patent grant or registration of a utility model or design.
Subject to ava ila
a trademark of Adobe Systems Incorporated.
is a registered trademark of Infineon Technologies AG
Stick are registered trademarks of Sony Electronics, Inc.
arks referenced are trademarks or registered trademarks of their
tsu Siemens Computers GmbH 2008
s, either in part or in whole.
s subject to compensation for damages.
bility and tech nical modifications.
Page 85

Inhoud
Nederlands
Inhoud
Dankzij innoverende technologie ....................................................... 1
Hybrid Graphics . . ...................................................................... 2
Wisselen van grafische modus .......................................................... 2
Tweede harde schijf in de RAID-groep ................................................... 3
®
Matrix Storage Manager en Help-fun ctie oproepen . . ............................. 3
Intel
Verdereinformatie ...................................................................... 4
Gebruikshandleiding "AMILO Notebook" . . ............................................ 4
Aansluitingen enbedieningselementen ................................................. 5
Belangrijke instructies ................................................................. 7
Eerste ingebruikname van hetnotebook ................................................ 8
Notebook uitpakken en controleren ....................................................... 8
Opstelplaats selecteren .................................................................. 9
Netadapter aansluiten . .................................................................. 10
Notebook voor het eerst inscha kelen . . ................................................... 11
Technische gegevens .................................................................. 12
Notebook . . . . . .......................................................................... 12
Netadapter . . .......................................................................... 12
10600969195, uitgave 1 Nederlands
Page 86

Inhoud
Nederlands 10600969195, uitgave 1
Page 87

Dankzij innoverende technologie
Dankzij innoverende technologie
... en een ergon omisch ontwerp is uw AMILO Notebook Xi 3650 een
gebruiksvriendelijk en betrouwbaar notebook.
Als u een notebook met een besturingssysteem van Microsoft Windows hebt gekocht, dan
is dit systeem reeds voorgeïnstalleerd en optimaal voor u geconfigureerd. Het notebook
is direct startklaar, wanneer u dit voor het eerst inschakelt.
Uw notebook is uitgerust met de modernste technologie, zodat u optimaal
van uw notebook kunt genieten.
• een station voor het lezen en beschrijven van CD’s/DVD’s en afhankelijk van de
toesteluitrusting voor het lezen van Blu-ray DVD’s
• drie USB-aansluitingen voor een eenvoudige uitbreiding met game-pads, printers en meer
• een gecombineerde eSATA-/USB-aansluiting, om een externe SATA harde schijf
of een extra USB-toestel te kunnen aansluiten
• een draadloze USB (WUSB) poort (optie, niet achteraf te installeren) voor een snelle
gegevensoverdracht volgens de USB-standaard zonder storende kabels
• LAN en Wireless LAN voor internet- en netwerktoegang
• afhankelijk van het toestel een tweede harde schijf om uw notebook met twe e
harde schijven in de RAID-groep aan te kunnen sturen
• een Firewire-aansluiting voor de snelle gegevensoverdracht met multimediatoestellen
• een HDMI-aansluiting voor de volledig dig itale overdracht van audio- en videogegevens
• een geïntegreerde webcam en een digitale microfoon voor meest uiteenlopende
multimediatoepassingen
• een multiformaat kaartlezer om digitale foto’s, muziek en videoclips snel
naar uw notebook te kopiëren
• een geïntegreerde audiocontroller, stereoluidsprekers en een subwoofer voor optimaal
luistergenot
• Bluethooth 2.1 voor de draadloze aansturing van verschillende toebehoren
• extra in- en uitgangen voor hoogwaardige audiotoebehoren
• een ingebouwde TV-tuner (optie, niet achteraf te installeren) voor de ontvangst
van terrestrische TV-programma’s
• een toetsenbord met afzonderlijk cijferblok
• een on-screen-display voor de visuele controle van de belangrijkste instellingen van uw notebook
• Hybrid Graphics voor optimale prestaties en een accubesparende werkwijze
bij minder veeleisende applicaties
• een multi-connector poort (optie, alleen in combinatie met de TV-tuner) als ingang
voor audio- en videosignalen van externe multimedia-toestellen
Met de gebruiksvriendelijke "BIOS-Setup-Utility" ku nt u de hardware van uw notebook
sturen en uw systeem beter beschermen tegen onbevoegde toegang, door gebruik
te maken van de krachtige wachtwoordbeveiliging.
In deze gebruiksaanwijzing is o.a. beschreven hoe u uw AMILO Notebook in ge bruik neemt en bedient.
10600969195, uitgave 1 Nederlands - 1
Page 88

Dankzij innoverende technologie
Hybrid Graphics
Uw Notebook is met Hybrid Graphics uitgerust. Via de sneltoets k unt u navigeren
tussen de accuspaarmodus en de Performance-modus.
Gebruik bij applicaties die grafisch minder veeleisend zijn (bijvoorbeeld bij het
afspelen van video’s, gebruik van e-mail of bij internet surfen) de in de chipset
ingebouwde grafische eenheid. Hierdoor worden warmteontwikkeling, geluidsniveau en
stroomverbruik verminderd. De gebruiksduur van de accu stijgt (accuspaarmodus).
Wanneer u hoge prestaties wen st (bijvoorbeeld voor spelletjes) kan worden
geschakeld naar de externe grafische eenheid (Performance-modus).
Wisselen van grafische modus
Op uw notebook is af fabriek de externe grafische modus (Performance-modus) vooraf ingesteld.
Een toestel dat is aangesloten op de HDMI-aansluiting van uw notebook (FullHD-resolutie) kan
alleen in de Performance-modus via de externe grafische e enheid worden aangestuurd.
► Druk op de sneltoets
De grafische w eergave wordt in de accuspaarmodus gezet.
► Druk nog maals op d e sneltoets
De grafische weergave wordt in de Performance-modus gezet.
Hybrid VGA
op het Multimedia Board van uw notebook:
Hybrid VGA
2 - Nederlands 10600969195, uitgave 1
Page 89

Dankzij innoverende technologie
Tweede harde schijf in de RAID-groep
RedundantArrayofIndependentDi sk sRAID
RAID (Redundant Array of Independent Disks, ook wel D isk-Array) is een methode voor
het combineren van twee harde schijven tot een logische eenheid.
Een zogenaamde Disk-Array is uitermate g eschikt om te worden gebruikt voor het verbeteren van
de prestaties of als alternatief om de fouttolerantie (gegevensbescherming) te verbeteren.
Fouttolerantie is mogelijk via gegevensreductie. Bij het uitvallen van een station bevat
een ander station een gespiegelde kopie van de gegevens. H ierdoor kan uitvallen van
het besturingssysteem of gegevensverlies worden voorkomen.
Het besturingssyste em herkent alle harde schijven in een Disk-Array als één fysische harde
schijf. De afzonderlijke ha rde schijven in een Disk-Array worden aangeduid als "Member" (lid).
Configuratiegegevens van een Member worden opgeslagen op een gereserveerde sector van de
harde schijf. Aan de hand van deze gegevens kan de harde schijf worden herkend als Member.
Normaal gesproken kunnen harde schijven via verschillende procedures met elkaar
worden gecombineerd. Deze procedures worden als v erschillende RAID-niveaus
aangeduid. De verschillende RAID-niveaus belichamen verschillende prestatieen veiligheidsfasen en implementatiekosten.
De tweede harde schijf mag alleen worden gedemonteerd en gemonteerd door erkende
onderhoudspartners van Fujitsu Siemens Computers GmbH. Indien de demontage
en montage door onbevoegden wordt uitgevoerd, dan vervalt de ga rantie.
U vindt meer informatie en adressen van onze servicepartners op het Internet
onder "http://ww w.fujitsu-siemens.com/support".
Afhankelijk van de grootte van de harde schijf kan het combineren van
twee harde schijven tot een RAID-groep enkele uren in beslag nemen.
Tijdens deze periode wordt het display zwart.
U vindt meer informatie over het configureren van het RAID-syste em onder de
Help-functie van het Intel
®
Matrix Storage Manager programma.
Intel®Matrix Storage Manager en Help-functie oproepen
Ga als volgt te werk om het programma Intel®Matrix Storage Manager en de Help-functie op te roepen:
► Selecteer Startmenu - Alle programma’s - Intel
®
Matrix Storage M anager.
Intel
Het programma wordt gestart.
► Klik in de bovenste menulijst op Help.
De Help-functie van het programma Intel®Matrix Storage Manager wordt opge roepen.
10600969195, uitgave 1 Nederlands - 3
®
Matrix Storage Manager -
Page 90

Dankzij innoverende technologie
Verdere informatie
Algemene informatie over uw AMILO Notebook vindt u in de
gebruikshandleiding "AMILO Notebook".
De drivers voor Windows Vista voor uw AMILO Notebook vindt u op onze
internetpagina. Van fabriekswege ondersteune n deze toestellen geen andere
besturingssystemen. Fujitsu Siemens Computers neemt geen aansprakelijkheid
op zich bij het gebruik van andere besturingssystemen.
Software-items in deze handleiding hebben betrekking op producten van
Microsoft, indien ze bij uw AMILO Notebook zijn geleverd.
Neem bij de installatie van andere softwareproducten de gebruikshandleidingen
van de fabrikant in acht.
Gebruikshandleiding "AMILO Notebook"
De gebruikshandleiding voor het "AMILO Notebook" vindt u onder het Windows startmenu
of op het internet onder "www.fujitsu-siemens.com/support".
4 - Nederlands 10600969195, uitgave 1
Page 91

Aansluitingen en b edieningselementen
Aansluitingen en bedieningselementen
In dit hoofdstuk worden de verschillende hardwarecomponenten van uw notebook voorgesteld.
U krijgt een overzicht van de indicatoren en aansluitingen va n het notebook. Voor u met het
notebook be gint te werken, dient u zich vertrouwd te maken met deze elementen.
WebcamMultimediaBoardTouchpad
ApartcijferblokToetsenbordStatusindicatorenTouchpad-toetsenMultiformaatkaartleze rInfraroodpoortvoorafstandsbedieningLineIn-aansluitingMicrofoonaansluitingAansluitingvoorhoofdtelefoonL ineOut-aansluitingSPDIF-aansluitingExpressCardsteekplaatsMultimedia-afstandsbedieningFirewire-aansluitingGecombineerdeeSATA-/USB-aansluitingLuidsprekersAan-/uitschakelaarUSB-aansluitingenAntennekabelaansluitingHDMI-aansluitingVGA-beeldschermaansluitingNetwerkaansluitingGelijkspanningsbus (DC IN)ServicevakgeheugenServicevak hardeschijfAccuMulti-connector-aansluitingSubwooferAntennekabelaansluiting
1
2
1
19
20
18
3
21
6
17
16
5
1
14
13
12
10
11
22
23
4
5
25
24
31
7
8
9
30
32
27
26
33
29
28
34
10600969195, uitgave 1 Nederlands - 5
Page 92

Aansluitingen en bedieningselementen
1 = Microfoons
2 = WebCam
3 = Multimedia Board
4 = Luidsprekers
5 = Toetsenbord met afzonderlijk cijferblok
en applicatietoetsen
6 = Touchpad
7 = Statusindicatoren
8 = Touchpad-toetsen
9 = Infraroodpoort voor afstandsbediening
10 = Multiformaat kaartlezer
11 = Line In-aansluiting
12 = Microfoonaansluiting
13 = Hoofdtelefoon-/Line Out-aansluiting
14 = SPDIF-/Line Out-aansluiting
15 = ExpressCard steekplaats met
multimedia-afstandsbediening
16 = LAN-aansluiting
17 = Gecombineerde eSATA-/USB-aansluiting
18 = Ventilatiegleuven
19 = Gelijkspanningsbus (DC IN)
20 = Kensington Lock-inrichting
21 = Aan-/uitschakelaar
22 = CD/DVD-station
23 = USB-aansluitingen
24 = Antennekabelaansluiting (optie)
25 = Multi-connector-aansluiting (optie)
26 = VGA-beeldschermaansluiting
27 = HDMI-aansluiting
28 = Firewire-aansluiting
29 = USB-aansluiting
30 = Servicevak geheugen
31 = Servicevak harde schijf 2
32 = Servicevak harde schijf 1
33 = Subwoofer
34 = Accu
6 - Nederlands 10600969195, uitgave 1
Page 93

Belangrijke instructies
Belangrijke instructies
Neem de veiligheidsinstructies in het handboek "Safety" (Veiligheid) en in
de gebruiksaanwijzing "AMILO Notebook" in acht.
Zorg er bij h et gebru ik van een TV-tuner-kaart voor dat deze voldoet aan de
norm IEC 60950-1: 2005, paragraaf 7.2.
Sluit een externe TV-tuner alleen aan op een TNV-1-circuit.
Zorg er bij het aansluiten van een coaxkabel op de externe TV-tuner voor dat deze
correct is verbonden met het aardingssysteem van het gebouw.
10600969195, uitgave 1 Nederlands - 7
Page 94

Eerste ingebruikname van het notebook
Eerste ingebruikname van het notebook
EersteingebruiknameNotebookIngebruiknameNotebook
Voor u voor het eerst met uw notebook kunt werken, moet de accu worden opgeladen.
Bij levering zit de accu in het accuvak of deze is bijgeleverd. De accu moet opgeladen
zijn als u uw notebook met accuvoeding wenst te gebruiken.
Bij mobiel gebruik zorgt de geïntegreerde accu voor de nodige energievoorziening. U kunt
de gebruikstijd verhogen door de beschikbare energiespaarfuncties te ge bruiken.
Als u het notebook thuis of op kantoor gebruikt, dient u het met de netadapter
aan te sluiten en niet met accuvoeding te werken.
Hoe u externe toestellen (bijv. muis, printer) aansluit op het notebook, is beschreven
in de gebruikshandleiding "AMILO Notebook".
Wanneer uw notebook met een Windows besturingssysteem is uitgerust, dan zijn de
benodigde hardware-drivers en de meegeleverde software reeds voorgeïnstalleerd.
De procedure voor de eerste ingebruikname kan bij het besturingssysteem Microsoft
Vista, afhankelijk van de hard- en softwa re-u itrusting tot 20 minuten in beslag nemen.
Bij de eerste keer inschakelen van uw notebook wordt een systeemtest
uitgevoerd. Hierbij kunnen er verschillende meldingen verschijnen. De
display kan kortstondig donker blijven of flikkeren.
Volg de aanwijzingen die op het beeldscherm verschijnen.
Schakel uw notebook tijdens de procedure voor de eerste ingebruikname nooit uit.
Notebook uitpakken en controleren
Als u transportschade vaststelt, verwittig dan onmiddellijk de verkoopdienst!
► Pak alle delen uit.
VerpakkingTransport
► Controleer het Notebook op zichtbare transportschade.
Wij raden u aan de originele verpakking van het toestel niet weg te gooien.
Bewaar de originele verpakking voor het geval u het toestel late r moet terugsturen.
8 - Nederlands 10600969195, uitgave 1
Page 95

Opstelplaats selecteren
OpstelplaatsselecterenNotebookNetadapter
Voor u uw Notebook opstelt, dient u een geschikte plaats voor het Notebook
te kiezen. Hou daarbij rekening met het volgende.
• Plaats het notebook en de netadapter nooit op een warmtegevoelige onderg rond.
Gebeurt dit wel, dan kan de ondergrond beschadigd raken.
• Plaats het Notebook nooit op een zachte ondergrond (b.v. tapijt, kussen
of bedje). Daardoor kan de ventilatie geblokkeerd raken, waardoor er
schade ten gevolge van verhitting kan ontstaan.
• Plaats het Notebook niet gedurende lange tijd rechtstre eks op uw benen. Tijdens
de normale werking wordt de onderzijde van het Notebook warm. Een langdurig
huidcontact kan onaangenaam worden of zelfs tot brandwonden leiden.
• Plaats het Notebook op een stabiele, effen en slipvaste ondergrond.
Let erop dat de rubbervoetjes van het Notebook sporen kunnen
achterlaten op gevoelige oppervlakken.
• De vrije ruimte rond het Notebo ok en de netadapter moet minstens 100 mm
bedragen, zodat voldoende verluchting gewaarbo rgd is.
• Dek nooit de ventilatiesleuven van het notebook af.
• Het Notebook mag niet a an extreme omgevingsvoorwaarden worden blootgesteld.
Bescherm het Notebook tegen stof, vocht e n hitte.
Eerste ingebruikname van he t notebook
10600969195, uitgave 1 Nederlands - 9
Page 96

Eerste ingebruikname van het notebook
Netadapter aansluiten
BedrijfsklaarmakenNetadapter
Neem de veiligheidsinstructies in het bijgeleverde handboek "Safety" (Veiligheid) in acht.
De bijgeleverde netkabel beantwoordt aan de voorschriften van het land
waarin u het notebook heeft gekocht. Let erop dat de netkabel toegelaten
is voor het land waarin u het notebook gebruikt.
De netkabel van de netadapter mag slechts aangesloten zijn op het stopcontact
als het notebook aangesloten is op de netadapter.
Ga na of de stroomopname van de netadapter niet groter is dan de stroomopname
van het elektriciteitsnet waarop u de netadapter aansluit (zie het hoofdstuk
"Technische gegevens", "Netadapter ", pagina 12).
1
3
2
► Sluit de netadapterkabel (1) aan
op de gelijkspanningsbus (DC IN)
van het notebook.
► Sluit de netkabel (2) aan op de netadapter.
► Sluit de netkabel (3) aan op een stopcontact.
10 - Nederlands 10600969195, uitgave 1
Page 97

Eerste ingebruikname van he t notebook
Notebook voor het eerst inschakelen
Voorheteerstinschakelen
Om de ingebruikname van uw notebook te vereenvoudigen, is het besturingssysteem
reeds op de harde schijf voorg eïnstalleerd.
Bij de ze procedure moet het notebook via de netadapter van spanning worden voorzien.
Wanneer u het notebook voor de eerste maal inschakelt, wordt de bijgeleverde
software geïnstalleerd en geconfigureerd. Deze procedure mag niet worden
onderbroken, daarom dient u de nodige tijd te voorzien en het notebook via
de netadapter op de netspanning aan te sluiten.
Tijdens de installatie mag het notebook enkel opnieuw worden opgestart
als hierom wordt gevraa gd!
U wordt gevraagd een veiligheidskopie van het voorgeïnstalleerde besturingssysteem
aan te maken. Met behulp van de veiligheidskopie kunt u uw notebook
later weer in de originele staat terugbrengen.
Informatie over het herstellen van het besturingssysteem, drivers, handboeken
en speciale software vindt u in het handboek m.b.t. de herstelprocedure
(recovery process) voor geïnstalleerde software.
► Schakel het notebook in (1).
1
► Volg tijdens de installatie de instructies op het beeldscherm.
Als iets niet duidelijk is m.b.t. de gevraagde invoergegevens, raadpleeg dan
het handboek van het besturingssysteem.
Wanneer er op uw notebook een Windows besturingssysteem voorgeïnstalleerd
is, dan vindt u meer informatie over het systeem, drivers, hulpprogramma’s,
updates, handboeken, etc. op uw notebook of op het internet onder
"www.fujitsu-siemens.com/support".
10600969195, uitgave 1 Nederlands - 11
Page 98

Technische gegevens
Technische gegevens
Technischegegevens
Notebook
Technischegegevens
Omgevingsgegevens
Bedrijfstemperatuur 5 °C – 35 °C
Afmetingen
Breedte x Diepte x Hoogte (voorzijde/achterzijde) 440 mm x 294 mm x 40/48 mm
Gewicht (inclusief 8-cellenaccu en 2 harde
schijven)
Het technisch blad bij dit notebook vermeldt bijkomende technische gegevens. U vindt
het technisch blad in uw notebook of op het Internet onder "www.fujitsu-siemens.com".
Netadapter
Technischegegevens
Elektrische gegevens
Primair (afhankelijk van toestel)
Nominale spanning
Nominale frequentie 50 Hz – 60 Hz (automatisch)
Secundair
Nominale spanning 20 V
Maximale nominale stroom (afhankelijk van
toestel)
ca. 3,9 kg
90 W
100 V – 240 V (automatisch)
4,5 A
U kan altijd een bijkomende netadapter en een bijkomende netkabel bestellen.
12 - Nederlands 10600969195, uitgave 1
Page 99

English
Deutsch
AMILO Notebook Xi 3650
Primeira colocação em
funcionamento
Français
Español
Italiano
Nederlands
Português
Page 100

Microsoft, MS
Windows and Windows Vista are registered trademarks of the Microsoft Corporation.
Adobe Reader is
MultiMediaCard
Sony and Memory
All other tradem
respective own
ers, whose protected rights are acknowledged.
Copyright © Fuji
All rights r eserv
ed, including rights of translation, reproduction by printing, copying
or similar method
Non-compliance i
All rights reserv
ed, including rights created by patent grant or registration of a utility model or design.
Subject to ava ila
a trademark of Adobe Systems Incorporated.
is a registered trademark of Infineon Technologies AG
Stick are registered trademarks of Sony Electronics, Inc.
arks referenced are trademarks or registered trademarks of their
tsu Siemens Computers GmbH 2008
s, either in part or in whole.
s subject to compensation for damages.
bility and tech nical modifications.
 Loading...