

Page 1

P3N1-E202-01ENZ0
XG2000 series
User's Guide
Page 2

XG2000 series User's Guide
2/315
All Rights Reserved, Copyright (C) PFU LIMITED 2009
Preface
You have purchased the XG2000 series, a compact, 20-port 10 Gigabit Ethernet layer 2 switch that achieves unsurpassed
standards of high throughput and low-latency performance.
This guide describes the XG2000 series (XG2000 / XG2000R / XG2000C / XG2000CR) functions, installation procedures,
configuration operations, and maintenance procedures and should be read and understood before you start using your
XG2000 series.
March, 2009
Linux is a registered trademark or trademark of Linus Torvalds in the United States and/or other countries.
All Rights Reserved, Copyright © PFU LIMITED 2009
Page 3
XG2000 series User's Guide
3/315
All Rights Reserved, Copyright (C) PFU LIMITED 2009
About this Manual
This section describes target readers, contents, notations, etc. of this guide.
Target Readers and Required Knowledge
This guide was written for administrators, who are in charge of network construction, maintenance, and management.
To use this guide, the following knowledge is required.
z Basic knowledge of networks, the Internet, and intranets
z Basic knowledge of system security
This guide omits explanations of network protocol terms.
Contents
This guide to the XG2000 series is composed of the following chapters.
Chapter 1. Features and Functions
Describes the features and functions.
Chapter 2. Using the CLI
Describes operating environment of CLI and how to operate CLI.
Chapter 3. Installation
Describes the necessary installation procedures.
Chapter 4. Functions and Procedures for Setting Functions
Describes how to use the console screen.
Chapter 5. Command References
Describes how to use the commands.
Chapter 6. Managing the Device
Describes the management of the device.
Chapter 7. Troubleshooting
Describes how to solve problems in the device.
Appendix A. Event Logs
Describes the contents of messages reported by the device and actions to be taken for each
message.
Appendix B. SNMP Traps
Describes message format of SNMP traps.
Appendix C. List of MIBs
Describes the list of MIBs supported by the SNMP agent
Related Manuals
The following are XG2000 series related manuals. Use these manuals as necessary.
z XG2000 Series Hardware Guide
Describes the hardware of the XG2000 series.
Symbols Used in This Guide
The symbols used in this guide have the following meanings.
indicates useful information related to using the XG2000 series.
indicates precautions to take when using the XG2000 series.
indicates supplementary information.
indicates related matters such as operation procedures, etc.
Page 4

XG2000 series User's Guide
4/315
All Rights Reserved, Copyright (C) PFU LIMITED 2009
Contents
Preface .........................................................................................................................................................................2
About this Manual.......................................................................................................................................................3
Contents ......................................................................................................................................................................4
Chapter 1 Features and Functions ....................................................................................................................10
1.1 Features ............................................................................................................................................................11
Chapter 2 Using the CLI......................................................................................................................................12
2.1 Overview of the CLI...........................................................................................................................................13
2.1.1 Operating Environment for the CLI .............................................................................................................13
2.1.2 Command Modes and Mode Switching ......................................................................................................14
2.1.3 startup-config and running-config................................................................................................................16
2.2 Using the CLI.....................................................................................................................................................17
2.2.1 How to Enter Commands ............................................................................................................................17
2.2.2 Context-Sensitive Help................................................................................................................................17
2.2.3 Command Completion.................................................................................................................................18
2.2.4 Command Abbreviation...............................................................................................................................18
2.2.5 Command-Line Error Messages .................................................................................................................18
2.2.6 Scrolling Down or Up a Line or a Page .......................................................................................................18
2.2.7 Command History........................................................................................................................................19
2.2.8 Aborting Command .....................................................................................................................................19
2.2.9 No Form of Commands...............................................................................................................................19
2.2.10 Filtering show Command Output...............................................................................................................20
2.2.11 Redirecting show Command Output .........................................................................................................20
2.2.12 Using the monitor Command ....................................................................................................................21
Chapter 3 Installation..........................................................................................................................................22
3.1 Workflow for Initial Setup of the Device.............................................................................................................23
3.1.1 Setting Up the Serial Interface ....................................................................................................................23
3.1.2 Configure Management LAN Interface........................................................................................................24
3.1.3 Telnet Connection via the Management LAN Interface (Optional)..............................................................24
3.1.4 SSH Connection via the Management LAN Interface (Optional)................................................................25
3.1.5 SNMP Configuration (Optional)...................................................................................................................25
Chapter 4 Switch Functions and their Configuration......................................................................................26
4.1 Basic Switch Functions......................................................................................................................................27
4.1.1 Switching Mode ...........................................................................................................................................27
4.1.2 MAC Address Table Management...............................................................................................................27
4.1.3 Jumbo Frame Support ................................................................................................................................28
4.1.4 Flow Control ................................................................................................................................................28
4.1.5 Storm Control ..............................................................................................................................................29
4.1.6 Port Security................................................................................................................................................29
4.1.7 Ingress Rate Control ...................................................................................................................................29
4.2 Port Mirroring.....................................................................................................................................................30
4.3 Link Pass Through.............................................................................................................................................31
4.4 Link Aggregation................................................................................................................................................32
4.4.1 Configuring Link Aggregation ......................................................................................................................33
4.4.2 Frame Distribution Methods in Link Aggregation ........................................................................................34
4.4.3 The Number of Ports That Require Linkup .................................................................................................34
4.4.4 Notes on Link Aggregation ..........................................................................................................................35
4.5 Uplink Filter........................................................................................................................................................36
4.6 Spanning Tree Protocol (STP)...........................................................................................................................39
4.6.1 Port Roles Based on Spanning Tree ...........................................................................................................40
4.6.2 Spanning Tree Protocol Port States ............................................................................................................40
4.6.3 Configuring Spanning Tree..........................................................................................................................40
Page 5

XG2000 series User's Guide
5/315
All Rights Reserved, Copyright (C) PFU LIMITED 2009
4.7 VLAN .................................................................................................................................................................41
4.7.1 Port-Based VLAN........................................................................................................................................41
4.7.2 Tag-Based (IEEE802.1Q) VLAN .................................................................................................................42
4.7.3 Multiple VLAN..............................................................................................................................................43
4.8 Quality of Service (QoS)....................................................................................................................................46
4.9 IGMP Snooping .................................................................................................................................................47
4.9.1 Registering Group Members .......................................................................................................................48
4.9.2 Removing Group Members .........................................................................................................................49
4.9.3 Managing Group Members .........................................................................................................................50
4.9.4 IGMP Querier ..............................................................................................................................................51
4.9.5 Configuring IGMP Snooping........................................................................................................................52
4.10 Network Management .....................................................................................................................................53
4.10.1 Traffic Statistics..........................................................................................................................................53
4.10.2 SNMP Agent..............................................................................................................................................54
4.10.3 RMON .......................................................................................................................................................54
4.11 RADIUS/TACACS+ authentication ..................................................................................................................55
4.11.1 RADIUS Attributes .....................................................................................................................................55
4.11.2 TACACS+ Attributes ..................................................................................................................................55
4.11.3 Configuring RADIUS/TACACS+ ................................................................................................................56
Chapter 5 Command Reference.........................................................................................................................57
5.1 About Command Reference ..............................................................................................................................58
5.1.1 Command System.......................................................................................................................................58
5.1.2 Configuration of Command Reference........................................................................................................59
5.2 Management LAN Interface Configuration Commands ....................................................................................60
5.2.1 show remote-host........................................................................................................................................60
5.2.2 management-lan ip......................................................................................................................................61
5.2.3 management-lan dns-server .......................................................................................................................62
5.2.4 management-lan domain ............................................................................................................................63
5.2.5 hostname.....................................................................................................................................................64
5.2.6 remote-host .................................................................................................................................................65
5.3 Serial/Telnet/SSH Configuration Commands ....................................................................................................67
5.3.1 terminal pager .............................................................................................................................................67
5.3.2 line...............................................................................................................................................................67
5.3.3 baud-rate .....................................................................................................................................................68
5.3.4 terminal timeout...........................................................................................................................................68
5.3.5 telnet-server ................................................................................................................................................69
5.3.6 ssh-server....................................................................................................................................................69
5.3.7 ssh-auto-key-generation .............................................................................................................................69
5.3.8 show ssh-host-key.......................................................................................................................................70
5.3.9 show ssh-rhost-key .....................................................................................................................................70
5.3.10 clear ssh-rhost-key ....................................................................................................................................71
5.3.11 generate ssh-host-key...............................................................................................................................71
5.3.12 terminal window.........................................................................................................................................72
5.4 System Basic Operation Commands ................................................................................................................73
5.4.1 enable..........................................................................................................................................................73
5.4.2 show history ................................................................................................................................................74
5.4.3 disable .........................................................................................................................................................74
5.4.4 configure terminal........................................................................................................................................75
5.4.5 exit...............................................................................................................................................................75
5.4.6 logout / quit..................................................................................................................................................76
5.4.7 do.................................................................................................................................................................76
5.4.8 help..............................................................................................................................................................77
5.4.9 show account ..............................................................................................................................................77
5.4.10 account......................................................................................................................................................78
5.4.11 password (Operator EXEC mode).............................................................................................................79
5.4.12 password (Administrator EXEC mode) .....................................................................................................80
5.4.13 reset ..........................................................................................................................................................81
5.4.14 system shutdown.......................................................................................................................................81
5.4.15 date ...........................................................................................................................................................82
5.4.16 date set......................................................................................................................................................82
5.4.17 date timezone............................................................................................................................................83
5.4.18 date summer-time .....................................................................................................................................84
5.4.19 ping............................................................................................................................................................86
Page 6

XG2000 series User's Guide
6/315
All Rights Reserved, Copyright (C) PFU LIMITED 2009
5.4.20 enable password .......................................................................................................................................87
5.4.21 banner .......................................................................................................................................................88
5.4.22 ntp-server ..................................................................................................................................................89
5.5 RADIUS/TACACS+............................................................................................................................................90
5.5.1 show authentication.....................................................................................................................................90
5.5.2 aaa authentication login ..............................................................................................................................91
5.5.3 show radius .................................................................................................................................................92
5.5.4 radius-server host........................................................................................................................................93
5.5.5 radius-server key.........................................................................................................................................94
5.5.6 radius-server timeout...................................................................................................................................95
5.5.7 show tacacs.................................................................................................................................................96
5.5.8 tacacs-server host .......................................................................................................................................97
5.5.9 tacacs-server key ........................................................................................................................................98
5.6 Configuration File Operation Commands..........................................................................................................99
5.6.1 copy running-config startup-config ..............................................................................................................99
5.6.2 show running-config ....................................................................................................................................99
5.6.3 show running-config (redirect)...................................................................................................................100
5.6.4 show startup-config ...................................................................................................................................103
5.6.5 show startup-config (redirect)....................................................................................................................104
5.6.6 copy startup-config.............................................................................................................................107
5.6.7 dir/ls...........................................................................................................................................................110
5.6.8 delete......................................................................................................................................................... 111
5.6.9 rename ......................................................................................................................................................11 2
5.6.10 tftp get......................................................................................................................................................113
5.6.11 scp get.....................................................................................................................................................115
5.6.12 tftp put......................................................................................................................................................117
5.6.13 scp put.....................................................................................................................................................118
5.7 Switch Basic Configuration Commands ..........................................................................................................120
5.7.1 clear bridge mac-address-table.................................................................................................................120
5.7.2 show bridge ...............................................................................................................................................121
5.7.3 show bridge mac-address-table ................................................................................................................122
5.7.4 bridge forward-mode .................................................................................................................................123
5.7.5 bridge jumbo-frame ...................................................................................................................................124
5.7.6 bridge learn-mode .....................................................................................................................................125
5.7.7 bridge mac-address-table..........................................................................................................................126
5.7.8 bridge mac-address-table filter..................................................................................................................128
5.7.9 bridge aging-time.......................................................................................................................................129
5.8 Link Aggregation Configuration Commands....................................................................................................130
5.8.1 show link-aggregation ...............................................................................................................................130
5.8.2 link-aggregation.........................................................................................................................................134
5.8.3 lacp system-priority ...................................................................................................................................136
5.8.4 lacp port-priority.........................................................................................................................................137
5.8.5 link-aggregation load-balance ip-hash-selection.......................................................................................137
5.9 Uplink Filter Commands ..................................................................................................................................138
5.9.1 show uplink................................................................................................................................................138
5.9.2 uplink-domain ............................................................................................................................................139
5.9.3 downlink allowed uplink-domain................................................................................................................141
5.10 Switch Port Configuration Commands ..........................................................................................................142
5.10.1 show interface .........................................................................................................................................142
5.10.2 show port-description ..............................................................................................................................145
5.10.3 shutdown (Administrator exec mode)......................................................................................................146
5.10.4 clear violation ..........................................................................................................................................146
5.10.5 interface port ...........................................................................................................................................147
5.10.6 description ...............................................................................................................................................148
5.10.7 flowcontrol ...............................................................................................................................................149
5.10.8 storm-control ...........................................................................................................................................150
5.10.9 suppress-address-learning......................................................................................................................150
5.10.10 shutdown (Interface edit mode).............................................................................................................151
5.10.11 shutdown (Global configuration mode)..................................................................................................151
5.10.12 port-security...........................................................................................................................................152
5.10.13 link-pass-through...................................................................................................................................153
5.10.14 ingress-bandwidth .................................................................................................................................154
5.10.15 multicast-forwarding ..............................................................................................................................155
Page 7

XG2000 series User's Guide
7/315
All Rights Reserved, Copyright (C) PFU LIMITED 2009
5.11 Spanning Tree Protocol (STP) Configuration Commands.............................................................................156
5.11.1 show spanning-tree .................................................................................................................................156
5.11.2 spanning-tree...........................................................................................................................................161
5.11.3 spanning-tree priority...............................................................................................................................162
5.11.4 spanning-tree hello-time ..........................................................................................................................163
5.11.5 spanning-tree max-age............................................................................................................................164
5.11.6 spanning-tree forward-time......................................................................................................................165
5.11.7 spanning-tree port-priority .......................................................................................................................166
5.11.8 spanning-tree port-path-cost ...................................................................................................................166
5.11.9 spanning-tree path-cost-default...............................................................................................................167
5.11.10 spanning-tree portfast............................................................................................................................168
5.11.11 spanning-tree portfast bpdu-guard ........................................................................................................169
5.11.12 spanning-tree portfast errdisable-timeout..............................................................................................169
5.11.13 spanning-tree portfast bpdu-filter...........................................................................................................170
5.12 Virtual LAN (VLAN) Setup Commands..........................................................................................................171
5.12.1 show vlan ................................................................................................................................................171
5.12.2 vlan..........................................................................................................................................................172
5.12.3 Interface vlan...........................................................................................................................................173
5.12.4 egress......................................................................................................................................................174
5.12.5 port-vlan-id ..............................................................................................................................................175
5.12.6 vlan-member allowed ..............................................................................................................................176
5.12.7 user-vlan-protocol-id................................................................................................................................177
5.12.8 ingress-filter no-vlan-member-frame .......................................................................................................177
5.12.9 ingress-filter tagged-frame ......................................................................................................................178
5.12.10 ingress-filter untagged-frame ................................................................................................................178
5.12.11 vlan-statistics collection.........................................................................................................................179
5.13 QoS Setup Commands..................................................................................................................................180
5.13.1 show qos .................................................................................................................................................180
5.13.2 qos default-priority...................................................................................................................................181
5.13.3 qos-map priority.......................................................................................................................................181
5.13.4 bridge diffserv-tos....................................................................................................................................182
5.13.5 qos egress-scheduling ............................................................................................................................183
5.13.6 qos bandwidth .........................................................................................................................................184
5.14 Port Mirroring Setup Commands...................................................................................................................185
5.14.1 show mirror..............................................................................................................................................185
5.14.2 mirror .......................................................................................................................................................186
5.15 IGMP Snooping Setup Commands ...............................................................................................................187
5.15.1 show ip snooping.....................................................................................................................................187
5.15.2 ip snooping protocol ................................................................................................................................189
5.15.3 ip snooping vlan ......................................................................................................................................190
5.15.4 ip snooping vlan max-group ....................................................................................................................191
5.15.5 ip snooping vlan mrouter.........................................................................................................................192
5.15.6 ip snooping vlan group-member-interval.................................................................................................193
5.15.7 ip snooping vlan fast-leave......................................................................................................................194
5.15.8 ip snooping vlan last-member-query-interval ..........................................................................................195
5.15.9 ip snooping vlan send-query-count .........................................................................................................196
5.15.10 ip snooping vlan querier ........................................................................................................................197
5.15.11 ip snoop.................................................................................................................................................198
5.15.12 ip snooping max-group..........................................................................................................................199
5.15.13 ip snooping mrouter...............................................................................................................................200
5.15.14 ip snooping group-member-interval ......................................................................................................201
5.15.15 ip snooping fast-leave ...........................................................................................................................202
5.15.16 ip snooping last-member-interval..........................................................................................................203
5.15.17 ip snooping send-query-count...............................................................................................................204
5.15.18 ip snooping querier................................................................................................................................205
5.16 Statistics Commands.....................................................................................................................................206
5.16.1 monitor traffic-bytes.................................................................................................................................207
5.16.2 monitor traffic-counts...............................................................................................................................209
5.16.3 monitor framesize-traffic-counts..............................................................................................................211
5.16.4 monitor qos-priority-traffic-bytes..............................................................................................................213
5.16.5 monitor qos-priority-traffic-counts............................................................................................................215
5.16.6 monitor vlan-traffic-bytes.........................................................................................................................217
5.16.7 monitor vlan-traffic-counts.......................................................................................................................218
5.16.8 monitor dataflow ......................................................................................................................................219
Page 8

XG2000 series User's Guide
8/315
All Rights Reserved, Copyright (C) PFU LIMITED 2009
5.16.9 monitor error............................................................................................................................................221
5.16.10 show statistics traffic-bytes....................................................................................................................223
5.16.11 show statistics traffic-counts..................................................................................................................224
5.16.12 show statistics framesize-traffic-counts.................................................................................................225
5.16.13 show statistics qos-priority-traffic-bytes ................................................................................................226
5.16.14 show statistics qos-priority-traffic-counts ..............................................................................................227
5.16.15 show statistics vlan-traffic-bytes............................................................................................................228
5.16.16 show statistics vlan-traffic-counts..........................................................................................................229
5.16.17 show statistics dataflow.........................................................................................................................230
5.16.18 show statistics error...............................................................................................................................231
5.16.19 clear statistics........................................................................................................................................232
5.17 SNMP Setup Commands ..............................................................................................................................233
5.17.1 show snmp-server ...................................................................................................................................233
5.17.2 snmp-server location ...............................................................................................................................234
5.17.3 snmp-server contact................................................................................................................................235
5.17.4 snmp-server access ................................................................................................................................236
5.17.5 snmp-server trap .....................................................................................................................................237
5.18 RMON Setup Commands..............................................................................................................................238
5.18.1 show rmon...............................................................................................................................................238
5.18.2 rmon collection history ............................................................................................................................240
5.18.3 rmon alarm ..............................................................................................................................................241
5.18.4 rmon event ..............................................................................................................................................243
5.19 System Operation Display Commands .........................................................................................................245
5.19.1 show system status .................................................................................................................................245
5.19.2 show system information.........................................................................................................................247
5.19.3 show optical-module sensor....................................................................................................................249
5.20 System Maintenance Commands .................................................................................................................250
5.20.1 clear log...................................................................................................................................................250
5.20.2 show log ..................................................................................................................................................251
5.20.3 log send...................................................................................................................................................252
5.20.4 save maintenance ...................................................................................................................................253
5.20.5 show maintenance ..................................................................................................................................253
5.20.6 tftp put-maintenance................................................................................................................................254
5.20.7 scp put-maintenance...............................................................................................................................256
5.20.8 clear maintenance...................................................................................................................................258
5.20.9 update-system.........................................................................................................................................259
5.20.10 boot-system...........................................................................................................................................263
Chapter 6 Managing the Device.......................................................................................................................264
6.1 Verifying the Device Operations......................................................................................................................265
6.1.1 Verifying Hardware Status.........................................................................................................................265
6.1.2 Verifying System Status ............................................................................................................................268
6.1.3 Reviewing Log Messages .........................................................................................................................268
6.2 Uploading/Downloading a Configuration File ..................................................................................................271
6.2.1 Preparing the remote Server.....................................................................................................................271
6.2.2 Uploading a Configuration File..................................................................................................................271
6.2.3 Downloading a Configuration File .............................................................................................................271
6.3 Updating Firmware ..........................................................................................................................................272
6.3.1 Updating Firmware....................................................................................................................................272
6.3.2 Selecting Firmware....................................................................................................................................273
6.4 Extracting of Maintenance Information............................................................................................................274
6.4.1 Procedure for Extracting Maintenance Information when a System /Subsystem Failure Occurred.........274
6.4.2 Procedure for Extracting Maintenance Information when an endless System Loop Occurred ................275
6.4.3 Procedure for Extracting Maintenance Information when a Malfunction Occurs......................................275
Chapter 7 Troubleshooting...............................................................................................................................276
7.1 Restoring Factory Defaults..............................................................................................................................277
7.1.1 Resetting startup-config to Factory Defaults.............................................................................................277
7.1.2 Selecting the Alternate Firmware Image...................................................................................................277
7.1.3 Restoring Factory Defaults........................................................................................................................278
Page 9

XG2000 series User's Guide
9/315
All Rights Reserved, Copyright (C) PFU LIMITED 2009
Appendix A Event Logs.......................................................................................................................................280
A.1 Overview of Event Logs .............................................................................................................................280
A.2 List of Event Logs.......................................................................................................................................281
A.2.1 env (Health Monitoring: 0-999).............................................................................................................281
A.2.2 kernel (Basic Control: 1000-1999)........................................................................................................283
A.2.3 swc (Layer 2 Basic Control: 2000-2999) ..............................................................................................284
A.2.4 npm (Network Protocol Control: 3000-3299)........................................................................................288
A.2.5 clim (Basic CLI Control: 3300-3999) ....................................................................................................292
A.2.6 xgsh (CLI Command History: 4000-4499)............................................................................................293
A.2.7 rstp (Rapid Spanning Tree Control: 4500-4999) ..................................................................................293
A.2.8 lacp (LACP Control: 5000-5499) ..........................................................................................................294
A.2.9 sys (Maintenance Support Function: 7400-7499) ................................................................................294
A.2.10 update (Firmware Update: 7500-7999) .............................................................................................295
A.2.11 snmp (SNMP Control: 8500-8599) ....................................................................................................298
A.2.12 ntp (NTP Control: 8600-8699) ...........................................................................................................299
A.3 Message Format for Forwarding syslog.....................................................................................................300
Appendix B SNMP Traps .....................................................................................................................................301
Appendix C List of MIBs......................................................................................................................................302
Index.........................................................................................................................................................................312
Page 10

XG2000 series User's Guide
10/315
All Rights Reserved, Copyright (C) PFU LIMITED 2009
Chapter 1 Features and Functions
This chapter describes the features and functions of the device.
Page 11

XG2000 series User's Guide
11/315
All Rights Reserved, Copyright (C) PFU LIMITED 2009
1.1 Features
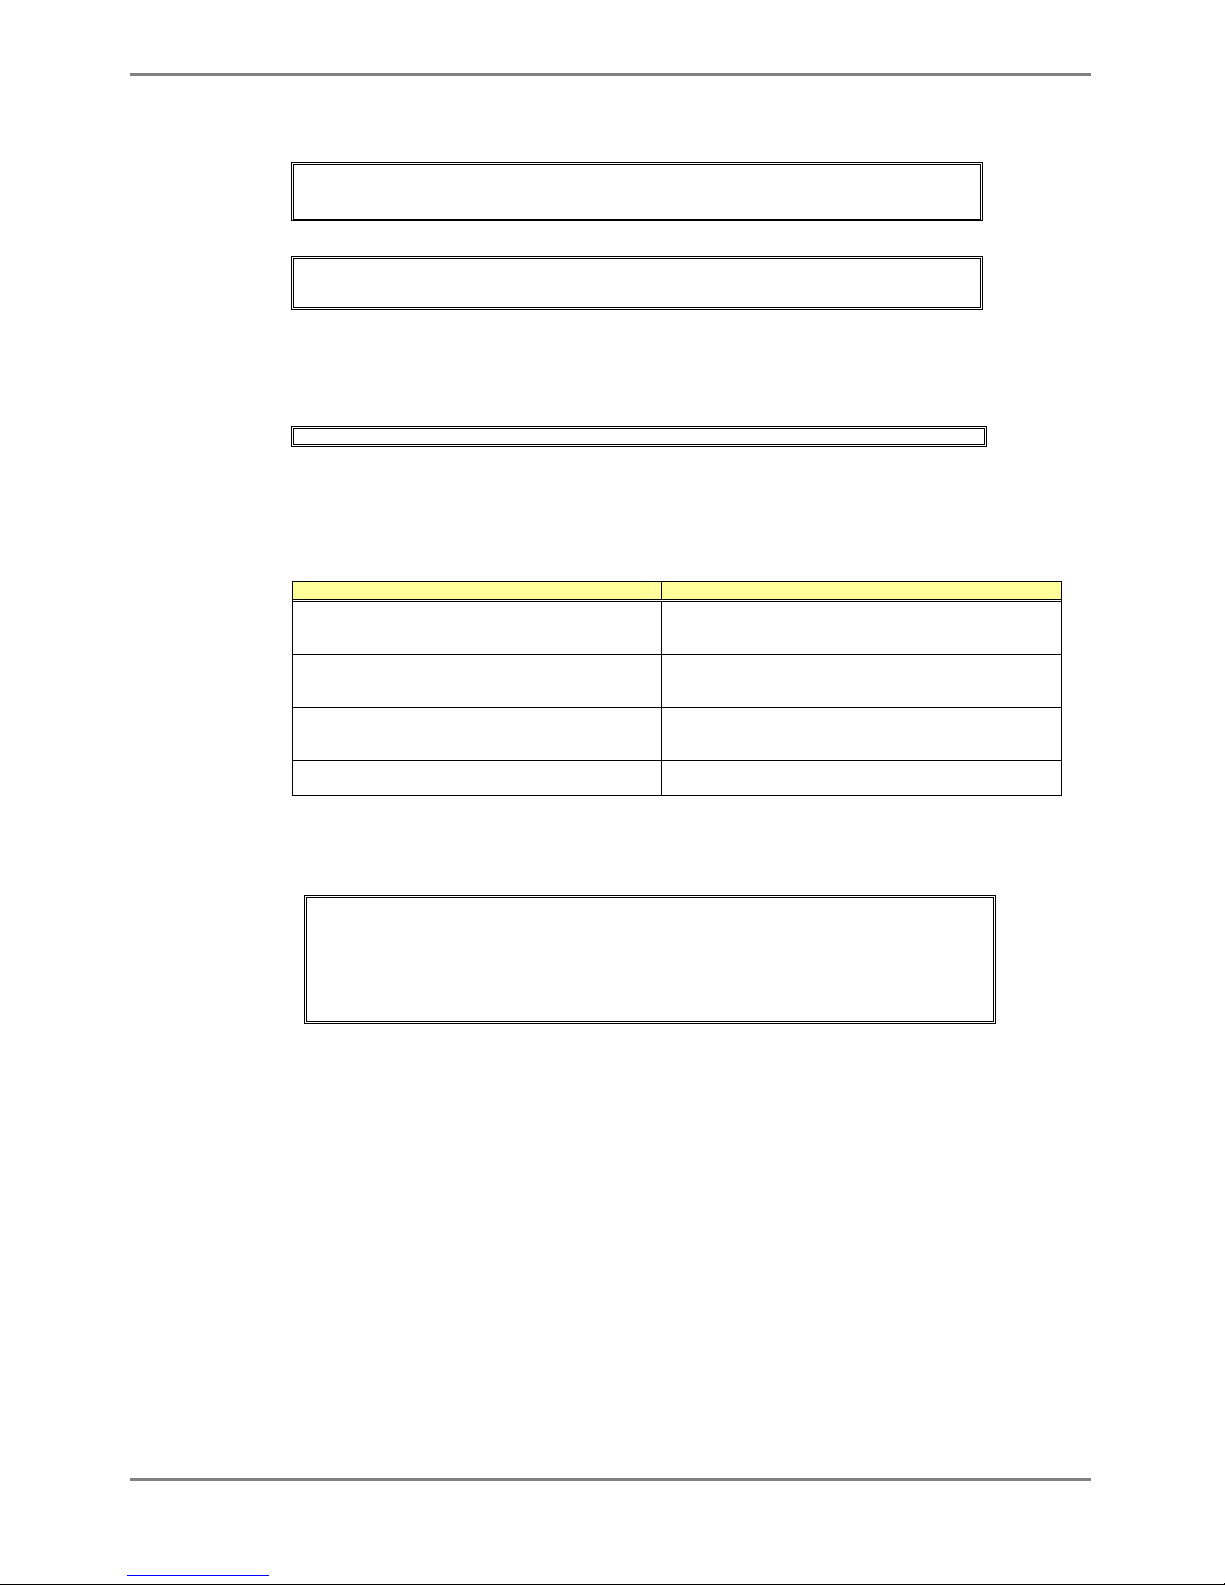
The XG2000 series is a compact, 20-port 10 Gigabit Ethernet Layer 2 switch.
Special features of the XG2000 series are shown below:
Item Function Features
Throughput 400Gbit/s
Latency 350ns (Exclude latency of XFPs)
Switching mode Either store-and-forward or cut-through is selectable.
MAC address learning table
size
16384 entries
MAC address learning SVL (Shared VLAN Learning), IVL (Independent VLAN Learning),
user selectable.
Jumbo frame support Up to 16KB (16128 bytes).
Flow control IEEE802.3x compliant pause frame control. Possible to specify flow
control options for each port.
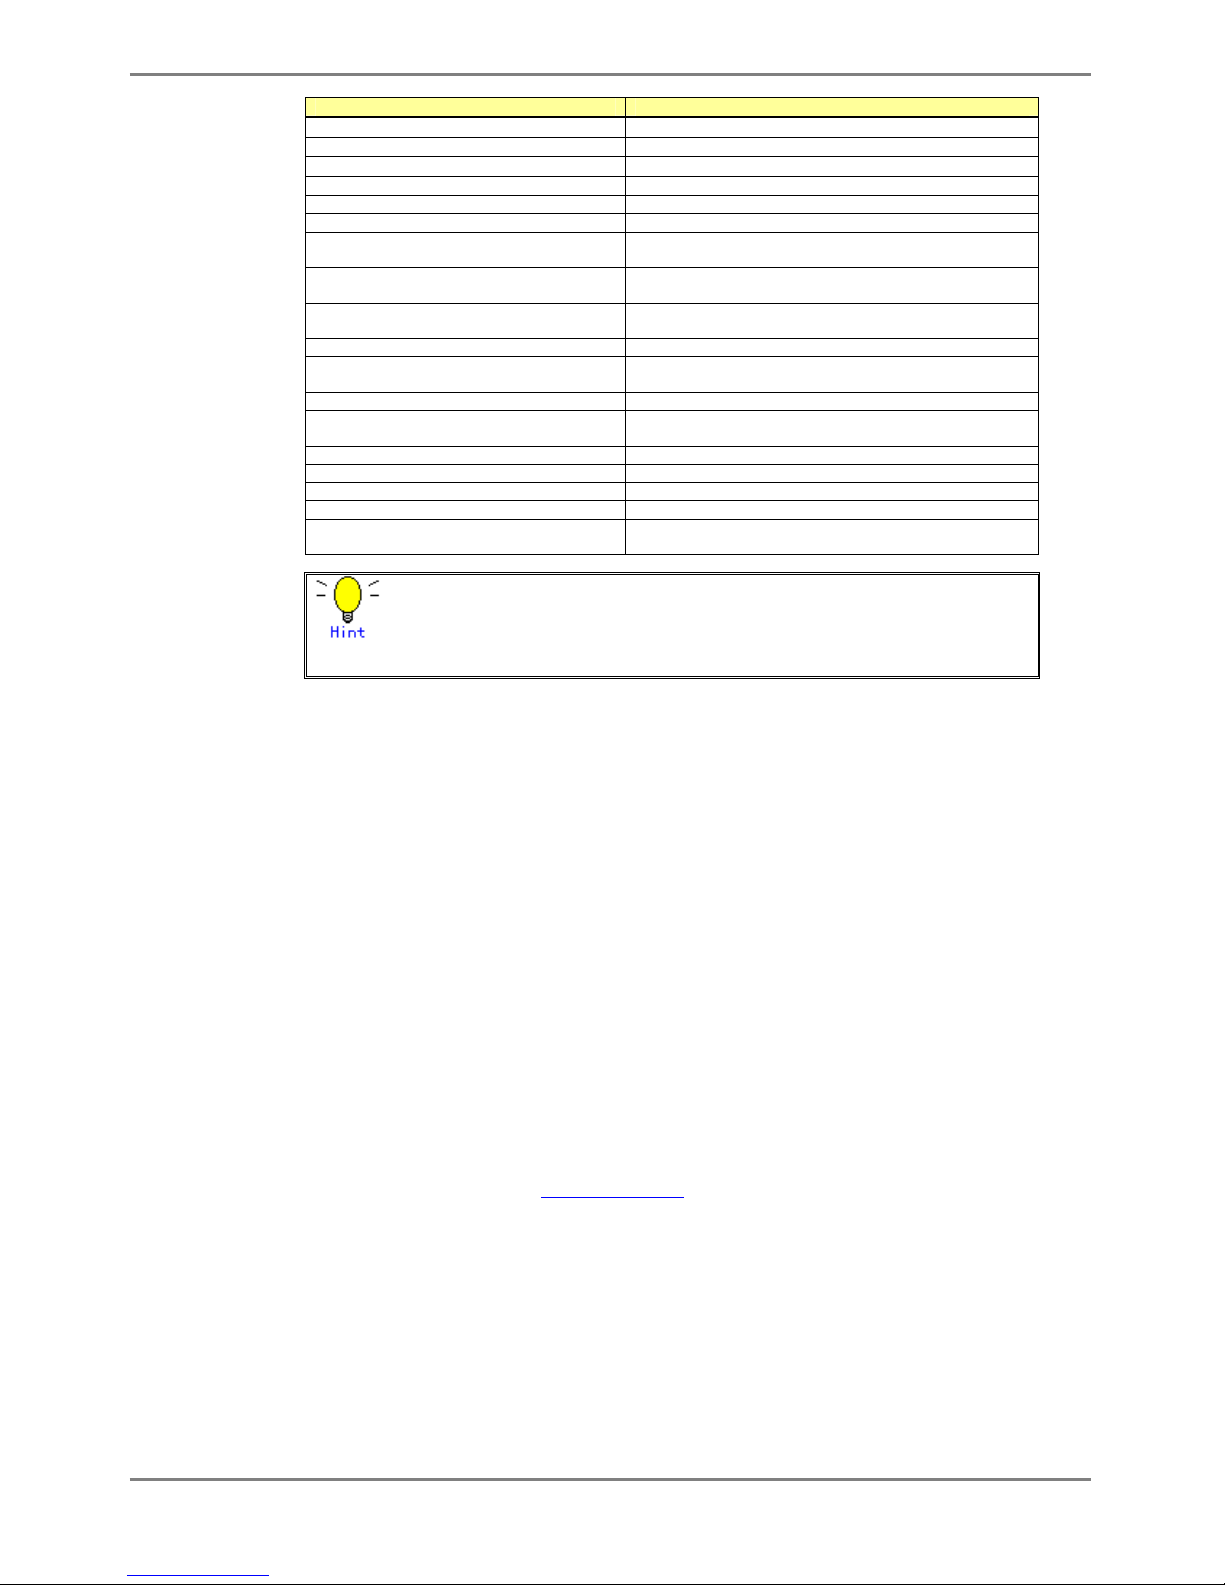
Storm control Detects the broadcast storm status to prevent the traffic from
overflowing the network and avoid degrading overall system
performance.
Port security Possible to restrict port access based on a source MAC address.
Ingress rate control Supports by-port ingress rate control.
Port mirroring Possible to monitor the incoming/outgoing traffic by port mirroring.
Basic Switch Functions
Link pass through Possible to synchronize the link state of a monitored port with the
link state of a single or multiple ports.
Link aggregation
(Static and LACP)
Possible to increase bandwidth and redundancy. (Up to 10 ports for
each link).
Also supports IEE802.3ad LACP.
Scalability
Uplink Filter Filtering multicast, broadcast and unlearned unicast frames from
leaf nodes to uplink. Possible to configure fat tree using several XG
series.
Redundancy IEEE802.1D STP,
IEEE802.1w RSTP
Possible to make a redundant and loop-free network using Rapid
Spanning Tree Protocol (upward compatible with Spanning Tree
Protocol).
IEEE802.1Q VLAN Max. 128 groups.
Filtering Ingress/egress filtering
VLAN support
Multiple VLAN Possible to create multiple tag-based VLAN, with user VLAN tag
identifier.
IEEE802.1p QoS
DiffServ
Supports 4 traffic classes based on VLAN priority or DSCP
(DiffServ Code Point) of IPv4/IPv6.
QoS
Scheduling Strict, DRR(Deficit Round Robin), Strict+DRR
Multi-cast support IGMP snooping Prevents unnecessary forwarding of multicast traffic to ports to
reduce unnecessary multicast traffic.
Traffic statistics Possible to analyze traffic and errors, using traffic statistics. Network Management
SNMP agent Can be used in conjunction with an SNMP manager, supporting
MIBs, including Standard MIB, Bridge MIB, and RMON MIB.
Console by
serial/management LAN
Dedicated management LAN is isolated from the serial interface
and 10 Gigabit ports to secure the device.
CLI Allows the user to provide environment settings and operation
management using command line interface (CLI).
Operation
management
Remote authentication RADIUS and TACACS+
Page 12

XG2000 series User's Guide
12/315
All Rights Reserved, Copyright (C) PFU LIMITED 2009
Chapter 2 Using the CLI
This chapter describes how to use the command line interface (CLI) to operate the device.
Page 13
XG2000 series User's Guide
13/315
All Rights Reserved, Copyright (C) PFU LIMITED 2009
2.1 Overview of the CLI
This section describes how to use the command line interface (CLI) for the XG Series.
2.1.1 Operating Environment for the CLI
There are two ways to access the device to run commands. Up to 5 terminal sessions can access the device concurrently.
z Serial connection
Connect to the serial port of the device using RS232C cable.
The available terminal emulation type is VT100.
When initially connecting a terminal to the device, configure the serial port on the client
side as shown below.
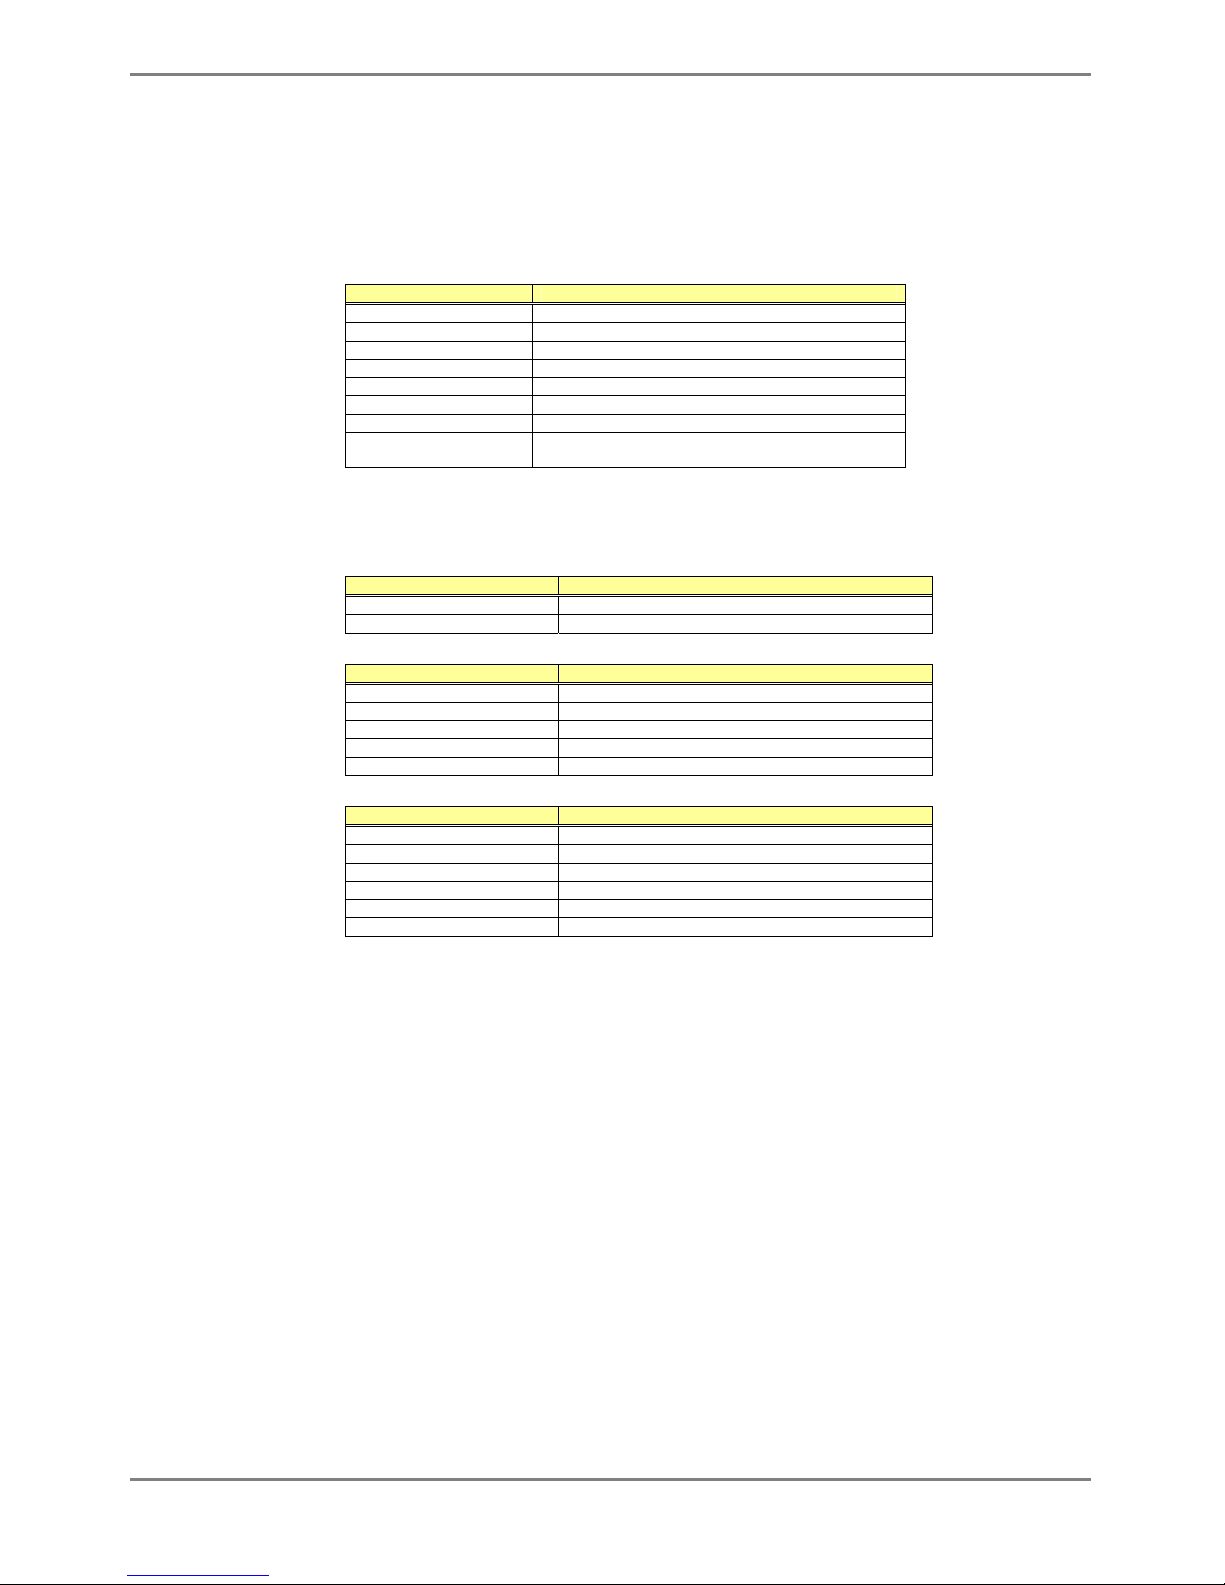
Item Setting value
Baud rate 9600 bps (can be changed)
Character size 8 bit
Parity None
Stop bits 1 bit
Flow control None
Emulation VT100
Character set ASCII
Line feed code Transmission: CR (carriage return) only
Reception: LF is added
The baud rate can be changed to one of 9600, 19200, 38400 and 57600 (bps) using the "baud-rate"
command.
z Remote connection via management LAN port
Connect a terminal using a telnet or SSH.
The following tables list the factory defaults.
Management LAN Interface initial settings
Item Setting value
IP address 192.168.0.2
Subnet mask 255.255.255.0
Telnet server initial settings
Item Setting value
Use telnet Disable (can be changed)
Port number 23 (TCP)
Emulation VT100/VT200/xterm
BackSpace key Delete
Character set ASCII
SSH server initial settings
Item Setting value
Use SSH Disable (can be changed)
Port number 22 (TCP)
Emulation VT100/VT200/xterm
BackSpace key Delete
Character set ASCII
SSH Protocol Version 2 (not support version 1)
To use the remote connection via the management LAN port, use the "management-lan ip" command
to configure the management LAN port for the device and use the "telnet-server" or “ssh-server”
command to enable the telnet or SSH service.
A VT100, VT200, or xterm can be used as a terminal.
Page 14
XG2000 series User's Guide
14/315
All Rights Reserved, Copyright (C) PFU LIMITED 2009
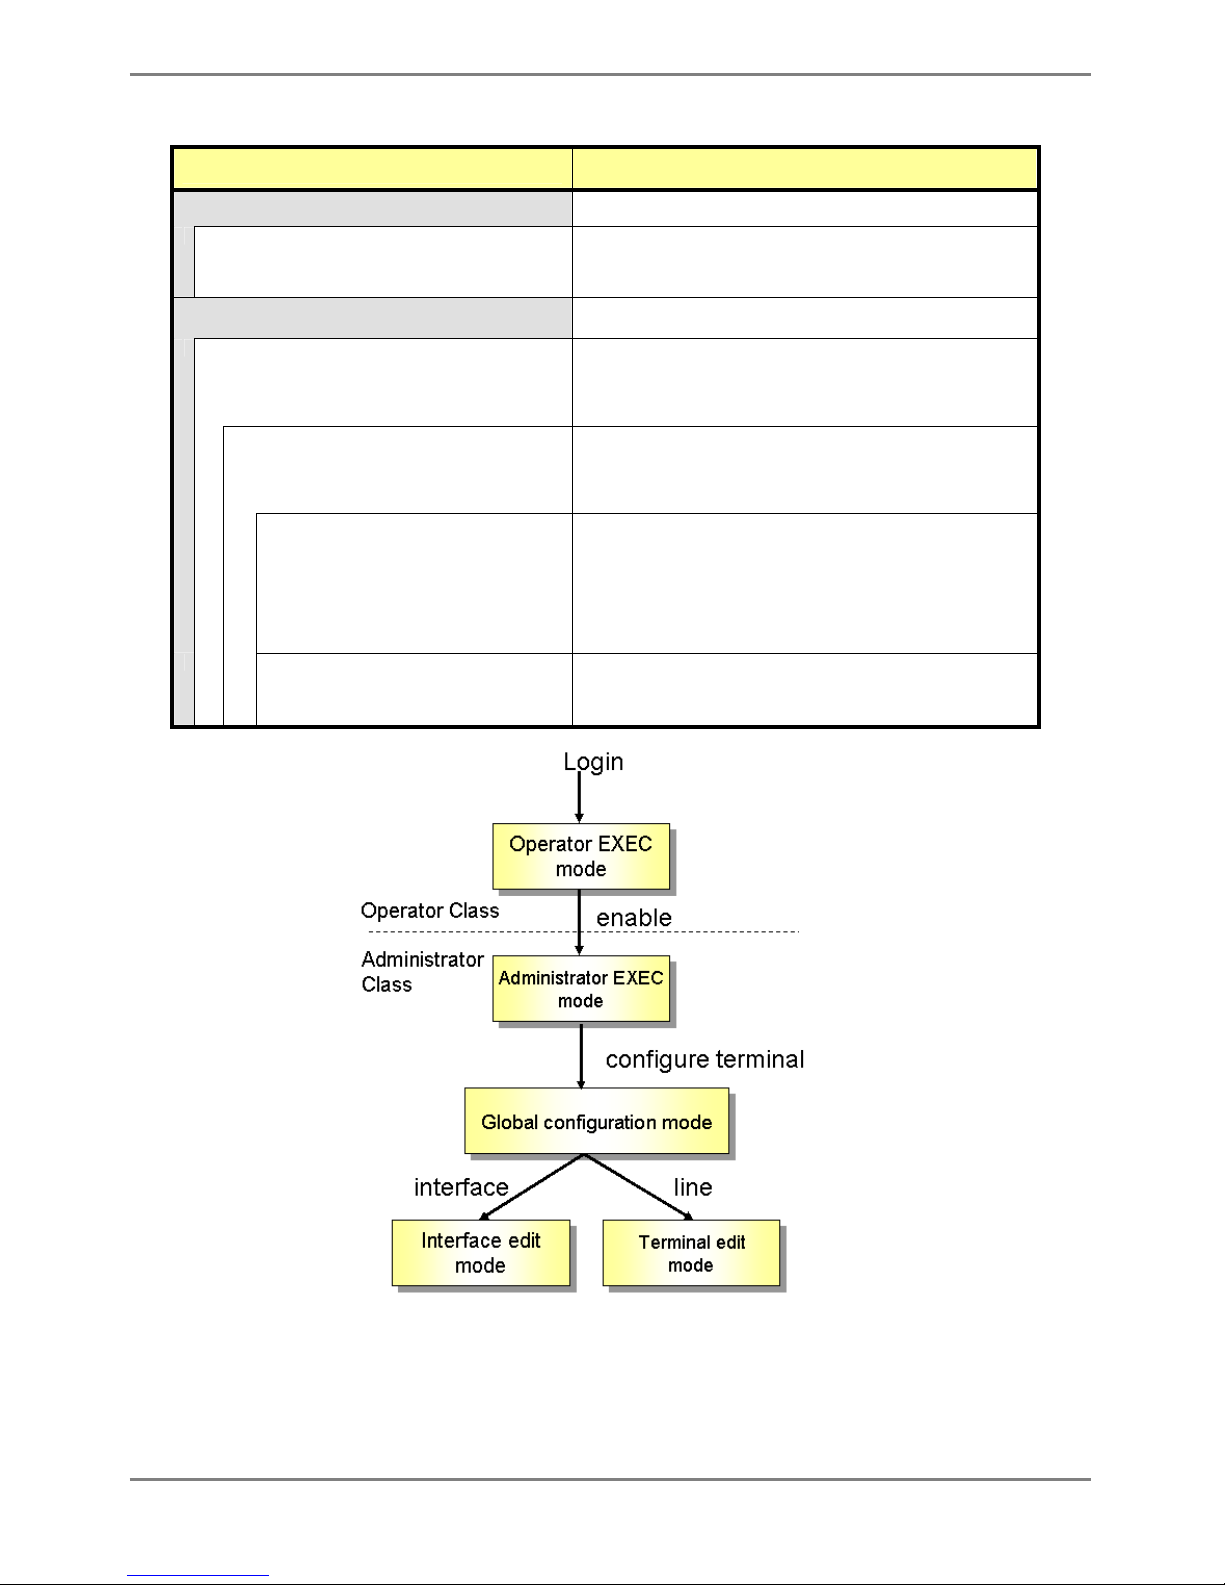
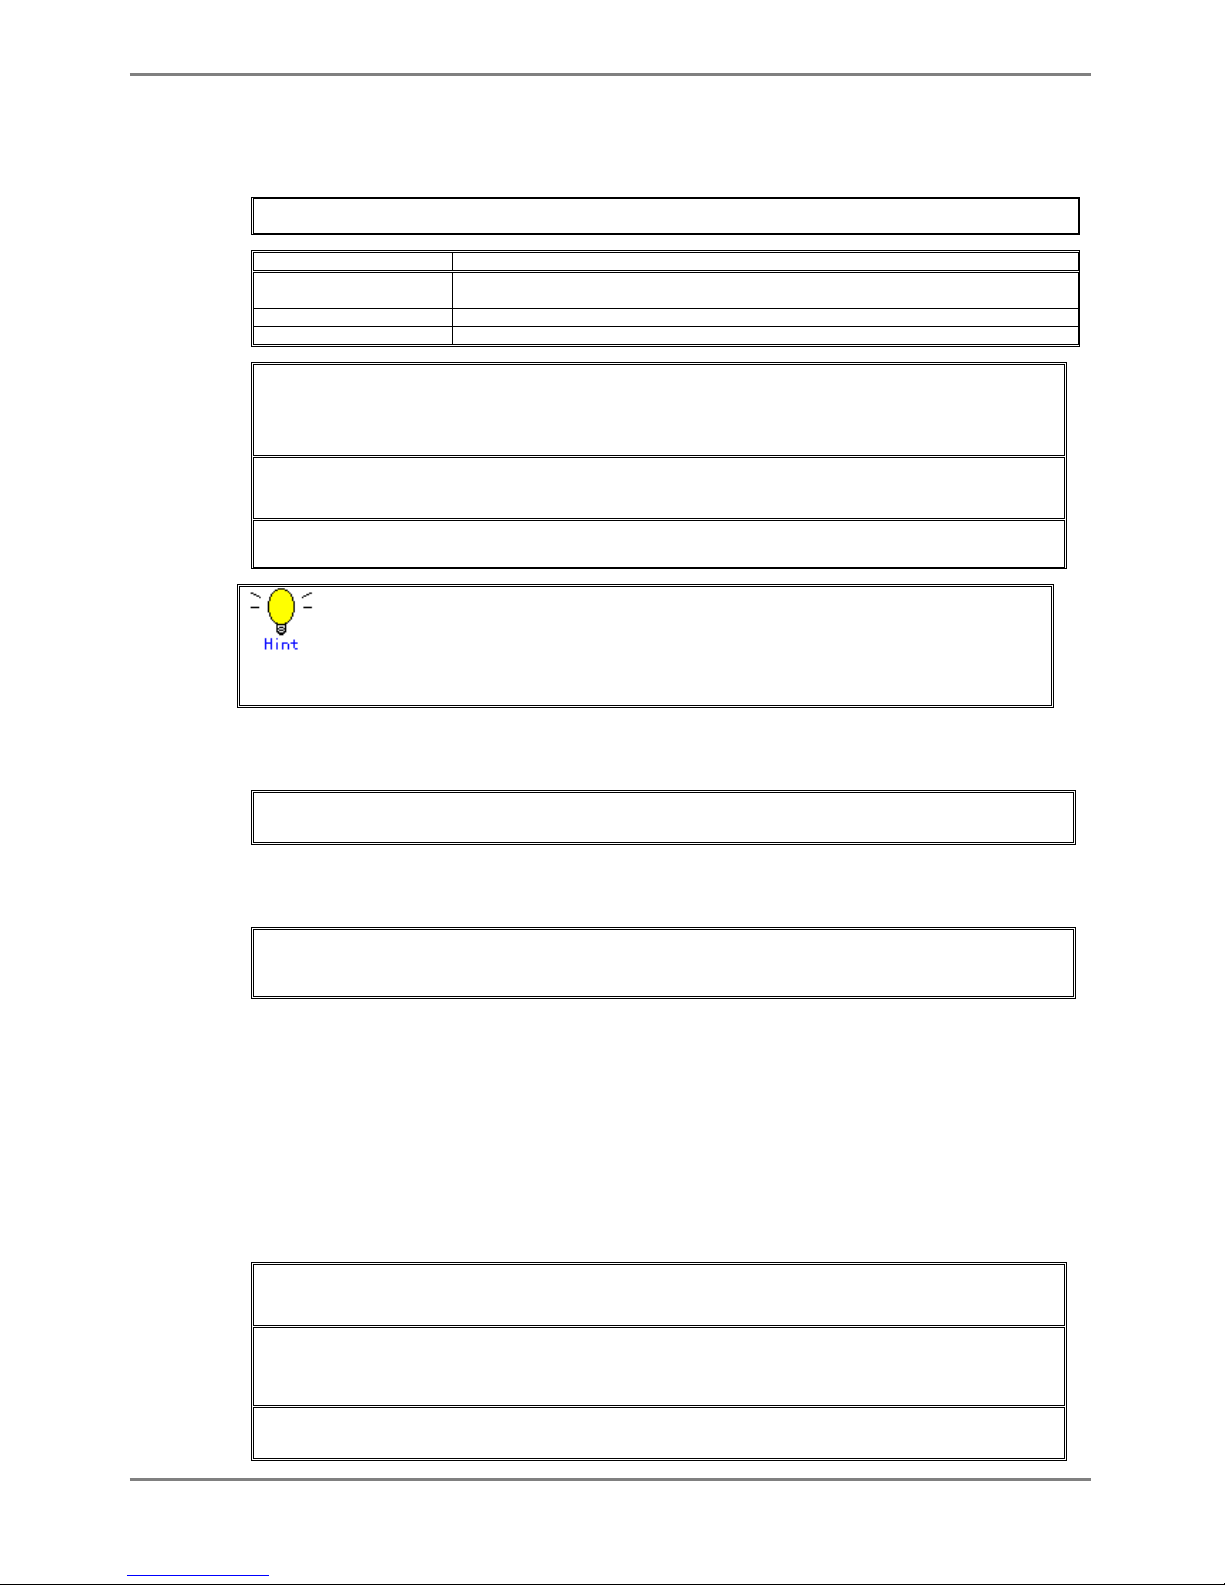
2.1.2 Command Modes and Mode Switching
The following table shows a hierarchy of command modes and mode switching.
Command Modes and Prompt Text
(host name for the device: xg)
Outline
Operator class The initial-level operating mode entered upon logging into the
system.
Operator EXEC mode
Prompt: xg>
Allows access to commands that have no effect on the switch
operations.
With the device, this mode is mainly used to view its status.
The prompt changes to "xg>".
Administrator class To enter this level, use the "enable" command in the operator class
or type the administrator's authentication password.
Administrator EXEC mode
Prompt: xg#
Allows users to perform operations that are related to the system
management of the device, such as date/time setting and firmware
update, in addition to those operations that are performed in the
operator EXEC mode.
The prompt changes to "xg#".
Global configuration mode
Prompt: xg(config)#
To switch to the global configuration mode, enter the "configure
terminal" command in the administrator EXEC mode.
This mode allows the user to define the environment settings for
the device that are to be saved in a configuration file.
The prompt changes to "xg(config)#".
Interface edit mode
Prompt: xg(config-if)#
xg(config-agg)# or
xg(config-vlan)#
To enter the interface edit mode, enter the "interface" command in
the global configuration mode.
This mode allows the user to configure each port or VLAN of the
switch.
The interface edit mode is represented by prompt "xg(config-if)#",
while the edit mode for a port that is created with link aggregation
function is represented by prompt "xg(config-agg)#". Also, The edit
mode for VLAN is represented by prompt “xg(config-vlan)#”.
Terminal edit mode
Prompt: xg(config-line)#
To enter the serial terminal edit mode, enter the "line console"
command in the global configuration mode.
The prompt changes to "xg(config-line)#".
Baud rate of the serial terminal and screen display size can be set.
Page 15
XG2000 series User's Guide
15/315
All Rights Reserved, Copyright (C) PFU LIMITED 2009
Entering a specific command allows switching from one mode to another. Entering the "exit" command returns program control
to the previous mode.
Entering "end" command or pressing [Ctrl] and [Z], or [C] simultaneously in the global configuration, interface edit or terminal
edit mode transfers program control to the administrator EXEC mode.
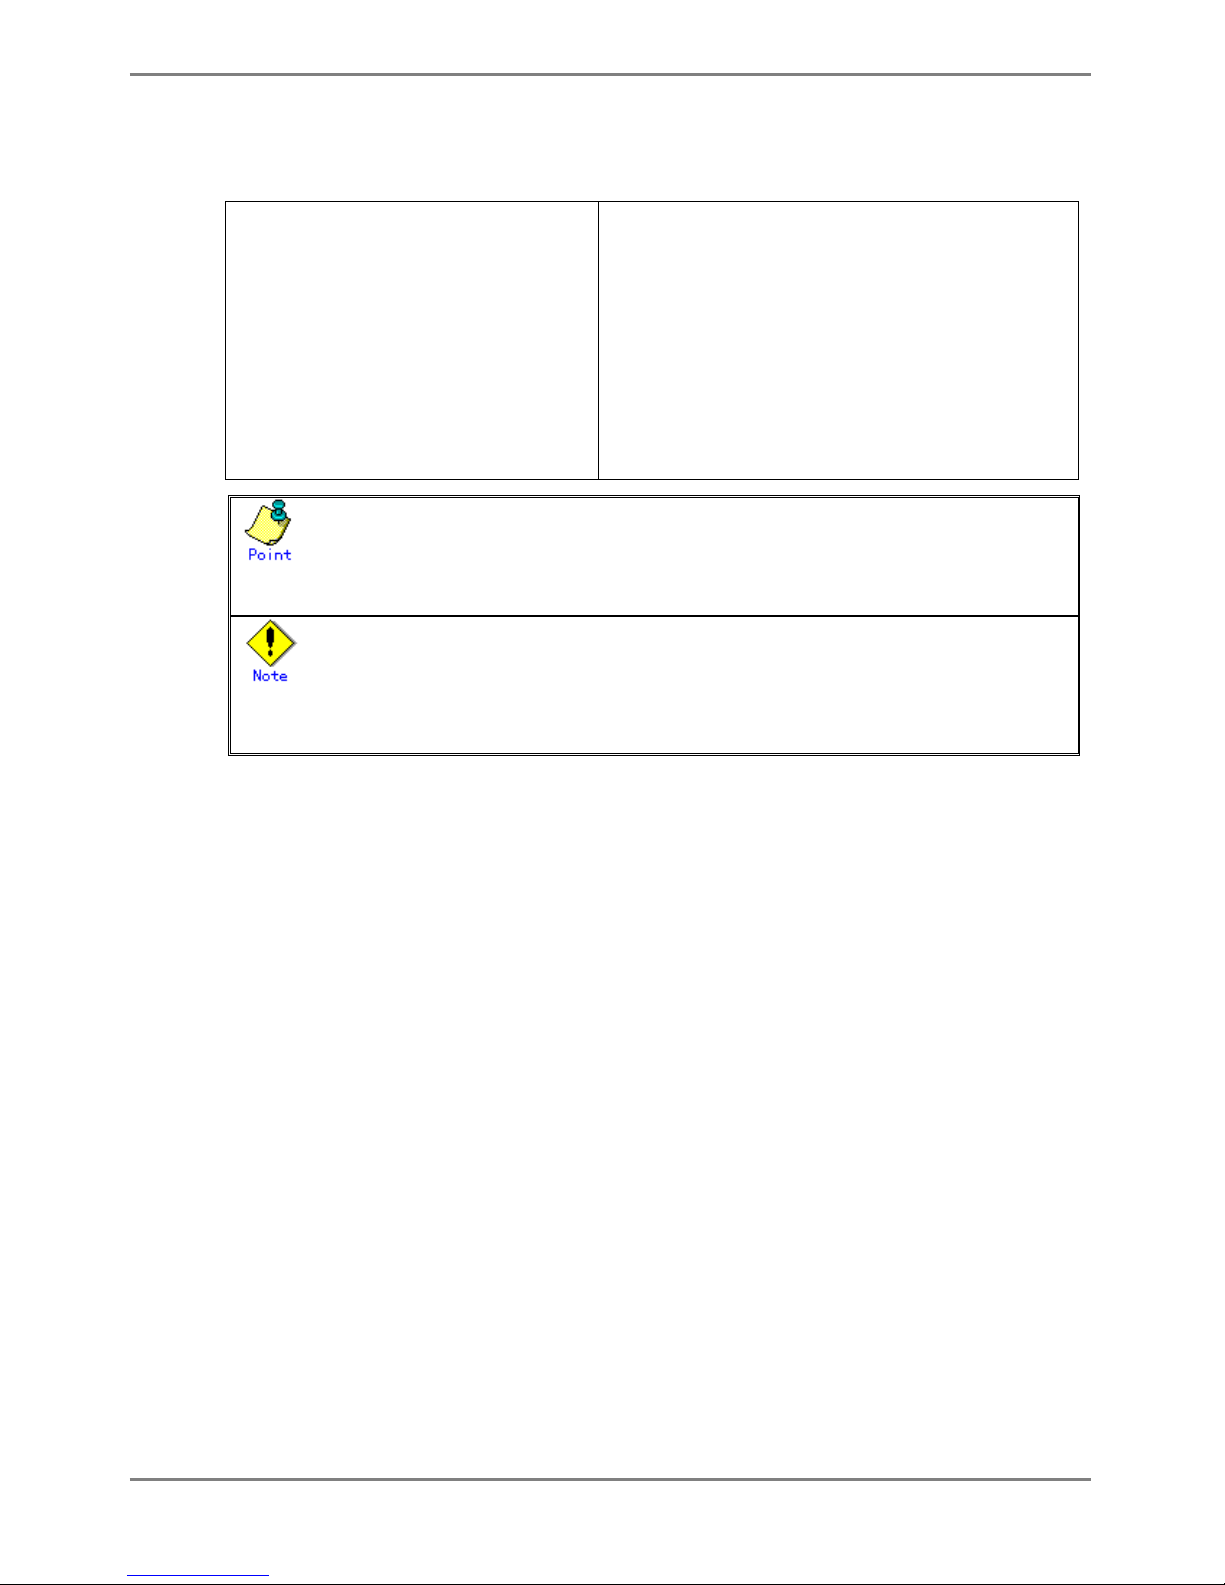
An example is given below.
Login: admin
password: ********
xg> enable
xg# configure terminal
xg(config)# interface port 1
xg(config-if)# exit
xg(config)# exit
xg# copy running-config startup-config
xg# exit
Switch to operator EXEC mode by performing a login operation.
By default, the login username is "admin" and password "password".
Use the "enable" command to switch to administrator EXEC mode.
Use the "configure terminal" command to switch to global
configuration mode.
Use the "interface" command to switch to interface edit mode.
Use the "exit" command to return to global configuration mode.
Use the "exit" command to return to administrator EXEC mode.
Copy the current configuration file in memory to the startup-config in
the nonvolatile memory.
User is logged out and session is disconnected.
z Multiple users can use the operator and administrator EXEC modes concurrently. (Up to 5 terminals)
z Only one terminal can switch to global configuration, interface edit or terminal edit modes at a time. It is not possible for
multiple terminals to simultaneously switch to global configuration mode.
z Pressing [Ctrl] and [C] simultaneously in the global configuration, interface edit or terminal edit mode transfers program
control to the administrator EXEC mode when “- -more- -“ is displayed in the last line in the console screen.
(“- -more- -“ is displayed when display command, such as “show”, is executed and information exceed the console
screen)
Page 16
XG2000 series User's Guide
16/315
All Rights Reserved, Copyright (C) PFU LIMITED 2009
2.1.3 startup-config and running-config
The configuration information is saved to startup-config and running-config files.
This section describes the functions of the startup-config and running-config files.
z startup-config
Startup-config is the configuration file that stores the environment settings that are enabled
upon device startup. The startup-config is saved in non-volatile memory and read the next
time the device is reset or power cycled.
z running-config
Running-config is a file stored in volatile memory that represents the operating environment
of the current running system. The information stored in the running-config file will be
lost when the system is restarted.
To assure the system configuration that is active in the current running-config file is enabled
the next time the system is started, use the "copy" command to save it to the startup-config
file.
xg# copy running-config startup-config
The contents of the startup-config and running-config match immediately after the device
is started.
z How to upload and save the startup-config and running-config files
To upload the configuration information to the remote server, run the "show" command.
Syntax (upload the file on a TFTP server:)
xg# show running-config | tftp HOST REMOTE-FILE
or
xg# show startup-config | tftp HOST REMOTE-FILE
Syntax (upload the file on a SSH server:)
xg# show running-config | scp USERNAME HOST REMOTE-FILE
or
xg# show startup-config | scp USERNAME HOST REMOTE-FILE
z How to download startup-config
To download the configuration information that was uploaded to the remote server as
startup-config, run the "copy" command.
Syntax (download a file from a TFTP server:)
xg# copy tftp HOST REMOTE-FILE startup-config
Syntax (download a file from a SSH server:)
xg# copy scp USERNAME HOST REMOTE-FILE startup-config
To enable the settings downloaded to the startup-config file, restart the device using the
"reset" command.
z Be sure to upload the contents of the startup-config file to a remote server because the contents
could be lost if the startup-config file is accidentally overwritten.
z Refer to "Uploading/Downloading a Configuration File
" for details on uploading and downloading
configurations.
z “scp” supports only password authentication, and this device can register up to 10 public keys of SSH
servers.
z Execute “clear ssh-rhost-key” command to delete a registered public key.
Page 17

XG2000 series User's Guide
17/315
All Rights Reserved, Copyright (C) PFU LIMITED 2009
2.2 Using the CLI
2.2.1 How to Enter Commands
z Command Entry Format
Separate each command, subcommand and argument with a single space.
<command> <subcommand> <argument 1> <argument 2> ... (" " indicates a space.)
xg(config)# management-interface ip 192.168.1.10/24 default-gw 192.168.1.150
xg(config)# management-interface dns-server 192.168.1.150
z Characters that can be entered:
− Any letter (A-Z, a-z) and digit (0-9)
− Space (ASCII code: 0x20)
− Symbols: !, ". #, $, %, `, ', (, ), _, -, ~, ^, ¥, {, }, :, +, ,, ., @, =, [, ], &, *, ;, /, ?, |, >
Command and option separators are recognized as one or more space characters (ASCII code:
0x20). Enclose a parameter in quotes if it contains a blank space.
The commands are not case-sensitive. Note that some entries (password, etc.) are
case-sensitive.
2.2.2 Context-Sensitive Help
Entering a question mark "?" at the command prompt displays a list of commands available for each command mode. A list of
command's associated with the keywords and parameters will be displayed.
z A list of commands that are available in the current mode
Entering a question mark "?" at the system prompt displays a list of commands and brief
descriptions available for the current command mode.
xg # ?
Exec commands:
boot-system Change firmware to boot
clear Reset functions
configure Enter configuration mode
copy Copy from one file to another
date Manage the system date and time
delete Delete files on current system
dir List files on current system
:
(The rest is omitted.)
xg# _
z Word help
Entering a question mark "?" in the middle of a command name, will list the possible command
options required to complete the command. The prompt will show the letters previously typed.
Enter the rest of the letters to complete the command entry.
xg # co?
Exec commands:
configure Enter configuration mode
copy Copy from one file to another
xg# co_
The CLI lists all possible commands that begin with "co".
z A list of options that are available in the current entry position
Entering a question mark "?" followed by a space after typing a command name, will cause
the CLI to list the possible commands or keywords that may be entered at the current option
position. For option 2 and 3 positions, the CLI also lists options
that can be entered at these positions. The prompt will show the letters previously typed.
Enter the rest of the letters to complete the command entry.
xg# configure ?
terminal Configure from the terminal
xg# configure _
CLI lists possible options that follow the "configure" command.
The <cr> symbol may appear in the list to indicate that the command can be executed without
entering any subsequent options. Parameters enclosed in square brackets can be omitted and,
therefore, the <cr> symbol does not appear.
Page 18
XG2000 series User's Guide
18/315
All Rights Reserved, Copyright (C) PFU LIMITED 2009
2.2.3 Command Completion
Entering part of a command or option and pressing the [Tab] key, causes the CLI to display the remaining command or option
characters.
xg# con<TAB>
↓
xg# configure _
For example, the only command that begins with "con" is "configure", so the CLI completes the command name as "configure".
Pressing the [Tab] key, causes the CLI to list all possible commands or option names.
xg# co<TAB>
configure copy
xg# co_
Since there are two commands that begin with "co" - "configure" and "copy" - the CLI lists both commands.
2.2.4 Command Abbreviation
Commands and options can be abbreviated to the minimum number of characters as long as command or option names are
unique and forward-match the entered letters.
xg# con t
For example, the "configure" command may be abbreviated to "con" because "configure" is the only command that begins with
"con", and "terminal" may be abbreviated to "t" because "terminal" is the only command that begins with "t".
2.2.5 Command-Line Error Messages
The table below shows error messages that appear when a command is incorrectly entered. The "configure terminal"
command is used as an example below:
Error Message Explanation
xg# co t
% Ambiguous command: "co t"
Insufficient characters were entered for the CLI to
recognize the command.
Re-enter the correct command string.
xg# configure
% Incomplete command.
All of the options or values required by this command
were not entered.
Enter all necessary options and values.
xg# configure aerminal
^
% Invalid input detected at '^' marker
The command incorrectly entered. A caret symbol (^)
indicates the incorrect entry.
Correct the entries and execute the command again.
xg# coc?
% Unrecognized command
Part of the command was incorrectly entered.
Re-enter the correct command string.
2.2.6 Scrolling Down or Up a Line or a Page
When the information displayed by a command contains more lines than the console screen will display, a "--More--" prompt is
displayed at the bottom of the screen and the CLI waits for a user entry.
xg# show running-config
!
interface port 1
:
:
(The rest is omitted.)
:
--More--
z Scrolling Up a Line
To scroll up one line, press the [Enter] key.
z Scrolling Up a Page
To scroll up one page, press the [Space] bar.
z Finishing Displaying
To finish displaying, press the [q] or [Q] key.
The following table shows the combinations of shortcut keys, function keys and the [Ctrl] key used to edit commands.
Page 19
XG2000 series User's Guide
19/315
All Rights Reserved, Copyright (C) PFU LIMITED 2009
Combinations of keys Description
"↑" or [Ctrl] + [P]
Recalls the previous command.
"↓" or [Ctrl] + [N]
Recalls the next command.
"←" or [Ctrl] + [B]
Moves the cursor back one character.
"→" or [Ctrl] + [F]
Moves the cursor forward one character.
[Home] or [Ctrl] + [A] Moves the cursor to the first character in line.
[End] or [Ctrl] + [E] Moves the cursor to the last character in line.
[Esc] + [B] Moves the cursor back one word (to the beginning of a
parameter).
[Esc] + [F] Moves the cursor forward one word (to the beginning of a
parameter).
[Backspace] Erases the character to the left of the cursor and moves the
cursor back one character.
[Delete] or [Ctrl] + [D] Deletes the character to the right of the cursor.
[Ctrl] + [W] Records the character to the left of the cursor before
deleting.
[Ctrl] + [U] Records the command line before deleting.
[Ctrl] + [K] Records all characters to the left of the cursor before
deleting.
[Ctrl] + [Y] Pastes a string recorded by [Ctrl]+[W], [U] or [K].
[Ctrl] + [L] Erases the current screen.
[Ctrl] + [C] Runs command result and aborts output.
[Enter], [Ctrl] + [J], or [Ctrl] + [M] Completes a command entry.
[Ctrl] + [T] Transposes the character located at the cursor with the
character to the left of the cursor.
If any of the above key combinations or command completion displays using the [Tab] key do not work
correctly, the correct VT100, VT200 or xterm terminal emulation type may not be selected.
2.2.7 Command History
Command history is a function that records command lines previously entered so they can be reused.
It is useful for repeatedly entering the same command line or for entering a similar command.
z To display the previous command line in the history:
Press the up arrow key or [Ctrl]+[P] to recall the previous command in the history to the
prompt.
Repeat the key sequence to recall successively older commands.
z To display a more recent command line:
Press the down arrow key or [Ctrl]+[N] to bring up the next line from the command history
to the prompt.
Repeat the key sequence to bring up successively more recent commands.
z To list the command history:
Use the "show history" command to view the list of commands saved in the history:
For each login up to 100 lines of command history can be registered.
2.2.8 Aborting Command
An executing command can be aborted by pressing [Ctrl]+[C]. Note that this key sequence may not be effective for some
commands.
2.2.9 No Form of Commands
Almost every configuration command has a no form. In general, the no form is used to cancel the settings of a configuration
command or restore default values.
Type "no" before entering a command name.
For details on using the no form, refer to the "Command Reference
".
Page 20
XG2000 series User's Guide
20/315
All Rights Reserved, Copyright (C) PFU LIMITED 2009
2.2.10 Filtering show Command Output
This function allows filtering the show command output so lines that only satisfy specific conditions (filter for strings) are
displayed. This function is useful in excluding unnecessary information from a large amount of output.
To use it, a "show" command must be followed by a keyword (pipe (|), begin, include or exclude) and a regular expression
(filtering condition).
Syntax
show | {begin | include | exclude} regular-expression
Keyword for filtering output Meaning
begin
Begins output starting at the first line that contains matches to given regular expression
parameters.
exclude
Does not display output lines that contain matches to given regular expression parameters.
include
Displays output lines that contain matches to given regular expression parameters.
xg# show history | begin 2
...skipping
2 configure terminal
3 show running-config
4 show history
5 show history | begin 2
xg# show history | exclude 2
1 enable
3 show running-config
4 show history
xg# show history | include 2
2 configure terminal
5 show history | begin 2
Regular expressions are case sensitive.
For example, if "| exclude strings" is entered, lines that include "String" are output, but those that include "strings" are
not.
2.2.11 Redirecting show Command Output
Redirect the output of "show" commands to a file in volatile memory using ">" (pipe) or "|” (redirect).
Syntax (To redirect the output of a show command to a file in volatile memory:)
show > FILE-NAME
show | FILE-NAME
z FILE-NAME
Specifies the file name in volatile memory that the output of the command is piped or
redirected.
"| tftp" or "| scp" redirects the output of the show command to a file on a remote server.
Syntax (Redirect the output of a show command to a file on a TFTP server:)
show | tftp HOST REMOTE-FILE
Syntax (Redirect the output of a show command to a file on a SSH server:)
show | scp USERNAME HOST REMOTE-FILE
z | tftp
Redirects the copy to a file on the TFTP server.
z | scp
Redirects the copy to a file on the SSH server.
z USERNAME
Specifies the username of the SSH server.
z HOST
Specifies the host name or IP address of the TFTP server or SSH server.
z REMOTE-FILE
Specifies the file name in the TFTP server or SSH server that the output of the command is
redirected.
In the following example, the current startup-config is redirected as filename "startup_09302005", the running-config file is
redirected as filename "running_09302005", and system information is redirected as filename "system_09302005".
The results of the redirection are confirmed with the "ls" command.
Then, using the "tftp" command, each of these files are moved to the TFTP server.
xg# show startup-config > startup_09302005
xg# show running-config > running_09302005
xg# show system information > system_09302005
xg# ls
(ls command output)
Update-time File-size File-name
- 2005/09/30 11:57:27 872 system_09302005
- 2005/09/30 11:54:01 2,310 startup_09302005
- 2005/09/30 11:55:58 2,437 running_09302005
xg# tftp put remote-host1 startup_09302005 restore_startup_09302005
xg# tftp put remote-host1 running_09302005 restore_running_09302005
xg# tftp put remote-host1 system_09302005 restore_system_09302005
Page 21
XG2000 series User's Guide
21/315
All Rights Reserved, Copyright (C) PFU LIMITED 2009
In the following example, show command output is redirected to TFTP server "remote-host1" using "| tftp".
xg# show startup-config | tftp remote-host1 restore_ startup_09302005
xg# show running-config | tftp remote-host1 restore_running_09302005
xg# show system information | tftp remote-host1 restore_system_09302005
In the following example, show command output is redirected to SSH server "remote-host2" using "| scp".
xg# show startup-config | scp foo remote-host2 restore_ startup_07012008
remote-host2's password:
xg# show running-config | scp foo remote-host2 restore_running_07012008
remote-host2's password:
xg# show system information | scp foo remote-host2 restore_system_07012008
remote-host2's password:
z “scp” supports only password authentication, and this device can register up to 10 public keys of SSH
servers.
z Execute “clear ssh-rhost-key” command to delete a registered public key.
2.2.12 Using the monitor Command
The monitor command provides additional key commands to perform screen navigation.
The following table shows the keys used to perform screen-related operations.
Displayed item Meaning
ESC:exit Press the [Esc] key to close the monitor screen.
F:refresh Press the [F] or [f] key to refresh the screen.
U:page up Press the [U] or [u] key to scroll up to the previous page.
If the current page is the first page of the display nothing occurs.
D:page down Press the [D] or [d] key to scroll down to the next page.
If the current page is the last page of the display, nothing occurs.
L:page left Press the [L] or [l] key to scroll the screen to the left.
If there are no additional columns of data to the left to display, nothing occurs.
R:page right Press the [R] or [r] key to scroll the screen to the right.
If there are no additional columns of data to the right of the display, nothing occurs.
Page 22

XG2000 series User's Guide
22/315
All Rights Reserved, Copyright (C) PFU LIMITED 2009
Chapter 3 Installation
This chapter describes the installation procedures for the device.
Refer to "Using the CLI
" for details on using the CLI.
Refer to "Command Reference
" for details on commands.
Page 23

XG2000 series User's Guide
23/315
All Rights Reserved, Copyright (C) PFU LIMITED 2009
3.1 Workflow for Initial Setup of the Device
This section describes the procedures to setup the device.
1. Prepare a terminal
Prepare a terminal for the initial configuration.
2. Setting Up the Serial Interface
Connect the device and terminal with an RS232C cable. The initial baud rate setting is 9,600
bps.
3. Turn on the device to start the system.
Turn on the terminal and the device to start the system.
4. Configure Management LAN Interface
The initial setting of the management LAN interface is disabled.
To use the following functions, set up the management LAN interface:
− Telnet connection
− SSH connection
− SNMP manager connection
− System log transmission
− Time synchronization using an NTP server
− Configuration file upload/download
− Firmware update
− Collection of maintenance information
5. Telnet Connection via Management LAN Interface (Optional)
The initial setting of the Telnet connection via the management LAN interface is disabled.
(IP address: 192.168.0.2, subnet address: 255.255.255.0)
6. SSH Connection via Management LAN Interface (Optional)
The initial setting of the SSH connection via the management LAN interface is disabled.
7. SNMP Configuration (Optional)
Initially, the SNMP agent configuration is not set.
Set the SNMP configuration as needed.
8. This is the end of the preparation procedure
Proceed with configuring the switch.
3.1.1 Setting Up the Serial Interface
Connect the device and terminal with an RS232C cable. The initial setting of baud rate setting is 9,600 bps.
Refer to "Operating Environment for the CLI
" for details on settings.
For serial interfaces, only the baud rate can be changed. To change the serial interface settings, carry out the following
procedure.
Command Task
xg login: admin
Password: ********
Login to the device from the serial terminal. The default
user name is "admin". The default password is "password".
xg> enable
Switch to administrator EXEC mode.
xg# configure terminal
Switch to global configuration mode.
xg(config)# line console
Switch to serial terminal edit mode.
xg(config-line)# baud-rate {9600 | 19200 |
38400 | 57600}
Change serial baud rate.
The baud rate is changed after the logout.
xg(config-line)# exit
Exit to global configuration mode.
xg(config)# terminal timeout console MINUTES
(Optional)
If the terminal is idle after the timeout period (in minutes)
expires the serial connection is terminated. The default is
10 minutes.
xg(config)# exit
Exit to administrator EXEC mode.
Page 24

XG2000 series User's Guide
24/315
All Rights Reserved, Copyright (C) PFU LIMITED 2009
3.1.2 Configure Management LAN Interface
The management LAN interface is initially enabled.
(IP address: 192.168.0.2, subnet address: 255.255.255.0)
To use the following functions, configure the management LAN interface.
− Telnet connection (enabled by default)
− SSH connection (disabled by default)
− SNMP manager connection
− System log transmission
− Time synchronization using an NTP server
− Configuration file upload/download
− Firmware update
− Collection of maintenance information
To configure the management LAN interface, carry out the following procedure.
Command Task
xg login: admin
Password: ********
Login to the device from the serial terminal. The default
user name is "admin". The default password is "password."
xg> enable
Switch to administrator EXEC mode.
xg# configure terminal
Switch to global configuration mode.
xg(config)# management-lan ip A.B.C.D/M
[ default-gw A.B.C.D]
Change the IP address and subnet, and set the default
gateway of the management LAN interface.
xg(config)# management-lan dns-server A.B.C.D
(Optional)
Set up DNS servers. Up to 4 DNS servers can be set up.
Priority is assigned to DNS servers in the order they are
defined. To change their order, delete them using the no
command before doing so.
xg(config)# management-lan domain DOMAIN-NAME
(Optional)
Set the name of the network domain.
xg(config)# remote-host A.B.C.D HOST-NAME
(Optional)
Associate a remote host name with an IP address.
This allows referencing a remote IP address with a host
name without relying on a DNS server.
xg(config)# exit
Exit to administrator EXEC mode.
3.1.3 Telnet Connection via the Management LAN Interface (Optional)
The "Telnet server function" via the management LAN interface is initially disabled.
To change the monitoring time for the telnet connection, carry out the following procedure in the administrator EXEC mode.
Command Task
xg# configure terminal
Switch to global configuration mode.
xg(config)# telnet-server
Enable Telnet connection,
xg(config)# terminal timeout vty <0-60>
(Optional)
If the Telnet session timeout period (in minutes) expires the
telnet connection is terminated.
xg(config)# exit
Exit to administrator EXEC mode.
Page 25

XG2000 series User's Guide
25/315
All Rights Reserved, Copyright (C) PFU LIMITED 2009
3.1.4 SSH Connection via the Management LAN Interface (Optional)
This device supports the “SSH server function”. This function is remote connection like “Telnet server function”.
After executing “ssh-server” command, the “SSH-server” is enabled and authentication key is generated (It takes some time to
generate authentication key).
The following shows the “SSH-server function” supported by this device.
Function Support
Protocol Version v2
Method of authentication Password
Authentication key RSA(2048bits, fixed), DSA(1024bits, fixed)
Method to generate
authentication key
Automatically generated, CLI
Method of coding aes128-cbc,3des-cbc,blowfish-cbc,cast128-cbc,arcfour128,ar
cfour256,arcfour,aes192-cbc,aes256-cbc,aes128-ctr,aes192-c
tr,aes256-ctr
Terminal sessions Maximum 4
(including Telnet connection)
Message authentication
code
hmac-md5,hmac-sha1,umac-64@openssh.com,hmac-ripemd
160,hmac-sha1-96,hmac-md5-96
The "SSH server function" via the management LAN interface is initially disabled.
To change the monitoring time for the SSH connection, carry out the following procedure in the administrator EXEC mode.
Command Task
xg# configure terminal
Switch to global configuration mode.
xg(config)# ssh-server
Enable SSH connection
xg(config)# terminal timeout vty <0-60>
(Optional)
If the SSH session timeout period (in minutes) expires the
SSH connection is terminated.
xg(config)# exit
Exit to administrator EXEC mode.
The “SSH-server function” supported by this device uses Open SSH free software that is published based on BSD licence.
Please refer to the following URL for more details.
http://www.openssh.com/
3.1.5 SNMP Configuration (Optional)
To operate in conjunction with an SNMP manager, the SNMP agent must be configured.
To configure the SNMP agent, carry out the following procedures in the administrator EXEC mode.
Command Task
xg# configure terminal
Switch to global configuration mode.
xg(config)# hostname HOST-NAME
xg(config)# snmp-server location
SYSTEM-LOCATION
xg(config)# snmp-server contact
SYSTEM-CONTACT
Set the switch name (HOST-NAME), switch's location
(SYSTEM-LOCATION), and contact
(SYSTEM-CONTACT).
xg(config)# snmp-server access host
{A.B.C.D|HOSTNAME} community COMMUNITY-NAME
Set the IP address (host name) of the SNMP manager and
the community name.
xg(config)# snmp-server trap host
{A.B.C.D|HOSTNAME} community COMMUNITY-NAME
[protocol {v1|v2c}]
Set the IP address (host name) of the host that is notified
of SNMP traps and community name, if the SNMP trap
notification is enabled.
xg(config)# exit
Exit to administrator EXEC mode.
Page 26

XG2000 series User's Guide
26/315
All Rights Reserved, Copyright (C) PFU LIMITED 2009
Chapter 4 Switch Functions and their
Configuration
This chapter describes the functions of the device and how to configure them.
Refer to "Operating Environment for the CLI
" for details on using the CLI.
Refer to "Command Reference
" for details on commands.
Page 27
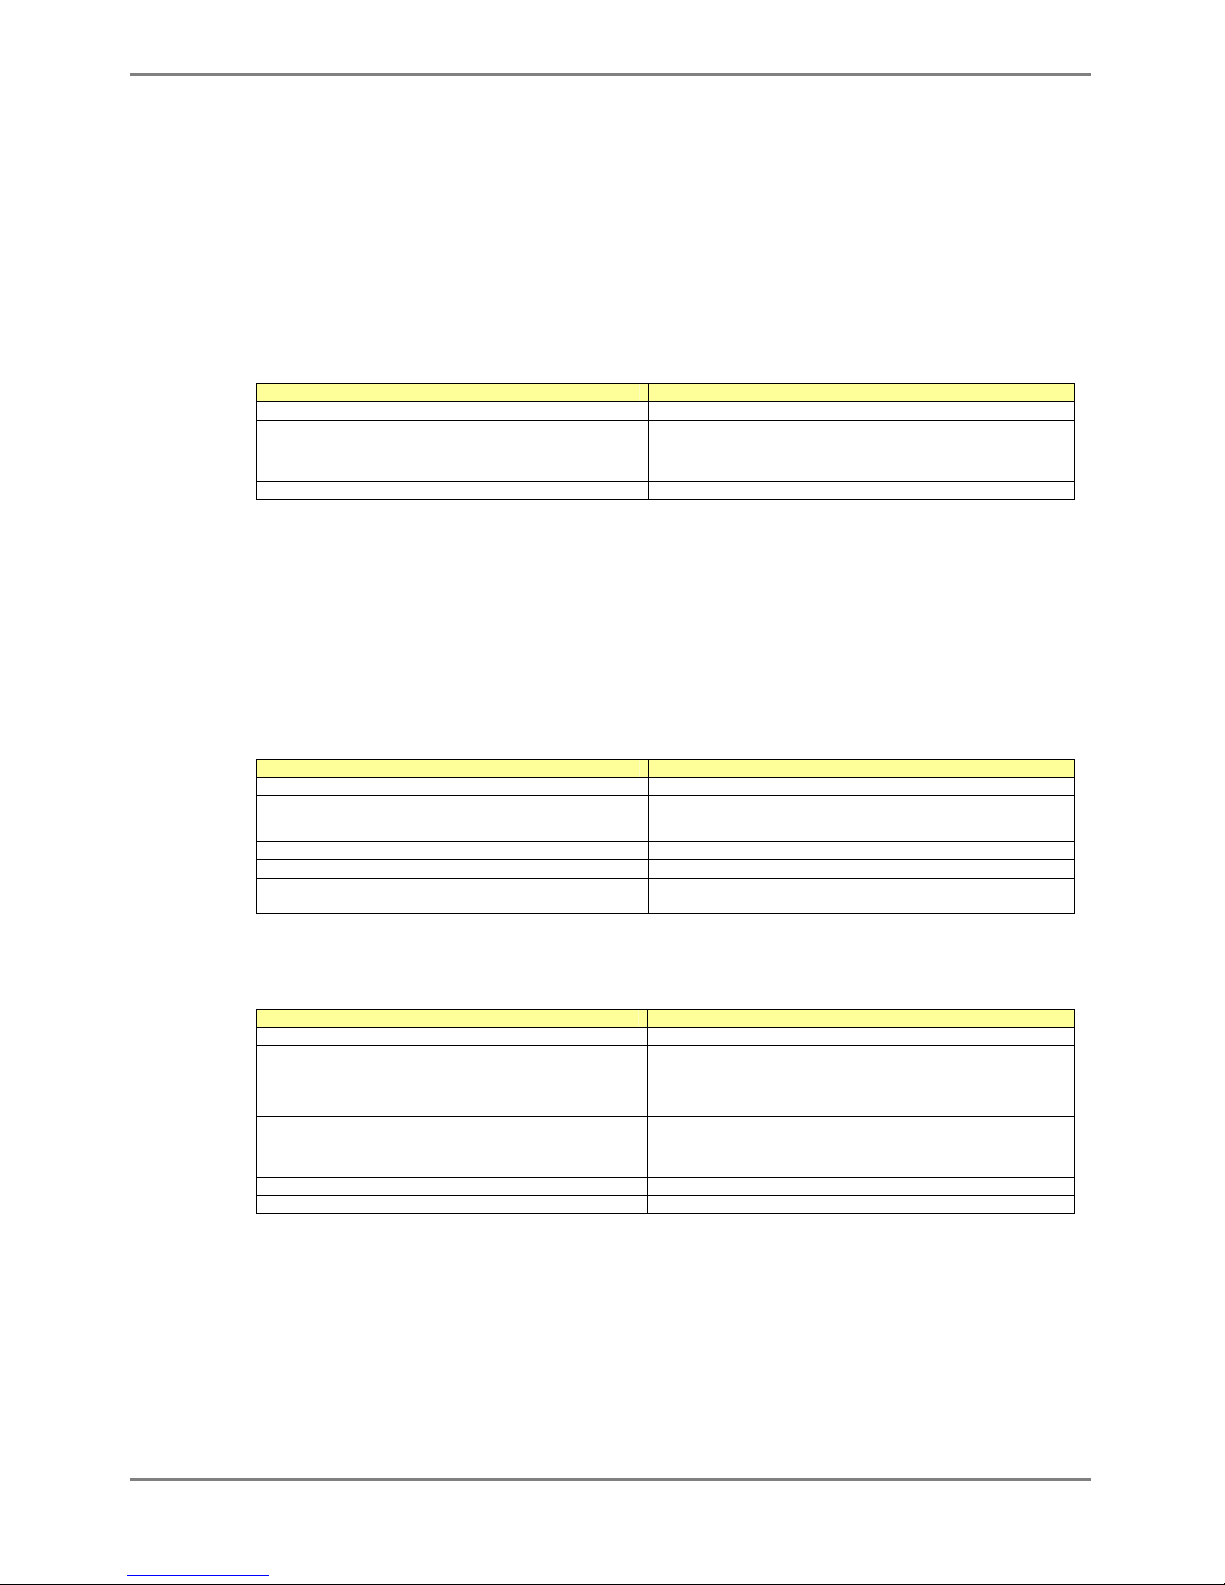
XG2000 series User's Guide
27/315
All Rights Reserved, Copyright (C) PFU LIMITED 2009
4.1 Basic Switch Functions
This section describes the basic switch functions.
4.1.1 Switching Mode
The device provides the following two switching modes.
z Store-and-forward switching mode
After the device finishes receiving a frame, it checks the FCS (Frame Check Sequence) and
performs a validity check (on packet size, etc.) before forwarding the frame. If the switch
receives a frame with an error frame, it discards it.
z Cut-through switching mode
The device transmits the frame to the destination as soon as the first 64 bytes of the frame
are received with no errors. Since the device starts transmitting the frame before it receives
the entire frame, this mode allows forwarding at low latency.
To change the switching modes, carry out the following procedures in the administrator EXEC mode.
Command Task
xg# configure terminal
Switch to global configuration mode.
xg(config)# bridge forward-mode
{cut-through | store-and-forward }
xg(config)# no bridge forward-mode
Select the cut-through (or store-and-forward) for the
switching mode.
xg(config)# exit
Exit to administrator EXEC mode.
4.1.2 MAC Address Table Management
The MAC address table is a database used for managing the association between address information and destination ports.
The device can learn up to 16384 entries of MAC addresses.
z MAC address table management
The device has two methods for MAC address table management.
− SVL(Shared VLAN Learning)
The device learns MAC addresses common to all VLANs. Different VLANs with identical
MAC addresses are treated as identical entries.
− IVL(Independent VLAN Learning)
The device learns MAC addresses separately for each VLAN. Identical MAC addresses with
different VLANs are treated as separate entries.
To change the MAC address table management modes, carry out the following procedures in the
management EXEC mode.
Command Task
xg# configure terminal
Switch to the global configuration mode.
xg(config)# bridge learn-mode { ivl | svl }
xg(config)# no bridge learn-mode
Select IVL or SVL for the MAC address table management
mode.
xg(config)# exit
Exit to administrator EXEC mode.
xg# copy running-config startup-config
Save the current settings of the device to nonvolatile memory.
xg# reset
If the MAC address table management mode is changed, the
new setting becomes enabled after the device is restarted.
z Dynamic MAC address learning
The device dynamically learns MAC addresses from received frames. If MAC addresses are not
refreshed before the aging time expires, they will be removed from the MAC address table.
To disable the dynamic learning, carry out the following procedures in the administrator
EXEC mode.
Command Task
xg# configure terminal
Switch to global configuration mode.
xg(config)# interface port 1 2 3
xg(config)# interface port range 1 3
Switch to the interface edit mode to specify the port(s) to be
configured.
In this example, the global interface configuration mode is
selected for ports 1 through 3.
xg(config-if)# suppress-address-learning
xg(config-if)# no
suppress-address-learning
Enable (or disable) the dynamic MAC address learning.
xg(config-if)# exit
Exit to global configuration mode.
xg(config)# exit
Exit to administrator EXEC mode.
Page 28

XG2000 series User's Guide
28/315
All Rights Reserved, Copyright (C) PFU LIMITED 2009
z Static unicast address
By registering a unicast MAC address with the MAC address table, unicast frames are forwarded
to a specified port. Static unicast addresses are not subject to MAC address removal controlled
by the aging function.
To register, change or delete a static unicast address, carry out the following procedures
in the administrator EXEC mode.
Command Task
xg# configure terminal
Switch to global configuration mode.
xg(config)# bridge mac-address-table
static MAC [vlan <1-4094>]
{[port <1-20>] | [agg-port <1-10>]}
xg(config)# no bridge mac-address-table
static MAC [vlan <1-4094>]
Register a static unicast address and destination port with the
MAC address table (or remove them from it).
xg(config)# exit
Exit to administrator EXEC mode.
z Static multicast address
By registering a multicast MAC address with the MAC address table, a specific multicast frame
will be forwarded to a designated port.
To register, change or delete a multicast address, carry out the following procedures in
the administrator EXEC mode.
Command Task
xg# configure terminal
Switch to global configuration mode.
xg(config)# bridge mac-address-table
static MAC [vlan <1-4094>]
[port <1-20> [<1-20> ]]
[agg-port <1-10> [<1-10> ]]
xg(config)# no bridge mac-address-table
static MAC [vlan <1-4094>]
Register (or remove) a static multicast address table and
destination port.
For a multicast MAC address, multiple ports can be specified.
xg(config)# exit
Exit to administrator EXEC mode.
4.1.3 Jumbo Frame Support
The device can transmit jumbo frames of up to 16KB (16128 bytes).
To configure jumbo frame support, carry out the following procedure in the administrator EXEC mode.
Command Task
xg# configure terminal
Switch to global configuration mode.
xg(config)# bridge jumbo-frame
[{9216 | 12288 | 15360 | 16128}]
xg(config)# no bridge jumbo-frame
Enable (or disable) jumbo frame support.
xg(config)# exit
Exit to administrator EXEC mode.
4.1.4 Flow Control
Flow control is a function that prevents frame loss when the receive buffer in the switch overflows due to temporary traffic
overload by using a PAUSE frame.
When the device receives a PAUSE frame, it temporarily stops sending frames at the receive port. If the receive buffer
overflows, it is possible to restrict frame transmission from the connected device by sending a PAUSE frame.
For each port, it is possible to select whether or not to send/recive a PAUSE frame.
To change the flow control mode, carry out the following procedures in the administrator EXEC mode.
Command Task
xg# configure terminal
Switch to global configuration mode.
xg(config)# interface port 1 2 3
xg(config)# interface port range 1 3
Switch to the interface edit mode to specify the port(s) to be
configured for flow control.
In this example, the global interface configuration mode is
selected for ports 1 through 3.
xg(config-if)# flowcontrol
{ disable | only-receive | only-send |
send-receive }
Set the flow control mode.
xg(config-if)# exit
Exit to global configuration mode.
xg(config)# exit
Exit to administrator EXEC mode.
Page 29

XG2000 series User's Guide
29/315
All Rights Reserved, Copyright (C) PFU LIMITED 2009
4.1.5 Storm Control
The device discards broadcast frames when the number of received broadcast frames are over a given threshold to prevent
unnecessary waste of bandwidth due to retained broadcast frames on the network. This function is called "Storm Control".
For each port, it is possible to configure storm control.
When broadcast frames are discarded by storm control, error logs are output, and storm control logging is disabled. To
re-enabled logging, these violations must be cleared with "clear violation".
To configure storm control, carry out the following procedures in the administrator EXEC mode.
Command Task
xg# configure terminal
Switch to global configuration mode.
xg(config)# interface port 1 2 3
xg(config)# interface port range 1 3
Switch to the interface edit mode to specify the port(s) to be
configured for storm control.
In this example, the global interface configuration mode is
selected for ports 1 though 3.
xg(config-if)# storm-control
Enable storm control.
xg(config-if)# exit
Exit to global configuration mode.
xg(config)# exit
Exit to administrator EXEC mode.
4.1.6 Port Security
Port security blocks connections attempted by unregistered hosts. When a host MAC address is registered, the device
receives only those frames that use registered source addresses.
For each port, it is possible to configure port security. To register a MAC address for a host, use the "bridge mac-address-table
static" command. The port that the host is connected must be registered as a member port. In Independent VLAN Learning
mode, this must be done for all VLANs that permit transmission.
Either of the following two modes can be specified for a security-violating (unregistered) frame the device receives.
− Restrict mode
Filters violating frames only, forwarding permitted frames.
− Shutdown mode
Filters all frames upon reception of a violating frame, and the port goes link down.
Once a security violation is detected, an error log is recorded. No further detection of a violating frame will cause an error log to
be recorded until security violations are reset by "clear violation".
To configure port security, carry out the following procedures in the administrator EXEC mode.
Command Task
xg# configure terminal
Switch to global configuration mode.
xg(config)# interface port 1 2 3
xg(config)# interface port range 1 3
Switch to the interface edit mode to specify the port(s) to be
configured for port security.
In this example, the global interface configuration mode is
selected for ports 1 though 3.
xg(config-if)# port-security violation
{restrict | shutdown}
Enable Port Security.
xg(config-if)# exit
Exit to global configuration mode.
xg(config)# exit
Exit to administrator EXEC mode.
xg# clear violation all
Clear security violations
4.1.7 Ingress Rate Control
It is possible to set an ingress rate-limiting value for each port in approximately 40Mbps increments.
To set an ingress rate-limiting value, carry out the following procedures in the administrator EXEC mode.
Command Task
xg# configure terminal
Switch to global configuration mode.
xg(config)# interface port 1 2 3
xg(config)# interface port range 1 3
Switch to the interface edit mode to specify the port(s) to be
configured for ingress rate control.
In this example, the global interface configuration mode is
selected for ports 1 though 3.
xg(config-if)# ingress-bandwidth <40-10000>
Specify an ingress rate limiting value.
xg(config-if)# exit
Exit to global configuration mode.
xg(config)# exit
Exit to administrator EXEC mode.
z The ingress rate is measured at 100us time intervals. Should burst transfers take place at intervals of 100us or over,
the ingress rate the device actually allows may be less than the specified value.
Page 30

XG2000 series User's Guide
30/315
All Rights Reserved, Copyright (C) PFU LIMITED 2009
4.2 Port Mirroring
It is possible to monitor the traffic by mirroring the frames sent or received by a port to another port.
To configure port mirroring, carry out the following procedure in the administrator EXEC mode.
Command Task
xg# configure terminal
Switch to global configuration mode.
xg(config)# mirror monitored-port <1-20>
[rx-mirroring-port <1-20>]
[tx-mirroring-port <1-20>]
Configure the port to be monitored and its mirror port to
be mirrored.
xg(config)# exit
Exit to administrator EXEC mode.
xg# show mirror
View the status of port mirroring.
Page 31

XG2000 series User's Guide
31/315
All Rights Reserved, Copyright (C) PFU LIMITED 2009
4.3 Link Pass Through
Link pass through is a function that monitors the status of a specified port link and notifies the device connected to the port via
link status notification of the link status of a monitored port by synchronizing the monitored port with the link status on the port.
This function allows the device to notify the port, after link status notification, of a link fault if detected at the monitored port.
Link pass through communicates the link fault status to the other port by sending a remote fault (RF) signal, as prescribed in
IEEE802.3ae LFS (Link Fault Signaling). When the link status of the monitored port is restored to normal, the other port is also
restored to normal, thereby restoring the network link.
To configure Link pass through, carry out the following procedure in the administrator EXEC mode.
Command Task
xg# configure terminal
Switch to global configuration mode.
xg(config)# link-pass-through { monitored-port
<1-20> | monitored-agg-port <1-10>}
[domino-port <1-20> [<1-20> ]]
[domino-agg-port <1-10> [<1-10> ]]
Set the relationship between the ports to be monitored
and ports link status notification were sent.
xg(config)# exit
Exit to administrator EXEC mode.
Page 32

XG2000 series User's Guide
32/315
All Rights Reserved, Copyright (C) PFU LIMITED 2009
4.4 Link Aggregation
Link aggregation is a function that combines multiple ports into a single logical link. A set of ports that comprise a logical link is
called an aggregation group.
Link aggregation provides:
z Increased bandwidth
By grouping multiple physical ports into a single logical link (an aggregation group), network
traffic (data sent and received) will be balanced across the physical ports, thereby providing
increased bandwidth.
z Redundancy
Multiplexing ports allows uninterrupted network operations should one of the multiple links
fail. Since the link status of the logical aggregation groups remains unchanged, there are
no fluctuations in network traffic, the effect of a fault having been minimized.
Up to 10 ports can be used to create a single link aggregation group using link aggregation. Up to 10 aggregation groups can
be created.
Page 33

XG2000 series User's Guide
33/315
All Rights Reserved, Copyright (C) PFU LIMITED 2009
4.4.1 Configuring Link Aggregation
Either static or dynamic (also known as LACP) configuration can be selected for Link Aggregation.
z Static configuration
Configures aggregation groups statically.
z LACP
Configures link aggregation using Link Aggregation Control Protocol (LACP). The LACP is a
switch-to-switch control protocol that enables dynamic configuration of aggregation groups
and is standardized by the IEEE802.3ad. The LACP facilitates load balancing across the
individual links aggregated between the devices connected.
Either "active" or "passive" LACP mode can be selected.
− active
The device starts LACP negotiation. Since the active mode allows the reception of LACP
control frames, it is possible to direct the device in "active" mode.
− passive
The device responds to LACP control frames but does not start LACP negotiation.
To configure static link aggregation, carry out the following procedure in the administrator EXEC mode.
Command Task
xg# configure terminal
Switch to global configuration mode.
xg(config)# link-aggregation agg-port <1-10>
protocol none port <1-20> <1-20>
Assign a number to the aggregation group to be created
(agg-port) and the port numbers assigned to the link
aggregation.
Specify "none" for static configuration.
xg(config)# interface agg-port <1-10>
To change the setting of the aggregation group created,
switch to the interface edit mode for the aggregation
group and specify the "interface agg-port" requiring
change.
The prompt changes to "config-agg".
xg(config-agg)# port-vlan-id vlan 2
(Optional)
Change the setting of the aggregation group as
required. In this example, default VLAN ID is set to 2.
xg(config-agg)# exit
Exit to global configuration mode.
xg(config)# exit
Exit to administrator EXEC mode.
To configure LACP link aggregation, carry out the following procedure in the administrator EXEC mode.
Command Task
xg# configure terminal
Switch to global configuration mode.
xg(config)# link-aggregation agg-port <1-10>
protocol lacp lacp-mode {active | passive }
port <1-20> <1-20>
Assign a number to the aggregation group to be created
(agg-port) and the port numbers assigned to the link
aggregation.
Specify "lacp" for LACP link aggregation. Specify the
desired negotiation operational mode in "lacp-mode".
xg(config)# interface agg-port <1-10>
To change the setting of the aggregation group created,
switch to the interface edit mode for the aggregation
group and specify the "interface agg-port" requiring
change.
The prompt changes to "config-agg".
xg(config-agg)# port-vlan-id vlan 2
(Optional)
Change the settings of the aggregation group as
required. In this example, default VLAN ID is set to 2.
xg(config-agg)# exit
Exit to global configuration mode.
xg(config)# exit
Exit to administrator EXEC mode.
Page 34

XG2000 series User's Guide
34/315
All Rights Reserved, Copyright (C) PFU LIMITED 2009
4.4.2 Frame Distribution Methods in Link Aggregation
How frames are distributed across physical ports that make up an aggregation group are determined by the contents of a
frame (source and destination MAC addresses).
There are three ways to specify how frames are distributed:
z Frame distribution based on destination MAC address (dst-mac)
The destination port is determined based on the destination MAC address of the frames.
z Frame distribution based on source MAC address (src-mac)
The destination port is determined based on the source MAC address of the frames.
z Frame distribution based on destination and source MAC addresses (dst-src-mac)
The destination port is determined based on the destination and source MAC addresses of the
frames.
z If there are too few MAC addresses to be distributed across an aggregation group, the distribution of
frames across the destination ports tends to become biased. To reduce such bias, use a distribution
method that uses more MAC addresses.
For example, if a server is connected to an aggregation group and a client is connected to a different
port, the "src-mac" or "dst-src-mac" parameters are recommended.
To set a distribution method, carry out the following procedure in the administrator EXEC mode.
Command Task
xg# configure terminal
Switch to global configuration mode.
xg(config)# link-aggregation agg-port <1-10>
protocol {none | lacp}
load-balance dst-mac|src-mac|dst-src-mac}
port <1-20> <1-20>
Specify a distribution method in the load-balance
parameter of the "link-aggregation" command.
xg(config)# exit
Exit to administrator EXEC mode.
4.4.3 The Number of Ports That Require Linkup
It is possible to specify the number of ports that enable a linkup state for an aggregation group. If the number of active ports
that make up an aggregation group in a linkup state is less than the specified number of ports, the aggregation group changes
to a linkdown state.
z For static link aggregation
If the number of ports that make up an aggregation group in a linkup state no longer satisfies
the specified number of ports, the aggregation group changes to a linkdown state.
z For LACP link aggregation
If the number of ports that make up an established LACP aggregation group changes, the
aggregation group reverts to a linkdown state.
To set the number of ports in the aggregation group, carry out the following procedure in the administrator EXEC mode.
Command Task
xg# configure terminal
Switch to global configuration mode.
xg(config)# link-aggregation agg-port
<1-10>
protocol {none | lacp} minimum-port <1-20>
port <1-20> <1-20>
Specify the required number of ports in "minimum-port"
parameter of the "link-aggregation" command.
The default value for "minimum-port" parameter is 1.
xg(config)# exit
Exit to administrator EXEC mode.
Page 35

XG2000 series User's Guide
35/315
All Rights Reserved, Copyright (C) PFU LIMITED 2009
4.4.4 Notes on Link Aggregation
The smallest port number in an aggregation group serves as the master port.
Port settings established after defining an aggregation group inherit the same settings as those of the master port, with some
exceptions. The settings that are not inherited from the master port are.
z "link-pass-through"
Settings for these ports are cleared.
z The information registered in MAC address table
All addresses related to ports configured are cleared.
z "spanning-tree port-path-cost"
Port-path-cost will be re-adjusted to match the new configuration.
When changing the port settings for aggregation groups that have already been created, the aggregation group changes to a
linkdown state, and then to a linkup state if one of the following conditions are satisfied.
z A master port was removed
z A master port changed
z The "protocol" or "lacp-mode" parameter changed
Page 36

XG2000 series User's Guide
36/315
All Rights Reserved, Copyright (C) PFU LIMITED 2009
4.5 Uplink Filter
When an uplink domain is defined, the domain's uplink domain ports filter (drops) multicast, broadcast and unlearned (flooding)
unicast frames from non-membership downlink ports. However it does not filter learned unicast frames that are forwarded
based on the MAC address table.
The uplink filter is useful in configuring large networks with multiple paths, such as a fat tree network, by cascading multiple
XG-series switches.
To configure an uplink filter, specify an uplink domain whose membership consists of one or more downlink ports and one or
more uplink ports. For example, in a fat tree network, an uplink domain is configured such that ports connected to switches are
designated as uplink ports, and leaf nodes as downlink ports. The uplink domain will then block multicast, broadcast and
flooding unicast frames to other uplink domains configured within the switch and only distribute traffic from the downlink to the
uplink ports within that domain.
If an uplink filter is specified to have multiple uplink ports, link aggregation and redundancy are provisioned within that domain.
The uplink filter differs from link aggregation in that the uplink ports within the uplink domain can be connected to different
switches or equipment to ensure redundancy within the various uplink ports.
Page 37

XG2000 series User's Guide
37/315
All Rights Reserved, Copyright (C) PFU LIMITED 2009
When specifying multiple uplink ports within an uplink domain, frame distribution among the uplink ports is performed equally
from port to port and not by type of frame. Frame distribution changes automatically when a fail-over or fail-back occurs,
thereby providing uplink redundancy.
Page 38

XG2000 series User's Guide
38/315
All Rights Reserved, Copyright (C) PFU LIMITED 2009
The following is an example of a fat tree configuration with network redundancy.
To configure an uplink filter, carry out the following procedures in the administrator EXEC mode.
Command Task
xg# configure terminal
Switch to global configuration mode.
xg(config)# uplink-domain 1 port 11 12
Create an uplink domain that consists of port 11 and 12.
xg(config)# interface port 1 2 3
(interface port range 1 3)
Switch to interface edit mode to assign downlink ports.
In this example, the global interface configuration mode
is selected for ports 1 through 3.
xg(config-if)# downlink allowed uplink-domain 1
Register each port as a downlink member of the uplink
domain.
xg(config-if)# exit
Exit to global configuration mode.
xg(config)# exit
Exit to administrator EXEC mode.
xg# show uplink
View the state of the uplink.
z Multicast, broadcast, and unlearned unicast frames are filtered by the uplink filter. But both statically and
dynamically learned unicast frames forwarded to a specified port are not filtered.
z An uplink port is not allowed to be a member of a link aggregation group.
z STP must be disabled on uplink ports.
z The IGMP snooping and uplink filter features cannot be used at the same time.
Page 39

XG2000 series User's Guide
39/315
All Rights Reserved, Copyright (C) PFU LIMITED 2009
4.6 Spanning Tree Protocol (STP)
The Spanning Tree Protocol (STP) is a function that prevents loops from occurring on a network. It is also possible to provide
network redundancy by intentionally creating a loop.
STP exclusively uses only one active path between network devices, and shuts out other paths, to avoid network loops. An
active path is selected by comparing path costs defined on each path. After the comparison, the lowest cost path will be
selected. If the selected path becomes disabled, STP will activate the lowest cost path amongst the paths remaining.
The device supports IEEE802.1w RSTP (Rapid Spanning Tree Protocol). The RSTP is upward compatible with IEEE802.1D
STP (Spanning Tree Protocol) and serves as a STP if the destination device only supports STP.
Page 40

XG2000 series User's Guide
40/315
All Rights Reserved, Copyright (C) PFU LIMITED 2009
4.6.1 Port Roles Based on Spanning Tree
RSTP assigns one of these port roles to individual ports:
z Root port
Provides the best path (lowest cost) when the switch forwards packets to the root switch.
z Designated port
Connects to the designated switch toward the leaves of the spanning tree. The port specified
connecting to the designated port serves as a root port.
z Alternate Port
The alternative port with the second lowest path cost. In the event that the root port goes
to a linkdown state, the alternate port serves as the root port. It does not always send
or receive frames while in the blocking state.
z Backup Port
Provides an alternative path to that specified. In the event that the specified port goes
into a linkdown state, the backup port serves as the new designated port. It does not always
send or receive frames while it is in the blocking state.
z Disabled Port
Disabled port, it does not send or receive any frames.
4.6.2 Spanning Tree Protocol Port States
The port states defined by the STP are:
z Discard
The port is in a "discarding state. BPDUs are only received.
z Learn
The port is in a "learning" state. A port in the learning state learns the destination MAC
address of the received frames but does not participate in frame forwarding.
z Forward
The port is ready to transmit data traffic.
The STP states "blocking" and "listening" have been merged into a unique RSTP "discarding" state. The correspondence
between STP port states and RSTP port states are shown below.
Display
Format
STP(IEEE802.1D) RSTP(IEEE802.1w)
Discard Blocking Discarding
Discard Listening Discarding
Learn Learning Learning
Forward Forwarding Forwarding
4.6.3 Configuring Spanning Tree
To configure the spanning tree protocol, carry out the following procedure in the administrator EXEC mode.
Command Task
xg# configure terminal
Switch to global configuration mode.
xg(config)# spanning-tree
Enable Spanning Tree Protocol.
xg(config)# spanning-tree priority <0-61440>
xg(config)# spanning-tree hello-time <1-10>
xg(config)# spanning-tree max-age <6-40>
xg(config)# spanning-tree forward-time <4-30>
Configure Spanning Tree Protocol parameters on the
device.
z Switch priority
z Hello time
z Maximum aging time (max-age)
z Forward delay time (forward-time)
xg(config)# interface port 1 2 3
xg(config)# interface port range 1 3
Switch to interface edit mode to configure spanning
tree-related parameters for a given port.
In this example, the global interface configuration mode
is selected for ports 1 through 3.
xg(config-if)# spanning-tree port-priority
<0-240>
xg(config-if)# spanning-tree port-path-cost
<1-200000000>
Configure the following parameters related to the
spanning tree topology:
z Port priority
z Path cost
xg(config-if)# spanning-tree portfast
(Optional)
If the port is configured as an edge port(*), this setting
can reduce the time taken to transition into the
forwarding state.
* It is available only when the port is directly connected
to an end terminal that has no influence on the spanning
tree configuration.
xg(config-if)# exit
Exit to global configuration mode.
xg(config)# exit
Exit to administrator EXEC mode.
xg# show spanning-tree [ detail ]
View the state of the spanning tree.
Page 41

XG2000 series User's Guide
41/315
All Rights Reserved, Copyright (C) PFU LIMITED 2009
4.7 VLAN
VLAN (Virtual LAN) is a technology that divides a single network into virtually separated networks.
VLANs are separate logical networks within one physical network. A VLAN capable switch can change and define new LAN
network configurations without changing physical cable connections. This creates a flexible and extensible network system.
The device provides for port-based or tag-based (IEEE802.1Q) VLANs.
4.7.1 Port-Based VLAN
Port-based VLAN is a method for configuring VLAN membership on a port basis. Forwarding is based on the destination MAC
addresses and related port.
To configure a port-based VLAN, carry out the following procedures in the administrator EXEC mode.
Command Task
xg# configure terminal
Switch to global configuration mode.
xg(config)# vlan <1-4094> [ description
VLAN_DESCRIPTION ]
Create a VLAN to use.
xg(config)# vlan-statistics collection <1-4094>
[ <1-4094> ]
(Optional)
Configure a VLAN that collects statistics.
xg(config)# interface port 1 2 3
(interface port range 1 3)
Switch to interface edit mode to assign a port to the
desired port-based VLAN.
In this example, the global interface configuration mode
is selected for ports 1 through 3.
xg(config-if)# port-vlan-id vlan <1-4094>
Set the default port VLAN ID for each port.
xg(config-if)# ingress-filter tagged-frame
xg(config-if)# ingress-filter untagged-frame
(Optional)
Define a filter on frames received (tagged and untagged
frames) if necessary.
xg(config-if)# exit
Exit to global configuration mode.
xg(config)# exit
Exit to administrator EXEC mode.
xg# show interface
Verify the port state.
Check the information displayed in [Port Default Vlan
ID] under command output [Vlan Information].
xg# show vlan
Verify the port VLAN membership.
Page 42

XG2000 series User's Guide
42/315
All Rights Reserved, Copyright (C) PFU LIMITED 2009
4.7.2 Tag-Based (IEEE802.1Q) VLAN
Tag-based VLAN is a method of configuring VLANs so that the frame forwarding decision is based on a tag in the MAC header
identifying the VLAN membership. 4 bytes of additional data in the header, called a VLAN tag, identifies the VLAN frame
ownership. Using a VLAN tag enables configuring a single physical link that shares multiple VLANs.
The device’s tag-based VLAN function is based on the IEEE 802.1Q standard.
The following figure shows an Ethernet frame format including a VLAN tag as specified by the IEEE 802.1Q standard.
To configure a tag-based VLAN, carry out the following procedures in the administrator EXEC mode.
Command Task
xg# configure terminal
Switch to global configuration mode.
xg(config)# vlan <1-4094> [ description
VLAN_DESCRIPTION ]
Create a VLAN to use.
xg(config)# vlan-statistics collection <1-4094>
[ <1-4094> ]
(Optional)
Configure a VLAN that collects statistics.
xg(config)# interface port 1 2 3
(interface port range 1 3)
Switch to interface edit mode for the desired ports to be
configured as tag-based VLAN members.
In this example, the global interface configuration mode
is selected for ports 1 though 3.
xg(config-if)# vlan-member allowed vlan
{ <1-4094> | all }
{ egress-untagging | egress-tagging }
Register VLAN port ownership.
xg(config-if)# ingress-filter tagged-frame
xg(config-if)# ingress-filter untagged-frame
(Optional)
Define a filter for frames received (tagged and untagged
frames) at the ports, if necessary.
xg(config-if)# exit
Exit to global configuration mode.
xg(config)# exit
Exit to administrator EXEC mode.
xg# show vlan
View the port's VLAN membership state.
Page 43

XG2000 series User's Guide
43/315
All Rights Reserved, Copyright (C) PFU LIMITED 2009
4.7.3 Multiple VLAN
With the user-defined VLAN tag protocol identifier, the IEEE 802.1Q standard tag can be replaced with a user-defined VPID,
allowing for encapsulation of multiple tags for multiple-tagged VLANs. The standard tag identifier or TPID is 0x8100 as defined
in IEEE 802.1Q.
For the frame format, refer to TPID (Tag Protocol Identifier) in "Tag VLAN Frame Format
".
Using multiple VLAN (also known as double tagging or Q-in-Q) allows a service provider to transparently forward customers'
VLAN traffic even if the service provider assigns customer traffic to different VLANs.
To configure multiple VLAN using a user-defined VLAN tag protocol identifier, carry out the following procedures in the
administrator EXEC mode.
Command Task
xg# configure terminal
Switch to global configuration mode.
xg(config)# vlan <1-4094> [ description
VLAN_DESCRIPTION ]
Create a VLAN to use.
xg(config)# vlan-statistics collection <1-4094>
[ <1-4094> ]
(Optional)
Configure a VLAN that collects statistics.
xg(config)# interface port 1
Switch to interface edit mode to designate a port for
multiple VLAN configuration.
In this example, the global interface configuration mode
is selected for port 1.
xg(config-if)# user-vlan-protocol-id <0x05DD ~
0xFFFF>
Set the user-defined VLAN tag protocol identifier.
xg(config-if)# vlan-member allowed vlan
{ <1-4094> | all }
{ egress-untagging | egress-tagging }
Register the port to the VLAN.
Specify "egress-tagging" for tagged output at the port.
Specify "egress-untagging" for the port untagged output
at the port.
xg(config-if)# ingress-filter tagged-frame
xg(config-if)# ingress-filter untagged-frame
(Optional)
Define a filter for frames received (tagged and
untagged) for the port, if necessary.
xg(config-if)# exit
Exit to global configuration mode.
xg(config)# exit
Exit to administrator EXEC mode.
xg# show interface
xg# show vlan
Verify the port state and VLAN membership state for
each port.
Page 44

XG2000 series User's Guide
44/315
All Rights Reserved, Copyright (C) PFU LIMITED 2009
An example of multiple VLAN and the movement of frames for a VLAN member outgoing port (VLAN-tagged frame), is shown
below.
An example of multiple VLAN and the movement of frames for a VLAN member outgoing port (VLAN-untagged frame), is
shown below.
Page 45

XG2000 series User's Guide
45/315
All Rights Reserved, Copyright (C) PFU LIMITED 2009
An example of multiple VLAN and the movement of frames when the user-defined VPID of the incoming and outgoing port
differ and the outgoing port is a VLAN member (VLAN-tagged frame), is shown below.
An example of multiple VLAN and the movement of frames when the user-defined VPID of the incoming and outgoing port
differ and the outgoing port is not a VLAN member (VLAN-untagged frame), is shown below.
Page 46

XG2000 series User's Guide
46/315
All Rights Reserved, Copyright (C) PFU LIMITED 2009
4.8 Quality of Service (QoS)
The device provides Quality of Service (QoS) that is based on the IEEE802.1p standard.
The device QoS determines the priority of frames at the ingress side using DiffServ, VLAN tag (including priority tag) or a port's
default priority. Their priorities are mapped to 4 output queues. The queues are processed in the order of the QoS priority
precedence.
The device priorities available are:
z DiffServ
Select QoS using the IPv4 header or DiffServ Code Point included in the IPv6 header.
z Default priority
Set a default priority of 0 to 7 for each port.
For frames whose priority was not set (VLAN-untagged frames), the default priority is assigned
according to the value of the frame.
z Mapping to output queues
The device is equipped with four output queues with different levels (0 to 3). Frames are
transmitted in order of output queue priority.
Each priority is mapped to a specified output queue.
To set the default priority and output queue mapping, carry out the following procedure in the administrator EXEC mode.
Command Task
xg# configure terminal
Switch to global configuration mode.
xg(config)# interface port 1 2 3
xg(config)# interface port range 1 3
Switch to interface edit mode and specify the port(s) to
set with a default QoS priority.
In this example, the global interface configuration mode
is selected for ports 1 though 3.
xg(config-if)# qos default-priority <0-7>
Set a default priority for frames whose priority was not
set (VLAN-untagged frame) when received.
xg(config-if)# exit
Exit to global configuration mode.
xg(config)# bridge diffserv-tos {ipv4 | ipv6}
(Optional)
Used to enable QoS based on DiffServ Code Point.
xg(config)# qos-map priority <0-7>
output-priority <0-3>
Set the level of output queue to map to each frame that
has a priority value.
xg(config)# exit
Exit to administrator EXEC mode.
xg# show qos [ qos-map ]
Show the QoS setting status.
Page 47

XG2000 series User's Guide
47/315
All Rights Reserved, Copyright (C) PFU LIMITED 2009
4.9 IGMP Snooping
IP multicast is often used to distribute multimedia data, including video and voice, over a network.
A layer 2 switch floods multicast frames, absorbing unnecessary network bandwidth. A layer 3 switch that supports Internet
Group Management Protocol (IGMP) manages multicast groups using IGMP packets. The device controls how IP multicast
packets are forwarded to required ports by monitoring IGMP packets generated by layer 3 switches, thereby preventing
unnecessary flooding. This function is called "IGMP Snooping".
The device supports IGMP snooping for IGMP v1/v2/v3.
z IGMP v3 does not support source IP addressing and filtering.
z IGMP snooping and the uplink filter function cannot be used at the same time.
z The XG2000 series floods IGMP Report messages. When IGMP v1/v2 is used, it is necessary to
connect a device, such as a L3 switch, that supports IGMP snooping between the XG2000 series and
the IGMP hosts in order to avoid flooding.
z It is necessary to set forward-unregistered-mac or filter-unregistered-mac when IGMP snooping is
used.
Page 48

XG2000 series User's Guide
48/315
All Rights Reserved, Copyright (C) PFU LIMITED 2009
4.9.1 Registering Group Members
On receiving an IGMP Report message, the device registers a multicast MAC address with the MAC address table for the port
that received the IGMP Report message and the connecting multicast router port.
The following figure shows the relationship between the registered IP multicast address and the multicast MAC address.
MAC addresses that are registered with IGMP snooping are between 0100.5E00.0000 and 0100.5E7F.FFFF. An IP multicast
address is 32 bits. The first 4 bits are always 1110 followed by 28 bits that represent the IP multicast address information. Of
these 28 bits, the lower order 23 bits are mapped to a MAC address and the data in the higher order 5 bits is not used.
Therefore 32 IP multicast addresses are mapped to the same single MAC address.
Page 49

XG2000 series User's Guide
49/315
All Rights Reserved, Copyright (C) PFU LIMITED 2009
4.9.2 Removing Group Members
The group members registered by IGMP snooping are removed under the following status.
z If after receiving an IGMP Report message for group registration, the group member interval expires before the device
receives another IGMP Report message, the switch removes that group member. The default setting for the group
member interval is 260 seconds.
z If an IGMP Leave message is sent from a host, the multicast router sends out an IGMP Specific Query (GSQ)
message to determine that the host has left the group.
If after receiving the IGMP Leave message, the last member query interval expires before the device receives another
IGMP Report message, the switch removes that group member. The default setting for the last member query interval
is 2 seconds.
Page 50

XG2000 series User's Guide
50/315
All Rights Reserved, Copyright (C) PFU LIMITED 2009
4.9.3 Managing Group Members
When network congestion causes Leave message loss or there is a host that uses IGMPv1, the multicast router does not
receive Leave messages. The multicast router sends out an IGMP General Query message to all hosts (IP address: 224.0.0.1)
at intervals (query interval) to determine membership information.
Upon reception of an IGMP General Query message, the host, a member of the group, returns an IGMP Report message to
maintain membership in the group.
In consideration of General Query or Report message loss caused by network congestion, it is recommended that the following
equation be used to determine the group member interval for the device.
z Group member interval = (query interval for multicast router) × 2 + 10 (seconds)
Since RFC 3376 defines the default query interval for multicast routers as 125 seconds, the device uses 260 seconds for the
default group member interval.
Page 51

XG2000 series User's Guide
51/315
All Rights Reserved, Copyright (C) PFU LIMITED 2009
4.9.4 IGMP Querier
In a typical network configuration, the multicast router periodically sends out an IGMP General Query message to determine if
any of the hosts on the network are members of any multicast groups. Receiving a response from a host ascertains its
membership in a multicast group.
IGMP Querier is a function that acts as a proxy for a multicast router when one is not available in a network segment to send
an IGMP General Query message to all hosts.
The frequency of Query messages issued is configured using the "ip snooping vlan send-query-count" command.
The frequency of the General Query messages sent (query interval) are automatically calculated by the following equation
based on the send query count and the group membership interval.
z Query interval = (Group membership interval - 10)/send query count (seconds)
The default setting for the Query interval is 125 seconds.
Upon reception of an IGMP Leave message, the device sends an IGMP Specific Query (GSQ) message to determine that the
host is interested in leaving the group.
If an IGMP Specific Query message is sent as many times as specified by the send query count and the host does not respond
with an IGMP Report message, that host is removed.
z Generally, IGMP Querier uses "0.0.0.0" for the source IP address when sending a Query message.
Since some client software does not return a response for a Query message with the source IP
address being set to "0.0.0.0", it is recommended that an address other than "0.0.0.0" be used.
z If a multicast router exists on the network segment, the device does not send Query message even if
IGMP Querier is valid.
Page 52

XG2000 series User's Guide
52/315
All Rights Reserved, Copyright (C) PFU LIMITED 2009
4.9.5 Configuring IGMP Snooping
To configure IGMP snooping, carry out the following procedure in the administrator EXEC mode.
Command Task
xg# configure terminal
Switch to global configuration mode.
xg(config)# ip snooping protocol igmp
Enable global IGMP snooping on the device.
xg(config)# ip snooping vlan <1-4094>
Enable IGMP snooping for each VLAN separately.
xg(config)# ip snooping vlan <1-4094>
group-member-interval <60-600>
(Optional)
Change the group member interval.
xg(config)# ip snooping vlan <1-4094>
mrouter { port <1-20> | agg-port <1-10> }
(Optional)
Register the port the multicast router resides statically.
xg(config)# ip snooping vlan <1-4094>
mrouter suppress-learning
(Optional)
Suppress dynamic registration on the port the multicast router
resides.
xg(config)# ip snooping vlan <1-4094>
last-member-query-interval <1-9>
(Optional)
Change the last member query interval.
xg(config)# ip snooping vlan <1-4094>
send-query-count <1-3>
(Optional)
Change the frequency of Query messages sent.
xg(config)# ip snooping vlan
max-group <10-128>
(Optional)
Change the number of multicast addresses that can be
registered with IGMP snooping for each VLAN.
xg(config)# ip snooping vlan <1-4094>
fast-leave
(Optional)
Set the fast-leave mode used when receiving an IGMP Leave
message.
xg(config)# interface port range 1 20
Switch to interface edit mode to designate ports to specify the
forwarding method for multicast frames.
All ports are selected in this example.
xg(config-if)# multicast-forwarding
forward-unregsitered-mac
Set forwarding method for multicast frames to
forward-unregistered-mac.
xg(config)# exit
Exit to administrator EXEC mode.
To enable IGMP query, carry out the following procedure in the administrator EXEC mode.
Command Task
xg# configure terminal
Switch to global configuration mode.
xg(config)# ip snooping protocol igmp
Enable global IGMP snooping on the device.
xg(config)# ip snooping vlan <1-4094>
Enable IGMP snooping for each VLAN separately.
xg(config)# ip snooping vlan <1-4094>
group-member-interval <60-600>
(Optional)
Change the group member interval.
xg(config)# ip snooping vlan <1-4094>
last-member-query-interval <1-9>
(Optional)
Change the last member query interval.
xg(config)# ip snooping vlan <1-4094>
send-query-count <1-3>
(Optional)
Change the frequency of Query messages sent.
xg(config)# ip snooping vlan <1-4094>
querier ip A.B.C.D
Enable IGMP query and set the source IP address for a Query
message.
xg(config)# exit
Exit to administrator EXEC mode.
Page 53

XG2000 series User's Guide
53/315
All Rights Reserved, Copyright (C) PFU LIMITED 2009
4.10 Network Management
4.10.1 Traffic Statistics
The device can display traffic statistics to analyze network operations such as traffic bytes, errors, etc.
The following are the Traffic Statistics the device provides.
z Displays traffic information on outgoing and incoming frames for each port.
z Displays traffic information on incoming frames by frame size range for each port.
z Displays traffic information on incoming frames for each VLAN.
z Displays incoming traffic information by QoS priority for each port.
z Displays information related to data flow for each port.
z Displays information about errors that occur during transmission/reception for each port.
To display traffic statistics, monitor and show commands are provided.
z "monitor" command
Displays real-time traffic statistics.
z "show statistics" command
Outputs details of the current accumulated traffic statistics.
Enter this command followed by "> FILE_NAME" or "| redirect FILE_NAME" to output the results
to a file in volatile memory.
To display traffic statistics, run the following commands in the operator EXEC mode or in the administrator EXEC mode.
Command Task
xg> monitor traffic-counts
{ current | total } [interval <3-60>]
xg> monitor traffic-bytes
{ current | total } [interval <3-60>]
xg> show statistics traffic-counts
xg> show statistics traffic-bytes
View incoming and outgoing traffic statistics (number of
frames and number of bytes) for each port.
xg> monitor framesize-traffic-counts
{ current | total } [interval <3-60>]
xg> show statistics framesize-traffic-counts
View traffic statistics (number of frames) by frame size range
for each port.
xg> monitor vlan-traffic-counts
{ current | total } [interval <3-60>]
xg> monitor vlan-traffic-bytes
{ current | total } [interval <3-60>]
xg> show statistics vlan-traffic-counts
xg> show statistics vlan-traffic-bytes
View traffic statistics (number of frames and number of bytes)
on incoming frames for each VLAN.
xg> monitor qos-priority-traffic-counts
{ current | total } [interval <3-60>]
xg> monitor qos-priority-traffic-bytes
{ current | total } [interval <3-60>]
xg> show statistics
qos-priority-traffic-counts
xg> show statistics
qos-priority-traffic-bytes
View incoming traffic statistics (number of frames and number
of bytes) by QoS priority for each port.
xg> monitor dataflow
{ current | total } [interval <3-60>]
xg> show statistics dataflow
View traffic statistics (number of frames) related to data flow
during frame forwarding for each port.
xg> monitor error
{ current | total } [interval <3-60>]
xg> show statistics error
View information about errors that occur during
transmission/reception for each port.
xg> enable
xg# clear statistics
Clear cumulative traffic statistics collected after system
startup.
Page 54

XG2000 series User's Guide
54/315
All Rights Reserved, Copyright (C) PFU LIMITED 2009
4.10.2 SNMP Agent
SNMP (Simple Network Management Protocol) is a protocol that monitors and manages devices on a network.
The device supports the SNMP (v1/v2c) function to collect management information blocks (MIBs) from a remote network
manager (SNMP manager). For operations via SNMP manager, only read-only operations are allowed. For the MIBs supported,
refer to Appendix C. The device can be configured for up to 4 SNMP managers and up to 4 SNMP trap destinations.
To configure the SNMP agent, carry out the following procedures in the administrator EXEC mode.
Command Task
xg# configure terminal
Switch to global configuration mode.
xg(config)# hostname HOST-NAME
xg(config)# snmp-server location SYSTEM-LOCATION
xg(config)# snmp-server contact SYSTEM-CONTACT
Set the system name (HOST-NAME), system's location
(SYSTEM-LOCATION), and contact (SYSTEM-CONTACT).
xg(config)# snmp-server access host HOST
community COMMUNITY-NAME
Set the IP address (host name) of the SNMP manager and the
community name.
xg(config)# snmp-server trap host HOST
community COMMUNITY-NAME [protocol {v1|v2c}]
Set the SNMP trap receiver IP address (host name) and the
community name.
xg(config)# exit
Exit to administrator EXEC mode.
4.10.3 RMON
Remote Monitoring (RMON) is a function provided to monitor communications over a network, such as traffic and errors.
RMON, used in conjunction with the SNMP agent, allows the remote monitoring of traffic on a LAN segment.
The device supports 4 RMON groups (Statistics, History, Alarm and Event).
z Statistics group
Collects traffic statistics for each port.
z History group
Records traffic statistics for each port at specified time intervals.
z Alarm group
Monitors MIBs at specified time intervals and, if the monitored MIB object value exceeds
or falls below a specified threshold, a RMON event is executed.
z Event group
Specifies an event operation that is executed by an alarm. Possible event operations include
creation of a log entry and generation of a SNMP trap.
To configure RMON, carry out the following procedure in the administrator EXEC mode.
Command Task
xg# configure terminal
Switch to global configuration mode.
xg(config)# rmon collection history <1-65535>
port <1-20> [buckets <1-20>] [interval <1-3600>]
[owner OWNERNAME]
(Optional)
Enable a RMON history group.
xg(config)# rmon alarm <1-65535> VARIABLE
interval <2-65535> {absolute | delta}
rising-threshold <0-2147483647> [<1-65535>]
falling-threshold <0-2147483647> [<1-65535>]
[owner OWNERNAME]
(Optional)
Enable a RMON alarm group.
xg(config)# rmon event <1-65535> [log]
[trap COMMUNITY] [description
DESCRIPTION-STRING]
[owner OWNERNAME]
(Optional)
Enable a RMON event group.
xg(config)# exit
Exit to administrator EXEC mode.
Page 55

XG2000 series User's Guide
55/315
All Rights Reserved, Copyright (C) PFU LIMITED 2009
4.11 RADIUS/TACACS+ authentication
RADIUS (Remote Authentication Dial In User Service) or TACACS (Terminal Access Controller Access Control System) is
used to manage authentication, authorization, accounting remotely. XG2000 supports RADIUS/TACACS+ authentication using
PAP (User Password) for login authentication. An administrator can unify the authentications of various devices, which support
RADIUS/TACACS+ clients functions through a RADIUS/TACACS+ server.
4.11.1 RADIUS Attributes
It displays RADIUS attributes.
Attribute Value of attribute Content
User-Name 1 The username to authenticate
User-Password 2 Password to authenticate
NAS-IP-ADDRESS 4 IP address of the device (management LAN)
Service Type 6 AuthenticateOnly(8)
NAS-Identifier 32 Hostname of the device
4.11.2 TACACS+ Attributes
It displays TACACS+ attributes.
Category Content
action TAC_PLUS_AUTHEN_LOGIN (0x01)
priv_lvl TAC_PLUS_PRIV_LVL_MIN (0x00)
authen_type TAC_PLUS_AUTHEN_TYPE_PAP (0x02)
service TAC_PLUS_AUTHEN_SVC_LOGIN (0x01)
user_len Size of user field
rem_addr_len 0
data_len Size of data field
user Username to authenticate
data Password of the user to authenticate
Page 56

XG2000 series User's Guide
56/315
All Rights Reserved, Copyright (C) PFU LIMITED 2009
4.11.3 Configuring RADIUS/TACACS+
To configure RADIUS/TACACS+ authentication, carry out the following procedure.
Command Task
xg# configure terminal
Switch to global configuration mode.
xg(config)# radius-server key KEY
(Optional)
Specifies a global secret key which is used as a
default parameter when RADIUS server is registered
with no key parameter.
xg(config)# tacacs-server key KEY
(Optional)
Specifies a global secret key which is used as a
default parameter when TACACS+ server is
registered with no key parameter.
xg(config)# radius-server timeout <1 – 15>
(Optional)
Specifies the timeout(sec) for authentication requests.
xg(config)# radius-server host HOST [auth-port
PORT] [key KEY]
Register a RADIUS server.
xg(config)# tacacs-server host HOST [key KEY]
Register a TACACS+ server.
xg(config)# aaa authentication login {console |
ssh} {local | radius | tacacs} {local | none}
Set login authentication method.
xg(config)# exit
Exit to administrator EXEC mode.
xg# account user001 class admin
(Optional)
Register the same account for using
RADIUS/TACACS+ authentication on XG2000
XG2000 cannot use an unregistered account.
xg# show radius
Displays the information of RADIUS server
xg# show tacacs
Displays the information of TACACS+ server
xg# show authentication
Displays the setting status of login authentication
method
xg# show account
Lists the all accounts registered in the device.
z It is needed to register RADIUS/TACACS+ user accounts to XG2000 before enabling
RADIUS/TACACS+ authentication. XG2000 does not allow any account except for "admin" for the
default configuration.
z RADIUS/TACACS+ authentication is only available if primary login is RADIUS/TACACS+
authentication and secondary login is disable by "aaa authentication login" command. Any user can
not login XG2000 under RADIUS/TACACS+ authentication is only available if RADIUS/TACACS+
server does not work. It is recommended to test RADIUS/TACACS+ authentication under local
authentication is available.
z XG2000 requests authentication in order of the lists displayed by "show radius", "show tacacs"
command. Up to 4 access requests are transmitted for each RADIUS servers and 1 access for
TACACS+ servers until receiving the reply from the RADIUS/TACACS+ server.
Page 57

XG2000 series User's Guide
57/315
All Rights Reserved, Copyright (C) PFU LIMITED 2009
Chapter 5 Command Reference
Page 58

XG2000 series User's Guide
58/315
All Rights Reserved, Copyright (C) PFU LIMITED 2009
5.1 About Command Reference
This section describes how to read command references.
5.1.1 Command System
The following is the system of commands provided in the device:
Item Function
Management LAN Interface Configuration
commands
These are used to configure functions related to the management LAN
interface.
Serial/telnet/SSH configuration commands These are used to configure functions related to serial, telnet and SSH
connections.
System Basic Operation commands These are necessary commands for system operation such as the
system time setting, password setting, and file operations.
Configuration Information Operation
commands
These are used for displaying or saving configuration information
(running-config and startup-config) in the device.
Switch Basic Configuration commands These are used to configure the basic functions of the device.
Link Aggregation Configuration commands These are used to create/delete aggregation groups.
Switch Port Configuration commands These are used to set the operating characteristics of each switch port.
Spanning Tree Protocol (STP) Setup
commands
These are used to configure STP (Spanning Tree Protocol).
Virtual LAN (VLAN) Configuration commands These are used to configure virtual LAN (VLAN).
Quality of Service (QoS) Setup commands These are used to configure QoS (Quality of Service) configuration.
Port Mirroring Setup commands These are used to configure port mirroring.
IGMP Snooping Setup commands These are used to configure IGMP Snooping.
Statistics commands These are used to display various operational statistics.
SNMP Configuration commands These are used to configure SNMP.
RMON Configuration commands These are used to configure RMON.
System Status Display commands These are used to display the system status of the device and the
operational status of its hardware.
Maintenance commands These are necessary for maintenance of the device.
Page 59

XG2000 series User's Guide
59/315
All Rights Reserved, Copyright (C) PFU LIMITED 2009
5.1.2 Configuration of Command Reference
This section describes the configuration of command reference and descriptive content.
Function
Explains the functions of the commands.
Prompt
Indicates the prompt of the operational mode.
Command syntax
Describes the command syntax. The notation of the command syntax is as follows:
Notation Meaning Example of description
Lower-case characters Indicate fixed strings such as command names
and keyword names.
enable
Upper-case characters Indicate parameters specifying any strings. delete FILE-NAME
[ ]
(Enclosed in a pair of square
brackets)
Indicate omissible parameters. date [ YYYYMMDD-hhmmss ]
{ | }
(Enclosed in a pair of curly
brackets with a vertical line
in-between)
Indicate parameters wherein at least one
alternative must be chosen.
baudrate
{ 9600|19200|38400|57600 }
< >
(Enclosed in a pair of angle
brackets)
Indicate parameters with a condition of numerical
range.
interface port <1-20>
Parameter
Explains how to specify command parameters, and their meanings.
Command type
Indicates configuration commands that retain configuration information in startup-config and running-config or operation
management commands that are related to configuration of the device, such as status display or time setting.
Default
Indicates the factory default of this command.
Output form
Explains the meaning of output (or input) results, when there is a command output (or input).
Message
Explains messages displayed when executing a command, their solution, and significance.
Note
Explains notes for commands.
Example
Describes how to use commands, using examples.
Page 60

XG2000 series User's Guide
60/315
All Rights Reserved, Copyright (C) PFU LIMITED 2009
5.2 Management LAN Interface Configuration Commands
This section explains configuration commands related to the Management LAN Interface.
5.2.1 show remote-host
Function
Displays the relationship between the remote hostname and IP address.
Prompt
xg> or xg#
Command syntax
show remote-host
Command type
Operation management commands.
Output form
xg# show remote-host
Remote Host 2008/02/05-11:37:34
================================
IP Address Host Name
--------------- --------------------------------------------------------------
11.22.33.45 HOST005
11.22.33.46 HOST006
z IP Address
Display the IP address of remote host
z Host Name
Display the hostname which is related to the IP address
Example
Display the list of hostname and the IP address.
xg# show remote-host
Page 61

XG2000 series User's Guide
61/315
All Rights Reserved, Copyright (C) PFU LIMITED 2009
5.2.2 management-lan ip
Function
Sets the IP address and default gateway, when the Management LAN Interface is used.
Use the no form to disable the Management LAN Interface.
Prompt
xg(config)#
Command syntax
management-lan ip A.B.C.D/M [default-gw A.B.C.D]
no management-lan ip
Parameter
z ip A.B.C.D/M
Specifies the IP address and subnet mask bit length of the Management LAN Interface in the
A.B.C.D/M format.
Specifies an IP address of A.B.C.D, and a subnet mask bit length to M.
IP addresses that can be set are: 1.0.0.1 - 126.255.255.254, 128.0.0.1 - 191.255.255.254,
and 192.0.0.1 - 223.255.255.254.
z default-gw A.B.C.D
Specifies the IP address of the default gateway.
Command type
Configuration command
Default
192.168.0.2/24
Message
% Invalid IP-address.
Explanation
The specified format of the IP address or specified content is incorrect.
Solution
Specify the IP address in a correct format and execute the command again.
Note
z When the IP address is changed from a telnet/SSH terminal using this command, the telnet/SSH connection will be
disconnected. Connect again with a new address.
Example
Make the Management LAN Interface usable by setting IP address to "12.34.56.25," subnet mask bit length to "24"
(255.255.255.0), and default gateway address to "12.34.56.1".
xg(config)# management-lan ip 12.34.56.25/24 default-gw 12.34.56.1
Page 62

XG2000 series User's Guide
62/315
All Rights Reserved, Copyright (C) PFU LIMITED 2009
5.2.3 management-lan dns-server
Function
Registers the IP address of a DNS (Domain Name Service) server used for host name resolution. Up to three DNS servers can
be registered.
Use the no form to delete registered DNS servers.
Prompt
xg(config)#
Command syntax
management-lan dns-server A.B.C.D
no management-lan dns-server [A.B.C.D]
Parameter
z dns-server A.B.C.D
Sets the IP address to register as a DNS server in A.B.C.D format.
IP addresses that can be set are: 1.0.0.1 - 126.255.255.254, 128.0.0.1 - 191.255.255.254,
and 192.0.0.1 - 223.255.255.254.
z (no management-lan) dns-server [A.B.C.D]
Deletes registered DNS server(s). Specifies IP address in A.B.C.D format.
When IP address is omitted, all registered DNS servers will be deleted.
Command type
Configuration command
Default
None
Message
% Not exist IP-address of DNS server
Explanation
The specified IP address is not found.
Solution
Specify the IP address of a registered DNS server.
% Number of DNS server is over (max=3)
Explanation
The upper limit of the number of registrable DNS servers was surpassed.
Solution
After deleting unnecessary DNS server information, execute the command again.
% Invalid IP-address.
Explanation
The specified format of the IP address or specified content is incorrect.
Solution
Specify the IP address in a correct format and execute the command again.
Note
z Since DNS server(s) connect via the Management LAN Interface, the Management LAN Interface must be configured
beforehand via the management-lan ip command.
z If DNS server is registered, the new setting becomes enabled after executing “copy running-config startup-config”
command and restart the device.
Example
Register DNS servers with IP addresses "12.34.56.76" and "12.34.56.77".
xg(config)# management-lan dns-server 12.34.56.76
xg(config)# management-lan dns-server 12.34.56.77
Delete all registered DNS servers.
xg(config)# no management-lan dns-server
Page 63

XG2000 series User's Guide
63/315
All Rights Reserved, Copyright (C) PFU LIMITED 2009
5.2.4 management-lan domain
Function
Sets the default domain name when referring to a DNS (Domain Name Service) server.
For example, when the host name is "hostname1," and "abc.jp" is specified as the default domain name, perform a search for
the address with an FQDN (Fully Qualified Domain Name) of "hostname1.abc.jp."
Use the no form to delete the set domain name.
Prompt
xg(config)#
Command syntax
management-lan domain DOMAIN-NAME
no management-lan domain
Parameter
z domain DOMAIN-NAME
Specifies the default domain name.
Follow these rules for specifying a domain name:
− Characters usable for the name
Alphabet ([a - z], [A - Z]), numerical characters ([0 - 9]), hyphen (-), and period (.)
− First character
Alphabet ([a - z], [A - Z])
− Last character
Alphabet ([a - z], [A - Z]), numerical characters ([0 - 9]), and period (.)
Command type
Configuration command
Default
None
Note
z If the default domain name is changed, the new setting becomes enabled after executing “copy running-config
startup-config” command and restart the device.
Example
Specify "corp.co.jp" for the default domain name of a DNS server.
Then, return to the operator exec mode, specify "hostname1" for a TFTP server name, and execute the "tftp" command. The
default domain name is added to "hostname1," and the IP address can be referenced from the DNS server with the FQDN
name of "hostname1.corp.co.jp."
xg(config)# management-lan domain corp.co.jp
xg(config)# exit
xg# tftp get hostname1 remotefile localfile
Page 64

XG2000 series User's Guide
64/315
All Rights Reserved, Copyright (C) PFU LIMITED 2009
5.2.5 hostname
Function
Changes the hostname of the device.
Use the no form to return to the default ("xg").
Prompt
xg(config)#
Command syntax
hostname HOST-NAME
no hostname
Parameter
z HOST-NAME
Specifies the hostname of the device. Specify the hostname using 63 characters or less, with
an alphabet character at the beginning.
Follow these rules for specifying the hostname:
− Characters usable for the name
Alphabet ([a - z], [A - Z]), numerical characters ([0 - 9]), hyphen (-), and period (.)
− First character
Alphabet ([a - z], [A - Z])
− Last character
Alphabet ([a - z], [A - Z]), numerical characters ([0 - 9]), and period (.)
Command type
Configuration command
Default
"xg"
Example
Specify the hostname of the device to be "xg2."
The prompt will change to "xg2."
Switching to the administrator exec mode and displaying the system status will confirm that the System Name was changed to
"xg2."
xg(config)# hostname xg2
xg2(config)# exit
xg2# show system information
System Information 2007/01/22-11:04:54
=======================================
System Name (hostname) : xg2
System Location : (none)
Page 65

XG2000 series User's Guide
65/315
All Rights Reserved, Copyright (C) PFU LIMITED 2009
5.2.6 remote-host
Function
Registers remote host information and shows the relationship between the remote hostname and IP address.
By registering the IP address of a remote host that is used frequently, the name can be specified instead of the IP address. The
relationship between the registered hostname and IP address is given priority over the DNS server configuration.
Use the no form to delete registered remote host information.
Prompt
xg(config)#
Command syntax
remote-host A.B.C.D HOST-NAME
no remote-host [ A.B.C.D ]
Parameter
z A.B.C.D
Specifies the IP address of a remote host in A.B.C.D format.
IP addresses that can be set are: 1.0.0.1 - 126.255.255.254, 128.0.0.1 - 191.255.255.254,
and 192.0.0.1 - 223.255.255.254.
z HOST-NAME
Specifies the remote hostname to register. Specify the hostname using 63 characters or less,
with an alphabet character at the beginning.
Follow the rules below for the hostname and domain name:
− Characters usable for the name
Alphabet ([a - z], [A - Z]), numerical characters ([0 - 9]), hyphen (-), and period (.)
− First character
Alphabet ([a - z], [A - Z])
− Last character
Alphabet ([a - z], [A - Z]), numerical characters ([0 - 9]), and period (.)
z (no remote-host) [A.B.C.D]
Deletes the registered remote host. Specify the IP address in A.B.C.D format.
When IP address is omitted, all registered remote hosts will be deleted.
Command type
Configuration command
Default
None
Message
% Invalid IP-address.
Explanation
The specified format of the IP address or specified content is incorrect.
Solution
Specify the IP address in a correct format and execute the command again.
% Number of remote-host is over (max=10)
Explanation
The upper limit of the number of registrable remote hosts was surpassed.
Solution
After deleting unnecessary hosts, execute the command again.
% Already exist name of remote host
Explanation
A remote hostname with the same IP address was previously registered.
Solution
Change the remote hostname of the IP address to the correct name, or register it again
after deleting it.
% Not exist IP-address of remote host
Explanation
The specified host definition is not registered.
Solution
Specify a registered IP address and execute the command again.
Page 66

XG2000 series User's Guide
66/315
All Rights Reserved, Copyright (C) PFU LIMITED 2009
Note
z If a remote host is registered or deleted, the new setting becomes enabled after executing “copy running-config
startup-config” command and restart the device.
Example
Register the IP address "11.22.33.45" as the hostname of "HOST005," and then "11.22.33.46" as the hostname of "HOST006."
Using the show remote-host command, registration of "HOST005" and "HOST006" can be confirmed.
xg(config)# remote-host 11.22.33.45 HOST005
xg(config)# remote-host 11.22.33.46 HOST006
xg(config)# exit
xg# show remote-host
Remote Host 2007/01/22-11:45:46
================================
IP Address Host Name
---------- -----------------------------------------
11.22.33.45 HOST005
11.22.33.46 HOST006
Page 67

XG2000 series User's Guide
67/315
All Rights Reserved, Copyright (C) PFU LIMITED 2009
5.3 Serial/Telnet/SSH Configuration Commands
This section explains configuration commands related to a serial connection/telnet/SSH connection.
5.3.1 terminal pager
Function
Enables or disables the pager function of the serial/telnet/SSH terminal.
Prompt
xg> or xg#
Command syntax
terminal pager { on | off }
Parameter
z pager { on | off }
Specifies enable/disable of the pager.
− on
Enables the pager.
− off
Disables the pager.
Command type
Operation management commands
Default
on
Note
z This command is effective until the terminal is disconnected.
5.3.2 line
Function
Switches to the terminal edit mode
Prompt
xg(config)#
Command syntax
line console
Parameter
z console
Switches to the terminal edit mode of the serial connection.
Command type
Configuration command
Example
Switch from the administrator exec mode to the terminal edit mode with the serial interface.
xg# configure terminal
xg(config)# line console
Page 68

XG2000 series User's Guide
68/315
All Rights Reserved, Copyright (C) PFU LIMITED 2009
5.3.3 baud-rate
Function
Sets the serial baud rate (bps).
Prompt
xg(config-line)#
Command syntax
baud-rate { 9600 | 19200 | 38400 | 57600 }
Parameter
z { 9600 | 19200 | 38400 | 57600 }
Specifies any of 9600/19200/38400/57600 as the serial baud rate (bps).
Command type
Configuration command
Default
9600
Note
z When the serial baud rate is newly set, it will become valid after logging out of the serial terminal session and
re-connecting.
Example
Switch from the global configuration mode to the terminal edit mode using the "line console" command. And then change the
serial baud rate to 38400bps.
xg(config)# line console
xg(config-line)# baud-rate 38400
5.3.4 terminal timeout
Function
Sets the monitoring idle time for a serial connection, or telnet and SSH connections.
When there is no operation from the terminal within the monitoring time specified with this command, the terminal will be
logged out automatically.
Use the no form to return to the default setup.
Prompt
xg(config)#
Command syntax
terminal timeout { console | vty } <0-60>
no terminal timeout { console | vty }
Parameter
z timeout { console | vty }
Specifies the type of the terminal.
− console
Sets the monitoring idle time for a serial connection.
− vty
Sets the monitoring idle time for a telnet and SSH connections.
z <0-60>
Specifies the monitoring idle time. Specified in the range of 0 to 60 minutes.
When 0 is specified, no-operation monitoring is performed, and the terminal will not be logged
out automatically.
Command type
Configuration command
Default
10 minutes
Note
z While the "monitor" command or the "update-system" command is being executed, no-operation monitoring is
deterred.
z The setting of this command will become valid after login.
Example
Set the monitoring idle time for the serial connection, and Telnet and SSH connections to 10 minutes and 5 minutes
respectively.
xg# configure terminal
xg(config)# terminal timeout console 10
xg(config)# terminal timeout vty 5
Page 69

XG2000 series User's Guide
69/315
All Rights Reserved, Copyright (C) PFU LIMITED 2009
5.3.5 telnet-server
Function
Enables telnet connections with the device.
Use the no form to disable telnet connections.
Prompt
xg(config)#
Command syntax
telnet-server
no telnet-server
Command type
Configuration command
Default
Disabled
Example
Enable telnet connections to the device.
xg(config)# telnet-server
5.3.6 ssh-server
Function
Enables SSH connections with the device. Up to 4 terminal sessions can access the device concurrently.
Use the no form to disable SSH connections.
Prompt
xg(config)#
Command syntax
ssh-server
no ssh-server
Command type
Configuration command
Default
None
Note
z The device supports password authentication.
z The device supports only version 2.
Example
Enable SSH connections to the device.
xg(config)# ssh-server
5.3.7 ssh-auto-key-generation
Function
Regenerate authentication key when enables SSH connection.
Use the no form not to regenerate authentication key.
Prompt
xg(config)#
Command syntax
ssh-auto-key-generation
no ssh-auto-key-generation
Command type
Configuration command
Default
None
Example
The following enables to regenerate authentication key.
xg(config)# ssh-auto-key-generation
Page 70

XG2000 series User's Guide
70/315
All Rights Reserved, Copyright (C) PFU LIMITED 2009
5.3.8 show ssh-host-key
Function
Shows authentication key.
Prompt
xg> or xg#
Command syntax
show ssh-host-key
Command type
Operation management commands
Output form
xg# show ssh-host-key
SSH Host Key 2007/09/07-17:10:33
===============================================================================
ssh-dss AAAAB3NzaC1kc3MAAACBALZunL9ymdBEx4QFOsKhwwCf7WpCwpLne6ZNgc7keG/2Yf0OY4Yx
MwOgf1Dm5SSaN/pSdfKotT/zN3ywpDQywlNVjNxF7IYk/p3Q/jABPa245A1Mu9l9a8IiOZhV+w0vMI8N
vTi4Cqk2S+tSDzf2vXQ58KCAijeyGDrEi71bZPgbAAAAFQDjkiO5/EupRfrKMc2HHpM7OWtF+QAAAIBR
c1CGq9Wt60LV6DkzrYhLNcRgkRNi/XFARzyyFX3TWm2LPBDd8/nbp3zc+N5poNKHBJ/61somWzqKVrTA
nR/AQDEyftltVgr4vWn1IDEtu6IZzShZGfgFDk2aZIVP3jFr0BEz5GV+eoGkQb4Be3qJHKiomIjNi+As
vrSYfBqSnQAAAIBj+rJ2lZcTRtzgkmeJvjf0q52sHFL+zSC27e24c/BU7V+Hr2xw50I+bVZNbxHGMWtb
Ma9mQmBbKmotWq8wRxHluBsQ/5ZktlQrT60M0F8zF+vBFYV3PPG+LvpA8MTYDvjXkZ7w0ZypU/ShRqiZ
R8X0wyVvA2GoBCiPlXj1VfmZHA== admin@xg
ssh-rsa AAAAB3NzaC1yc2EAAAABIwAAAQEA1qtD/sBupdj89yRApm2o3pZCpaodDwljdmgW8iBfmtmO
SUnLYcszHW+dNTg7QXeoEyU+MyZMzYxQH1kABB3Wl+rfP0dZ7Ri4nCm+fYWN6QCX8M5hHVuALz5ITmBA
sWxhQUvxDxI+VdpUB3ta4xgKiPOMFfVBjdr4M6Upr9+jaVG6pyWCDGtkEL4qbLUXTx1XqFsNtuLwembg
ZUWTXo3cU6BXZ2B+wo8mpgsvcabcN1gZiTycAs3WIj/0V8lp0hglQKsfOqIF8b9pNWEi2NqIMbDSG+yz
BzXNqwg6IbpCUMxdBMeij97YafJTl1+h5zJvxP2AsrannGlIdeYJxXYaWQ== admin@xg
===============================================================================
Example
The following shows authentication key.
xg# show ssh-host-key
5.3.9 show ssh-rhost-key
Function
Shows registered public key of SSH remote host.
Prompt
xg> or xg#
Command syntax
show ssh-rhost-key
Command type
Operation management commands
Output form
xg# show ssh-rhost-key
SSH Remote Host Key 2008/07/07-04:24:24
===============================================================================
192.168.1.10 ssh-rsa AAAAB3NzaC1yc2EAAAABIwAAAIEA0hyfbg54vUvQD8aUkpxTaSeRPFUdk
vKDGkXy+LBf+JWV2XZB4cINAJll6rn3HbkzEiJRrAG+Pwzn35FHRuW7sWjiyMmaRVXnWRrryFJwUKaAB
R2XchMbRLn3cz22ioA8H89OUvQj4JIGGYF3qjCxFz2rNPpU27Z18YczflvHHVM=yuyussh-rsaAAAAB3
NzaC1yc2EAAAABIwAAAIEA0hyfbg54vUvQD8aUkpxTaSeRPFUdkvKDGkXy+LBf+JWV2XZB4cINAJll6r
n3HbkzEiJRrAG+Pwzn35FHRuW7sWjiyMmaRVXnWRrryFJwUKaABR2XchMbRLn3cz22ioA8H89OUvQj4
JIGGYF3qjCxFz2rNPpU27Z18YczflvHHVM=
===============================================================================
Example
The following shows registered public key.
xg# show ssh-rhost-key
Page 71

XG2000 series User's Guide
71/315
All Rights Reserved, Copyright (C) PFU LIMITED 2009
5.3.10 clear ssh-rhost-key
Function
Delete registered public key of SSH remote host.
Prompt
xg#
Command syntax
clear ssh-rhost-key [ HOST ]
Parameter
z HOST
Specifies the host name or IP address of a SSH server.
If this parameter is omitted, all public keys will be deleted.
Command type
Operation management commands
Example
Delete the public key for the SSH server whose IP address is “192.168.1.10”
xg# clear ssh-rhost-key 192.168.1.10
5.3.11 generate ssh-host-key
Function
Generate authentication key. If it has already been made, it is regenerated.
Prompt
xg#
Command syntax
generate ssh-host-key
Command type
Operation management commands
Example
The following generates authentication key.
xg# generate ssh-host-key
Page 72

XG2000 series User's Guide
72/315
All Rights Reserved, Copyright (C) PFU LIMITED 2009
5.3.12 terminal window
Function
Sets the screen display size of the serial connection terminal.
Use the no form to return to the default setup.
For a telnet or SSH connection, the screen size will be obtained automatically from the client terminal.
Prompt
(config-line)#
Command syntax
terminal window <50-200> <12-100>
Parameter
z <50-200>
Specifies the number of columns (horizontal) of the screen. It can be set in the range of
50 to 200.
z <12-100>
Specifies the number of lines (vertical) of the screen. It can be set in the range of 12
to 100.
Command type
Configuration command
Default
80 columns by 24 lines
Page 73

XG2000 series User's Guide
73/315
All Rights Reserved, Copyright (C) PFU LIMITED 2009
5.4 System Basic Operation Commands
This section explains the basic commands of the device CLI (Command Line Interface).
5.4.1 enable
Function
Switches from the operator exec mode to the administrator exec mode.
When a password is set for the "enable" command, a password is required. When there is an error in entering the password,
re-entering the password will be allowed up to three times. Additionally, after successful authentication of the password, for a
given login session, the user will not be prompted for the password until they exit the administrator exec mode and re-enter the
mode.
Prompt
xg>
Command syntax
enable
Command type
Operation management commands
Example
Switch from the operator exec mode to the administrator exec mode using the "enable" command.
The prompt character will change to "xg#."
xg> enable
xg#
When a password is set for the "enable" command, enter the password.
When password authentication is successful, control switches to the administrator exec mode, and the prompt character will
change to "xg#."
xg> enable
Password: ←Enter the password to "enable."
xg# (The entered password is not displayed.)
Page 74

XG2000 series User's Guide
74/315
All Rights Reserved, Copyright (C) PFU LIMITED 2009
5.4.2 show history
Function
Displays the history of executed commands since logged into the device.
Prompt
xg> or xg#
Command syntax
show history
Command type
Operation management commands
Output form
xg# show history
1 enable
2 show system information
3 date
4 show system information
5 show history
Note
z If the same command is executed continuously, it is treated as one command.
z Up to 100 history will be displayed.
Example
Displays the history of executed commands.
xg# show history
5.4.3 disable
Function
Switch from the administrator exec mode to the operator exec mode.
Prompt
xg#
Command syntax
disable
Command type
Operation management commands
Example
Switch from the administrator exec mode to the operator exec mode using the "disable" command.
The prompt character will change to "xg>."
xg# disable
xg>
Page 75

XG2000 series User's Guide
75/315
All Rights Reserved, Copyright (C) PFU LIMITED 2009
5.4.4 configure terminal
Function
Switch from the administrator exec mode to the global configuration mode.
Prompt
xg#
Command syntax
configure terminal
Command type
Operation management commands
Message
Configuration is locked by other.
Explanation
A switch in state is not possible because a terminal session in global configuration
mode exists.
Solution
After switching the terminal session from global configuration mode to administrator
EXEC mode, re-execute the command.
Example
Switch from the administrator exec mode to the global configuration mode using the "configure terminal" command.
The prompt character will change to "xg(config)#."
xg# configure terminal
xg(config)#
5.4.5 exit
Function
Returns to the prior command mode level.
The relationship between the current command mode and the command mode status after executing the "exit" command is as
follows:
Current command mode Status after exit
Operator exec mode Log out
Administrator exec mode Log out
Global configuration mode Administrator exec mode
Interface Global configuration mode
Terminal edit mode Global configuration mode
Prompt
xg>, xg#, xg(config)# , xg(config-if)# , xg(config-agg)# , xg(config-vlan)# , xg(config-line)#
Command syntax
Exit
Command type
Operation management commands
Example
Switch from the global configuration mode to the administrator exec mode using the "exit" command.
The prompt character will change to "xg#."
xg#(config)# exit
xg#
Page 76

XG2000 series User's Guide
76/315
All Rights Reserved, Copyright (C) PFU LIMITED 2009
5.4.6 logout / quit
Function
Logs out and disconnects the terminal session.
Prompt
xg> or xg#
Command syntax
Logout
Command type
Operation management commands
Example
Log out and disconnect the terminal session.
xg# logout
Connection closed by foreign host.
5.4.7 do
Function
Executes administrator exec mode commands from the global configuration mode.
Using this command saves the trouble of having to return to the administrator exec mode.
Prompt
xg(config)#
Command syntax
do LINE
Parameter
z LINE
Specifies the command line for the administrator exec mode to execute.
Command type
Operation management commands
Message
Can't execute this command.
Explanation
The specified command cannot be executed with the do command.
Solution
Execute the command in an appropriate mode without using the do command.
Example
Set "bridge aging-time" from the global configuration mode. And then, without returning to the administrator exec mode, check
the setting status using the "show bridge" command.
xg(config)# bridge aging-time 200
xg(config)# do show bridge
Switch Basic Information 2007/01/22-12:16:17
================================================================
Aging Time : 200 (sec)
Cut-through Switching : Enabled
Jumbo Frame Support
: Enabled Max Frame Size: 9216 (byte)
Independent-vlan-learning: Enabled
DiffServ ToS : Disabled
================================================================
Page 77

XG2000 series User's Guide
77/315
All Rights Reserved, Copyright (C) PFU LIMITED 2009
5.4.8 help
Function
Displays help on how to use the CLI.
Prompt
xg>, xg#, xg(config)# , xg(config-if)# , xg(config-agg)# , xg(config-vlan)# , xg(config-line)#
Command syntax
Help
Command type
Operation management commands
5.4.9 show account
Function
Displays information about the user.
Prompt
xg> or xg#
Command syntax
show account
Command type
Operation management commands
Output form
xg# show account
Username Information 2007/10/04-14:33:42
=============================================================================
Username Class
-------------------------------- ---------admin admin
operator1 operator
user0001 admin
=============================================================================
z Username
Display the username.
z Class
Display the class that the user can access to.
operator : The user can access operator class only.
admin : The user can access both operator and administrator class.
Example
Display the user status.
xg# show account
Page 78

XG2000 series User's Guide
78/315
All Rights Reserved, Copyright (C) PFU LIMITED 2009
5.4.10 account
Function
Create a new user.
Use the no form to delete the specified user.
Prompt
xg#
Command syntax
account USERNAME class { operator | admin }
no account USERNAME
Parameter
z USERNAME
Specify a username with a length in the range of 2 to 16 characters, with an alphabet character
at the beginning.
Follow these rules for specifying a username:
− Characters usable for the username
Alphabet ([a - z], [A - Z]), numerical characters ([0 - 9]), hyphen (-), underscore (_), and period (.)
− First character
Alphabet ([a - z], [A - Z])
z class { operator | admin }
Specify the class that the user can access to.
− operator
The user can access operator class only.
− admin
The user can access both operator and administrator class.
Command type
Operation management commands
Default
admin (username) is admin class
Message
% The length of user name is invalid.
Explanation
The length of the username is invalid.
Solution
Specify the username between 2 and 16 characters.
% First character is invalid.
Explanation
The first character of the username is invalid.
Solution
Specify the first character of the username to be an alphabet.
% Invalid character is included.
Explanation
Invalid character is included in the username.
Solution
Specify characters usable for the username.
% USERNAME already exists.
Explanation
The user could not be added because specified username is already used.
Solution
Change the username or delete the user and execute the command again.
% cannot add user.
Explanation
The user could not be added.
Solution
Review the password and execute the command again.
% USERNAME does not exist.
Explanation
The user could not be deleted because it does not exist.
Solution
Review if the username exists.
% 4 users already exist.
Explanation
The maximum number of users was exceeded.
Solution
After deleting unnecessary users, execute the command again.
% The user name is reserved.
Explanation
Reserved username is specified.
Solution
Change the username and execute the command again.
Page 79

XG2000 series User's Guide
79/315
All Rights Reserved, Copyright (C) PFU LIMITED 2009
Note
z Specify a password with a length in the range of 5 to 16 characters.
z The maximum number of users that can register to this device is 4.
Example
Add user0001 as the username and specify operator class:
xg# account user0001 class operator
Changing password for user0001
Enter the new password (minimum of 5, maximum of 16 characters)
Please use a combination of upper and lower case letters and numbers.
Enter new password:****** ← Enter the password.
(The entered password is not displayed.)
Re-enter new password: ******** ← Enter the new password again for confirmation
Password changed. (The entered password is not displayed.)
5.4.11 password (Operator EXEC mode)
Function
Change the login password of logged in user to the device.
Prompt
xg>
Command syntax
password
Command type
Operation management commands
Message
Bad password: too short.
Explanation
The password is too short.
Solution
Specify a password using five or more characters.
Bad password: too long.
Explanation
The password is too long.
Solution
Specify a password using 16 or less characters.
Note
z This command (password command for Administrator exec mode) is executable only when the user can access
operator class only (see account command for the details).
z Specify a password with a length in the range of 5 to 16 characters.
z Make a note of the changed password and retain it. Refer to Section 7.1.3, Restoring Factory Defaults for recovery of
lost or forgotten passwords.
z Login password information is not included in the configuration information. Therefore, even when the configuration
information is downloaded to another device, the password information will not be displayed or transferred.
Example
operator1 that can access only operator class logged in the device and change own login password.
xg> password
Changing password for operator1
Enter the new password (minimum of 5, maximum of 16 characters)
Please use a combination of upper and lower case letters and numbers.
Enter new password:
Re-enter new password:
Password changed.
Page 80

XG2000 series User's Guide
80/315
All Rights Reserved, Copyright (C) PFU LIMITED 2009
5.4.12 password (Administrator EXEC mode)
Function
Change the login password of the device.
Prompt
xg#
Command syntax
password [USERNAME]
Parameter
z USERNAME
Specify the username to change its login password. When USERNAME is omitted, the login password
of own user is changed.
Command type
Configuration command
Message
Bad password: too short.
Explanation
The password is too short.
Solution
Specify a password using five or more characters.
Bad password: too long.
Explanation
The password is too long.
Solution
Specify a password using 16 or less characters.
Note
z This command (password command for Global configuration mode) is executable only when the user can access both
operator and administrator class (see account command for the details).
z Specify a password with a length in the range of 5 to 16 characters.
z Make a note of the changed password and retain it. Refer to Section 7.1.3, Restoring Factory Defaults for recovery of
lost or forgotten passwords.
z Login password information is not included in the configuration information. Therefore, even when the configuration
information is downloaded to another device, the password information will not be displayed or transferred.
Example
Change the login password of the user that username is operator1.
xg# password operator1
Changing password for operator1
Enter the new password (minimum of 5, maximum of 16 characters)
Please use a combination of upper and lower case letters and numbers.
Enter new password:
Re-enter new password:
Password changed.
Page 81

XG2000 series User's Guide
81/315
All Rights Reserved, Copyright (C) PFU LIMITED 2009
5.4.13 reset
Function
Restarts the device.
Prompt
xg#
Command syntax
reset [ factory-default ]
Parameter
z [ factory-default ]
When this parameter is specified, the contents of startup-config, log, and login password
will be returned to the factory default.
Command type
Operation management commands
Note
z When the system is restarted without having saved the running-config to startup-config, the information set in
running-config will be lost.
z When the device is restarted, the telnet and SSH sessions will be disconnected. Reconnect after restart of the system
is complete.
Example
Restart the device using the "reset" command.
When the "reset" command is executed, the confirmation message is displayed.
xg# reset
Do you restart system? (y/n) : Confirmation message is displayed.
When "y" or "Y" is entered, the reboot process will be performed. When "n" or "N" is entered, the reboot process will be
cancelled.
5.4.14 system shutdown
Function
Stops the device system and prepares it for power off.
After executing this command and the STATUS-LED goes out, turn off the power to the device.
Prompt
xg#
Command syntax
system shutdown
Command type
Operation management commands
Note
z When power to the device is turned off without executing the system shutdown command, the maintenance
information will not be properly stored. Furthermore, if the power is turned off while data is being written to nonvolatile
memory, it may be corrupted, and the system might not restart correctly on powerup.
z When the system is shut down without saving running-config to startup-config, the information set in running-config will
be lost.
Example
When the "system shutdown" command is executed, the confirmation message is displayed.
xg# system shutdown
Do you shutdown system? (y/n) : ← Confirmation message is displayed.
When "y" or "Y" is entered, the system shutdown process will be performed. When "n" or "N" is entered, the system shutdown
process will be canceled.
Page 82

XG2000 series User's Guide
82/315
All Rights Reserved, Copyright (C) PFU LIMITED 2009
5.4.15 date
Function
Displays the date/time of the current system clock.
Prompt
xg> or xg#
Command syntax
Date
Command type
Operation management commands
Output form
The current date and time is displayed in the form of "year/month/date-hour:minutes:seconds."
xg# date
2007/01/22-14:31:02
5.4.16 date set
Function
Changes the date/time of the current system clock.
Prompt
xg#
Command syntax
date set DATE-TIME
Parameter
z DATE-TIME
Enter the date and time in the form of "MMDDhhmm[[CC]YY][.ss]."
− MM
Specify the month to set in the range of 1 to 12.
− DD
Specify the day to set in the range of 1 to 31.
− hh
Specify the hour to set in the range of 0 to 23.
− mm
Specify the minutes to set in the range of 0 to 59.
− [[CC]YY]
Specify the first two digits of the four digits of the year for CC. When it is omitted
20 will be specified.
Specify the last two digits of the four digits of the year for YY.
If CC and YY are both omitted, the year will not be changed.
− [.ss] (second <0 - 59>)
Specify the seconds to set in the range of 0 to 59.
Command type
Operation management commands
Message
% invalid date %1$.
Explanation
The specified parameter of the date and time is incorrect.
[[Inserted string]]%1$: specified date and time
Solution
Check that no mistakes have been made in the date and time parameter.
Example
Set the date and time of the system to 20:25:30, June 30, 2005.
xg# date set 06302025.30 (Year omitted)
or
xg# date set 0630202505.30 (Year specified with the last two digits)
or
xg# date set 063020252005.30 (Year specified with four digits)
Page 83

XG2000 series User's Guide
83/315
All Rights Reserved, Copyright (C) PFU LIMITED 2009
5.4.17 date timezone
Function
Sets the time zone of the device.
Use the no form to return to the default setup.
Prompt
xg#
Command syntax
Date timezone gmt OFFSET
No date timezone
Parameter
z gmt [ OFFSET ]
Specifies the time zone as the difference from GMT (Greenwich Mean Time).
The time difference from GMT is specified in the form of "+hhmm" (+ can be omitted) when
setting forward from GMT.
It is specified in the form of "-hhmm" when setting backward from GMT.
− hh
Specifies the hour difference from GMT.
− mm
Specifies the minute difference from GMT.
It can be set in the range of -1200 to +1300.
Command type
Operation management commands
Default
0000
Message
% invalid input %1$.
Explanation
The specified parameter for the time difference is incorrect.
[[Inserted string]]%1$: specified time difference
Solution
Check that no mistakes have been made in the time difference parameter.
Note
z The setting will be valid after restarting the system.
z Use the "show system information" command to confirm the settings.
z The setting will not be included in the configuration information. Therefore, even if the configuration information was
restored by another device, the timezone setting will be invalid.
Example
Set the time zone to +9:00 (JST: Japan Standard Time) from GMT.
xg# date timezone gmt +0900
or
xg# date timezone gmt 0900
Then set the time zone to -1:30 from GMT.
xg# date timezone gmt -0130
Page 84

XG2000 series User's Guide
84/315
All Rights Reserved, Copyright (C) PFU LIMITED 2009
5.4.18 date summer-time
Function
Sets Daylight Saving Time.
Use the no form to return to the default setup.
Prompt
xg#
Command syntax
date summer-time START_DAY[/TIME] END_DAY[/TIME] [OFFSET]
no date summer-time
Parameter
z START_DAY[/TIME]
Specifies the day/time to start Daylight Saving Time in any form of "Mm.w.d/hhmm," "Jn/hhmm,"
or "n/hhmm."
− Mm.w.d
Specifies the day to start Daylight Saving Time in m, w, and d.
Specify month for m (1 to 12), week for w (1 to 5), and the day of the week for d (0
to 6).
w = 1 means the first week where d exists, and w = 5 means the last week.
d = 0 means Sunday.
− Jn
Specifies the day to start Daylight Saving Time in day-of-year (Julian day). In leap
years, February 29th is not counted. Specify a number in the range of 1 to 365 for
n.
− n
Specifies the day to start Daylight Saving Time in day-of-year. In leap years, February
29th is counted. Specify a number in the range of 1 to 366 for n.
Specifies the following values, for the first day of each month in "Jn" specification
and "n" specification.
specification Month/Day Jn specification
Common year Leap year
January 1st J1 1 1
February 1st J32 32 32
March 1st J60 60 61
April 1st J91 91 92
May 1st J121 121 122
June 1st J152 152 153
July 1st J182 182 183
August 1st J213 213 213
September 1st J244 244 245
October 1st J274 274 275
November 1st J305 305 306
December 1st J335 335 336
− hh
Specifies the hour to start Daylight Saving Time.
− mm
Specifies the minute to start Daylight Saving Time.
When hhmm is omitted, "0100" (an hour) is specified.
z END_DAY[/TIME]
Specifies the day/time to end Daylight Saving Time. The description format is the same as
"START_DAY/TIME."
z OFFSET
Specifies the time set forward during Daylight Saving Time in the form of "hhmm."
− hh
Specifies the hour set forward during Daylight Saving Time with a two-digit number.
It can be set in the range of 00 to 23.
− mm
Specifies the minute set forward during Daylight Saving Time with a two-digit number.
It can be set in the range of 00 to 59.
When this parameter is omitted, "0100" (an hour) is specified.
Command type
Operation management commands
Default
None
Page 85

XG2000 series User's Guide
85/315
All Rights Reserved, Copyright (C) PFU LIMITED 2009
Message
% DATE '%1$' is invalid
Explanation
The specified date/time is incorrect.
[[Inserted string]]%1$: incorrect parameter value is displayed.
Solution
Correct the error in the parameter, and execute the command again.
% OFFSET '%1$' is invalid
Explanation
The specified OFFSET is incorrect.
[[Inserted string]]%2$: incorrect parameter value is displayed.
Solution
Correct the error in the parameter, and execute the command again.
% Parameter '%1$' is too long
Explanation
The parameter specified is too long.
[[Inserted string]]%1$: incorrect parameter value is displayed.
Solution
Correct the error in the parameter, and execute the command again.
% DATE '%1$' is too long
Explanation
The date specified is too long.
[[Inserted string]]%1$: incorrect parameter value is displayed.
Solution
Correct the error in the parameter, and execute the command again.
% Type of start-day and end-day is inconsistency
Explanation
Different formats are specified for start date and end date parameters of Daylight Saving
Time.
Solution
Make the formats of the start date and end date of Daylight Saving Time (Mm.w.d/ Jn/
n) consistent, and execute the command again.
Note
z The setting will be valid after restarting the system.
z Use the "show system information" command to confirm the settings.
z The setting will not be included in the configuration information. Therefore, even if the configuration information was
restored by another device, the timezone setting will be invalid.
Example
Set Daylight Saving Time period (from 2:00, Sunday, the first week in April, through to 02:00, Sunday, the fifth week in October,
with a time difference of an hour).
xg# date summer-time M4.1.0/0200 M10.5.0/0200 0100
Page 86

XG2000 series User's Guide
86/315
All Rights Reserved, Copyright (C) PFU LIMITED 2009
5.4.19 ping
Function
Checks if communication with the specified host is possible by sending ICMP Echo Request packets to a specified host from
the manage LAN interface and observing the reception of ICMP Echo Reply packets.
Prompt
xg> or xg#
Command syntax
ping HOST [ count <1-100> ]
Parameter
z HOST
Specifies the hostname or IP address to check.
z count <1-100>
Sets the count to transmit. 1 to 100. If omitted, 10 will be specified.
Press Ctrl + C to abort the ping process.
Command type
Operation management commands
Output form (when the host to check is working normally)
xg# ping white
PING white (192.168.1.1) from 192.168.1.2 : 56(84) bytes of data.
64 bytes from white (192.168.1.1): icmp_seq=1 ttl=64 time=0.780 ms ← There is a response.
64 bytes from white (192.168.1.1): icmp_seq=2 ttl=64 time=0.592 ms ← There is a response.
--- white ping statistics --- ← Displayed after aborting the process pressing Ctrl+ C.
5 packets transmitted, 5 received, 0% loss, time 4041ms
rtt min/avg/max/mdev = 0.549/0.619/0.724/0.060 ms
Output form (when the host to check is in trouble)
xg# ping blue
PING blue (192.168.1.3) from 192.168.1.2 : 56(84) bytes of data.← There is no response.
292 packets transmitted, 0 received, 100% loss, time 293516ms ← Displayed after aborting the process
pressing Ctrl+ C.
Message
ping: unknown host %1$.
Explanation
The specified hostname is incorrect.
[[Inserted string]]%1$: specified hostname
Solution
Review the hostname, and execute the command again.
Page 87

XG2000 series User's Guide
87/315
All Rights Reserved, Copyright (C) PFU LIMITED 2009
5.4.20 enable password
Function
Sets the password for the enable command.
Use the no form to disable the password protection.
Prompt
xg(config)#
Command syntax
enable password
no enable password
Parameter
z password
Specifies the password to associate with the enable command.
After executing the command, entry of a password will be prompted. (Enter twice for
confirmation.)
Specify a password with a length in the range of 5 to 16 characters.
Command type
Configuration command
Default
None
Note
z The password will be encrypted and reflected in running-config.
z The password will not be displayed by any means after executing the command. Make a note of the set password and
retain it.
Example
Set the enable password from the global configuration mode using the "enable password" command.
Then, return to the administrator exec mode and execute "show running-config." The encoded password will be displayed.
xg(config)# enable password
Enter password: ← Enter the password.
(The entered password is not displayed.)
Re-enter password: ← Enter the password again for confirmation.
(The entered password is not displayed.)
xg(config)# exit
xg# show running-config
enable encryption-password 4DUzjKbFg9.iU ← The password is encoded and output.
!
Page 88

XG2000 series User's Guide
88/315
All Rights Reserved, Copyright (C) PFU LIMITED 2009
5.4.21 banner
Function
Sets the banner string to be displayed when logging in to the device.
Use the no form to delete the banner string.
Prompt
xg(config)#
Command syntax
banner login LINE
banner login default
no banner
Parameter
z login LINE
Sets a banner string. No need to enclose a parameter in quotes if it contains a blank space.
z login default
Returns the banner string to its default ("Product name firmware identification
information").
Command type
Configuration command
Default
"Product name(XG2000, XG2000R, XG2000C or XG2000CR) firmware identification information"
The firmware identification information is the same information displayed in FirmWare[1] or FirmWare[2] of the "
show system
information" command.
Example
Set the banner string to "Welcome to XG2000."
xg(config)# banner login Welcome to XG2000
Page 89

XG2000 series User's Guide
89/315
All Rights Reserved, Copyright (C) PFU LIMITED 2009
5.4.22 ntp-server
Function
Synchronizes the system time to a specified NTP server’s time, using NTP (Network Time Protocol) Version3. Up to four NTP
servers can be registered.
Use the no form to return the setting to its default.
Prompt
xg(config)#
Command syntax
ntp-server host HOST
ntp-server polling MINUTES
ntp-server timeout SECONDS
no ntp-server host HOST
no ntp-server polling
no ntp-server timeout
Parameter
z host HOST
Specifies the hostname or IP address of an NTP server.
IP addresses that can be set are: 1.0.0.1 - 126.255.255.254, 128.0.0.1 - 191.255.255.254,
and 192.0.0.1 - 223.255.255.254.
z polling MINUTES
Specifies the time interval for synchronizing the device time with an NTP server in minutes.
The value can be set in the range of 1 to 1440.
z timeout SECONDS
Specifies the response latency of an NTP server in seconds. The value can be set in the range
of 1 to 4.
Command type
Configuration command
Default
host : None
polling: 60 minutes
timeout: 1 second
Message
% hostname can register up to 4.
Explanation
The number of hosts that can be set to an NTP server was exceeded.
Solution
After deleting unnecessary NTP servers, execute the command again.
% Cannot find %1$
Explanation
The specified host cannot be found.
[[Inserted string]]%1$: specified hostname
Solution
Check that the hostname is correct, or the hostname is registered.
% Hostname is too long
Explanation
The specified hostname is too long.
Solution
Check that the hostname is correct.
% Invalid IP-address.
Explanation
The specified format of the IP address or specified content is incorrect.
Solution
Specify the IP address in a correct format and execute the command again.
Note
z Set the time zone and Daylight Saving Time to a correct value beforehand, and reboot the system. Then, NTP servers
can be registered.
z If several NTP servers’ IP addresses are registered by this command, the order of accessing to NTP servers are
shown in “show running-config” command.
z If the host name is specified instead of IP address, changing the NTP server’s IP address at DNS server will not be
enabled. It is necessary to restart the device after DNS server’s IP address has been changed.
Example
Register an NTP server with IP address "192.168.1.1" and set the interval for time synchronization to 600 minutes.
xg(config)# ntp-server host 192.168.1.1
xg(config)# ntp-server polling 600
Page 90

XG2000 series User's Guide
90/315
All Rights Reserved, Copyright (C) PFU LIMITED 2009
5.5 RADIUS/TACACS+
This section explains the commands related to RADIUS/TACACS+.
5.5.1 show authentication
Function
Displays the setting status of authentication method.
Prompt
xg#
Command syntax
show authentication
Command type
Operation management commands.
Output form
xg# show authentication
Authentication Information 2008/05/20-16:23:25
===============================================================================
Serial/Telnet(console)
====================================
Login Primary : Local
Login Secondary : none
SSH(ssh)
====================================
Login Primary : RADIUS
Login Secondary : none
===============================================================================
z Login Primary
Displays the primary login authentication method.
− Local
Local authentication based on the account information stored in the device is used.
− RADIUS
RADIUS authentication using PAP(User Password) is used.
− TACACS+
TACACS+ authentication using PAP(User Password) is used.
z Login Secondary
Displays the secondary login authentication method. Secondary login authentication is used
if primary login authentication is failed.
− Local
Local authentication based on the account information stored in the device is used.
− none
Secondary login authentication is disabled.
Example
Displays the setting status of authentication method.
xg# show authentication
Page 91

XG2000 series User's Guide
91/315
All Rights Reserved, Copyright (C) PFU LIMITED 2009
5.5.2 aaa authentication login
Function
Configure login authentication method.
Use the no form to return to the default setup.
Prompt
xg(config)#
Command syntax
aaa authentication login { console | ssh } { local | radius | tacacs } [{ local |
none }]
no aaa authentication login { console | ssh }
Parameter
z { console | ssh }
Select a service to login.
− console
Configure the authentication method for serial console or telnet login.
− ssh
Configure the authentication method for SSH login.
z { local | radius | tacacs }
Specify the primary login method.
− local
Local authentication based on the account information stored in the device is used.
− radius
RADIUS authentication using PAP(User Password) is used.
− tacacs
TACACS+ authentication using PAP(User Password) is used.
z { local | none }
Specify the secondary login authentication method. Secondary login authentication is used
if primary login authentication is failed.
− local
Local authentication based on the account information stored in the device is used.
− none
Secondary login authentication is disabled.
This parameter is valid when RADIUS/TACACS+ is set as the primary login method.
When this parameter is omitted, "local" is specified.
Command type
Configuration command
Default
Primary login is local and Secondary login is none for all services
Note
z It is needed to register RADIUS/TACACS+ user accounts to XG2000, using "account" command, before enabling
RADIUS/TACACS+ authentication. XG2000 does not allow any account except for "admin" for the default
configuration.
z Before local authentication is disabled, It is recommended to test RADIUS/TACACS+ authentication under local
authentication is available.
Example
The following configuration enables RADIUS authentication as primary method and local authentication as secondary method
for SSH login authentication.
xg(config)# aaa authentication login ssh radius local
Page 92

XG2000 series User's Guide
92/315
All Rights Reserved, Copyright (C) PFU LIMITED 2009
5.5.3 show radius
Function
Displays the information of RADIUS server.
Prompt
xg#
Command syntax
show radius
Command type
Operation management command
Output form
xg# show radius
RADIUS Information 2008/05/20-16:26:00
================================================================================
Global Parameters
===============================================
Secret Key : radius-b1
Timeout(sec) : 3
Server Information
=============================================================================
[No.1]
Host : 192.168.0.10
Auth Port : 1812
Secret Key: alkdje
[No.2]
Host : 192.168.0.11
Auth Port : 1812
Secret Key: dkaaff
[No.3]
Host : back-radius-server
Auth Port : 1645
Secret Key: owqkz
[No.4]
Host : sample.com
Auth Port : 1812
Secret Key: poiure123
================================================================================
Global Parameters
Displays the common information for configuring RADIUS servers.
z Secret Key
Displays a secret key which is used as a default parameter when the RADIUS server is registered
without secret key.
z Timeout (sec)
Displays timeout for access replay from a RADIUS server in seconds.
Server Information
Displays the current settings of RADIUS servers.
z [No. 1]
Indicates the register number of the RADIUS server. Access requests to RADIUS servers are
transmitted in order of the number.
z Host
Displays IP address or hostname of the RADIUS server.
z Auth Port
Displays UDP port number of the RADIUS server.
z Secret Key
Displays a secret key used by the device and the RADIUS server.
Note
z Displayed secret keys are not encrypted.
Example
Displays the information of RADIUS server.
xg# show radius
Page 93

XG2000 series User's Guide
93/315
All Rights Reserved, Copyright (C) PFU LIMITED 2009
5.5.4 radius-server host
Function
Registers a RADIUS server. Up to four RADIUS servers can be registered.
Use the no form to delete registered RADIUS servers.
Prompt
xg(config)#
Command syntax
radius-server host HOST [ auth-port <1 - 65535> ] [ key KEY ]
no radius-server host HOST
Parameter
z host HOST
Specifies the hostname or IP address of a RADIUS server. IP addresses that can be set are:
1.0.0.1 - 126.255.255.254, 128.0.0.1 - 191.255.255.254, and 192.0.0.1 - 223.255.255.254.
This device accesses to RADIUS servers in order which is shown in "show radius" command.
z auth-port <1 - 65535>
Specifies UDP port number of a RADIUS server. It can be set in the range of 1 to 65535.
1812 is specified if this parameter is omitted.
z key KEY
Specifies a secret key in ASCII character. Printable characters except for "?" and a
space(ASCII code 0x20) can be specified and its length should be less than 33. A global secret
key is specified if this parameter is omitted.
Command type
Configuration command
Default
None
Message
% Authentication server can register up to 4.
Explanation
Four RADIUS servers have already been registered.
Solution
Delete unnecessary RADIUS servers and execute the command again.
% Secret key is too long.
Explanation
The specified secret key is more than 32 characters.
Solution
Specifies the secret key under 33 characters.
% Invalid IP-address.
Explanation
The specified format of the IP address or the IP address is incorrect.
Solution
Specify the IP address in a correct format.
% Invalid secret key.
Explanation
A secret key is not specified, or an invalid character is set.
Solution
Specifies a secret key using available characters. If the secret key is not specified,
a global secret key should be configured by "radius-server key" command before executing
this command.
% Cannot find %1$
Explanation
The specified host cannot be found.
[[Inserted string]]%1$: specified hostname
Solution
Check that the hostname is correct, or the hostname is registered.
Example
The following example registers a RADIUS server as IP address is 192.168.0.10 and UDP port number is 1812 and secret key
is “radius-bl” .
xg(config)# radius-server host 192.168.0.10 auth-port 1812 key radius-b1
Page 94

XG2000 series User's Guide
94/315
All Rights Reserved, Copyright (C) PFU LIMITED 2009
5.5.5 radius-server key
Function
Specifies a global secret key which is used as a default parameter when the RADIUS server is registered without secret key.
Use the no form to delete a global secret key.
Prompt
xg(config)#
Command syntax
radius-server key KEY
no radius-server key
Parameter
z key KEY
Specifies a global secret key in ASCII character. Printable characters except for "?" and
a space(ASCII code 0x20) can be specified and its length should be less than 33.
Command type
Configuration command
Default
None
Message
% Secret key is too long.
Explanation
The specified secret key is more than 32 characters.
Solution
Specifies the secret key under 33 characters.
% Invalid secret key.
Explanation
An invalid character is set.
Solution
Specifies a secret key using available characters.
Note
z A global secret key is referred only when a RADIUS server is registered without specifying a secret key.
z A secret key for a RADIUS server will synchronize to a new global secret key when the same secret key is specified.
z A global secret key for a RADIUS server will not be deleted even when no command is committed.
Example
The following example specifies a global secret key.
xg(config)# radius-server key radius-b1
Page 95

XG2000 series User's Guide
95/315
All Rights Reserved, Copyright (C) PFU LIMITED 2009
5.5.6 radius-server timeout
Function
Specifies timeout for access replay from a RADIUS server.
Use the no form to return the setting to its default.
Prompt
xg(config)#
Command syntax
radius-server timeout <1 – 15>
no radius-server timeout
Parameter
z timeout <1 - 15>
Specifies timeout for access replay from a RADIUS server in seconds.
Command type
Configuration command
Default
None
Note
z The timeout is referred only when a RADIUS server is registered. It is necessary to register RADIUS servers again if
the timeout is changed so that RADIUS servers use new setting.
Example
The following example specifies the timeout in 10 seconds.
xg(config)# radius-server timeout 10
Page 96

XG2000 series User's Guide
96/315
All Rights Reserved, Copyright (C) PFU LIMITED 2009
5.5.7 show tacacs
Function
Displays the information of TACACS+ server.
Prompt
xg#
Command syntax
show tacacs
Command type
Operation management command
Output form
xg# show tacacs
TACACS+ Information 2008/06/18-12:12:15
================================================================================
Global Parameters
===============================================
Secret Key : tacacs-b1
Server Information
=============================================================================
[No.1]
Host : 192.168.0.10
Secret Key: alkdje
[No.2]
Host : 192.168.0.11
Secret Key: dkaaff
[No.3]
Host : back-tacacs-server
Secret Key: owqkz
[No.4]
Host : sample.com
Secret Key: poiure123
================================================================================
Global Parameters
Displays the common information for configuring TACACS+ servers.
z Secret Key
Displays a secret key which is used as a default parameter when the TACACS+ server is registered
without secret key.
Server Information
Displays the current settings of TACACS+ servers.
z [No. 1]
Indicates the register number of the TACACS+ server. Access requests to TACACS+ servers are
transmitted in order of the number.
z Host
Displays IP address or hostname of the TACACS+ server.
z Secret Key
Displays a secret key used by the device and the TACACS+ server.
Note
z Displayed secret keys are not encrypted.
Example
Displays the information of TACACS+ server.
xg# show tacacs
Page 97

XG2000 series User's Guide
97/315
All Rights Reserved, Copyright (C) PFU LIMITED 2009
5.5.8 tacacs-server host
Function
Registers a TACACS+ server. Up to four TACACS+ servers can be registered.
Use the no form to delete registered TACACS+ servers.
Prompt
xg(config)#
Command syntax
tacacs-server host HOST [ key KEY ]
no tacacs-server host HOST
Parameter
z host HOST
Specifies the hostname or IP address of a TACACS+ server. IP addresses that can be set are:
1.0.0.1 - 126.255.255.254, 128.0.0.1 - 191.255.255.254, and 192.0.0.1 - 223.255.255.254.
This device accesses to TACACS+ servers in order which is shown in "show tacacs" command.
z key KEY
Specifies a secret key in ASCII character. Printable characters except for "?" and a
space(ASCII code 0x20) can be specified and its length should be less than 33. A global secret
key is specified if this parameter is omitted.
Command type
Configuration command
Default
None
Message
% Authentication server can register up to 4.
Explanation
Four TACACS+ servers have already been registered.
Solution
Delete unnecessary TACACS+ servers and execute the command again.
% Secret key is too long.
Explanation
The specified secret key is more than 32 characters.
Solution
Specifies the secret key under 33 characters.
% Invalid IP-address.
Explanation
The specified format of the IP address or the IP address is incorrect.
Solution
Specify the IP address in a correct format.
% Invalid secret key.
Explanation
A secret key is not specified, or an invalid character is set.
Solution
Specifies a secret key using available characters. If the secret key is not specified,
a global secret key should be configured by "tacacs-server key" command before executing
this command.
% Cannot find %1$
Explanation
The specified host cannot be found.
[[Inserted string]]%1$: specified hostname
Solution
Check that the hostname is correct, or the hostname is registered.
Example
The following example registers a TACACS+ server as IP address is 192.168.0.10 and secret key is “tacacs-bl” .
xg(config)# tacacs-server host 192.168.0.10 key tacacs-b1
Page 98

XG2000 series User's Guide
98/315
All Rights Reserved, Copyright (C) PFU LIMITED 2009
5.5.9 tacacs-server key
Function
Specifies a global secret key which is used as a default parameter when the TACACS+ server is registered without secret key.
Use the no form to delete a global secret key.
Prompt
xg(config)#
Command syntax
tacacs-server key KEY
no tacacs-server key
Parameter
z key KEY
Specifies a global secret key in ASCII character. Printable characters except for "?" and
a space(ASCII code 0x20) can be specified and its length should be less than 33.
Command type
Configuration command
Default
None
Message
% Secret key is too long.
Explanation
The specified secret key is more than 32 characters.
Solution
Specifies the secret key under 33 characters.
% Invalid secret key.
Explanation
An invalid character is set.
Solution
Specifies a secret key using available characters.
Note
z A global secret key is referred only when a TACACS+ server is registered without specifying a secret key.
z A secret key for a TACACS+ server will synchronize to a new global secret key when the same secret key is specified.
z A global secret key for a TACACS+ server will not be deleted even when no command is committed.
Example
The following example specifies a global secret key.
xg(config)# tacacs-server key tacacs-b1
Page 99

XG2000 series User's Guide
99/315
All Rights Reserved, Copyright (C) PFU LIMITED 2009
5.6 Configuration File Operation Commands
This section explains the commands related to configuration files and file operations within volatile memory.
5.6.1 copy running-config startup-config
Function
Stores the configuration file (running-config) in volatile memory to the startup-config file in nonvolatile memory.
After changing running-config, use this command to use the same configuration file after restarting the system.
Prompt
xg#
Command syntax
copy running-config startup-config
Command type
Operation management command
Note
z When the system is restarted without saving the information of running-config into startup-config, the information set in
running-config will be lost.
z Be sure to upload the contents of the existing startup-config file to a remote server prior to saving running-config as the
contents of startup-config will be overwritten.
Example
Store running-config in startup-config. Then, check the information in startup-config using the show command.
xg# copy running-config startup-config
xg# show startup-config
5.6.2 show running-config
Function
Displays the configuration information (running-config) currently operating in volatile memory.
Prompt
xg#
Command syntax
show running-config
Command type
Operation management commands
Example
Display the contents of running-config.
xg# show running-config
Page 100

XG2000 series User's Guide
100/315
All Rights Reserved, Copyright (C) PFU LIMITED 2009
5.6.3 show running-config (redirect)
Function
Copies the configuration information (running-config) in the currently operating volatile memory to the volatile memory. Also, it
can be copied directly to a file in the remote server using the "tftp" or "scp" command.
Prompt
xg#
Command syntax
show running-config > CONFIG-FILE
show running-config | redirect CONFIG-FILE
show running-config | { tftp | scp USERNAME } HOST REMOTE-FILE
Parameter
z > CONFIG-FILE
Specifies the file name to copy in the volatile memory.
z | redirect CONFIG-FILE
Specifies the file name to copy in the volatile memory. It means the same as "> CONFIG-FILE."
Follow the rules below in specifying file names:
− File names must start with alphabet ([a - z], [A - Z]).
− Characters usable for file names are: alphabet ([a - z], [A - Z]), numerical characters ([0 - 9]),
underscore (_), and period (.)
z | tftp
Redirects the copy to a file on the TFTP server.
z | scp
Redirects the copy to a file on the SSH server.
z USERNAME
Specifies the username of the SSH server.
z HOST
Specifies the hostname or IP address of the TFTP server or SSH server.
IP addresses that can be set are: 1.0.0.1 - 126.255.255.254, 128.0.0.1 - 191.255.255.254,
and 192.0.0.1 - 223.255.255.254.
z REMOTE-FILE
Specifies the file name to copy onto the TFTP server or SSH server.
Command type
Operation management commands
Message
% tftp: %1$: Host name lookup failure
Explanation
The specified hostname does not exist.
[[Inserted string]]%1$: specified hostname
Solution
Check whether the specified hostname is correct.
% tftp: server says: %1$
Explanation
An error was received from the TFTP server.
[[Inserted string]]%1$: content of error message received from the TFTP server.
The content of message depends on the type of the TFTP server. For example, there is
a message as below.
− File not found: There are no files in the TFTP server.
− Access violation: File permission error occurred in the TFTP server.
− Not allowed to overwrite existing files: The file in the TFTP server cannot be overwritten.
− Could not open requested file for reading: There are no files in the TFTP server.
− File already exists: There are files in the TFTP server.
− Unknown transfer ID: Process will be aborted in time out.
Solution
Take actions in accordance with the message received from the TFTP server.
% tftp: last timeout
Explanation
There is no response from the TFTP server. There is a possibility of network communication
error with the management LAN, or the setting of time out of the TFTP server may be too
short.
Solution
Check whether there is no problem in network connection with the TFTP server using the
"ping" command. If the problem persists, review the setting of time out of the TFTP server.
 Loading...