

Page 1

LCD / Plasma TV
Betriebsanleitung / Operating Manual
LCD TV MYRICA VQ40-1
Deutsch, English, Français,
Español, Português,
Italiano, Nederlands,
Dansk, Svenska, Suomi,
Polski, Pycckий
Plasma TV
MYRICA PQ42-1 / PQ50-1
Downloaded From TV-Manual.com Manuals
Page 2

2950-4042-C292 00
Herausgegeben von/Published by
Fujitsu Siemens Computers GmbH
Printed in the Federal Republic of Germany
AG 0206 02/06
Ausgabe/Edition 1 - Februar 2006
Bestell-Nr./Order No.: A26361-K1088-Z120-1-M119
*A26361-K1088-Z120-1-M119 *
A26361-K1088-Z120-1-M119
Downloaded From TV-Manual.com Manuals
Page 3

Inhaltsverzeichnis
Wichtige Hinweise 2..............................
Sicherheitshinweise 2...........................
Wichtige Grundregeln zum Gebrauch 2...........
Entsorgung und Recycling 3.....................
Reinigung 3...................................
Reinigung des Bildschirmes 3.................
Reinigung des Gehäuses 3...................
Konformität 3..................................
Bei Störungen 3................................
Batterien 3....................................
Übersicht 4......................................
Lieferumfang 4................................
Anschlüsse 5..................................
Fernbedienung 6...............................
Bedienelemente am Gerät 7.....................
Vorbereitungen 8.................................
Blickrichtung 8..............................
Aufstellungsort 8............................
Aufstellen 8................................
Wandmontage 8............................
Bohrschablone 9............................
Anschliessen einer Antenne 10................
Einlegen der Batterien in die Fernbedienung 10..
Verwenden der Fernbedienung 10..............
Anschliessen des Netzkabels 10...............
Erstinstalltion 11................................
Sprache einstellen 11.........................
Landesauswahl für Sortierreihenfolge 11........
Bedienung 12....................................
Ein- / Ausschalten 12.........................
Kanalwechsel (Programmwechsel) 12...........
Lautstärke- und Toneinstellungen 12............
Gebrauch der Bild-im-Bild Funktion 13..........
Kombinationsmöglichkeiten Quelle mit
PIP Quelle 14...............................
Standbild 14.................................
Sleep Timer 14..............................
OSD-Menü Steuerung 15.........................
Grundeinstellungen 15...........................
Automatische Sendersuche 15.................
Manuelle Sendersuche 16.....................
Ändern von Kanalnamen 16...................
Decoder einstellen 17.........................
Programmübersicht bearbeiten 17..............
OSD-Einstellungen 18...........................
Bildeinstellungen 19.............................
Für AV-Quellen (TV, CVBS, YC, YUV, SCART1,
SCART2, HDMI) 19..........................
Für PC-Quellen (RGB, DVI) 20.................
Bildformate für AV-Quellen 21..................
Bildformate für PC-Quellen 22.................
Erweiterte Toneinstellungen 22....................
Einstellung Benutzer-Equalizer 23..............
DEUTSCH
Videotext 24....................................
Anschluss externer Geräte 25.....................
Anschluss an SCART1 / SCART2 25...........
Anschluss an die Component-Eingänge YUV 26..
Anschluss an den S-Video-Eingang 26..........
Anschluss an den HDMI-Eingang 27............
Anschluss an den PC DVI-I Eingang 27.........
Einstellungen für PC (RGB) 27..............
Einstellungen für PC (DVI) 28...............
Eingänge auswählen 28......................
Sonderfunktionen 29............................
Bildschirmschoner Nur Plasma-TV! 29..........
Fehlerbehebung 30................................
Technische Daten - MYRICA VQ40-1 31.............
Technische Daten - MYRICA PQ42-1 32.............
Technische Daten - MYRICA PQ50-1 33.............
Downloaded From TV-Manual.com Manuals
1DEUTSCH
Page 4

Wichtige Hinweise
Wichtige Hinweise
In diesem KapitelfindenSie Sicherheitshinweise,die Siebeim
Umgang mit Ihrem TV Gerät unbedingt beachten müssen.
Vermeiden Sie Standbilder auf dem Bildschirm für einen längeren Zeitraum, z. B. Standbilder bei Videos,
Sender-Label oder ähnliche (maximal 1 Stunde).
Diese Bilder können sichtbar bleiben! Vermeiden Sie
ebenso den längeren Betrieb in einem Bildmodus, in
dem schwarze Balken sichtbar sind (Betrieb im Bildformat 4:3). Auch diese schwarze Balken können
sichtbar bleiben.
Dieses Produkt von Fujitsu Siemens Computers enthält geistiges Eigentum Dritter. Jede Manipulation
oder Modifikation des Produkts setzt die Gewährleistung außer Kraft und kann zivil- oder strafrechtliche
Verfahren nach sich ziehen, die im vollen gesetzlich
zulässigen Umfang ausgeschöpft werden.
Sicherheitshinweise
Dieses Gerät entspricht den einschlägigen Sicherheitsbestimmungen für Audio-, Video- und TV-Geräte.
Falls Sie Fragen haben, ob Sie das Gerät in der vorgesehenen Umgebung aufstellen können, wenden Sie sich bitte an
Ihre Verkaufsstelle oder an unseren Help Desk.
D Die Display-Oberfläche des TV Gerätes ist druck - und
kratzempfindlich. Behandeln Sie deshalb die BildschirmOberfläche vorsichtig, um bleibende Schäden (NewtonRinge, Kratzer) zu vermeiden.
D Wenn das Gerät aus kalter Umgebung in den Betriebs-
raum gebracht wird, kann Betauung auftreten. Warten
Sie, bis das Gerät temperaturangeglichen und absolut
trocken ist, bevor Sie es in Betrieb nehmen.
D Beachten Sie beim Aufstellen und vor Betrieb des Ge-
räts die Hinweise für die Umgebungsbedingungen im
Kapitel Vorbereitungen.
D Um eine ausreichende Belüftung zu gewährleisten, müs-
sen die Zuluft- und Abluftöffnungen des Geräts unbedingt freigehalten werden.
D Das Gerät stellt sich automatisch auf eine Netzspan-
nung im Bereich von 100 V bis 240 V ein. Stellen Sie
sicher, dass die örtliche Netzspannung diesen Bereich
weder unter- noch überschreitet.
D Dieses Gerät darf nur an eine geerdete Steckdose ange-
schlossen werden.
D Stellen Sie sicher, dass die Steckdose am Gerät oder die
Schutzkontakt-Steckdose der Hausinstallation frei zugänglich ist.
D Der Ein-/Ausschalter trennt das Gerät nicht von der
Netzspannung. Zur vollständigen Trennung von der
Netzspannung müssen Sie den Netzstecker ziehen.
D Verlegen Sie die Leitungen so, dass sie keine Gefahren-
quelle (Stolpergefahr) bilden und nicht beschädigt werden. Beachten Sie beim Anschließen des Geräts die
entsprechenden Hinweise im Kapitel Vorbereitungen.
D Während eines Gewitters dürfen Sie Antennen- und Da-
tenübertragungsleitungen weder anschließen noch lösen.
D Achten Sie darauf, dass keine Gegenstände (z. B.
Schmuckkettchen, Büroklammern etc.) oder Flüssigkeiten in das Innere des Geräts gelangen (Gefahr von elektrischem Schlag, Kurzschluss).
D Es dürfen keine mit Flüssigkeiten gefüllten Gegen-
stände, z.B. Vasen, auf das Gerät gestellt werden. Das
Gerät ist nicht wasserfest! Schützen Sie das Gerät vor
Spritzwasser (Regen, Meerwasser).
D In Notfällen (z. B. bei Beschädigung von Gehäuse, Be-
dienelementen oder Netzleitung, bei Eindringen von
Flüssigkeiten oder Fremdkörpern) schalten Sie das Gerät sofort aus, ziehen Sie den Netzstecker und verständigen Sie Ihre Verkaufsstelle oder unseren Help Desk.
D Das Gerät muss nach den örtlichen Vorschriften über
Beseitigung von Sondermüll entsorgt werden. Bei Handhabung und Entsorgung sind die für Leuchtstoffmaterial
geltenden Sicherheitsbestimmungen zu beachten.
VQ40-1: Die Hintergrundbeleuchtung des LCD/PlasmaTVs ist quecksilberhaltig. Bei Handhabung und Entsorgung sind die für Leuchtstoffröhren geltenden Sicherheitsbestimmungen zu beachten.
D Reparaturen am Gerät dürfen nur von autorisiertem
Fachpersonal durchgeführt werden. Durch unbefugtes
Öffnen und unsachgemäße Reparaturen können erhebliche Gefahren für den Benutzer entstehen (elektrischer
Schlag, Brandgefahr).
D Stellen Sie nur die Bildschirmauflösungen und Bildwie-
derholfrequenzen ein, die im Kapitel ”Technische Daten”
angegeben sind. Wenn Sie andere Werte einstellen,
kann der Bildschirm beschädigt werden. Wenden Sie
sich im Zweifelsfall an Ihre Verkaufsstelle oder an unserenHelpDesk.
D Setzen Sie im PC-Betrieb einen Bildschirmschoner mit
bewegten Bildern ein und aktivieren Sie das Power-Management für Ihren Bildschirm, um ein ”Einbrennen” von
Standbildern zu vermeiden.
D Heben Sie diese Betriebsanleitung zusammen mit dem
Gerät auf. Wenn Sie das Gerät an Dritte weitergeben,
geben Sie bitte auch die Betriebsanleitung weiter.
Wichtige Grundregeln zum Gebrauch
Der von Ihnen erworbene LCD/Plasma-TV genügt den höchsten Qualitätsanforderungen in diesem Segment und wurde
bezüglich Pixelfehlern überprüft. Trotz höchster Sorgfalt bei
der Fertigung der Geräte ist aus technologischen Gründen
nicht zu 100% auszuschliessen, dass einige Bildpunkte Defekte aufweisen.
Wir bitten um Ihr Verständnis, dass derartige Effekte, solange
sie in der durch die Norm spezifizierten Grenzen liegen,nicht
als Gerätedefekt im Sinne der Gewährleistung betrachtetwerden können.
Bei einer längeren Verwendung als PC-Bildschirm können,
wie bei jedem anderen Fernsehgerät, Schatten auf dem Bildschirm entstehen. Dieses Phänomen bei LCD/Plasma-Bildschirmen, kann durch die Beachtung der folgenden Punkte
vermindert werden:
D keine lang andauernde Anzeige eines Standbildes
D nutzen Sie Ihren Bildschirm in einem bildschirmfüllenden
Format (16:9)
D aktivieren Sie den Bildschirmschoner
D soweit wie möglich Bewegtbilder anzeigen
D schalten Sie den Bildschirm immer aus, wenn er nicht
benutzt wird
D verringern Sie soweit wie möglich Kontrast und Hellig-
keit.
Ungünstige Bedingungen können zu einem Brummen Ihres
LCD/Plasma-TVs führen. Das Brummen kommt im allgemeinen aus der Netzspannungsversorgung und kann durch die
Verbindung von unterschiedlichen Schutzleitern entstehen.
Abhilfe können Sie hier schaffen, in dem Sie einen sogenann-
Downloaded From TV-Manual.com Manuals
2 DEUTSCH
Page 5
Wichtige Hinweise
ten Mantelstromfilter zwischen die ankommende Antennenleitung und den Antenneneingang am Bildschirm schalten.
Die Mantelstromfilterwerden inForm eines kleinen Zwischen steckers im Fachhandel angeboten.
Wenn Ihr LCD/Plasma-TV mit einer Außenantenne verbunden ist, muss dieser zum Schutz gegen Stromschläge und
statische Aufladungen geerdet sein. Die Erdung muß den geltenden Vorschriften entsprechen.
Bei der Nutzung als PC-Bildschirm empfehlen wiraus ergonomischen Gründen, die Verwendung von roten und blauen
Schriften oder Symbolen auf dunklen Hintergründen zu vermeiden. Eine derartige Darstellung verursachtwegen des geringen Kontrastes eine schlechte Lesbarkeit und ermüdet
frühzeitig die Augen. Verwenden Sie daher bitte möglichst
kontrastreiche Darstellungen, z.B. schwarze Schrift auf weißem Hintergrund.
Um Augenschmerzen zu vermeiden und den optimalen Betrachtungsabstand zu erhalten, sollte dieEntfernung zum Gerät das fünf- bis sechsfache der Bildschirmdiagonale betragen. In ihrem Fernsehzimmer sollte es so hell sein, dass man
auch lesenkönnte. Bei zu vielHelligkeitverlierensich dieKontraste. Zu wenig Licht strapaziert die Augen durch den HellDunkel-Wechsel auf dem Bildschirm.
Entsorgung und Recycling
Dieses Gerät wurde weitestgehend aus Materialien hergestellt,die umweltschonendentsorgtund einem fachgerechten
Recycling zugeführt werden können. Nach seinem Gebrauch
wird das Gerät zurückgenommen, um es einer Wiederverwendung oder wertstofflichenVerwertung zuzuführen, soweit
es in einem Zustand zurückgegeben wird, der dem bestimmungsgemäßen Gebrauch entspricht. Nicht verwertbare Geräteteile werden sachgemäß entsorgt.
Das Gerätdarf nicht mit dem Siedlungsabfall(Hausmüll) entsorgt werden. Dieses Gerät ist entsprechend dereuropäischen Richtlinie 2002/96/EG über
Elektro- und Elektronik-Altgeräte (waste electrical
and electronic equipment - WEEE) gekennzeichnet.
Die Richtlinie gibt den Rahmen für eine EU-weitgültige Rücknahme und Verwertung der Altgeräte vor.
Für die Rückgabe Ihres Altgeräts nutzenSie bitte die
Ihnen zur Verfügung stehenden Rückgabe- und
Sammelsysteme. Weitere Informationen hierzu finden Sie unter www.fujitsu-siemens.com/recycling.
Reinigung des Gehäuses
Benutzen Sie für die Reinigung des Gehäuses keine chemischen Lösung-und Reinigungsmittel, da sonst dieOberfläche
des Gerätes beschädigt werden könnte.
Wenn Sie die Gehäuseoberflächemit einemnassen Tuch reinigen, können Wassertropfen in das Gerät gelangen, was zu
Funktionsstörungen führt.
Zum Reinigen der Belüftungsöffnungen benutzen Sie einen
Staubsauger mit weichem Bürstenaufsatz.
Konformität
Der vorliegende Bildschirm ist ein LCD/Plasma-TV Gerät und
entspricht den folgenden Richtlinien und Normen der
Europäischen Union:
D 89/336/ECCE vom 3. Mai 1989 mitanschließenden Modi-
fikationen (Direktive 92/31/ECCE vom April 1992 und Direktive 93/68/ECCE vom 22. Juli 1993)
D 73/23/ECCE vom 19. Februar 1973 mit anschließenden
Modifikationen (Direktive 93/68/ECCE vom 22. Juli 1993)
D EN60065 (Sicherheitsanforderungen).
Die Übereinstimmung mit den Anforderungen wird durch die,
auf dem Produkt angebrachte,
ziert.
Der Hersteller kann nicht für den Betrieb außerhalb der Betriebsbedingungen, wie in dieser Bedienungsanleitung beschrieben, haftbar gemacht werden. Zudem erlöschen hier
durch Ihre Produkthaftungs- und Gewährleistungsansprüche.
Kennzeichnung zertifi-
Bei Störungen
Ziehen Sie den Netzstecker aus der Steckdose, wenn das
Gerät beschädigt ist.
Sofort den Netzstecker aus der Steckdose ziehen, wenn
Rauch, unangenehmer Geruch oder ungewöhnliche Geräusche aus dem Gerät kommen. Verfahren Sie ebenfalls in dieser Weise, wenn das Gerät nach dem Einschalten oder während des Betriebeskein Bild mehr darstellen kann.Versuchen
Sie nicht den Bildschirm in diesem Zustand weiter zu betreiben.
Öffnen Sie auf keinen Fall das Gerät selbst. In diesem Gerät
befinden sich keine Teile,die von Ihnen gewartet oder ausgewechselt werden können. Wenden Sie sich an unsere Service-Hotline oder eine andere Fachwerkstatt.
Batterien
DEUTSCH
Reinigung
Bevor Sie mitder Reinigungbeginnen, schalten Sie dasGerät
aus und ziehen den Netzstecker aus der Steckdose.
Reinigung des Bildschirmes
Für die Reinigungdes Bildschirmesverwenden Sieein mildes
Reinigungsmittel in Verbindung mit einem weichen Tuch.
Das Reinigungsmittel darf k eine Ketone (z.B. Azeton) oder
Ethylalkohol enthalten.
Benutzen Sie keine Scheuermittel!
Downloaded From TV-Manual.com Manuals
Beachten Sie beim Einlegen der Batterien, dass die Polarität
(+ / -) mit der Markierung an der Fernbedienung übereinstimmt.
Batterien dürfen nicht im Hausmüll entsorgt
werden. Die verbrauchten Batterien müssen
Sie an einer kommunalen Sammelstelle abgeben oder in die dafür ausgewiesenen Behältern im Handel einwerfen.
Die Batterien nicht übermäßiger Wärme aussetzen, nicht ins
Feuer werfen, nicht wiederaufladen, nicht versuchen zu öffnen; sie könnten auslaufen oder explodieren.
Bittenehmen SieBatterien aus der Fernbedienung,wenn das
Gerät über längere Zeit nicht benutzt wird.
3DEUTSCH
Page 6

Übersicht
Übersicht
Der LCD/Plasma-TV bietet vielfältige Anschlussmöglichkeiten für Personal Computer, DVD-Player, Videorecorder, Videokamera, etc. Egal ob Fernseh-, Video- oder PC-Bilder, alle werden gestochen scharf und verzerrungsfrei auf der völlig planen Bildschirmoberfläche dargestellt.Dabei zeichnensich dieBilder durch einehervorragende Helligkeit und außergewöhnlicheBrillanz
aus. Weitere wichtige Merkmale sind die große Bildschirmdiagonale bei einem Seitenverhältnis von 16:9 und die sehr geringe
Bautiefe.Für den Fernsehbetrieb istder Anschluss an eineterrestrische Antenne, SAT-Empfangsanlage oder Kabelfernsehanlage notwendig.
Die Bedienung erfolgtinteraktiv überdie mitgelieferteFernbedienung und das On-Screen-Menü (OSD). Dortkönnen umfangreiche Einstellungen an der Bildqualität vorgenommen werden.
Ein lüfterloses Kühlsystem ermöglicht den Betrieb des LCD/Plasma-TV’s ohne störende Nebengeräusche. Leise wie ein herkömmliches Fernsehgerät ist der LCD/Plasma-TV hervorragend geeignet für Wohn- und Konferenzräume.
Ausstattung
D Hochwertiges Aluminium-Gehäuse
D Lüfterloses Design
D HD ready
D Bildschirmfüllende Darstellung im 16:9 und 4:3 Format
D 3D Kammfilter
D Kompatibel mit PAL, SECAM und NTSC (NTSC nicht bei Tuner)
D Kompatibel mit VGA, SVGA, WXGA und XGA
D TOP / FLOF Videotext mit Seitenspeicher für 5000 Seiten
D Automatische Programmidentifizierung und Sendersortierung
D Sleep Timer
D Bildschirmschoner
D 2 x EURO SCART (SCART1 mit RGB, SCART2 mit Y/C)
D 1 x Y/C (S-Video)
D 3 x Cinch Y(CVBS)UV
D 1 x DVI (I) (Analog und Digital, Digital mit HDCP)
D 1 x HDMI
D Digitaler Audioeingang / Audioausgang
Lieferumfang
Bitte überprüfen Sie den LCD/Plasma-TV nach dem Auspacken auf mögliche Transportschäden und Vollständigkeit der Lieferung.Der Lieferant kann Ihre Ansprüche bei Transportschädennur dann gewähren, wenn Sieihm diese vorder erstenInbetriebnahme mitteilen.Fehlt ein Teil des Lieferumfangs, wenden Sie sich bitte an die Service-Hotline. Bewahren Sie bitte die OriginalVerpackung für einen eventuellen Transport des Monitors auf.
LCD/Plasma-TV
Netzkabel für Europa
(außer UK und Irland)
* Netzkabel für UK und
Irland
Batterien AAA
Antennenkabel SCART-Kabel
Bedienhandbuch,
Getting Started und
Garantieheft
Fernbedienung
Downloaded From TV-Manual.com Manuals
4 DEUTSCH
* je nach Ausstattungsvariante
Page 7

Anschlüsse
Übersicht
1
11
3 4 5 9
16 15 1714 1219 8 10
1813
6 72
21
11 DIG OUT COAX
Anschluss eines AV-Verstärkers mit koaxialen, digitalen
Audio-Eingang
1 LINE OUT SUB 12 DIG IN COAX
Anschluss für aktiven Subwoofer Anschluss von Geräten mit koaxialen, digitalen Audio-
Ausgang
2 LINE OUT L/R (Audioausgang) 13 PC AUDIO IN
z.B. Anschluss Audioverstärker oder DVD-Receiver z.B. Audio-Eingang PC mit Line-Out-Buchse
3 RF IN (Antenneneingang Haupttuner) 14 HDMI (High Definition Multimedia Interface)
muss über das Antennenverbindungskabel Anschluss für Geräte mit HDMI-Ausgang
mit ”RF out” verbunden sein z.B. DVD-Player
4 RF OUT (Antennenausgang PIP-Tuner) 15 RS-232
muss über das Antennenverbindungskabel Serielle Schnittstelle für Servicezwecke
mit ”RF in” verbunden sein
DEUTSCH
20
5 ANTENNA 16 PC DVI-I (HDCP)
Anschluss TV Antennen-Signal Anschluss PC, DVD-Player
(analoge terrestrische Antenne oder Kabelanschluss) (RGB bei analogen Signalen, DVI bei digitalen Signalen)
6 YUV / Y (Component Y), CVBS 17 S-VIDEO
Anschluss für DVD-Player mit YUV-Ausgang Anschluss Geräte mit S-Video-Ausgang
CVBS - Anschluss Gerät mit FBAS-Ausgang z.B. DVD-Player, Videorecorder, Camcorder
7 YUV / U (Component Pb) 18 LINE IN YUV (CVBS)
8 YUV / V (Component Pr) 19 LINE IN S-VIDEO
9 SCART 2 (YC, CVBS) 20 Netzeingangsbuchse
z.B. Anschluss Videorecorder oder Decoder Anschluss für das mitgelieferte Netzkabel
10 SCART 1 (RGB, CVBS) 21 Netzschalter
z.B. Anschluss Satellitenreceiver oder Videorecorder Ein / AUS
Downloaded From TV-Manual.com Manuals
Wenn Ihr PC über einen analogen VGA Ausgang verfügt,
benutzen Sie zum Anschluss Ihres PC’s an den
Bildschirm ein Anschlusskabel DVI-I auf 15 Pin HD-Sub.
Audio-Eingang für YUV (CVBS)
Audioeingang für S-VIDEO
5DEUTSCH
Page 8
Übersicht
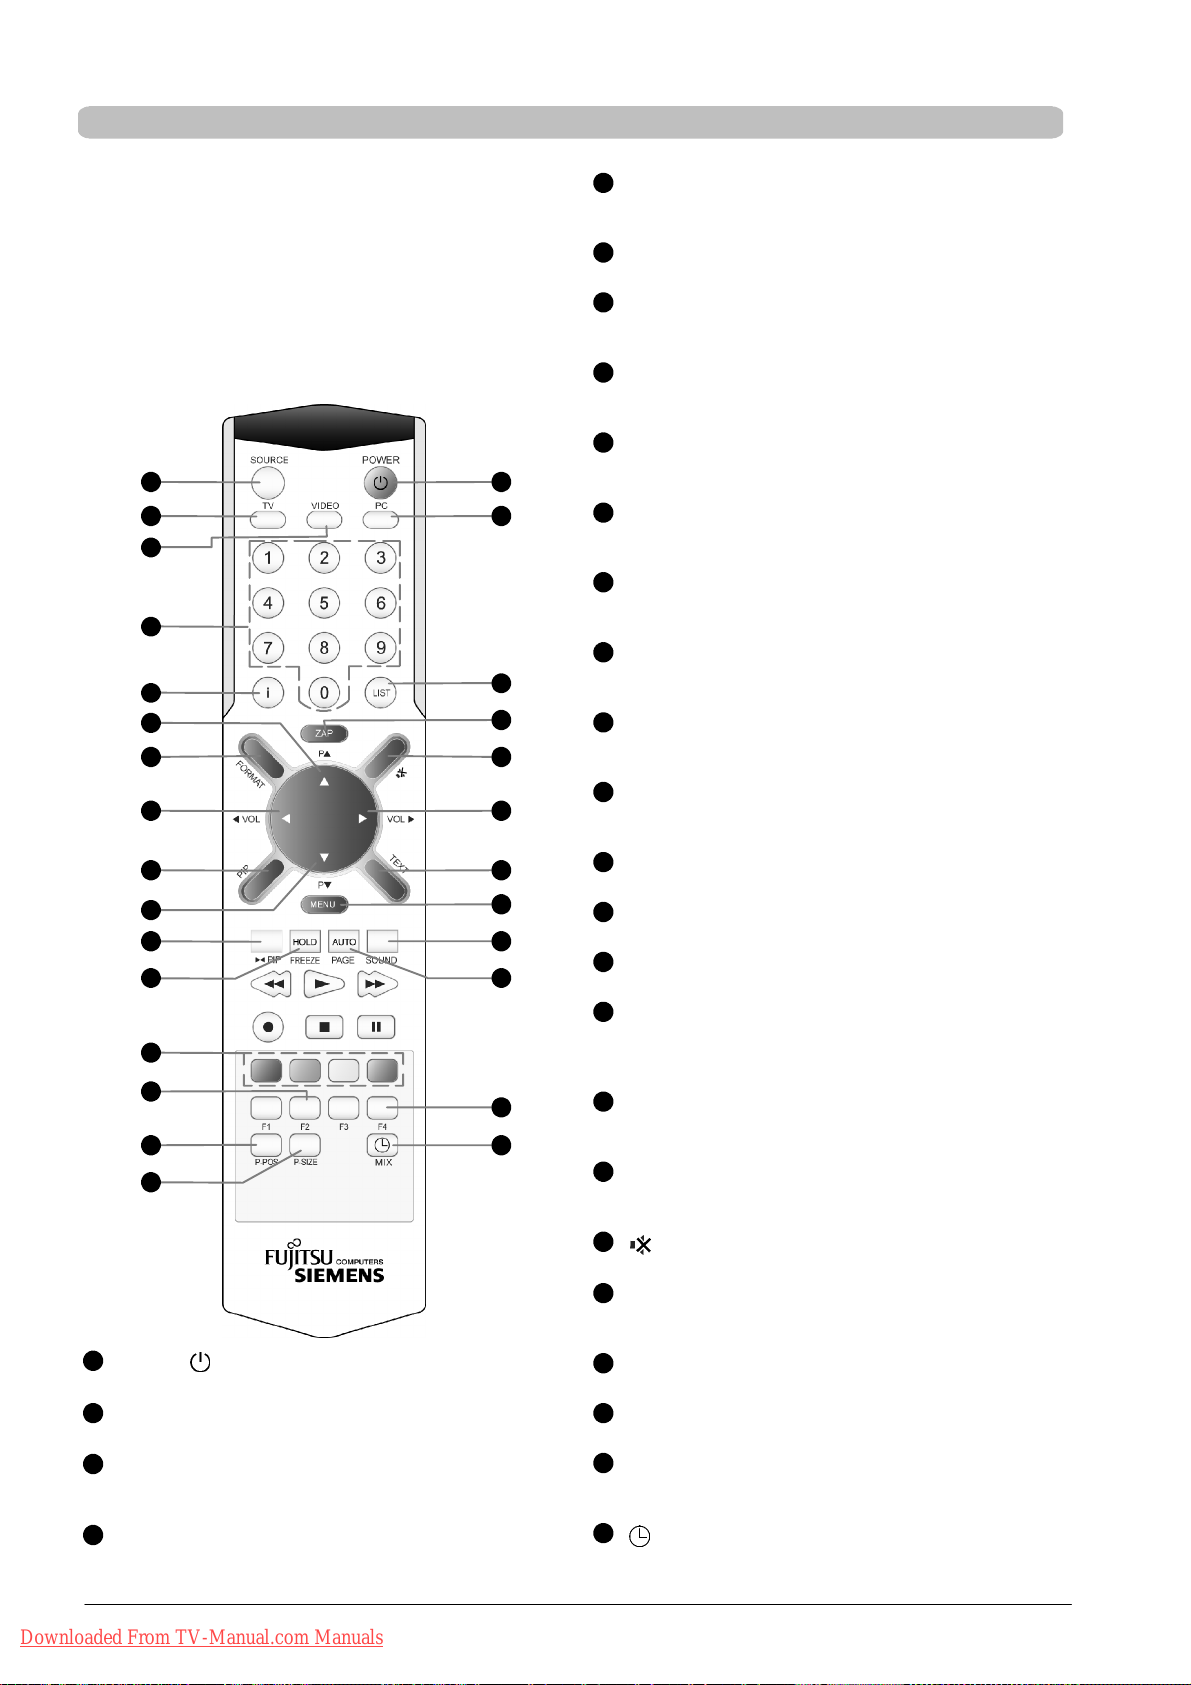
Fernbedienung
Um den LCD/Plasma-TV mit der Fernbedienung steuern zu
können, muss der Netzstecker eingesteckt und der Netzschalter eingeschaltet sein.
Die Infrarot-Fernbedienung funktioniert nur, wenn sich kein
Hindernis zwischen der Bedienung und dem Infrarot-Sensor
an derVorderseite (unten rechts)des LCD/Plasma-TVs befindet. Die Reichweite der Fernbedienung beträgt ca. 6m.
Wenn die Batterien schwächer werden, reduziert sich die
Reichweite der Fernbedienung. Wechseln Sie in diesem Fall
bitte die Batterien. Es dürfen nur 2 Batterien vom Typ LR03
AAA 1,5 V verwendet werden.
1
17
2
3
5
6
8
12
10
13
9
14
18
19
14
15
16
POWER
1
4
7
20
21
11
22
23
24
25
17
26
Schaltet das Gerät ein oder in den Standby-Modus
2
TV
Wechseln zum TV-Modus.
3
VIDEO
Wechseln zum Video-Modus.
Umschalten der Video-Quellen.
4
PC
Wählt den PC-Anschluss als Eingangsquelle.
Umschalten der PC-Quellen.
5
0-9Zifferntasten
TV-Modus: Kanalauswahl
Videotext-Modus: Anwahl einer Videotextseite.
6
i
Zeigt die Informationen zur aktuellen Quelle an.
7
LIST
TV-Modus: öffnen der Programmübersicht
Videotext-Modus: verdeckte Informationen anzeigen
8
PY
Erhöhen der Kanalnummer.
Navigation im OSD-Menü.
9
PB
Verringern der Kanalnummer.
Navigation im OSD-Menü.
10
A VOL
Vermindern der Lautstärke.
Navigation im OSD-Menü.
11
VOL "
Erhöhen der Lautstärke.
Navigation / Ausführen einer Funktion im OSD-Menü.
12
FORMAT
Umschalten der Bildformate.
Videotext-Modus: doppelte Zeichenhöhe
13
PIP
Aktiviert den PIP-Modus.
Umschalten der PIP-Formate (PIP / Split Screen).
14
"A
PIP / F2
Vertauschen von Hauptbild und eingeblendetem Bild
im PIP-Modus.
15
P-POS
Ohne Funktion!
16
P-SIZE
Ohne Funktion!
17
SOURCE / F4
Öffnen des Auswahlmenüs Eingänge (Quellen).
18
HOLD / FREEZE
Erzeugt von der aktuellen Szene ein Standbild.
Videotext-Modus: automatischen Seitenwechsel
stoppen.
19
Rot / Grün / Gelb / Blau
Rot: verlassen der Menüs.
Wählen einer Videotextseite.
20
ZAP
TV-Modus: wechselt zum zuvor eingestellten TV-Kanal.
Videotext-Modus: Unterseiten-Modus ein/aus
21
Schaltet den Ton ein oder aus.
22
TEXT
Schaltet den Videotext-Modus ein oder aus.
Umschalten der Formate (Vollbild / Split Screen).
23
MENU
Hauptmenü / Untermenüs öffnen.
24
SOUND
Ton-Modus einstellen.
25
AUTO / PAGE
PC-Modus analog: automatische Einstellung
Videotext-Modus: Seite 100 öffnen
26
/ MIX
Sleep Timer einstellen.
Videotext-Modus: Mischbetrieb (TV-Bild / Videotext)
Downloaded From TV-Manual.com Manuals
6 DEUTSCH
Page 9

Bedienelemente am Gerät
Übersicht
Die Funktionen der Tasten am Gerät entsprechen denen auf
der Fernbedienung.
DEUTSCH
1 = Kontrollleuchte Standby-Modus orange
Kontrollleuchte Ein blau
Infrarotempfänger
2 = Ein-/Ausschalter für den Standby-Modus
Hauptmenü / Untermenüs öffnen
3 = P- Verringern der Kanalnummer.
Navigation im OSD-Menü.
P+ Erhöhen der Kanalnummer.
Navigation im OSD-Menü.
4 =
- Vermindern der Lautstärke.
Navigation im OSD-Menü.
+ Erhöhen der Lautstärke.
Navigation / Ausführen einer Funktion im OSD-Menü.
Downloaded From TV-Manual.com Manuals
7DEUTSCH
Page 10

Vorbereitungen
Vorbereitungen
Blickrichtung
D Trotz des großen Blickwinkels bietet der LCD/Plas-
ma-TV die beste Performance bei direkter senkrechter
Blickrichtung. Richten Sie den LCD/Plasma-TV auf die
am häufigsten verwendete Blickrichtung aus.
Aufstellungsort
D Lichtreflexion
Vermeiden Sie die Aufstellung gegenüber von Fenstern
oder anderen Lichtquellen.
D Zugang zum Netzeingang
Netzeingang und Netzschalter sollten jederzeit leicht
erreichbar sein.
D Luftzufuhr
Um eine ausreichende Belüftung zu gewährleisten, müssen die Zuluft- und Abluftöffnungen des LCD/PlasmaTVs unbedingt freigehalten werden.
D Umgebungstemperatur
Für sicheren und zuverlässigen Betrieb muss die Umge bungstemperatur zwischen 5°C und 35°C liegen.
Aufstellen
D Entnehmen Sie den LCD/Plasma-TV nur mit zwei Perso-
nen aus der Verpackung und heben Sie den LCD/Plasma-TV niemals alleine hoch. Der Versuch den LCD/
Plasma-TV alleine zu heben, gefährdet Ihre Gesundheit.
D Stellen Sie den LCD/Plasma-TV auf eine standfeste und
waagerechte Unterlage. Der Untergrund muss fest und
statisch tragfähig sein.
D Vergewissern Sie s ich vor der Montage, dass der LCD/
Plasma-TV ausgeschaltet ist, sowie das Netzkabel und
die Signalkabel ausgesteckt sind.
Wandmontage
Bei der Aufstellung in Nischen halten Sie die Mindestabstände zur ausreichenden Belüftung des LCD/PlasmaTVs ein.
LCD-TV: A=5cm;B=10cm
Plasma-TV: A = 10 cm; B = 20 cm
Bei der Wandmontage beachten Sie die folgenden Mindestabstände:
LCD-TV: A = 10 cm; B = 20 cm
Plasma-TV: A = 20 cm; B = 30 cm.
D Der LCD/Plasma-TV darf nur an senkrechten Wänden
montiert werden.
D Prüfen Sie vor der Montage, ob die Tragfähigkeit der
Wand für das 3 fache Gewicht des LCD/Plasma-TVs
(Gewicht siehe Seite 31 “Technische Daten”) geeignet
ist. Ziehen Sie im Zweifelsfall einen qualifizierten Installateur zu Rate.
D Vergewissern Sie s ich vor der Montage, dass der LCD/
Plasma-TV ausgeschaltet ist, sowie das Netzkabel und
die Signalkabel ausgesteckt sind.
D Für die Montage sind zwei Personen notwendig.
D Drehen Sie den LCD/Plasma-TV mit der Frontseite (Bild-
schirm) nach unten und legen Sie ihn vorsichtig auf eine
völlig flache und sichere Grundlage.
D Lösen Sie die 6 Schrauben (M4x10) vom Tischfuss und
entfernen Sie ihn.
Downloaded From TV-Manual.com Manuals
8 DEUTSCH
Page 11

Vorbereitungen
D Montieren Sie 2 Befestigungshaken (Dübel und Be-
festigungshaken gehören nicht zum Lieferumfang)
waagerecht und im entsprechendem Abstand (Abstand
siehe Bohrschablone) an der Wand.
Öffnungen für
Befestigungshaken
Das Befestigungsmaterial muss für das 3 fache Gewicht des Bildschirmes ausgelegt sein. Wenden Sie
sich, falls es nötig ist, an einen qualifizierten Installateur.
D Positionieren Sie den LCD/Plasma-TV so, dass die Be-
festigungshaken in die dafür auf der Geräterückseite
vorgesehenen Öffnungen eingeführt werden können.
Für die Wiedermontage des Tischfusses dürfen Sie nur das
Originalbefestigungsmaterial verwenden.
Bitte bewahren Sie für diesen Zweck, die 6 demontierten
Schrauben (M4x10), sorgfältig auf.
DEUTSCH
Bohrschablone
LCDTVMYRICAVQ40-1 PlasmaTVMYRICAPQ42-1
Plasma TV MYRICA PQ50-1
Downloaded From TV-Manual.com Manuals
9DEUTSCH
Page 12

Vorbereitungen
Anschliessen einer Antenne
Einlegen der Batterien in die Fernbedienung
S Wenn Sie einen Kabelanschluss oder eine ter-
restrische Antenne (analog) anschließen möchten, verwenden Sie hierfür die Buchse “ANTENNA”.
S Öffnen Sie den Batteriefachdeckel.
S Legen Sie die beiden mitgelieferten Batterien
(AAA) in das Batteriefach ein.
Beachten Sie die Polaritätsangaben (+) und (-)
am Batteriefachboden.
S Schliessen Sie den Batteriefachdeckel.
Verwenden der Fernbedienung
Verwenden Sie dieFernbedienung innerhalb einer Distanz von etwa 6m zum Fernbedienungssensor am
LCD/Plasma-TVund innerhalb eineshorizontalenund
vertikalen Winkels von 30°.
Die Fernbedienung könnte nicht funktionieren, wenn
der Fernbedienungssensor des LCD/Plasma-TVs direkter Sonnenbestrahlung oder starkem Kunstlicht
ausgesetzt ist.
30° 30°
Anschliessen des Netzkabels
Downloaded From TV-Manual.com Manuals
10 DEUTSCH
S Stecken Sie das Netzkabel in die Netzeingangs-
buchse am LCD/Plasma-TV und den Netzstecker
in eine Steckdose.
S Schalten Sie den Netzschalter an der Rückseite
des LCD/Plasma-TVs auf Position “I”. Der LCD/
Plasma-TV ist nun im Standby-Betrieb und kann
mit der Fernbedienung eingeschaltet werden.
Page 13

Vorbereitungen
Erstinstalltion
Nach dem ersten Einschalten des LCD/Plasma-TVs müssen Sie nacheinander die Sprache und das Land einstellen. Danach
beginnt die automatische Sendersuche.
Sprache einstellen
S Wählen Sie mit der Taste [Y] oder [B] Ihre Lan-
dessprache aus. Drücken Sie die [MENU] Taste.
DEUTSCH
Landesauswahl für Sortierreihenfolge
S Wählen Sie Ihr Land mit der Taste Taste [Y] oder
B] aus, in welchem Land der LCD/Plasma-TV
[
betrieben wird.
Die Einstellung bewirkt eine länderspezifische
Sortierreihenfolge der TV Kanäle.
S Drücken Sie die [MENU] Taste.
Jetzt beginnt die automatische Sendersuche.
S Wenn Sie die automatische Sendersuche ab-
brechen möchten, drücken Sie die rote Taste.
Sollte kein TV Kanal gefunden werden, prüfen Sie die
Antennenanschlüsse und versuchen Sie die Sendersuche dann erneut.
Downloaded From TV-Manual.com Manuals
11DEUTSCH
Page 14

Bedienung
Bedienung
Ein- / Ausschalten
Anzeige bei Betrieb (Power On) (blau)
Anzeige in Bereitschaft (Standby) (orange)
IR-Sensor für Fernbedienung
Kanalwechsel (Programmwechsel)
/MENU
S Zum Einschalten des LCD/Plasma-TVs drücken
Sie die [POWER] / [MENU] Taste an der Fernbedienung oder auf die Taste
Die Anzeige Power Ein / Standby am LCD/Plasma-TV
leuchtet blau.
/MENU am Gerät.
S Zum Ausschalten des LCD/Plasma-TVs drücken
Sie die [POWER] Taste an der Fernbedienung.
Die Anzeige Power Ein / Standby am LCD/Plasma-TV
leuchtet orange.
Liegt an keinem Eingang ein Signal an, so wird der
LCD/Plasma-TVsautomatischnach einer Wartezeit in
den Bereitschaftsmodus geschaltet.
S Wählen Sie den TV-Modus durch das Drücken
der [TV] Taste an der Fernbedienung.
Mit den Tasten [P
Y]/[PB] an der Fernbedienung.
S Drücken Sie die Taste [PY] zum Erhöhen der
Programmnummer.
S Drücken Sie die Taste [PB] zum Verringern der
Programmnummer.
Mit den T asten [0...9] an der Fernbedienung.
Wählen Sie eine Programmnummer direkt durch das
Drücken der T asten [0...9] aus.
Mit der Programmübersicht im OSD -Menü.
S Drücken Sie die Taste [LIST] an der Fernbedie-
nung um die Programmübersicht am Bildschirm
anzuzeigen.
S Wählen Sie ein Programm mit den Tasten [BY
"A
] an der Fernbedienung aus.
S Drücken Sie die rote Taste zum Schliessen der
Programmübersicht.
Programminfo
TV - 24 - N24
Stereo
Lautstärke- und Toneinstellungen
Downloaded From TV-Manual.com Manuals
12 DEUTSCH
Mit den Tasten [VOL "]/[A VOL] ander Fernbedie-
nung.
S Drücken Sie die Taste [VOL "] zum Erhöhen der
Lautstärke.
S Drücken Sie die Taste [A VOL] zum Vermindern
der Lautstärke.
Page 15

Bedienung
Mit der Taste an der Fernbedienung den Ton
stumm schalten.
S Drücken Sie die Taste , der Ton ist stumm ge-
TV - 24 - N24
Ton aus
TV - 24 - N24
Ton ein
Gebrauch der Bild-im-Bild Funktion
Die Bild-im-Bild Funktion bietet Ihnen die Möglichkeit, zusätzlich zum Fernseh-Programm das Bild einer zweiten Bild-Quelle zu
betrachten.
Als Bild-Quelle können das zweite Empfangsteil (Tuner), DVD-Player, Videorecorder, SAT-Receiver oder PC benutzt werden,
sie müssen an den Eingangsbuchsen an der Rückseite des LCD/Plasma-TVs angeschlossen sein.
Hauptbild
Bild im Bild
schaltet.
S Drücken Sie die Taste erneut, um die Stumm-
schaltung wieder aufzuheben.
Hierzu können Sie auch die Taste [VOL
zen.
Bild-im-Bild (PIP)
"] benut-
S Drücken Sie die [PIP] Taste an der Fernbedie-
nung.
DEUTSCH
Hauptbild Nebenbild
TV - 24 - N24
TV - 28 - NTV
(PIP-Bild)
Info zu Hauptbild
Info zu Nebenbild
Geteilter Bildschirm (Split Screen)
S Drücken Sie erneut die [PIP] Taste an der Fern-
bedienung.
Die zuletzt gewählten Groß- und Kleinbilder sind
nebeneinander zu sehen.
S Tauschen zwischen Haupt - und Nebenbild (Bild-
im-Bild) mit Taste [
bedienung oder unter Menüpunkt <Anzeige ⇒
PIP tauschen
"A PIP] oder [F2] an der Fern-
>.
S Zum Beenden der Bild-im-Bild Funktion drücken
Sie ein- oder zweimal die [PIP] Taste an der Fernbedienung oder stellen im Menüpunkt <Anzeige
⇒ Layout> Single ein.
S Drücken Sie die [i] Taste an der Fernbedienung,
um die Information zu Haupt- und Nebenbild anzuzeigen.
Einstellungen
S Menüpunkt <Layout>
Single - Einzelbildschirm
PIP - Bild-im-Bild
Split Screen - geteilter Bildschirm
S Menüpunkt <PIP Quelle>
Wählen Sie mit den Tasten [
bedienung eine PIP-Quelle aus.
Ohne das OSD-Menü können Sie eine PIPQuelle durch Drücken der [TV] / [VIDEO] / [PC] /
[F4] Taste anwählen.
Die Kombinationen zwischen Quelle und PIPQuelle siehe Tabelle Seite 14.
"]/[A] an der Fern-
S Menüpunkt <PIP Grösse>
Wenn Sie Bild-im-Bild eingestellt haben, können
Sie die Größe des PIP-Bildes verändern.
S Menüpunkt <PIP Horiz. Pos.>
Wenn Sie Bild-im-Bild eingestellt haben, können
Sie die horizontale Position des PIP-Bildes verändern.
S Menüpunkt <PIP Vert. Pos.>
Wenn Sie Bild-im-Bild eingestellt haben, können
Sie die vertikale Position des PIP-Bildes verändern.
Downloaded From TV-Manual.com Manuals
13DEUTSCH
Page 16

Bedienung
Kombinationsmöglichkeiten Quelle mit PIP Quelle
= Quelle mit PIP Quelle kombinierbar
- = Quelle nicht
Quelle
mit PIP Quelle kombinierbar
Tuner
SCART1SCART
2
PIP Quelle
CVBS YC YUV HDMI
PC
(RGB)PC(DVI)
Tuner
SCART1 -
SCART2 -
CVBS -
YC -
YUV
HDMI - - - -
PC (RGB) - - - -
PC (DVI) - - - -
*
-
-
-
- - -
* nur bei Geräten mit Doppeltuner
Liegt an der gewählten PIP-Quelle keine Signal an, wird die Bild-im-Bild Funktion nach ca. 30 Sekunden beendet.
Standbild
Sie können Standbilder des laufenden Programmes
betrachten.
S Drücken Sie die Taste [FREEZE] an der Fernbe-
dienung, das aktuelle Bild wird eingefroren.
S Drücken Sie erneut die [FREEZE] Taste, um die
Standbild-Funktion wieder zu beenden.
Wenn die Bild-im-Bild Funktion eingestellt ist, werden
beide Bilder eingefroren.
S Im OSD-Menü können Sie ebenfalls die Stand-
bild-Funktion unter Menüpunkt <Anzeige ⇒
Standbild> ein- und ausschalten.
Sleep Timer
Downloaded From TV-Manual.com Manuals
14 DEUTSCH
Nach Ablauf der vorgewählten Zeit schaltet der Sleep
Timer den LCD/Plasma-TV in den Standby-Modus.
S Drücken Sie die Taste [ ] an der Fernbedienung
so oft, bis die gewünschte Zeit bis zum Ausschalten erreicht ist.
Die folgenden Zeiten können ausgewählt werden:
30, 60, 90, 120, 150, 180 Minuten und Aus.
Page 17

OSD-Menü Steuerung
Bedienung
Nachstehend ist grundlegend die Vornahme von Einstellungen im OSD-Menü beschrieben.
S Drücken Sie die [MENU], um das Hauptmenü am
Bildschirm anzuzeigen.
S Wählen Sie mit der Taste [Y] oder [B] einen
Menüpunkt aus und drücken die Taste [
S Wiederholen Sie diesen Vorgang, bis der ge-
wünschte Menüpunkt erreicht ist.
Angewählte Menüpunkte sind mit einem blauen Balken markiert. Menüpunkte mit einem weiteren Untermenü oder die direkt ausgeführt werden können sind
durch
gekennzeichnet.
S Mit den Tasten [A]/["] die gewünschte Option
oder einen Parameter wählen und die [MENU]
Taste drücken.
S Drücken Sie die [MENU] Taste, um das vorherige
Menü zurückzukehren.
S Wollen Sie das OSD-Menü schließen, drücken
Sie die rote Taste.
Im jedemMenü werden im unteren Teil die Tasten dargestellt, die Sie zur Bedienung benutzen können.
"].
DEUTSCH
Grundeinstellungen
Automatische Sendersuche
S Drücken Sie die [MENU] Taste, um das Haupt-
menü zu öffnen.
S Wählen Sie mit der Taste [Y] oder [B] das <Se -
tup> Menü aus und drücken Sie die Taste [
"].
S <Tuner> mit der Taste [Y] oder [B] anwählen und
die Taste [
"] drücken.
S Den Menüpunkt <Auto. Suche> wählen [Y]/[B]
und die die Taste [
"] drücken.
S Das Land auswählen [A]/["].
S <Suchumfang> wählen [Y]/[B].
S Den Suchumfang auswählen [A]/["].
Sie haben zwei Möglichkeiten zur Auswahl:
Alle Programme und Neue Programme.
Downloaded From TV-Manual.com Manuals
S <Suche starten> wählen [Y]/[B] und die Taste
"] drücken.
[
15DEUTSCH
Page 18

Bedienung
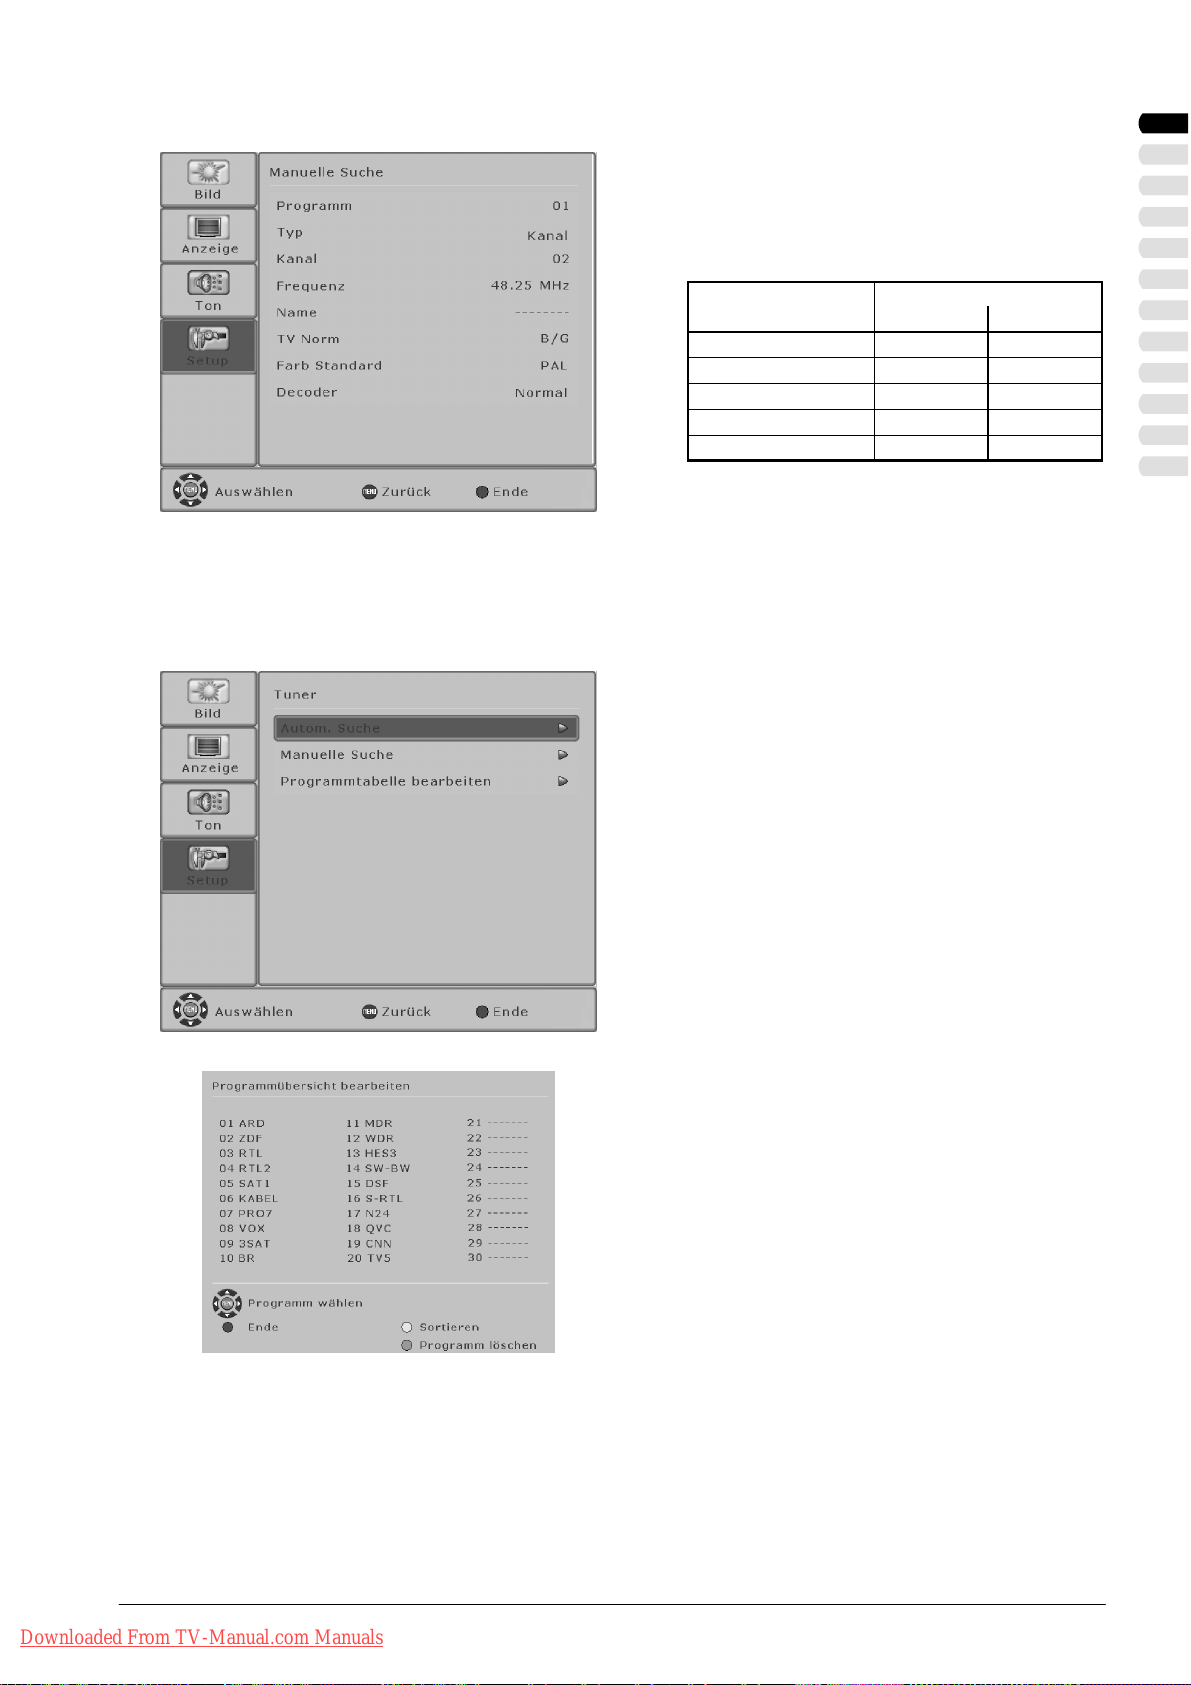
Manuelle Sendersuche
S Drücken Sie die [MENU] Taste, um das Haupt-
menü zu öffnen.
S Wählen Sie mit der Taste [Y] oder [B] das <Se -
tup> Menü aus und drücken Sie die Taste [
"].
S <Tuner> mit der Taste [Y] oder [B] anwählen und
die Taste [
"] drücken.
S Den Menüpunkt <Manuelle Suche> wählen [Y]/
B] und die Taste ["] drücken.
[
S <Programm> anwählen [Y]/[B].
Eine Programmnummer von 0 bis 99 wählen [
[
"].
A]/
S <Typ> anwählen [Y]/[B].
Sie haben zwei Möglichkeiten zur Auswahl:
Kanal und Sonderkanal [
A]/["].
S <Kanal> anwählen [Y]/[B].
Geben Sie eine Kanalzahl ein [0...9] oder [
[
"].
A]/
S <Frequenz> anwählen [Y]/[B] und die Taste ["]
drücken.
Benötigte Frequenz mithilfe der Zifferntasten
[0...9] fünfstellig eingeben.
S <Name> siehe Ändern von Kanalnamen
S <TV Norm> anwählen [Y]/[B].
Eine TV-Norm (Ton) auswählen [
Sie haben je Farbstandard drei Möglichkeiten zur
Auswahl;
bei Farbstandard PAL: B/G, D/K und I
bei Farbstandard SECAM: B/G, D/K und L
A]/["].
S <Farb Standard> anwählen [Y]/[B].
Einen Farbstandard PAL oder SECAM auswählen
[
A]/["].
S <Decoder> siehe Decoder einstellen
Ändern von Kanalnamen
Sie können jedem gespeicherten TV -Kanal einen aus bis zu acht Zeichen bestehenden Namen zuweisen bzw. ändern.
S <Name> anwählen [Y]/[B] und die Taste ["]
drücken.
Die erste Zeichenposition ist angewählt.
S Ein Zeichen auswählen [Y]/[B].
S Nächste Zeichenposition anwählen [A]/["].
S Wählen Sie erneut ein Zeichen aus [Y]/[B].
Der Name kann max. 8 Zeichen lang sein.
Downloaded From TV-Manual.com Manuals
16 DEUTSCH
Page 19
Decoder einstellen
D
Bedienung
Zum Anschliessen eines Decoders für verschlüsselte
TV-Kanäle (Pay-TV) können Sie den Eingang
SCART1 oder SCART2 benutzen.
S <Decoder> anwählen [Y]/[B].
Sie haben die folgenden Auswahlmöglichkeiten:
ecoder
Normal uncodiert uncodiert
Decoder A SCART1 uncodiert codiert
Decoder B SCART1 codiert codiert
Decoder A SCART2 uncodiert codiert
Decoder B SCART2 codiert codiert
Ton
TV-Kanal
Bild
Programmübersicht bearbeiten
Nachfolgend ist beschrieben, wie Sie die Reihenfolge der gespeicherten TV-Kanäle ändern oder aus der Programmübersicht
löschen können.
S Drücken Sie die [MENU] Taste, um das Haupt-
menü zu öffnen.
S Wählen Sie mit der Taste [Y] oder [B] das <Se -
tup> Menü aus und drücken Sie die Taste [
"].
S <Tuner> mit der Taste [Y] oder [B] anwählen und
die Taste [
"] drücken.
S Den Menüpunkt <Programmübersicht bearbei-
ten> wählen [
Y]/[B] und die Taste ["] drücken.
DEUTSCH
Downloaded From TV-Manual.com Manuals
Das Menü <Programmübersicht bearbeiten> erscheint auf dem Bildschirm.
Sortieren
S Wählen Sie mit den Tasten [YBA"] das Pro -
gramm aus, das verschoben werden soll.
S Drücken Sie die gelbe Taste. Das Programm ist
gelb markiert.
S Verschieben Sie das Programm mit den Tasten
YBA"] auf die gewünschte Position.
[
S Zum Abschluss drücken Sie erneut die gelbe Ta-
ste an der Fernbedienung.
Ein Programm löschen
S Wählen Sie mit den Tasten [YBA"] das Pro -
gramm aus, das gelöscht werden soll.
S Drücken Sie die grüne Taste, um das ausge -
wählte Programm aus der Programmübersicht zu
löschen.
S Zum Schliessen des Menüs drücken Sie die rote
Tas t e.
17DEUTSCH
Page 20

Bedienung
OSD-Einstellungen
S Drücken Sie die [MENU] Taste, um das Haupt-
menü zu öffnen.
S Wählen Sie mit der Taste [Y] oder [B] das <Se-
tup> Menü aus und drücken Sie die Taste [
"].
S <OSD> mit der Taste [Y] oder [B] anwählen und
die Taste [
Wartezeit
Unter dem Menüpunkt <Wartezeit> können Sie die
Anzeigedauer(Zeit nach der letzten Betätigung biszur
Ausblendung) des OSD-Menüs verändern.
"] drücken.
S <Wartezeit> anwählen [Y]/[B].
S Sie haben die folgenden Möglichkeiten zur Aus-
wahl: AUS; 5, 10, 15, 20, 25, und 30 Sekunden
[
A]/["].
Transparent
Die Funktion <Transparent> bietetdie Möglichkeit die
Transparenz des OSD-Menüs zu verändern.
S <Transparent> anwählen [Y]/[B].
S Sie können die Transparenz ausschalten oder im
Bereich von 1 bis 10 verändern [
Der Wert 10 ist die höchstmögliche Transparenz
des OSD -Menüs.
A]/["].
TTX Setup WEST
Logoeinblendung
Im Menüpunkt <Logoeinblendung> kann das bei beim
Einschalten oder beim Fehlendes Signalsangezeigte
Logo aus- bzw. eingeschaltet werden.
S <Logoeinblendung> anwählen [Y]/[B].
S Ein oder Aus wählen [A]/["].
Aufruf Werkseinstellungen
Sie haben die Möglichkeit alle im OSD-Menü vorge-
nommenen Änderungen wieder auf die ursprüngliche
Werkseinstellung zurückzusetzen.
S <Aufruf Werkseinstellungen> anwählen [Y]/[B].
S Drücken Sie die Taste ["], um die Werkseinstel-
lungen wieder herzustellen.
Der LCD/Plasma-TV schaltet automatisch in den
Standby-Modus.
Sprache einstellen
Bei der Erstinstallation Ihres LCD/Plasma-TV wird die
Sprache fürdas OSD-Menü gemäßIhrer Auswahleingestellt.
Im Menüpunkt <Sprache> können Sie dieeingestellte
Sprache ändern.
S <Sprache> anwählen [Y]/[B].
S Sprache wählen [A]/["].
Es können die folgenden Sprachen auswählt werden: Deutsch, Englisch, Französisch, Spanisch,
Italienisch, Niederländisch, Dänisch, Schwedisch,
Norwegisch, Finnisch, Portugisisch und Polnisch.
TTX Setup
Wählen sie einen Zeichensatz für den Videotext-Mo-
dus aus: WEST, EAST, RUSSIAN oder ARABIC.
Richtet sich nach der eingestellten Sprache des benutzten Videotextes. FürWest-Europa bitte die Option
WEST benutzen!
Downloaded From TV-Manual.com Manuals
18 DEUTSCH
S Zum Schliessen des Menüs drücken Sie die rote
Tas t e (M ) .
Page 21

Bedienung
Bildeinstellungen
Nach der Erstinstallation bzw. nach dem Zurücksetzen aufdie Werkseinstellungensind dieWerte imMenü <Bild>auf die Vorgabewerte eingestellt. Wie nachfolgend beschriebenkönnen Sie diese Werte,je nach persönlichem Geschmack und Standort des
LCD/Plasma-TVs bzw. dem damit verbundenen Lichteinfall, individuell anpassen.
Für AV-Quellen (TV, CVBS, YC, YUV, SCART1, SCART2, HDMI)
S Drücken Sie die [MENU] Taste, um das Haupt-
menü zu öffnen.
S Wählen Sie mit der Taste [Y] oder [B] das <Bild>
Menü aus und drücken Sie die Taste [
Kontrast
S <Kontrast> anwählen [Y]/[B].
S Drücken Sie Taste [ "] , der Kontrast wird erhöht.
S Drücken Sie Taste [ A ] , der Kontrast wird ver-
mindert.
Helligkeit
S <Helligkeit> anwählen [Y]/[B].
S Drücken Sie Taste [ " ] , das Bild wird heller.
S Drücken Sie Taste [ A ], das Bild wird dunkler.
Schärfe
S <Schärfe anwählen [Y]/[B].
S Drücken Sie Taste [ " ] , das Bild wird schärfer.
S Drücken Sie Taste [ A ] , das Bild wird weicher.
Farbe
S <Farbe> anwählen [Y]/[B].
S Drücken Sie Taste [ " ] , die Farbsättigung wird
erhöht.
S Drücken Sie Taste [ A ] , die Farbsättigung wird
vermindert.
Farbton
Farbeinstellung - nur bei NTSC!
Farbbalance
S <Farbbalance> anwählen [Y]/[B].
Sie haben die drei Möglichkeiten zur Auswahl:
Normal, Kalt und Warm [
Bildanpassung
A]/["].
S <Bildanpassung> anwählen [Y]/[B].
Sie haben die drei Möglichkeiten zur Auswahl:
Normal, Hell und Dunkel [
Filter (Grundeinstellung der Bildschärfe)
Nur bei CVBS, YC!
A]/["].
S <Filter> anwählen [Y]/[B].
Sie haben die drei Möglichkeiten zur Auswahl:
Normal, Soft und Intensiv [
DNC (Dynamic Noise Control)
Nicht bei HDMI!
Schwache TV -Signale oder schlechte Videosignale
können störendes Bildrauschenerzeugen. DNCpasst
die Wirkung derdigitalenRauschunterdrückung dynamisch dem Bildinhalt an.
A]/["].
S <DNC> anwählen [Y]/[B].
S Wählen Sie einen Wert zwischen 0 und 10 [A]/
["].
Foto CD
Nicht bei TV und HDMI!
Der Menüpunkt <Foto CD> ist speziell für die Wiedergabe von Standbildern z.B. von Foto-CD oder Picture-CD.
S Zum Schliessen des Menüs drücken Sie die rote
Tas t e.
"].
DEUTSCH
Downloaded From TV-Manual.com Manuals
19DEUTSCH
Page 22

Bedienung
Für PC-Quellen (RGB, DVI)
S Drücken Sie die [MENU] Taste, um das Haupt-
menü zu öffnen.
S Wählen Sie mit der Taste [Y] oder [B] das <Bild>
Menü aus und drücken Sie die Taste [
Kontrast
"].
S <Kontrast> anwählen [Y]/[B].
S Drücken Sie Taste [ "] , der Kontrast wird erhöht.
S Drücken Sie Taste [ A ] , der Kontrast wird ver-
mindert
Helligkeit
S <Helligkeit> anwählen [Y]/[B].
S Drücken Sie Taste [ " ] , das Bild wird heller.
S Drücken Sie Taste [ A ], das Bild wird dunkler.
Schärfe
S <Schärfe anwählen [Y]/[B].
S Drücken Sie Taste [ " ] , das Bild wird schärfer.
S Drücken Sie Taste [ A ] , das Bild wird weicher.
Farbbalance
S <Farbbalance> anwählen [Y]/[B].
Sie haben die drei Möglichkeiten zur Auswahl:
Normal, Kalt und Warm [
Bildanpassung
A]/["].
S <Bildanpassung> anwählen [Y]/[B].
Sie haben die drei Möglichkeiten zur Auswahl:
Normal, Hell und Dunkel [
DNC (Dynamic Noise Control)
Nur bei PC (RGB)
Schwache TV -Signale oder schlechte Videosignale
können störendes Bildrauschenerzeugen. DNCpasst
die Wirkung derdigitalenRauschunterdrückung dynamisch dem Bildinhalt an.
A]/["].
S <DNC> anwählen [Y]/[B].
S Wählen Sie einen Wert zwischen 0 und 10 [A]/
"].
[
S Zum Schliessen des Menüs drücken Sie die rote
Tas t e.
Downloaded From TV-Manual.com Manuals
20 DEUTSCH
Page 23

Bildformate für AV-Quellen
Bedienung
S Drücken Sie die [MENU] Taste, um das Haupt-
menü zu öffnen.
S Wählen Sie mit der Taste [Y] oder [B] das Menü
<Anzeige> aus und drücken Sie die Taste [
S Das gewünschte Bildformat auswählen [A]/["].
Auf dem Bildschirm erscheint das gewählte Bildformat.
S Zum Umschalten der Formate können Sie auch
wiederholt die Taste [FORMAT] auf der Fernbe dienung drücken.
Auto Zoom
Diese Funktionwertet das aktuelle Bildformat aus und
schaltet automatisch zwischen 4:3 und 16:9 um.
Vollbild
In dieser Formateinstellung wird das Bild in horizonta-
ler und vertikaler Richtung so angepasst, dass immer
eine bildschirmfüllende Darstellung sichtbar ist.
"].
DEUTSCH
TV - 24 - N24
Vollbild
Bildformat
Normal
Diese Formateinstellung stellt ein PAL 4:3 Bild im kor-
rekten Seitenverhältnis dar. Am linken und rechten
Bildrand sind dunkle Streifen sichtbar.
16:9
In diesem Mode wird das Bild horizontal auf die kom-
plette Bildbreite skaliert, vertikal wird oben und unten
ingesamt ca. 25% vom Bild abgeschnitten.
Der Mode sollteverwendet werden,um 16:9 Letterbox
Video-Material (mit schwarzen Balken oben und unten) bildschirmfüllend darzustellen.
16:9 Top
Bild im 16:9 Letterbox-Format mit Untertiteln
14:9
Bei 14:9 Zoom wird das Bild vertikal insgesamt um
15% vergrößert, d.h. ca. 15% vom Bildinhalt werden
vertikalabgeschnitten.Horizontalwird das Bild im Vergleich zur Vollbilddarstellung um 15% verkleinert, d.h.
es werden links und rechts schmale schwarze Balken
dargestellt.
14:9 Top
Bild im 14:9 Letterbox-Format mit Untertiteln
Downloaded From TV-Manual.com Manuals
Panorama
Diese Formateinstellung skaliert das Eingangssignal
automatisch in horizontaler und vertikaler Richtung
bildschirmfüllend, aber horizontal nicht linear. Das
heißt, dass die Bildinhalte in der Bildschirmmitte original dargestellt werden und zum Rand hineine stärkere
Skalierung stattfindet.
S Zum Schliessen des Menüs drücken Sie die rote
Tas t e.
21DEUTSCH
Page 24

Bedienung
Bildformate für PC-Quellen
S Drücken Sie die [MENU] Taste, um das Haupt-
menü zu öffnen.
S Wählen Sie mit der Taste [Y] oder [B] das Menü
<Anzeige> aus und drücken Sie die Taste [
"].
S Das gewünschte Bildformat auswählen [A]/["].
Normal
Stellt das PC-Bild bildschirmfüllend, ohne Änderung
des Seitenverhältnisses, dar.
Am linken und rechten Bildrand sind je nach Eingangsformat des PC -Bildes dunkle Streifen sichtbar.
Vollbild
In dieser Formateinstellung wird das Bild in horizonta-
ler und vertikaler Richtung so angepasst, dass immer
eine bildschirmfüllende Darstellung sichtbar ist.
OnetoOne
Bei dieser Einstellung wird die Bildschirmpixelzahl
dem Eingangssignal angepasst. D.h. bei einer Bildschirmauflösung von 1366 x 768 werden vomPC -Bild
immer 1366 x 768 Bildpunkte wiedergegeben.
S Zum Schliessen des Menüs drücken Sie die rote
Tas t e.
Weitere Formate sindverfügbar, wenn bei PC(DVI)im Menüpunkt<Anzeige ⇒ Overscan>Ein eingestelltist, sieheBildformate AV Quellen.
Erweiterte Toneinstellungen
S Drücken Sie die [MENU] Taste, um das Haupt-
menü zu öffnen.
S Wählen Sie mit der Taste [Y] oder [B] das Menü
<Ton> aus und drücken Sie die Taste [
S Gewünschten Menüpunkt (Funktion) mit der Ta-
Y] oder [B] anwählen.
ste [
S Einstellung wählen [A]/["].
S Zum Schliessen des Menüs drücken Sie die rote
Tas t e.
Lautstärke
Anzeige der aktuell eingestellten Lautstärke.
Balance
Balance zwischen linken und rechten Lautsprecher.
S Drücken Sie Taste ["] , um den linken
Lautsprecherpegel zu verringern.
S Drücken Sie Taste [A] , um den rechten
Lautsprecherpegel zu verringern.
"].
Downloaded From TV-Manual.com Manuals
22 DEUTSCH
Equalizer
Die folgenden Möglichkeiten (Klangmuster) stehen
zur Auswahl: Classic, Flat, Jazz, Rock, Pop, Vocal;
Benutzer (siehe Benutzer EQ Einstellung).
Modus
Hier können Sie den Tonmodus auswählen. Es ste-
hen, je nach Senderausstrahlung, verschiedene Mo dis zu Verfügung.
Bei Stereo Sendungen: Stereo, Stereobasis Erweitert
und Mono.
Page 25

Bedienung
Bei Mono Sendungen: Mono und Pseudo Stereo.
Bei 2-Ton Sendungen: Kanal A und Kanal B.
Bei Sendungen die in verschiedenen Sprachen ausgestrahlt werden können Sie hier zwischen den Sprachen wählen.
Lautstärke Line Out
Lautstärkepegel am Ausgang LINE OUT L/R.
S Wählen Sie den gewünschten Lautstärkepegel
A]/["].
[
Max. Ein-Lautstärke
Lautstärke beim Einschalten des Gerätes.
S Wählen Sie den gewünschten Lautstärkepegel
A]/["].
[
AVC (Automatic Voice Control)
Diese Funktion gewährleistet eine einheitliche Laut-
stärke,wenn Sie von einem TV-Kanal auf einen anderen umschalten.
SPDIF Input (Eingang für digitale Audiosignale)
Hierkönnen Sie den digitalenAudioeingang miteinem
Bildsignal von einer AV- oder PC-Quelle verbinden.
DEUTSCH
Einstellung Benutzer-Equalizer
Benutzer EQ Einstellungen
Für die individuelle Klangeinstellung mit Hilfe des
Equalizers. Siehe Einstellung Benutzer-Equalizer.
S Um Einstellungen im Menü <Benutzer EQ Ein-
stellung> durchzuführen, müssen Sie in Menüpunkt <Equalizer> die Einstellung Benutzer wählen und nach Anwahl des Menüpunktes
<Benutzer EQ Einstellung> das Menü mit der
Tas t e [
"] aktivieren.
Hier können Sie die Pegel für die einzelnen Frequen zen Ihren persönlichen Bedürfnissen anpassen.
S Wählen Sie die gewünschte Frequenz mit der
Y] oder [B] aus.
Tas t e [
S Drücken Sie Taste ["] , um die gewählte Fre-
quenz anzuheben.
S Drücken Sie Taste [A] , um die gewählte Fre-
quenz abzuschwächen.
Downloaded From TV-Manual.com Manuals
S Zum Schliessen des Menüs drücken Sie die rote
Tas t e.
23DEUTSCH
Page 26

Bedienung
Videotext
Der LCD/Plasma-TV kann TOP/FLOF Videotextinformationen empfangen und darstellen.
D Wählen Sie einen TV-Kanal mit Videotext.
S Drücken Sie Taste [TEXT] auf der Fernbedie-
nung, um den Videotext anzuzeigen. Durch mehr-
TV-Bild
Videotext
TV-Bild Videotext
maliges Drücken der [TEXT] Taste können Sie
den Videotext und das laufende Fernsehpro-
gramm gleichzeitig nebeneinander darstellen
(Split Screen) bzw. den Videotext-Modus wieder
verlassen.
Drücken Sie die [TV] Taste, um zum TV-Modus
zurückzukehren.
Seitenanwahl
D Zur direkten Anwahl von Videotextseiten benutzen Sie die Zifferntasten [0...9].
D Mit den Tasten [
Rückkehr zur Indexseite
D Drücken Sie die Taste [AUTO] oder [MENU], um die Indexseite (z.B. 100) direkt anzuwählen.
Anzeige von Unterseiten
D Mit den Tasten [
handen, oben in der Statuszeile neben der gewählten Seitennummer angezeigt.
D Drücken Sie die Taste [ZAP], um in den Direktwahl-Modus für Unterseiten zu wechseln
Wählen Sie direkt mit den Zfferntasten [0...9] die gewünschte Unterseite aus.
Videotextanzeige vergrößern
D Durch mehrmaliges Drücken der Taste [FORMAT] können Sie die Videotextanzeige für den oberen bzw. unteren Teil ver-
größern. Durch nochmaliges Drücken kehren Sie zur Normalanzeige zurück.
Verdeckte Informationen anzeigen
D Mit der Taste [LIST] können Sie verdeckte Informationen ein- bzw. ausschalten, wie sie z.B. auf Quiz- oder Rätselseiten
vorkommen.
Automatischen Seitenwechsel stoppen
D Wenn die gewählte Videotextinformation länger als eine Seite ist, so wird die Seite nach kurzer Zeit gewechselt. Zum
Stoppen des automatischen Seitenwechsels drücken Sie die Taste [HOLD]. Hinter der gewählten Seitennummer erscheint ein H. Drücken Sie erneut [HOLD], um den automatischen Seitenwechsel wieder einzuschalten.
Y] und [B] können Sie in den Videotextseiten vor- bzw- zurück blättern.
"] und [A] können Sie Unterseiten direkt anwählen. Die Nummern der Unterseiten werden, sofern vor-
Mischbetrieb
D Mit der Taste [MIX] können Sie den Mischbetrieb aktivieren bzw. deaktivieren. Der Videotext wird dem laufenden Fern-
sehprogramm überlagert.
Die rote, grüne, gelbe und blaue Taste auf der Fernbedienung haben je nach Videotextart unterschiedliche Funktionen, die im
unteren Bereich des Videotextes angezeigt werden.
Downloaded From TV-Manual.com Manuals
24 DEUTSCH
Page 27

Anschluss externer Geräte
Anschluss an SCART1 / SCART2
Bedienung
An SCART1 und SCART2 können Sie externeGeräte
wie: DVD-Player, DVD-Recorder, Videorecorder, Set
Top-Boxen und Camcorder anschliessen.
SCART1 verfügt zusätzlich überdie MöglichkeitRGBQuellen anzuschliessen.
SCART2 verfügt zusätzlich über die Möglichkeit YCQuellen anzuschliessen.
WennSie den EingangSCART1 oder SCART2 mit der
[VIDEO] Taste angewählt haben, können Sie die
nachfolgend beschriebenen Einstellungen vornehmen.
S Drücken Sie die [MENU] Taste, um das Haupt-
menü zu öffnen.
S Wählen Sie mit der Taste [Y] oder [B] das Menü
<Setup> aus und drücken Sie die Taste [
S <Eingänge> auswählen [Y]/[B] und die Taste
"] drücken.
[
S Gewünschten Menüpunkt (Funktion) mit der Ta-
Y] oder [B] anwählen.
ste [
S Einstellung wählen [A]/["].
S Zum Schliessen des Menüs drücken Sie die rote
Tas t e.
"].
DEUTSCH
TV SCART
Die Funktion muss auf Ein stehen, wenn beim Ein-
schalteneines Gerätesan SCART1 oderSCART2 automatisch auf den entsprechenden SCART-Eingang
umgeschaltet werden soll.
SCART1 RGB IN
S SCART :Liegt von einem externen Gerät eine
Schaltspannung an Pin 16 an, so schaltet der
LCD/Plasma-TV automatisch auf das anliegende
RGB-Signal um. Andernfalls wird ein CVBS-Signal wiedergegeben.
S Immer : Wiedergabe nur RGB-Signal
S Unbenutzt : Wiedergabe nur CVBS-Signal
SCART2 YC IN
S Immer : Wiedergabe YC-Signal
S Unbenutzt : Wiedergabe CVBS-Signal
FILM Mode
Diese Funktion erkennt, wenn es sich bei dem aus-
gestrahlten Bild-Material um Original-Kinofilme handelt und optimiert die Bildqualität. Standardmäßig ist
die Funktion deaktiviert. Um die Funktion zu aktivieren, stellen Sie den Menüpunkt <FILM Mode> auf Ein.
Besonders zu empfehlen ist diese Funktion bei der
Benutzung eines DVD-Players.
Formaterkennung
Wählen Sie Signal (Pegel) für die Formaterkennung
aus. Es stehen zwei Möglichkeiten zu Auswahl:
S Schaltspannung
Auswertung des Signals an Pin 8 der SCARTBuchsen
S Software
Erkennung von Letterbox-Filmen anhand der
schwarzen Balken oben und unten
16 : 9 Format (Nur wirksam bei Format Auto Zoom!)
Der Menüpunkt<16 : 9 Format>ist nur aktiv, wenn un-
Downloaded From TV-Manual.com Manuals
25DEUTSCH
Page 28

Bedienung
Anschluss an die Component-Eingänge YUV
ter Menüpunkt <Formaterkennung> Schaltspannung
eingestellt ist.
S Letterbox : Bild wird horizontal und vertikal auf full
screen gestreckt
S Anamorph : Bild wird nur horizontal auf full screen
gestreckt.
An YUV können Sie externe Geräte, wie DVD-Player
oder DVD-Recorder mit einem YUV-Ausgang, anschliessen.
Für das Audiosignal benutzen Sie die Eingänge LINE
IN YUV (L/R).
S Drücken Sie die [MENU] Taste, um das Haupt-
menü zu öffnen.
S Wählen Sie mit der Taste [Y] oder [B] das Menü
<Setup> aus und drücken Sie die Taste [
"].
S <Eingänge> auswählen [Y]/[B] und drücken Sie
die Taste [
"].
S Menüpunkt <FILM Mode> ein- bzw. ausschalten
A]/["].
[
Anschluss an den S-Video-Eingang
S Zum Schliessen des Menüs drücken Sie die rote
Tas t e.
FILM Mode
Siehe Anschluss an SCART1 / SCART2.
An S-VIDEO können Sie externe Geräte, wie DVDPlayer, Videorecorderund Camcorder mit einem S-Videoausgang, anschliessen.
Für das Audiosignal benutzen Sie die Eingänge LINE
IN S-VIDEO (L/R).
S Drücken Sie die [MENU] Taste, um das Haupt-
menü zu öffnen.
S Wählen Sie mit der Taste [Y] oder [B] das Menü
<Setup> aus und drücken Sie die Taste [
"].
S <Eingänge> auswählen [Y]/[B] und dann die
"] drücken.
Tas t e [
S Menüpunkt <FILM Mode> ein- bzw. ausschalten
A]/["].
[
Downloaded From TV-Manual.com Manuals
26 DEUTSCH
S Zum Schliessen des Menüs drücken Sie die rote
Tas t e.
FILM Mode
Siehe Anschluss an SCART1 / SCART2.
Page 29

Anschluss an den HDMI-Eingang
HDMI
Signal
Anschluss an den PC DVI-I Eingang
Bedienung
Der LCD/Plasma-TV ist mit einem HDMI-Eingang für
digitale Video- und Audiosignale ausgestattet.
Schliessen ein HDMI-kompatibles Gerät, wie z.B. einen DVD-Player oder eine Set Top-Box mit einer
HDMI-Ausgangsbuchse, an den HDMI-Eingang an.
S Drücken Sie die die Taste [F4], um das Auswahl-
menü <Eingänge> zu öffnen.
S Eingang auswählen [Y]/[B] und dann die rote
Taste (M) drücken.
Den HDMI-Eingang können Sie auch mittels der
[VIDEO] Taste anwählen.
Signal:
640 x 480 @ 60Hz
480i, 576i, 480p, 576p, 720p, 1080i
HDMI (RGB, YUV) Ton 2 Kanäle b is 48kHz
DVI (RGB), Ton über digital COAX IN
Für den Anschluss eines PCs benutzen Sie den Eingang PC DVI-I.
Verfügt Ihr PC über einen digitalen DVI-Ausgang, benutzen Sie zum Anschluss ein DVI-Kabel.
Besitzt Ihr PC einen RGB-Ausgang (DSUB 15), benutzen Sie für den Anschluss ein Adapterkabel DVI
auf DSUB.
DEUTSCH
Einstellungen für PC (RGB)
PC (DVI)
Signal
PC (RGB)
Signal
S Drücken Sie die die Taste [F4], um das Auswahl-
menü <Eingänge> zu öffnen.
S Eingang auswählen [Y]/[B] und dann die rote
Taste (M) drücken.
Die PC-Eingänge können Sie auch mittels der
[PC] Taste anwählen.
S Drücken Sie die [MENU] Taste, um das Haupt-
menü zu öffnen.
S Wählen Sie mit der Taste [Y] oder [B] das Menü
<Setup> aus und drücken Sie die Taste [
"].
S <Eingänge> auswählen [Y]/[B] und die Taste
"] drücken.
[
Auto. Abgleich
S Drücken Sie die Taste ["], um den Auto. Abgleich
zu starten.
Die Funktion versucht jetzt die optimalen Bildeinstellungen für das anstehende Signal zu finden.
Während der Einstellung bewegt sich das Bild
leicht hin und her.
H Total
S Hier können Sie die Abtastfrequenz für das PC -
Bild korrigieren. Diese Funktion ist nur für fachkundige Benutzer gedacht.
Downloaded From TV-Manual.com Manuals
27DEUTSCH
Page 30

Bedienung
Einstellungen für PC (DVI)
VPos.
S Stellen Sie die vertikale Bildposition ein [A]/["].
V Grösse
S Stellen Sie die vertikale Bildgrösse ein [A]/["].
HPos
S Stellen Sie die horizontale Bildposition ein [A]/
"].
[
H Grösse
S Stellen Sie die horizontale Bildgrösse ein [A]/
"].
[
Phase
S Beseitigen Sie Flimmern und Verzerrungen.
S Zum Schliessen des Menüs drücken Sie die rote
Tas t e.
S Drücken Sie die [MENU] Taste, um das Haupt-
menü zu öffnen.
S Wählen Sie mit der Taste [Y] oder [B] das Menü
<Anzeige> aus und drücken Sie die Taste [
"].
S <Overscan> auswählen [Y]/[B] und die Taste
"] drücken.
[
Overscan
S <Overscan> ein- bzw. ausschalten [A]/["]
Ist die Option Overscan eingeschaltet, so wird der
Bildrand um ca. 10% beschnitten. Durch diese
Beschneidung werden Störungen am Bildrand
beseitigt bzw. unsichtbar gemacht.
Eingänge auswählen
S Zum Schliessen des Menüs drücken Sie die rote
Tas t e.
Benutzen Sie für die Anwahl eines Einganges das
Auswahlmenü <Eingänge>.
S Drücken Sie die die Taste [SOURCE] oder [F4],
um das Auswahlmenü <Eingänge> zu öffnen.
S Eingang auswählen [Y]/[B] und dann die rote
Taste drücken.
Downloaded From TV-Manual.com Manuals
28 DEUTSCH
Page 31

Sonderfunktionen
Bildschirmschoner Nur Plasma-TV!
Bedienung
S Drücken Sie die [MENU] Taste, um das Haupt-
menü zu öffnen.
S Wählen Sie mit der Taste [Y] oder [B] das Menü
<Anzeige> aus und drücken Sie die Taste [
S <Bildschirmschoner> auswählen [Y]/[B] und die
"] drücken.
Tas t e [
Wählen Sieeine der folgendenOptionen aus [
S Weiß
Benutzen Sie diese Option für die Aufhebung von
jüngeren und wenig ausgeprägten “Einbrennungen” auf dem Bildschirm.
S Invertiert
Benutzen Sie diese Funktion für das Regenerieren des Bildschirmes im Fall von starken “Einbrennungen”.
S Zum Schliessen des Menüs drücken Sie die rote
Tas t e.
"].
A]/["]:
DEUTSCH
Downloaded From TV-Manual.com Manuals
29DEUTSCH
Page 32

Fehlerbehebung
Fehlerbehebung
Die nachstehende Tabelle zeigt herkömmliche Probleme und die entsprechenden Lösungen. Informieren Sie sich zuerst anhand dieser Tabelle, bevor Sie die Hotline bzw. den Service kontaktieren.
Sollten die angegebenen Hinweise zur Fehlerbehebung nicht zum Erfolg führen, schalten Sie das Gerät
am Netzschalter “Aus” und ziehen Sie den Netzstecker aus der Steckdose.
Versuchen Sie nicht, das Gerät selbst zu reparieren und entfernen Sie keinesfalls die hintere Abdeckung
am Gerät.
FEHLER MÖGLICHE URSACHE MÖGLICHE BEHEBUNG
Kein Bild und kein Ton,
obwohl der Netzstecker
eingesteckt und Gerät
eingeschaltet ist.
Bildschirm dunkel. D Kontrasteinstellung zu gering.
Schwache oder
übermäßige Farben.
Das Bild ist abgeschnitten
bzw. das Bild ist nicht
zentriert.
Das Bild ist zu gross bzw.
zu klein.
Die Fernbedienung
funktioniert nicht.
Das dargestellte Bild ist zu
dunkel.
Bild wird angezeigt, aber
kein Ton vorhanden.
Einzelne Buchstaben
werden nicht dargestellt
(PC-Modus).
Horizontale Streifen bei
TV- oder Video-Signalen.
Um alle Einstellungen wieder in den Grundzustand zu versetzen, benutzen Sie den Menüpunkt
D Netzschalter in Position “0” (AUS).
D Netzstecker von Gerät nicht in Steck-
dose eingesteckt.
D Defektes Netzkabel .
D Kein Eingangssignal, falscher Eingang
ausgewählt.
D Farbe nicht richtig eingestellt.
D Anschlusskabel nicht richtig ange-
schlossen.
D Bildlage nicht richtig eingestellt. D Korrigieren Sie die Bildlage.
D Bildformat falsch eingestellt. D Drücken Sie wiederholt die Taste [FORMAT],
D Die Batterien sind leer.
D Zwischen der Fernbedienung und dem
Sensor befindet sich ein Hindernis.
D Die Fernbedienung befindet sich
außerhalb ihres Betriebsbereiches.
D Die Bildqualität ist nicht richtig einge-
stellt.
D Ton ist stumm geschaltet.
D Lautstärke auf Minimum eingestellt.
D Signalquelle vor dem Bildschirm aufge-
stellt.
D Schirmung der Videokabel ist nicht aus-
reichend.
<Setup ⇒ OSD ⇒ Aufruf Werkseinstellungen>!
D Netzschalter in Position “I” stellen.
D Stecken Sie den Stecker vom Netzkabel in die
Steckdose.
D Service-Hotline anrufen.
D Helligkeit und/oder Kontrast richtig einstellen
(siehe Menüpunkt <Bild>).
D Anschlusskabel kontrollieren; richtigen Ein-
gang der Quelle zuordnen.
D Stellen Sie Farbe unter Menüpunkt <Bild> ein.
D Kabel korrekt anschließen.
Benutzen Sie die Auto Abgleich Funktion.
bis das Bild bildschirmfüllend angezeigt wird.
D Legen Sie neue Batterien ein.
D Entfernen Sie das Hindernis zwischen Fernbe-
dienung und Sensor.
D BetreibenSie die Fernsteuerung imangegebe-
nen Bereich.
D Korrigieren Sie Bildhelligkeitund Kontrastunter
Menüpunkt <Bild>.
D Drücken Sie die Taste auf der Fernbedie-
nung.
D Erhöhen Sie die Lautstärke.
D Stellen Sie die Phasenlage unter Menüpunkt
<Setup ⇒ PC ⇒ Phase> ein.
D Überprüfen Sie die Einstellung der Bildbreite.
D Führen Sie <Setup ⇒ PC ⇒ Auto. Abgleich>
aus.
D Platzieren Sie die Signalquellen grundsätzlich
seitlich oder hinter dem Bildschirm.
D Verwenden Sie nur hochwertige Signalkabel
mit hoher Schirmdämpfung.
Downloaded From TV-Manual.com Manuals
30 DEUTSCH
Page 33

Technische Daten - MYRICA VQ40 -1
Technische Daten - MYRICA VQ40-1
BILDSCHIRM
Größe / diagonal: 101 cm (40”), 16:9 Format
Darstellbare Bildgröße: 885 mm (horizontal) x 497 mm (vertikal)
Auflösung: 1366 x 768 Bildpunkte
Farbdarstellung: 16.7 Mio Farben
Betrachtungswinkel: 178° typisch
VIDEO STANDARDS
Video: PAL / SECAM / NTSC
TV Tuner: PAL (BG, DK, I) / SECAM (BG, DK, L), 47 - 861 MHz (VHF , UHF, Hyperband)
PALplus, Cinescope: Automatische Formaterkennung (Bildschirmfüllend)
Formate: 4:3, 16:9 (Top), 14:9 (Top), Panorama, Bildschirmfüllend
FREQUENZBEREICH PC
Horizontalfrequenz: 30 - 80 kHz
Vertikalfrequenz: 50 - 90 Hz
Clockfrequenz: max. 110 MHz
Auflösungen (VGA analog):
Empfohlene Auflösung:
Formate: 1:1, Bildschirmfüllend, Formatfüllend, Zoom
EINGÄNGE / ANSCHLÜSSE / SYNCHRONISATION
PC / Video-Eingang: RGB analog und automatische Sync-Erkennung
Video-Anschlüsse TV Tuner: IEC, 75 Ohm Eingangswiderstand
PC Anschluss analog/digital DVI-I: analog RGB
Audio-Anschlüsse Integrierte Lautsprecher: 4 x Breitband
DOS: 640 x 480 @ 60 Hz, 720 x 400 @ 70 Hz,
VGA: 640 x 480, SVGA: 800 x 600; WVGA: 848 x 480 @ 60 Hz
XGA: 1024 x 768 @ 60 Hz
WXGA: 1360 x 768 @ 60 Hz
SXGA: 1280 x 1024 @ 60 Hz
1360 x 768 @ 60 Hz
SCART1: RGB, FBAS Eingang, FBAS Ausgang
SCART2: YC, FBAS Eingang, FBAS Ausgang
Y/C: MiniDIN (HOSIDEN)
YUV (FBAS): 3 x Cinch (HDTV)
FBAS: 1 x Cinch (Y)
HDMI: digital Video/Audio (HDTV)
digital DVI 1.0 - HDCP
Stereo-Eingang: 2 x Cinch L/R 1Vrms (YUV (FBAS), YC)
1 x PC AUDIO IN
1 x Cinch Digitaler Audioeingang (DIG IN COAX)
2 x SCART 1 Vrms
Stereo-Ausgang: 2 x Cinch (LINE OUT L/R)
Aktiver Subwoofer: 1 x Cinch (LINE OUT SUB)
Digitaler Audioausgang: 1 x Cinch (DIG OUT COAX)
Ausgangsleistung Verstärker: 2 x 7W RMS (2 Ohm)
DEUTSCH
Synchronisation: Sync auf grün, Composite Sync mit automatischer Erkennung,
Bedienelemente: Netzschalter, IR-Fernbedienung (OSD-Menü 12 Sprachen), Ortsbedienung
BETRIEBSBEDINGUNGEN
Temperatur: +5°C – +35°C (Betrieb), -20 °C – +60 °C (Lagerung)
Luftfeuchtigkeit: 20% – 85% (nicht kondensierend) @ 35°C
Höhe: max. 2.000 m (7.000 ft)
DATEN NETZANSCHLUSS
Spannungsversorgung: 110 - 240 V ~
Netzfrequenz: 50 / 60 Hz
Leistungsaufnahme: 270 W typisch, < 3W im Stand-By Mode
ABMESSUNGEN UND GEWICHT
Gerät mit Standfuss H x B x T:
Gerät ohne Standfuss H x B x T
Gewicht Gerät:
Gewicht Standfuss:
Gesamtgewicht:
Downloaded From TV-Manual.com Manuals
Seperate H- und V-Sync
(657,1 mm x 989,1 mm x 244,2 mm) ± 3 mm
(616,5 mm x 989,1 mm x 113,6 mm) ± 3 mm
21,5 kg ± 10%
2,8 kg ± 10%
24,3 kg ± 10%
31DEUTSCH
Page 34

Technische Daten - MYRICA PQ42 -1
Technische Daten - MYRICA PQ42-1
BILDSCHIRM
Größe / diagonal: 106 cm (42”), 16:9 Format
Darstellbare Bildgröße: 920 mm (horizontal) x 518 mm (vertikal)
Auflösung: 1024 x 768 Bildpunkte
Farbdarstellung: 16.7 Mio Farben
Betrachtungswinkel: > 160°
VIDEO STANDARDS
Video: PAL / SECAM / NTSC
TV Tuner: PAL (BG, DK, I) / SECAM (BG, DK, L), 47 - 861 MHz (VHF , UHF, Hyperband)
PALplus, Cinescope: Automatische Formaterkennung (Bildschirmfüllend)
Formate: 4:3, 16:9 (Top), 14:9 (Top), Panorama, Bildschirmfüllend
FREQUENZBEREICH PC
Horizontalfrequenz: 30 - 80 kHz
Vertikalfrequenz: 50 - 90 Hz
Clockfrequenz: max. 110 MHz
Auflösungen (VGA analog):
Empfohlene Auflösung:
Formate: 1:1, Bildschirmfüllend, Formatfüllend, Zoom
EINGÄNGE / ANSCHLÜSSE / SYNCHRONISATION
PC / Video-Eingang: RGB analog und automatische Sync-Erkennung
Video-Anschlüsse TV Tuner: IEC, 75 Ohm Eingangswiderstand
PC Anschluss analog/digital DVI-I: analog RGB
Audio-Anschlüsse Integrierte Lautsprecher: 4 x Breitband
DOS: 640 x 480 @ 60 Hz, 720 x 400 @ 70 Hz,
VGA: 640 x 480, SVGA: 800 x 600; WVGA: 848 x 480 @ 60 Hz
XGA: 1024 x 768 @ 60 Hz
WXGA: 1360 x 768 @ 60 Hz
SXGA: 1280 x 1024 @ 60 Hz
1024 x 768 @ 60 Hz
SCART1: RGB, FBAS Eingang, FBAS Ausgang
SCART2: YC, FBAS Eingang, FBAS Ausgang
Y/C: MiniDIN (HOSIDEN)
YUV (FBAS): 3 x Cinch (HDTV)
FBAS: 1 x Cinch (Y)
HDMI: digital Video/Audio (HDTV)
digital DVI 1.0 - HDCP
Stereo-Eingang: 2 x Cinch L/R 1Vrms (YUV (FBAS), YC)
1 x PC AUDIO IN
1 x Cinch Digitaler Audioeingang (DIG IN COAX)
2 x SCART 1 Vrms
Stereo-Ausgang: 2 x Cinch (LINE OUT L/R)
Aktiver Subwoffer: 1 x Cinch (LINE OUT SUB)
Digitaler Audioausgang: 1 x Cinch (DIG OUT COAX)
Ausgangsleistung Verstärker: 2 x 7W RMS (8 Ohm)
Synchronisation: Sync auf grün, Composite Sync mit automatischer Erkennung,
Bedienelemente: Netzschalter, IR-Fernbedienung (OSD-Menü 12 Sprachen), Ortsbedienung
BETRIEBSBEDINGUNGEN
Temperatur: +5°C – +35°C (Betrieb), -20 °C – +60 °C (Lagerung)
Luftfeuchtigkeit: 20% – 85% (nicht kondensierend) @ 35°C
Höhe: max. 2.000 m (7.000 ft)
DATEN NETZANSCHLUSS
Spannungsversorgung: 110 - 240 V ~
Netzfrequenz: 50 / 60 Hz
Leistungsaufnahme: 330 W typisch, < 3W im Stand-By Mode
ABMESSUNGEN UND GEWICHT
Gerät mit Standfuss H x B x T:
Gerät ohne Standfuss H x B x T:
Gewicht Gerät:
Gewicht Standfuss:
Gesamtgewicht:
Downloaded From TV-Manual.com Manuals
32 DEUTSCH
Seperate H- und V-Sync
(697,8 mm x 1045 mm x 244,2 mm) ± 3 mm
(656,9 mm x 1045 mm x 99,9 mm) ± 3 mm
37,15 kg ± 10%
2,85 kg ± 10%
40,00 kg ± 10%
Page 35

Technische Daten - MYRICA PQ50 -1
Technische Daten - MYRICA PQ50-1
BILDSCHIRM
Größe / diagonal: 127 cm (50”), 16:9 Format
Darstellbare Bildgröße: 1106 mm (horizontal) x 622 mm (vertikal)
Auflösung: 1366 x 768 Bildpunkte
Farbdarstellung: 16.7 Mio Farben
Betrachtungswinkel: > 160°
VIDEO STANDARDS
Video: PAL / SECAM / NTSC
TV Tuner: PAL (BG, DK, I) / SECAM (BG, DK, L), 47 - 861 MHz (VHF , UHF, Hyperband)
PALplus, Cinescope: Automatische Formaterkennung (Bildschirmfüllend)
Formate: 4:3, 16:9 (Top), 14:9 (Top), Panorama, Bildschirmfüllend
FREQUENZBEREICH PC
Horizontalfrequenz: 30 - 80 kHz
Vertikalfrequenz: 50 - 90 Hz
Clockfrequenz: max. 110 MHz
Auflösungen (VGA analog):
Empfohlene Auflösung:
Formate: 1:1, Bildschirmfüllend, Formatfüllend, Zoom
EINGÄNGE / ANSCHLÜSSE / SYNCHRONISATION
PC / Video-Eingang: RGB analog und automatische Sync-Erkennung
Video-Anschlüsse TV Tuner: IEC, 75 Ohm Eingangswiderstand
PC Anschluss analog/digital DVI-I: analog RGB
Audio-Anschlüsse Integrierte Lautsprecher: 4 x Breitband
DOS: 640 x 480 @ 60 Hz, 720 x 400 @ 70 Hz,
VGA: 640 x 480, SVGA: 800 x 600; WVGA: 848 x 480 @ 60 Hz
XGA: 1024 x 768 @ 60 Hz
WXGA: 1360 x 768 @ 60 Hz
SXGA: 1280 x 1024 @ 60 Hz
1360 x 768 @ 60 Hz
SCART1: RGB, FBAS Eingang, FBAS Ausgang
SCART2: YC, FBAS Eingang, FBAS Ausgang
Y/C: MiniDIN (HOSIDEN)
YUV (FBAS): 3 x Cinch (HDTV)
FBAS: 1 x Cinch (Y)
HDMI: digital Video/Audio (HDTV)
digital DVI 1.0 - HDCP
Stereo-Eingang: 2 x Cinch L/R 1Vrms (YUV (FBAS), YC)
1 x PC AUDIO IN
1 x Cinch Digitaler Audioeingang (DIG IN COAX)
2 x SCART 1 Vrms
Stereo-Ausgang: 2 x Cinch (LINE OUT L/R)
Aktiver Subwoofer: 1 x Cinch (LINE OUT SUB)
Digitaler Audioausgang: 1 x Cinch (DIG OUT COAX)
Ausgangsleistung Verstärker: 2 x 7W RMS (8 Ohm)
DEUTSCH
Synchronisation: Sync auf grün, Composite Sync mit automatischer Erkennung,
Bedienelemente: Netzschalter, IR-Fernbedienung (OSD-Menü 12 Sprachen), Ortsbedienung
BETRIEBSBEDINGUNGEN
Temperatur: +5°C – +35°C (Betrieb), -20 °C – +60 °C (Lagerung)
Luftfeuchtigkeit: 20% – 85% (nicht kondensierend) @ 35°C
Höhe: max. 2.000 m (7.000 ft)
DATEN NETZANSCHLUSS
Spannungsversorgung: 110 - 240 V ~
Netzfrequenz: 50 / 60 Hz
Leistungsaufnahme: 450 W typisch, < 3W im Stand-By Mode
ABMESSUNGEN UND GEWICHT
Gerät mit Standfuss H x B x T:
Gerät ohne Standfuss H x B x T:
Gewicht Gerät:
Gewicht Standfuss:
Gesamtgewicht:
Downloaded From TV-Manual.com Manuals
Seperate H- und V-Sync
(792,3 mm x 1228 mm x 269,2 mm) ± 3 mm
(758,9 mm x 1228 mm x 107,7 mm) ± 3 mm
46,3 kg ± 10%
3,0 kg ± 10%
49,3 kg ± 10%
33DEUTSCH
Page 36

Downloaded From TV-Manual.com Manuals
Page 37

Table of contents
Important information 2...........................
Safety directions 2.............................
Important basic principles for use 2...............
Disposal and recycling 3........................
Cleaning 3....................................
Cleaning the screen 3.......................
Cleaning the c asing 3........................
Conformity 3..................................
In the event of any faults 3.......................
Batteries 3....................................
Overview 4......................................
Scope of supply 4..............................
Connection sockets 5...........................
Remote control 6...............................
Control elements on the unit 7...................
Preparations 8...................................
Viewing direction 8..........................
Location 8.................................
Installation 8................................
Wall mounting 8............................
Drilling template 9...........................
Connection of an aerial 10.....................
Insertion of the batteries into the remote control 10
Using the remote control 10...................
Connecting the mains cable 10.................
Initial installation 11..............................
Setting the language 11.......................
Selection of country for the sorting sequence 11..
For AV sources (TV, CVBS, YC, YUV, SCART1,
SCART2, HDMI) 19..........................
For PC sources (RGB, DVI) 20.................
Picture formats for AV sources 21..............
Picture formats for PC sources 22..............
Extended sound settings 22......................
User equalizer setting 23......................
Video text 24...................................
Connection of external devices 25.................
Connection to SCART1 / SCART2 25...........
Connection to the component inputs YUV 26.....
Connection to the S-video input 26.............
Connection to the HDMI input 27...............
Connection to the PC DVI-I input 27............
Settings for PC (RGB) 27...................
Settings for PC (DVI) 28....................
Select inputs 28..............................
Special functions 29.............................
Screen saver, plasma TV only! 29..............
Troubleshooting 30................................
Technical specifications - MYRICA VQ40-1 31........
Technical specifications - MYRICA PQ42-1 32........
Technical specifications - MYRICA PQ50-1 33........
ENGLISH
Operator control 12................................
Switching on / off 12..........................
Channel change (programme change) 12........
Volume and sound settings 12.................
Use of the picture-in-picture function 13.........
Possibilities of combining the source with a
Secondary input 14...........................
Still pic ture 14...............................
Sleep timer 14...............................
OSD menu control 15............................
Basic settings 15................................
Automatic channel search 15..................
Manual station search 16......................
Changing channel names 16..................
Setting the decoder 17........................
Editing the channel overview 17................
OSD settings 18................................
Picture settings 19...............................
Downloaded From TV-Manual.com Manuals
1ENGLISH
Page 38

Important information
Important information
In this section you will find safety directions that you must
follow when handling your TV set.
Avoid still pictures on the screen for long periods of
time, e.g. still pictures in videos, broadcaster’s logos
or similar (1 hour at the most). These pictures may remain visible permanently! Also avoid long operating
periods with a picture mode in which black bars are
visible (operation in picture format 4:3). These black
bars may also remain visible permanently.
This Fujitsu Siemens Computers product also
contains the intellectual property of third parties.
Any manipulation or modification of the product shall
render the warranty ineffective and may entail civil or
criminal proceedings which will be exhausted to the
full extent that is legally permitted.
Safety directions
This device meets the relevant safety stipulations for audio,
video and TV appliances.
If you have any questions as to whether you can install the
appliance in the envisaged environment, please contact your
place of purchase or our help desk.
D The display surface of the TV set is sensitive to pressure
and scratching. So treat the display surface with care in
order to avoid lasting damage (newton’s rings, scratches).
D If the device is brought into its operating room from cold
surroundings, condensation can occur. Wait until the
device has reached room temperature and is absolutely
dry before you put it into operation.
D Take note of the directions for ambient conditions in sec -
tion when you are installing the set and before operating
the set.
D The supply air and exhaust air openings on the device
must be kept absolutely free to ensure sufficient ventilation.
D The device will set itself automatically to a mains voltage
in the range of 100 V to 240 V. Ensure that the local
mains voltage does not exceed and is not less than this
range.
D This device may be connected to an earthed mains
outlet only.
D Make sure that the plug socket on the set or the mains
safety outlet of the building’s electrical system allows
free access.
D The On -Off switch does not disconnect the set from the
mains voltage. For complete disconnection from the
mains voltage you must pull out the mains plug.
D Lay the leads so that they do not present a danger
(danger of stumbling) and are not damaged. Take
heed of the corresponding information in the section
Preparations when connecting the set.
D During a thunderstorm you must neither connect nor
remove any aerials or data transmission leads.
D Take care that no objects (e.g. jewellery chains, paper
clips etc.) or liquids are allowed to get inside the set
(danger of an electric shock, short circuit).
D Do not put any vessels that are filled with liquids, e.g.
vases, on the set. The set is not waterproof! Protect the
set against spray water (rain, sea water).
D In emergencies (e.g. damage to the housing, controls
or mains power lead or if there is ingress of liquids or
foreign objects) turn off the set immediately, pull out the
mains plug and contact your place of purchase or our
Help Desk.
D The set must be disposed of as special waste in accor-
dance with your local waste disposal regulations. The
safety regulations that apply to luminous materials have
to be taken into account for handling and disposal purposes.
VQ40-1: The backlight of the LCD/plasma TV contains
mercury. The safety regulations that apply to fluorescent
tubes have to be taken into account for handling and
disposal purposes.
D Repairs to the set may be carried out only by authorized
skilled personnel. Considerable dangers can occur for
the user (electric shock, danger of fire) as a result of
unauthorized opening and improper repairs.
D Adjust only the screen resolutions and display refresh
rates as specified in the section ”Technical Specifications”. If you adjust any other values, the screen can get
damaged. If in doubt, consult your place of purchase or
our Help Desk.
D For PC operation use a screen saver with moving pictu-
res and activate the power management for your display
to avoid screen ”burns” being caused by still pictures.
D Keep these operating instructions together with the set.
If you pass the set on to any third parties, please pass
on the operating instructions as well.
Important basic principles for use
The LCD/plasma TV purchased by you meets the highest
quality requirements in this segment and has been checked
for pixel defects. Despite taking the greatest care during production of these units, for technological reasons it cannot be
excluded absolutely that there are some pixels with defects.
We request your understanding for the fact that such defects,
provided that they are within the limits specified by the
standard, cannot be considered to be as an appliance defect
in the terms of the warranty.
If used for a long period of time as a PC screen, shadows can
occur on the screen as with any other TV set. This phenomenon with LCD/plasma screens can be reduced by heeding
the following points:
D do no display a still picture for a long period of time
D use your display in full screen format (16:9)
D activate the screen saver
D display moving images as far as possible
D always switch off the display when it is not being used
D reduce the contrast and brightness as much as possible.
Unfavourable conditions can cause your LCD/plasma TV to
hum. The humming generally comes from the mains voltage
supply and can occur through the c onnection of differentearth
conductors. You can provide a remedy by placing a so-called
sheath current filter between the incoming antenna lead and
the antenna input socket on the display. Sheath current filters
are available inthe retail trade in the form of a small inline plug.
If your LCD/plasma TV is connected to an external antenna,
the latter must be earthed as protection against electric
shocks and static charging. The earthing must complywith the
valid regulations.
If using it as a PC screen, we recommend for ergonomic reasons that you avoid the use of red and blue fonts or symbols
against dark backgrounds. On account of the poor contrast
Downloaded From TV-Manual.com Manuals
2 ENGLISH
Page 39

Important information
such a display causes poor legibility and causes early eye
fatigue. Therefore pleaseuse displaysthat arerich incontrast,
e.g. black font on a white background.
To avoid aching eyes and obtain an optimized viewing
distance, the distance from the unit should be five to six times
the display’s diagonal dimension. In your television room it
should be so light that you couldalso read. Contrast islost with
too much brightness.Too little light strains the eyes due to the
alternation between light and dark on the display.
Disposal and recycling
This unit has been produced largely from materials that canbe
disposed of in an environmentally friendly manner and that
can be properly recycled. After use the unit will be taken back
for reuse or recycling, provided that it is handed back in a
condition that corresponds with its use having been in compliance with the intended use. Any non-recyclable parts of the
set will be disposed of in the proper manner.
The set must not be disposed of in your residential
waste (domestic waste). This deviceis marked in accordance with the European directive 2002/96/EC
on waste electrical and electronic equipment WEEE. This directive prescribes the framework for
the EU-wide applicabletaking-back and recycling of
the waste TV sets. Pleaseuse the return and collecting systems available to you forthe return of your old
set. You find further information about this on the
web site www.fujitsu-siemens.com/recycling.
Cleaning
Conformity
This screen is an LCD/ plasma TV set and complies with the
following directives and standards of the European Union:
D 89/336/ECCE of 03 May 1989 with subsequent modifica-
tions (directive 92/31/ECCE of April 1992 and directive
93/68/ECCE of 22 July 1993)
D 73/23/ECCE of 19 February 1973 with subsequent modi-
fications (directive 93/68/ECCE of 22 July 1993)
D EN60065 (Safety Requirements).
Conformity with the requirements is certified by the designation on
The manufacturer cannot be held liable for operation outside
of the operating conditions described in these operating
instructions. Moreover, your product liability and warranty
rights shall lapse as a result of this.
the product.
In the event of any faults
If the unitis damaged,disconnect the mains plug from the plug
outlet.
If the unit emits any smoke, an unpleasant odour or any
unusual noises, pull the mains plug out of the plug outlet.
Proceed in the same way,if the unit is no longer able to display
a picture after it has been switched on or during operation. Do
not attempt to continue operating the display in this condition.
Under no circumstances should you open the unit yourself.
Inside the display there areno parts that can be serviced or re placed by you. Contact our service hotline or another suitable
technical workshop.
ENGLISH
Before you start any cleaning, turn off the unit and disconnect
the mains plug from the plug outlet.
Cleaning the screen
Use a mild detergent with a soft cloth to clean the screen.
The cleaning agent must not contain any ketones (e.g. acetone) or ethyl alcohol.
Do not use any abrasives!
Cleaning the casing
Do not use any chemical solvents or cleaning agents for
cleaning the casing,otherwise the surface of the unit could get
damaged.
If you clean the surface of the casing with a wet cloth, drops
of watercan get inside the unit, which will cause malfunctions.
Use a vacuum cleaner with a soft brush attachment for cleaning the ventilating openings.
Batteries
When inserting batteries, ensure that the polarity (+ / -) tallies
with the markings on the remote control.
Batteries may not be disposed of in the
domestic waste collection system. Used
batteries must be disposed of at a municipal
collection centre or put into the c ontainers
provided for this purpose in the retail trade.
Do not expose the batteries to excessive heat, do not throw
them into a fire, do not recharge them and do not attempt to
open them; they could leak or even explode.
Please remove the batteries from the remote control,if theunit
is not to be used for a long period of time.
Downloaded From TV-Manual.com Manuals
3ENGLISH
Page 40

Overview
Overview
The LCD/plasma TV offers a broad range of connection facilities for a personal computer, DVD player, video recorder, video
camera etc.. No matter whether they are television, video or PC images, all are displayed with a sharp outline and distortion-free
on the absolutely flat display surface. and the pictures have an excellent degree of brightness and unusual brilliance. Other
important features are the display’s large diagonal dimension with a length ratio of 16:9 and a very slim overall depth. For TV
mode it is necessary to connect the set to a terrestrial antenna, SAT receiver or cable TV box.
Operator control is interactive via the remote control provided and the on-screen menu (OSD). A wide range of picture quality
settings can be effected with these.
A fanless cooling system enables operation of the LCD/plasma TV without any disturbing background noises. As it is as quiet
as a conventional television set the LCD/plasma TV is excellently suited for residential rooms and conference rooms.
Equipment
D High-quality aluminium enclosure
D Fanless design
D HD ready
D Full screen display in 16:9 and 4:3 formats
D 3D comb filter
D Compatible with PAL, SECAM and NTSC (NTSC not with tuner)
D Compatible with VGA, SVGA, WXGA and XGA
D TOP / FLOF teletext with page buffer for 5000 pages
D Automatic channel identification and channel sorting
D Sleep timer
D Screen saver
D 2 x EURO SCART (SCART1 with RGB, SCART2 with Y/C)
D 1 x Y/C (S -video)
D 3 x Cinch Y(CVBS)UV
D 1 x DVI (I) (analogue and digital, digital with HDCP)
D 1 x HDMI
D Digital audio input/audio output
Scope of supply
Afterunpacking the LCD/plasma TV please check it for possible damage incurred in transit and for completeness of the delivery.
The supplier can recognize claims for transportation damage only if you advise them of this prior to initial operation of the unit.
If any part of the scope of supply is missing, please contact our service hotline. Please keep the original packing for a possible
return of the display.
LCD/plasma TV
Mains cable for Europe
(except UK and Ireland)
* Mains cable for the
UK and Ireland
AAA batteries
Antenna cable SCART cable
Operating manual,
Getting started and
Warranty booklet
Remote control
Downloaded From TV-Manual.com Manuals
4 ENGLISH
* Depends on the equipment version
Page 41

Connection sockets
Overview
1
11
3 4 5 9
16 15 1714 1219 8 10
1813
6 72
21
20
11 DIG OUT COAX
Connection of an AV amplifier with a coaxial, digital
audio input
1 LINE OUT SUB 12 DIG IN COAX
Connection for an active sub -woofer Connection of devices with a coaxial, digital audio output
2 LINE OUT L/R (audio output) 13 PC AUDIO IN
E.g. connection of an audio amplifier or DVD receiver E.g. PC audio input with a line-out socket
3 RF IN (aerial input, main tuner) 14 HDMI (High Definition Multimedia Interface)
Must be connected via the aerial connection cable Connection for devices with an HDMI output
with ”RF out” e.g. DVD player
4 RF OUT (aerial output, PIP tuner) 15 RS-232
Must be connected via the aerial connection cable Serial interface for service purposes
with ”RF in”
ENGLISH
5 AERIAL 16 PC DVI-I (HDCP)
TV aerial signal connection PC, DVD player connection
(analogue terrestrial aerial or cable connection) (RGB for analogue signals, DVI for digital signals)
6 YUV / Y (component Y), CVBS 17 S-VIDEO
Connection for DVD player with a YUV output Connection of devices with an S-video output
CVBS - Connection of a device with an FBAS output e.g. DVD player, video recorder, camcorder
7 YUV / U (component Pb) 18 LINE IN YUV (CVBS)
8 YUV / V (component Pr) 19 LINE IN S-VIDEO
9 SCART 2 (YC, CVBS) 20 Mains input jack
E.g. connection of a video recorder or decoder Connection for the mains cable supplied
10 SCART 1 (RGB, CVBS) 21 Mains switch
E.g. connection of a satellite receiver or video recorder ON / OFF
Downloaded From TV-Manual.com Manuals
If your PC has an analogue VGA output,
to connect your PC to the display use a
DVI-I connection cable on a 15-pin HD-Sub.
Audio input for YUV (CVBS)
Audio input for S-VIDEO
5ENGLISH
Page 42

Remote control
To be able to c ontrol the LCD/plasma TV with the remote control, the mains plug must be plugged in and the mains switch
must be switched on.
The infrared remote control functions only if there are no
obstructions between the control and the infrared sensor on
the front side (bottom right) of the LCD/plasma TV. The range
of the remote control is approx. 6 m.
If the batteries become weak, the range of the remote control
is reduced. In this case please change the batteries. You must
use only 2 batteries of the type LR03 AAA 1.5 V.
1
17
2
3
5
6
8
12
10
13
9
14
18
19
14
15
16
POWER
1
4
7
20
21
11
22
23
24
25
17
26
Switches the device on or over to standby mode.
2
TV
Changes to TV mode.
3
VIDEO
Changes to video mode.
Switches between video sources.
4
PC
Selects the PC connection as an input source.
Switches between PC sources.
5
0-9Numeric buttons
TV mode: channel selection
Teletext mode: selection of a teletext page.
6
i
Displays the information for the current source.
7
LIST
TV mode: opens the channel overview
Teletext mode: displays hidden information
8
PY
Increases the channel number.
Navigation in the OSD menu.
9
PB
Decreases the channel number.
Navigation in the OSD menu.
10
A VOL
Reduces the volume.
Navigation in the OSD menu.
11
VOL+ / "
Increases the volume.
Navigation / execution of a function in the OSD menu.
12
FORMAT
Switches between picture formats.
Teletext mode: double character height
13
PIP
Activates PIP mode.
Switches between PIP formats (PIP / split screen).
14
"A
PIP / F2
Swaps the main picture and faded-in picture
in PIP mode.
15
P-POS
Without any function!
16
P-SIZE
Without any function!
17
SOURCE / F4
Opens the selection menu Inputs (sources).
18
HOLD / FREEZE
Generates a still picture of the current scene.
Teletext mode: stops automatic page change.
19
Red / Green / Yellow / Blue
Red: quits the menu.
Selection of a teletext page.
20
ZAP
TV mode: changes to the previously set TV c hannel
Teletext mode: sub-pages mode On/Off
21
Switches the s ound on or off.
22
TEXT
Switches video text mode on or off.
Switches between formats (full screen / split screen).
23
MENU
Opens main menu / submenus.
24
SOUND
Sets sound mode.
25
AUTO / PAGE
PC mode analogue: automatic setting
Teletext mode: opens page 100
26
/ MIX
Sets the sleep timer.
Teletext mode: mixed mode (TV picture / teletext)
Downloaded From TV-Manual.com Manuals
6 ENGLISH
Page 43

Control elements on the unit
The functions of the buttons on the unit match those on the
remote control!
ENGLISH
1 = Pilot lamp standby mode orange
PilotlampOnblue
Infrared receiver
2 = On/Off switch for standby mode
Opens main menu / submenus
3 = P- Decreases the channel number.
Navigation in the OSD menu.
P+ Increases the channel number.
Navigation in the OSD menu.
4 =
- Reduces the volume.
Navigation in the OSD menu.
+ Increases the volume.
Navigation / execution of a function in the OSD menu.
Downloaded From TV-Manual.com Manuals
7ENGLISH
Page 44

Preparations
Preparations
Viewing direction
D Despite the large viewing angle the LCD/plasma TV
offers the best performance with a directly vertical viewing direction. Align the LCD/plasma TV with the most
frequently used viewing direction.
Location
D Light reflection
Avoid locating the unit opposite windows or other light
sources.
D Access to the mains input
The mains input and mains switch should be easily
accessible at all times.
D Air supply
To ensure sufficient ventilation, the supply air and
exhaust air openings of the LCD/plasma TV must be
kept absolutely free.
D Ambient temperature
For safe and reliable operation the ambient temperature
must be between 5 °C and 35 °C.
Installation
D Two persons are required to remove the LCD/plasma TV
from its packing. Never lift the LCD/plasma TV alone.
An attempt to lift the LCD/plasma TV alone will put your
health at risk.
D Place the LCD/plasma TV on a stable and horizontal
base. The subsurface must be firm and capable of bearing a static load.
D Before installation make sure that the LCD/plasma TV is
switched off and that the mains cable and signal cable
are unplugged.
If installed in an alcove, keep the minimum distances
large enough to allow sufficient ventilation of the LCD/
plasma TV.
LCDTV: A=5cm;B=10cm
Plasma TV: A = 10 cm; B = 20 cm
Ensure the following minimum s pacings for wall mounting:
LCD TV: A = 10 cm; B = 20 cm
Plasma TV: A = 2 0 cm; B = 30 cm.
Wall mounting
D The plasma TV must be mounted on vertical walls only.
D Before mounting the set, check whether the loadbearing
capacity of the wall is suitable for 3-times the weight of
the LCD/plasma TV (for the weight see page 31 ”Techni cal specifications”). If in doubt, seek the advice of a
qualified installer.
D Before installation make sure that the LCD/plasma TV is
switched off and that the mains cable and signal cable
are unplugged.
D Two people are required for the mounting work.
D Turn the LCD/plasma TV so that the front side (screen)
is pointing downwards and place it carefully on a completely flat and firm surface.
D Loosen the 6 screws (M4x10) in the table feet and
remove them.
Fastening screws in the table feet
Downloaded From TV-Manual.com Manuals
8 ENGLISH
Page 45

Preparations
D Fit the 2 fastening hooks (rawl plugs and fastening
hooks are not included in the items supplied) horizontally to the wall with the appropriate distance between
them (for this distance see Drilling template).
min. 6.5 mm dia.
Openings for
fastening
hooks
The fastening material must be designed for 3-times
the weight of the display. If necessary, please consult a qualified installer.
D Position the LCD/plasma TV so that the fastening hooks
can be introduced into the openings provided for this
purpose on the rear side of the set.
You may useonly the original fastening material to fit the table
feet back on again.
Please keep the 6 removed screws(M4x10) in a safe placefor
this purpose.
ENGLISH
Drilling template
LCDTVMYRICAVQ40-1 PlasmaTVMYRICAPQ42-1
Plasma TV MYRICA PQ50-1
Downloaded From TV-Manual.com Manuals
9ENGLISH
Page 46

Connection of an aerial
Insertion of the batteries into the remote control
S If you would like to connect cable or a terrestrial
aerial, use the ”AERIAL” socket provided for this
purpose.
S Open the cover of the battery component.
S Insert the two batteries (AAA) supplied into the
battery compartment.
Pay attention to the polarity (+) and (-) marked on
the bottom of the battery compartment.
S Close the cover of the battery compartment.
Using the remote control
Use the remote control within a distance of about 6 m
from the remote controlsensor on the LCD/plasma TV
and within a horizontal and vertical angle of 30°.
The remote control may not work, if the remote control
sensor of the LCD/plasma TV is exposed to directsunlight or strong artificial light.
30° 30°
Connecting the mains cable
Downloaded From TV-Manual.com Manuals
10 ENGLISH
S Insert the mains cable into the mains input socket
on the LCD/plasma TV and the mains plug into a
mains outlet.
S Switch the mains switch on the rear side of the
LCD/plasma TV to position ”I”. The LCD/plasma
TV is now in standby mode and can be switched
on with the remote control.
Page 47

Initial installation
After switching on the LCD/plasma TV the first time you must successively set the language and the country. After that the automatic station search starts.
Setting the language
S With the button [Y]or[B] select your national
language. Press the [MENU] button.
Selection of country for the sorting sequence
ENGLISH
S Select the country in which the LCD/plasma TV is
being operated with the button [
This setting will cause a country-specific sorting
sequence of the TV channels.
Y]or[B].
S Press the [MENU] button.
The automatic channel search now starts.
S Press the red button, if you would like to abort the
automatic channel search.
If no TV channelis found,check the aerial connections
and attempt to search for the channels again.
Downloaded From TV-Manual.com Manuals
11ENGLISH
Page 48

Operator cont rol
Operator control
Switching on / off
Indication on operation (Power On) (blue)
Indication when on standby (orange)
IR sensor for remote control
Channel change (programme change)
/MENU
S To switch on the LCD/plasma TV press the
[POWER]button onthe remotecontrol or the button
/MENU on the set.
The indicatorPower On / Standby lights up blue on the
LCD/plasma TV.
S To switch off the LCD/plasma TV press the
[POWER] button on the remote control.
The indicator Power On / Standby lights up orange on
the LCD/plasma TV.
If a signal is pending at any input, the LCD/plasma TV
is switched automatically to standby mode after a
waiting period.
S Select TV mode by pressing the [TV] button on the
remote control.
With the buttons [P
Y]/[PB] on the remote control:
S Press the button [PY] to increase the channel num-
ber.
S Press the button [PB] to reduce the channel
number.
With the buttons [0...9] on the remote control:
Select the channel number directly by pressing the
buttons [0...9].
With the channel overview in the OSD menu:
S Press the button [LIST] on the remote control to dis-
play the channel overview on the display.
S Select a channel with the buttons [BY " A]on
the remote control.
S Press the red buttonto close the channel overview.
Channel information
Volume and sound settings
Downloaded From TV-Manual.com Manuals
12 ENGLISH
With the buttons [VOL "]/[A VOL] on the remote
control:
S Press the button [VOL "] to increase the volume.
S Press the button [A VOL] to reduce the volume.
Page 49

Operator cont rol
With the button on the remote control switch the
sound to mute.
S Press the button , the sound is now mute.
TV - 24 - N24
Mute On
TV - 24 - N24
Mute Off
Use of the picture-in-picture function
The picture-in picture function offers you the possibility of viewing a second picture source in addition to watching the TV
programme.
The second reception unit (tuner), DVD player, video recorder, SAT receiver or PC can be used as the picture source.
These have to be connected to the input jacks on the rear side of the LCD/plasma TV.
Main
screen
Picture-in-
Picture
(PIP picture)
S Press the button again to cancel out muteagain.
You can also use the button [VOL
Picture-in-Picture (PIP)
"]todothis.
S Press the [PIP] button on the remote control.
ENGLISH
Main picture
TV - 24 - N24
TV - 28 - NTV
Secondary
picture
Information about the
main picture
Information about the
secondary picture
Split screen
S Press the [PIP] button on the remote control again.
The large and small pictures last selected can be
seen next to each other.
S Swap between the main and secondary picture
(picture-in-picture) with the button [
on the remote control or under the menu option
<Display ⇒ Quick swap
>.
"A PIP] or [F2]
S To terminate the picture-in-picture function press
the [PIP]button on the remote control once or twice
or under menu option <Display ⇒ Layout> set Single.
S Press the button [i] on the remote control to display
the information about the main and secondary pictures.
Settings
S Menu option <Layout>
Single - Single screen
PIP - Picture-in-Picture
Split screen - Divided display
S Menu option <Secondary input>
With the buttons [
via the remote control.
Withoutthe OSDmenu you can select a Secondary
input source by pressing the [TV] / [VIDEO] / [PC] /
[F4] button.
For the combinations between source and Secondary input please refer to the table on page 14.
"]/[A] select a Secondray input
S Menu option <PIP Size>
If you have set picture-in-picture, you can alter the
size of the PIP picture.
S Menu option <PIP Horiz. Pos.>
If you have set picture-in-picture, you can alter the
horizontal position of the PIP picture.
S Menu option <PIP Vert. Pos.>
If you have set picture-in-picture, you can alter the
vertical position of the PIP picture.
Downloaded From TV-Manual.com Manuals
13ENGLISH
Page 50

Operator cont rol
Possibilities of combining the source with a Secondary input
= source combinable with Secondary input
- = source not
Source
combinable with Secondary input
Secondary input
Tuner SCART1 SCART2 CVBS YC YUV HDMI
PC
(RGB)PC(DVI)
Tuner
SCART1 -
SCART2 -
CVBS -
YC -
YUV
HDMI - - - -
PC (RGB) - - - -
PC (DVI) - - - -
*
-
-
-
- - -
* only on sets with twin tuners
If no signal is pending at the selected PIP source, the picture-in-picture function is terminated after approx. 30 seconds.
Still picture
You can view still pictures of the current channel.
S Press the button [FREEZE] on the remote control.
The current picture is frozen.
S Press the [FREEZE] button again to terminate the
still picture function again.
If the picture-in-picture function is set, both picturesare
frozen.
S On the OSD menu you can also switch the still pic-
ture function onand off under the menu option<Display ⇒ Freeze Picture>.
Sleep timer
Downloaded From TV-Manual.com Manuals
14 ENGLISH
Upon expiry of the preselected time the sleep timer
switches the LCD/plasma TV to standby mode.
S Press the button [ ] on the remote control until the
desired time up to switch-off is reached.
The following times can be selected:
30, 60, 90, 120, 150, 180 minutes and Off.
Page 51

OSD menu control
Operator cont rol
The performance of settings in the OSD menu is
described in detail below.
S Press [MENU] to display the main menu on screen.
S With the button [Y]or[B] select a menu option and
press the button [
S Repeat this procedure until the desired menu
option is reached.
Selected menu options are marked with a blue bar.
Menu options with a further submenu or that can be
executed directly are marked by
S With the buttons [A]/["] select the desired option
or a parameter and press the [MENU] button.
S Press the [MENU] button to return to the previous
menu.
S If you want to close the OSD menu, press the red
button.
In each menu those buttons that you can use for
control are displayed in the bottom section.
"].
.
ENGLISH
Basic setting s
Automatic channel search
S Press the [MENU] button to open the main menu.
S With the button [Y]or[B] select the <Setup> menu
and press the button [
"].
S Select <Tuner> with the button[Y]or[B] and press
the button [
"].
S Select themenu option<Auto Search>[Y]/[B] and
press the button [
"].
S Select the country [A]/["].
S Select <Search form> [Y]/[B].
S Select the search form [A]/["].
You can select between two possibilities:
All channels and new channels.
Downloaded From TV-Manual.com Manuals
S Select <Start search> [Y]/[B] and press the button
"].
[
15ENGLISH
Page 52

Operator cont rol
Manual station search
S Press the [MENU] button to open the main menu.
S With the button [Y]or[B] select the <Setup> menu
and press the button [
"].
S Select <Tuner> with the button[Y]or[B] and press
the button [
"].
S Select the menu option <Manual Search> [Y]/[B]
and press the button [
"].
S Select <Programme> [Y]/[B].
Choose a programme number between 0 and 99
[
A]/["].
S Select <Type> [Y]/[B].
You can select between two possibilities:
Channel and special channel [
A]/["].
S Select <Channel> [Y]/[B].
Enter a channel number [0...9] or [
A]/["].
S Select <Frequency> [Y]/[B] and press the button
"].
[
Enter the required five-digit frequency with the aid
of the number buttons [0...9].
S <Name> see Changing the channel name.
S Select <TV standard> [Y]/[B].
Select a TV standard (sound) [
You can select between three possibilities per colour standard;
for colour standard PAL: B/G, D/K and I
for colour standard SECAM: B/G, D/K and L
A]/["].
S Select <Color standard> [Y]/[B].
Select a colour standard PAL or SECAM [
A]/["].
S <Decoder> see Setting the decoder.
Changing channel names
You can assign or amend a name consisting of up to eight characters to each stored TV channel.
S Select <Name> [Y]/[B] and press the button ["].
The first character position is selected.
S Select a character [Y]/[B].
S Select the next character position [A]/["].
S Select a character again from [Y]/[B].
The name can have a max. length of 8 characters.
Downloaded From TV-Manual.com Manuals
16 ENGLISH
Page 53

Setting the decoder
D
Operator cont rol
You can use the SCART1 or SCART2 input to connect
a decoder for coded TV channels (pay TV).
S Select <Decoder> [Y]/[B].
You have the following selection options:
ecoder
Normal Uncoded Uncoded
Decoder A SCART1 Uncoded Coded
Decoder B SCART1 Coded Coded
Decoder A SCART2 Uncoded Coded
Decoder B SCART2 Coded Coded
TV channel
Sound
Picture
Editing the channel overview
It is described below how you can change the sequence of stored TV channels or delete them from the channel overview.
S Press the [MENU] button to open the main menu.
S With the button [Y]or[B] select the <Setup> menu
and press the button [
"].
S Select <Tuner> with the button[Y]or[B] and press
the button [
"].
S Select the menu option <Edit station list> [Y]/[B]
and press the button [
"].
ENGLISH
The menu <Edit station list> appears on screen.
Sort
S With the buttons [YBA"] select thechannel that is
to be shifted.
S Press the yellow button. The channel is marked yel-
low.
S Shift the channel with the buttons [YBA"]tothe
desired position.
S Press the yellow button on the remote control to
complete the procedure.
Deleting a c hannel
S With the buttons [YBA"] select thechannel that is
to be deleted.
S Press the green button to delete the selected chan-
nel from the channel overview.
S To close the menu press the red button.
Downloaded From TV-Manual.com Manuals
17ENGLISH
Page 54

Operator cont rol
OSD settings
S Press the [MENU] button to open the main menu.
S With the button [Y]or[B] select the <Setup> menu
and press the button [
"].
S Select <OSD> with the button [Y]or[B] and press
the button [
Time Out
Under the menu option <Time Out> you can alter the
display duration (time after last actuation up to mask
out) of the OSD menu.
"].
S Select <Time Out> [Y]/[B].
S You can select one of the following possibilities:
OFF; 5, 10, 15, 20, 25, and 30 seconds [
Transparency
The function <Transparency> offers the possibility of
changing the transparency of the OSD menu.
A]/["].
S Select <Transparency> [Y]/[B].
S You can switch off thetransparencyor change it wit-
hintherange1to10[
The value 10 is the maximum transparency of the
OSD menu.
A]/["].
Show Logo
In the menu option <Show Logo> the logo displayed
upon switching on or in the absence of a signal can be
switched on or off.
S Select <Show Logo> [Y]/[B].
S Select On or Off [A]/["].
Reset to factory defaults
You have the option of resetting all changes made in
the OSD menu back to the original default setting.
S Select <Reset to factory defaults> [Y]/[B].
S Press the button ["] to reset to the default settings.
The LCD/plasma TV switches automatically to
standby mode.
Setting the language
The first time your LCD/plasma TV is installed the
language for the OSD menu is set in accordance with
your selection.
You can change the language setting in the menu
option <Language>.
S Select <Language> [Y]/[B].
S Select the language [A]/["].
The following languages can be selected: German,
English, French, Spanish, Italian, Dutch, Danish,
Swedish, Norwegian, Finnish, Portuguese and Polish.
TTX Setup
Select a character set forteletext mode: WEST, EAST,
RUSSIAN or ARABIC.
This is governed by the language setting of the teletext
used. Please use the option WEST for west Europe!
Downloaded From TV-Manual.com Manuals
18 ENGLISH
S To close the menu press the red button (M).
Page 55

Operator cont rol
Picture settings
After first installation or after resetting to the ex-factory settings the values in the menu <Picture>are set to the defaults. You can
individually change these values as described below, depending on your personal preference, the location of the LCD/plasma
TV and the light incidence associated with the location.
For AV sources (TV, CVBS, YC, YUV, SCART1, SCART2, HDMI)
S Press the [MENU] button to open the main menu.
S With the button [Y]or[B]select the <Picture>menu
and press the button [
Contrast
S Select <Contrast> [Y]/[B].
S Press the button [ "], the contrast is increased.
S Press the button [ A ], the contrast is reduced.
Brightness
S Select <Brightness> [Y]/[B].
S Press button [ " ], the picture becomes brighter.
S Press button [ A ], the picture becomes darker.
Sharpness
S Select <Sharpness> [Y]/[B].
S Press button [ " ], the picture becomes sharper.
S Press button [ A ], the picture becomes softer.
"].
ENGLISH
Color
S Select <Color> [Y]/[B].
S Press button [ " ] and the colour saturation is in-
creased.
S Press the button [ A ] and the colour saturation is
reduced.
Tint
Colour setting - for NTSC only!
Color Balance
S Select <Colour balance> [Y]/[B].
You can select one of three possibilities:
normal, cold and warm [
Picture adjust
A]/["].
S Select <Picture adjust> [Y]/[B].
You can select one of three possibilities:
normal, light and dark [
Filter (basic setting for picture sharpness)
Only for CVBS, YC!
A]/["].
S Select <Filter> [Y]/[B].
You can select one of three possibilities:
normal, soft and intensive [
DNC (Dynamic Noise Control)
Not for HDMI!
Weak TV signals or poor video signals can generate
disturbing picture noise. DNC dynamically adapts the
effect of the digital noise suppression to the picture
content.
A]/["].
S Select <DNC> [Y]/[B].
S Select a value between 0 and 10 [A]/["].
Downloaded From TV-Manual.com Manuals
Photo CD
Not for TV or HDMI!
The menu option <Photo CD> is especially for the reproduction of still pictures, e.g. photo CD’s or picture
CD’s.
S To close the menu press the red button.
19ENGLISH
Page 56

Operator cont rol
For PC sources (RGB, DVI)
S Press the [MENU] button to open the main menu.
S With the button [Y]or[B]select the <Picture>menu
and press the button [
Contrast
"].
S Select <Contrast> [Y]/[B].
S Press the button [ "] and the contrast is
increased.
S Press the button [ A ] and the contrast is reduced.
Brightness
S Select <Brightness> [Y]/[B].
S Press button [ " ] and the picture becomes brigh-
ter.
S Press button [ A ] and the picture becomes darker.
Sharpness
S Select <Sharpness> [Y]/[B].
S Press button [ " ] and the picture becomes
sharper.
S Press button [ A ] and the picture becomes softer.
Color Balance
S Select <Color Balance> [Y]/[B].
You can select one of three possibilities:
normal, cold and warm [
Picture adjust
A]/["].
S Select <Picture adjust> [Y]/[B].
You can select one of three possibilities:
normal, light and dark [
DNC (Dynamic Noise Control)
Only for PC (RGB)
Weak TV signals or poor video signals can generate
disturbing picture noise. DNC dynamically adapts the
effect of the digital noise suppression to the picture
content.
A]/["].
S Select <DNC> [Y]/[B].
S Select a value between 0 and 10 [A]/["].
S To close the menu press the red button.
Downloaded From TV-Manual.com Manuals
20 ENGLISH
Page 57

Picture formats for AV sources
Operator cont rol
S Press the [MENU] button to open the main menu.
S With the button [Y]or[B] select the <Display>
menu and press the button ["].
S Select the desired picture format [A]/["].
The selected picture format appears on screen.
S To change between formats you can also repea-
tedly press the [FORMAT] button on the remote
control.
Auto zoom
This function evaluates the current picture format and
switches automatically between 4:3 and 16:9.
TV - 24 - N24
Fill all
Picture format
Fill all
In this format setting the picture isadapted inhorizontal
and vertical directions so that afull screendisplay isalways visible.
Normal
This format setting displays a PAL 4:3 picture with the
correct side ratio. Dark stripes are visible on the left
and right-hand edges of the picture.
16:9
In this mode the picture is scaled horizontally to the
complete picture width, approx. 25 % in total being cut
off the top and bottom of the picture.
This mode should be used for the full screen display
of 16:9 letterbox video material (with a black bar at top
and bottom).
16:9 Top
Picture in 16:9 letterbox format with subtitles.
14:9
With a 14:9 zoom the picture is enlarged vertically by
a total of 15 %, i.e. approx. 15 % of the picture content
is cut off vertically. Horizontally the picture is reduced
in size in comparison with the full picture display by
15 %, i.e. narrow bars are displayed on the right and
left.
ENGLISH
Downloaded From TV-Manual.com Manuals
14:9 Top
Picture in 14:9 letterbox format with subtitles.
Panorama
This format setting scales the input signal automatically in horizontal and vertical directions to fit the full
screen, but horizontallynot linearly.i.e.the picture contents in the centre of the screen are displayed as the
original and towards the edges more intense scaling
takes place.
S To close the menu press the red button.
21ENGLISH
Page 58

Operator cont rol
Picture formats for PC sources
S Press the [MENU] button to open the main menu.
S With the button [Y]or[B] select the <Display>
menu and press the button [
"].
S Select the desired picture format [A]/["].
Normal
Displays the PC picture as a fullscreen picture,without
changing the side ratio.
Dark stripes are visible on the left and right-hand
edges of the picture depending on the input format of
the PC picture.
Fill all
In this format setting the picture isadapted inhorizontal
and vertical directions so that afull screendisplay isalways visible.
Onetoone
With this setting the number of screen pixels is adap-
ted to the input signal,i.e. 1366 x 768 pixels are always
reproduced by the PC picture for a screen resolution
of 1366 x 768.
S To close the menu press the red button.
Other formats are available, if in the menu option <Display ⇒ Overscan> On is set for PC (DVI), see Picture formats AV
sources.
Extended sound settings
S Press the [MENU] button to open the main menu.
S With the button [Y]or[B] select the <Sound> menu
and press the button [
S Select the desired menu option (function) with the
Y]or[B].
button [
S Select the setting [A]/["].
S To close the menu press the red button.
Volume
Display of the currently set volume.
Balance
Balance between the right and left loudspeakers.
S Press the button ["] to reduce the left-hand loud-
speaker level.
S Press the button [A] to reduce the right-hand loud-
speaker level.
"].
Downloaded From TV-Manual.com Manuals
22 ENGLISH
Equalizer
The following options (equalizer settings) are availa-
ble forselection: Classic, Flat, Jazz, Rock, Pop,Vocal;
User (see User Equalizer).
Modus
You can select the sound mode here. Depending on
the broadcasting channel, various modes are available.
For stereo transmissions: stereo, enlarged stereo
basis and mono.
For mono transmissions: mono and pseudo stereo.
For 2-tone transmissions: channel A and channel B.
You can select the languages here for transmissions
that can be broadcast in various languages.
Page 59
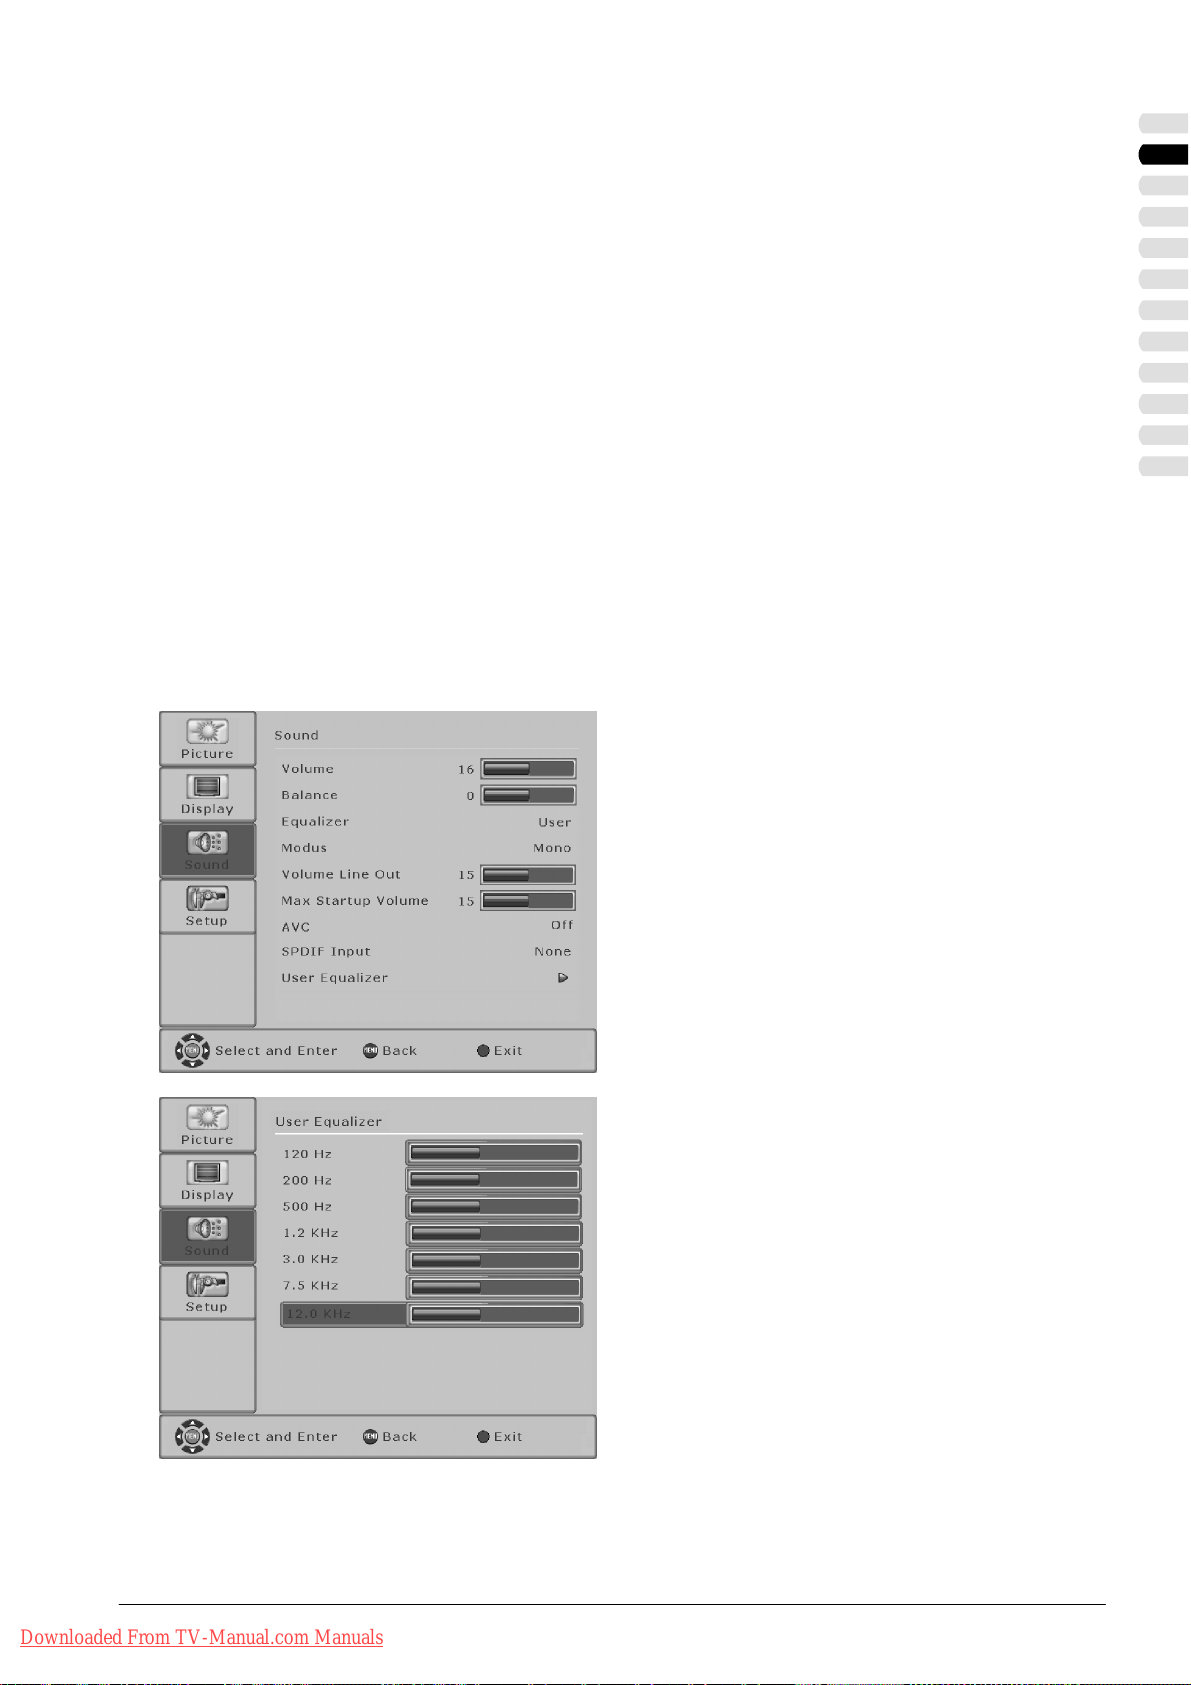
Operator cont rol
Volume Line Out
Volume level at the output LINE OUT L/R.
S Select the desired volume level
A]/["].
[
Max Startup Volume
Volume when the s et is switched on.
S Select the desired volume level
A]/["].
[
AVC (Automatic Voice Control)
This function ensures a uniform volume when you
switch over from one TV channel to another.
SPDIF input (input for digital audio signals)
You can connect the digital audio input with a picture
signal from an AV or PC source here.
User Equalizer
For an individual tone setting with the aid of the
equalizer. See User equalizer setting.
ENGLISH
User equalizer setting
S To perform settings in the menu <User Equalizer>,
you must select the User setting in the menu option
<Equalizer> and after selection of the menu option
<User Equalizer> activate the menu with the button
[
"].
You can adapt the level for the individual frequencies
to suit your personal requirements here.
S Select the desired frequency with the button [Y]or
B].
[
S Press the button ["] to raise the selected
frequency.
S Press the button ["] to weaken the selected
frequency.
Downloaded From TV-Manual.com Manuals
S To close the menu press the red button.
23ENGLISH
Page 60
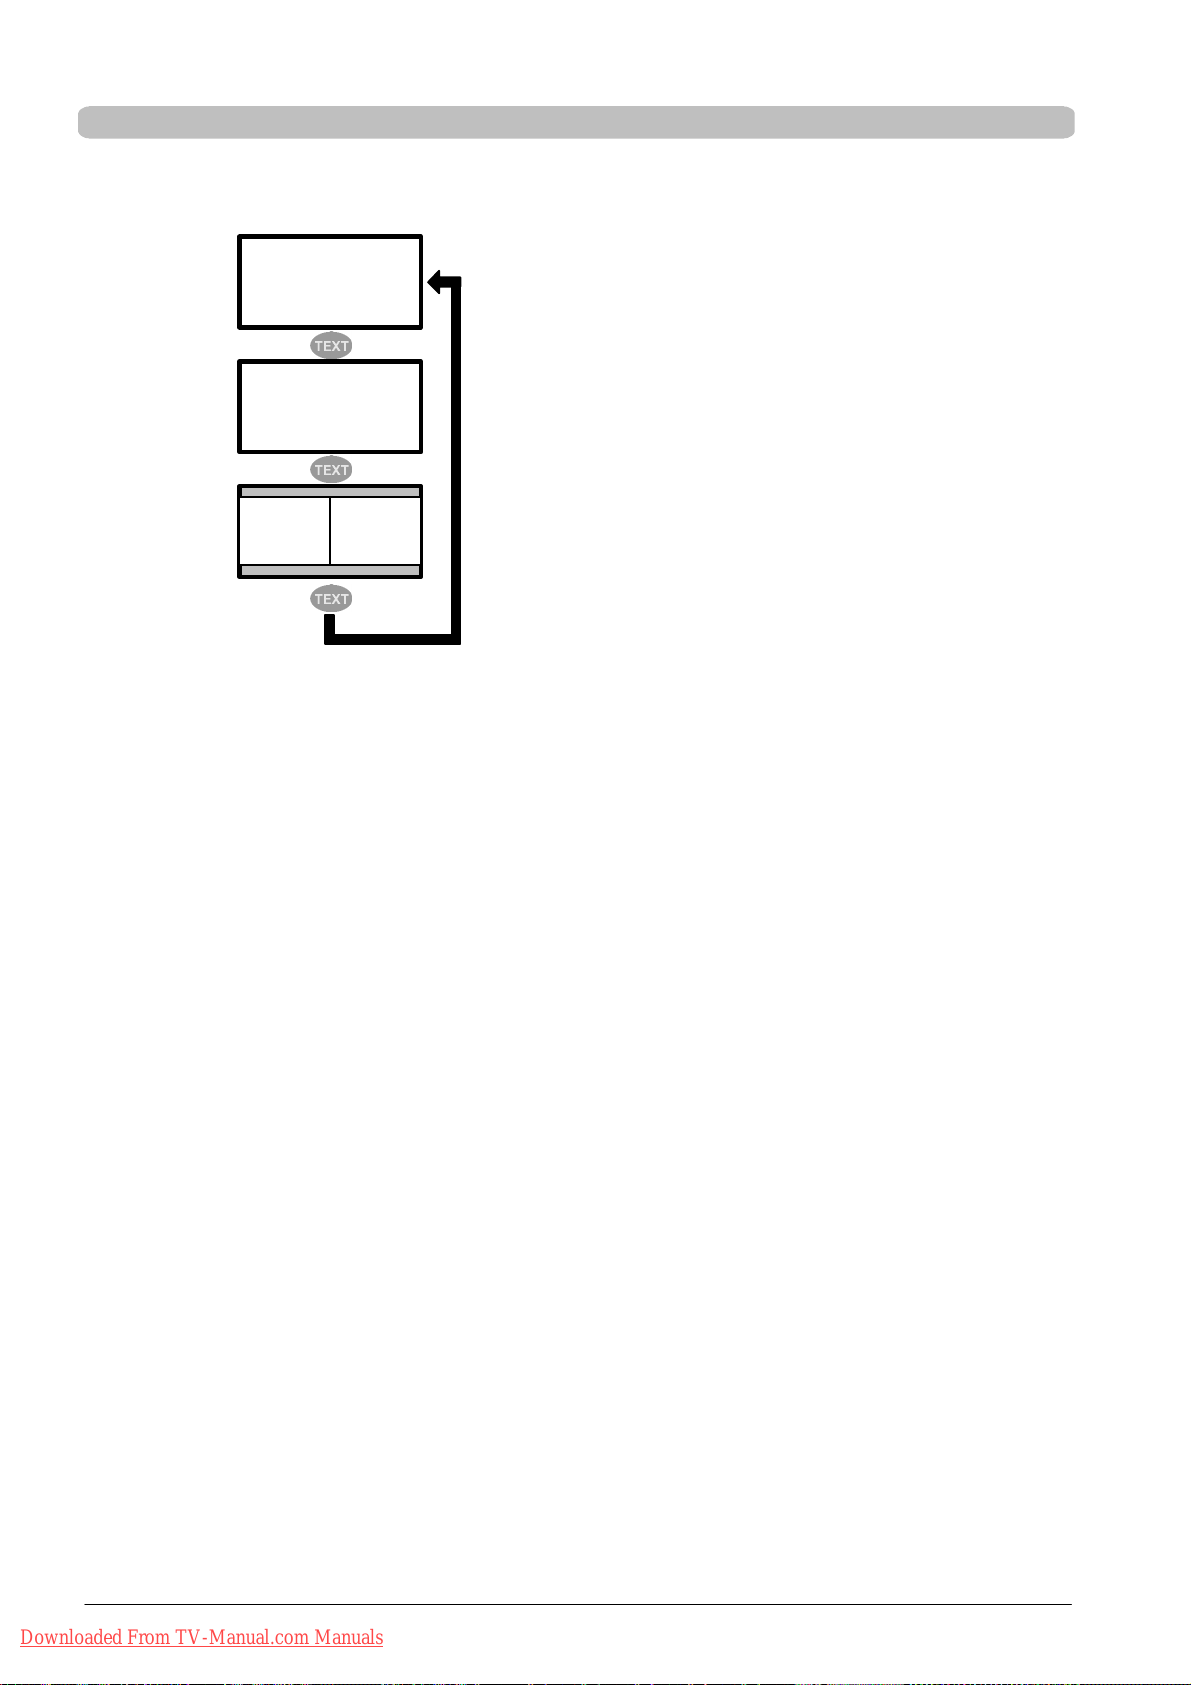
Operator cont rol
Video t ext
The LCD/plasma TV can receive and display TOP/FLOF teletext information.
D Select a TV channel with teletext.
S Press the button [TEXT] on the remote control
TV picture
Video text
TV picture Video text
to display the teletext. By pressing the [TEXT] button several times you can display the teletext and
the current television channel at the same tine next
to each other (split screen) or quit teletext mode
again.
Press the [TV] button to return to TV mode.
Page selection
D For direct selection of teletext pages use the numeric buttons [0...9].
D With the buttons [
Return to the index page
D Press the button [AUTO] or [MENU] to select the index page (e.g. 100) directly.
Display of sub-pages
D With the buttons [
at the top on the status line next to the selected page number.
D Press the button [ZAP] to change to direct selection mode for sub-pages.
Select the desired sub-page with the numeric buttons [0...9].
Enlarging the teletext display
D By pressing the button [FORMAT] several times you can enlarge the teletext display for the upper or lower parts.
Pressing it again brings you back to normal display.
Displaying concealed information
D By means of the button [LIST] you can switch hidden information on and off, as occurs, for example, on quiz pages.
Stopping the automatic page change
D If the selected teletext information is longer than one page, the page is changed after a short time. To stop the automatic
page change press the button [HOLD]. An H appears behind the selected page number. Press [HOLD] again to switch on
automatic page changing.
Y] and [B] you can scroll the teletext pages up and down.
"] and [A] you can select sub-pages directly. The numbers of the sub-pages, if available, are displayed
Mixed mode
D With the button [MIX] you can activate or deactivate mixed mode. Teletext is superimposed on the current television
programme.
The red, green, yellow and blue buttons on the remote control have different functions depending on the type of teletext, these
being displayed in the lower area of the teletext.
Downloaded From TV-Manual.com Manuals
24 ENGLISH
Page 61

Connection of external devices
Connection to SCART1 / SCART2
Operator cont rol
External devices such as the following can be connected to SCART1 and SCART2: DVD player, DVD recorder, video recorder, set top boxes and camcorders.
In addition SCART1 has the facility to connect RGB
sources.
In addition SCART2 has the facility to connect YC
sources.
If you have selected the input SCART1 or SCART2
with the [VIDEO] button, you can effect the settings
described below.
S Press the [MENU] button to open the main menu.
S With the button [Y]or[B] select the <Setup> menu
and press the button [
S Select <Inputs> [Y]/[B] and press the button ["].
S Select the desired menu option (function) with the
button [Y]or[B].
S Select the setting [A]/["].
S To close the menu press the red button.
"].
ENGLISH
TV SCART
This function must be On, if automatic switching-over
to the corresponding SCART input is to take place
when the set is switched on to SCART1 or SCART2.
SCART1 RGB IN
S SCART: ifa switch voltage is pending at pin 16 from
an external device, the LCD/plasma TV switches
over automatically to the pending RGB signal.
Otherwise a CVBS signal is reproduced.
S Always: reproduction of an RGB signal only
S Unused: reproduction of a CVBS signal only
SCART2 YC IN
S Always: reproduction of a YC signal
S Unused: reproduction of a CVBS signal
FILM Mode
This function detects whether the broadcast picture
material is an original cinema film and optimizes the
picture quality. This function is deactivated as standard. To activate this function, set the menu option
<FILM Mode> to On.
This function is especially recommended if using a
DVD player.
Format detection
Select the signal (level) for format detection.
Two options are available for selection:
S Switch voltage
Evaluationof thesignal topin 8 of theSCART sok kets.
S Software
Detection of letterbox films on the basis of the black
bars at the top and bottom.
16 : 9 format (effective only for the format Auto Zoom!)
The menu option <16 : 9 format> is active only if
the switch voltage is set under the menu option
<Format detection>.
S Letterbox: Picture is stretched horizontally and ver-
tically to full screen.
S Anamorphic: Picture is stretched horizontally only
to full screen.
Downloaded From TV-Manual.com Manuals
25ENGLISH
Page 62

Operator cont rol
Connection to the component inputs YUV
You can connect external devices, such as a DVD
player or DVD recorder with a YUV output, to YUV.
For the audio signal use the inputs LINE IN YUV (L/R).
S Press the [MENU] button to open the main menu.
S With the button [Y]or[B] select the <Setup> menu
and press the button ["].
S Select <Inputs> [Y]/[B] and press the button ["].
S Switch the menu option <FILM Mode> on or off [A]
"].
/[
S To close the menu press the red button.
FILM Mode
See Connection to SCART1 / SCART2.
Connection to the S-video input
You can connect external devices, such as a DVD
player, video recorder and camcorder with an S-video
output, to S -VIDEO.
For the audio signal use the inputs LINE IN S-VIDEO
(L/R).
S Press the [MENU] button to open the main menu.
S With the button [Y]or[B] select the <Setup> menu
and press the button ["].
S Select <Inputs> [Y]/[B] and then press the button
"].
[
S Switch the menu option <FILM Mode> on or off [A]
/["].
S To close the menu press the red button.
FILM mode
See Connection to SCART1 / SCART2.
Downloaded From TV-Manual.com Manuals
26 ENGLISH
Page 63

Connection to the HDMI input
HDMI
Signal
Connection to the PC DVI-I input
Operator cont rol
The LCD/plasma TV is equipped with an HDMI input
for digital video and audio signals.
Connect an HDMI-compatible device, e.g. a DVD
player or a set top box with an HDMI output socket,
to the HDMI input.
S Press the button [F4] to open the selection menu
<Inputs>.
S Select input [Y]/[B] and then press the red button
(M).
You can also select the HDMI input by means of the
[VIDEO] button.
Signal:
640 x 480 @ 60 Hz
480i, 576i, 480p, 576p, 720p, 1080i
HDMI (RGB, YUV) sound 2 channels up to 48 kHz
DVI (RGB), sound via digital COAX IN
For the connection of a PC use the input PC DVI-I.
If your PC has a digital DVI output, use a DVI cable for
connection.
If your PC has an RGB output (DSUB 15), use a DVI
adapter cable on a DSUB for the connection.
ENGLISH
Settings for PC (RGB)
PC (DVI)
Signal
PC (RGB)
Signal
S Press the button [F4] to open the selection menu
<Inputs>.
S Select input [Y]/[B] and then press the red button
(M).
You can also select the PC inputs by means of the
[PC] button.
S Press the [MENU] button to open the main menu.
S With the button [Y]or[B] select the <Setup> menu
and press the button [
"].
S Select <Inputs> [Y]/[B] and press the button ["].
Auto Setup
S Press the button ["] to start Auto setup.
This function will now attemptto findthe optimalpicture settings for the pending signal. During setting
the picture will move slightly back and forth.
H Total
S You can correct the scanning frequency for the PC
picture here. This function is intended only for competent users.
Downloaded From TV-Manual.com Manuals
27ENGLISH
Page 64

Operator cont rol
Settings for PC (DVI)
VPos.
S Sets the vertical picture position [A]/["].
VSize
S Sets the vertical picture size [A]/[" ].
HPos.
S Sets the horizontal picture position [A]/["].
HSize
S Sets the horizontal picture size [A]/["].
Phase
S Eliminate flickering and distortions.
S To close the menu press the red button.
S Press the [MENU] button to open the main menu.
S With the button [Y]or[B] select the <Display>
menu and press the button [
"].
S Select <Overscan> [Y]/[B] and press the button
"].
[
Overscan
S Switch <Overscan> on and off [A]/["]
As soon as the option Overscan is switched on, the
edge ofthe picture is cut by approx. 10 %. Any faults
on the edge of the picture are eliminated or made
non-visible by this cutting facility.
Select inputs
S To close the menu press the red button.
For the selection of an input use the selection menu
<Inputs>.
S Press the button [SOURCE] or [F4] to open the se-
lection menu <Inputs>.
S Select input [Y]/[B] and then press the red button.
Downloaded From TV-Manual.com Manuals
28 ENGLISH
Page 65

Special functions
Screen saver, plasma TV only!
Operator cont rol
S Press the [MENU] button to open the main menu.
S With the button [Y]or[B] select the <Display>
menu and press the button [
S Select <Screen saver> [Y]/[B] and press the but-
"].
ton [
Select one of the following options [
S White
Use this option for cancelling more recent and less
intensive “burns” on the display.
S Inverted
Use this function for regenerating the display in the
event of intensive “burns”.
S To close the menu press the red button.
"].
A]/["]:
ENGLISH
Downloaded From TV-Manual.com Manuals
29ENGLISH
Page 66
Troubleshooting
Troubleshooting
The following table shows conventional problems and the corresponding solutions. Inform yourself first of all using this table
before you contact our hotline or service department.
If the information provided for troubleshooting does not bring about success, switch OFF the unit via the
mains switch and pull the mains plug out of the plug outlet.
Do not attempt to repair the unit yourself and under no circumstances should you remove the rear cover
from the set.
DEFECT POSSIBLE CAUSE POSSIBLE REMEDY
No picture and no sound,
although the mains plug is
inserted and the unit is
switched on.
Screen dark. D Contrast setting too low.
Weak or excessive
colours.
The picture is cut off or the
picture is not centred.
The picture is too large or
too small.
The remote control is not
working.
The displayed picture is
too dark.
The picture is displayed,
but there is no sound.
Individual letters are not
displayed (PC mode).
Horizontal stripes with TV
or video signals.
D Mainsswitchinposition“0”(OFF).
D Mains plug of unit is not inserted into the
plug receptacle.
D Defective mains cable .
D No input signal, wrong input selected.
D Colour not correctly set.
D Connection cable not correctly
connected.
D Picture position not correctly set. D Correct the picture position.
D Picture format set wrongly. D Repeatedly press the button [FORMAT],
D The batteries are flat.
D There is an obstruction between the
remote control and the sensor.
D The remote control is located
outside of its operating range.
D The picture quality is not set correctly. D Correct the picture brightness and contrast
D The sound is switched to mute.
D Set volume to minimum.
D Signal source is set up before the
display.
D Screening of the v ideo cable is insuffi-
cient.
To reset all settings to their original status, use the menu option
<Setup ⇒ OSD ⇒ Reset to factory defaults>!
D Shift mains switch to position “I”.
D Insert the mains cable plug into the plug
receptacle.
D Call the service hotline.
D Set the brightness and/or contrast correctly
(see menu option <Picture>).
D Check the connection cable; assign correct
input to source.
D Set the colour under the menu option
<Picture>.
D Connect the cable correctly.
Use the auto setup function.
until the picture is displayed as a full screen.
D Insert the new batteries.
D Remove the obstruction between the remote
control and the sensor.
D Operate the remote control within the speci-
fied range.
under the menu option <Picture>.
D Press the button on the remote control.
D Increase the volume.
D Set the phase position under the menu option
<Setup ⇒ PC ⇒ Phase>.
D Check the setting for the picture width.
D Perform <Setup ⇒ PC ⇒ Auto Setup>.
D Always place the signal sources on the side
of or behind the display.
D Use only a high-grade signal cable with a
high screening attenuation.
Downloaded From TV-Manual.com Manuals
30 ENGLISH
Page 67

Technical specifications - MYRICA VQ40-1
Technical specifications - MYRICA VQ40-1
DISPLAY
Size / diagonal: 101 cm (40”), 16:9 format
Displayable picture size: 885 mm (horizontal) x 497 mm (vertical)
Resolution: 1366 x 768 pixels
Colour display: 16.7 million colours
Viewing angle: 178° typical
VIDEO STANDARDS
Video: PAL / SECAM / NTSC
TV tuner: PAL (BG, DK, I) / SECAM (BG, DK, L), 47 - 861 MHz (VHF , UHF, Hyperband)
PALplus, Cinescope: Automatic format detection (full screen)
Formats: 4:3, 16:9 (top), 14:9 (top), panorama, full screen
PC FREQUENCY RANGE
Horizontal frequency: 30 - 80 kHz
Vertical frequency: 50 - 90 Hz
Clock frequency: max. 110 MHz
Resolutions (VGA analogue):
Recommended resolution:
Formats: 1:1, full screen, format filling, zoom
INPUTS / CONNECTIONS / SYNCHRONIZATION
PC / Video input port: RGB analogue and automatic sync detection
Video connections: TV tuner: IEC, 75 ohms input resistance
PC analogue/digital connection DVI-I: analogue RGB
Audio sockets: Integrated loudspeakers: 4 x broadband
DOS: 640 x 480 @ 60 Hz, 720 x 400 @ 70 Hz,
VGA: 640 x 480, SVGA: 800 x 600; WVGA: 848 x 480 @ 60 Hz
XGA: 1024 x 768 @ 60 Hz
WXGA: 1360 x 768 @ 60 Hz
SXGA: 1280 x 1024 @ 60 Hz
1360 x 768 @ 60 Hz
SCART1: RGB, CVBS input, CVBS output
SCART2: YC, CVBS input, CVBS output
Y/C: MiniDIN (HOSIDEN)
YUV (CVBS): 3 x Cinch (HDTV)
CVBS: 1 x Cinch (Y)
HDMI: digital video / audio (HDTV)
digital DVI 1.0 - HDCP
Stereo input: 2 x Cinch L/R 1Vrms (YUV (CVBS), YC)
1 x PC AUDIO IN
1 x Cinch digital audio input (DIG IN COAX)
2 x SCART 1 Vrms
Stereo output: 2 x Cinch (LINE OUT L/R)
Active subwoofer: 1 x Cinch (LINE OUT SUB)
Digital audio output: 1 x Cinch (DIG OUT COAX)
Output wattage of amplifiers: 2 x 7W RMS (2 ohms)
ENGLISH
Synchronization: Sync on green, composite sync with automatic detection,
Operator control elements: Mains switch, IR remote control (OSD menu 12 languages), local operator control
OPERATING CONDITIONS
Temperature: +5 °C - +35 °C (in operation), -20 °C - +60 °C (storage)
Air humidity: 20 % - 85 % (non-condensating) @ 35 °C
Elevation: Max. 2,000 m (7,000 ft)
DATA MAINS CONNECTION
Voltage supply: 110 - 240 V ~
Mains frequency: 50 / 60 Hz
Power consumption: 270 W typical, < 3 W in standby mode
DIMENSIONS AND WEIGHT
Set with stand H x W x D:
Set without stand H x W x D:
Weight of set:
Weight of stand:
Total weight:
Downloaded From TV-Manual.com Manuals
Separate H and V sync
(657.1 mm x 989.1 mm x 244.2 mm) ± 3 mm
(616.5 mm x 989.1 mm x 113.6 mm) ± 3 mm
21.5 kg ± 10 %
2.8 kg ± 10 %
24.3 kg ± 10 %
31ENGLISH
Page 68

Technical specifications - MYRICA PQ42-1
Technical specifications - MYRICA PQ42-1
DISPLAY
Size / diagonal: 106 cm (42”), 16:9 format
Displayable picture size: 920 mm (horizontal) x 518 mm (vertical)
Resolution: 1024 x 768 pixels
Colour display: 16.7 million colours
Viewing angle: > 160°
VIDEO STANDARDS
Video: PAL / SECAM / NTSC
TV tuner: PAL (BG, DK, I) / SECAM (BG, DK, L), 47 - 861 MHz (VHF , UHF, Hyperband)
PALplus, Cinescope: Automatic format detection (full screen)
Formats: 4:3, 16:9 (top), 14:9 (top), panorama, full screen
PC FREQUENCY RANGE
Horizontal frequency: 30 - 80 kHz
Vertical frequency: 50 - 90 Hz
Clock frequency: max. 110 MHz
Resolutions (VGA analogue):
Recommended resolution:
Formats: 1:1, full screen, format filling, zoom
INPUTS / CONNECTIONS / SYNCHRONIZATION
PC / Video input port: RGB analogue and automatic sync detection
Video connections: TV tuner: IEC, 75 ohms input resistance
PC analogue/digital connection: DVI-I: analogue RGB
Audio sockets: Integrated loudspeakers: 4 x broadband
DOS: 640 x 480 @ 60 Hz, 720 x 400 @ 70 Hz,
VGA: 640 x 480, SVGA: 800 x 600; WVGA: 848 x 480 @ 60 Hz
XGA: 1024 x 768 @ 60 Hz
WXGA: 1360 x 768 @ 60 Hz
SXGA: 1280 x 1024 @ 60 Hz
1024 x 768 @ 60 Hz
SCART1: RGB, CVBS input, CVBS output
SCART2: YC, CVBS input, CVBS output
Y/C: MiniDIN (HOSIDEN)
YUV (CVBS): 3 x Cinch (HDTV)
CVBS: 1 x Cinch (Y)
HDMI: digitla video / audio (HDTV)
digital DVI 1.0 - HDCP
Stereo input: 2 x Cinch L/R 1Vrms (YUV (CVBS), YC)
1 x PC AUDIO IN
1 x Cinch digital audio input (DIG IN COAX)
2 x SCART 1 Vrms
Stereo output: 2 x Cinch (LINE OUT L/R)
Active subwoofer: 1 x Cinch (LINE OUT SUB)
Digital audio output: 1 x Cinch (DIG OUT COAX)
Output wattage of amplifiers: 2 x 7W RMS (8 ohms)
Synchronization: Sync on green, composite sync with automatic detection,
Operator control elements: Mains switch, IR remote control (OSD menu 12 languages), local operator control
OPERATING CONDITIONS
Temperature: +5 °C - +35 °C (in operation), -20 °C - +60 °C (storage)
Air humidity: 20 % - 85 % (non-condensating) @ 35 °C
Elevation: max. 2,000 m (7,000 ft)
DATA MAINS CONNECTION
Voltage supply: 110 - 240 V ~
Mains frequency: 50 / 60 Hz
Power consumption: 330 W typical, < 3 W in standby mode
DIMENSIONS AND WEIGHT
Set with stand H x W x D:
Set without stand H x W x D:
Weight of set:
Weight of stand:
Total weight:
Downloaded From TV-Manual.com Manuals
32 ENGLISH
Separate H and V sync
(697.8 mm x 1045 mm x 244.2 mm) ± 3 mm
(656.9 mm x 1045 mm x 99.9 mm) ± 3 mm
37.15 kg ± 10 %
2.85 kg ± 10 %
40.00 kg ± 10 %
Page 69

Technical specifications - MYRICA PQ50-1
Technical specifications - MYRICA PQ50-1
DISPLAY
Size / diagonal: 127 cm (50”), 16:9 format
Displayable picture size: 1106 mm (horizontal) x 622 mm (vertical)
Resolution: 1366 x 768 pixels
Colour display: 16.7 million colours
Viewing angle: > 160°
VIDEO STANDARDS
Video: PAL / SECAM / NTSC
TV tuner: PAL (BG, DK, I) / SECAM (BG, DK, L), 47 - 861 MHz (VHF , UHF, Hyperband)
PALplus, Cinescope: Automatic format detection (full screen)
Formats: 4:3, 16:9 (top), 14:9 (top), panorama, full screen
PC FREQUENCY RANGE
Horizontal frequency: 30 - 80 kHz
Vertical frequency: 50 - 90 Hz
Clock frequency: max. 110 MHz
Resolutions (VGA analogue):
Recommended resolution:
Formats: 1:1, full screen, format filling, zoom
INPUTS / CONNECTIONS / SYNCHRONIZATION
PC / Video input port: RGB analogue and automatic sync detection
Video connections: TV tuner: IEC, 75 ohms input resistance
PC analogue/digital connection: DVI-I: analogue RGB
Audio sockets: Integrated loudspeakers: 4 x broadband
DOS: 640 x 480 @ 60 Hz, 720 x 400 @ 70 Hz,
VGA: 640 x 480, SVGA: 800 x 600; WVGA: 848 x 480 @ 60 Hz
XGA: 1024 x 768 @ 60 Hz
WXGA: 1360 x 768 @ 60 Hz
SXGA: 1280 x 1024 @ 60 Hz
1360 x 768 @ 60 Hz
SCART1: RGB, CVBS input, CVBS output
SCART2: YC, CVBS input, CVBS output
Y/C: MiniDIN (HOSIDEN)
YUV (CVBS): 3 x Cinch (HDTV)
CVBS: 1 x Cinch (Y)
HDMI: digitla video / audio (HDTV)
digital DVI 1.0 - HDCP
Stereo input: 2 x Cinch L/R 1Vrms (YUV (CVBS), YC)
1 x PC AUDIO IN
1 x Cinch digital audio input (DIG IN COAX)
2 x SCART 1 Vrms
Stereo output: 2 x Cinch (LINE OUT L/R)
Active subwoofer: 1 x Cinch (LINE OUT SUB)
Digital audio output: 1 x Cinch (DIG OUT COAX)
Output wattage of amplifiers: 2 x 7W RMS (8 ohms)
ENGLISH
Synchronization: Sync on green, composite sync with automatic detection,
Operator control elements: Mains switch, IR remote control (OSD menu 12 languages), local operator control
OPERATING CONDITIONS
Temperature: +5 °C - +35 °C (in operation), -20 °C - +60 °C (storage)
Air humidity: 20 % - 85 % (non-condensating) @ 35 °C
Elevation: max. 2,000 m (7,000 ft)
DATA MAINS CONNECTION
Voltage supply: 110 - 240 V ~
Mains frequency: 50 / 60 Hz
Power consumption: 450 W typical, < 3 W in standby mode
DIMENSIONS AND WEIGHT
Set with stand H x W x D:
Set without stand H x W x D:
Weight of set:
Weight of stand:
Total weight:
Downloaded From TV-Manual.com Manuals
Separate H and V sync
(792.3 mm x 1228 mm x 269.2 mm) ± 3 mm
(758.9 mm x 1228 mm x 107.7 mm) ± 3 mm
46.3 kg ± 10%
3.0 kg ± 10 %
49.3 kg ± 10 %
33ENGLISH
Page 70

Downloaded From TV-Manual.com Manuals
Page 71

Table des matières
Remarques importantes 2.........................
Remarques de sécurité 2........................
Règles d’utilisation importantes 2.................
Recyclage et élimination 3.......................
Nettoyage 3...................................
Nettoyage de l’écran 3.......................
Nettoyage des parois de l’appareil 3...........
Conformité 3..................................
En cas de défaillances 3........................
Piles 3........................................
Aperçu 4........................................
Eléments livrés 4...............................
Raccordements 5..............................
Télécommande 6..............................
Eléments de commande sur l’appareil 7...........
Préparations 8...................................
Angledevision 8...........................
Positionnement 8...........................
Montage 8.................................
Montage mural 8............................
Gabarit de perçage 9........................
Branchement d’une antenne 10................
Introduire des piles dans la télécommande 10....
Utilisation de la télécommande 10..............
Branchement du câble de secteur 10...........
Première installation 11..........................
Régler la langue 11...........................
Sélection du pays pour l’ordre de classement 11..
Mode d’utilisation 12..............................
Mettreenmarche/arrêter 12..................
Changement de chaîne (changement de
programme) 12..............................
Réglages du volume et du son 12..............
Fonction Image dans image (PIP) 13............
Combinaisons possibles source et source PIP 14.
Image figée 14...............................
Programme somme il 14.......................
Commande du menu OSD 15.....................
Réglages de base 15............................
Recherche automatique des chaînes 15.........
Recherche de chaînes manuelle 16.............
Modifier le nom du canal 16...................
Régler le décodeur 17........................
Editer la liste des chaînes 17..................
Réglages OSD 18...............................
Réglages de l’image 19..........................
Pour les sources AV (TV, CVBS, YC, YUV,
SCART1, SCART2, HDMI) 19..................
Pour sources PC (RGB, DVI) 20................
Formats d’image pour sources AV 21...........
Formats d’image pour sources PC 22...........
Réglages du son avancés 22.....................
Réglage Egaliseur Utilisateur 23................
FRANÇAIS
Télétexte 24....................................
Raccordement à des périphériques externes 25.....
Raccordement à SCART1 / SCART2 25.........
Raccordement aux entrées YUV d e composant 26
Connexion à l’entrée S-vidéo 26................
Connexion à l’entrée HDMI 27.................
Connexion à l’entrée PC DVI-I 27...............
Configurations du PC (RVB) 27.............
Configurations du PC (DVI) 28..............
Sélectionner les entrées 28....................
Fonctions spéciales 29...........................
Ecran de veille uniquement sur le téléviseur
plasma ! 29.................................
Remédier aux défaillances 30.....................
Données techniques - MYRICA VQ40-1 31...........
Données techniques - MYRICA PQ42-1 32...........
Données techniques - MYRICA PQ50-1 33...........
Downloaded From TV-Manual.com Manuals
1FRANÇAIS
Page 72

Remarques importantes
Remarques importantes
Ce chapitre contient des remarques de sécurité qu’il faut
absolument suivre pour faire fonctionner votre téléviseur.
Evitez de figer longtemps les images sur l’écran, par
exemple images figées de vidéos, sigle de la chaîne
ou autres (au maximum 1 heure). Ces images risquent d’être visibles en permanence ! Evitez aussi de
faire fonctionner en mode image où des barres noires
sont affichées (fonctionnement en format image 4:3).
Ces barres noires risquent elles aussi d’être visibles
en permanence.
Ce produit de FujitsuSiemens Computers renferme la
propriété intellectuelle de tiers. Toute manipulation ou
modification du produit a pour effet la perte de la garantie et peut entraîner des procédures civiles et pénales utilisant l’ensemble du domaine d’application
de la loi.
Remarques de sécurité
Cet appareil réponde aux dispositions de sécurité se rapportant aux appareils audio, vidéo et TV.
Si vous avez des questions sur l’emplacement prévu pour
l’appareil, prenez contact avec votre point de vente ou avec
notre service d’aide en ligne.
D La surface d’affichage du téléviseur est sensible à la
pression et aux rayures. C’est pourquoi il faut traiter la
surface de l’écran avec beaucoup de précaution pour
éviter de l’endommager (anneaux de Newton, rayures).
D Quand l’appareil passe d’un endroit froid au lieu de fonc-
tionnement, de la condensation peut se former. Attendez
que l’appareil soit à la température de ce lieu et qu’il soit
absolument sec avant de le mettre en marche.
D Lors du montage de l’appareil et avant son fonctionne-
ment, suivez les remarques sur les conditions externes
dans le chapitre.
D Pour assurer une aération suffisante, il faut absolument
que les ouvertures d’entrée et de sortie d’air soient
dégagées.
D L’appareil se règle automatiquement sur la tension du
secteur entre 100 V et 240 V. Vérifiez que la tension du
secteur local se trouve ne se trouve ni au-dessus ni
au/-dessous de cette plage.
D L’appareil doit être branché uniquement sur une prise de
courant avec mise à la terre.
D Assurez-vous que la prise de courant sur l’appareil ou la
prise de courant de sécurité de l’installation électrique du
local soit accessible.
D L’interrupteur de mise en marche/d’arrêt coupe l’appareil
de l’alimentation du secteur. Afin de couper complètement l’alimentation du secteur, il faut retirer la fiche de la
prise de courant.
D Disposez les câbles de sorte qu’ils ne présentent pas de
risques (risque de chute) et qu’ils ne subissent pas de
dommages. Au branchement de l’appareil, suivez les
remarques respectives figurant dans le chapitre
Préparations.
D Au cours d’un orage, il ne faut ni brancher ni débrancher
les câbles d’antenne et de transmission de données.
D Il ne faut pas que des objets (chaînettes, agrafes de
bureau, par ex.) ni des liquides pénètrent à l’intérieur
de l’appareil (risque de décharge électrique, de courtcircuit).
D Il ne faut pas poser des objets contenant du liquide
(des vases, par ex.) sur l’appareil. L’appareil n’est pas
étanche ! Protégez l’appareil des projections d’eau
(pluie, eau de mer).
D En cas d’urgence (par ex. quand l’extérieur, les éléments
de commande ou le câble de secteur sont endommagés, au cas où des liquides ou des corps étrangers
ont pénétré) éteignez immédiatement l’appareil, retirez la
fiche de secteur et contactez votre point de vente ou
notre service d’aide en ligne.
D L’appareil doit être éliminé conformément aux direc-
tives locales sur l’élimination des déchets spéciaux.
Le matériel des tubes fluorescents doit être manipulé
et éliminé conformément aux consignes de sécurité en
vigueur.
VQ40-1 : L’éclairage d’arrière-plan des téléviseurs LCD/
plasma contient du mercure. Les tubes fluorescents doi vent être manipulés et éliminés conformément aux consignes de sécurité en vigueur.
D Les réparations de l’appareil doivent être effectuées uni-
quement par du personnel qualifié agréé. Une ouverture
non autorisée et des réparations non conformes peuvent
exposer l’utilisateur à des dangers graves (décharge
électrique, risque d’incendie).
D Réglez uniquement les résolutions d’écran et les
fréquences de reproduction d’images indiquées dans le
chapitre “Données techniques”. Vous risquez d’endom mager en réglant sur d’autres valeurs. En cas de doute,
adressez-vous à votre point de vente ou avec notre service d’aide en ligne.
D En mode PC, mettez un écran de veille avec des
images mouvantes et activez le mode de fonctionnement de votre écran pour éviter que les images fixes
ne s’incrustent.
D Conservez ce manuel d’instructions avec l’appareil.
Quand vous remettez l’appareil à un tiers, remettez
aussi le manuel d’instructions.
Règles d’utilisation importantes
Le téléviseur LCD/plasma que vous avez acheté répond aux
exigences de qualité les plus fortes dans ce segment et les
défauts de pixels ont fait l’objet d’une vérification. Cependant
malgré nos soins, il n’est pas exclus à 100% que pour des raisons technologiques quelques points de l’image présentent
des erreurs.
Nous comptons sur votre compréhension pour accepter que
de tels effets, dans la mesure où ils se situent dans les limites
fixées par la norme, ne signifient pas que l’appareil est défectueux dans le sens de la garantie.
En cas d’utilisation prolongée comme écran de PC, il se peut
que des ombres apparaissent sur l’écran, comme c’est le cas
avec n’importequel téléviseur. Pour éviterque ce phénomène
ne se présente sur les écrans LCD/plasma, il faut suivre les
points suivants :
D évitez l’affichage prolongé d’une image fixe
D utilisez le format (16:9) remplissant la totalité de l’écran
D activez l’écran de veille
D affichez des images mobiles dans la mesure du possible
D éteignez toujours l’écran quand vous ne vous en servez
pas
D réduisez le contraste et la luminosité dans la mesure du
possible.
Des conditions défavorables peuvent conduire votre écran
LCD/plasma à bourdonner. En général ce bourdonnement
vient de l’alimentation à la tension de secteur et peut être
causé par la connexion de différents conducteurs de protection.
Downloaded From TV-Manual.com Manuals
2 FRANÇAIS
Page 73

Remarques importantes
Pour y remédier vous pouvez brancher ce qu’on appelle un filtre de courant sur gaine entre le fil d’antenne d’arrivée et l’entrée de l’antenne sur l’écran. Le filtre de courant sur gaine est
vendu dans le commerce de matériel électrique sous forme
d’une petite fiche de raccord.
Si votre téléviseur LCD/plasma est c onnecté à une antenne
extérieure, celle-ci doit être mise à terre afin d’être à l’abri des
décharges électriques et des charges statiques. La mise à
terre doit répondre aux règlements en application.
Quand vousutilisez l’appareil comme écran de PC, nous vous
recommandons d’éviter l’utilisation de caractères rouges et
bleus et de symboles sur fond de couleur foncée pour des raisons d’ergonomie. En raison du faible contraste, une telle re présentation est difficile à lire et elle fatigue rapidement les
yeux. Dans la mesure du possible, utilisez de forts contrastes,
par exemple des caractères noirs sur fond blanc.
Pour éviter des douleurs des yeux et avoir une distance optimale entre les yeux et l’écran, il faudrait que cette distance représente cinq à six fois la diagonale de l’écran.La pièce dans
laquelle l’écran se trouve devraitêtre assez éclairée pourqu’il
soit possible d’y lire. S’il fait trop clair, les contrastes se per dent. S’il y a trop peu de lumière,vos yeux se fatiguent en passant du clair au foncé de l’écran.
Recyclage et élimination
Nettoyage des parois de l’appareil
Pour le nettoyage des parois de l’appareil, n’utilisez pas de
solvants chimiques ni de détergents, ils risquent d’endommager la surface de l’appareil.
Si vous nettoyez les parois de l’appareil avec une lingette
mouillée, des gouttes d’eau risquent de pénétrer dans l’appareil, ce qui provoque des défaillances de fonctionnement.
Pour nettoyer les fentes d’aération, servez-vous de l’embout
à brosse douce de l’aspirateur.
Conformité
Cet écran est un appareil de télévision LCD/plasma, il est
conforme aux directives et aux normes de l’Union européenne :
D 89/336/CEE du 3 mai 1989 et modifications suivantes
(Directive 92/31/CEE d’avril 1992 et Directive 93/68/CEE
du 22 juillet 1993)
D 73/23/CEE du 19 février 1973 et modifications suivantes
(Directive 93/68/CEE du 22 juillet 1993)
D EN60065 (Exigences de sécurité).
La conformité avec les exigences est certifiée par le marquage
Le fabricant ne peut pas être tenu pour responsable d’opérations effectuées non prévues dans le cadre des conditions
d’opération, comme elles sont décrites dans ces instructions
de service. En outre, dansun tel cas, la garantie applicable au
produit et la responsabilité prennent fin.
apposé sur le produit.
FRANÇAIS
Cet appareil est fabriquédans une très large mesure de matériaux susceptibles d’être éliminés dans de bonnes conditions
pour l’environnement et d’être recyclés dans les règles de
l’art. Après usage, l’appareil sera repris à fins d’autre utilisation ou de recyclage des matériaux, dans la mesure où il est
retourné dans un état conforme à l’usage déterminé. Les pièces de l’appareilnon recyclables seront éliminées de manière
appropriée.
L’appareil ne doit pas être éliminé dans les déchets
municipaux non triés (ordures ménagères). L’appareil porte le marquage conforme à la directive européenne 2002/96/CE sur les appareils électriques et
électroniques (DEEE). La directive fixe le cadre
d’application de reprise et de revalorisation des appareils usagés au niveau européen. Pour la reprise
de votre appareil usagé, servez-vous des systèmes
de remise et de collecte à votre disposition. Pour de
plus amples informations, consultez www.fujitsusiemens.com/recycling.
Nettoyage
Avant de commencer le nettoyage de l’écran, il faut éteindre
l’appareil et retirer la fiche de secteur de la prise de courant.
Nettoyage de l’écran
Pour nettoyer l’écran, utilisez un produit de nettoyage doux et
une lingette douce.
Le produit de nettoyage ne doit contenir ni cétone (acétone,
par ex.) ni éthanol.
N’utilisez pas de produits abrasifs !
En cas d e défaillances
Retirez la fiche de secteur de la prise de courant dès que
l’appareil est endommagé.
Retirez immédiatement la fiche de secteur de la prise de courant dès que de la fumée, une odeur désagréable ou des
bruits inhabituels s ont émis par l’appareil. Faites de même au
cas où aucune image n’apparaît à l’écran après que vous
avez allumé l’appareil ou n’apparaît plus pendant qu’il est en
marche. N’essayez pas de continuer à faire fonctionner
l’écran dans cet état.
En aucun cas n’ouvrez l’appareil vous-même. Vous ne pouvez ni réparer ni échanger aucune des pièces contenues
dans cet appareil. Prenez contact avec notre service en ligne
directe ou avec un autre atelier spécialisé dans ce domaine.
Piles
Quand vous introduisez des piles, vérifiez que les signes de
polarité (+ / -) correspondent bien aux signes figurantsur la télécommande.
Les piles ne doivent pas être jetées dans les
ordures ménagères. Les piles usées doivent
être remises aux lieux de collecte des administrations locales ou dans les boîtes mises à
disposition à cet effet dans le commerce.
Les piles ne doivent pasêtre soumises à une température élevée, ni jetées dans le feu,ni rechargées,il ne faut pas non plus
tenter de les ouvrir ; elles risqueraient de couler ou d’exploser.
Retirez les piles de la télécommande si vous ne vous servez
pas de l’appareil pendant une assez longue période.
Downloaded From TV-Manual.com Manuals
3FRANÇAIS
Page 74

Aperçu
Aperçu
Le téléviseur à écran LCD/plasma offre de nombreuses possibilités de raccordement, que ce soit à l’ordinateur, au lecteur DVD,
au magnétoscope, au caméscope et autres. Qu’il s’agisse d’images venant du téléviseur, du magnétoscope, du caméscope
ou de l’ordinateur, elles sont toutes d’une netteté exceptionnelle et exemptes de déformations quand elles apparaissent sur
l’écran à surface absolument plane. Les images se caractérisent par une luminosité excellente et une brillance inégalée. Parmi
les autres caractéristiques, il faut citer d’abord la grande diagonale de l’écran pour un rapport de côtés de 16:9 et la très faible
profondeur de conception. En mode télévision, le raccordement doit se faire à une antenne terrestre, un récepteur SAT ou une
installation de télévision à câble.
La commande interactive est réalisée par la télécommande livrée avec l’appareil et le menu affiché à l’écran (OSD). C’est là que
les réglages variés de qualité d’image sont effectués.
Un système de refroidissement sans ventilateur permet au téléviseur à écran LCD/plasma de fonctionner sans faire de bruits.
Le téléviseur à écran LCD/plasma, aussi silencieux qu’un téléviseur conventionnel, convient donc parfaitementà l’emploi dans
les locaux d’habitation et en salles de conférence.
Equipement
D Boîtier aluminium de haute qualité
D Conception sans ventilateur
D HD ready (prêt)
D Représentation sur la totalité de l’écran en format 16:9 et 4:3
D 3D filtre à peigne
D Compatible avec PAL, SECAM et NTSC (NTSC non sur le tuner)
D Compatible avec VGA, SVGA, WXGA et XGA
D TOP / FLOF Télétexte avec capacité de mémoire de 5000 pages
D Identification automatique de programmes et classement des émetteurs
D Programme somme il
D Ecrandeveille
D 2 x EURO SCART (SCART1 avec RGB, SCART2 avec Y/C)
D 1 x Y/C (S-Vidéo)
D 3 x Cinch Y (CVBS)UV
D 1 x DVI (I) (analogique et numérique, numérique avec HDCP)
D 1 x HDMI
D Entrée / sortie audio numérique
Eléments livrés
Dès que vous avez sorti le téléviseur LCD/plasma de son emballage, vérifiez s’il n’apas subi de dommages pendant le transport
et si la livraison est c omplète. Le fournisseur est responsable des dommages causés par le transport uniquement si vous les
lui communiquez avant la première mise en service. Si un des éléments de la livraison manque, adressez-vous à notre service
en ligne directe. Conservez l’emballage d’origine pour un transport éventuel du moniteur.
Téléviseur LCD/
plasma
Câble de secteur pour l’Europe
(sauf Royaume-Uni et Irlande)
* Câble de secteur pour
Royaume-Uni et Irlande
Piles AAA
Câble d’antenne Câble SCART
Manuel d’utilisation,
mise en route et
livret de garantie
Télécommande
Downloaded From TV-Manual.com Manuals
4 FRANÇAIS
* selon l’équipement
Page 75

Raccordements
Aperçu
1
11
3 4 5 9
16 15 1714 1219 8 10
1813
6 72
21
11 DIG OUT COAX
Port d’amplificateur AV avec entrée audio
coaxiale numérique
1 LINE OUT SUB 12 DIG IN COAX
Port pour subwoofer Actif port d’appareils à sortie audio coaxiale
numérique
2 LINE OUT L/R (sortie audio) 13 PC AUDIO IN
par ex. port amplificateur audio ou lecteur DVD par ex. entrée audio PC avec fiche line-out
3 RF IN (entrée antenne tuner principal) 14 HDMI (High Definition Multimedia Interface)
doit être connecté à “RF out” Raccordement pour appareils avec sortie HDMI
par le câble de branchement d’antenne par ex. lecteur DVD
4 RF OUT (sortie antenne tuner PIP) 15 RS-232
doit être connecté à “RF in” Interface sérielle pour maintenance
par le câble de branchement d’antenne
FRANÇAIS
20
5 ANTENNE 16 PC DVI-I (HDCP)
Branchement de signal d’antenne TV Branchement PC, lecteur DVD
(antenne terrestre analogique ou raccordement au câble) (RGB pour signaux analogiques, DVI pour signaux
6 YUV / Y (composante Y), CVBS 17 S-VIDEO
Port pour lecteur DVD à sortie YUV Port des appareils à sortie S vidéo
CVBS - port d’appareil à sortie FBAS par ex. lecteur DVD, magnétoscope, caméscope
7 YUV / U (composante Pb) 18 LIGNE ENTREE YUV (CVBS)
8 YUV / V (composante Pr) 19 LINE IN S-VIDEO
9 SCART 2 (YC, CVBS) 20 Fiche entrée secteur
par ex. port magnétoscope ou décodeur Port pour câble de secteur livré
10 SCART 1 (RGB, CVBS) 21 Interrupteur d’alimentation
par ex. port récepteur satellite ou magnétoscope Marche / Arrêt
Downloaded From TV-Manual.com Manuals
numériques). Si votre PC dispose d’une sortie
analogique VGA, le raccordement à votre PC à l’écran
se fait à l’aide d’un câble de raccordement DVI-I
surHD-Sub15broches.
Entrée audio pour YUV (CVBS)
Entrée audio pour S-VIDEO
5FRANÇAIS
Page 76

Télécommande
Pour commander le téléviseur LCD/plasmaà l’aide de la télécommande, il faut que la fiche de secteur soit branchée et
l’interrupteur d’alimentation en position de marche.
La télécommande à infrarouge fonctionne uniquement s’il n’y
pas d’obstacle entre la commande et lecapteur infrarouge sur
la partie avant (en bas à droite) du téléviseur LCD/plasma.La
télécommande a une portée de 6 m environ.
Quand les piles ne sont plus assez chargées, la portée de la
télécommande est réduite. Dans ce cas, changez les piles.
Utilisez uniquement 2 piles de type LR03 AAA 1,5 V.
17
2
3
5
6
8
12
10
13
9
14
18
19
14
15
16
1
MARCHE
met l’appareil en marche ou le fait passer en mode veille.
2
TV
passe au mode TV.
3
VIDEO
passe au mode vidéo.
Commutation des sources vidéo.
4
PC
sélectionne le port PC comme source d’entrée.
Commutation des sources PC.
1
4
7
20
21
11
22
23
24
25
17
26
5
0-9Boutons à chiffres
Mode TV : sélection du canal.
Mode télétexte : sélection d’une page de télétexte.
6
i
affiche des informations sur la source actuelle.
7
LIST
Mode TV : ouvre l’aperçu des chaînes.
Mode télétexte : affiche les informations cachées.
8
PY
augmente le numéro de chaîne.
Navigation dans le menu OSD.
9
PB
diminue le numéro de chaîne.
Navigation dans le menu OSD.
10
A VOL
réduit le volume.
Navigation dans le menu OSD.
11
VOL "
augmente le volume.
Navigation / exécution d’une fonction dans le menu OSD.
12
FORMAT
commute le format d’image.
Mode télétexte : hauteur des caractères double.
13
PIP
active le mode PIP.
commute les formats PIP (PIP / Ecran scindé).
14
"A
PIP / F2
échange l’image principale et l’image affichée
en mode PIP.
15
P-POS
sans fonction !
16
P-SIZE
sans fonction !
17
SOURCE / F4
ouvre le menu desélection Entrées (sourcesprincipales).
18
HOLD / FREEZE
fige l’image actuelle.
Mode télétexte : arrête le changement automatique
de page.
19
Rouge / Vert / Jaune / Bleu
Rouge : quitter les menus.
Sélection d’une page de télétexte.
20
ZAP
Mode TV: commute vers une chaîne TV réglée
précédemment.
Mode télétexte : marche/arrêt du mode sous pages.
21
Marche ou arrêt du s on.
22
TEXT
marche ou arrêt du mode télétexte.
Commute les formats (plein écran / écran scindé).
23
MENU
ouvre le menu principal / le sous-menu.
24
SOUND
règle le mode son.
25
AUTO / PAGE
Mode PC analogique : configuration automatique.
Mode télétexte : ouvrir page 100.
26
/ MIX
Réglage Sommeil.
Mode télétexte : fonctionnement mixte
(image TV / télétexte)
Downloaded From TV-Manual.com Manuals
6 FRANÇAIS
Page 77
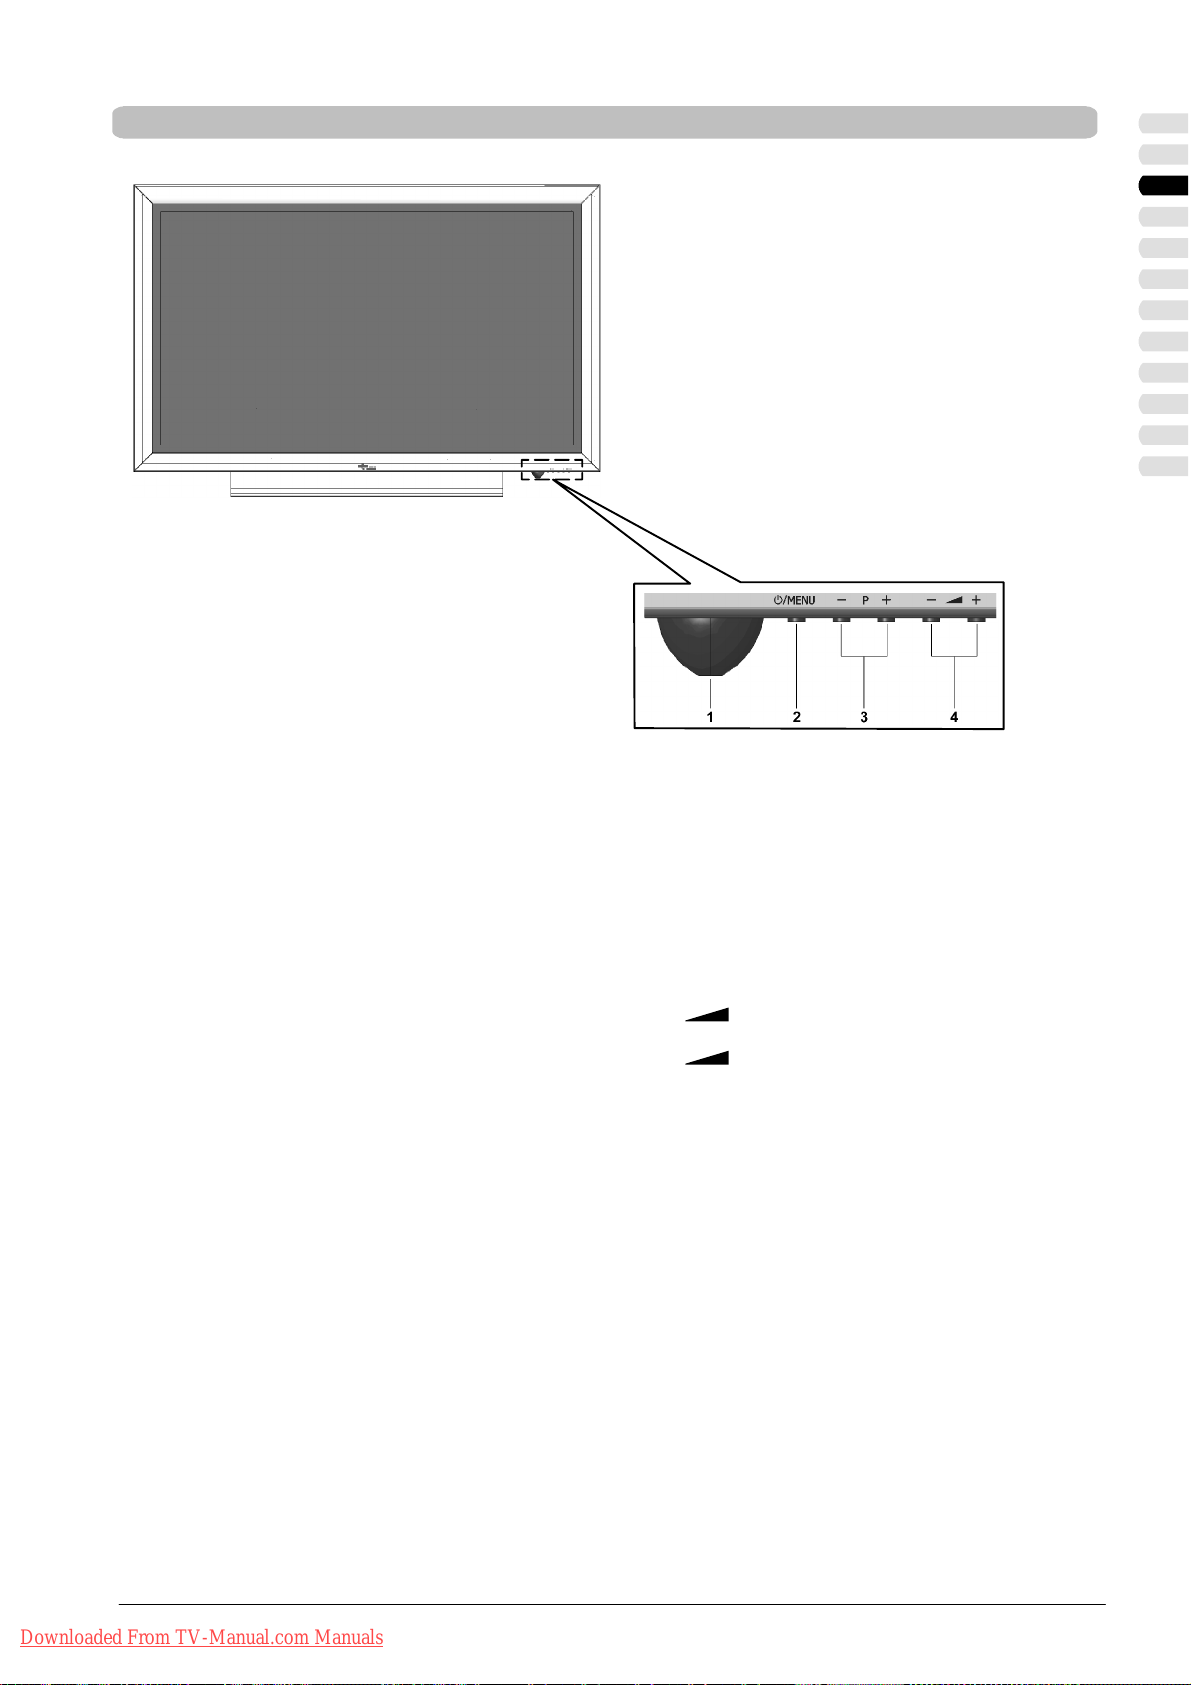
Eléments de commande sur l’appareil
Aperçu
La fonction des boutons de l’appareil coïncide avec ceux de
la télécommande !
FRANÇAIS
1 = témoin de mode veille orange
témoin de fonctionnement bleu
récepteur infrarouge
2 = marche/arrêt du mode veille
afficher le menu principal / les sous-menus
3 = P- diminue le numéro de chaîne.
Navigation dans le menu OSD.
P+ augmente le numéro de chaîne.
Navigation dans le menu OSD.
4 =
- réduit le volume.
Navigation dans le menu OSD.
+ augmente le volume.
Navigation / exécution d’une fonction dans le
menu OSD.
Downloaded From TV-Manual.com Manuals
7FRANÇAIS
Page 78

Préparations
Préparations
Angledevision
D Bien que le téléviseur à écran LCD/plasma offre un
grand angle de vision, pour maximiser ses performances l’angle doit être tout à fait droit. Orientez le téléviseur
LCD/plasma écran en fonction de l’angle de vision utilisé
le plus fréquemment.
Positionnement
D Réflexiondelalumière
Evitez de positionner l’écran en face de fenêtres ou
d’autres sources lumineuses.
D Accès à l’arrivée du secteur
L’arrivée du secteur et le commutateur principal doivent
être facilement accessibles à tout moment.
D Aération Pour assurer une aération suffisante, il faut
absolument que les ouvertures d’entrée et de sortie d’air
du téléviseur LCD/plasma soient dégagées.
D Température ambiante
Pour un fonctionnement sûr et fiable, il faut que la température ambiante se situe entre 5 °C et 35 °C.
Montage
D Sortez le téléviseur LCD/plasma de l’emballage avec
l’aide d’une seconde personne et ne soulevez jamais
l’écran tout seul. En essayant de soulever seul le téléviseur LCD/plasma, vous mettez votre santé en danger.
D Posez le téléviseur à écran LCD/plasma sur une surface
stable et horizontale. La base doit être ferme et conçue
statiquement pour pouvoir supporter la charge.
D Avant le montage, assurez-vous que le téléviseur LCD/
plasma est éteint et que le câble de secteur et le câble
de signalisation sont débranchés.
Quand il est placé dans un renforcement, la distance
minimale doit être respectée afin d’assurer une aération
suffisante du téléviseur LCD/plasma.
Téléviseur à écran LCD : A = 5 cm ; B = 10 cm
Téléviseur à écran plasma : A = 10 cm ; B = 20 cm
Pour un montage mural, respectez les distances minimales suivantes :
Téléviseur à écran LCD : A = 10 cm ; B = 20 cm
Téléviseur à écran plasma : A = 20 cm ; B = 30 cm
Montage mural
D Le téléviseur à écran LCD/plasma doit être monté uni-
quement sur des murs verticaux.
D Avant le montage, vérifiez si la paroi supporte une
charge égaleà3foislepoidsdetéléviseuràécranLCD/
plasma (poids voir page 31 “Données techniques”). En
cas de doute, demandez conseil à un installateur qualifié.
D Avant le montage, assurez-vous que le téléviseur LCD/
plasma est éteint et que le câble de secteur et le câble
de signalisation sont débranchés.
D Pour le montage, il faut deux personnes.
D Tournez le téléviseur LCD/plasma face (écran) vers le
bas et posez-le sur une base absolument plate et sûre.
D Desserrez les 6 vis (M4x10) du pied de table et enlevez-
le.
Visdefixationdupieddetable
Downloaded From TV-Manual.com Manuals
8 FRANÇAIS
Page 79

Préparations
D Montez les 2 crochets de fixation (les chevilles et les
crochets de fixation ne sont pas fournis) à l’horizontale
sur le mur et à une distance appropriée (pour la distance, voir le gabarit de perçage dans les accessoires).
Encoches pour
lescrochetsde
fixation
Le matériau sur lequel l’appareil sera fixé doit supporter 3 fois le poids de ce dernier. Si nécessaire,
adressez-vous à un installateur qualifié.
D Positionnez le téléviseur LCD/plasma de sorte que les
crochets de fixation puissent être introduits dans les encoches prévues au dos de l’appareil.
Le remontage du support de table doit être effectué uniquement avec le matériel de fixation d’origine.
A c et effet, conservez soigneusement les 6 vis démontées
(M4x10).
FRANÇAIS
Gabarit de perçage
LCDTVMYRICAVQ40-1 PlasmaTVMYRICAPQ42-1
Plasma TV MYRICA PQ50-1
Downloaded From TV-Manual.com Manuals
9FRANÇAIS
Page 80

Préparations
Branchement d’une antenne
Introduire des piles dans la télécommande
S Si vous voulez faire un branchement au câble ou
à une antenne terrestre (analogique), servezvous de la prise femelle ANTENNE.
S Ouvrez le couvercle du compartiment des piles.
S Introduisez les deux piles fournies (AAA) dans le
compartiment des piles.
Respectez les indications de polarité (+) et (-) au
fond du compartiment des piles.
S Refermez le couvercle du compartiment des
piles.
Utilisation de la télécommande
Utilisez la télécommande à 6 m environ au maximum
de l’appareilen la dirigeant vers le capteur de télécommande sur le téléviseur LCD/plasma et dans un angle
horizontal et vertical de 30 °.
Il se pourrait que la télécommande ne fonctionne pas
si le capteur de télécommande du téléviseur LCD/
plasma est exposé directement aux rayons du soleil
ou à une lumière artificielle intense.
30° 30°
Branchement du câble de secteur
Downloaded From TV-Manual.com Manuals
10 FRANÇAIS
S Branchez le câble de secteur dans la prise
d’arrivée de secteur sur le téléviseur LCD/plasma
et la fiche de secteur dans une prise de courant.
S Amener l’interrupteur d’alimentation situé au dos
du téléviseur LCD/plasma en position “I”. Le
téléviseur LCD/plasma se trouve alors en mode
de veille, il peut fonctionner à l’aide de la télécommande.
Page 81

Préparations
Première installation
Après avoir mis en marche le téléviseur LCD/plasma, il faut sélectionner l’un après l’autre la langueet le pays. Ensuitecommence
la recherche automatique des émetteurs.
Régler la langue
S Al’aidedelatouche[Y]ou[B] sélectionnez la
langue du pays. Appuyez sur la touche [MENU].
FRANÇAIS
Sélection du pays pour l’ordre de classement
S Sélectionnez votre pays à l’aide de la touche [Y]
B], pays dans lequel le téléviseur LCD/
ou [
plasma fonctionnera.
La configuration active un ordre de classement
des programmes TV spécifique à ce pays.
S Appuyez sur la touche [MENU].
Ensuite commence la recherche automatique des
émetteurs.
S Pour interrompre la recherche automatique des
émetteurs, appuyez sur la touche rouge.
Si vous ne trouvez pas de programme TV, vérifiez les
branchements de l’antenne et démarrez à nouveau la
recherche d’émetteurs.
Downloaded From TV-Manual.com Manuals
11FRANÇAIS
Page 82

Mode d’utilisation
Mode d’utilisation
Mettre en marche / arrêter
Affichage de fonctionnement (marche) (bleu)
Affichage de mode d’attente (veille) (orange)
Capteur infrarouge de télécommande
Changement de chaîne (changement de programme)
/MENU
S Pour mettre le téléviseur LCD/plasma en marche,
appuyez sur la touche [POWER] / [MENU] de la
télécommande ou sur la touche
l’appareil.
Sur le téléviseur LCD/plasma, le témoin de l’état de
marche / de veille est bleu.
/MENU sur
S Pour éteindre le téléviseur LCD/plasma, appuyez
sur la touche [POWER] de la télécommande.
Sur le téléviseur LCD/plasma, le témoin de l’état de
marche / de veille est orange.
En cas d’absence de signal sur l’une des entrées, le
téléviseur LCD/plasma se met automatiquement au
mode d’attente après un intervalle d’attente.
S Appuyez sur la touche [TV] de la télécommande
pour sélectionner le mode TV.
Avec les touches [P
Y]/[PB] de la télécommande.
S Appuyez sur la touche [PY] pour passer au
numéro de chaîne supérieur.
S Appuyez sur la touche [PB] pour passer au
numéro de chaîne inférieur.
Avec les touches [0...9] de la télécommande.
Sélectionnezun numéro de chaîne en appuyant directement sur les touches [0...9].
Avec l’aperçu des chaînes du menu OSD.
S Appuyez sur la touche [LIST] de la télécom-
mande pour afficher l’aperçu des chaînes à
l’écran.
S Sélectionnez une chaîne à l’aide des touches
BY " A] de la télécommande.
[
S Appuyez sur la touche rouge pour quitter l’aperçu
des chaînes.
Info de chaînes
TV - 24 - N24
STEREO
Réglages du volume et du son
Downloaded From TV-Manual.com Manuals
12 FRANÇAIS
Avec les touches [VOL"]/[AVOL] de la
télécommande.
S Appuyez sur la touche [VOL "] pour augmenter
le volume.
S Appuyez sur la touche [AVOL] pour réduire le
volume.
Page 83

Mode d’utilisation
Avec la touche de la télécommande, vous pouvez
couper le son.
S Appuyez sur la touche , le son est coupé.
TV - 24 - N24
Son désactivé
TV - 24 - N24
Son activé
Fonction Image dans image (PIP)
La fonction Image dans image vous permet de regarder à la fois la chaîne de télévision et l’image d’une seconde source d’image.
Cette source d’image peut être un deuxième élémentde réception (tuner), un lecteur DVD, un magnétoscope, un récepteur SAT
ou un ordinateur, il faut qu’ils soient branchés aux fiches d’entrée à l’arrière du téléviseur LCD/plasma.
Ecran
principal
Image dans
image
S Appuyez à nouveau sur la touche pour remet-
treleson.
Vous pouvez aussi vous servir de la touche
[VOL
"].
Image dans image (PIP)
S Appuyez sur la touche [PIP] de la télécommande.
FRANÇAIS
Ecran Ecran
principal secondaire
TV - 24 - N24
TV - 28 - NTV
(PIP)
Informations sur
l’écran principal
Informations sur
l’écran secondaire
Ecran scindé
S Appuyez à nouveau sur la touche [PIP] de la
télécommande.
La grande image et la petite sélectionnées en
dernier s’affichent l’une à côté de l’autre.
S Pour échanger l’image principale contre la secon-
daire (PIP), appuyez sur la touche [
[F2] de la télécommande ou dans le sous-menu à
<Ecran ⇒ Echange rapide
"A PIP] ou
>.
S Pour quitter la fonction PIP, appuyez une ou deux
fois sur la touche [PIP] de la télécommande ou à
l’option du menu, sélectionnez <Ecran ⇒ Picture
in picture> Désactivé.
S Appuyez sur la touche [i] de la télécommande
pour afficher des informations sur l’écran principal
et l’écran secondaire.
Réglages
S Option de menu <Picture in picture>
Désactivé - écran unique
PIP - Image dans image
Ecran scindé - écran divisé
S Option de menu <Source PIP>
Avec les touches [
sélectionnez une source PIP.
Sans le menu OSD, vous pouvez sélectionner
une source PIP en appuyant sur la touche [TV] /
[VIDEO]/[PC]/[F4].
Pour connaître les combinaisons possibles entre
Source et Source PIP, consultez le tableau
page 14.
"]/[A] de la télécommande,
S Option du menu <Taille PIP>
Après que vous avez réglé PIP, vous pouvez modifier la taille de l’écran PIP.
S Option du menu <Position horiz. PIP>
Après que vous avez réglé PIP, vous pouvez modifier la position horizontale de l’écran PIP.
S Option du menu <Position vert. PIP>
Après que vous avez réglé PIP, vous pouvez modifier la position verticale de l’écran PIP.
Downloaded From TV-Manual.com Manuals
13FRANÇAIS
Page 84

Mode d’utilisation
Combinaisons possibles source et source PIP
= source combinable à source PIP
- = source non
Source
combinable à la source PIP
TUNER
SCART1SCART
2
Source PIP
CVBS YC YUV HDMI
PC
(RVB)PC(DVI)
TUNER
SCART1 -
SCART2 -
CVBS -
YC -
YUV
HDMI - - - -
PC (RVB) - - - -
PC (DVI) - - - -
*
-
-
-
- - -
* uniquement pour les appareils à double tuner
En l’absence de signal sur le source PIP s électionnée, la fonction PIP s’arrête au bout de 30 secondes environ.
Image figée
Vous pouvez regarder des images figées du programme actuel.
S Appuyez sur la touche [FREEZE] de la télécom-
mande pour figer l’image actuelle.
S Appuyez à nouveau sur la touche [FREEZE] pour
quitter la fonction d’image figée.
Quand la fonction PIP est activée, les images sont
figées sur les deux écrans.
S Dans le menu OSD, vous pouvez aussi activer et
désactiver la fonction d’image figée à l’option du
menu <Ecran ⇒ Image figée>.
Programme sommeil
Downloaded From TV-Manual.com Manuals
14 FRANÇAIS
Au bout d’une durée présélectionnée, le Sommeil du
téléviseur LCD/plasma se met en mode d’attente.
S Appuyez sur la touche [ ] de la télécommande
autant de fois jusqu’à obtenir la durée après la quelle l’appareil s’éteindra.
Il est possible de sélectionner les durées suivantes :
30, 60, 90, 120, 150, 180 minutes et arrêt.
Page 85

Commande du menu OSD
Mode d’utilisation
Ci-après les réglages de base du menu OSD sont
décrits.
S Appuyez sur [MENU] pour afficher le menu princi-
pal à l’écran.
S Sélectionnez une option de menu à l’aide de la
touche [
S Reprenez cette opération jusqu’à arriver à l’option
de menu voulue.
Les options de menu sélectionnées sont mises en va leur par une barre bleue. Les options de menu à sousmenu oucelles àeffectuerdirectementsont marquées
à l’aide de
S Avec les touches [A]/["], sélectionnez l’option
voulue ou un paramètre et appuyez sur la touche
[MENU].
S Appuyez sur la touche [MENU] pour revenir au
menu précédent.
S Pour quitter le menu OSD, appuyez sur la touche
rouge.
Dans chaque menu, les touches dont vous pouvez
vous servir sont reproduites dans la partie inférieure.
Y]ou[B] puis appuyez sur la touche ["].
.
FRANÇAIS
Réglages de base
Recherche automatique des chaînes
S Appuyez sur la touche [MENU] pour ouvrir le
menu principal.
S Sélectionnez le menu de réglage <Réglages> à
l’aidedelatouche[
touche [
"].
Y]ou[B] puis appuyez sur la
S Sélectionnez <Tuner> à l’aide de la touche [Y]ou
B] et appuyez sur la touche ["].
[
S Sélectionnez l’option de menu <Recherche
auto.> [
Y]/[B] et appuyez sur la touche ["].
S Sélectionnez le pays [A]/["].
S Sélectionnez <Recherche> [Y]/[B].
S Sélectionnez la recherche [A]/["].
Vous pouvez choisir deux options :
Tout ou Nouvelles chaînes.
Downloaded From TV-Manual.com Manuals
S Sélectionnez <Rechercher> [Y]/[B] et appuyez
sur la touche [
"].
15FRANÇAIS
Page 86

Mode d’utilisation
Recherche de chaînes manuelle
S Appuyez sur la touche [MENU] pour ouvrir le
menu principal.
S Sélectionnez le menu de réglage <Réglages> à
l’aide de la touche [
touche [
"].
Y]ou[B] puis appuyez sur la
S Sélectionnez <Tuner> à l’aide de la touche [Y]ou
B] et appuyez sur la touche ["].
[
S Sélectionner l’option de menu <Recherche manu-
Y]/[B] appuyez sur la touche ["].
elle> [
S Sélectionnez <Programme> [Y]/[B].
Choisissez un numéro de chaîne entre 0 et 99
[
A]/["].
S Sélectionnez <Type> [Y]/[B].
Vous avez le choix entre deux options :
Canal ou Canal spécial [
A]/["].
S Sélectionnez <Canal> [Y]/[B].
Entrez un numéro de canal [0...9] ou [A]/["].
S Sélectionnez la <Fréquence> [Y]/[B] appuyez
sur la touche [
Entrez la fréquence voulue sous forme d’un nombreà5chiffresàl’aidedestouchesnumériques
[0...9].
"].
S <Nom> voir Modifier le nom du canal.
S Sélectionnez <Norme TV> [Y]/[B].
Sélectionnez une norme TV (ton) [
Avec chaque norme couleur, vous disposez de
trois options ;
norme couleur PAL : B/G, D/K et I
norme couleur SECAM : B/G, D/K et L
A]/["].
S Sélectionnez <Norme couleur> [Y]/[B].
Sélectionnez une norme couleur PAL ou SECAM
[
A]/["].
S <Décodeur> voir Régler le décodeur.
Modifier le nom du canal
Pour chaque canal TVsauvegardé, il vous est possible d’attribuer un nom composé de huitsignes aumaximum ou de le modifier.
S Sélectionnez <Nom> [Y]/[B] appuyez sur la
"].
touche[
La position du premier signe est sélectionnée.
S Sélectionner un signe [Y]/[B].
S Sélectionnez la position du signe suivant
A]/["].
[
S Sélectionnez à nouveau un signe [Y]/[B].
Le nom doit avoir 8 signes max.
Downloaded From TV-Manual.com Manuals
16 FRANÇAIS
Page 87

Régler le décodeur
D
écod
Mode d’utilisation
Pour brancher un décodeur pour lescanaux TV codés
(Pay-TV) vous pouvez vous servir de l’entrée
SCART1 ou SCART2.
S Sélectionnez <Décodeur> [Y]/[B].
Vous avez le choix entre les options suivantes :
eur
Normal non codé non codé
Décodeur A SCART1 non codé codé
Décodeur B SCART1 codé codé
Décodeur A SCART2 non codé codé
Décodeur B SCART2 codé codé
Canal TV
Son
Editer la liste des chaînes
Ci-après est décrit comment modifier l’ordre des canaux TV sauvegardés et les effacer de la liste des chaînes.
S Appuyez sur la touche [MENU] pour ouvrir le
menu principal.
S Sélectionnez le menu de réglage <Réglages> à
l’aidedelatouche[
touche [
"].
Y]ou[B] puis appuyez sur la
S Sélectionnez <Tuner> à l’aide de la touche [Y]ou
B] et appuyez sur la touche ["].
[
S Sélectionnez <Editer la liste des chaînes> [Y]/
B] et appuyez sur la touche ["].
[
Image
FRANÇAIS
Le menu <Editer la liste des chaînes> s’affiche.
Classer
S A l’aide des touches [YBA"], sélectionnez le
programme à commuter.
S Appuyez sur la touche jaune. Le programme est
mis en relief en jaune.
S A l’aide des touches [YBA"], amenez ce pro-
gramme à la position voulue.
S Pour terminer, appuyez à nouveau sur la touche
jaune de la télécommande.
Effacer un programme
S A l’aide des touches [YBA"], sélectionnez le
programme à effacer.
S Appuyez sur la touche verte pour effacer le pro-
gramme sélectionné de la liste des chaînes.
S Pour quitter le menu, appuyez sur la touche
rouge.
Downloaded From TV-Manual.com Manuals
17FRANÇAIS
Page 88

Mode d’utilisation
Réglages OSD
S Appuyez sur la touche [MENU] pour ouvrir le
menu principal.
S Sélectionnez le menu de réglage <Réglages> à
l’aide de la touche [
touche [
"].
Y]ou[B] puis appuyez sur la
S Sélectionnez <Menus> à l’aide de la touche [Y]
B] et appuyez sur la touche ["].
ou [
Disparition auto.
A l’option du menu <Disparition auto.>, vous pouvez
modifier la durée d’affichage (durée d’affichage de la
dernière opération) du menu OSD.
S Sélectionnez <Disparition auto.> [Y]/[B].
S Vous disposez des options suivantes : NON ; 5,
10, 15, 20, 25 et 30 secondes [
Transparence
La fonction <Transparence> permet de modifier la
transparence du menu OSD.
A]/["].
S Sélectionnez <Transparence> [Y]/[B].
S Il vous est possible d’éteindre la transparence ou
de la modifier entre 1 et 10 [
La transparence maximale du menu OSD est
de 10.
A]/["].
Afficher le logo
A l’option du menu <Afficher le logo>, il est possible
d’activeret de désactiver l’affichage éventuel du logo.
S Sélectionnez <Afficher le logo> [Y]/[B].
S Sélectionnez Oui ou Non [A]/["].
Sélection réglages usine :
Vous avez la possibilité de faire revenir toutes les modifications effectuées dans le menu OSD aux réglages
d’origine faits à l’usine.
S Sélectionnez <Retour réglages d’usine> [Y]/[B].
S Appuyez sur la touche ["] pour retourner aux
réglages d’usine.
Le téléviseur LCD/plasma se met automatiquement en mode d’attente.
Régler la langue
A la première installation de votre téléviseur LCD/
plasma, la langue du menu OSD est celle que vous
avez sélectionnée.
A l’option du menu <Langue>, vous pouvez modifier
la langue du réglage.
S Sélectionnez <Langue> [Y]/[B].
S Sélectionnez la langue [A]/["].
Vous pouvez sélectionner une des langues suivantes : allemand, anglais, français, espagnol,
italien, néerlandais, danois, suédois, norvégien,
finlandais, portugais et polonais.
TTX Setup
Sélectionnez une police de caractères pour le mode
télétexte : WEST, EAST, RUSSIAN ou ARABIC.
Elle correspond à la langue de réglage du télétexte utilisé. Pour l’Europe occidentale choisissez l’option
WEST !
Downloaded From TV-Manual.com Manuals
18 FRANÇAIS
S Pour quitter le menu, appuyez sur la touche
rouge (M).
Page 89

Mode d’utilisation
Réglages de l’image
Après la première installation ou, le cas échéant, après le retour aux réglages d’usine, les valeurs du menu <Image> sont les
valeurs de référence. La descriptionqui suitvous aideraà modifier ces valeurs individuellement selon vos goûtset selon l’emplacement du téléviseur LCD/plasma, le cas échéant selon l’incidence de la lumière.
Pour les sources AV (TV, CVBS, YC, YUV, SCART1, SCART2, HDMI)
S Appuyez sur la touche [MENU] pour ouvrir le
menu principal.
S Sélectionnez le menu <Image> à l’aide de la tou-
Y]ou[B] puis appuyez sur la touche ["].
che [
Contraste
S Sélectionnez <Contraste> [Y]/[B].
S Appuyez sur le bouton [ "] pour augmenter le
contraste.
S Appuyez sur le bouton [ A ] pour diminuer le
contraste.
Luminance
S Sélectionnez <Luminosité> [Y]/[B].
S Appuyez sur le bouton [ " ] pour rendre l’image
plus claire.
S Appuyez sur le bouton [ A ] pour rendre l’image
plus foncée.
Netteté
S Sélectionnez <Netteté [Y]/[B].
S Appuyez sur le bouton [ " ] pour que l’image soit
plus nette.
S Appuyez sur le bouton [ A ] pour que l’image soit
plus floue.
Couleur
S Sélectionnez <Saturation> [Y]/[B].
S Appuyez sur le bouton [ " ] pour augmenter la
saturation de couleur.
S Appuyez sur la touche[ A ] pour diminuer la satu-
ration de couleur.
Tei n te
S Réglage de la teinte uniquement sur NTSC !
Température des couleurs
S Sélectionnez <Température couleurs> [Y]/[B].
Vous avez le choix entre trois options :
normal, froid et chaud [
Intensité de l’image
S Sélectionnez <Intensité de l’image> [Y]/[B].
Vous avez le choix entre trois options :
normal, clair, foncé [
Filtre (réglage de base de netteté de l’image)
Uniquement sur CVBS, YC !
S Sélectionnez <Filtre> [Y]/[B].
Vous avez le choix entre trois options :
normal, soft, intensive [
DNC (Dynamic Noise Control)
Non sur HDMI !
Les signaux TV faibles ou les signaux vidéo de moindre qualité peuvent créer à l’écran des bruits
désagréables. DNC adapte de manière dynamique la
réduction numérique du bruit au contenu de l’image.
S Sélectionnez <Réduction de bruit> [Y]/[B].
S Sélectionnez une valeur comprise entre 0 et 10
A]/["].
[
CD photos
S Non sur TV ni HDMI !
L’option de menu <CD photos> est prévue spécialement pour la reproduction d’images figées, par exemple de CD photos ou de CD images.
S Pour quitter le menu, appuyez sur la touche
rouge.
A]/["].
A]/["].
A]/["].
FRANÇAIS
Downloaded From TV-Manual.com Manuals
19FRANÇAIS
Page 90
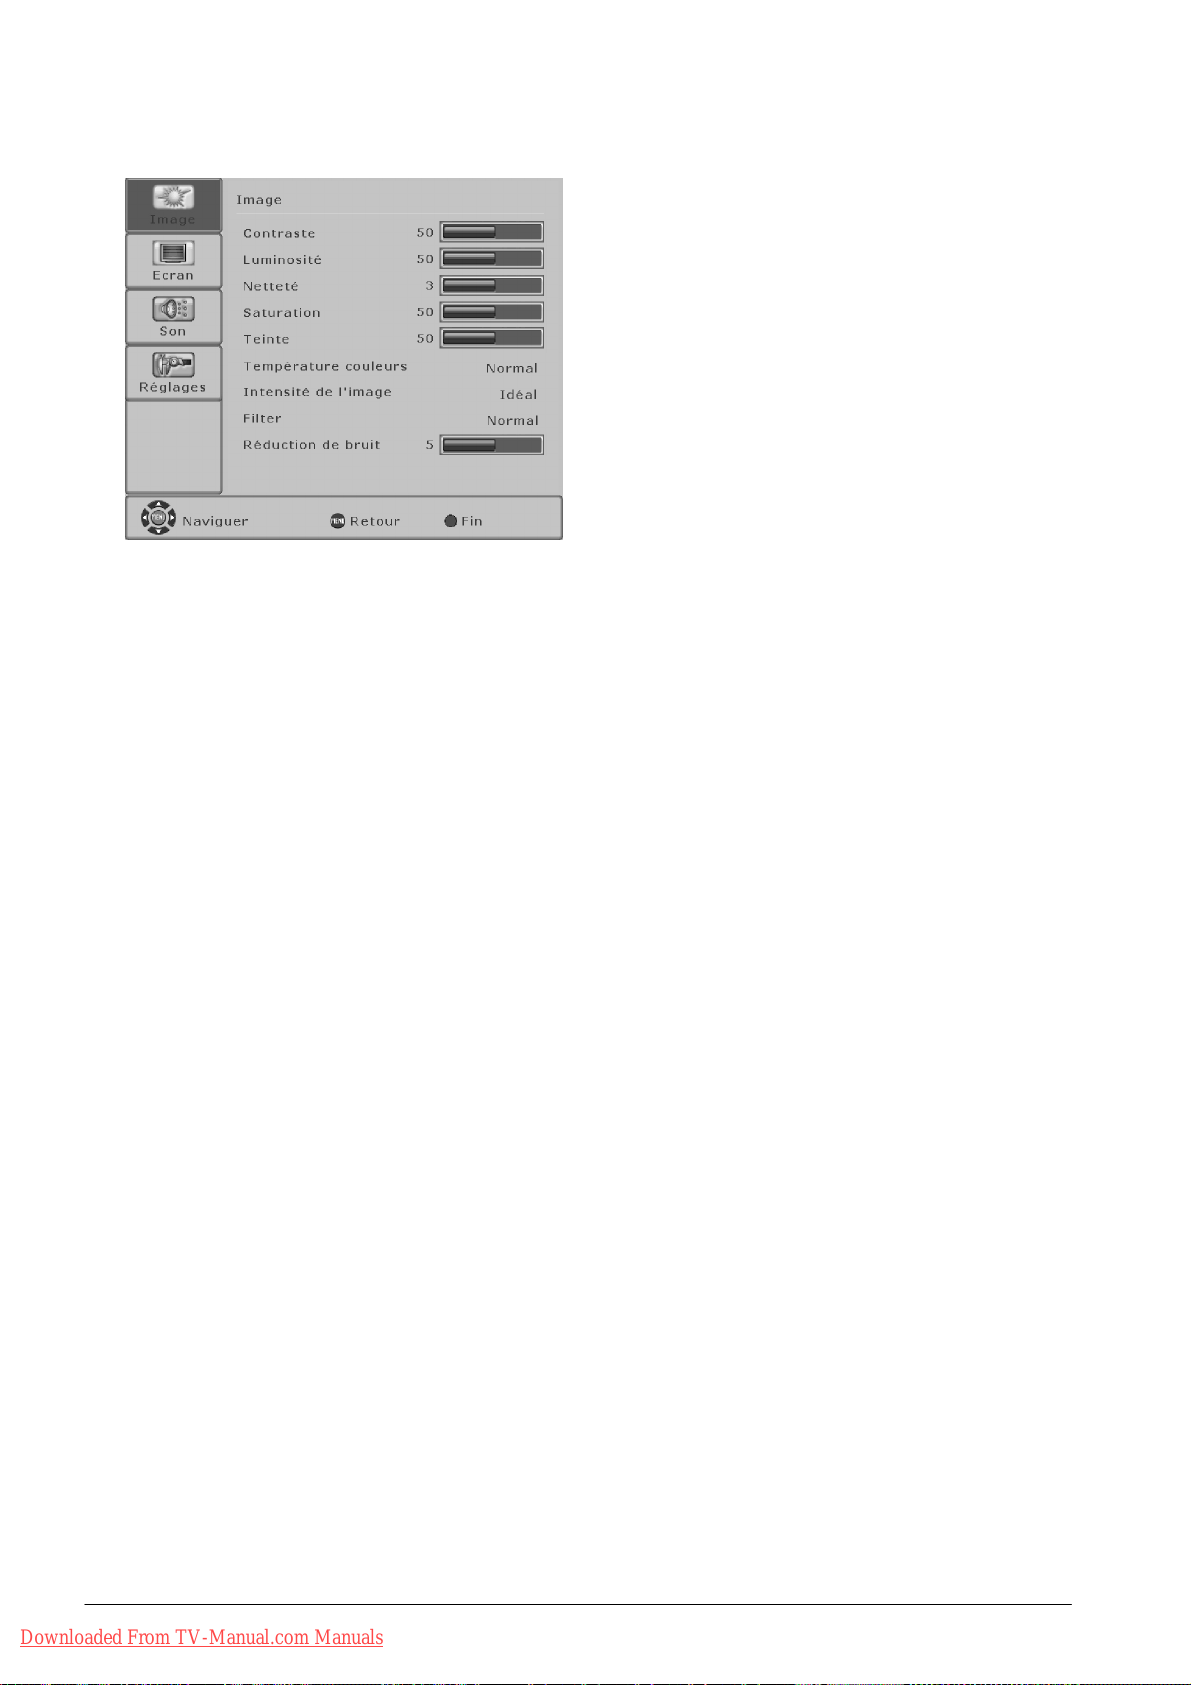
Mode d’utilisation
Pour sources PC (RGB, DVI)
S Appuyez sur la touche [MENU] pour ouvrir le
menu principal.
S Sélectionnez le menu <Image> à l’aide de la tou-
Y]ou[B] puis appuyez sur la touche ["].
che [
Contraste
S Sélectionnez <Contraste> [Y]/[B].
S Appuyez sur le bouton [ " ] pour augmenter le
contraste.
S Appuyez sur le bouton [ A ] pour diminuer le
contraste.
Luminance
S Sélectionnez <Luminosité> [Y]/[B].
S Appuyez sur la touche [ " ] pour rendre l’image
plus claire.
S Appuyez sur la touche [ A ] pour rendre l’image
plus foncée.
Netteté
S Sélectionnez <Netteté [Y]/[B].
S Appuyez sur la touche [ " ] pour que l’image soit
plus nette.
S Appuyez sur la touche [ A ] pour que l’image soit
plus floue.
Température des couleurs
S Sélectionnez <Température couleurs> [Y]/[B].
Vous avez le choix entre trois options :
normal, froid et chaud [
Intensité de l’image
A]/["].
S Sélectionnez <Intensité de l’image> [Y]/[B].
Vous avez le choix entre trois options :
normal, clair, foncé [
DNC (Dynamic Noise Control)
Uniquement sur PC (RGB)
Les signaux TV faibles ou les signaux vidéo de moindre qualité peuvent créer à l’écran des bruits
désagréables. DNC adapte de manière dynamique la
réduction numérique du bruit au contenu de l’image.
A]/["].
S Sélectionnez <Réduction de bruit> [Y]/[B].
S Sélectionnez une valeur comprise entre 0 et 10
A]/["].
[
S Pour quitter le menu, appuyez sur la touche
rouge.
Downloaded From TV-Manual.com Manuals
20 FRANÇAIS
Page 91

Formats d’image pour sources AV
Mode d’utilisation
S Appuyez sur la touche [MENU] pour ouvrir le
menu principal.
S Al’aidedelatouche[Y]ou[B], sélectionnez le
menu <Ecran> et appuyez sur la touche [
S Sélectionnez le format d’image voulu [A]/["].
Le format d’image voulu s’affiche à l’écran.
S Pour commuter les formats, vous pouvez aussi
appuyer plusieurs fois sur la touche [FORMAT]
de la télécommande.
Auto Zoom
Cette fonction évalue le format de l’image actuelle et
commute automatiquement entre 4:3 et 16:9.
"].
TV - 24 - N24
Image
FORMAT IMAGE
Image
Ce réglage de format permet d’obtenir toujours une
image remplissant la totalité de l’écran (isomorphique)
à la fois dans le sens vertical et le sens horizontal.
Normal
Ce réglage de format permet de représenter correc-
tement les bords d’une image PAL 4:3. Sur le bord
gauche etle borddroit de l’image,des bandes foncées
apparaissent.
16:9
Dans ce mode, l’image est amenée horizontalement à
l’échellede toutela largeur de l’écran,verticalementl’image est coupée en haut et en bas d’à peu près 25 %
en tout.
Ce mode devrait être utilisé pour que du matérielvidéo
en format 16:9 Letterbox (avec des barres noires en
haut et en bas) remplisse la totalité de l’écran.
16:9 Top
Image en format 16:9 Letterbox avec sous-titres
14:9
Avec le zoom 14:9, l’image est agrandie verticalement
de 15% en tout, c’est-à-dire que verticalement 15%
environ du contenu de l’image sont coupés. Par rapport à une image complète, cette image est réduite
horizontalement de 15%, c’est-à-dire qu’il y a des barres noires étroites à gauche et à droite.
FRANÇAIS
Downloaded From TV-Manual.com Manuals
14:9 Top
Image en format 14:9 Letterbox avec sous-titres
Panorama
Ce réglage de format modifie automatiquement le si-
gnal d’entrée dans le sens horizontal et vertical afin
d’avoirtoujours une représentation remplissant la totalité de l’écran mais non linéaire horizontalement. Cela
signifie que le contenu de l’image est représenté
comme dans l’originalau centre de l’écran et une augmentation ou une diminutionplus prononcée est effectuée sur les bords.
S Pour quitter le menu, appuyez sur la touche
rouge.
21FRANÇAIS
Page 92
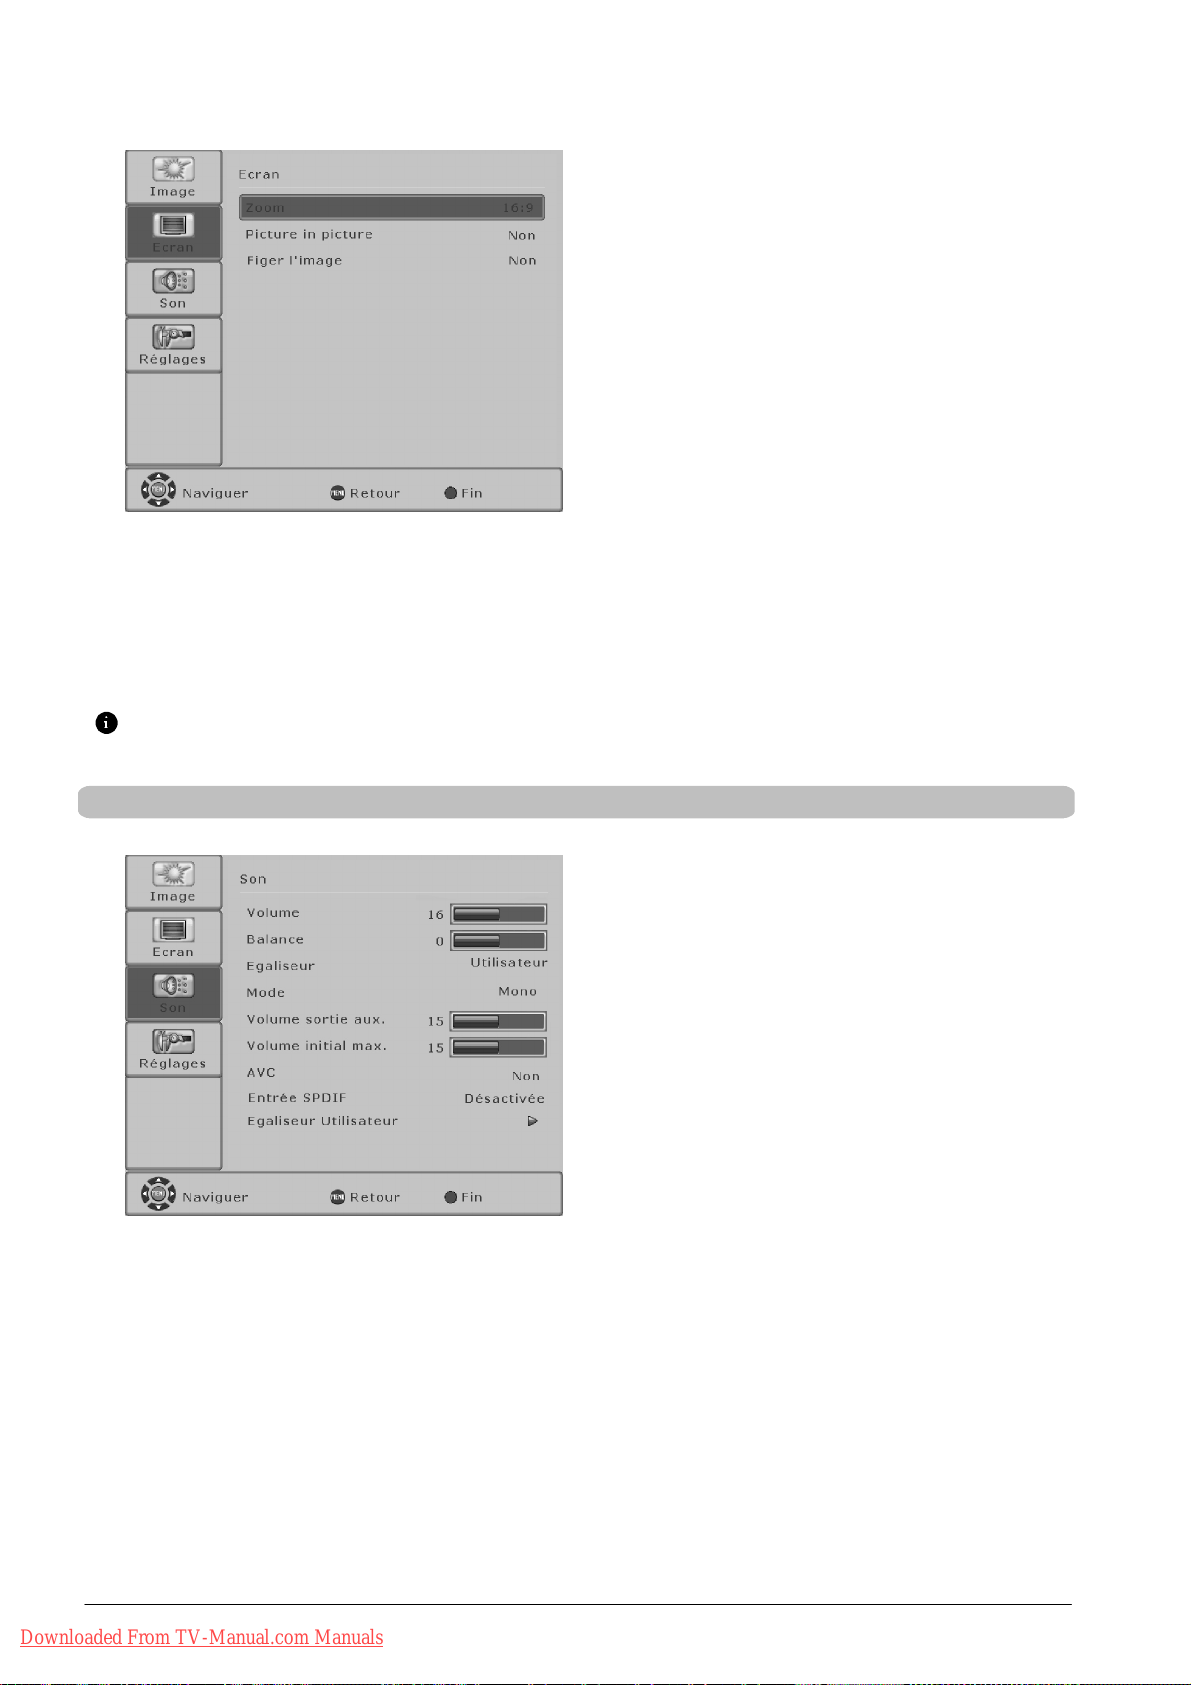
Mode d’utilisation
Formats d’image pour sources PC
S Appuyez sur la touche [MENU] pour ouvrir le
menu principal.
S Al’aidedelatouche[Y]ou[B], sélectionnez le
menu <Ecran> et appuyez sur la touche [
"].
S Sélectionnez le format d’image voulu [A]/["].
Normal
Règle l’image PC de sorte que l’écran soit rempli et
qu’elle soit affichée sans modifier le rapport des côtés.
Selon le format d’entrée de l’image PC, il y a des barres noires sur les bords gauche et droit de l’écran.
Image
Ce réglage de format permet d’obtenir toujours une
image remplissant la totalité de l’écran (isomorphique)
à la fois dans le sens vertical et le sens horizontal.
OnetoOne
Cette configurationpermet d’adapter le signald’entrée
au nombre de pixels de l’écran. Donc pourune résolution d’écran de 1366 x 768, l’image PC est toujours reproduite avec 1366 x 768 points image.
S Pour quitter le menu, appuyez sur la touche
rouge.
Pour obtenir d’autres formats, il faut que sur le PC (DVI) dans l’option de menu <Ecran ⇒ Overscan> Oui soit activé, voir
Formats d’image sources AV.
Réglages du son avancés
S Appuyez sur la touche [MENU] pour ouvrir le
menu principal.
S Al’aidedelatouche[Y]ou[B], sélectionnez le
menu <Son> et appuyez sur la touche [
S Sélectionnez l’option de menu voulue (fonction) à
l’aide de la touche [
S Sélectionnez la configuration [A]/["].
S Pour quitter le menu, appuyez sur la touche
rouge.
Volume
Affichage du réglage actuel du volume.
Balance
Balance entre les haut-parleurs gauche et droit.
S Appuyez sur la touche ["] pour diminuer le
niveau du haut-parleur gauche.
S Appuyez sur la touche [A] pour diminuer le
niveau du haut-parleur droit.
Y]ou[B].
"].
Downloaded From TV-Manual.com Manuals
22 FRANÇAIS
Egaliseur
Il est possible de choisir le type de sonorité parmi les
options suivantes : Classique, Flat, Jazz, Rock, Pop,
Vocal ;
Utilisateur (voir Egaliseur Utilisateur).
Mode
Vous pouvez y sélectionner le mode de son. Selon
la diffusion des émetteurs, des modes différents sont
disponibles.
Pour les émissions stéréo : Stéréo, Stéréo élargie et
Mono.
Page 93

Mode d’utilisation
Pour les émissions mono : Mono et Pseudo Stéréo.
Pour les émissions 2 sons : Canal A et Canal B.
Pour les émissions en deux langues, vous pouvez
choisir l’une ou l’autre des langues.
Volume sortie aux.
Niveau du volume à la s ortie SORTIE AUX. G/D.
S Sélectionnez le niveau de volume voulu
A]/["].
[
Volume initial max.
Volumeàlamiseenmarchedel’appareil.
S Sélectionnez le niveau de volume voulu
A]/["].
[
AVC (Automatic Voice Control)
Cette fonction permet de maintenir un volume identique quand vous commutez d’un canal TV à un autre.
Entrée SPDIF (entrée de signaux audio numériques)
Vous pouvez y connecter l’entrée audio numérique à
un signal image de source AV ou PC.
FRANÇAIS
Réglage Egaliseur Utilisateur
Egaliseur Utilisateur
Pour le réglage individuel du son à l’aide de l’égaliseur.
voir réglage Egaliseur Utilisateur.
S Pour effectuer des réglages dans le menu <Ega-
liseur Utilisateur>, il faut sélectionner le réglage
utilisateur à l’option <Egaliseur> et, après avoir
sélectionné l’option <Egaliseur Utilisateur>, il faut
ouvrirlemenuàl’aidedelatouche[
Vous pouvez adapter le niveau de chacune fréquences en fonction de vos besoins individuels.
"].
S Al’aidedelatouche[Y]ou[B] sélectionnez la
fréquence voulue.
S Appuyez sur la touche ["] pour augmenter la
fréquence sélectionnée.
S Appuyez sur la touche [A] pour diminuer la
fréquence sélectionnée.
Downloaded From TV-Manual.com Manuals
S Pour quitter le menu, appuyez sur la touche
rouge.
23FRANÇAIS
Page 94

Mode d’utilisation
Télétexte
Votre téléviseur LCD/plasma peut recevoir et afficher les informations télétexte TOP/FLOF.
D Sélectionnez un canal TV avec télétexte.
S Appuyez sur la touche [TEXTE] de la télécom-
mande pour afficher le télétexte. En appuyant
image TV
Télétexte
imageTVTélétexte
plusieurs fois sur la touche [TEXT], vous pou vez afficher parallèlement le télétexte et le programme TV en cours (Ecran scindé) ; le cas
échéant, vous pouvez à nouveau quitter le
mode télétexte.
Appuyez sur la touche [TV] pour revenir au
mode TV.
Choix de pages
D Pour ouvrir directement des pages télétexte, vous disposez des touches numériques [0...9].
D A l’aide des touches [
Retour à la page d’index
D Appuyez sur la touche [AUTO] ou [MENU] pour sélectionner directement la page d’index (100 par ex.).
Affichage des sous-pages
D A l’aide des touches [
affiché en haut de la barre d’état à côté du numéro de page sélectionnée.
D Appuyez sur la touche [ZAP] pour passer au mode de sélection directe des sous-pages.
Les touches numériques [0...9] permettent d’ouvrir directement la sous-page voulue.
Agrandir l’écran du télétexte
D Appuyez plusieurs fois sur la touche [FORMAT] pour agrandir la partie supérieure ou inférieure du télétexte. Appuyez
encore une fois pour revenir à l’écran normal.
Afficher des informations cachées
D La touche [LIST] vous permet d’afficher ou non des informations cachées, telles que des pages de quiz ou d’énigmes,
par exemple.
Arrêt automatique du saut de page
D Quand les informations de télétexte dépassent une page, la page suivante s’affiche assez rapidement. Pour arrêter le
saut de page automatique, appuyez sur la touche [HOLD]. Un H s’inscrit après le numéro de la page sélectionnée.
Appuyez à nouveau sur [HOLD] pour revenir au saut de page automatique.
Y]et[B], vous pouvez feuilleter les pages télétexte en avant et en arrière.
"]et[A], vous pouvez aller directement aux sous-pages. Le numéro des sous-pages existant est
Mode mixte
D La touche [MIX] permet d’activer et désactiver le mode mixte. Le télétexte s’affiche sur le programme de télévision en
cours.
Les touches rouge, vert, jaune et bleu de la télécommande ont des fonctions différentes selon le type de télétexte, elles sont
indiquées dans la partie inférieure du télétexte.
Downloaded From TV-Manual.com Manuals
24 FRANÇAIS
Page 95

Raccordement à des périphériques externes
Raccordement à SCART1 / SCART2
Mode d’utilisation
Il est possible de raccorder des périphériques externes à SCART1 et SCART2, par exemple lecteur DVD,
graveur DVD, magnétoscope, boîtier décodeur et
caméscope.
SCART1 permet en plus la connexion à des sources
RVB.
SCART2 permet en plus la connexion à des sources
YC.
Après avoir sélectionné l’entrée SCART1 ou SCART2
à l’aide de la touche [VIDEO], vous pouvez effectuer
les configurations décrites ci-dessous.
S Appuyez sur la touche [MENU] pour ouvrir le
menu principal.
S Sélectionnez le menu <Réglages> à l’aide de la
touche [
S Sélectionnez <Entrées> [Y]/[B] appuyez sur la
touche [
S Sélectionnez l’option de menu voulue (fonction) à
l’aidedelatouche[
S Sélectionnez la configuration [A]/["].
S Pour quitter le menu, appuyez sur la touche
rouge.
Y]ou[B] puis appuyez sur la touche ["].
"].
Y]ou[B].
FRANÇAIS
TV SCART
Il faut que la fonction soit active (”Oui”) pour commuter
directement sur l’entrée SCART appropriée quand un
appareil est allumé sur SCART1 ou SCART2 .
SCART1 Entrée RVB
S SCART : En présence d’une tension sur la bro-
che 16 venant d’un périphérique, le téléviseur
LCD/plasma commute automatiquement vers le
signal RVB présent. Sinon un signal CVBS est
transmis.
S Toujours : transmission de signal RVB seul
S Désactivé : transmission de signal CVBS seul
SCART2 Entrée YC
S Toujours : transmission de signal YC
S Désactivé : transmission de signal CVBS
Mode film
Cette fonction reconnaît aux images diffusées s’il
s’agit d’un film de cinéma original et optimise la qualité
de l’image. Par défaut, cette fonction n’est pas active.
Pour activer la fonction, réglez l’option du menu
<Mode film> sur Oui. Il est recommandé d’utiliser en
particulier cette fonction quand un lecteur DVD est utilisé.
Détection format
Sélectionnezle signal(niveau) de détection deformat.
Vous disposez de deux options :
S Tension
Evaluation du signal sur la broche 8 des prises
femelles SCART
S Logiciel
Détection de films Letterbox à partir des barres
noires en haut et en bas
Format 16 : 9 (efficace uniquement en format Zoom
automatique !)
L’option du menu <Format 16 : 9 > est active uniquement avec le réglage de la tension dans l’option du
menu <Détection format>.
Downloaded From TV-Manual.com Manuals
25FRANÇAIS
Page 96

Mode d’utilisation
Raccordement aux entrées YUV de composant
S Letterbox : l’image est étirée horizontalement et
verticalement sur tout l’écran
S Anamorphique : l’image est étirée uniquement
horizontalement sur tout l’écran.
Sur YUV vous pouvez connecter des périphériques,
tels que lecteur DVD ou graveur DVD avec une sortie
YUV.
Pour le signal audio, utilisez les entrées Entrée aux.
YUV (G/D).
S Appuyez sur la touche [MENU] pour ouvrir le
menu principal.
S Sélectionnez le menu <Réglages> à l’aide de la
touche [
Y]ou[B] puis appuyez sur la touche ["].
S Sélectionnez <Entrées> [Y]/[B] appuyez sur la
touche [
"].
S Activez ou désactivez l’option de menu <Mode
A]/["].
film> [
Connexion à l’entrée S-vidéo
S Pour quitter le menu, appuyez sur la touche
rouge.
Mode film
Voir connexion à SCART1 / SCART2.
Sur S-VIDEO vous pouvez connecter des
périphériques, tels que lecteur DVD, magnétoscope,
caméscope ayant une sortie S-vidéo.
Pour le signal audio, utilisez les entrées Entrée aux.
S-VIDEO (G/D).
S Appuyez sur la touche [MENU] pour ouvrir le
menu principal.
S Sélectionnez le menu <Réglages> à l’aide de la
touche [
Y]ou[B] puis appuyez sur la touche ["].
S Sélectionnez <Entrées> [Y]/[B] et appuyez sur
la touche [
"].
S Activez ou désactivez l’option de menu <Mode
A]/["].
film> [
Downloaded From TV-Manual.com Manuals
26 FRANÇAIS
S Pour quitter le menu, appuyez sur la touche
rouge.
Mode film
Voir connexion à SCART1 / SCART2.
Page 97

Connexion à l’entrée HDMI
HDMI
Signal
Connexion à l’entrée PC DVI-I
Mode d’utilisation
Le téléviseur LCD/plasma est équipé d’une entrée
HDMI pour les signaux numériques vidéo et audio.
Raccordez un appareilà compatibilité HDMI à l’entrée
HDMI, par exemple un lecteur DVD ou un boîtier déco deur à fiche femelle de sortie HDMI.
S Appuyez sur la touche [F4] pour ouvrir le menu
de sélection <Entrées>.
S Sélectionnez l’entrée [Y]/[B] et appuyez sur la
touche rouge (M).
L’entrée HDMI peut aussi être sélectionnée à l’aide de
la touche [VIDEO].
Signal :
640 x 480 @ 60Hz
480i, 576i, 480p, 576p, 720p, 1080i
HDMI (RVB, YUV) son 2 canaux jusqu’à 48kHz
DVI (RVB), son par COAX IN numérique
Pour connecter un PC, servez-vous de l’entrée
PC DVI-I.
Si votre ordinateur dispose d’une sortie DVI
numérique, effectuez la connexion à l’aide d’un câble
DVI.
Si votre ordinateur dispose d’une sortie RVB (DSUB
15), effectuez la connexion à l’aide d’un câble d’adaptateur DVI sur DSUB.
FRANÇAIS
PC (DVI)
PC (RVB)
Configurations du PC (RVB)
Signal
Signal
S Appuyez sur la touche [F4] pour ouvrir le menu
de sélection <Entrées>.
S Sélectionnez l’entrée [Y]/[B] et appuyez sur la
touche rouge (M).
Les entrées PC peuvent aussi être sélectionnées à
l’aidedelatouche[PC].
S Appuyez sur la touche [MENU] pour ouvrir le
menu principal.
S Sélectionnez le menu <Réglages> à l’aide de la
touche [
Y]ou[B] puis appuyez sur la touche ["].
S Sélectionnez <Entrées> [Y]/[B], appuyez sur la
touche [
Auto-réglage
"].
S Appuyez sur la touche ["] pour démarrer l’auto-
réglage .
La fonction essaie de trouver pour le signal
présent le réglage d’images optimal. Au cours du
réglage, l’image se déplace légèrement plusieurs
fois.
Total horizontal
S Il vous est possible de corriger la fréquence de
balayage de l’image PC. Cette fonction est destinée aux utilisateurs expérimentés.
Downloaded From TV-Manual.com Manuals
27FRANÇAIS
Page 98
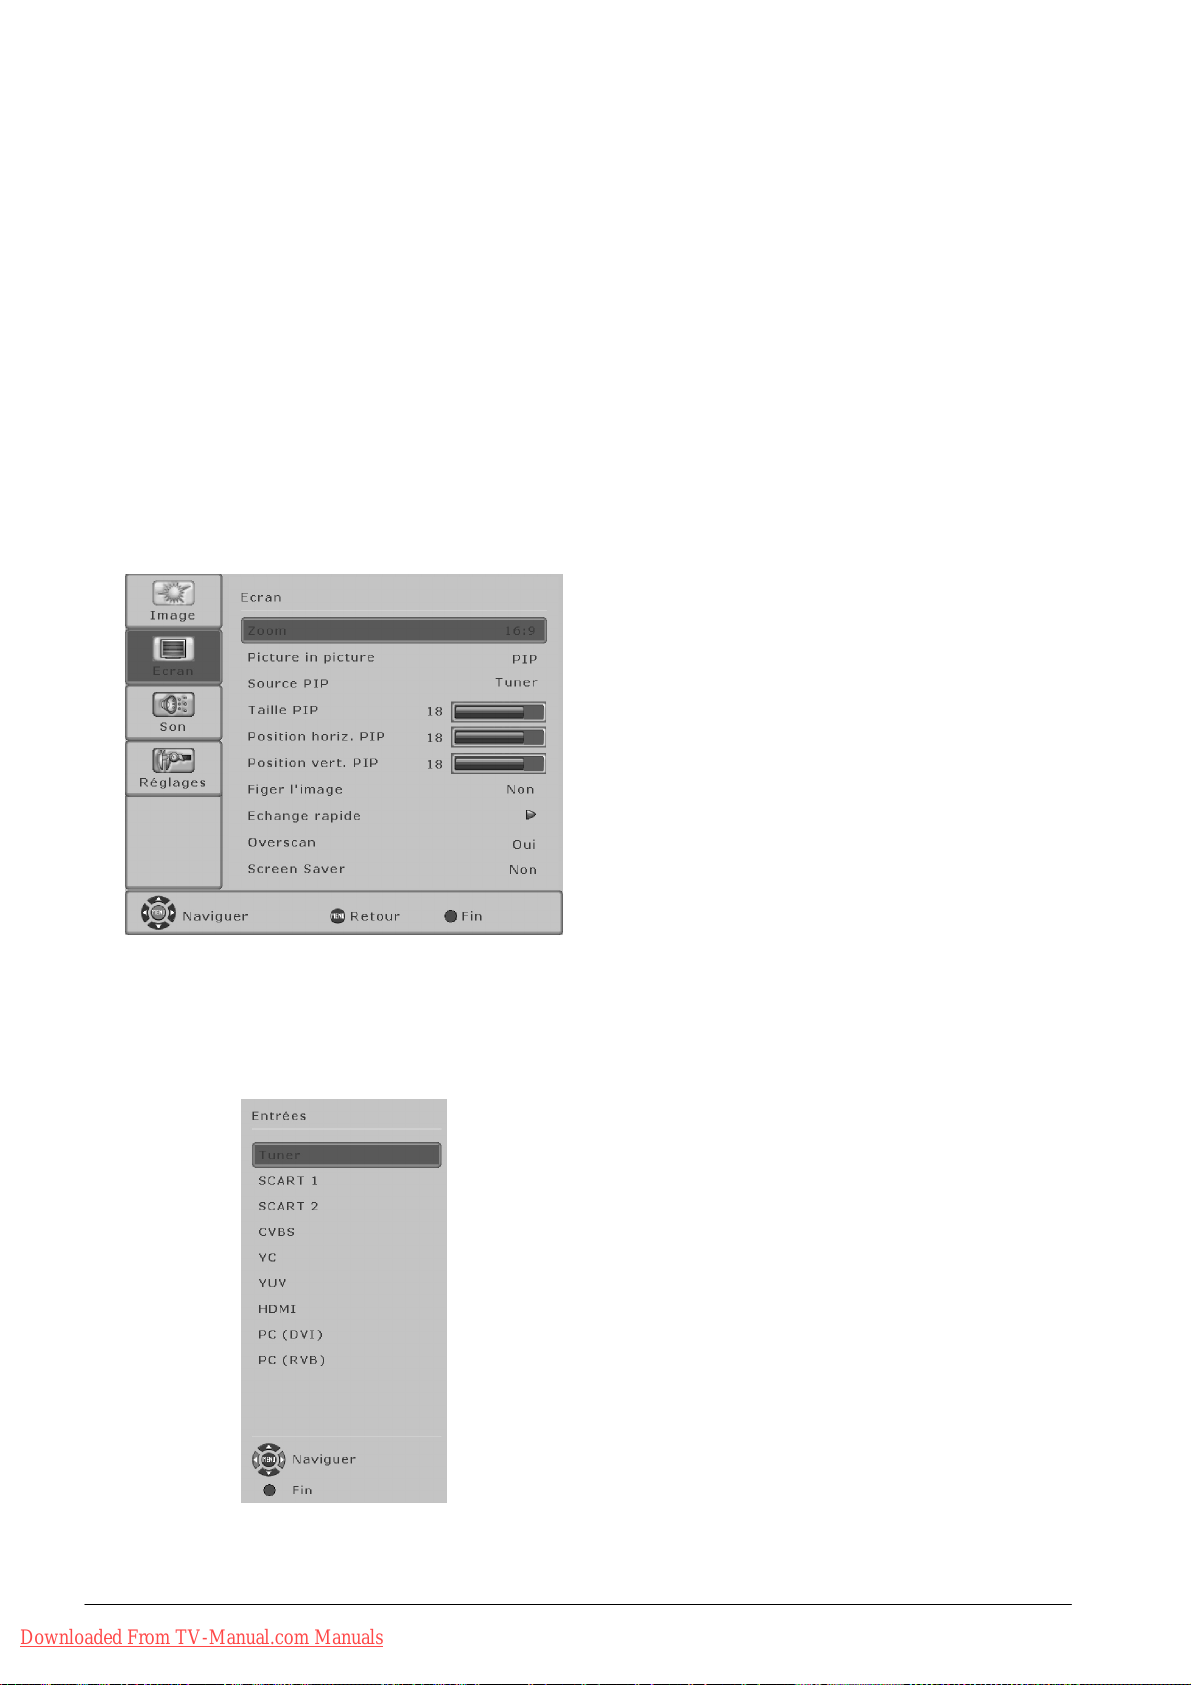
Mode d’utilisation
Configurations du PC (DVI)
Position verticale
S Réglez la position verticale de l’image [A]/["].
Hauteur
S Réglez la hauteur verticale de l’image [A]/["].
Position H
S Réglez la position horizontale de l’image [A]/["].
Largeur
S Réglez la largeur horizontale de l’image [A]/["].
Phase
S Eliminez les scintillements et les distorsions.
S Pour quitter le menu, appuyez sur la touche
rouge.
S Appuyez sur la touche [MENU] pour ouvrir le
menu principal.
S Al’aidedelatouche[Y]ou[B], sélectionnez le
menu <Ecran> et appuyez sur la touche [
"].
S Sélectionnez <Overscan> [Y]/[B] et appuyez
sur la touche [
Overscan
"].
S Activer et désactiver <Overscan> [A]/["].
Si l’option Overscan est activée, 10 % de l’image
environ sont coupés sur les bords. Cette réduction permet d’éliminer les défaillances sur le bord
de l’écran ou de les rendre invisibles.
Sélectionner les entrées
S Pour quitter le menu, appuyez sur la touche
rouge.
Pour sélectionner une entrée, ouvrez le menu de
sélection <Entrées>.
S Appuyez sur la touche [SOURCE] ou [F4] pour
ouvrir le menu de sélection <Entrées>.
S Sélectionnez l’entrée [Y]/[B] et appuyez sur la
touche rouge.
Downloaded From TV-Manual.com Manuals
28 FRANÇAIS
Page 99

Fonctions spéciales
Ecran de veille uniquement sur le téléviseur plasma !
Mode d’utilisation
S Appuyez sur la touche [MENU] pour ouvrir le
menu principal.
S Al’aidedelatouche[Y]ou[B], sélectionnez le
menu <Ecran> et appuyez sur la touche [
S Sélectionnez <Ecran de veille > [Y]/[B]etap-
puyez sur la touche [
Sélectionnez une des options suivantes [
"].
S White
Cette option permet d’éliminer les “incrustations”
récentes et peu prononcées se trouvant sur
l’écran.
S Inverted
Cette fonction permet de régénérer l’écran en cas
de fortes “incrustations”.
S Pour quitter le menu, appuyez sur la touche
rouge.
"].
A]/["]:
FRANÇAIS
Downloaded From TV-Manual.com Manuals
29FRANÇAIS
Page 100

Remédier aux défaillances
Le tableau suivant indique les difficultés courantes et les solutions proposées. Consultez d’abord le tableau pour vous informer
avant de contacter notre aide en ligne ou notre service.
Si les remarques ci-après ne vous permettent pas de remédier à la défaillance, amenez le commutateur
principal de l’appareil sur ARRET et retirez la fiche de secteur de la prise de courant.
N’essayez jamais de réparer vous-même l’appareil et n’enlever en aucun cas la protection recouvrant
l’arrière de l’appareil.
DEFAILLANCE CAUSE EVENTUELLE REMEDE POSSIBLE
Pas d’image et pas de
son, pourtant l’appareil est
branché et allumé.
Ecran sombre. D Contrastes mal réglés.
Couleurs pâles ou
exagérées.
L’image est coupée ou
l’image n’est pas centrée.
L’image est trop grande
ou trop petite.
La télécommande ne
fonctionne pas.
L’image est trop foncée. D La qualitéd’image n’est pas bien réglée. D Corrigez la luminance et le contraste del’image
Une image apparaît mais
il n’y a pas de son.
Certaines lettres ne sont
pas représentées (mode
PC).
Bandes horizontales avec
les signaux TV ou vidéo.
Pour ramener tous les réglages à leur position de départ, utilisez l’option de menu
D Commutateur principal en position “0”
(ARRET).
D Fiche de contact de l’appareil non bran-
chée dans la prise de c ourant.
D Câble de réseau défectueux.
D Pas de signal d’entrée, erreur de sélec-
tion d’entrée.
D Couleur mal réglée.
D Câble de branchement mal branché.
D Position de l’image mal réglée. D Corrigez la position de l’image.
D Format d’image mal réglé. D Appuyez plusieursfois surla touche [FORMAT]
D Les piles sont usées.
D Présence d’un obstacle entre la télé-
commande et le capteur.
D La télécommande se trouve hors
du rayon d’action.
D Le son est sur arrêt.
D Le volume sonore est réglé sur mini-
mum.
D Source de signal positionnée devant
l’écran.
D Blindage insuffisant du câble vidéo.
<Réglages ⇒ OSD ⇒ Ouvrir réglages d’usine >.
D Mettre le commutateur principal en position “I”.
D Enfoncer la fiche du câble de réseau dans la
prise de courant.
D Téléphoner au service en ligne directe.
D Luminance et/ou contraste bien réglé(e/s) (voir
option du menu <IMAGE>).
D Vérifier le câble de branchement ; rechercher
l’entrée de source correcte.
D Régler la couleur dans le menu sous
<IMAGE>.
D Brancher le câble correctement.
Servez-vous de la fonction d’auto-réglage.
jusqu’à ce que l’image remplisse l’écran.
D Introduisez de nouvelles piles.
D Eliminez l’obstacle se trouvant entre la télé-
commande et le capteur.
D Faites fonctionner la télécommande à l’inté-
rieur de son rayon d’action.
sous <IMAGE>.
D Appuyez sur le bouton de la télécom-
mande.
D Augmentez le volume sonore.
D Réglez la position de phase dans l’option du
menu <Réglages ⇒ PC ⇒ Phase>.
D Vérifiez le réglage de la largeur d’image.
D Effectuez <Réglages ⇒ PC ⇒ Réglage
REGLAGES>.
D De manière générale, positionnez les sour-
ces de signal sur le côté de l’écran ou derrière
celui-ci.
D Utilisez uniquement des câbles de signal de
bonne qualité à haute capacité de blindage.
Downloaded From TV-Manual.com Manuals
30 FRANÇAIS
 Loading...