

Page 1

Operating Manual
FUJITSU LIFEBOOK U9310
System
Page 2

Congratulations on your pu
product from Fujitsu.
rchase of an innovative
The latest information about our products, tips, updates etc. can be found
on the Internet at: "
You can find driver updates at: "http://s upport.ts.fujitsu.com /download"
Should you have any technical questions, please contact:
• our Hotline/Service Desk ("
• Your sales partner
• Your sales office
We hope you enjoy working with your new Fujitsu system!
http://www.fujitsu.com/fts/"
http://support.ts.fujitsu.com/contact/servicedesk")
Page 3

Page 4

Issued by / EU importer
chnology Solutions GmbH
Fujitsu Te
Mies-van-der-Rohe-Straße 8
80807 Munich, Germany
www.fujitsu.com/fts/"
http://
"
Copyright
© Fujitsu Technology Solutions GmbH2020. All rights reserved.
tion Date
Publica
06/2020
o.: A26391-K504-Z325-1-7619, edition 1
Order N
Page 5

FUJITSU LIFEBOOK U9310
Operating Manual
Innovative technology 7
Ports and controls 9
Important notes 12
First-time setup of your device 16
Working with the notebook 19
Security functions 45
Connecting external devices 52
Removing and installing components
during servicing 58
Settings in BIOS Setup Utility 59
Troubleshooting and tips 64
Technical data 72
Manufacturer’s notes 75
Index 76
Page 6

Remarks
Information on the product description meets the design specifications of Fujitsu and
is provided for comparison purposes. Several factors may cause the actual results to
differ. Technical data is subject to change without prior notification. Fujitsu rejects any
responsibility with regard to technical or editorial mistakes or omissions.
Trademarks
Fujitsu, the Fujitsu logo and LIFEBOOK are registered trademarks of Fujitsu Limited
or its subsidiaries in the USA and other countries.
Microsoft and Windows are trademarks or registered trademarks of Microsoft
Corporation in the USA and/or other countries.
The terms HDMI and HDMI High-Definition Multimedia Interface and the HDMI logo are trademarks or
registered trademarks of HDMI Licensing Administrator, Inc. in the United States and other countries.
Bluetooth® and the Bluetooth logo are registered trademarks of Bluetooth SIG , Inc.
Adobe Reader is a trademark of Adobe Systems Incorporated.
USB Type-C™ and USB-C™ are trademarks of the USB Implementers Forum
in the USA and other countries.
All other trademarks specified here are the property of their respective owners.
Copyright
No part of this publication may be copied, reproduced or translated without
the prior written consent of Fujitsu.
No part of this publication may be saved or transferred by any electronic means
without the written approval of Fujitsu.
Page 7

Contents
Contents
Innovativetechnology ................................................................. 7
Furtherinformation ...................................................................... 7
Notational conven tion s .................................................................. 8
Portsand controls ..................................................................... 9
Importantnotes ........................................................................ 12
Safetynotes ............................................................................ 12
Additional safety notes for devices with radio components . . . . . ............................. 13
Energysaving .......................................................................... 13
Energy saving under Windows ....................................................... 13
Travellingwith your notebook ............................................................ 14
Before you travel ................................................................... 14
Notebook: transporting ............................................................... 14
Cleaning the notebook .................................................................. 15
First-time set up o
Unpacking and che
Selectingalocat
Mains adapter con
Switchingonthe
Working withthenotebook ............................................................ 19
Status indicators ........................................................................ 19
Switching on the notebook . . . . ........................................................... 21
Notebook: switching off .................................................................. 21
Keyboard ............................................................................... 22
Virtual numeric keypad .............................................................. 24
Function keysand key combinations .................................................. 24
F-Lock setting ....................................................................... 26
Keyboard withbacklight .............................................................. 27
Country and keyboard s ettings ....................................................... 27
Touchpad and touchpad buttons .......................................................... 28
Moving the pointer .................................................................. 28
Selecting an item .................................................................... 28
Executing commands . . . . . ........................................................... 28
Dragging items ...................................................................... 29
Touchscreen/LCD screen without touch function (device-dependent) . . . ..................... 29
Using fingers ....................................................................... 30
WebCam and Infrared Camera ........................................................... 31
Rechargeable battery ................................................................... 32
Charging, caringforandmaintaining the battery ....................................... 32
Switch the battery offand on ......................................................... 32
Using the power-management features ................................................... 33
Adjusting fancontrol ................................................................. 34
Memory cards .......................................................................... 35
Supported formats .................................................................. 35
Inserting thememorycard ........................................................... 35
Removing the memory card .......................................................... 35
Loudspeakers and microphones . . . ....................................................... 36
SIM card (configuration dependent) ....................................................... 37
Inserting theSIMcard ............................................................... 37
fyourdevice .........................................................
cking the device ......................................................
ion .....................................................................
necting ...............................................................
device for the first time ..................................................
16
16
17
17
18
Fujitsu 3
Page 8

Contents
Removing aSIM card ............................................................... 38
Wireless components Wireless LAN / Bluetooth / LTE (optional) . . . .......................... 39
Switching the wireless components on and off ......................................... 39
Setting up WLANaccess ............................................................ 39
Access via LTE (optional) ............................................................ 39
Ethernet and LAN ....................................................................... 40
Your USB Type-C Port Re plicator (optional) . . ............................................. 41
Ports on the PortReplicator .......................................................... 41
Setting up theportreplicator ......................................................... 42
Connecting the mains adapter to the Port Replicator . .................................. 42
Connect the notebook to the port replicator . . . ......................................... 43
Switching on the notebook via the port replicator . . . . . .................................. 44
Switching offnotebook via PortReplicator ............................................. 44
Disconnecting the notebook from the Port Replicator .................................. 44
Security functions ..................................................................... 45
Configuring the fingerprint sensor ........................................................ 45
Configuring the palmveinsensor ......................................................... 46
Using the Security Lock ................................................................. 46
Configuring passwordprotection in BIOSSetupUtility ...................................... 47
Protecting BIOS Setup Utility (supervisor and user password) . .......................... 47
Password protection for booting of the operating system . .............................. 49
Password protection for the harddisk ................................................. 49
Trusted Platform Module (TPM) (device-dependent) . . . . . .................................. 50
Enabling TPM ....................................................................... 50
Disabling TPM ...................................................................... 50
SmartCard reader ....................................................................... 51
Inserting theSmartCard ............................................................. 51
Connecting externaldevices ........................................................... 52
HDMI port .............................................................................. 52
Connecting an external monitor to the port replicator . . . . . .................................. 53
Connecting USB devices ................................................................ 54
USB port Intel® Thunderbolt
TM
3with charging function anddisplay port(USBType-C) .... 55
USBport with charging function (Anytime USB charge) ................................. 56
HowtoremoveUSBdevices correctly ................................................ 56
Headset port ........................................................................... 57
Removing and installing components during servicing . . ............................... 58
Settings in BIOS Setup Utility . . ........................................................ 59
Starting the BIOS Setup Utility ........................................................... 59
Operating the BIOS Setup Utility ......................................................... 60
Exiting BIOS Setup Utility ................................................................ 61
Exit Saving Changes - save changes and exit BIOS Setup Utility . . . . ................... 61
Exit Discarding Changes – Discard changes and exit BIOS Setup Utility . . ............... 61
Load Setup Defaults – Copy Standard Entries ......................................... 61
Discard Changes – Discard changes without exiting the BIOS Setup Utility ............... 61
Save Changes - save changes without exiting the BIOS Setup Utility . ................... 61
Save Changes and Power Off . . . . . . ................................................. 61
Erase Disk ............................................................................. 62
Troubleshooting and tips .............................................................. 64
Help if problemsoccur ................................................................... 64
4 Fujitsu
Page 9

Contents
Reset by switching off thebattery ........................................................ 65
Restore contentsoftheharddiskfromRecovery CD/DVD .................................. 65
Restoring the system under Windows 10 . . . . . . ............................................ 66
The notebook’s date or time is incorrect ................................................... 66
Whencertain characters are entered on the keyboard, only numerals are written ............. 66
The notebook’s LCD screen remains blank . . . . ............................................ 66
The LCD screen is difficulttoread ........................................................ 66
The external monitorremains blank ...................................................... 67
The external monitorisblankortheimageisunstable ..................................... 67
The notebook cannot be started . . . ....................................................... 68
The notebook stops working . . ........................................................... 68
The printer does not print . . . . . ........................................................... 68
The wireless connection to a network does not work . . . .................................... 69
SmartCard reader is not recognised. . . . ................................................... 69
SmartCard PINforgotten ................................................................ 69
SmartCard lost ......................................................................... 69
Error messages on thescreen ........................................................... 70
Technical data ......................................................................... 72
LIFEBOOK ............................................................................. 72
Rechargeable battery ................................................................... 72
Mains adapter (notebook computer) . . . ................................................... 73
USBType-C Port Replicator (optional) .................................................... 73
Mains Adapter USB Type-C Port Replicator (optional) . . .................................... 74
Manufacturer’s notes .................................................................. 75
Disposal and recycling .................................................................. 75
TCO Certified ........................................................................... 75
Certification markings ................................................................... 75
Index .................................................................................. 76
Fujitsu 5
Page 10

Contents
6 Fujitsu
Page 11
Innovative technology
Innovative technology
... and ergonomic design make your device a reliable and convenient companion.
The device boots very quickly, is ready for immediate use and offers a particularly
long operating time because of its high capacity battery.
With the user-friendly "BIOS Setup Utility" you can control your notebook’s hardware and better
protect your system against unauthorised access by using the powerful password properties.
Information on the connections and user componen ts of your notebook
canbefoundin"
Ports and controls", Page 9.
Further information
The Windows drivers for your device can be found on our Internet site.
The factory installation of your device does not support any other operating
system. Fujitsu Technology Solutions accepts no liability whatsoever
if any other operating system is used.
Software oriented components of these instructions refer t o Microsoft products,
if they come within the scope of the delivery.
If you install other software products, pay attention to the operating
instructions of the manufacturer.
Fujitsu 7
Page 12
Innovative technology
Notational conventions
Pay particular attention to text marked with this symbol. Failure to observe
these warnings could pose a risk to health, damage the device or lead
to loss of data. The warra nty will be invalidated if the device becomes
defective through failure to observe these warnings.
Indicates important informa
tion for the proper use of the device.
►
This font
This font
This font
"This font"
Key
This font
Indicates an activity that must be performed
Indicates a result
indicates data entered
the command line, e.g.
start a program (star
indicates information that is displayed on the screen by a program, e.g.:
Installation is complete.
indicates
• terms an d texts used in a software interface, e.g.: Click on Save
• names of programs or files, e.g. Windows or setup.exe.
indicates
• cross-references to another section, e.g. "Safety information"
• cross-references to an external source, e.g. a web address: For more
information, go to "
• Names of CDs, DVDs and titles or designations for other materials,
e.g.: "CD/DVD Drivers & Utilities" or "Safety/Regulations" manua l
indicates a key on the keyboard, e.g:
indicates terms and texts that are emphasised or highlighted, e.g.: Do
not switch off the device
using the keyboard in a program dialogue or at
your password (Name123) or a command used to
t.exe)
http://www.fujitsu.com/fts/"
F10
8 Fujitsu
Page 13

Ports and controls
Ports and controls
This chapte r presents the individual hardware components of your device. It gives
an overview of the indicators and ports of the device. Please familiarise yourself with
these components before you start to work with the device.
Front
2
1
3
2
4
1
9
8
5
1 = Microphone (optional)
2 = Infrared camera sensors (optional)
3 = WebCam (optional)
4 = WebCam LED (optional)
5 = Status indicators
5
6
7
6 = ON/OFF button
7 = Fingerprint sensor (optional) or palm
sensor (optional)
8 = Touchpad buttons
9 = Touchpad
Fujitsu 9
Page 14

Ports and controls
Left side
1 4 5 7632
1 = DC input connector (DC IN)
2+3= USB port Intel® Thunderbolt
with charging function and display
port (USB Type-C)
4 = HDMI port
The descriptions in this document show the standard product configuration
with Intel® Thunderbolt
Alternative USB configurations without Intel® Thunderbolt
also available for projects:
• Pos. 2 = USB 3.2 Gen2 port with c harging function and DisplayPort (USB Type-C™)
• Pos. 3 = USB port 3.2 Gen1 (USB Type-C)
Right side
1 2 3 4 5
1=SlotforSI
M cards (optional)
2 = Slot for memory cards
3=USBport3
.2 Gen1 (USB Type-A)
5 = USB 3.2 Gen1 port with charging function
TM
3
(USB Type-A, Anytime USB charge)
6 = Headset jack
7 = SmartCard reader
TM
3.
TM
3are
4 = LAN connec
tor (removable)
5 = Security lock device
10 Fujitsu
Page 15
Ports and controls
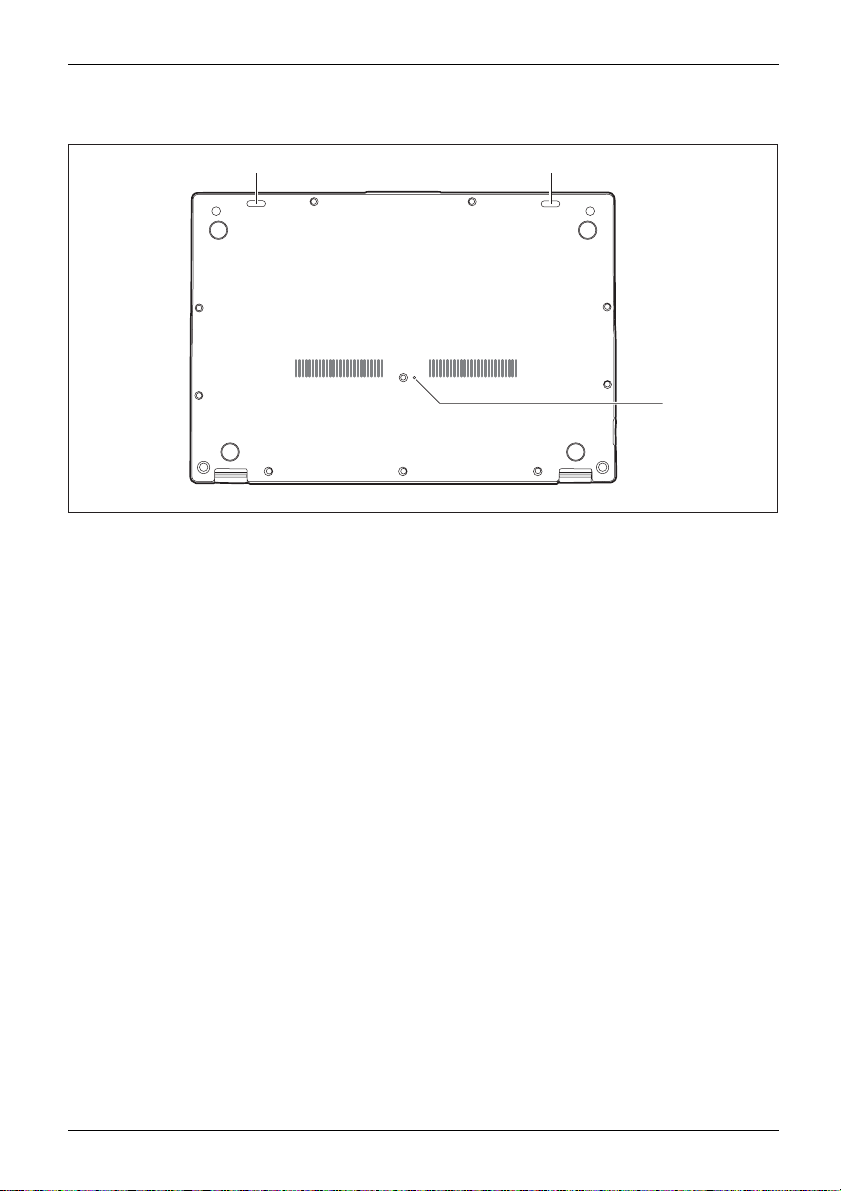
Bottom
1
1
2
1 = Loudspeaker 2 = Off button for the battery (recessed)
Fujitsu 11
Page 16

Important notes
Important notes
ImportantnotesNotes
Safety notes
SafetynotesNotes
This chapter contains essential safety information which must be followed
when working with your notebook. Other notes also provide useful information
which will help you with your n otebook.
Please follow the safety notes provided in the "Safety/Regulations" manual
as well as the safety notes given below.
Please pay special attention to the sections in the manual marked
with the symbol on the left.
When connecting and disconnecting cables, observe the relevant
notes in this operating manual.
In order to prevent burn injury or the device from overheating, do not lay the device
directly on your lap and make sure that the ventilation openings are not obstructed.
Read the information on the ambient con ditions in the "
Page 72 and "First-time setup of your device", Page 16 before preparing your
notebook for use and switching it on for the first time.
When cleaning the device, please observe the relevant notes in the
section "
Pay attention to the additional safety notes for devices with wireless components
provided in the "Safety/Regulations" manual.
Please refer to the notes in the chapter "
components during servicing", Page 58.
Cleaning the notebook", Page 15.
Technical data",
Removing and installing
This noteboo
equipment. I
please cont
Opening an
Please op
12 Fujitsu
k complies with the relevant safety regulations for data processing
f y ou have questions about using your notebook in a particular area,
act your sales outlet or our Hotline/Service Desk.
gle of the LCD screen
en the LCD screen carefully until you feel resistance. Do not try to open it further with force!
Page 17
Important notes
Additional safety notes for devices with radio components
Radiocomponent:WirelessLAN:Bluetooth,safetynotes
If a radio component (Wireless LAN, Bluetooth, LTE) is integrated in your notebook, you must
be sure to observe the following safety notes when using your notebook:
• Switch off the radio components when you are in an aircraft or driving in a car.
• Switch off the radio components when you are in a hospital, an operating room or near a medical
electronics system. The transmitted radio waves can impair the operation of medical devices.
• Switch off the radio components when you let the device get near flammable
gases or into hazardous environments (e.g. petro l station, paintshops), as the
transmitted radio waves can cause an explosion or a fire.
For information on how to switch radio components on and off, see chapter
Switching the wireless components on and off", Page 39.
"
Energy saving
NotesEnergyEnergysaving
Switch the notebo
are not using them
Youwillthenbea
ok off when it is not in use. Switch off external, connected devices if you
. If you use the energy saving functions, the notebook uses less energy.
ble to work for longer before having to recha rge the battery.
Energy efficien
You save money w
Energy savin
► Make use of the power management features (see ""Using the power-management features",
Page 33").
Fujitsu 13
cy is increased and the environmental impact is r educed.
hile protecting the environment.
g under Windows
Page 18
Important notes
Travelling with your notebook
MobileoperationNotesTrans portationNotebook
Please observe the points listed below when travelling with your notebook.
Before you travel
► Back up important data stored on your hard disk.
NotebookTravel,notebook
► Switch o ff the wireless component for data security reasons. With data traffic via a wireless
connection, it is also possible for unauthorised third parties to receive data.
Information on activating data encryption is provided in the documentation
for your wireless component.
► If you wish to use your notebook during a flight, first check with the flight
attendants if it is OK to do so.
When travelling in other countries
► If you a re travelling abroad, check that the mains adapter can be operated with the
local mains voltage. If this is not the case, obtain the appropriate mains adapter for
your notebook. Do not use any other voltage converter!
► Check whether the local mains voltage and the power cable are compatible. If this is
not the case, buy a power cable that matches the local conditions.
► Contact the rele vant authorities of the country you will be travelling in as to
whether you may operate the radio component integrated into your notebook
computer. Please observe the additional safety instructions for devices with radio
components, found in the handbook “Safety/formalities”.
Notebook: transporting
Protect the notebook from severe shocks and extreme temperatures
(e.g. direct sunlight in a car).
► Switch the notebook off.
► Unplug the mains adap ter and all external devices from the power socket.
► Disconnect the mains adapter cable and the data cables for all external devices.
► Close the LCD screen.
► To protect against damaging jolts and bumps, use a notebook carrying
case to transport your notebook.
14 Fujitsu
Page 19

Cleaning the notebook
Do not clean any interior parts yourself; leave this job to a service technician.
Only use cleaning products designed for computers. Normal household
cleaners and polishes can damage the markings on the keyboard and the
device, the paintwork or the notebook itself.
Ensure that no liquid enters the notebook.
The LCD screen very sensitive to scratches. Only clean the display
surface with a very soft, slightly damp cloth.
Important notes
► Switch the notebook off
CleaningNotesNotebookKeyboardTouchpadLCDscreenCrystalViewdisplay
► To prevent accidental activation of the device, remove the power plug of
the mains adapter from the power socket.
Thesurfacemaybecle
been dipped in water
To clean the keyboard and the Touchpad, if available, you can use disinfectant wipes.
Ensure that no liquid enters the device.
.
aned with a dry cloth. If particularly dirty, use a damp cloth that has
mixed with mild domestic detergent and then carefully wrung out.
Fujitsu 15
Page 20
First-time setup of your device
First-time setup of your devic
First-timesetu pGettingstarted
The battery must be charged if you w ant to operate your device using the battery.
When used on the move, the built-in battery provides the device with the necessary power. You
can increase the operating time by using the available energy-saving functions.
For instructions on how to connect external devices (e.g. mouse, printer) to your
device, please refer to the operating manual for your device.
Unpacking and c
► Unpack all the individual parts.
► Check your d
Please read the chapter "Important notes", Page 12.
If your device is equipped with a Windows operating system, the necessary
hardware drivers and supplied software are already pre-installed.
Before you switch on the device for the first time, connect it to the mains voltage
using the mains adapter, see "
adapter must be connected during the entire installation process.
A system test is performed when your device is first switched on. Various messages
can appear. The display may remain dark for a short time or may flicker.
Please follow the instructions on the screen.
NEVER switch off your device during the first-time setup process.
Mains adapter connecting", Page 17.Themains
hecking the device
Should you discover any damage that occurred during transportation,
notify your local sales outlet immediately!
PackagingTransport
evice for any visible damag e which may have occurred during transportation.
e
You m a y nee
16 Fujitsu
d the packaging in the future, if you need to transport your device.
Page 21
Selecting a location
SelectingalocationDeviceMainsadapter
Select a suitable location for the device before setting it up. F ollow
the instructions below when doing so:
• Never place the device or the mains adapter on a heat-sensitive surface.
The surface could be damaged as a result.
• Never place the device on a soft surface (e.g. carpeting, upholstered furniture,
bed). This can block the air vents and cause overheating and damage.
• The underside of the device heats up during normal operation. Prolonged contact
with the skin may become unpleasant or even result in burns.
• Place the device on a stable, flat, non-slippery surface. Please note that the
rubber feet of the device may mark certain types of delicate surfaces.
• Keep other objects at least 100 mm / 3.94 inches away from the device
and its mains adapter to ensure adequa te ventilation.
• Never cover the ventilation slots of the device.
• Do not expose the device to extreme environmental conditions. Protect
the device from dust, humidity, and heat.
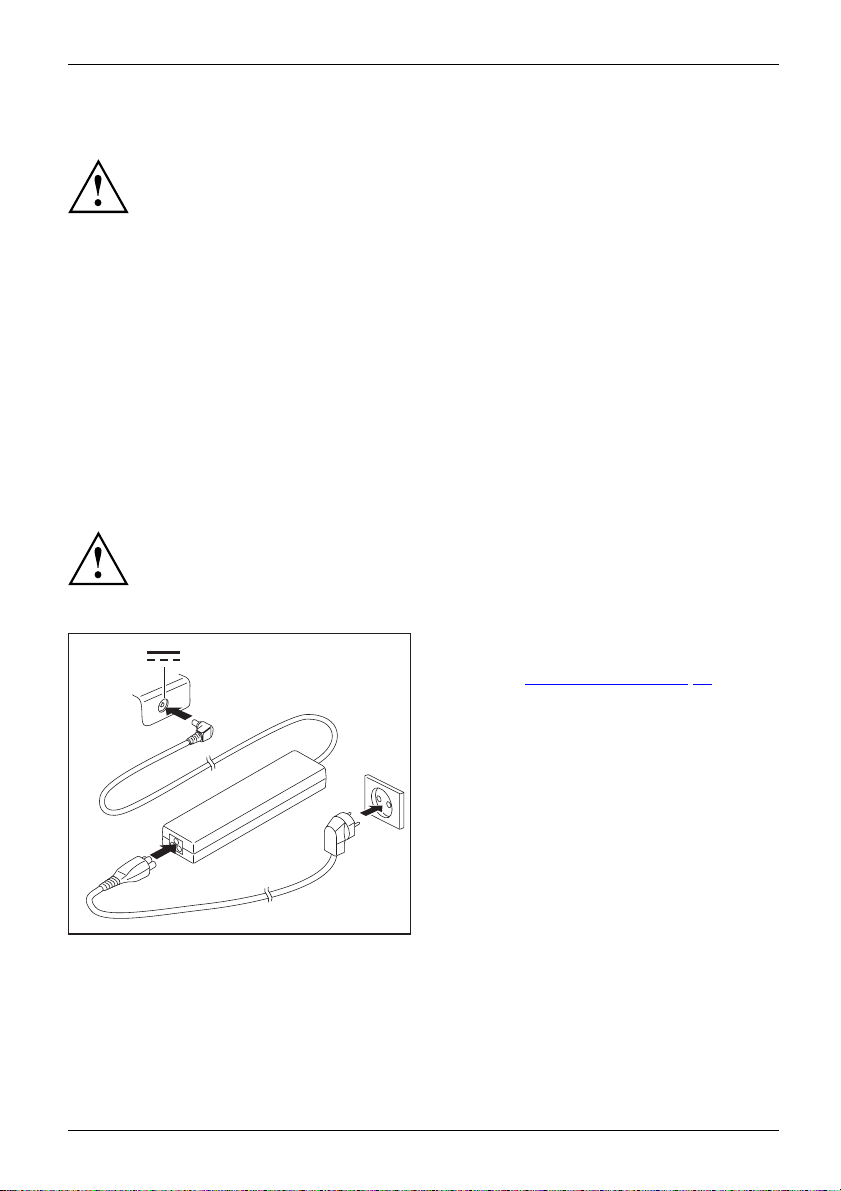
Mains adapter connecting
PreparingforoperationMainsadapter
Observe the safety notes in the enclosed "Safety/Regulations" manual.
The supplied power cable conforms to the requirements of the country in
which you purchased yo ur device. Make sure that the power cab le is approved
for use in the country in which you intend to use it.
First-time setup of your device
► Connect the power cable (1) to the power
adapter provided for the device, see
chapter "
Technical data", Page 72.
► Plug the mains cable (2) into a mains outlet.
3
► Connect the mains adapter cable (3) to
the DC jack (DC IN) of the device.
2
1
Fujitsu 17
Page 22

First-time setup of your device
Switching on the device for the first time
Switchingonforthefirsttime
When you switch on the device for the first time, the supplied software is
installed and configured. Because this procedure must not be interrupted,
you should set aside enough time for it to be fully completed and connect
the device to the mains using th e mains adapter.
During the installation process, DO NOT restart the device unless
you are requested to do so!
To make it easier to use yo
is pre-installed on the
► During install
hard disk.
ation, follow the instructions on screen.
If a W indows op
information o
n the system and drivers, help programmes, updates, manuals etc. on
the device or o
You can find in
on the Intern
et at "
ur device for the first time, the operating system
► Switch on your device.
erating system is installed on your device, you will find more
n the Internet under "
http://www.fujitsu.com/fts/support/".
formation and help on the Windows operating system functions
http://windows.microsoft.com".
18 Fujitsu
Page 23

Working w ith the notebook
Working with the notebook
Notebook,operationNotebook
This chapter describes the basics for operating your notebook. Please read the chapter
entitled "
devices such as a mouse and a printer to the notebook.
Status indicators
Statusindicators
The status indicators provide information about the status of the power supply,
the hard disk and the keyboard functions.
Connecting external devices", Page 52 for instructions on how to connect
Please refer to the notes in "Important notes", Page 12.
F
Fujitsu 19
Page 24
Working with the notebook
Indicator Description
Power-on indicator/Standby
StandbyindicatorPower-onindicator
• Indicator is illuminated: The notebook is switched on.
• Indicator flashes: The notebook is in standby mode.
• Indicator is off: The notebook is switched off.
Battery status indicator/ma
The state of charge of th e ba
1. With AC adapter connected
• The indicator lights up orange: The battery is cha rging.
• The indicator is off: Cha
• The indicator flashes orange: The battery cannot be charged as the battery
is too hot or cold for charging. The charg ing process is continued as soon
as the battery reaches a permissible temperature again.
2. Running on battery (wi
• The indicator is off: Battery level is 100-21%.
• The indicator light
3. Battery abnormality/error:
The indicator flash
BatterystatusindicatorBatterysymbolBatteryindicator
F Lock indicator
F
IndicatorFLock
The indicator lights up: The key combination
Instead of the imprinted standard functions of the function keys, the Fn functions
can be executed by pressing the keys directly (see chapter "
key combinations", Page 24).
Num Lock indicator
IndicatorNumLock
Indicator is illuminated: The
keypad is activated. You can output the characters indicated on the upper right of
the keys.
Caps Lock indicator
IndicatorCapsLock
Indicator is illuminated: The Caps Lock key has been pressed. All th e characters
you type will appear in upper case. In the case of overlay keys, the character
printed on the upper left of the key will appear when that key is pressed.
Scroll L
IndicatorScrollL
Indicat
effect
ock indicator
ock
or is illuminated: the key combination
that this key has varies between applications.
ins connection
ttery is shown by the battery indicator.
:
rging is completed.
thout AC adapter):
s up red: Battery level is 20-0%.
es red.
Fn
+
Num
key has been pressed. The virtual numerical
Fn+Scr
F
has been pressed.
Function keys and
has been pressed. The
20 Fujitsu
Page 25
Switching on the notebook
The power-on indicator is lit.
Notebook: switching off
Back up your data and close all applications before you switch off your
device. Otherwise data might be lost.
Working w ith the notebook
► Open the LCD screen.
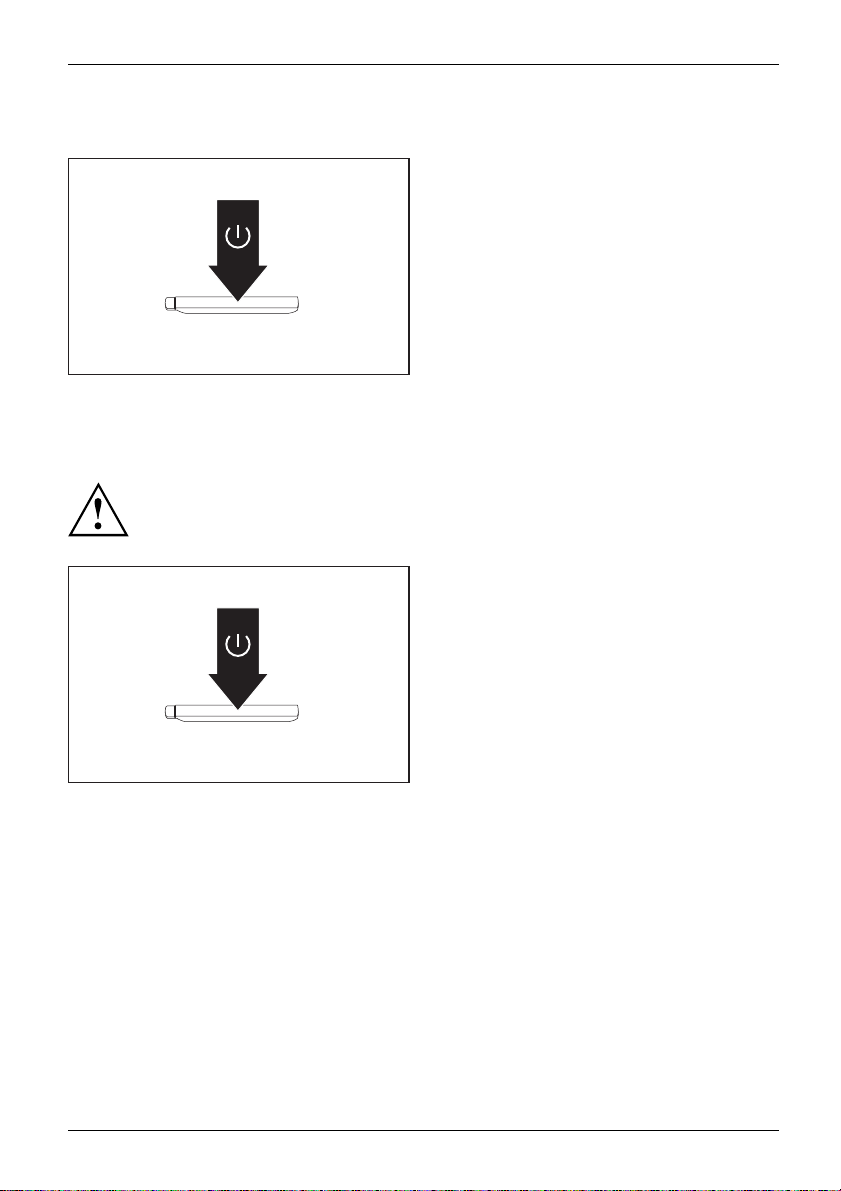
Switchingon
► Press the ON/OFF button for about 1
second to switch the notebook on.
► Shut down the operating system correctly.
Notebook
► If the notebook does not switch itself off
automatically, press the ON/OFF button
for about 5-10 seconds.
► Close the LCD screen.
Fujitsu 21
Page 26

Working with the notebook
Keyboard
KeyboardNumerickeypadNum erickeypadButtons
The keyboard of your notebook is subject to continuous wear through normal
use. The key markings are especially prone to wear. The key markings are
liable to wear away over the life of the notebook.
The keyboard has been desig
Some enhanced keyboard fun
The following descriptio
are described in the relev
The figure below shows how
The example applies when
The illustrations show
n of keys refers to Windows. Additional functions supported by the keys
ant manuals supplied with your application programs.
the Caps Lock key has not been activated.
=
+
0
=
0
ned to provide all the functions of an enhanced keyboard.
ctions are mapped with key combinations.
to access the different characters on keys with overlaid functions.
n below may differ from your a ctual device.
Num
}
}
=
0
=
}
0
+
=
0
}
}
Alt Gr
22 Fujitsu
Page 27

Key Description
Backspace key
The Backspace key deletes the character to the left of the cursor.
BackspaceBackspace
Working w ith the notebook
Tab key
The Tab key moves the cursor to
Tabkey
the next tab stop.
Enter key (return)
The Enter key terminates
is executed when you pres
EnterkeyReturnEnterLinefeed
a command line. The command you have entered
sthiskey.
Caps Lock key
The Caps Lock key activates the Caps Lock m ode, and the corresponding
icon is displayed in the Windows information area. In Caps Lock mode, all
of the characters you type appear in uppe r case. In the case of overlay
keys, the character printed on the upper left of the key will appear when
that key is pressed. To cancel the Caps Lock function, simply press the
Caps Lock key again.
ShiftkeyCapsLock
Shift key
The Shift key ca
keys, the chara
keyispressed.
ShiftkeyShift
uses uppercase characters to appear. In the case of overlay
cter printed on the upper left of the key appears when that
Fn key
Fn
The
"
Function ke
Fnkey
key activ
ates the Fn function of an overlay key (see c hapter
ys and key combinations", Page 24).
Cursor keys
The cursor
left, or ri
CursorkeysCursorcontrol
keys move the cursor in the direction of the arrow, i.e. up, down,
ght.
Windows key
The Windows key switches between the start screen and the last used
application.
Windowskey
Menu key
The Menu key opens the menu for the active application.
Fujitsu 23
Page 28

Working with the notebook
Virtual numeric keypad
NumerickeypadVirtualnumerickeypadNumLock
To provide the convenience of a numeric keypad, your keyboard is equipped with a virtual
numeric keypad. The special keys of the virtual numeric keypad are recognisable by the numbers
and symbols printed in the upper right corner of each key. If you ha ve switched on the virtual
numeric keypad, you can output the characters shown on the upper right of the keys.
The keyboard layout shown below may differ from your actual device.
1 = Valid characters when the
Num
key is not activated
r information about the status indicators can be found in chapter "
Furthe
Function keys and key combinations
nations
Keycombi
2 = Valid characters when the
keyisactivated
Status indicators", Page 19.
Num
The following description of the function keys and key combinations applies to W indows
operating systems. Some of the functions described below may not work in oth er
operating systems and with some device drivers.
Other key combinations are described in the relevant manu als supplied
with your application programs.
Key combinations are entered as follows:
► Press the first key in the combination and keep it pressed.
► While holding the first key down, press the other key or keys in the combination.
24 Fujitsu
Page 29

Function key Description
Switch microphone on/off
This function key switches the m icrophone off and o n .
F1EnableDisable
Switching the loudspeakers on and off
Use this function key to sw itch your notebook’s loudspeakers off
and on.
F2LoudspeakersLoudspeakers
Decrease volume
This function key reduces the volume of the built-in loudspeakers.
F3Volume
Increase volume
This function key increases the volume of the built-in loudspeakers.
F4Volume
Switching the wireles
This function key swi
F5Wirelesscompone nt sWirelesscomponents
Switching the touch
This function key sw
off or on.
F6TouchpadTouchpadbuttonsTouchpad
Decrease screen b
This function key
ss
F7LCDscreenScreenbrightne
Increase scree
This function k
ness
F8Screenbright
Power management functions
Use this function key to activate the energy saving functions (see
chapter "
F9Energysavingf unct ions
Using the power-management features", Page 33).
Toggle output screen
If an external monitor is connected, the screen on which the output
is to be displayed can be selected with this function key.
Screen output is possible:
• only on the notebook’s L CD screen
• on the LCD screen of the notebo ok and the external mon itor
atthesametime
• only on the external monitor
This setting is useful if you would like a high resolution and a
high refresh rate on an external monitor.
F10Toggleoutputs creen
Prt Scrn
This function key takes a screenshot of the current screen display
and saves it to the clipboard.
Num Lock
This function key activates the virtual number block. The
characters found on the upper right of the keys are then o utput.
Working w ith the notebook
s components on / off
tches the wireless components off or on.
pad and touchpad buttons on/off
itches the touchpad a n d the touchpad buttons
rightness
decreases the brightness of the screen.
nbrightness
ey increases the brightness of the screen.
Fujitsu 25
Page 30

Working with the notebook
Combination Description
ns
ch between several open
Del
AltCtrl
++
Switch between open applicatio
Use this k ey combination to swit
applications.
Alt+Tab
Windows security/Task-Manager
This key combination opens the Windows security/Task-Manager
window.
Ctrl+Alt+Del
Back tab
This key combination moves the cursor back to the previous tab
stop.
Shift+TabBacktab
Key combinations using the Windows keys are detailed in the manual
for your operating system.
In addition, the following non-labelled key combinations are supported:
Fn
Fn
Fn
S
+
= Pause
B
+
= Break
R
+
= SysRq
•
•
•
F-Lock setting
The F-Lock setting can b e used to s et either the hot ke ys or the function keys as
the primary function for the upper row of keys.
The F-Lock function is deactivated by default as delivered.
► F-Lock is turned on and off by pressing
When F-Lock is turned on, it remains activated like the
Changing t he F-Lock setting changes the primary and secondary key functions as follows:
Status Hot Key Function key
F-Lockisde
symbol is no
activated (F-Lock
t illuminated)
The hot key f
primary beh
► They are use
pressing t
hot key.
F-Lock is activated (F-Lock
symbol is illuminated)
The hot key functions are the
secondary behaviour:
► They are used by pressing
Fn
Fn+Esc
unctions are the
aviour:
dbysimply
he corresponding
+ the hot key.
.
Caps Lock
key.
The functio
secondary b
n keys beco me the
ehaviour:
► They are use
Fn
+ the funct
The function keys become the
primary behaviour:
► They are used by simply
pressing the corresponding
function key.
dbypressing
ion key.
26 Fujitsu
Page 31

Working w ith the notebook
Keyboard with backlight
KeyboardBackgroundlighting
On this version of the keyboard, repeated pressing of the key combination
space bar
allows the background lighting to be switched on an d off and also
Fn
+
a choice to be made between two levels of brightness.
In battery mode, it is recommended to turn on the backlight only when needed
and to use the lower brightness level to maximize b attery life.
Country and keyboard settings
► Change the country and keyboard settings as described in the documentation for your operating
system.
Fujitsu 27
Page 32

Working with the notebook
Touchpad and touchpad buttons
Keep the touchpad clean. Protect it from dirt, liquids and grease.
TouchpadTouchpad
Never use the touchpad if your fingers are dirty.
Do not rest heavy objects (e.g. books) on the touchpad or the touchpad buttons.
1 = Touchpad
1
2
2 = Touchpad buttons
Youcanmovethecurs
The touchpad button
to the buttons on a c
You can also deact
unintentionall
keys and key comb
or using the touchpad.
s allow you to select and execute commands. They correspond
onventional mouse.
ivate the touchpad with the
y move the poin ter on the screen (see chapter "
inations", Page 24).
Moving the pointer
► Move your finger on the touchpad.
Touchpad
The pointer will move.
Selecting an item
► Move the pointer to the item you wish to select.
Touchpad
► Tap the touchpad once or press the left button once.
The item is selected.
Executing commands
► Move the
Touchpad
► Tap the touchpad twice or press the left button twice.
The comm
pointer to the field you wish to select.
and is executed.
F6
key, so that you cannot
Function
28 Fujitsu
Page 33

Working w ith the notebook
Dragging items
► Select the desired item.
Touchpad
► Press and hold the left button and, with your finger on the touchpad, drag
the item to the desired position.
The item will be moved.
Touchscreen/LCD screen without touch
function (device-depen
LCDscreenNotes
High-quality LCD screens (TFT) are installed in Fujitsu notebooks. For technical rea sons,
these screens are manufactured for a certain resolution. An optimum and sharp image can
only be ensured with the resolution intended for the particular screen. A screen resolution
which d iffers from the specification can result in an unclear picture.
The resolution of your notebook’s screen is optimally set at the factory.
With the present standards of production technolog y, absolutely flawless screen images
cannot be guaranteed. There may b e a few constantly light or dark pixels (picture
elements) on the screen. The maximum permitted number of such faulty pixels is
specified in the international standard ISO 9241-307 (Class II).
Example:
A screen with an HD re solution of 1366 x 768 has 1366 x 768 = 1049088 pixels. Each pixel consists
of three subpixels (red, green and blue), making a total of about 3 million subpixels. According to ISO
9241-307 (class II), a maximum of 2 light and 2 dark pixels and in addition 5 light or 10 dark subpixels
or an equivalent mix (1 light subpixel counts as 2 dark subpixels) are allow ed to be defective.
Pixel
Subpixel
Cluster A cluster co
dent)
A pixel consists of 3 subpixels, normally red, green and
blue. A pixel is the smallest element that can be generated
by complete functionality of the display.
A subpixel is a separately addressable internal structure
within a pixel that enhances the pixel function.
ntains two or more defective pixels or
subpixels
in a 5 x 5 pixel block.
Background lighting
LCD screens are operated with background lighting. The luminosity of the background
lighting can decrease during the period of use of the notebook. H owever, you
can set the brightness of your screen individually.
Synchronising the display on the LCD screen and an external monitor
For more information , please refer to the chapter "
Page 24 under "Display output, switch between".
Fujitsu 29
Function keys and key combinations",
Page 34

Working with the notebook
Using fingers
You can use your finger on the touch screen of your device to execute
commands and start applications.
Action Description
Tapping
Type, hold, release ► Type and hold a symbol and release it again.
Dragging ► Tap and hold a symbol and
Double-tap ► To enlarge a view, quickly tap twice on a
Zoom in/Zoom out
Input fields Data must be entered for some apps, for
► Tap on a symbol, menu, button or folder to
selectthisoptionortoactivateit.
The selected action is pe
place.
You can for instance drag apps or widgets onto
the home page in this way.
web pa ge, map or another screen.
When you double-ta
browser, it will be
double-tap will m
► With some apps, y o
display size by m
the touchscreen
your fingers tog
instance an Internet page or your name and
password.
► Tapontheinputfield.
An on-screen keyboard opens, with which you
can enter your data.
rformed.
drag it to another
ponanimageinaweb
enlarged an d another
ake it smaller again.
u can enlarge the
oving two fingers apart on
, and reduce it by moving
ether.
30 Fujitsu
Page 35

WebCam and Infrared Camera
Webcam
Depending on the device version, your device may have an integral
Webcam with microphone.
This webcam also has an infrared function that enables auth entication
with Microsoft Windows Hello.
Working w ith the notebook
Depending on the softwar
record video clips or tak
The WebCam has its own st
• The picture quality dep
e used, you can use your Webcam to take pictures,
e part in web chats.
atus indicator. The indicator lights up when the WebCam is switched on.
ends on the lighting c onditions and the software being used.
• You can only operate the webcam with a particular application (e.g. an Internet telephony
program or a video conferencing program which supports a webcam).
• When using the webcam
the notebook support must not wobble.
• The webcam automatically adjusts itself to the current light level. For this reason
the LCD screen may flicker while the light level is adjusted.
Further information on using the webcam and on the additional settings
which are po ssible for your webcam can be found in the help function
of the program which uses the webcam.
Fujitsu 31
Page 36

Working with the notebook
Rechargeable battery
RechargeablebatteryBatteryLife,batteryRechargeablebatteryRechargeablebattery
When not plugged into a ma ins socket, the notebook runs on its built-in battery. You
can increase the life of the battery by caring for the battery properly. The average
battery life is around 500 charge/discharge cycles.
You can extend the battery life by taking advantage of the available energy saving functions.
Charging, caring for and maintaining the battery
BatteryBattery
The notebook’s rechargeable battery can only be charged when the ambient temperature
is between 5 °C / 41 °F and max. 35 °C / 95 °F.
You can charge the battery by connecting the notebook to the mains adapter
Mains adapter connecting", Page 17).
(see "
Please note that the rechargeable battery will not be charged if its state of charge is between
90 % and 100 %. I f the state of charge of the rechargeable battery is less than 90 % and
the mains adapter is connected, the battery will be charged to 100 %.
When the battery state of charge is low, a message from the operating system appears.
If you do not connect the mains adapter within about 5 minutes of the message
appearing, your notebook will automatically switch off.
monitoring the b attery charging level
BatteryBatterystatusmeter
Windows also has a "Battery status meter" in the taskbar for monitoring the battery capacity. When
you place the mouse pointer on the battery symbol, the system displays the battery status.
Switch the battery off and on
Switch off t he
You need the mains adapter to switch the battery on.
► Disconnect the device from the mains adapter and if applicable, from the Port Replicator as well.
► Use a penci
off button
The device is currentless.
Switch o
► Connect the device to the mains adapter of the notebook or to the Port Replicator.
► Switch
32 Fujitsu
nthebattery
the device on again.
battery
l or a wire (e.g. a paperclip) to press firmly into the opening of the
for the battery, this will switch off the sys tem .
Page 37

Working w ith the notebook
Using the power-management features
PowerPowerBattery
The notebook uses less power when the available power-management features are used. You
will then be able to work longer when using the battery before having to recharge it.
Power efficiency is increased and environmental pollution reduced. By
choosing the best power options, you can make significant savings and
at the s ame time help protect the environment.
When you close the LCD screen, depending on the setting in Windows, the
notebook automatically enters a powe r saving mode.
► Select the power management functions in your Control Panel.
If you need further information about an option, you can get help about most settings
by pressing the key combination
When the notebook i
During power savin
orinaswapfile on t
Never turn off yo
nearly empty, cl
Fn+F1
s in power-saving mode, the following must be remembered:
g mode, open files are held in the main memory
he hard disk.
ur notebook while it is in a power saving mode. If the built-in battery is
ose the open files and do not go into power saving mode.
to show the Microsoft help.
If you do not intend to use y our notebook for a long period of time:
► Exit power saving mode if necessary via the mouse or keyboard or by switching on the
notebook.
► Close all opened programs and completely shut down the notebook.
Fujitsu 33
Page 38

Working with the notebook
Adjusting fan control
You can adjust the fan control in the BIOS Setup Utility. The following settings are available:
• Normal: The system is cooled to ensure that the maximum system
performance is always available.
• Silent: The fan rotation speed, and therefore the noise created by the fan, is reduced.
► Call up the BIOS Setup Utility.
► In the menu Advanced - Miscellaneous Configurations select the Fan Control function.
► Choose the setting Normal or Silent.
Instructions for how to call up and operate the BIOS-Setup-Utility can be found
in chapter "
With the Fujitsu Utility Function Manager you can also switch between these two
settings with Windows. In the Function Manager, select the Fan menu item with
the options Quiet Mode (corresponds to Silent)andNormal Mode.
Settings in BIOS Setup Utility", Page 59.
34 Fujitsu
Page 39

Memory cards
Slot
Your notebook is equipped with an integrated memory card reader.
Observe the manufacturer’s instructions when handling the memory cards.
Memorycard
Supported formats
Your notebook supports the following forma t:
• Secure Digital (SD
Inserting the memory card
TM
card)
► Carefully push the memory card into the
slot until you feel it click into place. The
label area must be facing upward. Do not
apply any force, otherwise the delicate
contact surfaces could be damaged.
Memorycard
Depending on the particular type
used, the memory card may protrude
slightly from the slot.
Working w ith the notebook
Removing the memory card
Memorycard
In order to protect your data, always follow the correct procedure for removing
the card (see the documentation for your operating syste m).
► Press on the memory card (1).
Memorycard
The memory card is released and
can now be removed.
► Pull the memory card out of the slot (2).
1
2
Fujitsu 35
Page 40

Working with the notebook
Loudspeakers and microphones
MicrophoneLoudspeakersBassloudspeaker (subwoofer)Volumecontro l
You w i l l find information about the exact position of loudspeakers and microphones
in chapter "
Please refer to chapter "
the volume and also enabling/disabling the loudspeakers using key combinations.
Ports and controls", Page 9.
Function keys and key combinations", Page 24 for information on setting
When you connect headphones or external speakers, the built-in speakers are disabled.
Information on connecting headphones and a microphone can be found
in "
Connecting externa l devices", Page 52.
36 Fujitsu
Page 41

Working w ith the notebook
SIM card (configuration dependent)
Your device supports cards in Micro-SIM format (15 mm x 12 mm).
The device also supports the eSIM function. For information, please
contact your network pro vider.
A S IM Card (Subscriber Identity Module) is a chip card which is inserted in a mobile telephone or
notebook and, together with an integrated LTE module, enables access to a mobile radio network.
Follow the instructions supplied by the provider of the SIM card.
Inserting the SIM card
► Switch off the battery so that the device is currentless (see "Switch the battery off and on", Page 32
► Open the cover of the SIM card slot (1)
and pull the SIM card holder out (2).
1
2
► Place the SIM card in the carrier and slide the
SIM card fully home into the slot as shown.
The contacts point upwards. The SIM
2
1
► Switch the battery on again (see "
Fujitsu 37
Switch the battery off and on", Page 32
card does not latch into place.
► Close the cover of the SIM card slot (2).
Page 42

Working with the notebook
Removing a SIM card
► Switch off the battery so that the device is currentless (see chapter "Switch
the battery off and on", Page 32
► Open the cover of the SIM card slot (1).
► Pull the SIM card holder out of the
1
2
2
1
slot in the direction of the arrow and
remove the SIM card (2).
► Push the SIM card holder into the SIM
card slot (1) and close the cover of
the SIM card slot (2).
► Switch the batter
y on again (see chapter "
Switch the battery off and on", Page 32
38 Fujitsu
Page 43

Working w ith the notebook
Wireless components Wireless LAN /
Bluetooth / LTE (optional)
The installation of radio components not approved by Fujitsu will invalidate
the certifications issued for this device.
Switching the wireless components on and off
► Press the key with the radio symbol to switch the w ireless components on and off (flight
mode).
WirelessLANWirelessLANBl uetoo thBluetooth
If you switch off the radio components, the wireless LAN antenna and the
Bluetooth and LTE module will also be switched off.
Pay attention to the additional safety notes for devices with wireless components
provided in the "Safety/Regulations" manual.
You can obtain more information on LTE from your service provider.
Setting up WLAN access
• Requirement: A
corresponding
WLAN must be available and you must have the
access information.
Information o
documentati
Access via L
You can purchase the accessories for LTE reception from your r etailer
or your Fujitsu Technology Solutions de aler.
If you have ordered an LTE module, your device will already be
prepared when you receive it.
You will find information on establishing the connection with the LTE network
in the documentation for the hardware you are using.
Your device can connect with the Internet via the LTE module. To do this,
use one of the following types of connection:
• USB dongle
a USB stick with your mobile phone provider’s SIM card
• a mobile end-device (e.g. mobile phone) with Bluetooth connection
• a mobile end-device (e.g. mobile phone) with data cable
Fujitsu 39
nconfiguring the WLAN access can be found in the
on for your operating system.
TE (optional)
Page 44

Working with the notebook
Ethernet and LAN
EthernetLAN
The internal network module of your notebook supports Ethernet LAN. You can use it to
establish a connection to a local network (LAN = Local Area Network).
► Pull the LAN adapter out of the LAN port on
the notebook in the direction of the arrow.
Your network adm
The network cabl
cable can be obt
Use a shielded n
► Push the LAN adapter upw
1
direction of the arrow (
► Connect the network cable to the
ards in the
1).
LAN adapter (2).
2
► Connect the network
network port.
cable to your
inistrator can help you to configu re and use the LAN connections.
e is not included in the delivery scope. This type of
ained from a specialist dealer.
etwork cable (CAT 5e).
40 Fujitsu
Page 45

Working w ith the notebook
Your USB Type-C Port R eplicator (optional)
Your Port Replicator is a device that helps you to quickly connect your notebook to
your peripheral devices, such as a monitor, printer, etc.
The features offered by the P ort Replicator include standard ports for monitor, audio
and other U SB devices, such as mouse and keyboard.
You need only connect the notebook to the Port Rep licator in order to
work with your peripheral devices.
In addition to the USB type-C port replicator described here, this system
also supports a Thunderbolt 3 port replicator, which is also connected to
the system via the USB type-C connector.
Ports on the Port Replicator
PortReplicatorPorts
8
1
2
9
10
1 = Combined hea dphones/microphone port
2 = USB port 3.2 Gen1 (USB Type-A)
3 = VGA monitor port
4 = HDMI port
5 = DisplayPort
6 = LAN port
7 = USB 3.2 Gen1 port only for data
connection (USB Type-C)
3
7
2
6
5
4
8
8 = ON/OFF switch with power-on indicator
9 = DC input connector (DC IN)
10 = USB 3.2 Gen1 port for data connection
and power supply for the notebook
(USB Type-C)
Fujitsu 41
Page 46

Working with the notebook
Setting up the port replicator
Select a suitable location for the Port Replicator before setting it up.
Follow the instructions below when doing so:
• Never place the port replicator on a soft surface (e.g. carpeting, upholstered furniture, bed).
This can block the air vents of the notebook and cause overheating and damage.
• Place the port replicator on a stable, flat and non-slip surface. Please note that the
port replicator’s rubber feet may mark certain types of surface.
• Never place the port replicator and the mains adapter on a heat-sensitive surface.
• Do not expose the port replicator to extreme environmental conditions.
Protect the port replicator from dust, humidity and heat.
Connecting the mains adapter to the Port Replicator
► Connect the power cable (1) to the power
adapter provided for the device, see
chapter "
► Plug the power cable into the mains
3
2
socket (2).
► Connect the mains adapter cable to the DC
jack (DC IN) of the Port Replicator (3).
Technical data", Page 72.
1
When the notebook is conne cted to a Port Replicator, the operating system creates
a hardware profile for the "Do cked" mode. In this profile, for example, the setting is
saved as to which monitor was last used for output. This profile will be loaded, as
soon as the notebook is connected to a Port Replicator of the same type.
42 Fujitsu
Page 47

Working w ith the notebook
Connect the notebook to the port replicator
► Disconnect the mains adapter cable from the DC socket (DC IN) of the notebook.
1
2
► Connect one end of the USB cable (USB Type-C) to the USB port Intel® ThunderboltTM3
with charging function and display port (USB Type-C) on the notebook (1).
► Connect th
connectio
Fujitsu 43
e other end of the USB cable (USB Type-C) to the USB 3.2 Gen1 port for data
n and power supply (USB Type-C) on the Port Replicator (2).
Page 48

Working with the notebook
Switching on the notebook via the port replicator
► Press the ON/
OFF button on the port replicator to switch the notebook on.
Switching off notebook via Port Replicator
► Close all applications and shut down your operating system (please refer
to the manual for the operating system).
► Press the ON/OFF button on the port replicator to switch the notebook off.
If the notebook cannot be shut down properly, press the ON/OFF button
of the notebook for about four seconds. The notebook will switch itself
off. Any unsaved data may however be lost.
Disconnecting the notebook from the Port Replicator
► Disconnect the supplied USB cable (USB Type-C) from the USB port Intel® ThunderboltTM3
with charging function and display port (USB Type-C) of the notebook.
44 Fujitsu
Page 49

Security functions
Securityfunctions
Your notebook has several security features that you can use to secure your
system from unauthorised access.
This chapter explains how to use each function, and what the benefits are.
Please remember that in some cases, for example, forgetting your password,
you may be locked out and unable to access your data. Therefore,
please note the following information:
• Make regular backups to external data carriers such as external hard
drives, CDs, DVDs or Blu-ray Discs.
• Some secu rity functio
of the passwords and ke
If you forget your passwords you will need to contact the our Service
Desk. Deletion or resetting of passwords is not co vered by your warranty
and a charge will be made for assistance.
If you change the Password Severity setting from Strong to Stringent in the Security
BIOS Se tup Utility menu, the Fujitsu Service Desk can no longer reset the password.
In this case, the system can remain permanently unusable.
Therefore, Fujitsu recommends to generally set u p a supervisor password
with the setting Password Severity = Strong.
Configuring the fingerprint sensor
FingerprintsensorFingerprintsensor
Whether or not your device has a fingerprint sensor depends on the
device configuration you have ordered.
ns need you to choose passwords. Make a note
eptheminasafeplace.
Security functions
The fingerprint sensor can record an image of a fingerprint. With additional fingerprint
software, this image can be processed and used instead of a password.
► You must install the fingerprint software
in order to be able to use the
fingerprint sensor (1).
1
The current AuthConductor Basic software for hand vein a nd fingerprint
sensor is available on the Internet at:
https://www.fujitsu.com/emeia/solutions/business-technology/security/product/secure/"
"
Fujitsu 45
Page 50

Security functions
Configuring the p alm vein sensor
PalmveinsensorPalmveinsensor
The palm vein sensor can record the image of the pattern of the veins of the hand. Th is image
is evaluated by additional software and can be used instead of a password.
Whether your device has a palm vein sensor depends on the device
configuration you have ordered.
► To be able to use the palm vein sensor
(1), you must install the software.
1
The current AuthCo
sensor is availabl
"
https://www.fu
nductor Basic software for hand vein and fingerprint
e on the Internet at:
jitsu.com/emeia/solutions/business-technology/security/product/secure/"
Using the Security Lock
Your device comes with a Security Lock mechanism for the Kensington Lock Cable. You
can use the Kensington Lock Cable, a sturdy steel cable, to help protect your notebook
from theft. The Kensington Lock Cable is available as an accessory.
Fujitsu recommends the use of a c ombination lock.
► Fit the Kensington Lock Cable to the
mechanism on your notebook.
UsingtheKensingtonLockCableSecurityLockMec hanicalbackupAnti-theftprotection
K
46 Fujitsu
Page 51

Security functions
Configuring password protection in BIOS Setup Utility
Before using the various options for password protection in the BIOS Setup utility
to increase data security, please observe the following:
Make a note of the passwords and keep them in a safe place. If you forget your
supervisor password you will not be able to access your notebook. Deletion of the
password is not covered by your warranty and a charge will be made for assistance.
Passwordprotection
Your password can be up to
letters, numbers and spe
When using special char
on the country variants
If you change the Password Severity setting from Strong to Stringent in the Security
BIOS Se tup Utility menu, the Fujitsu Service Desk can no longer reset the password.
In this case, the system can remain permanently unusable.
Therefore, Fujitsu recommends to generally set u p a supervisor password
with the setting Password Severity = Strong.
Protecting BIOS Setup Utility (supervisor and user password)
If you have opened these operating instructions on the screen, we
recommend that you print them out. You cannot call the instructions onto
the screen while you are setting up the password.
lity
BIOSSetupUti
The supervisor password and the user password both prevent unauthorised use of the BIOS Setup
Utility. With the aid of the supervisor pa ssword you can access all of the functions of the BIOS
Setup Utility, while the user password will only give you access to some of the functions. You
can only set up a u ser password if a supervisor password has already been assigned.
32 characters long and can contain
cial characters.
acters, you must remember that these are dependent
of the keyboard used.
Please refer to section "Settings in BIOS Setup Utility", Page 59 for a de scription
of how to call up an d operate the BIOS-Setup-Utility.
Fujitsu 47
Page 52

Security functions
Assigning the supervisor and user passwords
► Start the BIOS Setup Utility and go to the Security menu.
► Select the Set Supervisor Password field and press the Enter key.
With Enter new Password: you are asked to enter a password.
► Enter the password and press the Enter key.
Confirm ne w Password requires you to co n firm the password.
► Enter the pa ssword again and press the Enter key.
Changes have been saved is a confi rmat ion that the new password has been saved.
► To set the user password, select Set User Password and proceed exactly as
when configuring the supervisor password.
If you do not want to change any other settings, you can exit BIOS Setup Utility.
► In the Exit menu, select the option Save Changes & Exit.
► Select Yes and press the Enter key.
PasswordSupervisorpasswordUserpassword
The notebook is then rebooted and the new password comes into effect. It will now be necessary
to first enter your supervisor or user password in order to open the BIOS Setup Utility.Please
note that the user password only provides access to a few of the BIOS settings.
Changing the supervisor or user password
You can only change the supervisor passwo rd when you have logged into the
BIOS Setup Utility with the supervisor password.
PasswordSupervisorpasswordUserpassword
► Call the BIOS Setup Utility andgototheSecurity menu.
► When changing the password, proceed exactly as for password assignment.
Removing passwords
To re move a password (without setting a new password) perform the following steps:
password
rd
PasswordSupervisor
Userpasswo
► Start the BIOS Setup Utility and go to the Security menu.
► Highlight the Set Supervisor Password or Set User Password field and press the Enter key.
You will be requested to enter the current password by the Enter Current Password prompt.
You will be requested to e nter a new password by the Enter New Password prompt.
► Press the Enter key twice.
► In the Exit menu, select the option Save Changes & Exit.
► Select Yes and press the Enter key.
The notebo ok will now reboot with the password removed.
Removing the supervisor password simultaneously deactivates the user password.
48 Fujitsu
Page 53

Security functions
Password protection for booting of the operating system
With the supervisor password you have set in the BIOS Setup Utility (see
section "
also prevent starting of the operating system.
Operatingsystem
Activating system protection
► Start the BIOS Setup Utility and go to the Security menu.
Operatingsystem
► Select the PasswordonBootoption and press the Enter key.
► Select the desired option (Disabled, First Boot or Every Boot) and press the Enter key
► Select the Save Changes & Exit option under Exit.
The notebook reboots. You will be prompted to en ter your password (the supervisor password).
Deactivating system protection
► Start the BIOS Setup Utility and go to the Security menu.
Operatingsystem
► Select the PasswordonBootoption and press the Enter key.
► Select the Disabled option and p ress the Enter key.
If you do not want to change any other settings, you can exit BIOS Setup Utility.
► Select the Save Changes & Exit option under Exit.
The notebook will reboot. The system is no longer password-protected.
Assigning the supervisor an d user passwords", Page 48), you can
Password protection for the ha rd disk
If a s upervisor password has been assigned, a password for the hard disk can
also be set in the Hard Disk Security me nu.
The hard disk is protected by this password. Data on this hard disk can only be read
into another system if the correct password has been entered.
Fujitsu 49
Page 54

Security functions
Trusted Platform Module (TPM) (device-dependent)
TPMTrustedPlatformModule
To use the TPM, you must activate the TPM in the BIOS Setup before the software
is installed . The condition for this is that you have assigned at least the supervisor
password (see "
Instructions for how to call up and use the BIOS Setup Utility can be found in
section "
Enabling TPM
• Requirement: You have set a supervisor passw ord, see "Security functions", Page 45.
► Call up the BIOS Setup a
► Mark the TPM (Security Chip) Setting field and press the Enter key
► Select the "Security
Once you have activated the TPM through a reboot, the Clear Security Chip menu option appears.
With Clear Securit
been used. With Ena
Root Keys, AIK - At
Please note that y
encrypted with t
► Select the Exit S
► Press the Enter key and select Yes.
The notebook w
Security functions", Page 45).
Settings in BIOS Setup Utility", Page 59.
nd select the Security menu.
Chip" "Enabled" entry to activate the TPM
yChip, you can delete the own er in the TPM, if the TPM has already
bled, all secret keys generated by applications (e.g. S RK - Storage
testation Identity Keys, etc.) are deleted.
ou will then no longer be able to access the data you have
he keys based on that holder.
aving Changes option in the Exit menu.
ill restart, and TPM will be enabled after the reboot.
Disabling TPM
• Requirement: You have set a supervisor passw ord, see "Security functions", Page 45.
► Call up the BIOS Setup and select the Security menu.
► Mark the TPM (Security Chip) Setting field and press the Enter key.
► Select the "Security Chip" "Disabled" entry to deac tiv ate the TPM
► From the Exit menu, choose the option Exit Saving Changes.
► Press the Enter key and select Yes.
Your notebook will now restart and TPM will be disabled.
50 Fujitsu
Page 55

Security functions
SmartCard reader
Securityfunctions,Securityfunctions
SmartCards are not supplied as standard equipment. You can use all SmartCards that comply with
the ISO standard 7816-1, -2 or -3. These SmartCards are available from various manufacturers.
With the appropriate software you can use your SmartCard as an alternative to password protection,
but also as a digital signature, for encrypting your e-mails or for home banking.
We recommend that you always use two SmartCards. A lways keep one of the SmartCards
in a safe place if you are carrying the other SmartCard with you.
In order to be able to take advantage of all the security features of your notebook,
you will need a CardOS SmartCard from Fujitsu.
The SmartCard can only be used with a PIN, offering maximum protection even if
you lose the SmartCard. In order to maximise your security, the CardOS SmartCard
is disabled if three incorrect attempts are made to enter the PIN.
When you use the CardOS SmartCard f or the first time, you will either need to enter the
preset PIN "12345678" or the PIN given to you by your systems administrator.
Inserting the SmartCard
Do not use force when inserting and removing the SmartCard.
Make sure that foreign o bjects do not fall into the SmartCard reader.
► Slide the Smar
reader with th
some variants
Fujitsu 51
tCard into the SmartCard
echipfacingupwards(on
it faces down) and to t he front.
Page 56

Connecting external devices
Connecting external devices
Always refer to the safety information provided in "Important notes", Page 12 before
connecting or disconnecting any devices to or from your notebook.
Always read the documentation supplied with the device you wish to connect.
Never connect or disconnect cables during a thunderstorm.
Never pull at a cable when disconnecting it. Always grasp the plug.
With some devices such as USB devices, it is not necessary to switch off
the no tebook and the device before connecting/disconnecting. For more
information about whether or not devices need to be switched off, please refer
to the documentation supplied with the external device.
Some of the external devices require special drivers (see the o perating
system and external device documentation).
HDMI port
HDMIport
The HDMI port on your notebook or on the optional Port Replicator can be used to connect
an external amplifier, LCD TV or a plasma TV w ith an HDMI connection.
► Connect the data cable to the
external device.
► Connect the da
port on the not
optional Por
ta cable to the HDMI
ebook or on the
t Replicator.
52 Fujitsu
Page 57

Connecting external devices
Connecting an external monitor to the port replicator
An analogue monitor is conn ecte d to the analogue VGA monitor port, a digital mon itor
to the DisplayPort on the optional Port Replicator. Including the internal screen, up
to 3 screens can be use d simultaneously (please refer to "
combinations", Page 24, section "Switching to output screen").
MonitorVGAconnectionsocketMonitorportMonitorport
Function keys and key
Analogue VGA monitor port (on optional port
Digital DisplayPort (on optional Port Replicator)
replicator)
► Switch off the not
ebook and the external monitor.
► Plug the data cable of the external monitor into the monitor port.
► First switch on
the exte rnal monitor and then the notebook.
You can also sw
notebook, see
You can displa
notebook LCD
itch between the external monitor and the LCD monitor of the
chapter "
Function keys and key combinations", Page 24.
y the same picture on the extern al monitor and the
monitor simultaneously.
Fujitsu 53
Page 58

Connecting external devices
Connecting USB devices
USBports
On the USB ports, you can connect external devices that also have a US B port
(e.g. a DVD drive, a printer, a scanner or a modem).
USB devices are hot-pluggable. This means you can connect and disconnect
devices while your operating system is running.
USB 1.x has a maximum data transfer rate of 12 Mbit/s.
USB 2.0 has a data transfer rate of up to 480 Mbit/s.
USB 3.0 has a data trans
USB 3.2 (Gen1) has a dat
USB 3.2 (Gen2) has a da
Additional informat
ferrateofupto5Gbit/s.
a transfer rate of up to 5 Gbit/s.
ta transfer rate of up to 10 Gbit/s.
ion can be found in the documentation for the USB devices.
► Connect the data cable to the
external device.
► Connect the data cable to a USB
port of the notebook.
Device drivers
USB devices will be automatically recognised and installed by your operating system.
54 Fujitsu
Page 59

Connecting external devices
USB port Intel® ThunderboltTM3 with charging function
and display port (USB Type-C)
USB-AnschlussmitAufladefunktion(USBType-C)IntelThunderbolt
At this USB port, you can charge a connected USB device or operate devices
without additional power supply.
This is also possible with connected notebook computers by g oing to the BIOS Setup Utility
under the menu Advanced > Miscellaneous Configurations and activating the function USB Type-C
Power Delivery on System-Off. Instructions for how to call up and operate the BIOS Setup
Utility can be found in section "
With the USB Type-C Port Replicator available as an accessory, the notebook
can be supplied with power via this USB port.
USB devices are hot-pluggable. This means yo u can connect and disconnect
the cables of USB devices while the system is running.
Additional information can be found in the documentation for the USB devices.
Settings in BIOS Setup Utility", Page 59.
► Connect the data cable to the
external device.
► Connect the data cable to the USB port
Intel® Thunderbolt
function and display port (USB Type-C)
of the notebook.
TM
3 with charging
Fujitsu 55
Page 60

Connecting external devices
USB port with charging function (Anytime USB charge)
You can use this USB port to charge or supply power to a connected USB device (e.g.
to charge a PDA or a mobile phone or to connect a USB lamp).
Charging is also possible when the notebook is switched off, if the Anytime USB Charge function
is activated in the Advanced menu of the BIOS Setup Utility. If the setting AC is selected,
the device will only be charged when the mains adapter is connected.
Please refer to section "
of how to call up and operate the BIOS-Setup-Utility.
USBchargingfunction
It is recommended that the notebook be operated with the power supply connected
whenever the USB port with charging function is in use, as this function will drain
the battery more quickly if an external USB device is being charged.
The power supply unit must already be connected when the notebook is
switched off, as otherwise the USB charging function will be disabled and
the connected USB devices will not be charged.
Some USB devices (e.g. mobile telephones) require a driver in order to utilise the
USB charging function. In this case the USB charging function will not work when the
notebook is switched off, as no drivers are active when the notebook is switched o ff.
Settings in BIOS Setup Utility", Page 59 for a description
► Connect the data cable to the
external device.
► Connect the data cable to a USB port
(Anytime USB charg e) of the notebook.
How to remove USB devices correctly
Always cor
to ensure
► Left click on the icon to safely remove hardware, located in the taskbar.
► Select t
► Press the Enter key.
56 Fujitsu
he device which you want to shut down and remove.
r the dialogue box which tells you that it is now safe to remove the device.
Wait fo
rectly remove the device according to the rules described below,
that none of your data is lost.
Page 61

Connecting external devices
Headset port
ConnectingaudiodevicesAudioportsC onne ctingheadphones
The headset port lets you connect a headset, headphones, external speakers
or microphones to your notebook.
► Connect the audio cable to the
external device.
► Connect the audio cable to the headset
port of the notebook.
The internal loudspeakers are disabled.
If you buy a cable from a ret ailer, please note the following information:
The headset port on your notebook is a "3.5 mm jack socket".
If you want to conn ect a headset, headphones or loudspeakers, you
will need a "3.5 mm jack plug".
Fujitsu 57
Page 62

Removing and installing components
during servicing
Removing and installing compo
during servicing
Only qualified technicians should repair your notebook. Unauthorised
opening or incorrect repair may greatly endanger the user (electric shock,
fire risk) and will invalidate your warranty.
Servicing
Components
nents
58 Fujitsu
Page 63

Settings in BIOS Setup Utility
Settings in BIOS Setup Utility
BIOSSetupUtilitySystemsettings,BIOSSetup UtilityConfiguration,BIOSSetupUtilitySetupSystemconfigurationHardwareconfiguration
The BIOS Setup Utility allows you to set the s ystem functions and the hardware
configuration for the notebook.
When it is delivered, the notebook is set to factory default setting s. You can
change these settings in BIOS Setup Utility. Any changes you make take effect as
soon as you save and exit the BIOS Setup Utility.
The BIOS Setup Utility program contains the following menus:
Info
System
Advanced
Security
Boot
Exit
Displays information relating to the BIOS, processor and notebook
Set calendar and clock, configure SATA drive
Configuration of various hardware components, such as mouse, keyboard,
processor
Password settings and security functions
Configuration of the start-up sequence
Exits the BIOS Setup Utility
Starting the BIO
► Start the device (switch off/on or reboot the Operating System).
BIOSSetupUtility
Depending on the setting for Fast Boot in the BIOS Setup Utility the following display,
if applicable, appears on the screen on start-up:
<F2> BIOS Setup <F12> Boot Menu
► Press the function key
► If a password has been assigned, enter the pa ssword and press the En ter key.
If you have forgotten the password, contact your system administrator
or contact our customer service centre.
The BIOS Setup Utility starts.
S S etup Utility
F2
.
Fujitsu 59
Page 64

Settings in BIOS Setup Utility
Operating the BIOS Setup Utility
BIOSSetupUtility
Press the
of the individual settings is shown in the right-hand window of the BIOS Setup Utility.
With the
F1
key to display help on the o peration of the BIOS SetupUtility. The description
F9
key you can load the default settings of the BIOS Setup Utility.
► Use the cursor keys
The menu is displayed on the screen.
► Select the option that you want to change with the cursor keys
←
or→to select the m enu in which you would like to configure settings.
↑
or↓.
► Press the Enter key.
► Press the
ESC
key to exit the selected menu.
► For future reference, make a note of the changes you have made (e.g. in this manual).
60 Fujitsu
Page 65

Settings in BIOS Setup Utility
Exiting BIOS Setup Utility
BIOSSetupUtility
You need to select the desired option in the Exit menu and activate it by pressing the Enter key:
Exit Saving Changes - save ch
► To save the current menu settings and exit the BIOS Setup Utility,selectExit Saving Changesand Yes.
The notebook is rebooted
and the new settings come into effect.
anges and exit BIOS Setup Utility
Exit Discarding Changes – Discard changes and exit BIOS Setup Utility
► To discard the changes, select Exit Discarding Changes and Yes.
The settings in place when BIOS Setup Utility was called remain effective. BIOS
Setup Utility is terminated and the note book is rebooted.
Load Setup Defaul
► To copy the standard entries for all menus of the BIOS Setup Utility,
choose Load Setup Defaults and Yes.
ts – Copy Standard Entries
Discard Changes – Discard changes without exiting the BIOS Setup Utility
► To discard the changes you have made, select Discard Changes and Yes.
ThesettingsinplacewhenBIOS Setup Utility was called remain effective.
You can now make additional settings in the BIOS Setup Utility.
► If yo u want to exitBIOS Setup Utilitywith these settings, select Exit Saving Changes and Yes.
Save Chan
ges - save changes without exiting
the BIOS Setup Utility
► To save the changes, select Save Changes and Yes.
The changes are saved. You can now make additional settings in the BIOS Setup Utility.
► If you want to exit BIOS Setup Utility with these settings, choose Exit Saving Changes and Yes.
Save Changes and Power Off
► To save the changes and switch off your device, select Save Changes and Power Off and Yes.
The changes are saved. Your device is shut down.
Fujitsu 61
Page 66

Settings in BIOS Setup Utility
Erase Disk
Erase Disk is a Fujitsu Technology Solutions feature embedded in the system firmware (UEFI:
Unified Extensible Firmware Interface), to erase all data from SATA hard disk(s) or SSDs.
This function can be used to delete all data from internal or external hard disks or SSDs
connected via the eSATA port, b efore the hard disks are discarded or the complete
computer system is disposed of. The functioncanalsobeusedifharddisksaretobe
completely deleted, e.g. before installing a new operating system.
The application can only be selected and run if an administrator/supervisor
password has been assigned (Menu B IOS Setup - Security).
To erase data from SATA h
► Call the BIOS Setup wi
► To start the application, select Erase Disk (BIOS Setup - Advanced or BIOS
Setup - Security) and set Start after Reboot.
► Then select Save Cha
a reboot and start E
Because of the reb o
to interrupt the p
► After the application starts, the Administrator/Supervisor password must
be entered for security reasons.
A dialogue field appears in which a particular, several or all the hard disks can be selected
for deletion. This depends on the number of hard disks in your system.
► Select the hard disk(s) to be deleted. The selected hard disk(s) will be deleted one-by-one.
Erase Disk offers four deletion options, from fast (with one deletion pass) to very
secure (w ith 35 d eletion passes). Depending on the algorithm chosen, the process
can take between ~10 seconds and ~10 minutes per GB:
• Zero Pattern (1 pass)
• German BSI/V S ITR (7 passes)
• DoD 5220.22-M ECE (7 passes)
• Guttmann (35 passes)
SSD driv
comman
ard disks or SSDs, proceed as follows:
th the Administrator/Supervisor password .
nges and Exit in the menu Save & Exit / Exit to initiate
rase Disk.
ot, the Erase Disk will be started. You have the option
rocess during the user selection.
es are securely erased with the Enhanced Secure Erase ATA
d integrated in the firmware.
► Select the desired deletion algorithm for the selected hard disks.
62 Fujitsu
Page 67

Settings in BIOS Setup Utility
The complete deletion process can be recorded as an audit-compliant log
and copied to an external USB stick, which must be formatted as FAT32.
Please connect only one external USB stick.
► Select whether a status report should be written to the USB stick.
The user can select the following tasks which should be run by the
system after the deletion process:
• Reset administrator and user password
• Load BIOS setup defaults
• Shutdown the Computer
• Exit Era se Disk with no additional options u pon completion
► Select the function which you require.
The deletion process starts.
Fujitsu 63
Page 68

Troubleshooting and tips
Troubleshooting and tips
TroubleshootingTipsFaultTroubleshooting
If a fault occurs, try to correct it as described. If you fail to correct the problem, proceed as follows:
► Make a note of the steps and the circumstances that led to the fault. Also
► Switch the notebook off.
► Please contact the Hotline/Service Desk.
Follow the safety notes in the "Safety/Regulations" manual when
connecting or disconnecting cables.
make a note of any error messages displayed.
The telephone numb ers can be found at: "http://support.ts.fujitsu.com/contact/servicedesk".
Have the fo llowing information ready when you call:
• The model name and serial number of the notebook. The serial number is
located on a sticker on the underside of the notebook.
• Notes of any messages that appear on the screen and information on acoustic signals.
• Any changes you have made to the ha rdwa re or software since
receiving the notebook.
• Any changes you have made to the BIOS Setup settings since re ceiving the notebook.
• Your system configuration and all peripheral devices connected to your system.
• Your sales contract.
Our notebooks
means that con
in terms of we
configuratio
compared to a
games with i
been appro
losses or m
versions c
Help if pr
Should you encounter a problem with your computer that you cannot resolve yourself:
► Note the ID number of your device. T he ID number is found on the type rating
plate on the back or underside of the casing.
► Contact the Service Desk responsible for your country for clarification of the problem:
http://support.ts.fujitsu.com/contact/servicedesk". When you do this, please have
"
ready the ID number and serial number of your system.
64 Fujitsu
oblems occur
have been designed primarily with mobile applications in mind. This
siderable effort has b een made to optimise components and equipment
ight, space and energy requirements. Depending on the particular
n you have purchased, it is possible that functionality ma y be slightly reduced
desktop PC if you are running processor-intensive gaming softwa re, e.g.
ntensive 3D graphics. Updating your hardware with drivers which have not
ved by Fujitsu Technology Solutions may result in pe rformance losses, data
alfunction of the equipment. A list of approved drivers and current BIOS
an be downloaded from: "
http://support.ts.fujitsu.com/Download/Index.asp"
Page 69

Troubleshooting and tips
Reset by switching off the battery
If the device no longer responds and does not react to the ON/OFF switch, use the battery
on/off button to switch the device off, it is located on the bottom of the device.
► Switch the battery off, then switch it on again (see chapter "
Switch the battery off and on", Page 32
Restore contents of the hard disk from Recovery CD/DVD
Harddisk:Operatingsystem,restoring
You can use the "Windows Recovery CD" (optionally available) and the "Drivers & Utilities
CD/DVD" to reinstall the operating system.
The instructions are provided on the case of the Recovery CD.
You will need an external optical drive available as an accessory.
During the reinstall process your personal files and any installed programs
will be deleted. We advise you to backup your files to an external hard
drive, or CD / DVD disk before you start.
► Switch the note
Depending on the Fast Boot setting in the BIOS Setup utility, the following
information may appear on the screen during start:
<ESC>Diagno
► When this mes
► Insert the "Windows Recovery CD" into the optical drive.
► Select CD-
► Follow the instructions on the scree n.
After the i
componen
► Insert th
► Click on the Desk Update button.
► Select A
► Follow the instructions on the scree n.
► Restar
Fujitsu 65
t your notebook when the driver installation is completed.
book on.
stic screen <F12>Boot Menu <F2>BIOS Setup
sage appears, press the function key
ROM and press the Enter key.
nstallation you must install all the drivers again. Some installed hardware
ts will not be correctly supported until this has been done.
e "Drivers & Utilities" CD/DVD into the optical drive. The CD starts automatically.
utomatic driver installation (Express) and click on Start installation.
F12
.
Page 70

Troubleshooting and tips
Restoring the system under Wind
If necessary, you can reset your system to the original state of the hard disk.
► Select Settings from the Start menu.
► Select Update & security.
► Select Recovery.
► Select according to your requirements from the options given.
The notebook’s date or ti
TimenotcorrectTimenotc orrectIncorrect date/timeDate is incorrect
Cause Troubleshooting
Time and date are incorr
If the time and date are still set in correctly after
switching on the notebook.
ect.
me is incorrect
► With the BIOS-Setup-Ut
date and time in the main
► Please contact your s
Hotline/Service De
ows 10
ility, y ou can set the
menu.
ales outlet or our
sk.
When certain characters are entered on the keyboard, only numerals are written
Cause Troubleshooting
The virtual numeric keypad of your device is
activated, see "
The notebook’
stoodark
LCDscreenLCDscreeni
Cause Troubleshoot
Monitor is switched off.
External monitor or television set connected. ► Press the key to switch screen output, see
Virtual numeric keypad", Page 24
s L CD screen remains blank
► Press the
► Pressakeyor
Function keys and key combinati ons",
"
Page 24.
Num
key.
ing
touch the touchpad.
The LCD screen is difficult to read
een
een
LCDscr
LCDscr
Cause Troubleshooting
Reflected glare ► Turn the notebook or alter the tilt of the LCD
66 Fujitsu
screen.
► Increa
se the brightness of the screen.
Page 71

Troubleshooting and tips
The external monitor remains bl
Monitor
Cause Troubleshooting
Monitor is switched off. ► Switch the external monitor on.
Power saving has been activated (monitor is
blank).
Brightness is set t o dark.
Screen output is set to the notebook’s LCD
screen
The external monitor’s
cable is not connected p
power cable or data
roperly.
► Press any key to continue.
► Adjust the brightness of the
► Press the key to switch scr
► Switch off the e xternal monitor and the
► Check whether the power cable is plugged
► Check whether the data cable is properly
► Switch on the external monitor and the
ank
monitor.
een output, see
Function keys and key co
"
Page 24.
notebook.
properly into the externa l monitor and into
the power socket.
connected to the notebook and the external
monitor (if it is plugged in with a connector).
notebook.
mbinations",
The external monitor is blank or the image is unstable
ScreenMonitor
Cause Troubleshooting
The wrong ext ernal monitor has been selected
or the wrong screen resolution has been set for
the application program.
► Stop the appli
Windows by pre
error persist
use the key fo
(see "
Functi
Page 24)toswi
notebook. C
► Set the screen resolution: Set the screen
resolution as described in the documentation
for your operating system.
► Select mo
describe
operatin
cation program und er
s after stopping the program,
r switching screen output
on keys an d key combinations",
hange the following setting:
nitor: Select m onitor 1 or 2 as
d in the documentation for your
g system.
Alt+F4
ssing
tch to the LCD screen of the
.Ifthe
Fujitsu 67
Page 72

Troubleshooting and tips
The notebook cannot be started
Notebook
Cause Troubleshooting
The battery is dead.
The power adapter is not connected correctly.
► Connect the notebook to the mains voltage
via the mains adapter and charge the
battery.
► Check w hether the mains adapter is
connected correctly to the notebook.
► Switch the notebook on.
The notebook stops worki
NotebookEnergysavingmode
Cause Troubleshooting
Notebook is in energy s
An application progr
malfunction.
The battery is dead.
aving mode.
amme has caused the
ng
► Leave energy saving mo
► Close the application program or restart
the notebook (by restarting the operating
system or switching the device off and back
on again).
► Connect the notebook to the mains voltage
via the mains adapter and charge the
battery.
de.
The printer does not print
Printerdoesnotprint
Cause Troubleshooting
The printer is not switched on. ► Make sure that the printer is switched
The p rinter is not connected correctly.
The printer driver is faulty or not correctly
installed, or it is the wrong printer driver.
on and ready for operation (refer to the
documentation supplied with the printer).
► Check that the data cable connecting
the notebook to the printer is properly
connected.
► Check that the data cable connecting
the notebook to the printer is properly
connected.
► Check whether the correct printer driver is
loaded (refer to the printer documentation).
68 Fujitsu
Page 73

Troubleshooting and tips
The wireless connection to a net
Thewirelessconnectiontoanetw orkdoesnotwork
Cause Troubleshooting
The wireless component is disa
The wireless component is enabled. Despite
this, the wireless connection to a network does
not work.
SmartCard reader is not
Cause
Chip card inserted incorrectly. ► Check if you inserted your SmartCard into
bled.
► Switch the wireless component on (see
► Check whether the wireless connection is
► Further information on using the wireless
recognised.
Troubleshooting
► Check whether the SmartCard you are using
work does not work
"
Switching the wireless components on and
off", Page 39).
switched on via the software.
component can be found in the help files.
the SmartCard reader correctly.
is supported. Your SmartCard must comply
with the ISO standard 7816-1, -2, -3 and -4.
SmartCard PIN forgotten
Cause
PIN forgotten ► If you are worki
Troubleshooting
system adminis
system with a Su
ng in a network, contact your
trator, who can unlock your
pervisor P IN.
SmartCard lost
Cause
SmartCard lost ► If you are working in a network, contact your
Fujitsu 69
Troubleshooting
system administrator, who can boot up your
notebook with a Supervisor SmartCard.
Page 74

Troubleshooting and tips
Error messages on the screen
ErrormessagesonthescreenErrormessage:
This section describes the error messages generated by the BIOS Setup. Error messages displayed
by the operating system or programmes are described in the relevant documen tation.
If the error message appears repeatedly, despite troubleshooting measures, please
contact the place of purchase or our customer service cen tre.
Error message/cause Resolution
CMOS battery bad
If the error message occurs repeatedly, the
buffer battery in the notebook is flat.
System CMOS checksum bad - default configuration
used
The system configuration information is
incorrect.
Extended memory failed at offset: xxxx Failing Bits:
zzzz zzzz
When testing th e extended memory an error has
resulted at the address xxxx.
Failure Fixed Disk n
The settings of the hard disk drive are incorrect.
Keyboard controller error
Keyboard error
nn Stuck key
Operating system not found
Press <F1> to resume, <F2> to SETUP
This error message appears if an error occurs
during the self-test before starting the operating
system.
► Contact your sales outlet
service centre.
► Switch the notebook of
► Switch the notebook on.
► Press the function k
BIOS Setup.
► In the BIOS Setup, select the Exit menu.
► Select the entry Lo
► Select OK and press the Enter key.
► Check whether the additional memory
module has been inserted correctly.
► Start the BIOS Setup (Primary Master
submenu) and select the correct settings.
► Switch the notebook off using with the
ON/OFF button.
► Wait 3 - 5 seconds and switch on the
notebook again.
If you are using an external keyboard:
► Check the connection and reboot the
notebook.
► Make sure that no key is pressed.
► Check
in the BIOS Setup whether your hard
as been set correctly.
disk h
► Make sure that the operating system is
installed on the corresponding drive.
F1
► Press the
function key to start the
operating system.
► Press the function key
BIOS Setup.
or our customer
f.
F2
ey
to access the
ad Setup Def aults.
F2
to access the
70 Fujitsu
Page 75

Error message/cause Resolution
Previous boot incomplete - Default configuration
used Due to an error during the previous system
► Press the
to do so.
boot, default values were used for certain
settings. Check the settings in the BIOS Setup.
Real time clock error
► Contact your sales outlet or
service centre.
nnnnK Shadow RAM failed a
Bits: zzzz
System ba ttery is dead - Replace and run SETUP
t offset: xxxx Failing
► Contact your sales outlet or our customer
service centre.
► Contact your sales outlet or our customer
service centre.
System cache error - C ache disabled
► Contact your sales out
service centre.
System timer error
► Contact your sales outlet or our customer
service centre.
Troubleshooting and tips
F1
function key when prom
our customer
let or our customer
pted
Fujitsu 71
Page 76

Technical data
Technical data
Technicaldata
LIFEBOOK
Technicaldata
Ambient conditions
Operating temperature 5 °C to 35 °C / 4 1 °F to 95 °F
Transport temperature
Relative humidity
Operating height
Dimensions
Width x depth x height
Weight
Main memory
The data sheet for the device provides fu rther technical data. You can
find the data sheet on your device or you can download it from the
Internet at "
http://www.fujitsu.com.fts/support/".
–10 °C .... 60 °C / 14 °F .... 140 °F
20 % ... 80 % (no condensation)
up to 3048 m
309 mm x 212 mm x 15.5 mm (without rubber
feet) /
12.1654 inch x 8.345 inch x 0.61 inches (excl.
rubber feet)
about 916 g with 50 Wh re chargeable battery /
about 2.02 lb with 50 Wh rechargeable battery
LPDDR3 memory with 8 or 16 GByte (soldered)
Rechargeable battery
You c an find information on the batteries used in your device on the
Internet at "
Nominal voltage 14.4 V
Rated capacity 3490 mAh
Type Lithium ions
Interchangeability By authorized service provider
Type Lithium metal
Interchangeability By authorized service provider
72 Fujitsu
http://www.fujitsu.com.fts/support/".
4-cell battery 50 Wh
Button cell battery CR1620
Page 77

Mains adapter (notebook computer)
Technicaldata
Electrical data
Primary 65 W
Rated voltage
Rated frequency 50 Hz – 60 Hz (automatic)
Secondary
Rated voltage 19 V
Maximum rated current 3.42 A
An additional mains adapter or power cable can be ordered at any time.
100 V – 240 V ( automa tic)
USB Type-C Port Replicator (optional)
Electrical data
Complied safety regulations CE
Protection class II
Ports
Monitor port (analogue)
HDMI port 1 x
Display port 1 x
Maximum resolution of an external monitor VGA: 1920 x 1200 pixels
LAN port RJ45
USB (Universal Serial Bus) 3 x USB 3.2 Gen 1, 2 x USB Type-C
Microphone port / Line in / Headphones port
/ Line out
15-pin
HDMI or Display Port: 4096 x 2160 pixels
3.5mmstereominijack
Technical data
Fujitsu 73
Page 78

Technical data
Mains Adapter USB Type-C Port Replicator (optional)
Connect only the 90 W mains adapter to the USB Type-C Port Replicator.
The following technical data applies to the mains adapter supplied with the USB
Type-C Port Replicator, which you can order separately.
Primary
Rated voltage
Nominal frequency 50 Hz to 60 Hz (automatic)
Max. rated current 0,7 A to 1,2 A
Secondary
Nominal power 90 W
Rated power voltage 19 V
Maximum rated current 4.74 A
An additional mains adapter or power cable can be ordered at any time.
100 V to 240 V (automa tic)
74 Fujitsu
Page 79

Manufacturer’s notes
Manufacturer’s notes
Disposal and recycling
Notes
If the battery is not replaceable by the user, have it replaced and disposed
of by an authorized service provider.
Information about this subject can be found on your notebook or on our website:
"
https://www.fujitsu.com/emeia/about/local/csr/recycling/"
TCO Certified
TCOCertified
Please note that TCOin the "TCO certified
Certification markings
kings
Certificationmar
Certification markings are listed as applicable in the "Manual Appendix Additional Certifications" supplement.
If such markings are available, you can find the s upplement on the Internet at
http://support.ts.fujitsu.com/Manuals/" with the Operating Manual for your device.
"
certified systems bear the "TCO certified" logo. Further information is given
" manual appendix at "
http://support.ts.fujitsu.com/Manuals/".
Fujitsu 75
Page 80

Index
Index
A
Alt + Tab 26
Anti-theft protection 46
Audio ports 57
B
Back tab 26
Background lighting 27
Backspace 23
Bass loudspeaker (subwoofer) 36
Battery
battery life 32
caring for and maintaining 32
charge level 32–33
charging 32
Battery indicator 20
Battery status indicator
see Battery indicator 20
Battery status meter 32
Battery symbol
see Battery indicator 20
BIOS Setup Utility
calling 59
exiting 61
operating 60
protecting with password 47
settings 59
Bluetooth
Switching the module off 39
Switching the module on 39
Bluetooth, safety notes 13
Buttons 22
C
Caps Lock 23
indicator 20
Certification markings 75
Cleaning 15
Components
installing / removing 58
Configuration, BIOS Setup Utility 59
Connecting audio devices 57
Connecting headphones 57
Crystal View display
cleaning 15
Ctrl+Alt+Del 26
Cursor control 23
Cursor keys 23
D
Date is incorre ct 66
Device
setting up 17
Disable
microphone 25
E
Enable
microphone 25
Energy
energy saving 13
Energy saving 13
Energy saving functions 25
Energy saving mode
leaving 68
Enter 23
Enter key 23
Error message:
on the screen 70
Error messages on the screen 70
Ethernet LAN 40
F
FLock
Indicator 20
F1 25
F10 25
F2 25
F3 25
F4 25
F5 25
F6 25
F7 25
F8 25
F9 25
Fault
correction 64
Fingerprint sensor 45
configure 45
First-time setup 16
Fn key 23
G
Getting started 16
H
Hard disk:
restoring the co ntents 65
76 Fujitsu
Page 81

Index
Hardware configuration 59
HDMI port 52
I
Important notes 12
Incorrect date/time 66
Indicator
Caps Lock 20
F Lock 20
Num Lock 20
Scroll Lock 20
Intel Thunderbolt 55
K
Key combinations 24
Keyboard 22
Background lighting 27
cleaning 15
L
LCD screen
cleaning 15
decrease brightness 25
difficult to read 66
notes 29
reflected glare 66
remains blank 66
LCD screen is too dark 66
Life, battery 32
Line feed 23
Loudspeakers 36
switch off 25
switch on 25
M
Mains ada pter
connecting 17
setting up 17
Mechanical backup 46
Memory card
handling 35
inserting 35
removing 35
Microphone 36
Mobile operation 14
Monitor
connecting 53
drifting display 67
remains blank 67
Monitor port
see VGA connection socket 53
N
Notebook
before you travel 14
cannot be started 68
cleaning 15
stops working 68
switching off 21
transporting 14
using 19
Notebook, operation 19
Notes 12
cleaning 15
disposal / recycling 75
energy saving 13
LCD screen 29
Safety 12
transport 14
Num Lock
indicator 20, 24
Numeric keypad 22
see Virtual numeric keypad 24
O
Operating system
activating system protection 49
cancel system protection 49
protecting with password 49
Operating system, restoring 65
P
Packaging 16
Palm vein sensor 46
Configuring 46
Password
changing 48
entering 48
removing 48
Password protection 47
Port Replicator
Ports 41
Ports
Port Replicator 41
Power
power consumption 33
power-management features 33
Power-on indicator 20
Preparing for operation 17
Printer does not print 68
R
Radio component:
safety notes 13
Fujitsu 77
Page 82

Index
Rechargeable battery 32
see Battery 32
Return 23
S
Safety notes 12
Screen
no screen display 67
Screen brightness
decrease 25
increase 25
Scroll Lock
indicator 20
Security functions 45
SystemLock 51
Security functions,
SmartCard 51
Security Lock 46
Selecting a location 17
Servicing 58
Setup
see B IO S Setup Utility 59
Shift 23
Shift + Tab 26
Shift key 23
Slot
Memory cards 35
Standby indicator 20
Status indicators 19
Supervisor password
changing 48
entering 48
removing 48
Switching on
the notebook 21
Switching on for the first time 18
System configuration 59
System settings, BIOS Setup Utility 59
T
Tab key 23
TCO Certified 75
Technical data 72
Mains adapter 73
notebook 72
The wireless connection to a network
does not work 69
Time not correct 66
Tips 64
Toggle output screen 25
Touchpad 25, 28
buttons 28
cleaning 15
dragging items 29
executing commands 28
moving the pointer 28
selecting an item 28
switch off 25
Touchpad buttons 25
TPM 50
Transport
Transport damage 16
Transportation 14
Travel, notebook 14
Troubleshooting 64
Trusted Platform Module 50
U
USB charging function 56
USB ports 54
USB-Anschluss mit Aufladefunktion (USB
Type-C) 55
User password
changing 48
entering 48
removing 48
Using the Kensington Lock Cable 46
V
VGA connection socket 53
Virtual n u m eric keypad 24
Volume
decrease 25
increase 25
Volume control 36
W
Webcam 31
Windows key 23
Wireless components
switch off 25
switch on 25
Wireless LAN
Switching the module off 39
Switching the module on 39
Wireless LAN:
safety notes 13
78 Fujitsu
 Loading...