

Page 1

User Guide - English
Fujitsu Software ServerView Suite
ServerView Update Management
ServerView Operations Manager V6.20
Edition June 2013
Page 2

Comments… Suggestions… Corrections…
The User Documentation Department would like to know your opinion of
this manual. Your feedback helps us optimize our documentation to suit
your individual needs.
Feel free to send us your comments by e-mail to
manuals@ts.fujitsu.com.
Certified documentation according to DIN EN
ISO 9001:2008
To ensure a consistently high quality standard and user-friendliness, this
documentation was created to meet the regulations of a quality management system which complies with the requirements of the standard
DIN EN ISO 9001:2008.
cognitas. Gesellschaft für Technik-Dokumentation mbH
www.cognitas.de
Copyright and trademarks
Copyright © 1998 - 2013 Fujitsu Technology Solutions.
All rights reserved.
Delivery subject to availability; right of technical modifications reserved.
All hardware and software names used are trademarks of their respective
manufacturers.
Page 3

Contents
Contents 3
1 Introduction 9
1.1 Concepts 10
1.2 Prerequisites 12
1.2.1 Prerequisites on managed servers 12
1.2.2 Prerequisites on connection blades 15
1.2.3 Prerequisites on systems with operating system ESXi (flash
via iRMC S3 using cURL) 15
1.2.4 Prerequisites on TFTP server 16
1.2.5 Prerequisites on the Central Management Station (CMS) 17
1.2.5.1 Update Management Logon (OS=Windows) 17
1.2.5.2 Configuration of Update Management (Repository, …)
1.2.5.3 Update Data 19
1.3 Notes on management stations 21
1.3.1 Shutdown and restart 21
1.3.1.1 Status after unplanned restart 21
1.3.1.2 Procedure for resolving the errors 21
1.3.2 Updating the management station with components which
needs a reboot 21
1.3.3 Multiple management stations 22
1.4 Autonomous Support Packages (ASP) 22
1.5 PRIMERGY Support Packages (PSP) 22
1.5.1 Current PSP versions 22
1.5.2 Components of a PSP 23
1.5.3 Product Detection of Primergy Support Packages 24
1.5.4 Initial Installation of Primergy Support Packages 26
1.6 Notes on deleting servers from the ServerList 27
1.7 Typographic conventions 28
1.8 ServerView Suite link collection 29
1.9 Documentation for the ServerView Suite 30
2 Overview 33
3 Update Procedures 37
3.1 Online update 38
3.2 Update via TFTP server 40
19
ServerView Update Management 3
Page 4

Contents
3.2.1 Updating a hardware system 41
3.2.2 Updating a system running a VMware ESXi operating system (flash via iRMC S3 using cURL) 43
3.3 Access to update data 45
4 Installing ServerView Update Agents 47
4.1 Installation on the managed server 47
4.1.1 Requirements for installation 47
4.1.2 Requirements for uninstallation 48
4.1.3 Installing Update Agent V6.0 (or later) 49
4.1.3.1 Installation under Windows 49
4.1.3.2 Installation under Linux or VMWare (ESX) 52
4.2 Installation on the TFTP server 55
4.2.1 Installation under Windows 55
4.2.2 Installation under Linux 56
5 User Interface 57
5.1 Update Manager Main Window 57
5.1.1 The tree structure 60
5.1.2 Server Details tab 65
5.1.3 Update Details tab 71
5.1.4 Job Details tab 76
5.1.5 Dialog boxes and wizards 80
5.1.5.1 LogOn dialog box 81
5.1.5.2 Cleanup Wizard 84
5.1.5.3 Server Details dialog box 89
5.1.5.4 Create Job Wizard 95
5.1.5.5 Update Details dialog box 106
5.1.5.6 PSP Details dialog box 110
5.1.5.7 Copy Job Wizard 112
5.1.5.8 Job Details dialog box 124
5.1.5.9 Edit Job dialog box 127
5.1.5.10 Change TFTP Address dialog box 130
5.2 Repository Manager Main Window 132
5.2.1 The tree structure 133
5.2.2 Updates tab 135
5.2.3 Collections tab 139
5.2.4 Dialog boxes 142
5.2.4.1 Edit Update's Properties dialog box 142
4 ServerView Update Management
Page 5

Contents
5.2.4.2 Import Repository Components dialog box 146
5.2.4.3 Import Repository Components - Results dialog box 149
5.2.4.4 Export Repository Components dialog box 151
5.2.4.5 Export Repository Components - Results dialog box 153
5.2.4.6 Delete Repository Components dialog box 155
5.2.4.7 Delete Repository Components - Results dialog box 157
5.2.4.8 PSP Details dialog box 159
5.2.4.9 Create Collection dialog box 161
5.2.4.10 Edit Collection dialog box 163
5.3 Download Manager Main Window 165
5.3.1 The tree structure 166
5.3.2 Task Management Tab 167
5.3.3 Scheduled Tasks Tab 170
5.3.4 Log Files Tab 172
5.3.5 Dialog boxes 175
5.3.5.1 Add Download Server Tasks dialog box 175
5.3.5.2 Edit Download Server Tasks dialog box 178
5.3.5.3 Activate Download Server Tasks dialog box 180
5.4 Configuration Main Window 182
5.4.1 General Settings Tab 183
5.4.2 Mail Settings Tab 185
5.4.3 Download Settings Tab 187
5.4.4 Configuration Wizard 189
5.4.4.1 Start step (Configuration Wizard) 190
5.4.4.2 Repository step (Configuration Wizard) 191
5.4.4.3 Miscellaneous step (Configuration Wizard) 196
5.4.4.4 Download Settings step (Configuration Wizard) 197
5.4.4.5 Mail Settings step (Configuration Wizard) 199
5.4.4.6 Activate step (Configuration Wizard) 201
5.5 Filter dialog box 203
5.5.1 Standard (Filter dialog box) 203
5.5.2 Character strings (Filter dialog box) 204
5.5.3 Integer values (Filter dialog box) 205
6 Managing Updates 207
6.1 Update Manager 207
6.1.1 Opening Update Manager 207
6.1.2 Closing Update Manager 208
6.1.3 Logging on to the Server 208
ServerView Update Management 5
Page 6

Contents
6.1.4 Resetting the update agent of a server 209
6.1.5 Displaying the update log for a server 211
6.1.6 Displaying detailed information about an update 211
6.1.7 Managing jobs 211
6.1.7.1 Creating a job 211
6.1.7.2 Copying a job 213
6.1.7.3 Releasing a job 215
6.1.7.4 Deleting a job 215
6.1.7.5 Displaying detailed information about a job 215
6.2 Repository Manager 216
6.2.1 Opening Repository Manager 216
6.2.2 Closing Repository Manager 216
6.2.3 Editing updates 217
6.2.4 Releasing updates 217
6.2.5 Managing user-defined groups (Collections) 218
6.2.5.1 Creating a user-defined group 218
6.2.5.2 Editing a user-defined group 218
6.2.5.3 Releasing updates in a user-defined group 219
6.2.5.4 Deleting a user-defined group 219
6.2.6 Re-Initializing the Repository 220
6.3 Download Manager 222
6.3.1 Adjusting the Download Service 222
6.3.2 General Information on Download Manager 223
6.3.3 Opening Download Manager 224
6.3.4 Closing Download Manager 224
6.3.5 Creating a new download task 224
6.3.6 Assigning servers to a download task 225
6.3.7 Editing a download task 225
6.3.8 Deleting a download task 226
6.3.9 Monitoring download tasks 226
6.3.10 Managing log files 227
6.4 Configuration 227
6.4.1 Opening the configuration 227
6.4.2 Closing the configuration 228
6.4.3 Setting Global Parameters 228
6.5 Filtering a table 232
7 Command-Line Interface 233
7.1 GFCLI (Command-Line Interface) 233
6 ServerView Update Management
Page 7

Contents
7.1.1 Call Parameters 234
7.1.2 StartFlash (Command) 237
7.1.3 WaitForDone (Command) 240
7.1.4 Reboot (Command) 242
7.1.5 Cleanup (Command) 244
7.1.6 Cancel (Command) 245
7.1.7 Result Files 247
7.1.7.1 StartFlash (Event) 248
7.1.7.2 Ready (Event) 251
7.1.7.3 Cancel (Event) 252
7.1.7.4 SequenceError (Event) 252
7.1.7.5 ParamError (Event) 253
7.1.7.6 LogonError (Event) 253
7.1.7.7 MemoryError (Event) 253
7.1.8 Batch Files (Examples) 254
7.1.9 CLI Standalone 267
7.2 citfs.bat (batch job) 267
8 Troubleshooting 271
8.1 Error messages in the Update Manager 271
8.2 Error messages in the Download Manager 276
8.3 Error messages in the Configuration Wizard 280
8.4 Error messages in the Repository Manager 283
8.5 Problems with Single Sign-On 283
8.6 Problems with Logon 283
8.7 Problems with entries in the tree structure 285
8.8 Problems with components 286
8.9 Problems with Fibre Channel (FC) Controllers 287
8.10 Event ID 2370 on managed node 287
8.11 Installation/Uninstallation of updateable components without
using Update Manager 289
Index 291
ServerView Update Management 7
Page 8

8 ServerView Update Management
Page 9

1 Introduction
ServerView Update Management allows you to manage updates for the firmware and software components of PRIMERGY servers. Update Management comprises the following applications:
l Update Manager provides a mechanism for managing updates and
installing them on the monitored managed nodes.
l Repository Manager provides a mechanism for managing the repos-
itory:
o
view a list of updates contained in the repository
o
change properties of contents
o
update your local repository on the management station
o
create collections
l Download Manager provides a mechanism for checking for available
updates and downloading new ones for the monitored managed nodes
from the Fujitsu Technology Solutions web server to the local repository
on the management station.
l Configuration provides a mechanism for defining the configuration set-
tings for the
o
Update Manager
o
Repository Manager
o
Download Manager
ServerView Update Management 9
Page 10

1 Introduction
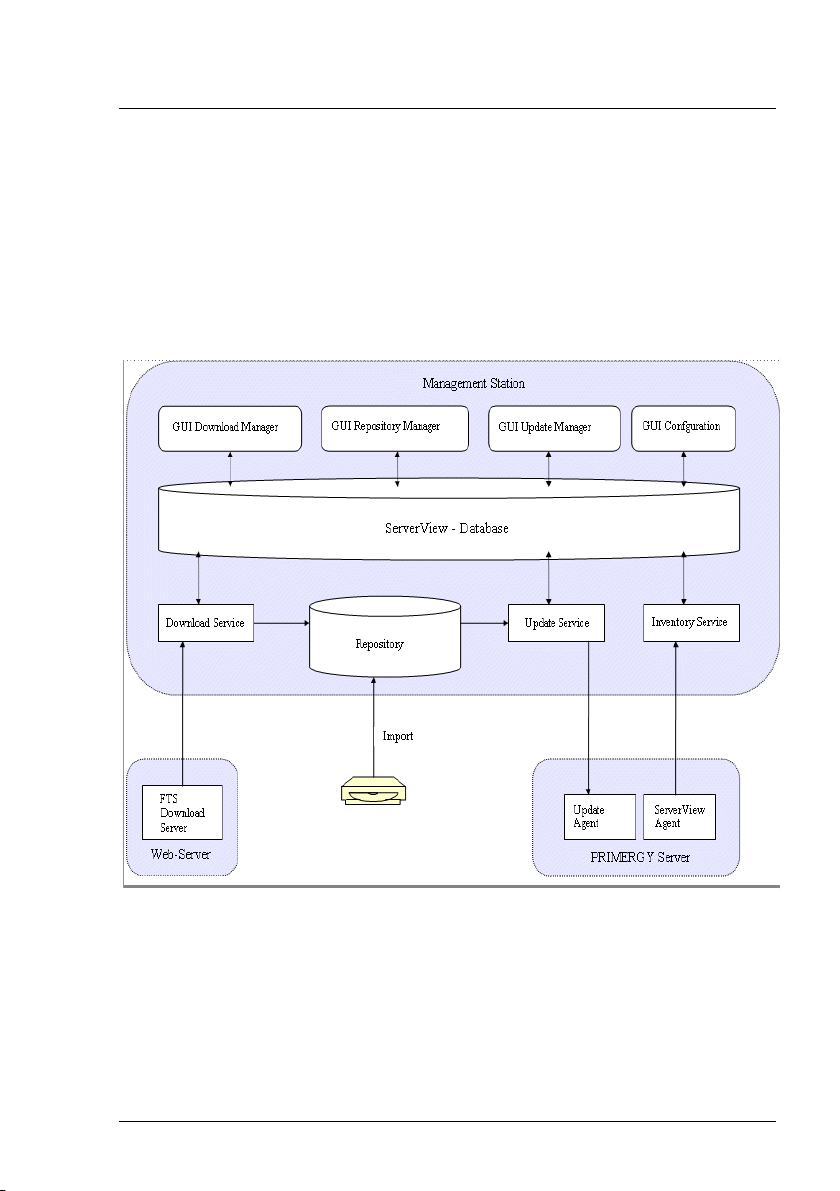
1.1 Concepts
Update Management is based on a database concept where the GUIs and
services communicate exclusively via the database:
1. The GUIs are used to define jobs for the services and write these jobs
to the database.
2. The services retrieve their jobs from the database, process these in the
background and write the results to the database.
3. The GUIs then display the results from the database.
The tasks performed by the various services are described below:
The Inventory Service reads the inventories of the PRIMERGY servers and
writes the results to the database. (The inventory contains the entire hardware and software configuration data of a PRIMERGY server.)
The Download Service downloads updates from the download server into
the repository.
In addition to the download via the Download Service, you can also
import updates from the ServerView-Update DVD to the repository
using the Repository Manager
For the initial update (Update Manager Express) of your PRIMERGY
server, load the updates from the ServerView Update DVD first
because otherwise this process may take a very long time to complete
due to the large volume of data. Since the DVD, which is published
almost monthly, may not contain the latest updates, you should then
download the latest updates using the Download Service.
10 ServerView Update Management
Page 11
1.1 Concepts
The Update Service performs the following tasks:
1. It detects which updates are available for the individual PRIMERGY
servers based on the inventories and repositories, and returns the result
to the database so that this can be displayed in the GUI.
2. It uses the jobs you define in the GUI to transfer the updates from the
repository to the PRIMERGY servers.
These interrelationships are illustrated in the following graphic.
Figure 1: Interaction between the various services for Update Management
ServerView Update Management 11
Page 12

1 Introduction
1.2 Prerequisites
You can get the applications ServerView Agents, ServerView Update Agent,
ServerView Operations Manager from the:
l ServerView Suite DVD 1 (bundled with PRIMERGY server)
l Download section of the Fujitsu Technology Solutions Web server:
http://support.ts.fujitsu.com
1.2.1 Prerequisites on managed servers
Online server allows components to be installed only while the operating system is running.
l ServerView Agents for Windows or Linux must be installed.
l ServerView Update Agent (Windows >=V5.10.02, Linux >=V5.10-01)
must be installed
l In a firewall configuration on the managed nodes, the following ports
must be enabled:
o
161 (snmp)
o
3171 (ServerView Update Agent)
o
3172 (SCS)
12 ServerView Update Management
Page 13

1.2 Prerequisites
Security
If you need security (configuration with AccountCheck) before performing an
update on the managed server, you can either use Single Sign-On or you
must specify a user group.
l Single Sign-On
Requirements:
o
ServerView agents as of V 5.0
o
ServerView update agent as of V 5.0
o
The certificate from the Central Management Station (CMS) must
be copied to the managed nodes.
l Specify a user group
Windows: during ServerView Update Agent installation
Linux: during ServerView Update Agent installation default settings are
configured
Default user group: GFUSER
Default user: globalflash with password globalflash
You can change the default settings by editing the file LinuxF-
wuAgent.cfg.
Inventory
Requirements of ServerView Agents for serving firmware of
l Broadcom LAN controller
Windows: PSP Broadcom_LAN_BACS/_E / …
Linux: SV Update Agent
l RAID controller
Linux: ServerView RAID
l Fibre Channel Controller (Emulex) and Linux Operating System
Requirements for updating the firmware are as follows:
ServerView Update Management 13
Page 14

1 Introduction
If Linux was installed either manually or using ServerView Installation
Manager <= 11.13.04, you have to perform the following activities:
o
Installing Emulex OCM package (Core or FUI)
o
Installing OEM drivers Ipwc, be2net, and be2scsi
o
In case of a 32-Bit operating system:
Installing 32 Bit libHBAAPI by using HBA tools.
o
In case of a 64-Bit operating system:
Installing 32-Bit libHBAAPI by using HBA tools
Installing the 32-Bit library libnl.so.1
o
Installing ServerView Agents V6.11 or newer
14 ServerView Update Management
Page 15

1.2 Prerequisites
1.2.2 Prerequisites on connection blades
To prepare a connection blade for update via Update Manager, configure it as
follows:
1. Open the graphical user interface of the connection blade, e.g. via a
browser:
http://<ipadr connection blade>
2. Security > Secure Shell:
Set the following values:
Admin Mode: Enable
SSH Version 1: Disable
SSH Version 2: Enable
1.2.3 Prerequisites on systems with operating system ESXi (flash via iRMC S3 using cURL)
Prerequisites:
l Operating sytem version: ESXi 5.0 or later.
l ServerView CIM Providers as of V6.00.05
To prepare a system running a VMware ESXi operating system for update via
Update Manager, configure it as follows:
1. Install the CIM Provider.
2. Make sure the system includes an iRMC S3 (with firmware as of 53A
for a TX/RXnnnS7 and firmware as of 5.26G for a BX920/924 S3).
3. Make sure that both the system and the iRMC S3 are connected to the
Network and configured.
4. Make sure ssh is enabled on the ESXi system.
ServerView Update Management 15
Page 16

1 Introduction
1.2.4 Prerequisites on TFTP server
A TFTP server is necessary for updating connection blades / management
blades.
l ServerView Agents for Windows or Linux >= V5.10 must be installed.
l ServerView Update Agent (Windows >=V5.10.02, Linux >=V5.30-00)
must be installed
A TFTP server is also necessary for updating iRMC S3 firmware and/or
BIOS on a VMware ESXi operating system.
l For updating iRMC S3 firmware, the following must be installed:
o
ServerView Agents for Windows or Linux >= V6.10
o
ServerView Update Agent for Windows or Linux >= 6.10
l For updating the BIOS, the following must be installed:
o
ServerView Agents for Windows or Linux >= V6.11
o
ServerView Update Agent for Windows or Linux >= 6.11
TFTP server Windows
l Fujitsu Technology Solutions PXE server (<=1.13.0000, >=1.15.0000)
must be installed.
Only the TFTP service has to be active!
For installation of TFTP Server Windows see "Installation under Win-
dows" on page 55.
TFTP server Linux
l The software package for tftp service (firewall configuration must allow
tftp) must be installed
For installation of TFTP server Linux see "Installation under Linux" on
page 56.
16 ServerView Update Management
Page 17

1.2 Prerequisites
1.2.5 Prerequisites on the Central Management Station (CMS)
On the central management station, ServerView Operations Manager must
be installed.
1.2.5.1 Update Management Logon (OS=Windows)
Configuration
l Configuration during the menu-driven installation of the ServerView
Operations Manager:
Step Update Management Logon Information
l During silent installation of the ServerView Operations Manager,
o
the user account is set to Local System
o
the ServerView Download Service is not started automatically.
You must change the user account manually.
l There are two ways to change the user account:
o
Modify ServerView Operations Manager > Step Update Management Logon Information
or
o
Services - ServerView Download Service - Properties - Log On
When you have changed the user account, you will need to restart the
ServerView Download Service.
Services - ServerView Download Service - Restart
System Policy
If the account was set during installation of ServerView Operations Manager,
this user will automatically get the right to logon as a service.
If the account was changed after installation of ServerView Operations Manager, check whether the account exists. If not, please add it.
ServerView Update Management 17
Page 18

1 Introduction
Administrative Tools – Local Security Policy – Security Settings –
Local Policies – User Rights Assignment – Log on as a service
The following applets use this logon and the ServerView Download Service:
l Configuration Wizard
l Download Manager
l Repository Manager
Format of the account
l local account: \.<user>
recommended: .\Administrator
l domain user account: <domain>\<user>
The remote database needs a domain user account
Requirements of this user account:
l Windows administration rights.
l Read/Write rights for SV OM installation directory
l Read/Write rights for local repository (if configured)
l Right to download (if Download Manager is configured)
You must add this account (e.g. Administrator) to SQL Server as described in
the manual ServerView Operations Manager Installation … under Win-
dows in the chapter "Adding a user account with SQL Server admin-
istrator rights", if the following SQL Server instances are used:
l SQL Server 2008 or higher
l Remote database (regardless of version and edition)
18 ServerView Update Management
Page 19

1.2.5.2 Configuration of Update Management (Repository, …)
Start the Configuration Wizard of Update Management and make the initial
settings for Update Management:
l ServerView Operations Manager - Base Configuration Wizard -
Update Management
or
l ServerView Operations Manager - Update Management – Con-
figuration
The settings relate mainly to:
l the Update Repository
l the TFTP server
l the Download Service
l Proxy and mail
In the final phase of the Configuration Wizard, update data is imported into
the repository.
1.2 Prerequisites
1.2.5.3 Update Data
Update data is the latest updates of BIOS, firmware, agents or drivers for
PRIMERGY servers.
You can get this data from the:
l ServerView - Update DVD
ftp://ftp.ts.fujitsu.com/images/serverview /UPDATE_DVD_
<vers>.<iso>
l from the Download section of the Fujitsu Technology Solutions Web
server:
http://support.ts.fujitsu.com
ServerView Update Management 19
Page 20

1 Introduction
There are two ways of maintaining the repository with the latest update data:
l Automatic maintenance
In the Download Manager, define a download task.
The task periodically checks and downloads the latest update data via
the internet for servers with inventory data.
l Manual maintenance
In the Repository Manager, import update data from the latest ServerView Suite - Update DVD.
20 ServerView Update Management
Page 21

1.3 Notes on management stations
1.3 Notes on management stations
1.3.1 Shutdown and restart
A shutdown/restart of the management station is only permitted if there are
no servers with the job status processing on the Server Details tab in the
Update Manager. Jobs with the status waiting (Job Details tab) are executed after the management station has been restarted, when the Start Time is
reached.
A shutdown/restart of the management station is not permitted if there are
any servers with the job status processing on the Server Details tab in the
Update Manager.
1.3.1.1 Status after unplanned restart
After an unplanned restart of the management station, the Job Details dialog
box may contains the following entries:
l Job Status: error
l Return Text: manager abort
1.3.1.2 Procedure for resolving the errors
l If the agent status on the Server Details tab is ready, you can regen-
erate the job by copying it (Copy Job).
l If the agent status is error or busy, first perform a cleanup and then rec-
reate the job by copying it (Copy Job).
1.3.2 Updating the management station with components which needs a reboot
During rebooting the management station, the connection from the web
browser (workstation) to the web server (management station) is interrupted.
After rebooting the management station, re-establish this connection (e.g. by
pressing F5 on the workstation).
ServerView Update Management 21
Page 22

1 Introduction
1.3.3 Multiple management stations
You can run multiple management stations in one network; however, these
management stations must be responsible for different servers. This means
that the server lists on the various management stations must be different.
1.4 Autonomous Support Packages (ASP)
Autonomous Support Packages (ASPs) are self-extracting, self-installing
software packages that allow you to install BIOS, firmware, agents or Addon-products on your server.
To install BIOS, firmware, agents or Add-on-products on a server component, you can call up the appropriate ASP directly.
1.5 PRIMERGY Support Packages (PSP)
A PRIMERGY Support Package (PSP) is the basic element for installing and
updating drivers and software products on your PRIMERGY server.
A PSP comprises several packages, which contain the different versions of
the same driver or software product.
1.5.1 Current PSP versions
The current versions of PSPs are released with the ServerView Update
DVD, a new version of which comes out approximately every two months.
PSPs can also be downloaded at
http://support.ts.fujitsu.com/globalflash
An overview of the components and server models that are supported
by the currently released PSPs is provided in the Readme file for the
relevant PSP.
22 ServerView Update Management
Page 23

1.5.2 Components of a PSP
Each PSP consists of the following elements:
l A zip archive containing the drivers or software products as well as the
files required to install the PSP
l Release notes (relnotes.txt)
l A PSP description file (xml file)
PSP description file (xml file)
The description file contains the following information:
l Name of the PSP
l Details of the version and contents of the PSP
l Information on the installation priority of the PSP
l Description of all packages contained in the PSP
For each package contained in the PSP, information is provided on the
version and on hardware and software dependencies, e.g. the chassis
ID, system board ID, PCI ID, firmware or operating system version.
1.5 PRIMERGY Support Packages (PSP)
Based on the information contained in the description file, the update tool can
check on the managed server whether the requirements of the hardware and
software dependencies are fulfilled.
ServerView Update Management 23
Page 24

1 Introduction
1.5.3 Product Detection of Primergy Support Packages
Product detection is available for most PSPs.
Requirements on the server:
l Primergy Support Package FSC_SCAN
l Tool PrimeUp >= V1.15.25 (up to Windows Server 2008)
l Tool PrimeUp >= V1.17.01 (Windows Server 2012)
The version of the PSP FSC_SCAN and the PrimeUp tool which comes
with the repository must be installed. (Always use the newest package version)
The ServerView Update Agent/GlobalFlash Agent calls the detection function automatically
l at every boot.
or
l after an update is completed.
The results of the detection are displayed on Update Manager.
Case “Not installed”
Example:
The customer has installed the hardware.The drivers of related products
have to be installed for using this hardware.
A "fake" PSP with version "0.0.0.0" is created to show the required product/driver.
Then a real PSP may be installed.
24 ServerView Update Management
Page 25

1.5 PRIMERGY Support Packages (PSP)
Case “Newer version installed”
Example:
The customer has installed a very new version of a product (perhaps
beta), which is not actually produced as a PSP on the FTS site.
A "fake" PSP with version "99.99.99.99" is created, to protect the customers
product against accidental overwriting/ updating by Update Manager.
If a PSP with this product/driver version or newer exists at a later date, the
protection is canceled and the PSP may be installed/updated with the real
PSP version belonging to this product/driver.
Case “Equal version installed”
Example:
The customer has installed the equal version by themselves, but not as a
PSP (native).
A "fake" PSP with the real version is created.
This PSP may be updated to the real version or newer.
Case “Previous version installed”
Example:
The customer has installed an older version than the version of the actual
PSP and the older version was not installed as a PSP, but by the customer themselves (native).
Because it is an older version than the version of the actual PSP, a "fake"
PSP with version "x.x.99.99" is created. (x.x version of the actual PSP - 1).
An update to the actual version (real version) is possible.
ServerView Update Management 25
Page 26

1 Introduction
1.5.4 Initial Installation of Primergy Support Packages
Initial installation is possible for all PSPs.
Requirements on the server:
l Primergy Support Package FSC_SCAN
l Tool PrimeUp >= V1.15.25 (up to Windows Server 2008)
l Tool PrimeUp >= V1.17.01 (Windows Server 2012)
The version of the PSP FSC_SCAN and the PrimeUp tool which comes
with the repository must be installed. (Always use the newest package version)
26 ServerView Update Management
Page 27

1.6 Notes on deleting servers from the ServerList
1.6 Notes on deleting servers from the ServerList
Deletion will be denied ...
Deletion of servers from the ServerList will be denied if update jobs with
Agent Status = busy and Job Details Status = transferring, transferred,
flashing or flashed exist.
Deletion will NOT be denied ...
Deletion of servers from the ServerList will not be denied if update jobs with
Agent Status = absent and Job Details Status = transferring,
transferred, flashing, flashed or rebooting exist.
To avoid error situations you must
l check the GlobalFlash Agent / Update Agent on the managed server
and if necessary restart it.
l check the LAN connection on the managed server and if necessary
repair it.
l do a manual cleanup via the Command Line Interface of the Update
Manager.
Depending on the situation you must use GFCLI –C (= Cleanup) or GFCLI –A
–S (= forced Cancel)
Cleanup will be done
l on the managed server.
l on the TFTP server (in the case a MMB flash).
ServerView Update Management 27
Page 28
1 Introduction
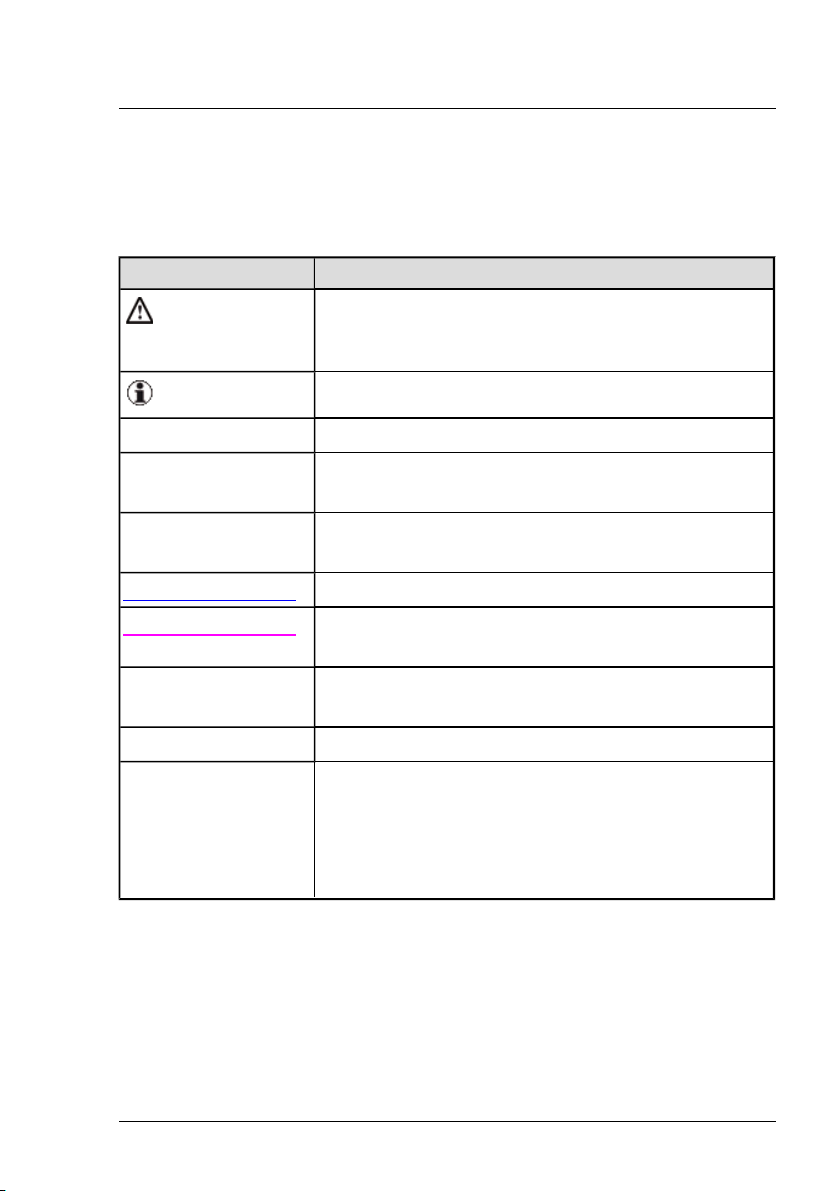
1.7 Typographic conventions
The following typographic conventions are used in this manual:
Convention Explanation
Indicates various types of risk, namely health risks,
risk of data loss and risk of damage to devices.
Indicates additional relevant information and tips.
bold Indicates references to names of interface elements.
monospace
monospace
semibold
blue continuous text Indicates a link to a related topic.
pink continuous text Indicates a link to a location you have already vis-
Indicates system output and system elements for
example, file names and paths.
Indicates statements that are to be entered using the
keyboard.
ited.
<abc> Indicates variables which must be replaced with real
values.
[abc] Indicates options that can be specified (syntax).
[key]
Indicates a key on your keyboard. If you need to
enter text in uppercase, the Shift key is specified, for
example,[SHIFT] + [A] for A. If you need to press
two keys at the same time, this is indicated by a plus
sign between the two key symbols.
Screenshots
Some of the screenshots are system-dependent, so some of the details
shown may differ from your system. There may also be system-specific differences in menu options and commands.
28 ServerView Update Management
Page 29

1.8 ServerView Suite link collection
1.8 ServerView Suite link collection
Via the link collection, Fujitsu Technology Solutions provides you with numerous downloads and further information on the ServerView Suite and PRIMERGY servers.
For ServerView Suite, links are offered on the following topics:
l Forum
l Service Desk
l Manuals
l Product information
l Security information
l Software downloads
l Training
The downloads include the following:
o
Current software statuses for the ServerView Suite as well as
additional Readme files.
o
Information files and update sets for system software components (BIOS, firmware, drivers, ServerView agents and ServerView update agents) for updating the PRIMERGY servers via
ServerView Update Manager or for locally updating individual
servers via ServerView Update Manager Express.
o
The current versions of all documentation on the ServerView
Suite.
You can retrieve the downloads free of charge from the Fujitsu Technology Solutions Web server.
For PRIMERGY servers, links are offered on the following topics:
l Service Desk
l Manuals
ServerView Update Management 29
Page 30

1 Introduction
l Product information
l Spare parts catalogue
Access to the link collection
You can reach the link collection of the ServerView Suite in various ways:
1. Via ServerView Operations Manager.
l Select Help – Links on the start page or on the menu bar.
This opens the start page of the ServerView link collection.
2. Via the start page of the online documentation for the ServerView Suite
on the Fujitsu Technology Solutions manual server.
You access the start page of the online documentation via the following link:
http://manuals.ts.fujitsu.com
l In the selection list on the left, select Industry standard servers.
l Click the menu item PRIMERGY ServerView Links.
This opens the start page of the ServerView link collection.
3. Via the ServerView Suite DVD.
l In the start window of the ServerView Suite DVD, select the option
Select ServerView Software Products.
l Click Start. This takes you to the page with the software products
of the ServerView Suite.
l On the menu bar select Links.
This opens the start page of the ServerView link collection.
1.9 Documentation for the ServerView Suite
The documentation can be downloaded free of charge from the Internet. You
will find the online documentation at http://manuals.ts.fujitsu.com under the
link Industry standard servers.
30 ServerView Update Management
Page 31

1.9 Documentation for the ServerView Suite
For an overview of the documentation to be found under ServerView Suite
as well as the filing structure, see the ServerView Suite sitemap (Server-
View Suite – Site Overview).
ServerView Update Management 31
Page 32

32 ServerView Update Management
Page 33

2 Overview
ServerView Update Management allows you to remotely apply the latest
updates of BIOS, firmware and drivers onto PRIMERGY servers.
General usage
1. Configure Update Management (see also "Prerequisites on the Central
Management Station (CMS)" on page 17)
l The Base Configuration Wizard is used to configure Update Man-
agement.
It opens automatically after new installation of ServerView Operations Manager:
o
Base Configuration Wizard – Update Management step
n Select Yes
n Click Start
n Configuration Wizard: Configure all necessary values
Note: Inventory data is collected automatically for all
servers in the ServerList
o
Base Configuration Wizard – Inventory Management step
n Select “Yes”
n Configure all necessary values
n Go on to item 2 and further items.
ServerView Update Management 33
Page 34

2 Overview
l The Base Configuration Wizard is not used to configure the
Update Management step.
o
Go on to item 2
o
Open one of the Update Management applets
o
Configuration Wizard: Configure all necessary values
Note: Inventory data is collected automatically for all servers
in the ServerList
o
Go on to item 4 and further items.
2. Add managed servers to the ServerList of ServerView Operations Manager.
3. Create Inventory data.
There are two possible ways:
l Automatic maintenance
In the Inventory Manager, define a scheduled inventory task.
l Manual maintenance
In the Inventory Manager, define a manually started inventory task.
Following collecting of the inventory data and comparison between the
inventory data and update data in the repository, the result will be
shown in the update icon column of the ServerList and in Update Manager itself.
4. In Update Manager - Update Details tab, create update jobs.
Unless users create update jobs explicitly, managed servers will not be
updated.
If you defined security settings for ServerView Update Agent, make
sure the prerequisites are met before you create update jobs, see "Pre-
requisites on managed servers" on page 12.
34 ServerView Update Management
Page 35

5. When the update job is completed, the inventory data and the repository
are automatically compared again to ensure that the latest update data
has been correctly applied to the managed server.
When upgrading Update Management components please observe the
following recommendation to prevent connection problems with the components.
Recommended update sequence:
1. ServerView Update Manager
2. ServerView Update Agent on managed node
3. ServerView Update Agent on TFTP server
ServerView Update Management 35
Page 36

36 ServerView Update Management
Page 37

3 Update Procedures
The Update Manager enables you to update drivers, ServerView agents,
update agents, firmware and BIOS globally and locally on PRIMERGY
servers. You can use the update procedures described below to do this.
Which particular components can be updated with which procedure is
described in the following files on the ServerView Suite DVD 1:
Windows:
SVSSoftware\Software\ServerView\Windows\GlobalFlash\Agents\
OnlineFlash\primlist_win.htm
Linux:
SVSSoftware\Software\ServerView\Linux\GlobalFlash\Agents\
OnlineFlash\primlist_lx.htm
ServerView Update Management 37
Page 38

3 Update Procedures
3.1 Online update
This procedure allows you to update components under the control of the
operating system that is currently running (Windows, Linux). In this case the
Update Manager uses tools which are provided by the software vendors.
Figure 2: Diagram of the update procedure (online)
1. The Inventory Manager creates inventories by collecting information on
the installed software and firmware components of all servers in the
server list and storing this information in a database. The Inventory Manager can create the inventories either on command or cyclically.
2. The Update Manager compares the inventories entered in the database
with the software and firmware components in the repository. Based on
the differences arising from this comparison, it then creates a list of
components and servers that need updating.
3. If you are updating via the graphical user interface select the components which are to be updated. If you are working with the CLI use
the -U option to specify the repository from which the update data is to
be taken.
38 ServerView Update Management
Page 39

3.1 Online update
4. The Update Manager fetches the update data required from the repository and defines the update jobs. In addition to the actual update data
each online update job contains an update tool for the component concerned and the job control file with the required parameters.
5. The update jobs are transferred to the update agent (socket communication).
6. The update agent starts an update handler (an auxiliary routine of the
agent), and this starts the update tool with the parameters required for
the components concerned.
7. The values returned by the update tool are evaluated by the handler and
returned to the agent.
8. The update agent updates the job status information.
9. The Update Manager fetches the current status and error information
and presents it on the graphical user interface or, if you are using the
CLI, places it in result files.
10. Depending on the request-specific parameters, the server may need to
be rebooted by the management station at the end of the update operation in order to enable the updated components.
If you use the command line interface for the update, the reboot does
NOT occur automatically. It must be explicitly executed with the command GFCLI -R.
The update procedure has then been completed.
ServerView Update Management 39
Page 40

3 Update Procedures
3.2 Update via TFTP server
This procedure is used to update PRIMERGY system components which
cannot be updated using the update tools available under Windows or Linux
either at all or only with great effort, or to update autonomous hardware systems on which none of these two operating systems runs. These system
components and hardware systems are updated via a ServerView Update
Agent of the type TFTP Server.
The system components and hardware systems must be able to fetch an
image from a TFTP server and to update themselves. They must have interfaces via which
l the configuration data can be read (e.g. version, name, MAC address,
etc.).
l the required parameters (IP address, path name and image name on the
TFTP server) can be set.
l the update procedure can be started.
The following control interface is currently implemented for this purpose in
the Update Manager:
SNMP (reading) and HTTP (writing) and SSH access
for updating a hardware system, e.g. the management blade of the blade
servers BX600 and BX900
In the case of BX600 MMB S2 there may be two alternate management blades in operation (master and slave) which have
just one joint update IP address for updating purposes. In this
case when an update procedure takes place both management
blades are always updated via this update IP address.
40 ServerView Update Management
Page 41

3.2.1 Updating a hardware system
Updating a hardware system taking a management blade as an example
Figure 3: Diagram of the update procedure (management blade via TFTP
server)
3.2 Update via TFTP server
1. The Inventory Manager on the management server uses SNMP commands to fetch the required inventory data from the management blade.
When you are updating via the graphical user interface the data is presented on the graphical user interface.
2. The Update Manager compares the inventories entered in the database
with the software and firmware components in the repository. Based on
the differences arising from this comparison, it then creates a list of
components and servers that need updating.
3. Characteristics when using MMBs:
In the case of MMB BX600 S3: Communication is processed using
SNMP. No login is required.
ServerView Update Management 41
Page 42

3 Update Procedures
In the case of MMB BX400S1 and BX900 S1: Up to ServerView Operations Manager V6.10, communication was processed using SNMP.
ssh login is evaluated as of Operations Manager V6.11.
4. The object-specific update job for the management blade is generated
by the Update Manager.
5. The Update Manager transfers the update images and the update job
(incl. update handler and update tool) to the TFTP server and starts the
update job (socket communication between the Update Manager and
the update agent on the TFTP server).
6. The update agent starts the update handler, and this starts the update
tool with the required parameters from the job control file supplied.
7. The update tool starts the dialog with the management blade and transfers the required update parameters using SNMP or ssh commands.
8. The download of the images from the TFTP server and the update procedure are then controlled completely by the management blade (TFTP
communication).
9. The return values from the components involved are transferred in the
reverse order from the update tool via the update handler to the update
agent.
10. The update agent updates the job status information.
11. The Update Manager fetches the current status and error information
and presents it on the graphical user interface or, if you are using the
CLI, places it in result files.
The update procedure has then been completed.
42 ServerView Update Management
Page 43

3.2 Update via TFTP server
3.2.2 Updating a system running a VMware ESXi operating system (flash via iRMC S3 using cURL)
Updating a system running an ESXi system (flash via iRMC S3 using
cURL):
Figure 4: Diagram of the update (ESXi system via iRMC S3 using cURL)
1. The Inventory Manager on the management server uses CIM commands to fetch the required inventory data from the VMware ESXi host.
(A pre-installed ServerView ESXi CIM provider is prerequisite.) When
updating via the graphical user interface the data is presented on the
graphical user interface.
2. The Update Manager compares the inventories entered in the database
with the software and firmware components in the repository. Based on
the differences arising from this comparison, it then creates a list of
components and servers that need updating.
3. The object-specific update job for updating BIOS / iRMC S3 firmware is
generated by the Update Manager.
4. The Update Manager transfers the update images and the update job
ServerView Update Management 43
Page 44

3 Update Procedures
(including the update handler and update tool) to the TFTP server and
starts the update job (socket communication between the Update Manager and the update agent on the TFTP server).
5. The update agent starts the update handler, and this starts the update
tool with the required parameters from the job control file supplied.
6. The update tool starts the dialog with iRMC S3 and transfers the
required update images using cURL.
7. In the case of an iRMC S3 firmware update: The update tool immediately reboots the iRMC S3 according to the firmware selector to activate the new firmware.
8. In the case of a BIOS update:
a. It is internally checked whether the VMware ESXi system on the
server is in maintenance mode.
b. Update-Manager takes from the ServerView Database the cre-
dentials for accessing the VMware ESXi system.
c. Update Manager reboots the VMware ESXi system to activate the
new system board BIOS.
9. The update procedure has then been completed.
10. The return values from the components involved are transferred in the
reverse order from the update tool via the update handler to the update
agent.
11. The update agent updates the job status information.
12. The Update Manager fetches the current status and error information
and presents it on the graphical user interface or, if you are using the
CLI, places it in result files.
The update procedure has then been completed.
44 ServerView Update Management
Page 45

3.3 Access to update data
To update the managed servers the Update Manager requires the corresponding update data. This data is contained in an repository with the following subdirectories:
Agent-Win Agent-Lx BladeSystem
FibreChannelController LanController ManagementController
PrimSupportPack-Win RemoteServiceBord ScsiController
SystemBoard Tools
The following options are available for accessing this data:
l Via the directory Firmware on the Update DVD.
l Via the Fujitsu Technology Solutions web server from which the update
data can be saved to a repository which you have created on an arbitrary drive of the management server.
You can update this repository regularly by means of the Download Manager from the Fujitsu Technology Solutions web server.
3.3 Access to update data
Content of Update Data
Following a successful systemtest the new components will be added.
After their official release, new components (BIOS, firmware, agents, drivers) and new versions are added to the repository.
ServerView Update Management 45
Page 46

46 ServerView Update Management
Page 47

4 Installing ServerView Update Agents
To find out which servers are supported and which system components can
be updated with the various update procedures please refer to the relevant
files on the ServerView Suite DVD 1 under ServerView Suite – Software
Products - ServerView – Maintenance & Update - Update (Supported
Systems and Info columns).
The ServerView Update Agent needs around 3 minutes to start up completely.
4.1 Installation on the managed server
4.1.1 Requirements for installation
l Installation sequence:
Install ServerView agents before ServerView Update Agent.
l For an online update only a functioning LAN connection is required.
l For an Update via TFTP Server refer to section "Installation on the
TFTP server" on page 55.
The following difference exist with regard to the components to be updated via the TFTP server:
In the case of autonomous hardware systems on which no Windows or
Linux operating system runs (e.g. management blades) it is not necessary to install the update agent on the managed system.
Management blades and connection blades are always updated via
a TFTP server.
ServerView Update Management 47
Page 48

4 Installing ServerView Update Agents
4.1.2 Requirements for uninstallation
If you want to uninstall ServerView Update Agent, ensure that all jobs on the
involved systems (management server, TFTP server, managed server) are
finished or deleted.
Uninstallation sequence:
1. Uninstall ServerView Update Agent
2. Uninstall ServerView agents
Several errors can occur if user does not use correct order of uninstallation.
48 ServerView Update Management
Page 49

4.1 Installation on the managed server
4.1.3 Installing Update Agent V6.0 (or later)
4.1.3.1 Installation under Windows
The following procedures are available for installation:
l Menu-Driven Installation (FTASetup.exe)
l Installation via the Command Line Interface
l Installation via ASP (Autonomous Support Package), SV Update Agent
>=V5.50
Menu-driven Installation (FTASetup.exe)
You start the installation via the FTASetup.exe file, which you will find on the
ServerView Suite DVD 1 under SVSSoft-
ware\Software\ServerView\Windows\GlobalFlash\Agents\OnlineFlash.
Start the menu-driven installation as follows:
1. Double-click the FTASetup.exe file.
2. Confirm the license conditions.
3. Define the parameters for the security settings.
ServerView Update Management 49
Page 50

4 Installing ServerView Update Agents
Figure 5: Security Settings
Security Settings
Account Check
Specifies whether access authorization should be checked when the
server is accessed. If this option is enabled, you can use access
authorization via certificates or via standard login.
User Group for Update
Name of the local user group
l This option is mandatory for access authorization via standard
login.
l If you use certificates, it is not really necessary to enter a user
group, but it is recommended for using the update agent, if no certificate is available or the validation of a certificate fails.
50 ServerView Update Management
Page 51

4.1 Installation on the managed server
All users in this group are authorized to perform the update procedure. The user group GFUSER is preset. If you want to use the
GFUSER group you must configure it under Windows.
But you can also use any other user group.
In the case of an update installation the default values are assigned to
the existing configuration values.
Installation via the Command Line Interface (FTASetup.exe)
You can install the update agent at command level using the following command :
FTAsetup -noaccountcheck {0|1}
[-flashusergroup <user_group>]
FTAsetup -GFAU
The options have the following meanings:
-noaccountcheck { 0 |1}
You use this option to enable (0) or disable (1) the password query.
-flashusergroup <user_group>
When the password query is enabled this option can be used to specify
the name of a local user group. All users in this user group are authorized
to perform the update procedure. If this option is omitted, GFUSER is the
default.
-GFAU
You use this option to start an update installation for the agents. In contrast to a complete new installation (without this option) parameters already set in the update agent are retained.
In the case of an update installation the default values are assigned to
the existing configuration values.
ServerView Update Management 51
Page 52

4 Installing ServerView Update Agents
Installation via ASP (Autonomous Support Package), SV Update
Agent >=V5.50
You start the installation via the installation package SVUpdateAgent_Win_
ASP_<vers>.exe, which you will find on the ServerView Update DVD under:
Firmware - Agent-Win - SV-Update-Agent.
You can install the update agent at the command level using the following
command:
start /wait SVUpdateAgent_Win_ASP_<vers>.exe
4.1.3.2 Installation under Linux or VMWare (ESX)
Update agent version 4.91 and higher is only installed if the server is onlineupdate-capable, i.e. online tools for updating the firmware are available. Older
systems are not supported as of Update Management V6.0.
Update Agent <= V5.00
You start the installation via the installation package SMAWgfa-<Release><Version>.rpm, which you will find on the ServerView Suite DVD 1 under
Firmware - Agent-Lx - SV-Update-Agent.
You can install the update agent at command level using the following command:
rpm {-i | -U --nopreun --nopostun}
SMAWgfa-<Release>-<Version>.rpm
The options have the following meanings:
-i
You use this option to start the initial installation.
-U
You use this option to start an update installation.
52 ServerView Update Management
Page 53

4.1 Installation on the managed server
--nopreun --nopostun (only for update installations)
If these options, which must always be specified together, are selected,
the uninstallation routines do not run when an update installation takes
place. Parameters already set in the update agent are retained.
Update Agent >= V5.01
You start the installation via the installation package SVUpdateAgent_Lx_
V<vers>.scexe, which you will find on the ServerView Suite DVD 1 under
SVSSoftware - Software - ServerView - Linux - GlobalFlash - Agents OnlineFlash.
You can install the update agent at the command level using the following
command:
sh SVUpdateAgent_Lx_V<vers>.scexe
Configuration of the Update Agent
When you have executed the command, the parameters are assigned default
values in the /opt/SMAW/SMAWgfa/cfg/LinuxFwuAgent.cfg file and you
can change these to suit your requirements.
FlashUserGroup=<user-group>
Name of the primary user group which is entered in /etc/passwd for the
user. All users in this group are authorized to execute the update procedure (default GFUSER).
If it does not yet exist the GFUSER group with the user globalflash and
the password globalflash is automatically set up during installation.
This parameter is evaluated only when NoAccountCheck = 0.
NoAccountCheck=<n>
n = 0 (password query enabled; default value)
n = 1 (password query disabled)
ServerView Update Management 53
Page 54

4 Installing ServerView Update Agents
TraceFile=<file>
File in which the agent’s actions are logged when TraceLevel > 0.
The directory must exist if given in <file>.
Default file name: /opt/SMAW/SMAWgfa/data/gf_agent.log
TraceLevel=<n>
n = 0 (no tracing)
n = 2 (tracing of errors)
n = 3 (tracing of the commands)
n = 5 (detailed tracing)
Default TraceLevel = 2
Parameter changes only become effective after the /etc/init.d/globalflash
restart command has been executed.
In the case of an update installation the default values are assigned to
the existing configuration values.
Uninstallation under Linux
Uninstallation is performed using the rpm -e SMAWgfa command.
54 ServerView Update Management
Page 55

4.2 Installation on the TFTP server
4.2 Installation on the TFTP server
The PXE or TFTP service should be stopped, if you use other PXE/TFTP
services, because a parallel use of two services might cause problems.
For how to install ServerView Update Agent, see section "Installing Update
Agent V6.0 (or later) " on page 49.
4.2.1 Installation under Windows
Installation sequence:
1. TFTP Server
2. ServerView Agents
3. ServerView Update Agent
To install TFTP server you have the following options:
l PRIMERGY ServerView Suite DVD 1
Use <dvd-root>:\Setup\WebUI\FjPXEServer.msi to install a TFTP
service on a TFTP server system.
l Deployment Manager (Deployment Service)
l ServerView Installation Manager > Remote Installation
ServerView Update Management 55
Page 56

4 Installing ServerView Update Agents
4.2.2 Installation under Linux
Installation sequence:
1. TFTP Server
2. ServerView Agents
3. ServerView Update Agent
To install TFTP server
l Install software package tftp
l TFTP must be enabled (file /etc/xinetd.d/tftp: param disable=no)
l Network service xinetd must be running
l If a firewall is activated: allow tftp
56 ServerView Update Management
Page 57

5 User Interface
The Update Management user interface comprises the interfaces of the
individual applications. The Configuration wizard starts automatically the first
time you open Update Management. This wizard allows you to make global
settings for all applications.
l Update Manager
l Repository Manager
l Download Manager
l Configuration
5.1 Update Manager Main Window
The main window contains the following elements (from top to bottom):
l the ServerView Suite header
l the ServerView Suite menu bars
l the work area with the tree structure on the left and tabs on the right.
ServerView Update Management 57
Page 58

5 User Interface
Figure 6: Update Manager Main Window
The appearance of the tabs is determined by the entry you select in the tree
structure. The following combinations are possible:
Tree
Work area tabs
structure
Server
Update Details Job Details
Details
Servers
List of
servers
Information
about the
selected
servers
Component
list in the form
of a tree structure (depends
on the selec-
Updates for the
components
selected in the
component list
Information
about the jobs
that exist for
the selected
servers
tion in the
server list)
58 ServerView Update Management
Page 59

5.1 Update Manager Main Window
Tree
structure
Updates
List of
updates
Jobs
List of jobs
Server
Details
Information
about all
servers for
which the
selected components are relevant
Information
about all
servers for
which the
selected jobs
are relevant
Work area tabs
Update Details Job Details
Server list in
the form of a
tree structure
(depends on
the selection
in the update
Updates for all
components
that are relevant for the
selected
servers
Combination
not permitted
list)
Combination not permitted Information
about the
selected jobs
ServerView Update Management 59
Page 60

5 User Interface
5.1.1 The tree structure
Figure 7: Update Manager tree structure
The tree structure is on the left of the work area in the Update Manager and
provides various views, divided into different groups, of the servers in a
domain. You can filter these views within the groupings down to object and
component level.
60 ServerView Update Management
Page 61

5.1 Update Manager Main Window
Tree structure Groupings
Servers Information about Servers within the domain
All Servers
All servers within the domain
Groups
Customized groups, which you created with the ServerList application
The icon in front of the server or group symbol (like for
Blade Servers, virtual systems, ...) indicates the cumulated update status of it:
An update is not required
An update is recommended
An update is urgently required
ServerView Update Management 61
Page 62

5 User Interface
Tree structure Groupings
Servers
(continued)
Update mandatory
Servers on which an update is urgently required
Update recommended
Servers on which an update is recommended
In the groups Update mandatory and Update rec-
ommended, instead of update status icons, server icons
are displayed, because the name of the group is the same
as the name of the update status of the servers in the
group.
For a description of the icons, see the online help of the
ServerBrowser application.
1. Start the ServerBrowser application.
2. Click Help - ON ServerBrowser
The ServerBrowser online help is displayed.
3. In the section Browsing Pane, a description of the
server icons is displayed.
Unsupported Servers
All checked servers with existing inventory data which
are not supported by the current Update Manager
Unknown Servers
All servers which could not be checked because no
inventory data exist.
Update done
Servers on which no update is required.
62 ServerView Update Management
Page 63

5.1 Update Manager Main Window
Tree structure Groupings
Updates Software and firmware components of the servers
All Components
All components, regardless of their version
Upgrades
Components for which an upgrade is available
Downgrades
Components for which a downgrade is available
Installed Updates
All components installed on the servers
User Collections
User-defined component groups, which you create in
the RepositoryManager
Update group
ServerView Update Management 63
Page 64

5 User Interface
Tree structure Groupings
Jobs Jobs defined for the update of the servers
Root All Jobs
All jobs, regardless of status
Waiting Jobs
Jobs that are waiting for the time to transfer the updates
from the management server to the PRIMERGY
servers
Jobs in Progress
Jobs that are currently in the update phase
Ready Jobs
Jobs that were executed without errors
(if a restart is required after an update phase, this status
is not displayed until the server has been restarted)
Failed Jobs
Jobs that failed
Completed jobs
Failed jobs
Jobs in process
Waiting jobs
64 ServerView Update Management
Page 65

5.1.2 Server Details tab
The Server Details tab displays information about servers, depending on
what you have already selected in the tree structure.
Tree structure Server Details Tab
Servers Information about the selected servers
Updates Servers for which the selected components are relevant
Jobs Servers for which the selected jobs are relevant
To open the tab, click the Server Details tab in the main window.
5.1 Update Manager Main Window
Figure 8: Server Details tab
In the table, a context menu is available. To open the context menu,
right-click an entry in the table.
ServerView Update Management 65
Page 66

5 User Interface
The columns in the table have the following meanings:
Column Meaning
Icon General update status of the server
An update is not required.
An update is recommended.
An update is urgently required.
To evaluate the General update status of server, the
contents of the following groups are checked:
l Unapplicable Updates
l Upgrades
l All Components:All newer updates present in
the repository are checked.
Opens the Filtering for <column> dialog box, where
you specify which rows are to be displayed in the table.
Name Name of the server
Network IP address of the server
Model Model name of the server
66 ServerView Update Management
Page 67

5.1 Update Manager Main Window
Column Meaning
Agent Status Status of the update agent on the server
ready The server is ready for the update
phase.
error An error occurred during the update
phase.
You must save the diagnostics
about the failed job, then initialize
the update agent with the Cleanup
function.
absent No update agent is installed on the
server or the agent is not running.
busy The server is currently in the update
phase.
unknown The agent status could not be deter-
mined.
not_managable The ServerView agent cannot cur-
rently be reached on the computer
via SNMP.
ServerView Update Management 67
Page 68

5 User Interface
Column Meaning
Agent Access Access status of the update agent on the server
granted Logon to the server has already
been successfully completed. You
have access to the server.
restricted Access to the server is currently
restricted. Log on must be performed with the appropriate user ID
and password on the server.
unrestricted Logon is not required to access the
server.
trusted Since the server was unavailable at
the time the logon was attempted,
the logon data was saved under the
assumption that it was correct.
certified A valid certificate is installed.
The managed server is ready for single sign-on.
not certified No valid certificate is installed.
The managed server is not ready for
single sign-on.
68 ServerView Update Management
Page 69

5.1 Update Manager Main Window
Column Meaning
Job Status Status of the relevant jobs specified for the server
done All components have been updated
and the job is now completed.
waiting The job is waiting to be executed
(this is the status before the data
transfer begins).
processing The job is currently being executed.
error Possible reasons:
l The update of at least one com-
ponent failed.
l Check-Job was not suc-
cessful
l Cleanup-Job was not suc-
cessful
l Status could not be retrieved
Last Check Last comparison of the server inventory with the repos-
itory
<Date> Date of the last successful check
Failed The last check failed.
To display more information, click
Show Details and then Show LogFile in the dialog box that appears.
N/A A check has not been performed for
this server yet.
ServerView Update Management 69
Page 70

5 User Interface
Buttons
Complete Update
Automatically establishes a list of all components that can be updated on
the previously selected server. The Create Job wizard then opens, via
which you start the update of the identified components.
This button is only enabled if you are logged on as administrator.
Logon
Opens the Logon dialog box, where you can log on to selected servers.
This button is only activated if you have selected one or more servers in
the table.
Cleanup
You can use the cleanup function to reset the update agent on a server to
a defined status. This function may be required, for example, if the update
agent was accessed by another management server (invalid configuration!), or if a job failed unexpectedly (Job Status = error, Returnt-
ext = Pending Job).
Show Details
Opens the Server Details dialog box, which displays information about
the selected server.
This button is only activated if you have selected a server.
Additional functions in the context menu
Force Check
A job with the name Check_xx is created (xx = sequence number). It per-
forms another comparison (check) of the server inventory with the repository. This job is displayed on the Job Details tab. The dialog box will be
closed automatically.
Show Logfile
Displays the log file for the currently selected server.
Show History
Opens a web page showing the flash log for the selected server.
70 ServerView Update Management
Page 71

Show Updates
Opens the Update Details tab to display update information about the
selected server.
5.1.3 Update Details tab
The Update Details tab contains information about updates. It comprises
the following elements:
l The update details list (tree structure)
l A table that contains the updates that match your selection in the server
list and update details list.
To open the tab, click the Update Details tab in the main window.
5.1 Update Manager Main Window
Figure 9: Update Details tab
In the table, a context menu is available. To open the context menu,
right-click an entry in the table.
ServerView Update Management 71
Page 72

5 User Interface
The content of the update details list depends on the entry that you have
already selected in the tree structure.
Tree structure Update details list (Update Details Tab)
Servers Displays the components belonging to the selected
servers.
In the update details list, you can filter the components
displayed in the table according to the following groups:
l All Components: Displays all components
belonging to the servers selected in the server list
l Upgrades: Displays the upgrades associated
with the servers selected in the server list
l Downgrades: shows all downgrades of the select-
ed servers in the server list.
l Installed Updates: Displays the updates
installed on the servers selected in the server list.
l Unapplicable Updates: Displays the updates
that cannot be installed. An explanation of why
the updates cannot be installed is displayed in the
Update Details dialog box. To open this dialog
box, click Show Details.
l Released Updates: Displays the updates asso-
ciated with the servers selected in the server list
which have been released in the Repository Manager.
l Inventory Information: Displays all installed firm-
ware and drivers on the servers selected in the
server list, even if they are not included in the
repository.
l User Collections: Displays the user-specific
update groups for the servers selected in the
server list
72 ServerView Update Management
Page 73

5.1 Update Manager Main Window
Tree structure Update details list (Update Details Tab)
Servers
(continuation)
In general, only the installed update versions contained in the underlying repository
are displayed in the table.
In the case of each upgrade, only the latest
version is displayed in the table and, in the
case of each downgrade, only the next older
version found in the repository is displayed
in the table.
Nevertheless, the version of the update can
be selected when executing the Create Job
Wizard later.
Updates Displays the servers that contain the selected com-
ponents
Jobs Combination not permitted
In the table, a context menu is available. To open the context menu,
right-click an entry in the table.
The columns in the table have the following meanings:
Column Meaning
Icon Importance of the update
An update is recommended.
An update is urgently required.
An update is not required.
Opens the Filtering for <column> dialog box, where
you specify which rows are to be displayed in the table.
ServerView Update Management 73
Page 74

5 User Interface
Column Meaning
Server Name Name of the server
Category Group to which the component belongs
Component Name of the component
Installed
Version of the installed update
Version
New Version Update version that is to replace the installed version
Reboot Indicates whether the server is restarted after the com-
ponents are updated. (Yes/No)
In case of yes, it is strongly recommended to close /
relocate all productive applications.
dynamic
Indicates that, in some cases, Update Manager will
restart the server at the specified boot time. As a precaution, it is strongly recommended to close / relocate
all productive applications.
auto (for components of the blade systems group only)
The component itself decides whether a reboot is necessary or not.
Job Name If the update is already assigned to a job, the name of
this job is displayed here.
Buttons
Create Job
Opens the Create Job Wizard, which allows you to create a job for the
selected updates.
Show Details
Opens the Update Details dialog box, which provides a detailed infor-
mation about the selected update.
74 ServerView Update Management
Page 75

5.1 Update Manager Main Window
ServerView Update Management 75
Page 76

5 User Interface
5.1.4 Job Details tab
The Job Details tab displays information about jobs, depending on what you
have already selected in the tree structure.
Tree structure Job Details Tab
Servers Job information for the selected servers
Updates Combination not permitted
Jobs Information about selected jobs
To open the tab, click the Job Details tab in the main window.
Figure 10: Job Details tab
76 ServerView Update Management
Page 77

5.1 Update Manager Main Window
In the table, a context menu is available. To open the context menu,
right-click an entry in the table.
The columns in the table have the following meanings:
Column Meaning
Icon Status of the current jobs
All components have been updated and the job
is now completed.
The job is waiting to be executed (this is the status before the data transfer begins).
The job is currently being executed.
Possible reasons:
l The update of at least one component
failed.
l Check-Job was not successful
l Cleanup-Job was not successful
l Status could not be retrieved
Opens the Filtering for <column> dialog box, where you
specify which rows are to be displayed in the table.
Name Name of the job
Server Name Name of the server
ServerView Update Management 77
Page 78

5 User Interface
Column Meaning
Status Current job status
waiting The job is waiting to be executed (this
transferring The job is currently being transferred.
transferred The job has been successfully trans-
flashing The job is currently in the update
flashed The update has been performed suc-
rescanning The inventory of the server is being
rebooting The server is currently rebooting.
is the status before the data transfer
begins).
ferred and is now waiting for the start of
the update procedure.
phase.
cessfully on the server.
redetermined.
preboot This special status is displayed if (and
only if) the management station itself
has been updated and a reboot is
required.
done All components have been updated and
the job is now completed.
error Possible reasons:
l The update of at least one com-
ponent failed.
l Check-Job was not successful
l Cleanup-Job was not successful
l Status could not be retrieved
78 ServerView Update Management
Page 79

5.1 Update Manager Main Window
Column Meaning
Start Time Time when the flash of the updates is started
Severity Cumulated status of the updates contained in the job (the
most critical status is shown in each case)
recommended An update is recommended.
mandatory An update is urgently required.
normal An update is not required.
Released Shows whether the job is released (yes) or not (no).
Description Description of the job (comment).
Buttons
Copy Job
Opens the Copy Job Wizard, which allows you to copy the selected job
to other servers.
Show Details
Opens the Job Details dialog box, which displays detailed information
about the selected job.
Edit Job
Opens the Edit Job dialog box, which allows you to change some properties of the selected job.
Delete
Deletes the selected job. A confirmation prompt appears before deletion is
initiated.
Release
Releases the selected jobs for execution on other PRIMERGY servers
(for example, after they have been processed without errors on a test
host). Jobs are indicated as released for information purposes only.
ServerView Update Management 79
Page 80

5 User Interface
5.1.5 Dialog boxes and wizards
Update Manager provides the following dialog boxes and wizards.
In the Server Details tab:
l LogOn dialog box
l Cleanup wizard
l Show Server Details dialog box
In the Update Details tab:
l Create Job wizard
o
Change TFTP Address dialog box
l Show Update Details dialog box
o
Show Release Notes dialog box
o
Show PSP Details dialog box
In the Job Details tab:
l Copy Job wizard
o
Change TFTP Address dialog box
l Show Job Details dialog box
80 ServerView Update Management
Page 81

5.1.5.1 LogOn dialog box
The LogOn dialog box allows you to log on to all servers that require user
authentication (AgentAccess = restricted or not certified).
To open the dialog box, choose any servers on the Server Details tab and
click Logon.
5.1 Update Manager Main Window
Figure 11: LogOn dialog box
The table in the dialog box displays all servers you selected on the Server
Details tab. All servers with restricted or not certified access status are
selected automatically.
If you have selected servers with an access status other than
restricted or not certified, Update Manager ignores attempts to log
on to these servers.
Column Meaning
Server Name of the server
Manageable Availability of the server
ServerView Update Management 81
Page 82

5 User Interface
Column Meaning
Agent Access Access status of the update agent on the server
granted Logon to the server has already
been successfully completed. You
have access to the server.
restricted Access to the server is currently
restricted. Log on must be performed with the appropriate user ID
and password on the server.
unrestricted Logon is not required to access the
server.
trusted Since the server was unavailable at
the time the logon was attempted,
the logon data was saved under the
assumption that it was correct.
certified A valid certificate is installed.
The managed server is ready for single sign-on.
not certified No valid certificate is installed.
The managed server is not ready for
single sign-on.
User Authentication
Login user ID and password for access control.
This parameters are only required if the ServerView update agent on the
managed node is configured with AccountCheck.
If the server is to be updated via a TFTP server, enter user ID and password for access to the hardware (Management Blade, Connection Blade,
iRMC S3 firmware / BIOS on a system running a VMware ESXi operating
system).
82 ServerView Update Management
Page 83

5.1 Update Manager Main Window
check and set Password
Checks the logon data and sets the access rights on the selected servers
(if Manageable = yes). The password is valid for the current session.
If the server is unavailable, the logon data is stored under the assumption
that it is correct (if Manageable = no).
Remove Server from List
Removes the selected server from the displayed list.
ServerView Update Management 83
Page 84

5 User Interface
5.1.5.2 Cleanup Wizard
You can use this wizard to clean up the update agent of a server if the agent
status is error.
Resetting the update agent may be necessary if a job stops with Job Status
= error and the return text contains the message Pending Jobs. You can
view the return text for a job by selecting the job on the Job Details tab and
opening the Show Job Details dialog. Pending Jobs is returned if the
update agent is already processing jobs from another management station or
jobs started via CLI.
The Cleanup Wizard comprises several dialog boxes to guide you through
the individual steps. All required steps are displayed in the tree structure on
the left.
To open the Cleanup Wizard, select the server on the Server Details tab
and click Cleanup.
LogOn step (Cleanup Wizard)
LogOn is the first step in the wizard. Here you log on to all servers that
require user authentication (AgentAccess = restrictedor not certified).
Figure 12: LogOn step
84 ServerView Update Management
Page 85

5.1 Update Manager Main Window
The table displays all servers you selected on the Server Details tab. All
servers with restricted or not certified access status are selected auto-
matically.
If you have selected servers with an access status other than
restricted or not certified, Update Manager ignores attempts to log
on to these servers.
Column Meaning
Server Name of the server
Manageable Availability of the server
Agent Access Access status of the update agent on the server
granted Logon to the server has already
been successfully completed. You
have access to the server.
restricted Access to the server is currently
restricted. Log on must be performed with the appropriate user ID
and password on the server.
unrestricted Logon is not required to access the
server.
trusted Since the server was unavailable at
the time the logon was attempted,
the logon data was saved under the
assumption that it was correct.
certified A valid certificate is installed.
The managed server is ready for single sign-on.
not certified No valid certificate is installed.
The managed server is not ready for
single sign-on.
ServerView Update Management 85
Page 86

5 User Interface
User Authentication
Login user ID and password for access control.
This parameters are only required if the ServerView update agent on the
managed node is configured with AccountCheck.
If the server is to be updated via a TFTP server, enter user ID and password for access to the hardware (Management Blade, Connection Blade,
iRMC S3 firmware / BIOS on a system running a VMware ESXi operating
system).
check and set Password
Checks the logon data and sets the access rights on the selected servers
(if Manageable = yes). The password is valid for the current session.
If the server is unavailable, the logon data is stored under the assumption
that it is correct (if Manageable = no).
Remove Server from List
Removes the selected server from the displayed list.
86 ServerView Update Management
Page 87

5.1 Update Manager Main Window
Enter TFTP step (Cleanup Wizard)
Enter TFTP is the second step in the wizard. This step is only displayed if
the cleanup runs via TFTP server (for example, in the case of a management
blade or a connection blade).
Figure 13: Enter TFTP step
The table shows a subset of the servers selected on the tab. For the servers
displayed here, cleanup will be done via the TFTP server.
Column Meaning
Server Name of the server
TFTP Address IP address of the TFTP server
Change TFTP Address
Click this button to change the IP address of the TFTP server for the
selected server.
ServerView Update Management 87
Page 88

5 User Interface
Schedule Job step (Cleanup Wizard)
Schedule Job is the last step in the wizard. Here you specify the time at
which the cleanup is to be executed.
Figure 14: Schedule Job step
Make sure that the server on which the cleanup is to be performed is up
and running at the time of execution.
Job Name
Unique name of the job
Default: CLEANUP_<sequence number, starts at 1>
Description
Description of the job as a comment (optional).
Exec Time
Start time for executing the job
Immediate Starts the job as soon as you click Finish to exit the
wizard.
Later Starts the job at the specified time.
Select date, hours, and minutes.
88 ServerView Update Management
Page 89

5.1.5.3 Server Details dialog box
The Server Details dialog box provides detailed information relating to the
server you selected on the Server Details tab.
If you selected a server of the group Unsupported Servers or
Unknown Servers, no server data will be displayed in this dialog.
To open this dialog box, click Show Details on the Server Details tab.
5.1 Update Manager Main Window
Figure 15: Server Details dialog box
Name
System name of the server
Network
IP address of the server
ServerView Update Management 89
Page 90

5 User Interface
Display Name
Name of the server
For a standalone server:
<server name>
For a blade server:
<blade server name>-<slotID>
For a host system of a virtual system:
<server name of the virtual system>-host
For a guest system of a virtual system:
<server name of the virtual system>-<servername>
Update Type
Method used to perform the update
online Update is performed while the operating system is run-
ning.
unknown The update type could not be determined because
l The server cannot be reached.
l No update agent is installed on the server.
illegal l An update agent ≥ V4.80 was manually installed
on an unsupported server type (e.g. offline
server).
l The model name of the server could not be deter-
mined. In this case, there is no entry in the Model
column.
old agent A GlobalFlash agent < V4.6x is installed.
For the server to be supplied with further updates, the
GlobalFlash agent must be updated first.
90 ServerView Update Management
Page 91

5.1 Update Manager Main Window
Agent Status
Status of the update agent on the server
ready The server is ready for the update phase.
error An error occurred during the update phase.
You must save the diagnostics about the failed job,
then initialize the update agent with the Cleanup function.
absent No update agent is installed on the server or the agent
is not running.
busy The server is currently in the update phase.
unknown The agent status could not be determined.
not_managable The ServerView agent cannot currently be reached on
the computer via SNMP.
Agent Access
Access status of the update agent on the server
granted Logon to the server has already been successfully
completed. You have access to the server.
restricted Access to the server is currently restricted. Log on
must be performed with the appropriate user ID and
password on the server.
unrestricted Logon is not required to access the server.
trusted Since the server was unavailable at the time the logon
was attempted, the logon data was saved under the
assumption that it was correct.
certified A valid certificate is installed.
The managed server is ready for single sign-on.
not certified No valid certificate is installed.
The managed server is not ready for single sign-on.
ServerView Update Management 91
Page 92

5 User Interface
Update Status
Cumulated update status of the server (the most critical status is displayed in each case)
normal An update is not required.
recommended An update is recommended.
mandatory An update is urgently required.
Display Update Status
Here you can forcibly change the value of Update Status, if necessary.
For example, you can change the Update Status to normal (meaning an
update is not required) if updates are recommended but you explicitly
want the update job to skip this server.
normal Update Status forcibly becomes normal.
recommended Update Status forcibly becomes recommended.
mandatory Update Status forcibly becomes mandatory.
automatic The value of Update Status is used as is. (default)
Check Status
Status of the last check
OK The last check was performed successfully.
Failed The last check failed.
To display more information, click Show Logfile.
92 ServerView Update Management
Page 93

5.1 Update Manager Main Window
Job Status
Status of the relevant jobs specified for the server
done All components have been updated and the job is now
completed.
waiting The job is waiting to be executed (this is the status
before the data transfer begins).
processing The job is currently being executed.
error Possible reasons:
l The update of at least one component failed.
l Check-Job was not successful
l Cleanup-Job was not successful
l Status could not be retrieved
Comment
Description field
Last Check
Last comparison result of the server inventory with the repository
Date Date of the last successful check.
Failed The last check failed.
To display more information, click Show LogFile.
N/A A check has not yet been performed for this server.
Last Inventory
Time at which the inventory was created on the server
Last Repository
Time at which the repository was last imported
Model
Model name of the server
ServerView Update Management 93
Page 94

5 User Interface
Operating Systems
Information about the operating system
Manageable
Availability of the server
yes The ServerView agent can be reached via SNMP.
no The ServerView agent cannot be reached.
Buttons
Force Check
A job with the name Check_xx is created (xx = sequence number). It per-
forms another comparison (check) of the server inventory with the repository. This job is displayed on the Job Details tab. The dialog box will be
closed automatically.
Show Logfile
Displays the log file for the currently selected server.
Show History
Opens a web page showing the flash log for the selected server.
94 ServerView Update Management
Page 95

5.1.5.4 Create Job Wizard
This wizard allows you to create new update jobs. The wizard comprises several dialog boxes to guide you through the individual steps. All required steps
are displayed in the tree structure on the left.
To open the wizard, choose any servers and updates on the Update Details
tab and click Create Job.
LogOn step (Create Job Wizard)
LogOn is the first step in the wizard. Here you log on to all servers that
require user authentication (AgentAccess = restricted or not certified).
5.1 Update Manager Main Window
Figure 16: LogOn step
The table displays all servers for which the updates you selected on the
Update Details tab are relevant. All servers with restricted or not certified
access status are selected automatically.
If you have selected servers with an access status other than
restricted or not certified, Update Manager ignores attempts to log
on to these servers.
ServerView Update Management 95
Page 96

5 User Interface
Column Meaning
Server Name of the server
Manageable Availability of the server
Agent Access Access status of the update agent on the server
granted Logon to the server has already
been successfully completed. You
have access to the server.
restricted Access to the server is currently
restricted. Log on must be performed with the appropriate user ID
and password on the server.
unrestricted Logon is not required to access the
server.
trusted Since the server was unavailable at
the time the logon was attempted,
the logon data was saved under the
assumption that it was correct.
certified A valid certificate is installed.
The managed server is ready for single sign-on.
not certified No valid certificate is installed.
The managed server is not ready for
single sign-on.
96 ServerView Update Management
Page 97

5.1 Update Manager Main Window
User Authentication
Login user ID and password for access control.
This parameters are only required if the ServerView update agent on the
managed node is configured with AccountCheck.
If the server is to be updated via a TFTP server, enter user ID and password for access to the hardware (Management Blade, Connection Blade,
iRMC S3 firmware / BIOS on a system running a VMware ESXi operating
system).
check and set Password
Checks the logon data and sets the access rights on the selected servers
(if Manageable = yes). The password is valid for the current session.
If the server is unavailable, the logon data is stored under the assumption
that it is correct (if Manageable = no).
Remove Server from List
Removes the selected server from the displayed list.
ServerView Update Management 97
Page 98

5 User Interface
Change Version step (Create Job Wizard)
Change Version is the second step in the wizard. The table displays all
updates you selected on the Update Details tab.
Figure 17: Change Version step
Column Meaning
Server Name Name of the server
Category The group to which the component belongs
Component Name of the component
Installed Version The version that is currently installed
New Version The version that is to replace the installed version
Change Version
Opens the Update Details dialog box, where you can select another ver-
sion as the new version.
98 ServerView Update Management
Page 99

5.1 Update Manager Main Window
Enter Job Name step (Create Job Wizard)
Enter Job Name is the third step in the wizard. Here you assign a name to
the job.
Figure 18: Enter Job Name step
Job Name
Unique name of the job
Default: JOB_<sequence number, starts at 1>
Description
Description of the job as a comment (optional)
The following fields are provided for information purposes only. You cannot
change the values.
If you create a job for multiple servers simultaneously, it may be that
the values of the parameters that should be displayed in the same field
are different. In this case, the string "---" will be displayed in this field.
ServerView Update Management 99
Page 100

5 User Interface
Example:
For one server entered in the job a reboot is necessary after the update
(Reboot=yes), while for others no reboot is necessary (Reboot=no).
In this case the Reboot field will show the string "---".
If the parameters that should be displayed in the same field have the
same value, this value will be displayed.
Server
Names of the server for which the updates are relevant
Severity
Importance of the updates
recommended An update is recommended
mandatory An update is urgently required
normal An update is not required
If you create a job for a single server, the highest severity weighting of an
update contained in the job is displayed (mandatory > recommended > normal).
100 ServerView Update Management
 Loading...