

Page 1
Quick Tips
It takes approximatel y 4 hours to
charge a fully disc harged single
battery with unit o ff or in
suspend mode.
Optimizing Bat tery Life
• Set power manageme nt setting
to Maximize Batter y Life.
• Adjust display brig htness levels
to lowest comfortable setting.
• Remove PC Card when
not needed.
• Utilize Suspend mod e when
not using your notebook .
• Read the Power Manage ment
section in your electr onic User’s
Guide for addition al features.
Adjusting Displ ay Brightness
• Fn + F6 to decrease bright ness
• Fn + F7 to increase bright ness
Adjusting Volume
• Fn + F8 to decrease volume
• Fn + F9 to increase volume
* Mono microphone ja ck or stereo
microphone/line in jack depending
on confi guration.
* * Stereo headphone/Optical Digital
Audio out jack or stere o headphone/Line O ut/Optical Digi tal
Audio out jack.
Drivers
Look for the latest dri vers on the
Drivers and Appl ications Restore
CD. Right-click the FDU ic on and
select “update”, or download
them at us.fujitsu.com/computers.
This convenient guide will lead you through the start-up
process and will also offer some valuable tips.
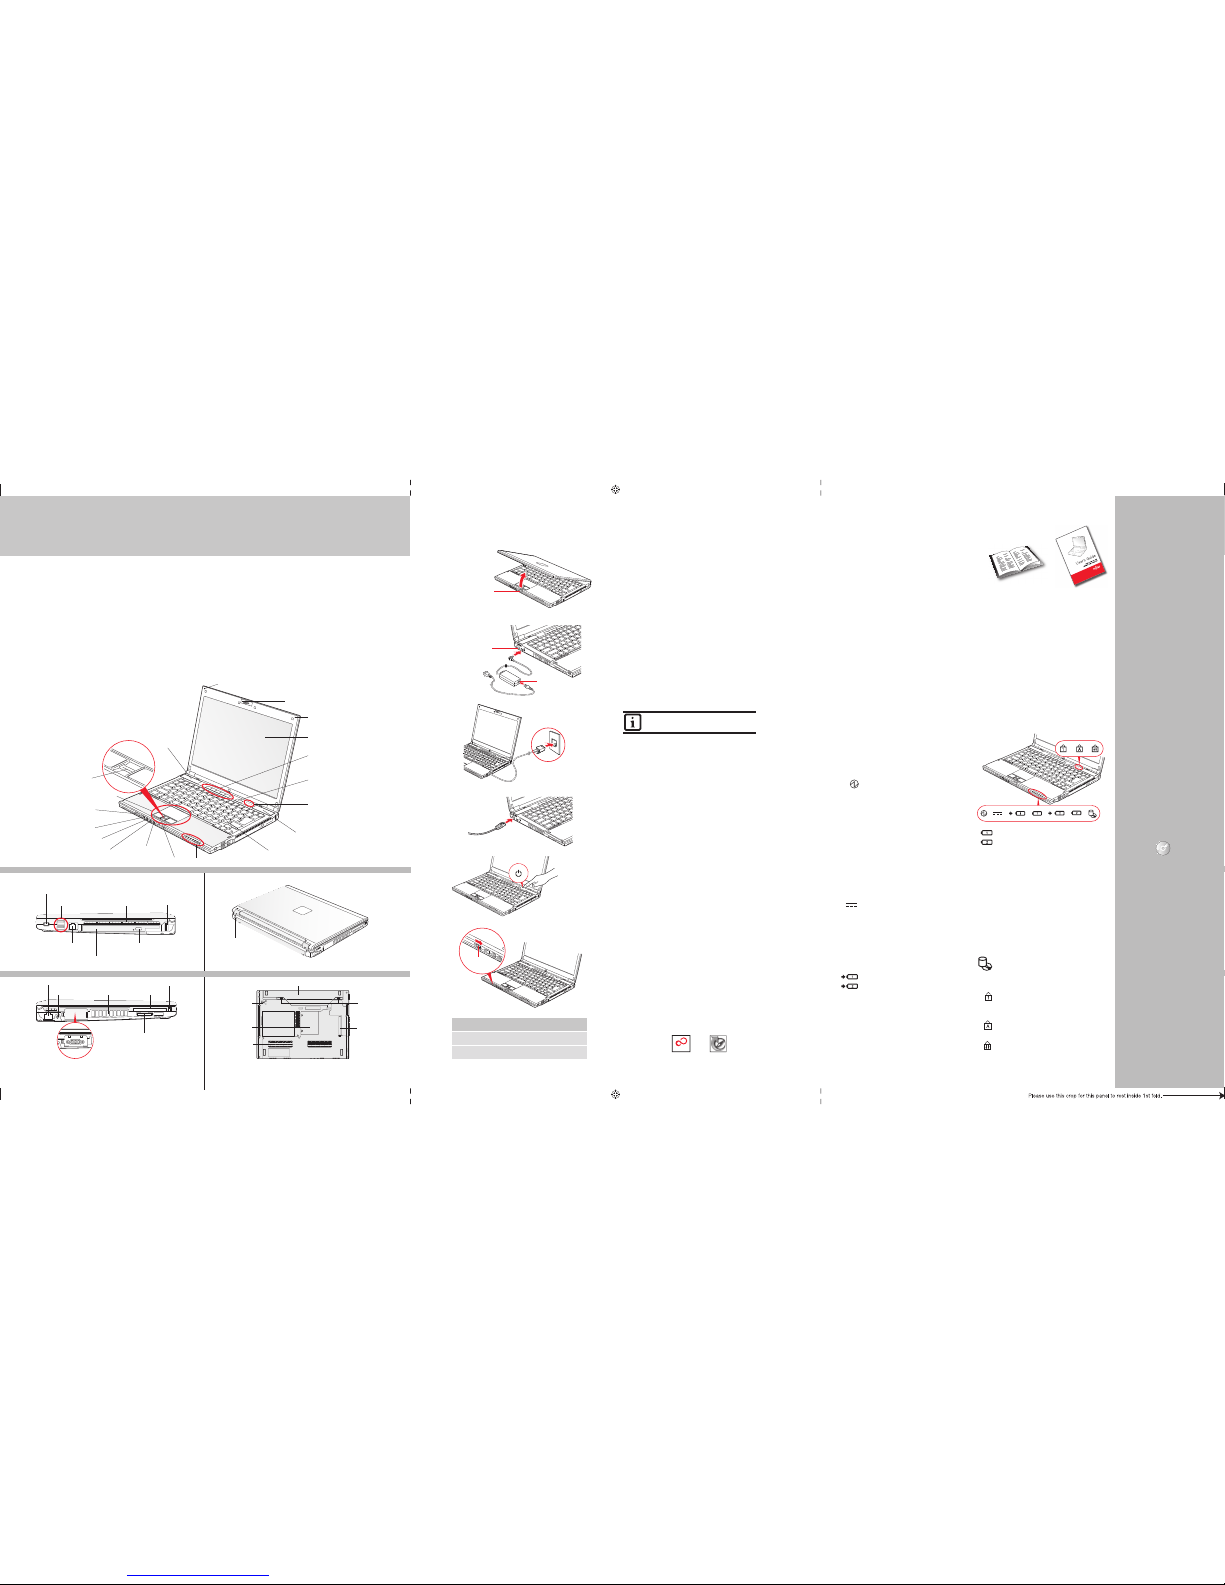
1. Open the Display Panel
Ensure that your LifeBook is on a hard level surfac e and that •
the air vents are not blocked.
Lift the display, being careful not to touch the scree n. •
Adjust t he display until it is at a comfortable viewing a ngle.•
2. Connect AC Power
Plug the A C adapter into your notebook.•
Plug the p ower cord into the AC adapter.•
Connec t the power cord to an electrical outlet .•
3. Connect to Internet or Network
Connect either a phone cord to the modem jack or an Etherne t •
cable to the LAN jack on your not ebook and to a wall jack
or to an Ethernet router.
Important:
During the setup procedure, do not disconnect the p ower supply, •
press any buttons, or use a ny peripheral devices such as a
mouse, keyboard, or remote control.
•
You should not attach any extern al devices and do not put a DVD/ CD in
your drive until you have gone through the initial power o n sequence.
4. Booting the System
Press the Suspend/Resume /Power button (a bove the keyboard) to •
turn on the notebook. When you d o this for the fi rst time, it will display
a Fujitsu logo on the screen. If you d o nothing the system will load
the operating system, and then the W indows Welcome will begin.
5. Register
For Genuine Microso ft® Windows® XP:
After the operating system has initialized, en ter the information •
as prompted to personalize your notebook a nd confi gure your
modem to dial.
For Genuine Windows V ista®:
Accept the Microsoft•
®
Windows® Licensing Agreement and the
Fujitsu End User License Agr eement to proceed.
Select your U ser ID and Password during the “Welcome Scr een.” •
•
Keep a record of your User ID and pas sword stored in a secure place.
•
THE SCREEN W ILL GO DARK FOR A PPROXIMATELY T WO MINUTES.
Do not at tempt to turn power on or off during this s tage. •
6. Registering Your LifeBook notebook
Register your notebook with Fujitsu Ser vice and Support via our •
Web site at us.fujitsu.com /computers.
You will need to be set up with an Internet Service Pr ovider (ISP) •
to register online.
7. Installing Click Me!
Check to be sure the WLAN switch i s on.•
For Genuine Microso ft® Windows® XP: The fi rst time you boot up
your system, you will see an icon called Click Me ! in the Start menu.
For Genuine Windows Vi sta®: In addition to an icon o n the
desktop, a dialog box will automatica lly open that prompts you
to run Click Me!. If you cho ose not run ClickMe! at this time,
the ClickMe! icon will appe ar on your desktop.
When you click the Click Me! icon, your system will automat ically •
build the icon tray in the bottom r ight of the screen. These icons
provide links to utilities that you will freq uently access.
Power Indicator
The Power indicator sy mbol states whethe r
your system is operati onal. It has several
different state s, each of which tells you
the mode your noteboo k is in.
Steady On: This me ans that there is power
to your notebook and tha t it is ready for use.
Flashing: Thi s means that your notebo ok
is in Standby mode.
Steady Off: Thi s means that your system i s
either in Save-to-D isk mode, or that your
notebook has been tu rned off.
If you are charging you r battery, the Power
indicator will rem ain on even if your noteb ook
is shut off. The Power in dicator will also
remain on if you have ei ther adapter conne cted
and are shut down fro m Windows.
AC Adapter Indicato r
The AC Adapter indica tor states whether you r
notebook is operati ng from the AC adapter,
Auto/Airline ad apter or battery. Thi s icon has
two different st ates that can tell you wha t
power source your noteb ook is using.
On: This means th at either of the adapter s
are currently in use.
Off: Power is only co ming from the batter y and
you do not have an adapter co nnected.
Battery Charge Indicators
Note that there are indi cators for the prima ry
battery (Bat tery 1) and an optiona l second
battery (Bat tery 2).
Orange, solid: Ba ttery is availabl e and system
is charging.
Green, solid: Bat tery is available a nd system
is fully charged.
Orange, blinkin g: Battery is avail able and
waiting to charge bat tery (batter y is out
of thermal range ).
Off: AC adapter is not p lugged in.
Battery Level In dicators
Note that there are indi cators for the prima ry
battery (Bat tery 1) and an optiona l second
battery (Bat tery 2).
The Battery Leve l indicators displ ay the charge
level of the indicated b attery pack, as fol lows:
Green, solid: Bat tery is between 51%
and 100% charged.
Orange, solid: Ba ttery is betwee n 13%
and 50% charged.
Red, solid: Batter y is 12% or less charged.
Orange, blinkin g: Blinks during ba ttery status
measurement ( Four seconds afte r the
battery is installed).
Red, blinking: T here is a problem with th e battery.
Off: There is no battery installed or the battery
has no charge.
Hard Drive/Optical Drive Access
Indicator
The Hard Drive/ Optical Drive Acc ess indicator
glows green when you r internal hard dri ve is
being accessed. N ote that fl ickering is normal.
NumLk Indicator
The NumLk indica tor states that the integ ral
keyboard is set in ten-key n umeric
keypad mode.
CapsLock Indicator
The CapsLock ind icator states that your
keyboard is set to type i n all capital lette rs.
ScrLk Indicator
The ScrLk indica tor states that your scro ll
lock is active.
Common Indicators
LEFT PANEL
BOTTOM PANEL
RIGHT PANEL BACK PANEL
CLICK ME
“Click Me!”
(For
Additional
Utilities)
(FDU)
(For
Latest
Drivers)
Controls, Connectors,
and Access Points
Initial Start Up
Status Display Panels
The Status Displa y Panels are located ab ove and below the
keyboard as shown. Fol lowing are some comm on indicators.
The Lithium ion bat tery is not charg ed upon purchase.
Initially you will n eed to connect eith er the AC adapter
or the Auto/Airli ne adapter to use your note book.
What’s in the Box
Check to see that all of the following items are in the box:
❏ LifeBook notebook ❏ Drivers and Applicatio ns Restore DVD
❏ Lithium ion battery, pre-inst alled ❏ Microsoft® associated material
❏ AC adapter with power cord ❏ Recovery and Utilit y Disc
❏ Weight saver module
Depending upon your confi guration, the following items may also be shipped with your notebook:
❏ DVD/CD-R W combo or Dual-Layer ❏ Additional Lithium ion bat tery
Multi-Format ❏ Modular Bay Battery
❏ DVD and/or CD -RW application CD
Keyboard
Power/Suspend/Resume
Button
Status Indicator Panel
Status Indicator Panel
Touchpad Pointing Device
Display Panel
Microphone
Microphone
Webcam
LAN (RJ-45) Jack PC Card Eject Button
DC-In Jack Air Vents PC Card Slot
External Video
Port
IEEE 1394 Jack
8. Install Additional Software
Close a ny open programs, applications or u tilities•
Inser t software application CD in to media drive.
Open the application folder, select the set-up icon, •
and load desired softwa re, as shown in the table.
Rest art your computer. •
9. Access your User’s Guide
To take advantage of all the features of your new Fujitsu Life Book •
notebook, it is highly recommended that you r ead your electronic
User’s Guide. It contains impor tant detailed information abo ut
your new computer. You can access your User’s Guide by
selecting its icon from the scre en desktop.
•
The Fujitsu Installer should auto matically launch. If it doesn’t, you will
need to fi nd the Setup.exe fi le on the Recovery CD’s root folder.
If you are using Genuine Windows Vista®, Click [A llow] in the •
User Account Control ( UAC) box.
Click [Continue]•
•
Select “I Agree” and click [Cont inue] in the License Agreement box.
Select “User’s Guide” from the “Utilities /Applications” cate gory.•
Click [Install Selected Subsystem s]•
The User’s Guide will be copied to your hard drive in the •
C:\Fujitsu\ Manual directory. Short cuts to the Users Guide
will be placed on your desktop and in the St art menu.
Power/Suspend /Resume
Button
Memory Stick/SD/xD Card Slot
Fingerprint Sensor
Display Panel Latch Button
S-Video Out Jack
LifeBook Security/Application
Panel
Stereo Speaker
Stereo Speaker
Lithium ion Battery Bay
Air Vents (multiple
locations)
Wireless LAN/Bluetooth
On/Off Switch
Memory Upgrade
Compartment
Dust Filter
Flexible Bay
Device Lock
Battery
Release
Latches
Headphone Jack
Microphone Jack
USB Ports Air Vents USB Port
Anti-Theft Lock Slot
Anti-Theft Lock Slot
Modem Jack Optical Drive Release Button
Flexible Bay (shown with Optical Drive installed
WLAN
Switch
Display Panel
Latch Button
DC Power
Jack
AC Adapter
Tele pho ne
Jack
LAN Jack
If you have a: You will need to ins tall
the followin g software :
Webcam
Arcsoft WebCam
Companion
Dual-Layer Mult i-Format CyberLink PowerProducer
DVD Writer
Page 2
SAVE THESE INSTRUCTIONS
IMPORTANT SAFETY INSTRUCTIONS
This unit require s an AC adapter to operate.
Use only UL Listed I.T.E. Class II Adapter s with an output rating of 19 VDC,
with a current of 4.22A ( 80 W)
. When using your noteb ook equipment, basic s afety precautions sh ould always be
followed to reduce the ri sk of fi re, electric shock a nd injury to persons, i ncluding the followin g:
AC adapter output pol arity:
Do not use this product n ear water for example, nea r a bathtub, washbowl, kitche n sink or laundry tub, in a wet •
basement or near a sw imming pool.
Avoid using the modem du ring an electrica l storm. There may be a remote ri sk of electric shock f rom lightning.•
Do not use the modem to rep ort a gas leak in the vic inity of the leak.•
Use only the power cord a nd batteries indica ted in this manual. Do not dis pose of batteries in a fi re. They may •
explode. Check with l ocal codes for possib le special disposa l instructions.
•
To reduce the risk of fi re, use only No. 26 AWG or larger UL Listed or CSA Ce rtifi ed Telecommunication Line Cord.
For TV tuner use: To protect f rom overvoltages and tr ansients on the Cable Di stribution System, be sur e that the •
outer shield of the co axial cable is con nected to earth (gro unded) at the buildi ng premise as close to the p oint of
cable entrance as pr acticable, as require d per NEC Article 820.93, AN SI/NFPA 70: 2005. If you have que stions
about your CATV installatio n, contact your servic e provider.
For Authorized Repair Technicia ns Only
DANGER OF EXPLOSION IF LIT HIUM (CLOCK) BATTERY IS INCO RRECTLY REPLACED. REPLACE ONLY WITH
THE SAME OR EQUIVALENT T YPE RECOMMENDED BY THE M ANUFACTURER. DISPOSE OF USED
BATTERIES ACCORDING TO THE MA NUFACTURER’S INSTRUCTION.
FOR CONTINUED PROTECTIO N AGAINST RISK OF FIRE, REPLACE ON LY WITH THE SAME TYPE
AND RATING FUSE.
System Disposal
LAMP(S) I NSIDE THIS PRODUCT CONTAIN MERC URY AND MUST BE RECYCLED OR DISPOSED O F
ACCORDING TO LOCAL, STATE, OR FEDERAL LAWS.
Recycling your battery
Over time, the batteri es that run your mobile co mputer will begin to hold a c harge for a shorter amo unt of time;
this is a natural occur rence for all batterie s. When this occurs, you may w ant to replace the batter y with a
fresh one*. If you replace it, it is i mportant that you disp ose of the old battery pro perly because batte ries
contain material s that could cause envi ronmental damage if d isposed of improper ly.
Popular Accessories
Memory Modules
• 1 GB SDRAM, DDR2-667 MHz
• 2 GB SDRAM, DDR2-667 MHz
Modular Bay Battery
Main Lithium ion Batter y
Auto/Airline Adapter
Additional AC Adapter
Port Replicator
Modular Dual-Layer Multi-format DVD Writer
Modular DVD/CD-RW Combo Dri ve
Modular Hard Drive Kit
External USB Floppy Disk D rive
USB Optical Mouse
Mini S Video Cable Adapter
Smart Card Adapter
Carrying Cases
• Diplomat (ballistic nyl on)
• Modella backpack
• Workstation Plus
Notebook Guardian™ Lock
Record your notebook s erial number here:
Serial #______________________
(see bottom of computer)
Fujitsu Computer Sy stems Corporation
1250 E. Arques Avenue M/S 122
Sunnyvale, CA 94085
Fujitsu, the Fu jitsu logo, an d LifeBook ar e registered t rademark s of Fujitsu Li mited.
Microsoft, Wi ndows, and Ge nuine Window s Vista are re gistered t rademarks o f
Microsoft Co rporation i n the United S tates and /or other cou ntries. Al l other
trademarks m entioned he rein are the pr operty of t heir respec tive owners .
Product descr iption dat a represent s Fujitsu des ign objecti ves and is prov ided
for comparati ve purpose s; actual re sults may va ry based on a va riety of
factors. Speci fi cations are subject to c hange with out notice.
©2007 Fujitsu Com puter Syst ems Corpora tion. All righ ts reserv ed.
Getting Started
Get Started with your
LifeBook
®
S6510 Notebook
This guide will lea d you through the start-up pro cess for your new LifeBo ok notebook and will also p rovide
some valuable tips. To lear n about all the exciting fea tures that your new LifeBo ok notebook has to offer,
please see the User ’s Guide that can be accesse d after completing th e start-up procedure.
+
Warning
Caution
Fujitsu is very conc erned with environ mental protection, and h as enlisted the serv ices of the Recharge able
Battery Recycli ng Corporation (R BRC)**, a non-profi t public service orga nization dedicated to pr otecting
our environment by rec ycling old batteries at n o cost to you.
RBRC has drop-off p oints at tens of thousand s of locations throughou t the United States and Can ada.
To fi nd the location nearest you, go to w ww.RBRC.org or call 1-800-822-8 837.
If there are no convenie nt RBRC locations near yo u, you can also go to the EIA Consu mer Education Initiati ve
website (http:// EIAE.org/) and sea rch for a convenient dispo sal location.
Remember—protecting the env ironment is a cooper ative effort, and you sho uld make every effor t
to protect it for current a nd future generation s.
* To order a new battery for your Fu jitsu mobile compute r, go to the Fujitsu shopping site at
www.shopfujitsu.com i n the US or www.fujitsu.ca/ products/notebook s in Canada.
** RBRC is an indepen dent third party to wh ich Fujitsu provides fu nding for battery rec ycling;
RBRC is in no way affi liated with Fujitsu.
Have questions or need help?
• Visit our website at us.fujitsu.com/computers
• Call us anytime at 1.800.8FUJITSU
• Email us at 8fujitsu@us.fujitsu.com
Want more information on Fujitsu products?
• Visit our website at www.shopfujitsu.com
• Call us anytime at 1.800.FUJITSU
Fujitsu Extended Service Plans available.
Visit us.fujitsu.com/computers
to purchase any of these accessories
or to get more information.
 Loading...