


Pocket LOOX User’s Manual
Copyright
Fujitsu Limited has made every effort to ensure the accuracy and completeness of this
document. However, as ongoing development efforts are continually improving the
capabilities of our products, we cannot guarantee the accuracy of the contents of this
document. We disclaim liability for errors, omissions, or future changes.
Trademarks
BluetoothTM is the trademark of the BluetoothTM SIG and is licensed to this company.
Microsoft®, Windows®, Windows® XP, Outlook, Pocket Outlook, and ActiveSync are
registered trademarks of the Microsoft Corporation of the United States in the United
States and elsewhere.
Intel, Pentium, Celeron and PXA255 Applications Processor are registered trademarks
of the Intel Corporation of the United States.
Other product names are trademarks or registered trademarks of their respective
companies.
Other products are copyrighted items of their respective companies.
©
All Right Reserved, Copyright
© Copyright 2003 Fujitsu Limited. All rights reserved. No part of this publication may be
copied, reproduced, or translated, without the prior written consent of Fujitsu Limited.
No part of this publication may be stored or transmitted in any electronic form without
the written consent of Fujitsu Limited.
Fujitsu Limited 2003
Website : www.pc-ap.fujitsu.com
i
Notation Used in this Manual
Sample Screens and Illustrations
The screens and illustrations in this manual are samples. The screens and illustrations
can vary slightly by model and with circumstances.
Notation in Text
Icon Meaning
Important
Critical Point
Product Designations
This manual uses the following product name abbreviations.
Product Name Notation in this Manual
Pocket LOOX This device
Microsoft® Pocket PC 2003 Pocket PC 2003
Microsoft® Windows® XP Professional Windows XP
Microsoft® Windows® XP Home Edition Windows XP
Microsoft® Windows® 2000 Professional Windows 2000
Microsoft® Word Word
Microsoft® Excel Excel
Microsoft® Outlook
Microsoft® ActiveSync
Microsoft® Internet Explorer Internet Explorer
Microsoft® Pocket Word Pocket Word
Microsoft® Pocket Excel Pocket Excel
Microsoft® Pocket Outlook
Microsoft® Pocket Internet Explorer Pocket Internet Explorer
This gives items requiring attention during use or items that must be
avoided. Always read these notes .
This gives information related to operations. Read these notes as
necessary.
This gives the manual to read.
This indicates a CD-ROM.
®
®
®
Outlook
ActiveSync
Pocket Outlook
ii
Safety Precautions
Icons for Safe Usage
Icon Meaning
CAUTION
WARNING
In order to distinguish the type of contents for danger and damage warnings, the
following symbols are used together with the above icons.
Icon Meaning
This icon indicates that if the contents of the message are ignored
and the device mishandled, this can result in death or serious injury.
This icon indicates that if the contents of the message are ignored
and the device mishandled, this can result in injury or material
damage.
The symbol within the triangle indicates that the item is a warning
∆
or caution. Within the symbol is indicated the concrete nature of the
warning. (The example on the left is a caution against getting fingers
trapped.)
indicates that the message is about behavior that must be
avoided (prohibited behavior). Within the symbol is indicated the
concrete nature of the prohibition. (The example on the left is a
general prohibition.)
indicates that the contents should always be followed. (The
example on the left is a general mandatory item.)
Data Storage Media and Customer Responsibilities
The only effective protection for the data stored in a computer, such as on a hard disk, is for you,
Purchaser to regularly back up the data. Fujitsu and its affiliates, suppliers, service providers and
resellers shall not be responsible for any software progr ams, data or other inf ormation stored or used
on any media or part of any Product returned to Fujitsu or its service providers for Warranty Service
or other repair, including but not limited to the costs of recovering such programs, data or other
information. It is solely your responsibility as the Purchaser to bac k up an y softw are programs , data,
or information stored on any storage media or any part of a Product returned for Warr anty Service or
repair to the designated service centers.
High Safety Required Use
This Product is designed, developed and manufactured as contemplated for general use, including
without limitation, general office use, personal use, household use and ordinary industrial use, but is
not designed,developed and manufactured as contemplated for use accompanying fatal risks or
dangers that, unless extremely high safety is secured, could lead directly to death, personal
injury,se v ere ph ysical damage or other loss (hereinafter ‘High Safety Required Use’), including without limitation, nuclear power reactioncore control in nuclear atomic facility, airplane automatic aircraft
flight control, air traffic control, operation control in mass transport control system,medical instrument
for life support system, missile launching control in weapon system. You shall not use this Product
without securing the sufficient safety required for the High Safety Required Use.
iii
WARNING
Electrical shock
In the unlikely event of an abnormality with this device involving heat or smoke,
abnormal smell, or abnormal noise, immediately switch off the power for this
device and unplug the power plug for the AC adapter from the socket.
Make sure that the smoke stops, then notify the contact point for inquiries
concerning Fujitsu products or the store you purchased this device from. Do
not attempt to make repairs yourself. That would be dangerous.
Using the device in an abnormal state can result in electrical shock and fire.
Electrical shock
If foreign matter (metal, liquid, etc.) gets inside this device , immediately switch
off the power for this device and unplug the power plug for the AC adapter from
the socket.
Then, notify the contact point for inquiries concerning Fujitsu products or the
store you purchased this device from. Using the device in this state can result
in electrical shock and fire.
Be particularly careful in households with young children.
Electrical shock
If this device is dropped or otherwise subject to strong shock and damage,
switch off the power for this device and unplug the power plug for the AC
adapter from the socket.
Then, notify the contact point for inquiries concerning Fujitsu products or the
store you purchased this device from.
Using the device in this state can result in electrical shock and fire.
Distraction
Do not use this device while driving an automobile.
Doing so can interfere with safe driving and cause an accident. First park the
automobile safely, then use this device.
Electrical shock
Connect the AC adapter to the ordinary household electrical supply (100-240
VAC).
Electrical shock
Do not plug or unplug the AC adapter with wet hands. Doing so can cause
electrical shock.
iv
WARNING
Electrical shock
Do not touch the metal parts of connectors or the AC adapter. Doing so can
cause electrical shock.
Fire
If dust gets on the AC adapter electrodes or the socket, wipe it off with a dry
cloth. Continuing to use this device with the dust can result in fire.
Electrical shock
Do not use this device if the AC adapter power cable is damaged or the socket
is loose. Using this device under these conditions can result in electrical shock
and fire.
Electrical shock
Do not damage or work on the AC adapter power cable. If you place a heavy
object on it, yank on it, bend or twist it too forcibly, or heat it, this can damage
the power cable and result in electrical shock and fire.
Electrical shock
Do not disassemble or alter this device yourself. Doing so can result in
electrical shock and fire.
Electrical shock
Do not use this device if the LCD screen is not working and can not display
anything.
For repairs, contact the contact point for inquiries concerning Fujitsu products
or the store you purchased this device from. Using the device in this state can
result in electrical shock and fire.
Electrical shock
Do not use this device anywhere with excessive humidity, dust, or oily smoke,
for example a kitchen, or any location with poor ventilation, or anywhere with
an open flame. Doing so can result in electrical shock and fire.
Electrical shock
Do not use this device anywhere water can get on it, for example in rooms with
bath tubs or showers. Doing so can result in electrical shock and fire.
v

PRECAUTIONS ON RADIO WAVE
Wireless Interoperability
This product is designed to achieve compatibility with a two-way communication system
for wireless LAN products based on DS-SS (Direct Sequence Spread Spectrum) radio
technologies. Additionally, this product complies with the Wi-Fi wireless LAN standard
defined by the Wi-Fi Alliance, an organization for verifying interconnectivity of wireless
LAN products.
Environmental Influence of Radio Wave Emission
• Like other high-frequency devices, this product emits high-frequency electromagnetic energy. However, the level of the energy emitted from this product is
controlled to a much lower lev el, compared to wireless devices like mobile phones.
• Since this product operates within the guidelines based on the high-frequency safety
standards and recommendations, we hav e confidence in user safety of this product.
The standards and recommendations reflect the unified view of the scientific
community and are based on studies and discussions by study groups and
committees composed of scientists engaged in ongoing and extensive literature
research and interpretation.
• Under certain circumstances or environment, the building owner or the authorized
representative of an organization may restrict use of this product. Such cases
include the following:
- Use of this product in an airplane
- Use of this product in an environment where there is a risk of interference with
other devices or services
• If the policy applicable to use of wireless devices is not clear to you with a certain
organization or in a certain environment (in an airport, for example), contact the
person responsible to make sure that use of this product is permitted before turning
on its power.
Health Influence of Radio Wave Emission
The output power from this product is much lower than the FCC radio wave emission
limit. Still, care should be taken to use this product so that potential is minimized to the
person contacting the device under the normal operation. Avoid contacting the antenna
section of this product whenever you can.
Precautions on Radio Interference
• This product generates, uses and emits high-frequency energy.
• Setting and/or using this product against the instructions in this manual may create
hazardous interference with wireless communications.
• If this product is causing hazardous interference with a radio or television receiver
(which can be checked by powering on/off the device), remove the interference by
following the steps below.
- Re-set the antenna orientation and/or position.
- Relocate this product and/or the receiver concerned to be wider apart.
vi

Contents
SECTION 1
1 Notice Concerning Usage ...................................................2
LCD Display Characteristics ..............................................................2
Handling Precautions ......................................................................... 2
Locations to Avoid for Usage and Storage .........................................2
Cleaning ............................................................................................. 3
2 Battery ...................................................................................4
Installing/Removing a Battery Pack.................................................... 4
Charging............................................................................................. 6
Checking the Remaining Battery Capacity......................................... 8
Considerations ................................................................................... 8
3 Switching the Power On/Off ..............................................10
4 Resets .................................................................................13
Normal Reset ................................................................................... 13
Full Resets ....................................................................................... 14
5 Connecting to a Computer ................................................15
Connecting ....................................................................................... 15
6 Installing Expansion Units ................................................17
Expansion Units That Can Be Used with This Device...................... 17
Setting a CF Card ............................................................................ 17
Setting an SD Card .......................................................................... 20
SECTION 2
1 Initial Screen and Application Startup .............................24
Today Screen ................................................................................... 24
Screen Configuration ....................................................................... 24
Starting/Switching Applications ........................................................ 25
Starting/Switching from the Menu..............................................26
Starting/Switching Applications from Application Buttons ................ 26
Differences between Switching Applications
and Ending Applications................................................................... 27
Ending Applications.......................................................................... 27
2 Operations Common to All Programs ..............................28
Navigation Bar and Command Bar .................................................. 28
Pop-Up Menus ................................................................................. 29
3 Data Input............................................................................30
Soft Input Panel................................................................................ 32
Editing T e xt....................................................................................... 38
vii

SECTION 3
SECTION 4
4 Sound Recording ...............................................................40
5 Help .....................................................................................41
6 Searches .............................................................................42
7 File Operations Using File Explorer .................................43
1 Connection Settings ..........................................................46
Preparations.....................................................................................46
Settings for Connecting to the Internet............................................. 46
Settings for Sending/Receiving Email .............................................. 49
2 Viewing Web Pages ............................................................53
Connecting/Disconnecting ............................................................... 53
Basic Pocket Internet Explorer Operation ........................................ 54
3 Sending/Receiving Email ..................................................57
Email Writing and Sending/Receiving .............................................. 57
Connecting to the Email Server and Sending/Receiving ................. 59
Basic Inbox Operations .................................................................... 60
4 Exchanging Instant Messages ..........................................66
Preparations.....................................................................................66
Sign-in and Sign-out......................................................................... 67
Basic MSN Messenger Operations .................................................. 69
viii
1 Summary .............................................................................74
Pocket Outlook Functions ................................................................ 74
Reminder Settings............................................................................ 74
2 Calendar ..............................................................................76
Screen Configuration ....................................................................... 76
Creating New Appointments ............................................................ 77
Using the Summary Screen ............................................................. 78
Revising/Deleting an Appointment ................................................... 78
Automatic Creation of a Meeting Reminder ..................................... 79

SECTION 5
3 Contacts ..............................................................................80
Screen Configuration ....................................................................... 80
Creating a New Contact ................................................................... 81
Searching the Contacts....................................................................81
Using the Summary Screen ............................................................. 82
Revising/Deleting Contacts .............................................................. 82
4 Tasks ...................................................................................83
Screen Configuration ....................................................................... 83
Creating a New Task ........................................................................84
Using the Summary Screen ............................................................. 85
Revising/Deleting T asks ................................................................... 85
5 Notes ...................................................................................86
Screen Configuration ....................................................................... 86
Creating a New Note........................................................................87
1 Program List .......................................................................90
Built-In Programs ............................................................................. 90
Bundled Applications........................................................................ 91
2 Standard Pocket PC 2003 Built-In Programs ...................92
Pock et W ord .....................................................................................92
Pocket Excel..................................................................................... 94
Windows Media Player for Pocket PC .............................................. 96
Pocket Internet Explorer ...................................................................97
Pocket Outlook ................................................................................. 97
MSN Messenger .............................................................................. 97
SECTION 6
3 Other Built-in Application..................................................98
LX Launcher.....................................................................................98
Automatic Storage Device Startup/Inf File Editor...........................101
LX-Backup...................................................................................... 103
LX Diagnostics ............................................................................... 105
1 ActiveSync Summary ......................................................108
ActiveSync ..................................................................................... 108
Installing ......................................................................................... 109
Starting Synchronization ................................................................ 109
Detailed Synchronization Settings ................................................. 110
Synchronization Settings................................................................ 111
Synchronization Options ................................................................ 111
Copying Files ................................................................................. 113
Synchronizing Files ........................................................................ 113
ix

SECTION 7
2 Synchronizing Web Pages and Email .............................114
Synchronizing Web Pages ............................................................. 114
Synchronizing Email....................................................................... 116
3 Synchronizing Pocket Word/Pocket Excel .....................117
Linking with Word...........................................................................117
Linking with Excel........................................................................... 117
4 Backing Up and Restoring ..............................................118
Backing up Data.............................................................................118
Restoring Data ............................................................................... 119
1 Connection Configurations That Can Be Used .............122
2 Wireless LAN Connections .............................................123
What is a Wireless LAN? ............................................................... 123
Settings .......................................................................................... 125
3 Wired LAN Connections ..................................................129
What is a Wired LAN?....................................................................129
Settings .......................................................................................... 130
4 Bluetooth™ Connections ................................................131
What is Bluetooth™? ..................................................................... 131
BluetoothTM Connections Using Pocket Plugfree
(for wireless model only) ................................................................ 133
Pocket Plugfree Screen Configuration ........................................... 139
File Operations...............................................................................147
Exchanging Business Cards .......................................................... 150
Connecting to the Internet..............................................................152
Using ActiveSync ........................................................................... 155
x

SECTION 8
SECTION 9
1 Settings .............................................................................158
List of Setting Items........................................................................ 158
Adjusting the Display...................................................................... 160
Adjusting the Memory .................................................................... 161
CPU Settings.................................................................................. 162
Setting the Date/Time .................................................................... 163
Menu Settings ................................................................................ 163
Setting the Owner Information ....................................................... 164
Setting the Password ..................................................................... 164
Power Settings ............................................................................... 165
Today Screen Settings ................................................................... 166
Application Buttons Settings .......................................................... 167
Infrared Communications Settings ................................................. 169
Setting Sound and Recording ........................................................ 170
Checking System Information ........................................................ 170
2 Adding/Removing Applications ......................................171
Applications You Can Add .............................................................. 171
Adding Applications Using Your Computer ..................................... 171
Adding Applications from the Internet ............................................ 171
Removing Applications................................................................... 172
1 Troubleshooting and Tips ................................................174
Installing New Software.................................................................. 174
Date or Time of the Pocket PC is Incorrect .................................... 174
The Display of the Pocket PC Remains Dark................................. 174
The Information on the Display of the Pocket PC
is Difficult to Read .......................................................................... 174
The Pock et PC Switches Off..........................................................175
The Pocket PC does not Start after Switch On .............................. 175
The Pocket PC Stops Working .......................................................176
The Battery Discharges Too Quickly .............................................. 179
The Suspend Button does not Respond Properly.......................... 180
No Sound or Minimal Volume ......................................................... 180
Contact Help Desk ......................................................................... 180
xi

xii

SECTION
SECTION
1
1

SECTION 1
1 Notice Concerning Usage
Please watch out for the following, which can cause malfunction and accidents.
LCD Display Characteristics
The following are characteristics of the LCD display. Please understand that they do not
signal any breakdown of the equipment.
• TFT LCD displays use high-level technology. The screen is comprised of over 230,000 pixels
(dots) (for this device). Therefore, there may be dots on the screen that do not light up or that
never turn off. Please understand that these do not signal any breakdown of the equipment.
• Due to the nature of the manufacturing process, the colors for the LCD display used in this
device can vary from product to product. Also, temperature fluctuation and the like can cause
a certain level of color unevenness.
Handling Precautions
• Do not subject this device to mechanical shock or vibration.
• Do not disassemble this device.
• If this device is used for prolonged periods of time, the temperature of the surface of this
device rises and becomes hot. This is because heat radiates from the device as a whole once
the temperature within the device reaches a certain level. It does not signal breakdown of the
device.
Locations to Avoid for Usage and Storage
Avoid using this device in locations such as the following.
• Locations with extremely high or low temperatures
Operating temperatures of this device are 0 ~ 40°C and storage temperatures is –25 ~ 60°C
• Locations subject to direct sunlight
• Locations subject to mechanical shock or vibration
• Excessively dusty locations
• Locations where water or any other liquid might get on this device
• Locations with high humidity
• Locations where BluetoothTM signals could be harmful (hospitals, within aircraft, in crowded
trains, etc.)
• The wireless device marked as shown above uses 2.4 GHz. It uses the DS-SS modulation
method and the estimated distance over which the device might cause interference is within
40 m.
• This device uses the 2.4-GHz band. This band is also used by industrial, scientific and medial
equipment such as microwave-ovens and other similar radio stations, on-premise radio
stations for identifying movable bodies used under license on factory production lines and
license-free, specified low-power radio stations and amateur radio stations (hereafter referred
to as “other radio stations”).
• Check that three is no medical institute or factory in the vicinity prior to using this device.
• If any radio interference ever occurs with “other radio stations”, immediately change the
channel on this device, change the location of use or stop the operation on the de vice.
• For other issues that require clarification or assistance, contact your dealer or the “Contact
point for inquiries concerning Fujitsu personal products”.
2

How to Stop the BluetoothTM Functions
In locations such as hospitals, aircraft, and crowded trains, where BluetoothTM signals
could be harmful, either stop using it or use this device with its BluetoothTM functions
stopped.
Cleaning
WARNING
In order to prevent electrical shock or injury, always execute the following
before cleaning.
• Switch Off the power for this device and disconnect the AC adapter.
• If this device is connected to a computer, remove this device from its
cradle.
Cleaning the Main Unit
To clean this device, wipe it gently with a soft dry cloth.
If the dirt is stubborn, use a cloth dipped in water or water with diluted neutral cleaning
solution and well-wrung out. When wiping off this device with diluted neutral cleaning
solution, wipe off the cleaning solution with a cloth dipped in water and well-wrung out.
When wiping this device, be careful not to let any water get into it. Never use paint
thinner, benzene, or any other strongly volatile solution or any washcloth with chemicals
imbedded in it.
Cleaning the Touch Screen (LCD display)
Gently wipe the touch screen clean with a soft, dry cloth or eyeglasses cloth.
Important
Never rub the touch screen surface with anything hard or press strongly against it. Doing so
could break the touch screen.
3
SECTION 1
2 Battery
This product operates on an external power via the AC adaptor or on a battery
pack. To operate this product on a battery pack, it is necessary to charge it
beforehand. While using this product, if
the screen, promptly recharge the battery or replace it with a charged spare
battery pack.
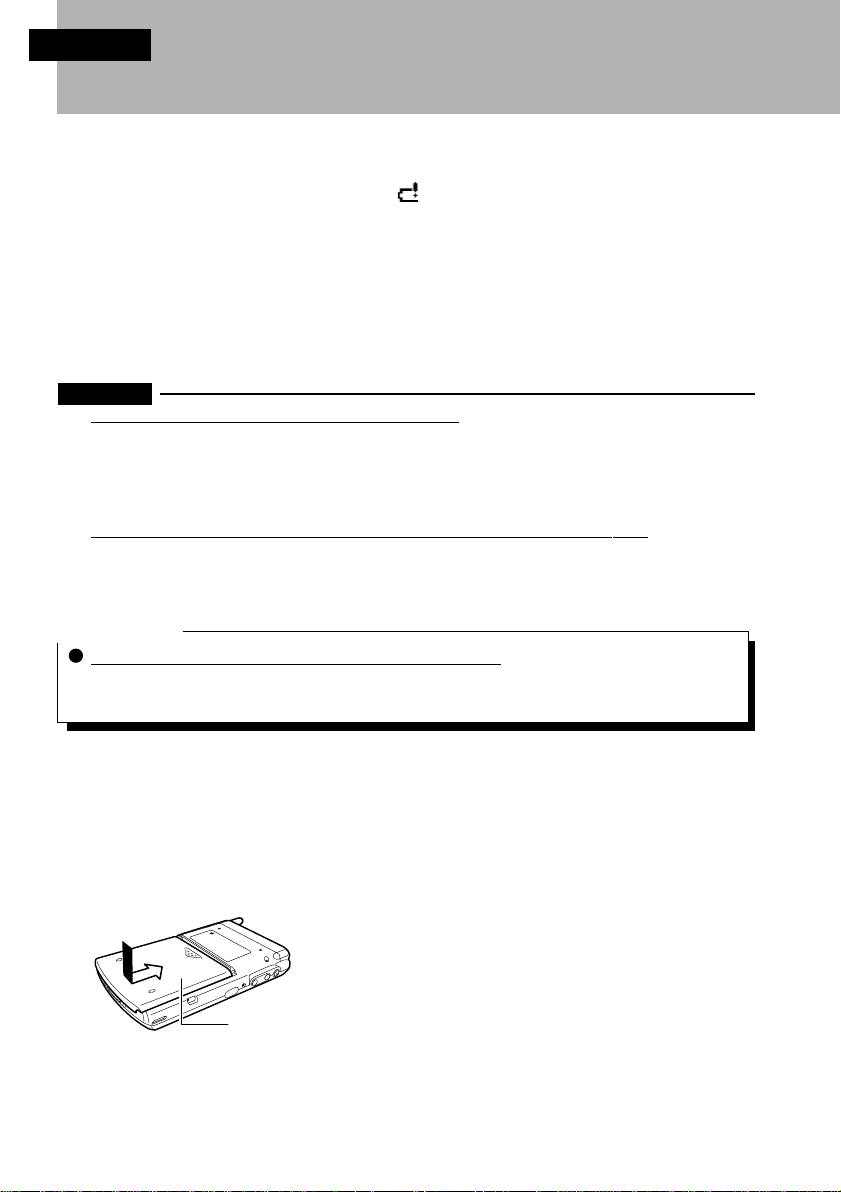
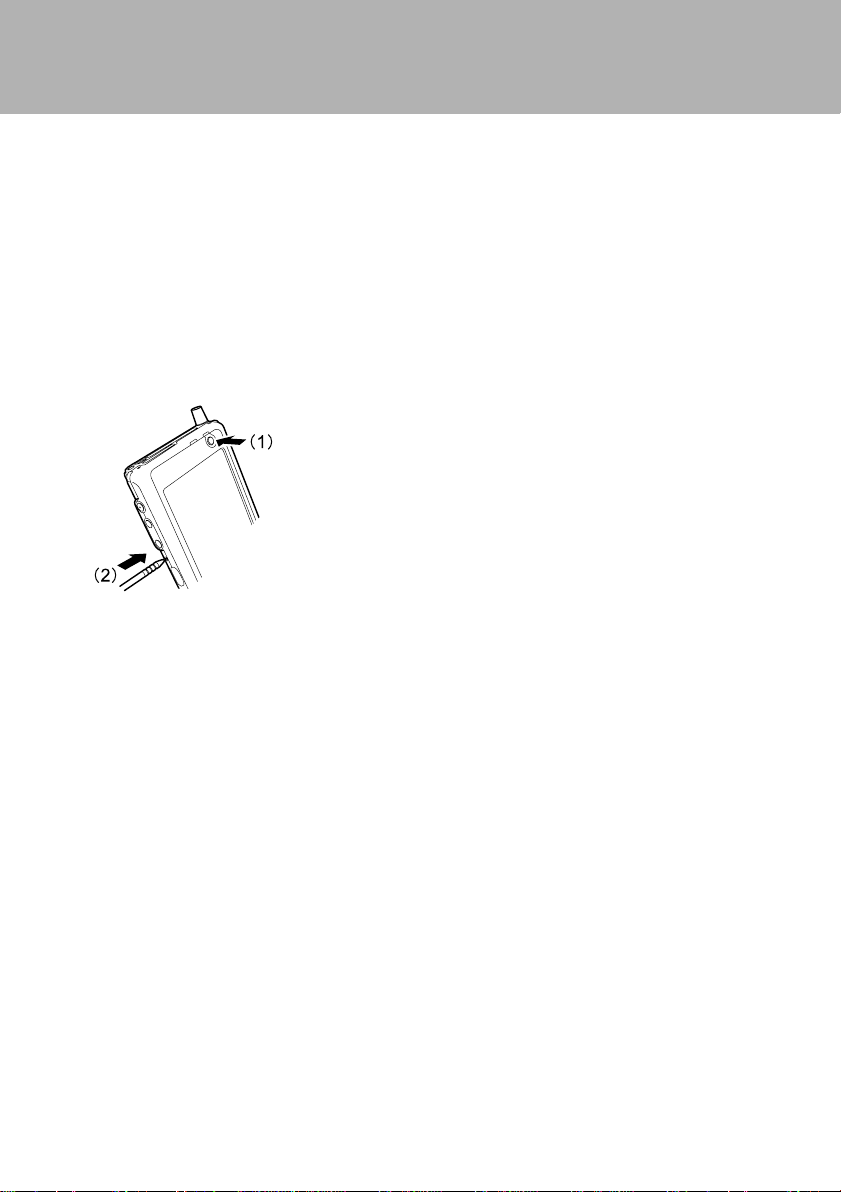
Installing/Removing a Battery Pack
Follow the procedures below for installing/removing a battery pack.
Important
Do not leave this product without a battery pack.
While the battery pack is being replaced, the internal backup battery preserves the data
being worked on, data that you have created and applications that y ou have added. Since the
backup battery is exhausted in about thirty minutes if it has been fully charged, battery
replacement should be performed quickly . Lea ving the device f or a long time without a battery
pack may result in data loss.
Be sure to lock the battery pack’s lock when using or carrying the device.
Until you lock the battery pack’s lock, the power of this product cannot be switched on.
Additionally , do not release the lock unless you are installing/removing a battery pack. Carrying
this product while the lock is released may cause the battery pack to fall and be damaged.
appears on the upper right corner on
Critical Point
Installing/Removing Separate Expansion Battery Pack
The separately purchased expansion batteries can also be installed and remedied by following
the same procedure.
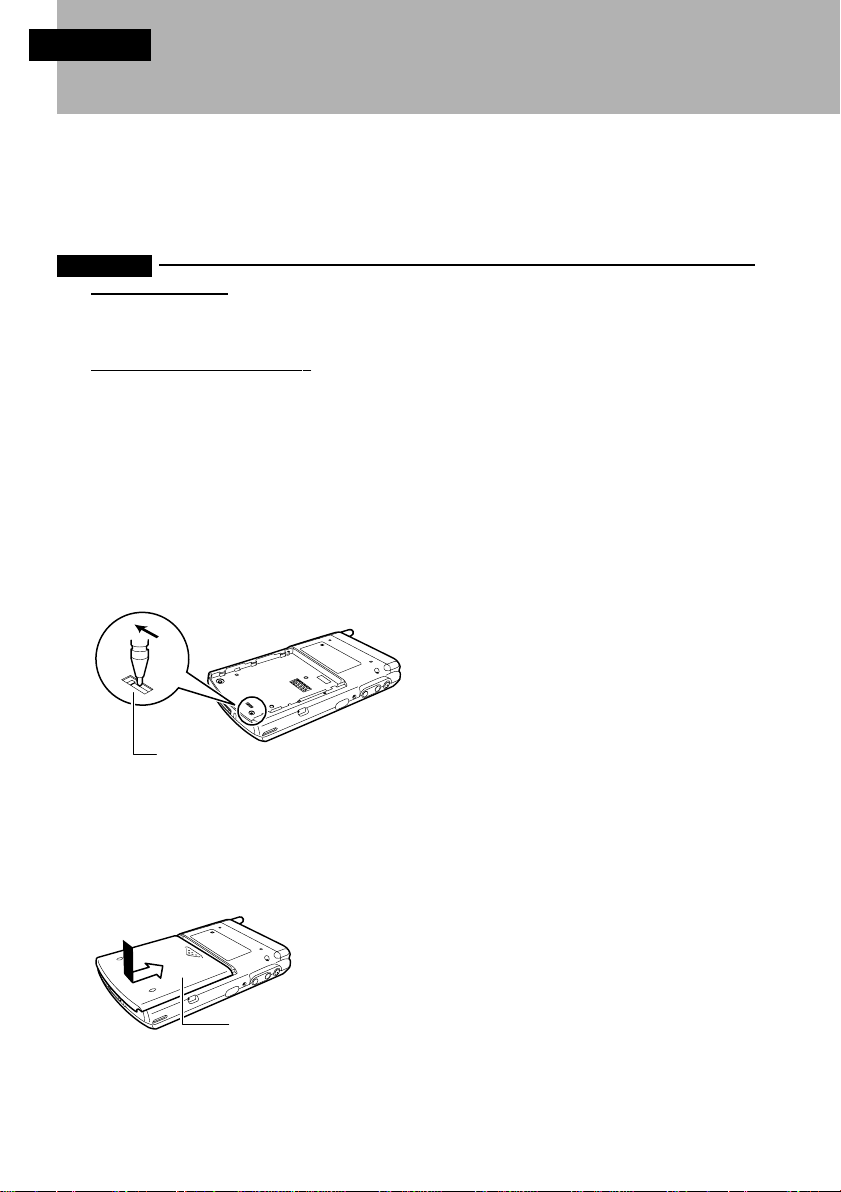
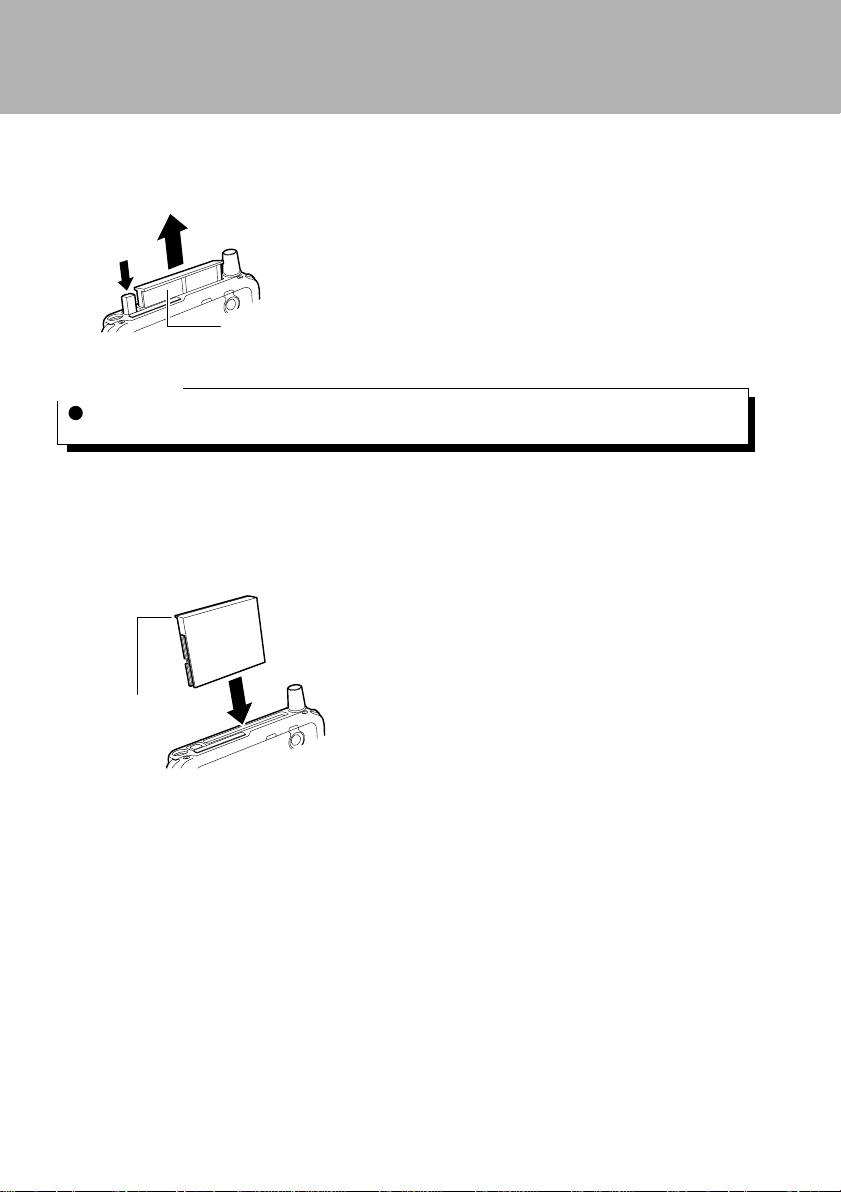
Installing
When using this product for the first time after purchasing it, install a battery pack after
turning the backup memory switch on.
1 Place a battery pack onto the location indicated in the figure, and slide it up
to install it.
Battery pack
4
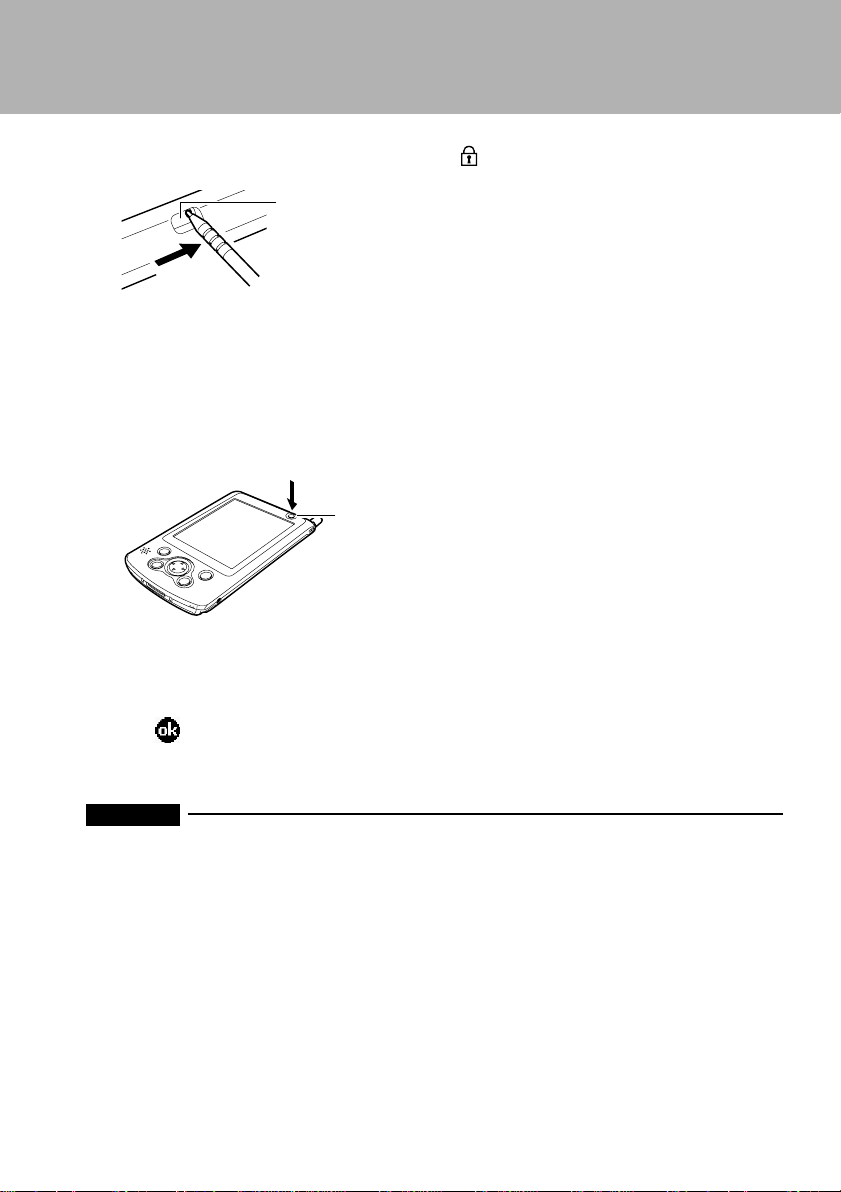
2 Slide the battery pack’s lock toward the side, using a stylus pen.
Battery pack’s lock
Removing
1 If the power of this product is turned on, turn it off by pressing the power
button.
Power button
2 Slide the battery pack’s lock toward the
side, using a stylus pen.
3 After sliding the battery pack, lift it and remove it.
5
Charging
The following three charging methods are available:
• Charging in the cradle
• Direct charging with the AC adaptor
• Charging with a charger
When using this product for the first time, install a battery pack after turning the backup
memory switch on, referring to “Information Before You Start”
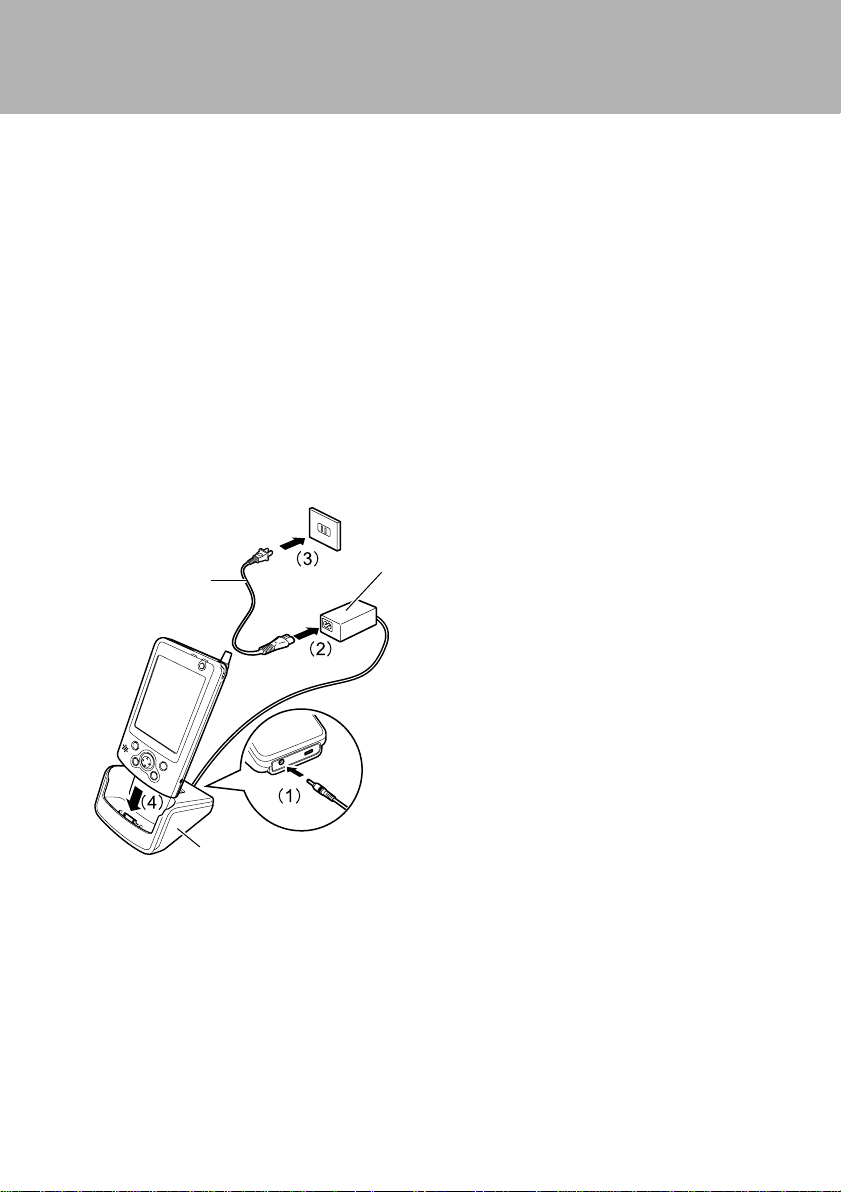
Charging in the Cradle
You can charge this product by setting it in the cradle.
As shown below, (1) connect the AC adaptor to the cradle, (2) connect one end of the
power cable to the AC adaptor, (3) connect the other cable end into the socket and (4)
place this product in the cradle.
AC adapter
Pow er cable
Cradle
6
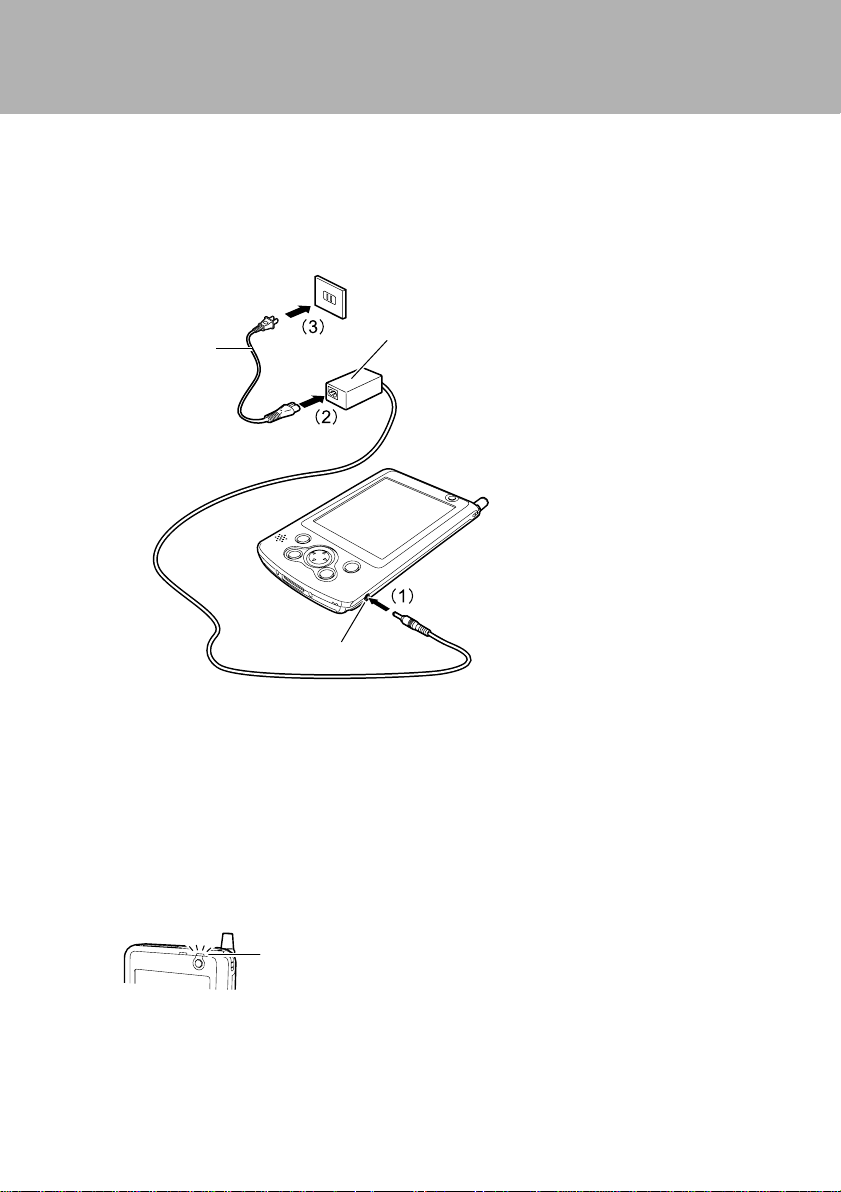
Direct Charging
Connect the AC adaptor to this product and charge its battery.
As shown below, (1) connect the AC adaptor to this product’s DC-IN connector, (2)
connect one end of the power cable to the AC adaptor and (3) connect the other cable
end into the socket.
AC adapter
Power cable
DC-IN connector
Charging with a Charger
To charge a battery pack separately, you can use a charger sold separately.
(1) connect the accompanying AC adaptor to the charger, (2) connect one end of the
power cable to the AC adaptor, (3) connect the other cable end into the socket and (4)
set the battery pack onto the charger.
Behavior during Charging and Charging Time
• During charging, the indicator on the power button flashes green.
Indicator
• Charging takes about four hours (when charging for the first time after the purchase
or charging a battery pack for the first time after purchasing it, it takes longer).
When charging is completed, the indicator lights up green.
7

Checking the Remaining Battery Capacity
After turning on this product’s power, you can check the remaining battery capacity
following the procedure below.
1 Tap
→ “Settings” → “System” tab → “Power” → “Battery” tab.
Check the remaining battery capacity at “Battery power remaining”.
Considerations
Remaining Battery Capacity and Data Protection
Note the following concerning protection of data stored in this product.
Important
The internal backup battery operates when the battery pack used is being replaced or is
totally exhausted to temporarily preserve the data being worked, data created that you have
created and applications you have added. The backup battery can operate for about thirty
minutes when it is fully charged. Thus, data loss may occur if this product is left without a
battery pack for a long time or recharging is not performed properly.
Even when the device’s power is turned off, the battery is operating to preserve the data
being worked on, data you have created and applications y ou hav e added. Theref ore, lea ving
the device for a long time without recharging will lead to total exhaustion of both the battery
pack and the backup battery, leading to data loss.
In order to prevent data loss, if appears on the upper right corner on the screen, promptly
charge the battery or replace it with a charged spare battery pack.
Fujitsu shall not be liable for loss of your data due to f ailure to recharge properly or to replace
the battery pack. Please be aware of the above provision in case of any data loss.
To avoid any possible data loss, regularly back up your data.
8

Notes on Charging
• When using this product for the first time or after a long interval, or when the
remaining battery capacity is low, charge the battery before using it.
• Give a generous amount of time for charging to have the battery fully charged.
• Note that an excessively high or low ambient temperature reduces the battery
charge capacity .
• In order to avoid battery deterioration, charge it once in two weeks, even if you are
not using this product.
Battery’s Service Life
The battery has a certain service life. Repeated charging/discharging over time
gradually shortens its operable hours. When you have realized that the battery’s
operable time has become extremely short, replace it with a battery pack separately
sold (the internal backup battery needs to be replaced by a competent repair shop).
Also note that the battery’s service life varies depending on the operating conditions.
Comply with the following precautions.
• Do not leave this product in a high/low-temperature environment. It would
accelerate exhaustion and deterioration of the battery.
• Instead of repeating complete discharging and recharging, repeating moderate
charging frequently extends its service life.
9
SECTION 1
3 Switching the Power On/Off
You can easily switch the power on/off , with some precautions to follow.
Powering On
Important
Note for power on
When planning to use this product for a long time or to use it for the communications purpose,
or when performing operations that consume large amounts of power , we recommend use of
this device with the AC adaptor connected to it.
Note for using a battery pack
In the following cases, the battery may not be charged. Check the remaining battery capacity
and recharge it as needed.
• At the time of purchase
• About seven days or later after the last charging
Information Before You Start
When using this product for the first time after purchase, turn on the backup
memory switch on and supply power to the memory.
1 Use the stylus pen to slide the backup memory switch to the ON position.
Backup
memory
switch
2 Place a battery pack onto the location indicated in the figure, and slide it up
to install it.
Battery pack
10
3 Slide the battery pack’s lock toward the side, using a stylus pen.
Battery pack’s lock
Normal Power On
1 When using this product with the AC adaptor, see “Direct Charging” to
connect the AC adaptor to the device.
2 Press the power button.
Power button
Power Off
1 Tap on the upper right corner on the screen to end the current operation.
This saves all data used in the current operation.
Important
Even though the device resumes the data from the last session when the pow er is turned on
again after power off, we recommend to make it a rule to explicitly save data whenever you
turn off the power. Without this data-saving practice, data could be lost in case of application
failure or battery exhaustion.
11
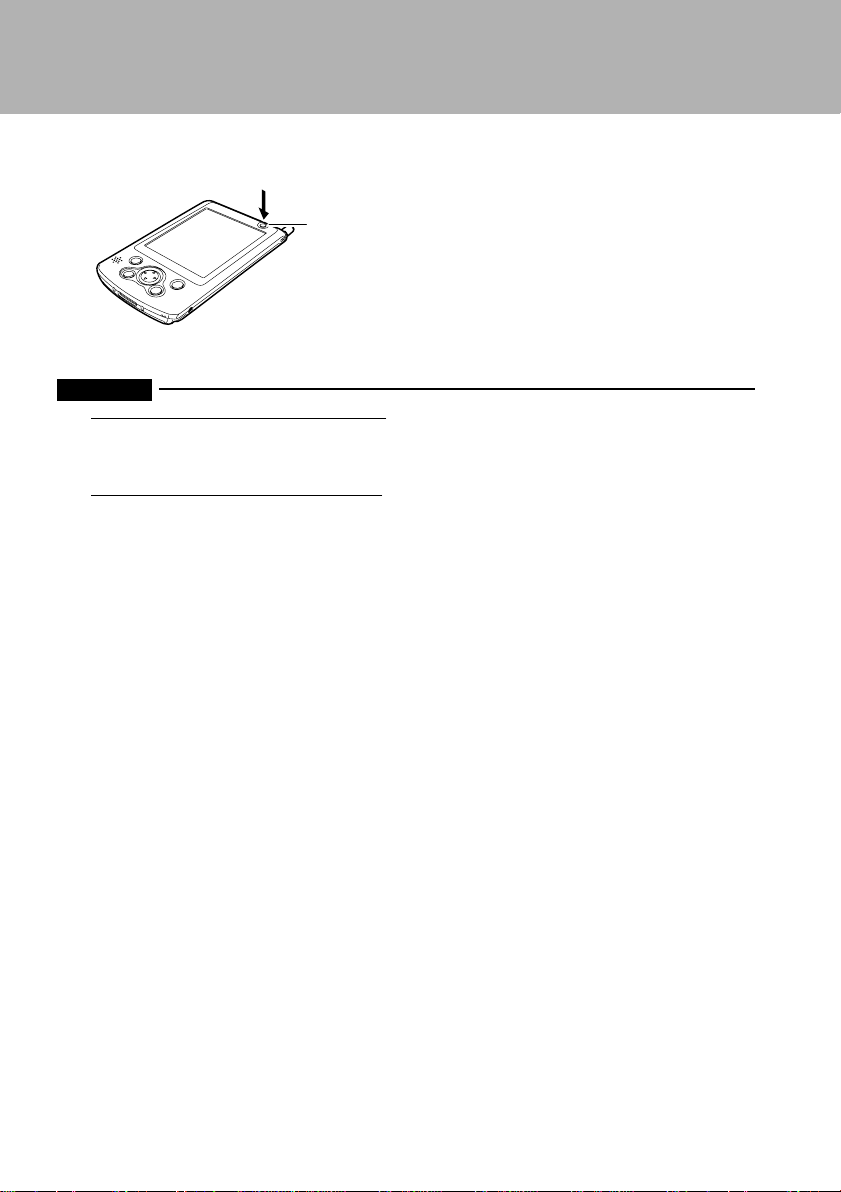
2 Press the power button.
Power button
Important
Note for disconnecting the AC Adaptor
When disconnecting the AC adaptor while using this product to switch to battery-driven
operation, check that the battery is charged. F or details on how to check the remaining battery
capacity, see “Checking the Remaining Battery Capacity”.
Note for prolonged out-of-service time
Follow the steps below when putting this product out of service for a long time:
1. Back up the current data, data you have created and applications you have added.
2. Disconnect the AC adaptor.
3. Remove the battery pack.
4. Slide the backup memory switch to the CLEAR position.
12
SECTION 1
4 Resets
Resetting is required when an OS or application failure has occurred.
There are two types of resets:
• Normal reset
• Full reset
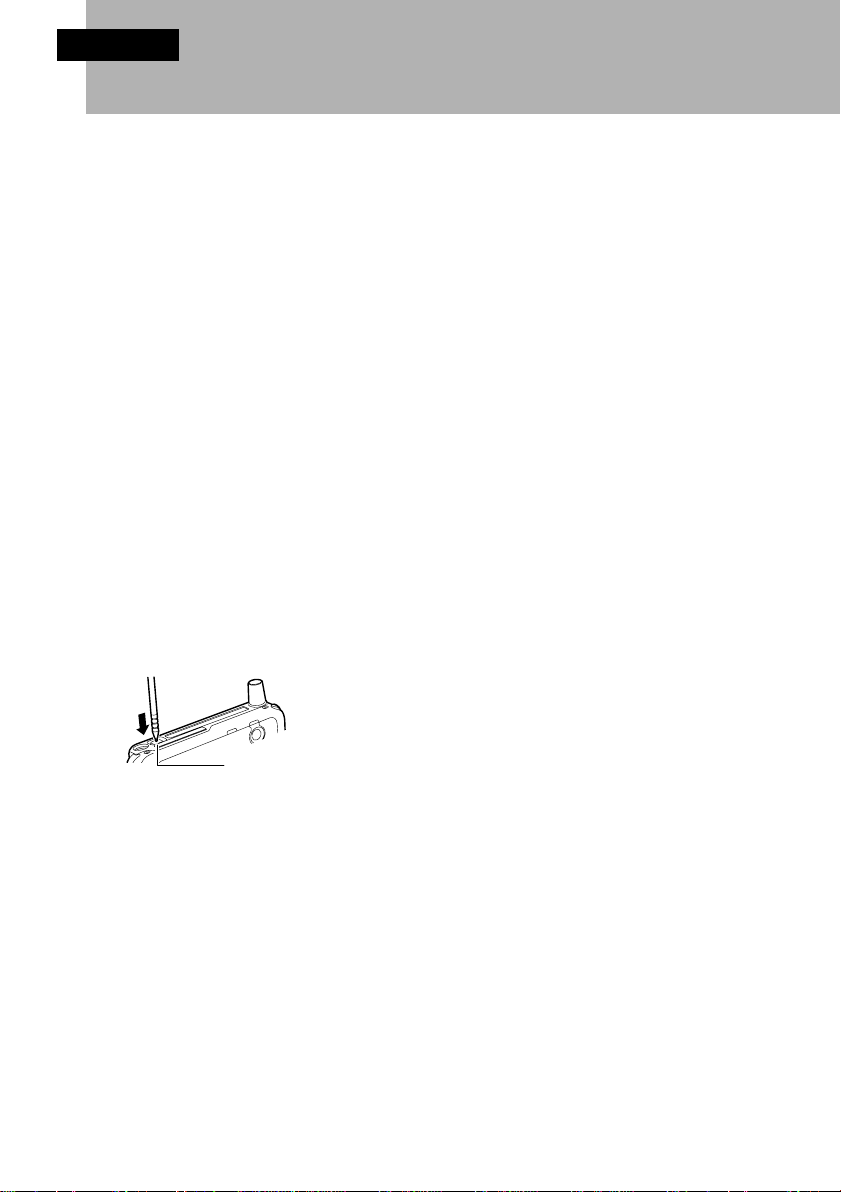
Normal Reset
Normal reset is equivalent to restarting a computer, and is required when a trouble has
occurred such as loss of response from the application.
Executing normal reset causes the current data to be discarded.
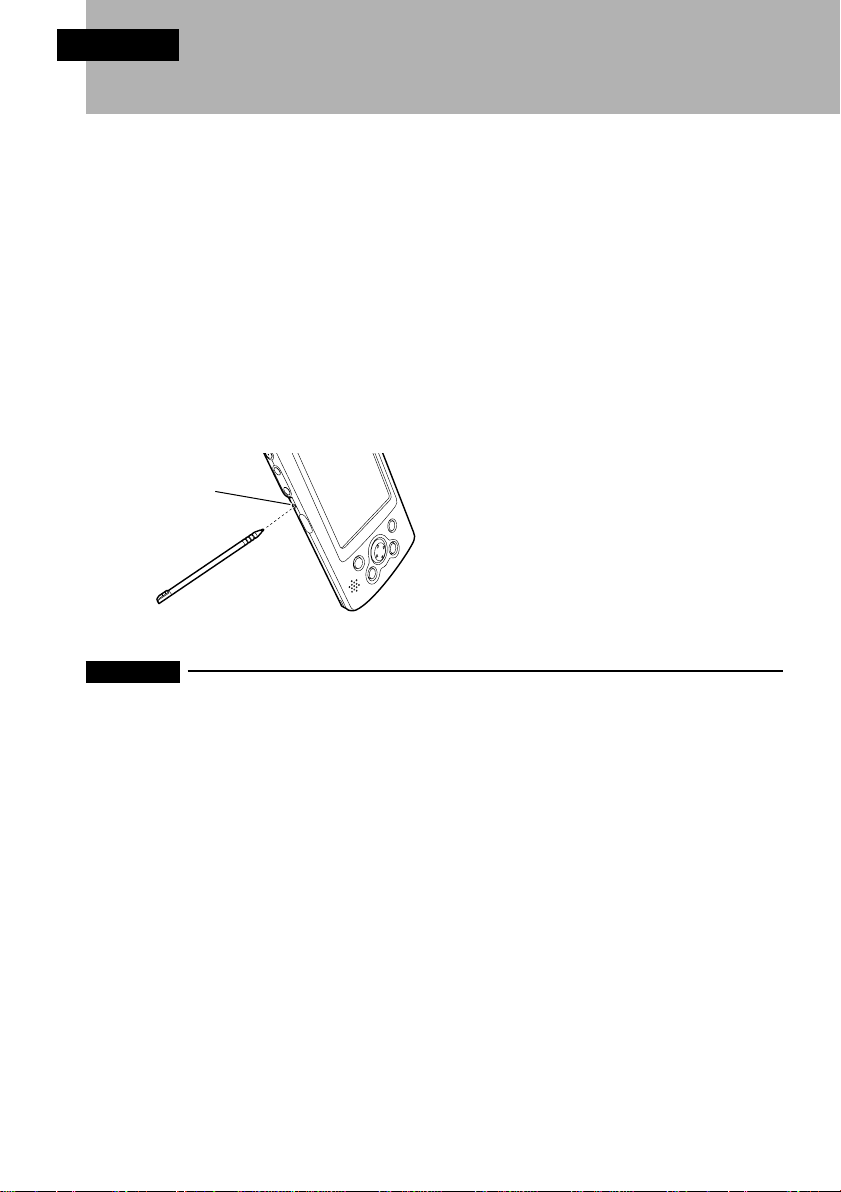
To execute normal reset, press the reset switch on the left-side of the device body with
the stylus pen, as shown in the figure below.
Reset switch
Important
When pressing the reset switch, be sure to use the accompanying stylus pen.
Using a ball-poin pen or the like may damage the device body.
13
Full Resets
Full reset is equivalent to recovery on a computer, and restores the state of this product
at the time of purchase. This operation is needed when problems such as inability to
start the OS occur.
Executing full reset causes the following data to be discarded:
• Current data
• Data you have created
• Applications you have added
To execute full reset, (1) hold down the power button, and (2) press the reset switch on
the left-side face of the device body with the stylus pen, as shown in the figure below.
14
SECTION 1
5 Connecting to a Computer
Connecting to a computer enables data exchanges between this product and the
computer.
Connecting
This product can be connected to a computer using any of the following methods.
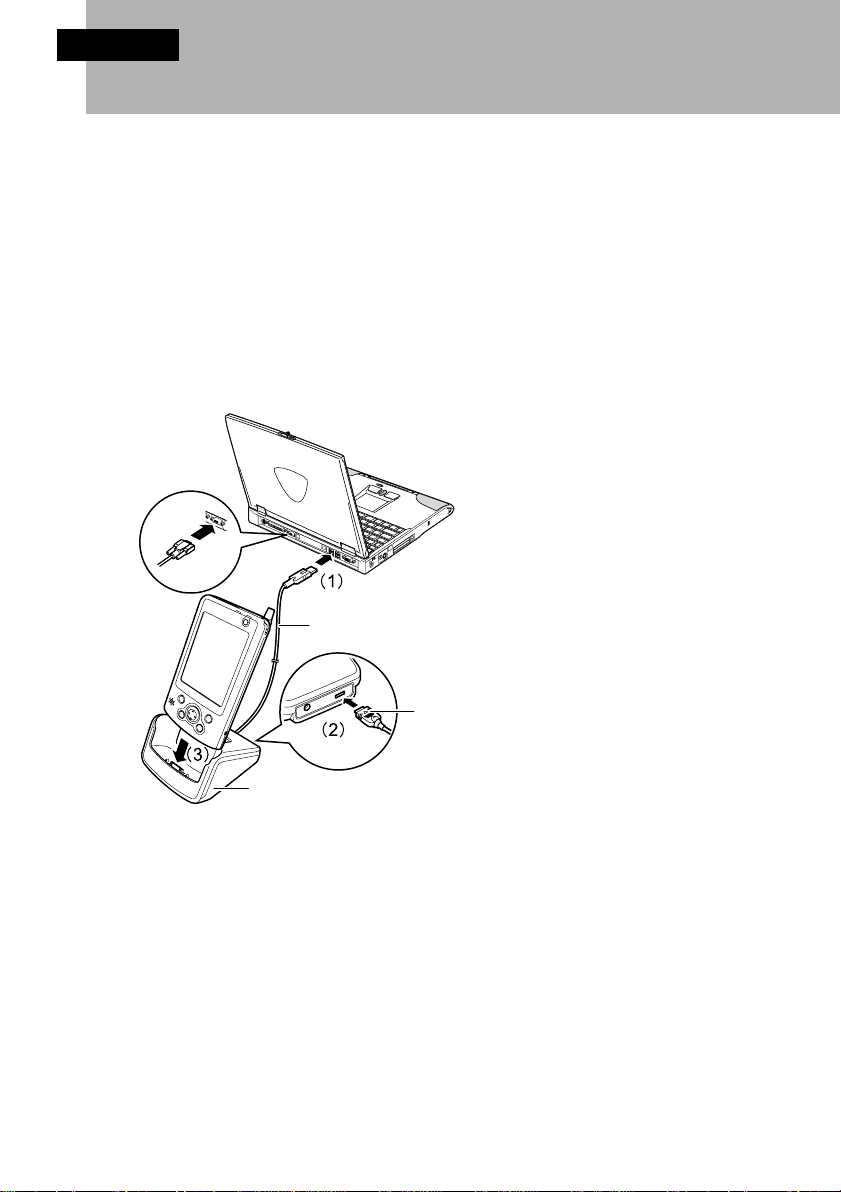
Connecting Using the Cradle
As shown in the following figure, (1) connect one end of the accompanying USB cable
or a separately available serial cable into the computer’s connector, (2) connect the
other cable end to the cradle and (3) place this product into the cradle.
For a serial cable
Cradle
USB cable
Put the side
marked with
triangles up.
15
Connecting Using a Cable
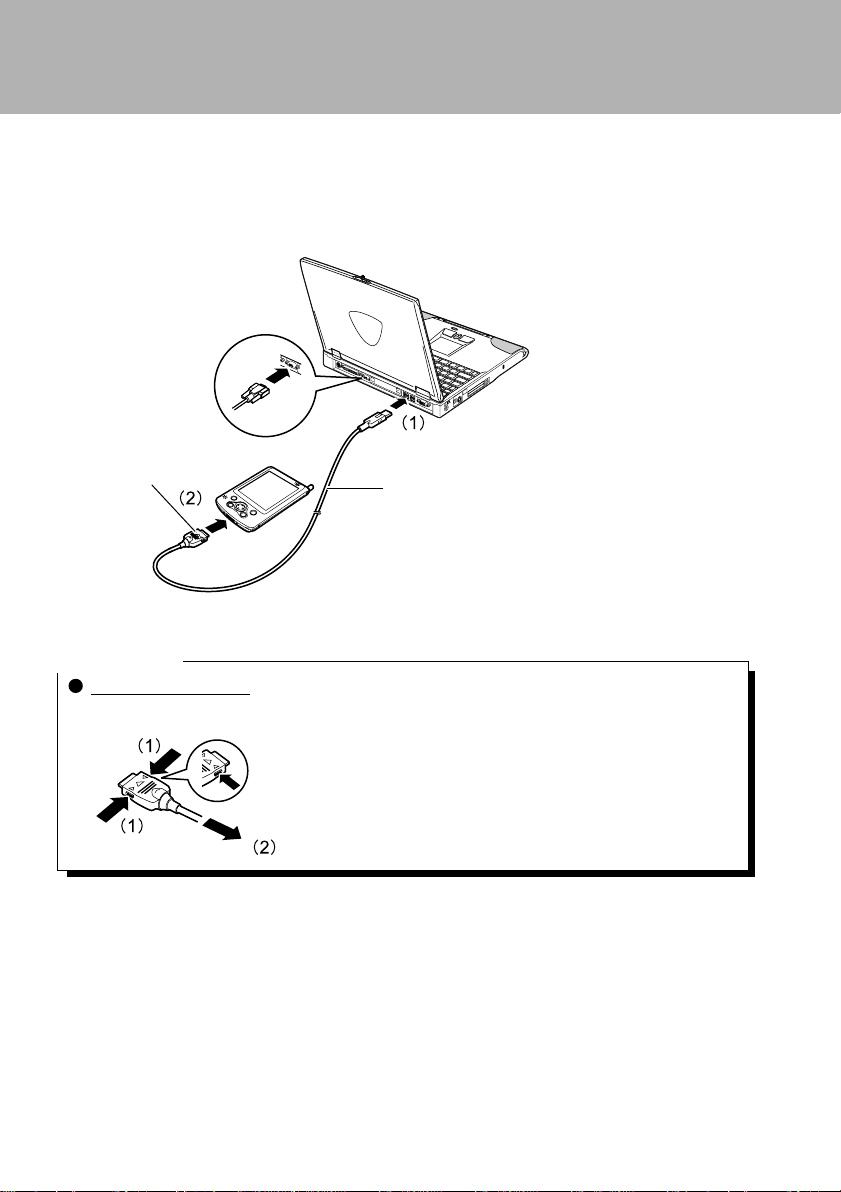
As shown in the following figure, (1) connect one end of the accompanying USB cable
or a separately available serial cable into the computer’s connector and (2) connect the
other cable end to this product’s external connection port.
For a serial cable
Put the side
marked with
triangles up.
USB cable
Critical Point
To remove the cable:
(1) Hold down the buttons at both ends of the connector and (2) disconnect the cable.
16
SECTION 1
6 Installing Expansion Units
You can enhance this product’s functionality by installing expansion units such
as a memory .
Expansion Units That Can Be Used with This
Device
The following units can be installed in this product.
• CF card
Installing a memory card enables you to save high-volume data files such as digital camera
pictures and additional software applications. You can also install an I/O type CF card (such
as a data communications card).
• SD card
Installing a memory card enables you to save high-volume data files such as digital camera
pictures and additional applications. Note that I/O type SD cards are not supported.
Setting a CF Card
Follow the procedure below to set/remove a CF card.
Setting
1 Press the CF card eject button.
The button head comes out.
CF card eject button
17
2 Press down the button that has come out to pull out the dummy card by
holding its projected section.
Dummy card
Critical Point
Keep the remov ed dummy card in safekeeping.
3 Set a CF card in place.
Set the card so that its protruding section and removal groove may face the rear
side of the device body.
Protruding
section and
removal
groove
18

Removing
1 Press the CF card eject button.
The button head comes out.
CF card eject button
2 Press down the button that has come out to pull out the CF card by holding
its projected section.
3 Set the dummy card in place.
19

Setting an SD Card
Follow the procedure below to set/remove an SD card.
Setting
1 Push the dummy card and release it when you hear a click.
The dummy card is ejected.
Important
The card ejection mechanism uses a spring. Be prepared as the card may be pushed out with
some force.
2 Pull out the dummy card.
Dummy card
Critical Point
Keep the removed dummy card in safekeeping.
20

3 Set an SD card in place.
With the cut-off section of the card facing the left-hand side, insert the card until
you hear a click.
Section where the tip
has been cut off
Removing
1 Push the SD card and release it when you hear a click.
The SD card is ejected.
Important
The card ejection mechanism uses a spring. Be prepared as the card may be pushed out with
some force.
2 Pull out the SD card.
Dummy card
21

3 Set the dummy card in place.
With the cut-off section of the dummy card facing the left-hand side, insert the card
until you hear a click.
Section where the tip
has been cut off
22

SECTION
SECTION
2
2

SECTION 2
1 Initial Screen and Application Startup
This section explains the initial screen for this device and methods for starting/
ending application.
Today Screen
The Today screen is the initial screen for this device. This screen shows important
information for the day at a glance . The Today screen is displayed in cases such as the
following.
• Each day, the first time the power switched on
• When this device has not been used for more than four hours (initial setting)
• When you tap → “Today” in that order
Screen Configuration
Tap to switch to
a program.
Tap to create a new item.
Tap to view Network
Connection.
Tap to change volume
or mute all sounds.
Tap to change date and time.
Tap to open an item.
Your day at a glance.
Tap to view connection status.
24

Critical Point
Customizing the Today screen
You can change the Today screen background, items displayed, etc. Tap → “Settings” →
“Personal” tab → “Today” in that order to make the settings.
Status Icons
The status icons are displayed at the bottom right of the Today’s screen. You can check
the status of this device with the status icons. The status icons and the meanings are as
follows.
Status Icon Meaning
All audio is On. To switch Off ( ) all the audio, tap here and check
with the dialog box displayed. You can also use this same dialog box
to adjust the volume.
The battery is charging.
The battery is fully charged.
The battery is running low.
The battery is running extremely low.
The device is connected to a network.
The device is connected to a computer.
Synchronization with a computer has been started.
You have an instant message.
You have mail.
Starting/Switching Applications
You can start or switch an application from the menu or with an application button.
25

Starting/Switching from the Menu
1 Tap the menu.
2 From the displayed menu, select the application you want to start or switch
to.
The selected application is started. If the application you selected has already been
started, this device switches to that application.
To start an application not registered for the menu, tap → “Programs” in that
order, then tap the application you want from the displayed application list.
Critical Point
To change an application displayed on the menu
You can change the applications displayed when you tap the menu.
Starting/Switching Applications from Application
Buttons
The applications registered to the application buttons on the front of this device can be
started or switched to by pressing the corresponding application buttons. For each
button, one application is started by pressing and releasing the button and another
application is started by holding down the button for about one second (long press).
Critical Point
To change an application assigned to an application button
You can change the applications started by pressing the application buttons.
26

Differences between Switching Applications and
Ending Applications
Even when you switch the application you are using or tap the at the top right,
the application is not ended. (The currently displayed application is closed and this
device returns to the previously started application.)
Details on how to completely end an application are given in “Ending Applications”.
Ending Applications
1 Tap → “Settings” → “System” tab in that order.
2 From the list of setting items, tap “Memory” → “Running Programs” tab in
that order.
3 Select the application to end.
Critical Point
Ending from the LX Launcher
You can also end from the LX Launcher task.
27

SECTION 2
2 Operations Common to All Programs
This section explains the operations common to all programs.
Navigation Bar and Command Bar
The blue section that is displayed at the top of the screen is the navigation bar. The
current time, the programs running, etc. are displayed.
The gray section always displayed at the bottom of the screen is the command bar. An
operation menu, buttons, etc. are displayed.
Tap to change volume or mute the device.
Tap to quickly select a program
you have recently used.
Tap to select a program.
This is the navigation bar.
28
Tap to see additional programs.
Tap to customize the device.
New button.
Menu names.
Buttons
Input panel button.

Pop-Up Menus
Using pop-up menus makes it possible to execute desired operations quickly and easily.
1 If you tap-and-hold the item for the operation with the stylus pen, a pop-up
menu is displayed.
2 Remove the stylus pen from the screen, then tap the desired operation from
the menu.
The pop-up menu displayed depends on the application.
Tap and hold to display
the pop-up menu.
Lift the stylus pen and tap
the action you want.
Tap outside the menu to close it
without performing an action.
If you tap anywhere other than the menu, the pop-up menu is closed without any
operation being executed.
29

SECTION 2
3 Data Input
You have several options for entering new information:
• Use the input panel to enter typed text, either by using the soft keyboard or Character
Recognizer.
• Write directly on the screen.
• Draw pictures on the screen.
• Speak into your Pocket PC microphone to record a message.
• Use ActiveSync to synchronise or copy information from your desktop computer to your
Pock et PC. For more information on ActiveSync, see the documentation accompanying
the “Companion CD” or ActiveSync Help.
Use the input panel to enter information in any programme on your Pocket PC. You can
either type using the soft keyboard or write using Character Recognizer. In either case,
the characters appear as typed text on the screen.
To show or hide the input panel, tap the Input Panel button.
30

The methods for inputting data to this device are as follows.
Input using soft keyboard
Text is input using the input panel displayed
on the screen. This method is usually used
for inputting text.
Writing
You can write characters directly on the
screen with the stylus pen just like writing on
paper. The characters you write this way are
stored as is.
Tap the Pen button and
use your stylus pen like a
pen.
31

Soft Input Panel
When you use the input panel, your Pocket PC anticipates the word you are typing or
writing and displays it above the input panel. When you tap the displayed word, it is
inserted into your text at the insertion point. The more you use your Pocket PC, the
more words it learns to anticipate.
Tap here if this is the right word.
To change word suggestion options, such as the number of words suggested at one
time, tap
, Settings, Personal tab, Input, and then the Word Completion tab.
To type with the soft keyboard
1 Tap the arrow next to the input method button and then Keyboard.
2 On the soft keyboard that is displayed, tap the keys with your stylus pen.
To use Character Recognizer
1 Tap the arrow next to the Input method button and then Letter Recognizer.
2 Write a letter in the box.
When you write a letter, it is converted to typed text that appears on the screen.
32

You can cut, copy, and paste text by tapping and holding the selected words and then
tapping an editing command on the pop-up menu, or by tapping the command on the
Edit menu.
In any programme that accepts writing, such as the Notes programme and the Notes
tab in Calendar, Contacts, and Tasks, you can use your stylus pen to write directly on
the screen. Write the way you do on paper. You can edit and format what you’ve written
and convert the information to text at a later time.
To write on the screen
Tap the Pen button to switch to writing mode. This action displays lines on the screen to
help you write.
Tap the Pen button and use your stylus pen like a
pen.
Some programs that accept writing may not have the Pen buttton. See the
documentation for that programme to find out how to switch to writing mode.
33

To select writing
If you want to edit or format writing, you must select it first.
1 Tap and hold the stylus pen next to the text you want to select until the insertion
point appears.
2 Without lifting, drag the stylus pen across the text you want to select.
If you accidentally write on the screen, tap Edit and then Undo and try again. You can
also select text by tapping the Pen button to deselect it and then dragging the stylus
pen across the screen.
You can cut, copy, and paste written text in the same way you work with typed text: tap
and hold the selected words and then tap an editing command on the pop-up menu, or
tap the command on the Edit menu.
To convert writing to text
Tap Tools and then Recognize.
If you want to convert only certain words, select them before tapping Recognize on the
Tools menu (or tap and hold the selected words and then tap Recognize on the popup menu). If a word is not recognised, it is left as writing.
34
Select the text you want to convert
and tap Recognize on the pop-up
menu.
The writing is turned into text.

If the conversion is incorrect, you can select different words from a list of alternatives or
return to the original writing. To do so, tap and hold the incorrect word (tap one word at
a time). On the pop-up menu, tap Alternates. A menu with a list of alternate words
appears. Tap the word you want to use, or tap the writing at the top of the menu to
return to the original writing.
Tap to return to your original writing.
Alternatively, tap the word you want to use.
Tips for getting good recognition
• Write neatly.
• Write on the lines and draw descenders below the line. Write the cross of the “t” and apostrophes
below the top line so that they are not confused with the word above. Write full stops and
commas above the line.
• For better recognition, try increasing the zoom level to 300% using the Tools menu.
• Write the letters of a word closely and leave big gaps between words so that the Pocket PC
can easily tell where words begin and end.
• Hyphenated words, foreign words that use special characters such as accents, and some
punctuation cannot be converted.
• If you add writing to a word to change it (such as changing a “3” to an “8”) after y ou attempt to
recognise the word, the writing you add will not be included if you attempt to recognise the
writing again.
35

Inputting Writing with Pocket Word
When you tap the “View” menu → “Writing” in that order, the ruled line is displayed
and you can input by writing.
1 This is the toolbar
Tap "View" →"Toolbar" to switch the operation mode. When writing with
the stylus pen, switch to the view with the frame. When you want to execute
a format change or other operation on written text, switch to the display
without the frame.
Tap here to change the line thickness for characters.
This is used to input a space. Tap, switch to the display with the frame, then
drag the section where you want to input the space. While you are
dragging, an arrow is displayed on the screen to show you how large the
space will be. A space the size of the dragged section is inserted. If you
drag in the opposite direction, the space is deleted.
Returns to the previous operation.
Marks with the light pen. Drag the range to be marked, then tap.
Critical Point
When writing is handled as drawing
If your writing extends over three or more of the ruled lines, it is handled as drawing.
36

You can draw on the screen in the same way that you write on the screen. The
difference between writing and drawing on the screen is how you select items and how
they can be edited. For example, selected drawings can be resized, while writing
cannot.
To create a drawing
Cross three ruled lines on your first stroke. A drawing box appears. Subsequent strokes
in or touching the drawing box become part of the drawing. Drawings that do not cross
three ruled lines will be treated as writing.
The drawing box indicates the
boundaries of the drawing.
Pen button
You may want to change the zoom level so that you can more easily work on or view
your drawing. Tap Tools and then a zoom level.
To select a drawing
If you want to edit or format a drawing, you must select it first.
• Tap and hold the stylus pen on the drawing until the selection handle appears. To
select multiple drawings, deselect the Pen button and then drag to select the
drawings you want.
You can cut, copy, and paste selected drawings by tapping and holding the selected
drawing and then tapping an editing command on the pop-up menu, or by tapping the
command on the Edit menu. To resize a drawing, make sure the Pen button is not
selected and drag a selection handle.
37

Editing T ext
Adding characters
1 Tap the location where you want to add characters.
The cursor is displayed flashing.
2 Input the characters.
The characters are added at the cursor position.
Deleting characters
1 To delete a single character, tap immediately after the character to delete it.
To delete multiple characters, drag the range to be deleted.
When one character is being deleted, the cursor flashes. When multiple characters
are being deleted, the character string in the dragged range is inverted.
2 Tap
When one character is deleted, the character immediately before the cursor is
deleted. When multiple characters are deleted, the entire inverted range is deleted.
Changing T ext
1 Drag the character string you want to change.
The selected range is inverted.
2 Input the new characters, then
The text is replaced with the new characters.
Copying T ext
1 Drag the character string you want to copy.
The selected range is inverted.
2 Tap the “Edit” menu → “Copy” in that order.
3 Tap the location to which you want to copy.
The cursor flashes.
4 Tap the “Edit” menu → “Paste” in that order.
The copied text is inserted at the position of the cursor.
.
.
38

Mo ving Text
1 Drag the character string you want to move.
The selected range is inverted.
2 Tap the “Edit” menu → “Cut” in that order.
3 Tap the location to which you want to move the text.
The cursor flashes.
4 Tap the “Edit” menu → “Paste” in that order.
The cut text is inserted at the position of the cursor.
39

SECTION 2
4 Sound Recording
The recording function enables you to capture thoughts, reminders or voice
messages quickly. The recorded messages can be inserted into your document
or stored as audio file.
You can record using the recording tool bar.
• Pocket Word
Tap the “View” menu → “Recording” in that order to display the recording tool bar .
• Notes
Tapping displays the recording tool bar.
Indicates an embedded
recording.
Tap to begin recording.
40
Tap to show or hide the recording toolbar.

SECTION 2
5 Help
You can check in the help to see how to operate the applications built into this
device and other applications installed on it.
The help function explains how to operate the programs built into this device.
Tapping → “Help” in that order displays the help screen for the active application.
41

SECTION 2
6 Searches
You can find the information you need quickly, search for file names and for text
strings included in files.
Tapping
→ “Search” in that order displays the search screen.
1
2
4
1 Input the text string you want to search for. Tapping
searched for text strings. This is used to search for the same text string
again.
2 Selects the type of information to search for.
3 Tapping here starts the search.
4 The results of the search are displayed. Tapping the information for a file
displays that file.
You can also use File Explorer to search files.
3
9 displays previously
42

SECTION 2
7 File Operations Using File Explorer
You can manage files using File Explorer.
Tap
→ “Programs” → “File Explorer” in that order to display the File Explorer screen.
Tap to change folders.
Select the sort order
for the list.
Tap the folder name to
open it.
Tap and hold to
create a new folder.
Creating a new folder
1 Move to the directory level in which you want to create the new folder.
2 Tap the “Edit” menu → “New Folder” in that order.
3 Input the folder name, then tap
to finalize it.
43

Deleting Folders/Files
1 Tap the folder/file you want to delete and hold down on it.
2 From the displayed pop-up menu, select “Delete”.
A dialog box is displayed to confirm that you want to delete the folder or file.
3 Tap “Y es”.
Copying Folders/Files
1 Tap the folder/file you want to copy and hold down on it.
2 From the displayed pop-up menu, select “Copy”.
3 Move to the folder you want to copy to.
4 Tap the “Edit” menu → “Paste” in that order.
Moving Folders/Files
1 Tap the folder/file you want to move and hold down on it.
2 From the displayed pop-up menu, select “Cut”.
3 Move to the folder you want to move to.
4 Tap the “Edit” menu → “Paste” in that order.
Changing the Names of Folders/Files
1 Tap-and-hold the folder/file you want to change the name of.
2 From the displayed pop-up menu, select “Rename”.
3 Input the desired new name, then tap
to finalize it.
Critical Point
When sending files with email
You can specify a file with File Explorer and send it with email. On the pop-up menu for the file
you want to send, tap “Send via Email” to display the Inbox. For details on sending from the
Inbox, see “Preparing and Sending/Receiving Email”.
Using infrared communications
From File Explorer, you can communicate with other devices via infrared.
44

SECTION
SECTION
3
3

SECTION 3
1 Connection Settings
This sets the parameters necessary for using the Internet.
This section explains connecting using a CF modem card. For details on connecting in
any other way, see help.
Preparations
The requirements for connecting to the Internet are as follows.
• This device
• CF modem card
It is also necessary to sign up for service with an Internet service provider. Sign up for
Internet service before making these settings.
For access to your company network, check the settings and other information with the
network administrator beforehand.
Settings for Connecting to the Internet
1 Set your CF modem card in the CF card slot.
When your FC card is set in this device for the first time, the “A new modem was
detected.” dialog box is displayed.
2 Tap “Internet”.
46

3 Operate as follows.
1
2
3
1 Input any name that will remind you what the contents of these connection
settings are. The name of the service provider is often a good choice.
2 Make sure it is the name for the CF card you installed.
3 Tap “Next”.
4 (1) Enter the access point (phone number) for your Internet service provider.
(2) T ap “Next”.
1
2
47

5 (1) Input your user name, password and domain, then (2) tap “Advanced”.
1
2
The detailed settings screen is displayed. Make settings if necessary, according to
the provider’s instructions.
48
Genaral setting Port Settings
TCP/IP setting Servers settings

6 When you finished the advanced settings, tap .
The display returns to the screen where you entered your user name, password
and domain.
7 Tap “Finish”.
Settings for Sending/Receiving Email
1 Tap → “Inbox” in that order.
The Inbox screen is displayed.
2 Tap the “Account” menu → “New Account” in that order.
The Email setup screen (1/5) is displayed.
Critical Point
What is a service
The setting information for one email address is considered as one service. If y ou have multiple
email addresses, each one is registered as a separate service. When sending/receiving email
you can switch among these services.
49

3 (1) Input the email address. (2) Tap “Next”.
1
2
4 (1) Check the “Status:”and if it is “Completed”, tap “Next”.
50
1
2

5 Input the user information.
1
2
3
1 Input your own name. This is the sender name given to the receiver.
2 Input the “User name” and “Password” required f or connecting to the email server.
3 Tap “Next”.
Critical Point
User names and passwords
Some providers use different designations. For example, the user name may be called the
email account, user ID, or email login name . The passw ord may be called the email pass word
or login password.
6 Execute the following operation.
1
2
3
1 Select “POP3” or “IMAP4”. “POP3” is the most widely used.
2 Input a service name. The name of the service provider is often a good choice.
3 Tap “Next”.
51

7 Input the server information.
1
2
3
4
1 Input the reception email server and transmission email server names specified
by the provider.
2 Set this for network connection. This does not need to be specified when
connecting with a CF card.
3 Set this as necessary. For the options, see help.
4 Tap “Finish”.
This completes the Inbox settings.
52

SECTION 3
2 Viewing W eb P ages
Once you have completed the settings for connecting to the Internet, you can
view Web pages using Pocket Internet Explorer.
This section explains how to view Web pages using a CF modem card. For details on
connecting in any other way, see help.
Connecting/Disconnecting
Connection Method
1 Set the card in this device.
2 Tap
3 Input the necessary items.
→ “Internet Explorer” in that order.
- Input the user name and password for connecting to the provider.
- Tap OK.
The connection is started and Pocket Internet Explorer is started up.
Disconnecting
The method for ending the connection is as follows.
1 Tap the navigation bar
→ “Exit” in that order.
53

Basic Pocket Internet Explorer Operation
Screen Configuration
Tap → “Internet Explorer” in that order.
Favorites button.
Home button.
Refresh button.
The operations of the buttons are as follows.
This returns the display to the previous page.
54
During reading-in, this stops the reading-in. At any other time, this updates
the page to the latest status.
This returns the display to the page set as the homepage. The homepage
can be set with the “Tools” menu → “Options” → “Homepage”.
This display is a list of your favorites.

Specifying and Opening Web Pages
Critical Point
When the address bar is not displayed
Tap the “View” menu → “Address Bar” in that order to display the address bar.
When you start Pocket Internet Explorer, the homepage is displayed first.
1 Input the URL for the Web page you want to display in the address bar.
2 Tap
at the right of the address bar.
The specified Web page is displayed.
Using Favorites
Registering pages that you view frequently in “Favorites” makes it easier to view them
again.
1 While you are displaying the page you want to register in the favorites, tap
on the command bar.
The “Favorites” screen is displayed.
2 Tap the “Add/Delete” tab → “Add” in that order.
55

3 (1) Change the name to be displayed in the favorites list if necessary, then (2)
T ap “Add”.
Tap the favorite you
want to view.
Tap to add or delete a
folder or favorite link.
The Web page is registered in the favorites list.
Critical Point
Deleting a Web page from the favorites
1 Tap on the command bar → “Add/Delete” in that order.
2 Select the page to be deleted from the favorites list, then tap “Delete”.
To display a Web page registered in the favorites, tap on the command bar, then tap
the desired page from the favorites.
56

SECTION 3
3 Sending/Receiving Email
You can use send/receive email through the Internet. Email sending and receiving
use the Pocket Outlook Inbox.
This section explains sending/receiving email using a CF modem card. For details on
connecting in any other way, see help.
Email Writing and Sending/Receiving
In order to send and receive email, it is necessary that the settings for connecting to the
email server are already completed.
Writing Email
This section explains how to write the new piece of email.
1 Tap
2 Tap “Inbox” and select the service to be used for connection. This operation
→ “Inbox” in that order.
The Inbox list is displayed.
is not necessary if only one service is registered.
Tap to send the message.
Tap to show or hide the
complete header.
Tap to show/hide the recording toolbar.
Tap to display the Address Book.
Tap to insert common messages.
3 Tap the “New” menu item.
4 Input the “To” and “Subj.”, then input the text.
57

Critical Point
Attaching files to email
On the email writing screen, tap the “Edit” menu → “Attach File” in that order. A list of files is
displayed, so tap the one you want to send.
Using My Text
On the new email writing screen, you can write email easily by selecting frequently used text
from My Text. Tap “My Text”, then select the text to input into your email from the list of texts
registered in My Text.
Editing texts registered in My Text
On the Inbox screen, tap the “Tools” menu → “Edit My Text messages” in that order. The My
Text message screen is displayed, so tap the desired message and edit it.
5 When input is complete, tap to the left of “To” and “Subj.”
The email you have written is stored and placed in the “Outbox”. If you are
connected to the email server, your email is sent immediately.
Critical Point
When not temporarily storing email you have written
For email that is still being edited and that you do not want to put in the “Outbox” yet, tap
to end. The email you have written is put in “Pending”.
After you edit email in “Pending” again, tap (ok) to move it to the “Outbox”.
58

Connecting to the Email Server and Sending/
Receiving
When you connect the email server, your email is automatically sent/received.
• Any email in the “Outbox” is sent.
• Any unread mail on the email server is received. Receiv ed email is put in the “Inbox.
The following operations are carried out with the Inbox. For details, see help.
1 Set the card in this device.
2 Tap the “Accounts” menu → “Connect”.
The services registered with “Settings for Sending/Receiving Email” are displayed
in the menu.
3 Tap
4 Input the password etc., then tap “OK”.
5 When email sending/reception is complete, tap the “Accounts” menu →
.
The connection screen for the service you are connecting to is displayed.
The connection is started. Any email in the “Outbox” is sent and any unread mail on
the email server is placed in the “Inbox”.
“Disconnect” in that order.
The connection with the email server is ended.
59

Basic Inbox Operations
Screen configuration
Tap → “Inbox” in that order.
1
2
3
4
5
6
1 Select the folder and service displayed.
2 Select the order for email list display.
3 The sender addresses and subjects of the emails are displayed. If you tap-
and-hold, a pop-up menu is displayed and you can carry out such operations
as deleting or forwarding the email or replying to it.
4 At “Tools”, you can set options; at “Account”, you can select the service.
5 Tapping here connects you to the selected service.
6 Tapping here connects you to the selected service and sends and receives
email.
60

Viewing Received Email
1 Tap → “Inbox” in that order.
A list of the email is displayed. If you want to look at email from other services, tap
“Inbox”, then select the other service.
2 In the email list, tap the email you want to view.
3 Tapping
here returns the display to the Inbox screen.
Replying to/Forwarding Email
Replying
1 Display the received email according to Steps 1 and 2 of the procedure in
“Viewing Received Email”.
2 Tap
3 Write your email reply.
4 Tap
on the command bar →“Reply”.
For “Reply”, the email you write is sent only to the sender of the original email. To
reply to all the addresses on the original email, including the cc’s, tap “Reply to all”.
to the left of “To”, “Subj.”
The email you have written is put in the “Outbox”. If you are connected to the email
server, your email is sent immediately.
61

Forwarding
1 Display the received email according to Steps 1 and 2 of the procedure in
“Viewing Received Email”.
2 Tap
3 Specify the email address to forward to as the “To”. When forwarding to an
4 Prepare your forward email, then tap
on the command bar → “Forward”.
email address registered in your Contacts, you can tap , then select the
contact.
to the left of “To”, “Subj.”
The email you have written is put in the “Outbox”. If you are connected to the email
server, your email is sent immediately.
For details on the method for sending email in the “Outbox”, see “Connecting to the
Email Server and Sending/Receiving”.
Deleting Email
1 From the list of the email in the Inbox, tap-and-hold the email you want to delete.
2 Tap “Delete” from the displayed pop-up menu.
The deleted email is moved to “Recycled items (local)”.
62

Critical Point
To completely delete email in “Recycled items (local)”
Tap the “Tools” menu → “Empty Recycle Bin” in that order.
Managing Email
Important
Operating on folders with this device
When executing the following operations on folders on this device, then connecting to your
email server, the operations depend on the service used (ActiveSync, SMS/POP3/IMAP4).
For details, see the Inbox help.
• Moving or deleting email
• Creating or editing folders
Email is managed with preset folders prepared by each service. The basic programs of
these preset folders are as follows.
• Drafts
Contains email being edited
• Recycled items
Contains deleted email
• Inbox
Contains received email.
• Outbox
Contains email to be sent in the next connection.
• Sent box
Contains email that has been sent.
Creating New Folders
New folders can be created for such tasks as managing email.
1 Tap the “Tools” menu → “Manage Folders” in that order.
The folder management screen is displayed.
2 (1) Select the folder to create the new folder under (normally, the Inbox).
(2) Tap the “New” menu.
63

2
3 (1) Input the folder name. (2) Tap .
2
1
Moving Email
1 From the email list, tap-and-hold the email you want to move.
2 From the displayed pop-up menu, tap “Move to folder”.
The screen for specifying the folder to move to is displayed. Email can not be
moved to a service folder.
3 Tap the folder to move the email to, then tap
The email is moved to the destination folder.
.
64

Changing Folder Names
It is not possible to change the name of an existing folder. Only the names of
folders that hav e just been created can be changed.
1 Tap the “Tools” menu → “Manage folders” in that order.
The folder management screen is displayed.
2 Tap the folder whose name you want to change, then tap “Change name”.
The folder name change screen is displayed.
3 (1) Input the folder name. (2) Tap
Deleting Folders
It is not possible to change the name of an existing folder. Only the names of
folders that hav e just been created can be changed.
1 Tap the “Tools” menu → “Manage folders” in that order.
The folder management screen is displayed.
2 Tap the folder you want to delete, then tap .
The”Delete?” is displayed.
3 Tap “Y es”.
The selected folder is deleted.
4 Tap to complete the operation.
.
65

SECTION 3
4 Exchanging Instant Messages
You can use the Pocket PC edition of MSN Messenger to exchange instant
messages and hold conversations (called chats) with multiple people.
This section explains simple MSN Messenger usage methods. For further details, see
the help for this device or the MSN Messenger help.
Preparations
Obtaining Accounts
Using MSN Messenger requires either of the following accounts.
• Passport account
• Microsoft Exchange email account
Critical Point
Obtaining a Passport Account
A Passport account is a Microsoft or Hotmail account. A Passport account can be obtained
from the following Web pages.
• Microsoft Passport account (http://www.passport.com)
• Hotmail Passport account (http://www.hotmail.com)
Settings
After obtaining a Passport account or Microsoft Exchange email account, make the
settings for MSN Messenger.
1 Tap → Program → “MSN Messenger” in that order.
The MSN Messenger screen is displayed.
2 Tap the “Tools” menu → “Options” → “Account” tab.
3 Input the items required on the account setting screen.
66

3
1
2
1 Select a Passport or Exchange account, then input the sign-in name and
password.
2 Select the account to sign in first.
3 Tap
.
Sign-in and Sign-out
You must sign in to use MSN Messenger and you sign out when you exit MSN
Messenger.
Sign-in
1 Set the CF card in place.
2 Tap
3 Tap the screen and sign in.
→ “Programs” → “MSN Messenger” in that order.
67

4 (1) Input your sign-in name and password. (2) Tap “Sign-in”.
1
2
5 When connecting to the Internet for the first time, input the required items.
(This is not necessary from the second time on.)
68

1 Input the user name and password for connecting to your provider.
2 Normally, this does not need to be input.
3 To store the password, tap the checkbox to select it .
4 Tap “OK”.
The MSN Messenger screen is displayed.
Sign-out
1 Tap the “Tools” menu → “Sign-out” in that order.
Basic MSN Messenger Operations
Screen Configuration
When you sign in, the following screen is displayed.
1 Displays your own status, online, offline, temporarily away from your seat,
busy with a call, etc.
2 Displays the status of other participants. You can chat with those who are
online.
3 You can set-up the additional participants, your own status and options.
Adding/Deleting Contacts
You register chat contacts beforehand.
1 Tap the “Tools” menu → “Add Contact” in that order.
2 (1) Input the sign-in name for the contact to be added. (2) Tap “Next”.
The completion screen is displayed and the new chat contact is added.
69

Adding/Deleting Contacts
You register chat contacts beforehand.
1 Tap the “Tools” menu → “Add Contact” in that order.
2 (1) Input the sign-in name for the contact to be added. (2) Tap “Next”.
The completion screen is displayed and the new chat contact is added.
Enter message.
Tap to send message.
When adding a chat contact, tap the “Tools” menu → “Add Contact” in that order, then
add the contact according to the instructions on the screen.
To delete a chat contact, tap-and-hold the name of the contact to be deleted, then tap
“Delete Contact”.
70

Chatting
You can exchange instant messages and chat with other participants.
1 Tap those you want to chat with from among those chat contacts who are
online.
2 (1) Use the input panel to input your message into the text box displayed in
the center of the screen. (2) Tap “Send”.
The message you sent is delivered to the other party and your messages back and
forth are displayed as a dialog on the screen.
When an instant message arrives for you from a chat contact, you are notified with a
pop-up.
Critical Point
Using My Text
You can write messages simply by selecting frequently used phrases registered in My Text.
If you tap “Chat”, you can switch to a separate chat with the contact who sent the
new message. If you tap “Ignore”, the chat with the current contacts is continued.
71

72

SECTION
SECTION
4
4

SECTION 4
1 Summary
As functions for using this device as a notebook, you can use the Pocket PC
edition of Microsoft Outlook (Pocket Outlook). This chapter is a simple
explanation of Pocket Outlook information, see the help.
Pocket Outlook Functions
The functions you can use with Pocket Outlook are as follows. This section explains
how to use “Calendar”, “Contacts”, “Tasks”, and “Notes”.
Function Summary
Calendar This program can be used as a schedule pad. You can write
Contacts This program can be used as a contact list. You can record
Tasks You can manage a list of tasks to do. You can also set alarms for tasks.
Notes You can use this device as a notebook. You can write characters and
Inbox This sends and receives email and manages email.
Critical Point
When using Microsoft Outlook on a computer, you can synchronize this device and the
computer.
appointments on the calendar and set alarms for appointments.
addresses, telephone numbers, email addresses, etc.
figures and also record sound.
Reminder Settings
When there is something that must be done, such as a task or appointment, an alarm,
message, or other notice can be given when the scheduled time arrives.
The reminder methods are as follows. You can also specify multiple forms of reminder
for the same event.
• A message box is displayed on the screen.
• An alarm is sounded. You can specify the type of sound.
• The indicator flashes.
The setting messages as follows.
1 Tap → “Settings” → “Personal” tab → “Sounds and Notifications” in that
order.
2 (1) Tap the “Volume” tab. (2) Select the “Programs” → “Reminder (alarm,
appointments, etc.)” checkbox .
74

3 Tap the “Notification” tab and specify the reminder method.
• If you want an audible reminder, select the checkbox and specify the type of
sound from the list box on the right.
4 Tap
.
75

SECTION 4
2 Calendar
This program can be used as a schedule pad. This application can be used as a
schedule pad. Appointments can be checked on calendars of various formats.
You can also set reminder by alarm or message for the calendar date and time.
Screen Configuration
Tap → “Calendar” in that order. The Calendar is displayed in the selected format.
Tap to go to today.
Tap to display or edit
the appointment details.
Tap to create a new appointment.
1 Displays today’s appointments. For a monthly or annual calendar, the
calendar for today’s month or year is displayed.
2 Each time you tap here, the display proceeds to the next appointments in the
units of the displayed calendar: day, week, month, or year. Each time you tap
;, the display moves back to the previous appointments.
3 This displays the calendar. If you tap-and-hold here, a pop-up menu is
displayed showing operations you can carry out on the appointment list.
4 You can write a new appointment.
5 You can set calendar options, such as the font size and time interval.
6 You can switch the display format for the calendar.
76

Switching the Display
You can switch the display by tapping the icon on the command bar. The screens
displayed for each icon are as follows.
Icon Screen Name Summary
Agenda display Lists the appointments for one day.
Day display Displays the appointments for one day in a timetable.
Week display Displays the appointments for one week. Tapping on a
Month display Displays the appointments for one month. Tapping on a
Year display Displays the calendar for the year.
date switches to the daily display for that day.
date switches to the daily display for that day.
Tapping the date switches to the day-by-day display
screens.
Creating New Appointments
1 Select the date and time for the new appointment.
• “Day Display” screen or “Week Display” screen
Tap the time or date into which you wish to enter the appointment.
• “Month Display” screen or “Year Display” screen
Tap the date into which you wish to enter the appointment, then tap the time on the “Day
display” screen.
2 Tap the “New” menu item.
3 Tap the item you want to input, then input the necessary items.
Tap to return to the calender
(the appointment is save automatically).
Tap to choosen from
predefined text.
Tap to choosen from
previously entered locations.
Tap to select a time.
Tap to select a date.
Notes is a good place for
maps and directions.
77

4 When the input is complete, tap .
The appointment is saved and the display returns to the Calendar screen.
Using the Summary Screen
The “Summary” screen is displayed when you tap an appointment on the “Agenda
display” screen or the “Day display” screen.
View appointment details.
View.
Tap to change
appointment.
Revising/Deleting an Appointment
Revising an Appointment
1 The summary screen for the appointment to be revised is displayed.
2 Tap the “Edit” menu.
3 Input the revised items in the same manner as when creating a new appointment.
4 When the revision is complete, tap
The display returns to the appointment list.
.
Deleting an Appointment
1 In Calendar, tap-and-hold the appointment to be deleted.
2 On the “Pop-up” menu → tap “Delete Appointment”.
The selected appointment is deleted.
3 Tap “Y es”.
78

Automatic Creation of a Meeting Reminder
The Calendar can be used to send a meeting notice email to an Outlook or Pocket
Outlook user.
Critical Point
Before writing a meeting notice
• The email addresses for the meeting attendees must be input in Contacts beforehand.
• The settings for the Inbox handling email sending/reception must be complete.
1 Input the appointment.
2 Tap the command bar input panel button (
input screen, to switch off the input panel display.
3 Tap the attendees.
A list of the email addresses already input to the Contacts are displayed.
4 From the email address list, select the contacts to send the meeting notice
introduction to by tapping them to select
5 Tap .
The meeting notice is created automatically and placed in the Outbox.
The next time you synchronize with the computer or connect to the network, the
meeting notice is sent to the attendees.
The sending method can be specified by tapping the “Tools” menu, “Option” →
“Meeting Attendance Request Reply Method”.
or the like) on the appointment
them.
79

SECTION 4
3 Contacts
In Contacts, addresses, telephone numbers, email addresses, etc. can be
registered. Also, the registered data can be shared quickly between this device
and another Pocket PC using.
Screen Configuration
Tap → “Contacts” in that order.
Select the category of contacts
displayed in the list.
Tap and enter part of name
to quickly find it in the list.
Tap to see additional phone numbers
and e-mail addresses.
Tap to display or edit the contact details.
Tap and hold to display a
pop-up menu of actions.
Tap to create a new contact.
Critical Point
Changing the Contacts display method
Tap the “Tools” menu → “Option” in that order to change the display method.
80

Creating a New Contact
1 Tap the “New” menu.
2 Tap the item to be input, then input the required item.
3 When the input is complete, tap
The information is stored and the display returns to the Contacts list screen.
.
Searching the Contacts
You can search using the input box under the navigation bar.
1 Input the character string you want to search for.
2 The search results are displayed.
To display the contact list again after the search, either clear the character string
from the input box or tap
to the right of the input box.
81

Using the Summary Screen
To display the “Summary” screen, tap a contact on the Contacts list.
View contact details.
Tap to view notes.
Tap to change contact information.
Revising/Deleting Contacts
Revising Contacts
1 In the Contacts list, tap the contact to be revised.
The summary screen is displayed.
2 Tap the “Edit” menu.
The contact list editing screen is displayed.
3 Input the revised items in the same manner as when creating a new contact.
4 When the revision is complete, tap
The display returns to the Calendar list.
.
Deleting a Contact
1 In the Calendar, tap-and-hold the contact to be deleted.
To select multiple contacts, drag and specify the range. Next, tap-and-hold the
selected range.
2 From the displayed pop-up menu, tap “Delete Contact”.
“Continue?” is displayed.
3 Tap “Y es”.
82

SECTION 4
4 Tasks
Tasks that need to be executed can be managed in Tasks. You can also set alarms
for registered tasks.
Screen Configuration
Tap → “Tasks” in that order.
Select the category of tasks you
want displayed in the list.
Select the short order of the list.
Indicates high priority.
Tap to display or edit the task details.
Tap and hold to display a pop-up
menu of actions.
Tap to create a new task.
Critical Point
Changing the Tasks display method
Tap the “Tools” menu → “Options” in that order to change the display method.
83

Creating a New Task
1 Tap the “New” menu item.
2 Tap the item to be input, then input the required item.
3 When the input is complete, tap .
The information is stored and the display returns to the Tasks screen.
Critical Point
Creating a Task list simply
Tap the “Tools” menu → select “Input Bar” to display the “Input” bar.
To set high priority, tap to set low priority, tap .
84

Using the Summary Screen
To display the “Summary” screen, tap a task on the Task list.
View task details.
Tap to show and hide additional
summary information.
View notes.
Tap to change task.
Revising/Deleting T asks
Revising a Task
1 From the Task list, tap the task to be revised.
The summary screen is displayed.
2 Tap the “Edit” menu.
3 Input the revised items in the same manner as when creating a new task.
4 When the revision is complete, tap
The display returns to the Task list.
.
Deleting a Task
1 From the Task list, tap-and-hold the task to be deleted.
To select multiple contacts, drag and specify the range. Next, tap-and-hold the
selected range.
2 From the displayed pop-up menu, tap “Delete task”.
The selected task or tasks are displayed.
“Continue?” is displayed.
3 Tap “Y es”.
85

SECTION 4
5 Notes
This device can be used as a notepad when you want to write something down
quickly. In addition to text and figures, you can also record sound.
Screen Configuration
Tap → Notes in that order.
Tap to change the sort order of
the list.
Tap to open a note or play a
recording.
Tap-and-hold to display a pop-up
menu of actions.
86
Tap to record.
Tap to show or hide the
Recording toolbar.
Tap to create a new item.

Creating a New Note
1 Tap the “New” menu item.
2 Input the contents of the note.
Tap to return to the note list
(the note is saved automatically).
Tap to write on the screen.
Tap to add a recording to the note.
Tap to show or hide the input panel.
3 When the input is complete, tap
.
The information is saved and the display returns to the note list screen.
87

88
 Loading...