

Page 1
Getting Star ted
P3PC-2712-03EN
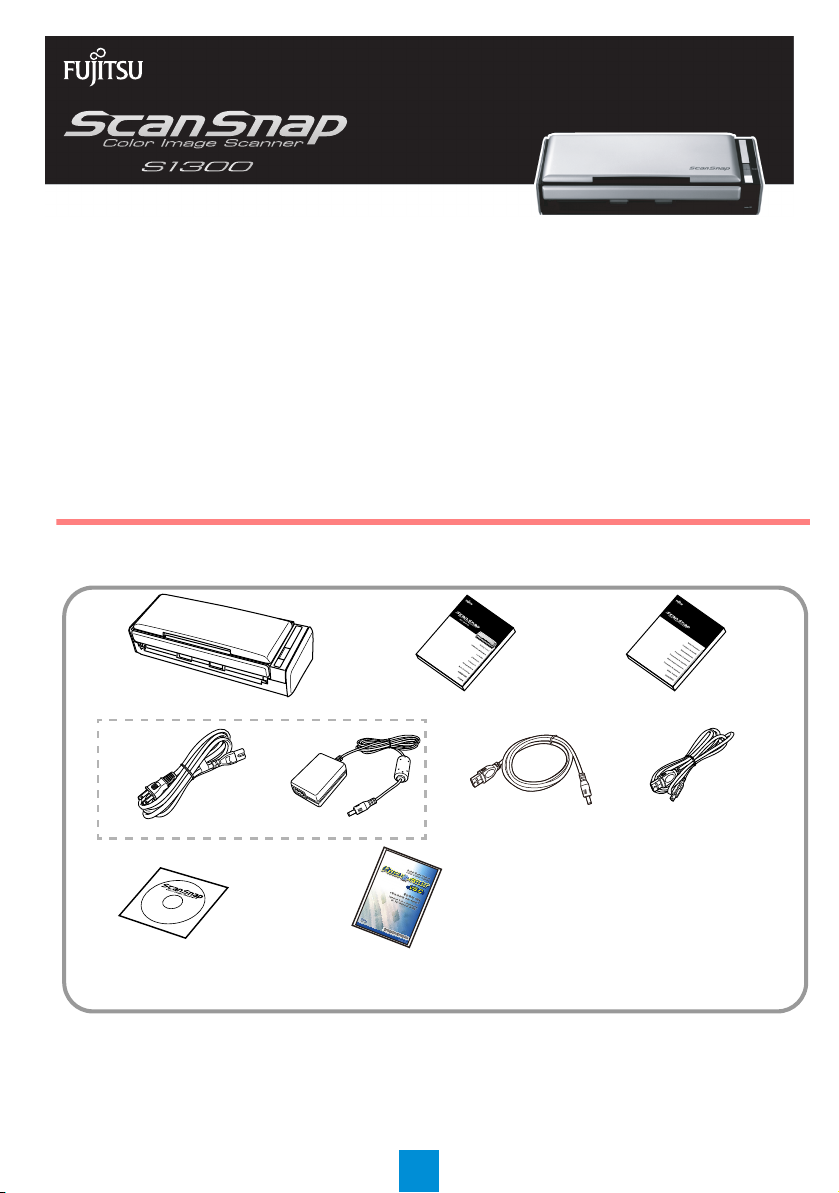
ScanSnap (× 1)
USB cable (× 1)
AC adapter (× 1)
AC cable (× 1) (*)
Setup DVD-ROM
(× 1)
Getting Started (× 1)
(This manual)
Safety Precautions (× 1)
USB bus power cable
(× 1)
(*) The contents may vary depending on the
country and the ScanSnap model purchased.
Rack2-Filer (× 1)
(Exclusive to S1300 with
Rack2-Filer)
Power cable
Thank you for purchasing ScanSnap S1300 (hereinafter referred to as "the ScanSnap"). This manual describes
the preparation required for use of the ScanSnap. Follow the preparation procedures described in this manual.
For details about ScanSnap functions and features, basic operation, daily care, and consumable replacement,
refer to the Operator's Guide (PDF) which is available on the Setup DVD-ROM. Keep this manual in a safe place
so that you can refer to it at any time when using the ScanSnap.
Microsoft, Windows, Windows Vista, Excel, and PowerPoint are either registered trademarks or trademarks of Microsoft
Corporation in the United States and/or other countries.
Apple, the Apple logo, Mac, Mac OS, iPhoto, and Rosetta are trademarks of Apple Inc.
ABBYY™ FineReader™ Engine ©2011 ABBYY. OCR by ABBYY
ABBYY and FineReader are trademarks of ABBYY.
Other company names and product names are the registered trademarks or trademarks of the respective companies.
© PFU LIMITED 2009-2011
Checking the Components
Make sure that all items shown below are included in the package.
August 2011
If any other packaging is provided, make sure to store it as well. Make sure to handle the components with care.
The box and packaging materials are required for storage and transportation of the ScanSnap. Do not throw them
away.
If anything is missing or damaged, contact your FUJITSU scanner dealer or an authorized FUJITSU scanner
service provider.
1
Page 2

Read the Safety Precautions
Before using the ScanSnap, make sure to read and
understand the information provided in the "Safety
Precautions" document.
Installing the Software
Windows® Installation (J page 2)
Mac OS Installation (J page 4)
Do not connect the ScanSnap to your
computer before installing the software.
Symbols Used in This Manual
The following symbols are used in this manual.
Symbol Description
This indication alerts operators to an
operation that, if not strictly observed, may
CAUTION
result in safety hazards to personnel or
damage to the product.
This symbol alerts operators to particularly
important information. Be sure to read this
information.
This symbol alerts operators to helpful
advice regarding operations.
This symbol indicates operations using
®
Windows
This symbol indicates operations using
Mac OS.
.
Referring to the "Operator's Guide"
To refer to the "Operator’s Guide", insert the Setup DVDROM in to the DVD-ROM drive, and follow the procedure
below.
Click the [Manuals] button in the [ScanSnap Setup]
dialog box, and then the [Operator's Guide] button.
When you export the data scanned by
ScanSnap to your mobile device, download
ScanSnap Connect Application for mobile from
an application store (such as the App Store).
Windows® Installation
■ Software
You can install the following software.
z ScanSnap Manager (Scanner driver)
z
ScanSnap Organizer (File management
application)
z CardMinder (Business card management
application)
z ABBYY FineReader for ScanSnap™ (OCR
application)
To use Evernote for Windows and/or Scan to
Microsoft SharePoint, the required software should
also be installed.
For details about each software and its installation
procedures, refer to "Installing the Software" in the
Operator's Guide.
Double-click the [Operator's Guide] icon in the
[ScanSnap] window.
2
Page 3
■ System Requirements
z
Operating
system
CPU
Memory
Display
resolution
Hard disk
space (*3)
USB port (*4) USB2.0/USB1.1
*1: Service Pack 2 or later is required
*2: Service Pack 4 or later is required
*3: For
Windows Vista®, if .NET Framework 3.5 SP1 is not
installed, a maximum of 500 MB of additional free hard
disk space is required for it.
For Windows
installed, a maximum of 530 MB of additional free hard
disk space is required for it.
For Windows
installed, a maximum of 310 MB of additional free hard
disk space is required for it.
*4: When using USB 3.0 port, it works as USB 2.0.
z
z
z
Windows® 7 (32-bit/64-bit)
z
Windows Vista® (32-bit/64-bit)
z
Windows® XP (32-bit) (*1)
z
Windows® 2000 (*2)
®
Core™ 2 Duo 2.2 GHz or higher
Intel
recommended
(Minimum: Intel
Windows® 7
32-bit: 1 GB or more
64-bit: 2 GB or more
Windows Vista
Windows® XP (32-bit)
Windows
512 MB or more
(1 GB or more recommended)
800 × 600 pixels or higher
2220 MB or more of free hard disk
space is required
(2670 MB or more of free hard disk
space is required for using with
Rack2-Filer)
®
XP, if .NET Framework 3.5 SP1 is not
®
2000, if .NET Framework 2.0 is not
®
Pentium® 4 1.8 GHz)
(32-bit/64-bit)
®
(32-bit/64-bit)
®
2000
If the CPU or the memory do not meet the
required specifications, or the type of USB port
or USB hub is USB 1.1, the scanning speed will
slow down.
When the font size is large, some screens may
not be displayed properly. In that case, use a
smaller font size.
The actual increase in used disk space after
installation and the required disk space for
installation may differ from each other
depending on your Windows
®
system disk
management.
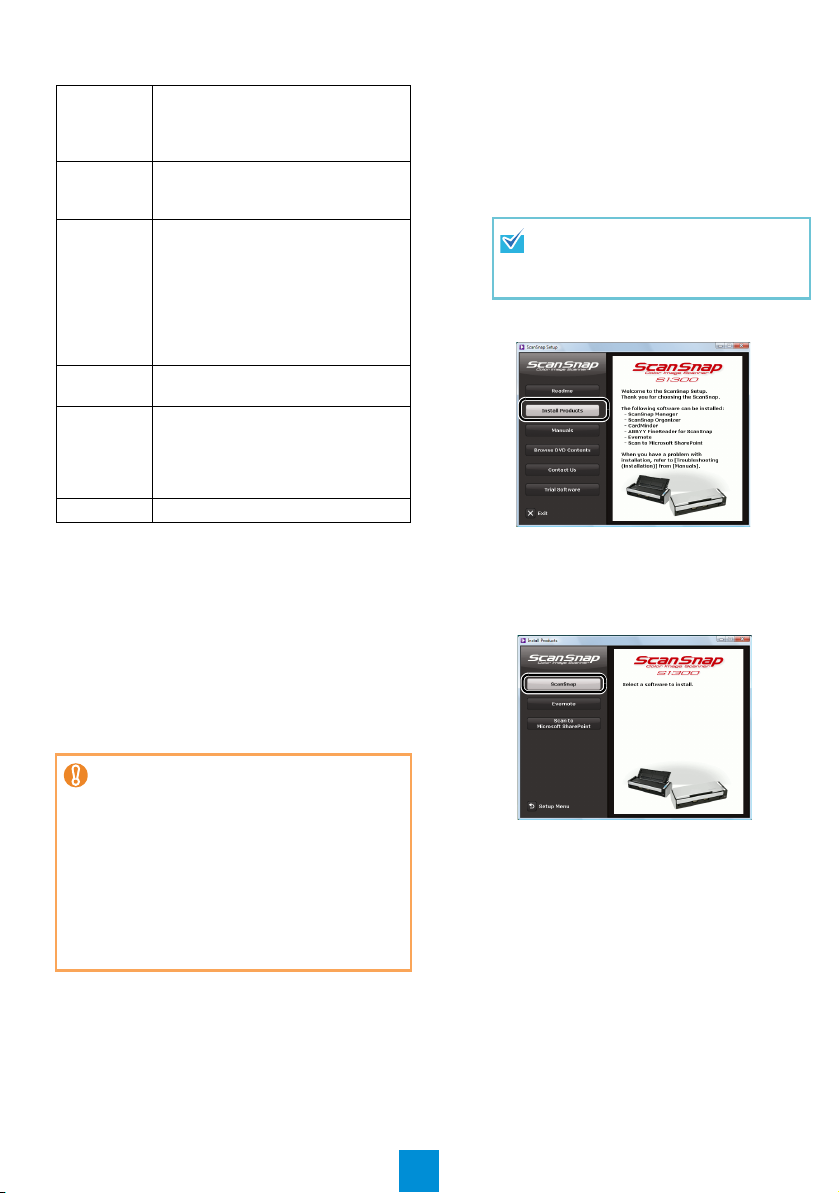
■ Installation
1. Turn on the computer and log on as a user
with Administrator privileges.
2. Insert the Setup DVD-ROM into the DVD-
ROM drive.
D The [ScanSnap Setup] dialog box appears.
If the [ScanSnap Setup] dialog box does
not appear, double-click
"ScanSnap.exe" in the DVD-ROM via
Windows Explorer.
3. Click the [Install Products] button.
D The [Install Products] dialog box appears.
4. Click the [ScanSnap] button.
Follow the instructions on the screen to continue
with the installation.
If installation is not completed successfully, click the
[Manuals] button in the [ScanSnap Setup] dialog box,
and then the [Troubleshooting (installation)] button,
and refer to Troubleshooting (installation).
3
Page 4

Mac OS Installation
■ Software
You can install the following software.
z ScanSnap Manager (Scanner driver)
z ABBYY FineReader for ScanSnap™ (OCR
application)
z Cardiris™ for ScanSnap (Business card text-
recognized application)
To use Evernote for Mac, it should also be installed.
For details about each software and its installation
procedures, refer to "Installing the Software" in the
Operator's Guide.
■ System Requirements
z
Operating
system (*1)
CPU
Memory
Display
resolution
Hard disk
space
USB port (*2) USB 2.0/USB 1.1
*1: It is recommended to apply the latest updates to Mac
OS.
*2: When using USB 3.0 port, it works as USB 2.0.
If the CPU or the memory do not meet the
required specifications, or the type of USB
port or USB hub is USB 1.1, the scanning
speed will slow down.
Mac OS X v10.7
z
Mac OS X v10.6
z
Mac OS X v10.5
z
Mac OS X v10.4
®
Core™ 2 Duo 2.4 GHz or higher
Intel
recommended
(Minimum: Intel
PowerPC
Mac OS X v10.7
2 GB or more
Mac OS X v10.6
1 GB or more
Mac OS X v10.5
Mac OS X v10.4
512 MB or more
(1 GB or more recommended)
1024 × 768 pixels or higher
1555 MB or more of free hard disk space
®
Core™ Duo 1.83 GHz,
®
G5 1.6 GHz)
■ Installation
1. Turn your computer on and log on as a
user with Administrator privileges.
2. Insert the Setup DVD-ROM into the DVD-
ROM drive.
D The [ScanSnap] window appears.
3. Double-click the [ScanSnap] icon.
Follow the instructions on the screen to continue
with the installation.
4
Page 5

Connecting the ScanSnap
CAUTION
AC Cable
AC
Adapter
USB Bus
Power Cable
z
Only one ScanSnap can be used by a
computer at a time.
z
Use only the cable supplied with the ScanSnap.
Do not use AC adapters other than the one
supplied with this ScanSnap. Doing so may cause
damage to the ScanSnap.
Manufacturer: LEI
Model No.: NU13-1072166-I3
3. Connect cables to the ScanSnap.
z
To power on the ScanSnap, the USB
cable and either of the power cables
(power cable or USB bus power cable)
need to be connected.
z
When connecting to USB hub, make sure
to connect the ScanSnap to the USB hub
which is connected to a USB port of your
computer. Use a powered USB hub (with
AC adapter).
z
If USB port or USB hub is USB 1.1,
scanning speed will slow down.
z
Connect the USB cable with the USB
mark facing up.
1.
Select the power cable type according to
power source for the ScanSnap.
z To use the ScanSnap at a fixed location
Use the power cable to connect to an AC outlet.
For details about the connection, refer to "Using
the Power Cable" (page 5) in Step 3.
z To use the ScanSnap in a remote location with
your laptop computer or a place without AC
outlets available nearby
Use the USB bus power cable for power supply
from your computer.
For details about the connection, refer to "Using the
USB Bus Power Cable" (page 5) in Step 3.
2. Remove the tape seal covering the USB
connector and power connector of the
ScanSnap.
z Using the Power Cable
1. Connect the power cable to the power
connector of the ScanSnap and plug in the
AC outlet.
2. Connect the USB cable to the USB
connector on the ScanSnap and the USB
port on your computer.
z Using the USB Bus Power Cable
1. Connect the USB bus power cable to the
power connector on the ScanSnap and the
USB port on your computer.
2. Connect the USB cable to the USB
connector on the ScanSnap and the USB
port on your computer.
5
Page 6

4. Open the ADF paper chute (cover) of the
[Scan] Button
ADF Paper Chute
(Cover)
Extension
Side Guides
ScanSnap.
D The ScanSnap is powered on and the [Scan]
button lights in blue.
The bottom of the ScanSnap may
become hot when the ScanSnap is
used. This heat does not affect
ScanSnap operation or cause any
physical harm directly. Be careful not to
drop the ScanSnap when hold the
bottom for carrying the ScanSnap.
5. Check the ScanSnap Manager icon.
D The ScanSnap Manager icon appears on the
taskbar.
D The ScanSnap Manager icon appears in the
Dock.
The icon varies depending on the power
source to use.
For power cable connection:
For USB bus power cable connection:
Scan Test
For details on documents that can be scanned with
the ScanSnap and how to load documents, refer to
"ScanSnap Overview" in the Operator's Guide.
1. Load a document in the ScanSnap.
1. Pull up the extension.
The icon varies depending on the power
source to be used.
For power cable connection:
For USB bus power cable connection:
In Windows® 7, the ScanSnap Manager
icon is displayed in the menu which
appears when you click on the
taskbar.
To have the ScanSnap Manager icon
always displayed on the taskbar, drag
the icon and drop it onto the taskbar.
2. Slide open the side guides of the right and
left.
6
Page 7

3. Load the document on the ADF paper chute
Set the document
face-down and top-first
(cover), and adjust the side guides to the size
of the document.
2. Press the [Scan] button on the ScanSnap.
D Scanning starts. The Quick Menu appears
when scanning is completed.
If scanning does not start, refer to
"Troubleshooting" in the ScanSnap
Manager Help.
3. In the Quick Menu, click the icon of the
application to link with ScanSnap
Manager.
D The selected application is started.
Confirm that ScanSnap Manager is linked with the
application that was selected from the Quick Menu.
7
Page 8

Contact for Inquiries
z ABBYY FineReader for ScanSnap™
For inquiries regarding ABBYY FineReader for
ScanSnap™, refer to the contact list by
proceeding to the following.
From the [Start] menu, select the [All Programs]
J [ABBYY FineReader for ScanSnap (TM) 4.1]
J [User's Guide] J [Technical Support] J
[ABBYY Offices].
From the Finder window, select the
[Applications]
ScanSnap] J [FineReader for ScanSnap
Preferences] J [Help] J [FineReader for
ScanSnap Help] J [ABBYY Offices].
z Cardiris™ for ScanSnap
For inquiries regarding Cardiris™ for ScanSnap,
refer to the following Web page:
http://www.irislink.com/support
z Evernote
For inquiries regarding Evernote, refer to the
following Web page:
http://www.evernote.com/about/contact/support/
z Google Docs™
For inquiries regarding Google Docs™, refer
to the Docs Help or the Help forum by clicking
on the Help link in Google Docs™.
z Salesforce
Contact your Salesforce system administrator.
J [ABBYY FineReader for
For other inquiries, refer to the FUJITSU Office
contact list on the last page of the Safety Precautions
manual.
8
 Loading...