

Page 1

CardMinder
User’s Guide
P3PC-1562-01ENZ0
™
Page 2

INTRODUCTION
■ About This Manual
This document describes the use of CardMinder, a business card scanning application.
1) About CardMinder
(A quick look at CardMinder)
2) Configuring Before Scanning
(Setting options before scanning)
3) Scanning and Synchronizing Business Card Data
(Basic procedures for common scanning tasks)
4) Business Card Data Handling
(Maintaining and using your Business Card database)
5) Correcting Recognized Character data
(Correcting the recognized data on a Business card)
6) Setting Preferences
(Setting CardMinder preferences)
7) Online Update of CardMinder
(CardMinder Online Update)
8) Troubleshooting
(Detecting and fixing CardMinder errors)
Symbols Used In This Manual
This manual uses the following symbols in explanations.
ATTENTION
HINT
This symbol alerts operators to particularly important information. Be sure to
read this information.
This symbol alerts operators to helpful advice regarding operation.
CardMinder User’s Guide i
Page 3

Screen Examples In This Manual
The screen examples in this manual are subject to change without notice in the interest of
product improvement.
The screenshots used in the examples in this manual were taken with Windows XP.
If the actual displayed screen differs from the screen examples in this manual, operate by
following the actual displayed.
■ Note, Liability
READ ALL OF THIS MANUAL AND RELATED MANUAL CAREFULLY BEFORE
USING THIS PRODUCT.
IF NOT USED CORRECTLY, UNEXPECTED INJURY MAY BE CAUSED TO USERS
OR BYSTANDERS.
While all efforts have been made to ensure the accuracy of all information in this manual,
PFU LIMITED assumes no liability to any party for any damage caused by errors or
omissions or by statements of any kind in this manual, its updates or supplements, whether
such errors are omissions or statements resulting from negligence, accidents, or any other
cause. PFU LIMITED further assumes no liability arising from the application or use of any
product or system described herein; nor any liability for incidental or consequential damages
arising from the use of this manual. PFU LIMITED disclaims all warranties regarding the
information contained herein, whether expressed, implied, or statutory.
PFU LIMITED reserves the right to make changes to any products herein, to improve
reliability, function, or design, without further notice and without obligation.
Use in High-safety Applications
This product has been designed and manufactured on the assumption that it will be used in
office, personal, domestic, regular industrial, and general-purpose applications. It has not
been designed and manufactured for use in applications (simply called "high-safety
applications" from here on) that directly involve serious danger to life and health when an
extremely high degree of safety is required, for example, in the control of nuclear reactions
at nuclear power facilities, automatic flight control of aircraft, air traffic control, operation
control in mass-transport systems, medical equipment for sustaining life, and missile firing
control in weapons systems, and when provisionally the safety in question is not ensured.
The user should use this product without adopting measures for ensuring safety in such highsafety applications. PFU LIMITED assumes no liability whatsoever for damages arising
from use of this product by the user in high-safety applications, and for any claims or
compensation for damages by the user or a third party.
CardMinder User’s Guide ii
Page 4

■ Trademarks
ScanSnap and CardMinder are trademarks of PFU LIMITED.
Microsoft and Windows are either registered trademarks or trademarks of Microsoft
Corporation of the United States and/or other countries.
Adobe and the Adobe logo as well as Acrobat and the Acrobat Logo are either registered
trademarks or trademarks of Adobe Systems Incorporated in the United States and/or other
countries.
Other product names referred to in this manual are registered trademarks or trademarks of
respective companies.
How Trademarks and Product Names are indicated in this Manual
In this document, the following product names are abbreviated as follows:
ScanSnap: Color image scanner ScanSnap
CardMinder: CardMinder
Windows 98: Microsoft® Windows® 98 operating system
Microsoft® Windows® 98 Second Edition operating system
Windows Me: Microsoft® Windows® Millennium Edition operating system
Windows 2000: Microsoft® Windows® 2000 Professional operating system
Windows XP: Microsoft® Windows® XP Professional operating system
Microsoft® Windows® XP Home Edition operating system
Microsoft Outlook:Microsoft® Outlook®
Where there is no need to distinguish one of the above operating systems from other ones,
the general term "Windows" is used.
In addition, "® (registered trademark)" and "
TM
application for ScanSnap
TM
TM
(trademark)" are omitted in this document.
■ Manufacturer
PFU LIMITED
International Sales Dept., Imaging Business Division, Products Group
Solid Square East Tower, 580 Horikawa-cho, Saiwai-ku, Kawasaki-shi Kanagawa 212-8563,
Japan
Phone: (81-44) 540-4538
• The contents of this manual may be revised without prior notice.
• We are unaccountable for any damages or passive damages from the use of this
equipment or this manual and any compensation of third party.
• It is prohibited by copyright law to copy this document, whether in whole or in part,
and/or to duplicate the software.
All Rights Reserved, Copyright© PFU LIMITED 2006.
CardMinder User’s Guide iii
Page 5

Multilingual OCR by I.R.I.S.(Image Recognition Integrated Systems) 1997 Copyright by
I.R.I.S., All rights reserved
The Proximity / Merriam Webster Linguibase
Copyright 1984 All rights reserved
Proximity Technology Inc.
Copyright 1984 All rights reserved
Merriam Webster Inc.
The Proximity / Merriam Webster Linguibase
Copyright 1984 All rights reserved
Proximity Technology Inc.
Copyright 1984 All rights reserved
Williams Collins Sons & Co. Ltd.
CardMinder User’s Guide iv
Page 6

CONTENTS
INTRODUCTION ............................................................................................ i
■ About This Manual ................................................................. i
■ Note, Liability ......................................................................... ii
■ Trademarks ........................................................................... iii
■ Manufacturer ........................................................................ iii
Chapter 1 About CardMinder ................................................... 1
1.1 About CardMinder .............................................................. 2
1.2 Features of CardMinder ..................................................... 5
1.3 Operation Flow.................................................................... 6
1.4 Operation Windows ............................................................ 9
1.5 User Authority................................................................... 14
Chapter 2 Configuration Before Scanning ........................... 15
Chapter 3 Scanning and Exporting Business Card Data .... 16
3.1 How to Scan Business Cards.......................................... 17
3.2 Exporting to Associated Application.............................. 25
Chapter 4 Business Card Data Handling .............................. 28
4.1 Data search by hot key..................................................... 29
CardMinder User’s Guide v
Page 7

4.2 Deleting data from the [Inbox] / [Exported] tab ............. 31
4.3 Restoring data from the [Trash] tab................................ 32
4.4 Deleting data from the [Trash] tab .................................. 34
4.5 Deleting data from the [Mobile] tab................................. 36
4.6 Extracting the business card image data....................... 38
4.7 Data search by keyword input ........................................ 40
4.8 Attaching related files to the business card data.......... 43
4.9 Viewing the business card data on other PCs............... 47
4.10 Sending e-mail ................................................................. 54
4.11 Activating Web Browser.................................................. 55
Chapter 5 Correction of Recognized Character Data .......... 56
5.1 Selection of language....................................................... 57
5.2 Recognition of all characters at once............................. 58
5.3 Recognition using Rectangle Selection ......................... 59
5.4 Keyword Recognition using Rectangle Area Selection 61
5.5 Data Correction by Manual Entry .................................... 63
Chapter 6 Setting Preferences............................................... 64
6.1 General settings of CardMinder ...................................... 65
6.2 Export item settings ......................................................... 68
CardMinder User’s Guide vi
Page 8

Chapter 7 Updating CardMinder Online................................ 69
Chapter 8 Troubleshooting .................................................... 72
INDEX .......................................................................................................... 75
CardMinder User’s Guide vii
Page 9

Chapter 1
About CardMinder
This chapter describes the features and basic operations of CardMinderTM.
1
1.1 About CardMinder................................................................................................... 2
1.2 Features of CardMinder.......................................................................................... 5
1.3 Operation Flow........................................................................................................ 6
1.4 Operation Windows ................................................................................................ 9
1.5 User Authority ....................................................................................................... 14
CardMinder User’s Guide 1
Page 10
1.1 About CardMinder
CardMinder is a business card scanning application for image scanners.
CardMinder provides quick scanning, image recognition and database storage solution for all your
office scanning needs.
Using an OCR (Optical Character Recognition) engine and sharing recognized data with a PIM
(Personal Information Manager), CardMinder is able to...
• Scan business cards and save the business card data
• Recognize the characters on the business card and send the character data to a PIM (Personal
Information Manager)
• Copy scanned business card data and the viewer application to removable media for utilizing
the data on other personal computers
• Link other related files to the business card data
• Easily find data on a business card using simple keyword searches
1.1 About CardMinder
1
About CardMinder
Business card data
CardMinder window:
Recognized data
Recognized characters
PIM window (Microsoft® Outlook® for example):
CardMinder User’s Guide
2
Page 11
■ System Requirements
CardMinder runs on the system of the following environment:
Computer:
• Intel Pentium II 450MHz or higher
(Intel Pentium III 1GHz or higher is recommended)
• CD-ROM drive (required for the installation of CardMinder)
• ScanSnap* and scanners that comply to TWAIN Standard
• Removable media (8MB or more free space is required for using Mobile linkage func-
tion)
• Keyboard
• Mouse
*"ScanSnap" is a FUJITSU compact color scanner. Although it is not compatible with
TWAIN Standard, this novel scanner can create PDF files directly from scanned images
with the touch of a button.
For more details, visit our website at: http://scansnap.fujitsu.com
1.1 About CardMinder
1
About CardMinder
ATTENTION
Operating system:
One of the following is required:
• Windows 98
• Windows Me
• Windows 2000
• Windows XP
If the screen resolution is set to 800 x 600, line breaks will occur at positions
where it would be inappropriate and lines of characters are misaligned when
you change a point size to a larger one.
It is recommended to use the operating system with the latest Service Pack applied.
HINT
Memory:
• 128M bytes or more
• Microsoft Internet Explorer 5.5 or later must be installed.
Disk space:
• 150M bytes or more
CardMinder User’s Guide
3
Page 12

1.1 About CardMinder
HINT
ATTENTION
To save the data of one business card (Duplex, Color, and Best image quality
scanning), 250K bytes of disk space is required.
Estimate the total amount of necessary disk space according to the number of
business cards you are to scan.
• When recognizing and viewing Japanese and Chinese business cards, use
Windows 2000 or Windows XP. These functions are not supported in Windows 98, Windows 98SE, and Windows Me.
• To recognize and view Japanese and Chinese business cards, change the
settings as follows:
Windows 2000
eral" tab. Check "Japanese," "Simplified Chinese," or "Traditional Chinese"
under "Language settings for the system."
Install Universal Font (Arial Unicode MS) from the Setup Disk of Microsoft
Office 2000 or later version.
Windows XP
> the "Languages" tab. Check "Install files for East Asian languages" under
"Supplemental Language support."
Install Universal Font (Arial Unicode MS) from the Setup Disk of Microsoft
Office 2000 or later.
: Select "Control Panel," -> "Regional Options," -> the "Gen-
: Select "Control Panel," -> "Regional and Language Options, " -
• Business cards written in Chinese cannot be recognized with scanners that
support the TWAIN driver.
• To text-recognize a business card written in Chinese with CardMinder, Scan-
Snap must be ready to scan. Make sure that ScanSnap is powered on and the
1
About CardMinder
S
ScanSnap icon on the task bar is in ready state.
S
• CardMinder can interact with other applications. However, characters written
on business cards may not be displayed properly in the interacting application.
CardMinder User’s Guide
4
Page 13

1.2 Features of CardMinder
The features of CardMinder are as follows:
• Scan one or both sides of the business cards just at the touch of the button on the scanner.
(ScanSnap).
• Capture memo written on business cards and create a database.
• Recognize characters on business cards and automatically create keywords such as Full Name
and Company.
The following can be Keywords:
Full Name
Company
Department
Job title
ZIP / Postal codes
Address
Location / Region
Phone number
Fax number
Mobile phone
E-mail
Web site address
Memo
Save date
• Export recognized data to PIMs (Personal Information Manager)
Supported Applications: Microsoft® Outlook® 6.0 and later
Microsoft® Outlook Express
TM
ACT!
GoldMine®
Microsoft® Excel (when the CSV format is used)
• Search business cards quickly by Full Name or Company
1.2 Features of CardMinder
1
About CardMinder
CardMinder User’s Guide
5
Page 14
1.3 Operation Flow
You can operate CardMinder by doing the following:
Selecting (See Chapter 2)
• An application to which the data is exported.
Scanning and recognizing a business card (See Section 3.1)
1. Set business card(s) onto the scanner.
2. Scan the business card(s).
3. After scanning is complete, the recognized data
is displayed in the Main window.
1.3 Operation Flow
1
About CardMinder
Common
Daily
Tasks
Exporting the data (See Section 3.2)
1. Select the data you want to export on the
[Inbox] tab.
2. Click the [Export] button.
Maintaining the data (See Chapter 4)
1. Select the data on the [Inbox] tab or the
[Exported] tab.
2. From the [Edit] menu, do the following:
• Delete the business card data. (See Section 4.2 or
Section 4.5.)
• Delete the business card data from the [Trash] tab.
(See Section 4.4.)
• Restore the business card data. (See Section 4.3.)
• Attach related files. (See Section 4.8.)
2
1
CardMinder User’s Guide
6
Page 15
Recognizing the data anew (See Chapter 5)
1. Select [Tool] on the menu bar -> [Recognition
Language], or click [ ] on the right side of the
[Recognition] button and then select a language to use from the list. (See Section 5.1.)
2. Select the data on the [Inbox] tab or the
[Exported] tab.
3. Recognize the data anew.
• Recognize business cards anew. (See Section 5.2.)
• Recognize data selected in the rectangular area.
(See Section 5.3.)
• Recognize by keyword in the rectangular area. (See
Section 5.4.)
Correcting Recognized data (See Section 5.5)
1. Select the data on the [Inbox] tab or the
[Exported] tab.
2. Correct the character strings.
1.3 Operation Flow
1
About CardMinder
Extracting the data (See Section 4.6)
1. Select the data from the [Inbox] tab or the
[Exported] tab.
2. Drag and drop the business card image you
want to extract onto Desktop.
Viewing the data on other PCs (See Section 4.9)
1. Select the data from the [Inbox] tab or the
[Exported] tab.
2. Drag and drop the image data onto the [Mobile]
tab.
3. Set the removable media onto your personal
computer.
4. Click the [Mobile Linkage] button.
Sending e-mail (See Section 4.10 )
1. Select the data on the [Inbox] tab, the
Exported] tab, the [Trash] tab, or the [Mobile]
tab.
2. Select [Tool] on the menu bar -> [E-mail], or
right-click on the data listed and select [E-mail]
from the menu.
2
1
CardMinder User’s Guide
7
Page 16
Displaying the Web browser (SeeSection 4.11 )
1. Select the data on the [Inbox] tab, the
[Exported] tab, the [Trash] tab, or the [Mobile]
tab.
2. Select [Tool] on the menu bar -> [Web page
browse], or right-click on the data listed and
select [Web page browse] from the menu.
1.3 Operation Flow
1
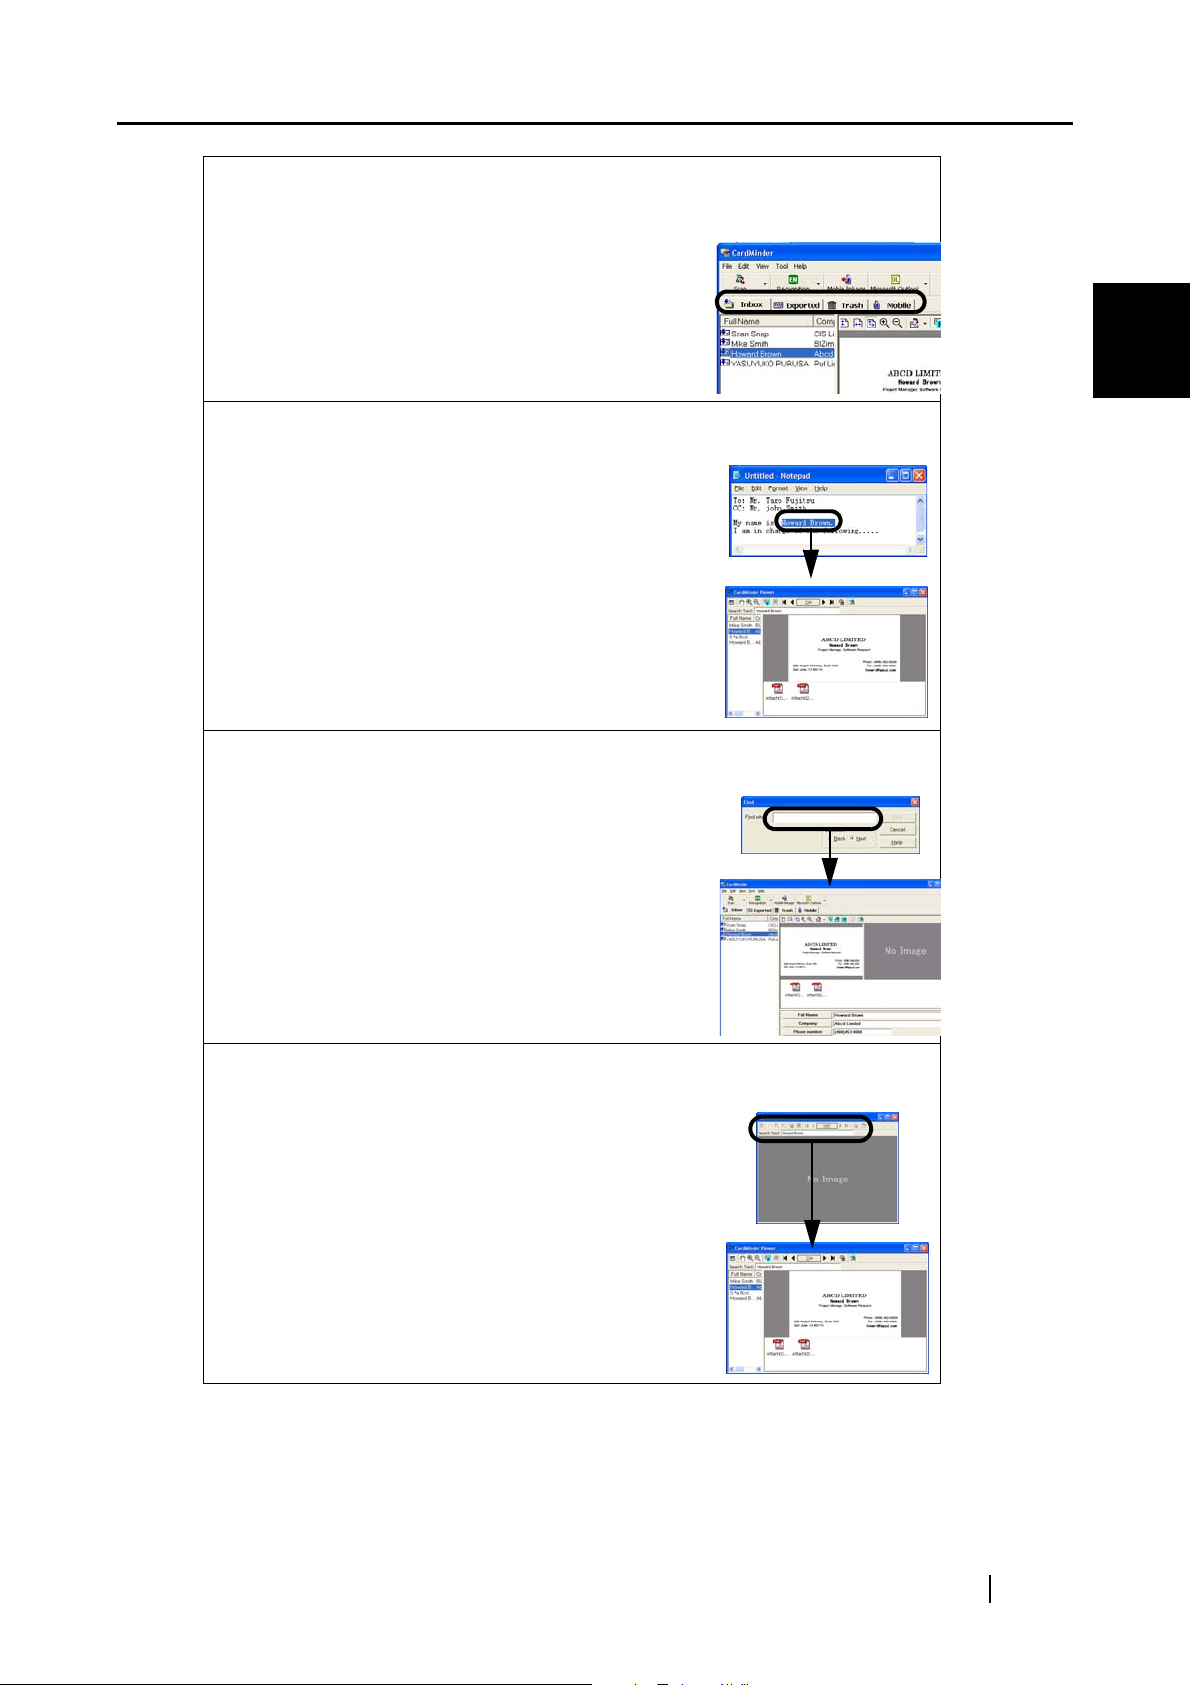
Searching data (1) (See Section 4.1)
1. In another application (Microsoft Notepad etc.),
select character strings you want to find (Full
Name or Company).
2. Press the F3 and Alt keys simultaneously on
your keyboard.
Searching data (2) (See Section 4.7)
1. Activate CardMinder.
2. Select [Edit] on the menu bar -> [Find...].
3. On the [Find] window, enter the character string
you want to find (Full Name or Company) in the
[Find what:] box and click the [Find] button.
About CardMinder
Searching data (3) (See Section 4.7)
1. Open CardMinder Viewer.
2. Enter character strings you want to find (Full
Name or Company) in the [Search Text:] box
and press the [Enter] key.
CardMinder User’s Guide
8
Page 17

1.4 Operation Windows
There are two types of operation windows in CardMinder.
1.4 Operation Windows
■ Main window
Command Toolbar
Shows icons (buttons) for the commonly-used commands.
Menu bar
Displays commands to
operate CardMinder.
Mode tabs
Displays data in
each mode.
1
About CardMinder
Image Toolbar
Shows the buttons used to adjust the
business card image in Image View.
Business Card Image View
Displays the image of
the business card selected
from Data List View.
Attachment View
Displays the files attached to the
business card data.
Data List View
Lists the business card data.
Recognition Result / Correction View
Displays recognized data, and is used
for the data correction.
Status bar
Explanations of the menu bar and buttons as well as the number of selected
business cards are displayed.
CardMinder User’s Guide
9
Page 18
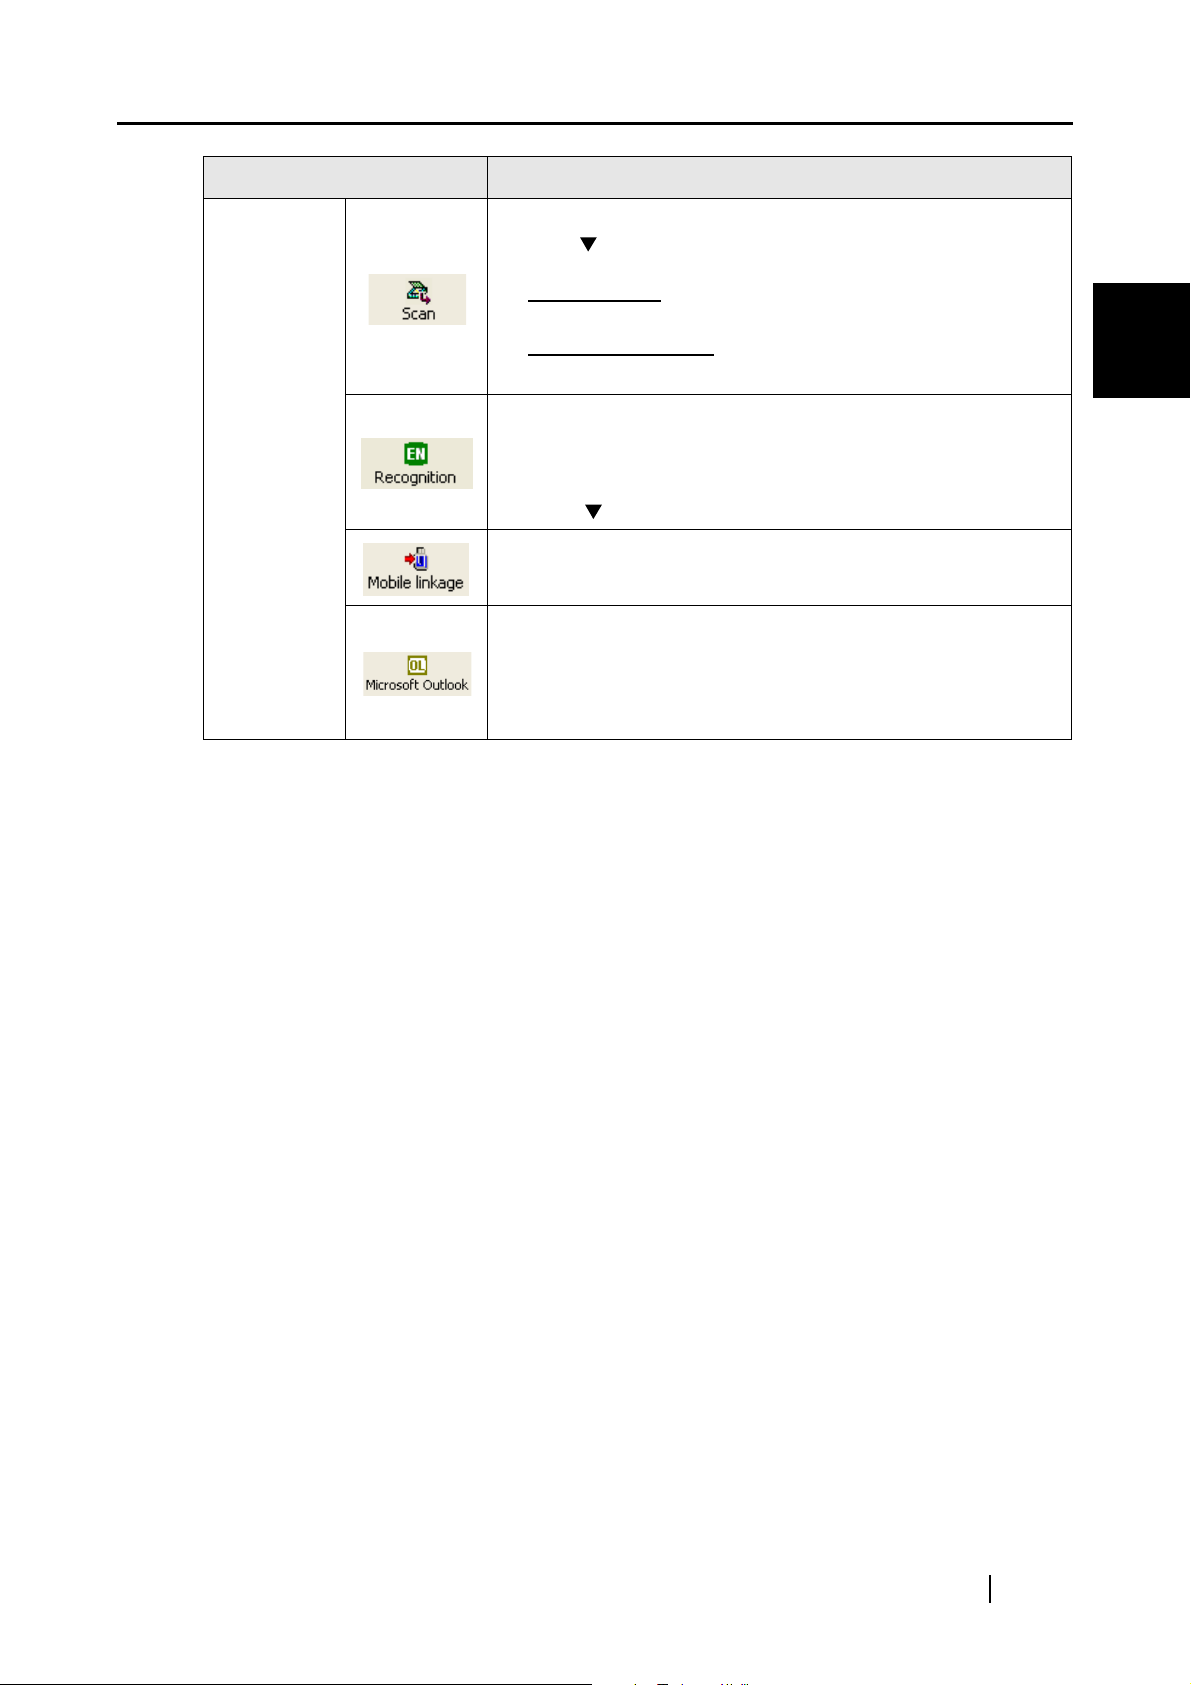
Command
toolbar
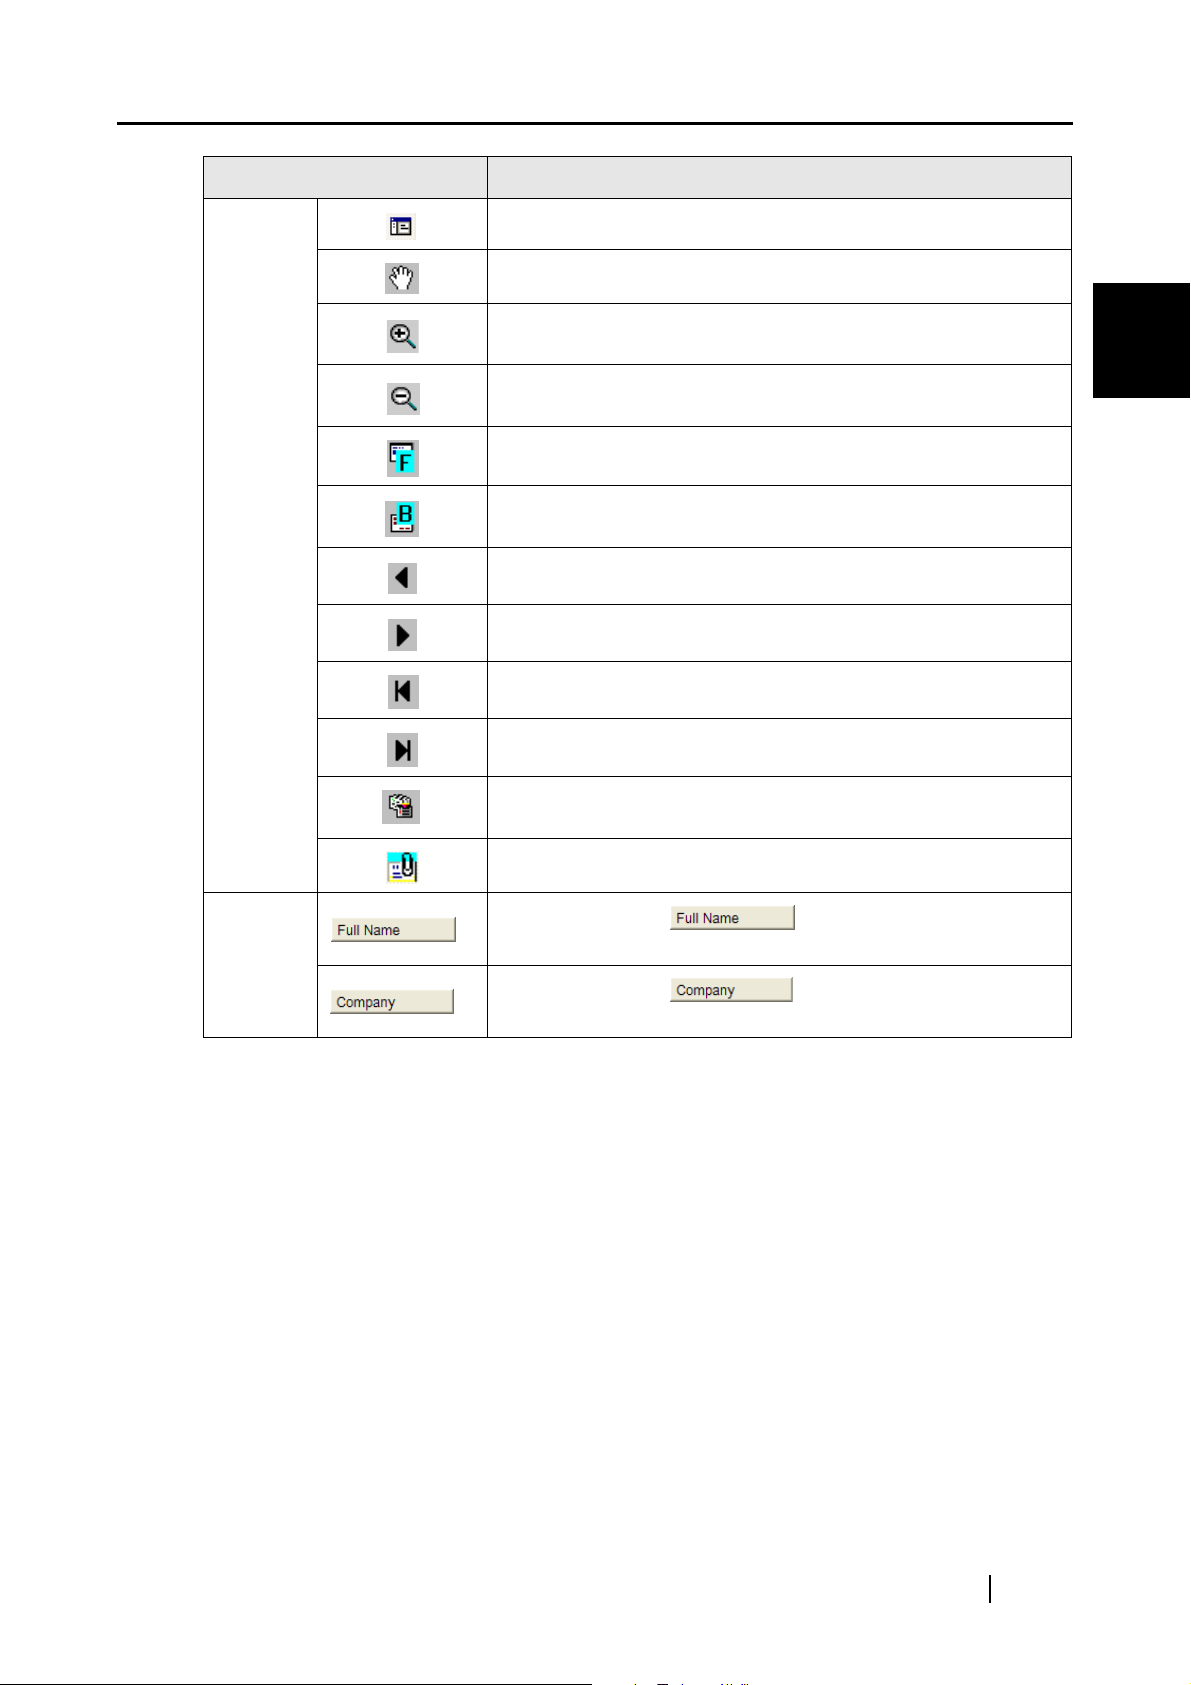
Icon / Display Function
Starts scanning of business card(s).
With the [ ] button, you can change scanning settings (Duplex/
Simplex) and:
• For ScanSnap: You can set scanning quality (Normal/Better/
Best).
• For TWAIN scanners: You can set resolution (150/200/300/
400dpi)
Recognizes the business card selected in the Data List View. Only the
characters on the front side of the business card are recognized. The
recognition result will automatically be displayed in Recognition /
Correction View.
With the [ ] button, you can select the language for recognition.
Copies the business card data on the [Mobile] tab to removable media
and then you can utilize the data on other personal computers.
Exports the business card data to another application. The data on
any tabs can be exported to the application specified. In addition, the
data on the [Inbox] tab is moved to the [Exported] tab.
The icon at the left shows that the destination is Microsoft Outlook.
Refer to Section 2 to select different applications.
1.4 Operation Windows
1
About CardMinder
CardMinder User’s Guide
10
Page 19
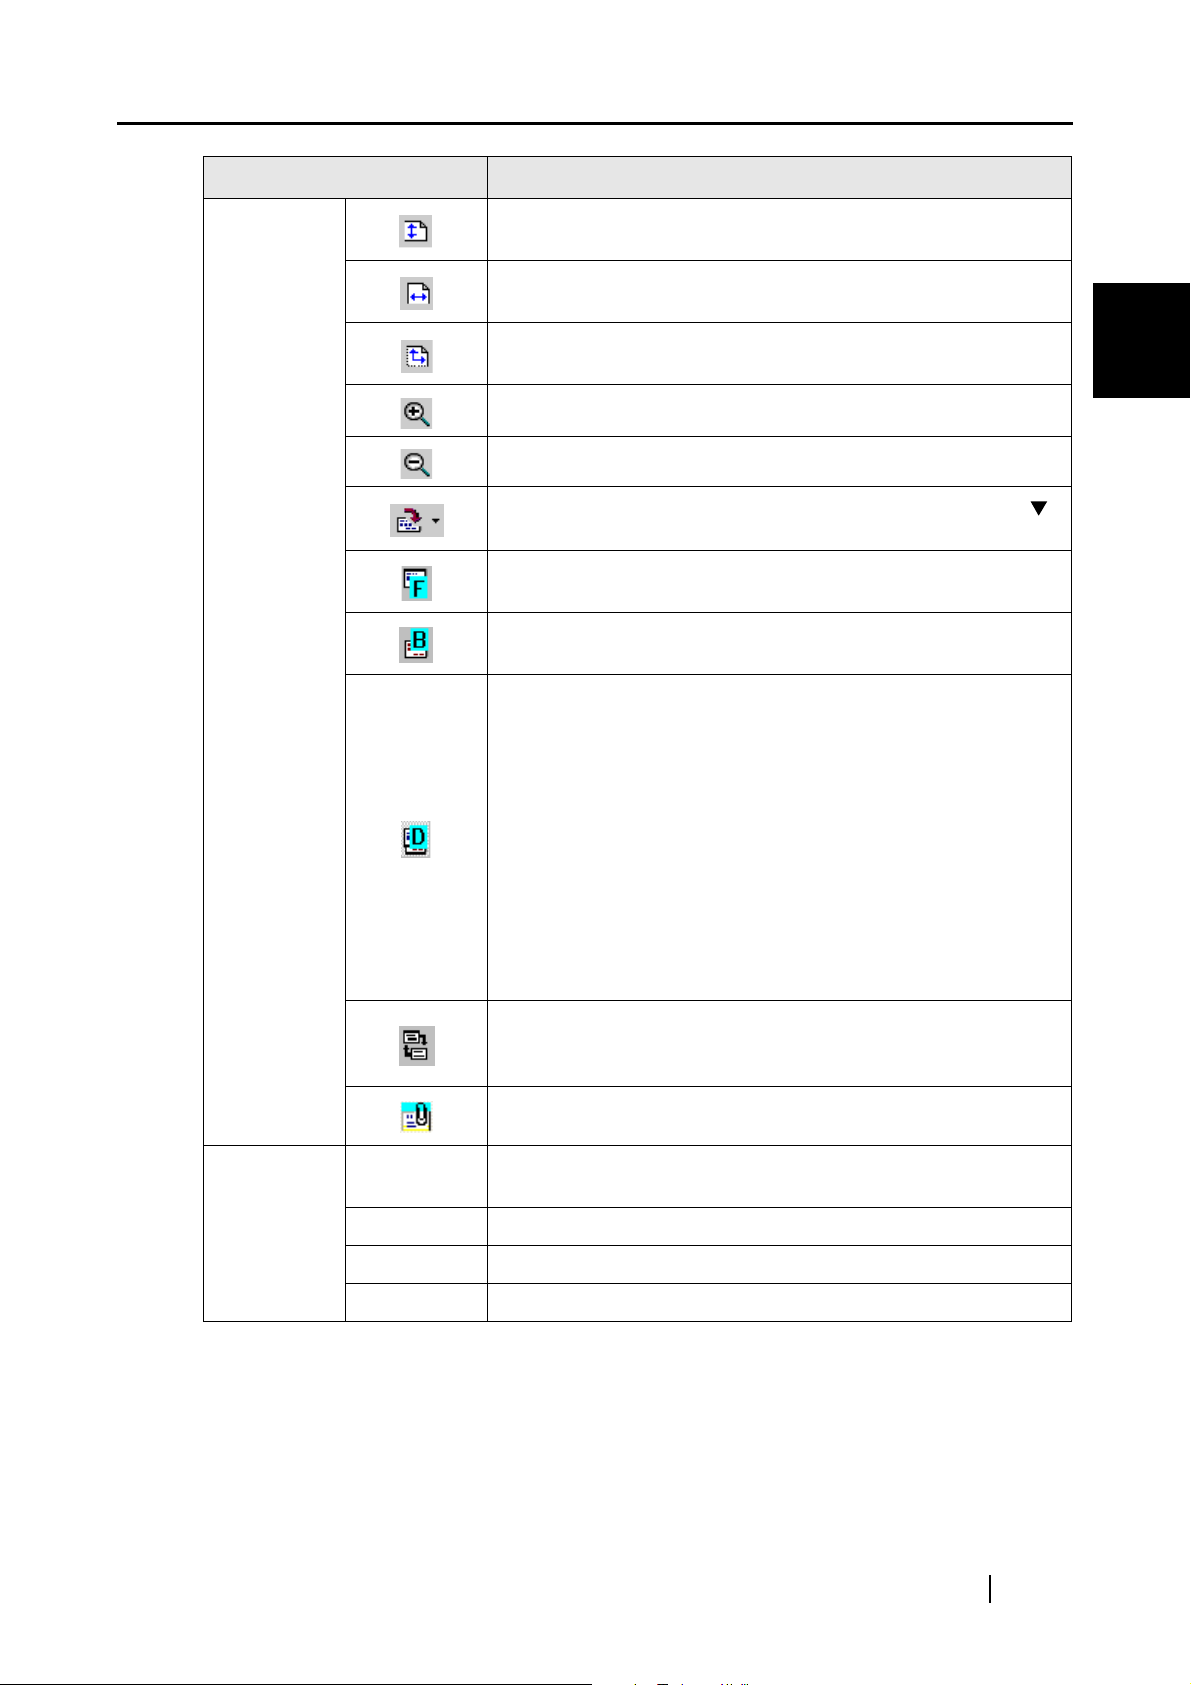
Icon / Display Function
The height of the business card image is adjusted to Image Display
View.
The width of the business card image is adjusted to Image Display
View.
1.4 Operation Windows
Image
toolbar
The height and width of the business card image is adjusted to the
image display view.
The business card image size is enlarged.
The business card image size is reduced.
Rotates the business card image 90 degrees clockwise. Click the [ ]
button to change the rotation angle and plane.
Displays the front side image of the business card. If no image exists,
[No Image] is shown instead.
Displays the back side image of the business card. If no back side
image exists, [No Image] is shown instead.
Displays both the front and back side images together. You can
specify how to display the business card image by selecting [View] on
the menu bar -> [Show duplex image] -> [Split view window vertically]
/[Split view window horizontally]. On the left side (or Upper side) of the
Business Card Image View, the front side of the business card is
shown. On the right side (or Lower side) of the Business Card Image
View, the back side of the business card is shown.
If you select [Auto] from the [Show duplex image] submenu using the
[View] menu, CardMinder automatically selects either of view types
(splitting vertically or horizontally) based on the front side image of the
business card, so that the images can be displayed in their maximum
size.
If no back side image exists, [No Image] is shown.
1
About CardMinder
Mode tabs
Swaps the front and back side of the business card image. The same
result is obtained by clicking the [View] menu and the [Swap data
(front and back)] command.
Displays or hides the Attachment View.
[Inbox] tab
[Exported] tab Data that has been exported to an application displayed in this tab.
[Trash] tab Data that has been sent to the Trash is displayed here.
[Mobile] tab Displays data to be copied to removable media.
Data that has been scanned but not been exported to an application
displayed in this tab.
CardMinder User’s Guide
11
Page 20
Icon / Display Function
1.4 Operation Windows
Data list
view
■ CardMinder Viewer
You can open this screen by doing any one of the following:
•Search words in another application such as Microsoft Notepad and so on.
•From the [Start] menu on the Desktop, select [All Programs] -> [CardMinder V3.0] ->
[CardMinder Viewer].
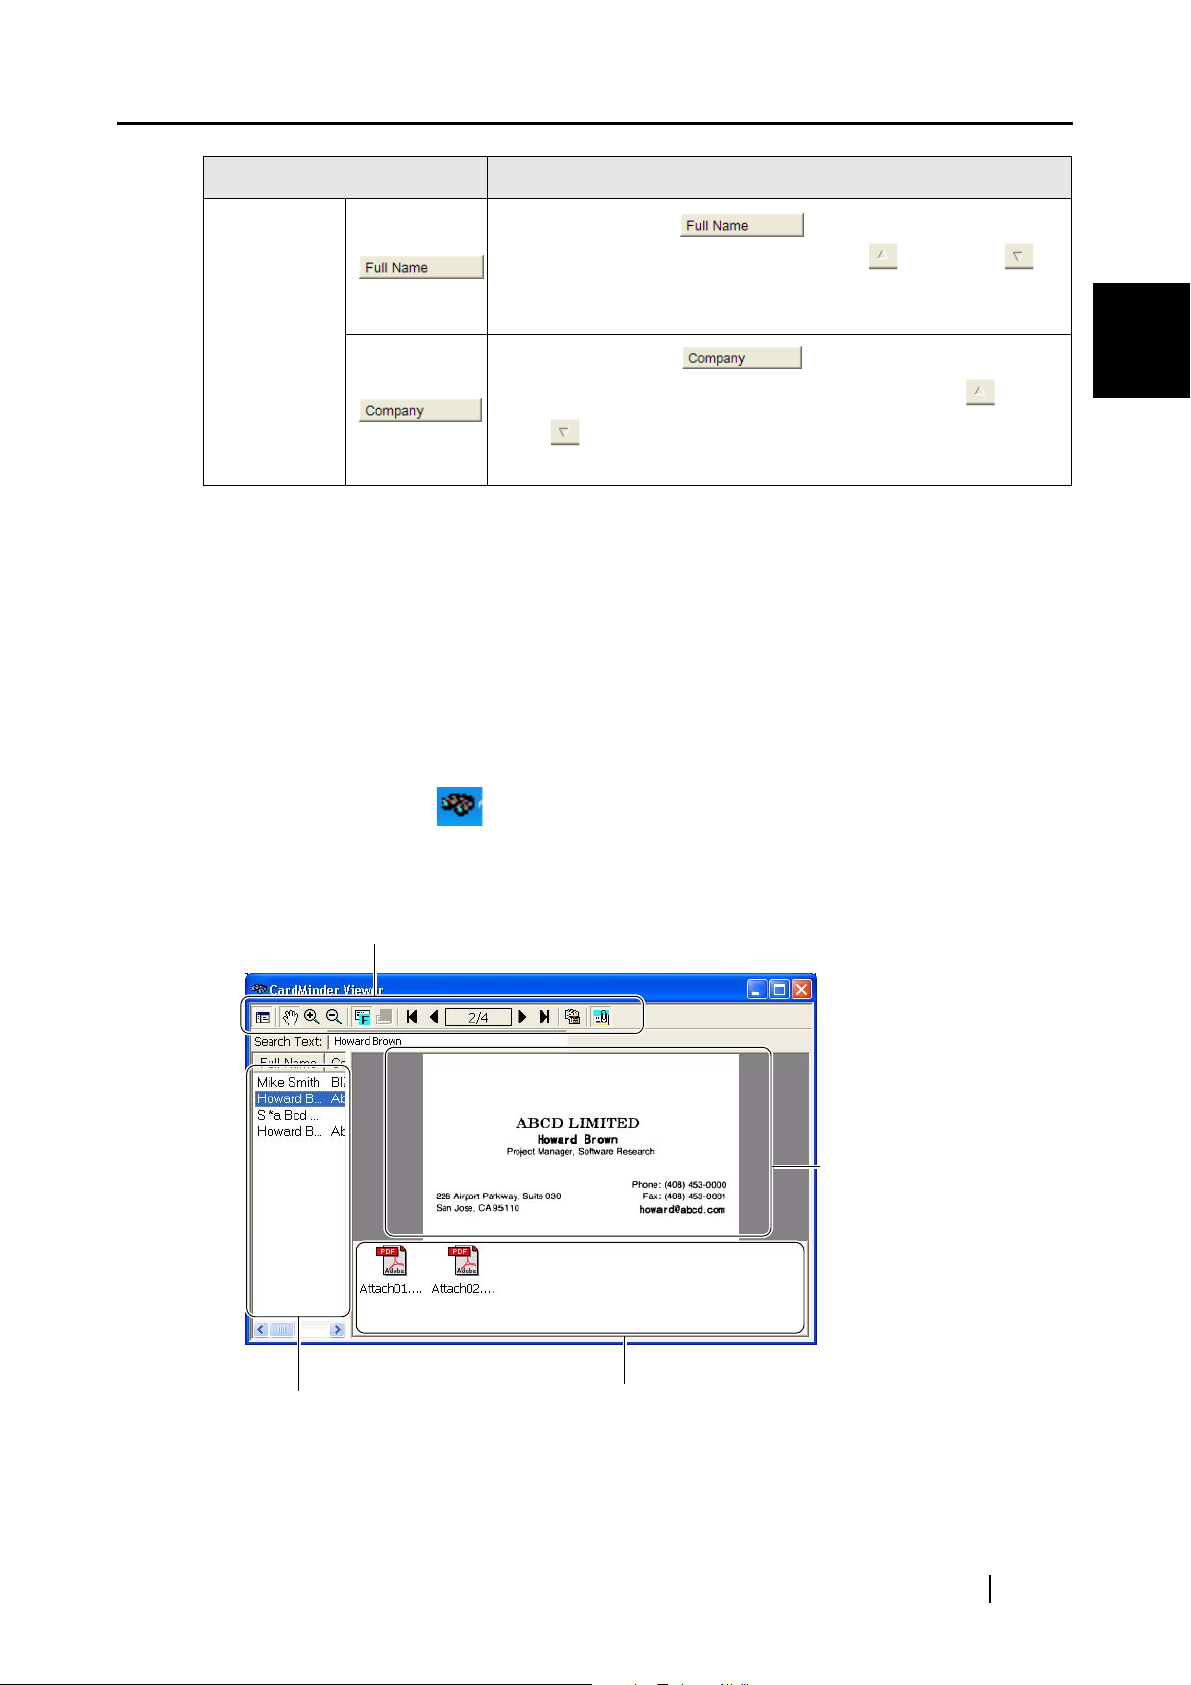
Clicking the heading sorts names in alphabetical
order. On the heading clicked for sorting, the mark or the
mark appears. Note that if names are listed in the order scanned (the
top of the list is the latest), no marks appears.
Clicking the heading sorts company names in
alphabetical order. On the heading clicked for sorting, the mark
or the mark appears. Note that if names are listed in the order
scanned (the top of the list is the latest), no marks appears.
1
About CardMinder
•Double-click the [ ] icon on the task bar, which is present when CardMinder Viewer
is active.
Image Toolbar
Shows buttons to adjust the business card image display of the Image View.
Business Card Image
View
Displays the image of
the business card
selected in Data List
View.
Data List View
Lists the searched business card
data.
Attachment View
Displays files attached to the business
card selected in the Data List View.
CardMinder User’s Guide
12
Page 21
Image
toolbar
Icon / Display Function
Displays or hides the Data List View.
Moves an image of a business card, dragging the image.
The image size is enlarged so that the clicked point becomes the center of the expansion.
Image size is reduced so that the clicked point becomes the center of
down scaling.
Displays the front side image of the business card.
Displays the back side image of the business card. If no back side
image exists, this icon is disabled.
Previous business card is shown.
Next business card is shown.
1.4 Operation Windows
1
About CardMinder
Data list
view
Displays the first business card data
Displays the last business card data
The current business card image and the data are shown on the main
window.
Displays or hides the Attachment View.
Clicking the heading sorts names in alphabetical
order.
Clicking the heading sorts company names in
alphabetical order.
CardMinder User’s Guide
13
Page 22

1.5 User Authority
The user authority to use CardMinder is as follows:
•If your operating system is Microsoft® Windows® 2000 Professional operating system
or Microsoft® Windows® XP Professional operating system,
you must be authorized as Standard User (Power Users group) or higher levels of user to
logon and use this software.
•If your operating system is Microsoft® Windows® XP Home Edition operating system,
you must be authorized as the computer administrator to logon and use this software.
1.5 User Authority
1
About CardMinder
CardMinder User’s Guide
14
Page 23
Chapter 2
Configuration Before Scanning
This chapter describes how to select a PIM application used with CardMinder.
For information about how to configure advanced settings for CardMinder, refer to Chapter 6.
1. From the [Start] menu on the desktop, select [All Programs] -> [CardMinder V3.0] ->
[CardMinder V3.0].
⇒ The main window of CardMinder appears.
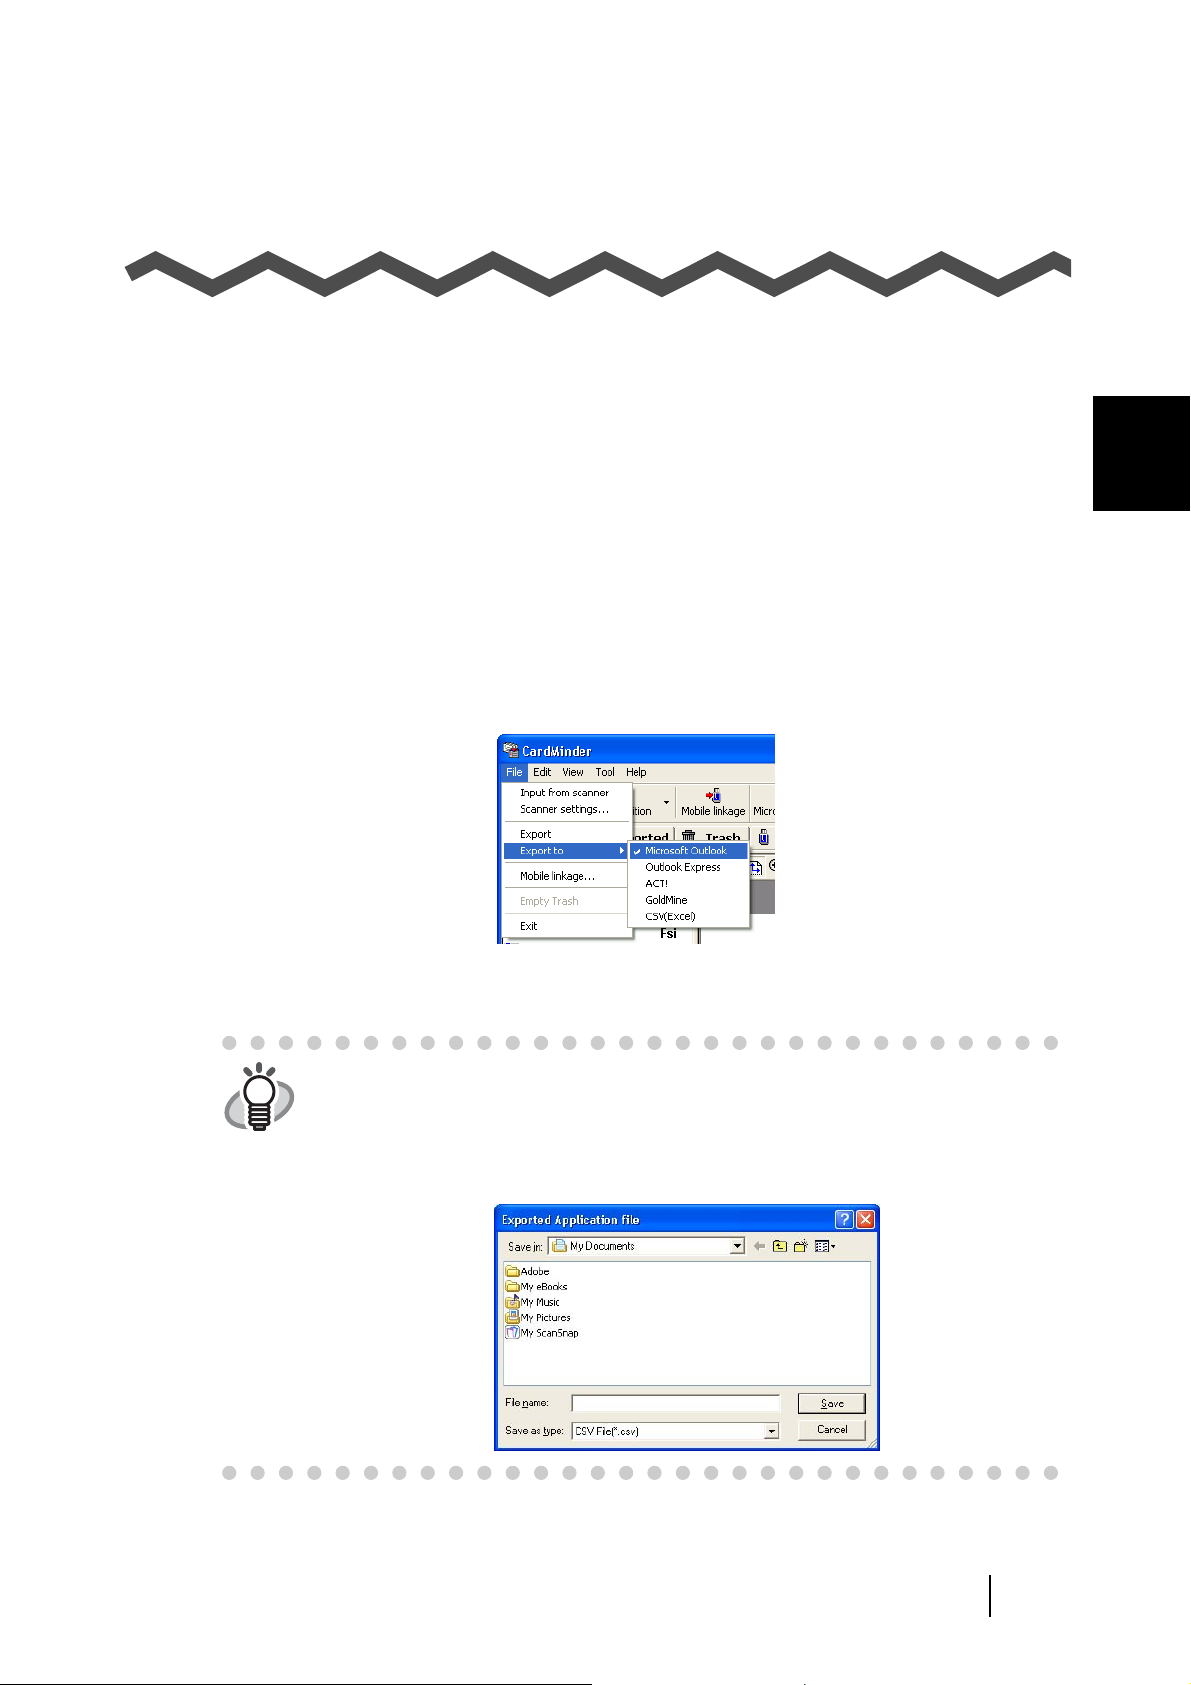
2. Select [File] -> [Export to].
⇒ A list of PIM applications appears. The marked application is the currently selected one.
3. Click an application to which you want to export the business card data.
2
HINT
• You can choose only one application. When you change the application, a new
icon appears in the main window of CardMinder.
• When CSV (Excel) is selected from the list, clicking the [CSV (Excel)] icon or
selecting [Export] from the [File] menu displays the following window. Specify a
file name and destination folder to save the Excel file.
CardMinder User’s Guide 15
Page 24

Chapter 3
Scanning and Exporting Business Card
Data
This chapter describes the procedure for scanning business cards with a scanner.
There are two ways of scanning; they are, Flatbed scanning and ADF (Auto Document Feeder)
scanning. Further information on both ways are described in this chapter.
3
3.1 How to Scan Business Cards .............................................................................. 17
3.2 Exporting to Associated Application .................................................................. 25
CardMinder User’s Guide 16
Page 25
3.1 How to Scan Business Cards
This section describes the business card scanning using the following methods:
•Flatbed
•ADF (Automatic Document Feeder)
■ Scanning with the Flatbed
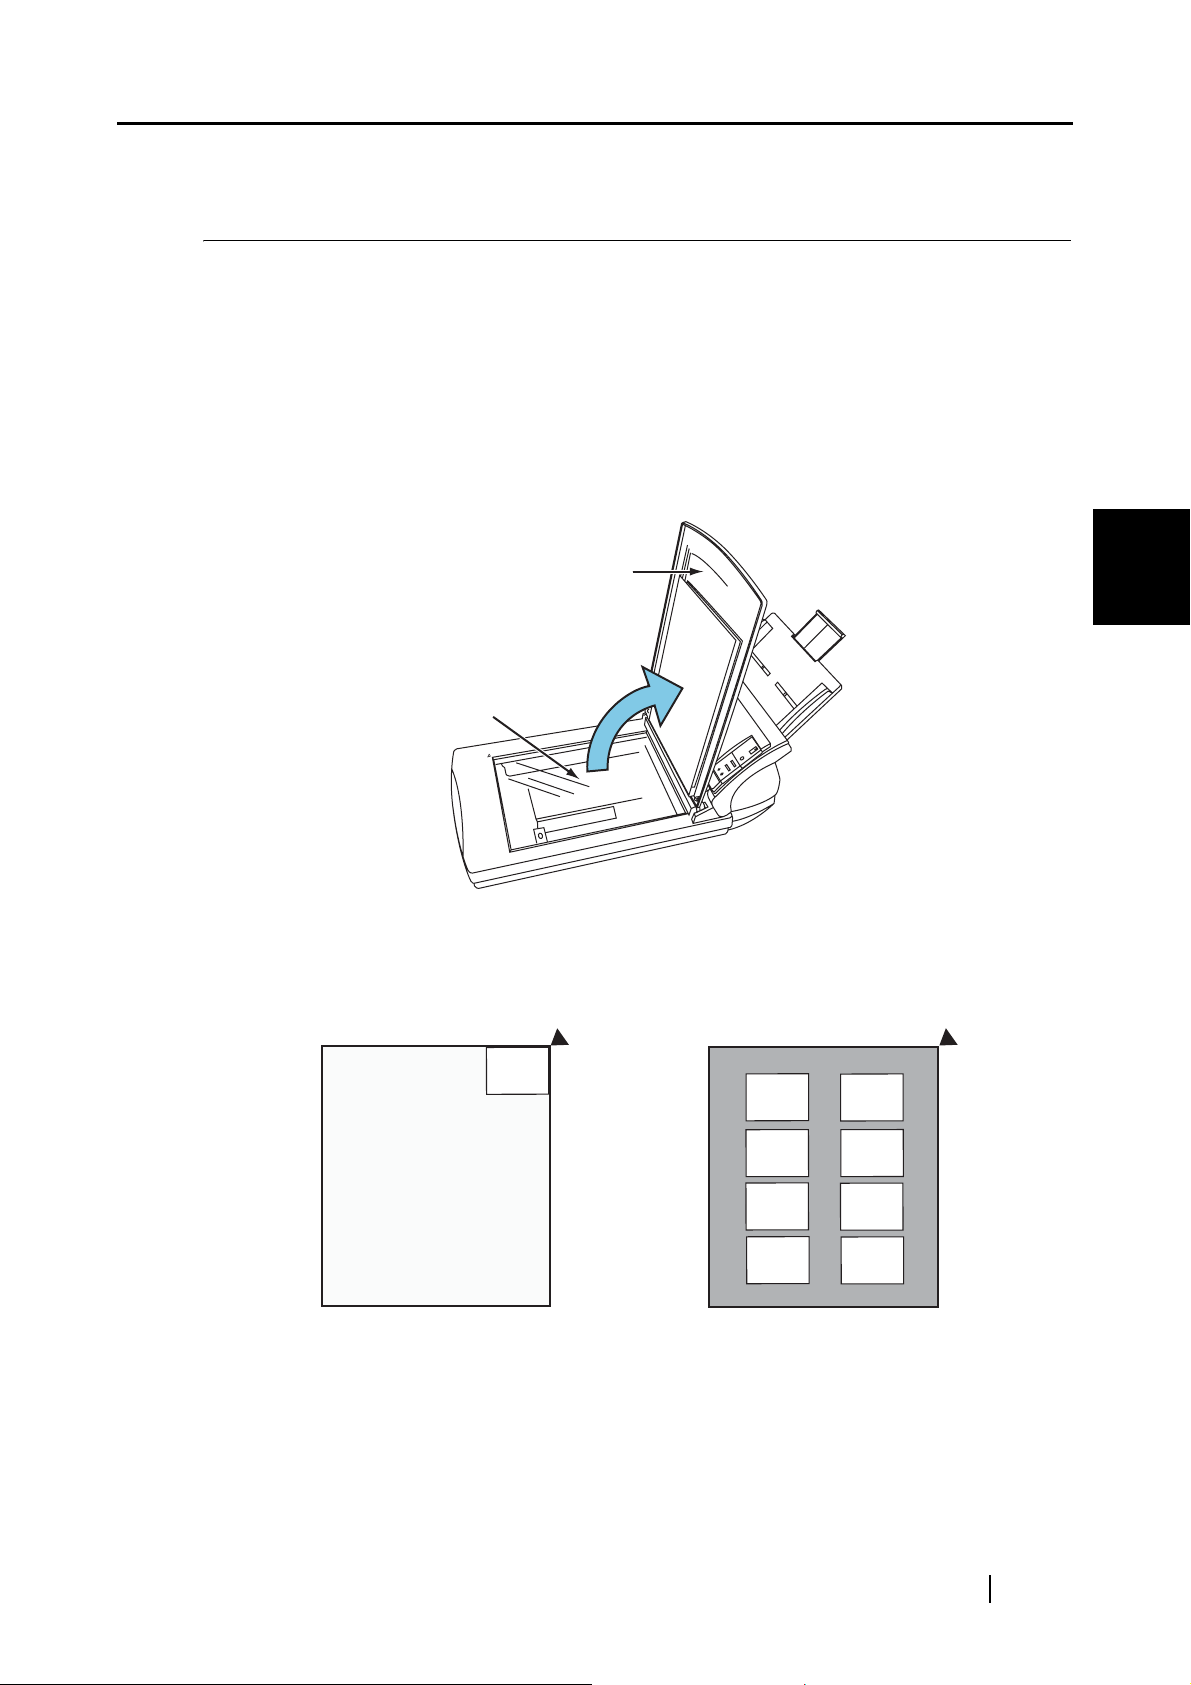
1. Open the scanner document cover.
3.1 How to Scan Business Cards
Document cover
Document bed
2. Place a business card with its face down on the document bed.
1. Scanning one card 2. Scanning multiple cards
Back side
3
Scanning and Exporting Business Card Data
Back sideBack side
Back sideBack side
Back sideBack side
Back sideBack side
Arrange the cards so that they do not
overlap each other, keeping enough distance between them.
CardMinder User’s Guide
17
Page 26
3.1 How to Scan Business Cards
ATTENTION
You cannot scan multiple cards at a time if
the types of business cards are the
following:
• Business cards with a dark-colored line
running across the length
• Business cards with its edge dark-colored
ABCD LIMITED
Haward Brown
Project Manager. Software Research
226 Airport Parkway, Suite 030
San JOSE, CA 95110
Phone: (408) 453-0000
Fax: (408) 453-0001
haward@abcd.com
Scan these business cards one-by-one.
When you scan only one business card, it is necessary to select "1 card to reference point" on "Flatbed scanning method" of the
[Scanner settings] window. Refer to Step 9 for details on the
[Scanner settings] window.
3. If you are scanning multiple cards per scan, spread out dark-colored paper, and place
it over the business cards.
Use dark-colored paper that covers the entire glass surface of the document bed.
4. Close the scanner document cover.
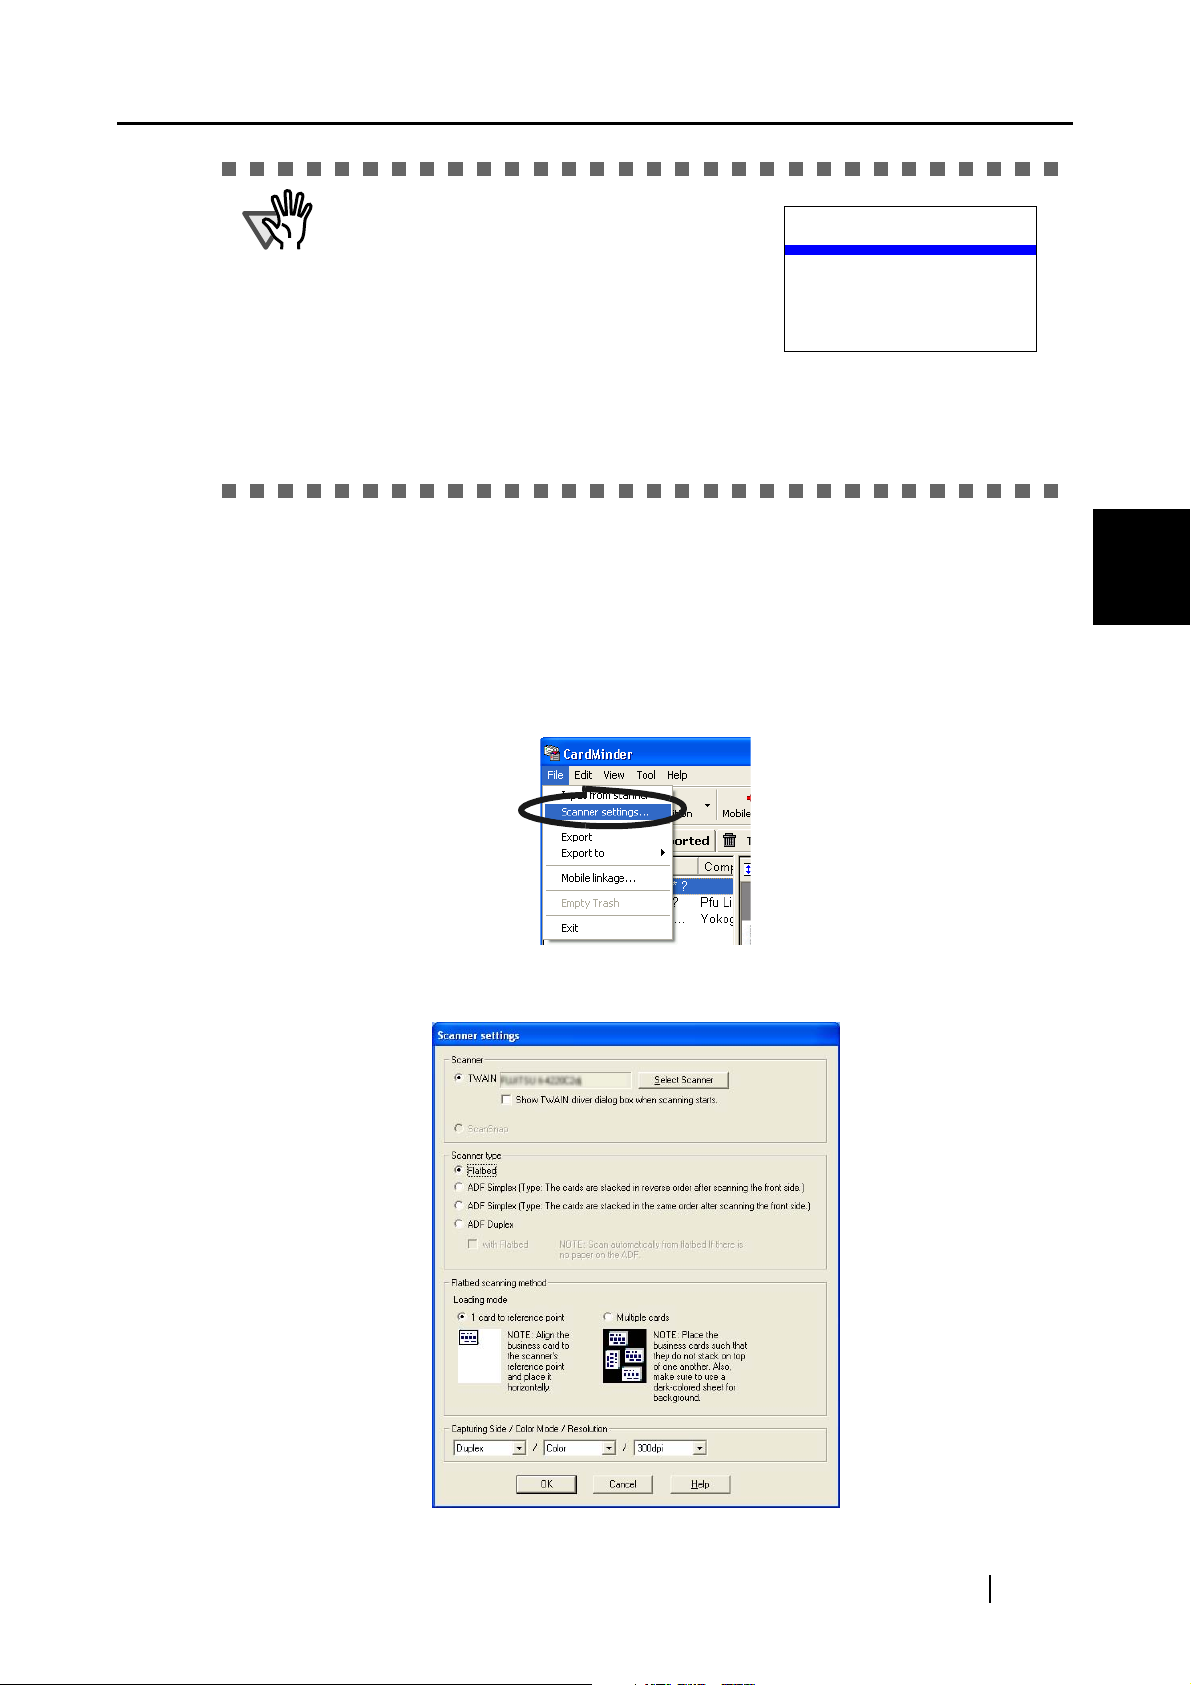
5. Select [File] on the menu bar -> [Scanner settings].
3
Scanning and Exporting Business Card Data
⇒ The following window appears.
CardMinder User’s Guide
18
Page 27

3.1 How to Scan Business Cards
6. For TWAIN scanners, click the [Select Scanner] button.
HINT
7. Select the scanner to use, and then click the [Select] button.
8. For the "Scanner type," select "Flatbed."
If you mark the "Show TWAIN driver dialog box when scanning starts" checkbox, the driver dialog box will appear before scanning, and you will be able to
specify scanning settings. Note that the settings configured in the TWAIN
driver dialog box is valid only for the scanning of this time.
3
Scanning and Exporting Business Card Data
9. For the "Flatbed scanning method," specify the "Loading mode" of the business
card(s).
1) To scan one card per scan, select "1 card to reference point."
2) To scan multiple cards per scan, select "Multiple cards."
CardMinder User’s Guide
19
Page 28

3.1 How to Scan Business Cards
10. For the "Capturing Side/Color Mode/Resolution," specify the scanning settings.
Capturing Side If the business card is printed on one side, select "Simplex." If it
is printed on both sides, select "Duplex." For "Duplex," after the
front side is scanned, the back side will be scanned.
When the message below appears, turn over the business card,
and click the [OK] button.
3
If you click the [Cancel] button, scanning mode is switched to
Simplex.
Color Mode Specify the color mode, "B&W" (Black & White) or "Color."
Resolution Specify the resolution to be used.
For TWAIN scanners:
To scan in color: "Best" or 300dpi is recommended.
To scan in B&W: "Best" or 400dpi is recommended.
11. When the configuration is finished, click the [OK] button to close the [Scanner settings] window.
12. Click the [Scan] button on the toolbar.
150, 200, 300, and 400dpi.
⇒ When the scanning is complete, the scanned images of the business cards are displayed
on the [Inbox] tab of the main screen.
ATTENTION
You may see the scanner driver dialog box (TWAIN dialog box) when scanning
business cards.
If this is the case, specify the following and proceed with operation.
• Recommended resolution
Color mode: 300 dpi
Black and White mode: 400 dpi
• Scanning size
Flatbed: A4
Scanning and Exporting Business Card Data
CardMinder User’s Guide
20
Page 29

3.1 How to Scan Business Cards
■ Scanning with the ADF (Automatic Document Feeder)
1. Load a business card onto the scanner.
(To scan multiple cards, stack the cards together and load them.)
2. Select [File] on the menu bar -> [Scanner settings].
3
Scanning and Exporting Business Card Data
⇒ The following window appears.
CardMinder User’s Guide
21
Page 30

3.1 How to Scan Business Cards
3. For TWAIN scanners, click the [Select Scanner] button.
For Scansnap
HINT
4. Select the scanner to be used, and click the [Select] button.
5. Under "Scanner type," select "ADF Simplex" or "ADF Duplex" to scan.
, this step is not required. Go to step 5.
If you mark the "Show TWAIN driver dialog box when scanning starts" checkbox, the driver dialog box will appear before scanning starts and you will be
able to specify the scanning settings. Note that the settings configured in the
TWAIN driver dialog box is valid only for the scanning of this time.
3
Scanning and Exporting Business Card Data
CardMinder User’s Guide
22
Page 31

3.1 How to Scan Business Cards
ATTENTION
When scanning multiple two-sided business cards with a ADF simplex-type
scanner, first scan the front side of all cards, and then scan the back side of
the cards. The front and back sides of each individual business card will be
combined.
Note that the scanning order may change depending on the Scanner type
selected, which is described in the previous page. The way of combining both
sides differs between the two Scanner types.
Be careful not to select the wrong Scanner type; the front and back sides of the
same business card will not be combined if you select the wrong type.
• The cards are stacked in reverse order after scanning the front side.
Front side: Scanning starts with the first sheet.
Back side: Scanning starts with the first sheet.
• The cards are stacked in the same order after scanning the front side.
Front side: Scanning starts with the first sheet.
Back side: Scanning starts with the last sheet.
6. At "Capturing Side/Color Mode/Resolution," specify the scanning settings.
3
Scanning and Exporting Business Card Data
Capturing Side If the business card is one-sided printed, select "Simplex." If it is
two-sided printed, select "Duplex." If the scanner is "ADF Simplex," and "Duplex" is selected, after the front side scan is completed, start the back side scan.
When the message below appears, turn over the business card,
and click the [OK] button.
If you click the [Cancel] button, it becomes simplex scanning
mode.
Color Mode Specify the color mode, "B&W" (Black & White) or "Color."
Resolution Specify the resolution.
For ScanSnap
For TWAIN scanners:
To scan in color: "Best" or 300dpi is recommended
To scan in B&W: "Best" or 400dpi is recommended.
: "Normal," "Better" and "Best."
150, 200, 300, and 400dpi.
7. When the configuration is finished, click the [OK] button to close the [Scanner settings] window.
8. Click the [Scan] button on the toolbar.
CardMinder User’s Guide
23
Page 32

Simplex
3.1 How to Scan Business Cards
ATTENTION
HINT
You may see the scanner driver dialog box (TWAIN dialog box) when scanning
business cards.
If this is the case, specify the following and proceed with operation.
• Recommended resolution
Color mode: 300 dpi
Black and White mode: 400 dpi
• Scanning size
Flatbed: A4
If you are using the ADF Simplex type scanner, you will see a message that
asks you to load business cards to scan the back side of the cards after the
front side of the cards are scanned.
When you see this message, load the business cards so that the back side of
the cards are scanned, and then click the [OK] button.
3
Scanning and Exporting Business Card Data
With ScanSnap S500 Series or ScanSnap fi-5110EOX, you can also perform
SCAN
scanning by pressing the [SCAN] button .
For the ScanSnap fi-4110EOX series, you can also perform scanning by
pressing the (duplex scan button) or (simplex scan button).
S
In this case, scanning is performed according to the settings of " ScanSnap
Manager (or ScanSnap Monitor) - Scan and Save Settings" window.
S
⇒ When the scanning is completed, the scanned images of the business cards are displayed
on the [Inbox] tab of the main screen.
CardMinder User’s Guide
24
Page 33

3.2 Exporting to Associated Application
3.2 Exporting to Associated Application
This section describes how to export data to another application linked with.
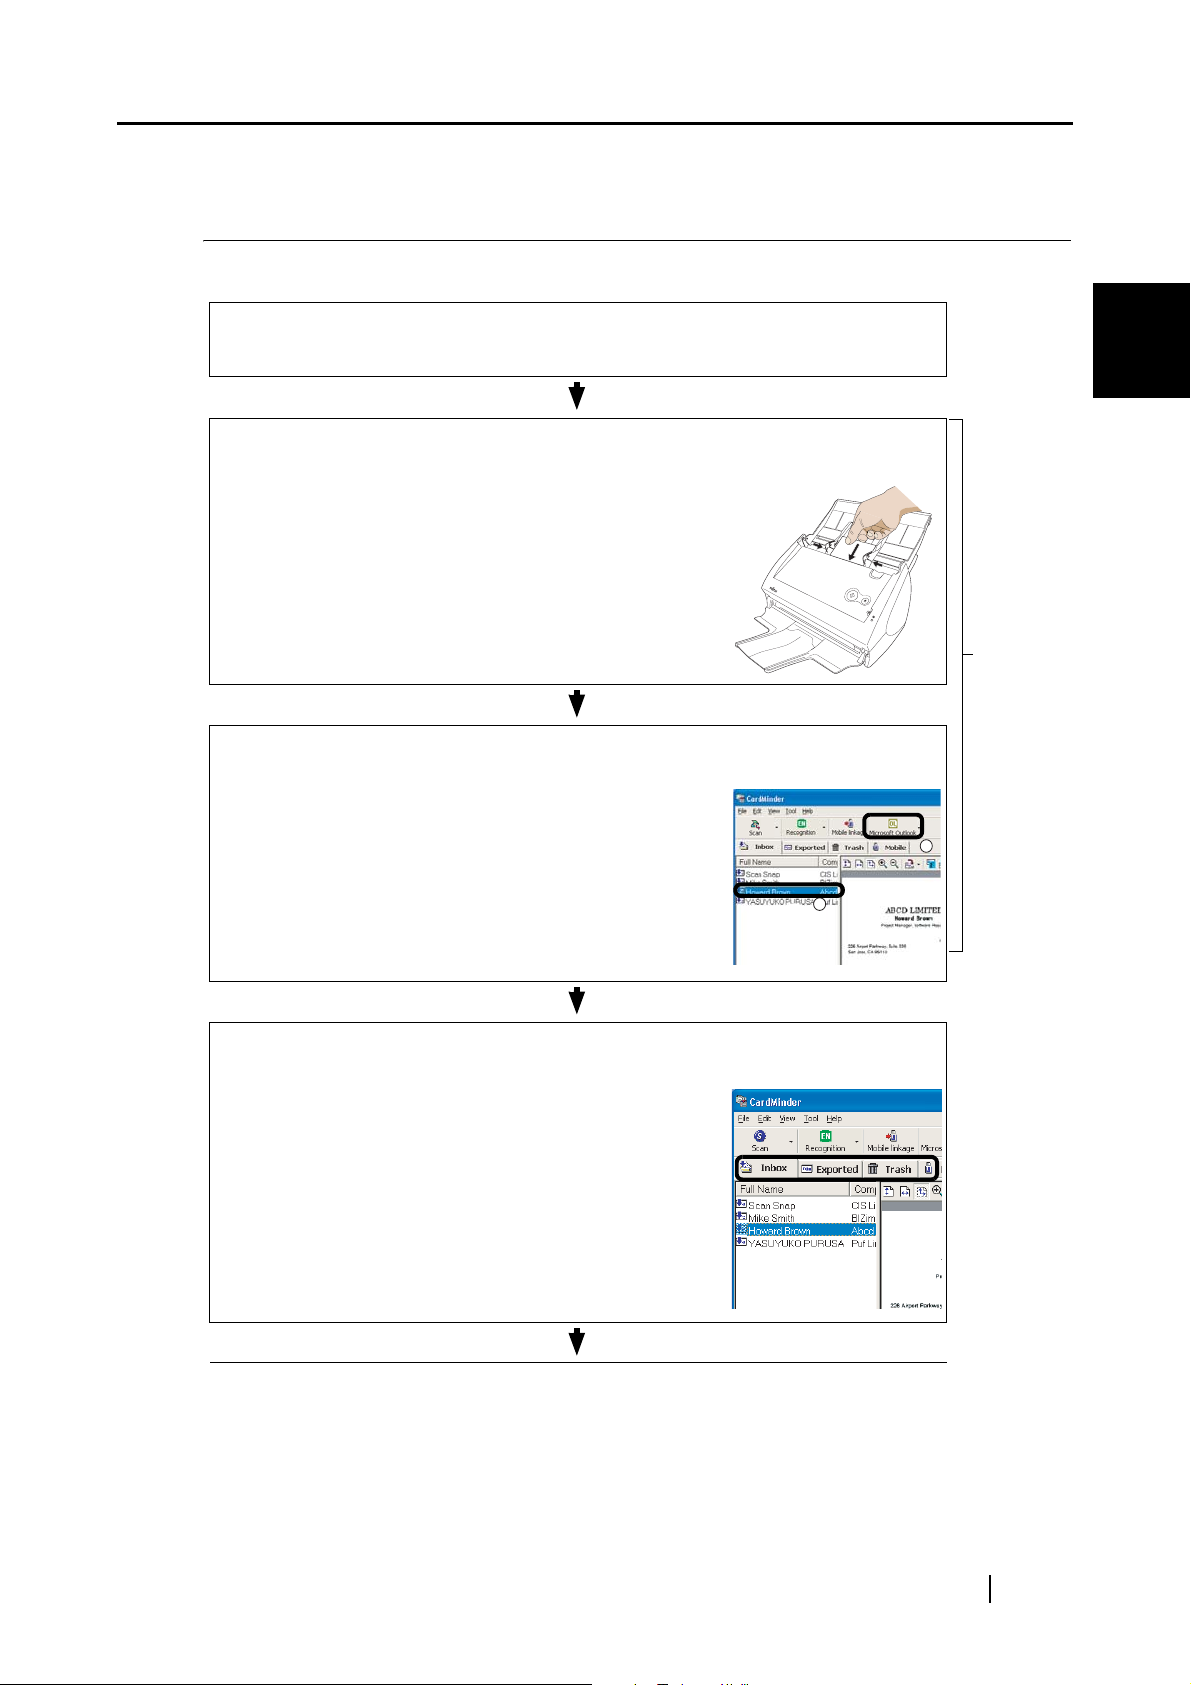
1. When scanning is completed, the [Inbox] tab is displayed in the Main window. Click a
business card in the Data list and visually check the recognized result of the front side
image.
You can correct the recognized data in this window. (See Chapter 5.)
3
HINT
Front side
Data list
• From the menu bar, select [View], and then select [Show duplex image] to
change the display mode.
• On the [General] tab of the [Settings] window, if you clear the "Show CardMin-
der window" checkbox under "Action when image scan" and perform a scan
using the [SCAN] button without starting CardMinder, the data is immediately
saved without being displayed in the CardMinder window. (See Section 6.1)
To display the "Settings" window, select [Tool] on the menu bar -> [Settings].<Only for ScanSnap>
When you use the [SCAN] button to scan documents, you must select "Card-
Minder" from the [Application:] pull-down list on the [Application] tab of
"ScanSnap Manager" (or ScanSnap Monitor) in advance.
• Even if the name of persons and/or companies are not scanned correctly,
those are stored in the database as they are. Please make sure that they are
recognized correctly after scanning.
Backside
Recognized data
S
S
Scanning and Exporting Business Card Data
CardMinder User’s Guide
25
Page 34

3.2 Exporting to Associated Application
2. Select the business card data you wish to export.
Select multiple records by following the procedures below.
- If they are contiguous and you want to add them at one time:
Select the records, while holding down the [Shift] key.
- If you want to add records one-by-one:
Select them, while holding down the [Ctrl] key.
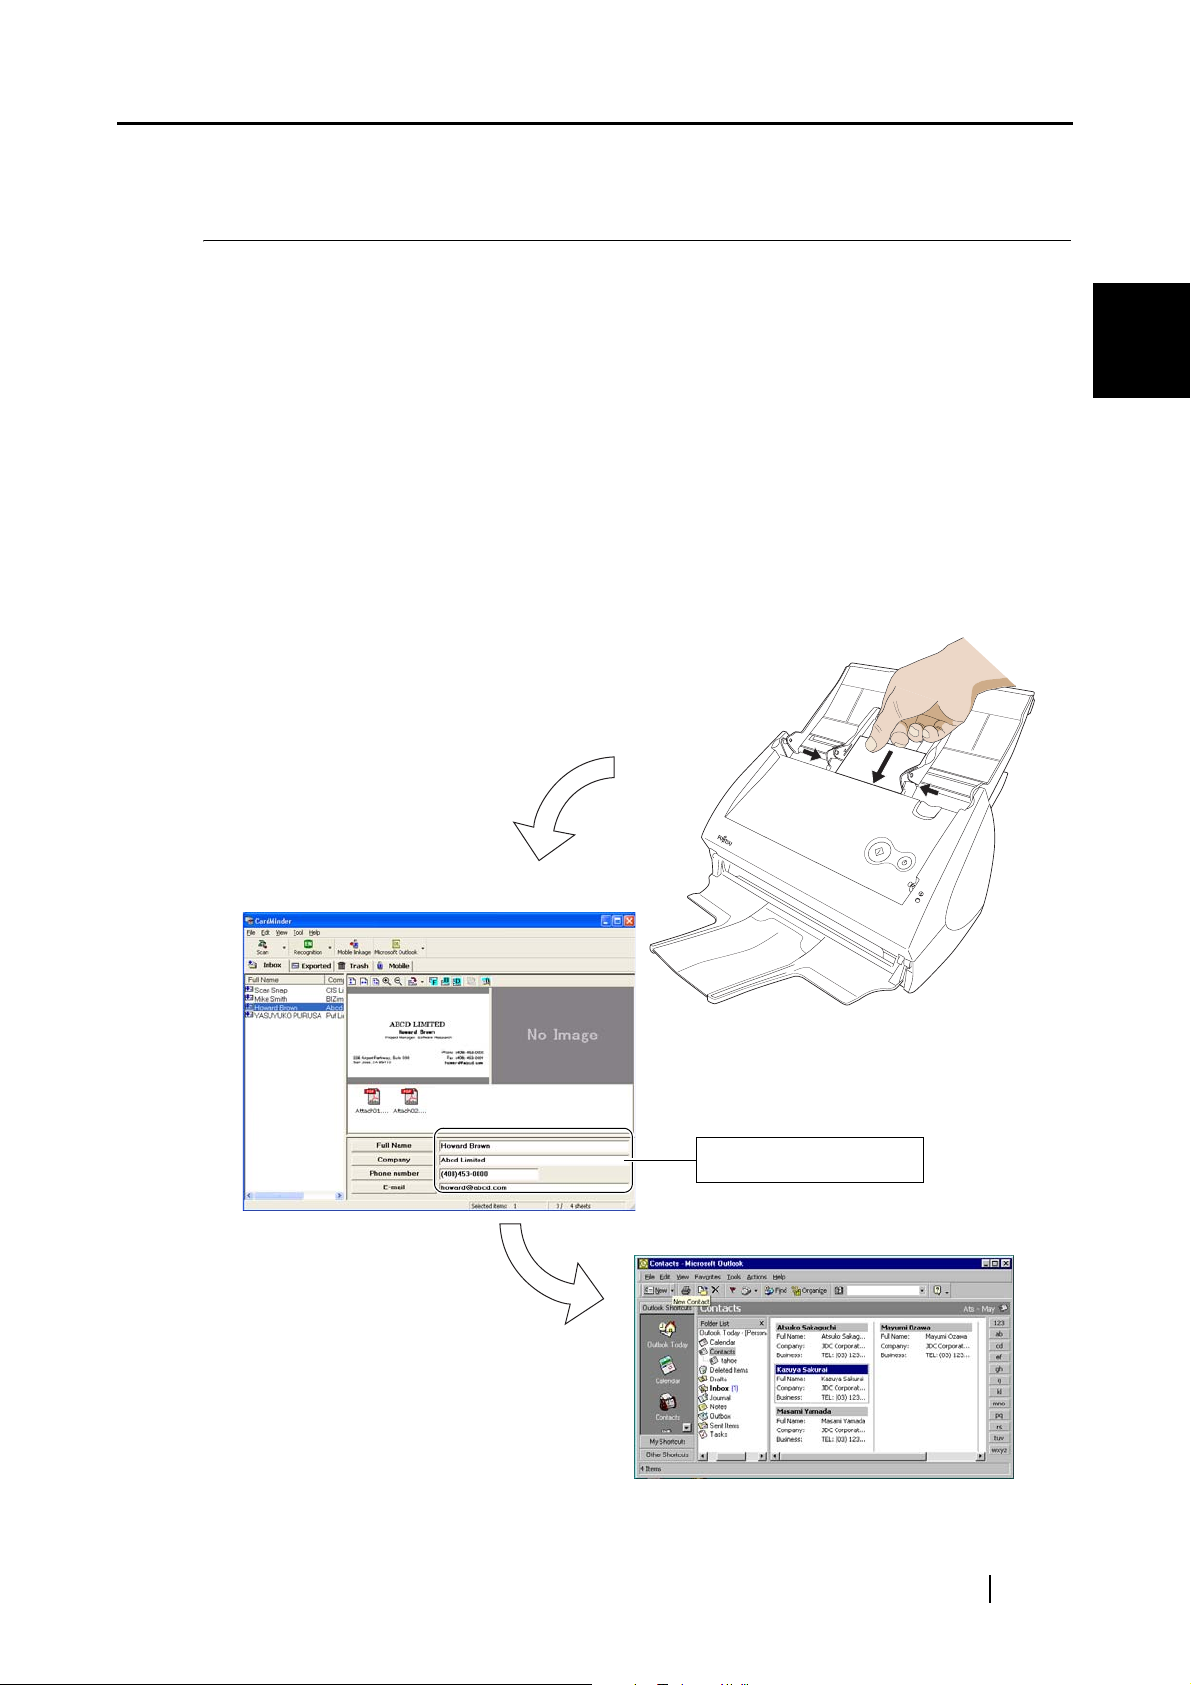
3. The following steps show an example using Microsoft Outlook. Click the [Microsoft
Outlook] icon on the toolbar.
⇒ The data selected in Step 2 is exported to Microsoft Outlook. The data is then moved
from the [Inbox] tab to the [Exported] tab.
You can confirm the export by activating Microsoft Outlook, and opening the [Contacts]
folder as follows.
3
Scanning and Exporting Business Card Data
CardMinder User’s Guide
26
Page 35

3.2 Exporting to Associated Application
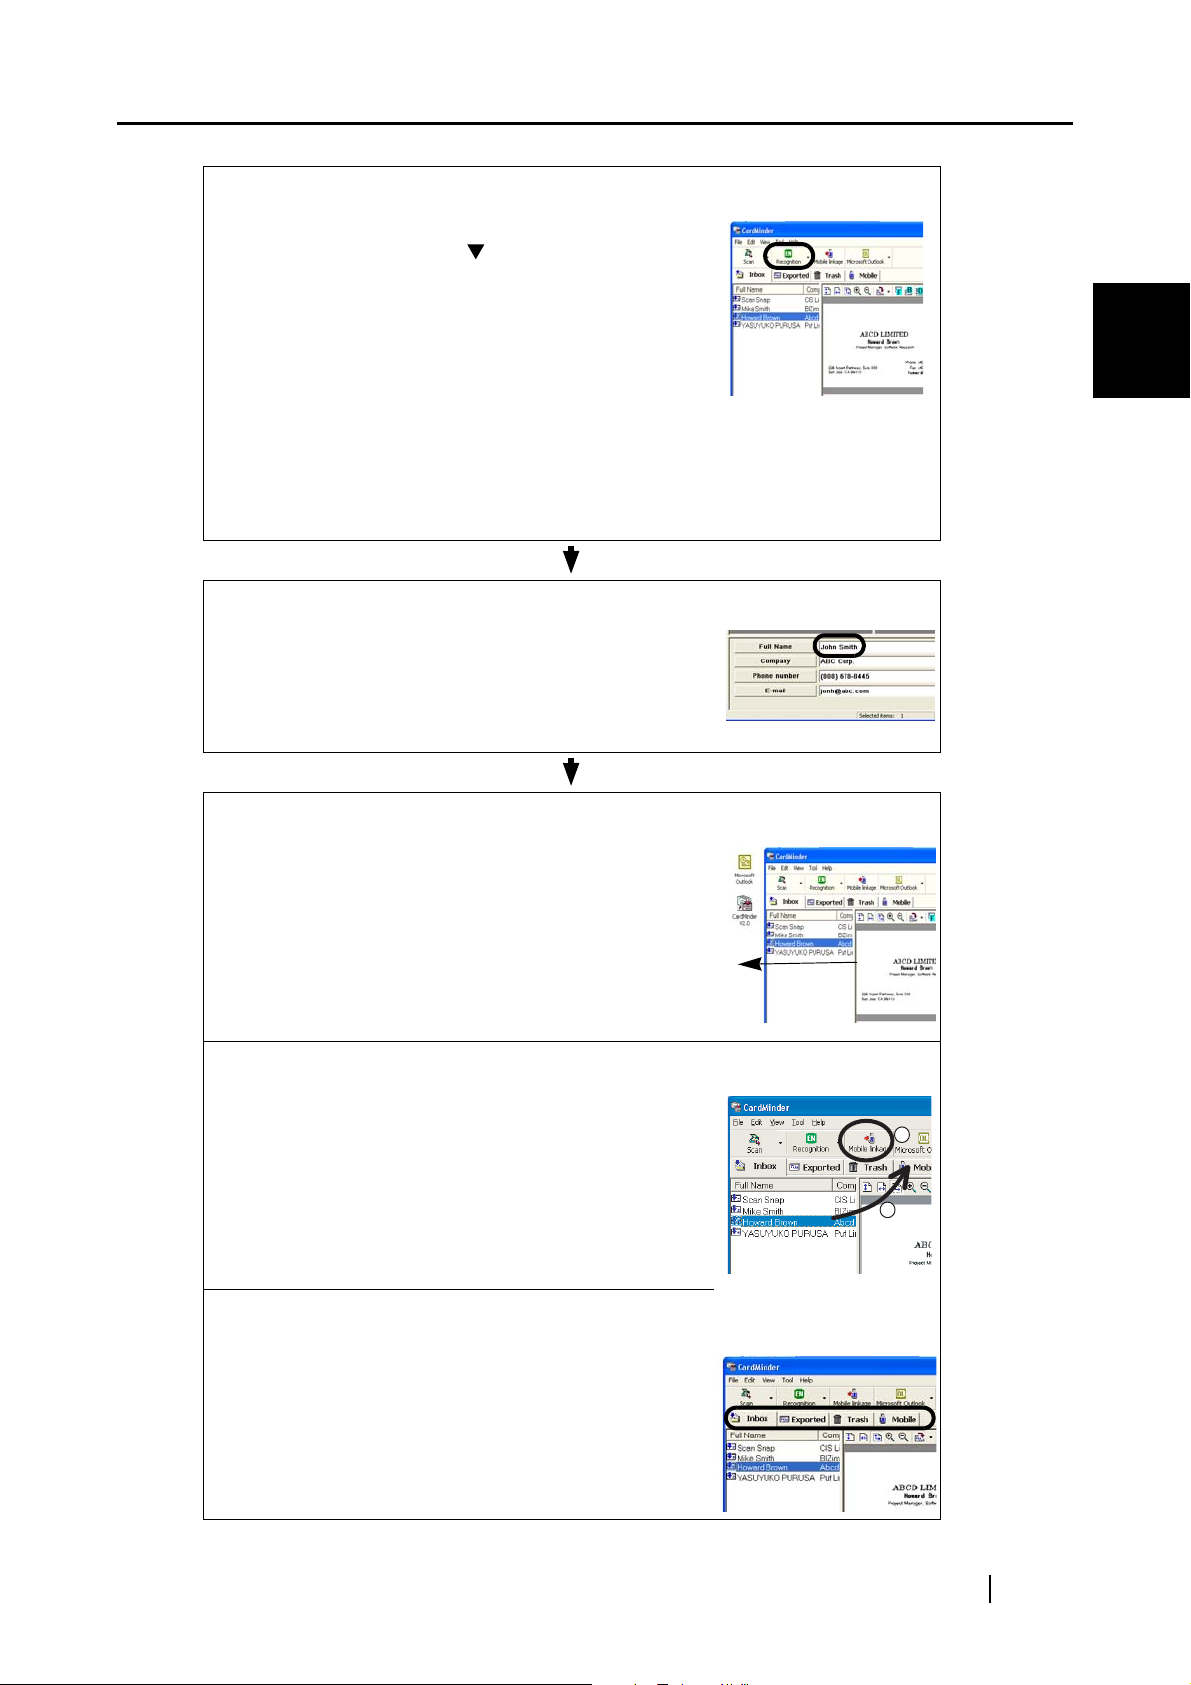
HINT
• Data can also be exported by selecting [File] on the menu bar -> [Export].
• The set Export items of displayed items in the Recognized data area (except
[Memo] and [Save date]) are exported to the linked application.
Refer to Section 6.2 for setting the Export item.
• You can drag and drop data on the [Exported] tab to the [Inbox] tab while hold-
ing down the [Shift] key. You can, in turn, drag and drop data on the [Inbox]
tab to the [Exported] tab while holding down the [Shift] key.
• For Microsoft® Outlook Express, ACT!
changes while the procedure for this operation is exactly the same.
Exported data is stored in Addresses.
TM
or GoldMine®, only the Icon
• When exporting data in the CSV (Excel) format, click the [CSV (Excel)] icon
and specify a file name and folder to save Excel data.
3
Scanning and Exporting Business Card Data
ATTENTION
The exported data is displayed on a sheet of the specified Excel data.
• If data in languages that the operating system does not support is exported,
characters may be displayed improperly.
e.g.) When attempting to display German in the Japanese operating system.
To avoid this, export data in languages supported by the operating system.
• If there is exactly the same name exists in the linked application, the following
message appears.
If you want to add it, click the [Add] button.
If you want to replace it, click the [Replace] button.
If you want to cancel exportation, click the [Cancel] button.
CardMinder User’s Guide
27
Page 36

Chapter 4
Business Card Data Handling
This chapter describes how to search, delete, restore and extract data items from a business card.
4.1 Data search by hot key......................................................................................... 29
4.2 Deleting data from the [Inbox] / [Exported] tab.................................................. 31
4.3 Restoring data from the [Trash] tab.................................................................... 32
4.4 Deleting data from the [Trash] tab ...................................................................... 34
4.5 Deleting data from the [Mobile] tab..................................................................... 36
4.6 Extracting the business card image data ........................................................... 38
4.7 Data search by keyword input............................................................................. 40
4.8 Attaching related files to the business card data .............................................. 43
4.9 Viewing the business card data on other PCs ................................................... 47
4
4.10 Sending e-mail .................................................................................................... 54
4.11 Activating Web Browser..................................................................................... 55
CardMinder User’s Guide 28
Page 37

4.1 Data search by hot key
With CardMinder, you can search business card data including a character string on other application (such as Microsoft Notepad) windows.
Follow the following procedures.
1. Select a character string of a name or a company in any document (e.g. Microsoft
Notepad).
4.1 Data search by hot key
2. Press the hot key (Alt+F3).
⇒ CardMinder starts searching automatically.
⇒ After searching, the CardMinder window opens and displays the business card data
including selected character strings.
The number
of the card
data found by
searching is
displayed.
4
Business Card Data Handling
CardMinder User’s Guide
29
Page 38

4.1 Data search by hot key
HINT
• Default setting for the hot key is Alt+F3. If you want to change the hot key, refer
to Section 6.1.
• By default, even when there is no matching character strings, "CardMinder
Viewer" will be activated. In this case, no image will be displayed on the CardMinder Viewer, but you can continue searching by entering a keyword in the
[Search Text:] box.
If you do not want to activate "CardMinder Viewer" when there is no matching
character strings, change settings. For information on how to change settings,
see Section 6.1, and how to search with "CardMinder Viewer," see Section 4.7.
• Data on the all tabs; namely the [Inbox], [Exported], [Trash], and [Mobile] tabs,
are targeted for searching.
4
Business Card Data Handling
CardMinder User’s Guide
30
Page 39

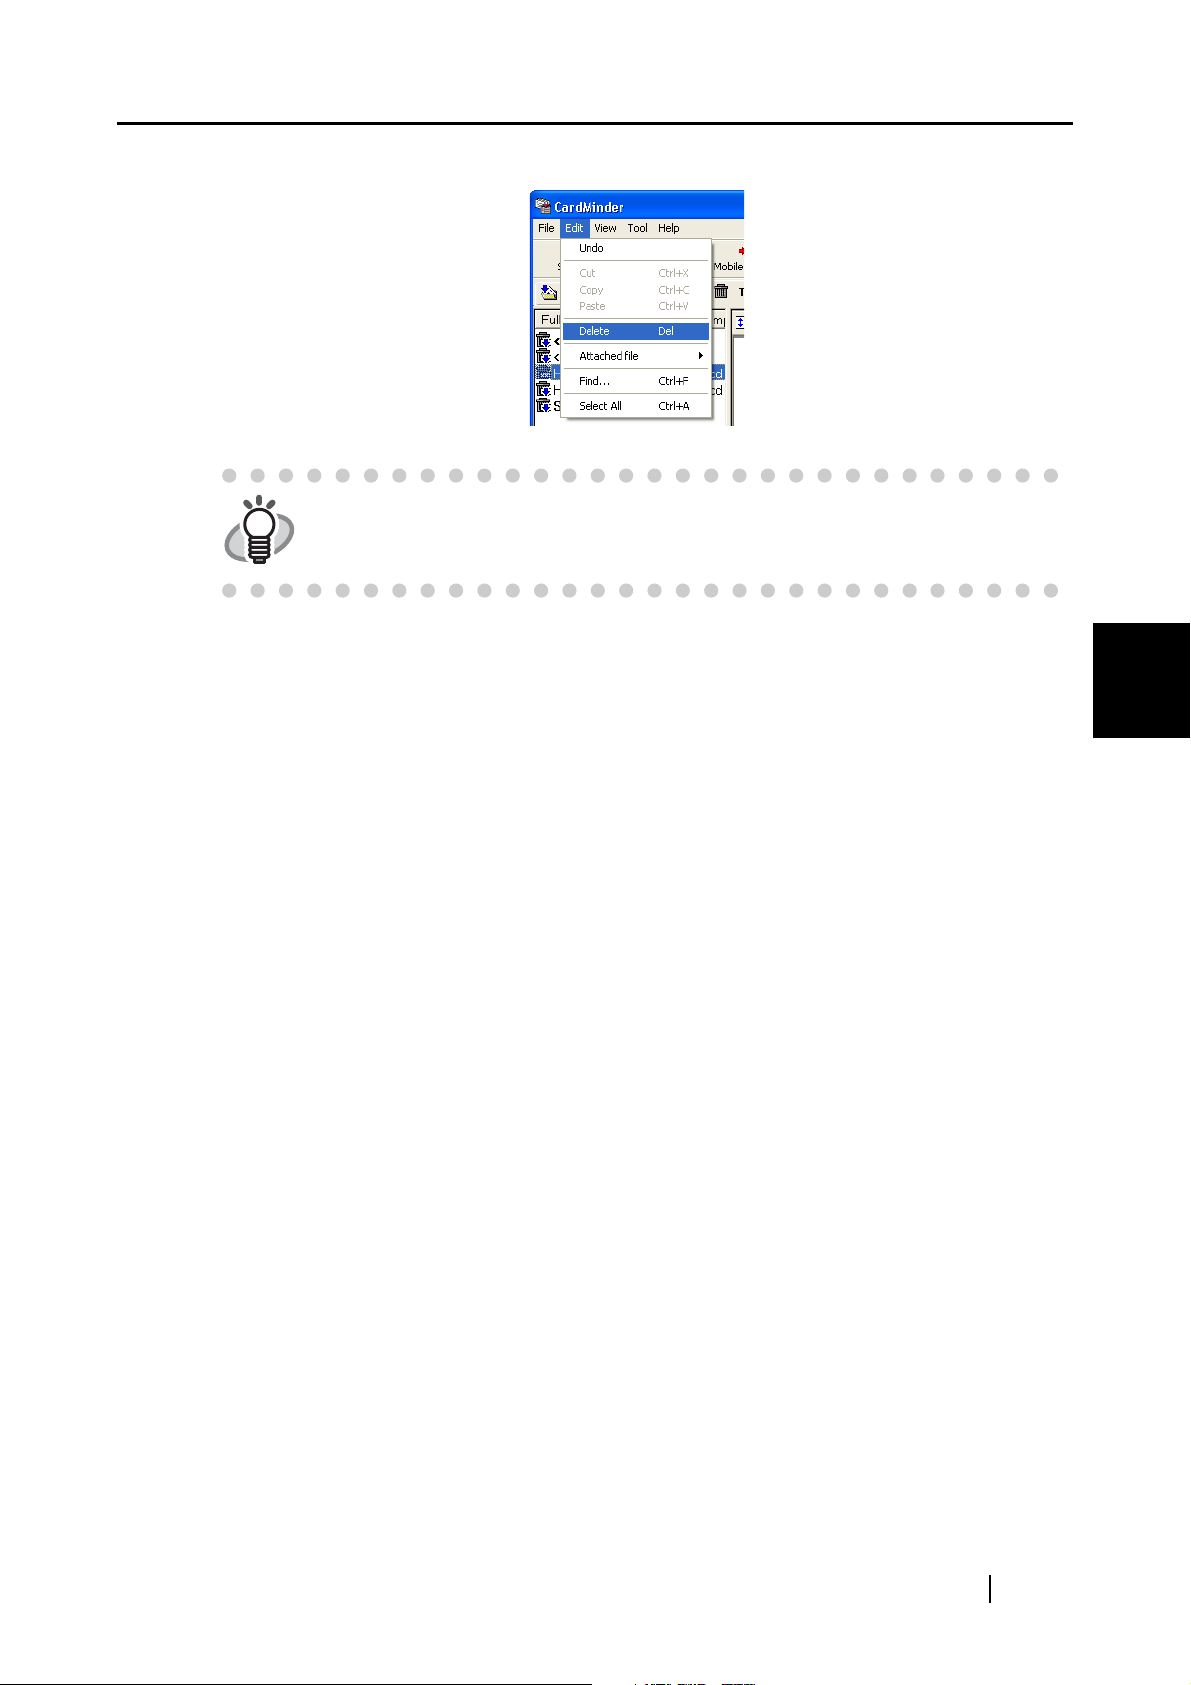
4.2 Deleting data from the [Inbox] / [Exported] tab
4.2 Deleting data from the [Inbox] / [Exported] tab
To delete unnecessary business card data from the [Inbox] or [Exported] tab, follow the following
procedures. The deleted data will be sent to the [Trash] tab.
1. Open CardMinder and select the [Inbox] or [Exported] tab.
2. Select the data you want to delete.
You can make multiple selection by clicking the data while holding down the [Shift] or [Ctrl]
key.
Select the data
in this list.
3. Select [Edit] on the menu bar -> [Delete].
4
Business Card Data Handling
HINT
⇒ The selected data is sent from the [Inbox] tab or the [Exported] tab to the [Trash] tab. If
You can also delete entries by:
• Pressing the [Delete] key on the keyboard,
• Drag&Drop the data to the [Trash] tab,
• Right-click on the selected data and select [Delete].
you want to restore the data from the [Trash] tab, see Section 4.3 for further details.
CardMinder User’s Guide
31
Page 40

4.3 Restoring data from the [Trash] tab
4.3 Restoring data from the [Trash] tab
To restore the data from the [Trash] tab, follow the following procedures.
Restored data will be returned to their original location on the [Inbox] tab or the [Exported] tab.
1. Open CardMinder, and then select the [Trash] tab.
⇒ The deleted data is shown on the window.
2. Select items you wish to restore from the [Trash] tab.
You can add data to the selection by clicking on the data item while holding down the [Shift]
or [Ctrl] key.
Select the
data
ATTENTION
3. Select [Edit] on the menu bar -> [Undo].
Data that was once deleted from the [Trash] tab cannot be restored.
For information on how to delete data from the [Trash] tab, see Section 4.4.
4
Business Card Data Handling
CardMinder User’s Guide
32
Page 41

4.3 Restoring data from the [Trash] tab
HINT
⇒ The selected data moves from the [Trash] tab to the [Inbox] or [Exported] tab.
Otherwise, right-click on the selected data and select [Undo] from the menu to
restore the selected data.
4
Business Card Data Handling
CardMinder User’s Guide
33
Page 42

4.4 Deleting data from the [Trash] tab
4.4 Deleting data from the [Trash] tab
To permanently delete data from the [Trash] tab, follow the procedure given below. The data is
permanently deleted and cannot be restored by the procedure described in Section 4.3.
■ Select the data to be deleted
ATTENTION
1. Open CardMinder and select the [Trash] tab.
2. Select the data you wish to delete. You can add data to the selection by clicking on
the data while pressing the [Shift] or [Ctrl] key.
Select the
data
The deleted data from the [Trash] tab is completely deleted from the CardMinder database.
Be careful not to delete necessary data because data deleted from the [Trash]
tab cannot be restored
4
Business Card Data Handling
ATTENTION
• The data will be permanently deleted by this method.
• The attached files are also deleted with the card data.
CardMinder User’s Guide
34
Page 43

4.4 Deleting data from the [Trash] tab
3. Select [Edit] on the menu bar, and then select [Delete].
HINT
4. A confirmation message appears. Click on the [Yes] button.
You can also delete data as follows:
• Press the [Delete] key on your keyboard.
• Right-click on the selected business card data, and then select "Delete."
⇒ Selected data in the [Trash] tab is deleted from the CardMinder database.
■ Empty [Trash]
ATTENTION
1. Start CardMinder and select the [Trash] tab.
If you empty the [Trash] tab, all data is completely deleted from the CardMinder
database.
Be careful not to delete necessary data because data deleted from the [Trash]
tab cannot be restored.
4
Business Card Data Handling
2. Select [File] on the menu bar, and then select [Empty Trash].
3. A confirmation message appears. Click the [Yes] button.
⇒ All data in the [Trash] tab will be deleted from the CardMinder database.
CardMinder User’s Guide
35
Page 44

4.5 Deleting data from the [Mobile] tab
4.5 Deleting data from the [Mobile] tab
If you want to delete unnecessary business card data in the [Mobile] tab, follow the following procedures to delete them.
By performing the procedures, the data is deleted from the [Mobile] tab.
For information on how to use the [Mobile] tab, see Section 4.9.
1. Open CardMinder and select the [Mobile] tab.
2. Select the data you wish to delete.
Select multiple records by following the procedures below.
- If they are contiguous and you want to add them at one time:
Select them, while holding down the [Shift] key.
- If you want to add records one-by-one:
Select them, while holding down the [Ctrl] key.
4
Business Card Data Handling
Select the
data
CardMinder User’s Guide
36
Page 45
3. Select [Edit] on the menu bar -> [Delete].
4.5 Deleting data from the [Mobile] tab
HINT
⇒ The selected data is deleted from the [Mobile] tab.
You can also delete data as follows:
• Press the [Delete] key on your keyboard.
• Right-click on the selected business card data, and select "Delete."
4
Business Card Data Handling
CardMinder User’s Guide
37
Page 46

4.6 Extracting the business card image data
4.6 Extracting the business card image data
Business card images scanned with CardMinder are stored as the PDF files, and therefore, you can
extract them to attach to e-mail as follows:
1. Select the data you wish to extract.
Select the
data
2. Drag and drop a business card image from the CardMinder window to any folder in
the Explorer or to your Desktop.
⇒ An image of the business card will be created where you drop it.
4
Business Card Data Handling
CardMinder User’s Guide
38
Page 47

4.6 Extracting the business card image data
HINT
3. You can attach the PDF file(s) (image data) to your e-mail using your mailing software.
• If the both sides of the business card are displayed, only one side can be
dragged at a time.
• The file name created will be "name(front/back).pdf." If the name is not speci-
fied, it will be "untitled.pdf."
However, if character(s) that cannot be used for the file name (\, /, :, *, ?, ", <,
> ) are included in the name, those characters are converted into "_ (under-
bar)."
e.g.) When the name specified is "Howard *Brown," the PDF file name will be
"Howard _Brown."
4
Business Card Data Handling
CardMinder User’s Guide
39
Page 48

4.7 Data search by keyword input
4.7 Data search by keyword input
With CardMinder or CardMinder Viewer, you can search business card data by entering a
keyword(s) using the procedure given below.
■ Searching business card data in CardMinder
1. Open CardMinder and select [Find] on the [Edit] menu.
2. The [Find] window appears. Enter a Name or a Company in the [Find what:] field, then
click the [Find] button.
⇒ The search result of the business card data will be displayed on the Main window. If there
is no matching data, the [End of Search] message appears on the screen.
For further reaching, re-enter another name or company on the [Find] window.
4
Business Card Data Handling
CardMinder User’s Guide
40
Page 49

4.7 Data search by keyword input
HINT
• You can use the following characters in the [Find what:] box.
- You can use wildcard characters "*" and/or "?"
- You can do AND-search by using one-byte space instead of "AND."
- You cannot use the characters in the following parentheses in the search
term. (\, /, :, *, ?, ", <, >)
These characters, if used, will be converted to a wildcard character "?"
automatically for searching the search term.
• [Direction] setting
Back: Data List will be searched backward from the current record.
Next: Data List will be searched forward from the current record.
• You can search for all data including the search term you enter. Both the
Name and Company on the business card are targeted for searching, and the
results will be either Name(s) or Company(-ies) that meets your search term.
• Search targets are the whole data on the [Inbox], [Exported], [Trash], and
[Mobile] tabs.
■ Searching business card data in CardMinder Viewer
1. Open CardMinder Viewer, enter a Name or a Company in the [Search Text:] box, and
press the [Enter] key.
4
Business Card Data Handling
⇒ Searching is started.
⇒ After searching, the business card data including a Name and/or Company you entered is
displayed.
CardMinder User’s Guide
41
Page 50

4.7 Data search by keyword input
The number of results
that match your search
term is displayed.
HINT
• You can use the following characters in the [Find what:] box.
- You can use wildcard characters "*" and/or "?"
- You can do AND-search by using one-byte space instead of "AND."
- You cannot use the characters in the following parentheses in the search
term. (\, /, :, *, ?, ", <, >)
These characters, if used, will be converted to a wildcard character "?"
automatically for searching the search term.
• You can search for all data including the search term you enter. Both the
Name and Company on the business card are targeted for searching, and the
results will be either Name(s) or Company(-ies) that matches your search
term.
• Search targets are the whole data on the [Inbox], [Exported], [Trash], and
[Mobile] tabs.
4
Business Card Data Handling
CardMinder User’s Guide
42
Page 51

4.8 Attaching related files to the business card data
4.8 Attaching related files to the business card data
You can attach files to the business card data using CardMinder.
For example, mark a business card record by attaching photos or profiles.
Follow the procedure below to attach files to the data.
■ Attaching files to the business card record
1. Select the card record you wish to attach files.
Select the
record
Attachment View
HINT
2. From the [Edit] menu, select [Attached file] -> [Add], or right-click on Attachment View
and then select [Add].
When Attachment View is not displayed, click the icon.
or
4
Business Card Data Handling
⇒ The [Open] window appears.
CardMinder User’s Guide
43
Page 52

4.8 Attaching related files to the business card data
3. Select a file to attach and then click the [Open] button.
⇒ The selected file is displayed on the Attachment View.
4
Business Card Data Handling
CardMinder User’s Guide
44
Page 53

4.8 Attaching related files to the business card data
HINT
• You can also drag and drop files onto Attachment View to attach to the busi-
ness card data.
• You cannot attach any folders to the Attachment View.
• Up to 100 files can be attached.
■ Opening the attached file
4
Business Card Data Handling
Double click the icon of the attached file on Attachment View.
⇒ The application linked to the file starts running automatically and the file will be opened.
CardMinder User’s Guide
45
Page 54

■ Deleting the attached file
1. Select the file to be deleted on the Attachment View.
2. From the [Edit] menu, select [Attached file] -> [Delete], or right-click on the file in the
Attachment View and then select [Delete].
⇒ The attached file selected is deleted from the Attachment View.
4.8 Attaching related files to the business card data
HINT
You can also delete attached files by doing the following.
• Press the [Delete] key on your keyboard.
4
Business Card Data Handling
CardMinder User’s Guide
46
Page 55

4.9 Viewing the business card data on other PCs
4.9 Viewing the business card data on other PCs
You can copy the business card data and the viewer software to a removable media for viewing or
searching on other personal computers.
Follow the procedure below to make copies on removable media such as MO (Magnetooptical
disk) and USB memory.
■ Select the data to copy
1. Start CardMinder and select the [Inbox] or [Exported] tab.
2. Select the data to copy.
You can add data to the selection by clicking on the data while holding down the [Shift] or [Ctrl]
key.
Select the
data
3. Drag and drop the data onto the [Mobile] tab.
4
Business Card Data Handling
CardMinder User’s Guide
47
Page 56

4.9 Viewing the business card data on other PCs
HINT
• Data in the [Inbox] tab and data in the [Exported] tab cannot be copied at one
time. First, copy one of the tab’s data into a removable media, then copy the
data of the other tab.
• Dragging and dropping the data into the [Mobile] tab does not move the origi-
nal data. Data in the [Mobile] tab is the link of the original business card data
in the [Inbox] and/or [Exported] tabs.
• Data in the [Mobile] tab is the link of the original business card data in the
[Inbox] and/or [Exported] tabs. Therefore, the data stored in the [Mobile] tab
will automatically be updated when the original data is modified. When the
original data is deleted from the [Trash] tab, the link remains in the [Mobile]
tab; when the [Trash] tab is emptied, the link is finally deleted from the
[Mobile] tab.
■ Copying the business card data to removable media
1. Start CardMinder and select the [Mobile] tab.
4
Business Card Data Handling
2. Set the removable media to your personal computer.
HINT
3. From the [File] menu, select [Mobile linkage] or click the [Mobile linkage] icon.
• Removable media is used to save data, and it can be connected to or discon-
nected from the personal computer as needed. Magneto-optic disks, Flash
memory devices (for USB interface, etc.) can be used for this function.
(* CD-R/RW, DVD-R/RW cannot be used.)
• Removable media larger than 64MB is recommended.
(At least 8MB of memory is required as the space for the business card data
and its viewer application.)
• Floppy disks do not have enough space for using this function.
or
CardMinder User’s Guide
48
Page 57

4.9 Viewing the business card data on other PCs
⇒ The [Mobile linkage setting] window appears.
4. Configure the settings on the [Mobile linkage setting] window.
Target data:
Select [Entire data], [Inbox], [Exported], or [Mobile], where the data you want to select is
stored. All the business card data in the specified tab is copied to the removable media specified by following the procedures below.
Select [Mobile] to copy the data of the [Mobile] tab.
HINT
Drive:
Select the drive to which the selected data will be copied. Click the
list, and then choose the available removable media.
Data to transfer:
Specify whether or not to include business card images in the data to copy.
HINT
When any files exist in the [Mobile] tab, the default setting is "Mobile."
When no file exist in the [Mobile] tab, the default setting is "Entire data."
• File size will increase when graphic data of business card is included. When
there is not enough space on the removable media, unmark this [Include image
data] checkbox.
• The attached files of the business card data will not be copied.
Number of data:
Indicates how many business card data are selected.
4
Business Card Data Handling
[] button to show the
Data volume:
When the [Check disk space] button is clicked, the size of currently selected business card
data is presented.
[Check disk space]
The selected business card data size is calculated, and it is displayed on [Data volume:].
CardMinder User’s Guide
49
Page 58

4.9 Viewing the business card data on other PCs
Free disk space:
Indicates free space in the removable media in the selected drive.
When the [Check disk space] button is clicked, free space in the removable media is presented, calculating it based on the size of currently selected business card data.
5. Click the [Transfer] button.
⇒ The copying of the selected business card data is started.
6. When copying operation is completed, a confirmation message will appear.
Click the [OK] button.
7. Remove the removable media from your personal computer.
4
Business Card Data Handling
CardMinder User’s Guide
50
Page 59

4.9 Viewing the business card data on other PCs
■ Utilizing the business card data on removable media
1. Connect the removable media to a personal computer.
2. From the [Start] menu, select [My Computer].
3. Select the removable media.
4. Double-click the [ BzCardViewer.exe] icon.
⇒ The [CardMinder Mobile Viewer] window will be displayed.
Image Toolbar
Shows the buttons used to adjust the image display in the Image View.
Data List View
Shows the list of searched data.
This window is not displayed if
the searching result contains
only one business card.
4
Business Card Data Handling
Business Card Image View
Displays the image of the business card
selected from Data List View.
Search tex:
Enter keywords for searching business card data.
CardMinder User’s Guide
51
Page 60

4.9 Viewing the business card data on other PCs
Icon / Display Function
Displays or hides the Data List View.
Displays the front side image of the business card.
Image toolbar
Image toolbar
Displays the back side image of the business card. If no back side
image exists, this icon is disabled..
Previous business card is shown.
Next business card is shown.
Displays the first business card data
Displays the last business card data
Displays image data of the business card. This button is only enabled
when the "Include image data" checkbox is marked on the "Mobile
Linkage Setting."
Displays the character data of the business card.
5. Enter keywords in [Search text:] to start searching business card data.
⇒ The business cards will be displayed as search results.
4
Business Card Data Handling
HINT
• You can use the following characters in the [Search Text] field.
- You can use wildcard characters "*" and/or "?"
- You can do AND-search by using one-byte space instead of "AND."
- You cannot use the characters in the following parentheses in the search
term. (\, /, :, *, ?, ", <, >)
These characters, if used, will be converted to a wildcard character "?"
automatically for searching the search term.
• You can search for all data including the search term you enter. Both the
Name and Company on the business card are targeted for searching, and the
results will be either Name(s) or Company(-ies) that matches your search
term.
• Search targets are the data in the [BzCardViewr] folder.
CardMinder User’s Guide
52
Page 61

4.9 Viewing the business card data on other PCs
■ Deleting data from removable media
1. Connect the removable media to a personal computer.
2. From the [Start] menu, select [My Computer].
3. Select the removable media.
4. Delete the following files and folder.
Files: BzCardViewer.exe, autorun.inf
Folder: [BzCardViewer] folder
4
Business Card Data Handling
CardMinder User’s Guide
53
Page 62

4.10 Sending e-mail
If a e-mail address is written on the business card scanned with CardMinder, you can send e-mail
to that address.
Follow the procedure below to send e-mail.
1. Select a person to whom you want to send e-mail from the data list of the business
card.
Select data.
4.10 Sending e-mail
HINT
2. Select [Tool] on the menu bar -> [E-mail], or right-click on the data in the Data List
View and select [E-mail].
The e-mail address must be presented in the E-mail field.
⇒ The [New Message] window of the mailer (E-mail program) installed in your computer
pops up.
4
Business Card Data Handling
HINT
The mailer or the E-mail program that automatically used is the one specified
in Microsoft Internet Explorer.
To specify an E-mail program in Microsoft Internet Explorer, select [Tools] ->
[Internet Options] -> the [Programs] tab, and then select the desired program
from the "E-mail" drop-down list.
CardMinder User’s Guide
54
Page 63
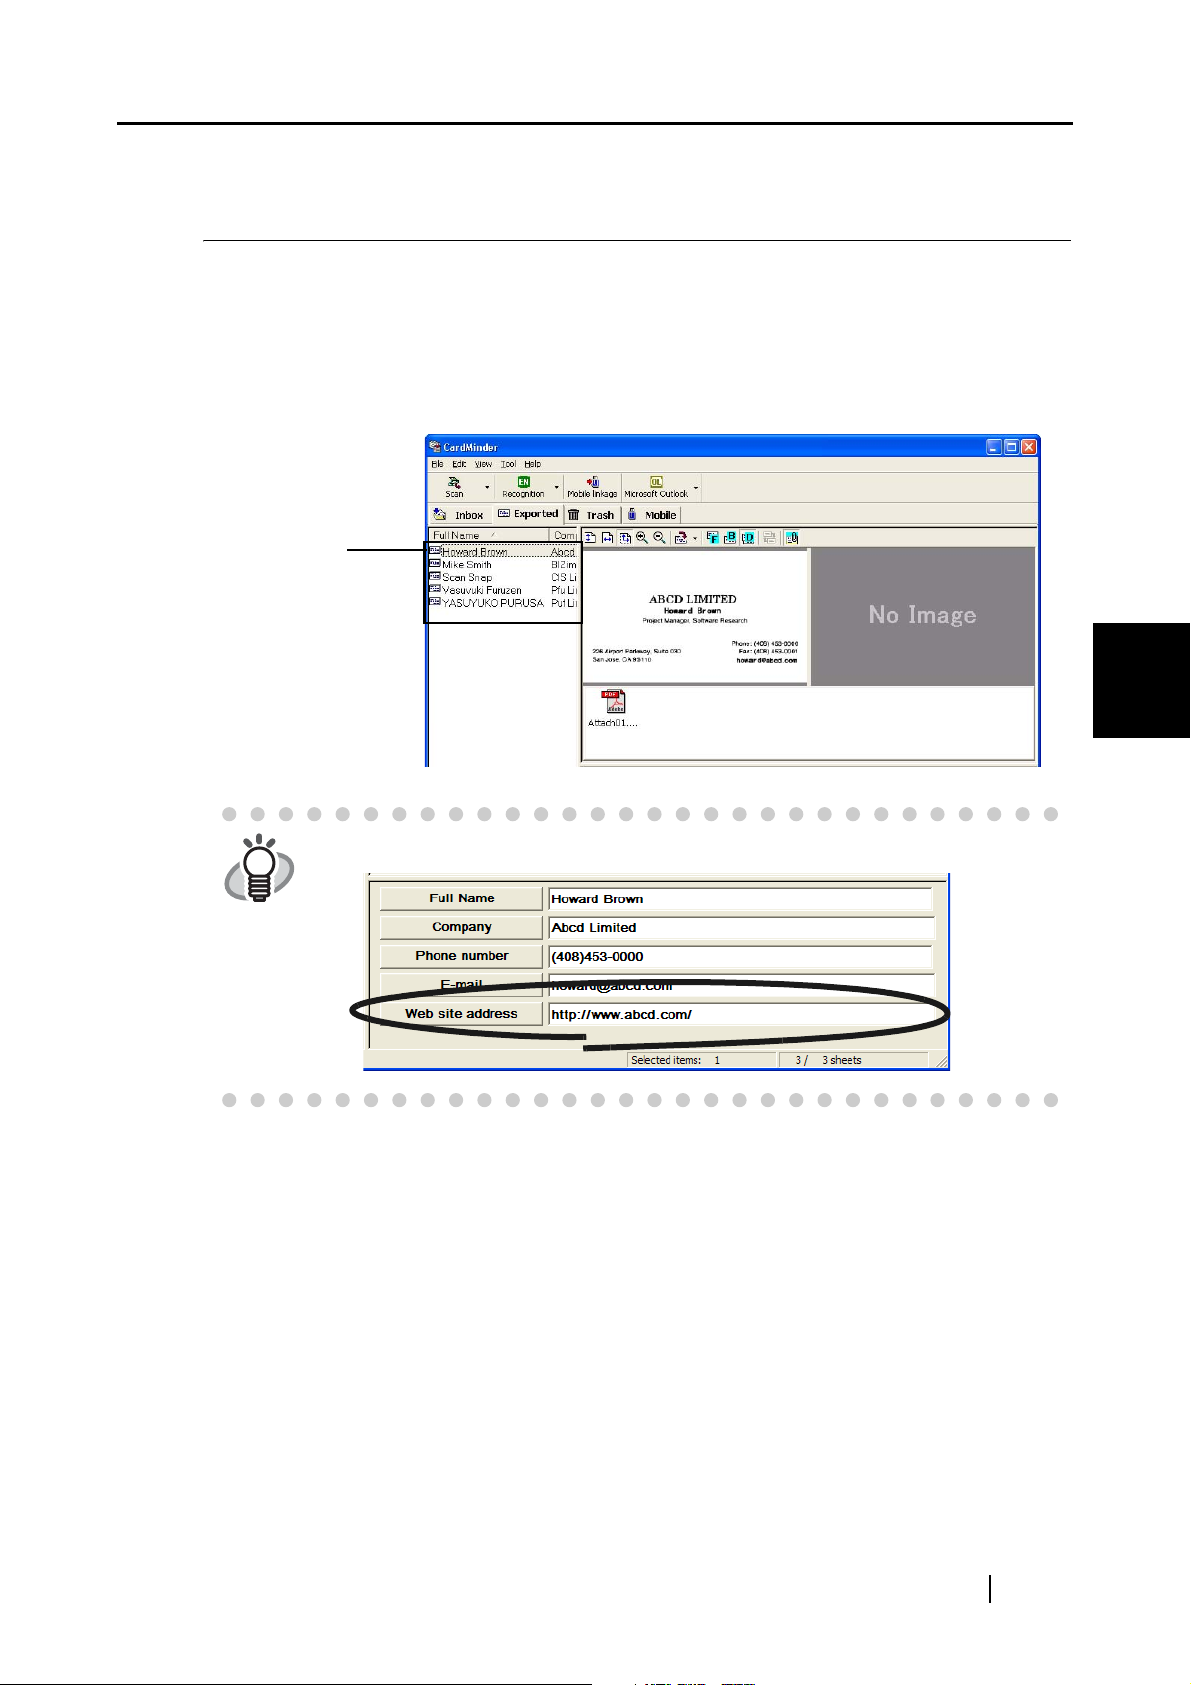
4.11 Activating Web Browser
If URL (Uniform Resource Locator) or the web site address is written on the business card scanned
with CardMinder, you can connect to the URL with the Web browser.
Follow the procedure below to activate the Web browser.
1. Select data including the web site address you want to connect to with the browser.
Select data.
4.11 Activating Web Browser
HINT
2. Select [Tool] on the menu bar -> [Web page browse], or right-click on the data in the
Data List View and select [Web page browse].
⇒ The browser installed in your computer is activated and the page is displayed.
You have to enter the web site address in the "Web site address" field.
4
Business Card Data Handling
CardMinder User’s Guide
55
Page 64
Chapter 5
Correction of Recognized Character Data
As the recognition cannot be perfect for all business cards, corrections may be needed for some
recognized data. This chapter describes how to correct the recognition results.
Check the following before doing data correction:
• If the orientation of the characters in the front side is incorrect, correct the orientation by click-
ing the Rotate icon as shown Section 1.4. Then try again.
• If the front side of the business card is shown on the right side (or lower side) of the Image
View window, swap the images by clicking the Swap Images icon and try the recognizing
again (See Section 5.2).
• If photos or logos are very close to characters, incorrect recognition may occur. In this case,
exclude the image area by using the rectangle selection method (Section 5.3 or 5.4), and try the
recognition again.
• In the case other than those above, enter the correct character(s) manually.
5
ATTENTION
5.1 Selection of language........................................................................................... 57
5.2 Recognition of all characters at once ................................................................. 58
5.3 Recognition using Rectangle Selection.............................................................. 59
5.4 Keyword Recognition using Rectangle Area Selection ....................................61
Quality of character recognition depends on:
- Placement of the text on the business card
- Font size used for the text.
- Style of the used font.
- Condition of the business card.
- Other factors may also affect the recognition performance.
5.5 Data Correction by Manual Entry ........................................................................ 63
CardMinder User’s Guide 56
Page 65

5.1 Selection of language
The character recognition function of CardMinder supports English, German, French, Italian,
Spanish, Chinese (Simplified/Traditional) and Japanese.
When selecting a language manually, select it following the procedure below before recognizing
business cards.
1. Select [Tool] - [Recognition Language] or use the [Recognition] icon.
5.1 Selection of language
or
2. Select a language from the following window.
⇒ The selected language is marked and the setting is applied to the recognition.
HINT
ATTENTION
When "Automatic" is selected, CardMinder automatically selects a language
from English, Germany, French, Italian and Spanish acceding to the scanned
business card.
• Business cards written in Chinese cannot be recognized with the scanner that
supports the TWAIN driver.
• When CardMinder recognizes a Chinese business card, the ScanSnap needs
to be ready to scan. Be sure the ScanSnap is powered on and the ScanSnap
5
Correction of Recognized Character Data
S
icon on the task bar is in the ready state.
S
CardMinder User’s Guide
57
Page 66

5.2 Recognition of all characters at once
5.2 Recognition of all characters at once
The data in the [Inbox] and [Exported] tabs can be corrected using the same method. Correction of
the data from the [Inbox] is described below.
1. Select the items you wish to recognize from the [Inbox] tab.
Select
the data
Front side
Recognized
data
HINT
2. Click the [Recognition] icon on the toolbar.
Only the front side image of the business card can be recognized.
Backside
5
Correction of Recognized Character Data
⇒ All characters are recognized. Old recognition data is replaced by the new data.
CardMinder User’s Guide
58
Page 67

5.3 Recognition using Rectangle Selection
5.3 Recognition using Rectangle Selection
The data in both the [Inbox] and [Exported] tabs can be corrected using this same method.
1. Select the items that you wish to recognize from the [Inbox] tab.
Select
the data
Front side
Recognized
data
HINT
2. Select the area to be recognized on the front side image of the business card by using
your mouse as shown below.
Only the selected area on the front or back side image of the business card
can be recognized.
Backside
5
Correction of Recognized Character Data
CardMinder User’s Guide
59
Page 68

5.3 Recognition using Rectangle Selection
3. Click the [Recognition] button on the toolbar.
⇒ All characters of the selected area are recognized. Old recognition data is replaced with
the new data.
5
Correction of Recognized Character Data
CardMinder User’s Guide
60
Page 69

5.4 Keyword Recognition using Rectangle Area Selection
5.4 Keyword Recognition using Rectangle Area
Selection
This section describes the recognition of selected keywords using a rectangle area.
The data in the [Inbox] and [Exported] tabs can be corrected with the same method.
1. Select the items you want to recognize from the [Inbox] tab.
Select
the data
Front side
Recognized
data
HINT
2. Specify the trimming area for the recognition of the front or back side image with your
mouse as shown below. Following is an example for the correction of [Company].
Only the selected area on the front or back side image of the business card
can be recognized.
Backside
5
Correction of Recognized Character Data
CardMinder User’s Guide
61
Page 70

5.4 Keyword Recognition using Rectangle Area Selection
3. Click the [Company] button located in the lower area of the Main window.
⇒ The recognized data is reflected to the selected item. Old recognition data is replaced
with the new one.
HINT
Data in fields other than [Company] can be corrected using the method above.
Correctable Items are:
[Full Name], [Company], [Department], [Job title], [ZIP/Postal codes],
[Address], [Phone number], [Fax number], [Mobile phone], [E-mail], [Web site
address], and [Memo].
You can use up to 60 two-byte characters or 120 one-byte characters in
[Memo].
5
Correction of Recognized Character Data
CardMinder User’s Guide
62
Page 71

5.5 Data Correction by Manual Entry
5.5 Data Correction by Manual Entry
The data in the [Inbox] and [Exported] tabs can be corrected using the same method. Data correction for the [Inbox] tab is described in this example.
1. Select the items you wish to correct from the [Inbox] tab.
Select
the data
Front side
Recognized
data
2. Click on the text you wish to correct.
Following shows an example of the correction of [Full Name].
⇒ A cursor appears in the selected column.
Backside
5
Correction of Recognized Character Data
3. Enter the correct name in the field [Full Name] manually.
HINT
• Columns other than [Full Name] can be corrected using a similar method.
Correctable Item
• [Full Name], [Company], [Department], [Job title], [ZIP/Postal codes],
[Address], [
[
Web site address], [Memo]
Phone number], [Fax number], [Mobile phone], [E-mail],
CardMinder User’s Guide
63
Page 72

Chapter 6
Setting Preferences
This chapter describes how to set CardMinder preferences.
6.1 General settings of CardMinder .......................................................................... 65
6.2 Export item settings ............................................................................................. 68
6
CardMinder User’s Guide 64
Page 73

6.1 General settings of CardMinder
6.1 General settings of CardMinder
The general settings of CardMinder described in this chapter are as follows:
•Action when image scan complete
•CardMinder Viewer
•Database file (specifying the database file of CardMinder)
1. Select [Tool] on the menu bar -> [Settings].
⇒ The [Settings] window will appear.
2. Select the [General] tab.
You can configure various settings on this tab.
6
Setting Preferences
Action when image scan is complete
•Show CardMinder window
Display the Main window and recognition result after the [SCAN] button is pressed on
ScanSnap.
CardMinder User’s Guide
65
Page 74

6.1 General settings of CardMinder
•Export Business Card data automatically
The recognized data is added to the database of CardMinder, and, at the same time, CardMinder is linked with another application to which data is exported. The wrong names of
persons or companies can be accidentally stored in your database. This method is not recommended unless you check that the correct data is stored.
On the Main window, by selecting [File] on the menu bar and [Export to] from the [File]
menu, you can see which application is linked with CardMinder on the submenu. The currently selected application is marked.
CardMinder Viewer
•Hot key
You use the hot key when performing automatic search with a keyword selected. To set a
hot key, on your keyboard, press the key that you want to use as the hot key.
You can designate the key from [A] to [Z], [0] to [9], and [F2] to [F12]. Also, such key(s) as
[Ctrl], [Shift], and [Alt] have to be followed by those keys.
Do not use the combinations of hot keys that are used for Windows as standard, such as [Alt]
+ [F4].
For example, the following combinations can be used:
[Ctrl]+[A], [Shift]+[Alt]+[0], [Ctrl]+[Shift]+[Alt]+[F2]
The combinations below and similar cannot be set as the hot key.
[9]+[F12], [Ctrl]+[Shift]
•Action
[Show image window when the card is not found] checkbox is marked by default. While it is
checked, the CardMinder Viewer window becomes active even if there is no matching data.
In this case no image of the business card is shown, but you can continue searching, entering
a keyword in the [Search Text] box.
While the checkbox is cleared, the CardMinder Viewer window will not be opened if there is
no results.
Database
•Database file
The database file folder (Full path) of CardMinder can be specified using this setting.
When [Browse] is clicked, you can specify the Data save folder in the [Browse for Folder]
window.
By default, CardMinder saves data to the C: drive. This setting may be useful when C: drive
is nearly full and data saving to another drive is required.
Default setting of the folder is,
If the operating system is Windows XP or Windows 2000
C:\Documents and Settings\<- Log-in User name->\Application Data\PFU\Card-
Minder\ENTRY\ENTRYDB.BID
<- Log-in User name-> is defined according to the current user.
If the operating system is Windows 98 or Windows Me
C:\Program files\Application Data\PFU\CardMinder\ENTRY\ ENTRYDB.BID
You do not have to change the folder to save the database under normal circumstances.
However, if there is not enough space in the C: drive, change this setting to save the data in
another drive.
6
Setting Preferences
CardMinder User’s Guide
66
Page 75

6.1 General settings of CardMinder
HINT
• To make a backup copy of the database in CardMinder, exit CardMinder and then
copy the following file and folder to the folder designated to store the "Database
file" as described above.
File to be copied: ENTRYDB.BID
Folder to be copied: [ENTRYDB] folder
• Uninstalling CardMinder does not delete its database. However, it is recom-
mended to make backup copies on a routine basis.
6
Setting Preferences
CardMinder User’s Guide
67
Page 76

6.2 Export item settings
The Export item settings described in this section are linked with the following settings.
•Settings of Recognition Result/Correction View
Export items checked on the [Settings] window are displayed on the Recognition Result/
Correction View.
•Settings of data items to be exported to another application linked with CardMinder.
The data of export items checked on the [Settings] window are exported to another
application.
1. In the Main window, Select [Tool] on the menu bar -> [Settings].
6.2 Export item settings
⇒ The [Settings] window appears.
2. Select the [Export Item] tab, and then mark the items you wish to export.
Clicking the [Default] button resets the settings to the default.
6
Setting Preferences
HINT
• The items [Memo] and [Save date] are displayed in the Main window, but they will
not be exported.
• The default items [Full Name], [Company], [Phone number] and [E-mail] cannot
be unchecked.
CardMinder User’s Guide
68
Page 77

Chapter 7
Updating CardMinder Online
In this chapter, how to update CardMinder online is described.
In an effort to improve the usability and functionality of CardMinder, program updates are carried
out timely.
On the Main window, CardMinder can check if the latest program (Update Pack) is available and
update the program.
ATTENTION
HINT
When updating CardMinder, follow the instructions below.
1. On the [Help] menu, select [Online Update].
• When updating, it is essential that Internet Explorer 5.5 or later is installed in a
system which can access the Internet.
• For Windows XP or Windows 2000, you must logon as an administrator.
We recommend that you update your program on a regular basis.
7
⇒ A message window to confirm whether or not to update CardMinder online appears.
CardMinder User’s Guide 69
Page 78

2. Click the [Yes] button.
⇒ If the latest Update program is available, a message window that asks you whether you
want to download and install the program online appears.
ATTENTION
HINT
3. Click the [Yes] button.
After an online update interruption, if you retry the online update immediately,
a message "File downloading has failed" appears and the operation may not
be possible. This is because it takes some time to delete the half-downloaded
file.
Wait for a while and retry the online update.
In the case where the latest update is already installed, the message below
appears.
Click the [OK] button to close the message.
7
Updating CardMinder Online
⇒ The program download starts, and the confirmation window appears when it completes.
CardMinder User’s Guide 70
Page 79

4. Click the [Install] button.
.
HINT
When you click the [Information] button, Microsoft Internet Explorer 5.5 or later
opens and information about the latest update for CardMinder appears.
Installation starts, and the “Welcome to InstallShield Wizard for CardMinder” window
⇒
appears.
Follow the instructions on the screen to install.
7
Updating CardMinder Online
CardMinder User’s Guide 71
Page 80

Chapter 8
Troubleshooting
This chapter describes the troubleshooting.
No Phenomena Recommendation
1 Scanning does not
start
⇒ Check the following items
When using ScanSnap
• Is ScanSnap Manager installed correctly?
Refer to Getting Started of ScanSnap and install the
ScanSnap Manager correctly.
S
• Is the ScanSnap icon on task bar shown as ?
If so, set ScanSnap Manager by referring to the ScanSnap
Operator’s Guide, so that the icon of ScanSnap Manager
changes to .
S
S
S
• Is the [ScanSnap Manager...] window opened?
Scanning is disabled when the window [ScanSnap
Manager...] is opened. Close the window.
• Is the scanner supported by ScanSnap?
CardMinder does not support the scanning by scanners
other than specified by ScanSnap.
8
2 The scanned
business card
image is not
displayed on the
window.
When using a TWAIN scanner
• Is the scanner driver installed correctly?
Refer to the scanner manual.
• Does the TWAIN scanner driver window remain on the
screen?
Close the TWAIN scanner driver window and then scan.
• Is the scanner TWAIN-compliant?
CardMinder is not compatible with scanners other than
ScanSnap and TWAIN-compliant scanners.
⇒ Did you scan the business card with the front side (the name is
printed on) toward the ADF paper chute?
Follow the instructions in the scanner manual to set the card
properly.
CardMinder User’s Guide 72
Page 81

No Phenomena Recommendation
3 The image is
scanned, but Full
Name or Company
does not appear or
appear incorrectly
on the Main
window.
4 The recognition of
images is not
correct.
⇒ Check the following items.
• Is the image of the characters aligned horizontally? If not,
correct the direction of the business card image by pressing
, and press on the toolbar.
• Are the front and back sides of the image switched?
The name should appear on the front side. Swap the front
and back side images of the business card by clicking
and pressing on the toolbar. (See Section 1.4 for
button functions)
Otherwise, try recognition again by referring to Section 5.1.
⇒ Check the following
• Do the characters and image
contact with each other or
aren’t they too close to each
other?
Such characters cannot be
recognized. Correct the data
manually. (See Section 5.5.)
• Is the color of the characters
white and the background
dark?
Those characters cannot be
recognized. Correct the data
manually. (See Section 5.5.)
Hideaki Imai
Sales Division
Quality Control Seciton
Mnager
8
Troubleshooting
5 The items you wish
to recognize do not
appear on the
window.
6 The original file is
not modified even if
the file attached to
the business card
data is modified.
• Are several phone numbers
printed together as shown in
the example?
These phone numbers cannot
be recognized. Please correct
the data manually. (See
Section 5.5.)
⇒ Select [Tool] on the menu bar -> [Settings] in the Main window.
Then select the [Export Item] tab. Add the check mark next to
the item you wish to recognize and export. (See Section 6.2.)
⇒ When attached files are included in the business card data,
they are copied and added to the database of CardMinder.
Therefore, modifications made on the original file do not affect
the attached file.
CardMinder User’s Guide 73
Page 82

No Phenomena Recommendation
7 Characters on the
scanned business
card is not textrecognized
correctly.
⇒ Verify the following:
• Aren’t many handwritten characters on the card?
If there are many handwritten characters on the card, the card
is prone to incorrect recognition. Recognize each item separately using the [Recognition] button after selecting the incorrectly scanned part. Otherwise, correct the characters by
directly typing in with the keyboard.
• Aren’t the background or the patterns overlapped?
If the background or patterns overlap with the name or the
address on the business card, the card is prone to incorrect recognition. Recognize each item separately using the [Recognition] button after selecting the incorrectly scanned part.
Otherwise, correct the characters by directly typing in with the
keyboard.
8
Troubleshooting
CardMinder User’s Guide 74
Page 83

INDEX
A
Action when image scan complete ......... 65
Add selection
Alt+F3
Application
Attaching files
Automatic (recognition language)
...................................................... 30
.............26, 31, 32, 43, 57, 58
.............................................. 15
.......................................... 43
........... 57
C
CardMinder ............................................... 2
CardMinder Viewer
CardMinder Viewr
Character direction
Check disk space
Command toolbar
........................... 51, 66
................................... 65
.................................. 73
.................................... 49
..................................... 9
Deleting data permanently
Deleting data temporarily
Deleting the attached file
Displayed item
......................................................... 38
Drag
........................................................ 49
Drive
......................................................... 38
Drop
......................................... 68
......................34
........................31
......................... 46
E
Export Item .............................................. 68
Export item
Exported
Exporting data
Extracting image data
.............................................. 68
............................................ 10, 11
......................................... 26
........................ 36, 38
Configuring CardMinder
Confirming data in application
Correction by manual entry
CSV (Excel)
...................................... 15, 27
.......................... 15
................. 26
..................... 63
D
Data correction ........................................ 56
Data list view
Data search by keyword input
Data to transfer
Data volume
Database
Database file
Default
Deleteing data from removable media
....................................... 9, 12
................. 40
....................................... 49
............................................ 49
................................................. 66
........................................... 65
............................................... 30, 68
.... 53
F
Finder window ......................................... 29
Free disk space
Front side
....................................... 49
..........................................56, 72
G
Getting Started Guide .............................. 72
H
Hot key .................................................... 30
I
Image data not displayed ........................72
Image toolbar
Image view
...................................... 9, 12
.......................................... 9, 12
CardMinder User’s Guide 75
Page 84

Inbox ....................................................... 11
Rectangle selection method
.................... 56
K
Keyword .................................................... 5
M
Main window ............................................. 9
Mobile linkage setting
Mode tab
................................................... 9
............................. 49
N
Number of data ....................................... 49
O
OCR .......................................................... 2
Online Update
Orientation of card
......................................... 69
.................................. 56
Removable media
Restoring data
...................................48
......................................... 32
S
Scanning .................................................16
Scanning not start
ScanSnap!
ScanSnap! driver
ScanSnap! icon
ScanSnap! Monitor
ScanSnap! scanner
Search
Selection
Selection of language
Status bar
Swapping images
Swapping sides
................................................. 2
............................................... 29, 40
............................................ 34, 36
.................................................. 9
...................................72
..................................... 72
....................................... 72
.................................. 72
................................. 72
.............................. 57
.................................... 56
....................................... 73
P
pening the attached file ........................... 45
............................................................ 2
PIM
Preferences
............................................. 64
R
Recognition ....................................... 58, 60
Recognition at once
Recognition item
Recognition item not shown
Recognition Language
Recognition of an item
Recognition result/Correction view
Recognition using rectangle selection
Recognized result not displayed
.......................... 57, 58
..................................... 68
.................... 73
............................ 57
............................ 61
........... 9
.... 59
............. 73
T
Target data .............................................. 49
Transfer
Trash
Trimming
................................................... 50
.......................................................11
...........................................59, 61
U
Update ..................................................... 69
Utilizing the business card data on
removable media
..................................... 51
V
Viewing the business card data on other
.............................................. 47, 54, 55
PCs
Rectangle Selection
................................ 59
CardMinder User’s Guide 76
Page 85

CardMinder™ User’s Guide
P3PC-1562-01ENZ0
Date of issuance: February, 2006
Issuance responsibility: PFU LIMITED
z The contents of this manual are subject to change without notice.
z PFU LIMITED assumes no liability for incidental or consequential
damages arising from the use of this Product, and any claims by a
third party.
z Copying of the contents of this manual in whole or in part and
copying of the scanner application is forbidden under the copyright
law.
 Loading...