

Page 1

P2WW-2300-01ENZ0
Organizer
User’s Guide
Page 2

CONTENTS
1. Introduction................................................................................. 1
Users who may use Windows Vista .......................................................... 4
1.1. System Requirements ......................................................................... 5
2. Basic Operations ........................................................................ 6
2.1. Starting ScanSnap Organizer.............................................................. 6
2.2. Operating Window ............................................................................... 8
2.2.1. Menu Bar ............................................................................................................. 11
2.2.2. Toolbar................................................................................................................. 24
2.2.3. Thumbnail View .................................................................................................. 26
2.3. Actions................................................................................................ 28
3. Using ScanSnap Organizer in Various Ways ......................... 29
3.1. Connecting to ScanSnap................................................................... 29
3.1.1. Preparing............................................................................................................. 29
3.1.2. Scanning ............................................................................................................. 31
3.1.3. Organizing Files ................................................................................................. 33
3.2. Copying/Moving Files, Folders, and Cabinets................................. 36
3.3. Converting PDF Files into Searchable Ones ................................... 37
3.4. Configuring Automatic Conversion Settings of PDF Files............. 49
3.5. Searching Files .................................................................................. 51
3.6. Creating/Deleting Shortcuts to Folders............................................ 52
3.6.1. Creating Shortcuts to Folders........................................................................... 52
3.6.2. Deleting Shortcuts to Folders........................................................................... 53
3.7. Importing Files ................................................................................... 54
3.8. Exporting Files ................................................................................... 55
3.9. Sending Files by E-mail..................................................................... 56
3.10. Printing ............................................................................................. 59
3.11. Converting into Word/Excel/PowerPoint® files.............................. 62
3.12. Deleting Cabinets, Folders, and Files ............................................ 66
3.13. Renaming Files................................................................................. 67
3.14. Displaying ScanSnap Setting Window........................................... 70
3.15. Updating Online ............................................................................... 71
Appendix 1. About Searchable PDF Files................................... 73
Index .............................................................................................. 77
i
Page 3

1. Introduction
Thank you for purchasing ScanSnap Organizer.
This product is a software application that displays (in a list or thumbnail view) and manages
PDF and JPEG files created with the duplex color scanner ScanSnap (S510 series).
ScanSnap Organizer has the following features.
● You can view document images scanned with the ScanSnap without opening them in
other applications and create folders to categorize files.
You can also flip through the pages of a PDF file in the thumbnail view to verify the
scanned images.
● You can send files by e-mail and print them with a printer.
● You can convert PDF files into Microsoft
PowerPoint
● You can search for a word or phrases within the PDF files. As well, you can convert
®
files.
PDF files created with the ScanSnap into searchable PDF files.
Before you start using this application, be sure to read this guide to ensure correct use.
®
Word, Microsoft® Excel or Microsoft®
High Risk Activity
The Customer acknowledges and agrees that the Product is designed, developed and
manufactured as contemplated for general use, including without limitation, general office
use, personal use, household use, and ordinary industrial use, but is not designed,
developed and manufactured as contemplated for use accompanying fatal risks or dangers
that, unless extremely high safety is secured, could lead directly to death, personal injury,
severe physical damage or other loss (hereinafter “High Safety Required Use”), including
without limitation, nuclear reaction control in nuclear facility, aircraft flight control, air
traffic control, mass-transport control, medical life support system, missile launch control
in weapon system. The Customer, shall not use the Product without securing the sufficient
safety required for the High Safety Required Use. In addition, PFU (or other affiliate’s
name) shall not be liable against the Customer and/or any third party for any claims or
damages arising in connection with the High Safety Required Use of the Product.
Trademarks
ScanSnap is the trademark of PFU LIMITED.
Microsoft, Windows and PowerPoint are registered trademarks of Microsoft Corporation
in the United States and/or other countries. Word and Excel are products of Microsoft
1
Page 4

Corporation in the United States.
Adobe, the Adobe logo, and Acrobat are either registered trademarks or trademarks of
Adobe Systems Incorporated.
Intel and Pentium are registered trademarks of Intel Corporation or its subsidiaries in the
United States and other countries.
Other company names and product names are the registered trademarks or trademarks of
the respective companies.
ABBYY™ FineReader™ 7.x Engine © ABBYY Software House 2005.
OCR by ABBYY Software House. All rights reserved.
ABBYY, FineReader are trademarks of ABBYY Software House.
How Trademarks Are Indicated In This Manual
The following abbreviated terms used in this guide are described.
Windows 2000: Microsoft
Windows XP: Microsoft
Microsoft
Windows Vista: Microsoft
(32bit),
Microsoft
system (32bit),
Microsoft
(32bit),
Microsoft
(32bit),
Microsoft
®
Windows® 2000 Professional operating system
®
Windows® XP Professional operating system,
®
Windows® XP Home Edition operating system
®
Windows Vista™ Home Basic operating system
®
Windows Vista™ Home Premium operating
®
Windows Vista™ Business operating system
®
Windows Vista™ Enterprise operating system
®
Windows Vista™ Ultimate operating system
(32bit)
Windows: Where there is no distinction between the different versions of
the above operating systems, the term “Windows” is used.
Adobe Acrobat: Adobe
®
Acrobat®
In this manual, explanations are given on the precondition that
Adobe Acrobat that comes with this product is installed on the
computer to use. Unless otherwise specified, the term Adobe
Acrobat refers to the Adobe Acrobat bundled with this product.
Note that Adobe Acrobat, which comes with this product, is
subject to update without notice. If there are any discrepancies
between those descriptions provided in this manual and actual
operations such as the dialog box, please refer to “Help” in
Adobe Acrobat.
Internet Explorer: Microsoft
ABBYY FineReader
for ScanSnap
:
ABBYY FineReader for ScanSnap™
®
Internet Explorer
2
Page 5

Copyright
Other than restricted usage equivalent to personal use or within the family, copyrighted
materials such as books, drawings, prints, maps, and blueprints cannot be copied without
the consent of the copyright owners.
Manufacturer
PFU LIMITED
International Sales Dept., Imaging Business Division, Products Group
Solid Square East Tower, 580 Horikawa-cho, Saiwai-ku, Kawasaki-shi Kanagawa
212-8563, Japan
Phone: (81-44) 540-4538
All Rights Reserved, Copyright © PFU LIMITED 2007
Symbols Used in This Manual
This manual uses the following symbols in explanation.
This symbol alerts operators to particularly important information. Be sure to read this
information.
This symbol alerts operators to helpful advice regarding operation.
Screen Examples in This Manual
The screen examples in this manual are subject to change without notice in the interest of
product improvement.
If the actual screen differs from the screen examples in this manual, operate by following
the actual screen displayed.
Screenshots in this manual are used according to guidelines provided by Microsoft
Corporation.
3
Page 6

Users who may use Windows Vista
All the screenshots in this manual were taken in Window XP. If the operating system you
are using is Windows Vista, the screen displays may vary slightly. The differences
between these operating systems are as follows:
Windows XP Windows Vista
[My ScanSnap] folder [ScanSnap] folder
[My Documents] [Documents]
4
Page 7

1.1. System Requirements
The following system requirements are essential for ScanSnap Organizer.
Operating System Windows 2000
Windows Vista
Windows XP
PC
CPU Intel® Pentium® III
Processor 600 MHz or
higher
®
(Intel
Pentium® 4
®
Pentium® 4
Intel
Processor 1.8GHz or
higher
Processor 1.8 GHz or higher
is recommended)
RAM 128 MB or more
512 MB or more
(256 MB or more is
recommended)
Hard disk space 320 MB or more of free hard disk space
To use the search function, Adobe Acrobat 7.0 or later must be installed.
(For details, refer to “3.3. Converting PDF Files into Searchable Ones” on page 37,
and “Appendix 1. About Searchable PDF Files” on page 73.)
To use the search function on Windows Vista, Adobe Acrobat in a version that supports
Windows Vista must be installed. The search function is not guaranteed in a version
that does not support Windows Vista.
To use Actions, ABBYY FineReader for ScanSnap 3.0 or later must be installed.
(For details, refer to “2.3. Actions” on page 28.)
5
Page 8
2. Basic Operations
This chapter explains how to use ScanSnap Organizer.
2.1. Starting ScanSnap Organizer
1. From the [Start] menu, select [All Programs] -> [ScanSnap Organizer] ->
[ScanSnap Organizer].
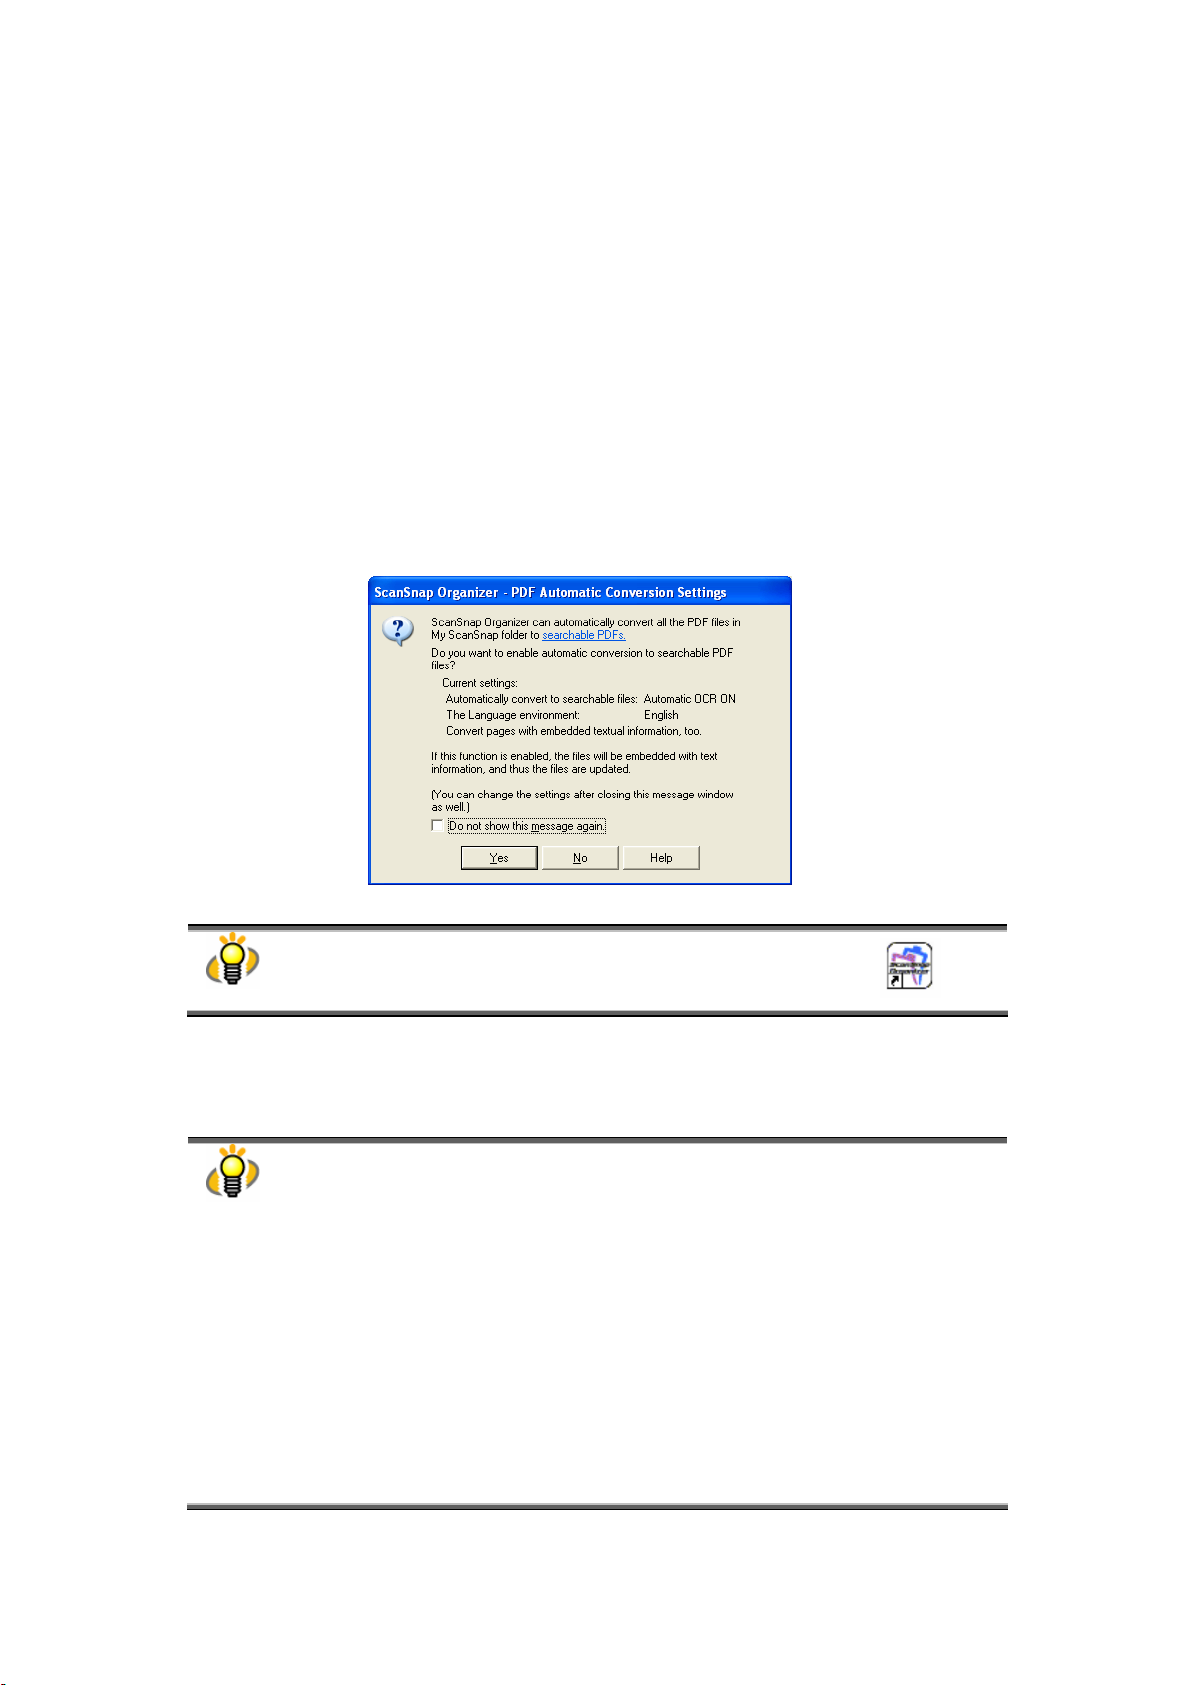
Ö The “PDF Automatic Conversion Settings” dialog box appears.
(Depending on the setting, it may not appear.)
You can also activate the ScanSnap Organizer by double-clicking the icon on
the desktop.
2. If you want to perform automatic conversion into searchable PDF, click the
[Yes] button, and if not, click the [No] button.
● ScanSnap is capable of making searchable PDF files by embedding textual
information in PDF files, which are the image data scanned with the ScanSnap. There
are two methods to use this function:
- Manually select only necessary PDF files to convert them into searchable files.
- Automatically convert PDF files added in the predetermined folder ([My ScanSnap]
folder).
To select the former method, click the [No] button; for the latter, click the [Yes] button.
● If you want to know what the searchable PDF files are, refer to “Appendix 1. About
Searchable PDF Files” on page 73.
● The “PDF Automatic Conversion Settings” dialog box can be hidden form view. Mark
the “Do not show this message again” checkbox if you don’t want to see this dialog
box again.
● You can change the “PDF Automatic Conversion Settings” later. For details on how to
change the settings, refer to “3.4. Configuring Automatic Conversion Settings of
PDF Files” on page 49.
6
Page 9
● Every log-in user can use his/her own “PDF Automatic Conversion Settings.”
Automatic conversion is executed while the user who added the PDF file into the [My
ScanSnap] folder logs on Windows and whenever any other applications are not
running on the computer. If the automatic conversion is not complete by the time the
user logs off, it will be restarted when the same user logs in again.
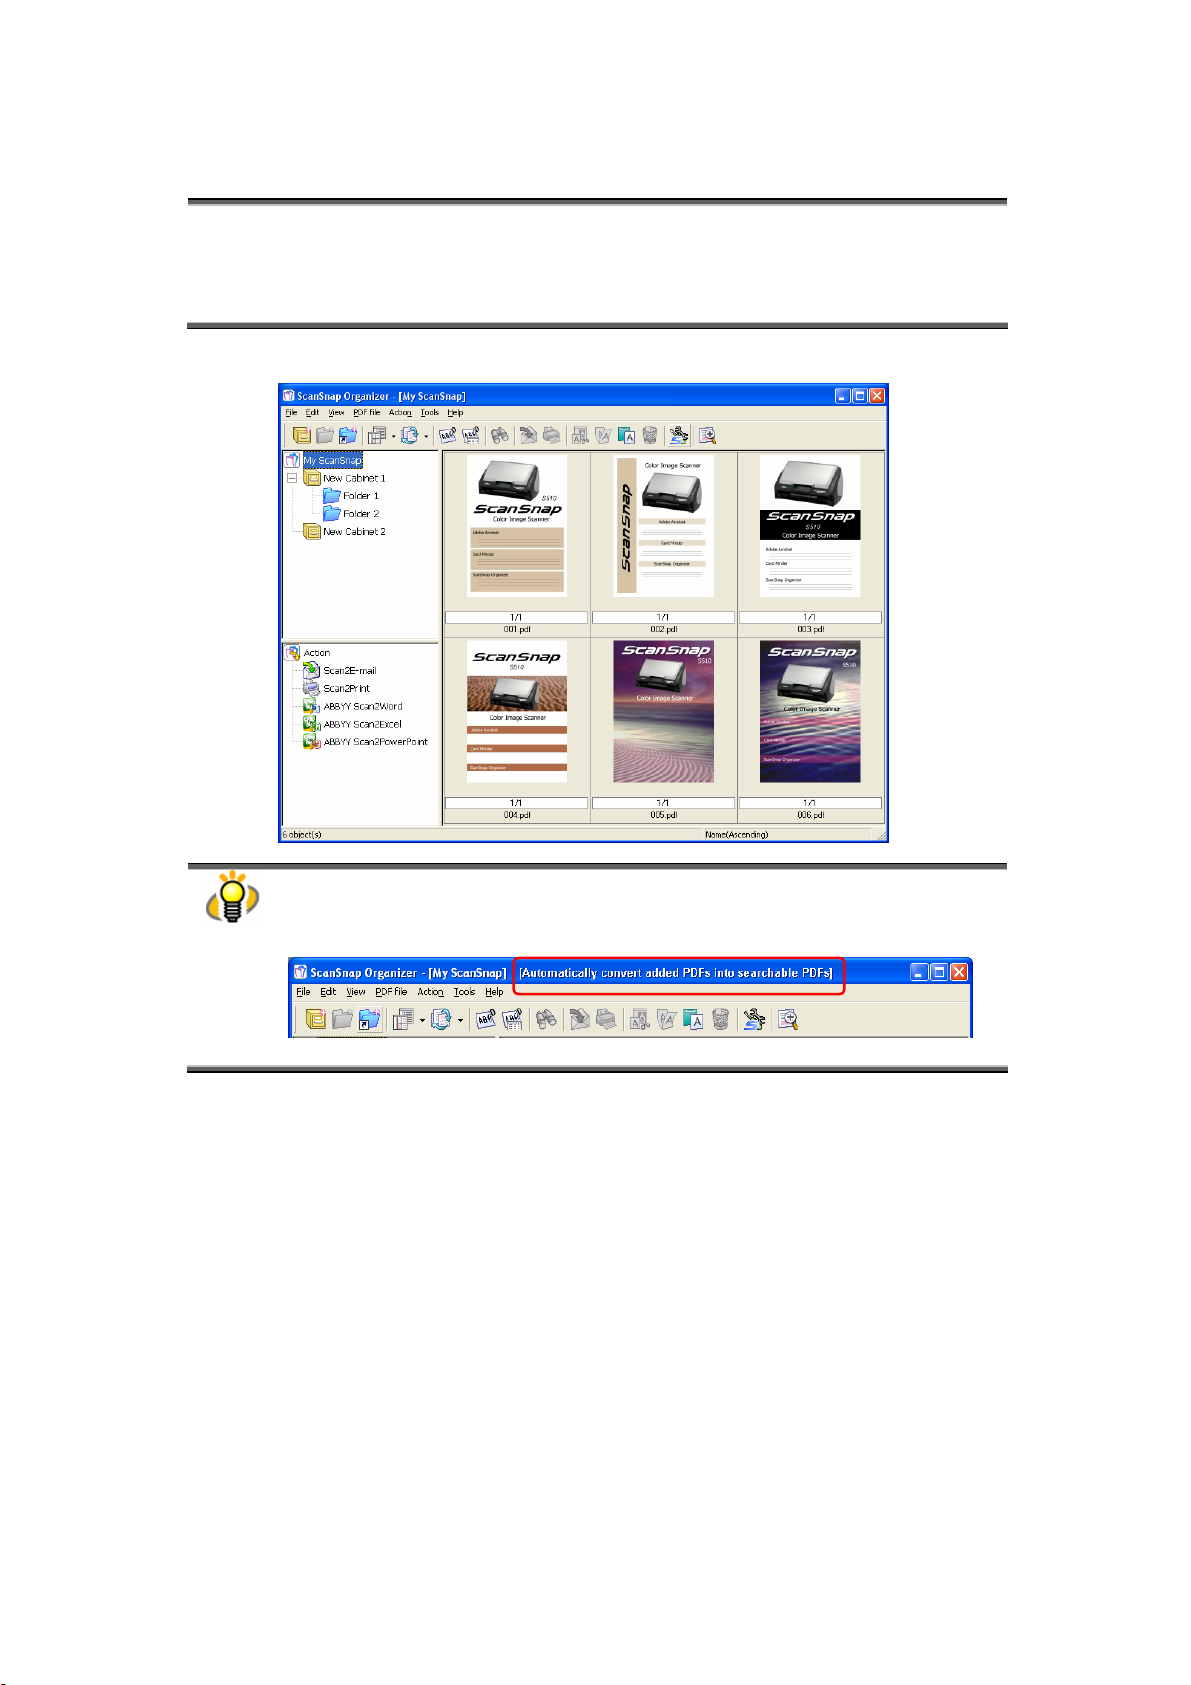
Ö The ScanSnap Organizer window appears.
If you turn Automatic OCR on (if you click the [Yes] button), “Automatically convert added
PDFs into searchable PDFs” appears on the title bar while the [My ScanSnap] folder is
selected to show files in the folder.
7
Page 10
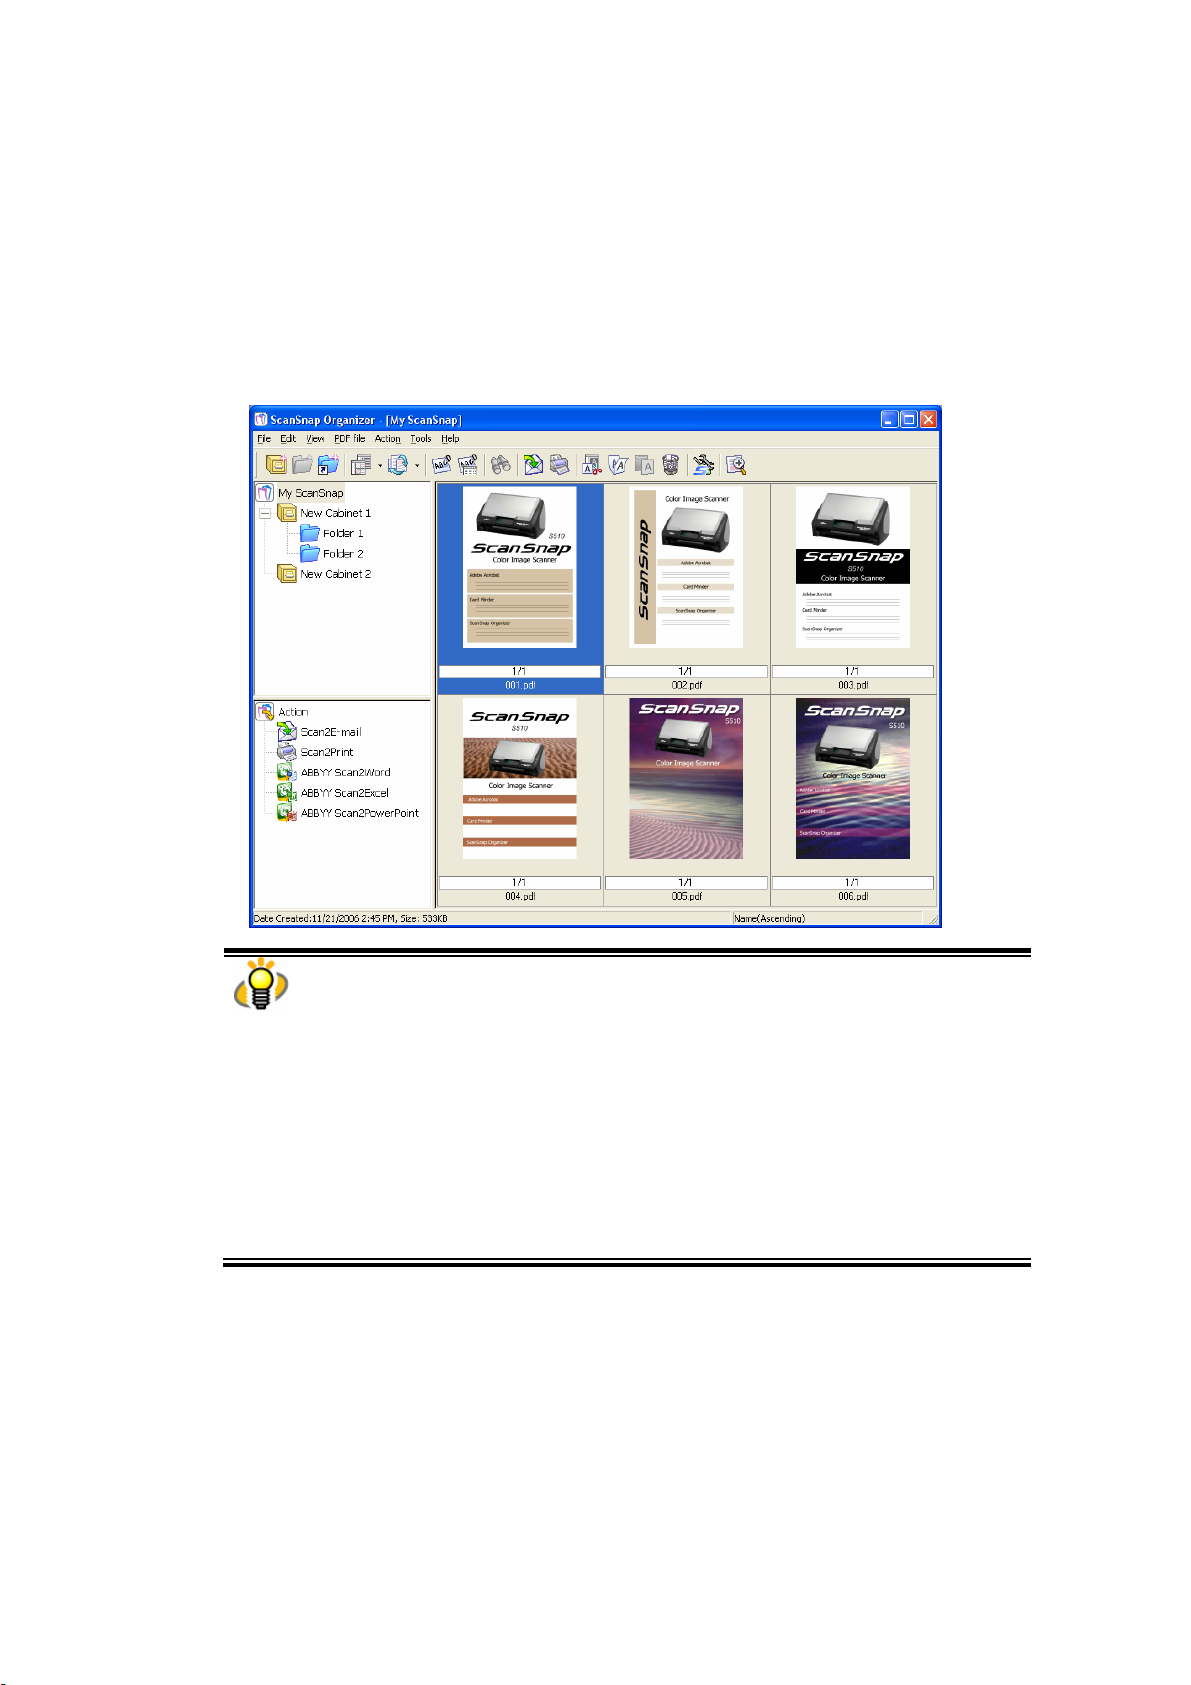
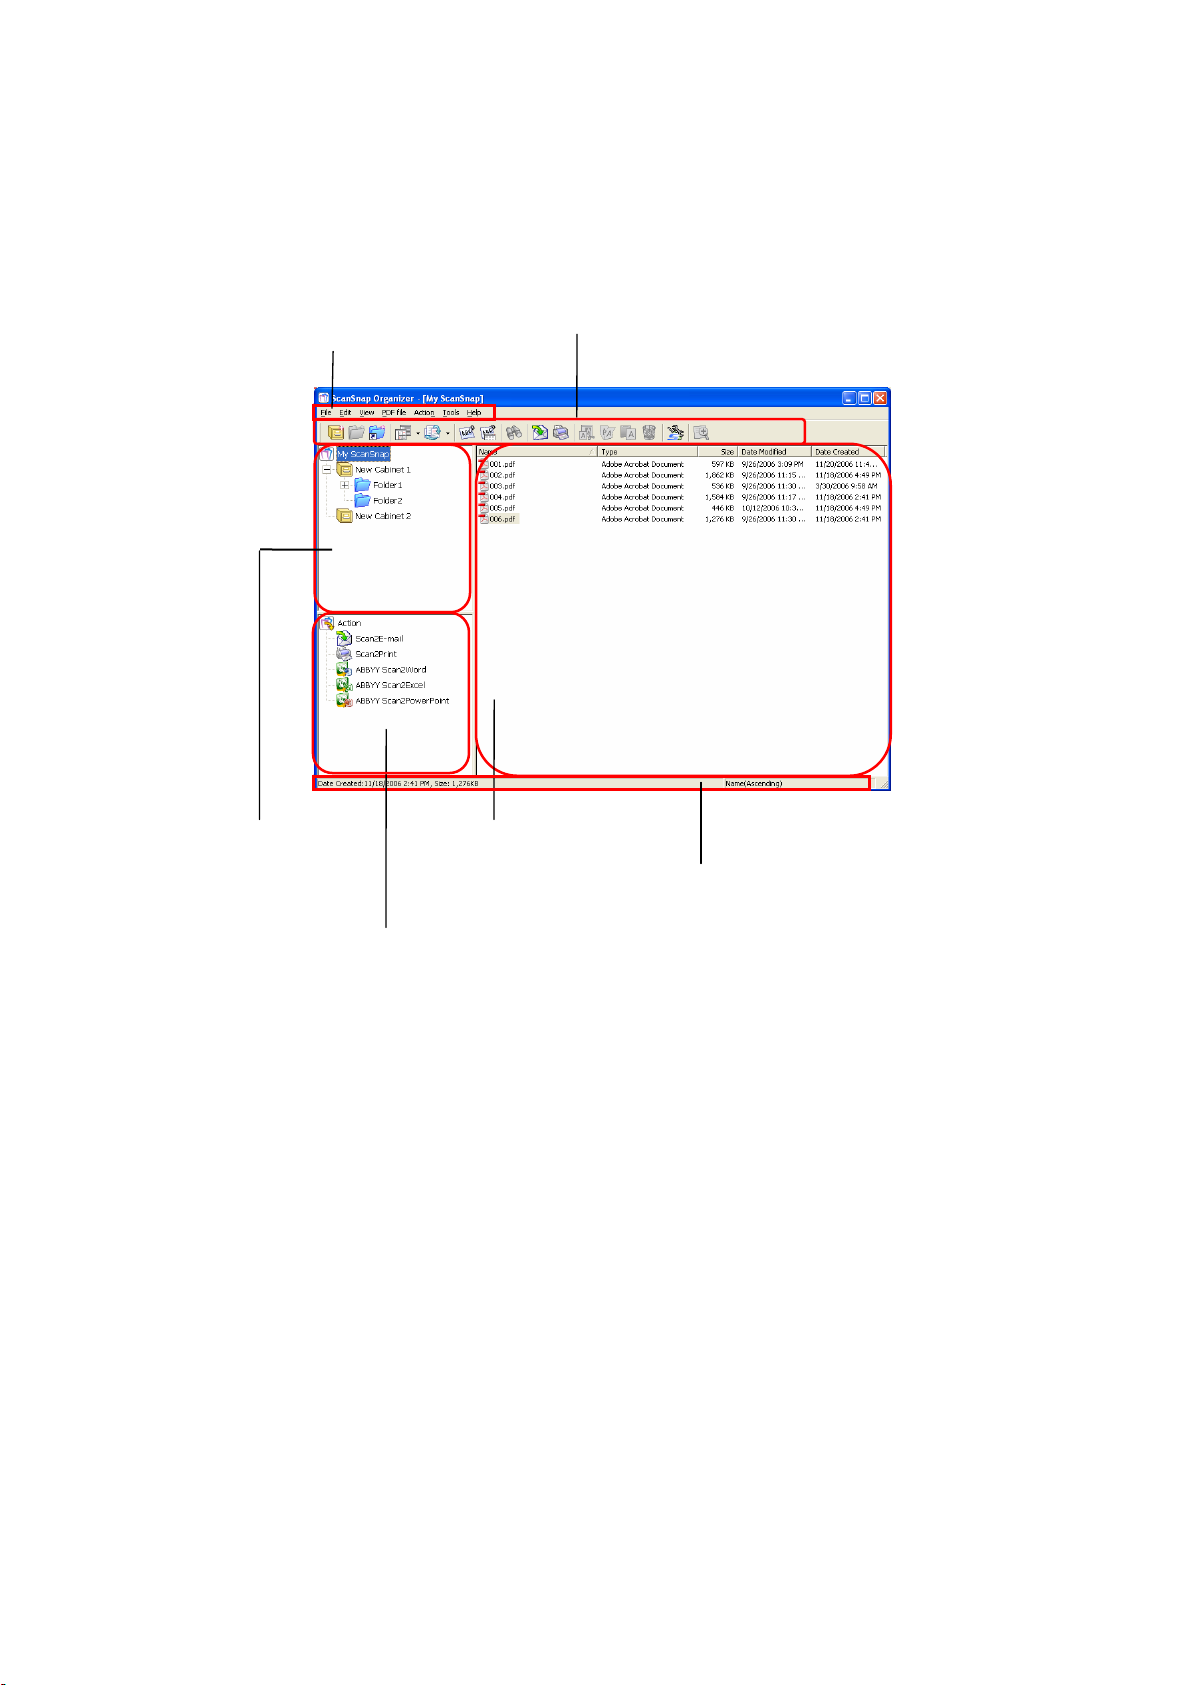
2.2. Operating Window
The following is an example of the ScanSnap Organizer main window, which is displayed at
startup. This window provides the controls that you can use in ScanSnap Organizer
<Main Window>
.
About the image display in ScanSnap Organizer
● ScanSnap Organizer creates cache data (temporarily stored data) of PDF files
capable of being thumbnailed so that it can display images faster. The cache data
is stored in the hidden “.organizer” subfolder in the folder where the relevant PDF
file is stored. If it is deleted accidentally, it takes time to display images. Be careful
not to delete the cache data.
● ScanSnap Organizer cannot create cache data of PDF files saved in unwritable
media such as the CD even if it displays the image of these PDF files. If you want
to display images faster, once copy the files from the said media into the hard disk
to create cache data, and then store the files with the cache data in the CD again.
● After scanning, images may not appear immediately or no images may appear
while additional operations such as password settings are being applied. If images
do not appear after setting a password, select [Refresh] from the [View] menu.
8
Page 11
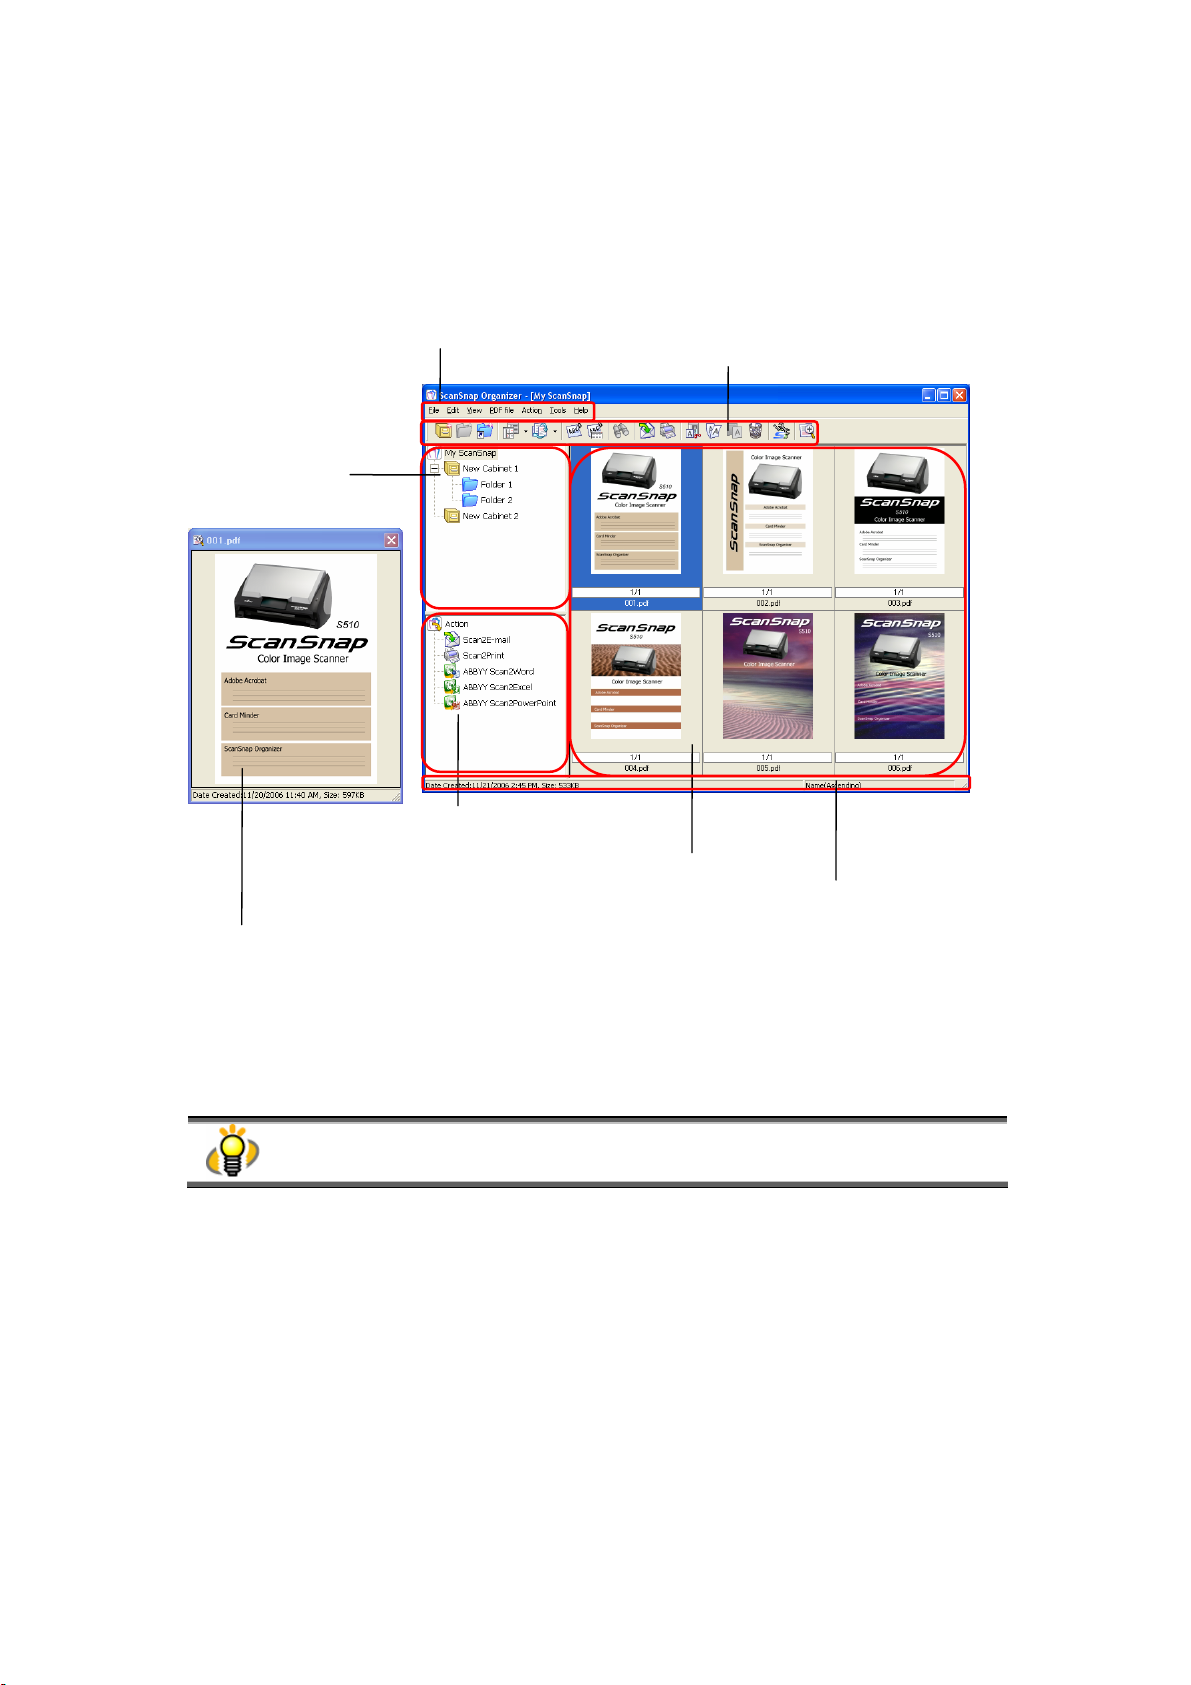
<Thumbnail View>
Menu bar
Displays the menu used in ScanSnap
Organizer.
Folder view
Folders managed in
ScanSnap Organizer are
listed.
Pop-up Thumbnail window
The selected page is displayed in a
Popup window when the thumbnail
view is used.
Action menu
The icons of the Action with
which the selected files are
utilized are displayed in this
list.
Toolbar
Frequently-used functions are indicated by
icons.
File view
PDF or JPEG files in
the selected folder
are displayed as
thumbnails.
Status bar
When any file is selected:
Date Created, Size, and File
sequence of the selected file
are shown.
When any folder is selected:
The total number of files in
the folder is shown.
PDF and JPEG files are displayed as thumbnails in the Folder view.
Other files are displayed as icons associated with their applications.
9
Page 12
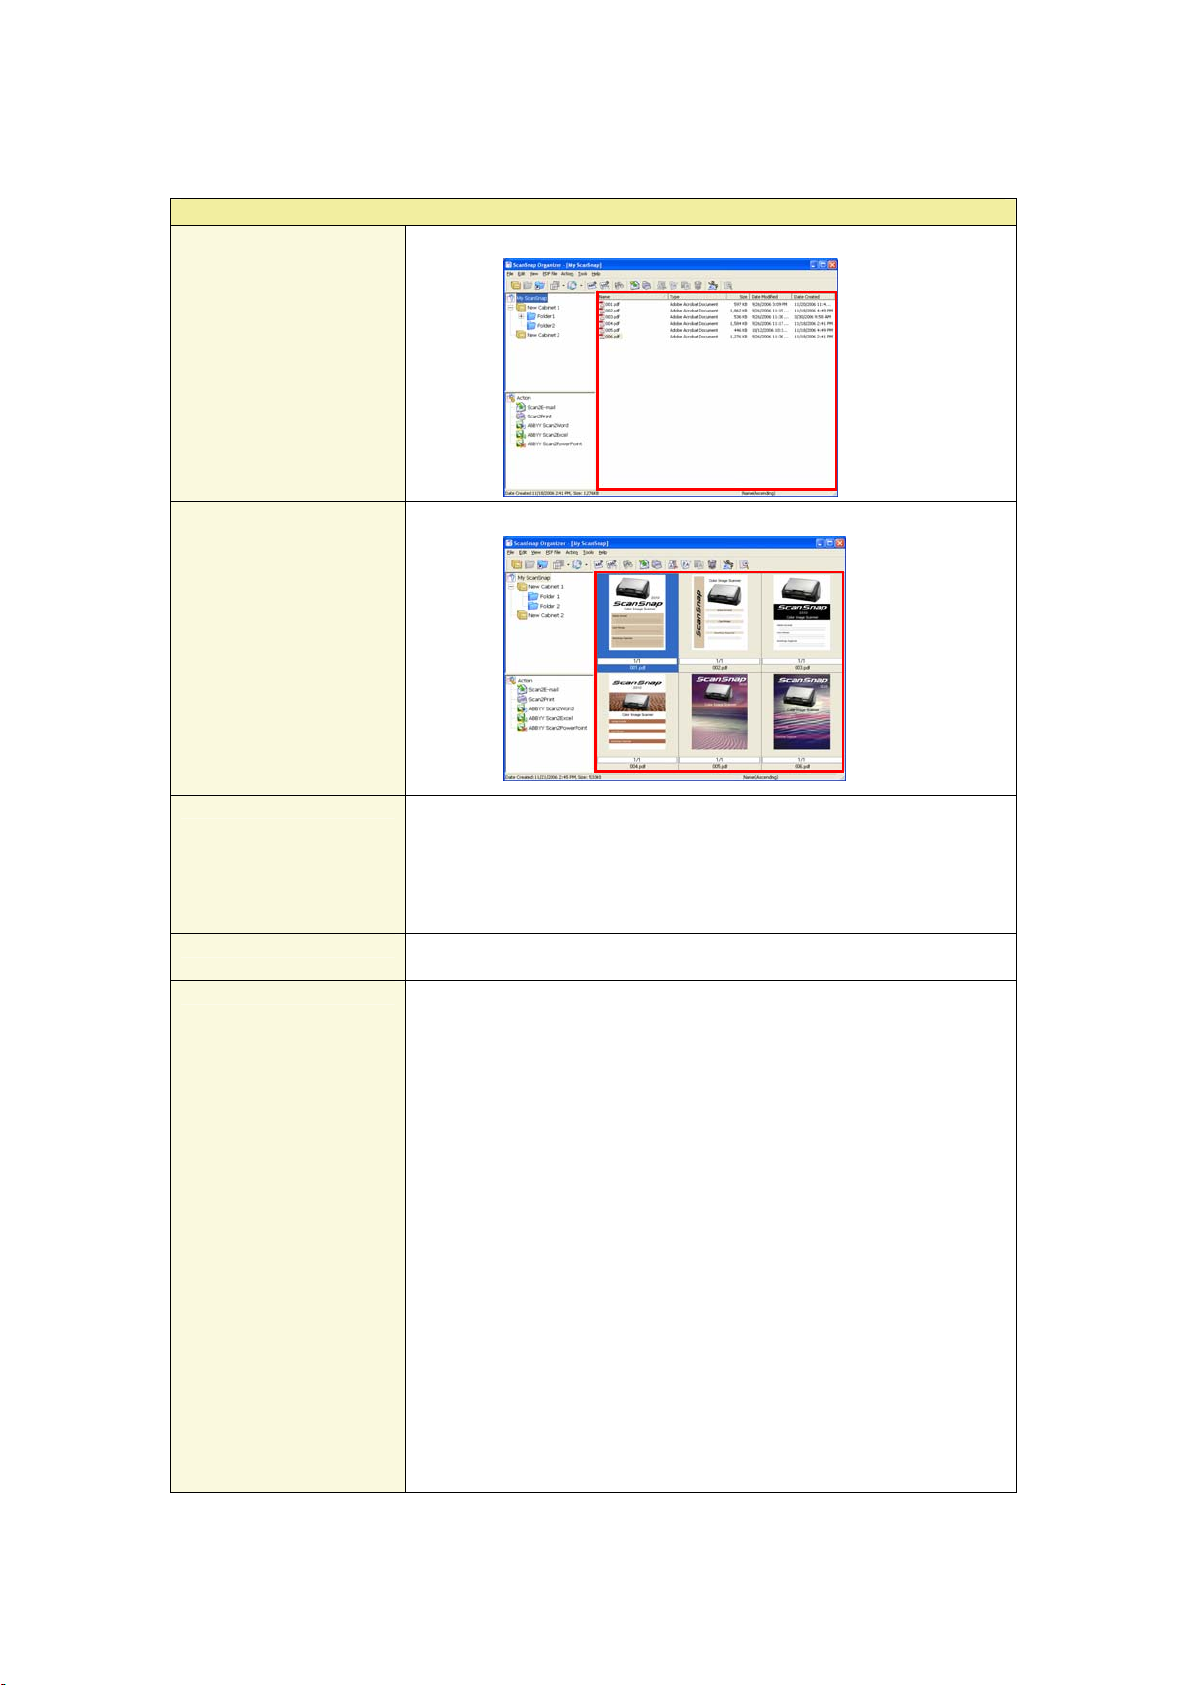
<List View>
Menu bar
Displays the menu used in ScanSnap
Organizer.
Folder view
Folders managed in
ScanSnap Organizer are
listed.
Action menu
The icons of the Action with
which the selected files are
utilized are displayed in this
list.
Toolbar
Frequently-used functions are indicated by
icons.
File view
Files in the selected folder
are listed.
Status bar
When any file is selected:
Date Created, Size, and File
sequence of the selected file
are shown.
When any folder is selected:
The total number of files in
the folder is shown.
10
Page 13

2.2.1. Menu Bar
This section explains each menu item of the menu bar.
<[File] menu>
File
Open
Print <Ctrl + P>
New
Shortcut
to folder
Delete shortcut to
folder
Import
Export
Delete <Del>
Rename <F2>
Properties
Exit
Starts an associated application to open a selected file.
(Example: For a PDF file, “Adobe Acrobat” is started.)
Prints a selected file.
(In addition, multiple files can be selected and printed at a time.)
Cabinet: <Ctrl + B>
Creates a new Cabinet directly under the [My ScanSnap] folder.
Folders or files can be stored inside it.
Folder: <Ctrl + F>
Creates a new Folder under the selected Cabinet.
Files can be stored inside it.
Folders cannot be created under the [My ScanSnap] folder.
Also, if a new folder is created directly under the [My ScanSnap]
folder in other programs such as Windows Explorer, it is shown as
[Cabinet] in ScanSnap Organizer.
Creates a shortcut to any existing folder directly under the [My
ScanSnap] folder.
Files within the selected folder can be previewed in ScanSnap Organizer.
The shortcut to the [My ScanSnap] folder, which is specified on the
[General Settings] tab in the “Options” dialog box, cannot be
created. The path is set to the “My ScanSnap” folder under My
Documents by default. (See page 21.)
Deletes the shortcut to the selected folder.
Copies files in other folders to the selected folder.
Copies the selected files to other folders.
Files cannot be exported to the [My ScanSnap] folder.
Deletes the selected file, Folder, or Cabinet.
Renames the selected file, Folder, Cabinet, or Shortcut.
Shows the folder to which the selected shortcut is linked.
This item is available only when the shortcut is selected.
Exits ScanSnap Organizer.
11
Page 14
<[Edit] menu>
Edit
Undo <Ctrl + Z>
Cut <Ctrl + X>
Copy <Ctrl + C>
Paste <Ctrl + V>
Select All <Ctrl + A>
<[View] menu>
View
File Name
Undoes the most recent action such as the following.
● Delete (to move to the Recycle Bin)
● Rename
● Copy/Move by a drag and drop action
● Cut or Paste
Cuts the selected file, Folder, or Cabinet.
Copies the selected file, Folder, or Cabinet.
Pastes the cut or copied file, Folder, Cabinet.
When [Folder] is pasted directly under the [My ScanSnap] folder, it
is changed to [Cabinet] in ScanSnap Organizer. On the other hand,
when [Cabinet] is copied/moved to under another [Cabinet] or
[Folder], it is changed to [Folder].
Selects all files displayed in File view.
Shows the file name under the
displayed thumbnail if it is checked
(when Thumbnail View is used).
Pop-up Thumbnail
Checking it shows a pop-up
thumbnail when you select a
file.
You can scale the thumbnail
up and down by dragging
the lower right corner.
12
Page 15
View
List
Displays a list of files instead of thumbnails in the File view area.
Thumbnails
Thumbnail size
Rearrange Folders by
Rearrange Files by
Displays the thumbnail view instead of the file list in the File view area.
Changes the size of thumbnails displayed in File view to Large, Medium,
or Small, or changes to Top Thumbnail view.
Large: 196 X 196 (Pixels)
Medium: 128 X 128 (Pixels)
Small: 96 X 96 (Pixels)
Top: Shows the upper part of the image
Rearranges the folders displayed in Folder view in ascending or
descending order according to folder names.
Rearranges the files in File view in ascending or descending order by the
following.
Name
You can rearrange the display sequences of files in File view in
alphabetical order according to the name.
Type
You can rearrange the display sequences of files in File view according
to the type.
Size
You can rearrange the display sequences of files in File view according
to the size.
Date Modified
You can rearrange the display sequences of files in File view according
to the date modified.
Date Created
You can rearrange the display sequences of files in File view according
to the date created.
The newly added file while ScanSnap Organizer is active is added
to the end of thumbnails/list.
You can change the order (ascending Ù descending) by clicking
each factor (Name, Type, Size, Date Modified, or Date Created) on
the menu.
13
Page 16
View
Refresh <F5>
Refreshes the display of Folder view and File view to the latest
information.
<[PDF file] menu>
PDF file
Convert into
Searchable PDF
- Execute
Converts selected PDF files, which are scanned with the ScanSnap, into
searchable PDF files.
Settings can be changed in the following dialog box.
● Pages
Specifies the pages you want to make searchable.
All pages
All pages are converted.
(It may take an extended period of time depending on the number of
pages/PDF files selected because all pages are converted.)
Current page only
Thumbnails: Only the currently thumbnailed page is converted.
List: Not available.
“Skip pages with embedded textual information” checkbox
Textual information is embedded into the scanned images when
PDF files are converted into searchable ones. If this checkbox is
marked, only pages not yet made searchable are converted. If the
check mark is cleared, all pages including those already searchable
are converted.
● Timing
Specifies timing to execute conversion.
Execute immediately
Conversion is started upon clicking the [OK] button.
Execute when the computer is idle
Conversion is performed depending on workload of the computer
while a user who is using this function logs on to Windows. If the
conversion is not complete by the time the user logs off, it will be
restarted when the same user logs on again.
14
Page 17
PDF file
Convert into
Searchable PDF
- Execute
(Continued)
“Display conversion list” checkbox
If the checkbox is marked, a list of files to be converted is displayed
upon clicking the [OK] button so that you can check the status.
This checkbox is available only when “Execute when the computer
is idle” is selected.
● Other settings
Language for conversion to searchable files
You can select a language in which the document to be converted is
written.
Error handling:
You can specify what to do in case of a conversion error.
You can specify it only when “Execute immediately” is selected as
“Timing.”
- Ignore the error and continue
Even if an error occurs, conversion is continued to the end of the
process.
- Ask for confirmation
If an error occurs during conversion, the confirmation message
is displayed and conversion is suspended.
- Stop processing and display error message
If an error occurs during conversion, the error message is
displayed and conversion is stopped halfway.
If “Execute when the computer is idle” is selected, errors are ignored
and conversion is continued to the end of the process.
By selecting a Folder, Cabinet, or Shortcut, you can also convert PDF
files stored the selected Folder, Cabinet, or Shortcut into searchable
PDF files.
In such case, the following dialog box will appear.
15
Page 18

PDF file
Convert into
Searchable PDF
- Execute
(Continued)
● Target pages
All pages
All pages are converted.
(It may take an extended period of time depending on the number of
pages/PDF files selected because all pages are converted.)
The first page only
Only the first page is converted.
“Skip pages with embedded textual information” checkbox
Textual information is embedded into the scanned images when
PDF files are converted into searchable ones. If this checkbox is
marked, only the pages not yet made searchable are converted. If
the check mark is cleared, all pages including those already
searchable are converted.
● Target files
Include subfolders
If the checkbox is marked, PDF files in the subfolder(s) are also
converted. Note that this checkbox is grayed out if the selected
folder is the [My ScanSnap] folder/Shortcut to folder on the
network.
● Timing
“Execute when the computer is idle” only
Conversion is performed depending on workload of the computer
while a user who is using this function logs on to Windows. If the
conversion is not complete by the time the user logs off, it will be
restarted when the same user logs on again.
“Display conversion list” checkbox
If the checkbox is marked, a list of files to be converted is displayed
upon clicking the [OK] button so that you can check the status.
● Other Settings
Language for conversion to searchable files
You can select the language used for conversion.
16
Page 19
r
PDF file
Convert into
Searchable PDF
- PDF Conversion List
Displays the “PDF Conversion List” in which PDF files to be converted
are listed so that you can check the status.
This list is used to check the status of PDF files to be converted as well
as show PDF files targeted for conversion while the computer is not
doing any other tasks (in other words, when idle).
You can also check the conversion results of PDF files to be converted
automatically.
Menu ba
File list
Title bar
Menu Bar
● File
Stop/Delete
from the list:
Conversion of the selected files is stopped and
those filenames are removed from the list.
Close: Upon selecting “Close” from the menu, the PDF
Conversion List dialog box closes.
● Edit
Select All: All files are selected.
● PDF Conversion
Suspend: Conversion into searchable PDF files is suspended.
This item switches to “Restart” when the
conversion is suspended. “Suspended” is displayed
on the title bar.
Restart: The suspended conversion is restarted. This item
switches to “Suspend” when the conversion is
restarted.
● History
Conversion
The conversion history of PDF files is displayed.
history:
● Tools
View
history
setting:
Specifies the number of days so that the name of
files whose “Status” is “Conversion failed” is
displayed in PDF Conversion List for a specified
number days.
● Help
Help: ScanSnap Organizer Help is displayed.
About
ScanSnap
Organizer:
The version information of “ScanSnap Organizer –
PDF Conversion List.”
17
Page 20

PDF file
Convert into
Searchable PDF
- PDF Conversion List
(Continued)
File List
● File name
The name of PDF files is displayed.
● Folder name
The path to the folder, in which PDF files are stored, is displayed.
● Status
The status of conversion is displayed.
Waiting: The task is on standby.
Converting: Conversion into searchable PDF files is in process.
Conversion
failed:
Being
stopped:
Being
suspended:
Conversion into searchable PDF files has failed, or
the PDF files incapable of being converted into
searchable PDF files.
Conversion into searchable PDF files was stopped
during conversion, and your system is stopping
conversion.
“Suspend” was selected during conversion.
Conversion to searchable PDF files is being
suspended. When the conversion is suspended, this
column will become blank.
● Cause
When the “Status” is “Conversion failed,” the cause of failure is
displayed.
● Pages
The number of pages targeted for conversion is displayed. Note that
the number of pages cannot be displayed if the PDF files are
security-protected (such as by a password).
● Date Listed
Date and time the conversion to searchable PDF files was directed.
● Date Finished
Date and time the conversion was finished.
The following file names are automatically removed from the “PDF
Conversion List”.
- The name of PDF files converted into searchable PDF files
successfully.
- The “Status” is “Conversion failed,” and the elapsed number of
days starting on “Date Finished” exceeds the number of days
specified on “View setting” dialog box.
When “PDF Conversion List” is brought to the front, conversion
starts even if the computer is not idle.
18
Page 21
PDF file
Convert into
Searchable PDF
- Automatic
Conversion Setting
You can set the setting so that PDF files added to the [My ScanSnap]
folder are automatically converted into searchable PDF files.
● “Automatically make PDF files searchable after the PDF
files are added to the My ScanSnap folder” checkbox
If this checkbox is marked, all PDF files scanned with the ScanSnap
and added to the [My ScanSnap] folder are automatically converted
into searchable PDF files.
All pages are converted every time. If you want to convert only
some pages, clear the check and select the files to convert those
pages.
Any files saved while this checkbox is unmarked are not targeted
for automatic conversion. If you want to convert those files, select
them to convert.
● Language for conversion to searchable files
You can select a language in which the document to be converted is
written.
● “Skip pages with embedded textual information” checkbox
Textual information is embedded into the scanned images when PDF
files are converted into searchable ones. If this checkbox is marked,
only pages not yet made searchable are converted. If the check mark
is cleared, all pages including those already searchable are converted.
● “Display the message to confirm the settings at ScanSnap
Organizer startup” checkbox
If this checkbox is marked, you will see a message confirming the
settings every time you start ScanSnap Organizer.
19
Page 22
PDF file
Search <Ctrl + S>
Searches PDF files.
● Enter search words
Enter the word(s) you want to find in the PDF file made searchable.
● Only the fully matching words are searched for
Mark this check box if you want to search only the words that
precisely match with what you enter above.
● Location
You can specify folders, cabinets, and shortcuts to be searched.
Upon clicking the [Search] button, Adobe Acrobat is activated and a
search is started. For details, refer to Help in Adobe Acrobat.
The Search function is available only when Adobe Acrobat 7.0 or later is installed on your
computer.
20
Page 23
<[Action] menu>
Action
Scan2E-mail
Scan2Print
ABBYY Scan2Word
ABBYY Scan2Excel
ABBYY
You can send e-mail with selected files attached.
You can print selected files with a printer.
You can convert selected files into Microsoft
You can convert selected files into Microsoft
You can convert selected files into Microsoft
®
Word file format.*
®
Excel file format.*
®
PowerPoint® file format.*
Scan2PowerPoint
* ABBYY FineReader for ScanSnap must be installed in advance.
<[Tools]menu>
Tools
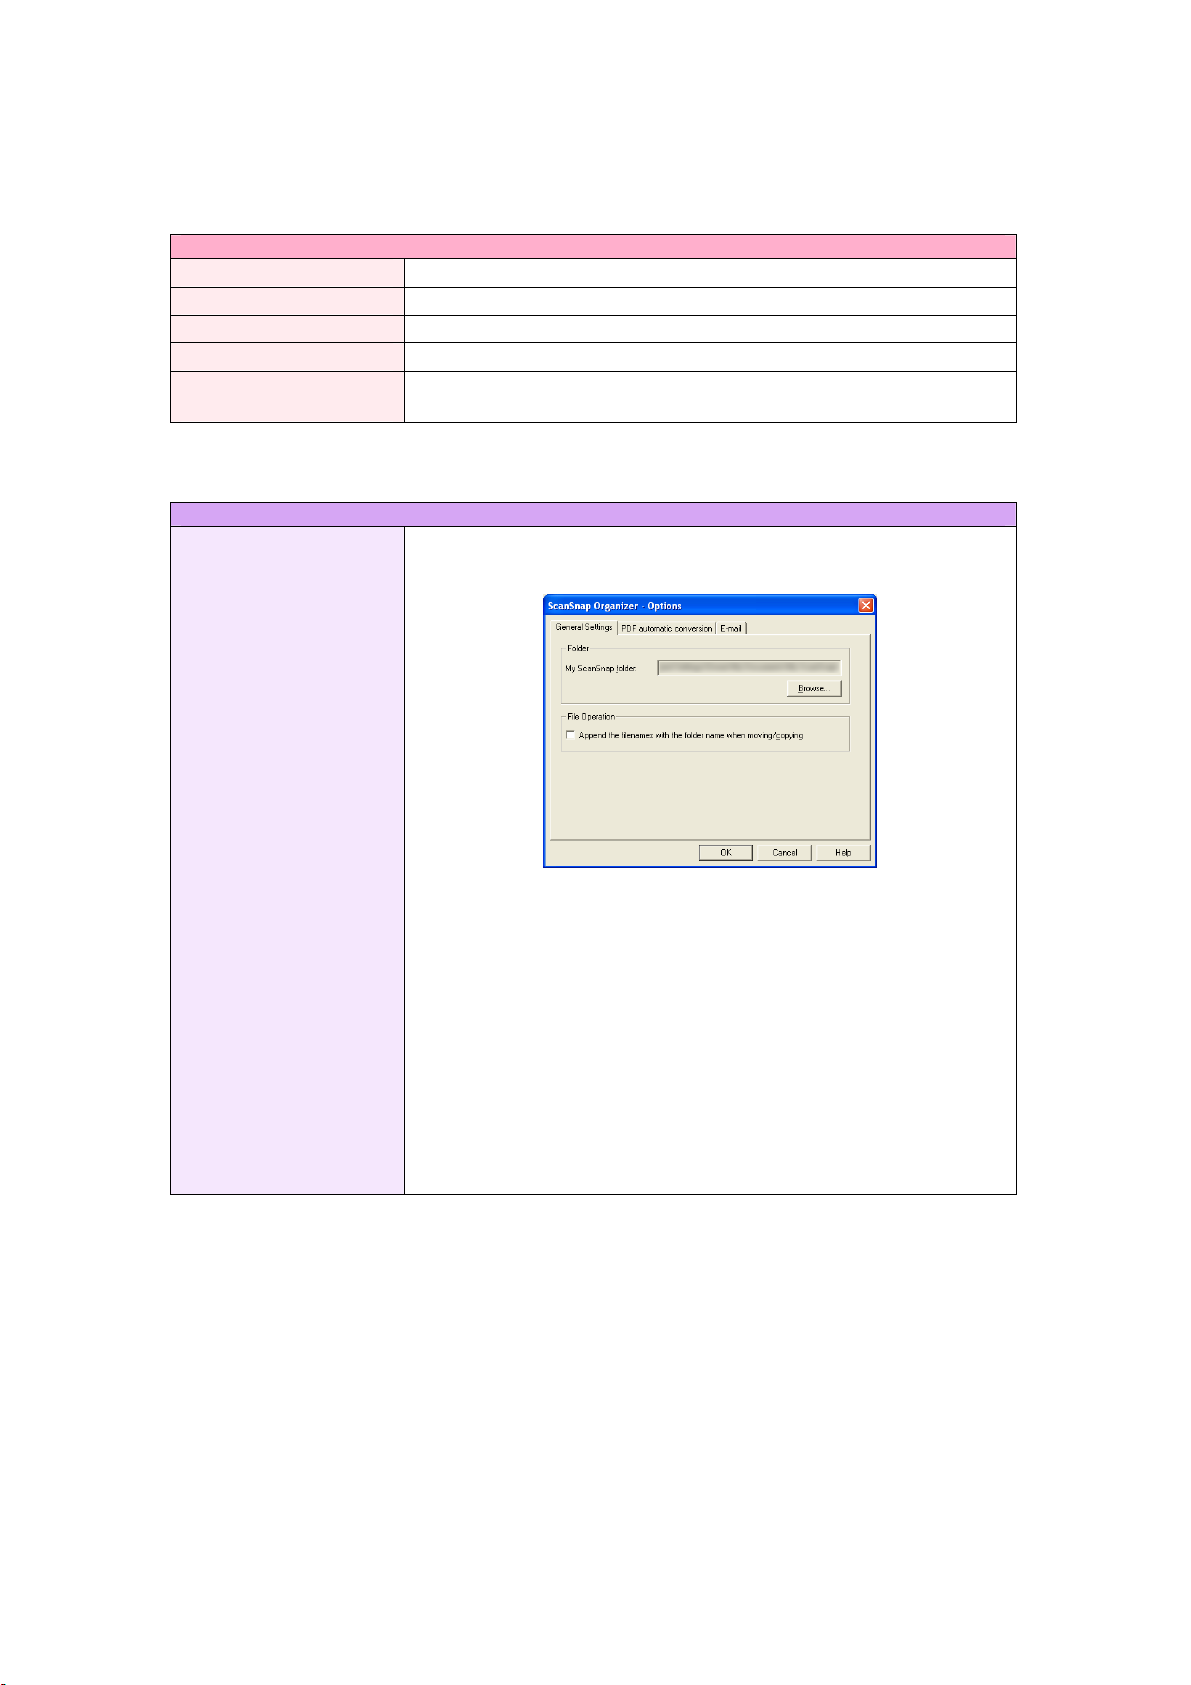
Options
- [General Settings]
tab
You can specify a destination folder and rename files when moving or
copying the files.
● My ScanSnap folder
Specifies the location of the [My ScanSnap] folder, which is present
in Folder view when ScanSnap Organizer is started. The specified
folder and the sub-folders can be displayed by ScanSnap Organizer.
● “Append the filenames with the folder name when
moving/copying” checkbox
When moving or copying a file, the destination folder’s name is
appended in front of the file name.
e.g.: When moving/copying a file named Snap001.pdf to a folder
named Scan.
File name after moving/copying: Scan_Snap001.pdf
21
Page 24
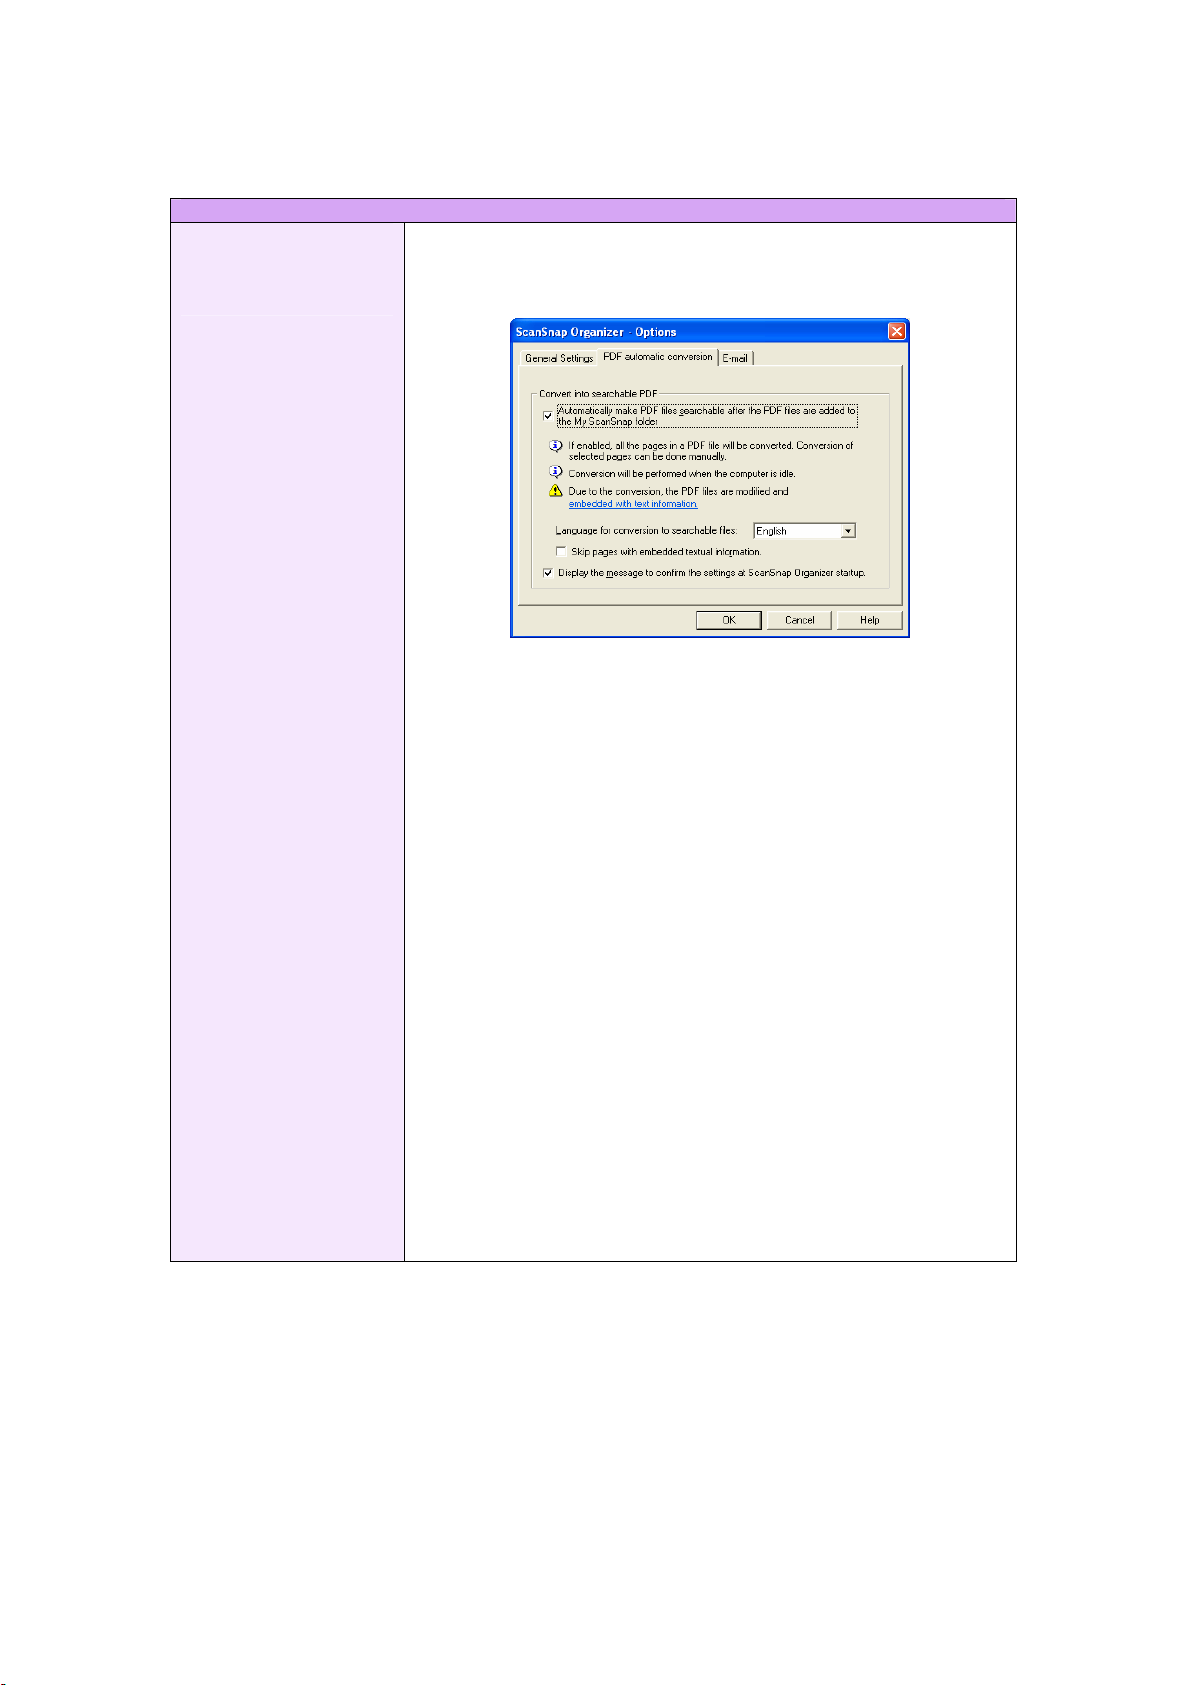
Tools
Options
- [PDF automatic
conversion] tab
You can set the setting so that all PDF files scanned with the
ScanSnap and added in the [My ScanSnap] folder are
automatically converted into searchable PDF files.
● “Automatically make PDF files searchable after the PDF
files are added to the My ScanSnap folder” checkbox
All PDF files scanned with the ScanSnap and added in the [My
ScanSnap] folder while this checkbox is marked are converted into
searchable PDF files automatically.
All pages are converted every time. If you want to convert only some
pages, clear the check and select the files to convert those pages.
Any files saved while this checkbox is unmarked are not targeted for
automatic conversion. If you want to convert those files, select them
to convert.
● Language for conversion to searchable files
You can select a language in which the document to be converted is
written.
● “Skip pages with embedded textual information” checkbox
Textual information is embedded the scanned images when PDF files
are converted into searchable ones. If this checkbox is marked, only
pages not yet made searchable are converted. If the check mark is
cleared, all pages including those already searchable are converted.
● “Display the message to confirm the settings at ScanSnap
Organizer startup” checkbox
If this checkbox is marked, you will see a message confirming the
settings every time you start Organizer.
22
Page 25
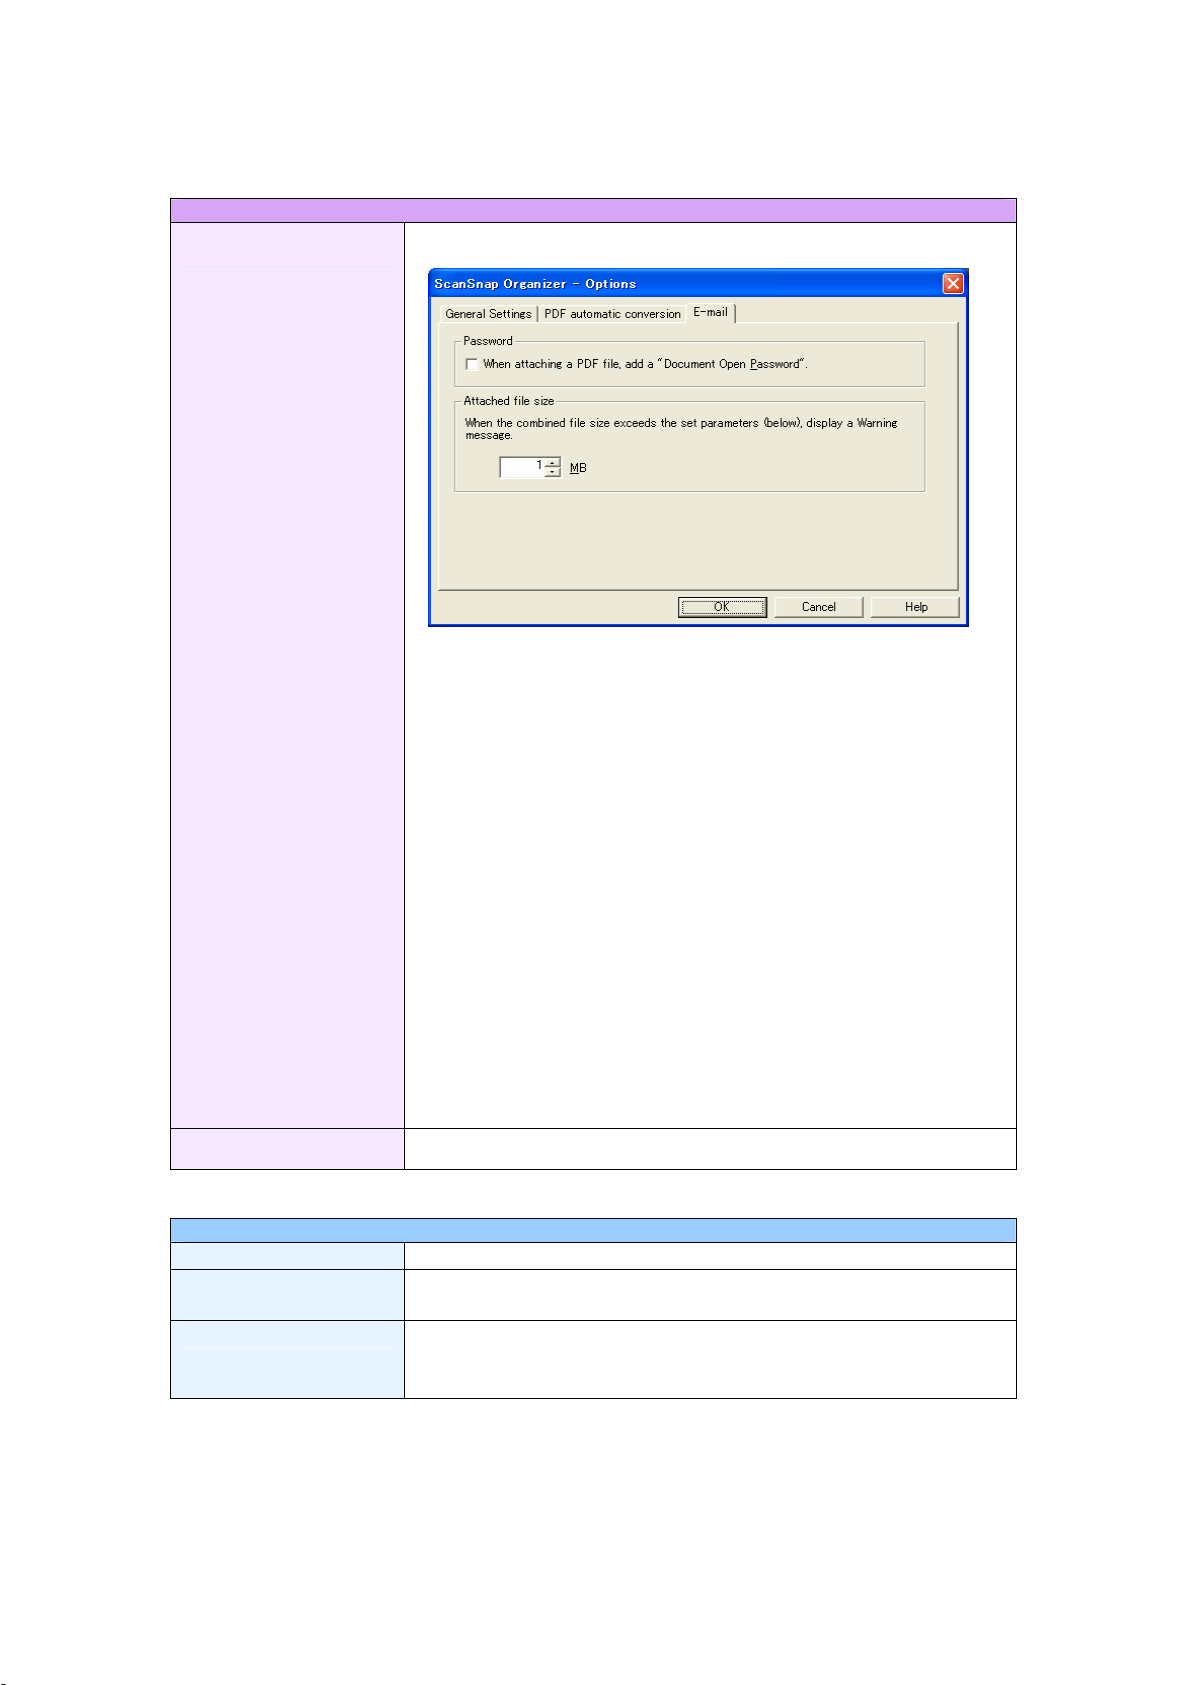
Tools
Options
You can change preferences for sending files by e-mail.
- [E-mail] tab
● “When attaching a PDF file, add a ‘Document Open
Password’ ” checkbox
ScanSnap Settings
<[Help] menu>
Help
Help
About ScanSnap
Organizer
Online Update
If this checkbox is marked, you can set a password for files in the
“Scan2E-mail - Set a password” dialog box that appears when sending
PDF files by e-mail.
Even if you mark this checkbox, you cannot set a password for the
selected files that are already protected with a “Document Open
Password”, or digital signatures are already applied to.
You can set a password only for PDF files that were created with the
ScanSnap.
● “When the combined file size exceeds the set parameters
(below), display a Warning message”
When the combined file size becomes larger than the preset size, a
Warning message is displayed.
You can set a parameter to between 1 and 10 MB.
Even if you see a Warning message, you can send the attached files.
However, it is recommended to send files not larger than 2MB (it
depends on your system environment).
ScanSnap Manager Settings is displayed.
Displays ScanSnap Organizer Help.
Displays ScanSnap Organizer’s version information.
Updates ScanSnap Organizer to the latest version.
It is essential that Internet Explorer is installed in a system which can
access the Internet.
23
Page 26

2.2.2. Toolbar
Buttons in the toolbar are as follows:
Create new cabinet:
Creates a Cabinet in Folder view.
A cabinet can be created only under [My ScanSnap] folder.
Create new folder:
Creates a Folder in a Cabinet in Folder view.
Folders cannot be created under the [My ScanSnap] folder.
Also, if a new folder is created directly under the [My ScanSnap] folder in
other programs such as Windows Explorer, it is shown as [Cabinet] in
ScanSnap Organizer.
Create shortcut to ScanSnap Organizer folder:
Creates a shortcut to any folder directly under the [My ScanSnap] folder.
The shortcut to the [My ScanSnap] folder, which is specified on the [General
Settings] tab in the “Options” dialog box, cannot be created. (Open the
“Options” dialog box by selecting the [Tools] menu -> [Options].) By default,
the path is set to the original “My ScanSnap” folder, which is under “My
Documents” folder. (See page 21.)
Change display mode:
Switches the File view between Thumbnails and the List.
Rearrange files:
Rearrange files displayed in File view according to the name, type, size, date
modified, or date created.
If a file is added while ScanSnap Organizer is active, you will find that it is
added to the end of the list.
You can rearrange files listed in ascending order or descending order every
time clicking the button or each factor (name, type, size, etc.) marked in the
pull-down list.
Convert into Searchable PDF:
Converts selected PDF files or PDF files in a selected folder, cabinet or shortcut
folder into searchable ones.
PDF Conversion List:
Displays a list of files being converted into searchable PDF files in order for you to
check the status.
Search:
Searches PDF files.
Scan2E-mail:
Opens your e-mail program with the selected file(s) attached to an e-mail message.
Scan2Print:
Prints the selected file(s).
Cut:
Cuts the selected cabinet/folder/file.
Copy:
Copies the selected cabinet/folder/file.
24
Page 27

Paste:
Pastes the cut or copied cabinet/folder/file.
If [Folder] is pasted directly under the [My ScanSnap] folder, it is changed to
[Cabinet] in ScanSnap Organizer.
Delete:
Deletes the selected file, folder, or Cabinet.
ScanSnap Settings:
Displays the ScanSnap Manager Settings.
Pop-up Thumbnail:
P
ops up the thumbnail selected when Thumbnail View is used.
25
Page 28

g
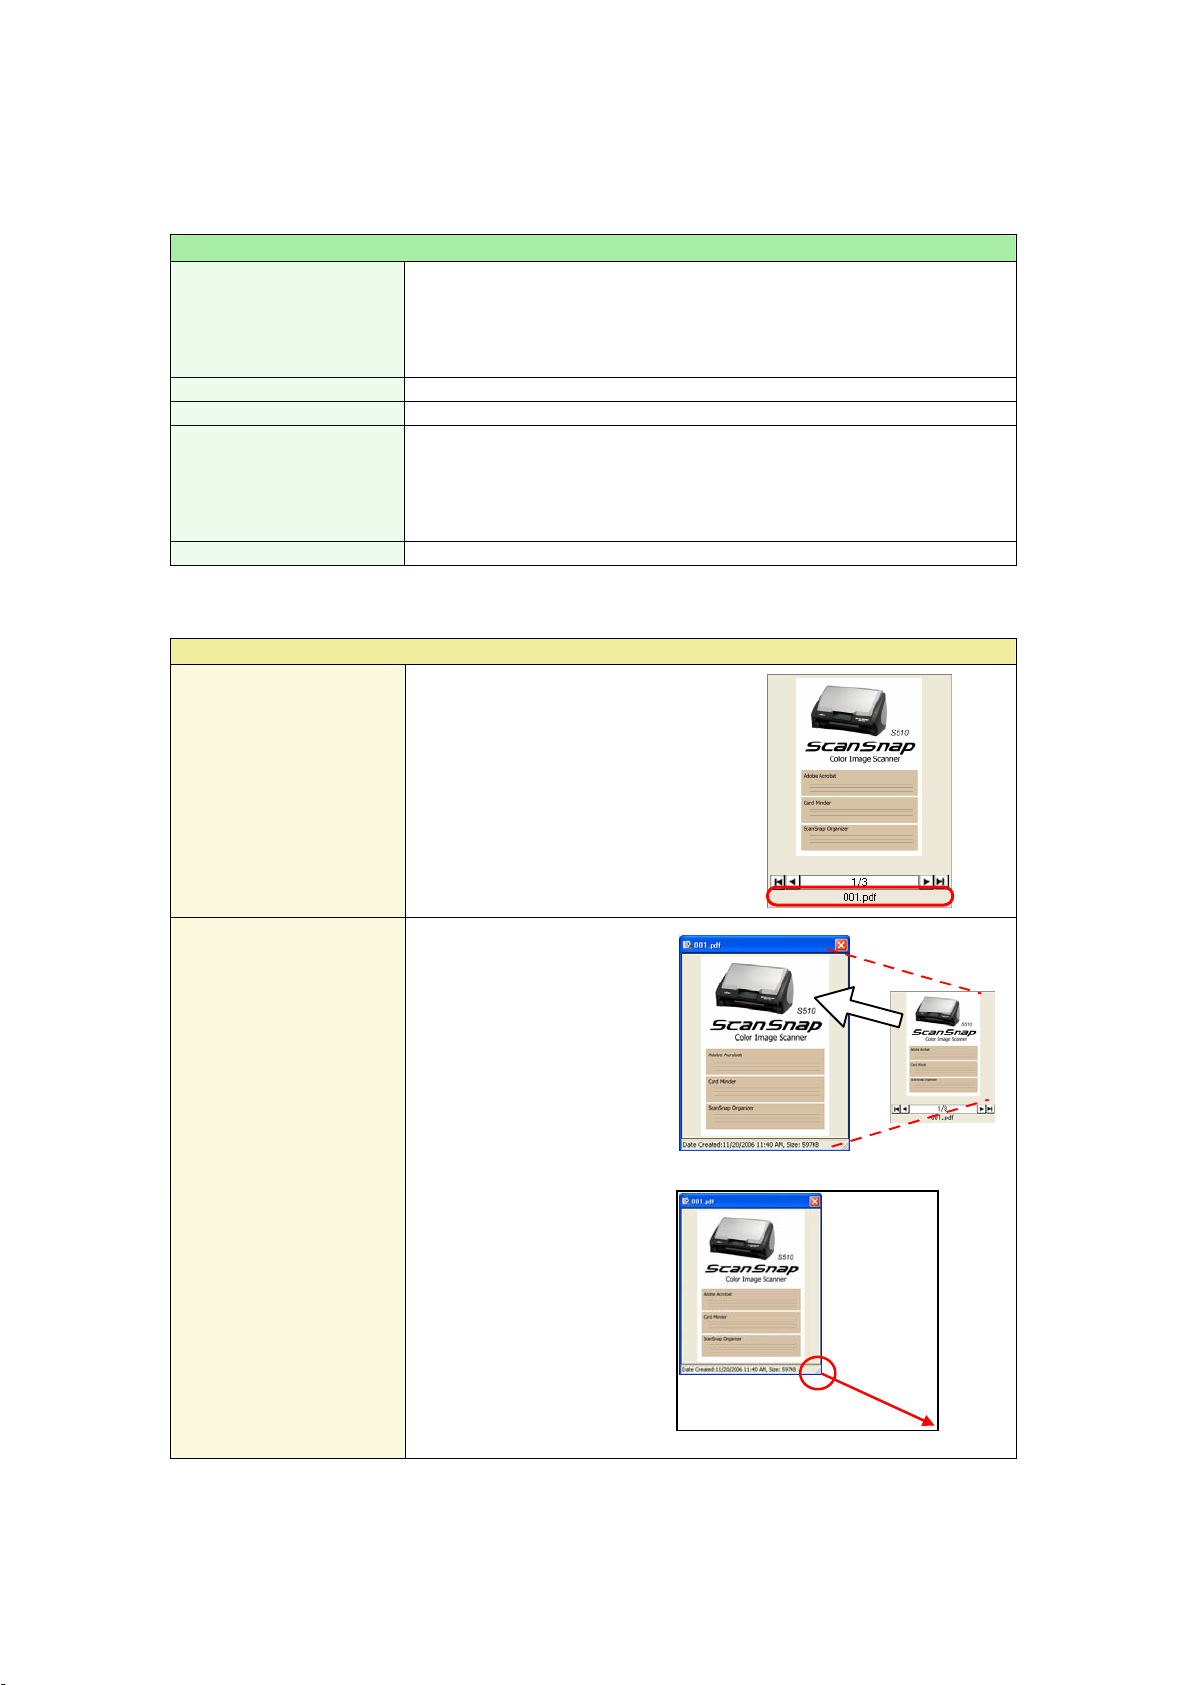
2.2.3. Thumbnail View
(Thumbnail Large/Medium/Small)
: Shown when a thumbnailed page of a PDF file
when is searchable.
: Indicates a password-protected file.
: Indicates a file with digital signatures.
Thumbnail image
Displays a miniature
ima
e of the file.
(Thumbnail Top)
File name
Page Forward / Backward button
If a file has multiple pages, you can page
forward to any page to see the thumbnail.
Page number
Shows the <current page number / total page
number>
You can type any number to show any page.
when the thumbnail size is not small.
26
Page 29

● PDF and JPEG files are thumbnailed.
Other kinds of files are displayed using the icon of applications associated with those
files.
● Thumbnails of password-protected PDF files cannot be displayed because of security
restrictions*. In this case, the Adobe Acrobat icon is displayed with a lock mark ( )
displayed on the lower left-hand corner.
* However, when both the following conditions are met, those PDF files can be
thumbnailed:
- ScanSnap Manager is active
- A Document Open Password is the same as a fixed password, which is set in the
“PDF file format option” dialog box. (To open this dialog box, select [SCAN Button
Settings] -> [File option] -> [Option] button)
Note that a PDF file protected with a “Permissions Password” cannot be thumbnailed
even if ScanSnap Manager is active and the fixed password and “Permission
Password” agree. Instead, the file icons each with a lock mark ( ) are displayed.
For details on how to set the fixed password, refer to “ScanSnap S510 Operator’s
Guide” or “ScanSnap Upgrade User’s Guide.”
● PDF files being converted into searchable PDF files are displayed with the text mark in
yellow ( ) and the thumbnail is changed to the icon of the associated application.
PDF files cannot be used while they are in the above state.
● If the icon of the PDF files is displayed instead of a thumbnail along with a lock mark
( ), such a file will not be accompanied by a text mark (
● When a PDF file bears digital signatures, a digital signature mark (
on the thumbnail. ).
).
) is displayed
Mouse Operations
Click the Thumbnail image
Double-click the Thumbnail image
Select a Thumbnail and click the File
name
Select a Thumbnail and click the Page
number
Click the [Page Forward/Backward] button
Drag the Thumbnail image and drop it on
to any location
Drag the Thumbnail image and press the
[Ctrl] key before dropping it on to any
location
The file is selected.
The associated application is started and the file
is opened.
(e.g.: If the file is PDF, “Adobe Acrobat” is
started.)
The file name can be changed.
Press the [Enter] key to confirm your entry.
The page displayed can be changed.
Type the (current) page number you want to
display and press the [Enter] key to confirm
your entry. The thumbnail of the entered page
number is displayed.
The thumbnail image changes as follows:
For
For
For
For
, advances by 1 page.
, advances to the last page.
, goes back by 1 page.
, goes back to the first page.
The selected file is moved to the location.
The selected file is copied to the location.
27
Page 30

2.3. Actions
Actions are frequently-used functions that help you make efficient use of your time at your
office. Only by selecting a PDF file created with the ScanSnap and clicking an icon, or by
dragging it onto an icon, you can print it with a printer, attach it to an e-mail, or convert it into a
Word/Excel/PowerPoint
®
document easily and quickly.
Name of Icon Function Reference
Scan2E-mail
Scan2Print
ABBYY
Scan2Word
ABBYY
Scan2Excel
ABBYY
Scan2PowerPoint
* It is required to install ABBYY FineReader for ScanSnap in advance.
For detailed operations, refer to the respective section above.
You can attach your selected files to
an e-mail message
You can print your selected files
with the printer.
You can convert your selected files
into a Microsoft
You can convert your selected files
into a Microsoft
You can convert your selected files
into a Microsoft
®
Word file.*
®
Excel file.*
®
PowerPoint® file.*
3.9. Sending Files by
E-mail
(page 56)
3.10. Printing
(page 59)
3.11. Converting into
Word/Excel/PowerPoint
® files
(page 62)
28
Page 31

3. Using ScanSnap Organizer in Various Ways
This chapter describes details of how to use ScanSnap Organizer with its various functions.
3.1. Connecting to ScanSnap
This section explains how to use ScanSnap Organizer to display and arrange images scanned
with the ScanSnap.
3.1.1. Preparing
When you use the Left-Click Menu Mode, which is one of the setting options for the [SCAN]
button, you need to configure the settings as the following procedure.
There are two setting options for the [SCAN] button:
● Quick Menu Mode
This is a mode in which you scan documents first and then you select an Action from
the Quick Menu that appears after scanning.
● Left-Click Menu Mode
This is a mode in which you first select the application you use after scanning and
then you scan documents.
For the details, see the “ScanSnap S510 Operator’s Guide” or “ScanSnap Upgrade
User’s Guide.”
1. Right-click the “ScanSnap Manager” icon on the Taskbar, and choose
[SCAN Button Settings] from the menu appeared.
Ö The “Scan and Save Settings” dialog box appears.
29
Page 32

2. Select “ScanSnap Organizer" from the “Application” drop-down list on the
"Application" tab.
Depending on the ScanSnap model you are using, the setting dialog box may differ from
the image above. For details on how to set the ScanSnap setting, refer to “ScanSnap
S510 Operator’s Guide” or “ScanSnap Upgrade User’s Guide” that comes with the
product.
3. Click the [OK] button.
Ö The “Scan and Save Settings” dialog box closes.
30
Page 33

3.1.2. Scanning
1. Load the document onto the scanner.
2. Press the [SCAN] button.
Ö Scanning is started.
When you scan with the Quick Menu Mode, the Quick Menu appears. Then Select “Save
with ScanSnap Organizer.”
Ö When scanning is finished, the “PDF Automatic Conversion Settings” dialog box
appears.
(Depending on the setting, it may not appear.)
3.
If you want PDF files to be converted automatically, click the [Yes] button; if
not, click the [No] button.
● ScanSnap is capable of making searchable PDF files by embedding textual information
in PDF files, which are the image data scanned with the ScanSnap. There are two
methods to use this function:
- Manually select necessary PDF files to convert them into searchable files.
- Automatically convert PDF files added in the predetermined folder ([My ScanSnap]
folder).
31
Page 34

To select the former method, click the [No] button; for the latter, click the [Yes] button.
● If you want to know what the searchable PDF files are, refer to “Appendix 1. About
Searchable PDF Files” on page 73.
● The “PDF Automatic Conversion Settings” dialog box can be hidden form view. Mark the
“Do not show this message again” checkbox if you do not want to see this dialog box
again.
● You can change the PDF automatic conversion settings later. For details on how to
change the settings, refer to “3.4. Configuring Automatic Conversion Settings of PDF
Files” on page 49.
● Every log-on user can use his/her own “PDF Automatic Conversion Settings.” Automatic
conversion of added PDF files is executed while the user who added the PDF file into the
[My ScanSnap] folder logs on to Windows and whenever any other applications are not
running on the computer. If the automatic conversion is not complete by the time the user
logs off, it will be restarted when the same user logs on again.
Ö When "ScanSnap Organizer" is activated, you will see the thumbnailed image you
scanned (when the display mode is [Thumbnails]).
● Scanned images are saved in the [My ScanSnap] folder, which is specified on the [General
Settings] tab in the "Options" dialog box. (See page 21.)
It is the [My ScanSnap] folder under [My Documents] by default.
● After scanning, images may not appear immediately or no images may appear while a
password is being set.
If images do not appear after setting a password, select [Refresh] from the [View] menu.
32
Page 35

3.1.3. Organizing Files
This section explains the procedure to create a new Cabinet or Folder, and how to move scanned
files to the Cabinet or Folder.
The idea is similar to arranging a big pile of documents (files) in the room ([My ScanSnap]
folder), purchasing a new shelf (Cabinet) and a new document tray (Folder), and classifying
them according to purposes for which the documents are used.
1. Click the [Create new cabinet] button on the toolbar.
Or, on the [File] menu, select [New] -> [Cabinet].
Ö Under the [My ScanSnap] folder in Folder view, [New Cabinet] is created.
2. Enter a name for the Cabinet.
Enter the name “Cabinet 1” here.
In the case that you want to change the name of a cabinet, select the name and click it. Or,
select the name, and then select [Rename] on the [File] menu.
3. Select the Cabinet created in Step 1.
33
Page 36

4. Click the [Create new folder] button on the toolbar.
Or, on the [File] menu, select [New] -> [Folder].
Ö Under the Cabinet created in Step 1, [New Folder] is created.
5. Enter a Folder name.
As an example, create two folders named [Folder 1] and [Folder 2].
In the case that you want to change the name of a folder, select the name and click it. Or,
select the name, and then select [Rename] on the [File] menu.
6. Repeat Steps 3, 4, and 5 to create folders as needed.
7. Select the [My ScanSnap] folder, and then select the file you want to move.
You can select multiple files at one time when you press and hold down the [Ctrl] or [Shift]
key while selecting the files.
34
Page 37

8. Drag-and-drop the selected file to the destination folder.
Ö The selected file is moved to the destination folder.
While holding the [Ctrl] key, drag and drop the file onto the destination folder. Doing so can
create a copy of the selected file.
9. Repeat Steps 7, 8 to store files in the destination folders.
Cabinets and Folders created in ScanSnap Organizer as well as the [My ScanSnap] folder
appear as icons (Cabinet:
Explorer and My Computer. (It is not applied in Windows Vista)
, Folder: , [My ScanSnap] folder: ) in Windows
35
Page 38

3.2. Copying/Moving Files, Folders, and Cabinets
This section explains how to copy/move files, Folders, or Cabinets to other Cabinets or Folders
in the [My ScanSnap] folder.
1. Select the files you want to copy or move in File view.
To copy or move Folders/Cabinets, select them in Folder view.
● You can select multiple files at one time while holding down the [Ctrl] or [Shift] key.
● When you copy/move a Folder or Cabinet, all the Folders or files in it are also
copied/moved.
● You cannot copy or move any Shortcut to Folder.
2. To copy files, Folders, or Cabinets, select [Copy] on the [Edit] menu, or click
the [Copy] button on the toolbar.
To move files, Folders, or Cabinets, select [Cut] on the [Edit] menu, or click
the [Cut] button on the toolbar.
3. Select the destination Cabinet or Folder in Folder view.
4. Select [Paste] on the [Edit] menu, or click the [Paste] button on the
toolbar.
Ö The selected file, Folder, or Cabinet is copied/moved to the destination Cabinet or Folder.
In ScanSnap Organizer, if [Folder] is pasted directly under the [My ScanSnap] folder, it is
changed to [Cabinet]. Conversely, if [Cabinet] is copied/moved into another [Cabinet] or
[Folder], it is changed to [Folder].
36
Page 39

3.3. Converting PDF Files into Searchable Ones
ScanSnap Organizer is capable to convert PDF files scanned with the ScanSnap into Searchable
PDF. This section describes how to perform the conversion. (For information about the
Searchable PDF, see page 73 for details.)
Select PDF file(s) to be made searchable in File view.
1.
Files you cannot convert into Searchable PDF
ScanSnap Organizer cannot convert the following types of files into Searchable PDF
files without performing the procedure below:
● For PDF files not created with the ScanSnap
Scan the documents with the ScanSnap and convert the created PDF files into
searchable PDF, or convert them with Adobe Acrobat.
● For files protected by security options such as passwords
Remove the security options and try again.
● For PDF files that bear digital signatures
ScanSnap Organizer does not convert PDF files that bear digital signatures into
searchable ones. Otherwise the digital signatures become invalid. Convert the files
into searchable PDF file before applying digital signatures.
2. Click the [Convert into Searchable PDF] button, or, on the [PDF file]
menu, select [Convert into Searchable PDF] -> [Execute].
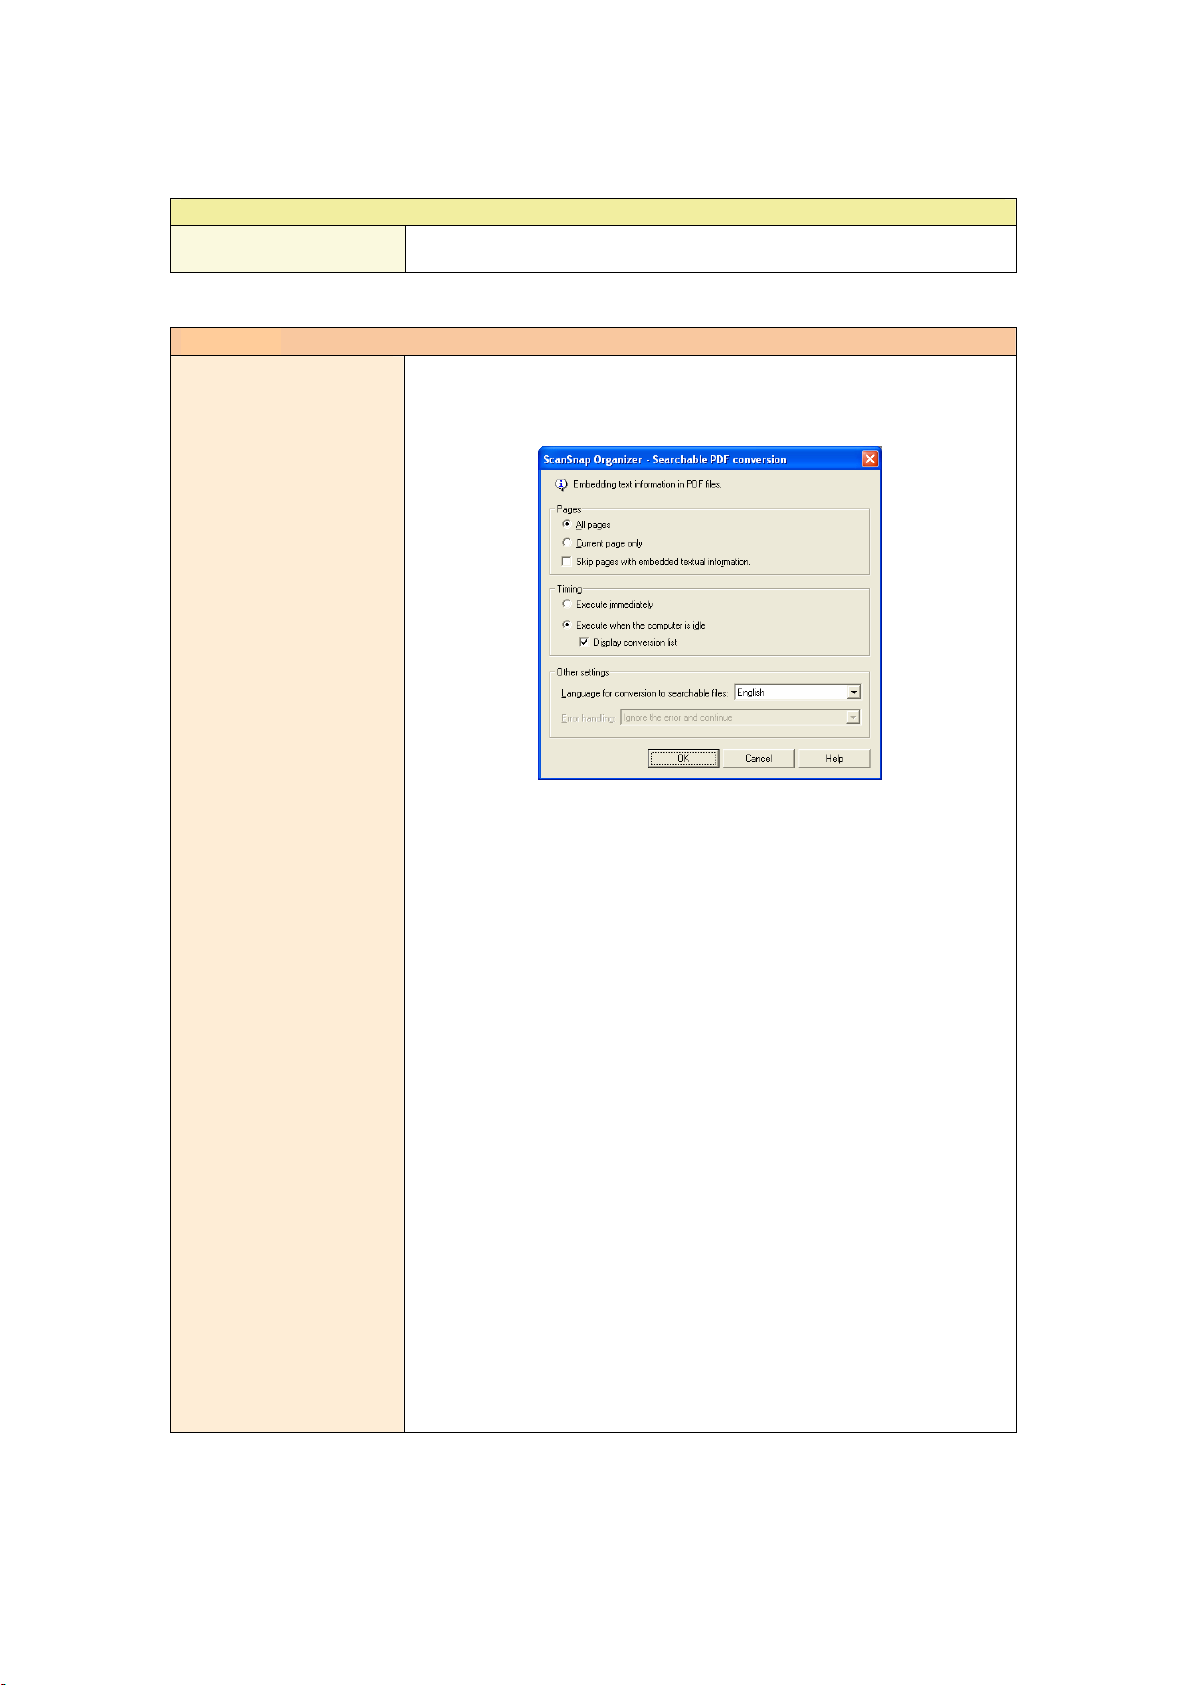
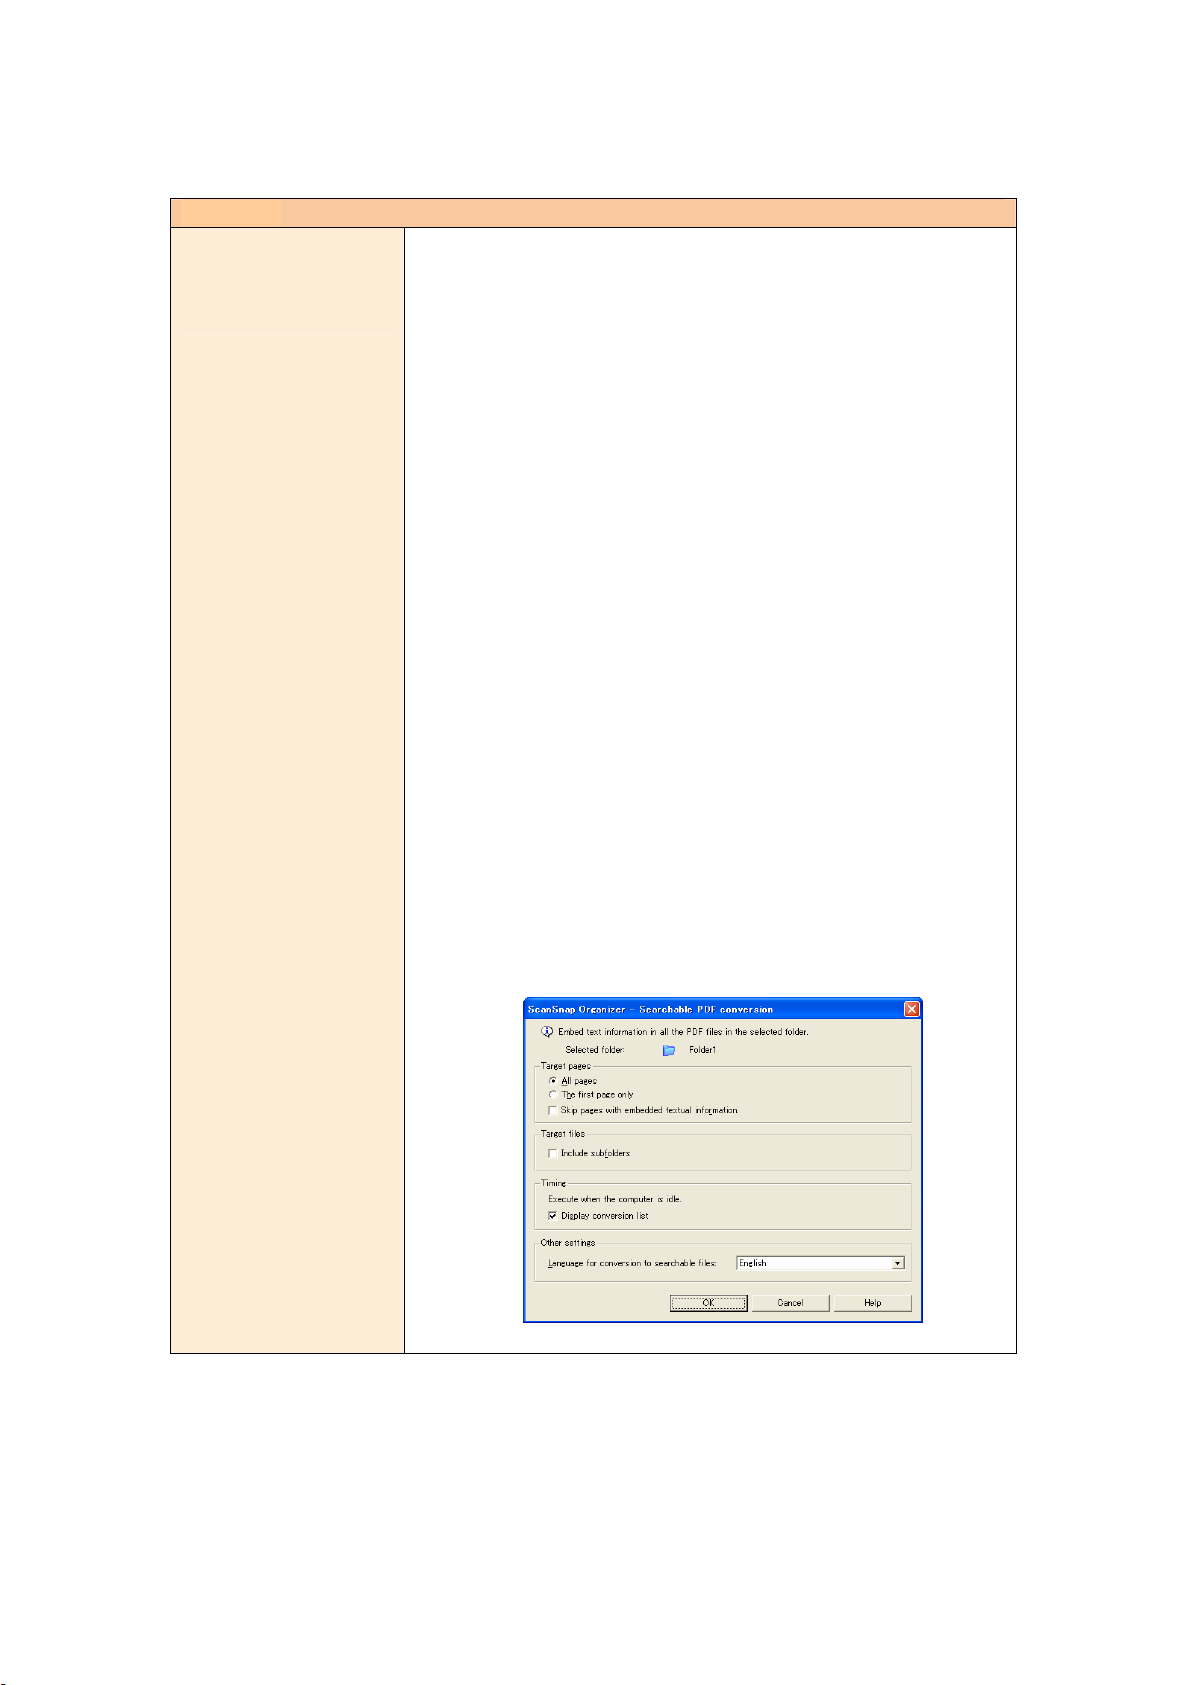
Ö The “Searchable PDF conversion” dialog box will appear.
3.
Select settings for converting into searchable PDF files.
● Pages
Select pages to be converted.
-
All pages
All pages of the selected PDF file(s) are converted.
(Therefore, this process may require an extended period of time depending on the
37
Page 40

number of pages included in the selected file or the number of files selected.)
- Current page only
Thumbnails: Only the currently thumbnailed page is converted.
List: Not available.
- “Skip pages with embedded textual information” checkbox
Textual information is embedded into the scanned images when PDF files are
converted into searchable ones. If this checkbox is marked, only pages not yet made
searchable are converted. If the check mark is cleared, all pages including those
already searchable are converted.
● Timing
Select the timing of execution.
- Execute immediately
Conversion is started upon clicking the [OK] button.
Execute when the computer is idle
-
Conversion is performed depending on workload of the computer while the user who
are using this function logs on Windows. If the conversion is not complete by the time
the user logs off, it will be restarted when the same user logs on again.
- “Display conversion list” checkbox
If the checkbox is marked, a list of files to be converted is displayed upon clicking the
[OK] button so that you can check the status.
This checkbox is available only when “Execute when the computer is idle” is marked.
● Other settings
- Language for conversion to searchable files
You can select a language in which the document to be converted is written.
- Error handling
You can specify what to do in case of a conversion error.
You can specify the measure only when “Execute immediately” is selected under
“Timing.”
• Ignore the error and continue
Even if an error occurs, conversion is continued to the end of the process.
•
Ask for confirmation
If an error occurs during conversion, the confirmation dialog is displayed
and conversion is suspended.
•
Stop processing and display error message
If an error occurs during conversion, an error message is displayed and text
38
Page 41

recognition is stopped halfway.
If “Execute when the computer is idle” is selected, errors are ignored and
conversion is continued to the end of the process.
4. Click the [OK] button.
Ö Conversion will start.
(1) When “Execute immediately” is selected:
The following dialog box appears and conversion starts.
If you click the [Stop] button, conversion is terminated after processing the current page.
Then the “Searchable PDF conversion” dialog box appears showing the message
“Conversion finished”.
When conversion is complete, the “Searchable PDF conversion” dialog box appears
showing the “Conversion finished” message.
If “Conversion failed” indicates any results other than zero, click the [Detailed information]
button to check the details shown in the Conversion_Log file.
39
Page 42

How to interpret the Log
● The results of conversion are displayed as follows:
Date = Date and time of conversion
File = Name of the file conversion performed
Path = Path to save the file
Result = Conversion result
Cause = The cause of failure (It is show when the Result is NG or except)
“Result” will be one of the following:
OK:
NG:
except:
canceled:
PDF conversion is complete without problem.
PDF conversion failed.
The file is not targeted for PDF conversion.
Conversion was canceled halfway through.
“Cause” will be one of the following:
If “Result” is “NG”
file not found:
The PDF file is not found. Before retrying conversion,
ensure that the file displayed after “File=” exists in the
folder displayed after “Path=”.
under file use:
The file is used by another application and conversion to
searchable PDF failed. Ensure that the file is available
before retrying conversion.
file open error:
The file cannot be opened because it is being used by
another application or access is not permitted. Ensure that
the file is available and you have the access right before
retrying conversion.
file access failure:
The file cannot be accessed or opened because it is being
used by another application or access is not permitted.
Ensure that the file is available and you have the access
right before retrying conversion.
OCR error:
out of memory:
disk full:
error:
A problem occurred during conversion to searchable PDF.
Retry conversion.
Conversion failed due to insufficient memory. Exit all
programs you are not using before retrying conversion. If
still errors occur, install additional memory.
There is not enough space in the disk drive in which the
folder including PDF files, the user’s [Temp] folder, or the
user’s profile exists. Delete unnecessary files or do
something to secure enough disk space before retrying
conversion.
An internal error occurred. Retry conversion.
40
Page 43

If “Result” is “except”
not ScanSnap PDF:
PDF with password:
PDF with digital
signature:
not PDF:
The Conversion_Log file (Conversion_Log.log) is overwritten to be stored in the
following folder. If you need to save the log records, save it by selecting [Save As]
from the [File] menu. The destination to save the log file is as follows:
Windows XP and Windows 2000
Drive name such as “C”: \Documents and Settings\(user name)\Application
Data\PFU\ScanSnap Organizer\Conversion_Log.log
The PDF file was not created with the ScanSnap.
ScanSnap Organizer cannot convert it into searchable PDF.
The PDF file is password-protected and cannot be
converted into searchable PDF. Cancel the password
before retrying conversion.
The PDF file is bearing a digital signature. ScanSnap
Organizer does not convert it into searchable PDF.
Otherwise the digital signature becomes invalid.
The file is not PDF. ScanSnap Organizer cannot convert it
into searchable PDF. (This result is displayed only when
you specify more than one file to convert; it is not
displayed if you specify folders to convert.)
Windows Vista
Drive name such as “C”:\Users\ (user name)
\AppData\Roaming\PFU\ScanSnap Organizer\Conversion_Log.log
In case of a conversion failure, do either of the following:
- Scan documents again.
- Perform text recognition in Adobe Acrobat.
41
Page 44

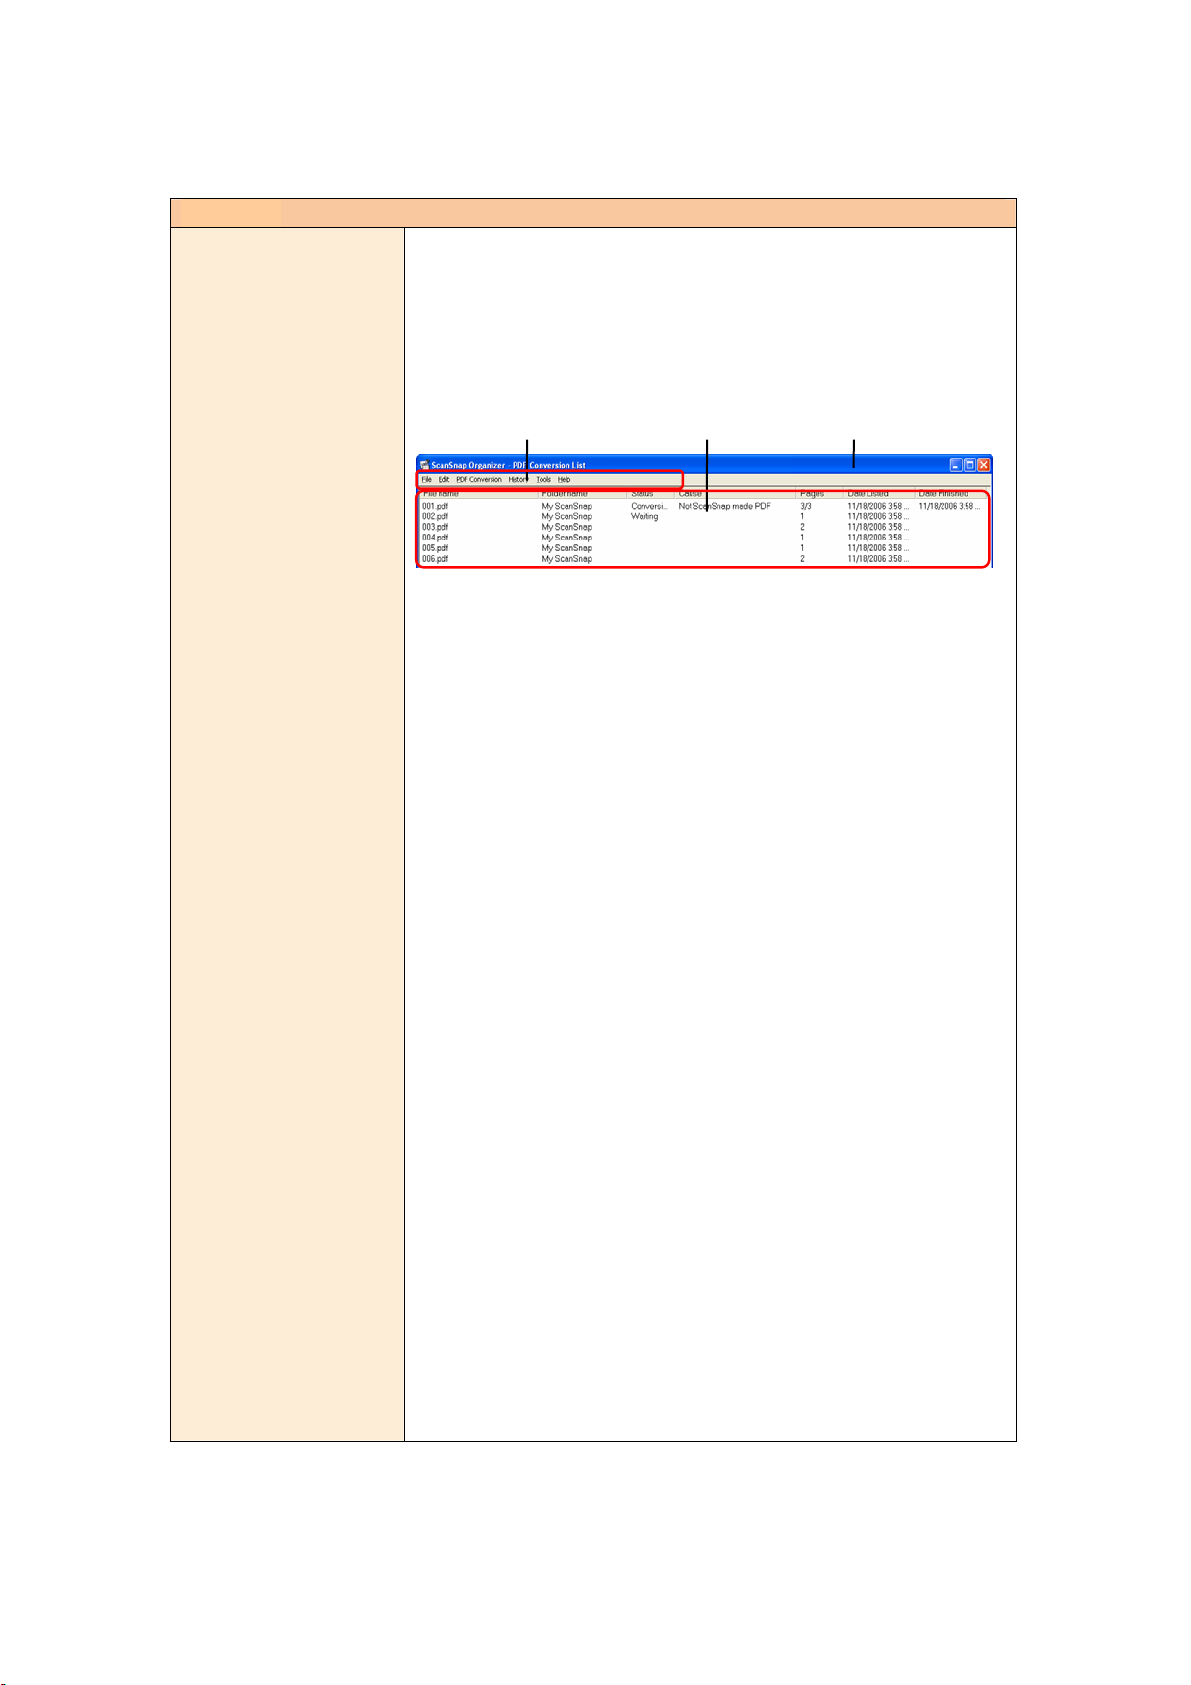
(2) When “Execute when the computer is idle” is selected:
Recognition is performed when the computer is idle.
If the “Display conversion list” checkbox is marked, a list of files to be converted is
displayed upon clicking the [OK] button, so that you can check the status.
Menu bar
Menu Bar
File list
● Conversion is carried out even if PDF Conversion List is not displayed. Close the PDF
Conversion List if you do not have to check the status.
PDF Conversion List can also be displayed by selecting [Start] -> [All Programs] ->
[ScanSnap Organizer] -> [PDF Conversion List] (or, with ScanSnap Organizer, select
[PDF file] on the menu bar -> [Convert into Searchable PDF] -> [PDF Conversion List])
whenever necessary.
● When “PDF Conversion List” dialog box is brought to the front, conversion starts even
if the computer is not idle.
● File
Stop/Delete from the
list
:
Close
: Closes the PDF Conversion List dialog box.
Stops conversion of selected files and removes the names of the
files from the list.
● Edit
Select All: All files are selected.
● PDF Conversion
Suspend: Conversion into searchable PDF files is suspended. This item
switches to “Restart” when the conversion is suspended.
“Suspended” is displayed on the title bar.
Restart: The suspended conversion is restarted. This item switches to
“Suspend” when the conversion is restarted.
42
Page 45

● History
Conversion history: Displays the “Job_History” log file on which the PDF Conversion
results are described.
How to interpret the Log
● The results of conversion are displayed as follows:
Date = Date and time of conversion
File = Name of the file conversion performed
Path = Path to save the file
Result = Conversion result
Cause = The cause of failure (It is show when the Result is NG or except)
“Result” will be one of the following:
OK: PDF conversion is complete without problem.
NG: PDF conversion failed.
except: The file is not targeted for PDF conversion.
canceled: Conversion was canceled halfway through.
“Cause” will be one of the following:
If “Result” is “NG”
file not found:
The PDF file is not found. Before retrying conversion, ensure
that the file displayed after “File=” exists in the folder displayed
after “Path=”.
under file use:
The PDF file is being used by another application and the name
of the file is moved to the last of PDF Conversion List. Check if
the file is available. (Conversion is automatically retried.)
file open error:
The file cannot be opened because it is being used by another
application or access is not permitted. Ensure that the file is
available and you have the access right before retrying
conversion.
file access
failure:
OCR error:
out of memory:
The file cannot be accessed or opened because it is being used by
another application or access is not permitted. Ensure that the file
is available and you have the access right before retrying
conversion.
A problem occurred during conversion to searchable PDF. Retry
conversion.
Conversion failed due to insufficient memory. Exit all programs
you are not using before retrying conversion. If still errors occur,
43
Page 46

install additional memory.
disk full:
error:
If “Result” is “except”
not ScanSnap
PDF:
PDF with
password:
PDF with
digital
signature:
not PDF:
There is not enough space in the disk drive in which the folder
including PDF files, the user’s [Temp] folder, or the user’s profile
exists. Delete unnecessary files or do something to secure enough
disk space before retrying conversion.
An internal error occurred. Retry conversion.
The PDF file was not created with the ScanSnap. ScanSnap
Organizer cannot convert it into searchable PDF.
The PDF file is password-protected and cannot be converted into
searchable PDF. Cancel the password before retrying conversion.
The PDF file is bearing a digital signature. ScanSnap Organizer
does not convert it into searchable PDF. Otherwise the digital
signature becomes invalid.
The file is not PDF. ScanSnap Organizer cannot convert it into
searchable PDF. (This result is displayed only when you specify
more than one file to convert; it is not displayed if you specify
folders.)
● Tools
View history
setting:
The log of PDF file conversion results is kept in the “Job_History” file.
The destination to save the log file is as follows:
Windows XP and Windows 2000
Drive name such as “C”:\Documents and Settings\(user name)\Application
Data\PFU\ScanSnap Organizer\Job_History.log
Windows Vista
Drive name such as “C”:\Users\(user name)\AppData\Roaming\PFU\ScanSnap
Organizer\Job_History.log
When the file size of the log reaches a certain level, it is overwritten. Save the log as
necessary on a regular basis.
Open the “PDF Conversion List” dialog box and select [Conversion history] from the
[History] menu; the log will be opened with Notepad. Save the log by selecting [Save As]
from the [File] menu.
Specifies the number of days so that the name of files whose
“Status” is “Conversion failed” is removed from PDF
Conversion List after the specified number of days are elapsed.
44
Page 47

● Help
Help:
About ScanSnap
Organizer:
Displays the ScanSnap Organizer Help.
Displays the version information of the “PDF Conversion
List” dialog box in ScanSnap Organizer.
File List
● File name
The name of PDF files is displayed.
● Folder name
The path to the folder, in which PDF files are stored, is displayed.
● Status
The status of conversion is displayed.
Waiting:
Converting:
Conversion
failed:
The task is in standby mode because other tasks are being
performed by the computer.
Conversion to searchable PDF files is in process.
Conversion to searchable PDF files was not successful, or the
selected PDF files are incapable of being converted into
searchable ones.
Being stopped:
Being
suspended:
“Stop” was selected during conversion. Conversion to
searchable PDF files is being stopped. When the conversion is
stopped, the selected file is deleted from the list.
“Suspend” was selected during conversion. Conversion to
searchable PDF files is being suspended. When the conversion
is suspended, this column will become blank.
● Cause
If the “Status” is “Conversion failed,” the reason why conversion failed is displayed.
If “Status” is blank or “Waiting”
The file is in use:
If “Status” is “Conversion failed”
No files:
Impossible to
open the file:
The PDF file is being used by another application and the
name of the file is moved to the last of PDF Conversion List.
Check if the file is available. (Conversion is automatically
retried.)
The PDF file cannot be found. Ensure that the file displayed in
the “File name” field exists in the folder displayed in the
“Folder name” field before retrying conversion.
The file cannot be opened because it is used by another
application or access is not permitted. Ensure that the file is
available and you have the access right before retrying
45
Page 48

conversion.
File access
unsuccessful:
OCR
unsuccessful:
Insufficient
memory:
Insufficient disk
space:
An error
occurred:
Not ScanSnap
made PDF:
Password
protected:
The file cannot be accessed or opened because it is used by
another application or access is not permitted. Ensure that the
file is available and you have the access right before retrying
conversion.
An error occurred during conversion into searchable PDF.
Retry conversion.
Conversion failed due to insufficient memory. Exit all
programs you are not using before retrying conversion. If still
errors occur, install additional memory.
There is not enough space in the disk drive in which the folder
including PDF files, the user’s [Temp] folder, or the user’s
profile exists. Delete unnecessary files or do something to
secure enough disk space before retrying conversion.
An internal error occurred. Retry conversion.
The PDF file was not scanned with the ScanSnap and
ScanSnap Organizer cannot convert it into the searchable PDF
file.
The PDF file is password-protected and cannot be converted
into searchable PDF. Cancel the password before retrying
conversion.
Bearing a digital
signature:
● Pages
The number of pages to be converted is displayed. Note that the number of pages
cannot be displayed if the PDF file is protected by security features such as a
password.
● Date Listed
The date (and time) on which the PDF files were listed in PDF Conversion List.
● Date Finished
The date (and time) on which the conversion of PDF files was completed.
● If either of the following conditions is met, the name of the file is automatically deleted
from the list.
- Files successfully converted into searchable PDF.
- Files that “Conversion failed” appears under “Status” on the “PDF Conversion
● When “PDF Conversion List” dialog box is brought to the front, conversion starts
even if the computer is not idle.
The PDF file is bearing a digital signature is applied to the
file. ScanSnap Organizer cannot convert it into searchable
PDF. Otherwise the digital signature becomes invalid.
List,” and the elapsed number of days starting on “Date Finished” exceeds the
number of days specified on “View setting” dialog box ([Tools] menu -> [View
history setting]).
46
Page 49

Note for moving/renaming folders and files
When you want to move/rename folders and/or files during the period from when
the PDF file is posted on the “PDF Conversion List” dialog box until when the file is
converted, perform the operation on ScanSnap Organizer.
If you use Windows Explorer to move/rename folders and/or files during the period,
ScanSnap Organizer will fail to find such files. It may cause failures during
conversion or incorrect conversion executed on wrong files.
Files that cannot be converted into searchable PDF files
The PDF files that are protected by security features such as a password and/or
bearing digital signatures cannot be converted into searchable PDF files even if
they are scanned with the ScanSnap.
Ö When conversion is complete, is displayed on the lower left of the thumbnail.
● PDF files being converted into searchable PDF files are displayed with the text mark
) in yellow and the displayed thumbnail is changed to the icon. The PDF file cannot
(
be operated while it is displayed as an icon.
● Depending on the files, conversion described above may require an extended period of
time. In such case, it is recommended to select “Execute when the computer is idle.”
● If you select “Execute when the computer is idle” for searchable PDF conversion and log
off Windows before conversion is complete, conversion restarts after the next logging-on
according to the following conditions:
- When 10 minutes passed after logging on
- When you display the “PDF Conversion List” dialog box.
- When a file is added in ”PDF Conversion List.” (In the case that you scan with
the ScanSnap, the conversion restarts 3 minutes after scanning.)
● The following kinds of documents may be converted improperly:
- Handwritten documents
- Documents including smaller characters, scanned in low quality
- Skewed documents
- Documents written in languages other than the specified “Language for
conversion to searchable files”
- Documents including texts written in Italic characters
47
Page 50

- Superscript/subscript letters and complex mathematical formulas
- Characters are written against an unevenly-colored or patterned background
* Characters to which effects (Shadow, Outline, and the like) are applied
* Shaded characters
- Documents of complex layout as well as documents including unreadable
characters (due to print-through and smudges)
(It may take an extended period of time to scan documents described above.)
These documents may be correctly converted if scanned at a higher resolution and/or
in different Color mode.
● When PDF files are converted into searchable ones, textual information is embedded in
the PDF files. Thus, the PDF files are updated.
48
Page 51

3.4. Configuring Automatic Conversion Settings of PDF Files
This section explains how to configure the settings to automatically convert PDF files scanned
with the ScanSnap and added in the [My ScanSnap] folder into searchable PDF files. (See page
73 for details.)
1. From the [PDF file] menu, select [Convert into Searchable PDF] ->
[Automatic Conversion Setting].
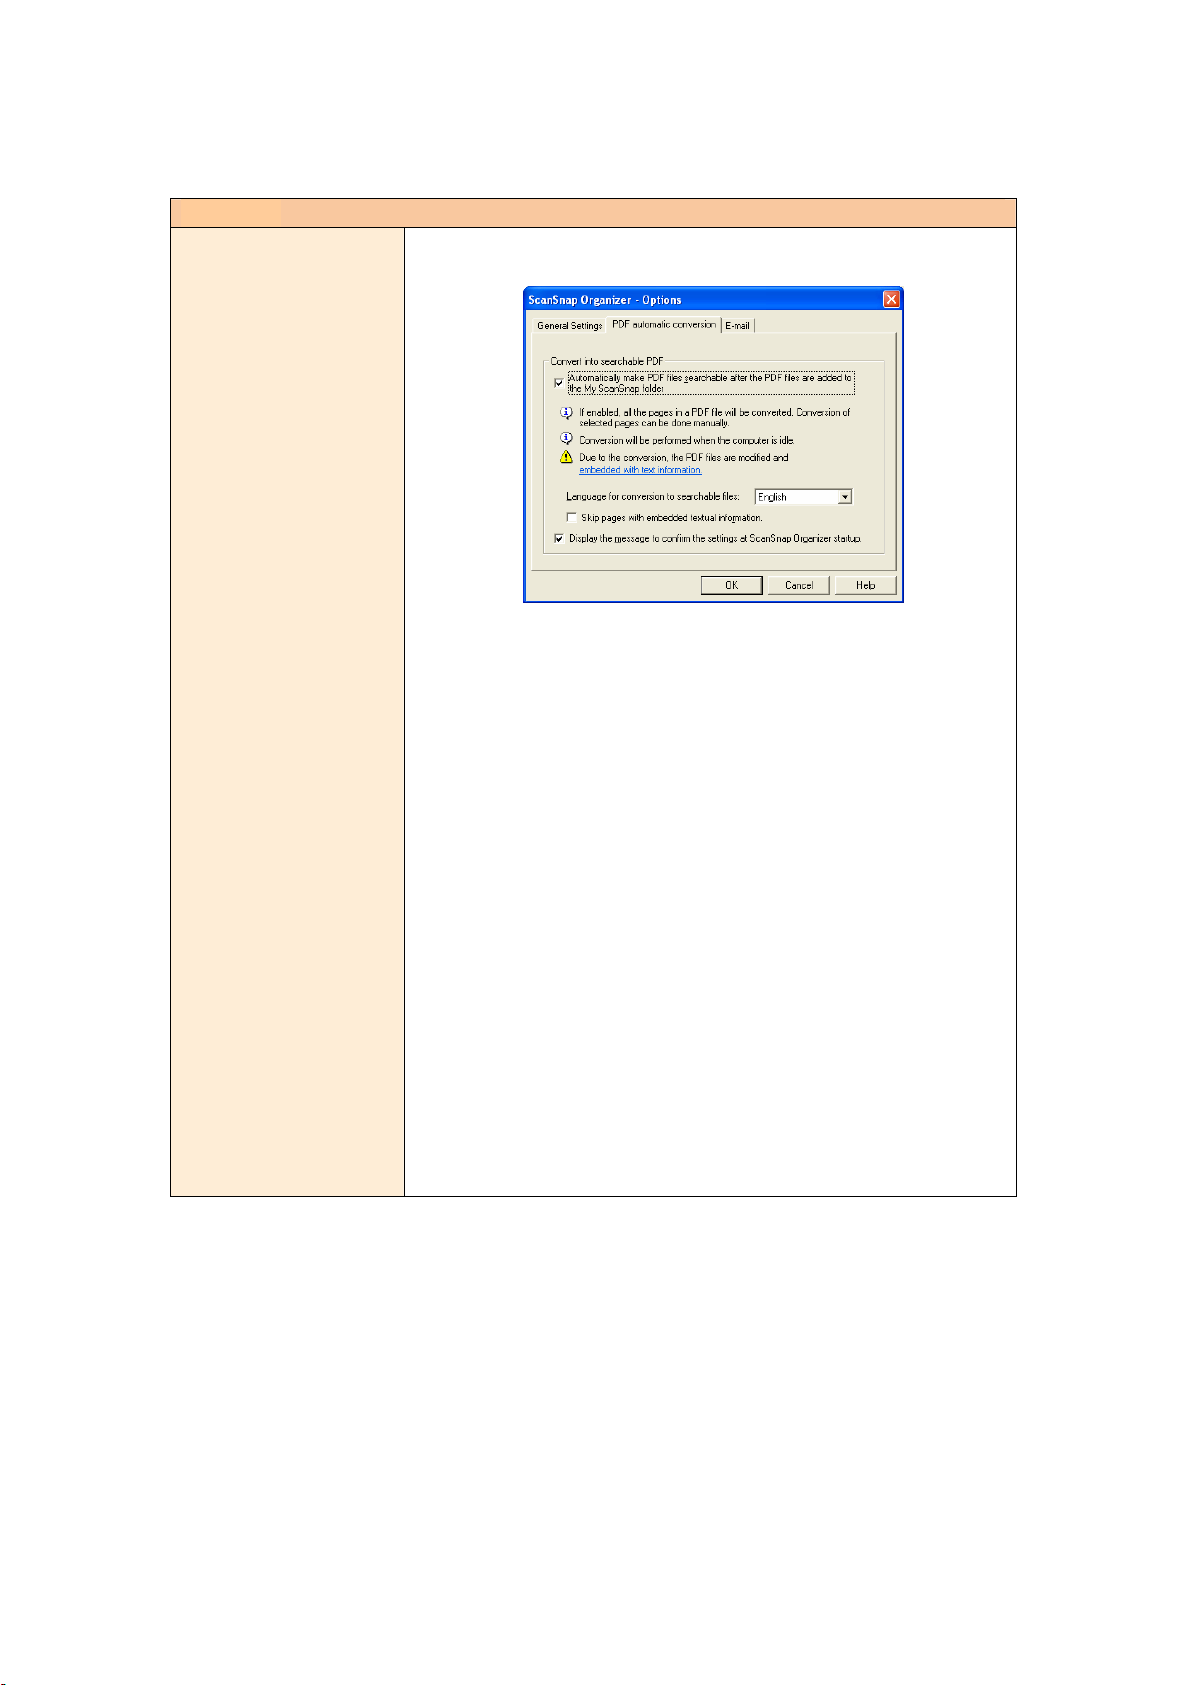
Ö The “Options” dialog box appears.
2. Mark the “Automatically make PDF files searchable after the PDF files are
added to the My ScanSnap folder” checkbox.
3. Select the “Language for conversion to searchable files.”
4. Mark the “Skip pages with embedded textual information” checkbox if you
want to convert only pages not yet made searchable.
5. If you want to display a confirmation message to switch automatic OCR
ON/OFF (automatic conversion to searchable PDF files) upon ScanSnap
Organizer startup, mark the “Display the message to confirm the settings at
ScanSnap Organizer startup” checkbox.
6. Click the [OK] button.
Ö The “Options” dialog box closes.
● If the “Automatically make PDF files searchable after the PDF files are added to the
My ScanSnap folder” checkbox is marked, “Automatically convert added PDFs into
searchable PDFs” will appear on the title bar on the Main screen (Operating window)
when the [My ScanSnap] folder is selected.
49
Page 52

● Any files saved while this checkbox is unmarked are not targeted for automatic
conversion. If you want to convert those files, select them to convert.
● This function converts all the pages of PDF files. If you want to specify pages to
convert them, select the files and convert those pages.
● If you mark the “Skip pages with embedded textual information” checkbox, you can
shorten the processing period because it skips conversion on pages already made
searchable.
● Automatic conversion of added PDF files is executed while the user who added the
PDF file into the [My ScanSnap] folder logs on Windows and whenever any other
applications are not running on the computer. If the automatic conversion is not
complete by the time the user logs off, it will be restarted when the same user logs on
again according to the following conditions:
- When 10 minutes passed after logging on
- When you display the “PDF Conversion List” dialog box
- When a file is added in ”PDF Conversion List” (when you scan with the
ScanSnap, the conversion restarts 3 minutes after scanning.)
● Through this conversion procedure, textual information is embedded in PDF files.
Thus, the PDF files are updated.
● You can check the status of PDF file conversion from the “PDF Conversion List”
dialog box.
● The PDF files that are protected by security features such as a password and/or
bearing a digital signature cannot be converted into searchable PDF files even if they
are scanned with the ScanSnap.
50
Page 53

3.5. Searching Files
This section explains how to search PDF files.
1. Click on the [Search] button on the toolbar.
Or, select the [Search] from the [PDF file] menu.
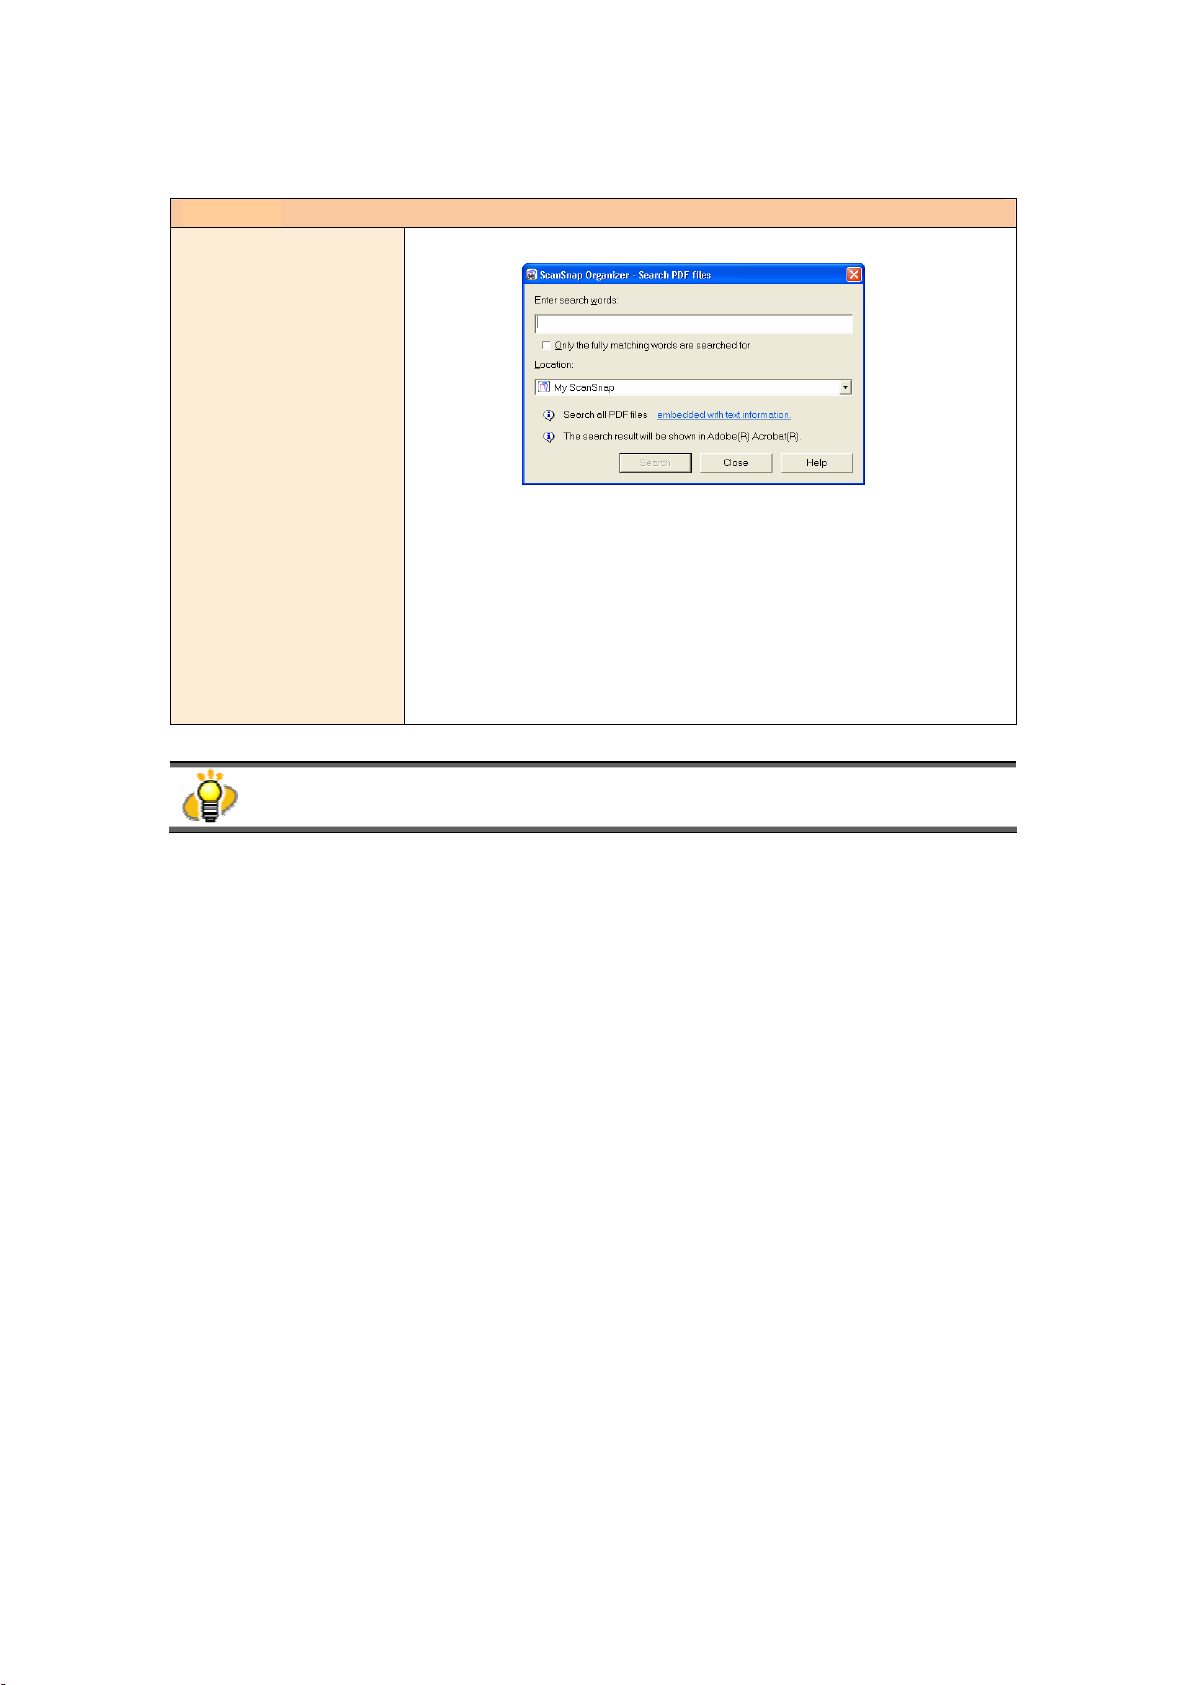
Ö The “Search PDF files” dialog box will appear.
2. Enter the words you want to search.
Mark the “Only the fully matching words are searched for” check box if you want to search
only the words that precisely match with what you have entered.
3. Designate the word and location you want to search.
You can designate one of the following as the location:
My ScanSnap
Cabinet (If any.)
Shortcut to folder (If any.)
Selected folder
Browse (Any cabinet or folder under the [My ScanSnap] folder.)
4. Click the [Search] button.
Ö Adobe Acrobat is activated and searching is started to find the word you input.
5. The search result is shown.
● The search function can be used only when Adobe Acrobat 7.0 or later is installed in
your computer.
● The search result is displayed in Adobe Acrobat; use Adobe Acrobat to display and find
the search results.
● For details on searching, refer to Help in Adobe Acrobat.
51
Page 54

3.6. Creating/Deleting Shortcuts to Folders
This section explains how to create shortcuts to any folders directly under the [My ScanSnap]
folder, and how to delete the shortcuts.
3.6.1. Creating Shortcuts to Folders
1. Click the [Create shortcut to ScanSnap Organizer folder] button on the
toolbar.
Or, select the [Shortcut to folder] from the [File] menu.
Ö The “Browse for Folder” dialog box will appear.
2.
Select any folder to which you want to create a shortcut, and click the [OK]
button.
The shortcut to the [My ScanSnap] folder, which is specified on the [General Settings] tab
in the “Options” dialog box, cannot be created. (The path is set to the “My ScanSnap”
folder under “My Documents” by default.) (See page 21.)
Ö A shortcut to the selected folder is added directly under the [My ScanSnap] folder on
Folder view, and you can browse in the folder using ScanSnap Organizer.
52
Page 55

3.6.2. Deleting Shortcuts to Folders
1. Select the shortcut you want to delete on Folder view.
2.
Select [Delete shortcut to folder] from the [File] menu.
Ö The selected shortcut is deleted and no longer appears on Folder view.
This operation deletes only the Shortcut to folder; the folder itself is not affected.
53
Page 56

3.7. Importing Files
This section explains how to import (copy) files in folders that are not managed with ScanSnap
Organizer to any Cabinet or Folder in the [My ScanSnap] folder.
1. In Folder view, select the Cabinet or Folder you want to copy files to.
(Files will be copied here.)
2. Select [Import] on the [File] menu.
Ö The “Open” dialog box appears.
3. Select the file, and click the [Open] button.
Ö The file is copied to the Cabinet or Folder selected in Step 1.
When the copied file is not shown in File view immediately, please select [Refresh] on the
[View] menu.
54
Page 57

3.8. Exporting Files
This section explains how to export (copy) files in the [My ScanSnap] folder to another folder
that is not managed with ScanSnap Organizer.
1. In File view, select the file.
2. Select [Export] on the [File] menu.
Ö The “Browse for Folder” dialog box appears.
3. Select the destination folder for the file, and click the [OK] button.
Ö The file selected in Step 1 is copied to the folder.
You cannot export files to the [My ScanSnap] folder, which is specified on the [General
Settings] tab of the “Options” dialog box. (The path is set to the “My Scan Snap” folder
under “My Documents” by default.) (See page 21.)
55
Page 58

3.9. Sending Files by E-mail
This section explains how to send the selected files attached to e-mail.
1. In File view, select a file you want to attach to an e-mail message.
2. Drag the selected file on “Scan2E-mail” icon in the Action menu.
Ö The e-mail program specified in Internet Explorer opens with the selected files attached
to a message.
You can also open the e-mail program with the selected files attached by either of the
following procedures:
● Click the [Scan2E-mail] button
● Click the “Scan2E-mail” icon
● Right-click on the selected file and click [Action] ->[Scan2E-mail] in the pop-up menu.
● In the menu bar, select [Action] -> [Scan2E-mail]
on the Toolbar.
in the Action menu.
56
Page 59

3. When the “Scan2E-mail – Set a password” dialog box appears, enter the
password and click [OK].
When you don’t need to set a password to open the PDF file attached to the e-mail message,
click the [Cancel] button. Then click [Yes] which is shown on the “Do you want to continue
the process without setting ‘Document Open Password’ for those PDF files?” dialog box.
● The “Scan2E-mail – Set a password” dialog box appears only when the following
conditions are met.
- You select [Tools] -> “Options” dialog box -> [E-mail] tab and mark the ”When
attaching a PDF file, add a ‘Document Open Password’” checkbox.
- Selected files are the ones that can be password protected.
● Only the PDF files created with the ScanSnap can be password-protected by
ScanSnap Organizer.
● You cannot set a password for files that “Document Open Password”, digital
signatures are already applied to.
4. Operate the e-mail program to send the e-mail.
● An e-mail program selected in the "E-mail" drop-down list on the [Programs] tab of the
"Internet Options" dialog box will be used; to display the "Internet Options" dialog box,
select the [Tools] menu within the Internet Explorer browser, and then select [Internet
Options]. An e-mail program that cannot be set here is not available.
Operations with the following e-mail programs have been verified.
• Microsoft® Windows® Mail (supplied as a part of Windows Vista)
• Microsoft
• Microsoft
• Eudora 7.1.0.9
• Thunderbird Version 1.5.0.9
* Start Thunderbird to be ready to send/receive E-mail before performing
● Even an e-mail program selected in the "E-mail" drop-down list on the [Programs] tab
of the "Internet Options" dialog box may not interact accurately. In such case, contact
the e-mail program selling agency.
Although some e-mail programs may not display the size of the attached file properly,
the size of the actually attached file is correct.
● It has been confirmed that attached file extensions are changed if sending attached
files by e-mail failed when the following conditions are met
®
Outlook® 2003 / 2007
®
Outlook Express 6
Scan2E-mail function.
57
Page 60

- The operating system you are using is Windows XP (Professional, Home Edition).
- You have set Hotmail as the associated e-mail program.
(File extensions are changed to those including a character "^".)This problem occurs
when a combination of Window XP and Hotmail is used. When you send attached
files by e-mail through Windows Explorer, the same problem will occur. Use other
e-mail programs with which correct operations are verified (as of March 2007).
58
Page 61

3.10. Printing
This section explains how to print the selected files using a printer.
Printing only files that can be thumbnailed
1. In File view, select the file.
2. Drag the selected file on “Scan2Print” icon in the Action menu.
Ö The “Scan2Print – Print” dialog box appears.
You can also open the “Scan2Print – Print” dialog box by either of the following
procedures:
● Click the [Scan2Print] button
● Click the “Scan2Print” icon in the Action menu.
● Right-click on the selected file and click [Action] ->[Scan2Print] in the pop-up menu.
● In the menu bar, select [Action] -> [Scan2Print].
● Select [Print] in the [File] menu.
on the Toolbar.
59
Page 62

You can select the following options in the dialog box.
Name
You can select a printer by clicking T on the right side of the drop-down list.
[Properties] button
Displays the properties of the printer you selected in the “Name” drop-down list. If there are
similar setting items to the ones on the “Scan2Print – Print” dialog box, the settings on the
“Scan2Print – Print” dialog box have priority over the settings on this properties.
Copies
You can specify the number of copies you want to print. Select a number between 1 and 99.
Same size / Scaling down
You can select an output size of the images to be printed; you can shrink images to fit the
output paper size when images to be printed are larger than the specified paper size or print
them in original size.
"Allow automatic rotation" checkbox
Images are rotated according to the length-to-width ratio of images so that they can be
printed in either portrait orientation or landscape orientation, whichever best fits.
"Center the image and print" checkbox
If you marked this checkbox when printing a document smaller than the paper, images are
centered and printed. Images will be printed on the upper left without the checkbox marked.
[OK] button
Clicking this button prints images by using settings selected in this dialog box.
[Cancel]
button
Clicking this button cancels all changes made in this dialog box and quits the printing
process.
60
Page 63

3. Click the [OK] button to start printing with the printer you selected.
If you click the [Cancel] button, the printing is canceled.
Printing files including files that cannot be thumbnailed
1. In File view, select the file.
2. Drag the selected file on the “Scan2Print” icon in the Action menu.
Ö The confirmation dialog box appears.
You can also open the “Scan2Print” dialog box by either of the following procedure:
● Click the [Scan2Print] button on the Toolbar.
● Click the “Scan2Print” icon
● Right-click on the selected file and click [Action] ->[Scan2Print] in the pop-up menu.
● In the menu bar, select [Action] -> [Scan2Print].
● Select [Print] in the [File] menu.
in the Action menu.
3. Click the [Yes] button, and then printing starts.
Printing is performed in the application associated with the file extension
using the default printer.
Clicking the [No] button cancels the printing process.
About Printer
If you want to print files that cannot be thumbnailed with printers other than the default
printer or you want to specify the number of copies, print them from an application
associated with each file.
You can start the associated application by double-clicking on the file in the File view.
● If you want to print PDF files with “Document Open Password”, which is not
thumbnailed, you need to specify the password in the password dialog box in Adobe
Acrobat.
● You cannot print PDF files that are not allowed printing.
61
Page 64

3.11. Converting into Word/Excel/PowerPoint® files
This section explains how to convert the selected PDF file into Word/Excel/PowerPoint® file.
To use this function, you need to install ABBYY FineReader for ScanSnap 3.0 or later in
advance.
1. In File view, select a PDF file you want to convert into the
Word/Excel/PowerPoint® file.
2. Drag the selected file on “ABBYY Scan2Word” icon, “ABBYY
Scan2Excel” icon or “ABBYY Scan2PowerPoint” icon in the
Action menu.
Ö The “ABBYY FineReader for ScanSnap(TM) 3.0” dialog box appears and conversion
into Word/Excel/PowerPoint
You can also convert PDF files by either of the following procedure:
● Click the “ABBYY Scan2Word” icon , “ABBYY Scan2Excel” icon or
“ABBYY Scan2PowerPoint” icon in the Action menu.
● Right-click on the selected file and click [Action] ->[ABBYY Scan2Word], [ABBYY
Scan2Excel] or [ABBYY Scan2PowerPoint] in the pop-up menu.
● In the menu bar, select [Action] -> [ABBYY Scan2Word], [ABBYY Scan2Excel] or
[ABBYY Scan2PowerPoint].
®
starts.
62
Page 65

When the conversion is complete, Microsoft® Word/Excel/PowerPoint® is started, and
the converted data is displayed.
3.
Edit the Word/Excel/PowerPoint® file displayed, if necessary, and save the
data.
About converting into Word/Excel/PowerPoint® file
● If Microsoft® Word/Excel/PowerPoint® is installed on your computer, the resulting data
of the conversion is opened with Microsoft® Word, Microsoft® Excel or Microsoft®
PowerPoint
If Microsoft® Word/Excel/PowerPoint® is not installed, the resulting data is saved to file;
if you select “ABBYY Scan2Word”, files are saved in RTF format (.rtf), if you select
“ABBYY Scan2Excel”, files are saved in XLS format (.xls), and if you select “ABBYY
Scan2PowerPoint”, files are saved in PPT format (.ppt).
● You cannot see the documents converted into Word/Excel/PowerPoint
Microsoft
completed user registration to use these applications. Install the above applications and
complete user registration to view the converted documents on your computer.
● If you selected more than one file, those files are converted to one document.
● ABBYY FineReader for ScanSnap can be used with the following versions of Microsoft
Word, Microsoft® Excel and Microsoft® PowerPoint®.
Microsoft® Word: 2000 / 2002 / 2003 /2007
Microsoft
Microsoft® PowerPoint®: 2002 / 2003
● If this action is executed while the Print or Search function is being performed in
Microsoft
not displayed but an error message appears. Do not perform this action and the
functions of Microsoft
time.
®
.
®
®
Word/Microsoft® Excel/Microsoft® PowerPoint® is installed or you have
®
Excel: 2000 / 2002 / 2003 / 2007
®
Word, Microsoft® Excel or Microsoft® PowerPoint®, the resulting document is
®
Word, Microsoft® Excel and Microsoft® PowerPoint® at the same
files unless
®
About setting ABBYY FineReader for ScanSnap
● You can configure the settings for converting PDF files into Word/Excel/PowerPoint
such as “Recognition Languages” in the ABBYY FineReader for ScanSnap setup
®
window. To open the window, click [Start]-> [All Programs] -> [ABBYY FineReader for
ScanSnap(TM) 3.0] -> [ABBYY FineReader for ScanSnap(TM) 3.0].
For details, refer to “ScanSnap S510 Operator’s Guide” or “ScanSnap Upgrade User’s
Guide” and “ABBYY FineReader for ScanSnap User’s Guide” ( [Start]-> [All Programs]
-> [ABBYY FineReader for ScanSnap(TM) 3.0] -> [User’s Guide] )
● When you convert the PDF file into Word/Excel/PowerPoint
®
from ScanSnap
Organizer, even though you mark the “Delete scanned images after recognition” check
box in [General Options] tab in the ABBYY FineReader for ScanSnap(TM) 3.0 setup
window ( [Start]-> [All Programs] -> [ABBYY FineReader for ScanSnap(TM) 3.0] ->
[ABBYY FineReader for ScanSnap(TM) 3.0]), the PDF file is not deleted.
63
Page 66

About the OCR function of ABBYY FineReader for ScanSnap
● Some types of documents are occasionally misrecognized. Before recognition, check
whether the documents you want to convert are suitable for conversion according to the
following guidelines.
- Suitable for conversion to Word
Documents created by using simple page layout with one or two columns
- Suitable for conversion to Excel
Simple tables in which every border line connects to the outside borders
- Not suitable for conversion to Word
Documents created by using complex page layout comprised of diagrams, tables,
and letters, such as a brochure, magazine, and newspaper
- Not suitable for conversion to Excel
Documents containing tables without borders, complex tables with too many
borders, convoluted tables containing sub-tables, diagrams, graphs and charts,
photographs, and/or characters written in vertical direction
(Diagrams, graphs and charts, photographs, and characters written in vertical
direction are not reproduced.)
● The following parameters may not be inherited from the originals during conversion. It is
recommended that the converted documents be opened with Microsoft
Microsoft® Excel or Microsoft® PowerPoint® to correct or edit misrecognized letters.
- Superscript and subscript
If “Japanese” is selected as a recognition language, the following parameters may also
not be inherited from the originals during conversion:
- Font and size of characters
- Character spacing and line spacing
- Underline, bold, and Italic
* Note that Scan2PowePoint does not support conversion in the Japanese language.
● The following types of documents may be misrecognized. If so, change the "Color
mode" to "Color" and/or increase the resolution (Image quality) to improve the results of
conversion.
- Documents containing handwritten characters
- Text including small characters (smaller than 10 points)
- Skewed documents
- Documents in languages other than the specified language
- Documents containing characters written in an unevenly-colored or patterned
background
(Characters to which effects, such as Shadow, Outline, and Shading, are applied.)
- Documents of complex layout and documents including unreadable characters
(It may take an extended period of time to convert these documents.)
● ABBYY FineReader for ScanSnap can text-recognize only PDF files that are created by
using the ScanSnap, but it cannot text-recognize PDF files created by using Adobe
Acrobat or other applications.
● Files that can be converted to Word/Excel/PowerPoint
®
are only the PDF files scanned
with ScanSnap and not protected by the security other than “Permissions Password”
(such as “Document Open Password”).
● A converted Excel worksheet can contain up to 65536 rows.
● If “Japanese” is selected as a recognition language and the documents are scanned
upside down or in landscape orientation, conversion will fail. Correct the document
orientation by using Adobe Acrobat, clicking [Document] -> [Rotate Pages].
* Note that Scan2PowerPoint does not support conversion in Japanese language.
System requirement
This function uses a large memory size comparing to a size used in other processing.
When the memory size is short, an error message of memory shortage appears and “Not
enough memory!” is indicated in the conversion indicator window. In this case, follow the
instruction below.
● Confirm recommended size of memory or more is installed in your computer. If it is not
enough, add more memory to your computer.
®
Word,
64
Page 67

● If other applications are in operation, quit these applications and try again.
● If a large number of pages are converted at one time, memory may become insufficient
during conversion. In this case, change settings for virtual memory configuration,
following the procedure below.
Windows XP
1. Select [Start], right-click [My Computer],
and then select [Properties] in the pop-up
menu.
2. In the "System Properties" dialog box,
select the [Advanced] tab, and then click
the [Settings] button under
"Performance."
3. In the "Performance Options" dialog box,
select the [Advanced] tab, and then click
the [Change] button under "Virtual
memory."
4. In the "Virtual Memory" dialog box, select
"Custom size," and then type in a rather
large number in the "Maximum size (MB)"
field.
5. Click the [Set] button.
6. Click the [OK] button to close all dialog
boxes.
Windows 2000
1. Right-click the [My Computer] icon on the
Desktop, and then select [Properties] in
the pop-up menu.
2. In the "System Properties" dialog box,
select the [Advanced] tab, and then click
the [Performance Options] button under
"Performance."
3. In the "Performance Options" dialog box,
click the [Change] button under "Virtual
memory."
4. In the "Virtual Memory" dialog box, type
in a rather large number in the "Maximum
size (MB)" field under "Paging file size for
selected drive."
5. Click the [Set] button.
6. Click the [OK] button to close all dialog
boxes.
● If the state is not improved through the above measures, add more memory on your
computer.
65
Page 68

3.12. Deleting Cabinets, Folders, and Files
This section explains how to delete unnecessary Cabinets, Folders, and files.
1. Select the Cabinet, Folder, or file you want to delete.
To delete Cabinets or Folders, use Folder view;
to delete files, use File view.
● When deleting files, you can select multiple files at one time while holding down the
[Ctrl] key or [Shift] key.
● If you delete Cabinets and/or Folders, all the files and Folders included in the Cabinets
and/or Folders are also deleted.
2. Click the [Delete] button on the toolbar.
Or, select [Delete] on the [File] menu to delete Cabinets, Folders, or files.
Ö The “Confirm File Delete,” “Confirm Folder Delete” or “Confirm Multiple File Delete”
window appears.
3. Click the [Yes] button.
Ö The selected Cabinet, Folder, or file is deleted.
66
Page 69

3.13. Renaming Files
This section explains how to rename the selected files.
1. Select a file you want to rename.
Use the combination of the [Ctrl] key or the [Shift] key to make multiple selection; select
files while holding down the [Ctrl]/[Shift] key.
2. Select [Rename] from the [File] menu.
Ö The “Rename” dialog box appears.
When “List” or “Thumbnails” are displayed with “File Name” on the [View] menu marked,
select one file, and then select [Rename] from the [File] menu. By doing so, the file name
becomes editable (but the “Rename” dialog box will not appear); rename the file directly.
3. Enter a new file name.
①.
When one file is selected:
Enter a new file name in the following dialog box.
● Name:
Enter a file name in the “Name:” field.
Note that the following characters cannot be used.
¥ / : * ? “ < > |
● [OK] button:
Click the [OK] button to apply the new name to the selected file.
● [Cancel] button:
Click the [Cancel] button to cancel renaming the selected file.
If the entered name already exists in the same folder, an error message appears.
67
Page 70

②. When multiple files are selected:
Enter a new file name in the following dialog box.
● Name:
Enter a file name in the [Name] field.
Note that the following characters cannot be used.
¥ / : * ? “ < > |
● Append the name with date created
Select this button to append “_ (under bar) and the date created of the file” to
the file name.
yyyy_MM_dd_HH_mm_ss
Date created is added to the file name using the date format of
“_yyyy_MM_dd_HH_mm_ss.”
yyyyMMddHHmmss
Date created is added to the file name using the date format of
“_yyyyMMddHHmmss.”
If the entered name already exists in the same folder, a serial number, which
starts with “_001” is added to the name.
68
Page 71

● Append the name with a serial number
Select this button to append “_” (under bar) and a serial number.
Consecutive number:
Click “▼” to show the drop-down list of consecutive numbers.
You can select a one- to six-digit number.
● [OK] button:
Click the [OK] button to apply the new name to the selected file.
● [Cancel] button:
Click the [Cancel] button to cancel renaming the selected file.
4. Click the [OK] button.
Ö The selected file is renamed.
The file extension is not changed when the file name is changed.
69
Page 72

3.14. Displaying ScanSnap Setup Dialog box
This section explains how to display the ScanSnap configuration dialog box directly from the
ScanSnap Organizer screen.
1. Click the [ScanSnap Settings] button on the toolbar.
You can also open the dialog box by selecting [ScanSnap Settings] from the [Tools] menu.
Ö The “ScanSnap Manager - Scan and Save Settings” dialog box appears.
2. Change settings as you like and click the [OK] button.
Ö The changes you made are saved.
● Depending on the ScanSnap model you are using, the setup dialog box may differ from
the image above.
● For details on how to configure the ScanSnap setting, refer to “ScanSnap S510
Operator’s Guide” or “ScanSnap Upgrade User’s Guide” that comes with the product.
70
Page 73

3.15. Updating Online
In an effort to improve the usability and functionality of ScanSnap Organizer, program updates
are carried out timely.
ScanSnap Organizer can automatically detect whether the latest program (Update Pack) is
available and update the program.
Update Packs are made available without notice. We recommend that you update your
program regularly.
When updating ScanSnap Organizer, follow the instructions below.
● When updating, it is essential that Internet Explorer is installed in a system which can
access the Internet.
● You need to log in with “Administrator” privilege.
1. On the [Help] menu, select [Online Update].
Ö A message window to confirm whether or not to update ScanSnap Organizer appears.
2. Click the [Yes] button.
Ö If any update is available, a message window to confirm the download and installation of
the program appears.
71
Page 74

If the latest update has already been installed, the message below appears.
Click the [OK] button to close the message.
3. Click the [Install] button.
When you click the [Information] button, Internet Explorer opens and information about the
latest update for ScanSnap Organizer appears.
Ö Installation starts, and the “Welcome to the InstallShield Wizard for ScanSnap
Organizer” dialog box appears.
Follow the instructions on the screen to install.
72
Page 75

Appendix 1. About Searchable PDF Files
(1) What is a searchable PDF file?
When a paper document is scanned and stored in the form of PDF file, all information in the
document such as text, pictures, and charts is output as one image.
In such cases, characters in the scanned document are not searchable because they are the
image without textual information.
Image
ABCDEF
PDF
This image cannot be
searched for character
strings!
ABCDEF
This being the case, you process the image data with OCR (text recognition) software to
retrieve textual information from the image and transparently superimpose the information
onto the image data. By doing so, the image data can be stored as a PDF file with textual
information.
Although such a PDF file appears to be image data, it has been made searchable, like the
text file, with textual information superimposed.
Only files scanned with the ScanSnap can be converted.
For details on how to convert PDF files into searchable PDF files, see “3.3. Converting
PDF Files into Searchable Ones.” (page 37)
73
Page 76

(2) About the operation
You can convert files into searchable PDF files using any of the following methods.
A. With the ScanSnap, perform a scan and conversion at the same time in order to output the
searchable PDF files.
You can set the setting at: The [File option] tab on the ScanSnap Manager.
Target Pages: All pages or the First page.
Advantage: ● It can save you from having to convert files afterwards.
Disadvantage:
● It takes an extended period of time to scan files.
● The setting cannot be changed for every file; all files
are affected.
● You can only select “All pages” or the “First page” to
convert.
B. Activate ScanSnap Organizer and perform automatic conversion.
You can set the setting at:
The [PDF file] menu on ScanSnap Organizer. Select
[Convert into Searchable PDF] -> [Automatic Conversion
Setting]. Or, click the [Yes] button to turn the “Automatic
OCR" ON in the “PDF Automatic Conversion Settings”
dialog box that appears at start-up.
Target Pages: All pages.
Advantage:
● Conversion will always be performed automatically.
● It won’t take long to complete scanning.
● You don’t have to worry how long it may take to
convert files because conversion is performed when
your using computer is idle.
Disadvantage:
● You cannot designate pages/files to be converted.
● It takes longer because “All pages” of every file are
converted.
● The setting cannot be changed for every file; all files
are affected.
C. Activate ScanSnap Organizer and perform conversion by selecting files or a folder.
You can set the setting at:
The [PDF file] menu on the ScanSnap Organizer. Select
[Convert into Searchable PDF] -> [Execute].
Target Pages: All pages, or designated pages when the file is selected in
the File view (Thumbnails).
Advantage:
● You can select files to be converted.
● It won’t take long to complete scanning.
● You can select timing to perform conversion. (Execute
immediately/Execute when the computer is idle)
● You don’t have to worry how long it may take to
convert files if you select to convert files when the
computer is idle.
● You can designate pages to be converted.
Disadvantage:
● You have to perform scanning and conversion
separately.
74
Page 77

For details on how to set the ScanSnap Manager settings, refer to “ScanSnap S510
Operator’s Guide” or “ScanSnap Upgrade User’s Guide.
Each method has advantages and disadvantages as described above. Use a method that meets
your needs. We hope that you find the following descriptions informative to determine the
method.
Conditions
When you don’t have to
Recommended conversion
Final state of PDF file
NA Not searchable.
make PDF files searchable.
● When only PDF files that
consist of images without
textual information are
handled.
● When you don’t have to
search files.
● When you have to use
applications that do not
support searchable PDF
files.
When you want to make the
PDF file searchable to
search the file immediately
after scanning, even though
conversion takes time.
Method A:
With the ScanSnap, perform
a scan and conversion at the
same time in order to output
the searchable PDF files.
Searchable immediately
after scanning.
When you want to scan files
quickly and make PDF files
searchable.
When you want to convert
PDF files separately after
scanning.
When you want to designate
pages to be converted into a
searchable file.
Method B:
Activate ScanSnap
Organizer and perform
automatic conversion.
Method C:
Activate ScanSnap
Organizer and perform
conversion by selecting files
or a folder.
Method A
With the ScanSnap, perform
a scan and conversion at the
same time in order to output
the searchable PDF files.
(First pages)
Method C:
Activate ScanSnap
Organizer and perform
conversion by selecting files
or a folder. (Designated
current pages)
Not searchable immediately
after scanning.
Searchable after conversion.
Not searchable immediately
after scanning.
Searchable after conversion.
Searchable immediately
after scanning.
(Searching character strings
included in the first pages.)
Not searchable immediately
after scanning.
Searchable after conversion
(Searching character strings
included in the designated
pages.)
75
Page 78

Conditions
Recommended conversion
Final state of PDF file
When you want to search
PDF files but don’t have
enough time to convert files.
Method A
With the ScanSnap, perform
a scan and conversion at the
same time in order to output
Searchable immediately
after scanning.
(Searching character strings
included in the first pages.)
the searchable PDF files
(First pages)
Method C:
Activate ScanSnap
Organizer and perform
conversion by selecting files
or a folder.
(Selected files, designated
Not searchable immediately
after scanning.
Searchable after conversion.
(Searching character strings
included in the designated
pages.)
current pages, Execute
immediately)
* Recommended conversion methods A, B, and C in the table correspond to those in the
previous page.
76
Page 79

Index
Execute immediately ...........................14, 38, 39
A
ABBYY Scan2Excel ........................................ 62
ABBYY Scan2PowerPoint............................... 62
ABBYY Scan2Word ........................................ 62
Action........................................................ 21, 28
Automatic Conversion..................... 6, 19, 31, 49
B
Buttons............................................................ 24
C
Cabinet ......................................................11, 33
Cause ............................................................. 45
Change display mode ..................................... 24
Connecting to ScanSnap ................................ 29
Execute when the computer is idle......................
................................................ 14, 16, 38, 42
Exit ..................................................................11
Export........................................................ 11, 55
F
File menu......................................................... 11
File Name ........................................................ 12
Fixed password ...............................................27
Folder ........................................................ 11, 34
G
General Settings tab........................................ 21
H
Convert into Excel........................................... 62
Convert into PowerPoint ................................. 62
Convert into Searchable PDF ....... 14, 22, 24, 37
Convert into Word ........................................... 62
Copy ................................................... 12, 24, 36
D
Delete ..................................................11, 25, 66
Deleting Shortcuts........................................... 53
Digital Signature mark............................... 26, 27
E
Edit menu........................................................ 12
E-mail.............................................................. 56
E-mail programs........................................ 56, 57
E-mail tab........................................................ 23
Help menu ....................................................... 23
I
Import ........................................................ 11, 54
Information about the latest update ................. 72
L
Left-Click Menu Mode......................................29
List view...........................................................13
Lock mark..................................................26, 27
M
Main Window.....................................................8
Mouse operations............................................27
Move................................................................36
77
Page 80

My ScanSnap folder.................................. 19, 21
N
New......................................................11, 33, 34
O
Online Update................................................. 23
Operating Window ............................................ 8
Options ............................................... 21, 22, 23
Organizing Files.............................................. 33
P
Password ...................................... 27, 37, 46, 57
PDF automatic conversion tab........................ 22
PDF Conversion List ........................... 17, 18, 42
PDF file menu ................................................. 14
Pop-up Thumbnail..................................... 12, 25
Print .....................................................11, 24, 59
Scan2Print...........................................24, 59, 61
Scanning .........................................................31
ScanSnap folder................................................4
ScanSnap Settings....................................25, 27
Search ................................................. 20, 24, 51
Searchable PDF Files......................................73
Send files by E-mail................................... 24, 56
Shortcut to folder ................................. 11, 24, 52
Starting ScanSnap Organizer............................6
Status ........................................................ 18, 45
System Requirements ....................................... 5
T
Text mark ................................................... 26, 27
Textual information ....................................38, 73
Thumbnail............................................ 12, 26, 27
Thumbnail size ................................................13
Thumbnail Top ................................................. 26
Thumbnail view .....................................9, 13, 26
Toolbar....................................................... 24, 25
Q
Quick Menu Mode........................................... 29
R
Rearrange Folders .......................................... 13
Rearranging Files............................................ 13
Refresh ........................................................... 14
Rename .....................................................11, 67
S
Scan2E-mail.............................................. 24, 56
Tools menu ......................................................21
U
Update.............................................................71
V
View menu.......................................................12
W
Windows Vista.................................4, 35, 41, 44
78
Page 81

ScanSnap Organizer
User’s Guide
P2WW-2300-01ENZ0
Issue Date: May 2007
Issued by: PFU LIMITED
The contents of this manual are subject to change without notice.
PFU Limited assumes no liability for incidental or consequential
damages arising from the use of this manual, and any claims by
a third party.
Copying of the contents of this manual in whole or in part is
prohibited under the copyright law.
 Loading...