

Page 1

C141-F071-01EN
MHV2100AH, MHV2080AH
MHV2060AH, MHV2040AH
DISK DRIVE
MAINTENANCE MANUAL
Page 2

FOR SAFE OPERATION
Handling of This Manual
This manual contains important information for using this product. Read thoroughly before using
the product. Use this product only after thoroughly reading and understanding especially the
section “Important Alert Items” in this manual. Keep this manual handy, and keep it carefully.
FUJITSU makes every effort to prevent users and bystanders from being injured or from suffering
damage to their property. Use the product according to this manual.
IMPORTANT NOTE TO USERS
READ THE ENTIRE MANUAL CAREFULLY BEFORE USING THIS PRODUCT.
INCORRECT USE OF THE PRODUCT MAY RESULT IN INJURY OR DAMAGE TO
USERS, BYSTANDERS OR PROPERTY.
While FUJITSU has sought to ensure the accuracy of all information in this manual, FUJITSU
assumes no liability to any party for any damage caused by any error or omission contained in this
manual, its updates or supplements, whether such errors or omissions result from negligence,
accident, or any other cause. In addition, FUJITSU assumes no liability with respect to the
application or use of any product or system in accordance with the descriptions or instructions
contained herein; including any liability for incidental or consequential damages arising therefrom.
FUJITSU DISCLAIMS ALL WARRANTIES REGARDING THE INFORMATION
CONTAINED HEREIN, WHETHER EXPRESSED, IMPLIED, OR STATUTORY.
FUJITSU reserves the right to make changes to any products described herein without further
notice and without obligation.
This product is designed and manufactured for use in standard applications such as office work,
personal devices and household appliances. This product is not intended for special uses (atomic
controls, aeronautic or space systems, mass transport controls, medical devices for life support, or
weapons firing controls) where particularly high reliability requirements exist, where the pertinent
levels of safety are not guaranteed, or where a failure or operational error could threaten a life or
cause a physical injury (hereafter referred to as "mission-critical" use). Customers considering the
use of these products for mission-critical applications must have safety-assurance measures in
place beforehand. Moreover, they are requested to consult our sales representative before
embarking on such specialized use.
The contents of this manual may be revised without prior notice.
The contents of this manual shall not be disclosed in any way or reproduced in any media without
the express written permission of Fujitsu Limited.
All Rights Reserved, Copyright FUJITSU LIMITED 2004
Page 3
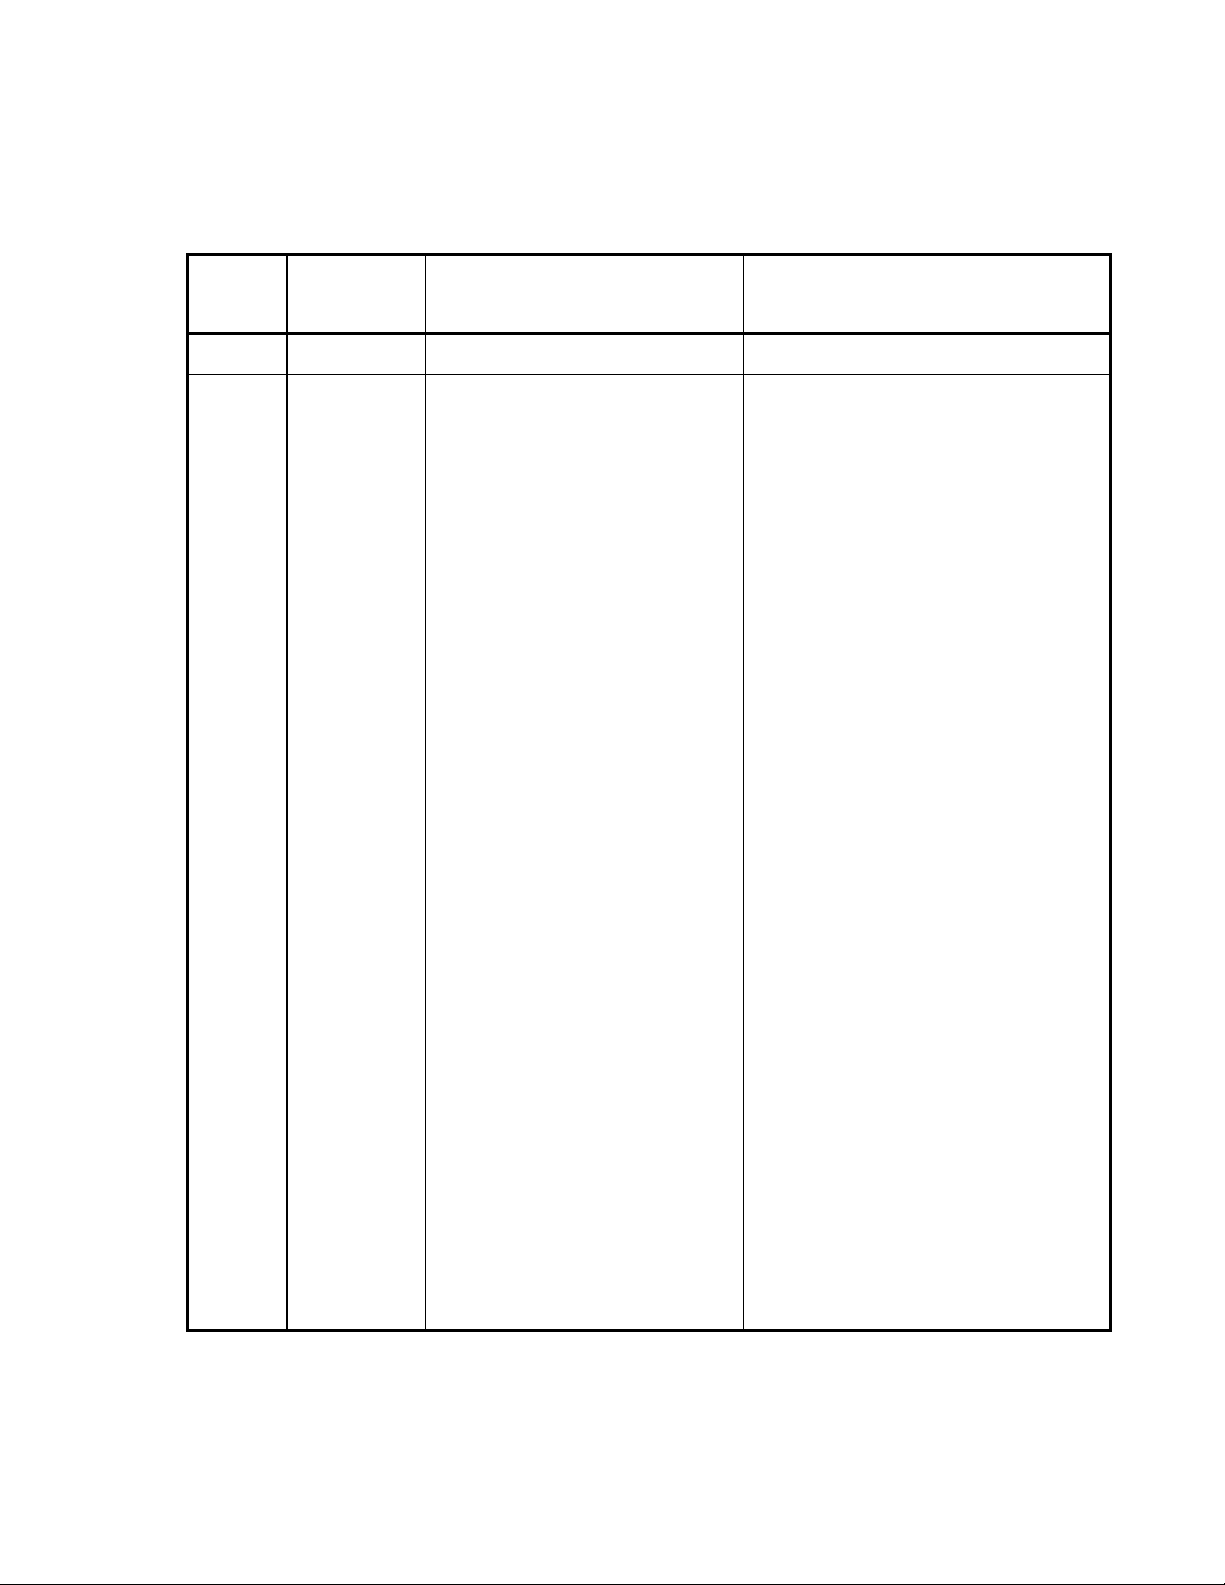
Revision History
(1/1)
Edition Date Revised section (*1)
(Added/Deleted/Altered)
01 2004-11-15 — —
Details
*1 Section(s) with asterisk (*) refer to the previous edition when those were deleted.
C141-F071
Page 4

This page is intentionally left blank.
Page 5
Preface
This manual describes the MHV2100AH, MHV2080AH, MHV2060AH, MHV2040AH 2.5-inch hard
disk drive with a built-in controller that is compatible with the ATA interface.
This manual explains, in detail, how to maintain the disk drives.
This manual assumes that users have a basic knowledge of hard disk drives and their application in
computer systems.
This manual consists of the following two chapters:
Overview of Manual
CHAPTER 1 Maintenance and Diagnosis
This chapter explains MHV2100AH, MHV2080AH, MHV2060AH, MHV2040AH
maintenance requirements, operation verification, and troubleshooting.
CHAPTER 2 Removal and Replacement Procedure
This chapter explains the procedure for removing and replacing MHV2100AH,
MHV2080AH, MHV2060AH, MHV2040AH.
Acronyms and Abbreviations
This section lists the abbreviated terms and their full words used in this manual.
Index
In this manual, disk drives may be referred to as drives, or devices.
IBM PC-AT is a registered trademark of IBM (International Business Machines
Corporation) of the United States of America.
Conventions for Alert Messages
This manual uses the following conventions to show the alert messages. An alert
message consists of an alert signal and alert statements. The alert signal consists
of an alert symbol and a signal word or just a signal word.
The following are the alert signals and their meanings:
This indicates a hazardous situation could result in
minor or moderate personal injury if the user does
not perform the procedure correctly. This alert
signal also indicates that damages to the product or
other property may occur if the user does not perform
the procedure correctly.
This indicates information that could help the user
use the product more efficiently.
C141-F071 i
Page 6

Preface
In the text, the alert signal is centered, followed below by the indented message.
A wider line space precedes and follows the alert message to show where the alert
message begins and ends. The following is an example:
(Example)
Don’t install or remove a PCA or connect or disconnect a cable or
connector plug when the drive is powered. This may give you an
electric shock.
The main alert messages in the text are also listed in the “Important Alert Items.”
Operating Environment
This product is designed to be used in offices or computer rooms.
For details regarding the operating environment of use, refer to the Product
Manual (C141-E217).
Attention
Please forward any comments you may have regarding this manual.
To make this manual easier for users to understand, opinions from readers are
needed. Please write your opinions or requests on the Comment at the back of
this manual and forward it to the address described in the sheet.
Liability Exception
“Disk drive defects” refers to defects that involve adjustment, repair, or
replacement.
Fujitsu is not liable for any other disk drive defects, such as those caused by user
misoperation or mishandling, inappropriate operating environments, defects in the
power supply or cable, problems of the host system, or other causes outside the
disk drive.
ii C141-F071
Page 7
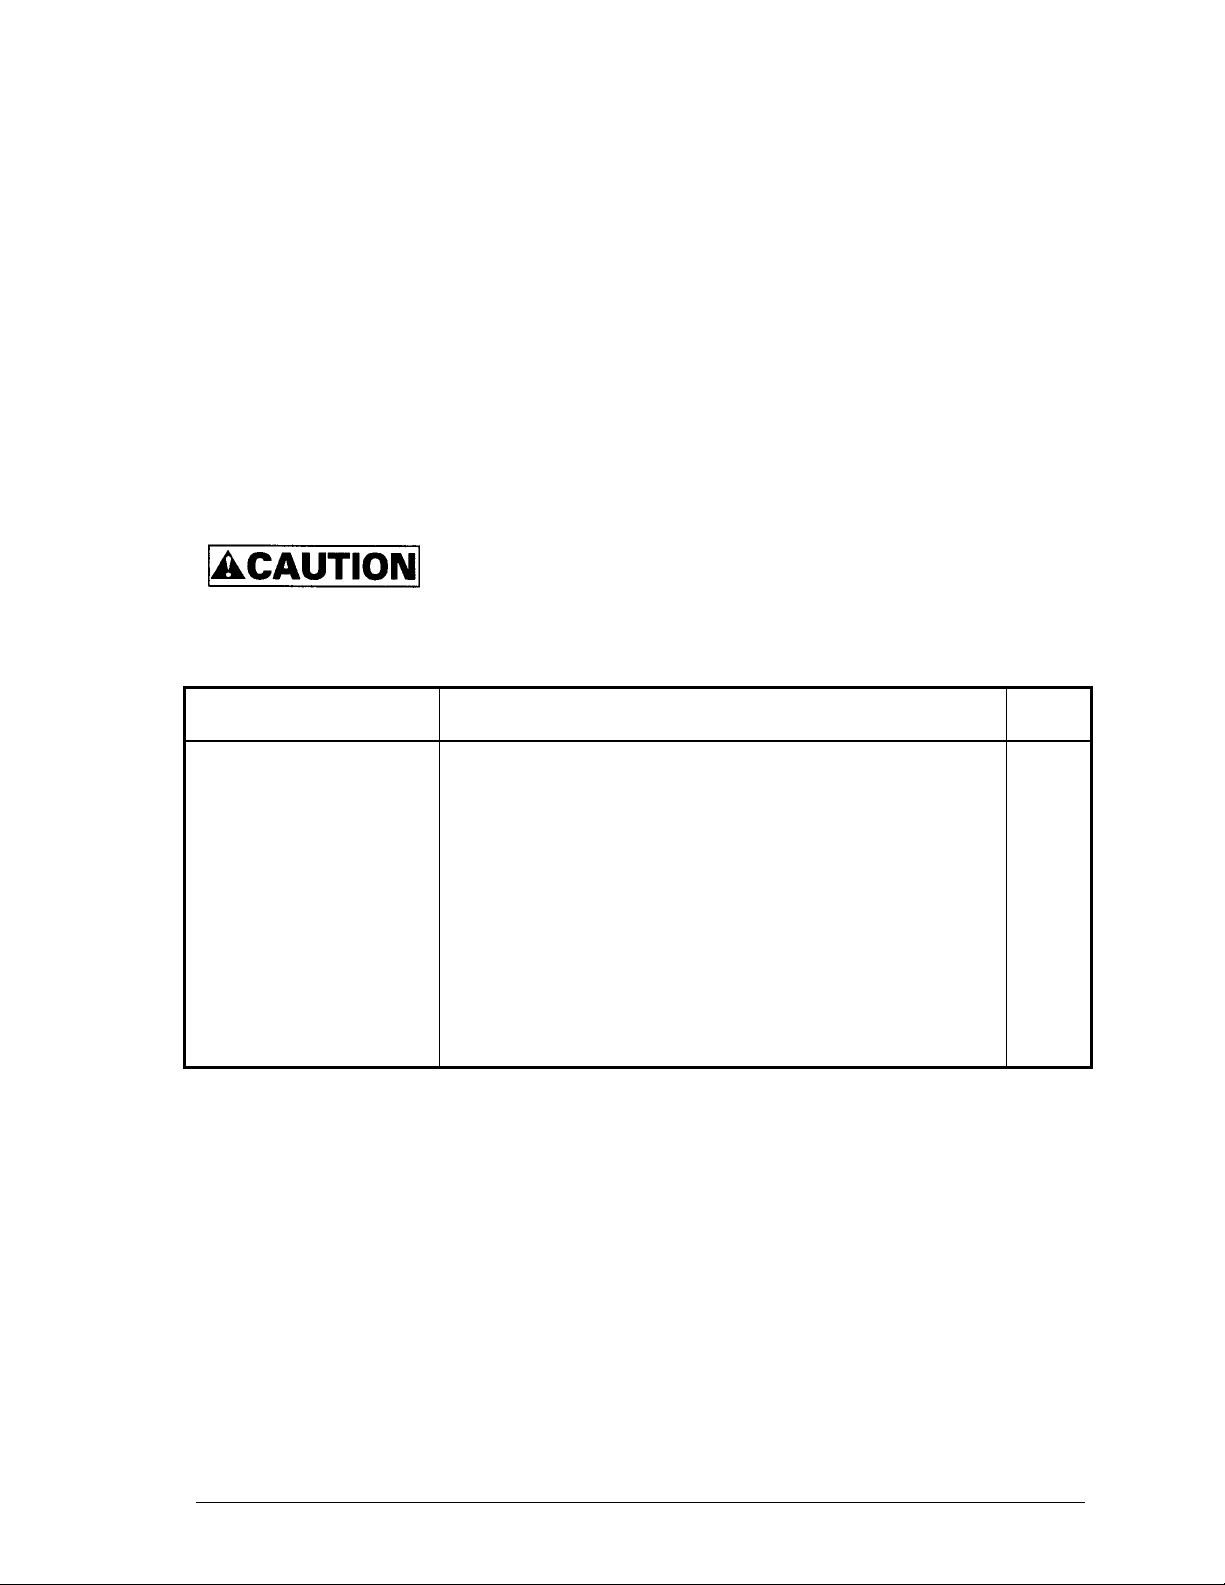
Important Alert Items
Important Alert Messages
The important alert messages in this manual are as follows:
This manual uses the key alert messages given below.
The following manual also contains notes on safety precautions:
A hazardous situation could result in minor or moderate personal
injury if the user does not perform the procedure correctly. Also,
damage to the predate or other property, may occur if the user does
not perform the procedure correctly.
Task Alert message Page
Maintenance
Static, Damage
1. Don’t install or remove a PCA or connect or disconnect
a cable or connector plug when the drive is powered.
This may give you an electric shock.
2. Keep away from mechanical assemblies in the unit
during operation. This may cause injuries.
3. Avoid dangerous detergent when the disk drive is
cleaned.
1-2
C141-F071 iii
Page 8

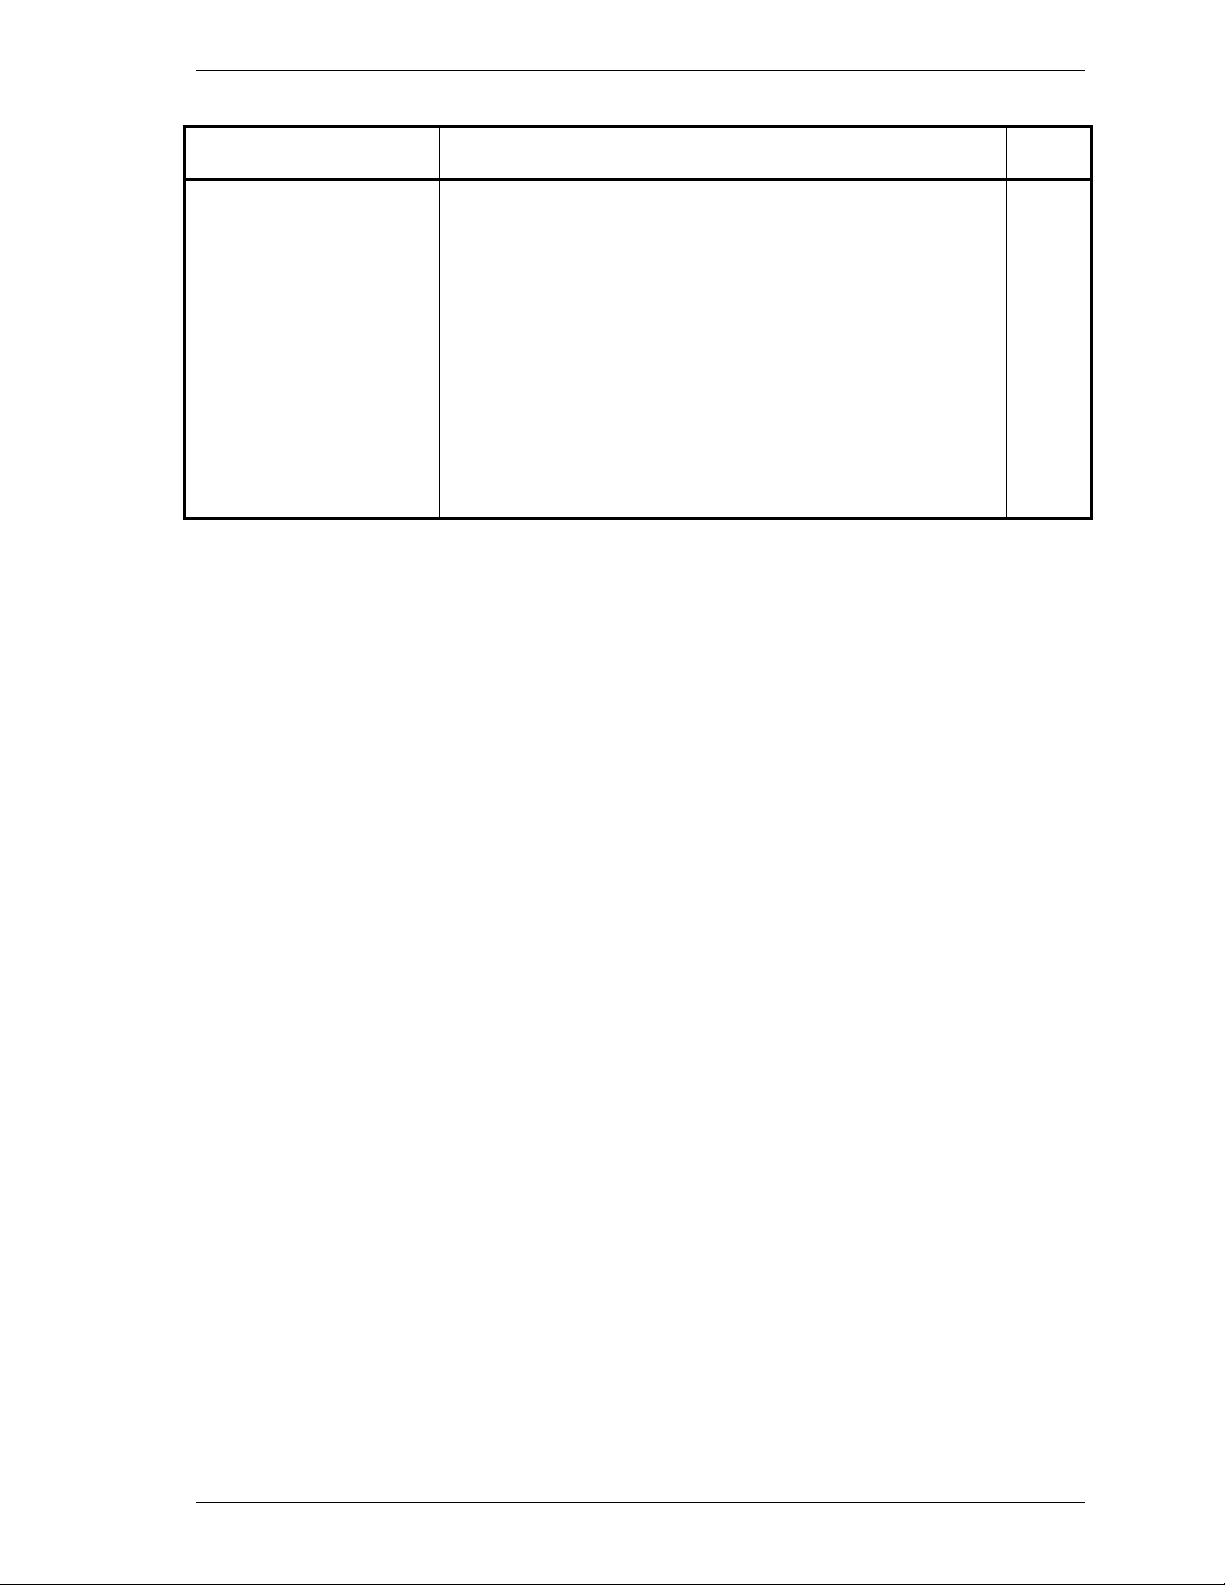
Important Alert Items
Task Alert message Page
Maintenance
Device damage
1. Before touching a PCA or the drive, wear a wrist strap
and perform the human body grounding to discharge
static electricity from your body. This will prevent
irreparable damage to the PCA and the head of the drive.
2. Don’t install or remove a PCA or connect or disconnect
a cable or connector plug when the drive is powered.
This will prevent electrical damage to the disk drive.
3. Operating the disk drive with one or more PCA missing
will be unpredictable. Only power the drive with all
boards installed.
4. Avoid any detergent which may cause short circuits
when cleaning assemblies.
5. Keep all vents open opened and unblocked. Avoid other
conditions which may cause circuits to overheat.
6. A ribbon type cable has one line marked. Ensure that
this line is always connected to pin 1 of the cable
connector.
7. Do not apply excessive force to the cover under any
circumstances. Doing so may cause irreparable damage
to the cover.
1-2
Device damage
The DE is completely sealed. Do not open the DE in the
1-3
field.
Data corruption
When asking for repair, save all data stored in the disk drive
1-4
beforehand. Fujitsu Limited is not responsible for any loss
of data during service and repair.
Device damage
The disk enclosure (DE) must never to be opened in the
1-13
field. Opening the disk enclosure may cause irreparable
damage.
iv C141-F071
Page 9
Important Alert Items
Task Alert message Page
Maintenance
Damage or Device damage
1. Perform any removal after the system power is
completely disconnected. The cable must not be
disconnected and the screws that attach the drive must
not be removed with the power ON.
2. Do not move the drive and attach or detach the
connector until it comes to a complete stop (about 30 s
after the power is turned OFF).
3. Perform the human body grounding to discharge any
static electricity from your body (Be sure to wear a wrist
strap).
2-2
C141-F071 v
Page 10

This page is intentionally left blank.
Page 11

Manual Organization
MHV2100AH, MHV2080AH
MHV2060AH, MHV2040AH
DISK DRIVE
PRODUCT MANUAL
(C141-E217)
MHV2100AH, MHV2080AH
MHV2060AH, MHV2040AH
DISK DRIVE
MAINTENANCE MANUAL
<This manual>
1. Device Overview
2. Device Configuration
3. Installation Conditions
4. Theory of Device Operation
5. Interface
6. Operations
1. Maintenance and Diagnosis
2. Removal and Replacement Procedure
C141-F071 vii
Page 12

This page is intentionally left blank.
Page 13

Contents
CHAPTER 1 Maintenance and Diagnosis.....................................................1-1
1.1 Maintenance..........................................................................................1-2
1.1.1 Rules for maintenance.........................................................................1-2
1.1.2 Maintenance requirements..................................................................1-3
1.1.3 Maintenance levels..............................................................................1-5
1.1.4 Disk drive revision number.................................................................1-6
1.1.5 Tools and test equipment .................................................................... 1-8
1.1.6 Self-diagnostics...................................................................................1-8
1.1.7 Test......................................................................................................1-8
1.2 Operation Confirmation......................................................................1-10
1.2.1 Operation test....................................................................................1-10
1.2.2 Diagnostic test...................................................................................1-11
1.3 Troubleshooting Procedure.................................................................1-11
1.3.1 Troubleshooting procedure...............................................................1-11
1.3.2 Troubleshooting disk drive replaced in field ....................................1-11
1.3.3 Troubleshooting at factory................................................................1-13
CHAPTER 2 Removal and Replacement Procedure....................................2-1
2.1 Spare Parts.............................................................................................2-2
2.2 Disk Drive Removal..............................................................................2-2
C141-F071 ix
Page 14

Contents
Figures
Tables
Illustrations
Figure 1.1 Disk drive revision number label................................................1-6
Figure 1.2 Display of disk drive revision number........................................1-7
Figure 1.3 Test flowchart..............................................................................1-9
Table 1.1 Status register contents..............................................................1-10
Table 1.2 Disposition for error register contents ......................................1-10
Table 1.3 System level and field troubleshooting.....................................1-12
Table 2.1 Model and parts numbers............................................................2-2
x C141-F071
Page 15

CHAPTER 1 Maintenance and Diagnosis
1.1 Maintenance
1.2 Operation Confirmation
1.3 Troubleshooting Procedure
This chapter describes the maintenance, diagnosis, operation check, and
troubleshooting of the disk drive. The following are explained:
• Rules for regular maintenance and troubleshooting
• Display of maintenance level (field and factory)
• Display of machine revision number and number change in the field
• Tools and t es t d ev i ces n eed ed for each m aintenance lev el
• Standard t es t i n g fo r each m aintenance lev el
• Recommended procedure for troubleshooting and fault diagnosis
C141-F071 1-1
Page 16

Maintenance and Diagnosis
1.1 Maintenance
1.1.1 Rules for maintenance
The following cautions must be observed to prevent injury during troubleshooting
or maintenance.
Static, Damage
1. Don’t install or remove a PCA or connect or disconnect a cable
or connector plug when the drive is powered. This may give
you an electric shock.
2. Keep away from m ech an i cal as s em b l ies in the u n i t d u ri n g
operation. This may cause injuries.
3. Avoid dangerous detergent when the disk drive is cleaned.
The following cautions must be observed to avoid damaging the disk drive during
troubleshooting and maintenance.
Device damage
1. Before touching a PCA or the drive, wear a wrist strap and
perform the human body grounding to discharge static
electricity from your body. This will prevent irreparable
damage to the PCA and the head of the drive.
2. Don’t install or remove a PCA or connect or disconnect a cable
or connector plug when the drive is powered. This will prevent
electrical d am ag e t o t h e d i s k d ri v e.
3. Operating the disk drive with one or more PCA missing will be
unpredictable. Only power the drive with all boards installed.
4. Avoid any detergent which may cause short circuits when
cleaning as s em b lies.
5. Keep all vents open opened and unblocked. Avoid other
conditions which may cause circuits to overheat.
6. A ribbon type cable has one line marked. Ensure that this line
is always connected to pin 1 of the cable connector.
7. Do not apply excessive force to the cover under any
circumstances. Doing so may cause irreparable damage to the
cover.
1-2 C141-F071
Page 17

1.1 Maintenance
1.1.2 Maintenance requirements
(1) Preventive maintenance
The disk drive needs no preventive maintenance, not even the air filter needs to be
changed.
Device damage
The DE is completely sealed. Do not open the DE in the field.
(2) Service life
In situations where management and handling are correct, the life of the disk drive
is five years when t h e DE s u rface t em p erat u re i s l es s t h an 48 °C . When the DE
surface temperature exceeds 48°C , t h e li fe i s fi ve years or 20,000 hours of
operation, whichever occurs first. Refer to Section 1.7 and 3.2 in Product Manual.
(3) Exchangeable part s i n fi el d
The PCA and the DE cannot be repl aced separat ely i n t h e fi el d. R epl ace t he
whole disk drive.
(4) Service sys t em an d rep ai r
Fujitsu Limited has a disk drive service system and repair facility. When making
a request for repair or parts replacement , you s hould provi de rel ated i nform at ion
usually including:
a) Model name of disk drive, part number (P/N), disk drive revision number,
manufacture serial number (S/N), and date of manufacture of the disk drive
b) Circumstances when th e fau l t o ccurred
− Date of trouble occurred
− System configuration
− Environmental conditions (including temperature, humidity, and voltage)
c) Fault history of the drive
d) Details of the fault
− Description of the fault
− Issued command and s p eci fi ed p aram et ers
− Status (Status / Error reg i s t er)
− Interval of the fault
− Other information for fault diagnosis
C141-F071 1-3
Page 18

Maintenance and Diagnosis
Data corruption
When asking for repair, save all data stored in the disk drive
beforehand. Fujitsu Limited is not responsible for any loss of data
during service and repair.
(5) Notes on handling
a. General notes
a) Vibrations and shocks more severe than allowed will cause fatal damage to
the device s o b e v ery careful. Be especially careful when u n p acking the
device.
b) Do not leave the device in a dusty environment.
c) B ecau s e t h e d evice uses GMR (giant MR head ) an d s t at i c s en s itive CMOS
semiconductors take the foll owi ng precauti ons , be careful of t he handl ing on
the following points after the device is unpacked.
b. Unpacking
a) Us e a fl at wo rk place, find which side of t he p ack i s u p an d be carefu l n o t t o
b) Be careful not t o ap p l y any ex ces s i v e fo rce t o t h e pack ed d evice when
c) When taking the device out of the antistatic bag, be especially careful not to
d) Never ever remove the DE seal label and screws and the DE cover.
c. Installation
a) When the power is ON, do not change the switch setting, or connecting, or
− Use an antistatic mat, etc. in the environment for handling the equipment.
The worker should also be physically grounded (e.g., wearing a wrist
strap).
− Hold by the DE section, do not directly touch the PCA unit
unnecessarily.
have the wrong side facing upwards. Do not pl ace t he devi ce di rect l y on a
hard table, place it on s om et hi ng so ft su ch as a rubber m at .
removing the shock absorbing material.
apply any excessive force to th e P C A or t o t he i nt erface connect or s ecti on.
disconnecting connectors.
b) Do not move the device or disconnect connectors with the power ON or until
the disk drive unit comes to a complete stop after the power is turned OFF.
(It is required to wait more than 30 seconds.)
d. Packaging
a) P l ace t h e devi ce in an ant i st at i c vinyl bag al ong wi t h a des i ccant (silica gel).
1-4 C141-F071
Page 19

1.1 Maintenance
b) It is recommended that you use the shock absorption cushion material and
packaging that contained the device when it was delivered by Fujitsu.
If the same packaging material cannot be used, use a shock absorbent box that
will transmit shocks directly to the device. When using this type of box,
adequately protect the PCA surface and interface connect or s ect i on.
c) Place a label s h ow i n g whi ch s i d e i s u p an d clearly stat i n g t h e no t es o n
handling on the outside of the packaging.
e. Delivery
a) As a ru l e, deliver as i t i s p ack aged an d k eep the up sid e up .
b) If delivering a single drive after it is unpacked, take it only a short distance.
Also, use shock absorbent material to protect it against shock and vibration.
Deliver an un pack ed d evice in eith er o f t h e al l o wab l e p acked p o s i t i o n s . Refer
to Section 3.2 of the MHV2100AH, MHV2080AH, MHV2060AH, MHV2040AH
Disk Drives Product Manual.
f. Storage
a) Store in dampproof packaging.
b) Take care that the environme nta l r e quir e me nts sa tisf y the non- ope r a ting
environmental spec ific a tions de sc r ibe d in Sec tion 1.4 of the MHV2100AH,
MHV2080AH, MHV2060AH, MHV2040AH Disk Drives Product Manual.
c) To prevent condensation, do not subject the device to sudden changes of
temperature.
1.1.3 Maintenance levels
Because of its compact s i ze an d s pecial repair requ i rem en t s , it is reco m m en d ed
that the wh o l e d i s k d ri v e b e replaced. Thi s s ect i o n d es cri b es maintenance o n t wo
levels.
(1) Field m ai n t en ance (d i s k d ri v e rep l acem en t )
• Replacemen t at t h e u s er s i te.
• Disk driv e repl acement requires o rd i n ary t o o l s .
• Usually, the user, retailer, seller, or OEM trader will replace the drive.
(2) Factory m ai n t en ance (p art s rep l acem en t )
• Only Fujitsu can perform maintenance at this level.
• This includes maintenance training and assisting other OEM traders. The
OEM trader usually assists the retailer and seller.
• Use the factory level tools and test equipment. This includes recommended
spare parts and repairing or replacing various parts.
C141-F071 1-5
Page 20

Maintenance and Diagnosis
1.1.4 Disk drive revision number
The disk drive revision number is a single alphabetic character followed by a
single alphanumeric character. It is stuck on the DE and marked on the revision
number label. Figure 1.1 shows the disk drive revision number label format.
Disk drive revision number
Firmware code/revision
Figure 1.1 Disk drive revision number label
(1) Revision number marking at delivery
The machine revision number is indicated by crossing out up to the relevant
number in the relevant alphabetic character row using = marks (see Figure 1.2).
(2) Revision number change in the field
When a part is replaced in the field or other modifications are made, the machine
revision number may need to be changed. The level is indicated by crossing out
the relevant number in the relevant alphabetic character row using ¡ marks (see
Figure 1.2).
(3) Firmware code and revision
First 4-digit indicates a firmware code and rest 4-digit indicates its revision.
Note:
For a change of revision number after delivery, Fujitsu issues a
“Change Request/Notice” and the disk drive revision number after
the change. When a change is made at the user site, the revision
number level should be changed as described above.
1-6 C141-F071
Page 21

1.1 Maintenance
Revision number mark when delivered
A2 Revision
Revision number change in the field
A3 Revision
Figure 1.2 Display of disk drive revision number
C141-F071 1-7
Page 22

Maintenance and Diagnosis
1.1.5 Tools and test equipment
At the field maintenance level, only ordinary hand tools are required for
troubleshooting and repairing the disk drive. Special tools and test equipment is
not required.
Factory level tools and test equipment are beyond the scope of this manual.
1.1.6 Self-diagnostics
The disk drive has the following self-diagnostics. These self-diagnostics allow
normal basic operation of an isolated disk drive can be checked.
• Initial self-diagnostics
• SMART comm an d (SMART Execut e Off-Li ne Im m ed i at e co m m and )
1.1.7 Test
The disk drive test can be divided into the following three levels.
• Operating test (See Subsection 1.2.1, “Operating test.”)
• Diagnostic test (See Subsection 1.2.2, “Diagnostic test.”)
Figure 1.3 shows the relationship between the test level and troubleshooting.
Tables 1.1 and 1.2 show the check contents.
1-8 C141-F071
Page 23

1.1 Maintenance
Start
Yes
Check the host system
(Table 1.1)
Operation test with the
host computer or test
equipment
Test acceptable?
Yes
Continue with the
operation
No
System normal?
Yes
Disk drive
replacement or repair
Disk drive normal?
Yes
Diagnostic test with
the host computer or
test equipment
Test acceptable?
Yes
Test using voltage or
temperature stress
No
No
No
Analyze the system
related failure
Test acceptable?
Yes
No failure
No Disk drive failure
analysis (Table 1.2)
Figure 1.3 Test flowchart
C141-F071 1-9
Page 24

Maintenance and Diagnosis
Table 1.1 Status register contents
Bit Contents
BIT0=1 Shown in Table 1.2
BIT1, 2 It is not necessary to take any measure when other bits are
normal, in spite of these bits. (Normal)
BIT3=1
BIT4=1
BIT5=1
BIT6=0
BIT7=1
BIT0
BIT1
BIT4
BIT6
BIT2
BIT7
Any of these
cases.
Error bit Method of disposition
Any of these
bits are “1”.
Any of these
bits are “1”.
(1) Check whether vibration is transmitted because of the way
the disk drive is mounted.
(2) Check th e p ow er, cab l e, and connect o r.
(3) If it is co n cl u d ed that the di s k d ri v e i s t h e cau s e, replace the
disk drive.
Table 1.2 Di sposition for error regis te r contents
If it is con cl u d ed t h at t h e d i s k d ri v e i s the cause, rep l ace t h e
drive.
(1) Check t h e s t atus of the h o s t , cable, and d ri v e.
(2) If it is concluded that the disk drive is the cause,
replace the dri v e.
1.2 Operation Confirmation
1.2.1 Operation test
When the host computer is processing data, the disk drive monitors disk drive
operation errors including data, command, and seek errors. The host is notified of
the error that the disk drive detected and the user is notified of its result.
The user may notice intermittent and indefinite failures such as overlong
execution time, abnormal noise, abnormal odor, or failures in particular processes.
The failure reported in the operation test will need further investigation. To
ascertain th e cau s e o f t h e d i s k d ri v e fai lure reported, the dis k d ri v e can b e
replaced. F ai lures in t he o p erat ion test are o ften not caus ed b y the host s y s t em.
1-10 C141-F071
Page 25

1.3 Troubleshooting Procedure
For example, not having enough power supply reserve, a loose cable connection,
no timing and mechanical reserves, or relationship with other systems.
In normal operation, the disk drive itself or the host determines the processing
(return or halt) following the detected failure state.
To troubleshoot the fail u re report ed in t h e t est at t hi s l evel, accurat el y reproduce
the condition that caused the failure. Then, by replacing the disk drive, try to
separate the fault from the other sections of the disk drive host system.
1.2.2 Diagnostic test
The diagnostic test is used to separate a confirmed disk drive failure to a disk
drive subassembly or to check the disk drive performance. A test of this level
usually includes a specific disk drive function or concentrated execution of a
group of functions. The test is usually performed by a factory engineer and not
where the failure was reported. The disk drive is tested using another host
computer or test equipment.
To troubleshoot the disk drive failure in the diagnostic test, the engineer will
reproduce the failure condi t ion. The en g i n eer t h en i s o l at es the failure t o a
subassembly or part of the disk drive.
The procedures used in a test of this level great depend on the test equipment
used. It is beyond the range of this manual.
1.3 Troubleshooting Procedure
1.3.1 Troubleshooting procedure
This section describes the troubleshooting procedures for a disk drive failure at
field maintenance level described in Subsection 1.1.3.
In this section, troubleshooting is made to isolate the reported failure to the disk
drive or a host system . Usual l y, troubleshooting is neces s ary only when a cause
of failure is uncertain or unknown. When a cause of failure is clear (for example,
abnormal sound in the DE or burnt parts on the PCA), a level of troubleshooting is
low.
1.3.2 Troubleshooting disk drive replaced in field
It is recommended that t h e wh o l e d ri v e be rep l aced i n m aintenance of t h i s l ev el .
If replacing t h e dr i ve co rrect s the fault, ret u rn t h e o l d dr i v e t o the factory for
testing and repair. If the new drive shows the same fault as the one that was
removed, the failure is elsewhere in the system.
System level troubleshooting, shown in Table 1.3, is performed at the user site to
isolate the reported failure to the disk drive or system.
C141-F071 1-11
Page 26

Maintenance and Diagnosis
Table 1.3 System level and field troubleshooting
Check to be made Recommended work
DC power voltage
level
Confirm that the DC power voltage is within ±5% of the standard value.
When measured at pins 41, 42 and 43 of the power supply connector, the
+5 VDC must be 4.75 to 5.25 VDC.
DC power ripple
noise
Power-interface
cable connect i o n
Check that the maximum ripple at +5 VDC power is less than 100 mV
peak to peak and 200 mV peak to peak respectively.
Confirm that t h e AT i nt erface cabl e is properl y connect ed at t he di s k
drive, power supply section, and control unit.
Switch setti ng Confirm that t he s wi t ch on th e i nt erface connector at t h e dis k driv e
control PCA is set for normal operation with the host computer. Refer to
Section 3.4 of the MHV2100AH, MHV2080AH, MHV2060AH,
MHV2040AH Dis k Dri v e s Pr oduct Manual for switch setting.
System cable Confirm that all cable connections throughout the system correctly
connected.
System diagnostic
test
Intermittent or
indefinit e erro r
To further isolate the failure, if it can be done, execute the system level
diagnostic routine described in the host computer manual.
Check the AC voltage level at the power supply section and recheck the
DC voltage level at the disk drive power supply connector.
If the AC voltage level is abnormal, or if there is a lot of electrical noise,
notify the user.
If the DC voltage level is uns tabl e, repl ace t he power s uppl y sect i on.
If possible, replace t he d i s k d ri v e. If the fault rem ai n s , the dis k d ri v e i s
not the case. For suggestions to isolate the failure further, refer to the
hardware and software manuals provided with the system.
1-12 C141-F071
Page 27

1.3 Troubleshooting Procedure
1.3.3 Troubleshooting at factory
When the trouble is recovered by replacing the drive at field (Subsection 1.3.2),
troubleshoot the replaced dri v e to i sol at e t he t roubl e t o t h e subas s emb ly part s.
To shorten the troubleshooting time and repairing time, gather the data, such as
environmental data and other information, from the user and then return the failed
drive to the factory to repair.
At the factory , user enviro n m ent is made and a reap p earance test is perfo rm ed . To
reappearance a same trouble at user, the failed drive is connected to the host
system. If no trouble occurs by the normal test, the reappearance test is performed
by adding t h e v o l t ag e/ t emperature load u s i n g a d i s k d ri v e t es t er o r t o o l s acco rd i n g
to the user environment.
When a trouble reappeared, troubleshoot t h e cause of fai l ure. Then, replace the
failed unit or parts.
As this level maintenance is made by a factory, this maintenance level is beyond
the scope of this manual.
Device damage
The disk enclosure (DE) must never to be opened in the field.
Opening the disk enclosure may cause irreparable damage.
C141-F071 1-13
Page 28

This page is intentionally left blank
Page 29

CHAPTER 2 Removal and Replacement Procedure
2.1 Spare Parts
2.2 Disk Drive Removal
This chapter explains the procedure for removing and replacing the disk drive. It
is assumed that the reader has a thorough knowledge of replacing the complete
disk dri v e and rep l aci n g t h e p o wer-i n t erface cab l e.
When carrying o u t t h es e pr oced u res , note the fo l lowing it em s .
• Be sure to wear a wrist strap when removing the disk drive from the host
system.
• The disk drive must have been removed from the host system.
• A power-interface cable to the di s k dri ve m u s t be di s connect ed.
• Mounting is done by reversing the steps for removal.
To carry out maintenance properly, observe the following:
• Place removed s crews an d other parts where th ey will not get lost or
damaged.
• Keep a record of all m ai n t en an ce work .
• Tighten screws securely but not excessively.
• Before touching the PCA, wear a wrist strap and check it is grounded to
discharge any static electricity from your body. This ensures that the worker
will not electrically damage the PCA.
• Do not push the DE cover under any circumstances.
C141-F071 2-1
Page 30

Removal and Replacement Procedure
2.1 Spare Parts
See Table 2.1 for the mo d el and p art s n u m b ers to order the rep l acem en t d i s k
drive.
Table 2.1 Model and parts numbers
Model Name
MHV2100AH 100GB
MHV2080AH 80GB
MHV2060AH 60GB
MHV2040AH 40GB
Capacity
(user area)
2.2 Disk Drive Removal
The method and procedures to demount the disk drive to check the jumper
terminal , ch an g e t h e j u m p er po s i tion, o r rep l ace t h e d ev i ce d i ffer d epen d o n the
system cab i n et s t ru ct u re. Therefore, for act u al wo rk i n g pro ced u res , the specific
conditi o ns n eces s ary fo r each s y s t em must be det erm i n ed . The general rem ov al
procedures, wi t h n ot es , are as follo ws .
a) Di s co n nect the power-in t erface cab l e.
b) Remove the screws that attach the drive and remove the drive from the
system cab inet.
Mounting screw Order No.
M3 Depth 3
M3 Depth 3
M3 Depth 3
M3 Depth 3
CA06531-B040/B140
CA06531-B048/B148
CA06531-B036/B136
CA06531-B024/B124
c) When storing or transporting the drive, pack it an antistatic bag in compliance
with section 1.1.2 (5) d. and (5) e..
To protect the device from damage and prevent the worker getting hurt, observe
the follo wi n g caut ions and precau t ions in Subsectio n 1 . 1 .1.
Damage or Device damage
1. Perform any removal after the system power is completely
disconnected. The cable must not be disconnected and the
screws that attach the drive must not be removed with the
power ON.
2. Do not move the drive and attach or detach the connector until
it comes to a complete stop (about 30 s after the power is
turned OFF).
3. Perform the human body grounding to discharge any static
electricity from your body (Be sure to wear a wrist strap).
2-2 C141-F071
Page 31

Acronyms and Abbreviations
A
ABRT Aborted command
AC Alternating current
AIC Automatic idle control
AMNF Address mark not found
ATA AT attachment
AWG Am eri can Wi re Gauge
B
BBK Bad block detected
BIOS Basic input-output system
C
CORR Corrected data
CH Cylinder high register
CL Cylinder low register
CM Command register
CMOS Complementary
metal-oxide semiconductor
CSR Current sense register
CSS Contact start/stop
CY Cylinder register
D
dBA dB A-scale weighting
DC Direct current
DE Disk enclosure
DH Device/head register
DRDY Drive ready
DRQ Data request bit
DSC Drive seek complete
DWF Drive write fault
E
ECC Error checki n g an d co rrect ion
ER Error register
ERR Error
H
HA Host adapter
HDD Hard disk drive
I
IDNF ID not found
IRQ14 Interrupt request 14
L
LED Light emitting diode
M
MB Mega-byte
MB/s Mega-byte per seconds
MPU Micro processor unit
MTBF Mean time between failures
MTTR Mean time to repair
O
OEM Original equipment manufacture
P
PCA Printed circuit assembly
PIO Programmed input-output
P/N Parts number
R
RLL Run-length-limited
S
SA System area
SC Sector count register
SG Signal ground
SN Sector number register
ST Status register
S/N Serial number
F
FR Features register
G
GB Giga byte
C141-F071 AB-1
TPI Tracks per inch es
TR0NF Track 0 not found
Typ Typical
T
Page 32

Acronyms and Abbreviations
U
UNC Un co rrect abl e E C C erro r
V
VCM Voice coil motor
AB-2 C141-F071
Page 33

Index
D
Dampproof packaging 1-5
Delivery 1-5
revision number marking 1-6
Diagnostic test 1-11
Disk drive
replaced, troubleshooting 1-11
replacement 1-5
revision number 1-6
revision number label 1-6
Disposition for error register contents 1-10
E
Exchangeable parts in field 1-3
F
Factory
maintenace 1-5
troubleshooting 1-13
Field
exchangeable part 1-3
maintenance 1-5
revision number change 1-6, 1-7
troubleshooting 1-12
Firmware code and revision 1-6
G
N
Note
general 1-4
on handling 1-4
O
Offline self-diagnostics 1-8
Operation
configuration 1-10
test 1-10
P
Packaging 1-4
dampproof 1-5
Part
number 2-2
replacement 1-5
Preventive maintenance 1-3
R
Removal and rep l acement procedu re 2 -1
Revision, firmware code 1-6
Revision number
change in field 1-6, 1-7
mark when delivered 1-6, 1-7
Rule for maintenance 1-2
General note 1-4
H
Handling, note 1-4
Self-diagnostics 1-8
initial 1-8
offline 1-8
S
Service
I
Initial self-diagnostics 1-8
Installation 1-4
life 1-3
system and repair 1-3
Spare part 2-2
Status register contents 1-10
Storage 1-5
L
Level, maintenance 1-5
M
Maintenance 1-1
level 1-5
requirement 1-3
Maintenance and diagnosis 1-1
System level 1-12
and field troubleshooting 1-12
T
Test 1-8
equipment 1-8
flowchart 1-9
Tool 1-8
Model 2-2
C141-F071 IN-1
Page 34

Index
Troubleshooting
at factory 1-13
disk drive replaced in field 1-11
procedure 1-11
system level and fiel d 1-12
U
Unpacking 1-4
IN-2 C141-F071
Page 35

READER’S COMMENT FORM
Your comments or suggestions on this document are cordially solicited. For any comments and suggestions you
may have, please complete and submit this form to your FUJITSU representative. The comments and
suggestions will be used in planning future editions. Thank you for your cooperation.
Date issued:
Manual name:
MHV2100AH, MHV2080AH
MHV2060AH, MHV2040AH
DISK DRIVE
MAINTENANCE MANUAL
Name:
Company or organization:
Address:
Comments:
Page Line Comments
Please evaluate overall quality of this manual by marking (√) in the appropriate boxes.
Good Fair Poor Good Fair Poor Good Fair Poor
Organization:
Accuracy:
Clarity:
Figures & tables:
Technical level: Too high
Overall rating of
this publication: Good
Reply requested: Yes No
Use of exampl es : Legibility:
Index coverage: Handiness/Binding:
Cross referencing: (Others):
General appearance:
Appropriate Too low
Fair Poor
Manual code:
C141-F071-01EN
FOR FUJITSU USE
Overseas office: Person in charge:
Note) Local representative should pass this form to the section in charge of distribution in FUJITSU.
Reply
By
Page 36

This page is intentionally left blank
Page 37

MHV2100AH, MHV2080AH, MHV2060AH, MHV2040AH DISK DRIVE
MAINTENANCE MANUAL
C141-F071-01EN
MHV2100AH, MHV2080AH, MHV2060AH, MHV2040AH DISK DRIVE
MAINTENANCE MANUAL
C141-F071-01EN
Page 38

This page is intentionally left blank
Page 39

Page 40

 Loading...