

Page 1
Quick Tips
It takes approximatel y 4 hours to
charge a fully disc harged single
battery with unit o ff or in
suspend mode.
Optimizing Batt ery Life
• Set power manageme nt setting
to Maximize Batter y Life.
• Adjust display brig htness levels
to lowest comfortab le setting.
• Remove PC Cards and Ex pressCards when not neede d.
• Utilize Suspend mod e when
not using your notebook .
• Read the Power Manage ment
section in your elec tronic User’s
Guide for addition al features.
Adjusting Displ ay Brightness
• Fn + F6 to decrease brightn ess
• Fn + F7 to increase bright ness
Adjusting Volume
• Fn + F8 to decrease volume
• Fn + F9 to increase volume
• Microphone/l ine in jack
• Headphone/l ine out jack.
This convenient guide will lead you through the start-up
process and will also offer some valuable tips.
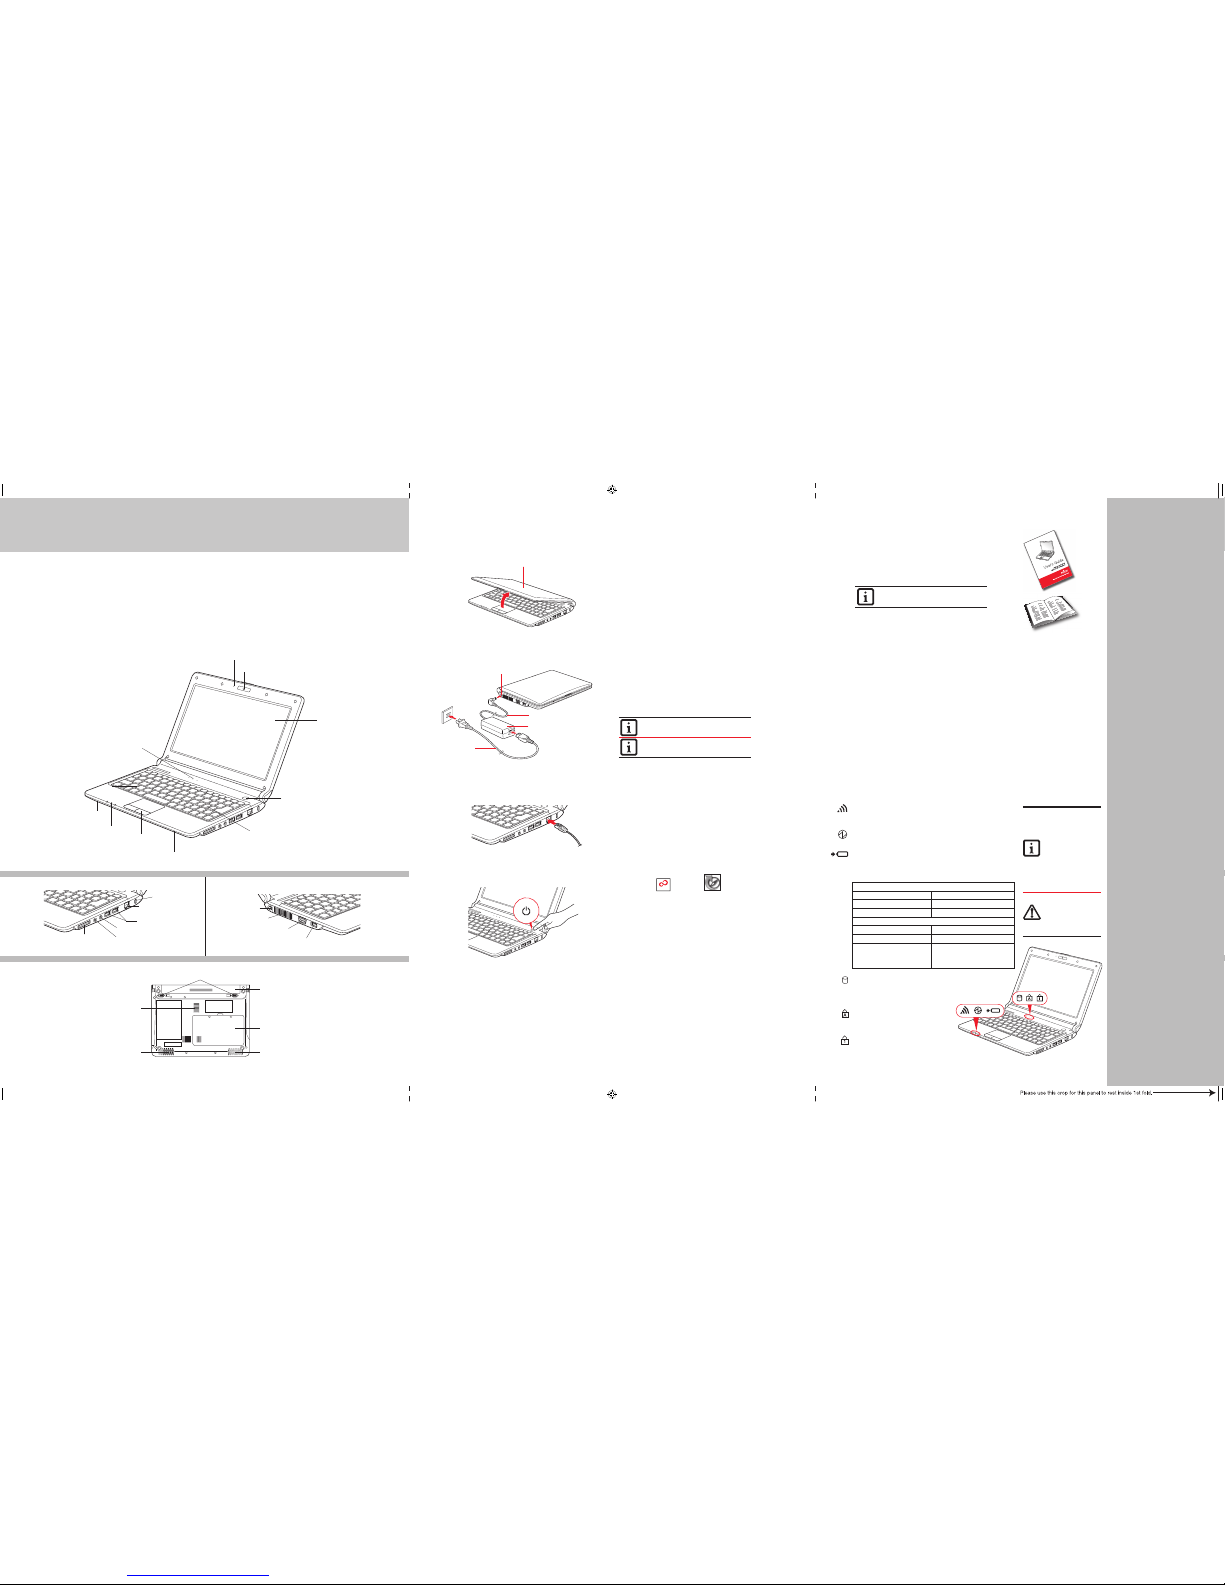
1. Open the Display Panel
• Ensure that your notebook is on a hard level surface and
that the air vents are not blocked.
• Lift the display, being careful not to touch the screen.
• Adjust the display until it is at a comfor table viewing angle.
2. Connect AC Power
• Plug the AC adapter into your noteb ook.
• Plug the power cord into the AC adap ter.
• Connect the power cor d to an electrical outlet.
3. Connect to Internet or Network
• Connect the Ethernet cable to the LAN jack on your
notebook and to a wall jack or to an Ethernet router.
Important:
• During the setup procedure, do not disconnect the power
supply, press any buttons, or use any peripheral devices.
•
You should not attach any exter nal devices
until you have gone
through the initial power on sequence.
4. Booting the System
• Press the Suspend/Resume/Power button ( above the
keyboard) to turn on the notebook. When you do t his for the
fi rst time, it will display a Fujitsu logo on the s creen. If you do
nothing the system will load the operating system, and then
the Windows Welcome will begin.
5. Installing Click Me!
• When you click the Click Me! icon, your system will
automatically build the icon tray in the bottom right
of the screen. These icons provide links to utilities
that you will frequently access.
• If the FDU Icon is missing from Windows taskbar notifi cation area, please download and install FDU package
from the support website. This application will keep your
notebook up to date with the latest released drivers.
6. Registering Your Fujitsu notebook
• Register your notebook with Fujitsu Service and Support
via our website at us.fujitsu.com/computers.
• You will need to be set up with an Internet Service Provider
(ISP) to register online.
7. Access your User’s Guide
• To take advantage of all the features of your new Fujitsu
notebook, it is highly recommended that you read your
electronic User’s Guide. It contains important det ailed
information about your new computer. You can access your
User’s Guide by selecting its icon from the screen desktop.
BOTTOM PANEL
RIGHT PANEL LEFT PANEL
Initial Start Up
What’s in the Box
Check to see that all of the following items are in the box:
❏ Fujitsu notebook
❏ Lithium ion battery, pre-inst alled
❏ AC adapter with power cord
❏ International Limited Warran ty and Registration booklet
8. Restoring Your System
• The original fact ory system is stored in a hidden partition on
your hard disk drive to keep it safe. For instructions on restoring the factory system, please follow the instr uctions in
the “Recovering Your Factory and System Images” manual
that is bundled separately with your system.
• On your deskto p, there is a Backup Drivers & Apps icon that
allows you to back up and restore your drivers and applications by fi rst backing them up to a dis c on an external drive.
You are strongly encouraged to make a backup of the drivers and applications in the event of hard disk failure. If you
ever you need to reinstall any drivers or applications, and
you have not made a backup of the drivers and applications
you will need to download them from the Fujitsu Support
website: http:/ /www.computers.us.fujitsu.com/suppor t.
• More detailed inf ormation is also available in your User’s
Guide on backing up your drivers and applications.
Microphone Jack
Headphone Jack
Anti-Theft Lock Slot
LAN (RJ-45) Jack
USB 2.0 Ports
USB 2.0 Ports
External Video Port
DC Power Jack
Air Vents
Air Vents (various locations)
Stereo Speaker
Secure Digital/Memory Stick
Card Slot
Display Cover
DC Power Jack
DC Ouput Cable
AC Cable
AC Adapter
LAN Jack
Common Indicators
Status Display Panel
The Status Indicator s represent speci c components of your Fujits u notebook. The LEDs bel ow each
symbol tell you how each o f those components are op erating.
Lithium ion Battery
Battery Latches
Memory Upgrade Compartment
Stereo Speaker
Controls, Connectors,
and Access Points
Power/Suspend/Resume
Button
Status Indicator Panel
Status Indicator Panel
Quick Point
Pointing Device
Display Panel
Stereo Speaker
Stereo Speaker
Keyboard
Built-in Microphone
1.3 Megapixel Web Camera
The Lithium ion bat tery is not charg ed upon purchase.
Initially you will n eed to connect eithe r the AC adapter
or the Auto/Airli ne adapter to use your noteb ook.
Be careful when you se lect the language.
The only way to change t he language
is to do a recovery proc ess.
IN ORDER TO MAKE COPI ES OF DRIVERS AND
APPLICATIONS, YOU MUST HAVE AN E XTERNALLY
CONNECTED DVD DRIV E.
CLICK ME
“Click Me!”
For
Additional
Utilities
(FDU)
For
Latest
Drivers
Power/Suspend /
Resume Button
Wireless Devic e Indicator
Glows blue when your w ireless device
is turned on.
Power Indicator
Glows blue when your sy stem is turned on.
Battery Char ger/DC-In In dicator
Hard Drive Acces s
Glows green when you r internal hard
drive is being acce ssed. Note that
fl icke ring is normal.
Caps Lock
Glows when your keyboa rd is set to
type in all capita l letters.
NumLock
Glows when the integra l keyboard is
in ten-key numeric keyp ad mode.
If the battery pac k is installed
while the power is tur ned off,
the battery level i ndicator will
display the charge le vel for
fi ve seconds after it blinks
orange.
If the AC adapter is not connected or the batter y pack
is not fully charged w hen
the computer is switc hed to
standby mode, the ind icator
will blink. The LED bl inks at
the rate of one second on /six
seconds off.
Batteries subje cted to
shocks, vibration o r extreme
temperatures can be
permanently da maged.
A shorted batter y is
damaged and must
be replaced.
Depending upon wh ether you have an AC adapter con nected or not,
the battery indic ator will appear in a vari ety of colors and states.
AC Adapter Connect ed
Solid blue Charge complete
Solid orange Charging in proces s
Purple, blinking Battery malfun ction
No AC Adapter Connec ted
Orange, blinking Battery is charg ed 12% or less
Purple, blinking Battery malfun ction
Off Battery charge b etween 13%
and 100%
Battery comple tely discharged
No battery instal led
Page 2
Warning
Caution
Warning
Popular Accessories
Lithium ion Battery
Auto/Airline Adapter
Additional AC Adapter
USB 2.0 Docking Station
USB Optical Mouse
Wireless Keyboard and Mouse
Carrying Cases
• Diplomat
• Workstation Plus
• Messenger Bag
• Tri-Pak Backpack
• Duo
• Phantom
• Protegé
Record your notebook se rial number here:
Serial #___ _____ _____ _____ ____
(see bottom of computer)
Fujitsu America, I nc.
1250 E. Arques Avenue
Sunnyvale, CA 94085 -3470, U.S.A.
Fujitsu and th e Fujitsu log o are registe red tradema rks of Fujit su Limited. Mic rosoft, Wi ndows,
and Genuine Win dows Vista a re registere d trademar ks of Microso ft Corpora tion in the Uni ted
States and/ or in other cou ntries. Al l other trade marks ment ioned herein a re the proper ty of
their respect ive owners. P roduct desc ription dat a represent s Fujitsu de sign object ives and
is provided for co mparativ e purposes ; actual resu lts may var y based on a var iety of fact ors.
Specificatio ns are subjec t to change wi thout notic e.
©2009 Fujitsu A merica, Inc. A ll rights res erved.
Getting Started
Get Started with your
Fujitsu M2011 Notebook
This guide will lea d you through the start-up p rocess for your new Fujits u notebook and will also pr ovide
some valuable tips. To lear n about all the exciting fe atures that your new noteboo k has to offer, please see
the User’s Guide that can be a ccessed after com pleting the start-up pro cedure.
SAVE THESE INSTRUCTION S
All repairs must be accomplished by an Authorize d Repair Technician.
HANDLING THE CORD ON THIS PRODUCT WIL L EXPOSE YOU TO LEAD, A CHEMICAL KNOWN TO THE STATE OF
CALIFORNIA TO CAUSE BIRTH DEFECTS OR OTHER REPRODUCTIVE HA RM. WASH HANDS AFTER HANDLING.
DECLARATION OF CONFOR MITY according to FCC Part 15 Responsible Par ty Name: Fujitsu Computer Sys tems
Corporation Address: 1250 E. Arques Avenue, M/ S 122 Sunnyvale, CA 94085 Telephone: (408) 746-6000 Decl ares
that product: Base Model Cong uration: Fujitsu M2011 notebook Complies with Part 15 of the FCC Rules.
This device complies with Par t 15 of the FCC rules. Operations are subject to the followin g two conditions:
(1) This device may not cause harmful inter ference, (2) This device must acc ept any interference received,
including interferenc e that may cause undesired operation.
IMPORTANT SAFETY INST RUCTIONS
This unit requires an AC adapter to operate. Use onl y UL Listed I.T.E. Class II Adapters with an output rating of 19 VDC, with a minimum current of 3.16 A.
AC adapter output polarity:
When using your notebook equipm ent, basic safety precautions shou ld always be followed to reduce the risk of re, electric
shock and injury to persons, inc luding the following:
• Do not use this prod uct near water for example, near a bathtub, washbowl, kitc hen sink or laundry tub, in a wet
basement or near a swimming poo l.
• Avoid using the mod em during an electrical storm. The re may be a remote risk of electric shock from lightn ing.
• Use only the power c ord and batteries indicated in this manu al. Do not dispose of batteries in a re. They may
explode. Check with local code s for possible special disposa l instructions.
•
To reduce the risk of re, use onl y No. 26 AWG or larger UL Listed or CSA Certied Telecommunic ation Line Cord.
For Authorized Repair Technicians Only
DANGER OF EXPLOSION IF LITHIUM (CLOCK ) BATTERY IS INCORRECTLY REPLACED. REPLACE ONLY WITH
THE SAME OR EQUIVALENT TYPE RECOMM ENDED BY THE MANUFACTURER. DISPOSE OF USED
BATTERIES ACCORDING TO THE MANUFACTURER’S INSTRUCTION.
FOR CONTINUED PROTECTION AGAINST RISK OF FIRE, REPL ACE ONLY WITH THE SAME TYPE
AND RATING FUSE
.
System Disposal
LAMP(S) INSID E THIS PRODUCT CONTAIN MERCURY AND MUST BE RECYCLED OR DISPOSED
OF ACCORDING TO LOCAL, STATE, OR FEDERAL LAWS.
Recycling your battery
Over time, the batteries that run your mob ile computer will begin to hold a charge for a shor ter amount of time;
this is a natural occurrence for all bat teries. When this occurs, you may want to replace th e battery with a fresh
one*. If you replace it, it is important that you dispose of the o ld battery properly because ba tteries contain
materials that could cause enviro nmental damage if disposed of impro perly.
Fujitsu is very concerned wi th environmental protection, and has enl isted the services of the Recharge able
Battery Recycling Corpo ration (RBRC)**, a non-prot publi c service organization ded icated to protecting
our environment by recycling old bat teries at no cost to you.
RBRC has drop-off points at tens of thous ands of locations throughout the United S tates and Canada.
To nd the location nearest you, go to www.RBRC.org or call 1-800-822-88 37.
If there are no convenient RBRC locatio ns near you, you can also go to the EIA Consumer Educatio n Initiative
website (http://EIAE.org /) and search for a convenient dispo sal location. Remember—protecting the environm ent
is a cooperative effort, and you sh ould make every effort to protect it for curr ent and future generations.
* To order a new battery for your Fujitsu mobile compute r, go to the Fujitsu shopping site at
www.shopfujitsu.com in the US or ww w.fujitsu.ca/products/noteboo ks in Canada.
** RBRC is an independent third par ty to which Fujitsu provides fundin g for battery
recycling; RBRC is in no way afliated wi th Fujitsu.
Have questions or need help?
• Visit our website at us.fujitsu.com/solutions
• Call us anytime at 1.800.831.3183
• Email us at solutions@us.fujitsu.com
Fujitsu Extended Service Plans available.
Visit us.fujitsu.com/solutions
to purchase any of these accessories
or to get more information.
 Loading...