

Fujitsu ETERNUS LT20 S2, ETERNUS LT40 S2, ETERNUS LT60 S2, LT20S2JNXU, LT40S2JNXU User Manual
...Page 1

P3AM-5262-01ENZ0
ETERNUS LT20 S2
(LT20S2JNXU)
ETERNUS LT40 S2
(LT40S2JNXU)
ETERNUS LT60 S2
(LT60S2JNXU)
Tape Library
User's Guide
-Monitoring Software Setup Procedure-
Page 2

FOR SAFE OPERATION
This manual contains important information regarding the use and handling of
this product. Read this manual thoroughly. Pay special attention to the section
"FOR SAFE OPERATION" Use the product according to the instructions and
information available in this manual. Keep this manual handy for further
reference.
Fujitsu makes every effort to prevent users and bystanders from being injured or
damage to their property. Use the product according to this manual.
ABOUT THIS PRODUCT
This product is designed and manufactured for use in standard applications such
as office work, personal devices and household appliances. This product is not
intended for special uses (atomic controls, aeronautic or space systems, mass
transport controls, medical devices for life support, or weapons firing controls)
where particularly high reliability requirements exist, where the pertinent levels of
safety are not guaranteed, or where a failure or operational error could threaten a
life or cause a physical injury (hereafter referred to as "mission-critical" use).
Customers considering the use of these products for mission-critical applications
must have safety-assurance measures in place beforehand. Moreover, they are
requested to consult our sales representative before embarking on such
specialized use.
TRADEMARKS ACKNOWLEDGEMENTS
- Microsoft, Windows,and MS are registered trademarks of Microsoft
Corporation in the United States or certain other countries.
- All other corporation names and product names mentioned herein are the
trademarks or registered trademarks of their respective owners.
P3AM-5262-01ENZ0
Page 3

RADIO FREQUENCY INTERFERENCE STATEMENT
The following notice is for EU users only.
WARNING: This is a product which meets Class A of EN55022. In a domestic
environment this product may cause radio interference in which case the user
may be required to take adequate measures.
The following notice is for USA users only.
This equipment has been tested and found to comply with the limits for a Class A
digital device, pursuant to Part 15 of the FCC Rules. These limits are designed
to provide reasonable protection against harmful interference when the
equipment is operated in a commercial environment. This equipment generates,
uses, and can radiate radio frequency energy and, if not installed and used in
accordance with the instruction manual, may cause harmful interference to radio
communications. Operation of this equipment in a residential area is likely to
cause harmful interference in which case the user will be required to correct the
interference at his own expense.
Measures against instantaneous voltage drop
The LT20 S2/LT40 S2/LT60 S2 may be affected by instantaneous voltage drop
due to lightning strikes or other factors. To protect the LT20 S2/LT40 S2/LT60
S2 against instantaneous voltage drop, the user should preferably provide an AC
uninterruptible power supply or the like for the LT20 S2/LT40 S2/LT60 S2.
Copyright 2011 FUJITSU LIMITED
P3AM-5262-01ENZ0
Page 4

Revision History
Edition Date Revised location (type) (*1) Revision
(1/1)
01 June, 2011
− −
*1 Items in the "Revised location" column refer to the latest edition unless the
P3AM-5262-01ENZ0
item is marked with an asterisk. An asterisk indicates an item in an older
edition.
Page 5

Page 6

Preface
Thank you for your purchasing the ETERNUS LT20 S2/LT40 S2/LT60 S2 Tape
Library.
To ensure the proper handling of this product, read this manual, the other
manuals supplied with this product, and the manuals supplied with the server and
software thoroughly and carefully before using it.
This manual explains the settings for using monitoring software "ETERNUS SF
Storage Cruiser" with the ETERNUS LT20 S2/LT40 S2/LT60 S2 Tape Library.
The purpose of this manual is to explain in detail how to set SNMP for this library
(hereafter called "tape library," "library," or "this device"), how to set up
"ETERNUS SF Storage Cruiser," and how to confirm SNMP trap sending with
this device.
This manual is intended for users who have a basic knowledge of magnetic tape
libraries and the usage of the tape libraries in computer systems. The
organization of the manuals related to this device and the coverage of this
manual are shown in "Manual Organization" provided later in this manual. Use
other manuals as well when necessary.
The organization and contents of this manual are explained below. This
information is followed by the symbols for alert messages with their meanings.
Organization and contents of This Manual
This manual has four chapters below.
Chapter 1 Setting up SNMP
Explains how to set up SNMP with this device.
Chapter 2 Setting up Monitoring Software
Explains how to set up monitoring software "ETERNUS SF Storage Cruiser."
Chapter 3 Confirming the SNMP Trap Settings
Explains how to send SNMP traps with this device.
Chapter 4 Event List
Explains the events that are reported by SNMP of this device.
P3AM-5262-01ENZ0 i
Page 7

Preface
Abbreviation
In this manual, the product names are abbreviated as follows:
Long title Abbreviation
Microsoft® Windows® XP Professional operating system
Microsoft® Windows® XP Home Edition operating system
Microsoft® Internet Explorer® Internet Explorer IE
Windows XP
ii P3AM-5262-01ENZ0
Page 8
Safety Precautions
Read thoroughly this manual to use this product safely and correctly.
Use the unit correctly according to this manual so that damage should not reach
the human body and your property.
Keep this Monitoring Software Setup Procedure at hand for quick reference at
anytime necessary.
In this User's Guide, the following indications are used to use the product safely
and correctly. Thoroughly understand the meaning of the indication before using
this product.
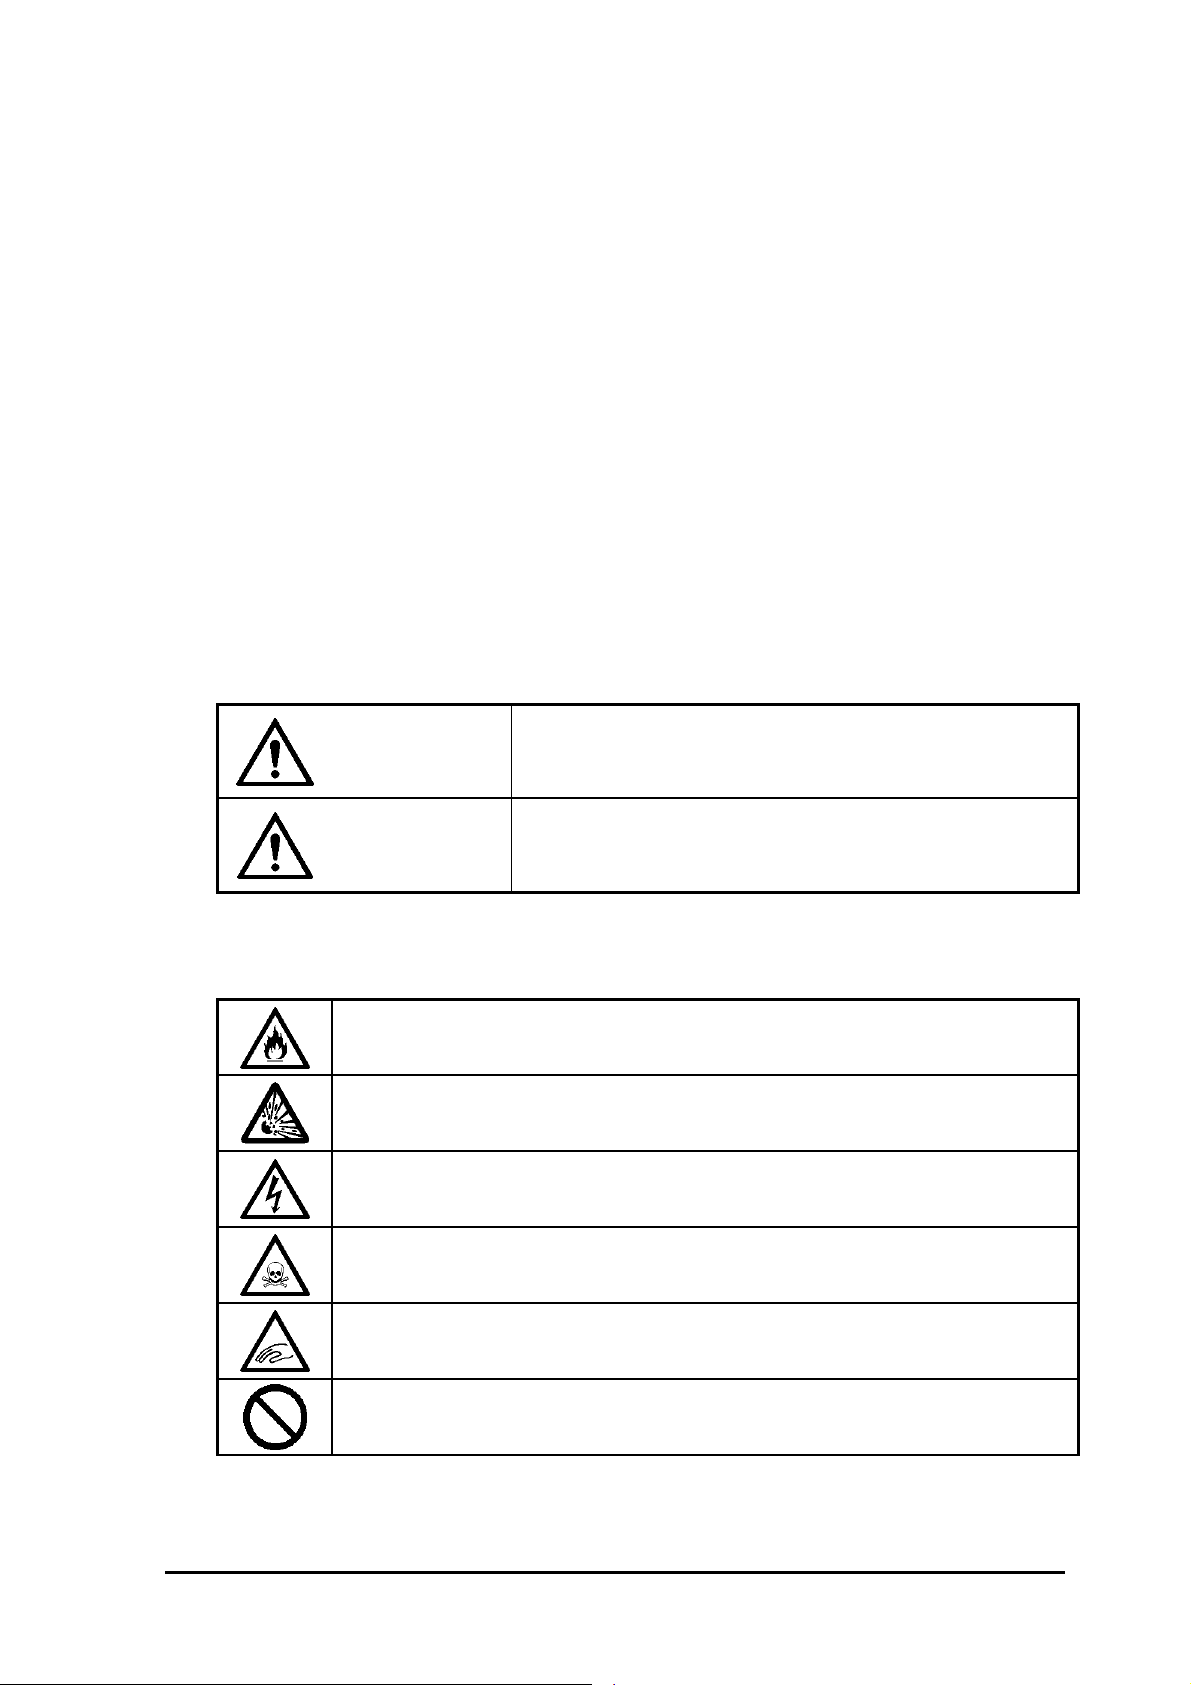
Note on Safety
Warning
Caution
Precautions and notices against hazards are presented with one of the following
symbols.
Indicates that improper use may cause fumes or fire.
Indicates that improper use may cause explosion.
Indicates that improper use may cause an electric shock.
Indicates that improper use may cause personal injury due to toxic material.
Failure to heed this sign could result in serious injury or
death.
Failure to heed this sign could result in personal injury or
damage to properties.
Indicates that improper use may cause hands or fingers to be caught.
Indicates a general prohibited action or warning that cannot be specifically
identified.
P3AM-5262-01ENZ0 iii
Page 9

Note on Safety
Indicates that the disassembling and modification of the product is inhibited.
Indicates that the user is inhibited to touch the product.
Indicates a general mandatory action or warning that cannot be specifically
identified.
Indicates an instruction to unplug the power cord from the outlet and turn off the
circuit breaker of power distribution panel.
iv P3AM-5262-01ENZ0
Page 10

Manual Organization
ETERNUS LT20 S2
LTO Library
Installing, Starting Up
and Maintaining
(P3AM-5382)
ETERNUS LT40 S2/
LT60 S2 LTO Library
Installing, Starting Up
and Maintaining
(P3AM-5392)
1. Preface
2. Product Description
3. Installing the Tape Library
4. Operating the LTO Library
5. Troubleshooting
6. Servicing
7. Packaging before Transportation
8. Technical Specifications
9. Recycling and Disposal
10. Regulatory Information
1. Preface
2. Product Description and Features
3. Installing the Tape Library
4. Operating the Tape Library
5. Troubleshooting
ETERNUS LT20 S2/
LT40 S2/LT60 S2
Tape Library
User's Guide
-Monitoring Software
Setup Procedure-
(P3AM-5262)
<This manual>
6. Servicing the Tape Library
7. Technical Specifications
8. Packaging Before Transportation
9. Recycling and Disposal
10. Regulatory Information
1. Setting up SNMP
2. Setting up Monitoring Software
3. Confirming the SNMP Trap Settings
4. Event List
P3AM-5262-01ENZ0 v
Page 11

Page 12

Contents
Contents
Preface ....................................................................................................................i
Note on Safety....................................................................................................... iii
Manual Organization ..............................................................................................v
Chapter 1 Setting up SNMP ................................................................................1-1
1.1 SNMP Function....................................................................................1-2
1.2 Notes on Setting SNMP.......................................................................1-2
1.3 SNMP Setting Procedure.....................................................................1-2
Chapter 2 Setting up Monitoring Software ..........................................................2-1
2.1 Monitoring function ..............................................................................2-2
2.2 Notes on using ETERNUS SF Storage Cruiser...................................2-2
2.3 ETERNUS SF Storage Cruiser Setup Procedure................................2-3
2.3.1 When using SAS interface ........................................................2-3
2.3.1.1 This device connected directly to the server................2-3
2.3.2 When using Fibre channel interface..........................................2-9
2.3.2.1 This device connected through a fibre channel
switch ...........................................................................2-9
2.3.2.2 This device connected directly to the server..............2-16
Chapter 3 Confirming the SNMP Trap Settings ..................................................3-1
3.1 Confirming the Monitoring Setting .......................................................3-2
3.2 Confirming the setting by sending a test trap from the remote
Management........................................................................................3-2
3.3 Procedure for Recovery to the Normal Status.....................................3-4
3.3.1 Procedure for recovery from the resource management
window.......................................................................................3-4
3.3.2 Procedure for recovery from the Manual Embedding
Window......................................................................................3-5
Chapter 4 Event List............................................................................................4-1
4.1 Event List .............................................................................................4-2
4.1.1 Information Events ....................................................................4-2
4.1.2 Warring Events..........................................................................4-3
4.1.3 Critical Events ...........................................................................4-5
4.1.4 Configuration Events .................................................................4-7
P3AM-5262-01ENZ0 vii
Page 13

Contents
Illustrations
Tables
Table 1.1 SNMP setting items....................................................................1-5
Table 4.1 Information Events List...............................................................4-2
Table 4.2 Warning Events ..........................................................................4-3
Table 4.3 Critical Events ............................................................................4-5
Table 4.4 Configuration Events..................................................................4-7
viii P3AM-5262-01ENZ0
Page 14

Chapter 1 Setting up SNMP
1.1 SNMP Function
1.2 Notes on Setting SNMP
1.3 SNMP Setting Procedure
This chapter explains the settings of the simple network management protocol
(SNMP) that can be used with this device and how to set up SNMP.
P3AM-5262-01ENZ0 1-1
Page 15

Setting up SNMP
1.1 SNMP Function
This device has the functions for sending SNMP traps and collecting MIB
information via SNMP. If you set up our monitoring software "ETERNUS SF
Storage Cruiser" in this device, you can receive SNMP traps.
1.2 Notes on Setting SNMP
Make the SNMP settings from the remote management.
Operations with the remote management require the following environment:
• 10BASE-T or 100BASE-TX Ethernet network
• IP address that can be used for the remote management
• Use Internet Explorer 7.x or Internet Explorer 8.x. (Windows XP, or later)
1.3 SNMP Setting Procedure
This section explains the SNMP setting procedure.
1) Start the Web browser on a terminal connected to the network.
2) As shown in the figure below, enter the IP address (default: 192.168.2.1) set
for this device as a URL to start the remote management.
1-2 P3AM-5262-01ENZ0
Page 16

1.3 SNMP Setting Procedure
3) In the login window, select "Administrator," enter the password, and then
click the "Login" button.
[Initial value] User : Administrator
Password: adm001
4) When you log in to the remote management, the initial window "Library
Information" shown below appears. Click the "Configuration" tab to display
the "Configuration" window.
5) The "System Configuration" window shown below appears. Click the "SNMP"
tab to display the "SNMP Configuration" window.
P3AM-5262-01ENZ0 1-3
Page 17

Setting up SNMP
6) The "SNMP Configuration" window is displayed. Table 1.1 lists the contents
of the items required for setting SNMP. Referring to
Table 1.1, enter the
required data for the items in the "SNMP Configuration" window.
1-4 P3AM-5262-01ENZ0
Page 18

1.3 SNMP Setting Procedure
Table 1.1 SNMP setting items
Item Setting
(1) Community
Name
Set the community name of SNMP.
- Initial value: public (for this device, the setting is
initial value only.)
(2) SNMP Enable Set Enabled or Disabled for the SNMP function.
- If you check this, you can manage this device from
other computers running the SNMP management
software.
According to the "Protocol Version" selected in the
"Network" tab in the "Configuration" window, either
or both of the "IPv4 SNMP Target Address" field and
"IPv6 SNMP Target Address" field are enabled for
entry.
- Initial value: not checked.
(3) IPv4 SNMP
Target Address
(SNMP Trap
notification
destination)
(4) IPv6 SNMP
Target Address
(SNMP Trap
notification
destination)
- Up to three Target Addresses can be set.
- Set the IP address of the SNMP Trap destination in
the XXX.XXX.XXX.XXX format (in decimal).
- Initial value: 0.0.0.0 (entry is disabled.)
not supported (cannot be used)
- Up to three Target Addresses can be set.
- Set the IP address of the SNMP Trap destination in
the xxxx:xxxx:xxxx:xxxx:xxxx:xxxx:xxxx:xxxx format
(in hexadecimal).
- Initial value: 0:0:0:0:0:0:0:0 (entry is disabled.)
(5) Version Set the Version of SNMP.
- This can be set for each Target Address.
- If "ETERNUS SF Storage Cruiser" is used, select
"v1."
(6) SNMP Trap
Notification Filter
(SNMP
notification level
setting)
Set the event type for which the SNMP Trap
notification is sent.
You can choose to use one of the four types: "Critical
Events," "Critical and Warning Events," "Critical,
Warning and Configuration Events," and "Critical,
Warning, Configuration and Information Events."
* The initial value is "Critical, Warning, Configuration
and Information Events."
7) After entering data for all items, click the "Submit" button.
P3AM-5262-01ENZ0 1-5
Page 19

Page 20

Chapter 2 Setting up Monitoring Software
2.1 Monitoring function
2.2 Notes on using ETERNUS SF Storage Cruiser
2.3 ETERNUS SF Storage Cruiser Setup Procedure
This chapter explains the settings for monitoring software "ETERNUS SF Storage
Cruiser" that can be used with this device and how to set up the monitoring
software.
P3AM-5262-01ENZ0 2-1
Page 21

Setting up Monitoring Software
2.1 Monitoring function
To set the monitoring function with this device (LT20 S2, LT40 S2 and LT60 S2),
you have to set up monitoring software "ETERNUS SF Storage Cruiser" in the
monitoring server. After setting ETERNUS SF Storage Cruiser, register this
device (LT20 S2, LT40 S2 and LT60 S2) as a manual embedding device.
2.2 Notes on using ETERNUS SF Storage Cruiser
When using ETERNUS SF Storage Cruiser for monitoring, note the following:
• Version: Use ETERNUS SF Storage Cruiser 14.1 or later.
2-2 P3AM-5262-01ENZ0
Page 22

2.3 ETERNUS SF Storage Cruiser Setup Procedure
2.3 ETERNUS SF Storage Cruiser Setup Procedure
This section explains this device registration procedures in manual embedding
mode.
2.3.1 When using SAS interface
2.3.1.1 This device connected directly to the server
1) Start the Manual Embedding Window.
2) From the menu of the Manual Embedding Window, select [Operation] [Create New Device] - [Library Device]. You can also perform this step by
selecting the relevant icon from the toolbar.
• When selecting from the menu:
P3AM-5262-01ENZ0 2-3
Page 23

Setting up Monitoring Software
• When selecting using the icon
3) The "New Device creation" dialog box is displayed. For this device, select
"Besides," and then click the "OK" button.
4) The "New Library device creation" dialog box is displayed. Select the
"Embedding Information (Required)" tab and then enter necessary
information (*1).
*1 For the information to enter, see "Register a device as a manually
embedded device" in the ETERNUS SF Storage Cruiser User's Guide.
2-4 P3AM-5262-01ENZ0
Page 24

2.3 ETERNUS SF Storage Cruiser Setup Procedure
• Embedding Information (Required) tab:
P3AM-5262-01ENZ0 2-5
Page 25

Setting up Monitoring Software
Option tab:
Enter the required information. To monitor this device, an address must be
entered in "IP Address."
Display Icon Setup tab
Select "Tape" for the device icon.
2-6 P3AM-5262-01ENZ0
Page 26

2.3 ETERNUS SF Storage Cruiser Setup Procedure
5) After entering the required information, click "OK" to create the device.
6) A dialog box indicating the completion of embedding is displayed.
7) After the above dialog box appears, the created device is then displayed in
the Manual Embedding Window as shown below:
P3AM-5262-01ENZ0 2-7
Page 27

Setting up Monitoring Software
8) Manual embedding is complete. Exit the Manual Embedding Window. The
"Refresh" dialog box is then displayed. Click "OK" to update the information.
9) The LT20 is displayed in the Main View. This completes the setup of
ETERNUS SF Storage Cruiser.
2-8 P3AM-5262-01ENZ0
Page 28

2.3 ETERNUS SF Storage Cruiser Setup Procedure
2.3.2 When using Fibre channel interface
2.3.2.1 This device connected through a fibre channel switch
1) Start the Manual Embedding Window.
2) From the menu of the Manual Embedding Window, select [Operation] [Create New Device] - [Library Device]. You can also perform this step by
selecting the relevant icon from the toolbar.
• When selecting from the menu:
• When selecting using the icon
P3AM-5262-01ENZ0 2-9
Page 29

Setting up Monitoring Software
3) The "New Device creation" dialog box is displayed.
Because this device is LT20 S2/LT40 S2/LT60 S2, select "Besides" and then
click the "OK" button.
4) The "New Library device creation" dialog box is displayed. Select the
"Embedding Information (Required)" tab and then enter necessary
information (*1).
*1 For the information to enter, see "Register a device as a manually
embedded device" in the ETERNUS SF Storage Cruiser User's Guide.
• Embedding Information (Required) tab:
2-10 P3AM-5262-01ENZ0
Page 30

2.3 ETERNUS SF Storage Cruiser Setup Procedure
5) After entering the required information, click "OK" to create a device.
6) A dialog box indicating the completion of embedding is displayed.
7) After the above dialog box appears, the created device is then displayed in
the Manual Embedding Window as shown below:
P3AM-5262-01ENZ0 2-11
Page 31

Setting up Monitoring Software
8) Select the Unknown FC port of the fibre channel switch to which this device
is connected, and then drag and drop it onto the created LT20 S2/LT40
S2/LT60 S2.
9) The "New Storage device setup" dialog box is displayed. Select the
"Embedding Information (Required)" tab and then set information on a drive
in this device.
Caution
Operation failure
For "Device Name," specify a name that is different from the
device name of the created LT20 S2/LT40 S2/LT60 S2.
2-12 P3AM-5262-01ENZ0
Page 32

2.3 ETERNUS SF Storage Cruiser Setup Procedure
10) Select the "Option" tab in the "New Storage device setup" dialog box, and
then set information on a drive in this device.
Caution
Operation failure
Do not set any information in the "IP Address" and
"Management Software" fields.
Don’t set.
P3AM-5262-01ENZ0 2-13
Page 33

Setting up Monitoring Software
11) After entering the required information, click "OK."
12) The dialog box shown below is displayed. Click "OK" and set the drive
information.
13) The fibre channel switch and this device are connected by a physical line as
shown in the figure below.
2-14 P3AM-5262-01ENZ0
Page 34

2.3 ETERNUS SF Storage Cruiser Setup Procedure
14) Manual embedding of this device is complete. Exit the Manual Embedding
Window. The "Refresh" dialog box is displayed. Click "OK" to update
information.
15) This device connected to the fibre channel switch by a physical line is
displayed in the Main View. This completes the setup of ETERNUS SF
Storage Cruiser.
P3AM-5262-01ENZ0 2-15
Page 35

Setting up Monitoring Software
2.3.2.2 This device connected directly to the server
1) Start the Manual Embedding Window.
2) From the menu of the Manual Embedding Window, select [Operation] [Create New Device] - [Library Device]. You can also perform this step by
selecting the relevant icon from the toolbar.
• When selecting from the menu:
• When selecting using the icon
2-16 P3AM-5262-01ENZ0
Page 36

2.3 ETERNUS SF Storage Cruiser Setup Procedure
3) The "New Device creation" dialog box is displayed.
Because this device is LT20 S2/LT40 S2/LT60 S2, select "Besides" and then
click the "OK" button.
4) The "New Library device creation" dialog box is displayed. Select the
"Embedding Information (Required)" tab and then enter the required
information (*1).
*1 For the information to enter, see "Register a device as a manually
embedded device" in the ETERNUS SF Storage Cruiser User's Guide.
P3AM-5262-01ENZ0 2-17
Page 37

Setting up Monitoring Software
5) After entering the required information, click "OK" to create a device.
6) A dialog box indicating the completion of embedding is displayed.
7) After the above dialog box appears, the created device is then displayed in
the Manual Embedding Window as shown below:
2-18 P3AM-5262-01ENZ0
Page 38

2.3 ETERNUS SF Storage Cruiser Setup Procedure
8) Click the Unknown FC port of the server to which this device is connected,
and then drag and drop it onto the created LT20 S2/LT40 S2/LT60 S2.
9) The "New Storage device setup" dialog box is displayed. Select the
"Embedding Information (Required)" tab and then set information on a drive
in this device.
Caution
Operation failure
For "Device Name," specify a name that is different from the
device name of the created LT20 S2/LT40 S2/LT60 S2.
P3AM-5262-01ENZ0 2-19
Page 39

Setting up Monitoring Software
10) Select "Option" in the "New Storage device setup" dialog box, and then set
information on a drive in this device.
Caution
Operation failure
Do not set any information in the "IP Address" and
"Management Software" fields.
Don’t set.
2-20 P3AM-5262-01ENZ0
Page 40

2.3 ETERNUS SF Storage Cruiser Setup Procedure
11) After entering the required information, click "OK."
12) The dialog box shown below is displayed. Click "OK" and then set the drive
information.
P3AM-5262-01ENZ0 2-21
Page 41

Setting up Monitoring Software
13) The server and this device are connected by a physical line as shown in the
figure below.
14) Manual embedding of this device is complete. Exit the Manual Embedding
Window. The "Refresh" dialog box is then displayed. Click "OK" to update
information.
2-22 P3AM-5262-01ENZ0
Page 42

2.3 ETERNUS SF Storage Cruiser Setup Procedure
15) This device connected to the server by a physical line is displayed in the
Main View. This completes the setup of ETERNUS SF Storage Cruiser.
P3AM-5262-01ENZ0 2-23
Page 43

Page 44

Chapter 3 Confirming the SNMP Trap
Settings
3.1 Confirming the Monitoring Setting
3.2 Confirming the setting by sending a test trap from the remote
management
3.3 Procedure for Recovery to the Normal Status
After monitoring software "ETERNUS SF Storage Cruiser" is set up, the
monitoring server receives SNMP traps (events) sent by this device. This
chapter explains how to check whether the monitoring server receives traps
normally.
P3AM-5262-01ENZ0 3-1
Page 45

Confirming the SNMP Trap Settings
3.1 Confirming the Monitoring Setting
Check whether the monitoring server normally receives SNMP traps (events)
sent by this device after monitoring software "ETERNUS SF Storage Cruiser" is
set up. Do this by taking the following steps in the order given:
Send a test trap from this device. Check whether the monitoring server receives
the corresponding event.
3.2 Confirming the setting by sending a test trap from the remote Management
This section explains how to send a test trap from the "SNMP Setting" window of
the remote management of this device to confirm the monitoring setting.
For details of remote management setup and operations, see
"SNMP Setting Procedure."
1) Start the Remote Management
2) Log in with administrator authority.
In the login window, select the "Administrator", enter your password
(Password), and then click the "Login" button.
[Default values] User: Administrator
Password: adm001
3) In the "Home" Window, click [Configuration] - [SNMP] to display the "SNMP
Setting" window.
Section 1.3,
4) Enter the required information, such as the Community name.
5) Check "Critical, Warning, Configuration and Information Events" for SNMP
Trap Notification Filter.
3-2 P3AM-5262-01ENZ0
Page 46

3.2 Confirming the setting by sending a test trap from the remote Management
6) Click the "Logoff" button.
7) The event information for the test trap is sent to ETERNUS SF Storage
Cruiser on the monitoring server.
Confirm that the event information is displayed in the "ETERNUS SF Storage
Cruiser" window.
At this time, "Error" should be displayed as the status of this device in the
"ETERNUS SF Storage Cruiser" window. After completing the confirmation,
proceed to the appropriate procedure in
the Normal Status," for recovery to the normal status.
P3AM-5262-01ENZ0 3-3
Section 3.3, "Procedure for Recovery to
Page 47

Confirming the SNMP Trap Settings
3.3 Procedure for Recovery to the Normal Status
This section explains two methods for using ETERNUS SF Storage Cruiser for
recovery to the normal status. Either method is suitable.
1) Recovery from the resource management window
2) Recovery from the Manual Embedding Window
3.3.1 Procedure for recovery from the resource management window
1) Start ETERNUS SF Storage Cruiser.
2) ETERNUS SF Storage Cruiser opens the resource management window. In
this window, select and right-click the icon of the device. From the pop-up
menu, select [Property].
3) The device properties are displayed.
4) In the property window, click the "Change" button for the device status. The
"Change Device Status" dialog box is displayed.
5) Select "normal" from the selection list, and then click the "OK" button.
6) The "Device Status Is Being Changed" dialog box is displayed.
7) In the property window, click "OK" to close the window. The device icon
turns green, and the device status changes to "normal."
This completes the procedure for recovery to the normal status from the resource
management window.
3-4 P3AM-5262-01ENZ0
Page 48

3.3 Procedure for Recovery to the Normal Status
3.3.2 Procedure for recovery from the Manual Embedding Window
1) Open the Manual Embedding Window of ETERNUS SF Storage Cruiser.
2) In the Manual Embedding Window, select and right-click the icon of the
device. From the pop-up menu, select "Change Device Information."
P3AM-5262-01ENZ0 3-5
Page 49

Confirming the SNMP Trap Settings
3) "Change Device Information" dialog is displayed.
A choice in Device Status is 'normal', 'warning' and 'error'.
4) Select 'normal'.
5) The device icon turns green, and the device status changes to "normal."
This completes the procedure for recovery to the normal status from the
Manual Embedding Window.
3-6 P3AM-5262-01ENZ0
Page 50

Chapter 4 Event List
4.1 Event List
This chapter explains the events that are reported by SNMP of this device.
P3AM-5262-01ENZ0 4-1
Page 51

Event List
4.1 Event List
The table below lists the events reported by SNMP. Displayed character strings
may be changed as a result of firmware revision.
4.1.1 Information Events
Events Events Code Description
Move Element 0x01 Move Element command
Inventory rescan 0x02 Inventory rescan
Drive Clean 0x03 Drive Cleaning Process
Mailslot Open 0x04 Open Mailslot command
Mailslot Close 0x05 Close Mailslot
Magazine Remove 0x06 Magazine remove Event
Magazine Reinsertion 0x07 Magazine insertion Event
Power On 0x08 Power On Event
Power Off 0x09 Power Off Event
User Login 0x0A User login at interface (RMU, OCP)
User Logout 0x0B User logout at interface (RMU, OCP)
System Test Run 0x0C System test result
Wellness Test Run 0x0D Wellness test result
Bus Reset occurred 0x0E Bus reset has occurred
Device Reset 0x0F Device Reset command
Abort 0x10 SCSI task aborted
Drive tape alert flag 0x11
Table 4.1 Information Events List
Drive reported informational tape alert
flag
4-2 P3AM-5262-01ENZ0
Page 52

4.1.2 Warring Events
Events Events Code Description
SCSI invalid opcode 0x30 SCSI invalid opcode
invalid element address 0x31 invalid element address
invalid field in CDB 0x32 invalid field in CDB
invalid SCSI ID message 0x33 invalid SCSI ID message
invalid LUN 0x34 invalid LUN
invalid drive specified 0x35 invalid drive specified
SEND DIAG: invalid
test number
command sequence error 0x37 command sequence error
invalid boot code 0x38 invalid boot code
invalid personality 0x39 invalid personality
invalid checksum 0x3A invalid checksum
parameter length error 0x3B parameter length error
parameter list: invalid field 0x3C parameter list: invalid field
parameter list: invalid value 0x3D parameter list: invalid value
invalid parameter value 0x3E invalid parameter value
saving parameters
not supported
destination element full 0x40 destination element full
transport element full 0x41 transport element full
no cartridge in slot 0x42 no cartridge in slot
source slot or drive empty 0x43 source slot or drive empty
magazine not accessible 0x44 magazine not accessible
drive media removal
Prevented
library media removal
Prevented
drive not enabled 0x47 drive not enabled
mailslot not enabled 0x48 mailslot not enabled
bad status library
Controller
source not ready 0x4A source not ready
destination not ready 0x4B destination not ready
reservation failed 0x4C reservation failed
wrong drive type 0x4D wrong drive type
invalid robotic request 0x4E invalid robotic request
robotic not initialized 0x4F robotic not initialized
parity error 0x50 parity error
err log overflow 0x51 err log overflow
4.1 Event List
Table 4.2 Warning Events (1/2)
0x36 SEND DIAG: invalid test number
0x3F saving parameters not supported
0x45 drive media removal prevented
0x46 drive media removal prevented
0x49 bad status library controller
P3AM-5262-01ENZ0 4-3
Page 53

Event List
Table 4.2 Warning Events (2/2)
Events Events Code Description
invalid cartridge 0x60 invalid cartridge
invalid upgrade Cartridge 0x61 invalid upgrade cartridge
invalid cleaning cartridge 0x62 invalid cleaning cartridge
cleaning tape installed 0x63 cleaning tape installed
cleaning failed 0x64 cleaning failed
cleaning tape expired 0x65 cleaning tape expired
echo buffer overwritten 0x6A echo buffer overwritten
SCSI message error 0x70 SCSI message error
SCSI parity error 0x71 SCSI parity error
SCSI invalid message 0x72 SCSI invalid message
overlapped command
Attempt
0x73 overlapped command attempt
SCSI invalid opcode 0x74 SCSI invalid opcode
invalid element address - invalid element address
invalid field in CDB - invalid field in CDB
overlapped command
Attempt
- overlapped command attempt
Move Retry 0x80 Movement Retry
Fan Alert 0x81 Fan alert
Clean Request 0x82 Clean request from drive
Media Attention 0x83 Media attention
Drive tape alert flag 0x84
Drive reported warning or
critical tape alert flag
Network problem 0x85 Autoclean media warning 0x86 Not enough media present to autoclean
Drive not supported 0x87
Drive FW unchanged
after Upgrade
Drive FW unchanged
after Upgrade
0x88 Drive FW unchanged after Upgrade
0x89 Power Supply Fan Failed
Drive automatically disabled because
not allowed to use in this library
Power Supply Failed 0x8A Power Supply Failed
No Power Good Signal 0x8B No Power Good Signal from PS
Invalid Robotic FW 0x8C
Invalid Robotic FW Detected
(Auto Upgrade)
4-4 P3AM-5262-01ENZ0
Page 54

4.1.3 Critical Events
Events Events Code Description
BCR Failure 0x80 HE: bar code reader init. failed
BCR Failure 0x81 HE: no response from BCR
Hardware Error 0x82 HE: no response from EEPROM
Robotic Error 0x83 HE: robotic controller error
Rob. HW Error 0x84 HE: gripper pic control failure
Rob. HW Error 0x85 HE: slider pic control failure
Rob. HW Error 0x86 HE: elevator pic control failure
Rob. HW Error 0x87 HE: rotation pic control failure
Rob. HW Error 0x88 HE: sled pic control failure
Mechanical Block 0x89 HE: gripper blocked
Mechanical Block 0x8A HE: slider blocked
Mechanical Block 0x8B HE: elevator blocked
Mechanical Block 0x8C HE: rotation blocked
Mechanical Block 0x8D HE: sled blocked
Robotic Failure 0x8E HE: cannot find gripper block
Robotic Failure 0x8F HE: cannot find slider block
Robotic Failure 0x90 HE: cannot find elevator block
Robotic Failure 0x91 HE: cannot find rotation block
Robotic Failure 0x92 HE: cannot find sled block
Robotic Failure 0x93 HE: gripper outside range
Robotic Failure 0x94 HE: slider outside range
Robotic Failure 0x95 HE: elevator outside range
Robotic Failure 0x96 HE: rotation outside range
Robotic Failure 0x97 HE: sled outside range
Robotic Failure 0x98 HE: cartridge detection failed
Robotic Failure 0x99 HE: slider home not found
Robotic Failure 0x9A HE: rotation home not found
Robotic Failure 0x9B HE: sled position not found
Robotic Failure 0x9C HE: invalid gripper range
Robotic Failure 0x9D HE: invalid slider range
Robotic Failure 0x9E HE: invalid elevator range
Robotic Failure 0x9F HE: invalid rotation range
Robotic Failure 0xA0 HE: invalid sled range
Mailslot failure 0xA1 HE: failed to open mailslot
Robotic Failure 0xA2 HE: failed to lock elevator (8U)
Rob. Comm.-Error 0xB0 HE: robotic response timeout
Rob. Comm.-Error 0xB1 HE: NACK received from robotic
Rob. Comm.-Error 0xB2 HE: robotic communication failed
Robotic Stopped 0xB3 HE: robotic emergency stop
Transp. Failed 0xB4 HE: cartridge movement failed
Rob. Comm.-Error 0xB5 HE: robotic no response
4.1 Event List
Table 4.3 Critical Events (1/2)
P3AM-5262-01ENZ0 4-5
Page 55

Event List
Table 4.3 Critical Events (2/2)
Events Events Code Description
Network Failure 0xC0 HE: network init
Network Failure 0xC1 HE: telnet interface
Network Failure 0xC2 HE: webserver
Net HW Failure 0xC3 HE: EEPROM parameter
Net HW Failure 0xC4 HE: cannot init LanCard
Net HW Failure 0xC5 HE: write data to EEPROM fail
Network Failure 0xC6 HE: ping (target not reached)
Upgrade failed 0xC7 HE: cannot upgrade from USB
Hardware Error 0xD0 HE: ROM Error
Hardware Error 0xD1 HE: RAM Error
Hardware Error 0xD2 HE: NVRam Error
Hardware Error 0xD3 HE: UART Error
Hardware Error 0xD4 HE: display error
Hardware Error 0xD5 HE: display error
Hardware Error 0xD6 HE: memory Error
System Error 0xD7 HE: fatal system error
System Error 0xD8 HE: data base error
SCSI HW Error 0xD9 HE: no SCSI IC detected
Invalid Barcode 0xDA HE: different barcode labels
Hardware Error 0xDB HE: Fan Failure
Hardware Error 0xDC HE: Internal I2C Bus Error
Hardware Error 0xDF HE: Power Supply has Failed
Drive Overtemp. 0xF0 HE: drive over-temperature
Drive Comm.-Err. 0xF1 HE: drive communication error
Drive Sled Miss. 0xF2 HE: drive sled not present
Drive Broken 0xF3 HE: drive broken: needs repair
Load Timeout 0xF4 HE: drive load timeout
Unload Timeout 0xF5 HE: drive unload timeout
4-6 P3AM-5262-01ENZ0
Page 56

4.1.4 Configuration Events
Table 4.4 Configuration Events
Events Events Code Description
Drive SCSI changed 0x41 Drive SCSI ID has changed
Library SCSI changed 0x42 Library SCSI ID changed (Note)
Drive Enable 0x43 Drive was enabled
Drive Disable 0x44 Drive disabled
Master Drive assigned 0x45 Drive Master assigned
Drive Sled added 0x46 Drive Sled added
Drive Sled removed 0x47 Drive Sled removed
Library Mode changed 0x48
Element address 0x49 Element address changed
Net Parameter 0x4A Network parameter have changed
Slots reserved 0x4B Slots reserved
Mailslot support 0x4C Mailslot support
Admin Password 0x4D Admin Password has changed
Date/Time set 0x4E Date and Time of RTC set
Barcode Format 0x4F Barcode format alignment changed
Default Config set 0x50 Default configuration set
FW Upgrade Library 0x51 FW upgrade Library
FW Upgrade Drive 0x52 FW Upgrade Drive
Autoclean Feature set 0x53 Autocleaning switched on or off
Drive FC parameters 0x54
Note: Only available in Dual SCSI configuration
4.1 Event List
Library Mode changed
(Sequential, Random)
Drive Fibre channel parameters
changed
P3AM-5262-01ENZ0 4-7
Page 57

Page 58

ETERNUS LT20 S2/LT40 S2/LT60 S2 Tape Library
User's Guide
-Monitoring Software Setup Procedure-
P3AM-5262-01ENZ0
Date of issuance: June 2011
Issuance responsibility: FUJITSU LIMITED
• The contents of this manual are liable to being updated without notice.
• While the contents of this manual are the product of all due care and diligence, no
responsibility can be accepted for operational problems arising from any errors or
missing information, or other use of the information contained in this manual.
• Fujitsu assumes no liability for damages to third party copyrights or other rights
arising from the use of any information in this manual.
• Contains of this manual are not to be reproduced without permission from Fujitsu.
Page 59

 Loading...