

Page 1

Operating Manual
FUJITSU LIFEBOOK U727
FUJITSU LIFEBOOK U747
FUJITSU LIFEBOOK U757
System
Page 2

Contact address in North America
FUJITSU AM
ERICA INC.
1250 East Arques Avenue, Sunnyvale,
CA 94085-3470, U.S.A.
e: 800 831 3183 or 408 746 6000
Telephon
"http://solutions.us.fujitsu.com"
"http://solutions.us.fujitsu.com/contact"
estion? Email us at: "AskFujitsu@us.fujitsu.com"
Have a qu
Copyright
ujitsu America, Inc. All rights reser
©2017F
FPC65.7692-02
ved
Page 3

FUJITSU LIFEBOOK U727
FUJITSU LIFEBOOK U747
FUJITSU LIFEBOOK U757
Operating Manual
Declarations of conformity 9
Fujitsu Contact Information 10
Ports and controls 12
Important notes 21
First-time setup of your device 25
Working with the notebook 28
Your USB Type-C dock (optional) 55
Security functions 59
Connecting external devices 65
Removing and installing components
during servicing 72
Settings in BIOS Setup Utility 83
Troubleshooting and tips 86
Technical data 93
Manufacturer’s notes 96
Appendix 105
Index 116
Page 4

Page 5

Page 6

Copyright and Trademark Information
Fujitsu America, Incorporated has made every effort to ensure the accuracy and completeness
of this document; however, as ongoing development efforts are continually improving the
capabilities of our products, we cannot guarante e the accuracy of the contents of this
document. We disclaim liability for errors, omissions, or future changes.
Fujitsu, the Fujitsu logo and LIFEBOOK are registered trademarks of Fujitsu Limited
or its subsidiaries in the United States and other countries.
Intel and Intel Core are trademarks or registered trad emarks of Intel Corporation or
its subsidiaries in t he United States and other countries.
Microsoft and Windows are either registered trad emarks or trade marks of Microsoft
Corporation in the United Sta tes and/or other countries.
Bluetooth is a trademark of Bluetooth SIG, Inc., USA.
The terms HDMI and HDMI High-Definition Multim edia Interface and the HDMI
Logo are either a registered trademarks or trademarks of HDMI Licensing, LLC
in the United States and/or othe r countries.
USB Type-C is a trademark or registered trademark of USB Implementers Forum
in the United States and other countries.
USB Type-C is a trademark or registered trademark of USB Implementers
Forum in Can ada and other countries.
All other trademarks specified here are the property of their respective owne rs.
Page 7

Contents
Contents
Declarationsofconformity ............................................................. 9
Fujitsu Contact Informatio
Notational conventions .................................................................. 11
Portsand controls ..................................................................... 12
FUJITSULIFEBOOK U727 .............................................................. 12
FUJITSULIFEBOOK U747 .............................................................. 15
FUJITSULIFEBOOK U757 .............................................................. 18
Importantnotes ........................................................................ 21
Safetyinstructions ...................................................................... 21
Additional safety no
Energysaving .......................................................................... 22
Energy saving unde
Traveling with you
Beforeyou travel ................................................................... 23
Transporting the
Cleaning the note
First-timesetupofyourdevice ......................................................... 25
Unpacking and checking the device . . . ................................................... 25
Choose a location . ...................................................................... 26
Connecting the AC adapter . . . ........................................................... 26
Switching on the device for the first time .................................................. 27
Installing Bonus Apps . . . . . ........................................................... 27
Working with
Status indic
Switching t
Switching t
Keyboard ............................................................................... 31
Hot keys an
F Lock set
Key combi
Virtual n
Separat
Country
Touchpa
LCD sc
Webc
Rech
Usi
Mem
dandtouchpadbuttons ..........................................................
Moving
Select
Execut
Dragg
reen ............................................................................
Using
am ...............................................................................
argeablebattery ...................................................................
ging,caring for andmaintainingthe battery .......................................
Char
ovingand installing the battery ...................................................
Rem
ng the energy saving functions . .......................................................
orycards ..........................................................................
pported formats ..................................................................
Su
r notebook . . ...........................................................
book ..................................................................
thenotebook ............................................................
ators ........................................................................
he notebook on . . . . ...........................................................
he notebook off . . . . ...........................................................
dfunctionkeys ...........................................................
tings ......................................................................
nations ...................................................................
umberkeys .................................................................
enumberkeypad ............................................................
andkeyboardsettings .......................................................
thepointer ..................................................................
inganitem ....................................................................
ing commands . . . . . ...........................................................
ingitems ......................................................................
fingers .......................................................................
n ............................................................
tes for devices with wireless components . . .............................
r Windows .......................................................
notebook ...........................................................
10
22
22
23
24
24
28
28
30
30
33
35
36
37
38
38
39
39
39
39
40
40
41
42
43
43
44
46
47
47
Fujitsu 5
Page 8

Contents
Insertingthememorycard ........................................................... 47
Removingthe memory card .......................................................... 47
Speaker and microphone ................................................................ 48
Wireless LAN / Bluetooth / wireless compo nents . . ......................................... 49
Switching the wireless components on and off ......................................... 49
ConfiguringWLAN access ........................................................... 49
Furtherinformationon WLANand Bluetooth ........................................... 49
Ethernetand LAN ....................................................................... 50
Your port replicator ...................................................................... 51
Portson theportreplicator ........................................................... 51
Connecting the notebook to the port replicator . . . . . . .................................. 52
Connecting the AC adapter to the port replicator . . . . .................................. 53
Switching on the notebook via the port replicator . . . . . .................................. 53
Disconnecting the notebook from the port replicator . .................................. 54
Your USBType-Cdock (optional) ....................................................... 55
Portson thedock ....................................................................... 55
Settingup thedock ..................................................................... 56
Connecting the AC adapter to the dock . . ................................................. 56
Connecting the notebook to the dock ..................................................... 57
Switching on the notebook via the port replicator . ......................................... 58
Switching off notebook via dock . . ........................................................ 58
Disconnecting thenotebookfromthedock ................................................ 58
Securityfunctions ..................................................................... 59
Configuring the fingerprint sensor ........................................................ 59
Settingup thepalmveinsensor .......................................................... 60
Usingthe Security Lock ................................................................. 60
Configuringpasswordprotectionin BIOS SetupUtility ...................................... 61
Protecting BIOS Setup Utility (supervisor passw ord and user password) .. ............... 61
Password protection for booting the operating system .................................. 62
Passwordprotectionfor theharddisk ................................................. 63
Trusted Platform Module - TPM (device dependent) . . . . . . .................................. 63
EnablingTPM ....................................................................... 63
DisablingTPM ...................................................................... 63
Smart Card reader . . . . . . ................................................................ 64
InsertingtheSmartCard ............................................................. 64
Connectingexternaldevices ........................................................... 65
Connecting an external monitor . . ........................................................ 66
HDMIport .............................................................................. 67
Connecting USB devices ................................................................ 68
USBportwith charging function (USBType-C) ......................................... 69
USBportwith charging function (Anytime USBcharge) ................................. 70
HowtoremoveUSB devices correctly ................................................ 70
Headsetport ........................................................................... 71
Removing and installing co mponents during servicing .. . .............................. 72
Notes on installing and removing boards and components .................................. 72
Preparing to remove components ........................................................ 73
Removing and installing memory expansion . . ............................................. 73
Removethe cover ................................................................... 74
Removinga memory module ......................................................... 74
Installing amemorymodule .......................................................... 75
6 Fujitsu
Page 9

Contents
Attachingthecover .................................................................. 75
Installing and removing an M.2 module ................................................... 76
Removethe cover ................................................................... 76
Installing theM.2 module ............................................................ 77
Removingthe M.2 module ........................................................... 77
Attachingthecover .................................................................. 78
Removingand installingtheharddisk(HDD,LIFEBOOK U757 only) ........................ 79
Removingthe hard disk .............................................................. 79
Installing ahard disk ................................................................. 81
Finishing component removal . ........................................................... 82
Settings in BIOS Setup Utility . . . ....................................................... 83
Startingthe BIOS SetupUtility ........................................................... 83
BIOSSetupUtilityoperation ............................................................. 84
ExitingBIOS Setup Utility ................................................................ 85
Exit Saving Changes - save changes and exit BIOS Setup Utility . . ..................... 85
Exit Discarding Changes - Reject changes and exit BIOS Setup Utility . . . . . .............. 85
Load Setup Defaults – load default values . ............................................ 85
Discard Changes - Discard Changes without exiting BIOS Setup Utility . . . . .............. 85
Save Changes - save changes without exiting the BIOS Setup Utility . . . . . . .............. 85
Savechanges and poweroff ........................................................ 85
Troubleshootingandtips .............................................................. 86
Helpifproblems occur ................................................................... 86
In the event you need to recover your system . ............................................ 86
The notebook’s date or time is incorrect ................................................... 87
Whencertaincharactersare entered onthe keyboard, only numerals arewritten ............. 87
The notebook’s LCD screen remains blank . . . . ............................................ 87
The LCD screen of the notebook is difficultto read ......................................... 87
Theexternalmonitorremainsblank ...................................................... 88
Theexternalmonitorisblankortheimageis unstable ..................................... 88
The notebook does not start a fter switching it on . . . ........................................ 89
The notebook stops working . . ........................................................... 89
The printer does not print . . . . . ........................................................... 89
The wireless connection to a network does not work . . . .................................... 90
Acousticwarning ........................................................................ 90
Smart Card reader is not recognized . . . ................................................... 90
SmartCard PINforgotten ................................................................ 90
SmartCard lost ......................................................................... 90
Errormessageson the screen ........................................................... 91
Technical data ......................................................................... 93
LIFEBOOK ............................................................................. 93
WLAN specifications .................................................................... 94
Rechargeable battery ................................................................... 95
AC adapter . . . .......................................................................... 95
Manufacturer’s notes .................................................................. 96
Disposaland recycling .................................................................. 96
Recyclingyourbattery ................................................................... 96
DOC(IndustryCANADA)Notices ........................................................ 97
ENERGYSTARCompliance ............................................................. 99
Declarations ofconformity ............................................................... 100
FCC Regulatory Information . . ........................................................... 101
Fujitsu 7
Page 10

Contents
Regulatory Notes and Statements . . . ................................................. 101
Canada, Industry Canada (IC) . . . ........................................................ 103
Canadian Notice . ................................................................... 104
Avis pour le Canada . ................................................................ 104
Appendix .............................................................................. 105
Before Using the Optional Wireless LAN . ................................................. 105
WirelessLAN Devices Covered bythisDocument ...................................... 105
Characteristics oftheWLANDevice .................................................. 105
Wireless LAN Modes Using this Device . . ............................................. 106
Deactivating/Disconnectingthe WLANDevice ......................................... 108
Configuringthe Wireless LAN ............................................................ 108
Configuring the WLAN Using Windows . . . ............................................. 108
Connection to the network . . . ........................................................ 108
TroubleshootingtheWLAN ........................................................... 109
Usingthe Bluetooth Device .............................................................. 111
Image Backup and Recovery Procedures ................................................. 112
Windows 10 Procedures . ............................................................ 112
Creatinga recovery drive ............................................................ 112
RecoveryoptionsinWindows10 ..................................................... 112
Downloading driver updates . ............................................................ 115
Index .................................................................................. 116
8 Fujitsu
Page 11

Declarations of conformity
Declarations o f conformity
DECLARATION OF CONFORMITY
according to FCC Part 15
Responsible Party Name: Fujitsu America, Inc.
Address: 1250 E.
Te
lephone: (408) 746-6000
Declares that product: Base Model Configuration: LIFEBOOK U727,
This device complies with Part 15 of the FCC rules. Operations are subject to the
following two conditions: (1)
device must accept any interference received, including interference that may cause
undesired operation.
LIFEBOOK U747, LIFEBOOK U757
Complies with Part 15 of the FCC Rules.
This device may not cause harmful interference. (2) This
Arques Avenue
Sunnyvale, CA
94085
Fujitsu 9
Page 12

Fujitsu Contact Information
Fujitsu Contact Information
Service and Support
You can contact Fujitsu Service and Support in the following ways:
• Toll free phone: 1-800-8Fujitsu (1-800-838-5487)
• Website: "
Fujitsu Shopping Online
Please go to "
Maintaining Latest Configuration
To ensure that you always have the most current driver updates related to your system, you should
occasionally access the Fujitsu So ftware Download Manager (FSDM) utility. The FSDM utility is
available from the Fujitsu Support site. FSD M will allow you to view a l ist of the most current
drivers, utilities and applications to determine whether you have the latest versions. If you have
a Windows 10 operating system, you will need to go to the Support Site to download the FSDM
Utility: "
Limited Warranty
Your LIFEBO OK notebook is backed by a Fujitsu International Limited Warranty. Check the
Limited Warranty Terms and Conditions Booklet that came with your notebook.
http://solutions.us.fujitsu.com/www/content/support/contact/index.php"
Before you place the call, have the following information ready so that the customer
support representative can provide you with the fastest possible solution:
• Product name
• Product configuration number
• Product serial number
• Purchase date
• Conditions under which the problem occurred
• Any error messages that have occurred
• Type of device connected, if any
http://www.shopfujitsu.com/store/ ".
http://support.fujitsupc.com/CS/Portal/support.do?srch=DOWNLOADS".
10 Fujitsu
Page 13
Notational conventions
Pay particular attention to text marked with this symbol. Failure to observe
this warning will endanger your life, will damage the device or lead to loss
of data. The warranty will be invalidated if the device becomes defective
through failure to observe these warnings.
Indicates important informa
Fujitsu Contact Information
tion which is required to use the device properly.
►
This style
This style
This style
"This style" indicates
Key
This style indicates terms and text that are emphasized or highlighted, e.g.: Do not
indicates an activity that must be performed
indicates a result
indicates data entered
command line, e.g. you
a pro gram (start.exe
indicates information that is displayed on the screen by a program, e.g.:
Installation is complete.
indicates
• terms and texts u s ed in a software interface, e.g.: Click on Save.
• names of programs or files, e.g. Windows or setup.exe.
• Cross-references to another section, e.g. "Safety information"
• cross-references to an external source, e.g. a w eb address: For more
information, go to "
• names of CDs, DVDs and titles or designations of other materials, e.g.:
"CD/DVD Drivers & Utilities" or "Safety/Regulations" manual
indicates a key on the keyboard, e.g:
switch off the device
using the keyboard in a program dialog or at the
r password (Name123) or a command used to start
)
http://solutions.us.fujitsu.com/"
F10
Fujitsu 11
Page 14
Ports and controls
Ports and controls
This chapter presents the individual hardware components of your device. It gives an
overview of the indicators and ports on the device. Please familiarize yourself with
these items before you start to work with the device.
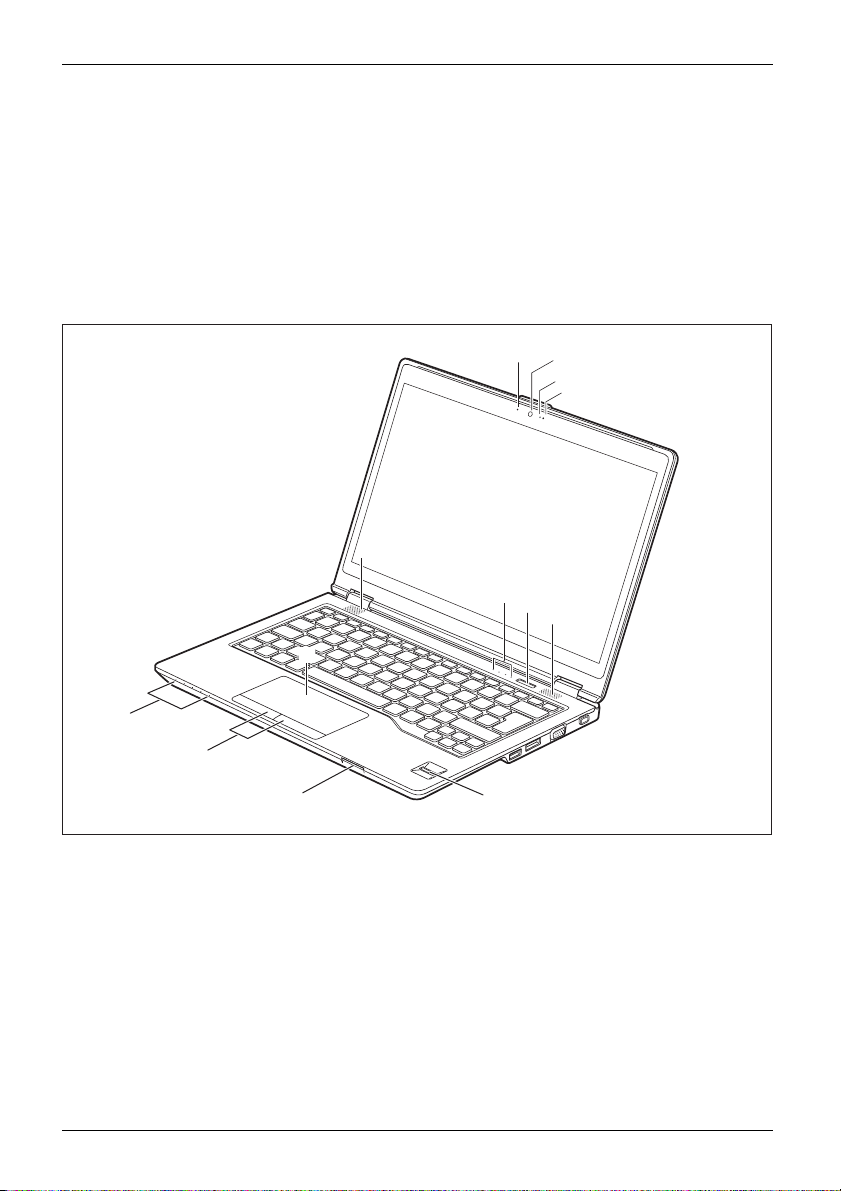
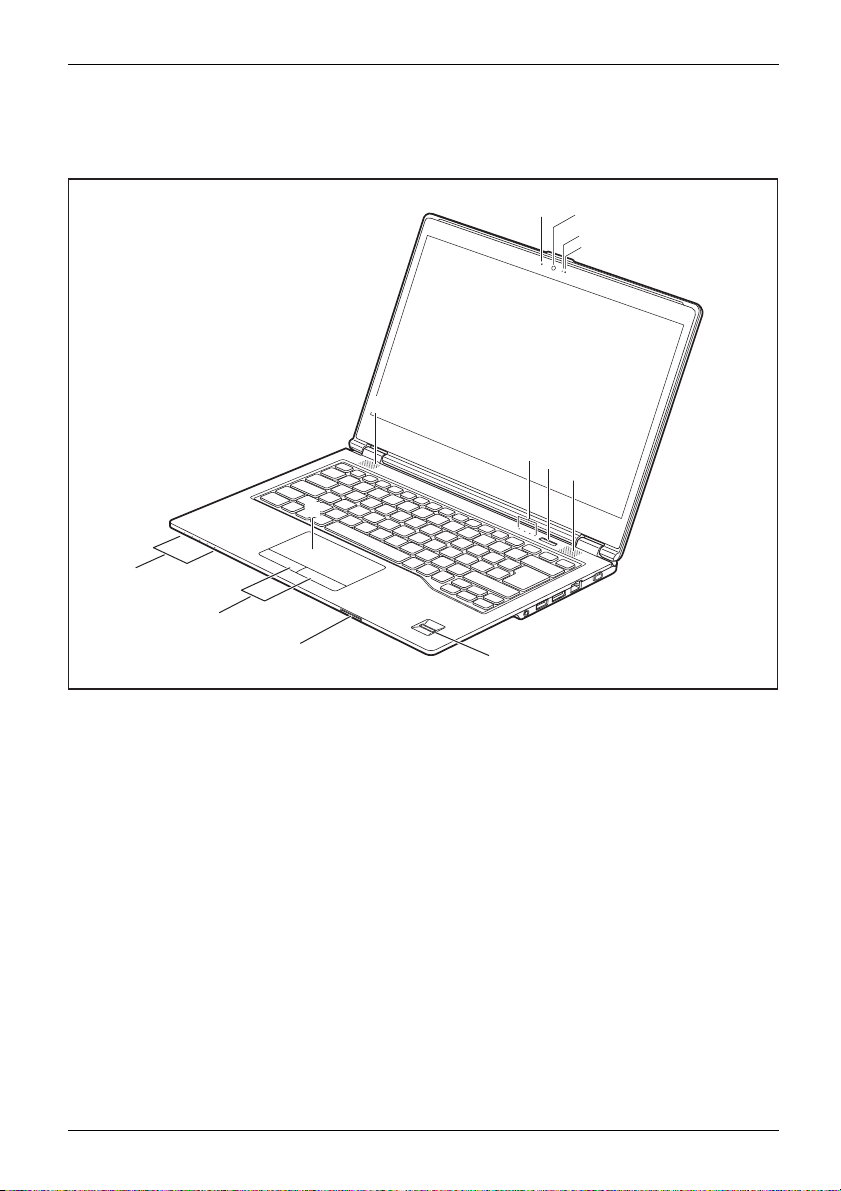
FUJITSU LIFEBOOK U727
Front
1
2
3
1
5
6
7
5
4
11
10
9
1 = Microphone (optional)
2 = Webcam (optional)
3 = Webcam LED (optional)
4 = Touchpad
5 = Speaker
6 = Status indicators
12 Fujitsu
8
7 = ON/OFF button
8 = Fingerprint sensor (optional) or palm
sensor (optional)
9 = Memory card slot
10 = Touchpad buttons
11 = Status indicators
Page 15
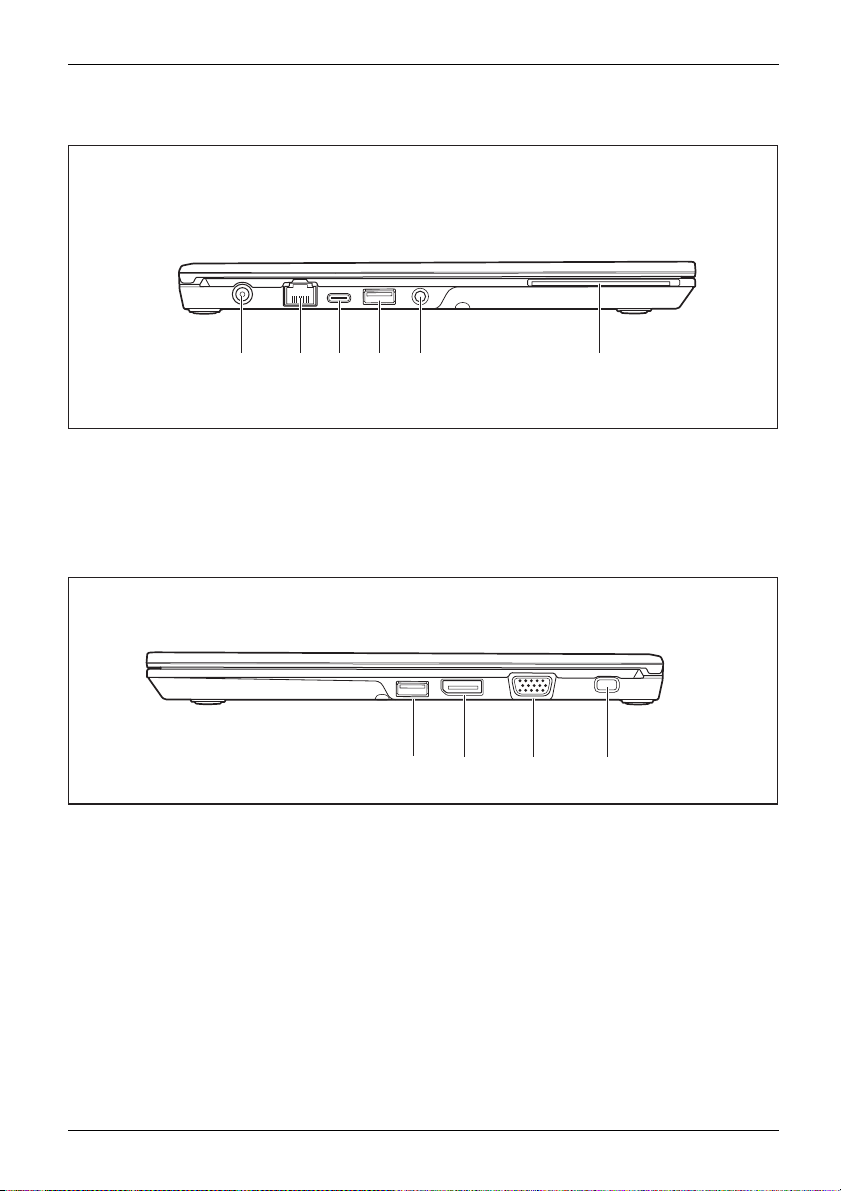
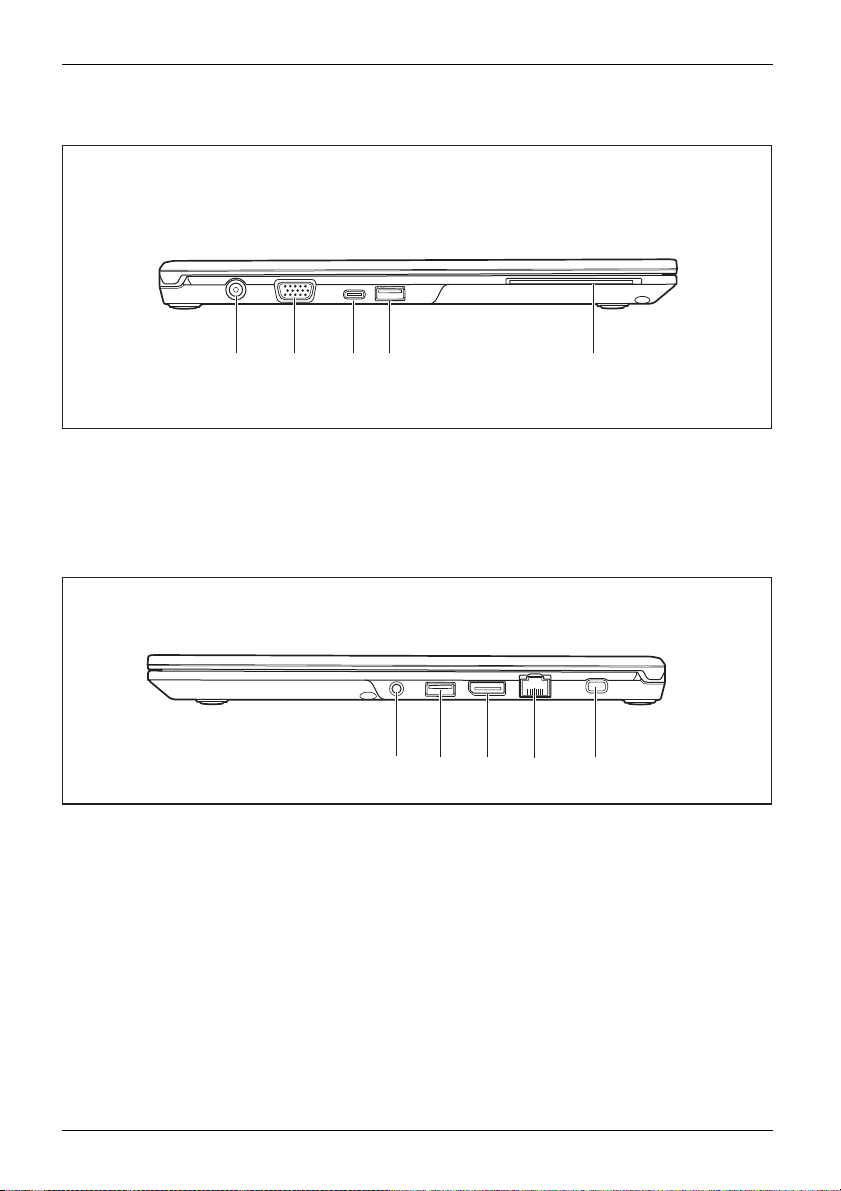
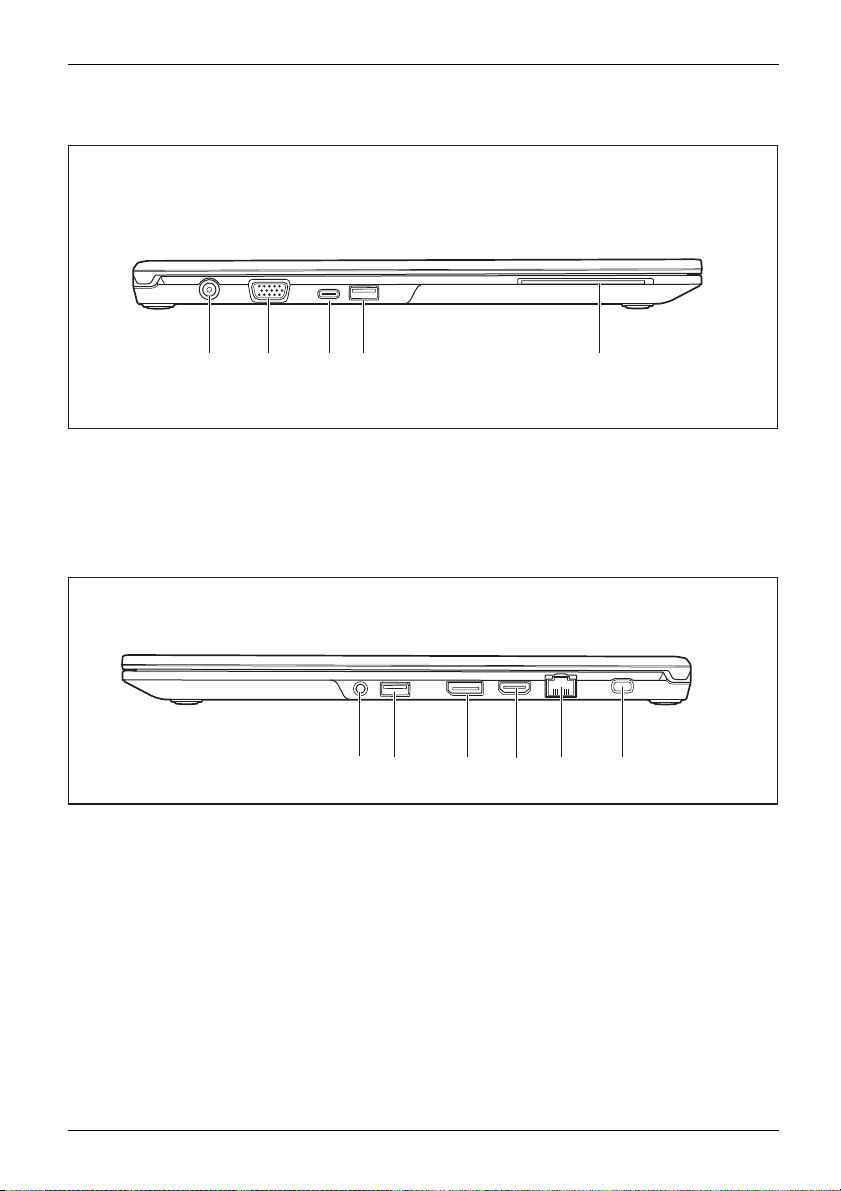
Left side
Ports and controls
1 2 3 4 56
1 = DC input connector (DC IN)
2 = LAN port
3 = USB port 3.1 Gen 1 with charging
function (USB Type-C®)
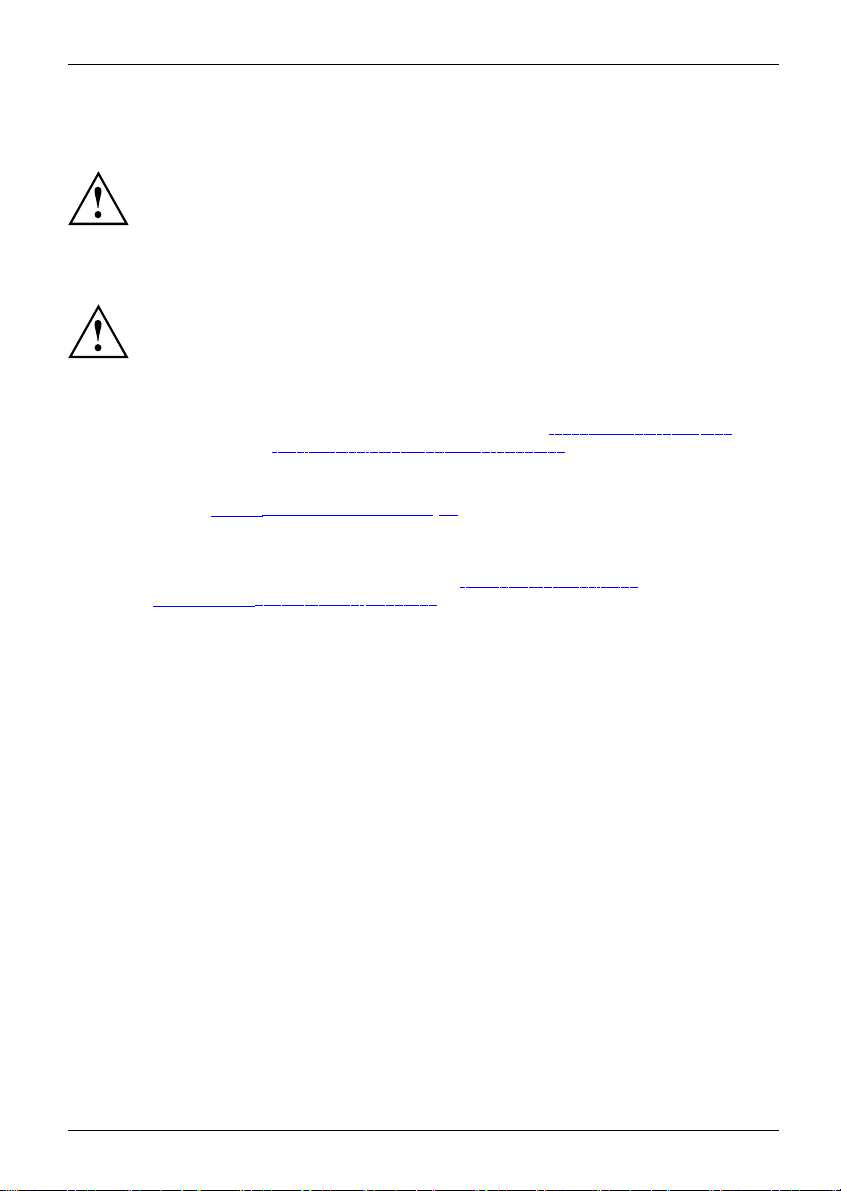
Right side
1=USBport3.0
2=DisplayPort
4 = USB port 3.0 with charging function
(Anytime USB charge)
5 = Headset port
6 = Smart Card reader (optional)
1 2 34
3 = External monitor po rt (VGA)
4 = Security Lock device
Fujitsu 13
Page 16
Ports and controls
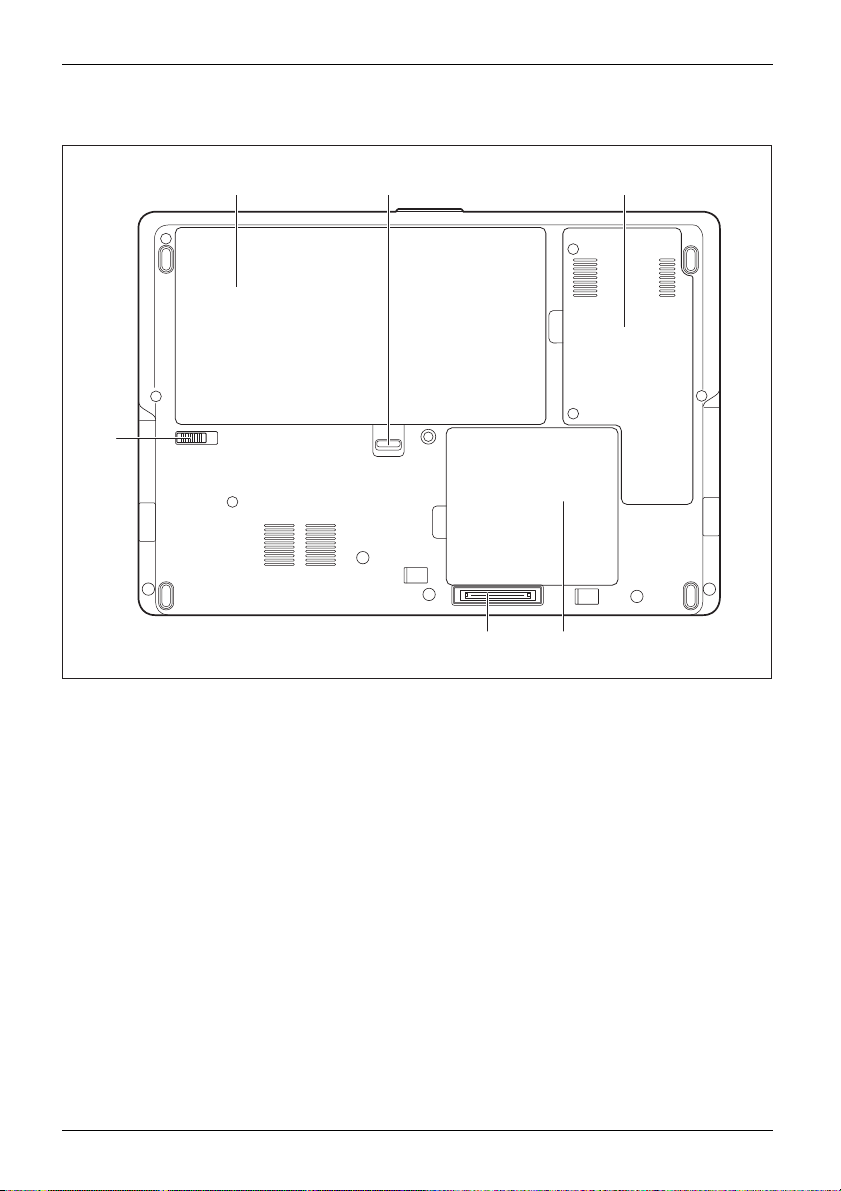
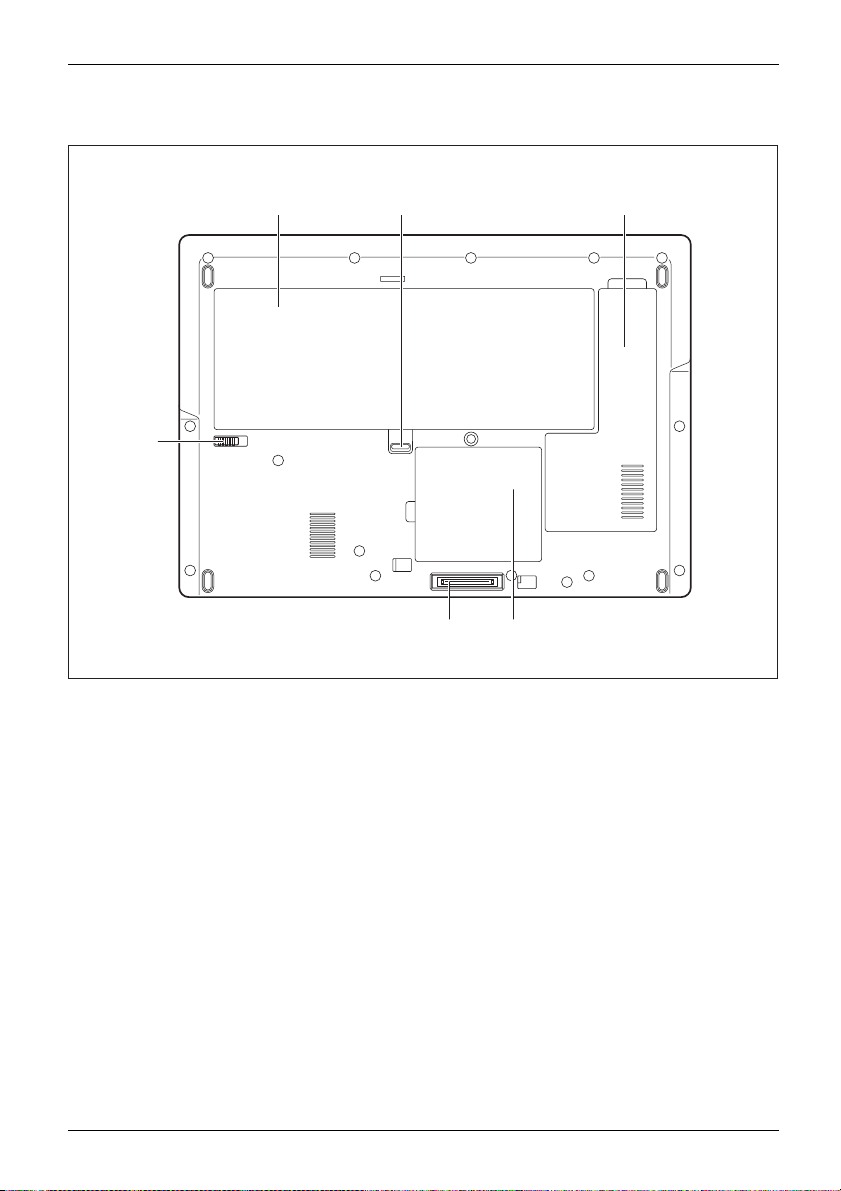
Bottom
13
6
1 = Rechargeabl
2 = Battery lock slider switch 1
3 = M.2 module c
e battery
ompartment
2
5
4 = Memory upgra
5 = Port replicator port
6 = Battery loc
4
de compartment
k slider switch 2
14 Fujitsu
Page 17
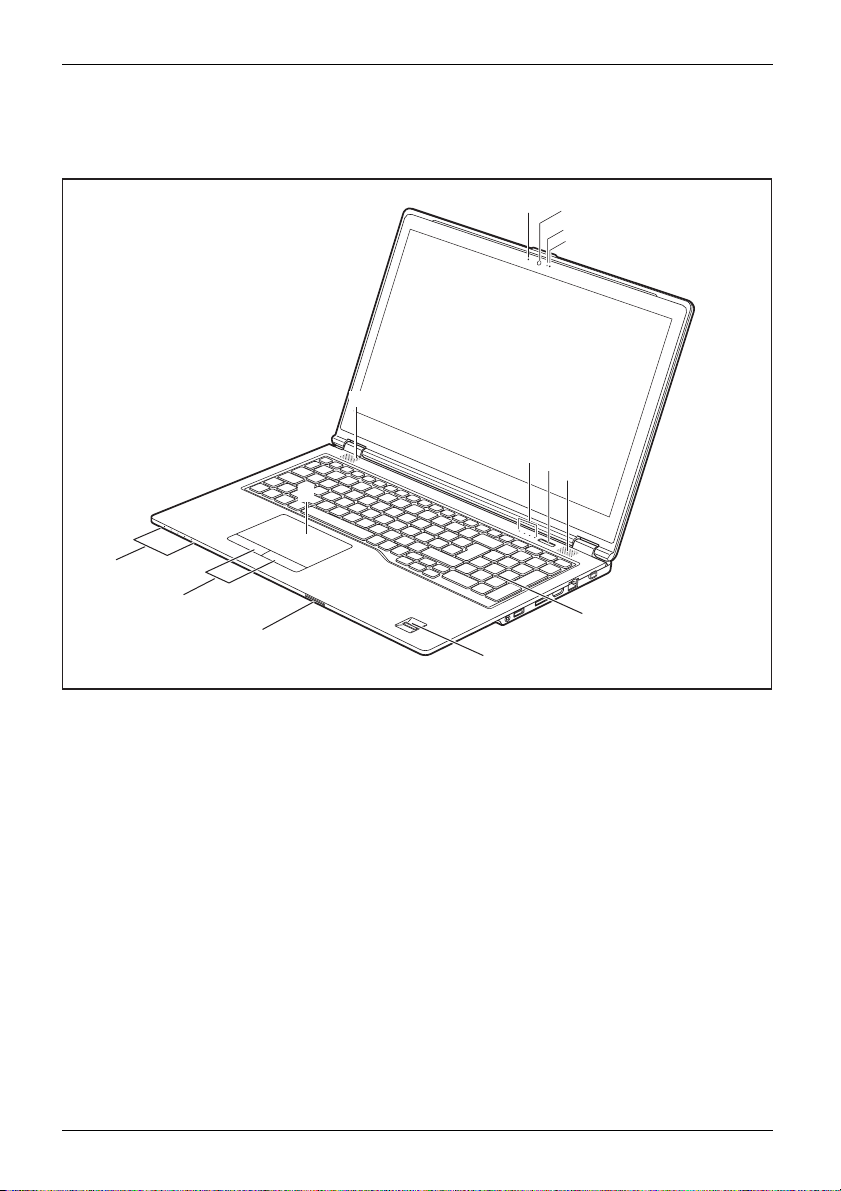
FUJITSU LIFEBOOK U747
Front
5
4
11
10
9
Ports and controls
1
2
3
1
6
7
5
8
1 = Microphon
2 = Webcam (optional)
3 = Webcam LED
4 = Touchpad
5 = Speaker
6 = Status indicators
Fujitsu 15
e (optional)
(optional)
7=ON/OFFbut
8 = Fingerprint sensor (optional) or palm
sensor (optional)
9 = Memory ca
10 = Touchpad buttons
11 = Status i
ton
rd slot
ndicators
Page 18
Ports and controls
Left side
1 2 3 45
1 = DC input connector (DC IN)
2 = External monitor port (VGA)
3 = USB port 3.1 Gen 1 with charging
function (USB Type-C)
Right side
1 = Headset port
2 = USB port 3.0
3 = Display Port
4 = USB port 3.0 with charging function
(Anytime USB charge)
5 = Smart Card reader (optional)
1 2 35
4 = LAN port
5 = Security Lock device
4
16 Fujitsu
Page 19
Bottom
Ports and controls
13
6
1 = Rechargeabl
2 = Battery lock slider switch 1
3 = M.2 modu le c
e battery
ompartment
2
5
4 = Memory upgra
5 = Port replicator port
6 = Battery loc
4
de compartment
k slider switch 2
Fujitsu 17
Page 20
Ports and controls
FUJITSU LIFEBOOK U757
Front
5
4
12
11
10
1
2
3
1
6
7
5
8
9
1 = Microphon
2 = Webcam (optional)
3 = Webcam LED
4 = Touchpad
5 = Speaker
6 = Status indicators
7=ON/OFFb
18 Fujitsu
e (optional)
(optional)
utton
8 = Separate n
9 = Fingerprint sensor (optional) or palm
sensor (optional)
10 = Memory ca
11 = Touchpad buttons
12 = Status i
umber keypad
rd slot
ndicators
Page 21
Left side
Ports and controls
1 2 3 45
1 = DC input connector (DC IN)
2 = External monitor port (VGA)
3 = USB port 3.1 Gen 1 with charging
function (USB Type-C)
Right side
1 = Headset port
2=USBport3.0
3=DisplayPort
4 = USB port 3.0 with charging function
(Anytime USB charge)
5 = Smart Card reader (optional)
1 2 35
4=HDMIport
5 = LAN port
6 = Security Lock device
4
6
Fujitsu 19
Page 22

Ports and controls
Bottom
13
6
1 = Rechargeabl
2 = Battery lock slider switch 1
3 = Hard drive a
(HDD or M.2
e battery
ccess compartment
module)
2
5
4
4 = Memory upgra
5 = Port replicator port
6 = Battery loc
de compartment
k slider switch 2
20 Fujitsu
Page 23
Important notes
ImportantnotesNotes
Safety instructions
SafetyinformationInformation,
This chapter contains essential safety information which must be followed
when working with your notebook. Other notes also provide useful information
which will help you with your notebook.
Please observe the following safety information.
e pay special attention to the sections in the manual marked
Pleas
with the symbol on the left.
When connecting and disconnecting cables, observe the relevant
notes in this operating manual.
Read the information on the ambient conditions in the "
chapter and the "First-time setup of your device", Page 25 chapter before preparing
your notebook for use and switching it on for the first time.
When cleaning the device, please observe the relevant notes in the
section "Cleaning the note book", Page 24.
Pay attention to the additional safety notes for devices with radio components
provided in the "Safety/Regulations" manual.
Please refer to the notes in the chapter "Removing and installing
components during se rvicing", Page 72.
When handling this device, you will come into contact with lead, a chemical which in
California is held to be a possible cause of birth defects and other damage to fertility.
Wash your hands after using the device.
Do not place objects or apply heavy pressure on your computer
Do not apply too much force to the display corners
Do not rotate display with excessive force
Do not pick up or hold the computer by display only
Do not shake or bump the display
Avoid excessive vibration and shocks
Avoid excess force when tapping or writing on the screen
Do not block the air vents
Do not leave the computer turned on when enclosed in a briefcase or backpack
In the event you drop your tablet PC or damage the housing in any way, immediately
turn off power and disconnect the power plug. Failure to do so could result in a short
circuit, smoke, and/or fire. Contact Fujitsu Service and Support to learn how to get the
computer repaired.
Important notes
Technical data", Page 93
This noteboo
If you have a
please con
Fujitsu 21
k complies with the relevant safety regulations for data processing equipment.
ny questions about setting up your notebook in the intended environment,
tact your sales outlet or our Hotline/Service Desk.
Page 24
Important notes
Additional safety notes for devices with wireless components
wirelesscomponentsWirelessLANBluetooth,Safetynotes
If a wireless c ompon ent (wireless LAN, Bluetooth) is incorporated in your notebook, y ou must
be sure to observe the following safety notes when using your notebook:
• Switch off the wireless components when you are in an aircraft or driving in a car.
• Switch off the wireless components when you are in a hospital, an operating
room or near a medical electronics system. The transm itted radio waves
can impair the operation of medical devices.
• Switch off the wireless components, when you let the device g et near flammable
gases or into hazardous environments (e.g. gas station, paintshops), as the
transmitted radio waves can cause a n explosion or a fire.
For further information on how to switch the wireless componen ts on and off, refer
to chapter "
Switching the wireless components on and off", Page 49.
Energy saving
NotesEnergyPowersaving
Switch the notebo
they are not in us
will then be abl
Energy savin
► Make use of the available energy saving functions as described in chapter
Using the energy saving functions", Page 46.
"
ok off when it is not in use. Switch off any connected external devices when
e. If you use the energy saving functions, the notebook uses less power. You
e to work for longer before having to recharge the battery.
The energy effic
You save money
iency is increased and environmental pollution is reduced.
and help protect the environment.
g under Windows
22 Fujitsu
Page 25
Important notes
Traveling with your notebook
MobileoperationNotesTrans portNotebook
Please observe the points listed below when traveling with your notebook.
Before you travel
► Back up important data stored on your hard disk.
NotebookTraveling,notebook
► Switch off the radio component for data security reasons. W ith data traffic via a wireless
connection, it is also possible for unauthorized third parties to receive data.
Information on activating data encryption is provided in the documentation
for your radio component.
► If you wish to use your notebook during a flight, check with the flight attendants if its use is safe.
When traveling in other countries
► If you are traveling abroad, check that the AC adapter can be operated with the local AC
voltage. If this is not the case, obtain the appropriate AC adapter for your notebook.
Do not use any other converter!
► Check whether the local AC voltage and the AC cable are compatible. If this is not
the case, buy an AC cable that suits the local conditions.
► Enquire with the corresponding government office of the country you will be traveling to,
whether you may use your notebook with its integrated radio component there.
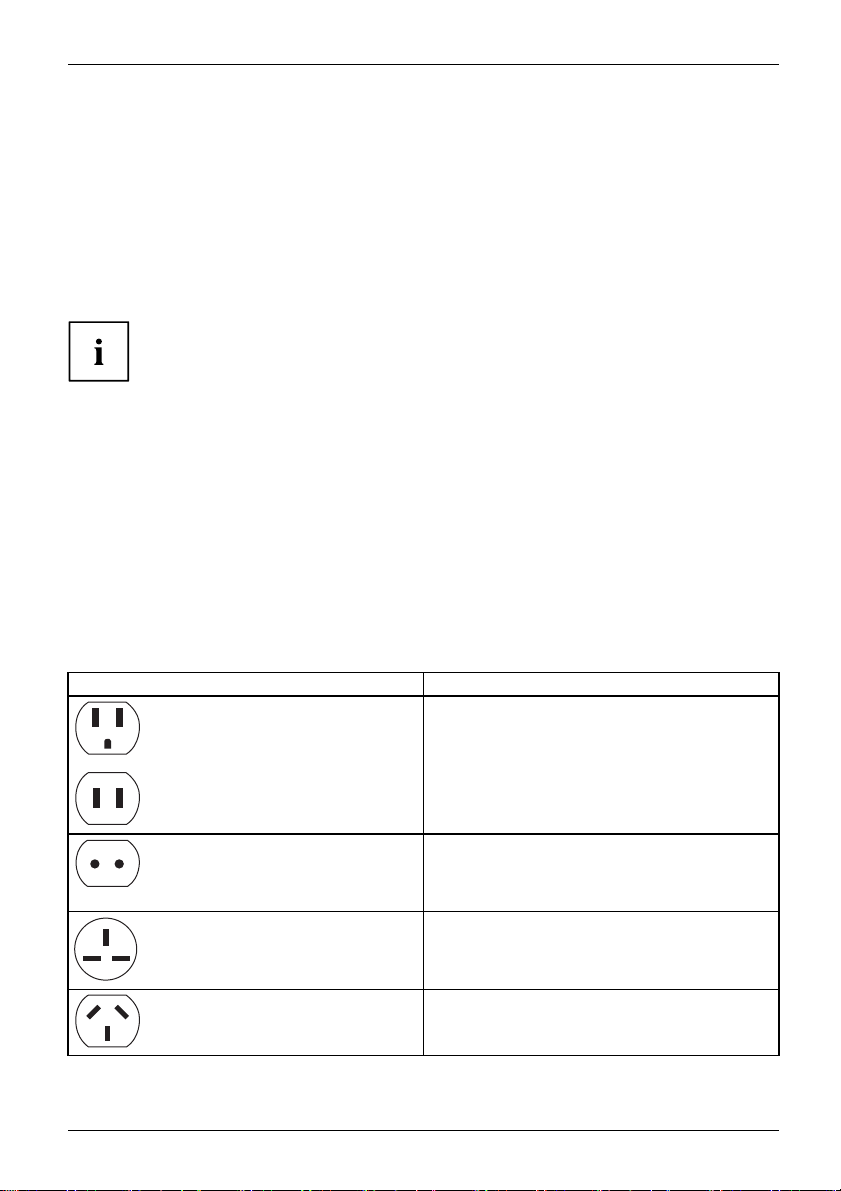
► Take the ne cessary travel adapters with you when traveling abroad. Check the following
table to see which travel adapters you will need, or ask your travel organizer.
Power con nection Travel destination
United States, Canada, Mexico, parts of Latin
America, Japan, Korea, Philippines, Taiwan
Russia and the Commonwealth of Indepe ndent
States (C IS), much of Europe, parts of Latin
America, the Middle East, parts of Africa, Hong
Kong, India, much of south-east Asia
United Kingdom, Ireland, Malaya, Singapore,
parts of Africa
China, Australia, New Zealand
Fujitsu 23
Page 26

Important notes
Transporting the notebook
Protect the notebook from severe shocks and extreme temperatures
(e.g. direct sunlight in a car).
► Switch the notebook off.
TransportNotebook
► Unplug the AC plug of the AC adapter and all external d evices from the power ou tlets.
► Disconnect the AC adapter cable and the data cables for all external devices.
► Close the LCD screen.
► To protect against damaging jolts and bumps, use a notebook carrying
case to transport your notebook.
Cleaning the notebook
Do not clean any interior parts yourself; leave this job to a service technician.
Only use cleaning products designed for computers. Normal household
cleaners and polishes can damage the markings on the keyboard and the
device, the paintwork or the notebook itself.
Ensure that no liquid enters the notebook.
The LCD screen is very sensitive to scratches. Only clean the display
surface with a very soft, slightly damp cloth.
► Switch the notebook off.
CleaningInstructionsNotebookKeyboardTouchpadLCDscreen
► To preve nt the device being switched on unintentionally, remove the AC plug
of the AC adapter from the power outlet and remove the battery (see chapter
Removing and installing the battery", Page 44).
"
The casing surfaces may be cleaned with a dry cloth.
If particularly dirty, use a damp cloth which has been dipped in water containing
some mild domestic detergent and then well wrung out.
To clean th
Ensure tha
e keyboard a nd the touchpad, you can use disinfectant wipes.
t no moisture reaches the inside of the device!
24 Fujitsu
Page 27

First-time setup of your device
First-time setup of your devic
First-timesetu pGettingstarted
When the device is delivered, the battery is located in the battery compartment. The battery
must be charged if you want to operate your device using the battery.
When used on the move, the built-in battery provides the device w ith the necessary power. You
can increase the operating time by using the available energy saving functions.
For instructions on how to connect external devices (e.g. mouse, printer) to your
device, please refer to the operating manual for y our device.
Unpacking and
► Unpack all the individual parts.
► Check your
Please read the chapter "Important notes", Page 21.
If your device is equipped with a Windows operating system, the necessary
hardware drivers and supplied software are already pre-installed.
Before switching it on for the first time, connect the device to the AC voltage using
the AC adapter, see "
remain connected during the whole of the installation process.
A system test is pe rformed when your device is first switched on. Various messages
can appear. The display may remain dark for a short time or may flicker.
Please follow the instructions on the screen.
NEVER switch off your device during the first-time setup process.
Connecting the AC adapter", Page 26. The AC adapter must
checking the device
If you find that damage has occurred during transport, please notify
your local sales outlet immediately!
PackagingTransport
device for any visible damage which may have occurred during transportation.
e
You may ne
you need t
Fujitsu 25
ed to reuse the packaging in the future, for example if
o ship your device.
Page 28
First-time setup of your device
Choose a location
ChoosealocationSetupACadapter
Choose a suitable location for the device before setting it up. In doing
so, please follow these instructions:
• Never place the device or the AC adapter on a heat-sensitive surface.
The surface could be damaged as a result.
• Never place the device on a soft surface (e.g. carpeting, upholstered furniture,
bed). This ca n block the air vents and cause overheating and damage.
• The underside of the device heats up during normal operation. Prolonged contact
with the skin can become unpleasant or even result in burns.
• Place the device on a stable, flat, non-slippery surface. Please note that the
rubber feet of the device may mark certain types of delicate surfaces.
• Keep other objects at least 100 mm / 3.97 inches away from the device
and its AC adapter to ensu re adequate ventilation.
• Never cover the ventilation openings of the device.
• Do not expose the device to extre me environmental conditions.
Protect the device against dust, humidity and heat.
Connecting the AC adapter
MakingreadytouseACadapter
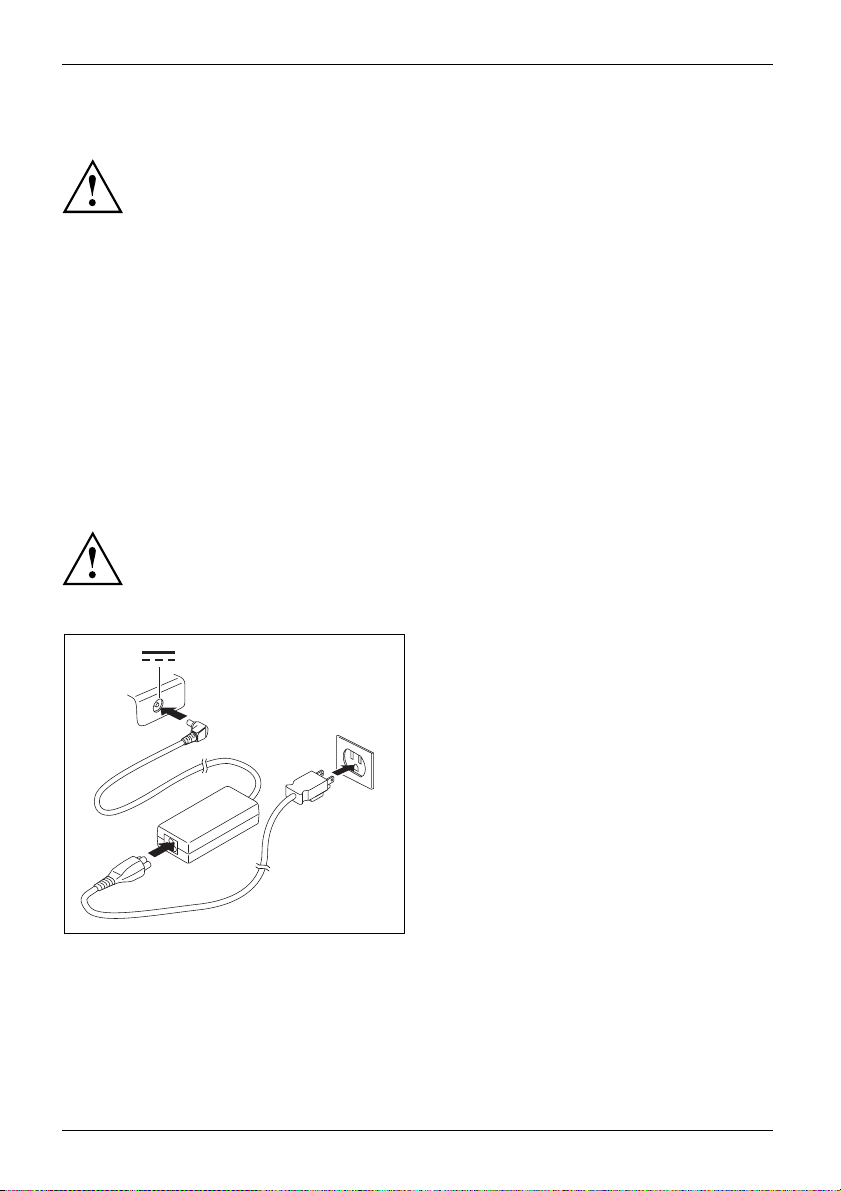
Observe the safety notes in the enclosed "Safety/Regulations" manual.
The supplied AC cable conforms to the requirements of the country in which
you purchased your device. Make sure that the A C cable is approved for
use in the country in which you intend to use it.
► Connect the AC cable (1) to the AC adapter.
► Plug the AC cable (2) into a power outlet.
► Connect the AC adapter cable (3) to the
DC jack socket (DC IN) of the device.
3
2
1
26 Fujitsu
Page 29
First-time setup of your device
Switching on the device for the first time
Switchingonforthefirsttime
To make it easier to use your device for the first time, the operating system
is pre-installed on the hard disk.
► Switch your device on.
► During the installation process, follow the on-screen instructions.
You can find information and help on the Windows operating system functions
on the Internet at "
http://windows.microsoft.com".
Installing Bonus Apps
BonusApps
The Bonus Apps can be found in the Start menu
► In the Start menu, click on Bonus Apps to view the additional apps that are available to you.
Applications that are already installed appear in grey, those that are
available for installation appear in blue.
► Select the applications you wish to install by selecting the checkbox adjacent to your selection.
or
► Click Select All if you would like to install all available applications.
► To confirm yo
ur selection, click Install.
Note that i
installat
There are
but one of
installi
n some cases (depending upon which application was selected for
ion) after installation completes, the system will prompt you to reboot.
also cases in which if multiple applications are selected to install
them needs a reboot, the system will reboot and continue
ng the rest of the selected applications.
Fujitsu 27
Page 30
Working with the notebook
Working with the notebook
Operation,notebookNotebook
This chapter describes the basics for operating your notebook. Please refer to
Connecting external device s", Page 65 for instructions on how to connect external
"
devices such as a m ouse and a printer to the notebook.
Please r efer to the notes in the chapter "Important notes", Page 21.
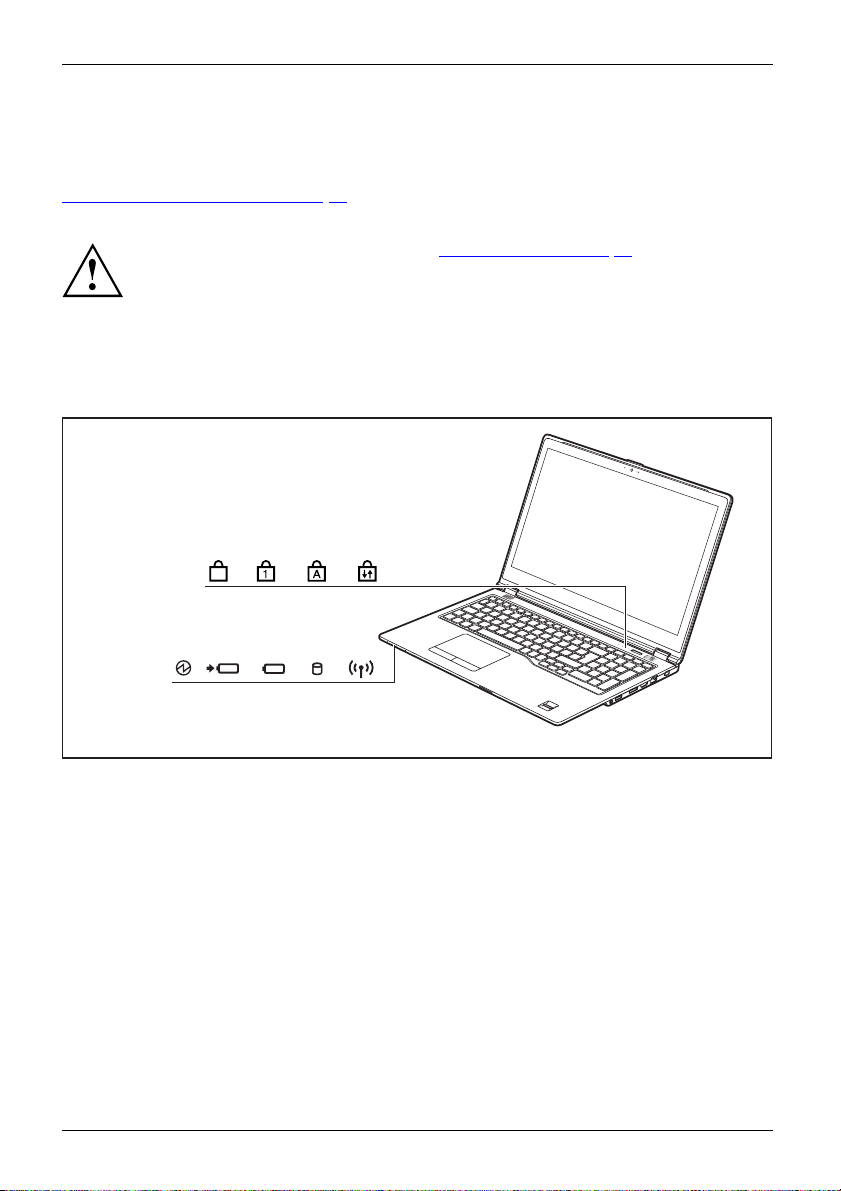
Status indicators
Statusindicators
The status indicators provide information about the status of the power supply,
the hard disks and the keyboard functions.
F
28 Fujitsu
Page 31

Display Description
Power-on indicator/Standby
StandbyindicatorPower-onindicator
• The indicator is illuminated: Th e notebook is switched on.
• The indicator flashes: The notebook is in standby mode.
• Indicator is off: The notebook is switched off.
Battery charging indicator/
The battery charging level
• The indicator lights up wh
rechargeable battery is i
• The indicator light is orange: The AC adapter is connected and the battery
is be ing charged.
•Theindicatorisflashin
cannot be charged as the
charging process is con
a permissible temper
• The indicator is flashing red: A fault ha s occurred.
• The indicator is not
BatterystatusindicatorBatterysymbolBatteryindicator
Battery in dicator
• The indicator lights up white: The rechargeable battery is charged to betwee n
51% and 100% of its maximum capacity.
• The indicator lig
13% and 50% of its
• The indicator lights up red: The rechargeable battery is charged to between
0% and 12% of its maximum capacity.
• The indicator
Drive indicat
DriveIndicator
The indicator
Working with the notebook
AC connection
is shown by the rechargeable battery indicator.
ite: The rechargeable battery is charged or no
nserted.
g orange: The AC adapter is connected but the battery
battery is too hot or too cold for charging. The
tinued as soon as the rechargeable battery has reached
ature again.
lit up: The AC ada pter is not connected.
ht is orange: The rechargeable bat tery is charged to between
maximum capacity.
is flashing red: A fault ha s occurred.
or
is illuminated: The hard disk drive is being accessed.
Wireless ind
• The indicat
icator
or is illuminated: The wireless components are switch ed on.
• Indicator is off: The wireless components are switched off.
F L ock indicator
F
IndicatorFLock
The indicator is illuminated: The key combination
Fn
pressed. Instead of the key combination
+ hot key, the hot key functions can be
executed by pressing the keys directly (see chapter "
Num Lock indicator
IndicatorNumLock
The indicator is illuminated: The
Num Lock
key has been pressed. The virtual
F
Fn
+
(ESC) has been
F Lock settings", Page 35
number keys have been switched on. You can output the characters indicated
on the upper right of the k eys.
Fujitsu 29
Page 32

Working with the notebook
Display Description
Caps Lock indicator
IndicatorCapsLock
The indicator is illuminated: The Caps Lock key has been pressed. All the
characters you type will appear in upper case. In the case of overlay keys, the
character printed on the upper left of the key will appear when that key is pressed.
Scroll L ock indicator
IndicatorScrollLock
The indicator is illuminat
The effect that this key ha
ed: The key combination
s varies be tween applications.
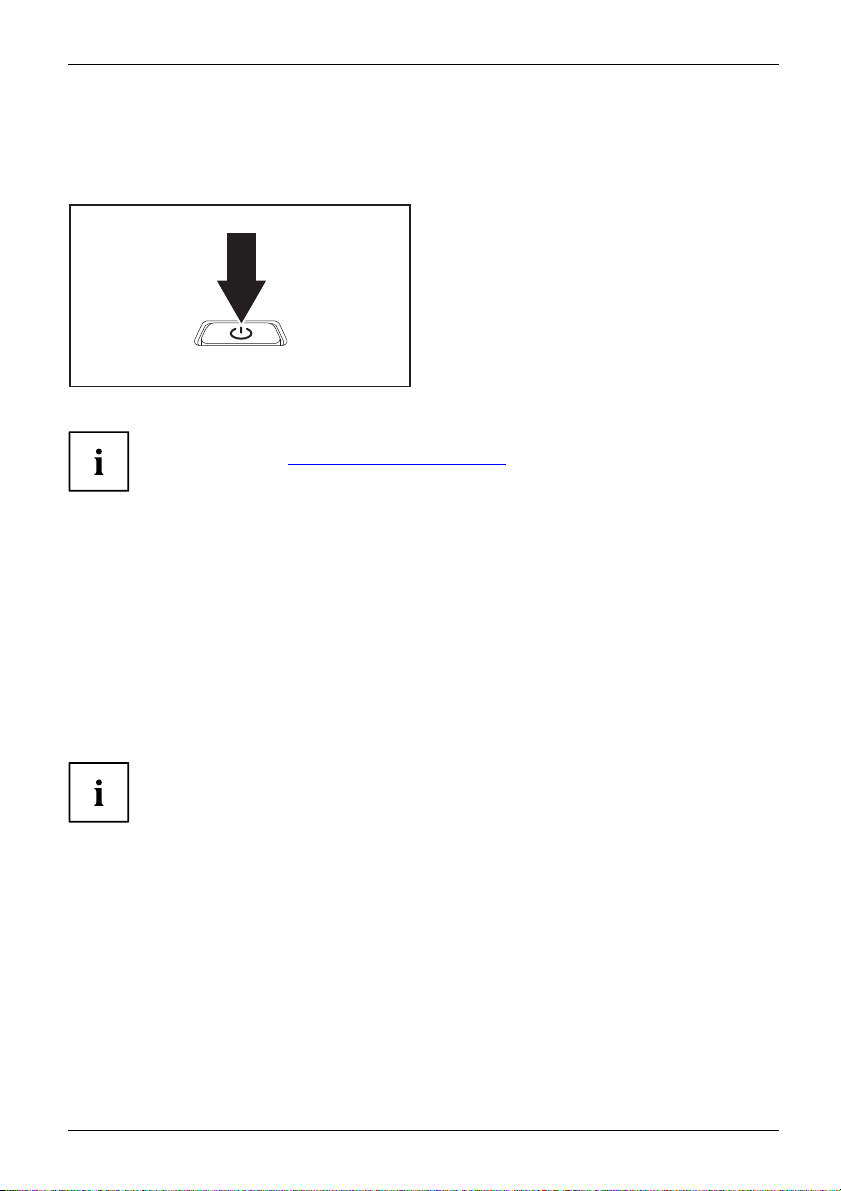
Switching the notebook on
The power-on indicator of the notebook is lit.
Fn+Rol
► Open the LCD screen.
Switchingon
has been pressed.
► Press the ON/OFF button for about one
second to switch on the notebook.
Switching the n
otebook off
Back up your data and close all applications before you switch off your
device. Otherwise data might be lost.
► Shut down the operating system correctly.
Notebook
► If the noteb
automatic
for approx
ook is not switched off
ally, press the O N/ OF F button
. five seconds.
► Close the LCD screen.
30 Fujitsu
Page 33

Keyboard
KeyboardNumer ic keypadNumberkeypadkeys
The keyboard of your notebook is subject to continuous wear through normal
use. The key markings are especially prone to wear. The key markings are
liable to wear away over the life of the notebook.
Working with the notebook
The keyboard has been desig
Some enhanced keyboard fun
The following descriptio
supported by the keys are d
The following illustrat
ion shows how to access the different characters on keys with overlaid
functions. The example a
ned to provide all the functions of an enhanced keyboard.
ctions are mapped with key combinations.
n of the keys applies to the Windows operating system. Additional functions
escribed in the relevant manuals supplied with your application programs.
pplies when the Caps Lock key has not been activated.
The illustration may di
Depending on the regi
keyboard layout (USA
Key Description
Backspace key
Backspace
The
cekey
ce
Backspa
Backspa
ffer from your device.
on you live in, your notebook is delivered with a mon olingual
) or a bilingual keyboard layout (Canada).
key deletes the c haracter to the left of the cursor.
Tab key
Tab
The
Tabkey
key moves the cursor to the next tab stop.
Enter key (return )
Enter
The
is executed when you press this key.
EnterkeyReturnEnterLinefeed
key terminates a command line. The c ommand yo u have entered
Fujitsu 31
Page 34

Working with the notebook
Key Description
Caps Lock key
Caps Lock/Caps Lock Fix Maj
The
the corresponding icon is displayed in the Windows information area. In
Bilingual keyboard:
Caps Lock m ode, all of the characters you type appear in upper case. In
the case of overlay keys, the character printed on the upper left of the key
will appear when that key is pressed. To ca ncel the Caps Lock function,
simply press the Caps Lock key again.
CapsLockkeyCapsLock
Shift key
Shift
Shift
The
overlay keys, the character printed on the upper left of the key will appear
when that key is pressed.
ShiftkeyShift
Fn key
Fn
The
Fnkey
Windows key
Windows
The
application.
Windowskey
Alt key
Alt
The
with other keys
Context Menu key
Context Menu
The
key activates the Caps Lock mode, and
key causes uppercase characters to appear. In the case of
key enables the special functions indicated on overlay keys.
key switches between the start screen and the last used
key activate
s special functions when it is pressed in combination
.
key opens the menu for the active application.
Bilingual keyboard:
Ctrl key
Ctrl
The
key activates special functions when it is pressed in combination
with other keys.
Cursor keys
The cursor keys move the cursor in the direction of the arro w, i.e. up, down,
left, or right.
keys
control
Cursor
Cursor
Home key
Home/Home/Debut
The
key jumps to the beginning of the line, document
page, cell or screen of where the cursor is positioned.
Bilingual keyboard:
32 Fujitsu
Page 35

Key Description
End key
End/End/Fin
The
screen of where the cursor is positioned.
Bilingual keyboard:
Working with the notebook
key jumps to the end of the line, document page, cell or
Insert key
When pressing the
Insert/Insert/Insér
ou change between two input
key, y
modes:
Bilingual keyboard:
1. Typeover mode: When typ
ing, you overwrite the character at the current
cursor position.
2. Insert mode: While typing, another character at the current cursor
position is inserted. All characters right of the cursor will be shifted
by one position.
Delete key
When pressing the
/
key, the character before the / on
Delete/Suppr
elete
D
the right of the cursor will be deleted.
Bilingual keyboard:
Hot keys and function keys
The top row of your notebook’s keyboard has both hot key and function key i cons:
1
2
3
4
1=Top
row of a monolingual keyboard layout
2 = Top row of a bilingual keyboard layout
3=Hot
4 = Function key
key
Fujitsu 33
Page 36

Working with the notebook
Hot keys
Hot keys are the icons on the top of the keys.
The hot keys activate features on your device (e. g. loudpeakers on/off, microphone enable/disable,
volume increase/decrease, brightness increa se/d ecrease). Hot keys are convenience features.
Hot keys may be set as the primary key functionality at Windows startup (see
chapter "
Hot key Description
F Lock settings", Page 35).
Enable/Disable the microph one
This hot key enables and disables the microphone.
MicrophoneMicrophone
Switch the speakers on and off
This hot key switches your notebook’s speakers off or on.
SpeakerSpeaker
Decrease the volum e
This hot key reduces the volume of the internal speakers.
Volume
Increase volume
This hot key increases the volume of the internal speakers.
Volume
Switch the wireless components on/off
This hot key switches the wireless components off or on.
ents
ents
Wirelesscompon
Wirelesscompon
Switch the touchpad and touchpad buttons on/off
This hot keyswitches the touchpad and the touchpad buttons on or off.
TouchpadTouchpadbuttonsTouchpad
Decrease the brightness of the screen
This hot key decreases the brightness of the scree n.
LCDscreenBrightnessofthescreen
Increase the brightness of the screen
This hot key increases the brightness of the screen.
Brightnessofthescreen
Activate energy saving functions
Use this hot key to activate the energy saving fu nctions (see chapter "
the energy saving functions", Page 46).
Energysavingfunctions
Switch between display outputs
Use this hot key to select which screen(s) is/are used for display if an
external monitor is connected.
Screen output is possible:
• only on the notebook’s LCD screen
• on the LCD screen of the notebook and the exte rnal monitor at the
same time
• only on the external monitor
This setting is useful if you would like a high resolution and a high
refresh rate on an external monitor.
chbetweendisplayoutputs
Fn+F10Swit
Using
34 Fujitsu
Page 37

Working with the notebook
Hot key Description
Create a screnshot
With this hot key, a screenshot of the current screen image is created and
Bilingual keyboard:
stored in the clipboard.
Enable/Disable virtu al number keys
This hot key enables and disables the virtual number keys. Those characters
Bilingual keyboard:
are issued, which are located at the top right corner of the respective keys.
Function keys
The function keys are the icons on the bottom of the keys.
The function keys are numbered from
F1
The function keys serve as short-cut key functions and activate opera ting
system and/or software functions.
Regardless of the F Lock setting, the function keys are always the primary key functionality:
• until Windows is loaded (after rebooting the system).
Then the primary keys functionality are maintained f rom the last F Lock setting
prior to reboot (see chapter "
• when accessing: If
Fn+F2orFn+F12
is not started. You must press the
F Lock settings", Page 35).
F2orF12
F12
up to
.
are pressed during boot, the BIOS men u
key alone.
F Lock settings
By pressing the
primary or secondary key functionality for the top row of keys.
F Lock is set to off by default out of factory.
► Press
If F Lock is set on, it stays on like the
When switching the F Lock settings, the primary or secondary key functionality changes as follows:
Status
FLockisoff(FLockindicatoris
not illuminated)
F Lock is on (F Lock indicator
is illuminated)
Fujitsu 35
F Lock
Fn+Esc
key, you may lock either the hot keys or function keys as the
to switch F Lock on or off.
Caps Lock
key.
Hot key Function key
Hot keys become the primary
keys:
► Press the h ot key alone.
Hot keys become the secondary
keys:
Fn
► Press
+ hot key.
Function keys become the
secondary keys:
► Press
Fn
Function keys become the
primary keys:
► Press the function key
alone.
+ function key.
Page 38

Working with the notebook
Key combinations
Keycombinations
The following description of key combinations applies to Windows operating systems. Some of the
following key combinations may not function in other operating systems or with certain device drivers.
Other key combinations are described in the relevant manuals supplied
with your application programs.
Key combinations are entered as follows:
► Press the first key in the key combination and keep it pressed.
► While holding the first key down, press the other key or keys in the combination.
Combination Description
Switch F Lock setting on/off
This key combination switches the F Lock setting
on/off (see chapter "
F Lock settings", Page 35).
Switch between open applicatio ns
This key combination switches between several open
applications.
Bilingual keyboard
:
Alt+Tab
Open Windows Security/Task Manager window
This key combination opens the Windows
Security/Task Manager window.
Ctrl+Alt+Del
Bilingual keyboard:
Back tab
Shift
This key combination moves the cursor back to the
previous tab stop.
Shift+TabBacktab
Enable/D
This key
which di
Fn+ScrollLock
isable Scroll Lock
combination activates special functions,
ffer from application to application.
Bilingual keyboard:
Toggle backlit keyboard settings
This key combination toggles the backlit
keyboard settings between low, high and off
(configuration-dependent).
Shift+TabBacktab
36 Fujitsu
Page 39

Working with the notebook
Key combinations using the Windows keys are detailed in the manual
for your operating system.
In addition, the following non-labeled key combinations are supported:
Fn
•
Fn
•
Fn
•
Virtual number keys
NumerickeypadVirtualnumberke ysNumLock
+
+
+
S
= Pause
B
= B reak
R
=SysRq
LIFEBOOK U727 and LIFEBOOK U747 have virtual number keys. LIFEBOOK
U757 has a separate number keyp ad on t he far right.
Virtual number keys are provided so that the keys of a number keypad can be used for certain
applications. The virtual number keys are recognizable on the keyboard by the numbers and
symbols printed in the upper right corner of each key. If you have switched on the virtual number
keys, you can output the characters shown on the upper right of the keys.
The key assignment shown below may be different from the
keyboard layout of your device.
&
*
7
4
9
8
6
5
:
;
<
>?
1
2
/
1 = Characte
keyboar
r valid when the
Num Lk/Num
d:
Num Lk
(bilingual
)keyisnotactive
2=Characte
keyboar
Further information about the status indicators can be found in chapter "
Fujitsu 37
r valid when the
Num Lk/Num
d:
Status indicators", Page 28.
+
3
Num Lk
)keyisactive
/
(bilingual
Page 40

Working with the notebook
Separate number keypad
NumerickeypadSeparatenumber keypadNumLock
LIFEBOOK U727 and LIFEBOOK U747 have virtual number keys. LIFEBOOK
U757 has a separate number keypad on the far right.
Country and keyboard settings
► Change the country and keyboard settings as described in the documentation for your operating
system.
38 Fujitsu
Page 41

Touchpad and touchpad buttons
Keep the touchpad clean. Protect it from dirt, liquids and grease.
TouchpadTouchpad
Do not use the touchpad if your fingers are dirty.
Do not rest heavy objects (e.g. books) on the touchpad or the touchpad buttons.
Working with the notebook
1
1 = Touchpad
2 = Touchpad buttons
2
The touchpad enables you to move the mouse pointer on the monitor.
The touchpad buttons allow you to select and execute commands. They correspond
to the buttons on a conventional mouse.
You can also deactivat e the touchpad via a key combination, so that you cannot move
the pointer on the monitor unintentionally (see chapter "
Moving the poin
► Move your finger on the touchpad.
Touchpad
The pointer w
ill move.
ter
Key combinations", Page 36).
Selecting an item
► Move the pointer to the item you wish to select.
Touchpad
► Tap the touchpad once or press the left button once.
The item is selected.
Executing commands
► Move the pointer to the field you wish to select.
Touchpad
► Tap the touchpad twice or press the left button twice.
The command is executed.
Fujitsu 39
Page 42

Working with the notebook
Dragging items
► Select the desired item.
Touchpad
► Press and hold the left button and drag the item to the desired position
with the finger on the touchpad.
The item will be moved.
LCD screen
LCDscreenNotes
High-quality LCD screens (TF T) are installed in Fujitsu notebooks. For technical reasons,
these screens are manufactured for a specific resolution. An optimal, clear picture can
only be ensured in the resolution intended for the particular screen. A resolution which
differs from the specification can result in an unclear picture.
The resolution of the monitor of your noteboo k is optimally set at the factory.
Current production technology cannot guarantee an absolutely fault-free screen display.
A few isolated constantly lit or unlit pixels may be present.
Background lighting
LCD screens are operated with background lighting. The luminosity of the background
lighting can decrease during the period of use of the notebook. However, you can
set the brightness of your monitor individually.
Synchronizing the display on the LCD screen and an external monitor
For m ore information, please refer to the chapter "
under "Display output, switch betwe en".
Key combinations", Page 36
CAUTION: Do not lift or hold the computer by the display/LCD panel. It can
damage LCD panel due to excessive flex. Always lift/carry computer by
holding the keyboard base with both hands .
40 Fujitsu
Page 43

Working with the notebook
Using fingers
You can execute commands and start applications by using finger tip on
the touchscreen of your device.
Action Description
Tap
Tap, hold, release ► Tap and hold an icon and release it again.
Dragging ► Touch and hold a symbol a
Double tap
Zoom in/Zoom out
Input fields With some apps, data must be entered, for
► Tap on a symbol, menu, a button or folder to
select this option or to activate it.
Theselectedactionispe
another place.
For instance, you can drag apps or widgets onto
the start-up screen in this way.
► To increase the size of a view, quickly
tap twice on a web page, map or another
screen.
Ifyoudouble-taponapictureinabrowser,it
will be enlarged, another double-tap makes it
smaller again.
► With some apps, you c an enlarge the
display size by mo ving two fingers apart on
the touchscreen, and reduce it by moving
your fingers together.
instance an Internet address or your name or
password.
► Taponaninputfield.
An on-screen keyboard opens, with which you
can enter your data.
rformed.
nd drag it to
Fujitsu 41
Page 44

Working with the notebook
Webcam
Webcam
Depending on the c onfiguration, your device may include a webcam
with integral microphone.
Depending on the software u
record video clips or take p
The webcam has its own stat
• The picture quality depe
sed, you can use your webcam to take pictures,
art in web chats.
us indicator. The indicator lights up when the webcam is active.
nds on the lighting conditions and the software being used.
• You can only operate th e webcam with a particular application (e.g. an Internet telephony
program or a video conferencing program w hich supports a webcam).
• When using the webcam, t
he notebook base must not wo bble.
• The webcam a utomatica lly adjusts itself to the current lig ht level. For this reason
the LCD display may flicker while the light level is adjusted.
Further information on use of the webcam and additional settings for your webcam
can b e found in the help function of the program using the webcam.
42 Fujitsu
Page 45

Working with the notebook
Rechargeable battery
BatteryBatteryServicelife,batteryRechargeablebatteryBattery
During use as a portable, the notebook runs on its built-in battery. You can increase
the service life of the battery by caring for the battery properly. The average battery
service life is around 500 charge/discharge cycles.
You can extend the battery service life by taking advantage of the available energy saving funct ions.
Charging, caring for and maintaining the battery
BatteryBattery
The notebook battery can only be charged if the ambient temperature is between
5°C / 41°F and a maximum o f 35°C / 95°F.
You can charge the battery by connecting the notebook to the A C adapter
Connecting the AC adapter", Page 26).
(see "
Be aware that the battery will not charge when the battery charge level is between
90% and 100%. If the battery charge level is less th an 90% and the AC adapter
is connected, the battery charges up to 100%.
If the battery is running low, an alert is triggered. If you do not connect the AC adapter within
five minutes after the alert tone, your notebook will automatically switch off.
Monitoring the b attery state of charge
Batterybatterychargemeter
Windows also has a "Battery charge meter" in the taskbar for monitoring the
battery capacity. When you place the mouse pointer on the battery symbol, the
system displays the state of charge of the battery.
Battery storage
rge,battery
ity,battery
BatteryBatterySelf-discha
Chargecapac
The battery should be s tored in a dry environment at a te mperatu re between 0°C / 32°F and
30°C / 86°F. The lower the storage temperature, the lower the rate of self-discharge.
If you will b e storing a ba ttery for a longer period (more than two months),
the battery charge level should be approx. 30%. To prevent exhaustive
discharge which would permanently damage the battery, check the level
of charge of the battery at regular intervals.
To be able to make use of the optimum capacity of the battery, you should allow
the battery to fully discharge and then recharge it.
If you do not intend to use a battery for long periods of time, remove it
from the notebook. Never store batteries in the unit!
Fujitsu 43
Page 46

Working with the notebook
Removing and installing the battery
Only use batteries approved by Fujitsu for your notebook.
Never use force when fitting or removing a battery.
Make sure that no foreign bodies get into the battery connections.
Never store a battery for long periods in the discharged state. This
can make it impossible to recharge.
The LIFEBOOK U747 is illustrated below. The procedure is the
same for all three device variants.
Removing a battery
► Prepare for removal, see chapter "Preparing to remove components", Page 73.
1 HOLD
a
1
3
3 PULL UP
► Slide the r
► Slide the release (button) (2) in the direction of the arrow.
► Reach int
in the di
elease (b utton) (1) in the direction of the arrow and hold it in place.
o the opening (b) and pull the battery out of the battery compartment
rection of the arrow (3).
2
2
44 Fujitsu
Page 47

Installing a battery
Working with the notebook
2
1
► Position the battery at the edge.
► Insert the battery into the battery compartment un til it engages positively (1)
► Slide the release (button) (2) in the direction of the arrow.
► Complete the removal, see chapter "
Finishing component removal", Page 82.
2
Fujitsu 45
Page 48

Working with the notebook
Using the energy saving functions
EnergyEnergyBattery
The notebook uses less power when the available energy-saving functions are used. You will
then be able to work longer when using th e battery before having to recharge it.
The energy efficiency is increased an d environmental pollution is reduced.
By choosing the best power options, you can make significant savings and
at the same time help protect the environment.
When you fold down and close the LCD screen, depending on the setting in W indow s,
the notebook automatically enters a power saving mode.
► Set the energy saving functions in your Control Panel.
If you need further information about an option, you can get help with most
F1
settings by pressing
When the notebook i
During energy savi
in a swap file on the
Never switch the
is nearly flat, cl
s in energy saving mode, the following must be rem embered:
notebook off while it is in an energy saving mode. If the built-in battery
ose all open files and do not go into energy saving mode.
to open the Microsoft Help.
ng mode, open data is held in main memory or
hard disk.
If you do not intend to use your notebook for a long period of time:
► Exit energy sa ving mode if necessary by moving the mouse, making an entry at the keyboard
or by switching on the notebook.
► Close all opened programs and co mpletely shut down the notebook.
46 Fujitsu
Page 49

Memory cards
Slot
Your notebook is equipped with an integrated memory card reader.
Follow the manufacturer’s instructions when handling the memory cards.
Memorycard
Supported formats
Your notebook supports the following format:
• Secure Digital (SD
Inserting the memory card
TM
Card)
► Gently push the memo ry card into the slot
until you feel it click into place. The label
area must be facing u pward. Do not apply
excessive force, as oth erwise the delicate
contact surfaces could be damaged.
Memorycard
Depending on the particular type
used, the memory card may protrude
slightly from the slot.
Working with the notebook
Removing the memory card
Memorycard
To avoid any loss of data, always follow the correct procedure for removing the
card (see the documentation for your operating system).
► On devices with card locking: Press
on the memory card (1).
Memorycard
The memory card is released and
can now be removed.
► Pull the memory card out of the slot (2).
1
2
Fujitsu 47
Page 50

Working with the notebook
Speaker and microphone
MicrophoneSpeakerVolumecontrol
You c a n find information about the exact position of s peakers and microphones
in chapter "
Please refer to chapter "
and also enabling/disabling the speakers using key combinations.
Ports and controls", Page 12.
Key combinations", Page 36 for information on setting the volume
If you attach an external microphone, the built-in microphone is disabled.
When you connect headphones or external speakers, the built-in speakers are disabled.
You can find information on connecting headphones and a microphone in
chapter "
Connecting external devices", Page 65.
48 Fujitsu
Page 51

Working with the notebook
Wireless LAN / Bluetooth / wireless components
The installation of wireless components not approved by Fujitsu will
invalidate the certifications issued for this device.
Switching the wireless components on and off
► Press the key with the wireless icon (keyF5) to start the WirelessSelector.
WirelessLANWirelessLANBluetoothBluetooth
The wireless indicator will illuminate when one or more wireless components are switched on.
If you switch off the wireless components, the wireless LAN antenna
and the B luetooth will also be switched off.
You can activate and deactivate the installed wireless component s
individually using the WirelessSelector program.
Pay attention to the additional safety notes for devices with wireless components
provided in the ""Safety/Regulations" manual.
Details on using a wireless LAN can be found in the online help system
included in the wireless LAN software.
You c a n find more information on how to use Bluetooth on the CD you
received with your Bluetooth software.
Configuring WLAN access
• Requirement: A WLAN is available and you have the necessary access data to hand.
Information on configuring WLAN access can be found in the
documentation for your operating system.
Further information on WLAN and Bluetooth
For further information abou t WLAN or Bluetooth, please refer to the
appendix of this Operating Manual.
For WLAN specifications, see chapter "
Fujitsu 49
WLAN specifications", Page 94.
Page 52

Working with the notebook
Ethernet and LAN
EthernetLAN
The internal network module of your notebook supports Ethernet LAN. You can use it to
establish a connection to a local network (LAN = Local Area Network).
► Connect the network cable to the LAN
port of the notebook (1).
► Connect the network cable to your
network connection (2).
1
2
Your network administra tor can help you to configure and use the LAN connections.
The network cable is not included in the delivery scope. This type of
cable can be obtained from a specialist dealer.
50 Fujitsu
Page 53

Working with the notebook
Your port replicator
Your port replicator is a device that helps you to quickly connect your notebo ok to
your peripheral devices, such as a monitor, printer, etc.
The features offered by the port replicator include standard ports for
monitor, audio, mouse and keyboard.
You need only dock the notebook in order to work with your peripheral devices.
Ports on the port replicator
PortreplicatorPorts
3
2
8
9
10
11
1
1 = Headphone port (left), microphone
port (right)
2 = ON/OFF button
3 = Connector on the port replicator for
the docking port on the underside
of the notebook
4 = Unlocking lever
5 = DC input connector (DC IN)
The DVI po rt and the neighboring Display Port cannot be used at the same time.
Multi-monitoring
You can use up to three screens with the optional port replicator and therefore bring multi-tasking
to a new level. With three screens, you can for example copy content from a document on one
screen into a document on a second screen and, at the same time, have your e-mails displayed
on the third screen w ith out having to close one application in order to be able to access another
application. This is the key t o efficient working in today’s business environment.
12
6 = USB 3.1 Gen 1 ports (USB Type-C)
7 = USB 3.0 ports
8 = Display Ports
9 = DVI-D monitor port
10 = External monitor port (VGA)
11 = LAN port
12 = Security Lock device
6
7
4
5
Fujitsu 51
Page 54

Working with the notebook
Connecting the notebook to the port replicator
The AC adapter must be connected to the port replicator when the
notebook is connected to the port replicator.
We recommend that the notebook is not operated with the LCD screen closed when
the notebook is connected to the port replicator. The resulting overheating can cause
reduced performance and increased activity of the integrated fan.
Portreplicator
► Disconnect the AC adapter cable from the DC input connector (DC IN) of the notebook.
1
► Position the notebook so that it is in line with the back edg e of the port replicator.
► Place the
notebook onto the port replicator (1) and ensure that it locks into place correctly.
52 Fujitsu
Page 55

Working with the notebook
Connecting the AC adapter to the port replicator
► Connect the AC cable to the AC adapter (1).
► Plug the AC cable into the power outlet (2).
► Connect the AC adapter cable to t he DC
jack (DC IN) of the port replicator (3).
3
2
1
When the notebook is connected to a port replicator, the operating system creates
a hardware profile for the "Docked" mode. In this profi le, for example, the monitor
which was last used for output is saved as a setting. T his profile will be loaded as
soon as the notebook is connected to a port replicator of the same type.
Switching on the notebook via the port replicator
► Press the ON/OFF button on the port
replicator to switch on the notebook.
The power-on indicator of the port
replicator lights up.
Fujitsu 53
Page 56

Working with the notebook
Disconnecting the notebook from the port replicator
2
1
► Pull the unlocki
► Lift off th e notebook (2).
ng lever in the direction of the arrow (1), until you hear the notebook unlatch.
54 Fujitsu
Page 57

Your USB Type-C dock (optional)
Your USB Type-C dock (optional
Your do ck is a device that helps you to quickly connect your notebook to your
peripheral devices, such as a monitor, printer, etc.
The features offered by the dock include standard ports for mo nitor, audio and
other USB devices, such as mouse and keyboard.
You need only connect the notebook to the dock in order to work with your periph eral devices.
)
Ports on the dock
DockPorts
8
6
5
1
2
4
3
7
2
8
9
10
1 = Combined headphones/microphone port
2 = USB 3.0 port
3 = VGA monitor port
4=HDMI
5=DisplayPort
6 = LAN port
7 = USB 3.1 Gen 1 port for data connection
only (USB Type-C)
Fujitsu 55
8 = ON/OFF button with power-on indicator
9 = DC input connector (DC IN)
10 = USB 3.1 Gen 1 port for data connection
and power supply for the notebook
(USB Type-C)
Page 58

Your USB Type-C dock (optional)
Settingupthedock
Select a suitable location for the dock before setting it up. In doing
so, please follow these instructions:
• Never place the dock on a soft surface (e.g. carpeting, upholstered furniture, bed). This
can block the air vents of the notebook and cause overheating and damage.
• Place the dock on a stable, flat and anti-slip surface. Please note that the
rubber fee t may mark certain types of surfaces.
• Never place the dock and the AC a d apter on a heat-sensitive surface.
• Do not expose the dock to extreme environmental conditions.
Protect the dock from dust, humidity and heat.
Connecting the AC a
3
2
1
When the notebook is connected to a dock, the operating system creates a
hardware profile for the "Docked" mode . In this profile, for example, the monitor
which was last used for output is saved as a setting. This profile will be loaded
as soon as the notebook is connected to a dock of the same type.
dapter to the dock
► Connect the AC cable to the AC adapter (1).
► Plug the A C cable into the power outlet (2).
► Connect the AC adapter cable to the DC
jack (DC IN) of the dock (3).
56 Fujitsu
Page 59

Your USB Type-C dock (optional)
Connecting the notebook to the dock
► Disconnect the AC adapter cable from the DC jack (DC IN) of the note book.
1
2
► Connect one
charging f
► Connect the other end of the USB cable (USB Type-C) to the USB 3.1 Gen 1 port for
data connection and power supply (USB Type-C) on the dock (2).
Fujitsu 57
end of the USB cable (USB Type-C) to the USB 3.1 Gen 1 port with
unction (USB Type-C) on the notebook (1).
Page 60

Your USB Type-C dock (optional)
Switching on the notebook via the port replicator
► Press the ON/OFF button on the dock to switch on the notebook.
Switching off notebook via dock
► Close al
l applications and then shut down your operating system (please
the manual for the operating system).
refer to
otebook cannot be shu t down properly, press the ON/OFF button on
If the n
k for approx. four second s. The notebook will switch off. However,
the doc
aved data may be lost in the process.
any uns
Disconnecting the notebook from the dock
► Disconnect the supplied USB cable (USB Type-C) from the USB 3.1 Gen
1 port (USB Type-C) on the notebook.
58 Fujitsu
Page 61

Security functions
Security functions
Securityfunctions
Your notebook has a variety of security functions that you can use to protect your
system and your personal data from unauthorized access.
This chapter explains how to use these functions, and what the benefits are.
Please remember that in some cases, for exa mple, forgetting your password,
you may be locked out of the system and unable to access your data.
Therefore, please note the following information:
• Make regular backups to external optical disks such as external hard
drives, CDs, DVDs or Blu-ray Discs.
• Some security functio
of the passwords and ke
If you forget your passwords you will need to contact our Service Desk.
Deletion or resetting of passwords are not covered by your warranty
and a charge will be m a de for assistance.
Configuring the fingerprint sensor
FingerprintsensorFingerprintsens or
Whether your device has a fingerprint sensor or not depends on the
device configuration which you ordered.
The fingerprint sensor can record the image of a fingerprint. With additional fingerprint
software, this image can be processed and used instead of a password.
ns need you to choo se passwords. Make a note
eptheminasafeplace.
► Install the fingerprint software to be able
to use the fingerprint sensor (1).
1
You can obtain further information on the fingerprint sensor in the
"appendix: Miscellaneous Information".
Fujitsu 59
Page 62

Security functions
Setting up the palm vein sensor
PalmveinsensorPalmveinsensor
The palm vein sensor can record the image of the veins on the palm of your hand. This image
is evaluated with additional software and can be used in place of a password.
Whether your device has a palm vein sensor or not depends on the
device configuration which you ordered,
► Install the s oftwar e to use the palm
vein sensor (1).
1
You can obtain further information on the palm vein sensor in the
"appendix: Miscellaneous I nformat ion".
Using the Secur
Your device comes with a Security Lock mechanism for the Kensington Lock Cable. You
can use the Kensington Lock Cable, a sturdy steel cable, to help protect your notebook
from theft. The Kensington Lock Cable is available as an accessory.
Fujitsu recommends the use of a combination lock.
ity Lock
► Fit the Ken
mechanism
KensingtonLockCableUsingthesecuritylockMechanicalsecurityAnti-theftprotection
sington Lock Cable to the
on your notebook.
K
another Kensington Lock Cable to your port replicator to protect
Attach
ort replicator from theft as well.
your p
60 Fujitsu
Page 63

Security functions
Configuring password protection in BIOS Setup Utility
Before using the various options for password protection in the BIOS Setup
Utility, please proceed as follows to increase data security:
Make a note of the passwords and keep them in a safe place. If you forget your
supervisor password you will not be able to access your notebook. Passwords are
not covered by your warranty and a charge will be made for assistance.
Passwordprotection
Yourpasswordcanbeupto
numbers. No distinction
Protecting BIOS Setup Utility (supervisor password and user password)
If you have opened these operating instructions on the screen, we recommend
that you print them out. You cannot call up the instructions on the screen
while you are setting up the password.
BIOSSetupUtility
The supervisor password and the user password both prevent unauthorized use of the BIOS
Setup Utility. The sup ervisor password allows you to access all of the functions of the BIOS Setup
Utility, while the user password will only give you access to some of the functions. You can
only set up a user password if a supervisor password has already been assigned.
Calling and using the BIOS Setup Utility is described in the chapter
Settings in BIOS Setup Utility", Page 83.
"
eight characters long and can contain letters and
is made between uppercase and lowercase.
Assigning the supervisor and user passwords
► Start the BI
► Select the Set Supervisor Password field and press the Enter key.
With Enter
► Enter the password and press the Enter key.
Confirm ne
► Enter the password again and press the Enter key.
Changes
► To set the user password, select Set User Password and proceed exactly as
when configuring the supervisor password.
If you d
► In the Exit menu, select the option Save Changes & Exit.
► Selec
word
rvisorpassword
password
Pass
Supe
User
The notebook is then rebooted and the new password comes into effect. It will now be necessary
to first enter your supervisor or user password in order to open the BIOS Setup Utility. Please
note that the user password only provides access to a few of the BIOS settings.
Fujitsu 61
OS Setup Utility and go to the Security menu.
new Password: y ou are asked to enter a password.
w Password requires you to confirm the password.
have been saved is displayed a s a confirmation that the new password has been saved.
o not want to change any other settings, you can exit BIOS Setup Utility.
t Yes and press the Enter key.
Page 64

Security functions
Changing the supervisor password or user password
You c an only change the supervisor password when you have logged into the
BIOS Setup Utility with the supervisor password.
PasswordSupervisorpasswordUserpassword
► Start the BIOS Setup Utility and go to the Security menu.
► When changing the password, p roceed exactly as when assigning a password.
Removing passwords
To remove a password (without setting a new password) perform the following steps:
PasswordSupervisorpasswordUserpassword
► Start the BIOS Setup Utility and go to the Security menu.
► Highlight the Set Supervisor Password or Set User Password field and press the Enter key.
You will be requested to enter the current password by the Enter Current Password prompt.
Enter New Password will appear and you will be requested to enter a new password.
► Press the Enter key twice at this request.
► In the Exit menu, select the option Save Changes & Exit.
► Select Yes and press the Enter key.
The notebook will now reboot with the password removed.
With the supervisor password, you simultaneo usly deactivate the user pa ssword.
Password protection for booting the operating system
With the superv
section "
also prevent b
Operatingsystem
isor password you have set in the BIOS Setup U tility (see
ning the supervisor and user passwords", Page 61), you can
Assig
ooting o f the operating system.
Activating system protection
► Start the BIOS Setup Utility and go to the Security menu.
Operatingsystem
► Select the Password on Boot option and press the Enter key.
► Select the option you require (Disabled, First Boot or Every Boot) and press the enter key
► Select the Save Changes & Exit option under Ex it.
The notebook will reboot. You will be prompted to enter your password (the supervisor password).
Deactivating system protection
► Start the BIOS Setup Utility and go to the Security menu.
Operatingsystem
► Select the Password on Boot option and press the Enter key.
► Select the Disabled option and press the Enter key.
If you do not want to change any other settings, you ca n exit BIOS Setup Utility.
► Select the Save Changes & Exit option under Ex it.
The notebook will reboot. The system is no longer password-protected .
62 Fujitsu
Page 65

Security functions
Password protection for the hard disk
If a supervisor password was set, an additional password for the hard disk
canbesetintheHard Disk Security menu.
The hard disk is protected by this password. Data on this hard disk can then only be
read in another system if the correct password is entered.
Trusted Platform Module - TPM (device dependent)
TPMTrustedPlatformModule
To use the TPM, you must enable the TPM in the BIOS Setup before the software
is installed. The condition for this is that you have assigned at least the supervisor
password (see "
Enabling TPM
• Requirement: You have assigned a supervisor password (see "Security func tions", Page 59).
► Call BIOS Setup and s
► Mark the TPM (Security Chip) Setting field and press the Enter key.
► Select the "Securi
Once you have enabled the TPM by rebooting, the Clear Security Chip menu item appears.
If the TPM was alre
TPM. With Enable
Identity Keys e
Take note that y
encrypted on t
► Select the Exi
► Press the Enter key and select Yes.
The notebook
Security functions", Page 59).
elect the Security menu.
ty Chip" "Enabled" entry to enable the TPM
ady in use, you can use Clear Security Chip to clear the holder in the
d, all secret keys (e.g. SRK - Storage Root Keys, AIK - Attestation
tc.) generated by applications are deleted.
ou can then no longer access the data you have
he holder-based keys!
t Saving Changes option in the Exit menu.
restarts and the TPM is switched on after the reboot.
Disabling TPM
• Requirement: You have assigned a supervisor password (see "Security func tions", Page 59).
► Call BIOS Setup and select the Security menu.
► Mark the TPM (Security Chip) Setting field and press the Enter key.
► Select the "Security Chip" "Disa bled" entry to deactivate the TPM.
► From the Exit menu, choose the option Exit Saving Changes.
► Press the Enter key and select Yes.
The notebook will now reboot with TPM deactivated.
Fujitsu 63
Page 66

Security functions
Smart Card reader
SecurityfunctionsSecurityfunctions
Smart Cards are not supplied as standard equipment. You can use all Smart Cards that comply with
the ISO standard 7816-1, -2 or -3. These Smart Cards are available from various manufacturers.
With t h e approp riate software you can use your Smart Card as an alternative to password
protection, but also as a digital signature, for encrypting your e-mails or for home banking.
We recommend that you always use two Smart Cards. Always keep one of the Smart Cards
inasafeplaceifyouarecarryingtheotherSmartCardwithyou.
Inserting the Smart Car
Do not use force when inserting and removing the Smart Card.
Make sure that foreign objects do not fall into the Smart Card reader.
d
► Slide the Smart Card into the Smart
Card reader with the chip facing upwards
(or downwards depending on the
device) and to the front.
64 Fujitsu
Page 67

Connecting external devices
Under all circumstances, please observe the safety notes provided in the
Important notes", Page 21 chapter before connecting or disconnecting
"
any devices to or from your notebook.
Always read the docume ntation supplied with the device you wish to connect.
Never connect or d isconnect cables during a thunderstorm.
Never pull at a cable when disconnecting it. Always grasp the plug.
With some devices such as USB devices, it is not necessary to switch off
the notebook and the device before connecting/disconnecting. For more
information about whether or not devices need to be switched off, please refer
to the documentation supplied with the external device.
Some of the external devices require special drivers (see the operating
system and external device documentation).
Connecting e xternal devices
Fujitsu 65
Page 68

Connecting external devices
Connecting an external monitor
An analog screen is con nected to the analog Video Graphics Array (VGA) monitor port, a digital
screen to the display port, or to the Digital Visual Interface - digital only (DVI-D) monitor port on the
optional port replicator or dock. The screen output is limited to a maximum of two screens at the same
time (see "
MonitorVGAsocke tMonitorportMonitorport
Key combinations", Page 36, the section on "Sw itching the setting for the screen output").
Digital display port (on the notebook or on the
optional port replicator/dock)
Analog external monitor port (VGA) (on
notebook or on optional port replicator/dock)
Digital DVI-D monitor port (on optional port
replicator)
► Switch off the notebook and the external monitor.
► Plug the data cable of th e external monitor into the monitor port.
► First s witch on the external monitor and then the notebook.
You can also switch back and forth between the external monitor and the LCD
screen of the notebook, see chapter "
Key combinations", Page 36.
You can display the same picture on the external monitor and the
notebook LCD screen simultaneously.
If you wish to operate the screen via a DVI p ort, use the port replicator
which is available as an option for your notebook.
66 Fujitsu
Page 69

Connecting e xternal devices
HDMI port
HDMIport
The HDMI port on your n otebook can be used to connect an external amplifier,
LCD TV or a plasma TV with an HDMI connection.
Depending on the device variant, your d evice may include an integ ral
HDMI port (LIFEBOOK U757 only).
► Connect the data cable to the
external device.
► Connect the data cable to the HDMI
port of the notebook.
Fujitsu 67
Page 70

Connecting external devices
Connecting USB devices
USBports
On the USB ports you can connect external devices that also have a USB port
(e.g. a DVD drive, a printer, a scanner or a modem).
USB devices are hot-pluggable. This means you can connect and disconnect the
cables of USB devices while the operating system is running.
USB 1.x has a maximum data transfer rate of 12 Mbps.
USB 2.0 has a data transfer rate of up to 480 Mbps.
USB 3.0 has a data transfer rate of up to 5 Gbps.
USB 3.1 Gen 1 has a data transfer rate of up to 5 Gbps.
USB 3.1 Gen 2 has a data transfer rate of up to 10 Gbps.
Additional information can be found in the documentation for the USB devices.
Device drive
USB devices w
► Connect the data ca
bletothe
external device.
► Connect the data cable to a USB
port of the notebook.
rs
ill be automatically recognized an d installed by your opera ting system.
68 Fujitsu
Page 71

Connecting e xternal devices
USB port with charging function (USB Type-C)
USBportwithchargingfunction(USBType-C)
At this USB (USB Type-C) port, you can charge a connected USB device or operate
devices without an additional power supply (e.g. a monitor or printer).
The USB Type-C connector is reversible and both ends of the cable are identical.
This is also possible with the notebook switched off, if the USB Type-C Power Delivery
on System Off function is activated in the Advanced - Miscellaneous Configurations menu
of the BIOS Setup Utility. Calling up and using the B IOS Setup Utility is described
in section "
Settings in BIOS Setup Utility", Page 83.
USB devices are hot-pluggable. This means you can connect and disconnect the
cables of USB devices while the operating system is running.
Additional information can be found in the documentation for the USB devices.
USB 3.1 Gen 1 has a data transfer rate of up to 5 Gbps.
USB 3.1 Gen 2 has a data transfer rate of up to 10 Gbps.
► Connect the data cable to the
external device.
+
► Connect the data cable to a USB port
(USB Type-C) on the notebook.
Fujitsu 69
Page 72

Connecting external devices
USB port with charging function (Anytime USB charge)
You can use this USB port to charge or supply power to a U SB device (e.g. to charge
a PDA or a mobile phone or to connect a USB lamp).
This is possible even when the notebook is switched off; in the BIOS-Setup-Utility in the
Advanced menu the function Anytime USB Charge must be activated. If the setting AC is selected
thereby, the device will only be charged when the AC adapter is connected.
Calling and using the BIOS-Setup-Utility is described in the sect ion "
in BIOS Setup Utility", Page 83.
USBchargingfunction
It is recommended that the notebook be operated with the AC adapter connected
whenever the USB port with charging function is in use , as this function will drain
the battery more quickly if an external USB device is being charged.
The AC adapter must already be connected when the notebook is switche d
off, as otherwise the USB charging function will be disabled and the
connected USB devices will not be charged.
Some USB devices (e.g. mobile telephony) require a driver in order to utilize the USB
charging function. In this case the USB charging function will not work when the
notebook is switched off, as no drivers are active when the notebook is switched off.
► Connect the data cable to t he
external device.
► Connect the data cable to a USB port
(Anytime USB charge) of the notebook.
Settings
How to remove USB devices correctly
Always cor
to ensure
► With the left mouse button, click on the symbol in the taskbar for safe removal of hardware.
► Select t
► Press the
70 Fujitsu
he device you wish to shut down and remove.
r the dialog box which te lls you that it is now safe to remove the device.
Wait fo
rectly remove the device according to the rules described below,
that none of your data is lost.
Enter
key.
Page 73

Connecting e xternal devices
Headset port
ConnectingaudiodevicesAudioconnectionsConne ctingheadphones
You can connect a headset, headphones or external loudspeakers to your
notebook via the headset port.
► Connect the audio cable to the
external device.
► Connect the audio cable to the headset
port on the notebook.
The inte rnal speakers are disabled.
If you buy a cable from a specialized dealer, please note the following information:
The headset port on your notebook is a "3.5 mm jack".
If you w ant to co nnect a headset, headphones or speaker, you will
need a "3.5 m m jack plug".
Fujitsu 71
Page 74

Removing and installing components
during servicing
Removing and installing compo
nents
during servicing
The illustrations shown below may differ from your actual device. They are
merely intended to clarify the principles involved.
Only q ualified technicians should repair your notebook. Unauthorized
opening or incorrect repair may greatly endanger the user (electric shock,
fire risk) and will invalidate your warranty.
Incaseofservice
Components
You m ay remove and install the components described in this chapter yourself
after consulting the Hotline/Service Desk.
If you remove and install components without consulting the Hotline/Service
Desk, then the warranty of your note book will be voided.
Notes on installing and removing boards and components
• Switch off your notebook and remove the AC plug from the power outlet.
• Always remo v e the battery.
• Take care when you use the locking mechanisms for the battery and an y other component.
• Never use sharp objects such as screwdrivers, scissors or knives as a lever to remove covers.
InstructionsBoardsESD
Boards with el
shown.
When handli
points:
• You must alw
object) be
• The equipment and tools you use must be free of static charge.
•Removeth
boards.
• Always hold boards by their edges.
• Never to
ectrostatic sensitive devices (ESD) are marked with the label
ng boards fitted with ESDs, you must always observe the following
ays discharge static build up (e.g. by touching a grounded
fore working with boards.
e AC plug from the power outlet before inserting or removing
uch connector pins or conductors on the board.
72 Fujitsu
Page 75

Removing and installing components
during servicing
Preparing to remove components
If you are going to remove or change system components, prepare for the removal as follows:
Please observe the safety information in chapter "Important notes", Page 21.
Remove the AC plug from the power outlet!
► Switch the device off.
The device must not be in energy saving mode.
► Close the LCD screen.
► Remove all the cables
from the device.
► Turn the device over and place it on a stable, flat and clean surface. If necessary, lay an
anti-slip cloth on this surface to prevent the device from being scratched.
,see"
► Remove the battery
Removing a battery", Page 44.
Removing and installing memory expansion
on
MemorymoduleMainmemoryMemoryremovalSystemexpansionSystemexpansi
If you are asked by the Hotline/Service Desk to remove or install a memory
expansion module yourself, proceed as follows:
Please observe the safety information in chapter "Important notes", Page 21.
During installation/removal of memory modules, the battery must remain
removed from the notebook and the notebook must not be connected to the
AC adapter, see "
Preparing to remove components", P age 73.
Only use memory modules that have been approved for use in your
notebook (see chapter "
Technical da ta", Page 93).
Never use force when installing or removing a memory module.
Make sure that no foreign objects fall into the memory upgrade compartment.
You must open the memory upgrade compartment to remove or install a memory
module. On some devices, it is possible that opening the compartment exposes various
components. Only authorized specialists are permitted to remove or change these
components. Therefore, be sure to observe the following:
Individual components can become very hot during operation. Therefore, we
recommend that you wait one hour after switching the notebook off before removing
or installing memory modules. Otherwise, there is a risk of suffering burns!
As some components are exposed that are sensitive to static electricity, please take
note of chapter "
Notes on installing and removing boards and components" , Page 72.
Fujitsu 73
Page 76

Removing and installing components
during servicing
Remove the cover
► Prepare for removal, see "Preparing to remove components", Page 73.
1
2
► Remove the screw (1).
Keep the screw in a safe place.
► Lift the cover off the notebook (2).
Removing a memory module
► Carefully push the two mounting
clips outwards (1).
pansion
dule
Memoryex
Memorymo
The memory module will fold upwards (2).
3
2
1
1
74 Fujitsu
► Pull the memory module out of its slot
in the direction of the arrow (3 ).
Page 77

Removing and installing components
Installing a memory module
2
1
a
Attaching the cover
during servicing
► Insert the memory module with the contacts
and the recess (a) forward in the slot (1).
MemoryexpansionMemorymodule
► Carefully push the memory module
downwards until you feel it click
into place (2).
2
1
► Place the cover in the correct location (1).
► Tighten the screw (2).
► Complete the installation, see "
Fujitsu 75
Finishing componen t removal", Page 82.
Page 78

Removing and installing components
during servicing
Installing and removing an M.2 m
LIFEBOOK U 727 and LIFEBOOK U747 are equipped with a service compartment for an M.2
module. In the LIFEBOOK U757, you can either install an M.2 module (with corresponding
M.2 adapter) or a standard hard disk (HDD, without M.2 adapter), see "
installing the hard disk (HDD, LIFEBOOK U757 only)", Page 79.
odule
Removing and
Remove the cover
1
1
2
► Remove the scre
Keep the screw
the same time,
other. If you
The screws ar
the correct
ws (1).
s in a safe place. If you are removing more than one component at
store the screws for the individual components separate from each
install the wrong screws, components may be damaged.
e not all the same length and when the cover is installed,
screws must be used.
► Lift the cover off the notebook (2).
76 Fujitsu
Page 79

Removing and installing components
during servicing
Installing the M.2 module
► LIFEBOOK U757: If relevant, insert the M.2 adapter in the service compartment.
2
1
► Position the M.2 module in the slot on the mainboard at a slight angle,
in the direction of the arrow (1).
► Secure the W.2 module in its location with the screw (2).
Removing the M.
► Loosen the screw (1).
The M.2 module folds slightly upwards.
► Pull the M.2 module out of t he slot on the mainboard in the direction of
the arrow (2) and remove it from the casing.
► LIFEBOOK U757: If you wish to install an HDD hard disk instead of another M.2 module,
remove the M.2 adapter (under the M.2 module) from the service compartment and install the
HDD, see "
Fujitsu 77
Removing and inst alling the hard disk (HDD, LIFEBOOK U757 only)", Page 79.
2 module
1
2
Page 80

Removing and installing components
Attaching the cover
2
1
during servicing
2
► Place the cover in t
► Tighten the s crews (2).
he correct location (1).
78 Fujitsu
Page 81

Removing and installing components
during servicing
Removing and installing the hard disk (HDD, LIFEBOOK U757 only)
In the LIFEBOOK U7 57, you can either install an M.2 module (with corresponding M.2 adapter, see
Installing and removing an M.2 module", Page 76) or a standard hard disk (HDD, without M.2 adapter).
"
Removing the hard disk
► Remove the cover, see "Remove the cover", Page 76.
For easier removal from the d evice, the hard disk is installed in a hard disk carrier.
2
1
1
► Pull the hard disk in the direction of the arrow (1).
► Release the connector from the hard disk (2).
► Remove the hard disk from the hard disk com partme nt.
Fujitsu 79
Page 82

Removing and installing components
during servicing
3
► Pull the hard disk out of the the hard disk carrier (3).
► If you wish to install an M.2 module instead of another HDD hard disk, release the hard disk
cable from the mainboard, place the M.2 adapter in the service compartment and install the M.2
module, see "
Removing and installing the hard disk (HDD , LIFEBOOK U757 only)", Page 79.
80 Fujitsu
Page 83

Removing and installing components
Installing a hard disk
► If relevant, remove the M.2 adapter from the service compartment.
Always insert the hard disk into the device in the relevant hard disk carrier.
1
during servicing
► Slide the hard d
► Attach the connecto r to the hard disk (2).
► Place the hard disk into the hard disk compartment (3).
► Connect the hard disk cables to the mainboard.
► Fasten the cover again, see "
Fujitsu 81
isk into the hard disk carrier (1).
2
3
3
Attaching the cover", Pa ge 78.
Page 84

Removing and installing components
during servicing
Finishing component removal
After you have removed or changed the system components as required, please
prepare your device for operation again as follows:
► Install the battery again, see "
► Turn the notebook the right way up again and place it on a flat surface.
► Reconnect the cables that were previously disconnected.
Installing a battery", Page 45.
82 Fujitsu
Page 85

Settings in BIOS Setup Utility
Settings in BIOS Setup Utility
BIOSSetupUtilitySystemsettings,BIOSSetupUtilityConfiguration,BIOSSetupUtilitySetupConfiguringsystemConfiguringhardware
The BIOS Setup Utility allows you to set the s ystem functions and the hardware
configuration for the notebook.
When a notebook is delivered, the factory default settings are effective. You can change
these settings in the menus of the BIOS Setup Utility. Any changes you make take
effect as soon as you save an d exit the BIOS Setup Utility.
The BIOS Setup Utility program contains the following menus:
About
System
Advanced
Security
Boot
Exit
Starting the BIOS Setup Utility
► Reboot the devi
BIOSSetupUtility
Depending on the setting for Fast Boot in the BIOS-Setup-Utility, the following
notification may appear on the screen during start-up:
<F2> BIOS Set
► Press the
► If a password has been assigned, enter the passw ord and press the
Displays information relating to the BIOS, processor a nd notebook
Advanced system settings
Configuration of various hardware components, such as mouse, keyboard,
processor
Password settings and security functions
Configuration of the start-up sequence
Exits the BIOS Setup Utility
ce (switch off/on or reboot the operating system).
up <F12> Boot Menu
F2
y.
ke
Enter
key.
If you have forgotten the password, contact your system administrator
or contact our customer service center.
The BIOS Setup Utility starts.
Fujitsu 83
Page 86

Settings in BIOS Setup Utility
BIOS Setup Utility operation
BIOSSetupUtility
► Use the cursor keys
► Select the option you want to change with the cursor keys
► Press the "Enter" key.
► Press the
► For future reference, make a note of the changes you have made (for example, in this manual).
Press theF1key to display help about operation of the BIOS Setup Utility. The description
of the individual settings is shown in the right-hand window of the BIOS Se tup Utility.
With the
F9
key you can load the default settings of the BIOS Setup Utility.
←
→
or
to select the menu you wish to access to make changes.
The menu is displayed on the screen.
↑
or↓.
ESC
key to exit the selected menu.
84 Fujitsu
Page 87

Settings in BIOS Setup Utility
Exiting BIOS Setup Utility
BIOSSetupUtility
You need to select the desired option in the Exit menu and activate it by pressing the Enter key:
Exit Saving Changes - save ch
► To save the current menu settings and exit the BIOS Setup U tility,selectExit Saving Changes and Yes.
The notebook is rebooted
and the new settings come into effect.
anges and exit BIOS Setup Utility
Exit Discarding Changes - Reject changes and exit BIOS Setup Utility
► To discard the changes, select Exit Discarding Changes and Yes.
The settings in place when BIOS Setup Utility was called remain effective. BIOS
Setup Utility is terminated and the notebook is rebooted.
Load Setup Defaul
► To copy the standard entries for all menus of the BIOS Setup Utility,
choose Load Setup Defaults and Yes.
ts – load default values
Discard Changes - Discard Changes without exiting BIOS Setup Utility
► To discard the changes you have made, select Discard Changes and Yes.
ThesettingsinplacewhenBIOS Setup U tility was called remain effective.
You can now make additional settings in the BIOS Setup Utility.
► If you want to exit the BIOS Setup Utility withthesesettings,selectExit Saving Changes and Yes.
Save Chan
ges - save changes without exiting
the BIOS Setup Utility
► To save the changes, select Save Changes and Yes.
The changes are saved. You can now make additional settings in the BIOS Setup Utility.
► If you want to exit BIOS Setup Utility with these settings, choose Exit Saving Changes and Yes.
Save changes and power off
► To save the changes and switch off your device, select Save Changes and Power Off and Yes.
The changes are saved. Your device is shut down.
Fujitsu 85
Page 88

Troubleshooting and tips
Troubleshooting and tips
TroubleshootingTipsFaultProblemsolving
If a fault occurs, try to correct it as described. I f you fail to correct the problem, proceed as follows:
► Make a note of the steps and the circumstances that led to t he fault. Also
make a note of any error messages displayed.
► Switch the notebook off.
► Please contact the Hotline/Service Desk.
You can contact Fujitsu Service and Support in the following ways:
• Toll free phone: 1-800-8Fujitsu (1-80 0-838-5487)
• Website: "
Before you place the call, have the following information ready so that the customer
support representative can provide you with the fastest possible solution:
• The model name and serial number of the notebook. The serial number is
located on a sticker on the underside of the notebook.
• Notes with the mess
informationonaco
• Any changes you have made to the hardware or software since
receiving the notebook.
• Any changes you h
• Your system configuration and all peripheral devices connected to your system.
• Your s ales cont
Our notebooks have been designed primarily with mobile applications in mind.
This means that considerable effort has been made to optimize components and
equipment in terms of weight, space and energy requirements. Depending on the
particular configuration you have purchased, it is possible that functionality may be
slightly reduced compared to a desktop PC if you are running processor-intensive
gaming software, e.g. games with intensive 3D graphics. Updating your hardwa re with
drivers which have not been approved by F ujitsu may result in performance losses,
data losses or malfunction of the equipment. A list of approved drivers and current
BIOS versions can be downloaded from: "
http://solu
tions.us.fujitsu.com/www/content/support/contact/index.php"
ages that appeared on the screen and
ustic signals.
ave made to the BIOS Setup settings after receiving the notebook.
ract.
http://solutions.us.fujitsu.com"
Help if problems occur
Should you encounter a problem with your computer that you cannot resolve yourself:
► Note the ID number of your device. The ID number is found on the type rating
plate on the back or underside of the casing.
► For further clarification of the problem, contact the Fujitsu Service Desk. When you do
this, please have ready the ID number and serial numbe r of your system.
In the event you need to recover your system
In the event you need to restore your original Factory Image, please refer to
the appendix of this Operating Manual.
86 Fujitsu
Page 89

Troubleshooting and tips
The notebook’s date or time is in
IncorrecttimeTimenotcorrectWr ongdate/timeDatenotcorrect
Cause Troubleshooting
Time and date are incorrect. ► With the BIOS-Setup-Utility,
Date and time are still set incorrectly after
switching on the notebook.
date and time in the Main menu.
► Please contact your sales out
hotline/service desk.
correct
you can set the
let or our
When certain c haracters are entered on the keyboard, only numerals are written
Cause Troubleshooting
The virtual number keys of your device are
activated, see "
Virtual number keys", Page 37
The notebook’s LCD s
LCDscreenBlankLCDscreen
Cause Troubleshooting
Screen is switched off.
External monitor or television set connected.
► Press the
creen remains blank
► Pressakeyortouch
► Press the key combination for changing over
the screen output, see "
Page 36.
Num
button.
the touchpad.
Key combinations",
The LCD screen of the notebook is difficult to read
LCDscreenLCDscreen
Cause Troubleshooting
Reflected glare ► Turn the notebook or alter the tilt of the LCD
screen.
► Increase the brightness of the screen.
Fujitsu 87
Page 90

Troubleshooting and tips
The external monitor remains bl
Monitor
Cause Troubleshooting
Monitor is switched off. ► Switch the external monitor on.
Power saving has been activated (monitor is
blank).
Brightness is set to dark.
Screen output is set to the notebook’s LCD
screen
The external monitor’s AC cable or data cable is
not connected properly.
The external mo
MonitorMonitor
Cause Troubleshooti
The wrong exte
or the wrong sc
the applicati
rnal monitor has been selected
reen resolution has been set for
on program.
nitor is blank or the image is unstable
► Press any key to continue.
► Adjust the brightness of the
► Press the key combination for changing over
► Switch off the external monitor and the
► Check whether the AC cable is plugged
► Check whether the data cable is properly
► Switch on the external monitor and the
► Terminate the
► Set the screen resolution: Set the screen
► Select mo
ank
the screen output, see "
Page 36.
notebook.
properly into the external monitor and into
the power outlet.
connected to the notebook and the external
monitor (if it is plugged in with a connector).
notebook.
ng
Windows by pre
error persist
use the key co
screen outpu
Page 36), in or
screen of th
Change the
resolution as described in the documentation
foryouroperatingsystem.
describe
operati
application program under
s after terminating the program,
mbination for switching the
t (see "
der to s witch to th e LCD
e notebook.
following setting:
nitor: Select monitor 1 or 2 as
d in the documentation for your
ng system.
Key combinations",
Alt+F4
ssing
Key combinations",
monitor.
.Ifthe
88 Fujitsu
Page 91

Troubleshooting and tips
The notebook does not start after switching it on
Notebook
Cause Troubleshooting
The battery is not installed correctly.
► Check whethe r the battery is installed
correctly in its compartment.
► Switch the notebook on.
The battery is dead.
► Charge the battery.
or
► Insert a charged battery.
or
► Connect the AC adapter to the notebook.
The AC adapter is not connected p ro perly. ► Check whether the AC adapter is prop erly
connected to the notebook.
► Switch the notebook on.
The notebook stops working
NotebookEnding
Cause Troubleshooting
The notebook is in energy saving mo de. ► End energy saving mode.
An application program has caused the
malfunction.
The battery is dead.
► Close the application program or restart
the notebook (by restarting the operating
system or switching the device off and back
on again).
► Charge the battery.
or
► Insert a charged battery.
or
► Connect the AC adapter to the notebook.
The printer does not print
Printerdoesnotprint
Cause Troubleshooting
The printer is not switched on. ► Make sure that the printer is switched
The printer is not connected correctly.
rinter driver is faulty or not correctly
The p
alled, or it is the wrong printer driver.
inst
Fujitsu 89
on and ready for operation (refer to the
documentation supplied with the printer).
► Check that the data cable connecting
the notebook to the printer is properly
connected.
► Chec
k whether the correct printer driver is
ed (refer to the printer d ocumentation).
load
Page 92

Troubleshooting and tips
The wireless connection to a net
Thewirelessconnectiontoanetw orkdoesnotwork
Cause Troubleshooting
The wireless component is switched off. ► Switch the wireless component on (see
The wireless component is switched on. D esp ite
this, the wireless connection to a network does
not work.
► Check whether the wireless connection is
► Further information on using the wireless
work does not work
Switching the wireless components on and
"
off", Page 49).
enabled by the softwa re.
component can be found in the help files.
Acoustic warning
Acousticwarn ingsErrors
Cause
A beep sounds every few seconds.
The battery is almost dead.
Troubleshooting
► Charge the battery.
Smart Card reader is not recognized
Cause
Smart Card inserted incorrectly. ► Make sure you have inserted your Smart
Troubleshooting
Card into the Smart Card reader with
the chip facing upwards / downwards
(device-dependent).
► Check whether t
using is suppor
comply with th
-3 and -4.
he Smart Card you are
ted. Your Smart Card m ust
e ISO standard 7816-1, -2,
Smart Card PIN forgotten
Cause
PIN forgotten ► If you are working in a network, contact your
Smart Ca
Cause
Smart Card lost. ► If you are working in a network, contact your
90 Fujitsu
rd lost
Troubleshooting
system administrator, who can unlock your
notebook with a Supervisor PIN.
Troubleshooting
system administrator, who can boot your
notebook with a Supervisor Smart Card.
Page 93

Troubleshooting and tips
Error messages on the screen
ErrormessagesonthescreenErrors
This section describes the error messages generated by the BIOS Setup. Error messages displayed
by the operating system or programs are describe d in the documentation for these programs.
If the error message appears repeatedly despite troubleshooting measures,
contact the place of purch ase or our customer service center.
Error message/cause Troubleshooting
CMOS Battery Bad
If the error message occurs repeatedly, the
back-up battery in the notebook is dead.
System CMOS checksum bad - Default configuration
used
The system configuration information is
incorrect.
Extended memory failed at offset: xxxx Failing Bits:
zzzz zzzz
When testing the extended memory. an error
has resulted at the address xxxx.
Failure Fixed Disk n
The settings of the hard disk drive are incorrect.
Keyboard controller error
Keyboard error
nn Stuck key
Operating system not found
Press <F1> to resume, <F2> to SETUP
This error message appears if an error occurs
during the self-test be fore starting the operating
system.
► Contact your sales outlet
service center.
► Switch the notebook of
► Switch the notebook on.
► Press th e function k
BIOS Setup.
► In the BIOS Setup, select the Exit menu.
► Select the entry Lo
► Select OK and press the Enter key.
► Check whether the additional memory
module has been inserted correctly.
► Start the BIOS Setup (Primary Master
submenu) and select the c orrect settings.
► Switch off the notebook with the ON/OFF
button.
► Wait 3 - 5 seconds and switch on the
notebook again.
If you use an external keyboard:
► Check the connection and reboot the
notebook.
► Make sure that no key is pressed.
► Check
in the BIOS Setup whether your hard
as been set correctly.
disk h
► Make sure that the operating system is
installed on the corresponding drive.
F1
► Press the
function key to start the
operating system.
► Press th e function key
BIOS Setup.
or our customer
f.
F2
ey
to access the
ad Setup Defaults.
F2
to access the
Fujitsu 91
Page 94

Troubleshooting and tips
Error message/cause Troubleshooting
Previous boot incomplete - Default configuration
used Default values have been set for certain
► Press the
to do so.
settings because of an error which occurred in
the previous system boot. Check the settings in
the BIOS Setup.
Real time clock error
► Contact your sales outlet or
service center.
nnnnK Shadow RAM failed a
Bits: zzzz
System battery is dead - Replace and run SETUP
t offset: xxxx Failing
► Contact your sales outlet or our customer
service center.
► Contact your sales outlet or our customer
service center.
System cache error - Cache disabled
► Contact your sales out
service center.
System timer error
► Contact your sales outlet or our customer
service center.
F1
function key when prom
our customer
let or our customer
pted
92 Fujitsu
Page 95

Technical data
Technical data
Technicaldata
LIFEBOOK
Technicaldata
Ambient conditions
Operating temperature 5 °C .... 35 °C / 41 °F .... 95 °F
Transport temperature
Dimensions
Width x Depth x Height
Weight
Main memory
Slots 2 slots 260 pin DDR4 - 2133 SO-DIMM with a total of max. 32 GB
Approved memory
modules
Display: LED backlight, Anti-glare
Size 12.5 in. (31.75 cm) 14 in. (35.56 cm) 15.6 in (39.6 cm)
HD Resolution
(optional) Non-Touch
LIFEBOOK U727 LIFEBOOK U747 LIFEBOOK U757
–15 °C .... 60 °C / 5 °F .... 140 °F
Device with LCD
screen without touch
function:
•302mmx
209 mm x
19.0 mm /
11.89” x 8.23” x
0.75”
Device with
Touchscreen:
•302mmx
209 mm x
19.6 mm /
11.89” x 8.23” x
0.77”
Device with L
screen with
CD
out touch
function:
• 1.28kg/
2.82 lbs
Device wi
Touchscr
th
een:
• 1.43kg/
3.15 lbs
Device with LCD
screen without touch
function:
•332.6mmx
234 mm x
19.0 mm /
13.09” x 9.21” x
0.75”
Device with
Touchscreen:
•332.6mmx
234 mm x 19.6
mm /
13.09” x 9.21” x
0.77”
Device with L
screen with
CD
out touch
function:
• 1.52kg/
3.35 lbs
Device wi
Touchscr
th
een:
• 1.71kg/
3.77 lbs
Device with LCD
screen w ithout touch
function:
•378mmx
256 mm x
19.2 mm /
14.88” x 10.08” x
0.76”
Device with
Touchscreen:
•378mmx
256 mm x
19.6 mm /
14.88” x 10.08” x
0.77”
Device with L
screen w ith
out touch
function:
•1.72kg/
3.79 lbs
Device wi
Touchscr
th
een:
•1.92kg/
4.23 lbs
4 GB, 8 GB or 16 GB DDR4 - 2133 SO-DIMM
1366 x 768 pixel,
500:1, 220cd/m
2
1366 x 768 pixel,
350:1, 220cd/m
2
1366 x 768 pixel,
350:1, 220cd/m
CD
2
Fujitsu 93
Page 96

Technical data
FHD Resolution
(optional) Non-Touch
FHD Resolution
(optional) Touchscreen
LIFEBOOK U727 LIFEBOOK U747 LIFEBOOK U757
1920 x 1080 pixel,
700:1, 300cd/m
1920 x 1080 pixel,
700:1, 300cd/m
2
2
1920 x 1080 pixel,
700:1, 300cd/m
1920 x 1080 pixel,
700:1, 300cd/m
2
2
1920 x 1080 pixel,
700:1, 300cd/m
1920 x 1080 pixel,
700:1, 300cd/m
2
2
The data sheet for the d evice provides further technical data. You can find the data
sheet on your device or you can download it from the Internet at "
www.fujitsu.com/us" .
WLAN specifications
Type of network Intel® Dual Band Wireless-AC 8265
Transfer rate (Automatic switchin
Active frequency • 802.11n: 2.4 GHz or 5 GHz
Typical operating distances** • 802.11a: 40 ft. (12 m) @ 54 Mbps; 300 ft.
Number of channels
11a/b/g/n/11ac), Wi-Fi ba sed*
g) IEEE802.11 a and g: 54
Mbps max. data rate; I
max. data r ate, IEEE
EEE802.11n: 300 Mbps
802.11ac: 867 Mbps max.
data rate
• 802.11b/g: 2400~2473 MHz
• 802.11a: 4900~5850 MHz
• 802.11a: 2.4 GHz / 5 GHz
(91m)@6Mbps
• 802.11ac: 40 ft. (12 m) @ 54 Mbps; 300
ft.(91 m) @ 6 Mbps
• 802.11b: 100 ft. (30 m) @ 11 Mbps; 300 ft.
(91m)@1Mbps
• 802.11g: 100 ft. (30 m) @ 54 Mbps; 300 ft.
(91m)@1Mbps
• 802.11n: Estimated double the operating
distance of 802.11g and 802.11a in their
respective frequencies
• 802.11a: 8 independent channels
• 802.11b/g: 11 channels, 3 non-o verlapping
channels
• 802.11n: Channel bonding takes two of
the non-overlapping 20MHz channe ls and
combines it into one 40MHz channel. It is
actually 12 non-overlapping channels with
channel bonding and 24 without. Also it is 1
non-overlapping channel in 2.4GHz when
channel bonding is used.
• 802.11ac: 5 independent channels
94 Fujitsu
Page 97

Technical data
Security
Encryption types: compatible with WEP, TKIP,
AES***, WPA 1.0 and WPA 2.0
Encryption key, lengths supported: 64 bits and
128 bits
Maximum recommended number of computers
10 units or less ****
to be connected over wireless LAN (during ad
hoc connection)
* “Wi-Fi based” indicate
interconnectivity of wi
** The operating distan
number of walls, reflect
*** Network key encryp
the fixed length of 24 bi
**** Depending on the
networked is reduce
s that the interconnectivity test of the organization which guarantees the
reless LANs (Wi-Fi Alliance) was passed.
ces given above increase or decrease depending on factors such as the
ing material or interference by external RF sources.
tion (WEP) occurs with the number of bits given above, after deduction of
ts the u ser may how ever also set 40 or 104 bits.
particular practical application, the number of computers which can be
d if necessary.
Rechargeable battery
For information on the batteries used in your device, please see
http://www.fujitsu.com/fts/support/".
"
LIFEBOOK U727:
3 cell rechargeable battery
45Wh
Rated voltage 10.8 V 14.4 V
Rated capacity 4170 mAh 3490 mAh
LIFEBOOK U747/U757:
4 cell rechargeable battery
50 Wh
AC adapter
ldata
Technic a
An a
Fujitsu 95
al data
Electric
Primary
Rated voltage
requency
Rated f
65 W/90 W
100 V – 240 V (automatic)
50 Hz – 6
0 Hz (automatic)
Secondary
Rated voltage 19 V
Max. rated current
3.42 A/4.7 4 A
dditional AC adapter or pow er cable can be ordered at any time.
Page 98

Manufacturer’s notes
Manufacturer’s notes
Disposal and recycling
Notes
You can find information on this subject o n your notebook or on our website
http://solutions.us.fujitsu.com/www/content/products/trade-in_program/").
("
Recycling your battery
Over time, the batteri
shorter amount of time
may want to replace the
that you dispose of th
could cause environ
Fujitsuisverycon
Rechargeable Batt
dedicated to prot
RBRC has drop-off
To find the locatio
If there are no co
Education Init
es that run your mobile computer will begin to hold a charge for a
; this is a natural occurrence for all batteries. When this occurs, you
battery with a brand new one*. If you replace it, it is important
e old ba ttery properly because batteries contain materials that
mental damage if disposed of improperly.
cerned with environmental protection, and has enlisted the services of the
ery Recycling Corporation (RBRC)**, a nonprofit public service organization
ecting our environment by recycling old batteries at no cost to you.
points at many convenient locations throughout the United States and Canada.
n nearest you, go to "
nvenient RB RC locations near you, you can also go to the EIA Consumer
iative website "
http://EIAE.org/ " and search for a convenient disposal location.
www.RBRC.org" or call 1-800-822-8837.
Remember – pro
make every eff
*Toorderane
at "
www.shop
** RBRC is an
battery rec
96 Fujitsu
tecting the environment is a cooperative effort, and you should
ort to protect it for current and future generations.
w battery for your Fujitsu mobile computer, go to the Fujitsu shopping site
fujitsu.com" in the US or "www.fujitsu.ca/products/notebooks" in Canada.
independent third party to which Fujitsu provides funding for
ycling; RBRC is in no way affiliated with Fujitsu.
Page 99

Manufacturer’s notes
DOC (Industry CANADA) Notices
DOC(INDUSTRYCANADA)NOTICES
Notice to Users of Radios and Television
This Class B digital apparatus me ets all requirements of Canadian Interference-Causing Equipment
Regulations.
CET appareil numérique de la class B respecte toutes les exigence du Réglement
sur le matérial brouilleur du Canada.
Notice to Users of the Canad ian Telephone Network
NOTICE:
This equipment meets the applicable Industry Canada Terminal Equipment Technical
Specifications. Th is is confirmed by the registration number. The abbreviation, IC, before
the registratio n number signifies that registration was performed based on a Declaration of
Conformity indicating that Industry Canada technical specifications were met. It does not
imply that Industry Canada approved the equipment. Before c onnecting this equipment to
a telephone line the user should ensure that it is permissible to connect this equipment to
the local telecommunica tion facilities. The user should be aware that compliance with the
certification standards does not prevent service degradation in some situations.
Repairs to telecommunication equipment should be made by a Canadian authorized
maintenance facility. Any repairs or alterations not expressly approved by Fujitsu or
any equipment failures may give th e telecommunication company cause to request the
user to disconnect the equipment from the telephone line.
NOTICE:
The Ringer Equivalence Number (REN) for this terminal equipment is 0.0. The REN assigned
to each terminal equipment provides an indication of the maximum number of terminals
allowed to be connected to a telephone interface. The termination on an interface may
consist of any combination of de vice s subject only to the requirement that the sum of the
Ringer Equivalence Numbers of all the devices does not exceed five.
CAUTION:
For safety, users should ensure that the electrical ground of the power u tility, the
telephone lines and the metallic wate r pipes are connected together. Users should NOT
attempt to make such c onnections them selves but should contact the appropriate electric
inspection authority or electrician. This may be particularly important in rural areas.
Avis Aux U
AVIS : L e
applica
Le sigl
confor
d’Ind
Avant
s’il e
loca
peut
Les
ntenance agréé au Canada. Toute réparation ou modification, qui n’est pas expressément
mai
tilisateurs Du Réseau Téléphon ique Canadien
présent matériel est conform e aux spécifications tech niques d’Industrie Canad a
bles au matériel terminal. Cette conformité est confirmée par le numéro d’enregistre ment.
e IC, placé devant le numéro d’enregistrement, signifie que l’enregistrement s’est effectué
mément à une déclaration de conformité et indique que les spécifications techniques
ustrie Canada ont été respectées. Il n’implique pas qu’Industrie Canada a approuvé le matériel.
de connecter cet équipement à une ligne téléphonique, l’utilisateur doit vérifier
st permis de connecter cet équipement aux installations de télécommunications
les. L’utilisateur est averti que même la conformité aux normes de certification ne
dans certains cas empêcher la dégradation du service.
réparations de l’équipement de télécommunications doivent être eVectuées par un service de
Fujitsu 97
Page 100

Manufacturer’s notes
approuvée par Fujitsu, ou toute défaillance de l’équipement peut entraîner la compagnie de
télécommunications à exiger que l’utilisateur déconnecte l’équipement de la ligne téléphonique.
AVIS : L’indice d ’équivalence de la sonnerie (IES) du présent matériel est de 0.0. L’IES
assigné à chaque dispositif terminal indique le nombre maximal de terminaux qui peuvent
être raccordés à une interface téléphonique. La terminaison d’une interface peut consister
en une combinaison quelconque de dispositifs, à la seule condition que la somme d’indices
d’équivalence de la sonnerie de tous les dispositifs n’excède pas 5.
AVERTISSEMENT :
Pour assurer la sécurité, les utilisateurs doivent vérifier que la prise de terre du service
d’électricité, les lignes télphoniques et les conduites d’eau métalliques sont connectées
ensemble. Les utilisateurs NE doivent PAS tenter d’établir ces connexions eux-mêmes,
mais doivent contacter les services d’inspection d’installations électriques appropriés
ou un électricien. Ceci peut être particulièrement important en régions rurales.
UL Notice
Important safety in
This unit requires
of 19 VDC, with a min
AC adapter label. R
structions
an AC adapter to operate. Only use UL Listed I.T.E. adapters with an output rating
imum current of 3.42A (65W). The c orrect output rating is indicated on the
efer to the illustration below for the correct AC adapter output polarity:
CAUTION:
When using your notebook equ ipment, basic safety precautions should
always be followed to reduce the risk of fire, electric shock and injury
to persons, including the following:
• Do not use this product near water for example, near a bathtub, washbowl, kitchen
sink or laundry tub, in a wet basement or near a swimming pool.
• Use only the power cord and batteries indicated in this manual.
• Do not dispose of batteries in a fire. They may explode.
• Check with local codes f or possible spe cial disposal instructions.
• SAVE THESE INSTRUCTIONS.
For Authorized Repair Technicians Only
CAUTION:
For continued protection against risk of fi re, replace only with the
same type and rating fuse.
WARNING:
Danger of explosion if Lithium (CMOS) battery is incorrectly replaced. Replace only
with the same or equivalent type recommended by the manufacturer.
Dispose of used batteries according to the manufacturer’s instruction.
98 Fujitsu
 Loading...