

Page 1

Getting Started
Get Started with your
LifeBook® T4410 Tablet PC
This guide will lead you through the start-up process for your new LifeBook Tablet PC a nd will also provide
some valuable tips. To learn about all the exciting features that your new LifeBook notebook has to offer,
please see the User’s Guide that can be accessed after completing the start-up procedure.
English * Français
Page 2
This convenient guide will lead you through the start-up
process and will also offer some valuable tips.
What’s in the Box
Check to see that all of the following items are in the box:
o LifeBook T Series Tablet PC o Restore disc
o AC adapter and power cable o Microfiber cleaning cloth
o Lithium ion battery (pre-installed) o Media may very:
o Pen-kit including one pen, five - Drivers and Applications disc
additional pen tips, and tip - Trusted Platform Module application disc
replacement tool - Microsoft-associated discs
o Warranty Terms & Conditions Booklet - Third party application disc
o Pen tether
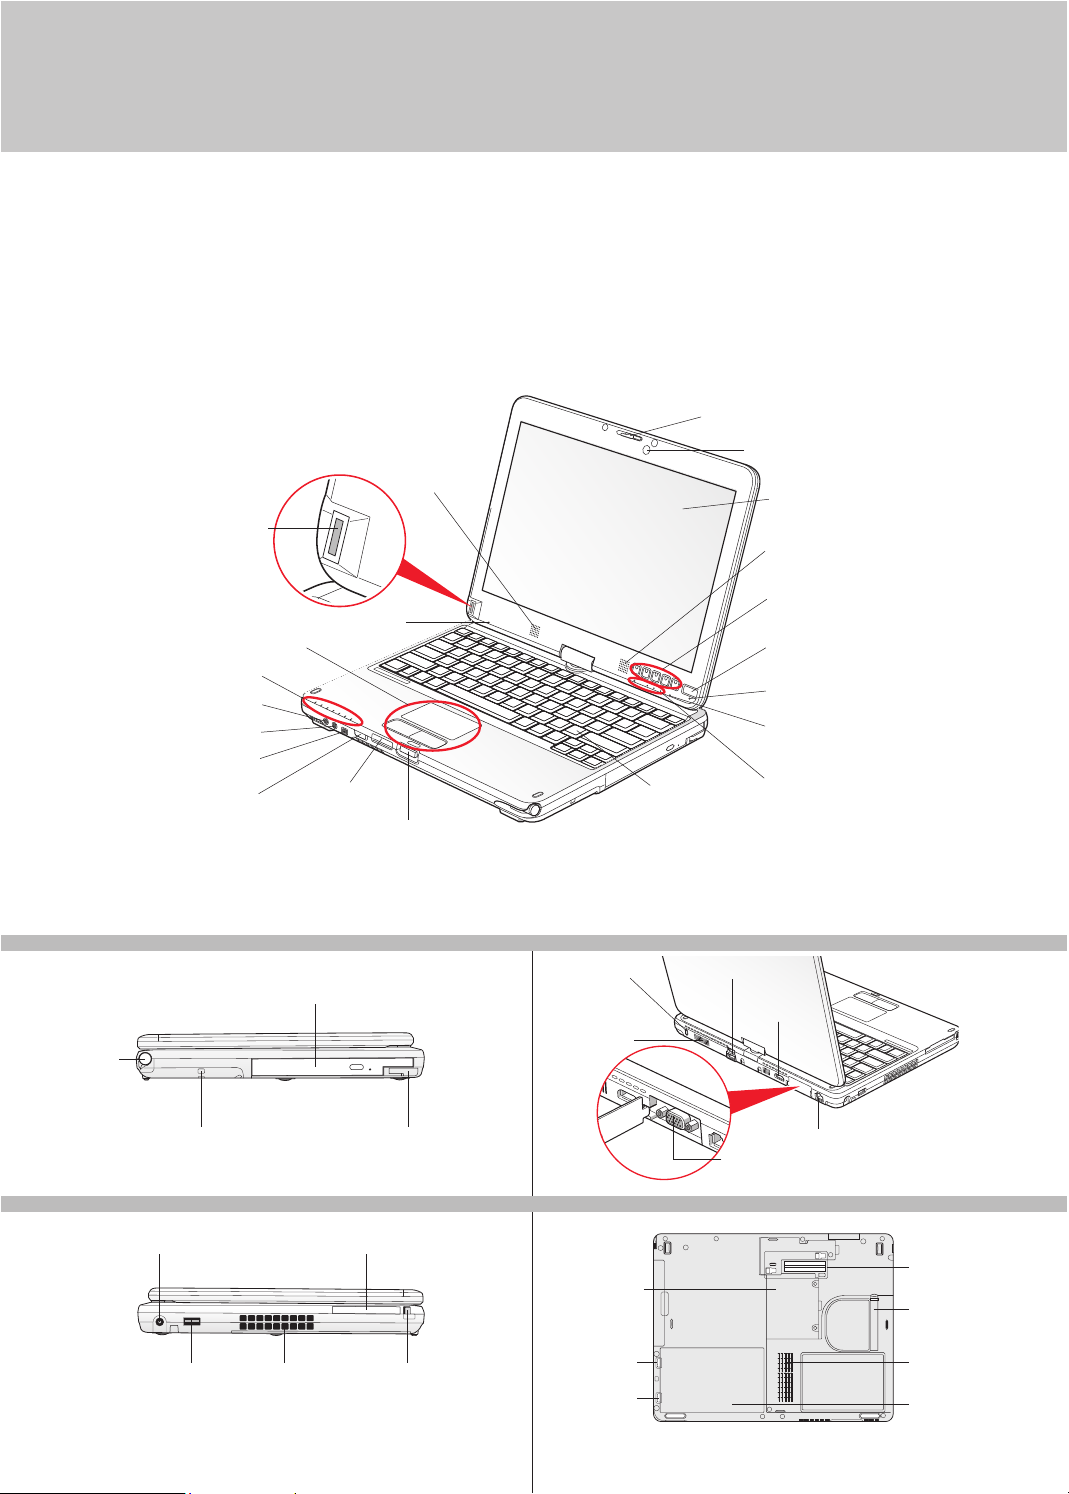
Controls, Connectors,
and Access Points
Stereo Speaker
Fingerprint Sensor
Built-in Microphone
Touchpad Cursor Control
Status Indicator Panel
Headphone Jack
Microphone Jack
IEEE 1394 Jack
Wireless LAN/Bluetooth/
WWAN On/Off Switch
* Using the Optional Capacitive Touchscreen
Certain configurations of this Tablet PC have a capacitive touchscreen with dual digitizer option. This type of display allows you to use either
the stylus or your finger(s) as a pointing device. This type of display also allows you to use “gestures” to perform such actions as scroll,
zoom, and rotate. See your User’s Guide for more details.
RIGHT PANEL BACK PANEL
Pen Garage
Memory Stick/
SD Card Slot
Modular Bay
Display Latch Button
Anti-Theft
Lock Slot
Air Vents
Keyboard
USB 2.0 Port
Display Latch
Optional Webcam
Display Panel
*(Optional Capacitive
Touchscreen)
Stereo Speaker
LifeBook Security/
Tablet PC Buttons
Power Suspend/
Resume Button
Ambient Light Sensor
Built-in Microphone
Status Indicator Panel
HDMI Port
Pen Tether Attachment Point
LEFT PANEL
USB 2.0 Port Air Vents ExpressCard Eject Button
2
Modular Bay Release Latch
ExpressCard SlotDC Power Jack
*No modem on systems with WWAN device
BOTTOM PANEL
Memory Upgrade
Compartment
Battery Latch
Battery Latch
Gigabit LAN (RJ-45) Jack
External Video Port
Port Replicator
Connector
Removeable
Dust Filter
Air Vents
Lithium ion
Battery Bay
Page 3

Initial Start Up
Rotating
Display
AC Adapter
Top Latch
Bottom
Latch
DC Power Jack
Lid
Display Side
1. Open the Display Panel
• Ensure that your LifeBook is on a hard level surface and that the
air vents are not blocked.
• Lift the display.
• Adjust the display until it is at a comfortable viewing angle.
To avoid possible dama ge to your compute r, be sure
the disp lay pane l is perp endic ular to th e keyboa rd
before rota ting it.
Caution
2. Convert from Notebook to Tablet
• Open your notebook and lift the display so it is perpendicular to
the keyboard.
• Rotate the display 180 degrees (either direction).
• Carefully fold the display down onto the keyboard.
• Push the latch down toward the display.
• Reverse this procedure to return to the notebook configuration.
Be sure to rotate the display in the opposite direction.
3. Connect AC Power
• Plug the power cord into the AC adapter.
• Plug the AC adapter into your notebook.
• Connect the power cord to an electrical outlet.
4. Connect to Internet or Network
• Move the wireless switch to “On” to turn on the wireless device.
• Connect an Ethernet cable (not supplied) to the LAN jack on
your notebook and to a wall jack or to Ethernet router.
5. Turn on Power
• Slide the Power/Suspend/Resume switch.
• The notebook is now on and the battery is being charged.
•
The notebook will begin a power-on self test. Once
successfully completed, the operating system will begin
the initialization process.
LAN Connector
Power/Suspend/
Resume Button
WLAN/Bluetooth/
WWAN Switch
The Lit hium io n battery is not c harge d upon pu rchase.
Initia lly you will need to c onnec t eithe r the AC adapter
or the Auto/Air line ad apter to use yo ur noteb ook.
6. Register
For Genuine Windows Vista®:
• Accept the Microsoft
Fujitsu End User License Agreement to proceed. Select your User
ID and Password during the “Welcome Screen.” Keep a record of
your User ID and password stored in a secure place. THE SCREEN
WILL GO DARK FOR APPROXIMATELY TWO MINUTES. Do not
attempt to turn power on or off during this stage.
• Register your LifeBook with Fujitsu Service and Support
via our website (us.fujitsu.com/computers). This helps
us to better serve you.
For Microsoft
• After the operating system has initialized, the Windows Welcome
screen will appear. Accept the Microsoft
Agreement and the Fujitsu End User License Agreement
to proceed.
• Follow the on-screen directions as prompted. Accepting the
automatic update feature is recommended.
• If connected, you will be able to automatically access the Internet.
If you are not connected and plan to register at a later time,
click the Skip button.
• Once connected to the Internet, select Yes to continue registration,
complete requested information, and click Next to complete
registration.
• Register your notebook with Fujitsu by going to our website at:
us.fujitsu.com/computers. Ensure you are connected to
the Internet.
For Genuine Microsoft
• After the operating system has initialized, accept the Microsoft
Windows
®
Licensing Agreement and the Fujitsu End User License
Agreement to proceed. Then enter the information as prompted
to personalize your notebook.
®
Windows® Licensing Agreement and the
®
Windows® 7
®
®
Windows® Licensing
Windows® XP Tablet PC:
®
3
Page 4
7. Activate Additional Utilities & Drivers
• Check to be sure the WLAN switch is on. The Pen and touch
functions will not be calibrated until ClickMe! is activated. Ensure
that the AC adapter is connected and supplying power to your
notebook before activating ClickMe! It will take 25 to 30 minutes
for ClickMe! to install and confi gure your drivers and utilities.
For Genuine Windows Vista
• In addition to an icon on the desktop, a dialog box will automatically
®
and Microsoft® Windows® 7
open that prompts you to run Click Me!. If you choose not run
ClickMe! at this time, the ClickMe! icon will appear on your
desktop. When you click the Click Me! icon, your system will
automatically build the icon tray in the bottom right of the
screen. These icons provide links to utilities that you will
frequently access.
For Genuine Microsoft
• Please refer to your Genuine Windows
®
Windows® XP Tablet PC:
®
XP Drivers Installation
fl yer the fi rst time that you power-on your system.
8. Create backup media with MyRecovery
(HDD recovery models only)
• Click on the [MyRecovery] icon to create backup recovery media
and application discs.
• Look in the “Saving and Recovering Your Factory and
System Images” guide for more detailed instructions.
9. User’s Guide
•
Your electronic User’s Guide contains important detailed information
about your new computer. You can access your User’s Guide by
selecting its icon from the screen desktop.
• The Fujitsu Installer should automatically launch. If it doesn’t,
you will need to fi nd the Setup.exe fi le on the Recovery disc’s
root folder.
• If you are using Genuine Windows Vista
User Account Control (UAC) box.
• Click [Continue].
• Select “I Agree” and click [Continue] in the License Agreement box.
• Select “User’s Guide” from the “Utilities/Applications” category.
• Click [Install Selected Subsystems].
• The User’s Guide will be copied to your hard drive in the
C:\Fujitsu\Manual directory. Shortcuts to the User’s Guide
will be placed on your desktop and in the Start menu.
®
, click [Allow] in the
(For
Addition al
Utilitie s)
“Click Me! ”
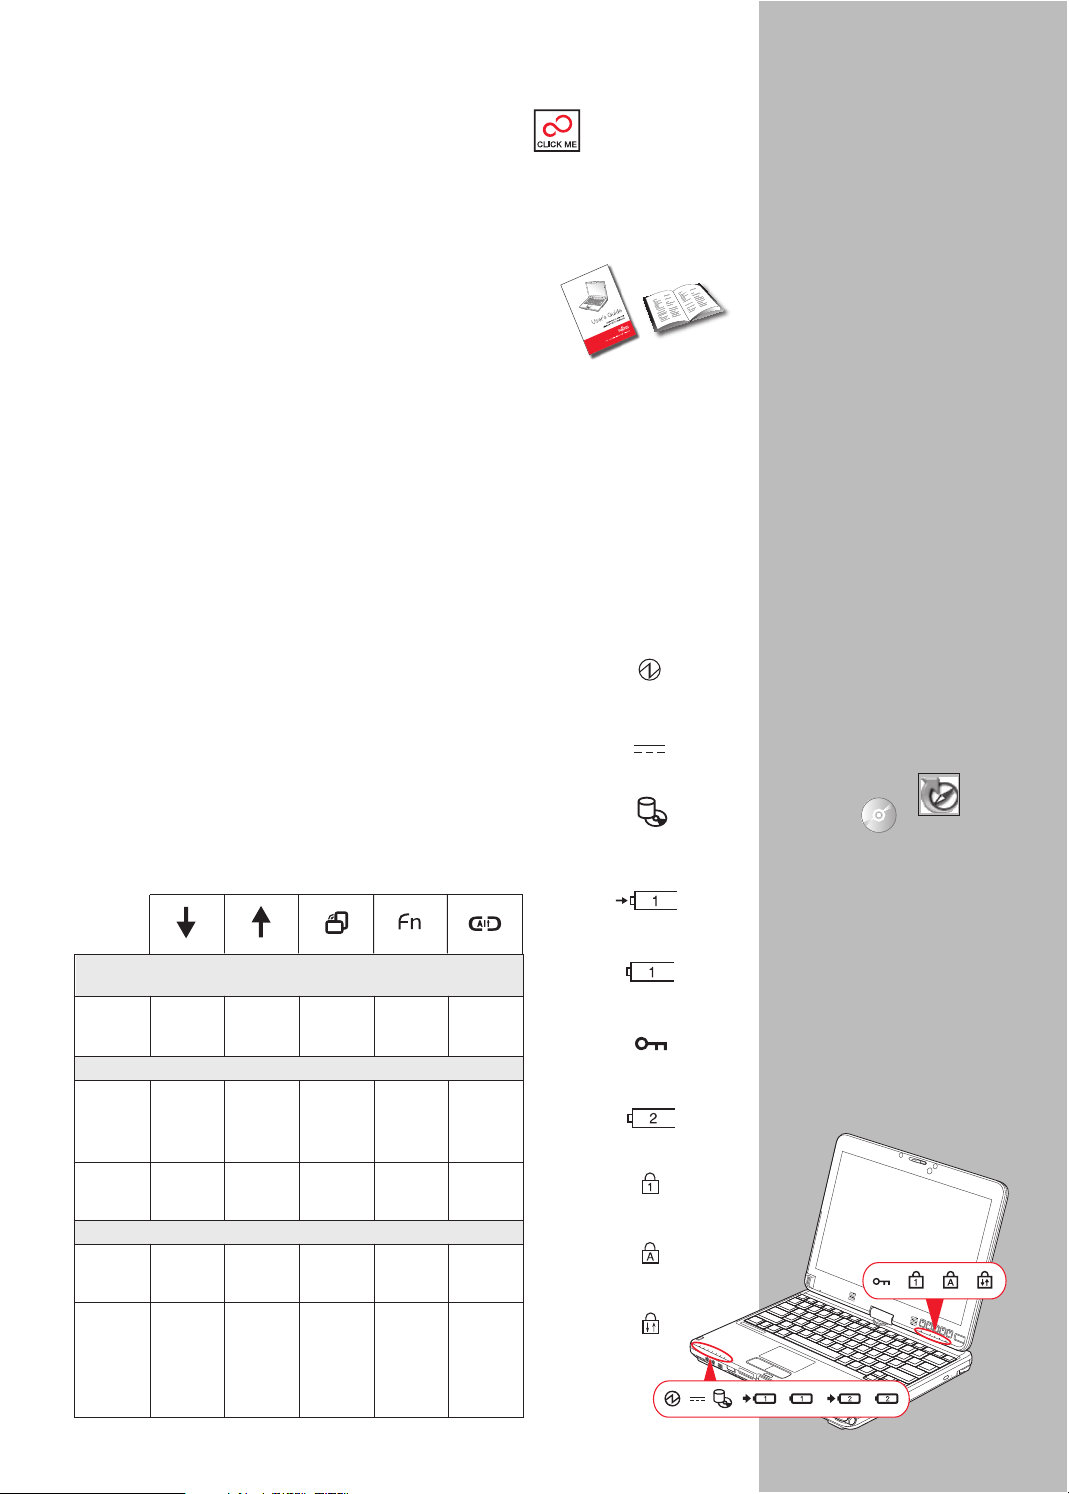
Common
Indicators
Status Indicators
Top of keyboard
LED Indicators
Button Icon and Name
(Primary)
External Power
Optical/Hard
Drive Access
Batter y 1 Charging
Power
LifeBook Security/
Tablet PC Buttons
The fi ve secur ity/Tablet PC buttons
are located on the bottom righthand side of the display whe n
it is confi gured to be used
as a notebook.
• Security functions: All ve buttons
are used when implementing
security functions. Four of the
buttons are used to enter the
password, and the fi fth is used
as an Enter button.
• Tablet PC functions: The Tablet
PC buttons have a number of
functions, depending upon the
state of the system: pre-logon
state or post-logon state.
•
The system is pre-logon when
the Windows logon screen is
displayed; the system is post-logon
when the W indows desktop is
displayed. All ve of the buttons
have primary functions. Several of
the buttons also have secondary
functions when used as application
buttons and are activated by pressing
the Function (Fn ) button while
pressing the application button.
In post logon, the se condary func-
tions of the Application A and B
buttons can be changed to launch
any application. See User’s Guide
for more information about using
the Security/Application Buttons.
Drivers
To fi nd the latest drivers, rightclick the FDU icon ( located in the
Start Menu, System Tray, or on
the Desktop) and sele ct “update”,
or download them at us.fujitsu.
com/computers.
(FDU )
Security Panel Button Functions
System State: pre-boot or resuming from suspend
Security Security Security Security Security
Button 1 Button 2 Button 3 Button 4
Button
System State: pre-logon (Windows logon screen is displayed)
Tablet PC <Tab> <Enter> Rotate Used to
Function Screen start Button
second
function
Secondary <Shift> <Escape> None None None
Functions <Tab>
(Fn+ Button)
Primary Page Page Screen Secondary
Tablet PC Down up Rotation Function Button
Function Selection
Secondary User- User- Display Fujitsu None
Functions defi ned Defi ned Switching Menu
(FN + Button)
(Default = (Default = 2. CRT only
Calculator) MS Journal) 3. Dual
Display
System State: post-logon (Windows desktop is displayed)
App A App B 1. LED only Utility
Entry
Ctl+ALT+Del
Ctl+Alt+ Del
4
Batter y 1 Level
Security Indicator
Batter y 2 Level
NumLk
CapsLk
ScrLk
Page 5

SAVE THESE INSTRUCTIONS
IMPORTANT SAFETY INSTRUCTIONS
This unit requires an AC adapter to operate. Use only UL Listed I.T.E. Class II Adapters with an output rating of 19 VDC,
with a current of 4.22 A (80 W).
AC adapter output polarity:
When using your notebook equipment, basic safety precautions should always be followed to reduce the risk of fire, electric
shock and injury to persons, including the following:
• CAUTION - HOT SURFACE: The bottom of this notebook computer can become hot when used for long periods
of time. When using this notebook, take caution to limit long term or continuous use while resting it on exposed
skin, such as the lap.
• Do not use this product near water for example, near a bathtub, washbowl, kitchen sink or laundry tub, in a wet
basement or near a swimming pool.
• Avoid using a modem during an electrical storm. There may be a remote risk of electric shock from lightning.
• Do not use a modem to report a gas leak in the vicinity of the leak.
• Use only the power cord and bat teries indicated in this manual. Do not dispose of batteries in a fire. They may
explode. Check with local codes for possible special disposal instructions.
To reduce the risk of re, use only No. 26 AWG or larger UL Listed or CSA Certied Telecommunication Line Cord.
•
For TV tuner use: To protect from overvoltages and transients on the Cable Distribution System, make sure that the outer
shield of the coa xial cable is connected to earth (grounded) at the building premise as close to the point of cable entrance
as practicable, as required per NEC Article 820.93, ANSI/NFPA 70: 2005. If you have questions about your CATV
installation, contact your service provider.
Warning
Caution
For Authorized Repair Technicians Only
• DANGER OF EXPLOSION IF LITHIUM (CLOCK) BATTERY IS INCORRECTLY REPLACED. REPLACE ONLY
WITH THE SAME OR EQUIVALENT TYPE RECOMMENDED BY THE MANUFACTURER. DISPOSE
OF USED BATTERIES ACCORDING TO THE MANUFACTURER’S INSTRUCTION.
• FOR CONTINUED PROTECTION AGAINST RISK OF FIRE, REPLACE ONLY WITH THE SAME TYPE
AND RATING FUSE.
Recycling your battery
• Over time, the batteries that run your mobile computer will begin to hold a charge for a shorter amount of
time; this is a natural occurrence for all batteries. When this occurs, you may want to replace the bat tery
with a fresh one*. If you replace it, it is important that you dispose of the old battery properly because
batteries contain materials that could cause environmental damage if disposed of improperly.
Fujitsu is very concerned with environmental protection, and has enlisted the services of the Rechargeable
Battery Recycling Corporation (RBRC)**, a non-prot public service organization dedicated to protecting
our environment by recycling old batteries at no cost to you.
RBRC has drop-off points at tens of thousands of locations throughout the United States and Canada. To nd the
location nearest you, go to www.RBRC.org or call 1- 800-822-8837. If there are no convenient RBRC locations
near you, you can also go to the EIA Consumer Education Initiative website (http://EIAE.org/ ) and search for a
convenient disposal location. Remember—protecting the environment is a cooperative effort, and you should
make every ef fort to protect it for current and future generations.
* To order a new battery for your Fujitsu mobile computer, go to the Fujitsu shopping site at
www.shopfujitsu.com in the US or www.fujitsu.ca/ products /notebooks in Canada.
** RBRC is an independent third party to which Fujitsu provides funding for battery recycling;
RBRC is in no way afliated with Fujitsu.
5
Page 6

Notes:
6
Page 7

Popular Accessories
Memory Modules
• 1 GB DDR3 1066 MHz SO-DIMM
• 2 GB DDR3 1066 MHz SO-DIMM
Additional Lithium ion batteries
• Standard main battery
• High Capacity Main Batter y
Auto/airline adapter
Additional AC adapter
Battery Charger with AC Adapter
External USB DVD/CD-RW Combo Drive
External USB DVD+RW Drive
Battery Charging Station with Adapter Kit
Carrying cases
• Duo Travel Bag
• Protégé Case
• Director Leather case
• Two-piece Slip Case
• Executive Leather Por tfolio
• Convertible Bumpcase
• Diplomat Nylon case
• Woman’s Professional Shoulder Bag
Notebook Guardian lock
USB Optical Mouse
Screen Protector (Compatible with
active digitizer configuration)
Have questions or need help?
• Visit our website at us.fujitsu.com/computers
• Call us anytime at 1.800.8FUJITSU
• Email us at 8fujitsu@us.fujitsu.com
Want more information on Fujitsu products?
• Visit our website at www.shopfujitsu.com
• Call us anytime at 1.800.FUJITSU
Fujitsu extended service plans available.
Visit us.fujitsu.com/computers
to purchase any of these accessories
or to get more information.
Record your notebook serial number here:
Serial #___ ___ ___ ___ ___ ___ ____
(see bottom of computer)
Fujitsu America, Inc.
1250 E. Arques Avenue
Sunnyvale, CA 94085
Fujit su, the Fujit su logo, and LifeBoo k are reg iste red tr adema rks of Fujit su Limi ted.
Micro soft and Win dows are regi stere d trademar ks of Microso ft Co rpor ation.
All ot her tr adema rks mentio ned he rein ar e the pro perty of t heir re spec tive
owner s. Product de scri ption data re presents F ujit su des ign obj ecti ves and is
provi ded for c omparati ve purpose s; act ual result s may vary ba sed on a
vari ety of f actors. Spec ification s are su bject t o chan ge wit hout notic e.
©2009 Fu jits u America, Inc. All r ight s reserved.
7
Page 8

Ce guide pratique vous explique comment mettre
en marche votre nouvel ordinateur et vous offre quelques conseils utiles.
Contenu de la boîte
Assurez-vous que les articles suivants sont bien inclus dans la boîte :
o PC Tablette LifeBook Série T o Disque de restauration
o Adaptateur secteur et cordon d’alimentation o Lingette de nettoyage en microfibres
o Batterie au lithium (pré-installée) o Les supports peuvent varier :
o Kit stylo comprenant un stylo, cinq - Disque de pilotes et d’applications
pointes de stylos supplémentaires, avec - CD d’applications Trusted Platform Module
outil de remplacement de pointe - Disques complémentaires Microsoft
o Livret de conditions et conventions de garantie - Disque d’applications tierces
o Cordon du stylo
Clavier
Loquet de l’écran
Webcam en option
Écran
* (écran tactile
capacitif en option)
Haut-parleur stéréo
Boutons de sécurité/
PC Tablette LifeBook
Bouton d’alimentation/
veille/reprise
Capteur de lumière ambiante
Microphone intégré
Tableau de voyants d’état
Commandes, connecteurs et points d’accès
Capteur d’empreintes
Tableau de voyants d’état
Prise d’écouteurs
Commutateur marche/
arrêt pour réseau local sans fil/
Bluetooth/réseau étendu
digitales
Commande du curseur
Touchpad
Prise de micro
Prise IEEE 1394
Microphone intégré
Fente pour carte
MemoryStick/SD
Haut-parleur
stéréo
Loquet de l’écran
* Utilisation de l’écran tactile capacitif en option
Certaines configurations de ce PC Tablette offrent un écran tactile capacitif avec numériseur double en option. Ce type d’écran permet d’utiliser
soit le stylo inclus, soit le bout de vos doigts comme dispositif de pointage. Ce type d’écran permet également d’utiliser des « mouvements » pour
exécuter diverses opérations, notamment pour défiler, zoomer et pivoter. Pour plus de détails, consultez le guide d’utilisation.
CÔTÉ DROIT ARRIÈRE
Support
de stylo
Baie modulaire
Fente pour
dispositif
antivol
Grilles de
ventilation
Port USB 2.0
Port HDMI
Point d’attache du cordon
du stylo
CÔTÉ GAUCHE
Prise d’alimentation c.c.
Port USB 2.0 Grilles de
8
ventilation
Bouton d’ouverture de la
baie modulaire
Fente pour carte
ExpressCard
Bouton d’éjection de
carte ExpressCard
Prise de réseau local Gigabit (RJ-45)
Port vidéo externe
*Aucun modem n’est installé sur les modèles avec carte de réseau étendu.
DESSOUS
Compartiment
de mémoire
supplémentaire
Loquet de la
batterie
Loquet de la
batterie
Connecteur
pour duplicateur
de ports
Filtre anti-poussière amovible
Grilles de
ventilation
Compartiment de
batterie au lithium
Page 9

Démarrage initial
Couvercle
1. Ouverture de l’écran
• Assurez-vous que votre LifeBook est posé sur une surface plane et
ferme et que les grilles de ventilation sont dégagées.
• Soulevez l’écran.
• Ajustez l’écran pour obtenir un angle de vue confortable.
Pour évi ter d’endom mager votre ordin ateur, assurez-vous
que l’écran est perpendic ulaire a u clavie r avant de le
Attention
faire piv oter.
Pivoter
l’écran
Adaptateur secteur
Connecteur de
réseau local
Commutateur pour réseau
local sans fil/Bluetooth/
réseau étendu sans fil
Loquet
supérieur
Loquet
inférieur
Prise d’alimentation c.c.
Bouton d’alimentation/
veille/reprise
Côté écran
2. Conversion de la configuration
portable à la configuration tablette
• Ouvrez votre ordinateur portable et relevez l’écran pour qu’il soit
perpendiculaire au clavier.
• Faites tourner l’écran sur 180 degrés (dans n’importe quel sens).
• Abaissez doucement l’écran en direction du clavier.
• Abaissez le loquet vers l’écran.
• Inversez cette procédure lorsque vous désirez retrouver la configura-
tion portable classique. N’oubliez pas de faire tourner l’écran dans le
sens inverse.
3. Branchement de l’ordinateur sur
l’alimentation secteur
• Branchez le cordon d’alimentation sur l’adaptateur secteur.
• Branchez l’adaptateur secteur sur l’ordinateur.
• Branchez le cordon d’alimentation sur une prise électrique.
4. Connexion à Internet ou à un réseau
• Placez le commutateur de communications sans fil sur la position «
Marche » pour que l’ordinateur soit prêt.
• Branchez le câble Ethernet (non inclus) sur la prise de réseau
local de votre ordinateur, puis sur une prise murale ou sur un routeur
Ethernet.
5. Allumez l’ordinateur
• Glissez l’interrupteur d’alimentation/veille/reprise.
• L’ordinateur démarre et la batterie se charge.
•
L’ordinateur exécute un autotest de mise sous tension. Lorsque l’autotest est terminé, le système débute la procédure
d’amorçage.
Lorsqu e vous rec evez votre no uvel ordinateu r, la batteri e
au lithi um n’est pas ch argée. Lors de la pre mière utilisat ion
de votre ord inateur, vous devez con necter l’adaptateur
secteur o u l’adaptate ur auto /avion.
6. Enregistrement
Si votre ordinateur fonctionne avec Windows Vista® d’origine :
• Acceptez le contrat de licence Microsoft® Windows® et le contrat de
licence d’utilisation Fujitsu pour poursuivre. Lorsque l’écran « Bienvenue » apparaît, sélectionnez votre nom d’utilisateur et votre mot de
passe. Gardez votre nom d’utilisateur et votre mot de passe en lieu sûr.
L’ÉCRAN SE VIDERA PENDANT ENVIRON DEUX MINUTES. N’essayez
pas d’allumer ou d’éteindre l’ordinateur pendant cette phase.
• Enregistrez votre LifeBook auprès du Service clientèle et assis-
tance Fujitsu via notre site internet (us.fujitsu.com/computers) .
Nous serons ainsi mieux en mesure de vous aider.
Si votre ordinateur fonctionne avec Microsoft® Windows® 7 :
• Une fois la procédure d’initialisation terminée, l’écran de bienvenue
Windows apparaît. Acceptez le contrat de licence Microsoft
®
dows
et le contrat de licence d’utilisation Fujitsu pour poursuivre.
• Suivez les instructions à l’écran. Il est recommandé d’accepter la
fonctionnalité de mise à jour automatique.
• Si votre ordinateur est raccordé à Internet, vous y aurez accès automatiquement. Dans le cas contraire, ou si vous envisagez de vous y
raccorder ultérieurement, cliquez sur le bouton [Sauter].
• Une fois le raccordement effectué, cliquez sur [Oui] pour conti-
nuer l’enregistrement,saisissez les informations demandées puis
cliquez sur [Suivant] pour terminer l’enregistrement.
• Enregistrez votre ordinateur auprès de Fujitsu par l’intermédiaire de
notre site : us.fujitsu.com/computers. Assurez-vous d’être connecté à
Internet.
Si vous avez Microsoft® Windows® XP Édition Tablet PC d’origine :
• Une fois l’initialisation du système d’exploitation entamée, acceptez le
contrat de licence Microsoft
lisation Fujitsu pour poursuivre. Saisissez les informations demandées
pour personnaliser votre ordinateur.
®
Windows® et le contrat de licence d’uti-
®
Win-
9
Page 10

7. Activation des pilotes et utilitaires
supplémentaires
• Assurez-vous que le commutateur de réseau sans fi l est en position
de marche. Le stylo et les fonctions de touches ne sont pas étalonnés
tant que ClickMe! n’est pas activé. Avant d’activer ClickMe!,
assurez-vous que l’adaptateur secteur est sous tension et connecté
à votre ordinateur portable. Il faudra environ 25-30 minutes pour que ClickMe!
puisse installer et confi gurer vos pilotes et vos utilitaires.
Si votre ordinateur fonctionne avec Windows Vista®
ou Windows® 7 d’origine :
• Une icône apparaîtra sur votre bureau, ainsi qu’une boîte de dialogue
automatiquement et vous demandera d’exécuter Click Me! Si vous décidez
de ne pas exécuter Click Me!, l’icône demeurera sur votre bureau pour une
installation future. Lorsque vous cliquez sur l’icône Click Me!, votre système
confi gure automatiquement la barre d’icônes dans le coin inférieur droit de
l’écran. Ces icônes offrent des liaisons avec des utilitaires susceptibles d’être
utilisés fréquemment.
qui s’ouvrira
Si vous avez Microsoft® Windows® XP Édition Tablet PC d’origine :
Avant de mettre votre système sous tension pour la première fois, veuillez lire la
•
feuille indiquant comment installer les pilotes Windows
®
XP d’origine.
8. Créez des copies de sécurité avec
MyRecovery (modèles pourvus de
la fonction de sauvegarde de disque
dur uniquement)
• Cliquez sur l’icône [MyRecovery] pour créer des copies de sécurité sur
disques et des disques d’applications.
• Pour de plus amples informations, consultez le guide traitant de la
« Sauvegarde et de la restauration des images d’origine et de système ».
9. Guide d’utilisation
•
Votre guide d’utilisation électronique contient des informations importantes
à propos de votre nouvel ordinateur. Pour y accéder, sélectionnez l’icône
« Guide d’utilisation » sur le bureau (l’écran).
• L’assistant d’installation devrait alors se lancer automatiquement. Dans le
cas contraire, vous devrez trouver le fi chier Setup.exe dans le dossier racine
du disque de restauration.
• Si vous utilisez Windows Vista
de la boîte « Contrôle du compte d’utilisateur ».
• Cliquez sur [Continuer].
• Sélectionnez « J’accepte » et cliquez sur le bouton [Continuer] de la boîte «
Contrat de licence ».
• Sélectionnez « Guide d’utilisation » dans la catégorie « Utilitaires/Applications ».
• Cliquez sur [Installer les sous-systèmes sélectionnés].
• Le guide d’utilisation sera alors copié sur votre disque dur, dans le réper-
toire C:\Fujitsu\Manual directory. Vous pourrez ensuite créer des raccourcis
sur votre bureau et dans le menu Démarrer pour accéder directement au
guide d’utilisation.
(état du système : pré-démarrage ou reprise après veille)
Bouton de Bouton de Bouton de Bouton de Bouton
Sécurité 1 Sécurité 2 Sécurité 3 Sécurité 4
Sécurité
PC Tablette <Tab> <Entrée> Rotation Utilité
Fonction Écran démarrer bouton
seconde
fonction
Secondaire <Maj> <Échap> Aucune Aucune Aucune
Fonctions <Tab>
[Fn + Bouton]
État du système : Post-démarrage (bureau Windows af fi ché)
Primaire Page Page Écran Secondaire
PC Tablette bas haut Rotation Fonction bouton
Fonctions Sélection
Secondaire Application A Application B Écran Fujitsu Aucune
fonction utilisateur- utilisateur- Commutation Menu
[Fn+ Bouton]
(Défaut = (Défaut = 2. CRT
Calculateur) Journal MS) 3. Affi chage mixte
Fonctions des boutons de sécurité
État du système : Pré-démarrage
(écran d’identifi cation Windows affi ché)
défi nie défi nie 1. ACL uniquement Utilitaire
10
®
d’origine, cliquez sur le bouton [Permettre]
Entrée
Ctrl+Alt+Suppr
Ctrl+Alt+Suppr
uniquement
(Pour le s
utilita ires supplément aires)
« Click Me! »
de
Voyants
principaux
Voyants d’état
Haut du clavier
Voyants lumineux
Icône et nom des bou-
tons (primaires)
Alimentation
Alimentation ex terne
Accès au disque
dur/optique
Batterie 1 charge
en cours
Batterie 1 niveau
de charge
Voyant de sécurité
Batterie 2 niveau
de charge
Verr num
Verr maj
Verr défi l
Boutons de
sécurité/
PC Tablette LifeBook
Cinq boutons de sécurité /application
tablet te sont situés sur le côté inférieur
droit de l’écran lorsqu’il est confi guré
pour une utilisation en ordinateur
portable classique.
• Fonctions de sécurité : Les cinq
boutons sont utilisés pour l’activation des fonctions de sécurité.
Quatre des boutons sont utilisés
pour entrer un mot de passe et le
cinquième sert de bouton Entrée.
• Fonctions PC Tablette : Les boutons du PC Tablette ont différentes
fonctions selon l’état du système :
état de pré- ou de post-connexion.
Le système est en pré-connexion
•
lorsque l’écran de connexion Windows est af fi ché, et en post-connexion lorsque le bureau Windows
est af ché. Les cinq boutons ont
une fonction principale. Plusieurs
boutons ont également une fonction
secondaire lorsqu’ils sont utilisés
dans le cadre d’une application et activés
en garda nt l’un d’eux enfoncé et en
sur le bouton de fonction
appuyant
(Fn). Les fonctions secondaires des
boutons d’application A et B peuvent
être remplacées par n’impor te quelle
autre fonction. Consultez le Guide
d’utilisation pour de plus amples
informations sur la façon d’utiliser les
boutons de sécurité et d’application.
Pilotes
Pour repérer les plus récents
pilotes, faites un clic droit sur
l’icône FDU (située dans le
menu Démarrer, dans la zone de
noti cation, ou sur le bureau),
puis sélectionnez « Mise à jour »
; ou téléchargez-les à partir de
us.fujitsu.com/computers.
(FDU )
Page 11

CONSERVEZ CES INSTRUCTIONS
CONSIGNES DE SÉCURITÉ IMPORTANTES
Pour fonctionner, cet appareil nécessite un adaptateur secteur. Utilisez uniquement un adaptateur de classe 2 homologué UL
avec une sortie nominale de 19 V c.c. et un courant de 4,22 A (80 W).
Polarité de sortie de l’adaptateur secteur :
Pendant l’utilisation de l’ordinateur portable, observez toujours les consignes de sécurité élémentaires ci-après an de réduire
au minimum le risque d’incendie, d’électrocution ou d’autres blessures. D’autre part :
• ATTENTION - SURFACE CHAUDE : Le dessous de cet ordinateur peut s’échauffer lorsque l’appareil est utilisé
pendant une longue période. Lorsque vous utilisez cet ordinateur et qu’il repose à même la peau (sur les jambes
nues), prenez garde à ne pas l’utiliser pendant trop longtemps ou de manière continue.
• N’utilisez pas ce produit à proximité d’un point d’eau (baignoire, lavabo, évier de cuisine, évier de buanderie) ni
dans un sous-sol humide ou à côté d’une piscine.
• Durant un orage électrique, évitez d’utiliser le modem. Il existe de faibles risques que la foudre cause une électro-
cution.
• N’utilisez pas le modem pour signaler une fuite de gaz s’il est situé à proximité de la fuite.
• Utilisez uniquement le cordon d’alimentation et les piles recommandés dans ce manuel. Ne jetez pas les piles ou
les batteries dans un feu. Elles risquent d’exploser. Vérifiez si la réglementation locale comporte des instructions
spéciales d’élimination.
Pour réduire les risques d’incendie, utilisez uniquement un cordon d’alimentation pour télécommunications de
•
grosseur 26 AWG ou plus, avec homologation UL ou CSA.
Si l’appareil est utilisé à titre de récepteur de télévision : Si vous utilisez un système de câblodistribution, protégez-vous contre
les surtensions et les ondes transitoires en vous assurant que la gaine extérieure du câble co-axial est reliée à la terre dans
le bâtiment, aussi près que possible du point d’entrée du câble, conformément à l’article 820.93 du code électrique des
États-Unis et à la norme ANSI/NFPA 70 : 2005. Si vous avez des questions concernant votre installation de câblodistribution,
contactez votre câblodistributeur.
Avis réservé à des réparateurs qualifiés
• IL Y A RISQUE D’EXPLOSION SI LA BATTERIE AU LITHIUM (HORLOGE) N’EST PAS
REMPLACÉE CORRECTEMENT. LA BATTERIE DOIT ÊTRE REMPLACÉE UNIQUEMENT PAR
UNE BATTERIE IDENTIQUE OU D’UN TYPE ÉQUIVALENT RECOMMANDÉ PAR LE FABRICANT.
Avertissement
JETEZ LES BATTERIES USAGEES CONFORMEMENT AUX INSTRUCTIONS DU FABRICANT.
• POUR UNE PROTECTION PERMANENTE CONTRE LES RISQUES D’INCENDIE, REMPLACEZ
LES FUSIBLES PAR DES FUSIBLES DE MÊME TYPE ET DE MÊME CAPACITÉ.
Attention
Recyclage de la batterie
• Avec le temps, l’autonomie des batteries qui alimentent votre ordinateur portable finira par diminuer ;
c’est un phénomène naturel pour toutes les batteries. Lorsque vous remarquerez cela, songez à installer
une batterie neuve*. Si vous remplacez votre ancienne batterie, il est important que vous la jetiez comme
il convient car, dans le cas contraire, les matériaux qu’elle contient risquent de nuire à l’environnement.
Chez Fujitsu, nous portons une attention particulière à la protection de l’environnement et nous collaborons
donc avec la Rechargeable Battery Recycle Corporation (RBRC*), une organisation de service public à but
non lucratif qui s’engage dans la protection de l’environnement en recyclant les batteries et piles usagées
sans aucun frais pour vous.
La RBRC dispose de dizaines de milliers de points de collecte aux États-Unis et au Canada. Pour trouver
le lieu de collecte le plus proche de chez vous, visitez www.RBRC.org ou appelez au 1-800-822-8837. Si
aucun des lieux proposés par la RBRC ne vous convient, vous pouvez en chercher un autre en visitant le
site internet de la Consumer Education Initiative (Initiative pour l’éducation des consommateurs) de l’EIA à
http://EIAE.org/. Rappelez-vous que la protection de l’environnement est l’affaire de tous, vous devriez donc
faire tout votre possible afin d’y contribuer, pour la génération actuelle et les générations suivantes.
* Pour commander une nouvelle batterie compatible avec votre ordinateur portable Fujitsu, visitez le site
www.shopfujitsu.com si vous résidez aux États-Unis ou www.fujitsu.ca/products/notebooks si vous résidez
au Canada.
** La RBRC est une organisation indépendante dont Fujitsu nance une partie des activités de recyclage ;
la RBRC n’est en aucune façon afliée à Fujitsu.
11
Page 12

Accessoires préférés
des utilisateurs
Modules de mémoire
• SO-DIMM DDR3 1066 MHz de 1 Go
• SO-DIMM DDR3 1066 MHz de 2 Go
Batteries au lithium supplémentaires
• Batterie principale standard
• Batterie principale grande capacité
Adaptateur auto/avion
Adaptateur secteur supplémentaire
Chargeur de batterie avec adaptateur secteur
Lecteur mixte USB de DVD/CD-RW
Lecteur externe USB de DVD+RW
Chargeur de batterie avec adaptateur
Mallettes de transport
• Sac de voyage Duo
• Malette renforcée
• Malette de directeur en cuir
• Malette en deux éléments
• Portefeuille en cuir Affaires
• Malette renforcée convertible
• Malette en nylon Diplomate
• Sac à bandoulière de travail pour femme
Antivol Guardian™
Souris optique USB
Protecteur d’écran (compatible avec
configuration de numériseur actif)
Questions ? Besoin d’aide ?
• Visitez notre site à us.fujitsu.com/computers
• Appelez-nous en tout temps au
1.800.8FUJITSU
• Envoyez-nous un courriel à
8fujitsu@us.fujitsu.com
Vous voulez en savoir davantage sur les
produits Fujitsu?
• Visitez notre site Internet www.shopfujitsu.com
• Appelez-nous en tout temps au
1.800.FUJITSU
Des programmes de garantie prolongée Fujitsu
sont disponibles.
Pour obtenir de plus amples informations
ou pour acheter des accessoires,
allez sur us.fujitsu.com/computers.
12
Notez ici le numéro de série de votre ordinateur :
N° de série__ ___ ___ ___ ___ ___ ___ __
(voir sous l’ordinateur)
Fujitsu America, Inc.
1250 E. Arques Avenue
Sunnyvale, CA 94085
Fujit su, le logo Fuji tsu et LifeB ook son t des marques d éposées de F ujit su Limi ted.
Micro soft et Wind ows so nt des m arque s déposées d e Micro soft Corporation.
Toutes le s autres mar ques de comme rce men tionnées d ans le p résen t document
sont la p ropriété de l eur dét ente ur resp ectif. Les inf ormations de desc ription de pr oduit
correspon dent à des obje ctif s de concept ion de Fujits u. Elles sont of fertes un iquement
à titr e indic atif. Les résu ltat s réels peuvent var ier en fonct ion d’un e grande var iété de
facte urs. Les spéc ifica tion s sont su jettes à mod ifica tion s ans préavis.
© 2009 Fuj itsu America, In c. Tous droi ts rés ervés.
 Loading...