

Page 1
A Displ ay SideBottom L atch
B Displ ay SideTop Latch
LifeBook Security/
Tablet PC Buttons
Pleas e refe r to Table 1
The five securit y/Tablet PC
buttons are located on the
bottom right-hand side of the
display when it is configured
to be used as a notebook.
Securit y functions: All five
buttons are used when implementing
security functions. Four of the
buttons are used to enter the
password, and the fif th is used
as an Enter button.
Tablet PC funct ions: The Tablet
PC buttons have a number of
functions, depending upon the
state of the system: pre-logon
state or post-logon state.
The system is pre-logon when the
Windows logon screen is displayed;
the system is post-logon when the
Windows desktop is displayed.
All five of the buttons have primary
functions. Several of the buttons
also have secondary functions
(see chart) when used as
applic ation buttons and are
activated by pressing the Function
(Fn) button while pressing the
applic ation button. In post logon,
the secondar y functions of the
Application A and B buttons
can be changed to launch any
applic ation. Se e User’s Guide for
more information about using the
Security/Application Buttons.
CLICK ME
Table 1
LED Indicators
Button Ico n and Name
(Primar y)
Power
External Power
Optical/Hard
Drive Access
Batter y 1 Charging
Batter y 1 Level
Batter y 2 Charging
Batter y 2 Level
NumLk
CapsLk
ScrLk
Security
Drivers
Look for the latest drivers on
the Drivers and Applications
CD. Right-click the FDU icon
and select “update”, or go to
us.fujitsu.com/compute rs.
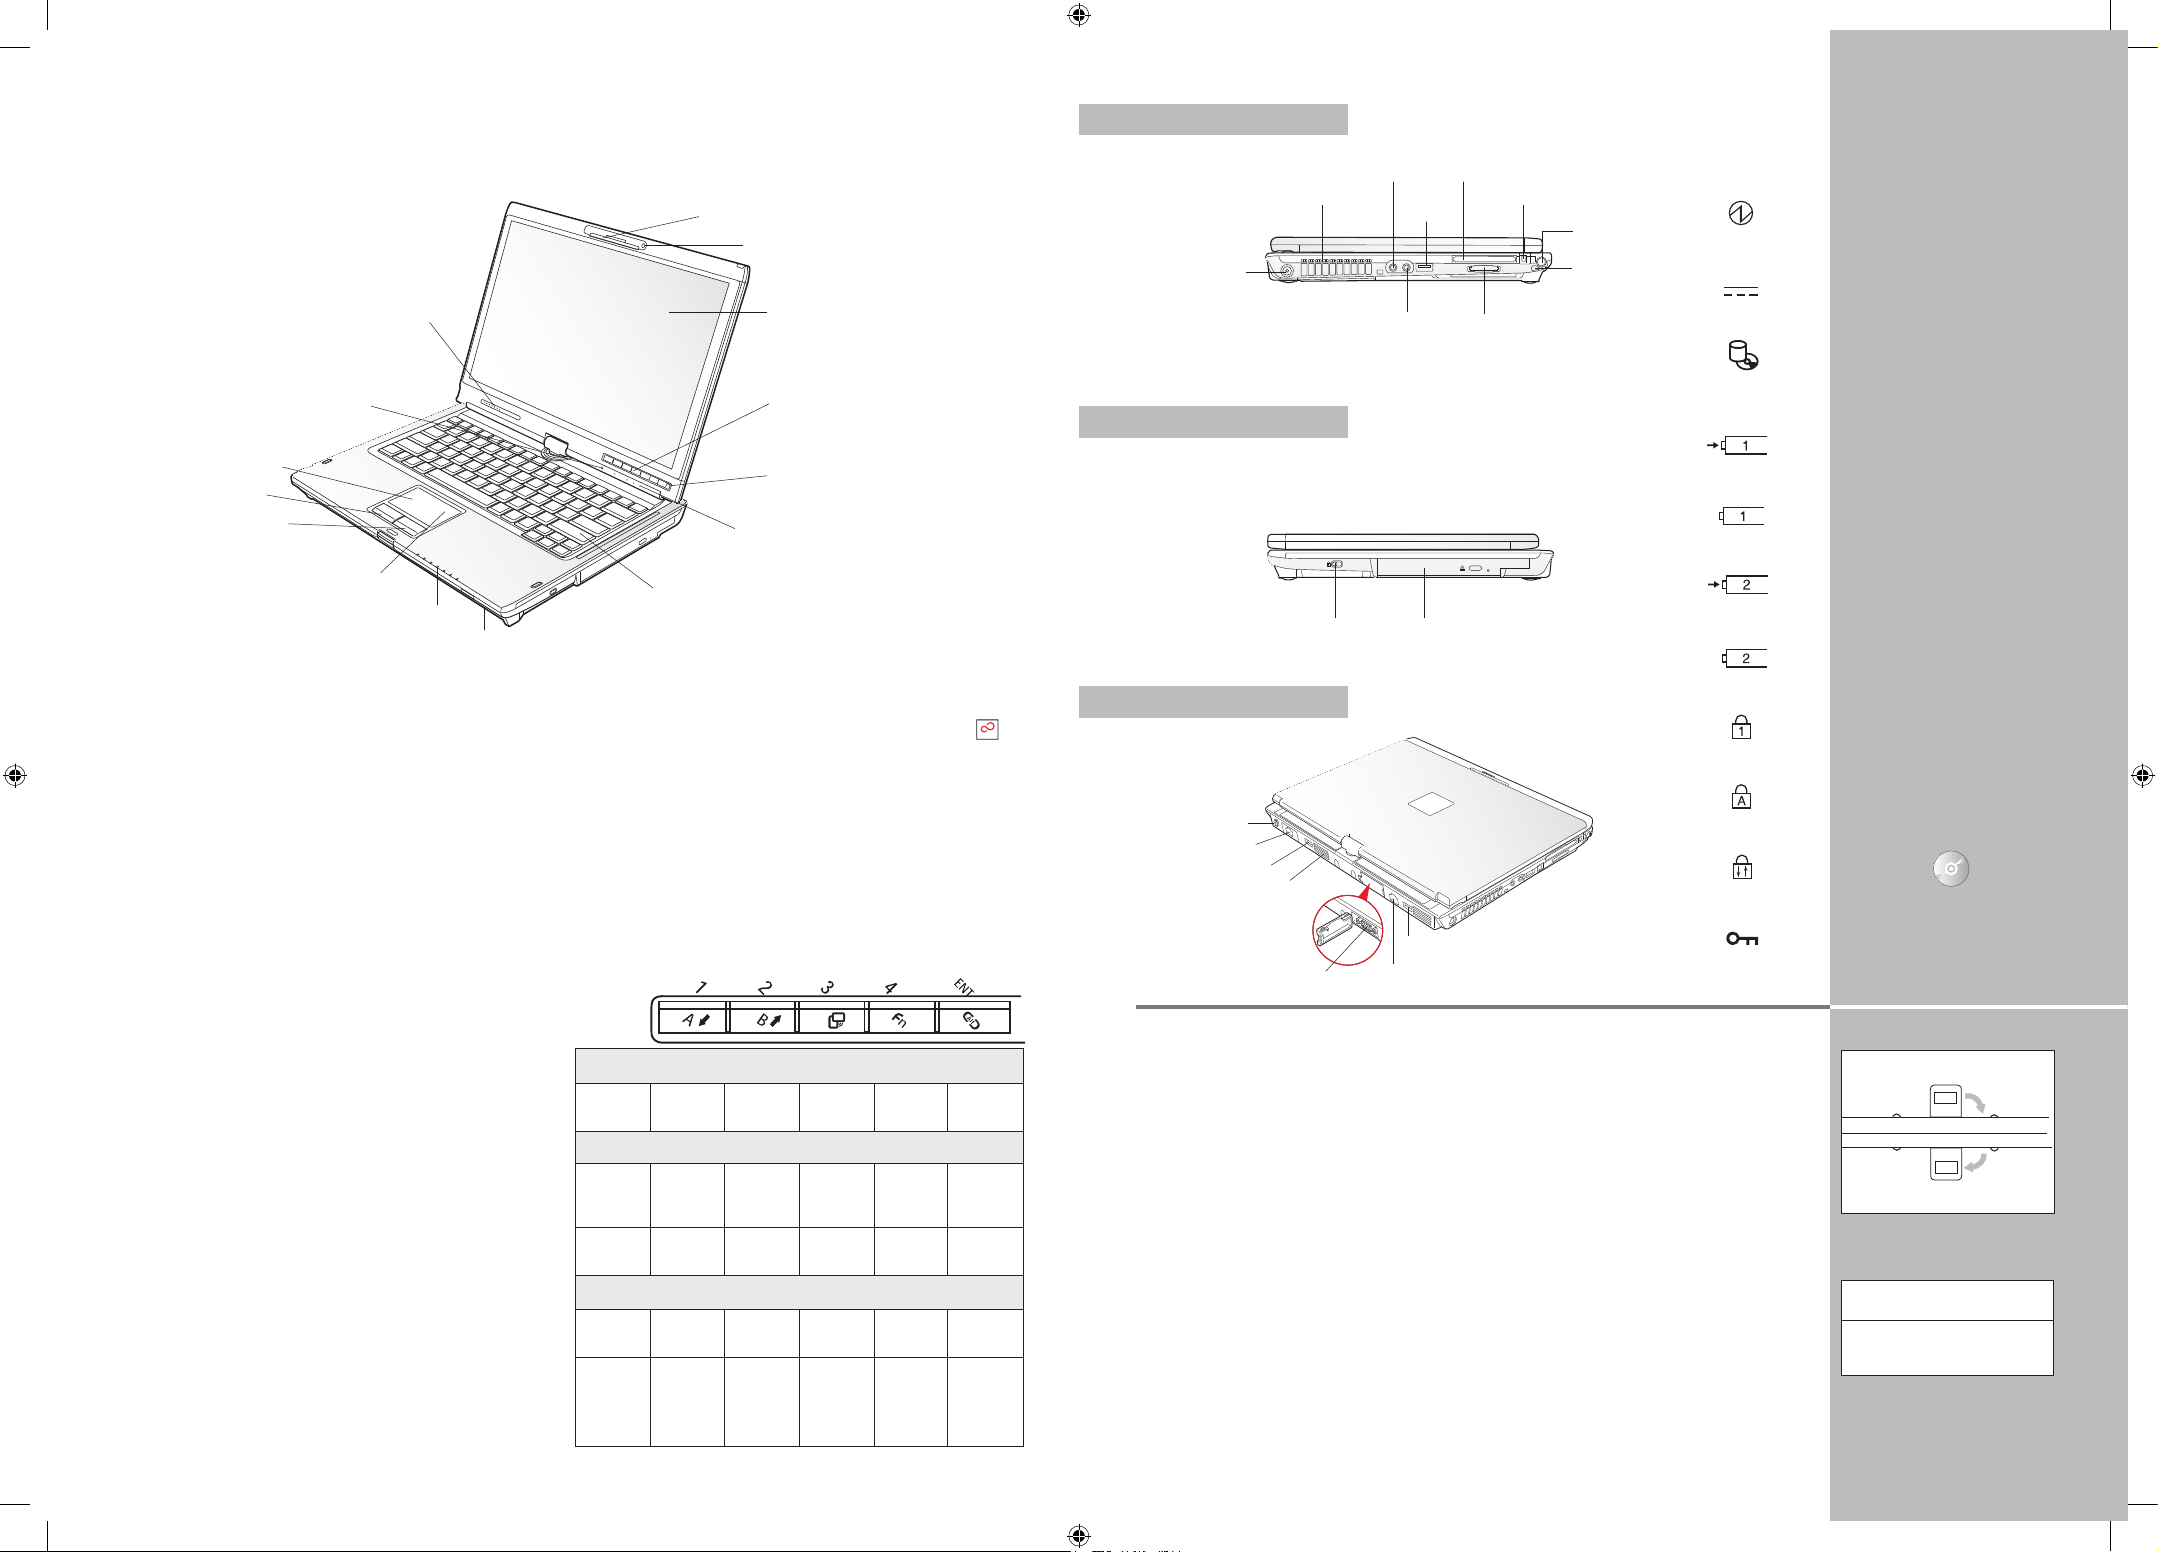
LEFT PANEL
RIGHT PANEL
BACK PANEL
4. Installing Click Me!
Check to be sure the wireless device switch is on.•
For Genuine Microsoft® Windows® XP Tablet PC: The first time
you boot up your system, you will see an icon called Click Me!
in the Start menu.
For Genuine Windows Vista®: In addition to an icon on the
desktop, a dialog box will automatically open that prompts
you to run Click Me!. Please proceed with ClickMe! to
complete the system initial installation.
When you click the Click Me! icon, your system will automatically •
build the icon tray in the bottom right of the screen. These icons
provide links to utilities that you will frequently access.
5. Register Your Tablet PC
Register your Tablet PC with Fujitsu Service and Support
via our website ( us.fujitsu.com/computers) .
1. What’s in the Box
Check to see that all of the following are in the box:
m LifeBook T Series Tablet PC
m AC adapter and power cable
m
Lithium ion battery (pre-installed )
m Drivers and Application CD
m
Warranty Terms & Conditions Booklet
2. Turn on Your Tablet PC
Plug the AC adapter into your Tablet PC.•
Plug the power cord into the AC adapter.•
Connect the power cord to an electrical outlet.•
Connect phone cord or Ethernet cable to your •
Tablet PC and to a wall jack.
Press the Suspend/Resume switch to turn on the Tablet PC.•
The Tablet PC is now on and the battery is being charged.•
The Tablet PC will begin a power-on self test.•
Once the self test is successfully completed, the operating •
system will begin the initialization process.
3. Register
For Genuine Microsoft® Windows® XP Tablet PC: After the operating
system has initialized, accept the Microsoft® Windows® Licensing
Agreement and the Fujitsu End User License Agreement to proceed.
Then enter the information as prompted to personalize your notebook
and configure your modem* to dial.
For Genuine Windows Vista®: Accept the Microsof t® Windows®
Licensing Agreement and the Fujitsu End User License Agreement
to proceed. Select your User ID and Password during the “Welcome
Screen.” Keep a record of your User ID and password stored in a
secure place. THE SCREEN WILL GO DARK FOR APPROXIMATELY
TWO MINUTES. Do not attempt to turn power on or off
during this stage.
Getting started with your new Fujitsu
LifeBook® T1010 Tablet PC
This convenient guide will lead you through the start-up process in eight easy steps and will also offer some valuable tips.
Touchpad Cursor Control
Left Button
Right Button
Scroll Strip
Status Indicator Panel
Keyboard
Status Indicator Panel
6. Convert from Notebook
to Tablet
Lift the display until it is perpendicular to •
the keyboard.
Carefully rotate the display clockwise or counter •
clockwise until it is facing backwards.
Holding the top edge of the display panel, push •
it down until it is nearly on top of the keyboard.
Push the display latch down (the latch will pivot •
clockwise ). The top latch disappears, and the
bottom latch appears (A).
Holding the latch down, gently push down on •
the display until the latch engages.
To return to a notebook configuration, press the •
latch release button, and raise the screen until
it is perpendicular to the keyboard. Be sure to
turn the display in the direction indicated by the
display rotation light and push the display latch
so it faces forward ( B).
7. Installing Additional
Software
Load the Drivers and Applications disc to check •
for the latest versions of pre-installed drivers and
applications. Install additional applications not
pre-installed on your system, such as CyberLink
Power Director and Make Disc (on select models).
8. Additional instructions
for WWAN (Wireless
Wide Area Network)
model
If your system comes with a built-in Mobile •
Broadband module, please follow the
installation and activation instructions,
which are included in a separate package
with your LifeBook Tablet PC.
Wireless Device On/Off Switch
Power Suspend/Resume
Switch
LifeBook Security/Tablet PC
Buttons
Display Panel
Optional Webcam
Display Latch
Built-in Microphone
Pen Tether
Attachment
Point
Pen Garage
Air Vents PC Card Slot Eject Button
DC Power Jack
USB 2.0
Port
Headphone Jack Memory Stick/
SD Card Slot
Microphone Jack PC Card Slot
Anti-Theft Lock Slot
Anti-Theft Lock Slot
Optical Drive
Air Vents
USB 2.0 Port
USB 2.0 Port
Gigabit LAN (RJ-45) JackExternal Video Port
Modem (RJ-11) Jack
m
Microsoft associated discs
m Pen tether
m Restore disc
m
Microfiber Cleaning Cloth
m
Third party application discs
If you have : You will nee d to install
the fol lowing s oft ware :
Dual-Layer CyberLink
Multi-Format Power Director
DVD Wri ter and Mak e Disc
Scroll Sensor
(for Tablet Mode)
* Wireless WAN model does not come with modem.
Security Panel Button Functions
(System State—pre-boot or resuming from suspend)
Security Security Security Security S ecurity
Butt on 1 Button 2 Butt on 3 Button 4
Enter
Button
Pre-logon Tablet PC Button Functions
(System State – pre-logon (Windows logon screen is displayed)
Notebook <Tab> < Enter > R otate Us ed to Ct l+A lt+Del
Function Screen invoke But ton
secondary
funct ion
Secondary <Shif t> <Esc ape> None None None
Functions <Tab >
(Fn + Butt on)
Post-logon Tablet PC Button Functions
(System State – pre-logon (Windows logon screen is displayed)
Primar y Page Page Rotate Seconda ry Ctl+Al t+ Del
Noteb ook Down up Screen function Button
Function Selection
Secon dary User- User- Display Fujitsu None
Funct ions defi ned Defined Switch ing: Menu
(Fn + Butt on) Applic ation App lication 1. LED o nly Ut ility
A (Def ault = B (Default = 2. CRT on ly
Calcula tor) MS Jour nal) 3. Dual
Display
GSG_T1010_SenecaLC.indd 1-2 8/20/08 4:00:59 PM
Page 2

Getting Started
Get Started with your
LifeBook® T1010 Tablet PC
Popular Accessories
Docking Options
Port replicator•
Memory Options
1 GB SDRAM, DDR3 1066 MHz•
2 GB SDRAM, DDR3 1066 MHz•
Power Options
AC adapter with US cord•
Main battery•
Auto airline adapter•
Battery charger w/AC adapter•
Carrying Cases
Director leather carrying case•
Diplomat carrying case•
Executive Leather Por tfolio•
Convertible Bumpcase•
Modella Plus Backpack•
Input Devices
Replacement stylus set (2 pack)•
USB optical mouse•
Additional Accessories
Notebook guardian lock•
4-in-1 PC Card Adapter•
Logitech wireless keyboard and mouse•
Screen Protector (6 pack)•
Deluxe Stylus Tether•
Fujitsu extended service plans available.
Visit us.fujitsu.com/computers
to purchase any of these accessories
or to get more information.
Have questions or need help?
•
Visit our website at us.fujitsu.com/computers
•Callusanytimeat1.800.8FUJITSU
•Emailusat8fujitsu@us.fujitsu.com
WantmoreinformationonFujitsuproducts?
•Visitourwebsiteatwww.shopfujitsu.com
•Callusanytimeat1.800.FUJITSU
Record your notebook serial number here:
Serial #___ ___ _____ ___ ___ ___ __
(see bottom of computer)
Fujitsu Computer Systems Corporation
1250 E. Arques Avenue M/S 122
Sunnyvale, CA 94085
Fujit su, the Fujit su logo, and Li feBoo k are reg istered tra demarks of Fujit su Limi ted.
Micro soft, Wind ows and Windo ws Vis ta are regist ered tradem arks of Micro soft
Corp orat ion. All o ther t rademark s ment ioned h erein are the p roper ty of their
respe ctive owne rs. Pro duct de scriptio n data re presents F ujit su des ign obj ecti ves
and is pr ovide d for compar ative p urposes ; actu al resu lts may var y base d on a
vari ety of f actors. Specific ation s are subject t o chan ge wit hout notice.
©2008 Fu jits u Computer Sy stems Corp oration. Al l right s reserve d.
GSG_T1010_SenecaLC.indd 3-4 8/20/08 4:00:59 PM
 Loading...