

Page 1
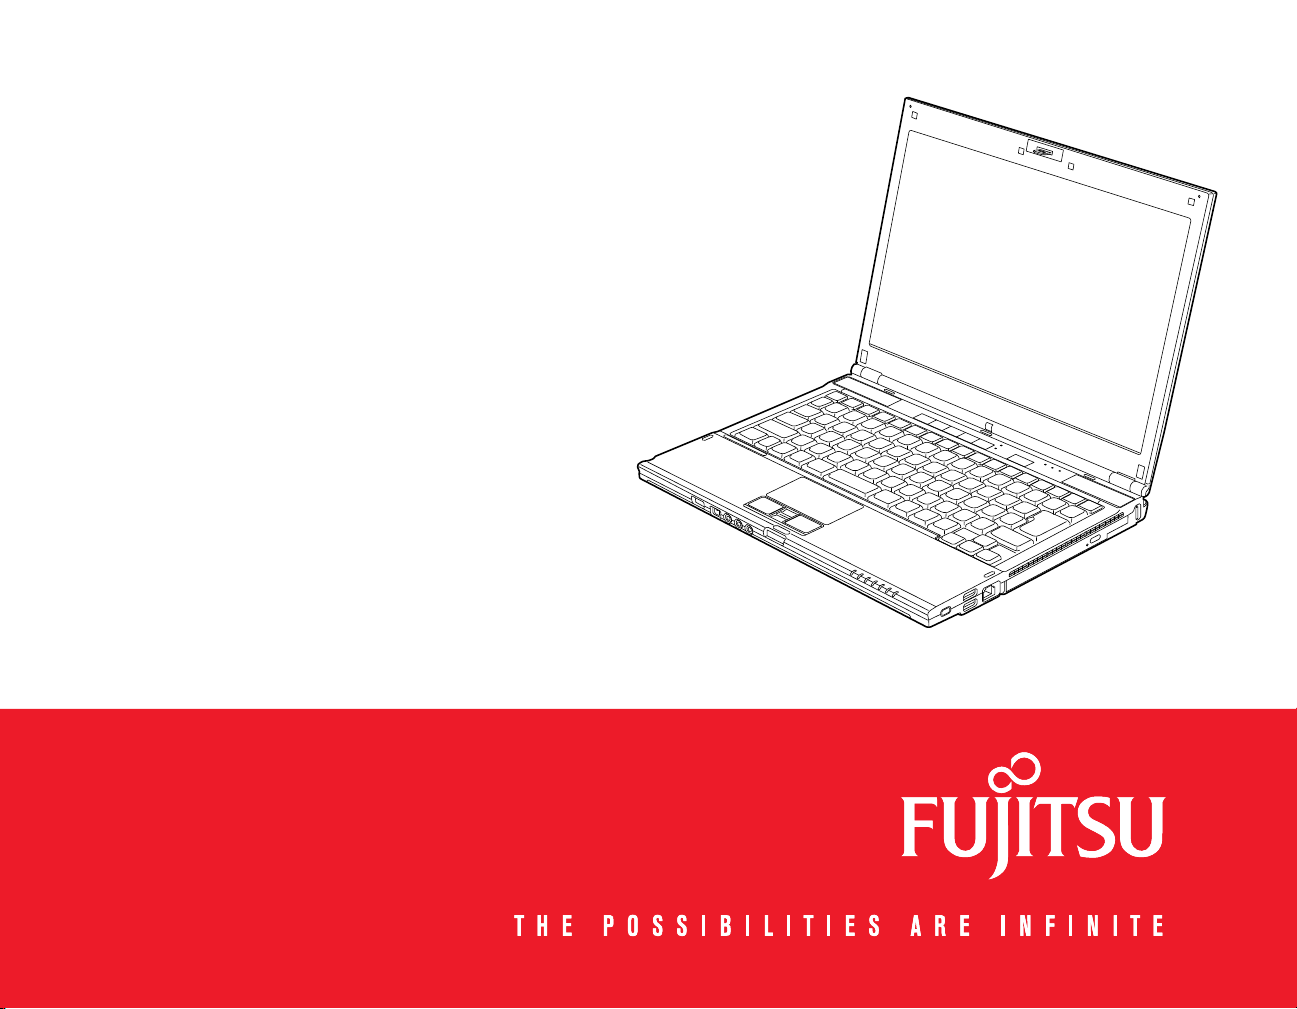
User’s Guide
Learn how to use
your Fujitsu LifeBook
S6520 notebook
Page 2

Copyright and Trademark Information
Fujitsu Computer Systems Corporation has made every effort to ensure the accuracy and completeness of this document; however, as
ongoing development efforts are continually improving the capabilities of our products, we cannot guarantee the accuracy of the contents
of this document. We disclaim liability for errors, omissions, or future changes.
Fujitsu, the Fujitsu logo, and LifeBook are registered trademarks of Fujitsu Limited.
Intel, Intel Core, Centrino, and Intel Centrino Pro are trademarks or registered trademarks of Intel Corporation or its subsidiaries in the
United States and other countries.
Microsoft, Windows, and Windows Vista are either registered trademarks or trademarks of Microsoft Corporation in the United States
and/or other countries.
PCMCIA is a trademark of the Personal Computer Memory Card International Association.
Bluetooth is a trademark of Bluetooth SIG, Inc., USA.
OmniPass is a trademark of Softex, Inc.
Roxio is a trademark of Roxio, a division of Sonic Solutions.
PowerProducer is a trademark of CyberLink Corp.
ArcSoft is a trademark of ArcSoft Incorporated.
Adobe, Acrobat, and Acrobat Reader are either registered trademarks or trademarks of Adobe Systems Incorporated in the United States
and/or other countries.
Norton and Norton Internet Security are trademarks or registered trademarks of Symantec Corporation in the United States and other
countries.
The DVD player found in some models of the LifeBook notebook incorporates copyright protection technology that is protected by
method claims of certain U.S. patents and other intellectual property rights owned by Macrovision Corporation and other rights users.
Use of this copyright protection technology must be authorized by Macrovision Corporation, and is intended for home and other limited
viewing uses only unless authorized by Macrovision Corporation. Reverse engineering or disassembly is prohibited.
All other trademarks mentioned herein are the property of their respective owners.
Page 3

WARNING
HANDLING THE CORD ON THIS PRODUCT WILL EXPOSE YOU TO LEAD, A CHEMICAL KNOWN TO THE
S
TATE OF CALIFORNIA TO CAUSE BIRTH DEFECTS OR OTHER REPRODUCTIVE HARM.
W
ASH HANDS AFTER HANDLING.
© Copyright 2008 Fujitsu Computer Systems Corporation. All rights reserved.
No part of this publication may be copied, reproduced, or translated, without prior written consent of Fujitsu. No part of this publication
may be stored or transmitted in any electronic form without the written consent of Fujitsu. B5FJ-8311-01ENZ0-00
DECLARATION OF CONFORMITY
according to FCC Part 15
Responsible Party Name: Fujitsu Computer Systems Corporation
Address: 1250 E. Arques Avenue, M/S 122
Sunnyvale, CA 94085
Telephone: (408) 746-6000
Declares that product: Base Model Configuration:
LifeBook S6520 notebook
Complies with Part 15 of the FCC Rules.
This device complies with Part 15 of the FCC rules. Operations are subject to the following two conditions:
(1) This device may not cause harmful interference, (2) This device must accept any interference received,
including interference that may cause undesired operation.
Page 4

IMPORTANT SAFETY INSTRUCTIONS
+
AC adapter output polarity:
This unit requires an AC adapter to operate. Use only UL Listed I.T.E. Class II Adapters with an output rating of 19 VDC, with a current
of 4.22A (80 W).
When using your notebook equipment, basic safety precautions should always be followed to reduce the risk of fire, electric shock and
injury to persons, including the following:
• Do not use this product near water for example, near a bathtub, washbowl, kitchen sink or laundry tub, in a wet basement or near a
swimming pool.
• Avoid using the modem during an electrical storm. There may be a remote risk of electric shock from lightning.
• Do not use the modem to report a gas leak in the vicinity of the leak.
• Use only the power cord and batteries indicated in this manual. Do not dispose of batteries in a fire. They may explode. Check with
local codes for possible special disposal instructions.
• To reduce the risk of fire, use only No. 26 AWG or larger UL Listed or CSA Certified Telecommunication Line Cord.
• For TV tuner use: To protect from overvoltages and transients on the Cable Distribution System, be sure that the outer shield of the
coaxial cable is connected to earth (grounded) at the building premise as close to the point of cable entrance as practicable, as
required per NEC Article 820.93, ANSI/NFPA 70: 2005. If you have questions about your CATV installation, contact your service
provider.
SAVE THESE INSTRUCTIONS
For Authorized Repair Technicians Only
DANGER OF EXPLOSION IF LITHIUM (CLOCK) BATTERY IS INCORRECTLY REPLACED. REPLACE ONLY
WITH THE SAME OR EQUIVALENT TYPE RECOMMENDED BY THE MANUFACTURER. DISPOSE OF USED
BATTERIES ACCORDING TO THE MANUFACTURER’S INSTRUCTION.
OR CONTINUED PROTECTION AGAINST RISK OF FIRE, REPLACE ONLY WITH THE SAME TYPE AND
F
RATING FUSE.
Page 5

System Disposal
Hg
LAMP(S) INSIDE THIS PRODUCT CONTAIN MERCURY AND MUST BE RECYCLED OR DISPOSED OF
ACCORDING TO LOCAL, STATE, OR FEDERAL LAWS.
Recycling your battery
Over time, the batteries that run your mobile computer will begin to hold a charge for a shorter amount of time; this is a natural
occurrence for all batteries. When this occurs, you may want to replace the battery with a fresh one*. If you replace it, it is important
that you dispose of the old battery properly because batteries contain materials that could cause environmental damage if disposed of
improperly.
Fujitsu is very concerned with environmental protection, and has enlisted the services of the Rechargeable Battery
Recycling Corporation (RBRC)**, a non-profit public service organization dedicated to protecting our environment
by recycling old batteries at no cost to you.
RBRC has drop-off points at tens of thousands of locations throughout the United States and Canada. To find the
location nearest you, go to www.RBRC.org or call 1-800-822-8837.
If there are no convenient RBRC locations near you, you can also go to the EIA Consumer Education Initiative website
(http://EIAE.org/
Remember – protecting the environment is a cooperative effort, and you should make every effort to protect it for current and future
generations.
* To order a new battery for your Fujitsu mobile computer, go to the Fujitsu shopping site at www.shopfujitsu.com
www.fujitsu.ca/products/notebooks
** RBRC is an independent third party to which Fujitsu provides funding for battery recycling; RBRC is in no way affiliated with
Fujitsu.
) and search for a convenient disposal location.
in the US or
in Canada.
Page 6

Contents
Preface
About This Guide . . . . . . . . . . . . . . . . . . . . . . . . . . . . . . . . . . . . . . . . . . . . . 8
Conventions Used in the Guide . . . . . . . . . . . . . . . . . . . . . . . . . . . . . . . . . 8
Fujitsu Contact Information . . . . . . . . . . . . . . . . . . . . . . . . . . . . . . . . . . . . 9
Chapter 1 Getting to Know Your LifeBook
Overview . . . . . . . . . . . . . . . . . . . . . . . . . . . . . . . . . . . . . . . . . . . . . . . . . . . . 11
Locating the Controls and Connectors . . . . . . . . . . . . . . . . . . . . . . . . . . . . 12
Top Components . . . . . . . . . . . . . . . . . . . . . . . . . . . . . . . . . . . . . . . . . . . . 13
Left-Side Panel Components . . . . . . . . . . . . . . . . . . . . . . . . . . . . . . . . . . . 15
Right-Side Panel Components . . . . . . . . . . . . . . . . . . . . . . . . . . . . . . . . . . 17
Back Panel Components. . . . . . . . . . . . . . . . . . . . . . . . . . . . . . . . . . . . . . . 20
Bottom Components. . . . . . . . . . . . . . . . . . . . . . . . . . . . . . . . . . . . . . . . . . 21
Status Indicator Panel . . . . . . . . . . . . . . . . . . . . . . . . . . . . . . . . . . . . . . . . . 23
AC Adapter Indicator . . . . . . . . . . . . . . . . . . . . . . . . . . . . . . . . . . . . . . . . . 24
Hard Drive/Optical Drive Access Indicator . . . . . . . . . . . . . . . . . . . . . . . . 25
Keyboard . . . . . . . . . . . . . . . . . . . . . . . . . . . . . . . . . . . . . . . . . . . . . . . . . . . . 27
Using the Keyboard . . . . . . . . . . . . . . . . . . . . . . . . . . . . . . . . . . . . . . . . . . 27
Page 7

Touchpad Pointing Device . . . . . . . . . . . . . . . . . . . . . . . . . . . . . . . . . . . . . . 30
Navigating Using Gestures. . . . . . . . . . . . . . . . . . . . . . . . . . . . . . . . . . . . . 35
Touchpad Control Adjustment . . . . . . . . . . . . . . . . . . . . . . . . . . . . . . . . . . 36
Volume Control . . . . . . . . . . . . . . . . . . . . . . . . . . . . . . . . . . . . . . . . . . . . . . . 37
Controlling the Volume . . . . . . . . . . . . . . . . . . . . . . . . . . . . . . . . . . . . . . . 37
Flexible Bay Devices . . . . . . . . . . . . . . . . . . . . . . . . . . . . . . . . . . . . . . . . . . . 38
Removing and Installing Modular Devices . . . . . . . . . . . . . . . . . . . . . . . . 39
LifeBook Security/Application Panel . . . . . . . . . . . . . . . . . . . . . . . . . . . . . 41
Setting up Your LifeBook Security Panel . . . . . . . . . . . . . . . . . . . . . . . . . 42
Passwords . . . . . . . . . . . . . . . . . . . . . . . . . . . . . . . . . . . . . . . . . . . . . . . . . . 42
Operating Your LifeBook Security/Application Panel. . . . . . . . . . . . . . . . 44
Precautions . . . . . . . . . . . . . . . . . . . . . . . . . . . . . . . . . . . . . . . . . . . . . . . . . 45
Uninstalling the Security Panel Application. . . . . . . . . . . . . . . . . . . . . . . . 46
Launching Applications with the Security/Application Panel . . . . . . . . . . 48
Chapter 2 Getting Started with Your LifeBook
Power Sources . . . . . . . . . . . . . . . . . . . . . . . . . . . . . . . . . . . . . . . . . . . . . . . . 50
Connecting the Power Adapters . . . . . . . . . . . . . . . . . . . . . . . . . . . . . . . . . 51
Display Panel . . . . . . . . . . . . . . . . . . . . . . . . . . . . . . . . . . . . . . . . . . . . . . . . . 52
Opening the Display Panel . . . . . . . . . . . . . . . . . . . . . . . . . . . . . . . . . . . . . 52
Adjusting Display Panel Brightness. . . . . . . . . . . . . . . . . . . . . . . . . . . . . . 53
Using the Keyboard . . . . . . . . . . . . . . . . . . . . . . . . . . . . . . . . . . . . . . . . . . 53
Using the Power Options (Windows Vista) . . . . . . . . . . . . . . . . . . . . . . . . 53
Using the Windows Mobility Center (Windows Vista) . . . . . . . . . . . . . . . 53
Starting Your LifeBook Notebook. . . . . . . . . . . . . . . . . . . . . . . . . . . . . . . . 54
Power On . . . . . . . . . . . . . . . . . . . . . . . . . . . . . . . . . . . . . . . . . . . . . . . . . . 54
Boot Sequence . . . . . . . . . . . . . . . . . . . . . . . . . . . . . . . . . . . . . . . . . . . . . . 55
Hard Disk Drive Passwords . . . . . . . . . . . . . . . . . . . . . . . . . . . . . . . . . . . . 55
Page 8

BIOS Setup Utility . . . . . . . . . . . . . . . . . . . . . . . . . . . . . . . . . . . . . . . . . . . 56
Booting the System. . . . . . . . . . . . . . . . . . . . . . . . . . . . . . . . . . . . . . . . . . . 57
Starting Windows Vista the first time . . . . . . . . . . . . . . . . . . . . . . . . . . . . 57
Starting Windows XP the First Time . . . . . . . . . . . . . . . . . . . . . . . . . . . . . 59
Registering Your LifeBook notebook with Fujitsu . . . . . . . . . . . . . . . . . . 60
Installing Click Me! . . . . . . . . . . . . . . . . . . . . . . . . . . . . . . . . . . . . . . . . . . 60
Fujitsu Driver Update Utility . . . . . . . . . . . . . . . . . . . . . . . . . . . . . . . . . . . 61
Power Management. . . . . . . . . . . . . . . . . . . . . . . . . . . . . . . . . . . . . . . . . . . . 62
Power/Suspend/Resume Button . . . . . . . . . . . . . . . . . . . . . . . . . . . . . . . . . 62
Standby (Sleep) Mode . . . . . . . . . . . . . . . . . . . . . . . . . . . . . . . . . . . . . . . . 63
Hibernation (Save-to-Disk) Feature . . . . . . . . . . . . . . . . . . . . . . . . . . . . . . 64
Windows Power Management . . . . . . . . . . . . . . . . . . . . . . . . . . . . . . . . . . 64
Restarting the System . . . . . . . . . . . . . . . . . . . . . . . . . . . . . . . . . . . . . . . . . 65
Powering Off . . . . . . . . . . . . . . . . . . . . . . . . . . . . . . . . . . . . . . . . . . . . . . . 65
Chapter 3 User-Installable Features
Lithium ion Battery. . . . . . . . . . . . . . . . . . . . . . . . . . . . . . . . . . . . . . . . . . . . 67
Recharging the Batteries. . . . . . . . . . . . . . . . . . . . . . . . . . . . . . . . . . . . . . . 68
Replacing the Battery . . . . . . . . . . . . . . . . . . . . . . . . . . . . . . . . . . . . . . . . . 70
Optical Drive . . . . . . . . . . . . . . . . . . . . . . . . . . . . . . . . . . . . . . . . . . . . . . . . . 72
Media Player Software . . . . . . . . . . . . . . . . . . . . . . . . . . . . . . . . . . . . . . . . 73
Loading Media on Your Drive . . . . . . . . . . . . . . . . . . . . . . . . . . . . . . . . . . 73
Removing Media . . . . . . . . . . . . . . . . . . . . . . . . . . . . . . . . . . . . . . . . . . . . 75
Emergency Optical
Drive Tray Release . . . . . . . . . . . . . . . . . . . . . . . . . . . . . . . . . . . . . . . . . . . 75
Using the Media Player Software. . . . . . . . . . . . . . . . . . . . . . . . . . . . . . . . 76
Using Media Player on Battery Power . . . . . . . . . . . . . . . . . . . . . . . . . . . . 77
Memory Stick/Secure Digital/xD Cards . . . . . . . . . . . . . . . . . . . . . . . . . . . 79
Installing/Removing Memory Stick/SD/xD Cards. . . . . . . . . . . . . . . . . . . 80
3
Page 9

Using PC Cards . . . . . . . . . . . . . . . . . . . . . . . . . . . . . . . . . . . . . . . . . . . . . . . 81
Installing PC Cards. . . . . . . . . . . . . . . . . . . . . . . . . . . . . . . . . . . . . . . . . . . 82
Removing PC Cards . . . . . . . . . . . . . . . . . . . . . . . . . . . . . . . . . . . . . . . . . . 83
Memory Upgrade Module . . . . . . . . . . . . . . . . . . . . . . . . . . . . . . . . . . . . . . 84
Installing Memory Upgrade Modules. . . . . . . . . . . . . . . . . . . . . . . . . . . . . 84
Removing a Memory Upgrade Module . . . . . . . . . . . . . . . . . . . . . . . . . . . 86
Checking the Memory Capacity. . . . . . . . . . . . . . . . . . . . . . . . . . . . . . . . . 86
Device Ports . . . . . . . . . . . . . . . . . . . . . . . . . . . . . . . . . . . . . . . . . . . . . . . . . . 88
Modem (RJ-11) Telephone Jack. . . . . . . . . . . . . . . . . . . . . . . . . . . . . . . . . 88
Infrared Port . . . . . . . . . . . . . . . . . . . . . . . . . . . . . . . . . . . . . . . . . . . . . . . . 89
IEEE 1394 Port. . . . . . . . . . . . . . . . . . . . . . . . . . . . . . . . . . . . . . . . . . . . . . 90
Internal LAN (RJ-45) Jack . . . . . . . . . . . . . . . . . . . . . . . . . . . . . . . . . . . . . 91
Universal Serial Bus Ports . . . . . . . . . . . . . . . . . . . . . . . . . . . . . . . . . . . . . 91
Headphone/Line-Out Jack . . . . . . . . . . . . . . . . . . . . . . . . . . . . . . . . . . . . . 92
Microphone/Line-In Jack . . . . . . . . . . . . . . . . . . . . . . . . . . . . . . . . . . . . . . 93
External Video Port . . . . . . . . . . . . . . . . . . . . . . . . . . . . . . . . . . . . . . . . . . 93
S-Video Out Jack . . . . . . . . . . . . . . . . . . . . . . . . . . . . . . . . . . . . . . . . . . . . 94
Chapter 4 Troubleshooting Your LifeBook
Troubleshooting. . . . . . . . . . . . . . . . . . . . . . . . . . . . . . . . . . . . . . . . . . . . . . . 95
Identifying the Problem . . . . . . . . . . . . . . . . . . . . . . . . . . . . . . . . . . . . . . . 95
Specific Problems. . . . . . . . . . . . . . . . . . . . . . . . . . . . . . . . . . . . . . . . . . . . 97
Power On Self Test Messages . . . . . . . . . . . . . . . . . . . . . . . . . . . . . . . . . . 108
Emergency Media Player Drive Tray Release . . . . . . . . . . . . . . . . . . . . . . 113
Restoring Your Pre-installed Software . . . . . . . . . . . . . . . . . . . . . . . . . . . . 114
Re-installing Individual Drivers and Applications. . . . . . . . . . . . . . . . . . . 114
Restoring the Operating System for Windows Vista Systems . . . . . . . . . . 115
Restoring the Operating System for Windows XP Systems. . . . . . . . . . . . 118
Automatically Downloading Driver Updates . . . . . . . . . . . . . . . . . . . . . . . 119
4
Page 10

Chapter 5 Care and Maintenance
Caring for your LifeBook Notebook . . . . . . . . . . . . . . . . . . . . . . . . . . . . . . 120
Cleaning your LifeBook notebook . . . . . . . . . . . . . . . . . . . . . . . . . . . . . . . 122
Cleaning the dust filter . . . . . . . . . . . . . . . . . . . . . . . . . . . . . . . . . . . . . . . . 123
Storing your LifeBook notebook . . . . . . . . . . . . . . . . . . . . . . . . . . . . . . . . 124
Traveling with your LifeBook notebook . . . . . . . . . . . . . . . . . . . . . . . . . . 125
Batteries . . . . . . . . . . . . . . . . . . . . . . . . . . . . . . . . . . . . . . . . . . . . . . . . . . . 126
Media Care . . . . . . . . . . . . . . . . . . . . . . . . . . . . . . . . . . . . . . . . . . . . . . . . . 127
PC Cards . . . . . . . . . . . . . . . . . . . . . . . . . . . . . . . . . . . . . . . . . . . . . . . . . . . 128
Chapter 6 System Specifications
Specifications . . . . . . . . . . . . . . . . . . . . . . . . . . . . . . . . . . . . . . . . . . . . . . . . . 129
Configuration Label . . . . . . . . . . . . . . . . . . . . . . . . . . . . . . . . . . . . . . . . . . 129
Microprocessor . . . . . . . . . . . . . . . . . . . . . . . . . . . . . . . . . . . . . . . . . . . . . . 130
Chipset . . . . . . . . . . . . . . . . . . . . . . . . . . . . . . . . . . . . . . . . . . . . . . . . . . . . 130
Memory. . . . . . . . . . . . . . . . . . . . . . . . . . . . . . . . . . . . . . . . . . . . . . . . . . . . 130
Video. . . . . . . . . . . . . . . . . . . . . . . . . . . . . . . . . . . . . . . . . . . . . . . . . . . . . . 130
Audio . . . . . . . . . . . . . . . . . . . . . . . . . . . . . . . . . . . . . . . . . . . . . . . . . . . . . 131
Mass Storage Device Options. . . . . . . . . . . . . . . . . . . . . . . . . . . . . . . . . . . 131
Features. . . . . . . . . . . . . . . . . . . . . . . . . . . . . . . . . . . . . . . . . . . . . . . . . . . . 132
Device Ports . . . . . . . . . . . . . . . . . . . . . . . . . . . . . . . . . . . . . . . . . . . . . . . . 133
Keyboard. . . . . . . . . . . . . . . . . . . . . . . . . . . . . . . . . . . . . . . . . . . . . . . . . . . 134
Power . . . . . . . . . . . . . . . . . . . . . . . . . . . . . . . . . . . . . . . . . . . . . . . . . . . . . 134
Dimensions and Weight . . . . . . . . . . . . . . . . . . . . . . . . . . . . . . . . . . . . . . . 135
Environmental Requirements . . . . . . . . . . . . . . . . . . . . . . . . . . . . . . . . . . . 135
Popular Accessories . . . . . . . . . . . . . . . . . . . . . . . . . . . . . . . . . . . . . . . . . . 135
Pre-Installed Software . . . . . . . . . . . . . . . . . . . . . . . . . . . . . . . . . . . . . . . . 136
Learning About Your Software . . . . . . . . . . . . . . . . . . . . . . . . . . . . . . . . . 137
5
Page 11

Glossary/Regulatory
Glossary . . . . . . . . . . . . . . . . . . . . . . . . . . . . . . . . . . . . . . . . . . . . . . . . . . . . . 140
Regulatory Information . . . . . . . . . . . . . . . . . . . . . . . . . . . . . . . . . . . . . . . . 156
Appendix A: WLAN User’s Guide
Before Using the Optional Wireless LAN. . . . . . . . . . . . . . . . . . . . . . . . . . 164
Wireless LAN Device Covered by this Document. . . . . . . . . . . . . . . . . . . 164
Characteristics of the WLAN Device. . . . . . . . . . . . . . . . . . . . . . . . . . . . . 164
Wireless LAN Modes Using this Device . . . . . . . . . . . . . . . . . . . . . . . . . . 165
Deactivating/Disconnecting the WLAN Device . . . . . . . . . . . . . . . . . . . . 167
Deactivation Using the
Wireless On/Off Switch . . . . . . . . . . . . . . . . . . . . . . . . . . . . . . . . . . . . . . . 168
Disconnection Using the Icon in the Taskbar. . . . . . . . . . . . . . . . . . . . . . . 168
Activating the WLAN Device . . . . . . . . . . . . . . . . . . . . . . . . . . . . . . . . . . 168
Configuring the Wireless LAN. . . . . . . . . . . . . . . . . . . . . . . . . . . . . . . . . . . 169
Configuring the WLAN Using Windows Vista . . . . . . . . . . . . . . . . . . . . . 169
Configuring the WLAN Using Windows XP . . . . . . . . . . . . . . . . . . . . . . 170
Connection to the network . . . . . . . . . . . . . . . . . . . . . . . . . . . . . . . . . . . . . 170
Troubleshooting the WLAN. . . . . . . . . . . . . . . . . . . . . . . . . . . . . . . . . . . . . 171
Troubleshooting . . . . . . . . . . . . . . . . . . . . . . . . . . . . . . . . . . . . . . . . . . . . . 171
WLAN Specifications . . . . . . . . . . . . . . . . . . . . . . . . . . . . . . . . . . . . . . . . . . 173
Specifications . . . . . . . . . . . . . . . . . . . . . . . . . . . . . . . . . . . . . . . . . . . . . . . 173
Using the Bluetooth Device. . . . . . . . . . . . . . . . . . . . . . . . . . . . . . . . . . . . . . 175
What is Bluetooth . . . . . . . . . . . . . . . . . . . . . . . . . . . . . . . . . . . . . . . . . . . . 175
Where to Find Information About Bluetooth . . . . . . . . . . . . . . . . . . . . . . . 175
6
Page 12

Appendix B: Fingerprint Sensor Device
Introducing the Optional Fingerprint Sensor Device . . . . . . . . . . . . . . . . 177
Getting Started . . . . . . . . . . . . . . . . . . . . . . . . . . . . . . . . . . . . . . . . . . . . . . 178
Installing OmniPass . . . . . . . . . . . . . . . . . . . . . . . . . . . . . . . . . . . . . . . . . . 178
User Enrollment . . . . . . . . . . . . . . . . . . . . . . . . . . . . . . . . . . . . . . . . . . . . . 181
Using OmniPass . . . . . . . . . . . . . . . . . . . . . . . . . . . . . . . . . . . . . . . . . . . . . 184
Configuring OmniPass . . . . . . . . . . . . . . . . . . . . . . . . . . . . . . . . . . . . . . . . 189
OmniPass Control Center . . . . . . . . . . . . . . . . . . . . . . . . . . . . . . . . . . . . . . 191
Troubleshooting . . . . . . . . . . . . . . . . . . . . . . . . . . . . . . . . . . . . . . . . . . . . . 193
Index. . . . . . . . . . . . . . . . . . . . . . . . . . . . . . . . . . . . . . . . . . . . . . . . . . . . . . . . 195
7
Page 13

Preface
About This Guide
The LifeBook S6520 notebook from Fujitsu Computer Systems Corporation provides desktop
performance with a fast, Intel® Core™ 2 processor. Your notebook has a built-in 14.1” TFT WXGA color
display. This system brings the computing power of desktop personal computers (PCs) to a portable
environment.
Your computer comes with Microsoft Windows® XP Professional or Windows Vista Business operating
system pre-installed.
This manual explains how to operate your LifeBook notebook’s hardware and factory-installed system
software.
Conventions Used in the Guide
Keyboard and on-screen keys appear in brackets. Example: [Fn], [F1], [ESC], [ENTER] and [CTRL].
Pages with additional information about a specific topic are cross-referenced within the text.
For example: (“See Installation Procedure on page 43”.)
On screen menu items appear in bold. Example: “Click Fujitsu Menu, and select your choice”.
DOS commands you enter appear in Courier type. Example: “Shutdown the computer?”
8
Page 14

THE INFORMATION ICON HIGHLIGHTS INFORMATION THAT WILL ENHANCE YOUR UNDERSTANDING OF
THE SUBJECT MATERIAL.
HE CAUTION ICON HIGHLIGHTS INFORMATION THAT IS IMPORTANT TO THE SAFE OPERATION OF YOUR
T
COMPUTER, OR TO THE INTEGRITY OF YOUR FILES. PLEASE READ ALL CAUTION INFORMATION
CAREFULLY.
T
HE WARNING ICON HIGHLIGHTS INFORMATION THAT CAN BE HAZARDOUS TO EITHER YOU, YOUR
L
IFEBOOK NOTEBOOK, OR YOUR FILES. PLEASE READ ALL WARNING INFORMATION CAREFULLY.
Fujitsu Contact Information
Service and Support
You can contact Fujitsu Service and Support in the following ways:
• Toll free: 1-800-8Fujitsu (1-800-838-5487)
• E-mail: 8fujitsu@us.fujitsu.com
• Website: http://www.computers.us.fujitsu.com/support
Before you place the call, you should have the following information ready so that the customer support
representative can provide you with the fastest possible solution:
• Product name
• Product configuration number
• Product serial number
9
- About This Guide
Page 15

• Purchase date
• Conditions under which the problem occurred
• Any error messages that have occurred
• Type of device connected, if any
Fujitsu Shopping Online
You can go directly to the online by going to the website at: www.shopfujitsu.com.
YOU MUST HAVE AN ACTIVE INTERNET CONNECTION TO USE THE ONLINE URL LINKS.
Limited Warranty
Your LifeBook notebook is backed by a Fujitsu International Limited Warranty. Check the service kit that
came with your notebook for the Limited Warranty period and terms and conditions.
10
- About This Guide
Page 16
Chapter 1
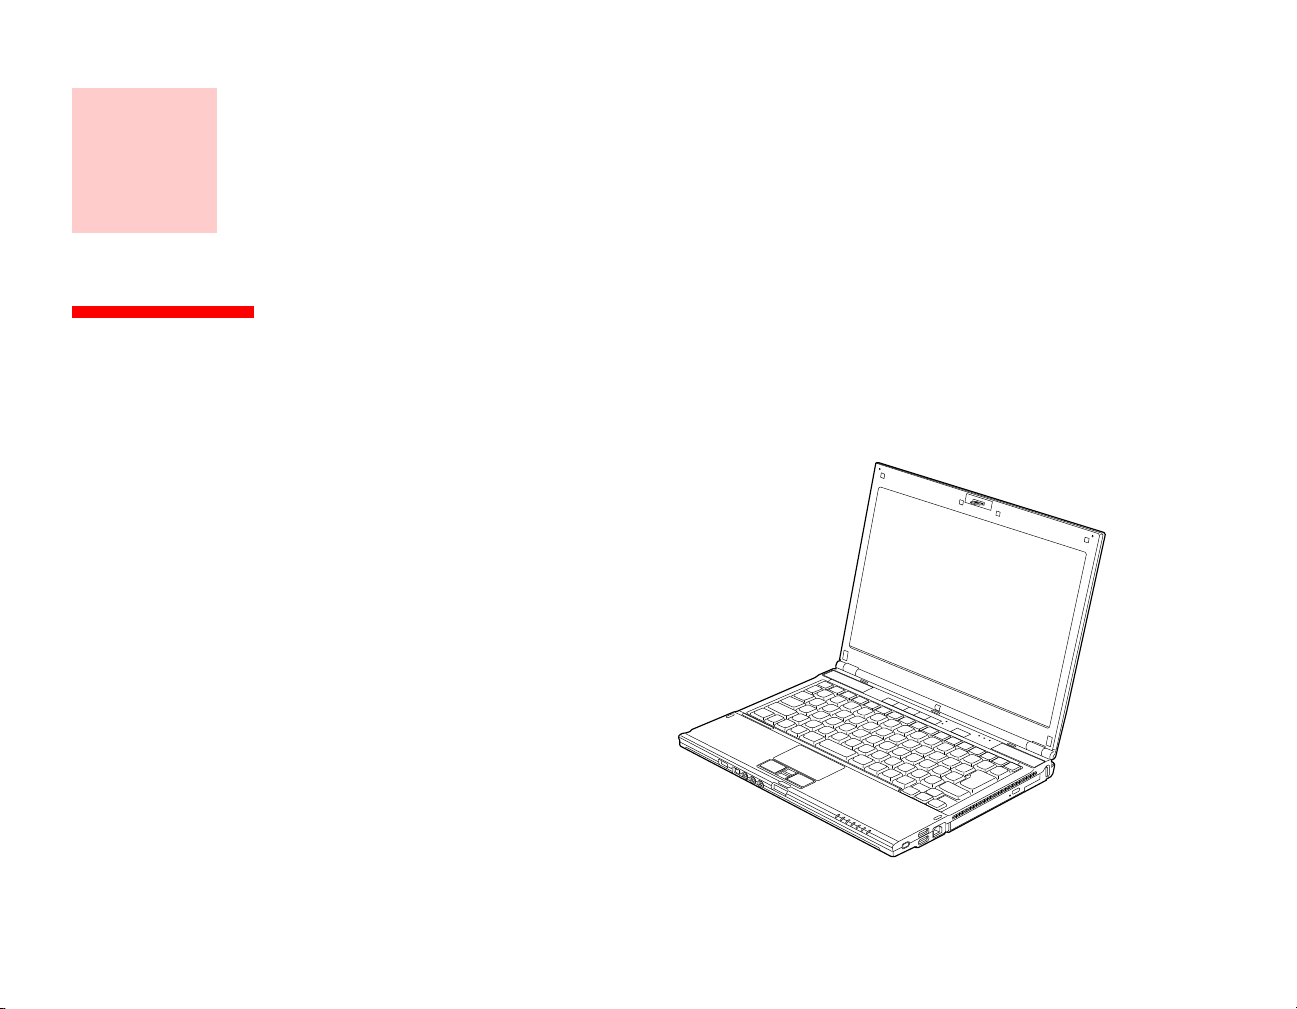
Getting to Know Your LifeBook
Overview
This section describes the
components of your Fujitsu
LifeBook S6520 notebook. We
strongly recommend that you read
it before using your notebook –
even if you are already familiar
with notebook computers.
Figure 1. Fujitsu LifeBook S6520 notebook
11
Page 17
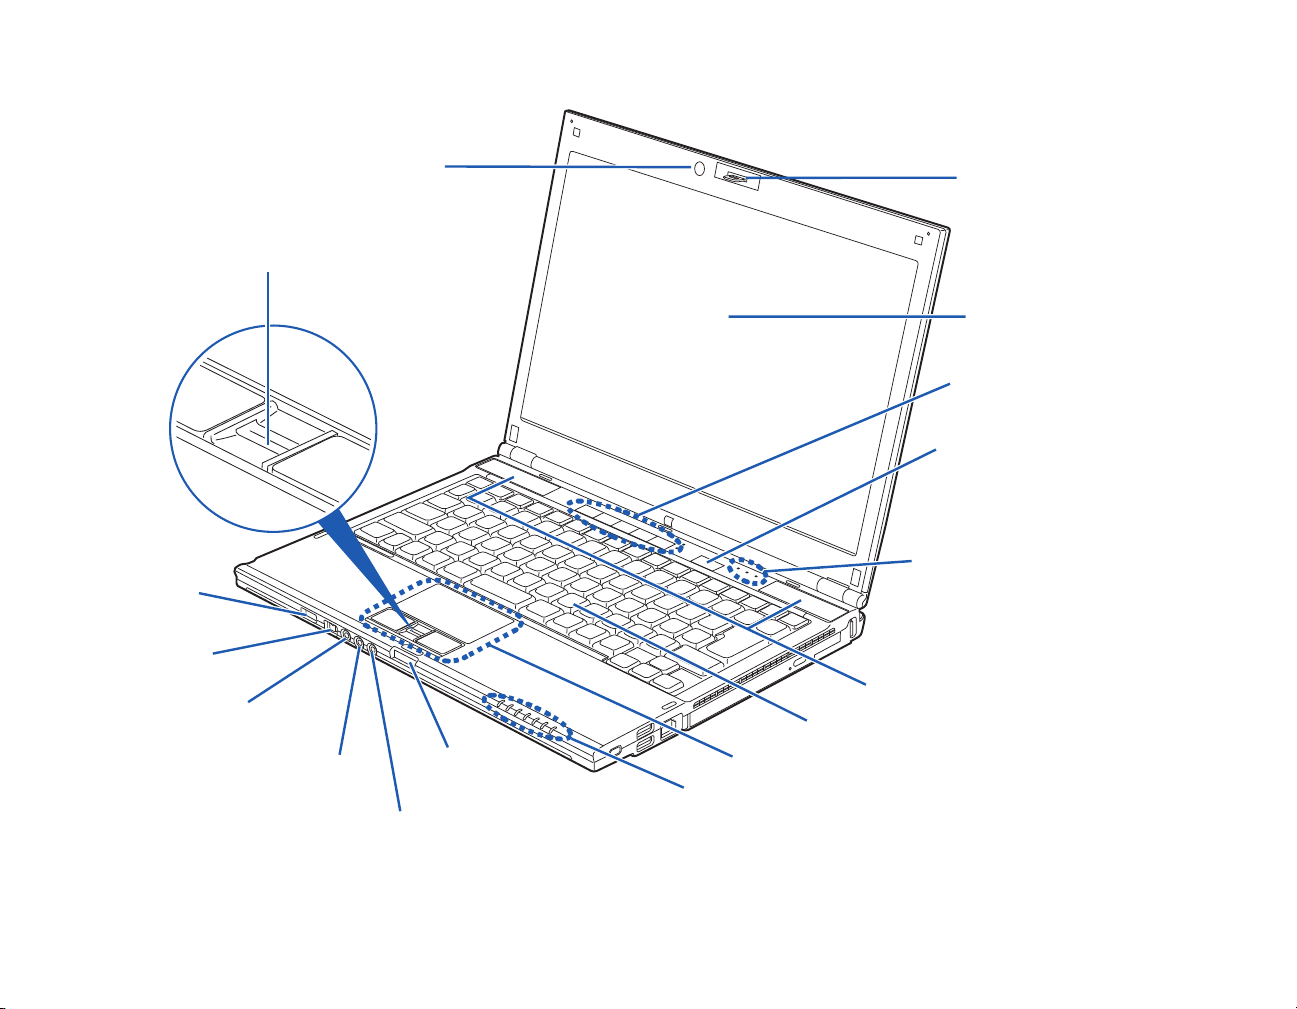
Locating the Controls and Connectors
Display Panel
Status Indicator Panel
Keyboard
Touchpad Pointing Device
Power/Suspend/Resume Button
Display Panel
Wireless LAN/
Stereo Speakers
Fingerprint Sensor
Latch Button
LifeBook Security/
Application Panel
Bluetooth
On/Off Switch
IEEE1394 Jack
Headphone Jack
Microphone Jack
S-Video Out Jack
Status Indicator Panel
Web Camera
Display Latch
Figure 2. LifeBook notebook with display open
12
- Locating the Controls and Connectors
Page 18

Top Components
The following is a brief description of your LifeBook notebook’s top components.
Display Panel
The display panel is a color LCD panel with back lighting for the display of text and graphics.
LifeBook Security/Application Panel
The LifeBook Security/Application Panel provides hardware security and one-touch application launch
capability. See “LifeBook Security/Application Panel” on page 41.
Status Indicator Panel
The Status Indicator Panel displays symbols that correspond with a specific component of your LifeBook
notebook. See “Status Indicator Panel” on page 23.
Power/Suspend/Resume Button
The Power/Suspend/Resume button allows you to suspend notebook activity without powering off,
resume your LifeBook notebook from suspend mode, and power on your notebook when it has been shut
down from Windows. See “Power/Suspend/Resume Button” on page 62.
Stereo Speakers
The built-in dual speakers allow for stereo sound.
Keyboard
A full-size keyboard with dedicated Windows keys. See “Keyboard” on page 27.
Touchpad Pointing Device
The Touchpad pointing device is a mouse-like cursor control with three buttons: a right button, a left
button, and a scroll button. The touchpad is gesture-enabled. This allows you to zoom in or out and scroll
continually using simple gestures. See “Touchpad Pointing Device” on page 30. Depending upon the
configuration of your system, the scroll button may be configured as a fingerprint sensor device. See
“Appendix B: Fingerprint Sensor Device” on page 177.
13
- Locating the Controls and Connectors
Page 19

Display Panel Latch Button
The display panel latch button is used to latch and unlatch the display. See “Opening the Display Panel”
on page 52.
S-Video Out Jack
The S-Video output is used to transmit a higher resolution video signal to a compatible TV or VCR. Note
that in order to use this jack, you must use the S-Video adapter cable that came with your system. See “SVideo Out Jack” on page 94.
Microphone Jack
The microphone jack allows you to connect an external mono microphone. See “Microphone/Line-In
Jack” on page 93.
Headphone/Line Out Jack
The headphone/line out jack allows you to connect headphones. See “Headphone Jack*” on page 45.
IEEE 1394 (4-pin) Jack
The 4-pin 1394 jack is used to connect between your LifeBook and an IEEE 1394 peripheral such as a
digital video camera. See “Connecting a IEEE 1394 device” on page 90.
Wireless LAN/Bluetooth On/Off Switch
The wireless LAN/Bluetooth on/off switch is used to turn the optional WLAN and Bluetooth devices on
and off. Switching the device off when not in use will help to extend battery life. See “Activating the
WLAN Device” on page 168.
Web Camera
The built-in camera has a resolution of 1.3 megapixels. For instructions on using the camera, see the help
files that are included with the ArcSoft WebCam Companion software application.
14
- Locating the Controls and Connectors
Page 20
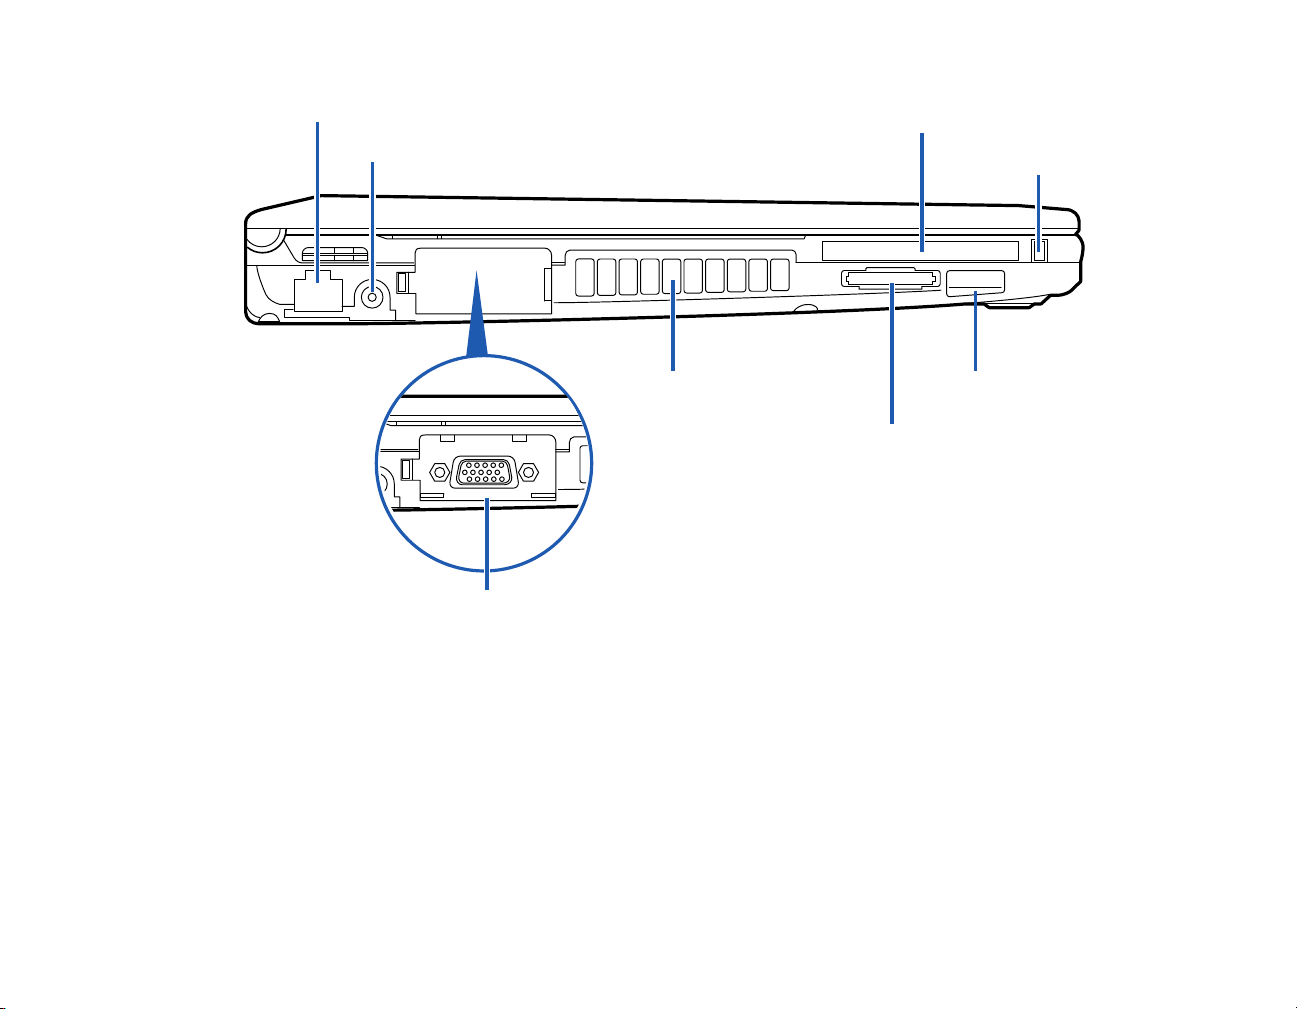
LAN (RJ-45) Jack
DC-In Jack
Air Vents
External Video Port
Memory Stick/SD/xD Card Slot
PC Card Slot
PC Card Eject Button
Infrared Port
Figure 3. LifeBook notebook left-side panel
Left-Side Panel Components
The following is a brief description of your LifeBook notebook’s left-side components.
Gigabit LAN (RJ-45) Jack
The internal LAN (RJ-45) jack is used for an internal Gigabit (10Base-T/100Base-Tx/1000Base-T)
Ethernet LAN connection. See “Internal LAN (RJ-45) Jack” on page 91.
15
- Locating the Controls and Connectors
Page 21

DC Power Jack
The DC power jack allows you to plug in the AC adapter to power your LifeBook notebook and charge
the internal Lithium ion battery.
PC Card Slot
The PC Card Slots allow you to install a PC Card. See “Using PC Cards” on page 81.
PC Card Eject Button
The PC Card eject button is used for removing a PC Card from the slot.
Infrared Port
The IrDA-compatible port allows you to communicate with another IrDA-compatible infrared device
without a cable.
Memory Stick/SD/xD Card Slot
The Memory Stick/Secure Digital/xD card slot allows you to install a flash memory card for data storage.
This architecture allows you to transfer data from a variety of different digital devices. See “Memory
Stick/Secure Digital/xD Cards” on page 79.
Air Vents
The air vents allow air to circulate through the system to cool down the components.
TO PROTECT YOUR NOTEBOOK FROM DAMAGE AND TO OPTIMIZE PERFORMANCE, BE SURE TO KEEP ALL
AIR ALL VENTS UNOBSTRUCTED, CLEAN, AND CLEAR OF DEBRIS. THIS MAY REQUIRE PERIODIC
CLEANING, DEPENDING UPON THE ENVIRONMENT IN WHICH THE SYSTEM IS USED.
O NOT OPERATE THE NOTEBOOK IN AREAS WHERE THE AIR VENTS CAN BE OBSTRUCTED, SUCH AS IN
D
TIGHT ENCLOSURES OR ON SOFT SURFACES LIKE A BED OR CUSHION.
External Video Port
The external monitor port allows you to connect an external monitor or LCD projector. See “External
Video Port” on page 93.
16
- Locating the Controls and Connectors
Page 22
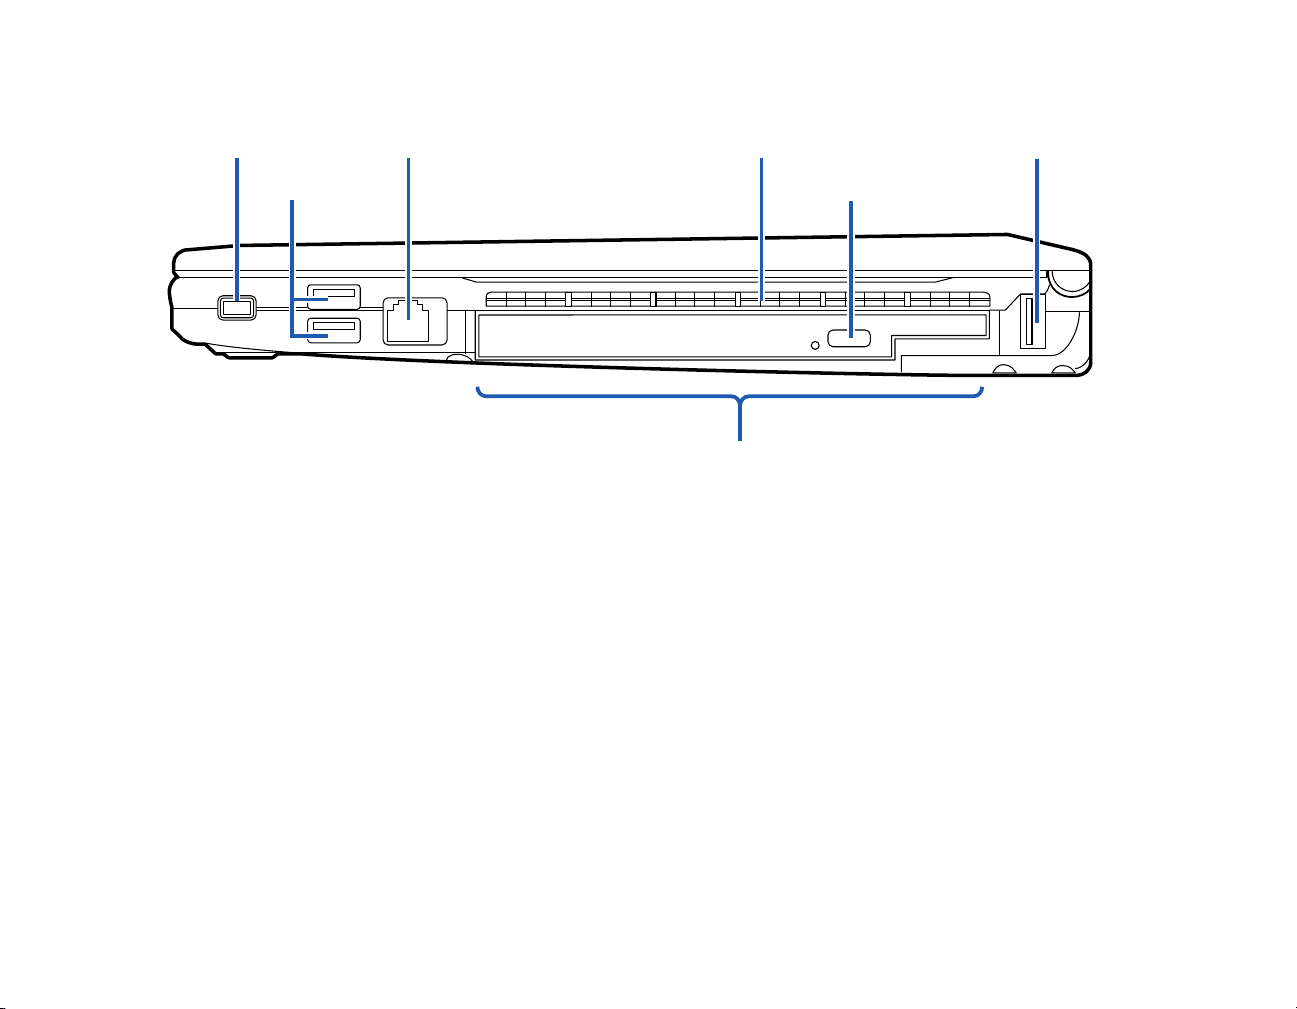
Right-Side Panel Components
USB Ports
Modem Jack
Anti-Theft Lock Slot
Air Vents
Optical Drive
USB Port
Flexible Bay (shown with Optical Drive installed)
Release Button
The following is a brief description of your LifeBook notebook’s right-side components.
Anti-theft Lock Slot
The anti-theft lock slot allows you to attach an optional physical lock down device.
USB 2.0 Ports
The USB 2.0 ports allow you to connect Universal Serial Bus devices. USB 2.0 transfers data at up to 480
Mbps and is backward-compatible with USB 1.1 devices, which transfer data at up to 12 Mbps. See
“Universal Serial Bus Ports” on page 91.
Figure 4. LifeBook notebook right-side panel
17
- Locating the Controls and Connectors
Page 23

Modem (RJ-11) Telephone Jack
The Modem (RJ-11) telephone jack is for attaching a telephone line to the internal multinational 56K
modem. See “Modem (RJ-11) Telephone Jack” on page 88.
THE INTERNAL MODEM IS NOT INTENDED FOR USE WITH DIGITAL PBX SYSTEMS. DO NOT CONNECT
THE INTERNAL MODEM TO A DIGITAL PBX AS IT MAY CAUSE SERIOUS DAMAGE TO THE INTERNAL
MODEM OR YOUR ENTIRE NOTEBOOK. CONSULT YOUR PBX MANUFACTURER’S DOCUMENTATION FOR
DETAILS. SOME HOTELS HAVE DIGITAL PBX SYSTEMS. BE SURE TO FIND OUT BEFORE YOU CONNECT
YOUR MODEM.
HE INTERNAL MULTINATIONAL MODEM IS DESIGNED TO THE ITU-T V.90/V.92 STANDARD. ITS
T
MAXIMUM SPEED OF 53000 BPS IS THE HIGHEST ALLOWED BY FCC, AND ITS ACTUAL CONNECTION
RATE DEPENDS ON THE LINE CONDITIONS. THE MAXIMUM SPEED IS 33600 BPS AT UPLOAD, IN
ACCORDANCE WITH FCC REGULATIONS.
F
OR ADDITIONAL INFORMATION ABOUT THE MODEM, REFER TO THE FUJITSU WEBSITE AT:
US.FUJITSU.COM/COMPUTERS.
Air Vents
The air vents allow air to circulate through the system to cool down the components.
O PROTECT YOUR NOTEBOOK FROM DAMAGE AND TO OPTIMIZE PERFORMANCE, BE SURE TO KEEP ALL
T
AIR ALL VENTS UNOBSTRUCTED, CLEAN, AND CLEAR OF DEBRIS. THIS MAY REQUIRE PERIODIC
CLEANING, DEPENDING UPON THE ENVIRONMENT IN WHICH THE SYSTEM IS USED.
D
O NOT OPERATE THE NOTEBOOK IN AREAS WHERE THE AIR VENTS CAN BE OBSTRUCTED, SUCH AS IN
TIGHT ENCLOSURES OR ON SOFT SURFACES LIKE A BED OR CUSHION.
Optical Drive Release Button
The optical drive release button opens the optical drive.
18
- Locating the Controls and Connectors
Page 24

Flexible Bay
The flexible bay can accommodate any of the following modular devices. (See “Flexible Bay Devices”
on page 38.)
• Modular Dual-Layer Multi-Format DVD Writer
• Modular DVD/CD-RW combo drive
• Modular Lithium ion battery
• Weight Saver
19
- Locating the Controls and Connectors
Page 25

Back Panel Components
Anti-Theft Lock Slot
Following is a brief description of your LifeBook notebook’s back panel components.
Anti-theft Lock Slot
The anti-theft lock slot allows you to attach an optional physical lock down device.
Figure 5. LifeBook notebook back panel
20
- Locating the Controls and Connectors
Page 26
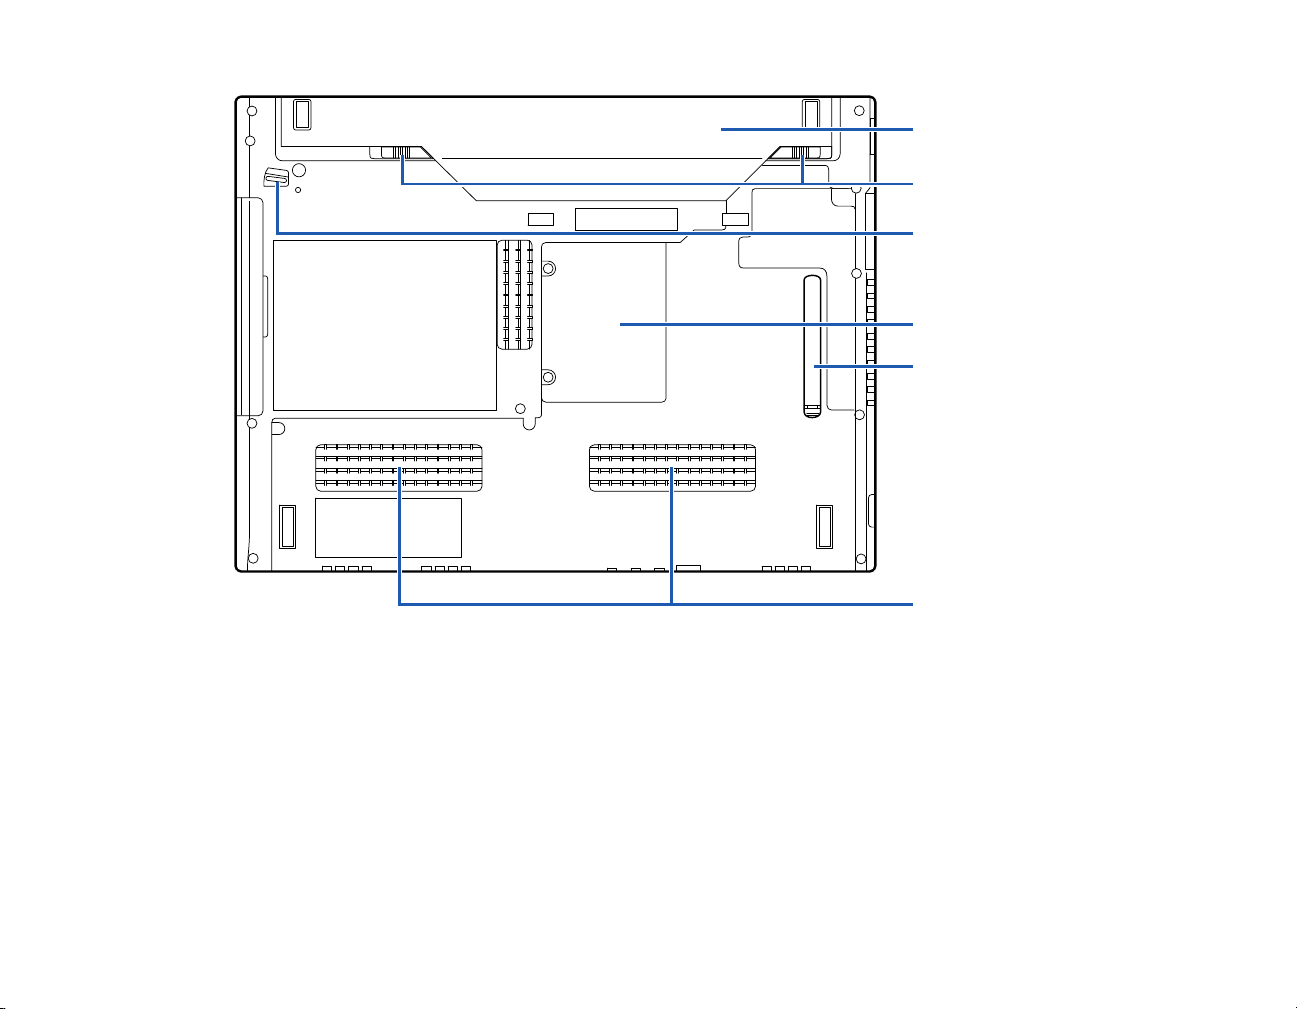
Figure 6. LifeBook notebook bottom panel
Memory Upgrade Compartment
Lithium ion Battery Pack
Air Vents
(multiple locations)
Dust Filter
Battery Release Latches
Flexible Bay Device Lock
Bottom Components
The following is a brief description of your LifeBook notebook’s bottom panel components.
Lithium ion Battery Pack
The battery bay contains the internal Lithium ion battery pack. It can be unlatched for the removal of the
battery when stored over a long period of time or for swapping a discharged battery with a charged
Lithium ion battery. See “Lithium ion Battery” on page 67.
21
- Locating the Controls and Connectors
Page 27

Battery Release Latches
The battery release latches are used to lock and release the battery in the battery bay. See “Lithium ion
Battery” on page 67.
Flexible Bay Device Lock
The flexible bay device lock is used to lock and release a modular flexible bay device in the flexible bay.
See “Flexible Bay Devices” on page 38.
Memory Upgrade Compartment
Your notebook comes with high speed Double Data Rate 3 Synchronous Dynamic RAM (DDR3
SDRAM). The memory upgrade compartment allows you to expand the system memory capacity of your
notebook, thus improving overall performance. See “Memory Upgrade Module” on page 84. Under
normal circumstances, it should not be necessary to open this compartment.
Dust Filter
The dust filter is used to help prevent dust and dirt from entering your system. (See “Cleaning the dust
filter” on page 123).
Air Vents
The air vents allow air to circulate through the system to cool down the components.
TO PROTECT YOUR NOTEBOOK FROM DAMAGE AND TO OPTIMIZE SYSTEM PERFORMANCE, BE SURE TO
KEEP ALL AIR ALL VENTS UNOBSTRUCTED, CLEAN, AND CLEAR OF DEBRIS. THIS MAY REQUIRE
PERIODIC CLEANING, DEPENDING UPON THE ENVIRONMENT IN WHICH THE SYSTEM IS USED.
DO NOT OPERATE THE NOTEBOOK IN AREAS WHERE THE AIR VENTS CAN BE OBSTRUCTED, SUCH AS IN
TIGHT ENCLOSURES OR ON SOFT SURFACES LIKE A BED OR CUSHION.
22
- Locating the Controls and Connectors
Page 28

Status Indicator Panel
NumLk
CapsLk
ScrLk
Hard Drive/
Optical Drive
Access
Power
AC Adapter
Battery 1 Charge
Battery 2 Charge
Battery 1 Level
Battery 2 Level
Figure 7. Status Indicator Panel
The Status Indicators display symbols that correspond to specific components of your Fujitsu LifeBook
notebook. The LEDs below each symbol tell you how each of those components is operating.
Power Indicator
The Power indicator symbol states whether your system is operational. It has several different states, each
of which tells you the mode your notebook is in.
• Steady On: This means that there is power to your notebook and that it is ready for use.
• Flashing: This means that your notebook is in Standby mode.
23
- Status Indicator Panel
Page 29
• Steady Off: This means that your system is either in Save-to-Disk mode, or that your notebook has
1
2
1
2
been turned off.
If you are charging your battery, the Power indicator will remain on even if your notebook is shut off. The
Power indicator will also remain on if you have either adapter connected and are shut down from
Windows.
AC Adapter Indicator
The AC Adapter indicator states whether your notebook is operating from the AC adapter, Auto/Airline
adapter or battery. This icon has two different states that can tell you what power source your notebook is
using.
• On: This means that either of the adapters is currently in use.
• Off: Power is only coming from the battery and you do not have an adapter connected.
Battery Charge Indicators
Note that there are indicators for the primary battery (Battery 1) and an optional second battery (Battery 2.)
• Orange, solid: System battery is charging.
• Green, solid: System battery is fully charged.
• Orange, blinking: System is waiting to charge battery (battery is out of thermal range).
• Off: AC adapter is not plugged in.
Battery Level Indicators
Note that there are indicators for the primary battery (Battery 1) and an optional second battery (Battery 2.)
The Battery Level indicators display the charge level of the indicated battery pack, as follows:
• Green, solid: Battery is between 51% and 100% charged.
24
- Status Indicator Panel
Page 30

• Orange, solid: Battery is between 13% and 50% charged.
• Red, solid: Battery is 12% or less charged.
• Orange, blinking: Blinks during battery status measurement (Four seconds after the battery is
installed).
• Red, blinking: There is a problem with the battery.
• Off: There is no battery installed or the battery has no charge.
• If the battery pack is installed while the power is turned off, the battery level indicator will display
the charge level for five seconds after it blinks orange.
• If the AC adapter is not connected or the battery pack is not fully charged when the computer is
switched to standby mode, the indicator will blink. The LED blinks at the rate of one second on/six
seconds off.
• Batteries subjected to shocks, vibration or extreme temperatures can be permanently
damaged.
• A shorted battery is damaged and must be replaced.
Hard Drive/Optical Drive Access Indicator
The Hard Drive/Optical Drive Access indicator glows green when your internal hard drive is being
accessed. Note that flickering is normal.
NumLk Indicator
The NumLk indicator states that the integral keyboard is set in ten-key numeric keypad mode.
25
- Status Indicator Panel
Page 31

CapsLock Indicator
The CapsLock indicator states that your keyboard is set to type in all capital letters.
ScrLk Indicator
The ScrLk indicator states that your scroll lock is active.
26
- Status Indicator Panel
Page 32

Keyboard
Fn Key Windows Key
Function Keys
Numeric Keypad
Application Key Cursor Keys
(surrounded by heavy line)
Figure 8. Keyboard
Using the Keyboard
Your Fujitsu LifeBook notebook has an integral 84-key keyboard. The keys perform all the standard
functions of a 101-key keyboard, including the Windows keys and other special function keys. This
section describes the following keys.
• Numeric keypad: Your notebook allows certain keys to serve dual purposes, both as standard
characters and as numeric and mathematical keys. The ability to toggle between the standard
character and numerical keys is controlled through the [NumLk] key.
27
- Keyboard
Page 33

• Cursor keys: Your keyboard contains four arrow keys for moving the cursor or insertion point to
the right, left, up, or down within windows, applications and documents.
• Function keys: The keys labeled [F1] through [F12], are used in conjunction with the [Fn] key to
produce special actions that vary depending on what program is running.
• Windows keys: These keys work with your Windows operating system and function the same as
the onscreen Start menu button, or the right button on your pointing device.
Numeric Keypad
Certain keys on the keyboard perform dual functions as both standard character keys and numeric keypad
keys. NumLk can be activated by pressing the [NumLk] keys. Turning off the NumLk feature is done the
same way. Once this feature is activated you can enter numerals 0 through 9, perform addition ( + ),
subtraction ( - ), multiplication ( * ), or division ( / ), and enter decimal points ( . ) using the keys designated
as ten-key function keys. The keys in the numeric keypad are marked on the front edge of the key to
indicate their secondary functions.
Windows Keys
Your LifeBook notebook has two Windows keys, consisting of a Start key and an Application key. The
Start key displays the Start menu. This button functions the same as your onscreen Start menu button. The
Application key functions the same as your right mouse button and displays shortcut menus for the
selected item. (Please refer to your Windows documentation for additional information regarding the
Windows keys.)
Cursor Keys
The cursor keys are the four arrow keys on the keyboard which allow you to move the cursor up, down,
left and right in applications. In programs such as Windows Explorer, it moves the “focus” (selects the
next item up, down, left, or right).
28
- Keyboard
Page 34

Function Keys
Your LifeBook notebook has 12 function keys, F1 through F12. The functions assigned to these keys differ
for each application. You should refer to your software documentation to find out how these keys are used.
• The [Fn] key provides extended functions for the notebook and is always used in conjunction with
another key.
• [Fn+F3]: Pressing [F3] while holding [Fn] will toggle the Audio Mute on and off.
• [Fn+F6]: Pressing [F6] repeatedly while holding [Fn] will lower the brightness of your display.
• [Fn+F7]: Pressing [F7] repeatedly while holding [Fn] will increase the brightness of the display.
• [Fn+F8]: Pressing [F8] repeatedly while holding [Fn] will decrease the volume of your LifeBook
notebook.
• [Fn+F9]: Pressing [F9] repeatedly while holding [Fn] will increase the volume of your LifeBook
notebook.
• [Fn+F10]: Pressing [F10] while holding [Fn] allows you to change your selection of where to send
your display video. Each time you press the combination of keys you will step to the next choice.
The choices, in order, are: built-in display panel only, external monitor only, and both built-in
display panel and external monitor.
29
- Keyboard
Page 35

Touchpad Pointing Device
Cursor Control
Left Button
Right Button
Scroll/Fingerprint Sensor
Figure 9. Touchpad pointing device
The Touchpad pointing device comes built into your Fujitsu LifeBook notebook. It is used to control the
movement of the pointer to select items on your display panel. The Touchpad is composed of a cursor
control, a left button, a right button, and a scroll/fingerprint sensor.
The cursor control works the same way a mouse does, and moves the cursor around the display. It only
requires light pressure with the tip of your finger. The left and right buttons function the same as mouse
buttons. Additionally, the touchpad allows you to zoom in or out and scroll through large documents using
simple gestures. The actual functionality of the buttons may vary depending on the application that is
being used.
30
- Touchpad Pointing Device
Page 36

Note that the fingerprint recognition sensor also functions as a scroll sensor. After logging in, moving your
finger up and down the sensor will act the same as a scroll button. To learn how to use the fingerprint
sensor, see “Appendix B: Fingerprint Sensor Device” on page 177.
AN EXTERNAL MOUSE CAN BE CONNECTED TO THE USB PORTS ON YOUR LIFEBOOK NOTEBOOK AND
USED SIMULTANEOUSLY WITH THE TOUCHPAD. HOWEVER, IF YOU BOOT THE SYSTEM WITH AN
EXTERNAL MOUSE CONNECTED THE TOUCHPAD WILL BE DISABLED OR ENABLED DEPENDING ON THE
SPECIFICATIONS IN YOUR BIOS SETTINGS. See “BIOS Setup Utility” on page 56.
Clicking
Clicking means pushing and releasing a button. To
left-click, move the cursor to the item you wish to
select, press the left button once, and then immediately
release it. To right-click, move the mouse cursor to the
item you wish to select, press the right button once,
and then immediately release it. You also have the
option to perform the clicking operation by tapping
lightly on the Touchpad once.
Figure 10. Clicking with button
31
- Touchpad Pointing Device
Figure 11. Clicking with Touchpad
Page 37

Double-Clicking
Double-clicking means pushing and releasing the left
button twice in rapid succession. This procedure does
not function with the right button. To double-click,
move the cursor to the item you wish to select, press the
left button twice, and immediately release it. You can
also perform the double-click operation by tapping
lightly on the Touchpad twice.
Figure 12. Double-clicking with button
Figure 13. Double-clicking with Touchpad
32
- Touchpad Pointing Device
Page 38

Dragging
Dragging means pressing and holding the left button,
while moving the cursor. To drag, move the cursor to
the item you wish to move. Press and hold the left
button while moving the item to its new location and
then release it. Dragging can also be done using the
Touchpad. First, tap the Touchpad twice over the item
you wish to move making sure to leave your finger on
the pad after the final tap. Next, move the object to its
new location by moving your finger across the
Touchpad, and then release your finger.
Figure 14. Dragging with button
33
- Touchpad Pointing Device
Figure 15. Dragging with Touchpad
Page 39

Scrolling
Using the fingerprint sensor as a scrolling button allows
you to navigate through a document quickly without
using the window’s scroll bars. This is particularly
useful when you are navigating through on-line pages.
To use the sensor, slide your finger forwards or
backwards, depending upon the direction you want to
scroll. When you have reached the desired section of
the page, lift your finger.
To use the sensor for fingerprint recognition, see
“Appendix B: Fingerprint Sensor Device” on page 177.
Figure 16. Scrolling with fingerprint sensor
34
- Touchpad Pointing Device
Page 40

Navigating Using Gestures
The touchpad allows you to use gestures to zoom in or out on a page or scroll quickly through large
documents.
Zooming In:
To zoom in on a page using the touchpad, simply place two fingers together on the touchpad and move
them away from each other. (See Figure 17)
Zooming Out:
To zoom out on a page using the touchpad, place two fingers on the touchpad and move towards each
other. (See Figure 18)
Continuous Scroll:
To scroll through a large document using gestures (“ChiralMotion”), hold your finger on the right side
touchpad for a couple of seconds until a circular icon appears, then move your finger in a clockwise
circular motion to scroll down, or counter-clockwise to scroll up. To scroll side to side, hold your finger
on the botttom edge of the touchpad for a couple of seconds until a circular icon appears, then move your
finger clockwise to scroll right, and counter-clockwise to scroll left. (See Figure 19)
Momentum:
To increase the cursor movement speed, slide your finger quickly across the touchpad. (See Figure 20)
Enabling/Disabling Gesture Functions:
1 To enable or disable the gesturing functions, go to Start > Control Panel > Hardware and Sound.
2 Double-click Mouse, and the Mouse Properties window will appear.
3 Select the Device Settings tab and click the [Settings...] button.
4 To enable/disable continuous scrolling: Select Virtual Scrolling from the left pane, check Enable Vertical
Scrolling and/or Enable Horizontal Scrolling, and then check Chiral Motion.
5 To enable/disable the zoom function, select Pointer Motion in the left pane, then check Pinch.
6 To enable or disable the momentum feature, select Pointer Motion in the left pane, then select Momentum and
check Enable Momentum.
35
- Touchpad Pointing Device
Page 41

Touchpad Control Adjustment
The Windows Control Panel allows you to customize your Touchpad with selections made from within
the Mouse Properties dialog box.
Figure 17. Zooming in with Touchpad Figure 18. Zooming out with Touchpad
Figure 19. Continuous scrolling
36
- Touchpad Pointing Device
Figure 20. Speeding up cursor movement
Page 42

Volume Control
Your Fujitsu LifeBook notebook has multiple volume controls which interact with each other.
Controlling the Volume
The volume can be controlled in several different ways:
• Volume can be changed or muted from within the Volume Control in the system tray.
• Volume can be controlled with the F8 and F9 functions keys. Pressing [F8] repeatedly while holding
[Fn] will decrease the volume of your notebook. Pressing [F9] repeatedly while holding [Fn] will
increase the volume of your notebook.
• Volume can be muted by pressing the [F3] key while holding down the [Fn] key. To restore audio,
repeat the [Fn+F3] procedure.
• Volume can be controlled by many volume controls that are set within individual applications.
• Certain external audio devices you might connect to your system may have hardware volume
controls.
ANY SOFTWARE THAT CONTAINS AUDIO FILES WILL ALSO CONTAIN A VOLUME CONTROL OF ITS OWN. IF
YOU INSTALL AN EXTERNAL AUDIO DEVICE THAT HAS AN INDEPENDENT VOLUME CONTROL, THE
HARDWARE VOLUME CONTROL AND THE SOFTWARE VOLUME CONTROL WILL INTERACT WITH EACH
OTHER. IT SHOULD BE NOTED THAT IF YOU SET YOUR SOFTWARE VOLUME TO OFF, YOU WILL OVERRIDE
THE EXTERNAL VOLUME CONTROL SETTING.
Each source discussed above puts an upper limit on the volume level that must then be followed by the
other sources.
We recommend that you experiment with the various volume controls to discover the optimal sound level.
37
- Volume Control
Page 43

Flexible Bay Devices
Flexible Bay
Flexible Bay Release Button
Emergency Tray Release
Your Fujitsu LifeBook notebook contains a Flexible Bay. The Flexible Bay can house an optical drive, a
Lithium ion battery, or a weight saver.
Your Flexible Bay will have one of the following devices installed.
• Modular Dual-Layer Multi-Format DVD Writer: This allows you to access movies, software, and
audio DVD/CDs and record to DVD, CD, and DVD-RAM discs.
• Modular Lithium ion battery: This is a rechargeable battery that can be used to power your
LifeBook notebook when an adapter is not connected.
• Weight Saver: This is used to fill the bay when no device is needed.
Figure 21. Flexible Bay
38
- Flexible Bay Devices
Page 44

Flexible Bay
Release Latch
Removing and Installing Modular Devices
There are two ways to remove and install modular devices in the Flexible Bay:
• Cold-swapping: swapping devices while your LifeBook notebook is powered off.
• Hot-swapping: swapping devices while your system is active, using the Safely Remove Hardware
icon from your system tray.
YOU SHOULD NEVER LEAVE YOUR FLEXIBLE BAY EMPTY WHEN THE NOTEBOOK IS IN OPERATION. IF LEFT
EMPTY, DUST OR FOREIGN MATTER MAY ACCUMULATE INSIDE THE NOTEBOOK.
Cold-swapping
To cold-swap modular devices in your Flexible Bay follow these easy steps:
1 Close any open files.
2 Shut down your LifeBook notebook.
3 Turn your system upside down.
4 As you press the Flexible Bay release
latch as shown in Figure
Flexible Bay module until it is clear of
the bay. This will require light force.
5 Slide the device you are installing into
your notebook until it clicks into place.
6 It is now safe to turn your notebook
back on.
7 You can now access and use the
device.
22, pull out the
39
- Flexible Bay Devices
Figure 22. Removing/installing a Flexible Bay device
Page 45

Your LifeBook notebook will automatically detect the new device and activate it within your system. The
drive letters associated with the device will be created and listed under My Computer and Windows
Explorer.
Hot-swapping
Hot-swapping is provided through the Safely Remove Hardware utility. The icon for the utility appears in
the system tray. Click on the icon and follow the on-screen instructions.
40
- Flexible Bay Devices
Page 46

Figure 23. LifeBook Security/Application Panel
Button 1
Button 2
Button 3
Button 4
Enter Button
Security Indicator
LifeBook Security/Application Panel
A unique feature of your LifeBook notebook is the Security/Application Panel that allows you to secure
your notebook from unauthorized use. The Security/Application Panel also allows you to launch
applications with the touch of a button when your system is on.
If the security system is activated, upon starting your notebook or resuming from suspend mode, the
security system requires you to enter a password code using the buttons on the Security/Application Panel.
After entering a correct password, your notebook resumes system operation.
41
- LifeBook Security/Application Panel
Page 47

Setting up Your LifeBook Security Panel
When you receive your LifeBook notebook, the security panel application is pre-installed without any
passwords. The following sections provide detailed information on your security panel, and how to set,
change or remove passwords.
Numbered Buttons
Use these buttons to enter your password.
Enter Button
After entering the button strokes, push this button to enter the password into the LifeBook notebook.
Passwords
The user and supervisor password may be set on this notebook. A supervisor password is typically the
same for all LifeBook notebooks in a working group, office, or company to allow for system management.
Individual LifeBook notebooks in a group environment should not use a common password. A password
consists of one to five button strokes plus the [Enter] button. A valid stroke consists of pushing one or up
to four buttons simultaneously. The following are valid button strokes:
• Pushing [4] by itself
• Pushing [2] and [3] at the same time
• Pushing [1], [2], and [4] at the same time
• Pushing [1], [2], [3], and [4] at the same time
The following are valid passwords. The numbers within braces ({ }) are button strokes using more than
one button.
• {[2]+[3]}, [1], [enter]
• [4], [enter]
• {[1]+[3]}, {[2]+[3]+[4]}, [1], [4], [2], [enter]
42
- LifeBook Security/Application Panel
Page 48

Setting Passwords
When shipped from the factory, no passwords are set. You have a choice of having no password or setting
supervisor and user passwords. You must set the supervisor password before the user password.
THE PURPOSE OF SUPERVISOR PASSWORD IS TO BE ABLE TO BYPASS THE USER PASSWORD IN CASE
THE USER PASSWORD IS FORGOTTEN. THE SUPERVISOR PASSWORD ALONE WILL NOT LOCK THE
SYSTEM. YOU MUST SET BOTH THE SUPERVISOR AND USER PASSWORDS FOR THE SECURITY PANEL TO
WORK.
Setting Supervisor Password
You must have set a supervisor password before setting any user passwords. The supervisor password can
bypass the user password. Depending upon your operating system, use the appropriate procedure below.
Windows XP:
1 Go to the Start menu.
2 Click on Run.
3 Typ e i n :
C:\Program Files\Fujitsu\Security Panel Application\Supervisor\FJSECS.EXE, then
press [Enter]
4 Follow the on-screen instructions to set the Supervisor password.
Windows Vista:
1 Go to the Start menu.
2 Select All Programs.
3 Select Accessories, then select Run.
4 Typ e i n :
C:\Program Files\Fujitsu\Security Panel Application\Supervisor\FJSECS.EXE, then
press [Enter]
5 Follow the on-screen instructions to set the Supervisor password.
43
- LifeBook Security/Application Panel
Page 49

Setting User Password
Windows XP:
1 Go to the Start menu.
2 Click on Programs.
3 Click on Security Panel Application and Set User Password.
4 Follow the on-screen instructions to set the user password
Windows Vista:
1 Go to the Start menu.
2 Select All Programs.
3 Select Security Panel Application and Set User Password.
4 Follow instructions to set the user password.
YOU MAY CHANGE OR REMOVE THE SUPERVISOR OR USER PASSWORD BY REPEATING THE STEPS
DEFINED ABOVE.
Operating Your LifeBook Security/Application Panel
The security lock feature is in effect both when the system resumes from Off or suspend state. You will
need to enter the user password right after pressing the Suspend/Resume button. Your system will not boot
or resume from Standby without entering your supervisor/user password.
From Off State
1 Turn on your system.
2 When the Security Indicator flashes, enter the password and press [Enter] button. For example, if the password
is 22222, press button number [2] five times and press [Enter] button.
3 The notebook will boot to normal operation.
44
- LifeBook Security/Application Panel
Page 50

From Suspend State
1 Press your Power/Suspend/Resume button.
2 When the Security Indicator flashes, enter the password and press [Enter] button.
3 The notebook should resume normal operation.
Incorrect Password Entry
If an invalid supervisor or user password is entered three times in succession, the system will “beep” for
about one minute. If a valid password is entered within a minute (while system beeps), the beeping will
stop and the notebook will resume normal operation. If no password (or an invalid one) is entered while
the system beeps, the system will return to its previous locked state (suspend or off) and the Security
Indicator will go off. To reactivate the notebook after a password failure, you must press the
Power/Suspend/Resume button, then enter a correct password.
REMEMBER THE USER PASSWORD YOU SPECIFIED ON THE SECURITY PANEL APPLICATION. IF YOU
FORGET THE PASSWORD YOU WILL NOT BE ABLE TO USE YOUR COMPUTER. THE SUPERVISOR
PASSWORD CAN OVERRIDE THE USER PASSWORD.
Precautions
Opening and Closing the Cover
Closing the cover automatically places the notebook into suspend mode. Opening the cover does not
automatically place the notebook into normal operation. Instead, you must enter the proper security
password after pushing the Power/Suspend/Resume button. This setting can be changed in the Power
Options Control Panel.
Low Battery Operations
If your LifeBook notebook has low battery, pushing the Power/Suspend/Resume button only turns on the
Security Indicator. Your notebook does not unlock, the Security Indicator turns off after one minute. To
resume normal operation, first attach a power supply to the notebook. Then you may unlock the notebook.
45
- LifeBook Security/Application Panel
Page 51

Uninstalling the Security Panel Application
You have two options when uninstalling the security panel application:
• Uninstall the security panel application software. This will disable all security features.
• Uninstall the security panel application with password still active. This will not allow any changes
to the password.
Uninstalling the Security Panel Application
Remove passwords when the User wants no password protection whatsoever and doesn’t want to give
anybody the utility to set a password on their computer. In this case, if passwords (supervisor, user, or
both) are set, the passwords must first be cleared BEFORE removing the application. To clear passwords,
follow same procedure in “Setting Passwords” except this time, select [Remove], enter current password
then click [Next]. When asked to confirm, select [Yes].
Removing Security Panel Application with Passwords Still Active
Using this feature will not allow any changes to the password. Depending upon your operating system,
the procedures differ slightly, as noted below.
REMOVING THE APPLICATIONS DOES NOT REMOVE THE PASSWORD. IT SIMPLY REMOVES THE UTILITY
TO CHANGE/ADD/REMOVE PASSWORDS. TO CHANGE YOUR PASSWORD YOU MUST REINSTALL THE
APPLICATION.
User:
1 Go to Start Menu, Click on Control Panel.
2 Open Add or Remove Programs (In Vista: Programs and Features) in the Control Panel.
3 Select the Security Panel Application (In Vista: Security Panel) in the list, and click Add/Remove.
4 When the Confirm File Deletion box appears, click Yes .
46
- LifeBook Security/Application Panel
Page 52

Supervisor:
1 Go to Start Menu, Click on Control Panel.
2 Open Add/Remove Programs Properties in the Control Panel.
3 Select the Security Panel Application for Supervisor (In Vista: Security Panel for Supervisor) in the list,
and click Add/Remove.
4 When the Confirm File Deletion box appears, click Yes .
Reinstalling the Security/Application Panel
To reinstall supervisor or user security application, you will need your Drivers and Applications CD. The
Utilities/Security Application Panel folder contains two separate folders: Supervisor and User. The
setup files for supervisor and user security applications are contained in those folders.
1 Go to the Utilities/Security Application Panel/Supervisor folder on the CD and double-click the setupS.exe
file. (In Vista, the path is: Utilities/SAP/Vista/Supervisor/SetupS.exe). The Installing Security Panel
Application window will appear. Follow the instructions on the screen.
2 Go to the Utilities/Security Application Panel/User folder on the CD and double-click the setup.exe file.(In
Vista, the path is: Utilities/SAP/Vista/Setup.exe) The Installing Security Panel Application window will appear.
Follow the instructions on the screen.
Supervisor and user passwords can be set via Windows software using the FJSECS.exe and FJSECU.exe
files, respectively. FJSECU.exe for the user password cannot run without first setting a supervisor
password. You need to run FJSECS.exe first to set the supervisor password. Follow instructions under
Setting Passwords on page 43.
If you forget both passwords, contact Fujitsu Computer Systems Corporation Service and Support at 1800-8FUJITSU (1-800-838-5487). Fujitsu Computer Systems Corporation charges a service fee for
unlocking a password restricted LifeBook notebook. When calling please have a valid credit card and
provide proof of ownership. You will then be given instructions on where to ship your notebook.
47
- LifeBook Security/Application Panel
Page 53

Launching Applications with the Security/Application Panel
The security panel also enables you to launch applications with the touch of a button when your system is
on. Pressing any of the buttons will launch a user-defined application. Your notebook is pre-installed with
software utilities that let you operate and configure your LifeBook Security /Application Panel. These
utilities are found in the Control Panel under Application Panel. They include two Application Panel
Setup tabs, E-mail Setup, and Internet Setup.
Configuring your LifeBook Application Panel
When you start Windows, the LifeBook Application Panel is automatically activated. As an application
launcher, the LifeBook Application Panel is very flexible, giving you a variety of options. To set up the
Panel to best suit your needs, we have provided the Application Panel Setup utility that quickly and easily
helps you make the most of this valuable feature.
To configure your LifeBook Application Panel with Application Panel Setup:
1 Click on [Start].
2 Click on Programs (or Settings in Windows XP).
3 Click on LifeBook Application Panel (or Control Panel in Windows XP).
4 Click on Application Panel Setup. The Application Panel Setup utility will appear. There are tabs that correspond
to the application buttons on the LifeBook Application Panel. When you receive your notebook, these buttons
are pre-configured to launch specific programs, as referenced in Chapter 7 of this document.
THE TABS IN APPLICATION PANEL SETUP MAY NOT BE IN THE SAME ORDER AS THE BUTTONS ON YOUR
L
IFEBOOK NOTEBOOK, PLEASE SELECT THE TAB YOU WISH TO CHANGE CAREFULLY.
To change an application associated with the Application buttons, click on the tab for the button you would
like to reconfigure – for example, Application A. Click on Browse from Start Menu, scroll down the list
of applications, click on the application you wish to launch with this button, and then click OK. The button
will now launch the new application.
48
- LifeBook Security/Application Panel
Page 54

The Internet tab is different. It comes set to launch your Windows default Internet browser (Internet
Explorer), unless you have changed this in Windows. In order to reconfigure it to launch another program
follow these easy steps:
1 Click on Other from the Internet browser box.
2 Click on Browse from Start Menu.
3 Scroll down the list of applications, and then click on the application you wish to launch with this button.
4 Click OK. The button will now launch the new application. If you want to return to launching your Windows
default Internet browser with this button, you need only click on “Default Internet Browser” from the Internet
browser box. Be aware that you will erase the settings for the “other application”. If you wish to go back to
launching the “other application” from this button, you will need to reconfigure it as described above.
IF YOUR SYSTEM HAS DEDICATED ONE OF THE APPLICATION LAUNCHER BUTTONS TO BE AN INTERNET
LAUNCHER, THE BUTTON CAN STILL BE CONFIGURED TO LAUNCH ANY APPLICATION YOU WISH, NOT JUST
AN INTERNET BROWSER.
When you have finished with Application Panel Setup click OK, and the new settings will take effect. You
can reconfigure your LifeBook Application Panel as often as you like.
Deactivating and Activating the LifeBook Application Panel
To deactivate the LifeBook Application Panel in Windows XP, follow these easy steps:
1 Click on Start-> Programs.
2 Click on LifeBook Application Panel.
3 Click on Stop Application Panel.
To re-activate, follow the same procedure, except for step 4. Click on Activate Panel instead.
EVERY TIME YOU START WINDOWS THE LIFEBOOK APPLICATION PANEL IS ACTIVATED, EVEN IF YOU
DEACTIVATED IT BEFORE YOU SHUT DOWN.
49
- LifeBook Security/Application Panel
Page 55

Chapter 2
DC Power Jack
AC Adapter
Getting Started with Your LifeBook
Power Sources
Your Fujitsu LifeBook notebook has three possible power sources: a primary Lithium ion battery, an AC
adapter or an optional Auto/Airline adapter.
Figure 24. Connecting the AC Adapter
50
Page 56

Connecting the Power Adapters
The AC adapter or optional Auto/Airline adapter provides power for operating your notebook and
charging the batteries.
Connecting the AC Adapter
1 Plug the DC output cable into the DC power jack of your LifeBook notebook.
2 Plug the AC adapter into an AC electrical outlet.
Connecting the Optional Auto/Airline Adapter
1 Plug the DC output cable into the DC power jack on your notebook.
2 Plug the Auto/Airline adapter into the cigarette lighter of an automobile with the ignition key in the On or
Accessory position.
OR
3 Plug the Auto/Airline adapter into the DC power jack on an airplane seat.
Switching from AC Adapter Power or the Auto/Airline Adapter to Battery Power
1 Be sure that you have at least one charged battery installed.
2 Remove the AC adapter or the Auto/Airline adapter.
THE LITHIUM ION BATTERY IS NOT CHARGED UPON PURCHASE. INITIALLY, YOU WILL NEED TO CONNECT
EITHER THE AC ADAPTER OR THE AUTO/AIRLINE ADAPTER TO USE YOUR NOTEBOOK.
51
- Power Sources
Page 57

Display Panel
Display Panel Latch Button
Your Fujitsu LifeBook notebook contains a display panel that is backlit for easier viewing in bright
environments and maintains top resolution through the use of active-matrix technology.
Opening the Display Panel
1 Press the Display Panel latch button in. This releases the locking mechanism, allowing you to raise the display.
2 Lift the display backwards, being careful not to touch the screen, until it is at a comfortable viewing angle.
Figure 25. Opening the Display Panel
52
- Display Panel
Page 58

Adjusting Display Panel Brightness
Once you have turned on your LifeBook notebook, you may want to adjust the brightness level of the
screen to a more comfortable viewing level. In Windows XP systems, the brightness can be adjusted using
the keyboard. In Windows Vista systems, there are three ways to adjust the brightness, by using the
keyboard, the Power Options, or the Windows Mobility Center.
NOTE THAT WHEN YOU CHANGE THE DISPLAY SETTINGS IN WINDOWS XP SYSTEMS, THE CHANGES
WILL BE RETAINED AFTER STANDBY AND RESTART. IN WINDOWS VISTA SYSTEMS, THE CHANGED
SETTINGS ARE TEMPORARY BY DEFAULT, BUT THEY CAN BE MADE PERMANENT BY USING THE POWER
O
PTIONS UTILITY IN THE CONTROL PANEL.
Using the Keyboard
Adjusting the brightness using the keyboard changes the setting only temporarily.
• [Fn+F6]: Pressing repeatedly will lower the brightness of your display.
• [Fn+F7]: Pressing repeatedly will increase the brightness of the display.
Using the Power Options (Windows Vista)
To change the brightness using the Power Options utility, open the Control Panel and double-click on the
Power Options icon. Select Adjust the display brightness in the left panel, then drag the brightness bars
to the desired level. Note that the settings you make via this utility become permanent until you decide to
change them again.
Using the Windows Mobility Center (Windows Vista)
In the Control Panel, double-click the Windows Mobility Center icon. Drag the Display Brightness bar
to the desired level.
53
- Display Panel
Page 59

Starting Your LifeBook Notebook
Power On
Power/Suspend/Resume Button
The Power/Suspend/Resume button is used to turn on your LifeBook notebook from its off state. Once
you have connected your AC adapter or charged the internal Lithium ion battery, you can power on your
LifeBook notebook.
WHEN YOU TURN ON YOUR LIFEBOOK NOTEBOOK, BE SURE YOU HAVE A POWER SOURCE. THIS MEANS
THAT A BATTERY IS INSTALLED AND CHARGED, OR THAT THE AC OR AUTO/AIRLINE ADAPTER IS
CONNECTED AND HAS POWER.
To turn on your LifeBook notebook from its off state, press the Power/Suspend/Resume button, located
above the keyboard to the right. When you are done working you can either leave your notebook in
Suspend mode, See “Standby (Sleep) Mode” on page 63, or you can turn it off. See “Powering Off” on
page 65.
D
O NOT CARRY YOUR LIFEBOOK NOTEBOOK AROUND WITH THE POWER ON OR SUBJECT IT TO SHOCKS
OR VIBRATION, AS YOU RISK DAMAGING YOUR NOTEBOOK.
When you power on your LifeBook, it will perform a Power On Self Test (POST) to check the internal
parts and configuration for correct functionality. If a fault is found, your LifeBook notebook will emit an
audio warning and/or an error message will be displayed. See “Power On Self Test Messages” on page 108
Depending on the nature of the problem, you may be able to continue by starting the operating system or
by entering the BIOS setup utility and revising the settings.
After satisfactory completion of the POST, your notebook will load your operating system.
54
- Starting Your LifeBook Notebook
Page 60

NEVER TURN OFF YOUR LIFEBOOK NOTEBOOK DURING THE POWER ON SELF TEST (POST) OR IT WILL
CAUSE AN ERROR MESSAGE TO BE DISPLAYED WHEN YOU TURN YOUR LIFEBOOK NOTEBOOK ON THE
NEXT TIME. See “Power On Self Test Messages” on page 108
Boot Sequence
The procedure for starting-up your notebook is termed the Bootup sequence and involves your notebook’s
BIOS. When your LifeBook notebook is first turned on, the main system memory is empty, and it needs
to find instructions to start up your notebook. This information is in the BIOS program. Each time you
power up or restart your notebook, it goes through a boot sequence which displays a Fujitsu logo until
your operating system is loaded. During booting, your notebook is performing a standard boot sequence
including a Power On Self Test (POST). When the boot sequence is completed without a failure and
without a request for the BIOS Setup Utility, the system displays the operating system’s opening screen.
The boot sequence is executed when:
• You turn on the power to your LifeBook notebook.
• You restart your notebook from the Windows Shut Down dialog box.
• The software initiates a system restart. Example: When you install a new application.
Hard Disk Drive Passwords
To provide additional security for your data, you can assign passwords to your hard disk drive(s). This
feature is managed in the system BIOS Setup Utility. See BIOS Setup Utility below for information about
accessing the utility.
R
EMEMBER YOUR PASSWORDS. IF YOU SET AND FORGET YOUR USER AND MASTER HARD DISK
PASSWORDS, FUJITSU COMPUTER SYSTEMS WILL NOT BE ABLE TO RESET IT. YOU MAY LOSE DATA AND
HAVE TO REPLACE YOUR SYSTEM BOARD OR HARD DISK DRIVE.
55
- Starting Your LifeBook Notebook
Page 61

BIOS Setup Utility
The BIOS Setup Utility is a program that sets up the operating environment for your LifeBook notebook.
Your BIOS is set at the factory for normal operating conditions, therefore there is no need to set or change
the BIOS’ environment to operate your notebook.
The BIOS Setup Utility configures:
• Device control feature parameters, such as changing I/O addresses and boot devices.
• System Data Security feature parameters, such as passwords.
Entering the BIOS Setup Utility
To enter the BIOS Setup Utility do the following (or use the TrustedCore Menu, as detailed below):
1 Turn on or restart your LifeBook notebook.
2 To enter the BIOS Setup Utility, press the [F2] key once the Fujitsu logo appears on the screen. This will open
the main menu of the BIOS Setup Utility with the current settings displayed.
3 Press the [RIGHT ARROW] or [LEFT ARROW] key to scroll through the other setup menus to review or alter
the current settings.
Using the TrustedCore Menu
When the Fujitsu logo appears on the screen. press the [Enter] key or click on the left mouse or touchpad
button; the TrustedCore Menu will appear.
The TrustedCore Menu provides shortcuts to the following menus and information screens:
• BIOS Setup
• Diagnostic Screen
• Boot Menu
• Patent Information
• System Information
• Continue Booting
56
- Starting Your LifeBook Notebook
Page 62

Clicking on any of the fields will invoke the screen, information, or action described.
The Boot Menu can also be invoked by pressing the [F12] key when the Fujitsu logo appears on the screen.
BIOS Guide
A guide to your notebook’s BIOS is available online. Please visit our service and support website at
http://www.computers.us.fujitsu.com/support, then select User’s Guides under Online Support. Select
your Product, Series, and Model, then click [Go]. Under the Manuals tab, select the BIOS Guide.
Booting the System
We strongly recommend that you not attach any external devices and do not put a DVD/CD in your drive
until you have gone through the initial power on sequence.
When you turn on your notebook for the first time, it will display a Fujitsu logo on the screen. If you do
nothing the system will load the operating system, and then the Windows Welcome will begin.
Depending upon your operating system (Windows Vista or XP edition), there is a different procedure for
stating your system for the first time, as outlined below.
Starting Windows Vista the first time
THE FIRST TIME YOU INITIALIZE YOUR WINDOWS VISTA SYSTEM, THE SCREEN WILL BE BLANK FOR
APPROXIMATELY TWO MINUTES. THIS IS NORMAL. AFTER INITIALIZATION, A “SET UP WINDOWS” DIALOG
BOX WILL APPEAR.
I
MPORTANT: DURING THE SETUP PROCEDURE, DO NOT DISCONNECT THE POWER SUPPLY, PRESS ANY
BUTTONS, OR USE ANY PERIPHERAL DEVICES SUCH AS A MOUSE, KEYBOARD, OR REMOTE CONTROL.
In order to ensure that you receive the most benefits from the Windows Vista operating system, it should
be registered the first time you use it.
57
- Starting Your LifeBook Notebook
Page 63

1 First of all, you will need to read and accept the End User License Agreements (EULAs).
• IF YOU REJECT THE TERMS OF THE LICENSE AGREEMENTS YOU WILL BE ASKED TO REVIEW THE LICENSE
AGREEMENTS FOR INFORMATION ON RETURNING WINDOWS OR TO SHUT DOWN YOUR LIFEBOOK NOTEBOOK.
• YOU CANNOT USE YOUR NOTEBOOK UNTIL YOU HAVE ACCEPTED THE LICENSE AGREEMENTS. IF YOU STOP THE
PROCESS YOUR NOTEBOOK WILL RETURN TO THE BEGINNING OF THE WINDOWS WELCOME PROCESS, EVEN IF
YOU SHUT YOUR NOTEBOOK DOWN AND START IT UP AGAIN.
2 You will be prompted to enter your User Name and Password and you will be given a chance to select an icon
for your account.
3 The next screen asks for a Computer Name and allows you to choose a desktop background.
4 You will next see a "Help protect Windows automatically" screen in which the default choice is "Use
recommended settings”. The other two choices are "Install important updates only" and "Ask me later". Select
from the three choices.
5 On the next screen set your time and date settings.
6 You will next see the "Select your computer's current location" screen. Make your selection from Home, Work
(Default), and Public location.
7 The "Thank you" screen follows and an offer for free Norton Internet Security is extended. Following are several
screens while Windows checks the system performance.
8 Windows will then boot up for the first time. As noted above, the first time you initialize your Windows Vista
system, the screen will be blank for approximately two minutes. This is normal. During this period, do not
disconnect the power supply, press any buttons, or use any peripheral devices such as mouse, keyboard, or
remote control.
Registering Windows Vista with Microsoft
1 After Windows has booted up for the first time, the Control Panel Welcome Center will appear. If the Register
Windows Online icon is not seen in the window, click on “Show all xx items” (where “xx” is the number of topics
in the Welcome Center).
2 Click on Register Windows Online and follow the instructions that appear to register your copy of Windows.
58
- Starting Your LifeBook Notebook
Page 64

Starting Windows XP the First Time
Registering Windows XP with Microsoft
In order to ensure that you receive the most benefits from the Windows operating system, it should be
registered the first time you use it.
After you receive the Windows Welcome screen, you will be prompted to enter registration information
in the following order.
First of all, you will need to read and accept the End User License Agreements (EULAs). After accepting
the EULAs, you will be asked if you want to enable the Automatic Updates feature. Acceptance of this
feature is recommended because it allows your system to be updated automatically whenever an important
change becomes available for your notebook.
• IF YOU REJECT THE TERMS OF THE LICENSE AGREEMENT YOU WILL BE ASKED TO REVIEW THE LICENSE
AGREEMENT FOR INFORMATION ON RETURNING WINDOWS OR TO SHUT DOWN YOUR LIFEBOOK NOTEBOOK.
• YOU CANNOT USE YOUR LIFEBOOK NOTEBOOK UNTIL YOU HAVE ACCEPTED THE LICENSE AGREEMENT. IF YOU
STOP THE PROCESS YOUR NOTEBOOK WILL RETURN TO THE BEGINNING OF THE WINDOWS WELCOME
ROCESS, EVEN IF YOU SHUT YOUR NOTEBOOK DOWN AND START IT UP AGAIN.
P
Several additional windows will appear, prompting you to enter a name and description for your computer,
an Administrator password, and a domain name. Read the instructions on the screens carefully and fill in
the information as directed.
You will then be automatically connected to the Internet, if you have an appropriate connection available.
If an automatic connection is not possible, you will be asked about how you dial out from where you will
be using your LifeBook notebook. If you are not connected to a phone line and plan to register at a later
time, you may click the Skip button.
Once you are connected to the Internet, you will be asked if you wish to continue with the registration. If
you select Ye s you will then enter your name and address, and email address if desired. Click Next to
complete registration.
59
- Starting Your LifeBook Notebook
Page 65

Registering Your LifeBook notebook with Fujitsu
ClickMe!
You can register your LifeBook by going to our website at: us.fujitsu.com/computers. You will need to
be set up with an Internet Service Provider (ISP) to register online.
Installing Click Me!
BEFORE INSTALLING THE CLICKME! UTILITY, BE SURE THE WIRELESS LAN SWITCH IS TURNED ON.
Windows Vista Systems
The first time you boot up your system, you will see a “Primary Settings for the PC” window. This window
explains the installations which will be performed by the Click Me! utility. If you click [Execute], Click
Me! will begin installing. If after clicking the button you receive a “User Account Control” window, you
will be asked for your permission to continue. Click [Continue] to continue. If you cancel the operation,
the Click Me! icon will appear on your desktop for later installation.
Windows XP Systems
The first time you boot up your system, you will see an icon called Click Me! in the Start menu. We highly
recommend that you install the ClickMe! utility the first time you boot up. When you click the Click
Me! icon, your system will automatically create the related icons in the system tray in the bottom right of
the screen. These icons provide links to utilities that you will frequently access, such as wireless LAN
software provided by the wireless LAN manufacturer.
I
N ADDITION TO THE APPLICATIONS AND UTILITIES INSTALLED BY CLICKME!, OTHER THIRD-PARTY
APPLICATIONS MAY NEED TO BE INSTALLED FROM THE INCLUDED DISCS. FOR MORE INFORMATION,
REFER TO YOUR GETTING STARTED GUIDE.
60
- Starting Your LifeBook Notebook
Page 66

Fujitsu Driver Update Utility
Your system has a convenient tool called the Fujitsu Driver Update (FDU) utility. With FDU, you can
choose to automatically or manually go to the Fujitsu site to check for new updates for your system. For
more information about the FDU utility, refer to “Automatically Downloading Driver Updates” on
page 119.
61
- Starting Your LifeBook Notebook
Page 67

Power Management
Your Fujitsu LifeBook notebook has many options and features for conserving battery power. Some of
these features are automatic and need no user intervention, such as those for the internal modem. However,
others depend on the parameters you set to best suit your operating conditions, such as those for the
display brightness. Internal power management for your notebook may be controlled from settings made
in your operating system, pre-bundled power management application, or from settings made in BIOS
setup utility.
Besides the options available for conserving battery power, there are also some things that you can do to
prevent your battery from running down as quickly. For example, you can create an appropriate power
saving profile, put your notebook into Standby (Sleep) mode when it is not performing an operation, and
you can limit the use of high power devices. As with all mobile, battery powered computers, there is a
trade-off between performance and power savings.
Power/Suspend/Resume Button
When your notebook is active, the Power/Suspend/Resume button can be used to manually put the
notebook into Standby (Sleep) mode. Push the Power/Suspend/Resume button when the notebook is
active, but not actively accessing anything, and immediately release the button.
PLEASE NOTE THAT “STANDBY MODE” IN WINDOWS XP IS KNOWN AS “SLEEP MODE” IN WINDOWS
V
ISTA. THE TWO TERMS ARE INTERCHANGEABLE. FOR PURPOSES OF THIS DOCUMENT, “STANDBY
M
ODE” WILL BE USED.
If your notebook is suspended, pushing the Power/Suspend/Resume button returns your notebook to
active operation. You can tell whether the system is Suspended by looking at the Power indicator. If the
indicator is visible and not flashing, your notebook is fully operational. If the indicator is visible and
flashing, your notebook is in Standby mode. If the indicator is not visible, the power is off or your
notebook is in Hibernation mode. (See Hibernation Feature)
62
- Power Management
Page 68

Standby (Sleep) Mode
Standby (Sleep) mode in Windows saves the contents of your system memory during periods of inactivity
by maintaining power to critical parts. This mode turns off the CPU, display, hard drive, and all other
internal components except those necessary to maintain system memory and for restarting.
Your notebook can be put in Standby mode by:
• Pressing the Power/Suspend/Resume button when your system is turned on.
• Selecting Standby (“Sleep” in Windows Vista) from the Windows Shut Down menu.
• Timing out from lack of activity.
• Allowing the battery to reach the Dead Battery Warning condition.
System memory typically stores the files on which you are working, open application information, and
any other data required to support operations in progress. When you resume operation from Standby, your
system will return to where it left off. You must use the Power/Suspend/Resume button to resume
operation, and there must be an adequate power source available, or your notebook will not resume.
■
IF RUNNING YOUR NOTEBOOK ON BATTERY POWER, BE AWARE THAT THE BATTERY CONTINUES TO DISCHARGE
WHILE YOUR NOTEBOOK IS IN STANDBY MODE, THOUGH NOT AS FAST AS WHEN FULLY OPERATIONAL.
■
DISABLING THE POWER/SUSPEND/RESUME BUTTON PREVENTS IT FROM BEING USED TO PUT THE NOTEBOOK INTO
S
TANDBY OR HIBERNATION (SAVE-TO-DISK) MODE. THE BUTTON RESUME FUNCTION CAN’T BE DISABLED.
■
THE STANDBY OR HIBERNATION (SAVE-TO-DISK) MODE SHOULD NOT BE USED WITH CERTAIN PC CARDS. CHECK
YOUR PC CARD DOCUMENTATION FOR MORE INFORMATION. WHEN PC CARDS OR EXTER NAL DEVICES ARE IN
USE, HIBERNATION (SAVE-TO-DISK) MODE CANNOT RETURN TO THE EXACT STATE PRIOR TO SUSPENSION,
BECAUSE ALL OF THE PERIPHERAL DEVICES WILL BE RE-INITIALIZED WHEN THE SYSTEM RESTARTS.
■
IF YOUR NOTEBOOK IS ACTIVELY ACCESSING INFORMATION WHEN YOU ENTER THE STANDBY OR HIBERNATION
(S
AVE-TO-DISK) MODE, CHANGES TO OPEN FILES ARE NOT LOST. THE FILES ARE LEFT OPEN AND MEMORY IS KEPT
ACTIVE DURING STANDBY MODE OR THE MEMORY IS TRANSFERRED TO THE INTERNAL HARD DRIVE DURING HIBER-
NATION MODE.
HE MAIN ADVANTAGE OF USING HIBERNATION (SAVE-TO-DISK) IS THAT POWER IS NOT REQUIRED TO MAINTAIN
T
YOUR DATA. THIS IS PARTICULARLY IMPORTANT IF YOU WILL BE LEAVING YOUR NOTEBOOK IN A SUSPENDED STATE
FOR A PROLONGED PERIOD OF TIME. THE DRAWBACK OF USING HIBERNATION MODE IS THAT IT LENGTHENS THE
POWER DOWN AND POWER UP SEQUENCES AND RESETS PERIPHERAL DEVICES.
63
- Power Management
Page 69

Hibernation (Save-to-Disk) Feature
The Hibernation feature saves the contents of your notebook’s system memory to the hard drive as a part
of the Suspend/Resume mode. You can enable or disable this feature.
Enable or Disable the Hibernation Feature
Windows Vista:
The default settings are not enabled. To enable or disable the Hibernation feature follow these steps:
1 From the Start menu, select Control Panel, then double-click Power Options.
2 Select Choose what the power button does or Choose what closing the lid does, then make your
selections (Do Nothing, Sleep, Hibernate, or Shut Down).
Windows XP:
The default settings are not enabled. To enable or disable the Hibernation feature follow these steps:
1 From the Start menu, select Settings, and then select Control Panel.
2 From the Control Panel select Power Options.
3 Select the Hibernate tab. Select the box to enable or disable this feature.
Windows Power Management
The Power Options icon located in the Windows Control Panel allows you to configure some of the power
management settings. For example, you can use the Power Options to set the timeout values for turning
off the display and hard disks whether you are running the notebook on battery power or one of the
adapters.
64
- Power Management
Page 70

Restarting the System
If your system is on and you need to restart it, be sure that you use the following procedure.
Windows Vista:
1 Click the Start button, and then move the mouse over the right arrow.
2 Select the desired action from the list.
Windows XP:
1 Click the Start button, and then click Shut Down.
2 Select the Restart option from within the Windows Shut Down dialog box.
3 Click OK to restart your notebook. Your notebook will shut down and then reboot.
TURNING OFF YOUR LIFEBOOK NOTEBOOK WITHOUT EXITING WINDOWS OR TURNING ON YOUR
NOTEBOOK WITHIN 10 SECONDS OF THE NOTEBOOK BEING SHUT OFF MAY CAUSE AN ERROR WHEN
YOU START THE NEXT TIME.
Powering Off
Before turning off the power, check that the hard drive/optical drive access indicator is off. If you turn off
the power while accessing a disk there is a risk of data loss. To ensure that your notebook shuts down
without error, use the Windows shut down procedure.
E SURE TO CLOSE ALL FILES AND EXIT ALL APPLICATIONS PRIOR TO TURNING OFF THE POWER. IF
B
FILES ARE OPEN WHEN YOU TURN THE POWER OFF, YOU WILL LOSE ANY CHANGES THAT HAVE NOT
BEEN SAVED, AND MAY CAUSE DISK ERRORS.
65
- Power Management
Page 71

Using the correct procedure to shut down from Windows allows your notebook to complete its operations
and turn off power in the proper sequence to avoid errors. The proper sequence is:
Windows Vista:
Click the [Start] button, and then move the mouse over the small arrow at the bottom right of the righthand pane. Select Shut Down from the list.
Windows XP:
Click the [Start] button, click Turn Off Computer, and then select the Turn Off option.
If you are going to store your notebook for a month or more, see Care and Maintenance Section.
66
- Power Management
Page 72

Chapter 3
User-Installable Features
Lithium ion Battery
Your LifeBook notebook has a Lithium ion battery that provides power for operating your notebook when
no external power source is available. The battery is durable and long lasting, but should not be exposed
to extreme temperatures, high voltages, chemicals or other hazards.
The Lithium ion battery operating time may become shorter if it is used under the following conditions:
• When used at temperatures that exceed a low of 5°C or a high of 35°C (41° to 95° F). Extreme
temperatures not only reduce charging efficiency, but can also cause battery deterioration. The
Charging icon on the Status Indicator panel will flash when you try to charge a battery that is outside
its operating temperature range. See “Status Indicator Panel” on page 23.
• When using a high current device such as a modem, Multi-Format DVD Writer, CD-ROM drive,
DVD/CD-RW combo drive, or the hard drive, using the AC adapter will conserve your battery life.
DO NOT LEAVE A FAULTY BATTERY IN YOUR NOTEBOOK. IT MAY DAMAGE YOUR AC ADAPTER, OPTIONAL
A
UTO/AIRLINE ADAPTER, ANOTHER BATTERY OR YOUR NOTEBOOK ITSELF. IT MAY ALSO PREVENT
OPERATION OF YOUR NOTEBOOK BY DRAINING ALL AVAILABLE CURRENT INTO THE BAD BATTERY.
67
Page 73

• ACTUAL BATTERY LIFE WILL VARY BASED ON SCREEN BRIGHTNESS, APPLICATIONS, FEATURES,
POWER MANAGEMENT SETTINGS, BATTERY CONDITION AND OTHER CUSTOMER PREFERENCES. CD-
ROM
DRIVE, MULTI-FORMAT DVD WRITER, DVD/CD-RW DRIVE COMBO, OR HARD DRIVE USAGE
MAY ALSO HAVE A SIGNIFICANT IMPACT ON BATTERY LIFE. THE BATTERY CHARGING CAPACITY IS
REDUCED AS THE BATTERY AGES. IF YOUR BATTERY IS RUNNING LOW QUICKLY, YOU SHOULD
REPLACE IT WITH A NEW ONE.
• UNDER FEDERAL, STATE, OR LOCAL LAW IT MAY BE ILLEGAL TO DISPOSE OF BATTERIES BY PUTTING
THEM IN THE TRASH. PLEASE TAKE CARE OF OUR ENVIRONMENT AND DISPOSE OF BATTERIES
PROPERLY. CHECK WITH YOUR LOCAL GOVERNMENT AUTHORITY FOR DETAILS REGARDING
RECYCLING OR DISPOSING OF OLD BATTERIES. IF YOU CANNOT FIND THIS INFORMATION ELSEWHERE,
CONTACT YOUR SUPPORT REPRESENTATIVE AT 1-800-8FUJITSU (1-800-838-5487)
Recharging the Batteries
If you want to know the condition of the primary Lithium ion battery, check the Battery Level indicator
located on the Status Indicator panel. The indicator changes as the battery level changes.
The Lithium ion battery is recharged internally using the AC adapter or Auto/Airline adapter. To recharge
the battery make sure the battery that needs to be charged is installed in your LifeBook notebook and
connect the AC or Auto/Airline adapter.
AKE SURE THAT THE BATTERY CHARGING INDICATOR AND THE PERCENTAGE CHARGE IS DISPLAYED
M
BY THE BATTERY LEVEL INDICATOR ON THE STATUS INDICATOR PANEL.
There is no memory effect on the Lithium ion battery, therefore you do not need to discharge the battery
completely before recharging. The charge times will be significantly longer if your notebook is in use
while the battery is charging. If you want to charge the battery more quickly, put your notebook into
Standby mode, or turn it off while the adapter is charging the battery. (See Power Management on page
62 for more information on Standby mode and shutdown procedure)
68
- Lithium ion Battery
Page 74

USING HEAVY CURRENT DEVICES SUCH AS THE MODEM OR FREQUENT DVD/CD-RW/CD-ROM
ACCESSES MAY PREVENT CHARGING COMPLETELY.
Low Battery State
When the battery is running low, a low battery notification message will appear. If you do not respond to
the low battery message, the batteries will continue to discharge until they are too low to operate. When
this happens, your notebook will go into Standby mode. There is no guarantee that your data will be saved
once the notebook reaches this point.
■
ONCE THE LOW BATTERY NOTIFICATION MESSAGE APPEARS, YOU NEED TO SAVE ALL YOUR ACTIVE DATA AND PUT
YOUR LIFEBOOK NOTEBOOK INTO STANDBY MODE UNTIL YOU CAN PROVIDE A NEW POWER SOURCE. YOU SHOULD
PROVIDE A CHARGED BATTERY, AN AC POWER ADAPTER, OR AUTO/AIRLINE ADAPTER AS SOON AS POSSIBLE.
■
WHEN YOU ARE IN STANDBY MODE THERE MUST ALWAYS BE AT LEAST ONE POWER SOURCE ACTIVE. IF YOU
REMOVE ALL POWER SOURCES WHILE YOUR LIFEBOOK NOTEBOOK IS IN STANDBY MODE, ANY DATA THAT HAS
NOT BEEN SAVED TO THE HARD DRIVE WILL BE LOST.
Once your notebook goes into Dead Battery Suspend mode you will be unable to resume operation until
you provide a source of power either from an adapter, or a charged battery. Once you have provided power,
you will need to press the Power/Suspend/Resume button to resume operation.
In the Dead Battery Suspend mode, your data can be maintained for some time, but if a power source is
not provided promptly, the Power indicator will stop flashing and go out, meaning that you have lost the
data that was not stored. Once you provide power, you can continue to use your notebook while an adapter
is charging the battery.
Shorted Batteries
The Status Indicator panel uses an LED next to the battery outline of the Battery Level indicator to display
the operating level available in that battery. If this display shows a Shorted Battery, it means the battery is
damaged and must be replaced so it does not damage other parts of your LifeBook notebook.
69
- Lithium ion Battery
Page 75

Replacing the Battery
With the purchase of an additional battery, you can have a fully charged spare to swap with one that is not
charged. There are two ways to swap batteries, cold-swapping and hot-swapping:
Cold-swapping Batteries
To cold-swap batteries in your battery bay follow these easy steps:
1 Have a charged battery ready to install.
2 Shut down your notebook and disconnect the AC adapter.
3 Orient your system as shown in Figure 26.
4 Push the right battery latch to the right to unlock it.
5 Push the spring-loaded left battery latch to the left. While holding it, lift the battery out of the battery bay at the
battery lift point.
6 Insert a new battery into the bay, and press it down so that the latch clicks into place.
7 Push the right battery latch to the left.
8 Plug in the AC adapter and turn the power on.
Hot-swapping Batteries
To hot-swap batteries in your battery bay follow these easy steps:
B
E SURE TO PLUG IN AN AC ADAPTER PRIOR TO REMOVING THE BATTERY. THERE IS NO BRIDGE
BATTERY PRESENT TO SUPPORT THE SYSTEM WHILE THE BATTERY IS BEING REPLACED. IF YOU DO NOT
USE AN AC ADAPTER YOU WILL LOSE ANY UNSAVED FILES.
1 Plug an AC Adapter into the system and connect it to a power outlet.
70
- Lithium ion Battery
Page 76

Battery Lift Point
Battery Pack
Left Battery Latch
Right Battery Latch
Figure 26. Removing a Battery
2 Follow steps 3 through 6 in “Cold Swapping Batteries”.
IF THE LITHIUM ION BATTERY CONNECTOR IS NOT FULLY SEATED, YOU MAY NOT BE ABLE TO USE YOUR
NOTEBOOK OR CHARGE YOUR BATTERY.
71
- Lithium ion Battery
Page 77
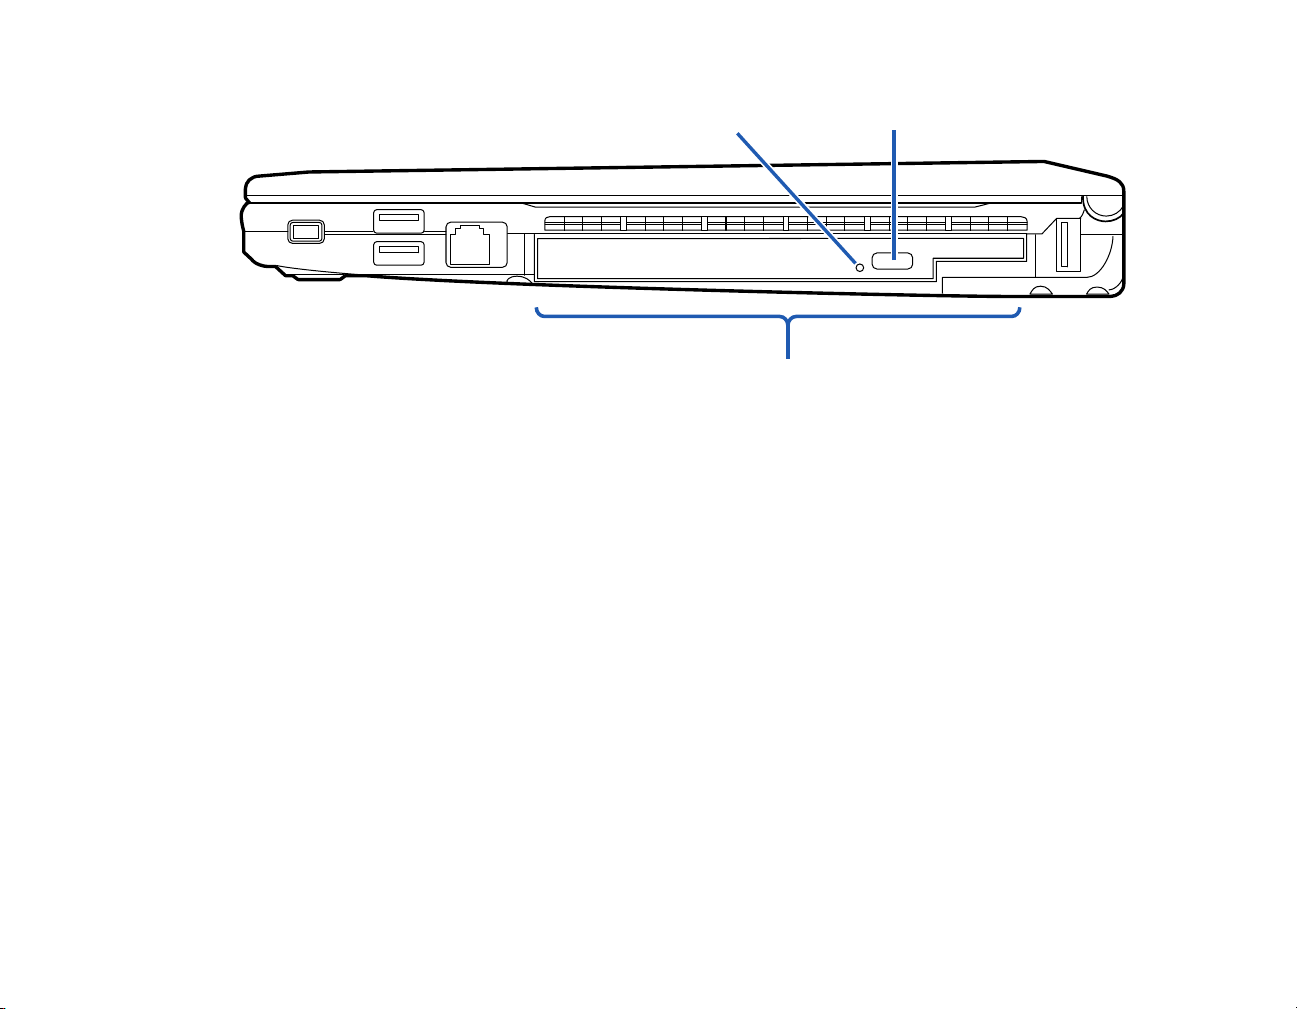
Optical Drive
Media Holder Tray
Media Tray Eject Button
Emergency Tray Release
There is a variety of media available to use with your systemif you have the optional Multi-Format DVD
Writer installed. The drive is also known as an “optical drive”.
DVD-R and DVD-RW discs hold up to 4.7 GB of data (DVD-R discs used with Multi-Format Dual-Layer
DVD writer hold up to 8.5 GB). A DVD-R disc can only be written to once; DVD-RW discs can be written
to over and over. DVD-R and DVD-RW discs can be played on most standard players.
Figure 27. Optical Drive
CD-R and CD-RW discs hold up to 640 MB of data. A CD-R disc can only be written to once; CD-RW
discs can be written to over and over.
Depending upon your notebook configuration, you may have the following optical drive installed:
• Dual-Layer Multi-Format DVD Writer: This drive allows you to access movies, software, and
audio DVD/CDs as well as to read and write to CD-R, CD-RW, DVD-R, DVD+R, DVD-RW,
DVD+RW, and DVD RAM discs. The dual-layer architecture allows you to record up to 8.5 GB of
data on DVD+R discs.
72
- Optical Drive
Page 78

Media Player Software
With the Dual-Layer Multi-Format DVD Writer and media player software you can play DVD movies and
music CDs on your notebook. The media player includes controls which allow you to take full advantage
of the features of a DVD movie, as well as standard features such as fast forward, fast reverse, pause, etc.
With this drive you can also burn onto recordable DVD-R/RW, DVD+R/RW, or CD-R/RW discs.
• DO NOT OPERATE YOUR OPTICAL DRIVE UNLESS YOUR LIFEBOOK NOTEBOOK IS SITTING ON A FLAT
SURFACE. USING A DRIVE WHEN THE SYSTEM IS NOT LEVEL MAY DAMAGE THE DRIVE OR PREVENT
PROPER OPERATION.
• PROLONGED USE OF THE OPTICAL DRIVE, SUCH AS WATCHING A DVD MOVIE, WILL SUBSTANTIALLY
REDUCE YOUR BATTERY LIFE IF NO EXTER NAL POWER SOURCE IS ATTACHED.
Loading Media on Your Drive
To load a disc into your optical drive:
1 Push and release the eject button on the front of the optical drive to open the holder tray. The tray will come out
of the LifeBook notebook a short distance.
2 Gently pull the tray out until a media disc can easily be placed in the tray.
• YOU SHOULD PERIODICALLY CHECK THE FUJITSU WEBSITE AT US.FUJITSU.COM/COMPUTERS FOR THE
MOST CURRENT DRIVERS.
• ALL LIFEBOOK DVD PLAYERS ARE SET TO PLAY DVD TITLES WITH REGION CODE NUMBER 1 WHICH
IS SPECIFIED FOR THE NORTH AMERICAN MARKET. THE REGION NUMBER IS A REGIONAL RESTRICTION
CODE DEFINED BY THE DVD FORUM ACTING ON HOLLYWOOD REQUIREMENTS. DIFFERENT REGION
CODES ARE RECORDED ON VIDEO DVD TITLES FOR PUBLICATION IN DIFFERENT AREAS OF THE
WORLD. IF THE REGIONAL CODE OF THE DVD PLAYER DOES NOT MATCH THE REGIONAL CODES ON
THE TITLES, THEN PLAYBACK IS IMPOSSIBLE.
• YOU CAN CHANGE THE REGION CODE ON THE DVD PLAYER USING THE PROPERTIES MENU OF THE
DVD
SOFTWARE. NOTE, HOWEVER, THAT YOU CAN ONLY CHANGE THE REGION CODE UP TO FOUR
TIMES. AFTER THE 4TH CHANGE, THE LAST CODE ENTERED BECOMES PERMANENT, AND CANNOT BE
CHANGED.
73
- Optical Drive
Page 79

3 Place the media into the tray, label side up, with the hole in the center of the disc. Snap the disc onto the raised
1.
2.
3.
4.
circle in the center of the tray.
4 Gently push the holder tray back in until you hear a click
I
F YOU HAVE DISABLED THE AUTO INSERT NOTIFICATION FUNCTION, YOU WILL HAVE TO START THE
DRIVE EITHER BY USING MY COMPUTER OR FROM WITHIN WINDOWS EXPLORER, SINCE YOUR
NOTEBOOK WILL NOT AUTOMATICALLY RECOGNIZE THAT MEDIA HAS BEEN LOADED.
Figure 28. Loading/Ejecting Media
74
- Optical Drive
Page 80

Removing Media
1 Push and release the eject button on the front of the optical drive. This will stop the drive and the holder tray will
come out of the LifeBook notebook a short distance.
2 Gently pull the tray out until the disc can easily be removed from the tray.
3 Carefully remove the media disc from the holder tray.
4 Gently push the holder tray back in until you hear a click.
Emergency Optical Drive Tray Release
If for some reason the eject button fails, you
can open the media tray with a paper clip or
similar tool inserted into the eject hole in the
right side of the front of the tray as shown in
Figure 29. Straighten one side of a paper clip
and push it gently into the hole. The tray will
pop out.
This procedure will work whether the
system is running or not.
Figure 29. Emergency Tray Release
75
- Optical Drive
Page 81

Using the Media Player Software
DEPENDING UPON ITS CONFIGURATION, YOUR SYSTEM MAY NOT HAVE THE MEDIA PLAYER SOFTWARE
PRE-INSTALLED. IF IT IS NOT INSTALLED, REFERENCE THE DOCUMENTATION THAT ACCOMPANIES THE
MEDIA APPLICATION.
Starting a DVD Movie
1 Insert the DVD into the optical drive of the notebook. If the CD AutoRun feature activates, skip Step 2.
2 The first time you insert a movie into the DVD/CD-RW tray, you will be prompted to select what you want the
system to do when discs are inserted (e.g., start automatically or wait for a prompt). Until you make a selection,
you will receive the same prompt whenever you insert a disc.
3 Click OK to close the About DVD Player Performance dialog box and the movie will begin.
Opening the Media Player Control Panel
With most DVD-ROMs, you have the option of altering how the movie should play and what you wish to
view. You can do this by using the media player control panel and the mouse.
1 Right-click on the movie screen to open a dropdown menu for options.
2 Select View, then Player for all the controls available. This will open a control panel in the bottom of the screen.
Using the Media Player Control Panel
The media player software allows you to watch the movie much like a VCR player. You can pause, rewind,
fast-forward and stop the movie at any point.
1 To pause the movie, click the on-screen button.
2 To rewind the movie, click the button to rewind to a specific portion of the movie, or the button to return to
the opening screen.
3 To fast-forward the movie, click the button to forward to a specific portion of the movie, or the button to jump
to the ending credits.
4 To stop the movie, click the button.
76
- Optical Drive
Page 82

Exiting the Media Player
1 Click the U located in the upper right corner of the title bar. This will open a media player dialog box.
2 Click Yes to stop and exit the movie, or No to close the media player dialog box and return to the movie.
Using Media Player on Battery Power
Since optical drives consume a lot of power, your overall battery life will be significantly shorter when
operating the optical drive continuously (such as watching a DVD movie) than during standard operation.
Many movie run-times are longer than your notebook can support on a single charged battery. If you are
watching a DVD movie on battery power you may need to swap in an additional, charged battery or attach
AC power during the movie to view it in its entirety.
• MANY MOVIE RUN-TIMES ARE LONGER THAN YOUR SYSTEM CAN SUPPORT ON A SINGLE BATTERY. IF
YOU ARE WATCHING A DVD MOVIE ON BATTERY POWER YOU MAY NEED TO SWAP IN AN ADDITIONAL,
CHARGED BATTERY OR ATTACH AC POWER DURING THE MOVIE TO VIEW IT IN ITS ENTIRETY.
• AN ADDITIONAL FULLY-CHARGED BATTERY IS HIGHLY RECOMMENDED IF YOU WILL BE WATCHING DVD
MOVIES ON BATTERY POWER. IF YOU DON’T HAVE AN ADDITIONAL BATTERY, YOU MAY PURCHASE ONE
EITHER ONLINE AT: HTTP://WWW.COMPUTERS.US.FUJITSU.COM OR BY CALLING 1-877-372-3473.
To Watch a Movie on Battery Power:
1 Have an additional full-charged battery or your AC adapter ready for use.
2 Start watching your DVD movie.
3 When the low battery warning occurs, immediately stop the movie and exit the media player.
F YOU DO NOT STOP THE MEDIA PLAYER QUICKLY AND THE LIFEBOOK NOTEBOOK ATTEMPTS TO AUTO-
I
SUSPEND (CRITICAL BATTERY LOW STATE) THE LIFEBOOK NOTEBOOK WILL SHUT DOWN IMPROPERLY.
I
F THIS OCCURS, YOU MAY NEED TO PERFORM A HARD RESET AND FOLLOW THE INSTRUCTIONS, IF ANY,
PRESENTED TO YOU BEFORE THE SYSTEM WILL REBOOT.
77
- Optical Drive
Page 83

4 Power down your notebook and replace the discharged battery with an additional fully-charged battery. If you
do not have an additional battery, you may attach AC power as soon as you see the low battery warning.
5 Resume operation by pressing the Suspend button again. This is not required if you attached AC power without
entering standby mode.
6 Restart your media player, locate and skip to the chapter of the movie you were last watching, then continue
watching your DVD movie.
SOME SHORTER DVD MOVIES MAY NOT REQUIRE YOU TO SWAP BATTERIES OR ATTACH AC POWER TO
COMPLETE THEM. HOWEVER, IT IS BEST TO BE PREPARED SINCE ACTUAL BATTERY LIFE WHILE
OPERATING THE OPTICAL DRIVE CANNOT BE GUARANTEED.
78
- Optical Drive
Page 84

Memory Stick
SD Card
xD Card
Memory Stick/SD/xD
Card Slot
Figure 30. Memory Stick, SD Card, xD Card
Memory Stick/Secure Digital/xD Cards
Your LifeBook notebook supports Memory Sticks, Secure Digital (SD), and xD-Picture cards, on which
you can store and transfer data to and from a variety of digital devices. These cards use flash memory
architecture, which means they don’t need a power source to retain data.
Memory Stick is a flash memory technology that allows you to record, transfer and share digital content,
such as digital pictures, movies, music, voice, and computer data and applications.
Secure Digital (SD) Cards are very similar to Memory Sticks. Like Memory Sticks, SD Cards allow
portable storage among a variety of devices, such as cell phones, GPS systems, digital cameras, and PDAs.
SD Cards transfer data quickly, with low battery consumption. Like the memory stick, it uses flash
memory architecture.
79
- Memory Stick/Secure Digital/xD Cards
Figure 31. Installing a Memory Stick/SD/xD Card
Page 85

xD-Picture Cards work the same as Memory Sticks and SD Cards, but they are much smaller than either
one. xD-Picture Cards are primarily used to store and transfer images with devices such as cell phones.
Installing Memory Stick/SD/xD Cards
Memory Stick, SD, and xD Cards are installed in the Memory Stick/SD/xD Card slot. To install a card,
follow these steps:
INSTALLING OR REMOVING A MEMORY STICK, SD, OR XD CARD DURING YOUR LIFEBOOK NOTEBOOK’S
SHUTDOWN OR BOOTUP PROCESS MAY DAMAGE THE CARD AND/OR YOUR LIFEBOOK NOTEBOOK.
D
O NOT INSERT A CARD INTO A SLOT IF THERE IS WATER OR ANY OTHER SUBSTANCE ON THE CARD AS
YOU MAY PERMANENTLY DAMAGE THE CARD, YOUR LIFEBOOK NOTEBOOK, OR BOTH.
1 Make sure there is no card currently in the slot. If there is, see Removing a Memory Stick/SD/xD Card.
2 Insert your card into the slot with the product label facing up.
3 Push the card firmly into the slot until it is seated in the connector.
Removing A Memory Stick/SD/xD Card
To remove a Memory Stick, SD, or xD Card, push the card in until it unlatches. It will then eject from the
slot for removal.
80
- Memory Stick/Secure Digital/xD Cards
Page 86

Using PC Cards
Eject Button
PC Card Slot
PC Card
Your LifeBook notebook supports PC Cards, which can perform a variety of functions depending on
which type of card you install. Some available PC Cards:
• Gigabit Ethernet Local area network (LAN) cards
• IEEE1394 cards
• S-ATA II cards
• IEEE802.11n WLAN cards
For further information, refer to the instructions supplied with your card(s).
Figure 32. Installing/Removing PC Cards
81
- Using PC Cards
Page 87

Installing PC Cards
• INSTALLING OR REMOVING A PC CARD DURING YOUR NOTEBOOK’S SHUTDOWN OR BOOTUP
PROCESS MAY DAMAGE THE CARD AND/OR YOUR NOTEBOOK.
• DO NOT INSERT A PC CARD INTO A SLOT IF THERE IS WATER OR ANY OTHER SUBSTANCE ON THE
CARD AS YOU MAY PERMANENTLY DAMAGE THE CARD, YOUR NOTEBOOK, OR BOTH.
OU MAY BE REQUIRED TO LOG ON AS ADMINISTRATOR OR A MEMBER OF THE ADMINISTRATOR’S
Y
G
ROUP TO COMPLETE THIS PROCEDURE. IF YOUR COMPUTER IS CONNECTED TO A NETWORK,
NETWORK POLICY SETTINGS MAY ALSO PREVENT YOU FROM COMPLETING THIS PROCEDURE.
See your PC Card manual for instructions on the installation of your card. Some cards may require that
your notebook is off while installing them.
To install a PC Card, follow these steps:
1 When not in use, you should keep the PC Card plug inserted in the slot to prevent system contamination. Make
sure there is no PC Card or PC Card plug currently in the slot. If there is, see Removing PC Cards.
2 If the eject button is extended, press it in until it clicks.
3 Insert your PC Card into the slot with the product label facing up.
4 Push the card firmly into the slot until it is seated in the connector.
82
- Using PC Cards
Page 88

Removing PC Cards
See your PC Card manual for specific instructions on removing your card. Some cards may require your
notebook to be in Standby Mode or Off during removal.
• WINDOWS HAS A SHUTDOWN PROCEDURE FOR PC CARDS THAT MUST BE FOLLOWED BEFORE REMOVING A
CARD. (REVIEW YOUR OPERATING SYSTEM MANUAL FOR THE CORRECT PROCEDURE.) IT IS GOOD PRACTICE TO
REMOVE DEVICES USING THE SAFELY REMOVE HARDWARE ICON IN THE SYSTEM TRAY.
• IF THE DIALOG BOX STATES THAT THE DEVICE CANNOT BE REMOVED, YOU MUST SAVE ALL OF YOUR OPEN FILES,
CLOSE ANY OPEN APPLICATIONS AND SHUT DOWN YOUR NOTEBOOK.
To remove a PC Card, follow these steps:
1 Unlock the card or card plug from the slot by pressing the eject button. When pressed, the button will pop out.
2 Firmly press the button again until it is flush with the notebook. This will eject the card slightly out of the slot
allowing you to remove the card.
83
- Using PC Cards
Page 89

Memory Upgrade Module
Your Fujitsu LifeBook notebook comes with a minimum of 1GB of high speed Double Data Rate 3
Synchronous Dynamic RAM (DDR3-1066 SDRAM) factory installed. To increase your notebook’s memory
capacity, you may install an additional memory upgrade module. The memory upgrade must be a dual-inline (DIMM) SDRAM module. To ensure 100% compatibility, purchase the SDRAM module only from
the Fujitsu web store at www.shopfujitsu.com.
• DO NOT REMOVE ANY SCREWS FROM THE MEMORY UPGRADE MODULE COMPARTMENT EXCEPT THE
ONES SPECIFICALLY SHOWN IN THE DIRECTIONS FOR INSTALLING AND REMOVING THE MEMORY
UPGRADE MODULE.
• THE MEMORY UPGRADE MODULE CAN BE SEVERELY DAMAGED BY ELECTROSTATIC DISCHARGE
(ESD). T
-- B
ELECTRICITY BUILT UP IN YOUR BODY.
-- W
ANY CONTACTS OR CHIPS. BE CAREFUL NOT TO TOUCH ANY INTERNAL COMPUTER TERMINALS OR
COMPONENTS; THE OIL FROM YOUR FINGERS COULD CAUSE A SHORT TO THE COMPONENTS.
-- BE SURE TO POWER DOWN YOUR SYSTEM BEFORE ADDING OR REMOVING MEMORY MODULES. EVEN
IF THE SYSTEM IS IN HIBERNATE OR STANDBY STATES, DATA COULD BE LOST OR THE MEMORY
COULD BE DAMAGED IF POWER IS STILL AVAILABLE TO THE SYSTEM.
O MINIMIZE RISK TO THE MODULE, OBSERVE THE FOLLOWING PRECAUTIONS:
EFORE HANDLING A MEMORY MODULE, TOUCH A GROUNDED METAL OBJECT TO DISCHARGE STATIC
HEN INSTALLING OR REMOVING A MEMORY MODULE, HOLD IT BY THE EDGE SO AS NOT TO TOUCH
Installing Memory Upgrade Modules
1 Turn off power to your notebook, remove any power adapter (AC or auto/airline). Remove the battery.
2 Make sure that all the connector covers are closed.
3 Turn the notebook bottom side up, and remove the screw from the memory upgrade module compartment.
4 Remove the cover.
5 Remove the memory upgrade module from the static guarded sleeve.
6 Align the memory upgrade module with the component side up. Align the connector edge of the module with
the connector slot in the compartment. Be sure the alignment keys line up with those in the slot.
84
- Memory Upgrade Module
Page 90

Alignment Keys
Figure 33. Opening the Memory Compartment Figure 34. Installing a Memory Module
7 Insert the memory upgrade module at a 45° angle. Press the connector edge of the module firmly down and
into the connector until it lodges under the retaining clip. You’ll hear a click when it is properly in place.
8 Replace the cover and reinstall the screws.
THE MEMORY UPGRADE MODULE IS NOT SOMETHING YOU ROUTINELY REMOVE FROM YOUR NOTEBOOK.
O
NCE IT IS INSTALLED, YOU CAN LEAVE IT IN PLACE UNLESS YOU WANT TO CHANGE SYSTEM MEMORY
CAPACITY.
85
- Memory Upgrade Module
Page 91

Removing a Memory Upgrade Module
Memory
Clip
1 Perform steps 1 through 4 of Installing a Memory Upgrade
Module.
2 Pull the clips sideways away from each side of the memory
upgrade module at the same time.
3 While holding the clips out, remove the module from the
slot by lifting it up and pulling it away from your notebook.
4 Store the memory upgrade module in a static guarded
sleeve.
5 Replace the cover and reinstall the screws.
Figure 35. Removing memory module
Checking the Memory Capacity
Once you have changed the system memory capacity by replacing the installed module with a larger one,
be sure to check that your notebook has recognized the change.
Windows XP: Check the memory capacity by clicking [Start] -> Settings -> Control Panel, then doubleclicking the System icon. Select the General tab and check the amount of memory under “Computer:”
Windows Vista: Check the memory capacity by clicking [Start] -> Control Panel -> System and
Maintenance -> System. The amount of memory is displayed next to “Memory - RAM:”
86
- Memory Upgrade Module
Page 92

There may be a variation between the actual memory size and what is displayed. This is possible if your
system is configured with a graphics controller which dynamically allocates system memory to accelerate
graphics performance.
IF THE TOTAL MEMORY DISPLAYED IS INCORRECT, CHECK THAT YOUR MEMORY UPGRADE MODULE IS
PROPERLY INSTALLED. (IF THE MODULE IS PROPERLY INSTALLED AND THE CAPACITY IS STILL NOT
CORRECTLY RECOGNIZED, SEE TROUBLESHOOTING ON PAGE 95.
87
- Memory Upgrade Module
Page 93

Device Ports
Your Fujitsu LifeBook notebook and the optional Port Replicator come equipped with multiple ports to
which you can connect external devices including: disk drives, keyboards, modems, printers, etc.
Modem (RJ-11) Telephone Jack
The modem (RJ-11) jack is used for an internal modem. To connect the telephone cable follow these steps:
1 Align the connector with the port opening.
2 Push the connector into the port until seated.
3 Plug the other end of the cable into a telephone outlet.
The modem sound may be deactivated initially. To
activate modem sound, follow these steps.
Windows XP:
1 Select [Start] > Settings > Control Panel.
2 Double-click Phone and Modem Options. You may
3 Select the Modems tab and highlight the modem.
4 Click [Properties].
5 Select the Modem tab again, then adjust the volume
initially need to enter your area code in order to open
the Phone and Modem Options window.
with the volume slider.
Figure 36. Connecting Modem
Windows Vista:
1 Select [Start] > Control Panel.
2 Select Classic View in the left pane.
3 Double-click Phone and Modems. You may initially need to enter your area code in order to open the Phone
and Modem Options window.
88
- Device Ports
Page 94

4 Select the Modems tab, and click the [Properties] button.
5 Select the Modem tab and adjust the volume as necessary.
THE INTERNAL MODEM IS NOT INTENDED FOR USE WITH DIGITAL PBX SYSTEMS. DO NOT CONNECT
THE INTERNAL MODEM TO A DIGITAL PBX AS IT MAY CAUSE SERIOUS DAMAGE TO THE INTERNAL
MODEM OR YOUR ENTIRE LIFEBOOK NOTEBOOK. CONSULT YOUR PBX MANUFACTURER’S
DOCUMENTATION FOR DETAILS. SOME HOTELS HAVE DIGITAL PBX SYSTEMS. BE SURE TO FIND OUT
BEFORE
YOU CONNECT YOUR MODEM.
• THE INTERNAL MODEM IS DESIGNED TO THE ITU-T V.90 STANDARD. ITS MAXIMUM SPEED OF 53000BPS IS THE
HIGHEST ALLOWED BY FCC, AND ITS ACTUAL CONNECTION RATE DEPENDS ON THE LINE CONDITIONS. THE
MAXIMUM SPEED IS 33600BPS AT UPLOAD.
• THE INTERNAL MODEM ON ALL LIFEBOOK NOTEBOOKS FROM FUJITSU ARE CERTIFIED FOR USE IN THE UNITED
TATES AND CANADA. THE MODEM MAY BE CERTIFIED IN OTHER COUNTRIES.
S
Infrared Port
The infrared IrDA port allows for wireless data transfer between your notebook and other IrDAcompatible devices, such as another computer or a printer, without the use of a cable. (See figure 3 on page 15 for
location)
It is important to keep in mind that while carrying out IR communication, both devices must be placed so
their infrared ports are directly facing each other without obstruction. The devices must be separated by
at least 6" but no more than 36" for maximum performance.
The following conditions may interfere with infrared communications:
• A television, radio remote control unit, or a wireless headphone is being used nearby.
• Direct sunlight, fluorescent light, or incandescent light shines directly on the port.
• DO NOT MOVE EITHER DEVICE WHILE COMMUNICATION IS ACTIVE AS IT MAY INTERRUPT DATA TRANSMISSION.
• BE CAREFUL NOT TO SCRATCH THE INFRARED PORT LENS. DIRT, SCRATCHES, OR OTHER SURFACE MARKS CAN
DEGRADE OPERATION.
89
- Device Ports
Page 95

IEEE 1394 Port
The 4-pin 1394 port allows you to connect digital devices that are compliant with IEEE 1394 standard
(also known as “FireWire”). The IEEE 1394 standard is easy to use, connect, and disconnect. This port
allows up to 400 Mbps transfer rate. A third-party application may be required to operate your device with
the 1394 port.
THE 1394 PORT USED IN THIS SYSTEM USES A FOUR-PIN CONFIGURATION. IF YOU INTEND TO
INTERFACE WITH DEVICES WHICH USE A SIX-PIN CONFIGURATION, YOU WILL NEED TO PURCHASE AN
ADAPTER.
In order to connect a 1394 device, follow
these steps: (See Figure)
1 Align the connector with the port
opening.
2 Push the connector into the port until it
is seated.
90
- Device Ports
Figure 37. Connecting a IEEE 1394 device
Page 96

Internal LAN (RJ-45) Jack
The internal LAN (RJ-45) jack is used for a Gigabit (10Base-T/100Base-Tx/1000Base-T) Ethernet LAN
connection. You may need to configure your notebook to work with your particular network. (Please refer
to your network administrator for information on your network configuration.) To connect the LAN cable
follow these easy steps:
1 Align the connector with the port
opening.
2 Push the connector into the port
until it is seated.
3 Plug the other end of the cable into
a LAN outlet.
Figure 38. Connecting LAN Device
Universal Serial Bus Ports
The Universal Serial Bus 2.0 ports (USB) allow you to connect USB devices such as external game pads,
pointing devices, keyboards and/or speakers. There are three USB 2.0 ports on the right side of your
notebook.
In order to connect a USB device follow these steps:
1 Align the connector with the port opening, then push the connector into the port until it is seated.
D
UE TO THE ONGOING CHANGES IN USB TECHNOLOGY AND STANDARDS, NOT ALL USB DEVICES
AND/OR DRIVERS ARE GUARANTEED TO WORK.
91
- Device Ports
Page 97

Figure 39. Connecting a USB Device
USB 2.0 Ports
Headphone/Line-Out Jack
The headphone/line-out jack allows you to connect headphones or powered external speakers to your
notebook. Your headphones or speakers must be equipped with a 1/8” (3.5 mm) stereo mini-plug. In order
to connect headphones or speakers follow these easy steps:
1 Align the connector with the port opening.
2 Push the connector into the port until it is seated.
IF YOU PLUG HEADPHONES INTO THE HEADPHONE JACK, BUILT-IN STEREO SPEAKERS WILL BE
DISABLED.
92
- Device Ports
Page 98

Microphone/Line-In Jack
The microphone/line-in jack allows you to connect an external mono microphone. Your microphone must
be equipped with a 1/8”(3.5 mm) mono mini-plug in order to fit into the microphone jack of your
notebook. In order to connect a microphone follow these easy steps:
1 Align the connector with the port opening.
2 Push the connector into the port until it is seated.
External Video Port
The external video port allows you to
connect an external monitor or LCD
projector. In order to connect an external
video device, follow these easy steps:
1 Align the connector with the port opening.
2 Push the connector into the port until it is
seated.
3 Tighten the two hold-down screws,
located on each end of the connector.
Figure 40. Connecting an External Video Device
PRESSING THE [FN] + [F10] KEYS ALLOWS YOU TO CHANGE YOUR SELECTION OF WHERE TO SEND
YOUR DISPLAY VIDEO. EACH TIME YOU PRESS THE KEY COMBINATION, YOU WILL STEP TO THE NEXT
CHOICE, STARTING WITH THE BUILT-IN DISPLAY PANEL ONLY, MOVING TO THE EXTERNAL MONITOR
ONLY, FINALLY MOVING TO BOTH THE BUILT-IN DISPLAY PANEL AND AN EXTERNAL MONITOR.
93
- Device Ports
Page 99

S-Video Out Jack
The S-Video Out jack is used to transmit a higher resolution video signal to a compatible TV or VCR. Note
that in order to use this jack, you must use the Mini S-Video Cable Adapter that came with your system.
(Figure 41). To connect the S-Video cable follow these easy steps:
1 Align the adapter cable connector with the jack
opening.
2 Push the connector into the jack until it is seated.
3 Plug the other end of the cable into a standard S-
Video cable from the video device.
Figure 41. Mini S-Video Cable Adapter
94
- Device Ports
Figure 42. Connecting S-Video Device
Page 100

Chapter 4
Troubleshooting Your LifeBook
Troubleshooting
There may be occasions when you encounter simple setup or operating problems that you can solve on the
spot, or problems with peripheral devices that can be solved by replacing the device. The information in
this section helps you isolate and resolve some of these straightforward issues and identify failures that
require service.
Identifying the Problem
If you encounter a problem, go through the following procedure before pursuing complex troubleshooting:
1 Turn off your LifeBook notebook.
2 Make sure the AC adapter is plugged into your notebook and to an active AC power source.
3 Make sure that any card installed in the PC Card slot is seated properly. You can also remove the card from the
slot, thus eliminating it as a possible cause of failure.
4 Make sure that any devices connected to the external connectors are plugged in properly. You can also
disconnect such devices, thus eliminating them as possible causes of failure.
5 Turn on your notebook. Make sure it has been off at least 10 seconds before you turn it back on.
6 Go through the boot sequence.
95
 Loading...