

Page 1

Getting Started
Get Started with your
LifeBook® PH520 Notebook
This guide will lead you through the start-up process for your new LifeBook notebook and will also provide
some valuable tips. To learn about all the exciting features that your new LifeBook notebook has to offer,
please see the User’s Guide that can be accessed after completing the start-up procedure.
Page 2
This convenient guide will lead you through the start-up
process and will also offer some valuable tips.
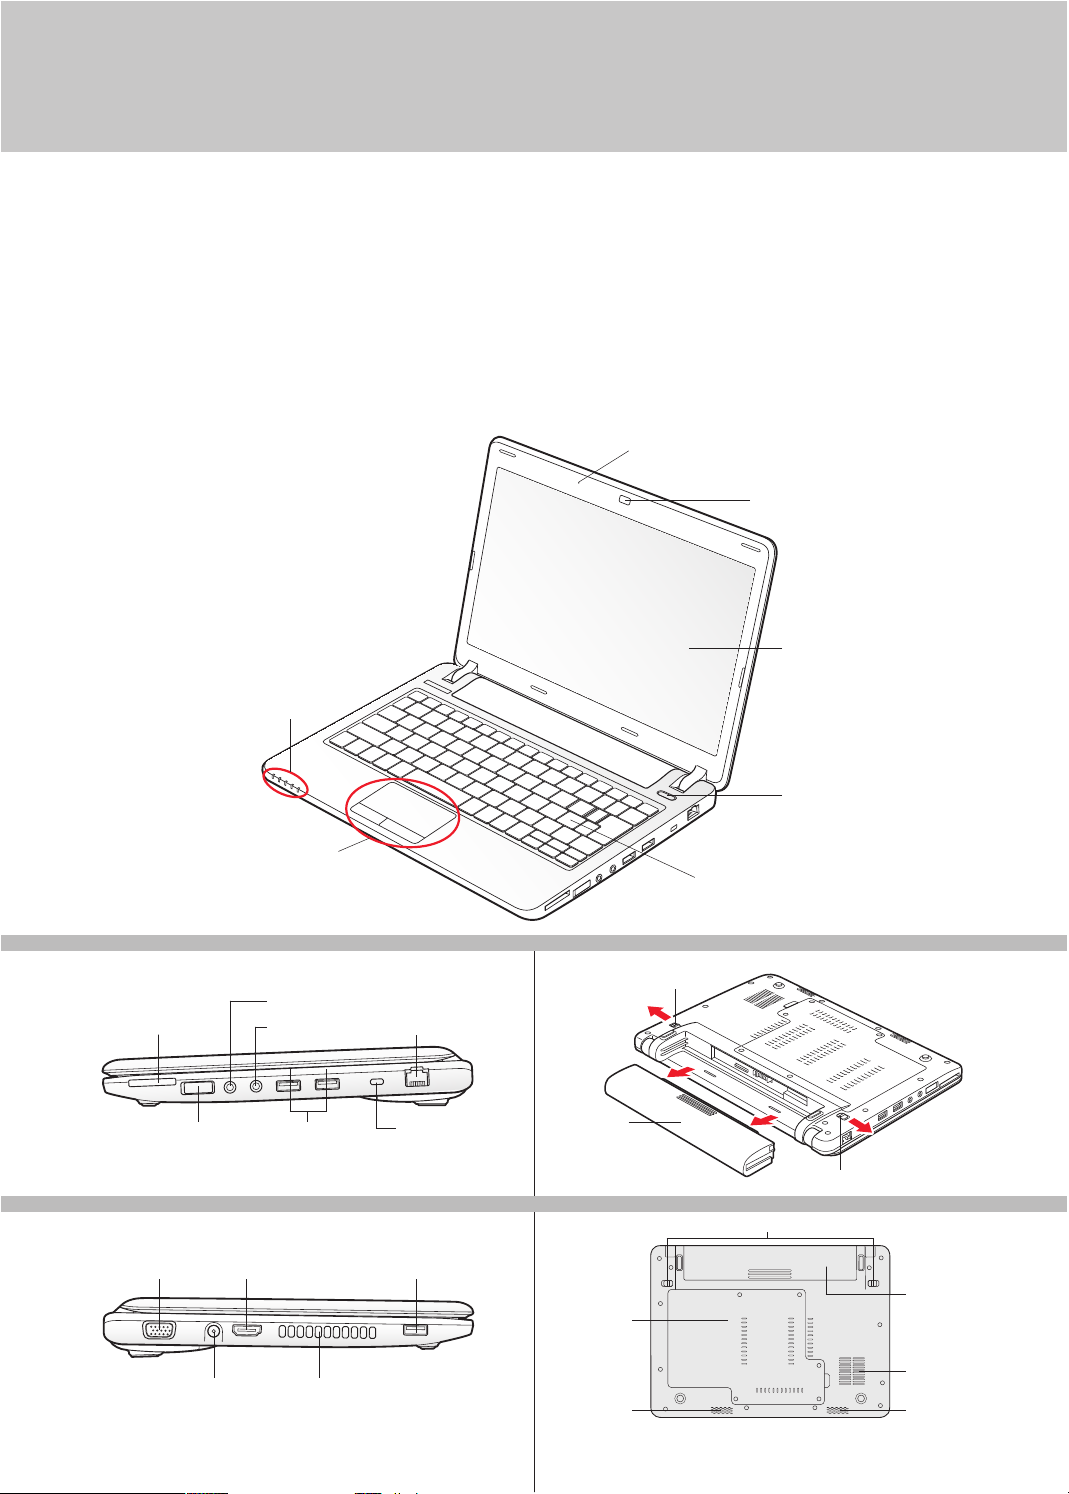
What’s in the Box
Check to see that all of the following items are in the box:
o LifeBook notebook
o Preinstalled Lithium ion battery
o AC adapter with power cord
o International Limited Warranty document
Controls, Connectors,
and Access Points
Built-in Microphone
1.3 Megapixel Web Camera
Display Panel
Status Indicator Panel
Touchpad Pointing Device
RIGHT PANEL BACK PANEL
Battery Release Latch
Secure Digital/Memory
Stick Card Slot
Wireless LAN/
Bluetooth Switch
LEFT PANEL
External Video Port USB 2.0 PortHDMI Port
2
Headphone Jack
Microphone Jack
USB 2.0 Ports
Air VentsDC Power Jack
LAN (RJ-45)
Jack
Anti-Theft
Lock Slot
Battery Pack
BOTTOM PANEL
Memory
Upgrade
Compartment
Stereo
Speaker
Power/Suspend/Resume Button
Keyboard
Battery Release Latch
Battery Latches
Lithium ion
Battery
Air Vents
(various
locations)
Stereo
Speaker
Page 3
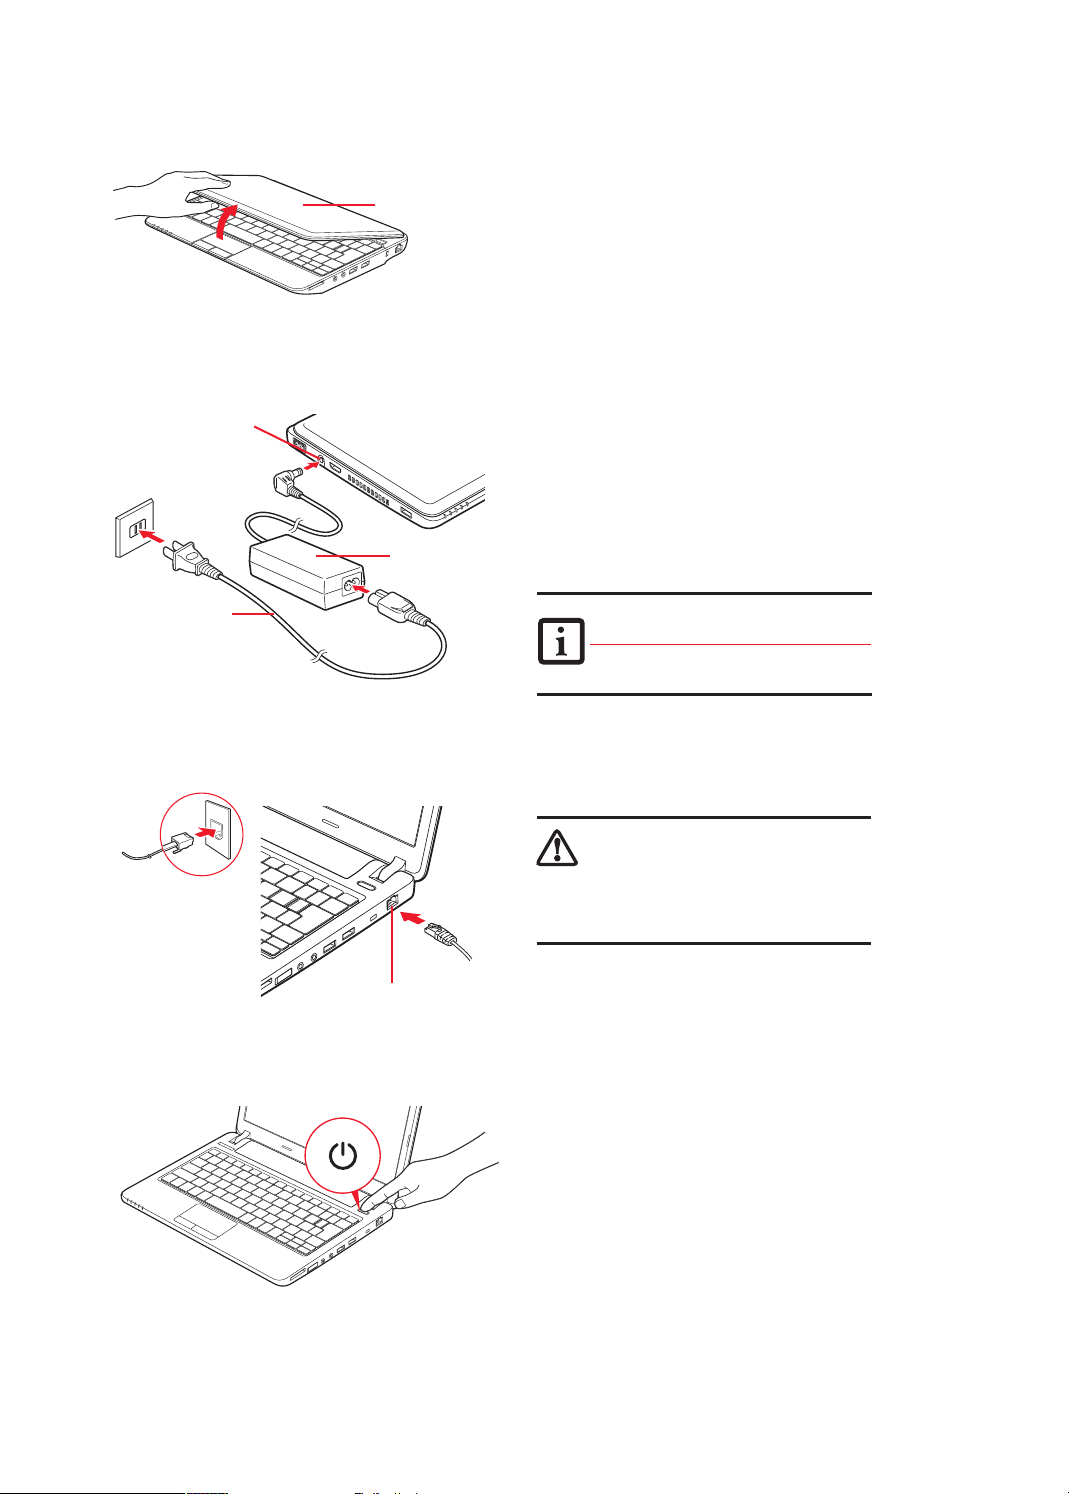
Initial Start Up
DC Power Jack
AC Cable
Display Cover
AC Adapter
1. Open the Display Panel
• Ensure that your LifeBook is on a hard level surface and that
the air vents are not blocked.
• Lift the display, being careful not to touch the screen.
• You will need to hold the base of the unit down when opening
the display cover.
• Adjust the display until it is at a comfortable viewing angle.
2. Connect AC Power
• Plug the AC adapter into your notebook.
• Plug the power cord into the AC adapter.
• Connect the power cord to an electrical outlet.
3. Connect to Internet or Network
• Connect an Ethernet cable (not included) to the LAN jack on
your notebook and to a wall jack or to an Ethernet router.
Important:
During the setup procedure, do not disconnect the power supply,
press any buttons, or use any peripheral devices such as a
remote control.
• You should not attach any external devices and do not put a
DVD/CD in your drive until you have gone through the initial
power on sequence.
4. Booting the System
The Lit hium io n battery is not c harge d upon pu rchase.
Initia lly you will need to c onnec t eithe r the AC adapter
or the Auto/Air line ad apter to use yo ur noteb ook.
Be caref ul when y ou selec t the lan guage.
The onl y way to chan ge the la nguag e
is to do a recovery pr ocess.
LAN Jack
Connecting a LAN Plug
Power/Suspend/
Resume Button
• Press the Power/Suspend/ Resume button (above the
keyboard) to turn on the notebook. When you do this for
the first time, it will display a Fujitsu logo on the screen.
If you do nothing, the system will load the operating
system, and then the Windows Welcome will begin.
DO NOT SHUT DOWN YOUR SYSTEM BEFORE THE
FIRST BOOT IS COMPLETED.
If the sys tem is shu t down befo re the firs t boot is
comple ted and Mi crosof t® Window s® is setup,
there is t he risk that the system will n ot succe ssfull y
boot the n ext tim e you powe r up your notebook.
If this oc curs, you will nee d to use the re store dis c
to recover your syste m
5. Register
•
After the operating system has initialized, the Windows
Welcome screen will appear. Accept the Microsoft
®
Windows
Licensing Agreement and the Fujitsu End
®
User License Agreement to proceed.
• Follow the on-screen directions as prompted. Accepting
the automatic update feature is recommended.
• If connected, you will be able to automatically access the
Internet. If not and plan to register at a later time, click
the Skip button.
• Once connected to the Internet, select Yes to continue
registration,
complete requested information, and click
Next to complete registration.
• Register your notebook with Fujitsu by going to our website
at: us.fujitsu.com/computers. Ensure you are connected
to the Internet.
6. Registering Your LifeBook notebook
• Register your notebook with Fujitsu Service and Support via
our website at us.fujitsu.com/computers.
• You need to have internet access (wired or wireless) to
register online.
3
Page 4
7.
Activate Additional Utilities & Drivers
It is cri tical th at you ru n Click Me ! to inst all nece ssar y
applic ations, u tiliti es, and dr ivers.
• Check to be sure the WL AN switch is on.
• The fi rst time you boot up your system, you will see an icon
called Click Me! in the Start menu. We highly recommend
that you install ClickMe! the fi rst time you boot up.
•
When you click the Click Me! icon, your system will
automatically
create the related icons in the system
tray in the bottom right of the screen. These icons
provide links to utilities that you will frequently access.
8. Create backup media with
MyRecovery (Hard Disk Drive
recovery models only)
• Recovery discs (for your pre-installed operating system)
are NOT included with LifeBooks that are shipped with
MyRecovery. If your hard drive crashes or the computer
system becomes corrupted, you can use the recovery
discs that you create to restore the system to its
original condition.
• You will need to purchase or have access to the external USB
optical drive to create backup CDs /DVD
• Click on the [ MyRecovery] icon to create backup recovery
media and application discs.
• Refer to the “Saving and Recovering Your Factory and
System Images” guide for more detailed instructions.
9. Access your User’s Guide
• To take advantage of all the features of your new Fujitsu
LifeBook notebook, it is highly recommended that you read
your electronic User’s Guide. It contains important detailed
information about your new computer. You can access your
User’s Guide by selecting its icon from the screen desktop or
locate one from the service and support site.
(For
Addition al
Applica tions
and Utili ties)
CLICK ME
“Click Me! ”
WLAN/Bluetooth
On/Off Switch
(For
Latest
Drivers )
(FDU )
Quick Tips
• Power your notebook through
the AC or optional auto/airline
adapter whenever possible.
• If your notebook is running on
battery power all day, connect
it to the AC adapter overnight
to recharge the battery.
• Keep brightness to the lowest
level comfortable.
• Set the power management for
maximum battery life.
• Put your notebook in standby
mode when it is turned on and
you are not actually using it.
• Limit your media drive access.
• Disable the Media Player auto
insert notifi cation function.
Always use a fully charged battery.
•
Adjusting display brightness
• Fn + F6 to decrease brightness
• Fn + F7 to increase brightness
Adjusting volume
• Fn + F8 to decrease volume
• Fn + F9 to increase volume
• Fn+F3 will toggle the Audio Mute
on and off.
ECO
• Fn+F11 will enable and disable
ECO mode.
Mouse
• Fn+F4 will toggle the mouse on
and off.
Common Indicators
Status Indicators
Power Indicator
This indicator
system is operational. When it is
solid blue, it means that there is
power to your computer and that
it is ready for use.
Battery Charge /DC-In Indicator
Depending upon whether you have
an AC adapter connected or not,
the battery indicator will appear
in a variety of colors and states.
AC Adapter connected
• Solid blue: Charge complete
• Solid orange: Charging in process
• Purple, blinking: Battery malfunction
No AC Adapter connected
• Orange, blinking: Battery is charged
12% or less.
• Purple, blinking: Battery malfunction
• Off: Battery charge between 13%
and 100%
– Battery completed discharged
– No battery installed
4
shows whether your
Hard Drive Access Indicator
Lights blue when your internal hard
drive is being accessed.
CapsLock Indicator
Shows that your keyboard is set to
type in all capital letters.
NumLk Indicator
Shows that the integral keyboard is set
in ten-key numeric keypad mode.
Page 5

SAVE THESE INSTRUCTIONS
IMPORTANT SAFETY INSTRUCTIONS
This unit requires an AC adapter to operate. Use only UL Listed I.T.E. Class II Adapters with an output rating of 19 VDC,
with a minimum current of 3.16 A (60 W).
AC adapter output polarity:
When using your notebook equipment, basic safety precautions should always be followed to reduce the risk of fire, electric
shock and injury to persons, including the following:
• CAUTION - HOT SURFACE: The bottom of this notebook computer can become hot when used for long
periods of time. When using this notebook, take caution to limit long term or continuous use while
resting it on exposed skin, such as the lap.
Warning
DANGER OF EXPLOSION IF LITHIUM (CLOCK) BATTERY IS INCORRECTLY REPLACED. REPLACE ONLY
WITH THE SAME OR EQUIVALENT TYPE RECOMMENDED BY THE MANUFACTURER. DISPOSE OF
USED BATTERIES ACCORDING TO THE MANUFACTURER’S INSTRUCTION.
FOR CONTINUED PROTECTION AGAINST RISK OF FIRE, REPLACE ONLY WITH THE SAME TYPE
Caution
AND RATING FUSE.
• Do not use this product near water, for example, near a bathtub, washbowl, kitchen sink or laundry tub,
in a wet basement or near a swimming pool.
• Avoid using a modem during an electrical storm. There may be a remote risk of electric shock from lightning.
• Use only the power cord and batteries indicated in this manual. Do not dispose of batteries in a fire.
They may explode. Check with local codes for possible special disposal instructions.
CAUTION - To reduce the risk of fire, use only No. 26 AWG or larger UL Listed or CSA Certified Telecommunication
•
Line Cord.
• For TV tuner use: To protect from overvoltages and transients on the Cable Distribution System, make
sure that the outer shield of the coaxial cable is connected to earth (grounded) at the building premise
as close to the point of cable entrance as practicable, as required per NEC Article 820.93, ANSI/NFPA
70: 2005. If you have questions about your CATV installation, contact your ser vice provider.
For Authorized Repair Technicians Only
Recycling your Battery
Over time, the batteries that run your mobile computer will begin to hold a charge for a shorter amount of
time; this is a natural occurrence for all batteries. When this occurs, you may want to replace the battery
with a fresh one*. If you replace it, it is important that you dispose of the old battery properly because
batteries contain materials that could cause environmental damage if disposed of improperly
Fujitsu is very concerned with environmental protection, and has enlisted the services of the Rechargeable
Battery Recycling Corporation (RBRC)**, a non-profit public service organization dedicated to protecting
our environment by recycling old batteries at no cost to you.
RBRC has drop-off points at tens of thousands of locations throughout the United States and Canada.
To find the location nearest you, go to www.RBRC.org or call 1-800-822-8837.
If there are no convenient RBRC locations near you, you can also go to the EIA Consumer Education Initiative
website (http://EIAE.org/) and search for a convenient disposal location.
Remember – protecting the environment is a cooperative effort, and you should make every effort to protect it
for current and future generations.
* To order a new battery for your Fujitsu mobile computer, go to the Fujitsu shopping site at www.shopfujitsu.com
in the US or www.fujitsu.ca/products/notebooks in Canada.
** RBRC is an independent third party to which Fujitsu provides funding for battery recycling; is in no way
affiliated with Fujitsu.
5
Page 6

Notes:
6
Page 7

Popular Accessories
Memory Modules
• 2 GB DDR3 1333 MHz SO-DIMM
Additional Lithium ion Batteries
• Standard Main Battery
Auto/airline Adapter
Additional AC Adapter
USB Optical Drive
Carrying Cases
• P Series Slip Case
• Duo Travel Bag
• Protege Case
• Director Leather Case
• Diplomat Nylon Case
Notebook Lock
USB Optical Mouse
Record your notebook serial number here:
Serial #______________________
(see bottom of computer)
Have questions or need help?
• Visit our website at us.fujitsu.com/computers
• Call us anytime at 1.800.8FUJITSU
• Email us at 8fujitsu@us.fujitsu.com
Want more information on Fujitsu products?
• Visit our website at www.shopfujitsu.com
• Call us anytime at 1.800.FUJITSU
Fujitsu extended service plans available.
Visit solutions.us.fujitsu.com
to purchase any of these accessories
or to get more information.
Fujitsu America, Inc.
1250 E. Arques Avenue
Sunnyvale, CA 94085
Fujit su, the Fujit su logo, and LifeBook are registered tradema rks of Fujitsu Limi ted.
Microsoft, Windows and Genui ne Windows Vista a re trademar ks or registered
trademarks of Mic rosoft Cor poration in the United States and /or other cou ntries.
All other tradema rks mentioned herein are the pro perty of their respective
owner s. Product description data re presents Fujitsu design objecti ves and
is provided for comparative purposes; ac tual results may vary based o n a
variety of f actors. Spec ifications are subject to change wit hout notice.
©2010 Fujit su America, Inc. All right s reserved.
7
Page 8

Ce guide pratique vous explique comment mettre en marche
votre nouvel ordinateur et vous offre quelques conseils utiles.
Contenu de la boîte
Assurez-vous que les articles suivants sont bien inclus dans la boîte :
o Ordinateur por table LifeBook
o Batterie au lithium, pré-installée
o Adaptateur secteur avec cordon d’alimentation
o Garantie internationale limitée
Microphone intégré
Caméra web 1,3 mégapixels
Commandes,
connecteurs et
points d’accès
Écran
Tableau de voyants d’état
Pavé tactile TouchPad
CÔTÉ DROIT ARRIÈRE
Fente pour cartes
Memory Stick/
Secure Digital
Commutateur
réseau local sans fil/
Bluetooth
CÔTÉ GAUCHE
Port vidéo externe Port USB 2.0Port HDMI
8
Prise d’écouteurs
Prise de micro
Ports USB 2.0
Grilles de ventilationPrise d’alimentation c.c.
Loquet de dégagement
Prise de
réseau local
(RJ-45)
Fente pour
dispositif
antivol
Compartiment
supplémentaire
Haut-parleur
de la batterie
Batterie au
lithium
DESSOUS
de mémoire
stéréo
Bouton d’alimentation/veille/
reprise
Clavier
Loquet de dégagement de la batterie
Loquets de la batterie
Batterie au
lithium
Grilles de
ventilation
(divers
emplacements)
Haut-parleur
stéréo
Page 9

Démarrage initial
Prise d’alimentation c.c.
Câble secteur
Couvercle de
l’écran
Adaptateur
secteur
1. Ouverture de l’écran
• Assurez-vous que votre LifeBook est posé sur une surface plane
et ferme et que les grilles de ventilation sont dégagées.
• Levez l’écran en prenant garde à ne pas toucher la surface
d’affichage.
• Veillez à retenir la base de l’ordinateur lorsque vous soulevez l’écran.
• Ajustez l’écran pour obtenir un angle de vue confor table.
2. Branchement de l’ordinateur
sur l’alimentation secteur
• Branchez l’adaptateur secteur sur l’ordinateur.
• Branchez le cordon d’alimentation sur l’adaptateur secteur.
• Branchez le cordon d’alimentation sur une prise électrique.
3. Connexion à Internet ou
à un réseau
• Branchez le câble Ethernet (non inclus ) sur la prise de réseau
local de votre ordinateur, puis sur une prise murale ou sur un
routeur Ethernet.
Important :
Pendant la procédure de configuration, ne débranchez pas,
n’appuyez sur aucun bouton et n’utilisez aucun périphérique
tel qu’une télécommande.
• Vous ne devez pas installer de périphérique externe ni insérer de
DVD/CD dans votre lecteur avant que la procédure de démarrage
initial ne soit entièrement terminée.
4. Amorçage du système
Lorsqu e vous rec evez l’ordin ateur, la batte rie au li thium n’est
pas char gée. Lors d e la premi ère util isatio n, vous deve z
conne cter l’adapt ateur secteur ou l’ada ptateur a uto/av ion.
Faites at tentio n lorsqu e vous ch oisiss ez une lan gue. La se ule
façon de c hange r la lang ue est de pr océde r à une rest aurati on.
Prise de réseau local
Raccordement au
réseau local
Bouton
d’alimentation/
veille/reprise
• Pour mettre votre ordinateur en marche, appuyez sur le bouton
d’alimentation /veille/reprise (au-dessus du clavier). Lorsque vous
effectuez cette opération pour la première fois, un logo Fujitsu
s’affiche à l’écran. Si vous n’intervenez pas, l’ordinateur charge le
système d’exploitation et lance la procédure d’ouverture Windows.
N’ÉTEIGNEZ PAS L’ORDINATEUR AVANT QUE LE PREMIER
AMORÇAGE NE SOIT TERMINÉ.
Si vous l’éteig nez avant q ue le prem ier amo rçage n e soit ter miné
et que vous c onfigu rez Micro soft® Window s®, le systèm e risque
de ne pas s’initialiser cor recteme nt lors d u procha in déma rrage
de l’ordina teur. Si cela se produit, vo us devrez utilise r le disque
de restau ration pour res taurer l e système.
5. Enregistrement
• Une fois la procédure d’initialisation terminée, l’écran de bienvenue
Windows apparaît. Acceptez le contrat de licence Microsoft
®
Windows
• Suivez les instructions à l’écran. Il est recommandé d’accepter la
fonctionnalité de mise à jour automatique.
• Si votre ordinateur est raccordé à Internet, vous y aurez accès
automatiquement. Dans le cas contraire, ou si vous envisagez de
vous y raccorder ultérieurement, cliquez sur le bouton [Passer].
• Une fois le raccordement effectué, cliquez sur [Oui ] pour continuer
l’enregistrement,
sur [Suivant] pour terminer l’enregistrement.
• Enregistrez votre ordinateur auprès de Fujitsu par l’intermédiaire
de notre site : us.fujitsu.com /computers. Assurez-vous d’être
connecté à Internet.
et le contrat de licence d’utilisation Fujitsu pour poursuivre.
saisissez les informations demandées puis cliquez
®
6. Enregistrement de votre ordinateur
LifeBook
• Enregistrez votre ordinateur auprès du service d’assistance Fujitsu
en ligne sur le site us.fujitsu.com/computers.
• Pour vous enregistrer en ligne, vous devez disposer d’une connexion
à Internet (avec ou sans fil).
9
Page 10

7.
Activation des pilotes et utilitaires
supplémentaires
Il est très i mpor tant d’exécuter « Cli ck Me! » p our ins taller
les appl icatio ns, utili taires et pilotes nécessa ires.
• Assurez-vous que le commutateur de réseau sans fi l est en
position de marche.
• La première fois que le système démarre, l’icône Click Me!
apparaît dans le menu Démarrer. Nous vous conseillons
vivement d’installer l’utilitaire Click Me! la première fois
que vous faites démarrer l’ordinateur.
•
Lorsque vous cliquez sur l’icône Click Me!, votre système confi gure
automatiquement les icônes appropriées dans la zone de notifi cation
en bas à droite de l’écran. Ces icônes offrent des liaisons avec des
utilitaires susceptibles d’être utilisés fréquemment.
8. Créez des copies de sécurité avec
MyRecovery (uniquement avec les
modèles pourvus de la fonction
de sauvegarde de disque dur)
• Les disques de restauration (pour le système d’exploitation pré-
installé) NE SONT PAS fournis avec les ordinateurs LifeBook dotés
de la fonction MyRecovery. Si le disque dur subit un plantage ou
si le système se corrompt, vous pourrez utiliser les disques de
restauration que vous aurez créés pour restaurer le système
à son état original.
• Pour créer des CD/ DVD de sauvegarde, vous devrez acheter un
lecteur optique USB externe ou avoir accès à un lecteur de ce
type.
• Cliquez sur l’icône [ MyRecovery] pour créer des supports de
sauvegarde et des disques d’applications.
• Pour de plus amples informations, consultez le guide traitant
de la « Sauvegarde et de la restauration des images d’origine
et de système ».
9. Accès au Guide d’utilisation
• Afi n de profi ter de toutes les fonctionnalités de votre nouvel ordi-
nateur portable Fujitsu LifeBook, nous vous recommandons fortement de lire le Guide d’utilisation en version électronique. Vous
y trouverez des renseignements détaillés importants à propos
de votre nouvel ordinateur. Pour consulter le Guide d’utilisation,
sélectionnez l’icône correspondante sur le bureau Windows ou
recherchez-le sur le site de soutien et de service après vente.
(Pour tr ouver
des appli cations
et des utili taires
supplém entaires)
CLICK ME
« Click Me! »
Commutateur de
carte réseau local
sans fi l/Bluetooth
(Pour
les derni ers
pilotes )
(FDU )
Conseils rapides
• Alimentez votre ordinateur portable
avec l’adaptateur secteur ou
l’adaptateur d’auto/avion optionnel
chaque fois que vous le pouvez.
• Si votre ordinateur portable
fonctionne sur l’alimentation par
batterie pendant toute une journée,
branchez-le sur l’adaptateur
secteur durant la nuit pour
recharger la batterie.
• Gardez la luminosité au niveau le
plus bas possible.
• Réglez la gestion de la consommation d’énergie pour une durée de
vie maximale de la batterie.
• Lorsque votre ordinateur est
allumé et que vous ne l’utilisez pas,
mettez-le en mode veille.
• Limitez votre accès au lecteur
multimédia.
• Désactivez la fonction d’avis automatique d’insertion de votre lecteur.
•
Utilisez toujours des batteries
chargées complètement.
Réglage de la luminosité de l’écran
• Fn + F6 pour diminuer la luminosité.
• Fn + F7 pour augmenter la
luminosité.
Réglage du volume
• Fn + F8 pour baisser le volume.
• Fn + F9 pour augmenter le volume.
• Fn + F3 pour activer ou désactiver
le mode Sourdine.
ECO
• Fn + F11 pour activer ou désactiver
le mode ECO.
Souris
• Fn+F4 pour activer ou désactiver
la souris.
Voyants principaux
Voyants d’état
Voyant d’alimentation
Indique si votre système est opérationnel.
Lorsqu’il est bleu, cela signifi e que votre
ordinateur est alimenté en énergie et est
prêt à être utilisé.
Voyant de niveau de charge/entrée c.c.
Selon que votre adaptateur secteur est
branché ou non, le voyant de la batterie
apparaîtra dans des couleurs et états
différents.
Adaptateur secteur branché...
• Bleu continu : Charge complète
• Orange continu : Charge en cours
• Violet, clignotant : Batterie défectueuse
Aucun adaptateur secteur branché...
• Orange clignotant : Batterie chargée à
12% ou moins de sa capacité maximale.
• Violet, clignotant : Batterie défectueuse
• Éteint : Batterie chargée entre 13% et
100% de sa capacité maximale.
– Batterie complètement déchargée
10
– Aucune batterie installée
Voyant d’accès au disque dur
Ce voyant s’allume en bleu lorsque votre
disque dur est en cours d’utilisation.
Voyant Verr maj
Ce voyant est allumé lorsque la frappe
en majuscules est activée.
Voyant Verr num
Ce voyant est allumé lorsque le pavé
numérique de 10 touches du clavier
est activé.
Page 11

CONSERVEZ CES INSTRUCTIONS
CONSIGNES DE SÉCURITÉ IMPORTANTES
Pour fonctionner, cet appareil nécessite un adaptateur secteur. Utilisez uniquement un adaptateur de classe 2 I.T.E. homologué
UL avec une sortie nominale de 19 V c.c. et un courant de 3,16 A (60 W).
Polarité de sortie de l’adaptateur secteur :
Pendant l’utilisation de l’ordinateur portable, observez toujours les consignes de sécurité élémentaires ci-après afin de réduire
au minimum le risque d’incendie, d’électrocution ou d’autres blessures. D’autre part :
• ATTENTION - SURFACE CHAUDE : Le dessous de cet ordinateur peut s’échauffer lorsque l’appareil est
utilisé pendant une longue période. Lorsque vous utilisez cet ordinateur et qu’il repose à même la peau (sur
les jambes nues), prenez garde à ne pas l’utiliser pendant trop longtemps ou de manière continue.
Avertissement
Attention
• N’utilisez pas ce produit à proximité d’un point d’eau (baignoire, lavabo, évier de cuisine, évier de buanderie)
ni dans un sous-sol humide ou à côté d’une piscine.
• Durant un orage électrique, évitez d’utiliser le modem. Il existe de faibles risques que la foudre cause une
électrocution.
• Utilisez uniquement le cordon d’alimentation et les piles recommandés dans ce manuel. Ne jetez pas les
piles ou les batteries dans un feu. Elles risquent d’exploser. Vérifiez si la réglementation locale comporte des
instructions spéciales d’élimination.
ATTENTION : Pour réduire les risques d’incendie, utilisez uniquement un câble téléphonique AWG de calibre
•
26 ou supérieur, homologué UL ou CSA.
• Pour utilisation du syntoniseur télé : Si vous utilisez un système de câblodistribution, protégez-vous contre les
surtensions et les ondes transitoires en vous assurant que la gaine extérieure du câble co-axial est reliée à la
terre dans le bâtiment, aussi près que possible du point d’entrée du câble, conformément à l’article 820.93
du code électrique des États-Unis et à la norme ANSI/NFPA 70 : 2005. Si vous avez des questions concernant votre installation de câblodistribution, contactez votre câblodistributeur.
Avis réser vé à des réparateurs qualifiés
IL Y A RISQUE D’EXPLOSION SI LA BATTERIE AU LITHIUM (HORLOGE) N’EST PAS REMPLACÉE
CORRECTEMENT. LA BATTERIE DOIT ÊTRE REMPLACÉE UNIQUEMENT PAR UNE BATTERIE IDENTIQUE
OU D’UN TYPE ÉQUIVALENT RECOMMANDÉ PAR LE FABRICANT. JETEZ LES BATTERIES USAGÉES
CONFORMÉMENT AUX INSTRUCTIONS DU FABRICANT.
POUR UNE PROTECTION PERMANENTE CONTRE LES RISQUES D’INCENDIE, REMPLACEZ LES
FUSIBLES PAR DES FUSIBLES DE MÊME CAPACITÉ ET DE MÊME TYPE.
Recyclage de la batterie
Avec le temps, l’autonomie des batteries qui alimentent votre ordinateur portable finira par diminuer ; c’est un
phénomène naturel pour toutes les batteries. Lorsque vous remarquerez cela, songez à installer une batterie
neuve*. Si vous remplacez votre ancienne batterie, il est important que vous la jetiez comme il convient car,
dans le cas contraire, les matériaux qu’elle contient risquent de nuire à l’environnement.
Chez Fujitsu, nous portons une attention particulière à la protection de l’environnement et nous collaborons
donc avec la Rechargeable Battery Recycle Corporation (RBRC*), une organisation de service public à but
non lucratif qui s’engage dans la protection de l’environnement en recyclant les batteries et piles usagées
sans aucun frais pour vous.
La RBRC dispose de dizaines de milliers de points de collecte aux États-Unis et au Canada. Pour trouver le
lieu de collecte le plus proche de chez vous, visitez www.RBRC.org ou appelez au 1-800-822-8837.
Si aucun des lieux proposés par la RBRC ne vous convient, vous pouvez en trouver un en visitant le site de
la Consumer Education Initiative (Initiative pour l’éducation des consommateurs) de l’EIA à l’adresse
http://EIAE.org/.
Rappelez-vous que la protection de l’environnement est l’affaire de tous, vous devriez donc faire tout votre
possible pour protéger la génération actuelle et les générations futures.
* Pour commander une nouvelle batterie compatible avec votre ordinateur portable Fujitsu, visitez le site
www.shopfujitsu.com si vous résidez aux États-Unis ou www.fujitsu.ca/products/notebooks si vous résidez
au Canada.
** La RBRC est une organisation indépendante dont Fujitsu finance une partie des activités de recyclage ;
la RBRC n’est en aucune façon affiliée à Fujitsu.
11
Page 12

Accessoires préférés
des utilisateurs
Modules de mémoire
• DDR3 1333 MHz SO-DIMM 2 Go
Batteries au lithium supplémentaires
• Batterie principale standard
Adaptateur auto/avion
Adaptateur secteur supplémentaire
Lecteur optique USB
Mallettes de transport
• Étui de protection P Series
• Sac de voyage Duo
• Mallette renforcée
• Mallette de directeur en cuir
• Mallette en nylon Diplomat
Verrou de l’ordinateur
Souris optique USB
Notez ici le numéro de série de votre ordinateur :
N° de série__ ____________________
(voir sous l’ordinateur)
Fujitsu America, Inc.
1250 E. Arques Avenue
Sunnyvale, CA 94085
Questions ? Besoin d’aide ?
• Visitez notre site à us.fujitsu.com/computers
• Appelez-nous en tout temps au
1.800.8FUJITSU
• Envoyez-nous un courriel à
8fujitsu@us.fujitsu.com
Vous voulez en savoir davantage sur les
produits Fujitsu ?
• Visitez notre site Internet www.shopfujitsu.com
• Appelez-nous en tout temps au
1.800.FUJITSU
Des programmes de garantie prolongée
Fujitsu sont disponibles.
Pour obtenir de plus amples informations
ou pour acheter des accessoires,
allez sur solutions.us.fujitsu.com.
12
Fujit su, le logo Fuji tsu et LifeBook son t des marques d éposées de Fujitsu Limi ted. Microsoft, Windo ws et Genuine W indows Vista (d’origin e) sont des ma rques dépos ées ou des
marques de commerc e de la société Micros oft aux État s-Unis et/ou dans d’autres pay s.
Toutes le s autres marques de commerce men tionnées dans le présen t document
sont la p ropriété de leur détenteur resp ectif. Les informations de desc ription de pr oduit
correspon dent à des objectif s de concept ion de Fujits u. Elles sont of fertes un iquement
à titre indic atif. Les résultat s réels peuvent var ier en fonction d’un e grande variété de
facte urs. Les spécifications sont su jettes à modification s ans préavis.
© 2010 Fujitsu America, Inc. Tous dro its réser vés.
 Loading...