

Page 1

Fujitsu Computer Systems Corporation
Port Replicator User’s Guide
FPCPR87AP / FPCPR88AP / FPCPR89AP
This user’s guide contains information on your port replicator with your Fujitsu LifeBook®. We strongly recommend
that you read this guide before using the port replicator even
if you are already familiar with such accessories.
This user’s guide is applicable to three different models, with
differences noted as follows:
FPCPR87AP: Port Replicator
FPCPR88AP: Port Replicator with Dual-Layer Multi-
Format DVD Writer
FPCPR89AP: Port Replicator with DVD/CD-RW Combo
Drive
Device Ports/Connectors on the Port Replicator
The port replicator extends the functionality of your LifeBook by providing the following ports:
• Four USB 2.0 ports
• One 15-pin D-SUB connector for external monitor
• One LAN (RJ-45) port
• One DC-in connector
• One DVI-D connector
• One headphone connector
•One docking connector
The port replicator connects to the bottom of the notebook.
1
Page 2
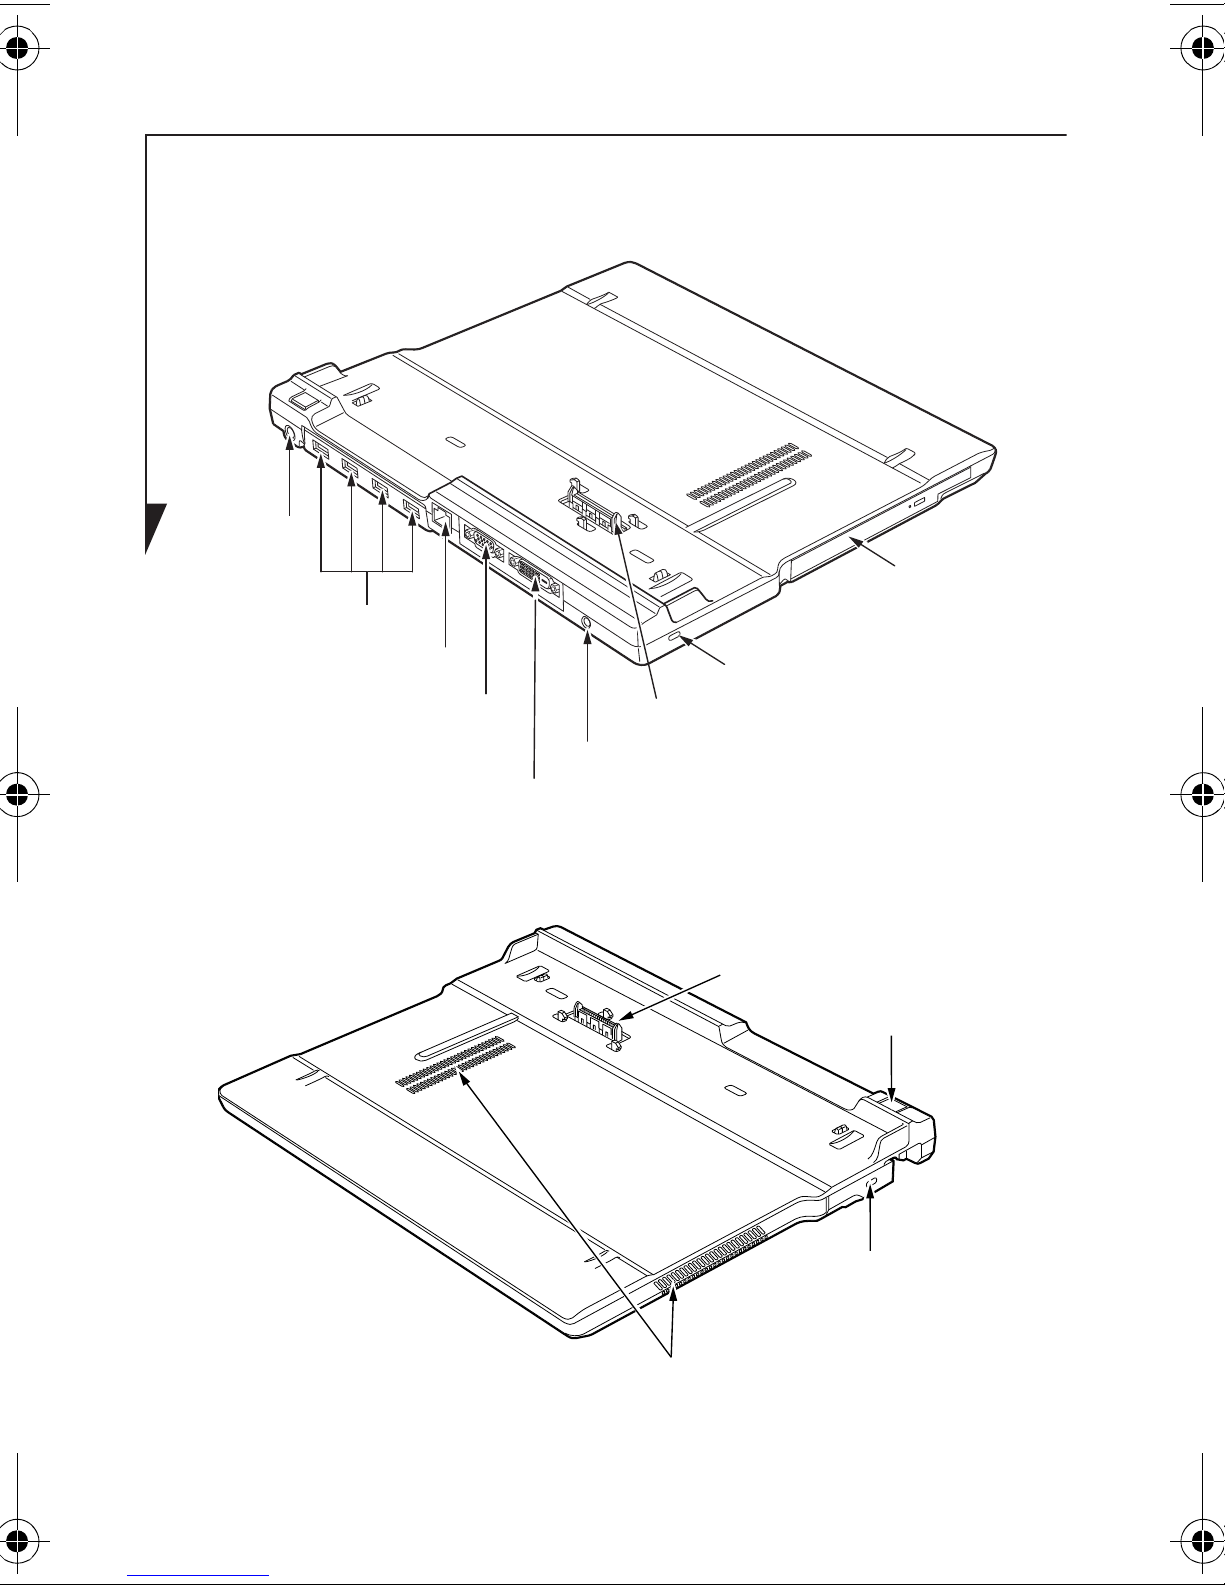
Figure 1. Port Replicator - Rear and Left Side
USB Ports
LAN Connector
Connector
External Monitor
DVI-D Connector
Docking Connector
DC
Headphone Jack
Optional
Power
Jack
Security
Lock Slot
Optical
Drive
Docking Connector
Latch Release
Air Vents
Suspend/
Resume Button
with Security
Lock Slot
2
Figure 2. Port Replicator - Front and Right Side
Page 3

REAR PANEL/LEFT SIDE COMPONENTS
The following is a brief description of the port replicator’s
rear and left side components. (Figure 1)
DC Power Jack
The DC power jack allows you to plug in the AC adapter or
the optional Auto/Airline adapter to power your notebook.
USB Ports
There are four USB 2.0 ports on the port replicator. USB 2.0
ports let you connect any USB 2.0 device for up to 480 Mbps
transfer rate. USB 2.0 is backward-compatible with USB 1.1.
LAN (RJ-45) Jack
The LAN port lets you connect an RJ-45 cable. Note that
when your notebook is connected to the port replicator, the
LAN port on the system is not accessible; the port replicator
LAN port is the only one that can be used when attached to
the system.
External Monitor Port
The external monitor port allows you to connect an external
VGA or SVGA CRT monitor.
Digital Video Interface (DVI-D)
The DVI-D port allows you to connect a flat-panel LCD
monitor or television that is equipped with a DVI-D port for
ultra-crisp digital images and graphics.
Headphone Jack
The headphone jack allows you to connect headphones to
your notebook.
3
Page 4

Optical Drive (on select models)
On the left-hand side of the port replicator -- depending
upon which model of port replicator you purchased -- there
may be a fixed optical drive. If you have an optical drive
installed, see the instructions contained in “Using the
optional optical drive” on page 8.
FRONT/RIGHT SIDE COMPONENTS
The following is a brief description of the port replicator’s
front and right side components. (Figure 2)
Docking Connector
The docking connector mates with the connector on the
bottom of the LifeBook to connect the two electronically.
Suspend/Resume Button
The power on/suspend/resume button allows you to
suspend/resume your system via the port replicator.
Latch Release with Security Lock Slot
The latch release is used to release the system from the port
replicator. The security lock slot allows you to secure the
port replicator with an optional security lock/cable. When
the system is installed in the port replicator, the slot secures
both.
4
Page 5
Air Vents
Air vents are used to cool the system to prevent overheating
To protect your notebook and/or port replicator
from damage and to optimize performance, be
sure to keep all air all vents unobstructed,
clean, and clear of debris. This may require
periodic cleaning, depending upon the
environment in which the system is used.
Do not operate the notebook in areas where the
air vents can be obstructed, such as in tight
enclosures or on soft surfaces like a bed.
ATTACHING THE PORT REPLICATOR
The port replicator can be attached to your notebook while
.
the power is on, while in suspend mode, or while the power
is off.
The AC adapter must be plugged into the port
replicator in order to use all of the ports. If the
adapter is connected to the system, several of
the port replicator ports will not be usable.
1. Unplug the AC adapter from the system if it is connected
and any other connectors that are attached to the back
of the system.
5
Page 6
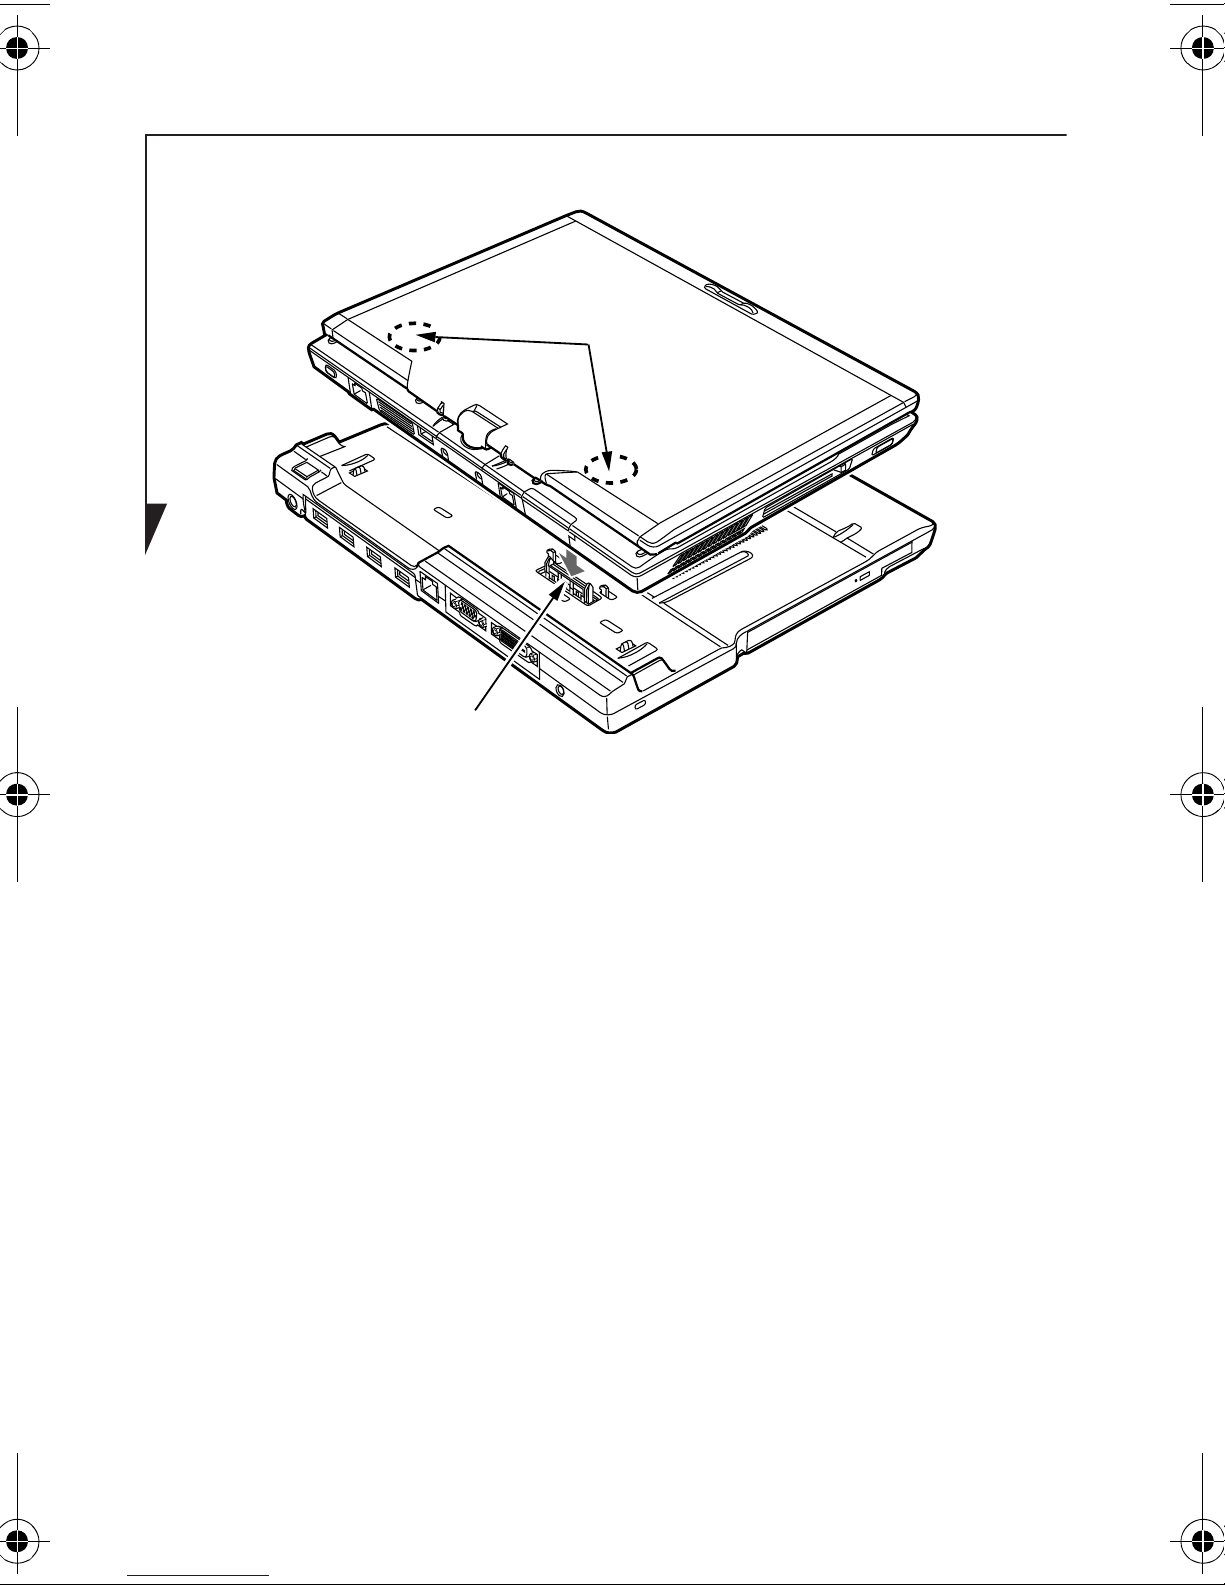
Figure 3. Attaching the Port Replicator
Docking connector
Press points
2. Position the system so that the docking connector on the
bottom of the system is aligned with the docking
connector on the port replicator (Figure 3).
3. Push your notebook down at the two press points indicated in Figure 3 to connect it securely to the port replicator.
4. Plug the AC adapter into the DC power jack on the port
replicator and plug the other end into a power outlet.
Attach any peripheral devices to the port replicator.
6
Page 7

DETACHING THE PORT REPLICATOR
The port replicator can be detached from your notebook
while the power is on, while in suspend mode, or while the
power is off. To detach the port replicator follow these steps:
1. Pull the port replicator latch release outwards (Figure 4).
2. While holding the port replicator latch release, lift your
notebook to detach it from the port replicator.
Figure 4. Detaching the notebook
7
Page 8

USING THE OPTIONAL OPTICAL DRIVE
Emergency
Tray Release
Optical Drive Tray
Drive Tray Release Button
Depending upon which model of port replicator you
purchased, it may have a built-in optical drive.
Figure 5. Optical Drive Location
There is a variety of media available to use with your system,
depending upon the port replicator configuration you have
selected. Multi-Format DVD Writers and DVD/CD-RW
Combo drives are collectively known as “optical drives”.
DVD-R/DVD-RW discs hold up to 4.7 GB of data (DVD-R
discs used with Multi-Format Dual-Layer DVD writer hold
up to 8.5 GB). DVD-R discs can only be written to once;
DVD-RW discs can be written to several times. DVD-R/
DVD-RW discs can be played on most standard players.
CD-R and CD-RW discs hold up to 700 MB of data. A CD-R
disc can only be written to once; CD-RW discs can be
written to over and over.
8
Page 9

Depending upon your notebook configuration, you may
have one of the following fixed optical drives:
• DVD/CD-RW combo: The combo drive allows you to
access movie, software, data, or audio DVD/CDs, and to
write data onto recordable CD-R and CD-RW discs.
• Dual-Layer Multi-Format DVD Writer: This drive allows
you to access movies, software, and audio DVD/CDs as
well as to read and write to CD-R, CD-RW, DVD-R,
DVD+R, DVD-RW, DVD+RW, and DVD RAM discs.
Depending upon your port replicator
configuration, if you have an optical drive
model it will include one of the following
software packages.
FPCPR88AP (Port Replicator with Dual-Layer
Multi-Format DVD Writer):
• Roxio Creator LJ
• CyberLink PowerDirector™ DE
FPCPR89AP (Port Replicator with DVD/CDRW Combo Drive):
• Roxio Creator LJ
Install your media player software before first
using the optical drive. Refer to the readme or
help file associated with the software.
9
Page 10

MEDIA PLAYER SOFTWARE
The optical disk drive and media player software let you play
DVDs and CDs on your notebook. The media player
includes controls which allow you to take full advantage of
the DVD movie features, as well as standard features like fast
forward, fast reverse, pause, etc. With this drive you can also
burn onto recordable discs.
Do not operate your optical drive unless your
LifeBook notebook is sitting on a flat surface.
Using a drive when the system is not level may
damage the drive or prevent proper operation.
LOADING MEDIA ON YOUR DRIVE
To load a disc into your optical drive: (Figure 6)
1. Push and release the eject button on the front of the
optical drive to open the holder tray. The tray will come
out of the port replicator a short distance.
2. Gently pull the tray out until a media disc can easily be
placed in the tray.
You should periodically check the Fujitsu
website at:
http://www.us.fujitsu.com/computers
for current updated drivers.
10
Page 11

• All LifeBook DVD players are set to play DVD
titles with region code number 1 which is
specified for the North American market. The
region number is a regional restriction code
defined by the DVD Forum acting on Hollywood requirements. Different region codes
are recorded on video DVD titles for publication in different areas of the world. If the
regional code of the DVD player does not
match the regional codes on the titles, then
playback is impossible.
• You can change the region code on the DVD
player using the Properties menu of the DVD
software. Note, however, that you can only
change the region code up to four times.
After the fourth change, the last region code
entered becomes permanent, and cannot be
changed.
3. Place the media into the tray, label side up, with the hole
in the center of the disc. Snap the disc onto the raised
circle in the center of the tray.
4. Gently push the holder tray back in until you hear a
click. (Figure 6)
If you have disabled the Auto Insert
Notification Function, you will have to start
the drive from your desktop, since your
LifeBook notebook will not automatically
recognize that media has been loaded.
11
Page 12

Figure 6. Loading/Ejecting Media
(a)
(b)
(c) (d)
REMOVING MEDIA
1. Push and release the eject button on the front of
the optical drive. This will stop the drive and the holder
tray will come out of the LifeBook notebook a short
distance.
2. Gently pull the tray out until the disc can easily be
removed from the tray.
3. Carefully remove the media disc from the holder tray.
4. Gently push the holder tray back in until you
hear a click.
12
Page 13

EMERGENCY MEDIA TRAY RELEASE
If for some reason the eject button fails, you can open the
media tray with a paper clip inserted into the eject hole in
the far right side of the front of the tray. Straighten one side
of a paper clip and push it gently into the hole. The tray will
pop out a short distance. (Figure 7)
Figure 7. Emergency Removal of a CD/DVD
13
Page 14

DECLARATION OF CONFORMITY
according to FCC Part 15
Responsible Party Name: Fujitsu Computer Systems Corporation
Address: 1250 E. Arques Avenue, M/S 122
Sunnyvale, CA 94085
Telephone: (408) 746-6000
Declares that products: - Port Replicator FPCPR87AP
- Port Replicator (w/Dual-Layer Multi Format DVD Writer) FPCPR88AP
- Port Replicator (w/DVD/CD-RW
Drive) FPCPR89AP
Comply with Part 15 of the FCC Rules.
This device complies with Part 15 of the FCC rules. Operations are
subject to the following two conditions: (1) This device may not
cause harmful interference, (2) This device must accept any interference received, including interference that may cause undesired
operation.
14
Page 15

15
Page 16

Fujitsu Computer Systems Corporation
1250 E. Arques Avenue, (M/S 122)
Sunnyvale, California 94085
For more information, call 1-800-FUJITSU
or visit our Web site at: www.shopfujitsu.com
For technical support call:1-800-8FUJITSU (1-800-838-5487) or e-mail
us at: 8fujitsu@us.fujitsu.com
Fujitsu and the Fujitsu logo are registered trademarks of Fujitsu Ltd.
Roxio® is a trademark or registered trademark of Sonic Solutions.
PowerDirector is a trademark of CyberLink Corporation. All other
trademarks mentioned herein are the property of their respective
owners.
Product description data reflects Fujitsu design objectives and is
provided for comparative purposes; actual results may vary based
on a variety of factors. Specifications are subject to change without
notice.
© 2008 Fujitsu Computer Systems Corporation. All rights reserved.
B5FY-9011-01EN-00
16
 Loading...