

Fujitsu Stylistic 4110P, Stylistic 4120, Stylistic 4120P, Stylistic 4121, Stylistic ST4110 User Manual
...Page 1

Fujitsu Stylistic
®
ST4000 Series
TABLET DOCK
USER’S GUIDE
Page 2

This device complies with Part 15 of the FCC rules. Operations are subject to the following two conditions:
(1) This device must not be allowed to cause harmful interference, (2) This device must accept any interfer-
ence received, including interference that may cause undesired operation.
DECLARATION OF CONFORMITY
according to FCC Part 15
Responsible Party Name: Fujitsu PC Corporation
Address: 5200 Patrick Henry Drive
Santa Clara, CA 95054
Telephone: (408) 982-9500
Declares that products: Tablet Dock (w/Combo DVD/CD-RW) FPCPR32AP
Tablet Dock (w/CD-ROM) FPCPR33AP
Comply with Part 15 of the FCC Rules.
Page 3
Tablet Dock User’s Guide
Stylistic ST4000 Series Tablet Dock
This guide contains information on using your Tablet
Dock. You should read this section before using the
dock, even if you are familiar with other computer
docking devices.
Your Tablet Dock may be configured in one of two ways:
Configuration Part Number
Tablet Dock with CD-ROM Drive FPCPR33AP
Tablet Dock with Combo DVD/
FPCPR32AP
CD-RW Drive
Your Fujitsu Stylistic ST4000 Series Tablet Dock has the
following interfaces:
Port/Jack Purpose
LAN (RJ-45)
Jack
Allows you to connect a Local Area
Network (LAN) device or broadband
device such as a cable modem.
VGA Port Allows you to connect an external
monitor.
Line Out
Jack
Allows you to connect headphones or
external speakers.
DC In Allows you to connect power to the
system.
USB Ports
(Quantity 3)
Allow you to connect up to three
Universal Serial Bus (USB) Revision 1.1
devices or hubs.
IEEE 1394
Jack
Allows you to connect a peripheral
such as a digital video camera.
UNPACKING
When removing your Tablet Dock from the packaging
materials, check for these items:
■
Tab le t D oc k
■
Warranty statement
■
User’s Guide (this document)
■
CD containing additional applications (included with
Tablet Dock with Combo Drive only)
Contact your dealer if you do not have all of the
above items.
WARNINGS
■
Do not expose the Tablet Dock to rain, moisture,
excessive dirt or temperatures outside the Environmental Specifications as it may cause fire and shock
hazards.
■
High voltage is present inside the Tablet Dock. Do not
remove the cover under any circumstances. There is a
serious shock hazard.
■
Switch the unit OFF, unplug the power cord and
contact a qualified service technician or Fujitsu
Services and Support if:
■
Liquid has been spilled on the Tablet Dock.
■
The Tablet Dock has been dropped.
■
Small metal objects went inside your Tablet
Dock which may cause a short circuit and/or
create a hazard of shock.
■
Fuses continue to blow out.
■
A distinct change in the operation and
performance of the Tablet Dock occurs.
■
The power cord or plug is damaged or frayed.
■
The unit should be operated only from the type of
power indicated on the marked label.
■
The socket outlet must be installed near the equipment to be accessible using the system’s AC power
cord.
■
For additional environmental specifications, see
“Tablet Dock Specifications” on page 10.
POINTS
■
Always use your Tablet Dock on a solid, flat, level,
clean, and dry surface. Nearby there should be electric power, as well as a telephone jack for a modem or
a LAN port.
■
Save packing material in order to safely ship or store
the Tablet Dock in the future.
3
Page 4
Stylistic ST4000 Series Tablet Dock
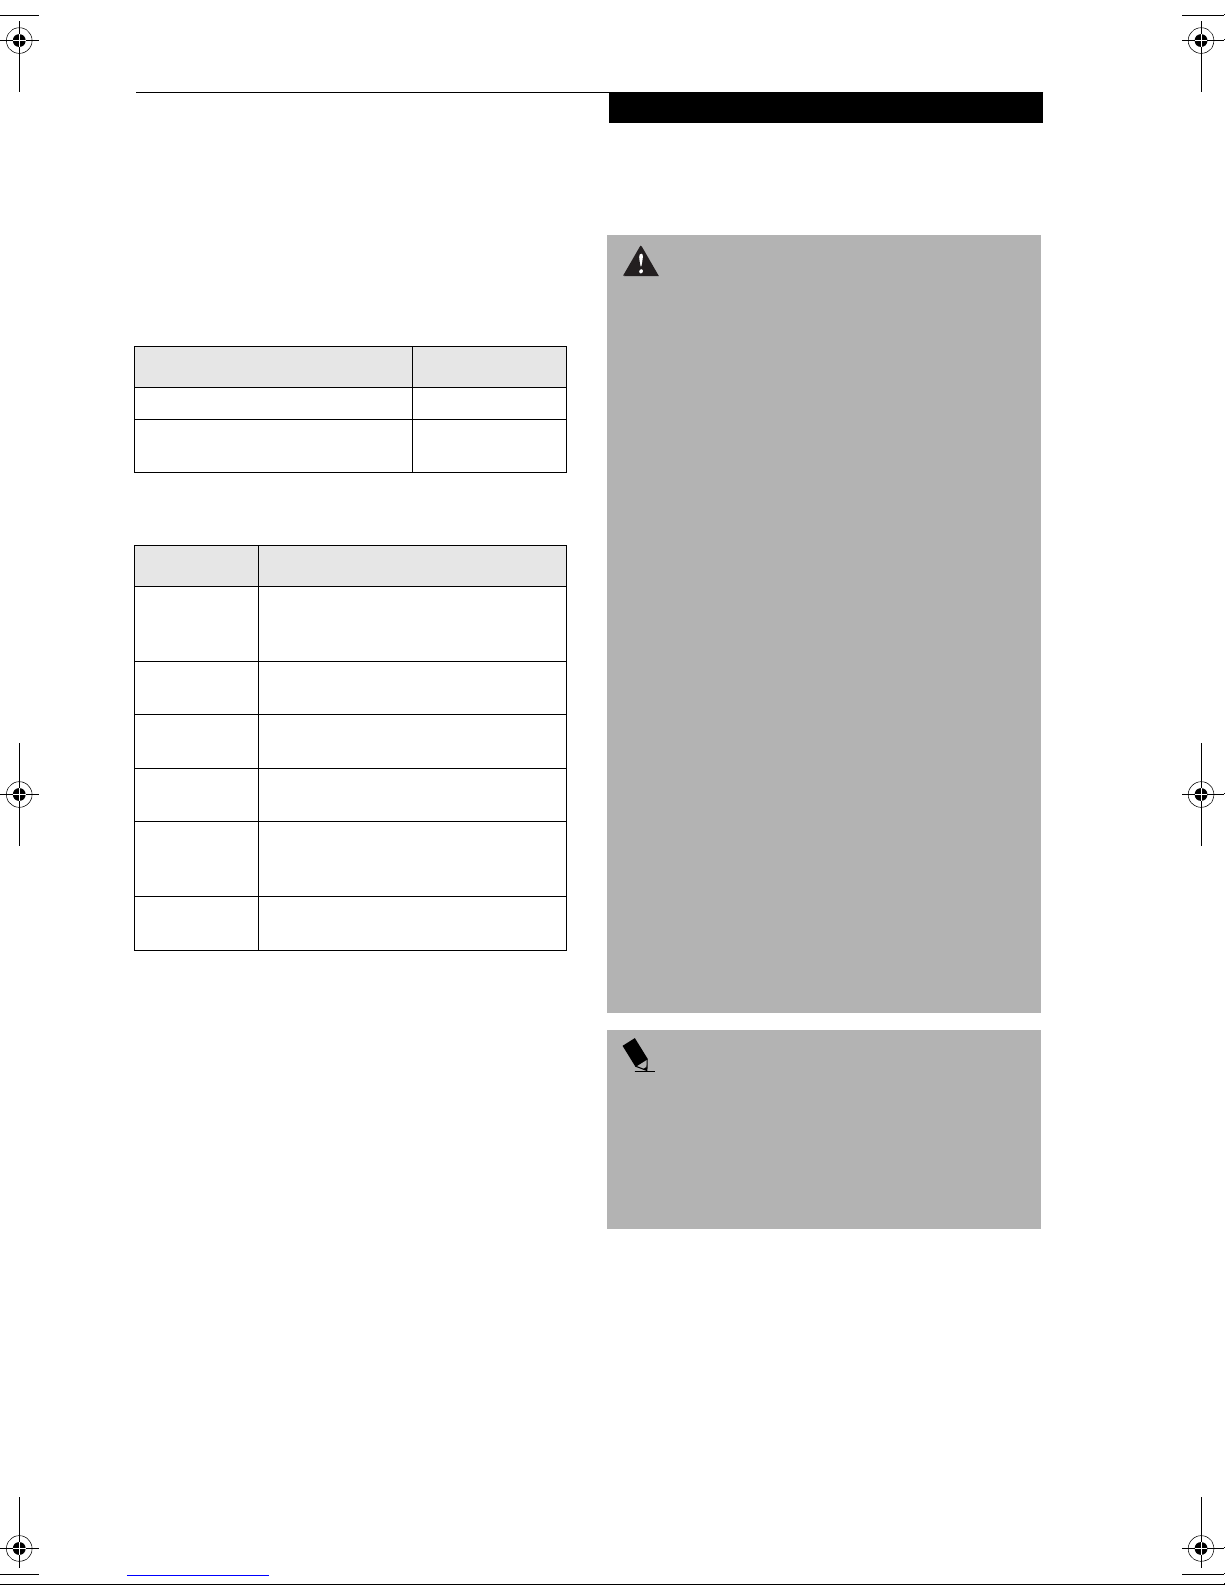
IDENTIFYING THE COMPONENTS
Before using your Tablet Dock, you should familiarize yourself with its various features.
Side Latch
(both sides)
Interface
Connector
Back Latch
Positioning Guide
Platform
Front of base
(Do not use as
a carrying handle).
Positioning Guide
Back Latch
Lock Release
Button
Lock Handle
Kensington®
Lock Slot
CD-ROM or
Combo DVD/
CD-RW Drive
Easel Release
Buttons
LAN (RJ-45) Jack
External Monitor (VGA) Port
Line Out Jack
Figure 1. Front View
IEEE 1394 Jack
USB Ports (Qty. 3)
DC In Jack
Figure 2. Back View
4
Page 5

Tablet Dock User’s Guide
DOCKING YOUR SYSTEM
Microsoft® Windows® uses “plug- and-play” technology
to automatically load the files necessary to operate your
Tablet Dock and any attached devices.
POINT
The following instructions assume the Tablet Dock is
positioned in portrait mode, with the Lock Handle on
the right of the dock.
1. Plug the system’s AC adapter into a wall outlet, then
into the Tablet Dock’s DC Input jack.
2. Set the ST4000 system on the Tablet Dock, with the
system oriented in the same direction as the dock.
(See Figure 3 for location). The connector in the back
of the system should be aligned with the interface
connector on the Tablet Dock.
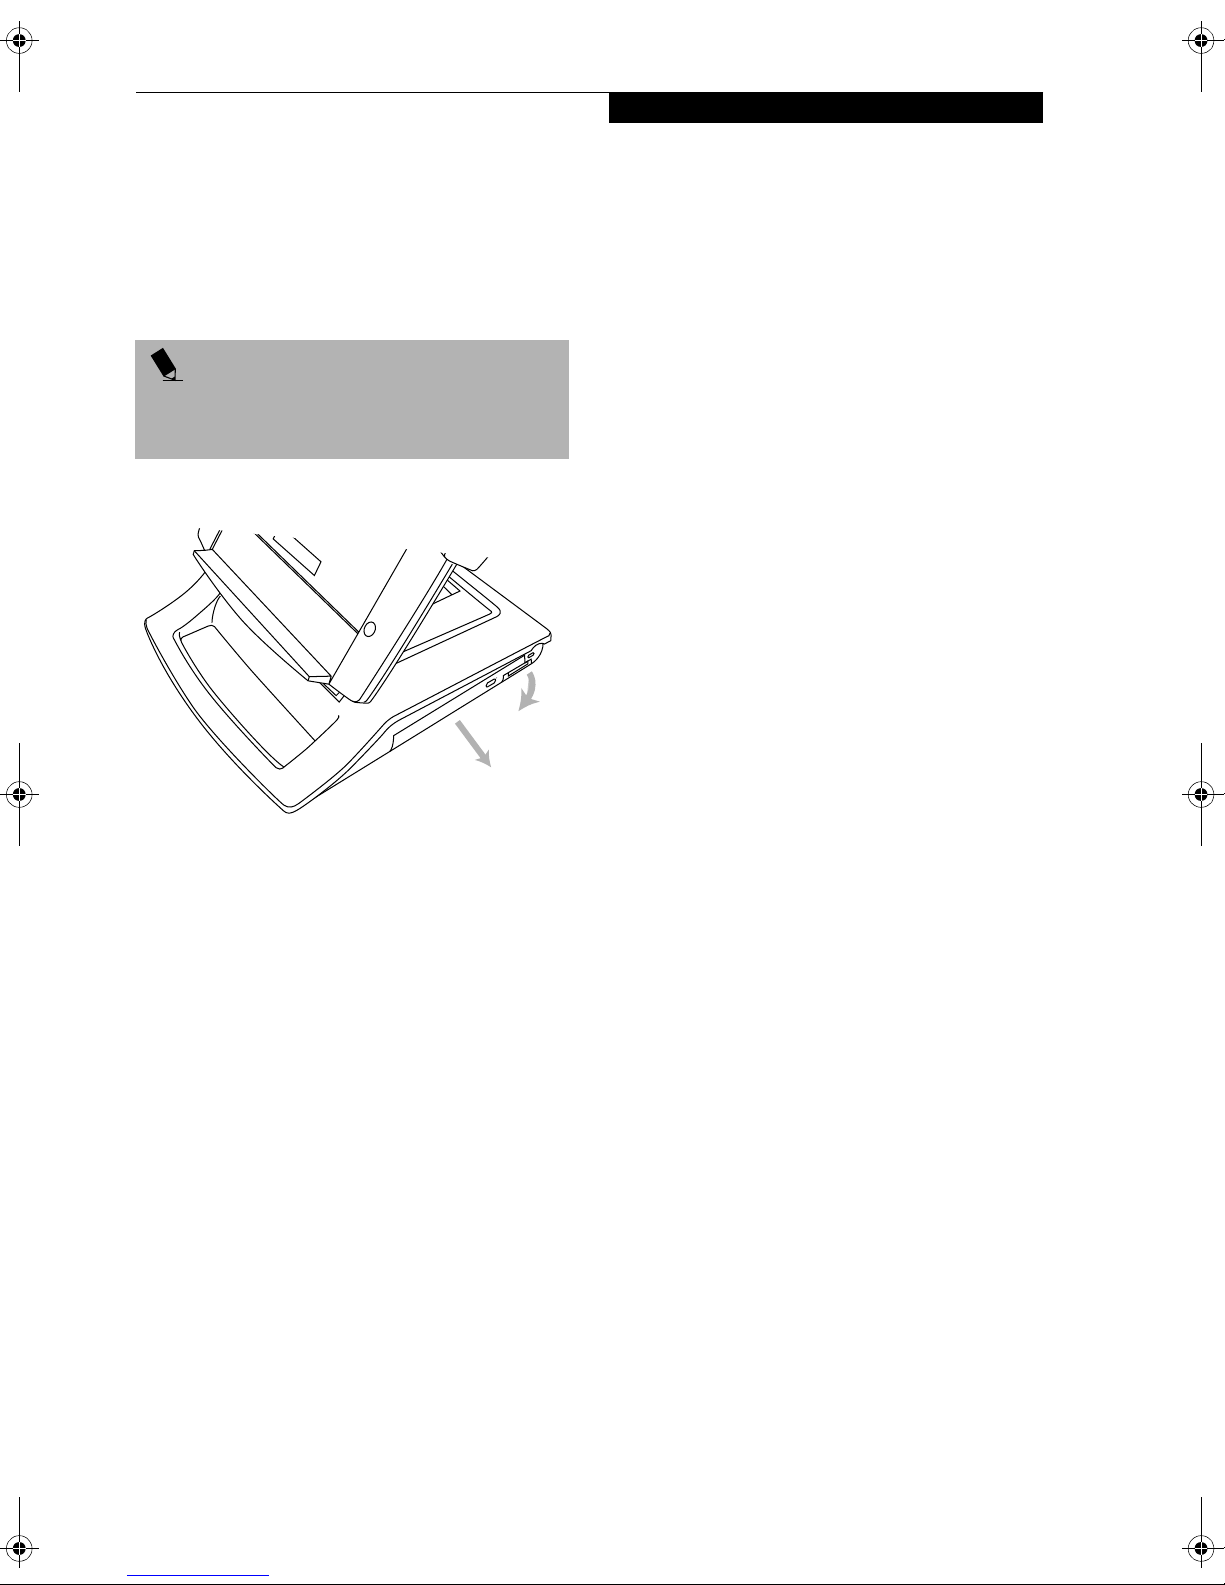
UNDOCKING YOUR SYSTEM
Use these instructions when you want to remove your
system from the Tablet Dock.
POINT
The system can be removed from the Tablet Dock
whether the system is operating or not.
1. If you are running a CD or DVD in the Tablet Dock
drive, be sure to stop the drive before undocking the
ST4000.
2. Press the lock release button on the top of the right
slide (above the lock handle). While holding it down,
pull the lock handle upwards to unlatch the back
latches from the system.
3. Pull the system upwards, away from the platform.
The system is now undocked.
Figure 3. Docking the system
3. Carefully push the system towards the docking port
until you hear a click. The click indicates that the side
latches are in place. Note that the system is not yet
locked into place until the following step is
performed.
4. Firmly pull the lock handle down as far as it will go.
This engages the back latches and side latches, and
locks the system in place.
5. Your Tablet Dock is now ready for use. You may now
attach devices to it.
POINT
The front portion of the base should not be used as a
handle.It is designed to support the system when it is
installed in the Tablet Dock.
5
Page 6

Stylistic ST4000 Series Tablet Dock
CHANGING SYSTEM ORIENTATION
With the Tablet Dock, you have the option of viewing
the display either in Portrait (vertical) or Landscape
(horizontal) mode.
Figure 4. Portrait Orientation
Figure 6. Changing DIsplay from Portrait to Landscape Mode
Figure 5. Landscape Orientation
To change the position of the display, simply grasp the
edge of the system and turn it in the direction shown in
Figures 6 and 7.
■
If the display is in portrait position, turn the display
to the right, as shown in Figure 6.
■
If the display is in landscape position, turn the
display to the left, as shown in Figure 7.
6
Figure 7. Changing Display from Landscape to Portrait Mode
POINT
When you change the orientation of the system, the
display does not change orientation. To change the orientation of the display, use the Orientation application
button. (See your system User’s Guide for more information).
Page 7

Tablet Dock User’s Guide
CONNECTING DEVICES
Once your system is installed in the Tablet Dock, you are
ready to attach external devices to the dock.
To Attach an External VGA Monitor
This option allows you to use an external monitor with
your system. The only requirement is that the external
device (monitor, projector) is a VGA device. Consult the
instructions that come with the device.
1. Securely insert the external monitor plug into the
display port on the back of the Tablet Dock
(Figure 2). Always check the icon by the port before
inserting. Tighten screws if available.
2. You may switch between the internal monitor and
external monitor using the Display Configuration
utility located in the system tray at the bottom right
of the screen, or through the Control Panel settings.
To Attach a USB device
Use of the USB ports allows attaching USB devices to a
docked system.
1. Securely insert the connector into one of the three
USB ports on the left side of the Tablet Dock
(Figure 2). It may be necessary to wait a short time
while the appropriate drivers are located and
installed by the system.
To Attach an IEEE 1394 device
The IEEE 1394 jack allows attaching peripherals such as
digital cameras to a docked system.
1. Securely insert the connector into the IEEE 1394
jack on the left side of the Tablet Dock (Figure 2).
Refer to the device manufacturer’s installation and usage
instructions for configuration instructions.
To Attach External Audio Equipment
The Tablet Dock provides a Line Out jack for headphones or external speakers.
POINT
Connecting external speakers (including headphones)
or microphone disables the system’s internal speaker or
internal microphone.
1. To attach an external audio device, insert the plug
into the Line Out jack on the back of the Tablet
Dock (Figure 2).
To Attach a LAN Device
The LAN (RJ-45) jack allows you to connect the system’s
internal Fast Ethernet to a LAN, or broadband devices
such as a cable modem, DSL, or satellite internet.
1. To attach a LAN device, insert the plug into the LAN
(RJ-45) jack on the back of the Tablet Dock.
Refer to the device manufacturer’s installation and usage
instructions for configuration instructions.
USING THE INTERNAL MEDIA DRIVE
The Tablet Dock is outfitted with either a CD-ROM
drive or a Combo DVD/CD-RW drive, depending upon
the configuration of your dock. A CD-ROM drive allows
you to access software, data, or audio CDs. A DVD/CDRW combo drive allows you to access movies, audio,
software, data, or audio DVD/CDs, and to write data
onto recordable CDs.
■
CD-ROM drive
All of the software you need to run the CD-ROM drive
is already installed on the ST4000 system. The drive
will work as soon as the system is docked and powered
up.
■
Combo DVD/CD-RW drive
Packaged with the Tablet Dock is a CD that contains
the applications required to run the DVD and CD/RW
features. The combo drive will only act as a CD-ROM
drive until you install the additional software. To
install the additional software, refer to the instructions
on the CD.
The instructions for installing and removing disks is the
same for both drives. For information about the software’s features and capabilities, refer to the help files
associated with the related applications.
POINTS
■
Prolonged use of the media drive, such as watching
a DVD movie, will substantially reduce your battery
life if no other power source is attached. Be sure to
attach an AC Adapter when using the Tablet Dock
for prolonged tasks.
■
You should periodically check the Fujitsu Web site at
www.fujitsupc.com for current updated drivers.
■
All Fujitsu DVD players are set to play DVD titles
with region code number 1 which is specified for the
North American market. The region number is a
regional restriction code defined by the DVD Forum
acting on the requirements of Hollywood. Different
region codes are recorded on video DVD titles for
publication in different areas of the world. If the
regional code of the DVD player does not match the
regional codes on the titles, then playback is impossible.
■
You can change the region code on the DVD player
using the Properties menu of the DVD software.
Note, however, that you can only change the region
code up to four times. After the fourth change, the
last region code entered becomes permanent, and
cannot be changed.
7
Page 8

Stylistic ST4000 Series Tablet Dock
CAUTION
Do not operate your media drive unless your system is
sitting on a relatively flat surface. Using the drive when
the system is not level may damage the drive or prevent
proper operation.
LOADING MEDIA
(Refer to Figure 8 for the following steps)
To load a disc into your media player drive, follow these
steps:
1. Push and release the eject button on the front of the
drive to open the holder tray. The tray will come out
of the system a short distance.
2. Gently pull the tray out until a media disc can easily
be placed in the tray.
CAUTION
There may be a protective sheet in the tray from when it
was shipped; please make sure it is removed before
operating the drive.
3. Place the media into the tray, label side up, with the
hole in the center of the disc. Snap the disc onto the
raised circle in the center of the tray.
4. Gently push the holder tray back in until you hear
a click.
REMOVING MEDIA
(Refer to Figure 8 for the following steps)
1. Push and release the eject button on the front of
the media player drive. This will stop the drive and
the holder tray will come out of the system a short
distance.
2. Gently pull the tray out until the disc can easily be
removed from the tray.
3. Carefully remove the media disc from the holder
tray.
4. Gently push the holder tray back in until you
hear a click.
Figure 8. Loading/Ejecting Media
8
Page 9
Tablet Dock User’s Guide
REMOVING THE DRIVE
To remove the media drive from your Tablet Dock:
1. If the ST4000 and media drive are running, click on
the “Safely Remove Hardware” icon in the system
tray at the bottom right of your screen and disable
the media drive.
POINT
It is recommended that you always have the media
drive installed while you are using your ST4000 in the
Tablet Dock.
2. Pull the drive latch away from the Tablet Dock to
unlatch the drive from the dock. (See Figure 9.)
2
Figure 9. Removing the Media Drive
3. Pull the module out of the Tablet Dock.
SAFETY PRECAUTIONS
■
Never move the Tablet Dock with the system docked
unless it is fully locked. If the system were to undock
accidentally, it could drop and be damaged.
■
Never power-off or remove the computer from the
Tablet PC while the system is reading or writing to a
floppy or hard drive. This could result in data loss.
■
Always wait at least 5 seconds before restarting the
Tablet PC after turning it off. Failure to do this can
result in damage to the system’s electrical circuitry.
FUJITSU CONTACT INFORMATION
If you have problems you are unable to resolve, consult
your support representative, toll free at
■
Phone: 1-800-8Fujitsu (1-800-838-5487)
■
FAX: 901-259-5900
■
E-mail: 8fujitsu@fujitsupc.com
■
Web Site: www.fujitsupc.com
Before you place the call have the following information
1
ready so the customer support representative can
provide you with the fastest possible assistance:
■
Product name and model number for both the Tablet
Dock and your system.
■
Product configuration number for both the Tablet
Dock and your system.
■
Product serial number for both the Tablet Dock and
your system.
■
Purchase date for both the Tablet Dock and your
Stylistic ST4000 Series Tablet PC.
The information you need is on the unit label on the
back of your system and on the bottom of your Tablet
Dock.
9
Page 10

Stylistic ST4000 Series Tablet Dock
TABLET DOCK SPECIFICATIONS
Feature Details
Ports
Power
Dimensions
Weight
Environmental
■
100-pin docking connector
■
VGA, D-sub 15-pin female
connector, DDC compliant
■
Line Out Jack (3.5mm) for headphones or external speakers
■
DC input, 16VDC
■
IEEE 1394, 4-pin standard
connector
■
USB (Universal Service Bus) Ports
(quantity: 3)
■
LAN connector: 100Base-TX/
10Base-T; RJ-45
■
System Bay: Accommodates
CD-ROM or DVD/CD-RW drive
■
16VDC, with current of 3.75 A
■
Height: 12.95” (329mm)
■
Width: 8.66” (220mm)
■
Depth: 10.35” (263mm)
■
5.95 lbs. (2.7Kg)
■
Operating Temperature:
o
-95o F (5o-35o C)
40
■
Storage Temperature:
o
-5
-140o F (-20o -60o C)
■
Relative Humidity: 20-80%
10
Table 1. Tablet Dock Specifications
Page 11

Tablet Dock User’s Guide
11
Page 12

Stylistic ST4000 Series Tablet Dock
5200 Patrick Henry Drive, Santa Clara, California 95054
For more information, call
1-877-FPCDIRECT (1-877-372-3473)
or visit our Web site at: www.fujitsupc.com
For technical support call 1-800-8fujitsu (1-800-838-5487)
or e-mail us at: 8fujitsu@fujitsupc.com
Microsoft and Windows are registered trademarks of the Microsoft Corporation. Fujitsu and the Fujitsu logo are registered trademarks of Fujitsu Ltd., and Stylistic is a registered trademark of Fujitsu PC Corporation. All other trademarks
mentioned herein are the property of their respective owners.
Product description data reflects Fujitsu design objectives and is provided for comparative purposes; actual results may vary
based on a variety of factors. Specifications are subject to change without notice.
© 2002 Fujitsu PC Corporation. All rights reserved.
B5FY-3011-01EN-00
12
 Loading...