

Page 1
minidock.fm Page 1 Tuesday, August 21, 2001 3:30 PM
Fujitsu PC Corporation
Mini-Dock
Installation Guide
FPCPR25
INSTRUCTIONS
This mini-dock is designed to extend the connectivity of
your pen tablet by providing a number of ports that are not
available on the system. Refer to Figures 1, 2, and 3 for port
locations. The mini-dock can also be used as a charging
dock for periods when the pen tablet is not being used.
Note that this mini-dock is not
or Stylistic LT C-500 pen tablet computers.
compatible with Stylistic LT
This mini-dock provides the following interfaces:
■
PS/2-style Mouse Port
Used for connecting a mouse with a PS/2-style connector.
■
AC Adapter Port
Used for connecting the AC adapter to supply power to
the system.
■
Parallel Port
Ordinarily used for connecting a printer.
■
Serial Port
Used for connecting a serial device.
Page 2
minidock.fm Page 2 Tuesday, August 21, 2001 3:30 PM
■
Video Port
Used for connecting a video monitor for displaying the
contents of the pen tablet screen.
■
Floppy Disk Drive Port
Used for connecting the optional floppy disk drive.
■
PS/2-style Keyboard Port
Used for connecting a PS/2-style keyboard connector.
■
LAN Port
Used for connecting the pen tablet’s optional internal LAN
module to a LAN hub.
Note s: The mini-dock is required in order to use the internal
LAN module; there is no LAN port on the pen tablet.
A ferrite core is supplied with the mini-dock. To comply
with FCC Class B requirements, use the ferrite core on
the LAN cable (not supplied). Installation instructions
are included in the ferrite core packaging.
■
USB Port
Used for connecting Universal Serial Bus-compliant
devices.
The viewing angle of the mini-dock can be adjusted to four
different positions. The bottom of the support bail on the
rear of the support platform (see Figure 3) snaps into one of
four slots. When storing the mini-dock, flip the bail up
against the back of the support platform to allow the platform to lie flat.
Note that the right-hand support can be removed to accommodate an optional wireless module (see Figure 4). To
remove the support, slide it upwards until it unlatches from
the support platform.
2
Page 3
minidock.fm Page 3 Tuesday, August 21, 2001 3:30 PM
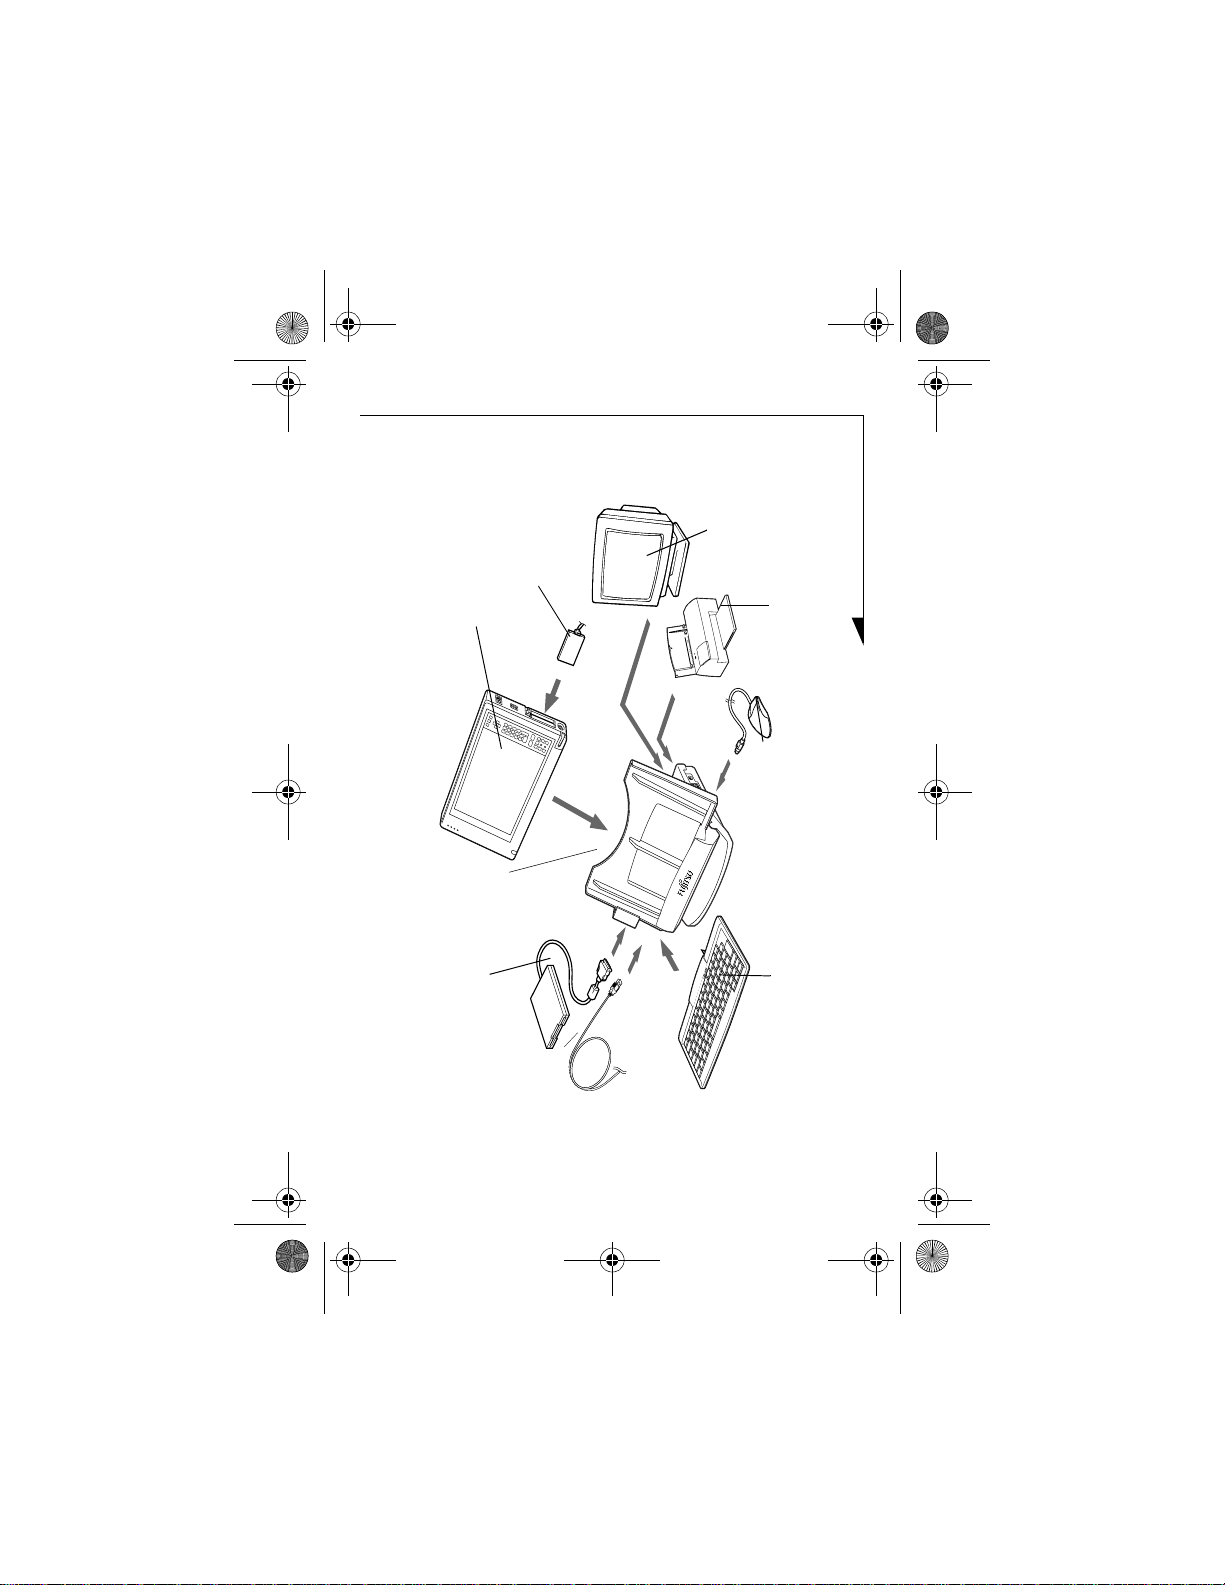
PC Card
Video
Monitor
Pen Tablet
Mini-Dock
Floppy
Disk Drive
USB
Device
Figure 1. Mini-dock peripheral interfaces
Printer
PS/2-Style
Mouse
Keyboard
3
Page 4

minidock.fm Page 4 Tuesday, August 21, 2001 3:30 PM
PS/2-style
Mouse Port
Figure 2. Right Side of Mini-dock
AC Adapter
Port
LAN Port
4
Page 5

minidock.fm Page 5 Tuesday, August 21, 2001 3:30 PM
Shutdown
Switch Access
Opening
Support
Bail
Parallel
Port
Serial Port
Figure 3. Rear and Left-Side of Mini-Dock
Video Port
Floppy Disk
Drive Port
Support
Platform
PS/2-style
Keyboard
Port
USB
Port
5
Page 6

minidock.fm Page 6 Tuesday, August 21, 2001 3:30 PM
Installing the System into the Mini-Dock
CAUTIONS
■
Dropping conductive material onto the charging
contacts could result in internal damage to the pen
tablet circuitry.
■
Prior to installing your pen tablet into the mini-dock, be
sure to power down your system first. Failure to do so
could result in damage to the system or mini-dock.
1. Shut down the system by selecting Start> Shut Down>
Shut Down.
2. If a wireless module is installed in your system, remove
the right-hand support to accommodate the extra depth
(see Figure 4). To remove the support, slide it upwards
until it unlatches from the support platform.
3. Position the pen tablet against the positioning guide and
the back of the mini-dock.
4. Slide the pen tablet into the tray at the bottom of the
mini-dock and press it down firmly until it is seated, as
shown in Figure 4. The alignment guide in the bottom
of the tray ensures that the system is properly seated
over the connector.
5. Re-start your system.
6
Page 7

minidock.fm Page 7 Tuesday, August 21, 2001 3:30 PM
Positioning
Guide
Pen Tablet
Removable
Slide
Mini-Dock
Base
Figure 4. Installing the System in the Mini-Dock
Mini-dock
Removing the System from the Mini-Dock
1. Shut down the system by selecting Start> Shut Down>
Shut Down.
2. While holding the base of the mini-dock with one hand,
grasp the pen tablet at the top and firmly pull it straight
up from the base.
3. Restart your system.
7
Page 8

minidock.fm Page 8 Tuesday, August 21, 2001 3:30 PM
5200 Patrick Henry Drive
Santa Clara, CA 95054
For more information, visit our Web site
at: www.fujitsupc.com
For technical support call:
1-800-8Fujitsu (1-800-838-5487)
or e-mail us at: 8fujitsu@fujitsupc.com
Fujitsu and the Fujitsu logo are registered trademarks of Fujitsu, Ltd. Stylistic is a
trademark of Fuji tsu PC Corporation. All other t rademarks mentioned herein are th e
property of their respective owners. We cannot guarantee the accuracy of the contents of
this document. We disclaim liability for errors, omissions or future changes.
© 2001 Fujitsu PC Corporation. All rights reserved. FPC58-0582-01
B5FY-1651-01EN-00
8
 Loading...