

Page 1

FUJITSU Storage
ETERNUS DX, ETERNUS AF
Configuration Guide -Server Connection-
P3AM-4572-19ENZ0
(Fibre Channel) for Citrix® XenServer
®
Page 2

This page is intentionally left blank.
Page 3

This manual briefly explains the operations that need to be performed by the user in order to connect an
ETERNUS DX/AF to a server running Citrix® XenServer® via a Fibre Channel interface.
This manual should be used in conjunction with any other applicable user manuals, such as those for the
ETERNUS DX/AF, server, OS, Fibre Channel cards, and drivers.
Refer to "Configuration Guide -Server Connection- Notations" for the notations used in this manual such as
product trademarks and product names. For storage systems that are supported by the OS, refer to the Server
Support Matrix of the ETERNUS DX/AF.
The Contents and Structure of this Manual
This manual is composed of the following nine chapters.
"Chapter 1 Workflow" (page 8)
•
Preface
19th Edition
December 2017
This chapter describes how to connect the ETERNUS DX/AF storage systems to a server running Citrix® XenServer®.
"Chapter 2 Checking the Server Environment" (page 11)
•
This chapter describes which servers can be connected to ETERNUS DX/AF storage systems.
"Chapter 3 Notes" (page 12)
•
This chapter describes issues that should be noted when connecting the ETERNUS DX/AF storage systems
and server.
"Chapter 4 Checking Fibre Channel Card Information" (page 14)
•
This chapter describes the Fibre Channel card WWNs that are required for ETERNUS DX/AF settings and Fibre Channel switch settings.
"Chapter 5 Installing and Setting Up ETERNUSmgr" (page 15)
•
This chapter describes how to install ETERNUSmgr.
"Chapter 6 Setting Up the ETERNUS DX/AF" (page 16)
•
This chapter describes how to set up an ETERNUS DX/AF.
"Chapter 7 Setting Up the Fibre Channel Switches" (page 17)
•
This chapter describes how to set up the Fibre Channel switches.
"Chapter 8 Setting Up XenServer" (page 19)
•
This chapter describes how to set up Citrix® XenServer®.
"Chapter 9 SAN Boot" (page 30)
•
This chapter provides notes for SAN Boot.
3
FUJITSU Storage ETERNUS DX, ETERNUS AF Configuration Guide -Server Connection- (Fibre Channel) for Citrix® XenServer
Copyright 2017 FUJITSU LIMITED
®
P3AM-4572-19ENZ0
Page 4

Preface
Naming Conventions
■
Citrix XenServer Terminology
Storage Repository (SR)
•
A container where virtual disk images are stored
Virtual Disk Image (VDI)
•
A storage abstraction that is presented to a Virtual Machine
The fundamental unit of virtualized storage in XenServer
Physical Block Device (PBD)
•
An interface between a physical server and a Storage Repository
A connector object to map a Storage Repository to a XenServer host
Virtual Block Device (VBD)
•
A connector object to map between VDIs and VMs
Virtual Machine (VM)
•
A virtual machine that is created on XenServer (Guest OS)
■
Fibre Channel card names
Refer to "Server Support Matrix" to check the Fibre Channel cards.
"Fujitsu Emulex Fibre Channel cards" refers to Fibre Channel cards with the following product IDs.
•
PG-FC105
-
PG-FC106
-
PG-FC107
-
PG-FC201
-
PG-FC202/PG-FC202L
-
PG-FC203/PG-FC203L
-
PG-FC204/PG-FC204L
-
PG-FCD201
-
PG-FCD202
-
MC-0JFC31/MCX0JFC31/MC-0JFC3L
-
MC-0JFC91/MCX0JFC91/MC-0JFC9L
-
MC-0JFC41/MCX0JFC41/MC-0JFC4L
-
MC-0JFCA1/MCX0JFCA1/MC-0JFCAL
-
MC-0JFC71/MCX0JFC71
-
MC-0JFC72/MCX0JFC72/MC-0JFC7L
-
MC-0JFC81/MCX0JFC81
-
MC-0JFC82/MCX0JFC82/MC-0JFC8L
-
MC-0JFC11/MC-0JFC1L
-
MC-0JFC21/MC-0JFC2L
-
MC-08FC11/MC-08FC71
-
MC-08FC31/MC-08FC41
-
4
FUJITSU Storage ETERNUS DX, ETERNUS AF Configuration Guide -Server Connection- (Fibre Channel) for Citrix® XenServer
Copyright 2017 FUJITSU LIMITED
®
P3AM-4572-19ENZ0
Page 5

Preface
MC-08FC51/MC-08FC61
-
MC-08FC81/MC-08FC91
-
S26361-F2624-E1
-
S26361-F2843-E1/S26361-F2843-E201
-
S26361-F3141-E10/S26361-F3141-E210
-
S26361-F3141-E1
-
S26361-F3306-L1/S26361-F3306-L201
-
S26361-F3961-L1/S26361-F3961-L201
-
S26361-F3961-L2/S26361-F3961-L202
-
S26361-F3306-E601/BX600-FC42E
-
MC-FC82E
-
"Fujitsu QLogic Fibre Channel cards" refers to Fibre Channel cards with the following product IDs.
•
PG-FCD101
-
PG-FCD102
-
PG-FC205/PG-FC205L
-
PG-FC206/PG-FC206L
-
S26361-F3023-E1
-
S26361-F3631-L1/S26361-F3631-L201
-
S26361-F3631-L2/S26361-F3631-L202
-
5
FUJITSU Storage ETERNUS DX, ETERNUS AF Configuration Guide -Server Connection- (Fibre Channel) for Citrix® XenServer
Copyright 2017 FUJITSU LIMITED
®
P3AM-4572-19ENZ0
Page 6

Table of Contents
Chapter 1 Workflow 8
Chapter 2 Checking the Server Environment 11
2.1 Servers ......................................................................................................................................... 11
2.2 Fibre Channel Switches................................................................................................................. 11
2.3 Fibre Channel Cards...................................................................................................................... 11
2.4 Connection Compatibility of ETERNUS DX/AF Storage Systems to XenServer Host......................... 11
2.5 Virtual Machine............................................................................................................................ 11
Chapter 3 Notes 12
3.1 Installation Notes......................................................................................................................... 12
3.2 Operating Notes ........................................................................................................................... 12
3.3 ETERNUS DX/AF Setup Notes......................................................................................................... 12
3.4 Server Startup and Power Supply Control Notes............................................................................ 13
Chapter 4 Checking Fibre Channel Card Information 14
Chapter 5 Installing and Setting Up ETERNUSmgr 15
Chapter 6 Setting Up the ETERNUS DX/AF 16
Chapter 7 Setting Up the Fibre Channel Switches 17
Chapter 8 Setting Up XenServer 19
8.1 Setting Up the Fibre Channel Cards .............................................................................................. 19
8.1.1 For PRIMERGY .....................................................................................................................................................19
8.1.2 For Fujitsu Emulex Fibre Channel Cards ..............................................................................................................19
8.1.3 For Fujitsu QLogic Fibre Channel Cards ...............................................................................................................21
8.2 Turning On the Devices ................................................................................................................ 23
8.3 Checking LUN Status .................................................................................................................... 24
8.4 Creating a Storage Repository ...................................................................................................... 25
8.5 Setting the Multipaths ................................................................................................................. 25
6
FUJITSU Storage ETERNUS DX, ETERNUS AF Configuration Guide -Server Connection- (Fibre Channel) for Citrix® XenServer
Copyright 2017 FUJITSU LIMITED
®
P3AM-4572-19ENZ0
Page 7

Table of Contents
Chapter 9 SAN Boot 30
7
FUJITSU Storage ETERNUS DX, ETERNUS AF Configuration Guide -Server Connection- (Fibre Channel) for Citrix® XenServer
Copyright 2017 FUJITSU LIMITED
®
P3AM-4572-19ENZ0
Page 8

Chapter 1
Workflow
This chapter describes how to connect the ETERNUS DX/AF to a server running Citrix XenServer. The workflow
is shown below.
Required Documents
"Server Support Matrix"
•
"Server Support Matrix for FC-SWITCH"
•
"Configuration Guide -Server Connection- Storage System Settings" that corresponds to the ETERNUS DX/AF
•
to be connected
"Configuration Guide -Server Connection- (Fibre Channel) Fibre Channel Switch Settings"
•
"ETERNUS Web GUI User's Guide"
•
"ETERNUSmgr Install Guide"
•
"ETERNUSmgr User Guide"
•
Manuals supplied with the Fibre Channel card and software
•
Workflow
Checking the Fibre Channel Card Information
Obtain the WWN information of the Fibre Channel card.
"Chapter 4 Checking Fibre Channel Card Information" (page 14)
•
8
FUJITSU Storage ETERNUS DX, ETERNUS AF Configuration Guide -Server Connection- (Fibre Channel) for Citrix® XenServer
Copyright 2017 FUJITSU LIMITED
®
P3AM-4572-19ENZ0
Page 9

Chapter 1 Workflow
Installing and Setting Up ETERNUSmgr
If ETERNUSmgr is to be used, install it and set up the ETERNUS DX/AF.
"Chapter 5 Installing and Setting Up ETERNUSmgr" (page 15)
•
"Chapter 6 Setting Up the ETERNUS DX/AF" (page 16)
•
Checking the setup and maintenance operations
•
"ETERNUS Web GUI User's Guide"
-
Installing ETERNUSmgr
•
"ETERNUSmgr Install Guide"
-
Checking the ETERNUSmgr operational procedures
•
"ETERNUSmgr User Guide"
-
Setting up the ETERNUS DX/AF
•
"Configuration Guide -Server Connection- Storage System Settings" that corresponds to the ETER-
-
NUS DX/AF to be connected
Setting Up the Fibre Channel Switches
If a Fibre Channel switch is to be used, set it up now.
"Chapter 7 Setting Up the Fibre Channel Switches" (page 17)
•
Setting up the Fibre Channel switches
•
"Configuration Guide -Server Connection- (Fibre Channel) Fibre Channel Switch Settings"
-
Checking the Fibre Channel switch connection requirements
•
"Server Support Matrix for FC-SWITCH"
-
Setting Up XenServer
Set up XenServer to connect to the ETERNUS DX/AF.
"Chapter 8 Setting Up XenServer" (page 19)
•
Setting up XenServer and the Fibre Channel card
•
"8.1 Setting Up the Fibre Channel Cards" (page 19)
-
Checking the Fibre Channel card driver versions
•
"Server Support Matrix"
-
9
FUJITSU Storage ETERNUS DX, ETERNUS AF Configuration Guide -Server Connection- (Fibre Channel) for Citrix® XenServer
Copyright 2017 FUJITSU LIMITED
®
P3AM-4572-19ENZ0
Page 10

Chapter 1 Workflow
Checking the LUNs
Check whether the server recognizes the LUNs of the ETERNUS DX/AF and set up the LUNs so that they
can be used on XenServer.
"8.3 Checking LUN Status" (page 24)
•
Creating a Storage Repository
Create a Storage Repository.
"8.4 Creating a Storage Repository" (page 25)
•
Setting the Multipaths
Use the XenServer multipath to perform a redundant configuration.
"8.5 Setting the Multipaths" (page 25)
•
10
FUJITSU Storage ETERNUS DX, ETERNUS AF Configuration Guide -Server Connection- (Fibre Channel) for Citrix® XenServer
Copyright 2017 FUJITSU LIMITED
®
P3AM-4572-19ENZ0
Page 11
Chapter 2
Checking the Server Environment
Connection to servers is possible in the following environments.
Check the "Server Support Matrix" for server environment conditions.
2.1 Servers
For supported servers, refer to "Server Support Matrix" and the following URL:
http://hcl.xensource.com/
If a logical unit (LUN) of the ETERNUS DX/AF storage systems is used as a boot disk, refer to "Server Support
Matrix" to check the server environment.
2.2 Fibre Channel Switches
The Fibre Channel switches that can be connected depend on the connection configuration that is used (the
OS and the ETERNUS DX/AF). Refer to "Server Support Matrix for FC-SWITCH".
2.3 Fibre Channel Cards
Refer to the "Server Support Matrix".
2.4 Connection Compatibility of ETERNUS DX/AF Storage Systems to XenServer Host
Refer to the "Server Support Matrix".
2.5 Virtual Machine
For details on the procedure and notes about installing a Virtual Machine that is supported by XenServer,
refer to the manuals that can be obtained on the following Citrix web-site:
https://support.citrix.com/en/products/xenserver
11
FUJITSU Storage ETERNUS DX, ETERNUS AF Configuration Guide -Server Connection- (Fibre Channel) for Citrix® XenServer
Copyright 2017 FUJITSU LIMITED
®
P3AM-4572-19ENZ0
Page 12
Chapter 3
Notes
Note the following issues when connecting the ETERNUS DX/AF to a server.
3.1 Installation Notes
To ensure reliable access to ETERNUS DX/AF storage systems, multipath configuration is recommended.
•
Setting up multiple access paths between the server and the ETERNUS DX/AF storage systems, then using
•
the XenServer multipath, provides improved access redundancy.
Enable the virtualization support functions (Intel VT or AMD-V) of the server before installing XenServer.
•
For details on the settings, refer to the relevant manual of the server to be used.
Install XenServer when the ETERNUS DX/AF is not connected to the server.
•
The ETERNUS Multipath Driver does not need to be installed on the XenServer Virtual Machine. The Xen-
•
Server multipath provides path redundancy.
When multiple paths are used, a multipath driver must be set. If a multipath driver is not set, the XenServ-
•
er multipath does not perform proper load balancing for the ETERNUS DX/AF.
Before setting a multipath configuration, create Storage Repositories for all the LUNs that exist in the
•
ETERNUS DX/AF.
3.2 Operating Notes
If a path error occurs in a multipath configuration using XenServer, the status of the failed multipath may
•
not be displayed. The status is displayed again when the failed path recovers.
When XenServer is managed and operated with XenCenter, multipath errors may not be detected properly
•
by XenCenter. When checking multipath status, also check the status on the XenServer host side.
3.3 ETERNUS DX/AF Setup Notes
Host Response must be set before the ETERNUS DX/AF is connected to the XenServer host.
•
Even if the Eco-mode of the ETERNUS DX/AF is enabled for a multipath configuration with XenServer, disk
•
motors may not stop according to the Eco-mode settings.
12
FUJITSU Storage ETERNUS DX, ETERNUS AF Configuration Guide -Server Connection- (Fibre Channel) for Citrix® XenServer
Copyright 2017 FUJITSU LIMITED
®
P3AM-4572-19ENZ0
Page 13

Chapter 3 Notes
3.4 Server Startup and Power Supply Control Notes
3.4 Server Startup and Power Supply Control Notes
Before turning the server on, check that the ETERNUS DX/AF storage systems and Fibre Channel switches are
all "Ready". If the server is turned on and they are not "Ready", the server will not be able to recognize the
ETERNUS DX/AF storage systems.
Also, when the ETERNUS DX/AF power supply is being controlled by a connected server, make sure that the
ETERNUS DX/AF does not shut down before the connected servers. Similarly, the Fibre Channel switches must
also be turned off after the connected servers have been shut down. If turned off, data writes from the running server cannot be saved to the ETERNUS DX/AF storage systems, and already saved data may also be
affected.
13
FUJITSU Storage ETERNUS DX, ETERNUS AF Configuration Guide -Server Connection- (Fibre Channel) for Citrix® XenServer
Copyright 2017 FUJITSU LIMITED
®
P3AM-4572-19ENZ0
Page 14

Chapter 4
Checking Fibre Channel Card Information
The WWNs of Fibre Channel cards are necessary when a system error occurs, when server access to the ETERNUS DX/AF is limited (such as when using the Host Affinity function), or when the ETERNUS DX/AF is connected to the server via Fibre Channel switches.
Use the methods described in the following examples to obtain the WWN information of the Fibre Channel
card to be used.
Example 1:
Check the WWN using the utilities that are provided by the Fibre Channel card vendors.
Emulex: LightPulse BIOS Utility
QLogic: Fast!UTIL
Example 2:
When XenServer is already installed, a WWN can be checked using the following tools that are installed in
XenServer.
Emulex: OneCommand Manager Command Line Interface (XenServer 5.6 or later)
HBAnyware Command Line Interface (XenServer 5.5)
QLogic: SANsurfer FC HBA CLI (XenServer earlier than 6.5)
QConvergeConsole CLI (XenServer 5.6 or later)
14
FUJITSU Storage ETERNUS DX, ETERNUS AF Configuration Guide -Server Connection- (Fibre Channel) for Citrix® XenServer
Copyright 2017 FUJITSU LIMITED
®
P3AM-4572-19ENZ0
Page 15

Chapter 5
Installing and Setting Up ETERNUSmgr
If ETERNUSmgr is to be used, install it according to the directions given in the "ETERNUSmgr Install Guide".
After installation is complete, follow the instructions in "ETERNUSmgr User Guide" and set up ETERNUSmgr.
15
FUJITSU Storage ETERNUS DX, ETERNUS AF Configuration Guide -Server Connection- (Fibre Channel) for Citrix® XenServer
Copyright 2017 FUJITSU LIMITED
®
P3AM-4572-19ENZ0
Page 16

Chapter 6
Setting Up the ETERNUS DX/AF
Set up the ETERNUS DX/AF storage systems using ETERNUS Web GUI or ETERNUSmgr.
ETERNUS DX/AF setup can be performed independently of server setup. For details on how to perform these
settings, refer to the following manuals.
"Configuration Guide -Server Connection- Storage System Settings" that corresponds to the ETERNUS DX/AF
•
to be connected
"ETERNUS Web GUI User's Guide" or "ETERNUSmgr User Guide"
•
16
FUJITSU Storage ETERNUS DX, ETERNUS AF Configuration Guide -Server Connection- (Fibre Channel) for Citrix® XenServer
Copyright 2017 FUJITSU LIMITED
®
P3AM-4572-19ENZ0
Page 17

Chapter 7
Port2Port0
Port6Port4
Port3Port1 Port7Port5
Port2Port0
Port6Port4
Port3Port1 Port7Port5
ZONE1 ZONE2 ZONE3
ZONE4
Name : Server#1
Port1
Port0
Name : Server#2
Port1Port0
Cascading
line
FC switch FC switch
CM0
CM1
Name : RAID#1
ETERNUS DX/AF
Port1 Port1Port0 Port0
Setting Up the Fibre Channel Switches
Perform the settings required to connect the ETERNUS DX/AF storage systems and server via the Fibre Channel switch, according to "Configuration Guide -Server Connection- (Fibre Channel) Fibre Channel Switch Settings".
If the access path is set with ETERNUS SF Storage Cruiser, the Host Response settings are set to the default
values.
If the Host Response settings are changed from the default values, set the Host Response again.
The following examples show configurations in which a server is connected to a Fibre Channel switch with
zoning.
The following example shows a configuration for multiple servers.
FUJITSU Storage ETERNUS DX, ETERNUS AF Configuration Guide -Server Connection- (Fibre Channel) for Citrix® XenServer
17
Copyright 2017 FUJITSU LIMITED
®
P3AM-4572-19ENZ0
Page 18

Port2Port0
Port6Port4
Port3Port1 Port7Port5
Port2Port0
Port6Port4
Port3Port1 Port7Port5
Cascading
line
ZONE1
ZONE2
ZONE3
ZONE4
FC switch
Server
Port0 Port1
CM0
CM1
ETERNUS DX/AF
Port0 Port0 Port1Port1
FC switch
Chapter 7 Setting Up the Fibre Channel Switches
The following example shows a configuration for a single server.
FUJITSU Storage ETERNUS DX, ETERNUS AF Configuration Guide -Server Connection- (Fibre Channel) for Citrix® XenServer
Copyright 2017 FUJITSU LIMITED
18
®
P3AM-4572-19ENZ0
Page 19

Chapter 8
Setting Up XenServer
Set up XenServer to connect the ETERNUS DX/AF.
The settings described in this chapter are performed using Citrix XenCenter applications. Prepare a XenCenter
environment before setting up XenServer. For details on how to install and operate XenCenter, refer to the
Citrix documents.
The screenshots in this manual were captured using XenCenter version 5.5.0.
8.1 Setting Up the Fibre Channel Cards
Perform Fibre Channel card settings.
8.1.1 For PRIMERGY
The required procedures vary depending on the Fibre Channel card product ID. For Fujitsu Emulex Fibre Channel cards, refer to "8.1.2 For Fujitsu Emulex Fibre Channel Cards" (page 19). For Fujitsu QLogic Fibre Channel cards, refer to "8.1.3 For Fujitsu QLogic Fibre Channel Cards" (page 21).
8.1.2 For Fujitsu Emulex Fibre Channel Cards
This section explains how to install Emulex Fibre Channel cards in the XenServer host and how to connect the
ETERNUS DX/AF.
Log in to the XenServer network or use the Console function of XenServer to perform settings.
For the installation procedure and functions regarding XenCenter, refer to the manuals that can be obtained
on the following Citrix web-site:
https://www.citrix.com/support/
Since the standard driver that is supplied with the OS is used for the Fibre Channel driver, other drivers do
not need to be installed.
Use the following procedure to set the drive parameters.
Use the OneCommand Manager Command Line Interface or the HBAnyware Command Line Interface
•
that are installed in XenServer as standard to set the driver parameters. For mode details, refer to help.
Set the parameters without the ETERNUS DX/AF connected.
•
19
FUJITSU Storage ETERNUS DX, ETERNUS AF Configuration Guide -Server Connection- (Fibre Channel) for Citrix® XenServer
Copyright 2017 FUJITSU LIMITED
®
P3AM-4572-19ENZ0
Page 20

Chapter 8
8.1 Setting Up the Fibre Channel Cards
Setting Up XenServer
1 Perform the following driver parameter settings for each model of ETERNUS DX/AF that is to be connec-
ted.
Driver parameter ETERNUS DX/AF
lpfc_lun-queue-depth Arbitrary (*1)
lpfc_topology
lpfc_link-speed (*2)
lpfc_max-luns 512
*1: Recommended value = 1024 ¸ (number of Fibre Channel ports that are connected to a single CA
port) ¸ number of LUNs
(Round the result down)
• Use the value of "8" if the actual result is lower. Use the maximum value if the actual result ex-
ceeds the maximum value for the driver.
• To achieve maximum system performance, this value can be changed according to the server
load and the peak operating times.
• The number of simultaneous command executions per CA port for the ETERNUS DX/AF is limited
to 1024. This value is used by multiple servers that share the CA port. A maximum of 1024 commands can be executed per CA port.
*2: Use the following "lpfc_link-speed" values.
(Up to 1024 for each FC port of the ETERNUS DX/AF)
• For direct connections: 4
• For switch connections: 2
When a direct connection is used and the LinkSpeed is 16Gbit/s or more, select "2".
Fibre
Channel
card
transfer
rate
32Gbit/s 32 16 8 – – 32 16 8 –
16Gbit/s 16 16 8 4 – 16 16 8 4
8Gbit/s 8 8 8 4 2 8 8 8 4
4Gbit/s – 4 4 4 2 – 4 4 4
Switch connection
Fibre Channel switch transfer rate
32Gbit/s 16Gbit/s 8Gbit/s 4Gbit/s 2Gbit/s 32Gbit/s 16Gbit/s 8Gbit/s 4Gbit/s
Direct connection
CA transfer rate
• After the driver parameter settings are complete for XenServer 7.0, create an initial RAM disk.
Create an initial RAM disk image file to match the kernel being used. Refer to the Emulex Fibre
Channel card manual for details on the creation method.
• Creating an initial RAM disk is not required for XenServer 7.1 and later.
2 Shut down the server.
After the driver parameter settings are complete, shut down the XenServer host, and then connect the
ETERNUS DX/AF to the XenServer host with cables.
20
FUJITSU Storage ETERNUS DX, ETERNUS AF Configuration Guide -Server Connection- (Fibre Channel) for Citrix® XenServer
Copyright 2017 FUJITSU LIMITED
®
P3AM-4572-19ENZ0
Page 21

Chapter 8
8.1 Setting Up the Fibre Channel Cards
Setting Up XenServer
8.1.3 For Fujitsu QLogic Fibre Channel Cards
This section explains how to install QLogic Fibre Channel cards in the XenServer host and how to connect the
ETERNUS DX/AF.
Log in to the XenServer network or use the Console function of XenServer to perform settings.
For the installation procedure and functions regarding XenCenter, refer to the manuals that can be obtained
on the following Citrix web-site:
https://www.citrix.com/support/
Since the standard driver that is supplied with the OS is used for the Fibre Channel driver, other drivers do
not need to be installed.
Use the following procedure to set the drive parameters.
Use the SANsurfer FC HBA CLI or the QConvergeConsole CLI to set the driver parameters. The SANsurfer
•
FC HBA CLI or the QConvergeConsole CLI is installed in XenServer as standard.
For details on how to use the SANsurfer FC HBA CLI or the QConvergeConsole CLI, refer to the command
help.
Set the parameters without the ETERNUS DX/AF connected.
•
21
FUJITSU Storage ETERNUS DX, ETERNUS AF Configuration Guide -Server Connection- (Fibre Channel) for Citrix® XenServer
Copyright 2017 FUJITSU LIMITED
®
P3AM-4572-19ENZ0
Page 22

Chapter 8
8.1 Setting Up the Fibre Channel Cards
Setting Up XenServer
1 Perform the following driver parameter settings for each model of ETERNUS DX/AF that is to be connec-
ted.
Parameter
Setting value Remarks
QLE2560/QLE2562
Connection Options 0 (direct connection)
1 (switch connection)
Data Rate (*1)
Frame Size 2048
Hard Loop ID 0
Loop Reset Delay (seconds) 5
Enable Host HBA BIOS Disabled
Enable Hard Loop ID Disabled
Enable FC Tape Support Disabled
Operation Mode 0
Interrupt Delay Timer (100ms) 0
Execution Throttle 65535
Login Retry Count 8
Port Down Retry Count 30
Enable LIP Full Login Enabled
Link Down Timeout (seconds) 30
Enable Target Reset Enabled
LUNs Per Target 128
Enable Receive Out Of Order Frame Disabled
If the current parameter values are different, change them to the indicated
values.
*1: Use the following "Data Rate" setting values
Fibre
Channel
card
transfer
rate
32Gbit/s 6 5 4 — — 6 5 4 —
16Gbit/s 5 5 4 3 — 5 5 4 3
8Gbit/s 4 4 4 3 1 4 4 4 3
4Gbit/s — 3 3 3 1 — 3 3 3
Switch connection
Fibre Channel switch transfer rate
32Gbit/s 16Gbit/s 8Gbit/s 4Gbit/s 2Gbit/s 32Gbit/s 16Gbit/s 8Gbit/s 4Gbit/s
Direct connection
CA transfer rate
2 Add the following line to the /etc/modprobe.conf configuration file and set the QueueDepth value.
options qla2xxx ql2xmaxqdepth=X
22
FUJITSU Storage ETERNUS DX, ETERNUS AF Configuration Guide -Server Connection- (Fibre Channel) for Citrix® XenServer
Copyright 2017 FUJITSU LIMITED
®
P3AM-4572-19ENZ0
Page 23

Chapter 8
8.2 Turning On the Devices
Setting Up XenServer
The setting value for X depends on the ETERNUS DX/AF model. Refer to the following tables.
Driver parameter Setting value
ql2xmaxqdepth Arbitrary (*1)
*1: Recommended value = 1024 ¸ (number of Fibre Channel ports that are connected to a single CA
Example (when "8" is set for "ql2xmaxqdepth")
(Up to 1024 for each FC port of the ETERNUS DX/AF)
port) ¸ number of LUNs
(Round the result down)
• Use the value of "8" if the actual result is lower. Use the maximum value if the actual result ex-
ceeds the maximum value for the driver.
• To achieve maximum system performance, this value can be changed according to the server
load and the peak operating times.
• The number of simultaneous command executions per CA port for the ETERNUS DX/AF is limited
to 1024. This value is used by multiple servers that share the CA port. A maximum of 1024 commands can be executed per CA port.
options qla2xxx ql2xmaxqdepth=8
• After the driver parameter settings are complete for XenServer 7.0, create an initial RAM disk.
Create an initial RAM disk image file to match the kernel being used. Refer to the QLogic Fibre
Channel card manual for details on the creation method.
• Creating an initial RAM disk is not required for XenServer 7.1 and later.
3 Shut down the server.
After the driver parameter settings are complete, shut down the XenServer host, and then connect the
ETERNUS DX/AF to the XenServer host with cables.
8.2 Turning On the Devices
To turn on the connected devices, use the following procedure:
1 Turn on the Fibre Channel switch power (if used).
2 Check that the Ready LED (or equivalent) is lit on the Fibre Channel switch.
3 Turn on the ETERNUS DX/AF.
23
FUJITSU Storage ETERNUS DX, ETERNUS AF Configuration Guide -Server Connection- (Fibre Channel) for Citrix® XenServer
Copyright 2017 FUJITSU LIMITED
®
P3AM-4572-19ENZ0
Page 24
Chapter 8
8.3 Checking LUN Status
Setting Up XenServer
4 Check that the Ready LED is lit on the ETERNUS DX/AF.
5 Turn on the server.
8.3 Checking LUN Status
This section describes how to check LUNs.
1 Log into XenServer with the administrator account (root user).
Log into XenServer remotely using a terminal emulator or log into XenServer using XenCenter.
24
FUJITSU Storage ETERNUS DX, ETERNUS AF Configuration Guide -Server Connection- (Fibre Channel) for Citrix® XenServer
Copyright 2017 FUJITSU LIMITED
®
P3AM-4572-19ENZ0
Page 25

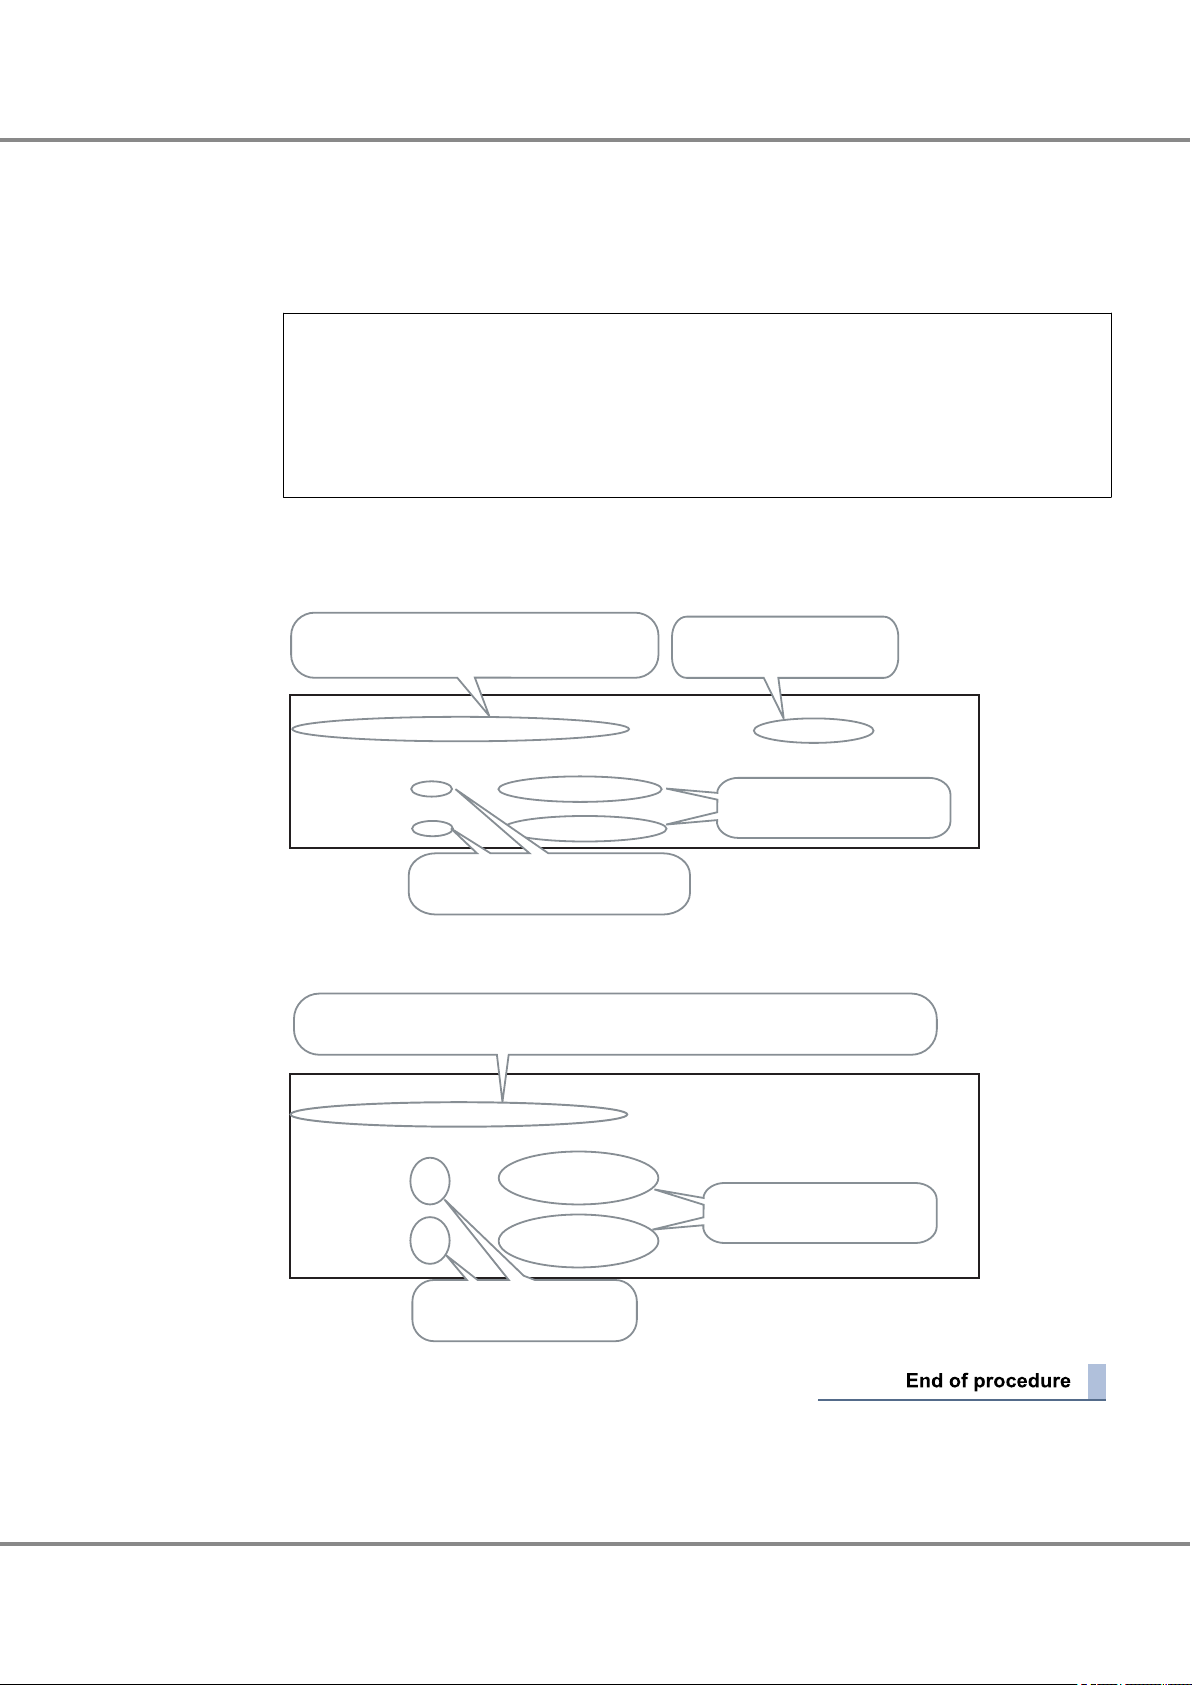
$ cat /proc/scsi/scsi
Host: scsi5 Channel: 00 Id: 00 Lun: 00
Vendor: FUJITSU Model: ETERNUS_DXL Rev: 0000
Type: Direct-Access ANSI SCSI revision: 05
Host: scsi5 Channel: 00 Id: 00 Lun: 01
Vendor: FUJITSU Model: ETERNUS_DXL Rev: 0000
Type: Direct-Access ANSI SCSI revision: 05
Host: scsi6 Channel: 00 Id: 00 Lun: 00
Vendor: FUJITSU Model: ETERNUS_DXL Rev: 0000
Type: Direct-Access ANSI SCSI revision: 05
Host: scsi6 Channel: 00 Id: 00 Lun: 01
Vendor: FUJITSU Model: ETERNUS_DXL Rev: 0000
Type: Direct-Access ANSI SCSI revision: 05
Check that the number of recognized LUNs is correct.
The SCSI disks for the number of connected LUNs
for each path are recognized. (In this example,
four SCSI disks are recognized since there are
two LUNs in the two-path configuration.)
Check that the connected
ETERNUS DX/AF model
is correct.
For a multipath configuration,
check that the same number of LUNs is
recognized for each path.
Chapter 8
8.4 Creating a Storage Repository
Setting Up XenServer
2 Execute the following command in the console screen and check the recognition status of the LUNs.
cat /proc/scsi/scsi
Output example:
When connecting the ETERNUS DX80 S2 in a two-path configuration by creating two LUNs
8.4 Creating a Storage Repository
To create a Storage Repository, refer to the relevant Citrix documents.
8.5 Setting the Multipaths
The XenServer multipath improves path redundancy.
Complete Storage Repository creation for all the LUNs to be used before starting the setup for multipath
configuration.
FUJITSU Storage ETERNUS DX, ETERNUS AF Configuration Guide -Server Connection- (Fibre Channel) for Citrix® XenServer
25
Copyright 2017 FUJITSU LIMITED
®
P3AM-4572-19ENZ0
Page 26

Chapter 8
8.5 Setting the Multipaths
Setting Up XenServer
1 Start the maintenance mode for the server in which the multipath is configured.
When the server is in maintenance mode, the "!" image is displayed next to the XenServer icon.
2 Edit the "/etc/multipath.conf" file.
Check the "/etc/multipath.conf" file for the system that is used and apply the necessary changes according to the following examples.
Depending on the XenServer version, the contents that are shown in the example may not be included in the "/etc/multipath.conf" file. In that case, add all the contents shown in the example into the
file.
• For XenServer 7.0 and 7.1
Define the settings at the end of the "/etc/multipath.conf" file as shown below.
device {
vendor "FUJITSU"
product "ETERNUS_DXM"
getuid_callout "/sbin/scsi_id -g -u -s /block/%n"
features "1 queue_if_no_path"
hardware_handler "0"
path_selector "round-robin 0"
path_grouping_policy group_by_prio
failback immediate
rr_weight uniform
no_path_retry 10
rr_min_io 1000
path_checker tur
prio alua
}
26
FUJITSU Storage ETERNUS DX, ETERNUS AF Configuration Guide -Server Connection- (Fibre Channel) for Citrix® XenServer
Copyright 2017 FUJITSU LIMITED
®
P3AM-4572-19ENZ0
Page 27

# device {
# vendor "FUJITSU"
# product "ETERNUS_DX(L|400|8000|M|H)"
# getuid_callout "/sbin/scsi_id -g -u -s /block/%n"
# features "1 queue_if_no_path"
# hardware_handler "0"
# path_selector "round-robin 0"
# path_grouping_policy group_by_prio
# failback immediate
# rr_weight uniform
# no_path_retry 10
# rr_min_io 1000
# path_checker tur
# prio alua
# }
Add "|M|H"
Delete these "#" marks
device {
vendor "FUJITSU"
product "ETERNUS_DXL|ETERNUS_DX400|ETERNUS_DX8000|ETERNUS_DXM|ETERNUS_DXH"
prio_callout "/sbin/mpath_prio_alua %d"
path_grouping_policy group_by_prio
path_selector "round-robin 0"
failback immediate
path_checker tur
no_path_retry 10
}
(*1)
Chapter 8 Setting Up XenServer
8.5 Setting the Multipaths
The parameter for "product" varies depending on the model to be used as detailed in the following
table:
ETERNUS DX/AF to be connected "product" value
ETERNUS DX60 S4/DX100 S4/DX200 S4,
ETERNUS DX60 S3/DX100 S3/DX200 S3,
ETERNUS AF250 S2,
ETERNUS AF250,
ETERNUS DX200F
ETERNUS DX500 S4/DX600 S4,
ETERNUS DX500 S3/DX600 S3,
ETERNUS AF650 S2,
ETERNUS AF650
•
For XenServer versions 6.2.x to 6.5.x
Delete the "#" marks from the beginning of the following default definition in the "/etc/multipath.conf" file and enable the definition.
For the ETERNUS DX500 S4/DX600 S4, the ETERNUS DX500 S3/DX600 S3, the ETERNUS DX8700 S3/
DX8900 S3, the ETERNUS AF650 S2, or the ETERNUS AF650, add an "|M|H" in the "product" line as
shown below.
ETERNUS_DXL
ETERNUS_DXM
• For XenServer versions 6.0.x to 6.1.x
Define the settings as shown below.
*1: Add these lines if they are missing.
FUJITSU Storage ETERNUS DX, ETERNUS AF Configuration Guide -Server Connection- (Fibre Channel) for Citrix® XenServer
Copyright 2017 FUJITSU LIMITED
27
®
P3AM-4572-19ENZ0
Page 28
Chapter 8
8.5 Setting the Multipaths
Setting Up XenServer
• For XenServer 5.5 and 5.6
The parameter for "product" varies depending on the model to be used as detailed in the following table:
Define the settings at the end of the "/etc/multipath.conf" file ("/etc/multipathenabled.conf" for XenServer 5.6GA and earlier) as shown below.
devices {
device {
vendor "FUJITSU"
product "ETERNUS_DXL"
prio_callout "/sbin/mpath_prio_alua %d"
path_grouping_policy group_by_prio
path_selector "round-robin 0"
failback immediate
no_path_retry 10
path_checker tur
}
}
ETERNUS DX/AF to be connected
ETERNUS DX60 S2/DX80 S2/DX90 S2 ETERNUS_DXL
ETERNUS DX400 S2 series ETERNUS_DX400
ETERNUS DX8000 S2 series ETERNUS_DX8000
"product" value
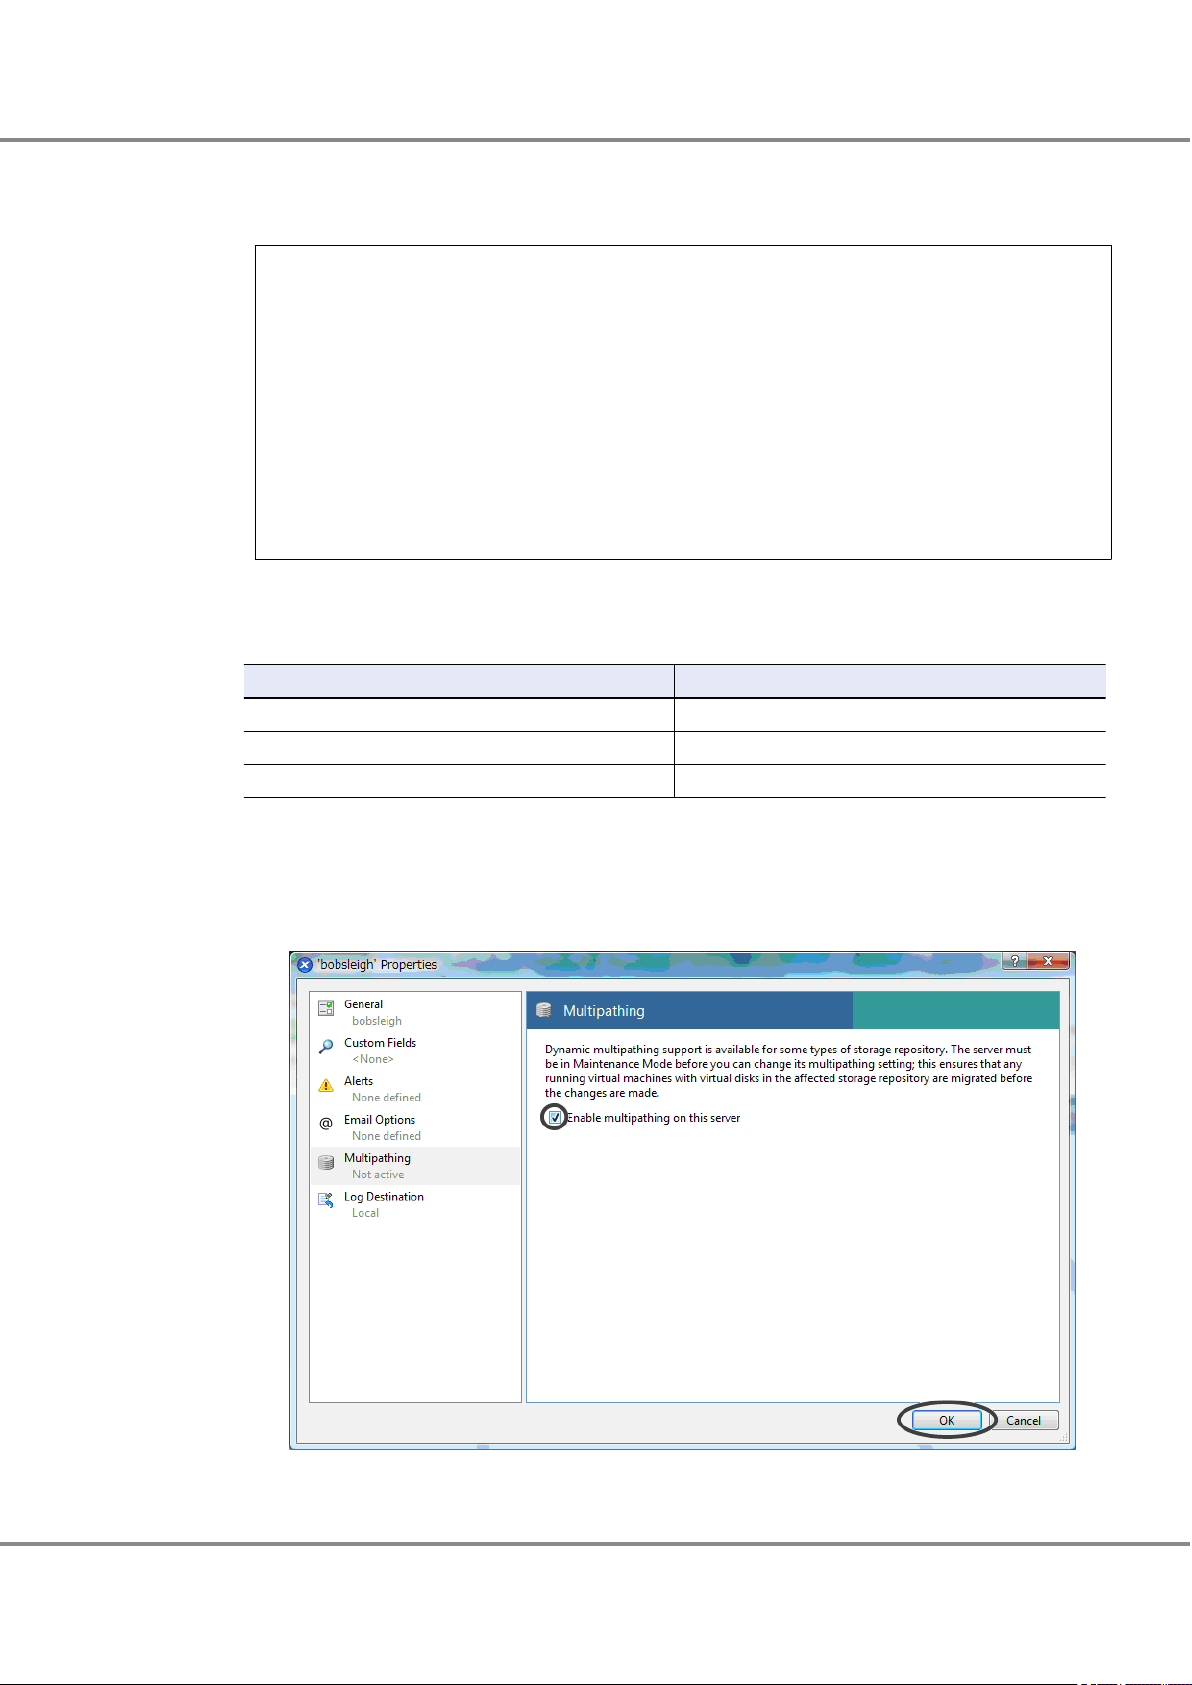
3 Enable multipath.
(1) Select [Server] from the XenCenter menu bar and open [Properties].
(2) Select [Multipathing] in the [Properties] screen, check "Enable multipathing on this server", and
click the [OK] button.
4 Release the maintenance mode, and then reboot the server.
28
FUJITSU Storage ETERNUS DX, ETERNUS AF Configuration Guide -Server Connection- (Fibre Channel) for Citrix® XenServer
Copyright 2017 FUJITSU LIMITED
®
P3AM-4572-19ENZ0
Page 29
$ mpathutil status
3600000e00d0000000001000000720000 dm-0 FUJITSU,ETERNUS_DXL
[size=20G ][features=1 queue_if_no_path][hwhandler=0 ]
\_ round-robin 0 [prio=50][active]
\_ 1:0:0:0 sdb 8:16 [active][ready]
\_ round-robin 0 [prio=10][enabled]
\_ 4:0:0:0 sdn 8:208 [active][ready]
The multipath consists of the block device names "sdb"
and "sdn. "3600000e00d0000000001000000720000"
is created.
When the path status is normal,
"[active][ready]" is displayed.
Two block device names are displayed
for a two-path configuration.
"ETERNUS_DXL" is displayed
since the ETERNUS DX80 s2 is
connected.
$ mpathutil status
3600000e00d0000000001000000720000 dm-0 FUJITSU,ETERNUS_DXL
[size=10G ][features=1 queue_if_no_path][hwhandler=0 ]
\_ round-robin 0 [prio=100][enabled]
\_ 1:0:0:0 sdb 8:16 [active][ready]
\_ 3:0:0:0 sdl 8:176 [active][ready]
\_ round-robin 0 [prio=20][enabled]
\_ 4:0:0:0 sdq 65:0 [active][ready]
\_ 2:0:0:0 sdg 8:96 [active][ready]
The multipath consists of a path group with the block devices "sdb" and "sdl" and a path
group with the block devices "sdq" and "sdg". "3600000e00d0000000001000000720000" is
created.
When the path status is normal,
"[active][ready]" is displayed.
Four block device names are
displayed for a four-path
configuration.
Chapter 8
8.5 Setting the Multipaths
Setting Up XenServer
5 Check the multipath status.
Check that all the Storage Repositories that are created in XenServer have multiple paths.
(1) Execute the "mpathutil list" command and check that all the Storage Repositories that were cre-
(2) Execute the "mpathutil status" command to check the following items.
ated in "8.4 Creating a Storage Repository" (page 25) are displayed.
Example:
$ mpathutil list
3600000e00d0000000001000000720000
3600000e00d0000000001000000730000
3600000e00d0000000001000000740000
3600000e00d0000000001000000320000
3600000e00d0000000001000000330000
Example:
When the ETERNUS DX80 S2 is connected in a two-path configuration
Example:
When the ETERNUS DX80 S2 is connected in a four-path configuration
FUJITSU Storage ETERNUS DX, ETERNUS AF Configuration Guide -Server Connection- (Fibre Channel) for Citrix® XenServer
Copyright 2017 FUJITSU LIMITED
29
®
P3AM-4572-19ENZ0
Page 30

Chapter 9
SAN Boot
Refer to "Server Support Matrix" to check the support status of SAN Boot and refer to the manual of the
•
server, OS, or the Fibre Channel card that is to be used.
When using a logical unit (LUN) of the ETERNUS DX/AF storage systems as a boot disk, make sure that the
•
LUN has enough capacity to install the OS.
30
FUJITSU Storage ETERNUS DX, ETERNUS AF Configuration Guide -Server Connection- (Fibre Channel) for Citrix® XenServer
Copyright 2017 FUJITSU LIMITED
®
P3AM-4572-19ENZ0
Page 31

FUJITSU Storage ETERNUS DX, ETERNUS AF Configuration Guide -Server Connection-
(Fibre Channel) for Citrix® XenServer
P3AM-4572-19ENZ0
Date of issuance: December 2017
Issuance responsibility: FUJITSU LIMITED
The content of this manual is subject to change without notice.
•
This manual was prepared with the utmost attention to detail. However, Fujitsu shall assume no responsibility for any
•
operational problems as the result of errors, omissions, or the use of information in this manual.
Fujitsu assumes no liability for damages to third party copyrights or other rights arising from the use of any information
•
in this manual.
The content of this manual may not be reproduced or distributed in part or in its entirety without prior permission from
•
Fujitsu.
®
Page 32

 Loading...