

Page 1

Fujitsu Dot Matrix Printer
DL Series
Printer Driver Installation Guide
- Windows 7
- Windows Server 2008 R2
Rev.01: April 12, 2010
Page 2
IMPORTANT NOTE TO USERS
For Windows 7 / Windows Server 2008 R2, install the printer driver before
connecting the printer to your personal computer.
Either of the following messages is displayed in the setup program: Printer is
ready for installation. or Printer driver installation has been completed. After
the message is displayed, connect the printer to your PC.
If the printer is already connected to your PC before the printer driver
installation, see the section Troubleshooting in Setup in this manual.
Do not use this printer driver in other printers (other than Fujitsu DL7600).
Do not use Fujitsu DL7600 printer with any printer driver from other
manufacturers.
When printing in Windows 7 / Windows Server 2008 R2, set the printer
function setting to its default factory configurations.
If any other setting is used, the desired printing results will not be provided.
After inserting the Setup Disk into your PC’s CD-ROM drive, the FUJITSU
DL Series Software setup window is displayed. If your operating system is
Windows 7 / Windows Server 2008 R2, click the OK button. For any other
Windows operating system, click the EXIT button.
For some versions of Windows 7 / Windows Server 2008 R2, the installation
procedure or display contents may vary. If so, follow the recommended
onscreen instructions.
For setup, always log on using an administrator account.
During setup, in the User Account Control dialog box, you may be asked, Do
you want to allow the following program from an unknown publisher to make
changes to this computer ? Select Yes.
When using 64-bit Windows 7, follow the above procedure also.
If a different-version printer driver has been installed, delete it first and
proceed with set up.
The contents of this manual are subject to change without notice for its
improvement.
Fujitsu Isotec bears no responsibility for any infringement of any third-party’s
patent right or any other rights resulted from the usage of data provided in this
document.
Copyright © 2010 FUJITSU ISOTEC LIMITED
All rights reserved.
2 / 24
Page 3

ABBREVIATIONS USED IN THIS MANUAL
Windows® 7 Ultimate
Windows® 7 Ultimate x64 Edition
Windows® 7 Enterprise
Windows® 7 Enterprise x64 Edition
Windows® 7 Professional
Windows® 7 Professional x64 Edition
Windows® 7 Home Premium
Windows® 7 Home Premium x64 Edition
Windows® 7 Starter
Microsoft® Windows Server® 2008 R2 Enterprise
Microsoft® Windows Server® 2008 R2 Standard
ABOUT THE TRADEMARK
Company names and product names mentioned above are registered trademarks
or trademarks of each company.
referred to as Windows 7
referred to as
Windows Server 2008 R2
3 / 24
Copyright © 2010 FUJITSU ISOTEC LIMITED
All rights reserved.
Page 4

INSTALLING
PRINTER DRIVER
In this section, Windows 7 Professional is used as an
example of how to install the printer driver on a PC using
Windows 7 / Windows Server 2008 R2 operating system.
In the following procedure, the Fujitsu DL7600 printer
driver is set up.
When using another printer or another printer driver,
change it to your current printer or printer driver name to
follow the procedure.
Setup using Plug & Play
1. Log on as an administrator of the computer.
2. Insert the Setup Disk into your PC’s CD-ROM drive.
The Auto Play window will be displayed.
Click Run DLSELECT.EXE.
If the Auto Play window is not displayed, use Explorer
or another application to open CD-ROM.
and double click the DLSELECT.EXE file.
3. The FUJITSU DL Series Software Setup window is
displayed.
From the printer driver list, select DL7600 and click the
OK button.
Note:
When using the latest printer driver downloaded
from our web site, double click the executable
program (a file whose extension is EXE) in the
downloaded driver data folder.
1
2
4 / 24
Copyright © 2010 FUJITSU ISOTEC LIMITED
All rights reserved.
Page 5
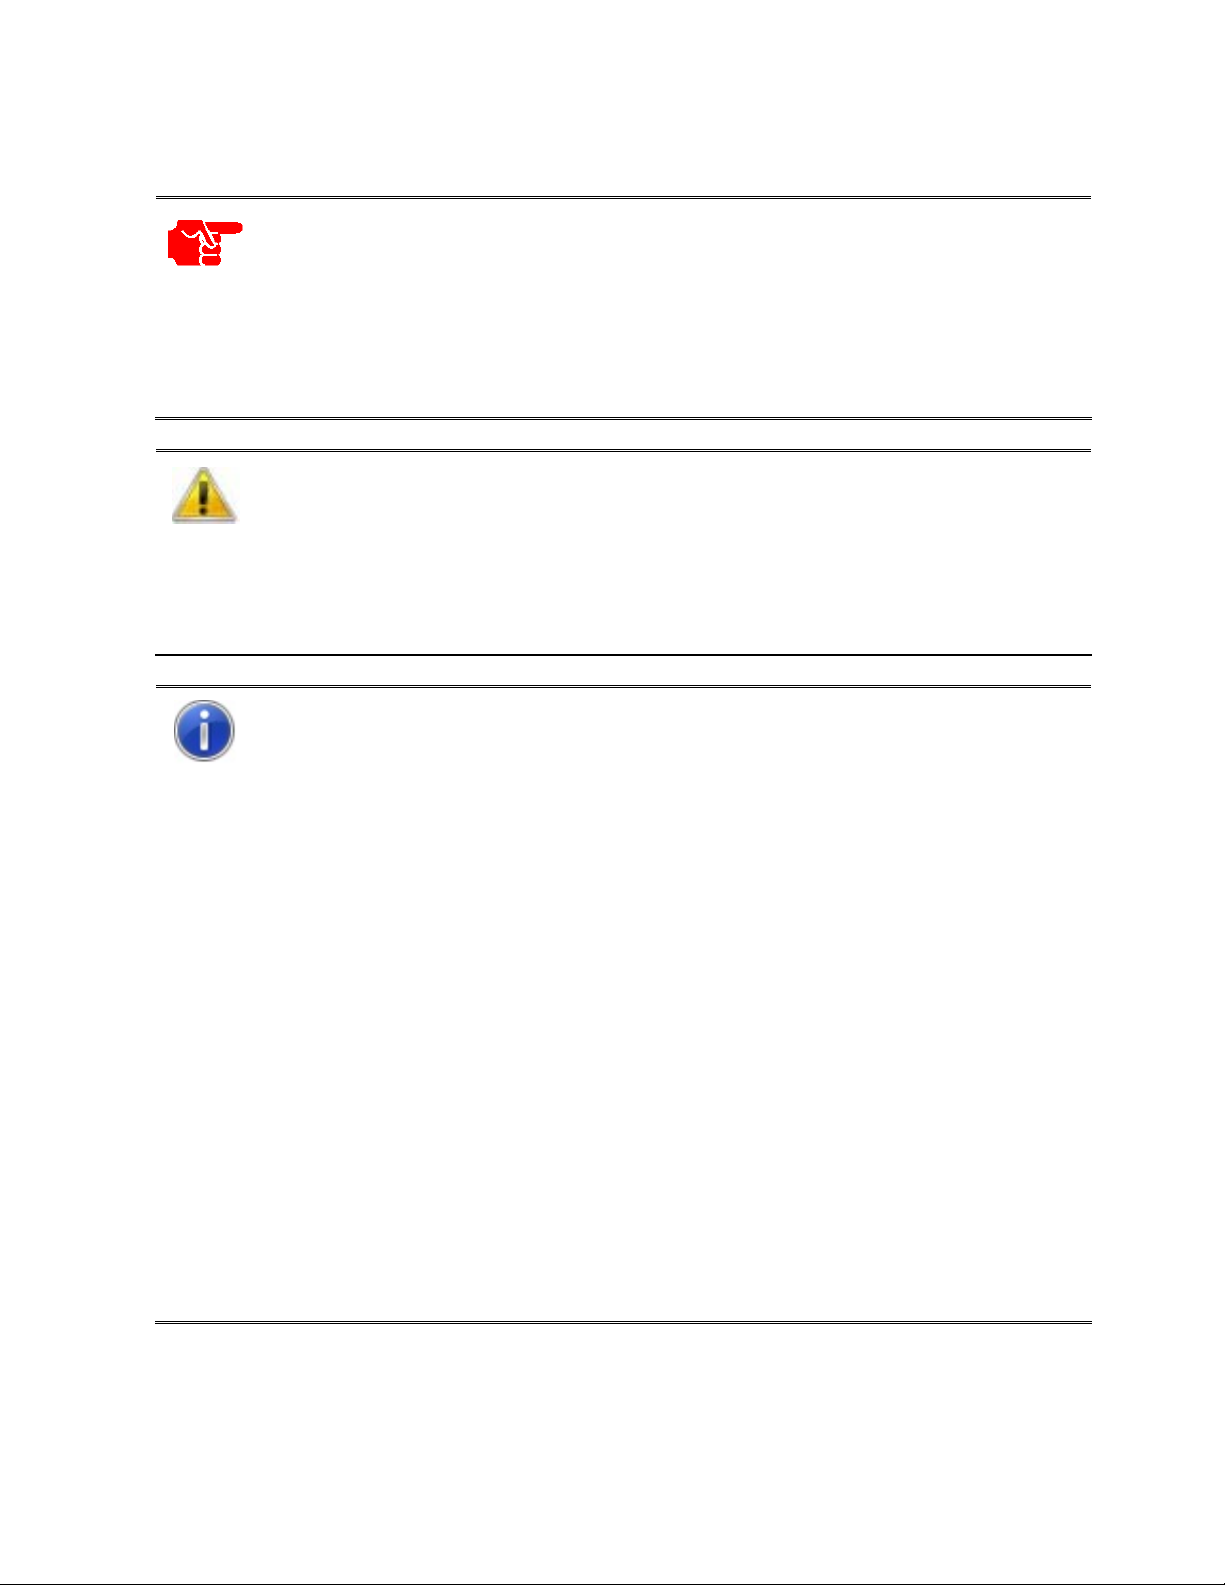
4. When the dialog box, Do you want to allow the
following program from an unknown publisher
to make changes to this computer ? is displayed,
click Yes.
5. The FUJITSU DL Series Printer Driver Package
window is displayed.
Click the OK button.
6. Select a printer driver to add will be displayed.
To use a network port, check mark the option “Use a
network port.”
Note:
Depending on the printer driver selected in the
FUJITSU DL Series Software Setup Window,
the window composition may vary. In this manual,
Fujitsu DL7600 has been used as reference.
5 / 24
Copyright © 2010 FUJITSU ISOTEC LIMITED
All rights reserved.
Page 6
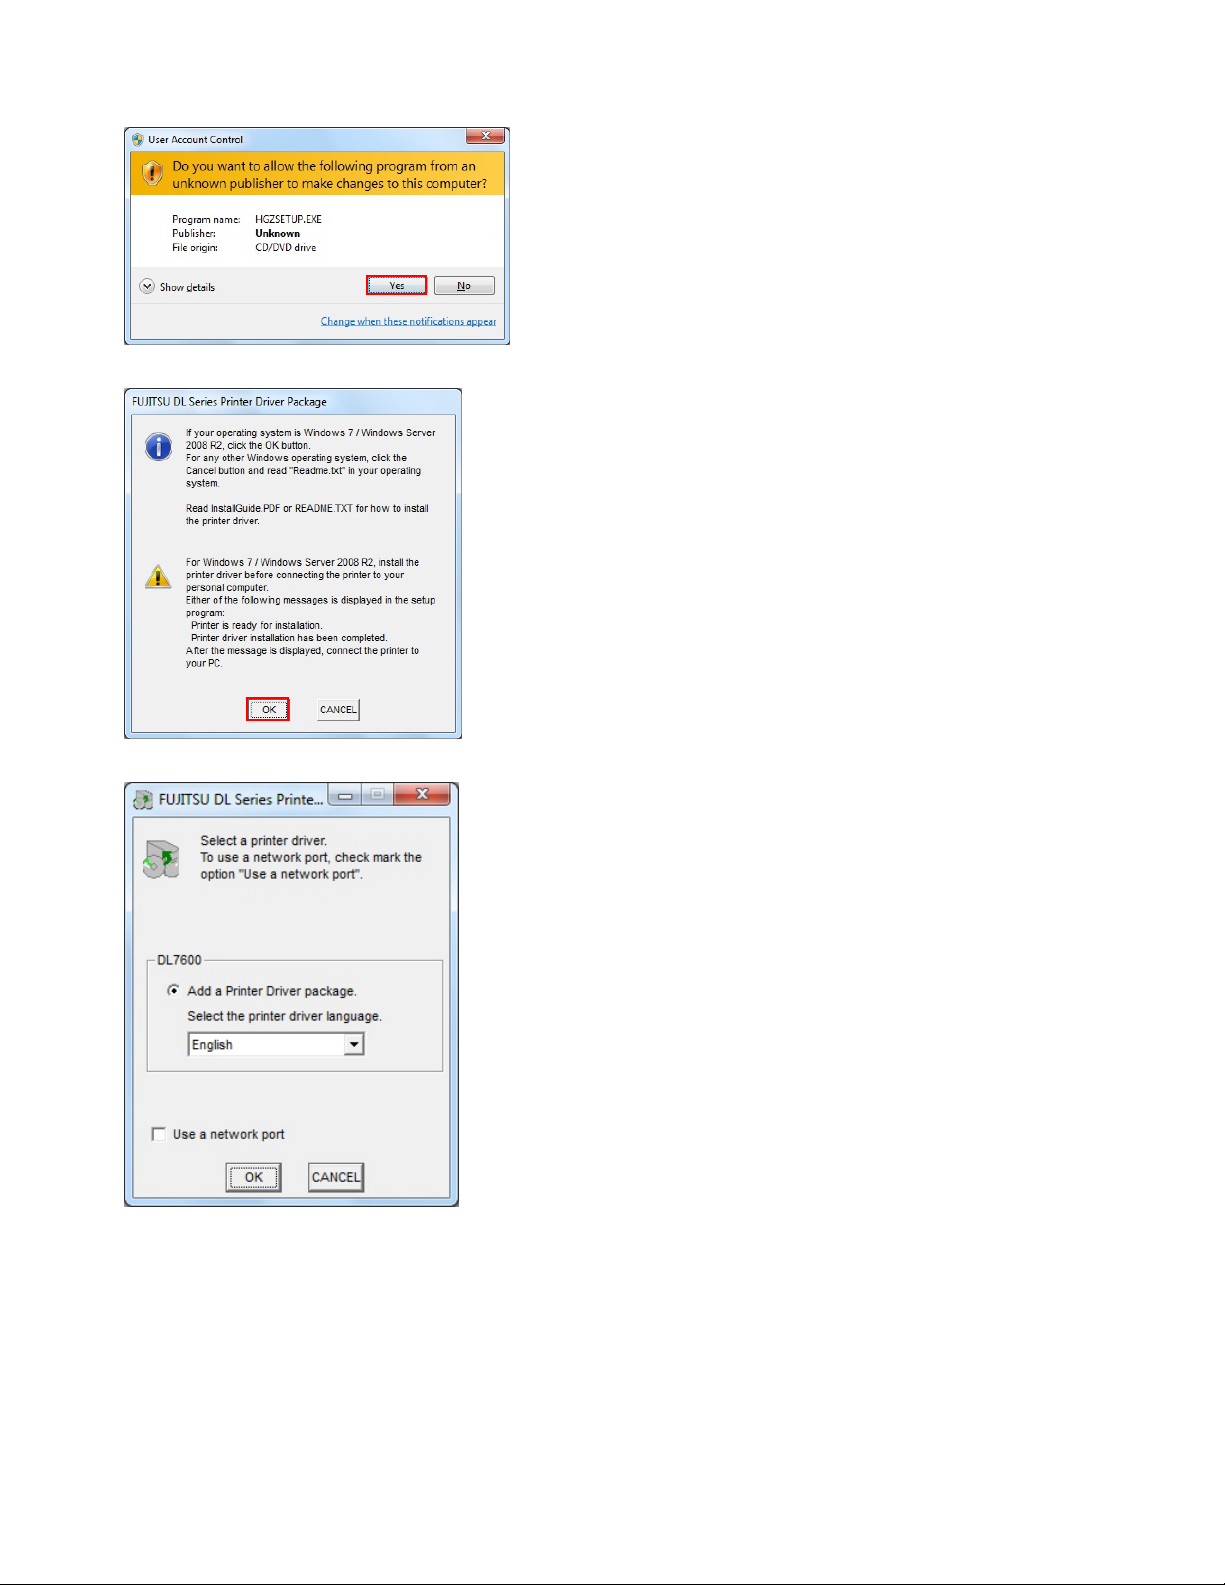
7. Follow the display menu and select a printer driver
to install.
Then, click the OK button.
Note:
▪ If selecting Use a network port, go to step a.
▪ If you do not wish to install the printer driver,
select
Cancel
without any printer driver installation, double click
each executable program of FUJITSU DL Series
Software Setup or FUJITSU DL Series Printer
Driver Package again or install the printer driver
through Setup method using Add a Printer Wizard.
▪ About “Use a network port”…
(1) For creation or setup method of a network
port, read the manual or setup guide of an
optional LAN board or LAN adapter or see
the Help topic in Windows 7 or Windows
Server 2008 R2.
(2) When using a network port created through
an optional LAN board or LAN adapter or
using Windows Standard TCP/IP port, select
this item.
(3) Do not select this item when using a parallel
port or a USB port.
. When the procedure is ended
8. In Windows Security dialog box the dialog, Windows
can’t verify the publisher of this driver software is
displayed.
Select Install this driver software anyway.
9. A file copy starts.
Note:
Wait until the message Printer driver is ready for
installation.
10. Once the message, Printer driver is ready for
installation, is displayed - Click the OK button.
Copyright © 2010 FUJITSU ISOTEC LIMITED
All rights reserved.
6 / 24
Page 7
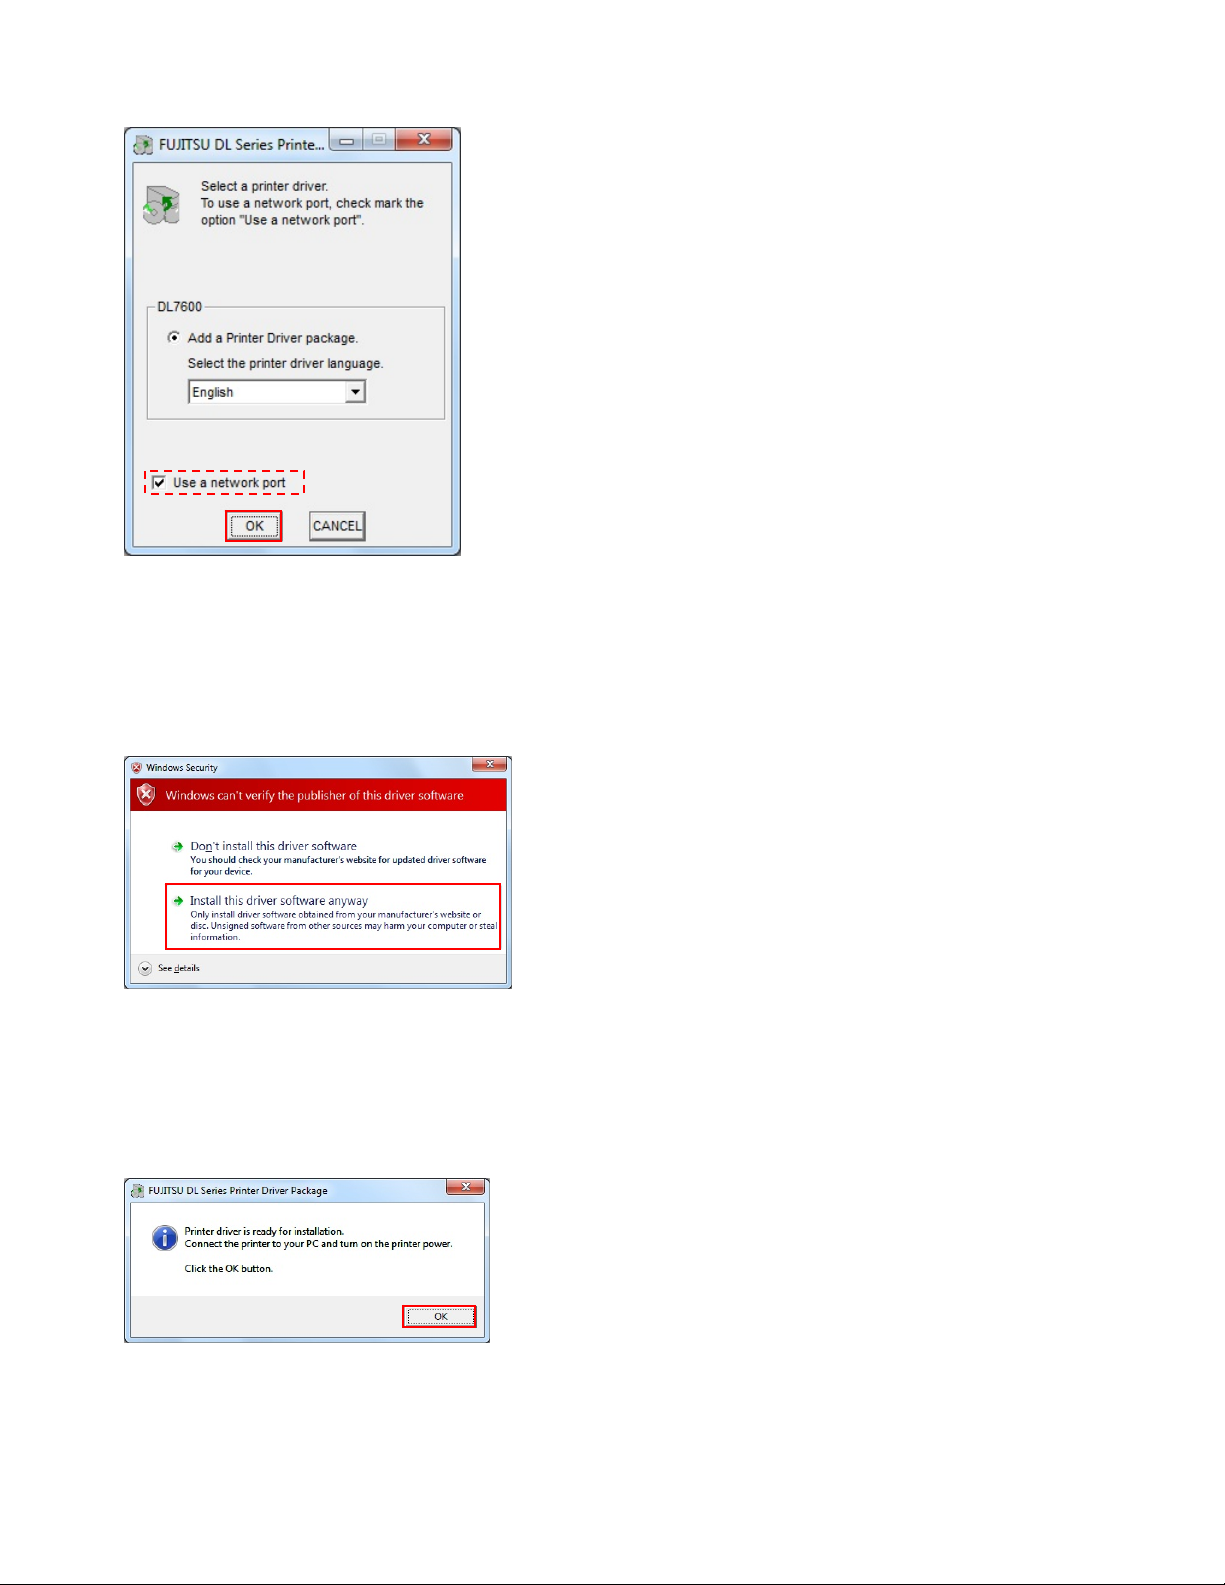
11. Connect the printer to your PC and turn on the
printer power.
12. Installing device driver software is displayed in the
taskbar notification area.
After a while, the message Fujitsu DL7600 Device
driver software installed successfully is displayed.
Note:
When a USB interface is used for connection – the
message Your device is ready to use is displayed
instead.
13. Select Start, and then select Devices and Printers.
2
1
7 / 24
Copyright © 2010 FUJITSU ISOTEC LIMITED
All rights reserved.
Page 8

14. Make sure that the printer driver icon is added to
Printers and Faxes section.
15. Restart Windows.
This completes the printer driver setup.
When Use a network port is selected:
a. The following message is displayed: Use a network
port is selected.
Read the instructions carefully and click the OK
button.
b. In the Windows Security dialog box, the message,
Windows can't verify the publisher of this driver
software is displayed, select Install this driver
software anyway.
c. A file copy starts.
Note:
Wait until the window of Procedure D. is displayed.
Copyright © 2010 FUJITSU ISOTEC LIMITED
All rights reserved.
8 / 24
Page 9

d. The Add Printer Wizard is displayed.
Select Add a local printer.
e. Specify a port to connect the printer and click Next.
Note:
If a port is not available, for example, in cases where
a network port to use is not present in the list of Use
an existing port, select a temporary port such as
LPT1:(Printer Port).
1
2
f. The dialog Install the printer driver is displayed.
From Manufacturer, select FUJITSU. From the list of
Printers, choose a model to use and click the Next
button.
2
1
3
g. The dialog Type a printer name is displayed.
Type the printer name and click the Next button.
Note:
When changing the printer name, key-in the
changed printer name.
Copyright © 2010 FUJITSU ISOTEC LIMITED
All rights reserved.
9 / 24
Page 10

h. A file copy starts.
Note:
Wait until the window of Procedure I. or Procedure
J. is displayed.
i. The Printer Sharing Window is displayed.
Select according to your computer environment and
click the Next button.
Note:
The Printer Sharing Window may not be displayed
for some computer environments.
When the Printer Sharing Window is displayed,
select according to your computer environment.
(1) Not sharing : Select
(2) Sharing : Select
Do not share this printer
Share this printer so
that others on your network
can find and use it
Share name, Location, and
Comment.
and enter
.
j. Make sure that the message, You've successfully
added Fujitsu DL7600, is displayed, and click the
Finish button to terminate the wizard.
Note:
▪ When multiple printer drivers have been installed,
Set as the default printer is displayed. Select as
needed.
▪ In this window, the
displayed. If required print a test page.
▪ Notes on test page printing…
(1) When a temporary port is selected in
Procedure E., do not print any test page.
(2) Make sure that the printer is online when
printing test pages.
(3) Test pages are printed according to the printer
driver settings at that point. In the printer
driver default, Paper Source: Automatically
Select and Paper Size: Letter are configured.
Print test pages with Letter-sized cut sheet.
(4) To use a non-default feed method or paper
size, change the setting first and then print
test pages.
Print a test page
button is
10 / 24
Copyright © 2010 FUJITSU ISOTEC LIMITED
All rights reserved.
Page 11

k. The following message is displayed: Printer driver
installation has been complet ed.
Read the instructions carefully and click the OK
button.
l. Select Start, and then select Devices and Printers.
2
1
m. Make sure that the printer driver icon is added to
Printers and Faxes section.
n. Restart Windows.
This completes the printer driver setup.
11 / 24
Copyright © 2010 FUJITSU ISOTEC LIMITED
All rights reserved.
Page 12

Setup using the
Add Printer Wizard
Use the Add Printer Wizard to set up the printer driver.
In this section, the setup procedure for Windows 7 is
described.
In the following procedure, Fujitsu DL7600 printer driver
is set up.
When using another printer or another printer driver,
change it to your current printer or printer driver name
to follow the procedure.
When using Windows Server 2008 R2, use this
procedure to install the printer driver as well.
1. Log on as an administrator of the computer.
2. Select Start, and then select Devices and Printers.
2
1
3. From the Devices and Printers folder, select Add
a printer.
12 / 24
Copyright © 2010 FUJITSU ISOTEC LIMITED
All rights reserved.
Page 13

4. The Add Printer Wizard is displayed. Select Add a
local printer.
Note:
In Windows Server 2008 R2, the following
window is displayed.
Select
Add a local or network printer as an
administrator
This window is not displayed when you log in
using built-in administrator account.
.
5. Specify a port to connect the printer to and click the
Next button.
Note:
If a port is not available, for example, in a case
where a port to connect the printer is not present
in the list of
temporary port such as LPT1:(Printer Port)
instead.
Use an existing port
, select a
6. The window of Install the printer driver is displayed.
Click Have Disk.
Copyright © 2010 FUJITSU ISOTEC LIMITED
All rights reserved.
13 / 24
Page 14

7. Insert the Setup CD-ROM into CD drive (D:).
2
Then, change the path name from “A:\” to
“D:\Drivers\DL7600\English\Win7” and click the
OK
button.
Note:
1
The CD drive is set to “D:” in the above example.
If your CD drive is set to another driver, change the
path to the correct drive.
For 64-bit Windows 7, the above folder should be
specified as well.
For Windows Server 2008 R2, enter “D:\Drivers\
DL7600\English\Win28R2” as the path name.
When installing another printer driver, change the
printer driver part to your model’s printer drive
name in the path to specify.
When using the latest printer driver downloaded
from our web site, type “(a folder name where
downloaded driver data is present)\Win7”.
** When using Windows Server 2008 R2,
change the part “Win7” to “Win28R2” instead.
8. The model names are displayed in the list box.
Select the printer driver to use and click
Next
.
Note:
When the window containing the message, Which
version of the driver do you want to use ?, is
1
displayed, select
Replace the current driver
.
2
9. The dialog Type a printer name is displayed.
Type the printer name and click
Next
.
Note:
To change the printer name, key-in the changed
printer name.
Copyright © 2010 FUJITSU ISOTEC LIMITED
All rights reserved.
14 / 24
Page 15

10. In the Windows Security dialog box, the message,
Windows can’t verify the publisher of this driver
software is displayed. Select
software anyway
.
Install this driver
11. A file copy starts.
Note:
Wait until the window of Procedure 12. or Procedure
13. is displayed.
12. The Printer Sharing Window is displayed.
Select according to your computer environment and
click the Next button.
Note:
The Printer Sharing Window may not be
displayed for some computer environments.
When the Printer Sharing Window is displayed,
select according to your computer environment.
(1) Not sharing : Select
(2) Sharing : Select
Do not share this printer
Share this printer so
that others on your network
can find and use it
Share name, Location, and
Comment.
and enter
.
15 / 24
Copyright © 2010 FUJITSU ISOTEC LIMITED
All rights reserved.
Page 16

13. Make sure that the message, You've successfully
added Fujitsu DL7600, is displayed, and click the
Finish button to terminate the wizard.
Note:
▪ When multiple printer drivers have been installed,
Set as the default printer is displayed. Select as
needed.
▪ In this window, the
displayed. If required print a test page.
▪ Notes on test page printing…
(1) When a temporary port is selected in
Procedure E., do not print any test page.
(2) Make sure that the printer is online when
printing test pages.
(3) Test pages are printed according to the
printer driver settings at that point. In the
printer driver default, Paper Source:
Automatically Select and Paper Size: Letter
are configured.
Print test pages with Letter-sized cut sheet.
(4) To use a non-default feed method or paper
size, change the setting first and then print
test pages.
Print a test page
button is
14. Restart Windows.
This completes the printer driver setup.
When the printer is connected after the setup in this
method, the dialog Installing device driver software
may be displayed and the connected printer may be
displayed under Unspecified part of Devices and
Printers. In that case, restart Windows.
16 / 24
Copyright © 2010 FUJITSU ISOTEC LIMITED
All rights reserved.
Page 17

TROUBLE
SHOOTING
When the printer is connected to
the PC before the printer driver is
installed
When the printer is connected to the PC before the printer
driver is installed, the message, Device driver software was
not successfully installed is displayed on the notification
area (on the right bottom of the window).
In this case, follow the below procedure.
In this section, Windows 7 Professional Windows (when
Fujitsu DL7600 is installed) is provided as an example.
When using another printer, change it to your current printer
name to follow the procedure.
For Windows Server 2008 R2, use the following procedure to
fix the problem.
Note:
If you click the balloon, the following window will be
displayed. After checking the instructions, click the
button
Close
- Parallel interface
- USB interface
.
17 / 24
Copyright © 2010 FUJITSU ISOTEC LIMITED
All rights reserved.
Page 18

1. Log on as an administrator of the computer.
2. Select Start, and then select Devices and Printers.
2
1
3. Check that the connected printer is displayed under
Unspecified part in the
Note:
When the printer is connected through a USB
interface, the following window is displayed.
Devices and Printers
folder.
4. Right click on the blank part of the
Printers
the displayed menu.
Note:
folder and select
If the message, Do you want to allow the following
program from an unknown publisher to make
changes to this computer ?, is displayed in the
User Account Control
Device Manager
dialog box, click
Devices and
from
.
Yes
Copyright © 2010 FUJITSU ISOTEC LIMITED
All rights reserved.
18 / 24
Page 19

5. Device Manager starts.
Double click
Other devices
.
Right click on the displayed printer (the connected
printer) and select
Uninstall
from the displayed
menu.
1
2
6. The
Confirm Device Uninstall
Click the OK button.
Note:
After clicking the OK button, click the
on the upper right of the Device Manager
Window to terminate
Device Manager
window is displayed.
button
Close
.
7. Press the printer’s power to the | side to turn off
the power.
8. Restart Windows.
This completes the recovery when the printer and the PC
are connected before the printer driver installation.
After restart, install the printer driver in the procedure
described in Installing Printer Driver.
19 / 24
Copyright © 2010 FUJITSU ISOTEC LIMITED
All rights reserved.
Page 20

When an error is displayed in the
setup program
When the setup program started ,
Error Window was displayed.
Cause: Click the OK button without selecting any printer
driver.
Measure: Select the printer driver to install and click the OK
button.
Cause: The folder path exceeds the specified number of
characters.
Measure: Move the folder path of the Fujitsu DL Series
Software Setup program to the place where
the number of characters is 100 or less.
Alert Window or
Cause: The setup information file required for the
installation cannot be found.
(1) The setup information file may not be
present.
(2) The setup information file may be destroyed.
Measure: (1) Run the Fujitsu DL Series Software Setup
program again.
(2) Obtain the latest printer driver from Support
& Downloads of the Fujitsu Isotec web site.
http://jp.fujitsu.com/group/fit/en/
** The above address was the URL at the
time when this manual was written.
Copyright © 2010 FUJITSU ISOTEC LIMITED
All rights reserved.
20 / 24
Page 21

Cause: There is an error in the setup information file
required for the installation.
(1) The setup information file may not be
present.
(2) The setup information file may be destroyed.
Measure: (1) Run the Fujitsu DL Series Software Setup
program again.
(2) Obtain the latest printer driver from Support
& Downloads of the Fujitsu Isotec web site.
http://jp.fujitsu.com/group/fit/en/
** The above address was the URL at the
time when this manual was written.
Cause: FUJITSU DL Series Printer Driver Package
Installer for the selected printer driver cannot
be found.
Measure: (1) Restart Windows 7 or Windows Server 2008
(1) A system error may have occurred.
(2) FUJITSU DL Series Printer Driver Package
Installer may not be present.
(3) FUJITSU DL Series Software Setup program
may be destroyed.
R2.
(2) Run the Fujitsu DL Series Software Setup
program again.
(3) Obtain the latest printer driver from Support
& Downloads of the Fujitsu Isotec web site.
http://jp.fujitsu.com/group/fit/en/
** The above address was the URL at the
time when this manual was written.
Cause: FUJITSU DL Series Printer Driver Package
Installer for the selected printer driver cannot
be found.
(1) A system error may have occurred.
(2) FUJITSU DL Series Printer Driver Package
Installer may not be present.
(3) FUJITSU DL Series Software Setup program
Measure: (1) Restart Windows 7 or Windows Server 2008
may be destroyed.
R2.
(2) Run the Fujitsu DL Series Software Setup
program again.
(3) Obtain the latest printer driver from Support
& Downloads of the Fujitsu Isotec web site.
http://jp.fujitsu.com/group/fit/en/
** The above address was the URL at the
time when this manual was written.
Copyright © 2010 FUJITSU ISOTEC LIMITED
All rights reserved.
21 / 24
Page 22

Cause: The printer driver installation was aborted.
(1) The item Don’t install this driver
software was selected in the Windows
Security Window during the setup.
(2) The Cancel button was selected while the
Add Printer Wizard was in progress.
Measure: Run the FUJITSU DL Series Software Setup or
FUJITSU DL Series Printer Driver Package
program again.
Cause: Installation was executed in an operating system
other than Windows 7 or Windows Server 2008
R2.
Measure: Run the FUJITSU DL Series Software Setup or
FUJITSU DL Series Printer Driver Package in
Windows 7 or Windows Server 2008 R2.
Cause: The folder path exceeds the specified number of
characters.
Measure: Move the folder path of the Fujitsu DL Series
Printer Driver Package program to the place where
the number of characters is 100 or less.
Cause: The setup information file required for the
installation cannot be found.
(1) The setup information file may not be
present.
(2) The setup information file may be destroyed.
Measure: (1) Run the Fujitsu DL Series Printer Driver
Package program again.
(2) Obtain the latest printer driver from Support
& Downloads of the Fujitsu Isotec web site.
http://jp.fujitsu.com/group/fit/en/
** The above address was the URL at the
time when this manual was written.
22 / 24
Copyright © 2010 FUJITSU ISOTEC LIMITED
All rights reserved.
Page 23

Cause: There is an error in the setup information file
required for the installation.
(1) The setup information file may not be
present.
(2) The setup information file may be destroyed.
Measure: (1) Run the Fujitsu DL Series Printer Driver
Package program again.
(2) Obtain the latest printer driver from Support
& Downloads of the Fujitsu Isotec web site.
http://jp.fujitsu.com/group/fit/en/
** The above address was the URL at the
time when this manual was written.
Cause: There is an error in the setup information file or
the printer driver file required for installation.
(1) The setup information file or the printer
driver file may not be present.
(2) The setup information file or the printer
driver file may be destroyed.
Measure: (1) Run the Fujitsu DL Series Printer Driver
Package program again.
(2) Obtain the latest printer driver from Support
& Downloads of the Fujitsu Isotec web site.
http://jp.fujitsu.com/group/fit/en/
** The above address was the URL at the
time when this manual was written.
Cause: A system error occurred.
Measure: Run the FUJITSU DL Series Software Setup or
FUJITSU DL Series Printer Driver Package again.
23 / 24
Copyright © 2010 FUJITSU ISOTEC LIMITED
All rights reserved.
Page 24

24 / 24
Copyright © 2010 FUJITSU ISOTEC LIMITED
All rights reserved.
 Loading...